


Basic Manual
San-Ei Building, 22-2, Nishi Shinjuku 1-chome, Shinjuku-ku, Tokyo, Japan.
OLYMPUS OPTICAL CO., LTD.
(Customer support) Tel. 0426-42-7499
http://www.olympus.co.jp
OLYMPUS AMERICA INC.
Two Corporate Center Drive, Melville, NY 11747-3157, U.S.A. Tel. 631-844-5000
(Customer support) Tel. 1-888-553-4448
http://www.olympus.com
OLYMPUS OPTICAL CO. (EUROPA) GMBH.
(Premises/Goods delivery) Wendenstraße 14-18, 20097 Hamburg, Germany. Tel. 040-237730
(Letters) Postfach 10 49 08, 20034 Hamburg, Germany.
http://www.olympus-europa.com
Hotline Numbers
Tel. 01805-67 10 83 for Germany
Tel. 00800-67 10 83 00 for Austria, Belgium, Denmark, France, Netherlands, Norway,
Sweden, Switzerland, United Kingdom
Tel. +49 180 5-67 10 83 for Finland, Italy, Luxemburg, Portugal, Spain, Czech Republic
Tel. +49 40-237 73 899 for Greece, Croatia, Hungaria and the Rest of Europe
Our Hotline is available from 9am to 6pm (Monday to Friday)
(E-Mail) di.support@olympus-europa.com
Manuel de base
Kurzgefaßte Bedienungsanleitung
Manual básico
This manual provides simple instructions. For more details, refer to the
Reference Manual on the CD-ROM provided with the camera.
Le présent manuel mentionne des instructions simples. Pour obtenir
de plus amples détails, référez-vous au manuel de référence du
disque CD-ROM fourni avec l'appareil photo.
Dieses Handbuch enthält einfache Anleitungen. Für weitere Hinweise
siehe die Bedienungsanleitung auf der CD-ROM, die der Kamera
beiliegt.
Este manual contiene instrucciones sencillas. Para las instrucciones
más detalladas, consulte el manual de referencia del CD-ROM
suministrado con la cámara.
English
Français Deutsch
Español
Printed in Japan
“CE” mark indicates that this product complies with the European requirements for safety,
•
health, environment and customer protection.
La marque “CE” indique que ce produit est conforme avec les exigences européennes
•
en matière de sécurité, santé, environnement et protection du consommateur.
Das CE-Zeichen bestätigt, daß dieses Produkt mit den europäischen Bestimmungen für
•
Sicherheit, Gesundheit, Umweltschutz und Personenschutz übereinstimmt.
La marca “CE” indica que este producto está en conformidad con los requerimientos
•
europeos de seguridad, salud, medio ambiente y protección al usuario.
VT1627-03

Contents
IMPORTANT NOTICES......................... 3
PRECAUTIONS .................................... 4
BATTERY HANDLING PRECAUTIONS....
English
Getting Started ...................................... 8
Taking Pictures .................................... 15
Viewing and Managing Images ........... 18
Shooting Features ............................... 21
Special Settings .................................. 26
Reference............................................ 28
Français
Mise en marche................................... 36
Prise de vues ...................................... 43
Visionner et gérer les images.............. 46
Caractéristiques de prise de vues....... 49
Paramétrage spécial ........................... 54
Deutsch
Zu Beginn ............................................ 64
Aufnahmen machen ............................ 71
6
Wiedergabe und Bearbeitung von Bildern ..
Aufnahme-Funktionen ......................... 77
Besondere Einstellungen .................... 82
Anhang ................................................ 84
Español
Para empezar...................................... 92
Para fotografíar.................................... 99
Para mirar y administrar imágenes ... 102
Características fotográficas............... 105
Ajustes especiales ............................ 110
Referencia ......................................... 112
74
Référence............................................ 56

䡲 Thank you for purchasing this digital Olympus
camera.
䡲 Before you use this camera, read this manual
carefully .
䡲 We recommend that you spend some time
taking test shots and experimenting with all of
the features before you take important
pictures.
Thank you for purchasing the CAMEDIA E-10.
To ensure years of reliable and enjoyable
service, please read this Basic Manual carefully
and use the camera safely. Store this Basic
Manual in a safe location where you can find it
for future use.
© Copyright 2000. Olympus Optical Co., Ltd.
All rights reserved.
IMPORTANT NOTICES
Disclaimer of Warranty
Olympus makes no representations or
warranties, either expressed or implied, by or
concerning any content of these written
materials or software, and in no event shall be
liable for any implied warranty of
merchantability or fitness for any particular
purpose or for any consequential, incidental or
indirect damages (including but not limited to
damages for loss of business profits, business
interruption and loss of business information)
arising from the use or inability to use these
written materials or software. Some countries
do not allow the exclusion or limitation of
liability for consequential or incidental
damages, so the above limitations may not
apply to you.
English
Only the included USB cable should be used to
connect the camera to a personal computer.
Trademarks
• IBM is a registered trademark of International
Business Machines Corporation.
• Microsoft and Windows are registered
trademarks of Microsoft Corporation.
• Macintosh is a trademark of Apple Computer,
Inc.
• CompactFlash and CF are trademarks of San
Disk Inc.
• All other company and product names are
registered trademarks and/or trademarks of
their respective owners.
Copyright Notice
All rights reserved. No part of these written
materials or software may be reproduced or
used in any form or by any means, electronic or
mechanical, including photocopying and
recording and the use of any kind of
information storage and retrieval system,
without prior permission in writing from
Olympus. No liability is assumed with respect to
the use of the information contained in these
written materials or software, or for damages
resulting from the use of the information
contained in these written materials or of the
software. Olympus reserves the right to alter
the features and contents of this publication or
software without obligation or advance notice.
WARNING
Unauthorized photographing or use of
copyrighted material may violate applicable
copyright laws. Olympus assumes no
responsibility for unauthorized photographing,
use or other acts that infringe upon the rights of
copyright owners.
3
PRECAUTIONS
This camera is a precision instrument. Use caution when handling the unit. Do not apply strong
vibration or pressure to the camera or lens, as this may cause damage to the finely tuned internal
arts.
General Precautions
If you have any questions about this product, please consult your nearest Olympus dealer in the
provided Authorized Distributors List. (Refer to the Technical Hotline Numbers for technical support,
and the Authorized Distributors for repair service, etc.)
If you experience problems
•Do not use the camera if it seems not to function correctly. Take the batteries out or disconnect the
AC adapter immediately, and consult your dealer or an Olympus Authorized Service Center.
Never disassemble or modify
•To prevent damage to the camera, never disassemble it. For internal repairs, consult your dealer or
an Olympus Authorized Service Center. Always protect the camera from humidity and dust.
•Do not store in dusty places, as using the camera afterwards may result in a fire or an electric
shock.
•If the unit has been dropped, or if liquid or a foreign object has entered the camera, discontinue use
and consult your dealer or an Olympus Authorized Service Center.
•To avoid severe electrical shock, never touch internal parts. The camera interior contains high
voltage points.
Protect from high temperatures
•To avoid internal damage to the camera from high temperature, never leave the camera in a closed
car, etc. in direct sun light.
Cleaning
•Before servicing or cleaning the unit, always disconnect the AC adapter.
•The camera can be cleaned by wiping with a soft cloth. To remove stains, wipe with a soft cloth
moistened with a mild detergent solution and wrung dry, and then wipe with a dry soft cloth.
•To avoid corrosion of the camera casing, never use benzene, thinner, acetone, alcohol, or any other
organic chemical product to clean the camera.
Precautions When Using Camera
WARNING
WARNING
Using the flash
•Always use caution when taking flash pictures at close range.
•When you fire the flash, you must be at least 1 meter away from the faces of your subjects,
especially when taking pictures of infants and small children. Firing the flash too close to the
subject’s eyes could cause a momentary loss of vision.
Handle the camera carefully
•To avoid personal injury, always use the camera from a stable position to prevent losing your
balance.
•Use the camera with care to prevent any foreign substances, especially dirt, dust, rain, and
sand, from entering the camera when the battery compartment cover or lens barrier is open.
The WARNING indication alerts you to a potential hazard that if not
avoided may result in death or serious injury.
4

• To prevent damage, never drop the camera or subject it to severe shock or vibration.
• This camera is not water-resistant. Always protect it from water, especially rain and salt
water.
• Do not use the camera outside during a rain or lightning storm.
• To avoid damaging the internal circuits of the camera, always switch the camera OFF before
you replace the batteries.
Storage environment
• To avoid damage to or malfunction of the camera, store it within the following ranges of
temperature and humidity:
–20°C ~ 60°C
10 ~ 90% RH (with no condensation)
• To prevent damage from condensation, never use the camera in high humidity.
• When the camera is not in use, always store it in a safe location out of the reach of small
children.
Usage environment
• To prevent the hazards of fire, explosion, and serious personal injury, never use the camera
in a factory, laboratory, etc. near large concentrations of flammable or explosive gases.
• To avoid damage or malfunction of the camera, use it within the following ranges of
temperature and humidity:
0°C ~ 40°C
30 ~ 90% RH (with no condensation)
• Avoid subjecting the camera from sudden, extreme changes in temperature (bringing it into a
warm room on a cold day, or vice versa). To avoid the formation of condensation inside the
camera which could damage it, place the camera in a plastic bag and then remove it after it
has reached ambient temperature.
• Please remember that batteries have a shorter service life at low temperature.
Using accessories
• To prevent the hazards of fire, electrical shock, and damage to the camera, use only the
supplied accessories, or accessories recommended by Olympus. For details, please consult
the dealer where the unit was purchased or contact an Olympus Authorized Service Center.
• To prevent fire or electrical shock, always disconnect the AC adapter when the camera is not
being use.
• To prevent serious injury from electrical shock, never handle or connect the AC adapter with
wet hands.
• The power supply cord should be routed so it will not be walked on. Never place a heavy
object on the power cord and never wrap the power cord around the leg of a table or chair.
Keep the areas around the power cord connection points, at the power outlet and at the
product connection, free of all obstacles. Never place the power cord near a heat source.
Before using the camera
• Before taking particularly important picture, or if the camera has been not used for a long
period, make sure that it is operating correctly. If you experience any problem, consult an
Olympus Authorized Service Center.
• We can take no responsibility concerning the loss of data, down time, loss of revenue or any
other direct or indirect damage or claims caused by this camera.
English
Important:
• A “Note” indicates information you should be aware of.
• Your camera may differ slightly from that shown in illustrations.
5

BATTERY HANDLING PRECAUTIONS
WARNING
To prevent damage or fire caused by battery leakage, please read these instructions carefully
and always observe the following guidelines when handling or installing batteries:
• Never heat or throw the batteries into a fire.
• Never disassemble, modify or solder batteries.
• Never install batteries with their polarities (+, –) reversed.
• Take precautions when carrying or storing batteries to prevent them from coming into contact
with any metal objects like jewellery, pins, fasteners, etc.
• Never use old batteries together with new ones, and never use different types of batteries
together.
• To prevent corrosion, never store batteries in high humidity.
• Never use a battery if it appears damaged in any way.
• Never use a battery if it is leaking, warped, swollen, warm to the touch, or shows any other
abnormal condition.
• If you notice any abnormality in new batteries, return them to the dealer where you
purchased them.
• To prevent the hazards or fire and serious injury, never use a battery without its protective
insulation cover.
• If the liquid gets into your eyes, do not rub them. Rinse with clean water, then seek medical
attention immediately.
• If the liquid gets in contact with your skin or clothing, rinse with clean water.
• If the liquid has leaked inside the battery compartment, clean it carefully with a wet rag
before inserting new batteries.
• If old batteries are left inside the camera they may leak. If the camera is going into storage,
or if you intend not to use the camera for a long period of time, always remove the batteries.
• To prevent battery leakage, never store the camera and/or batteries in an air tight container.
• To prevent leakage which could damage the camera, never attempt to recharge Ni-Cd or
Lithium batteries.
• Store batteries in a cool, dry location protected for direct sunlight. Storing batteries in a hot,
enclosed location (e.g., inside a vehicle on a hot day) could shorten their service life.
• Always store batteries in a safe location out of the reach of small children.
• If children are going to use the camera, teach them how to use it safely and correctly
according to the instructions in the manual. Make sure that children never remove the
batteries from the camera.
• When you dispose of dead batteries always observe the local laws and regulations regarding
the disposable of such items.
6

English
7

Getting Started
Important Parts and Names
1
2
3
4
5
6
7
8
9
0
A
B
C
W
X
V
U
T
S
R
Q
P
O
N
M
L
K
J
I
H
G
F
E
D
§
•
k
l
m
n
o
p
q
r
s
t
u
vwx
y
£
¢
†
ç
å
~
}
|
{
z
æ
º
µ
Y
Z
c
d
e
b
a
`
¶
]
ß
\
[
j
i
h
¡ø¬ ¤
f
8
g
©
®
…⁄
¥
™
fi
›
‹

1 Metering mode button
2 Drive button
3 Remote cable jack
4 Built-in flash
5 Flash button
6 Manual focus ring
7 Zoom ring
8 Exposure compensation button
9 Macro button
0 Flash synchro socket
A Focus mode switch
B Strap eyelet
C DC IN jack cap/DC IN jack
D Monitor
E Eyepiece shutter lever
F Diopter adjustment ring
G Viewfinder
H Main dial
I Card cover
J Card cover lock
K SM/CF memory card button
L Card access lamp
M Light button
N AE lock button
O Power switch
P Mode dial
Q White balance mode button
R Sub dial
S Control panel
T Record mode button
U Flash mode button
V Hot shoe
W Video OUT jack
X USB connector
Y Monitor lock/release button
Z INFO button
[ Protect button
\ Erase button
] Arrow pad
^ OK button
a Menu button
b Monitor button
c Shutter button
d Remote control receiver/self-timer lamp
e Strap eyelet
f Battery compartment
g T ripod socket
h Lens
i Quick reference white balance button
j AF port
Control panel
Flash control
k Flash intensity control
l Slow synchro
m Fill-in flash
n Red-eye reduction
o 2nd-curtain
p Shutter speed
q Aperture value
r Macro
s Self-timer
t Conversion lens
u Sequential shooting
v Remote control
w Battery check
x Selected memory card
y Number of storable pictures
z Card error
{ Memory gauge
| Metering mode
} Exposure compensation/Exposure level
~ Auto bracket
å Manual focus
ç White balance
† ISO
¢ Image adjustment
£ Record mode
Viewfinder
§ Spot metering area
• AF correct mark
¶ Flash warning
ß Macro
® Shutter speed
© Aperture value
™ White balance
¥ AE (Automatic Exposure) Lock
µ Exposure compensation/Exposure level
º Metering mode
æ AF target mark
Monitor Display
ø AF correct mark
¡ Flash warning
¬ Macro
… Shutter speed
⁄ Aperture value
¤ White balance
‹ AE Lock
› Exposure compensation/Exposure level
fi Metering mode
English
9

Make Sure That You Have Everything
Lens cap
Camera
Lens hood
Remote control
USB cable
Lithium battery packs (CR-V3)
CompactFlash (16 MB/8x speed)
Dedicated connection cable (jump shot cable)
Driver: 8 cm CD-ROM
Quick Start Guide
Strap
Video cable
Customer Registration card
Warranty card
• Basic Manual
• Remote control instruction
• Software CD’s including
Windows 98 USB driver,
Reference Manual
Optional Accessories Available
for This Camera
Dedicated External Flash (FL-40)
Dedicated Flash Bracket (FL-BK01)
Dedicated Bracket Cable (FL-CB01~04)
Conversion Lenses
Remote Cable (RM-CB1)
Camera Case (Semi-Hard Case)
AC Adapter
AA (R6) Ni-MH (Nickel-Metal Hydride) battery
10
Dedicated Recharge Device
Lithium Polymer Battery (B-10LPB)
Power Battery Holder (B-HLD10)
Lithium Polymer Battery Recharger
(B-20LPC)
SmartMedia (8MB, 16MB, 32MB, or 64MB)
PC Card Adapter MA-2E
Floppy Disk Adapter FlashPath MAFP-2NE
SmartMedia Reader/Writer MAUSB-2
Printer P-400/P-330NE
August 2000

Attaching the Strap
Slide one end of the strap through a strap
eyelet on the camera. Slide the end of the strap
through the sleeve and frame on the strap, and
then slide the sleeve completely up to the
eyelet. Pull the strap tight around the frame and
make sure that it does not slip. In the same
way, attach the other end of the strap to the
eyelet on the other side of the camera.
Inserting the batteries
You can use 2 lithium battery pack (CR-V3), or
4 AA (R6) Ni-MH, Ni-Cd or Alkaline batteries
with this camera. Make sure the power switch is
at the OFF position. Confirm that the card
access lamp is off. Raise the battery
compartment knob and turn it to the open
position . Remove the battery holder.
If you are inserting lithium batteries, install a set
in each side of the battery holder. If you are
installing AA (R6) batteries, install 2 batteries in
each side of the holder. Make sure that you do
not reverse the polarities of the batteries when
you insert them. Gently press down on the
batteries until they lock in place. Insert the
battery holder into the bottom of the camera.
While pushing down on the battery holder, turn
the battery compartment knob to the close
position .
1
English
CR-V3
2
3
4
AA (R6) Ni-MH,
Ni-Cd or Alkaline
11

Inserting and Selecting Memory
Cards
Memory cards, hereafter referred to simply as
“cards”, store the digital images of the pictures
that you take with the camera. The camera can
hold one SmartMedia (SM) and one
CompactFlash (CF) media card.
You can use Olympus or any other brand 3V
(3.3V) SmartMedia memory card (5V cards
cannot be used).
SmartMedia CompactFlash
Make sure that the card access lamp is off.
Press down on the card cover lock and raise it,
and then open the card cover. To insert a
SmartMedia card, hold it with the notched
corner down and insert it into the narrow slot
closest to the rear of the camera. Push the card
completely into the slot. (Insert the SmartMedia
card until you can see above 2 mm of the card
above the edge of the slot.)
To insert the CompactFlash card, hold it with
the arrow facing the rear of the camera and
insert it into the wide slot closest to the front of
the camera. Push the card completely into the
slot. Close the card cover and press it gently
until it locks.
To remove the SmartMedia card, press on it
gently to release it then remove it from its slot.
To remove the CompactFlash card, gently
press the eject button to release it then remove
it from its slot.
When one card is installed in the camera, that
card is automatically selected to store images.
With both cards installed, you can select either
card for storage. When one card becomes full,
you can quickly switch to the other card and
continue shooting. Press and hold down the
SM/CF memory card button, and then slowly
turn the main dial or sub dial until you see
(SmartMedia) or (CompactFlash) displayed
in the control panel. When you see , the
SmartMedia card is selected for image storage,
and when you see , the CompactFlash card
is selected.
12
Connecting the AC Adapter
Use the optional AC adapter as an alternate
power source for long shooting sessions in
order to conserve battery power. Switch the
camera off and make sure that the card access
lamp is not blinking. Plug the AC adapter power
cord into a power outlet. Remove the DC IN
jack cap on the left side of the camera and
connect the AC adapter to the camera, and
then switch on the camera. Use only the AC
adapter intended for use with this camera. For
details about using the AC adapter in any
country other than where you purchased the
camera and AC adapter, contact an Olympus
Service Center.
OFF
ON
DC IN jack
AC adapter power cord
plug
AC adapter
Power outlet
Switching the Camera On/Off
To switch the camera on or off, move the power
switch to ON or OFF. When the camera is in the
shooting mode (mode dial set to P, A, S or M),
if it remains idle for a specified length of time it
will switch off the displays automatically and
enter the sleep mode to conserve battery
power. To restore the camera to full operation,
press any button on the camera. If the camera
remains idle for one hour after entering the
sleep mode, the camera will shut itself off
completely. In order to restore full operation,
switch the camera off and switch it on again.
The first time that you switch the camera on,
you should set the date and time.
Checking the Battery
The battery check mark (shaped like an AA
(R6) battery) in the control panel indicates
battery performance. When the camera is
switched on, if the battery check appears full
and goes off this means the batteries are fully
charged. If the battery check mark appears
partially filled and continues blinking, the
batteries are low and should be replaced as
soon as possible. If the battery check mark
partially filled goes off and the control panel
extinguishes completely, this means the
batteries are fully discharged and you cannot
continue shooting pictures until you have
replaced the batteries.
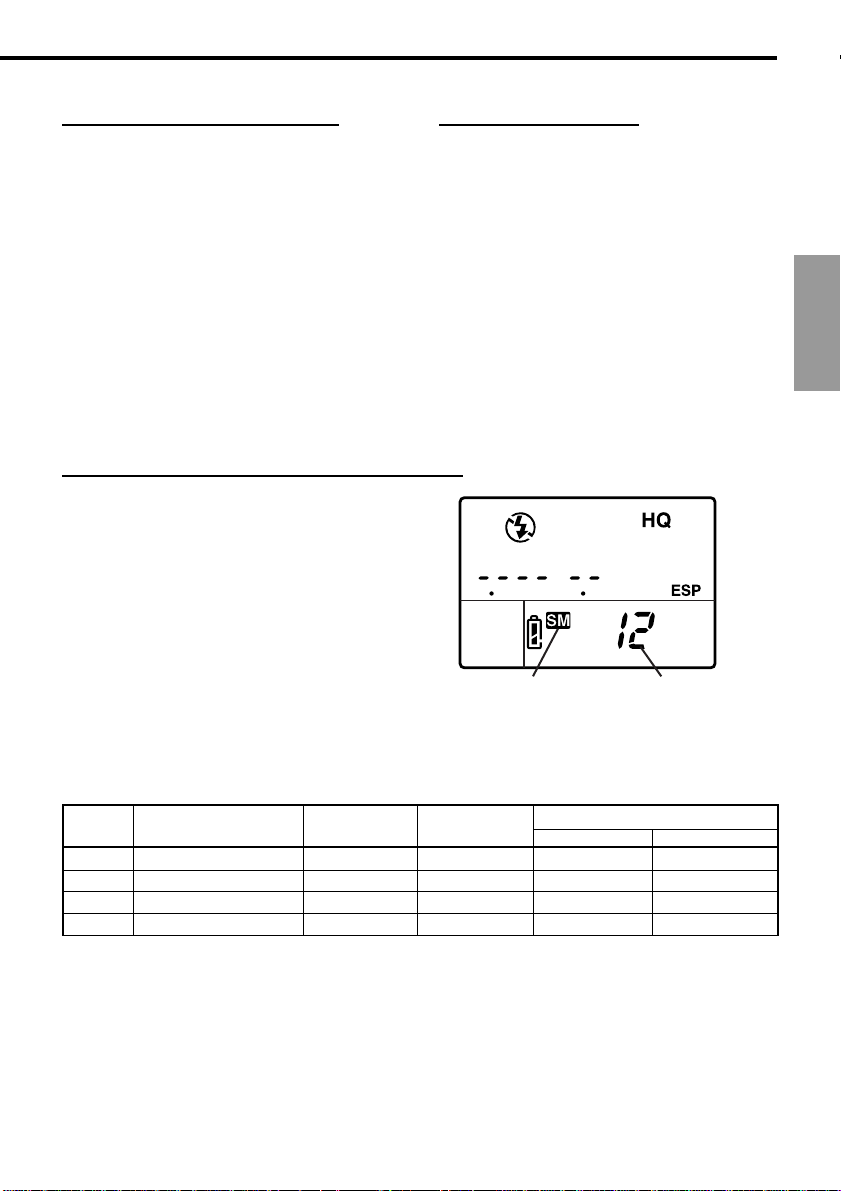
Checking the Number of Storable Pictures
The large two-digit number in the lower right
section of the control panel displays the
number of storable images. When this number
reaches zero, replace the card or if you have
two cards installed in the camera, select the
other card. The number of images that y ou can
store on a card is determined by the size of the
images. The size of the image is determined by
the record mode settings (quality, resolution,
compression) that you select in the shooting
mode. The available qualilty selections are
TIFF, SHQ, HQ (default), and SQ (Tagged
Image File Format, Super High Quality, High
Quality, Standard Quallity).
English
Number of storable picturesSelected card
Memory card storage capacity
Quality Resolution (pixels) Compression File Size
(Default settings) (Default settings) (Reference value)
TIFF 2240 x 1680 (FULL) 1:1 11.3 MB 0 shots 2 shots
SHQ 2240 x 1680 (FULL) 1:2.7 2.8 MB 2 shots 11 shots
HQ 2240 x 1680 (FULL) 1:8 950 KB 8 shots 34 shots
SQ 1280 x 960 (SXGA) 1:8 300 KB 27 shots 110 shots
Images per Card (Reference value)
8 MB
32 MB
13

Date or Time
You can use settings in the setup/connection
mode to set the date, time and date format.
When you take a picture, the current date and
time are recorded with the image. This
recorded date or time can be stamped on
printed image if you use select date or time
stamping for printing. Processing and handling
images with CAMEDIA Master 2.5 ensures that
this date and time information is preserved,
even after the images are transferred to a
computer. Otherwise, this date and time
information may be lost with other graphics
software applications.
After you set up date or time stamping, the
setting applies to all images selected for
printing. Insert the memory card that contains
the pictures that you want to select for date or
time stamp printing. Check the control panel
display and make sure that the mark for the
source card, SmartMedia or CompactFlash
is displayed. If the correct mark is not
displayed, press and hold the SM/CF memory
card button, and then turn the main dial or sub
dial until it is displayed. Set the mode dial to the
print reserve mark . Press the menu button
to open the menu in the monitor. Press
or to move the green highlight to the date/
stamp mark . Press to move the green
highlight to the right, and then press again to
move the green highlight to DATE or TIME, or if
you want to cancel the date or time setting
move the green highlight to OFF. Press the
button to select the setting. Press the button
again to close the menu.
14

T aking Pictures
Composing Pictures
Make sure that the camera is switched on,
remove the lens cover, and look through the
viewfinder. To adjust the viewfinder for your
eyes, turn the diopter adjustment ring until the
AF target mark in the center of the viewfinder is
sharp and clear. If you cannot see the AF target
mark, make sure that the eyepiece shutter lever
on the left side of the viewfinder is up. With the
strap around your neck, hold the camera by the
grip on the right side of the camera, and use
your left hand to support the camera base.
Make sure that your fingers do not block the
lens, flash (if it is up), the AF port or the remote
control receiver/self-timer lamp on the front of
the camera. Holding the camera as steady as
possible, point at the subject and compose the
picture in the viewfinder.
Composing a Picture with the
Monitor
Make sure that the camera is switched on,
remove the lens cover, and press the monitor
button . Lower the eyepiece shutter lever on
the left side of the viewfinder. Push the monitor/
lock release button to release the monitor
slightly from the camera. To raise the monitor,
pull the bottom of the monitor out. Make sure
that your fingers do not block the lens, flash (if
it is up), the AF port, or the remote control
receiver/self-timer lamp on the front of the
camera. Holding the camera as steady as
possible, point at the subject and compose the
picture in the monitor.
Releasing the Shutter
Shutter release is a two-step operation. Set the
mode dial to P. Compose the picture in the
viewfinder or monitor. Half-press the shutter
button to start automatically setting the focus
and exposure. When you hear a small beep
and see the AF correct mark in the lower left
corner of the viewfinder light, the subject is in
focus. As long as you keep the shutter button
depressed half way, the subject will remain in
focus with the selected exposure. This is called
AF/AE lock. Full-press the shutter button to
release the shutter and take the picture. After
the picture is taken, the image of the picture will
appear briefly in the monitor and the card
access lamp will blink for a few seconds and
then go off after the image is stored on the
card. The camera requires a few seconds to
store each picture. However, you can take up to
four quick shots until the four segments of the
memory gauge fill. When the memory gauge is
full, you will have to wait until at least one
segment clears before you can take the next
shot.
Half-press
(gently pressing the button down half-way)
Full-press
(after half-pressing, gently press down all
the way.)
English
If the AF correct mark blinks, the subject is not
in focus. Lift your finger from the shutter button,
and compose the picture again by pointing to
another part of the picture and then half-press
the shutter button. While keeping the shutter
button depressed half-way, compose the
picture again. Some subjects are difficult to
focus. If you see the flash warning appear in
the viewfinder, the picture is underexposed,
and you should use the flash. Press the flash
button to raise the flash unit and shoot the
picture with the flash.
15

Using Zoom
To zoom in and make the subject larger in the
viewfinder, rotate the zoom ring to the left. To
zoom out and make the subject smaller, rotate
the zoom ring to the right. You can take a
picture up to 60 cm from the subject.
You can also take extremely close-up shots
within a range of 20 cm to 60 cm from the
subject by setting the camera in the macro
mode. To set the camera in the macro mode,
hold down the macro button and then turn
the main dial or sub dial until you see the
macro mark in the control panel. Repeat the
procedure to switch off the macro mark and
return the camera to normal operation.
Using the Built-in Flash
When the flash warning blinks in the lower left corner of the viewfinder, there is not enough light to
take the picture. Press the flash button to raise the built-in flash unit, and then take the picture.
After raising the flash, the flash warning may continue to blink until the flash is fully charged. When
you take the picture, the flash will fire with an intensity adjusted automatically for the best exposure.
Flash Range
ISO Max. WIDE (WIDE Limit) Max. TELE (TELE Limit)
AUTO 0.6~8.9 m 0.5~7.4 m
80 0.6~6.3 m 0.5~5.2 m
160 0.9~8.9 m 0.7~7.4 m
320 1.3~12.5 m 1.0~10.4 m
Use the flash within these ranges to prevent overexposure and underexposure of your pictures.
Rapidly firing the flash could cause it to overheat. Do not fire it more than 30 times in succession.
After prolonged use, allow the flash to cool for at least 10 minutes between shooting sessions. Before
using the flash, make sure that its face is clean.
16

To select the flash mode
The flash mode selection determines how the flash is fired to achieve various effects. To select the
flash mode, hold down the flash mode button , and then turn the main dial or sub dial button to the
left or right until you see the desired setting.
Control Panel Flash Mode Function
Display
(none) Auto Flash Adjusts flash intensity according to the brightness of the subject.
SLOW Slow Flash fires just before the end of the shutter release. When
2nd-CURTAIN Synchronization 2nd-CURTAIN is not selected, the camera is set to release to fire the
Fill-in Flash always fires, regardless of the light conditions.
Red-eye Camera fires 10 short bursts to contract the pupils of the subject’s eyes
Reduction to reduce the red-eye effect. There is a 1-second delay before the
The number of available flash control mode settings is determined by the current shooting mode
selection.
Flash control modes for P (Program) and A (Aperture priority) modes
Control Panel Display
(None)
(Red-eye Reduction)
(Red-eye Reduction)
flash at the beginning of the shutter release (1st-CURTAIN).
shutter releases after pressing the shutter button.
Flash mode Flash Timimg
Auto flash
Auto flash
Slow synchro
Slow synchro
Red-eye
Reduction
NO
YES
YES
NO
1st-curtain YES
1st-curtain
1st-curtain
1st-curtain
Fires automatically
in dark light,
backlighted subject
YES
YES
YES
Always
fires
NO
NO
NO
NO
English
Slow synchro
(2nd Curtain)
Fill-in flash
NO
NO
2nd-curtain
1st-curtain
YES
NO
NO
YES
Flash control modes for S (Shutter priority) and M (Manual) modes
Control Panel Display
Flash mode
Fill-in flash
(Red-eye Reduction)
Fill-in flash
(2nd Curtain)
Red-eye
Reduction
Fill-in flash
YES
NO
Flash Timimg
1st-curtain
2nd-curtain
1st-curtain
Fires automatically
in dark light,
backlighted subject
NO
NO
NONO
Always
fires
YES
YES
YES
To use flash mode compensation
If you encounter difficulty with a subject that is too bright or too dark when shooting with the flash,
use flash control compensation. Set the mode dial to P, A, S or M, and then press the menu button
. In the shooting mode, select the flash control mark and set the flash compensation value.
After you press the button to close the menu, take the picture. To release the flash mode
compensation setting, repeat this procedure and select zero for the flash compensation setting.
17

Viewing and Managing Images
Playing Back Images
To enter the playback mode so you can view
images, set the mode dial to , or with the
mode dial set to P, A, S or M, rapidly press the
monitor button twice. The image of the
most recent picture taken is displayed in the
monitor. Press or to display the previous
or next image. Press or to jump 10
frames to the previous image or jump 10 to the
next image.
If you want to enlarge an image, set the mode
dial to playback , and then turn the main dial
to the right toward the magnifying glass mark
(or turn the sub dial clockwise). Every time
you move the dial one position to the right, the
magnification of the image increases. Use the
pointers on the arrow pad to scroll the image
left, right, up, or down. To restore the original
display, rotate the main dial to the left (or rotate
the sub dial counterclockwise).
If you want to display more than one image in
the monitor, use the index display. Set the
mode dial to playback , and then turn the
main dial to the left toward the index mark (or
turn the sub dial counterclockwise). Every time
you move the dial one position to the left, the
number of images displayed in the index
increases (4, 9, 16). To move the green
highlight in the index, press or to select
the previous or next image. Press or to
display the previous or next index. With the
green highlight on the image you want to
select, rotate either dial to the right to return to
the single-image display.
To leave the playback mode, if the mode dial is
set to playback , set the mode dial to P, A, S
or M. If the mode dial is set to P, A, S or M,
press the monitor button once to switch off
the monitor.
You can also use the playback mode menu to
set up a slide show that will automatically
display each image for 5 seconds continuously,
starting with the currently displayed image, until
you press the or button.
Displaying Image Information
While viewing an image during playback, you can display the information about the settings when the
picture was taken. Set the mode dial to playback (or with the mode dial set to P, A, S or M, rapidly
press the monitor button twice). Hold down the INFO button and then turn the main dial or
sub dial to the right or left to select one of the three information display formats superimposed on the
displayed image. If the histogram feature is switched on, an additional display will show the
histogram. The histogram display can be switched on in the shooting mode. The sample below shows
the display with all the information (without the histogram).
Memory card
Folder name/
file name
Standard DCF
file information
Date picture
taken
18
Protected
Time picture
taken
Selected for printing
Record mode (resolution, compression)
Shutter speed, aperture value
Exposure compensation
White balance setting
ISO (AUTO, ISO setting)
Flash intensity compensation
Frame number (or rate of enlargement if
image enlarged for display)

Protecting Images
Images stored on a card can be protected from
accidental deletion. Enter the playback mode
and display the image that you want to protect.
Press the protect button . A protect mark
is displayed on the image. To remove
protection, display the protected image and
press the protect button to switch off the
protect mark. If you want to protect all the
images on a SmartMedia card, attach a protect
seal to the card. Please remember that
protecting an image does not protect it if the
card is formatted.
Deleting Images
Delete poorly exposed or other images that you
do not want to keep to create more storage
space on a card. Enter the playback mode and
display the image that you want to delete. (You
can also delete images in the index display.
Just move the green highlight to the image that
you want to delete.) Press the erase button
, press to select YES, and then press
the button. The card access lamp blinks as
the image is erased. If you want to delete all
images on the card, select the card that you
want to erase. Use the card erase option of the
CARD SETUP feature in the shooting mode to
erase all the images on the card.
Copying Images to Another Card
With two cards installed in the camera, you can
select images one by one for copying to the
other card, or copy all images to the other card.
Insert the source and destination cards in the
camera.
Formatting a Memory Card
A card which has been formatted for use on a
computer or another camera, must be
formatted before it can be used with this
camera. Formatting deletes all images and
information stored on a card.
Selecting an Image File Naming
Scheme
The camera automatically assigns a file name
to every image and then saves it in a folder on
the card. These file names can be used to
select and process images on a computer.
Folders are named with three digits in the
format nnnOLYMP. Files are named with four
digits in the format Pmdd왕왕왕왕.jpg.
All folders
DCIM
100 OLYMP
P2030001.jpg
P2030002.jpg
P2030003.jpg
P2030004.jpg
Day (01~31)
Month (10, 11, 12 are
numbered A, B, C)
File number (0001~9999)
After taking 9999 pictures, the counter is reset
to 0001 for the next picture, the folder number
increments by 1 to name and create a new
folder where the next image (file) is stored.
Set the mode dial to the setup/connection mark
, and then press the menu button . On the
arrow pad, press or to select FILE NAME.
Press to move the green highlight to the
right. Press or to move the green highlight
to AUTO or RESET. Press the button to
select the setting, and then press the button
to close the menu.
You can select the naming scheme with the
FILE NAME item in the setup/connection mode
menu. The AUTO selection numbers all files
and folders consecutively for every card you
use to ensure that no file names are duplicated.
The RESET selection restarts file numbering
every time you insert another card.
Folder name
OLYMP
Folder number
(100~999)
File name
Pmdd .jpg
English
19

Selecting Images for Printing
You can select images one by one or select all
images on the card for printing on a DPOF
compatible printer or printing by a DPOF
printing service.
To select single images for printing
Insert and select the card with the images that
you want to select for printing. Set the mode
dial to print reserve mode . Use the arrow
pad to display the image that you want to select
for printing, and then press the button. Press
or to select the number of copies that you
want to print, and then press the button. The
image is marked with the print reserve mark
and the number of copies that you have
selected. Repeat this procedure to select and
mark more images for printing. Reset the mode
dial to leave the print reserve mode. To cancel a
selection, repeat this procedure and select zero
for the number of copies.
To select or cancel all images for printing
Insert and select the card with the images that
you want to select for printing. Set the mode
dial to print reserve mode , and then press
the menu button . Use the print reserve item
on the print reserve mode menu to select
or clear all images on the card for printing.
To select images for date or time stamping
Insert and select the memory card that
contains the images that you want to select for
date or time stamping. Set the mode dial to
print reserve mode , and then press the
menu button . In the print reserve mode
menu use the Date or Time Stamping item
to set date or time stamping for the image.
To select or cancel index printing
Insert and select the memory card that
contains the images that you want to select for
index printing. Set the mode dial to print
reserve mode , and then press the menu
button . In the print reserve mode menu, use
the Index Printing item to select or clear all
previous selections for printing.
Reading Images with a Computer
You can use the USB cable provided with the
camera to connect the camera to a computer
equipped with a USB interface and read
images from either card in the camera with the
computer. The following equipment is required:
• A USB cable provided with the camera.
• A USB driver. A USB driver is provided with
CAMEDIA Master 2.5. The most recently
updated USB drivers are available from the
Olympus Home page at www.olympus-
europa.com or contact an Olympus Service
Center.
• An IBM compatible PC/AT with Windows 98,
Windows 98 Second Edition, or Windows
2000 installed.
• An Apple Macintosh or iMac with Mac OS 8.6
to 9.0 installed.
For more details refer to the software CD’s
Reference Manual on CD-ROM.
Optional Devices for Reading Cards
You can also use one of the optional devices to
read image files from a memory card if your
computer is not equipped with a USB port.
Before you purchase one of these optional
devices, make the device can be used with
your computer. For more details, contact an
Olympus Service Center.
To read a SmartMedia card
• Floppy Disk Adapter FlashPath MAFP-2NE.
A 3.5-inch floppy disk drive is required.
• PC Card Adapter MA-2E. A PCMCIA card
slot is required on your computer.
• SmartMedia Reader/Writer MAUSB-2. A
USB connector is required.
To read a CompactFlash card
• PC Card Adapter. A PCMCIA card slot is
required.
20

Shooting Features
Selecting the Shooting Mode
Set the mode dial to P, A, S or M to select the
shooting mode.
• P (Program mode) The camera automatically
selects the aperture value and shutter speed
for the pictures.
• A (Aperture priority mode) You set the
aperture value while the camera automatically
selects the correct shutter speed. A large
aperture value focuses the subject and blurs
the background for portrait shots, and a small
aperture value will focus both foreground and
background for group shots or scenery.
• S (Shutter priority mode) You set the shutter
speed while the camera selects the correct
aperture value. Use a fast shutter speed to
freeze moving subjects, or select a slow
shutter speed to create the effect of blurred
motion.
• M (Manual mode) You set the aperture and
shutter speed manually to achieve special
effects in your pictures.
Adjusting Aperture Value
Set the mode dial to A (Aperture priority
mode), and then turn the main dial or sub dial
to adjust the aperture value in 1/3 increments.
Turn the main dial to the right (or turn the sub
dial clockwise) for a large aperture or turn the
main dial to the left (or turn the sub dial
counterclockwise) for a smaller aperture. The
selected aperture value is displayed in the
viewfinder and control panel. The diameter of
the aperture is inversely proportional to the
aperture value. The larger the aperture value
the smaller the diameter of the aperture and
the greater the depth of field, allowing both the
subject and background to be in sharp focus.
The smaller the aperture value, the larger the
diameter of the aperture and the shallower the
depth of field, allowing you to focus the subject
against a blurred background.
Selecting the Metering Method
The metering method determines whether the
camera meters the light in a wide or smaller
area of the picture composed in the viewfinder.
Hold down the metering mode button on
top of the camera, and then turn the main dial
or sub dial until you see the icon for the
metering method that you want to set displayed
in the viewfinder or control panel.
Control Panel Method
ESP Digital ESP metering. The
entire image is metered for
light and brightness patterns.
Displayed only in the control
panel.
Center weighted averaging
metering. Meters the entire
picture, yet concentrates on
the area in the mark in the
viewfinder, approximately 3
times the size of the spot
metering area. Displayed in
the viewfinder and control
panel.
Spot metering. Only the area
covered by the spot metering
mark in the viewfinder is
metered, approximately 1.2%
of the viewfinder display.
Displayed in the viewfinder
and control panel.
Adjusting Shutter Speed
Set the mode dial to S (Shutter priority mode),
and then turn the main dial or sub dial to select
a shutter speed. For every position that you
move the dial the shutter speed is increased (or
decreased) in 1/3 steps. Turn the main dial to
the right (or turn the sub dial clockwise) for a
faster shutter speed or turn the main dial to the
left (or turn the sub dial counterclockwise) for a
slower shutter speed. (range: 1/640 to 2 sec.)
The selected shutter speed is displayed in the
viewfinder and control panel. The built-in flash
may not be effective with a shutter speed of 1/
250 or higher.
English
21

Focusing
The camera can focus a subject automatically.
Set the focus mode switch to AF (Automatic
Focus). Compose the picture with the AF target
mark in the center of the viewfinder on the
subject. If you compose the picture with the
monitor, make sure the subject is in the center
of the monitor. Half-press the shutter button
until the camera beeps and the AF correct
mark in the viewfinder lights, and then fullpress the shutter button to take the picture.
To focus a difficult subject
If the AF correct mark in the lower left corner of
the viewfinder continues to blink the camera
cannot achieve focus automatically. Some
subjects are difficult to focus.
Subject of low contrast
A subject without
distinct patterns could
be difficult to focus.
Subject with center glare
A subject with center
glare could be difficult
to focus.
Two objects at different distances from the
camera
The camera cannot
autofocus on a single
subject with two
objects at different
distances from the
camera in the
viewfinder.
Subject in light from street lights and
windows
A subject at night in
light from street lights
or from building
windows could be
difficult to focus.
Subject without vertical lines
The camera cannot
focus on a subject with
only horizontal lines.
Hold the camera
vertically, half-press the
shutter button, and
then hold it down to lock the focus. Re-position
the camera horizontally, compose the picture,
and then full-press the shutter button to shoot
the picture.
Moving subject
It is impossible to hold
a fast moving object in
the center of the
viewfinder long enough
for automatic focusing,
so lock the focus on an
object that is at the same distance from the
camera as the subject you want to shoot, wait
for the subject to appear, and then shoot the
picture.
Shooting through glass or glaring surface
A picture taken through a window, or shooting a
glaring surface like shiny metal, could be
difficult to focus. If this problem occurs, set the
focus mode switch to MF (manual focus) and
focus the subject manually.
Backlit subjects
Strongly backlit subjects could be difficult to
focus. Set the focus mode switch to MF
(manual focus) and focus the subject manually.
In such situations, you can use substitute
focusing. Compose a picture with the AF target
mark in the viewfinder on an object that is the
same distance from the camera as the subject
that you want to shoot. Half-press the shutter
button to focus on the substitute object, keep
the shutter button half pressed, compose the
picture again with the original subject and then
full-press the shutter button to take the picture.
(If you are waiting for a fast moving subject to
appear, keep the shutter button half pressed
until the subject appears in the viewfinder.)
22
To focus manually
Set the focus mode switch to MF (Manual
Focus). Turn the manual focus ring until you
see the subject focused in the viewfinder or the
monitor. The image in the monitor is doublesize to make focusing easier, and the camerato-subject distance is displayed in the lower
part of the monitor.
Exposure Compensation
Use exposure compensation to manually
increase or decrease the exposure setting
automatically selected by the camera to create
a brighter or darker image. Set the mode dial to
P, A or S. Hold do wn the e xposure
compensation button , and then turn the
main dial or sub dial to select the exposure.
Exposure compensation can be adjusted in the
range of ±3EV in 1/3EV steps. You can confirm
changes in brightness in the range ±2EV on the
monitor.
AE Lock
Point the camera at the subject, press the
automatic exposure lock button , halfpress the shutter button to focus the subject
automatically, and then full-press to take the
picture. The exposure setting will not change as
long as the button is depressed so you
can continue to shoot with the same exposure
setting.
Bracketing Shots
You can set the camera to automatically
bracket a shot with three different exposure
settings at 1/3EV, 2/3EV or 1EV full exposure
step for each shot.
Changing ISO
The ISO setting is equivalent to the ISO
settings performed with traditional SLR
cameras that employ film.
White Balance
The light source can affect how the camera
reproduces color. Normally, the camera uses a
white portion of the composed picture as a
base to reproduce other colors, but if the
picture does not contain white, or if you are
shooting under artificial lights (especially
fluorescent lights), you may need to adjust the
white balance to achieve the most natural color
reproduction in your pictures. White balance
can be adjusted three ways.
• Auto white balance. The camera performs
balance color automatically using a white
portion of the composed picture as a
reference. Press and hold down the white
balance mode button , turn the main dial or
sub dial until you see -A- in the viewfinder and
control panel, or AUTO WB in the monitor,
and then take the picture.
• Quick reference white balance. Under the
same light source where you intend to take
the picture, point the camera at a white
surface (wall, sheet of paper, etc.), fill the
viewfinder with the white surface, and then
press the quick reference white balance
button on the front of the camera. When
you see GOOD displayed in the monitor,
press the button to save the setting, and
then take the picture. If you see NO GOOD,
this means that not enough white surface was
available, the white surface reflected too
much light, or color around the corners of the
sheet interfered with the registration.
• Preset white balance. Hold down the white
balance mode button , and then turn the
main dial or sub dial until you see the desired
color temperature setting, and then release
the button. Select AUTO, a color
temperature setting in the range 3000K to
7500K, or Quick Reference.
English
23
Setting the Record Mode
The record mode settings determine the quality
of the images and also affects the file sizes.
The better the quality, the larger the file size.
Hold down the record mode button , and then
turn the main dial or sub dial to the left until you
see the desired setting in the control panel
(TIFF, SHQ, HQ, SQ), or turn to the right to
display them in reverse order. The settings are
translated as follows: TIFF (Tagged Image File
Format), SHQ (Super High Quality), HQ (High
Quality), SQ (Standard Quality).
Setting Resolution Compression
TIFF 2240 x 1680 1:1
SHQ 2240 x 1680 1:2.7
HQ 2240 x 1680 1:8
SQ 1280 x 960 1:8
1
Approximate estimations.
The resolution (number of pixels) and the
compression ratios can be adjusted in the
shooting mode for each setting.
(no. of pixels)
1
Adjusting Sharpness
In the shooting mode, you can select HARD,
NORMAL, or SOFT for the sharpness setting.
Adjusting Contrast
In the shooting mode, you can select HIGH,
NORMAL, or LOW to adjust the amount of
gradation between areas of different brightness
in the image.
Taking Multiple Exposures in
Sequence Mode
With the camera in the sequential mode, press
and hold down the shutter button to take four
rapid shots. Set the mode dial to P, A, S or M,
and then hold down the drive button until
you see the sequential mode mark in the
control panel. Press and hold down the shutter
button. The camera will continue to take
pictures (up to four) until you release the
shutter button. The pictures are taken at the
same exposure, while bracketing exposures
takes multiple pictures at different exposures.
Using the Self-Timer
The self-timer delays shutter release for 12
seconds so you can include yourself in a group
picture.
Using the Remote Unit RM-1
With the camera in the remote mode, you can
use the Remote Unit RM-1 to release the
shutter while you are standing in front of the
camera.
Using the Optional Remote Cable
RM-CB1
Use the remote cable to prevent camera shake,
caused by pressing the shutter button with your
finger, when shooting at a slow shutter speed.
Using Time Lapse
In the time lapse mode, the camera takes
pictures automatically at specified intervals. You
can specify the time interval in hours and
minutes in a range from 1-minute to 24-hour
time intervals. The camera will continue to
shoot until the batteries discharge, or until the
selected card fills up. For a long shooting
session, connect the optional AC adapter to the
camera to conserve battery power.
For more details and important notes about
using this feature, refer to the Reference
Manual on the CD-ROM provided with the
camera.
Using the Optional Dedicated
External Flash FL-40
Use the optional External Flash FL-40,
dedicated for exclusive use with this camera,
alone or with the camera’s built-in flash. Before
you use the dedicated flash, read the External
Flash FL-40 instructions.
Use the FL-40 the same way you would use the
built-in flash. A generic external flash unit and
the optional FL-BK01 dedicated bracket can
also be used.
24

Using an Optional Conversion Lenses
The conversion lenses listed below can be used with this camera. Before you use a conversion lens,
make sure that the zoom is set to TELE or WIDE, whichever is required.
Conversion Lens
Type
3x Extension Lens Tele 300 Pro
TCON-300
F2.8
f=420mm equivalent
Filter diameter 49mm
Complete Multi-Coat
1.45x Tele Extension Lens Pro
TCON-14B
F2.4
f=200mm equivalent
Filter diameter 86mm
Complete Multi-Coat
0.8x Wide Extension Lens Pro
WCON-08B
F2
f=28mm equivalent
Filter diameter 105mm
Complete Multi-Coat
Attachment
Method
Support
arm
Screw
Screw
Zoom
Setting
TELE
TELE
WIDE
Control Panel
Display
flashing
illuminated
English
Macro Extension Lens Pro
MCON-35
F2~F2.4
Possible to shoot area up
to size of approx. 49mm x 37mm
Filter diameter 72mm
Complete Multi-Coat
To select the conversion lens mode (not close-up shooting)
Press and hold down the macro button , and then turn the main dial or sub dial until you see the
conversion lens mark in the control panel. If a 3x Extension Lens Tele 300 Pro is attached, the
mark will blink. Otherwise the mark will not blink.
To set up close-up shooting with a conversion lens
Set the mode dial to setup/connection , and then press the menu button. In the Setup/connection
mode menu, select the macro mode/conversion lens mark .
Screw
WIDE~TELE
25

Special Settings
Shutter Sound
You can use settings in the shooting mode to
set the camera to emit a beep upon shutter
release, or you can switch this feature off. If you
set the camera to emit a beep, this will tell you
that the shutter has released when you are
using the remote unit or remote cable to take a
picture. If you set the camera to emit a beep,
you can also adjust the volume of the sound.
RecView Time
You can use settings in the shooting mode to
set the length of time that a picture is displayed
on the monitor immediately after it is taken.
Three settings are provided: AUTO, OFF, 5sec.
Warning Sound
You can use settings in the shooting mode to
set the camera to beep twice when the picture
is in focus, beep once when exposure is locked,
or you can switch this feature off. Use the
shooting mode to set up this feature.
Sleep Mode
You can use settings in the shooting mode to set the amount of time the camera remains idle before
the camera enters the sleep mode. When the camera enters the sleep mode, the monitor, control
panel, and viewfinder displays are switched off to conserve battery power, or the camera switches
itself off, depending on the mode dial setting. To restore the camera to full operation after it has
entered the sleep mode, just press any button. If the camera remains in the sleep for one hour, the
camera switches itself off automatically. To restore normal operation, switch the camera off and on
again.
1MIN
2MIN
5MIN
10MIN
26
OFF
Camera never enters sleep mode.
Camera neither enters sleep mode, nor switches itself off.
Camera enters sleep mode if it remains idle for 1 minute.
Camera enters sleep mode if it remains idle for 2 minutes.
Camera enters sleep mode if it remains idle for 5 minutes.
Camera enters sleep mode if it remains idle for 10 minutes.

RAW Mode
Use the Shooting mode settings to set the
camera in the RAW data mode. When the
camera is in the RAW mode, images are
recorded from the CCD as 10bit/channel data,
resulting in an extremely large file size (about
7.6MB) because the images are not
compressed. Note the following important point
about the RAW mode.
• In order to handle images recorded in the
RAW mode, you will need CAMEDIA Master
2.5.
English
27

Reference
Using the Menus
Use the menus to set up how the camera operates. Four menus are provided. To open a menu, set
the mode dial to the appropriate setting and press the menu button .
Mode Dial Mode Press to display:
P, A, S or M Shooting Shooting mode menu
Playback Playback mode menu
Print reserve Print reserve mode menu
Setup/connection Setup/connection mode menu
Set the mode dial to the setting to display the desired menu. Press the menu button to open the
menu in the monitor. On the arrow pad, press to move the green highlight down the menu, or
press to move the green highlight up the menu.
Note
Some menus have more than one page. The notation in the upper left corner of the page tells you which page you
are currently viewing. For example, if you see 1/3 you are viewing page 1 of 3 pages. To display the next page of the
menu, just press
With the green highlight on the option that you want to set, press to move the green highlight to
the right. Select the desired setting. If more than one setting is available for selection, press or
to move the green highlight to the desired setting, and then press the button. If the setting requires
an entry (a number for a date or time, ON or OFF selection) press or to move the green
highlight to the desired setting, and then press or to until you see the setting you desire, and
then press the button. If more than one setting is required (a time setting for example), the green
highlight will move to the next setting so you can select the desired setting by pressing or . After
you press the button to select your choices, the green highlight returns to the right. When you are
finished performing settings in the menu, press the button to close the menu. For detailed
summaries of the menus and their settings, refer to the tables on the following pages.
when the green highlight is at the last selection.
28

List of Menu
For more details refer to the software CD’s Reference Manual on CD-ROM.
Shooting mode menus for P (Program mode), A (Aperture
priority mode), S (Shutter priority mode), M (Manual mode)
1/3
2/3
3/3
Delete all images from selected
SmartMedia or CompactFlash
card, and format a card.
ISO (sensitivity) setting.
Bracket same subject with 3
rapid shots with different
exposures.
Flash intensity control
Sharpness.
Overall image contrast.
Record mode (quality,
resolution, compression).
Set interval time (specify time
interval between shots during
automatic time lapse photography).
Shutter sound setting (high,
low, OFF).
Default
Setting after and
pressed at the same time
—
AUTO
OFF
±0EV
NORMAL
NORMAL
—
OFF
OFF
English
Warning sound (ON, OFF).
Image display after shooting.
Sleep mode timer setting.
ON
OFF
1MIN
29
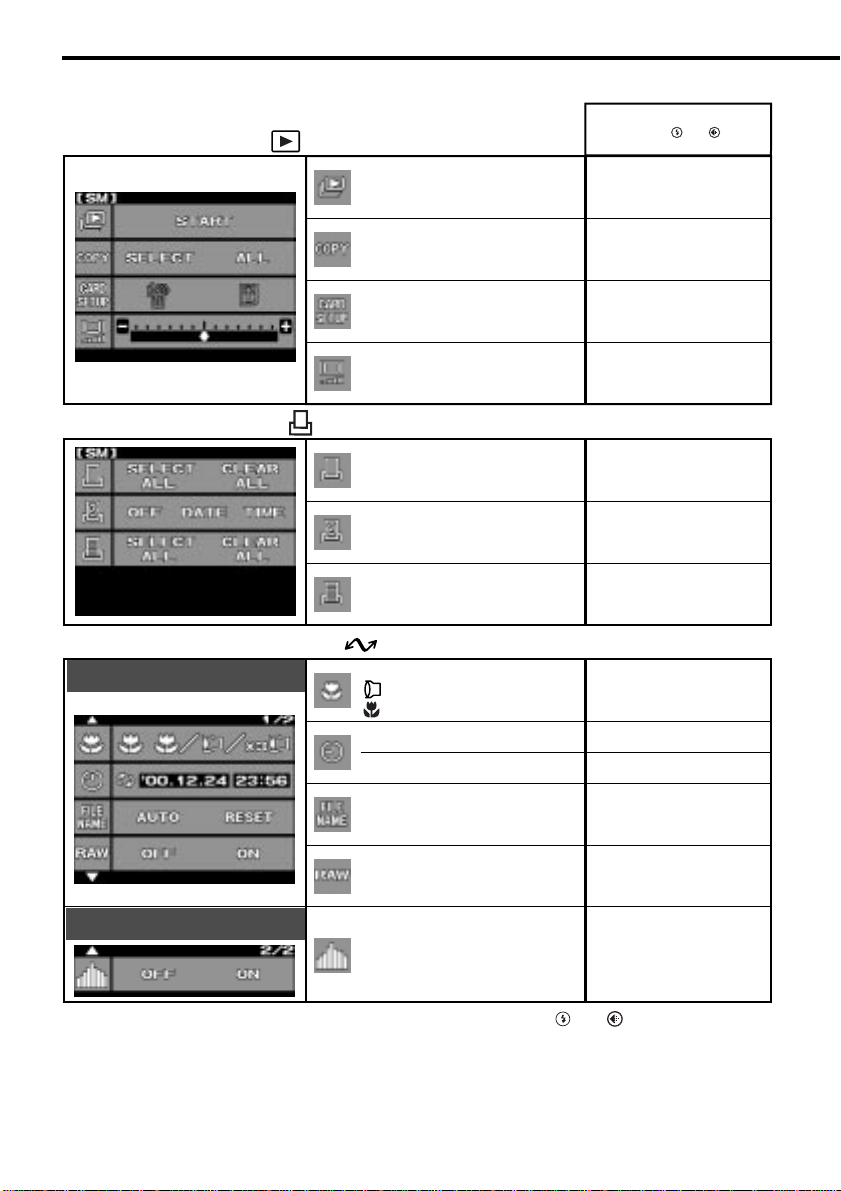
Playback mode menu
Default
Setting after and
pressed at the same time
Print reserve mode menu
Setup/connection mode menu
1/2
2/2
Slide show
(Automatic playback).
Copy images card-to-card.
Delete all images from card,
format card.
Monitor brightness.
Select or cancel all pictures for
printing.
Set date or time stamping on
prints.
Select or cancel all pictures for
index printing.
Determines whether conversion lens
is selected when marcro button
is pressed.
Set year/month/day format.
Set current date and time.
After you replace a memory card, you can
restart file numbering (RESET) or continue
sequential file numbering (AUTO).
Pictures stored as RAW
(unprocessed, uncompressed)
data.
Switches histogram on and off.
Year/month/day
AUTO
—
—
—
±0
—
OFF
—
OFF
OFF
∗
∗
∗
∗
∗
∗
∗
∗
30
∗ Unchanged even after pressing and .

Error Messages
If a problem occurs with a memory card, a message will be displayed in the control panel and the
monitor. When a memory card error message is displayed, first remove the card and then insert it
again. If the error message occurs again, refer to the table below to solve the problem.
Viewfinder
Control
Panel
Monitor
CARD COVER
OPEN
CARD ERROR
NO CARD Card is not present. Insert the card in the camera.
UNFORMATED
CARD
WRITE
PROTECT
Explanation Solution
Card compartment
cover is open.
You cannot store
pictures, play back
images, or delete
images from the card.
Card is not formatted
or is damaged.
The card is protected
with an adhesive seal,
or a folder on the card
has been designated
“read-only”. The card
has been selected only
for playback, so it
cannot be used for
taking pictures, images
cannot be deleted, and
it cannot be initialized.
Insert the card and lock the card
compartment cover.
Remove the card, wipe clean the
electrical contacts, insert the card, and
then try again. If the message is
displayed again, the card can no
longer be used.
You may be able to use the card again
if you format it. However, formatting
the card will erase all images stored
on the card.
Format the card. Formatting the card
will erase all images stored on the
card. On the arrow pad, press to
select YES, and then press the
button to format the card.
If the card is protected with an
adhesive seal, remove the seal, or if
the card has been selected for
playback only, cancel the playbackonly selection. If this does not solve
the problem, the card is operating
abnormally. Try to transfer the images
to a computer, or try to copy the
images to another card installed in the
camera. After copying the images, try
to format the card again.
English
No display
NO PICTURE Playback cannot be
executed because
there are no pictures
stored on the card.
Make sure that a card that contains
images is inserted, or take a picture.
31

Viewfinder
No display
No display
Control
Panel
(No more
images can
be stored
on the
card.)
Monitor
CARD FULL
(Card is full.
No space for
storing more
pictures.) *1
CARD FULL
No display
Explanation Solution
Card is full and you
cannot continue
shooting.
During Shooting
Folder numbering has
reached 999, or file
numbering has
reached 9999, so you
cannot continue
shooting.
During Print Selection
Card is full so you
cannot continue
selecting or cancelling
pictures for printing.
(Selecting pictures for
printing stores data on
the card.)
Camera interior has
overheated.
Replace the card with a fresh card, or
delete images that you do not need,
or transfer the images to a computer,
and then delete all the images from
the card.
Replace the card with a fresh card, or
transfer the images to a computer,
and then delete all the images from
the card.
Replace the card with a fresh card, or
delete images that you do not need, or
transfer the images to a computer, and
then delete all images from the card.
Switch the camera off and allow it to
cool, and then switch the camera on
again.
No display No display
No display
No display
PICTURE
ERROR
CANNOT
OPEN FILE
The selected picture
cannot be displayed for
playback, but be used for
other processing.
Picture shot
with this camera
The selected
picture cannot be
displayed for
playback, but be
used for other
processing.
Picture shot
with another
camera
The picture cannot
be displayed for
playback with this
camera.
Remove the card, wipe clean the
electrical contacts, insert the card and
then try again. If the message is
displayed again, the card can no
longer be used.
You may be able to use the card
again if you format it. However,
formatting the card will erase all
images stored on the card.
Select and display the picture on the
camera used to take the picture.
*1
The sizes of the clusters are different on a SmartMedia and CompactFlash card, so you may not be
able to store exactly the same number of images on either card. For this reason, you may not be able
to copy all the images from a full card to the other card, even if it is completely empty. (You will see
the CARD FULL message before copying is completed.) In this case, you should delete some
images that you do not need, or for the target card use a higher capacity card.
32

Specifications
Product type SLR digital camera (recording, playback)
Recording system Digital recording, JPEG, in accordance with Design rule for
Memory 3V (3.3V) SmartMedia: 4MB, 8MB, 16MB, 32MB, 64MB;
Storable pictures Approx. 8 frames (HQ/8MB)
Erase Single frame, All frame erase
Image pickup element 2/3 in. primary color filter
Image recording 2240 x 1680 pixels
White balance Auto (full TTL), Preset (7 steps), Quick Reference
Lens Olympus 9~36 mm, f/2.0~f/2.4, 14 elements in 11 groups
Filter diameter 62 mm
Metering system Digital ESP (Electro Selective Pattern) metering, Center
Exposure control P (Program mode), A (Aperture pr ior ity), S (Shutter priority),
Aperture WIDE : F2.0~11,
Shutter 2~1/640
Exposure compensation ±3EV (1/3EV Steps)
Working range (from lens)
Viewfinder SLR
Monitor 1.8 in. TFT color liquid crystal display
Monitor resolution Approx. 118,000 pixels
Flash recharge time Approx. 7 sec. at normal temperature with new batteries
Flash working range (ISO 80) WIDE 0.6 m~6.3 m
(from lens surface) TELE 0.5 m~5.2 m
Flash modes Auto (auto activated in low light, backlight)
Camera File (DCF), TIFF (non-compressed), DPOF
compatible.
CompactFlash (Compatible with Type I and II. Micro drive
cannot be used.)
4 million pixels (picture elements)
1600 x 1200 pixels
1280 x 960 pixels
1024 x 768 pixels
640 x 480 pixels
(one-touch)
(equivalent to 35~140 mm lens on standard SLR 35 mm
camera)
weighted averaging metering, Spot metering
M (Manual mode)
TELE : F2.4~11
Manual mode: bulb (Limit: 30 sec.), 8~1/640
Standard: 0.6 m~∞
Macro: 0.2 m~0.6 m
Finder view field 95%, Wide x 0.42, Tele x 1.60
Operation : Used to compose pictures, just like the viewfinder.
Playback : Image display (single-frame, multi-frame
index display, enlarged display)
(CR-V3)
Red-eye reduction
Fill-in flash (disabled if built-in flash closed),
Slow synchronization, 2nd-CURTAIN
Off (no flash)
English
33

Autofocus Dual Autofocus
Detection system Contrast detection system/active AF method
Focusing range Normal shooting mode: 0.6 m~∞,
Self-timer Operation time: 12 sec.
External connectors DC IN ja ck, USB connector, video OUT jack
Date, time Recorded with image file information
Automatic calendar Auto correction up to year 2030
Print reserve selection DPOF standard (setting number of copies, index
RAW data output feature 10-bit AD output data (ORF file format), ICC profile not
Interval time 1 min. to 24 hours
for time-lapse shooting
Calendar power supply Non-removable manganese-lithium
Operating environment
Temperature Operation: 0~40°C
Humidity Operation: 30~90%
Power supply 3V lithium battery pack CR-V3 x 2
Macro: 0.2 m~0.6 m
For camera infor mation display, or date or time stamp
for printing possible
printing, date or time stamping)
attached
Storage: −20~60°C
Storage: 10~90% without condensation
AA (R6) Nickel-Metal Hydride batteries x 4
AA (R6) Ni-Cd batteries x 4
AA (R6) Alkaline batteries x 4
AA (R6) Lithium polymer battery
AC Adapter
Note: Never use AA (R6) Zinc-carbon or AA (R6) Lithium batteries. They could overheat
and damage the camera.
Dimensions 128.5 W x 103.5 H x 161 L mm (protuberances not included)
Weight 1050 g (without cards, batteries and lens cap)
Specifications are subject to change without prior notice or obligation.
34

English
35

Mise en marche
Organes importants et nomenclature
1
2
3
4
5
6
7
8
9
0
A
B
C
W
X
V
U
T
S
R
Q
P
O
N
M
L
K
J
I
H
G
F
E
D
§
•
k
l
m
n
o
p
q
r
s
t
u
vwx
y
£
¢
†
ç
å
~
}
|
{
z
æ
º
µ
Y
Z
c
d
e
36
f
[
g
\
b
a
`
]
j
i
h
¶
ß
¡ø¬ ¤
©
®
…⁄
¥
™
fi
›
‹

1 Bouton de mesure
2 Bouton de commande
3 Prise de câble de déclencheur souple
4 Flash incorporé
5 Bouton de commande de flash
6 Bague de mise au point manuelle
7 Bague de zoom
8 Bouton de compensation d’exposition
9 Bouton de gros plan
0 Prise synchro-flash
A Levier de mode de mise au point
B Œillet de bandoulière
C Capuchon de prise d’alimentation secteur
(DC IN)/Prise d’entrée courant continu
D Écran
E Levier d’obturateur d’œilleton de visée
F Bague de réglage dioptrique
G Viseur
H Molette principale
I Couvercle de logement de carte
J
Verrouillage de couvercle de logement de carte
K Bouton de carte de mémoire SM/CF
L Voyant d’accès de carte
M Bouton d’éclairage
N Bouton de calage AE
O Levier d’alimentation
P Molette de mode
Q Bouton de calage de balance des blancs
R Molette secondaire
S Écran de commande
T
Bouton de sélection de mode d’enregistrement
U
Touche de sélection de mode d’exposition au flash
V Griffe porte-accessoires
W Prise de sortie vidéo (OUT)
X Connecteur USB
Y Bouton de verrouillage/libération d’écran
Z Bouton INFO
[ Bouton de protection en écriture
\ Bouton d’effacement d’image
] Bloc de touches fléchées
^ Bouton OK
a Bouton de menu
b Bouton d’écran
c Bouton de déclencheur
d
Capteur de signaux de télécommande/témoin de retardateur
e Œillet de bandoulière
f Logement de piles
g Écrou de pied photo
h Objectif
i
Bouton de calage de balance des blancs de référence rapide
j Port AF
Écran de commande
p Vitesse d’obturation
q Valeur d’ouverture du diaphragme
r Gros plan
s Retardateur
t Téléconvertisseur
u Prise de vues en série
v Télécommande
w Contrôle de puissance des piles
x Carte de mémoire sélectionnée
y Nombre de vues à mémoriser
z Signe d’erreur de carte
{ Échelle graduée de mémoire
| Mode de mesure
}
~ Exposition automatique différenciée
å Mise au point manuelle
ç Balance des blancs
† ISO
¢ Qualité
£ Réglage de l’image
Viseur
§ Zone de mesure ponctuelle
• Indicateur de calage exact AF
¶ Indicateur de flash
ß Gros plan
® Vitesse d’obturation
© Valeur d’ouverture du diaphragme
™ Balance des blancs
¥ Calage AE
µ
º Mode de mesure
æ Indicateur de mise au point automatique
Affichage sur l’écran
ø Indicateur de calage exact AF
¡ Indicateur de flash
¬ Gros plan
… Vitesse d’obturation
⁄ Valeur d’ouverture du diaphragme
¤ Balance des blancs
‹ Calage AE
›
fi Mode de mesure
Commande de flash
k Commande de puissance du flash
l Synchronisation lente
m Flash d’appoint
n Atténuation des yeux rouges
o 2ème rideau
Français
Compensation de l’exposition/niveau d’exposition
Compensation de l’exposition/niveau d’exposition
Compensation de l’exposition/niveau d’exposition
37

Vérifier que tous les accessoires sont là
Bouchon d’objectif
Appareil photo
Télécommande
Blocs de piles au lithium (CR-V3)
CompactFlash (16 Mo/vitesse de 8x)
Câble de connexion spécial (cordon de
liaison et le logiciel Jump Shot)
Lecteur: CD-ROM de 8 cm
Guide de démarrage rapide
Parasoleil
Câble USB
Bandoulière
Câble vidéo
Carte d’enregistrement client
Conditions de garantie
• Manuel de base
• Instructions de télécommande
• CDs de logiciel comprenant le
programme d’installation de pilote
USB pour Windows 98 et le manuel
de référence
Accessoires optionnels disponibles
pour cet appareil photo
Flash extérieur spécialisé (FL-40)
Équerre de fixation de flash spécialisé
(FL-BK01)
Câble d’équerre de fixation de flash spécialisé
(FL-CB01 à 04)
Lentilles de conversion
Câble de déclenchement (RM-CB1)
Boîtier d’appareil photo (Boîtier semi-dur)
Adaptateur d’alimentation secteur
Pile AA (R6) Ni-MH (nickel-métal hydrure)
38
Dispositif de charge spécialisé
Bloc de piles au lithium-polymère (B-10LPB)
Boîtier de pile d’alimentation (B-HLD10)
Chargeur de bloc de piles au lithium-polymère
(B-20LPC)
SmartMedia (8 Mo, 16 Mo, 32 Mo ou 64 Mo)
Adaptateur de carte PC MA-2E
Adaptateur de disquette FlashPath MAFP-
2NE
Dispositif de lecture/écriture sur SmartMedia
MAUSB-2
Imprimantes P-400/P-330NE
Août 2000

Fixation de la bandouliere
Faire passer l’une des extrémités de la
bandoulière dans l’œillet du boîtier d’appareil
photo. Faire passer l’extrémité de la
bandoulière dans la bague et le cadre arrêtoir
montés sur la bandoulière et faire coulisser
complètement la bague jusqu’à l’œillet. Tirer
fermement sur la bandoulière passant dans le
cadre arrêtoir pour vérifier qu’elle ne coulisse
pas. En procédant de la même façon, faire
passer l’autre extrémité de la bandoulière dans
l’œillet de l’autre bord du boîtier de l’appareil
photo.
Mise en place des piles
Il est également possible de se servir de 2
blocs de piles au lithium (CR-V3) ou de 4 piles
AA (R6) Ni-MH, Ni-Cd ou encore de piles
alcalines avec cet appareil photo. Vérifier que
l’interrupteur d’alimentation est en position
OFF. S’assurer que le voyant d’accès de carte
est éteint. Relever le bouton du logement des
piles et le tourner sur la position d’ouverture du
logement . Sortir le boîtier de piles.
Si des piles au lithium sont introduites, installer
un jeu de piles dans chaque partie du boîtier
de piles. Si des piles AA (R6) sont introduites,
installer 2 piles dans chaque partie du boîtier
de piles. Veiller à ne pas inverser la polarité des
piles au moment de les introduire dans le
boîtier. Appuyer sur les piles sans brutalité
dans le logement jusqu’à ce qu’elles soient
bloquées. Introduire le boîtier de piles dans la
base de l’appareil photo. Tout en appuyant sur
le boîtier de piles, tourner le bouton du
logement de pile jusqu’à la position de
fermeture .
1
CR-V3
Français
2
3
4
AA (R6) Ni-MH,
Ni-Cd ou alcaline
39

Introduction et sélection des
cartes de mémoire
Les cartes de mémoire, qui se réfèrent à
l’appellation “cartes” dans les descriptions qui
suivent, permettent de mémoriser les images
numériques des vues prises avec l’appareil
photo. L’appareil photo peut accueillir une carte
SmartMedia (SM) et une carte de mémoire
CompactFlash (CF).
Vous pouvez utiliser une carte de mémoire
SmartMedia de 3V (3,3V) Olympus ou de
n’importe quelle autre marque (les cartes de
mémoire de 5V ne peuvent pas être utilisées).
SmartMedia CompactFlash
Vérifier que le voyant d’accès à la carte est
éteint. Appuyer sur le verrouillage de couvercle
du logement des cartes pour le relever. Pour
introduire une carte SmartMedia, la saisir en
prenant soin de diriger l’angle coupé vers le
bas et l’introduire dans la fente de l’appareil qui
est placée le plus près de l’arrière de l’appareil
photo. Repousser complètement la carte dans
la fente. (Introduire la carte SmartMedia jusqu’à
ce qu’environ 2 mm de la carte soit visible audessus du bord de la fente.)
L’introduction d’une carte CompactFlash se fait
en prenant soin de diriger la flèche imprimée
vers l’arrière de l’appareil photo, puis
l’introduire dans la fente de chargement large
placée le plus près de l’avant de l’appareil
photo. Repousser complètement la carte dans
la fente de chargement. Rabattre le couvercle
du logement des cartes et appuyer
modérément dessus jusqu’au verrouillage.
Le retrait d’une carte SmartMedia s’effectue en
appuyant délicatement dessus pour libérer son
verrouillage, après quoi, il suffit de la retirer de
sa fente. Le retrait d’une carte CompactFlash
s’effectue en appuyant délicatement sur le
bouton d’éjection de manière à libérer la carte,
après quoi, il suffit de la retirer de sa fente.
Quand une seule carte est installée dans
l’appareil photo, cette carte de mémoire est
automatiquement sélectionnée pour mémoriser
les photos prises. Lorsque les deux sortes de
carte sont installées dans l’appareil photo, il est
possible de sélectionner librement l’une ou
l’autre carte pour mémoriser les photos prises.
40
Lorsqu’une carte est pleine, il est possible de
sélectionner rapidement l’autre carte et de
continuer la prise de vues. Pour ce faire,
appuyer et maintenir enfoncé le bouton de
carte SM/CF, puis tourner lentement la molette
principale ou la molette secondaire jusqu’à ce
(carte SmartMedia) ou (carte
CompactFlash) apparaisse sur l’écran de
commande. Lorsque apparaît, la carte
SmartMedia est sélectionnée pour mémoriser
les vues prises et lorsque apparaît, la carte
CompactFlash est sélectionnée.
Raccordement de l’adaptateur
d’alimentation secteur
Utiliser l’adaptateur d’alimentation secteur
optionnel comme autre source d’alimentation
pour effectuer une prise de vues de longue
durée et économiser l’énergie des piles.
Couper l’alimentation de l’appareil photo et
vérifier que le voyant d’acces à la carte ne
clignote pas. Brancher le cordon de
l’adaptateur d’alimentation secteur dans la
prise de sortie secteur. Retirer le capuchon de
prise d’alimentation secteur (DC IN) sur le flanc
gauche de l’appareil photo et raccorder
l’adaptateur d’alimentation secteur à l’appareil
photo et mettre ce dernier sous tension. Utiliser
uniquement l’adaptateur d’alimentation secteur
recommandé pour fonctionner avec cet
appareil photo. Pour obtenir de plus amples
détails sur la façon d’utiliser l’adaptateur
d’alimentation secteur dans les pays autres
que le pays d’achat de l’appareil photo et de
l’adaptateur d’alimentation secteur, se
renseigner auprès d’un centre de service
après-vente Olympus.
OFF
ON
Prise DC IN
Prise de cordon d’alimentation
de l’adaptateur d’alimentation
Adaptateur
d’alimentation
Prise de sortie
secteur
secteur
secteur

Mise sous tension et arrêt de
l’appareil photo
L’appareil photo est mis sous tension et arrêter
en déplaçant l’interrupteur d’alimentation sur la
position ON ou la position OFF. Lorsque
l’appareil photo est réglé en mode de prise de
vues (molette de mode réglée en position P, A,
S ou M). Si l’appareil photo n’est pas utilisé
pendant une durée spécifiée, il éteindra
automatiquement l’écran de commande et se
commutera en mode de veille de manière à
économiser l’énergie des piles. Pour rétablir le
fonctionnement normal et complet de l’appareil,
il suffit d’appuyer sur n’importe quel bouton de
l’appareil photo. Si l’appareil photo reste
inutilisé pendant une heure après s’être
commuté en mode de veille, l’appareil photo
s’éteindra automatiquement et complètement.
Pour rétablir le fonctionnement normal et
complet de l’appareil, couper d’abord
l’alimentation et la rétablir. La date et l’heure
doivent être introduits la première fois que
l’appareil est mis sous tension.
Contrôle de l’état des piles
L’indicateur de contrôle de puissance des piles
(en forme de pile AA (R6)) de l’écran de
commande indique la puissance actuelle des
piles. Lorsque l’appareil photo est mise sous
tension, si l’indicateur de contrôle de puissance
des piles est plein, puis s’éteint, cela signifie
que la charge des piles est maximale. Si
l’indicateur de contrôle de puissance des piles
est partiellement plein et continue à clignoter,
cela signifie que la puissance des piles est
faible et qu’elles doivent être remplacées
immédiatement. Si l’indicateur de contrôle de
puissance des piles partiellement plein s’éteint
et que l’écran de commande s’éteint
complètement, cela signifie que les piles sont
complètement déchargées et qu’il est
impossible de continuer la prise de vues tant
que les piles ne seront pas remplacées.
Vérification du nombre de vues enregistrables
Le nombre à deux grands chiffres qui apparaît
dans la partie inférieure droite de l’écran de
commande indique le nombre de vues
enregistrables. Lorsque le nombre atteint 0,
remplacer la carte ou si deux cartes sont en
place dans l’appareil photo, choisir l’autre carte.
Le nombre de vues qu’il est possible
d’enregistrer sur une carte est déterminé par la
taille des images. La taille des images est
déterminée par le paramétrage de mode
d’enregistrement (qualité, définition et
compression) sélectionné par le mode de prise
de vues. Les sélections de qualité d’image
actuellement possibles sont TIFF, SHQ, HQ
(défaut) et SQ (à savoir format pour fichier
d’image étiqueté, super haute qualité, haute
qualité et qualité normale).
Capacité de stockage d’une carte de mémoire
Qualité
TIFF 2240 x 1 680 (FULL) 1:1 11,3 Mo 0 vues 2 vues
SHQ 2 240 x 1 680 (FULL) 1:2,7 2,8 Mo 2 vues 11 vues
HQ 2240 x 1 680 (FULL) 1:8 950 Ko 8 vues 34 vues
SQ 1 280 x 960 (SXGA) 1:8 300 Ko 27 vues 110 vues
Résolution (en pixels) Compression
(Réglage par défaut)
(Réglage par défaut) (Valeur de référence)
Carte sélectionnée
Taille de fichier
Images par carte (Valeur de référence)
8 Mo
Nombre de vues
enregistrables
32 Mo
Français
41

Réglage de la date ou de l’heure
Les paramètres du mode de configuration /
connexion peuvent être utilisés pour introduire
la date, l’heure et le format de la date.
Lorsqu’une photo est prise, la date actuelle et
l’heure sont enregistrées en même temps que
l’image. La date ou l’heure enregistrée peut
être imprimée sous forme de sceau sur l’image
imprimée lorsqu’une impression du sceau de la
date ou de l’heure est sélectionnée. Le
traitement et la manipulation des images avec
le logiciel CAMEDIA Master 2.5 permet de
préserver les informations de la date et de
l’heure même après le transfert des photos à
un ordinateur. Ces informations de la date et de
l’heure peuvent être perdues si d’autres
logiciels sont utilisés.
Après avoir sélectionné d’apposer le sceau de
la date ou de l’heure sur les épreuves, le
paramétrage s’applique à toutes les images
sélectionnées pour l’impression. Introduire la
carte de mémoire qui contient les images à
sélectionner pour une impression avec
l’apposition du sceau de la date ou de l’heure.
Vérifier l’écran de commande et que
l’indicateur de la carte source apparaît, carte
SmartMedia ou carte CompactFlash
est affiché. Si l’indicateur exact n’apparaît pas,
appuyer et maintenir enfoncé le bouton de
carte de mémoire SM/CF, puis tourner
lentement la molette principale ou la molette
secondaire jusqu’à ce qu’il apparaisse sur
l’écran de commande. Tourner la molette de
mode sur l’indicateur de réserve d’impression
. Appuyer sur le bouton de menu pour
ouvrir le menu sur l’écran. Appuyer sur la
touche ou pour déplacer la surbrillance
verte et l’amener sur l’indicateur de sceau
de la date et de l’heure. Appuyer sur la touche
pour déplacer la surbrillance verte vers la
droite et appuyer encore une fois dessus pour
déplacer la surbrillance verte sur DATE ou sur
TIME, mais il est également possible d’annuler
le réglage de la date ou de l’heure en
déplaçant la surbrillance verte sur la position
OFF. Appuyer sur le bouton pour choisir le
réglage. Appuyer encore une fois sur le bouton
pour fermer le menu.
42

Prise de vues
Composition des photos
Vérifier que l’appareil photo est sous tension,
retirer le bouchon d’objectif et regarder dans le
viseur. Pour ajuster le viseur à votre vue, utiliser
la bague de réglage dioptrique et ajuster
jusqu’à ce que l’indicateur de cible AF dans la
partie centrale du viseur soit net et
parfaitement visible. Si l’indicateur de cible AF
n’est pas visible, vérifier que le levier
d’obturateur d’œilleton de visée placé à gauche
du viseur est en position haute. Après avoir
passé la bandoulière autour du cou, saisir la
partie droite de l’appareil photo et se servir de
la main gauche pour supporter la base de
l’appareil photo. Vérifier que les doigts
n’obturent pas l’objectif, le flash (s’il est relevé),
le port AF ou le voyant de réception de
télécommande ou de retardateur de la face
avant de l’appareil photo. Immobiliser au mieux
l’appareil photo, le diriger vers le sujet à
photographier et faire la composition de l’image
dans le viseur.
Composition d’une photo avec
l’écran
Vérifier que l’appareil photo est sous tension,
retirer le bouchon d’objectif et appuyer sur le
bouton d’écran . Abaisser le levier
d’obturateur d’œilleton de visée placé à gauche
du viseur. Appuyer sur le bouton de verrouillage
/ libération d’écran de manière à dégager
légèrement l’écran de l’appareil photo. L’écran
est relevé en relevant le bord inférieur de
l’écran. Vérifier à cette occasion que les doigts
n’obturent pas l’objectif, le flash (s’il est relevé),
le port AF ou le voyant de réception de
télécommande ou de retardateur de la face
avant de l’appareil photo. Immobiliser au mieux
l’appareil photo, le diriger vers le sujet à
photographier et faire la composition de l’image
sur l’écran.
Déclenchement de l’obturateur
Le déclencheur se déclenche en deux étapes.
Régler tout d’abord la molette de mode en
position P. Faire la composition de l’image à
prendre dans le viseur ou sur l’écran. Enfoncer
à mi-course le bouton de déclencheur pour
assurer le calage automatique de la mise au
point et de l’exposition. Dès qu’un faible signal
sonore est entendu et que l’indicateur de
calage exact AF de la partie inférieure gauche
du viseur s’allume, le sujet est au point. Tant
que le bouton du déclencheur est enfoncé à
mi-course, le sujet restera net et le calage de
l’exposition sera maintenu. Cette fonction a
pour appellation “verrouillage AF/AE”. Appuyer
au maximum sur le bouton du déclencheur
pour que l’obturateur se déclenche et que la
photo soit prise. Après avoir pris la photo,
l’image de la vue prise apparaît sur l’écran
pendant un court instant tandis que le voyant
d’accès de la carte clignote pendant quelques
secondes alors que la sauvegarde de la vue
est effectuée sur la carte. L’appareil photo
prend quelques secondes pour mémoriser
chaque vue sur la carte. Cependant, il est
possible de prendre une série de quatre vues
en mode d’exposition multiple jusqu’à ce que
quatre segments de la jauge de mémoire
soient indiqués. Lorsque la jauge de mémoire
est pleine, il faudra attendre qu’au moins un
segment de la jauge de mémoire s’éteigne
avant de pouvoir continuer et prendre la vue
suivante.
Enfoncement à mi-course
(appuyer doucement sur le déclencheur à
mi-course)
Enfoncement complet
(après une pression à mi-course, enfoncer
complètement mais sans brutalité)
Si l’indicateur de calage exact AF clignote, cela
signifie que le sujet n’est pas au point. Relever
le doigt du bouton de déclencheur, refaire la
composition de l’image en dirigeant cette fois-ci
l’appareil photo vers une autre partie de l’image
et enfoncer à nouveau le bouton du
déclencheur à mi-course. Tout en maintenant le
bouton de déclencheur enfoncé à mi-course,
refaire la composition de l’image. Il faut
cependant savoir que certains sujets sont
difficiles à mettre au point. Si l’indicateur de
rappel de flash apparaît dans le viseur, la vue
risque d’être sous-exposée auquel cas le flash
doit être utilisé. Appuyer sur le bouton de flash
pour relever le flash et prendre la vue avec
le flash.
43
Français

Utilisation de la fonction de zoom
Pour se rapprocher du sujet et l’agrandir dans
le viseur, utiliser la bague de zoom et la tourner
vers la gauche. Pour s’éloigner du sujet et
réduire la taille du sujet observé dans le viseur,
tourner la bague de zoom vers la droite. Il est
possible de prendre une photo en se plaçant à
60 cm du sujet. Il est également possible de
prendre des photos en plans très rapprochés
dans les limites de 20 à 60 cm du sujet en
réglant l’appareil photo en mode de grosplan.
Pour régler l’appareil photo en mode de gros
plan, presser et maintenir le bouton de gros
plan enfoncé et tourner la molette principale
ou la molette secondaire jusqu’à ce que
l’indicateur de gros plan apparaisse sur
l’écran de commande. Refaire cette opération
pour faire disparaître l’indicateur de gros plan
et ramener l’appareil photo en mode de
fonctionnement normal.
Utilisation du flash incorporé
Lorsque l’indicateur de flash clignote dans le coin inférieur gauche du viseur, c’est l’indice qu’il n’y
a pas assez de lumière pour prendre la photo normalement. Appuyer sur le bouton de flash pour
que le flash incorporé se relève et prendre la photo. Dès que le flash incorporé est sorti, l’indicateur
de flash risque de continuer à clignoter jusqu’à la charge totale du flash. Lorsque la photo est prise,
le flash se déclenche avec une intensité de l’éclair automatiquement ajustée pour que l’exposition
soit optimale.
Limites de portée du flash
ISO Réglage WIDE maximum (limites WIDE) Réglage TELE maximum (limites TELE)
AUTO 0,6 à 8,9 m 0,5 à 7,4 m
80 0,6 à 6,3 m 0,5 à 5,2 m
160 0,9 à 8,9 m 0,7 à 7,4 m
320 1,3 à 12,5 m 1,0 à 10,4 m
Utiliser le flash dans les limites de portée indiquées ci-dessous pour éviter toute surexposition ou
sous-exposition de vos photos. Un déclenchement successivement d’une rafale d’éclairs risque de
provoquer une surchauffe du flash. Ne pas le déclencher plus de 30 fois successivement. Après
l’avoir utilisé pendant un long moment, laisser au flash le temps de refroidir pendant au moins 10
minutes entre chaque série d’utilisation. Faire en sorte que la face avant du flash soit toujours propre
avant de l’utiliser .
Sélection d’un mode de fonctionnement du flash
La sélection d’un mode de fonctionnement du flash détermine la façon dont le flash se déclenche et
ceci permet d’obtenir les effets les plus divers. La sélection du mode d’exposition au flash se fait en
appuyant et en maintenant la touche de sélection de mode de flash , puis en tournant la molette
principale ou la molette secondaire vers la gauche ou vers la droite jusqu’à faire apparaître le
réglage souhaité.
44

Affichage dans Mode de fonctionnement
Fonction
l’écran de commande du flash
(aucune indication)
Flash automatique Ajuste la puissance de l’éclair en fonction de la luminosité du sujet.
SLOW Synchronisation Le flash se déclenche juste avant la fin du déclenchement de
2nd-CURTAIN lente l’obturateur. Lorsque 2nd-CURTAIN n’est pas sélectionné, l’appareil
photo est réglé pour déclencher l’éclair au moment du déclenchement
de l’obturateur (1st-CURTAIN).
Flash d’appoint Le flash se déclenche toujours quelles que soient les conditions
d’éclairage.
Atténuation de L’appareil photo déclenche 10 courts éclairs afin de contracter la
l’effet “yeux rouges” pupille des yeux et permettre d’atténuer l’effet “yeux rouges”. Un délai
d’environ 1 seconde est aménagé avant que l’obturateur se déclenche
après avoir pressé à fond le bouton du déclencheur.
Le paramétrage du mode de commande de nombre d’éclairs disponibles est déterminé par la
sélection du mode de prise de vues en cours.
Modes de commande du flash pour les mode P (mode programmé) et A (mode de priorité à l’ouverture)
Affichage dans l’écran
de commande
(aucun)
Mode de
fonctionnement
du flash
Flash automatique
Flash automatique (Atténuation
de l’effet “yeux rouges”)
Synchronisation lente (Atténuation
de l’effet “yeux rouges”)
Synchronisation
lente
Synchronisation
lente
ème
(2
rideau)
Flash d’appoint
Atténuation
de l’effet
“yeux rouges”
NON
OUI
OUI
NON
NON
NON
Synchronisation
du flash
er
1
rideau OUI
er
rideau
1
er
1
rideau
er
1
rideau
ème
rideau
2
er
1
rideau
Se déclenche automati-
quement sous faible
éclairement, lorsque le
sujet est en contre-jour
OUI
OUI
OUI
OUI
NON
Se
déclenche
toujours
NON
NON
NON
NON
NON
OUI
Modes de commande du flash pour les modes S (priorité à la vitesse d’obturation) et M (manuel)
Affichage dans l’écran
de commande
Mode de
fonctionnement
du flash
Flash d’appoint (Atténuation
de l’effet “yeux rouges”)
Flash d’appoint
ème
rideau)
(2
Flash d’appoint
Atténuation
de l’effet
“yeux rouges”
OUI
NON
Synchronisation
du flash
er
1
rideau
ème
rideau
2
er
1
rideau
Se déclenche automati-
quement sous faible
éclairement, lorsque le
sujet est en contre-jour
NON
NON
NONNON
Se
déclenche
toujours
OUI
OUI
OUI
Utilisation de la compensation par contrôle du flash
La compensation par contrôle du flash peut être utilisée lorsqu’il est difficile de prendre un sujet au
flash dont la luminosité est trop forte ou si le sujet est trop sombre. Pour ce faire, régler la molette de
mode en position P, A, S ou M et appuyer sur le bouton de menu . À partir du mode de prise de
vues, choisir l’indicateur de contrôle du flash et régler la valeur de compensation par contrôle
du flash. Après avoir appuyé sur le bouton pour fermer le menu, prendre la vue. Pour débrayer le
mode de compensation par contrôle du flash, il suffit de reprendre la procédure depuis le début et de
choisir la valeur zéro comme valeur de compensation par contrôle du flash.
Français
45

Visionner et gérer les images
Visionnement des images
L’accès au mode de visionnement afin de voir
les photos prises est obtenu en réglant la
molette de mode en position ou en
positionnant la molette de mode sur P, A, S ou
M en appuyant rapidement deux fois sur le
bouton d’écran . L’image de la vue la plus
récente apparaît sur l’écran. Appuyer sur la
touche ou pour afficher la vue précédente
ou la vue suivante. Appuyer sur la touche ou
pour sauter de dix vues avant la vue
précédente ou de sauter de 10 vues plus loin
après la vue suivante.
Pour agrandir l’image affichée, régler la molette
de mode en position de lecture , puis tourner
la molette principale vers la droite sur
l’indicateur en forme de loupe (ou bien
tourner la molette secondaire dans le sens des
aiguilles d’une montre). À chaque fois que la
molette de mode est tournée d’une position
vers la droite, l’agrandissement de l’image
affichée augmente. Se servir du bloc de
touches fléchées pour opérer le déroulement
de l’image vers la gauche, la droite, vers le
haut ou vers le bas. Pour ramener l’image au
format normal, tourner la molette principale
vers la gauche (ou tourner la molette
secondaire dans le sens inverse des aiguilles
d’une montre).
Pour afficher plus d’une image sur l’écran,
utiliser le mode d’affichage en index. Régler la
molette de mode en position de lecture , puis
tourner la molette principale vers la gauche en
direction de l’indicateur d’index (ou bien
tourner la molette secondaire dans le sens
inverse des aiguilles d’une montre). À chaque
fois que la molette de mode est tournée d’une
position vers la gauche, le nombre des images
affichées en index augmente (4, 9, 16). Pour
déplacer la surbrillance verte dans l’affichage
en index, appuyer sur la touche ou pour
sélectionner l’image précédente ou l’image
suivante. Appuyer sur la touche ou pour
afficher l’image précédente ou l’image suivante.
Dès que la surbrillance verte est sur l’image à
sélectionner, tourner l’une ou l’autre molette
vers la droite pour revenir en mode d’affichage
d’une seule vue.
Pour quitter le mode de lecture, si la molette de
mode est en position de lecture , positionner
la molette de mode sur P, A, S ou M. Si la
molette de mode est réglée sur P, A, S ou M,
appuyer une seule fois sur le bouton d’écran
pour éteindre l’écran.
Il est également possible d’utiliser le menu de
mode de lecture pour configurer un
visionnement en diaporama qui affichera
automatiquement et en continu chaque image
pendant 5 secondes en commençant par
l’image en cours d’affichage jusqu’à ce que le
bouton ou le bouton soit pressé.
Affichage des informations d’image
Tout en visionnant une image pendant le mode de lecture, il est possible d’afficher les informations
relatives aux paramétrages correspondant au moment où la photo a été prise. Régler la molette de
mode en position de lecture (ou bien à l’aide de la molette de mode placée sur P, A, S ou M,
appuyer rapidement deux fois sur le bouton d’écran ). Appuyer et immobiliser le bouton INFO
, puis tourner la molette principale ou la molette secondaire vers la droite ou vers la gauche pour
choisir l’un des trois formats d’affichage d’informations à superposer sur l’image affichée. Si la
fonction d’histogramme est sollicitée, un affichage supplémentaire fera apparaître l’histogramme. Il
est possible de solliciter la fonction d’affichage d’histogramme pendant la prise de vues. Un exemple
d’affichage est représenté ci-dessous indiquant toutes les informations affichées (sans
histogramme).
Carte de mémoire
Nom de
dossier/nom
de fichier
Renseignements
de fichier
standard DCF
Date à laquelle la
photo a été prise
46
Image protégée
Heure à laquelle la
photo a été prise
Sélectionné pour impression
Mode d’enregistrement
(définition, compression)
Vitesse d’obturation, ouverture du
diaphragme, compensation de l’exposition
Calage de balance des blancs
Sensibilité ISO (AUTO, réglage photo ISO)
Compensation de puissance du flash
Numéro de vue
(ou pourcentage d’agrandissement de
l’image affichée sur l’écran)

Protection des images
Les images mémorisées sur une carte peuvent
être protégées afin d’éviter tout effacement
intempestif. Passer en mode de lecture et faire
apparaître l’image à protéger. Appuyer sur le
bouton de protection . L’indicateur d’image
protégée est affiché sur l’image. Pour
supprimer la protection, faire apparaître l’image
protégée, puis appuyer sur le bouton de
protection de manière à libérer la
protection et faire disparaître l’indicateur. Pour
protéger toutes les images d’une carte de
mémoire SmartMedia, coller un autocollant de
protection sur la carte. Veuillez noter que la
protection d’une image ne la protège pas
lorsque la carte est formatée.
Suppression des images
Les images assez mal exposées ou d’autres
images que l’on ne souhaite plus conserver
peuvent être supprimées afin d’aménager de la
place sur la carte. Passer en mode d’affichage
pour faire apparaître l’image à supprimer. (Il est
également possible d’effacer des images à
partir de l’affichage en index. Pour ce faire, il
suffit de déplacer la surbrillance verte et de
l’amener sur l’image à supprimer.) Appuyer sur
le bouton d’effacement d’image , appuyer
sur la touche pour choisir YES, puis sur la
touche . Le voyant d’accès de carte clignote
pendant que l’image sélectionnée est
supprimée de la carte. Pour effacer toutes les
vues d’une carte, choisir la carte sur laquelle
se trouvent les images à effacer. Utiliser l’option
d’effacement de carte de la fonction CARD
SETUP à partir du mode de prise de vues pour
effacer toutes les vues de la carte de mémoire.
Copie des images sur une autre
carte
Lorsque deux cartes sont installées en même
temps dans l’appareil, il est possible de copier
les images d’une carte à l’autre ou encore de
copier la totalité des images d’une carte à
l’autre. Introduire les cartes source et
destination dans l’appareil photo.
Formatage d’une carte
Si une carte a été formatée pour être utilisée
dans un ordinateur ou un autre appareil photo,
elle doit être à nouveau formatée pour être
utilisée avec cet appareil photo. Le formatage
supprime toutes les images et les informations
mémorisées sur la carte.
Schéma d’attribution de nom aux
fichiers d’image
L’appareil photo attribue automatiquement un
nom de fichier à chaque image et le
sauvegarde dans un dossier sur la carte. Ces
noms de fichier peuvent être utilisés
ultérieurement à des fins de sélection et de
traitement des images sur un ordinateur.
L’attribution des noms de dossier est accompli
à l’aide de trois chiffres sous le format
nnnOLYMP. L’attribution des noms de fichier
est accompli à l’aide de quatre chiffres sous le
format Pmdd왕왕왕왕.jpg.
Tous les dossiers
DCIM
100 OLYMP
P2030001.jpg
P2030002.jpg
P2030003.jpg
P2030004.jpg
Nom de dossier
OLYMP
Numéro de dossier
(100~999)
Nom de fichier
Pmdd .jpg
Jour (01~31)
Les mois (10, 11, 12
sont numérotés sous
la forme A, B, C)
Numéro de fichier (0001~9999)
Après avoir pris 9999 vues, le compteur revient
à 0001 avant de prendre la vue suivante, le
numéro de dossier augmente par unité à la
fois pour affecter un nom et créer un nouveau
dossier où l’image suivante (fichier) sera
sauvegardé.
Régler la molette de mode sur l’indicateur de
configuration / connexion , puis appuyer sur
le bouton de menu . À l’aide du bloc de
touches fléchées, appuyer sur la touche ou
pour choisir FILE NAME. Appuyer sur la
touche pour déplacer la surbrillance verte
vers la droite. Appuyer sur la touche ou
pour déplacer la surbrillance verte sur AUTO
ou RESET. Appuyer sur le bouton pour
retenir le réglage, puis appuyer sur la bouton
pour fermer le menu.
La rubrique FILE NAME permet de choisir le
schéma d’attribution de nom dans le menu de
mode de configuration / connexion. La sélection
de AUTO permet de numéroter tous les fichiers
et les dossiers consécutivement pour chaque
carte utilisée pour avoir l’assurance qu’aucune
duplication de nom de fichier ne se produise.
La sélection de RESET permet de redémarrer
le numérotage à chaque fois qu’une carte est
introduite dans l’appareil photo.
47
Français

Sélection des images pour
exécuter une impression
Il est possible de sélectionner des images
individuellement ou toutes les images à des
fins d’impression à l’aide d’une imprimante
DPOF ou par un service d’impression DPOF.
Sélection individuelle d’images à des fins
d’impression
Introduire et sélectionner la carte sur laquelle
se trouvent les images à sélectionner pour
exécuter l’impression. Régler la molette de
mode sur le mode de réservation d’impression
. Utiliser le bloc de touches fléchées pour
afficher l’image souhaitée à des fins
d’impression puis appuyer sur le bouton .
Appuyer sur la touche ou pour
sélectionner le nombre d’épreuves à imprimer,
puis appuyer sur le bouton . Le symbole de
réservation d’impression apparaît sur
l’image en même temps que le nombre
d’épreuves sélectionnées. Refaire cette
opération pour sélectionner et marquer d’autres
images à des fins d’impression. Repositionner
la molette de mode pour quitter le mode de
réservation d’impression. Pour annuler une
sélection, refaire la procédure et sélectionner
zéro pour le nombre de copies.
Sélection ou annulation de toutes les
images à des fins d’impression
Introduire et sélectionner la carte sur laquelle
se trouvent les images à sélectionner pour
exécuter l’impression. Régler la molette de
mode sur le mode de réservation d’impression
et appuyer sur le bouton de menu . Utiliser
la rubrique de réservation d’impression du
menu de mode de réservation d’impression
pour sélectionner ou annuler toutes les
images à imprimer d’une carte.
Sélection des images avec apposition de la
date ou de l’heure
Introduire et sélectionner la carte de mémoire
sur laquelle se trouvent les images à
sélectionner pour y apposer la date ou l’heure.
Régler la molette de mode sur le mode de
réservation d’impression et appuyer sur le
bouton de menu . À partir du menu de mode
de réservation d’impression, utiliser la rubrique
d’apposition de la date ou de l’heure pour
apposer la date ou l’heure sur les épreuves
d’impression.
Sélection ou annulation d’impression en
index
Introduire et sélectionner la carte de mémoire
sur laquelle se trouvent les images à
sélectionner pour exécuter une impression
d’index. Régler la molette de mode sur le mode
48
de réservation d’impression et appuyer sur
le bouton de menu . À partir du menu de
mode de réservation d’impression, utiliser la
rubrique d’impression en index pour
sélectionner ou annuler toutes les sélections
précédentes d’images à imprimer.
Lecture des images à partir d’un
ordinateur
Il est possible d’utiliser le câble USB fourni
avec l’appareil photo pour raccorder l’appareil
et un ordinateur équipé d’une interface USB et
de lire les images de l’une ou l’autre carte
placée dans l’appareil photo à l’aide de
l’ordinateur. L’équipement suivant est
nécessaire :
• Le câble USB fourni avec l’appareil photo.
• Le pilote USB. Le pilote USB est fourni avec
le programme CAMEDIA Master 2.5. Il est
possible de télécharger les plus récentes
mises à niveau du programme à partir du site
Internet Olympus www.olympus-europa.
com ou en prenant contact avec un service
après-vente Olympus agréé.
• Un ordinateur compatible IBM PC/AT avec
Windows 98, Windows 98 deuxième édition
ou Windows 2000 installé.
• Un ordinateur Macintosh ou iMac avec Mac
OS 8.6 à 9.0 installé.
Consulter le manuel de référence du CDROM pour obtenir de plus amples détails
sur le CD de logiciel.
Dispositifs optionnels de lecture
de carte
Il est également possible de se servir des
dispositifs mentionnés pour lire les fichiers
d’image d’une carte dans la mesure où
l’ordinateur est équipé d’un port USB. Avant de
faire l’achat de l’un de ces dispositifs
optionnels, vérifier au préalable que le dispositif
choisi est compatible avec l’ordinateur utilisé.
Se renseigner auprès d’un service après-vente
Olympus agréé pour obtenir de plus amples
détails à ce sujet.
Pour lire une carte de mémoire SmartMedia
• Adaptateur de disquette FlashPath MAFP2NE. Un lecteur de disquette 3,5 pouces est
requis.
• Adaptateur de carte PC MA-2E. Une fente
de chargement de carte PCMCIA est requise.
• Dispositif de lecture/écriture sur
SmartMedia MAUSB-2. Un connecteur USB
est requis.
Pour lire une carte de mémoire
CompactFlash
• Adaptateur de carte PC. Une fente de
chargement de carte PCMCIA est requise.

Caractéristiques de prise de vues
Sélection du mode de prise de vues
Régler la molette de mode en position P, A, S
ou M pour choisir le mode de prise de vues.
• P (Mode programmé) L’appareil photo
sélectionne automatiquement la valeur
d’ouverture du diaphragme et la vitesse
d’obturation idéales pour les vues.
• A (Mode de priorité à l’ouverture du
diaphragme) Il est possible de régler la
valeur d’ouverture du diaphragme pendant
que l’appareil photo sélectionne
automatiquement la vitesse d’obturation
appropriée. Une valeur d’ouverture du
diaphragme élevée rend le sujet net et
l’arrière-plan volontairement flou tandis
qu’une faible valeur d’ouverture du
diaphragme permet de rendre les sujets et
l’arrière-plan nets et de photographier des
groupes ou des paysages.
• S (Mode de priorité à la vitesse
d’obturation) La vitesse d’obturation peut
être choisie tandis que l’appareil sélectionne
le réglage d’ouverture du diaphragme
approprié. Se servir d’une vitesse d’obturation
rapide pour fixer les sujet en mouvement ou
sélectionner une vitesse d’obturation plus
lente pour créer volontairement un flou de
mouvement.
• M (Mode de réglage manuel) La valeur
d’ouverture du diaphragme et de la vitesse
d’obturation peuvent être sélectionnées
manuellement afin de produire des effets
spéciaux sur les photographies.
Réglage de la valeur d’ouverture
du diaphragme
Régler la molette de mode en position A (mode
de priorité à l’ouverture) et tourner la molette
principale ou la molette secondaire pour
changer la valeur d’ouverture du diaphragme
par incréments de 1/3 d’ouverture. Tourner la
molette principale vers la droite (ou tourner la
molette secondaire dans le sens des aiguilles
d’une montre) pour obtenir une plus grande
valeur d’ouverture du diaphragme ou bien
tourner la molette principale vers la gauche (ou
tourner la molette secondaire dans le sens
inverse des aiguilles d’une montre) pour obtenir
une plus petite valeur d’ouverture du
diaphragme. La valeur d’ouverture du
diaphragme sélectionnée est affichée dans le
viseur et sur l’écran de commande. Le diamètre
de l’ouverture du diaphragme est inversement
proportionnel à la valeur d’ouverture du
diaphragme. Plus la valeur d’ouverture du
diaphragme est élevée et plus le diamètre de
l’ouverture est faible et plus la profondeur de
champ est longue, ce qui permet de rendre à la
fois le sujet et l’arrière-plan nets. Plus la valeur
d’ouverture du diaphragme est réduite et plus
le diamètre de l’ouverture est grand et plus la
profondeur de champ est courte, ce qui permet
de rendre le sujet net sur un arrière-plan flou.
Sélection de la méthode de mesure
La méthode de mesure détermine la façon dont
l’appareil photo mesure la luminosité du sujet
dans une vaste zone ou une zone réduite de
l’image composée dans le viseur. Appuyer et
maintenir le bouton de mesure enfoncé qui
se trouve à la partie supérieure de l’appareil
photo, puis tourner la molette principale ou la
molette secondaire jusqu’à ce que l’icône de
méthode de mesure souhaité apparaisse dans
le viseur ou sur l’écran de commande.
Écran de
commande
ESP Mesure ESP numérique. Mesure la
Mesure moyenne centrale
Plage de mesure moyenne
totalité de l’image de sorte que non
seulement l’analyse de la
luminosité générale mais aussi des
plages lumineuses est effectuée.
N’apparaît que sur l’écran de
commande.
pondérée. Mesure la totalité de
l’image tout en se concentrant sur
la mesure de la plage indiquée
dans le viseur, une plage environ
trois plus grande que la taille de
l’indicateur de plage de mesure
ponctuelle. Apparaît dans le viseur
et sur l’écran de commande.
centrale pondérée. Se concentre
sur la mesure de la lumière de la
plage centrale de l’image indiquée
dans le viseur, une plage d’environ
1,2 % de la taille du viseur.
Apparaît dans le viseur et sur
l’écran de commande.
Méthode
Réglage de la vitesse d’obturation
Régler la molette de mode en position S (mode
de priorité à la vitesse d’obturation) et tourner
la molette principale ou la molette secondaire
pour changer la vitesse d’obturation. Chaque
mouvement de la molette accroît (ou diminue)
la vitesse d’obturation par incrément de 1/3.
Tourner la molette principale vers la droite (ou
tourner la molette secondaire dans le sens des
aiguilles d’une montre) pour obtenir une vitesse
d’obturation plus rapide ou bien tourner la
molette principale vers la gauche (ou tourner la
molette secondaire dans le sens inverse des
aiguilles d’une montre) pour obtenir une vitesse
d’obturation plus lente. (limites de réglage de
1/640e à 2 sec.) La vitesse d’obturation
sélectionnée est affichée dans le viseur et
l’écran de commande. Le flash incorporé risque
de s’avérer inefficace avec des vitesses
d’obturation égales ou supérieures à 1/250e.
49
Français

Mise au point
L’appareil photo fait automatiquement la mise
au point sur le sujet.
Placer le levier de mode de mise au point en
position AF (mise au point automatique).
Composer l’image en plaçant l’indicateur de
cible AF au centre dans le viseur. Si la
composition de l’image est faite sur l’écran,
vérifier que le sujet se trouve au centre de
l’écran. Enfoncer à mi-course le bouton du
déclencheur jusqu’à ce que l’appareil émette
un bip sonore et que l’indicateur de calage
exact AF du viseur s’allume pour enfoncer au
maximum le bouton du déclencheur.
Mise au point des sujets sur lesquels la
mise au point est difficile à faire
Si l’indicateur de calage exact AF dans le coin
inférieur gauche du viseur continue à clignoter,
c’est l’indice que l’appareil photo ne peut pas
faire automatiquement la mise au point sur le
sujet. Certains sujets sont difficiles à mettre au
point.
Sujet à faible contraste
Un sujet comportant
des motifs sans
définition précise peut
être difficile à mettre au
point.
Sujet avec un reflet dans la zone centrale
Un sujet avec un reflet
central peut être
difficile à mettre au
point.
Deux objets placés à des distances
différentes de l’appareil
L’appareil ne peut pas
faire la mise au point
automatique sur un
sujet alors que deux
objets observés dans
le viseur se trouvent à
des distances
différentes de
l’appareil.
Sujet sous un éclairage public et provenant
de fenêtres
50
Un sujet photographié
de nuit et placé sous
un éclairage ou des
dispositifs d’éclairage
publics ou encore sous
un éclairage provenant
des fenêtres d’un
immeuble peut être
difficile à mettre au
point.
Sujet sans lignes verticales
L’appareil ne peut pas
faire la mise au point
automatique sur un
sujet uniquement
composés de lignes
horizontales. Tenir
l’appareil en position
course sur le bouton du déclencheur et
maintenir ce dernier enfoncé pour verrouiller la
mise au point. Réorienter l’appareil en position
horizontale, refaire la composition de l’image,
puis enfoncer à fond le bouton du déclencheur
pour prendre la photo.
Sujet en mouvement
être utilisée de sorte qu’il faut dans ce cas
verrouiller la mise au point sur un sujet se
trouvant à la même distance de l’appareil que
le sujet à photographier, guetter l’apparition du
sujet et prendre la photo dès qu’il est capté.
Photographie prise au travers d’une vitre ou
photographie d’une surface réfléchissant de
la lumière
Quand une photo est prise au travers d’une
vitre ou qu’une surface réfléchissant de la
lumière telle qu’une plaque de métal brillante
est photographiée, la mise au point risque
d’être difficile à faire. Si ce genre de problème
se produit, régler le sélecteur de mode de mise
au point sur MF (mise au point manuelle) et
faire manuellement la mise au point sur le
sujet.
Sujets en contre-jour
Il peut s’avérer difficile de faire la mise au point
sur des sujets placés devant un puissante
source lumineuse de contre-jour. Il faut dans ce
cas régler le sélecteur de mode de mise au
point sur MF (mise au point manuelle) et faire
manuellement la mise au point sur le sujet.
Dans ce genre de situation, il est possible
d’utiliser une méthode de mise au point de
rechange. Faire la composition de l’image en
plaçant l’indicateur de cible AF visible dans le
viseur sur un sujet placé à la même distance
que le sujet à photographier. Appuyer à micourse sur le bouton du déclencheur pour faire
la mise au point sur le sujet de rechange, puis
sans relâcher la pression du bouton de
déclencheur, refaire la composition de l’image
en incluant le sujet d’origine et appuyer à fond
sur le bouton du déclencheur pour prendre la
photo. (Si un sujet se déplaçant rapidement doit
être pris, maintenir le bouton de déclencheur
enfoncé à mi-course jusqu’à l’apparition du
sujet dans le viseur.)
verticale, appuyer à mi-
Il est impossible de
fixer un sujet se
déplaçant rapidement
dans la partie centrale
du viseur suffisamment
longtemps pour que la
mise au point
automatique puisse

Mise au point manuelle
Tourner le sélecteur de mode de mise au point
sur la position MF (mise au point manuelle).
Tourner la bague de mise au point manuelle
jusqu’à ce que le sujet observé dans le viseur
ou sur l’écran soit net. L’image sur l’écran est
deux fois plus grande afin de faciliter la mise au
point tandis que la distance qui sépare
l’appareil photo du sujet est affichée dans la
partie inférieure gauche de l’écran comme aide
à la mise au point.
Compensation de l’exposition
Se servir de la compensation de l’exposition
pour accroître ou diminuer manuellement le
réglage d’exposition automatiquement
sélectionné par l’appareil photo afin d’éclaircir
ou d’assombrir l’image. Régler la molette
principale ou la molette secondaire en position
P, A ou S. T out en maintenant le bouton de
compensation d’exposition enfoncé,
actionner la molette principale ou la molette
secondaire pour choisir l’exposition.
La compensation de l’expositon peut être
réglée dans les limites de ±3EV par paliers de
1/3EV. Il est possible de confirmer la luminosité
dans les limites de ±2EV sur l’écran.
Calage AE
Diriger l’appareil photo vers le sujet, appuyer
sur le bouton de verrouillage automatique de
l’exposition , enfoncer à mi-course le
bouton de déclencheur pour caler
automatiquement la mise au point et appuyer à
fond sur le bouton de déclencheur pour
prendre la photo. Le verrouillage de l’exposition
est conservé aussi longtemps que le bouton
est maintenu pressé, ce qui permet de
continuer à photographier avec le même
réglage d’exposition.
Exposition automatique
différenciée
L’appareil photo peut être réglé pour une
exposition automatique différenciée avec trois
sortes de réglage d’exposition différent par
paliers d’exposition de 1/3EV, 2/3EV ou 1EV
exposition totale pour chaque vue.
Modification du paramètre ISO
Le paramètre ISO est l’équivalent des réglages
de sensibilité ISO effectués sur un appareil
photo reflex à film 35mm ordinaire.
Balance des blancs
La lumière peut influencer la façon dont
l’appareil photo reproduit les couleurs.
Normalement, l’appareil photo se sert d’une
plage blanche de l’image de composition
comme base pour reproduire les couleurs,
mais si l’image ne comporte aucune plage
blanche ou encore si la prise de vues est
effectuée sous un éclairage artificiel
(notamment sous un éclairage fluorescent), il
peut s’avérer nécessaire de refaire le calage de
balance des blancs afin d’obtenir une
reproduction naturelle des couleurs dans vos
photos. Il existe trois façons de faire le calage
de la balance des blancs.
• Calage de balance des blancs
automatique. L’appareil exécute
automatiquement l’équilibre chromatique en
utilisant une plage blanche de l’image de
composition comme moyen de référence.
Appuyer et maintenir le bouton de sélection
de mode de balance des blancs enfoncé,
puis tourner la molette principale ou la
molette secondaire jusqu’à l’apparition de –
A– dans le viseur et sur l’écran de commande
ou que AUTO WB apparaisse sur l’écran et
prendre la photo.
• Calage de balance des blancs de référence
rapide. Sous la même source d’éclairage qui
doit être utilisée pour prendre la photo, diriger
l’appareil vers une surface blanche (un mur,
une feuille de papier, etc.) cadrer la surface
blanche au maximum dans le viseur, puis
appuyer sur le bouton de calage de balance
des blancs de référence rapide implanté
sur la face avant de l’appareil photo. Lorsque
le message GOOD apparaît sur l’écran,
appuyer sur le bouton pour mémoriser le
réglage, puis prendre la photo. Si le message
NO GOOD apparaît, cela signifie qu’il n’y a
pas suffisamment de surface blanche à
analyser, que la surface blanche réfléchit trop
de lumière ou que la couleur sur les bords de
la feuille de papier créent une interférence
avec l’opération de mémorisation.
• Calage de balance des blancs de
présélection. Appuyer et maintenir le bouton
de sélection de mode de balance des blancs
enfoncé, puis tourner la molette principale
ou la molette secondaire jusqu’à l’apparition
du réglage de température de couleur
souhaité et relâcher le bouton . Choisir
AUTO, ce qui correspond à un réglage de
température de couleur compris entre 3 000
K et 7 500 K ou une référence rapide.
Français
51

Réglage du mode d’enregistrement
Les réglages de mode d’enregistrement
déterminent la qualité des images et affectent
également la taille des fichiers. Plus la qualité
est élevée, plus le volume du fichier d’image
est important. Appuyer et maintenir le bouton
de sélection de mode d’enregistrement
enfoncé, puis tourner la molette principale ou la
molette secondaire jusqu’à ce que la qualité
d’image désirée apparaisse sur l’écran de
commande (TIFF, SHQ, HQ, SQ ou bien
tourner la molette vers la droite pour les faire
apparaître dans l’ordre inverse comme suit :
TIFF (format pour fichier d’image étiqueté)
SHQ (super haute qualité), HQ (haute qualité)
et SQ (qualité normale).
Qualité Définition Compression
TIFF 2 240 x 1680 1:1
SHQ 2240 x 1 680 1:2,7
HQ 2240 x 1 680 1:8
SQ 1 280 x 960 1:8
1
Évaluation approximative.
La définition (nombre de pixels) et les taux de
compression sont ajustés dans le mode de
prise de vues pour chaque réglage.
(nombre de pixels)
1
Réglage de netteté
En mode de prise de vues, les réglages de
netteté des images HARD, NORMAL ou SOFT
peuvent être sélectionnés.
Réglage de contraste
En mode de prise de vues, les réglages de
contraste HIGH, NORMAL ou LOW sont
sélectionnés pour ajuster le pourcentage de
gradation entre les zones de différente
luminosité de l’image photo.
Exposition multiple en mode
de prise de vues en série
Lorsque l’appareil photo est réglé en mode de
prise de vues en série, appuyer et maintenir le
bouton de déclencheur enfoncé pour prendre
une série rapide de quatre vues. Régler la
molette de mode en position P, A, S ou M, puis
appuyer et maintenir le bouton de commande
enfoncé pour que l’indicateur de mode de
prise de vues en série apparaisse sur
l’écran de commande. Appuyer et maintenir le
déclencheur enfoncé pour que l’appareil photo
prenne une série de photos (une à quatre) tant
que le bouton du déclencheur est maintenu
enfoncé. L’appareil photo prend les photos
suivant une exposition identique tandis que le
mode d’exposition automatique différenciée
52
prend plusieurs vues suivant des expositions
différentes.
Utilisation du retardateur
Le retardateur temporise le déclenchement de
l’obturateur pendant 12 secondes et ceci vous
permet de vous intégrer dans une photo de
groupe.
Utilisation de la télécommande
RM-1
Alors que l’appareil est réglé en mode de
télécommande, la télécommande RM-1 peut
être utilisée pour déclencher l’obturateur de
l’appareil.
Utilisation du câble de
déclenchement RM-CB1 optionnel
Utiliser le câble de déclenchement pour
empêcher l’appareil photo de bouger si cela
risque de se produire en enfonçant le bouton
de déclencheur ou en photographiant à une
vitesse d’obturation lente.
Utilisation de la
chronophotographie
En mode chronophotographie, l’appareil photo
prend automatiquement des photos suivant
l’intervalle spécifié. L’intervalle peut être
spécifié en heures et minutes dans les limites
d’une minute à 24 heures. L’appareil photo
continuera à prendre des photos en mode de
chronophotographie jusqu’à épuisement total
de l’énergie des piles ou jusqu’à ce que la
carte de mémoire sélectionnée soit
complètement pleine. L’adaptateur
d’alimentation secteur doit être utilisé lorsque la
prise de vues est effectuée en mode de
chronophotographie longue durée pour
économiser les piles.
Pour obtenir de plus amples détails et les
renseignements importants à propos de cette
fonction, consulter le manuel de référence du
CD-ROM fourni avec cet appareil photo.
Utilisation du flash extérieur
spécialisé FL-40 optionnel
Utiliser le flash extérieur spécialisé FL-40
optionnel exclusivement conçu pour être utilisé
avec cet appareil photo, seul ou avec le flash
incorporé. Avant de faire usage du flash
extérieur spécialisé, lire les instructions qui
accompagnent le flash FL-40.
Se servir du flash extérieur spécialisé de la
même façon que le flash incorporé. Un flash
extérieur générique et la griffe porteaccessoires optionnelle FL-BK01 peuvent être
également utilisés.

Utilisation d’une lentille de conversion en option
Les lentilles de conversion mentionnées ci-dessous peuvent être utilisées avec cet appareil photo.
Avant d’utiliser les lentilles de conversion, s’assurer que le zoom de l’appareil photo est réglé en
position TELE ou WIDE suivant le réglage requis.
Lentille de conversion
Type
Bague-allonge téléphoto 300 Pro 3 fois
TCON-300
f/2,8
f = équivalent à 420 mm
Diamètre de filtre: 49 mm
Traitement multicouches
Bague-allonge téléphoto Pro 1,45 fois
TCON-14B
f/2,4
f = équivalent à 200 mm
Diamètre de filtre: 86 mm
Traitement multicouches
Bague-allonge grand angle Pro 0,8 fois
WCON-08B
f/2
f = équivalent à 28 mm
Diamètre de filtre: 105mm
Traitement multicouches
Bague-allonge macrophotographie Pro
MCON-35
f/2 à f/2,4
Possibilité de photographier un format
pouvant aller jusqu’à 49 x 37 mm
Diamètre de filtre: 72 mm
Traitement multicouches
Méthode de
fixation
Potence
de fixation
Vis
Vis
Vis
Réglage
de zoom
TELE
TELE
WIDE
WIDE-
TELE
Affichage sur
l’écran de commande
clignote
Français
s’allume
Comment sélectionner le mode de lentille de conversion (non pas pour une prise de vues en
gros plan)
Appuyer et maintenir le bouton macro enfoncé , puis tourner la molette principale ou la molette
secondaire jusqu’à ce que l’indicateur de lentille de conversion apparaisse sur l’écran de
commande. Si une Bague-allonge téléphoto 300 Pro 3 fois est montée sur l’appareil photo,
l’indicateur clignote. Dans le cas contraire, l’indicateur ne clignote pas.
Configuration de prise de vues en gros plan avec une lentille de conversion
Régler la molette de mode de configuration / connexion en position et appuyer sur le bouton de
menu. Dans le menu de configuration / connexion, sélectionner l’indicateur de mode macro / lentille
de conversion .
53

Paramétrage spécial
Son de déclenchement de
l’obturateur
Il est possible de régler l’appareil à partir du
mode de prise de vues pour qu’il produise un
son au moment du déclenchement de
l’obturateur pendant la prise de vues bien qu’il
soit également possible d’interrompre cette
fonction. Si l’appareil est réglé pour avertir
l’opérateur et produire un bip sonore, ceci
permettra de savoir que l’obturateur s’est
déclenché lorsque la télécommande ou le
câble de déclenchement souple est utilisé pour
prendre la photo. Si l’appareil est réglé pour
avertir l’opérateur et produire un bip sonore, il
est également possible d’ajuster le volume
sonore.
Son d’avertissement
Il est possible de régler l’appareil à partir du
mode de prise de vues pour qu’il produise deux
bips sonores lorsque la mise au point est calée
ou un seul bip sonore lorsque l’exposition est
calée bien qu’il soit également possible de
débrayer cette fonction. Se servir du mode
prise de vues pour configurer cette fonction.
Durée d’affichage de contrôle
Il est possible de régler l’appareil à partir du
mode de prise de vues sur une durée
spécifique d’affichage de l’image sur l’écran
juste après qu’elle ait été prise. Trois réglages
sont possibles : AUTO, OFF, 5sec.
Mode de veille
L’appareil peut être réglé à partir du mode de prise de vues sur la durée pendant laquelle l’appareil
photo reste inactif avant de se commuter en mode de veille. Si l’appareil photo se commute en mode
de veille, l’écran, l’écran de commande et l’affichage du viseur s’éteignent afin de ne pas gaspiller
l’énergie des piles ou bien l’appareil photo s’arrête automatiquement suivant le réglage de la molette
de mode. Pour rétablir le mode de fonctionnement normal de l’appareil après qu’il soit commuté en
mode de veille, il suffit d’appuyer sur n’importe quel bouton. Si l’appareil photo reste inactif en mode
de veille pendant une heure, il s’arrêtera automatiquement. Pour rétablir le mode de fonctionnement
normal et intégral de l’appareil, il suffit de couper son alimentation, puis de la rétablir.
L’appareil photo n’est jamais commuté en mode d’inactivité.
OFF
L’appareil photo ne se commute ni en mode de veille si ne
s’arrête tout seul.
1MIN
2MIN
5MIN
10MIN
54
L’appareil photo est commuté en mode de veille s’il
reste en état d’inactivité pendant 1 minute.
L’appareil photo est commuté en mode de veille s’il reste
en état d’inactivité pendant 2 minutes.
L’appareil photo est commuté en mode de veille s’il reste
en état d’inactivité pendant 5 minutes.
L’appareil photo est commuté en mode de veille s’il reste
en état d’inactivité pendant 10 minutes.

Mode de données RAW
Utiliser les réglages du mode de prise de vues
pour régler l’appareil photo en mode de
données RAW. Lorsque l’appareil photo est
réglé en mode de données RAW, les images
sont enregistrées sous la forme de données à
10 bits par canal à partir du dispositif à
transfert de charges (CCD) et ceci produit un
fichier dont la taille est très volumineuse
(environ 7,6 Mo), les images n’étant pas
compressées.
• Pour que les fichiers enregistrés en données
RAW puissent être manipulés, le logiciel
CAMEDIA Master 2.5.
Français
55

Référence
Utilisation des menus
Utiliser les menus pour effectuer la configuration des modes de fonctionnement de l’appareil photo.
Quatre menus sont disponibles. L’ouverture d’un menu s’effectue en réglant la molette de mode sur
la position appropriée et en appuyant sur le bouton de menu .
Molette de mode Mode Appuyer sur le bouton pour afficher:
P, A, S ou M Prise de vues Menu de mode prise de vues
Lecture Menu de mode de lecture
Réservation d’impression
Configuration/connexion
Pour ouvrir le menu souhaité, régler la molette de mode sur la position appropriée. Appuyer sur le
bouton de menu pour ouvrir le menu sur l’écran. Se servir du bloc de touches fléchées et appuyer
sur la touche pour déplacer la surbrillance verte vers le bas dans le menu ou sur la touche
pour déplacer la surbrillance verte vers le haut dans le menu.
Remarque
Certains menus ont plus d’une page. La notation dans le coin supérieur droit de la page permet de savoir quelle
page est ouverte. Par exemple, si 1/3 apparaît, la page 1 de 3 pages de menu est ouverte. L’affichage de la page
suivante du menu ouvert est obtenue en appuyant tout simplement sur la touche
est sur la dernière sélection.
Alors que la surbrillance verte se trouve sur l’option à régler, appuyer sur la touche pour déplacer
la surbrillance verte vers la droite. Choisir le paramétrage souhaité. Si plusieurs options sont
proposées pour le même paramètre, appuyer sur la touche ou pour déplacer la surbrillance
verte sur le paramètre souhaité et appuyer enfin sur le bouton . Si le paramètre exige de saisir une
valeur ( un nombre pour une date ou l’heure, choisir ON ou OFF), appuyer sur la touche ou
pour déplacer la surbrillance verte sur le paramètre souhaité et appuyer sur la touche ou
jusqu’à ce que la valeur souhaitée du paramètre choisi apparaisse et appuyer enfin sur le bouton .
Lorsque plus d’un réglage est nécessaire (spécification de l’heure, par exemple), la surbrillance verte
se déplacera jusqu’à la position du réglage suivant pour que la valeur de ce réglage puisse être
choisie avec la touche ou . Après avoir appuyé sur le bouton pour conserver vos choix, la
surbrillance verte retournera à droite. Lorsque le réglage de tous les paramètres a été fini, appuyer
sur le bouton pour fermer le menu. Consulter les tableaux des les pages suivantes car ils
indiquent en détail le contenu des menus et leurs paramètres.
Menu de mode de réservation d’impression
Menu de mode de configuration/connexion
alors que la surbrillance verte
56

Liste des menus
Consulter le manuel de référence du CD-ROM pour obtenir de plus amples
détails sur le CD de logiciel.
Menus de mode de prise de vues pour les modes P (mode
programmé), A (mode de priorité à l’ouverture du
diaphragme), S (mode de priorité à la vitesse d’obturation), M
(Mode de réglage manuel)
1/3
Supprime toutes les photos de la carte
de mémoire SmartMedia ou de la carte
de mémoire CompactFlash
sélectionnée et formate la carte.
Paramètre de réglage ISO
(sensibilité).
Valeur par défaut
Validé après avoir pressé
simultanément et
—
AUTO
2/3
3/3
Exposition automatique différenciée
du même sujet par trois vues rapides
avec des expositions différentes.
Contrôle de puissance du flash.
Netteté.
Contraste général de la photo.
Mode d’enregistrement
(qualité, définition, compression).
Détermine l’intervalle de temps
(specifie l’intervalle de temps entre
chaque vues prise en mode de
chronophotographie automatique).
Paramètre de sonorité d’obturateur
(forte, faible, OFF).
Bip sonore de rappel (activation,
désactivation).
Supprime toutes les images d’une
carte et formate la carte.
Paramètre de temporisateur de
veille.
OFF
Français
±0EV
NORMAL
NORMAL
—
OFF
OFF
ON
OFF
1MIN
57

Menu de mode de lecture
Valeur par défaut
Validé après avoir pressé
simultanément et
Diaporama
(visionnement automatique).
Copie d’images de carte à
carte.
Supprime toutes les images
d’une carte et formate la carte.
Luminosité d’écran.
Menu de mode de réservation d'impression
Sélectionne ou annule la
sélection de toutes les images
d’impression.
Règle la date ou l’heure à
imprimer sur les épreuves
d’impression.
Sélectionne toutes les images
pour une impression en index.
Menu de mode de configuration/connexion
1/2
Détermine si une lentille de conversion
est sélectionnée lorsque le bouton
de gros plan est pressé.
Règle le format année/mois/jour.
Règle l’horodatage actuel courant.
Après avoir introduit une
nouvelle carte de mémoire, le
numérotage des fichiers peut
être redémarré (RESET) ou
bieu poursuivre le numérotage
continu des fichiers (AUTO).
Images mémorisées au format
RAW (données non traitées,
non compressées).
2/2
Fait apparaître ou disparaître
l’histogramme.
—
—
—
∗
±0
—
∗
OFF
—
∗
Année/mois/jour
∗
∗
AUTO
∗
OFF
∗
OFF
∗
58
∗ Inchangé même après avoir appuyé sur et .

Messages d'erreur
Si une anomalie se produit dans une carte, un message apparaît sur l’écran de commande et
l’écran. Lorsqu’un message d’erreur de carte est affiché, retirer tout d’abord la carte, puis la
réintroduire. Si le message d’erreur est à nouveau affiché, consulter le tableau ci-dessous pour
résoudre le problème.
Écran de
commande
ÉcranViseur Explication Solution
CARD COVER
OPEN
CARD ERROR
NO CARD
UNFORMATED
CARD
WRITE
PROTECT
Le couvercle de logement
de carte est ouvert.
Les vues ne peuvent
pas être mémorisées,
les images lues ou
supprimées la carte.
Il n’y a pas de carte
dans l’appareil.
La carte utilisée n’est
pas formatée ou est
endommagée.
La carte est protégée
par un autocollant de
protection ou un
dossier de la carte a
été mis en “lecture
seule”. La carte a été
sélectionnée pour être
lue seulement de sorte
qu’elle ne peut pas
être utilisée pour
prendre des photos,
les images ne peuvent
pas être supprimées et
la carte ne peut pas
être initialisée.
Introduire une carte et verrouiller le
couvercle du logement de carte.
Retirer la carte, nettoyer
soigneusement les contacts électriques
de la carte, introduire la carte dans
l’appareil et refaire un essai. Si le
message apparaît encore une fois, la
carte est inutilisable.
La carte peut éventuellement être
réutilisée après formatage. Cependant,
le formatage de la carte effacera toutes
les images mémorisées sur la carte.
Introduire une carte dans l’appareil.
Formater la carte. Le formatage de la
carte effacera toutes les images
mémorisées sur la carte. À l’aide du
bloc de touches fléchées, appuyer sur
la touche pour choisir YES et
appuyer ensuite sur le bouton pour
formater la carte.
Si la carte est protégée par un
autocollant de protection, décoller
l’autocollant ou si la carte a été
sélectionnée pour être lue seulement,
désactiver la sélection de lecture
seule. Si ceci ne permet pas de
résoudre le problème, il existe une
anomalie dans la carte. Essayer de
transférer les images à un ordinateur
ou de faire une copie des images sur
une autre carte placée dans l’appareil.
Après avoir fait une copie des images,
essayer de formater à nouveau la
carte.
Français
Aucune
indication
NO PICTURE
Le visionnement ne
peut pas être exécuté
parce qu’aucune image
n’est mémorisée sur la
carte.
Vérifier qu’une carte sur laquelle des
images sont enregistrées est en place
dans l’appareil ou bien prendre une
photo.
59

Aucune
indication
Aucune
indication
Écran de
commande
(Il n’est pas
possible de
mémoriser
d’autres
images sur
la carte.)
ÉcranViseur Explication Solution
CARD FULL
(La carte est
pleine. Plus
d’espace
pour
mémoriser
d’autres
images.) *1
CARD FULL
Aucune
indication
La carte est pleine et la
prise de vues est
Pendant une prise de vues
impossible.
Le numérotage de
dossier a atteint 999 ou
le numérotage de
fichier a atteint 9999 de
sorte qu’il est
impossible de continuer
la prise de vues.
Pendant une sélection d’impression
La carte est pleine de
sorte que la sélection ou
l’annulation d’impression
est impossible. (La
sélection d’images
d’impression mémorise
des données sur la
carte.)
Surchauffe à l’intérieur de
l’appareil.
Remplacer la carte par une neuve ou
bien supprimer les images devenues
inutiles ou encore, transférer les
images à un ordinateur, puis
supprimer toutes les images de la
carte.
Remplacer la carte par une neuve ou
bien supprimer les images devenues
inutiles ou encore, transférer les
images à un ordinateur, puis
supprimer toutes les images de la
carte.
Remplacer la carte par une neuve ou
bien supprimer les images devenues
inutiles ou encore, transférer les
images à un ordinateur, puis
supprimer toutes les images de la
carte.
Arrêter l’appareil et attendre qu’il
refroidisse, puis le remettre sous
tension.
Aucune
indication
Aucune
indication
Aucune
indication
Aucune
indication
PICTURE
ERROR
CANNOT
OPEN FILE
Les images sélectionnées
ne peuvent pas être
reproduites mais peuvent
être utilisées pour d’autres
sortes de traitement.
Les images
Image prise avec
l’appareil
sélectionnées ne
peuvent pas être
reproduites mais
peuvent être utilisées
pour d’autres sortes
de traitement.
Image prise
avec un autre
appareil
La vue ne peut
pas être visionnée
avec cet appareil.
Retirer la carte, nettoyer
soigneusement les contacts
électriques de la carte, introduire la
carte dans l’appareil et refaire un
essai. Si le message apparaît encore
une fois, la carte est inutilisable.
La carte peut éventuellement être
réutilisée en la formatant. Cependant,
le formatage de la carte effacera
toutes les images mémorisées sur la
carte.
Sélectionner et visionner la vue dans
l’appareil avec lequel la photo a été
prise.
*1
La taille des blocs d’une carte SmartMedia et d’une car te CompactFlash est différente de sor te qu’il
n’est pas toujours possible de mémoriser exactement le même nombre de vues sur l’une ou l’autre
carte. C’est pourquoi la copie intégrale des vues d’une carte pleine n’est pas toujours possible sur
une autre carte, même lorsque cette dernière est complètement vierge. (Le message CARD FULL
apparaîtra avant que la copie soit effectuée.) Si le cas se produit, supprimer les vues indésirables
ou en ce qui concerne la carte de destination, utiliser une car te dont la capacité est supérieure.
60

Caractéristiques technique
Type de produit Appareil photo numérique reflex mono-objectif
(enregistrement, visionnement)
Système d’enregistrement
Mémoire 3 V (3,3 V), SmartMedia: 4 Mo, 8 Mo, 16 Mo, 32 Mo, 64 Mo;
Images enregistrables Environ 8 vues (HQ/8 Mo)
Effacement Vue par vue, toutes les vues
Capteur d’image de 2/3 pouce à filtre de couleur primaire
Enregistrement d’image 2 240 x 1680 pixels
Balance des blancs Automatique (entièrement automatique à travers l’objectif),
Objectif Olympus de 9 à 36 mm, f/2,0 à f/2,4, 14 éléments en 11
Diamètre de filtre 62 mm
Système de mesure Mesure ESP numérique ESP (Electro Selective Pattern),
Commande d’exposition P (mode programmé), A (mode de priorité à l’ouverture du
Ouverture WIDE (réglage grand angulaire): f/2,0 à 11,
Obturateur 2 à 1/640
Compensation de l’exposition
Gamme opérationnelle Standard: 0,6 m à ∞
(à partir de l’objectif) Macrophotographie: 0,2 m à 0,6 m
Viseur SLR
Écran Écran d’affichage couleur à cristaux liquides TFT de 1,8 pouce
Résolution de l’écran Environ 118 000 pixels (éléments d’image)
Enregistrement numérique, JPEG, selon le système Design
rule for Camera File (DCF), TIFF (non-compressé),
compatible DPOF.
CompactFlash (compatible avec les Types I et II. Il est
impossible d’utiliser un micro lecteur.)
1600 x 1200 pixels
1280 x 960 pixels
1024 x 768 pixels
640 x 480 pixels
manuelle (7 paliers), à référence rapide (commande unique)
groupes (équivalent à un objectif 35 à 140 mm d’un appareil
photo reflex mono-objectif 24 x 36 mm standard)
mesure centrale moyenne pondérée mesure ponctuelle
diaphragme), S (mode de priorité à la vitesse d’obturation),
M (mode manuel)
TELE (réglage téléobjectif): f/2,4 à 11
Mode manuel: pose limite: 30 sec., 8 à 1/640
e
e
± 3 EV (paliers 1/3 EV)
Champ de visée dans le viseur de 95 %, grand angulaire:
0,42, téléobjectif: 1,60
Fonctionnement: Utilisé pour composer les vues, comme
dans le viseur.
Visionnement: Affichage d’image (affichage d’une seule vue,
affichage à index de plusieurs vues, affichage agrandi)
Français
61

Durée de recharge de flash Environ 7 sec. à la température normale avec des
piles neuves (CR-V3)
Portée du flash (ISO 80) WIDE (réglage grand angulaire) 0,6 à 6,3 m
(à partir de la surface de l’objectif) TELE (réglage téléobjectif) 0,5 à 5,2 m
Modes de fonctionnement de flash Automatique (déclenchement automatique du
flash sous faible éclairage, à contre-jour),
Synchronisation lente, 2nd-CURTAIN,
Atténuation de l’effet “yeux rouges”,
Flash d’appoint (invalidé si le flash incorporé est
rabattu),
Arrêt (aucun déclenchement de flash)
Mise au point automatique Double système de mise au point automatique
Système de détection Système de détection de contraste/méthode AF
active
Active limites de mise au point Mode de pr ise de vues normale: 0,6 m à ∞,
Gros plan: 0,2 à 0,6 m
Retardateur Durée de fonctionnement: 12 sec.
Connecteurs extérieurs Prise d’alimentation secteur DC IN, connecteur
USB, prise de sortie vidéo OUT
Date, heure Enregistré avec les informations de fichier d’image
Pour que l’affichage des informations photo ou
l’impression du sceau de la date ou de l’heure
soient possibles
Calendrier automatique Correction automatique jusqu’à l’an 2030
Sélection de réservation d’impression
Caractéristiques de sortie de Données de sortie 10 bits AD (format de fichier
données RAW ORF, profil ICC non prévu)
Durée d’intervalle de prise de vues 1 min. à 24 heures
en chronophotographie
Alimentation de calendrier Pile zinc-carbone-lithium non amovible
DPOF standard (paramétrage du nombre de
copies, impression d’index, sceau d’horodatage)
Conditions de fonctionnement
Température En service: 0 à 40°C
Rangement: – 20 à 60°C
Humidité En service : 30 à 90%
Rangement: 10 à 90 % sans condensation
Alimentation Bloc de pile lithium 3 V CR-V3: 2
Piles nickel-métal hydrure AA (R6): 4
Piles Ni-Cd AA (R6): 4
Piles alcalines AA (R6): 4
Pile au lithium-polymère AA (R6)
Adaptateur d’alimentation secteur
62

Remarque : Ne jamais utiliser des piles zinc-carbone AA (R6) ou des piles lithium AA
(R6). Elles peuvent surchauffer et endommager l’appareil.
Dimensions 128,5 (l) x 103,5 (H) x 161 (L) mm (parties
saillantes non comprises)
Poids 1 050 g (sans cartes, piles et bouchon d’objectif)
Sous réserve de modification des caractéristiques techniques sans préavis ni notification
obligatoire.
Français
63

Zu Beginn
Bezeichnung und Funktionen der Teile
1
2
3
4
5
6
7
8
9
0
A
B
C
W
X
V
U
T
S
R
Q
P
O
N
M
L
K
J
I
H
G
F
E
D
§
•
k
l
m
n
o
p
q
r
s
t
u
vwx
y
£
¢
†
ç
å
~
}
|
{
z
æ
º
µ
Y
Z
c
d
e
64
f
[
g
\
b
a
`
]
j
i
h
¶
ß
¡ø¬ ¤
©
®
…⁄
¥
™
fi
›
‹

1 Meß-Modus-Taste
2 Motorantriebs-Taste
3 Kabel-Fernbedienungs-Buchse
4 Eingebautes Blitzlicht
5 Blitz-Taste
6 Ring für manuelles Fokussieren
7 Zoomring
8 Belichtungskorrektur-Taste
9 Makro-Taste
0 Synchro-Anschluß für Blitzlicht
A Fokus-Schalter
B Öse für Trageriemen
C DC IN-Anschlußkappe/DC IN-Anschluß
D Monitor
E Sucher-Verschlußhebel
F Dioptrien-Einstellring
G Sucher
H Hauptregler
I Kartenfachabdeckung
J Verschluß der Kartenfachabdeckung
K SM/CF-Speicherkarten-Taste
L Schreibanzeige-LED
M Beleuchtungs-Taste
N Taste für automatische Belichtungssperre
O Betriebsschalter
P Modus-Einstellrad
Q Weißabgleich-Modus-T aste
R Nebenregler
S LCD-Feld
T Aufzeichnungs-Modus-Taste
U Blitzmodus-Taste
V Blitzkontakt
W Video OUT -Anschluß
X USB-Anschluß
Y Monitor-Sperre/Auslöse-Taste
Z INFO-Taste
[ Schreibschutz-Taste
\ Löschen-Taste
] Pfeiltasten-Feld
^ T aste OK
a Menü-Taste
b Monitor-Taste
c Auslöser
d Fernbedienungs-/Selbstauslöser-Anzeige
e Öse für Trageriemen
f Batteriefach
g Stativgewinde
h Objektiv
i Schnellreferenz-Weißabgleich-Taste
j Autofokus-Meßzelle
LCD-Feld
Blitz-Betriebsarten
k Blitzintensitäts-Korrektur
l Langsame Synchronisation
m Aufhellblitz
n Verringerung des Rote-Augen-Effektes
o 2. Verschlußphase
p V erschlußgeschwindigkeit
q Blendenwert
r Makro
s Selbstauslöser
t Konverter-Objektiv
u Serienaufnahme
v Fernbedienung
w Batterieprüfung
x Gewählte Speicherkarte
y Anzahl der speicherbaren Bilder
z Kartenfehler
{ Speicheranzeige
| Meßverfahren
} Belichtungskorrektur/Belichtungspegel
~ Automatische Belichtungsreihe
å Manueller Fokus
ç Weißabgleich
† ISO
¢ Bildeinstellungen
£ Aufzeichnungs-Modus
Sucher
§ Spot-Meßfeld
• Autofokus-Korrekturmarkierung
¶ Blitzwarnung
ß Makro
® V erschlußgeschwindigkeit
© Blendenwert
™ Weißabgleich
¥ Automatische Belichtungssperre
µ Belichtungskorrektur/Belichtungspegel
º Meßverfahren
æ Autofokus-Markierung
Monitor-Anzeige
ø Autofokus-Korrekturmarkierung
¡ Blitzwarnung
¬ Makro
… V erschlußgeschwindigkeit
⁄ Blendenwert
¤ Weißabgleich
‹ Automatische Belichtungssperre
› Belichtungskorrektur/Belichtungspegel
fi Meßverfahren
Deutsch
65

Überprüfen Sie die Vollständigkeit
Objektivdeckel
Kamera
Sonnenblende
Fernbedienung
USB-Kabel
Lithium-Batterien (CR-V3)
CompactFlash (16 MB/8x Geschwindigkeit)
Gerätespezifisches Verbindungskabel
(Jump Shot-Kabel)
Treiber: 8 cm CD-ROM
Inbetriebnahme-Anleitung
Trageriemen
Videokabel
Kunden-Registrierkarte
Garantiekarte
• Kurzgefaßte Bedienungsanleitung
• Bedienungsanleitung für Fernbedienung
• Software-CDs, einschließlich
Windows 98 USB-Treiber,
Bedienungsanleitung
Sonderzubehör für diese Kamera
Gerätespezifisches externes Blitzgerät (FL-40)
Gerätespezifisches Blitzlicht-Halterung
(FL-BK01)
Gerätespezifisches Halterungskabel
(FL-CB01-04)
Konverter-Objektive
Kabel-Fernbedienung (RM-CB1)
Kameratasche (Halbfeste Tasche)
Netzadapter
AA (R6) Ni-MH-Batterie
66
Gerätespezifisches Aufladegerät
Lithium-Polymer-Batterie (B-10LPB)
Batteriehalterung (B-HLD10)
Ladegerät für Lithium-Polymer-Batterie
(B-20LPC)
SmartMedia (8MB, 16MB, 32MB oder 64MB)
PC Card Adapter MA-2E
Floppy Disk Adapter FlashPath MAFP-2NE
SmartMedia Reader/Writer MAUSB-2
Drucker P-400/P-330NE
August 2000

Anbringen des Trageriemens
Das eine Ende des Trageriemens durch die
Öse für den Riemen auf der Kamera schieben.
Das Ende des Riemens wie in der Abbildung
gezeigt durch die Schnalle und die Schlaufe auf
dem Riemen schieben, dann die Schlaufe bis
zur Riemenöse schieben. Den Riemen fest
durch die Schnalle ziehen und sicherstellen,
daß er nicht rutscht. Diesen Vorgang zum
Anbringen des anderen Riemenendes an der
Öse auf der anderen Seite der Kamera
wiederholen.
Einsetzen der Batterien
Mit dieser Kamera können zwei LithiumBatterien (CR-V3) oder vier AA (R6) Ni-MH-,
Ni-Cd- oder Alkali-Batterien verwendet werden.
Stellen Sie sicher, daß der Betriebsschalter auf
die Position OFF eingestellt ist. Prüfen Sie, daß
die Schreibanzeige-LED nicht aufleuchtet. Die
Verriegelung des Batteriefachs anheben und
durch Drehen auf Position öffnen. Die
Batteriehalterung entfernen.
Beim Einsetzen von Lithium-Batterien jeweils
einen Satz auf jeder Seite der
Batteriehalterung einsetzen. Beim Einsetzen
von AA (R6)-Batterien zwei Batterien auf jeder
Seite der Halterung einsetzen. Stellen Sie
sicher, daß die Polarität der Batterien beim
Einsetzen nicht umgekehrt ist. Vorsichtig auf
die Batterie drücken, bis sie einrastet. Die
Batteriehalterung auf der Unterseite in die
Kamera einschieben. Auf die Batteriehalterung
drücken und dabei die Verriegelung des
Batteriefachs durch Drehen auf die Position
schließen.
1
CR-V3
2
3
Deutsch
4
AA (R6) Ni-MH,
Ni-Cd oder Alkali
67

Einsetzen und Wahl von
Speicherkarten
Speicherkarten, im folgenden einfach als
“Karten” bezeichnet, speichern die digitalen
Bilder, die mit der Kamera aufgenommen
werden. Mit dieser Kamera kann jeweils eine
SmartMedia- (SM) und eine CompactFlashKarte (CF) eingesetzt werden.
Sie können SmartMedia-Karten von Olympus
oder 3V (3,3V)-Karten anderer Hersteller
verwenden. (5V-Karten können nicht verwendet
werden.)
SmartMedia CompactFlash
Stellen Sie sicher, daß die Schreibanzeige-LED
nicht aufleuchtet. Den Verschluß der
Kartenfachabdeckung andrücken und anheben.
Eine SmartMedia-Karte mit der abgeschrägten
Ecke nach unten halten und in den schmalen
Schlitz nahe der Rückseite der Kamera
einsetzen. Die Karte ganz in den Schlitz
drücken. (Die SmartMedia-Karte so einsetzen,
daß sie etwa 2 mm oberhalb des Schlitzes
sichtbar ist.)
Eine CompactFlash-Karte mit dem Pfeil auf die
Rückseite der Kamera weisend in den breiteren
Schlitz nahe der Vorderseite der Kamera
einsetzen. Die Karte vollkommen in den Schlitz
drücken. Die Kartenfachabdeckung schließen
und bis zum hörbaren Einrasten vorsichtig
drücken.
Zum Entnehmen der SmartMedia-Karte leicht
zum Ausrasten auf die Karte drücken und sie
aus dem Schlitz ziehen. Zum Entnehmen der
CompactFlash-Karte vorsichtig zum Ausrasten
auf die Auswurftaste drücken und sie aus dem
Schlitz ziehen.
Wenn nur eine Karte in die Kamera eingesetzt
ist, wird sie automatisch zum Speichern der
Bilder gewählt. Wenn beide Karten eingesetzt
sind, kann eine der beiden Karten zum
Speichern gewählt werden. Wenn eine Karte
voll ist, kann schnell auf die andere Karte
umgeschaltet und weiter Aufnahmen gemacht
werden. Die SM/CF-Speicherkarten-Taste
gedrückt halten und dann den Hauptregler oder
den Nebenregler drehen, bis (SmartMedia)
oder (CompactFlash) im LCD-Feld
angezeigt wird. Bei der Anzeige von ist die
SmartMedia-Karte zum Speichern von Bildern
gewählt und bei der Anzeige von ist die
CompactFlash-Karte gewählt.
Anschließen des Netzadapters
Der separat erhältliche Netzadapter kann als
alternative Stromquelle für lange
Aufnahmeserien verwendet werden, um
Batteriestrom einzusparen. Die Kamera
ausschalten und sicherstellen, daß die
Schreibanzeige-LED nicht blinkt. Das
Netzkabel des Netzadapters an eine Steckdose
anschließen. Die DC IN-Anschlußkappe auf der
linken Seite der Kamera entfernen, den
Netzadapter an der Kamera anschließen und
dann die Kamera einschalten. Verwenden Sie
nur den für diese Kamera vorgesehenen
Netzadapter. Für Hinweise zur Verwendung des
Netzadapters in anderen Ländern als dem
Land, in dem die Kamera gekauft wurde,
wenden Sie sich bitte an den OlympusKundendienst.
OFF
ON
DC IN-Anschluß
Stecker des
Netzadapterkabels
68
Netzadapter
Netzsteckdose

Die Kamera ein- und ausschalten
Zum Ein- oder Ausschalten der Kamera den
Betriebsschalter auf die Position ON oder OFF
bewegen. Wenn die Kamera bei Einstellung auf
den Aufnahme-Modus (das Modus-Einstellrad
ist auf P, A, S oder M eingestellt) für eine
bestimmte Zeit nicht verwendet wird, schaltet
sie automatisch alle Anzeigen aus und wird
zum Einsparen von Batteriestrom auf den
Abschalt-Modus eingestellt. Zum
Wiederherstellen des Kamerabetriebs eine
beliebige Taste auf der Kamera drücken. Wenn
die Kamera nach Einstellung auf den AbschaltModus eine Stunde lang nicht verwendet wird,
schaltet sie sich vollständig aus. Zum erneuten
Verwenden der Kamera muß die Kamera ausund wieder eingeschaltet werden. Beim
erstmaligen Einschalten der Kamera sollte das
Datum und die Zeit eingestellt werden.
Prüfen der Batterie
Die Batterie-Anzeige (in der Form einer AA
(R6)-Batterie) im LCD-Feld zeigt die
Batterieleistung an. Wenn beim Einschalten der
Kamera die Batterie-Anzeige voll ist und dann
erlischt, bedeutet dies, daß die Batterien voll
geladen sind. Wenn die Batterie-Anzeige
teilweise gefüllt ist und blinkt, sind die Batterien
schwach und sollten so bald wie möglich
ausgetauscht werden. Wenn die teilweise
gefüllte Batterie-Anzeige erlischt und das LCDFeld vollständig erlischt, bedeutet dies, daß die
Batterien verbraucht sind und keine Bilder
aufgenommen werden können, bevor die
Batterien ausgetauscht werden.
Überprüfen der Anzahl der speicherbaren Bilder
Die große zweistellige Zahl im unteren rechten
Teil des LCD-Feldes zeigt die Anzahl der
speicherbaren Bilder an. Wenn diese Zahl Null
erreicht, sollte die Karte ausgetauscht werden
oder, wenn zwei Karten in die Kamera
eingesetzt sind, die andere Karte gewählt
werden. Die Anzahl der speicherbaren Bilder
auf der Karte wird durch die Größe der Bilder
bestimmt. Die Größe der Bilder wird durch die
Einstellungen des Aufzeichnungs-Modus
(Qualität, Auflösung, Kompression) festgelegt,
der im Aufnahme-Modus gewählt wird. Die
verwendbaren Qualitäten sind TIFF, SHQ, HQ
(Grundeinstellung) und SQ (Tagged Image File
Format, Super High Quality, High Quality,
Standard Quallity).
Gewählte Karte
Deutsch
Anzahl der speicherbaren
Bilder
Speicherkapazität einer Speicherkarte
Qualität Auflösung (Pixel) Kompression Dateigröße
(Grundeinstellung) (Grundeinstellung) (Referenzwert)
TIFF 2240 x 1680 (VOLL) 1:1 11,3 MB 0 Bilder 2 Bilder
SHQ 2240 x 1680 (VOLL) 1:2,7 2,8 MB 2 Bilder 11 Bilder
HQ 2240 x 1680 (VOLL) 1:8 950 KB 8 Bilder 34 Bilder
SQ 1280 x 960 (SXGA) 1:8 300 KB 27 Bilder 110 Bilder
Bilder pro Karte (Referenzwert)
8 MB
32 MB
69

Datum oder Uhrzeit
Im Einstellungs-/Verbindungs-Modus können
das Datum, die Uhrzeit und das Datumsformat
eingestellt werden.
Bei der Aufnahme eines Bildes werden das
aktuelle Datum und die Zeit zusammen mit
dem Bild gespeichert. Dieses gespeicherte
Datum oder die Zeit kann mit dem Bild
zusammen ausgedruckt werden, wenn der
Datums- oder Zeitstempel für den Ausdruck
verwendet wird. Das Bearbeiten und die
Handhabung von Bildern mit CAMEDIA Master
2.5 stellt sicher, daß diese Datums- und
Zeitinformationen erhalten bleiben, selbst wenn
die Bilder auf einen Computer übertragen
werden. Diese Datums- und Zeitinformationen
können bei der Bearbeitung mit anderer GrafikSoftware verloren gehen.
Nach der Einstellung des Datums- oder
Zeitstempels gilt diese Einstellung für alle zum
Ausdruck gewählten Bilder. Die Speicherkarte
mit den für den Ausdruck mit dem Datumsoder Zeitstempels zu wählenden Bildern in die
Kamera einsetzten. Das LCD-Feld überprüfen
und sicherstellen, daß die Anzeige für die
SmartMedia-Karte oder CompactFlashKarte angezeigt wird. Wenn die richtige
Anzeige nicht angezeigt wird, die SM/CFSpeicherkarten-Taste gedrückt halten und den
Hauptregler oder den Nebenregler drehen, bis
die Anzeige angezeigt wird. Das ModusEinstellrad auf Ausdruckwahl drehen. Dann
die Menü-Taste zum Aufrufen des Menüs
auf dem Monitor drücken. oder zum
Bewegen der grünen Markierung auf den
Datums- oder Zeitstempel drücken.
zum Bewegen der grünen Markierung nach
rechts und dann erneut die Taste zum
Bewegen der grünen Markierung auf DATE
(Datum) oder TIME (Zeit) drücken oder zum
Stornieren der Datums- oder Zeiteinstellung die
grüne Markierung auf OFF (Aus) bewegen. Die
Taste zur Wahl der Einstellung drücken. Die
Taste erneut zum Beenden des Menüs
drücken.
70

Aufnahmen machen
Bildausschnitte zusammenstellen
Sicherstellen, daß die Kamera eingeschaltet
ist, die Objektivkappe entfernen und durch den
Sucher schauen. Zur Einstellung des Suchers
auf die Augen den Dioptrien-Einstellring
solange drehen, bis die Autofokus-Markierung
in der Mitte des Suchers scharf und deutlich zu
erkennen ist. Wenn die Autofokus-Markierung
nicht sichtbar ist, sollte sichergestellt werden,
daß der Sucher-Verschlußhebel auf der linken
Seite des Suchers nach oben geschoben ist.
Mit dem Riemen um den Hals die Kamera am
Griff auf der rechten Seite fassen und die linke
Hand zum Abstützen der Kamera verwenden.
Sicherstellen, daß die Finger nicht das
Objektiv, das Blitzlicht (wenn es ausgeklappt
ist), die Autofokus-Meßzelle oder die
Fernbedienungs-/Selbstauslöser-Anzeige auf
der Vorderseite der Kamera blockieren. Die
Kamera so ruhig wie möglich halten, das
Objekt fokussieren und den Bildausschnitt im
Sucher zusammenstellen.
Bildausschnitt mit dem Monitor
wählen
Sicherstellen, daß die Kamera eingeschaltet
ist, die Objektivkappe entfernen und die
Monitor-Taste drücken. Den SucherVerschlußhebel auf der linken Seite des
Suchers nach unten schieben. Die MonitorSperre/Auslöse-Taste zum Ausklappen des
Monitors drücken. Zum Anheben des Monitors
die Unterseite des Monitors herausziehen.
Sicherstellen, daß die Finger nicht das
Objektiv, das Blitzlicht (wenn es ausgeklappt
ist), die Autofokus-Meßzelle oder die
Fernbedienungs-/Selbstauslöser-Anzeige auf
der Vorderseite der Kamera blockieren. Die
Kamera so ruhig wie möglich halten, das
Objekt fokussieren und den Bildausschnitt auf
dem Monitor zusammenstellen.
Den Auslöser drücken
Der Verschluß wird in zwei Stufen ausgelöst.
Das Modus-Einstellrad auf P drehen. Den
Bildausschnitt im Sucher oder auf dem Monitor
zusammenstellen. Den Auslöser bis zur Hälfte
drücken, um den Fokus und die Belichtung
automatisch einzustellen. Wenn ein kurzer
Signalton ertönt und die Autofokus-
Korrekturmarkierung in der unteren linken Ecke
des Suchers aufleuchtet, ist das Objekt
fokussiert. Solange der Auslöser zur Hälfte
gedrückt ist, bleibt das Objekt mit der
gewählten Belichtung fokussiert. Dies wird
automatische Belichtungssperre genannt. Den
Auslöser zum Auslösen des Verschlusses bis
zum Anschlag nach unten drücken und die
Aufnahme ausführen. Nach der Aufnahme wird
das Bild kurz auf dem Monitor wiedergegeben,
die Schreibanzeige-LED blinkt für einige
Sekunden und erlischt, wenn das Bild auf der
Karte gespeichert ist. Die Kamera benötigt
einige Sekunden zum Speichern eines Bildes.
Es können jedoch vier Aufnahmen schnell
hintereinander ausgeführt werden, bis die vier
Teile der Speicheranzeige gefüllt sind. Wenn
die Speicheranzeige voll ist, müssen Sie
mindestens so lange warten, bis ein Teil der
Speicheranzeige frei ist, bevor Sie eine weitere
Aufnahme ausführen können.
Halb gedrückt (vorsichtig halb drücken)
Deutsch
Ganz gedrückt
(nach dem halben Drücken vorsichtig
ganz bis zum Anschlag drücken)
Wenn die Autofokus-Korrekturmarkierung
blinkt, ist das Objekt nicht fokussiert. Den
Finger vom Auslöser nehmen, den
Bildausschnitt durch das Ausrichten der
Kamera auf einen anderen Bildteil erneut
wählen und dann den Auslöser bis zur Hälfte
drücken. Während der Auslöser zur Hälfte
gedrückt ist, stellen Sie jetzt den Bildausschnitt
erneut zusammen. Einige Objekte sind schwer
zu fokussieren. Wenn die Blitzwarnung im
Sucher angezeigt wird, ist das Bild
unterbelichtet und das eingebaute Blitzlicht
sollte verwendet werden. Die Blitz-Taste
zum Ausklappen des Blitzlichtes drücken und
die Aufnahme mit dem Blitzlicht ausführen.
71

Verwendung der Zoom-Funktion
Zum Einzoomen und Vergrößern des Objektes
im Sucher den Zoomring nach links drehen.
Zum Auszoomen und Verkleinern des Objektes
den Zoomring nach rechts drehen. Die
Aufnahme kann bis zu 60 cm vom Objekt
entfernt ausgeführt werden.
Nahaufnahmen können durch Einstellung der
Kamera auf den Makro-Modus in einem
Bereich von 20 cm bis 60 cm vom Objekt
entfernt ausgeführt werden. Zur Einstellung der
Kamera auf den Makro-Modus die Makro-Taste
drücken und dann den Hauptregler oder den
Nebenregler drehen, bis die Makro-Anzeige
im LCD-Feld angezeigt wird. Den Vorgang zum
Löschen der Makro-Anzeige und zum
Zurückstellen der Kamera auf normalen Betrieb
wiederholen.
Verwendung des eingebautes Blitzlichtes
Wenn die Blitzwarnung in der unteren linken Ecke des Suchers blinkt, ist nicht ausreichend Licht
für die Aufnahme vorhanden. Die Blitz-Taste zum Ausklappen des eingebauten Blitzlichtes
drücken und dann die Aufnahme ausführen. Die Blitzwarnung kann weiterhin blinken, bis das
Blitzlicht wieder vollkommen aufgeladen ist. Bei Ausführen der Aufnahme wird der Blitz mit einer
automatisch eingestellten Intensität für die beste Belichtung ausgelöst.
Reichweite des Blitzes
ISO Max. WIDE (WIDE-Grenze) Max. TELE (TELE-Grenze)
AUTO 0,6~8,9 m 0,5~7,4 m
80 0,6~6,3 m 0,5~5,2 m
160 0,9~8,9 m 0,7~7,4 m
320 1,3~12,5 m 1,0~10,4 m
Das Blitzlicht sollte innerhalb dieser Reichweite verwendet werden, um eine Über- oder
Unterbelichtung der Bilder zu vermeiden. Fortlaufendes, schnelles Blitzen kann zum Überhitzen des
Blitzlichtes führen. Niemals mehr als 30 Blitzaufnahmen hintereinander machen. Nach längerer
Verwendung sollte mindestens 10 Minuten zum Abkühlen des Blitzlichtes gewartet werden, bevor
weitere Aufnahmen gemacht werden. Stellen Sie vor der Verwendung des Blitzlichtes sicher, daß die
Oberfläche sauber ist.
Wahl eines Blitzmodus
Durch die Wahl des Blitzmodus wird festgelegt, auf welche Art zur Erzielung besonderer
Beleuchtungseffekte geblitzt werden soll. Zur Wahl des Blitzmodus die Blitzmodus-Taste gedrückt
halten und dann den Hauptregler oder den Nebenregler nach rechts oder links drehen, bis die
gewünschte Einstellung angezeigt wird.
72

LCD-Feld Blitzmodus Funktion
(keine) Automatischer Blitz Einstellung der Blitzintensität entsprechend der Helligkeit des
SLOW Langsame Der Blitz wird kurz vor dem Ende der Verschlußauslösung ausgelöst.
2nd-CURTAIN Synchronisation Wenn 2nd-CURTAIN nicht gewählt ist, ist die Kamera auf die
Aufhellblitz Der Blitz wird immer ausgelöst, unabhängig von den
Verringerung des Die Kamera löst 10 kurze Vorblitze zum Zusammenziehen der Pupillen
Rote-Augen- der aufzunehmenden Person zum Verringern des Rote-AugenEffektes Effektes aus. Nach dem Drücken des Auslösers entsteht eine
Objektes.
Auslösung des Blitzes am Beginn der Verschlußauslösung eingestellt
(1st-CURTAIN).
Belichtungsbedingungen.
Verzögerung von einer Sekunde bis zum Auslösen des Verschlusses.
Die Anzahl der möglichen Einstellungen für die Blitz-Betriebsarten ist abhängig von der Einstellung
des Aufnahme-Modus.
Blitz-Betriebsarten für den Programm-Modus (P) und den Blenden-Modus (A)
Anzeige auf dem
LCD-Feld
(Keine)
Verringerung
Blitzmodus Blitzauslösung
Automatischer Blitz
Automatischer Blitz
(Verringerung des
Rote-Augen-Effektes)
Langsame
Synchronisation
(Verringerung des
Rote-Augen-Effektes)
Langsame
Synchronisation
Langsame
Synchronisation
(2. Verschlußphase)
Aufhellblitz
des Rote-AugenEffektes
NEIN
JA
JA
NEIN
NEIN
NEIN
1. Verschlußphase
1. Verschlußphase
1. Verschlußphase
1. Verschlußphase
2. Verschlußphase
1. Verschlußphase
Blitzt automatisch bei
Unterbeleuchtung,
Gegenlicht
JA
JA
JA
JA
JA
NEIN
Blitzt
immer
NEIN
NEIN
NEIN
NEIN
NEIN
JA
Deutsch
Blitz-Betriebsarten für den Verschluß-Modus (S) und den manuellen Modus (M)
Anzeige auf dem
LCD-Feld
Verringerung
Blitzmodus Blitzauslösung
Aufhellblitz
(Verringerung des
Rote-Augen-Effektes)
Aufhellblitz
(2. Verschlußphase)
Aufhellblitz
des Rote-AugenEffektes
JA
NEIN
1. Verschlußphase
2. Verschlußphase
1. Verschlußphase
Blitzt automatisch bei
Unterbeleuchtung,
Gegenlicht
NEIN
NEIN
NEINNEIN
Blitzt
immer
JA
JA
JA
Verwendung der Blitz-Belichtungskorrektur
Wenn Probleme mit einem Objekt auftreten, das bei einer Aufnahme mit dem Blitzlicht zu hell oder
zu dunkel ist, kann die Blitz-Belichtungskorrektur verwendet w erden. Das Modus-Einstellrad auf P, A,
S oder M drehen und dann die Menü-Taste drücken. Im Aufnahme-Modus die BlitzBelichtungskorrektur-Anzeige wählen und den Blitz-Belichtungskorrektur-Wert einstellen.
Nach dem Drücken der Taste zum Beenden des Menüs die Aufnahme ausführen. Zum
Zurückstellen des Blitz-Belichtungskorrektur-Wertes den Vorgang wiederholen und Null für die
Einstellung wählen.
73

Wiedergabe und Bearbeitung von Bildern
Wiedergabe von Bildern
Zur Einstellung der Kamera auf den
Wiedergabe-Modus zur Wiedergabe von
Bildern das Modus-Einstellrad auf oder bei
Einstellung des Modus-Einstellrades auf P, A,
S oder M die Monitor-Taste zweimal
schnell drücken. Das zuletzt aufgenommene
Bild wird auf dem Monitor wiedergegeben.
oder zur Wiedergabe des nächsten oder
vorherigen Bildes drücken. oder zum
Überspringen von 10 Bildern vorwärts oder
zum Überspringen von 10 Bildern zurück
drücken.
Zum Vergrößern des Bildes das ModusEinstellrad auf Wiedergabe drehen, dann
den Hauptregler nach rechts auf die LupenAnzeige (oder den Nebenregler im
Uhrzeigersinn) drehen. Jedesmal beim Drehen
des Reglers um eine Position wird die
Vergrößerung erhöht. Die Pfeiltasten zum
Verschieben des Bildes nach links, rechts,
oben oder unten verwenden. Zum Zurückgehen
auf die ursprüngliche Größe den Hauptregler
nach links (oder den Nebenregler entgegen
dem Uhrzeigersinn) drehen.
Zur gleichzeitigen Wiedergabe von mehr als
einem Bild auf dem Monitor kann die IndexAnzeige verwendet werden. Das ModusEinstellrad auf Wiedergabe drehen, dann
den Hauptregler nach links auf die IndexAnzeige (oder den Nebenregler entgegen
dem Uhrzeigersinn) drehen. Jedesmal beim
Drehen des Reglers um eine Position nach
links erhöht sich die Anzahl der
wiedergegebenen Bilder im Index (4, 9, 16).
Zum Bewegen der grünen Markierung im Index
oder zur Wahl des vorherigen oder
nächsten Bildes drücken. oder zur
Wiedergabe des vorherigen oder nächsten
Index drücken. Die grüne Markierung auf das
zu wählende Bild bringen und den Hauptregler
oder den Nebenregler nach rechts zum
Zurückgehen auf die Wiedergabe des
Einzelbildes drehen.
Zum Beenden des Wiedergabe-Modus bei
Einstellung des Modus-Einstellrades auf
Wiedergabe das Modus-Einstellrad auf P, A,
S oder M drehen. Wenn das Modus-Einstellrad
auf P, A, S oder M eingestellt ist, drüc k en Sie
die Monitor-Taste einmal zum Ausschalten
des Monitors.
Im Wiedergabe-Modus-Menü kann auch die
automatische Diashow eingestellt werden. Mit
dem aktuellen Bild beginnend werden die
Bilder jeweils 5 Sekunden lang fortlaufend
angezeigt, bis die Taste oder gedrückt
wird.
Anzeige von Bildinformationen
Während der Wiedergabe der Bilder können die Informationen über die Einstellungen bei der
Aufnahme des Bildes angezeigt werden. Das Modus-Einstellrad auf Wiedergabe drehen (oder bei
Einstellung des Modus-Einstellrades auf P, A, S oder M die Monitor-Taste zweimal schnell
drücken.) Die INFO-Taste gedrückt halten und dann den Hauptregler oder den Nebenregler
nach rechts oder links drehen, um eine der drei Formate für die Anzeige der Informationen zum
Einblenden im wiedergegebenen Bild zu wählen. Wenn die Histogramm-Funktion aktiviert wird, wird
zusätzlich das Histogramm wiedergegeben. Die Histogramm-Anzeige kann im Aufnahme-Modus
eingeschaltet werden. Die untere Abbildung zeigt die Wiedergabe aller Informationen (ohne das
Histogramm).
Speicherkarte
Ordnername/
Dateiname
Standard-DCFDatei-Information
Schreibgeschützt
Zum Ausdrucken gewählt
Aufzeichnungs-Modus (Auflösung,
Kompression)
Verschlußgeschwindigkeit, Blendenwert
Belichtungskorrektur
Weißabgleich-Einstellung
ISO (AUTO, ISO-Wert-Einstellung)
Blitzintensitäts-Korrektur
74
Aufnahmedatum
des Bildes
Aufnahmezeit
des Bildes
Bildnummer (oder Vergrößerungsrate,
wenn das Bild vergrößert angezeigt wird)

Bilder schützen
Auf einer Karte gespeicherte Bilder können vor
versehentlichem Löschen geschützt werden.
Den Wiedergabe-Modus einstellen und das zu
schützende Bild wiedergeben. Die
Schreibschutz-Taste drücken. Die
Schreibschutz-Anzeige wird oben auf dem Bild
angezeigt. Zum Löschen des Schreibschutzes
das geschützte Bild wiedergeben und die
Schreibschutz-Taste zum Löschen der
Schreibschutz-Anzeige drücken. Wenn alle
Bilder auf einer SmartMedia-Karte geschützt
werden sollen, kann ein SchreibschutzAufkleber auf der Karte angebracht werden.
Bitte beachten Sie, daß geschützte Bilder
trotzdem gelöscht werden, wenn die Karte
formatiert wird.
Bilder löschen
Schwach belichtete Bilder oder Bilder, die Sie
nicht mehr benötigen, können von der Karte
gelöscht werden, um mehr Speicherplatz zu
schaffen. Den Wiedergabe-Modus einstellen
und das zu löschende Bild wiedergeben. (Bilder
aus der Index-Anzeige können ebenfalls
gelöscht werden. Die grüne Markierung auf das
zu löschende Bild bewegen.) Die LöschenTaste drücken, zur Wahl von YES (Ja)
und dann die Taste drücken. Die
Schreibanzeige-LED blinkt, während das Bild
gelöscht wird. Zum Löschen aller Bilder auf
einer Karte die zu löschende Karte wählen.
Die Karten-Lösch-Anzeige der KartenEinstellungs-Funktion (CARD SETUP) im
Aufnahme-Modus zum Löschen aller Bilder auf
der Karte verwenden.
Kopieren von Bildern auf eine
andere Karte
Wenn beide Karten in die Kamera eingesetzt
sind, können Sie einzelne Bilder zum Kopieren
auf die andere Karte wählen oder alle Bilder
gleichzeitig auf die andere Karte kopieren.
Formatieren einer Speicherkarte
Karten, die auf einem Computer oder in einer
anderen Kamera formatiert wurden, müssen
vor der Verwendung in dieser Kamera
formatiert werden. Durch das Formatieren
werden alle auf der Karte gespeicherten Bilder
und Informationen gelöscht.
Wahl der Benennung von
Bilddateien
Nach der Aufnahme eines Bildes weist die
Kamera diesem einen eigenen Dateinamen zu
und speichert es in einem Ordner auf der
Karte. Der Ordner und der Dateiname können
später für die Bearbeitung der Dateien auf
einem Computer verwendet werden.
Ordnernamen haben drei Stellen im Format
nnnOLYMP. Dateinamen haben vier Stellen im
Format Pmdd왕왕왕왕.jpg.
Ordnername
OLYMP
Ordnernummer
(100~999)
Dateiname
Pmdd .jpg
DCIM
100 OLYMP
P2030001.jpg
P2030002.jpg
P2030003.jpg
P2030004.jpg
Alle Ordner
Tag (01~31)
Monat (10, 11, 12
werden zu A, B, C)
Dateinummer (0001~9999)
Nach der Aufnahme von 9999 Bildern wird
das Zählwerk für das nächste Bild auf 0001
zurückgestellt, die Ordnernummer um eine 1
erhöht und damit ein neuer Ordner erstellt, in
dem das nächste Bild (Datei) gespeichert
wird.
Das Modus-Einstellrad auf die Einstellungs-/
Verbindungs-Modus-Anzeige einstellen und
dann die Menü-Taste drücken. Die
Pfeiltasten und zur Wahl von FILE NAME
(Dateiname) drücken. zum Bewegen der
grünen Markierung nach rechts drücken.
oder zum Bewegen der grünen
Markierung auf AUTO oder RESET drüc ken.
Die T aste zur Wahl der Einstellung und dann
die T aste zum Beenden des Menüs drücken.
Die Benennung kann mit FILE NAME im
Einstellungs-/V erbindungs-Menü gewählt
werden. Bei der Wahl von AUTO werden alle
Dateien und Ordner der Reihe nach für jede
verwendete Karte numeriert, um
sicherzustellen, daß kein Dateiname doppelt
vorhanden ist. Bei der Wahl von RESET startet
die Numerierung der Dateien jedesmal bei
Einsetzen einer anderen Karte.
75
Deutsch

Wahl von Bildern zum Ausdruck
Bilder können einzeln oder es können alle
Bilder auf einer Karte zum Ausdruck auf einem
DPOF-kompatiblen Drucker oder in einem
DPOF-Fotolabor gewählt werden.
Wahl einzelner Bilder zum Ausdruck
Die Karte mit den auszudruckenden Bildern
einsetzen und wählen. Das Modus-Einstellrad
auf Ausdruckwahl drehen. Mit den
Pfeiltasten das auszudruckende Bild
wiedergeben und dann die Taste drücken.
oder zur Wahl der Anzahl der zu druckenden
Kopien und dann die Taste drücken. Das Bild
wird mit der Ausdruckwahl-Anzeige und der
Anzahl der gewählten Kopien markiert. Diesen
Vorgang zur Wahl und zum Markieren weiterer
Bilder für den Ausdruck wiederholen. Zum
Stornieren einer Wahl diesen Vorgang
wiederholen und Null für die Anzahl der Kopien
wählen.
Wahl (oder Stornieren der Wahl) aller Bilder
zum Ausdruck
Die Karte mit auszudruckenden Bildern
einsetzen und wählen. Das Modus-Einstellrad
auf Ausdruckwahl drehen und dann die
Menü-Taste drücken. Die AusdruckwahlAnzeige im Ausdruckwahl-Modus-Menü
zur Wahl oder zum Stornieren der Wahl der
Bilder auf der Karte zum Ausdruck verwenden.
Wahl von Bildern für den Datums- und
Zeitstempel
Die Karte mit den für den Datums- oder
Zeitstempel zu wählenden Bildern einsetzen
und wählen. Das Modus-Einstellrad auf
Ausdruckwahl drehen und dann die MenüTaste drücken. Im Ausdruckwahl-ModusMenü die Datums- oder Zeitstempel-Anzeige
zur Einstellung des Datums- oder
Zeitstempels für das Bild verwenden.
Einstellung (oder Stornieren der
Einstellung) für den Index-Ausdruck
Die Karte mit den für den Index-Ausdruck zu
wählenden Bildern einsetzen und wählen. Das
Modus-Einstellrad auf Ausdruckwahl drehen
und dann die Menü-Taste drücken. Im
Ausdruckwahl-Modus-Menü die Inde xAusdruck-Anzeige zur Wahl der Bilder oder
zum Stornieren aller vorher gewählten Bilder
für den Ausdruck verwenden.
76
Bearbeiten von Bildern auf einem
Computer
Das mit der Kamera mitgelieferte USB-Kabel
kann für die Verbindung der Kamera mit einem
Computer, der mit einem USB-Anschluß
ausgestattet ist, und zum Bearbeiten der Bilder
von der Karte in der Kamera auf einem
Computer verwendet werden. Die folgenden
Gegenstände sind notwendig:
• Mit der Kamera mitgeliefertes USB-Kabel.
• Ein USB-Treiber. Ein USB-Treiber wird mit der
Software CAMEDIA Master 2.5 mitgeliefert.
Die neuesten USB-Treiber können von der
Olympus-Webseite bei www.olympus-
europa.com heruntergeladen werden oder
sind beim Olympus Kundendienst erhältlich.
• Ein IBM-kompatibler PC/AT mit Windows 98,
Windows 98 Second Edition oder Windows
2000 installiert.
• Ein Apple Macintosh oder iMac mit Mac OS
8.6 - 9.0 installiert.
Für weitere Hinweise siehe auch die
Bedienungsanleitung auf der CD-ROM.
Separat erhältliche Geräte zum
Lesen von Karten
Sie können ebenfalls eines der separat
erhältlichen Geräte zum Lesen von Bilddateien
von einer Speicherkarte verwenden, falls der
Computer nicht mit einem USB-Anschluß
ausgestattet ist. Vor dem Kauf eines dieser
Geräte sicherstellen, daß das Gerät mit Ihrem
Computer zusammen verwendet werden kann.
Für weitere Hinweise wenden Sie sich bitte an
den Olympus Kundendienst.
Zum Lesen einer SmartMedia-Karte
• Floppy Disk Adapter FlashPath MAFP-2NE.
Ein 3,5 Zoll Floppy Disk-Laufwerk ist
notwendig.
• PC Card Adapter MA-2E. Ein PCMCIA-
Kartensteckplatz muß am Computer
vorhanden sein.
• SmartMedia Reader/Writer MAUSB-2.
Ein USB-Anschluß ist notwendig.
Zum Lesen einer CompactFlash-Karte
• PC Card Adapter . Ein PCMCIA-
Kartensteckplatz ist notwendig.

Aufnahme-Funktionen
Einstellung des Aufnahme-Modus
Das Modus-Einstellrad auf P, A, S oder M
drehen, um den Aufnahme-Modus einzustellen.
• P (Programm-Modus): Die Kamera wählt
automatisch den Blendenwert und die
Verschlußgeschwindigkeit für das Bild.
• A (Blenden-Modus): Sie können die Blende
selbst einstellen, während die Kamera
automatisch die richtige
Verschlußgeschwindigkeit einstellt. Ein großer
Blendenwert fokussiert das Objekt und kann
den Hintergrund bei einer Portraitaufnahme
unscharf machen. Ein kleiner Blendenwert
fokussiert sowohl Vordergrund als auch
Hintergrund für Gruppen- oder
Landschaftsaufnahmen.
• S (Verschluß-Modus): Sie können selbst die
Verschlußgeschwindigkeit einstellen, während
die Kamera automatisch den richtigen
Blendenwert wählt. Für sich schnell
bewegende Objekte wählen Sie eine schnelle
Verschlußgeschwindigkeit zum Einfrieren des
Objektes. Zur Erzielung des Effektes von
verschwommenen Bewegungen wählen Sie
eine langsame Verschlußgeschwindigkeit.
• M (Manueller Modus): Sie können die
Blende und Verschlußgeschwindigkeit
manuell zur Veränderung der Aufnahme für
ganz besondere Effekte in den Bildern
einstellen.
Einstellung des Blendenwertes
Das Modus-Einstellrad auf A (Blenden-Modus)
drehen und dann den Hauptregler oder den
Nebenregler zur Einstellung des
Blendenwertes in 1/3-Schritten drehen. Den
Hauptregler nach rechts (oder den Nebenregler
im Uhrzeigersinn) für eine größere Blende oder
den Hauptregler nach links (oder den
Nebenregler entgegen dem Uhrzeigersinn) für
eine kleinere Blende drehen. Der gewählte
Blendenwert wird im Sucher und im LCD-Feld
angezeigt. Der Durchmesser der Blende ist
umgekehrt proportional zum Blendenwert. Je
größer der Blendenwert, umso kleiner ist die
Blende und umso besser die Tiefenschärfe;
dadurch werden das Objekt und der
Hintergrund beide scharf.
Je kleiner der Blendenwert, umso größer ist die
Blende und umso geringer die Tiefenschärfe;
dadurch wird das Objekt fokussiert und der
Hintergrund ist verschwommen.
Wahl des Meßverfahrens
Das Meßverfahren bestimmt, ob die Kamera
das Licht in einem weiten oder kleinen Bereich
des im Sucher zusammengestellten
Bildausschnittes mißt. Die Meß-Modus-Taste
auf der Oberseite der Kamera drücken und
dann den Hauptregler oder den Nebenregler
drehen, bis die Anzeige für das zu
verwendende Meßverfahren im Sucher oder im
LCD-Feld angezeigt wird.
LCD-Feld Methode
ESP Digitale ESP-Messung. Das
gesamte Bild wird für Lichtund Helligkeitsmuster
gemessen. Wird nur im LCDFeld angezeigt.
Mittenmessung. Das gesamte
Bild wird gemessen, jedoch
wird auf den Bereich in der
Markierung im Sucher
konzentriert, der etwa dreimal
die Größe des Bereichs für
die Spotmessung hat.
Anzeige im Sucher und auf
dem Monitor.
Spotmessung. Nur der vom
Spot-Meßfeld abgedeckte
Bereich im Sucher wird
gemessen, etwa 1,2% der
Anzeige im Sucher. Anzeige
im Sucher und auf dem
Monitor.
Einstellung der
Verschlußgeschwindigkeit
Das Modus-Einstellrad auf S (VerschlußModus) einstellen und dann den Hauptregler
oder den Nebenregler zur Wahl der
Verschlußgeschwindigkeit drehen. Bei jedem
Drehen wird die Verschlußgeschwindigkeit um
einen 1/3-Schritt erhöht (oder verringert). Durch
Drehen des Hauptreglers nach rechts (oder
des Nebenreglers im Uhrzeigersinn) wird die
Verschlußgeschwindigkeit schneller und durch
Drehen des Hauptreglers nach links (oder des
Nebenreglers entgegen dem Uhrzeigersinn)
langsamer. (Bereich: 1/640 bis 2 Sekunden)
Die gewählte Verschlußgeschwindigkeit wird im
Sucher und im LCD-Feld angezeigt. Das
eingebaute Blitzlicht ist bei
Verschlußgeschwindigkeiten von 1/250 oder
schneller eventuell nicht wirksam.
Deutsch
77

Fokussieren
Die Kamera kann ein Objekt automatisch
fokussieren. Den Fokus-Schalter auf AF
(Autofokus) einstellen. Den Bildausschnitt so
wählen, daß die Autofokus-Markierung das
Objekt in der Mitte des Suchers abdeckt. Wenn
der Bildausschnitt mit dem Monitor festgelegt
wird, sicherstellen, daß das Objekt in der Mitte
des Monitors ist. Den Auslöser bis zur Abgabe
des Signaltons und zum Aufleuchten der
Autofokus-Korrekturmarkierung im Sucher halb
drücken und dann den Auslöser zum Ausführen
der Aufnahme ganz drücken.
Schwer zu fokussierende Objekte
Wenn das Objekt nicht richtig fokussiert ist,
blinkt die Autofokus-Korrekturmarkierung in der
unteren linken Ecke, wenn die Kamera nicht
automatisch fokussieren kann. Einige Objekte
können schwer zu fokussieren sein.
Objekte mit geringem Kontrast
Ein Objekt ohne
auffällige Muster kann
schwierig zu
fokussieren sein.
Objekte, die in der Mitte glänzen
Ein Objekt, das in der
Mitte glänzt, kann
schwierig zu
fokussieren sein.
Zwei Objekte mit verschiedenen Abständen
von der Kamera
Die Kamera kann nicht
automatisch auf ein
einzelnes Objekt
fokussieren, wenn zwei
Objekte mit
verschiedenen
Abständen von der
Kamera im Sucher
sind.
Objekt wird von Straßenlampen oder
Fenstern beleuchtet
Ein Objekt, das nachts
von Straßenlampen
oder Fenstern
beleuchtet wird, kann
schwierig zu
fokussieren sein.
Objekte ohne Vertikalstreifen
Die Kamera kann nicht
ein Objekt mit nur
horizontalen Streifen
fokussieren. Die
Kamera vertikal halten,
den Auslöser halb
drücken und dann
gedrückt halten, damit
der Fokus gesperrt wird. Die Kamera erneut
horizontal ausrichten, den Bildausschnitt
festlegen und dann den Auslöser zum
Aufnehmen ganz drücken.
Sich bewegende Objekte
Es ist unmöglich, ein
sich schnell
bewegendes Objekt
lange genug zum
automatischen
Fokussieren in der
Mitte des Suchers zu
halten, deshalb sollte
der Fokus auf ein Objekt eingestellt werden,
das den gleichen Abstand von der Kamera hat
wie das aufzunehmende Objekt. Warten, bis
das sich bewegende Objekt erscheint und dann
die Aufnahme durchführen.
Aufnahme durch Glas oder eine spiegelnde
Oberfläche
Bei der Aufnahme durch ein Fenster oder bei
der Aufnahme einer spiegelnden Oberfläche,
zum Beispiel rückstrahlendes Metall, kann das
Fokussieren schwierig sein. In diesem Fall die
Fokus-Taste auf MF (manueller Fokus)
einstellen und das Objekt von Hand
fokussieren.
Hinterbeleuchtete Objekte
Objekte mit starker Hinterbeleuchtung
(Gegenlicht) können schwer zu fokussieren
sein. Die Fokus-Taste auf MF (manueller
Fokus) einstellen und das Objekt von Hand
fokussieren.
In solchen Situationen können Sie das
vorläufige Fokussieren verwenden. Stellen Sie
den Bildausschnitt zusammen, indem die
Autofokus-Markierung im Sucher auf ein Objekt
ausgerichtet wird, das den gleichen Abstand
von der Kamera wie das Objekt hat. Dann den
Auslöser zum Sperren des Fokus halb drüc ken.
Den Auslöser halb gedrückt halten und den
aufzunehmenden Bildausschnitt neu festlegen,
dann den Auslöser ganz nach unten drücken,
um das Bild aufzunehmen. (Wenn Sie darauf
warten, daß ein sich schnell bewegendes
Objekt im Sucher erscheint, halten Sie den
Auslöser halb gedrückt, bis das sich
bewegende Objekt erscheint.)
78

Manuelle Entfernungseinstellung
Den Fokus-Schalter auf MF (manuelles
Fokussieren) einstellen. Den Fokusring drehen,
bis das Objekt im Sucher oder auf dem Monitor
fokussiert ist. Das Bild wird auf dem Monitor
doppelt so groß wiedergegeben, um das
Fokussieren einfacher zu machen und der
Abstand von der Kamera zum Objekt wird im
unteren Teil des Monitors angezeigt.
Belichtungskorrektur
Die Belichtungskorrektur kann zum manuellen
Erhöhen oder Verringern der automatisch von
der Kamera gewählten Belichtungseinstellung
für ein helleres oder dunkleres Bild verwendet
werden. Das Modus-Einstellr ad auf P, A oder S
drehen. Die Belichtungskorrektur-Taste
drücken und den Hauptregler oder den
Nebenregler zur Wahl der Belichtung drehen.
Die Belichtungskorrektur kann im Bereich von
±3EV in 1/3-Schritten eingestellt werden.
Änderungen der Helligkeit innerhalb des
Bereiches von ±2EV können auf dem Monitor
überprüft werden.
Automatische Belichtungssperre
Die Kamera auf das Objekt ausrichten und die
Taste für die automatische Belichtungssperre
drücken, den Auslöser zum
automatischen Fokussieren des Objektes halb
drücken und dann zum Ausführen der
Aufnahme ganz drücken. Die
Belichtungseinstellung ändert sich nicht,
solange die Taste gedrückt wird. So kann
die Aufnahme mit der gleichen
Belichtungseinstellung ausgeführt werden.
Belichtungsreihen
Sie können mit der Kamera automatische
Belichtungsreihen mit 1/3EV, 2/3EV oder 1EV
Belichtungsschritt für jede Aufnahme
ausführen.
Änderung der ISO-Einstellung
Die ISO-Einstellung entspricht den ISOEinstellungen, die mit traditionellen
Spiegelreflexkameras mit Filmen durchgeführt
werden.
Weißabgleich
Die Lichtquelle kann die von der Kamera
wiedergegebenen Farben beeinflussen.
Normalerweise nutzt die Kamera einen weißen
Teil des zusammengestellten Bildes als
Grundlage zur Wiedergabe anderer Farben.
Wenn das Bild jedoch kein Weiß enthält oder
wenn die Aufnahme unter Kunstlicht
(besonders Fluoreszenzlicht) ausgeführt wird,
muß der Weißabgleich eingestellt werden,
damit die Farben möglichst natürlich in den
Bildern wiedergegeben werden. Diese Kamera
hat drei Möglichkeiten zur Einstellung des
Weißabgleichs.
• Automatischer Weißabgleich: Die Kamera
wählt einen weißen Teil des Bildausschnittes
im Sucher und nimmt diesen Teil als
Referenz. Die Weißabgleich-Modus-Taste
gedrückt halten und den Hauptregler oder
den Nebenregler drehen, bis -A- im Sucher
und im LCD-Feld oder AUTO WB auf dem
Monitor angezeigt wird. Dann die Aufnahme
ausführen.
• Schnellreferenz für den Weißabgleich: Mit
der gleichen Lichtquelle wie für das
aufzunehmende Bild die Kamera auf eine
weiße Oberfläche richten (Wand, Blatt Papier
usw.) und den Sucher mit der weißen
Oberfläche ausfüllen. Dann die
Schnellreferenz-Weißabgleich-Taste auf
der Vorderseite der Kamera drücken. Bei
Anzeige von GOOD (Gut) auf dem Monitor
die T aste zum Speichern der Einstellung
drücken und die Aufnahme ausführen. Wenn
NO GOOD (Nicht gut) angezeigt wird,
bedeutet dies, daß nicht ausreichend weiße
Oberfläche vorhanden ist, die weiße
Oberfläche zuviel Licht reflektiert oder Farben
an den Ecken des Blatts die Registrierung
beeinflußt haben.
• V oreingestellter Weißabgleich: Die
Weißabgleich-Modus-Taste gedrückt
halten und dann den Hauptregler oder den
Nebenregler drehen, bis die gewünschte
Farbtemperatur-Einstellung angezeigt wird,
dann die Taste loslassen. AUTO, eine
Farbtemperatur-Einstellung im Bereich von
3000K bis 7500K oder Schnellreferenz
wählen.
Deutsch
79

Einstellung des AufzeichnungsModus
Der Aufzeichnungs-Modus bestimmt die
Qualität der Bilder und hat auch einen Einfluß
auf die Dateigröße. Je besser die Qualität,
desto größer wird die Datei. Die
Aufzeichnungs-Modus-Taste gedrückt halten
und dann den Hauptregler oder den
Nebenregler nach links drehen, bis die
gewünschte Einstellung (TIFF, SHQ, HQ, SQ)
im LCD-Feld angezeigt wird oder nach rechts
zur Anzeige in umgekehrter Reihenfolge
drehen. Die Abkürzungen für die QualitätsEinstellungen haben die folgenden
Bedeutungen: TIFF (Tagged Image File
Format), SHQ (Super High Quality), HQ (High
Quality) und SQ (Standard Quality).
Einstellung Auflösung Kompression
TIFF 2240 x 1680 1:1
SHQ 2240 x 1680 1:2,7
HQ 2240 x 1680 1:8
SQ 1280 x 960 1:8
1
Schätzwerte.
Die Auflösung (Anzahl der Pixel) und das
Kompressionsverhältnis können im AufnahmeModus für jede Einstellung geändert werden.
(Anzahl der Pixel)
1
Einstellung der Bildschärfe
Im Aufnahme-Modus können Sie HARD (Hart),
NORMAL (Normal) oder SOFT (Weich) als
Einstellung für die Bildschärfe wählen.
Einstellung des Kontrasts
Im Aufnahme-Modus können Sie HIGH (Stark),
NORMAL (Normal) oder LOW (Gering) wählen,
um die Abstufungen zwischen Bereichen mit
unterschiedlicher Helligkeit einzustellen.
Mehrere Aufnahmen machen
Serienaufnahmen
Bei Einstellung der Kamera auf
Serienaufnahme-Modus den Auslöser für vier
Aufnahmen gedrückt halten. Das ModusEinstellrad auf P, A, S oder M drehen und dann
die Motorantriebs-Taste drücken, bis die
Serienaufnahme-Anzeige im LCD-Feld
angezeigt wird. Den Auslöser drücken. Die
Kamera führt die Aufnahmen (bis zu vier) aus,
bis der Auslöser losgelassen wird. Die Bilder
werden mit der gleichen Belichtung
aufgenommen, während bei Belichtungsreihen
80
die Bilder mit unterschiedlicher Belichtung
aufgenommen werden.
Verwendung des Selbstauslösers
Mit dem Selbstauslöser wird der Verschluß 12
Sekunden nach dem Drücken des Auslösers
ausgelöst, damit Sie sich im Aufnahmebereich
einfinden können.
Verwendung der Fernbedienung
RM-1
Bei Einstellung der Kamera auf den
Fernbedienung-Modus kann der Verschluß mit
der elektronischen Fernbedienung RM-1
ausgelöst werden, während Sie vor der Kamera
stehen.
Verwendung der KabelFernbedienung RM-CB1
Die Kabel-Fernbedienung verwenden, um ein
Verwackeln durch die Kamera zu verhindern,
das durch das Drücken des Auslösers mit dem
Finger bei langsamen
Verschlußgeschwindigkeiten verursacht werden
kann.
Verwendung von IntervallAufnahmen
Im Intervall-Aufnahme-Modus nimmt die
Kamera automatisch in bestimmten
Zeitabständen Bilder auf. Dieser Intervall kann
in Stunden und Minuten in einem Bereich von 1
Minute- bis 24 Stunden-Intervallen eingestellt
werden. Die Kamera führt die Aufnahmen
solange aus, bis die Batterien verbraucht sind
oder bis die gewählte Karte voll ist. Für eine
lange Aufnahmedauer sollte der separat
erhältliche Netzadapter zum Einsparen von
Batteriestrom an der Kamera angeschlossen
werden.
Verwendung des externen
gerätespezifischen Blitzgerätes FL-40
Das separat erhältliche externe Blitzgerät FL40 ist für die Verwendung mit dieser Kamera
vorgesehen, alleine oder zusammen mit dem
eingebauten Blitzlicht. Vor der Verwendung des
gerätespezifischen Blitzgerätes lesen Sie bitte
die Bedienungsanleitung des externen
Blitzgerätes FL-40 durch.
Das Blitzgerät FL-40 sollte auf die gleiche
Weise wie das eingebaute Blitzlicht verwendet
werden. Ein anderes Blitzgerät und die separat
erhältliche gerätespezifische Halterung FLBK01 können ebenfalls verwendet werden.

Verwendung der separat erhältlichen Konverter-Objektive
Die folgenden Konverter-Objektive können mit der Kamera verwendet werden. Vor der Verwendung
eines Konverter-Objektivs sicherstellen, daß der Zoom-Hebel entsprechend auf TELE oder WIDE
eingestellt ist.
Konverter-Objektiv
Art
3x Ansatz-Objektiv Tele 300 Pro
TCON-300
F2,8
entspricht f=420 mm
Filterdurchmesser 49 mm
Vollständiges Multi-Coat
1,45x Ansatz-Objektiv Tele Pro
TCON-14B
F2,4
entspricht f=200 mm
Filterdurchmesser 86 mm
Vollständiges Multi-Coat
0,8x Ansatz-Objektiv Weitwinkel Pro
WCON-08B
F2
entspricht f=28 mm
Filterdurchmesser 105 mm
Vollständiges Multi-Coat
Ansatz-Objektiv Makro Pro
MCON-35
F2~F2,4
Möglichkeit zur Aufnahme eines
Bereichs von etwa 49 mm x 37 mm
Filterdurchmesser 72 mm
Vollständiges Multi-Coat
Befestigungs-
methode
Stützarm
Schraube
Schraube
Schraube
Zoom-
Einstellung
TELE
TELE
WIDE
WIDE~TELE
LCD-Feld
blinkt
Deutsch
leuchtet auf
Wahl des Ansatz-Objektiv-Modus (keine Nahaufnahme)
Die Makro-Taste gedrückt halten und dann den Hauptregler oder den Nebenregler drehen, bis die
Konverter-Objektiv-Anzeige im LCD-Feld angezeigt wird. Wenn ein 3x Ansatz-Objektiv Tele 300
Pro angebracht wird, blinkt die Anzeige. Ansonsten blinkt die Anzeige nicht.
Einstellung auf Nahaufnahmen mit einem Konverter-Objektiv
Das Modus-Einstellrad auf die Einstellungs-/Verbindungs-Modus-Anzeige einstellen und dann die
Menü-Taste drücken. Im Einstellung-/Verbindungs-Menü den Makro-Modus/Konverter-Objektiv-
Anzeige wählen.
81

Besondere Einstellungen
Verschlußton
Die Wiedergabe eines Verschlußtons bei der
Auslösung des Verschlusses der Kamera kann
aktiviert oder deaktiviert werden. Wenn die
Kamera auf die Abgabe eines Verschlußtons
eingestellt wird, zeigt sie das Auslösen des
Verschlusses bei der Verwendung der
Fernbedienung oder der Kabel-Fernbedienung
zur Aufnahme eines Bildes an. Wenn die
Kamera auf die Abgabe eines Signaltons
eingestellt wird, kann die Lautstärke des
Verschlußtons ebenfalls gewählt werden.
Signalton
Die Kamera kann auf die Abgabe eines
Signaltons eingestellt werden, der darauf
aufmerksam macht, daß ein Vorgang beendet
wurde (Autofokus, Belichtungskorrektur usw.).
Diese Funktion kann auch deaktiviert werden.
Den Aufnahme-Modus zur Einstellung dieser
Funktion verwenden.
Zeit für die Wiedergabe einer
Aufnahme während des Speicherns
Die Zeitdauer für die Wiedergabe des Bildes
auf dem Monitor unmittelbar nach der
Aufnahme kann im Aufnahme-Modus
eingestellt werden. Drei Einstellungen sind
vorhanden: AUTO (Automatik), OFF (Aus) und
5 Sekunden.
Abschalt-Modus
Die Zeit bis zur Einstellung der Kamera auf den Abschalt-Modus kann im Aufnahme-Modus
eingestellt werden. Wenn die Kamera auf den Abschalt-Modus eingestellt wird, werden der Monitor,
die Anzeigen im LCD-Feld und im Sucher zum Einsparen von Batteriestrom ausgeschaltet oder die
Kamera schaltet sich selbst aus, abhängig von der Einstellung des Modus-Einstellrades. Zum
Beenden des Abschalt-Modus drücken Sie einfach eine Taste. Wenn die Kamera 1 Stunde lang im
Abschalt-Modus bleibt, schaltet sie sich automatisch aus. Zum Zurückstellen auf den normalen
Betrieb schalten Sie die Kamera aus und wieder ein.
OFF
1MIN
2MIN
5MIN
10MIN
82
Kamera wird nicht auf den Abschalt-Modus eingestellt.
Kamera wird nicht auf den Abschalt-Modus eingestellt und
schaltet sich nicht aus.
Kamera wird auf den Abschalt-Modus eingestellt, wenn sie
eine Minute nicht benutzt wird.
Kamera wird auf den Abschalt-Modus eingestellt, wenn sie
zwei Minuten nicht benutzt wird.
Kamera wird auf den Abschalt-Modus eingestellt, wenn sie
fünf Minuten nicht benutzt wird.
Kamera wird auf den Abschalt-Modus eingestellt, wenn sie
zehn Minuten nicht benutzt wird.

RAW-Modus
Der RAW-Daten-Modus der Kamera kann im
Aufnahme-Modus eingestellt werden. Bei
Einstellung der Kamera auf den RAW-Modus
werden die Bilder vom CCD-Teil der Kamera
als 10 Bit/Kanaldaten aufgenommen, was zu
besonders großen Dateigrößen führen kann
(etwa 7,6 MB), weil die Bilder nicht komprimiert
sind. Bitte beachten Sie den folgenden
wichtigen Punkt des RAW-Modus.
• Zum Bearbeiten von Bildern, die im RAWModus aufgenommen wurden, wird
CAMEDIA Master 2.5 benötigt.
Deutsch
83

Anhang
Verwendung der Menüs
Die Menüs zum Einstellen des Kamerabetriebs verwenden. Vier Menüs stehen zur Verfügung. Zum
Aufrufen eines Menüs das Modus-Einstellrad auf die entsprechende Einstellung drehen und die
Menü-Taste drücken.
Modus-Einstellrad
P, A, S oder M Aufnehmen Aufnahme-Menü
Das Modus-Einstellrad auf die Einstellung zur Anzeige des gewünschten Menüs drehen. Die MenüTaste zum Aufrufen des Menüs auf dem Monitor drücken. Auf dem Pfeiltasten-Feld zum
Bewegen der grünen Markierung nach unten oder zum Bewegen der grünen Markierung nach
oben verwenden.
Hinweis
Einige Menüs haben mehr als eine Seite. Die Anzeige in der oberen linken Ecke des Menüs gibt an, welche Seite
gerade wiedergegeben wird. Zum Beispiel bedeutet 1/3, daß die erste von 3 Seiten wiedergegeben wird. Zur
Anzeige der nächsten Seite des Menüs
Wenn die grüne Markierung auf dem einzustellenden Punkt ist, drücken Sie zum Bewegen der
grünen Markierung nach rechts. Die Einstellung wählen. Wenn mehr als eine Einstellung zur
Verfügung stehen, drücken Sie oder zum Bewegen der grünen Markierung auf die gewünschte
Einstellung und dann die Taste . Wenn die Einstellung eine Eingabe benötigt (eine Zahl für ein
Datum oder die Zeit, Wahl von ON oder OFF), drücken Sie oder zum Bewegen der grünen
Markierung auf die gewünschte Einstellung und dann oder , bis die gewünschte Einstellung
angezeigt wird; danach die Taste drücken. Wenn mehr als eine Einstellung notwendig ist (zum
Beispiel eine Zeit-Einstellung), geht die grüne Markierung auf die nächste Einstellung, so daß diese
durch das Drücken von oder gewählt werden kann. Nach dem Drücken der Taste zur Wahl
der Einstellung geht die grüne Markierung nach rechts zurück. Nach Beendigung der Einstellungen
im Menü die Taste zum Beenden des Menüs drücken. Für eine Zusammenfassung der Menüs
und ihre Einstellungen siehe die Tabellen auf den folgenden Seiten.
Modus Zur Anzeige des folgenden drücken:
Wiedergabe Wiedergabe-Menü
Ausdruckwahl Ausdruckwahl-Menü
Einstellung-/Verbindung Einstellungs-/Verbindungs-Menü
drücken, wenn die grüne Markierung auf dem letzten Menüpunkt ist.
84

Auflistung der Menüs
Für weitere Hinweise siehe auch die Bedienungsanleitung auf der CD-ROM.
Aufnahme-Menü für P (Programm-Modus), A (Blenden-Modus),
S (Verschluß-Modus) und M (Manueller Modus)
1/3
2/3
3/3
Löscht alle Bilder von der gewählten
SmartMedia-Karte oder der CompactFlashKarte und formatiert die Karte.
Einstellung des ISO-Wertes
(Empfindlichkeit).
Belichtungsreihe von drei aufeinanderfolgenden
Aufnahmen mit dem gleichen Objekt mit
unterschiedlicher Belichtung.
Blitzintensitäts-Korrektur.
Bildschärfe.
Gesamtbild-Kontrast.
Aufzeichnungs-Modus (Qualität,
Auflösung, Kompression)
Intervallzeit einstellen (die Zeit zwischen den
Aufnahmen während der automatischen
Intervall-Aufnahme festlegen).
Einstellung des Verschlußtons
(Laut, leise, AUS).
Grundeinstellung
Einstellung nach dem
gleichzeitigen Drücken
von und
−
AUTO
OFF
±0EV
NORMAL
NORMAL
−
OFF
OFF
Deutsch
Signalton (EIN, AUS).
Wiedergabe der Aufnahme
während des Speicherns.
Einstellung des Abschalt-Modus.
ON
OFF
1MIN
85

Wiedergabe-Menü
Grundeinstellung
Einstellung nach dem gleichzeitigen
Drücken von und
Ausdruckwahl-Menü
Einstellungs-/Verbindungs-Menü
1/2
2/2
Diashow
(Automatische Wiedergabe).
Kopieren von Bildern von
Karte zu Karte .
Löschen aller Bilder von der
Karte, Karte formatieren.
Monitor-Helligkeit.
Alle Bilder zum Ausdruck
wählen oder stornieren.
Einstellung des Datums- oder
Zeitstempels in einem Bild.
Alle Bilder zum IndexAusdruck wählen oder
stornieren.
Einstellung für die Wahl des
Konverter-Objektivs beim
Drücken der Makro-Taste .
Einstellung des Formats
Jahr/Monat/Tag.
Einstellung des aktuellen Datums
und der Uhrzeit.
Nach dem Auswechseln einer Karte kann
die Numerierung neu begonnen werden
(RESET) oder die fortlaufende Numerierung
weitergeführt werden (AUTO).
Bilder werden als RAW-Dateien
gespeichert (unbearbeitet, nicht
komprimiert).
Histogramm-Anzeige ein oder
aus.
Jahr/Monat/Tag
—
—
—
±0
—
OFF
—
∗
∗
AUTO
OFF
OFF
∗
∗
∗
∗
∗
∗
86
∗ Wird auch durch Drücken von und nicht geändert.

Fehlermeldungen
Wenn ein Problem mit einer Speicherkarte auftritt, wird eine Meldung im LCD-Feld und auf dem
Monitor angezeigt. Bei Anzeige einer Speicherkarten-Fehlermeldung zuerst die Karte entfernen und
sie wieder einsetzen. Wenn die Fehlermeldung erneut angezeigt wird, siehe die folgende Tabelle zur
Behebung des Problems.
Keine
Anzeige
LCD-Feld
MonitorSucher Erklärung Lösung
CARD COVER
OPEN
CARD ERROR
NO CARD
UNFORMATED
CARD
WRITE
PROTECT
NO PICTURE
Kartenfachabdeckung
ist offen.
Bilder können nicht
gespeichert,
wiedergegeben oder
von der Karte gelöscht
werden.
Keine Karte
vorhanden.
Die Karte ist nicht
formatiert oder
beschädigt.
Die Karte ist durch
einen Aufkleber
schreibgeschützt oder
ein Ordner auf der
Karte wurde als
schreibgeschützt
eingestellt. Die Karte
wurde nur auf
Wiedergabe eingestellt,
also kann sie nicht für
die Aufnahme von
Bildern, Löschen von
Bildern oder das
Formatieren der Karte
verwendet werden.
Die Wiedergabe kann
nicht verwendet
werden, weil keine
Bilder auf der Karte
vorhanden sind.
Eine Karte einsetzen und die
Abdeckung schließen.
Die Karte entfernen, die elektrischen
Kontakte säubern, die Karte wieder
einsetzen und dann erneut versuchen.
Wenn die Meldung wieder angezeigt
wird, kann die Karte nicht länger
verwendet werden.
Die Karte kann evtl. wieder verwendet
werden, wenn sie formatiert wird.
Durch das Formatieren der Karte
werden jedoch alle auf der Karte
gespeicherten Bilder gelöscht.
Eine Karte in die Kamera einsetzen.
Die Karte formatieren. Durch das
Formatieren der Karte werden alle auf
der Karte gespeicherten Bilder
gelöscht. Auf dem Pfeiltasten-Feld
zur Wahl von YES und dann die Taste
zum Formatieren der Karte
drücken.
Wenn die Karte durch einen Aufkleber
schreibgeschützt ist, entfernen Sie den
Aufkleber; wenn die Karte nur auf
Wiedergabe eingestellt wurde, sollte
der Schreibschutz auf dem Kartenteil
deaktiviert werden. Wenn dadurch das
Problem nicht gelöst wird, weist die
Karte Fehlfunktionen auf. Versuchen
Sie, die Bilder auf einen Computer zu
übertragen oder die Bilder auf eine
andere in der Kamera eingesetzte
Karte zu kopieren. Nach dem
Kopieren der Bilder sollte die Karte
erneut formatiert werden.
Sicherstellen, daß die eingesetzte
Karte Aufnahmen enthält oder eine
neue Aufnahme machen.
Deutsch
87

Keine
Anzeige
Keine
Anzeige
LCD-Feld
(Es können
nicht mehr
Bilder auf
der Karte
gespeichert
werden.)
MonitorSucher Erklärung Lösung
CARD FULL
(Karte ist
voll. Kein
Platz zum
Speichern
von weiteren
Bildern.) *1
Karte ist voll und es
können keine
Während der Aufnahme
Aufnahmen mehr
gemacht werden.
Die Ordnernummer hat
999 oder die
Dateinummer hat 9999
erreicht, deshalb können
keine Aufnahmen
ausgeführt werden.
Die Karte durch eine neue Karte
auswechseln, nicht mehr benötigte
Bilder löschen oder die Bilder auf
einen Computer übertragen und alle
Bilder auf der Karte löschen.
Die Karte durch eine neue Karte
auswechseln oder die Bilder auf einen
Computer übertragen und alle Bilder
auf der Karte löschen.
Während Ausdruckwahl
CARD FULL
Keine
Anzeige
Die Karte ist voll, und es
können keine Bilder für
den Ausdruck gewählt
oder storniert werden.
(Durch das Wählen der
Bilder für den Ausdruck
werden Daten auf der
Karte gespeichert.)
Das Innere der Kamera
ist überhitzt.
Die Karte durch eine neue Karte
auswechseln, nicht mehr benötigte
Bilder löschen oder die Bilder auf
einen Computer übertragen und alle
Bilder auf der Karte löschen.
Die Kamera ausschalten und
abkühlen lassen, dann die Kamera
wieder einschalten.
Keine
Anzeige
Keine
Anzeige
Keine
Anzeige
Keine
Anzeige
PICTURE
ERROR
CANNOT
OPEN FILE
Das gewählte Bild kann
nicht wiedergegeben
werden, es kann jedoch
anderweitig bearbeitet
werden.
Mit dieser Kamera
aufgenommene
Bilder
Das gewählte Bild
kann nicht
wiedergegeben
werden, es kann
jedoch anderweitig
bearbeitet werden.
Mit einer anderen
Kamera
aufgenommene
Bilder
Das Bild kann
nicht mit dieser
Kamera
wiedergegeben
werden.
Die Karte entfernen, die elektrischen
Kontakte säubern, die Karte wieder
einsetzen und dann erneut
versuchen. Wenn die Meldung wieder
angezeigt wird, kann die Karte nicht
länger verwendet werden.
Die Karte kann evtl. wieder
verwendet werden, wenn sie
formatiert wird. Durch das
Formatieren der Karte werden jedoch
alle auf der Karte gespeicherten
Bilder gelöscht.
Das Bild auf der gleichen Kamera
wählen und wiedergeben, mit der das
Bild aufgenommen wurde.
*1
Die Clustergröße ist unterschiedlich auf SmartMedia- und CompactFlash-Karten, so daß nicht genau
die gleiche Anzahl von Bildern auf beiden Karten gespeichert werden kann. Aus diesem Grund
können nicht alle Bilder von einer vollen Karte auf eine andere Karte kopiert werden, selbst wenn
diese vollkommen leer ist. (Vor dem Beenden des Kopiervorgangs wird CARD FULL (Karte voll)
angezeigt.) In diesem Fall sollten einige nicht mehr benötigte Bilder gelöscht oder eine Karte mit
größerer Speicherkapazität verwendet werden.
88

Tec hnische Daten
Gerätetyp Spiegelreflex-Digital-Kamera (Aufnahme, Wiedergabe)
Aufzeichnungssystem Digitales Aufnahmesystem, JPEG, in Übereinstimmung mit
Bildspeicher 3V (3,3V) SmartMedia: 4MB, 8MB, 16MB, 32MB, 64MB;
Speicherbare Bilder Ca. 8 Bilder (HQ/8MB)
Löschen Einzelbild, Alle Bilder löschen
Bildwandler 2/3-Zoll Primärfarbfilter
Bildauflösung 2240 x 1680 Pixel
Weißabgleich Auto (vollautomatisch TTL), Voreinstellung (7 Stufen),
Objektiv Olympus-Objektiv 9~36 mm, f/2,0~f/2,4, 14 Elemente in 11
Filterdurchmesser 62 mm
Belichtungsmessung Digitale ESP-Messung (Electro Selective Pattern),
Belichtungssteuerung P (Programm-Modus), A (Blenden-Modus), S (Verschluß-
Blende WIDE : F2,0~11,
Verschluß 2~1/640
Belichtungskorrektur ±3EV (1/3EV Schritte)
Aufnahmebereich
(vom Objektiv)
Sucher Spiegelreflex
Monitor 1,8 Zoll TFT-Farbflüssigkristall-Anzeige
Monitorauflösung Ca. 118.000 Pixel
Blitzladezeit Ca. 7 Sek. bei normaler Temperatur mit neuen Batterien
Blitzreichweite (ISO 80) WIDE 0,6 m~6,3 m
(von der Objektivoberfläche)
Design rule for Camera File system (DCF), TIFF (keine
Kompression) DPOF-kompatibel.
CompactFlash (Kompatibel mit Typ I und Typ II. MikroLaufwerk kann nicht verwendet werden.)
4 Millionen Pixel (Bildelemente)
1600 x 1200 Pixel
1280 x 960 Pixel
1024 x 768 Pixel
640 x 480 Pixel
Schnellreferenz (ein Tastendruck)
Gruppen (entspricht einem 35~140 mm Objektiv auf einer
35 mm Standard-Spiegelreflexkamera)
Mittenmessung, Spotmessung
Modus), M (Manueller Modus)
TELE : F2,4~11
Manuelle Belichtung: Ball-Modus-Aufnahme (Grenze: 30
Sek.), 8~1/640
Standard-Modus: 0,6 m~∞
Makro-Modus: 0,2 m~0,6 m
Sucherausschnitt 95%, Weitwinkel x 0,42, Tele x 1,60
Betrieb: Verwendung für Bildausschnitt, wie der Sucher.
Wiedergabe : Bild-Anzeige (Einzelbild, Mehrfachbild-Format,
Index-Anzeige, vergrößerte Wiedergabe)
(CR-V3)
TELE 0,5 m~5,2 m
Deutsch
89

Blitz-Betriebsarten Automatik (automatisch aktiviert bei schwachem Licht,
Autofokus Dualer Autofokus
Vergleichssystem Kontrastvergleichssystem/Aktives AF-Verfahren
Schärfeeinstellungsbereich
Selbstauslöser Betriebszeit: 12 Sek.
Externe Anschlüsse DC IN-Anschluß, USB-Buchse, Video-OUT-Anschluß
Datum, Zeit Aufzeichnung zusammen mit den Bilddaten
Automatischer Kalender Automatische Korrektur bis zum Jahr 2030
Ausdruckwahl DPOF-Standard (Einstellung der Kopienanzahl, Index-
RAW-Daten Ausgabe-Funktion
Zeitintervall für Intervall- 1 Minute bis 24 Stunden
Aufnahmen
Stromversorgung des Nicht entfernbare Mangan-Lithium-Batterie
Kalendersystems
Betriebsbedingungen
Temperatur Betrieb: 0~40°C
Luftfeuchtigkeit Betrieb: 30~90%
Stromversorgung 3V Lithiumbatterie CR-V3 x 2
Gegenlicht)
Modus zur Verr ingerung des “Rote-Augen-Effektes”
Aufhellblitz (deaktiviert, wenn eingebautes Blitzlicht
geschlossen ist), langsame Synchronisation,
2. Verschlußphase
Aus (kein Blitz)
Normaler Aufnahme-Modus: 0,6 m~∞,
Makro: 0,2 m~0,6 m
Zur Anzeige der Kamerainformationen oder zum Ausdruck
mit Datum oder Zeit
Ausdruck, Ausdruck mit Datum und Zeit)
10-Bit AD-Ausgangsdaten (ORF Dateienformat), ICC Profil nicht
angebracht
Lagerung: −20~60°C
Lagerung: 10~90% ohne Kondensierung
AA (R6) Ni-MH-Batterien x 4
AA (R6) Ni-Cd-Batterien x 4
AA (R6) Alkali-Batterien x 4
AA (R6) Lithium-Polymer-Batterie
Netzadapter
Hinweis: Niemals AA (R6) Zink-Karbon- oder AA (R6) Lithium-Batterien verwenden.
Abmessungen 128,5 B x 103,5 H x 161 L mm
Gewicht 1050 g (ohne Kar ten, Batter ien und Objektivdeckel)
Änderungen der technischen Daten für Verbesserungen vorbehalten.
Diese können überhitzen und die Kamera beschädigen.
(Vorsprünge nicht eingeschlossen)
90

Deutsch
91

Para empezar
Partes importantes y sus nombres
1
2
3
4
5
6
7
8
9
0
A
B
C
W
X
V
U
T
S
R
Q
P
O
N
M
L
K
J
I
H
G
F
E
D
§
•
k
l
m
n
o
p
q
r
s
t
u
vwx
y
£
¢
†
ç
å
~
}
|
{
z
æ
º
µ
Y
Z
c
d
e
92
f
[
g
\
b
a
`
]
j
i
h
¶
ß
¡ø¬ ¤
©
®
…⁄
¥
™
fi
›
‹

1 Botón del modo de medición
2 Botón de accionamiento
3 Conector de cable disparador
4 Flash incorporado
5 Botón del flash
6 Anillo de enfoque manual
7 Anillo del zoom
8 Botón de compensación de exposición
9 Botón de macro
0 Zócalo de sincronización del flash
A Interruptor del modo de enfoque
B Ojal para correa
C Tapa de la toma DC IN/Toma DC IN
D Monitor
E Palanca del obturador del ocular del visor
F Anillo de ajuste de dioptrías
G Visor
H Dial principal
I Cubierta de la tarjeta
J Cierre de la cubierta de la tarjeta
K Botón de tarjeta de memoria SM/CF
L Lámpara de acceso a tarjeta
M Botón de luz
N Botón de bloqueo de AE
O Interruptor de alimentación
P Dial de modo
Q Botón del modo del equilibrio del blanco
R Dial secundario
S Panel de control
T Botón del modo de grabación
U Botón del modo del flash
V Zapata de contacto directo
W Toma de salida de vídeo
X Conector USB
Y Botón de bloqueo/liberación del monitor
Z Botón de información (INFO)
[ Botón de protección
\ Botón de borrado
] Control de flechas
^ Botón OK
a Botón de menús
b Botón del monitor
c Botón disparador del obturador
d
Receptor de mando a distancia/lámpara de autodisparador
e Ojal para correa
f Compartimiento de las baterías
g Zócalo para trípode
h Objetivo
i
Botón de equilibrio del blanco de referencia rápida
j Puerto AF
Panel de control
Control del flash
k Control de intensidad del flash
l Sincronización lenta
m Flash de relleno
n Reducción de ojos rojos
o 2.a cortina
p Velocidad del obturador
q Valor de la abertura
r Macro
s Autodisparador
t Lente de conversión
u Fotografiado secuencial
v Mando a distancia
w Verificación de la batería
x Tarjeta de memoria seleccionada
y
Número de fotografías que pueden guardarse
z Error de tarjeta
{ Indicador de memoria
| Modo de medición
}
Compensación de exposición/Nivel de exposición
~ Horquillado automático
å Enfoque manual
ç Equilibrio del blanco
† ISO
¢ Ajuste de imagen
£ Modo de grabación
Visor
§ Área de medición de punto
• Marca de corrección de AF
¶ Advertencia del flash
ß Macro
® Velocidad del obturador
© Valor de la abertura
™ Equilibrio del blanco
¥ Bloqueo de AE (exposición automática)
µ
Compensación de exposición/Nivel de exposición
º Modo de medición
æ Marca de enfoque automático
Visualización del monitor
ø Marca de corrección de AF
¡ Advertencia del flash
¬ Macro
… Velocidad del obturador
⁄ Valor de la abertura
¤ Equilibrio del blanco
‹ Bloqueo de AE
›
Compensación de exposición/Nivel de exposición
fi Modo de medición
Español
93

Asegúrese de que no le falte nada
Tapa del objetivo
Cámara
Visera del objetivo
Mando a distancia
Cable USB
Baterías de litio (CR-V3)
CompactFlash (16 MB/velocidad 8x)
Cable de conexión dedicado (cable Jump Shot)
Controlador: CD-ROM de 8 cm
Guía rápida
Correa
Cable de vídeo
Tarjeta de registro del cliente
Acuerdo de garantía
• Manual básico
• Instrucciones para el mando a distancia
• CDs de software que incluyen manual
de referencia para el controlador USB
para Windows 98
Accesorios opcionales
disponibles para esta cámara
Flash exterior exclusivo (FL-40)
Soporte de flash exclusivo (FL-BK01)
Cable de soporte exclusivo (FL-CB01~04)
Objetivos de conversión
Cable disparador (RM-CB1)
Estuche (Estuche semiduro) para la cámara
Adaptador de CA
Batería Ni-MH (hidruro de metal de níquel)
AA (R6)
94
Dispositivo de recarga exclusivo
Batería de polímero de litio (B-10LPB)
Soporte de batería (B-HLD10)
Cargador de batería de polímero de litio
(B-20LPC)
SmartMedia (8MB, 16MB, 32MB o 64MB)
Adaptador MA-2E para tarjeta PC
Adaptador FlashPath MAFP-2NE para discos
flexibles
SmartMedia Reader/Writer MAUSB-2
Impresora P-400/P-330NE
Agosto 2000

Colocación de la correa
Deslice un extremo de la correa por uno de los
ojales de la cámara. Deslice el extremo de la
correa por la pieza rectangular y el marco, y
deslice por completo la pieza rectangular hacia
arriba. Tire de la correa con fuerza en torno a
la pieza rectangular y asegúrese de que no
resbala. Del mismo, modo pase el otro extremo
de la correa por el ojal del otro lado de la
cámara.
Inserción de las baterías
Podrá emplear 2 baterías de litio (CR-V3), AA
(R6) Ni-MH, Ni-Cd o pilas alcalinas con esta
cámara. Asegúrese de que el interruptor de la
alimentación está en la posición OFF. Confirme
que la lámpara de acceso a la tarjeta esté
apagada. Levante la perilla del compartimiento
de las baterías y gírela a la posición .
Extraiga la caja de las baterías.
Si emplea baterías de litio, instale un juego en
cada lado de la caja de las baterías. Si instala
baterías AA (R6), instale 2 baterías en cada
lado de la caja. Asegúrese de no invertir las
polaridades de las baterías cuando las inserte.
Presione con cuidado las baterías hasta que
queden bloqueadas en su lugar. Inserte la caja
de las baterías en la parte inferior de la
cámara.
Mientras empuja la caja de las baterías, gire la
perilla del compartimiento de las baterías a la
posición de cierre.
1
CR-V3
2
3
4
Español
AA (R6) Ni-MH,
Ni-Cd o Alcalina
95

Inserción y selección de las
tarjetas de memoria
Las tarjetas de memoria, denominadas a partir
de aquí “tarjetas” simplemente, guardan las
imágenes digitales de las imágenes que usted
toma con la cámara. La cámara tiene cabida
para una tarjeta SmartMedia (SM) y una
CompactFlash (CF).
Puede utilizar una tarjeta de memoria
SmartMedia de 3 V (3,3 V) de Olympus o de
cualquier otra marca (las tarjetas de 5 V no
pueden utilizarse).
SmartMedia CompactFlash
Confirme que la lámpara de acceso a la tarjeta
esté apagada. Presione el cierre de la cubierta
de la tarjeta y levántelo, y abra entonces la
cubierta de la tarjeta. Para instalar una tarjeta
SmartMedia, tómela con la esquina ranurada
abajo, e insértela en la ranura estrecha más
cercana al respaldo de la cámara. Empuje la
tarjeta por completo en la ranura. (Inserte la
tarjeta SmartMedia hasta que pueda ver unos
2 mm de la misma por encima del borde de la
ranura.)
Para instalar la tarjeta CompactFlash, tómela
con la flecha de la tarjeta hacia el respaldo de
la cámara e insértela en la ranura ancha más
cercana a la parte frontal de la cámara. Empuje
la tarjeta hasta que se inserte por completo en
la ranura. Cierre la cubierta de la tarjeta y
presiónela con cuidado hasta que quede
bloqueada.
Para extraer la tarjeta SmartMedia, empújela
un poco para liberarla y tire de la misma afuera
de la ranura.
Para extraer la tarjeta CompactFlash, presione
con cuidado el botón de expulsión para
liberarla y tire de la misma afuera de la ranura.
Cuando se ha instalado una tarjeta en la
cámara, esta tarjeta se selecciona
automáticamente para guardar las imágenes.
Cuando se han instalado ambas tarjetas, usted
podrá seleccionar la que se usa para el
almacenamiento. Cuando se llena una tarjeta,
podrá cambiar con rapidez a la otra tarjeta para
seguir fotografiando. Presione y mantenga
presionado el botón de tarjeta de memoria SM/
CF, y gire lentamente el dial principal o el dial
secundario hasta que vea visualizado
(SmartMedia) o (CompactFlash) en el
panel de control. Cuando vea , la tarjeta
SmartMedia estará seleccionada para guardar
las imágenes, y cuando vea se habrá
seleccionado la tarjeta CompactFlash.
Conexión del adaptador de CA
Emplee el adaptador de CA como fuente de
alimentación alternativa para largas sesiones
fotográficas con el fin de conservar energía de
las baterías. Desconecte la alimentación de la
cámara y asegúrese de que la lámpara de
acceso a la tarjeta no esté parpadeando.
Enchufe el cable de alimentación del adaptador
de CA a una toma de corriente. Extraiga la tapa
del conector DC IN, del lado izquierdo de la
cámara, y conecte el adaptador de CA a la
cámara, y luego conecte la alimentación de la
cámara. Emplee sólo el adaptador de CA
hecho para su utilización con esta cámara.
Para los detalles sobre el empleo del
adaptador de CA en un país que no sea en el
que ha comprado esta cámara y el adaptador
de CA, póngase en contacto con un centro de
servicio de Olympus.
OFF
ON
Toma DC IN
Clavija del cable de
alimentación del adaptador
Adaptador de CA
Toma de corriente
de CA
96

Conexión y desconexión de la
alimentación de la cámara
Para conectar y desconectar la alimentación de
la cámara, mueva el interruptor de alimentación
a ON u OFF. Cuando la cámara está en el
modo de toma de fotografías (dial de modo
ajustado en P, A, S o M), si está libre durante
un tiempo especificado apaga
automáticamente las visualizaciones y se
establece en el modo de espera para ahorrar
energía de las baterías. Para reponer la
cámara a la operación completamente normal,
presione cualquier botón de la cámara. Si se
deja la cámara inactiva en el modo de espera
durante 1 hora, se desconectará la
alimentación automáticamente. Para reponer la
operación completa, deberá desconectar la
alimentación de la cámara y luego conectarla
otra vez. La primera vez que conecte la
alimentación de la cámara, deberá ajustar la
fecha y la hora.
Comprobación de las baterías
La marca de comprobación de las baterías
(con una forma de una batería AA (R6)) del
panel de control indica el estado de las
baterías. Cuando se conecta la alimentación de
la cámara, si la marca de comprobación de las
baterías está completamente llena y se apaga,
significa que las baterías están completamente
cargadas. Si la marca de comprobación de las
baterías está parcialmente llena y sigue
parpadeando, significa que las baterías tienen
poca carga y que deben reemplazarse lo antes
posible. Si la marca de comprobación
parcialmente llena se apaga y el panel de
control se apaga completamente, significa que
las baterías están completamente descargadas
y que no podrá tomar más fotografías hasta
que cambie las baterías.
Comprobación del número de imágenes que pueden guardarse
El número grande de dos dígitos de la parte
inferior derecha del panel de control muestra el
número de imágenes que pueden cargarse.
Cuando este número llega a cero, reemplace la
tarjeta o si tiene dos tarjetas instaladas en la
cámara, seleccione la otra tarjeta. El número
de imágenes que puede guardar en una tarjeta
se determina por el tamaño de las imágenes.
El tamaño de las imágenes se determina
mediante los ajustes del modo de grabación
(calidad, resolución, compresión) que usted
seleccione en el modo de toma de fotografías.
Las selecciones de calidad disponibles son
TIFF, SHQ, HQ (ajuste inicial), y SQ (formato
de archivo de imagen marcada, calidad súper
alta, calidad alta, y calidad estándar).
Tarjeta seleccionada
Número de fotografías
que pueden guardarse
Español
Capacidad de memoria de tarjeta
Calidad Resolución (pixels) Compresión
TIFF 2240 x 1680 (FULL) 1:1 11,3 MB 0 fotografías 2 fotografías
SHQ 2240 x 1680 (FULL) 1:2,7 2,8 MB 2 fotografías 11 fotografías
HQ 2240 x 1680 (FULL) 1:8 950 KB 8 fotografías 34 fotografías
SQ 1280 x 960 (SXGA) 1:8 300 KB 27 fotografías 110 fotografías
(Ajustes predeterminados)
(Ajustes predeterminados) (Valor de referencia)
Tamaño del archivo
Imágenes por tarjeta (Valor de referencia)
8 MB
32 MB
97

La fecha o la hora
Podrá emplear los ajustes del modo de
preparación/conexión para ajustar la fecha, la
hora y el formato de la fecha. Cuando toma una
fotografía, la fecha y la hora actuales pueden
estamparse en la imagen impresa si usted
selecciona la estampación de la fecha o la hora
para impresión. El proceso y manipulación de
imágenes con la CAMEDIA Master 2.5 asegura
que esta información de la fecha y la hora se
conservan incluso después de transferir las
imágenes a un ordenador. De lo contrario, esta
información de la fecha y la hora podría
perderse con otras aplicaciones de software de
gráficos.
Después de ajustar la estampación de la fecha
o la hora, el ajuste se aplica todas las
imágenes seleccionadas para impresión.
Inserte la tarjeta de memoria que contenga las
imágenes que desee seleccionar para la
impresión de la fecha o la hora estampada.
Compruebe la visualización del panel de
control y asegúrese de que se visualiza la
marca de tarjeta de origen, SmartMedia o
CompactFlash . Si no se visualiza la marca
correcta, presione y mantenga presionado el
botón de la tarjeta de memoria SM/CF, y luego
gire el dial principal o dial secundario hasta
que se visualice. Ajuste el dial del modo a la
marca de reserva de impresión . Presione el
botón del menú para abrir el menú del
monitor. Presione o para mover la
selección verde a la marca de la fecha/
estampado . Presione para mover la
selección verde a la derecha, y entonces
presiónelo de nuevo para mover la selección
verde a DATE o TIME, o si desea cancelar el
ajuste de la fecha o la hora, mueva la selección
verde a OFF. Presione el botón para
seleccionar el ajuste. Presione de nuevo el
botón para cerrar el menú.
98

Para fotografíar
Composición de las imágenes
Asegúrese de que la alimentación de la
cámara esté conectada, extraiga la tapa del
objetivo, y mire por el visor. Para ajustar el visor
a su visión, gire el anillo de ajuste de dioptrías
hasta que la marca AF propuesta del centro del
visor se vea clara y nítida. Si no puede ver la
parte AF propuesta, asegúrese de que la
palanca del obturador del ocular del visor, del
lado izquierdo del visor, esté subida. Con la
correa puesta por el cuello, sostenga la cámara
por la empuñadura del lado derecho de la
cámara, y emplee la mano izquierda para
sostener la base de la cámara. Asegúrese de
que los dedos no obstruyan el objetivo, el flash
(si está levantado), puerto de AF o receptor de
mando a distancia/lámpara del disparador
automático de delante de la cámara.
Sosteniendo la cámara lo más nivelada que se
pueda, oriéntela al motivo y componga la
imagen en el visor.
Composición de la imagen con el
monitor
Asegúrese de que la alimentación de la
cámara esté conectada, extraiga la tapa del
objetivo, y presione el botón del monitor .
Baje la palanca del obturador del ocular del
visor, en el lado izquierdo del visor. Presione el
botón de bloqueo/liberación del monitor para
liberar un poco el monitor de la cámara. Para
elevar el monitor, tire de la parte inferior del
monitor hacia fuera. Asegúrese de que los
dedos no obstruyan el objetivo, el flash (si está
levantado), puerto de AF o receptor de mando
a distancia/lámpara del disparador automático
de delante de la cámara. Sosteniendo la
cámara lo más nivelada que se pueda,
oriéntela al motivo y componga la imagen en el
monitor.
Disparo del obturador
El disparo del obturador es una operación de
dos pasos. Ajuste el dial de modo a P.
Componga la imagen en el visor o monitor.
Presione a medias el botón disparador para
iniciar automáticamente el ajuste del enfoque y
de la exposición. Cuando escuche un pequeño
pitido y vea la marca de AF correcta en la
esquina inferior izquierda de la luz del visor,
significa que el motivo está enfocado. Mientras
el botón disparador esté presionado a medias,
el motivo quedará enfocado con la exposición
seleccionada. Esto se denomina bloqueo de
AF/AE. Presione a fondo el botón disparador
para disparar el obturador y tomar la fotogr afía.
Después de haber tomado la fotografía, la
imagen de la foto aparecerá brevemente en el
monitor y la lámpara de acceso a la tarjeta
parpadeará durante algunos segundos y luego
se apagará cuando la imagen quede guardada
en la tarjeta. La cámara necesita algunos
segundos para almacenar cada fotografía. Sin
embargo, podrá tomar cuatro tomas rápidas
hasta que se llenen los cuatro segmentos del
medidor de la memoria. Cuando el medidor de
la memoria este lleno, deberá esperar a que se
borre por lo menos un segmento antes de
poder realizar la toma siguiente.
Media pulsación (pulse suavemente el
botón hasta la mitad)
Pulsación completa (después de la media
pulsación, púlselo suavemente hasta el
fondo)
Español
Si la marca de AF correcta parpadea, significa
que el motivo no está enfocado. Aparte el dedo
del botón disparador, y componga la imagen
otra vez orientado la cámara a otra parte de la
imagen y presione entonces a medias el botón
disparador. Mientras mantiene el botón
disparador presionado a medias, componga de
nuevo la imagen. Algunos motivos son difíciles
de enfocar. Si ve que aparece la marca de
aviso del flash en el visor, significa que la
imagen está subexpuesta, y que deberá
emplear el flash. Presione el botón del flash
para levantar el flash y tomar la fotografía con
el flash.
99

Empleo del zoom
Para acercar la imagen con el zoom y hacer
que el motivo se vea más grande en el visor,
gire el anillo del zoom hacia la derecha. Podrá
tomar una fotografía hasta a 60 cm del motivo.
También podrá tomar primeros planos muy
cercanos dentro de un margen de 20 cm a 60
cm del motivo ajustando la cámara en el modo
de macrofotografía. Para ajustar la cámara en
el modo de macrofotografía, mantenga
presionado el botón de macro y gire
entonces el dial principal o dial secundario
hasta ver la marca de macro en el panel de
control. Repita el procedimiento para apagar la
marca de macro y reponer la cámara a la
operación normal.
Empleo del flash incorporado
Cuando parpadee la marca del flash en la esquina inferior izquierda del visor, significa que no hay
iluminación suficiente para tomar la fotografía. Presione el botón del flash para elevar el flash
incorporado y tome entonces la fotografía. Después de levantar el flash, la marca de aviso del flash
seguirá parpadeando hasta que el flash esté completamente cargado. Cuando tome la fotografía, el
flash disparará con la intensidad ajustada automáticamente para obtener la mejor exposición.
Alcance de funcionamiento del flash
ISO
AUTO 0,6~8,9 m 0,5~7,4 m
80 0,6~6,3 m 0,5~5,2 m
160 0,9~8,9 m 0,7~7,4 m
320 1,3~12,5 m 1,0~10,4 m
Emplee el flash dentro de estas distancias para evitar sobreexposición y subexposición en las
fotografías. Si se dispara rápidamente el flash puede sobrecalentarse. No lo dispare más de 30
veces seguidas. Después de haberlo utilizado prolongadamente, deje que se enfríe el flash por lo
menos durante 10 minutos antes de seguir fotografiando. Antes de emplear el flash, asegúrese de
que su superficie de destello esté limpia.
Máximo granangular (Límite granangular) Máximo telefoto (Límite telefoto)
Para seleccionar el modo de flash
La selección del modo de flash determina cómo se dispara el flash para conseguir diversos efectos.
Para seleccionar el modo de flash, mantenga presionado el botón del modo del flash , y entonces
gire el dial principal o botón del dial secundario a la izquierda o derecha hasta ver el ajuste deseado.
100
 Loading...