

Olympus CAMEDIA C-7070 WIDE ZOOM QUICK START GUIDE
DIGITAL CAMERA
C-7070 Wide Zoom
Advanced
Manual
Thank you for purchasing an Olympus digital camera. Before you start to use your
new camera, please read these instructions carefully to enjoy optimum performance
and a longer service life. Keep this manual in a safe place for future reference.
We recommend that you take test shots to get accustomed to your camera before
taking important photographs.
In the interest of continually improving products, Olympus reserves the right to update
or modify information contained in this manual.
Detailed explanations of all the
functions for getting the most out
of your camera.
Basic Operation
Basic Shooting
Advanced Shooting
Playing Back
Printing
Online Pictures
Camera Settings
Navigation
How to use the camera
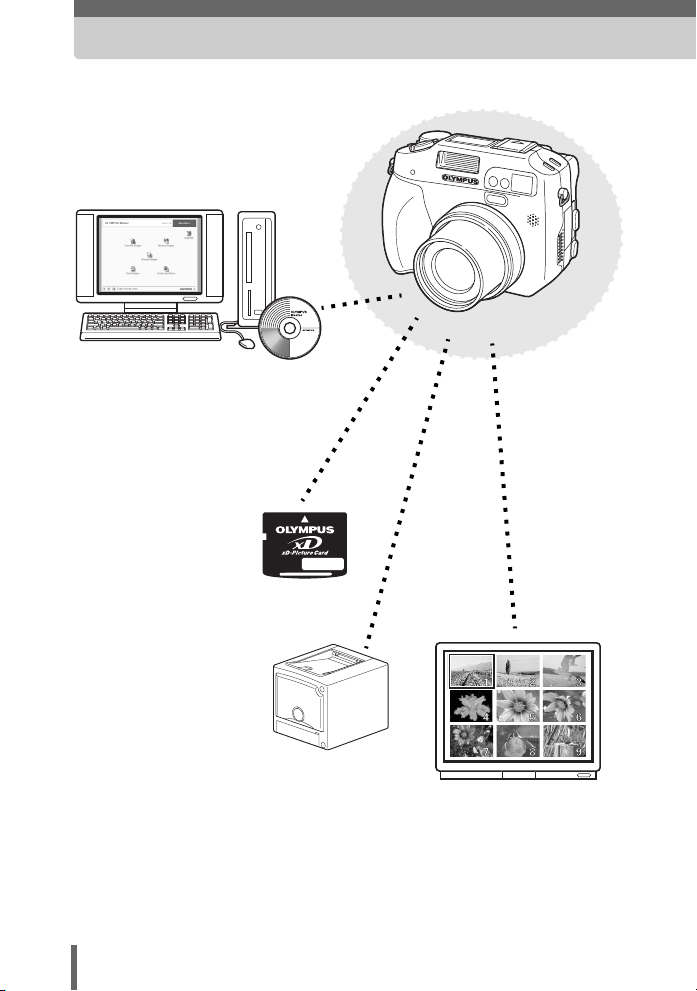
Using a computer...
Using the OLYMPUS Master
software on your computer lets
you enjoy editing, viewing, and
printing the pictures downloaded
from your camera.
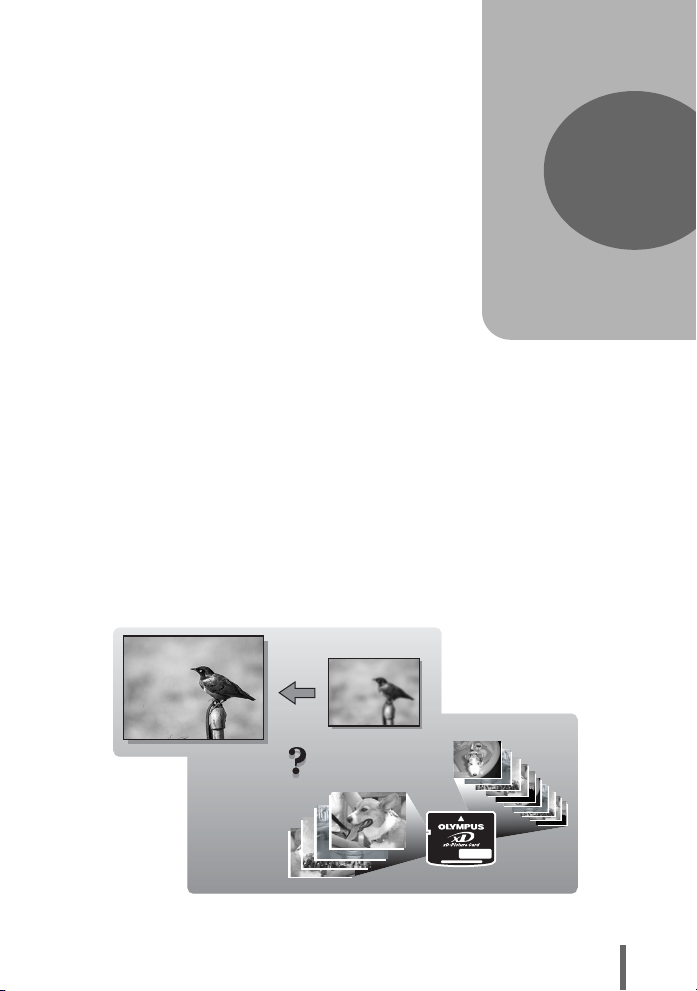
Using a card...
Pictures taken with this
camera are stored on
card media (e.g. xDPicture Card). By storing
the relevant print
reservation data with the
images on the card, you
can print pictures at a
photo store or on a
PictBridge-compatible
printer.
Using a printer...
With a PictBridge-compatible
printer, you can print pictures
directly from your camera.
Using a TV...
You can use a TV to view
pictures or playback
movies from your camera.
2
DRIVE
WB
SELECT
DRIVE
MODE MENU
± 0.3
± 0.7
WB
± 1.0
BKT
3
MODE MENU
5
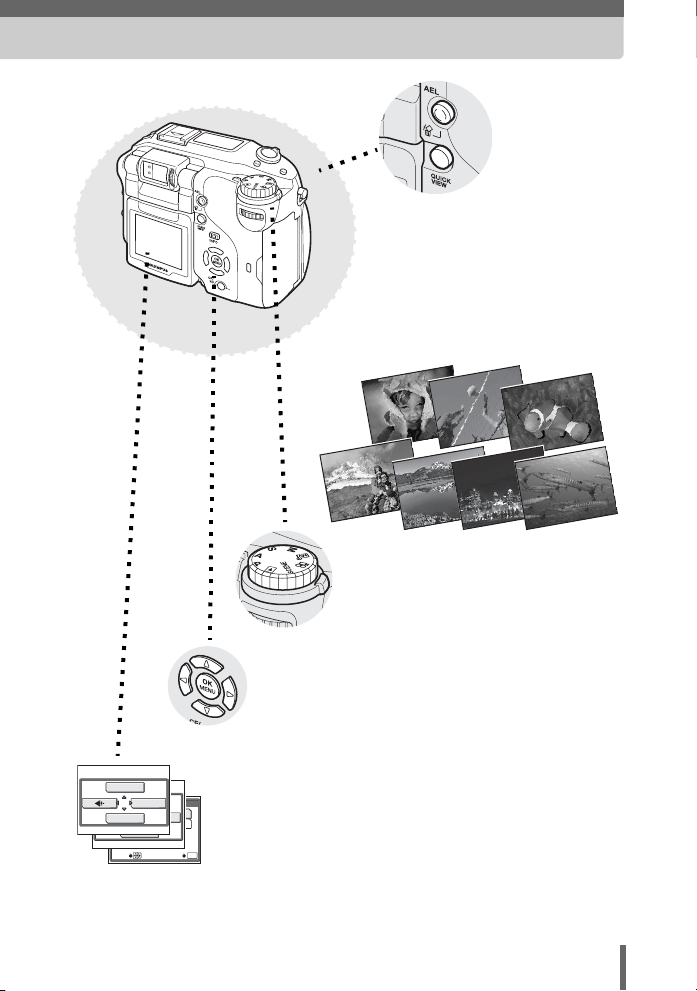
Using the mode dial...
Use the mode dial to select a shooting
or playback mode.
the optimum settings for the shooting
conditions from 7 different situations.
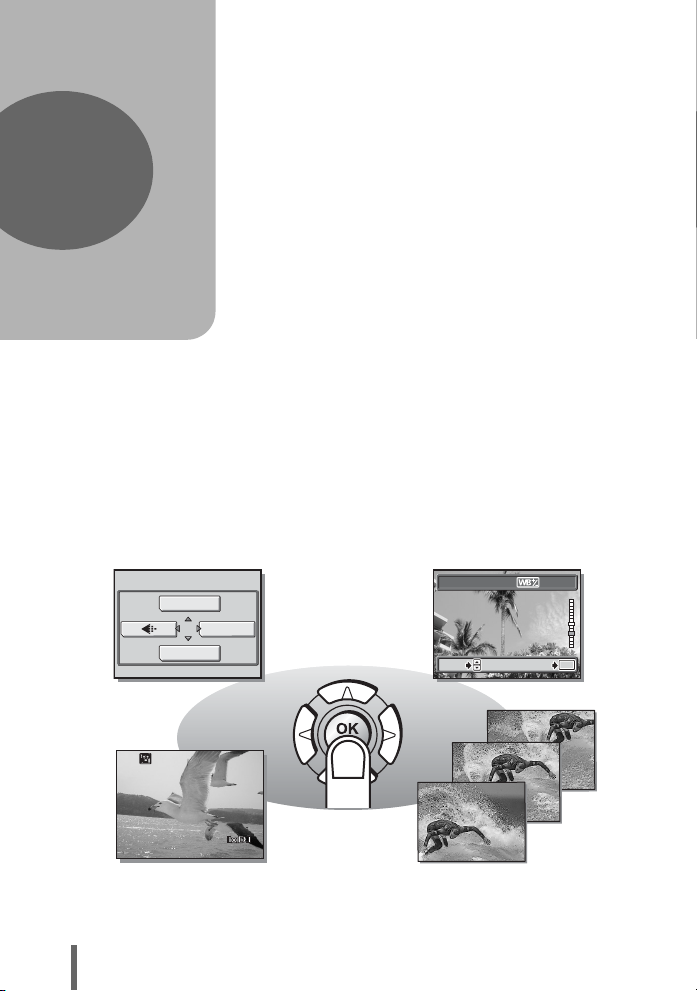
Using the arrow pad and Z
button...
The arrow pad and Z button are for selecting and
setting menu options as well as viewing pictures
frame by frame.
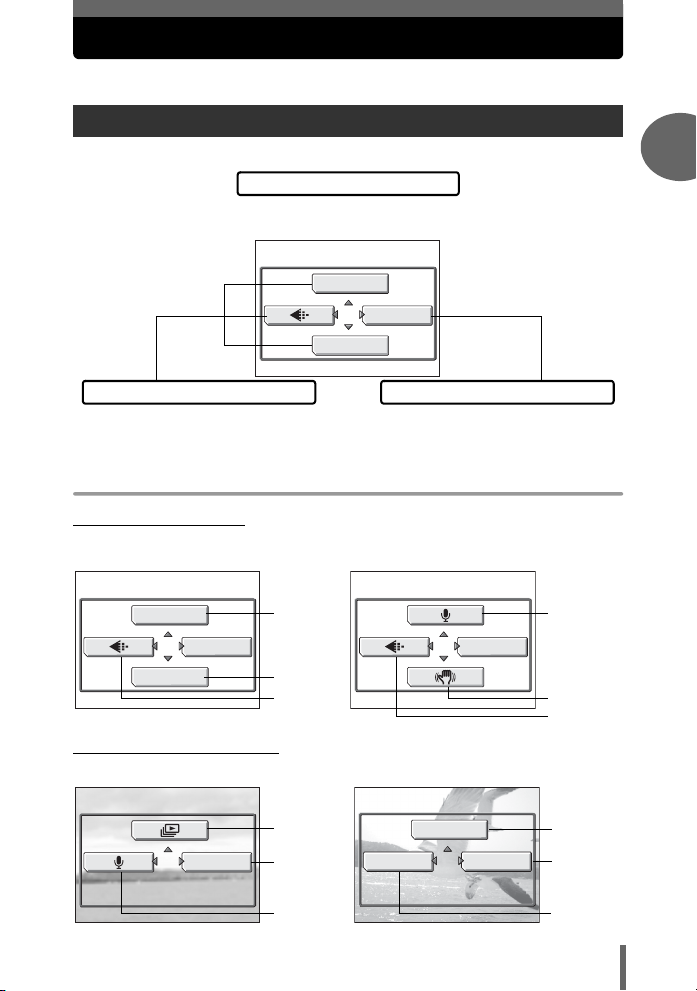
Using the menus...
Shooting and playback-related
functions are set from the menus
OK
GO
displayed on the monitor.
Using the direct
buttons...
Direct buttons let you perform
functions such as erasing or
protecting pictures or setting the
flash mode, making camera
operation easy.
f
lets you select
3
How to use this manual
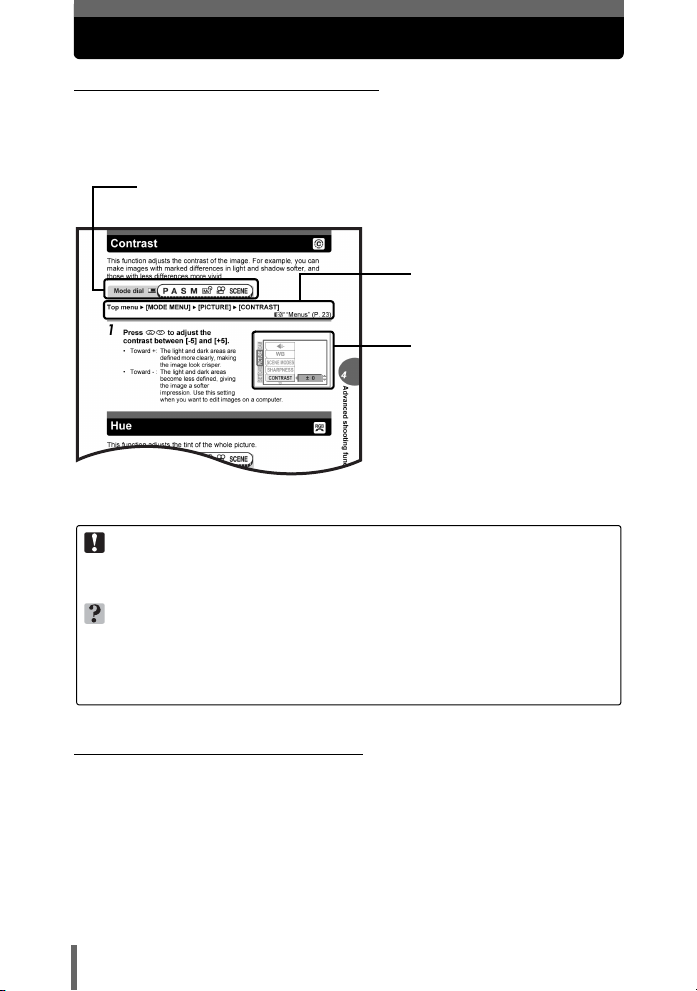
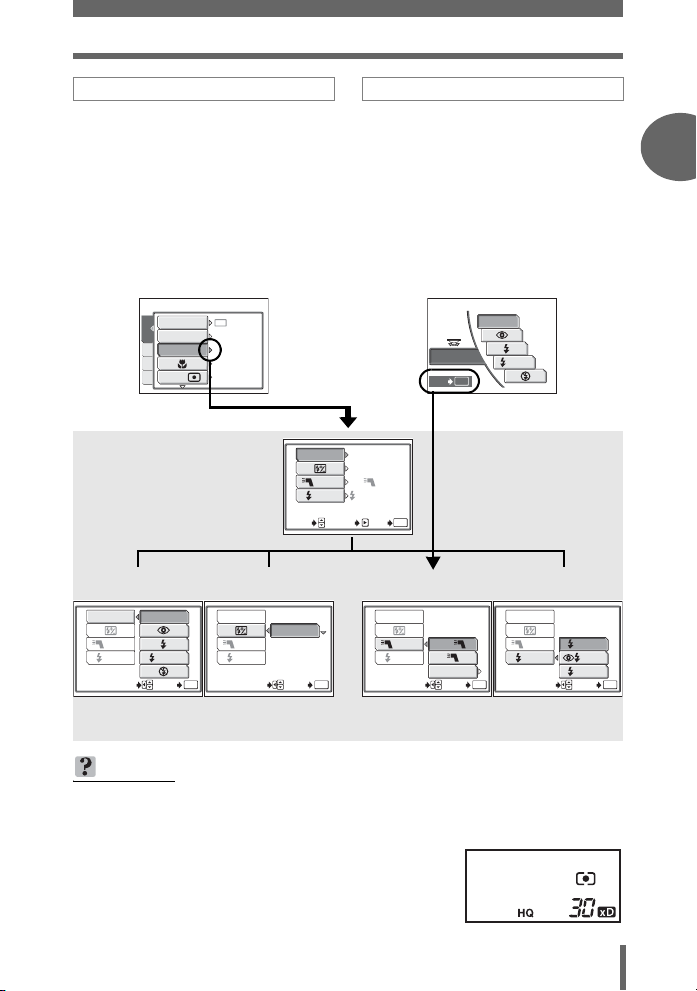
(Indications used in this manual
A sample page is shown below to explain how to read the instructions in this
manual. Look at it carefully before taking or viewing pictures. See the
reference pages for further details on how to use the buttons or menus.
Set the mode dial to one of these symbols.
g“Mode dial” (P. 13)
Select the menus in the
order indicated by.
g“Menus” (P. 23)
Available languages vary
depending on the area where
you purchased this camera.
g“Selecting a language”
(P. 122)
This sample page is only for your reference. It may differ from the actual page in
this manual.
Note
Important information on factors which may lead to a malfunction or operational
problems. Also warns of operations that should be absolutely avoided.
TIPS
Useful information and hints that will help you get the most out of your camera.
g
Reference pages describing details or associated information.
(Basic and Advanced Manuals
The instruction manual accompanying this camera is divided into two
parts: the Basic Manual and the Advanced Manual (this document).
Basic
Manual
Advanced
Manual
This manual helps you get used to the camera. It gives you easy-tofollow explanations on how to take pictures and view them.
This manual introduces you to the camera’s many functions after you
have mastered the basics. It will help you to use the camera’s
capabilities to take much more creative pictures, with more fun!
4

Composition of the manual
A quick guide to the camera’s
capabilities.
Read this part before using the
camera.
Explanations of techniques
from basics to advanced,
giving you an understanding of
all the functions related to
taking pictures.
To view, edit and sort the
pictures you have taken.
Settings to make your camera
easier to use.
To print the pictures you have
taken.
How to use the camera
Table of Contents
Basic operation
Tips before you start
taking pictures
Basic shooting functions
Advanced shooting
functions
Additional functions
Playback
Settings
Printing pictures
P. 2
P. 6
P. 12
P. 27
P. 41
P. 56
P. 86
P. 98
P. 118
P. 140
1
2
3
4
5
6
7
8
To enjoy the pictures you have
taken on a computer. How to
use OLYMPUS Master.
Troubleshooting.
For when you want to know the
names of parts, see a list of
menus, or find what you are
looking for.
Connecting the camera to
a computer
Appendix
Miscellaneous
P. 158
P. 173
P. 196
The title page of each chapter gives a short description of the contents.
Be sure to check it out.
5
9
10
11

Table of Contents
How to use this manual....................................................................... 4
Composition of the manual ................................................................. 5
1 Basic operation - - - - - - - - - - - - - - - - - - - - - -12
Mode dial........................................................................................... 13
How to set functions.......................................................................... 14
Direct buttons .................................................................................... 16
Using the direct buttons in shooting mode .................................. 16
Using the direct buttons in playback mode ................................. 21
Menus ............................................................................................... 23
About the menus ......................................................................... 23
How to use the menus ................................................................ 25
2 Tips before you start taking pictures - - - - - -27
Holding the camera ........................................................................... 28
Using the monitor and viewfinder...................................................... 29
Movement range of the monitor .................................................. 29
Adjusting the viewfinder .............................................................. 29
When to use the monitor and viewfinder..................................... 30
If correct focus cannot be obtained................................................... 31
How to focus (focus lock) ............................................................ 31
Subjects that are difficult to focus on .......................................... 32
Record mode ............................................................................. 33
Still picture record modes............................................................ 33
Movie record modes.................................................................... 34
Card capacity in number of pictures/remaining recording time... 35
Changing the record mode.......................................................... 37
Using card media .............................................................................. 38
Inserting and removing card media (optional)............................. 39
Switching cards ........................................................................... 40
3 Basic shooting functions- - - - - - - - - - - - - - - 41
Selecting a shooting mode according to the situation....................... 42
Zooming in on a distant subject ........................................................ 44
Using the optical zoom................................................................ 44
Using the digital zoom................................................................. 45
Taking close-up pictures
(macro/super macro/super macro MF) ................. 46
Flash shooting .............................................................................. 47
Flash intensity control .......................................................... 51
6
Table of Contents
Slow synchronization ...................................................... 51
Selecting the flash ........................................................................ 52
Using the external flash (optional)............................................... 52
Using commercially available external flashes............................ 54
Using a slave flash mode ............................................................ 55
4 Advanced shooting functions - - - - - - - - - - - 56
Program shift .............................................................................. 57
Aperture priority shooting ............................................................ 57
Shutter priority shooting ............................................................... 59
Manual shooting .......................................................................... 60
Real display .......................................................................... 62
My Mode ..................................................................................... 62
Focusing applications........................................................................ 63
AF mode...................................................................................... 63
Fulltime AF .................................................................................. 63
Oracle AF ............................................................................ 64
Motion AF ........................................................................... 65
AF target ..................................................................................... 65
AF illuminator .............................................................................. 66
Manual focus ....................................................................... 67
Metering ............................................................................................ 69
ESP/Spot metering/Center-weighted metering ..... 69
Multi-metering ......................................................... 69
AE lock .................................................................................... 71
ISO sensitivity ................................................................................... 72
Exposure compensation .............................................................. 73
White balance .......................................................................... 74
Auto white balance ...................................................... 75
Preset1/Preset2 white balance ................................................... 75
Custom white balance ................................................................. 76
One-touch white balance ..................................................... 76
White balance compensation ............................................. 78
Saving a custom white balance................................................... 79
Scene modes .................................................................................... 80
Sharpness ................................................................................... 80
Contrast ....................................................................................... 81
Hue ............................................................................................. 81
Saturation ................................................................................... 82
Noise reduction .......................................................................... 82
7
Table of Contents
Histogram ................................................................................... 83
Frame assist...................................................................................... 85
5 Additional functions - - - - - - - - - - - - - - - - - -86
Recording movies ....................................................................... 87
Camera movement compensation ....................................... 88
Sequential shooting .................................... 89
High speed sequential shooting/Sequential shooting/
AF sequential shooting ............................ 89
Auto bracketing ................................................................. 90
Self-timer shooting ..................................................................... 91
Function shooting (panorama/black & white/sepia) .......................... 92
Panorama shooting ..................................................................... 92
Black & white/sepia ..................................................................... 93
Remote control shooting (optional) ............................................... 94
Changing the time until remote control is activated .................... 95
Recording sound with still pictures .............................................. 96
Recording sound with movies ...................................................... 97
Accessory settings (optional) ............................................................ 97
6 Playback - - - - - - - - - - - - - - - - - - - - - - - - - - - 98
Single-frame playback ................................................................ 99
Close-up playback ....................................................................... 99
Index display ............................................................................ 100
Selecting the number of pictures ........................................ 101
Slideshow ................................................................................ 102
Picture rotation .......................................................................... 102
Playing back movies ................................................................ 103
Editing still pictures ......................................................................... 104
Editing raw data ........................................................................ 104
Resizing ............................................................................. 106
Trimming ........................................................................... 106
Red-eye correction.................................................................... 108
Recording sound ........................................................................ 108
Editing movies................................................................................. 109
Creating an index...................................................................... 110
Editing a movie.......................................................................... 111
Playback on a TV ............................................................................ 112
Video output selection............................................................... 113
Copying pictures ............................................................................. 114
8

Table of Contents
Protecting pictures .................................................................... 115
Erasing pictures .................................................................. 116
Single-frame erase .............................................................. 116
All-frame erase .................................................................. 116
Formatting ................................................................................. 117
7 Settings - - - - - - - - - - - - - - - - - - - - - - - - - - - 118
Reset............................................................................................... 119
All reset ........................................................................................... 120
Exposure steps ............................................................................... 122
Selecting a language ........................................................... 122
Setting the date and time ........................................................ 123
My Mode setup ......................................................................... 124
Sound.............................................................................................. 126
Button operation beep............................................................... 126
Shutter sound............................................................................ 127
Beep .................................................................................. 128
Playback volume ....................................................................... 128
Power on/off setup .......................................................................... 129
Screen setup ............................................................................. 129
Monitor brightness adjustment ................................................ 130
Rec view.......................................................................................... 131
File name ........................................................................................ 131
Pixel mapping.................................................................................. 132
Measurement units (m/ft) ....................................................... 133
Dual control panel ........................................................................... 133
USB................................................................................................. 134
Shortcut ........................................................................................... 134
Setting the shortcut menus ....................................................... 135
Using the shortcut menus ......................................................... 136
Custom button ........................................................................... 136
Setting the custom button ......................................................... 137
Using the custom button ........................................................... 138
Dial .................................................................................................. 138
My Mode/SCENE selection screen ................................................. 139
8 Printing pictures - - - - - - - - - - - - - - - - - - - - 140
Direct printing (PictBridge) .............................................................. 141
Using the direct printing function............................................... 141
Connecting the camera to a printer........................................... 142
9

Table of Contents
Printing pictures ........................................................................ 143
Easy printing ............................................................................. 143
Printing by selecting a print mode ............................................. 145
Trimming ........................................................................... 148
Exiting direct printing ................................................................. 149
If an error code is displayed...................................................... 150
Print settings (DPOF) ................................................................ 151
How to make print reservations................................................. 151
All-frame reservation/Single-frame reservation ........... 152
Trimming ........................................................................... 155
Resetting print reservation data .......................................... 156
9 Connecting the camera to a computer - - - - 158
Flow................................................................................................. 159
Using OLYMPUS Master ................................................................ 160
What is OLYMPUS Master?...................................................... 160
Installing OLYMPUS Master ..................................................... 161
Connecting the camera to a computer ............................................ 164
Starting up OLYMPUS Master ........................................................ 165
Displaying camera images on a computer ...................................... 167
Downloading and saving images .............................................. 167
Viewing still pictures and movies .................................................... 169
Printing pictures .............................................................................. 170
To download and save images to a computer without using
OLYMPUS Master..................................................................... 172
10 Appendix - - - - - - - - - - - - - - - - - - - - - - - - - 173
Troubleshooting .............................................................................. 174
Error codes................................................................................ 174
Troubleshooting ........................................................................ 176
Camera care ................................................................................... 183
Accessories (optional)..................................................................... 184
AC adapter (optional)................................................................ 184
Power battery holder ................................................................. 185
Precautions for using Microdrive............................................... 185
Using commercially available external flashes.......................... 186
Safety Precautions .......................................................................... 187
Handling the Camera ................................................................ 187
Battery handling precautions..................................................... 189
Card handling precautions ........................................................ 191
10

Table of Contents
LCD Monitor .............................................................................. 192
Glossary of terms ............................................................................ 193
11 Miscellaneous - - - - - - - - - - - - - - - - - - - - - 196
Menu list.......................................................................................... 197
List of factory default settings.......................................................... 204
Modes and shooting functions ........................................................ 207
Names of parts ................................................................................ 210
Camera ..................................................................................... 210
Control panel/dual control panel indications ............................. 213
Monitor indications .................................................................... 215
Index ............................................................................................... 218
11
1 Basic operation
BLUE
RED
GO
OK
SELECT
1
Basic operation
Don’t you sometimes feel that advanced
shooting and editing functions are only for
professional photographers?
With their experience and skill, they can
make all kinds of fine adjustments to
achieve a variety of effects.
Now you can achieve such effects simply by
pressing the buttons on your digital camera.
You can use the advanced functions
available on your camera by setting the
menu items to adjust the amount of light
passing through the aperture or alter the
focusing range.
Just display a menu on the monitor and use
the buttons to choose a setting. Familiarize
yourself with the buttons and menus before
reading the explanations of the various
functions.
12
DRIVE
WB
Movies
MODE MENU
0000:303000:30
PRESET1
GO
GO
SELECT
SELECT
Sequential shooting
BLUE
RED
OK
OK
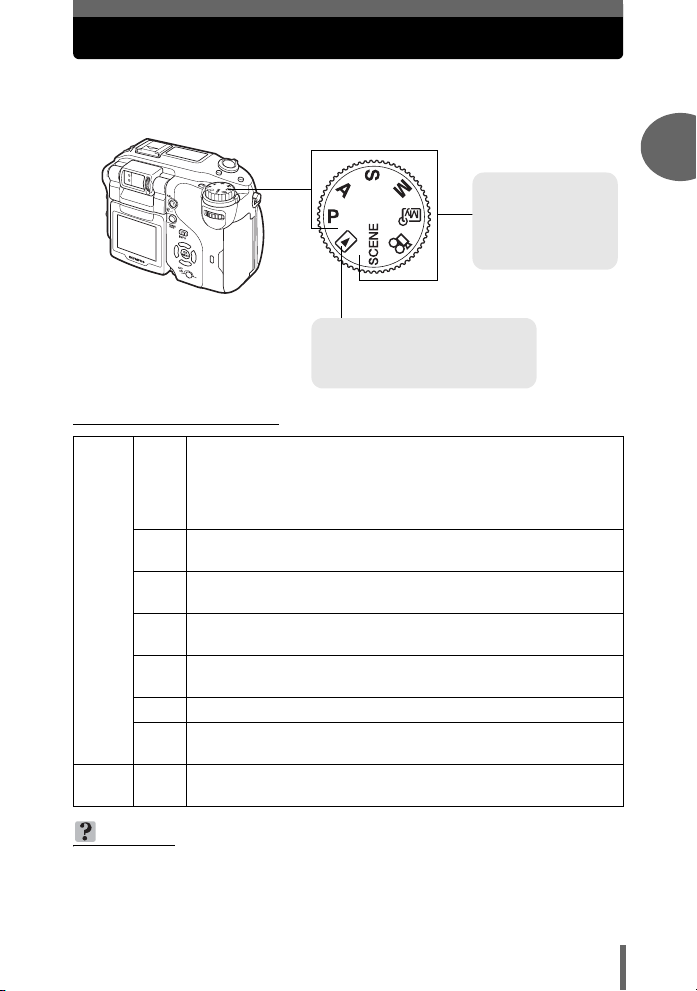
Mode dial
This camera features a shooting mode and a playback mode. The modes are
selected using the mode dial. Shooting mode is divided into a further 7 modes.
Select the mode you want, then turn the power switch to turn the camera on.
Shooting mode
Set the mode dial to
one of these
positions to take
pictures or movies.
Playback mode
Set the mode dial to this position
to view pictures or movies.
(About the mode dial
The camera automatically sets the optimum aperture value and
shutter speed for the brightness of the subject. Using the program
P
shift function allows you to change the combination of the
aperture value and shutter speed while maintaining the exposure.
gP. 57
This function allows you to set the aperture manually. The camera
A
sets the shutter speed automatically. gP. 57
This function allows you to set the shutter speed manually. The
S
camera sets the aperture automatically. gP. 59
This function allows you to set the aperture and shutter speed
M
Shooting mode
Playback
mode
manually. gP. 60
This function allows you to set your own shooting parameters and
r
register them as your original mode. gP. 62
n This function allows you to record movies with sound. gP. 87
This function allows you to select from 7 situation-related modes
f
set to the shooting conditions. gP. 42
This function allows you to play back still pictures or movies. You
q
can also play back sound. gP. 99
1
Basic operation
TIPS
•
Direct button functions and menu contents vary depending on the position of the
mode dial. g“Direct buttons” (P. 16), “Menus” (P. 23), “Menu list” (P. 197)
• You can change the mode before and after turning the camera on.
13

How to set functions
The direct buttons and menus are used to set and operate the many
functions available on this camera.
All the functions set with direct buttons can be set using menus. g“Direct
buttons” (P. 16), “Menus” (P. 23)
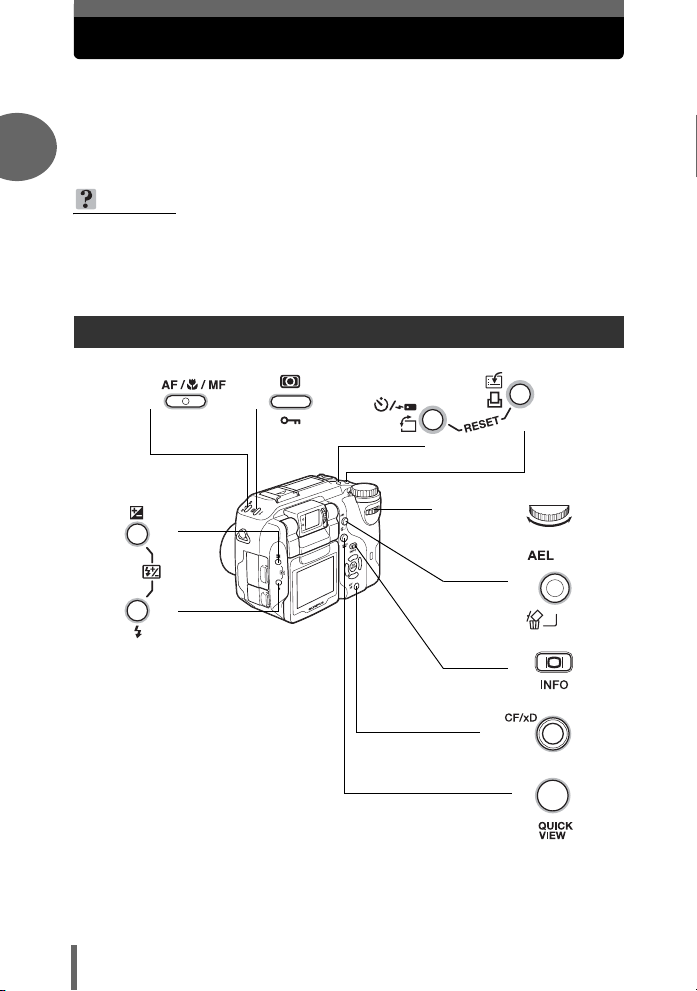
1
Ex: To make flash settings Control dial
Basic operation
# button
acbd buttons
Z button
14
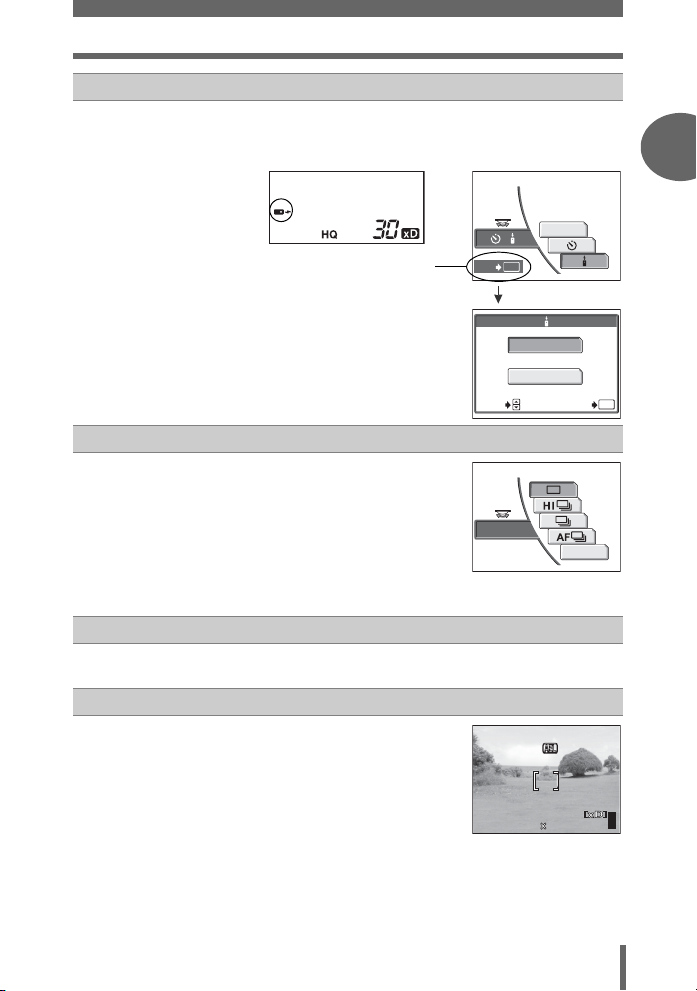
How to set functions
Using the menus
Press Z to display the top menu, then
select [MODE MENU], [CAMERA], and
[FLASH MODE] in order.
•Use acbdZ to make flash-
related settings.
Using the direct buttons
Press the # button, and turn the control dial.
• The setting screen is displayed on
the monitor.
• Select the flash mode, and press the
#button. The flash mode setting is
made, and the display returns to the
shooting screen.
• To make further settings, follow the
operation guide at the bottom of the
screen.
FLASH MODE
OK
SET
AUTO
SLOW
DRIVE
ISO
CAMERA
FLASH MODE
PIC
AF/ /MF
CARD
ESP/
SET
AUTO
AUTO
AF
ESP
Press Z.Press d.
AUTO
FLASH MODE
0.0
FLASH
IN+
SLOW1SLOW
OK
GO
SET
[FLASH MODE]
FLASH MODE
FLASH
SLOW
SELECT
AUTO
SLOW
FLASH MODE
OK
GO
SELECT
[w] [QFLASH] [#SLOW]
FLASH
SLOW
SELECT
2.0
+
OK
GO
FLASH MODE
FLASH
SLOW
SELECT GO
IN+
SLAVE
OK
FLASH MODE
FLASH
SLOW
SELECT GO
SLOW1
SLOW
SLOW2
The same setting screen is displayed using the direct button or the mode menu.
g
“Menus” (P. 23)
OK
1
Basic operation
Basic operation
TIPS
• The flash intensity control (w) can be adjusted directly by pressing the F and
# buttons simultaneously, and turning the control dial.
To set functions with the monitor closed
→ Use the direct button to make settings. Turn the
control dial to view your selected settings on the
control panel.
15
Direct buttons
The direct buttons have different functions in shooting mode and in
playback mode.
Pressing the direct buttons, and turning the control dial allows you to select
menu options or change the settings of different functions. Certain settings
require the direct button to be pressed repeatedly.
1
TIPS
• Each menu is displayed when the respective direct button is pressed. Press the
button again to return to the shooting screen.
• Direct button functions can be changed when making settings in combination
with the control dial. g“Dial” (P. 138)
Basic operation
Using the direct buttons in shooting mode
16
e
f
h
g
Control dial
c
i
d
k
l
j
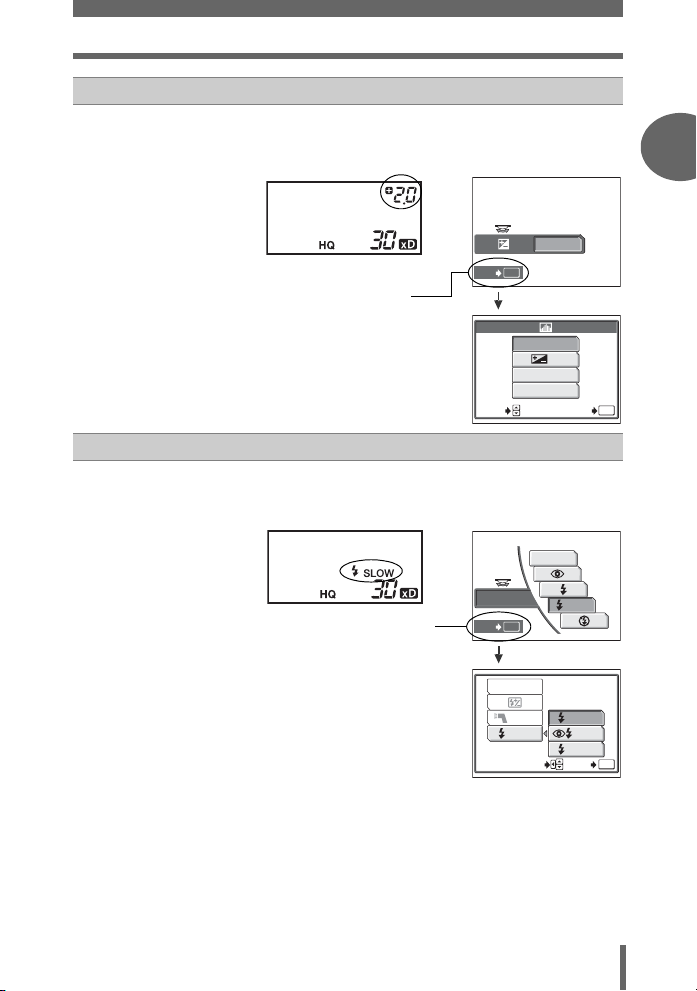
F (Exposure compensation) button gP. 73
F2.8
1/1000
2.0
c
Changes the exposure compensation value.
Press the F button to display the following screen. Turn the control dial
to make settings.
1/1000
P
OK
SET
The histogram can be
set. gP. 83
• While the histogram is displayed, press
the F button, and use the arrow pad to
move the histogram target mark.
g“Moving the histogram target mark”
(P. 85)
# (Flash mode) button gP. 47
d
SELECT
Select the flash mode from [AUTO], [!], [#], [#SLOW], and [$].
Press the # button to display the following screen. Turn the control dial
to make settings.
Direct buttons
F2.8
2.0
+ 2.0
OFF
ON
ON
DIRECT
AUTO
GO
OK
1
Basic operation
Basic operation
For setting [FLASH MODE],
[w], [Q FLASH], and
[# SLOW].
FLASH MODE
OK
SET
FLASH MODE
FLASH
SLOW
SELECT GO
SLOW
SLOW1
SLOW
SLOW2
OK
17
Direct buttons
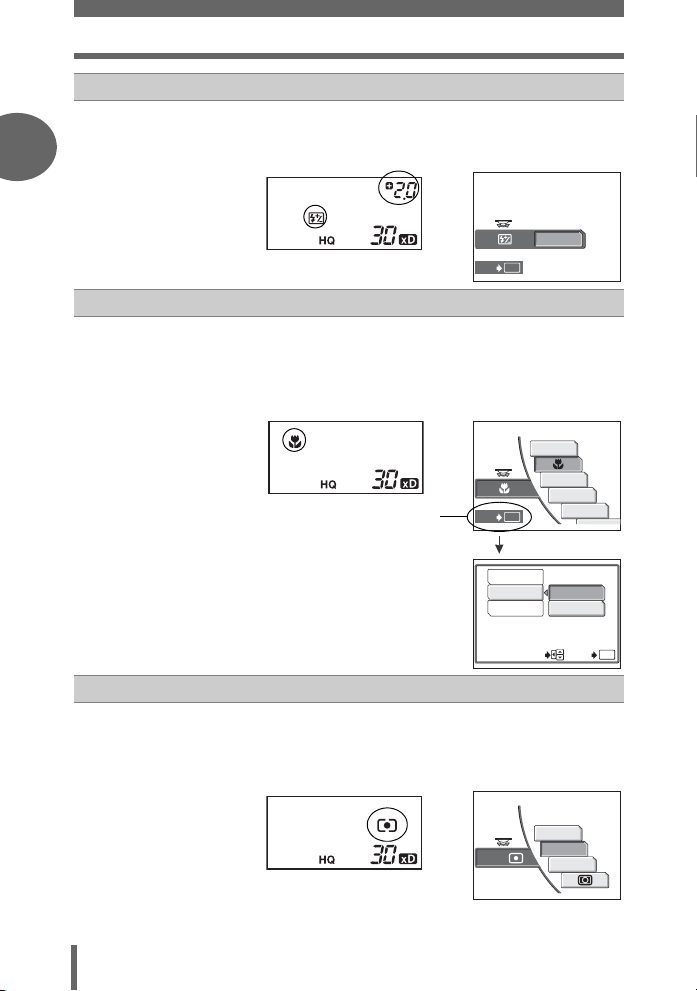
c+d
w (Flash intensity control) gP. 51
Adjusts the amount of light emitted by the flash.
Press the F and # buttons simultaneously to display the following
1
Basic operation
screen. Turn the control dial to make settings.
OK
SET
AF/&/MF (AF/Macro/MF) button gP. 46, 63, 67
e
+ 2.0
Select the focus mode from [AF] (auto focus), [&], [ORACLE AF],
[MOTION AF], [MF] (manual focus), [%] (super macro), and [%MF]
(super macro MF).
Press the AF/&/MF button to display the following screen. Turn the
control dial to make settings.
AF
For setting [FOCUS MODE],
[AF MODE], and
AF/ /MF
SET
OK
ORACLE AF
MOTION AF
MF
[FULLTIME AF].
FOCUS MODE
AF MODE
FULLTIME AF
iESP
SPOT
SELECT GO
OK
18
4 (Metering) button gP. 69
f
Select the metering mode from [ESP] (no indication), [SPOT] (3),
[MULTI METERING] (MULTI3), and [2] (center-weighted metering).
Press the 4 button to display the following screen. Turn the control dial
to make settings.
ESP/
ESP
SPOT
MULTI METERING
g
F2.8
1/1000
0.0
3072 2304
HQ
h
g+h
i
Direct buttons
Z (Self-timer/remote control) button gP. 91, 94
Activates the self-timer (Y) or remote control function (<).
Press the Z button to display the following screen. Turn the control
dial to make settings.
OFF
/
When the remote control is
selected, you can select
SET
OK
the operating time.
AUTO
3
SEC
OK
SELECT
GO
z (Custom) button gP. 136
You can make settings for the function
registered on the custom button.
DRIVE
BKT
[DRIVE] registered to
the custom button
RESET (Camera reset) gP. 119
Press these buttons simultaneously for more than 3 seconds to reset
camera settings.
[ (AE lock) button gP. 71
Locks the exposure. The lock function is
alternately activated and canceled each
F2.8
1/1000
P
0.0
time you press the button.
1
Basic operation
Basic operation
HQ
3072 2304
303030
19
Direct buttons
ISO100
3072 2304
HQ
F2.8
1/1000
2.0
F2.8
1/1000
2.0
HQ
3072 2304
QUICK VIEW button
j
Pressing the QUICK VIEW button displays the last picture taken on the
monitor. All the functions in normal playback mode are available.
1
g“6 Playback” (P. 98)
To return to shooting mode for taking the next picture, press the QUICK
VIEW button or press the shutter button halfway.
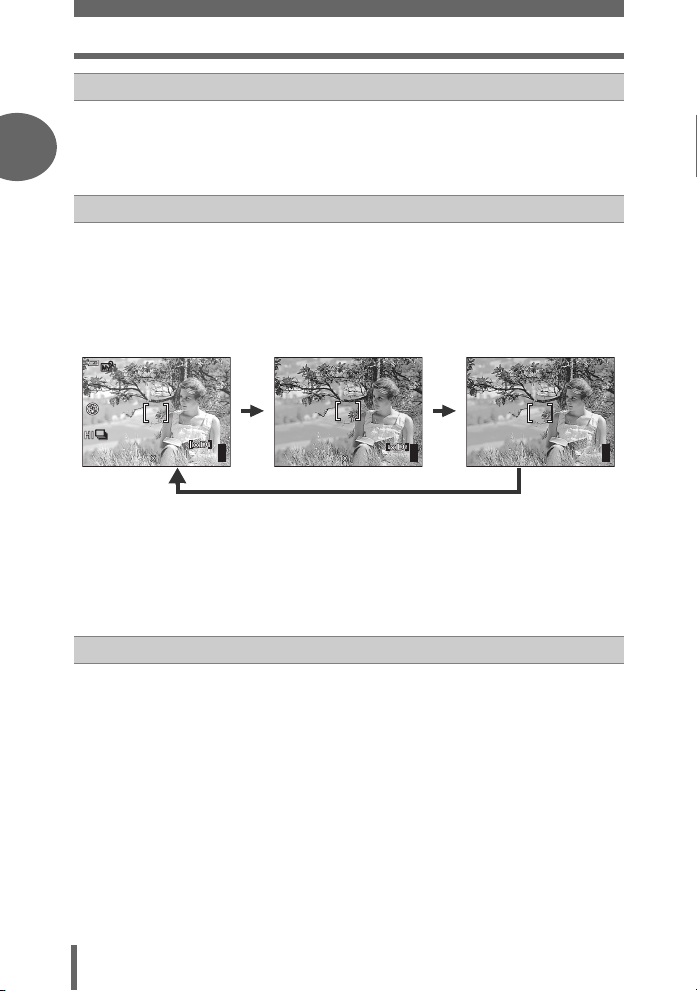
f (INFO) button
k
When you turn on the camera in shooting mode, the monitor turns on and
shooting information is displayed. Each time you press f to change
the information display in the following order.
Basic operation
Detailed shooting information
is displayed.
g
*1
“Monitor indications” (P. 215)
F2.8
1/1000
+2.0
ISO100
The ready-to-shoot
screen is displayed.
F2.8
1/1000
P
2.0
*1
Only the AF target mark
is displayed.
*2
f
303030
HQ
3072 2304
After
3 sec.
303030
303030
HQ
3072 2304
f
The monitor turns off.
*1
The frame is displayed when [FRAME ASSIST] is set to [ON]. g “Frame assist”
(P. 85)
*2
The histogram screen is displayed when [u] is set to [ON]. g“Histogram”
(P. 83)
*3
The dual control panel is displayed when [DUAL CONTROL PANEL] is set to
*3
[ON]. g“Dual control panel” (P. 133)
CF/xD (Card) button gP. 40
l
Selects the card to be used when there are 2 card types in the camera.
20
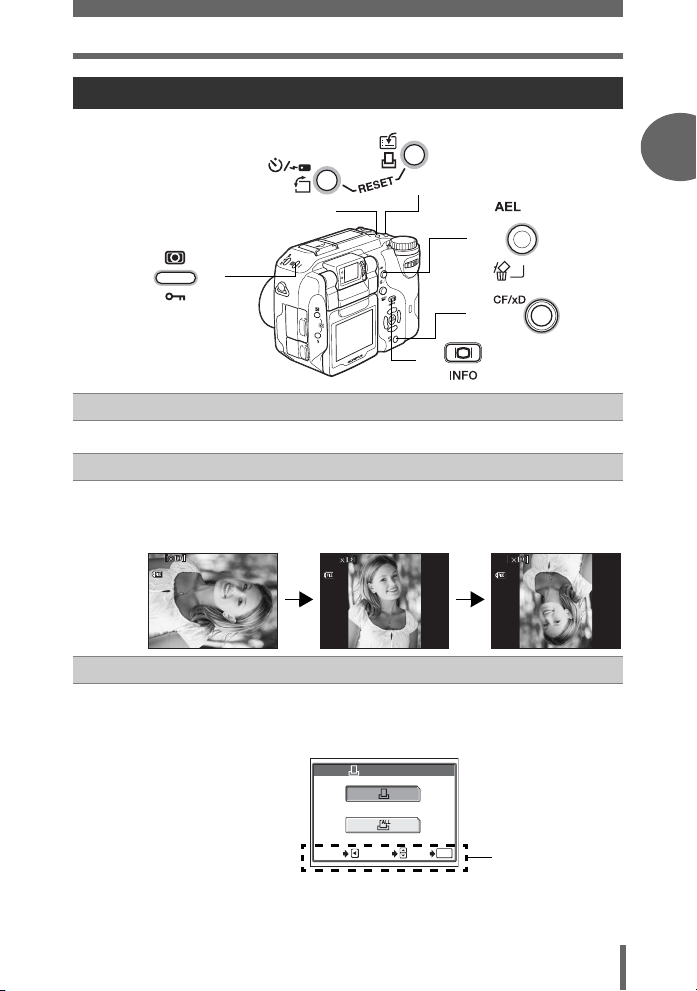
Using the direct buttons in playback mode
16 15
30 30
100
0030
HQ
16 15
30 30
100
0030
HQ
16 15
30 30
100
0030
HQ
SELECTGOGO
OK
e
d
f
c
h
g
0 (Protect) button gP. 115
c
Press the 0 button after selecting a picture to set the protect function.
y (Rotation) button gP. 102
d
Press the y button after selecting a still picture to rotate it in the following
order: 90° counterclockwise, 90° clockwise, and back to the original
orientation.
100
-
0030
HQ
100
-
0030
HQ
100
Direct buttons
-
0030
HQ
1
Basic operation
Basic operation
e
’0505.
0202.
16 15
:
30 30
’0505.
0202.
16 15
:
30 30
’0505.
0202.
< (Print reservation) button gP. 151
Press the < button to display the following screen.
This function stores print reservation data on the card. Follow the
operation guide at the bottom of the screen to make settings.
PRINT ORDER
OK
GO
OK
Operation guide
SELECT
SELECT
CANCEL
16 15
:
30 30
21
Direct buttons
GO
OK
SELECT
16 15
30 3030
100
0030
HQ
15
30
HQ
30
1/100
2.8
+2.0
ISO
400
16 15
30
100
0030
HQ
30
1/100
2.8
+2.0
ISO
400
3072
2304
SIZE : :
d+e
RESET (Camera reset) gP. 119
Press these buttons simultaneously for more than 3 seconds to reset
camera settings.
1
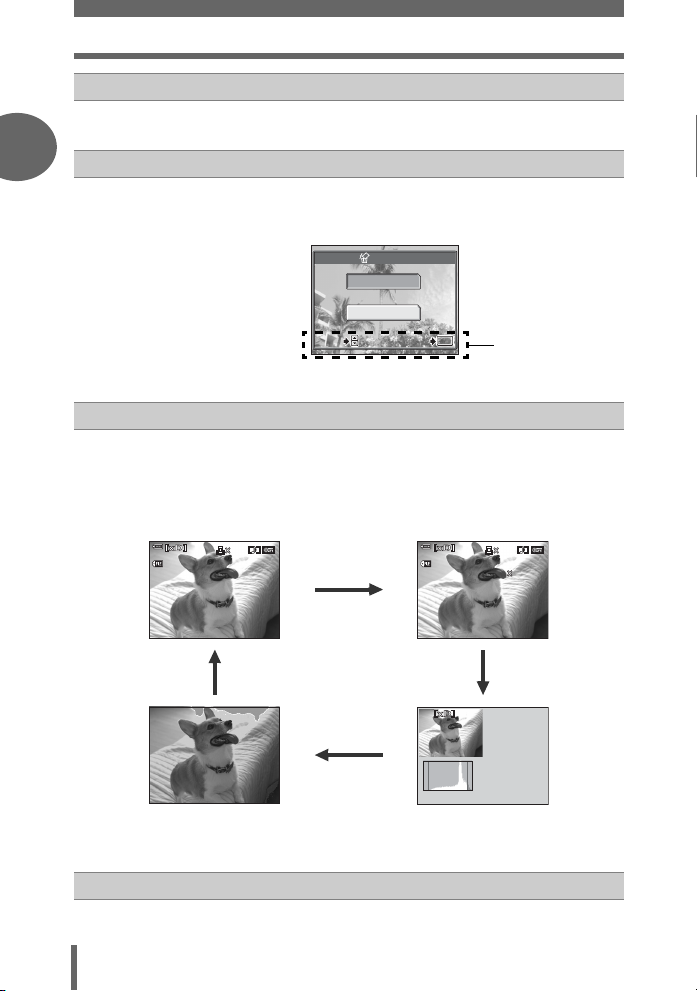
S (Erase) button gP. 116
f
Press the S button after selecting a picture to display the following
screen. This function erases the image. Follow the operation guide at the
bottom of the screen to make settings.
ERASE
YES
Basic operation
SELECT
SELECT
f (INFO) button
g
NO
OK
OK
GO
GO
Operation guide
Press f to change the information displayed in the following order.
Detailed camera
The playback screen
is displayed.
0202.
1010
-
0030
16 15
HQ
:
30
100
’0505.
f
information is displayed.
g“Monitor indications”
(P. 215)
-
0030
SIZE
F
’0505. . 0202.
1010
HQ
3072
2304
1/100
2.8
+2.0
5
ISO
400
16 15
:
30
30
100
ff
The histogram is
displayed directly on
f
’0505.
0202.
1616 15
The histogram is
displayed.
HQ
F
2.8
1/100
+2.0
5
ISO
400
:
30
30
the picture.
CF/xD (Card) button gP. 40
h
Selects the card to be used when there are 2 card types in the camera.
22
Menus
Press Z to display the top menu on the monitor.
About the menus
The menu items that can be used differ depending on the mode.
Top menu
Menus are divided into shortcut menus
and mode menus.
DRIVE
MODE MENU
WB
1
Basic operation
Shortcut menus
You can select menu items that are normally
accessed from the mode menu. Some shortcut
menus are for making on/off settings.
Shortcut menus
Shooting modes
(
P A S M r f modes
(For still pictures)
DRIVE
MODE MENU
WB
(Factory default setting)
gP. 89
gP. 74
gP. 33
(Playback mode (q)
gP. 102
MODE MENU
gP. 24
gP. 108
Mode menus
Settings are categorized by function into
tabs.
n mode
(For movies)
gP. 97
MODE MENU
gP. 88
gP. 33
For moviesFor still pictures
MOVIE PLAYBACK
COPY
MODE MENU
gP. 103
gP. 24
gP. 114
23
Menus
TIPS
• The functions registered in the shortcut menus can also be accessed from the
mode menu. You can change shortcut menus in any mode except n and q
1
modes. g“Shortcut” (P. 134)
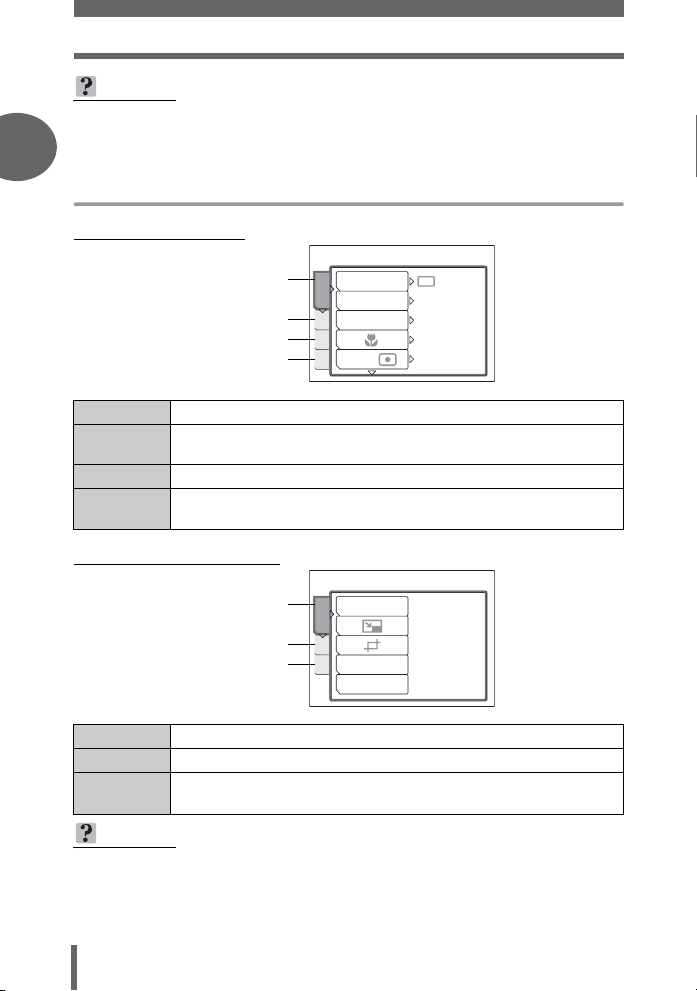
Mode menus
Shooting modes
(
CAMERA tab
Basic operation
PICTURE tab
CARD tab
SETUP tab
DRIVE
ISO
CAMERA
FLASH MODE
PIC
AF/ /MF
CARD
ESP/
SET
AUTO
AUTO
AF
ESP
CAMERA tab For setting shooting-related functions.
PICTURE tab
For setting picture-related functions, such as record mode and white
balance.
CARD tab For formatting cards.
SETUP tab
For making basic camera settings and settings that make the
camera easier to use.
(Playback mode (q)
EDIT tab
CARD tab
SETUP tab
EDIT tab For editing saved pictures.
CARD tab For formatting cards and erasing all image data.
SETUP tab
For making basic camera settings and settings that make the
camera easier to use.
TIPS
•In n mode, the mode menus for shooting and playback modes differ. For
details, see “Menu list” (P. 197).
• For a list of mode menu items for shooting and playback modes, see “Menu list”
(P. 197).
RAW DATA EDIT
EDIT
CARD
COPY
SET
REDEYE FIX
24
Menus
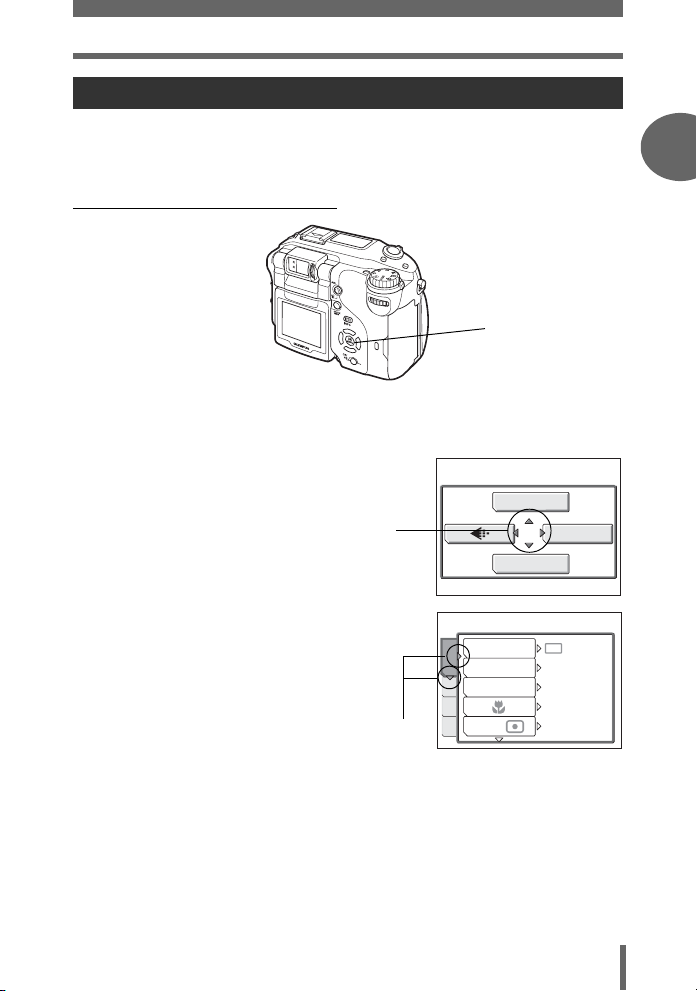
How to use the menus
Use the arrow pad and Z to set menu items.
Follow the operation guide and arrows on the screen to select and make settings.
This section explains how to use the menus.
Ex: To set [7] (Auto bracketing)
acbd buttons
Z button
1
Basic operation
Basic operation
1 Press Z in shooting mode.
• The top menu is displayed.
2 Press d to select [MODE MENU].
This refers to the arrow
pad (acbd).
3 Press ac to select the
[CAMERA] tab, and press d.
• Refer to the arrows on the screen to
select and make settings with the arrow
pad.
This refers to the arrow
pad (cd).
Top menu
DRIVE
ISO
CAMERA
FLASH MODE
PIC
AF/ /MF
CARD
ESP/
SET
DRIVE
MODE MENU
WB
AUTO
AUTO
AF
ESP
25
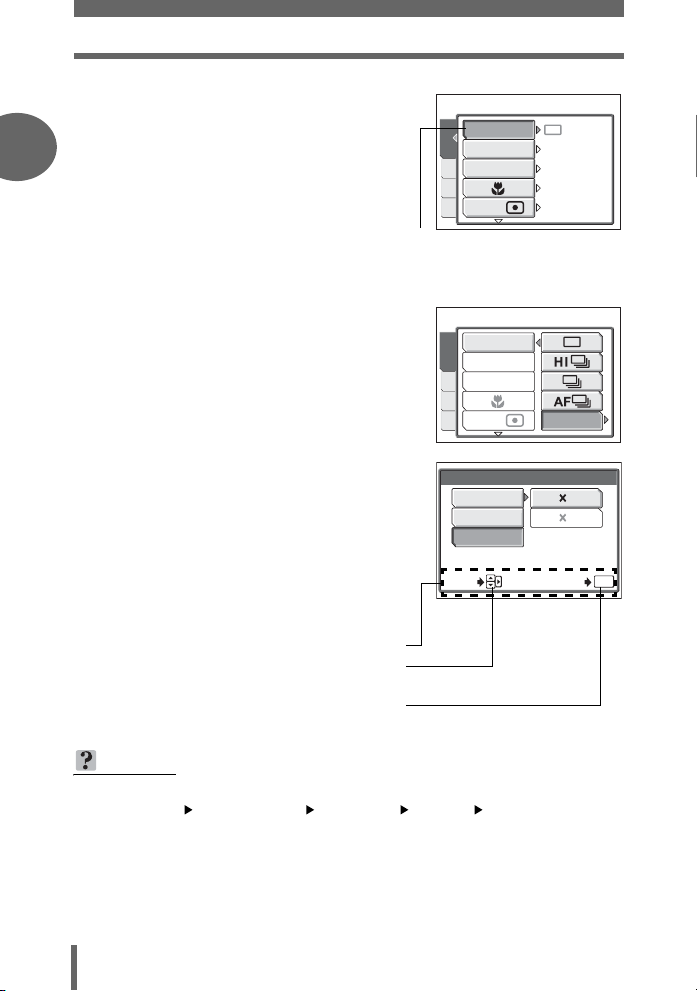
Menus
4 Press ac to select [DRIVE],
and press d.
1
Basic operation
• Refer to the arrows on the screen to
select and make settings with the arrow
pad.
• Unavailable settings cannot be
selected.
5 Press ac to select [BKT], and
press d.
• Refer to the arrows on the screen to
select and make settings with the arrow
pad.
The selected item
appears indented.
DRIVE
ISO
CAMERA
FLASH MODE
PIC
AF/ /MF
CARD
ESP/
SET
DRIVE
ISO
CAMERA
FLASH MODE
PIC
AF/ /MF
CARD
ESP/
SET
AUTO
AUTO
AF
ESP
BKT
6 Press ac to select the
exposure differential from [±0.3],
[±0.7], and [±1.0], then press d.
Press ac to select the number
of shots from [×3] and [×5], then
press Z.
• Follow the operation guide at the bottom
of the screen to select and make
settings using the arrow pad.
Operation guide
Press ac to select a setting.
Press d to move through settings.
Press Z to finalize the setting.
SELECT
± 0.3
± 0.7
± 1.0
BKT
3
5
GO
TIPS
• In this manual, Steps 1 to 5 of how to use the menus are expressed as follows:
Top menu [MODE MENU] [CAMERA] [DRIVE] [BKT]
26
OK
2 Tips before you start taking pictures
SHQ
SQ2
Tips before you start
taking pictures
Your pictures are almost guaranteed to
come out well just by setting the mode dial
to P and pressing the shutter button. But
occasionally, you can’t focus on your
subject, or the subject is too dark, or the
picture doesn’t come out the way you
want…
Just knowing which button to press or which
setting to change can help you solve these
problems.
And did you know that by selecting an
image size according to how you plan to use
the pictures afterwards, you can store more
pictures on the memory card? These are
just some of the hints provided in this
chapter.
Online applications
SQ2
Ideas
Ideas
SQ2
2
Printing
applications
SHQ
SHQ
27
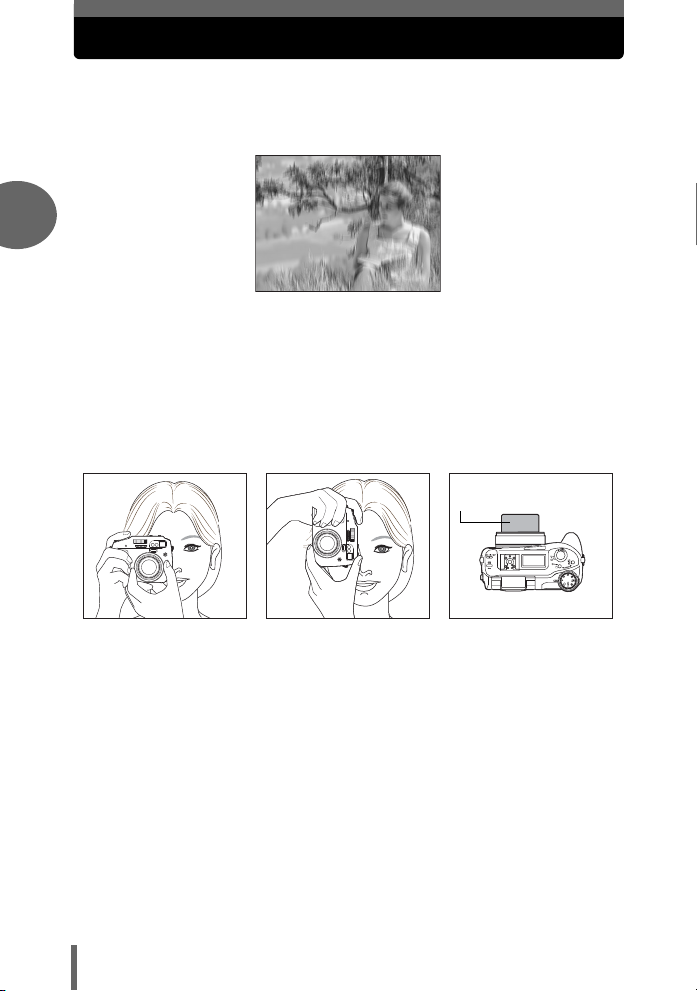
Holding the camera
Sometimes when you look at a picture you have taken, the contours of the
subject are blurred. This is often caused by movement of the camera at the
precise moment that the shutter button is pressed.
2
Picture where subject is not clearly defined
To prevent the camera from moving, hold the camera firmly with both
hands while keeping your elbows at your sides. When taking pictures
with the camera in the vertical position, hold the camera so that the flash
is positioned higher than the lens. Keep your fingers and the strap away
from the lens and flash.
Horizontal grip Vertical grip Top view
Do not hold this part
of the lens.
Tips before you start taking pictures
28
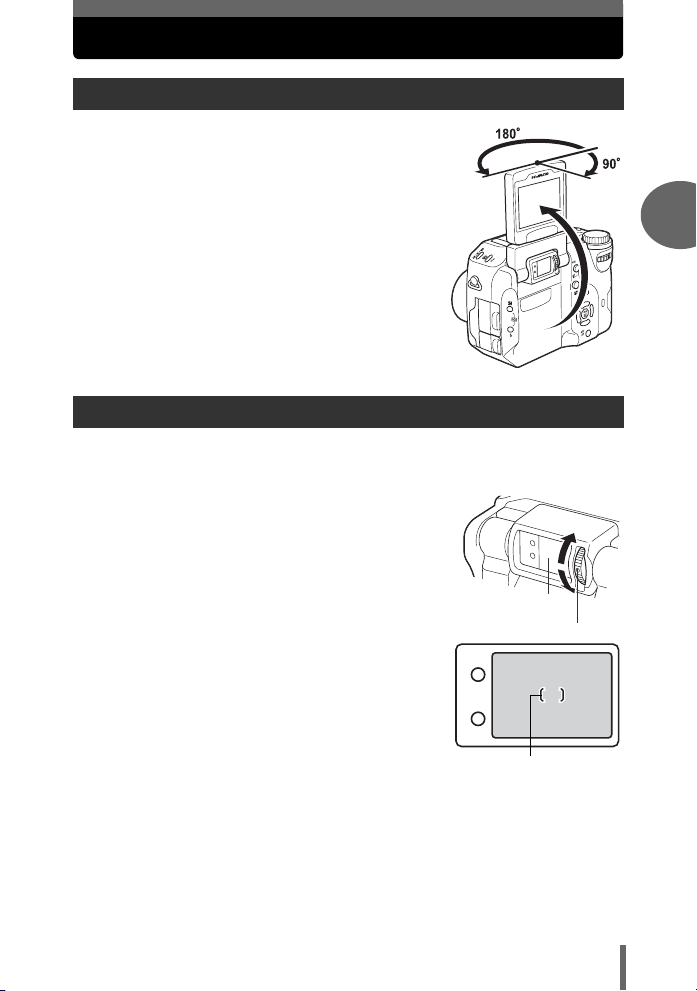
Using the monitor and viewfinder
Movement range of the monitor
• The range of monitor movement is shown on the
right. By turning the monitor toward the lens, you can
take pictures of yourself with the monitor.
• Move the monitor slowly within the permitted range.
Adjusting the viewfinder
You can adjust the viewfinder to match your eyesight (visual acuity).
1 While looking through the viewfinder,
slowly turn the diopter adjustment dial.
Viewfinder
Diopter adjustment dial
2 Turn the diopter adjustment dial until
the AF target mark can be seen clearly.
2
Tips before you start taking pictures
AF target mark
29
Using the monitor and viewfinder
F2.8
1/1000
0.0
3072 2304
HQ
When to use the monitor and viewfinder
You can take pictures using either the monitor or the viewfinder. Use the one that is
most apt for the situation.
To turn the monitor on or off, press f. g“Direct buttons” (P. 16)
Monitor Viewfinder
2
Disadvantages
Tips before you start taking pictures
You can check the picture area
Advantages
Tips
Viewfinder
that the camera actually
records.
Camera movement occurs easily
and subjects may be difficult to
see in bright/dark places. The
monitor uses more battery power
than the viewfinder.
Use the monitor when you need
to know the exact area the
camera records, or to take a
close-up of a person or flower
(macro shooting).
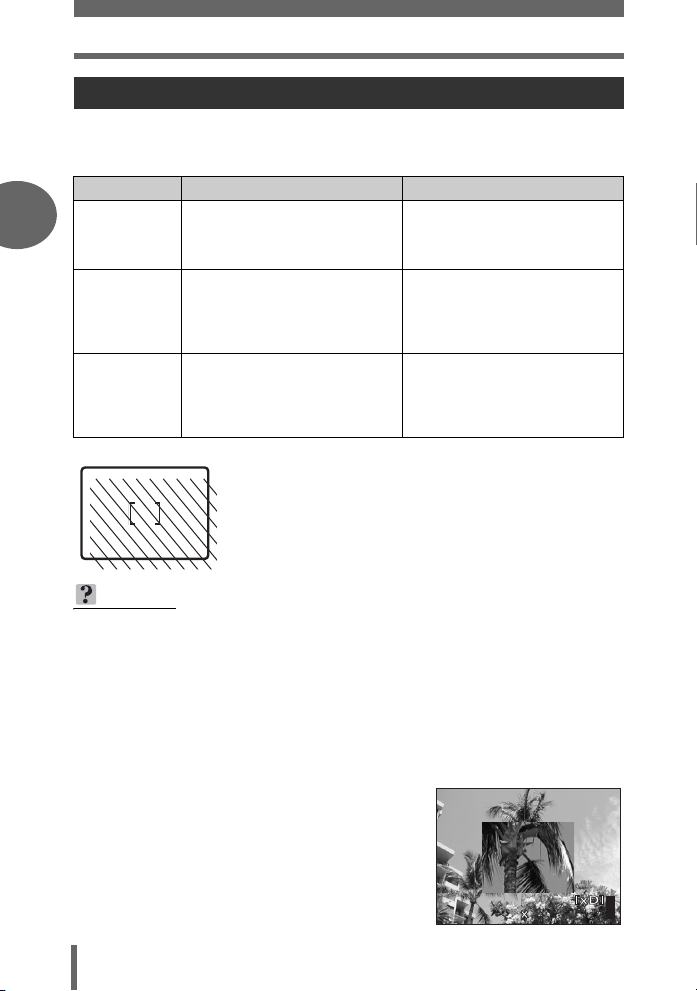
• The camera records a wider area than the image in the
viewfinder.
• As you get closer to the subject, the actual image recorded
(the shaded area in the illustration on the left) differs
slightly from the image in the viewfinder.
TIPS
When the monitor turns off automatically
→ If the camera is not used for over 3 minutes, the monitor turns off
automatically. Press the shutter button or zoom lever to turn the monitor on.
To adjust the brightness of the monitor
→ Adjust the brightness with the [s] settings. g“Monitor brightness
adjustment” (P. 130)
When the monitor is hard to see
→ Bright light, such as direct sunlight, may cause vertical lines (smears) to
appear on the image in the monitor. This does not affect recorded pictures.
To check the area the camera is focus ing
on
→ If you press f while pressing the
shutter button halfway, the area you are
focusing on is enlarged. Pressing f
again returns the size to normal. This
function is not available with digital
zoom. g“Using the digital zoom”
(P. 45)
Camera movement does not
occur easily and subjects can be
seen clearly even in bright places.
Little battery power is used.
When close to a subject, the
image in the viewfinder differs
slightly from the picture that the
camera actually records.
Use the viewfinder for general
snapshots, landscape pictures
and other casual shots.
F2.8
1/1000
P
HQ
3072 2304
0.0
303030
30
 Loading...