

Page 1
MOdCI
BHT
Page 2
This instruction
manual
has
been
written
for
the
use
of theOlympus
System
Microscope
Model
BHT.
lt is
recommended
thatyou
read the
manual carefully
in
orderto
familiarize
yourself
fully
with the
use
of the
microscope,
so
that
you
can
obtain
optimum
performance
from
it.
IMPORTANT
Observe
the
following
points
carefully:
I
Operation
1.
Always
handle the
microscope
with
the care
it
deserves,
and
avoid abrupt
motions.
2.
Avoid
the
use and
maintenance
of the microscope
in
direct sunlight,
high temperature
and
humidity,
dust
and
vibration.
Only
use
the tension
adjustment
ring
for altering
the
tension
of
the
coarse
adjustment
knobs.
(Do
not
twist
the two
coarse
adjustment
knobs
in
opposite
directions simultaneous-
ly,
as this
will cause
damage.)
Make
sure
that
the
voltage
selector
switch
on the
base
plate
is
set to
conform
with the
local
mains
voltage.
Make it
a
point
of
grounding
the
microscope
to
prevent
electric accidents.
I
Maintenance
1.
Lenses
must always
be
kept
clean.
Carefully
wipe
off
oil or
fingerprints
deposited
on the
lens surfaces
with
gauze
moistened
with a
small
amount
of
xylene, alcohol
or
ether.
2.
Do not
use
organic solutions
to
wipe the surfaces
of
various
components.
Plastic
parts,
especially,
should
be cleaned
with
neutral
detergent.
3.
Never
disassemble
the
microscope
for
repair.
Only
authorized
Olympus
service
personnel
should
make
repairs.
4. The
microscope
should
be
covered
with the
vinyl
dust cover
provided
and
stored
in
a
place
free
from humidity
and
fungi.
For extended storage
it is
recommended
to
keep objectives
and
eyepieces in
desiccators,
containing
desiccants such
as
silica
gel.
3.
4.
5.
Page 3
I.
STANDARD
EOUIPMENT
II . NOM
ENCLATU
R E
III. ASSEM
BLY
IV. IDENTIFICATION
AND FUNCTION
V.
OPE
RATION
A. Switching
on the Light Source
CONTENTS
VARIOUS COMPONENTS
r'* ooir;.r;;;
OF
2
3
4
6
9
Voltage
Adjustment and
Light Intensity
Placement of
a
Specimen
Slide
la"""r
classl
fStadl
Observation
Tube
1.
Interpupillary Distance
Adjustment
2.
Diopter
Adjustment
3.
Light
Path
Selector
Condenser
Adjustment
1.
Condenser
Centration
Field lris Di
m
Aperture
lris Diaphragm
Focusing Adjustment
1. Tension
of
Coarse
Adjustment
Knobs
and
Use of Rubber
Cap
for Fine Adjustment
Knob
2.
Pre-Focusing Lever
3. Adjustment
of Stage Block
Height
F. Use
of
lmmersion Objectives
G.
Photomicrography
VI.
OPTICAL
DATA
.
.'. .
VII.
TROUBLESHOOTING
B.
10
11
C.
12
D.
13
E.
14
16
17
Page 4
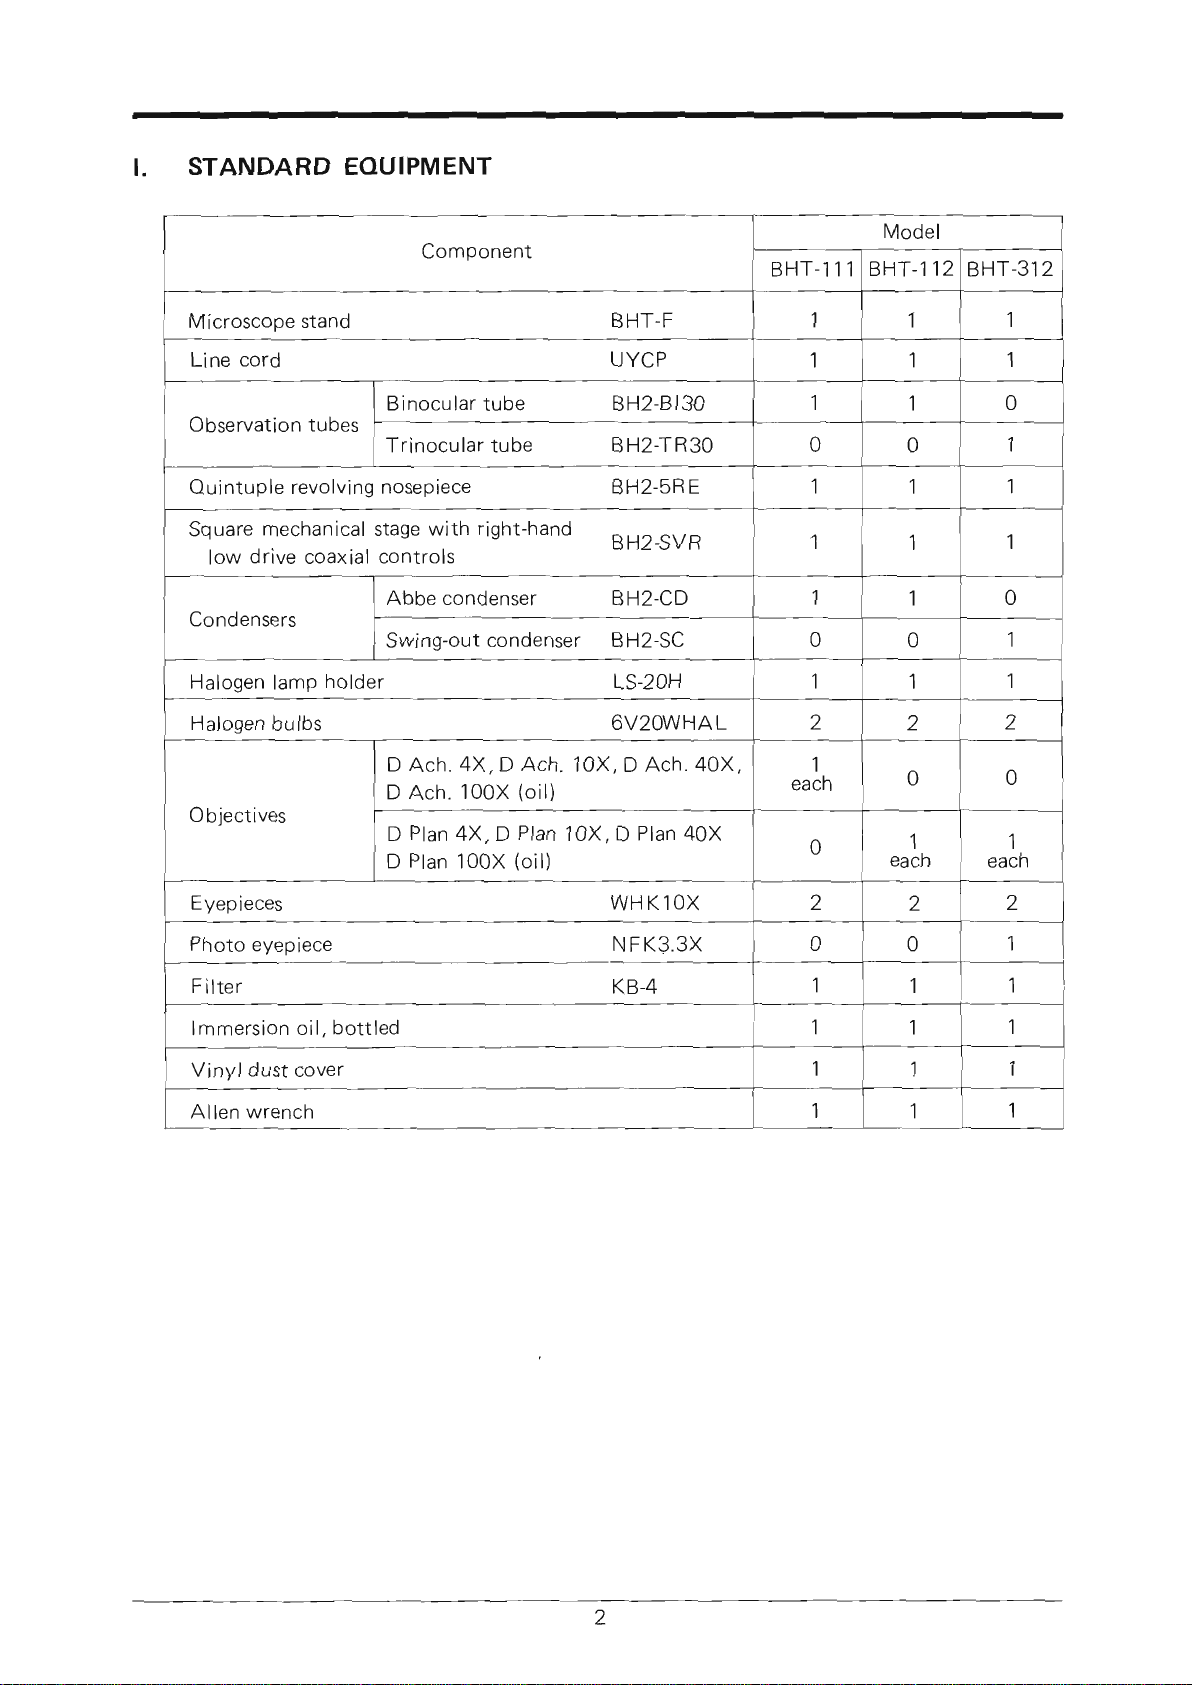
t.
STANDARD
EOUIPMENT
Component
Model
BHT-11
1
BHT-112
BHT-312
Microscope
stand
BHT-F
1
1
1
Line
cord
UYCP
1
1
1
Observation
tubes
Binocular
tube
BH2-8130
1
1
0
Trinocular
tube
BH2-TR30
0
0
1
Ouintuple
revolving
nosepiece
BH2-5RE
1
1
1
Square
mechanical
stage
with
right-hand
BH2-SVR
low
drive
coaxial
controls
1
1
1
Condensers
Abbe
condenser
BH2-CD
1
1
0
Swing-outcondenser
BH2-SC
0
0
1
Halogen
lamP
holder
LS-20H
1
1
1
Halogen
bulbs
6V20WHAL
2
2
2
Objectives
D
Ach.
4X,
D Ach.
10X,
D Ach.
40X,
D
Ach.
100X
(oil)
1
each
0
0
D
Plan 4X,
D
Plan 10X,
D
Plan
40X
D
Plan 100X
(oil)
0
1
each
1
each
Eyepieces
WHK1OX
2
2
2
Photo
eyepiece
NFKS'3X
Filter
KB-4
0
0
1
1
1
1
lmmersion
oil,
bottled
Vinyl
dust
cover
Allen
wrench
1
1
1
1
1
1
1
1
1
Page 5
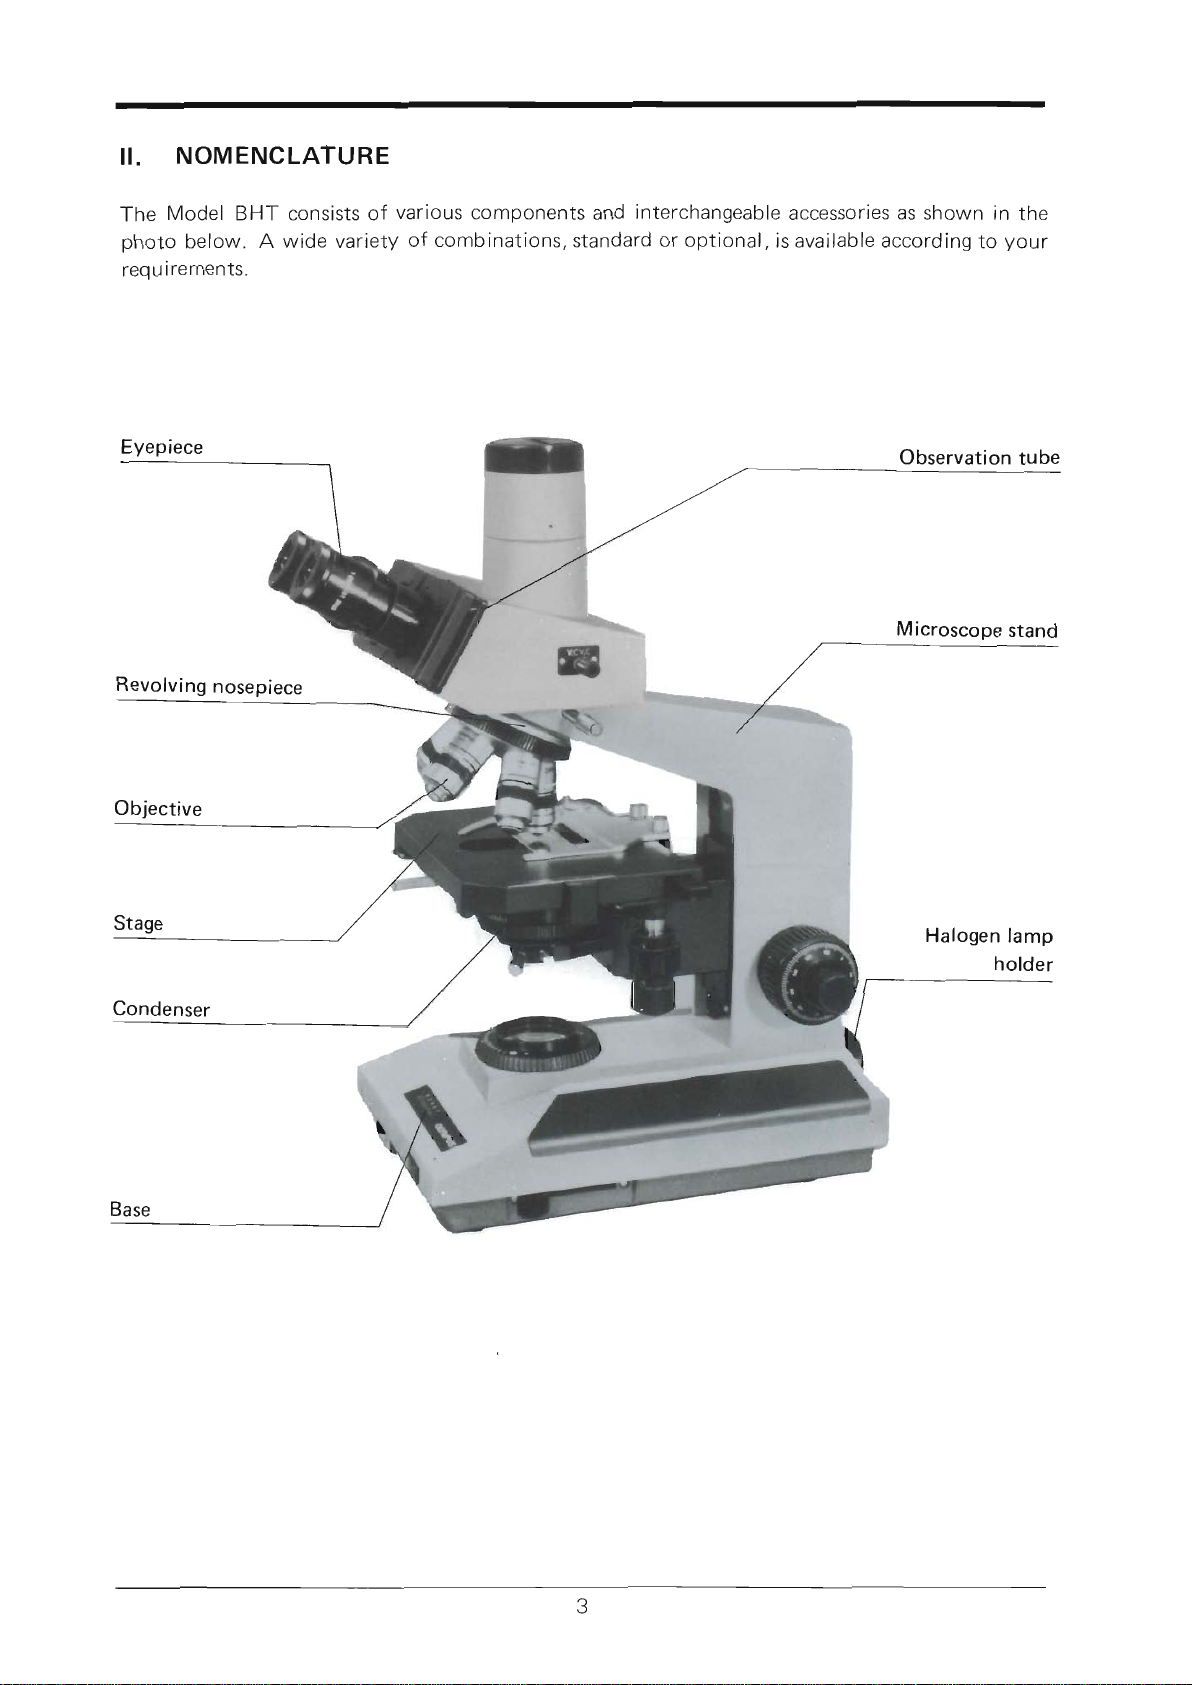
II. NOM
ENCLATURE
The
Model
BHT
consists
of
various
components
and
interchangeable
accessories
as
shown
in
the
photo
below. A
wide variety of combinations,
standard
or
optional,
isavailable
according
to
your
req u i
re
men ts.
Eyepiece
Halogen
lamp
holder
Observation
tube
Microscope
stand
Revolving
nosepiece
Page 6
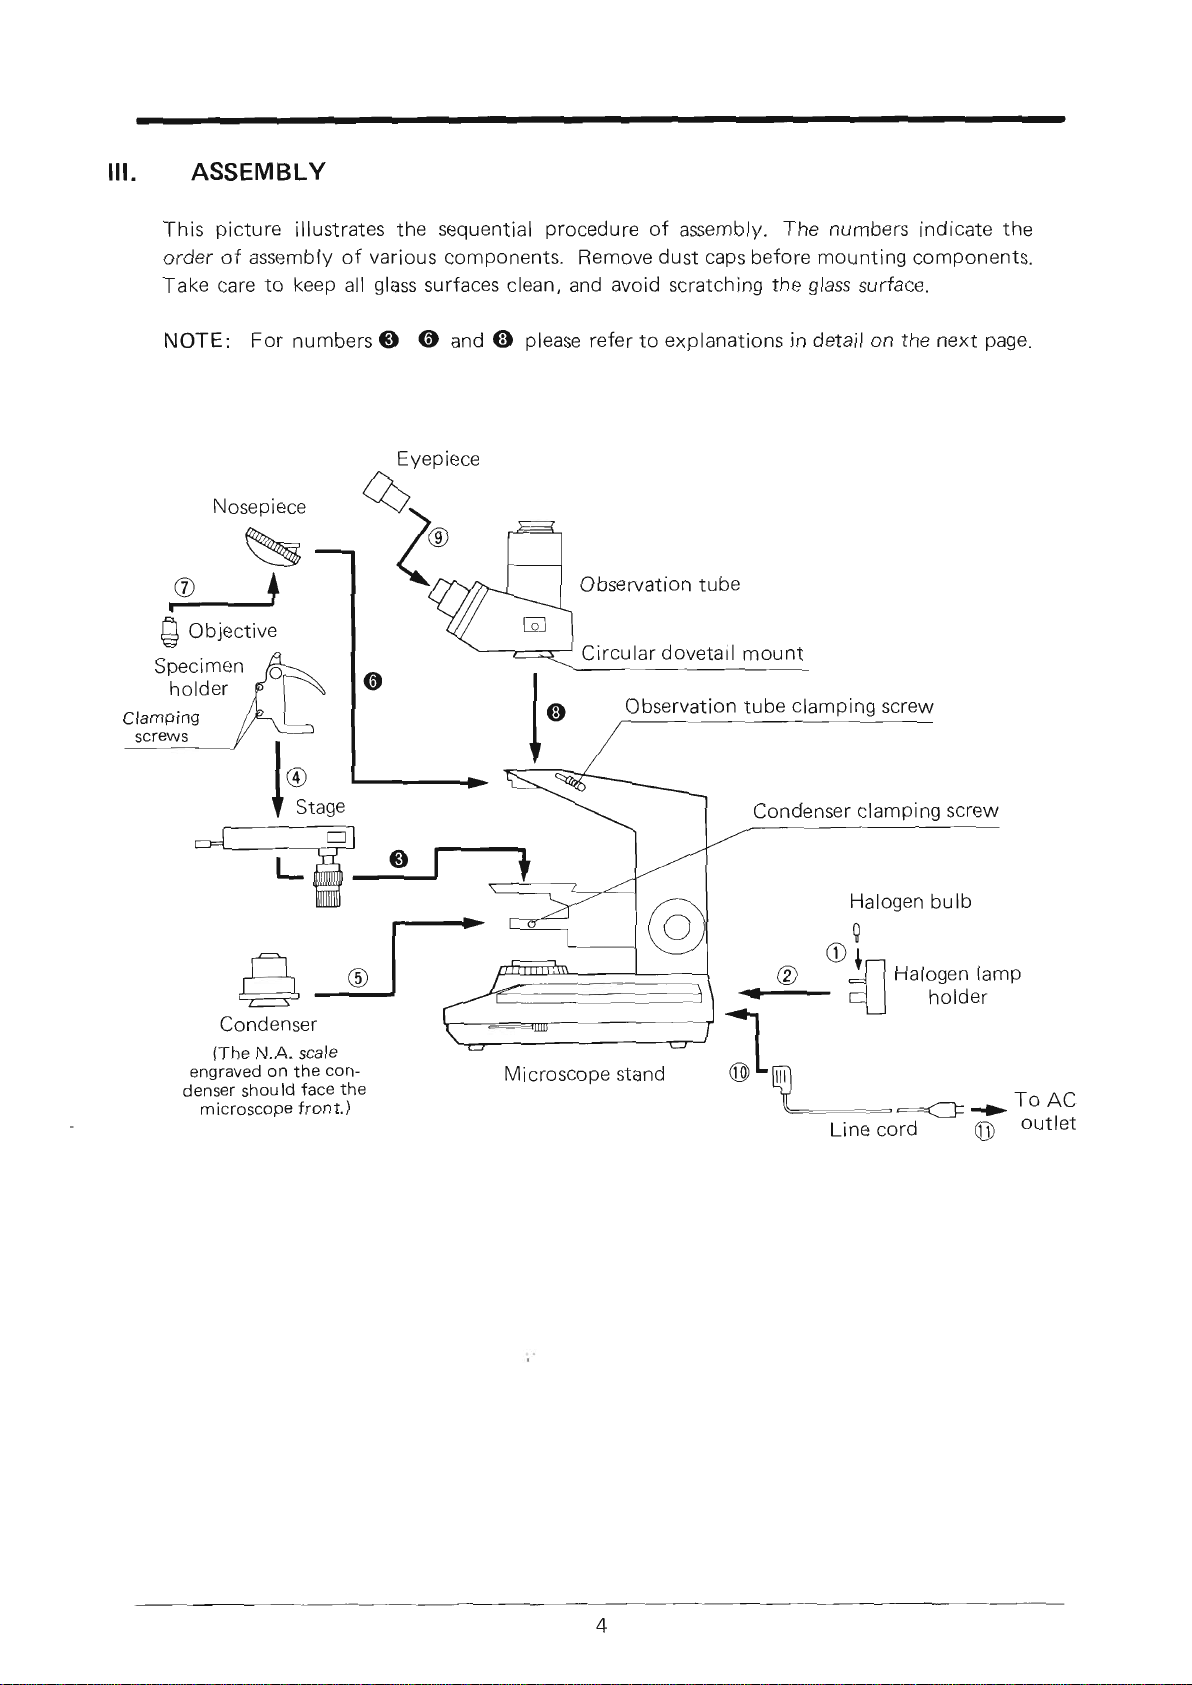
III.
ASSEMBLY
This
picture
illustrates
the
sequential
procedure
of assembly.
The
numbers
indicate
the
order
of assembly
of
various
components.
Remove
dust
caps
before
mounting
components'
Take
care
to
keep
all
glass
surfaces
clean,
and
avoid
scratching
the
glass
surface'
NoTE:
For
numbers
@
@
and @
please
refer
to
explanations
in
detail
on
the
next
page'
Specimen
holder
Observation
tube
clamping
screw
Clamping
scre\n
s
Condenser
clamPi
ng
screw
NosePiece
%
I8..,,
Halogen
bulb
0
riri
@
-5l
Halogen
lamp
- +l
holcier
Condenser
(The
N-A-
scale
engraved
on
the
con-
denser
shou
ld
face
the
microscoPe
front.)
Microscope
stand
;r
--4--Ta-
To AC
t-inercorO
@
outlet
Observation
tube
Circular
dovetai
I
mount
Page 7
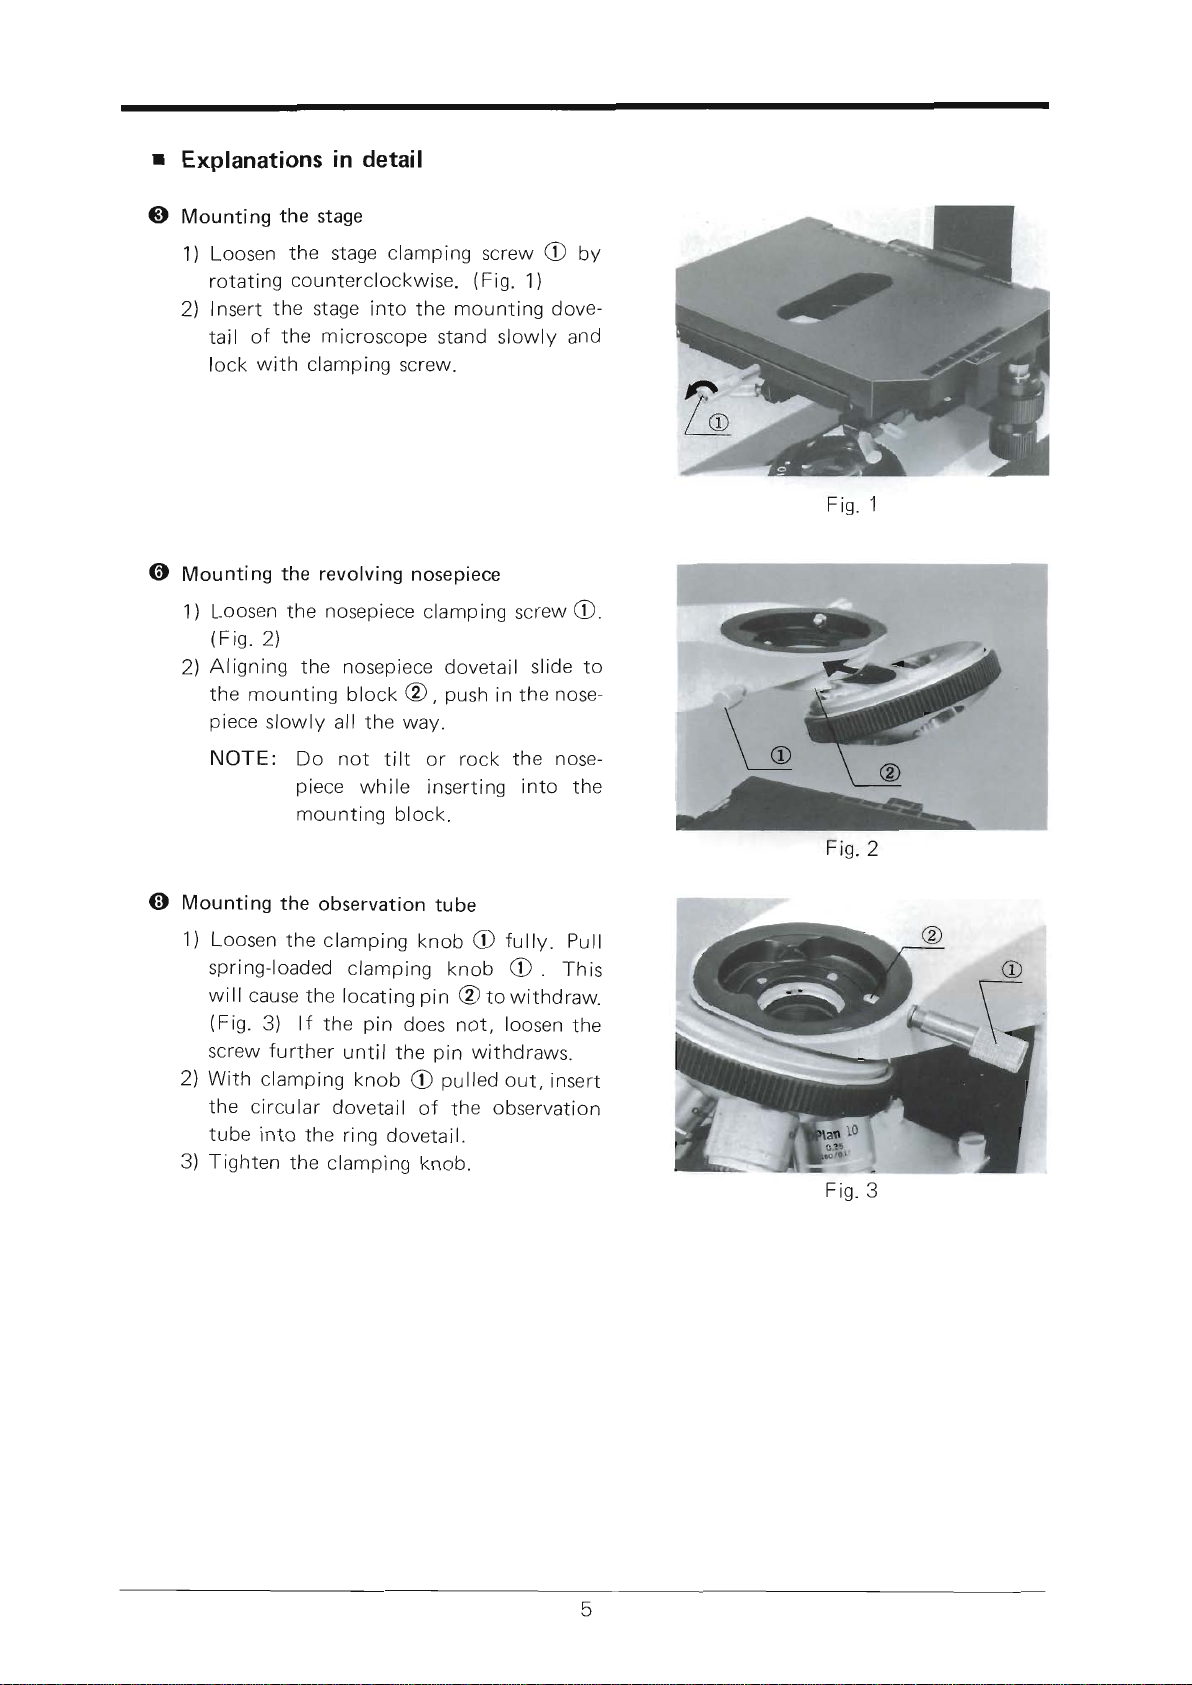
@
Explanations
in
detail
Mounting
the
stage
1) Loosen the stage
clamping
screw
O
Ov
rotating counterclockwise.
(Fig.
1)
2)
Insert
the stage
into the
mounting
dove-
tail
of
the
microscope
stand slowly and
lock with
clamping screw.
Mounting
the
revolving
nosepiece
1)
L-oosen
the
nosepiece
clamping
screw
O.
(Fig.2)
2) Aligning
the nosepiece dovetail
slide to
the mounting
block @,
push
in
the
nose-
piece
slowly all the way.
NOTE:
Do not
tilt
or rock
the nose-
piece
while inserting
into
the
mountinq
block.
Mounting
the observation
tube
1) Loosen
the clamping
knob
e
tutty.
pull
spring-loaded
clamping
knob
O
. This
will
cause
the locating
pin
@
to
withdraw.
(Fig.
3) lf
the
pin
does
not,
loosen
the
screw
further
until
the
pin
withoraws.
2)
Witfr clamping
knob
e
pulled
out,
insert
the
circular
dovetail
of
the
observation
tube
into
the ring
dovetail.
3) Tighten
the
clamping
knob.
Fis.
1
@
@
Fig.2
Fig.3
Page 8

IV.
IDENTIFICATION
AND
FUNCTION
OF
VARIOUS
COMPONENTS
Sliding
voltage
control
lever
Voltug"
lowers
as the
lever
is
pulled
toward
the
microscope
front.
&
Light
path
selector
knob
The
knob
can
be
operated
in
3
positions to
deflect
the
light
as
desired.
Tension
adjustment
rlng
Clockwise
rotation
increases
coarse
adjustment
tension'
Coarse
adjustment
knob
Coarse
adjustment
range:
26mm
Fine
adjustment
knob
Stage
clamPing
screw
Loosen
the
screw
ano
the
stage
can
be
rotated.
Condenser
centering
knobs
Y-axis
low
drive
control
knob
Y
excursion
range: 50mm
Page 9

_n
Diopter
adjustment
flng
Field
iris
diaPhragm
ring
Arrow
mark O
+Q
indicates
increase
in
diaPhragm
diameter'
Condenser
height
adjustment
knob
Pre-focusing
lever
Line
cord
I
<
\,\.
Page 10

c)
l-
o)
-
P
:l
C)
Summary
of
Putting
dre Microscope
into
Operation
Model
BHT
A. Match
the voltage
selector
switch
to local mains voltage
(page
g).
B.
Switch
on
the light
source
(page
9).
C.
Place
a specimen
slide on
the mechanical
stage
(page
9).
D.
Coarse
focus
with
the 10X
objective
(page
10.
13).
E.
Make
interpupillary distance
and
diopter
adjustments
(page
1l
).
F.
Adjust the condenser
position
(page
12).
G.
Swing in the desired
objective.
H.
Adjust light
intensity.
l. Fine focus.
J.
Adjust
aperture
iris diaphragm
and
field
iris diaphragm
(page
12).
Adjustment
of
lllumination
System
for
Various
objective
Powers
*N.A.
is somewhat
low,
but
still compatible
with
a
100X
objective.
(Cut
off
this
page
at
dotted
line and
put
it
on
the wall
near the microscopefor useasa
reminder
of micro-
scopic
procedure.)
Objective
magnif
ication
Achromatic-
aplanatic
condenser
BH2.AAC
Swing-out
condenser
BH2-SC
Low
power
condenser
BH2-UL-C
Compatible
Compatible
Compatible
Swing in
top
lens
oL:yMPus
Page 11

V.
OPERATION
-
A.
Switching
on
the
Light
Source
1) Ascertain
that the voltage
selector
switch
O
is
set to conform
with
the local
mains
volt-
ase.
(Fig.
a)
lf
the
switch
is
not
correctly
set,
adjust
it
by
means
of
the
Allen wrench
provided
or
a
i
screwdriver.
T
2)
Place
the
sliding
voltage
control
lever
on
the
I
right
side of
the microscope
base
to a
posi-
tion closest
to
you
(low
voltage
position).
Switch on
the
light
source.
(Fig.
)
Voltage
Adjustment
and
Light Intensity
As
you push
the control
lever@
in the
direc-
tion of
the arrow
in order
to
obtain
increas-
ing
intensity
(Fig.
5),
the
LED readout
@
will display
the lamp
voltage.
B. Placement
of a
Specimen
Slide
1) Rotate
the coarse
adjustment
knobs
O in
the direction
of
the
arrow
to rack
down
the
stage
so that
a
specimen
slide can
be
placed
on
the
stage.
(Fig.
6)
NOTE:
The rotation
of
the
coarse
and fine
adjustment
knobs
in
the
direction
of
the
arrow
will
rack
down
the
stage.
2)
Opening
the
spring-loaded
finger
of
the
specimen
holder
with
one
hand,
place
a
specimen
slide
inside
the
holder.
(Fig.
7)
When
the
slide comes
in contact
with
the
back
of
the
specimen
holder,
slowly
return
the
spring-loaded
f
inger.
WARNING:
lf
the
spring-loaded
finger
is
returned
quickly,
it may
cause
damage
to
the
specimen
slide.
)}
..J
Fis.
5
1I'
Fig.4
Fis.6
Fig.7
Page 12

a
An
Olympus
objective
engraved
"i60/0.17"
requires
a
cover
glass
of
0.17mm
thickness.
lf the
numerical
aperture
of
the
objective
is
0.7
or
higher
(except
immersion
objectives)
and
no
correction
collar
is
provided,
the
resolving
power
deteriorates
to
a
great
extent if
cover
glass
thickness
deviates
from the
above
listed
value'
NOTE:
In
some
countries
aO.17
mm
cover
glass
corresponds
to
a
designation
of
#1%.
o
A cover
glass
(O.4mm
thick)
for blood
counting,
etc.
can
be
used
with Olympusobjectives
except
D
Plan
40X, S
Plan Apo
40X
and
S
Plan 100X'
I
Specimen
slides
0.8
mm
to 1.5
mm thick
are
recommended
for Olympus
objectives.
o
Specimen
slides
0.8
mm to
1.2
mm thick
are
recommended
for the
darkfield
condenser
and
the
differential
interference
contrast
con-
denser.
3)
Bring
the
portion
of
the
specimen
for obser-
vation
into
the
light
path
by
means
of the
low
drive
control
knobs.
(Fig.
B)
*
Tighten
the
stage
clamping
screw
O
in the
microscoPe
front.
r-----------.'l
I
Stage
I
I
The
specimen
holder
can
accommodate
two
standard
specimen
slides
simultaneously.
o
The
specimen
holder
is
removable
to
obtain
a large
unobstructed
stage
surface
to
hold
specimens
uP to
55
mm x 85
mm.
o
To
rotate
the stage
loosen
the
stage
clamping
screw
O
and
holding
this
screw,
rotate
the
stage
into
the
desired
direciton.
(Fig.
9)
@
Stage
clips
for use
with
immersion
objectives.
(Fis.
i 0)
A
pair
of stage
clips are
optionally
available
to
hold
the
specimen
on the
stage,
eliminat-
ing
a specimen
drag
caused
by
immersion
oil
between
slide
and
stage
surface.
T'he
clips
can
be inserted
into
the
holes O
provided
on
the
specimen
holder.
Fig.
9
10
Fig.
10
Page 13

c.
Observation
Tube
Interpupillary
Distance
Adjustment
1)
Click
the
i0X objective
into
position.
2) Looking
through
the
eyepieces
with
both
eyes,
adjust
the
interpupillary
distance
of
the binocular
tube
by
adjusting
the
knurled
dovetail
slides
O of
the right
and
left
eyepiece
tubes with
both
hands
until
perfect
binocular
vision
is
obtained.
(Fig.
11)
Diopter
Adjustment
1) Look
at
the image
through
the right eye-
piece
with
your
right
eye
and focus
on
the
specimen
with
the
fine
adjustment
knobs.
2) Next,
look at
the image
through
the
left
eyepiece
with
your
left eye
and
rotate
the
diopter
adjustment
ring
O to focus
on
the specimen
without
using
the coarse
and
fine
adjustment
knobs.
(Fig.
12)
Light Path
Selection
1) The trinocular
tube
is
provided
with
a
light
path
selector knob to direct
the
light
to
the observation
tube
and/or
to
the
photo
tube
in 3
positions. (Fig.
13)
1.
2.
3.
Fig.
i 1
Fis.
12
o
E\
ffilrF--s,*
Fis.
13
The
indicator
plate
is
provided
at the
knob
port
to
summarize the usage of
the above
table;
it
can be consulted
before
operating
the
knob.
V: Viewer
(white
letter)
CV:
Camera & viewer
(yellow-green
letters)
C:
Camera
(red
letter)
The colors
of
the letters
correspond
with
the color bands
on the knob
shaft.
Knob Position
Pushed
in all
the
way
(v)
Pulled
out halfway
(c.
v.)
Pulled
out
all
the
way
(c)
Amount
of
light
1O0o/o
into binocular
tube
20%
BO%o
nto binocular
tube
nto
photo
tube
lOO%
into
photo
tube
Application
O
Observation
@
Dark
specimens
O
Observation of
exces-
^
sively bright
specimens
€)
Photo
m icrography
(fo-
cusing
through
the
bi-
nocu lar
tube)
Photomicrography
of
dark
specimens
11
Page 14

D.
CondenserAdjustment
1. Condenser
Centration
1)
Stop
down
the
f
ield
iris
diaphragm
with
knurled
ring
O by
rotating
in
the
direc-
tion
of
the
arrow.
(Fig'
14)
2)
Use
the
condenser
height
adjustment
knob
@
to
move
the
condenser
uP
and
down
until
an
image
of
the
field
dia-
phragm
can
be
seen
clearly
in
the
eye-
oieces.
The
rotation
of the
knob
in
the
direction
of
the
arrow
lowers
the
con-
Field
of
view
lf
the
polygonal
image
of
the
iris
the
field
diaphragm
is
centered.
o
The
field iris
diaphragm
controts
the
diameter
of
the
ray
bundle
impining
on
the
speci-
men
surface
and
therefore,
by
stopping
down
the
fierd
diaphragm
until
it
is
slightly
larger
than
the
field
of
view,
it
can
reduce
stray
light,
which
in
turn
increases
image
defi-
nition
and
contrast.
Fig. 14
denser.
Field
iris
diaphragm
ffi+o
Bring
the
field
iris
diaphragm
image
into
denser
centering
knobs
@.
(Fig.
1a)
the
center
of
the
field
of
view
with
the
two
con-
4)Widenthediameteroftheirisdiaphragmprogressive|y'
diaphragmbecomesinscribedinthefie|ditmeansthat
(Fig.
1
5)
Field
lris
DiaPhragm
Aperture
lris
DiaPhragm
o
rn
order
to
achieve
optimum
objective
performance,
the
opening
of
the
aperture
rrs
diaphragm
should
be
matched
to
the
numerical
aperture
of
the
objective
in
use'
lt
is
often
preferable,
however,
to
stop
down
the
aperture
diaphragm
slightly
more
than
in-
dicated
by
the
objective
N.A.
Thiswill
result
in
better
image
contrast,
increased
depth
of
focus
and
a
flatter
field.
After
completing
focus
adjustment,
re-
move
one
of
the
eyepieces
from
the
ob-
servation
tube
and
look
into
the
empty
eyepiece
tube.
As
You
stoP
down
the
aperture
iris
diaphragm,
the
image
of the
iris
diaphragm
can
be
seen
in
the
object-
ive
pupil.
Adjust
the
opening
of the
diaphragm
to
match
the
N'A.
of
the
ob-
jective
in
use.
lf
the
specimen
is
low
in
contrast,
it
is recommended
to
stop
down
lo
70%
-
8O%o
of the
objective
N.R'
(Fig'
16)
Opening
of the
aperture
diaPhragm
Objective
exit
PuPil
12
Fig.
16
Page 15

.
Focus Adjustment
1. Tension
of Coarse
Ad
justment
Knobs and
Fine
Adjustment.
Although the tension
of
the
coarse adjust-
ment
knobs has
been already adjusted
for
optimum
performance
by
the
manufacturer,
it is
possible
to
personally
adjust the tension
of
the
coarse
adjustment
for either
heavy or
light
movement
depending
on
the
operator's
preference
by
rotating the tension
adjust-
ment rins
e.
(Fig.
17)
The
ring can
be rotated
by
inserting
a screwdriver into
one of the holes
on
the
periphery
of
the
ring. The
clockwise
rotation
(in
the
direction
of
the arrow) tightens
the
coarse adjust-
ment
knobs. Do not loosen
the ring too
much, because the stage
may drop
or
the
fine
adjustment
knobs may
slip.
NOTE: Do
not
rotate the
right
and
left coarse
adjustment
knobs
in
the
opposite
directions
simultaneously.
lf
the stage
drops and the
specimen
goes
out of
focus,
the tension
adjustment
ring
is
too
loose. Tighten the
ring.
Use
of Rubber
Cap
for
Fine
Adjustment
Knob
Attaching
this
cap over the
fine
adjustment
knob
increases
the
sensitivity
of
the
fine
focus-
ing
motion.
(The
rubber
cap
is
optionally
avail-
able.)
2.
Pre-Focusing Lever
This lever
@
is
provided
to
prevent
possible
contact
between specimen
and
objective
as
well as
to
simplify
coarse
focusing.
(Fig.
1B)
The
lever
is
locked after
coarse
focus
has
been accomplished.
This
prevents
further
upward
travel
of
the stage
by means of the
coarse
adjustment
knobs,
and automatically
provides
a limiting stop lf
the stage is
lowered
and then
raised again. The
pre-focusing
lever
does
not restrict f ine
focusing.
3. Adjustment
of
Stage
Block
Height
ln addition
to the
vertical
movement of the
stage
by means
of
coarse
and
fine
adjust-
ments, the stage
block
height can be changed
for
observation
of
specimens'which
are
thicker
than standard slides,
e.g. chambers,
flasks,
etc. with
much
larger
thickness.
The
stage
block
height can be adjusted
by
loosening
the stage
block locking screw
O
'19
Then,
dislocate
the
After
lowering the
with
the Allen
wrench
provided
and
retightening it
at
the
upper
position.
lower limit stop
pin
beneath the stage
block
into
a
lower tapped
hole.
stage
block,
reclamp
the
stage block
locking
screw
@.
(Fig.
19)
t-
t:
t\..
Er r \
I t----l
ll---ri--- | | |
It---: | | t
l.:
l/
Fig.
17
F
is. 18
13
Page 16

F. Use
of
lmmersion
Objectives
1)
Focus
the specimen
with
a low
power
objective.
2)
put
a
drop
of immersion
oil
on the
specimen
slide
and
the
front
lens of
the immersion
objective.
3) Turn
the
revolving
nosepiece
to
bring
the
immersion
objective
into
the
light
path,
and
focus
with
the
fine adjustment
knobs.
NOTE:
O
For immersion
condensers
such
as an
achromatic-aplanatic
condenser
or Abbe
condenser,
remove
the
specimen
from
the
mechanical
stage
and
place
a
drop
of
immersion
oil
on
the
front
lens
of the
condenser.
Then,
place
the specimen
on
the
stage
and
slowly
raise
the
condenser
until
firm contact
with the
underside
of
the
sPecimen
slide
is
made.
@ Care
shouid
be taken
to
prevent
oil
bubbles
from
forming
in the
oil
film
between
condenser
and
specimen
slide.
lf any,
re-apply
immersion
oil,
for
these
bubbles
greatly
deteriorate
the
lens
performance.
@
After
use
carefully
wipe
off the
immersion
oil
deposited
on
the
lens
surfaces
with
gauze
moistened
with xylene.
Never
leave
oil on
the
lens
surfaces
after
use
as
oil
remnants
will seriously
impair
the
performance
of
the lens
system.
G.
PhotomicrograPhY
The
Olympus
photomicrographic
Equipment
Model
PM-1OAD
is
uniquely
qualified
to be
used
with
the
BHT
microscope
for routine
and
advanced
photomicrography.
A separate,
detailed
instruction
manual
is
available
for
the
PM-1OAD
camera
system'
For
quick
reference,
however,
you
may
want to
refer to
the
following
pointerswhen using
the
PM-104D-
1.
Photographic
EYePiece
Use
N F K
photo
eyepieces
for
photomicro-
graPhY.
Insert
the
eyepiece
into
the
eyepiece
tube
of
the
photo
tube.
(Fig.
20)
Fig.
20
2.
Mounting
the
PhotograPhic
Unit
Slip
the
body
of the
photographic
unit
over the
photo
tube.
Align
the
dots
on
photo
tube
and
the
PM-iOAD
body and
clamp
the
camera
unit
to
the
photo
tube.
(Fig.
21)
3. Setting
the
Light
Path
Selector
Refer
to section
C.3.
on
Page
1
1.
Fis.21
14
Page 17

4.
Focusing Procedure
Use the
field of view eyepieces
for focusing
on
the
film
plane.
Each
field of vieweyepiece
has a
focusing
front
lens and
a reticle with 4
frames,
each
frame
indicating the area covered
by a
specif ic
power
N F
K
photo
eyepeice.
(Fig.
22!-.
The number at each frame
indicates the
magnification of
the
photo
eyepiece.
The
image in the
field
of view eyepiece
and
the
image
on
the
film
plane
are
in
focus
at
the
same time. Several
type
field of view eye-
pieces
are available,
according
to
the
film
size
employed.
Field of
view
eyepiece
35WH Kl OX
PWH
Kl
OX 4X5WH K
1OX
MHWH
Kl OX
Attachment camera
35mm Back 3T+" x 4Y+"
Polaroid
Back
4" x5"
Sheet
Film
or
Polaroid
Film
Holder
16
mm
Bolex
camera
120 Roll
Film
Holder
1) Select the
field
of view eyepiece matching
the
camera back
in
use
and insert it into the
right eyepiece
tube
of
the trinocular
tube,
aligning
locating
groove
and
locating
pin.
2)
While
looking through
the
field
of view eyepiece, rotate
the
eyepiece front
lens
in
screw
mount to
focus
on
the
double cross
lines in
the
field.
For
sharp
focusing
with objectives
4X
or
lower,
the
focusing
magnifier
FT
is recommended.
3) Bring the specimen
detail
to
be
photographed
within the
frame
corresponding to the
power
of
the
NFK eyepiece
in use
and
focus
on
the specimen
with
the
microscope fine
adjustment
knobs.
Make
sure the light
path
selector
knob on
the
observation
tube
is
either
on the white
(V)
or
yellowgreen
(CV)
band.
4) lt
is
recommended to
tighten the tension adjustment ring considerably to
prevent
the
stage
from dropping during
long
exposures.
Fig.22
15
Page 18

VI.
OPTICAL
DATA
o
Resolving
power:
o
Focal
depth:
o
Field
number:
*
lmmersion
objectives
The
resolving
Power
and
Technical
terms:
o
Working
distance:
o
Numerical
aperture:
focal
depth
are
obtained
with
fully
opened
aperture
diaphragm'
The
distance
from
the
cover
glass
to
the
nearest
point
of
the
objective.
The
N.A.
represents
a
performance
number
which
can
be
com-
pared
to
the
relative
aperture
(f-number)
of
a camera
lens.
The
N.A.
values
can
be
used
for
directly
comparing
the
resolving
powers
of all
types
of
objectives.
The
larger
the
N.A.,
the
higher
resolving
power.
The
ability
of a
lens
to
register
smalldetails.
The
resolving
power
of a
lens
is
measured
by
its
ability
to
separate
two
points.
The
distance
between
the
upper
and
lower
limits
of sharpness
in
the
image
formed
by an
optical
system.
As
you
stop
down
the
aperture
iris
diaphragm,
the
focal
depth
becomes
larger.
The
larger
the
N.A.
of an
objective
the
shallower
the
focal
depth.
A
number
that
represents
the
diameter
in
mm
of the
image
of
the
field
diaphragm
that
is
formed
by
the
lens
in
front
of
it.
o
Field
of view
diameter:
The
actual
size
of the
f
ield
of
view
in
mm
on the
object
surface.
i.il
tii
lrl
1,,
Objective
Eyepiece
Type
D
Achromat
D
Plan
Ach.
Magnifi-
cation
4X
10x
40x
100x*
4X
10x
40x
100x*
N.A.
0.10
o.25
0.65
1.30
0.10
o.25
0.65
1.25
W.D.
(mm)
18.2
7.2
0.6
o.20
7.03
7.4
o.27
o.17
Focal length
(mm)
30.03
16.9
4.58
1.91
34.23
17.5
4.67
1.75
Resolving
power
(r)
3.36
1.34
o.52
o.26
3.36
1.34
o.52
o.27
WHKlOX
(Field
number
201
Total
mag.
40x
100x
400x
1000x
40x
100x
400x
1000x
Focal
depth
(p)
171.6
27.45
3.0
o.7
171.6
27.45
3.0
o.7
Field
of
view
(mm)
5
2
0.5
o.2
5
2
0.5
o.2
16
Page 19

VII. TROUBLESHOOTING
lf
you
are
unable to obtain
table
below as
pointers
for
full
performance
from
your
microscope,
please
consult
with
the
troubleshooting.
Phenomenon
Cause
Remedy
1. Optical
System
a)
With illuminator
switched
on, the
field
of view
is
dark.
Field
iris
diaphragm
is
not
opened
sufficiently.
Open diaphragm
to
proper
diameter.
Condenser
is
lowered too
much.
Adjust condenser height.
Light
path
selector lever
is
pulled
out
to
C
position.
Push
in lever up
to CV
or V
position.
b)
Field
of
view
is
cut off or
i
I lum
inated
irregularly.
Light
path
selector
lever
is
stopped midway.
Ctick
it
into
proper position
according to
your purpose.
Nosepiece
is
not
clicked
into
place.
Slightly
rotate
nosepiece until
it clicks
into
place.
Nosepiece
is
not correctly
mounted.
Insert nosepiece dovetail
into
microscope frame
all
the way,
then lock.
The
power
of objective
used
exceeds
the illumination ca-
pacity
of
condenser.
Choose a
condenser
to meet
your purpose.
Condenser
is not centered.
Center condenser.
Field
iris
diaphragm
is
stopped
down excessively.
Open
diaphragm
to
proper
diameter.
c) Dust
or dirt
is
visible
in
the
f
ield
of view.
Dust,
etc.
on
light exit
lens. Remove
dust, etc.
Clean
front
lenses.
Dust on
condenser
top
lens.
Dirty
specimen.
Dust on eyepiece.
d) Excessive
image
contrast.
Condenser is lowered
too
much.
Adjust
condenser height.
Aperture
iris
diaphragm
is
stopped down excessively.
Open diaphragrn
to
proper
diameter.
17
Page 20

e)
Resolution
Problems:
o
lmage
is
not
sharP.
o
Insufficient
contrast.
o
lmage
details
lack
defi-
nition.
Insert
nosePiece
dovetail
into
microscope
frame
all
the
waY,
then
lock.
Nosepiece
is
not
correctlY
mounted.
Click
nosePiece
into
Place.
Objective
is
not
correctlY
positioned in
the
light
Path.
R
otate
correction
col
lar,
keep-
ing
specimen
in
fine
focus
until
oPtimum
resolution
is
obtained.
Objective
correction
collar
is
not
adjusted.
Clean
front
lens.
Dust
on
objective
front
lens'
Use
immersion
oil.
lmmersion
objective
is
not
used
with
immersion
oil.
Remove
bubbles
(and
reap-
ply
oil).
Bubbles
in
immersion
oil'
Use
OlymPus
immersion
oil.
lmmersion
oil
designated
bY
Olympus
is
not
used.
Dirty
specimens.
Dust
on
condenser
lens.
lnsert
nosePiece
dovetail
into
microscope
frame
all
the
waY,
then
lock.
Nosepiece
is
not
correctlY
mounted.
f ) Field
of
view
is
PartiallY
out
of
focus,
or image
is
PartlY
out
of
focus.
Slightly
rotate
nosePiece
until
it
clicks
in
place.
Objective
is
not
correctlY
positioned
in
the
light
Path.
Place
specimen
slide
correctlY
on stage,
and
Place
stage
cliPs
open
it.
Specimen
is
not
correctlY
positioned on stage.
Insert
nosePiece
dovetail
into
microscope
frame
all
the
waY,
then
lock.
Nosepiece
is
not
correctlY
mounted.
g)
Specimen
image
is
Partial-
ly
out
of
focus.
SlightlY
rotate
nosePiece
until
it
clicks
into
Place.
Objective
is
not
correctlY
positioned
in
the
light
Path.
Center
condenser.
Condenser
is
not
centered.
h)
Field
of
view
becomes
only
slightlY
brighter
bY
increasing
voltage.
Adjust
condenser
height.
Condenser
is
lowered
too
much.
2.
Electric
System
Match
selector
switch
to
mains
voltage.
Line
voltage
selector
switch
is
not
matched
with
local
mains
voltage.
a)
llluminator
is
too
bright
(or
too
dark)
even
when
adjusting
control
lever.
b)
Voltage
for illuminator
cannot
be
raised.
Page 21

Phenomenon
Cause Remedy
c) Lamp
goes
off
and
on.
Bulb
f
ilament is
likely
to
burn out.
Replace
bulb.
Loose electric
connections. Check
all connections.
d)
Bulb burns out frequently.
Line voltage
selector switch is
not matched
with local mains
voltage.
Match
selector
switch
to
mains voltage.
Bulb
is
not
standard one.
Use standard bulb.
3.
Coarse and
Fine
Adjustments
a)
Coarse adjustment knob
is
too tight.
Tension adjustment ring
is
tightened too much.
Loosen ring
properly.
User
is trying
to
raise
stage
above
the
focusing
limit
im-
posed
by
the
engaged
pre-
focusing
lever.
Unlock
lever.
b)
Stage drops
or
specimen
goes
out of focus
during
observation
due
to
slipping
fine
adjustment knobs.
Tension adjustment
ring
is
too loose.
Tighten ring
properly.
c)
Stage cannot be
raised
to
the upper limit.
Pre-focusing
lever
is
engaged
in lower than focusing
posi-
tion.
Unlock
lever.
d)
Stage
cannot be lowered
to the
lower
limit.
Stage is
mounted
too
low.
Raise
stage
mount
with
Allen
wrench.
e)
Objective
front
lens hits
specimen before coming
into
focus.
Specimen is
placed
on
stage
upside down.
Reverse
specimen.
4. Observation
Tubes
a) Incomplete binocular
vi-
sion.
I
nterpupillary
d
istance is
not
correctly
adjusted.
Correct the interpupillary distance.
Diopter adjustment
is incom-
plete.
Complete
the
diopter
adjust-
ment.
Right
and left eyepieces
are
not matched.
Use a
pair
of matched eye-
pieces.
User
is
unaccustomed
to
bi-
nocular
vision.
Prior
to
looking
into the bi-
nocular observation
tube,
look
at
a
far
away object.
5.
Stage
a)
lmage easily
goes
out of
focus
when
you
touch
the
stage.
Stage
is
not
correctly
locked.
Clamp stage securely.
b)
Specimen stops
midway
on
the
east-west
traverse.
Specimen
is
not correctly
po-
sitioned.
Adjust specimen
position.
Page 22

 Loading...