

Page 1

533106K
Page 2

Page 3

CONTENTS
INTRODUCTION................................................................. 1
GETTING TO KNOW YOUR XSMALL............................... 2
KEYS AND FUNCTION ................................................ 2
KEYBOARD OPERATION............................................3
USING YOUR NEW XSMALL FOR THE FIRST TIME.......4
RESET.......................................................................... 4
USING THE XSMALL CASE ........................................5
TURN ON AND OFF.....................................................5
CONNECTING OR DISCONNECTING KEYBOARD ... 6
NAVIGATING THE XSMALL ........................................6
INFORMATION BAR ....................................................7
PERSONALIZATION .................................................... 7
USING THE TOOLS MENU ................................................ 8
PROTECTING DATA WITH A PIN NUMBER (OPT.)....... 10
ENTERING A PIN NUMBER ......................................10
ACCESSING LOCKED DATA ....................................10
CHANGING THE PIN NUMBER.................................11
REMOVING THE PIN NUMBER................................. 11
TIME AND ALARM MODES ............................................. 11
SETTING THE CLOCK...............................................12
SETTING WORLD CITY............................................. 14
SETTING ALARMS..................................................... 14
USING THE PHONE DIRECTORY................................... 15
ENTERING PHONE RECORDS................................. 15
VIEWING PHONE RECORDS.................................... 17
iii
Page 4

SEARCHING PHONE RECORDS..............................18
EDITING PHONE RECORDS..................................... 18
DELETING PHONE RECORDS ................................. 19
COPYING PHONE RECORDS................................... 19
USING THE SCHEDULE/ANNIVERSARY FUNCTION ...19
ENTERING SCHEDULE/ANNIVERSARY
RECORDS.................................................................. 19
VIEWING SCHEDULE/ANNIVERSARY
RECORDS ................................................................. 22
EDITING, DELETING AND COPYING
SCHEDULE/ANNIVERSARY RECORDS ................. 23
USING THE TO-DO MODE............................................... 23
ENTERING TO-DO RECORDS..................................23
VIEWING TO-DO RECORDS.....................................25
EDITING TO-DO RECORDS......................................25
DELETING AND COPYING TO-DO RECORDS ........ 25
USING THE MEMO FUNCTION ....................................... 26
ENTERING MEMO RECORDS .................................. 26
VIEWING, EDITING, DELETING AND COPYING
MEMO RECORDS .....................................................26
USING THE EXPENSE MANAGER .................................26
ENTERING EXPENSE RECORDS ............................26
VIEWING EXPENSE RECORDS ...............................27
CREATING EXPENSE REPORTS............................. 28
EDITING EXPENSE RECORDS ................................28
DELETING EXPENSE RECORDS............................. 28
USING THE METRIC CONVERSION FUNCTION ...........29
USING THE CURRENCY CONVERSION FUNCTION.....30
iv
Page 5

CONVERTING CURRENCIES ................................... 30
SETTING CURRENCY AND EXCHANGE RATES .... 30
EURO CONVERSION ................................................31
USING THE CALCULATOR FUNCTION .........................31
DATA COMMUNICATION WITH A P. C. .........................32
CHANGING BATTERIES.................................................. 33
GENERAL SPECIFICATIONS..........................................34
v
Page 6

INTRODUCTION
Thank you for purchasing Xsmall - the Card Size Organizer.
Please read this manual caref ully to famili arize yourself wit h the
organizer’s many features, and ensure years of reliable
operation.
NOTICE
.This product was not designed to bend or survive
extreme pressu re.
When in a bag or briefcase, make sure that it is stationary and
well padded and protected.
.To provide a longer product life, make sure the display is
covered to avoid scratching or damage when carrying the
product. We strongly suggest you use the organizer case
included with this product. Do not apply harsh chemicals or
water to the display. Al ways keep the unit in a dry place. Do
not store the product in environments where temperature
ranges can be extreme.
.We assume no responsibility for any damage or loss
resulting from the use of this manual.
.We strongly recommend that separate, permanent printed
records be kept of all important data
circumstances, such as exposure to an electrostatic discharge,
data may be lost or altered, or the unit may become inoperative
until reset. Therefore, we assume no responsibility for lost data
or otherwise ren de re d u nu sab le , wh e th er as a resu lt of impr ope r
use, repair, battery replacement, use after the specified battery
life has exp ired o r s imilar cau ses.
.We assume no responsibility, directly or indirectly, for financial
losses or clai ms from thi rd perso ns resulti ng from t he use of
this product and all of its func tions, s uch as stole n credit card
numbers, the loss or alteration of stored data, etc.
.The information provided in this manual is subject to change
without notice.
Do not carry it in your trouser pockets.
. Under certain
1
Page 7
GETTING TO KNOW YOUR XSMALL
KEYS AND FUNCTIONS
Eight keys are located on the front right side of the Xsmall.
From top to bottom:
Calculator
Currency and Euro conversion functions.
Menu on/off
functions provides a step back. Turns unit on/off when
pressed for 3 sec.
View
Enter
Cursor Keys
- toggles between Calculator, Metric,
- returns view to main screen. In some
- allows changing view.
- confirms entries.
down, left or right.
- move cursor up,
2
Page 8

KEYBOARD OPERATION
Certain keys on the keyboard provide more than one function. In
these cases, features are activated by touching [2
that specific key. The secondary characters or functions are
illustrated above the corresponding key on the keyboard and are
colored in white or gray. Additional features and c har-acters are
activated by touching [Ctrl] and t hen that specific key. I n these
cases, the characters or functions are illustrated above the
corresponding key on the keyboard and are colored in green.
A to Z
- alphabetic entries.
0 to 9
- numerical entries, special characters and access to
various modes using the [Ctrl] key or the [2
del
- deletes a character or record, and clears the entries
in the calculator.
enter
- confirms entries.
esc -
cancels the present operation or goes back to the
last view.
space
- puts a space between characters or words.
nd
2
- provides access to additional characters and
functions located above the keys.
Ctrl
- provides access to additional characters and
functions located above the keys.
caps -
upper case characters.
3
nd
] and then
nd
] key.
Page 9

edit/tools
- updates or changes a record's existing data.
<, >, ∧,∨, - Cursor Keys: moves the cursor left, righ t, up or down .
secret - allows for password entry or editing.
@ - alpha entry of the @ symbol
view - allows changing the view.
link - used for unit-to-PC data synchronization with
Organizer Link™ software.
Reset - refreshes the keyboard operations
USING YOUR NEW XSMALL FOR THE
FIRST TIME
Battery power must be established the first time you use the
organizer.
1. Turn the unit over; gently open the battery compartment.
There are 2 CR2032 batteries already installed in this unit.
2. Lightly hold the uncovered battery in place and remove the
mylar tab by pulling the it gently from under the batteries
3. Replace the battery door. If the unit is not on, turn it on by
pressing [menu-on/off] key.
NOTE: YOU MUST RESET THE UNIT BEFORE USING IT
FOR THE FIRST TIME. FOLLOW THE RESET INSTRUCTION.
RESET
1. Insert the pointed end of a paper clip into the small round
hole located at the back of the organizer next to the word
"RESET". Push gently.
2. The display will prompt: "Clear Data? (Yes/No)".
3. Use the cursor keys to highlight 'Yes' and touch the
[enter] key. This will initialize and activate the organizer.
NOTE: RESET WILL CLEAR THE MEMORY OF ALL
DATA AND SETTINGS.
4
.
Page 10

USING THE XSMALL CASE
In order to protect the product and provide you with an easy
way to handle it, a protective case is enclosed.
1. Make sure that the backside of the organizer is clean by
wiping it with a dry cloth.
2. Remove the adhesive strip cover exposing the adhesive
strip on the unit case.
3. Align the back of the product to the case and press gently
against the adhesive strap. Do not apply force.
4. To reposition or better align the organizer in the case,
gently detach it from the adhesive strip, reposition and
press gently again.
The flap to which the Xsmall is attached is flexible, providing
an easy access to the RESET recess in the back of the unit.
You can use the case to hold the organizer in a standing
position on a flat surface (such as an office desk) in order to
allow for easy access while using your keyboard.
Important Note: To protect your Xsmall, carry it in its
protective case at all times. Make sure that no glass, metal
or plastic items are placed against the display or inside the
case. In spite of being protected in its case, the Xsmall is an
electronic device, sensitive to extreme shock, pressure or
stress. Handle it with care and it will provide you with long
lasting useful operations.
TURN ON AND OFF
To turn the unit on, touch the menu key colored in green on
the right side of the unit. In order to turn the unit off press the
green menu key continuously for 3 seconds.
5
Page 11

The Xsmall has a built in power save mode that allows the
unit to shut down by itself when no key is touched. To set the
desired auto shut-off time, see the following section 'Using
the Tools Menu'.
CONNECTING OR DISCONNECTING THE
KEYBOARD
THE XSMALL MUST BE TURNED OFF WHEN
CONNECTING OR DISCONNECTING THE KEYBOARD!
Important Note: Do not apply force to the keyboard or to the
product connectors. The keyboard connector will slide easily
into the unit when in correct orientation. Make sure that the
small • reassessed symbol on the keyboard cable connector
is facing the BACKSIDE of the Xsmall.
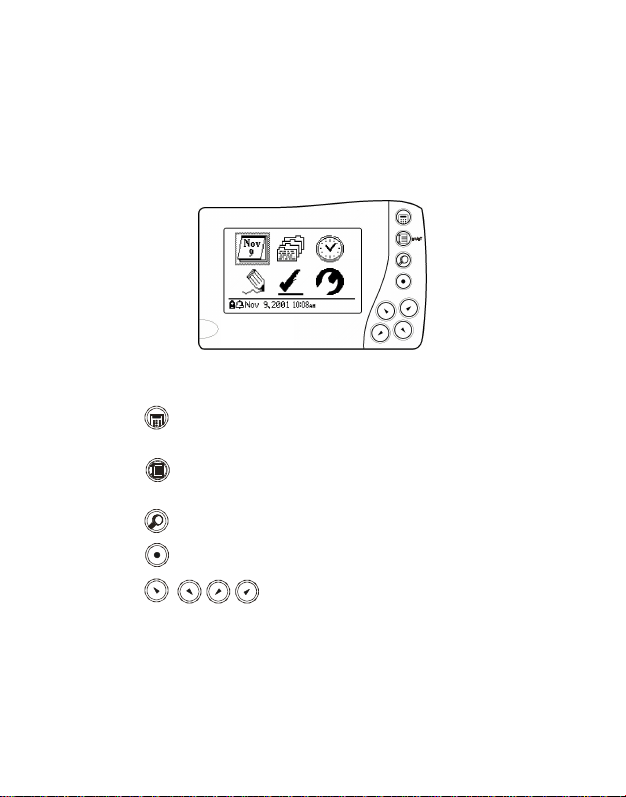
NAVIGATING THE XSMALL
The following is the main menu:
Upper line icons from left to right:
Schedule function, Phone Directory, Time and Alarm mode.
Lower line icons from left to right:
Memo function, To-do mode, Tools.
Use the directional arrow on the unit or keyboard to navigate
between functions. Use the [enter] or [Ctrl] keys and the
desired application on the keyboard in order to select the
organizer function. Touch [menu] or [esc] (on the keyboard)
to return to the main screen.
6
Page 12

INFORMATION BAR
The icons and text displayed at the bottom of the screen
provide useful information such as the status of the battery,
alarms, date/time and navigation within the organizer
functions. The following is a sample view of the information
bar:
From left to right:
1. A flashing battery icon indicates low battery.
2. An alarm bell icon indicates alarm is on.
3. Date/time displays home city’s date/time.
4. Function specific indicator: specifies field in the function or
availability of the [view] key for use.
5. Scroll options indicate more data available to view by
scrolling up and/or down.
PERSONALIZATION
You can enter your personal information into the product.
This is the only information accessible if a data protection
secret number (password) is set.
To enter your personal information:
1. In the main screen touch [view] to access the personalized
screen.
2. Touch [edit]. The bar at the left side of the screen flashes.
3. Use [esc] to clear text.
4. Use the keyboard to enter the desired information.
5. Use the directional arrows to move to the next line.
7
Page 13

6. Touch [enter] to save. An '*' symbol on the left of the first
line indicates that data is stored.
7. Touch [menu] or [esc] to return to the main screen.
To view personalized data, touch [view] in the main screen.
USING THE TOOLS MENU
The Tools function allows you to setup your preferences and
selected activities.
OPERATION DISPLAY
Select [tools] on the main
screen and touch [enter] or
touch the key [2
[Tools] on the keyboard.
Touch [∧] or [∨] to scroll
between the different
options.
Time Format
Touch [enter] and use [∧] or
[∨] to select 12/24 hour time
format. Touch [enter] to
save setting.
Date Format
Touch [enter] and use [∧] or
[∨] to select date format.
Touch [enter] to save
setting.
Alarm Sound
Touch [enter] and use [∧] or
[∨] to select sound on/off.
Touch [enter] to save
setting.
nd
] and
:
:
:
8
Page 14

Key Clicks Sound
:
Touch [enter] and use [∧] or
[∨] to select key sound
on/off. Touch [enter] to
save setting.
Auto Shut-Off
Touch [enter] and use [∧] or
[∨] to select desired shut-off
delay. Touch [enter] to save
setting.
Prompt Language
Touch [enter] and use [∧] or
[∨] to select desired
language.
Memory Free
This prompt gives you
information about your
available memory.
Touch [enter] to return to
the main screen.
Contrast Control
Touch [enter] and use [∧] or
[∨] to select desired
contrast. Touch [enter] to
save setting.
:
:
:
:
Synchronization
Connect PC cable. Touch [enter] and use [∧] or [∨] to
select 'yes'. Touch [enter] to start the data synchronization. After the synchronization, the option will automatically return to 'No'. Touch [enter] to return to the Tools
option selection. See the Organizer Link™ software
instructions for complete operation instructions.
:
9
Page 15

PROTECTING DATA WITH A PIN NUMBER
(OPTIONAL)
The pin number allows you to protect the Telephone,
Schedule, Anniversary, Memo and To-Do records from
unauthorized access.
ENTERING A PIN NUMBER
1. When in the main screen view, touch [ ] key to enter the
password protection mode. The display will show "Enter
new pin number:"
2. Type a 4 digit secret number using the numeric keys or
directional arrows.
3. The display will show "Are you sure? (Yes/No)".
4. Use the directional arrows to highlight Yes and touch
[enter] to confirm.
The next time the organizer is turned on; the pin number will
protect all records from unauthorized access. The only
available information for view is your personalized screen
(see Personalization above).
ACCESSING LOCKED DATA
1. When accessing Telephone Directory, Appointment,
Anniversary, To-do or Memo modes, the display will show
"Enter pin number:" Type the pin number using the
keyboard or scroll to display the secret number using the
directional arrows.
2. Touch [enter].
If the pin number is correct, all function modes can be
accessed. The correct pin number entry will only be required
again on the next power on cycle.
Note: When the wrong pin number is entered, the display will
show "Try again!"
10
Page 16

CHANGING THE PIN NUMBER
1. In the main menu touch [ ] to enter the pin number
protection mode. The display will show "Enter old pin
number:"
2. Input the correct secret number. Touch [enter].
3. Use [∨] to select "Edit pin number" and touch [enter].
4. From this point, the instructions are similar to entering a
new pin number.
REMOVING THE PIN NUMBER
1. In the main menu touch [ ] to enter the pin number
protection mode. The display will show "Enter old pin
number:"
2. Input the correct pin number. Touch [enter].
3. Use [∨] to select "Remove pin number" and touch [enter].
4. Display will return to last application. Data protection is
now removed.
WARNING:
WRITE DOWN YOUR PIN NUMBER AND STORE IT IN A
SAFE PLACE. PROTECTED ORGANIZER DATA
CANNOT BE ACCESSED WITHOUT ENTERING THE
CORRECT PIN NUMBER. IF YOU FORGET YOUR PIN
NUMBER, THE ORGANIZER WILL HAVE TO BE RESET.
RESETTING THE ORGANIZER WILL ERASE ALL DATA
IN THE ORGANIZER. WE DO NOT HAVE ANY “BACK
DOOR” METHODS TO ACCESS DATA IF IT IS PIN
NUMBER-PROTECTED.
TIME AND ALARM MODES
Xsmall's clock keeps track of two time zones: Home Time,
which is set to show local date and time and World Time
which shows the date, time and a three letter code of a
11
Page 17

selected World City. In addition, the home time shows 3
preset alarms.
To access Home Time, touch [enter] when the clock is
highlighted at the main screen view or use the [clock] key on
the keyboard.
Home time, city and country are shown on the left side of the
display in the Home time mode. On the right side, alarm
times of scheduled events are shown in the square window
under the date. The next alarm is highlighted.
To access World Time, touch [enter] at the Home Time view
or touch [2nd] and [w.time] key on the keyboard.
SETTING THE CLOCK
1. Select the Home Time mode.
2. Touch [view] to enter the Settings mode:
3. Use [enter] to enter the setting and the directional keys to
navigate within the Settings mode.
Time and Date
1. When 'Time and date' is highlighted in the Settings
screen, touch [enter].
12
Page 18

2. Time Settings: Use [∧] or [∨] to Scroll to the right time
(note: am/pm changes with scroll in 12hr time format).
Touch [>] when done to set the minutes and seconds in a
similar manner.
3. Touch [enter] or [>] in the seconds field to move the cursor
to the date settings. Enter current date information. Touch
[enter] when done.
4. Modify date fields using [∧] or [∨]. Move between date
fields by using [<] or [>].
5. Touch [enter] to confirm the new settings.
6. If data entered is not valid, display will show: 'ERROR!'
Home City
1. When 'Home City' is highlighted in the Settings screen,
touch [enter].
2. Use directional arrows to navigate and input city/country
information.
3.Touch [enter] to confirm.
Summer Time
Summer Time is provided for international reference only. It
is not Daylight Saving Time and should not be used for
Daylight Saving Time.
1. When 'Summer time' is highlighted in the Settings screen,
touch [enter].
2. Use directional arrows to navigate and input Summer
Time information in home and world cities.
3. Touch [enter] to confirm.
13
Page 19

SETTING WORLD CITY
1. Select the World Time mode by touching [enter] in the
Time mode.
2. Press [>] or [<] to enter the world city settings and select
the desired country and city.
3. Touch [enter] to confirm.
SETTING ALARMS
Three separate alarm options are provided. Each one of the
three alarms can be a daily or weekly reminder or a specified
date and time reminder.
Set time
1. Select Home Time mode.
2. Touch [view] to enter Settings mode.
3. Use [>] to highlight 'Set alarm' field. Touch [enter].
4. To input the alarm time for Alarm1, touch [enter].
5. To input the alarm time for Alarm2, touch [enter].
6. To input the alarm time for Alarm3, touch [enter].
Note: in order to input a new alarm, touch [∧] or [∨] to select
numerals and [<] or [>] to navigate.
14
Page 20

Repeat
1. Select the Home Time mode.
2. Touch [view] to enter the Settings mode.
3. Use [>] to highlight 'Repeat' field. Touch [enter].
4. Select occurrence option: Once, Weekly or Daily.
5. Select repeat option.
6. Touch [enter].
View Alarm
1. Select 'View alarm'. Touch [enter].
2. Use [<] or [>] or [enter] to view desired alarm.
3. Use [esc] to exit mode.
USING THE PHONE DIRECTORY
There are 3 separate directories:
Other.
There is an additional viewing directory:
directory is used to view all records from all 3 directories.
Each directory can store the following field names as one
record.
FIRST NAME, LAST NAME
Name:
COMPANY
Company:
Phone Numbers:
Address:
E-mail:
Note:
ENTERING PHONE RECORDS
Either
entered to be a valid record. The keyboard must be
connected to the product in order to enter or edit any
records. Records can also be entered using Organizer
Link™ PC software and synchronizing that information to the
unit.
HOME, WORK, FAX, CELL, PAGER
STREET, CITY, STATE, ZIP
E-MAIL
NOTE
LAST NAME
or the
Business, Personal
COMPANY
15
, and
All
. This last
48 characters max. each
48 characters max. each
48 characters max. each
48 characters max.
96 characters max.
96 characters max.
field must have data
Page 21

Operations Display
g
g
Select the Telephone
Directory on the main screen
or touch the [2
the keyboard to enter the
Telephone mode.
Touch the [edit] key, then
touch [enter].
Select Personal, Business or
Other to enter a new contact in
the desired directory by using
[∧] or [∨]. Touch [enter].
nd
] & [tel] key on
Input information and use [∧]
or [∨] to navi
fields. Use [enter] to store the
record.
Note: You cannot store a
record before enterin
name/company and at least
one phone number.
1. Records are sorted automatically in alphabetical order by
Last name.
2. If incorrect information is entered, touch [<] or [>] keys to
move the cursor and use the [del] and then alphabet keys
to make the correction.
3. Letter, number and symbol characters are valid entries all
contact fields including phone fields.
ate between
16
Page 22

VIEWING PHONE RECORDS
1. Select the Telephone Directory on the main screen on the
Xsmall or touch the [2
enter the Telephone mode function.
2.Touch [view] to select the desired directory. Use [∧] or [∨]
to select the directory. Touch [enter]. You can view the
current directory on the right side of the information bar at
the bottom of the display.
3. Use [<] or [>] to scroll through alphabetical ordered letter
tabs.
4. To go to a specific letter tab, touch the desired letter.
5. Use [∧] or [∨] to select the desired contact within a letter
tab. Touch [enter] to view the contact detailed information.
The Xsmall has a built in SmartVue feature that allows you to
highlight a contact field. In order to display a field in
SmartVue:
1. After finding the desired contact, touch [enter]. The first
field will be highlighted.
2. Use [∧] or [∨] to select the desired contact field. Touch
[enter].
3. The desired field is now displayed in
4. To go back to the regular contact view, touch [enter]
nd
] & [tel] key on the keyboard to
the SmartVue mode:
17
Page 23

SEARCHING PHONE RECORDS
The search of phone records is based on First Name, Last
Name or Company fields.
Sequential Search by Name
The contact records are alphabetically ordered. In order to
find a record using the sequential method see 'viewing
phone records' above.
Direct Search
Direct search of records is only available when the keyboard
is connected to the unit.
1. Select the Telephone Directory on the main screen or
touch the [2
Telephone mode.
2. Touch [0/Search] on the keyboard.
3. Display will show 'Search:'.
4. Input any character string from the record's first name, last
name or company (10 char max).
5. Touch [enter] to display results.
Note: The search is done on the first few characters of the
field (first name, last name or company). All corresponding
records will be displayed in the appropriate letter tab.
EDITING PHONE RECORDS
1. After finding the contact in the desired directory, touch
[enter] to view the contact details.
2. Touch the [edit] key and select 'Edit record'.
3. The first character of the name will flash.
4. Enter the corrections to the name field. Use [del] if
required. Use [∧] or [∨] to navigate between fields.
5. Touch [enter] to save after making all the desired
changes.
nd
] & [tel] key on the keyboard to enter the
18
Page 24

Note:
a. Touching any function or [on/off] while in the Edit mode
will cause the organizer to exit from Edit mode without
saving changes.
b. In the Edit Mode, touch [del] to delete individual
characters. Touch [esc] to delete a whole line.
DELETING PHONE RECORDS
1. To delete a record, search and view record details and
touch [edit]. Select 'Delete record' and touch [enter].
Display prompts, “Delete record?”.
2. Select 'Yes' and touch [enter] to confirm.
COPYING PHONE RECORDS
1. To copy a record, search and view the record
details.
2. Touch [edit]. Select 'Copy record'.
3. Touch [enter].
USING THE SCHEDULE/ANNIVERSARY
FUNCTIONS
ENTERING SCHEDULE/ANNIVERSARY
RECORDS
Operations Display
Select the Schedule function
on the main menu or touch the
nd
] & [anniv/schd] key on the
[2
keyboard to enter the day view
in the schedule mode. To
access anniversary touch [Ctrl]
19
Page 25

and [anniv/schd] on the
keyboard. In Schedule mode,
touch [view] once for the week
view. Touch [view] again for
month view. Select date by
using arrows.
When in month view, touch
[enter] to return to the day
view in the selected date.
In day view touch [edit] on the
keyboard. Touch [enter] to
create a new event.
Use [<] or [>] to select if time
entry is desired for event.
Use [∧] or [∨] to navigate
between fields. When Start
Time or End Time is
highlighted, a new time can be
entered. If Alarm is selected
for 'Yes', the Alarm Options
field becomes available.
To set alarm options; highlight
Alarm Options and touch
[enter]. Select your preferred
alarm time:
0-99 minutes before event.
When desired alarm options
are set and highlighted, touch
[enter].
20
Page 26

In order to set a recurring
event, touch [>] when
'Recurring' is highlighted and
touch [enter].
Note: Default recurring event
is ‘No’
Use [∧] or [∨] to navigate
between recurring event
options. Touch [enter].
The confirmation screen
allows you to modify repeat
frequency. When desired
frequency is entered, touch
[enter].
Note: When 'Repeat for' is set
for 0, the event will occur once
only.
Input desired event text. Touch
[enter] to save event.
NOTE:
1. The Schedule Alarm will sound for about 60 seconds
when the Home Time reaches the preset scheduled alarm
time. Alarm screen will show time, date and text entered
for event. Touch any key to stop the alarm.
21
Page 27

2. If the organizer is off, when the Home Time reaches the
schedule time, the Schedule Alarm will automatically turn
the unit on and the alarm will sound.
3. Once a recurring event is created, it is completely separa-
te from the original event. In order to change recurring
events, you have to go to each individual event and
modify or delete it.
VIEWING SCHEDULE/ANNIVERSARY RECORDS
Schedule/Anniversary records are sorted chronologically.
The records can be displayed on a daily, weekly and monthly
view. Follow these steps to review the scheduled events:
Daily View
1. Select the schedule on the main menu or touch the [2
and [anniv/schd] keys on the keyboard to enter the
Schedule /Anniversary mode.
2. First screen in Schedule/Anniversary mode is a daily view.
Use the search [∨] key to view the pending records for
same date.
3. Use [<] or [>] to view the previous or next day schedule.
4. Highlight an event and touch [enter] to view the complete
record information.
Weekly View
1. When in schedule/anniversary daily
key.
22
view, press the [view]
nd
]
Page 28

2. In weekly view, dark bars indicate planner events.
3. Use [<] or [>] to view the previous or next week’s
schedule.
4. To view the schedule for the first day of the week, touch
[enter].
Monthly View
1. When in the schedule/anniversary weekly view, press the
[view] key twice.
2. In the monthly view, the dates with planner events are
shown with a small arrow on their right. The current date
is highlighted.
3. Use [∧] or [∨] to view the previous or next month’s
schedule.
4. Use [<] or [>] to view the previous or next day.
5. Touch [enter] to view the highlighted day detailed
information.
EDITING, DELETING AND COPYING
SCHEDULE/ANNIVERSARY RECORDS
Same procedures as used in editing Telephone records.
USING THE TO-DO MODE
ENTERING TO-DO RECORDS
Operations Display
To enter the To-Do, select
the To-Do mode on the main
screen or touch the [2
[todo] key on the keyboard
mode. Touch [edit] to enter a
new task and then touch
[enter] when 'New Record' is
highlighted. The Priority field
nd
] &
23
Page 29

is then highlighted. Use [<] or
[>] to select the priority.
Touch [enter] or [∨] when
finished. Select the due date.
When a date is different than
today or tomorrow is desired,
select ‘Choose Date’ and
touch [enter]. Highlight the
date and touch [enter].
Enter the task text. Touch
[enter] to save the record.
NOTE:
1. Priorities can be selected on a level of 1 through 5.
2. The records are sorted in order of date, within their
respective priority levels. This order is maintained in the
'All' view even when a task is 'done'.
In order to mark a task ‘done’, view the task details and
touch [enter].
Touch [enter] again to mark a done task – pending.
In order to return to the To-do view, touch [menu] or [esc].
24
Page 30

VIEWING TO-DO RECORDS
1. Select the To-Do mode on the main menu or touch the
nd
[2
] and [todo] keys on the keyboard.
2. Touch [view] to select viewing pending, done or all tasks.
3. Select desired view and touch [enter]. Default view is ‘All’.
EDITING TO-DO RECORDS
1. When the task is in the full screen view, touch [edit] key.
2. Select ‘Edit Record’ and touch [enter].
3. Change the priority and due date as in Entering To-Do
Record above. Touch [enter].
4. Task text will appear. The bar will flash at the first
character in the text. Modify the text according to the
desired new task.
Note: When editing a task marked 'done', the task does not
automatically become pending. The 'done' mark has to be
removed by viewing the task details and touching [enter] as
shown above.
DELETING AND COPYING TO-DO RECORDS
Follow similar procedures as used for Deleting and Copying
Telephone records.
25
Page 31

USING THE MEMO FUNCTION
ENTERING MEMO RECORDS
1. To enter the Memo function, select the MEMO mode on
the main screen or touch the [2
keyboard mode.
2. Touch [edit] to enter a new memo. Touch [enter].
3. Enter the memo text. All alphanumeric entries are valid.
Touch [enter] to save the record.
Note: Records are sorted alphabetically.
nd
] & [memo] key on the
VIEWING, EDITING, DELETING AND COPYING
MEMO RECORDS
Follow the similar procedures as used for Viewing, Editing,
Deleting and Copying Telephone records.
USING THE EXPENSE MANAGER
The Expense Manager tracks personal or household expenses and provides expense summaries. You can enter, view,
search and edit the expense records in the 'Expe nse' mode.
Each expense record has seven fields: date, payment, type,
reference no., receipt, amount, and note. In addition, you can
change the name of the expense categories to suit your
specific needs.
ENTERING EXPENSE RECORDS
1. Touch the [calc] key on the Xsmall to toggle until the
Expense Manager mode is selected or touch the [2
[exp] key on the keyboard.
2. Use [∨] or [∧] keys to highlight one of three expense lists.
Touch [enter].
26
nd
] &
Page 32

3. Touch [edit] for date entry.
4. Touch [enter] for new expense item.
5. Select report date. If 'Choose date' is selected, use the
monthly view to highlight a desired date. Touch [enter].
6. Use [∨] or [∧] to select the appropriate payment method:
Cash, Check, Card and Other. Touch [enter].
7. Use [∨] or [∧] to select the appropriate expense type:
Meals, Hotel, Car, Phone, Fares, Enter't (entertainment),
Tips or Misc. (miscellaneous). Touch [enter] to confirm.
8. Input the expense reference number if applicable. Touch
[enter].
9. Touch [∨] if receipt is not available. Touch [enter] to
confirm.
10.Input expense amount. Touch [enter].
11.Input note if desired. Touch [enter] to complete the record.
VIEWING EXPENSE RECORDS
Follow the steps below to search for expense records.
Expense records are stored in chronological order. Use [∨]
or [∧] to find the record or in order to find an expense related
to the specific date (this method using the keyboard only):
1. Touch the [edit] key.
2. Select ‘Search’. Touch [enter].
27
Page 33

3. Enter the expense date and touch [enter].
Note: If the expense records are found on a specified date,
the first expense record will be displayed. If there is no
expense record on a specified date, "No Record!" will be
displayed.
CREATING EXPENSE REPORTS
You can generate a summary report of total expenses for
any specified period.
1. While in Expense mode, touch [edit].
2. Select ‘Total amount’. Touch [enter].
3. Input date range for expense report. Touch [enter].
4. Total amount is shown.
5. Touch [view] to see the total amount breakdown by
expense type.
6. Touch [menu] or [esc] to go back to the expense view.
EDITING EXPENSE RECORDS
1. In the Expense mode, select the desired expense item
and touch [edit].
2. Select ‘Edit record’. Touch [enter].
3. Modify record. Use the [∨] key to highlight the notes field.
Touch [enter] to save the changes.
DELETING EXPENSE RECORDS
1. In the Expense mode, select the desired expense item
and touch [edit].
2. Select ‘Delete record’. Touch [enter].
3. Display will prompt ‘Delete record?’ Select ‘Yes’ or ‘No’
and touch [enter] to confirm.
28
Page 34

USING THE METRIC CONVERSION
FUNCTION
1. Touch the [calc] key on the Xsmall two times or touch the
[conv] key on the keyboard.
2. Select the desired conversion. Touch [enter].
3. Use [view] to scroll within the conversion to select the
desired field conversion.
4. Use [<] or [>] to change conversion direction (Example
Meters to Feet or Feet to Meters). A small arrow on right
side of the physical measure, points at base quantity to be
converted.
5. Input quantity and touch [=] to complete the conversion.
6. The on-screen numeric pad is also available for data
entry.
To use the on-screen keypad:
.
Use [∨] or [∧] to select the desired digit and touch
[enter] to confirm.
.
Touch [=] and then [enter] to complete the conversion.
.
Touch [ce] and [enter] to clear all data.
Physical measures in Metric Conversion Function:
Length: 1 Inch = 2.54 cm, 1 yard = 0.9144 m, 1 yard = 3 feet,
1 mile = 1.609344 km
Area: 1 acre = 4046.85 ca
Volume: 1 gal US = 3.78541 liter, 1gal UK = 4.5609 liter
Weight: 1 lb = 0.45359237 kg, 1 st = 907.18475 kg,
1 lb = 16 ons, 1 ons = 28.3495 st
Temperature: 1 F = 9/5 C + 32, 1 K = C + 273
Calories: 1 cal = 4.1868 joule
Pressure: 1 psi = 6894.7573 pa
29
Page 35

USING THE CURRENCY CONVERSION
FUNCTION
Note: Before to use currency 1 and 2 you must set exchange
rates. Don’t change Euro exchange rates.
Touch the [calc] key on the Xsmall three times or touch the
nd
] and [conv] keys on the keyboard twice for Currency
[2
Conversion mode.
CONVERTING CURRENCIES
1. In currency view select the desired currency field
(currency 1/2/Euro) and touch [enter] key. Input amount.
2. Touch [=] for conversion.
3. Touch [ce] to clear entries.
4. On-screen numeric pad is also available for data entry.
To use the on-screen keypad:
y
Use [<] or [>] to select desired digit and touch [enter] to
confirm.
y
Select [=] and touch [enter] to complete conversion.
ySelect [ce] and touch [enter] to clear all data.
SETTING CURRENCY AND EXCHANGE RATES
Two different currencies can be preset for conversion.
Set Currency
1. In the currency view select currency for conversion
(currency 1 or 2) and touch [enter].
2. Touch [edit] or [view]. Select ‘Set Currency’. Touch [enter].
3. Use [<] or [>] to select the desired currency to be set as
base currency.
4. Touch [enter]. Currency will appear on top.
Set Rate
1. In the currency view, select the currency for conversion
(currency 1 or 2) and touch [enter].
30
Page 36

2. Touch [edit] or [view]. Select ‘Set Rate’. Touch [enter].
3. Input exchange rates for desired currencies. Use [<] or [>]
to navigate between currencies. Touch [=].
4. When finished, touch [edit] or [view] and select
‘Conversion’.
EURO CONVERSION
In the currency conversion view select ‘EURO’ and touch
[enter}.
The Euro conversion function operation is similar to the
Currency conversion function.
Euro conversion is preset for 11 currencies. The rate for 1
Euro is show in the following table:
Currency Symbol Rate
Austria ATS 13.7603
Belgium BEF 40.3399
Finland FIM 5.94573
France FRF 6.55957
Germany DEM 1.95583
Ireland IEP 0.787564
Italy ITL 1936.27
Luxembourg LUF 40.3399
Netherlands NLG 2.20371
Spain PTE 200.482
Portugal ESP 166.386
USING THE CALCULATOR FUNCTION
The 12-digit calculator function allows viewing of last 4
activities on the screen.
Functions include: addition (+), subtraction (-), multiplication
(x), division (/), square root (
), percentage (%), and sign
¥
31
Page 37

change (-/+). Memory storage with operations of M-, M+,
MR, and MC are also available.
Note:
y
Calculations are performed in order of entry, not by
algebraic conversion.
y
"M" on the display indicates a number is stored in memory.
y
"E" on the display indicates an error: a number longer than
12 digits or when divided by 0. Tap [ce/c] to clear the error.
y
[M+] adds the currently displayed value to the current
memory contents.
y
[M-] subtracts the currently displayed value to the current
memory contents.
y
[MR] Recalls the numbers stored in memory.
y
[MC] Clears the number after recall from memory.
y
[CE/C] clears all calculations from display.
In the Calculator mode, use of [2
basic arithmetic functions with the keyboard (example: touch
Q for plus).
The on-screen keyboard is available for quick calculations.
Use directional arrows on the Xsmall for navigation. Highlight
the desired digit or functions and touch [enter]. Touch [=] and
[enter] to finalize the calculation.
nd
] is not required to activate
DATA COMMUNICATION WITH A
PERSONAL COMPUTER
Telephone, Schedule, Anniversary, Memo, To-Do and
Expense data records can automatically be updated so the
Personal Computer (PC) and Xsmall have the same
information (full synchronization) using the Organizer Link™
software.
32
Page 38

In order to initiate the data synchronization follow these
directions:
1. Make sure that the appropriate software is installed and
running on your PC. Detailed instructions are provided
with the PC link software package.
2. Make sure that your Xsmall is linked to the serial port of
your PC using the PC-link cable. The PC cable connects
to the small plug at the lower left side of the Xsmall under
the Xsmall keyboard connector.
3. Touch the [link] key to start synchronization or select
synchronize in the Tools menu. Display will show
'Synchronizing…’
4. When synchronization is complete, the display will show
‘Successful Synchronization!’ and returns to the last
active mode.
CHANGING BATTERIES
The battery indicator on the Information Bar will flash when
the power level is low. The main battery needs to be
changed when the "BATTERY LOW" message appears on
the display. To change the batteries, do the following:
1. Turn off the unit.
2. Remove the upper battery power cover on the right side
of the Xsmall. Use a thin-flat object and press outwards
near the reassessed area of the cover.
NOTE: DO NOT APPLY FORCE TO THE BATTERY
COVER.
3. Remove the battery and insert a fresh CR2032 battery.
Make sure that you insert the new battery with (+) facing
the back of the Xsmall.
4. Replace the battery door and resume normal operation.
33
Page 39

5. Skip the RESET (do not clear data) in order to prevent
loss of previously stored data, and adjust the Home Time
clock.
WARNING
THIS UNIT USES LITHIUM BATTERIES (CR2032).
"CAUTION: DANGER OF EXPLOSION IF BATTERY IS
INCORRECTLY REPLACED. REPLACE ONLY WITH THE
SAME TYPE THAT IS RECOMMENDED BY THE
MANUFACTURER. DISPOSE OF USED BATTERIES
ACCORDING TO THE MANUFACTURER'S
INSTRUCTIONS."
GENERAL SPECIFICATIONS:
Power supply: Two lithium batteries (CR2032).
Ambient temperature range: 0°C – 40°C (32°F –104°F)
Dimension (unit): 60.1 x 91.1 x 7.7mm
Weight: 45g (1.6 oz) including batteries
1 Main and 1 Backup
2.37" x 3.59" x 0.3"
65g (2.3 oz) keyboard
34
 Loading...