

Page 1

Ref: 527714
Page 2

Il programma ENERGY STAR è stato istituito dal ministero per la protezione dell’ambiente
degli Stati Uniti per la riduzione del consumo di energia, in risposta alle esigenze di
salvaguardia ambientale per promuovere la progettazione e l’utilizzo di apparecchiature
per l’ufficio a più alto rendimento per energia assorbita.
The ENERGY STAR program is an energy reduction plan introduced by the United States
Environmental Protection Agency in response to environmental issues and for the purpose
of advancing the development and utilization of more efficient office equipment.
Das Programm 'ENERGY STAR' ist ein Energiesparplan der Umweltschutzbehörde (EPA) der
Vereinigten Staaten. Er wurde eingeführt, um zum Umweltschutz beizutragen; außerdem
dient der Plan dem Zweck, die Entwicklung und Verwendung von Bürogeräten mit
größerer Energieeinsparung zu fördern.
Le programme ENERGY STAR est un plan de réduction d’énergie présenté par l’Agence
pour la protection de l’Environnement des États-Unis afin de répondre aux problèmes
concernant l’environnement et pour encourager le développement et l’utilisation
d’équipement de bureau ayant un meilleur rendement énergétique.
El programa ENERGY STAR es un plan para reducir el consumo de energía, creado por la
Agencia de Protección del Medio Ambiente de los Estados Unidos como propuesta para
hacer frente a los problemas del medio ambiente y para avanzar en el desarrollo y uso de
equipos de oficina con mayor eficiencia energétic.
O programa ENERGY STAR é um plano de redução de energia introduzido pela Agência de
Protecção Ambiental dos Estados Unidos em resposta aos problemas ambientais e com o
objectivo de promover o desenvolvimento e a utilização de equipamentos para escritórios
mais eficientes do ponto de vista energético.
Het ENERGY STAR-programma is een energiebesparingsplan dat door de
milieubeschermingsorganisatie van de overheid van de Verenigde Staten is opgesteld als
antwoord op de milieuproblematiek met als doel de ontwikkeling en het gebruik van meer
energiebesparende kantoorapparatuur.
Olivetti S.p.A.
Gruppo Telecom Italia
Via Jervis, 77 - 10015 Ivrea (TO)
Italy
www.olivetti.com
I requisiti qualitativi di questo prodotto
sono attestati dall’apposizione della
marcatura sul prodotto.
Die Qualitätsanforderungen dieses Produkts
werden durch die -Kennzeichnung
bescheinigt, die am Produkt angebracht ist.
Les qualités requises pour ce produit sont
garanties par le label appliqué sur le
produit même.
Los requisitos de calidad de este producto
son atestiguados mediante la aplicación de
la Marca en il producto.
A marca afixada ao produto certifica que
o produto satisfaz os requisitos básicos
de qualidade.
Het CE-merk dat op dit product is
aangebracht getuigt ervan dat het product
aan de kwaliteitseisen voldoet.
Trademarks: Microsoft and Windows are registered trademarks
of Microsoft Corporation.
Other trademarks and trade names may be used in this document
to refer to either the entities claiming the marks and names or
their products. Olivetti disclaims any proprietary interest in
trademarks and trade names other than its own.
Date of publication: October 2006
Printed in Thailand
Realizado/Publicado/Fabricado por:
Samengesteld/Uitgegeven/Geproduceerd door:
Realizzato/Pubblicato/Prodotto da:
Edited/Published/Produced by:
Herausgegeben/Erschienenen/Erzeugt:
Edité/Publié/Produit par:
Realizado/Publicado/Producto:
Code: 527714
2006
Page 3

INDICE
iii
INDICE
GUIDA RAPIDA . . . . . . . . . . . . . . . . . . . . . . . . . . . . . . . . . . . . . . .1
PER INIZIARE . . . . . . . . . . . . . . . . . . . . . . . . . . . . . . . . . . . . . . . . . .2
Generalità . . . . . . . . . . . . . . . . . . . . . . . . . . . . . . . . . . . . . . . .2
Istruzioni inerenti la sicurezza . . . . . . . . . . . . . . . . . . . . . . . . . .2
Pulizia della stampante . . . . . . . . . . . . . . . . . . . . . . . . . . . . . . .3
Informazioni inerenti la qualità di stampa e la garanzia . . . . . . .3
Ricerca di informazioni . . . . . . . . . . . . . . . . . . . . . . . . . . . . . . .3
INSTALLAZIONE DELLA STAMPANTE VIA BLUETOOTH
(MODELLO BLUETOOTH) . . . . . . . . . . . . . . . . . . . . . . . . . . . . . . . . .4
Attivazione Bluetooth . . . . . . . . . . . . . . . . . . . . . . . . . . . . . . . .4
Installazione USB con stampa Bluetooth da computer
in ambiente Windows . . . . . . . . . . . . . . . . . . . . . . . . . . . . . . .5
Installazione Bluetooth da computer in ambiente Macintosh
. . . .5
Installazione Bluetooth per stampa da computer
in ambiente Windows . . . . . . . . . . . . . . . . . . . . . . . . . . . . . .5
PANNELLO FRONTALE DELLA STAMPANTE . . . . . . . . . . . . . . . . . . .7
Stati del pannello frontale della stampante . . . . . . . . . . . . . . . .9
Collegamento alla stampante di una macchina
fotografica digitale . . . . . . . . . . . . . . . . . . . . . . . . . . . . . . . .9
UTILIZZO DELLA STAMPANTE SENZA UN COMPUTER . . . . . . . . . .10
Copia di un documento . . . . . . . . . . . . . . . . . . . . . . . . . . . . .10
Creazione e stampa del Photo Index . . . . . . . . . . . . . . . . . . . .10
Stampa di foto da una macchina fotografica PictBridge . . . . .10
Stampa di foto da una macchina fotografica digitale DPOF
. . . .11
CARTUCCE D’INCHIOSTRO . . . . . . . . . . . . . . . . . . . . . . . . . . . . . .11
Verifica dei livelli d’inchiostro . . . . . . . . . . . . . . . . . . . . . . . . .11
Informazioni necessarie per l’acquisto di nuove
cartucce d’inchiostro . . . . . . . . . . . . . . . . . . . . . . . . . . . . . .11
Sostituzione delle cartucce d’inchiostro . . . . . . . . . . . . . . . . . .12
Page 4

INDICE
iv
UTILIZZO DELLA STAMPANTE DA UN COMPUTER . . . . . . . . . . . . .12
Prima di iniziare . . . . . . . . . . . . . . . . . . . . . . . . . . . . . . . . . . .12
Il Toolbox . . . . . . . . . . . . . . . . . . . . . . . . . . . . . . . . . . . . . . . .13
Il Monitor di stato della stampante . . . . . . . . . . . . . . . . . . . . .14
Stampa, copia e scansione mediante il Toolbox . . . . . . . . . . . .14
Stampa da un applicativo utilizzando proprietà di stampa . . . .16
Scansione di un originale da un applicativo . . . . . . . . . . . . . . .17
Scansione di un originale dal pannello frontale
della stampante . . . . . . . . . . . . . . . . . . . . . . . . . . . . . . . . . .18
INDICE ANALITICO. . . . . . . . . . . . . . . . . . . . . . . . . . . . . . . . . . . .19
Page 5

INDICE
v
DIRETTIVA 2002/96/CE SUL TRATTAMENTO, RACCOLTA, RICICLAGGIO E SMALTIMENTO
DI APPARECCHIATURE ELETTRICHE ED ELETTRONICHE E LORO COMPONENTI
INFORMAZIONI
1. PER I PAESI DELL'UNIONE EUROPEA (UE)
È vietato smaltire qualsiasi apparecchiatura elettrica ed elettronica come rifiuto solido urbano: è obbligatorio
effettuare una sua raccolta separata. L'abbandono di tali apparecchiature in luoghi non specificatamente
predisposti ed autorizzati, può avere effetti pericolosi sull'ambiente e sulla salute. I trasgressori sono soggetti
alle sanzioni ed ai provvedimenti a norma di Legge.
Per smaltire correttamente le nostre apparecchiature potete:
a Rivolgervi alle Autorità Locali che vi forniranno indicazioni e informazioni pratiche sulla corretta gestione
dei rifiuti, ad esempio: luogo e orario delle stazioni di conferimento, ecc.
b All'acquisto di una nostra nuova apparecchiatura, riconsegnare al nostro Rivenditore un'apparecchiatura
usata, analoga a quella acquistata.
Il simbolo del contenitore barrato, riportato sull'apparecchiatura, significa che:
• L'apparecchiatura, quando sarà giunta a fine vita, deve essere portata in centri di
raccolta attrezzati e deve essere trattata separatamente dai rifiuti urbani;
• Olivetti garantisce l'attivazione delle procedure in materia di trattamento, raccolta,
riciclaggio e smaltimento della apparecchiatura in conformità alla Direttiva 2002/96/
CE (e succ. mod.).
2. PER GLI ALTRI PAESI (NON UE)
Il trattamento, la raccolta, il riciclaggio e lo smaltimento di apparecchiature elettriche ed elettroniche dovrà
essere effettuato in conformità alle Leggi in vigore in ciascun Paese.
Page 6

INDICE
vi
Tutte le informazioni qui contenute sono soggette a modifiche senza preavviso. Olivetti S.p.A. non è responsabile per
perdite o danni, diretti o indiretti, derivanti da o connessi all'uso di questo manuale di istruzioni.
MIPC (Mobile Imaging and Printing Consortium)
Il MIPC è un’associazione di settore senza scopo di lucro fondata nel 2004 da Aziende leader nei settori della stampa
fotografica consumer e dei telefoni cellulari. La sua missione è di promuovere e supportare lo sviluppo di linee guida
che definiscano l’inter-operabilità e la stampa di immagini ed altri contenuti, tra Telefoni Cellulari e Stampanti. Queste
linee guida sono promosse internazionalmente per garantire agli utenti di telefoni cellulari un ampio spettro di prodotti
e servizi. http://www.mobileprinting.org
SIMPLE_WAY: Questo prodotto "Mobile Printing Ready" è stato progettato per facilitare la stampa di immagini da
Telefono Cellulare. Rispetta le linee guida del "Mobile Image Printing Consortium" (MIPC) - "Implementation
Guidelines for Home Printing with Mobile Terminals Versione 1.0", per: PictBridge.
SIMPLE_WAY Bluetooth: Questo prodotto "Mobile Printing Ready" è stato progettato per facilitare la stampa di
immagini da Telefono Cellulare. Rispetta le linee guida del "Mobile Image Printing Consortium" (MIPC) "Implementation Guidelines for Home Printing with Mobile Terminals Versione 1.0", per: Bluetooth, PictBridge.
SIMPLE_ WAY Wifi: Questo prodotto "Mobile Printing Ready" è stato progettato per facilitare la stampa di immagini
da Telefono Cellulare. Rispetta le linee guida del "Mobile Image Printing Consortium" (MIPC) - "Implementation
Guidelines for Home Printing with Mobile Terminals Versione 1.0", per: Wifi, PictBridge.
Page 7
GUIDA RAPIDA
1
GUIDA RAPIDA
PER INIZIARE
INSTALLAZIONE DELLA STAMPANTE VIA BLUETOOTH (MODELLO BLUETOOTH)
PANNELLO FRONTALE DELLA STAMPANTE
UTILIZZO DELLA STAMPANTE SENZA COMPUTER
CARTUCCE D’INCHIOSTRO
UTILIZZO DELLA STAMPANTE DA UN COMPUTER
INDICE ANALITICO
Page 8

GUIDA ALLA CONNETTIVITÀ WI-FI
2
PER INIZIARE
GENERALITÀ
Questo prodotto multifunzionale svolge le funzioni di stampante a getto di inchiostro ad alta qualità e di
scanner a colori formato A4 di tipo flat bed e consente la stampa, la scansione e la copia di documenti e
immagini in bianco e nero e colori.
La stampante multifunzionale è corredata di due testine, nera e colori, per le normali operazioni di stampa e
copia; per stampare fotografie ed ottenere una qualità comparabile a quella garantita dai laboratori fotografici
si consiglia di sostituire la testina nera con quella fotografica, venduta separatamente.
nota: Le cartucce d’inchiostro nero, colori e fotografico sono disponibili anche in versione Alta Capacità.
La stampante multifunzionale può essere utilizzata anche senza computer per effettuare copie e per
stampare fotografie semplicemente collegando la macchina fotografica digitale all’interfaccia USB sul
pannello frontale, inserendo una memoria USB nel relativo connettore o utilizzando il Photo Index. Il CD di
installazione contiene il software per la connessione al personal computer e per la gestione di documenti e
immagini, contiene anche il pratico applicativo Olivetti Toolbox che consente un rapido accesso a tutte le
funzionalità disponibili.
Il modello bluetooth consente di stampare direttamente le immagini catturate con il telefono cellulare via
Bluetooth.
Il modello wifi permette di utilizzare la modalità “senza fili” utilizzando la connessione Wi-Fi: La connettività
radio è integrata.
La prima installazione e l’eventuale configurazione della stampante multifunzione in modalità Wi-Fi avviene
sempre tramite il cavo USB, è poi possibile rimuovere il cavo e lavorare senza fili.
nota: Per l’installazione del modello wifi seguire le istruzioni riportate nel manuale Wi-fi Info.
ISTRUZIONI INERENTI LA SICUREZZA
Leggere e seguire scrupolosamente le seguenti informazioni ai fini della sicurezza:
• Utilizzare esclusivamente il cavo di alimentazione fornito insieme al prodotto, oppure un cavo di
alimentazione autorizzato dal produttore.
• Collegare il cavo di alimentazione ad una presa elettrica con messa a terra che si trovi in prossimità del
prodotto e che sia facilmente accessibile.
• Installare la stampante su una superficie piana e stabile, in una collocazione tale che non sia possibile
calpestare il cavo di alimentazione o inciamparvi.
• Non utilizzare la stampante in ambenti umidi, o con le mani bagnate.
• Non esporre la stampante a pioggia o umidità.
• Non cercare di smontare la stampante.
• Rispettare tutte le avvertenze e le istruzioni riportate direttamente sulla stampante.
• Leggere e seguire attentamente la documentazione fornita in dotazione con la stampante.
Page 9

GUIDA ALLA CONNETTIVITÀ WI-FI
3
PULIZIA DELLA STAMPANTE
• Pulire la carrozzeria utilizzando un panno morbido asciutto o inumidito con acqua tiepida per eliminare
polvere, sporco e macchie esclusivamente dalla carrozzeria esterna.
• Pulire con delicatezza il lato interno bianco della copertura superiore utilizzando un panno morbido
asciutto o inumidito con acqua tiepida.
• Pulire il piano di esposizione con un panno morbido inumidito con acqua tiepida o con un prodotto per
la pulizia dei vetri.
INFORMAZIONI INERENTI LA QUALITÀ DI STAMPA E LA GARANZIA
Al fine di garantire il corretto funzionamento della stampante e un’elevata qualità di stampa, è
fondamentale utilizzare esclusivamente cartucce Olivetti originali.
Olivetti declina qualsiasi responsabilità per danni alla stampante causati dalla manomissione o dalla
rigenerazione delle cartucce a getto d’inchiostro. Inoltre, tali azioni fanno decadere la garanzia.
RICERCA DI INFORMAZIONI
Parte Descrizione
Guida all’Installazione Collocata nell’imballo della stampante, fornisce le istruzioni per l’installazione
della stampante multifunzionale.
Guida rapida Questo documento, fornisce le informazioni necessarie per iniziare ad utilizzare
la stampante.
Guida utente Fornito sul CD-ROM “Installation” (“Installazione”), questo documento in
formato PDF può essere stampato in qualsiasi momento. Rispetto alla Guida
rapida, fornisce delle informationi più dettagliate riguardo i componenti della
stampante e fornisce le informazioni necessarie per la ricerca guasti.
Per accedere alla Guida utente da Windows, fare clic su Start > Programmi o
Tutti i programmi > Olivetti > SIMPLE_WAY Manual.
Online Help Fornito sul CD-ROM “Installation” (“Installazione”), l’Online Help è
automaticamente installato sul computer durante l’installazione dei driver.
Fornisce informazioni ancora più complete riguardo l’utilizzo della stampante ed
è attivabile dal pulsante Help nelle finestre di dialogo.
Funzionalità di aiuto nelle
finestre di dialogo
Fare click sul pulsante Help nelle finestre di dialogo per visualizzare le
informazioni riguardanti l’attuale schermata.
Foglio di garanzia Fornito nell’imballo della stampante, il Foglio di garanzia spiega le condizioni di
garanzia del prodotto e fornisce informazioni per contattare l’assistenza tecnica.
Page 10

GUIDA ALLA CONNETTIVITÀ WI-FI
4
INSTALLAZIONE DELLA STAMPANTE VIA BLUETOOTH (MODELLO BLUETOOTH)
E’ possibile stampare senza fili di connessione via Bluetooth se il computer è dotato di questa funzionalità
integrata o se è stato installato un dispositivo esterno Bluetooth (ad esempio una chiave Bluetooth USB). La
funzione Bluetooth sulla stampante deve essere attiva.
La portata del sistema Bluetooth è di norma circa 10 metri ma può variare a seconda delle caratteristiche
dell’ambiente in cui viene installato. La stampante supporta il sistema di comunicazione Bluetooth 1.2 Classe
2 per la connessione a computer e cellulari compatibili.
Le modalità di installazione variano in funzione del tipo di utilizzo della stampante.
ATTIVAZIONE BLUETOOTH
La Stampante è configurata per l’utilizzo del Bluetooth da telefono cellulare compatibile e non richiede alcun
tipo di installazione.
Per verificare se la funzionalità Bluetooth è disponibile controllare che sul pannello frontale sia acceso il led
blu dell’icona Bluetooth. Se il led blu dell’icona Bluetooth è spento procedere come segue:
• In ambiente windows:
1 Eseguire l’installazione USB come descritto nella documentazione “Installazione della stampante”
(Setting Up Your Printer).
nota: Se l’installazione è già stata eseguita non è necessario ripeterla.
2 Aprire il programma Toolbox (Start > Olivetti> Programmi> Toolbox).
nota: Il cavo USB deve essere collegato e la stampante deve essere accesa.
3 Cliccare sul bottone Impostazioni e poi su Impostazioni Bluetooth per accedere alla configurazione dei
parametri Bluetooth.
4 Abilitare la modalità Bluetooth e cliccare su Invia impostazioni: Attendere la ricezione automatica dei dati
della rete Bluetooth presente: Si accenderà la luce blu sulla stampante.
Chiudere il programma Toolbox.
5 Ora la stampante è in grado di operare in ambiente Bluetooth.
Se in fase di connessione viene richiesta una password inserire 0000 (o altra se impostata dall’utente).
• In ambiente Mac OS X:
1 Eseguire l’installazione USB come descritto nella documentazione “Installazione della stampante”
(Setting Up Your Printer).
nota: Se l’installazione è già stata eseguita non è necessario ripeterla.
2 Eseguire il programma To ol b ox dal desktop.
nota: Il cavo USB deve essere collegato e la stampante deve essere accesa.
3 Cliccare sul bottone Impostazioni e poi su Impostazioni Bluetooth per accedere alla configurazione dei
parametri Bluetooth.
4 Cliccare su Stato Bluetooth. Attivare la modalità Bluetooth e attendere la ricezione automatica dei dati
della rete Bluetooth presente: Premere Applica.
Chiudere il programma Toolbox.
5 Ora la stampante è in grado di operare in ambiente Bluetooth.
Se in fase di connessione viene richiesta una password inserire 0000 (o altra se impostata dall’utente).
Page 11

GUIDA ALLA CONNETTIVITÀ WI-FI
5
INSTALLAZIONE USB CON STAMPA BLUETOOTH DA COMPUTER IN AMBIENTE WINDOWS
E’ possibile stampare senza fili di connessione con il collegamento Bluetooth se il computer è dotato di
questa funzionalità integrata o se è stato installato un dispositivo esterno Bluetooth (ad esempio una chiave
Bluetooth USB). La funzione Bluetooth sulla stampante deve essere attiva (Led blu acceso).
1 Eseguire l’installazione USB come descritto nella documentazione “Installazione della stampante”
(Setting Up Your Printer).
2 Attivare la modalità Bluetooth sul Computer (dipende dal dispositivo Bluetooth installato).
Annotarsi la porta COM che il sistema Windows ha associato al canale Bluetooth (In ambiente Windows Xp
è disponibile nella systray l'icona Bluetooth per la ricerca dei dispositivi collegati; per gli altri sistemi operativi
consultare il manuale del produttore).
3 Aprire la cartella Stampanti e cliccare su Aggiungi Stampanti. Seguire le istruzioni per aggiungere una
stampante e selezionare Stampante locale o di rete successivamente Selezionare la porta stampante e
impostare la porta COM di comunicazione Bluetooth annotata in precedenza.
Selezionare Installa il software stampante ricercare e selezionare la stampante Olivetti modello
SIMPLE_WAY e aggiungerla all'elenco delle stampanti disponibili (quando viene verificata la presenza del
driver confermare
Mantieni il driver esistente).
Per maggiori informazioni sull’aggiunta di una stampante al sistema consultare la documentazione del
sistema operativo utilizzato.
INSTALLAZIONE BLUETOOTH DA COMPUTER IN AMBIENTE MACINTOSH
E’ possibile stampare senza fili di connessione con il collegamento Bluetooth se il computer è dotato di
questa funzionalità integrata o se è stato installato un dispositivo esterno Bluetooth (ad esempio una chiave
Bluetooth USB). La funzione Bluetooth sulla stampante deve essere attiva (LED blu acceso).
1 Per impostare la stampante in modalità Bluetooth selezionare Preferenze di sistema > Bluetooth.
2 Cliccare su Dispositivi e poi successivamente su Nuovo dispositivo.
Sullo schermo compare l’Impostazione Assistita Bluetooth.
3 Cliccare su Continua e poi selezionare il tipo di dispositivo: Stampante.
4 Continuare l’Impostazione Assistita selezionando Cerco la stampante, e poi seguire le istruzioni fornite
sullo schermo.
5 Assegnare alla stampante il nomeSIMPLE_WAY Bluetooth e terminare l’installazione.
INSTALLAZIONE BLUETOOTH PER STAMPA DA COMPUTER IN AMBIENTE WINDOWS
E’ possibile stampare senza fili di connessione con il collegamento Bluetooth se il computer è dotato di
questa funzionalità integrata o se è stato installato un dispositivo esterno Bluetooth (ad esempio una chiave
Bluetooth USB). La funzione Bluetooth sulla stampante deve essere attiva.
La connessione Bluetooth alla stampante avviene attraverso una porta COM disponibile sul sistema.
nota: Se è stata eseguita precedentemente un’installazione USB è necessario rimuoverla dal sistema prima di
procedere.
nota: Prima di procedere accertarsi che il sistema Bluetooth sia attivo e funzionante, in caso contrario fare
riferimento al produttore dell’hardware o alla documentazione specifica del prodotto installato.
Page 12

GUIDA ALLA CONNETTIVITÀ WI-FI
6
Con la connessione Bluetooth non è possibile utilizzare le funzioni di “copia” e di “scansione”, il
programma Toolbox non è disponibile. La funzione di “copia” si può eseguire dalla tastiera del pannello
frontale della stampante.
1 Attivare la modalità Bluetooth sul Computer (dipende dal dispositivo Bluetooth installato).
Annotarsi la porta COM che il sistema Windows ha associato al canale Bluetooth (In ambiente Windows Xp
è disponibile nella systray l'icona Bluetooth per la ricerca dei dispositivi collegati; per gli altri sistemi operativi
consultare il manuale del produttore).
2 Accendere il computer ed inserire il CD-ROM “Installation” nel drive.
3 Nella videata iniziale, selezionare la Lingua desiderata e fare clic su Avanti nella videata successiva
selezionare Bluetooth e seguire le istruzioni fornite sullo schermo.
nota: Se non viene visualizzata la videata d'installazione, fare clic su Start > Esegui > Sfoglia, selezionare il
drive del CD-ROM e fare clic su Setup.exe.
nota: Se è stata eseguita precedentemente un’installazione USB è necessario rimuoverla dal sistema prima di
procedere.
4 Quando viene richiesta la porta di comunicazione COM selezionare quella associata al Bluetooth che era
stata annotata in precedenza e completare l’installazione.
La stampante è stata aggiunta all’elenco delle stampanti disponibili sul sistema ed è ora in grado di operare
in ambiente Bluetooth.
ATTENZIONE: Con la connessione Bluetooth non è possibile utilizzare le funzioni di “copia” e
di “scansione”, il programma Toolbox non è disponibile. La funzione di “copia”
si può eseguire dalla tastiera del pannello frontale della stampante.
Page 13

GUIDA ALLA CONNETTIVITÀ WI-FI
7
PANNELLO FRONTALE DELLA STAMPANTE
456
710
811912
3
Simple
31
Bluetooth
32
Wifi
Riferimento Parte Descrizione
1 Icona Bluetooth
(modello bluetooth)
Si illumina di colore blu per indicare che la connettività Bluetooth è
attiva e disponibile per un collegamento.
2 Icona di rete
(modello wifi)
Si illumina di colore verde per indicare che è connesso alla rete Wi-Fi.
3 LED di stato USB per
connessione PictBridge
Si illumina di colore verde per indicare la connessione di una
macchina fotografica digitale o di una memoria USB (Mass Storage).
4 Pulsante di stampa
Si abilita quando una macchina fotografica digitale non Pictbridge
o una memoria USB (Mass Storage) è connessa all’interfaccia USB
sul frontale. In queste condizioni, se viene premuto è possibile
stampare il Photo Index.
5 Pulsante di selezione
Qualità
Consente di selezionare la qualità di stampa o di copia, la stampante
regola automaticamente la propria risoluzione di stampa (alta o
normale) a seconda della qualità scelta.
È consigliata la scelta della modalità foto se l’originale da copiare è
un’immagine o se si stampa su carta fotografica.
Page 14

GUIDA ALLA CONNETTIVITÀ WI-FI
8
6 Pulsante di copia B/N Premere questo pulsante per eseguire una copia in B/N. Premere e
tenere premuto per attivare la funzionalità "Adatta al formato".
Vedere "Copia di un documento".
7 Pulsante di copia a
colori
Premere questo pulsante per eseguire una copia a colori. Premere e
tenere premuto per attivare la funzionalità "Adatta al formato".
Vedere "Copia di un documento".
8 Contatore copie Visualizza il numero di copie selezionate. Il contatore diminuisce a
mano a mano che sono stampate le copie.
Lampeggia visualizzando una “E” per indicare uno stato di errore
sulla stampante.
9 Pulsante di selezione
copie
• Premere il segno Più (+) per incrementare il numero di copie
(max. 9) da effettuare.
• Premere il segno Meno (-) per diminuire il numero di copie (min.
1) da effettuare.
Il numero selezionato è visualizzato dal contatore copie.
10 Pulsante di scansione • Si abilita quando la stampante è collegata ad un computer.
• Premere questo pulsante per eseguire la scansione del
documento o della foto collocati sul piano di esposizione. Vedere
"Scansione dal pannello frontale". Sarà visualizzata una finestra
del Toolbox che consente di acquisire l’immagine direttamente
nell’applicativo desiderato e di personalizzare le impostazioni di
scansione.
11 Pulsante Annulla • Consente di annullare immediatamente una stampa, una
scansione o una copia in corso, provocando l’espulsione della
carta.
• Riporta le selezioni a quelle di fabbrica.
12 Pulsante On/Off
Consente di accendere e spegnere la stampante.
Quando la stampante è accesa si illumina e lampeggia durante la fase
di stampa. Se si verificano degli errori, per esempio manca la carta o
la cartuccia, lampeggia.
Riferimento Parte Descrizione
Page 15
GUIDA ALLA CONNETTIVITÀ WI-FI
9
STATI DEL PANNELLO FRONTALE DELLA STAMPANTE
Premere il pulsante On/Off presente nella parte destra del pannello frontale.
nota: prima di agire sul pulsante On/Off, accertarsi che il cavo di alimentazione sia collegato ad una presa di
corrente con messa a terra. Per le informazioni inerenti l’installazione della stampante, vedere la Guida
all’Installazione fornito con la stessa.
Dopo aver premuto il pulsante On/Off, la stampante esegue una serie di test autodiagnostici aventi lo scopo
di rilevare eventuali malfunzionamenti del sistema. Qualsiasi errore rilevato in questa fase sarà segnalato dal
pannello frontale, oppure dal personal computer collegato alla stampante.
Al termine della fase di auto-diagnosi e in assenza di rilevamento di errori, si illumina il pulsante On/Off.
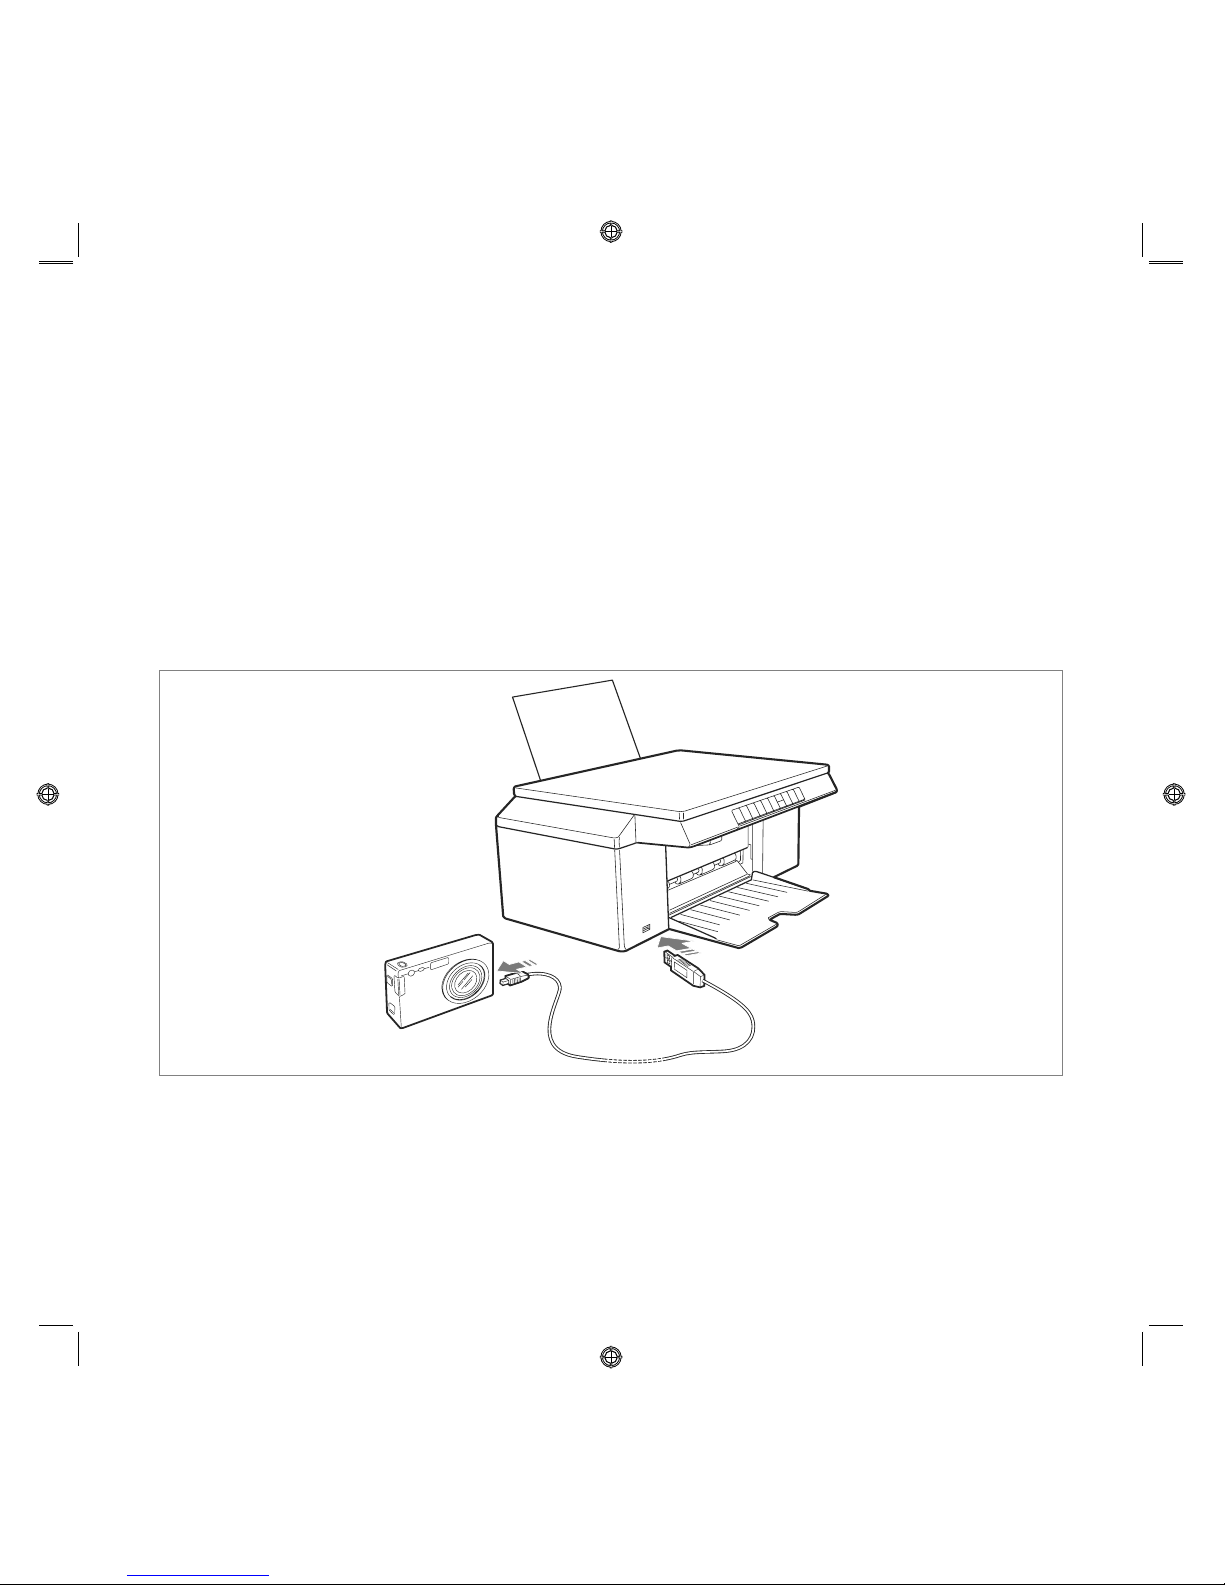
COLLEGAMENTO ALLA STAMPANTE DI UNA MACCHINA FOTOGRAFICA DIGITALE
1 Accendere la macchina fotografica digitale. Per maggiori informazioni, leggere la Guida Utente della
macchina fotografica.
2 Con la stampante accesa, collegare un’estremità del cavo USB della macchina fotografica al suo connettore
USB e l’altra estremità del cavo al connettore USB presente nel pannello frontale della stampante.
Il LED verde di stato USB si accende per indicare il collegamento di una macchina fotografica digitale o di una
memoria USB. Se la stampante non riconosce la macchina fotografica collegata, il Led rimane spento.
Page 16

GUIDA ALLA CONNETTIVITÀ WI-FI
10
UTILIZZO DELLA STAMPANTE SENZA UN COMPUTER
COPIA DI UN DOCUMENTO
1 Accendere la stampante.
2 Caricare la carta di stampa.
3 Sollevare la copertura del piano di esposizione e collocare il documento sul piano stesso e con il lato da
copiare rivolto verso il basso. Accertarsi che l’angolo superiore sinistro del documento o della foto sia
allineato con l’angolo superiore sinistro del piano di esposizione.
4 Abbassare la copertura del piano di esposizione.
5 Selezionare la qualità di copia, Foto o Normale, premendo il pulsante di selezione Qualità. Per copiare un
testo normale in bianco e nero oppure un documento misto bianco e nero e a colori, selezionare normale.
Per copiare una foto oppure un documento contenente delle foto, scegliere foto.
6 Per eseguire più di una copia, premere più volte il segno Più (+) del pulsante di Selezione copie fino alla
visualizzazione del numero di copie sul contatore.
7 Premere il pulsante Copia B/N o Copia a colori a seconda delle necessità.
nota: Se il formato della carta di stampa non corrisponde al formato dell’originale, premere e tenere
premuto il pulsante Copia B/N o Copia a colori per attivare la funzionalità “Adatta al formato”.
La stampante regolerà automaticamente il formato dell’originale affinché corrisponda al formato della carta
caricata.
CREAZIONE E STAMPA DEL PHOTO INDEX
Quando un dispositivo non PictBridge è collegato alla stampante e quando non sono associati alle immagini
archiviate file DPOF, sul pannello frontale della stampante è attivo il pulsante di Stampa. Premendo il
pulsante Stampa senza aver effettuato alcuna selezione delle immagini visualizzate si avvia la stampa del
Photo Index.
nota: È indispensabile avere nel supporto carta della carta in formato A4.
Il Photo Index contiene le immagini con i bordi in formato miniatura 5x4 e sotto ad ognuna di esse c’è uno
spazio per la selezione del numero delle copie che può variare da 1 a 4; al fondo della pagina l’utente può
scegliere se eseguire la stampa con o senza bordi, e i formati intero, 2x1, 4x1.
Il Photo Index, compilato con le selezioni desiderate, deve essere posizionato sul piano di esposizione dello
scanner e la stampa si avvia premendo per alcuni secondi il pulsante di Stampa.
La stampante riconosce il Photo Index posizionato sul piano di esposizone e le foto selezionate saranno
stampate come indicato. La qualità di stampa deve essere impostata dal pannello frontale della stampante
mentre l’immagine verrà adattata automaticamente al formato carta presente nell’alimentatore carta.
Il Photo Index può essere riutilizzato più volte; per poterlo riutilizzare bisogna avere lo stesso dispositivo, le
stesse foto posizionate nello stesso ordine, ed il dispositivo collegato alla stampante.
STAMPA DI FOTO DA UNA MACCHINA FOTOGRAFICA PICTBRIDGE
Per ottenere i migliori risultati di stampa delle foto, si consiglia di installare la cartuccia a colori e la cartuccia
foto e di utilizzare la carta fotografica. Vedere "Sostituzione delle cartucce d’inchiostro".
1 Accertarsi che la macchina fotografica digitale PictBridge sia accesa e collegata alla stampante. Per maggiori
informazioni, vedere "Collegamento alla stampante di una macchina fotografica digitale".
Page 17

GUIDA ALLA CONNETTIVITÀ WI-FI
11
2 La stampa è gestita direttamente dalla macchina fotografica. Pertanto, per le istruzioni inerenti la procedura
di stampa delle foto, leggere la Guida Utente della macchina fotografica.
Durante il processo di stampa, il pulsante di stampa lampeggia.
nota: Se il formato della carta caricata differisce dal formato selezionato dalla macchina fotografica digitale,
le stampe saranno eseguite in modo inappropriato.
Se questa funzione non è disponibile sulla macchina fotografica, la stampa viene eseguita utilizzando il
formato carta presente nel vassoio.
STAMPA DI FOTO DA UNA MACCHINA FOTOGRAFICA DIGITALE DPOF
La stampante è in grado di riconoscere le informazioni DPOF associate ai file delle foto. In caso di
collegamento ad una macchina fotografica digitale DPOF, la stampante stamperà le foto selezionate
direttamente dalla macchina.
nota: Prima di stampare le foto, leggere la Guida Utente della macchina fotografica per accertarsi che sia
compatibile DPOF.
Per ottenere i migliori risultati di stampa delle foto, si consiglia di installare la cartuccia a colori e la cartuccia
foto e di utilizzare la carta fotografica.
Vedere "Sostituzione delle cartucce d’inchiostro".
1 Accertarsi che la macchina fotografica digitale DPOF sia accesa e collegata alla stampante. Per maggiori
informazioni, vedere "Collegamento alla stampante di una macchina fotografica digitale".
2 Selezionare la qualità di stampa a seconda delle proprie necessità.
3 Premere il pulsante di Stampa sul pannello frontale per stampare le foto. Per maggiori informazioni, vedere
"Pannello frontale della stampante".
nota: Se il formato della carta caricata differisce dal formato selezionato dalla macchina fotografica digitale,
le stampe saranno eseguite in modo inappropriato.
Se questa funzione non è disponibile sulla macchina fotografica, la stampa viene eseguita utilizzando il
formato carta presente nel vassoio.
CARTUCCE D’INCHIOSTRO
VERIFICA DEI LIVELLI D’INCHIOSTRO
La verifica dei livelli di inchostro è disponbile dall’applicativo Toolbox quando la stampante e collegata al
computer. In alternativa è possibile, utilizzare l’applicativo “Monitor di stato”, presente nell’elencodei
programmi Olivetti oppure sulla barra di stato di Windows per avere maggiori informazioni.
INFORMAZIONI NECESSARIE PER L’ACQUISTO DI NUOVE CARTUCCE D’INCHIOSTRO
Al fine di garantire il corretto funzionamento della stampante e un’elevata qualità di stampa, è fondamentale
utilizzare esclusivamente cartucce Olivetti originali.
Utilizzare i seguenti codici di prodotto per l’acquisto delle cartucce:
• Cartucca d’inchiostro nero, codice IN501
• Cartuccia d’inchiostro a tre colori, codice IN503
• Cartuccia d’inchiostro fotografica, codice IN505
• Cartucca d’inchiostro nero ad alta capacità, codice IN502
• Cartuccia d’inchiostro a tre colori ad alta capacità, codice IN504
• Cartuccia d’inchiostro fotografica ad alta capacità, codice IN506
Page 18

GUIDA ALLA CONNETTIVITÀ WI-FI
12
ATTENZIONE: Le cartucce sono da intendersi per un solo utilizzo.
SOSTITUZIONE DELLE CARTUCCE D’INCHIOSTRO
Per la sostituzione delle cartucce d’inchiostro fare riferimento alla Guida di Installazione.
Nel caso in cui si sostituisse la cartuccia nera con la cartuccia fotografica, e viceversa, riporre quella non
utilizzata nel garage.
UTILIZZO DELLA STAMPANTE DA UN COMPUTER
PRIMA DI INIZIARE
Installare la stampante come descritto nella Guida all’Installazione.
Il software d'installazione permette di scegliere il tipo di connessione desiderata per utilizzare la stampante.
Le connessioni disponibili sono:
• USB: Per stampare, copiare ed eseguire la scansione utilizzando la connessione USB.
• Wi-Fi: Solamente per il modello wifi, per stampare, copiare ed eseguire la scansione in modalità Wi-Fi
utilizzando la connessione senza fili di tipo wireless.
nota: Questa sezione fornisce le informazioni di base necessarie per utilizzare la stampante quando è
collegata ad un computer. Per maggiori informazioni sulle funzionalità offerte, leggere l’Online Help o la
Guida utente.
Per accedere all’Online Help da Windows:
• Selezionare il pulsante Help nelle finestre di dialogo.
Per accedere alla Guida utente:
• Fare clic su Start > Programmi o Tutti i programmi > Olivetti > SIMPLE_WAY Manual.
Page 19

GUIDA ALLA CONNETTIVITÀ WI-FI
13
IL TOOLBOX
Il Toolbox è un’applicativo che consente di stampare, copiare ed eseguire la scansione direttamente da una
singola interfaccia utente sul monitor del computer. Permette anche di inviare via fax il documento
sottoposto a scansione dalla stampante multifunzionale a condizione che sul computer, dotato di modem,
sia installato un applicativo per fax.
Per il modello wifi è possibile impostare i paramentri necessari per accedere ad una rete Wi-Fi.
Incluso nel CD-ROM "Installation", il Toolbox è installato automaticamente sul computer quando è installato
il software contenuto in questo CD-ROM.
Dalla videata principale del Toolbox, è possibile:
• Stampare immagini ed effettuare copie.
• Eseguire la scansione di documenti o foto e scegliere la destinazione dell’immagine sottoposta a scansione.
• Conoscere la quantità d’inchiostro rimanente nelle cartucce installate.
• Accedere alla funzionalità Soluzioni e Assistenza, che consente di:
– Pulire e verificare gli ugelli delle cartucce.
– Allineare automaticamente le cartucce d’inchiostro per migliorare la qualità di stampa.
– Reperire l’indirizzo del sito web del produttore, dove è possibile accedere alle informazioni necessarie
all’acquisto di nuove cartucce d’inchiostro.
– Accedere alle informazioni inerenti la ricerca guasti.
• Accedere alla funzionalità Impostazioni che consente di personalizzare le impostazioni di fabbrica del
Toolbox.
• Accedere alla funzionalità Impostazioni di rete per la modalità wireless (modello wifi)
• Accedere alla funzionalità Impostazioni di rete per la modalità Bluetooth (modello bluetooth).
• Per accedere al Toolbox:
1 Fare clic sul pulsante destro del mouse sull’icona Olivetti nella barra delle applicazioni di Windows, oppure
fare clic su Start > Programmi o Tutti i programmi > Olivetti > Olivetti Toolbox.
Sarà visualizzata la videata del Toolbox.
Page 20

GUIDA ALLA CONNETTIVITÀ WI-FI
14
IL MONITOR DI STATO DELLA STAMPANTE
Il Monitor di stato della stampante fornisce informazioni sullo stato corrente della stampante ed è installato
in modo permanente quando viene installato il software contenuto nel CD-ROM "Installation"
(“Installazione”).
Visualizzato automaticamente all’inizio di un’operazione di stampa o copia, il Monitor di stato si chiude
automaticamente al termine dell’operazione di stampa o copia, ma può essere chiuso in qualsiasi momento
attraverso la relativa icona nella barra delle applicazioni di Windows.
Se il Monitor di stato è chiuso durante un’operazione di stampa o copia, sarà automaticamente visualizzato
nuovamente nelle seguenti condizioni:
• Quando la stampante è nella condizione di quasi fine inchiostro o di fine inchiostro. Un punto esclamativo
colorato indicherà la condizione di basso livello d’inchiostro (a colori, nero o entrambi) e le percentuali
relative. Saranno visualizzate finestre a comparsa, con l’indirizzo del sito web del produttore dove è possibile
accedere alle informazioni necessarie all’acquisto di nuove cartucce d’inchiostro.
• Quando si verificano situazioni di errore, in questo caso è possibile scegliere se continuare o se annullare
l’operazione di stampa facendo clic sul relativo pulsante visualizzato sullo schermo.
STAMPA, COPIA E SCANSIONE MEDIANTE IL TOOLBOX
La sezione principale del Toolbox comprende le icone che rappresentano i vari strumenti disponibili.
Icona del Toolbox: è possibile:
Stampa foto • Scorrere l’hard disk o la memoria della macchina fotografica digitale non-
PictBridge/DPOF collegata al computer, per cercare la cartella contenente le
foto da stampare.
• Selezionare tutte le foto salvate nella cartella oppure le singole foto
desiderate, quindi scegliere quante copie stampare.
• Selezionare il tipo e il formato di carta su cui stampare.
• Selezionare se stampare le foto su una pagina singola, oppure due foto su
una pagina o quattro su una pagina.
• Stampare un indice delle foto.
• Stampare le foto selezionate.
Page 21

GUIDA ALLA CONNETTIVITÀ WI-FI
15
Fotocopiatrice • Definire le caratteristiche del tipo di documento da copiare.
• Selezionare il tipo e il formato di carta su cui stampare.
• Definire la qualità di copia.
• Schiarire o scurire la copia e selezionare la copia B/N o a colori.
• Selezionare il layout della copia stampata: Eseguire copie multiple della
stessa immagine su una pagina singola; effettuare copie formato poster
definendo il numero di pagine su cui adattare l’immagine copiata; riprodurre
l’immagine copiata il numero di volte necessario senza ridimensionare
l’immagine, oppure stampare semplicemente l’immagine copiata su una
singola pagina.
• Ingrandire o ridurre il documento o la foto da copiare, oppure regolare
automaticamente la dimensione in modo da adattarlo al formato di carta
selezionato.
• Selezionare il numero di copie da eseguire.
Acquisisci in un file
Acquisisci in un applicativo
Acquisisci in una e-mail
Acquisisci in un fax
• Eseguire la scansione di un’anteprima del documento o della foto collocato
sul piano di esposizione.
• Utilizzare gli appositi comandi di selezione per delimitare l’area
dell’anteprima che si desidera sottoporre a scansione.
• Ruotare, ribaltare, ingrandire o ridurre l’immagine di anteprima.
• Definire il tipo di documento da sottoporre a scansione e selezionare la
modalità a colori pieni, sfumature di grigio o bianco e nero.
• Definire la risoluzione, l’intensità del colore, la luminosità e il contrasto
dell’immagine sottoposta a scansione.
A seconda dello strumento selezionato:
• Acquisisci in un file: Salva l’immagine sottoposta a scansione in formato
TIFF (.tif), bitmap (.bmp) o JPEG (.jpg) in una cartella del computer.
• Acquisisci in un applicativo: Esegue la scansione del documento o della
foto in un applicativo selezionabile (come un programma di grafica, un word
processor o un desk-top publisher).
• Acquisisci in una e-mail: Allega il documento o la foto sottoposto a
scansione, in formato .jpg compresso, ad un messaggio di posta elettronica
aperto dall’applicativo e-mail di default del computer.
• Acquisisci in un fax: Esegue la scansione del documento o della foto, in
formato .jpg compresso, in un applicativo fax selezionabile.
Icona del Toolbox: è possibile:
Page 22

GUIDA ALLA CONNETTIVITÀ WI-FI
16
L’interfaccia utente principale del Toolbox fornisce anche i link a Help, Soluzioni e assistenza, e Impostazioni.
STAMPA DA UN APPLICATIVO UTILIZZANDO PROPRIETÀ DI STAMPA
1 Con il documento o la foto aperti nell’applicativo in uso, fare clic su File > Stampa per aprire la finestra di
dialogo Stampa.
2 Fare clic su Preferenze o Proprietà, a seconda del sistema operativo utilizzato.
Sarà visualizzata l’interfaccia utente del driver della stampante dalla quale è possibile utilizzare la stampante
multifunzionale, come indicato nella seguente tabella:
Link del Toolbox: è possibile:
Help • Visualizzare ulteriori informazioni sull’elemento correntemente visualizzato.
Soluzioni e assistenza • Pulire e verificare le cartucce d’inchiostro.
• Allineare automaticamente le cartucce.
• Reperire l’indirizzo del sito web del produttore, dove è possibile accedere
alle informazioni necessarie all’acquisto di nuove cartucce d’inchiostro.
• Accedere alle informazioni inerenti la ricerca guasti.
• Accedere alle informazioni inerenti contatti vari.
Impostazioni • Modificare le impostazioni di default inerenti il Toolbox.
Preferenze/Proprietà: è possibile:
Carta/Qualità • Selezionare manualmente la composizione del documento da stampare:
Solo testo nero o grafica, combinazione di testo nero o grafica a colori o
foto, solo foto; oppure impostare il rilevamento automatico dell’originale
come una combinazione di testo nero o grafica a colori o foto.
• Selezionare il tipo di carta da utilizzare, le dimensioni della carta, se caricarla
manualmente oppure se stampare senza bordi su carta patinata, lucida o su
cartoline.
• Selezionare la qualità di stampa.
• Selezionare la stampa delle foto a colori realistici (in qualità fotografica)
quando è caricata carta fotografica ed è selezionato Foto come tipo di
documento.
• Scegliere di stampare in B/N o a colori.
• Definire il numero di copie da stampare, iniziando o meno dall’ultima
pagina.
Page 23

GUIDA ALLA CONNETTIVITÀ WI-FI
17
SCANSIONE DI UN ORIGINALE DA UN APPLICATIVO
1 Collocare il documento o la foto sul piano di esposizione con il lato da sottoporre a scansione rivolto verso il
basso e allineato con l’angolo superiore sinistro del piano stesso.
2 Acquisire l’immagine dall’applicativo in uso.
Sarà visualizzata la videata dell’interfaccia utente del driver dello scanner con un’anteprima a bassa
risoluzione del documento o dell’immagine sul lato sinistro dello schermo.
Quindi, è possibile:
• Utilizzare l’apposito comando di selezione per delimitare l’area dell’anteprima da sottoporre a scansione.
• Ruotare, ribaltare a specchio, ingrandire o ridurre l’anteprima.
• Eseguire la scansione di una nuova anteprima nel caso in cui l’originale venga accidentalmente rimosso dal
piano di esposizione.
• Eseguire la scansione finale secondo le impostazioni effettuate.
Layout • Impostare la stampa delle singole pagine del documento, o foto, su una
singola pagina.
• Decidere se stampare su pagine multiple o su un singolo foglio di carta.
• Definire l’ordine con cui le pagine multiple saranno inserite sul singolo foglio
di carta, e impostare o meno l’inserimento di un bordo attorno alle singole
immagini sul singolo foglio di carta.
• Impostare la stampa di pagine multiple in formato poster, espandendo
quindi il contenuto di una singola pagina su più di un foglio di carta.
• Definire il numero di fogli su cui stampare l’immagine del poster selezionata
e decidere se inserire o meno un bordo attorno a ciascuna immagine di cui si
compone il poster.
Livelli d’inchiostro • Visualizzare la quantità stimata di inchiostro rimanente nelle cartucce nera e
a colori.
• Avere un link diretto alla videata Manutenzione del Toolbox, che consente di
visualizzare informazioni sulla manutenzione e sulla ricerca guasti.
• Avere un link diretto all’indirizzo del sito web del produttore, dove è
possibile accedere alle informazioni necessarie all’acquisto di nuove cartucce
d’inchiostro.
Preferenze/Proprietà: è possibile:
Page 24

GUIDA ALLA CONNETTIVITÀ WI-FI
18
Sul lato destro dell’interfaccia del driver dello scanner, personalizzare le impostazioni come indicato nella
seguente tabella:
SCANSIONE DI UN ORIGINALE DAL PANNELLO FRONTALE DELLA STAMPANTE
1 Collocare il documento o la foto sul piano di esposizione con il lato da sottoporre a scansione rivolto verso il
basso e allineato con l’angolo superiore sinistro del piano stesso.
2 Premere il pulsante di Scansione sul pannello frontale della stampante.
Viene eseguito l’applicativo Toolbox in modalità Copia ed effettuata una prescansione.
AL termine, viene visualizzato il programma Toolbox con la possibilità di scegliere “Acquisisci in un file”,
“Acquisisci in un applicativo”, “Acquisisci in una e-mail”, “Acquisisci in un fax”.
Selezionare il tipo di destinazione per l’acquisizione. Terminare l’operazione usando la finestra di dialogo
visualizzata.
Driver dello scanner: è possibile:
Standard • Definire la composizione del documento sottoposto a scansione:
Solo testo o grafica nero, combinazione di testo nero o grafica a colori o
foto, o solo foto.
• Impostare se eseguire la scansione a colori pieni, in grigio o in B/N.
Personalizzato • Selezionare la risoluzione di scansione.
• Selezionare il numero di colori distinti che possono essere rappresentati in
numero di bit (Intensità colore).
• Schiarire o scurire l’immagine da sottoporre a scansione, aumentarne o
diminuirne il contrasto.
• Attivare un filtro per omogeneizzare lo sfondo dell’immagine, ad esempio
quando sono scansionate le pagine di giornale.
Page 25

19
INDICE ANALITICO
A
Acquisto di nuove cartucce
d’inchiostro 11
Attivazione Bluetooth 4
in ambiente Mac OS X 4
in ambiente windows 4
B
Bluetooth 4, 5, 7
C
Cartucce d’inchiostro 11
livelli d’inchiostro 11
sostituzione 12
Collegamento alla
stampante di una
macchina fotografica
digitale 9
Contatore copie 8
Copia 14
a colori 8
B/N 8
di un documento 10
G
Garanzia 3
I
Installazione Bluetooth in
ambiente Windows 5
Installazione USB stampa
Bluetooth in ambiente
Windows 5
L
LED di stato USB 7
Link del Toolbox 16
help 16
impostazioni 16
soluzioni e assistenza 16
Livelli d’inchiostro 11, 17
M
Monitor di stato 14
P
Pannello frontale della
stampante 7, 9
contatore copie 8
copia a colori 8
copia B/N 8
icona Bluetooth 7
icona di rete wireless 7
LED di stato USB 7
pulsante di selezione copie 8
scansione 8
selezione Qualità 7
stampa 7
Photo Index 10
Preferenze/Proprietà 16
carta/qualità 16
layout 17
livelli d’inchiostro 17
Q
Qualità 7
Page 26

INDICE ANALITICO
20
S
Scansione 8, 14, 17
Selezione copie 8
Sostituzione delle cartucce
d’inchiostro 12
Stampa 7, 10, 14
del Photo Index 10
delle fotografie
da scheda di memoria 10
Stampa di fotografia
da una macchina fotografica
digitale DPOF 11
da una macchina fotografica
PictBridge 10
T
Toolbox 13, 14
acquisisci in un applicativo 15
acquisisci in un fax 15
acquisisci in un file 15
acquisisci in una e-mail 15
fotocopiatrice 15
stampa foto 14
W
Wireless 7
Page 27

CONTENTS
i
CONTENTS
1 QUICK REFERENCE GUIDE . . . . . . . . . . . . . . . . . . . . . . . . . . . . . .1
GETTING STARTED . . . . . . . . . . . . . . . . . . . . . . . . . . . . . . . . . . . . .2
Overview . . . . . . . . . . . . . . . . . . . . . . . . . . . . . . . . . . . . . . . . .2
Safety Instructions . . . . . . . . . . . . . . . . . . . . . . . . . . . . . . . . . .2
Printer Cleaning . . . . . . . . . . . . . . . . . . . . . . . . . . . . . . . . . . . .3
Information on Print Quality and Your Printer Warranty . . . . . .3
Finding Information . . . . . . . . . . . . . . . . . . . . . . . . . . . . . . . . .3
INSTALLING THE PRINTER VIA BLUETOOTH
(BLUETOOTH MODEL) . . . . . . . . . . . . . . . . . . . . . . . . . . . . . . . . . . .4
Activating Bluetooth . . . . . . . . . . . . . . . . . . . . . . . . . . . . . . . . .4
USB Installation and Bluetooth Printing from
Computer in the Windows Environment . . . . . . . . . . . . . . . .5
Bluetooth Installation from Computer in
Macintosh Environment . . . . . . . . . . . . . . . . . . . . . . . . . . . .5
Installing Bluetooth for Printing from Computer in
Windows Environment . . . . . . . . . . . . . . . . . . . . . . . . . . . . . .5
PRINTER FRONT PANEL . . . . . . . . . . . . . . . . . . . . . . . . . . . . . . . . . .7
Printer Front Panel States . . . . . . . . . . . . . . . . . . . . . . . . . . . . . .9
Connecting a Digital Camera to Your Printer . . . . . . . . . . . . . .9
USING YOUR PRINTER WITHOUT A COMPUTER . . . . . . . . . . . . . .10
Copying a Document . . . . . . . . . . . . . . . . . . . . . . . . . . . . . . .10
Creating and Printing of the Photo Index . . . . . . . . . . . . . . . .10
Printing Photos from Your PictBridge Digital Camera . . . . . . .11
Printing Photos from a DPOF Digital Camera . . . . . . . . . . . . . .11
INK CARTRIDGES . . . . . . . . . . . . . . . . . . . . . . . . . . . . . . . . . . . . .11
Checking Ink Levels . . . . . . . . . . . . . . . . . . . . . . . . . . . . . . . .11
Information Required When Purchasing New Ink Cartridges . .11
Replacing Ink Cartridges . . . . . . . . . . . . . . . . . . . . . . . . . . . . .12
Page 28

CONTENTS
ii
USING YOUR PRINTER FROM A COMPUTER . . . . . . . . . . . . . . . . .12
Before You Begin . . . . . . . . . . . . . . . . . . . . . . . . . . . . . . . . . .12
The Toolbox . . . . . . . . . . . . . . . . . . . . . . . . . . . . . . . . . . . . . .13
The Printer Status Monitor . . . . . . . . . . . . . . . . . . . . . . . . . . .14
Printing, Copying and Scanning from the Toolbox . . . . . . . . . .14
Printing from an Application Using Print Properties . . . . . . . . .16
Scanning an Original from Your Application . . . . . . . . . . . . . .17
Scanning an Original from the Printer Front Panel . . . . . . . . . .18
INDEX . . . . . . . . . . . . . . . . . . . . . . . . . . . . . . . . . . . . . . . . . . . . . .19
Page 29

CONTENTS
iii
DIRECTIVE 2002/96/CE ON THE TREATMENT, COLLECTION, RECYCLING AND DISPOSAL OF
ELECTRIC AND ELECTRONIC DEVICES AND THEIR COMPONENTS
INFORMATION
1. FOR COUNTRIES IN THE EUROPEAN UNION (EU)
The disposal of electric and electronic devices as solid urban waste is strictly prohibited: it must be collected
separately. The dumping of these devices at unequipped and unauthorized places may have hazardous
effects on health and the environment. Offenders will be subjected to the penalties and measures laid down
by the law.
To dispose of our devices correctly:
a Contact the Local Authorities, who will give you the practical information you need and the instructions
for handling the waste correctly, for example: location and times of the waste collection centres, etc.
b When you purchase a new device of ours, give a used device similar to the one purchased to our dealer
for disposal.
The crossed dustbin symbol on the device means that:
• When it to be disposed of, the device is to be taken to the equipped waste
collection centres and is to be handled separately from urban waste;
• The manufacturer guarantees the activation of the treatment, collection, recycling
and disposal procedures in accordance with Directive 2002/96/CE (and subsequent
amendments).
2. FOR OTHER COUNTRIES (NOT IN THE EU)
The treatment, collection, recycling and disposal of electric and electronic devices will be carried out in
accordance with the laws in force in the country in question.
Page 30

CONTENTS
iv
All information included herein is subject to change without notice. Olivetti S.p.A. is not responsible for any loss or
damages, direct or indirect, arising from or related to the use of this operation manual.
MIPC (Mobile Imaging and Printing Consortium)
The MIPC is a non-profit industry association founded in 2004 by leading companies in home photo printing and the
mobile phone industry. Its mission is to promote and support the development of interoperability guidelines enabling
printing of images and other content between mobile phones and home printers. The guidelines are promoted for use
internationally to ensure a broad spectrum of products and services for mobile phone consumers.
www.mobileprinting.org.
SIMPLE_ WAY: This Mobile Printing Ready product is designed to provide easy printing from mobile phones. This
product follows Mobile Imaging and Printing Consortium (MIPC) Implementation Guidelines for Printing with Mobile
Terminals, Version 1.0, for : PictBridge.
SIMPLE_ WAY Bluetooth: This Mobile Printing Ready product is designed to provide easy printing from mobile
phones. This product follows Mobile Imaging and Printing Consortium (MIPC) Implementation Guidelines for Printing
with Mobile Terminals, Version 1.0, for: Bluetooth, PictBridge.
SIMPLE_ WAY Wifi: This Mobile Printing Ready product is designed to provide easy printing from mobile phones. This
product follows Mobile Imaging and Printing Consortium (MIPC) Implementation Guidelines for Printing with Mobile
Terminals, Version 1.0, for: WiFi, PictBridge.
Page 31

QUICK REFERENCE GUIDE
1
QUICK REFERENCE GUIDE
GETTING STARTED
INSTALLING THE PRINTER VIA BLUETOOTH (BLUETOOTH MODEL)
PRINTER FRONT PANEL
USING YOUR PRINTER WITHOUT A COMPUTER
INK CARTRIDGES
USING YOUR PRINTER FROM A COMPUTER
INDEX
Page 32

QUICK REFERENCE GUIDE
2
GETTING STARTED
OVERVIEW
This multi-functional tool performs the functions of a high quality ink-jet printer and of a flat-bed type A4
format colour scanner, allowing documents and images in colour and black and white, to be printed,
scanned and copied.
The printer is equipped with two ink cartridges, black and colour, for normal printing and copy operations.
To obtain a quality compatible with that of a photo lab when printing photos, the black ink cartridge can be
replaced with the photographic ink cartridge, sold separately.
note: The black, colour and photographic ink cartridges are also available in a High Capacity version.
The multi-functional printer can also be used without a computer to make copies and print photographs by
simply connecting the digital camera to the USB interface on the front panel, inserting a USB memory into
the related connector or using the Photo Index. The installation CD contains the software necessary for
personal computer connection and managing documents and images; it also contains the Olivetti Toolbox
application allowing rapid access to all features available.
The Bluetooth model allows you to directly print images captured by a mobile phone using Bluetooth.
The Wi-Fi model can be used in "wireless" mode via a Wi-Fi connection: radio connectivity is integrated.
Initial installation and configuration of the multi-functional printer in Wi-Fi mode is always carried out using
the USB cable; after which you can remove the cable and work in wireless mode.
note: To install the Wi-Fi model, follow the instructions provided in the Wi-Fi Info manual.
SAFETY INSTRUCTIONS
In the interests of saftey, read and follow attentively the instructions below:
• Use only the power cable supplied with this product, or a power cable authorised by the manufacturer.
• Connect the power cable to a grounded electrical outlet that is near the product and easily accessible.
• Install your printer on a flat, stable surface, in a location where no one can step on or trip over the power
cable.
• Do not use your printer in humid environments or with wet hands.
• Do not expose your printer to rain or moisture.
• Do not attempt to disassemble your printer.
• Observe all warnings and instructions marked on your printer.
• Read and understand all the documentation supplied with your printer.
Page 33

QUICK REFERENCE GUIDE
3
PRINTER CLEANING
• Clean the printer casing using a soft dry cloth or moistened with tepid water to remove dust, dirt or smears
from the printer outer casing only.
• Clean gently the white inner side of the top cover with a soft dry cloth or moistened with tepid water.
• Clean the scanner glass with a soft cloth moistened with tepid water or with a glass cleaning solution.
INFORMATION ON PRINT QUALITY AND YOUR PRINTER WARRANTY
To guarantee correct operation of your printer and top quality printing, you should only use original Olivetti
ink cartridges.
Olivetti declines any responsibility for damage to your printer caused by tampering with, or refilling the inkjet cartridges. Such actions also lead to forfeiture of the Warranty.
FINDING INFORMATION
Part Description
Installation guide Located in the printer packaging, this document provides instructions for setting
up your multi-functional printer.
Quick Reference Guide This printed document provides the basic information needed to get you started
right away.
User Guide Provided on the "Installation" CD-ROM, this document comes in PDF format so
you can print it at your own convenience. With respect to the Quick Reference
Guide, it includes more detailed information on your printer’s components and
troubleshooting assistance. To access the User Guide from Windows, click Start
> Programs or All programs > Olivetti > SIMPLE_WAY Manual.
Online Help Provided on the "Installation" CD-ROM, the Online Help is automatically
installed on your computer when you install the drivers.
Supplying more complete information on using the printer, it
can be activated using the Help button in the dialogue boxes.
Dialogue box Help Click the Help button in the software dialogue boxes to view information
regarding the screen you are currently using.
Warranty Card Provided in the printer packaging, the Warranty Card provides product warranty
conditions, and contact information for product servicing.
Page 34

QUICK REFERENCE GUIDE
4
INSTALLING THE PRINTER VIA BLUETOOTH (BLUETOOTH MODEL)
Printing on the Bluetooth wireless connection is possible if this capability is integrated in the computer or if
an external Bluetooth device has been installed (e.g. a Bluetooth USB pen). The Bluetooth function must be
active on the printer.
The range of the Bluetooth system is usually around 10 meters but may vary according to the characteristics
of the environment in which it is installed.
The printer supports the Bluetooth 1.2 Class 2 communication system for connection to compatible
computers and cellphones.
Installation methods vary according to printer use.
ACTIVATING BLUETOOTH
The printer is configured for using Bluetooth from compatible cellphones and does not require any type of
installation.
To verify whether the Bluetooth capability is available, check that the blue LED of the Bluetooth icon is ON.
If the blue LED of the Bluetooth icon is OFF, proceed as follows:
• In the Windows environment
1 Carry out USB installation as described in the documentation entitled "Setting up your printer".
note: If installation has already been performed, it is not necessary to repeat it.
2 Open the Toolbox program (Start > Olivetti > Programs > Toolbox).
note: The USB cable must be connected and the printer must be ON.
3 Click the Settings button and then Bluetooth Settings to access Bluetooth parameter configuration.
4 Enable Bluetooth mode and click Send settings: wait for automatic reception of the data of the Bluetooth
network present: the blue light on the printer turns on.
Close the Toolbox program.
5 The printer can now operate in the Bluetooth environment.
If a password is requested during the connection phase, type 0000 (or any other if defined by the user).
• In the Mac OS X environment:
1 Carry out USB installation as described in the documentation "Setting up your printer".
note: If installation has already been performed, it is not necessary to repeat it.
2 Run the Toolbox program from the desktop.
note: The USB cable must be connected and the printer must be ON.
3 Click the Settings button and then Bluetooth Settings to access Bluetooth parameter configuration.
4 Click Bluetooth Status. Activate Bluetooth mode and wait for automatic reception of the data of the
Bluetooth network present: press Apply.
Close the Toolbox program.
5 The printer is now able to operate in the Bluetooth environment.
If a password is requested during the connection phase, type 0000 (or any other if defined by the user).
Page 35

QUICK REFERENCE GUIDE
5
USB INSTALLATION AND BLUETOOTH PRINTING FROM COMPUTER IN WINDOWS ENVIRONMENT
Printing on the Bluetooth wireless connection is possible if this capability is integrated in the computer or if
an external Bluetooth device has been installed (e.g. a Bluetooth USB pen). The Bluetooth function must be
active on the printer (blue LED on).
1 Carry out USB installation as described in the documentation entitled "Setting up your printer.
2 Activate Bluetooth mode on the computer (depends on the Bluetooth device installed).
Make a note of the COM port that the Windows system has associated with the Bluetooth channel (in the
Windows XP environment, the Bluetooth icon is available in the systray allowing you to search for the
devices connected; for other operating systems, consult the manufacturer's manual).
3 Open the Printers folder and click on Add Printers. Follow the instructions to add a printer and select
Local or network printer then Select the printer port and set the Bluetooth communication COM port
noted previously.
Select Install printer software, locate and select the Olivetti SIMPLE_WAY printer model and add it to the
list of available printers (when the presence of the driver is checked, confirm Maintain existing driver).
For further information on how to add a printer to the system, refer to the documentation of the operating
system used.
BLUETOOTH INSTALLATION FROM COMPUTER IN MACINTOSH ENVIRONMENT
Wireless mode printing is possible via the Bluetooth connection if the computer is fitted with this integrated
capability or if an external Bluetooth device has been installed (for example a Bluetooth pen). The Bluetooth
function on the printer must be active (blue LED on).
1 To set the printer to Bluetooth mode, select System preferences > Bluetooth.
2 Click Devices and then New device.
The "Bluetooth Guided Setting" appears on the screen.
3 Click Continue and then select the type of device: Printer.
4 Continue Guided Setting selecting Search for the printer, and then carry out the instructions provided on
the screen.
5 Assign the printer the name SIMPLE_WAY Bluetooth and complete installation.
INSTALLING BLUETOOTH FOR PRINTING FROM COMPUTER IN WINDOWS ENVIRONMENT
Printing on the Bluetooth wireless connection is possible if this capability is integrated in the computer or if
an external Bluetooth device has been installed (e.g. a Bluetooth USB pen).
The Bluetooth function must be active on the printer.
The Bluetooth connection to the printer is made via a COM port available on the system.
note: If a USB installation has been carried out previously, you must remove it from the system before
proceeding.
note: Before continuing, make sure that the Bluetooth system is active and functioning; otherwise contact
the hardware manufacturer or consult the specific documentation for the product installed.
With the Bluetooth connection, it is not possible to use the "copy" and "scan" functions; the Toolbox program
is not available. You can run the "copy" function from the front panel keypad of the printer.
Page 36

QUICK REFERENCE GUIDE
6
1 Activate Bluetooth mode on the computer (depends on the Bluetooth device installed).
Make a note of the COM port that the Windows system has associated with the Bluetooth channel
(in the Windows XP environment, the Bluetooth icon is available in the systray allowing you to search for the
devices connected; for other operating systems, consult the manufacturer's manual).
2 Switch on the computer and insert the "Installation" CD-ROM in the drive.
3 In the initial screen page, select the Language you want and click Next; in the next screen page, select
Bluetooth and follow the instructions shown on the screen.
note: If the installation screen page is not displayed, click on Start > Execute > Browse, select the drive of
the CD-ROM and click Setup.exe.
note: If a USB installation has been carried out previously, you must remove it from the system before
proceeding.
4 When you are requested for the COM communication port, select the one assigned to Bluetooth as noted
previously and complete installation.
The printer has been added to the list of printers available on the system and can now operate in the
Bluetooth environment.
WARNING: With the Bluetooth connection, you can not use the "copy" and "scan" functions;
the Toolbox program is not available. You can run the "copy" function from the
front panel keypad of the printer.
Page 37

QUICK REFERENCE GUIDE
7
PRINTER FRONT PANEL
Reference Part Description
1 Bluetooth icon
(Bluetooth model)
Blue light indicates that Bluetooth connectivity is active and available
for a connection.
2 Network icon
(Wi-Fi model)
Green light indicates that it is connected to the Wi-Fi network.
3 USB status LED for
PictBridge connection
Green light indicates that a digital camera or a USB memory (Mass
Storage) is connected.
4 Print button Enabled when a non PictBridge digital camera or a USB memory
(Mass Storage) is connected to the USB interface on the front panel.
If button is pressed in these circumstances the Photo Index can be
printed.
5 Quality selection button Allows you to select print or copy quality, the printer automatically
regulates its print resolution (high or normal) according to the quality
selected.
You are advised to select photo mode if the original you are copying
is an image or if you are printing on photographic paper.
Page 38

QUICK REFERENCE GUIDE
8
6 B/W copy button Press this button to make a copy in B/W. Press and hold down to
activate the "Adapt to Format" function.
See "Copying a Document".
7 Colour copy button Press this button to make a colour copy. Press and hold down to
activate the "Adapt Colour to Format" function.
See "Copying a Document".
8 Copy counter Displays the number of copies selected. The counter decreases
gradually as copies are printed.
In the case of a printer error condition, flashes displaying an "E".
9 Copy selection button • Press the Plus (+) sign to increase the number of copies (max. 9)
to be made.
•Press the Minus (-) sign to reduce the number of copies (min. 1)
to be made.
The number selected is displayed by the copy counter.
10 Scan button • Enabled when the printer is connected to a computer.
• Press this button to scan the document or photo placed on the
exposure bed.
See "Scanning from the Front Panel". A Toolbox window will be
displayed to allow you to save the image directly in the desired
application or to personalize the scan settings.
11 Cancel button • Allows you to immediately cancel an on-going print or copy
operation, causing the paper to be ejected.
• Restores selections to factory settings (default values).
12 On/Off button Press to power the printer On/Off.
This button is lit when the printer is On, and flashes during printing
operations. It also flashes when an error occurs, such as paper or
cartridge out.
Reference Part Description
Page 39

QUICK REFERENCE GUIDE
9
PRINTER FRONT PANEL STATES
Press the On/Off button on the right side of the front panel.
note: Before operating the On/Off button, make sure that the power supply cable is connected to a
grounded power outlet. For information regarding printer installation see its accompanying Installation
Guide.
After pressing the On/Off button, the printer performs a series of auto-diagnostic tests to detect any possible
system malfunctions. Any error detected during this phase will be indicated on the front panel or on the
personal computer connected to the printer.
At the end of the auto-diagnostic phase if no errors are detected, the On/Off button comes on.
CONNECTING A DIGITAL CAMERA TO YOUR PRINTER
1 Turn on your digital camera. Read your camera’s User’s Guide for more information.
2
With the printer powered on, plug one end of the digital camera’s USB cable to the USB connector on
the camera and the other end to the USB connector on the printer front panel.
The USB status green LED comes on to indicate that a digital camera or a USB memory is connected. If the
printer does not recognise that a camera connected, the LED remains off.
Page 40

QUICK REFERENCE GUIDE
10
USING YOUR PRINTER WITHOUT A COMPUTER
COPYING A DOCUMENT
1 Turn on your printer.
2 Load the paper to print on.
3 Open the top cover and place the document you want to copy face down on the scanner glass. Make sure
the upper left corner of the front of the item aligns with the upper left corner of the scanner glass.
4 Close the top cover.
5 Select copy quality, either Photo or Normal, by pressing the Quality button. If you are copying a normal B/W
text or a mixed B/W and colour document, choose Normal. If you are copying a photo or a document
containing photos, choose Photo.
6 To make more than one copy, press the plus sign (+) on the Copy selection button until the number you
require is displayed in the copy counter.
7 Press the Black Copy button to create a B/W copy, or press the Colour Copy button to create a colour copy.
note: If you are copying on a different paper size to the original, press and hold down the Black Copy or
Colour Copy button to activate the Fit-to-Page feature. The printer will automatically adjust the size of the
original document to fit the size of the paper loaded.
CREATING AND PRINTING A PHOTO INDEX
When a non-PictBridge device is connected to the printer and there are no DPOF files associated with the
images saved, the Print button is active on the display of the printer front panel.
If you press the Print button without first selecting any of the images displayed, the Photo Index is printed.
note: You must have A4 format paper in the paper tray.
The Photo Index contains the images with borders in a 5x4 thumbnail format; under each image there is a
space for you to select the number of copies (from 1 to 4). At the bottom of the page, you can select
whether you want printing with or without borders and the full formats, 2x1, 4x1.
The Photo Index, completed with the settings you require, must be positioned on the scanner glass. To start
printing press and hold down the Print button for a few seconds.
The printer recognizes the Photo Index positioned on the scanner glass and the photos selected will be
printed as indicated.
Print quality must be set from the printer front panel while the image will be adapted automatically to the
format of the paper in the paper tray.
The same Photo Index can be used more than once; however to re-use it you must use the same device with
the same photos positioned in the same order, and with the device connected to the printer.
Page 41

QUICK REFERENCE GUIDE
11
PRINTING PHOTOS FROM YOUR PICTBRIDGE DIGITAL CAMERA
To obtain the best results when printing photos, you are advised to install the colour cartridge and the photo
cartridge, and to use photographic paper. See "Replacing the Ink Cartridges".
1 Make sure your PictBridge digital camera is turned on and connected to the printer. For more information,
see "Connecting a Digital Camera to Your Printer".
2 The print operation is managed directly by your camera, so read your camera’s User’s Guide for instructions
on how to print photos.
During printing, the Print button flashes to indicate that printing is under way.
note: If the paper format loaded is different from that set on the digital camera, printing will not be correct.
If this function is not available on the camera, printing is carried out using the paper format present in the
paper tray.
PRINTING PHOTOS FROM A DPOF DIGITAL CAMERA
Your printer is able to recognize DPOF information associated with photo files. When a DPOF digital camera
is connected, the printer prints the photos selected directly from the camera.
note: Before proceeding, make sure your digital camera is DPOF-complaint by checking in its User’s Guide.
To obtain the best results when printing photos, you are advised to install the colour cartridge and the photo
cartridge, and to use photographic paper. See"Replacing the Ink Cartridges".
1 Make sure your DPOF digital camera is turned on and connected to the printer. For more information, see
"Connecting a Digital Camera to Your Printer".
2
Select the print quality according to your print requirements.
3 Press the Print button on your printer’s front panel to print your photos. For more information see “Printer
Front Panel”.
note: If the paper format loaded is different from that selected from the digital camera, printing will not be
carried out correctly. If this function is not available on the camera, printing is carried out using the format of
the paper in the paper tray.
INK CARTRIDGES
CHECKING INK LEVELS
You can check ink levels from the Toolbox when the printer is connected to the computer. Alternatively, you
can use the Status Monitor, listed among the available Olivetti programs, or in the Windows status bar.
INFORMATION REQUIRED WHEN PURCHASING NEW INK CARTRIDGES
To guarantee correct printer functioning and high print quality, you must use only original Olivetti cartridges.
Use the following product codes to purchase cartridges:
• Black ink cartridge, code IN501
•
Three-colour ink cartridge, code IN503
• Photographic ink cartridge, code IN505
• High capacity black ink cartridge, code
IN502
•
High capacity three-colour ink cartridge, code IN504
• High capacity photographic ink cartridge, code IN506.
Page 42

QUICK REFERENCE GUIDE
12
WARNING: Cartridges can be used once only.
REPLACING INK CARTRIDGES
To r eplace ink cartridges, refer to the Installation Guide.
If you want to replace a black cartridge with a photographic cartridge, or vice versa, store the one not used
in the garage
.
USING YOUR PRINTER FROM A COMPUTER
BEFORE YOU BEGIN
Install the printer as described in the Installation Guide.
The installation software allows you to select the type of connection you want to use for the printer.
Connection types available:
• USB: to print, copy and scan using the USB connection.
• Wi-Fi: only for the Wi-Fi photo model, to print, copy and scan in Wi-Fi mode using the wireless connection.
note: This chapter provides the basic information you need to use the printer when it is connected to a
computer. For more information to take full advantage of all the features offered, read the Online Help or
the User Guide.
To access the Online Help from Windows:
• Click the Help button in the dialogue boxes.
To access the User Guide from Windows:
• Click Start > Programs or All programs > Olivetti > SIMPLE_WAY Manual.
Page 43

QUICK REFERENCE GUIDE
13
THE TOOLBOX
The Toolbox application allows you to control print, copy, and scan operations directly from a single user
interface on your computer monitor. You can also fax the document you have scanned using the multifunctional printer, provided that a fax application is installed on the computer and it has a modem.
For the Wi-Fi model, you can set the parameters necessary to access a Wi-Fi network.
The Toolbox is included on the "Installation" CD-ROM and is installed automatically on your computer when
the software contained on the CD-ROM is installed.
From the Toolbox main screen, you can:
• Print images and make copies.
• Scan documents or photos and decide where to send the scanned image.
• View the amount of ink left in the ink cartridges installed.
• Access a Solutions and Assistance facility which allows you to:
– Clean and test the ink cartridge nozzles.
– Automatically align the ink cartridges to improve print quality.
– Find the address of the manufacturer’s web site, where you can access the information necessary to
purchase new ink cartridges.
– Access troubleshooting and contact information.
• Access the Settings function which allows you to personalise the Toolbox factory-defined settings.
• Access the network Settings function for wireless mode (Wi-Fi model).
• Access the network Settings function for Bluetooth mode (Bluetooth model).
• To a c ces s t he To ol bo x:
1 Right click your mouse button on the Olivetti icon in the Windows task bar and select the Toolbox, or click
Start > Programs or All Programs > Olivetti > Olivetti Toolbox. The Toolbox is displayed.
Page 44

QUICK REFERENCE GUIDE
14
THE PRINTER STATUS MONITOR
The printer Status Monitor provides information on the current state of your printer. It is installed on your
computer when you install the software contained on the "Installation" CD-ROM.
The Status Monitor is displayed automatically at the beginning of a print or copy job, and closes
automatically at the end. However you can close it at any time via its icon in the Windows task bar. If you
close the Status Monitor during a print or copy job, it is automatically redisplayed in the following
conditions:
• When the ink remaining in the cartridges is low, or when the cartridges are out of ink. A coloured
exclamation mark will indicate the cartridge in a low ink condition (colour, black, or both) and the
importance of the condition. Pop-ups will be displayed with the address of the manufacturer’s web site,
where you can access information on how to purchase new ink cartridges.
• When error conditions occur, you can choose whether to continue or cancel printing by clicking on the
related button shown on the screen.
PRINTING, COPYING AND SCANNING FROM THE TOOLBOX
The main area of the Toolbox includes the icons representing the different tools available.
Toolbox icon: You can:
Print photos • Browse your hard disk or the memory of the non-Pictbridge/DPOF digital
camera connected to your computer, to search for the folder containing
photos to print.
• Select all the photos stored in the folder or just the individual ones wanted,
and choose how many copies to print.
• Select the type and format of the paper to print on.
• Select whether to print each photo on a separate page, or to print two to a
page or four to a page.
• Print a photo index.
• Print the photos selected.
Photocopier • Define the characteristics of the document to copy.
• Choose the type and format of the paper to print on.
• Define the copy quality.
• Lighten or darken the copy, and select either B/W or colour copy.
• Select the layout of the printed copy: make multiple copies of the same
image on a single page, make poster-size copies defining the number of
pages on which to fit the copied image, clone the copied image the number
of times required without resizing, or just simply print the copied image
onto a single page.
• Enlarge or reduce the document or photo to be copied, or automatically
adjust its size to fit the paper size selected.
• Select the number of copies to make.
Page 45

QUICK REFERENCE GUIDE
15
The main user screen of the Toolbox provides also links to Help, Solutions and Assistance, and Settings.
Scan to file
Scan to application
Scan to email
Scan to fax
• Scan a preview of the document or a photo placed on the scanner glass.
• Use selection handles to delimit the area of the preview image you want
scanned.
• Rotate, flip, enlarge or reduce the preview image.
• Define the type of document to be scanned and choose the mode: fullcolour, shades of grey or B/W.
• Define the resolution, colour depth, brightness and contrast of the image to
be scanned.
Depending on the tool selected:
•With Scan to file, save the scanned image in a TIFF (.tif), bitmap (.bmp) or
JPEG (.jpg) format in a folder on your computer.
•With Scan to application, scan the document or photo to an application of
your choice (such as a graphics program, word processor or desk-top
publisher).
•With Scan to email, attach the scanned document or photo, in
compressed .jpg format, to an e-mail message opened by the default
e-mail application on your computer.
•With Scan to fax, scan the document or photo, in compressed .jpg format,
to a fax application of your choice.
Toolbox icon: You can:
Toolbox link: You can:
Help • Read more information on the currently displayed topic.
Solutions and assistance • Clean and test the ink cartridges.
• Automatically align the ink cartridges.
• Find the address of the manufacturer’s web site, where you can access the
information required to purchase new ink cartridges.
• Access troubleshooting information.
• Access contact information.
Settings • Change the Toolbox default settings.
Page 46

QUICK REFERENCE GUIDE
16
PRINTING FROM AN APPLICATION USING PRINT PROPERTIES
1 With the document or photo open in the application you are using, click File > Print to open the Print
dialogue box.
2 Depending on your operating system, click either Preferences or Properties.
The printer driver user interface screen is displayed, allowing you to use your multi-functional printer as
indicated in the following table.
Preferences/Properties You can:
Paper/Quality • Define manually whether the document to print consists of: only black text
or graphics, a combination of black text, colour graphics or photos, only
photos. Alternatively you can set automatic detection of the original as a
combination of black text, colour graphics or photos.
• Select the type of paper to use, its size, if loading is manual, printing is with
or without borders, and on coated paper, glossy paper or on cards.
• Select the print output quality.
• Select to print your photos in true-life colour (photo quality) with
photographic paper loaded and document type set as Photo.
• Select B/W or Colour printing.
• Define the number of copies to print, and whether printing should begin
from the last page.
Layout • Define settings to print the pages of a document, or photos, on a single
sheet of paper.
• Define whether to print on multiple pages or on a single sheet of paper.
• Define the order in which the multiple pages are to be fitted onto the single
sheet of paper, and whether or not a border should appear around each
image.
• Set multiple page printing in poster format, expanding the contents of a
single page onto more than one sheet of paper.
• Define on how many sheets to fit the selected poster image and whether to
include a border around each image composing the poster.
Ink Levels • View the estimated amount of ink left in the black and colour ink cartridges.
• Link directly to the Toolbox Maintenance screen which allows you to view
maintenance and troubleshooting information.
• Link directly to the manufacturer’s web site address, where you can access
information necessary for purchasing new ink cartridges.
Page 47

QUICK REFERENCE GUIDE
17
SCANNING AN ORIGINAL FROM YOUR APPLICATION
1 Place the document or photo you want to scan face down on the scanner glass and aligned with the upper
left corner of the glass.
2 Acquire the image from your application.
The scanner driver user interface screen is displayed with a low resolution preview of the document or image
on the left-hand side of the screen.
You can :
• Use selection handles to delimit the area of the preview image that you want to scan.
• Rotate, flip, enlarge or reduce the preview image.
• Scan a new preview in case you accidentally removed the original from the scanner glass.
• Launch the final scan according to the settings that you have made.
On the right-hand side of the scanner driver interface screen, customise your scan settings as indicated in
the following table:
Scanner driver You can:
Standard • Define whether the document to be scanned consists of: black text or
graphics only, a combination of black text, colour graphics and photos, or
just photos.
• Select whether to scan in full colour, in grey or in B/W.
Custom • Select the scanner resolution.
• Select the number of distinct colours that can be represented in number of
bits (colour depth).
• Lighten or darken the image you want to scan, and increase or decrease its
contrast.
• Activate a filter that smooths the image background, for example when
scanning newspaper pages.
Page 48

QUICK REFERENCE GUIDE
18
SCANNING AN ORIGINAL FROM PRINTER FRONT PANEL
1 Place the document or photo that you want to scan face down on the scanner glass and aligned with the
upper left corner of the glass.
2 Press the Scan button on your printer’s front panel. The Toolbox program is run in Copy mode and a
preliminary scan effected. At the end, a Toolbox pop-up is displayed allowing you to choose from: Scan to
file, Scan to application, Scan to e-mail and Scan to fax. Select where you want to send the scanned image
by clicking on the corresponding tool icon.
The scanner driver user interface screen is displayed with a low resolution preview of the document or image
on the left-hand side of the screen. Conclude the operation using the dialogue box displayed.
Page 49

19
INDEX
A
Activation of Bluetooth
in the Mac OS X
environment 4
in the Windows
environment 4
B
Bluetooth 6
C
Checking Ink Levels 11
Connecting a digital camera
to your printer 9
Copying 14
B/W 7
color 8
Copying a Document 10
H
How to improve print
quality of the photos 10
I
Ink cartridges 11
P
Preferences/Properties 16
ink levels 16
layout 16
paper/quality 16
Printer front panel 7
copy contrast button 8
copy selection button 8
selection button 8
USB connector 7
USB Status LED 7
Wi-Fi network icon 7
Printing 14, 16
Printing photos from a DPOF
Digital Camera 11
from your PictBridge digital
camera 11
S
Scanning 14
Scanning an original 17
Setting up your printer 5
Status monitor 14
T
Toolbox 13, 14
photocopier 14
print photos 14
scan to application 15
scan to email 15
scan to fax 15
scan to file 15
Toolbox link 15
help 15
settings 15
solutions and assistance 15
W
Warranty 3
Wireless 7
Page 50

INDEX
20
Page 51

INHALT
i
INHALT
1 KURZANLEITUNG . . . . . . . . . . . . . . . . . . . . . . . . . . . . . . . . . . . . .1
ERSTE SCHRITTE . . . . . . . . . . . . . . . . . . . . . . . . . . . . . . . . . . . . . . .2
Übersicht . . . . . . . . . . . . . . . . . . . . . . . . . . . . . . . . . . . . . . . . .2
Sicherheitsanweisungen . . . . . . . . . . . . . . . . . . . . . . . . . . . . . .2
Reinigen des Druckers . . . . . . . . . . . . . . . . . . . . . . . . . . . . . . .3
Informationen zur Druckqualität und zur Garantie . . . . . . . . . .3
Informationen finden . . . . . . . . . . . . . . . . . . . . . . . . . . . . . . . .3
DRUCKERINSTALLATION MITTELS BLUETOOTH
(MODELL BLUETOOTH) . . . . . . . . . . . . . . . . . . . . . . . . . . . . . . . . . .4
Aktivieren von Bluetooth . . . . . . . . . . . . . . . . . . . . . . . . . . . . .4
Installation USB und Druck Bluetooth vom Computer
in Windows Umgebung . . . . . . . . . . . . . . . . . . . . . . . . . . . .5
Bluetooth-Einstellung in Macintosh-Umgebung . . . . . . . . . . . .5
Bluetooth Installation zum Drucken vom Computer aus
in Windows Umgebungen . . . . . . . . . . . . . . . . . . . . . . . . . .5
FRONTKONSOLE DES DRUCKERS . . . . . . . . . . . . . . . . . . . . . . . . . . 7
Anzeigen der Frontkonsole des Druckers . . . . . . . . . . . . . . . . . 9
Anschliessen einer Digitalkamera an den Drucker . . . . . . . . . . . 9
BENUTZEN DES DRUCKERS OHNE COMPUTER . . . . . . . . . . . . . . .10
Kopieren von Dokumenten . . . . . . . . . . . . . . . . . . . . . . . . . . .10
Erstellung und Ausdruck von Photo Index . . . . . . . . . . . . . . . .10
Ausdrucken von Fotos von Ihrer PictBridge Digitalkamera . . . .10
Ausdrucken von Fotos von Ihrer DPOF Digitalkamera . . . . . . .11
TINTENPATRONEN . . . . . . . . . . . . . . . . . . . . . . . . . . . . . . . . . . . . .11
Prüfen des Tintenstands . . . . . . . . . . . . . . . . . . . . . . . . . . . . .11
Notwendige Informationen für den Kauf von neuen
Tintenpatronen . . . . . . . . . . . . . . . . . . . . . . . . . . . . . . . . . . . .11
Ersetzen der Tintenpatronen . . . . . . . . . . . . . . . . . . . . . . . . . .12
Page 52

INHALT
ii
BENUTZEN DES DRUCKERS VOM COMPUTER AUS . . . . . . . . . . . .12
Erste Schritte . . . . . . . . . . . . . . . . . . . . . . . . . . . . . . . . . . . . .12
Die Toolbox . . . . . . . . . . . . . . . . . . . . . . . . . . . . . . . . . . . . . .13
Der Drucker Status-Monitor . . . . . . . . . . . . . . . . . . . . . . . . . .14
Drucken, Kopieren und Scannen über die Toolbox . . . . . . . . .14
Drucken aus ihrer Anwendung mit den
Druckeigenschaften . . . . . . . . . . . . . . . . . . . . . . . . . . . . . . .16
Das Bild über Ihre Anwendung erfassen . . . . . . . . . . . . . . . . .17
Einscannen eines Originals vom Frontkonsole aus . . . . . . . . . .18
STICHWORTVERZEICHNIS . . . . . . . . . . . . . . . . . . . . . . . . . . . . . .19
Page 53

INHALT
iii
RICHTLINIE 2002/96/CE FÜR DIE BEHANDLUNG, SAMMLUNG, WIEDERVERWERTUNG UND
ENTSORGUNG VON ELEKTRO- UND ELEKTRONIK ALTGERÄTEN UND DEREN BESTANDTEILE
INFORMATIONEN
1. FÜR DIE LÄNDER DER EUROPÄISCHEN UNION (EG)
Es ist verboten, jede Art von Elektro- und Elektronik-Altgeräten als unsortierten Siedlungsabfall zu entsorgen:
es ist Pflicht, diese separat zu sammeln. Das Abladen dieser Geräte an Orten, die nicht speziell dafür
vorgesehen und autorisiert sind, kann gefährliche Auswirkungen für Umwelt und Gesundheit haben.
Widerrechtliche Vorgehensweisen unterliegen den Sanktionen und Maßnahmen laut Gesetz.
Um unsere geräte ordnungsgemäß zu entsorgen, können sie:
a
Sich an die örtliche Behörde wenden, die Ihnen praktische Auskünfte und Informationen für die
ordnungsgemäße Verwaltung der Abfälle liefert, beispielsweise: Ort und Zeit der Sammelstation etc.
b Beim Neukauf eines unserer Geräte ein benutztes Gerät, das dem neu gekauften entspricht, an unseren
Wiederverkäufer zurückgeben.
Das durchkreuzte Symbol auf dem Gerät bedeutet, dass:
• Nach Ableben des Gerätes, dieses in ausgerüstete Sammelzentren gebracht werden
und separat von Siedlungsabfällen behandelt werden muss;
• Olivetti die Aktivierung der Behandlungs-, Sammel-, Wiederverwertungs- und
Entsorgungsprozedur der Geräte in Konformität mit der Richtlinie 2002/96/CE
(u. folg.mod.) garantiert.
2. FÜR DIE ANDEREN LÄNDER (NICHT-EG-STAATEN)
Das Behandeln, Sammeln, Wiederverwerten und Entsorgen von Elektro- und Elektronik-Altgeräten muss
nach den geltenden Vorschriften des jeweiligen Landes erfolgen.
Page 54

INHALT
iv
Sämtliche enthaltene Informationen können ohne vorherige Ankündigung geändert werden. Olivetti S.p.A. übernimmt
keine Verantwortung für Verluste oder Beschädigungen direkter oder indirekter Art, die aus der Verwendung dieses
Handbuchs entstehen.
MIPC (Mobile Imaging and Printing Consortium)
Das MIPC ist ein gemeinnütziger Industrieverein, der 2004 von führenden Unternehmen aus den Bereichen der
Heimfotodruck- und Mobiltelefonindustrie gegründet wurde. Sein Ziel ist es, die Entwicklung von
Interoperabilitätsrichtlinien, die das Drucken von Bildern und anderen Inhalten zwischen Mobiltelefonen und
Heimdruckern ermöglichen, zu fördern und unterstützen. Die Richtlinien werden international gefördert, um eine
breites Spektrum von Produkten und Dienstleistungen für die Endverbraucher der mobilen Telefone zu sichern.
http://www.mobileprinting.org.
SIMPLE_ WAY: Dieses "Mobile Printing Ready" Produkt ist entwickelt worden, um ein einfaches Drucken direkt vom
Mobiltelefonen heraus zu ermöglichen. Es folgt den Richtlinien "Mobile Imaging and Printing Consortium (MIPC)
Implementation Guidelines for Printing with Mobile Terminals, Version 1.0" für PictBridge.
SIMPLE_ WAY Bluetooth: Dieses "Mobile Printing Ready" Produkt ist entwickelt worden, um ein einfaches Drucken
direkt vom Mobiltelefonen heraus zu ermöglichen. Es folgt den Richtlinien "Mobile Imaging and Printing Consortium
(MIPC) Implementation Guidelines for Printing with Mobile Terminals, Version 1.0" für Bluetooth, PictBridge.
SIMPLE_ WAY Wifi: Dieses "Mobile Printing Ready" Produkt ist entwickelt worden, um ein einfaches Drucken direkt
vom Mobiltelefonen heraus zu ermöglichen. Es folgt den Richtlinien "Mobile Imaging and Printing Consortium (MIPC)
Implementation Guidelines for Printing with Mobile Terminals, Version 1.0" für Wifi, PictBridge.
Page 55

KURZANLEITUNG
1
KURZANLEITUNG
ERSTE SCHRITTE
DRUCKERINSTALLATION MITTELS BLUETOOTH (MODELL BLUETOOTH)
FRONTKONSOLE DES DRUCKERS
BENUTZEN DES DRUCKERS OHNE COMPUTER
TINTENPATRONEN
BENUTZEN DES DRUCKERS VOM COMPUTER AUS
STICHWORTVERZEICHNIS
Page 56

KURZANLEITUNG
2
ERSTE SCHRITTE
ÜBERSICHT
Dieses multifunktionale Gerät vereinigt zwei Funktionen in sich: Hochqualitativer Tintenstrahldrucker und A4
Flatbed-Farbscanner, was das Drucken, Scannen und Kopien von Dokumenten und Bildern in Schwarzweiss
und Farben ermöglicht.
Der Multifunktionsdrucker ist mit zwei Druckköpfen ausgestattet, einer schwarz und der andere farbig, für
normale Druckarbeiten und Kopien; um Fotografien zu drucken und Fotolaborqualität zu erzielen, empfiehlt
sich der Austausch des schwarzen Druckkopfs mit dem Fotodruckkopf, der separate erhältlich ist.
Hinweis: Die Tintenpatronen in Schwarz, Farbe und für Fotos sind auch in der Hochleistungs-Version
verfügbar.
Der Multifunktionsdrucker kann auch ohne Computer verwendet werden, um Kopien herzustellen und
Fotos zu drucken, indem einfach die Digital-Kamera an die USB-Schnittstelle an der Vorderseite des
Druckers, ein USB-Speichermedium am entsprechenden Port angeschlossen oder der Photo Index benutzt
wird. Die mitgelieferte Installations-CD enthält die Software zum Anschluss an den PC und die Verwaltung
von Dokumenten und Bildern. Darüberhinaus gestattet die praktische Olivetti Toolbox einen schnellen
Zugriff auf alle verfügbaren Funktionen.
Das Modell Bluetooth gestattet, direkt die mit dem Mobiltelefon mittels Bluetooth aufgezeichneten Bilder zu
drucken.
Das wifi Modell erlaubt den drahtlosen Betrieb über den WiFi-Anschluss; die Radioverbindung ist integriert.
Die Erstinstallation und eventuelle Konfiguration des Multifunktionsdruckers im Wi-Fi-Modus erfolgt immer
über das USB-Kabel. Danach kann man das Kabel entfernen und drahtlos arbeiten.
Hinweis: Für die Installation dieses Modells befolgen Sie bitte die Anweisungen im Wifi Info-Handbuch.
SICHERHEITSANWEISUNGEN
Lesen Sie die folgenden Anweisungen sorgfältig, um Ihre eigene Sicherheit zu garantieren:
• Benutzen Sie nur das mitgelieferte Netzkabel oder eins, das vom Hersteller genehmigt ist.
• Schließen Sie das Netzkabel an eine geerdete Steckdose an, die sich in der Nähe des Geräts befindet und
leicht zugänglich ist.
• Installieren Sie Ihren Drucker auf einer flachen, stabilen Oberfläche und achten darauf, dass niemand über
das Netzkabel stolpern kann.
• Benutzen Sie den Drucker nicht in der Nähe von Wasser oder mit feuchten Händen.
• Setzen Sie den Drucker nicht Regen oder Feuchtigkeit aus.
• Versuchen Sie nicht, Ihren Drucker auseinanderzunehmen.
• Beachten Sie alle Warnungen und Hinweise auf dem Drucker.
• Lesen und studieren Sie alle Dokumente, die mit Ihrem Drucker geliefert wurden.
Page 57

KURZANLEITUNG
3
REINIGEN DES DRUCKERS
• Das Druckergehäuse mit einem trockenen oder mit lauwarmem Wasser befeuchteten, weichen Lappen
reinigen, um Staub, Schmutz oder Schmierflecken nur von der Außenseite des Gehäuses abzuwischen.
• Die Innenseite des Deckels mit einem trockenen weichen Lappen oder einen mit warmen Wasser
befeuchteten reinigen.
•
Das Scannerfenster mit einem weichen Lappen reinigen, der mit Wasser oder einem Glassreiniger befeuchtet ist.
INFORMATIONEN ZUR DRUCKQUALITÄT UND ZUR GARANTIE
Um den korrekten Betrieb Ihres Druckers und eine Spitzendruckqualität zu garantieren, ist es wichtig, nur
Olivetti Original-Tintenpatronen zu verwenden.
Olivetti lehnt jede Verantwortung für Schäden am Drucker ab, die durch die falsche Handhabung oder das
Wiederauffüllen der Tintenstrahlpatronen entstehen. Außerdem führen solche Vorgänge zum Verfall der
Garantie.
INFORMATIONEN FINDEN
Te il Beschreibung
Installationsanleitung Diese in der Druckerpackung enthaltene Übersicht liefert Angaben für die
Installation Ihres Multifunktionsdruckers.
Kurzanleitung Diese Anleitung auf Papier liefert die Basisinformationen, die Sie benötigen, um
Ihren Drucker sofort verwenden zu können.
Gebrauchsanleitung Diese auf der CD-ROM "Installation" enthaltene Anleitung ist im
PDF-Format, so dass Sie sie selbst nach Belieben ausdrucken können. In Bezug
auf die Kurzanleitung beinhaltet sie eine Übersicht über die Komponenten Ihres
Druckers und Informationen zur Fehlersuche. Für den Zugriff auf die
Gebrauchsanleitung über Windows, auf Start > Programme oder Alle
Programme > Olivetti > SIMPLE_WAY Manual klicken.
Online-Hilfe Die auf der CD-ROM "Installation" enthaltene Online-Hilfe wird automatisch
auf Ihrem Computer installiert, sobald Sie die Treiber installieren.
Liefert noch vollständigere Informationen über den Gebrauch des Druckers und
kann über die Schaltfläche Hilfe in den Dialogfenstern aktiviert werden.
Dialogbox Hilfe Klicken Sie auf den Hilfe Button in der Software Dialogbox, um Informationen
bezüglich der Bildschirmseite zu erhalten, auf der Sie sich gerade befinden.
Garantiekarte Die in der Druckerpackung enthaltene Garantiekarte liefert Informationen zu
den Garantiebedingungen und zur Kontaktaufnahme für den Produktservice.
Page 58

KURZANLEITUNG
4
DRUCKERINSTALLATION MITTELS BLUETOOTH (MODELL BLUETOOTH)
Man kann ohne Kabelverbindung über Bluetooth drucken, wenn beim Computer diese Funktion eingebaut
ist oder eine externe Bluetooth Einrichtung (z.B. ein Bluetooth USB Schlüssel) installiert ist. Auf dem Drucker
muss die Bluetooth Funktion aktiviert sein.
Die Reichweite eines Bluetooth Systems beträgt normalerweise 10 m, kann aber abhängig von den
Bedingungen am Installationsort variieren.
Der Drucker unterstützt das Bluetooth System 1.2 Klasse 2 zur Verbindung mit Computern und kompatiblen
Handys.
Die Art der Installation variieren je nach der Benutzungsweise des Druckers.
AKTIVIEREN VON BLUETOOTH
Der Drucker ist für Bluetooth Benutzung einem kompatiblen Handy aus konfiguriert und dafür ist keinerlei
Installation nötig.
Die Bluetooth Funktion ist verfügbar, wenn auf der Frontkonsole das blaue Bluetooth Symbol erleuchtet ist.
Wenn die blaue LED des Bluetooth Symbols aus ist, wie folgt vorgehen:
• In Windows Umgebungen:
1 Die USB Installation durchführen wie in Druckerinstallation beschrieben (Setting Up Your Printer).
Hinweis: Wenn schon installiert ist, braucht das nicht wiederholt zu werden.
2 Das Toolbox Programm öffnen (Start > Olivetti > Programme > Toolbox).
Hinweis: Das USB Kabel muss eingesteckt und der Drucker angeschaltet sein.
3 Auf Einstellungen und dann auf Bluetooth Einstellungen klicken, um auf die Konfiguration der
Bluetooth Parameter zuzugreifen.
4 Den Bluetooth Modus aktivieren und auf Einstellungen senden klicken: den automatischen Empfang der
Daten des vorhandenen Bluetooth Netzes abwarten. Es geht die blaue Leuchte des Druckers an.
Das Toolbox Programm schließen.
5 Jetzt kann der Drucker in einer Bluetooth Umgebung arbeiten.
Wenn beim Anschluss ein Passwort verlangt wird, 0000 (oder einen anderen zuvor vom Anwender
eingerichteten Code) eingeben.
• In Mac OS X Umgebungen:
1 Die USB Installation durchführen wie in Druckerinstallation beschrieben (Setting Up Your Printer).
Hinweis: Wenn schon installiert ist, braucht das nicht wiederholt zu werden.
2 Das Toolbox Programm vom Desktop aus laufen lassen.
Hinweis: Das USB Kabel muss eingesteckt und der Drucker angeschaltet sein.
3 Auf Einstellungen und dann auf Bluetooth Einstellungen klicken, um auf die Konfiguration der
Bluetooth Parameter zuzugreifen.
4 Auf Bluetooth Status klicken. Den automatischen Empfang der Daten des vorhandenen Bluetooth Netzes
abwarten: auf Anwenden drücken.
Das Toolbox Programm schließen.
Page 59

KURZANLEITUNG
5
5 Jetzt kann der Drucker in einer Bluetooth Umgebung arbeiten.
Wenn beim Anschluss ein Passwort verlangt wird, “0000” (oder einen anderen zuvor vom Anwender
eingerichteten Code) eingeben.
INSTALLATION USB UND DRUCK BLUETOOTH VOM COMPUTER IN WINDOWS UMGEBUNG
Man kann ohne Kabelverbindung über Bluetooth drucken, wenn beim Computer diese Funktion eingebaut
ist oder eine externe Bluetooth Einrichtung (z.B. ein Bluetooth USB Schlüssel) installiert ist. Auf dem Drucker
muss die Bluetooth Funktion aktiviert sein (blaue LED leuchtet).
1 Die USB Installation durchführen wie in Druckerinstallation beschrieben (Setting Up Your Printer).
2 Auf dem Computer den Bluetooth Modus (je nach Art der installierten Bluetooth Einrichtung) aktivieren. Die
COM Schnittstelle notieren, die das Windows System dem Bluetooth Kanal zugeordnet hat. (In der
Windows XP Umgebung gibt es im Systray ein Bluetooth Symbol zur Suche der angeschlossenen
Einrichtungen. Bei anderen Betriebssystemen das Handbuch des Herstellers zu Rate ziehen).
3 Den Ordner Drucker öffnen und auf Drucker hinzufügen klicken. Den Anweisen zum Installieren eines
Druckers folgen und lokaler oder Netzwerkdrucker wählen. Dann die Druckerschnittstelle wählen und
die zuvor notierte COM Schnittstelle für Bluetooth eingeben.
Installieren der Druckersoftware wählen, den Olivetti Drucker Modell SIMPLE_WAY suchen und wählen
und ihn in die Liste der verfügbaren Drucker setzen (wenn das Vorhandensein des Treibers verifiziert wird,
Den vorhandenen Treiber beibehalten bestätigen).
Für weitere Informationen siehe die Dokumentation zum benutzten Betriebssystem.
BLUETOOTH-EINSTELLUNG IN MACINTOSH-UMGEBUNG
Es ist möglich, kabellos mit der Bluetooth-Verbindung zu drucken, wenn der Computer diese Einstellung
integriert besitzt oder ein externes Bluetooth-Gerät (z.B. ein Bluetooth USB-Speicher) angeschlossen ist. Die
Bluetooth-Funktion des Druckers muss aktiviert sein ( blaue LED leuchtet).
1 Um die Einstellung Bluetooth auf dem Drucker einzustellen, wählen Sie
Systemeinstellungen > Bluetooth
.
2 Auf Geräte klicken, danach auf Neues Gerät klicken.
Auf dem Bildschirm erscheint die Einstellung "Bluetooth Assistent".
3 Auf Fortfahren klicken und daraufhin das Gerät Drucker auswählen.
4 Mit der Einstellung fortfahren und Suche Drucker auswählen, daraufhin den Anleitungen folgen, die auf
dem Bildschirm auftauchen.
5 Dem Drucker den Namen SIMPLE_WAY Bluetooth zuweisen und die Einstellung beenden.
BLUETOOTH INSTALLATION ZUM DRUCKEN VOM COMPUTER AUS IN WINDOWS UMGEBUNGEN
Man kann ohne Kabelverbindung über Bluetooth drucken, wenn beim Computer diese Funktion eingebaut
ist oder eine externe Bluetooth Einrichtung (z.B. ein Bluetooth USB Schlüssel) installiert ist. Auf dem Drucker
muss die Bluetooth Funktion aktiviert sein.
Die Bluetooth Verbindung erfolgt über einen COM Port, der auf dem System verfügbar ist.
Hinweis: Wenn zuvor eine USB Installation ausgeführt wurde, muss sie entfernt werden, ehe man weiter
vorgehen kann.
Page 60

KURZANLEITUNG
6
Hinweis: Vor Beginn sicherstellen, dass das Bluetooth aktiviert ist und funktioniert. Andernfalls den
Hardware-Hersteller oder die spezifische Dokumentation zum installierten Produkt zu Rate ziehen.
Bei Bluetooth Anschluss können die Kopier- und Scan-Funktionen nicht benutzt werden: das Toolbox
Programm ist nicht verfügbar. Kopiert werden kann mit Hilfe der Tastatur auf der Frontkonsole des Druckers.
1 Auf dem Computer den Bluetooth Modus aktivieren (je nach Art der installierten Einrichtung).
Die COM Schnittstelle notieren, die das Windows System dem Bluetooth Kanal zugeordnet hat. (In der
Windows XP Umgebung gibt es im Systray ein Bluetooth Symbol zur Suche der angeschlossenen
Einrichtungen. Bei anderen Betriebssystemen das Handbuch des Herstellers zu Rate ziehen).
2 Den Computer anschalten und die CD-ROM "Installation" ins Laufwerk legen.
3 Im Anfangsbildschirm die gewünschte Sprache wählen und auf Weiter klicken.
Im folgenden Bildschirm Bluetooth wählen und den Anweisungen auf dem Bildschirm folgen.
Hinweis: Wenn der Installationsbildschirm nicht erscheint, auf Start > Ausführen > Durchsuchen klicken,
das CD-ROM Laufwerk wählen und auf Setup.exe klicken.
Hinweis: Wenn auf dem System schon USB installiert ist, muss dies zu Beginn vom System gelöscht werden.
4 Wenn der COM Port angefordert wird, den mit Bluetooth assoziierten wählen, den man sich zuvor notiert
hat, und die Installation abschließen.
Der Drucker ist nun in diese Liste der auf dem System verfügbaren Drucker aufgenommen und kann im in
der Bluetooth Umgebung arbeiten.
WICHTING: Bei Bluetooth Anschluss können die Kopier- und Scan-Funktionen nicht benutzt
werden: das Toolbox Programm ist nicht verfügbar. Kopiert werden kann mit Hilfe
der Tastatur auf der Frontkonsole des Druckers.
Page 61

KURZANLEITUNG
7
FRONTKONSOLE DES DRUCKERS
Bezug Te il Beschreibung
1 Bluetooth Symbol
(bluetooth-Modell)
Leuchtet blau, um anzuzeigen, dass die Bluetooth-Verbindung aktiviert
und anschlussbereit ist.
2 Netz-Symbol
(wifi-Modell)
Leuchtet grün, um anzuzeigen, dass der Drucker mit einem Wi-FiNetzwerk verbunden ist.
3 LED für den
USB-Status
PictBridge-Verbindu
Leuchtet grün, wenn eine Digitalkamera oder ein USB-Speichermedium
(Mass Storage) angeschlossen sind.
4 Druck-Taste Wird aktiviert, wenn eine Digital-Kamera non-PictBridge oder ein USB-
Speicher(Mass Storage) an die USB-Schnittstelle auf der Vorderseite
angeschlossen wird.
5 Qualitätswahl-Taste
Ermöglicht die Druck- oder Kopierqualität auszuwählen. Der Drucker regelt
automatisch die eigene Druckerauflösung (hoch oder normal) je nach
gewählter Qualität.
Es empfiehlt sich, den Foto-Modus auszuwählen, wenn das zu kopierende
Original ein Bild ist, oder wenn auf Fotopapier gedruckt wird.
456
710
811912
3
Simple
31
Bluetooth
32
Wifi
Page 62

KURZANLEITUNG
8
6 Schwarzweiss-
Kopie-Taste
Für Schwarzweiss-Kopien diese Taste drücken. Drücken und gedrückt
halten, um die Funktion "Format-Anpassung" zu aktivieren. Siehe
"Kopieren eines Dokuments".
7 Farbkopie-Taste Diese Taste drücken, um eine Farbkopie zu machen. Drücken und
gedrückt halten, um die Funktion "Format-Anpassung" zu aktivieren.
Siehe "Kopieren eines Dokuments".
8 Kopien-Zähltaste Zeigt die Anzahl der gewählten Kopien. Der Zähler läuft je nach
gedruckten Kopien rückwärts.
Taste blinkt mit sichtbarem "E", um einen Druckerfehler anzuzeigen.
9 Kopien-Auswahl-
Ta st e
•Das Plus-Symbol (+) drücken, um die Anzahl der zu erstellenden
Kopien zu vergrössern (max. 9).
• Das Minus-Symbol (-) drücken, um die Anzahl der zu erstellenden
Kopien zu verringern (min. 1).
Die gewählte Anzahl wird vom Kopienzähler angezeigt.
10 Scan-Taste • Wird aktiviert, wenn der Drucker an einen Computer angeschlossen
ist.
• Diese Taste drücken, um das auf das Scannerfläche aufgelegte
Dokument oder Foto zu scannen. Siehe "Scannen vom vorderen
Bedienfeld aus". Das auftauchende Fenster der Toolbox gestattet,
das Bild direkt in die gewünschte Anwendung zu laden und die
Scanner-Einstellungen individuell anzupassen.
11 Löschtaste • Gestattet, sofort einen Druck- oder Kopiervorgang abzubrechen und
veranlasst den Ausstoss des Blattes.
• Macht einen Reset der Einstellungen auf die des Herstellers.
12 On/Off - Taste Zum Ein- und Ausschalten des Druckers. Bei eingeschaltetem Drucker
leuchtet die Taste, während eines Druckvorgang blinkt sie. Blinkt bei
Auftauchen eines Fehlers, wie z.B. Papier- oder Tintenmangel.
Bezug Te il Beschreibung
Page 63

KURZANLEITUNG
9
ANZEIGEN DER FRONTKONSOLE DES DRUCKERS
Die Taste On/Off auf der rechten Seite der Frontkonsole drücken.
Hinweis: Vor dem Einschalten der On/Off-Taste sicherstellen, dass das Stromzuführungskabel in einer
geerdete Steckdose steckt. Für Informationen hinsichtlich der Drucker-Einstellungen siehe das mitgelieferte
Installations-Handbuch.
Nach Drücken des On/Off-Tastes führt der Drucker eine Reihe von Selbsttests durch, um mögliche
Fehlfunktionen des Systems zu ermitteln. Jeder in dieser Phase ermittelte Fehler wird auf der Frontkonsole
oder vom PC angezeigt, an den der Drucker angeschlossen ist. Nach Beenden der Selbstdiagnose und wenn
keine Fehler ermittelt wurden, leuchtet die Taste On/Off.
ANSCHLIESSEN EINER DIGITALKAMERA AN DEN DRUCKER
1 Schalten Sie Ihre Digitalkamera ein. Lesen Sie deren Anleitung.
2 Wenn der Drucker eingeschaltet ist, stecken Sie ein Ende des USB Kabels der Kamera in den USB Stecker der
Kamera und das andere in den USB Stecker auf der Frontkonsole des Druckers.
Grüne LED für den USB Status leuchtet, um den Anschluss einer Digitalkamera oder eines USB
Speichermediums anzuzeigen. Wenn der Drucker die angeschlossene Kamera nicht erkennt, bleibt die LED aus.
Page 64

KURZANLEITUNG
10
BENUTZEN DES DRUCKERS OHNE COMPUTER
KOPIEREN VON DOKUMENTEN
1 Den Drucker einschalten.
2 Legen Sie das Papier ein, auf das Sie drucken wollen.
3 Öffnen Sie den Deckel und legen Sie das Dokument das Sie kopieren wollen, mit der Vorderseite nach unten
auf das Scannerfenster. Sicherstellen, dass die obere linke Ecke der Vorderseite mit der oberen linken Ecke
des Scannerfensters ausgerichtet ist.
4 Schließen Sie den Deckel.
5 Wählen Sie die Qualität der Kopien, Foto oder Normal, indem Sie die Qualitätswahl-Taste drücken. Um einen
normalen Schwarzweiß-Text zu kopieren, wählen Sie Normalpapier. Um ein Dokument zu kopieren, das
schwarzweiß und farbig ist, wählen Sie Foto.
6 Um mehr als eine Kopie anzufertigen, drücken Sie das Pluszeichen (+) auf der Taste zur Wahl der Kopien so
oft, bis die gewünschte Anzahl auf dem Kopienzähler angezeigt wird.
7
Drücken Sie die Taste für Schwarzkopieren für Schwarzweißkopien oder die Farbkopier-Taste für Farbkopieren.
Hinweis: Wenn Sie auf andere Papierformate als die der Originale drucken, halten Sie die T
aste für
Schwarzkopieren oder die Farbkopier-Taste gedrückt, um die Formatanpass-Funktion zu aktivieren. Der Drucker
passt dann automatisch die Größe des Originals an das Format des eingelegten Papiers an.
ERSTELLUNG UND AUSDRUCK VON PHOTO INDEX
Wenn ein nicht PictBridge-Gerät am Drucker angeschlossen ist wenn mit den archivierten Bildern keine
DPOF Dateien assoziiert sind, ist auf dem Frontkonsole die Drukertaste (die Taste leuchtet).
Wird die Drukertaste gedrückt, ohne eine Auswahl der angezeigten Bilder getroffen zu haben, startet der
Ausdruck des Photo Index.
Hinweis: Es ist unerlässlich, im Papierfach DIN A4 Papier zu haben.
Auf dem Photo Index sind die Bilder mit Rändern in Miniaturformat 5 x 4 enthalten und unter jedem Foto ist
ein Platz für die Wahl der Kopienanzahl, die von 1 bis 4 variieren kann. Am Ende der Benutzerseite können
Sie wählen, ob Sie den Ausdruck mit oder ohne Rand möchten und das Gesamtformat 2x1, 4x1.
Der nach Wunsch ausgefüllte Photo Index muss auf die Auflagenfläche des Scanners gelegt werden und der
Ausdruck wird gestartet, indem man für einige Sekunden dieDrukertaste drückt.
Der Drucker erkennt den Photo Index auf der Auflagenfläche und die gewählten Fotos werden wie
beschrieben ausgedruckt.
Die Druckqualität muss über das Vorderseite des Druckers eingegeben werden, während das Bild
automatisch an das im Papierbehälter einliegende Papierformat angepasst wird.
Der Photo Index kann mehrmals wieder verwendet werden. Um ihn erneut zu verwenden, braucht man
dasselbe Gerät, dieselben Fotos in derselben Reihenfolge positioniert und das Gerät muss am Drucker
angeschlossen sein.
AUSDRUCKEN VON FOTOS VON IHRER PICTBRIDGE DIGITALKAMERA
Um die besten Druckergebnisse der Fotos zu bekommen, ist es ratsam, die Farbpatrone und die Fotopatrone
einzusetzen und das Fotopapier zu benutzen. Siehe “Auswechseln der Tintenpatrone”.
1 Sicherstellen, dass Ihre PictBridge Digitalkamera eingeschaltet und an den Drucker angeschlossen ist. Mehr
Informationen finden Sie unter "Anschließen einer Digitalkamera an den Drucker".
Page 65

KURZANLEITUNG
11
2 Das Ausdrucken wird direkt von der Kamera verwaltet. Anleitungen zum Ausdrucken Ihrer Fotos finden sich
daher in der Gebrauchsanleitung der Kamera.
Beim Drucken blinkt die Drucktaste, um anzuzeigen, dass ein Druckjob ausgeführt wird.
Hinweis: Wenn das Format des im Drucker eingelegten Papiers anders ist als das von der Digitalkamera zum
Ausdrucken gewählte und Sie zu drucken starten, sind die Ausdrucke falsch.
Wenn diese Funktion nicht in der Kamera verfügbar ist, wird der Druck auf dem Papierformat ausgeführt,
das sich im Papierfach befindet.
AUSDRUCKEN VON FOTOS VON IHRER DPOF DIGITALKAMERA
Der Drucker kann die mit den Bilddateien assoziierten DPOF Informationen erkennen. Bei Anschluss einer DPOF
Kamera, kann der Drucker daher direkt die Fotos ausdrucken, die Sie auf Ihrem Fotoapparat wählen.
Hinweis: Vor Beginn sicherstellen, das Ihre Digitalkamera DPOF-kompatibel ist. Lesen Sie die
Gebrauchsanweisung des Fotoapparats.
Um die besten Druckergebnisse der Fotos zu bekommen, ist es ratsam, die Farbpatrone und die Fotopatrone
einzusetzen und das Fotopapier zu benutzen. Siehe “Auswechseln der Tintenpatrone”.
1 Sicherstellen, dass Ihre DPOF Kamera eingeschaltet und an den Drucker angeschlossen ist. Mehr
Informationen finden Sie unter "Anschließen einer Digitalkamera an den Drucker".
2 Wählen Sie die Druckqualität je nach Ihren Druckerfordernissen.
3 Drücken Sie die Druckertaste auf der Frontkonsole des Druckers, um Ihre Fotos auszudrucken.
Weitere Informationen finden Sie unter "Frontkonsole des Druckers".
Hinweis: Wenn das Format des im Drucker eingelegten Papiers anders ist als das von der Digitalkamera zum
Ausdrucken gewählte und Sie zu drucken starten, sind die Ausdrucke falsch.
Wenn diese Funktion nicht in der Kamera verfügbar ist, wird der Druck auf dem Papierformat ausgeführt,
das sich im Papierfach befindet.
TINTENPATRONEN
TINTENSTAND KONTROLLIEREN
Sie können den Tintenstand über die Toolbox-Applikation kontrollieren, wenn der Drucker an den Computer
angeschlossen ist.Alternativ können Sie die "Status-Monitor"-Applikation in der Olivetti-Programm-Liste
oder in der Status-Leiste von Windows benutzen, um weitere Informationen zu erhalten.
NOTWENDIGE INFORMATIONEN FÜR DEN KAUF VON NEUEN TINTENPATRONEN
Um schließlich ein einwandfreies Funktionieren und eine erhöhte Druckqualität des Druckers zu garantieren,
ist es unumgänglich, ausschließlich Originalpatronen von Olivetti zu benutzen.
Benutzen Sie folgende Produkt-Code beim Kauf der Patronen:
• Schwarze Tintenpatrone, Code IN501
• Dreifarbige Tintenpatrone, Code IN503
• Fotografische Tintenpatrone, Code IN505
• Schwarze, hoch leistungsfähige Tintenpatrone, Code IN502
• Dreifarbige, hoch leistungsfähige Tintenpatrone, Code IN504
• Fotografische, hoch leistungsfähige Tintenpatrone, Code IN506
Page 66

KURZANLEITUNG
12
WICHTING: Die Patronen sind nur für den einmaligen Gebrauch gedacht.
TINTENPATRONEN ERSETZEN
Um die Tintenpatronen zu ersetzen, lesen Sie die Installations-Anleitung.
Im Falle, dass Sie die schwarze Patrone mit der Fotopatrone austauschen, oder umgekehrt, bewahren Sie die
unbenutzte in der Gara
ge auf.
BENUTZEN DES DRUCKERS VOM COMPUTER AUS
ERSTE SCHRITTE
Den Drucker installieren wie auf der Installationsanleitung beschrieben.
Mit der Installationssoftware kann die Verbindungsart gewählt werden, in der der Drucker benutzt werden
soll.
Möglich sind folgende Anschlüsse:
• USB: zum Drucken, Kopieren und Scannen über eine USB Kabelverbindung.
• Wi-Fi: nur bei dem Modell Photo Wifi, zum Drucken, Kopieren und Scannen im Wi-Fi Modus über eine
drahtlose Verbindung (Wireless).
Hinweis: Dieses Kapitel umreißt die Basisinformation, die Sie in die Lage versetzt, mit dem Drucker zu
arbeiten, wenn er über USB Kabel an einen Computer angeschlossen ist. Weitere Informationen, die Ihnen
ermöglichen, alle angebotenen Funktionen voll auszunutzen finden Sie in der Online-Hilfe oder
Gebrauchsanleitung:
Zum Zugriff auf die Online-Hilfe über Windows:
• Wählen Sie die Taste Hilfe in den Dialogfenstern.
Für den Zugriff auf die Gebrauchsanleitung über Windows:
• Auf Start > Programme oder Alle Programme > Olivetti > SIMPLE_WAY Manual klicken.
Page 67

KURZANLEITUNG
13
DIE TOOLBOX
Mit der Toolbox können Sie Drucken, Kopieren und Scannen direkt über eine einzige Anwenderoberfläche
auf Ihrem Computerbildschirm steuern. Sie können auch mit dem All-in-one Drucker eingescannte
Dokumente faxen, wenn die auf Ihrem Computer installierte Fax-Anwendung mit einem Modem
ausgerüstet ist.
Beim wifi modell können die nötigen Parameter zum Anschluss an ein Wi-Fi Netzwerk eingestellt werden.
Die Toolbox ist ein Bestandteil der CD-ROM "Installation" und wird automatisch auf dem Computer
installiert, wenn Sie auf der CD-ROM enthaltene Software laden.
Von der Hauptseite der Toolbox aus können Sie:
• Bilder ausdrucken und Kopien anfertigen.
• Dokumente oder Fotos einscannen und dann entscheiden, wo das gescannte Bild hin soll.
• Den Füllstand der installierten Tintenpatronen anzeigen lassen.
• Auf Problemlösungen und Pflege zugreifen, mit denen Sie:
– Die Düsen der Tintenpatronen reinigen und testen können.
– Die Tintenpatronen automatisch ausrichten, um die Druckqualität zu erhöhen.
– Die Adresse der Website des Herstellers finden, auf der Sie die zum Kauf neuer Tintenpatronen nötigen
Informationen erhalten.
– Auf Informationen für Fehlerbeheben und Kontakte zugreifen.
• Zur Funktion Einstellungen gelangen, um die Fabrikvoreinstellungen der Toolbox.
• Auf die Funktion für Netzwerkeinstellungen für den Wireless Modus zugreifen (wifi modell).
• Auf die Funktion für Netzwerkeinstellungen für den Bluetooth Modus zugreifen (bluetooth modell).
• Zum Zugang zur Toolbox:
1 Mit der rechten Maustaste auf das Olivetti Icon auf der Windows-Taskleiste klicken oder auf Start >
Programme oder Alle Programme > Olivetti > Olivetti Toolbox.
Es erscheint die Toolbox.
Page 68

KURZANLEITUNG
14
DER DRUCKER STATUS-MONITOR
Der Drucker Status-Monitor liefert Informationen über den aktuellen Status des Druckers. Er ist dauernd auf
Ihrem Computer installiert, wenn Sie die Software von der CD-ROM "Installation" geladen haben. Der
Status-Monitor wird zu Anfang eines Druckjobs angezeigt und:
Der Status-Monitor schließt sich automatisch am Ende des Druck- oder Kopierjobs. Sie können ihn auch
jederzeit zu seinem Symbol auf der Windows Task-Leiste reduzieren.
Wenn Sie den Status-Monitor während eines Druck- oder Kopierjobs geschlossen haben, öffnet er sich
automatisch wieder, wenn eine der folgenden Bedingungen auftritt:
• Wenn der Tintenstand in den Patronen niedrig ist oder wenn die Tintenpatronen leer sind. Ein farbiges
Ausrufezeichen gibt an, welche Patrone fast leer ist (Farbe, Schwarz oder beide). Es erscheinen Fenster mit
der Adresse der Website des Herstellers, auf der Sie die zum Kauf neuer Tintenpatronen nötigen
Informationen finden können.
• Wenn sich Fehlersitutationen ergeben, kann man entscheiden, ob man mit dem Druckvorgang fortfahren
oder ob man ihn annulieren möchte, indem man auf die entsprechende Schaltfläche am Video klickt.
DRUCKEN, KOPIEREN UND SCANNEN ÜBER DIE TOOLBOX
Die Hauptseite der Toolbox enthält Symbole, die die verfügbaren Tools repräsentieren.
Toolbox Symbol: können Sie:
Fotos drucken • Die Festplatte oder den Speicher der an den Computer angeschlossenen,
nicht-PictBridge/DPOF Digitalkamera durchsuchen, um den Ordner zu
finden, der die zu druckenden Fotos enthält.
• Alle im Ordner enthaltene Fotos oder einzelne darunter wählen und
angeben, wie viele Kopien Sie davon drucken wollen.
• Die Papiersorte und das Format wählen, auf die Sie drucken wollen.
• Wählen, ob Sie ein, zwei oder vier Fotos auf einer Seite drucken wollen.
• Ein Verzeichnis der Fotos ausdrucken.
• Die gewählten Fotos drucken.
Fotokopierer • Die Art des zu kopierenden Dokuments definieren.
• Die Papiersorte und das Format wählen, auf die Sie drucken wollen.
• Die Qualität der Kopie definieren.
• Ihre Kopie heller oder dunkler ausdrucken und definieren, ob sie
schwarzweiß oder in Farbe sein soll.
• Das Layout Ihrer gedruckten Kopie wählen: Mehrfachkopien des gleichen
Bildes auf einer einzelnen Seite anfertigen; Kopien im Posterformat
anfertigen, wobei die Anzahl der Seiten definiert wird, an die das kopierte
Bild angepasst werden soll; das kopierte Bild so oft wie gewünscht
reproduzieren, ohne die Größe des Bildes zu ändern oder das kopierte Bild
einfach auf einer Seite ausdrucken.
• Das zu kopierende Dokument oder Bild vergrößern oder verkleinern oder es
automatisch so anzupassen, dass es auf das gewählte Papierformat passt.
• Die Zahl der anzufertigenden Kopien wählen.
Page 69

KURZANLEITUNG
15
Auf der Hauptseite der Toolbox finden Sie außerdem Links zur Hilfe, zu Problemlösungen und Pflege sowie
zu Einstellungen.
Einscannen als Datei
Einscannen und in
Anwendung öffnen
Einscannen und als E-Mail
versenden
Einscannen und als Fax
versenden
• Die Vorabansicht eines auf dem Scannerfenster liegenden Dokuments oder
Fotos einscannen.
• Den Bereich auf der Vorabansicht umreißen, den Sie einscannen wollen.
• Die Vorabansicht drehen, kippen, vergrößern oder verkleinern
• Die Art des zu scanneden Dokuments definieren: Farbe, Grautöne oder
Schwarzweiß.
• Auflösung, Farbtiefe, Helligkeit und Kontrast des gescannten Bildes
definieren.
Je nach gewähltem Tool:
•Mit Einscannen als Datei, das gescannte Bild in einer TIFF- (.tiff), Bit-
Abbildungs- (.bmp) oder JPG- (.jpg) Datei in einem Ordner auf Ihrem
Computer speichern.
•Mit Einscannen und in Anwendung öffnen, das Dokument oder Foto in
die gewünschte Anwendung scannen (z.B. ein Grafikprogramm, eine
Textbearbeitungsprogramm oder einen Desktop Publisher).
•Mit Einscannen und als E-Mail versenden, ein eingescanntes Dokument
oder Foto im komprimierten.jpg Format an eine E-Mail anhängen, die von
der -E-Mail Standardanwendung Ihres Computers angelegt wird.
•Mit Einscannen und als Fax versenden, das Dokument oder Foto im
komprimierten .jpg Format in die gewünschte Fax-Anwendung scannen.
Toolbox Symbol: können Sie:
Toolbox Link: können Sie:
Hilfe • Mehr zu dem gerade dargestellten Thema lesen.
Problemlösungen und
Pflege
• Die Düsen der Tintenpatrone reinigen und testen.
• Die Tintepatronen automatisch ausrichten.
• Die Adresse der Website des Herstellers finden, auf der Sie die zum Kauf
neuer Tintenpatronen nötigen Informationen erhalten.
• Auf Informationen zur Fehlersuche zugreifen.
• Kontaktinformationen aufrufen.
Einstellungen • Die Default-Einstellungen der Toolbox ändern.
Page 70

KURZANLEITUNG
16
DRUCKEN AUS IHRER ANWENDUNG MIT DEN DRUCKEIGENSCHAFTEN
1 Wenn das Dokument oder das Foto in der benutzten Anwendung geöffnet ist, klicken Sie auf Datei >
Drucken, um das Dialogfenster Drucken zu öffnen.
2 Je nach dem installierten Betriebssystem klicken Sie auf Einstellungen oder Eigenschaften.
Es erscheint die Benutzeroberfläche des Druckertreibers, die Ihnen ermöglicht, Ihren All-in-one Drucker zu
benutzen, wie in der folgenden Tabelle beschrieben:
Einstellungen/
Eigenschaften
können Sie:
Papier/Druckqualität • Manuell oder automatisch definieren, ob das auszudruckende Dokument
nur aus schwarzem Text oder Strichzeichnungen besteht, aus einer
Kombination aus schwarzem Text oder Strichzeichnungen, Farbgrafik und
Fotos oder nur aus Fotos.
• Die zu verwendende Papierart und das Papierformat wählen und definieren,
ob das Papier manuell eingeführt wird und ob ohne Rand auf Beschichtetes
Papier, Glanzpapier oder auf Karton gedruckt werden soll.
• Die Druckqualität wählen.
• wählen, ob Sie Fotos farbecht (Fotoqualität) drucken wollen, wenn
Fotopapier einlegen und als Dokumentart Foto wählen.
• Den Schwarzweiß- oder Farbendruck wählen.
• Die Anzahl der zu druckenden Kopien definieren und wählen, ob Drucken
mit der letzten oder der ersten Seite begonnen werden soll.
Layout • Wählen, die einzelnen Seiten Ihres Dokuments oder Ihre Fotos in einem
einheitliche Seiten-Layout zu drucken.
• Wählen, ob Mehrfachseiten oder Fotos auf ein einzelnes Blatt Papier
ausgedruckt werden sollen.
• Die Anordnung definieren, in der die Seiten auf das einzelne Blatt gedruckt
werden und ob um die einzelnen Seiten auf dem Blatt von einem Rand
umgeben werden sollen.
• Wählen, den Inhalt eines Posters über mehrere Seiten verteilt auszudrucken.
• Definieren, auf wie viele Blätter das Poster ausgedruckt werden soll und ob
Rahmen um die einzelnen Blätter des Posters gedruckt werden sollen.
Tintenstand • Die geschätzte Tintenmenge sehen, die noch in der Farbpatrone und der
schwarzen Patrone verfügbar ist.
• Direkt zur Seite Maintenance der Toolbox gelangen, um Informationen zur
Wartung und Fehlersuche zu erhalten.
• Direkt zur Adresse der Website des Herstellers gelangen, auf der Sie die zum
Kauf neuer Tintenpatronen nötigen Informationen finden.
Page 71

KURZANLEITUNG
17
DAS BILD ÜBER IHRE ANWENDUNG ERFASSEN
1 Das Dokument oder Foto mit der zu scannenden Seite nach unten auf das Scannerfenster legen und auf die
obere linke Ecke des Fensters ausrichten.
2 Bild von Ihrer Anwendung einscannen.
Die Benutzeroberfläche des Scannertreibers öffnet sich mit einer Vorabansicht mit niedriger Auflösung des
Dokuments oder Bildes links im Fenster.
Sie können:
•
Den Bereich auf der Vorabansicht umreißen, den Sie einscannen wollen
.
•
Die Vorabansicht drehen, kippen, vergrößern oder verkleinern
.
• Eine neue Vorabansicht einscannen, wenn Sie unbeabsichtigt das Original vom Scannerfenster entfernt
haben.
• Das endgültige Einscannen mit den vorgenommenen Einstellungen starten.
Rechts im Fenster des Scannertreibers Ihre Einstellungen wie in folgender Tabelle beschrieben anpassen:
Scannertreiber: können Sie:
Standard • Definieren, ob das einzuscannende Dokument nur aus schwarzem
Text oder Strichzeichnungen besteht, aus einer Kombination aus
schwarzem Text oder Strichzeichnungen, Farbgrafik und Fotos oder
nur aus Fotos.
• Wählen, ob mit voller Farbtiefe, in Grautönen oder in schwarzweiß
gescannt werden soll.
Benutzerdefiniert • Die Auflösung wählen, mit der Sie Scannen möchten.
• Die Anzahl der verschiedenen Farben wählen, die als Bitzahl
angegeben wird (Farbtiefe).
• Das einzuscannende Bild heller oder dunkler machen und dessen
Kontrast erhöhen oder verringern.
• Einen Filter aktivieren, der das Bild glättet.
Page 72

KURZANLEITUNG
18
EINSCANNEN EINES ORIGINALS VOM FRONTKONSOLE AUS
1 Das Dokument oder Foto mit der zu scannenden Seite nach unten auf das Scannerfenster legen und auf die
obere linke Ecke des Fensters ausrichten.
2 Die Scantaste auf der Frontkonsole des Druckers drücken. Es öffnet sich ein Fenster mit den folgenden Tools
der Toolbox: Einscannen als Datei, Einscannen und in Anwendung öffnen, Einscannen und als E-Mail
versenden und Einscannen und als Fax versenden. Wählen Sie, wohin Sie das eingescannte Bild schicken
wollen, indem Sie auf das Symbol des entsprechenden Tools klicken.
Die Benutzeroberfläche des Scannertreibers öffnet sich mit einer Vorabansicht mit niedriger Auflösung des
Dokuments oder Bildes links im Fenster. Beenden Sie die Operation, indem Sie den Anweisungen im
Dialogfenster folgen.
Page 73

19
STICHWORTVERZEICHNIS
A
Aktivieren von Bluetooth
in Mac OS X Umgebungen 4
in Windows Umgebungen 4
Auswechseln der schwarzen
Patrone 12
B
Bild erfassen 17
D
Drucken 14
E
Einstellungen/
eigenschaften 16
Layout 16
Papier/Druckqualität 16
Tintenstand 16
F
Fotos ausdrucken
von Ihrer DPOF
Digitalkamera 11
von Ihrer PictBridge
Digitalkamera 10
Frontkonsole des Druckers 7
Druck 8
Kopienzähler 8
LED für USB Fehler 7
Qualitätswahl 8
G
Garantie 3
K
Kontrolle des
Tintenstands 11
Kopieren 14
Schawarzweiss 8
Farbkopie 8
Kopieren von
Dokumenten 10
S
Scannen 14
Status-Monitor 14
T
Tintenpatronen 11
Toolbox 13, 14
einscannen als Datei 15
einscannen und als E-Mail
versenden 15
einscannen und als Fax
versenden 15
einscannen und in
Anwendung öffnen 15
Fotokopierer 14
Fotos drucken 14
Toolbox Link 15
einstellungen 15
Hilfe 15
Problemlösungen und
Pflege 15
Page 74

STICHWORTVERZEICHNIS
20
Page 75

TABLE DES MATIÈRES
i
TABLE DES MATIÈRES
MISE EN ROUTE RAPIDE . . . . . . . . . . . . . . . . . . . . . . . . . . . . . . . .1
POUR COMMENCER . . . . . . . . . . . . . . . . . . . . . . . . . . . . . . . . . . . .2
Generalites . . . . . . . . . . . . . . . . . . . . . . . . . . . . . . . . . . . . . . . .2
Instructions de securite . . . . . . . . . . . . . . . . . . . . . . . . . . . . . . .2
Nettoyage de l'imprimante . . . . . . . . . . . . . . . . . . . . . . . . . . . .3
Informations sur la qualite d'impression et la garantie . . . . . . . .3
Recherche d'informations . . . . . . . . . . . . . . . . . . . . . . . . . . . .3
INSTALLATION DE L'IMPRIMANTE VIA BLUETOOTH
(MODELE BLUETOOTH) . . . . . . . . . . . . . . . . . . . . . . . . . . . . . . . . . .4
Activation Bluetooth . . . . . . . . . . . . . . . . . . . . . . . . . . . . . . . . .4
Installation usb et impression Bluetooth a partir de
l'ordinateur en environnement Windows . . . . . . . . . . . . . . . . .5
Installation Bluetooth a partir de l'ordinateur en
environnement Macintosh . . . . . . . . . . . . . . . . . . . . . . . . . . . .5
Installation Bluetooth pour l'impression a partir de
l'ordinateur en environnement Windows . . . . . . . . . . . . . . . . .6
PANNEAU AVANT DE L'IMPRIMANTE . . . . . . . . . . . . . . . . . . . . . . .7
Etat du panneau avant de l'imprimante . . . . . . . . . . . . . . . . . . .9
Branchement d'un appareil photo numerique a l'imprimante
. . . . .9
UTILISATION DE L'IMPRIMANTE SANS ORDINATEUR . . . . . . . . . . .10
Copie d'un document . . . . . . . . . . . . . . . . . . . . . . . . . . . . . . .10
Creation et impression a partir de Photo Index . . . . . . . . . . . .10
Impression d'une photo a partir d'un appareil photo
numerique PictBridge . . . . . . . . . . . . . . . . . . . . . . . . . . . . . . .11
Impression d'une photo a partir d'un appareil photo
numerique DPOF
. . . . . . . . . . . . . . . . . . . . . . . . . . . . . . . . 11
CARTOUCHES D'ENCRE . . . . . . . . . . . . . . . . . . . . . . . . . . . . . . . .12
Verification des niveaux d'encre . . . . . . . . . . . . . . . . . . . . . . .12
Informations necessaires pour l'achat de cartouches
d'encre neuves . . . . . . . . . . . . . . . . . . . . . . . . . . . . . . . . . . . .12
Remplacement des cartouches d'encre . . . . . . . . . . . . . . . . . .12
Page 76

TABLE DES MATIÈRES
ii
UTILISATION DE L'IMPRIMANTE A PARTIR D'UN ORDINATEUR
. . . . .13
Avant de commencer . . . . . . . . . . . . . . . . . . . . . . . . . . . . . . .13
La Toolbox . . . . . . . . . . . . . . . . . . . . . . . . . . . . . . . . . . . . . . .13
Le moniteur d'etat de l'imprimante . . . . . . . . . . . . . . . . . . . . .14
Impression, copie et numerisation a l'aide de la Toolbox
. . . . . .14
Impression a l'aide d'une application en utilisant les
proprietes d'impression . . . . . . . . . . . . . . . . . . . . . . . . . . . . .16
Numeriser un original de l'application . . . . . . . . . . . . . . . . . . .17
Numeriser un original a partir du panneau avant
de l'imprimante
. . . . . . . . . . . . . . . . . . . . . . . . . . . . . . . . . 18
INDEX ANALYTIQUE . . . . . . . . . . . . . . . . . . . . . . . . . . . . . . . . . .19
Page 77

TABLE DES MATIÈRES
iii
DIRECTIVE 2002/96/CE SUR LE TRAITEMENT, LA COLLECTE, LE RECYCLAGE ET L'ELIMINATION DES
EQUIPEMENTS ELECTRIQUES ET ELECTRONIQUES ET DE LEURS COMPOSANTS
INFORMATIONS
1. POUR LES PAYS DE L'UNION EUROPEENNE (UE)
Il est interdit d'éliminer tout équipement électrique ou électronique avec les déchets municipaux non triés : il
est obligatoire de les collecter à part. S'ils sont jetés dans des lieux non spécifiquement appropriés et non
autorisés, ils peuvent nuire gravement à l'environnement et à la santé. Les transgresseurs s'exposent aux
sanctions et aux dispositions prévues par la loi.
Pour éliminer correctement les équipements, vous pouvez :
a Vous adressez aux autorités locales qui vous fourniront des indications et des renseignements pratiques
sur la gestion correcte des déchets (emplacement et horaire des déchetteries, etc.).
b Si vous achetez un équipement identique à celui usagé, remettez ce dernier au revendeur.
La poubelle barrée d'une croix indiquée sur l'équipement signifie que :
• Au terme de sa durée de vie, l'équipement doit être remis à un centre de collecte
approprié et traité séparément des déchets municipaux non triés ;
• Olivetti garantit l'activation des procédures relatives au traitement, à la collecte, au
recyclage et à l'élimination de l'équipement, conformément à la Directive 2002/96/CE
(et aux modifications suivantes).
2. POUR LES AUTRES PAYS (NON UE)
Le traitement, la collecte, le recyclage et l'élimination des équipements électriques et électroniques doivent
être effectués conformément aux lois en vigueur dans chaque pays.
Page 78

TABLE DES MATIÈRES
iv
MIPC (Mobile Imaging and Printing Consortium)
MIPC est une association industrielle à but non lucratif fondée en 2004 par des sociétés leaders dans le secteur des
imprimantes photographiques et des téléphones portables. Sa mission est de promouvoir et soutenir des règles définissant
l'interopérabilité et l'impression d'images et d'autres contenus entre des téléphones portable et des imprimantes. Ces
règles sont promues au niveau international pour garantir aux utilisateurs de téléphone portable un large éventail de
produits et de services. http://www.mobileprinting.org.
SIMPLE_ WAY : Ce produit "Mobile Printing Ready" a été conçu pour faciliter l'impression d'images à partir d'un
téléphone portable. Il respecte les règles du "Mobile Imaging and Printing Consortium (MIPC) - Implementation Guidelines
for Printing with Mobile Terminals, Version 1.0" pour les PictBridge.
SIMPLE_ WAY Bluetooth : Ce produit "Mobile Printing Ready" a été conçu pour faciliter l'impression d'images à partir
d'un téléphone portable. Il respecte les règles du "Mobile Imaging and Printing Consortium (MIPC) Implementation
Guidelines for Printing with Mobile Terminals, Version 1.0" pour les Bluetooth, PictBridge.
SIMPLE_ WAY Wifi : Ce produit "Mobile Printing Ready" a été conçu pour faciliter l'impression d'images à partir d'un
téléphone portable. Il respecte les règles du "Mobile Imaging and Printing Consortium (MIPC) Implementation Guidelines
for Printing with Mobile Terminals, Version 1.0" pour les Wifi, PictBridge.
Toutes les informations figurant dans ce manuel peuvent être modifiées sans préavis. Olivetti S.p.A. n'est pas responsable
des pertes ou des dommages, directs ou indirects, résultant de l'utilisation du présent manuel ou liés à celui-ci.
Page 79

MISE EN ROUTE RAPIDE
1
MISE EN ROUTE RAPIDE
POUR COMMENCER
INSTALLATION DE L'IMPRIMANTE VIA BLUETOOTH (MODELE BLUETOOTH)
PANNEAU AVANT DE L'IMPRIMANTE
UTILISATION DE L'IMPRIMANTE SANS ORDINATEUR
CARTOUCHES D'ENCRE
UTILISATION DE L'IMPRIMANTE A PARTIR D'UN ORDINATEUR
INDEX ANALYTIQUE
Page 80

MISE EN ROUTE RAPIDE
2
POUR COMMENCER
GENERALITES
Ce produit multifonction exécute les fonctions d'une imprimante jet d'encre haut de gamme et d'un scanner
à plat, couleur, format A4 ; il permet d'imprimer, de numériser et de copier des documents et des images
noir et blanc et couleur.
L'imprimante multifonction est pourvue de deux têtes, noire et couleur pour les opérations normales
d'impression et de copie ; pour imprimer des photos et obtenir une qualité comparable à celle d'un
laboratoire de photos, il est conseillé de remplacer la cartouche noire par une cartouche photo (vendue à part).
remarque : les cartouches d'encre noire, couleur et photo sont aussi disponibles en version Haute
Définition.
L'imprimante multifonction peut être utilisée sans ordinateur pour imprimer des copies et des photos ; pour
ce faire, il suffit de relier l'appareil photo numérique à l'interface USB située sur le panneau avant et d'insérer
une carte de mémoire USB dans le connecteur correspondant ou d'utiliser le Photo Index. Le CD
d'installation contient le logiciel permettant de relier l'imprimante à l'ordinateur et de gérer des documents
et des images, ainsi que le programme Olivetti Toolbox pour accéder rapidement à toutes les fonctions
disponibles.
Le modèle Bluetooth permet d'imprimer directement les images capturées par le téléphone portable via
Bluetooth.
Le modèle wifi permet d'utiliser la modalité "sans fil" à travers la connexion Wi-Fi : la connectivité radio est
intégrée.
Pour effectuer la première installation et l'éventuelle configuration de l'imprimante multifonction en
modalité Wi-Fi, vous devez utiliser le câble USB ; après cela, vous pouvez retirer le câble et travailler sans fil.
remarque : pour installer le modèle wifi, suivez les instructions figurant dans le Manuel Wifi Info.
INSTRUCTIONS DE SECURITE
Pour garantir la sécurité, lisez attentivement et observez les prescriptions ci-dessous :
• Utilisez seulement le cordon d'alimentation qui accompagne l'imprimante ou un cordon autorisé par le
fabricant.
• Branchez le cordon d'alimentation à une prise secteur, d'accès facile, reliée à la terre, se trouvant à proximité
de l'imprimante.
• Installez l'imprimante sur une surface plate et stable en veillant à ce que personne ne puisse marcher sur le
cordon d'alimentation ou trébucher.
• N'utilisez pas l'imprimante dans des milieux humides ou si vos mains sont mouillées.
• N'exposez pas l'imprimante à la pluie ou à l'humidité.
• N'essayez pas de démonter l'imprimante.
• Respectez tous les avertissements et les instructions indiqués sur l'imprimante.
• Lisez et suivez attentivement la documentation qui accompagne l'imprimante.
Page 81

MISE EN ROUTE RAPIDE
3
NETTOYAGE DE L'IMPRIMANTE
• Utilisez un chiffon doux sec ou humecté d'eau tiède pour enlever la poussière, la saleté et les tâches
exclusivement sur la carrosserie.
• Nettoyez délicatement la partie interne blanche du capot supérieur à l'aide d'un chiffon doux sec ou
humecté d'eau tiède.
• Nettoyez la vitre d'exposition du scanner à l'aide d'un chiffon doux sec, humecté d'eau tiède ou d'un
produit pour nettoyer les vitr
es.
INFORMATIONS SUR LA QUALITE D'IMPRESSION ET LA GARANTIE
Afin de garantir le bon fonctionnement de l'imprimante et une qualité d'impression élevée, il est essentiel
d'utiliser exclusivement des cartouches d'encre Olivetti originales.
Olivetti décline toute responsabilité pour les dommages à l'imprimante dus à l'altération ou au remplissage
des cartouches jet d'encre. Par ailleurs, ces actions entraîneront l'annulation de la garantie.
RECHERCHE D'INFORMATIONS
Partie Description
Guide d'installation Ce document, qui se trouve dans l'emballage, indique comment installer
l'imprimante multifonction.
Mise en route rapide Ce document fournit les informations nécessaires pour utiliser l'imprimante.
Guide de l'utilisateur Ce document au format PDF, qui se trouve sur le CD-ROM "Installation", peut
être imprimé à tout moment. Il fournit des informations, sur les composants de
l'imprimante, plus détaillées que celles figurant dans la Mise en route rapide ; il
permet par ailleurs de résoudre les anomalies de fonctionnement.
Pour accéder au Guide de l'utilisateur, cliquez sur Démarrer > Programmes ou
Tous les Programmes > Olivetti > SIMPLE_WAY Manual.
Aide en ligne L'Aide en Ligne se trouve sur le CD-ROM "Installation" ; Il est automatiquement
chargé sur l'ordinateur lors de l'installation des pilotes. Il fournit des
informations encore plus complètes sur l'utilisation de l'imprimante. Pour
l'activer, cliquez sur le bouton Aide dans les boîtes de dialogue.
La fonction d'Aide dans les
boîtes de dialogue
Cliquez sur le bouton Aide des boîtes de dialogue pour afficher les informations
relatives à la page-écran courante.
Feuille de garantie La feuille de garantie, qui est fournie avec l'imprimante, explique les conditions
de garantie du produit et indique comment contacter le service Après-vente.
Page 82

MISE EN ROUTE RAPIDE
4
INSTALLATION DE L'IMPRIMANTE VIA BLUETOOTH (MODELE BLUETOOTH)
Vous pouvez imprimer sans fil via Bluetooth si l'ordinateur est pourvu de cette fonctionnalité intégrée ou si
un dispositif Bluetooth externe a été installé (par exemple une clé Bluetooth USB).
La fonction Bluetooth doit être activée sur l'imprimante.
La portée du système Bluetooth est normalement d'environ 10 mètres mais elle peut varier selon les
caractéristiques du milieu où le système est installé.
L'imprimante supporte le système de communication Bluetooth 1.2 Classe 2 pour la connexion à
l'ordinateur et aux téléphones portables compatibles
Les modalités d'installation varient en fonction du type d'utilisation de l'imprimante.
ACTIVATION BLUETOOTH
L'imprimante est configurée pour l'utilisation de Bluetooth à partir d'un téléphone portable compatible et ne
requiert aucune installation.
Pour vérifier si la fonctionnalité Bluetooth est disponible, contrôlez que le voyant bleu de l'icône Bluetooth est
allumé sur le panneau avant. Si tel n'est pas le cas, procédez comme suit :
• En environnement Windows :
1 Effectuez l'installation USB tel que décrit dans la documentation "Installation de l'imprimante"
(Setting Up Your Printer).
remarque : si l'installation a déjà été effectuée, il n'est pas nécessaire de la répéter.
2Ouvrez le programme Toolbox (Démarrer > Olivetti > Programmes > Toolbox).
remarque : le câble USB doit être branché et l'imprimante doit être sous tension.
3 Cliquez sur le bouton Assignations puis sur Assignations Bluetooth pour accéder à la configuration des
paramètres Bluetooth.
4 Activez la modalité Bluetooth et cliquez sur Envoyer assignations : attendez la réception automatique des
données du réseau Bluetooth présent : le voyant bleu de l'imprimante s'allumera.
Quittez le programme Toolbox.
5 Maintenant l'imprimante peut travailler en environnement Bluetooth.
Lors de la connexion, si le système vous demande de saisir le mot de passe, tapez 0000 (ou celui prédisposé
par l'utilisateur).
• En environnement Mac OS X :
1 Effectuez l'installation USB tel que décrit dans la documentation "Installation de l'imprimante"
(Setting Up Your Printer).
remarque : si l'installation a déjà été effectuée il n'est pas nécessaire de la répéter.
2 Lancez le programme Toolbox à partir du bureau électronique.
remarque : le câble USB doit être branché et l'imprimante doit être sous tension.
Page 83

MISE EN ROUTE RAPIDE
5
3 Cliquez sur le bouton Assignations puis sur Assignations Bluetooth pour accéder à la configuration des
paramètres Bluetooth.
4 Cliquez sur Condition Bluetooth. Activez la modalité Bluetooth et attendez la réception automatique des
données du réseau Bluetooth présent : appuyez sur Appliquer.
Quittez le programme Toolbox.
5
Maintenant l'imprimante peut travailler en environnement Bluetooth.
Lors de la connexion, si le système vous demande de saisir le mot de passe, tapez
0000
(ou celui prédisposé par
l'utilisateur).
INSTALLATION USB ET IMPRESSION BLUETOOTH A PARTIR DE L'ORDINATEUR EN ENVIRONNEMENT
WINDOWS
Vous pouvez imprimer sans fil via Bluetooth si l'ordinateur est pourvu de cette fonctionnalité intégrée ou si
un dispositif Bluetooth externe a été installé (par exemple une clé Bluetooth USB).
La fonction Bluetooth doit être activée sur l'imprimante (voyant bleu allumé).
1 Effectuez l'installation USB tel que décrit dans la documentation "Installation de l'imprimante"
(Setting Up Your Printer).
2 Activez la modalité Bluetooth sur l'ordinateur (cela dépend du dispositif Bluetooth installé).
Notez le port COM que le système Windows associe au canal Bluetooth (en environnement Windows Xp,
l'icône Bluetooth est disponible dans le systray pour rechercher les dispositifs branchés; pour les autres
systèmes d'exploitation, consultez le manuel du producteur).
3 Ouvrez le dossier Imprimantes et cliquez sur Ajouter imprimantes. Suivez les instructions pour ajouter
une imprimante et sélectionnez Imprimante locale ou de réseau puis l'option Sélectionner la porte
imprimante ; définissez le port COM de communication Bluetooth noté précédemment.
Sélectionnez Installer le logiciel imprimante, cherchez puis sélectionnez l'imprimante Olivetti modèle
SIMPLE_WAY et ajoutez-la à la liste des imprimantes disponibles (la présence du pilote ayant été vérifiée,
validez en cliquant sur "Garder le driver existant").
Pour plus de renseignements sur l'ajout d'une imprimante, consultez la documentation de votre système
d'exploitation.
INSTALLATION BLUETOOTH A PARTIR DE L'ORDINATEUR EN ENVIRONNEMENT MACINTOSH
Vous pouvez imprimer sans fil via Bluetooth si l'ordinateur est pourvu de cette fonction intégrée ou si un
dispositif Bluetooth externe a été installé (par exemple une clé Bluetooth USB). La fonction Bluetooth doit
être activée sur l'imprimante (voyant bleu allumé).
1 Pour programmer l'imprimante en modalité Bluetooth, sélectionnez Préférences du système > Bluetooth.
2 Cliquez sur Dispositif puis sur Nouveau dispositif.
Sur l'écran la fenêtre "Programmation assistée Bluetooth"apparaît.
3 Cliquez sur Continuer puis sélectionnez le type de dispositif : Imprimante.
4 Continuez la Programmation assistée en sélectionnant Chercher l'imprimante puis suivez les
instructions qui s'affichent.
5 Assignez à l'imprimante le nom SIMPLE_WAY Bluetooth et terminez l'installation.
Page 84

MISE EN ROUTE RAPIDE
6
INSTALLATION BLUETOOTH POUR L'IMPRESSION A PARTIR DE L'ORDINATEUR EN ENVIRONNEMENT
WINDOWS
Vous pouvez imprimer sans fil via Bluetooth si l'ordinateur est pourvu de cette fonctionnalité intégrée ou si
un dispositif Bluetooth externe a été installé (par exemple une clé Bluetooth USB).
La fonction Bluetooth doit être activée sur l'imprimante.
La connexion Bluetooth vers l'imprimante a lieu à travers le port COM disponible sur le système.
remarque : si une installation USB a été effectuée précédemment, il faut la supprimer du système avant de
procéder.
remarque : avant de procéder, vérifiez que le système Bluetooth est actif et qu'il fonctionne. Si tel n'est pas
le cas, contactez le producteur du matériel ou reportez-vous à la documentation spécifique du produit
installé.
Avec la connexion Bluetooth, vous ne pouvez pas utiliser les fonctions "copier" et "numérisation" car le
programme Toolbox n'est pas disponible. Toutefois, la commande "copier" peut être lancée à l'aide du
bouton relatif situé sur le panneau avant de l'imprimante.
1 Activez la modalité Bluetooth sur l'ordinateur (cela dépend du dispositif Bluetooth installé).
Notez le port COM que le système Windows associe au canal Bluetooth (en environnement Windows XP,
l'icône Bluetooth est disponible dans le systray pour rechercher les dispositifs branchés; pour les autres
systèmes, consultez le manuel du producteur).
2 Mettez l'ordinateur sous tension et introduisez le CD-ROM "Installation" dans le lecteur.
3 Sur la page-écran initiale, sélectionnez la Langue voulue et cliquez sur OK ; dans la page suivante,
sélectionnez Bluetooth et suivez les instructions qui s'affichent.
remarque : si la page-écran d'installation n'apparaît pas, cliquez sur Démarrer > Effectuer > Parcourir,
sélectionnez l'unité CD-ROM et cliquez sur Setup.exe.
remarque : si une installation USB a déjà été installée, il faut la supprimer du système avant de procéder.
4 Quand le système vous demande d'entrer le port de communication COM, sélectionnez celui associé au
Bluetooth noté précédemment et terminez l'installation.
L'imprimante a été ajoutée à la liste des imprimantes disponibles sur le système et peut maintenant travailler
en environnement Bluetooth.
ATTENTION : avec la connexion Bluetooth, vous ne pouvez pas utiliser les fonctions "copier"
et "numérisation" car le programme Toolbox n'est pas disponible. Toutefois, la
commande "copier" peut être lancée à l'aide du bouton relatif situé sur le
panneau avant de l'imprimante.
Page 85

MISE EN ROUTE RAPIDE
7
PANNEAU AVANT DE L'IMPRIMANTE
Reference Partie Description
1 Icône Bluetooth
(modèle bluetooth)
Le voyant bleu s'allume pour indiquer que la connectivité Bluetooth est
activée et disponible.
2 Icône de réseau
(modèle wifi)
Le voyant vert s'allume pour indiquer que l'imprimante est reliée au réseau
Wi-Fi.
3 Voyant d'état USB
pour connexion
PictBridge
Le voyant vert s'allume pour indiquer la connexion d'un appareil photo
numérique ou d'une carte de mémoire USB (Mass Storage).
4 Bouton Impression Il est activé lorsqu'un appareil photo numérique non-Pictbridge ou une
carte de mémoire USB est relié à l'interface USB sur le panneau avant.
Dans ce cas, en appuyant sur ce bouton, vous pouvez imprimer le Photo
Index.
456
710
811912
3
Simple
31
Bluetooth
32
Wifi
Page 86

MISE EN ROUTE RAPIDE
8
5 Bouton Sélection
Qualité
Il permet de sélectionner la qualité d'impression ou de copie ; l'imprimante
règle automatiquement la résolution d'impression (haute ou normale)
selon la qualité choisie. Il est conseillé de choisir la modalité photo si
l'original est une image ou si vous imprimez sur du papier
photographique.
6 Bouton Copie N/B Appuyez sur ce bouton pour faire une copie noir et blanc. Maintenez-le
enfoncé pour activer la fonction "Adapter au format".
Voir la rubrique "Copie d'un document".
7 Bouton Copie
couleur
Appuyez sur ce bouton pour faire une copie couleur. Maintenez-le enfoncé
pour activer la fonction "Adapter au format". Voir rubrique "Copie d'un
document".
8 Compteur de copies Il affiche le nombre de copies sélectionné. Celui-ci diminue au fur et à
mesure que les copies sont imprimées.
Il affiche un "E" pour indiquer une condition d'erreur sur l'imprimante.
9 Bouton Sélection de
copies
• Appuyez sur le signe Plus (+) pour augmenter le nombre de copies
(maxi. 9).
• Appuyez sur le signe Moins (-) pour diminuer le nombre de copies
(min. 1).
Le nombre sélectionné est indiqué sur le compteur de copies.
10 Bouton
Numérisation
• Il est activé quand l'imprimante est reliée à un ordinateur.
• Appuyez sur ce bouton pour numériser un document ou une photo
placé sur la vitre d'exposition. Voir la rubrique "Numérisation à partir
du panneau avant". Le système affichera une fenêtre de la Toolbox
permettant d'entrer l'image directement dans le programme voulu et
de personnaliser les paramètres de numérisation.
11 Bouton Annuler • Il permet d'annuler immédiatement une impression, une numérisation
ou une copie en cours, en provoquant l'expulsion du papier.
• Il rétablit les paramètres définis en usine.
12 Bouton Marche/
Arrêt
Il permet de mettre l'imprimante sous et hors tension.
Lorsque celle-ci est sous tension, il s'allume et clignote durant la phase
d'impression. Par la suite, il clignotera si des erreurs se vérifient (par ex.
manque de papier ou encre épuisée).
Reference Partie Description
Page 87

MISE EN ROUTE RAPIDE
9
ETAT DU PANNEAU AVANT DE L'IMPRIMANTE
Appuyez sur le bouton Marche/Arrêt situé à droite du panneau avant.
remarque : avant d'enfoncer le bouton Marche/Arrêt, vérifiez que le cordon d'alimentation est branché à
une prise secteur reliée à la terre. Pour les informations concernant l'installation de l'imprimante, reportezvous au Guide d'installation correspondant.
Quand vous appuyez sur le bouton Marche/Arrêt, l'imprimante lance une série de tests d'autodiagnostic
pour repérer les éventuels dysfonctionnements du système. Toute erreur relevée durant cette phase sera
signalée sur le panneau avant ou sur l'écran de l'ordinateur relié à l'imprimante.
Le voyant du bouton Marche/Arrêt s'allume au terme de l'autodiagnostic si aucune erreur n'a été relevée.
BRANCHEMENT D'UN APPAREIL PHOTO NUMERIQUE A L'IMPRIMANTE
1 Allumez l'appareil photo numérique. Pour plus de détails, lisez le Guide de l'utilisateur correspondant.
2 L'imprimante étant sous tension, reliez une extrémité du câble USB de l'appareil photo à son connecteur
USB et l'autre extrémité au connecteur USB situé sur le panneau avant de l'imprimante.
Le témoin vert d'état USB s'allume pour indiquer la connexion d'un appareil photo numérique ou d'une
carte de mémoire USB. Si l'imprimante ne reconnaît pas l'appareil photo, le témoin reste éteint.
Page 88

MISE EN ROUTE RAPIDE
10
UTILISATION DE L'IMPRIMANTE SANS ORDINATEUR
COPIE D'UN DOCUMENT
1 Mettez l'imprimante sous tension.
2 Chargez le format papier voulu dans le bac.
3 Soulevez le capot du scanner et placez le document sur la vitre d'exposition, face à copier tournée vers le
bas. Veillez à ce que l'angle supérieur gauche du document ou de la photo soit aligné avec l'angle supérieur
gauche de la vitre d'exposition.
4 Baissez le capot du scanner.
5 Sélectionnez la qualité de la copie (Photo ou Normale) en appuyant sur le bouton Sélection Qualité.
Pour copier un texte normal noir et blanc ou un document mixte noir et blanc/couleur, sélectionnez
Normale. Pour copier une photo ou un document contenant une photo, choisissez Photo.
6 Pour faire plusieurs copies, appuyez sur le signe Plus (+) du bouton Sélection de copies jusqu'à ce que le
nombre de copies voulu soit affiché sur le compteur de copies.
7 Appuyez sur le bouton Copie N/B ou Copie couleur selon vos exigences.
remarque : si le format de papier chargé dans le bac ne correspond pas au format du document original,
appuyez et maintenez enfoncé le bouton Copie N/B ou Copie Couleur pour activer l'option "Adapter à la
Page". L'imprimante adaptera automatiquement le format du document original au format chargé dans le
bac à papier.
CREATION ET IMPRESSION A PARTIR DE PHOTO INDEX
Lorsqu'un dispositif non PictBridge est relié à l'imprimante et qu'aucun fichier DPOF n'est associé aux images, le
bouton
Impression
est activé sur le panneau avant de l'imprimante.
Si vous appuyez sur ce bouton sans sélectionner aucune des images visualisées, vous lancez l'impression du
Photo Index.
remarque : il est indispensable que le bac à papier contienne un format A4.
Le Photo Index contient les images bordées de blanc, au format miniature 5x4, avec un espace au-dessous
pour indiquer le nombre de copies (de 1 à 4) ; au bas de la page, l'utilisateur peut choisir l'impression avec
ou sans bords ainsi que les formats entiers (2x1, 4x1).
Après avoir indiqué les sélections voulues, mettez-le Photo Index sur la vitre d'exposition du scanner et
maintenez enfoncé pendant quelques secondes le bouton Impression.
L'imprimante reconnaît le Photo Index positionné sur la vitre d'exposition et imprime les photos
sélectionnées.
La qualité d'impression doit être programmée sur le panneau avant de l'imprimante tandis que l'image sera
automatiquement adaptée au format présent dans le bac à papier.
Le Photo Index peut être utilisé plusieurs fois ; pour cela, il faut relier le même dispositif à l'imprimante et les
photos doivent être positionnées dans le même ordre.
Page 89

MISE EN ROUTE RAPIDE
11
IMPRESSION D'UNE PHOTO A PARTIR D'UN APPAREIL PHOTO NUMERIQUE PICTBRIDGE
Pour obtenir les résultats d'impression les plus performants, il est conseillé d'installer la cartouche couleur et la
cartouche photo et d'utiliser du papier photographique. Voir la rubrique "Remplacement des cartouches
d'encre".
1
Assurez-vous que l'appareil photo numérique PictBridge est allumé et qu'il est relié à l'imprimante. Pour plus
d'informations, reportez-vous à la rubrique "Branchement d'un appareil photo numérique à l'imprimante".
2 L'impression est gérée directement par l'appareil photo. Par conséquent, pour les instructions concernant la
procédure d'impression des photos, reportez-vous au Guide de l'utilisateur de cet appareil.
Pendant l'impression, le bouton Impression clignotera.
remarque :
si le format du papier chargé dans le bac est différent de celui sélectionné par l'appareil photo, les
impressions ne seront pas exécutées correctement.
Si cette fonction n'est pas disponible sur l'appareil photo, l'impression sera exécutée avec le format présent
dans le bac à papier.
IMPRESSION D'UNE PHOTO A PARTIR D'UN APPAREIL PHOTO NUMERIQUE DPOF
L'imprimante peut reconnaître les informations DPOF associées aux fichiers images. Si elle est reliée à un
appareil photo numérique DPOF, elle imprimera les photos sélectionnées directement par celui-ci.
remarque : avant d'imprimer les photos, consultez le Guide de l'Utilisateur de l'appareil photo pour vous
assurer qu'il est compatible PDQF.
Pour obtenir les résultats d'impression les plus performants, il est conseillé d'installer la cartouche couleur et
la cartouche photo et d'utiliser du papier photographique. Reportez-vous à la rubrique "Remplacement des
cartouches d'encre".
1 Assurez-vous que l'appareil photo numérique DPOF est allumé et qu'il est relié à l'imprimante. Pour plus
d'informations, reportez-vous à la rubrique "Branchement d'un appareil photo numérique à l'imprimante".
2 Sélectionnez la qualité d'impression selon vos besoins.
3 Appuyez sur le bouton Impression du panneau avant de l'imprimante pour imprimer les photos. Pour plus
d'informations, reportez-vous à la rubrique "Panneau avant de l'imprimante".
remarque : si le format du papier chargé dans le bac est différent de celui sélectionné par l'appareil photo,
les impressions ne seront pas exécutées correctement.
Si cette fonction n'est pas disponible sur l'appareil photo, l'impression sera exécutée avec le format présent
dans le bac à papier.
Page 90

MISE EN ROUTE RAPIDE
12
CARTOUCHES D'ENCRE
VERIFICATION DES NIVEAUX D'ENCRE
Lorsque l'imprimante est reliée à un ordinateur, vous pouvez vérifier les niveaux d'encre à l'aide de
l'application Toolbox.
Vous pouvez également utiliser l'application "Gestionnaire d'état", présente dans la liste des programmes
Olivetti ou sur la barre des tâches de Windows, pour obtenir plus d'informations.
INFORMATIONS NECESSAIRES POUR L'ACHAT DE CARTOUCHES D'ENCRE NEUVES
Afin de garantir le bon fonctionnement de l'imprimante et une qualité haut de gamme, il est fondamental
d'utiliser exclusivement les cartouches Olivetti originales.
Utilisez les codes du produit suivants pour acheter les cartouches :
• Cartouche d'encre noire, code IN501
• Cartouche d'encre à trois couleurs, code IN503
• Cartouche d'encre photo, code IN505
• Cartouche d'encre noire haute définition, code IN502
• Cartouche d'encre à trois couleurs haute définition, code IN504
• Cartouche d'encre photo haute définition, code IN506.
ATTENTION : les cartouches doivent être utilisées une seule fois.
REMPLACEMENT DES CARTOUCHES D'ENCRE
Pour remplacer les cartouches d'encre, consultez le Guide d'installation.
Si vous remplacez la cartouche noire par la cartouche photo, ou inversement, rangez la cartouche non
utilisée dans le boîtier approprié.
Page 91

MISE EN ROUTE RAPIDE
13
UTILISATION DE L'IMPRIMANTE A PARTIR D'UN ORDINATEUR
AVANT DE COMMENCER
Installez l'imprimante tel qu'il est décrit dans le Guide d'installation.
Le logiciel d'installation permet de choisir le type de connexion voulue pour utiliser l'imprimante.
Voici les connexions disponibles :
• USB : pour imprimer, copier et exécuter la numérisation en utilisant la connexion USB.
• Wi-Fi : uniquement pour le modèle wifi, pour imprimer, copier et exécuter la numérisation en modalité Wi-Fi
en utilisant la connexion sans fil.
remarque :
ce chapitre fournit les informations de base nécessaires pour utiliser l'imprimante reliée à
l'ordinateur. Pour plus d'informations sur les fonctions disponibles, lisez l'Aide en Ligne ou le Guide de l'utilisateur.
Pour accéder à l'Aide en ligne de Windows :
• Cliquez sur le bouton Aide dans les boîtes de dialogue.
Pour accéder au Guide de l'utilisateur :
• Cliquez sur Démarrer > Programmes ou Tous les Programmes > Olivetti > SIMPLE_WAY Manual.
LA TOOLBOX
La Toolbox (boîte à outils) est une application permettant de contrôler l'impression, la copie et la
numérisation à partir d'une interface utilisateur affichée sur l'écran de l'ordinateur. Elle permet aussi de
télécopier le document numérisé avec l'imprimante multifonction, à condition que l'ordinateur soit pourvu
d'un modem et qu'il dispose d'une application pour télécopie. Pour le modèle wifi, vous pouvez définir les
paramètres nécessaires pour accéder à un réseau Wi-Fi. La Toolbox se trouve dans le CD-ROM "Installation"
;
elle est automatiquement chargée sur l'ordinateur lors de l'installation du logiciel.
A partir de la page-écran principale de la Toolbox, vous pouvez :
• Imprimer des images et effectuer des copies.
• Numériser des documents ou des photos et choisir la destination de l'image numérisée.
• Contrôler le niveau d'encre des cartouches.
• Accéder à l'option "Solutions et assistance" permettant de :
– Nettoyer et tester les buses des cartouches d'encre.
– Aligner automatiquement les cartouches d'encre pour améliorer la qualité d'impression.
– Trouver l'adresse du site web du producteur pour obtenir les informations nécessaires à l'achat des
cartouches d'encre neuves.
– Accéder aux informations relatives aux anomalies de fonctionnement.
• Accéder aux fonctions Paramètres pour personnaliser les paramètres standard de la Toolbox.
• Accès à la fonction Paramétrage réseau pour définir la modalité Wi-Fi (modèle wifi).
• Accès à la fonction Paramétrage réseau pour définir la modalité Bluetooth (modèle Bluetooth).
Page 92

MISE EN ROUTE RAPIDE
14
• Pour accéder à la Toolbox :
1 Cliquez à l'aide du bouton droit de la souris sur l'icône Olivetti située dans la barre des tâches de Windows
ou sélectionnez Démarrer > Programmes ou Toutes les Programmes > Olivetti > Olivetti Toolbox
.
Le système affichera la Toolbox.
LE MONITEUR D'ETAT DE L'IMPRIMANTE
Le moniteur d'état de l'imprimante fournit des informations sur l'état courant de la machine. Il est chargé
sur l'ordinateur lors de l'installation du logiciel figurant sur le CD-ROM "Installation".
Il s'affiche automatiquement au début d'une opération d'impression ou de copie et disparaît
automatiquement au terme de l'opération. Vous pouvez toutefois le fermer, à tout moment, en cliquant sur
l'icône relative située dans la barre des tâches de Windows.
Si le moniteur d'état est fermé pendant une impression ou une copie, il sera automatiquement affiché :
• Quand l'encre est presque ou complètement épuisée. Un point d'exclamation coloré indiquera un bas niveau
d'encre (cartouche couleur, noire, ou les deux) et les pourcentages relatifs. L'adresse du site web du
producteur où vous trouverez les informations nécessaires à l'achat de cartouches d'encre neuves apparaîtra
dans une fenêtre qui surgira.
• Quand des situations d'erreur se vérifient, dans ce cas vous pouvez continuer ou annuler l'impression en
cliquant sur le relatif bouton affiché.
IMPRESSION, COPIE ET NUMERISATION A L'AIDE DE LA TOOLBOX
La zone principale de la Toolbox comprend les icônes qui représentent les différents outils disponibles.
Icône de la Toolbox : Vous pouvez :
Imprimer des Photos • Parcourir le disque dur ou la mémoire de l'appareil photo numérique non
compatible PictBridge/DPOF relié à l'ordinateur pour trouver le dossier
contenant les photos à imprimer.
• Sélectionner toutes les photos enregistrées dans le dossier ou quelques-unes et
choisir le nombre de copies à effectuer.
• Sélectionner le type et le format de papier pour l'impression.
• Sélectionner l'impression sur une page d'une, de deux ou de quatre photos.
• Imprimer un index des photos.
• Imprimer les photos sélectionnées.
Page 93

MISE EN ROUTE RAPIDE
15
Photocopieur • Définir les caractéristiques du type de document à copier.
• Sélectionner le type et le format de papier pour l'impression.
• Définir la qualité de la copie.
• Eclaircir ou foncer la copie et sélectionner la copie N/B ou couleur.
• Sélectionner la mise en page de la copie imprimée : faire des copies
multiples de la même image sur une seule page, faire des copies au format
poster en définissant le nombre de pages sur lesquelles il faut adapter
l'image copiée, reproduire l'image copiée autant de fois que nécessaire sans
redimensionner l'image, ou imprimer l'image copiée sur une seule page.
• Agrandir ou réduire le document ou la photo à copier, ou régler
automatiquement sa dimension pour l'adapter au format papier
sélectionné.
• Sélectionner le nombre de copies à exécuter.
Numérisation sur fichier
Numérisation sur
application
Numérisation sur courriel
Numérisation sur fax
• Numériser un aperçu du document ou de la photo placé sur la vitre du
scanner.
• Utiliser les commandes de sélection appropriée pour délimiter la zone de
l'aperçu de l'image à numériser.
• Tourner, renverser, agrandir ou réduire l'aperçu de l'image.
• Définir le type de document à numériser et sélectionner le mode couleur,
niveaux de gris ou noir et blanc.
• Définir la résolution, l'intensité de la couleur, la luminosité et le contraste de
l'image numérisée.
Selon l'outil sélectionné :
• Avec Numérisation sur fichier, enregistrer l'image numérisée dans un
format TIFF (.tif), bitmap (.bmp) ou JPEG (.jpg) dans un dossier de
l'ordinateur.
• Avec Numérisation sur application, numériser le document ou la photo
dans une application sélectionnable (telle que des programmes graphiques,
un programme de traitement de textes ou un logiciel PAO).
• Avec Numérisation sur courriel, joindre en annexe le document ou la
photo numérisé, dans un format comprimé .jpg, à un courrier électronique
ouvert par l'application e-mail par défaut de l'ordinateur.
• Avec Numérisation sur fax, numériser le document ou la photo, en format
.jpg comprimé, dans une application de télécopie sélectionnable.
Icône de la Toolbox : Vous pouvez :
Page 94

MISE EN ROUTE RAPIDE
16
L'interface utilisateur principale de la Toolbox fournit aussi les liens vers les options Aide, Solutions et
assistance et Paramètres.
IMPRESSION A L'AIDE D'UNE APPLICATION EN UTILISANT LES PROPRIETES D'IMPRESSION
1 Le document ou la photo étant ouvert dans l'application courante, cliquez sur Fichier > Imprimer pour
ouvrir la boîte de dialogue Imprimer.
2 Cliquez sur Préférences ou Propriétés, selon le système d'exploitation chargé.
Le système affiche l'interface utilisateur du pilote de l'imprimante permettant d'utiliser l'imprimante
multifonction tel qu'indiqué dans le tableau suivant :
Lien de la Toolbox : Vous pouvez :
Aide • Obtenir des informations supplémentaires sur le sujet courant affiché.
Solutions et assistance • Nettoyer et tester les cartouches d'encre.
• Aligner automatiquement les cartouches d'encre.
• Trouver l'adresse du site web du producteur pour obtenir les informations
nécessaires à l'achat de cartouches d'encre neuves.
• Accéder aux informations concernant les anomalies de fonctionnement.
• Accéder aux informations concernant les différents contacts.
Paramètres • Modifier les paramètres standards de la Toolbox.
Préférences/Propriétés Vous pouvez :
Papier/Qualité • Sélectionner manuellement si le document à imprimer est formé seulement
de textes ou de graphiques noirs, d'une combinaison de textes noirs et de
graphiques couleurs ou de photos, ou bien seulement de photos ; vous
pouvez également définir le relevé automatique de l'original comme une
combinaison de textes noirs ou de graphiques couleurs ou de photos.
• Sélectionner le type et le format papier à utiliser, s'il faut le charger
manuellement, s'il faut imprimer sans bords sur du papier couché, brillant
ou sur des cartes postales.
• Sélectionner la qualité de l'impression.
• Sélectionner l'impression des photos en couleurs naturelles (Qualité Photo) si
du papier photo est chargé et que l'option Photos est sélectionnée comme
type de document.
• Sélectionner l'impression noir et blanc ou couleur.
• Définir le nombre de copies à imprimer et si l'impression doit partir ou non
de la dernière page.
Page 95

MISE EN ROUTE RAPIDE
17
NUMERISER UN ORIGINAL DE L'APPLICATION
1 Placez le document ou la photo sur la vitre du scanner, face à numériser tournée vers le bas. Veillez à ce que
l'angle supérieur gauche du document ou de la photo soit aligné avec l'angle supérieur gauche de la vitre
d'exposition.
2 Saisissez l'image à partir de l'application courante.
Le système affiche l'interface utilisateur du pilote du scanner avec un aperçu à basse résolution du document
ou de l'image sur le coté gauche de l'écran.
Vous pouvez ainsi :
• Utiliser la commande de sélection appropriée pour délimiter la zone de l'aperçu à numériser.
• Tourner, renverser, agrandir ou réduire l'aperçu.
• Numériser un nouvel aperçu, au cas où l'original soit accidentellement retiré de la vitre du scanner.
• Exécuter la numérisation finale selon les paramètres établis.
Mise en page • Définir l'impression des pages du document ou des photos, sur une seule
page.
• Décider d'imprimer sur des pages multiples ou un seule feuille de papier.
• Définir l'ordre dans lequel les pages multiples seront insérées sur un seule
feuille de papier, et sélectionner ou non l'insertion d'un bord autour des
images sur une feuille simple.
• Définir l'impression de pages multiples au format poster, en étendant donc le
contenu d'une page sur plusieurs feuilles.
• Définir le nombre de feuilles sur lesquelles l'image du poster sera imprimée
et décider s'il faut insérer un bord autour de chaque image composant le
poster.
Niveaux d'encre • Afficher l'estimation de la quantité d'encre qui reste dans les cartouches
noire et couleur.
• Accéder directement, à travers un lien, à la page Entretien de la Toolbox
contenant les informations sur l'entretien et les anomalies de
fonctionnement.
• Accéder directement, à travers un lien, à l'adresse du site web du
producteur pour obtenir les informations nécessaires à l'achat de cartouches
d'encre neuves.
Préférences/Propriétés Vous pouvez :
Page 96

MISE EN ROUTE RAPIDE
18
Sur le côté droit de l'interface du pilote du scanner, vous pouvez personnaliser les paramètres tel qu'indiqué
dans le tableau suivant :
NUMERISER UN ORIGINAL A PARTIR DU PANNEAU AVANT DE L'IMPRIMANTE
1 Placez le document ou la photo sur la vitre du scanner, face à numériser tournée vers le bas. Veillez à ce que
l'angle supérieur gauche du document ou de la photo soit aligné avec l'angle supérieur gauche de la vitre
d'exposition.
2 Appuyez sur le bouton Numérisation situé sur le panneau avant de l'imprimante.
Le système ouvre l'application Toolbox en modalité Copie et exécute une pré-numérisation au terme de
laquelle il affiche les options suivantes : Numérisation sur fichier, Numérisation sur application, Numérisation
sur courriel et Numérisation sur fax.
Sélectionnez l'option voulue et terminez l'opération.
Pilote du scanner : Vous pouvez :
Standard • Définir si le document à numériser est formé seulement de textes ou de
graphiques noirs, d'une combinaison de textes noirs ou de graphiques
couleurs ou de photos, ou bien seulement de photos.
• Sélectionner si la numérisation doit être effectuée en couleur, en niveaux de
gris ou en noir et blanc.
Personnaliser • Sélectionner la résolution de numérisation.
• Sélectionner le nombre de couleurs différentes qui peuvent être
représentées en nombre de bits (Intensité de couleur).
• Eclaircir ou foncer l'image à numériser, augmenter ou réduire le contraste.
• Activer un filtre pour rendre homogène l'arrière-plan de l'image, par
exemple pour la numérisation des pages d'un journal.
Page 97

19
INDEX ANALYTIQUE
A
Achat de cartouches
d'encre neuves 12
Activation Bluetooth 4
en environnement
Mac OS X 4
en environnement
Windows 4
B
Bluetooth 4, 5, 6, 7
C
Cartouches d’encre 12
niveaux d’encre 12
remplacement 12
Compteur de copies 8
Copie 14
couleur 8
d'un document 10
N/B 8
G
Garantie 3
I
Impression 7, 10, 14
Impression a partir de Photo
Index 10
Impression d’une
photographique
a partir d’un appareil photo
numerique DPOF 11
Installation
Bluetooth en environnement
Windows 6
de l'imprimante 4
USB et impression Bluetooth
a partir de l'ordinateur en
environnement
Windows 5
L
Lien de la Toolbox 16
aide 16
paramètres 16
solutions et assistance 16
M
Moniteur d'etat 14
N
Niveaux d’encre 12, 17
Numérisation 8, 14
Numériser un original 17
P
Panneau avant de
l'imprimante 4, 7, 9
bouton sélection de copies 8
compteur de copies 8
copie couleur 8
copie N/B 8
icône Bluetooth 7
icône de réseau wireless 7
impression 7
numérisation 8
sélection qualité 8
voyant d’état USB 7
Photo Index 10
Préférences/propriétés 16
mise en page 17
niveaux d’encre 17
papier/qualité 16
Q
Qualité 8
Page 98

INDEX ANALYTIQUE
20
R
Remplacement des
cartouches d'encre 12
S
Sélection de copies 8
T
Toolbox 13, 14
imprimer des photos 14
numérisation sur
application 15
numérisation sur courriel 15
numérisation sur fax 15
numérisation sur fichier 15
photocopieur 15
V
Verification des niveaux
d’encre 12
Voyant d’état USB 7
W
Wireless 7
Page 99

ÍNDICE GENERAL
i
ÍNDICE GENERAL
1 GUÍA RÁPIDA . . . . . . . . . . . . . . . . . . . . . . . . . . . . . . . . . . . . . . . .1
CONOCER EL PRODUCTO . . . . . . . . . . . . . . . . . . . . . . . . . . . . . . . .2
Generalidades . . . . . . . . . . . . . . . . . . . . . . . . . . . . . . . . . . . . .2
Instrucciones inherentes a la seguridad . . . . . . . . . . . . . . . . . . .2
Leer y seguir escrupulosamente las siguientes
informaciones relativas a la seguridad . . . . . . . . . . . . . . . . . .2
Limpieza de la impresora . . . . . . . . . . . . . . . . . . . . . . . . . . . . .3
Informaciones inherentes a la calidad de
impresión y la garantía . . . . . . . . . . . . . . . . . . . . . . . . . . . . .3
Búsqueda de Información . . . . . . . . . . . . . . . . . . . . . . . . . . . . .3
INSTALACIÓN DE LA IMPRESORA VÍA BLUETOOTH
(MODELO BLUETOOTH) . . . . . . . . . . . . . . . . . . . . . . . . . . . . . . . . .4
Activación Bluetooth . . . . . . . . . . . . . . . . . . . . . . . . . . . . . . . .4
Instalación usb e impresión bluetooth
desde ordenador en ambiente windows . . . . . . . . . . . . . . . .5
Instalación Bluetooth desde un ordenador
en ambiente Macintosh . . . . . . . . . . . . . . . . . . . . . . . . . . . .5
Instalación Bluetooth para la impresión desde un ordenador
en ambiente Windows . . . . . . . . . . . . . . . . . . . . . . . . . . . . .6
PANEL FRONTAL DE LA IMPRESORA . . . . . . . . . . . . . . . . . . . . . . . .7
Estados del panel frontal de la impresora . . . . . . . . . . . . . . . . .9
Conexión a la impresora de una máquina fotográfica digital
. . . . .9
USO DE LA IMPRESORA SIN UN ORDENADOR . . . . . . . . . . . . . . . .10
Copia de documentos . . . . . . . . . . . . . . . . . . . . . . . . . . . . . .10
Creación e impresión del Photo Index . . . . . . . . . . . . . . . . . . .10
Impresión de fotografias desde una máquina
fotográfica digital PictBridge . . . . . . . . . . . . . . . . . . . . . . . .10
Impresión de fotografías desde una máquina
fotográfica digital DPOF . . . . . . . . . . . . . . . . . . . . . . . . . . .11
CARTUCHOS DE TINTA . . . . . . . . . . . . . . . . . . . . . . . . . . . . . . . . .11
Control de los niveles de tinta . . . . . . . . . . . . . . . . . . . . . . . . .11
Informaciones necesarias para adquirir nuevos
cartuchos de tinta . . . . . . . . . . . . . . . . . . . . . . . . . . . . . . . .11
Sustitución de los cartuchos de tinta . . . . . . . . . . . . . . . . . . . .12
Page 100

ÍNDICE GENERAL
ii
USO DE LA IMPRESORA DESDE UN ORDENADOR . . . . . . . . . . . . .12
Antes de iniciar . . . . . . . . . . . . . . . . . . . . . . . . . . . . . . . . . . . .12
Toolbox . . . . . . . . . . . . . . . . . . . . . . . . . . . . . . . . . . . . . . . . .13
Monitor de Estado de la impresora . . . . . . . . . . . . . . . . . . . . .14
Impresión, copia y escaneo desde el Toolbox . . . . . . . . . . . . . .14
Impresión desde la aplicación utilizando las propiedades
de impresión . . . . . . . . . . . . . . . . . . . . . . . . . . . . . . . . . . . .16
Escaneo de un original desde la aplicación . . . . . . . . . . . . . . .17
Escaneo de un original desde el panel frontal
de la impresora . . . . . . . . . . . . . . . . . . . . . . . . . . . . . . . . . .18
ÍNDICE ANALÍTICO. . . . . . . . . . . . . . . . . . . . . . . . . . . . . . . . . . . .19
 Loading...