

Code: 383330 G
Edited/Published/Produced by:
Realizzato/Pubblicato/Prodotto da:
Olivetti S.p.A.
Gruppo Telecom Italia
Via Jervis, 77
Ivrea (TO)
Italy
www.olivetti.com
Copyright © Olivetti, 2009
All rights reserved
Tutti i diritti riservati
I requisiti qualitativi di questo prodotto sono
attestati dall apposizione della marcatura CE
sul prodotto.
The mark affixed to the product certifies that
the product satisfies the basic quality
Requirements.
Code:
383330 G
Data di pubblicazione: Dicembre 2009
Marchi registrati: Microsoft e Windows sono marchi
registrati di Microsoft Corporation.
Altri marchi registrati e nomi commerciali possono essere
utilizzati in questo documento come riferimento ai
rispettivi proprietari o ai nomi dei loro prodotti. Olivetti
declina qualsiasi interesse proprietario in marchi registrati
e nomi commerciali di terzi.
Date of publication: December 2009
Trademarks: are registered
trademarks of Microsoft Corporation.
Other trademarks and trade names
may be used in this document to refer to either the entities
claiming the marks and names or their products.
Olivetti disclaims any proprietary interest in trademarks and
trade names other than its own.
Microsoft and Windows
Directive 2002/96/CE - Direttiva 2002/96/CE
DIRETTIVA 2002/96/CE SUL TRATTAMENTO, RACCOLTA,
RICICLAGGIO E SMALTIMENTO DI APPARECCHIATURE ELETTRICHE
ED ELETTRONICHE E LORO COMPONENTI
1. PER I PAESI DELL'UNIONE EUROPEA (UE)
È vietato smaltire qualsiasi apparecchiatura elettrica ed elettronica come
rifiuto solido urbano: è obbligatorio effettuare una sua raccolta separata.
L'abbandono di tali apparecchiature in luoghi non specificatamente
predisposti ed autorizzati, può avere effetti pericolosi sull'ambiente e sulla
salute.
I trasgressori sono soggetti alle sanzioni ed ai provvedimenti a norma di
Legge.
Per smaltire correttamente le nostre apparecchiature potete:
a) Rivolgervi alle Autorità Locali che vi forniranno indicazioni e informazioni
pratiche sulla corretta gestione dei rifiuti, ad esempio: luogo e orario delle
stazioni di conferimento, ecc.
b) All'acquisto di una nostra nuova apparecchiatura, riconsegnare al nostro
Rivenditore un'apparecchiatura usata, analoga a quella acquistata.
l simbolo del contenitore barrato, riportato
sull'apparecchiatura, significa che:
- L'apparecchiatura, quando sarà giunta a fine vita, deve
essere portata in centri di raccolta attrezzati e deve essere
trattata separatamente dai rifiuti urbani;
- Olivetti garantisce l'attivazione delle procedure in materia di
trattamento, raccolta,riciclaggio e smaltimento della
apparecchiatura in conformità alla Direttiva 2002/96/CE (e
succ.mod.).
DIRECTIVE 2002/96/CE ON THE TREATMENT, COLLECTION,
RECYCLING AND DISPOSAL OF ELECTRIC AND ELECTRONIC
DEVICES AND THEIR COMPONENTS
1. FOR COUNTRIES IN THE EUROPEAN UNION (EU)
The disposal of electric and electronic devices as solid urban waste is
strictly prohibited: it must be collected separately. The dumping of these
devices at unequipped and unauthorized places may have hazardous
effects on health and the environment.
Offenders will be subjected to the penalties and measures laid down by
the law.
To dispose of our devices correctly:
a) Contact the Local Authorities, who will give you the practical
information you need and the instructions for handling the waste
correctly,for example: location and times of the waste collection
centres, etc.
b) When you purchase a new device of ours, give a used device similar
to the one purchased to our dealer for disposal.
The crossed dustbin symbol on the device means that:
- When it to be disposed of, the device is to be taken to
the equipped waste collection centres and is to be
handled separately from urban waste;
- Olivetti guarantees the activation of the treatment,
collection, recycling and disposal procedures in
accordance with Directive 2002/96/CE (and subsequent
amendments).
2. PER GLI ALTRI PAESI (NON UE)
Il trattamento, la raccolta,il riciclaggio e lo smaltimento di apparecchiature
elettriche ed elettroniche dovrà essere effettuato in conformità alle Leggi in
vigore in ciascun Paese.
2. FOR OTHER COUNTRIES (NOT IN THE EU)
The treatment, collection,recycling and disposal of electric and electronic
devices will be carried out in accordance with the laws in force in the
country in question.
M815L QG TOC eng.fm Page I Saturday, August 1, 2009 1:54 PM
Guida Rapida
M815L QG TOC eng.fm Page I Saturday, August 1, 2009 1:54 PM
Guida Rapida
M815L QG TOC ita.fm Page I Wednesday, August 5, 2009 11:10 AM
Sommario
Informazioni su questa guida rapida .........................................1
Guida di avvio rapido ...............................................................1
Descrizione del sistema: vista anteriore e posteriore .................2
Descrizione del sistema: vista laterale e inferiore .......................3
Indicatori LED ...........................................................................4
Tastiera e tasti funzione ...........................................................5
Installazione driver ...................................................................6
Specifiche tecniche ..................................................................7
Guida Rapida
I
M815L QG TOC ita.fm Page II Wednesday, August 5, 2009 11:10 AM
Istruzioni per la custodia e il funzionamento
Il computer netbook è progettato per un uso mobile ed è piuttosto robusto, ma può essere danneggiato da un uso improprio.
Per evitare qualsiasi danno, attenersi ai seguenti suggerimenti:
• Non lasciarlo cadere ed evitare urti. Se il computer cade, è possibile che il telaio e i componenti possano esserne danneggiati.
• Tenerlo all'asciutto e non provocarne il surriscaldamento.
Tenere il computer e l'alimentazione lontani da ogni tipo di
impianto di riscaldamento. Si tratta di un apparato elettrico. Se
acqua o altri liquidi dovessero penetrarvi, esso potrebbe risultarne
seriamente danneggiato.
• Evitare le interferenze. Tenere il computer lontano da trasforma-
tori ad alta capacità, motori elettrici e altri intensi campi magnetici.
Ciò può impedire il corretto funzionamento e danneggiare i dati.
• Attenersi alle corrette procedure di lavoro con il computer.
Spegnere il computer correttamente e non dimenticare di salvare il
proprio lavoro. Ricordare di salvare frequentemente i propri dati
poiché essi potrebbero essere persi nel caso in cui la batteria si
esaurisse.
Assistenza
Ogni tentativo di riparare da soli il computer può annullare la garanzia ed esporre l'utente a scosse elettriche. Per l'assistenza rivolgersi solo a personale tecnico qualificato, in particolar modo
nelle situazioni seguenti:
• Quando il cavo di alimentazione è danneggiato o logorato.
• Se il computer è stato esposto alla pioggia o ad altri liquidi.
• Se il computer non funziona normalmente dopo aver seguito
correttamente le istruzioni operative.
• Se il computer è caduto o si è danneggiato ( Attenzione : in caso
di rottura dello schermo LCD non toccare il liquido che ne fuoriesce in quanto è tossico ).
• Se c'è un odore non usuale, calore o fumo che fuoriesce dal
Guida Rapida
computer.
Informazioni di sicurezza
• Utilizzare esclusivamente un adattatore approvato per l'utilizzo di
questo computer.
• Utilizzare solo il cavo di alimentazione e le batterie indicate in questo
manuale. Non gettare le batterie nel fuoco, poiché potrebbero esplodere. Fare riferimento alle normative locali per istruzioni speciali in
tema di smaltimento rifiuti.
• Non continuare a usare in alcun modo una batteria che sia caduta in
terra o che sembri danneggiata (es. piegata o torta). Anche se il computer continua a funzionare con una batteria danneggiata, questa
può provocare danni ai circuiti risultanti in pericolo di incendio.
• Assicurarsi che il computer sia completamente spento prima di inserirlo in una borsa da viaggio (o in un contenitore simile).
• Prima di pulire il computer ricordare sempre di rimuovere la batteria e
di scollegare il computer da qualsiasi fonte di alimentazione esterna,
da periferiche e altri cavi (incluse linee telefoniche).
• Per pulire il computer utilizzare solo un panno morbido e pulito, evitando di applicare detergenti direttamente sul computer. Non utilizzare detergenti volatili (distillati di petrolio) o abrasivi su qualsiasi
parte del computer.
• Non provare a riparare il pacco batteria. Fare riferimento sempre
all'assistenza tecnica o a personale qualificato per la riparazione o la
sostituzione del pacco batteria.
Smaltimento della batteria & Attenzione
Il prodotto acquistato contiene una batteria ricaricabile. La batteria è
riciclabile. Al termine della durata di uso, in base alle diverse leggi locali e statali, può essere illegale smaltire questa batteria insieme ai rifiuti comuni. Controllare i requisiti previsti nella propria zona
consultando i funzionari locali addetti allo smaltimento dei rifiuti solidi per le opzioni di riciclo o lo smaltimento corretto.
Pericolo di esplosione in caso sostituzione errata della batteria. Sostituire solamente con lo stesso tipo o con uno analogo raccomandato
dal produttore. Eliminare la batteria usata seguendo le istruzioni del
produttore.
II
M815L QG (Ita).fm Page 1 Monday, December 21, 2009 3:30 PM
Informazioni su questa guida
rapida
Questa guida rapida rappresenta un’introduzione all’avvio
del sistema. Si tratta di un supplemento e non di una
sostituzione del Manuale per l'utente completo in formato
Adobe Acrobat, memorizzato sul disco Device Drivers &
User's Manual fornito a corredo del computer. Questo
disco contiene inoltre i driver necessari per il corretto uso
del computer (Nota: La società si riserva il diritto di
revisionare la presente pubblicazione o di modificarne il
contenuto senza preavviso).
Tutte le funzionalità del computer sono già state
configurate in fabbrica . Nel caso si stia pianificando di
riconfigurare (o reinstallare) componenti del sistema, fare
riferimento al Manuale utente completo.
Il disco Device Drivers & User’s Manual non contiene il
sistema operativo.
Informazioni legali e di sicurezza
Prestare particolare attenzione alle informative legali e di
sicurezza contenute nel manuale dell'utente che si trova sul
disco Device Drivers & User’s Manual.
© Agosto 2009
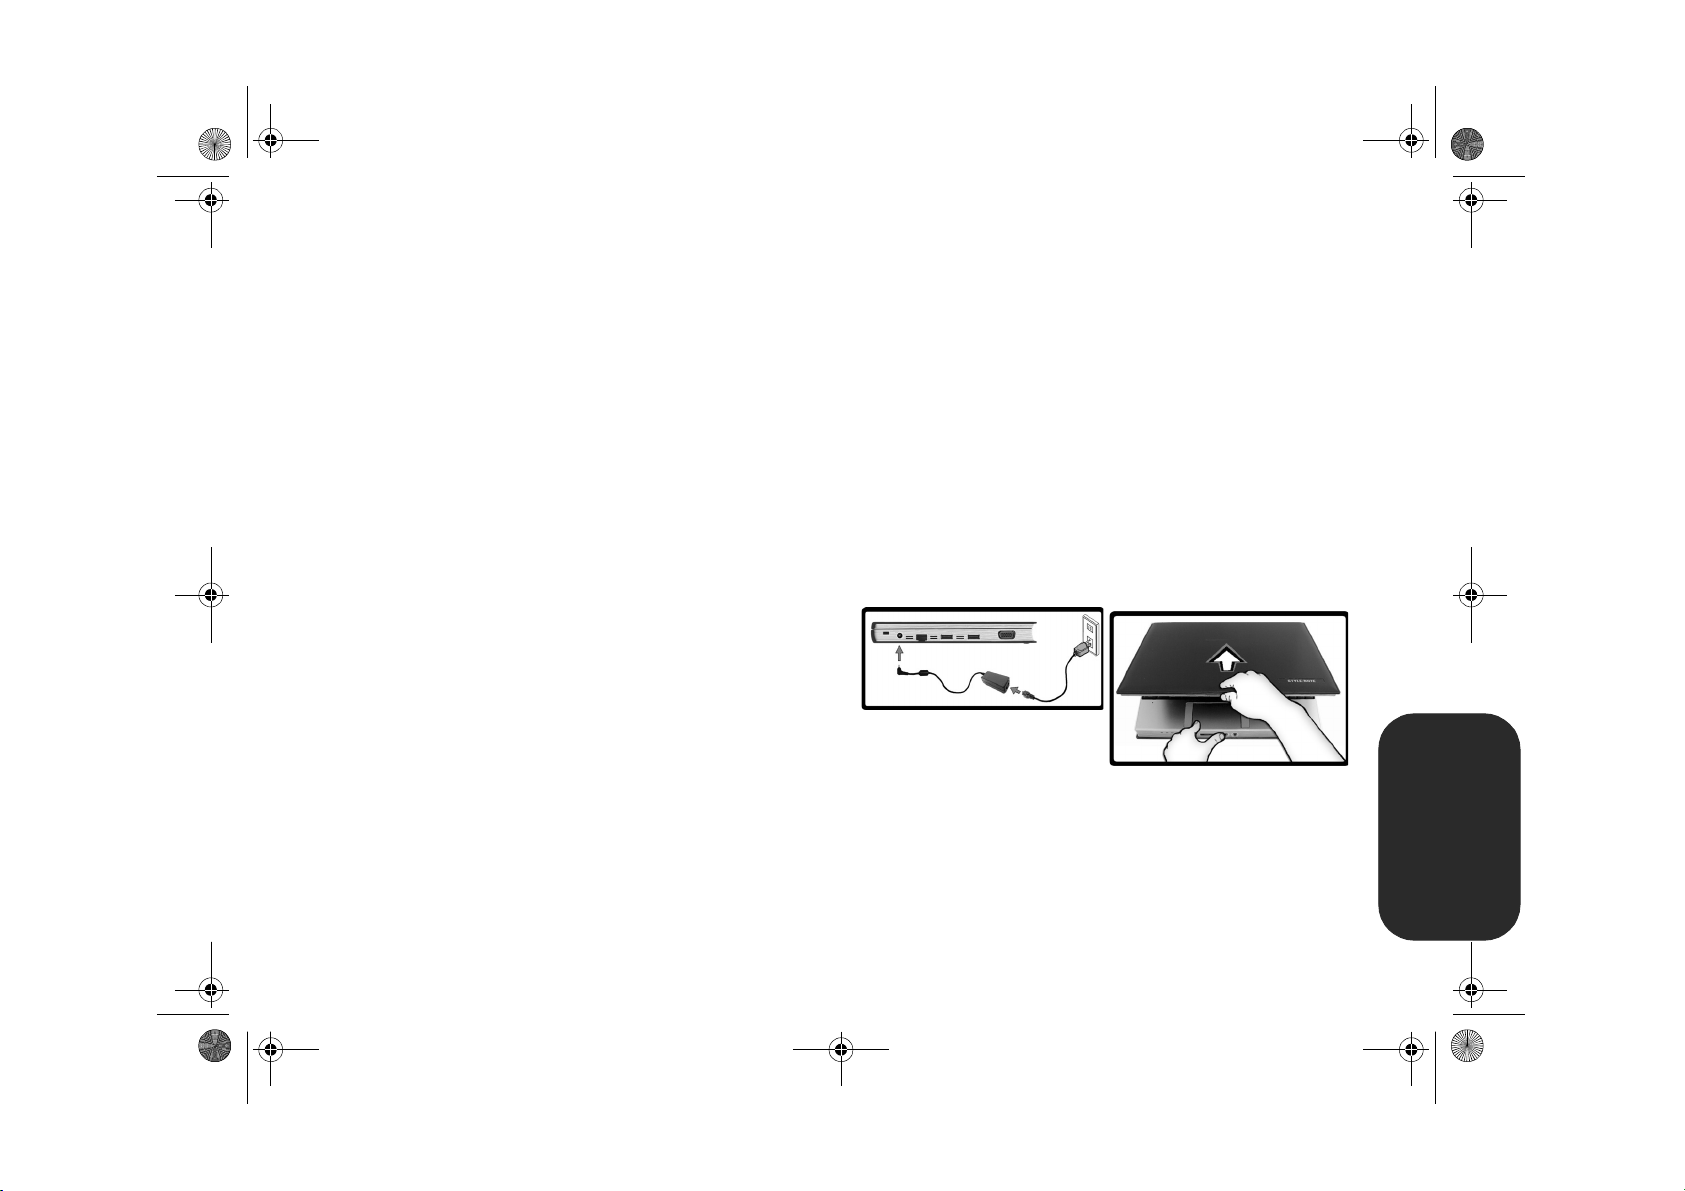
Guida di avvio rapido
1. Eliminare tutti i materiali di imballo.
2. Appoggiare il computer su una superficie stabile.
3. Collegare bene le periferiche che si desidera usare con il
computer (per esempio tastiera e mouse) alle porte
corrispondenti.
4. Collegare l'adattatore CA/CC al jack di ingresso CC situato
alla sinistra del computer, quindi inserire il cavo di
alimentazione CA in una presa e collegare il cavo di
alimentazione CA all'adattatore CA/CC.
5. Con una mano sollevare con cautela il coperchio/LCD fino a
un angolo di visione comodo, mentre con l'altra mano si
mantiene la base del computer (Nota: non sollevare mai il
computer tenendolo dal coperchio/LCD).
6. Premere il pulsante di alimentazione per accendere il
computer.
Figura 1
Computer con alimentatore
CA/CC collegato
Guida Rapida
Marchi registrati
Intel ed Atom sono marchi/marchi registrati di Intel
Corporation.
Olivetti and Alice sono marchi/marchi registrati di
Telecom Italia S.p.A.
Software del sistema
Il software è già pre-installato sul computer.
Questo manuale si riferisce al sistema operativo Microsoft
Win 7 Starter Edition.
1
M815L QG (Ita).fm Page 2 Monday, December 21, 2009 3:30 PM
Descrizione del sistema: vista anteriore e posteriore
1
Parte anteriore aperta
2
3
4
5
6
7
Spegnimento
È importante tenere presente
che è sempre necessario spegnere il computer scegliendo
il comando Spegni compu-
ter disponibile dal menu
Start di Windows. In questo
modo si evitano problemi al
sistema o al disco rigido.
Guida Rapida
Lato anteriore
11
Lato posteriore
9. Lettore di schede 7-in-1
10. Jack ingresso del microfono
11. Jack uscita delle cuffie
12. Batteria
1. Camera PC
2. Schermo LCD
3. Altoparlanti incorporati
4. Pulsante di alimentazione
8
9
10
12
Figura 2 - Vista anteriore e posteriore
5. Tastiera
6. Microfono incorporato
7. TouchPad e pulsanti
8. Indicatori LED
2
M815L QG (Ita).fm Page 3 Monday, December 21, 2009 3:30 PM
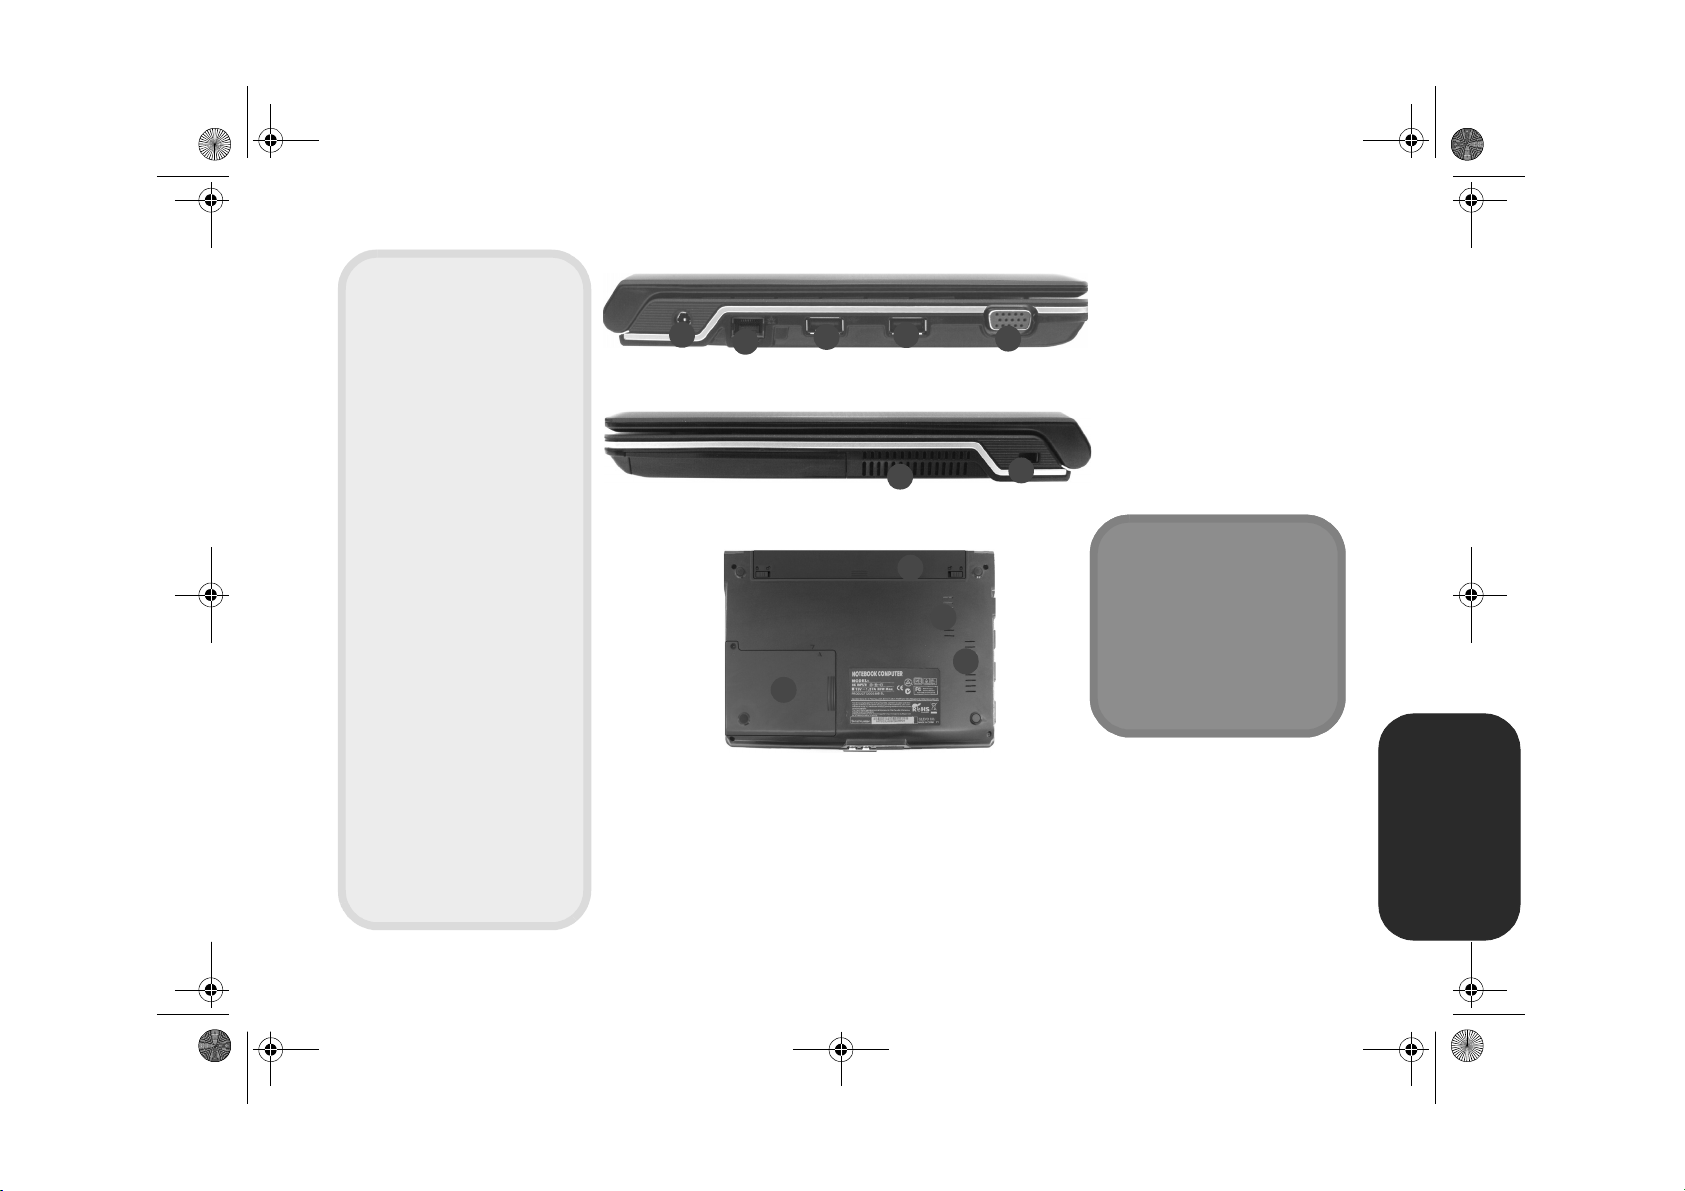
Descrizione del sistema: vista laterale e inferiore
Unità ottiche esterne
Per installare applicazioni, driver e componenti simili, è necessario collegare una
periferica ottica ( lettore CD o
DVD ROM) esterna alle porte
USB. In caso di problemi nel rilevamento di unità ottiche
esterne, attivare la funzione di
rilevamento avanzata di queste periferiche:
1. Premere F2 all'avvio per
entrare nell'programma
di configurazione e utilizzare i tasti freccia per navigare al menu Advanced.
2. Utilizzare i tasti freccia per
selezionare "Enhance
USB ODD detection" e
impostare la voce "Ena-
bled" utilizzando la barra
spaziatrice.
3. Premere F10 per salvare e
uscire. Per eseguire l'avvio
dall'unità ottica esterna
sarà necessario impostare
la priorità nel menu Boot
dopo che l'unità è stata
rilevata.
2
Modello A
3
4
Lato sinistro
Lato destro
6
Parte inferiore
4
7
9
7
7
Figura 3
Vista laterale e inferiore
1. Slot blocco di sicurezza
5
1
2. Jack di ingresso CC
3. Jack RJ-45 per LAN
4. 2 Porte USB 2.0
5. Porta per monitor esterno
6. Sede disco rigido
7. Ventola
8. Pulsante di alimentazione
9. Batteria
Surriscaldamento
Per prevenire il surriscaldamento del computer,
accertarsi che non vi sia nulla
che ostruisca la (le) ventola
(ventole) durante l’uso del
computer.
Guida Rapida
3

M815L QG (Ita).fm Page 4 Monday, December 21, 2009 3:30 PM
Indicatori LED
Gli indicatori LED sul computer segnalano importanti
informazioni relative allo stato corrente del computer.
Icona Colore Descrizione
Arancione L'alimentatore è collegato
Verde Il computer è acceso
Guida Rapida
Verde lam-
peggiante
Arancione La batteria è in carica
Verde Batteria completamente carica
Arancione
lampeg-
giante
Verde Il disco rigido è in uso
Verde Il modulo Wireless LAN è attivo
Il computer è in modalità Sospensione
La batteria ha raggiunto lo stato critico di
carica bassa
Tabella 1 - Indicatori LED
4

Numeric
M815L QG (Ita).fm Page 5 Monday, December 21, 2009 3:30 PM
Tastiera e tasti funzione
Nella tastiera è stato integrato un tastierino numerico per un
facile inserimento dei numeri. Premere Fn + Bloc Num per
commutare l’attivazione e la disattivazione della tastiera
numerica. Dispone anche di tasti funzione che consentono di
cambiare istantaneamente le funzionalità operative.
I tasti funzione (da F1 a F12) agiscono come Hot-Key quando
premuti tenendo premuto il tasto Fn. In aggiunta alle
combinazioni di tasti funzione base, quando è installato il
driver hot key (HotKey Driver) sono disponibili gli indicatori
visivi.
Ta st i Tasti funzione e indicatori visivi Ta st i Funzione/indicatori visivi
Fn + ~ Play/pausa (nei programmi Audio/Video) Fn + F7 Commutazione Display
Fn + F1
Fn + F2
Fn + F3 Commutazione Mute Fn + Bloc Num
Fn + F4 Commutazione Sospendi Fn + Bloc Scorr
Fn +F5/F6
Attiva/disattiva
TouchPad
Spegne la retroilluminazione dello schermo LCD (premere
un tasto o utilizzare il TouchPad per ripristinare lo schermo)
Riduzione/Aumento
volume audio
Tabella 2 - Tasti funzione e indicatori visivi
Tasti funzione
Tasto Fn
Fn +F8/F9
Fn + F10
Fn + F11
Tastierino
numerico
Figura 4 - Tastiera
Riduzione/Aumento lumi-
nosità LCD
Attiva/disattiva Camera
PC
Attiva/disattiva il modulo
Wireless LAN
Attiva/disattiva il tastie-
rino numerico
Attiva/disattiva il blocco
dello scorrimento
Attiva/ disattiva maiuscolo
Bloc Num &
Bloc Scorr
Guida Rapida
5

M815L QG (Ita).fm Page 6 Monday, December 21, 2009 3:30 PM
Installazione driver
Il disco Device Drivers & User’s Manual contiene i driver e le utilità necessari per il
corretto funzionamento del computer.
Se per qualsiasi ragione avete la necessità di reinstallare un driver, inserite il disco,
aprite la cartella Drivers e localizzate il driver di vostra necessità.
lanciando il programma eseguibile (“setup.exe”) contenuto nella cartella e seguite la
procedura guidata. Se avete la necessità di installare piu di un driver, assicuratevi di
seguire l’ordine indicato nella tabella (Figura 5).ʳ
Se compare l’installazione guidata Trovato nuovo hardware durante la procedura di
installazione, fare clic su Annulla per chiudere l’installazione guidata e seguire la
procedura di installazione come descritto.
Driver - Win 7
Chipset
Video
Audio
LAN
TouchPad
Questa configurazione è stata già eseguita.
Installate il driver
Linee guida generali per
l'installazione dei driver in
in Win 7
Come guida generale, attenersi
alle istruzioni predefinite visualizzate sullo schermo per ogni
driver (ad esempio Avanti >
Avanti > Fine) finché le proprie
conoscenze non consentiranno
di operare come utente più
avanzato. Per installare il driver
spesso sarà necessario riavviare
il computer.
Verificare che tutti i moduli (ad
esempio videocamera PC,
WLAN) siano ACCESI prima di
installare il driver appropriato.
Guida Rapida
Card Reader
Hot Key
PC Camera Module
Wireless LAN Module
Figura 5 - Installazione driver
6

M815L QG (Ita).fm Page 7 Monday, December 21, 2009 3:30 PM
Specifiche tecniche
Ultimi aggiornamenti delle specifiche
tecniche
Le specifiche tecniche elencate in questa
sezione sono corrette al momento di andare in stampa. Alcuni elementi (in particolare tipi di processore e velocità)
possono essere modificati o aggiornati
causa la programmazione del produttore.
Per dettagli rivolgersi al proprio centro di
assistenza.
CPU
La CPU non è un componente che
necessita assistenza da parte dell’utente.
Accedere alla CPU in qualsiasi modo
implica una violazione della garanzia.
Velocità dell'unità disco rigido
Se si sta aggiornando/sostituendo l'unità
disco rigido, si niti che è consigliabile
utilizzare dischi rigidi con velocità
massima pari a 5400 rpm. NON utilizzare
dischi rigidi da 7200 rpm o più veloci.
Processore
Processore Intel® Atom™ N450
1,6 GHz, cache L2 da 512KB & FSB a
533MHz, package BGA
Core Logic
Chipset Intel® NM10 Express
Memoria
Due slot SODIMM da 200 pin, dotate di
supporto per la memoria DDR2 667 MHz
Memoria espandibile fino a 2GB
LCD
10,1" WSVGA TFT LCD
Visualizzazione
Scheda video integrata Intel® NM10
Architettura di memoria condivisa (fino a
256MB di memoria video condivisa, assegnata
dinamicamente dalla memoria del sistema
quando necessario)
Compatibile con MS DirectX® 9.0
Periferiche di memorizzazione
Un disco rigido da 2,5" SATA rimovibile di
9,5 mm (altezza)
BIOS
Phoenix BIOS (SPI Flash ROM da 8Mb)
Audio
Interfaccia conforme High Definition Audio
2 altoparlanti incorporati
Microfono incorporato
Sicurezza
Slot blocco di sicurezza (tipo Kensington®)
Password del BIOS
Interfaccia
Due porte USB 2.0
Un jack uscita delle cuffie
Un jack ingresso del microfono
Un jack RJ-45 per LAN
Un jack di ingresso CC
Una porta per monitor esterno
Ta st ie ra
Tasti e r a "W i n Key "
Guida Rapida
Periferica di puntamento
TouchPad incorporato (funzionalità tasto di
scorrimento integrata)
7

M815L QG (Ita).fm Page 8 Monday, December 21, 2009 3:30 PM
Comunicazione
Modulo Half Mini-card Wireless LAN
802.11b/g/n
LAN 10Mb/100Mb Ethernet
PC camera USB da 1,3M pixel
Lettore di schede
Modulo lettore di schede 7-in-1
(MS/ MS Pro/ SD/ Mini SD/ MMC/ RS MMC/
MS Duo)
Nota: Schede MS Duo/ Mini SD/ RS MMC
richiedono PC adattatore
Slot per schede aggiuntive
Due slot di tipo Mini-card (uno per il modulo
Wireless LAN di tipo PCIe e uno di tipo USB
per Minicard)
Alimentazione
Adattatore CA/CC full range
Ingresso CA: 100-240 V, 50-60 Hz
Uscita CC: 19 V, 1,57 A / 1,58 A (30 W)
Pacco batteria ai polimeri rimovibile,
3550 mAh
Requisiti ambientali
Temperatura
In esercizio: 5
Non in esercizio: -20
Umidità relativa
In esercizio: 20% - 80%
Non in esercizio: 10% - 90%
Dimensioni fisiche e peso
271 (larghezza) x 188,6 (profondità) x
19,5 - 28 (altezza) mm (min)
Circa 1,2 kg con batteria
°C - 35 °C
°C - 60 °C
Funzionamento del dispositivo senza
fili a bordo di un aereo
Solitamente l’uso di qualsiasi dispositivo
di trasmissione elettronica è proibito a
bordo di un aereo. Accertarsi che i
moduli wireless siano spenti quando
si utilizza il computer in aereo.
Guida Rapida
8

M815L QG TOC eng.fm Page I Saturday, August 1, 2009 1:54 PM
Quick Guide

M815L QG TOC eng.fm Page I Saturday, August 1, 2009 1:54 PM
Quick Guide

M815L QG TOC eng.fm Page I Wednesday, August 5, 2009 11:13 AM
Contents
About this Quick Guide ............................................................1
System Startup .........................................................................1
System Map: Front & Rear Views ..............................................2
System Map: Side & Bottom Views ...........................................3
LED Indicators ..........................................................................4
Keyboard & Function Keys .......................................................5
Driver Installation .....................................................................6
Specifications ...........................................................................7
Quick Guide
I

M815L QG TOC eng.fm Page II Wednesday, August 5, 2009 11:13 AM
Instructions for Care and Operation
The computer is designed for a mobile use and is quite rugged, but it can be damaged. To prevent this, follow these suggestions:
• Don’t drop it, or expose it to shock. If the computer falls, the
case and the components could be damaged.
• Keep it dry, and don’t overheat it. Keep the computer and
power supply away from any kind of heating element. This is an
electrical appliance. If water or any other liquid gets into it, the
computer could be badly damaged.
• Avoid interference. Keep the computer away from high capacity
transformers, electric motors, and other strong magnetic fields.
These can hinder proper performance and damage your data.
• Follow the proper working procedures for the computer.
Shut the computer down properly and don’t forget to save your
work. Remember to periodically save your data as data may be lost.
Servicing
Do not attempt to service the computer yourself. Doing so
may violate your warranty and expose you and the computer
Quick Guide
to electric shock. Refer all servicing to authorized service personnel. Unplug the computer from the power supply. Then refer servicing to qualified service personnel under any of the
following conditions:
• When the power cord is damaged or frayed.
• If the computer has been exposed to any liquids.
• If the computer does not work normally when you follow the
operating instructions.
• If the computer has been dropped or damaged (do not touch
the poisonous liquid if the LCD panel breaks).
• If there is an unusual odor, heat or smoke coming from your
computer.
Safety Information
• Only use an AC/DC adapter approved for use with this computer.
• Use only the power cord and batteries indicated in this manual. Do
not dispose of batteries in a fire. They may explode. Check with
local codes for possible special disposal instructions.
• Do not continue to use a battery that has been dropped, or that
appears damaged (e.g. bent or twisted) in any way. Even if the
computer continues to work with a damaged battery in place, it
may cause circuit damage, which may possibly result in fire.
• Make sure that your computer is completely powered off before
putting it into a travel bag (or any such container).
• Before cleaning the computer, make sure it is disconnected from
any external power supplies, peripherals and cables (including telephone lines). It is advisable to also remove your battery in order to
prevent accidentally turning the machine on.
• Use a soft clean cloth to clean the computer, but do not apply
cleaner directly to the computer. Do not use volatile (petroleum distillates) or abrasive cleaners on any part of the computer.
• Do not try to repair a battery pack. Refer any battery pack repair or
replacement to your service representative or qualified service personnel.
Battery Disposal & Caution
The product that you have purchased contains a rechargeable battery. The battery is recyclable. At the end of its useful life, under
various state and local laws, it may be illegal to dispose of this battery into the municipal waste stream. Check with your local solid
waste officials for details in your area for recycling options or proper disposal.
Danger of explosion if battery is incorrectly replaced. Replace only
with the same or equivalent type recommended by the manufacturer. Discard used battery according to the manufacturer’s instructions.
II

M815L QG (Eng).fm Page 1 Monday, December 21, 2009 3:49 PM
About this Quick Guide
This quick guide is a brief introduction to getting your
system started. This is a supplement, and not a substitute
for the expanded English language User’s Manual in
Adobe Acrobat format on the Device Drivers & User’s
Manual disc supplied with your computer. This disc also
contains the drivers necessary for the proper operation
of the computer (Note: The company reserves the right
to revise this publication or to change its contents
without notice).
The computer features have already been setup. If you
are planning to re-configure (or re-install) portions of the
system, refer to the expanded User’s Manual. The Device
Drivers & User’s Manual disc does not contain an
operating system.
Regulatory and Safety Information
Please pay careful attention to the safety information
contained in the expanded User’s Manual on the Device
Drivers & User’s Manual disc.
© August 2009
Trademarks
Intel and Atom are trademarks/registered trademarks of
Intel Corporation.
Olivetti and Alice are trademarks/registered trademarks
of Telecom Italia S.p.A.
System Startup
1. Remove all packing materials.
2. Place the computer on a stable surface.
3. Securely attach any peripherals you want to use with the
notebook (e.g. keyboard and mouse) to their ports.
4. Attach the AC/DC adapter to the DC-In jack on the left of the
computer, then plug the AC power cord into an outlet, and
connect the AC power cord to the AC/DC adapter.
5. Use one hand to carefully raise the lid/LCD to a comfortable
viewing angle, while using the other hand o support the base of
the computer (Note: Never lift the computer by the lid/LCD).
6. Press the power button to turn the computer “on”.
Quick Guide
Figure 1
Computer with AC/DC
Adapter Plugged-In
System Software
Your computer come with system software pre-installed.
You will find this manual refers to the Microsoft Win 7
Starter Edition operating system.
1

M815L QG (Eng).fm Page 2 Monday, December 21, 2009 3:49 PM
System Map: Front & Rear Views
6
Quick Guide
1
Front Open
Shutdown
2
3
4
5
7
Note that you should always
shut your computer down by
choosing the Turn Off Com-
puter command from the
Start menu in Windows.
This will help prevent hard
disk or system problems.
Front
Rear
9. 7-in-1 Card Reader
10. Microphone-In Jack
11. Headphone-Out Jack
12. Battery
1. Built-In PC Camera
2. LCD
3. Speakers
4. Power Button
8
11
10
9
12
Figure 2 - Front & Rear Views
5. Keyboard
6. Built-In Microphone
7. TouchPad & Buttons
8. LED Indicators
2

M815L QG (Eng).fm Page 3 Monday, December 21, 2009 3:49 PM
System Map: Side & Bottom Views
External Optical Device
Drives
To install applications and drivers etc. you will need to attach
an external optical device ( CD
or DVD ROM ) to the USB ports.
If you are having problems detecting external ODDs, enable
the enhanced detection of
these devices as follows:
1. Press F2 at startup to enter
the Setup Utility and use
the arrow keys to navigate
to the Advanced menu.
2. Use the arrow keys to select
“Enhance USB ODD
detection” and set the item
to “Enabled” using the
spacebar.
3. Press F10 to save and exit (if
you want to start from the
external ODD you will need
to set it as first priority in the
Boot menu after it has been
detected).
2
3
Figure 3 - Side & Bottom
Views
1. Security Lock Slot
2. DC-In Jack
3. RJ-45 LAN Jack
4. 2 * USB 2.0 Ports
4
Left
4
5
5. External Monitor Port
6. Hard Disk Bay
7. Vent
8. Power Button
9. Battery
Quick Guide
1
Right
7
9
7
7
6
Overheating
To prevent your computer
from overheating make
sure nothing blocks any
vent while the computer is
in use.
Bottom
3

M815L QG (Eng).fm Page 4 Monday, December 21, 2009 3:49 PM
LED Indicators
The LED indicators on the computer display helpful
information about the current status of the computer.
Icon Color Description
Quick Guide
Orange
Green The Computer is On
Blinking Green The Computer is in Sleep Mode
Orange The Battery is Charging
Green
Blinking
Orange
Green Hard Disk Activity
Green
Table 1 - - LED Indicators
DC Power is Plugged In
The Battery is Fully Charged
The Battery Has Reached Critically
Low Power Status
The Wireless LAN Module is Powered On
4

M815L QG (Eng).fm Page 5 Monday, December 21, 2009 3:49 PM
Keyboard & Function Keys
The keyboard has a numeric keypad for easy numeric data
input. Pressing the Fn +NumLk keys turns on/off the
numeric keypad. It also features function keys to allow you
to change operational features instantly.
The function keys (F1 - F12 etc.) will act as hot keys when
pressed while the Fn key is held down. In addition to the
basic function key combinations, visual indicators are
available when the hot key driver is installed.
Keys Function/Visual Indicators Keys Function/Visual Indicators
Fn + ~ Play/Pause (in Audio/Video Programs) Fn + F7 Display Toggle
Fn + F1 TouchPad Toggle
Fn + F2
(Press a key to or use TouchPad to turn on)
Tur n L C D Back l i ght Off
Fn + F8/F9
Fn + F10
Fn + F11
Keypad
Function Keys
Fn Key
Figure 4 - Keyboard
Brightness Decrease/
Increase
PC Camera Power
Toggle
WLAN Module Power
Toggle
NumLk &
ScrLk
Numeric
Keypad
Quick Guide
Fn + F3 Mute Toggle Fn + NumLk Number Lock Toggle
Fn + F4 Sleep Toggle Fn + ScrLk Scroll Lock Toggle
Fn +F5/F6
Volume Decrease/
Increase
Caps Lock Caps Lock Toggle
Table 2 - Function Keys & Visual Indicators
5

M815L QG (Eng).fm Page 6 Monday, December 21, 2009 4:14 PM
Driver Installation
The Device Drivers & User’s Manual disc contains the drivers necessary for the
proper operation of the computer. This setup has already been done for you. If for
any reason you need to reinstall the drivers , insert the disc and browse the Driver
Folder to locate the driver you need. Install it by starting the executable file (
“Setup.exe” ) present in each of the folders and follow the guided procedure.
If you need to intall more than one driver , take care to install them in the order
indicated in Figure 5.
If the
Found New Hardware
click Cancel to close the window, and follow the installation procedure as directed.
Quick Guide
wizard appears
Chipset
Video
Audio
LAN
TouchPad
during the installation procedure,
Driver - Win 7
General Guidelines for
Installing the Drivers Under
Win 7
As a general guide follow the default onˀscreen instructions for
each driver (e.g. Next > Next >
Finish) unless you are an advanced user. In many cases a restart is required to install the
driver.
Make sure any modules (e.g. PC
Camera, WLAN ) are ON before
installing the appropriate driver.
Card Reader
Hot Key
PC Camera Module
Wireless LAN Module
Figure 5 - Driver Installation
6

M815L QG (Eng).fm Page 7 Monday, December 21, 2009 3:49 PM
Specifications
Latest Specification Information
The specifications listed in this here are
correct at the time of going to press. Certain items (particularly processor types/
speeds) may be changed, delayed or updated due to the manufacturer's release
schedule. Check with your service center
for details.
CPU
The CPU is not a user serviceable part.
Accessing the CPU in any way may violate
your warranty.
Hard Disk Drive Speeds
If you are going to upgrade/replace the
hard disk drive, note that It is
recommended that HDDs of a maximum
speed of 5400 rpm are used. DO NOT use
7200 rpm or higher HDDs.
Processor
Intel® Atom® Processor N450
1.6 GHz, 512KB L2 Cache, 533MHz FSB, BGA
Package
Core Logic
Chipset Intel® NM10 Express
Memory
Two 200 Pin SO-DIMM Sockets Supporting
DDR2 667 MHz Memory
Memory Expandable up to 2GB
Display
10.1” WSVGA TFT LCD
Video Adapter
Intel NM10 integrated video card
Shared Memory Architecture (up to 256MB
shared video memory dynamically allocated
from system memory where needed)
MS DirectX® 9.0 compatible
Storage
One Removable 2.5" 9.5 mm (h) SATA Hard
Disk Drive
BIOS
One 8Mb SPI Flash ROM
Phoenix™ BIOS
Audio
High Definition Audio Compliant Interface
2 * Built-In Speakers
Built-In Microphone
Security
Kensington Lock
BIOS Password
Interface
Two USB 2.0 Ports
One Headphone-Out Jack
One Microphone-In Jack
One External Monitor Port
One RJ-45 LAN Jack
One DC-in Jack
Keyboard
“WinKey” keyboard
Pointing Device
Built-in TouchPad (scrolling key functionality
integrated)
Quick Guide
7

M815L QG (Eng).fm Page 8 Monday, December 21, 2009 3:49 PM
Communication
802.11b/g/n Wireless LAN Half Mini-Card
Module
10Mb/100Mb Ethernet LAN
1.3M Pixel USB PC Camera Module
Card Reader
Embedded 7-in-1 Card Reader (MS/ MS Pro/
SD/ Mini SD/ MMC/ RS MMC/ MS Duo)
Note: MS Duo/ Mini SD/ RS MMC Cards
require a PC adapter
Slots for additional cards
Two Mini-card type slots (one for the PCI-type
Wireless WAN module and the other for USB-
Quick Guide
type Minicards)
Power
Full Range AC/DC Adapter
AC Input: 100 - 240 V, 50 - 60 Hz
DC Output: 19 V, 1.57 A / 1.58 A (30 Watts)
Removable Polymer Battery Pack, 3550 mAh
Environmental Spec
Temperature
Operating: 5
Non-Operating: -20 °C - 60 °C
Relative Humidity
Operating: 20% - 80%
Non-Operating: 10% - 90%
°C - 35 °C
Dimensions & Weight
271 mm (w) * 188.6 mm (d) * 19.5 28 mm (h)
Around 1.2 kg With Battery
Wireless Device
Operation Aboard Aircraft
The use of any portable electronic
transmission devices aboard aircraft is
usually prohibited. Make sure the
wireless modules are OFF if you are
using the computer aboard aircraft.
8

M815L QG TOC eng.fm Page I Saturday, August 1, 2009 1:54 PM

M815L QG TOC eng.fm Page I Saturday, August 1, 2009 1:54 PM
 Loading...