

Page 1

OLIBOARD
INTERACTIVE WHITEBOARDS
User Manual
Manuel de l'utilisateur
Benutzerhandbuch
Manuale utente
Manual del usuario
INTERACTIVE WHITEBOARDS - TABLEAUX INTERACTIFS -
INTERAKTIVE TAFELN - LAVAGNE INTERATTIVE - PIZARRAS INTERACTIVAS
Page 2

PUBLICATION ISSUED BY:
Olivetti S.p.A.
Gruppo Telecom Italia
Via Jervis, 77 - 10015 Ivrea (ITALY)
www.olivetti.com
Copyright © 2011, Olivetti
All rights reserved
EDITION 1.1
The label applied to the product certifies that the product
satisfies the basic quality requirements.
The manufacturer reserves the right to carry out modifications to the product described in this manual at any time
and without any notice.
Your attention is drawn to the following actions which could compromise the conformance guaranteed
above, as well as the technical features of the product:
• incorrect electrical power supply;
• incorrect installation, incorrect or improper use or use not in compliance with the warnings provided in the
User’s Manual supplied with the product;
• replacement of original components or accessories with others of a type not approved by the manufacturer, or
performed by unauthorised personnel.
All rights reserved. No part of this material may be reproduced or transmitted in any form or by any
means, electronic or mechanical, including photocopying, recording or similar, without prior permission in
writing from Olivetti S.p.A.
The content of this manual can be modified without warning. Every care has been set in the creation,
realization, verification and documentation of the software related to the Oliboard whiteboard and of the
documentation written in this manual; nevertheless Olivetti S.p.A. disclaims any liability of any kind for
any damages whatsoever resulting from the use of the software and of the manual. The same thing can
be said for any person or company involved in the creation, realization, production and verification of the
software and of the manual.
The registered trademarks are the property of their respective owners.
Page 3

INSTRUCTION: provides additional software instructions.
NOTE: describes problems that could occur when using the whiteboard
and how to avoid and resolve them.
WARNING: draws attention to the danger of personal injury or
product damage if improperly used.
Caution Warning
• In order to avoid electric shocks, do not install the interactive whiteboard in
damp or smoky environments.
• After the interactive whiteboard is installed, avoid touching its power and
data cables.
• Keep the interactive whiteboard away from open flames, electrical contacts
and direct sunlight.
• After the interactive whiteboard is installed, make sure that it is fixed securely.
• Avoid looking directly at the beam of light emitted by the projector onto the
whiteboard.
• Do not touch the projector because it could be hot even after only a few
minutes of operation. Refer to the projector manual for all warnings and rules
relating to its use.
• Do not hang onto the support stand of the projector.
When the whiteboard is mounted on a pedestal, be careful not to trip over the
pedestal.
OLIBOARD – Interactive Whiteboard III
Page 4
Important notes
• The interactive whiteboard must be used only with the special electronic
pens. Do not use marker pens, pencils or other types of pen. If necessary,
clean the whiteboard using alcohol.
• Make sure that the whiteboard is correctly connected to the computer and
to the electrical mains. The decision to lay the connection and power cables
in a hidden way is preferable, so as to avoid them being pulled and
disconnected. Do not leave the cables lying on the floor to avoid any
possibility of them being tripped over.
• Do not scratch the surface or the frame of the whiteboard with sharp or hard
objects. Environmental conditions: no strong magnetic fields m us t be present.
If there is a wall made of metal or other magnetic materials, a distance of 10
meters must be maintained between the whiteboard and the wall.
• When writing on the whiteboard with the electronic pen, keep the pen
vertical to the board and do not press.
• When fixed onto a wall, the whiteboard must be vertical to the wall surface.
• Do not hang objects or weights onto the whiteboard and, if present, the
pedestal.
• When it is installed on the pedestal, use caution whenever you move it to
avoid it tipping over.
This manual relates exclusively to the Oliboard whiteboard and the software
provided with it. Although references are made to the computer connec ted to the
whiteboard (notebook, PC and so on) and to the video-projector, for these
devices you should refer to the original documentation provided by their
manufacturers.
OLIBOARD – Interactive Whiteboar d IV
Page 5
Warning
FURTHER WARNINGS FOR INSTALLATIONS IN SCHOOL ENVIRONMENTS
The warnings and precautions for using the whiteboard and projector must be
recommended to students as well. The following in particular must be stressed:
• Do not look directly at the beam of light emitted by the projector onto the
whiteboard.
• Do not touch the projector because it could be hot, even after only a few
minutes of operation.
• Pay attention to the connection cables and, if the whiteboard is mounted on
a pedestal, be careful not to trip over it. In any case, it is recommended not to
run near the whiteboard and the pedestal.
• Do not hang onto the support stand of the projector and, if present, the
pedestal.
OLIBOARD – Interactive Whiteboard V
Page 6

Page left intentionally blank
OLIBOARD – Interactive Whiteboar d VI
Page 7

TABLE OF CONTENTS
INTRODUCTION..............................................................................................1
Overview...............................................................................................................1
System Requirements............................................................................................ 2
Unpacking the Interactive Whitebo ard and accessories .......................................... 3
Main Features....................................................................................................... 6
External View................................................................................................... 6
Whiteboard Function Keys.....................................................................................7
Technical Specifications....................................................................................8
Hardware Installation............................................................................................9
Installing the Battery of the Electronic Pen........................................................... 10
WINDOWS SOFTWARE INSTALLATION .........................................................11
Express Installation.............................................................................................. 11
Step-by-step Installation...................................................................................... 12
Installing the Oliboard Software Driver............................................................12
Installing the Oliboard Software......................................................................13
Installing the Software Driver for the USB Cable..............................................13
Removing the Oliboard Softw ar e.........................................................................14
Running the Software......................................................................................... 14
Starting the Driver of the Interactive Whiteboard............................................ 14
Orienting the Interactive Whiteboard.............................................................. 15
Starting the Whiteboard Application Software................................................17
Creating a Personal Account and Password ....................................................18
Setting Up the Oliboard Functions.................................................................. 20
LINUX-UBUNTU SOFTWARE INSTALLATION ..................................................21
Installing the oliboard software ...........................................................................21
Removing the Software....................................................................................... 23
Running the Software......................................................................................... 24
Starting the Oliboard Driver............................................................................ 24
Orienting the Interactive Whiteboard.............................................................. 25
Running the Whiteboard Software Application............................................... 27
MAC SOFTWARE INSTALLATION ..................................................................28
Installing the Oliboard software...........................................................................28
Installing the USB cable software driver............................................................... 29
Removing the Software....................................................................................... 32
Running the Software......................................................................................... 32
Starting the Oliboard Driver............................................................................ 32
Orienting the Interactive Whiteboard.............................................................. 33
Running the Whiteboard Software Application............................................... 35
SOFTWARE REGISTRATION...........................................................................36
TROUBLESHOOTING.....................................................................................37
ENGLISH
OLIBOARD - Interactive Whiteboards VII
Page 8

Page left intentionally blank
OLIBOARD - Interactive Whiteboards VIII
Page 9

INTRODUCTION
OVERVIEW
The Interactive Whiteboard is an input peripheral device that, thanks to the application
of stable, advanced technologies, allows an interactive environment to be cr eated that,
by connecting a computer and a video-projector, can be used for teaching and demos.
Features
• The Oliboard whiteboard is furnished with a hard surface to ensure resilience to
wear and a protection against acts of vandalism; featuring high tracing precision,
rapid response and operational sensitivity it allows intuitive use by even less expert
users.
• The software provided offers sophisticated functions such as partial m agnification,
searchlight, replay, camera, customised background, specialized tools (compass,
ruler, set square, etc),
• With the electronic pen, you can write, take notes, erase, trace geometrical
figures, copy, run and save files.
• The electronic pen can also be used as a mouse to send commands to the
computer.
ENGLISH
OLIBOARD - Interactive Whiteboards 1
Page 10

SYSTEM REQUIREMENTS
The whiteboard must be connected to a computer that displays images on the
whiteboard by means of a video-projector.
Minimum Configuration Recommended Configuration
CPU: 1GHz CPU: 1.7 GHz or higher
RAM: 512 MB RAM: 1 GB or higher
USB port (for connecting
whiteboard)
VGA port (female, type SUB-D15)
Hardware
Configuration
Software
Configuration
Recommended Computer Setup:
1) To obtain the best picture on the whiteboard, the format of the computer video
output (its resolution) and of the projector must be the same as that of the
whiteboard.
Therefore, for whiteboards in format 4/3 (Oliboard 78S and Oliboard 78D), it is
recommended to use an output resolution corresponding to the 4/3 format (e.g.
1024x768 or 800x600).
For a whiteboard in format 16:9 (Oliboard 95D), it is recommended to use an output
resolution corresponding to the 16:9 format (e.g. 1280x800).
2) While using the whiteboard, the computer connected could enter “stand-by” mode.
To avoid this, it is advisable to deactivate the screen-saver and energy-saving
functions.
for connecting the videoprojector.
NOTE: some computers (e.g.
MAC) are not equipped with this
type of port. In this case you
must use an adapter (not
supplied with the whiteboard
and projector).
Windows 2000, XP, Vista, 7 Windows 2000, XP, Vista, 7
Linux Ubuntu7.0/8.0
(I386/AMD64)
Mac OS X V10.4 and later
(Intel platform)
USB port (for connecting
whiteboard)
VGA port (female, type SUB-D15)
for connecting the videoprojector.
NOTE: some computers (e.g.
MAC) are not equipped with this
type of port. In this case you must
use an adapter (not supplied with
the whiteboard and projector).
Linux Ubuntu7.0/8.0 and later
(I386/AMD64);
Mac OS X V10.4 and later
(Intel platform)
OLIBOARD - Interactive Whiteboards 2
Page 11

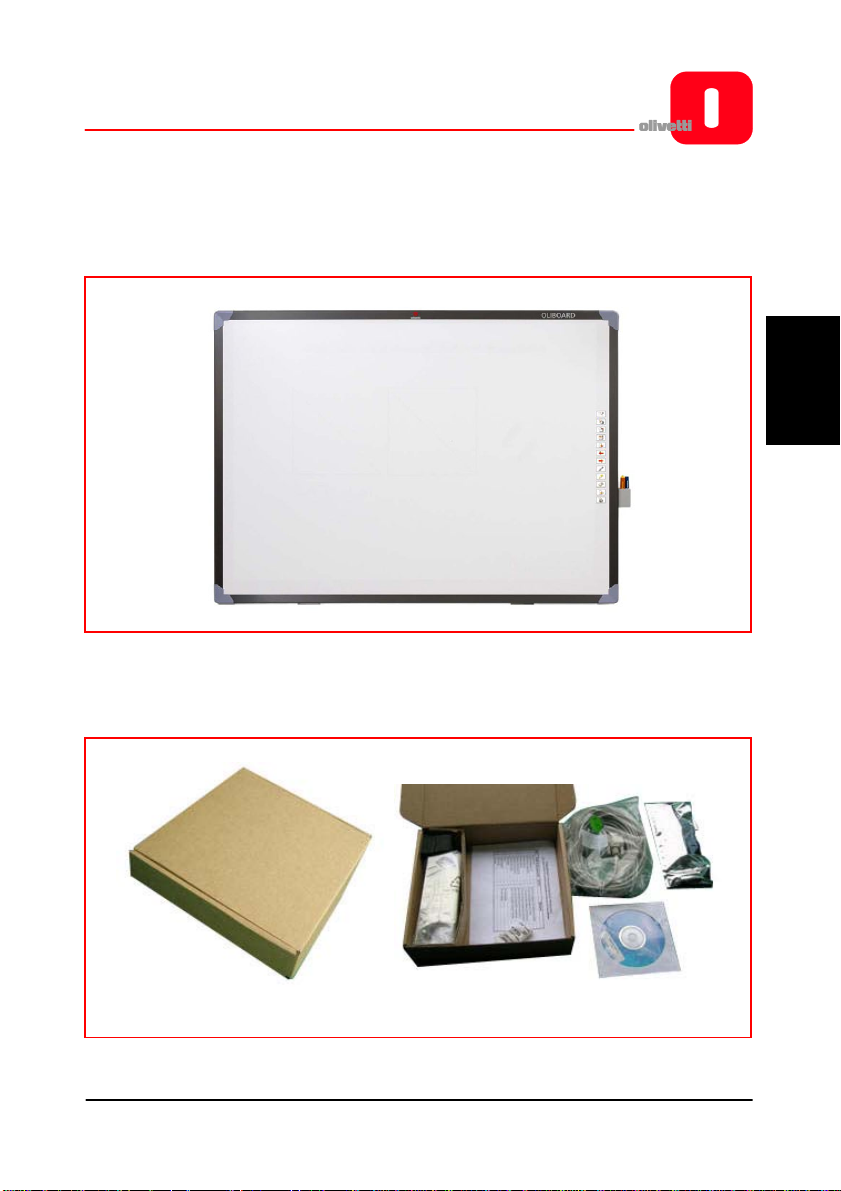
UNPACKING THE INTERACTIVE WHITEBOARD AND ACCESSORIES
The standard Interactive Whiteboard kit contains the following components:
• Interactive Whiteboard
(the colour of the product could vary)
• Accessories
ENGLISH
OLIBOARD - Interactive Whiteboards 3
Page 12

The standard accessories provided include:
Description Quantity Purpose Image
Special pen for
Interactive
Electronic pen 2
Special 10-meter
cable
Oliboard
Installation Disk
User Manual 1 User Guide
1
Up to 3
disks
Whiteboard.
Each pen has one
1.5V AAA battery
(mini-Style).
Cable for
connecting the
computer to the
Interactive
Whiteboard
Drivers and
application
software for
Windows, Linux
and Mac
Colours can vary
Installation brackets
and accessories for
wall fixing
1 Wall fixing kit Various mechanical parts
OLIBOARD - Interactive Whiteboards 4
Page 13

• Optional Accessories
Instead of wall installation, you can also choose to install the Interactive Whiteboard
on a special floor stand, available on order. In the following, the model B5848.
ENGLISH
Optional floor stand (mod. B5848)
Floor stand dimensions (without whiteboard or projector) model B5848:
- width: 127 cm; depth: 75 cm;
- height: 246 cm (max. height of projector stand when assembled).
OLIBOARD 95D whiteboard on floor stand (mod. B5848)
Model B5848 comes into two packages:
- package 1: cm. 1680 x 770 x 110, gross weight ~ 34,5 Kg
- package 2: cm. 2030 x 750 x 170 , gross weight ~ 28 Kg
OLIBOARD - Interactive Whiteboards 5
Page 14

MAIN FEATURES
External View
(The colour varies according to the model).
Ref. Description
1 Writing Area
2 Function Keys
3 Pen Holder
4 Interface Board
Interface for the special cable to connect to the USB port of the
5
6 Power Socket (normally not used).
computer (the whiteboard is normally powered via this same
cable).
OLIBOARD - Interactive Whiteboards 6
Page 15
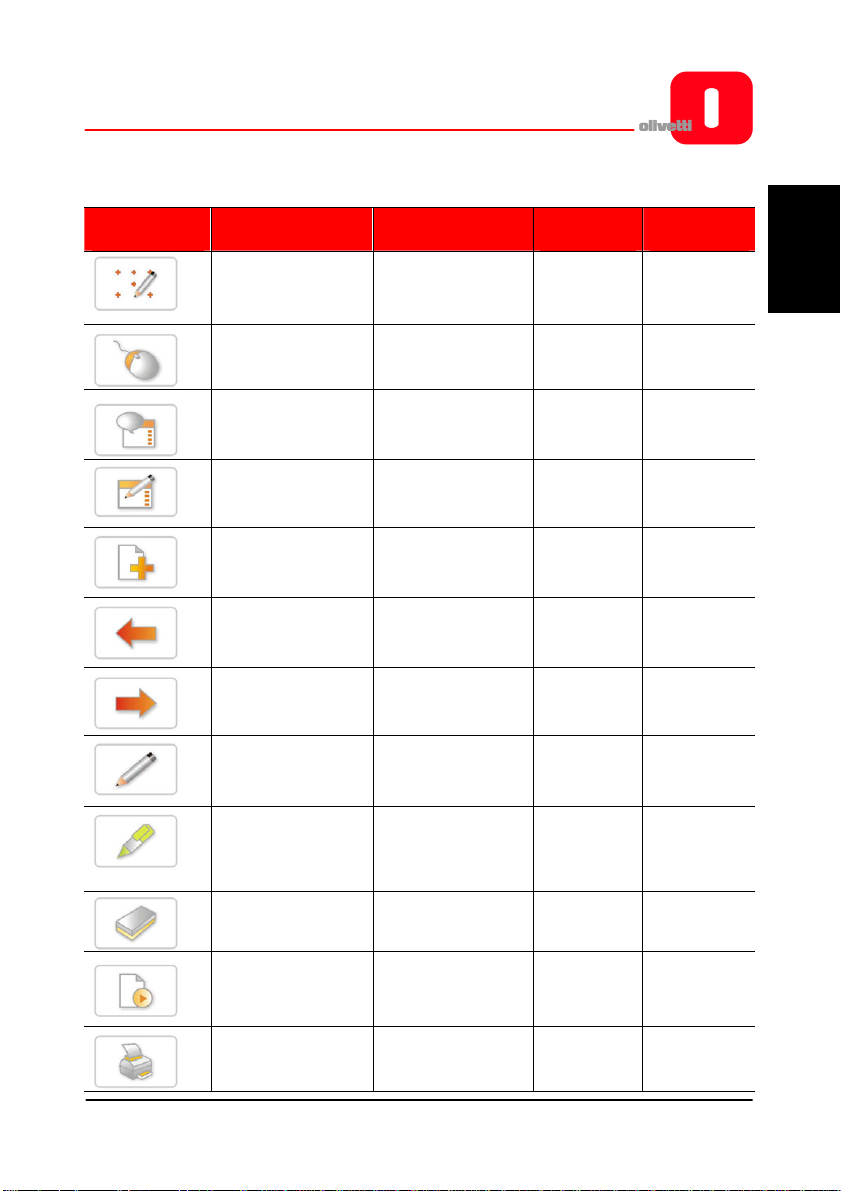
WHITEBOARD FUNCTION KEYS
Function
keys
Definition Control Mode
Orientation
(tuning)
Control Mode
(mouse-like)
Annotation Mode
Window Mode No effect Front Page Front Page
Creates a blank
page
Page Up No effect Page Up Page Up
Page Down No effect Page Down Page Down
Normal Pen
Transparent Pen
Orientation Orientation Orientation
No effect
Switch to
Annotation Mode
Create a blank
page
Switch to
Annotation Mode,
using Normal Pen
Switch to
Annotation Mode,
using Transparent
Pen
Window
Mode
Switch to
Control
Mode
Switch to
Annotation
Mode
Create a
blank page
Normal Pen Normal Pen
Transparent
Pen
tion Mode
Switch to
Control
Mode
No effect
Create a
blank page
Transparent
Pen
Annota-
ENGLISH
Eraser Eraser Eraser Eraser
Replay Replay pages Replay pages Replay pages
Print Print Print Print
OLIBOARD - Interactive Whiteboards 7
Page 16

Technical Specifications
Hardware Platform Peripheral device for computer, notebook.
Tracking rate
Precision +/- 0.05 mm
Operating Principle Electromagnetic induction
Operation Modes
USB Power Supply 100mA 5V DC
Electronic pen battery service life
Operating Temperature
Operating Humidity
Power capability < 2W
Models
Oliboard 78S: 17m/s (669 inch/s)
Oliboard 78D, Oliboard 95D: 8 m/s (314 inch/s)
Control Mode
Window Mode
Annotation Mode
Full-screen Mode
The service life of the batteries v ar ies ac c or ding to
their type; common alkaline batteries can last for
up to approximately three months.
+20 °C ÷ +55 °F
RH 30% ÷ 80%
OLIBOARD 78S
OLIBOARD 78D
External area
- diagonal
- dimensions
Active area
- width
- height
Aspect ratio 4:3 16:9
Net weight (+/- 1 kg) 17 Kg 25.5 Kg
Packaging
- dimensions
- gross weight (+/- 2 Kg)
85"
174 x 127 cm
78"
160 x 119 cm
1860 x 1400 x 120 cm
29 Kg
OLIBOARD 95D
101"
223 x 127 cm
95"
210 x 118 cm
2350 x 1400 x 120 cm
32 Kg
OLIBOARD - Interactive Whiteboards 8
Page 17

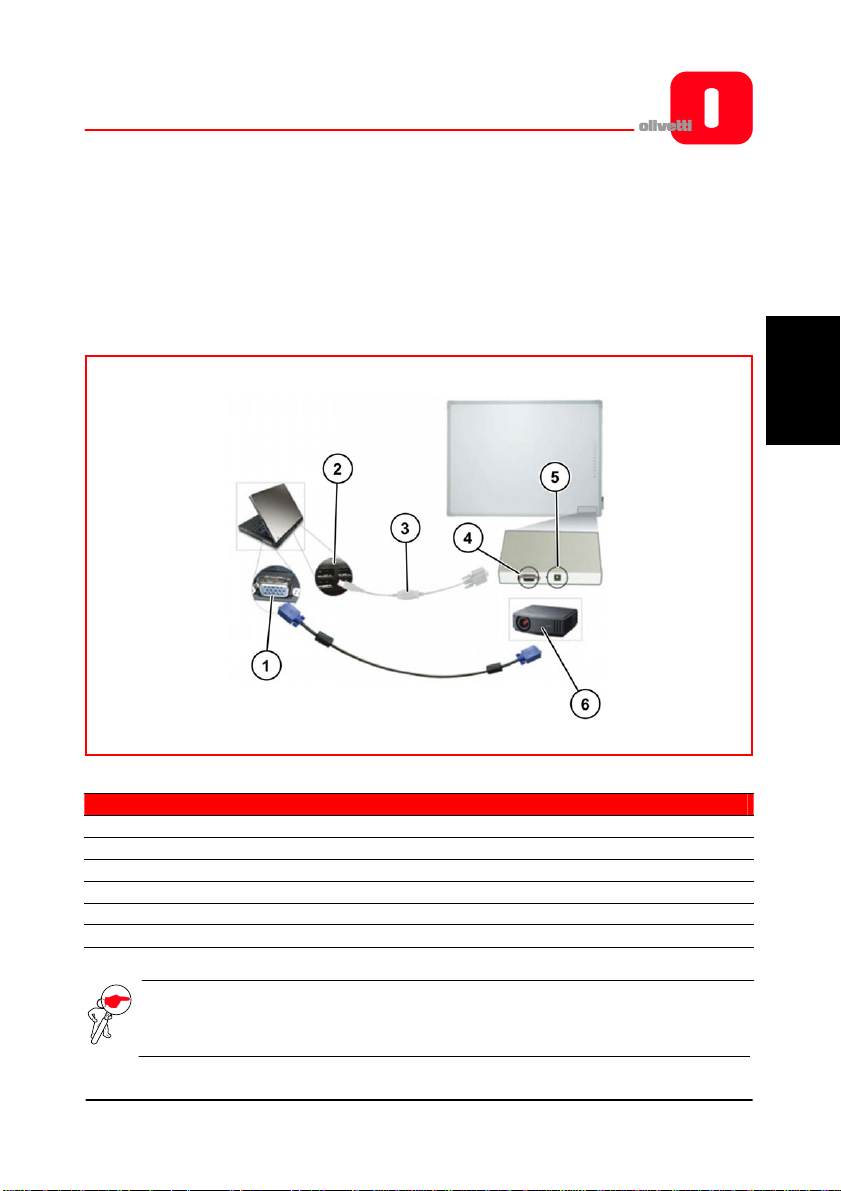
HARDWARE INSTALLATION
Wall or stand installation must be carried out by authorised personnel according to the
requirements stated in the Olivetti documentation.
The cable for connecting the whiteboard must be connected to the USB port of the
computer. The VGA (or HDMI) cable of the video-projector must be connected to the
VGA (or HDMI) port of the computer.
ENGLISH
Ref. Description
1 VGA (or HDMI)
2 USB
3 USB special cable
4 Whiteboard interface port for special-purpose cable provided
5 Power socket (not used normally)
6 Video-Projector
NOTE: When connecting the computer to the video-projector both devices
must be switched off.
OLIBOARD - Interactive Whiteboards 9
Page 18

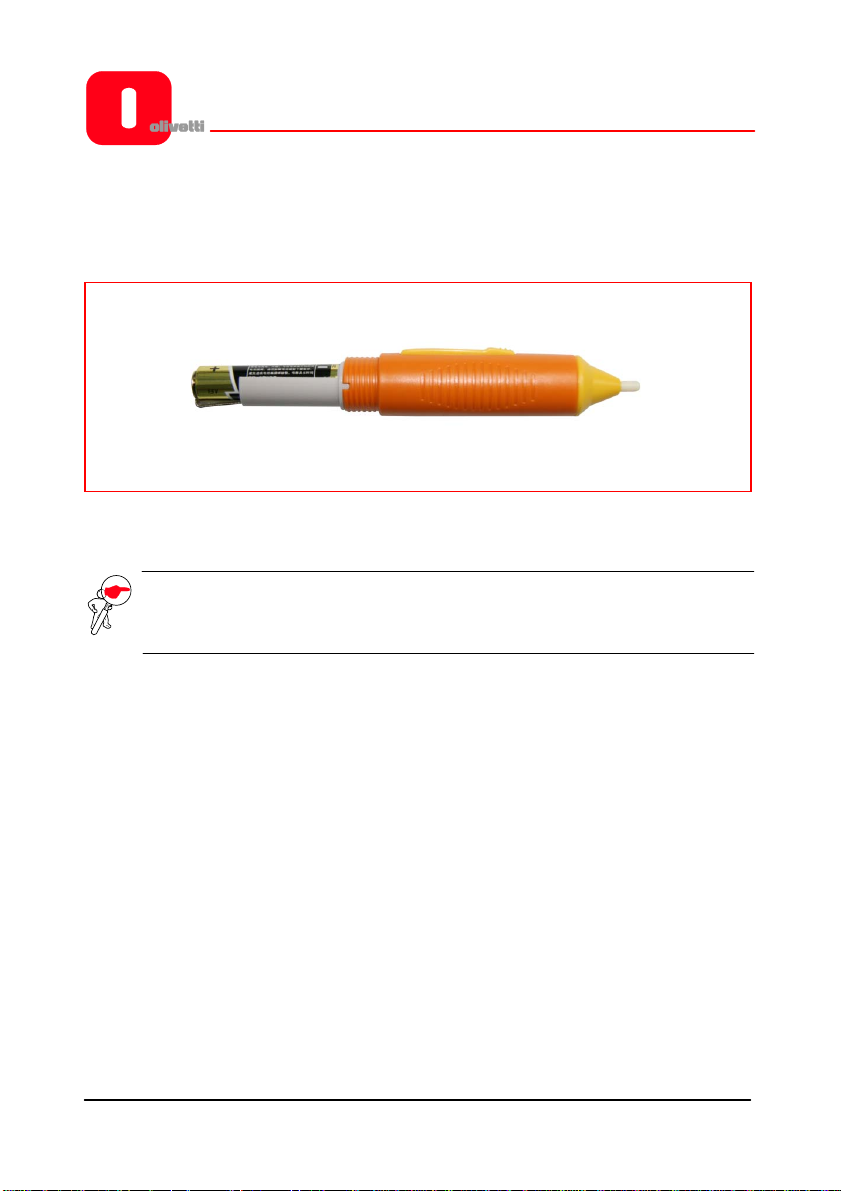
INSTALLING THE BATTERY OF THE ELECTRONIC PEN
Unscrew the rear cap of the electronic pen, turning it in an anti-clockwise direction.
Insert one 1.5V AAA (mini Style) battery, as shown in the figure below, then tighten
the rear cap again, turning in a clockwise direction.
The external colour of the pen can be different from the photo.
NOTE: The electronic pen is equipped with a lateral button that, depending
on operating way of the software, works as the right button of a
mouse.
OLIBOARD - Interactive Whiteboards 10
Page 19

WINDOWS SOFTWARE INSTALLATION
The Oliboard software provides two types of installation: “Express installation” and
“Step-by-step installation”.
Express installation includes the following phases that are carried out automatically in
sequence:
- Installation of Oliboard software driver.
- Installation of Oliboard application software.
- Installation of software driver for USB cable.
Step-by-step installation allows the software to be installed one step at a time.
EXPRESS INSTALLATION
Do not connect the cable of the whiteboard to the computer (if the USB cable
is already connected to the computer, disconnect it). During the installation
procedure, a message is displayed on the screen indicating when you should
connect the cable.
(If installation is started with the cable already connected, afterwards you will have to
install the software driver for the USB cable).
1. Insert the Oliboard Software disk.
2. Click on the program logo (this is equivalent to running the “autorun” program).
3. The Installation Guide window opens.
4. Click “Install All“ to perform the express installation.
5. Choose the language you want to install and confirm with “Next“.
6. Select the installation path and confirm with “Next“. Software installation starts;
at the end, the driver for the USB cable is installed.
ENGLISH
7. When the system asks if you want to install the FTDI USB driver, click on “YES“ to
perform the installation. At the end (after a few seconds), a message is displayed
asking you to connect the USB cable to the computer.
Connect the cable to a USB port on the computer (the other end of the cable
must be connected to the Interactive Whiteboard).
After connecting the cable, click “OK“.
OLIBOARD - Interactive Whiteboards 11
Page 20

8. When the installation completed message is displayed, click on “Finish” then, on
returning to the main screen, click “Exit”.
9. Follow the instructions in the paragraph “Running the Software”.
STEP-BY-STEP INSTALLATION
This type of installation is recommended only when upgrading the software provided
with the whiteboard.
1. Insert the Oliboard Software disk.
2. Click the program logo.
3. The Installation Guide window opens.
4. Click “Install Step By Step” to install the Oliboard driver and software, and the
driver for the USB cable following the step-by-step procedure.
Installing the Oliboard Software Driver
1. Click to install the driver for the Interactive Whiteboard.
2. Choose the language you want to install and confirm with “Next”.
3. Select the installation path and confirm with “Next”.
4. End the installation by clicking the “Finish” button. Connect the cable to a USB
port on the computer (the other end of the cable must be connected to the
Interactive Whiteboard). After connecting the cable, click on “OK”.
OLIBOARD - Interactive Whiteboards 12
Page 21

Installing the Oliboard Software
1. Click .
2. Choose the language you want to install.
3. Select the installation path. The software installation starts.
4. When installation completes a message appears; click on “Finish”.
Installing the Software Driver for the USB Cable
Normally it is not necessary to execute this procedure if the “Express installation” has
already been performed.
1. Click “Install USB Driver” to install the driver for the USB
cable.
2. Click “Install FTDI Driver” to install the driver.
After connecting the cable, click “OK”. If the installation completes correctly, a
message to this effect is displayed.
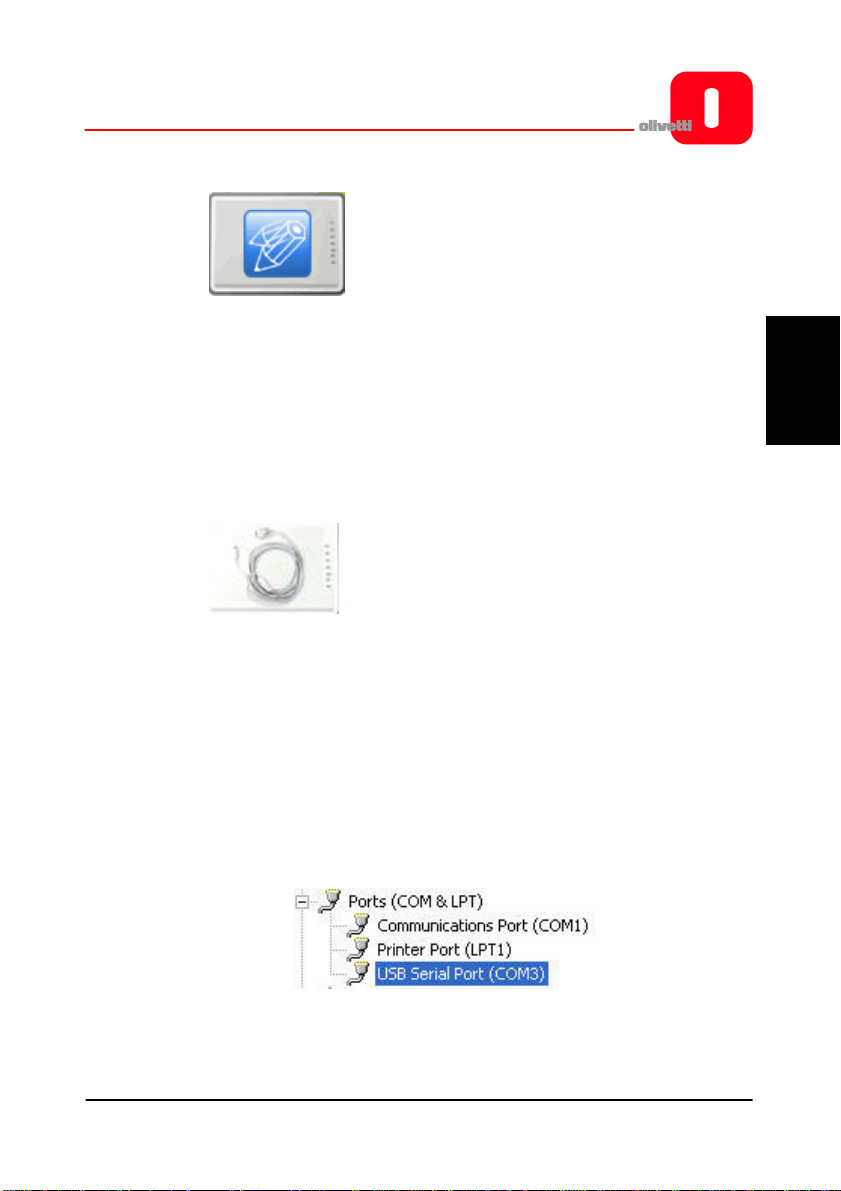
You can check if the USB cable driver has been installed by clicking with the mouse
right button on “Computer Resources”, then with the mouse left button on
“Properties“ → “Hardware“ → “Device Manager“ → “Port“ (COM and LPT)”.
The device “USB Serial Port“ is shown. Make sure that the COM port assigned is less
than 10 (e.g. COM 5) and that the transmission speed is 57600.
ENGLISH
OLIBOARD - Interactive Whiteboards 13
Page 22

REMOVING THE OLIBOARD SOFTWARE
Click on “Start” → “Control Panel” → “Add or Remove Programs”, select
“Oliboard” then click on “Add/Remove”.
Select the option for removing all the features installed and follow the instructions
shown on the screen.
Alternatively, insert the software disk, click on the Oliboard program logo and run the
software removal guide following the instructions on the screen.
At the end of removal, it is recommended that you restart the computer.
RUNNING THE SOFTWARE
The whiteboard cable must be connected to the USB port of the computer.
To run the software, first of all the software driver of the whiteboard must be started,
the orientation operation performed if necessary, after which the whiteboard software
can be started.
Starting the Driver of the Interactive Whiteboard
Click “Start“ → “All programs“ → “Olivetti“ → “Oliboard Softwa re “ and start
the Oliboard Driver. The Communications module icon
corner of the Status bar on the desktop.
NOTE: If the message “Communication with whiteboard failed“, first make
sure that the cable of the whiteboard is connected correctly between
the computer and the whiteboard. Click on the Oliboard Driver icon
and select “Reconnect“ in the popup menu. If this warning persists,
make sure that the driver of the USB cable is installed correctly (see
the note on how to check installation of the USB cable on page 13).
appears in the lower right
OLIBOARD - Interactive Whiteboards 14
Page 23

NOTE: After having started the driver, click on the icon of the Oliboard driver
to activate or deactivate the “autostart” parameter, depending on
whether or not you want the Oliboard driver to be run automatically
the next time the computer is powered on. If the computer is
permanently connected to the whiteboard, it is advisable to activate
“autostart”. On the other hand, if the computer could be
disconnected from the whiteboard, it is advisable to deactivate
“autostart” to avoid an error message appearing the next time the
computer is powered on which indicates that no whiteboard is
connected.
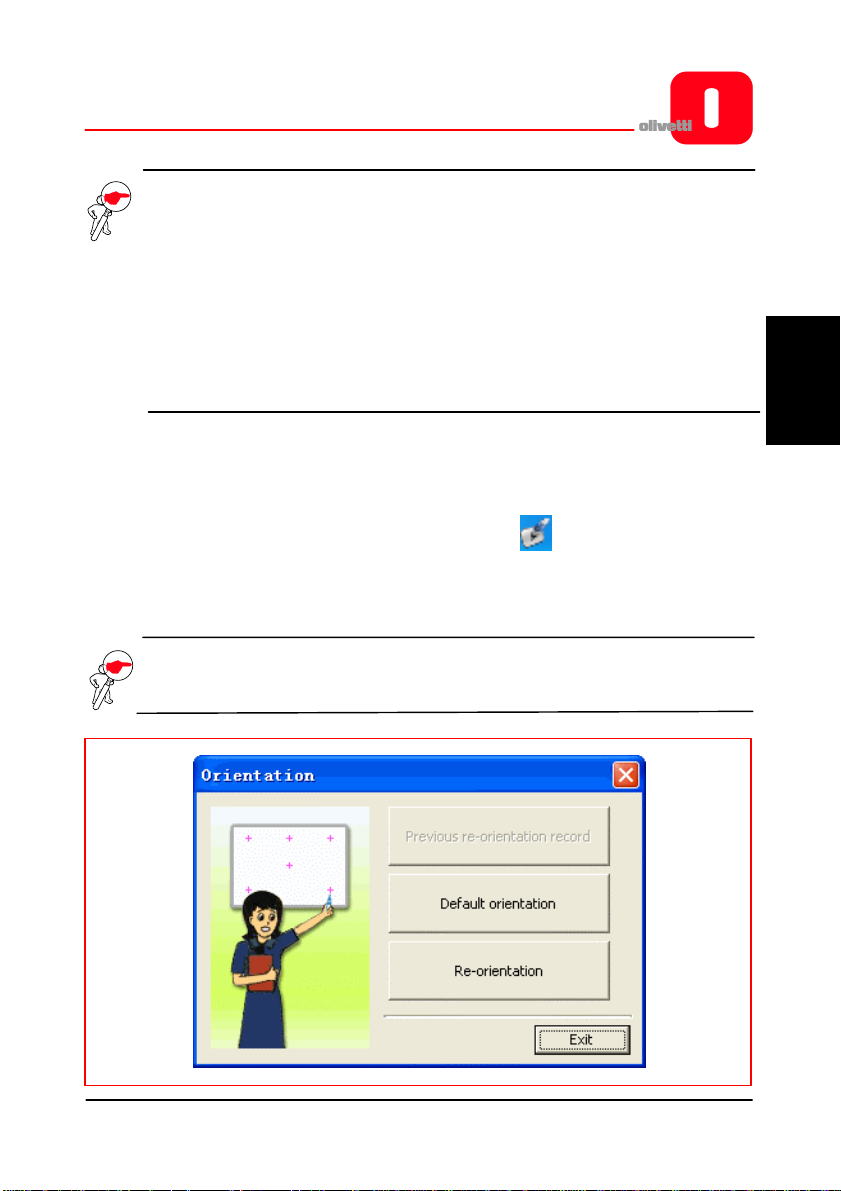
Orienting the Interactive Whiteboard
This function serves to tune the whiteboard for the image to be projected onto it.
1. Using the mouse left button, click on the Oliboard Driver icon in the control
bar at the bottom. Select “Orientation“ in the popup menu, then select the type
of orientation required (see the INSTRUCTION note at the end of this paragraph).
NOTE: The orientation operation can also be activated by means of the special
key at the top of the Function Key panel on the whiteboard.
ENGLISH
OLIBOARD - Interactive Whiteboards 15
Page 24

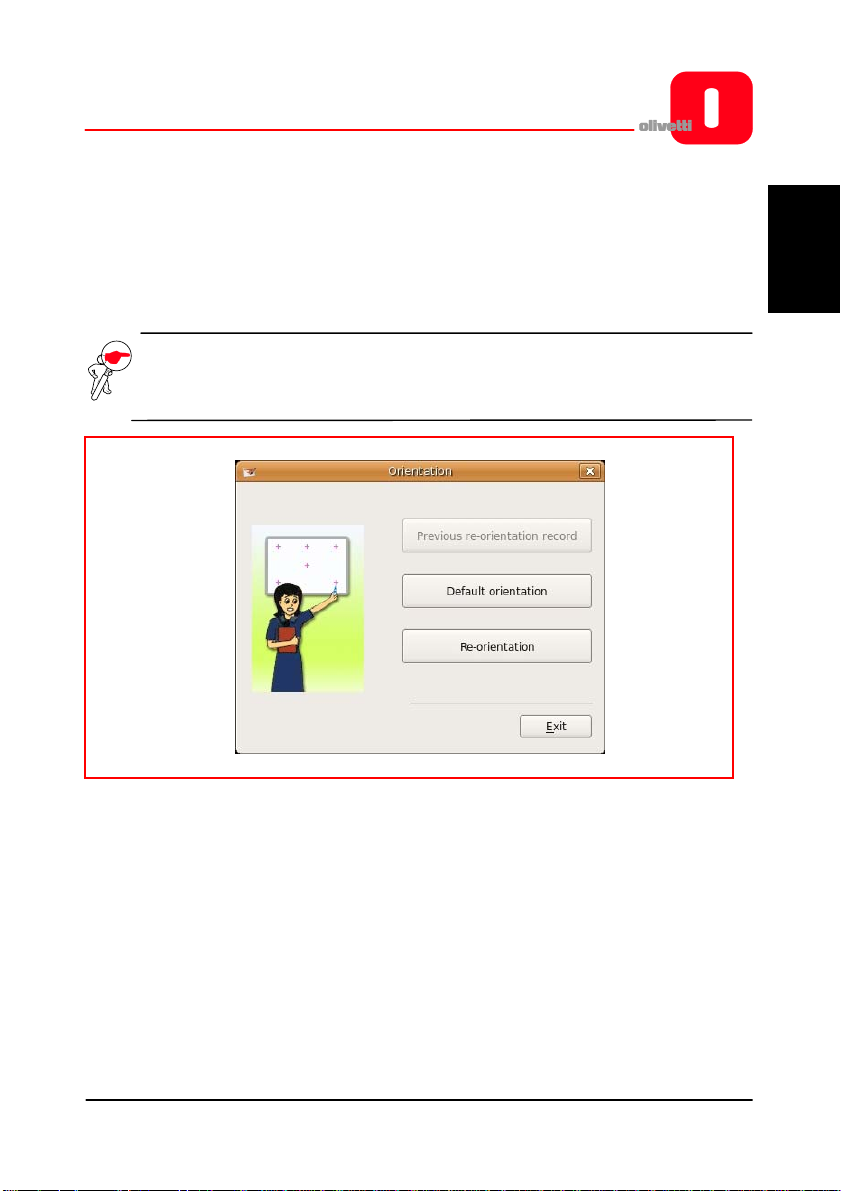
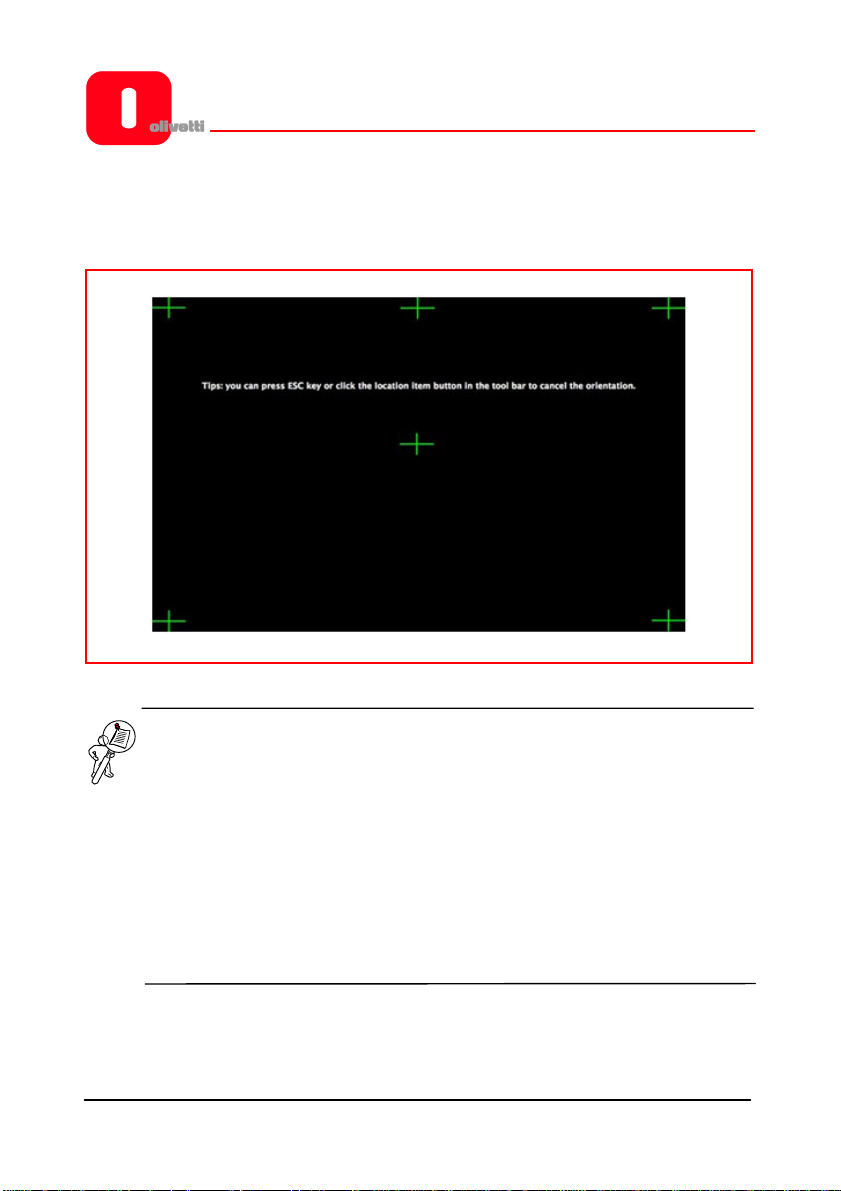
2. Wth the mouse left button click on “Re-orientation“ to open the popup
window for Orientation. With the electronic pen, click on the mid-point of the
flashing cross “+“ on the whiteboard. Repeat this same operation for all the other
orientation points (there are six in all), being careful to canter well the mid-point
of the flashing cross with the electronic pen.
INSTRUCTION: Select “Re-orientation” the first time you install the
Oliboard Driver or if the position of the projector or the
Interactive Whiteboard changes, or if the display mode
changes (e.g. the image size or resolution).
To perform a rapid re-orientation, you can select “Previous
re-orientation record” as long as no changes have been
made since it was last used. If an accurate orientation is not
required, you can select “Default orientation”.
OLIBOARD - Interactive Whiteboards 16
Page 25

Starting the Whiteboard Application Software
1. Click “Start” → “All programs” → “Olivetti” → “Oliboard Software” and
start the application program. A Logon window opens in which you can enter the
user name and the password.
2. To start the software using the default account, click simply on the “Login”
button without entering any data, otherwise you can enter your own personal
account. When a personal account is used, the user can customise the tool bar,
resources and templates.
NOTE: Before starti ng the applic ation s of tw ar e, make sure that the Interac tiv e
Whiteboard is connected correctly to the computer and that the
Interactive Whiteboard driver is running.
NOTE: For how to operate the software, refer to the instructions in the
ONLINE HELP selectable from main menu of the Oliboard software.
ENGLISH
OLIBOARD - Interactive Whiteboards 17
Page 26

Creating a Personal Account and Password
1. Click “Start” → ”All Programs” → ”Olivetti” → ”Oliboard Software” →
“User Manager” to display the following window:
Key-in the administrator account data to access the software. The default
administrator account is Administrator and the Password is Oliboard.
2. The User Manager window is displayed.
OLIBOARD - Interactive Whiteboards 18
Page 27

3. Select “Edit” → ”New User” to create a personal account.
4. Key-in the user name and password and select “Create”.
5. When the process completes, the new user appears in the window:
ENGLISH
OLIBOARD - Interactive Whiteboards 19
Page 28

Setting Up the Oliboard Functions
Click “Options” to open the window shown below.
For the Oliboard 78D and Oliboard 95D models of whiteboard, set the “Double Pen”
function as shown below.
OLIBOARD - Interactive Whiteboards 20
Page 29

LINUX-UBUNTU SOFTWARE INSTALLATION
INSTALLING THE OLIBOARD SOFTWARE
Note that you must have Administrator access and its related password, if set, to be
able to install the software and drivers.
In the installation folder, two installation procedures are present for the Ubuntu
software distribution: one for Intel processors (i386 architecture and derivations) and
the other for AMD64 processors.
Select the procedure for the processor installed on your computer.
Connect the whiteboard cable to the USB port of the computer.
At this point, two installation methods are possible:
1. First method:
Double-click on Oliboard_for_Linux_V2.1.deb
ENGLISH
OLIBOARD - Interactive Whiteboards 21
Page 30

The installation procedure consists of the following steps (follow the instructions on
the screen):
• Click “Install Package”.
• Enter the password (depends on the permissions the user account has on the
operating system).
• The installation procedure is performed. At the end, a message is displayed to
the effect that installation has completed.
2. Second method:
• Open a terminal window.
• Ente r the commands necessary for accessing the directory where
Oliboard_for_Linux_V2.1.deb resides.
• Type the following command (in case of processor i386):
sudo dpkg -i Oliboard_for_Linux_V2.1_Packet2101_I386.deb.
and enter the password for root.
• If a problem occurs, enter the command using this other sequence:
su –
root password.
Enter the commands necessary for accessing the folder where
Oliboard_for_Linux_V2.1.deb resides.
dpkg –i Oliboard_for_Linux_V2.1.deb.
OLIBOARD - Interactive Whiteboards 22
Page 31

REMOVING THE SOFTWARE
Before removing the software, deactivate the software driver (via the “Exit” command
that can be activated by clicking on the driver icon in the control bar) and exit from the
application if it is still running.
The Oliboard for Linux software can be removed from your computer in one of two
ways. The first way is to follow the on-screen instructions, the second way is to use the
command line.
1. First method:
• Launch the Synaptic Package Manager (System -> Administration)
• Type the following word in the search bar: Oliboard.
• Select the Oliboard item to remove Oliboard for Linux from your computer and
confirm with “Apply”
2. Second method:
• Open a terminal window.
• Type the following command:
sudo dpkg -P Oliboard.
Oliboard for Linux is removed from your computer.
ENGLISH
OLIBOARD - Interactive Whiteboards 23
Page 32
RUNNING THE SOFTWARE
The whiteboard cable must be connected to the USB port of the computer.
To run the software, you must first of all run the whiteboard software driver, then
perform the orientation operation if necessary before finally starting the whiteboard
software.
Starting the Oliboard Driver
1. Click “Applications” → “Oliboard” → “Oliboard Driver” to run the Oliboard
Driver.
2. When the Oliboard Driver starts, the related icon appears on the panel in the top
right corner of the desktop:
3. When the driver starts, the whiteboard runs a connection check. If an error is
encountered, make sure that the whiteboard cable is connected correctly
between the computer and the whiteboard. Click on the driv er ic on and selec t the
“Reconnect” option from the popup menu.
NOTE: After having installed the driver, it is automatically run the next time
the computer is powered on. If the computer is often disconnected to
the whiteboard, it is advisable to deactivate the automatic execution
by means of the Startup Applications Preferences panel to avoid an
error message appearing the next time the computer is powered on
indicating that no whiteboard is connected.
OLIBOARD - Interactive Whiteboards 24
Page 33
Orienting the Interactive Whiteboard
This function is used to tune the whiteboard for the image projected on it.
1. Click on the driver icon in the panel at the top of the desktop and select “Re-
orientation” in the popup menu, then select the orientation mode required (see
the INSTRUCTION note at the end of this paragraph).
NOTE: The orientation operation can also be activated using the related key at
the top of the Function Key panel on the whiteboard.
ENGLISH
OLIBOARD - Interactive Whiteboards 25
Page 34

2. Clicking with the mouse left button on “Re-orientation”, a popup window
appears. With the electronic pen, click at the mid-point of the flashing cross “+”
on the whiteboard. Repeat this same operation for all the other orientation points
(there are six in all), being careful to center precisely the mid-point of the flashing
cross with the electronic pen.
INSTRUCTION: Select “Re-orientation” the first time the Oliboard Driver is
installed or if the position of the projector or of the Interactive
Whiteboard changes, or if the display mode changes (e.g. image
size or resolution).
To perform a rapid orientation, you can select “Previous re-
orientation record” as long as no changes have been made
since it was last used. If an accurate orientation is not required,
select “Default Orientation”.
OLIBOARD - Interactive Whiteboards 26
Page 35
Running the Whiteboard Software Application
1. Click “Applications” → ”Oliboard” → ”Oliboard” to start the application.
2. A login window is displayed into which you can enter a user name and password.
To start the software using the default account, just click on the “Login” button
without entering any data, otherwise enter your personal account details. When a
personal account is used, the user can customise the tool bar, resources and
templates.
NOTE: In order to start the software, the Oliboard driver must be running and
the whiteboard connected to the cable in the correct manner.
NOTE: For how to operate the software, refer to the instructions in the
ONLINE HELP.
ENGLISH
OLIBOARD - Interactive Whiteboards 27
Page 36
MAC SOFTWARE INSTALLATION
Note that Administrator access rights and its related password, if any, are necessary f or
installing both the software and the drivers.
INSTALLING THE OLIBOARD SOFTWARE
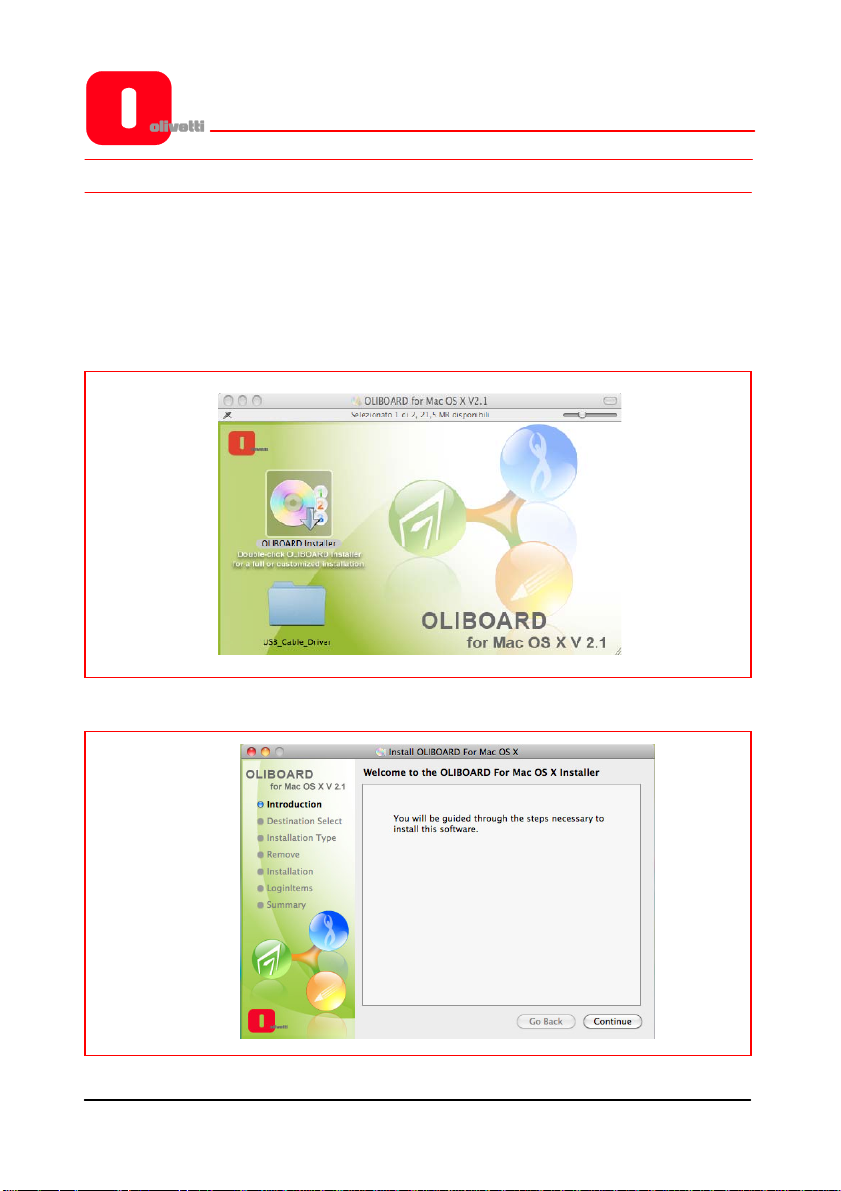
1. Insert the Oliboard Software disk. Don’t connect the USB whiteboard cable.
2. Click Oliboard Installer to start.
OLIBOARD - Interactive Whiteboards 28
Page 37
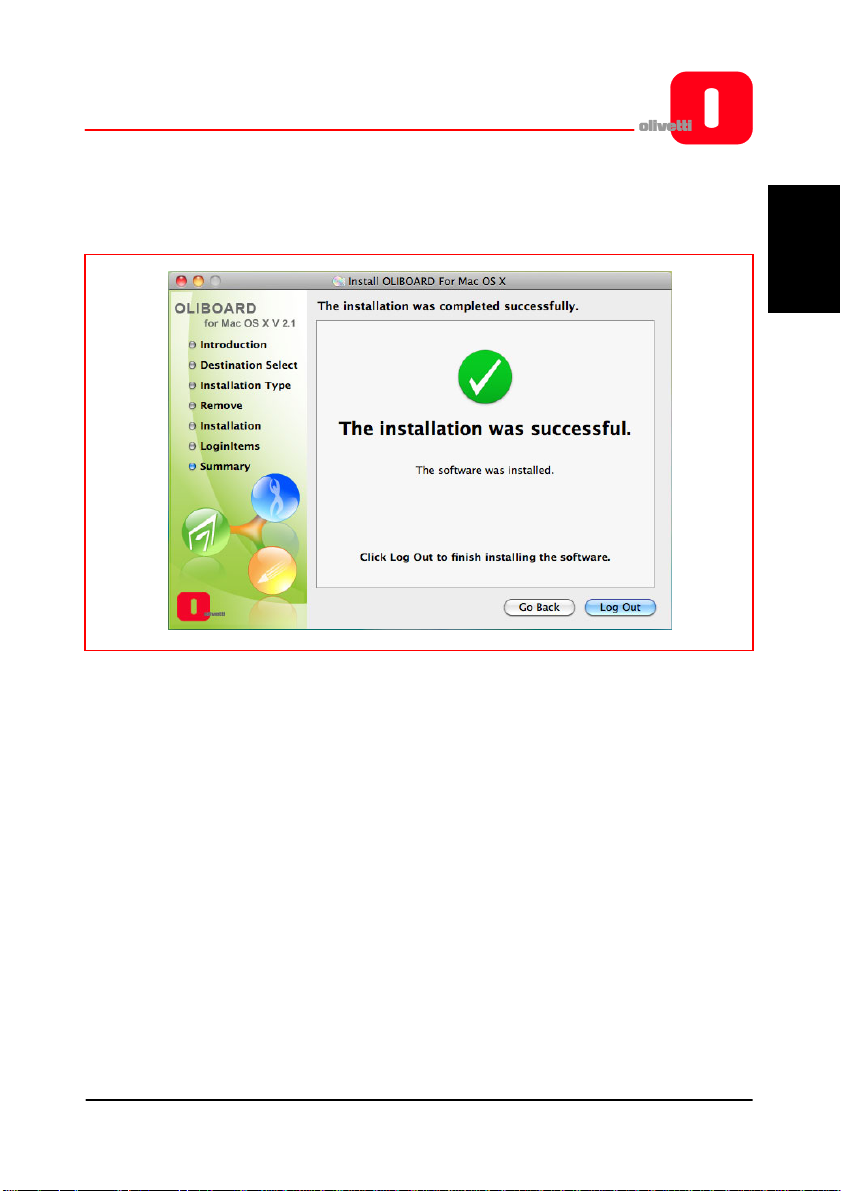
3. Click on “Continue” and follow the instructions displayed until installation
completes.
ENGLISH
At this point, you must install the software driver for the USB cable.
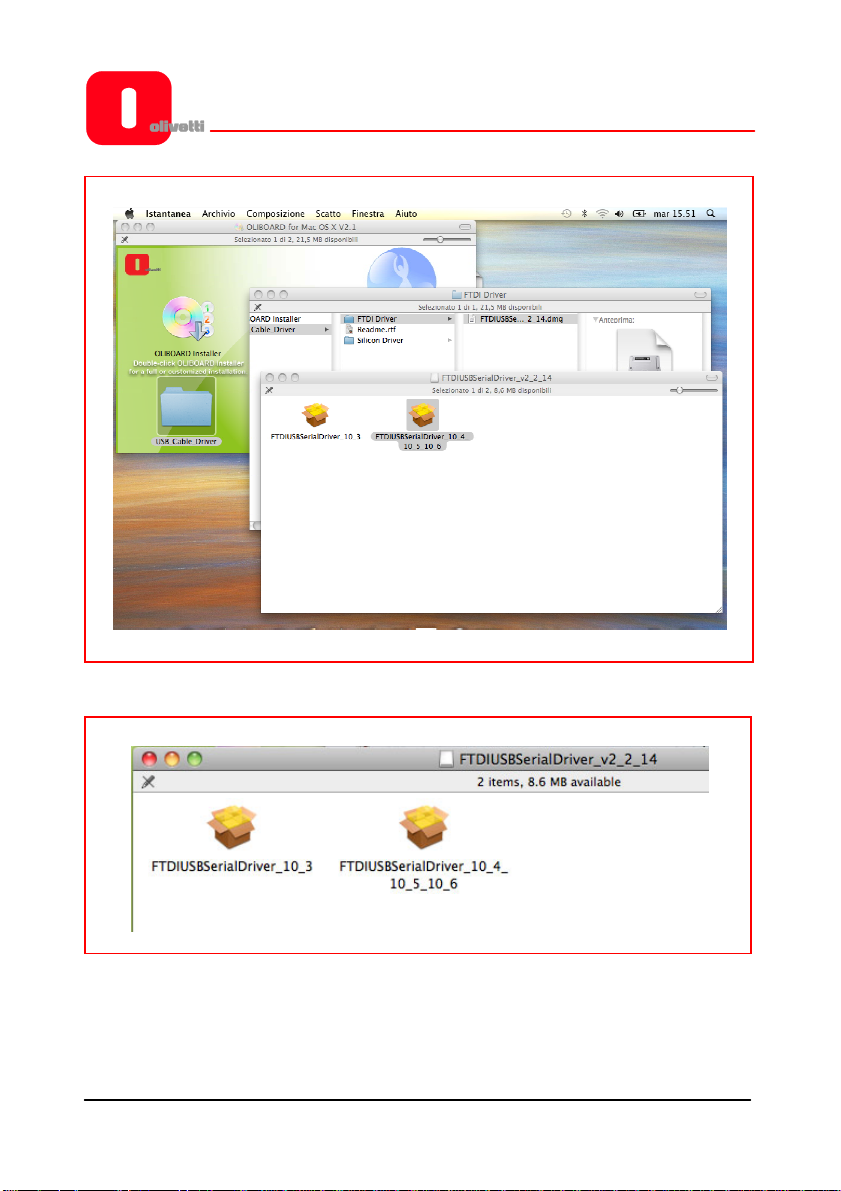
INSTALLING THE USB CABLE SOFTWARE DRIVER
Go back to the main installation display mask and click on “USB_Cable_Driver”and
then to FTDI driver to enter in the folder containing two installation drivers:
- FTDIUSBSerialDriver_10_3.dmg (for MAC OS 10.3)
- FTDIUSBSerialDriver_10_4_10_5_10_6.dmg, (for MAC OS 10.4, 10.5 and 10.6)
OLIBOARD - Interactive Whiteboards 29
Page 38
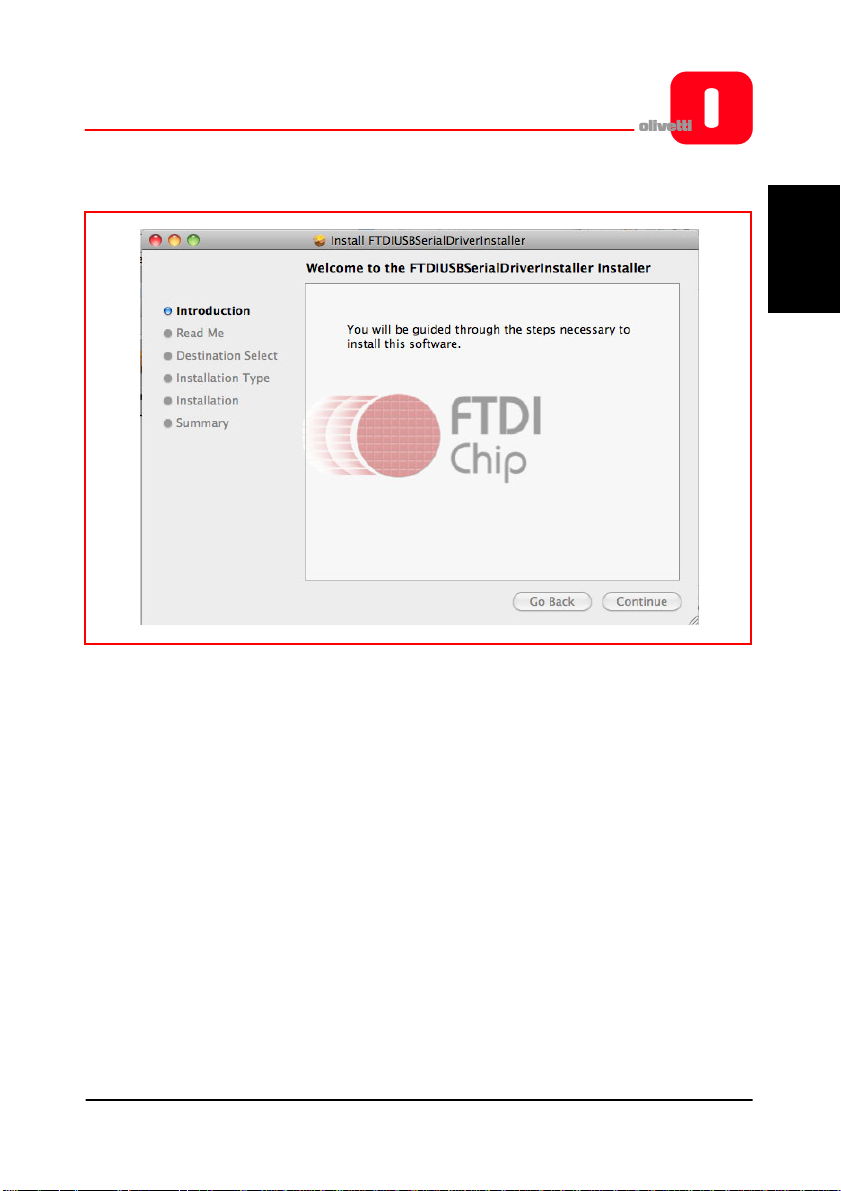
At this point you must double-click on the driver to start the installation.
OLIBOARD - Interactive Whiteboards 30
Page 39
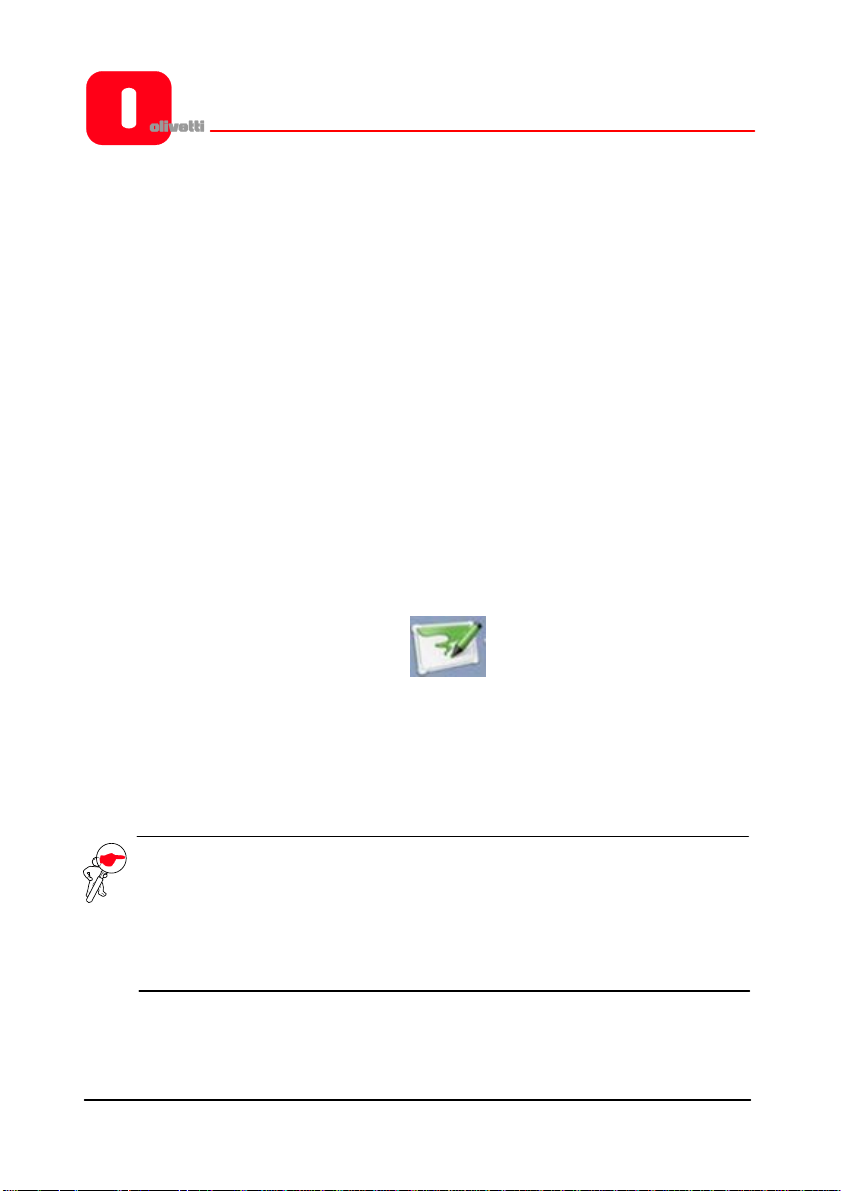
Then follow the instructions displayed on the video.
ENGLISH
OLIBOARD - Interactive Whiteboards 31
Page 40
REMOVING THE SOFTWARE
1. Select the Oliboard software in “Applications” then click “Uninstall” to start the
software removal procedure and confirm the software removal.
2. Click “YES” to start the software removal.
RUNNING THE SOFTWARE
To run the software, you must first of all start the software driver of the whiteboard,
then if necessary perform the orientation operation before starting the whiteboard
software.
Starting the Oliboard Driver
1. Connect the whiteboard USB cable to the computer. Click “System“ →
“Applications“ →“Oliboard Software“ → “Driver“→“V2.1“ → “Oliboard
Driver“ to run the Oliboard driver.
2. After starting the Oliboard Driver, the related icon is displayed on the desktop.
3. When the Oliboard driver is run, it automatically checks the whiteboard. If an
error message appears, check the connection between the whiteboard and the
computer. Click the driver icon and select the “Reconnect“ option from the
popup menu “Settings”.
NOTE: After having installed the driver, it is automatically run the next time
the computer is powered on. If the computer is often disconnected to
the whiteboard, it is advisable to deactivate the automatic execution
(click on the driver icon with the right button of the mouse and
deactivate option for driver execution at login).
OLIBOARD - Interactive Whiteboards 32
Page 41
Orienting the Interactive Whiteboard
This function calibrates the whiteboard for the image projected onto it.
1. Click the driver icon, select “Orientation“ from the popup menu then select the
orientation mode you require (see the INSTRUCTION note at the end of this
paragraph).
NOTE: The orientation operation can also be activated using the related key at
the top of the Function Key panel on the whiteboard.
ENGLISH
OLIBOARD - Interactive Whiteboards 33
Page 42

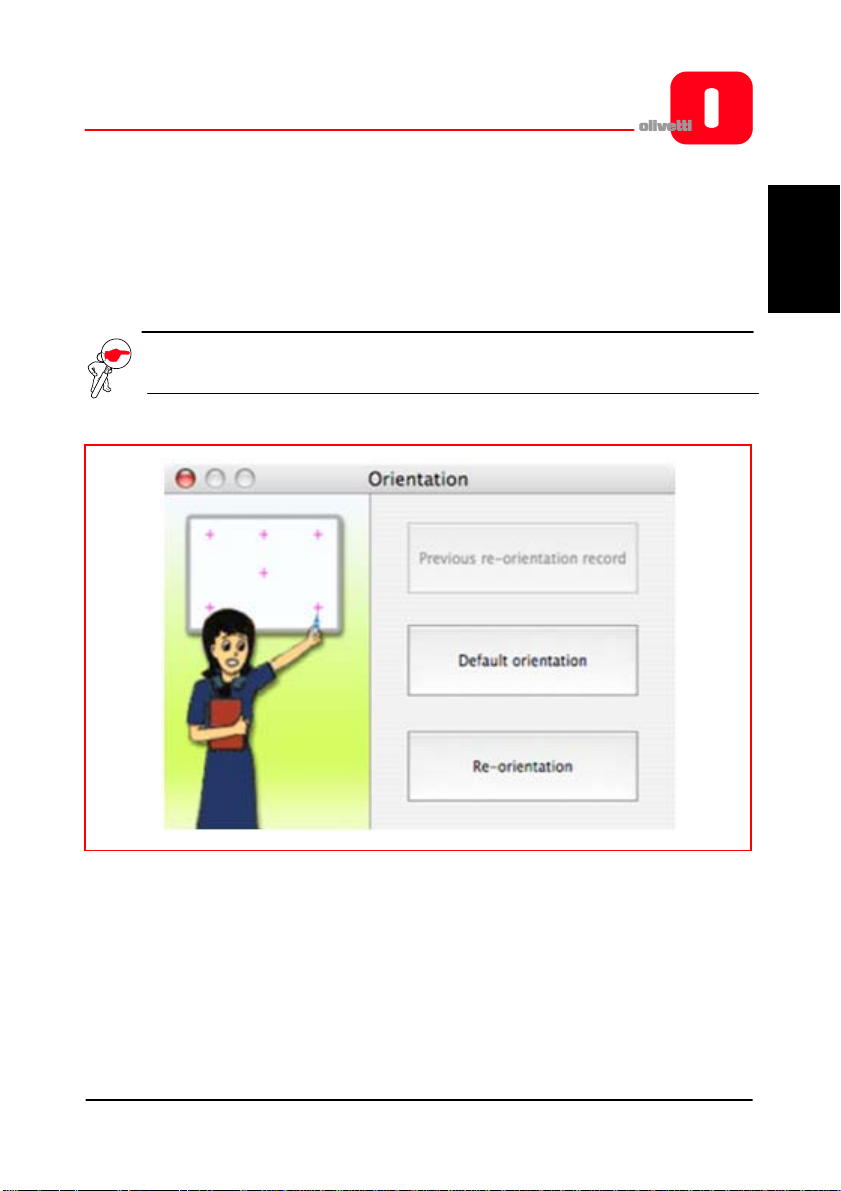
2. With the mouse left button click on “Re-orientation“ to open the popup
window for Orientation shown below. With the electronic pen, click at the midpoint of the flashing cross “+“ on the whiteboard. Repeat the same operation for
all the other orientation points (there are six in all), being careful to center
precisely the mid-point of the flashing cross with the electronic pen.
INSTRUCTION: Select “Re-orientation” the first time you install the Oliboard
Driver, when the position of the projector or the Interactive
Whiteboard changes or when the display mode changes (e.g.
the image size or resolution).
To perform a rapid re-orientation, you can select “Previous re-
orientation record” as long as no changes have been made
since it was last used. If an accurate orientation is not required,
select “Default orientation”.
OLIBOARD - Interactive Whiteboards 34
Page 43
Running the Whiteboard Software Application
1. Click “System“ → “Applications“ → “Oliboard Software“ → “Software“ →
“Oliboard“ to start the application.
2. A login window is displayed into which you can enter a user name and password. To
start the software using the default account, just click on the “Login” button
without entering any data, otherwise enter your personal account details. When a
personal account is used, the user can customise the tool bar, resources and
templates.
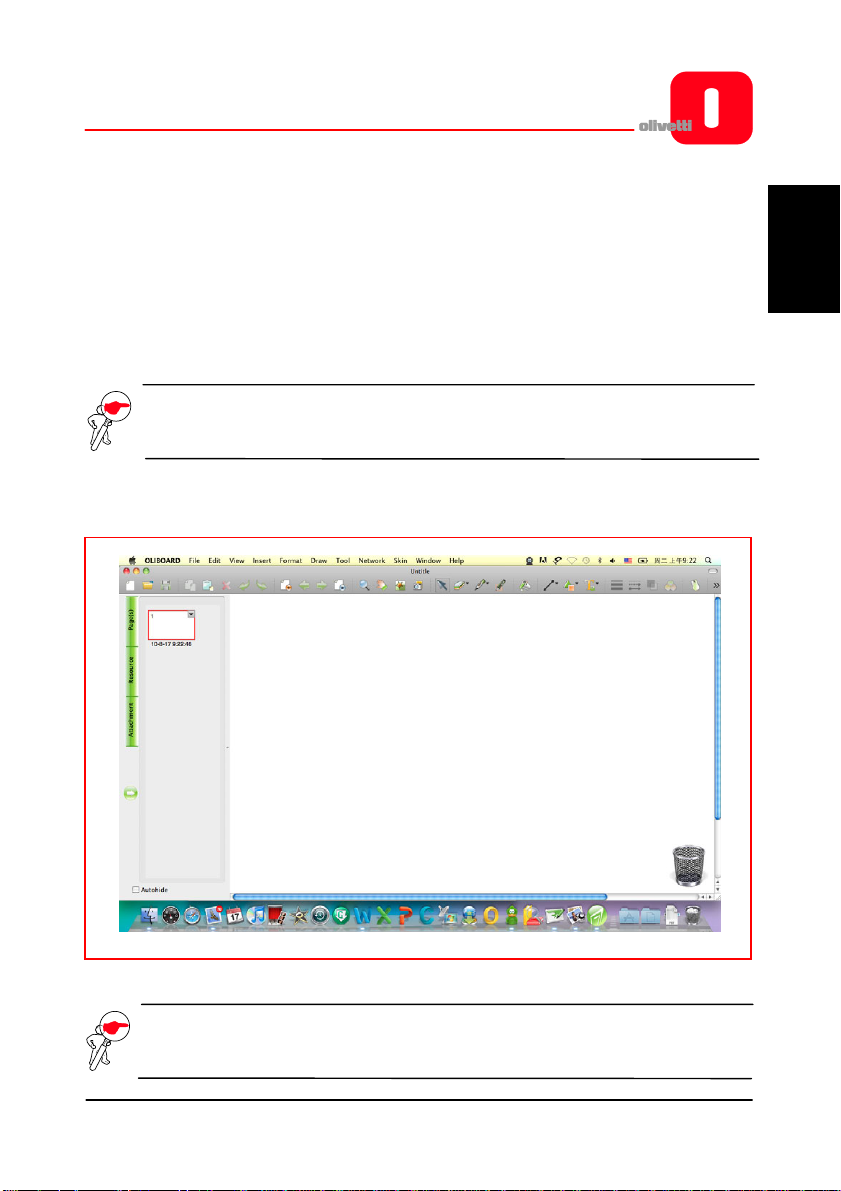
The application appears as follows:
NOTE: In order to start the software, the Oliboard driver must be running and
the whiteboard must be connected correctly to computer.
ENGLISH
NOTE: For how to operate the software, refer to the instructions in the
ONLINE HELP.
OLIBOARD - Interactive Whiteboards 35
Page 44

SOFTWARE REGISTRATION
First time Oliboard software runs on a computer not connected to the whiteboard, the
registration of the software is requested.
It is possible to immediately execute the procedure, or it is possible to postpone the
registration.
When the number of execution without registration is finished, it is necessary to
remove the software.
In order to execute the registration process, it is necessary a direct connection to
Internet and to insert the activation code (normally included in the CD-ROM).
NOTE: Registration is not requested if whiteboard is connected to the
computer.
OLIBOARD - Interactive Whiteboards 36
Page 45

TROUBLESHOOTING
1. If a message is displayed: “Failed to verify the whiteboard, the program
can't run further!“, check whether there is a good connection between
whiteboard and the computer.
• Make sure that the special-purpose connection cable of the whiteboard
has been used, and that the cable has been connected correctly.
• Check that the whiteboard is powered-on (the red indicator lamp on the
rear, right side, must be lit).
• Check that the software driver of the whiteboard is running.
• Check that the software driver of the USB cable has been correct ly inst alled
(see the note in the paragraph related to its installation).
• If this message appears when the computer should not be connected to
the whiteboard, make sure that the “autostart” parameter of the Oliboard
driver has been deactivated (click on the icon to deactivate the parameter).
2. When the software starts, a message appears: “Error while loading the XML
File“.
Check the version of Internet Explorer. Update to Internet Explorer version 6.0 if the
version in use is 5.0 or earlier.
3. Only certain parts of whiteboard can be written on.
Carry out the procedure for orienting the whiteboard.
4. Some orientation points cannot be found when orienting
the whiteboard.
Make sure that the lateral deviation and the vertical offset of the projector are
correct. Ensure that all contents of the computer screen can be entirely projected
onto the whiteboard.
5. Electronic pen does not write normally.
• Check the current working mode of the software. The writing functionality is
only effective in Draw Mode or Annotation Mode, not in Control Mode.
• Do not press the electronic pen button while writing.
• Keep the nib of the electronic pen vertical to the whiteboard panel.
• Avoid pressing the electronic pen.
• Check that the battery is charged, if not replace it with a new one.
ENGLISH
OLIBOARD - Interactive Whiteboards 37
Page 46

6. How to exit from the Oliboard software?
• Click on the Operation Round Plate in ”Control Mode” , then on
”Exit” in the popup menu.
• Click ”File” (in the main menu), then ”Exit”, or Click the Oliboard icon in
the “Main Tool Bar”, then click ”Exit” in reply to the prompt.
7. Why is the image projected in the shape of a trapezium? Why must it be adjusted,
and how to do so?
• It sometimes happens that the projector is not level (for example, because
the front is higher than the back, or vice-versa) and consequently the
image projected is trapezoidal in shape.
• A trapezoidal image is a distorted image and it must be adjusted until a
normal projection is achieved.
• Generally speaking, the image can be adjusted by using a remote control
device or by correcting the height of the projector. For detailed
information, refer to the User Manual provided with the projector.
Trapezium
Rectangle
8. What type of projector must be used with the Interactive Whiteboard?
The projector must satisfy the three following requisites. It must:
• be a front projector;
• support the computer resolution;
• have a minimum luminous flux exceeding 500 Lumens. For the precise
amount, the room size must be taken into account.
9. What to do when an unerasable colour pen has been used to write on the
whiteboard?
Never use colour pens to write on the Oliboard! Should this happen, clean the
whiteboard lightly using cotton-wool dampened with alcohol.
OLIBOARD - Interactive Whiteboards 38
Page 47

10. How to clean the panel of the whiteboard?
Clean the panel passing over it lightly with a damp cloth.
CAUTION: After wetting the cloth, you must wring it out to remove
any excess water. This is to avoid water penetrating
inside the whiteboard.
11. Why is it not possible to use network functions?
• If the Double Pen function is chosen for the configuration, the network
functionality is not available.
• Click ”Operation Round Plate” → ”Option” to change the configuration
of the Double Pen function if you want to use network functionality.
ENGLISH
OLIBOARD - Interactive Whiteboards 39
Page 48

Page left intentionally blank
OLIBOARD - Interactive Whiteboards 40
Page 49

OLIBOARD
TABLEAUX INTERACTIFS
Page 50
PUBLICATION EMISE PAR :
Olivetti S.p.A.
Gruppo Telecom Italia
Via Jervis, 77 - 10015 Ivrea (ITALY)
www.olivetti.com
Copyright © 2011, Olivetti
Tous droits réservés
ÉDITION 1.1
Les qualités requises pour ce produit sont garanties par le
label appliqué sur le produit même.
Le producteur se réserve le droit de modifier le produit décrit dans ce manuel à tout moment et sans préavis.
Nous attirons votre attention sur les actions suivantes qui peuvent compromettre la conformité attestée
ci-dessus et les caractéristiques du produit :
• alimentation électrique erronée ;
• installation ou utilisation erronée ou non conforme aux indications exposées dans le manuel d’utilisation fourni
avec le produit ;
• remplacement de composants ou d’accessoires originaux par des pièces non approuvées par le constructeur,
ou effectué par du personnel non autorisé.
Tous les droits sont réservés. La reproduction partielle ou intégrale de ce document est interdite sous
quelque forme que ce soit ou par le biais d'un quelconque instrument, électronique ou mécanique, y
compris la photocopie, enregistrement ou autres, et ce, sans autorisation écrite préalable d'Olivetti S.p.A.
Le contenu de ce manuel peut être modifié sans préavis. Le plus grand soin ayant été apporté lors de la
création, du contrôle et de la documentation du logiciel associé au tableau Oliboard et à la
documentation contenue dans ce manuel, Olivetti S.p.A. ne pourra être tenu pour responsable de
problèmes, de quelque nature que ce soit, dérivant de l'utilisation du logiciel et de la documentation. Ceci
valant également pour toute personne ou société impliquée dans la création, réalisation, production et
contrôle du logiciel et de ce manuel.
Les marques enregistrées appartiennent à leurs propriétaires respectifs.
Page 51

INSTRUCTION : constitue une instruction supplémentaire relative au logiciel.
REMARQUE : décrit d'éventuels problèmes susceptibles de surgir durant
l'utilisation du tableau ainsi que les solutions permettant de
les résoudre et d'en prévenir la survenance.
A TTENTION : attire l'attention de l'utilisation sur les risques de blessures
ou dommages au produit en cas d'usage inapproprié.
Avertissement
• Afin de prévenir les décharges électriques, ne pas installer le tableau interactif
dans des environnements humides ou enfumés.
• Après avoir installé le tableau interactif, éviter de toucher le cordon
d'alimentation et le câble de transmission des données.
• Tenir le tableau loin des flammes libres, contacts électriques et éviter
d'exposer le produit à la lumière directe du soleil.
• Après avoir installé le tableau, contrôler que celui-ci ait été fixé correctement.
• Éviter de regarder directement le rayon de lumière émis par le projecteur sur
le tableau.
• Ne pas toucher le projecteur car celui-ci pourrait être chaud, et ce, même après
quelques minutes quelques minutes de fonctionnement. Consulter le m anuel du
projecteur pour ce qui est des avertissements et norm es d'utilisation le conc ernant.
• Ne pas s'accrocher à l'équerre de soutien du projecteur.
En cas d'installation du tableau sur le piédestal, faire attention à ne pas se
prendre les pieds dans ce dernier.
OLIBOARD - Tableaux interactifs III
Page 52
Remarques importantes
• Le tableau interactif ne doit être utilisé qu'avec les stylets électroniques
spéciaux. Ne pas utiliser de marqueurs, crayons ou d'autres types de stylos. Si
nécessaire, nettoyer le tableau avec de l'alcool.
• Contrôler que le tableau ait été branché correctement à l'ordinateur et au
réseau électrique. Il est préférable d'opter pour la pose cachée des câbles de
branchement et d'alimentation, et ce, afin d'éviter que ceux-ci ne puissent
être tirés ou débranchés. Ne jamais laisser de câbles traîner sur le sol pour
éviter que les personnes ne puissent s'y prendre les pieds.
• Ne pas rayer la surface ni le cadre du tableau avec des objets durs ou
pointus. La zone environnant le tableau doit être exempte de champs
magnétiques élevés. En présence d'une paroi en métal ou d'un autre
matériau magnétique, laisser un espace de 10 mètres en celle-ci et le
tableau.
• Pour pouvoir écrire avec le stylet électronique, il est nécessaire de tenir ce
dernier de façon perpendiculaire au tableau, et ce, sans appuyer.
• En cas d'installation murale, le tableau doit être parallèle à la surface murale.
• Ne pas accrocher d'objets ou de poids sur le tableau et, si présent, sur le
piédestal.
• En cas d'installation sur le piédestal, faire attention que le tableau ne bascule
pas durant les déplacements.
Ce manuel concerne uniquement le tableau Oliboard et le logiciel
l'accompagnant. Même s'il est fait référence à des ordinateurs (portables, PC,
etc...) branchés au tableau et au vidéo-projecteur, pour ce qui est de ces derniers,
consulter la documentation d'origine fournie avec ces appareils.
OLIBOARD - Tableaux interactifs IV
Page 53

Avertissement
AUTRES AVERTISSEMENTS SE RAPPORTANT À L'INSTALLATION DANS UN
ENVIRONNEMENT SCOLAIRE
Il est nécessaire que les élèves soient informés des avertissements et précautions
d'usage se rapportant au tableau et au projecteur. Comme, entre autres :
• Ne pas regarder directement le rayon de lumière émis par le projecteur sur le
tableau.
• Ne pas toucher le projecteur car celui-ci pourrait être chaud, et ce, même
après quelques minutes quelques minutes de fonctionnement.
• Faire attention aux câbles de branchement et, si le tableau est installé sur un
piédestal, recommander aux élèves de faire attention à ne pas s'y prendre les
pieds. Dans tous les cas, recommander aux élèves de ne pas chahuter autour
du tableau et du piédestal.
• Ne pas s'accrocher à l'équerre de soutien du projecteur et, si présent, au
piédestal.
OLIBOARD - Tableaux interactifs V
Page 54

Page laissée blanche intentionnellement
OLIBOARD - Tableaux interactifs VI
Page 55

SOMMAIRE
INTRODUCTION..............................................................................................1
Préambule.............................................................................................................1
Configuration minimale du système.......................................................................2
Déballage et accessoires........................................................................................ 3
CARACTÉRISTIQUES PRINCIPALES......................................................................... 6
Aspect extérieur............................................................................................... 6
Touches de fonction présentes sur le tableau......................................................... 7
Informations techniques...................................................................................8
Installation............................................................................................................9
Installation de la pile dans le stylet électronique................................................... 10
INSTALLATION DU LOGICIEL SOUS WINDOWS .............................................11
Installation rapide................................................................................................11
Installation guidée............................................................................................... 12
Installation du pilote du logiciel Oliboard........................................................12
Installation du logiciel Oliboard....................................................................... 13
Installation du pilote du câble USB..................................................................13
Désinstallation du logiciel Oliboard......................................................................14
Exécution du logiciel............................................................................................14
Lancement du pilote du tableau interactif....................................................... 14
Orientation du tableau interactif..................................................................... 15
Lancement du logiciel du tabl eau ...................................................................17
Création d'un compte et d'un mot de passe personnels.................................. 18
Configuration des fonctions Oliboard............................................................. 20
INSTALLATION DU LOGICIEL SOUS LINUX-UBUNTU......................................21
Installation..........................................................................................................21
Désinstallation du logiciel.................................................................................... 23
Exécution du logiciel............................................................................................24
Lancement du pilote Oliboard.........................................................................24
Orientation du tableau interactif.................................................................... 25
Lancement du logiciel du tabl eau ...................................................................27
INSTALLATION DU LOGICIEL POUR MAC......................................................28
Installation du logiciel Oliboard............................................................................ 28
Installation du pilote du logiciel du câble USB...................................................... 29
zDésinstallation du logiciel...................................................................................31
Désinstallation du logiciel.................................................................................... 32
Exécution du logiciel............................................................................................32
Lancement du pilote Oliboard.........................................................................32
Orientation du tableau interactif..................................................................... 32
Orientation du tableau interactif..................................................................... 33
Lancement du logiciel du tabl eau ...................................................................35
ENREGISTREMENT DU LOGICIEL...................................................................36
RECHERCHE DES PANNES.............................................................................37
OLIBOARD - Tableaux interactifs VII
FRANÇAIS
Page 56

Page laissée blanche intentionnellement
OLIBOARD - Tableaux interactifs VIII
Page 57

INTRODUCTION
PREAMBULE
Le tableau interactif est un appareil périphérique d'entrée qui, grâce à l'application de
technologies avancées et d'une haute fiabilité, permet de disposer, en le branchant à
un PC et à un vidéoprojecteur, d'un environnement interactif pour un usage
didactique ou démonstratif.
Caractéristiques
• Le tableau Oliboard est caractérisé, d'une part, par une surface rigide dans un
souci de résistance à l'usure et de protection contre les actes de vandalisme, et
d'autre part, par une très haute précision de traçage, rapidité de réponse et
sensibilité opérationnelle assurant un usage convivial même pour les moins
experts.
• Le logiciel accompagnant le produit offre des fonctions avancées comme
l'agrandissement partiel, le réflecteur, la reproduction, l'appareil photo, le fond
d'écran personnalisable et des outils spécialisés (compas, règle, équerre,
rapporteur).
• Le stylet électronique permet d'écrire, de prendre des notes, d'effacer, de tracer
des figures géométriques, de copier, reproduire et enregistrer des fichiers.
• Le stylet électronique peut également être utilisé telle une souris afin de
commander le PC.
FRANÇAIS
OLIBOARD - Tableaux interactifs 1
Page 58

CONFIGURATION MINIMALE DU SYSTEME
Le tableau doit être branché à un ordinateur en mesure d'afficher les images sur le
tableau par le biais d'un vidéoprojecteur.
Configuration minimale Configuration conseillée
Unité centrale : 1,7 GHz ou
supérieur
RAM : 1 GB ou supérieur
Porte USB (pour le branchement
du tableau)
Porte VGA (type SUB-D15
femelle) pour le branchement du
vidéoprojecteur)
REMARQUE : certains
ordinateurs (comme les MAC par
exemple) sont dépourvus de ce
type de porte. Dans ce cas, il sera
nécessaire d'utiliser un
adaptateur (non fourni avec le
tableau et le vidéoprojecteur).
Linux Ubuntu7.0/8.0 et supérieur
(I386/AMD64) ;
Mac OS X V10.4 et supérieur
(plateformes Intel)
Configuration
matériel
informatique
Configuration
logicielle
Unité centrale : 1GHz
RAM : 512 MB
Porte USB (pour le branchement
du tableau)
Porte VGA (type SUB-D15
femelle) pour le branchement du
vidéoprojecteur)
REMARQUE : certains
ordinateurs (comme les MAC par
exemple) sont dépourvus de ce
type de porte. Dans ce cas, il sera
nécessaire d'utiliser un
adaptateur (non fourni avec le
tableau et le vidéoprojecteur).
Windows 2000, XP, Vista, 7 Windows 2000, XP, Vista, 7
Linux Ubuntu7.0/8.0
(I386/AMD64) ;
Mac OS X V10.4 et supérieur
(plateformes Intel)
Configuration suggérée pour l'ordinateur :
1) Pour une vision optimale du tableau, le format de
la sortie vidéo de l'ordinateur (soit la résolution) et du projecteur doivent être
paramétrés sur le même format que celui du tableau.
Soit, pour les tableaux au format 4/3 (Oliboard 78S et Oliboard 78D), il est conseillé
d'utiliser une résolution de la sortie correspondant au format 4/3 (par exemple
1024x768 ou 800x600).
Pour les tableaux au format 16:9 (Oliboard 95D), il est conseillé d'utiliser une
résolution de la sortie correspondant au format 16:9 (par exemple 1280x800).
2) Durant l'utilisation du tableau, il est possible que
l'ordinateur se mette en veille. Pour éviter cette situation, il convient de désactiver les
fonctions d'écran de veille et d'économie d'énergie.
OLIBOARD - Tableaux interactifs 2
Page 59
DEBALLAGE ET ACCESSOIRES
Le tableau interactif comprend normalement les composants suivants :
• Tableau interactif
(la couleur du produit peut varier)
• Accessoires
FRANÇAIS
OLIBOARD - Tableaux interactifs 3
Page 60

Le kit d'accessoires normal comprend :
Description Quantité Fonction Position
Stylet
électronique pour
Stylet électronique 2
Câble spécial de 10
mètres
1
tableau interactif,
avec une pile
AAA de 1,5 V par
stylet.
Câble pour
brancher
l'ordinateur au
tableau interactif
Les couleurs peuvent varier
CD d'installation
Oliboard
Manuel de
l'utilisateur
Équerres
d'installation et kit
de fixation murale
Jusqu’à 3
CD
1
1
Pilote et logiciel
pour Windows,
Linux et Mac
Guide
d'utilisation
Kit de fixation
murale
Pièces mécaniques en vrac
OLIBOARD - Tableaux interactifs 4
Page 61

• Accessoires en option
En alternative à l'installation murale, il est possible de placer le tableau interactif sur un
piédestal spécial qui peut être commandé séparément. Ci-après, le modèle B5848.
FRANÇAIS
Piédestal en option (mod. B5848)
Dimensions piédestal (sans tableau ni projecteur) modèle B5848 :
- largeur : 127 cm ; prof. 75 cm ;
- hauteur : 246 cm (hauteur maxi du support projecteur monté).
Tableau OLIBOARD 95D sur piédestal mod. B5848
Emballage piédestal modèle B5848 (composé de deux emballages) :
- emballage 1 : 1680 x 770 x 110 cm, poids brut 34,5 Kg env.
- emballage 2 : 2030 x 750 x 170 cm, poids brut 28 Kg env.
OLIBOARD - Tableaux interactifs 5
Page 62

CARACTÉRISTIQUES PRINCIPALES
Aspect extérieur
(La couleur peut varier en fonction du modèle)
Réf. Description
1 Zone d'écriture
2 Touches de fonction
3 Pot à crayons
4 Fiche interface
Interface pour le câble spécial à brancher à la porte USB de
5
6 Connecteur d'alimentation (normalement, non utilisé)
l'ordinateur (le tableau est normalement alimenté par le biais
de ce câble)
OLIBOARD - Tableaux interactifs 6
Page 63

TOUCHES DE FONCTION PRESENTES SUR LE TABLEAU
Touches de
fonction
Définition
Orientation
(équilibrage)
Modalité
commande
(similaire à souris)
Modalité
annotation
Modalité fenêtre Aucun effet
Créer nouvelle
page
Page Haut Aucun effet Page Haut Page Haut
Page Bas Aucun effet Page Bas Page Bas
Stylet normal
Stylet transparent
(marqueur)
Modalité
commande
Orientation Orient. Orient.
Aucun effet
Passer à modalité
annotation
Créer nouvelle
page
Passer à modalité
annotation et
utiliser stylet norm.
Passer à modalité
annotation et
utiliser stylet
transp.
Modalité
fenêtre
Passer à
modalité
commande
Passer à
modalité
annotation
Page de
garde
Créer
nouvelle
page
Stylet normal Stylet normal
Stylet
transparent
Modalité
Annotation
Passer à
modalité
commande
Aucun effet
Page de
garde
Créer
nouvelle
page
Stylet
transparent
FRANÇAIS
Gomme Gomme Gomme Gomme
Reproduire Reproduire pages
Imprimer Imprimer Imprimer Imprimer
OLIBOARD - Tableaux interactifs 7
Reproduire
pages
Reproduire
pages
Page 64

Informations techniques
Plateforme informatique Dispositif périphérique pour PC portable.
Oliboard 78S : 17m/s (669 pouces/s)
Vitesse d'entraînement
Précision +/- 0,05 mm
Principe de fonctionnement. Induction électromagnétique
Modalités opérationnelles
Alimentation USB CC 5V 100mA
Durée de vie de la pile du stylet
électronique
Température de fonctionnement
Taux d'humidité de
fonctionnement
Puissance < 2W
Modèles
Oliboard 78D, Oliboard 95D : 8 m/s (314
pouces/s)
Modalité commande
Modalité fenêtre
Modalité annotation
Modalité plein écran
La durée de vie de la pile du stylet varie en
fonction du type ; les piles alcalines standard
peuvent arriver à trois mois environ.
de 20°C à +55
Taux d'humidité : de 30% à 80%
OLIBOARD 78S
OLIBOARD 78D
Zone extérieure
- diagonale
- dimensions
Zone active
- largeur
- hauteur
Format 4/3 16:9
Poids net (+/- 1 kg) 17 Kg 25,5 Kg
Emballage
- dimensions
- poids brut (+/- 2 Kg)
85"
174 x 127 cm
78"
160 x 119 cm
1860 x 1400 x 120 cm
29 Kg
OLIBOARD 95D
101"
223 x 127 cm
95"
210 x 118 cm
2350 x 1400 x 120 cm
32 Kg
OLIBOARD - Tableaux interactifs 8
Page 65
INSTALLATION
L'installation murale ou sur piédestal doit être effectuée par un personnel agréé
conformément aux dispositions visées dans la documentation Olivetti.
Le câble de branchement du tableau doit être branché à la porte USB de l'ordinateur.
Le câble BGA (ou HDMI) du vidéoprojecteur doit être branché à la porte VGA (ou
HDMI) de l'ordinateur.
FRANÇAIS
Réf. Description
1 VGA (ou HDMI)
2 USB
3 Câble spécial USB
4 Porte interface tableau pour câble spécial fourni en dotation
5 Connecteur d'alimentation (normalement, non utilisé)
6 Vidéoprojecteur
REMARQUE : le branchement entre l'ordinateur et le vidéoprojecteur doit être
effectué lorsque ces deux dispositifs sont éteints.
OLIBOARD - Tableaux interactifs 9
Page 66
INSTALLATION DE LA PILE DANS LE STYLET ELECTRONIQUE
Ouvrir le capuchon arrière du stylet électronique en le faisant tournant dans le sens
contraire des aiguilles d’une montre, y placer la pile AAA de 1,5 V tel qu'illustré puis
visser à nouveau le capuchon arrière dans le sens des aiguilles d'une montre.
La couleur extérieure du stylet peut différer de celle illustrée.
REMARQUE : le stylet est muni d'une touche qui, suivant les modalités
opérationnelles du logiciel, peut avoir les fonctions de la touche
droite de la souris.
OLIBOARD - Tableaux interactifs 10
Page 67

INSTALLATION DU LOGICIEL SOUS WINDOWS
Le logiciel Oliboard prévoit deux types d'installation : une « installation rapide » et une
« installation guidée ».
L'installation rapide comprend les phases suivantes exécutées automatiquement et
dans l'ordre suivant :
- Installation du pilote du logiciel Oliboard.
- Installation du logiciel Oliboard.
- Installation du pilote du logiciel du câble USB.
L'installation guidée permet d'installer le logiciel étape par étape.
INSTALLATION RAPIDE
Ne jamais brancher le câble du tableau à l'ordinateur (si le câble USB a déjà été
branché à l'ordinateur, le débrancher) ; en effet, durant la pr océdure d'inst allation,
un message vous demandant de procéder au branchement s'affic hera.
(Si la procédure d'installation est lancée alors que le câble a déjà été branché, il sera
ensuite nécessaire d'installer le pilote du logiciel du câble USB).
1. Insérer le CD Logiciel Oliboard.
2. Cliquer sur l'icône du programme (ce qui équivaut à lancer le programme en
mode d'exécution automatique).
FRANÇAIS
3. Une fenêtre pour l'installation guidée s'affichera.
4. Cliquer sur « Tout installer » afin de pouvoir lancer l'installation rapide.
5. Sélectionner la langue voulue puis confirmer en appuyant sur « Continuer ».
6. Sélectionner la destination pour l'installation du logiciel et confirmer en appuyant
sur « Continuer ». L'installation du logiciel commencera ; l'installation du pilote
du câble USB aura lieu en dernier.
7. Lorsque le système demandera si l'on souhaite installer le pilote FTDI USB, cliquer sur
l'option « Oui » pour lancer l'installation. À la fin (au bout de quelques secondes),
un message s'affichera : il demandera de brancher le câble USB à l'ordinateur.
Brancher le câble à une porte USB de l'ordinateur (l'autre extrémité doit être
branchée au tableau interactif).
Après avoir branché le câble, cliquer sur « Ok ».
OLIBOARD - Tableaux interactifs 11
Page 68
8. Lorsque le message d'installation terminée s'affichera, cliquer sur « Fin » et, une
fois revenu à la fenêtre initiale, cliquer sur « Quitter ».
9. Suivre les instructions indiquées dans le paragraphe « Exécution du logiciel ».
INSTALLATION GUIDEE
Ce type d'installation est recommandé uniquement en cas de nécessité de mise à jour
du logiciel fourni avec le tableau.
1. Insérer le CD Logiciel Oliboard.
2. Cliquer sur l'icône du programme.
3. Une fenêtre pour l'installation guidée s'affichera.
4. Cliquer sur « Installation guidée » afin de procéder à l'installation du pilote et
du logiciel Oliboard ainsi que du pilote du câble USB, et ce, tout en suivant les
instructions indiquées sur l'écran.
Installation du pilote du logiciel Oliboard
1. Cliquer sur pour installer le pilote du tableau interactif.
2. Sélectionner la langue voulue puis confirmer en appuyant sur « Continuer ».
3. Sélectionner la destination pour l'installation du pilote et confirmer en appuyant
sur « Continuer ».
4. Achever l'installation en appuyant sur la touche « Fin ». Brancher le câble à une
porte USB de l'ordinateur (l'autre extrémité doit être branchée au tableau
interactif).
Après avoir branché le câble, cliquer sur « Ok ».
OLIBOARD - Tableaux interactifs 12
Page 69
Installation du logiciel Oliboard
1. Cliquer sur .
2. Sélectionner la langue voulue.
3. Sélectionner la destination de l'installation du logiciel. L'installation du logiciel
commencera.
4. Lorsque le message de conclusion de l'installation s'affichera, cliquer sur « Fin ».
Installation du pilote du câble USB
Normalement, il n'est pas nécessaire d'exécuter cette procédure si l'installation rapide
a déjà été réalisée.
1. Cliquer sur « Installer le pilote USB » afin de pouvoir installer
le pilote du câble USB.
2. Cliquer sur « Installer le pilote FTDI » afin de pouvoir installer le pilote.
Après avoir branché le câble, cliquer sur « Oui ».
Si l'installation a été réalisée correctement, un message d'installation terminée
devrait s'afficher.
Il est possible de contrôler la bonne installation du câble USB en cliquant, avec la
touche droite de la souris, sur « Ordinateur » puis, avec la touche gauche de la souris,
sur « Propriétés » → « Gestion périphériques » → « Contrôleurs de bus » : la
périphérique « Porte sérielle USB » devrait figurer dans la liste. Contrôler que la
porte COM assignée est inférieure à 10 (ex. : COM 5) et que la vitesse de transmission
est de 57600.
FRANÇAIS
OLIBOARD - Tableaux interactifs 13
Page 70
DESINSTALLATION DU LOGICIEL OLIBOARD
Cliquer sur « Démarrer » → « Panneau de configuration » → « Installation
programmes » puis sélectionner « Oliboard » et enfin cliquer sur « Désinstaller
programmes ».
Sélectionner l'option afin de supprimer toutes les caractéristiques installées et s uivre les
instructions indiquées sur l'écran.
Autre solution, insérer le CD du logiciel, cliquer sur l'icône du programme Oliboard et
lancer la procédure guidée de désinstallation du logiciel en suivant les indications
affichées sur l'écran.
Une fois la désinstallation terminée, il est recommandé de redémarrer l'ordinateur.
EXECUTION DU LOGICIEL
Le câble du tableau doit être branché à la porte USB de l'ordinateur.
Pour ce qui est de l'exécution du logiciel, il est tout d'abord nécessaire de lancer le
pilote du logiciel du tableau, exécuter, si besoin est, la fonction d'orientation puis
lancer le logiciel du tableau.
Lancement du pilote du tableau interactif
Cliquer sur « Démarrer » → « Tous les programmes » → « Olivetti »→ « Logiciel
Oliboard » et lancer le pilote Oliboard. Dans le coin inférieur à droite de la barre des
tâches du bureau, l'icône du module de communication devrait être affichée.
REMARQUE : si le message « Échec communication avec tableau »est affiché,
contrôler que le câble du tableau est branché correctement à
l'ordinateur et au tableau. Puis cliquer sur l'icône Pilote Oliboard
et sélectionner « Se reconnecter » dans le menu déroulant. Si le
problème persiste, contrôler que le pilote du câble USB ait été
installé correctement (voir remarque sur contrôle installation du
câble USB page 13).
OLIBOARD - Tableaux interactifs 14
Page 71
REMARQUE : après avoir lancé l'exécution du pilote, cliquer sur l'icône du pilote
Oliboard afin d'activer ou de désactiver le paramètr e de « démarrage
automatique » selon si l'on souhaite lancer ou non automatiquement
l'exécution d'Oliboard lors du prochain dém arrage de l'ordinateur. Si
l'ordinateur est branché en permanenc e au tableau, il est préférable
d'activer la fonction de « démarrage automatique ». Si, au contraire,
l'ordinateur n'est pas toujours branché au tableau, il est conseillé de
désactiver cette fonction afin d'éviter l'affic hage du message d'erreur de
branchement du tableau lors du prochain démarrage de l'ordinateur.
Orientation du tableau interactif
Cette fonction permet de régler le tableau pour ce qui est de l'image projetée sur ce dernier.
1. Cliquer sur la touche gauche de la souris sur l'icône du Pilote Oliboard dans la
barre des tâches en bas ; sélectionner « Orientation » dans le menu déroulant
puis sélectionner la modalité d'orientation souhaitée (voir remarque INSTRUCTION
à la fin de ce paragraphe).
REMARQUE : la fonction d'orientation peut être également activée par le biais
de la touche placée en haut de la barre des touches sur le tableau.
FRANÇAIS
OLIBOARD - Tableaux interactifs 15
Page 72
2. En cliquant sur la touche gauche de la souris sur « Réorientation », un menu
déroulant intitulé Orientation s'ouvrira. Cliquer, à l'aide du stylet électronique, au
centre de la croix clignotante « + » sur le tableau. Puis, répéter l’opération pour
les autres points d'orientation (soit six au total), tout en veillant à bien centrer
avec le stylet électronique le cœur de la croix clignotante.
INSTRUCTION : sélectionner « Réorientation » lors de la première installation
du pilote Oliboard ou lorsque la position du projecteur ou du
tableau interactif a été changée, ou encore si la modalité
d'affichage a été modifiée (ex. : dimension de l'image ou
résolution).
Pour effectuer l'orientation de façon rapide, il est possible de
sélectionner « Réorientation précédente » à condition
qu'aucune modification n'ait été apportée depuis la dernière
utilisation du tableau.
S'il n'est pas nécessaire de procéder à une quelconque
orientation, sélectionner « Orientation par défaut ».
OLIBOARD - Tableaux interactifs 16
Page 73

Lancement du logiciel du tableau
1. Cliquer sur « Démarrer » → « Tous les programmes » → « Olivetti » →
« Logiciel Oliboard » et lancer le programme. Une fenêtre d'accès s'ouvrira :
celle-ci permettra de saisir le nom utilisateur et le mot de passe.
2. Pour lancer le logiciel en utilisant le compte par défaut, il suffit de cliquer sur la
touche de connexion « Se connecter » sans rien saisir, ou bien, de saisir son
propre identifiant. En cas d'utilisation d'un identifiant personnel, l'utilisateur a la
possibilité de personnaliser la barre d'outils, les ressources ainsi que les modèles.
REMARQUE : avant de lancer le programme, contrôler que le tableau
interactif a été branché correctement au PC et que le pilote du
tableau est en cours d'exécution.
REMARQUE : pour ce qui est des modalités de fonctionnement du logiciel,
consulter les instructions du GUIDE en ligne (AIDE en ligne) qui
peut être activé depuis le menu du logiciel Oliboard
FRANÇAIS
OLIBOARD - Tableaux interactifs 17
Page 74

Création d'un compte et d'un mot de passe personnels
1. Cliquer sur « Démarrer » → « Tous les programmes » → « Olivetti » →
« Logiciel Oliboard » → « Gestionnaire utilisateur » pour afficher la fenêtre
suivante :
Saisir les données du compte administrateur afin de pouvoir accéder au logiciel. Le
compte administrateur par défaut est le suivant : Administrateur, Mot de passe :
oliboard.
2. La fenêtre Gestionnaire utilisateur s'ouvrira.
OLIBOARD - Tableaux interactifs 18
Page 75
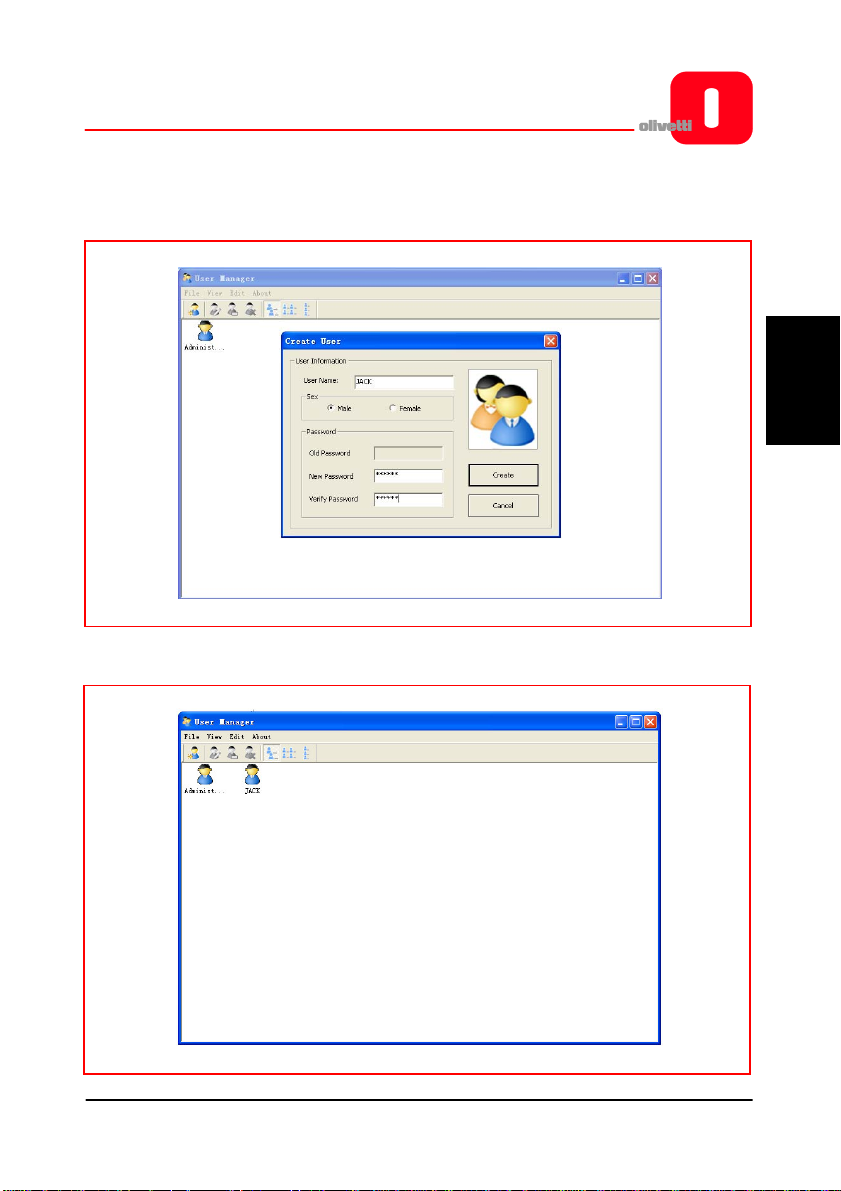
3. Sélectionner « Modifier » → « Nouvel utilisateur » pour créer un compte
personnel.
4. Saisir le nom utilisateur et le mot de passe puis sélectionner « Créer ».
5. À la fin, le nouvel utilisateur sera affiché dans la fenêtre :
FRANÇAIS
OLIBOARD - Tableaux interactifs 19
Page 76

Configuration des fonctions Oliboard
Cliquer sur « Options » pour ouvrir la fenêtre illustrée ci-dessous.
Pour les modèles de tableau Oliboard 78D et Oliboard 95D, configurer la fonction
« double stylet » tel qu'illustré ci-dessous.
OLIBOARD - Tableaux interactifs 20
Page 77

INSTALLATION DU LOGICIEL SOUS LINUX-UBUNTU
INSTALLATION
Il faut savoir qu'afin de pouvoir finaliser l'installation, tant du logiciel que des différents
pilotes, il est nécessaire de disposer des droits d'administrateur ainsi que de l'éventuel
mot de passe.
Dans le dossier d'installation, sont disponibles, pour la distribution Ubuntu, deux
procédures d'installation : celle pour les processeurs Intel (architecture i386 et dérivées )
et celles pour les processeurs AMD64.
Sélectionner la procédure relative au processeur de son propre ordinateur.
Brancher le câble du tableau à la porte USB de l'ordinateur.
Deux méthodes d'installation sont alors possibles :
1. Première méthode :
Double-cliquer sur Oliboard_for_Linux_V2.1.deb
FRANÇAIS
OLIBOARD - Tableaux interactifs 21
Page 78

La procédure d'installation prévoit de suivre les étapes suivantes (suivre les instructions
affichées à l'écran) :
• Sélectionner « Installer paquet ».
• Saisir le mot de passe (en fonction des droits du compte utilisateur enregistré
dans le système d'exploitation).
• Exécution de la procédure d'installation ; à sa conclusion, un message signalant
le bon aboutissement de la procédure s'affichera.
2. Seconde méthode :
• Ouvrir une fenêtre terminal.
• Saisir les commandes nécessaires pour accéder au dossier où est situé
Oliboard_for_Linux_V2.1.deb.
• Saisir la commande suivante (pour les processeurs i386) :
sudo dpkg -i Oliboard_for_Linux_V2.1_Packet2101_I386.deb.
et saisir le mot de passe root.
• En cas de problèmes, saisir la commande en deux étapes :
su –
le mot de passe root.
Saisir les commandes nécessaires pour accéder au dossier où est situé
Oliboard_for_Linux_V2.1.deb.
dpkg –i Oliboard_for_Linux_V2.1.deb.
OLIBOARD - Tableaux interactifs 22
Page 79

DESINSTALLATION DU LOGICI EL
Avant de pouvoir désinstaller le logiciel, il est nécessaire de désactiver le pilote du
logiciel (par le biais de la commande « Quitter » activable en cliquant sur l'icône du
pilote dans la barre de commande) et quitter l'application si encore en exécution.
Oliboard pour Linux peut être supprimé de l'ordinateur de deux façons. La première
consiste à suivre les instructions affichées sur l'écran, la seconde à utiliser la ligne de
commande.
1. Première méthode :
• Ouvrir Synaptic Package Manager (Système -> Administration)
• Saisir le mot suivant dans la barre de recherche : Oliboard.
• Sélectionner l'élément Oliboard afin de supprimer Oliboard pour Linux de
l'ordinateur puis confirmer la désinstallation en appuyant sur « Appliquer ».
Oliboard pour Linux sera supprimé de l'ordinateur.
2. Seconde méthode :
• Ouvrir une fenêtre terminal.
• Saisir la commande suivante :
sudo dpkg -P Oliboard.
Oliboard pour Linux sera supprimé de l'ordinateur.
FRANÇAIS
OLIBOARD - Tableaux interactifs 23
Page 80
EXECUTION DU LOGICIEL
Le câble du tableau doit être branché à la porte USB de l'ordinateur.
Pour ce qui est de l'exécution du logiciel, il est tout d'abord nécessaire de lancer le
pilote du logiciel du tableau, exécuter, si besoin est, la fonction d'orientation puis
lancer le logiciel du tableau.
Lancement du pilote Oliboard
1. Cliquer sur « Applications » → « Oliboard » → « Pilote Oliboard » pour lancer
l'exécution du Pilote Oliboard.
2. Une fois le pilote Oliboard exécuté, l'icône s'y rattachant apparaîtra sur le
panneau, dans le coin en haut à droite du bureau.
3. Lors de l'exécution du pilote, le tableau effectuera un test de connexion. En cas
d'erreur, contrôler que le câble du tableau ait été correctement branché à
l'ordinateur et au tableau ; puis cliquer sur l'icône du pilote et sélectionner « Se
reconnecter » dans le menu déroulant.
REMARQUE : Une fois installé, le pilote Oliboard sera lancé automatiquement
lors des prochains démarrages de l'ordinateur. Si l'ordinateur est
souvent débranché du tableau, il est conseillé de désactiver
l'exécution automatique par le biais du gestionnaire
programmes lors du démarrage (Startup Applications
Preferences) afin d'éviter l'affichage du message d'erreur de
branchement tableau lors du prochain démarrage de
l'ordinateur.
OLIBOARD - Tableaux interactifs 24
Page 81
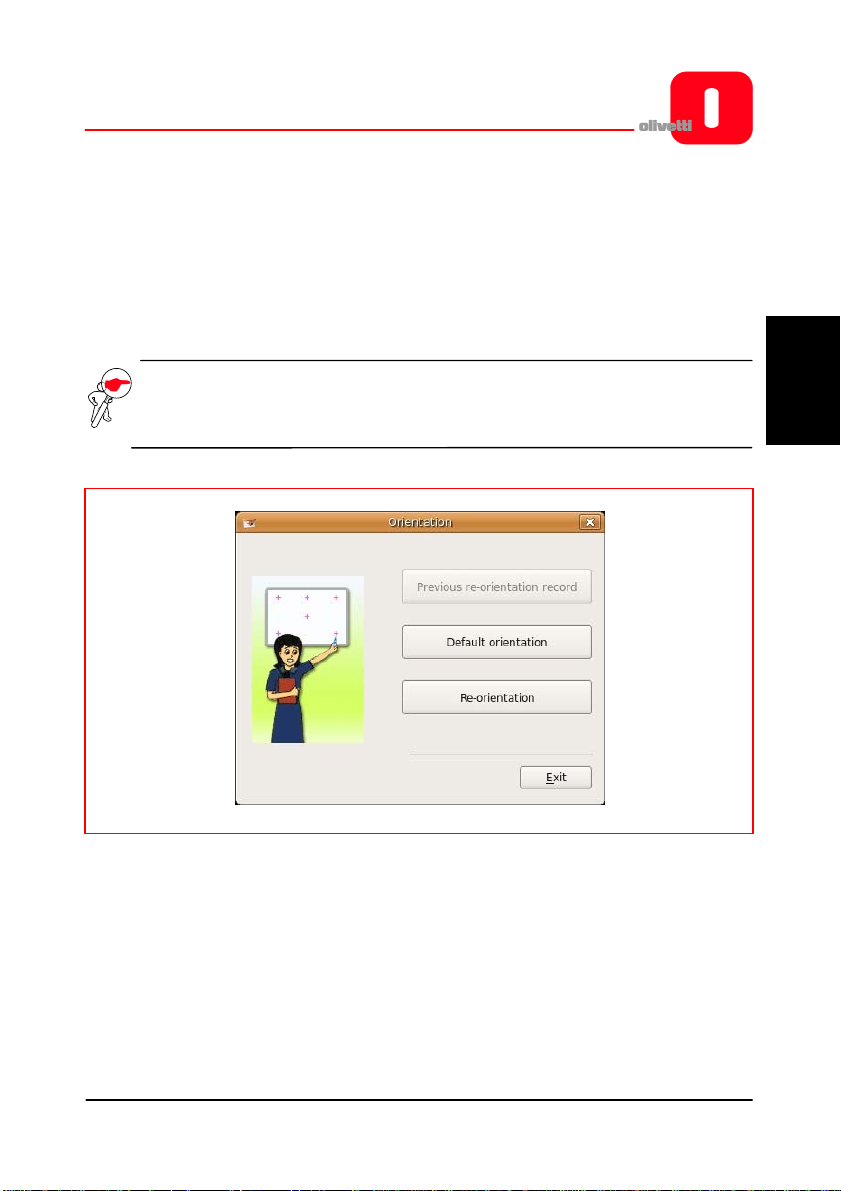
Orientation du tableau interactif
Cette fonction permet de régler le tableau pour ce qui est de l'image projetée sur ce
dernier.
1. Cliquer sur l'icône du Pilote Oliboard située sur le panneau en haut du bureau ;
sélectionner « Réorientation » dans le menu déroulant puis sélectionner la
modalité d'orientation souhaitée (voir remarque INSTRUCTION à la fin de ce
paragraphe).
REMARQUE : la fonction d'orientation peut être également activée par le biais
de la touche placée en haut de la barre des touches sur le
tableau.
FRANÇAIS
OLIBOARD - Tableaux interactifs 25
Page 82
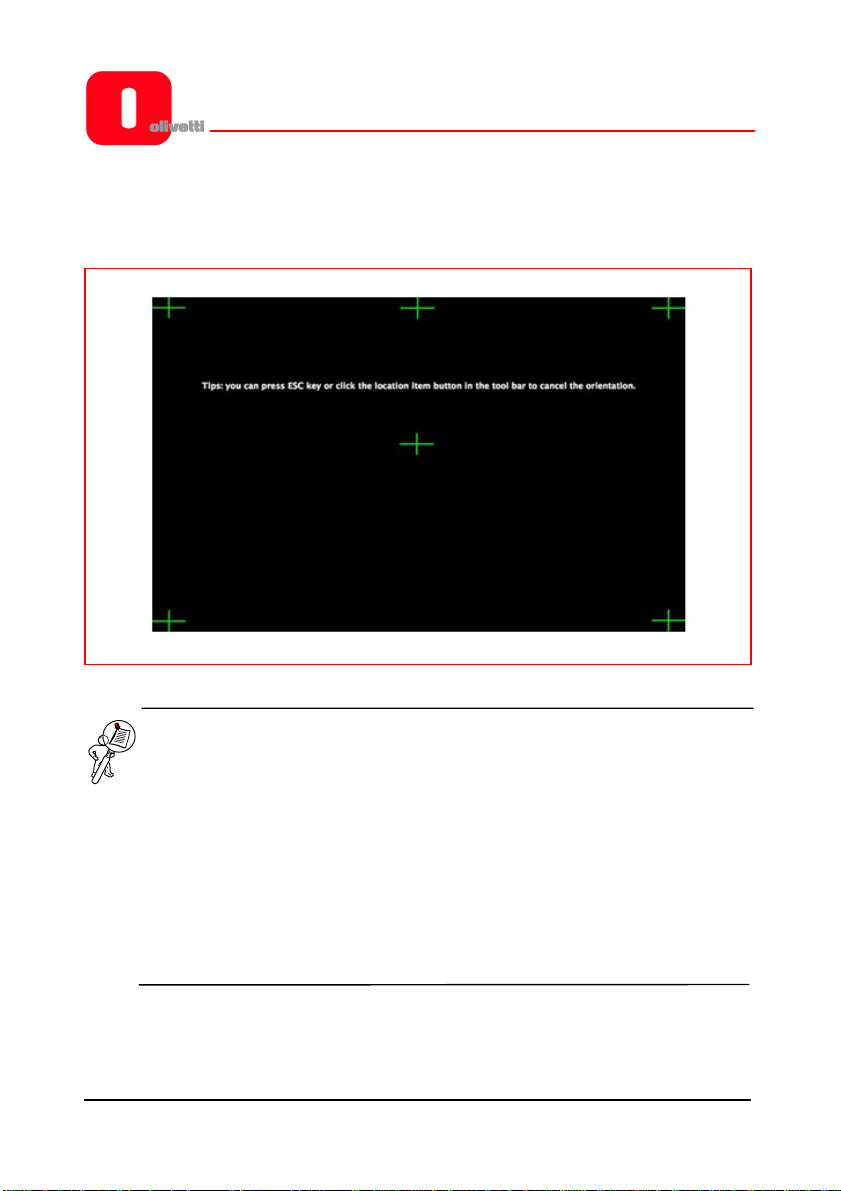
2. En cliquant sur la touche gauche de la souris sur « Réorientation », un menu
déroulant intitulé Orientation s'ouvrira. Cliquer, à l'aide du stylet électronique, au
centre de la croix clignotante « + » sur le tableau. Puis, répéter l’opération pour
les autres points d'orientation (soit six au total), tout en veillant à bien centrer
avec le stylet électronique le cœur de la croix clignotante.
INSTRUCTION : sélectionner « Réorientation » lors de la première installation
du pilote Oliboard ou lorsque la position du projecteur ou du
tableau interactif a été changée, ou encore si la modalité
d'affichage a été modifiée (ex. : dimension de l'image ou
résolution).
Pour effectuer l'orientation de façon rapide, il est possible de
sélectionner « Réorientation précédente » à condition
qu'aucune modification n'ait été apportée depuis la dernière
utilisation du tableau.
S'il n'est pas nécessaire de procéder à une quelconque
orientation, sélectionner « Orientation par défaut ».
OLIBOARD - Tableaux interactifs 26
Page 83
Lancement du logiciel du tableau
1. Cliquer sur « Applications » → « Oliboard » → « Oliboard » pour lancer
l'application.
2. Une fenêtre d'accès s'ouvrira : celle-ci permettra de saisir le nom utilisateur et le
mot de passe. Pour lancer le logiciel en utilisant le compte par défaut, il suffit de
cliquer sur la touche de connexion « Se connecter » sans rien saisir, ou bien, de
saisir son propre identifiant. En cas d'utilisation d'un identifiant personnel,
l'utilisateur a la possibilité de personnaliser la barre d'outils, les ressources ainsi
que les modèles.
REMARQUE : afin de pouvoir lancer le logiciel, il est nécessaire que le pilote
Oliboard soit en cours d'exécution et que le câble ait été
branché correctement au tableau.
REMARQUE : pour ce qui est des modalités de fonctionnement du logiciel,
consulter les instructions fournies dans l'AIDE EN LIGNE.
FRANÇAIS
OLIBOARD - Tableaux interactifs 27
Page 84
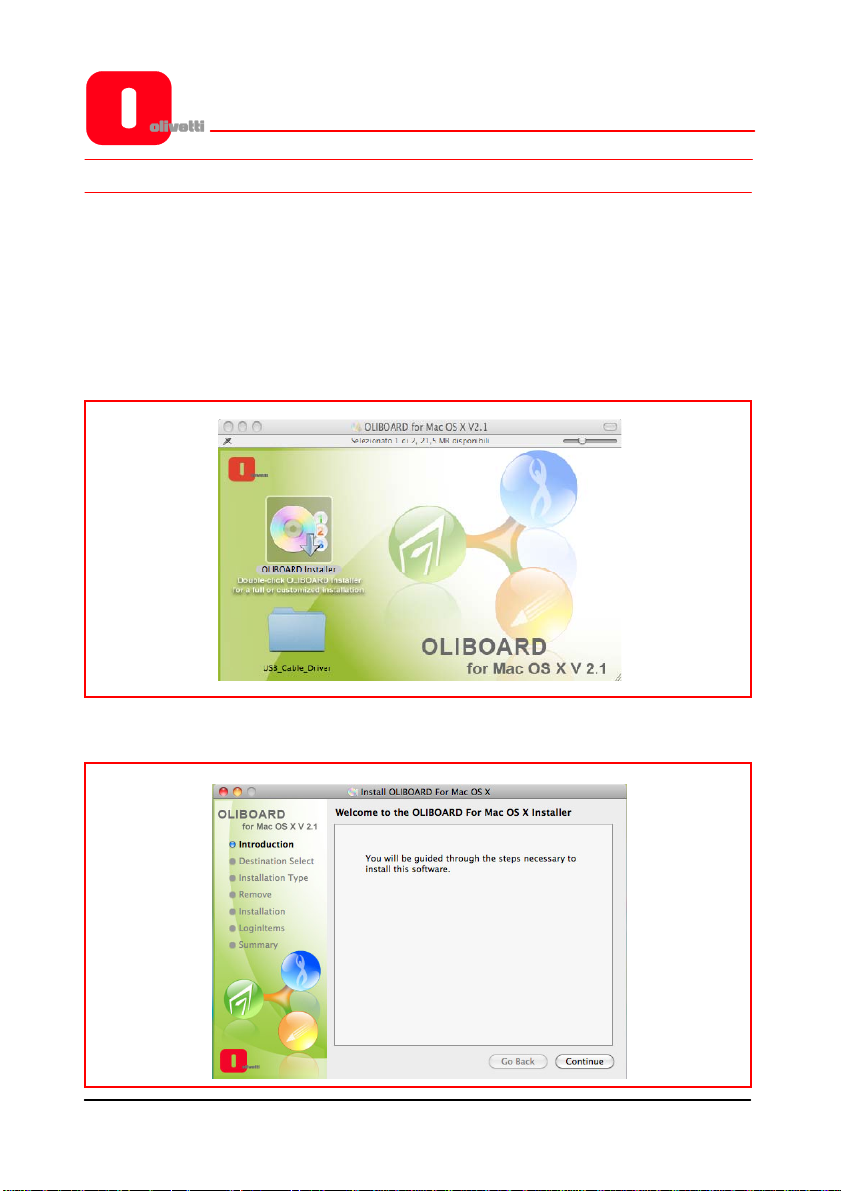
INSTALLATION DU LOGICIEL POUR MAC
Il faut savoir qu'afin de pouvoir finaliser l'installation, tant du logiciel que des différents
pilotes, il est nécessaire de disposer des droits d'administrateur ainsi que de l'éventuel
mot de passe.
INSTALLATION DU LOGICIEL OLIBOARD
1. Insérer le CD du logiciel Oliboard pour MAC (ne pas brancher le câble USB du
tableau à l'ordinateur).
2. Cliquer sur la touche « Oliboard installer ».
OLIBOARD - Tableaux interactifs 28
Page 85
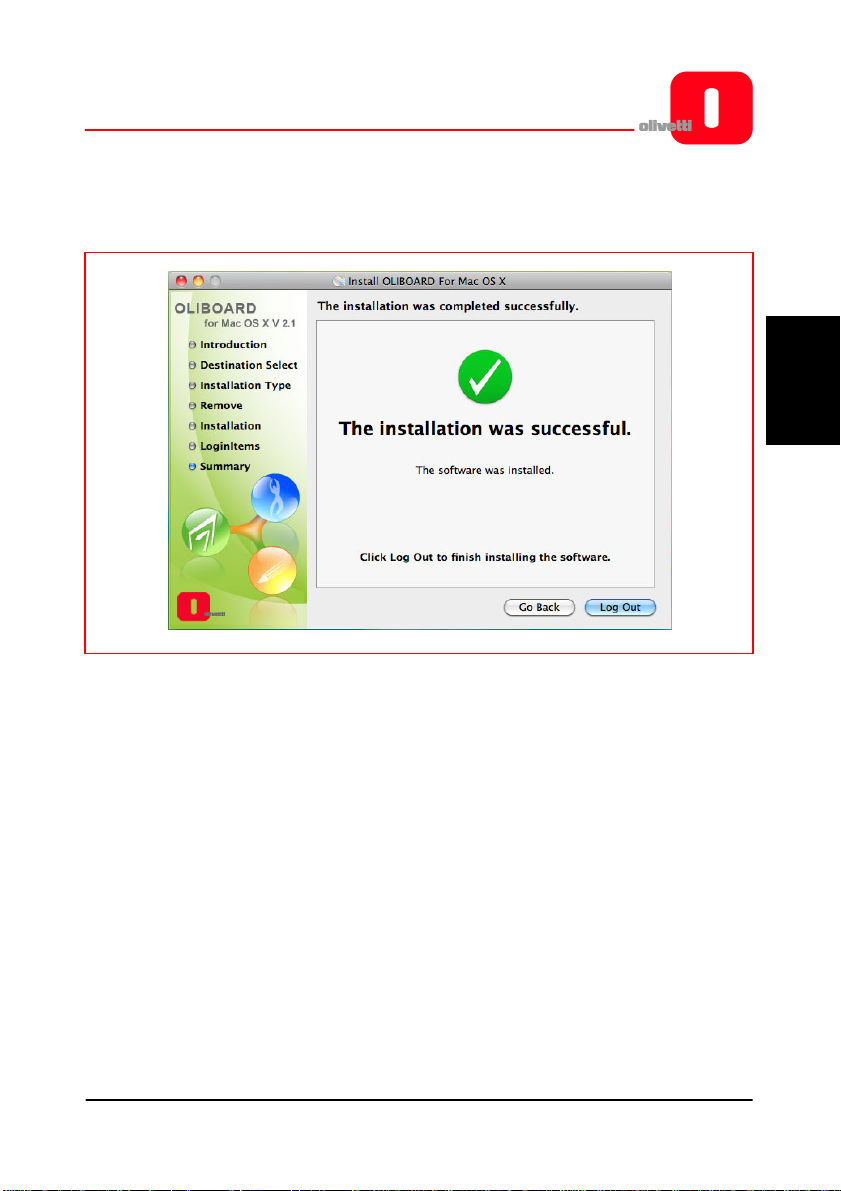
3. Cliquer sur « Continuer » et suivre les instructions affichées sur l'écran jusqu'à ce
que l'installation ait abouti.
Installer ensuite le pilote du logiciel du câble USB.
FRANÇAIS
INSTALLATION DU PILOTE DU LOGICIEL DU CABLE USB
Revenir à l'écran initial et cliquer afin de pouvoir accéder au dossier
« USB_Cable_Driver » puis aller au dossier FTDI Driver qui contient deux pilotes
d'installation possibles :
- FTDIUSBSerialDriver_10_3.dmg (pour systèmes d'exploitation MAC 10.3)
- FTDIUSBSerialDriver_10_4_10_5_10_6.dmg, (pour systèmes d'exploitation MAC
10.4, 10.5 et 10.6)
OLIBOARD - Tableaux interactifs 29
Page 86
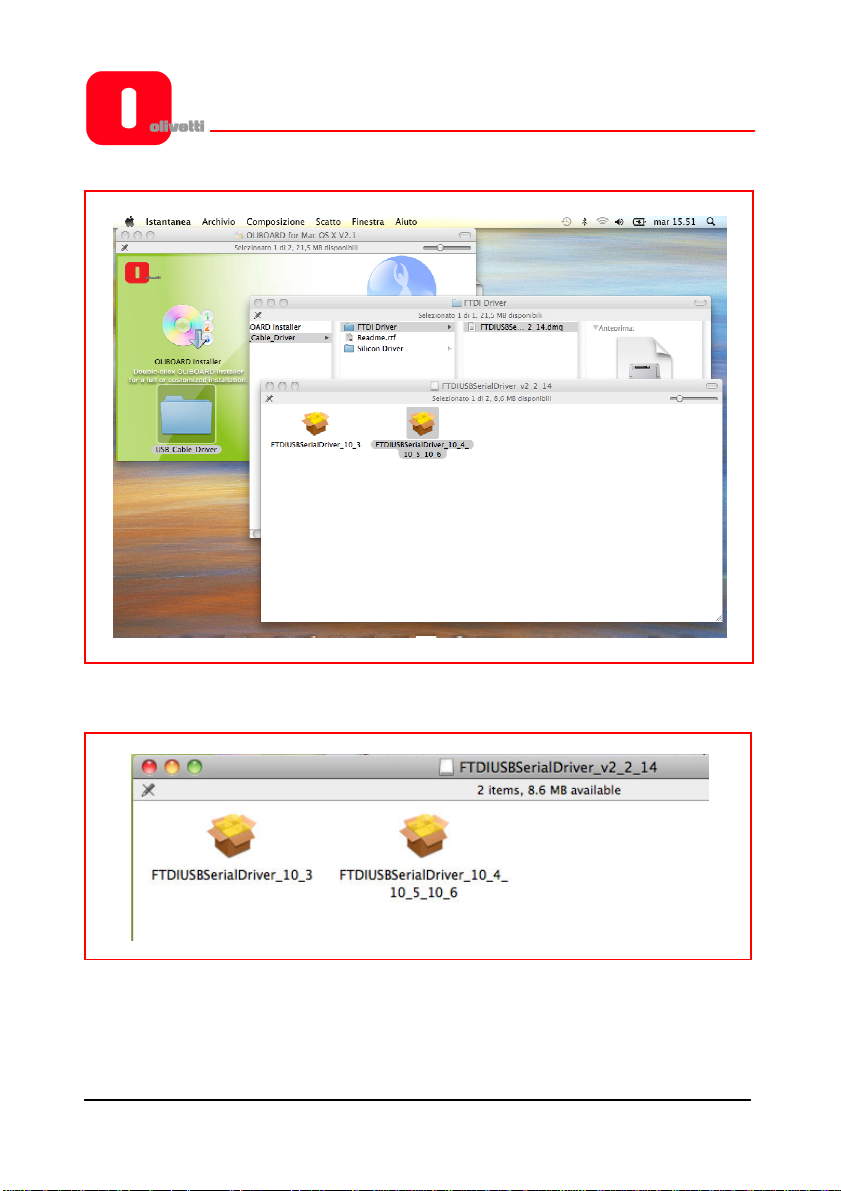
Pour lancer l'installation, double cliquer sur le pilote choisi.
OLIBOARD - Tableaux interactifs 30
Page 87
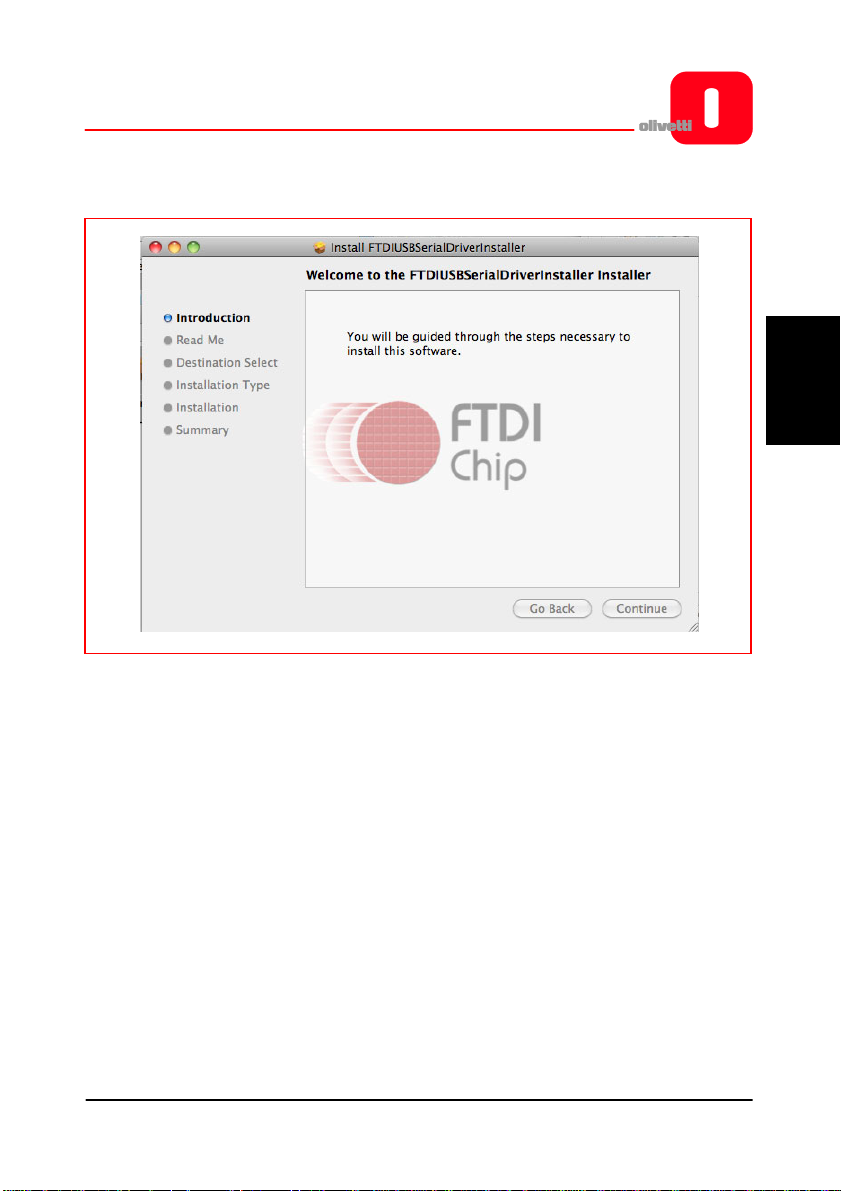
Puis suivre les instructions affichées sur l'écran.
FRANÇAIS
Z
OLIBOARD - Tableaux interactifs 31
Page 88

DESINSTALLATION DU LOGICIEL
1. Sélectionner le logiciel Oliboard dans « Applications », puis cliquer sur
« Désinstaller » afin de lancer la procédure de désinstallation du logiciel. Enfin,
confirmer la désinstallation.
2. Cliquer sur "Oui" pour lancer la désinstallation du logiciel.
EXECUTION DU LOGICIEL
Pour ce qui est de l'exécution du logiciel, il est tout d'abord nécessaire de lancer le
pilote du logiciel du tableau, exécuter, si besoin est, la fonction d'orientation puis
lancer le logiciel du tableau.
Lancement du pilote Oliboard
1. Brancher le câble du tableau à l'ordinateur. Cliquer sur « Système » →
« Applications » → « Logiciel Oliboard » → « Pilote » → « V2.1 » → « Pilote
Oliboard » pour lancer le pilote Oliboard.
2.Après avoir lancé le pilote Oliboard, l'icône du pilote apparaîtra sur le bureau.
3. Lorsqu'il est en exécution, le pilote Oliboard contrôle automatiquement le statut
de la connexion au tableau. Si un message d'erreur s'affiche, contrôler le
branchement entre le tableau et l'ordinateur, cliquer sur l'icône du pilote et
sélectionner « Se reconnecter » dans le menu déroulant de la commande
« Configuration ».
REMARQUE : Une fois installé, le pilote Oliboard sera lancé automatiquement
lors des prochains démarrages de l'ordinateur. Si l'ordinateur est
souvent débranché du tableau, il est recommandé de désactiver
l'exécution automatique (cliquer avec la touche de droite de la
souris sur l'icône du pilote et désactiver l'option de démarrage
lors de la connexion).
OLIBOARD - Tableaux interactifs 32
Page 89
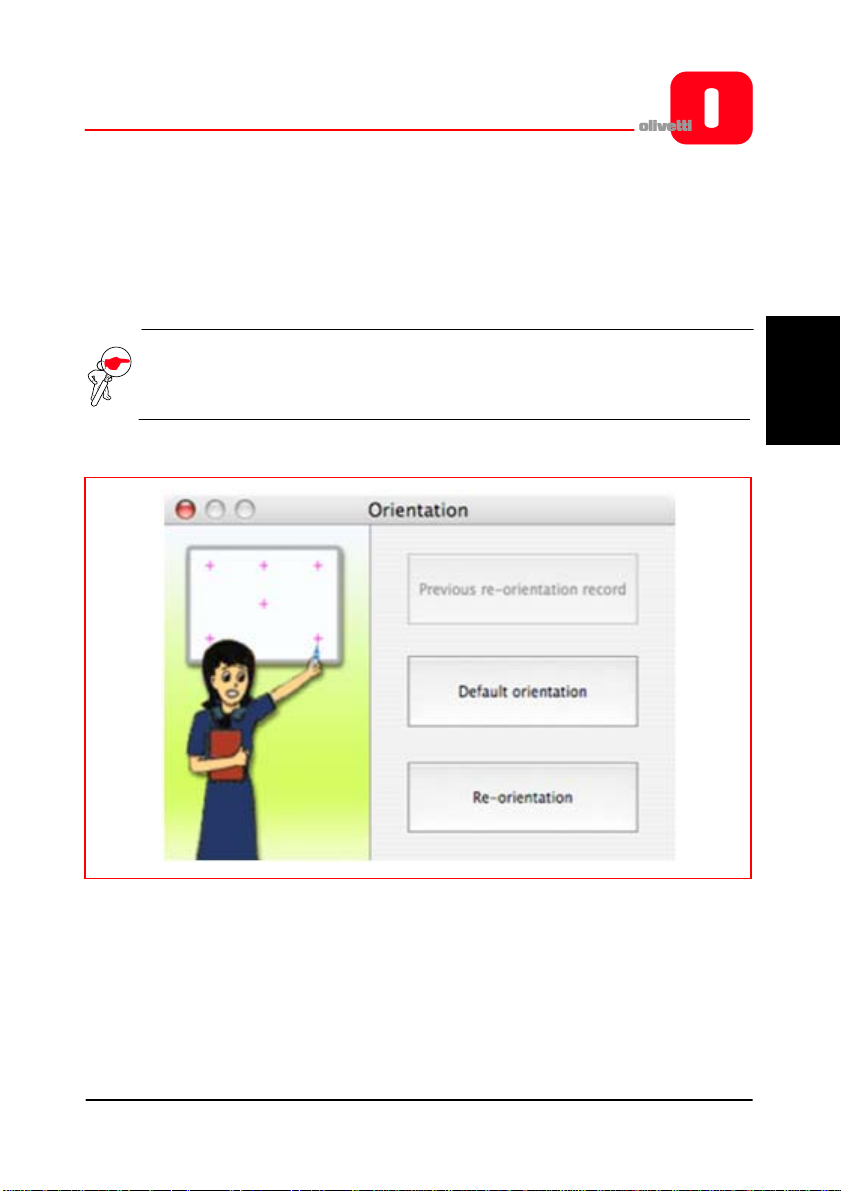
Orientation du tableau interactif
Cette fonction permet de régler le tableau pour ce qui est de l'image projetée sur ce
dernier.
1. Cliquer sur l'icône du pilote, sélectionner « Orientation » dans le menu
déroulant puis sélectionner la modalité d'orientation souhaitée (voir remarque
INSTRUCTION à la fin de ce paragraphe).
REMARQUE : la fonction d'orientation peut être également activée par le biais
de la touche placée en haut de la barre des touches sur le
tableau.
FRANÇAIS
OLIBOARD - Tableaux interactifs 33
Page 90

2. En cliquant sur la touche gauche de la souris sur « Réorientation », un menu
déroulant intitulé Orientation s'ouvrira. Cliquer, à l'aide du stylet électronique, au
centre de la croix clignotante « + » sur le tableau. Puis, répéter l’opération pour
les autres points d'orientation (soit six au total), tout en veillant à bien centrer
avec le stylet électronique le cœur de la croix clignotante.
INSTRUCTION : sélectionner « Réorientation » lors de la première installation
du pilote Oliboard ou lorsque la position du projecteur ou du
tableau interactif a été changée, ou encore si la modalité
d'affichage a été modifiée (ex. : dimension de l'image ou
résolution).
Pour effectuer l'orientation de façon rapide, il est possible de
sélectionner « Réorientation précédente » à condition
qu'aucune modification n'ait été apportée depuis la dernière
utilisation du tableau.
S'il n'est pas nécessaire de procéder à une quelconque
orientation, sélectionner « Orientation par défaut ».
OLIBOARD - Tableaux interactifs 34
Page 91
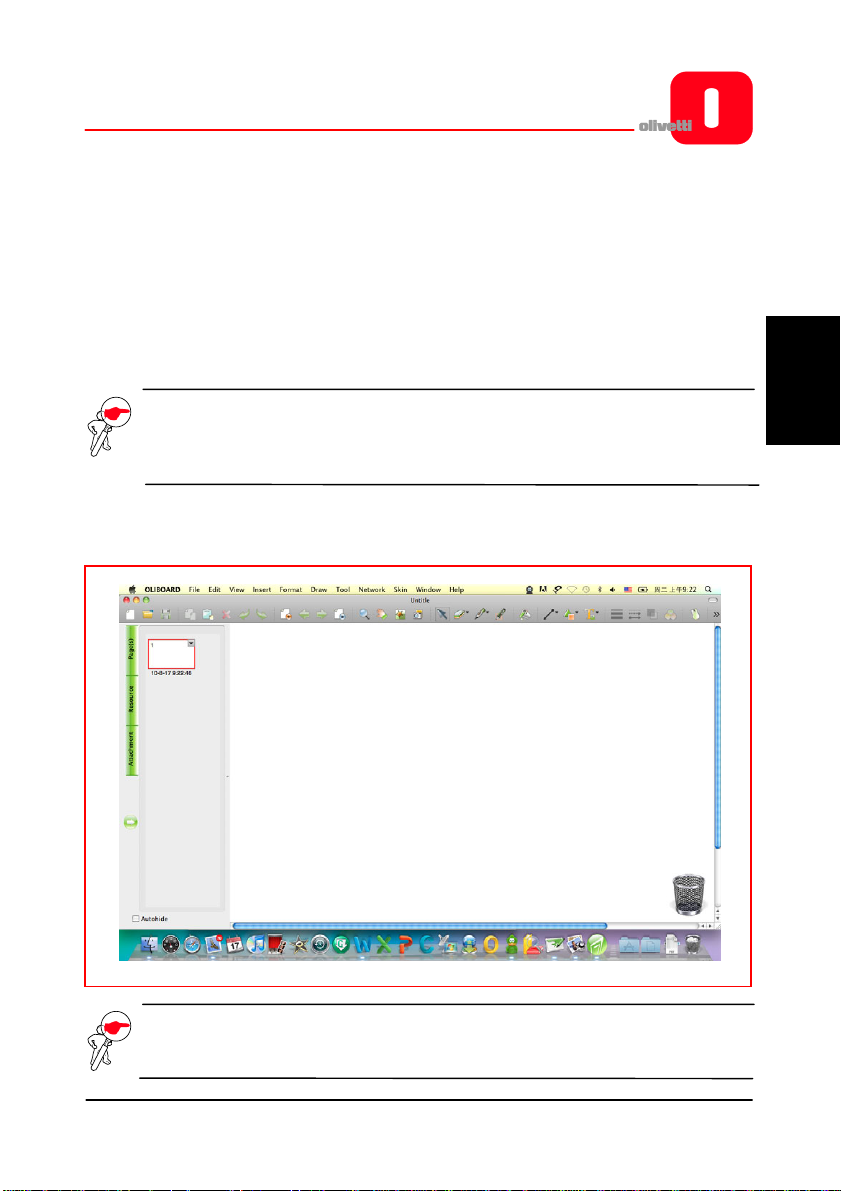
Lancement du logiciel du tableau
1. Cliquer sur « Système » → « Applications » →
« Logiciel Oliboard » → « Logiciel » → « Oliboard » pour lancer l'application.
2. Une fenêtre d'accès s'ouvrira : celle-ci permettra
de saisir le nom utilisateur et le mot de passe. Pour lancer le logiciel en utilisant le
compte par défaut, il suffit de cliquer sur la touche de connexion « Se connecter »
sans rien saisir, ou bien, de saisir son propre identifiant. En cas d'utilisation d'un
identifiant personnel, l'utilisateur a la possibilité de personnaliser la barre d'outils, les
ressources ainsi que les modèles.
REMARQUE : afin de pouvoir lancer le logiciel, il est nécessaire que le pilote
Oliboard soit en cours d'exécution et que le tableau ait été
branché correctement à l'ordinateur.
L'application se présentera comme suit :
FRANÇAIS
REMARQUE : pour ce qui est des modalités de fonctionnement du logiciel,
consulter les instructions fournies dans l'AIDE EN LIGNE.
OLIBOARD - Tableaux interactifs 35
Page 92

ENREGISTREMENT DU LOGICIEL
Lors de la toute première exécution du logiciel Oliboard sur un ordinateur non branché
à un tableau, il est demandé de procéder à l'enregistrement du logiciel.
Il est possible ou de procéder à l'enregistrement immédiatement ou bien de le faire
plus tard.
Si le tableau n'a pas été enregistré et que le nombre de d'exécutions possibles est
épuisé, il sera nécessaire de désinstaller le logiciel.
Pour enregistrer le logiciel, il est nécessaire d'être connecté à Internet et de disposer du
code d'activation (normalement fourni avec le CD-ROM du logiciel).
REMARQUE : l'enregistrement du logiciel n'est pas nécessaire si un tableau
interactif est branché à l'ordinateur.
OLIBOARD - Tableaux interactifs 36
Page 93

RECHERCHE DES PANNES
1. Si le message « Échec contrôle tableau, le programme ne peut plus
fonctionner ! », contrôler le branchement entre le tableau et l'ordinateur.
• Contrôler que le câble spécial ait été utilisé pour brancher le tableau à
l'ordinateur et qu'il ait été branché correctement.
• Contrôler que le tableau est allumé (le voyant rouge placé à l'arrière, côté
droit, doit être allumé).
• Contrôler que le pilote du logiciel du tableau est en fonction.
• Contrôler que le pilote du logiciel du câble USB ait été installé
correctement (voir remarque dans le paragraphe se rapportant à son
installation).
• Si l'ordinateur ne doit pas être branché au tableau et que ce message
s'affiche, contrôler que le paramètre "démarrage auto" du pilote Oliboard
ait été désactivé (cliquer sur l'icône et désactiver le paramètre).
2. Au démarrage du logiciel, le message
« Erreur durant le chargement du fichier XML » s'affiche.
Contrôler la version d'Internet Explorer. Mettre à jour le logiciel avec la version 6.0 si la
version utilisée est 5.0 ou inférieure.
3. Il n'est possible d'écrire que sur certaines parties
du tableau.
Exécuter la procédure de Réorientation du tableau.
4. Durant l'orientation du tableau, il est
impossible de trouver certains points d'orientation.
Contrôler que la déviation latérale et l'offset vertical du projecteur sont corrects.
Contrôler que tous les contenus affichés sur l'écran de l'ordinateur puissent être
projetés dans leur intégralité sur le tableau.
5. Le stylet électronique écrit mal.
• Contrôler la modalité opérationnelle actuelle du logiciel. La fonction
d'écriture est activée uniquement en modalité dessin ou en modalité
annotation tandis qu'elle n'est pas activée dans la modalité commande.
• Ne pas appuyer sur la touche du stylet électronique pendant l'écriture.
• Tenir la pointe du stylet électronique en position verticale par rapport au
tableau.
• Éviter d'appuyer sur le stylet électronique.
• Contrôler que la pile est chargée. Sinon, la remplacer par une nouvelle.
FRANÇAIS
OLIBOARD - Tableaux interactifs 37
Page 94
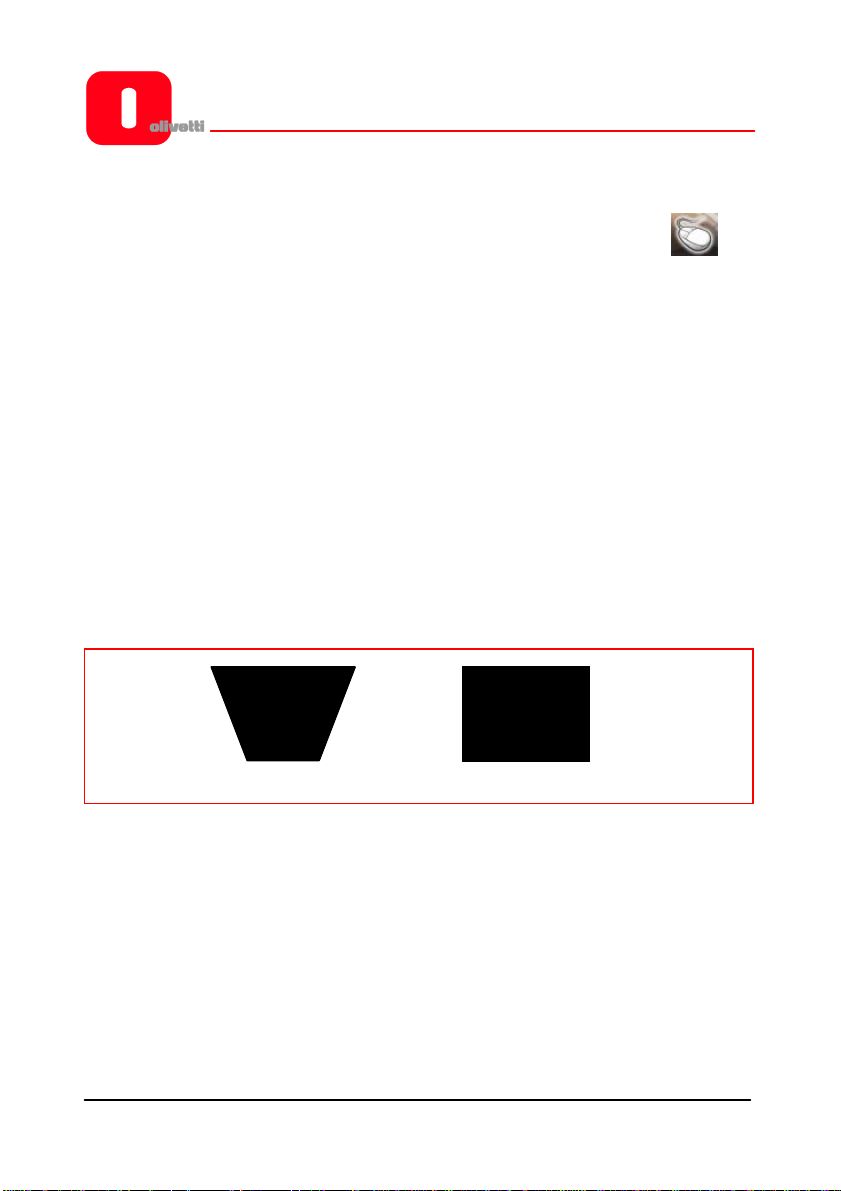
6. Comment quitter l'Oliboard ?
• Cliquer sur la Palette opérationnelle en « Modalité commande » puis
cliquer sur « Quitter » dans le menu déroulant.
• Ou bien, cliquer sur « Fichier » (menu principal) puis sur « Quitter » ou
encore cliquer sur l'icône Oliboard dans la « Barre d'outils principale » puis,
lorsque le message s'affiche, cliquer sur « Quitter ».
7. Pourquoi l'image projetée a une forme trapezoidale?
Pourquoi est-il nécessaire de la corriger et comment faut-il procéder ?
• Il est possible que le projecteur ne soit pas en plan (par exemple, parce que
la partie avant est plus haute que la partie arrière ou vice-versa) et, par
conséquent, l'image projetée prend cette forme trapézoïdale.
• Une image trapézoïdale est une image déformée qui nécessite d'être réglée
afin de pouvoir redevenir normale.
• En général, il est possible de régler l'image en utilisant un manipulateur à
distance ou en corrigeant la hauteur du projecteur. Pour plus
d'informations, consulter le Manuel de l'utilisateur fourni en dotation avec
le projecteur.
Trapèze
Rectangle
8. Quel type de projecteur doit être utilisé avec le tableau interactif ?
Le projecteur doit satisfaire la configuration suivante :
• le projecteur doit être de type frontal ;
• il doit être compatible avec la résolution de l'ordinateur ;
• la puissance lumineuse minimale doit être supérieure à 500 Lumen. Pour une
configuration spécifique, faire référence aux dimensions de la salle.
9. Que faire lorsqu'on a utilisé un feutre de couleur non effaçable pour écrire
sur le tableau ?
Ne jamais utiliser de feutres colorés pour écrire sur le tableau ! Si cela arrive,
nettoyer délicatement le tableau à l'aide d'un coton absorbant humidifié d'alcool.
OLIBOARD - Tableaux interactifs 38
Page 95

10. Comment nettoyer le panneau du tableau ?
Nettoyer le panneau en frottant délicatement à l'aide d'un chiffon humide.
ATTENTION : après avoir mouillé le chiffon, l'essorer afin d'éliminer
l'excès d'eau. De cette façon, l'on éviter le risque
d'infiltrations d'eau à l'intérieur du tableau.
11. Pourquoi est-il impossible d'utiliser la fonction grille ?
• Si, dans la configuration, « Double stylet » a été sélectionné, la fonction grille
ne peut pas fonctionner.
• Cliquer sur « Palette opérationnelle »" → « Option » afin de modifier le
paramétrage de la fonction Double stylet si l'on souhaite utiliser la fonction
grille.
FRANÇAIS
OLIBOARD - Tableaux interactifs 39
Page 96

Page laissée blanche intentionnellement
OLIBOARD - Tableaux interactifs 40
Page 97

OLIBOARD
INTERAKTIVE TAFELN
Page 98

HERAUSGEBER:
Olivetti S.p.A.
Gruppo Telecom Italia
Via Jervis, 77 - 10015 Ivrea (ITALY)
www.olivetti.com
Copyright © 2011, Olivetti
Alle Rechte vorbehalten
AUSGABE 1.1
Die Qualitätsanforderungen dieses Produkts werden durch die –
Kennzeichnung bescheinigt, die am Produkt angebracht ist.
Der Hersteller behält sich das Recht vor, jederzeit und ohne vorherige Ankündigung Änderungen an dem in
diesem Handbuch beschriebenen Produkt vorzunehmen.
Wir möchten Sie darauf hinweisen, dass folgende Aktionen die oben bescheinigte Konformität und die
Funktionalität des Produkts beeinträchtigen können:
• Falsche Stromversorgung;
• Installations- und Bedienungsfehler sowie unsachgemäße Benutzung bzw. Nichtbeachtung der
Hinweise in der mit dem Produkt ausgelieferten Bedienungsanleitung;
• Der Austausch von Komponenten oder Originalzubehör durch vom Hersteller nicht zugelassene
Bauteile oder von nicht autorisiertem Personal durchgeführte Reparaturen.
Alle Rechte vorbehalten. Ohne vorherige schriftliche Genehmigung seitens der Fa. Olivetti S.p.A. dürfen
diese Unterlagen oder Teile davon weder vervielfältigt noch in jeglicher Form, elektronisch oder
mechanisch z.B. durch Fotokopieren, Aufnahme oder ähnliches, weitergereicht werden.
Der Inhalt dieses Handbuches kann ohne vorherige Ankündigung geändert werden. Die Software der
Oliboard-Tafel sowie der Inhalt des vorliegenden Handbuches wurden mit größter Sorgfalt konzipiert,
ausgearbeitet und überprüft; trotzdem kann die Fa. Olivetti S.p.A. keinerlei Haftung für jegliche Schäden
übernehmen, die durch den Gebrauch der Software und der Bedienungsanleitung entstanden sind.
Gleiches gilt für alle Personen oder Firmen, die an der Erstellung, Realisierung, Produktion und Prüfung
der Software sowie der Bedienungsanleitung beteiligt waren.
Eingetragene Markenzeichen sind das Eigentum der jeweiligen Eigner.
Page 99
ANWEISUNG: Zusätzliche Software-Anweisungen stehen zur Verfügung.
HINWEIS: Beschreibung von Fehlern, die beim Gebrauch der Tafel
auftreten können, sowie Tipps zur Vermeidung und Behebung.
VORSICHT: Hinweis auf Verletzungsgefahr oder Beschädigung des
Produkts bei unsachgemäßer Benutzung.
Sicherheitshinweise
• Um Stromschläge zu vermeiden, stellen Sie die interaktive Tafel nicht in
einer feuchten oder dunstigen Umgebung auf.
• Vermeiden Sie nach dem Aufstellen der interaktiven Tafel mit dem Strom-
versorgungskabel und dem Datenkabel in Berührung zu kommen.
• Halten Sie die interaktive Tafel fern von offenem Feuer, Stromkontakten
und direkter Sonneneinstrahlung.
• Vergewissern Sie sich nach dem Aufbau, dass die interaktive Tafel sicher
befestigt ist.
• Vermeiden Sie direkt in den Lichtstrahl zu schauen, der vom Projektor auf
die Tafel geworfen wird.
• Den Projektor nicht berühren, da er schon nach wenigen Minuten Betrieb
bereits heiß sein könnte. Beachten Sie alle in der Projektoranleitung
angegebenen Hinweise und Vorsichtsmaßnahmen.
• Keine Gegenstände an die Halterung des Projektors hängen.
Wenn die Tafel im Ständer aufgebaut ist, darauf achten, dass Sie nicht über
den Ständer stolpern.
OLIBOARD – Interaktive Tafel III
Page 100

Wichtige Hinweise
• Die interaktive Tafel darf nur mit den dafür vorgesehenen elektronischen
Stiften verwendet werden. Benutzen Sie keine Textmarker, Bleistifte oder
sonstige Stifte. Falls nötig, reinigen Sie die Tafel mit Alkohol.
• Vergewissern Sie sich, dass die Tafel korrekt am Rechner und an der
Stromversorgung angeschlossen ist. Es ist empfehlenswert, die
Anschluss- und Stromversorgungskabel verdeckt zu verlegen, um ein
unbeabsichtigtes Lösen und Herausziehen zu vermeiden. Die Kabel nicht
auf dem Boden herum liegen lassen, da Stolpergefahr besteht.
• Die Oberfläche und den Rahmen der Tafel nicht mit harten oder spitzen
Gegenständen zerkratzen. In der Umgebung dürfen keine starken
Magnetfelder vorhanden sein. Sollte eine Wand aus Metall oder aus
anderen magnetischen Materialien in der Umgebung sein, ist zwischen
der Wand und der Tafel ein Mindestabstand von 10 Meter einzuhalten.
• Beim Schreiben mit dem elektronischen Stift auf der Tafel, muss der Stift
senkrecht zur Tafel gehalten werden, ohne dabei Druck auszuüben.
• Bei Wandmontage muss die Tafel vertikal zur Wandfläche angebracht
werden.
• Hängen Sie keine Gegenstände oder Gewichte an die Tafel und, falls
vorhanden, an den Ständer.
• Bei Montage im Ständer die Tafel mit Vorsicht verschieben, damit sie nicht
umkippt.
Dieses Handbuch ist ausschließlich für die Oliboard-Tafel und die mitgelieferte
Software bestimmt. Auch wenn auf den Rechner (Notebook, PC, usw.) und den
Videoprojektor Bezug genommen wird, die an der Tafel angeschlossen sind,
muss für diese anderen Geräte in der Originaldokumentation der jeweiligen
Hersteller nachgeschlagen werden.
OLIBOARD – Interaktive Tafeln IV
 Loading...