

Page 1
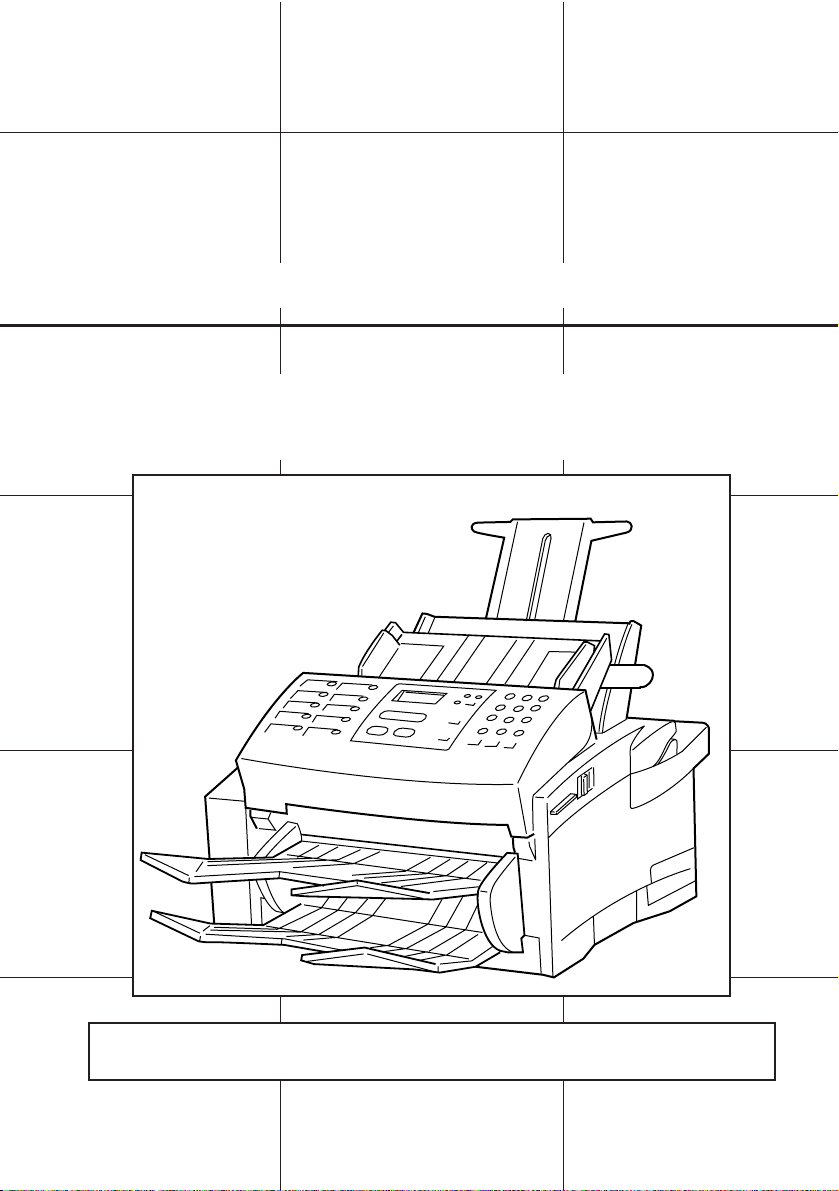
INSTRUCTION HANDBOOK
Please read the instruction handbook before using the facsimile. Keep it close to
the facsimile for easy reference.
Olivetti OFX5500
Page 2

Windows™ and MS-DOS® are registered trademarks of Microsoft Corporation.
IBM and IBM PC/AT are registered trademarks of International Business
Machines, Inc.
Centronics is a registered trademark of Centronics Corporation.
HP PCL is a trademark of Hewlett-Packard Corporation.
LaserFax is a registered trademark of Wordcraft International Limited.
Xerox and TextBridge Pro 96 are trademarks of Xerox Corporation.
All other company and product names are trademarks or registered trademarks
of their respective company.
Page 3

Important! Please read first.
This section contains notes and cautions which
should be read prior to using the facsimile for the
first time in order to ensure safe and proper
operation of this facsimile.
Fax operation (Basic)
This section contains explanations from set-up
through to basic fax operation. The set-up
procedures and other portions of this section
should be read even if the machine is to be used
for purposes other than standard fax
communication.
Making copies
This section contains explanations necessary for
using this facsimile as a copier. Group and sort
copying, as well as standard copying, is
possible.
Fax operation (Various functions)
This section contains explanations of
transmission and reception procedures which are
somewhat more elaborate than the basic
operation and include timer controlled
communication, as well as broadcast
transmission which allows automatic transmission
of the same document to multiple destinations.
Replacing consumables and maintenance
This section contains explanations on replacing
the imaging unit and cleaning the inside of the
facsimile.
Troubleshooting
This section contains explanations on handling
problems which may occur during daily operation
of your facsimile such as communications errors
and paper jams, as well as information on
troubleshooting procedures.
Fax operation (Other functions)
This section contains explanations on somewhat
more complicated functions of the facsimile
which, through their use, can make the facsimile
an even more convenient tool.
Report/List print out
This section contains explanations on how to
print out the various management reports and
lists which contain important information about
fax communications and facsimile settings.
Other settings
This section contains explanations on certain
settings which the user can adjust themselves.
Refer to this section to change default settings.
Printing System
This section contains explanations on use when
the facsimile is to be used as a printer in
conjunction with your computer.
Class 1 mode
This section contains explanations on using the
PC-Fax, PC-Printer and PC-Scanner capabilities
which are available when the facsimile is
connected to your computer via an RS-232C
cable.
Scanning System (TWAIN)
This section contains explanations on using the
facsimile as a scanner in conjunction with
TWAIN compatible software.
Reference
This section contains information on operation
flow, error code explanations and machine
specifications.
Using this Instruction Handbook
Operational procedures and explanations have been separated into different sections in order to allow
those using a facsimile for the first time, as well as those well familiar with fax operation, to use this
facsimile efficiently and properly and with relative ease. A basic introduction to each section can be
found below for reference.
Page 4
Please read the instruction handbook before using the facsimile.
Keep it close to the facsimile for easy reference.
The sections of this handbook and parts of the facsimile marked with symbols are safety
warnings meant to protect the user, other individuals and surrounding objects, and ensure
correct and safe usage of this facsimile. The symbols and their meanings are indicated
below.
DANGER: Indicates that serious injury or even death will very possibly result from
insufficient attention to or incorrect compliance with the related points.
WARNING: Indicates that serious injury or even death may result from insufficient
attention to or incorrect compliance with the related points.
CAUTION: Indicates that personal injury or mechanical damage may result from
insufficient attention to or incorrect compliance with the related points.
Symbols
The
△
symbol indicates that the related
section includes safety warnings.
Specific points of attention are indicated
inside the symbol.
...........[General warning]
...........[Warning of danger of
electrical shock]
...........[Warning of high
temperature]
The symbol indicates that the related
section includes information on
prohibited actions. Specifics of the
prohibited action are indicated inside the
symbol.
...........[Warning of prohibited
action]
...........[
Disassembly prohibited
]
The ● symbol indicates that the related
section includes information on actions
which must be performed. Specifics of the
required action are indicated inside the
symbol.
...........[Alert of required
action]
...........[Remove the power
plug from the outlet]
...........[Always connect the
facsimile to an outlet
with a ground
connection]
Please contact your service representative
to order a replacement if the safety
warnings in the handbook are illegible or if
the handbook itself is missing. (fee
required)
<Note>
Due to performance updating, information in this instruction handbook is subject to change
without notice.
Page 5

1
Contents
Important! Please read first.
Fax operation (Basic)
CAUTION LABELS ...................................................................................................7
INSTALLATION PRECAUTIONS ............................................................................8
PRECAUTIONS FOR USE.....................................................................................10
Names of parts..............................................................................................................13
(1) Main body................................................................................................................13
(2) Operation panel.......................................................................................................15
Preparation....................................................................................................................17
(1) Setting paper...........................................................................................................18
(2) Using OHP transparencies......................................................................................19
(3) Connecting the power cord .....................................................................................21
(4) Warm up..................................................................................................................21
Other features of this facsimile ...................................................................................21
(1) Dual access.............................................................................................................21
(2) File number .............................................................................................................24
(3) Memory transmission vs. ADF transmission...........................................................24
(4) Power saver modes ................................................................................................24
(5) Using the message display to make settings..........................................................24
(6) Auto clear function ..................................................................................................24
Automatic fax transmission.........................................................................................25
Automatic fax reception...............................................................................................31
One-touch keys.............................................................................................................33
(1) Registration.............................................................................................................33
(2) Modification or deletion ...........................................................................................37
(3) Dial list print out.......................................................................................................41
Page 6

2
Contents
Making copies
Standard copying..........................................................................................................55
Group copying ..............................................................................................................57
Sort copying..................................................................................................................59
Fax operation (Various functions)
Standby transmission ..................................................................................................61
Interrupt transmission..................................................................................................62
Broadcast transmission...............................................................................................63
Timer controlled communication ................................................................................65
Print out a sample image of awaiting documents .....................................................67
Cancelling a communication in memory....................................................................68
Manual fax transmission..............................................................................................69
Manual fax reception ....................................................................................................71
Changing the automatic reception mode ...................................................................73
Auto FAX/TEL switching ..............................................................................................75
Message telephone reception......................................................................................77
● Inputting characters..................................................................................................42
Abbreviated numbers...................................................................................................44
(1) Registration.............................................................................................................44
(2) Modification or deletion ...........................................................................................49
(3) Dialling with an abbreviated number.......................................................................53
Redialling.......................................................................................................................54
(1) Automatic redialling.................................................................................................54
(2) Manual redialling.....................................................................................................54
Page 7

3
Remote reception..........................................................................................................95
(1) Operation ................................................................................................................95
(2) Changing the remote reception number..................................................................96
Polling............................................................................................................................97
(1) Polling transmission ................................................................................................97
(2) Memory polling transmission...................................................................................98
(3) Polling reception....................................................................................................100
(4) Cancelling a polling reception ...............................................................................102
Group dial keys and batch transmission keys.........................................................104
(1) Registration...........................................................................................................104
(2) Modification or deletion .........................................................................................107
(3) Dialling with group dial or batch transmission keys...............................................110
Memory reception.......................................................................................................111
(1) Password registration............................................................................................111
(2) Deleting the password...........................................................................................112
(3) Memory reception ON/OFF and document print out.............................................113
Fax forwarding ON/OFF..............................................................................................115
Fax operation (Other functions)
Contents
When the ERROR indicator lights...............................................................................83
When this message is displayed.................................................................................83
When paper jams ..........................................................................................................86
When a document jams................................................................................................89
Troubleshooting tables ................................................................................................91
Troubleshooting
Replacing consumables and maintenance
Replacing the imaging unit..........................................................................................79
Cleaning inside the fax.................................................................................................81
Page 8

Activity report..............................................................................................................117
(1) Automatic print out ................................................................................................117
(2) Manual print out ....................................................................................................118
Transmission report ...................................................................................................119
(1) Automatic print out ................................................................................................119
(2) Manual print out ....................................................................................................121
Memory file report.......................................................................................................122
Preset list.....................................................................................................................123
G3 monitor report .......................................................................................................124
Class 1 report..............................................................................................................125
Cancellation report .....................................................................................................126
Type of phone line ......................................................................................................127
Date and time ..............................................................................................................128
Self-station information (fax number and name).....................................................129
Paper size ....................................................................................................................131
Speaker ON/OFF .........................................................................................................132
Power saver mode select...........................................................................................133
PSTN/PBX select.........................................................................................................135
ECM transmission ON/OFF........................................................................................137
Memory Switches........................................................................................................138
(1) Changing the settings ...........................................................................................138
(2) Memory Switch tables...........................................................................................140
Other settings
Report/List print out
4
Contents
Page 9

5
Contents
Windows 3.1 ................................................................................................................143
(1) Recommended computer environment.................................................................143
(2) Connecting the printer to your computer...............................................................143
(3) Installing the printer driver.....................................................................................145
(4) Connecting to the printer in Windows 3.1 .............................................................145
(5) Setting the printing parameters.............................................................................145
(6) Managing the printing process..............................................................................148
(7) Removing the printer driver...................................................................................152
(8) Cautions when printing..........................................................................................152
Windows 95 .................................................................................................................153
(1) Recommended computer environment.................................................................153
(2) Connecting the printer to your computer...............................................................153
(3) Installing the printer driver.....................................................................................153
(4) Connecting to the printer in Windows 95 and making a test print.........................154
(5) Setting the printing parameters.............................................................................155
(6) Managing the printing process..............................................................................157
(7) Removing the printer driver...................................................................................160
(8) Cautions when printing..........................................................................................160
PCL 4.5 Emulation ......................................................................................................161
(1) Description ............................................................................................................161
(2) Printing..................................................................................................................162
Printing System
(1) Functions.................................................................................................................163
(2) Cautions ..................................................................................................................164
(3) Connecting the facsimile to your computer .............................................................164
(4) Using the PC-Fax function.......................................................................................165
(5) Using the PC-Printer function..................................................................................165
(6) Using the PC-Scanner function ...............................................................................165
(7) Turning the Class 1 mode ON.................................................................................166
(8) Memory Switch settings...........................................................................................167
Class 1 mode
Page 10

6
Contents
Specifications..............................................................................................................176
Appendix 1: Available languages table ....................................................................177
Appendix 2: Available characters table....................................................................178
Appendix 3: Function flow chart ...............................................................................179
Appendix 4: Error code tables...................................................................................180
Reference
(1) Recommended computer environment ...................................................................169
(2) Connecting the scanner to your computer...............................................................169
(3) Installing the TWAIN system ...................................................................................169
(4) Recommended applications ....................................................................................170
(5) Setting the scanning parameters.............................................................................171
(6) Operation.................................................................................................................172
(7) Error messages .......................................................................................................173
(8) Removing the TWAIN system .................................................................................175
Scanning System (TWAIN)
Page 11
7
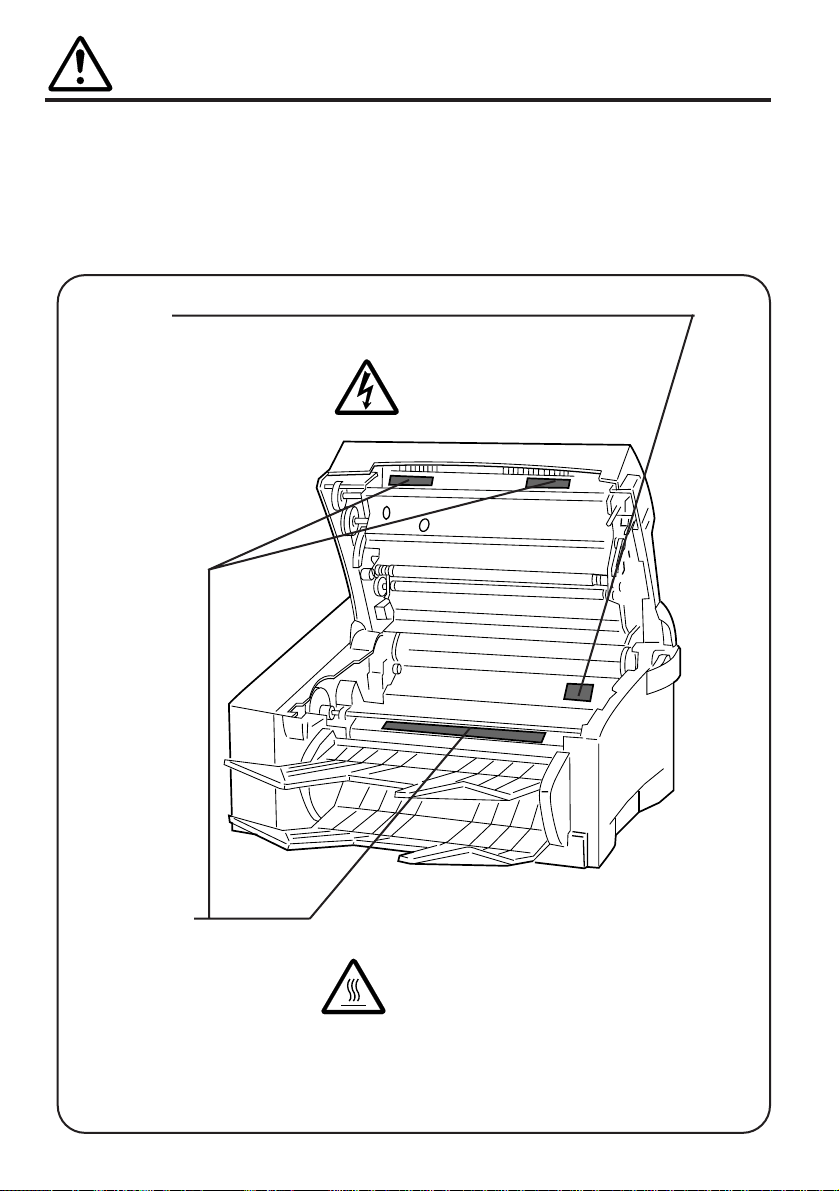
CAUTION LABELS
Caution labels have been attached to the facsimile at the following locations for
safety purposes. BE SUFFICIENTLY CAREFUL to avoid fire or electric shock
when removing a paper jam or when replacing toner.
Label 1, 2, 3
High temperature inside.
Do not touch parts in this
area, because there is a
danger of getting burned......
Label 4
High voltage inside.
NEVER touch parts in this
area, because there is a
danger of electric shock. ......
NOTE: DO NOT remove these labels.
Page 12
8
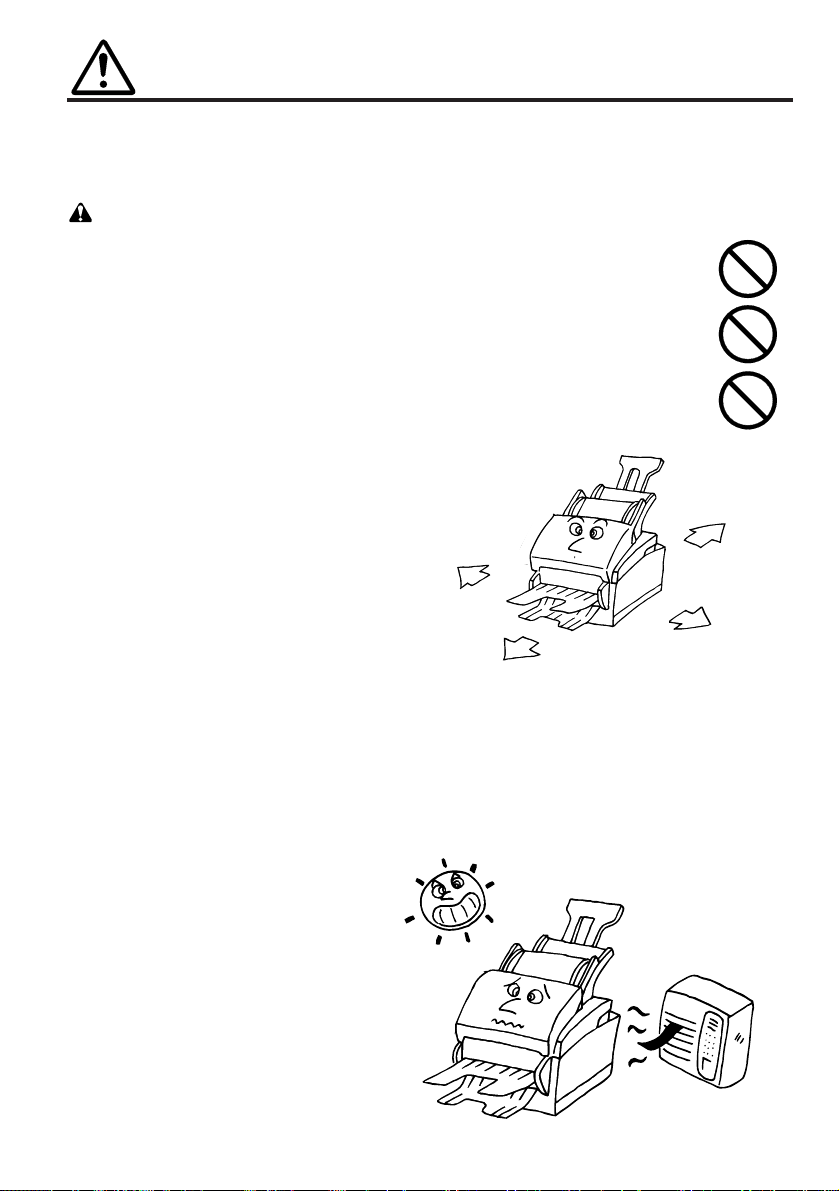
INSTALLATION PRECAUTIONS
■ Environment
CAUTION
• Avoid placing the facsimile on or in locations which are unstable or not level.
Such locations may cause the facsimile to fall down or fall over. This type of
situation presents a danger of personal injury or damage to the facsimile.........
•
Avoid locations with humidity or dust and dirt. If dust or dirt become attached to
the power plug, clean the plug to avoid the danger of fire or electrical shock.......
• Avoid locations near radiators, heaters, or other heat sources, or locations
near flammable items, to avoid the danger of fire...............................................
• To keep the facsimile cool and facilitate
changing of parts and maintenance, allow
access space as shown at right.
Leave adequate space, especially around
the rear cover, to allow air to be properly
ventilated out of the facsimile.
Other precautions
• Adverse environmental conditions may affect the safe operation and
performance of the facsimile. Install in an air-conditioned room
(recommended room temperature: around 20°C, humidity: around 65%RH)
and avoid the following locations when selecting a site for the facsimile.
.
Avoid locations near a window
or with exposure to direct
sunlight.
.
Avoid locations with vibrations.
.
Avoid locations with drastic
temperature fluctuations.
.
Avoid locations with direct
exposure to hot or cold air.
.
Avoid poorly ventilated
locations.
Rear:
≧15cm
Right:
≧50cm
Front:
≧50cm
Left:
≧50cm
Page 13
9
INSTALLATION PRECAUTIONS
■ Power supply/Grounding the facsimile
WARNING
• DO NOT use a power supply with a voltage other than that specified. Avoid
multiple connections in the same outlet. These types of situations present a
danger of fire or electrical shock.........................................................................
• Plug the power cord securely into the outlet. If metallic objects come in contact
with the prongs on the plug, it may cause a fire or electric shock.......................
• Always connect the facsimile to an outlet with a ground connection to avoid
the danger of fire or electrical shock in case of an electric short. If an earth
connection is not possible, contact your service representative.........................
Other precautions
• DO NOT connect the facsimile to the same outlet as an air conditioner or
copier, etc.
• Connect the power plug to the closest outlet possible to the facsimile.
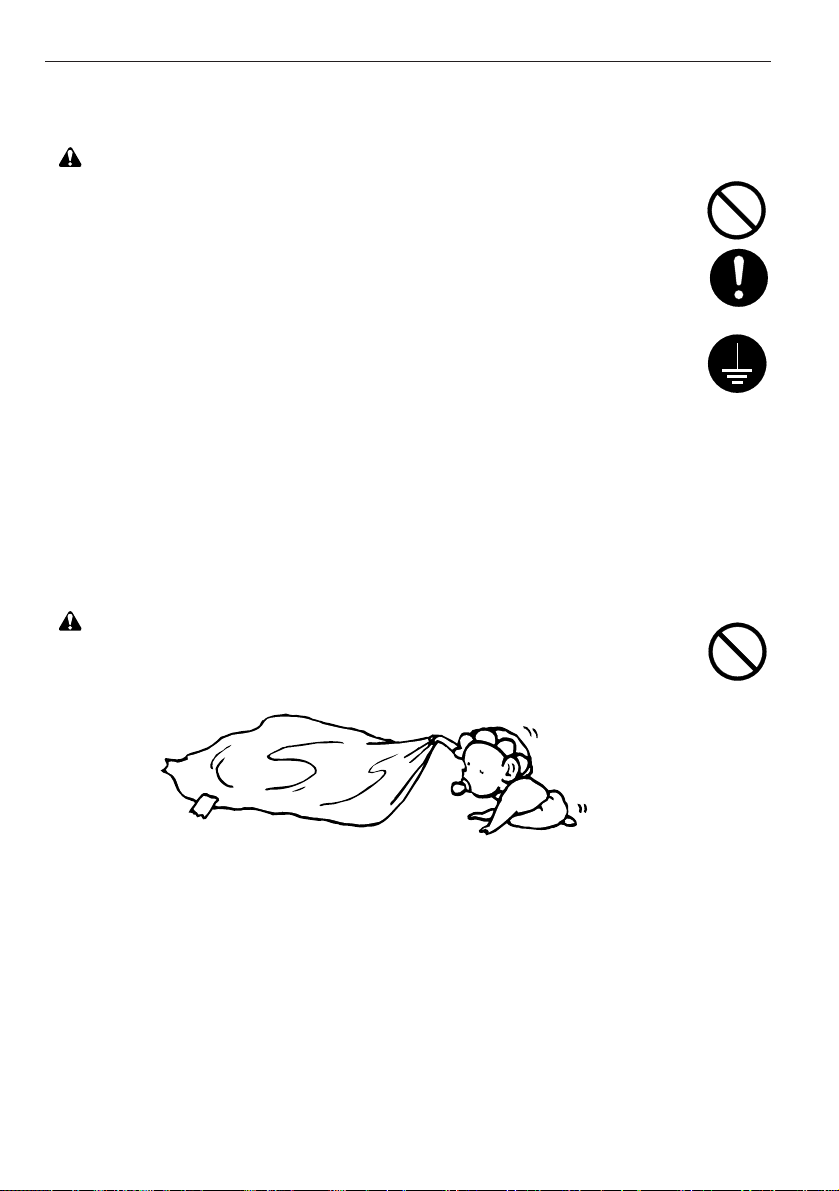
■ Handling of plastic bags
WARNING
• Keep the plastic bags that are used with the facsimile away from children. The
plastic may cling to their nose and mouth causing suffocation...........................
Page 14
10
PRECAUTIONS FOR USE
■ Cautions when using the facsimile
WARNING
• DO NOT place metallic objects or containers with water (flower vases, flower
pots, cups, etc.) on or near the facsimile. This type of situation presents a
danger of fire or electrical shock should they fall inside......................................
• DO NOT remove any of the covers from the facsimile as there is a danger of
electrical shock from high voltage parts inside the facsimile. .............................
• DO NOT damage, break or attempt to repair the power cord. DO NOT place
heavy objects on the cord, pull it, bend it unnecessarily or cause any other
type of damage.
These types of situations present a danger of fire or electrical shock. ...............
• NEVER attempt to repair or disassemble the facsimile or its parts as there is a
danger of fire, electrical shock or damage to the laser. If the laser beam
escapes, there is a danger of it causing blindness.............................................
• If the facsimile becomes excessively hot, smoke appears from the facsimile,
there is an odd smell, or any other abnormal situation occurs, there is a
danger of fire or electrical shock. Remove the power plug from the outlet
immediately and contact your service representative. .......................................
• If anything harmful (paper clips, water, other fluids, etc.) falls into the facsimile,
remove the power plug from the outlet immediately to avoid the danger of fire
or electrical shock. Then contact your service representative. ...........................
• DO NOT remove or connect the power plug with wet hands, as there is a
danger of electrical shock. ..................................................................................
• Always contact your service representative for maintenance or repair of
internal parts. ......................................................................................................
Page 15
11
PRECAUTIONS FOR USE
CAUTION
• DO NOT pull the power cord when removing it from the outlet. If the cord is
pull, the wires may become broken and there is a danger of fire or electrical
shock. (ALWAYS grasp the plug when removing the power cord from the
outlet.).................................................................................................................
• ALWAYS remove the power plug from the outlet when moving the facsimile. If
the cord is damaged, there is a danger of fire or electrical shock.......................
• If dust accumulates within the facsimile, there is a danger of fire or other
trouble. It is therefore recommended that you consult with your service
representative in regard to cleaning of internal parts. This is particularly
effective if accomplished prior to seasons of high humidity. Consult with your
service representative in regard to the cost of cleaning the internal parts of the
facsimile..............................................................................................................
• For safety purpose, ALWAYS remove the power cord from the outlet when
performing cleaning operations...........................................................................
Other precautions
• DO NOT place heavy objects on the facsimile or cause other damage to the
facsimile.
• DO NOT open the front cover or pull out the power plug while transmitting,
receiving, or copying.
• During print out, some ozone is released, but the amount does not cause any
ill effect to one's health. If, however, the facsimile is used over a long period of
time in a poorly ventilated room or when making an extremely large number of
copies, the smell may become unpleasant. To maintain the appropriate
environment for the facsimile, it is suggested that the room be properly
ventilated.
• The facsimile may only be used within the country of purchase due to the
different safety and communication standards in each country. (International
communication standards, however, make the communication between
countries possible.)
• The facsimile may be inoperable in areas with poor telephone lines or
communication conditions.
Page 16
12
PRECAUTIONS FOR USE
• “CALL WAITING” or other telephone company optional services that produce
audible tones or clicks on the line can disrupt or cause termination of facsimile
communications.
• DO NOT touch electrical parts, such as connectors or printed circuit boards.
They could be damaged by static electricity.
• DO NOT attempt to perform any operations not explained in this handbook.
Other precautions
• Always read the safety instructions which are included in the box or printed on
the container when handling consumables.
• Dispose of the imaging unit in accordance with Federal, State and Local rules
and regulations.
• Store consumables in a cool, dark location.
■
Cautions when handling consumables
CAUTION
• Keep consumables out of reach of children and infants. ....................................
• If toner gets on your hands, wash it off with soap and water. If toner gets in
your eyes, rinse immediately with water and immediately see a doctor.
If children, or others, ingest toner by mistake, have them drink a few glasses
of water to dilute the contents ingested, and see a doctor immediately. ............
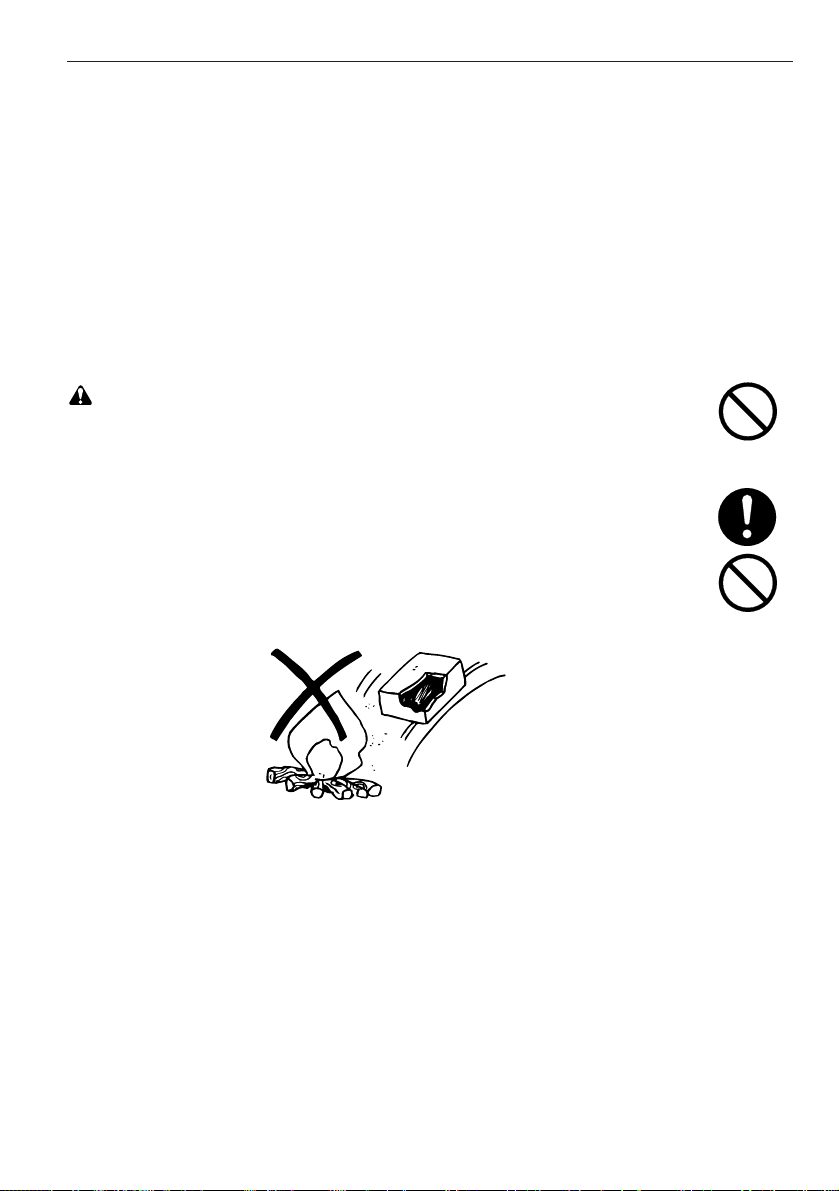
• DO NOT attempt to burn the toner or toner containers in an incinerator or
other fire as it may cause dangerous sparks. .....................................................
Page 17
1
3
7
4
8
12
2
10
9
T‑1
13
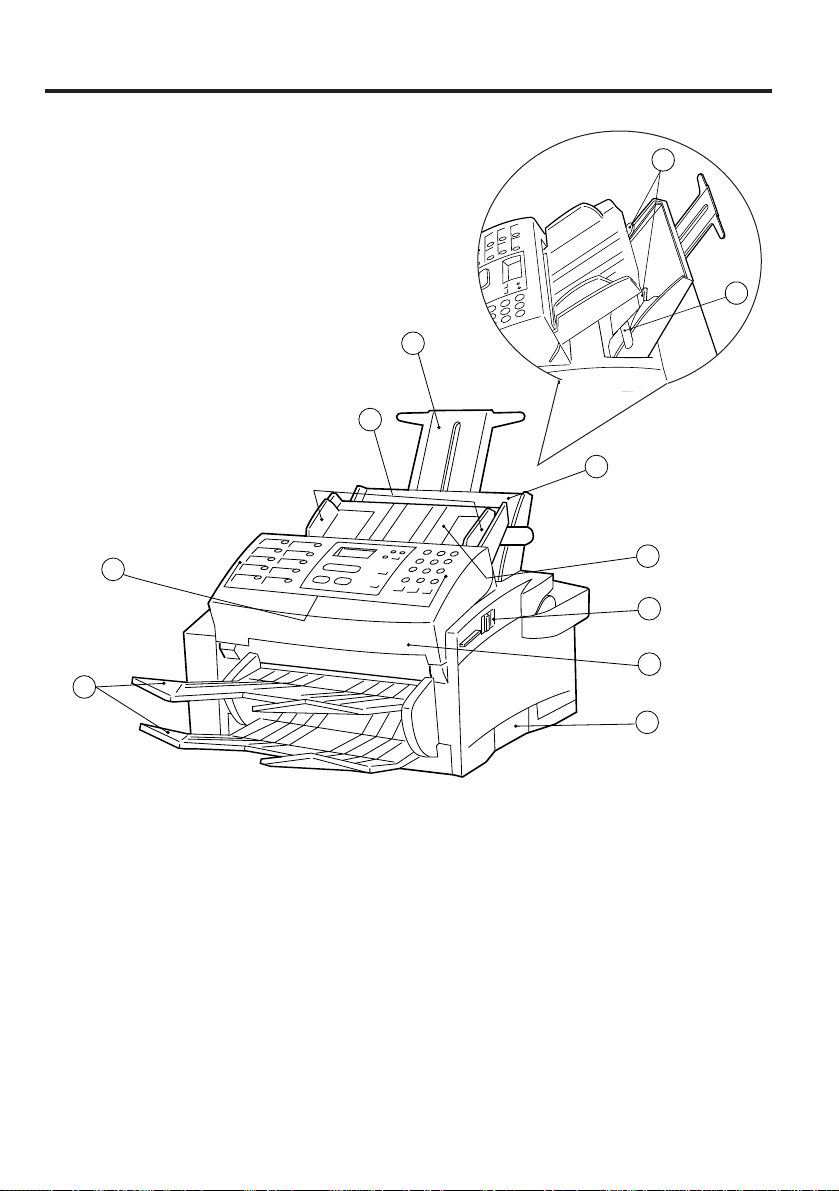
Operation panel…Use to operate the fax.
Document table…Where to set documents to be transmitted or copied.
Document guides…Adjust to match the width of documents.
Paper table…100 sheet capacity (standard paper: 64 g/m2- 80 g/m2)
Paper table cover…Open when setting paper.
Paper guides…Adjust to match the width of the paper.
Paper table extension…Extend when setting paper.
Main body release lever…Slide towards you to open the facsimile.
ADF (Automatic Document Feeder) cover…Open when a document jams.
Document/Paper eject trays…Once ejected, documents are stacked on the upper tray while
received faxes and copies are stacked on the lower tray.
Names of parts
(1) Main body
(Front view)
5
6
Fax operation (Basic)
Page 18
14
Fax operation (Basic)
15
13
14
16
17
18
11
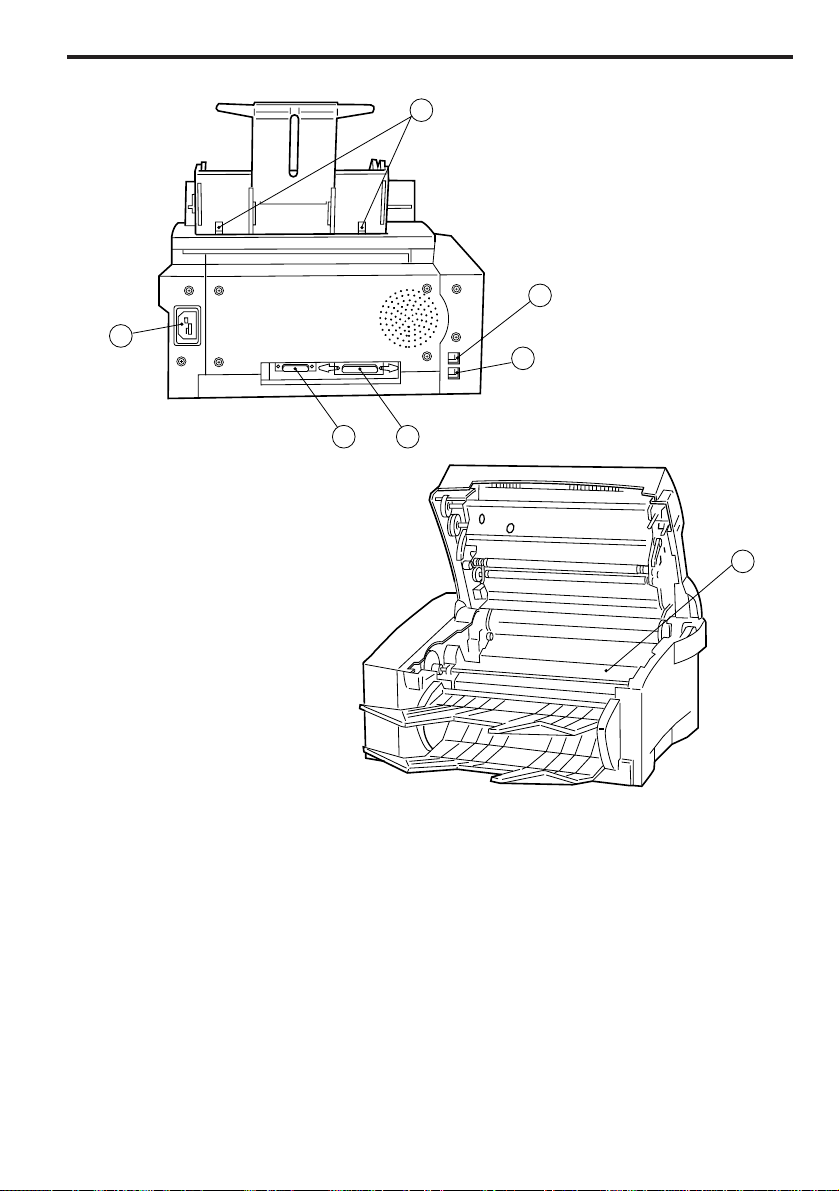
Imaging unit…This section of the fax plays a major role in creating the image on received faxes
and copies. When a message is displayed which tells you to replace the imaging unit, replace the
old unit with a new one.
Fax moving handles…Hold these handles when moving the facsimile.
Telephone jack…For connecting a separately purchased telephone.
* This jack is not available in those units purchased in the U.K. and Portugal.
Line jack…For connecting the fax to a telephone line via the modular cord.
Power receptacle…For connecting the power cord.
Printer connector (Parallel port)…For connecting a 36-pin parallel cable.
Printer connector (Serial port)…For connecting a 24-pin RS-232C cable.
Paper table release buttons…Press when removing the paper table from the facsimile.
(Rear view)
(Internal view)
Page 19

15
Fax operation (Basic)
17
1 2 3
4
6
5
8
9
1112 10
13
14
15 1618
7
12
3
4
56
7
8
9
10
A A
123
456
789
0
#
C
GHI
ABC DEF
JKL MNO
PQRS TUV WXYZ
(2) Operation panel
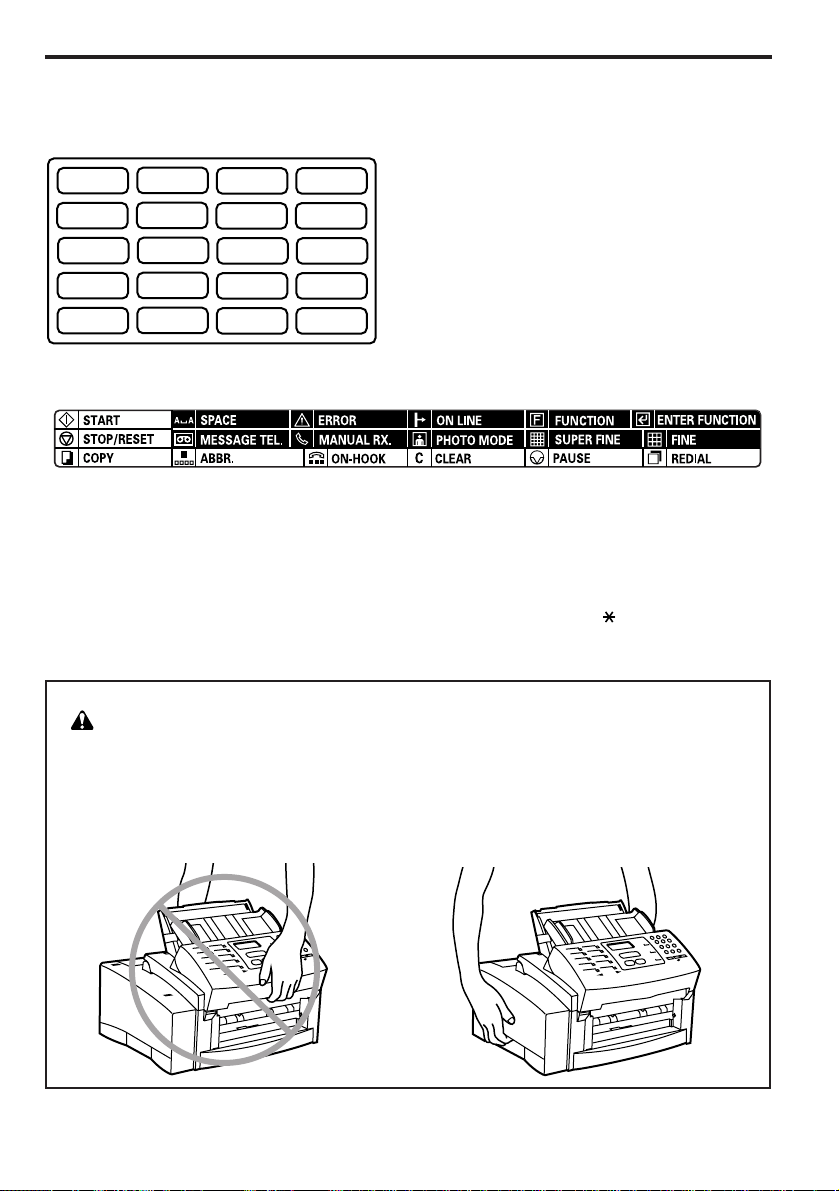
STOP/RESET key…Press to stop operations in progress, revert to the initial mode, or eject
documents from the ADF (Automatic Document Feeder).
COPY/SPACE key…Press to start copying or to insert a space during input of the other party’s
name or fax number.
START key…Press to start fax transmission, manual fax reception or other operations.
ON-HOOK/CLEAR key…Press to dial without the need to pick up the receiver of a separately
purchased telephone, or to erase a registered fax number or other data when registering and
deleting data under a given function.
ON-HOOK indicator…Lit when the ON-HOOK/CLEAR key has been pressed while the telephone
receiver is still “on the hook”.
PAUSE/REDIAL key…Press while registering a destination number under an abbreviated number
or one-touch key in order to insert a pause of a few seconds at that point in dialling. Press also to
redial the last number dialled.
NOTICE: For those units purchased in Sweden, dial tone detection is activated.
ABBR. key…Press to dial with abbreviated numbers.
Message display…Displays the present date, time, operation procedures and trouble, etc.
Resolution mode select key…Press to select the degree of resolution most suitable to the
documents being transmitted or copied.
Page 20

16
Fax operation (Basic)
Resolution mode indicators…
The uppermost indicator is for the PHOTO MODE setting, the middle
indicator is for the SUPER FINE mode, and the lowermost indicator is for the FINE mode. Press the
resolution mode select key to light the resolution mode indicator corresponding to the desired mode.
When all of the indicators are out, the fax is in the NORMAL mode. (Refer to page 27.)
Reception mode select key…Press to select the desired reception mode.
Reception mode indicators…The uppermost indicator is the MESSAGE TEL. indicator. The
bottom indicator is the MANUAL RX. indicator. Press the reception mode select key to light the
reception mode indicator corresponding to the desired mode. When using a separately purchased
telephone with message telephone capabilities in conjunction with the fax, make sure the
MESSAGE TEL. indicator is lit. When using the manual fax reception mode with a separately
purchased telephone connected to the facsimile, make sure the MANUAL RX. indicator is lit. When
using the automatic fax reception mode, both indicators should be out.
FUNCTION key…Press to select one of the facsimile’s functions or registration procedures.
ENTER FUNCTION key…Press during registration and setting procedures to register the currently
entered data under a given function.
ERROR indicator…Lit when a communications error or mechanical problem has occurred.
ON LINE indicator…Lit when the facsimile is to be used as a printer or scanner.
Keypad…Use to dial a fax number, or to input fax numbers for registration under abbreviated
numbers and one-touch keys.
* Even if your telephone service is for pulse dialling, press the key after connecting to the
other party and any key pressed on the keypad after that will transmit the related tone signal.
One-touch keys (1 - 10)…Press to dial fax numbers registered under the corresponding one-
touch key. Each of the 10 keys can be designated to function as either a one-touch key, a group
dial or a batch transmission key.
* When inputting names, etc., press one-touch key No. 9 to move the cursor to the left, and one-
touch key No. 10 to move the cursor to the right.
NOTE: Available functions may differ depending upon the country and region
where this unit was purchased.
Page 21
17
Fax operation (Basic)
Preparation
* A label sheet like that shown at left is included
with this unit for placing to the left of each onetouch key in order to allow notation of the
information registered under that key.
* An explanation sticker like that shown above is included with this unit to explain the symbols
corresponding to each key and indicator on the operation panel. Place the sticker corresponding to
the language you desire in a convenient location on the fax. Refer to “(2) Operation panel”, page 15,
for a more detailed explanation of each key and indicator on the operation panel.
* A label indicating those characters available under the pound ( #) and star ( ) keys when
inputting destination names, etc., is included with this unit for placing under the corresponding keys.
CAUTION
Anytime the facsimile is moved, it should be maintained in a horizontal position and
the fax moving handles should be used. If the facsimile is held by the front and
rear, the weight imbalance may cause it to be dropped and there is a danger of
damage to the unit or personal injury.
Page 22
18
Fax operation (Basic)
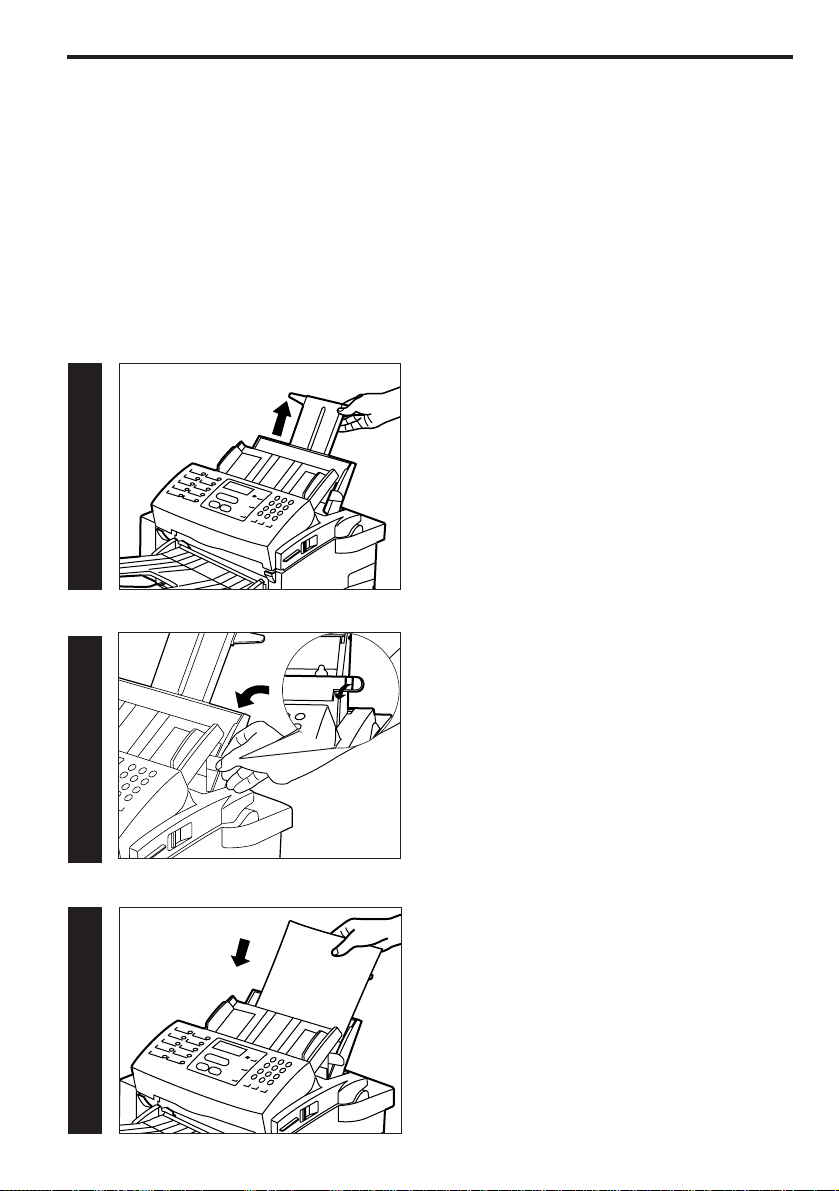
(1) Setting paper
Up to 100 sheets of plain paper (standard paper: 64 g/m2- 80 g/m2) may be set on the paper table at
one time. When the facsimile is to be used for standard fax communication, use A4, Letter or Legal
size paper. If paper of a size smaller than A4 is set in the facsimile, memory reception is possible but
the data cannot be printed out. When this facsimile unit is being used as a printer, paper between A4R
and A5R sizes, as well as envelopes, may be used.
* The maximum acceptable number of sheets differs by paper type:
• Standard paper (64 g/m2- 80 g/m2): 100 sheets
• Envelopes (COM-10, C5, DL, Monarch): 10 sheets
• OHP transparencies (Recommended brand: 3M Corp. [PP2500]): 1 sheet
11
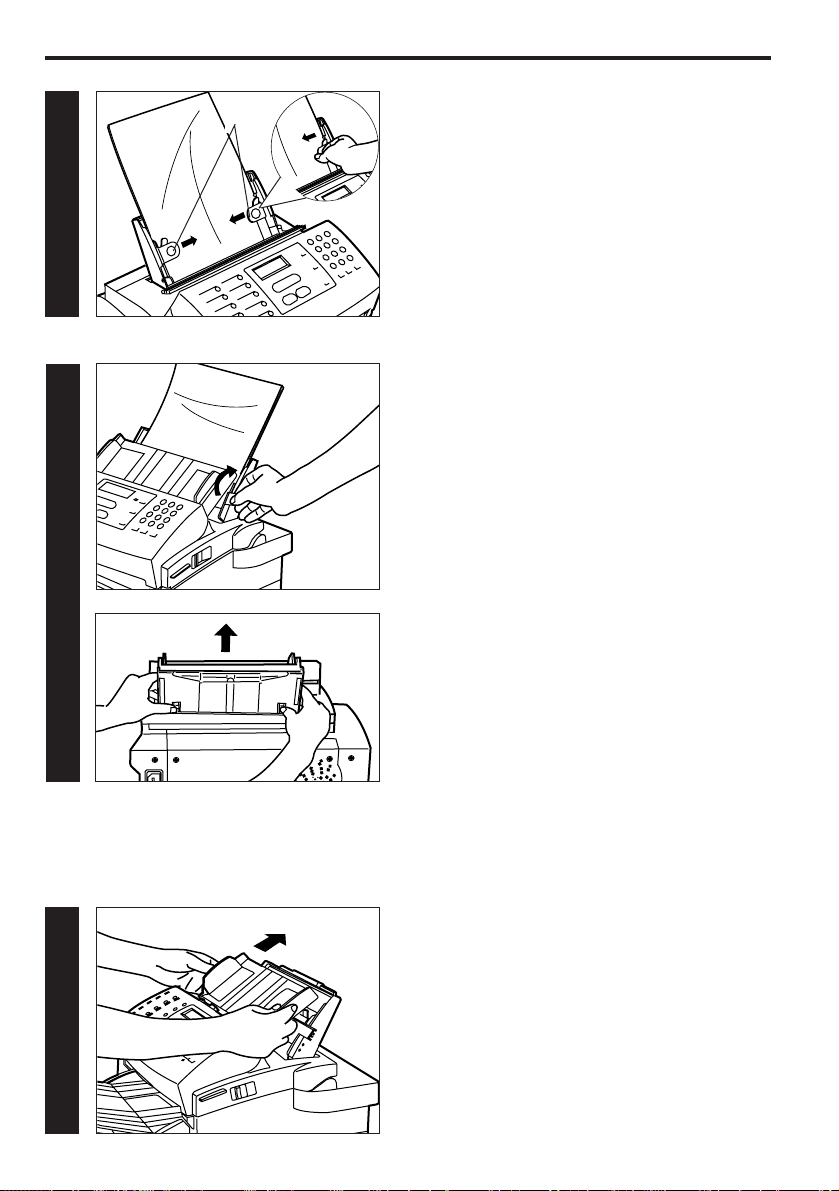
1. Extend the paper table extension.
33
22
2. Open the paper table cover.
3. With the paper guides sufficiently spread open,
set the paper.
Page 23
19
Fax operation (Basic)
11
22
(2) Using OHP transparencies
It is necessary to install the OHP transparency guide when using OHP transparencies. To install the
OHP transparency guide, carry out the following procedure.
1. Remove the document table from the facsimile.
2. Press in the two paper table release buttons
located on the rear of the table and remove the
paper table from the facsimile.
44
55
4. Adjust the paper guides 1 to match the width of
the paper.
* If the paper guides are difficult to adjust when
changing to a different size of paper, remove
the document table first and then set the
paper.
5. Close the paper table cover.
* If the document table has been removed,
replace it in its original position.
1
* To remove the paper table, press in the two paper
table release buttons located on the rear of the
table and pull the paper table out of the facsimile.
Page 24
20
Fax operation (Basic)
33
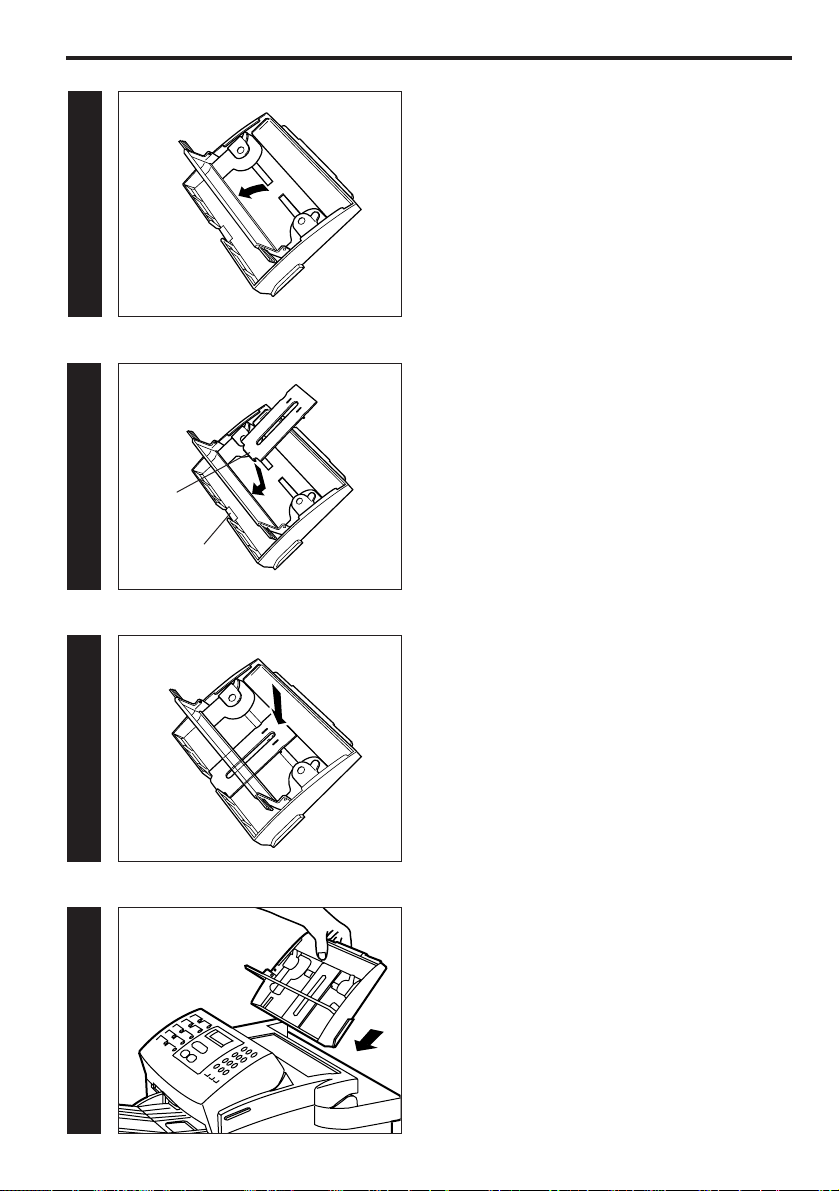
3. Open the paper table cover in the direction of the
arrow shown in the illustration.
44
4. Align the portion of the OHP transparency guide
marked 1 in the illustration with the portion of the
paper table marked 2 and attach the guide to
the paper table.
55
66
77
5. Push the OHP transparency guide in the
direction of the arrow to install the guide
securely to the paper table.
1
2
6. Set the paper table back into the facsimile and
close the paper table cover.
7. Replace the document table in its original
position.
Page 25
21
Fax operation (Basic)
Other features of this facsimile
(1) Dual access
This function enables the fax to simultaneously process 2 operations. For example, memory reception
is possible while the Printing System is in use. Or, it is possible to engage the Printing System and
use the fax as a printer even during a fax transmission. Refer to “● Dual access function tables”,
pages 22 and 23.
Due to the fact that the fax handles all operations automatically, there is no need for user intervention
or setting.
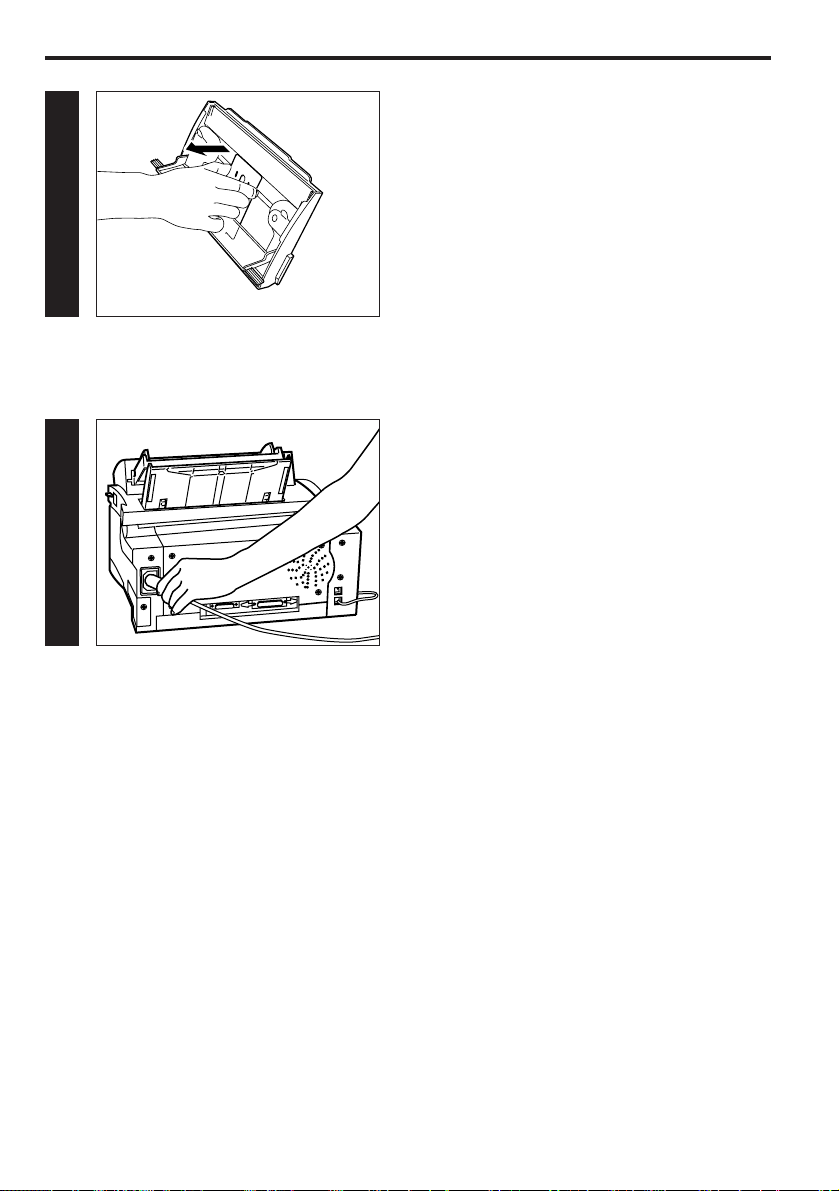
Plug the power cord into the power receptacle.
(3) Connecting the power cord
11
(4) Warm up
Once the power cord is connected to the facsimile and an outlet, the fax will begin to warm up.
Warm up normally requires less than 40 seconds. Once the fax has warmed up, it will automatically
enter the initial mode (waiting for operation).
* To remove the OHP transparency guide, hold the
guide as shown in the illustration and pull it out in
the direction of the arrow.
Page 26

22
Fax operation (Basic)
○: Dual access operation is possible.
△: Reception is accomplished directly to memory and that data is printed out AFTER printing with
the Printing System is completed.
▽: After the present printing operation is completed, printing with the Printing System will begin.
−: Not available
● Dual access function tables
○○○○○○○○○○○
ーーーーーーーーーー
ー ーーーーーーーーー
ーー ーーーーーーーー
ーーー ーーーーーーー
ーーーー ーーーーーー
ーーーーー ーーーーー
ーーーーーー ーーーー
ーーーーーーー ーーー
ー○○ー○ーーー ーー
ー○○ー○ーーーー ー
ー○○ー○ーーーーー
ー○○ー○ーーーーーー
ーーーーーーーーーーー
ーーーーーーーーーーー
ー○○ーーーーーーーー
ー○○ーーーーーーーー
ー○○ー○ーーーーーー
ーーーーーーーーーーー
ー○○ー○ーーーーーー
ー○○○○ーー○○○△
ーーーーーーーーー○○
○○○○○○○○○○○
Initial mode
Copying
Memory transmission
ADF transmission
Fax operation
Fax
transmission
Fax reception
Print out
PC-Fax
Printer
Scanner
Registration
Cancelling a communication
Report/List print out (Manual)
File print out
ADF transmission
Memory transmission
Memory reception
Other reception
Printing (Memory reception)
Report/List print out (Automatic)
Telephone (Purchased separately)
PC-Fax transmission
PC-Fax reception
PC-Printer
PC-Scanner (ADF)
PC-Scanner (Memory)
Printing System
During scanning
During uploading to your personal
computer
Additional operation
Present operation
Page 27

23
Fax operation (Basic)
○: Dual access operation is possible.
△: Reception is accomplished directly to memory and that data is printed out AFTER printing with
the Printing System is completed.
▽: After the present printing operation is completed, printing with the Printing System will begin.
−: Not available
◆: Dialling from the keypad is not available.
● Dual access function tables
○○○○○○○○○○○
ーー◆ーーーーー▽ーー
ーー◆ーーーーー○ーー
ーー◆ーーーーー○ーー
ーー◆ーーーーー○ーー
ーー◆ーーーーー○ーー
ーー◆ーーーーー▽ーー
ーー◆ーーーーー▽ーー
ーーーーーーーー○ーー
ーーーーーーーー○○○
ーーーーーーーー○○○
ーーーーーーーー▽○○
ー○ーーーーー▽○○
ー ○ーーーーー▽○○
ーー ーーーーー○ーー
ー○ー ーーーー○ーー
ー○ーー ーーー○ーー
ーー○ーー ーー▽ーー
ーー◆ーーー ー○ーー
ーー○ーーーー ○ーー
ーー○○○△○○ ○○
○○◆ーーーーー○ ー
○○○ーーーーー○ー
Initial mode
Copying
Memory transmission
ADF transmission
Fax operation
Fax
transmission
Fax reception
Print out
PC-Fax
Printer
Scanner
Registration
Cancelling a communication
Report/List print out (Manual)
File print out
ADF transmission
Memory transmission
Memory reception
Other reception
Printing (Memory reception)
Report/List print out (Automatic)
Telephone (Purchased separately)
PC-Fax transmission
PC-Fax reception
PC-Printer
PC-Scanner (ADF)
PC-Scanner (Memory)
Printing System
During scanning
During uploading to your personal
computer
Additional operation
Present operation
Page 28

24
Fax operation (Basic)
(2) File number
For every communication which will be initiated by dialling from your
fax, a distinct, 3-digit file number will appear on the message display
at the end of the input procedure. The facsimile uses this file number
for the purpose of managing each communication.
This number must be referred to and must be input during the procedure for cancelling, editing the
transmission time, etc., for documents scheduled for timer controlled communication.
In addition to being shown on the message display, the file number can be verified by printing out and
checking the Memory file report which offers information regarding transmissions which are waiting in
memory. (Refer to “Memory file report” page 122.)
(3) Memory transmission vs. ADF transmission
In the memory transmission mode, documents are scanned and entered into memory first. Then, the
other party is dialled automatically and, once the connection is established, fax transmission will
begin. In this case, since documents are scanned before the other party is dialled, documents are
returned to you, ready to use, much faster.
In the ADF transmission mode, the other party’s fax number is dialled first, and, once the connection
has been established, scanning of the documents to be transmitted begins and is alternated with
transmission of the data itself.
Memory transmission is the default setting in this fax.
* In order to change between the two fax transmission modes, refer to Memory Switch No. 94:
“Transmission Mode” page 142.
(4) Power saver modes
This fax has 2 power saver modes: One which engages automatically when there is no activity with
the fax (transmission, reception, copying, etc.) or no keys are pressed for a period of 15 minutes, and
another which engages and then ends at designated times. If a fax transmission comes in while the
facsimile is in one of these power saver modes, the data will be received into memory (refer to page
32) and will be printed out once warm up is completed. (Refer to “Power saver mode select”, page
133.)
F-001/PAGE:01
MEMORIZED 90%
(5) Using the message display to make settings
A large number of settings are made by selecting numbers on the
keypad which are then shown on the message display. While the
selection itself is made using the keypad, the explanation of which
setting corresponds to which number as well as the information
regarding the settings themselves is contained throughout this handbook. The number corresponding
to the presently selected setting will flash.
(6) Auto clear function
The fax will revert to the initial mode if, during any procedure, no key is pressed for a period of more
than 1 minute.
0:CONTINUE/1:END
0-1/ENTER
Page 29

25
Fax operation (Basic)
2 Set the documents face down on the document
table. The documents will be pulled slightly
under the ADF cover in preparation for
scanning.
* To remove the documents, press the
STOP/RESET key or carefully remove them by
hand.
* When using documents of a length greater
than 355 mm, support them with your hand.
22
2. Set the documents to be
transmitted.
When transmitting documents, set the documents
according to the following procedure. Improperly set
documents are a major cause of document jams
and other communication trouble.
1 Adjust the document guides to match the width of
the documents.
11
1. Verify that the fax is in the initial
mode.
Check the message display to verify that the
facsimile is in the initial mode.
Automatic fax transmission
This is a method of automatically sending a fax transmission without the need to speak to the other
party.
01.04.'97 12:00*
100%
Page 30

26
Fax operation (Basic)
<Initial mode>
The initial mode refers to the operational status of the fax while it is waiting for some operation to begin.
The fax will revert to this initial mode at the end of each successful operation and when the
STOP/RESET key is pressed. The fax will also revert to the initial mode if, during any procedure, no key
is pressed for a period of more than 1 minute.
<Documents>
● Acceptable size and thickness
• Size: Folio, A4R - A5R
(Width: 140 mm - 216 mm
Length: 128 mm - 1,000 mm)
• Thickness: 50 g/m2- 160 g/m
2
* If a document over 1,000 mm is fed into the ADF, the ERROR indicator will light.
● Acceptable number
A maximum of 20 documents can be set on the document table at one time.
(However, documents made of special paper or of any thickness other than 64 g/m2- 80 g/m2should
be fed one at a time.)
● Notes
• Very low contrast images may not be received clearly.
• Make sure that documents written in ink or containing glue, etc., have dried completely before
setting them for transmission or copying.
• Always set documents AFTER removing clips and staples as they can cause damage to the
facsimile.
• Documents of sizes outside the prescribed range may not be transmitted successfully.
Page 31

A A
27
Fax operation (Basic)
4. Dial the destination fax number.
Use the keypad to input the destination fax number.
* A destination fax number may occupy up to 32
digits.
44
3. Select the resolution.
Press the resolution mode select key to select the
resolution most suitable to the documents to be
transmitted.
* Normally, all of the resolution mode indicators are
out, and the fax is in the NORMAL mode. If the
NORMAL mode is to be used, there is no need to
make any changes to this setting. To use any of
the other modes (FINE, SUPER FINE and
PHOTO MODE), press the resolution mode
select key to light the resolution mode indicator
corresponding to the desired mode.
33
* If a mistake is made during input, press the
STOP/RESET key or the ON-HOOK/CLEAR key,
and start the procedure once again from the
beginning.
* It is also possible to dial the other party using an
abbreviated number or the one-touch keys.
(Refer to “Abbreviated numbers”, page 44.)
1234567
KEYPAD/ENT/START
A A
123
ABC DEF
GHI JKL MNO
4
PQRS TUV WXYZ
56
789
Page 32

28
Fax operation (Basic)
<Resolution modes>
It is possible to select a resolution mode, from among the following 4 settings, most appropriate to the
documents being transmitted.
• NORMAL: For documents with standard size characters
• FINE: For documents with relatively small characters or thin lines
• SUPER FINE: For documents with detailed lines and characters, etc.
• PHOTO MODE: For the clearest reproduction of documents containing both photographs, etc., as
well as text
<Notes>
• In the FINE and SUPER FINE modes, reproduced images appear clearer in comparison to
transmission in the NORMAL mode, but transmission time is longer.
• In the PHOTO MODE setting, greys can be reproduced clearly, but transmission time is longer than
in the NORMAL or FINE modes.
<Cancelling operations in progress>
To cancel operations in progress, press the STOP/RESET key. The fax will revert to the initial mode.
* If an operation is cancelled in progress due to a mistake in input or for any other reason, perform the
operation once again from the beginning.
Page 33

A A
29
Fax operation (Basic)
55
5. Start transmitting.
Press the START key.
* The fax will start transmitting operations.
<Dialling with a one-touch key>
Press the one-touch key under which the
destination number is registered.
44
12
3
56
7
4
8
Page 34

30
Fax operation (Basic)
<One-touch dialling>
In order to use the one-touch keys for dialling, it is necessary to register, in advance, the desired
destination fax or telephone number under one of the one-touch keys. (Refer to “(1) Registration”,
page 33.)
* When an unregistered one-touch key is pressed, “NOT IN USE” will be displayed. Verify the correct
one-touch key and press that key.
Page 35

31
Fax operation (Basic)
3. Fax reception will start.
* Once reception starts, “ON LINE” will appear
on the message display.
* To stop the reception, press the FUNCTION
key 4 times and then the ENTER FUNCTION
key twice.
33
2. When a call comes in, the fax will not actually
ring but will wait an amount of time equal to the
designated number of rings (1 - 11).
22
1. Verify that both the MESSAGE TEL. indicator
and the MANUAL RX. indicator are out.
* If either is lit, press the reception mode select
key until both indicators are out.
11
Automatic fax reception
When the facsimile is used as a dedicated fax machine, incoming faxes will be received automatically.
* Refer to “Changing the automatic reception mode”, page 73, to select the desired mode for
automatic reception.
* In order to receive faxes in the SUPER FINE mode, it is necessary to install the optional memory
board and turn ON the setting for Memory Switch No. 89: “S-Fine Copy/S-Fine Reception ON/OFF”,
page 142.
● Automatic fax reception is accomplished as follows
A A
Page 36

32
Fax operation (Basic)
<Reception modes>
This facsimile allows use of the following 4 modes for receiving a fax.
• Automatic fax reception…The standard mode for using the facsimile to receive a fax automatically.
• Auto FAX/TEL switching (Page 75)…The facsimile will automatically switch between fax reception
and allowing the bell to ring, depending on whether the call is from a facsimile or a telephone.
• Manual fax reception (Page 71)…Reception is initiated manually from a separately purchased
telephone.
• Message telephone reception (Page 77)…For using a separately purchased telephone (with
message telephone capabilities) in conjunction with the fax.
* If a separately purchased telephone is used in conjunction with the facsimile, the telephone will ring
the designated number of times. In order to set the number of times the telephone will ring, refer to
Memory Switch No. 04: “Number of Rings”, page 140.
<Receiving directly into memory>
When print out is not possible because paper has run out or paper jams, incoming data will be stored
temporarily in memory from where it will be printed out automatically once printing is enabled.
<Time and/or date print out>
It is possible to select whether or not the time and/or date of reception will be included on received
documents. (Refer to Memory Switch No. 16: “Reception Time/Date Print Out”, page 141.)
Page 37

33
Fax operation (Basic)
2. Press the ENTER FUNCTION key.
3. Press the ENTER FUNCTION key once again.
22
33
1. Press the FUNCTION key 5 times.
11
* To cancel the procedure part way through, press
the STOP/RESET key. The fax will revert to the
initial mode.
One-touch keys
(1) Registration
10 one-touch keys are provided for registering destination fax or telephone numbers.
REG. SPEED DIAL
FUNCTION/ENTER
ENTER OT DIAL
OT
A A
01.04.'97 12:00*
100%
Page 38

123
4
56
789
ABC DEF
GHI JKL MNO
PQRS TUV WXYZ
34
Fax operation (Basic)
4. Press an unregistered one-touch key.
44
5. Press the ENTER FUNCTION key.
55
6. Use the keypad to input the destination fax
number to be registered. (Max. 32 digits)
66
OT01:NEW DIAL
OT/ENTER
01:
KEYPAD/ENTER
01:1234567
KEYPAD/ENTER
12
3
4
56
7
8
7. Press the ENTER FUNCTION key.
77
01-NAME:
KEYPAD/ENTER
Page 39

7
89
0
#
C
PQRS TUV WXYZ
11. Press the ENTER FUNCTION key.
1111
35
Fax operation (Basic)
10. Use the keypad to select the desired fax
transmission speed.
High speed: Press “0”.
Low speed: Press “1”.
* If communication errors occur frequently to a
given destination, change the setting to low
speed. However, if low speed is selected,
transmission time will be increased.
1100
9. Press the ENTER FUNCTION key.
99
8. Refer to “● Inputting characters”, page 42, and
input the destination name. (Max. 16 characters)
88
01-NAME:ABC
KEYPAD/ENTER
01-MODEM 0:H/1:L
0-1/ENTER
01-SS 0:OFF/1:ON
0-1/ENTER
123
ABC DEF
GHI JKL MNO
4
PQRS TUV WXYZ
56
789
Page 40

36
Fax operation (Basic)
14. Use the keypad to select whether or not to
continue registering one-touch keys.
Continue: Press “0”.
Stop: Press “1”.
1133
1122
0:CONTINUE/1:END
0-1/ENTER
1144
1155
12. Use the keypad to select whether to turn the
special speed feature ON or OFF.
Turn ON: Press “1”.
Turn OFF: Press “0”.
* If the special speed feature is turned ON, all
communication with facsimiles of this same
model type will be accomplished at a higher
speed. This setting should normally be left
ON.
15. Press the ENTER FUNCTION key.
* If you chose to continue registering one-touch
keys, return to step 4. If you chose to stop
registering one-touch keys, the fax will revert
to the initial mode.
13. Press the ENTER FUNCTION key.
123
ABC DEF
GHI JKL MNO
4
PQRS TUV WXYZ
56
789
123
ABC DEF
GHI JKL MNO
4
56
PQRS TUV WXYZ
789
Page 41

37
Fax operation (Basic)
2. Press the one-touch key containing the data to
be modified or deleted.
* To delete data, proceed to “● Deleting data
registered under a one-touch key”. To modify
data, proceed to “● Modifying data registered
under a one-touch key”.
33
1.
Carry out steps 1 - 3 of “(1) Registration”, page 33.
22
* To cancel the procedure part way through, press
the STOP/RESET key. The fax will revert to the
initial mode.
11
(2) Modification or deletion
ENTER OT DIAL
OT
OT01:ABC
OT/ENTER/CLEAR
0:CONTINUE/1:END
0-1/ENTER
● Deleting data registered under a one-
touch key
3. Press the ON-HOOK/CLEAR key.
01.04.'97 12:00*
100%
12
3
56
4
7
8
PQRS TUV WXYZ
7
89
0
#
C
Page 42

38
Fax operation (Basic)
4. Use the keypad to select whether or not to
continue deleting one-touch keys.
Continue: Press “0”.
Stop: Press “1”.
5. Press the ENTER FUNCTION key.
* If you chose to continue deleting one-touch
keys, return to step 2. If you chose to stop
deleting one-touch keys, the fax will revert to
the initial mode.
44
55
● Modifying data registered under a one-
touch key
3. Press the ENTER FUNCTION key.
33
4. Use the keypad to change the registered
destination fax number to that desired.
(Max. 32 digits)
If you do not wish to modify the presently
registered number, proceed to step 5.
44
01:1234567
KEYPAD/ENTER
01:7654321
KEYPAD/ENTER
123
4
56
789
ABC DEF
GHI JKL MNO
PQRS TUV WXYZ
5. Press the ENTER FUNCTION key.
55
01-NAME:ABC
KEYPAD/ENTER
123
GHI JKL MNO
ABC DEF
4
PQRS TUV WXYZ
789
56
Page 43

9. Press the ENTER FUNCTION key.
99
39
Fax operation (Basic)
8. Use the keypad to select the desired fax
transmission speed.
High speed: Press “0”.
Low speed: Press “1”.
* If communication errors occur frequently to a
given destination, change the setting to low
speed. However, if low speed is selected,
transmission time will be increased.
88
7. Press the ENTER FUNCTION key.
77
66
01-SS 0:OFF/1:ON
0-1/ENTER
6. To modify the destination name, refer to
“● Inputting characters”, page 42, and input the
new destination name. (Max. 16 characters)
If you do not wish to modify the presently
registered name, proceed to step 7.
01-NAME:BBB
KEYPAD/ENTER
01-MODEM 0:H/1:L
0-1/ENTER
123
4
56
789
ABC DEF
GHI JKL MNO
PQRS TUV WXYZ
PQRS TUV WXYZ
7
89
0
#
C
Page 44

40
Fax operation (Basic)
10. Use the keypad to select whether to turn the
special speed feature ON or OFF.
Turn ON: Press “1”.
Turn OFF: Press “0”.
* If the special speed feature is turned ON, all
communication with facsimiles of this same
model type will be accomplished at a higher
speed. This setting should normally be left
ON.
1100
1111
12. Use the keypad to select whether or not to
continue modifying one-touch keys.
Continue: Press “0”.
Stop: Press “1”.
1122
13. Press the ENTER FUNCTION key.
* If you chose to continue modifying one-touch
keys, return to step 2. If you chose to stop
modifying one-touch keys, the fax will revert
to the initial mode.
1133
0:CONTINUE/1:END
0-1/ENTER
11. Press the ENTER FUNCTION key.
PQRS TUV WXYZ
7
89
0
#
C
PQRS TUV WXYZ
7
89
0
#
C
Page 45

11
22
33
44
41
Fax operation (Basic)
(3) Dial list print out
Printing out this list enables the user to confirm the names and fax or telephone numbers registered,
not only under one-touch keys (page 33), but under abbreviated numbers (page 44), group dial keys
(page 104) and batch transmission keys (page 104) as well.
4. Press the ENTER FUNCTION key.
A Dial list will be printed out.
3. Press the FUNCTION key 4 times.
1. Press the FUNCTION key 3 times.
2. Press the ENTER FUNCTION key.
ACTIVITY REPORT
FUNCTION/ENTER
FAX NUMBER LIST
FUNCTION/ENTER
NOW PRINTING
* To cancel the procedure part way through, press
the STOP/RESET key. The fax will revert to the
initial mode.
01.04.'97 12:00*
100%
Page 46

42
Fax operation (Basic)
2 Once the desired character is
displayed, press one-touch key No.
10 to register that character.
1
Refer to the table below and press the
key on the keypad corresponding to
the desired letter, number or symbol
until the desired character appears.
● Inputting characters
Character input is required for registering information identifying your self-station and destination
names. Input is carried out with the keypad, the one-touch keys and the COPY/SPACE key.
COPY/SPACE key … Press to enter a space.
One-touch key No. 9 … Press to move the cursor to the left.
One-touch key No. 10 … Press to move the cursor to the right.
*1 … Refer to “Appendix 2: Available characters table”, page 178, for the special letters and other
symbols available in each language.
Labels indicating the characters available under the pound (
#
) and star ( ) keys are also
included with this unit for reference.
Key
Displayed character
1
1
A → B → C → a → b → c → 2
D → E → F → d → e → f → 3
G → H → I → g → h → i → 4
J → K → L → j → k → l → 5
M → N → O → m → n → o → 6
P → Q → R → S → p → q → r → s → 7
T → U → V → t → u → v → 8
W → X → Y → Z → w →x → y → z → 9
0
Available letters and other symbols differ
depending on the language being used in the
message display. *1
2
3
4
5
6
7
8
9
0
#
123
4
56
789
ABC DEF
GHI JKL MNO
PQRS TUV WXYZ
. → : → , → - → + → / → & → ' → ( →) →
56
7
9
8
10
Page 47

[Ex.] The destination name is to be registered
as “AKZ” under a one-touch key
1. Press “2” on the keypad one time.
11
2. Press one-touch key No. 10 to register the
character entered in step 1.
22
3. Press “5” on the keypad twice.
33
4. Press one-touch key No. 10 to register the
character entered in step 3.
44
43
Fax operation (Basic)
01-NAME:A
KEYPAD/ENTER
01-NAME:A
KEYPAD/ENTER
01-NAME:AK
KEYPAD/ENTER
01-NAME:AK
KEYPAD/ENTER
123
4
56
789
ABC DEF
GHI JKL MNO
PQRS TUV WXYZ
56
7
9
123
GHI JKL MNO
4
PQRS TUV WXYZ
8
10
ABC DEF
56
789
56
7
8
9
10
Page 48

44
Fax operation (Basic)
* To cancel the procedure part way through, press
the STOP/RESET key. The fax will revert to the
initial mode.
Abbreviated numbers
(1) Registration
Up to 50 destination fax numbers can be registered under abbreviated numbers by using a 2-digit
coding system from 01 - 50.
6. Press one-touch key No. 10 to register the
character entered in step 5.
66
5. Press “9” on the keypad 4 times.
55
01-NAME:AKZ
KEYPAD/ENTER
01-NAME:AKZ
KEYPAD/ENTER
56
7
8
9
10
01.04.'97 12:00*
100%
123
ABC DEF
GHI JKL MNO
4
PQRS TUV WXYZ
56
789
A A
Page 49

1. Press the FUNCTION key 5 times.
11
2. Press the ENTER FUNCTION key.
22
3. Press the FUNCTION key twice.
33
4. Press the ENTER FUNCTION key.
44
45
Fax operation (Basic)
REG. SPEED DIAL
FUNCTION/ENTER
REG. OT DIAL
FUNCTION/ENTER
REG. ABBR. DIAL
FUNCTION/ENTER
AD--:ENTER NO.
0-9
Page 50

46
Fax operation (Basic)
8. Press the ENTER FUNCTION key.
88
7. Use the keypad to input the destination fax
number to be registered. (Max. 32 digits)
77
6. Press the ENTER FUNCTION key.
66
5. Use the keypad to input 2 digits (01 - 50)
corresponding to the desired abbreviated
number.
55
10:
KEYPAD/ENTER
10:1234567
KEYPAD/ENTER
10-NAME:
KEYPAD/ENTER
AD1O:NEW DIAL
0-9/ENTER
123
4
56
789
ABC DEF
GHI JKL MNO
PQRS TUV WXYZ
123
GHI JKL MNO
ABC DEF
4
PQRS TUV WXYZ
789
56
Page 51

9. Refer to “● Inputting characters”, page 42, and
input the destination name. (Max. 16 characters)
99
10. Press the ENTER FUNCTION key.
1100
11. Use the keypad to select the desired fax
transmission speed.
High speed: Press “0”.
Low speed: Press “1”.
* If communication errors occur frequently to a
given destination, change the setting to low
speed. However, if low speed is selected,
transmission time will be increased.
1111
12. Press the ENTER FUNCTION key.
1122
47
Fax operation (Basic)
10-MODEM 0:H/1:L
0-1/ENTER
10-SS 0:OFF/1:ON
0-1/ENTER
10-NAME:ABC
KEYPAD/ENTER
123
4
56
789
ABC DEF
GHI JKL MNO
PQRS TUV WXYZ
123
GHI JKL MNO
4
PQRS TUV WXYZ
ABC DEF
56
789
Page 52

48
Fax operation (Basic)
16. Press the ENTER FUNCTION key.
* If you chose to continue registering
abbreviated numbers, return to step 5. If you
chose to stop registering abbreviated
numbers, the fax will revert to the initial
mode.
1166
15. Use the keypad to select whether or not to
continue registering abbreviated numbers.
Continue: Press “0”.
Stop: Press “1”.
1155
14. Press the ENTER FUNCTION key.
1144
13. Use the keypad to select whether to turn the
special speed feature ON or OFF.
Turn ON: Press “1”.
Turn OFF: Press “0”.
* If the special speed feature is turned ON, all
communication with facsimiles of this same
model type will be accomplished at a higher
speed. This setting should normally be left
ON.
1133
0:CONTINUE/1:END
0-1/ENTER
123
ABC DEF
GHI JKL MNO
4
PQRS TUV WXYZ
56
789
123
ABC DEF
GHI JKL MNO
4
56
PQRS TUV WXYZ
789
Page 53

(2) Modification or deletion
1.
Carry out steps 1 - 4 of “(1) Registration”, page 45.
11
2. Input the abbreviated number (01 - 50)
containing the data to be modified or deleted.
* To delete data, proceed to “● Deleting data
registered under an abbreviated number”. To
modify data, proceed to “● Modifying data
registered under an abbreviated number”.
22
33
49
Fax operation (Basic)
* To cancel the procedure part way through, press
the STOP/RESET key. The fax will revert to the
initial mode.
● Deleting data registered under an
abbreviated number
3. Press the ON-HOOK/CLEAR key.
AD--:ENTER NO.
0-9
AD10:ABC
0-9/ENTER/CLEAR
0:CONTINUE/1:END
0-1/ENTER
01.04.'97 12:00*
100%
123
GHI JKL MNO
4
ABC DEF
56
PQRS TUV WXYZ
789
PQRS TUV WXYZ
7
89
0
#
C
Page 54

50
Fax operation (Basic)
10:1234567
KEYPAD/ENTER
10:7654321
KEYPAD/ENTER
4. Use the keypad to change the registered
destination fax number to that desired.
(Max. 32 digits)
If you do not wish to modify the presently
registered number, proceed to step 5.
44
● Modifying data registered under an
abbreviated number
3. Press the ENTER FUNCTION key.
33
5. Press the ENTER FUNCTION key.
* If you chose to continue deleting abbreviated
numbers, return to step 2. If you chose to stop
deleting abbreviated numbers, the fax will
revert to the initial mode.
55
4. Use the keypad to select whether or not to
continue deleting abbreviated numbers.
Continue: Press “0”.
Stop: Press “1”.
44
123
4
56
789
ABC DEF
GHI JKL MNO
PQRS TUV WXYZ
123
GHI JKL MNO
4
PQRS TUV WXYZ
789
ABC DEF
56
Page 55

5. Press the ENTER FUNCTION key.
55
7. Press the ENTER FUNCTION key.
77
8. Use the keypad to select the desired fax
transmission speed.
High speed: Press “0”.
Low speed: Press “1”.
* If communication errors occur frequently to a
given destination, change the setting to low
speed. However, if low speed is selected,
transmission time will be increased.
88
51
Fax operation (Basic)
6. To modify the destination name, refer to
“● Inputting characters”, page 42, and input the
new destination name. (Max. 16 characters)
If you do not wish to modify the presently
registered name, proceed to step 7.
66
10-NAME:ABC
KEYPAD/ENTER
10-NAME:BBB
KEYPAD/ENTER
10-MODEM 0:H/1:L
0-1/ENTER
123
ABC DEF
GHI JKL MNO
4
PQRS TUV WXYZ
56
789
123
ABC DEF
GHI JKL MNO
4
PQRS TUV WXYZ
56
789
Page 56

52
Fax operation (Basic)
12. Use the keypad to select whether or not to
continue modifying abbreviated numbers.
Continue: Press “0”.
Stop: Press “1”.
1122
11. Press the ENTER FUNCTION key.
1111
10. Use the keypad to select whether to turn the
special speed feature ON or OFF.
Turn ON: Press “1”.
Turn OFF: Press “0”.
* If the special speed feature is turned ON, all
communication with facsimiles of this same
model type will be accomplished at a higher
speed. This setting should normally be left
ON.
1100
9. Press the ENTER FUNCTION key.
99
10-SS 0:OFF/1:ON
0-1/ENTER
0:CONTINUE/1:END
0-1/ENTER
123
ABC DEF
GHI JKL MNO
4
PQRS TUV WXYZ
56
789
123
ABC DEF
GHI JKL MNO
4
56
PQRS TUV WXYZ
789
Page 57

13. Press the ENTER FUNCTION key.
* If you chose to continue modifying
abbreviated numbers, return to step 2. If you
chose to stop modifying abbreviated
numbers, the fax will revert to the initial
mode.
1133
(3) Dialling with an abbreviated number
In order to use abbreviated numbers for dialling, it is necessary to register, in advance, the destination
fax or telephone number under a 2-digit abbreviated number in “(1) Registration”, page 44.
1. Set the documents to be transmitted.
11
2. Press the ABBR. key.
22
53
Fax operation (Basic)
* To cancel the procedure part way through, press
the STOP/RESET key. The fax will revert to the
initial mode.
AD--:ENTER NO.
0-9
01.04.'97 12:00*
100%
PQRS TUV WXYZ
7
89
0
#
C
Page 58

54
Fax operation (Basic)
4. Press the START key.
44
3. Use the keypad to input the 2-digit abbreviated
number corresponding to the desired
destination.
* When an unregistered abbreviated number is
entered, “NOT IN USE” will be displayed.
Verify the correct abbreviated number and
input that number.
33
Redialling
(1) Automatic redialling
When attempting to transmit documents, etc., the other party’s fax may be busy with another
communication and may not respond. In this type of situation, your fax will automatically attempt to
redial that same number with no need for any user intervention.
Automatic redialling will occur up to 3 times at a set interval.
(2) Manual redialling
It is possible to redial the most recently dialled number without the need to reenter that number.
1. Press the PAUSE/REDIAL key.
The most recently dialed number will be shown on the
message display.
2. Press the START key.
The fax will automatically start dialing that number.
AD10:ABC
0-9/ENTER/START
123
4
56
789
ABC DEF
GHI JKL MNO
PQRS TUV WXYZ
A A
PQRS TUV WXYZ
7
89
0
C
#
Page 59

55
Making copies
* To cancel the procedure part way through, press
the STOP/RESET key. The fax will revert to the
initial mode.
11
1. Set the documents to be copied on the document
table, and select the desired resolution.
22
2. Press the COPY/SPACE key.
Standard copying
To make individual copies from one or more documents carry out the following procedure.
* The copy magnification can also be changed from 100% to a reduction ratio of anywhere between
70% - 99% in 1% increments.
* When copying, if PHOTO MODE is not selected, the resolution will be automatically be set to FINE.
* To copy photographs, etc., as clearly as possible, press the resolution mode select key to light the
PHOTO MODE indicator.
* In order to copy in the SUPER FINE mode, it is necessary to install the optional memory board and
turn ON the setting for Memory Switch No. 89: “S-Fine Copy/S-Fine Reception ON/OFF”, page 142.
# COPIES? 1
0-9/ENTER/COPY
A A
01.04.'97 12:00*
100%
A A
Page 60

56
Making copies
33
3. Press the ENTER FUNCTION key.
REDUCTION 100%
0-9/COPY
44
4. Use the keypad to select a desired reduction
ratio (70% - 99%).
* If you do not wish to change the magnification
from 100%, proceed to step 5.
* To return the magnification to 100%, press the
ON-HOOK/CLEAR key.
REDUCTION 78%
0-9/COPY
5. Press the COPY/SPACE key.
* Copying will begin.
55
A A
123
ABC DEF
GHI JKL MNO
4
56
PQRS TUV WXYZ
789
Page 61

57
Making copies
2. Press the COPY/SPACE key.
22
1. Set the documents to be copied on the document
table, and select the desired resolution.
11
* To cancel the procedure part way through, press
the STOP/RESET key. The fax will revert to the
initial mode.
Group copying
To make multiple copies from one or more documents, with each copy produced from a single
document grouped together in a set, carry out the following procedure.
* A maximum of 99 copies can be designated at one time per original.
* Refer to “Standard copying”, page 55, for information on selecting the copy magnification ratio and
resolution modes.
# COPIES? 1
0-9/ENTER/COPY
A A
01.04.'97 12:00*
100%
A A
Page 62

58
Making copies
3. Use the keypad to input the desired number of
copies per original. (Max. 99)
33
COPY COUNT 58
0-9/ENTER/COPY
REDUCTION 100%
0-9/COPY
4. Press the ENTER FUNCTION key.
44
5. Use the keypad to select a desired reduction
ratio (70% - 99%).
* If you do not wish to change the magnification
from 100%, proceed to step 6.
* To return the magnification to 100%, press the
ON-HOOK/CLEAR key.
55
REDUCTION 78%
0-9/COPY
6. Press the COPY/SPACE key.
* Copying will begin.
66
A A
123
ABC DEF
GHI JKL MNO
4
PQRS TUV WXYZ
56
789
123
ABC DEF
GHI JKL MNO
4
56
PQRS TUV WXYZ
789
Page 63

59
Making copies
Sort copying
To make multiple sets of copies from a set of documents, carry out the following procedure.
* In order to copy in this mode, it is necessary to install the optional memory board.
* A maximum of 99 sets of copies can be designated at one time.
* Refer to “Standard copying”, page 55, for information on selecting the copy magnification ratio and
resolution modes.
1. Set the documents to be copied on the
document table, and select the desired
resolution.
2. Press the COPY/SPACE key.
3. Use the keypad to input the desired number of
copy sets. (Max. 99)
# COPIES? 1
0-9/ENTER/COPY
COPY COUNT 58
0-9/ENTER/COPY
01.04.'97 12:00*
100%
11
22
A A
33
123
4
56
789
ABC DEF
GHI JKL MNO
PQRS TUV WXYZ
* To cancel the procedure part way through, press
the STOP/RESET key. The fax will revert to the
initial mode.
Page 64

60
Making copies
4. Press the ENTER FUNCTION key.
5. Use the keypad to select a desired reduction
ratio (70% - 99%).
* If you do not wish to change the magnification
from 100%, proceed to step 6.
* To return the magnification to 100%, press the
ON-HOOK/CLEAR key.
6. Press the ENTER FUNCTION key.
7. Press “1” on the keypad.
REDUCTION 78%
0-9/ENTER/COPY
SORT 0:NO/1:YES
0-1/COPY
REDUCTION 100%
0-9/ENTER/COPY
44
66
77
55
88
A A
8. Press the COPY/SPACE key.
* Copying will begin.
123
ABC DEF
GHI JKL MNO
4
PQRS TUV WXYZ
56
789
Page 65

61
Fax operation (Various functions)
Standby transmission
1. Set the documents to be transmitted on the document
table.
* The fax is currently occupied with another
communication.
2. Input the destination fax number.
* A destination fax number may be dialled with the
keypad, abbreviated numbers or one-touch keys.
3. If the destination fax number was entered with the
keypad or an abbreviated number, press the START
key.
* Those documents set on the document table will now
be scanned and stored in memory.
* To cancel the procedure part way through, press the
STOP/RESET key. The fax will revert to the initial mode.
003:-- G3 -ON LINE
STORING
MEM. REMAIN 80%
12345
KEYPAD/ENT/START
A A
Standby transmitting refers to the process where documents are scheduled for transmission
while the fax is occupied with another communication. If, during that communication, the
documents to be transmitted are set on the document table and the destination fax number is
input, those documents will be automatically transmitted once the communication has been
completed.
* A maximum of 5 standby transmissions (including timer controlled communications) can be
scheduled at one time.
Page 66

Fax operation (Various functions)
62
4. Set the documents to be transmitted on the document
table.
1. Press the STOP/RESET key.
* The fax is currently occupied with another
communication.
2. Press the FUNCTION key.
3. Press the ENTER FUNCTION key.
* The message display will revert to the initial mode.
Interrupt transmission
This function is convenient for those times you want to transmit documents in a hurry, but the
fax is in the middle of transmitting a large number of documents. If the interrupt transmission
procedure is performed, that transmission will be stopped between pages and the connection
with the other party terminated. Once the interrupt transmission is completed, the fax will
automatically return to and continue the operation that was in progress prior to the
interruption.
5. Input the destination fax number.
* A destination fax number may be dialled with the
keypad, abbreviated numbers or one-touch keys.
6. Press the START key.
* The fax will start transmitting operations for your
documents. Once the interrupt transmission is
completed, the fax will automatically redial the
previous party and continue the transmission from the
point of the interruption.
TX/RX STOP
FUNCTION/ENTER
TX/RX STOP
01.04.'97 12:00*
MTX 84%
12345
KEYPAD/ENT/START
DELETION
FUNCTION/ENTER
Page 67

63
Fax operation (Various functions)
Broadcast transmission
This function enables the same documents to be transmitted successively to a number of
destinations one after another, in a single operation. If transmitting the same documents from
a central office to multiple branch offices, this function is quite convenient as it requires
operations to be carried out only once.
The documents to be transmitted need only to be stored in memory, and dialling and
transmitting operations are repeated automatically for each destination.
* If all of the destination numbers are entered using abbreviated numbers, one-touch keys or
group dial keys, this fax is capable of automatically transmitting the same documents to up
to 50 different destinations in a single operation. If the keypad is used, up to 10 different
destinations is possible.
* Once the broadcast operation to all of the destinations is complete, a Broadcast
transmission report will be printed out.
* To cancel the procedure part way through, press the
STOP/RESET key. The fax will revert to the initial mode.
1. Set the documents to be transmitted on the document
table, and select the desired resolution.
Transmitting fax
Receiving faxes
01.04.'97 12:00*
100%
Page 68

64
Fax operation (Various functions)
2. Input the destination fax numbers in order of preference.
Repeat steps 1 and 2 below until all desired numbers
have been input.
* Numbers may be input with the keypad, abbreviated
numbers, one-touch keys or group dial keys.
* If the number of destinations exceeds the acceptable
limit, “EXCEED MAX.DEST.” will appear on the
message display.
1 Input the destination fax number. (Max. 32 digits)
* If using fax numbers registered under an
abbreviated number, etc., carry out the appropriate
procedure for each number.
2 Check the displayed destination and press the
ENTER FUNCTION key.
3. Press the ENTER FUNCTION key.
TIME --:--
0-9/ENTER/START
TIME 12:34
0-9/ENTER/START
1234567
ENTER/CL/START
4. If you wish to designate a time for the broadcast
transmission to start, use the keypad to input the
desired start time.
To start broadcast transmission operations immediately,
proceed to step 6.
* The time should be set on a 24-hour time basis
(00:00 - 23:59).
5. Press the ENTER FUNCTION key.
6. Press the START key.
* The documents will be scanned at this point and a
corresponding file number will be displayed. Once the
broadcast operation to all of the destinations is
complete, a Broadcast transmission report will be
printed out.
F-001/PAGE:01
MEMORIZED 97%
NOW PRINTING
100%
123
4
56
789
ABC DEF
GHI JKL MNO
PQRS TUV WXYZ
Page 69

65
Fax operation (Various functions)
Timer controlled communication
If a time for a communication to start is designated in advance, when the appointed time is
reached, that communication will be carried out automatically. A timer controlled
communication can be designated during the operation procedure for various types of fax
communication such as broadcast transmission, polling receiving, etc.
* The communication must be set to start within the ensuing 24 hour period.
* Up to 5 timer controlled communications can be set at one time (including standby
transmissions).
* When using the ADF transmission mode and with the documents designated to be
transmitted at an appointed time, the documents will remain on the document table until the
appointed time is reached. In this case, the timer controlled transmission can be cancelled
simply by removing the documents from the document table. The fax will then revert to the
initial mode.
* A Transmission report can be set to be printed out automatically at the completion of all
timer controlled transmissions. (Refer to “(1) Automatic print out”, page 119.)
* To cancel the procedure part way through, press the
STOP/RESET key. The fax will revert to the initial mode.
1. If the operation involves the transmission of documents,
set the documents to be transmitted on the document
table, and select the desired resolution.
Transmitting fax
Receiving fax
The documents
are set for
transmission
Transmission
begins
01.04.'97 12:00*
100%
[Example: Timer controlled transmission]
Page 70

A A
66
Fax operation (Various functions)
2. Input the destination fax number.
* Numbers may be input with the keypad, abbreviated
numbers or one-touch keys.
3. Press the ENTER FUNCTION key twice.
4. Use the keypad to input the desired start time.
* The time should be set on a 24-hour time basis
(00:00 - 23:59).
5. Press the ENTER FUNCTION key.
6. Press the START key.
A corresponding file number will be displayed.
* If the present communication involves the
transmission of documents, the documents will be
scanned prior to the display of the file number.
* “MTX” will be shown on the message display
whenever there is a timer controlled transmission
waiting in memory.
01234567
KEYPAD/ENT/START
TIME --:--
0-9/ENTER/START
TIME 12:34
0-9/ENTER/START
01234567
ENTER/CL/START
F-001/PAGE:01
MEMORIZED 97%
01.04.'97 12:00*
MTX 90%
123
4
56
789
ABC DEF
GHI JKL MNO
PQRS TUV WXYZ
Page 71

Fax operation (Various functions)
Print out a sample image of awaiting documents
To examine the contents of documents that are stored in memory and scheduled for
transmission, print out a Memory input report and check the sample image of the first page of
the documents which is printed on the report.
* Even if a sample image of the documents is printed out, the transmission will be carried out
on schedule.
1. Press the FUNCTION key 3 times.
2. Press the ENTER FUNCTION key.
3. Press the FUNCTION key 3 times.
* To cancel the procedure part way through, press the
STOP/RESET key. The fax will revert to the initial mode.
PRINT REPORT
FUNCTION/ENTER
MEMORY ENTRY
FUNCTION/ENTER
4. Press the ENTER FUNCTION key.
5. Press the FUNCTION key until the file number
corresponding to the desired documents is displayed.
* If the destination fax number corresponding to those
documents was entered using an abbreviated number
or one-touch key under which the destination name
was also registered, that name will be displayed.
F-001:ABC
FUNCTION/ENTER
NOW PRINTING
6. Press the ENTER FUNCTION key. A Memory input
report will be printed out.
ACTIVITY REPORT
FUNCTION/ENTER
67
01.04.'97 12:00*
MTX 98%
Page 72

68
Fax operation (Various functions)
F-001:ABC
FUNCTION/ENTER
1. Press the FUNCTION key 4 times.
2. Press the ENTER FUNCTION key.
3. Press the FUNCTION key.
* To cancel the procedure part way through, press the
STOP/RESET key. The fax will revert to the initial mode.
NOW PRINTING
90%
CANCEL MODE
FUNCTION/ENTER
DELETION
FUNCTION/ENTER
4. Press the ENTER FUNCTION key.
5. Press the FUNCTION key until the file number
corresponding to the communication to be cancelled is
displayed.
* If the destination fax number corresponding to that
communication was entered using an abbreviated
number or one-touch key under which the destination
name was also registered, that name will be displayed.
6. Press the ENTER FUNCTION key. A Cancellation
report will be printed out.
TX/RX STOP
FUNCTION/ENTER
Cancelling a communication in memory
To cancel a scheduled timer controlled transmission or reception, carry out the following
procedure.
* In order to cancel a communication which has already begun, press the STOP/RESET key
and carry out the following procedure from step 4.
* A Cancellation report will be printed out for verification of the contents of the cancelled
communication.
01.04.'97 12:00*
MTX 90%
Page 73

69
Fax operation (Various functions)
Manual fax transmission
Once the connection has been made with the destination fax, transmission is started manually
by pressing the START key. Use this mode to talk to the other party prior to transmission, or
when the other party must manually switch to the fax mode.
** Manual fax transmission is only possible if a separately purchased telephone is used in
conjunction with the facsimile.
1. Set the documents to be transmitted on the document
table, and select the desired resolution.
2. Pick up the receiver of the separately purchased
telephone.
* To cancel the procedure part way through, press the
STOP/RESET key. The fax will revert to the initial mode.
12
3
Transmitting fax
Receiving fax
01.04.'97 12:00*
100%
Page 74

70
Fax operation (Various functions)
3. Use the facsimile to input the destination fax number.
* A destination fax number may be dialled with the
keypad, abbreviated numbers or one-touch keys.
4. Listen through the telephone receiver to verify whether
the connection has been made with the destination fax
or not.
If you hear a fax tone…
If the other party answers…
You are connected to a facsimile.
Press the START key.
The fax will start to transmit the documents.
You are connected to a telephone.
If that party is able to manually switch to fax
reception, press the START key at the end
of the conversation to initiate transmission.
The fax will start to transmit the documents.
5. Hang up the receiver when “ON LINE” appears on the
message display.
ABC DEF
123
GHI JKL MNO
4
PQRS TUV WXYZ
789
56
Page 75

71
Fax operation (Various functions)
Manual fax reception
When a call comes in, reception is initiated by picking up the receiver of a separately
purchased telephone, verifying that the call is from a facsimile and pressing the START key.
** Manual fax reception is only possible if a separately purchased telephone is used in
conjunction with the facsimile.
1. Verify that the MANUAL RX. indicator is lit.
* If it is not lit, press the reception mode select key until
it lights.
● Manual fax reception is accomplished as follows
Transmitting fax
Receiving fax
From a
fax
From a
telephone
Page 76

72
Fax operation (Various functions)
2. When a call comes in, the separately purchased
telephone will ring. Pick up the telephone receiver.
3. Speak with the other party.
3. Press the START key. Fax reception will
begin.
* Hang up the receiver when “ON LINE”
appears on the message display.
* If you are using a telephone with tone
dialling capabilities, it is possible to
answer using the Remote reception
function. (Refer to “Remote reception”,
page 95.)
If you are connected to a telephone…
If you are connected to a facsimile…
A A
Page 77

73
0:FAX/1:FAX&TEL
0-1/ENTER
Changing the automatic reception mode
This facsimile has 2 automatic reception modes: automatic fax reception (page 31) and auto
FAX/TEL switching (page 75). To change the presently selected mode, carry out the following
procedure.
* To cancel the procedure part way through, press the
STOP/RESET key. The fax will revert to the initial mode.
1. Press the FUNCTION key 6 times.
2. Press the ENTER FUNCTION key.
3. Press the FUNCTION key.
USER SETTING
FUNCTION/ENTER
SET AUTO RECEPT.
FUNCTION/ENTER
4. Press the ENTER FUNCTION key.
SETTING
FUNCTION/ENTER
01.04.'97 12:00*
100%
Fax operation (Various functions)
Page 78

74
Fax operation (Various functions)
5. Use the keypad to select between the automatic fax
reception mode and the auto FAX/TEL switching mode.
The automatic fax reception mode: Press “0”.
The auto FAX/TEL switching mode: Press “1”.
6. Press the ENTER FUNCTION key once again. The fax
will revert to the initial mode.
ABC DEF
123
GHI JKL MNO
4
PQRS TUV WXYZ
789
56
Page 79

75
Fax operation (Various functions)
Auto FAX/TEL switching
After a separately purchased telephone rings a designated number of times, and if the call is
from a facsimile, fax reception will start automatically. If the call is from a telephone, a different
bell will ring in the fax and may be answered from the telephone.
** Auto FAX/TEL switching is only possible if a separately purchased telephone is used in
conjunction with the facsimile.
1. Verify that both the MESSAGE TEL. indicator and the
MANUAL RX. indicator are out.
* If either is lit, press the reception mode select key until
both indicators are out.
● Auto FAX/TEL switching is accomplished as follows
* To use the auto FAX/TEL switching mode, it is necessary to select “FAX&TEL” in “Changing
the automatic reception mode”, page 73.
* Even if you are not there, or do not answer the telephone, the calling party will incur
telephone charges starting at the point after the telephone rings the initial designated
number of times.
From a
fax
From a
telephone
Transmitting fax
Receiving fax
Page 80

76
Fax operation (Various functions)
3. A different bell will ring in the fax for 25
seconds.
* If the telephone receiver is not picked up
while this bell is still ringing, the
facsimile will switch to fax reception.
* The volume of this bell can be set to one
of 3 levels. (Refer to Memory Switch
No. 93: “Operator-Call Bell Volume”,
page 142.)
4. Pick up the receiver and speak with the
other party.
At the end of the conversation, fax
reception may be initiated manually.
3. Fax reception will start automatically.
If you are connected to a telephone…
If you are connected to a facsimile…
2. The separately purchased telephone will ring a
designated number of times (1 - 11).
* In order to set the number of times the telephone will
ring, refer to Memory Switch No. 04: “Number of
Rings”, page 140.
* If the telephone receiver is picked up while the bell is
still ringing, the facsimile will deal with this the same
as a standard manual fax reception. Refer to “Manual
fax reception”, page 71, and perform the procedure
explained there starting from step 3.
Page 81

77
Fax operation (Various functions)
Message telephone reception
After the telephone with message telephone capabilities rings a designated number of times,
and if the call is from a facsimile, fax reception will begin automatically. If the call is from a
telephone, the functions of the message telephone will engage. Thus, even when you are not
in, the caller will be able to leave a message if your message telephone is turned on.
** Message telephone reception is only possible if a separately purchased telephone with
message telephone capabilities is used in conjunction with the facsimile.
* It is recommended that the setting for the number of rings of the message telephone itself be
adjusted to less than the number of times the fax is set to ring in the message telephone
reception mode. If it is set to ring more times than the fax, there is a possibility that fax
reception will not be accomplished.
* Refer to the Instruction Manual for the telephone in use for details on recording and listening
to messages, etc.
* When a separately purchased telephone with message telephone capabilities is used in
conjunction with this facsimile, use the supplied modular cord to connect the line jack on the
fax to the telephone jack in the wall. Use another modular cord to connect the telephone
jack on the fax to the telephone itself. (Refer to “● Connection diagram”.)
* If the message telephone capabilities of the telephone are turned ON, MAKE SURE that, in
the first minute after the telephone answers the incoming call, there are no silent pauses of 6
seconds or more in either the message you record or the message you receive. If there is
such a pause, the silence detection function of the fax will be activated and the facsimile will
switch to fax reception.
● Connection diagram
Telephone jack in the wall Facsimile
Telephone with message
telephone capabilities
Transmitting fax
From a
fax
From a
telephone
Receiving fax
Page 82

78
Fax operation (Various functions)
2. If the message telephone capabilities of the telephone
are turned ON, the telephone will ring the number of
times designated in the message telephone.
* If the message telephone capabilities of the telephone
are turned OFF, the telephone will ring the number of
times designated in the fax and then the connection
will be made to the fax.
In order to set the number of times the fax will ring,
refer to Memory Switch No. 98: “Number of Rings
(Message telephone)”, page 142.
* If the telephone receiver is picked up while the
telephone is still ringing, the facsimile will deal with
this the same as a standard manual fax reception.
Refer to “Manual fax reception”, page 71, and perform
the procedure explained there starting from step 3.
If you are connected to a telephone…
If you are connected to a facsimile…
3. Fax reception will start automatically.
3. The functions of the message telephone
will engage, your message will be played
and the caller will be able to leave a
message.
* If there is a silent pause of 6 seconds or
more, the facsimile will switch to fax
reception.
1. Verify that the MESSAGE TEL. indicator is lit.
* If it is not lit, press the reception mode select key until
it lights.
● Message telephone reception is accomplished as follows
Page 83

2. Hold the imaging unit by pinching the handles 1
on both sides of the unit as shown in the
illustration and slowly remove the imaging unit
from the facsimile.
22
WARNING
High voltage is present in the charger section. Take sufficient care when
working in this area, as there is a danger of electrical shock.
CAUTION
The facsimile’s fixing unit is extremely hot. Take sufficient care when
working in this area, as there is a danger of getting burned.
1. Slide the main body release lever on the right
side of the fax towards you and open the
facsimile until it stops.
79
Replacing consumables and maintenance
11
Replacing the imaging unit
When “CHANGE IU” is displayed, the toner has run
low. A limited number of pages can still be printed,
but, because printing will be impossible after that,
the imaging unit should be replaced as soon as
possible.
CHANGE IU
100%
1
Page 84

3. Take the imaging unit out of its box. Tear open
the imaging unit package at the notch A, and
take the new imaging unit out.
4. Hold the new imaging unit horizontally and slowly
shake it a few times from side to side.
5. Set the new imaging unit in the facsimile frontend first.
80
Replacing consumables and maintenance
33
A
44
55
CAUTION
DO NOT attempt to burn the toner or toner containers in an incinerator or
other fire as it may cause dangerous sparks.
Page 85

81
Replacing consumables and maintenance
66
77
11
7. Gently close the facsimile.
* If the facsimile doesn’t close properly, the
imaging unit may not be set properly. Reinstall
the imaging unit correctly.
1. Slide the main body release lever on the right
side of the fax towards you and open the
facsimile until it stops.
6. Remove the protective tape 2 on both sides of
the imaging unit and then remove the drum
cover.
Cleaning inside the fax
If lines appear on printed copies or receptions, or they appear dirty, perform the following cleaning
operations.
2
CAUTION
For safety purpose, ALWAYS remove the power cord from the outlet
when performing cleaning operations.
Page 86

WARNING
High voltage is present in the charger section. Take sufficient care when
working in this area, as there is a danger of electrical shock.
CAUTION
The facsimile’s fixing unit is extremely hot. Take sufficient care when
working in this area, as there is a danger of getting burned.
82
Replacing consumables and maintenance
22
33
44
55
2. Hold the imaging unit by pinching the handles 1
on both sides of the unit as shown in the
illustration and slowly remove the imaging unit
from the facsimile.
* Set the imaging unit on a stable, horizontal
surface to prevent the toner from spilling.
3. Wipe the glass section 2 with the cloth supplied
with the facsimile.
4. Replace the imaging unit in its original position in
the facsimile front-end first.
5. Gently close the facsimile.
* If the facsimile doesn’t close properly, the
imaging unit may not be set properly. Reinstall
the imaging unit correctly.
1
2
Page 87

When the ERROR indicator lights
In the event of trouble, the ERROR indicator will light. Likewise, an alarm will sound to notify you of
the error. Refer to the message display for the type of error and follow the necessary procedure to
eliminate the trouble.
If the ERROR indicator does not go out even after following the required procedure, press the
STOP/RESET key.
* The volume of the error alarm can be set to one of 3 levels (refer to Memory Switch No. 06:
“Speaker Volume”, page 140) or it can be turned OFF (refer to Memory Switch No. 54: “Alarm
ON/OFF”, page 141).
83
When this message is displayed
● “ERROR!” is displayed
An error has occured during transmission or reception. A
message regarding the error will be displayed and the ERROR
indicator will light. When the error involves a transmission, a
Transmission report will be printed out.
* The cause of the error will be indicated by an error code on the
Transmission report which is printed out when a
communications error occurs during a transmission. In the case
of an error during a reception, print out an Activity report (refer
to page 117) and verify the error code. Refer to “Appendix 4:
Error code tables”, page 180, for an explanation of each error
code.
● “PAPER JAM” is displayed
Paper has jammed inside the facsimile. Follow the procedure in
“2 Paper jam inside the facsimile”, page 87, and remove the
jammed paper.
ERROR !
PAPER JAM
The ERROR indicator will light when…
• the facsimile is open.
• the imaging unit needs to be replaced.
• paper has run out.
• there is a paper jam.
• there is a document jam.
• there is a communications error, etc.
Troubleshooting
Page 88

84
Troubleshooting
● “DOCUMENT JAM” is displayed
A document has jammed in the facsimile. Follow the procedure
in “When a document jams”, page 89, and remove the jammed
document.
● “CHECK PAPER/OPEN COVER” is displayed
Paper has jammed in the paper table. Follow the procedure in
“1 Paper jam in the paper table”, page 86, and remove the
jammed paper.
● “CHANGE IU” is displayed
It is necessary to replace the imaging unit. A limited number of
pages can still be printed, but, after that, printing will be
impossible. Follow the procedure in “Replacing the imaging
unit”, page 79, and replace the imaging unit as soon as possible.
● “CLOSE MAIN BODY” is displayed
The facsimile is open. Close it securely.
● “SYSTEM ERROR” is displayed
Maintenance requires serviceman intervention. Remove the
power plug from the outlet and contact your service
representative, an authorised service centre or the place of
purchase.
DOCUMENT JAM
CHECK PAPER
OPEN COVER
CHECK PAPER
CHANGE IU
CLOSE MAIN BODY
SYSTEM ERROR
● “CHECK PAPER” is displayed
There is no paper on the paper table. Follow the procedure in
“(1) Setting paper”, page 18, and set paper on the paper table.
Page 89

85
Troubleshooting
MEMORY FULL
CHANGE TO ADF TX
USED IN MEM.FILE
MEMORY FULL
●
“MEMORY FULL / CHANGE TO ADF TX” is displayed
The memory has reached its capacity while scanning documents
into memory. The data for those documents already scanned will
be deleted from memory.
Remove all documents and…
1. Start the procedure once again from the beginning after
clearing sufficient data from memory, or
2. Start the procedure once again from the beginning and
transmit in the ADF transmission mode. (Refer to Memory
Switch No. 94: “Transmission Mode”, page 142.)
● “USED IN MEM. FILE” is displayed
The fax number which you tried to modify or delete is registered
under a one-touch key, group dial key or batch transmission key
which was used to schedule another communication still in
memory. Perform the modification or deletion procedure after the
corresponding communication is completed.
● “MEMORY FULL” is displayed
There are already 5 communications (standby transmissions
and/or timer controlled communications) scheduled and waiting in
memory. Schedule your communication after…
1. One of the previously scheduled communications is completed,
or
2. Clearing sufficient data from memory.
Page 90

86
Troubleshooting
11
22
When paper jams
When paper jams, a message regarding the paper jam will be displayed, the ERROR indicator will
light and the alarm will sound.
* DO NOT reuse paper which has jammed as it can cause another jam.
* ALWAYS try to remove jammed paper without tearing it. If the paper does happen to tear, be sure to
remove all loose scraps. Loose scraps of paper inside the facsimile are a primary cause of paper
jams.
1 Paper jam in the paper table
When a message like that at left is displayed, a
paper jam has occurred in the paper table. Remove
the jammed paper according to the following
procedure.
1. Open the paper table cover and remove all of the
paper on the paper table.
* BE SURE to remove the jammed paper without
tearing it.
2. Slide the main body release lever on the right
side of the fax towards you and open, and then
close, the facsimile.
The ERROR indicator will go out and printing will
again be possible.
CHECK PAPER
OPEN COVER
Page 91

87
Troubleshooting
33
11
1. Slide the main body release lever on the right
side of the fax towards you and open the
facsimile until it stops.
3. Reset the paper on the paper table.
2 Paper jam inside the facsimile
When a message like that at left is displayed, a
paper jam has occurred inside the facsimile.
Remove the jammed paper according to the
following procedure.
PAPER JAM
WARNING
High voltage is present in the charger section. Take sufficient care when
working in this area, as there is a danger of electrical shock.
CAUTION
The facsimile’s fixing unit is extremely hot. Take sufficient care when
working in this area, as there is a danger of getting burned.
Page 92

88
Troubleshooting
22
33
2. Remove the jammed paper without tearing it.
3. Gently close the facsimile.
The ERROR indicator will go out and printing will
again be possible.
* If the ERROR indicator does not go out, there
is still paper inside the facsimile.
Repeat steps 1 - 3.
Page 93

When a document jams
The ERROR indicator will light and “DOCUMENT
JAM” will appear on the message display.
89
Troubleshooting
11
22
33
2. Open the ADF cover.
3. With the ADF cover open, remove the jammed
document without tearing it.
* If the document cannot be removed from the
document insert side of the ADF, remove it
from the document eject side.
1. Remove all documents from the document table.
* DO NOT try to remove the document with
undue force as there is a danger that the
documents will tear.
DOCUMENT JAM
Page 94

90
Troubleshooting
44
55
4. Close the ADF cover.
The ERROR indicator will go out and printing will
again be possible.
5. Reset the documents on the document table.
Page 95

Troubleshooting
91
Troubleshooting tables
If you experience trouble with your facsimile, refer to the tables below to carry out minor adjustments.
If trouble persists, contact your service representative, an authorised service centre or the place of
purchase.
No paper is printed
out
Was the data received to
memory?
Has paper run out?
Has paper jammed?
18
86
113
Set paper on the paper
table.
Remove the jammed
paper.
Print out the documents
that are in memory.
Problem
-
Check point
Procedure
Page
The facsimile
cannot be operated
at all
Is the power cord connected
correctly?
Connect the power cord
correctly.
Printed paper is
blank
Are received documents blank?
When copying, were the
documents set face down?
Check with the
transmitting party.
Set the documents face
down.
-
-
Page 96

Troubleshooting
92
Paper often jams Is the paper set correctly?
Is the paper curled or wrinkled?
Are there loose scraps of paper
remaining inside the facsimile?
Set the paper correctly on
the paper table.
Replace the curled or
wrinkled paper with new
paper.
Perform the appropriate
procedure to remove the
paper scraps.
18
18
86
The image is dirty Is the facsimile dirty inside? Perform cleaning
operations.
81
Problem Check point
Procedure
Page
The printed image
is light
Is a message to replace the
imaging unit displayed?
Is the paper damp or wet?
Replace the imaging unit.
Replace the damp or wet
paper with new paper.
79
18
Page 97

Troubleshooting
93
No document feed
or skewed feed
Are the documents set correctly?
Are the document length, width,
and thickness appropriate?
Has a document jammed?
Are there too many documents?
Set the documents
correctly on the document
table.
Use only appropriate
sized documents.
Set only the appropriate
number of documents at
one time.
Remove the jammed
document and set the
documents once again.
25
26
26
89
Problem Check point
Procedure
Page
Transmission is
impossible
Is the modular cord connected
correctly?
Is “ERROR!” displayed?
Connect the modular cord
correctly.
Perform the necessary
procedure to correct the
error and try to transmit
the documents again.
-
83
Broadcast
transmission is
impossible
Is the memory full? Start the Broadcast
transmission procedure
once again from the
beginning after clearing
sufficient data from
memory.
68
Page 98

Troubleshooting
94
Reception is
impossible
Memory reception
is impossible
Polling reception is
impossible
Is the modular cord connected
correctly?
Is “ERROR!” displayed?
Is the memory full?
Did the transmitting party
perform the polling transmission
procedure correctly?
Connect the modular cord
correctly.
Perform the necessary
procedure to correct the
error and try to receive
the documents again.
Clear sufficient data from
memory.
Check with the
transmitting party.
-
83
68
-
Remote reception is
not possible
Is your telephone service set for
pulse dialling?
Did you use the correct remote
reception number?
Contact your telephone
company and change
your service to push
button (tone) dialling.
Check the registered
number.
-
123
Problem Check point
Procedure
Page
Page 99

95
Fax operation (Other functions)
Remote reception
● Remote reception is accomplished as follows
1. Pick up the telephone receiver while the bell is ringing.
2. If a fax tone is heard, use the telephone to input the 2digit remote reception number.
* If you are connected to a telephone, speak with the
other party.
(1) Operation
3. The connection will switch to the fax and reception will
start automatically.
If a separately purchased telephone is connected to the fax, fax reception may be initiated
from the telephone. If, during an incoming call, the telephone receiver is picked up while the
telephone is still ringing and a fax tone is heard, simply input the 2-digit remote reception
number and the fax will automatically start receiving operations.
** Remote reception is only possible if a separately purchased telephone with tone dialling
capabilities is used in conjunction with the facsimile.
* The factory setting for the 2-digit remote reception number is “55”. To change this number,
refer to “(2) Changing the remote reception number”, page 96.
Page 100

96
Fax operation (Other functions)
3. Press the FUNCTION key 10 times.
6. Press the ENTER FUNCTION key. The fax will revert to
the initial mode.
5. Use the keypad to input the new remote reception
number (2 digits).
4. Press the ENTER FUNCTION key.
2. Press the ENTER FUNCTION key.
SETTING
FUNCTION/ENTER
REMOTE RX NUMBER
FUNCTION/ENTER
NUMBER 55
0-9/ENTER
NUMBER 66
0-9/ENTER
(2) Changing the remote reception number
* To cancel the procedure part way through, press the
STOP/RESET key. The fax will revert to the initial mode.
USER SETTING
FUNCTION/ENTER
1. Press the FUNCTION key 6 times.
01.04.'97 12:00*
100%
 Loading...