

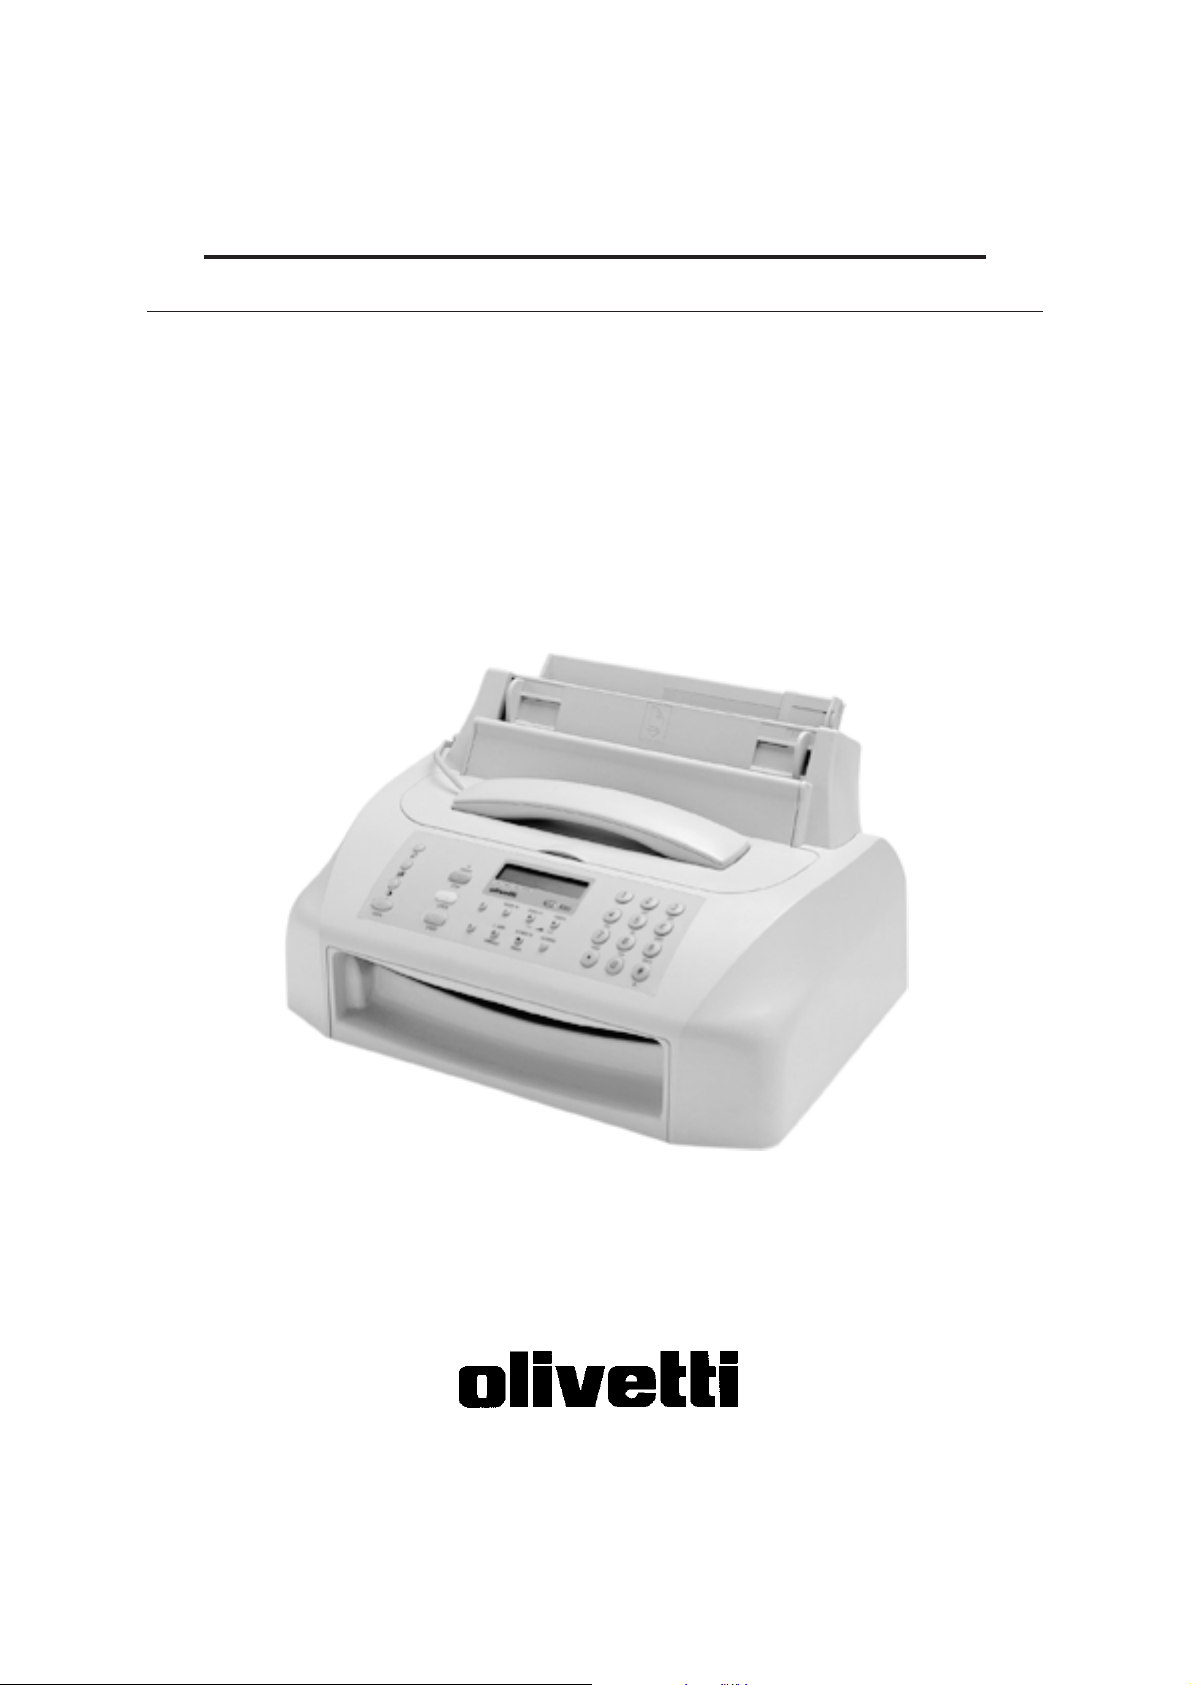
Facsimile
OFX 520
INSTRUCTIONS
PUBLICATION ISSUED BY:
Olivetti Lexikon, S.p.A.
Via Jervis, 77 - 10015 Ivrea (Italy)
Publishing department:
Olivetti Lexikon, S.p.A.
Documentazione Utente
Via Romano, 1 - 10010 Scarmagno (Italy)
Copyright © 2000, Olivetti
All rights reserved
- ONLY FOR U.K. -
THIS EQUIPMENT IS NOT DESIGNED FOR
MAKING EMERGENCY TELEPHONY CALLS
WHEN THE POWER FAILS ALTERNATIVE
ARRANGEMENTS SHOULD BE MADE FOR
ACCESS TO EMERGENCY SERVICES
The manufacturer reserves the right to carry out modifications to the product described in this manual
at any time and without any notice.
"This equipment has been approved to [Council Decision 98/482/EC - "CTR 21"] for pan-European
single terminal connection to the Public Switched telephone Network (PSTN). However, due to
differences between the individual PSTNs provided in different countries, the approval does not, of
itself, give an unconditional assurance of succesful operation on every PSTN termination point.
In the event of problems, you should contact your equipment supplier in the first instance."
ENERGY STAR is a U.S. registered mark
This product’s conformity with quality requirements
is certified by the Mark it bears, in accordance
with the 1999/05/EC standard.
Your attention is drawn to the following actions which could compromise the conformity attested
to above, as well as the characteristics of the product:
• incorrect electrical power supply;
• incorrect installation, incorrect or improper use or use not in compliance with the warnings provided
in the User’s Manual supplied with the product;
• replacement of original components or accessories with others of a type not approved by the manufacturer, or performed by unauthorised personnel.
WARNING: THIS EQUIPMENT MUST BE EARTHED.
The wall socket must be easily accessible and in close proximity. To disconnect the machine from the
electrical power supply, remove the power cable plug from the wall socket.
copy-e.p65 08/05/00, 14.172
ê
Gu------.p65 25/02/00, 9.061
- Cut off and keep - Cut off and keep - Cut off and keep - Cut off and keep - Cut off and keep - Cut off and keep - Cut off and keep - Cut off and keep - Cut off and keep - Cut off and keep -
mode.
restore the fax machine
then pre ss
conf irm and STOP to
to the initia l waiting
START
to
01-03 -99 08:00
Type new date and time
DD/MM/YY HH: MM
26-02 -99 16:30
START
DD/MM/YY HH: MM
START
FORMAT:24 H
START
FORMAT: DD/MM/ YY
FUNCTION (several
START
times)
Press KEY DISPLAY
FAX SET-UP
DATE AND TIME
CHANGING DATE AND TIME
Enter your fa x number
machine t o the initi al
waiting mode.
230023, then press
_
TYPE YOUR NUMBER
230023
(max 20 dig its) e.g.:
START t o conf ir m and
STOP to rest ore t he fax
START
TYPE YOUR NUMBER
START
PHONE NUMBER
You can s et up to 16 c haracter s, select ing them, o ne
at a time, w ith t he numer ic keys.
_
to start the
tran smiss ion.
FUNCTION (several
START
times)
STATION NAME
TYPE YOUR NAME
3
Press t he START key
number ( max. 52 di git s)
keypad.
direc tly on th e fax
FUNCTION (several
START
times)
Press KEY DISPLAY
INSTALLATION
TEL. LINE SET-UP
1
2
Dial the remote party
Inser t the documen t in
ADF.
Procedure DISPLA Y
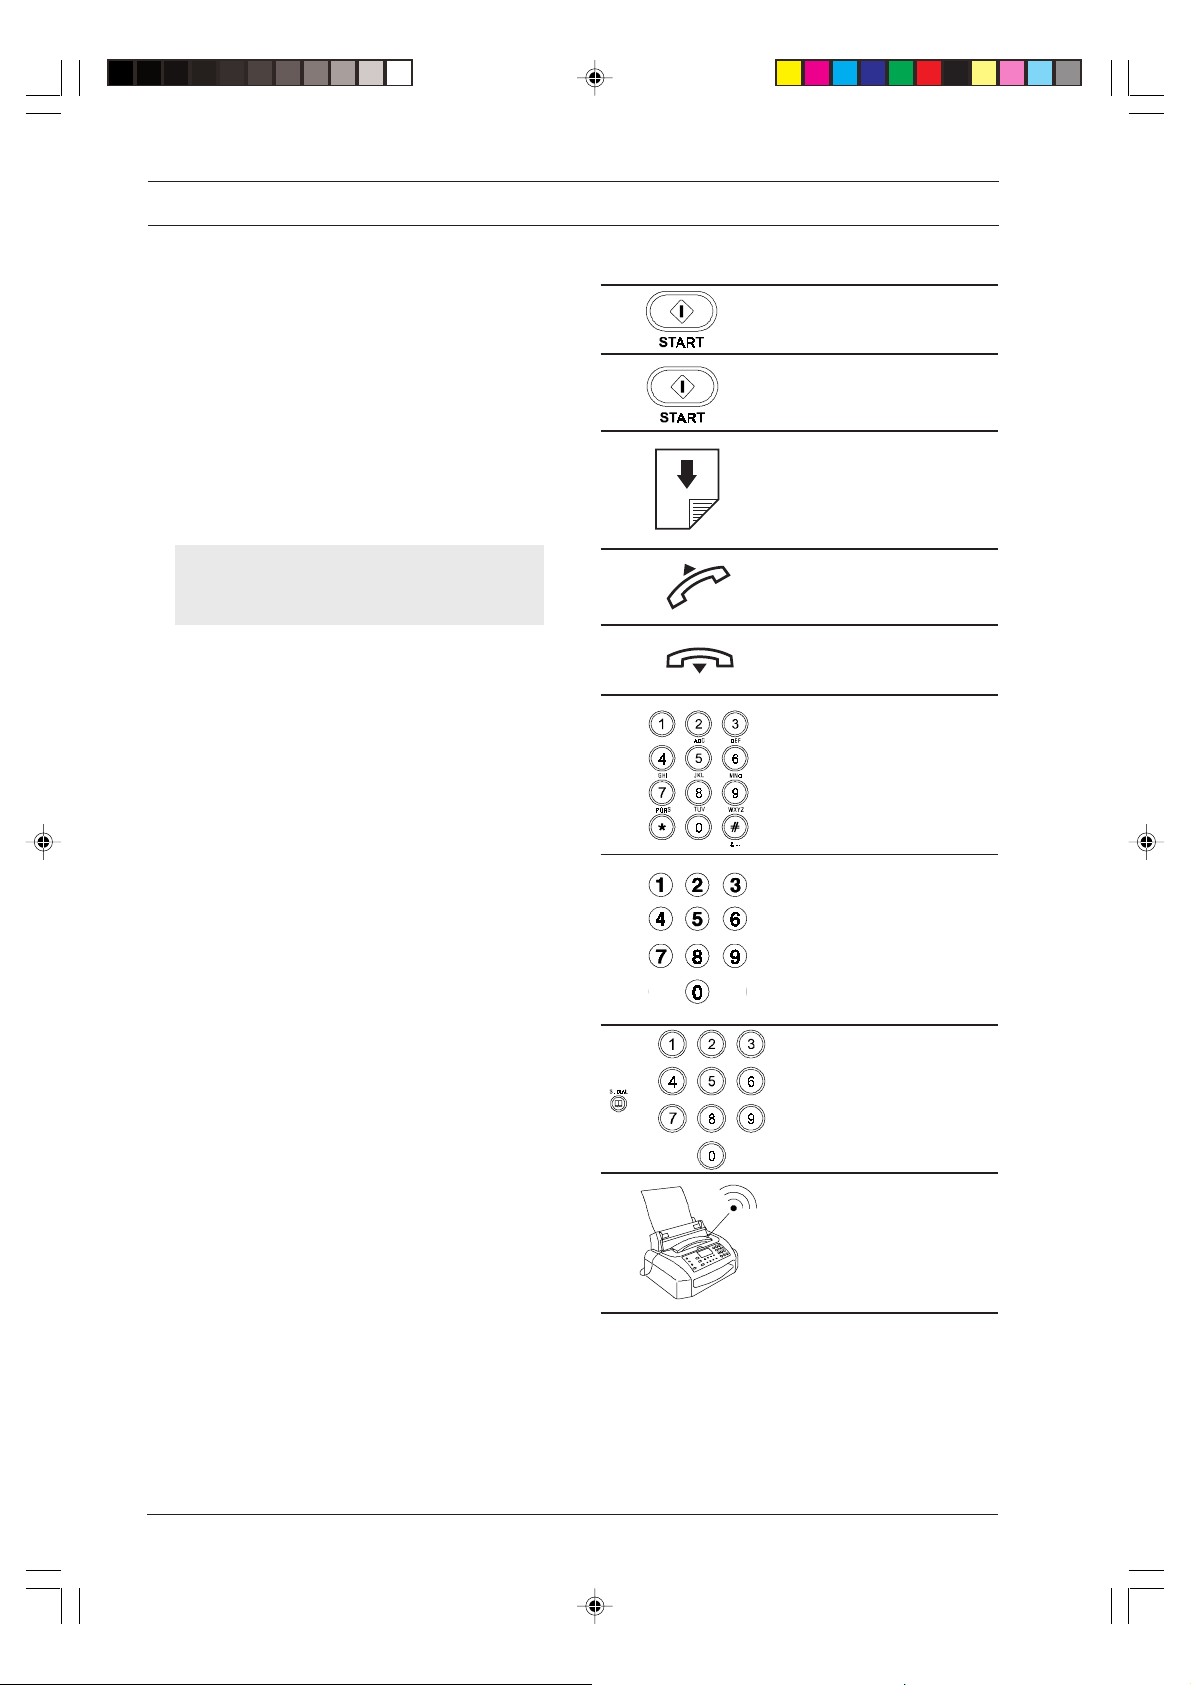
ENTERING YOUR NAME AND FAX NUMBER
QUICK REFERENCE GUIDE
TRANSMITTING A DOCUMENT
02 4890 78
TYPE NUMBER
DOCUMENT READY
NORMAL

Gu------.p65 25/02/00, 9.062
1
Inser t the doc ument in
COPY key.
ADF and p ress t he
Procedure DISPLA Y
100% TEXT
NORMAL 1
,
2
Choose, using on the
, and
100% TEXT
NORMAL 1
3
140%).
requir e (m ax 9) before
number o f copi es you
press ing th e COPY ke y.
otherw ise enter the
Press the COPY key
make a singl e copy,
direct ly if you w ish to
100% TEXT
NORMAL 5
PHOTO) and the zoom
value (100 %, 70% and
resolu tion ( TEXT and
and NORMAL), of
contrast (LIGHT, DARK
keys, the ty pe of
TO MAKE ONE OR MORE COPIES
QUICK REFERENCE GUIDE
TO PRINT OUT THE TRANSMISSION,
ACTIVITY AND BR OADCASTING REPORTS
waiti ng mode.
2
4
(in th e example: “LAST
BROAD. REPORT” ).
machine automatically
returns to the ini tial
Press t he START key
to c onfir m your
sele ction. Th e fax
and “PRI NT: I D LIST
“ACTIVITY REPORT”
3
Press t he START key. LAST TX REPORT
Press t he </ > ke ys t o
disp lay the other t wo
optio ns availabl e
1
Press t he FUNCT ION
key (several t imes).
Procedure DISPLAY
02-03 -99 10:48
AUTOMATIC RX
LAST BROAD. REPORT
PRINT OUT REPORT

READ THESE IMPORTANT RECOMMEND A TIONS FIRST ...
The fax machine you have purchased is a high quality
product satisfying all
For its best use you should f ollow the general recommendations indicated hereafter.
LOCATION ...
• Place the fax machine on a stab le, flat surface with no
vibrations, in order to avoid it falling, thus causing injury to people or damage to the product.
• Keep the fax away from water or steam sources, excessive heat sources and dusty rooms. Also, do not
expose it to direct sunlight.
• Keep the fax away from other electrical or electronic
appliances which may generate interference, e.g. radio, tele vision, etc.
• Do not surround the fax with books, documents or
objects which reduce the space necessary for air circulation. Ideal environmental conditions f or its location
are from 5°C to 35°C with a humidity rate between
15% and 85%.
• Leave enough room in front of the outlet slot f or originals, received or copied documents, so they will not
fall onto the floor.
CONNECTION TO THE ELECTRICAL POWER
SUPPLY ...
• The fax machine is provided with a power cab le with a
grounded plug. If your wall power socket does not
allow plug insertion or if it does not have a ground, get
in touch with a qualified electrician to update your electrical mains outlet to the current standards.
• Make sure that the power cable is easily accessible
without obstructing the passage, avoiding treading on,
or tripping over it.
• Make sure that power voltage and frequency of the
electrical outlet correspond to the power voltage and
frequency values indicated on the rear plate of the f ax
machine.
• Nev er connect the fax to a multiple plug or to an e xtension cable to which another appliance is already connected: poor electrical contact may cause o verheating
and originate fire or electrical shocks.
CONNECTION TO THE TELEPHONE LINE ...
Since the connection of the fax machine, telephone, answering machine and other devices to a telephone line is
subject to national standards, please refer to the current
regulations in your own country.
INSTALLATION AND SET-UP PARAMETERS ...
At national level, the settings and set-up parameters for
each installation may change according to the requirements
or individual user needs. Therefore, these settings and
requirements.
those indicated in the manual may not always be the same:
it is suggested that you print them out before making any
modifications.
MAINTENANCE ...
• When cleaning the fax, first disconnect it from the
electrical power supply. Use only a dampened cloth.
Do not use corrosive substances, such as solvents,
alcohol, petrol or abrasive components.
• Never introduce foreign bodies (liquids included) into
the fax machine: their accidental contact with po wered
parts may cause a fire or electric shocks.
REPAIRS ...
• Never try to repair the fax if you do not have the nec-
essary competence: by removing the outer casing, you
may risk electrical shocks or other injury . Alwa ys call a
qualified service technician.
• When replacing components (accessories included),
make sure that you use only original material approved
by the manufacturer . Use of other material might compromise the safety features, as well as causing fire
and electrical shocks.
• Disconnect the fax from the power supply and contact
a qualified service technician, if any of the following
conditions occur:
- the power cable, or its plug are damaged or worn
- the outer casing is damaged
- liquid has been poured inside by accident (rain in-
cluded!)
FOR CORRECT USE ...
• Before using your fax machine, read carefully the in-
structions contained in this manual. K eep the manual
for further consultation.
• The fax machine has already been set for operation
according to the standards of the telephone network
within your country.
• If you do not use the fax machine for long periods it
should be disconnected from the power supply to avoid
damage from power surges and peaks.
THE HANDSET...
• In case of voltage drop or interruption in the power
supply, you can neither make nor receive telephone
calls the keypad is disabled.
• However, if you absolutely need the fax machine to
make a call, you have to use an emergency phone, a
type certified by the network manager, which you
can connect directly to the fax machine.
Nt------.p65 25/02/00, 9.071
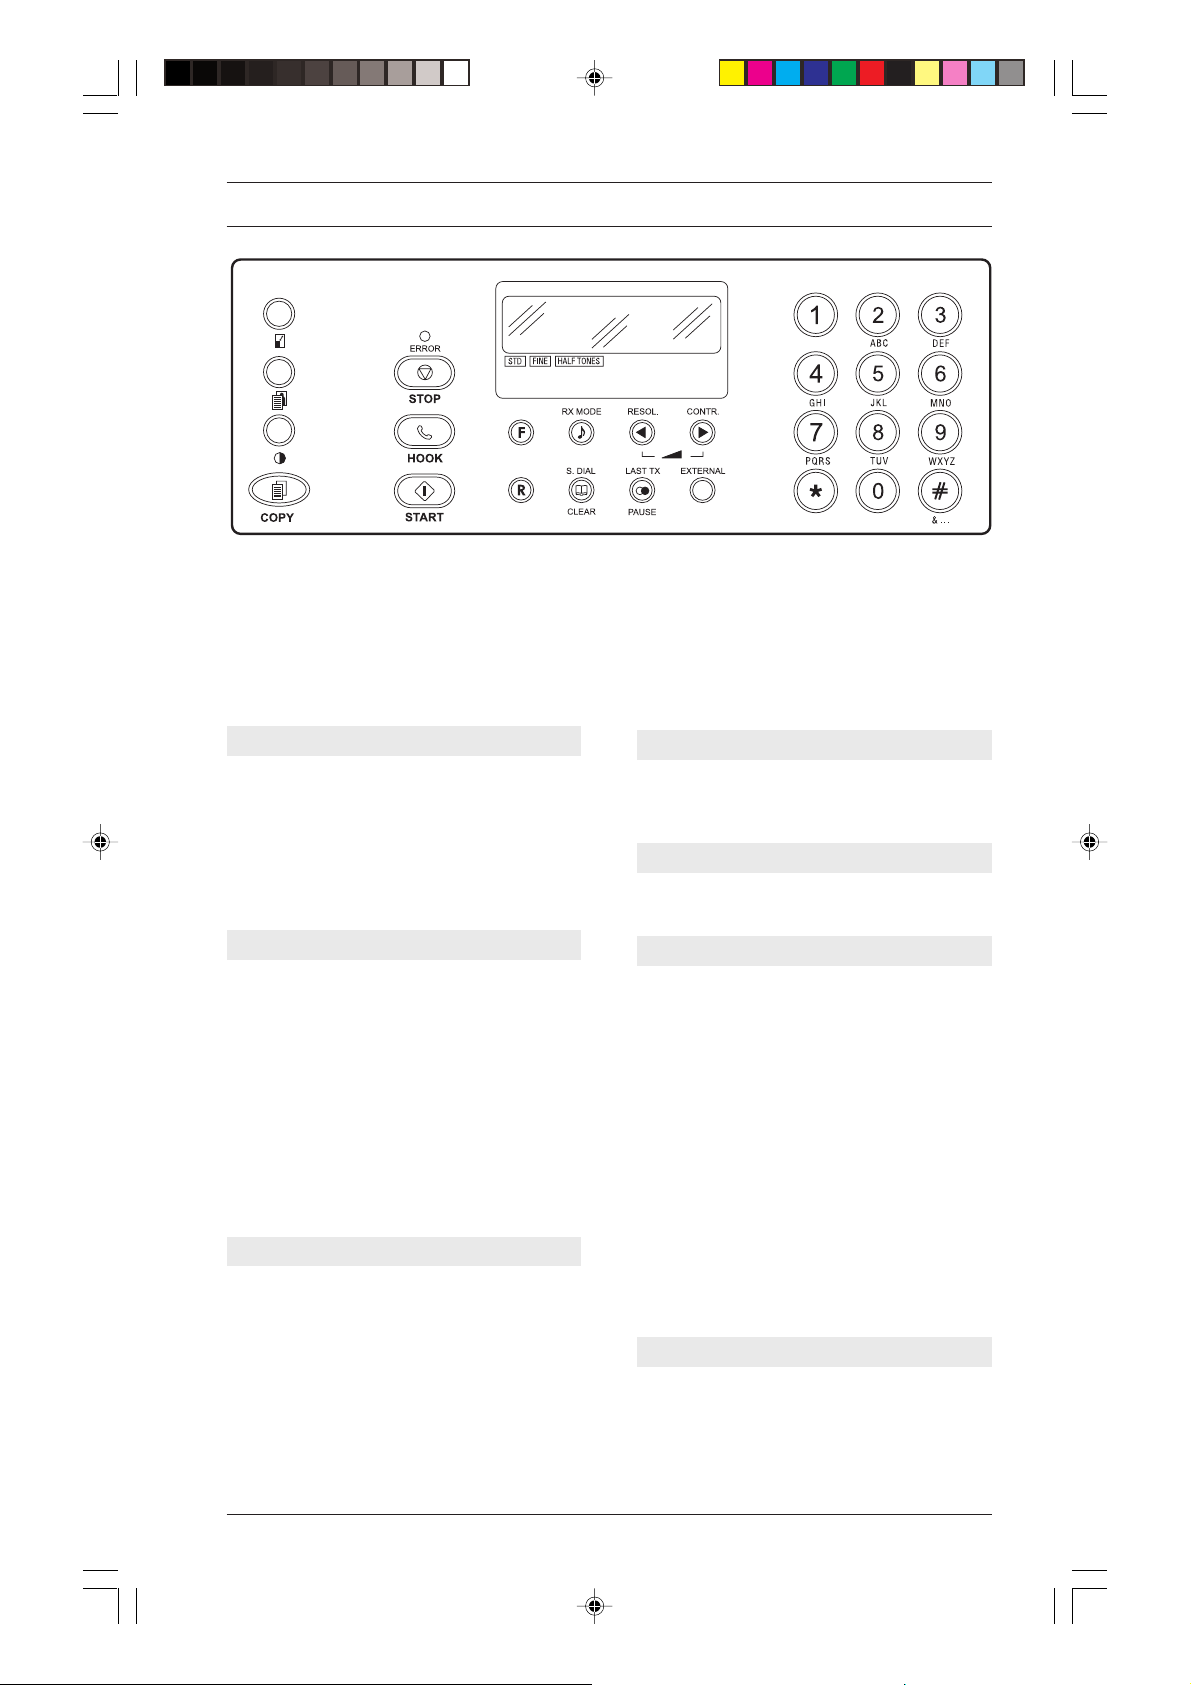
CONSOLE
Some keys may perform several functions, depending on the operational setting of the fax machine:
A Waiting mode, when the fax machine is not active.
P Programming mode (access to various menus) after pressing the FUNCTION key.
C Comnunication mode, during transmission or reception operation.
L Line mode, after pressing the HOOK key or lifting the receive r.
DISPLAY
Displays on two 16-characters lines:
• Date and time
• Machine status, menu and sub-menu
items, parameters and relative values
• Error messages
• Resolution and contrast values f or document scanning.
NUMERIC KEYPAD (0-9)
A-L For dialling the fax machine or tel-
ephone number.
A If kept pressed for more than one sec-
ond, they automatically selects (if programmed previously) the telephone or
fax number they are associated with
(one-touch dial feature).
P Sets any other numeric data.
Selects digits and alphanumeric characters during the setting of numbers and
names.
KEY
*
P Selects "next" special characters and
symbols during the setting of names.
Dials remote control codes.
A-L With tone dialling, it transmits a tone down
the line for special netwo rk services.
L-A-P Used for switching temporarily from
pulse (decadic) to tone dialling
(multifrequency).
KEY #
A-L
KEY &
P
F (FUNCTION)
A Accesses to programming mode.
P Selects menus and sub-menus.
This feature is enabled only in some countries
A-L Pressed while dialling the fax or tel-
P It performs the same function for num-
R
L
With tone dialling, it transmits a tone
down the line for special network services.
“Back” selects special characters and
symbols when setting names.
When setting the time, it changes (if you
chose the 12-hour time format) the format from p.m. to a.m. and vice versa.
.
ephone number, it associates with that
number the ability to detect a second
tone when dialling, in some telephone
exchanges.
bers programmed under one-touch dial
and speed dialling.
With the handset lifted, to access special functions provided by the network
operator and commonly known as REGISTER RECALL (R function).
Console1.p65 25/02/00, 9.071

RX MODE
A
Selects reception methods.
(HOLD)
L During a telephone conversation, puts
the call on hold.
</>
P
Select “next” or “previous” parameter
value.
L To raise or lower loudspeaker volume
after pressing the HOOK key.
RESOL.
A
Adjusts the resolution of the documents
to be transmitted (only with the document inserted in ADF).
CONTR.
A
Adjusts the contrast of the documents
to be transmitted/copied (only with the
document inserted in ADF).
S. DIAL
A
Followed by two alphanumeric ke ys (01-
32), selects automatically (if it has been
programmed) the telephone or the fax
machine number associated to them.
CLEAR
P Clears incorrect settings and program-
ming errors.
LAST TX
A If pressed once it displays the outcome
of the last transmission.
(REDIAL)
A
If pressed twice, it redials the last fax
number entered (only if the document is
inserted in the ADF).
Redials the last telephone number entered.
P AUSE
A -L Sets a pause between the digits of the
international code, the area code and
the remote party number during the dialling of the telephone or fax machine
number.
P Performs the same function for the num-
bers entered under the speed dialling
and the one touch dialling.
EXTERNAL
A-L
If pressed before dialling a number it
allows access to the public line, if the
fax machine is connected to a private
branch exchange.
P Performs the same function f or numbers
programmed under one-touch dial and
speed dialling.
"ERROR" LED
•
Signals an operating anomaly occurring
during transmission or reception.
STOP
A Interrupts a copying operation.
Ejects a document from ADF.
Switches off the ERROR led.
P Restores the fax machine to the wait-
ing mode.
Interrupts a programming operation.
C Interrupts a transmission or reception
operation.
HOOK
A
Line setting: equivalent to lifting the
handset.
START
L
A-L
Starts reception.
After dialling the fax number, it star ts
transmission (only with the document
inserted in ADF).
P Confirms the selection of menus, sub-
menus, parameters and related values
and moves on to next procedure.
A Starts copying (only with the document
inserted in ADF).
A Reduces or enlarges the documents to
be copied (only with the document inserted in ADF). Av ailable reduction and
enlargement values are respectively:
70% and 140%.
A Adjusts the resolution of the documents
to be copied (only with the document
inserted in ADF).
A Adjusts the contrast of the documents to
be copied (only with the document inserted in ADF).
Console2.p65 25/02/00, 9.081

1. Enclosed handset.
2. Paper support extension.
3. Sheet feeder (ASF) adjustable according to the following paper formats: A4, Letter and Legal. Maximum capacity:
40 sheets (80 gr/m2).
4. Paper feeder adjustment lever.
5. Automatic feeder for documents to be transmitted and copied (ADF). Maximum capacity: 5 A4, A5, Letter and
Legal sheets.
6. Paper guides. Adjustable according to the width of the document to be transmitted or copied.
7. Operator console.
8. Display.
9. Outlet for the originals and for received or copied documents.
10. Loudspeaker.
11. Connection sockets.
12. Print head compartment cover.
13. Print head compartement and band blocking the print head carriage (to be removed before connecting the fax
machine to the mains power supply).
14. Optical scanner.
15. Serial number label (see the bottom casing).
Compone.p65 25/02/00, 9.071

TABLE OF CONTENTS
INSTALLATION 1
P A CKAGE CONTENTS... .......................................... 1
INST ALLING.............................................................. 1
CONNECTING TO THE ELECTRICAL POWER
SUPPL Y AND TO THE TELEPHONE LINE... ............. 2
Connecting to the electrical power supply ... ................ 2
Connecting to the telephone line... .............................2
Connecting a possible emergency telephone or
other equipment ....................................................... 2
LOADING P APER ... .................................................. 3
INSTALLING THE PRINT HEAD ............................... 3
CHANGING DATE AND TIME ................................... 6
ONLY YOUR NAME AND YOUR F AX NUMBER
ARE MISSING ... ....................................................... 6
Setting the name ....................................................... 6
Setting the fax number ... ........................................... 7
Name and fax number position .................................. 7
TRANSMITTING A DOCUMENT FROM
MEMORY ................................................................ 16
CHANGING/RESENDING/CLEARING A
PRESET MEMORY TRANSMISSION ... .................. 17
IF THE TRANSMISSION IS NO T
SUCCESSFUL ... ....................................................17
RECEIVING A DOCUMENT ... ................................ 18
IF THE FAX MACHINE R UNS OUT OF PAPER
OR INK OR IN THE CASE OF PO WER FAILURE... 18
RECEPTION MODES ... .......................................... 18
Manual reception ... .................................................18
Automatic reception ... ............................................. 19
Automatic reception with call type recognition ... ...... 19
Reception with an external answering machine …...... 20
PROGRAMMING ONE-TOUCH DIAL AND
SPEED DIALLING ... ............................................... 20
One-touch dial.......................................................... 20
Speed dialling .......................................................... 22
CONFIGURING THE FAX TO THE
TELEPHONE LINE ... 8
CONNECTING T O A PUBLIC LINE ... ....................... 8
CONNECTING T O A PRIVATE LINE (PBX) ... ........... 9
FOR EVERYDAY USE 1 0
WHICH DOCUMENTS YOU CAN USE ................... 11
INSERTING THE DOCUMENT IN ADF .................. 11
ADJUSTING THE CONTRAST AND
RESOLUTION OF A DOCUMENT T O BE
TRANSMITTED OR COPIED ... .............................. 11
TRANSMITTING A DOCUMENT............................. 12
P A RTICULAR DIALLING CASES ... ........................ 13
TRANSMITTING A DOCUMENT AT A PRESET
TIME (DELA YED TRANSMISSION)......................... 14
CHANGING/CLEARING A PRESET DELA YED
TRANSMISSION... .................................................. 15
TRANSMITTING WITH ONE-TOUCH DIAL ... ........ 23
TRANSMITTING WITH SPEED DIALLING ............. 23
TRANSMITTING WITH ONE-TOUCH DIAL OR
SPEED DIALLING BY SEARCHING IN THE
ASSOCIA TED LISTS ... ........................................... 23
REPORTS AND LISTS............................................ 24
The reports... ........................................................... 24
Enabling/disabling automatic printing of
transmission report and error report ... ....................25
Enabling/disabling automatic printing of broadcast
report ...................................................................... 25
Enabling/disabling automatic printing of data
about a delayed transmission ... ............................... 25
Printing on request the transmission report, the
activity report and the broadcasting report ............... 26
Interpreting the reports ... ........................................26
Lists... ......................................................................27
Printing the setup parameters ... .............................. 27
Printing the configuration parameters list, the
data stored in the speed dialling codes and the
one-touch dial numeric keys ... ................................. 27
In-i--ii.p65 25/02/00, 9.091
i

USING THE FAX MACHINE AS A
TELEPHONE 28
CALLING WITH ONE-TOUCH DIAL ....................... 28
CALLING WITH SPEED DIALLING... ...................... 28
CALLING WITH ONE-TOUCH DIAL OR SPEED
DIALLING BY SEARCHING IN THE
ASSOCIA TED LISTS ... ............................................ 28
MAINTENANCE 39
REPLACING THE PRINT HEAD ............................. 39
REPLACING THE INK CARTRIDGE ... ................... 41
PRINT HEAD CLEARING AND MANUAL
NOZZLE TESTING ... .............................................. 42
CLEANING THE ELECTRICAL CONTA CTS
OF THE PRINT HEAD ............................................ 43
USING THE FAX MACHINE AS A COPIER 2 9
DOCUMENTS YOU CAN COPY............................... 29
MAKING A COPY ... ................................................ 29
FOR A MORE SOPHISTICATED USE 3 1
OTHER USEFUL RECEPTION SETTINGS............. 31
Reducing the print area of a received document ... .. 31
Receiving a document longer than the paper size ... 31
Changing the number of rings … ............................... 32
T o change ringing volume ... .................................... 32
Changing the beeper duration ................................. 33
Changing the silence lapse ...................................... 33
Changing the remote control code... ........................ 34
OTHER USEFUL TRANSMISSION SETTINGS....... 34
Setting automatic resolution... .................................. 34
Enabling/disabling the re-transmission of a failed
transmission ... ......................................................... 35
Hearing the connection tones .................................. 35
Adjusting the loudspeaker volume ... ........................ 35
Adjusting the volume of the buzzer ... ....................... 36
Reducing the speed transmission ... ......................... 36
Enabling/disabling the ECM mode ... ........................ 36
TRANSMITTING/RECEIVING A DOCUMENT
WITH THE POLLING FACILITY ... ........................... 37
What is polling ... ...................................................... 37
Making the transmission request (polling for
reception) ... ............................................................ 37
Changing/deleting a previously set polling reception
operation ... ............................................................. 38
Programming the fax machine to poll a document
(polling in transmission) ... ........................................ 38
CLEANING THE PRINT HEAD PAD ... .................... 44
CLEANING THE OPTICAL READER ...................... 44
CLEANING THE CASING ....................................... 45
REMOVING JAMMED DOCUMENTS AND
SHEETS ... .............................................................. 45
SOL VING SMALL PROBLEMS ................................ 46
ERROR CODES ... .................................................. 47
SIGNALS AND MESSAGES ... ................................ 48
Acoustic signals ... .................................................... 48
Error messages on display ... ................................... 48
APPENDIX 50
OTHER ACOUSTIC SIGNALS ................................ 50
OTHER MESSA GES ON DISPLA Y ... ...................... 50
TECHNICAL DATA ... .............................................. 51
EXAMPLE STANDARD FORM ITU-TS TEST
SHEET N°1 (SLEREXE LETTER) ...........................52
INDEX 53
CONSOLE (Fold-out)
ii
In-i--ii.p65 25/02/00, 9.092
INSTALLATION
P A CKA GE CONTENTS...
In addition to the machine, supplied with a power cord, in
the package you will find:
• The telephone connection cord
• The telephone Plug (where required)
• The package containing a print head
• The telephone receiver
• The support for feeder paper
• 1 transparency with back sheet to use as document
holders
• This manual, together with “Quic k Reference Guide”.
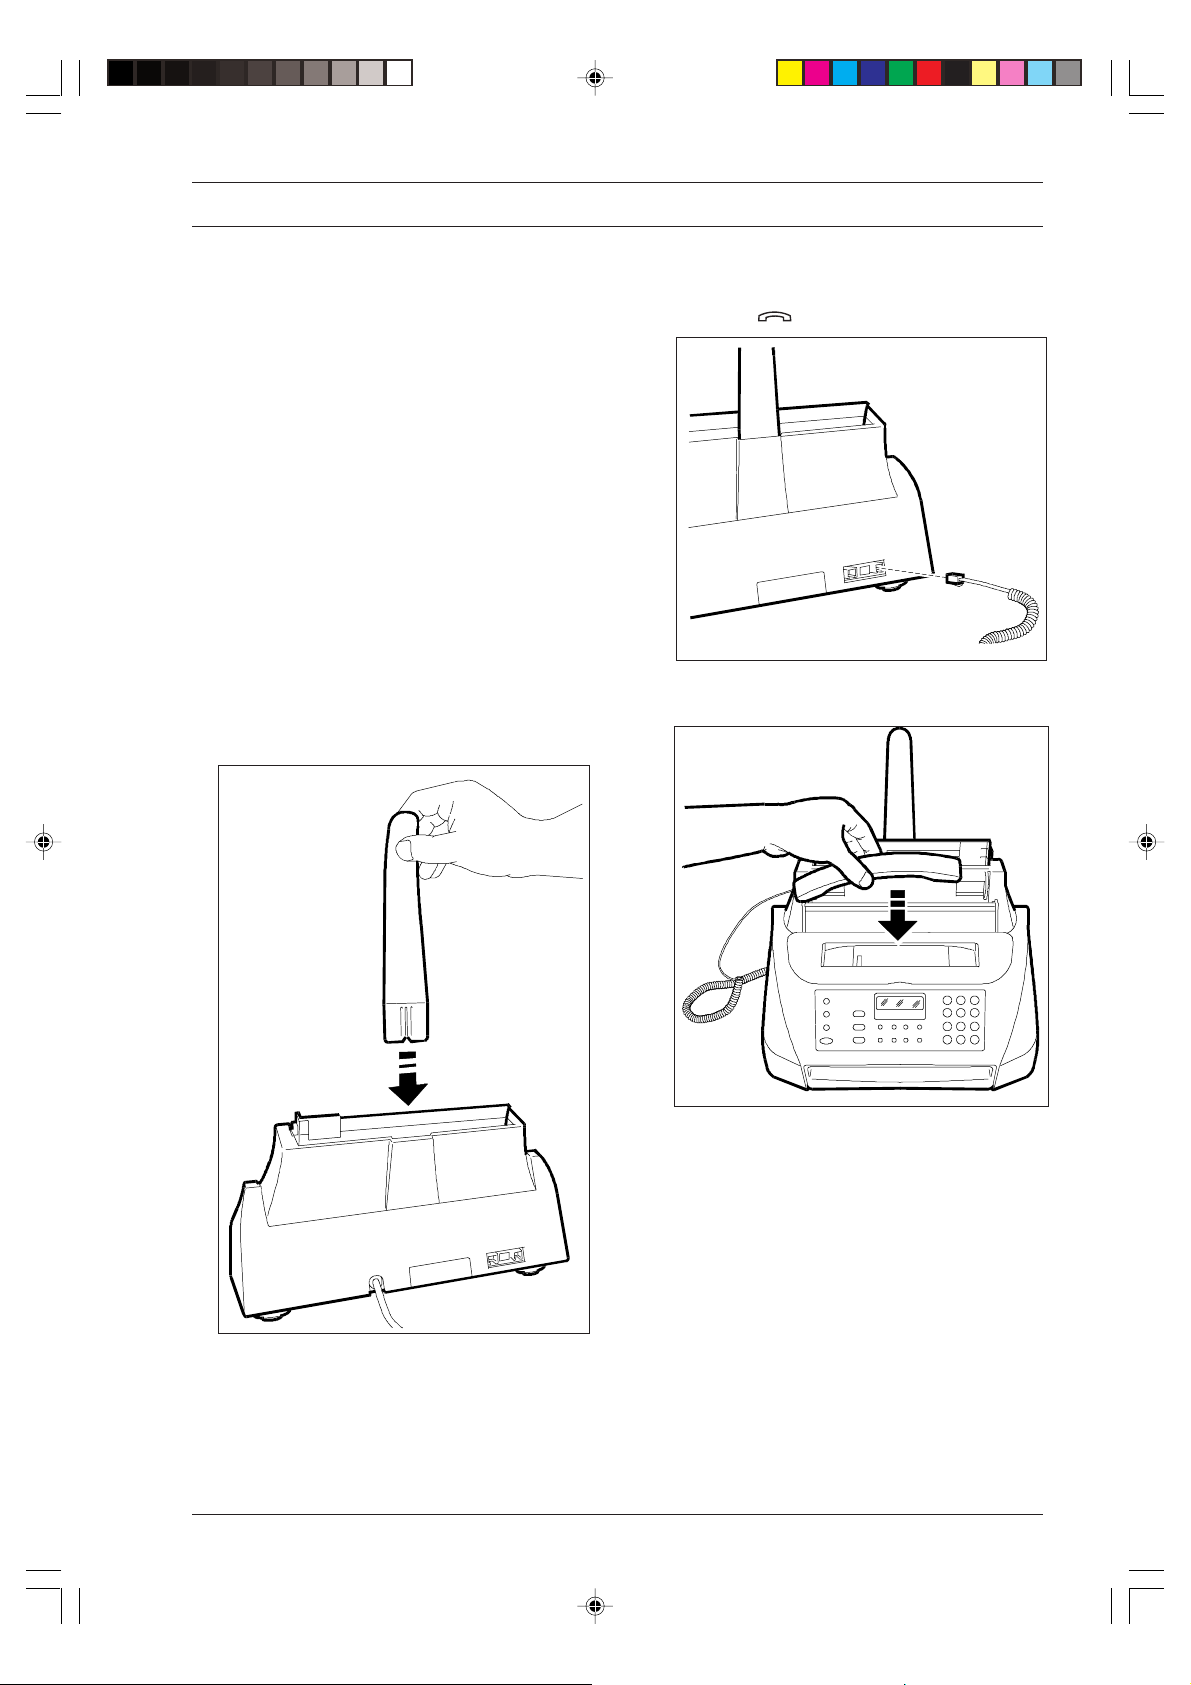
2 . Insert the handset cord connector into the socket with
INST ALLING...
1. Insert the “paper support extension” in the appropriate slot by pushing it until it clicks.
3. Place the handset in its cradle.
the symbol on the fax machine.
-1--1--7.p65 25/02/00, 9.091
1
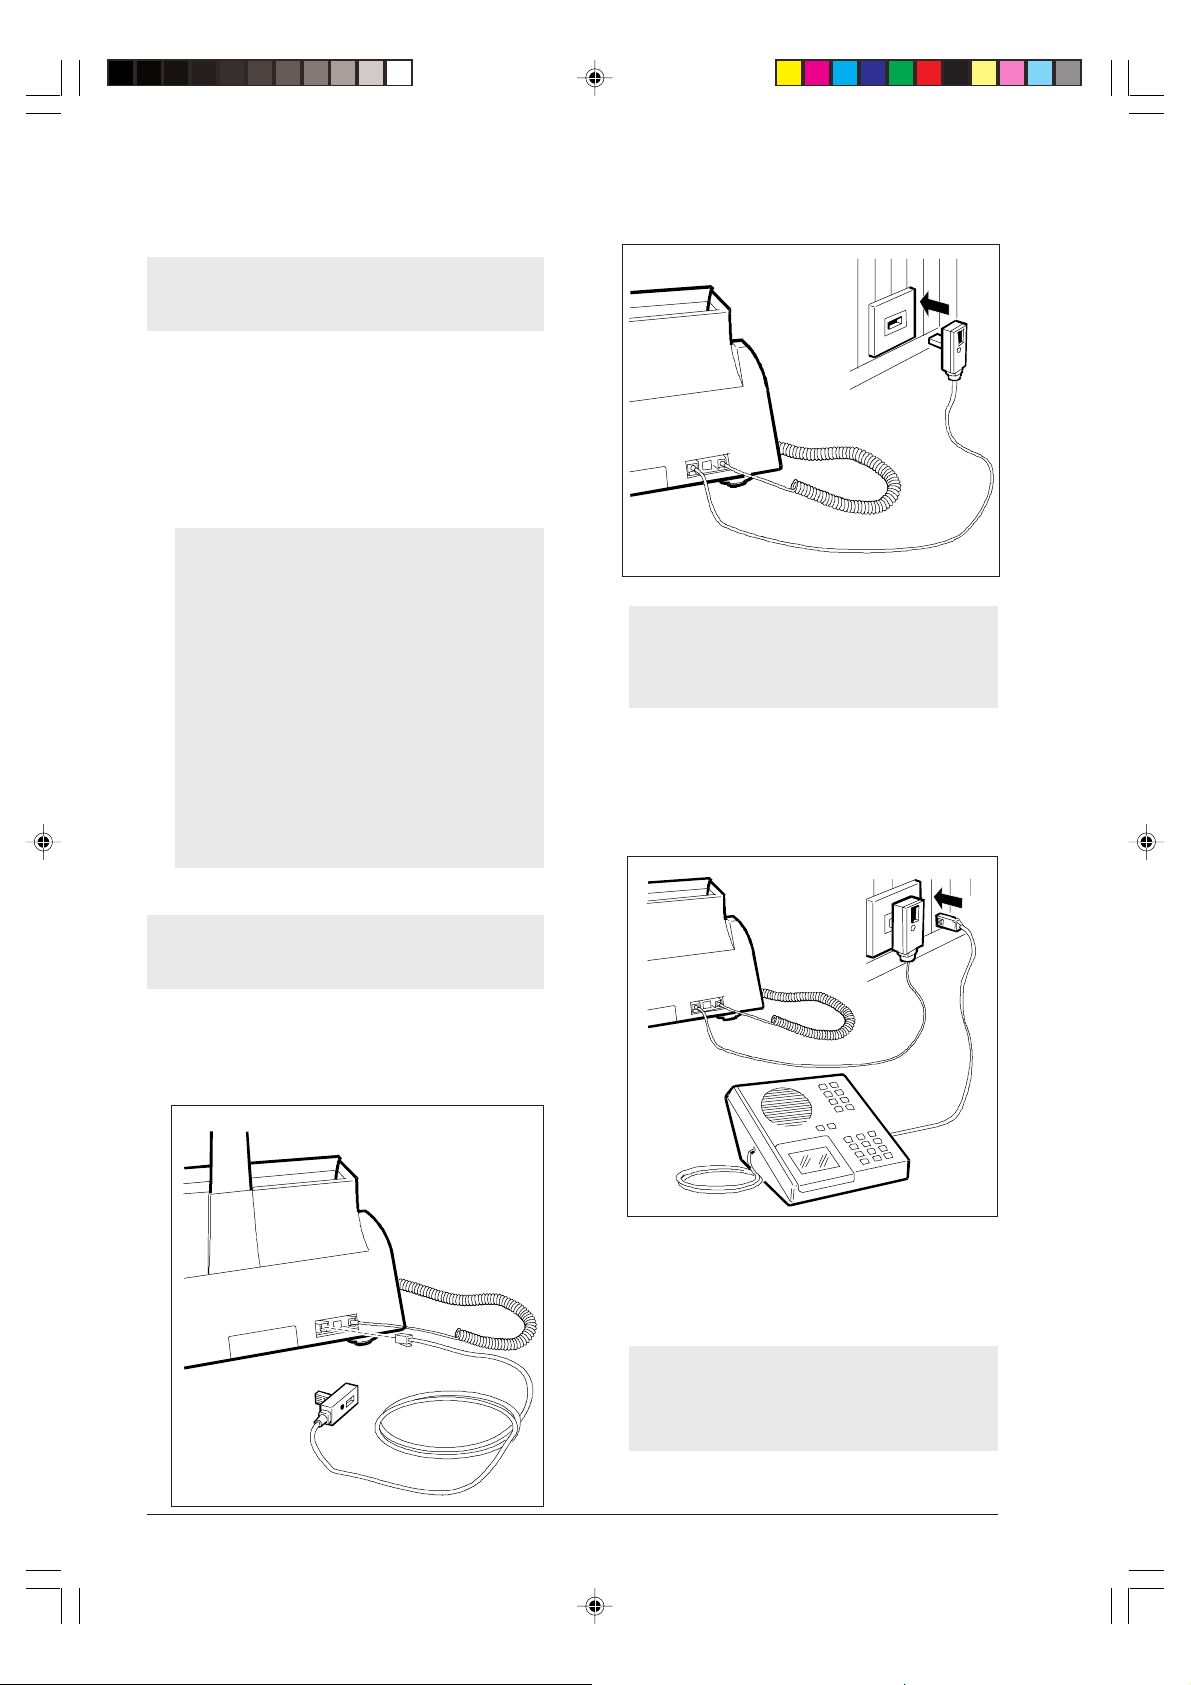
CONNECTING TO THE ELECTRICAL POWER
SUPPLY AND TO THE TELEPHONE LINE...
Remove the band which blocks the print head carriage before connecting the fax machine to the mains
power supply (see the print head compartiment).
Connecting to the electrical power supply...
1. Plug the power cord into the wall power socket. The
fax machine automatically performs a quick self-test
procedure to check that its components operate properly, the display will then show the following messages: “A UT OMA TIC RX” on the top line and “CHECK
PRINT HEAD” on the bottom line.
The fax machine will be connected perma-
nently, ready to receive and transmit documents
24 hours a day.
If you want to switch it off, you have to un-
plug the power cable from the electrical power
supply as the fax machine has no on-off switch.
If by accident the displayed messages are not
written in your language, select the desired “LAN-
GUAGE” among those available by pressing in
sequence the following keys
FUNCTION (eight times), ST A RT, FUNCTION,
ST ART, </> until you select the desired lan-
guage, then START and finally ST OP.
2 . Insert the extension plug at the other end of the cord
into the telephone line wall socket.
If the network to which the fax machine is connected has more than one socket connected
in series, you must connect the fax machine to
the primary socket.
Connecting a possible emergency
telephone or other equipment ...
1. Plug the telephone cord or the answering machine
cord into the socket on the extension plug.
Connecting to the telephone line...
Connect the fax machine with the telephone line
using only the provided cord. Do not use other cords,
otherwise the fax machine ma y not work properly .
1. Insert the miniature connector (which is small and
transparent) of the telephone line connection cord
into the “LINE” socket on the fax machine. A click
indicates that it has been inserted correctly.
In some countries, answering machines, telephones or
other equipment can be connected via socket TEL on
the fax machine (covered by a tear-off flap). For further information refer to the standards in y our country.
If the network to which the fax machine is connected has more than one socket connected
in series, you must use an approved telephone
model.
2
-1--1--7.p65 25/02/00, 9.092
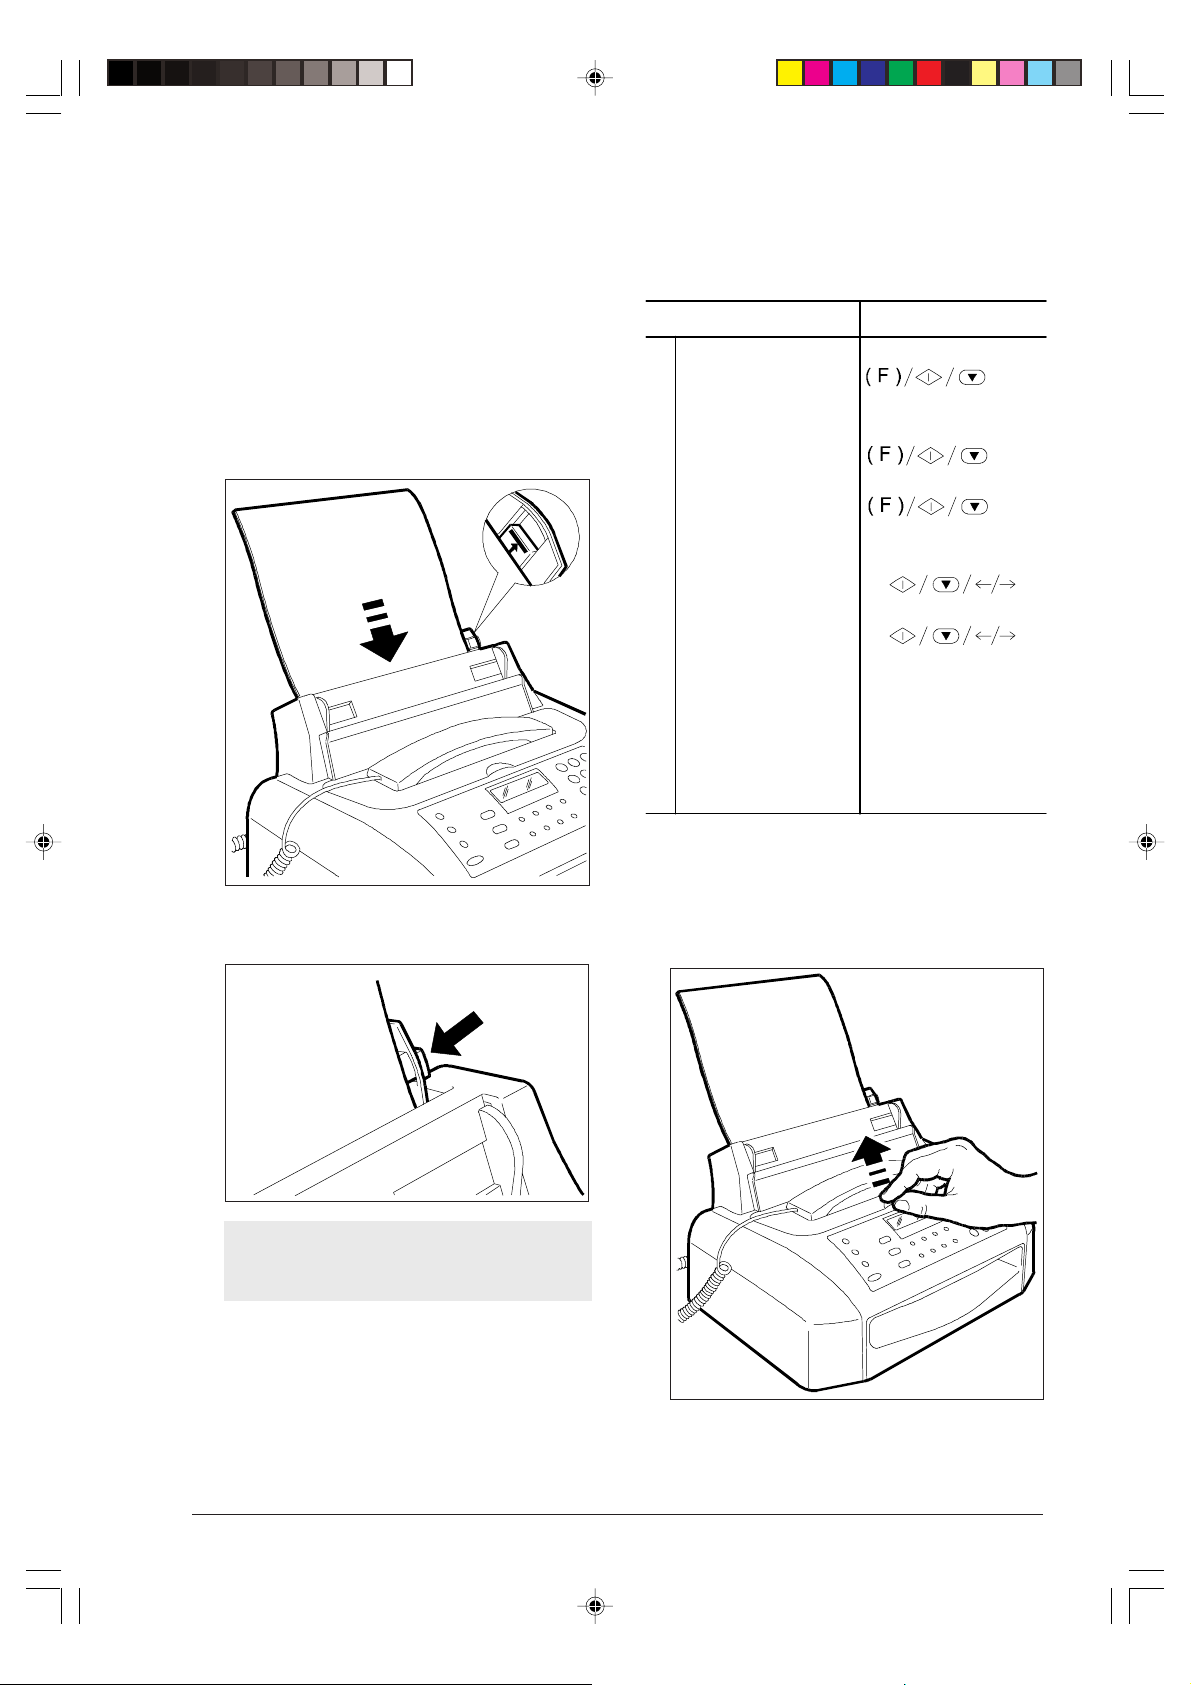
LOADING PAPER ...
After manually adjusting the sheet feeder , to ensure the
proper operation of the fax machine, you also have to
The sheet feeder tray (ASF) can contain a quantity of
sheets not exceeding the reference notch (usually, 40
check whether the print format set on the fax machine
coincides with the paper format you want to use.
sheets of 80 gr/m2) which are used to print received
documents or to photocopy any type of original. The
tray can accommodate paper sizes A4 (210 x 297), US
Letter (216 x 279 mm), and US Legal (216 x 356 mm),
1
of weights ranging from 70 gr/m2 to 90 gr/m2.
1. Holding the sheets by the top edge, drop them into
2
the sheet feeder without folding or forcing them.
3
4
Procedure DISPLA Y
Press the FUNCTION
FAX SET-UP
key unti l t he dis play
shows --->
Press the START key. DATE AND TI ME
Press the FUNCTION
PRINTER PARAMET.
key key until the display
shows --->
Press the START key. SIZE: A4
REFERENCE
NOTCH
5
6
INST ALLING THE PRINT HEAD ...
2. Push the sheets against the left side of the tray using
the adjustment lever .
1. Lift the cover of the print head compartment, plac-
Press t he keys </>
SIZE:LETT ER
until the display shows
the format you want to
use, in t he example
"Let ter".
Press the START key
to confirm the settin g,
AUTOMATIC RX
CHECK PRINT HEAD
then the STOP key.
ing your finger in the centre recess.
If you add more sheets into the sheet feeder,
make sure care to insert the fresh sheets under
and not over the remaining ones.
-1--1--7.p65 25/02/00, 9.093
3

3. Insert the print head in its housing with the electri-
2. Remove the print head from its box and, holding it by
its finger grip, remove the protective film from the
print nozzles.
cal contacts towards the front part of the fax machine.
Avoid touching the nozzles and the electrical
contacts.
If the print head has an interchangeable ink cartridge, do not remove the cartridge from the print
head.
4. Push the print head in the direction of the arrow
until you hear a click, confirming that it has been
inserted proper ly, then close the print head compartment cover.
4
-1--1--7.p65 25/02/00, 9.094
If, after installing the print head, the message “CHECK
PRINT HEAD” is displayed again, try to remove and
reinsert the print head pushing it harder. If the message persists, remove the print head and clean the
electrical contacts of the print head and of the carriage, see “Cleaning the electrical contacts of the
print head”, under the “Maintenance” chapter .
To release the print head, push the levers in the
direction of the arrow.
5. The fax machine automatically feeds a sheet of
paper and starts the nozzles cleaning and check-
ing procedure, which ends with:
• printing, on the automatically fed sheet, the fol-
lowing diagnostic result
numbered scale
black areas
ONE ORE MORE GAPS IN THE TOP NUMBERED SCALE AS WELL AS WHITE HORIZONTAL LINES
IN SOLID BLACK AREAS MEAN A LOWER PRINT QUALITY.
PLEASE, REFER TO THE CHAPTER 'MAINTENANCE' IN THE INSTRUCTIONS.
containing:
-a numbered scale, to check ink flow and the
electrical circuits associated with the print head
nozzles.
- a set of graphics and text, to assess print quality.
• displaying the message: “CHECK PRINT OUT,
1=EXIT 0=REPEAT”.
6 . Examine the print sample as follows:
• Check the numbered scale for interruptions and
the black areas for horizontal white lines: if
none are present, then the print head is installed
properly and is operating normally. Set the value
1, and the fax machine will go back to its initial
waiting mode and ready for use. The “AUTOMA TIC RX” message will be displayed on the upper line and the “date and time” on the lo wer line.
• If, instead, y ou see interruptions or white lines,
set 0 to repeat only the nozzle cleaning operation: if the new pr int sample continues to be unsatisfactory, repeat the procedure again.
• If, after repeating the procedure three times , print
quality still fails to meet expectations, perform
the following oper ations consecutively, stopping
as soon as a satisfactory print sample is obtained:
- Use the fax machine to make a copy of a document with the type of graphics or text you require
and assess its quality.
- Change paper type (the paper you are using may
be very porous) and repeat the procedure again.
- Remove and reinstall the print head.
- Remove the pr int head and visually check for the
presence of a particle on the pr int nozzle; if you
find one, carefully remove it, taking care not to
touch the electrical contacts; move the carriage
against the left side, then clean the print head
pad, see “Cleaning the print head pad” under
the “Maintenance” chapter. Lastly, reinstall the
print head.
- Remove the print head and clean its electrical
contacts and those of the print head carriage,
see “Cleaning the electrical contacts of the
print head” under the “Maintenance” chapter.
- Reinstall the print head.
- Call technical service.
Print head replacement
If the print head provided with your fax has an inter-
changeable ink cartridge, you can change the
cartridge up to 6 times before replacing the whole
print head.
To replace both the ink cartridge and the print head
refer to the chapter "Maintenance".
-1--1--7.p65 25/02/00, 9.095
5
CHANGING DATE AND TIME ...
If the date and time on the display are not correct, you
can change them at any time.
Procedure DISPLAY
If in any operating phase two minutes pass without you entering any data, the fax machine will
automatically go back to its initial waiting mode.
Remember that the waiting mode indicates the conditions of inactivity the fax machine is in.
FUNCTI O N until the
FAX SET-UP
display shows --->
START
DAT E AN D TI ME
If you think you have made a mistake, press STOP
and repeat the procedure.
START
FORMAT: DD/MM/YY
If you want to select a different format from the one
displayed, press the
START
</>
keys.
FORMAT:24 H
The format is displayed
If you want to select the other time format (12 hour),
press the </> keys.
START
The cursor blinks on the
DD/MM/YY HH:MM
20-03-99 09:22
first digit of the date.
If you have selected the 12 hour time for mat, the letter
“P” (p.m.) or the letter “A ” (a.m.) will be displayed. To
toggle from one letter to the other, press the
FUNCTI ON key.
Type the new date and
time (e.g. 21-03-99,
DD/MM/YY HH:MM
21-03-99 10:30
10:30). Each time you
enter a digit, the cursor
moves o n to the next
one.
If you only want to change some digits, move the
cursor on them using the </> keys and type the correct
digits over them.
START
VARIOUS SETTINGS
The procedure for
changing date and time
is now complete.
New dat e and time will automati cally be updated and
will be printed on every transmit ted page.
STOP ...
To restore the fax
AUTOMATIC RX
21-03-99 10:32
machine to its initi al
waiting mode.
ONLY Y OUR NAME AND YOUR FAX NUMBER
ARE MISSING ...
Once set, the name and number (sender identification)
will remain unchanged, unless modified, and both will
appear on every fax page transmitted.
Setting the name ...
Press KEY DISPLAY
FUNCTION ...
... unti l the displ ay sh ows
--->
START
FUNCTION (twice)
START
You can enter a maximum of 16 characters by selecting them, one by one, using the numer ic keys. Each
numeric key selects cyclically the characters present
in its repertor y (see console left side), starting from
the numeric character and proposing the next character each time it is pressed. B y pressing the k eys * and #
you can enter a variety of symbols in your name, e.g. &.
If you want to enter an empty space, simply move the
cursor using the > key without entering any character.
For example, to enter the name "LARA":
Press KEY DISPLAY
5 ...
... until the lett er "L" has
been sel ected.
> ...
... the cursor moves
forward of one posit ion.
2 ...
... until the lett er "A" is
displ ayed.
INSTALLATION
TEL. LINE SET-UP
STATION NAME
TYPE YOUR NAME
_
TYPE YOUR NAME
L
TYPE YOUR NAME
L_
TYPE YOUR NAME
LA_
6
-1--1--7.p65 25/02/00, 9.096
Continue in the same way until your name is completed,
then check its correctness b y scrolling the cursor (keys
</>) along the characters.
If there is an error, position the cursor on the wrong
character and overwrite the correct character; if you
want to cancel the name completely, press CLEAR.
START ...
... to confirm the name.
PHONE NUMBER
Changing the position ...
FUNCTION
display shows --->
If you think that you made a mistake, press STOP and
repeat th e proc edure.
START
Press KEY DISPLAY
until the
FAX SET-UP
DATE AND TIME
Setting the fax number ...
Press KE Y DISPLAY
START
Enter yo ur fax number
(max. 20 d igit s), by
press ing, o ne by o ne, all
the nu mbers e. g.: 620103.
To enter a space, press
the > key.
If you make a mistake, correct it as described in
"set ting t he nam e".
When setting the number, you want to enter the
inter nat ional code, instea d of zer os, pr ess t he * key;
the d isplay shows the symbol +. This symbol will be
print ed before your fax number on each p age transmitted.
START . ..
... to c onfi rm the numbe r.
STOP ...
... to restore the fax to
the initial waiting mode.
TYPE YOUR NUMBER
_
TYPE YOUR NUMBER
620103
DIAGNOSTICS
AUTOMATIC RX
21-03- 99 10:32
FUNCTION
START . ..
... unti l the di spl ay
shows --->
</> .. .
...to select the alternative
paramet er.
START . ..
... to confirm the setting
STOP ...
... to r estor e t he fax
machine to its initial
waiti ng mode.
VARI OUS SETTINGS
HEADER INSIDE
HEADER OUTSIDE
RETRANS. DOC.: OFF
AUTOMATIC RX
21-03- 99 10:40
Name and fax number position ...
The information in the heading of the document to be
transmitted (name, fax number, date and time and
number of pages) can be shown either outside the te xt
area, just below the upper edge of the page, or inside
the text area and slightly lower down.
Your fax machine has been set up to transmit this inf ormation within the text area.
-1--1--7.p65 25/02/00, 9.097
7
CONFIGURING THE FAX TO THE TELEPHONE LINE ...
CONNECTING T O A PUBLIC LINE ...
The fax machine is already set to be connected to a
public line. In any case, check that:
• the " PUBLIC LINE" parameter is selected
• the dialling mode selected (pulse = decadic or
tone = multifrequency) corresponds to that of the
public telephone exchange managing the line to
which the fax machine has been connected. If in
doubt about the selection to be made, ask the public telephone network manager.
In some countries the pulse dialling mode =
decadic is not available. In this case, the fax machine will not show the messages given in steps 5
and 6 of the following procedure:
1
2
3
4
If the fax machine is set for connection to "private
line", press the </> keys to select connection to
"publ ic line" .
5
6
7
Procedure DISPLAY
Make sur e that the
disp lay shows the init ial
AUTOMATI C RX
02-03 -99 10: 48
waiti ng mode wit h da te
and tim e.
Press t he FUNCT ION
INSTALL ATION
key until the disp lay
shows --->.
Press t he START key. TEL . LINE SET-UP
Press t he START key. PUBL.LINE (PSTN)
Press t he START key. PSTN DIAL:TONE
Press th e </> ke ys to
PSTN DIAL: PULSE
select the other dialling
mode: “PSTN
DIAL:PULSE” .
Press t he START key
to confirm the s election
AUTOMATI C RX
02-03 -99 10: 48
and the n the STOP key
to restore the initi al
waiti ng mode of t he fa x
machine.
8
-2--8--9.p65 25/02/00, 9.138
CONNECTING TO A PRIVATE LINE (PBX) ...
Procedure DISPLAY
To connect your fax machine to a private line and to be
able to use it also on a public line, you have to:
• select the "PRIVATE LINE" parameter.
• set the dialling mode (pulse = decadic or tone =
multifrequency) to the one used by the private
telephone exchange (switchboard) managing the
line to which the fax machine has been connected.
If in doubt about the selection to be made, ask the
private telephone network manager.
• set the output mode (area code or flash ) to ac-
cess the public telephone exchange from the private telephone exchange (switchboard).
• adjust the dialling type (pulse or tone) to the one
used by the public telephone exchange.
In some countries the pulse dialling mode =
decadic is not available. In this case, the fax machine will not show the messages given in steps 6,
7, 10 and 11 of the following procedure:
1
2
3
4
5
6
7
8
Make sur e that the
disp lay shows the initi al
AUTOMATI C RX
02-03 -99 10: 48
waiting mode with date
and tim e.
Press t he FUNCT ION
INSTALL ATION
key until the dis play
shows --->
Press t he START key. TEL . LINE SET-UP
Press t he START key. PUBL .LINE ( PSTN)
Press t he </ > ke ys t o
PRIV.LIN E (PBX)
show t he ot her op tio n
availabl e: " PRIV.LINE
(PBX)".
Press t he START key. PBX DIAL: TONE
Press t he </ > ke ys t o
PBX DIAL: PULSE
show t he ot her di al ling
mode: "PBX
DIAL:PULSE"
Press t he START key
EXT. LINE: PREFIX
to c onfir m you r
sele ction.
Press th e </> ke ys to
9
EXT.LINE :FLASH
show t he ot her op tio n
"EXT. LINE:FLASH" or
go directly to the next
step if you want to
conf irm the
"EXT. LINE:PREFIX"
outpu t mode.
Press t he START key. PSTN DIAL:PULSE
10
Press th e </> ke ys to
11
PSTN DIAL:TONE
sele ct the othe r diall ing
mode: “PSTN
DIAL:TONE”
Press t he START key
12
to c onfir m you r
AUTOMATI C RX
02-03 -99 10: 48
sele ction and t hen the
STOP key to r e st o re
the inital wait ing mode
of th e fax machi ne.
If you have confirmed the "EXT.LINE: PREFIX" output
mode, the fax machine will ask you to dial the number
corresponding to the prefix (max. 3 digits). Once the
mode for the fax machine to access the public line has
been confir med; press the EXTERNAL key to access it .
-2--8--9.p65 25/02/00, 9.139
9
FOR EVERYD AY USE
Now that your fax machine has a name and a number,
you can use it to:
• transmit documents (also in delayed mode or using the polling method)
• receive documents (also using the polling method)
• make phone calls (see the "Using the fax machine
as a telephone" chapter)
• copy documents (see the " Using the fax machine
as a copier" chapter)
From now on, to simplify the procedures described, the following graphic representations
will be used at the beginning of each procedure:
Press this key once.
Press this key X times.
X
Insert the document with
the transmitting or copying
side face down (max 5
pages at a time).
Lift the receiver.
Replace the receiver.
Dial on the numeric keypad.
Press a numeric key for
more than one second (onetouch dial key).
Press the S. DIAL key and
enter a speed dialling code.
Incoming call.
10
-3-10-27.p65 25/02/00, 9.1610
WHICH DOCUMENTS Y OU CAN USE ...
INSERTING THE DOCUMENT IN ADF ...
Dimensions
• Width min. 148 mm - max. 216 mm
• Length min. 216 mm - max. 600 mm
Thickness
From: 60 - 90 gr/m2 (max. 5 sheets)
50 - 140 gr/m2 (1 sheet at a time)
140 - 160 gr/m2 (if using document holders)
For originals differing from specified formats, use
the appropriate document holder.
Recommendations
In order to avoid damage that could make your fax machine out of order and that could invalidate its guarantee,
make sure that the documents you use do not contain:
• staples
• clips
• adhesive tape
• corrective ink or wet glue.
NEVER USE
rolled paper
paper that is too thin
Insert the document face down, without forcing it, into
the automatic feed slot for or iginal documents (ADF),
with the sheet to be transmitted facing dow nwards, then
adjust the paper guides according to its width.
ADJUSTING THE CONTRAST AND
RESOLUTION OF A DOCUMENT TO BE
TRANSMITTED OR COPIED ...
Before transmitting or copying a document you can
make some adjustments in order to optimize the print
quality .
In particular, you can adjust the print contrast with the
CONTR. key for lighter or darker tones and the RESOL.
key to adjust the resolution of the characters by setting
higher or lower resolution values depending on the type
of text or images in the document.
Select the type of contrast as follows:
• NORMAL, if the document is neither too light nor
too dark . The upper row of display shows "DOCUMENT READY" and the lower "NORMAL".
• LIGHT, if the document is par ticularly dark. The
upper row of display shows "DOCUMENT READ Y"
and the lower, "LIGHT".
• DARK, if the document is particularly light. The
upper row of display shows "DOCUMENT READ Y"
and the lower, "DARK".
torn paper
wet or moist paper
paper that is too small
crumpled paper
carbon paper
In all these cases you must photocopy the document and
transmit the copy or use the appropriate document holder .
When the fax machine has finished a transmission, it
alwa ys restores the default contrast v alue: NORMAL.
11
-3-10-27.p65 25/02/00, 9.1611

Select the type of resolution as follows:
ê
• STD (STANDARD), if the document is easily readable. The upper row of display shows "DOCUMENT
READ Y" and the lower ro w , an arrow in correspondence with the indication "STD" on the console.
• FINE , if the document contains very small char-
acters or drawings. The upper row of display sho ws
"DOCUMENT READY" and the lower row, an arrow in correspondence with the indication "FINE"
on the console.
• HALF TONES, if the document contains shades.
The upper row of display shows "DOCUMENT
READ Y" and the lower ro w , an arrow in correspondence with the indication "HALF TONES" on the
console.
If you do not select the resolution type, the fax machine will automatically transmit the document with
the pre-set value (see “ Setting Automatic Resolu-
tion”).
TRANSMITTING A DOCUMENT
If these diagrams are not enough:
A
A
Procedure DISPL AY
Ensure that the display
1
shows the initial wai ting
AUTOMATIC RX
21-03- 99 10:50
mode wit h d ate an d
time.
Inser t the doc ument in
2
ADF. The dis play shows
DOCUMENT READY
NORMAL
the original values for
contr ast a nd res olut ion:
NORMAL and STD
(stand ard), re specti vely.
If the do cu ment you are ab out to trans m i t is pa rticul arly
light or dark, or it contains very small characters or
drawing s, you h ave to c hange the p r e-s et c ont rast and
resolu tio n value s, a s descr ibe d above.
Dial t he number (max.
3
52 digit s) dire ctly on the
TYPE NUMBER
125 230223
numeri c keypad of your
fax to select the remote
par ty to whom you want
to se nd you r docu ment.
If you di al th e wr ong nu mber : pos iti o n th e cur sor us ing
the </> keys, on th e wrong nu mber an d overwr ite with
the c orrect number. If you want to delete the number
completely, press the CLEAR ke y.
è è
B
è
è è
read the following instructions:
"Press the START key.
4
The fax machine starts
transmitting.
At the end, t he
message "TX
COMPLETED" is
displ ayed for a few
seconds and then t he
initial waiting mode.
AUTOMATIC RX
21-03- 99 10:51
12
-3-10-27.p65 25/02/00, 9.1612

B
ê
Procedure DISPLAY
Ensure that the display
1
shows the init ial wa iting
mode with da te and
time.
Insert the document in
2
ADF. The display shows
the o rigi nal val ues fo r
contr ast an d reso luti on:
NORMAL and STD
(standa rd), r especti vely.
Pick up the p hone by
3
lif ting t he hand set.
Dial t he n umber (max .
4
52 di gits) dir ectly on the
numeri c keypad of your
fax to select the remote
par ty to whom you want
to send your doc ument.
If the remote party’s fax mach in e is set u p f or au toma tic
recepti on, you wil l he ar t he fax mach ine’ s tone.
If i t is set up for manual re ception, a p erson will pick
up the phone. Ask them to press the star t key on the
fax machi ne, after wh ich you wil l wait to he ar the fax
machine’ s tone.
Press the START key to
5
star t trans mitting and
hang up the ha ndset.
At the end o f the
transmis sion, the
message “T X
COMPLETED” will b e
displ ayed and then the
initial waiting mode.
AUTOMATIC RX
21-03- 99 10: 50
DOCUMENT READY
NORMAL
TEL CALL
AUTOMATIC RX
21-03- 99 10: 51
In both cases, the fax machine will not print the
transmission report (if enabled) once the transmission has been completed. See “Reports and
lists” in this chapter for its interpretation.
You can print the transmission report whenever you
want: see “Repor ts and lists ” in this chapter.
If connection is not made because of line anomalies or because the remote party number is engaged,
the fax machine automatically redials the number
up to three times.
If you want to interrupt the transmission in
progress, press the STOP key. The fax machine
ejects the document from ADF and returns to its
initial waiting mode.
If the document to be removed includes more than
one sheet, before pressing STOP to eject the first
one, remove all other sheets manually.
PARTICULAR DIALLING CASES ...
The procedure to dial the number described at step 3
(procedure A) and at step 4 (procedure B) changes, in
the following cases:
1. The fax machine is connected to a private line
Connect to the public line by pressing the EXTERNAL key before dialling the number. The display
will show an “E” (external).
If the mode required by your telephone exchange
is different from the one set on your fax machine,
program it according to the required external connection mode (see “Connecting to a private line
(PBX)”, under the “Configuring the fax to the telephone line” chapter).
If, at t he end of t he transmiss ion, you forgot to hang
up the han dset, th e fax mach ine wi ll e mit an aud ible
warning to remind you to hang up .
-3-10-27.p65 25/02/00, 9.1613
2. To modify the dialling mode temporarily
If the fax machine is set up for pulse dialling (see
the “Configuring the fax to the telephone line"
chapter) and you want to set it for tone
(multifrequency) dialling:
- temporarily modify your dialling mode by pressing the key either before or while dialling the
*
number.
At the end of the transmission, the fax machine
will always restore the preset dialling mode.
13

3. You want to call the remote party back without
dialling his/her number again
The fax machine always stores the last number dialled, which can simply be called up again by pressing the (REDIAL) key twice. This feature is also
useful when the transmission does not take place
in spite of the automatic re-dialling attempts.
4. The remote party belongs to another area code
If the remote party belongs to another area code,
when using pulse dialling, it is better to insert a
pause (P AUSE k ey) between the international code,
the area code and the remote party number.The
display shows a “P” (pause).
5. The remote party is connected to a telephone
exchange accessed by a second tone detection
To enable the dialled number to detect a second
tone of the telephone exchange, press the FUNC-
TION (F) key while dialling the number. The displa y
will show ":" (this feature is enabled onl y in some
countries).
Procedure DISPLAY
Press the HOOK key
1
on your fax, t o connect
TYPE NUMBER
_
to the line.
Dial t he re mote p art y
2
number on the nu meri c
TYPE NUMBER
230087
keypad of your fa x.
7. If you want to use rapid dialling procedures
The fax machine also has rapid dial features: onetouch dial and speed dialling. To use these fea-
tures, you must programme them as described in
the section "Programming one-touch dial and
speed dialling".
Once you have programmed them, it will be sufficient to press one key (one-touch dial) or a key
followed by a two-digit numeric code (speed dialling) to dial a n umber (see "Transmitting with
one-touch dial" and "Transmitting with speed
dialling").
6. If you want to listen to the line tones while dialling without picking up the phone (handsfree)
TRANSMITTING A DOCUMENT A T A PRESET
TIME (DELAYED TRANSMISSION)...
The fax machine is already enabled to listen both
to the connection signals and to the line tones. If
this is not the case, read the following procedure
or see "Hearing the connection tones" chapter
"For a more sophisticated use".
This feature allows you to avoid time zone problems, if
the remote party is thousands of miles away, and also
to avoid paying high rates by selecting times with less
traffic on the lines.
If this diagram is not enough:
è
è
read the following instr uctions:
14
-3-10-27.p65 25/02/00, 9.1614

Procedure DISPLAY
ê
Make sure th at the
1
disp lay shows th e initi al
AUTOMATI C RX
22-03 -99 15: 10
waiting mode with date
and tim e.
Insert the document in
2
ADF.
Select the contrast and
3
DOCUMENT READY
NORMAL
resol uti on yo u consi de r
most appropriate.
Press t he FUNCTION
4
DELAYED TX
key until the dis play
shows --->
Press t he START key.
5
The dis play reques ts
TYPE TI ME
HH:MM
you to enter the time of
tran smissi on. e.g.
“17:00”.
Press t he START key. TY PE FAX NUMBER
6
NUM/TOUCH/SPEED
Dial the number of the
7
remote party, using any
TYPE NUMBER
011 2333 23
one of th e dialli ng
proce dures. For
example, key-in the
number di rect ly on the
numeri c keypad of you r
fax.
Press t he START key
8
to confirm th e setting. If
AUTOMATI C RX
TX AT 17:00
the fax machine is
enable d, it wi ll
automatically print the
parameters of th e
delayed tran smissi on
(see in this chapter
“Repor ts and lists ”),
and “PRINT DELAY
TX” is di splayed. It th en
returns to its initial
waiting mode.
You ca n clea r th e sett ing for th e delayed tran smis sion
by removing the document from ADF or by pressing
the STOP ke y.
CHANGING/CLEARING A PRESET DELAYED
TRANSMISSION...
Procedure DISPLA Y
Make sure t hat you
1
have set a de layed
tran smissi on.
Press t he FUNCTION
2
key until the disp lay
shows --->
Press t he START key. ALRE ADY ENTERED
3
Press t he START key. CHANGE PARAM.?
4
If you want t o clear the tr ansmissi on you have
set pr eviously, press th e > key : the display shows
the messa ge “CANCEL SETTIN G?”,
then pre ss START to confirm deletion.
The fax machine automatically returns to the initial
waiti ng c ondi tio n. If you wi sh to chan ge th e ti me of t he
tran smission or the number of the reci pient you w ish
to s end th e docum ent to, follow the step s bel ow.
Press t he START key. TYPE TIME
5
If you wish to restor e curre nt ti me, press the CLEAR
key, t he START key, and follow t he st eps b elow.
Overwr ite the new ti me,
6
then co nfirm the setti ng
with the
START
key or
confi rm the existing
time by dir ectl y
press ing th e START
key.
Overwr ite the new
7
number a nd co nfi rm t he
setting with the START
key or conf irm the
existi ng one by dir ectly
press ing th e START
key. The fax machi ne
automatically returns to
the i nit ial w aiti ng mode.
AUTOMATIC RX
TX AT 17:00
DELAYED TX
HH:MM
TYPE NUMBER
06 3361 551
AUTOMATIC RX
TX AT 18:00
15
-3-10-27.p65 25/02/00, 9.1615

TRANSMITTING A DOCUMENT FROM
ê
MEMORY ...
The fax machine has a memory which allows you to
send documents at a preset time (delayed transmis-
sion) and to transmit a document to several remote
parties (max. 10): broadcasting transmission.
The fax machine will only allow you to memorise
one transmission at a time.
Procedure DISPLAY
Make sur e that the
1
disp lay shows the ini tial
waiti ng mode wit h da te
and tim e.
Inser t the do cument i n
2
ADF.
Selec t the contr ast and
3
resol ution ty pe you
consi der mos t
appro pri ate.
Press t he FUNCTION
4
key.
Press t he START key.
5
The fax machine starts
stor ing t he doc ument .
When the st orage is
fini shed, the message
"DOC. N. XX XX" is
disp layed for a few
seconds and then --->
Enter the transmission
6
time, then pres s the
START key or press
immedi ately t he START
key to confi rm the t ime
disp layed.
Dial t he number of t he
7
remot e part y using any
one of the dialli ng
proce dures th en press
the START key. The
fax mach ine asks you
to en ter anoth er
number.
If you want to send the document to several remote
parties, repeat step 7 as many times as necessary,
then pre ss the START key to end th e proc edure.
If you w ant to send the docu me nt to one remote party
only, press the START key directly without entering
other num bers.
AUTOMATI C RX
22-03 -99 15:1 0
DOCUMENT READY
NORMAL
TX FROM MEMORY
TYPE TI ME
HH:MM
TYPE FAX NUMBER
NUM/
TYPE FAX NUMBER
NUM/
When the transmission has terminated, if it has been
enabled, the fax machine will automatically print out
a broadcasting report (if the document was sent to
several remote par ties) or a transmission report (if
the document was sent to one remote party). See
the section "Reports and Lists" further on.
To interrupt the transmission, follow the procedure
described in section "Transmitting a Document".
The fax machine automatically cancels all memorised
transmissions after a successful transmission.
Once set, transmission from memory can be:
• resent only if programmed to do so should transmission fail (see “ Enabling/disabling the re-trans-
mission of a failed transmission from memory”
chapter “For a more sophisticated use"),
• cancelled at any time,
• modified only if it is not in progress.
See procedure in the next section. You can also request the printout of the relative parameters. The parameter printout contains the following information:
• Doc N. Reference number of the
stored document. This number associates a document
to each transmission (single
or broadcasting) operated
from memory.
• Pag es Total number of pages of
the stored document.
• Set for: Date and time at which the
transmission was stored in
memory (single or broadcasting).
• Act. N. Progressive number of
each transmission stored in
memory. In case of broadcasting, the number increases for each single
transmission associated
with the broadcast.
• Dialled Number Fax number on the remote
fax that you have called.
• Date/Time Date and time at which the
transmission was carried out
from memory. In case of
broadcasting, it will indicate
the date and time at which
each transmission associated with the broadcasting
has been carried out.
16
-3-10-27.p65 25/02/00, 9.1616

• Status Status of transmission from
memory. In case of broadcasting transmission, the
status of each single transmission associated with the
broadcasting will be indicated.
Besides the above-mentioned parameters, the fax
prints a small portion of its text to help you identify
the stored document.
If you select "CHANGE PARAM.?", continue as
indicated in steps 6 and 7 of the procedure.
"Transmitting a document from memory".
If the transmission from memory has already started the
message "TRANSMITTING..." will be displayed. In this
case, as already stated, you cannot make any further
modifications.
If you select "CANCEL SETTING?", the fax machine
will cl ear the setting and then return automatically to
the initial waiting mode.
CHANGING/RESENDING/CLEARING A
PRESET MEMORY TRANSMISSION ...
Procedure DISPLA Y
Make sure you have
1
set a transmission from
memory.
Press t he FUNCT ION
2
key.
Press t he START key. ALREADY ENTERED
3
Press t he START key. PRINT SETTI NG?
4
If you onl y wan t t o pr in t t he r el at ive param ete rs, pr ess
the START k ey. When the printout is completed the fax
machine returns automatically to the initial waiting
mode.
If you want to change, resend or clear the transmission
set, pr oceed as foll ows:
Press t he </ > key s to
5
show one of the two
other opt ions availa ble:
"CHANGE PARAM.?"
or "CANCEL
SETTING?" (In the
example: "CHANGE
PARAM. ?") t hen pres s
the START ke y t o
conf irm your selecti on.
AUTOMATI C RX
MEMORY TX
TX FROM MEMORY
CHANGE PARAM.?
IF THE TRANSMISSION IS NOT
SUCCESSFUL ...
1. Sometimes, because prob lems such as overloaded
telephone lines or other types of disturbance, the
transmitted document received by the remote party
is garbled, therefore retransmit it.
In this case, it is better to retransmit the document
at a lower speed. The fax normally transmits at a
speed of 9600 bps (bit per second), and you can
reduce this speed to 4800 bps, by follo wing the procedure described in the section “Reducing the
transmission speed”, chapter “For a more sophisticated use”.
2. If the transmission is not executed because of
line or fax anomalies, the ERROR led lights up and
the fax beeps; in this case, the fax machine prints
automatically the transmission report (see the
section “Printing reports and lists”), in which the
error code indicates the cause (you will find a list
of all the error codes in chapter “Maintenance”).
When the printout of the transmission report is completed, press the STOP key to eject the original
document from ADF . If the document to be removed
consists of more than one sheet, remove manually
all the sheets except the one that has been already
inserted in ADF, then press the STOP key to eject
the first one.
If you have set a transmission from memor y, you
can try to resend it (see the previous section).
-3-10-27.p65 25/02/00, 9.1617
3. If you attempt to transmit a document that is too
long (more than 600 mm) or if the document is
jammed during the transmission, the fax machine
interrupts automatically the transmission and beeps
to warn you.
17

RECEIVING A DOCUMENT ...
RECEPTION MODES ...
You can set up the fax machine to receive documents
sent by remote parties in four distinct modes, which
you can access by pressing the RX MODE key.
• Manual reception, for situations in which you are
present and thus you can answer calls personally.
• Automatic reception, for situations in which you
are absent but you wish to receive faxes anyway
(this is the mode your fax machine is set up for).
• Automatic reception with call type recognition .
With this reception mode the fax machine, after a
certain number of rings, connects to the phone line
and is able to recognise whether the incoming call
is a fax or phone call.
• Reception with answering machine. In this reception mode, the answering machine receives the calls,
records any messages from the remote party and if
the latter intends to send you a document, lets the
fax machine receive it.
Any on-going reception can be interrupted by pressing the STOP key. The fax machine retur ns to its
initial waiting mode.
Manual reception ...
If this diagram is not enough:
è
read the following instr uctions:
Procedu r e DISPLAY
Make sure that the
1
display shows the init ial
wait ing mode wi th date
and ti me.
Press the RX MODE
2
key until manual
rece ption is sele cted.
When t he t ele phone
3
rings lift the receiver to
connec t t o th e LI NE.
è
AUTO MATIC RX
22-03-99 15:10
MANUAL RX
22-03-99 15:10
è
TEL CALL
IF THE F AX MACHINE RUNS OUT OF PAPER
OR INK OR IN THE CASE OF POWER
F AILURE...
Thanks to its memory, the fax machine will still be
able to receive even if:
• there is no paper, ink, or print head
• the pr int head compar tment cover is open.
In case of power failure, the fax machine will maintain in memory, date and time, programmed numbers for a one-touch dial and speed dialling and the
reports. Documents still in the memory will be lost. In
this case the fax machine will automatically print out
a report which will show the total number of pages (in
transmission or reception) cancelled from memory.
If during reception the paper runs out or is jammed
or the ink runs out, or if you open the print head
compartment cover, the print will be interrupted,
the display shows the appropriate message and the
document you are receiving will be temporarily
stored in the memory. Once the anomaly has been
restored, the facsimile will start printing again.
As soon as you hear
4
the fax t one o r i f t he
remot e part y asks you
to r ecei ve, p ress the
START key.
Hang up the handset.
5
The fax mac hine st art s
receiving and the
disp lay shows
information on t he
rece ption in progre ss,
including the remote
par ty's fax number or, if
progr ammed, his name.
When r ecep tio n is
6
completed, the
message "RX
COMPLETED" is
disp layed for a few
seconds and then the
wait ing mode.
CONNECTING
MANUAL RX
22-0 3-99 15:10
18
-3-10-27.p65 25/02/00, 9.1618
If the remote party called to talk only to you, at the
end of the conversation:
If your telephone installation has several sock-
ets and the connected telephone is not near the fax
machine, you can enable the latter for remote re-
ception, as long as the telephone works with tone
dialling (multifrequency):
• Connect to the line by lifting the telephone receiver.
• Press the * key on the telephone, followed by
the remote control code. Remember that the
code digit must be the one you have already
programmed (see "Changing the remote con-
trol code” chapter "For a more sophisticated
use").
After ringing
twice (*)
PHONE/FAX RX enabled
A FAX MACHINE is
calling
Your fax machine is
set to receive automatically.
A TELEPHONE is
calling
Your fax machine
beeps for 20 seconds (*). The display
shows "LIFT HANDSET".
Automatic reception ...
The fax receives the documents automatically without
any intervention.
The fax machine is already programmed to receive the
documents in automatic mode. Otherwise, press the
RX MODE key until “AUTOMATIC RX” is displayed.
The reception procedure is explained in the previous
section (Manual reception).
Automatic reception with call type recognition ...
You have programmed the fax machine, by pressing
the RX MODE key , to receive with this mode (“PHONE/
FAX RX” has to be displayed).
The behaviour of the fax in this reception mode will
depend on the caller. The procedure is illustrated in the
following diagram:
The remote party
called just to talk to
you: at the end of the
conversation, replace
the receiver.
20 seconds have
passed and you have
not lifted the receiver.
Your fax is set to receive automaticaly. It
will wait to receive a
document for about
30 seconds, then it
will return to the initial
waiting mode.
The remote party asks
you to receive.
-3-10-27.p65 25/02/00, 9.1619
Your fax is set to receive.
(*) You can modify both ring number and volume,
as well as the duration of the buzzer emitted by
the fax machine.
19

If you pick up the telephone receiver before the
second ring and hear the fax connection tone press
the STAR T button and hang up the receiver. Your
fax machine is now ready to receive.
If your telephone installation has several sock-
ets, you can set your fax machine for remote re-
ception as explained in the “Manual Reception”
section.
If your telephone installation has several sock-
ets, you can pick up the line within 20 seconds,
even from a secondary set, as long as it works
with tone dialling.
• pick up the handset and press the keys * and # on
the telephone (to get a line).
After the number of rings of the answering machine
The remote party who called listens to the prerecorded
message on the answering machine
If a FAX
MACHINE called.
If a remote party
called to send a
fax.
If a remote party
called to talk.
Y our f ax machine
Reception with an external answering
machine …
is automatically
set for reception.
If your fax machine has an external answering machine
and, by pressing the RX MODE, you have set it to operate in this reception mode (the display must sho w “T AD/
FAX RX”), make sure that:
• the answering machine is switched on.
• the answering machine will start working within 5
ringing tones.
• the silence lapse (the time after which the answer-
ing machine hangs up if it does not detect either a
reply message or the connection tones) set on the
answering machine is longer than the one set
PROGRAMMING ONE-TOUCH DIAL AND
SPEED DIALLING ...
on the fax machine (the time set on your fax ma-
chine is 6 seconds; to change it, see “Changing the
silence lapse” chapter "For a more sophisticated
use").
• the message recorded in the answering machine
As illustrated in “Particular dialling cases”, you can
program the fax machine to carry out the following rapid
dialling procedures:
• One-touch dial
does not exceed 15-20 seconds.
• Speed dialling
With this reception mode, your fax machine’ s behav our
depends on the caller as shown in the following diagram:
One-touch dial...
The remote party
presses the transmission start key .
Y our f ax machine
is automatically
set for reception.
The remote party
leaves a message
after the beep.
20
-3-10-27.p65 25/02/00, 9.1620
You can associate a fax number, a name and a tel-
ephone number to each of the 10 one-touch dial numeric keys (0 - 9). The number/name stored will be
selected automatically when you press the corresponding key .

Associating a fax number:
Associating a name:
Procedure DI SPLAY
Make sure t hat the
1
displ ay shows the init ial
AUTOMATIC RX
26-03- 99 17:45
waiti ng mode wit h date
and tim e.
Press t he FUNCTION
2
FAX SET-UP
key until the disp lay
shows --->
Press t he START key. DATE AND TIME
3
Press t he
4
FUNCTION
ONE TOUCH DIAL
key until the disp lay
shows --->
Press t he START key. TYPE ONE TOUCH
5
KEY: 0-9
Press th e one-touc h
6
FAX NO.
dial num eric key to
which you want to l ink
a fax number ( e.g. 1).
Press t he
7
key. 1: FAX NO.
START
_
If a fax number has already been stored under this key ,
it will be displayed.
Dial t he remo te par ty
8
1: NAME
fax number (max. 52
digits) directly on the
numer ic keypad of yo ur
fax and press the
START key to confirm
the setting.
The name has no effect on dialling but is useful for
checking.
If a nam e has alr e ady be en s tore d, i t wi ll be dis played.
Enter your remote party
9
EDIT ANOTHER YES
name (m ax. 16
charac ters) as you di d
for your name and your
fax number ( see
"Set ting the name"
under the "Installation"
chapter) then confirm it
with the START key.
If t here ar e som e spel l in g mi st akes, p os iti on t h e cur sor
under the incorrect letter and overwrite it with the
corr ect let ter. If ins tead you w ant to cancel the name
complet ely press the CLEAR button.
At this point you can continue the procedure from step
10 or programme another one-touch dial numeric
key by pressing the START button and repeating the
procedure in step 6.
If you entered a wrong number, position the cursor on
the wrong number and overwrite the correct numbe r;
if you want to delete the number completely, press the
CLEAR key.
If your fax machine is connected to a private line
(PBX), connect to the public line by pressing the
EXTERNAL key before dialling the number. The
display shows the letter "e" (external). If the external
connection mode requested by your telephone
exchange is different from the one set on your fax,
programme it according to the external connection
mode requested (see "Connecting to a private line"
chapter “Conf iguring the fax to t he telephone line”).
If t he rem ote pa rt y bel ongs to anot her tel ephone area
code, it is better to enter a pause (PAU SE key)
between the international code, the area code and the
remote par ty number.
-3-10-27.p65 25/02/00, 9.1621
21

Associating a telephone number:
Speed dialling ...
Confir m with the
10
START key to conti nue
stori ng the te lephone
number.
Re-ent er th e 1 o ne-
11
touch dial key and
press the </> keys .
12
Press the
START
TYPE ONE TOUCH
KEY: 0 - 9
TEL NO.
key. 1: TEL NO.
Using a series of codes (01-32) you can store more fax
and telephone numbers, and names that will be auto-
matically selected by pressing the S. DIAL key and the
appropriate key code.
Associating a fax number:
Same procedure as for the one-touch dial with the following variations:
_
Dial t he remote par ty
13
number ( max. 52 d igit s)
direct ly on th e numer ic
1: NAME
_
4
keypad of your fax
machine and press the
key to confi rm
START
the setting.
At this point, as the
14
other information does
AUTOMATIC RX
26-03- 99 17:46
5
6
not chan ge, press the
STOP key to retur n to
the initial waiting mode
of your fax.
If you like, you can associate only a telephone number
to a one-touch dial numeric key without storing a fax
number.
Follow the procedure "Associating a fax number" until step 6, then proceed as follows:
Procedure DISPLA Y
Associating a name:
Same procedure as for one-touch dial.
Associating a telephone number:
Same procedure as for one-touch dial with the following
variations:
Procedure DISPLA Y
Press t he FUNCTION
CODED SPEED DIAL
key until the disp lay
shows --->
Press START key. TYPE SPEED NO.
(01-32):
Enter t he speed dial ling
FAX NO.
code to which you want
to as soci ate t he fax
number ( i. e. 01).
Press t he > key. TEL NO.
1
Press t he
2
key. 1: TEL NO.
START
_
Dial the remote party
3
telep hone number
1: NAME
_
direc tly on th e numer ic
keypad of your fax and
press the START key
to confirm the setti ng.
From this step on t he
proce dure c onti nues as
descr ibed previ ously.
22
Procedure DISPLA Y
Confir m with the
10
START key t o cont inue
TYPE SPEED NO.
(01- 32):
stori ng the te lephone
number.
Re-enter the 01 speed
11
TEL NO.
diall ing code an d pr ess
the </> key s.
As in one-touch dial, you can associate to a speed dialling code only a telephone number without storing a
fax number .
-3-10-27.p65 25/02/00, 9.1622

Follow the procedure "Associating a fax number" for
one-touch dial (taking into account the changes for speed
dialling) until step 6; then proceed as follows:
TRANSMITTING WITH SPEED DIALLING ...
All that is required is this diagram:
Procedure DISPLA Y
Press the > key. TEL NO.
1
Press the START key. 01: TEL NO.
2
_
Dial your r emote par ty
3
teleph one nu mber
01: NAME
_
direct ly on th e numer ic
keypad of your fax and
press the START key
to confirm the s etting.
From this ste p on the
proced ure co nti nues as
descr ibed previo usly.
If you want, you can print the information stored in the
10 one-touch dial numeric keys and in the 32 speed
dialling codes (see the section " Reports and Lists"
in this chapter). In this w ay , you can chec k the correctness of the stored numbers (fax and telephone) and
the other information (remote party's name, transmission speed, etc.). You can also check which keys/
codes have been programmed and which are still
free.
è
As in normal transmission (see "Transmitting a docu-
ment"), you can set contrast and resolution before
starting the transmission operation.
As soon as you have pressed the S.DIAL key followed
by the speed dialling code (in the example 01), the associated fax number as well as the name, if stored, will
be displayed.
Once the number has been dialled, transmission proceeds as described in "Transmitting a document".
è è
TRANSMITTING WITH ONE-T OUCH DIAL OR
SPEED DIALLING BY SEARCHING IN THE
ASSOCIA TED LISTS ...
If you cannot remember the one-touch dial numeric key
or the speed dialling code you associated to a fax
number, y ou can still star t the transmission by looking
it up in the associated lists, as follows:
TRANSMITTING WITH ONE-TOUCH DIAL ...
If this diagram is not enough:
All that is required is this diagram:
è
As in normal transmission (see “Transmitting a document”), you can set contrast and resolution before
starting the transmission.
If you press the desired numeric key (in the example, 1)
for over a second, the associated fax number as well as
the name, if stored, will be displayed.
Once the number has been dialled, the transmission proceeds as already described.
follow this procedure:
è
è è
-3-10-27.p65 25/02/00, 9.1623
23

Procedure DISPLA Y
ê
Make sure the disp lay
1
shows the initial waiting
AUTOMATIC RX
24-03 -99 17: 00
mode with date and
time.
Inser t the document i n
2
ADF. As in norm al
DOCUMENT READY
NORMAL
transmi ssion (see
“Transmitting a
document”) , you c an set
up contrast a nd
resolution b efore starting
the transmission.
Press the S. DIAL key. FAX CALL
3
• Activity repor t (journal): contains the data refer-
CODE OR
Press the </ > ke ys t o
4
find t he fax number or
name of t he remote
par ty you want to send
your document to.
Press the START key
5
• Last transmission repor t: contains the data re-
to s tar t diall ing . Once
dial lin g is compl ete, the
tran smissi on c ont inues
• Failed transmission report: also contains the data
in t he k nown man ner.
REPORTS AND LISTS
The reports...
By printing reports, the fax machine allows you to check
the outcome of all the operations executed (transmissions and receptions), the number of documents handled and other useful information. Some reports are al-
ways printed automatically .
Others can be programmed to be printed regularly and
automatically or at your request when required.
• Last broadcasting transmission report: it con-
When normal operating conditions are restored, the
fax machine can behave in two different ways:
- If power failed while the fax mac hine was trans-
mitting or receiving, it will automatically print a
report with the data for that transmission or reception.
- If the power fails during or after a transmis-
sion from memory or a reception in memory,
a report will automatically be printed out sho wing the number of pages (in transmission or reception) cancelled from the memory after the
power failure.
ring to the last 32 transactions (transmissions and
receptions); the fax machine stores them and the
report is printed automatically (after 32nd operation, with subsequent deletion of the stored data)
or upon your request.
ferring to the last transmission. You can pro-
gramme it to be printed automatically after each
transmission or upon your request.
referring to the last transmission but it is printed
automatically only after an unsuccessful trans-
mission attempt. The fax machine is set to print
automatically this report; if you want to disable it,
see the corresponding paragraph.
tains data on the last broadcasting report. This
can be programmed to be printed always and au-
tomatically after every broadcasting transmission.
The following list identifies the types of reports: for their
printing and interpretation, see the corresponding paragraphs:
• Power failure report: always printed automati-
cally if a power failure occurs during a reception or
transmission operation.
24
-3-10-27.p65 25/02/00, 9.1624

Enabling/disabling automatic printing of
transmission report and error report ...
Enabling/disabling automatic printing of
broadcast report ...
Procedu re DIS PLAY
Make sure that the
1
disp lay shows t he ini
waiting mode with date
and ti me.
Press the FUNCTI ON
2
key unti l the di splay
shows --->
Press the START key. DATE A ND TIME
3
Press the FUNCTI ON
4
key.
Press the START key
5
until the display
shows --->
Press the </> keys to
6
show th e other two
opti ons availabl e: "TX
REPORT:ALWAYS" and
"TX REPORT:OFF" (in
the example: "TX
REPORT:ALWAYS").
AUTO MATIC R X
02-03-99 10:48
tial
i
FAX SET-UP
VARIOUS SETTINGS
FAI L E D T X R E P OR T
TX REPORT:ALWAYS
Procedure DI SPLAY
Make sur e t hat th e
1
disp lay shows the
initial waiting mode
with date and time.
Press t he FUNCTI ON
2
key until the disp lay
shows --->
Press t he START key
3
until th e dis play sh ows
--->
Press t he </ > key s to
4
show th e oth er opt ion
availabl e: "BROADC.
REP. : OFF"
Press t he START key
5
to confi rm your ch oice
then pre ss the STOP
key to res tore your fax
to the initial waiting
mode.
AUTOMATIC RX
02-03 -99 10: 48
FAX SET-UP
BROADC. REP. : OFF
BROADC. REP. : ON
AUTOMATIC RX
02-03 -99 10: 48
Enabling/disabling automatic printing of
data about a delayed transmission ...
Sele cting "FAILED T X REPORT", yo u set your fa x to
automatically print a report only after an unsuccessful
transmission.
Selecti ng "TX RE PORT: ALWAYS", you set your f ax to
auto matica lly p rint a repo rt aft er ever y tran smiss ion
rega rdles s of its o utcome.
Selecting "TX REPORT: OFF", you set your fax not
to print any repor ts.
Press the START key
7
to confir m your choice
then pres s t he STOP
key to res tore you r fax
to the i nitial waiting
mode.
AUTO MATIC R X
02-03-99 10:48
Procedu re DI SPLAY
Make sure that the
1
display shows the init ial
wait ing mode wi th date
and ti me.
Press the FUNCTI ON
2
keyuntil the display
shows - -- >
Press the START key DATE AND TIME
3
Press the FUNCTI ON
4
key.
Press the START key
5
until the display shows
--->
Press the </> keys to
6
show th e other op tion
availabl e: "DEL AY LIST:
OFF".
AUTO MATIC RX
02-03-99 10:48
FAX SET-UP
VARIOUS SETTINGS
DELAY LIS T: ON
DELAY LIS T: OFF
-3-10-27.p65 25/02/00, 9.1625
+
25

Pres s the START key to
7
confirm your choice then
press the STOP key to
rest ore your fa x to t he
AUTOMATIC RX
02-03- 99 10: 48
Interpreting the reports ...
The reports contain the following information:
• Act. n. Progressive number of transactions
initial wai ting mode.
Printing on request the transmission report,
• Type Type of operation:
the activity report and the broadcasting
report ...
Procedure DISPLA Y
Make sure the display
1
shows the init ial waiting
AUTO MATIC RX
02-03-99 10:48
mode with date and
time.
Press the FUNCTI ON
2
PRINT OUT REPORT
key unt il t he dis play
shows - -- >
Press the START key. LA ST TX REPORT
3
Press the </> keys to
4
ACTIVITY REPORT
show th e other op tions
availabl e: " LAST
BROAD. REP.",
"ACTIVITY RE PORT'"
and "PR INT OUT:
EXIT". (In the example:
"ACTIVITY REPORT").
Press the START key
5
to confirm your choice.
AUTO MATIC RX
02-03-99 10:48
The fax re turn s
automatically to the
initial waiting mode.
• Doc. N. Reference number of memorised
• Dialled
• Received Id Number (and name if available) of the
• Date/Time Date and time of transaction.
• Duration Duration of transaction (in minutes and
• Pages Total number of transmitted/received
• Result Result of transaction:
(transmissions/receptions).
- TX , TX ECM, TX POLL or TX
POLL ECM for transmission
- RX , RX ECM, RX POLL or RX
POLL ECM for reception.
document. This number will be used
to associate the document with each
(single or broadcasting) transmission
carried out by the memory .
Number Fax number of the remote party you
called.
remote party you called.
This corresponds to the number you
dialled, only if the remote party has set
his/her fax number correctly. Otherwise,
it may be different or even missing altogether.
seconds).
pages.
- OK: if the transaction ended successfully
- XX ERROR CODE: if the transaction was not executed/completed. For
the meanings of the error codes (see
"Error codes", chapter "Mainte-
nance").
26
-3-10-27.p65 25/02/00, 9.1626

Lists...
You can obtain, at any time, printout of the lists of the
setup and configuration parameters as well as a
printout of data stored in the speed dialling codes
and in the one-touch dial keys.
When you request the printout of the setup and configuration parameters, you can have an updated report of
both the preset values and the values you have set according to your requirements.
Printing the setup parameters ...
Printing the configuration parameters list,
the data stored in the speed dialling codes
and the one-touch dial numeric keys ...
1
2
Procedure DI SPLAY
Make sure that the
1
displ ay shows the
initial waiting mode with
AUTOMATIC RX
02-03- 99 10:48
3
4
date and time.
Press the FUNCTION
2
key unti l th e dis play
INSTALLATION
5
shows --->
Procedure DISPLAY
Make sure th at the
disp lay shows th e initi al
AUTOMATI C RX
02-03 -99 10:48
waiting mode with date
and tim e.
Press t he FUNCTION
FAX SET-UP
key until the dis play
shows --->
Press t he START key. DATE AND TIME
Press t he FUNCTION
PRINT OU T SE T-UP
key until the dis play
shows --->
Press t he START key. PRINT S ETTING S
Press the START key. TEL. LINE SET-UP
3
Press the FUNCTION
4
PRINT INSTALL.
key unti l th e dis play
shows --->
Press the START key. P RINT OUT:
5
With the </> keys you can display the other option
available: "PRIN T OUT: EXIT" .
Press the START key
6
to confi rm your
selection.
If you have selected "PRINT OUT: ", once the
printout is completed the fax machine returns
automatically to its initial waiting mode. If not, you mu st
press the STOP key to r esto re i ts wai tin g mode.
Press t he </ > key s to
6
show the other thr ee
optio ns avai labl e:
"PRINT: ONE TOUCH",
"PRINT:SP EED DIAL"
and "PRI NT OUT:
EXIT" . ( In the example :
"PRINT: ONE TOUCH".
Press t he START key
7
to confirm your
selection.
PRI N T: O NE TO UC H
-3-10-27.p65 25/02/00, 9.1627
27

USING THE FAX MACHINE AS A TELEPHONE
The fax machine is also a traditional telephone set.
When you get the line by lifting up the handset, you
have all common telephone features found in normal
phone sets.
One feature is the R (REGISTER RECALL) function.
Activated with the R key, it allows access to special
services provided by the telephone network manager.
The following functions are also available:
• To call the remote party using the rapid dialling procedures programmed, see “Calling with one-touc h
dial” and “Calling with speed dialling” below.
• To suspend a phone call momentarily by pressing
the (HOLD) key. The conversation is restored as
soon as you press the same key again.
CALLING WITH ONE-T OUCH DIAL ...
All that is required is this diagram:
è
As soon as you press the S. DIAL key, followed by the
speed dialling code (in the example, 01), the telephone
number (see “Programming one-touch dial and
speed dialling”, under the “For everyday use” chapter) as well as the name, if stored, will be displayed.
Once dialling is complete, you can talk if the remote
party is free.
CALLING WITH ONE-T OUCH DIAL OR SPEED
DIALLING BY SEARCHING IN THE
ASSOCIA TED LISTS...
If you cannot remember the one-touch dial numeric key
or the speed dialling code associated to a fax number,
you can still make the call by looking it up in the associated lists, proceeding as follows:
If this diagram is not enough:
è è è
follow this procedure:
If you press, for more than one second, the numeric
key required (in the example, 1), the telephone n umber
(see “Programming one-touch dial and speed dial-
ling”, under the “For everyday use” chapter) as well
as the name, if stored, will be displayed..
If the remote party is free, as soon as he/she answers,
pick up the handset to talk.
CALLING WITH SPEED DIALLING...
All that is required is this diagram:
è
è è
Procedure DISPLAY
Make su re t he dis play
1
shows the initial waiting
conditi on wit h date an d
time.
Pick up t he hands et to
2
get the line.
Press th e S. DIAL key. TEL CAL L
3
Press th e </> keys to
4
find the telephon e
number or the name of
the remote party you
want to call.
Press th e START key
5
to start dialling.
AUTOMATIC RX
24-03-99 17:00
TEL CALL
CODE OR
28
-4-28-28.p65 25/02/00, 9.1728

USING THE FAX MACHINE AS A COPIER
DOCUMENTS Y OU CAN COPY...
Before making a copy, ensure that the original complies with the characteristics described in “Which docu-
ments you can use”, under the “For everyday use”
chapter.
MAKING A COPY ...
As already mentioned, you can also use the fax machine as a photocopier. The quality of the copy obtained depends on the contrast and resolution val-
ues that, through the and keys, you will select
before making the copy.
Choose contrast according to the following cr iteria:
• NORMAL, if the document is neither too dark nor
too light.
• LIGHT, if the document is particularly dark.
• DARK, if the document is particularly light.
Choose resolution according to the following criteria:
• TEXT, if the document contains text with good
readability or simple graphics.
• PHOTO, if the original contains shades.
The fax machine is able to make a single copy or
multiple copies of the document, as well as to reduce and enlarge the copies ( key).
If this diagram is not enough...
Procedure DISPLAY
Make sure that the
1
display shows the initial
waiti ng mode with dat e
and t ime.
Inser t the doc ument in
2
ADF and p ress t he
COPY key. The display
shows the initial values
for contr ast and
resolutio n: NORMAL
and TEXT, respect ively.
Select , usin g
3
, and keys,
both con trast (LI GHT,
DARK and NORMAL)
and r esoluti on ( TEXT
and PH OTO) as wel l as
the enlarge vale (100%,
70% and 140%).
Press the
4
COPY
direct ly if you onl y want
to make a sing le copy,
otherw ise enter t he
number of copi es you
want (max. 9) before
press ing th e COPY key.
The fax machine stor es
the page s of the
documen t, one by one,
before making the
copie s.
key
AUTOMATIC RX
22-03- 99 15:10
100% TEXT
NORMAL 1
100% TEXT
NORMAL 1
100% TEXT
NORMAL 5
è
read the following procedures:
-5-29-30.p65 25/02/00, 9.1729
If you want to interrupt the copying operation, press
the STOP key twice: the first time to eject the original
from the ADF, the second time to restore the fax
machine to its initial waiting mode.
If t he doc ument to b e rem oved consi sts of mor e t han
one sheet, befor e pressi ng STOP to eject the first one,
manuall y remove all ot her sheets.
29

To obtain an excellent quality copy of a document con-
taining shades, in addition to setting the resolution value
to PHOT O, ensure that the "COPY: HIGH QUAL." set-
ting on the fax is active. If not, follow this procedure:
Procedure DISPLAY
Make su re tha t the
1
display shows the initial
AUTOMATIC RX
22-03-99 09:00
waiting mode with date
and time.
Press the FUNCT ION
2
FAX SET- UP
key until the display
shows - -->
Press the START key. DATE AND TIME
3
Press the FUNCT ION
4
PRINTER PARAMET.
key until the display
shows - -->
Press the START key
5
COPY: NORMAL
until the display shows
--->
Press the </> keys to
6
COPY: HIGH QUAL.
select the other value
availa ble
Press the START key
7
to confirm the sett ing,
AUTOMATIC RX
22-03-99 09:00
then the STOP key to
rest ore th e fax mach ine
to its initi al waiting
mode.
30
-5-29-30.p65 25/02/00, 9.1730

FOR A MORE SOPHISTICATED USE
OTHER USEFUL RECEPTION SETTINGS
Reducing the print area of a received
document ...
The fax machine allows you to reduce the print area of
a received document up to 70% of the original paper
size. The reduction values av ailable are 94%, 80%, 76%
and 70%. The appropriate value to select depends on
the paper size used: A4 = 94%, Letter = 80%, Legal =
No (disabled).
The reduction value set-up on your f ax machine is 94%.
Procedure DISPLAY
Make sure that the
1
displ ay shows the ini tial
waiti ng mode with dat e
and t ime.
Press the
2
key unti l th e dis play
shows --->
Press the START key. DATE AND T IME
3
Press the FUNCTION
4
key.
Press the FUNCTION
5
key.
Press the START key
6
until the displ ay shows
--->
Press the
7
selec t one of reduct ion
values avail able: 80%,
76%, 70% and OFF
(no reduction) then
confi rm t he sel ect ion
with the START key
and pr ess t he STOP
key to r esto re t he fax to
its initial waiting mode.
FUNCTION
</>
keys t o
AUTOMATIC RX
03-03- 99 10: 48
FAX SET-UP
VARIOUS SETTINGS
PRINTER PARAMET.
REDUCTION 94%
AUTOMATIC RX
03-03- 99 10:48
Receiving a document long er than the paper
size ...
If you receive a document longer than the paper size in
the fax, you can make your fax print the remaining text
on another sheet.
Procedure DISPLAY
Make sure t hat the
1
displ ay shows the init ial
waiti ng mode wit h date
and tim e.
Press t he
2
key until the disp lay
shows --->.
Press t he START key. DATE AND TI ME
3
Press t he FUNCTION
4
key.
Press t he FUNCTION
5
key.
Press t he START key
6
until the dis play shows
--->
Press t he </> ke ys t o
7
selec t one of t he ot her
two paramet ers
availabl e:
"SURPLUS: OFF " or
"SURPLUS: ON". (In
the exa mple:
"SURPLUS: ON" ) t hen
press the START key
to c onfir m your
selection.
Press t he STOP key t o
8
restor e the fax to t he
initial waiting mode.
If you select the parameter "SURPLUS: A UT O ", the fax
will print t he remaining text on another sheet, provi ded
that t he rema i ning t ext fill s at l east 12 mm of the page.
If you s elect the parameter " SURPLUS: ON", th e fax
will always print the remai ning text on an other sheet .
If you select the paramete r "SURPLUS: OFF", the fax
machine will not print th e remaining text.
FUNCTION
AUTOMATIC RX
10-03- 99 10: 48
FAX SET-UP
VARI OUS SETTINGS
PRINTER PARAMET.
SURPLUS: AUTO
SURPLUS: ON
AUTOMATIC RX
10-03- 99 10: 48
-6-31-38.p65 25/02/00, 9.1831
31

Changing the number of rings …
To change ringing volume ...
If the fax machine is set to automatic reception with
call type recognition, when there is an incoming call,
the fax machine will recognise automatically after ringing twice whether the call comes from another fax ma-
chine (FAX) or from a telephone (PHONE).
If you wish you can change the number of times it rings
as follows:
Procedure DI SPL AY
Make sure t hat the
1
displ ay shows the init ial
PHONE/FAX RX
30-03- 99 12: 55
waiti ng mode wit h date
and tim e.
Press t he FUNCTION
2
INSTALLATION
key until the disp lay
shows --->.
Press t he
3
Press t he START key
4
START
key. TEL . LINE SET-UP
RING COUNT: 02
until the dis play shows
--->.
Press t he </> ke ys t o
5
RING COUNT: 04
show th e oth er values
availabl e: "01, 0 4, 08 ".
(In t he example: "04" ).
Press t he START key
6
to c onfir m your
PHONE/FAX RX
30-03- 99 12:55
selec tion and th en t he
STOP key to r e st o re
the fax initial waiting
mode.
You can also change the ringing volume as follows:
Procedure DISPLAY
Make sure t hat the
1
displ ay shows the init ial
PHONE/FAX RX
30-03- 99 12: 55
waiti ng mode wit h date
and tim e.
Press t he FUNCTION
2
FAX SET-UP
key until the disp lay
shows --->.
Press t he START key. DATE AND TIME
3
Press t he FUNCTION
4
VARI OUS SETTINGS
key.
Press t he START key
5
RING VOLUME: HIGH
until the dis play shows
--->.
Press t he </> ke ys t o
6
RING VOLUME: LOW
show th e oth er opt ions
availabl e: "RING
VOLUME: LOW",
"RING VOLUME: OFF",
"RING VOLUME: MED".
(In t he example: "R ING
VOLUME: LOW").
Press t he START key
7
to c onfir m your
PHONE/FAX RX
30-03- 99 12:55
selec tion and th en t he
STOP key to r e st o re
the fax initial waiting
mode.
32
-6-31-38.p65 25/02/00, 9.1832

Changing the beeper duration ...
Changing the silence lapse ...
When the fax machine is set to automatic reception
with call type recognition, it behaves as follows:
• If a fax is calling, it will receive automatically after
the set number of rings
• If a telephone device is calling, it will beep for 20
seconds, after which, if you still have not lifted up
the receiver, it will receive automatically.
You can change the beeper duration as follows:
Procedure DISPLAY
Make sure t hat the
1
displ ay shows the init ial
PHONE/FAX RX
30-03- 99 12: 55
waiti ng mode wit h date
and tim e.
Press t he FUNCTION
2
INSTALLATION
key until the disp lay
shows --->.
Press t he START key. TEL . LINE SET-UP
3
Press t he START key
4
FAX/TEL TIMER: 20
until the dis play shows
--->.
This feature is enabled only in some countries.
Remember that if the silence lapse set on the answering machine is inferior to that set on your fax, the
latter will never be able to function automatically in re-
ception as the answering machine starts operating first
and as the fax does not hear any answering message,
within the set time lapse, it interrupts the connection.
You must decrease the value of the silence lapse on
your fax so that it can connect to the line first.
To change the silence lapse value on your f ax, proceed
as follows:
Procedure DISPLAY
Make sure th at the
1
displ ay shows the i nit ial
TAD/FAX RX
30-03- 99 12:55
waiti ng mode with dat e
and time.
Press the FUNCTION
2
INSTALLATION
key unti l t he dis play
shows --->.
Press the START key. TEL. LINE SET-UP
3
Press t he </> ke ys t o
5
show th e oth er values
availabl e: "15", "30 " e
"40". (In th e example:
"15") .
Press t he START key
6
to c onfir m your
selection, then the
STOP key to r e st o re
the fax to the initial
waiti ng mode.
FAX/TEL TIMER: 15
PHONE/FAX RX
30-03- 99 12:55
Press the START key
4
until the display shows
--->.
Press the </> key s to
5
show th e othe r val ues
available: "3", "4", "8",
"10" and "NO". (In the
example: "4") .
Press the
6
START
to co nfi rm your
selection, then the
STOP key to restore
the fax to the initial
waiti ng mode.
SILENCE LAPSE: 6
SILENCE LAPSE: 4
TAD/FAX RX
key
30-03- 99 12:55
-6-31-38.p65 25/02/00, 9.1933
33

Changing the remote control code...
If the fax machine is connected to a secondary telephone
operating in tone dialling and set for manual reception
or for automatic reception with recognition of the call
type, whenever a remote party calls to send a document,
you can control its reception by entering the code * * on
the same secondary telephone. This oper ation is similar to
pressing the START ke y on your fax.
You can replace the second asterisk of this code with
a digit from 0 to 9.
Proceed as follows:
OTHER USEFUL TRANSMISSION
SETTINGS...
Setting automatic resolution...
If you have not selected the resolution before transmitting or copying a document, the fax machine will auto-
matically transmit or copy based on the preset value (in
this case: STANDARD).
You can set the fax machine to transmit or copy auto-
matically with FINE resolution using the following pro-
cedure:
Procedure DISPLA Y
Make sure t hat the
1
displ ay shows the init ial
MANUAL RX
30-03- 99 12: 55
waiti ng mode wit h date
and tim e.
Press t he FUNCTION
2
INSTALLATION
key until the disp lay
shows --->.
Press t he START key. TEL .LINE SET-UP
3
Press the START key. PUB.LINE (PSTN)
4
Press the START key
5
REMOTE START: ON
until the display shows
--->.
With the </> keys, you can show the other option
available: "R EMOTE START: OF F".
Press the
6
key. TYPE CODE
START
CODE (0/9, *) **
Enter t he new code,
7
e.g.: "*8 ".
Press the
8
START
to co nfir m t he ent ered
key
TYPE CODE
CODE (0/9, *) *8
MANUAL RX
30-03- 99 12:55
data, then the STOP
key to rest ore the fax to
the initial waiting mode.
Procedure DISPLA Y
Make su re t hat th e
1
disp lay shows the init ial
AUTOMATIC RX
22-03 -99 12:15
waiti ng mode with dat e
and tim e.
Press t he
2
FUNCTION
FAX SET-UP
key until this app ears
on the display --->
Press t he START key. DATE AND TIME
3
Press t he FUNCT ION
4
VARI OUS SETTINGS
key.
Press t he START key
5
TX RESOL. STD
until th is ap pears on
the display --->
Press t he </ > keys to
6
TX RESOL. FINE
see the other values
availabl e "TX RESOL.
FINE".
Press t he START key
7
to c onfir m you r c hoice
AUTOMATI C RX
22-03 -99 12:1 5
then the STOP ke y to
return the fax mac hine
to the initia l waiting
mode.
If you ar e connect ed to a pr ivate l ine, fol low the sa me
procedure but after step 4, press the > key to show
the optio n "PRIV.LINE (PBX) ".
34
-6-31-38.p65 25/02/00, 9.1934

Enabling/disabling the re-transmission of a
failed transmission ...
Procedure DISPLAY
Make sure that the
1
displ ay shows the ini tial
waiti ng mode with dat e
and t ime.
Press the FUNCTION
2
key unti l th is ap pear s
on th e disp lay - -->
Press the START key. DATE AND T IME
3
Press the FUNCTION
4
key.
Press the START key
5
until this appear s on
the display --->
Press the </> keys to
6
see the oth er values
availabl e:
"RETRANS.DOC: OFF".
Press the START key
7
to co nfi rm your choi ce
the fax machine return
to the initial waiting
mode.
AUTOMATIC RX
05-03- 99 16:10
FAX SET-UP
VARI OUS SETTINGS
RETRANS. DOC.: ON
RETRANS. DOC.: OFF
AUTOMATIC RX
05-03- 99 16:10
Adjusting the loudspeaker volume ...
If the volume of either the line tones or the connection
signals seem too low or too high to you, just use the
</> keys to modify it.
Procedure DISPLAY
Make sure that the
1
displ ay shows the ini tial
AUTOMATIC RX
02-03- 99 10: 48
waiti ng mode with dat e
and t ime.
Press the FUNCTION
2
INSTALLATION
key unti l th e dis play
shows --->
Press the START key. TEL. LINE SET-UP
3
Press the FUNCTION
4
DIAGNOSTICS
key unti l th e dis play
shows --->
Press the START key
5
LINE MONITOR:OFF
until the displ ay shows
--->
Press the </> keys unt il
6
LINE MONITOR:ON
the display shows --->
Press the START key
7
to confirm the setting,
AUTOMATIC RX
02-03- 99 10: 48
then pres s the STOP
key to r esto re t he fax
init ial w aiti ng mode.
Hearing the connection tones ...
The fax machine has already been set so that you can
hear the connection tones exchanged between your f ax
machine and the remote party, as well as the dialling
tones during the dialling mode. If this is not the case,
program it as follows:
1
2
3
Procedure DISPLAY
Make sure t hat the
displ ay shows the init ial
AUTOMATIC RX
02-03- 99 10: 48
waiti ng mode wit h date
and tim e.
Press t he HOOK key. TYPE NUMBER
_
Press t he < or > key s
to increase or decr ease
the l oudsp eaker
volume.
35
-6-31-38.p65 25/02/00, 9.1935

Adjusting the volume of the buzzer ...
Press t he START key. DATE AND TI ME
3
Procedure DISPLAY
Make sure that the
1
displ ay shows the init ial
AUTOMATIC RX
02-03- 99 10: 48
waiting mode with date
and t ime.
Press the FUNCTION
2
FAX SET-UP
key until the display
shows --->
Press the START key. DATE AND TIME
3
Press the FUNCTI ON
4
VARIOUS SETTING
key.
Press the START key
5
BUZZER VOL.:LOW
until the displ ay shows
--->
Press the </ > keys to
6
BUZZER VOL.:HIGH
show the other value s
availabl e: "BUZZ ER
VOL.:HIGH", "BUZZER
VOL. : ME D" a nd
"BUZZER VOL.: OFF".
In the example :
"BUZZER VOL.: HIGH".
Press the START key
7
to confi rm your
AUTOMATIC RX
02-03- 99 10:4 8
selec tion then pr ess the
STOP key to restore
the fax to the initial
waiting mode.
Reducing the speed transmission ...
The fax machine usually transmits at a speed of 9600
bps (bit per second). The transmission speed at 4800
bps is advisable on disturbed telephone lines.
Press t he FUNCTION
4
VARIOUS SETTINGS
key.
Press t he START key
5
TX SPEED 9 .6
until the dis play shows
--->
Press t he </> keys t o
6
TX SPEED 4.8
show th e oth er value
available: " TX SPEED
4.8" .
Press t he START key
7
to c onfir m your
AUTOMATIC RX
02-03- 99 10: 48
selection then the
STOP key to r e st o re
the fax to the initial
waiti ng mode.
Enabling/disabling the ECM mode ...
ECM ( Error Correction Mode ) is a system for correct-
ing errors caused by line interference. This function is
effective only if it has been enabled both on your fax
and on that of the remote party. It is highlighted by a
"E" on the display.
The fax machine is already set to transmit with this
mode but you can set it to transmit normally as follo ws:
Procedure DISPLAY
Make sure that t he
1
display shows the in itial
waitin g mode wi th da te
and ti me.
Press the FUNCTION
2
key unti the dis play
shows.
AUTOMATIC RX
06-03- 99 12:12
FAX SET-UP
Procedure D ISPLAY
Make sure t hat the
1
displ ay shows the init ial
waiti ng mode wit h date
and tim e.
Press t he FUNCTION
2
key until the disp lay
shows --->.
36
-6-31-38.p65 25/02/00, 9.1936
AUTOMATIC RX
02-03- 99 10: 48
FAX SET-UP
Press the START key. DATE AND TI ME
3
Press the FUNCTI ON
4
VARI OUS SETTINGS
key.
Press the START key. ECM: ON
5
Press the </ > keys until
6
ECM: OFF
the display shows --->
Press the START key
7
to confirm the settin g,
AUTOMATIC RX
06-03- 99 12:12
then STOP key to
restor e the fax t o th e
initial waiting mode.

TRANSMITTING/RECEIVING A DOCUMENT
Follow the procedure below:
WITH THE POLLING FACILITY ...
What is polling ...
It is a transmission request from one fax machine to
another so that the latter transmits the requested document automatically.
The main characteristics of polling communications are:
• the user receiving the document who requests
the transmission. This means that a user ma y connect to another fax machine and make it send him
a document automatically (preset) even if there is
no user at the other end of the line.
• the transaction is c harged to the party who re-
quests the transmission (i.e.: the user who receives the document and not to the sender).
1
2
3
4
Making the transmission request (polling for
reception) ...
Agree with your remote party the time at which the document is to be polled so that he inserts the document to be
transmitted. Then set your f ax machine to receive the document, programming the dialling method to be used to
call the remote party and the time at which the document
is to be received.
5
Procedure DISPLAY
Make sure th at the
disp lay shows th e initi al
AUTOMATI C RX
22-03-99 15:10
waiting mode with date
and tim e.
Press t he FUNCTION
POLLING RX
key until the dis play
shows --->
Press t he START key.
The display asks you
the time you want to
reque st t he
tran smissi on, e.g.
"17:15".
Press t he START key
to confirm the current
TYPE FAX NUMBER
NUM/TOUCH/SPEED
time, or enter the new
time and t hen p res s the
START key.
Dial the number of the
remot e part y in one of
TYPE NUM BER
02 458629
the mode s allowed. For
example, enter di rectly
the numbe r on the fax
numeri c key pad.
TYPE TI ME
HH:MM
Press t he START key
6
to confirm th e setting.
The fax mach ine
retur n s aut omati cally to
the ini tial waiting m ode.
AUTOMATI C RX
POLL RX 17:15
-6-31-38.p65 25/02/00, 9.1937
37

Changing/deleting a previously set polling
ê
reception operation ...
Programming the fax machine to poll a
document (polling in transmission) ...
Procedure DI SPLAY
Make sur e you h ave
1
set a pol li ng
AUTOMATIC RX
POLL RX 17:15
reception.
Press t he FUNCTION
2
POLLING RX
key until the disp lay
shows --->
Press t he START key. ALRE ADY ENTERED
3
Press t he START key. CHANGE PARAM.?
4
If you want to cancel a poll i ng recepti on operat i on that
has al ready been set, pres s the > key: the message
"CANCEL SETTING?, is displayed;
then press START to confirm cancellation. The fax
machine returns automatically to the initial waiting
mode.
If you want to change the time in which the
transm ission r equest is to be c ar ried out or the remote
party number from which you want to receive the
documen t, procee d as follows:
Press t he START key. TYPE TI ME
5
HH:MM
Procedure DISPLAY
Make sure th at the
1
displ ay shows the i nit ial
AUTOMATIC RX
22-03- 99 15:10
waiti ng mode with dat e
and tim e.
Inser t the document in
2
ADF.
Selec t th e cont rast and
3
DOCUMENT READY
NORMAL
resolution type you
consi der m ost
approp ri ate.
Press t he FUNCTION
4
POLLING TX
key until the displ ay
shows --->
Press t he START key
5
twice.
AUTOMATIC RX
POLLING TX SET
You can c ancel th e pol li ng s ett i ng dur i ng tr ansm iss ion ,
by removi ng the document from the ADF o r pressing
the STOP ke y.
Ovewr ite the new time
6
and t hen con fir m th e
setting with the
START key or confi r m
the exist ing one by
press ing d irect ly t he
START key.
Overwr ite the new
7
number a nd co nfi rm t he
setting with the START
key or conf irm the
existi ng one by
press ing d irect ly t he
START key. The fax
returns automatically to
the int ial wait ing mode.
TYPE NUMBER
0125 45686
AUTOMATIC RX
POLL RX 18:00
38
-6-31-38.p65 25/02/00, 9.1938

MAINTENANCE
To ensure the correct functioning of your fax machine,
refer to the recommendations at the beginning of this
manual. These recommendations concern the replace-
ment of accessories, (ink cartridge and print head) and
the periodical cleaning of the following parts:
• print head nozzles
• print head electric contacts
• print head pad
• optical reader
• casing
and the removal of both jammed documents and
jammed paper.
For other problems mainly due to incorrect use, refer
to the paragraph “Solving small problems ...”
1. Lift the print head compartment cover, placing y our
finger in the centre recess.
REPLACING THE PRINT HEAD ...
When the ink in the cartridge runs out, the display
shows the message "OUT OF INK". At this point either:
• replace the ink cartridge if the print head is
equipped with an interchangeable cartridge
or
• replace the print head if the print head used is of
the disposable type.
If the fax machine is equipped with an interchange-
able ink cartridge, this may be replaced up to 6
times after which the printing quality will deterio-
rate. In this case, you may have to replace the entire print head (see appropriate paragraph).
-7-39-49.p65 25/02/00, 9.5039
39

2. Release the print head (including the cartridge, if
the print head has an interchangeable ink cartridge)
acting on the lever, then remove it from its compartment.
3. Remove the new print head from its package and,
holding it by the grip, peel off the protective film.
4. Insert the print head in its housing with the electrical contacts facing the front of the fax machine.
Avoid touching the nozzles and the electrical contacts and, if the print head has an in-
terchangeable ink cartridge, do not remove the
cartridge from the print head.
5. Push the print head in the direction of the arrow
until your hear the click confirming its correct insertion, and close the print head compar tment cover.
40
-7-39-49.p65 25/02/00, 9.5040

If the new print head is of the single-use type
and you have replaced it because it ran out of
ink, the fax machine automatically recognises
the replacement and the display shows the
following message “NEW HEAD? 1 = ON,
0 = OFF”. Set the value 1.
If the new print head is of the single-use type
but you replaced it because the printing qual-
ity had deteriorated, follo w the procedure “ Print
head clearing and manual nozzle testing”,
reported farther on in the manual.
Once you close the cover, the fax machine will
automatically check the nozzles and perform
a print test (already described in “Installing the
print head”, under the “Installation” chapter).
REPLACING THE INK CARTRIDGE ...
1. Lift the print head compartment cover placing your
finger in the centre recess.
2. Release the ink cartridge using the lever.
3. Remove the cartridge.
-7-39-49.p65 25/02/00, 9.5041
4. Remove the new car tridge from its package and
peel off protective film.
41

Avoid touching the inked area.
PRINT HEAD CLEARING AND MANUAL
NOZZLE TESTING ...
If the printing quality deteriorates you can quickly
clear the print head and test the nozzles with a printout
showing their condition.
Procedu re DISPLAY
5. Immediately inser t the cartridge in its housing and
press it until you hear the click confirming its correct
insertion. Close the print head compartment cover.
Make sure that the
1
display shows the initial
PHONE/FAX RX
10-03-99 12:55
waiting mode
with date and t ime.
Press the FUNCTI ON
2
HEAD MAINTE NANCE
key until the display
shows --- >
Press the START key. NEW HEAD : ON
3
If the print head is new, press the
START
key. The
fax machine automatically initiates the print head reactivation and nozzle testing operation, printing its
diag nost ic r esul t.
If th e prin t head is no t new, follow the steps bel ow.
Press the </> key to
4
NEW HEAD : OFF
disp lay th e o ther
availa ble optio n: “NEW
HEAD: OFF”.
Press the START key
5
CLEANING: ON
twice. The fax machine
init iates the pri nt head
re-activation and nozzle
test ing op eration ,
prin ting i ts diag nost ic
result.
42
-7-39-49.p65 25/02/00, 9.5042
By pressing the STOP key you bri ng the fax machin e
to the i nitial waiti ng mode.
To interpret the diagnostic print, see the “Installation” chapter.

CLEANING THE ELECTRICAL CONT A CTS OF
THE PRINT HEAD ...
1. With the fax machine off , lift the head compartment
cover, positioning your finger in the centre recess.
2. Release the print head (including the cartridge, if it
is an interchangeable ink cartridge head) using the
levers.
3. Remove the print head.
4. Clean the electrical contacts using a slightly damp
cloth.
Do not touch the print head nozzles.
5. With a slightly damp cloth, also clean the electrical
contacts of the print head carriage, then reinsert
the print head and close the print head compar tment cover.
43
-7-39-49.p65 25/02/00, 9.5043

CLEANING THE PRINT HEAD PAD ...
CLEANING THE OPTICAL READER ...
1. With the fax machine switched off, lift the print
head compartment cover, placing your finger in the
centre recess.
2. Move the print head carriage against the right-hand
side as shown in the figure.
Dust accumulating on the optical reader glass may cause
document scanning problems. To avoid this problem, you
must clean the glass frequently as described below:
1. With the fax machine switched off, lift the printer
head compartment cover placing your finger in the
centre recess.
3. Clean the print head pad with a dry cotton swab,
then close the print head compartment cover.
2. Move the print head against the left-hand side and
lift the optical reader screen using the lever located
on the right-hand side of the fax machine.
44
-7-39-49.p65 25/02/00, 9.5044

3. Clean the optical reader glass using a cloth damp-
ened with a product specifically designed for cleaning glass, and then carefully wipe it dry . Do not pour
or spray the cleaning product directly on the glass.
Reinsert the roller and lower the operator console
again.
To check if the optical reader is clean, make a
copy with a blank page. If the copy presents
vertical lines but the optical reader is found to
be perfectly clean, contact a qualified technical
service technician.
If the document or the sheet do not come out auto-
matically, remove them manually as described below:
1. Lift up the print head compartment cover placing
your finger in the centre recess. (If you have to remove a document consisting of multiple sheets, before you lift the print head compartment cover, remove any sheets which may still be in the feeder).
2. Press the lever located on the left side of the fax
machine and, by pressing down on it, remove the
jammed document or sheet.
CLEANING THE CASING ...
1. Disconnect the fax machine from the power supply
and from the telephone line socket.
2. Use only a soft lint-free cloth, dampened with diluted washing-up liquid.
REMOVING JAMMED DOCUMENTS AND
SHEETS ...
During transmission or when copying, a document
may become jammed (the message: “REMOVE DOCU-
MENT, PRESS " is displayed to indicate this condition).
It is also possible that the paper used to print received
documents or to copy documents can become
jammed (the message: “PAPER ERROR, PRESS "
is displayed to indicate this condition).
In both cases, try to eject the document or the sheet of
paper by pressing the STOP key.
-7-39-49.p65 25/02/00, 9.5045
45

SOLVING SMALL PROBLEMS ...
The following list may be useful as a guide to solving
small problems.
PROBLEM SOLUTION
The fax machi ne does
not swi tch o n.
The docu ment c annot be
inser ted co rrectl y.
The fax machi ne cannot
transmi t a do cument .
The fax machi ne cannot
receive in automatic
mode.
The fax machi ne can
neither copy nor receive.
Check that t he power
cable is con nected.
Check that t he document
corr esponds to the
recommen dations
indic ated i n th e paragr aph
Which docume nts you
"
can use ", chapter "For
everyday use ".
Check that t he document
is not jammed inside the
machine.
The l ine is busy, wait unt il
it is free, then retransmit.
You have s et it for
manual r ecep tion: r eset i t
for automatic reception.
Check that t he document
or the pr inting pa per are
not j ammed ins ide t he
machine.
The type of pa per that
you are using is n ot
corr ect: check paper
charact eri stics ind icated
in the "Appe ndix".
The fax machi ne prints
out c omplet ely blan k
document s.
If the fax machine does not transmit or receive documents, this may also depend on other causes . They
will be indicated with an error code in the "Trans-
mission report" and in the "Activity report", see
"Printing lists and reports", chapter "For every-
day use".
46
-7-39-49.p65 25/02/00, 9.5046
Position the document
correctly with the side to
be copi ed fac e down.

ERROR CODES ...
The error codes are printed both on the transmision and actvity reports and are represented by two digits indicating
the cause of the error. On the activity repor t,due to lack of space only the code is indicated without any message.
CODE MESSAGE ERROR CAUSE ACTION
OK No mess age. Operation
complet ed cor rectly.
02 IMPOSSIBLE CONNECTI ON Th e fax machine does n ot
detec t any line t one or rec eives
incor rect sign als.
03 RECEIVER DOES NOT
ANSWER
04 ERR. WHIL E TRANSMITTING
RESEND FROM PAGE:
The remot e part y does not
answer or is no t a fax.
An anomaly has been detect ed
durin g transmis sion. "nn" = page
number o n whi ch er ror occure d.
05 RESEND PAGES:
nn, ..... nn
The fax machine of the remote
par ty de tect ed er rors durin g
recep tion. "nn" = page numbe r
on which error occurred.
07 DOCUMENT TOO LONG The doc ument t o be t ransm itte d
is too long. Transmission time
exceeds p er mitte d li mit.
08 C HECK THE DO CUMENT Opti cal s canne r unable to r ead
documen t.
No action .
Check t hat t he fax machi ne i s
connect ed corr ectly to t he line
and t hat th e hand set i s on the
hook. Ret ry the c onnect ion.
Retr y.
Repeat the transmission starting
from the pa ge indic ated in the
report.
Repeat the transmission starting
from the pa ge indic ated in the
report.
Divi de document t o be
transmitted.
Remove doc ument f rom A DF
and r e-in ser t it befor e repe ati ng
transmi ssi on.
09 STOP PRESSED You have inter rupted the
No action .
transmi ssion .
10 No message Fax has detect ed anomaly
durin g recepti on.
11 No message Print er anomaly during
reception. Remainder of
doc umen t sto red in memo r y but
Contac t send er and ask him t o
repeat th e tra nsmissi on.
Corre ct pr int ing pr oblem, then
wait until the stored document
has been pr inted.
memor y capacit y exceeded
before end of procedur e.
13 ER RORS WHILE POLLING Remot e fax has no document in
Contac t send er.
ADF and was not set for polling
transmi ss ion .
16 POWER FAILURE ON PAGE Power failure during
transmission or reception.
(OK) No message. The docume nt was received but
Repeat tran smissi on fro m the
page in dicated on t he repor t.
Contac t send er.
the printing quality i s not very
good.
OCC LINE BUSY The l ine i s eng aged. Retr y con nectio n.
47
-7-39-49.p65 25/02/00, 9.5047

SIGNALS AND MESSAGES ...
Message: “ CHECK PAPER, PRESS "
Problems which may occur are normally indicated by
acoustic signals (sometimes accompanied by visual
signals: ERR OR led on) or by error messages on the
display.
In the appendix of this manual, you will find a list of
the acoustic signals and display messages, which
do not indicate an error condition.
Acoustic signals ...
1 second short tone
• You have pressed the wrong key during an operating procedure.
3 seconds continuous tone plus error led on
• Operation unsuccessful.
Permanent tone
• Handset off hook; you forgot to replace it after a
previous operation.
To switch off the "ERROR" led, press the STOP
key.
• There is no paper in the tray: add paper and press
STOP to clear the message from the display.
• The paper is not fed properly: reposition the paper
in the tray and press STOP to restore the fax ma-
chine to its operating condition.
Message: “ CHECK PRINT HEAD”
•
The fax machine does not detect the presence of
the print head because you forgot to insert it or because you installed it incorrectly: insert/reinsert the
print head.
•
Some print head nozzles are damaged, reducing
print quality: perform the print head clearing procedure (see “Print head clearing and manual noz-
zle testing”).
Message: “COPY INTERRUPTED”
•
You interrupted the copying operation by pressing
the STOP key.
•
There was an anomaly while copying the document
and it could not be printed: check the type of anomaly
on the display and remove it.
Message: “ COVER OPEN”
Error messages on display ...
The messages are listed in alphabetical order. Corrective action is indicated.
Message: “AUTOREDIAL nnn”
Connection could not be established due to line anomalies or because the receiver is engaged: the fax machine is waiting to carry out the automatic redialling
attempts.
Message: “ CHECK DOCUMENT, PRESS "
The document is not being fed properly: reposition the
document in ADF and press the STOP key to restore
the fax machine to its operating condition.
You forgot to close the print head compartment cover.
Message: “ DOC IN MEMORY”
The received document was stored in the memory because an anomaly was present during the reception
phase and it could not be printed right away: check the
type of anomaly (no paper or jammed paper, no ink,
cover open, etc.) and remove it.
Message: “LAST TX ERR. XX”
The last transmission was not completed correctly: you
can press the (REDIAL) key to make another
transmission attempt or you can press the STOP key
to restore the fax machine to its initial waiting mode.
48
-7-39-49.p65 25/02/00, 9.5048
Message: “ MEMORY FULL”
Message: “ REMOVE DOCUMENT”, “PRESS “
One or more documents received in the memory, due
to an anomaly during reception, have filled up the
memory: check the type of anomaly (no paper or
jammed paper, no ink, cover open, etc.) and remove it.
The documents will automatically be printed, clearing
the memory.
Message: “ NOT PROGRAMMED”
You have chosen a one-touch dial key or a speed-dialling code that you had not programmed: program the
key or the code (see “Programming one-touch dial
and speed dialling”, under the “For everyday use”
chapter).
Message: “ OUT OF INK”
The ink in the cartr idge has run out: replace the print
head if it is of the disposable type or replace the cartridge if it is replaceable (see “Replacing the print
head” or “Replacing the ink cartridge”).
Message: “ PAPER ERROR, PRESS ”
The paper jammed while copying or receiving a document: press the STOP key and, if the sheet is not
ejected automatically, check where it jammed and remove it (see “Removing jammed documents and
sheets”).
Message: “ POLL. RETRY nnn”
•
A document jammed while copying or transmitting:
press the STOP key and, if the document is not
ejected automatically, remove it manually (see “Re-
moving jammed documents and sheets”).
•
You interrupted the document scanning operation
by pressing the STOP key.
Message: “RX ERROR”
Reception was not completed correctly: press the STOP
key to turn off the “ERROR” indicator light and to clear
the message from the display.
Message: “RX IN MEMORY”
Reception continues in memory because an anomaly
took place while receiving a document, which could not
be printed: check, on the lower line of the display, the
type of anomaly, and remove it.
Message: “SYSTEM ERROR nn”
An anomaly which blocked the fax machine has occurred: switch the fax machine off and on again. If the
error persists, switch the fax off and call the technical
support ser vice.
Message: “ TX ERROR”
Transmission was not completed correctly: press the
STOP key to turn off the “ERROR” indicator light and
to clear the message from the display, then repeat the
transmission.
You have set a reception polling and the connection
could not be established because of errors on the line
or because the receiver was engaged: the fax machine
is waiting to carry out the automatic redialling attempts.
-7-39-49.p65 25/02/00, 9.5049
49

APPENDIX
OTHER ACOUSTIC SIGNALS ...
1 second short tone
• Transaction was carried out correctly.
20 second intermittent tone
• Prompt to lift the receiver to answer a telephone call.
You hav e carried out a transmission request (P olling reception).
The fax machine is printing a report or a list.
OTHER MESSA GES ON DISPLAY ...
A reception is under way.
Message: “CHECK PRINT OUT”
"1=EXIT 0=REPEAT"
The fax machine has automatically tested the print head
nozzles with the subsequent print test: from the test,
check whether print quality is acceptable and reply accordingly.
Message: "CONNECTING"
The fax is carrying out the connection with your remote
party fax machine.
Message: "DIALLING"
The fax is dialling the remote party.
Message: " DOCUMENT READY"
You have correctly inserted the document in ADF.
Message: “LAST TX OK”
The last transmission was completed correctly.
Message: "LIFT HANDSET"
The remote party has booked a voice communication:
lift the receiver to answer the call.
Message: "LINE ON HOLD", "PRESS HOLD"
You have temporar ily “held” a telephone conversation
by pressing the " " (HOLD) ke y: press the " " (HOLD)
key to talk your remote party again.
Message: "NEW PRINT HEAD ?", "1=YES 0=NO"
You have inser ted a disposable print head for the first
time or removed and then reinserted it: answ er appropriately. If you answer “yes” but the print head is not new,
the fax machine will not detect the end of ink condition.
The reception was carried out successfully.
You interrupted the reception by pressing the STOP key .
The fax machine is storing the pages making up the
document to be copied.
You connected to the line by lifting the handset of the
connected telephone.
A transmission is under way.
A transmission is in progress.
You have set a transmission for a preset time (delayed
transmission).
The transmission was completed correctly.
You have set a transmission from memory
You interrupted the transmission by pressing the STOP
key.
Message: "POLL RX HH:MM"
Message: “ PRINTING REPORT”
Message: "RECEIVING FAX"
Message: "RX COMPLETED"
Message: “ RX INTERRUPTED”
Message: “STORING”
Message: “TEL CALL”
Message: “TRANSMITTING”
Message: "TRANSMITTING..."
Message: “TX AT HH:MM”
Message: “TX COMPLETED”
Message: "MEMORY tx"
Message: “TX INTERRUPTED”
50
Ap-50-52.p65 25/02/00, 9.2150

TECHNICAL DAT A ...
GENERAL FEATURES
• Model Desktop transceiver
• Display LCD 16 + 16 crt.
• Memory capacity (*) 21 pages
Dimensions:
• Width 359 mm
• Depth 234 mm + 84 mm (**)
• Height 180 mm + 138 mm (**)
Weight
~ 6.7 Kg
COMMUNICATION FEATURES
• Telephone network Public/private
• Compatibility ITU
• Communication speed 9600 - 7200 - 4800 2400 bps
• Compression methode MH, MR
POWER FEATURES
• Power voltage 220-240 VAC or 110-120 VAC
(see the label on the back of the
fax machine)
• Frequency 50-60 Hz
(see the label on the back of the
fax machine)
OPTICAL READER FEATURES
• Scanning method CIS
Reading resolution
:
• hor izontal 8 pixel/mm
• ver tical STANDARD 3.85 lines/mm
• ver tical FINE 7.7 lines/mm
TRANSMISSION FEATURES
• Transmission time 15 s (9600 bps)
• ADF 5 sheets A4,
Letter and Legal
RECEPTION FEATURES
• Printing method Printing on plain paper with
ink jet printer
• Maxim um
printing width 208 mm
• Printing paper A4 (210 mm x 297 mm),
Letter and Legal
US Letter (216 x 279 mm) and
US Legal (216 x 356 mm)
weight: 70 - 90 gr/m
2
• Paper feed Plain paper cassette
(40 sheets 80 gr/m2)
Power consumption
:
• Stand-by 7 VV
• Power max. 35 VV
ENVIRONMENTAL CONDITIONS
• Temperature from 5o C to +35oC
(operating)
from -15 oC to +45oC
(transport)
from 0 oC to +45 oC
(storage and parking)
• Relative humidity 15% - 85% (operating
storage/parking )
5% - 95% (transport)
(*) ITU TS format, Test Sheet No. 1 (Slerexe Letter) in standard resolution with MH compression.
(**) With the paper suppor t extension.
51
Ap-50-52.p65 25/02/00, 9.2151

EXAMPLE STANDARD FORM ITU-TS TEST SHEET N°1 (SLEREXE LETTER)
52
Ap-50-52.p65 25/02/00, 9.2152

INDEX
A
Acoustic signals 50
ADF 11
ASF 3
B
Buzzer 36
Buzzer volume 36
C
Casing 45
Cleaning 39
Clearing the print head 42
Configuration parameters 27
Connection tone 35
Contrast 11
adjustment 11
Copying 29
contrast and resolution values 29
enlargements 29
multiple copies 29
reductions 29
single copy 29
Error codes 17, 47
Error correction mode 36
ERROR led 48
F
Fax number 7
I
Ink cartridge 4, 5, 39
replacing the ink cartridge 39
L
Language 2
Line characteristics 8
private line 9
public line 8
Lists
automatic print out
of delayed transmission data 27
printing
configuration parameters 27
installation parameters 27
D
Date and time 6
Dialling 13
pulse 8, 9, 13
tone 8, 9, 13
Display 48
error messages 48
other messages 50
E
Electrical contacts 4, 40
of the print head 4, 43
of the print head carriage 43
Electrical power supply 2
connecting to the power supply 2
Ia-53-54.p65 25/02/00, 9.2153
M
Maintenance 39
Memory 16, 17, 18
printout of parameters 16
transmission from memory
changing/resending/clearing 17
transmitting a document from memory 16, 17
Messages 48
error messages 48
error messages on display 48
N
Name 6
Nozzles 4, 39, 40
cleaning 5, 42
53

O
S
One-touch dial 20, 23
Optical reader 44
cleaning 45
Original document 11
inserting the document in ADF 11
removing jammed documents 45
which documents can be used 11
which documents you can copy 29
P
Packaging 1
Paper 3, 11
automatic sheet feeder (ASF) 3
loading paper 3
paper format 3
paper sizes 11
removing jammed sheets 45
Periodic cleaning 39
Polling 37
in reception 37
in transmission 38
Pow er supply 51
Pow er supply cable 2
Print head 3, 5, 39
clearing the print head 42
inserting the print head 3
replacing the print head 39
Print head pad 39, 44
Problems 46
R
Sender identification 6
position of the name and fax number 7
setting a fax number 7
setting a name 6
Set-up parameters 27
Silence lapse 33
Speed dialling 20, 22, 23
Surplus 31
T
T echnical data 51
T elephone line 2
connecting an emergency phone 2
connecting the answering device 2
connecting the fax machine 2
private line (switchboard) 9
public line 8
T elephone line connection cable 1, 2
Telephone set 28
telephoning with one-touch dialling 28
telephoning with speed dialling 28
T ransmission
delayed transmission 15
from memory 16
interrupting 13
transmitting a document 11
transmitting with one-touch dial 23
transmitting with speed dialling 23
T ransmission speed
reducing 17
reducing transmission speed 20
Reception 18
automatic reception 19
with call type recognition 18, 19
interrupting 18
manual 18
with external answering machine 18
Redialling (REDIAL) 14
Reports
interpreting reports 26
print 24
types 24
Resolution 11
adjusting 11
54
Ia-53-54.p65 25/02/00, 9.2154

NETWORK COMPATIBILITY DECLARATION
Scarmagno, 29 Mar'99
We,
Olivetti Lexikon S.p.A.
Via Jervis, 77
10015 Ivrea (TO) (Italy)
declare, under our sole responsability, that the telefax products:
Olivetti OFX 520
are designed tointerwork within all the networks of the EC countries and also Switzerland and Norway.
The full Network compatibility in each country could depend upon the corresponding country Software
Switches, to be set accordingly.
In case of problems related to connection to networks other than EC PSTN, please contact your
national technical support centre.
Name: Aurelio Maruggi
Signature :
NetWork.p65 25/02/00, 9.211

Monochrome print head part numbers
Single-block print head: P/N 84431 W
Single-block print head with pigmented ink: P/N B0042 C
Rechargeable print head + 2 cartridges: P/N 52419 E
Two cartridge package: P/N 84433 S
Rechargeable print head + 4 cartridges: P/N 82070 A
Codtes.p65 25/02/00, 9.221

Part Number 237188 U
P-number.p65 25/02/00, 9.221
 Loading...