

Page 1

Printer
JP 90
MANUALE DELL’OPERATORE
USER’S MANUAL
MANUEL D’UTILISATION
BEDIENUNGSANLEITUNG
MANUAL DEL USUARIO
Page 2

Copyright © 1997, 2000 Olivetti Publication issued by:
Olivetti Lexikon, S. p. A.
All rights reserved Documentazione
Via Jervis, 77 - 10015 IVREA (Italy)
Olivetti Lexikon, S. p. A. reserves the right to modify the equipment described in this manual at any time and without notice.
TRADEMARKS
Any trademarks and/or proprietry names indicated are the property of their respective owners.
Printed in Italy
NOTICE: Olivetti Lexikon, S. p. A. makes no representations or warranties with respect to the contents of this document and
specifically disclaims any implied warranties of fitness for any particular purpose. The information contained in this document is
accurate to the best of our knowledge, but Olivetti Lexikon, S. p. A. is not liable for errors or misinterpretations.
Page 3
III
Page 4
IV
Page 5
B
B
3 4
V
Page 6
CVIC
W
E
O
R
P
L
N
N
E
O
M
F
R
T
E
R
D
R
E
O
G
A
D
E
C
F
Page 7
VII
Page 8
VIII
Page 9
IX
Page 10
O
P
W
E
R
N
O
L
N
R
M
O
E
F
E
F
E
D
R
T
A
R
C
D
G
E
W
E
O
R
P
L
I
N
N
E
O
F
M
R
O
F
W
O
E
R
P
L
N
N
E
O
M
F
R
T
R
E
R
D
E
O
A
G
D
C
E
F
P
O
W
E
R
N
O
L
N
R
M
O
E
F
E
F
E
D
R
T
A
R
C
D
G
E
R
I
E
T
D
R
E
G
A
D
E
C
O
P
W
E
R
N
O
L
N
R
M
O
E
F
E
F
E
D
R
T
A
R
C
D
G
E
XXIXII
Page 11

Page 12
Page 13

English
Page 14
This product satisfies the basic requirements of Electromagnetic
Compatibility and Safety required by the Directive s:
• 89/336/CEE of 3rd May 1989 with subsequent modifications
(Directive 92/31/CEE of 28th April 1992 and Directive 93/68/CEE of
22nd July 1993);
• 73/23/CEE of 19th F ebruary 1973 with subsequent modifications
(Directive 93/68/CEEof22nd July1993);
as having been designed in conformity with the requirements of the
following Reference Norms:
• EN 55022 (Limits and methods of measurements of ra dio
interference characteristics of Information Technology Equipment);
• EN 50082-1 (Electromagnet ic Compatibility - Generic Immunity
Standard - Part 1: Residential, commercial and light industry);
• EN 60555-2 (Disturbance in supply systems caused by household
appliances and similar equipment - Par t 2: Harmonics);
• EN 60950 (Safety of information technology equipment, including
electrical business equipment).
Conformity with the above basic requirements is certified by means of
the Mark shown on the product.
The Mark was introduced in 1995.
Your attent ion is drawn to the following actions that could compromise
the characteristics of the product:
• incorrect electrical supply;
• incorrect installation; incorrect or improper use, or, in any case, not
in accordance with the warnings given in the User Manual supplied
with the product;
• replacement of original components or accessories with ot hers of a
type not approved by the manufacturer, or carried out by
unauthorized personnel.
NOTE: This equipment has been tested and found to comply with the
limitsforaCLASSBdigitaldevice pursuantto Part15 ofthe FCCRules.
These limits are designed to provide reasonable protection against
harmful interference in a residential installation. This equipment
generates, uses and can radiate rad io frequency energy and, if not
installed and u sed in accordance with the instructions, may cause
harmful interference to radio communications. However, there is no
guarantee that interference will not occur in a particular insta llation.
If this equipment doescauseharmful interference to radio or television
reception, which can be determined by turning the equipment off and
on, the user is encouraged to try to correct the interference by one or
more of the following measures:
. Reorient or relocate the receiving antenna.
. Increase the separation between the equipment and receiver.
. Connect the equipment into an outlet of a circuit different from that
to which thereceiver is connected.
. Consult the dealer or an experienced radio/TV technician for
assistance.
Changes or modifications not expressly approved by the party
responsible for compliance could void the user’s authority to operate
the equipment.
Connection of peripherals requiresthe use of grounde d shielded signal
cables.
This digital equipment does not exceed the CLASS B limits for radio
noise emissions from digital apparatus set out in the
interference-causing equipment standard ent itled “Digital Apparatus”,
ICES-003 of the Industry Canada.
Ce dispositif numérique respecte les limites bruits radioélectriques
applicables aux appareils numériques de CLASSE B prescrites dans
la norme sur le matériel brouilleur : “Appareils Numériques”, NMB-003
édictée par le ministère des Communications.
Page 15
Preface
This non-impact portable printer is designed and constructed
to give constant print quality for both text and high resolution
graphics.
The printer can be connected to the electrical power supply
using the AC/DC adapter included in the packing carton, or
can be operated using market standard LR6/AA type
batteries or either of the optional NiCd or NiMH battery packs
available.
The disposable monochrome print head with water-r esistant
ink, which uses ink jet technology, produces a laser-l ike print
density of up to 600 x 300 dots per inch (dpi) with minimal
operating disturbance. An optional colour kit, containing a
colour print head, driver diskette and instructions manual, is
available.
The printer can be connected to portable or desktop PCs
with a Centronics parallel interface. The resident firmware
contains three different emulations: PCL III + (emulates the
HP DeskJet 500 printer), EPSON LQ 850 and IBM Proprinter
X24 (4207/1). Compatible with MS-DOS, MS-Windows and
IBM OS/2 environments, as well as other commonly-used
software applications, the printer can be used in most Word
Processing and Desk-Top Publishing environments.
With a built-in ASF as its standard paper handling device and
its compact size, this printer is the ideal companion for
itinerant and freelance professionals.
The Structure of the Manual
This multilingual manual has seven sections: a common
section, containing the illustrations, five independent
language sections and a final section only in English
containing the command codes and programmable
parameters.
Each language section is divided into two parts: a Quick
Start, which contains the essential information for installing
and operating the printer, and a User Guide, which contains
more detailed information on the printer’s features and
functions. Each language section also contains a glossary
of terms and an alphabetical index.
Quick Start
Unpacking
•
Identifying the printer parts
•
Connecting your printer
•
Switching on your printer
•
Inserting the print head
•
Loading paper
•
Printing the demo page
•
Installing printer software
•
English
Preface iii
Page 16

User Guide
UserInterface
Adhesive template, containing light indicator sequences
and common error conditions.
Operator panel, containing the fu nctions of the light
indicators (LEDs) and keys.
InkJet PrintHead
How to insert/remo ve the ink jet print head in/from
the printer, how to clean it and preserve optimum
print quality.
How to obtain the print test.
Paper
Characteristics of the paper that can be used in the printer.
Using Batteries
How to insert a nd recharge batteries or a battery pack.
UsingSoftware
How to change the printer settings via the printer
driver settings or the printer set-up utility.
Troubleshooting
Troubleshooting guide, indicating common
problems and their solution.
Options and product characteristics.
Refer totheappropriatechapterof theuserguidewhenever
youencounteraproblem.
iv Preface
Page 17

Table of Contents
User Interface
Templates.....................9
Quick Start
Unpacking .................... 1
OpeningthePrinter............... 1
IdentifyingthePrinterParts........... 1
ConnectingtheAC/DCAdapter ....... 2
SwitchingonthePrinter............. 2
InsertingthePrintHead............. 2
LoadingPaper.................. 3
PrintingtheDemoPage ............ 4
Connecting to a Computer/Host System . . . 4
InstallingPrinterSoftware............ 4
Help........................ 7
OperatorPanel..................9
Basickeyfunctions ................. 9
Specialkeyfunctions ................10
Lightindicators....................11
Ink Jet Print Head
ReplacingthePrintHead........... 13
Printheadremoval .................13
Monochrome print head with replaceable ink
cartridge .......................13
Optional colour print head with replaceable ink
cartridge .......................14
PrintHeadCare ................ 16
Printtest........................16
Cleaningtheprinthead ..............17
Transportingtheprinter...............17
Paper
TypesandDimensions............. 18
Insertion..................... 18
English
PrintArea.................... 19
Table of Contents v
Page 18

Using Batte ries
Supplies and Options
MarketStandardBatteries...........20
RechargeableBatteryPack..........20
Charging or Recharging Battery Packs ....21
Using Software
Modifying the Parameters in t he Windows®
3.1/3.11orWindows®95Drivers .......22
DOSEnvironment................24
RunningthePrinterSETUPUtility ........24
NoteforWindows®95users............ 24
Troubleshooting
GeneralCare..................26
ProblemsandSolutions.............27
Installation...................... 27
Paper......................... 28
Printhead ......................29
Printing........................ 29
Product C harac teristic s
Glossary
Index
Command Codes
Programmable Printer Features
vi Table of Contents
Page 19

Quick Start
This section is a rapid guide for installing your pr inter and
preparing it for use. It contains a sequence of operations
which should be
More detailed information about the printer and its functions is
givenintheUserGuide.
performed in the order described
.
Opening the Printer
To open the printer:
Raise and tip back the top cover).
•
Extend the paper support, pulling it out to the left and then
•
rotating it upwards until it is vertical (see figure on page X).
The top cover serves as the input/output tray for the
sheets of paper inserted in/expelled from the printer.
Open the front cover only to access the print head.
•
English
Unpacking
Keep the carton and all the packing materials in case you
have to repack or ship the printer.
Do NOT leave the printer exposed to direct sunlight or
heat sources, or in dusty, dirty or poorly ventilated
environments.
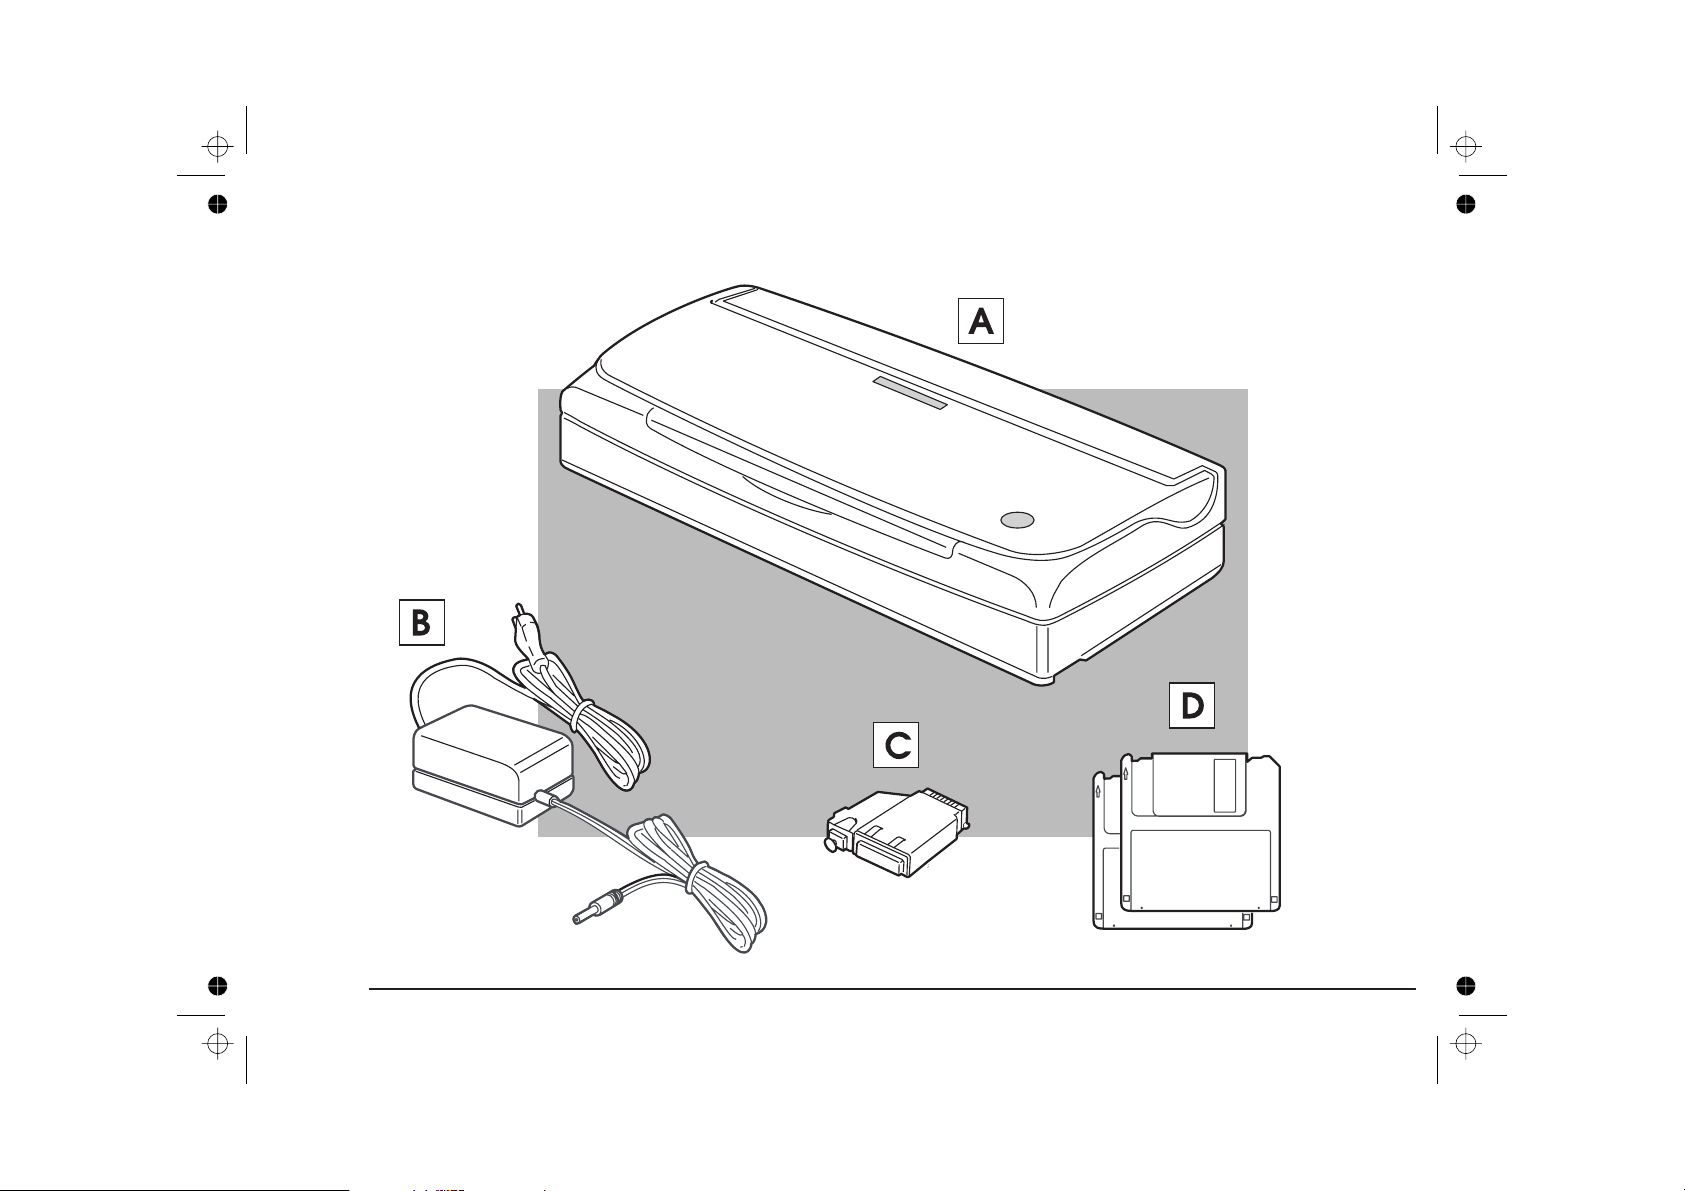
Carton contents
As well as this instructions manual, the packing carton also
contains the following (see page III):
A) Printer B) AC/DC adapter
C) Ink jet print head D) Driver diskettes
If anything is missing or damaged, call your local retailer
immediately.
✽
Instead of the A C/DC adapter supplied, you can use 10
market standard LR6/AA type batteries or either of the
optional NiCd or NiMH battery packs (item 1 on
page IV) to operate your printer (see “Using Batteries”
in the User Guide).
✽
Identifying the Printer Parts
Take a few mi nutes to identify and locate the principal parts
of your printer
Quick Start 1
Page 20
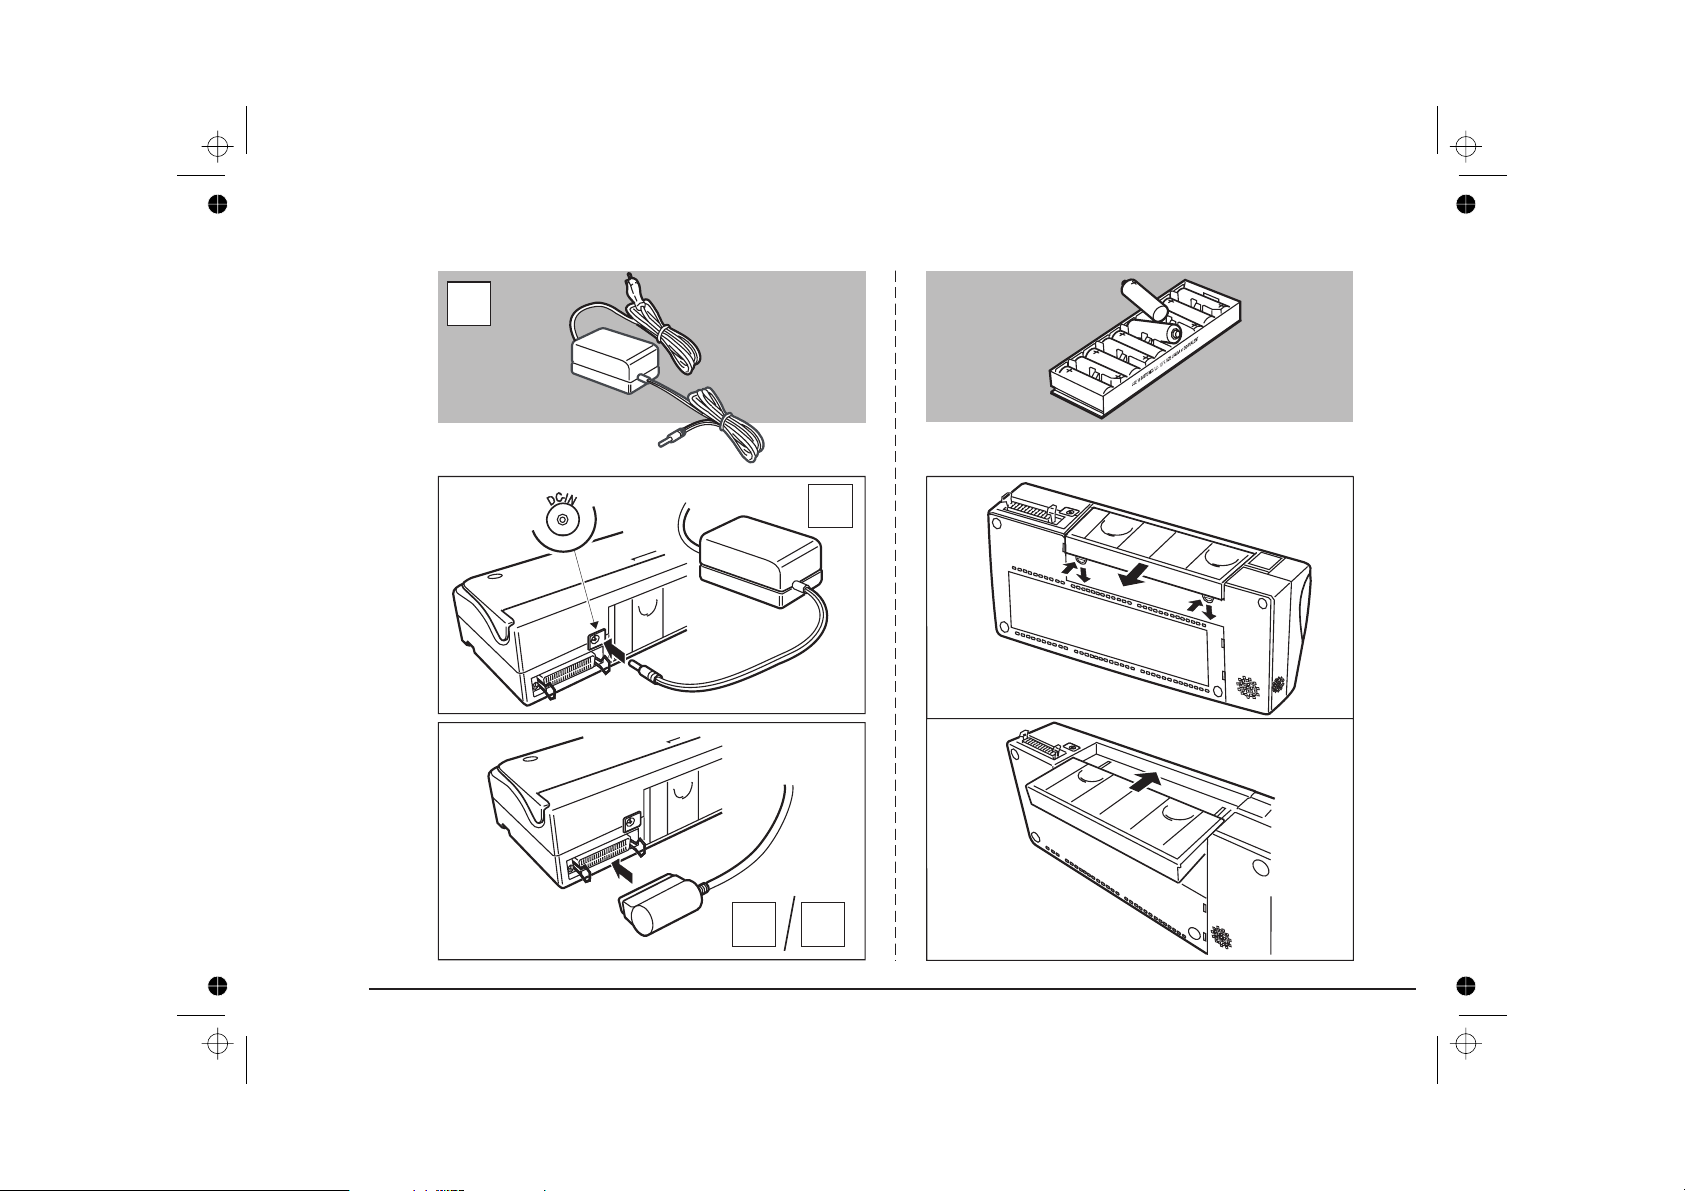
Connecting the AC/DC Adapter
The AC/DC adapter (i tem B on page III) serves as the power
supply for your printer when you are working in an office
environment.
As the AC/DC adapter is powered as soon as it is connected to the electrical power supply, make sure that it is
NOT plugged into the power supply socket when
connecting its jack to the printer.
Make sure that the voltage indicated on the electrical data
plate on the base of the AC/DC adapter corresponds to that of
your electrical power supply.
If the voltage indicated is not that supplied, call your local
retailer immediately. DO NOT, UNDER ANY CIRCUMSTANCES,
CONNECT THE AC/DC ADAPTER.
either of the optional battery packs (item 1 on page IV)
available (
see “Using Batteries” in the User Guide
).
Switching on the Printer
Press the POWER key on the operator panel to switch on
•
the printer.
The light indicators on the operator panel flash once in
sequence, and the POWER light indicator remains lit.
Whenever you switch on the printer, it undergoes a series of
internal checks and a mechanical reset is executed (a slight
noise is audible).
Make sure that the plug on the power cable of the AC/DC
adapter is of the type accepted by the power socket yo u intend
to use; if it is not, call your local retailer. Do NOT att empt to
change the plug yourself.
The manufacturer declines all responsibility for accidents to
persons or damage to the printer arising from the
non-observance of this warnin g.
Place the printer and the AC/DC adapter on a flat surface.
•
Plug the AC/DC connector jack into the socket marked
•
DC-IN on the rear of the printer (see figure on page V).
Insert the plug of the AC/DC adapter in the power socket
•
Instead of the AC/DC adapter, your can use 10 market
standard LR6/AA type batteries (see figure on page V), or
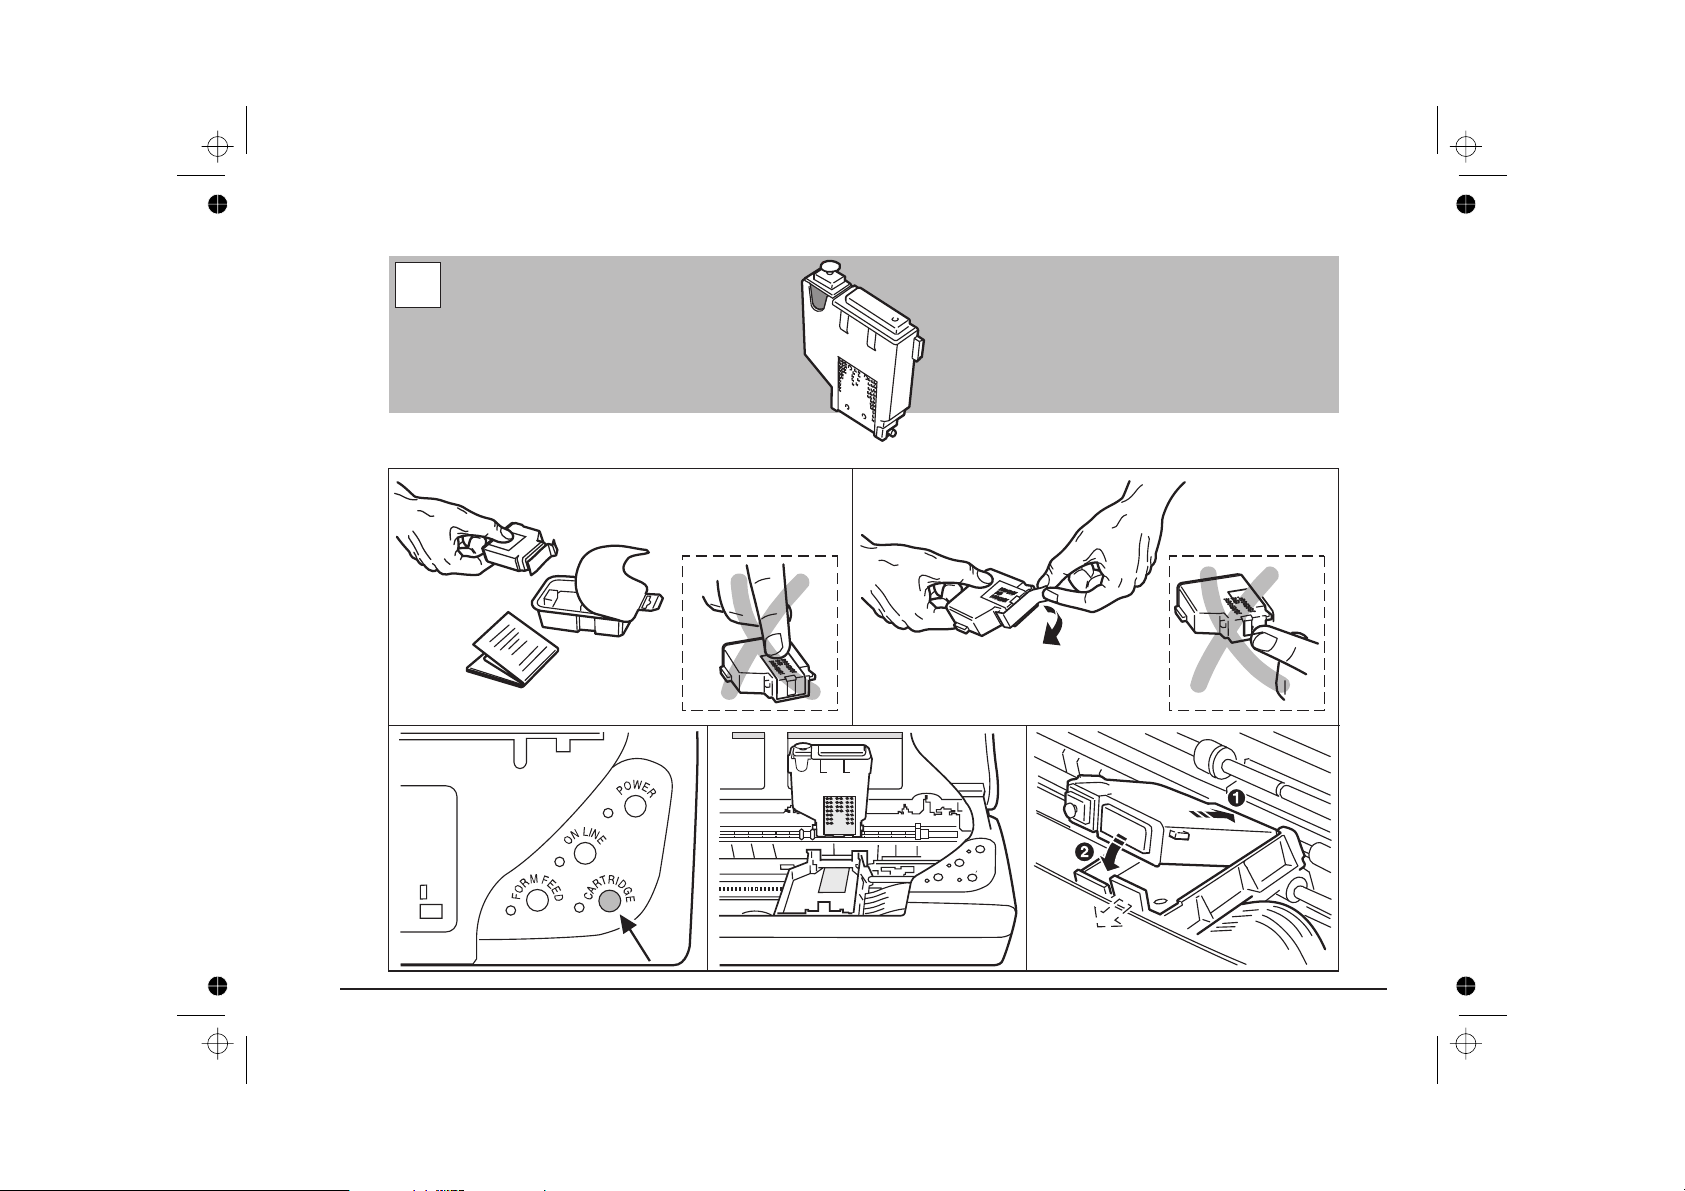
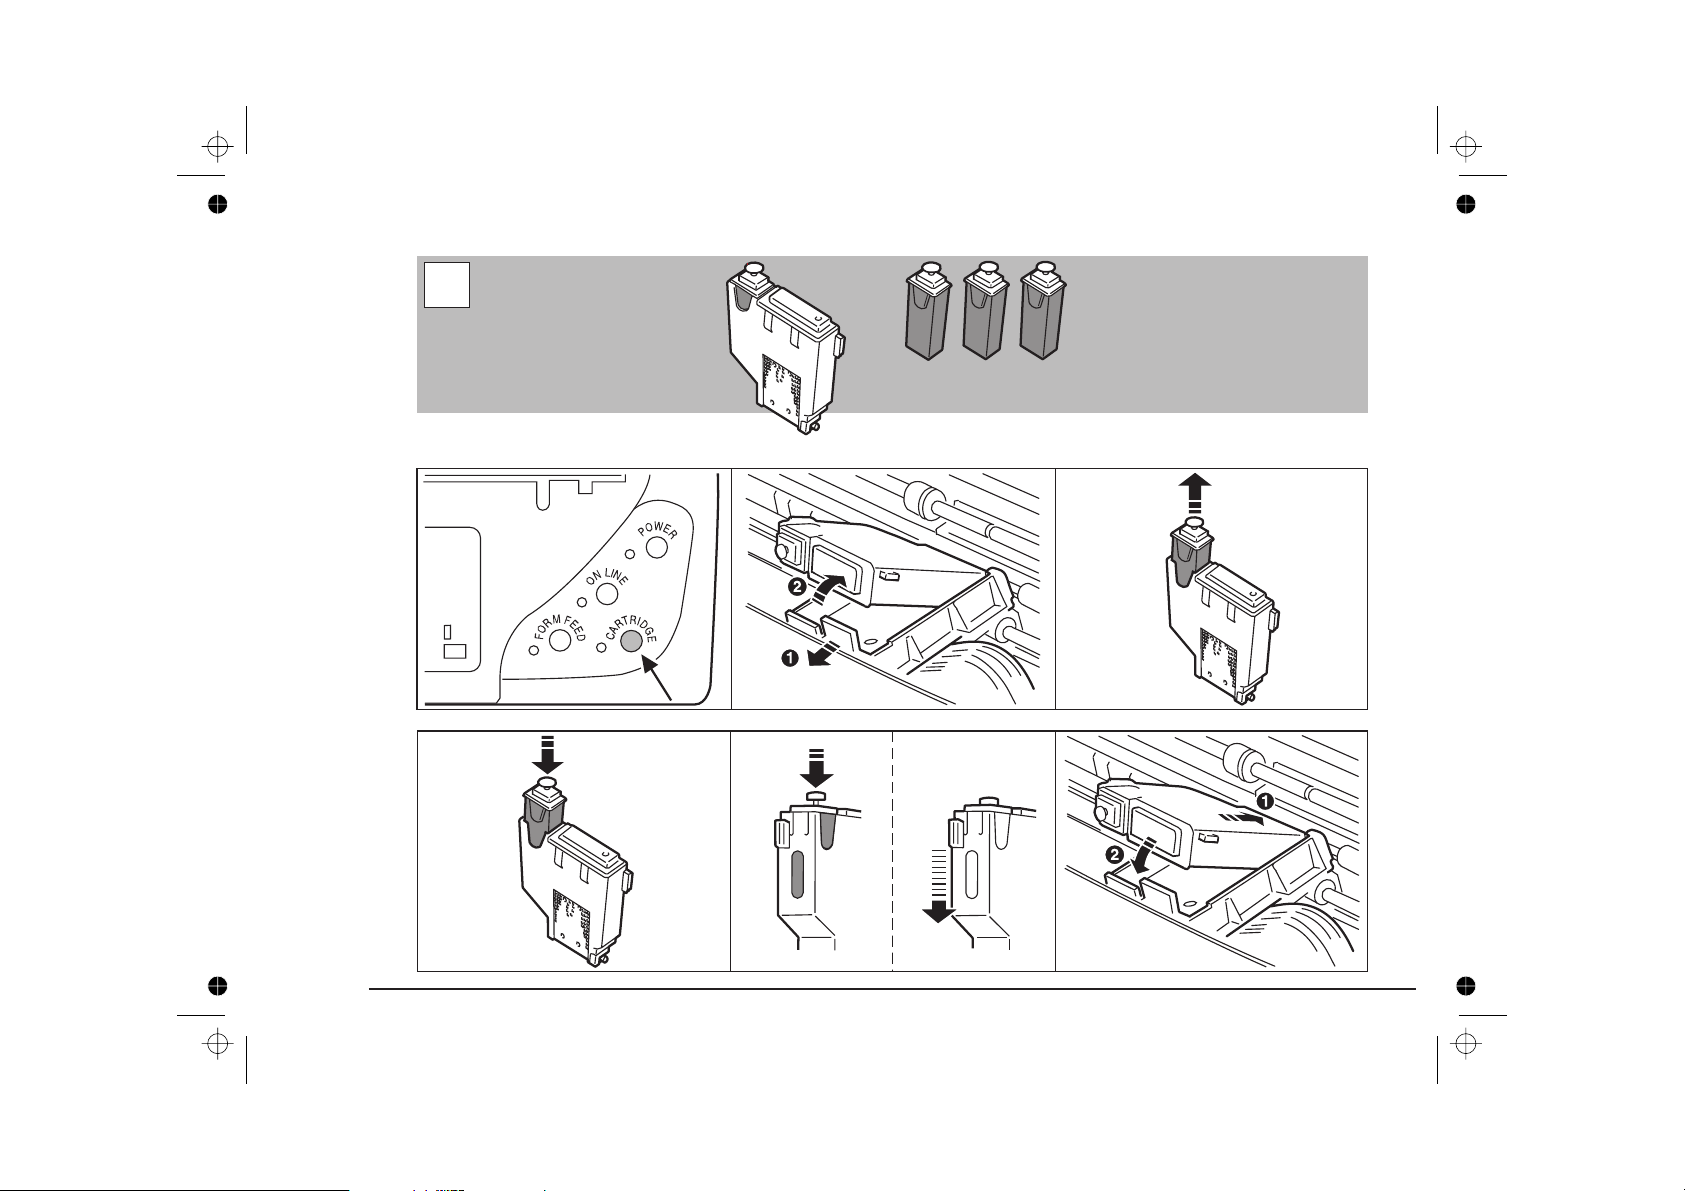
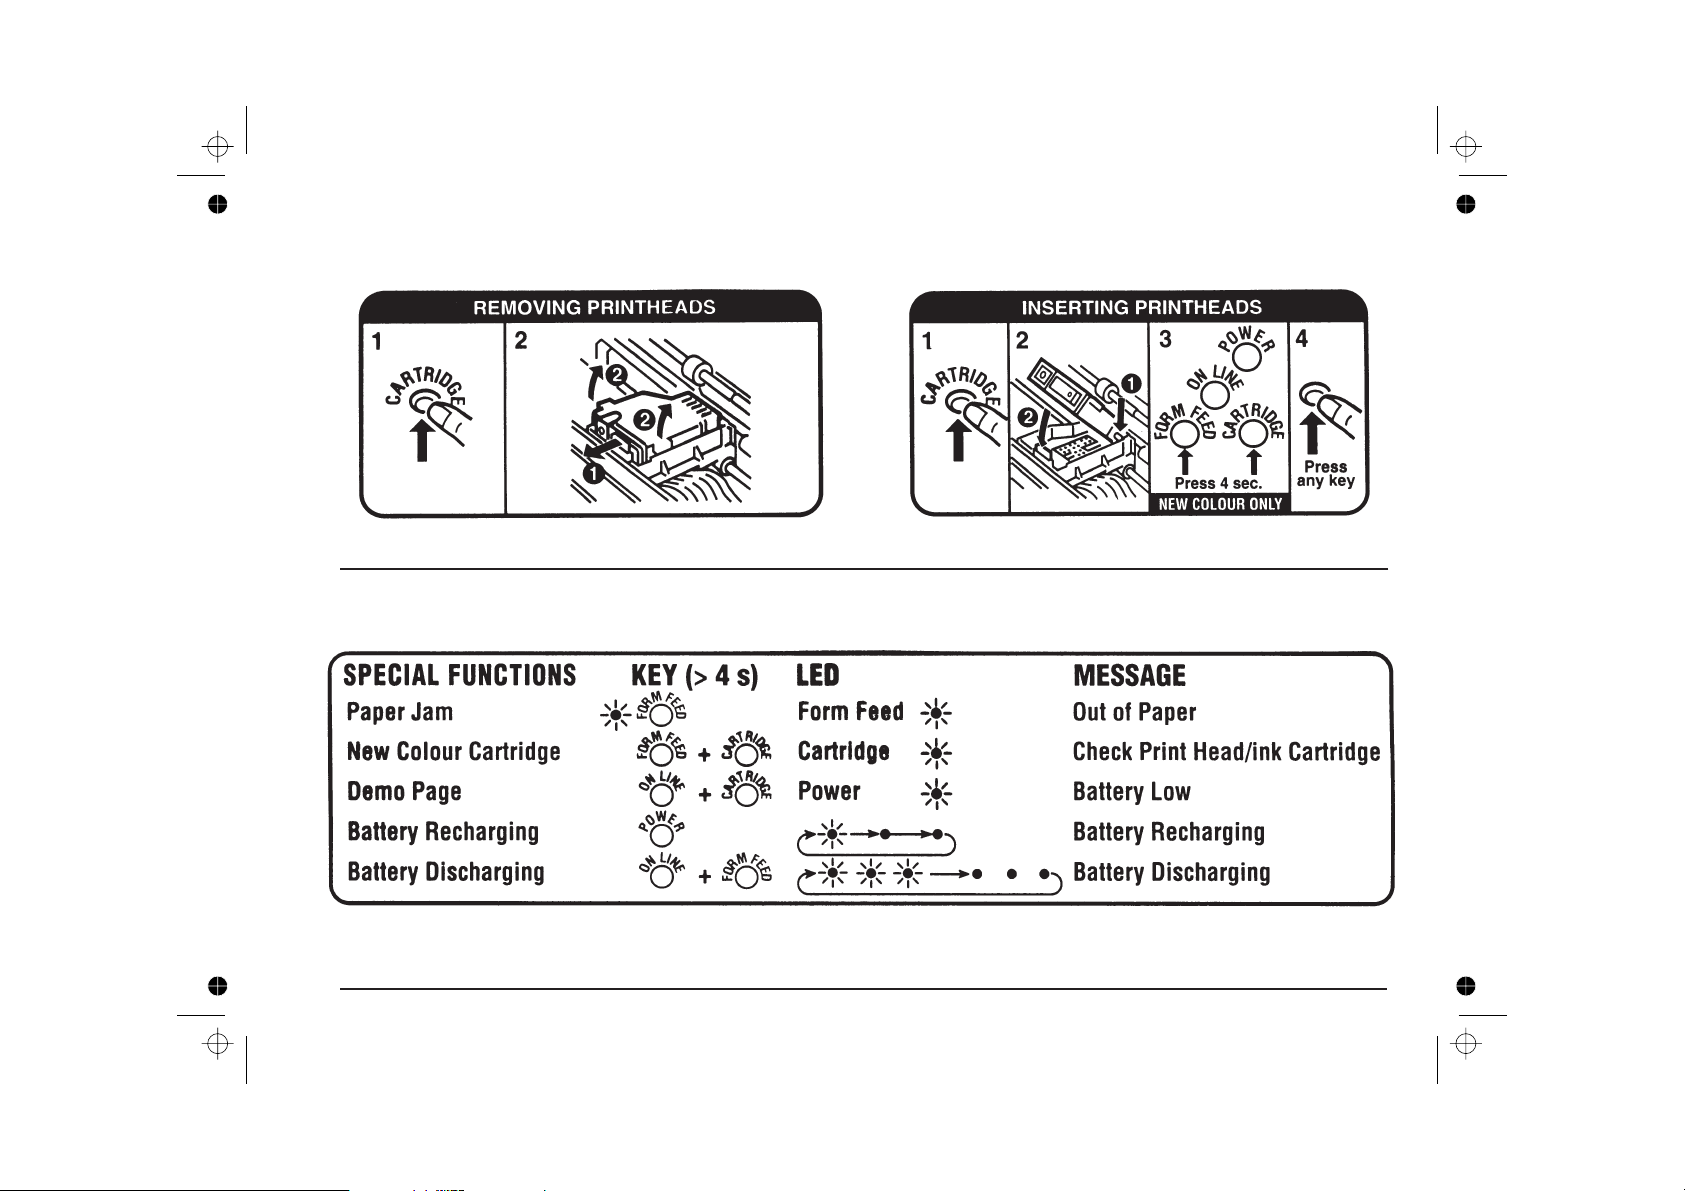
Inserting the Print Head
See the sequence of figures on page VI and the
instruction template on the inside of t h e front cover.
Open the sealed print head container (item C on page III)
•
and remove the print head, holding it by the casing (the
end opposite the protective film).
Still holding the print head casing, remove the protective
•
film.
Do not touch t he electrical contacts or the printing
nozzles nor sit t he print head on either of them.
With the printer already powered, press the CARTRIDGE
•
key on the operator panel to move the print head carriage
to the head loading position.
2 Quick Start
Page 21

Open the front cover of the printer.
•
With the electrical contacts towards the corresponding
•
contacts in the housing on the print head carriage, insert
the print head, tilting it towards the contacts and then
pushing it down to fix it in place.
Do NOT push in the print head horizontally; if presented
correctly for insertion, it only needs to be pushed down
gently into place.
Close the front cover.
•
Press the CARTRIDGE key to return the print head to its
•
rest position.
See “Ink Jet Print Head” in the User Guide for further
details on the handling and care of the ink jet print head.
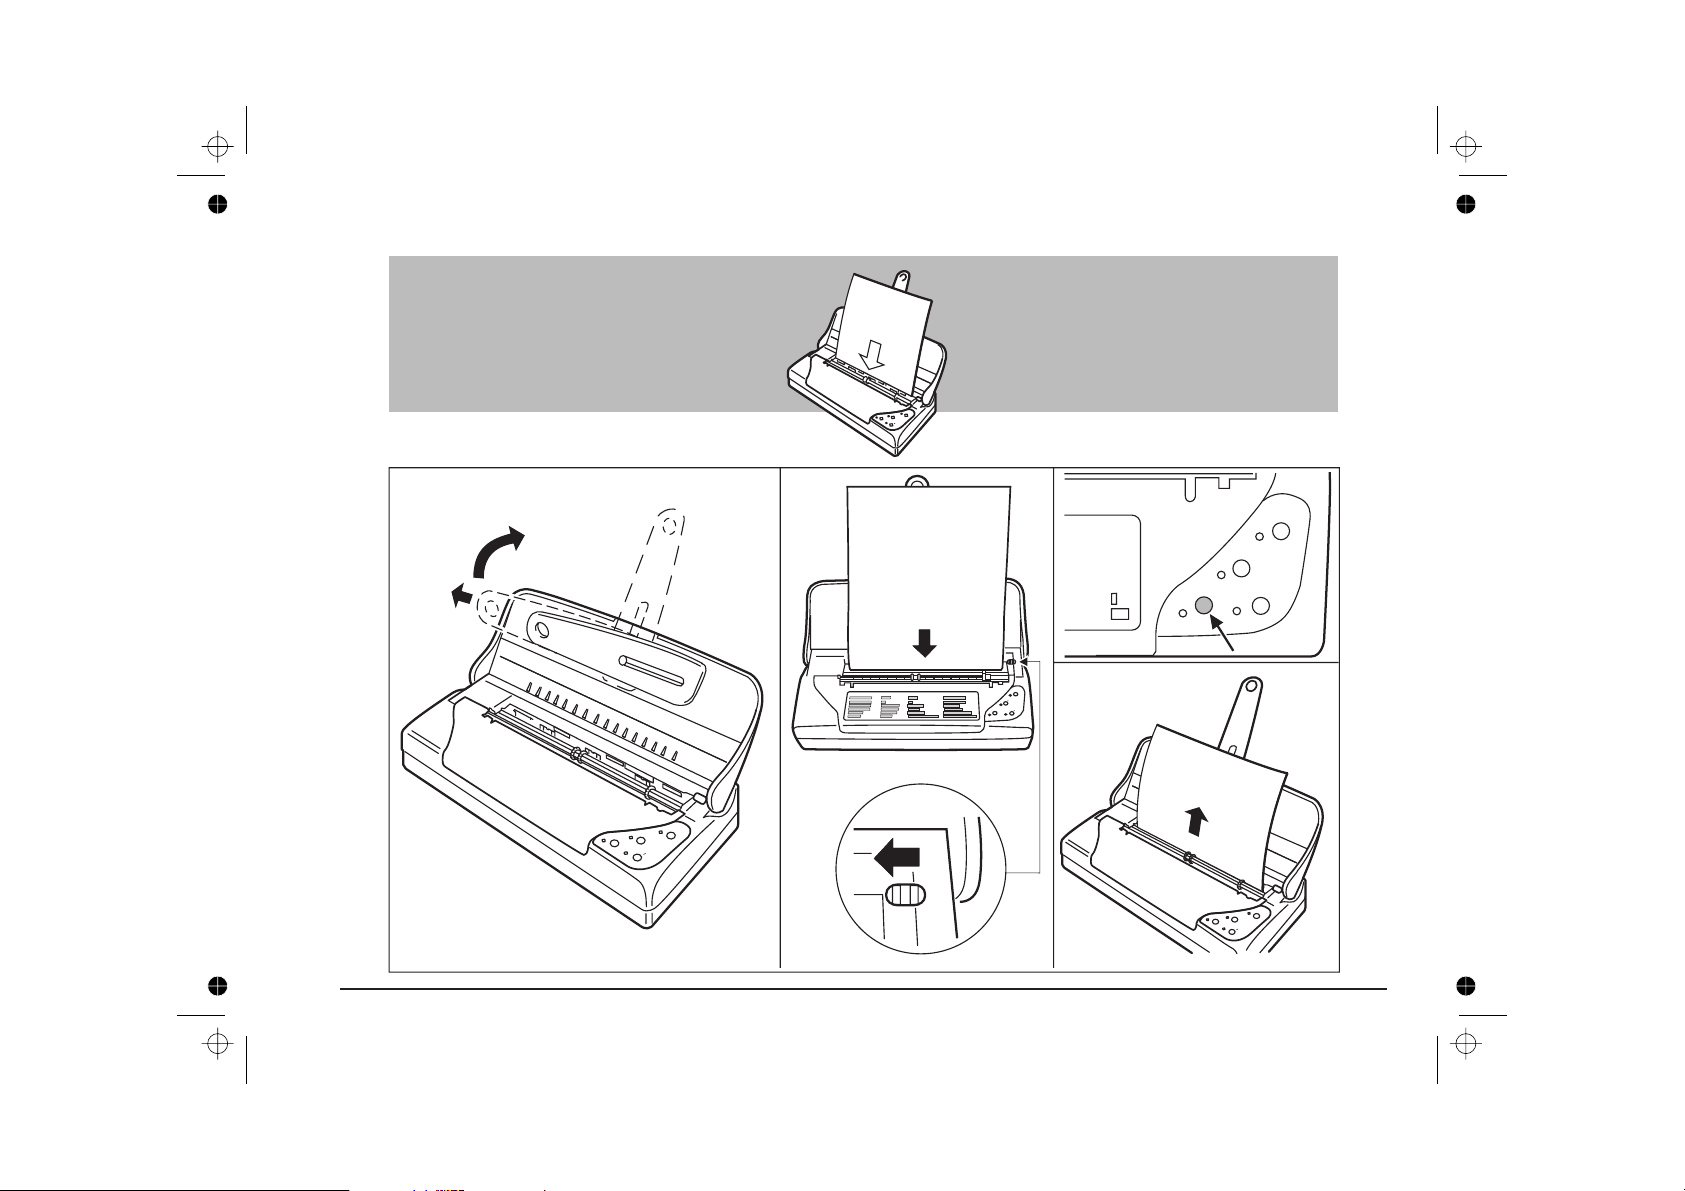
Loading Paper
(See the sequence of figures on page X.)
Make sure the paper support is in its vertical position
(see the section entitled “Opening the Printer”) .
You can load up to 15 sheets of paper in the automatic
•
sheet feeder (ASF). Fan the sheets thoroughly and make
sure their edges are squared.
Press down the movable right guide and position it to
•
correspond with the paper format indicated at the lower
right edge of the top cover (A4 or US).
Align the paper against the left edge of the insertion slot
•
and insert it until it stops against the feed rollers.
To check that the paper feeds correctly:
•
– Press FORM FEED to insert a sheet of paper to the
first print position (TOF - Top of Form).
– Press FORM FEED again to expel the paper to the
output stacker.
The paper must not be crumpled or torn, ot herwise it may
feed crooked and jam, or even not be inserted.
English
On reception of text to be printed, a sheet will be fed into the
printer to the first print line. If there is no operation for more
than 60 seconds, any paper inserted in the printer will be
expelled.
Quick Start 3
Page 22

After printing, the paper is expelled from the printer and
stacked in the output rack (capacity 10 sheets) in front of the
ASF.
Always make sure there is no paper in the printer before
switching it off.
See “Paper” in the User Guide for the types and sizes of
paper you can use in your printer.
Printing the Demo Page
With the printer powered, press the ON LINE and
•
CARTRIDGE keys for at least four seconds.
A sheet of paper will be fed into the printer and the “demo”
•
page will be executed automatically. The ON LINE will
flash slowly while the “demo” page is being printed.
Do not open the front cover of the printer while printing is
in progress, as this may cause the paper to jam.
Connecting to a Computer/Host System
The interface cable for connecting the printer to your PC
is NOT supplied with the printer. A manufacturerrecommended interface cable is available as an option.
Make sure both your printer and your computer/host
system are switched off.
Plug the interface cable connector (item 3 or 4 on page IV)
•
into the socket on the rear of the printer (see figure on
page V).
Connect the other end of the interface cable to the
•
appropriate interface connector socket (port) on your
computer/host system.
Installing Printer Software
The diskettes (item D on page III) supplied with your printer
contain:
To print another “demo” page, r epeat the above procedure.
To suspend printing temporarily, press ON LINE (pressing
this key a second time will cause printing to continue).
The “demo” page lists the principal features of your printer.
The “demo” page contents (see example on page XI) may
vary slightly, but t his will not affect the functioning of
your printer in any way.
a monochrome multilingual driver for Windows® 95,
•
a monochrome multilingual driver for Windows® 3.1/3.11
•
and the printer set-up utility (for personalised settings
under DOS).
The contents of the diskettes guarantee compatibility with the
specific operating environments and provide a user-friendly
interface for programming the printer. The diskettes have a
“Read-Me” file which contains last minute information on your
driver.
4 Quick Start
Page 23

For Windows® users
Windows® 95 environment, you
appropriate Windows® driver from the diskettes. These
drivers give you access to all the printer features.
For DOS users
Guide.
: to work in Windows® 3.1/3.11 or
: please refer to “Using Software” in the User
MUST
first install the
Windows® 3.1/3.11
To install the Windows® driver through Control Panel in
Main folder, proceed as follows:
1. Insert the specific diskette in drive A (usually) of your PC.
2. Activate Windows® environment (if necessary, consult
your Windows® user manual).
3.
Activate the Control Panel in the Main window, clicking
twice with your mouse indicator on the corresponding icon.
4.
Select the Printers icon, in the same way.
5.
If the Installed Printers box is empty, click on Install..
6.
If the Installed Printers box already contains one or more
driver names, click on Add>> , select Install Unlisted or
Updated Printer in the List of Printers andthenclickon
Install... .
8.
Click on Browse..., to display the nationalised
drivers available.
Click twice on the driver name you require in
Directories: (suffix “en” = driver in English) and
then click on OK.
9.
The Install Driver window will now show the driver you
have selected; click on OK.
10.
The Add Unlisted or Updated Printer window contains
the list of drivers present on the diskette. Select the driver
with your printer name and click on OK.
11. Your driver is now installed and your printer name appears
in the List of Printers.
12.
With your printer name highlighted, click on the Set as
Default Printer button, so that your printer will be active in
all your Windows® applications.
13. Check your printer connection by clicking on the
Connect.. button.
By default, your printer will be connected on the LPT1 port
which corresponds to the hardware connection of a
parallel interface cable.
14.
Click on the Close button of the Printers dialogue box.
For further information, consult your Windows® 3.1/3.11
documentation.
English
7.
Check that the Install Driver window already indicates the
drive (usually A) in which you have inserted the driver
diskette, otherwise, click on the drive name and change it,
using your PC keyboard.
Quick Start 5
Page 24

Windows® 95
To choose the driver language you require and then install
the driver using the “Plug and Play” feature, proceed as
follows:
Your printer must b e powered, connected to your PC and
NOT in error mode (no LEDs flashing).
1. Insert the specific driver diskette in drive A (usually) of
your PC.
2. Activate Windows® (if necessary, consult your Windows®
user manual).
3.
Press Start and select the option Run....
4. Type “ a:\?????” (your printer name, as indicated on the
diskette label) and press Enter/Return.
A screen indicating the language selection is displayed;
follow the instructions on this and the subsequent screens,
to configure the language you require. Once the language
configuration is completed, the Desktop screen will be
redisplayed.
5. Now restart Microsoft® Windows® 95 (execute the “shut
down” command and restart from Start).
6. A window, indicating that a new peripheral has been
detected (New hardware found and the printer name), is
displayed.
The same window shows the Driver from disk provided
by hardware manufacturer option already highlighted.
ClickontheOK button.
7.
With the Install from Disk window displayed, insert the
specific driver diskette in the drive selected, specify this
drive and click on OK.
8.
Your printer name is displayed in the Select Device
window. Click on OK.
9.
The Add Printer Wizard window is displayed. If there are
no printer drivers already installed on your system, your
printer will be installed as the Default printer. If other
drivers are already installed, you will be asked if you want
to use this printer as the default. Click on Yes.
10.
Click on Next. The same window will prompt you to print
a Test Page.ClickonYes, if you want to be sure that the
driver has been installed correctly. This page also gives
you a list of all the files that have been copied into your
system during installation.
11. Your driver is now installed. A window will ask you if the
test page has been completed. An affirmative reply
indicates that the driver is installed correctly.
For further information, consult your Windows® 95
documentation.
Your printer is now ready to operate in Windows®
environment.
For more details on the drivers and printer set-up, see
“Using Software” in the User Guide.
6 Quick Start
Page 25

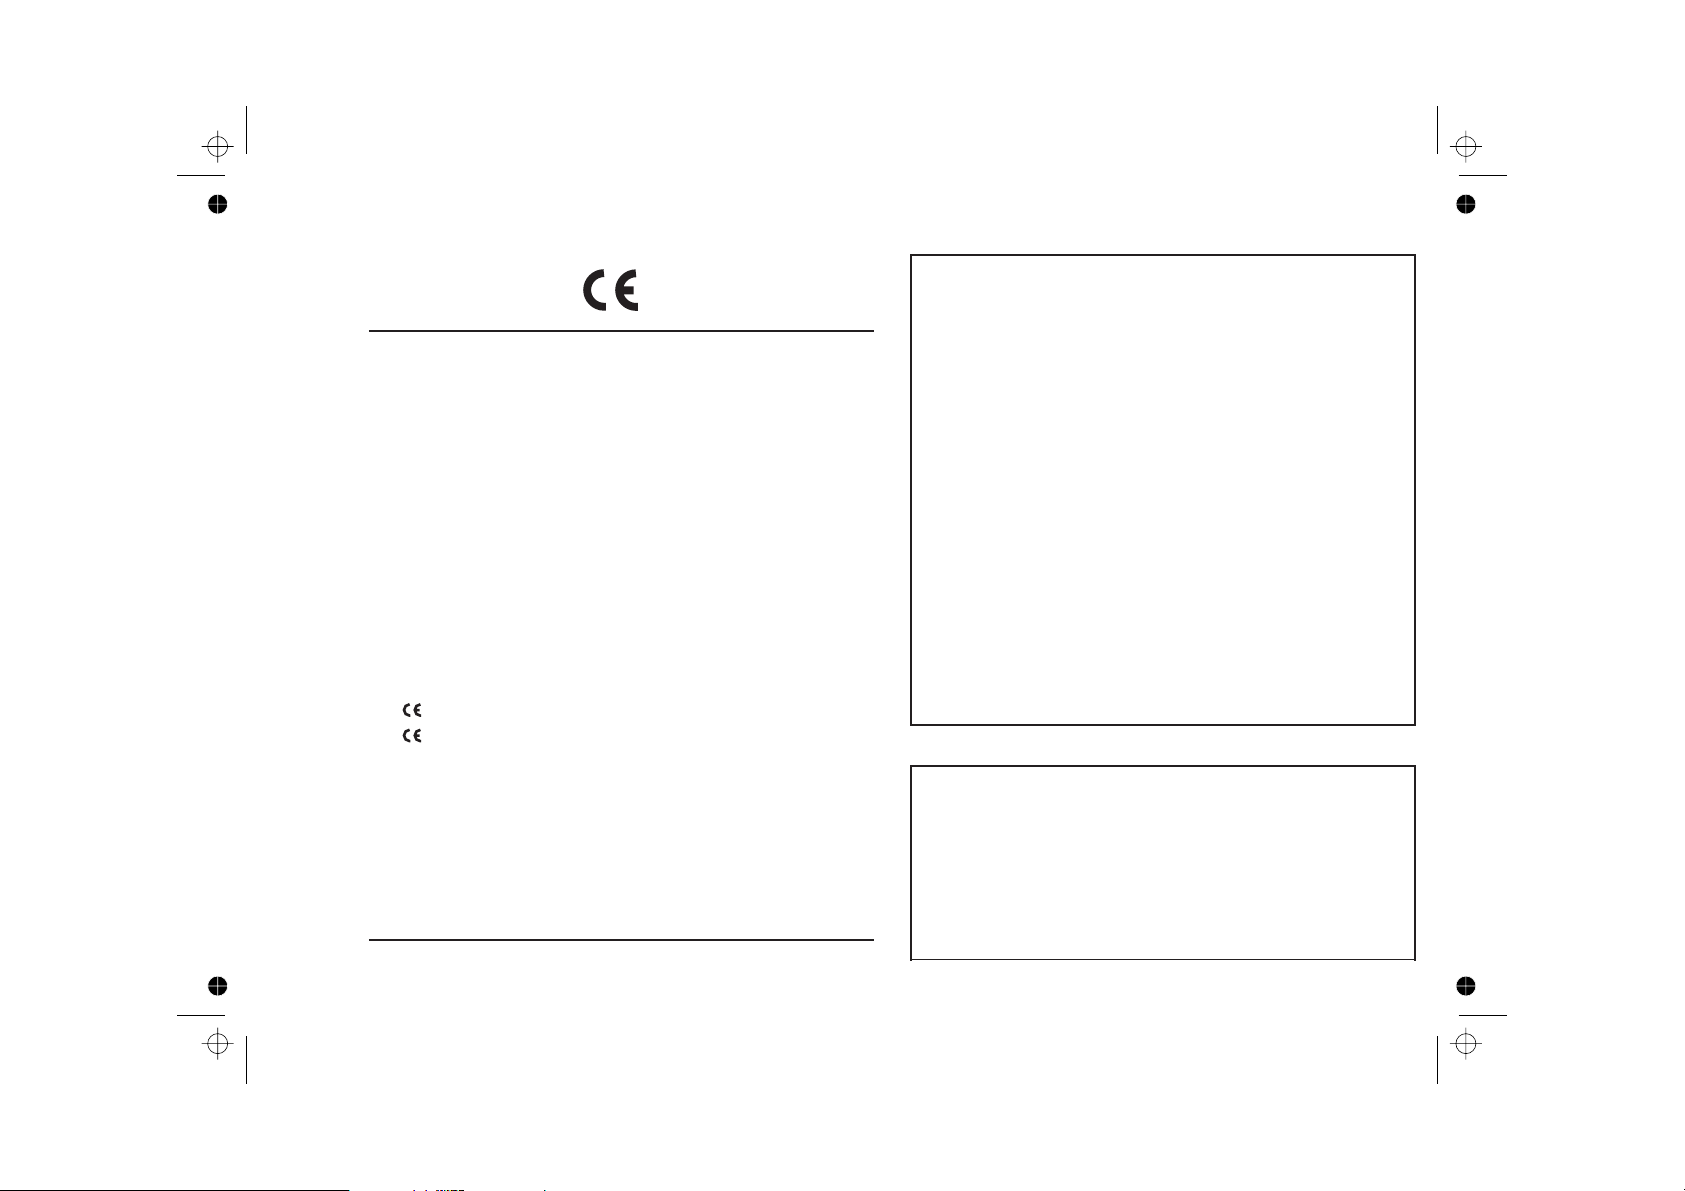
Help
On the top side of the front cover, there is label illustrating a
number of light indicator configurations and key sequences.
Embossed on the inside of the front cover, there are the
instructions for replacing the print head.
page XII and “User Interface” in the User Guide for
further details.
If you have any problems setting up and/or operating the
printer, check that you have followed the specific procedure
correctly. If you are unable to solve the problem or require
further information,
and Solutions” in Troubleshooting in the User Guide.
refer to the section entitled “Problems
See figures on
English
Quick Start 7
Page 26

Page 27
User Interface
Templates
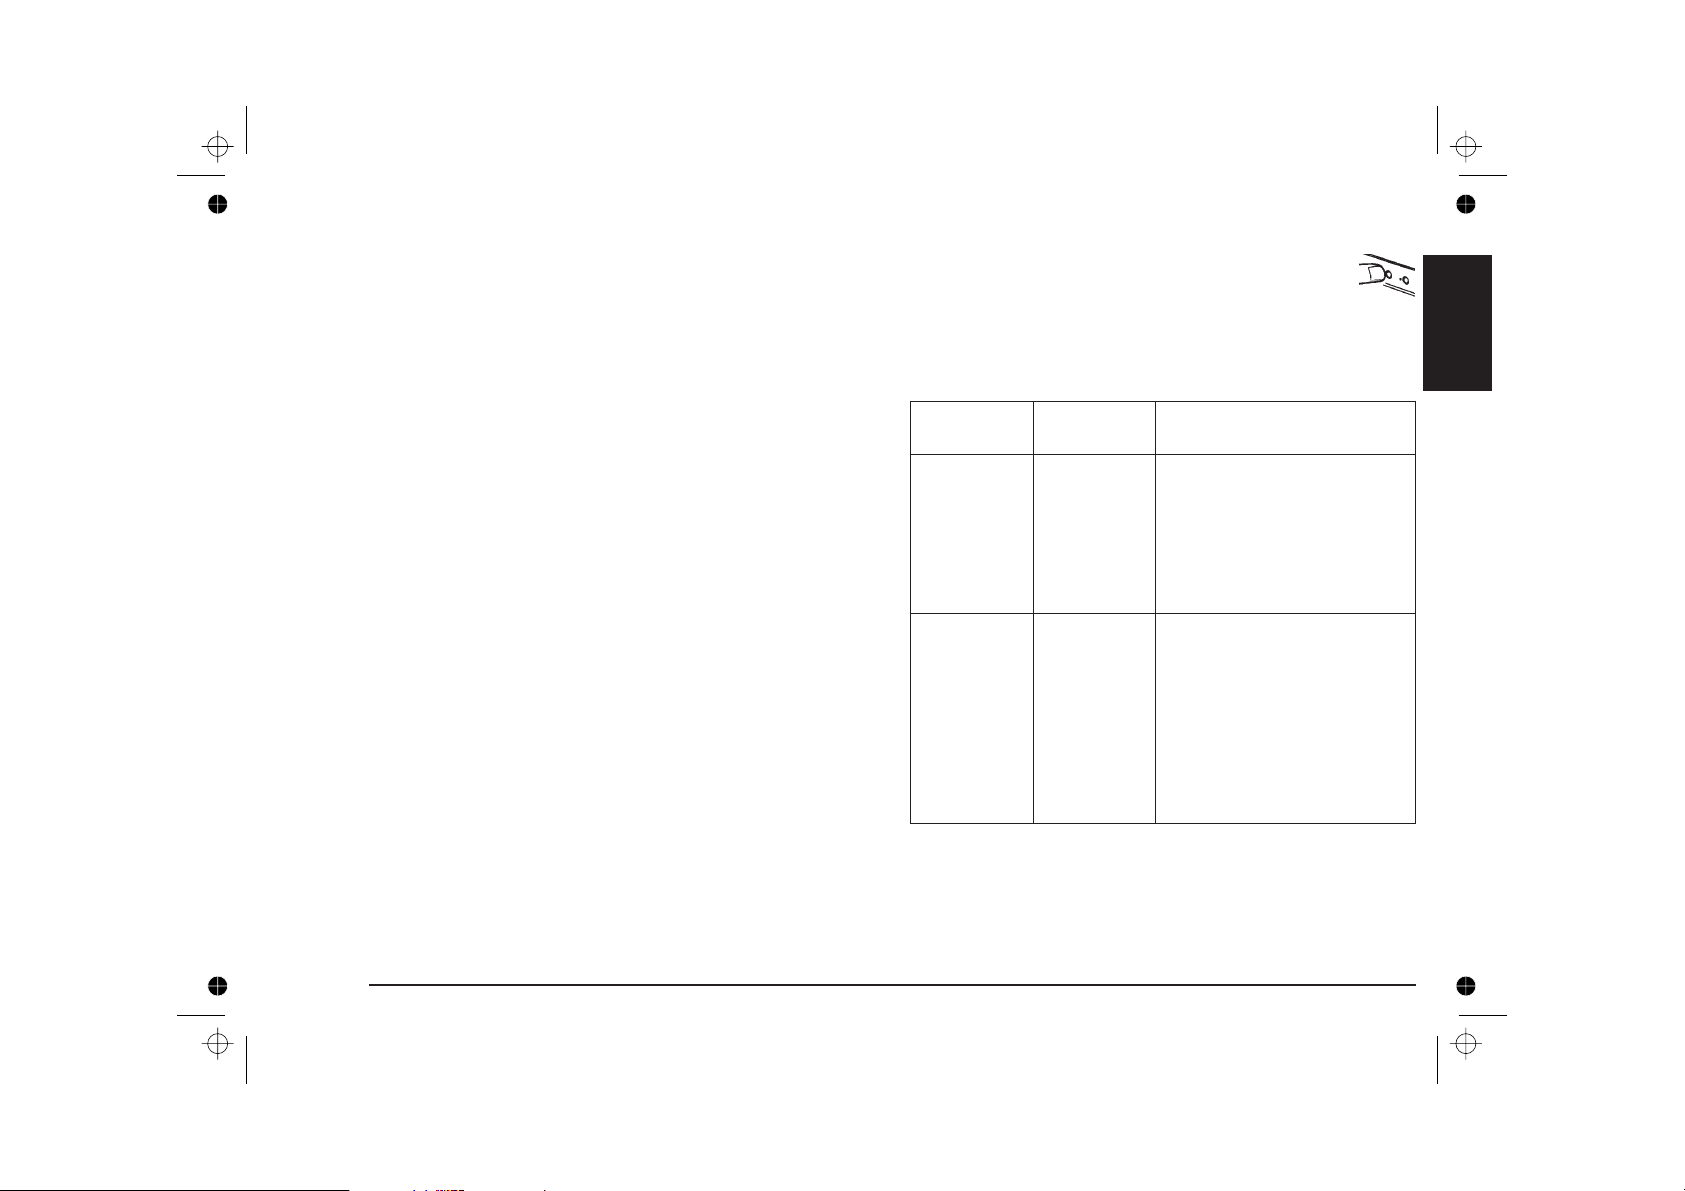
Operator Panel
This section describes the functions of the keys and
indicator lights on the operator panel.
English
Basic key function s
Your printer has two instruction templates (see examples on
page XII) to help you when you are using the printer.
one, on the upper side of the front cover, shows a number
•
of the key and light indicator functions.
the other, containing the instructions for the
•
insertion/replacement of the print head, is embossed on
the inside of the front cover.
Function Key(s) Indication
PrinterOn/Off POWER
Printerready/
Pause
(less than 4 s.)
ON LINE
(less than 4 s.)
TogglestheprinterON/OFF
condition.
When t hePOWERlightindi cator
isoff,pressingthiskeywillswitch
theprinteron.
When t hePOWERlightindi cator
islit,pressingthiskeywillswitch
theprinteroff.
Togglesthep rinter ON-/OFF
LINEcondition.
Whenthep rinteris ON LINE,t he
ONLINE lightind icator is litand
theprinterisundercomputer
control.
When theprinterisOFFLINE,
theprint headcarriageisin its
restposition,theONLINElight
indicatorisoffandanyprinting
operationissuspended.
User Guide - User Interface 9
Page 28
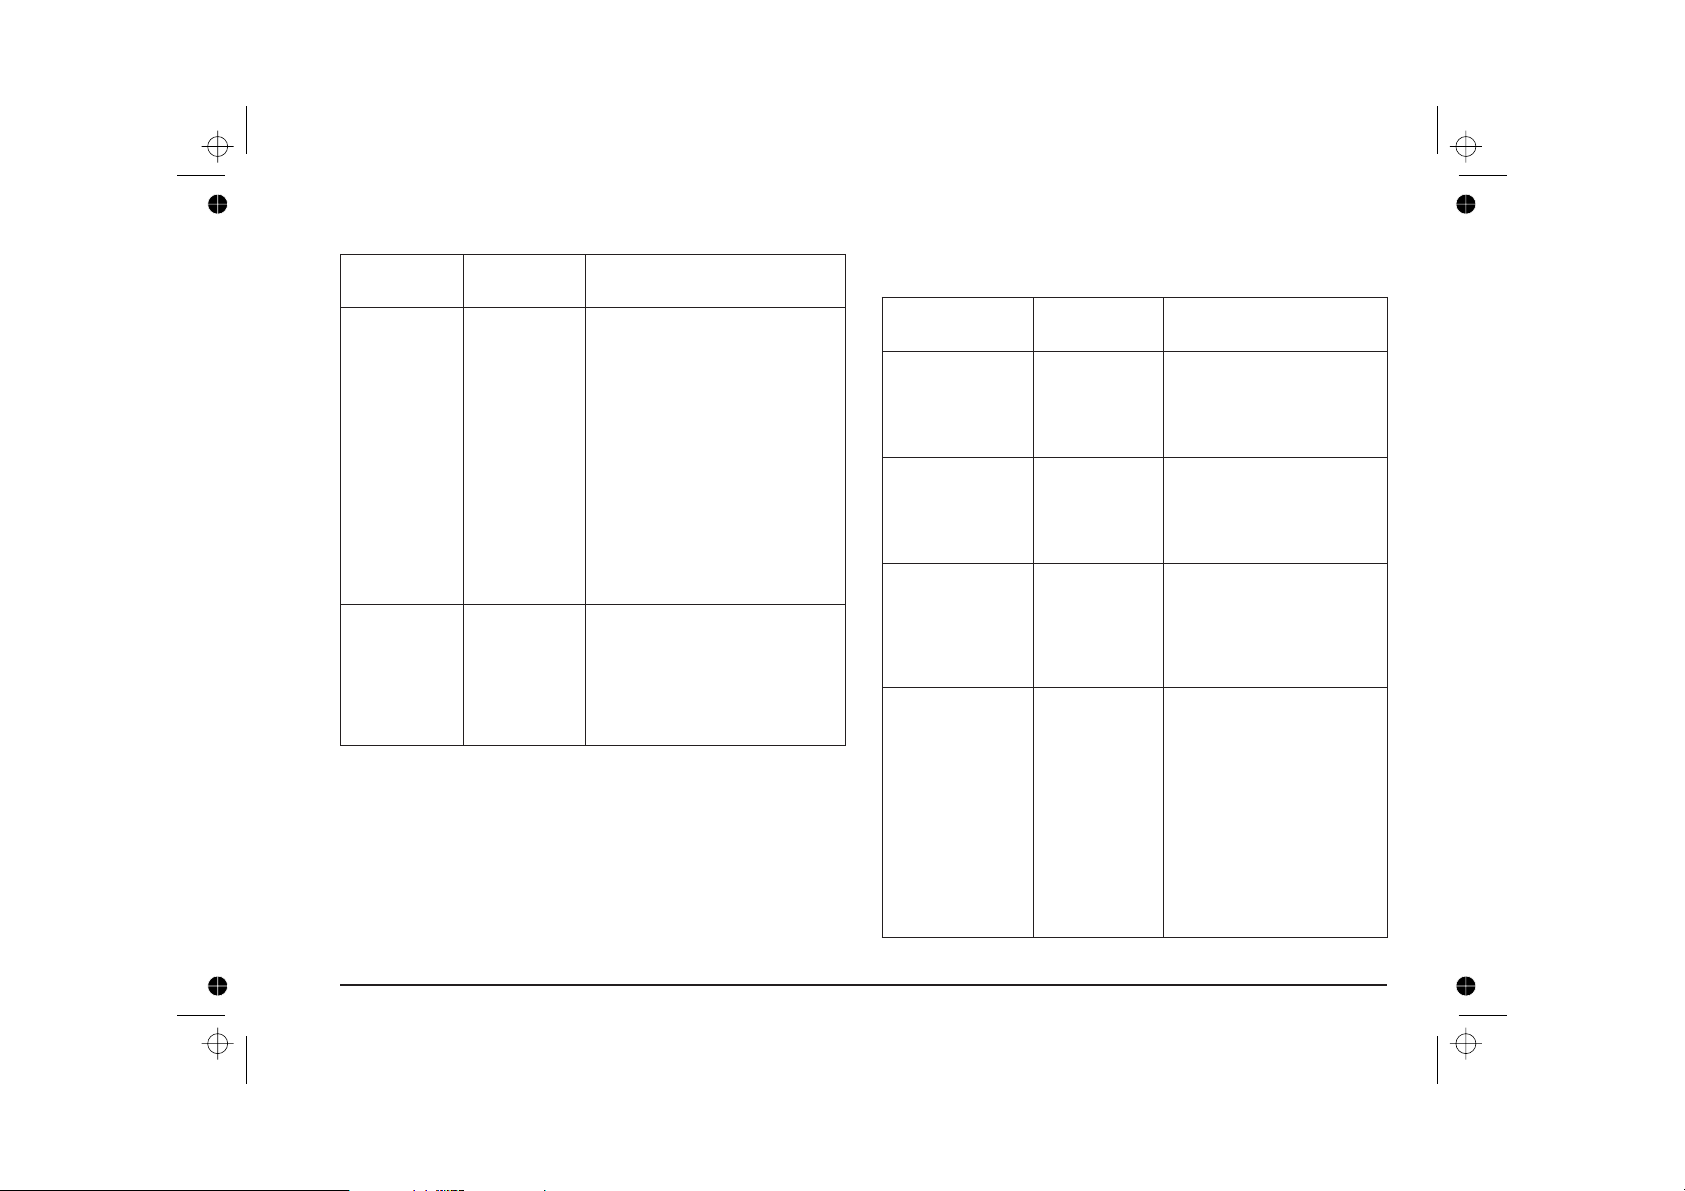
Function Key(s) Indication
Special key functions
Paperload/
eject
Changeprint
head
FORM FEED
(les s than 4s.)
CARTRIDGE Thefirsttime thiskeyispres sed,
Ifthereis nopaper i ns erted r eady
forprinting,causesasheetto be
insertedfrom the ASFto th efirst
printposition (Topof FormTOF).
If asheet of paper isalready
presentin theprinter,causes its
expulsiontotheoutputtray.
If there is no paper in theASF or
theprin ter and t heFORMFEED
lightindicatorisflashingslowly,
this means that therei sdatato
be printed. Load paper inthe
ASFandpress this key to
continuetheprintingoperation.
theprintheadcarriagemoves
fromitsrestpositiontothe
insertion/removalposition.
Thesecondtimeitispressed,the
printheadcarriagemovesback to
itsrestposition.
Function Key(s) Indication
Demopage ONLINE and
Paperjam FORM FEED
Print test POWER and
Batteryrecharging POWER
Terminating
batteryrecharge
Batterypack
discharging (only
NiCd)
CARTRIDGE
(morethan4 s.)
(morethan4 s.)
CARTRIDGE
(morethan4s.)
ON LINE and
FORM FEED
(morethan4s.)
The“demo ” pagei spr inted.
TheON LINElightindicator
flasheswhilethepageis
beingprinted
Pull the jammed pageback
outof thepri nter.
Hold t hekey
is completely free
With the printer
the keys simultane ously;
release first POWER then
CARTRIDGE.
The print test is printed.
The light indica tors start
flashing in sequence.
The printer returns ON LINE.
Causes the rapid discharge
of a NICd battery pack.
Throughout the discharge
operation, the light indicators
continuously light all
together and then go out
one at a time in sequence.
until the paper
.
OFF
,press
10 User Guide - User Interface
Page 29
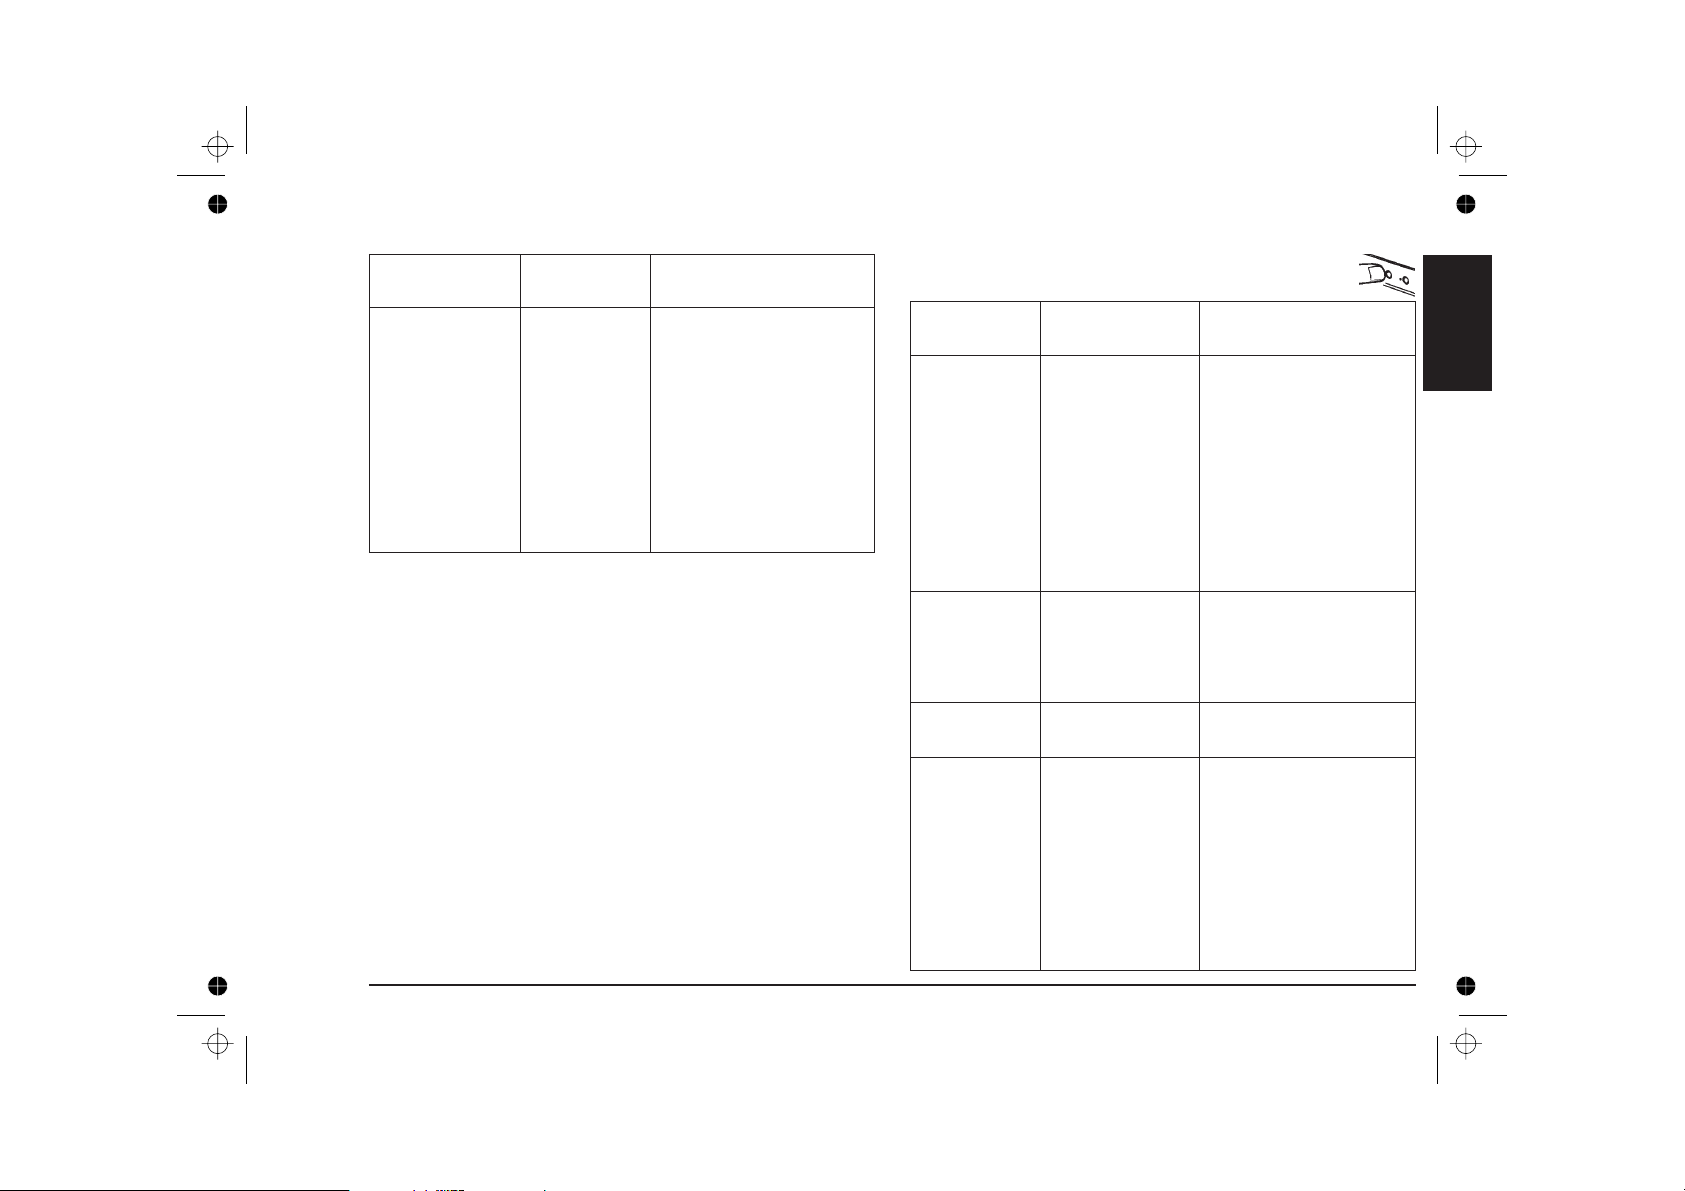
Function Key(s) Indication
Light indicators
Hex-dump POWERand
FORM FEED
Withtheprin ter
the keys simultaneously;
release first POWER then
FORM FEED.
Sets the printer to operate in
hexadecimal mode (see
Troubleshooting
The ON LINE fla shes while a
hex-dump operation is in
process.
To exit from hex-dump
mode, the pr inter must be
switched off.
OFF
).
,press
The template on the upper side of the front cover of the
printer illustrates some o f the special key functions indicated
in the above table.
LED Status Indication
English
POWER lit The printer is switched on.
off The printer is switched off.
flashing slowly The batteries/battery pack
is low (approximately 5
standard pages can still be
printed).
flashing rapidly The batteries/battery pack
is discharged (they /it must
be recharged or replaced).
ON LINE lit The p rinter is ON LINE.
off The printer is OFF LINE.
flashing slowly Data is being processed.
FORM FEED flashing slowly There is no paper in the
ASF.
CARTRIDGE flashing slowly “End of ink” c ondition.
flashing rapidly Change print hea d (the
print head currently inserted
is not compatible with the
file transmitted for printing),
or
no print head in printer, or
print head no t inserted
correctly.
(continued)
User Guide - User Interface 11
Page 30
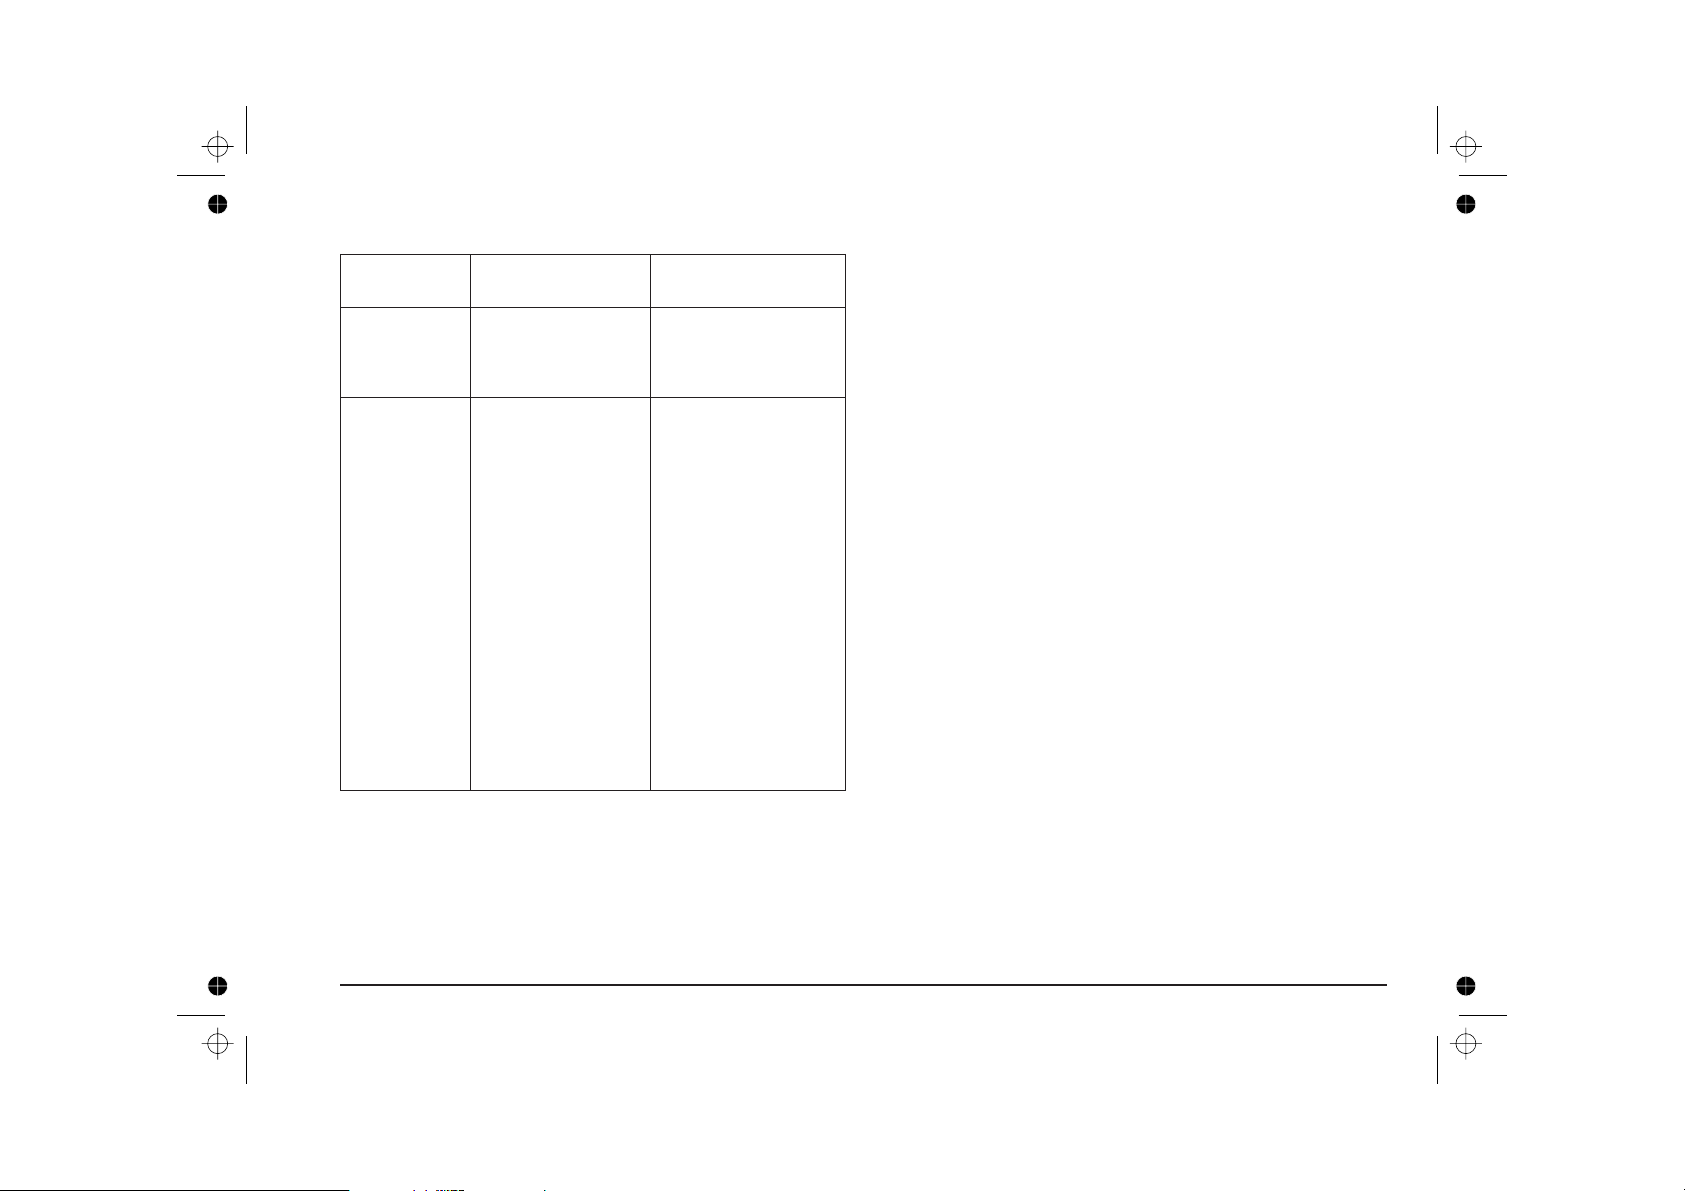
LED Status Indication
CARTRIDGE
(continued)
All four light
indicators
flashing rapidly Press CARTRIDGE to
flash once in sequence The printer has been
flash three times
simultaneously
off The printer is in standby
flash continuously in
sequence
light all together and
then go out one at a
time in sequence,
continuously
move the print head
carriage to the head
loading position.
switched on.
Incorrect operator action
Troubleshooting
(see
mode, i.e. there has
been no printer/operator
activity within the last 30
seconds.
Press any key to return
to ON LINE mode.
The battery pack is
being charged.
The NiCd battery pack is
being discharged.
The template on the upper side of the front cover illustrates
some of the light indicator functions indicated in the above
table.
).
12 User Guide - User Interface
Page 31

Ink Jet Print Head
This section describes how to replace the ink jet print head
and the ink cartridge (see the sequences of figures on pages
VI - VII), how to clean the print head and preserve optimum
print quality.
It also describes how to obtain the print test (page XI).
Your printer comes with a monochrome print head with a
replaceable ink cartridge. A colour print head with
replaceable ink cartridge is available as an option (see
specific paragraph in this section).
ALWAYS use manufacturer-original Ink Jet Print Heads.
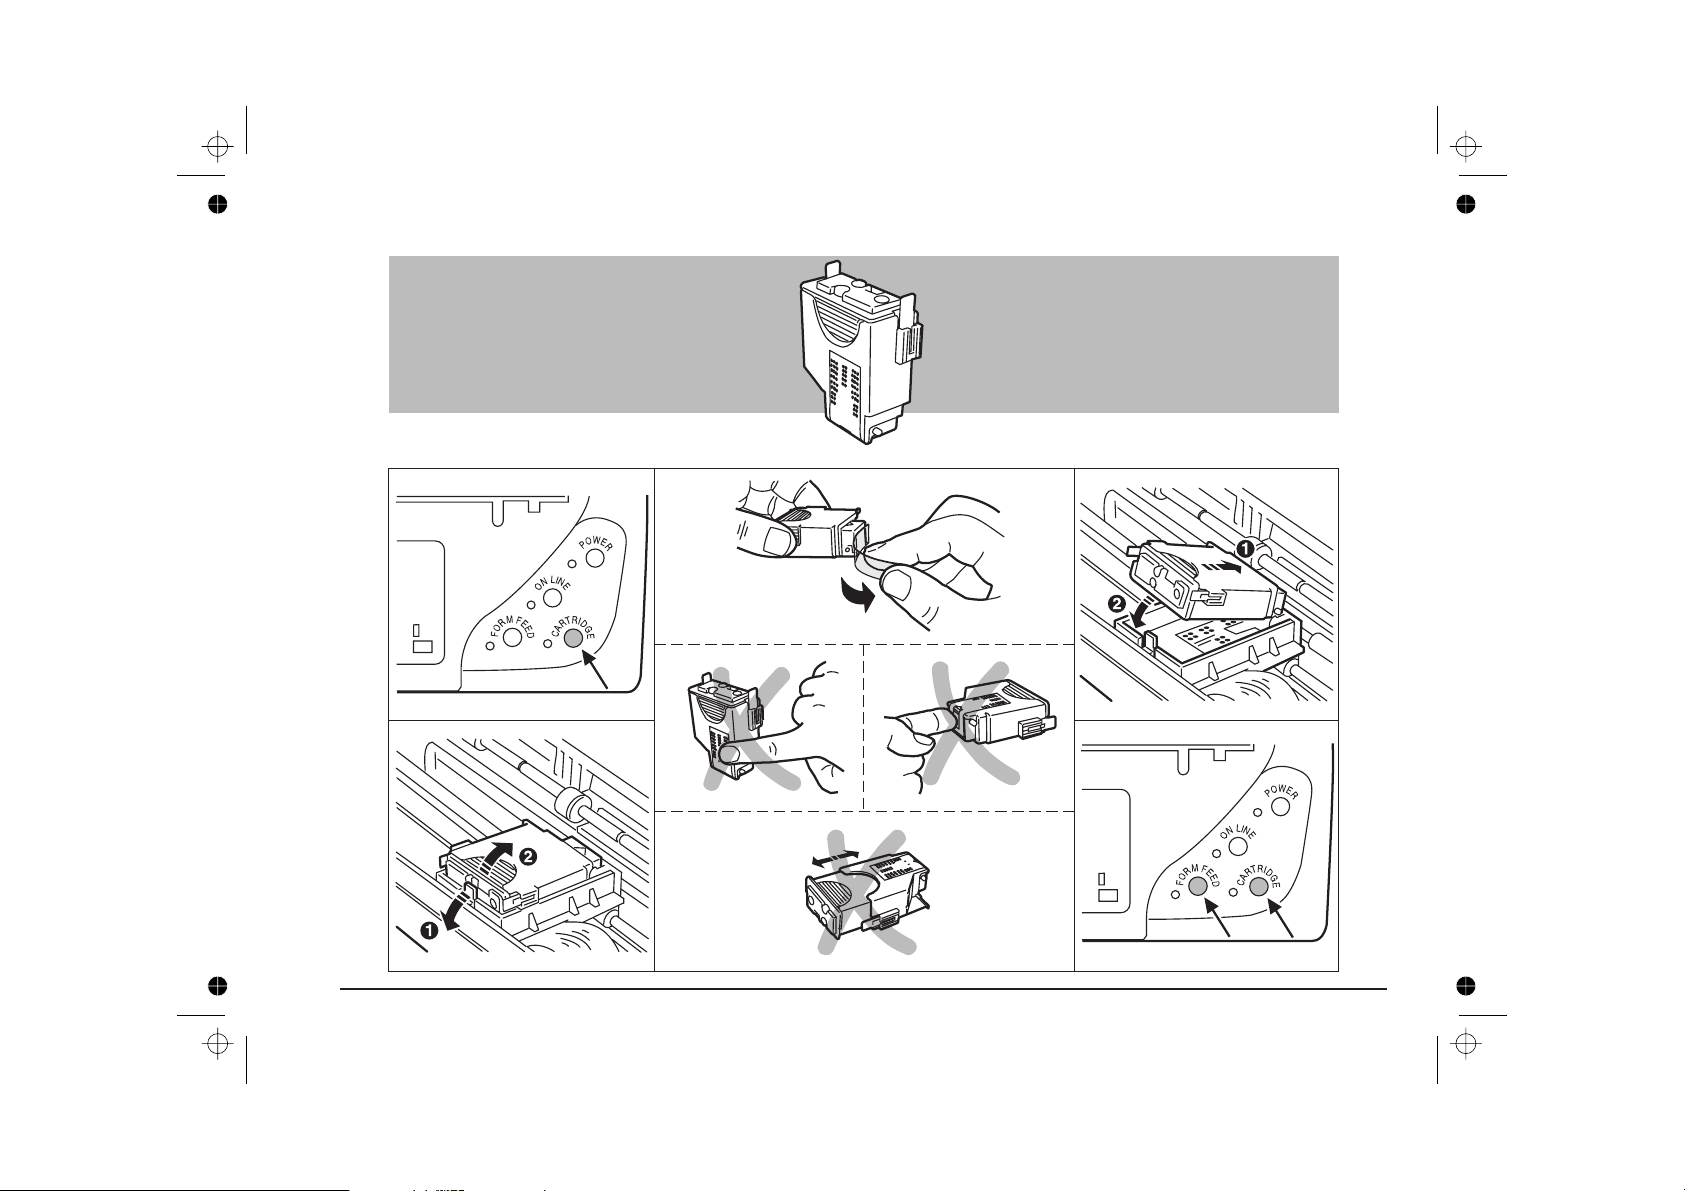
Replacing the Print Head
See the instructions embossed on the inside of the front
cover.
When the printer is not powered, idle or in standby mode, the
print head carriage is locked in its rest position (at the
extreme left).
Do NOT try to move the print head carriage manually.
The carriage lock is released by an internal motor prior to
any printer operation.
Print head removal
The print head is removed to replace the ink cartridge
when an “end of ink” condition is signalled, to repeat
insertion in the case of faulty printing or to exchange it
with a colour print head.
With the printer powered, press CARTRIDGE to position
•
the print head carriage in the head loading position.
Open the front cover.
•
Pull the black lip on the front of the print head housing
•
slightly towards you (see the traced arrow in the figure on
page VI); the print head will be released.
Holding it by its casing, remove the print head from the
•
printer.
Monochrome print head with replaceable ink
cartridge
The monochrome print head supplied with your printer has a
replaceable ink cartridge. This cartridge can be substituted
several times before you have to change the entire print
head.
To substitute the empty ink cartridge (see the sequence of
figuresonpageVII):
Remove the print head from the printer, as described in
•
the previous paragraph.
Holding the print head vertically, with the nozzles facing
•
downwards, remove the ink cartridge from the print head,
pulling it upwards.
English
User Guide - Ink Jet Print Head 13
Page 32

Still holding the print head with the nozzles downwards,
•
insert a new ink cartridge.
Check that the print head housing is clean and free of
•
foreign bodies.
Make sure the ink cartridge is completely inserted.
•
Press the knob on the top of the cartridge to empty the ink
•
into the print head.
Check that the ink cartridge is empty, by controlling the ink
•
level indicator on the side of the print head.
THE INK CARTRIDGE MUST REMAIN INSERTED IN
THE PRINT HEAD.
Reinsert the print head in the printer (
•
paragraph in “Quick Start”
Close the front cover
•
Press CARTRIDGE to return the print head to its rest
•
position, before starting a printing operation.
Do not reload the print head with more than one ink
cartridge at a time.
Make sure the print head is inserted and fixed correctly. If
necessary, repeat the insertion operation.
Do NOT push in the print head horizontally; if presented
correctly for insertion, it only needs to be pushed down
gently into place.
If you have problems inserting the print head:
Make sure the print head carriage is in the head loading
•
position (slightly to the right of the centre of the carriage
shaft).
).
see the specific
NEVER force the print head into the housing.
•
If you have problems when inserting the print head,
always remove it completely and repeat the entire
insertion operation.
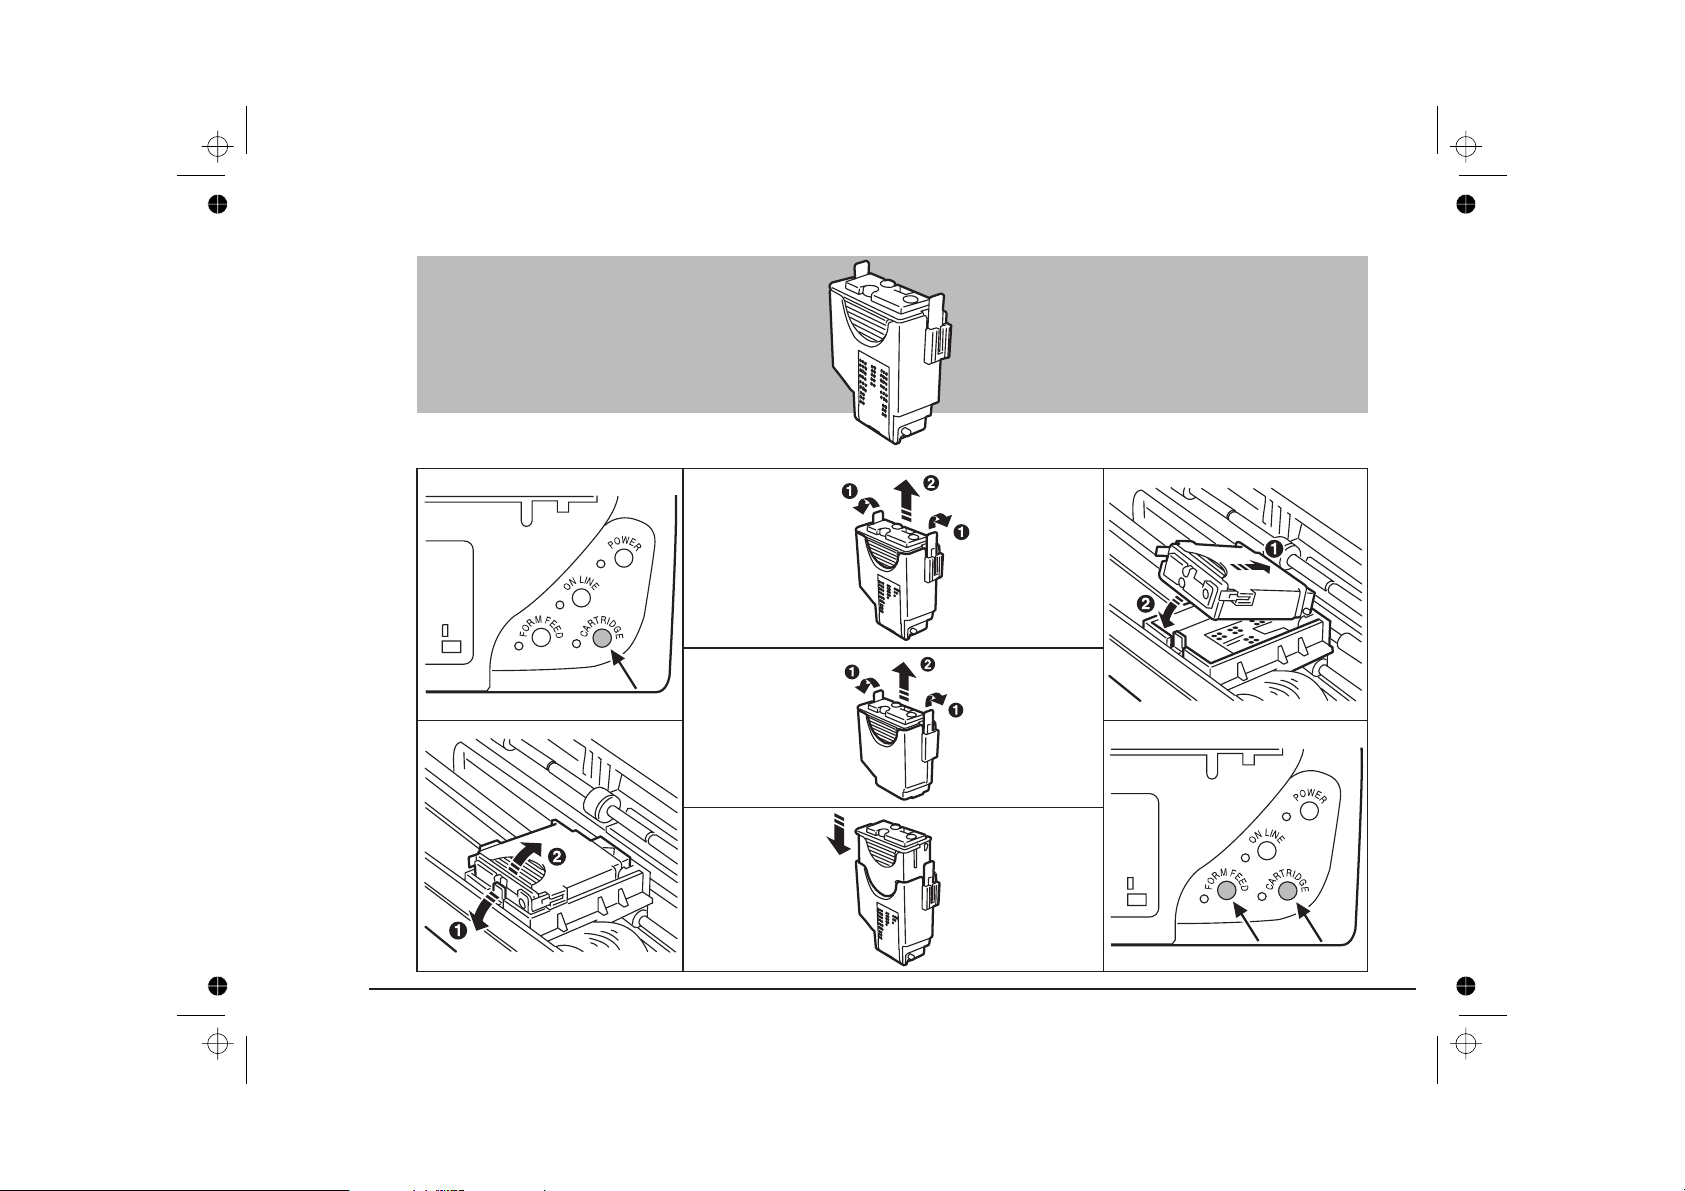
Optional colour print head with replaceable ink
cartridge
Your printer can use a specific three-colour print head,
available in an optional colour kit which also contains a
colour printer driver on diskette, a storage box (item 5 on
page IV) for whichever print head you are not currently using
and installation instructions.
The colour print head has a replaceable cartridge which you
must change when one or more of the coloured inks runs
out. After you have substituted the ink cartridge several
times, you should replace the entire print head with a new
one (see the sequences of figures on pages VIII and IX).
To insert the colour print head, proceed as follows:
Open the sealed print head container and remove the print
•
head, holding it by the casing.
Remove the protective film.
•
Do not touch t he electrical contacts or the printing
nozzles nor sit t he print head on either of them.
Make sure there is paper in the ASF.
•
14 User Guide - Ink Jet Print Head
Page 33

With the printer already powered, press CARTRIDGE to
•
move the print head carriage to the head loading position.
Open the front cover of the printer.
•
Remove the print head currently in the printer (if any).
•
With the electrical contacts towards the corresponding
•
contacts on the print head carriage, insert the colour print
head, tilting it towards the contacts and then pushing it
down to fix it in place.
Do NOT push in the print head horizontally; if presented
correctly for insertion, it only needs to be pushed down
gently into place.
Close the front cover.
•
Holding down CARTRIDGE, press FORM FEED.When
•
you release both keys, the printer will automatically run a
print test to check the correct functioning of the print head,
and will then be ready for use.
To substitute the colour ink cartridge:
Make sure there is paper in the ASF.
•
Remove the entire print head from the printer, as
•
described previously in this section.
Holding the print head vertically, with the nozzles facing
•
downwards, release and remove the used ink cartridge
from the print head, pulling it upwards.
Holding the new ink cartridge vertically, remove it from its
•
protective cover.
Insert the new ink cartridge in the print head; hold the print
•
head vertically with the nozzles facing downwards.
Make sure the cartridge is completly inserted and snaps
into place with both lateral locks attached.
Re-insert the print head in the printer, as described above.
•
Close the front cover.
•
English
This operation is indispensible to ensure the correct
functioning of the colour print head.
User Guide - Ink Jet Print Head 15
Holding down CARTRIDGE, press FORM FEED.When
•
you release both keys, the printer will automatically run a
print test to check the correct functioning of the print head,
and will then be ready for use.
This operation is indispensible to ensure the correct
functioning of the colour print head.
Page 34

Print Head Care
Print test
The print test (see example on page XI) fills a maximum of
three A4-size pages ( PCL emulation, Portrait orientation) and
contains information on the printer firmware ( release,
emulation and character generators) and the correct
operation of the print head nozzles.
Check the print quality of the test, making sure that all the
characters are clearly defined and complete.
If you have any problems running the print test, check
that you have followed the operating procedures
correctly; if so, see Troubleshooting.
Print testcontents
Make sure that the print head is inserted and that there is
paper in the ASF.
With the printer in a power
•
and CARTRIDGE simultaneously. Release first POWER
and then CARTRIDGE.
A sheet of paper will be fed into the printer and the print
•
test will be executed automatically.
Do not open the front cover of the printer while printing is
in progress, as this may cause the paper to jam.
To suspend the print test temporarily, press ON LINE
•
(pressing this key a second time will cause printing to
resume).
To abandon the print test, switch the printer off.
•
Once the print test is completed and the last sheet of paper
expelled, the printer will go automatically into ON LINE
condition.
OFF
condition, press POWER
Let us have a quick look at what has been printed.
the first two lines of the print test contain technical
•
information on the printer status.
the third line of the print test (Print Head Test) allows you
•
to check whether any dots are missing.
This test consists of:
– the Print Head type,
– a diagonal line indicating the performance of the head
nozzles,
– the Nozzles Test Report indicating Black or Colour
followed by OK!, if the nozzles are all functioning
correctly, or by the number or the faulty nozzle(s) if
one or more are blocked.
If one or more of the nozzle(s) is/are blocked, see the
paragraph entitled
section (and, eventually,
solutions to this problem. Then repeat the print test.
Cleaning the print head nozzles
Troubleshooting
) for the possible
in this
16 User Guide - Ink Jet Print Head
Page 35

The rest of the print test contains a print-out of the printer
•
SETUP (currently selected operating parameters), the
currently selected Character set and the FONT TEST with
the resident portrait or landscape fonts, depending on the
value of the “Orientation” parameter. The contents of this
part of the print test will vary according to the emulation
selected.
In most cases, the operating parameters will be determined
by your printer driver, and will override the internal printer
set-up. If you wish to modify your printer set-up, see the
section
Using Software
.
Cleaning the print head
The print head is “primed” periodically while the printer is
powered. This operation clears the print head nozzles,
guaranteeing the ink flow.
If there is a problem with the printing quality that is not solved
by the automatic nozzle clearing operation, remove the print
head from the printer and clean it, as follows:
Press CARTRIDGE to position the print head carriage in
•
the head loading position.
Open the front cover, release and remove the print head
•
(see the specific paragraphs in this section).
Clean the electrical contacts on the print head and on the
•
carriage with a slightly damp lint-free cloth, taking care not
to touch the print head nozzles.
If there is still no improvement in the print quality, try
cleaning the print head nozzles.
This operation MUST NOT be repeated systematically, as
it will damage the print head. It should ONLY be
attempted as a last resort, before changing the print head.
Dampen a tissue handkerchief with distilled water; wring it
•
slightly to remove any excess water.
Remove the print head from the printer.
•
Holding the print head with the nozzles facing downwards,
•
blot it against the handkerchief, pressing lightly.
Repeat the blotting operation a few times on different
•
areas of the handkerchief, to clean the nozzles.
Reinsert the print head in the printer and run a print test to
•
check the quality of printing (see the specific paragraph in
this section).
Transporting the printer
Always make sure that the print head is in its rest position
before moving or transporting the printer. To ensure this,
always switch off the printer BEFORE switching off the PC
(or other host) to which it is connected.
English
Re-insert the print head in the printer, close the front cover
•
and press CARTRIDGE to return the print head carriage to
its rest position.
User Guide - Ink Jet Print Head 17
Page 36

Paper
Dimensions
The following table contains the dimensions of the types of
paper which you can use in your printer:
This section describes the types and characteristic s of the
paper you can use in your printer.
Types and Dimensions
Types
Plain paper: paper weight between 70 and 80 g/m2.
•
Transparencies: paper-backed transparencies specifically
•
indicated for ink-jet printers.
Coated paper.
•
Glossy paper.
•
Best results are obtained using good quality plain office
paper. Up to 15 sheets of paper can be inserted in the ASF.
Sub-standard paper can affect the quality of printing.
Always align the paper/film at the left hand edge.
Make sure the paper is inserted in the printer so as to
print on the right face of t he page (see indication arrow
on paper wrapping).
Format millimetres inches
Horizontal A5 210 x 148 8.26 x 5.8
A4 210 x 297 8.26 x 11.7
Letter 215.9 x 279.4 8.5 x 11
Legal 215.9 x 355.6 8.5 x 14
The maximum paper feed path is 217 mm/8.54 in.
Insertion
The paper loading procedure is described in the Quick Start
and illustrated on page X.
Automatic
Plain paper: up to 15 standard format single sheets
•
inserted as a pack.
Transparencies: up to 5 pieces at a time, with a single
•
sheet of plain paper after the last piece to help feedthrough. Remove each piece from the output stacker as
soon as it has been expelled from the printer.
Coated paper: up to 5 sheets at a time.
•
18 User Guide - Paper
Page 37

Manual
Glossy: one sheet at a time, with a single sheet of plain
•
paper behind each sheet of glossy paper.
Print Area
The print area is defined via software and must be within the
physical limits of the page inserted for printing. The printer
can print a maximum of 67 lines on an A4 page with 6 lpi
linespacing (the last line may be printed with slightly
defective linespacing).
Your application may add its own default margins to your
page layout, thus further reducing the print area.
Use of documents that do not conform to the
specifications indicated will result in crooked or incorrect
insertion and feed-through, with a risk of jamming.
English
User Guide - Paper 19
Page 38

Using Batteries
Instead of using the AC/DC adapter and the electrical power
supply to power your printer, you can operate it either with
ten LR6/ AA-size 1.2 to 1.5 Volt market standard batteries
available from any electri cal supplies shop and most
supermarkets or with one of the optional battery packs
available.
Batteries should always be replaced/recharged all at the
same time.
Do not mix batt ery types and always dispose of used
batteries in accordance with your local legislation.
Rechargeable Battery Pack
Market Standard Batteries
To insert the batteries in the printer, proceed as follows (see
also the sequence of figures on page V):
Remove the battery container from the rear of the printer:
•
– hold the printer vertical
– with the index or middle fingers, press down on the two
catches on the undersi de of the printer and,
simultaneously, with the thumbs, push the battery
container outwards.
Remove any batteries from the battery container.
•
Insert the new batteries in the battery container, making
•
sure that their polarity is correct (see the indications on the
inside of the battery container).
Reinsert the battery container in the printer.
•
The battery container must NOT be removed from the
printer when you transport it.
Two types of battery pack (item 1 on page IV), recognised
automatically once inserted in the printer, are available:
A 12 Volt, 600 mAh capacity Ni-Cd (nickel-cadmium)
•
battery pack which gives an autonomy of operation of
approximately 80 pages*.
A 12 Volt, 1 Ah capacity Ni-MH (nickel-metal hydride)
•
battery pack which gives an autonomy of operation of
approximately 140 pages*.
✽
With a fully-charged battery pack and normal usage.
The duration of the battery pack will depend on the
volume of text per page.
20 User Guide - Using Batteries
Page 39

To insert the battery pack in the printer, proceed as follows:
Remove the battery container from the rear of the printer,
•
and keep it for future use.
In its place, insert the battery pack with its contacts
•
towards the corresponding contacts inside the printer.
Make sure the battery pack is completely and correctly
inserted.
The battery pack must NOT be removed from the printer
when you transport it.
For safety, brand-new battery packs are uncharged; you
must therefore charge the pack before use.
Always switch off the printer when it is not in use, t o
avoid damage to t he battery pack (over- discharging).
Information on battery level
Charging or Recharging Battery Packs
Both types of battery pack can be recharged while in
the printer; the Ni-Cd battery pack has a r echarge time of
approximately 6 hours, the Ni-MH battery pack, 12 hours.
With the printer connected to the electrical power supply
using the AC/DC adapter and switched on, battery
recharging can be started:
automatically
•
if you are using a NiCd battery pack.
If the FORM FEED and ON LINE keys are pressed
simultaneously, recharging will stop and the printer will be
set ON LINE. Take care not to continually recharge or
overcharge the battery pack, as this will adversely affect
its operating life.
manually
•
the battery pack will be recharged as long as the printer is
idle.
When the printer receives an operating command,
recharging will automatically be suspended, to be
resumed as soon as the printer is idle again.
, when a low battery condition is detected or
(by pressing POWER for more than 4 seconds),
English
POWER light indicator
condition
Flashing slowly Autonomy for only five more pages
Flashing rapidly Batteries discharged
Lit and steady Batteries ready for use
Battery status
An optional fast charger (item 6 on page IV) is available (see
Supplies and Options
).
User Guide - Using Batteries 21
Page 40

Using Software
This section explains how to change the printer settings by
varying them in your printer driver, or using the printer set-up
utility contained on one of the two diskettes supplied with the
printer.
Your printer has a number of parameters which you can
define according to your specific requirements. Your printer
driver contains most of these parameters which can be
defined (using Control Panel) when you install the driver.
The parameter settings defined in the driver always have
priority over the settings made using the set -up utility.
Modifying the Parameters in the
Windows® 3.1/3.11 or Windows® 95
Drivers
The monochrome multilingual Windows® drivers on the
diskettes supplied optimise all the features and functions of
the printer. First install the printer driver in the language you
require (see
parameters of the driver correspond to the type of print-out
you require.
If you installed the driver using the Plug and Play feature,
you can configure the monochrome driver by opening the
Printers folder, highlighting your printer icon and clicking
on the Properties tab.
Otherwise, proceed as follows:
Open Windows®.
•
In Program Manager, activate the Main menu and then
•
Control Panel, clicking twice with your mouse indicator on
the corresponding icons.
From Control Panel menu, activate the Printers dialogue
•
box, in the same way.
To alter the default parameters, click once on Setup;the
•
following parameters are proposed and can be altered, if
necessary:
Quick Start
) and then check that the default
– Resolution ( dpi): selection of graphic densities (600,
300, 150, 75 dpi).
22 User Guide - Using Software
Page 41

– Paper size: A4, Letter, Legal, A5 (default setting: A4
or Letter, depending on country).
– Paper source: ASF, Manual (semi-automatic).
– Paper Orientation: Portrait or Landscape.
Print quality
LQ gives a combination of speed and good
quality
Presentation gives best quality at a lower speed
English
If you click on Options... in the Setup dialogue box, a
•
further series of parameters is displayed:
– Paper Quality: Plain paper or Transparency.
– Print Quality: LQ, Economy, Draft.
– Dithering: defines the way colours are mi xed (default
setting: Coarse).
– Intensity Contro l: increases/decreases the darkness of
graphics (default setting: Normal) .
The Dithering and Intensity Control parameters are
effective only when you print files which have been
created in black and white.
Fonts
Scalable and/or TrueType fonts are avail able when you
operate with a Microsoft® Windows® driver, level 3.1 or
later. You will be able to print using the Windows® TrueType
fonts as well as the printer-resident portrait fonts (you cannot
use your printer-resident landscape fonts in Windows®
environment).
Draft gives fast printing
Economy saves ink
Paper quality
If you select Transparencies, output will be LQ, regardless of
the print quality parameter setting selected.
To close the dialogue boxes, click once on OK in the
corresponding dialogue box, if you have changed any
setting(s) and wish to confirm it/them or on Cancel to exit
without saving any changes.
To validate all the setting for your printer driver, click once on
the Close buttoninthePrinters dialogue box.
User Guide - Using Software 23
Page 42

DOS Environment
Running the Printer SETUP Utility
If you use a DOS Software programme, you will require a
specific driver for each printer model and application to
access the main features of your printer. Ask your computer
dealer for advice.
To install any of the drivers, always refer to the specific
software application documentation. Should any of the
parameters you require not be accessible through the driver,
you can access them using the printer SETUP utility.
Your printer has three resident emulations: PCL III + (default
value) and IBM Propri nter X24 Model 4207/1 and EPSON LQ
850:
PCL III + mode:
•
Choose the PCL III + driver when setting your application
software. If PCL III + is not available, choose HP DeskJet
500C or HP DeskJet 500. The PCL III + mode supports
both black and colour printing.
IBM Proprinter X24 mode:
•
Choose the IBM Proprinter X24 Model 4207/1 driver when
setting your application software. Note that this mode
supports ONLY black printing with a black print head.
Attempting to print with a colour print head will result in an
error condition. The demo page is not available if this
emulation is selected.
EPSON LQ 850 mode:
•
Choose the EPSON LQ 850 model driver when setting
your application software. Note that this mode supports
ONLY black printing with a black print head. Attempting to
print with a colour print head will result in an error
condition. The demo page is not available if this emulation
is selected.
This programme is aimed at DOS-based applications. It
should be used if the feature you require cannot be selected
through the driver you have installed or if no driver is
available.
We suggest that you make a copy of this programme on
another diskette, and keep the original as a master.
Use a good quality interface cable for your computerprinter connection, to ensure correct communication (ask
your retailer for details).
Note for Windows® 95 users
If you have Windows ® 95 installed on your PC, BEFORE
running the SETUP utility, you must disable the DOS
spooler, as follows:
1. In the “Printer” folder, select a printer than “Properties” tab.
2. In the “Details” sheet, click on the “Port Settings” button.
3. A window entitled “Configure LPT ports” opens, with the
option “Spool MS-DOS print jobs” selected.
4. Click on the box, to disactivate the option. This will enable
the DOS application to handle the port directly.
5. Close Windows® 95.
To re-enable the “Spool MS-DOS printjobs” feature, just
repeat the above procedure.
24 User Guide - Using Software
Page 43

To run the SETUP utility, proceed as follows:
1. Insert the diskette containing the SETUP utility in drive
(usually) of your computer.
2. At the DOS prompt, type A:\ (or B:\)????? (your printer
name as indicated on the diskette label), and press
ENTER.
3. The programme will read the printer’s identification code
and its internal settings. It will then display this information
on your PC screen.
4. If you click on Change Parameters, the parameter group
selection screen for the emulation currently selected is
displayed.
You can now select, one at a time, the parameter groups
containing the feature(s) you wish to change.
5. If you click on Factory Default,you restore the default
settings
6. If you click on Quit, you abandon the SETUP utility and
return to DOS. If any settings were changed, you will be
prompted to “Save setup into printer?”.
within the emulation currently selected
A
.
The parameter settings d ef ined in the driver always have
priority over the settings made using the SETUP utility.
English
User Guide - Using Software 25
Page 44

Troubleshooting
This section contains a troubleshooting guide which indicates
some of the problems which may occur during the day-to-day
use of your printer, together with suggestions for their
solution.
Your printer is designed to require only minimum
maintenance. However, everyday use will give rise to a
number of simple printer-c are operations.
General Care
1. Environment.
Keep your printer in a stabilised, ventilated environment
•
(temperature range: 5 to 35oC; relative humidity: 15% 85%).
Do not subject your printer to brusque changes in
•
temperature and/or humidity.
Do not leave your printer in a hot, closed car when not
•
in use.
If you detect serious mechanical damage to or a failure in
the printer, do not attempt to repair it yourself! CALL
THE TECHNICAL ASSISTANCE SERVICE.
26 User Guide - Troubleshooting
2. Transportation.
Always make sure that the print head is in its rest position.
•
Take care not to drop your printer.
•
If you use batteries to power your printer, do NOT remove
•
the battery holder during transportation.
Page 45

Problems and Solutions
If you have problems while working with the printer, check
through the following list, to see if you can find the cause of
the problem.
If a printer malfunction other than those indicated below
occurs, or if, after executing the suggested corrective
action, the problem persists, call your retailer or the
Technical Assistance Service.
Installation
1. Missingordamagedparts.
Contact your retailer immediately.
•
2. ProblemsconnectingprintertoAC/DCadapterand/orto
electricalpowersupply.
IncompatibilitybetweenprintersocketandAC/DCadapter
jackand/or AC/DCadapter plug andpower socket.
Contact your retailer immediately.
•
DO NOT attempt to change the AC/DC adapter jack and/or
plug yourself.
3. PrinterdoesnotswitchonafterpressingPOWERkey.
Nopower supply (thePOWERlight indicator is off).
Check that the AC/DC adapter is connected properly both
•
to the printer and to the power socket.
4. Noinitialreset.
When POWERispressedforthefirsttime,the print
headcarriaged oesnotmov e.
Check that the carriage path is free of impediment.
•
Try switching the printer off and then on again.
•
If the POWER light indicator is flashing rapidly, there is a
•
failure on the mother board; call the technical assistance
service.
5. Demopage/Printtestdidnotrun.
Repeat the key sequence, as described.
•
If the carriage does not move, check that its path is not
•
obstructed.
If the FORM FEED light indicator flashes slowly: there is
•
no paper in the printer; load up to 15 sheets into the paper
input tray and press the FORM FEED key on the operator
panel.
6. Problemswithconnectiontohost.
Check that your interface cable is of the approved type.
•
Make sure you have fixed the interface connectors
•
properly both to the printer and to the host.
Check that you have configured your application correctly
•
(see the driver installation procedure and your application
manual).
English
If you are using batteries or a battery pack, check that
•
they/it do not require replacing/recharging.
User Guide - Troubleshooting 27
Page 46

Paper
Precautions
The paper must not be crumpled or torn, otherwise it may
•
jam or even not be inserted. Always use paper in perfect
condition and within the specifications defined (see the
section
Make sure the paper feeds smoothly, and that it is not held
•
too tightly nor has too much play.
If you remove the paper from the ASF, you MUST repeat
•
the entire paper loading operation from the start.
If there is no operator panel or printer operation for more
•
than 60 seconds, any paper inserted in the printer will be
expelled.
Paper
).
2. Paperdoesnotload.
Check that the size and weight of the paper used are
•
within the limits allowed.
If you removed the paper from the ASF, you must repeat
•
the entire paper loading operation.
Make sure the paper is not feeding in crookedly.
•
Paper jamming - point 3 in this paragraph.
•
Make sure the correct paper feed device is selected in
•
your printer driver, load paper in the ASF and press the
FORM FEED key on the operator panel.
3. Paperjamsortears.
Always make sure there is no paper inserted for printing
•
before switching off the printer.
Printing on both sides of the paper may cause smudging.
•
1. Nopaper.
If,on a printcommand,there isnopapertoloadinthe
printer,theFORM FEEDlightindicatorflashesslowly.
Toclearthiscondition, load up t o 15sheetsof paperinto
the ASFand presstheFORM FEEDkeyont heoperator
panel.
The most common cause of paper jamming is the
non-observance of the paper loading p rocedure. When
adding paper to the paper input tray or after removing
jammed paper, ALWAYS remove any paper already in the
paper input tray and reload it all as a single pack.
Set the printer OFF LINE (On Line LED off).
•
Hold down the FORM FEED key while pulling the jammed
•
paper carefully back out of the printer.
DO NOT pull the jammed paper out through the front of
the printer as this can damage the print mechanism.
Check that the paper output tray is not overloaded
•
(capacity 10 printed sheets).
It is a good idea to remove any printed sheets from the
paper output rack before starting a new printing operation.
28 User Guide - Troubleshooting
Page 47

Do not attempt to print on small adhesive labels attached
•
to larger size glossy paper (e.g. A4 format). This type of
label tends to detach during printing and recovery from
inside the printer is difficult.
4. Incorrectstacking.
Too many sheets in input and/or output tray.
•
The input tray can contain up to 15 standard sheets; the
output tray can contain up to 10 printed sheets.
Heavily printed sheets t end to curl and may not stack
correctly. They may also stain the rear of the page
stacked over them, as they require longer to dry. Always
remove heavily printed sheets from the output tray as
soon as they are expelled from the printer.
3. Printingwithmissingdots.
Ifdotsor linesarenotprintedcompletely:
Remove the ink jet print head completely, and then
•
reinsert it.
Clean the electrical contacts on the print head and those
•
on the print head carriage (see the specific paragraph in
the section
If these operations result in improved print quality, you must
replace the print head.
Ink Jet Print Head
).
Printing
1. Printerdoesnotprint/receivedata.
English
Print head
1. Printerdoesnotprint.
Check that you have removed the protective film from the
•
print head.
2. Printedcharactersarefaint.
Make sure you are using paper within the specifications
•
given (see the specific paragraphs in the sections
and
Product Characteristics
Replace the ink cartridge or the entire print head (see the
•
specific paragraphs in the section
).
Ink Jet Print Head
Paper
).
Check that the printer is switched on and On Line (the
•
POWER and ON LINE light indicators on the operator
panel must be lit).
Check the physical (cables) and logical (application and
•
driver) connections between the printer and host.
Check that host system is switched on.
•
If the carriage does not move and the POWER indicator
•
light flashes rapidly, press the POWER key to switch off
the printer, wait a couple of seconds and then press
POWER again.
If the POWER light indicator continues to flash rapidly, call
the Technical Assistance Service.
User Guide - Troubleshooting 29
Page 48

Check that you have removed the protective film from the
•
print head.
If the FORM FEED light indicator flashes slowly, check
•
that paper is present and that it loads correctly.
2. Printingstops.
If the FORM FEED light indicator flashes slowly, check
•
that paper is present and that it loads correctly.
If there is no paper in the printer, load up to 15 sheets of
paper in the ASF and press the FORM FEED keyonthe
operator panel.
See the section “Paper” for the correct paper loading
procedure.
3. Poorprintquality.
Make sure you are using good quality paper.
•
Try printing on the other side of the paper.
•
4. Strangecharactersareprinted.
Check that you are using the correct emulation.
•
Check that the driver you have selected is compatible with
•
the emulation you intend to use.
– In a printer OFF condition, press and hold the POWER
and FORM FEED keys simultaneously, then release
first POWER and then FORM FEED.
– Send a
content of this file is printed as a string of hexadecimal
codes corresponding to the individual characters
transmitted.
– To exit from hex-dump mode, press PO WER; the print
is switched off. Press POWER agai n to switch the
printer on.
5. Printtestexecutedcorrectly,butunabletoprintin
Windows®environment.
Theprinterdriver maynotbeinstalled correctly.
Check that the name of the printer appears in the List of
•
printers in the Printers dialogue box:
– If the printer name is not listed, install it following the
driver installati on procedure described in
– If the printer name is listed, remove it from the list by
clicking on the Remove buttoninthePrinters dialogue
box and then repeat the dr iver installation procedure.
short
test file from your computer. The
Quick Start
.
If you cannot solve this problem, your hot line service may
request to run a hex-dump of a test piece to check that the
data transmission is operative. To run the hex-dump,
proceed as follows:
30 User Guide - Troubleshooting
Page 49

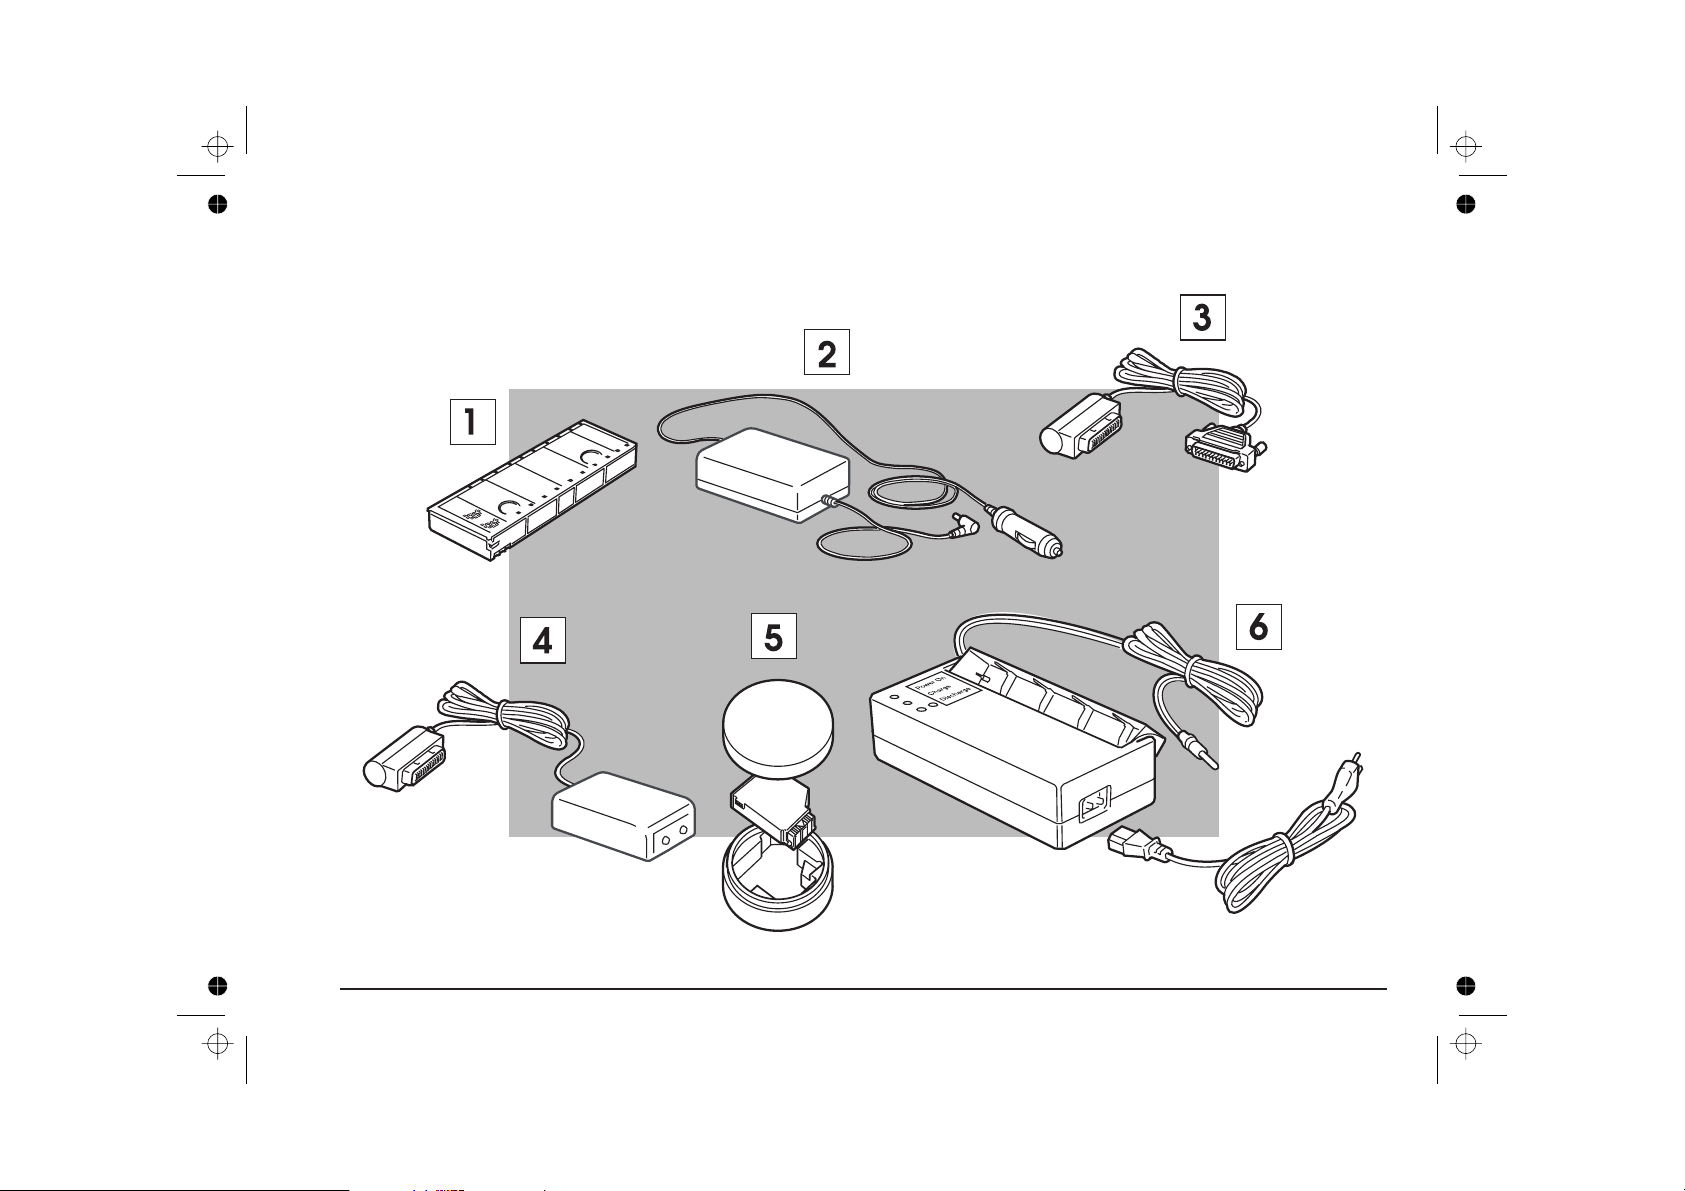
Supplies and Options
The following items c an be ordered from your retailer. They
are packed individually and have a specific instructions
booklet.
Supplies
Ink jet print head with spare cartridge
•
Pack of ink cartridges
•
Options
Ni-Cd and Ni-MH battery packs (see
•
Car lighter adapter
•
Parallel interface cable with flat connector
•
Universal AC/DC adapter + fast charger (for battery packs)
•
Supplementary AC/DC adapter
•
Colour kit (see
•
Single colour print head
•
Infra-red infterface (item 4 on page IV).
•
Ink Jet Print Head
Using Batteries
)
)
Car lighteradapter
Using this option (item 2 on page IV), the printer can be
powered from a 12 Volts car cigarette lighter.
For the characteristics of the car lighter and its use, see the
instructions booklet included with the option.
Parallel interface cable
This option (item 3 on page IV) is recommend in order to
guarantee correct data transfer to and from the printer.
Forthe characteristics of the interface cable andits use, see
the instructions leaflet included with the option.
Universal adapterandfast charger
A universal power supply combined with a fast battery pack
recharger is available as an option (i tem 6 on page IV). This
device, which you connect to your electrical power supply,
guarantees safe, efficient battery pack recharging, reducing
considerably the recharge time and preventing overcharging.
To recharge a battery pack, remove it from the printer and
insert it in the charger. Using the fast recharger, the Ni-Cd
battery pack can be recharged in approximately 40 minutes,
the Ni-MH battery pack, in approximately an hour. If there is
a temporary interruption of the power supply, recharging will
be resumed automatically when power is restored.
Do not disassemble used battery packs and always
dispose of them in accordance with your local legislation.
English
User Guide - Supplies and Options 31
Page 50

Product Characteristics
PrintingTechnique
Non-impact,bubbleinkjet,withwater-resistantink
MonochromePrintHeadwithReplaceableInkCartridge
50nozzles
PrintingSpeed(10cpi)
Windows or OS/2 environments
up to 3 pages per minute (ppm)
DOS and similar environments
180 cps in Draft
140 cps in LQ
N.B.:these values may vary depending on the print mode (Draft/LQ), the
software application and/ or the type of computer used.
Paper Handling
Automatic sheet feeder
SheetFeederCapacity
Plain paper : up to 15 sheets
Transparencies : up to 5 sheets
Paper Format
A4 (210 mm x 297 mm)
Horizontal A5 (210 mm x 148.5 mm)
U.S. Letter (8.5 in x 11 in)
U.S. Legal (8.5 in x 14 in)
:
:
Print Area onPage
Value min. max.
Sheet width 210 mm / 8.26 in 215.9 mm / 8.5 in
Print line length —- 203.2 mm/ 8 in
Left margin 3.4 mm / 0.134 in —Right margin 3.4 mm / 0.134 in —Topmargin-TOF 5mm 6mm/0.24in
Bottom margin - BOF 12.7 mm/ 0.5 in —Sheet length 148 mm / 5.8 in 356 mm / 14 in
PaperType
Plain office paper
Transparencies
Paper Weight
70 to 80 g/m
2
GraphicDensity
75, 100, 150, 300, 600 dpi
Resident Emulations
HP DJ 500 (PCL III +) - default;
EPSON LQ 850;
IBM Proprinter X24
32 User Guide - Product Characteristics
Page 51

ResidentFonts
PCL III +
EPSON LQ 850
- Sans Serif: Portrait; 10, 12, 15 cpi, PS; Upright and Italic;
- Serif: Portrait; 10, 12, 15 cpi, PS; Upright and Italic;
- Courier:
orientation: Portrait and Landscape
pitch: 5, 8.33, 10, 16.67, 20, 33.34 cpi
size: 6, 12 points
style: Upright (Italic 5, 10, 20 cpi)
- Team Nordic:
orientation: Portrait
pitch: Proportional
size 6, 12 points
style: Upright and Italic
- Letter Gothic:
orientation: Portrait and Landscape
pitch: 5, 6, 8.33, 10, 12, 20, 24, 33.34 cpi
size: 4.75,6, 9.5, 12 points
style: Upright (Italic 10, 12, 20, 24 cpi; 12 points)
-BFTeam:
orientation: Portrait
pitch: Proportional
size: 8, 10, 12, 14 points
style: Upright and Italic
-Linea:
orientation: Portrait
pitch: Proportional
size: 8, 10, 12, 14 points
style: Upright (Italic 10, 12 points)
-LineDraw
IBM Proprinter X24 4207/1
- Letter Quality 1: Portrait and Landscape; 10, 1 2 cpi; Upright
- Letter Quality 2: Portrait and Landscape; 10, 12 cpi, PS;
Upright
CharacterSets
PCL III +
Western - Latin alphabets:
CP 437 International; Roman 8; PC 8 Denmark/ Norway;
CP 850 Multilingual; ECMA- 94 Latin 1; ISO 4 United
Kingdom; ISO 21 Germany; ISO 69 France; ISO 15 Italy;
ISO 60 Norway 1; ISO 61 Norway 2; ISO 11 Sweden Names;
ISO 10 Sweden; ISO 17 Spain; ISO 6 ASCII; ISO 2 IRV;
ISO 16 Portugal; ISO 14 JIS ASCII; Legal; CP 860 Portugal;
Danish OPE I; UNIX International; Danish OPE II; Spain II;
CP 863 French Canadian
East European alphabets: PC Slovenia, CP 852; ISO 8859/2
Turkish alphabets: CP 857; ISO 8859/9
Cyrillic alphabets: CP 866; CP 855; ISO 8859/5
Greek alphabets: CP 210; CP 851; ISO 8859/7
Hebrew alphabets: CP 862; ISO 8859/8
PC WIN:
ANSI Windows 3.1; East European Windows 3.1; Turkish
Windows 3.1; Cyrillic Windows 3.1; Greek Windows 3.1
English
User Guide - Product Characteristics 33
Page 52

EPSON LQ 850
Product Certification
With ITALIC table:
USA; France; Germany; United Kingdom; Denmark 1;
Denmark 2; Sweden; Italy; Spain 1; Spain 2; Japan; Norway;
Latin America; Korea; Legal
With GRAPHIC table:
USA; Multilingual; Portugal; Canada-French; Norway
IBM Proprinter X24
International 1; International 2; Denmark OPE 1; Denmark
OPE 2; Spain 2; CP 850; CP 860
Interface
Parallel (Centronics)
RAM
128K bytes
Operating Environment
Temperature: 5 to 35oC
Relative Humidity: 15% - 85%
Sound level
48 dB in LQ printing mode
For USA and Canada
Electromagnetic compatibility:
FCC Class B “Certified”
Safety regulations:
USA: UL 1950
Canada: CSA C22-2 No. 950
For EEC:
Electromagnetic compatibility:
EN 55022 Class B
89/336/EEC
Safety regulations:
EN 60950 + Nordic Deviations
Physical Characteristics
Printer
Height 2.63 in (67 mm)
Width 11.81 in (300 mm)
Depth 5.19 in (132 mm)
Weight 2.86 lbs (1.3 kg)
34 User Guide - Product Characteristics
Page 53

Glossary
characterset
Assignmenttablebetweenacodeandaspecificprintable
character(usuallyinconnectionwithnationallanguages).
ASCII-table
(AmericanStandardCodeofInformationInter-change);
standardizedcodeandcharacterassignmenttablefrom0to
127decimal.
BIM
(BitImageMode); graphicprinting mode,in which a byteis
notinterpretedascharacter.Itsbit scausetheindividual
nozzl es oftheprint headt o printo r not.
bit
Smallest informationitem; asignal set to 0o r 1.Eightbits
makeonebyte(character).
BOF
(Bottom Of Form); the areaat the f ootof each form, inwhich
printingwillnotbepossible(itwillbeskippedautomatically).
buffer
Built-inmemoryinthe printer,inwhichdatawillbestored
untilitisprinted.
byte
Standardunitforcharacter/symbolrepresentation.Abyte
consistsof8bits.
charactergenerator
Aresident printerprogram,whichconvertsacharactercode
(byte)into apixelmatrix for printing.
compressedprinting
See “condensed printing”
condensedprinting
Aprint modewhichnormallyhas acharacterspacingdensity
higher t han 12cpi (16.6or 20 cpi).
cpi
Charactersperinch;indicatesthenumberofcharacters
which canbe printedin oneinch.
dB(decibel)
Unitofmeasurementforsound.
default
Thestandardinitial setting of a featureor a parameter.Can
usuallybemodified .
dotmatrix
Printingtechnologywhichcreatescharacters(andgraphics)
bythecompositionofprogrammedcolumnsofdots.
dotsize
Size of the smallestelementused to createthecharacter
image(default value:1/72in).
doublewidthprinting
Eachcharacter(ev enSPACE)isstretchedhorizontallyt o
doublethenominalpitchwidth.
English
Glossary G-1
Page 54

driver
Software program which c ontrols output to the printer and
does necessary code c onversions between application
program and printer.
handshaking
The signal exchange between the printer and the controlling
system, which regulates the loading of data to the printer’s
buffer and avoids overflow of this buffer.
economy print mode
Low dot resolution print mode. All ows ink saving.
elementary spacing
Smallest possible horizontal or vertical movement of the pr int
head carriage.
emulation
Set of commands that can be interpreted by the printer
and/or driver.
ESCAPE character
The special character with the decimal value 27 (ESC),
which tells the printer that the following character(s) form a
control sequence.
ESCAPE sequence
A set of characters , starting with the ESC character, which
controls an action of the printer as defined by its emulation.
factory settings
Printer settings defined by the manufacturer; also known as
default settings (
firmware
The built-in control intelligence of the printer which cannot be
changed by the user.
font
A set of characters available in a certain typeface and size
(
see also items “cpi” and “dot size”
see item
).
).
hexdump
A printing mode in which the transmitted characters (and also
control codes) are printed as two digit hexadecimal c odes.
Used for debugging.
initialisation
The process at printer switch-on in which the printer
executes an automatic self- diagnosis of its hardware and
loads the settings as defined in programming (set up). Reset
by command also causes (re-)initialisation of the printer (but
without hardware check).
interface
Physical (with cable) and logical (synchronization and
interpretation of signals) connection of the printer with a host
system/computer.
ISO table
(International Standardization Organization); a convention
which assigns to cer tain ASCII codes (
one-per-nation set of special European characters.
landscape
Page orientation in which the characters are printed along
the long side of the paper.
LED
(Light Emitting Diode); indicator which lights up on the printer
operator panel.
see item
)a
G-2 Glossary
Page 55

linebuffer
TheRAMmemoryoftheprinter whereincomingdatais
storeduntil it is processed.Thefilling of thelinebufferis
controlledby thehandshaking(seeitem)proced ureofthe
transmissionprotocol.
LOCALcondition
Anotherword forthe printerOff-Linestate(
see item
).
portrait
Page orientation in which the characters are printed acr oss
the short side of the paper.
print buffer
An intermediate buffer in which data coming from the line
buffer is stored, until the transmission of a code which
commands printing.
English
off-line
Printer operating condition in which data and commands via
interface are accepted until the input buffer is full, but are not
executed. It permits the execution of operations commanded
via the operator panel.
on-line
Operating condition in which the printer is completely
controlled by its host.
parallel interface
A means of connecting the printer to a computer with a
defined standard plug and pin assignment . Data is
transmitted by 8 “ parallel” lines, i.e. one complete byte at a
time.
parameter
A command or feature, the value of which may be varied
(
see setting
PCL commands
(Printer Command Language); one of the resident
emulations. A proprietary name of Hewlett-Packard.
pitch
The character spacing measured in characters per inch.
).
print quality
Letter Quality (LQ): printing with a high character definition
which approaches solid c haracter profiles.
Draft: printing with reduced definition, to enable faster
printing.
proportional printing
A print mode in which the print head movement is
proportional to the width of the character printed. Lines of the
same length may therefore contain different numbers of
characters.
RAM
(Random Access Memory); A memory area which may be
written to repeatedly, e.g. the print buffer (volatile, i.e. loses
contents when overwritten or at printer switch-off).
release X.X
Indicates the version/updating level of the firmware.
reset
Commands the printer to clear the buffer and all temporary
settings, returning to an initial switch-on state.
resolution
Print density defined as the number of dots printed per inch
(default value: 300 dpi)
Glossary G-3
Page 56

ROM
(Read Only Memory); A memory area which can be read
(used) but not m odified and contains e.g the built-in
character generator, command code emulation etc. (not
volatile).
scalable font
A file containing the basic elements of a set of characters the
size of which can be enlarged and/or reduced (within the
specifications indicated) by the user.
setting
The value of a parameter, command or feature.
SET-UP
An operating procedure in which it is possible to define the
printer parameter settings and memorize them.
subscript
A print mode in which the characters are printed in reduced
size in lower half of character frame.
superscript
A print mode in which the characters are printed in reduced
size in upper half of character frame.
throughput
The optimum average output (in pages per minute) of the
printer.
user settings
Parameter values defined by the user, in SET-UP mode.
word length
(7 or 8 bits); Refers to the format in which a byte is
transmitted to and interpreted by the printer.
For parallel transmission only the definition of the number of
bits per byte ar e important.
TOF
(Top Of Form); the space on top of a form in which p rinting is
not possible. Will be skipped automatically on the execution
of an FF.
G-4 Glossary
Page 57

Index
A
AC/DC adapter, 2
ASF, 3
capacity, 18, 32
B
Batteries, 2
disposal of, 20
how to insert, 20
removing the battery container, 20
type, 20
Battery level, 21
Battery pack, 2
automatic recharge, 21
autonomy, 20
how to insert, 21
how to recharge, 10
how to terminate recharge, 10
manual recharge, 21
recharge time, 21, 31
recharging, 21
removing the battery container, 21
type, 20
C
Car lighter adapter, 31
Carton contents, 1
Character sets, 33
EPSON LQ 850 command codes, A-8
EPSON LQ 850 emulation, A-14
IBM Proprinter X24 command codes, A-10
IBM Proprinter X24 emulation, A-14
PCL III + command codes, A-2, A-3
PCL III + emulation, A-13, A-14
user-definable parameters, A-13, A-14
Colour print head (option), 14
how to insert, 14, 15
how to replace the ink cartridge, 15
Command codes
EPSON LQ 850 emulation, A-7, A-8
font attribute selection priority, A-1
IBM Proprinter X24 emulation, A-9, A-10
multiple ESCape sequences, A-1
page attribute selection pr iority, A-1
PCLIII+emulation,A-2,A-3,A-4,A-5,A-6,A-7
Connecting the printer
to a computer/host s ystem, 4
to the AC/DC adapter, 2
D
Default settings, A-11
EPSON LQ 850 emulation, A-11
how to restore, 25
IBM Proprinter X24 emulation, A-11
PCL III + emulation, A-11
Demo page
how to obtain, 4, 10
DOS environment, 24, 25
English
Index I-1
Page 58

Draft, 23
Drivers
diskettes, 4
how to change printer parameters, 22
installation, 6
E
Economy, 23
Electrical data plate, 2
Emulations, 32
EPSON LQ 850 emulation
character sets, 34, A-14
default settings, A-11
fonts, 33, A-12
others (parameter group), A-15
paper, A-14
quality, A-14
F
Factory settings, A-11
Fonts, 33
EPSON LQ 850 emulation, 33, A-12
IBM Proprinter X24 emulation, 33, A-13
PCL III + command codes, A-2, A-3
PCL III + emulation, 33, A-12
resident, 33
user-definable parameters, A-12, A-13
G
Graphic printing
density, 32
EPSON LQ 850 command codes, A-8
IBM Proprinter X24 command codes, A-9
IBM Proprinter X24 command codes, A-9
PCL III + command codes, A-6
I
IBM Proprinter X24 emulation
character sets, 34, A-14
default settings, A-11
fonts, 33, A-13
others (parameter group), A-15
paper, A-14
quality, A-14
Identifying the printer parts, 1
Ink cartridge
how to replace, 13, 14
Ink jet print head, 13, 14, 15, 16, 17
cleaning, 17
colour print head (option), 14
how to remove, 13
how to replace, 13, 14
how to replace the ink cartridge, 13, 14
Inserting the print head, 2
Installing printer software, 4
I-2 Index
Page 59

K
P
Keys, 9, 10, 11
basic functions, 9, 10
special functions, 10, 11
L
LEDs, 11, 12
Letter quality, 23
Loading a printer driver, 22
Loading paper, 3, 4
N
Nozzles test, 16
O
ON/OFF switch, 2
Operating environment, 26, 34
Operator panel, 9
LEDs, 11, 12
template, 11, 12
Others
EPSON LQ 850 command codes, A-8
IBM Proprinter X24 command codes, A-10
PCL III + command codes, A-6
Others (parameter group)
EPSON LQ 850 emulation, A-15
IBM Proprinter X24 emulation, A-15
PCL III + emulation, A-15
user-definable parameters, A-15
Page format, 32
EPSON LQ 850 command codes, A-7, A-8
IBM Proprinter X24 command codes, A-9
PCL III + command codes, A-4
Paper, 18, 19
dimensions, 18
EPSON LQ 850 emulation, A-14
format, 18
how to load, 3, 4
IBM Proprinter X24 emulation, A-14
PCL III + emulation, A-14
solutions to problems with, 28, 29
types, 18
user-definable parameters, A-14
Paper characteristics, 32
Paper guide, 3
Paper jam
how to remove, 10
Parallel interface
connector socket, 4
Parallel interface cable, 31
PCL III + emulation
character sets, 33, A-13, A-14
default settings, A-11
fonts, 33, A-12
others (parameter group), A-15
paper, A-14
quality, A-14
Physical characteristics, 34
Print area, 19
Print attributes
EPSON LQ 850 command codes, A-7, A-8
IBM Proprinter X24 command codes, A-9
PCL III + command codes, A-3, A-4
English
Index I-3
Page 60

Print head
electrical contacts, 2, 14
printing nozzles, 2, 14
rest position, 13, 26
Print head care, 16
cleaning print head, 17
Print position
PCL III + command codes, A-5
Print speed, 32
Print test, 16, 17
contents, 16
how to abandon, 16
how to interrupt, 16
how to obtain, 10, 16
how to resume, 16
nozzle test, 16
Printer care, 26
Printer characteristics, 32, 33, 34
Printer SET-UP Utility
EPSON LQ 850 emulation default values, A-11
IBM Proprinter X24 emulation default values, A-11
user-definable parameters, A-12, A-13, A-14, A-15, A-16
Printing
demo page, 4
print test, 16
Product certification, 34
Programmable printer features
factory settings, A-11
user-definable parameters, A-12, A-13, A-14, A-15, A-16
Q
Quality
EPSON LQ 850 emulation, A-14
IBM Proprinter X24 emulation, A-14
paper, 18
PCL III + emulation, A-14
transparencies, 18
user-definable parameters, A-14
Quickstart,1,2,3,4,5,6,7
R
Rechargeable battery pack, 20
S
Settings, A-14, A-15
SETUP utility, 24
how to access, 25
how to exit, 25
how to restore default settings, 25
how to select parameters, 25
Software, 22, 23, 24, 25
character sets, A-14
DOS environment, 24
printer SET-UP utility, 22
Windows® environment, 22, 23
Speed, 32
I-4 Index
Page 61

T
U
Template
operator panel, 11
Troubleshooting, 26, 27, 28, 29, 30
demo page, 27
faint characters, 29
host, 27
installation, 27
missing dots, 29
paper, 28
power supply, 27
print head, 29
print quality, 30
print test, 27
printer switch-on, 27
printing, 29, 30
printing stops, 30
strange characters, 30
Windows® environment, 30
Universal adapter and fast charger, 31
Unpacking, 1
User interface
operator panel, 9
User-definable parameters, A-12, A-13, A-14, A- 15, A-16
character sets, A-13, A-14
fonts, A-12, A-13
others (parameter group), A-15
paper, A-14
quality, A-14
W
Windows® environment, 22, 23
driver diskettes, 4
installing the driver, 5, 6
settings, 22, 23
English
Index I-5
Page 62

Page 63

Italiano
Page 64

Questo pro dotto so ddisfa i requisiti esse nziali di Compatib ilità
Elettromagnetica e di Sicurezza previsti dalle Direttive:
• 89/336/CEE del 3 maggio 1989 con successive modificazioni
(Direttiva92/31/CEE del 28 aprile1992 e Direttiva93/68/CEEdel 22
luglio 1993);
• 73/23/CEE de l 19 febbraio 1973 con successive modifiche (Direttiva
93/68/CEE del 22 luglio 1993);
inquanto progettato in conformità alle prescrizioni delle seguenti Norme
Armonizzate:
• EN 55022 (Limits and methods of measurements of ra dio
interference characteristics of Information Technology Equipment);
• EN 50082-1 (Electromagnet ic Compatibility - Generic Immunity
Standard - Part 1: Residential, commercial and light industry);
• EN 60555-2 (Disturbance in supply systems caused by household
appliances and similar equipment - Par t 2: Harmonics);
• EN 60950 (Safety of information technology equipment, including
electrical business equipment).
La conformità ai suddetti requisiti essenziali vien e attestata mediante
l’apposizione della Mar catura sul prodotto.
La marcatura è stata introdotta nell’anno 1995.
Si richiama l’attenzione sulle seguenti azioni che possono
compromettere le caratteristiche del prodotto:
• errata alimentazione elettrica;
• errata installazione o uso errato o improprio o comunque difforme
dalle avvertenze riportate sul manuale d’uso fornito col prodotto;
• sostituzione di componenti o accessori originali con altri di tipo non
approvato dal costruttore, o effettuata da personale non autorizzato.
NOTE: This equipment has been tested and found to comply with the
limitsforaCLASSBdigital device pursuant to Part 15 of the FCC Rule s.
These limits are designed to provide reasonable protection against
harmful interference in a residential installation. This equipment
generates, uses and can radiate rad io frequency energy and, if not
installed and u sed in accordance with the instructions, may cause
harmful interference to radio communications. However, there is no
guarantee that interference will not occur in a particular insta llation.
If this equipment does cause harmful interference to radio or television
reception, which can be determined by turning the equipment off and
on, the user is encouraged to try to correct the interference by one or
more of the following measures:
. Reorient or relocate the receiving antenna.
. Increase the separation between the equipment and receiver.
. Connect the equipment into an outlet of a circuit different from that
to which thereceiver is connected.
. Consult the dealer or an experienced radio/TV technician for
assistance.
Changes or modifications not expressly approved by the party
responsible for compliance could void the user’s authority to operate
the equipment.
Connection of peripherals requiresthe use of grounde d shielded signal
cables.
This digital equipment does not exceed the CLASS B limits for radio
noise emissions from digital apparatus set out in the
interference-causing equipment standard ent itled “Digital Apparatus”,
ICES-003 of the Industry Canada.
Ce dispositif numérique respecte les limites bruits radioélectriques
applicables aux appareils numériques de CLASSE B prescrites dans
la norme sur le matériel brouilleur : “Appareils Numériques”, NMB-003
édictée par le ministère des Communications.
Page 65

Prefazione
Questa stampante portatile non a i mpatto è stata progettata
e costruita per garantire una qualità di stampa costante sia a
livello di testo che di immagini ad alta risoluzione.
La stampante può essere collegata all’alimentazione di rete
mediante l’adattatore AC/DC incluso nella confezione,
oppure può funzionare con pile stilo LR6/AA o con uno dei
gruppi batteria NiCd o NiMH opzionali.
La testina di stampa sostituibile con inchiostro resistente
all’acqua sfrutta la tecnologia a getto di inchiostro,
producendo una densità di stampa simile a quella laser, fino
a 600 x 300 punti per pollice (dpi, dots per inch), con disturbo
operativo minimo. È disponibile un kit colore opzionale,
contenente una testina di stampa a colori, il dischetto dei
driver e il manuale di istruzioni.
Struttura del manuale
Questo manuale multilingue è composto da 7 sezioni: una
prima sezione comune a tutte le lingue, che contiene le
figure, cinque sezioni nazionalizzate indipendenti ed una
sezione finale in inglese che riporta i codici dei comandi ed i
parametri programmabili.
Ciascuna sezione in lingua è suddivisa in 2 parti: Guida
rapida, contenente le informazioni essenziali per
l’installazione ed il funzionamento della stampante, e Guida
utente, con informazioni più dettagliate sulle funzioni e le
caratteristiche della stampante. Ogni sezione i n lingua
contiene inoltre un glossario dei termini ed un indice
alfabetico.
Guida rapida
Disimballo
•
Italiano
La stampante può essere collegata a PC portatili o desktop
mediante interfaccia parallela Centronics. Il firmware
residente dispone di tre diverse emulazioni: PCL III +
(emulazione HP DeskJet 500), EPSON LQ 850 ed IBM
Proprinter X24 (4207/1). Compatibile con gli ambienti
MS-DOS, MS-Windows e OS/2 IBM e con altre applicazioni
software comunemente utilizzate, la stampante può essere
usata in molti ambienti di W ord Processing e Desktop
Publishing.
Grazie all’ASF integrato di cui dispone, il dispositivo standard
di gestione carta, ed alla dimensione compatta, questa
stampante è la compagna ideale di professionisti
indipendenti e sempre in movimento.
Localizzazione delle parti della stampante
•
Collegamento della stampante
•
Accensione della stampante
•
Inserimento della testina di stampa
•
Caricamento della carta
•
Stampa della pagina demo
•
Installazione del software della stampante
•
Prefazione iii
Page 66

Guida utente
Interfaccia utente
Etichetta adesiva, con le sequenza degli indicatori
luminosi e le condizioni di errore più frequenti.
Pannello operatore, con le funzioni degli indicatori
luminosi (LED) e dei tasti.
Testina distampa
Spiega come inserire/rimuovere la testina di stampa
nella/dalla stampante, come pulirla, e come mantenere
unaqualitàdistampaottima.
Spiega come eseguire la prova di stampa.
Carta
Descrive le caratteristiche della carta che può essere
utilizzata.
Uso delle pile/del gruppo batteria
Spiega come inserire e ricaricare le pile o il gruppo
batteria.
Usodel software
Fornisce indicazioni su come modificare le impostazioni
delle stampante mediante le impostazioni del driver di
stampante o il programma di configurazione (setup utility).
Soluzione dei problemi
Guida alla soluzione dei problemi, c on la descrizione dei
problemi più comuni e della re lativa soluzione.
Opzioni e caratteristiche tecniche del prodotto.
Perogniproblema,consultateilcapitoloappropriatonella
guidautente.
iv Prefazione
Page 67

Indice generale
Guida rapida
Disimballo .................... 1
Aperturadellastampante ........... 1
Interfaccia utente
Etichette .....................9
Pannellooperatore ...............9
Funzionidibasedeitasti .............. 9
Funzionispecialideitasti ..............10
Indicatoriluminosi..................11
Localizzazione delle parti della stampante . . 1
Collegamentodell’adattatoreCA/CC.... 2
Accensionedellastampante ......... 2
Inserimentodellatestinadistampa...... 2
Caricamentodellacarta............ 3
Stampadellapaginademo.......... 4
Collegamento ad un Computer/S iste ma Host 4
Installazione del softwar e della stampante . 4
Aiuto ....................... 7
Testina di stampa
Sostituzionedellatestinadistampa..... 13
Rimozione della testina di stampa . . . . . . . . 13
Testina di stampa monocromatica con cartuccia
d’inchiostrosostituibile ...............13
Testina di stampa a colori o pzionale con cartuccia
d’inchiostrosostituibile ...............14
Manutenzione della testina di stam pa . . . 16
Provadistampa...................16
Puliziadellatestinadistampa ...........17
Trasportodellastampante.............18
Carta
Tipiedimensioni................ 19
Inserimento................... 19
Areastampabile................ 20
Indice generale v
Italiano
Page 68

Uso delle pile/gruppo batteria
Accessori ed opzioni
Pilestandard ..................21
Gruppobatteriaricaricabile..........21
Caricaoricaricadelgruppobatteria ....22
Uso del software
ModificadeiparametrineidriverdiWindows®
3.1/3.11oWindows®95 ............23
AmbienteDOS .................25
Esecuzione del programma di co nfig ur azione
dellastampante ................25
Soluzione dei problemi
Manutenzionegenerale............27
Problemiesoluzioni...............28
Installazione..................... 28
Carta......................... 29
Testinadistampa.................. 30
Stampa........................ 31
Caratteristiche tecniche
Glossario
Indice alfabetico
vi Indice generale
Page 69

Guida rapida
Questa sezione fornisce una guida rapida all’installazione
della stampante ed alla relativa preparazione all’uso:
descrive una sequenza di operazioni che devono essere
eseguite nell’ordine riportato.
Per informazioni più dettagliate sulla stampante e sulle
relative funzioni, consultate la Guida utente.
Disimballo
Conservate la scatola di cartone e tutti le parti dell’imballaggio in caso sia necessario reimballare o trasportare la
stampante.
Contenuto della scatola
All’interno del cartone, oltre a questo manuale, troverete
(vedi figura a Pag. III):
A) Stampante B) Adattatore CA/CC
C) Testina di stampa D) Dischi dei driver
In caso di danneggiamento o di mancata consegna,
contattate immediatamente il vostro rivenditore.
✽
Apertura della stampante
Per aprire la stampante:
Sollevate e inclinate all’indietro il coperchio superiore.
•
Aprite il supporto carta, estraendolo verso sinistra e quindi
•
ruotandolo verso l’alto fino a raddrizzarlo (vedi figura a
Pag. X).
Il coperchio superiore svolge la funzione di cassetto di
alimentazione/raccolta dei fogli inseriti nella/espulsi dalla
stampante.
Aprite il coperchio anteriore solo per accedere alla testina
•
di stampa.
La stampante NON deve rimanere esposta alla luce
diretta o a fonti di calore, né essere collocata in ambienti
polverosi, sporchi o scarsamente ventilati.
Localizzazione delle parti della stampante
Dedicate alcuni minuti alla individuazione dei componenti
principali della stampante.
Italiano
✽
In alternativa all’adattatore CA/CC in dotazione, è
possibile far funzionare la stampante (vedi “Uso delle
pile/gruppo batteria” nella Guida Utente) utilizzando 10
pile stilo LR6/AA oppure uno dei gruppi batteria NiCd o
NiMHopzionali(voce1aPag.IV).
Guida rapida 1
Page 70

Collegamento dell’adattatore CA/CC
L’adattatore CA/CC (elemento B a Pag. III) consente di
alimentare la stampante quando questa viene utilizzata in un
ambiente dotato di prese elettriche.
Poiché l’adattatore CA/CC si attiva non appena viene
inserito nella presa elettrica, verificate che NON sia
collegato alla presa di rete quando collegate il suo
spinotto alla stampante.
Controllate che la tensione di rete corrisponda a quella indicata
sulla targhetta dei dati elettrici postasulla base dell’adattatore
CA/CC.
Se la tensione indicata è diversa da quella disponibile,
contattate immedia tamente il rivenditore locale. NON
COLLEGATE,INNESSUNCASO,L’ADATTATORECA/CC,NÉ
ACCENDETE LA STAMPANTE.
Assicuratevi che la spina del cavo dell’alimentazione di rete
dell’adattatore CA/CC sia del tipo adatto alla presa di corrente
che intendete utilizza re; in caso contrario, contattate il
rivenditore locale. NON cercate di sostituire v oi stessi la presa.
Il produttore declina qualsiasi responsabilità in caso di incidenti
alle persone o di danni alla stampante derivanti dall a mancata
osservanza di quanto qui specificato.
Collocate la stampante e l’adattatore CA/CC su una
•
superficie piana.
Inserite lo spinotto dell’adattatore CA/CC nella presa
•
contrassegnata DC-IN sul retro della stampante (vedi
figura a Pag. V).
Inserite la spina dell’adattatore CA/CC nella presa di
•
corrente.
In alternativa all’adattatore CA/CC, è possibile far funzionare
la stampante utilizzando 10 pile stilo LR6/AA (vedi figura a
Pag. V) oppure uno dei gruppi batteria opzionali a
disposizione (elemento 1 a Pag. IV) (vedi “Uso delle pile/
gruppo batteria” nella Guida Utente).
Accensione della stampante
Per accendere la stampante, premere il tasto POWER sul
•
pannello operatore.
Gli indicatori luminosi sul pannello operatore lampeggiano
in sequenza, e l’indicatore POWER rimane acceso.
Ogni volta che accendete la stampante, vengono eseguiti
una serie di controlli interni ed un azzeramento meccanico.
Inserimento della testina di stampa
Vedere le figure a Pag. VI e l’etichetta con le istruzioni
posta all’interno del coperchio anteriore.
Aprite il contenitore sigillato della testina di stampa
•
(elemento C a Pag. III) ed estraetela, afferrandola per il
telaio (zona opposta al nastro protettivo).
Sempre sostenendo la testina di stampa per il telaio,
•
rimuovete il nastro protettivo.
Non toccate i contatti elettrici o gli ugelli di stampa, né
appoggiatevi la testina di stampa .
2 Guida rapida
Page 71

Con la stampante già accesa, premete il tasto
•
CARTRIDGE per spostare il carrello porta-testina nella
posizione di caricamento.
Aprite il coperchio anteriore della stampante.
•
Con i contatti elettrici rivolti verso quelli corrispondenti
•
nell’alloggiamento sul carrello porta-testina, inserite la
testina di stampa inclinandola verso di essi e successivamente spingendola in posizione.
NON spingete la testina di stampa orizzontalmente; se
collocata correttamente per l’inserimento, è sufficiente
spingerla delicatamente verso il basso.
Chiudete il coperchio anteriore.
•
Premete il tasto CARTRIDGE per riportare la testina di
•
stampa nella posizione di riposo.
Per ulteriori informazioni sulla gestione e sulla
manutenzione della testina di stampa, vedere “Testina di
stampa” nella Guida Utente.
Caricamento della carta
(Vedi figure a Pag. X)
Assicuratevi che il supporto carta sia in posizione
verticale (vedi sezione “Apertura della st ampante”).
Potete caricare fino a 15 fogli di carta nell’ASF. Smazzate
•
i fogli accuratamente e verificate che i bordi superiore e
sinistro formino un angolo retto.
Premete verso il basso la guida mobile di destra e
•
posizionatela in corrispondenza del formato carta indicato
sul bordo inferiore destro del coperchio superiore(A4 o
US).
Allineate la carta contro il bordo sinistro della feritoia di
•
inserimento e inseritela in modo che poggi sui rullini di
trascinamento.
Per verificare se la carta è inserita correttamente:
•
– Premere FORM FEED per portare un foglio in
corrispondenza della prima riga di stampa.
– Premere nuovamente FORM FEED per espellere il
foglio nel vassoio di raccolta.
Verificate che la carta non presenti deformazioni,
altrimenti può provocare un inceppamento o addirittura
può non essere prelevata.
Italiano
Non appena il testo da stampare viene ricevuto dalla
stampante, viene alimentato un foglio in corrispondenza della
prima riga di stampa. Se per più di 60 secondi non avviene
nessuna operazione a livello di pannello operatore o di
stampante, il foglio inserito sarà espulso.
Guida rapida 3
Page 72

Al termine della s tampa, il foglio viene espulso dalla
stampante e impilato nel vassoio raccolta carta (capacità 10
fogli) di fronte all ’ASF.
Verificate sempre che non ci sia più carta nella stampante
prima di spegnerla.
Il contenuto della pagina Demo (vedi esempio a Pag. XI)
può essere leggermente diverso da quello illustrato in
figura, tuttavia ciò non influisce assolutamente sul
funzionamento della stampante.
Vedere la sezione “Carta” nella Guida Utente per
informazioni su dimensioni e tipi di carta utilizzabili nella
stampante.
Stampa della pagina demo
Con la stampante accesa, tenete premuti i tasti ON LINE e
•
CARTRIDGE per almeno quattro secondi.
Un foglio di carta viene alimentato nella stampante e la
•
pagina demo viene eseguita automaticamente.
L’indicatore luminoso ON LINE lampeggia lentamente.
Non aprite il coperchio anteriore della stampante mentre la
•
stampa è in corso, poiché ciò potrebbe causare
l’inceppamento della carta.
Per stampare un’altra pagina demo, ripetete la procedura
appena descritta.
Per sospendere temporaneamente la stampa, premete il
tasto ON LINE (premendo nuovamente questo tasto, la
stampa viene riattivata).
La pagina demo elenca le funzioni principali della stampante.
Collegamento ad un Computer/Sistema
Host
Il cavo interfaccia per collegare la stampante al vostro PC
NON è fornito in dotazione. Come accessorio opzionale, è
disponibile un cavo interfaccia consigliato dal produttore.
Assicuratevi che la stampante ed il computer/sistema
host siano spenti.
Inserite il connettore del cavo interfaccia (elemento 3 o 4 a
•
Pag. IV) nella presa collocata sul retro della stampante
(vedi figura a Pag. V).
Collegate l’altra estremità del cavo interfaccia nella presa
•
del connettore cavo interfaccia appropriata (porta) del
computer/sistema host.
Installazione del software della stampante
I dischetti (elemento D a Pag. III) forniti con la stampante
contengono:
un driver multilingue monocromatico per l’ambiente
•
Windows® 95 ,
un driver multilingue monocromatico per Windows®
•
3.1/3.11 e la utility di configurazione della stampante (per
la personalizzazione delle impostazioni sotto DOS).
4 Guida rapida
Page 73

Il contenuto dei dischetti garantisce la compatibilità con gli
specifici ambienti operativi e fornisce un’interfaccia di facile
utilizzo per la pr ogrammazione della stampante. I dischetti
comprendono un file “Leggimi” con le informazioni più recenti
sul driver.
Utenti Windows® : per lavorare in ambiente Windows®
3.1/3.11 o Windows® 95, è NECESSARIO prima installare il
driver appropriato di Wi ndows® dai dischetti. Tale driver
permette di accedere a tutte le funzioni della stampante.
Utenti DOS : vedere il capitolo “Uso del software” nella Guida
utente.
Windows® 3.1/3.11
Per installare il driver di Windows® attraverso il Pannello di
Controllo (gruppo Principale), procedere come segue:
1. Inserite il dischetto opportuno nell’unità A (solitamente) del
PC.
2. Attivare Windows® (se necessario, consultate la guida
utente di Windows®).
3.
Attivate il Pannello d i controllo nella finestra Principale
facendo doppio clic sulla relativa icona.
4.
Selezionate l’icona Stampantinello stesso modo.
5.
Se la casella Stampanti inst allate è vuota, fate clic su
Installa...
6.
Se la casella Stampanti inst allate contiene già
uno o più nomi di driver, fate clic su Aggiungi>>,
selezionate Stampante aggiornata o non in
elenco nell’Elenco stampant i, quindi fate clic su
Installa....
7.
Verificate che nella finestra Installa... sia già visualizzato il
nome dell’unità (solitamente A) in cui avete inserito il
dischetto dei driver, altrimenti fate clic sul nome dell’unità
e modificatelo utilizzando la tastiera del PC.
8.
Fate clic su Sfoglia..., per visualizzare i driver
nazionalizzati disponibili.
Fate clic due volte sul nome del driver in Directory:
(suffisso “it” = driver in Italiano) e quindi fate clic su OK.
9.
OralafinestraInstalla... mostra il driver selezionato; fate
clic su OK.
10.
La finestra Aggiungi stampante aggiornata o non in
elenco contiene una lista di driver presenti sul dischetto.
Selezionate il driver con il nome della stampante e fate clic
su OK.
11. A questo punto il driver è installato ed il nome della
stampante è visualizzato nell’Elenco stampanti.
12. Evidenziate il nome della stampante e fate clic sul
pulsante Imposta come stampante predefinita;in
questo modo la stampante sarà attiva in tutte le
applicazioni Windows®.
13. Verificate il collegamento della stampante facendo clic sul
pulsante Collega...
Per default, alla stampante verrà assegnata la porta LPT1
che corrisponde alla connessione hardware del cavo di
interfaccia parallela.
Italiano
Guida rapida 5
Page 74

14.
Fate clic sul pulsante Chiudi della finestra di dialogo
Stampanti.
Per ulteriori informazioni, consultate la documentazione
di Windows® 3.1/3.11.
Windows® 95
Per scegliere la versione nazionale desiderata e quindi
installare il driver mediante la prestazione “Pl ug and Play”,
procedere come segue:
La stampante deve essere accesa, collegata al PC e NON
deve trovarsi in modalità di errore (nessun LED
lampeggiante).
1. Inserire l’opportuno dischetto dei driver nell’unità A (di
norma) del vostro PC.
2. Attivare Windows® (se necessario, consultate la guida
utente di Windows®).
3.
Premere Avvio e selezionare l’opzione Esegui....
4. Digitare “ a:\????? (nome della vostra stampante, come
indicato sull’etichetta del dischetto) e premere Invio.
Appare una finestra per la selezione della lingua; seguire
le istruzioni visualizzate per configurare la lingua
desiderata. Dopo la configurazione della lingua, appare
nuovamente la finestra del Desktop.
In tale finestra è già selezionata l’opzione Driversu disco
fornito dal produttore hardware.
Fare clic sul pulsante OK.
7.
Con la finestra Installazione da disco floppy
visualizzata, inserire l’opportuno dischetto driver nell’unità
prescelta, specificare tale unità e fare clic su OK.
8. Il nome della vostra stampante viene visualizzato nella
finestra Installazione stampante. FateclicsuOK.
9.
Appare la finestra Aggiungi stampante. Se nel sistema
non erano già stati installati altri driver di stampante, la
stampante sarà installata come stampante predefinita. In
caso contrario, vi sarà chiesto di specificare tale opzione.
Fate clic su Si.
10.
Fate clic su Avanti. La stessa finestra propone la stampa
di una Pagina di prova.FateclicsuSi, se volete
verificare che il driver sia stato installato correttamente.
Questa pagina inoltre, elenca tutti i file copiati sul sistema
durante l’installazione.
11. A questo punto il driver è stato installato. Una finestra
chiede di confermare il completamento della stampa della
pagina di prova. Una risposta affermativa indica che il
driver è stato installato correttamente.
Per ulteriori informazioni, consultate la documentazione
di Windows® 95.
5. Riavviare Microsoft® Windows® 95 (eseguire il comando
“chiudi sessione” e ricominciate dal menu Avvio).
6. Appare una finestra che segnala il rilevamento di una
nuova periferica (Nuovo component e hardware
individuato seguito dal nome stampante).
La stampante è ora pronta per lavorare in ambiente
Windows®.
Consultate la sezione “Uso del software” per ulteriori
dettagli sulla configurazione di driver e stampanti.
6 Guida rapida
Page 75

Aiuto
Sul lato superiore del coperchio frontale, vi è una etichetta
che riporta una serie di configurazioni di indicatori luminosi e
di sequenza di tasti. Impresse sul lato interno del coperchio
frontale, vi sono le istruzioni relative alla sostituzione della
testina di stampa. Vedere figure a Pag. XII e la sezione
“Interfaccia utente” per ulteriori dettagli.
In caso di problemi durante la configurazione e/o l’utilizzo
della stampante, verificate di aver eseguito correttamente la
relativa procedura. Se non riuscite a risolvere il problema o
avete bisognodi ulteriori informazioni, consultate la sezione
“Problemi e Soluzioni” nella sezione “Soluzione dei
problemi” della Guida Utente.
Italiano
Guida rapida 7
Page 76

Page 77

Interfaccia utente
Pannello operatore
Questa sezione descrive le funzioni dei tasti e degli
indicatori luminosi (LED) del pannello operatore.
Etichette
La vostra stampante è dotata di due etichette (vedi esempi a
Pag. XII) che riportano istruzioni che facilitano l’uso della
stampante:
una, apposta sul lato superiore del coperchio anteriore,
•
illustra una serie di funzioni di tasti e indicatori luminosi.
l’altra, con le istruzioni per l’inserimento/sostituzione della
•
testina di stampa, è apposta sul lato interno del coperchio
anteriore.
Funzioni di base dei tasti
Funzione Tasto(i) Descrizione
StampanteOn/
Off
Stampante
pronta/Pausa
POWER
(meno di 4 s.)
ON LINE
(meno di 4 s.)
Attiva/disattivalastampante.
Quandol’indicatorePOWERè
spento,premendoquestotasto
siattivalastampante.
Quan doèacceso, premendo
questotastolasi spegne.
Attiva/disattivalacondizionedi
ON-/OFFLINEdellastampante.
QuandolastampanteèON
LINE,l ’indicatoreluminosoOn
Lineè accesoe la stampante
può elaborareestamparei dati
ricevutidalcomputer.
QuandolastampanteèOFF
LINE,ilcarrelloporta-testinasi
trovanellaposizionediriposoal
marginefisicosinistro,
l’indicatoreOnLineèspentoed
èsospesaqualsiasioperazione
distampa.
Italiano
Guida Utente - Interfaccia utente 9
Page 78

Funzione Tasto(i) Descrizione
Funzioni speciali dei tasti
Caricacarta/
espellicarta
Sostituzione
dellatestinadi
stampa
FORM FEED
(meno di 4 s.)
CARTRIDGE Laprimavoltachesi p reme
Senon èstatainseritala carta
perla st ampa,v ieneprelevato
unfogliodall’ASFedinserito
all’iniziodelmodulo(Topof
Form, TOF).
Senellastampanteègià
presenteunfoglio,essoviene
espulsonelvass oioraccolta
carta.
Senell’ASFnonc’è carta e
l’indicatoreluminosoFORM
FEEDlampeggialentamente,
significachevisono ancoradati
dastamparein attesanelbuffer
dist ampa.Car icatealcunifogli
nell’ASFepremetequestotasto
per co mp letarel’operazionedi
stampa.
questotasto,latestinadi
stampapassadallaposizionedi
riposoallaposizio nedi
inserimento/ri mozione.
Lasecondavoltachesipremeil
tasto,latestinadistampa
ritornainposizionediriposo.
Funzione Tasto(i) Descrizione
Paginademo ON LINE e
Inceppamento
carta
Prova di stampa POWER e
Ricarica batteria POWER
Fine ricarica
batteria
Scaricamento
gruppo batteria
(solo NiCd)
CARTRIDGE
(più di 4 s.)
FORM FEED
(più di 4 s.)
CARTRIDGE
(più di 4 s.)
ON LINE e
FORM FEED
(più di 4 s.)
Provocalastampadella
pagina“demo” .
Il LED ON LINElampeggia
durantelastampa.
Estrarredallastampanteil
foglioinceppatotirandolo
all’indietro.
Mantenetepremut oiltasto
fino a quando
l’inceppamento no n è stato
completamente eliminato.
Con la stampante SPENTA,
premete contemporaneamente
i due tasti; rilasciare prima
POWER equindi
CARTRIDGE. Provoca la
stampa della pagina di prova.
I LED lampeggia no in
sequenza.
La stampante torna in modalità
ON LINE.
Provoca lo scaricamento
rapido di un gruppo batteria al
NiCd. Durante l’operazione, i
LED rimangono tutti accesi e
quindi si spengono uno alla
volta in sequenza.
10 Guida Utente - Interfaccia utente
Page 79

Funzione Tasto(i) Descrizione
Indicatori luminosi
Hex-dump POWER e
FORM FEED
Conla stampanteSPENTA,
premete contemporaneamente
i due tasti; rilasciate prima
POWER equindiFORM FEED.
Imposta la stampante in
modalità esadecimale (vedi
Soluzione dei problemi).
Durante l’operazione, il led ON
LINE lampeggia.
Per uscire dalla modalità
hex-dump, spegnere la
stampante.
L’etichetta sul lato superiore del coperchio frontale della
stampante illustra alcune delle funzioni speciali indicate nella
tabella precedente.
LED Stato Descrizione
POWER acceso La stampante è accesa.
spento La stampante è spenta.
lampeggiante
lento
lampeggiante
veloce
ON LINE acceso La stampante è in modalità ON
spento La stampante è in modalità OFF
lampeggiante
lento
FORM FEED lamp eggiante
lento
CARTRIDGE lampeggiante
lento
La batteria è scarica (possono
essere stampate ancora 5 pagine
standard circa).
La batteria è esaurita (la batteria
deve essere ricaricata o sostituita).
LINE.
LINE.
Idatisonoinfasedielaborazione.
Manca carta nell’ASF.
Condizione di “Inchiostro esaurito”.
(segue)
Italiano
Guida Utente - Interfaccia utente 11
Page 80

LED Stato Descrizione
LED Stato Descrizione
CARTRIDGE
(continua)
Tutti e quattro i
LED
lampeggiante
veloce
lampeggiano
una volta in
sequenza
lampeggiano
tre volte
contemporaneamente
sono spenti La stampante è in modalità
lampeggiano
stabilmente in
sequenza
Sostituire la testina di stampa (la
testina inserita non è compatibile
con il formato del file inviato in
stampa), la testina di stampa è
assente o non è inserità
correttamente.
Premere CARTRIDGE per portare
il carrello di stampa in posizione di
caricamento testina.
La stampante è stata accesa.
Azione errata dell’operatore
(vedi Soluzione dei problemi).
standby, cioè non vi è stata alcuna
attività di stampante/operatore
negli ultimi 30 secondi.
Premere un tasto qualsiasi per
tornare alla modalità ON LINE.
La batteria della stampante è sotto
carica.
(segue)
Tutti e quattro i
LED
(continua)
lampeggiano
tutti insieme e
quindi si
spengono uno
alla volta
ripetutamente
Il gruppo batteria NiCd è in fase di
scaricamento.
L’etichetta sul lato superiore del coperchio frontale illustra
alcune delle funzioni dei LED riportate nella tabella
precedente.
12 Guida Utente - Interfaccia utente
Page 81

Testina di stampa
Questo capitolo descrive come sostituire la testina di stampa
e la cartuccia d’inchiostro (vedi figure a Pag. VI - VII), come
pulire la testina di stampa e come mantenere una qualità di
stampa ottimale. Inoltre, descrive come eseguire la prova di
stampa (Pag. XI).
La stampante è dotata di una testina di stampa
monocromatica con una cartuccia d’inchiostro sostituibile.
Opzionalmente, è disponibile una testina di stampa a colori
con cartuccia d’inchiostro s ostituibile (vedi il paragrafo
relativo in questa sezione).
Usate SEMPRE testine di stampa originali.
Sostituzione della testina di stampa
Vedere l’etichetta con le istruzioni posta all’interno del
coperchio anteriore.
Rimozione della testina di stampa
La testina di stampa viene rimossa per sostiture la
cartuccia d’inchiostro ogni volta che viene segnalata una
condizione di fine inchiostro, per ripeter l’inserimento nel
caso di stampa difettosa oppure per essere sostituita con
una testina di stampa a colori.
Con la stampante già accesa, premete il tasto
•
CARTRIDGE per posizionare il carrello porta-testina nella
posizione di caricamento.
Aprite il coperchio anteriore.
•
Tirate delicatamente verso di voi il bordo nero sulla parte
•
anteriore dell’alloggiamento della testina di stampa (vedi la
freccia tracciata nella figura a Pag. VI); la testina di
stampa viene rilasciata.
Tenendola per il telaio, rimuovete la testina di stampa
•
dalla stampante.
Testina di stampa monocromatica con cartuccia
d’inchiostro sostituibile
Italiano
Quando la stampante è spenta o inattiva, il c arrello
porta-testina è bloccato nella posizione di riposto (estrema
sinistra).
NON tentate di spostare il carrello porta-testina
manualmente.
Il carrello viene sbloccato da un motorino interno prima di
qualsiasi operazione della stampante.
La testina di stampa monocromatica fornita con la stampante
dispone di una cartuccia d’inchiostro sostituibile. È possibile
sostituire la cartuccia più volte prima che sia necessario
cambiare l’intera testina di stampa.
Per sostituire la c artuccia d’inchiostro vuota (vedi figure a
Pag. VII):
Rimuovete la testina di stampa dalla stampante, seguendo
•
le modalità descritte nel paragrafo precedente.
GuidaUtente-Testinadistampa 13
Page 82

Tenendo la testina di stampa verticale, con gli ugelli rivolti
•
verso il basso, estraete la cartuccia d’inchiostro dal lato
sinistro della stessa, tirando verso l’alto.
Mantenendo sempre la testina con gli ugelli rivolti verso il
•
basso, inserite una nuova cartuccia d’inchiostro.
Assicuratevi che la cartuccia d’inchiostro sia
•
completamente inserita.
Premete sull’impugnatura della cartuccia per svuotarne il
•
contenuto nella testina di stampa.
Verificate che la cartuccia d’inchiostro sia vuota,
•
controllando l’indicatore del livello dell’inchiostro su lato
della testina di stampa.
LA CARTUCCIA D’INCHIOSTRO DEVE RIMANERE
INSERITA NELLA TESTINA DI STAMPA.
Inserite nuovamente la testina di stampa nella stampante
•
(vedere il paragrafo relativo in “Guida rapida”).
Chiudere il coperchio anteriore.
•
Premere CARTRIDGE per riportare la testina di stampa
•
nella posizione di riposo, prima dell’inizio di un’operazione
di stampa.
Non ricaricate la testina di stampa con più di una
cartuccia d’inchiostro alla volta.
Assicuratevi che la testina di stampa sia inserita e fissata
correttamente. Se necessario, ripetete l’operazione di
inserimento.
NON spingete la testina di stampa orizzontalmente; se
collocata correttamente per l’inserimento, è sufficiente
spingerla delicatamente verso il basso.
In caso di pr oblemi durante l’inserimento della testina di
stampa:
Verificate che il carrello porta-testina sia nella posizione di
•
caricamento (leggermente a destra rispetto al centro
dell’albero del carrello).
Controllate che l’alloggiamento della testina di stampa sia
•
pulito e libero da corpi estranei.
Non forzate MAI la testina di stampa nell’alloggiamento.
•
In caso di problemi durante l’inserimento della test ina di
stampa, estraetela completamente e ripetete l’operazione
di inserimento dall’inizio.
Testina di stampa a colori opzionale con ca rtucc ia
d’inchiostro sostituibile
La stampante può utilizzare una testina di stampa a tre
colori, disponibile in un kit colore opzionale il quale contiene
inoltre un driver per stampante a color i su disco, le istruzioni
per l’installazione ed una scatola (elemento 5 a Pag. IV) per
riporre la testina di stampa inutilizzata.
La testina di stampa a colori ha una cartuccia sostituibile che
deve essere cambiata quando uno o più degli inchiostri
colorati giungono ad esaurimento. Dopo aver sostituito la
cartuccia d’inchiostro alcune volte, è necessario sostituire
l’intera testina di s tampa (vedi figure a Pag. VIII e IX).
Per inserire la testina di stampa a colori, procedere c ome
segue:
14 Guida Utente - Testina di stampa
Page 83

Estraete la testina di stampa dalla confezione sigillata
•
tenendola per il telaio.
Rimuovete la pellicola protettiva.
•
Non toccate i contatti elettrici o gli ugelli di stampa e non
appoggiate la testina su di essi.
Assicuratevi che vi sia carta nell’ASF.
•
Con la stampante accesa, premete CARTRIDGE per
•
portare il carrello porta-testina nella posizione di
caricamento testina.
Aprite il coperchio anteriore della stampante.
•
Rimuovete l’eventuale testina di stampa presente nella
•
stampante.
Con i contatti elettrici rivolti verso i contatti corrispondenti
•
del carrello porta-testina, inserite la testina di stampa a
colori, inclinandola verso i contatti e quindi spingendola
verso il basso per bloccarla in posizione.
NON spingete la testina di stampa orizzontalmente; se
collocata correttamente per l’inserimento, è sufficiente
spingerla delicatamente verso il basso.
Chiudete il coperchio anteriore.
•
Tenendo premuto il tasto CARTRIDGE,premeteFORM
•
FEED. Quando si rilasciano i due tasti, la stampante
esegue automaticamente una prova di stampa per
verificare il corretto funzionamento della testina di stampa,
e quindi si predispone all’utilizzo.
Per sostituire la c artuccia d’inchiostro a color i:
Controllate che vi sia carta nell’ASF.
•
Rimuovere l’intera testina di stampa, come descritto
•
precedentemente in questa sezione.
Tenendo la testina di stampa verticale, con gli ugelli rivolti
•
verso il basso, rilasciate ed estraete la cartuccia
d’inchiostro esaurita dalla testina di stampa, tirandola
verso l’alto.
Mantenendo la nuova cartuccia d’inchiostro in posizione
•
verticale, estraetela dalla confezione protettiva.
Inserite la nuova cartuccia nella testina di stampa;
•
mantenete la testina di stampa in posizione verticale con
gli ugelli rivolti verso il basso.
Verificate che la cartuccia sia completamente inserita
(deve produrre uno scatto e i fermi laterali devono essere
agganciati).
Re-inserite la testina di stampa nella stampante, come
•
descritto in precedenza.
Chiudete il coperchio anteriore.
•
Tenendo premuto il tasto CARTRIDGE, premete il tasto
•
FORM FEED. Rilasciando quindi i due tasti, la stampante
esegue una prova di stampa per verificare il corretto
funzionamento della testina di stampa, e si predispone
all’utilizzo.
Questa oeprazione è indispensabile per assicurare il
corretto funzionamento della testina di st ampa a colori.
Italiano
Questa operazione è indispensabile per assicurare il
corretto funzionamento della testina di st ampa a colori.
GuidaUtente-Testinadistampa 15
Page 84

Manutenzione della testina di stampa
Prova di stampa
La prova di s tampa (vedi esempio a Pag. XI) occupa un
massimo di tre pagine A4 (emulazione PCL, orientamento
verticale); essa fornisce i nformazioni sul firmware della
stampante (versione, emulazione e generatori di caratteri) e
sul corretto funzionamento degli ugelli della testina di stampa.
Assicuratevi che la testina di stampa sia inserita e che vi
sia carta nell’ASF.
Con la stampante spenta, premete contemporaneamente
•
POWER e CARTRIDGE. Quindi rilasciare prima POWER
e poi CARTRIDGE.
Un foglio di carta viene alimentato nella stampante e la
•
prova di stampa viene eseguita automaticamente.
Non aprite il coperchio anteriore della stampante mentre
la stampa è in corso, poiché ciò potrebbe causare
l’inceppamento della carta.
Per sospendere la prova di stampa temporaneamente,
•
premete il tasto ON LINE (premendo nuovamente questo
tasto, la stampa riprenderà).
Per abbandonare la prova di stampa, spegnete la
•
stampante.
Una volta terminata la prova di stampa, l’ultimo foglio viene
espulso e la s tampante entra automaticamente nella
condizione di ON LINE.
Controllate la qualità di stampa della prova, assicurandovi
che tutti i caratteri siano stampati chiaramente e la loro
sagoma sia completa.
In caso di problemi durante l’esecuzione della prova di
stampa, assicuratevi di aver eseguito corrett amente le
procedure operative; in caso affermativo, vedere
“Soluzione dei problemi”.
Contenuto della prova di stampa
Questa sezione descrive brevemente quanto viene stampato
nella prova di stampa.
le due prime righe contengono informazioni tecniche sullo
•
stato della stampante.
la terza riga (Print Head Test) consente di verificare
•
l’eventuale mancanza di punti stampati. La prova
contiene:
– il tipo di testina di stampa,
– una linea diagonale indicante il funzionamento degli
ugelli della testina ,
– i ris ultati del test che indica Bianco/nero o Colore
seguito da OK! se gli tutti gli ugelli funzionano
correttamente, oppure dal numero di ugelli
malfunzionanti, nel caso che uno o più di essi risultino
ostruiti.
Se uno o più ugelli sono ostruiti, vedere il paragrafo
Pulizia della testina di stampa in questa sezione (ed
eventualmente Soluzione dei problemi per le possibili
soluzioni a questo problema. Quindi ripetere la prova di
stampa.
16 Guida Utente - Testina di stampa
Page 85

Il seguito della prova di stampa contiene informazioni sulla
•
configurazione della stampante (i parametri operativi
correntemente selezionati), il set di caratteri selezionato
ed i font portrait (verticale) o landscape (orizzontale), a
seconda del parametro “Orientation”. Il contenuto di
questa parte del testo varia a seconda della emulazione
selezionata.
Nella maggior parte dei casi, i parametri operativi saranno
determinati dal driver stampante ed avranno la priorità sulla
configurazione interna della stampante. Per modificare la
configurazione della stampante, vedere “Uso del software”.
Pulizia della testina di stampa
La testina di stampa viene “inizializzata” periodicamente
durante il funzionamento della stampante. Tale operazione
pulisce gli ugellil della testina di stampa, per garantire il
flusso di inchiostro.
Se la qualità di stampa è insoddisfacente nonostante
l’operazione automatica di pulizia degli ugelli, rimuovere la
testina di stampa e pulirla nel modo seguente:
Premere CARTRIDGE per posizionare il carrello
•
porta-testina nella posizione di caricamento testina.
Aprite il coperchio anteriore, sbloccate e rimuovete la
•
testina di stampa (vedere il paragrafo relativo in questa
sezione).
Reinserite la testina di stampa nella stampante,
•
chiudete il coperchio anteriore e premete
CARTRIDGE per riportare il carrello porta-testina
nella posizione di riposo.
Se ancora non si registra un miglioramento nella qualità di
stampa, provate a pulire gli ugelli della testina di stampa.
Questa operazione NON DEVE essere ripetuta
sistematicamente, in quanto danneggia la testina di
stampa, ma dovrebbe essere eseguita SOLAMENTE come
ultimo tentativo prima di cambiare la testina.
Inumidite un fazzoletto di carta con acqua distillata;
•
strizzatelo delicatamente per eliminare eventuale acqua in
eccesso.
Estraete la testina di stampa dalla stampante.
•
Tenendo la testina di stampa con gli ugelli rivolti verso il
•
basso, asciugatela sul fazzoletto, premendo
delicatamente.
Ripetete l’operazione alcune volte in diverse zone del
•
fazzoletto per pulire gli ugelli.
Reinserite la testina di stampa nella stampante ed
•
eseguite una prova di stampa per verificarne la qualità
(vedere il paragrafo relativo in questa sezione).
Italiano
Pulite i contatti elettrici sulla testina e nella relativa
•
ubicazione con un panno inumidito senza pelucchi,
facendo attenzione a non toccare gli ugelli della testina di
stampa.
GuidaUtente-Testinadistampa 17
Page 86

Trasporto della stampante
Accertatevi sempre che la testina di stampa si trovi nella
posizione di riposo prima di spostare o trasportare la
stampante. Per esserne sicuri, spegnete sempre la
stampante PRIMA di spegnere il PC (o altro host) a cui è
collegata.
18 Guida Utente - Testina di stampa
Page 87

Carta
Dimensioni
La tabella che segue elenca le dimensioni dei vari tipi
di carta utilizzabili con la stampante:
Questa sezione descrive i tipi e le caratteristiche della carta
che potete utilizzare nella stampante.
Tipi e dimensioni
Tipi
Carta normale: grammatura compresa fra 70 e 80 g/m2.
•
Pellicole: usate solo pelicole patinate specificamente
•
indicati per stampanti a getto d’inchiostro.
Carta patinata.
•
Carta satinata.
•
I migliori risultati si ottengono utilizzando carta per
fotocopiatrici e lucidi (pellicola) di buona qualità . Potete
inserire fino a 15 fogli di carta nell’ASF.
Carta di tipo diverso può influire negativamente sulla
qualità di stampa.
Allineate sempre la carta/pellicola al bordo sinistro.
Assicuratevi che la carta sia inserita nella stampante in
modo che la stampa avvenga sul giusto lato della pagina
(controllate la freccia che indica la facciata da stampare
sulla confezione della carta).
Formato millimetri pollici
Orizzontale A5 210 x 148 8,26 x 5,8
A4 210 x 297 8,26 x 11,7
Letter 215,9 x 279,4 8,5 x 11
Legal 215,9 x 355,6 8,5 x 14
La lunghezza massima del percorso di alimentazione
carta è pari a 217 mm/8,54".
Inserimento
La procedura di caricamento della carta è descritta in “Guida
rapida” ed è illustrata a Pag. X.
Automatico
Carta normale: fino a 15 fogli di formato standard.
•
Lucidi: fino a 5 fogli per volta, aggiungendo un foglio di
•
carta semplice dopo l’ultima pellicola per facilitarne
l’alimentazione. Rimuovete CIASCUNA pellicola dal
vassoio di raccolta NON APPENA essa viene espulsa
dalla stampante.
Italiano
Guida Utente - Carta 19
Page 88

Carta patinata: fino a 5 fogli per volta.
•
Manuale
Carta satinata: solo un foglio alla volta, aggiungendo un
•
foglio di carta normale dietro il lucido.
Area stampabile
L’area stampabile è definita dal software e deve essere
compresa nei limiti fisici della pagina inseri ta per la stampa.
La stampante può stampare fino a 67 righe su una pagina in
formato A4 con interlinea 6 lpi (l ’interlinea dell’ultima riga
potrebbe essere leggermente inferiore).
L’applicativo utilizzato potrebbe sommare i propri margini
di default al layout della pagina, riducendo ulteriormente
le dimensioni dell’area stampabile.
L’uso di documenti non conformi alle specifiche indicate
provoca un inserimento ed un’alimentazione obliqua o
incorretta, con rischio di inceppamento.
20 Guida Utente - Carta
Page 89

Uso delle pile/gruppo batteria
In alternativa all’adattatore CA/C ed all’alimentazione di rete,
potete far funzionare la stampante con dieci pile stilo
(LR6/AA) da 1,2 a 1,5 Volt disponibili presso qualsiasi
negozio di materiale elettrico, o presso la maggior parte dei
supermercati, oppure potete utilizzare uno dei gruppi batteria
disponibili.
Pile standard
Per inserire le pile nella stampante, procedere come segue
(vedere anche le figure a Pag. V):
Estraete il contenitore delle pile dalla parte posteriore della
•
stampante:
– mantenete la stampante verticale
– con il dito indice o medio di entrambe le mani, premete
sui due fermi posti sulla base della stampante e,
contemporaneamente, con i pollici, spingete all’esterno
il contenitore delle pile.
Rimuovete le pile dal contenitore.
•
Inserite le nuove pile nel contenitore, assicurandovi che la
•
polarità sia corretta (vedere le indicazioni poste all’interno
del contenitore).
Il contenitore delle pile NON deve essere estratto
durante il trasporto della stampante.
Le pile dovrebbero esser e sempre sostituite/ricaricate tutte
nello stesso momento.
Non usate tipi di pile diversi e una volta esaur ite non
disperdetele nell’ambiente, ma osservate quanto
prescritto dalla normativa locale.
Gruppo batteria ricaricabile
Sono disponibili due tipi di gruppo batteria (elemento 1 a
Pag. IV) che vengono riconosciuti automaticamente non
appena inseriti nella stampante:
Un gruppo batteria Ni-Cd (al nichel-cadmio), 12 Volt,
•
capacità 600 mAh, che conferisce un’autonomia operativa
di circa 80 pagine*.
Un gruppo batteria Ni-MH (all’idrossido di nichel), 12 Volt,
•
capacità 1 Ah, che conferisce un’autonomia operativa di
circa 140 pagine*.
✽
Con un gruppo batteria completamente carico ed in
condizioni di uso normale.
La durata del gruppo batteria dipende dal volume del
testo stampato per pagina.
Italiano
Reinserite il contenitore nella stampante.
•
Guida Utente - Uso delle pile/gruppo batteria 21
Page 90

Per inserire il gruppo batteria nella stampante, procedete nel
seguene modo:
Rimuovete il contenitore delle pile dalla parte posteriore
•
della stampante e conservatelo per un uso futuro.
Al suo posto, inserite il gruppo batteria con i contatti rivolti
•
verso quelli corrispondenti interni alla stampante.
Assicuratevi che il gruppo batteria sia inserito
completamente e in modo corretto.
Il gruppo batteria NON deve essere rimosso durante il
trasporto della stampante.
Per sicurezza, i gruppi batteria nuovi non sono carichi; di
conseguenza, dovete caricare il gruppo prima di
utilizzarlo.
Spegnete sempre la stampante quando non la usate per
evitare di danneggiare il gruppo batteria.
Informazioni sullo stato della batteria
Condizione indicatore
POWER
Stato batteria
Carica o ricarica del gruppo batteria
Entrambi i tipi di gruppo batteria possono essere ricaricati
senza doverli rimuovere dalla stampante; il tempo di ricarica
del gruppo batteria Ni-Cd è di 6 ore circa, mentre quello del
gruppo batteria Ni-MH è di 12 ore.
Collegare la stampante all’alimentazione di rete mediante
l’adattatore CA/CC e accenderla; ora può iniziare la ricarica
della batteria:
automaticamente, nel caso venga rilevata una
•
condizione di batteria bassa o se state utilizzando un
gruppo batteria NiCd.
Se i tasti FORM FEED e ON LINE vengono premuti
contemporaneamente, la ricarica si interrompe e la
stampante viene ripristinata nella condizione di ON LINE.
Fate attenzione a non sovraccaricare o ricaricare
continuamente il gruppo batteria, poiché ciò potrebbe
comprometterne negativamente la durata.
manualmente (premendo POWER per oltre 4 secondi), il
•
gruppo batteria viene ricaricato fintanto che la stampante
rimane inattiva.
Ogni volta che la stampante riceve un comando operativo,
la ricarica viene sospesa automaticamente per riprendere
non appena la stampante torna inattiva.
Lampeggiante lento Autonomiasolo per altre cinque pagine
Lampeggiante veloce Batterie scariche
Acceso fisso Batterie pronte per l’uso
È disponibile un car icabatterie rapido (elemento 6 a Pag. IV)
come accessorio opzionale ( vedi “Accessori ed Opzioni”).
22 Guida Utente - Uso delle pile/gruppo batteria
Page 91

Uso del software
Questa sezione spiega come cambiare le impostazioni della
stampante modificandole dal relativo driver, oppure
utilizzando il programma di configurazione contenuta su uno
dei due dischetti forniti in dotazione con la s tampante.
La stampante utilizza una serie di parametri definibili in base
alle specifiche esigenze. Il driver della stampante contiene
molti di questi par ametri che potete definire (mediante il
Pannello di controllo) al momento dell’installazione del driver.
Le impostazioni definite nel driver hanno sempre la
priorità su quelle specificate mediante il programma di
configurazione.
Modifica dei parametri nei driver di
Windows® 3.1/3.11 o Windows® 95
I driver monocromatici multilingue di Windows® sui dischetti
forniti, ottimizzano le prestazioni e le funzionalità della
stampante. Innanzitutto, i nstallate il driver di stampante nella
lingua desiderata (vedere Guida rapida) e quindi verificate
che i parametri predefiniti del driver diano luogo al tipo di
stampa desiderato.
Se avete installato il driver mediante la prestazione Plug
and Play, potete configurare il driver monocromatico
aprendo la cartella Stampanti, evidenziando la vostra
icona di stampante e facendo clic su Proprietà.
In caso contrario, procedete come segue:
Avviate Windows®.
•
Nel Program Manager, attivate il gruppo Principale e
•
quindi il Pannello di Controllo, facendo doppio clic col
mouse sulle relative icone.
Dal Pannello di Controllo, attivate nello stesso modo la
•
finestra Stampanti.
Per modificare i parametri di default, fate clic su Imposta;
•
vengono visualizzati i seguenti parametri per la modifica
(se necessaria):
Italiano
– Risoluzione (dpi): selezione di densità grafiche (600,
300, 150, 75 dpi).
Guida Utente - Uso del software 23
Page 92

– Dimensioni fogl io: A4, Letter, Legal, A5 (impostazione
di default: A4 o Letter, a seconda della nazione di
appartenenza).
Qualità stampa
LQ consente di combinare velocità e buona qualità
– Alimentazione: ASF, Manuale (semi-automatica).
– Orientamento: Verticale (portrait) o Orizz ontale
(landscape).
Facendo clic su Opzioni... nella finestra di dialogo
•
Imposta, viene visualizzata una seconda serie di
parametri:
– Qualità carta: Carta normale o Pellicola.
– Qualità stampa: LQ, Economy, Bozza.
– Retinatura: definisce le misture dei colori
(impostazione di default: Spessa).
– Controllo i ntensità: aumenta/diminuisce la chiarezza
delle immagini grafiche (impostazione di default:
Normale).
I parametri Retinatura e Controllo intensità sono attivi
solo quando si stampano file creati in bianco e nero.
Font
Se si utilizza un driver Microsoft® Windows® 3.1 o
successivo, sono disponibili i font scalabili e/o TrueType. La
stampa può avvenire con i font TrueType Windows® o con i
font portrait residenti sulla stampante (non è possibile usare i
font landscape della stampante in ambiente Windows®).
Presentation fornisce la miglior qualità ad una velocità inferiore
Bozza esegue una stampa veloce
Economy risparmia inchiostro
Qualità carta
Selezionando Pellicola, la qualità della stampa sarà LQ,
indipendentemente dall’impostazione prescelta.
Per chiudere le finestre di dialogo, fate clic su OK in
ciascuna finestra, se avete modificato una o più impostazioni
e desiderate confermare tali modifiche, oppure fate clic su
Annulla per uscire senza salvare i cambiamenti.
Per accettare tutte le impostazioni del driver della stampante,
fate clic sul pulsante Chiudi nella finestra di dialogo
Stampanti.
24 Guida Utente - Uso del software
Page 93

Ambiente DOS
Se utilizzate un programma software per DOS, per accedere
alle principali funzioni di stampa avrete bisogno di un driver
specifico per ogni modello di stampante e ogni applicazione.
Contattate il vostro rivenditore di computer per informazioni.
Per installare i driver, consultare sempre la documentazione
della specifica applicazione software. Nel caso non fosse
possibile accedere dal driver ad uno dei parametri richiesti,
utilizzate il programma di configurazione della stampante.
La stampante può operare nelle seguenti emulazioni: PCL III
+ (predefinita), IBM Proprinter X24 Mod. 4207/1 e EPSON
LQ 850 :
modalità PCL III +:
•
Durante la configurazione del software applicativo
scegliere il driver PCL III +. Se PCL III + non è
disponibile, scegliere HP DeskJet 500C o HP DeskJet
500. La modalità PCL III + supporta anche la stampa a
colori.
Modalità IBM Proprinter X24:
•
Durante la configurazione del software applicativo
scegliere il driver IBM Proprinter X24 Mod. 4207/1. Questa
modalità supporta SOLO la stampa in bianco e nero. Se si
tenta di stampare con una testina a colori, si provoca una
condizione di errore. La pagina demo non è disponibile
per questo tipo di emulazione.
Modalità EPSON LQ 850:
•
Durante la configurazione del software applicativo
scegliere il driver Epson LQ 850. Questa modalità
supporta SOLO la stampa in bianco e nero. Se si tenta di
stampare con una testina a colori, si provoca una
condizione di errore. La pagina demo non è disponibile
per questo tipo di emulazione.
Esecuzione del programma di
configurazione della stampante
Questo programma è specifico per applicazioni DOS e
dovrebbe essere utilizzato se la funzione richiesta non può
essere selezionata dal driver che avete installato oppure se
non ci sono driver disponibili.
Vi consigliamo di copiare questo programma su un altro
dischetto e di conservare l’originale come copia di
archivio.
Utilizzate un cavo di interfaccia di buona qualità per
effettuare la connessione computer-stampante in modo
da garantire una corretta comunicazione (per ulteriori
dettagli rivolgetevi al vostro rivenditore).
Note per utenti di Windows® 95
Se avete installato Windows® 95 s ul vostro PC, PRIMA di
avviare la utility di configurazione, dovete disabilitare lo
spooler DOS nel modo che segue:
1. Nella cartella “Stampanti”, selezionate una stampante e
quindi “Proprietà”.
2. Nella scheda “Dettagli”, fate clic sul pulsante “Impostazioni
della porta”.
3. Appare una finestra “Configura porte LPT”, con l’opzione
“Spool MS-DOS print jobs” già selezionata.
Italiano
Guida Utente - Uso del software 25
Page 94

4. Fate clic sulla casella per disattivare l’opzione. Ciò
consente all’applicativo DOS di gestire direttamente la
porta.
5. Uscire da Windows® 95.
Per riabilitare la prestazione “Spool MS-DOS print jobs”,
ripetere la procedura descritta.
Per avviare il programma di configurazione, procedere come
segue:
1. Inserite il dischetto contenente il programma di
configurazione nell’unità A (normalmente) del computer.
2. Al prompt del DOS, digitate A:\(o B:\)????? (nome della
vostra stampante, come indicato sull’etichetta del
dischetto), e premete INVIO.
3. Il programma legge il codice di identificazione della
stampante e le sue impostazioni. Quindi visualizza tali
informazioni sullo schermo del PC.
4. Facendo clic su Cambiare, viene visualizzata la finestra di
selezione dei parametri per l’emulazione corrente.
Ora è possibile selezionare, una alla volta, i gruppi di
parametri relativi alle caratteristiche da modificare.
5. Facendo clic su Default, è possibile ripristinare le
impostazioni predefinite dell’emulazione selezionata.
Le impostazioni definite nel driver hanno sempre la
priorità su quelle effettuate mediante la utility SETUP.
6. Facendo clic su Uscita, si abbandona il programma di
configurazione e si ritorna al DOS. Se sono state eseguite
modifiche, il programma chiede “Salva configurazione
della stampante?”.
26 Guida Utente - Uso del software
Page 95

Soluzione dei problemi
Questa sezione costituisce una guida alla soluzione dei
problemi con la descrizione di alcune situazione che
potrebbero verificarsi durante l’uso giornaliero della
stampante ed una serie di suggerimenti per la loro soluzione.
La stampante è progettata in modo da richiedere solo
pochissima manutenzione. Tuttavia, l’uso quotidiano
comporta lo svolgimento di un certo numero di semplici
operazioni volte a preservarne il buon funzionamento.
Se riscontrate un grave guasto di tipo meccanico o un
danno alla stampante, non cercate di ripararlo da soli!
CHIAMATE IL SERVIZIO DI ASSISTENZA TECNICA.
Manutenzione generale
1. Ambiente operativo.
Collocate la stampante in un ambiente ventilato e
•
stabilizzato (temperatura: da 5 a 35oC; umidità relativa:
da 15% a 85%).
Non sottoponete la stampante a bruschi sbalzi di
•
temperatura e/o di umidità.
Quando non la utilizzate, non lasciate la stampante
•
nell’auto al sole e con i finestrini chiusi.
2. Trasporto.
Accertatevi sempre che la testina di stampa si trovi nella
•
posizione di riposo.
Fate attenzione a non rovesciare la stampante.
•
Se utilizzate le pile per alimentare la stampante, NON
•
rimuovetene il contenitore durante il trasporto.
Italiano
GuidaUtente-Soluzionedeiproblemi 27
Page 96

Problemi e soluzioni
Se insorgono dei problemi mentre usate la stampante,
cercate di individuarne la causa nella seguente lista.
Se il problema non è compreso fra quelli qui riportati,
oppure se dopo aver applicato la soluzione proposta il
problema persiste, chiamate il vostro rivenditore o il
Servizio di Assistenza Tecnica.
Installazione
1. Partimancantiodanneggiate.
Contattate immediatamente il vostro rivenditore.
•
Se state utilizzando le pile o un gruppo batteria, controllate
•
che tali dispositivi non debbano essere sostituiti/ricaricati.
4. Mancata inizializzazione.
Quando si preme per la prima volta POWER, il carrello
porta-testina non si muove.
Controllate che il percorso del carrello sia libero da
•
impedimenti.
Provate a spegnere e riaccendere la stampante.
•
Se l’indicatore POWER lampeggia velocemente, significa
•
che si è verificato un guasto nella scheda base; chiamate
il servizio di assistenza tecnica.
2. Problemi connessi all’adattatore CA/CC e/o
all’alimentazione direte.
Incompatibilità fra la presa della stampante ed lo s pinotto
della presa dell’adattatore CA/CC e/o fra la spina
dell’adattatore CA/CC e la presa di alimentazione di rete.
Contattate immediatamente il vostro rivenditore.
•
NON cercate di cambiare lo spinotto e/o la presa
dell’adattatore CA/CC da soli.
3. La stampante non si accende dopo aver premuto il tasto
POWER.
Manca la corrente ( l’indicatore luminoso POWER è spento).
Verificate che l’adattatore CA/CC sia correttamente
•
collegato alla stampante ed alla presa di rete.
5. Non è stata eseguita la pagina demo/prova distampa.
Ripetete la sequenza di tasti, come descritto.
•
Se il carrello non si muove, controllate che il percorso non
•
sia ostruito.
Se l’indicatore luminoso FORM FEED lampeggia
•
lentamente: non c’è carta nella stampante; caricate fino a
15 fogli nel cassetto di alimentazione e premete il tasto
FORM FEED del pannello operatore.
6. Problemi di connessione all’host.
Controllate che il cavo di interfaccia sia del tipo giusto.
•
Assicuratevi di aver fissato correttamente i connettori
•
dell’interfaccia alla stampante e all’host.
28 Guida Utente - Soluzione dei problemi
Page 97

Accertatevi di aver configurato l’applicazione
•
correttamente (vedere la procedura di installazione del
driver ed il manuale dell’applicazione).
Per uscire da questa condizione, inserite fino a 15
fogli di carta nel cassetto di alimentazione e
premete il tasto FORM FEED del pannello
operatore.
Carta
Precauzioni
La carta non deve essere stropicciata né strappata,
•
altrimenti potrebbe incepparsi o non venir alimentata.
Usate sempre carta in perfette condizioni e con
caratteristiche conformi a quelle specificate (vedi sezione
“Carta”).
Controllate che la carta venga alimentata in modo
•
uniforme, che non sia tenuta troppo saldamente né che
abbia troppo gioco.
Se rimuovete la carta dall’ASF, DOVETE ripetere tutta
•
l’operazione di caricamento dall’inizio.
Se per più di 60 secondi non viene eseguita nessuna
•
operazione a livello del pannello operatore o della
stampante, l’eventuale carta inserita nella stampante verrà
espulsa.
Controllate sempre che non vi sia carta inserita per la
•
stampa prima di spegnere la stampante.
La stampa in fronte/retro può causare sbavature.
•
1. Manca la carta.
Se, dopo avere inviato un comando di stampa, non c’è
carta da caricare nella stampante, l’indicatore luminoso
FORM FEED lampeggia lentamente.
2. La carta nonviene caricata.
Controllate che la dimensione e la grammatura della carta
•
usata siano comprese nei limiti previsti.
Se avete rimosso la carta dall’ASF, dovete ripetere tutta
•
l’operazione di caricamento dall’inizio.
Assicuratevi che l’alimentazione della carta avvenga
•
uniformemente.
Inceppamento carta: vedere il punto 3 di questa sezione.
•
Verificate che nel driver della stampante sia selezionato il
•
dispositivo di alimentazione carta corretto, quindi caricate
la carta nell’ASF e premete il tasto FORM FEED del
pannello operatore.
3. La carta si inceppa o si strappa.
Le cause più frequenti di inceppamento della carta nel
cassetto di alimentazione sono l’aggiunta di carta quando
il cassetto non è vuoto e/o il caricamento incorretto della
stessa. Ogni volta che aggiungete la carta nel cassetto di
alimentazione o dopo che avete rimosso la carta
inceppata, estraete SEMPRE quella che si trova già nel
cassetto di alimentazione e ricaricatela come una risma
unica.
GuidaUtente-Soluzionedeiproblemi 29
Italiano
Page 98

Impostate la stampante su OFF LINE (l’indicatore
•
luminoso On Line è spento).
Premete e mantenete premuto il tasto FORM FEED
•
mentre tirate via delicatamente la carta inceppata dalla
stampante.
NON estraete la carta inceppate dalla parte anteriore della
stampante perché cos’ rischiate di danneggiare il
meccanismo.
Controllate che il cassetto di raccolta non sia
•
eccessivamente pieno (capacità 10 fogli stampati).
Si consiglia di rimuovere tutti i fogli stampati dal cassetto
di raccolta prima di iniziare una nuova operazione di
stampa.
Non cercate di stampare su piccole etichette adesive
•
attaccate su carta lucida di dimensione superiore (ad
esempio, formato A4). Questo tipo di etichetta tende a
staccarsi durante la stampa e ricuperarla dentro la
stampante non è facile.
4. La carta non viene impilata correttamente.
Testina di stampa
1. Lastampantenonstampa.
Assicuratevi di aver rimosso la pellicola protettiva dalla
•
testina di stampa.
2. I caratteri stampati sono sbiaditi.
Verificate che la carta utilizzata corrisponda alle specifiche
•
indicate (vedi il paragrafo relativo nelle sezioni “Carta”e
“Caratteristiche tecniche”).
Sostituite la cartuccia d’inchiostro o l’intera testina di
•
stampa (vedi il paragrafo relativo nella sezione “Testina di
stampa”).
3. Stampa con punti mancanti.
Se i punti e le linee non vengono stampati nella loro
interezza:
Ci sono troppi fogli nel cassetto di alimentazione e/o in
•
quello di raccolta.
Il cassetto di alimentazione può contenere fino a 15 fogli
standard, mentre quello di raccolta fino a 10 fogli stampati.
I fogli molto stampati tendono ad arricciarsi e potrebbero
non impilarsi correttamente. Inoltre, potrebbero
macchiare il retro della pagina impilata su di essi, poiché
impiegano più tempo per asciugarsi. Rimuovete sempre i
fogli molto stampati dal cassetto di raccolta non appena
questi vengono espulsi dalla stampante.
Estraete completamente la testina di stampa e quindi
•
reinseritela.
Pulite i contatti elettrici della testina di stampa e quelli del
•
carrello porta-testina (vedi il paragrafo relativo nella
sezione “Testina di stampa”).
Se nessuna di queste operazione riesce a migliorare la
qualità di stampa, dovete sostituire la testina di stampa.
30 Guida Utente - Soluzione dei problemi
Page 99

Stampa
1. Lastampantenonstampa/riceveidati.
Controllate che la stampante sia accesa e On Line (gli
•
indicatori luminosi POWER e ON LINE del pannello
operatore devono essere accesi).
3. Qualità di stampa insufficiente.
Assicuratevi che la carta utilizzata sia di buona
•
qualità.
Provate a stampare sull’altro lato della carta.
•
Controllate i collegamenti fisici (cavi) e logici (applicazione
•
e driver) fra la stampante e l’host.
Verificate che il sistema host sia acceso.
•
Se il carrello non si sposta e l’indicatore luminoso POWER
•
lampeggia velocemente, premere il tasto POWER per
spegnere la stampante, attendere alcuni secondi e quindi
premere nuovamente POWER.
Se l’indicatore luminoso POWER continua a lampeggiare
velocemente, chiamate il Servizio di Assistenza Tecnica.
Assicuratevi di aver rimosso la pellicola protettiva dalla
•
testina di stampa.
Se l’indicatore FORM FEED lampeggia lentamente,
•
assicuratevi che la carta sia presente e che venga
caricata correttamente.
2. La stampa si interrompe.
Se l’indicatore luminoso FORM FEED lampeggia
•
lentamente, assicuratevi che la carta sia presente e che
venga caricata correttamente.
Se nella stampante non c’è carta, caricate fino a 15 fogli di
carta nell’ASF e premete il tasto FORM FEED del
pannello operatore.
Per informazioni sulla corretta procedura di caricamento
carta, vede la sezione “Carta”.
4. Vengono stampati caratteri anomali.
Assicuratevi che l’emulazione utilizzata sia corretta.
•
Verificate la compatibilità del driver selezionato con
•
l’emulazione che intendete usare.
Se non riuscite a risolvere questo problema, è probabile che
contattando il servizio di assistenza tecnica vi si richieda di
eseguire una stampa in modalità hex-dump di un testo per
verificare il funzionamento della trasmissione di dati. Per
eseguire la stampa in modalità hex-dump, procedete come
segue:
– Con la stamapnte spenta, premete
contemporaneamente e mantenete premuti i tasti
POWER e FORM FEED e quindi rilasciate prima
POWER e successivamente FORM FEED.
– Inviate un breve file di prova dal computer. Il
contenuto di questo file viene stampato come una
stringa di codici esadecimali corrispondenti ai singoli
caratteri trasmessi.
– Per uscir e dalla modalità hex-dump, premere POWER;
la stampante si spegne. Premere nuovamente
POWER per riaccendere la stampante.
GuidaUtente-Soluzionedeiproblemi 31
Italiano
Page 100

5. La prova di stampa è stata eseguita correttamente, ma
non è possibile stampare in Windows®.
Il driver della stampante potrebbe non essere installato
correttamente.
Controllate che il nome della stampante sia presente
•
nell’Elenco stampantidella finestra di dialogo Stampanti:
– Se il nome della stampante non è elencato, installate il
relativo driver seguendo la procedura di installazione
descritta in Guida rapida.
– Se il nome della stampante è elencato, rimuovetelo
dall’elenco facendo clic sul pulsante Rimuovinella
finestra di dialogo Stampanti, quindi ripetete la
procedura di installazione del driver.
32 Guida Utente - Soluzione dei problemi
 Loading...