

Page 1

Printer
JP 883
User’s Manual
Page 2

The mark affixed to the product certifies that the product satisfies the
basic quality requirements.
Your attention is drawn to the following actions that could compromise the
characteristics of the product:
incorrect electrical supply;
•
incorrect installation; incorrect or improper use, or, in any case, not in accordance with
•
the warnings given in the User Manual supplied with the product;
replacement of original components or accessories with others of a type not approved
•
by the manufacturer, or carried out by unauthorized personnel.
Use a clean, dry, lint-free cloth to clean the printer. Do NOT use alcohol, solvents or
other abrasive cleaners.
Always disconnect the power cable plug from the electrical power supply.
Do not spill water or other liquids on or in the printer.
NOTE: This equipment has been tested and found to comply with the limits for a CLASS B digital device
pursuant to Part 15 of theFCC Rules.These limits are designedto provide reasonableprotection against
harmful interference in a residential installation. This equipment generates, uses and can radiate radio
frequency energy and, if not installed and used in accordance with the instructions, may cause harmful
interference to radio communications. However, there is no guarantee that interference will not occur
in a particular installation.
If this equipment does cause harmful interference to radio or television reception, which can be
determined by turning the equipment off and on, the user is encouraged to try to correct the interference
by one or more of the following measures:
. Reorient or relocate the receiving antenna.
. Increase the separation between the equipment and receiver.
. Connect the equipment into an outlet of a circuit different from that to which the receiver is connected.
. Consult the dealer or an experienced radio/TV technician for assistance.
Changes or modifications not expressly approved by the party responsible for compliance could void
the user’s authority to operate the equipment.
Connection of peripherals requires the use of grounded shielded signal cables.
This digital equipment does not exceed the CLASS B limits for radio noise emissions from digital
apparatus set out in the interference-causing equipment standard entitled “DigitalApparatus”, ICES-003
of the Industry Canada.
Ce dispositif numérique respecte les limites bruits radioélectriques applicables aux appareils
numériques de CLASSE B prescrites dans la norme sur le matériel brouilleur : “Appareils Numériques”,
NMB-003 édictée par le ministère des Communications.
Trademarks and/or proprietary names indicated are the property of their respective owners.
Page 3
JP 883
This manual describes how to install your printer and
prepare it for use. It also contains information on
day-to-day use and care of your printer.
The initial installation procedure consists of a sequence
of operations which should be performed in the order
described.
You will find further information about the printer
features and functions in the On-Line Help on the
diskettes supplied with the printer.
Page 4

Supplies and Optional Items
The following items can be ordered from your computer dealer. They are packed individually and have
their own specific instructions leaflets.
Print heads and ink cartridges
Disposable high-quality four-colour print head) B0205 M
Disposable monochrome (black) print head B0046 G
Monochrome print head with replaceable ink cartridge: blister pack containing a complete
monochrome ink jet print head (outer casing with cartridge inserted) and two spare cartridges
Blister pack containing 2 monochrome ink cartridges B0048 J
Optional economy colour print head with replaceable colour ink cartridge: blister pack containing a
complete colour ink jet print head (outer casing with cartridge inserted) and two spare cartridges
Blister pack containing 2 four-colour ink cartridges for optional economy colour print head B0045 F
B0047 H
B0044 E
Printing media
Description Format Contents Code
Plain paper A4 500 sheets B0187 T
Coated paper A4 100 sheets B0093 Y
Glossy paper A4 20 sheets B0035 V
Photo glossy paper A4 20 sheets B0090 H
Transparency film A4 20 sheets B0036 W
T-shirt transfers A4 5 sheets B0094 Z
Optional items
Serial interface kit for EIA RS 232C/V24 interface 01306 R
Print head container B0213 C
Page 5

Table of contents
InstallationGuide........................... 1
Unpacking ..................................1
Location ...................................1
Connectingyourprinter ...........................2
Switchingonyourprinter ..........................2
Mounting the document support for the multiple document feeder . . . . . 3
Mounting the document support for the single document feeder . . . . . . 3
Mountingthedocumentoutputtray.....................3
Insertingtheprintheads...........................4
Loadingdocumentsintheprinter......................6
Installingtheprintersoftware ........................7
Preparing your printer using the Printer Monitor . . . . . . . . . . . . . . 8
Troubleshooting .......................... 10
Disinstallingtheprinterdriver .......................11
Printeroperatorpanel ....................... 12
Buttons-basicfunctions .........................12
Buttons-specialfunctions.........................12
Lightindicator ...............................13
Embossedtemplates........................ 14
On-lineGuide ............................ 14
Moreaboutprintheads ...................... 15
Replacingtheprintheads .........................15
Replacingtheinkcartridge ........................16
Printheadcareandprecautions .....................18
Printheadcontainer............................19
Moreaboutpaperandspecialprintingmedia.......... 20
Loadingdocuments ............................20
Output support for envelopes, narrow documents and photographs . . . 23
Documenttypes ..............................24
DOSenvironment.......................... 25
ProductCharacteristics ...................... 27
Guarantee
Table of con tents
Page 6
Installation Guide
Unpacking
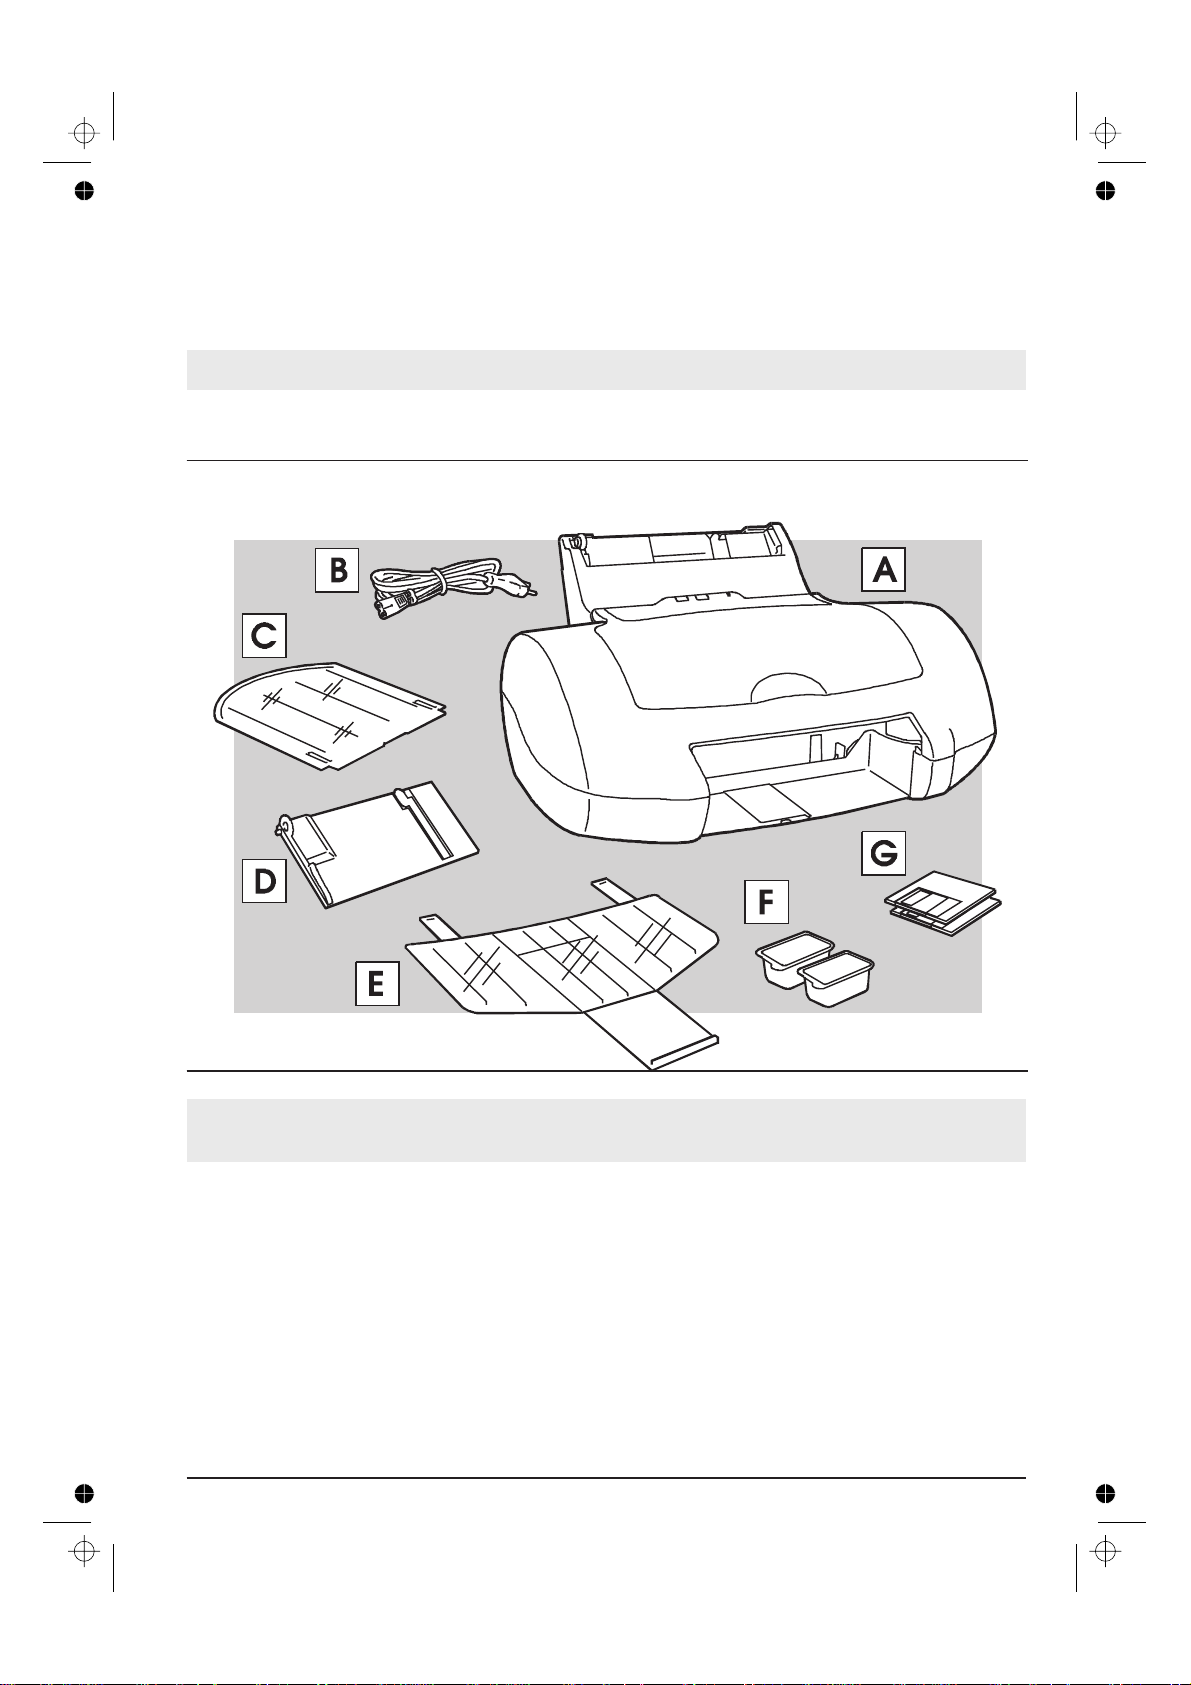
Keep the carton and all the packing materials in case you have to repack or ship the printer.
As soon as you have unpacked the printer and its accessories, check that all the parts ordered have
been delivered and are undamaged. As well as this booklet, the packing carton should also contain:
A - Printer B - Power cable C - Transparent document support
D - Manual feeder document support E - Output tray
F - Two ink jet print heads (Colour and Black) G - Driver diskette(s)
If anything is missing or damaged, call your local retailer immediately. The interface cable for
connecting the printer to your PC is NOT supplied with the printer.
Location
1. Place the printer on an ample, stable surface near your computer.
2. Make sure that there is enough space around the printer for all its parts to be accessed comfortably.
3. Make sure that there is a convenient independent electrical power supply socket to which you can
connect the printer.
4. Do NOT leavethe printerexposed to direct sunlight or heatsources, orin dusty,dirty orpoorly
ventilated environments.
Installation Guide 1
Page 7
Connecting your printer
To the electrical power supply
Before plugging into the power supply socket,
make sure the printer is on a stable surface, that
its cover is closed and read the following
warning carefully.
Make sure the electrical power supplies the
voltage indicated on the electrical data plate on
the rear of the printer.
If the electrical data plate indicates a
different voltage, call your local retailer
immediately. DO NOT, UNDER ANY
CIRCUMSTANCES, CONNECT THE PRINTER
TO THE ELECTRICAL POWER SUPPLY.
Make sure that the plug on the power cable of
the printer is of the type accepted by the wall
socket you intendto use;if itis not, call your local
retailer.
Do NOT attempt to change the plug yourself.
The manufacturer declines all responsibility for
accidents to persons or damage to the printer
arising from the non-observance of this warning.
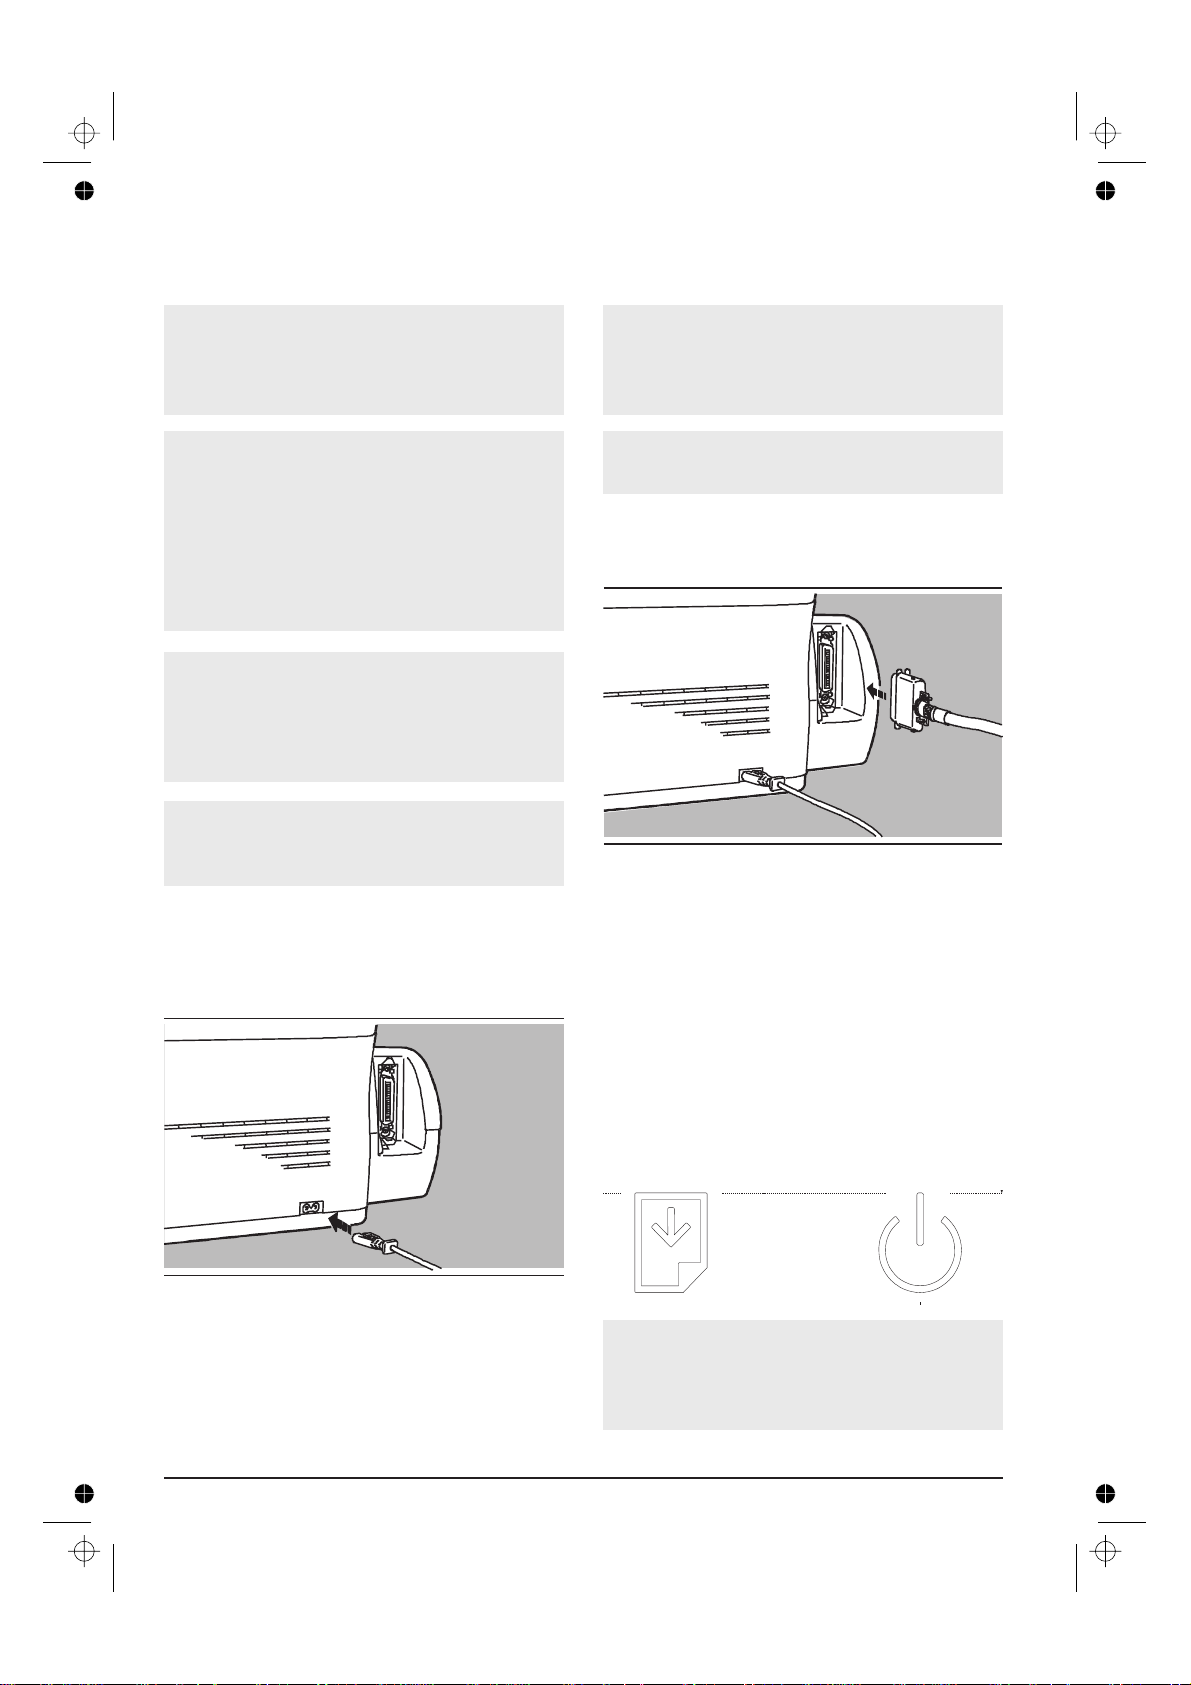
1. Insert the small two-pin connector of the
printer power cable in the socket on the rear
of the printer.
To your computer
To connect your printer to your PC you require
a standard, bi-directional IEEE 1284-type
inferface cable. The interface cable is NOT
supplied with the printer.
Make sure that neither your printer nor your PC
are powered.
1. Plug the interface cable connector into the
socket on the rear of the printer and close the
spring clips on it.
2. Connect the other end of the interface cable
to the appropriate interface connector socket
(port) on your computer/host system.
Switching on your printer
Press the “POWER” button on the printer operator panel. The printer will take a few moments to
execute a series of internal checks (there will be
some mechanical movement), after which it will
be in STANDBY condition (the light indicator lit).
POWER
PAPER
2. Plug the other end of the cable into a wall
socket.
The socket outlet shall be installed near the
equipment and shall be easily accessible.
2 Installation Guide
After approximately twominutes ofinactivity, the
printer will go into “sleep” mode with the print
head carriage in its restposition at the right hand
margin.
Page 8
Mounting the document support
for the multiple document feeder
Mounting the document output
tray
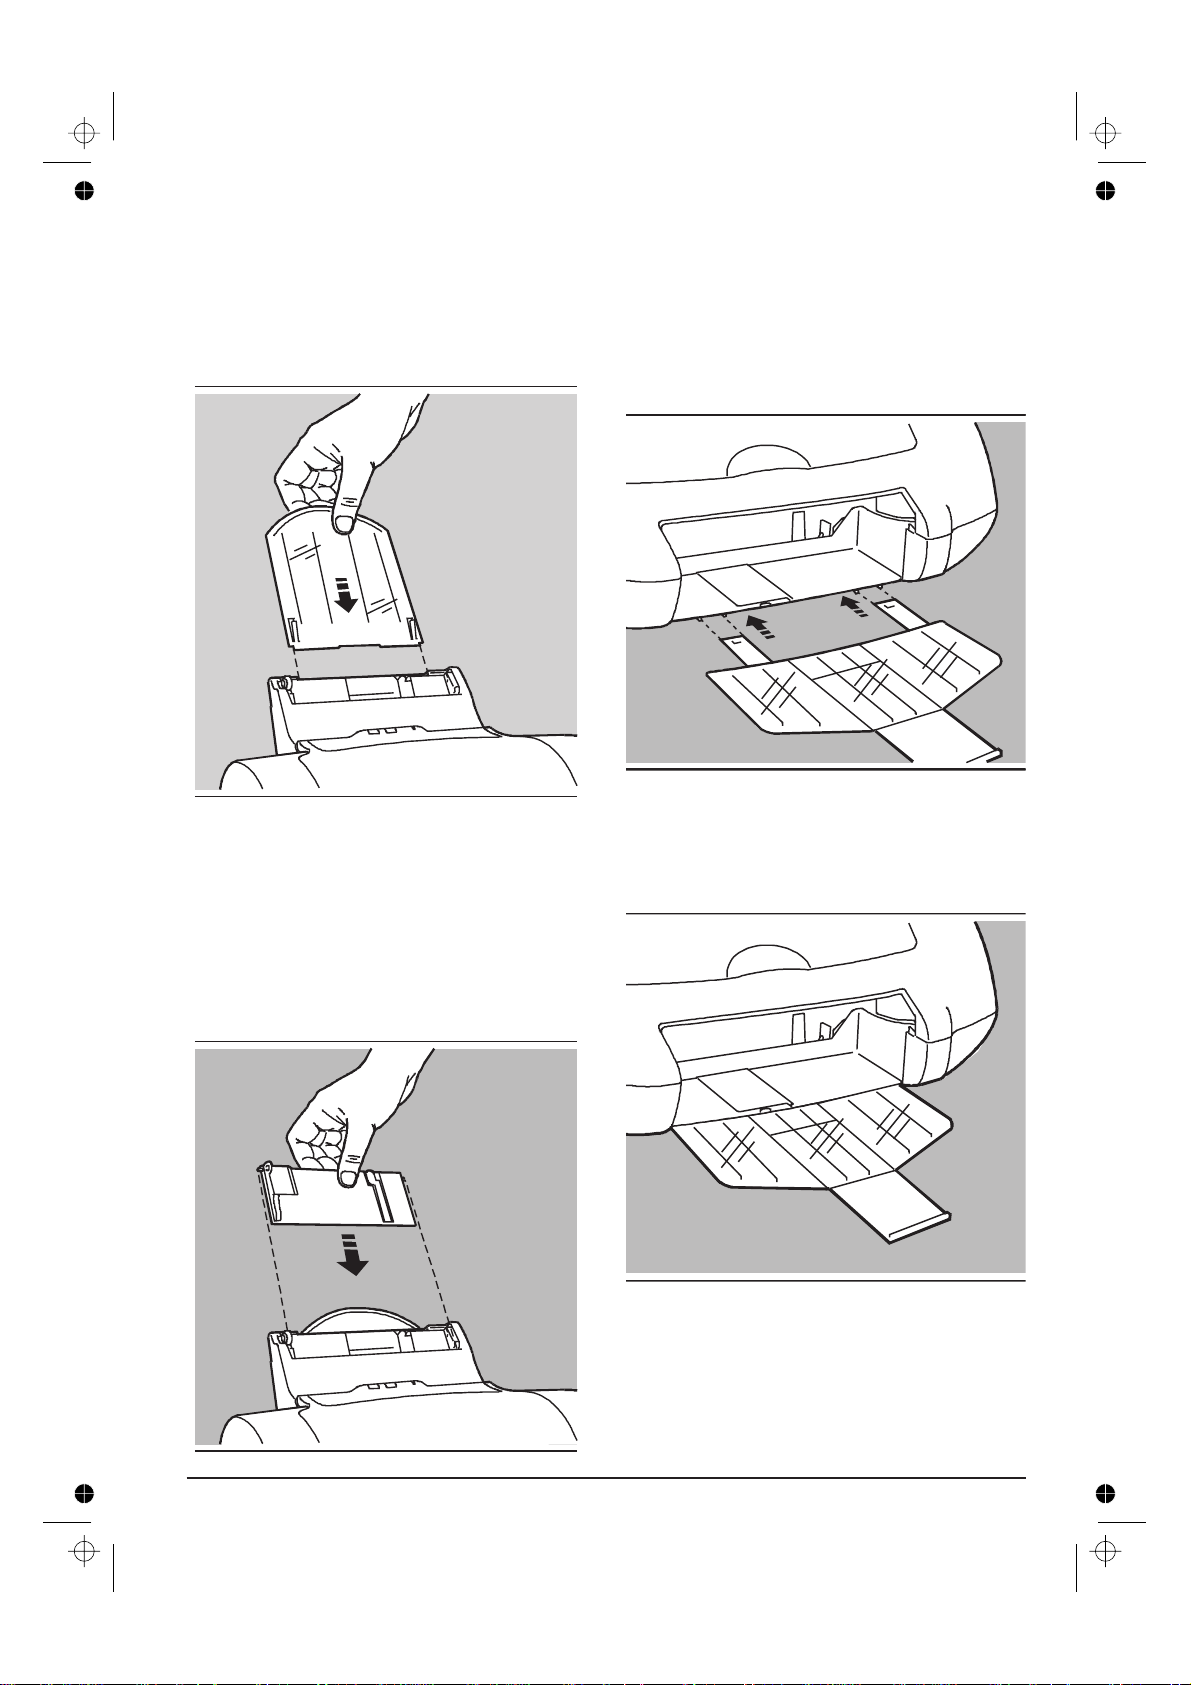
With the rounded part of the guide as the top
edge, insert the document support in the slot on
the rear of the multiple document feeder so that
it slides completely into the casing.
Mounting the document support
for the single document feeder
With the flat end towards the printer and the lip at
the opposite end facing upwards, insert the
document output tray under the front of the
printer, making sure the holes on the tray arms fit
on to the notches on the printer base.
The tray has an adjustable centre panel which
should be extended according to the document
format you are using (standard format sizes A4,
Letter and Legal are marked on the panel).
With the adjustable margin guide to the front left,
insert the document support in the front of the
multiple document feeder so that it sits in the
grooves and forms a second document insertion
channel for single documents.
Installation Guide 3
Page 9
Inserting the print heads
The print head carriage on your printer is
designed to hold two types of print head: monochrome black, on the left and colour on the right.
The two print heads supplied with your printer are
both disposable: once they are empty they MUST
be replaced (see the specific section in More
about print heads).
BOTH print heads MUST be installed BEFORE
attempting any printing operation.
To insert the print heads, proceed as follows:
1. Make sure the printer is powered - the light
indicator should be lit (if it is not, press the
POWER button on theprinter operator panel).
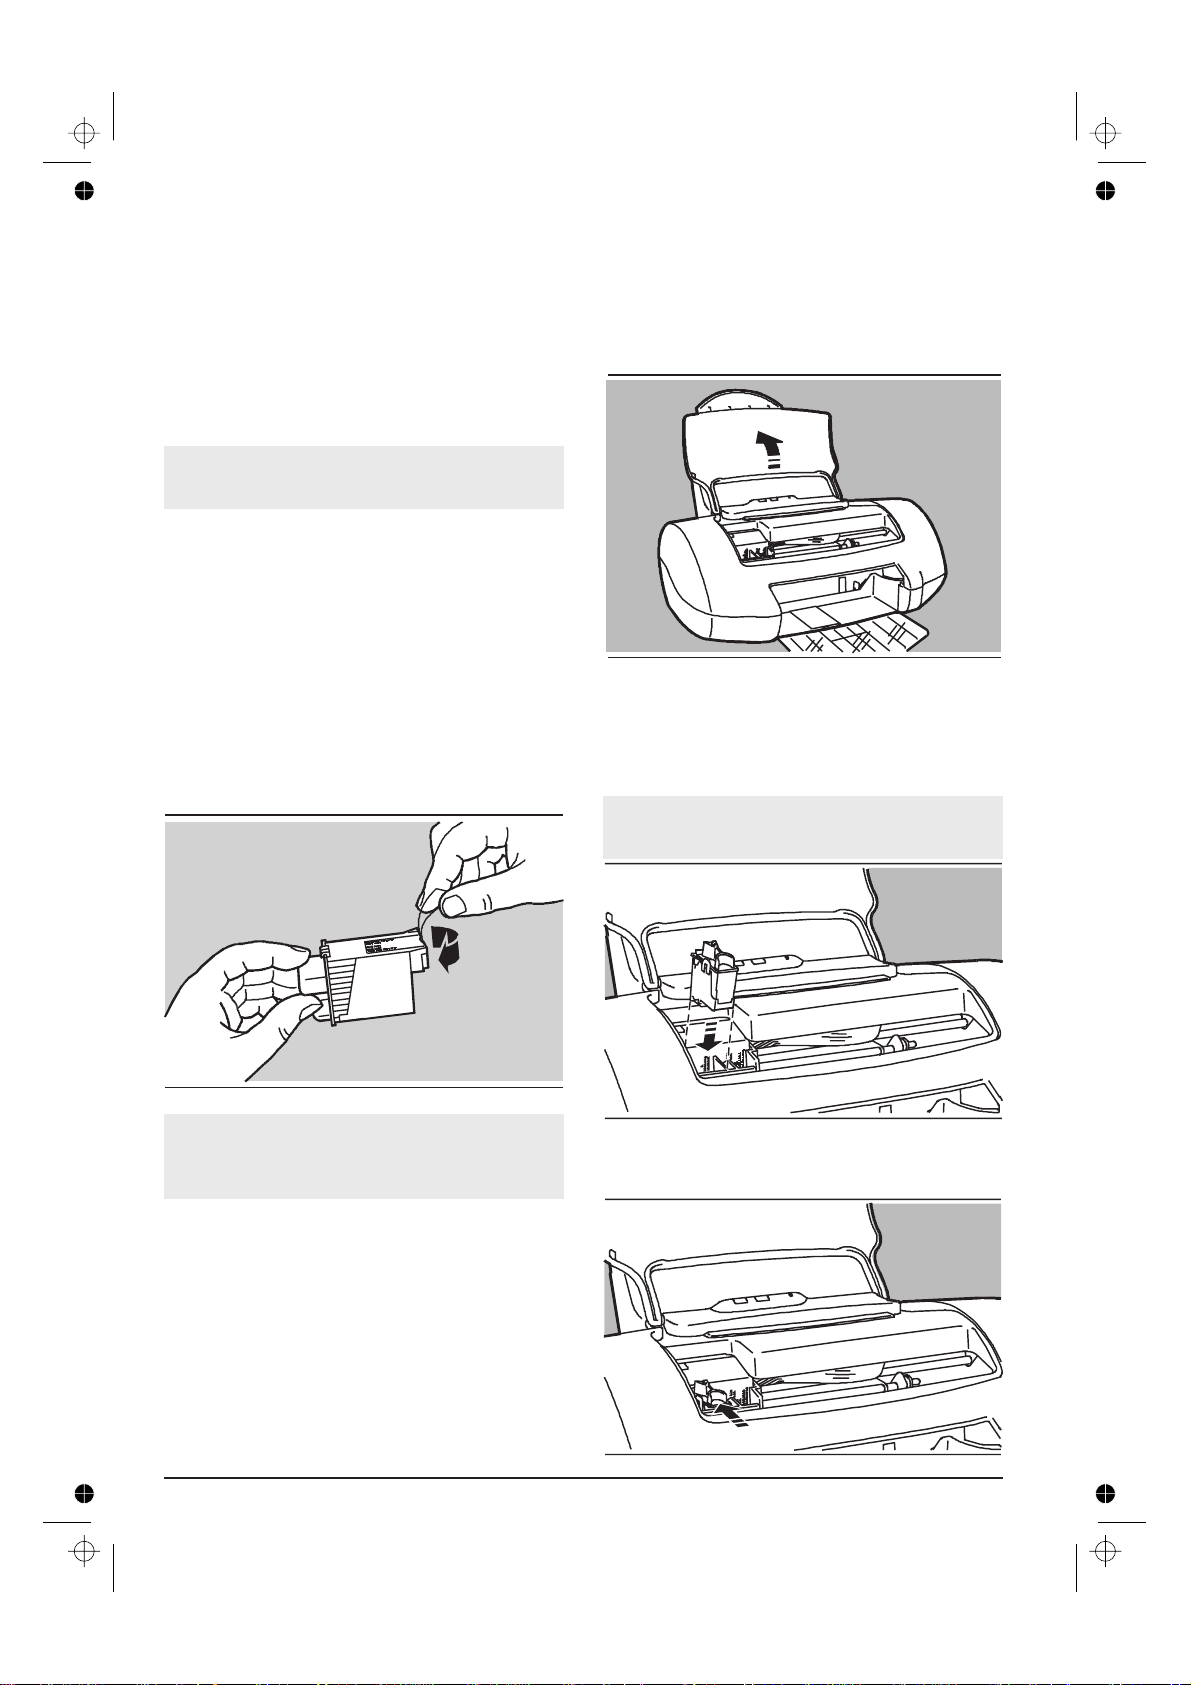
2. Open the sealed print head container of the
monochrome print head and remove the
print head, holding it by the thumb and finger
grip (end opposite the protective film).
3. Remove the protective film.
4. Open the printer cover. The print head
carriage will move automatically to the
loading position for the monochrome print
head (left hand chamber) and the light
indicator starts flashing rapidly.
5. With the electrical contacts (gold-coloured
part) towards the corresponding contacts in
the housing on the print head carriage, insert
the print head in its chamber.
Take care not to touch the electrical contacts
(gold-coloured part) in the print head chamber.
Do not touch either the electrical contacts
(gold-coloured part) or the printing nozzles nor
sit the print head on either of them.
4 Installation Guide
6. Push the print head towards the rear of the
printer to fix it in place.
Page 10
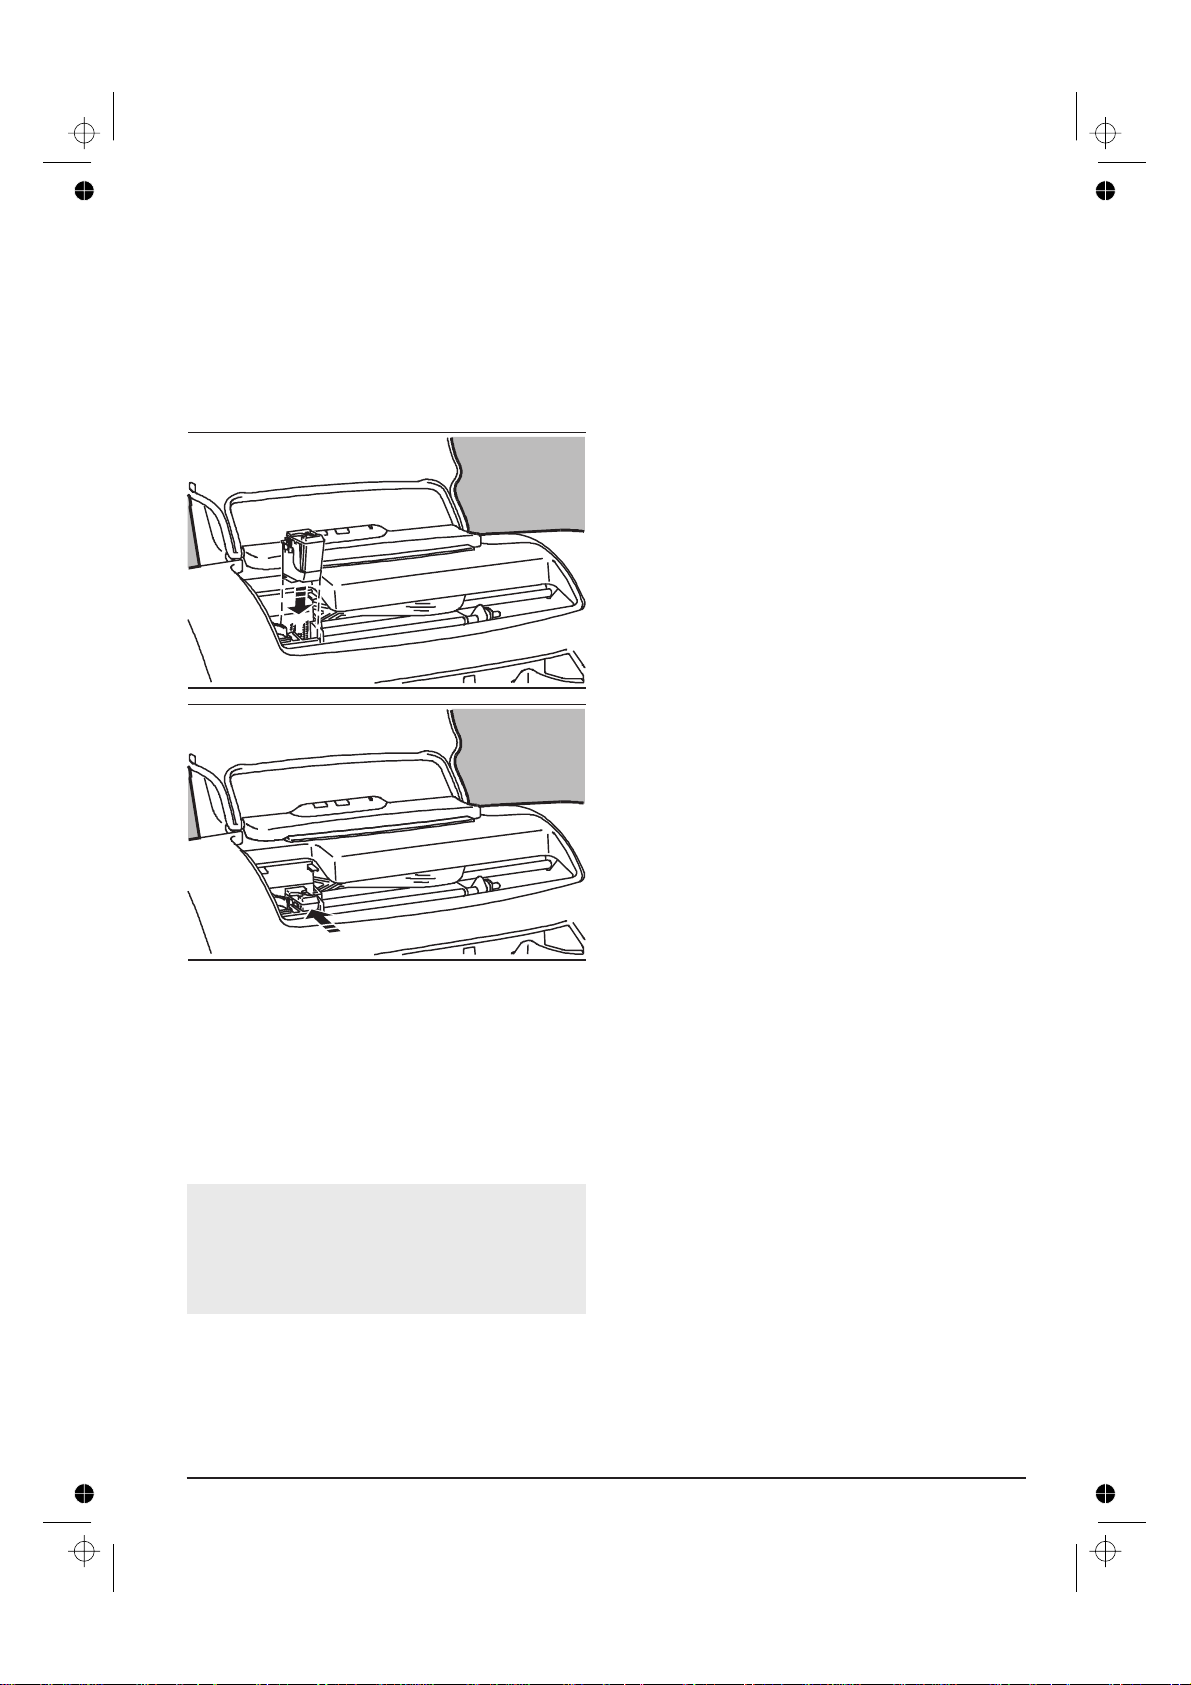
7. Press PAPER on the printer operator panel.
The print head carriage moves to the colour
print head loading position (right hand
chamber).
8. Repeat points 2, 3, 5, 6 of this paragraph to
insert the colour print head.
9. Before closing the printer cover, press and
hold the PAPER button and press the
POWER button for at least two seconds, to
signal that new print heads have been
inserted. The light indicator will flash three
times in acknowledgment and the printer will
then be in standby condition.
See “Replacing the print head”, “Replacing the
ink cartridge” and “Print head care” in More
about print heads for further details on the
handling, substitution and care of the print
heads.
Installation Guide 5
Page 11
Loading documents in the
printer
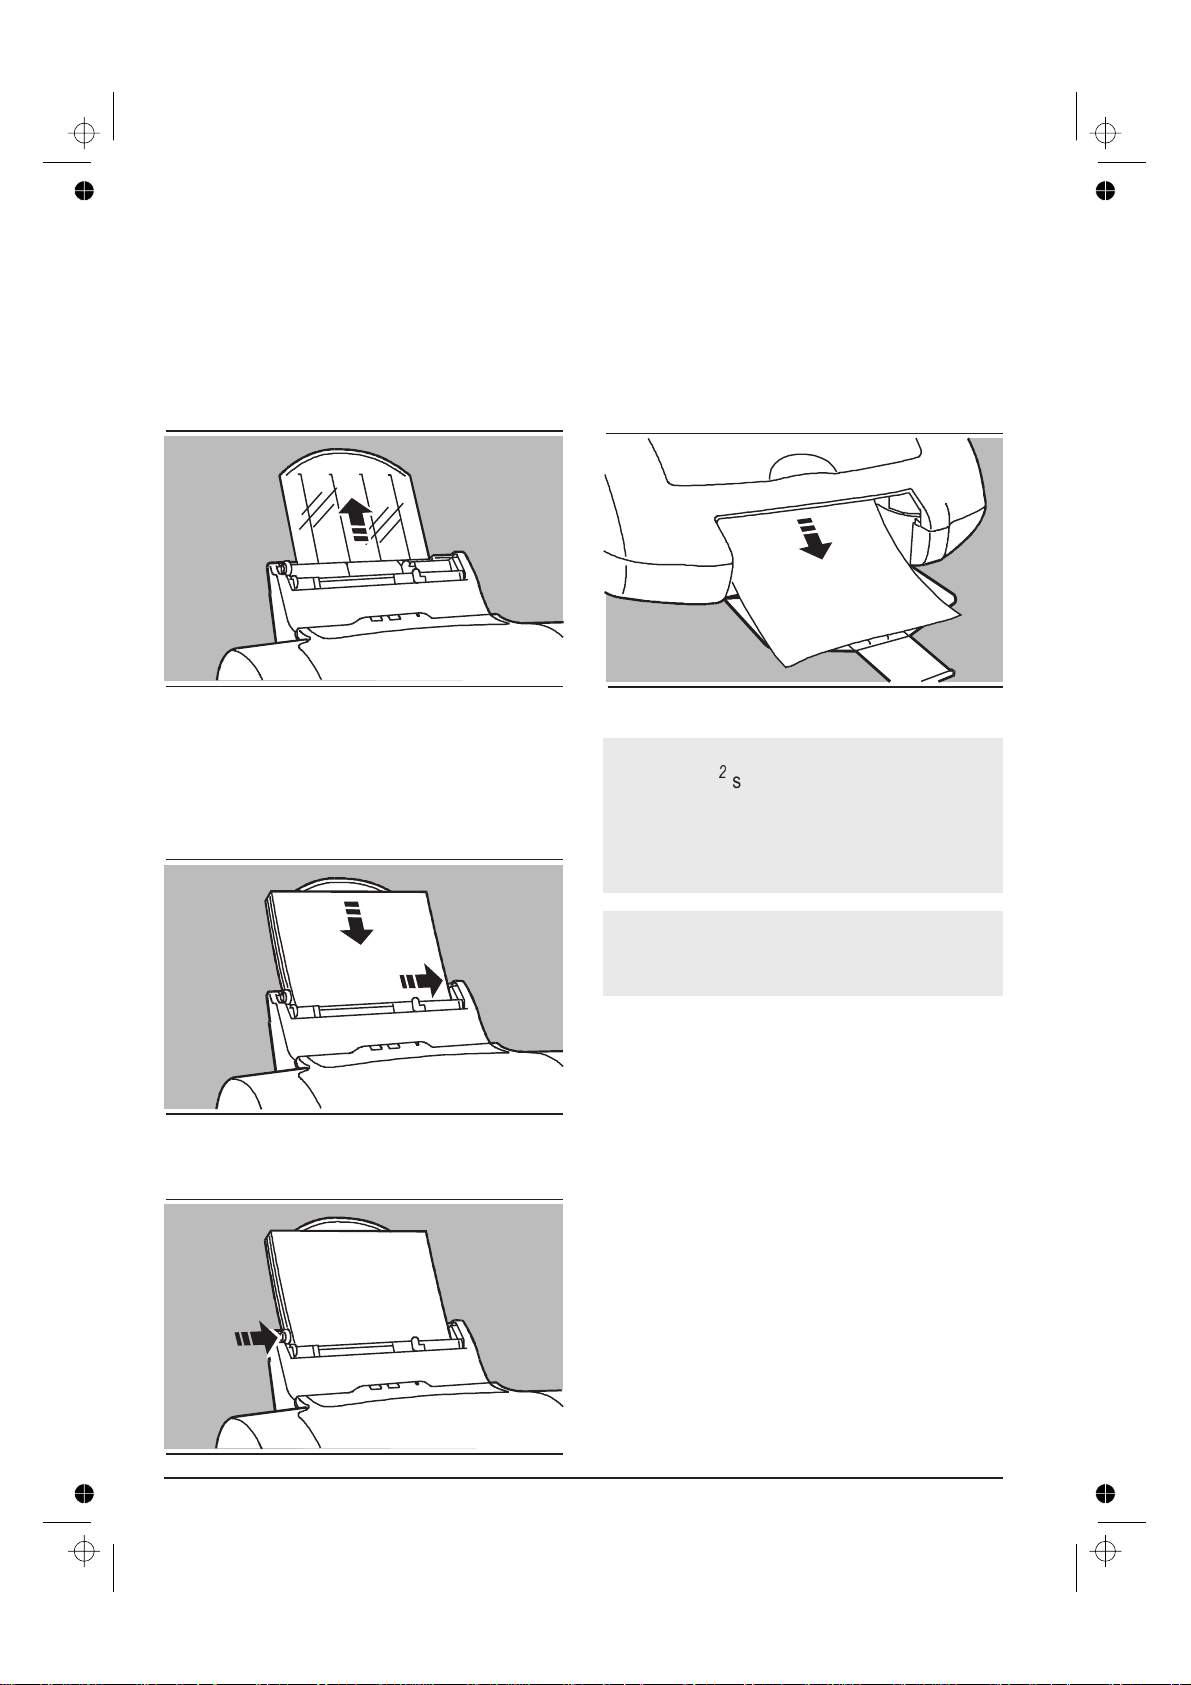
1. Pull up document support on the rear of the
multiple document feeder to support the
document format you are loading and make
sure that the left margin guide on the multiple
document feeder is at the physical left hand
margin.
2. Fan the documents thoroughly.
3. Align the documents against the physical
right margin and load them into the multiple
document feeder, inserting them carefully
until them stop inside the printer.
5. Press PAPER on the printer operator panel.
The first document is inserted to the first print
position. Press PAPER again, to make sure
that the document feeds smoothly through
and exits from the printer without crushing or
skewing.
The multiple document feeder can contain up to
120x80g/m
types and sizes of documents and envelopes,
see “Product Characteristics”inthismanual
and the specific topic in the On-Line Guide
loaded when you install your printer driver.
2
sheets of plain paper. For other
Do NOT add paper to that already in the multiple
sheet feeder; always remove any existing paper
and fan it together with the paper to be loaded.
4. Position the left guide against the left edge of
the paper.
6 Installation Guide
Page 12

Installing the printer software
q Before installing your printer software
The diskette(s) supplied with your printer contain
a high quality colour and monochrome printing
system for both Windows® 3.1/3.11 and
Windows® 95 environments.
This printing system includes :
a printer driver which gives you access to all
•
the printer features through easy-to-use
property sheets,
a printer monitor for easy access to Printing
•
Status and Printer Care,
on-line documentation,
•
an “uninstall” programme, to remove the
•
printer software, should a re-installation be
necessary.
The diskettesalso containa printer set-up utility
programme (CONFIG.EXE), for personalised
printer settings under DOS if necessary (see
“DOS environment”).
Before installing any printer driver, we strongly
recommend that you make a back-up copyof the
original diskettes (according to “Terms and
conditions of the user license” included with the
diskettes) and then use this copy for the
installation procedure. This will allow you to
keep the original diskettes as masters so that,
should any problem arise with the back-up copy,
you can make another copy.
Software installation procedure
The installation procedure varies, depending on
the Windows® environment installed on your PC.
q Windows® 3.1/3.11
1. Insert the printer driver diskette in drive A
(usually) of your PC.
2. Activate Windows® 3.1/3.11 (if it is already
running, make sure that all Windows applications are closed before starting to install the
driver; if necessary, consult your Windows®
user documentation).
3. Activate the Control Panel in the Main win-
dow, clicking twice with your mouse indicator
on the corresponding icons.
4. Select the Printers icon in the same way.
5. If the Installed Printers box is empty,click on
Install... .
6. If the Installed Printers box already contains
one or more driver names, click on Add>>,
select Install Unlisted or Updated Printer in
the List of Printers andthenclickon
Install... .
7. Check that the Install Driver window already
indicates the drive (usually A) in which you
have inserted the driver diskette, otherwise
click on the drive name and change it, using
your PC keyboard.
8. Click on OK.
9. The Add Unlisted or Updated Printer
q Minimum system requirements
From Windows® 3.1 up to Windows® 95,
•
PC 486 or laterwith atleast 4 MBytes of RAM,
•
4 MByte of free disk space.
•
Installation Guide 7
window contains the list of drivers present on
the diskette. Select the driver with your
printer name and click on OK.
10. Your driver is now installed and your printer
name appears in the List of Printers.
11. With your printer name highlighted, click on
Set as Default Printer button, so that your
printer will active in all your Windows®
applications.
Page 13

12. Check you printer connection by clicking on
the Connect... button. By default, your
printer will be connected to the LPT1 port
which corresponds to the hardware
connection of a parallel interface cable.
13. Click on the Close button in the Printers
dialogue box.
A group window with the driver name will be
created automatically. It allows immediate
access to the Spool Manager, the Printer Monitor,
the On-line Documentation and information files
whenever these are required.
q Windows® 95
The Microsoft Windows® 95 operating system
allows automatic installation of peripherals
through the Plug & Play feature, a bi-directional
communication and hardware recognition
procedure.
as the Default printer.
If other printer drivers are already installed,
and you wish to install the current one as the
default printer, click Yes and then the Finish
button. The installation of the driver files will
start.
6. At the endof the installation, you will be asked
to remove the diskette and restart Windows.
You can also install the printer driver using the
“Add Printer” feature in Printers in the Settings
folder. In this case, your printer need not be
connected to your PC.
In both cases, a folder with the driver name will
be created automatically in the Programs folder.
It allows easy access at any time to the Printer
Monitor, the On-line Documentation, Disinstall
programme and information files whenever these
are required.
1. Make sure that both printer and PC are
powered.
The printer must NOT be in error mode, i.e.
the indicator light must not be flashing.
2. Activate Microsoft Windows® 95. If already
started, execute the “Shut down” command
and restart your computer.
3. A window, indicating that a new peripheral
has been detected (New Hardware found
and the printer name) is displayed.
The same window shows the Driver from
disk provided by hardware manufacturer
option already highlighted. Click the OK
button.
4. With the Install from Disk window displayed,
insert the driver diskette in the drive selected,
specify this drive if requested and click OK.
5. The Add Printer Wizard window is
displayed.
If there are no printer drivers already installed
on your system, your printer will be installed
Preparing your printer using the
Printer Monitor
The Printer Monitor is an on-screen aid with an
extensive, user-friendly HELP feature. It contains a series of functions that are designed to
help you during daily use of the printer. It can be
viewed by clicking on the specific icon and allows
you to:
view the printer operating status on your PC
•
screen during a print job. It indicates the
proportion of the document printed and
eventual error messages (Status),
perform printer care functions, to maintain
•
optimum working conditions (Printer Care).
Once you have installed the printer software from
the diskette(s) supplied, you must prepare your
printer by performing a number Printer Care
functions contained in the Printer Monitor.
8 Installation Guide
Page 14

How to access the Printer Monitor
q Under Windows® 3.1/3.11:
You can access the Printer Monitor from your
printer driver group at any time, by doubleclicking its icon.
q Under Windows® 95:
You can access the Printer Monitorin eitherof the
following ways:
(a) Click Start, highlight Programs and then the
printer name in the sub-menu which opens.
The Printer Care tabalsohastwoother
functions:
q Cleaning the print head (Clean)
If you notice a deterioration in the print quality,
before changing the print head or replacing the
ink cartridge, run the “Clean” function.
1. Click the printer monitor icon, then the Printer
Care tab, (if necessary).
2. Click the Clean button, then follow the
instructions displayed.
(b) Click the Printer Monitor icon.
OR:
(a) Click Start, highlight Settings, and then click
Printers in the sub-menu which opens.
(b) Click your printer name to highlight it.
(c) Click your right mouse button.
(d) Select theoption “Run the Printer Monitor”inthe
menu which opens.
With the Printer Monitor displayed on your PC
screen, click the Printer Care tab:
1. Click on both the “New Print Head” check
boxes ONLY if you did NOT press POWER
and PAPER when you inserted the print
heads.
2. Click the Align button, to check the accuracy
of bidirectional printing; follow the instruc-
tions displayed.
q Running the print test (Test)
The print test gives you a print-out of the printer’s
functional characteristics (firmware release, print
head tests, current settings).
1. Click the printer monitor icon, then the Printer
Care tab, (if necessary).
2. Click the Test button, then follow the
instructions displayed.
Your printer is now ready for use.
If you have had problems with any of the
printer installation procedures, check that
you have followed the instructions as given.
If a repetition of the instructions is
unsuccessful, see the appropriate topic in the
Troubleshooting section that follows.
3. Click the Demo button, to print the demo
page; follow the instructions displayed.
If you have problems with any operating
procedure, or are unable to perform a specific
Once you have completed these operations, you
can reduce the Printer Monitor to an icon.
function, always check that you have followed
the instructions as given. If a repetition of the
instructions is unsuccessful, see the
appropriate section in “Troubleshooting” in
the On-line Guide loaded with the printer
driver.
Installation Guide 9
Page 15

Troubleshooting
Your printer is designed to require only minimum
maintenance, however, everyday use will give
rise to a number of simple printer-care
operations.
During normal printer operation, an error
condition will be signalled by the rapid flashing of
the light indicator and the positioning of the print
head carriage to indicate whether the error is due
a paper or print head malfunction.
If you are unable to run the operation you require,
first check that you have followed correctly the
instructions given in this manual or the section
“How to...” in the On-Line Guide. If, after
repeating the procedure, you still have a problem,
consult the specific topic in Troubleshooting in
the On-Line Guide.
If you detect serious mechanical damage to or a
failure in the printer, do not attempt to repair it
yourself! CALL THE TECHNICAL SUPPORT
SERVICE.
q Transportation
Always make sure that the print head is in its
•
rest position.
To ensure this, always press POWER to
switch off your printer BEFORE switching off
your PC.
Take care not to drop your printer.
•
Repack your printer in its original carton,
•
whenever possible.
Installation
q Missing or damaged parts.
Contact your retailer immediately.
•
q Printer is not powered.
No power supply (the light indicator is not lit).
General care
q Environment
Keep your printer in a stabilised, ventilated
•
environment (temperature range: 15 to 35
-60to95
Do not subject your printer to brusque
•
changes in temperature and/or humidity.
Do not let dust accumulate on the printer; use
•
a slightly damp cloth to remove dust.
Do NOT use abrasive or corrosive cleaning
fluids to clean the printer.
o
F; relative humidity: 20% - 80%).
Check that the printer is connected properly
•
to the electrical power supply socket.
Press POWER.
•
q No printer reaction.
o
C
When you press POWER, the print head carriage
and the output tray spoilers do not move.
Check that the carriage path and the spoilers
•
are free of impediment.
Try switching the printer off and then on
•
again.
If the light indicator flashes rapidly, there is a
•
failure on the mother board; press POWER to
switch the printeroff, disconnect itand callthe
technical support service.
10 Troubleshooting
Page 16

q Demo page/Print test did not run.
Press POWER to switch the printer off, wait a
•
few seconds and then press POWER again.
Repeat the correct key sequence (see
“Buttons - special functions”inPrinter
operator panel or click the appropriate
button in the Printer Care tab in the Printer
Monitor (see specific item in Printer Monitor.
If the light indicator flashes rapidly:
•
– there is no paper in the printer; follow the
instructions given in“Loading documentsin the
printer ”intheInstallation Guide.
– the print head/ink cartridge is not inserted
correctly or needs replacing; follow the
instructions given in “Inserting the print heads”
in the Installation Guide,or“Replacing the
print head ” and/or “Replacing theink cartridge”
in More about print heads.
q Problems with connection to host.
Check that your interface cable is of the
•
correct type. It must be a standard,
bi-directional IEEE 1284-type inferface
cable. If you have any doubts, contact your
computer dealer.
Make sure you have fixed the interface
•
connectors properly both to the printer and to
the host.
If your PC is an “ECP”-type PC,check thatthe
•
printer port setting on it is Printer Port: LPTx.
If necessary, change this setting as follows:
– right click on the My Computer icon,
– select Properties, then Device Manager,
– double click on Ports (COM&LPT).
to your computer documentation and/or
contact your computer dealer.
Check that you have configured your
•
application correctly (see the On-Line Guide
loaded with your driver, and your application
manual).
q Printer care functions in Printer Monitor
not active
If, when you open the Printer Monitor, you find
that the Printer Care buttons are not active:
Check that the interface cable is ofthe correct
•
type. It must be a standard, bi-directional
IEEE 1284-type inferface cable. If you have
any doubts, contact your computer dealer.
Check that the interface cable is connected
•
correctly both to your printer and to your PC.
Disinstalling the printer driver
If you have problems printing that are not solved
with normal printer care operations (document
and print heads inserted correctly, appropriate
selections in the printer driver, etc.), it may be
necessary to re-install the printer driver.
To do this, you must first disinstall the driver, by
clicking on the specific icon created in the printer
group when you first loaded the driver. This
allows a complete and correct removal of all the
files loaded from the diskettes and/or created in
your PC during driver installation, permitting a
correct re-installation (see “Installing the printer
software”).
– select Printer Port: LPTx.
If Ports (COM&LPT) does not offer a simple
LPTx port or if the selection of this port does
not solve your problem, you must change the
LPT mode setting in your computer BIOS to
either [Standard] or [Bi-directional]. For
further information on the BIOS setting, refer
Troubleshooting 11
For other problems regarding the use of print
heads, printing media, etc., refer to the specific
topics in the Troubleshooting section of the
On-Line Guide loaded with your printer driver.
Page 17

Printer operator panel
The behaviour of the buttons and light indicator
on the operator panel will depend on the printer’s
status.
q Printer states:
standby/sleep: no data to be printed;
•
printing: from the reception of data until the
•
completion of its printing;
error: when an error has been detected and
•
the printer is waiting for user intervention.
service: user-invoked mode for special
•
functions, independent of host.
POWER
PAPER
Buttons - basic functions
Function Button Description
Printer on/off Power Toggles the printer
ON/ OFF condition.
Paper load/
eject
Paper Loads/ejects a docu-
ment in/from the
printer.
If a document is
already present in the
printer, causes its
expulsion.
If there is no document
in the printer, causes
one to be loaded to the
first print position.
The printer is in printing status, forces the
completion of the current page and expels
the document.
Buttons - special functions
q with printer cover closed
Function Button(s) Description
Demo page Power held
and Paper
pressed three
times; then
released
together
Print test Power held
and Paper
pressed once;
then released
together
Clean print
heads
Hex dump Power held
Power held
and Paper
pressed
twice; then
released
together
and Paper
pressed five
times; then
released
together
The light indicator
starts flashing in an
three-flash sequence.
The demo page is
printed, after which
the printer returns to
standby mode.
The light indicator
starts flashing in a
single on-off
sequence.
The print test is
printed, after which
the printer returns to
standby mode.
The light indicator
starts flashing with a
two-flash sequence.
A print head cleaning
cycle is executed,
after which the printer
returns to standby
mode.
The light indicator
starts flashing with a
five-flash sequence.
All subsequent data
transmitted to the
printer will be printed
in its hexadecimal
format.
This feature should
be used only under
technical guidance,
as it can generate
extremely long printouts.
12 Printer operator pan el
Page 18

Buttons - special functions
Light indicator
q with printer cover open
The print head carriage will be positioned to
indicate the type of error on the template
embossed on the printer casing (see “Embossed
templates”).
Function Button(s) Description
Print head
carriage
movement
New print
head/ink
cartridge
Paper Toggles the
monochrome/colour
print head loading
position.
Paper held and
Power pressed
for at least two
seconds, then
released together
Signals that a
NEW print head
and/or ink cartridge has been
inserted.
The light indicator
flashes three
times in acknowledgment
The status of the light indicator indicates the
different printer conditions.
Status Condition
off The printer is not powered.
lit The printer is powered.
flashing slowly The printer is receiving data.
flashing rapidly An error or failure condition has
occurred in the printer.
Paper out condition.
Solution: Load a document and
press PAPER (see “Loading
documents in the printer ”inthe
Installation Guide).
Paper jam condition.
Solution: Remove the jammed
document (see the specific
section in More about paper and
special printing media).
End of ink condition.
Solution: Replace the ink
cartridge or change the entire
print head (see the specific items
in More about print heads).
Failure condition.
Switch off the printer and
disconnect it from the electrical
power supply. Make sure that the
print head carriage and paper
feed paths are notobstructed and
then reconnect and switch on the
printer.
If the light indicator continues
flashing rapidly, disconnect the
printer and call the technical
support service or your dealer.
Printer operator panel 13
Page 19

Embossed templates
On-line Guide
Your printer has two embossed instruction
templates: one on the printer casing under the
cover, the other on the inside of the cover.
q on the printer casing:
how to move from one print head loading
•
position to the other (see “Buttons - special
functions”inPrinter operator panel);
the print head carriage position if a “paper
•
out/jam” condition occurs (see specific items
in Troubleshooting in the On-line Guide).
q on the inside of the cover:
the operating procedure forchanging the print
•
heads and/or ink cartridges (see the specific
sections in More about print heads).
The diskettes containing the printer software also
contain an On-line Guide. This guide contains
further information on the printer features, and
print head and paper handling. It is structured in
two parts: “How do I...” and Troubleshooting.
The information contained in the On-line Guide
is organised in “topics”; e.g. “Paper ”, “Print
Head ”, etc., and can be printed screen by screen
or by topic.
To access the On-line Guide, click on the
specific icon in the Printer group created when
you loaded the printer software.
14 Embossed templates
Page 20

More about print heads
Replacing the print heads
q Removing a print head
You should remove a print head from the printer
only to replace it or to repeat its insertion in the
case of faulty printing. To remove the print head,
proceed as follows:
1. Open the top cover:
(a) print head with replaceable cartridge only:
If an “end of ink” condition has been signalled by
the printer (printing stopped, light indicator on the
printer operator panel flashing rapidly and an
error message on your PC screen), the print head
carriage moves automatically to the loading
position of the print head that caused the error
signal when you open the printer cover.
(b) all types of print head:
If you detect deteriorated print quality that has not
been signalled by the printer, when you open the
printer cover, the print head carriage will move to
the monochrome print head loading position. If
you wish to change the colour print head, you
must press the PAPER button to move the print
head carriage to the correct loading position.
(b) on the right for the colour print head.
3. Remove the entire print head, pulling it
upwards by its thumb and finger grip.
4. Insert a new print head of the SAME type
(black/colour, see “Inserting the print head ”
in the Installation Guide).
5. Before closing the printer cover, press and
hold the PAPER button and press the
POWER button for at least two seconds to
signal that a new print head has been
inserted; the light indicator will flash three
times in acknowledgment.
2. Press downthe green printhead release lever
to release the print head:
q Driver settings
(a) on the left for the monochrome print head.
Before starting to print, check carefully that the
settings in your driver correspond to the type of
print head inserted. If the settings and print head
do not correspond, when you attempt to print,
your PC screen will show a warning.
More about print heads 15
Page 21

Replacing the ink cartridge
Your printer can also operate with a type of print
head that has a replaceable ink cartridge. This
type of printhead consists of an outer casing,with
the electrical contacts and print nozzles, and a
removable cartridge that contains the ink. You
can replace the ink cartridge several times before
having to change the entire print head.
When the ink cartridge in the print head runs out
of ink, an “end of ink” condition will be signalled
by a warning on your PC screen, the rapid
flashing of the light indicator on the printer
operator panel and the interruption of the printing
operation.
Do not attempt to perform a print head clearing
operation (CLEAN) if an empty ink cartridge has
been signalled.
To substitute an empty ink cartridge:
1. Open the printer cover.
The print head carriage will move to the
loading position of the print head that has
caused the error signal.
(b) to the right for the colour print head.
Do not release or remove the print head casing
from the print head carriage.
3. Remove the cartridge from the print head
casing, pulling it upwards.
2. Release ONLY the ink cartridge from the print
head casing, pulling gently outwards the lip
on the print head casing.
(a) to the left for the monochrome print head.
16 More about print heads
Page 22

4. Open the sealed ink cartridge container and,
grasping the thumb and finger grip, remove
the new ink cartridge from it.
5. Remove the protective tape/capsule from the
new ink cartridge.
Do NOT touch the ink pad area on the cartridge.
6. Insert the new cartridge in the print head
casing immediately, pressing it until it clicks
into place.
(a) monochrome cartridge in the left casing,
7. Before closing the printer cover, press and
hold PAPER and press POWER for at least
two seconds to signal that a new ink cartridge
has been inserted. The light indicator will
flash three times in acknowledgment.
Remove the ink cartridge ONLY to replace it. Do
NOT remove and then reinsert it.
If the new ink cartridge is not inserted correctly,
the light indicator on the operator panel will
continue to flash. You must repeat completely
the replacement operation.
If the quality of printing is not optimum, do the
“Clean” operation (see “Printer Monitor”).
After you have replaced several ink cartridges in
the same print head, you must replace the entire
print head.
If you have problems inserting the print head or
ink cartridge:
(b) colour cartridge in the right casing.
Make sure the print head carriage is in the
•
print head loading position.
Check that the print head/chamber is clean
•
and free of foreign bodies.
NEVER force the print head into the chamber
•
or the ink cartridge into the print head; always
remove it completely and repeat the entire
insertion operation.
More about print heads 17
Page 23

Print head care and precautions
Always keep the print heads and ink
•
cartridges sealed until they are to be used.
Remove the ink cartridge from the print head
•
ONLY to replace it. Do NOT remove and then
reinsert it.
Remember to remove the protective tape
•
before inserting the print head/ink cartridge in
the printer. Take care not to get ink on your
clothes; the ink in the head/cartridge stains.
Do NOT attempt to refill the print head/ink
•
cartridge with ink, as this damages the print
head and the printer.
DO NOT shake the print head; it is not a
•
fountain pen. If it does not print, do the
cleaning operations described in “Cleaning
the print head ”.
If you think that the number of pages printed
•
with the current print head/ink cartridge is
fewer than usual, try cleaning it. If the “end of
ink” condition persists, the print head/ink
cartridge is empty and requires replacing.
Always make sure that the print head isin its rest
position BEFORE switching off your computer.
Switching off your printer before your computer
will guarantee this. When the printer is powered,
the print head carriage will automatically return
to its rest position and go into standby mode
after approximately two minutes of inactivity.
q Cleaning the print head (Clean)
The print heads are cleaned automatically at
regular intervals while the printer is powered.
This operation clears the print head nozzles,
guaranteeing the ink flow. If you have a problem
with the printing quality that is not solved by this
automatic nozzle clearing operation, you can do
the same operation, using the “CLEAN” function
in the Printer Care tab in Printer Monitor (see the
specific paragraph in “Preparing the printer using
the printer monitor ”).
If you have a problem with the printing quality that
is not solved by the nozzle clearing operation
described above, try cleaning the print head, as
follows:
1. Open the printer cover.
2. Position, release and remove the print head
that is causing the problem.
3. Clean the electrical contacts (gold part) onthe
print head and in the housing on the print
head carriage with a slightly damp lint-free
cloth, taking care not to touch the print head
nozzles.
4. Re-insert the print head in the printer and
close the cover.
If there is still no improvement in the print quality,
try cleaning the print head nozzles.
18 More about print heads
Page 24

Print head container
This operation MUST NOT be repeated
systematically, as it will damage the print head.
It should ONLY be attempted as a last resort,
before changing the ENTIRE print head.
1. Dampen a tissue handkerchief with distilled
water; squeeze it slightly to remove any
excess water.
2. Open the printer cover.
3. Position, release and remove the print head.
4. Holding the print head with the nozzles facing
downwards, blot it against the handkerchief,
pressing lightly.
Instead of the standard colour print head, youcan
use an optional economy colour printer head with
replaceable cartridge, available from your dealer.
This optional print head has the same function
and duration as the standard colour print head,
but has a slightly inferior output. If you do not
intend to print photographs or high quality colour
ouput, you may find this optional print head more
economic to use.
If you decide to buy and use the optional colour
print head, you MUST also acquire and use a
print head container (see “Supplies and options”)
to store the standard colour print head that you
have removed from the printer. Place the
standard colour print head, IMMEDIATELY, AS
IT IS, in the storage container, closing the lid
securely to prevent the ink drying and blocking
the print nozzles.
DO NOT PLACE TAPE, PAPER, OR ANY
OTHER MATERIAL OF THE PRINT HEAD
NOZZLES.
You can then insert the optional colour print head
in the printer, following the print head insertion
procedure described in the Installation Guide.
5. Repeat the blotting operation a few times on
different areas of the handkerchief, to clean
the nozzles.
6. Reinsert theprint headin the printerand close
the printer cover.
7. Print the “demo” page to check the quality of
printing (see the specific paragraph in
“Preparing the printer using the printer
monitor ”).
More about print heads 19
Page 25

More about paper and
special printing media
Loading documents
You can insert all document formats either in
packs through the multiple document feeder or
one at a time through the single document feeder.
The document in the single document feeder will
have priority over the documents in the multiple
document feeder. All documents can be fed
either automatically or manually (using the
PAPER button), depending on the setting in
Paper Source in the printer driver.
When insertingthe documentsfor printing,make
sure that the printing surface isfacing the correct
way (see the instructions on the paper
packaging or container).
The printer can handle the following document
combinations:
Only standard size (A4, Letter, Legal,
•
Executive and ALL user-defined formats)
pages in the multiple document feeder.
Only envelopes or narrow documents (less
•
than 6.5 in/165 mm wide) in the multiple
document feeder.
In this case, you must first open and use the
intermediate right hand margin guide on the
multiple document feeder.
20 More about paper and special printing media
Page 26

Only a standard size page in the single
•
document feeder.
Only an envelope or a narrow document in
•
the single document feeder.
In this case, you must first open and use the
intermediate right hand margin guide on the
single document feeder.
Standard size pages in the multiple docu-
•
ment feeder, with single standard page in
the single document feeder.
Standard size pages in the multiple docu-
•
ment feeder, with single envelope or narrow document in the single document
feeder.
In this case, you must first open and use the
intermediate right handmargin guide only on the
single document feeder.
More about paper and special printing media 21
Page 27

Envelopes or narrow documents in the
•
multiple document feeder,withsingle
envelope or narrow document in the single
document feeder.
In this case, you must first open and use the
intermediate right hand margin guideon boththe
multiple document feeder AND the single
document feeder.
Banners:
•
(a) from the multiple sheet feeder:
– Place the banner as a single pack in the
multiple sheet feeder, aligning it against the
fixed right hand margin. The leading edge
must be facing down towards the paper feed
channel.
– Position the adjustable left hand guide against
the left edge of the banner, making sure that it
is not held too tightly nor has too much play.
(b) from behind the printer:
If you load envelopes or narrow documents in
the multiple document feeder, you CANNOT
then insert a wider format using the single
– Push down the transparent document support
until it is completely lowered (or remove it from
the printer, pulling it upwards).
document feeder.
22 More about paper and special printing media
Page 28

– Place the banner pack on the table behind the
printer, with the leading edge of the paper
towards the printer.
– Insert the leading edge of the first page in the
multiple sheet feeder, aligning against the
fixed right hand margin and feeding it in until it
stops.
Output support for envelopes, narrow
documents and photographs
If you are printing on envelopes, narrow
documents, or photographs, you should open the
output support in the document exit area, rotating
it upwards.
This support guarantees a level printing plane for
the entire document.
– Position the adjustable left hand guide against
the left edge of the paper, making sure it is not
held too tightly nor has too much play.
More about paper and special printing media 23
Page 29

Document types
Precautions
Sub-standard paper can affect the quality of
•
printing.
Make sure the paperfeeds smoothly, and that
•
it is not held too tightly nor has too much play.
The document/envelope must not be curled,
•
crumpled or torn, otherwise it may jam or
even not be inserted. Always use paper in
perfect condition and within the specifications
defined.
Printing on both sides of the paper may
•
increase the risk of misfeeds or paper jams
and may cause smudging.
If you remove the paper from or add paper to
•
the multiple document feeder, you MUST
repeat the entire paper loading operation.
When using user-defined/non-standard size
•
documents, remember to select the
appropriate paper type in your printer driver
(see the On-Line Documentation loaded
with your printer driver).
For all types ofspecial media,always readthe
•
instructions included with the media pack.
Remember that heavily printed pages tend to
curl and thus not stack correctly. They also tend
to stain the rear of the page stacked over them,
as they require longer to dry. Remove these
pages as soon as they are expelled from the
printer and leave them to dry singly before
handling them.
q Envelopes
Envelopes can be inserted either in packs of up
to 25 in the multiple document feeder or one at a
time through the single document feeder.
You MUST use the intermediate right hand margin guide regardles of which feeder you use.
The envelopes must inserted with their short side
as the leading edge, the printing side face up and
the sealing flap underneath. Remember to select
a landscape font for printing (in Windows®
environment, you will require a TrueType font).
q Special printing media
For optimum printing quality, you should always
use printing media specifically indicated for ink jet
printers, see Supplies and Accessories for
recommended media types.
For all types of special media, always read the
instructions included with the media pack.
Coated paper
•
This type of paper has a very smooth finish
on the side to be used for printing.
Glossy paper
•
This type of paper has a glossy coating, and
issimilartothatusedusedinthephotographic industry.
Photographic paper
•
This type of paper has a sophisticated glossy
coating, and gives a professional finish to
your print job.
See “Printer Characteristics” for the formats and
dimensions ofplain paper/specialprinting media
you can use in your printer.
24 More about paper and special printing media
Transparencies
•
Always use those specifically indicated for ink
jet printers; they are designed to absorb the
ink correctly.
T-shirt transfers
•
Always use those specifically indicated for ink
jet printers; they are designed to absorb the
ink correctly.
Page 30

q Note cards
DOS environment
Note cards can be inserted either in packs of up
to 10 in the multiple document feeder or one at a
time through the single document feeder. You
MUST use the intermediate right hand margin
guide regardless of which feeder you use.
q Banners
Banners, up to 1.5 metres long, can be handled
automatically, providing that the application
software you are using with your PC is also able
to handle them.
Driver settings
Always make sure that you have selected in your
printer driver the Paper Source, Paper Type and
Paper Format features that correspond to the
feeder and the type of printing media you intend
to use. In particular, the colour calibration in the
driver is set specifically for each of the different
types of media handled, so an incorrect setting
will result in unsatisfactory quality print-out.
You access the driver settings by clicking on
Start, highlighting Settings, clicking Printers
and then right clicking your printer icon and then
Properties.
Although optimsed for operation in a Windows®
environment, your printer will also operate in
DOS, recognising PCL III + command codes.
The diskettes supplied with your printer contain a
printer set-up utility programme
(CONFIG.EXE), which allows you to personalise
the printer settings.
The programmable features available through
CONFIG.EXE are the following:
Parameter
(Identifier)
PaperFormat A4, A5, Letter, Legal, Executive,
C5, C6, B6, COM #10, DL
PerSkip Off (no bottom margiin - BOF)
ON (BOF - 12.7 mm)
TextScale Off
On
Bimdensity 75, 150, 300 (dots per inch)
Terminator
Quality LQ (Letter Quality)
Normal (CR=CR;LF=LF;FF=FF)
AutoLF (CR=CR+LF;LF=LF;FF=FF)
AutoCR (CR=CR+LF;LF=LF;FF=CR+FF)
AutoCRLF (CR=CR+LF;LF=LF+CR;
FF=CR+FF)
NLQ (Near Letter Quality)
DRAFT (Draft)
Value(s)
(Qualifier)
WidthType Off (nominal character size)
HalfWidth
HalfHeight
HalfWidthHeight)
TypeStyle 1 - 99 (internal fonts)
1 (Courier Upright Port. 10cpi 12pt)
24 (Courier Upright Land. 10cpi 12pt)
☞
DOS environment 25
Page 31

Parameter
(Identifier)
Charset 1- CP 437 International
2-PC8Denmark/Norway
3 - CP 850 Multilingual
4-ECMA-94Latin1
5-Roman8
6 - Legal
7-ISO2-IRV
8 - ISO 4 - United Kingdom
9 - ISO 6 - ASCII
10 - ISO 10 - Sweden
11 - ISO 11 - Sweden Names
12 - ISO 14 - JIS ASCII
13 - ISO 15 - Italy
14 - ISO 16 - Portugal
15 - ISO 17 - Spain
16 - ISO 21 - Germany
17 - ISO 60 - Norway 1
18 - ISO 61 - Norway 2
19 - ISO 69 - France
20 - CP 860 Portugal
21 - UNIX International
22 - CP 863 French Canadian
23 - PC Abicomp International
24 - PC Abicomp Portugal
25 - CP 850
26 - CP 857 Turkey
27 - CP 866 Cyrillic
28 - CP 210 Greece
29 - CP 851 Greece
30 - CP 862 Hebrew
Value(s)
(Qualifier)
* Parameters significant only if the optional serial
interface is present and connected.
Orientation Portrait
Landscape
Baudrate* 1200, 2400, 9600, 19200, 38400
baud
Parity* None
Even
Odd
HandShaking*Hard (DTR - within 500 character of
the input buffer capacity)
Soft (Xon / X off + DTR - within 500
character of the input buffer capacity)
26 DOS environment
Page 32

Product Characteristics
Printing Technique
Non-impact, bubble ink jet, with water-resistant
ink
Print Heads
Monochrome disposable
Four-colour disposable,
Monochrome, with replaceable Ink Cartridge,
Optional economic colour, with Ink Cartridge.
Throughput
N.B.: this value may vary depending on the print mode, the
software application and/or the type of compu ter used.
Windows® environment:
up to 6 pages per minute (ppm)
Paper Handling
Automatic or manual through multiple or single
document channel
Multiple Sheet Feeder Capacity
Plain paper : up to 120 sheets (80 g/m
Envelopes : up to 25 envelopes (80 g/m
Note cards : up to 10 pieces (110 g/m
2
paper)
2
2
paper)
paper)
Photographic paper : up to 5 sheets
Specialprintingmedia:upto40sheets(90g/m
paper)
Graphic Resolution
Up to 1200 dpi
Resident Emulation
PCL III +
RAM
1 Mbyte
Interface
Parallel (Centronics)
Product Certification
For USA and Canada
Safety regulations:
USA: UL 1950/478
Canada: C/UI
Electromagnetic compatibility:
FCC part 15 Class B Certified
For EEC:
Safety regulations:
2
“CE” mark
NEMKO EN 60950 + A1, A2, A3
Paper Type
Plain office paper
Transparencies
High resolution glossy/coated papers
Envelopes
Electromagnetic compatibility:
“CE” mark
EN 55022 Class B
EN 50082-1
EN 60555-2
Note cards
T-Shirt transfers
Operating Environment
Temperature: 60 to 95 ºF - 15 to 35 ºC
Paper Weight
Single sheets: 60 to 135 g/m
Envelopes: 75 to 100 g/m
Note cards: 100 to 200 g/m
2
2
2
Special printing media: 90 to 135 g/m
2
Relative Humidity: 20% - 80%
Sound level
49 dB in LQ printing mode
Electrical Characteristics
Paper Size
Single sheets: A4, A5, Letter, Legal, Executive
Envelopes: COM-10, DL , C5, C6, B6
- 110 - 120 V, +/- 10%; 50 - 60 Hz
- 220 - 240 V, +/- 10%; 50 - 60 Hz
Note cards: 4 x 6 in, 5 x 8 in, A6
Banner: up to 1.5 metres handled automatically
Product Characteristics 27
Page 33

Character Sets
CP 437 International
Roman 8
PC 8 Denmark/Norway
CP 850 Multilingual
ECMA-94 Latin 1
ISO 4 - United Kingdom
ISO 21 - Germany
ISO 69 - France
ISO 15 - Italy
ISO 60 - Norway 1
ISO 61 - Norway 2
ISO 11 - Sweden Names
ISO 10 - Sweden
ISO 17 - Spain
ISO 6 - ASCII
ISO 2 - IRV
ISO 16 - Portugal
ISO 14 - JIS ASCII
Legal
CP 860 Portugal
UNIX International
CP 863 French Canadian
PC Abicomp International
PC Abicomp Portugal
CP 857 Turkey
CP 866 Cyrillic
CP 210 Greece
CP 851 Greece
CP 862 Hebrew
Resident Font
- Courier:
orientation: Portrait and Landscape
pitch: 5, 8.33, 10, 16.67, 20, 33.34 cpi
size: 6, 12 points
style: Upright (Italic 5, 10, 20 cpi)
Physical Characteristics
Height 9.84 in (250 mm)
Width 18.11 in (460 mm)
Depth 10.55 in (368 mm)
Weight 11.4 lbs (5.2 kg)
28 Product Characteristics
Page 34

TERMS AND CONDITIONS OF THE USER LICENSE OF PROGRAM
PRODUCTS FOR OLIVETTI PRINTERS
Olivetti hereby grants to the end-user customer (“Customer”), of the Olivetti Program Product to which
this document is annexed (“Program”) a non- transferable and non-exclusive license to use the Program
under the following terms and conditions.
1. OWNERSHIP
(a) The Program (which term as used herein shall include the set of machine readable material on magnetic
media, the user documentation and any other related material delivered to the Customer by or on behalf of
Olivetti), as well as the related copyrights and other industrial or intellectual property rights, are the exclusive
property of Olivetti and/or its suppliers. The Customer acquires no title, right or interest in the Program other
than the license rights granted herein.
(b) The Customer shall not remove from the Program any trademark, tradename, copyright notice or other notice,
and shall be responsible for their conservation on the copies received hereunder and for their repro- duction
on any backup copy of the Program or on any portion of the same merged into other programs, subject to the
provisions of Section 2 below.
2. LICENSE
(a) For the purposes hereof “use of Program” shall mean the copying of any portion of the instructions or data
contained in the Program by transferring or reading them from a medium into a computer in order to drive an
Olivetti printer connected thereto.
(b) Under the license granted to the Customer hereunder, the Customer has the right to use the Program only
on a single CPU unit having connected thereto a single unit of an Olivetti printer. The Customer may also
merge the Program, or part thereof, into another program for its use on said single CPU unit. Any portion of
the Program merged into another program will continue to be subject to the terms and conditions hereof. The
Customer shall not make any other use of the Program, without the prior written permission of Olivetti.
(c) The Customer may not copy, in whole or in part, the Program except for a single back-up copy for recovery
in case of break-down, provided however that such back-up copy shall be used solely on said single CPU and
be subject to the terms and conditions hereof.
(d) The Customer may not disassemble or decompile in whole or in part the Program, nor otherwise analyse its
codes or logical structure (except to the limited extent expressly provided by mandatory provisions of law
implementing EEC Directive 91/250 of May 14, 1991 on software protection).
(e) The Customer may not copy, either in whole or in part, the documentation provided by Olivetti for the use of
the Program and any other printed material supplied by or on behalf of Olivetti to the Customer.
(f) Additional copies of this documentation may be supplied by, or on behalf of, Olivetti at its rates in force at the
time of ordering.
3. DISCLAIMER OR WARRANTY AND LIMITATION OF LIABILITY
Olivetti or its suppliers gives no warranties with respect to the Program licensed hereunder and all
implied warranties including any warranty of merchantability and fitness for purpose are hereby
excluded. IN NO EVENT WILL OLIVETTI OR ITS SUPPLIERS BE LIABLE FOR INDIRECT
CONSEQUENTIAL, INCIDENTAL OR SPECIAL DAMAGES EVEN IF OLIVETTI HAS BEEN ADVISED
OF THE POSSIBILITY OF SUCH DAMAGES AND THE MAXIMUM LIABILITY OF OLIVETTI SHALL
BE LIMITED TO REFUND TO THE CUSTOMER THE PRICE PAID BY THE CUSTOMER FOR THE
PROGRAM.
Page 35

4. TRANSFER OF THE LICENSE
Customer may not rent or lease the Program or otherwise transfer the Program or this license, on a
temporary basis, to any third party.
Customer may transfer the Program and this license to another party on a definitive basis, solely in
conjunction with the definitive transfer to such third party of the Olivetti ink-jet printer unit in connection
with which the Program is used, provided that said third party agrees to accept these license terms and
conditions, and that the Customer transfers or destroys all portions of the Program in its possession or
control and does not retain any right on the Program.
Olivetti may assign or transfer its rights and obligations hereunder to Olivetti’s suppliers of the Program
or to any Olivetti Subsidiary.
5. TERMINATION OF THE LICENSE
(a) The license granted hereunder may be revoked and terminated forthwith by Olivetti by written notice to the
Customer if any of the following events occurs:
– in case of breach by the Customer of any provisions hereof; or
– in case of non-payment by the Customer in due time of any sum due from the Customer in consideration
of delivery and license of the Program.
Upon termination of the license granted hereunder, Olivetti reserves the right to take any legal action
necessary to recover any damages incurred by Olivetti.
(b) Upon termination of the license granted hereunder the Customer shall refrain from any further use of the
Program, and Olivetti may require either the destruction of any copy of the Program, in any form, in the
possession of the Customer or the return of the same to Olivetti.
6. RE-EXPORT RESTRICTIONS
The Customer acknowledges that the Program licensed hereunder may be subject to certain export
restrictions in accordance with national and international regulations. Therefore the Customer
undertakes not to export the Program or any technical Information received hereunder other than to
member countries of the European Economic Community without having first obtained the prior
governmental consents as needed.
Page 36

GUARANTEE
Thank you for buying an Olivetti Lexikon pr oduct. Please
read the following terms and conditions, should you require
technical support for your machine dur ing the guar antee
period.
TERMS AND CONDITIONS OF GUARANTEE
This product is guaranteed against material and
manufacturing defects for the period of guarantee. The
guarantee period varies from country to country and s hall
be communicated to you by theretailerfromwhom you pur-
chased the product. Fu rtherm ore, Olivetti Lexikon offers
equivalent or improved guarantee conditions with respect
to those established by law in the countries in which the
product is so ld. If you require further information, plea se
contact your Olivetti Lexikon sales organisation represen-
tative or local authoris ed dealers (an up-to-date list of
addresses is available at the Internet address given at the
end of this document).
The guarantee is valid commencing from the date
•
of purchase, as proven by invoice or fiscalreceipt.
The guarantee covers only the repair or replace-
•
ment free of charge of any component parts found
to have manufacturing defects.
LIMITS TO GUARANTEE
1.
The guarantee does notcover parts oraccessoriesthat,
for the normal functioning of the product, require
periodic replacement (i.e. print heads, ink cartridges,
toner, etc.).
2.
The guarantee does not cover products and single
component parts found to be defective or damaged due
to
:
(a) I
ncorrect power supply, incorrect or improper
installationor use in contrast with the indications given
in the users manual supplied with the product, lack of
care during use and/or storage of the product.
(b) T
ampering with or unauthorised substitution of original
component parts or accessories with parts or
accessories not approved by the manufacturer or
carried out by unauthorised personnel, use of
non-original accessories or those regenerated by third
parties.
(c)
Accidents or damage that cannot be attributed to
Olivetti Lexikon, including, but not limited to, natural
events (floods, earthquakes,fire, etc.), negligenceand
willful damage.
(d) A
ccidents or damage that occurred during transport to
or fromthe purchaser(in this case,the carrierisliable),
or due to incorrect or inadequate packaging by the
purchaser.
3.
The guarantee does not cover parts in glass or light
bulbs
.
4.
Should the product require repair during the period of
guarantee, the purchaser must deliver the product,
complete with a copy of the purchase invoice or fiscal
receiptto the authorisedrepair centre. Transport ofthe
product to the repair centre is paid for and at the risk of
the purchaser.
The product will be returned to the purchaser as
requested by him or according to the procedure
established bytherepair centre, with the cost ofreturn
charged to the purchaser.
Toprevent damageduringtransport,not coveredby the
guarantee, the product should be repacked in its
original packaging.
5.
Repair(s) carried out during the guarantee period do
not modify the duration or expiry date of the same.
6.
The guarantee does not cover modifications for
adaptation to local power supply voltage or safety
requirements. Modifications of this type can affect the
correctfunctioningof the productand will invalidatethe
guarantee.
7.
In those parts where this guarantee does not conform
to local legislation, it shall be considered modified to
conform to such legislation.
8.
Up to the limits established by local legislation, this
guaranteeindicates the onlysolutions to thepurchaser
recognised by Olivetti Lexikon through the authorised
service network.
9.
Thisguaranteedoes notinany way limit the purchasers
rights as recognised by local legislation nor those
concerning the contract of sale between the purchaser
and the dealer.
An up-to-date list of Olivetti Lexikon addresses for
guarantee and technical problems on HW and drivers
is available at the following Internet address:
http://www.olivettilexikon.com/world/index.html
Page 37

PrintedinItaly
Olivetti Lexikon, S.p.A.
Documentazione
77, Via Jervis - 10015 Ivrea (Italy)
Part Number
204768 Y
Copyright © 1998, by Olivetti
All rights reserved
 Loading...