

Page 1

User's Manual
Ink Jet Colour Printer
Artjet 12
Page 2

Page 3

Contents
Introducing the Printer . . . . . . . . . . . . . . . . . . . . . . . . . . . . . . . . . . . . . . . . . . 1
Parts of the Printer . . . . . . . . . . . . . . . . . . . . . . . . . . . . . . . . . . . . . . . . . . . . . 1
Switching on and off of the Printer . . . . . . . . . . . . . . . . . . . . . . . . . . . . . . . . . 2
The Operator's Panel . . . . . . . . . . . . . . . . . . . . . . . . . . . . . . . . . . . . . . . . . . . 3
Printer statuses . . . . . . . . . . . . . . . . . . . . . . . . . . . . . . . . . . . . . . . . . . . . . 3
Button Functions . . . . . . . . . . . . . . . . . . . . . . . . . . . . . . . . . . . . . . . . . . . . 4
Printer Software . . . . . . . . . . . . . . . . . . . . . . . . . . . . . . . . . . . . . . . . . . . . . . . . 5
The Printer Monitor . . . . . . . . . . . . . . . . . . . . . . . . . . . . . . . . . . . . . . . . . . . . 6
Opening the Printer Monitor . . . . . . . . . . . . . . . . . . . . . . . . . . . . . . . . . . . . 7
Printer Properties . . . . . . . . . . . . . . . . . . . . . . . . . . . . . . . . . . . . . . . . . . . . . . 7
Opening Printer Properties . . . . . . . . . . . . . . . . . . . . . . . . . . . . . . . . . . . . . 8
Spool Manager for Windows 3.1/3.11 . . . . . . . . . . . . . . . . . . . . . . . . . . . . . . 9
Opening the Spool Manager . . . . . . . . . . . . . . . . . . . . . . . . . . . . . . . . . . . 9
On-line Help Guides . . . . . . . . . . . . . . . . . . . . . . . . . . . . . . . . . . . . . . . . . . 10
Accessing the on line help guide for the print driver . . . . . . . . . . . . . . . . . 10
Accessing the Troubleshooting on line help guide . . . . . . . . . . . . . . . . . . 12
The Print Head . . . . . . . . . . . . . . . . . . . . . . . . . . . . . . . . . . . . . . . . . . . . . . . . 13
Replacing the Print Head . . . . . . . . . . . . . . . . . . . . . . . . . . . . . . . . . . . . . . . 14
Completing Print Head Installation . . . . . . . . . . . . . . . . . . . . . . . . . . . . . . 16
Print Head Alignment . . . . . . . . . . . . . . . . . . . . . . . . . . . . . . . . . . . . . . . . . . 17
Print Head Care and Preservation . . . . . . . . . . . . . . . . . . . . . . . . . . . . . . . . 18
Cleaning the Print Head . . . . . . . . . . . . . . . . . . . . . . . . . . . . . . . . . . . . . . . . 18
Cleaning the Print Head Nozzles . . . . . . . . . . . . . . . . . . . . . . . . . . . . . . . 19
Manually Cleaning Print Head Nozzles and Electrical Contacts . . . . . . . 20
Cleaning the Print Head Carriage Electrical Contacts . . . . . . . . . . . . . . . 21
Print Test from Printer Monitor . . . . . . . . . . . . . . . . . . . . . . . . . . . . . . . . . . . 22
Printing on Common Paper . . . . . . . . . . . . . . . . . . . . . . . . . . . . . . . . . . . . . . 23
Loading the Paper . . . . . . . . . . . . . . . . . . . . . . . . . . . . . . . . . . . . . . . . . . . . 23
Loading the Paper in the Automatic Feeder . . . . . . . . . . . . . . . . . . . . . . . 23
Printer Settings . . . . . . . . . . . . . . . . . . . . . . . . . . . . . . . . . . . . . . . . . . . . . 24
Loading the Paper in the Manual Feeder . . . . . . . . . . . . . . . . . . . . . . . . . 25
Contents iii
Page 4

Printing on Other Supports . . . . . . . . . . . . . . . . . . . . . . . . . . . . . . . . . . . . . . 26
Printing on Photographic Paper . . . . . . . . . . . . . . . . . . . . . . . . . . . . . . . . . . 27
Printing on Transparent Paper . . . . . . . . . . . . . . . . . . . . . . . . . . . . . . . . . . 28
Printing on Coated Paper . . . . . . . . . . . . . . . . . . . . . . . . . . . . . . . . . . . . . . 29
Printing on Glossy Paper . . . . . . . . . . . . . . . . . . . . . . . . . . . . . . . . . . . . . . . 30
Printing on Tee Shirt Transfers . . . . . . . . . . . . . . . . . . . . . . . . . . . . . . . . . . 31
Printing Envelopes . . . . . . . . . . . . . . . . . . . . . . . . . . . . . . . . . . . . . . . . . . . . 32
Printing Cards . . . . . . . . . . . . . . . . . . . . . . . . . . . . . . . . . . . . . . . . . . . . . . . 33
Printing on Customised Paper Sizes . . . . . . . . . . . . . . . . . . . . . . . . . . . . . . 34
Printing on Banners . . . . . . . . . . . . . . . . . . . . . . . . . . . . . . . . . . . . . . . . . . . 35
Consumables . . . . . . . . . . . . . . . . . . . . . . . . . . . . . . . . . . . . . . . . . . . . . . . . . 37
Print Heads . . . . . . . . . . . . . . . . . . . . . . . . . . . . . . . . . . . . . . . . . . . . . . . 37
Print Supports . . . . . . . . . . . . . . . . . . . . . . . . . . . . . . . . . . . . . . . . . . . . . 37
Technical Specifications . . . . . . . . . . . . . . . . . . . . . . . . . . . . . . . . . . . . . . . . 38
iv Contents
Page 5
Introducing the Printer
G
Your machine is a colour inkjet printer for high quality graphic and text printing. It can print on
individual sheets, envelopes, labels, cards, glossy paper, coated paper, photographic paper,
transparencies, banners and transfers for tee-shirts.
Parts of the Printer
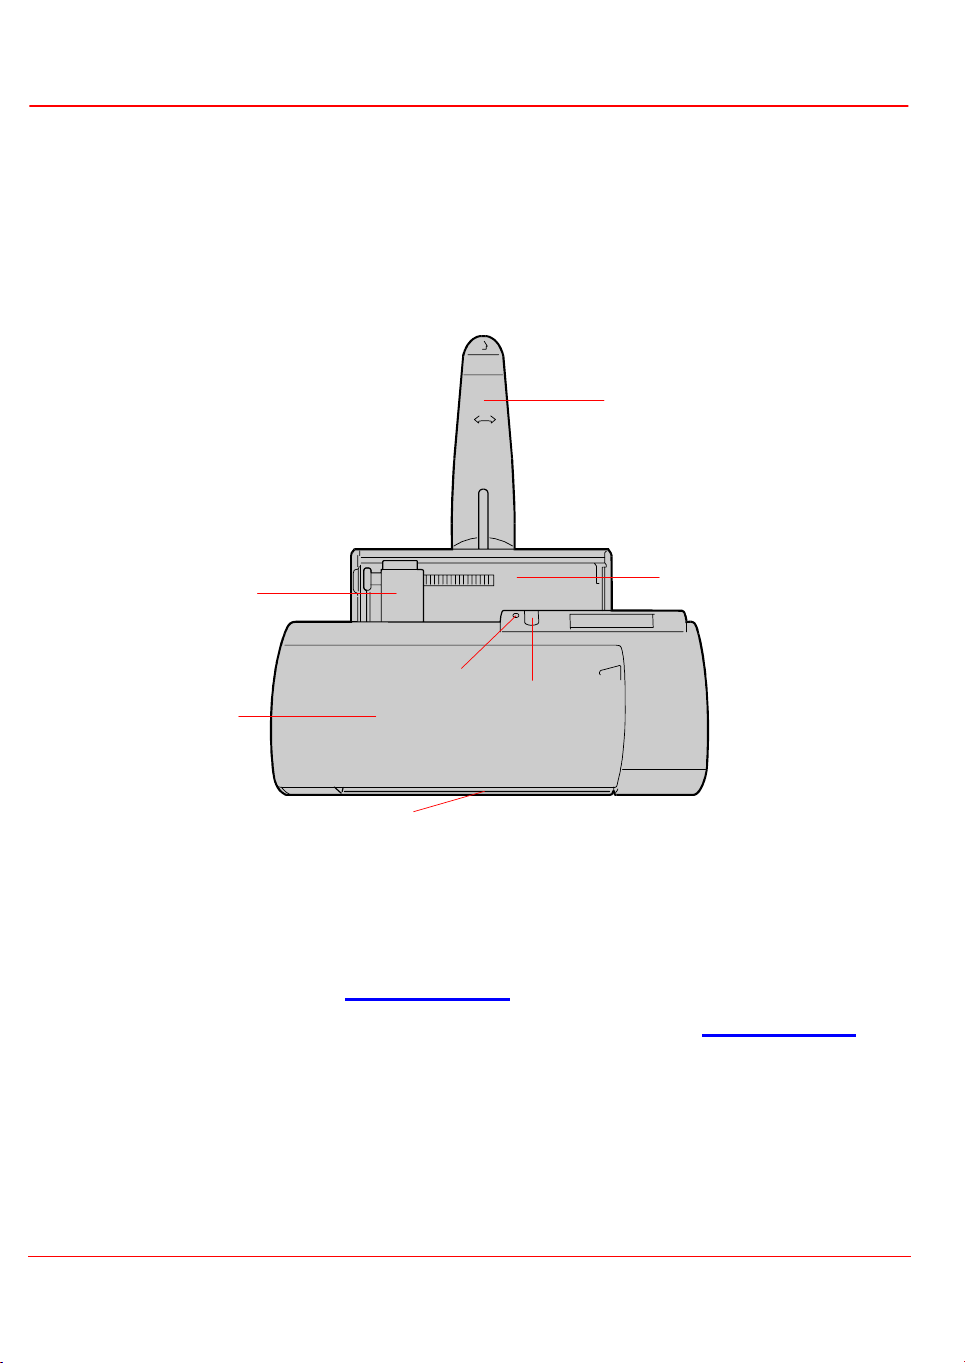
The figure below shows the front parts of the printer.
A
B
F
Paper support
A.
feeder.
Side paper guide
B.
Automatic feeder
C.
Operator panel button
D.
Indicator LED on the operator's panel
E.
section).
Front door
F.
jams.
Paper outlet
G.
: it supports the paper and any other materials loaded into the automatic sheet
: aligns sheets according to their width.
: inserts paper and special print supports.
Button Functions
: see
: allows access inside the machine to replace the print head or remove paper
: after documents are printed.
C
E
: indicates printer status (see
D
section.
Printer Statuses
Introducing the Printer 1
Page 6
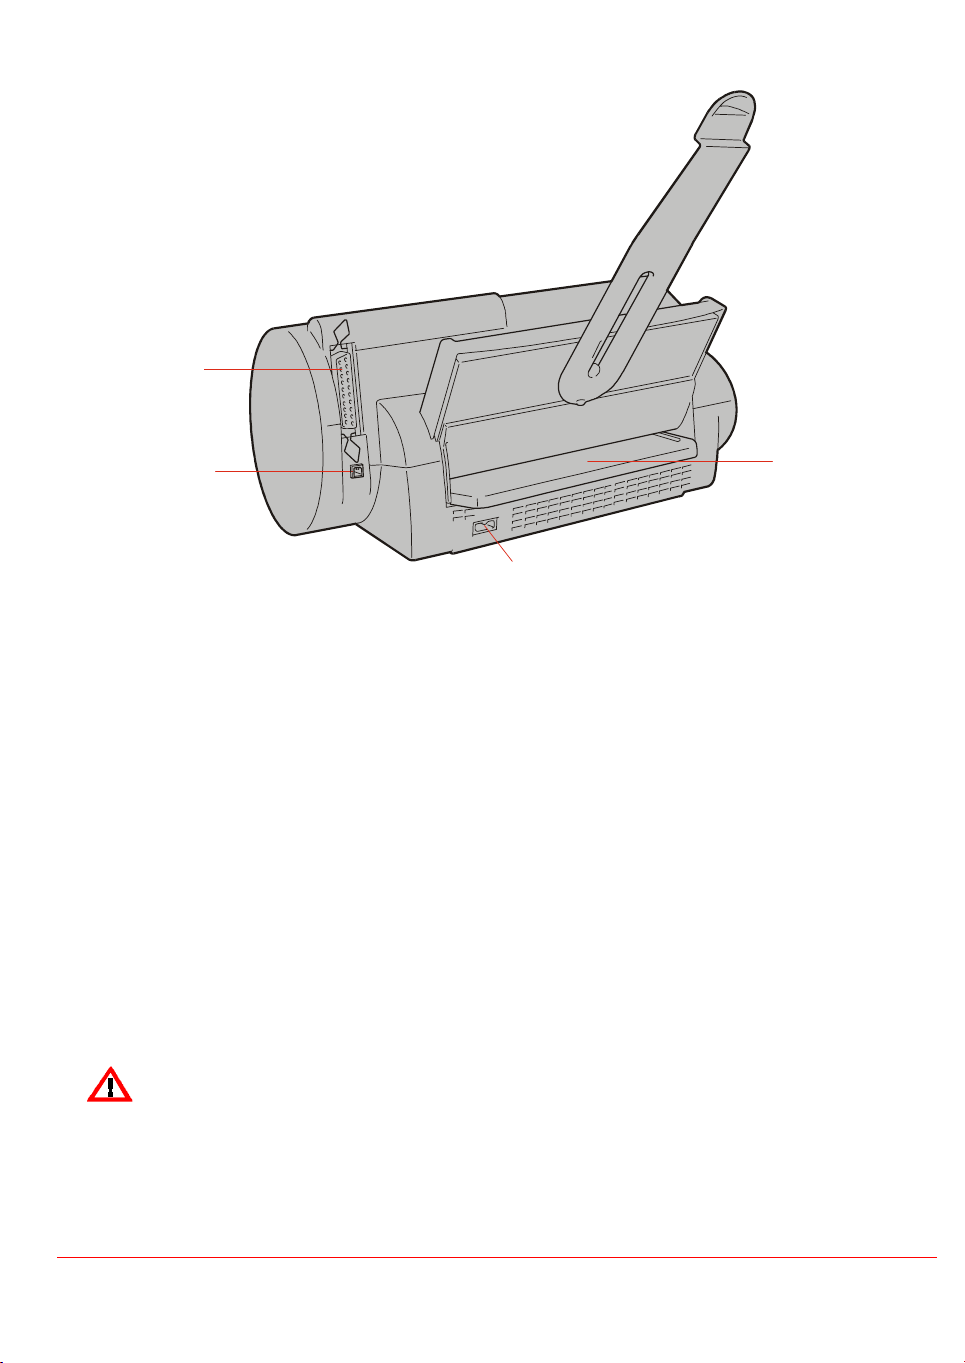
The following figure shows the parts that can be accessed from the rear of the printer.
H
J
K
Manual feeder
H.
: allows to insert special print supports or a single sheet into the machine.
Power cord connector
I.
Parallel communication port
J.
interface).
USB communication port
K.
Serial Bus interface).
: allows to connect the printer to mains power supply.
: allows connection and dialogue with the computer (parallel
: allows connection and dialogue with the computer (Universal
Switching on and off of the Printer
The printer has no on/off switch.
• It switches itself off automatically after being inactive for 4 minutes (by going into "Energy
Saving mode").
• It switches itself on automatically when receiving commands from the PC or data to print out.
Do not ever forget to unplug the printer when accessing its electronic internal parts.
2 Introducing the Printer
Page 7

The Operator's Panel
The Operator's panel on the printer features a button and an indicator LED.
Button operation depends on the status of the printer, which is indicated by the LED.
Printer statuses
STATUS Description Indicator LED
Standby The printer is on but the FW has not been
loaded yet.
Ready The printer is free and ready to receive
data to print out.
Energy Saving The printer, after being inactive for four
minutes, goes automatically into the
"energy saving" mode and remains ready
to receive data to print out.
Data receiving The printer is busy receiving data until the
printout is completed.
Error Error condition (no paper, paper jammed,
no print head, printer failure).
On
On
Off
Low frequency blinking
High frequency blinking
The printer goes from
The change from the
inactive for four minutes).
standby
ready
ready
to
energy saving
to
mode once the FW has been loaded.
mode is automatic (timeout driven; after being
Introducing the Printer 3
Page 8

Button Functions
The button functions depend on the printer mode:
Ready/Energy Saving
1.
mode:
• Pressing the button the first time moves the print head carriage to the
replacement
• Pressing the button the second time returns the print head carriage to its
Data Receiving
2.
• The button is inactive.
Error
3.
mode:
• Pressing the button once can cause:
a) Paper feeding by the automatic feeder (paper present).
b) Paper ejection, if the paper is stopped under the print head.
position.
mode:
print head
rest
position.
4 Introducing the Printer
Page 9

Printer Software
The printer is not operational before you install the software, which is contained in one of
the two CDs supplied with the machine.
After installation, described in the
the computer:
Printer Monitor
•
Printer Properties
•
Spool Manager for Windows 3.1x
•
The following
Operator Manual
•
This document, which you can consult from Acrobat Reader and
and page numbering)
Print driver help
•
context-driven, available from WinHelp
Troubleshooting
•
context-driven, available from WinHelp
guides
are also available:
Installation
folder, the following
applications
print
(with table of contents
are available on
Printer Software 5
Page 10
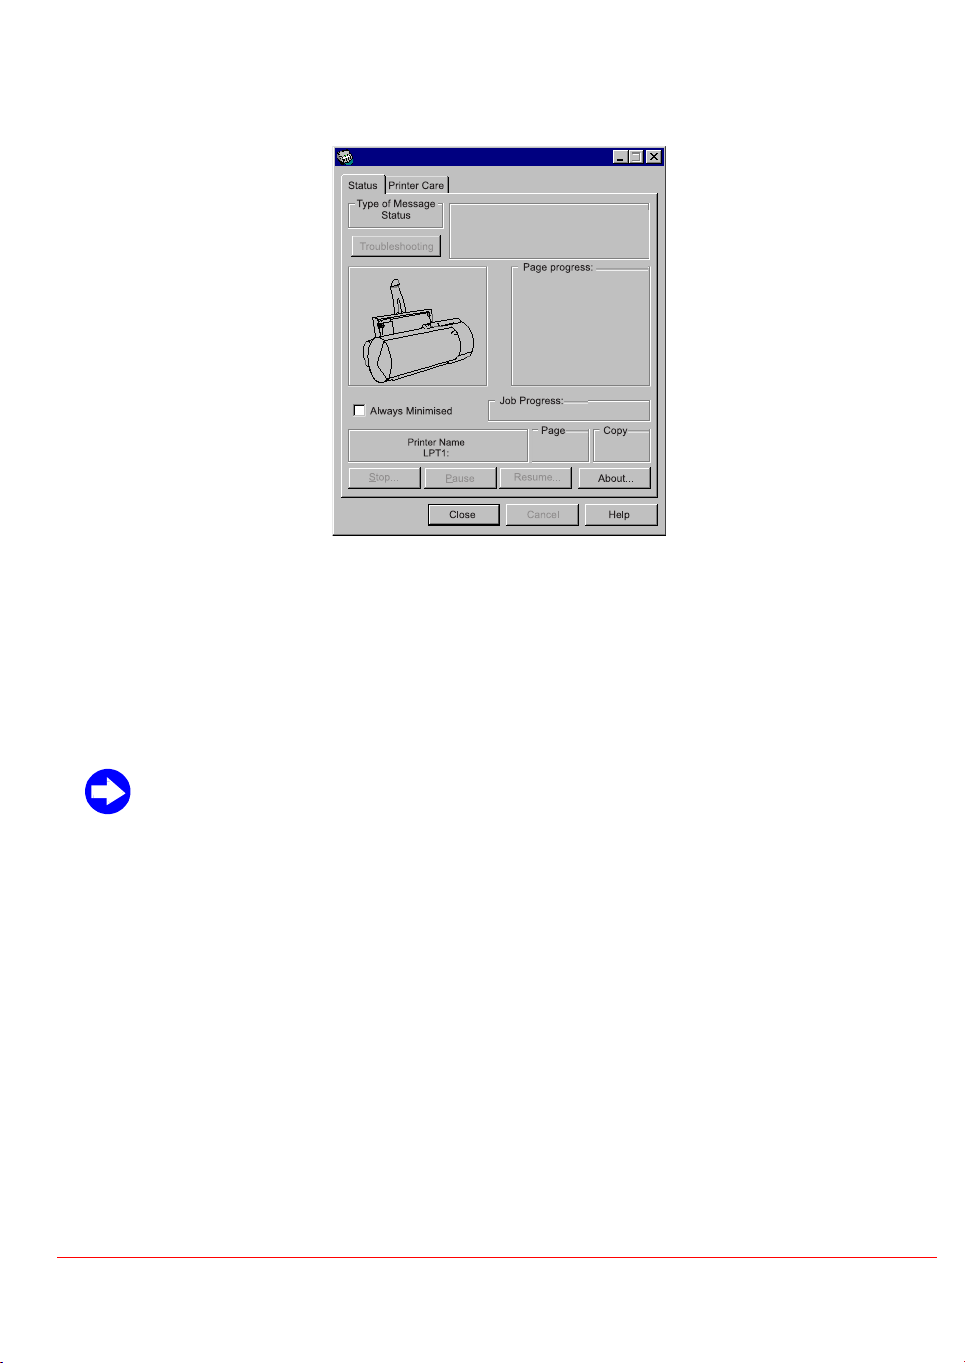
The Printer Monitor
The Printer monitor is displayed (or run minimized) when a print process is sent to the machine.
It comprises two tabs:
1. the Status tab
2. the Printer Care tab
Status tab
The
any error conditions.
If an error is signalled, click on the
page of the context-driven help which will help to solve the problem.
Printer Care tab
The
• Install, replace, align and clean the print head
• Print a demo and a test page
• Access the
See also the sections
allows to display the progress of an ongoing print process and it also indicates
Troubleshooting
displays the quantity of ink still available and it allows to:
Driver Help
Printer Monitor
Troubleshooting
and
sections of the
button of the
on-line help guides
Driver Help
.
Status tab
to open the
6 Printer Software
Page 11
Opening the Printer Monitor
In Windows 95/98/2000/NT
1. Click on
2. Click on the
3. Click on
In Windows 3.1/3.11
Double click on the
Start
and then on
“Printer_Name”
Printer Monitor
Printer Monitor
:
Programs
:
Printer Properties
Program group
icon in the
“Printer_Name”
Program group.
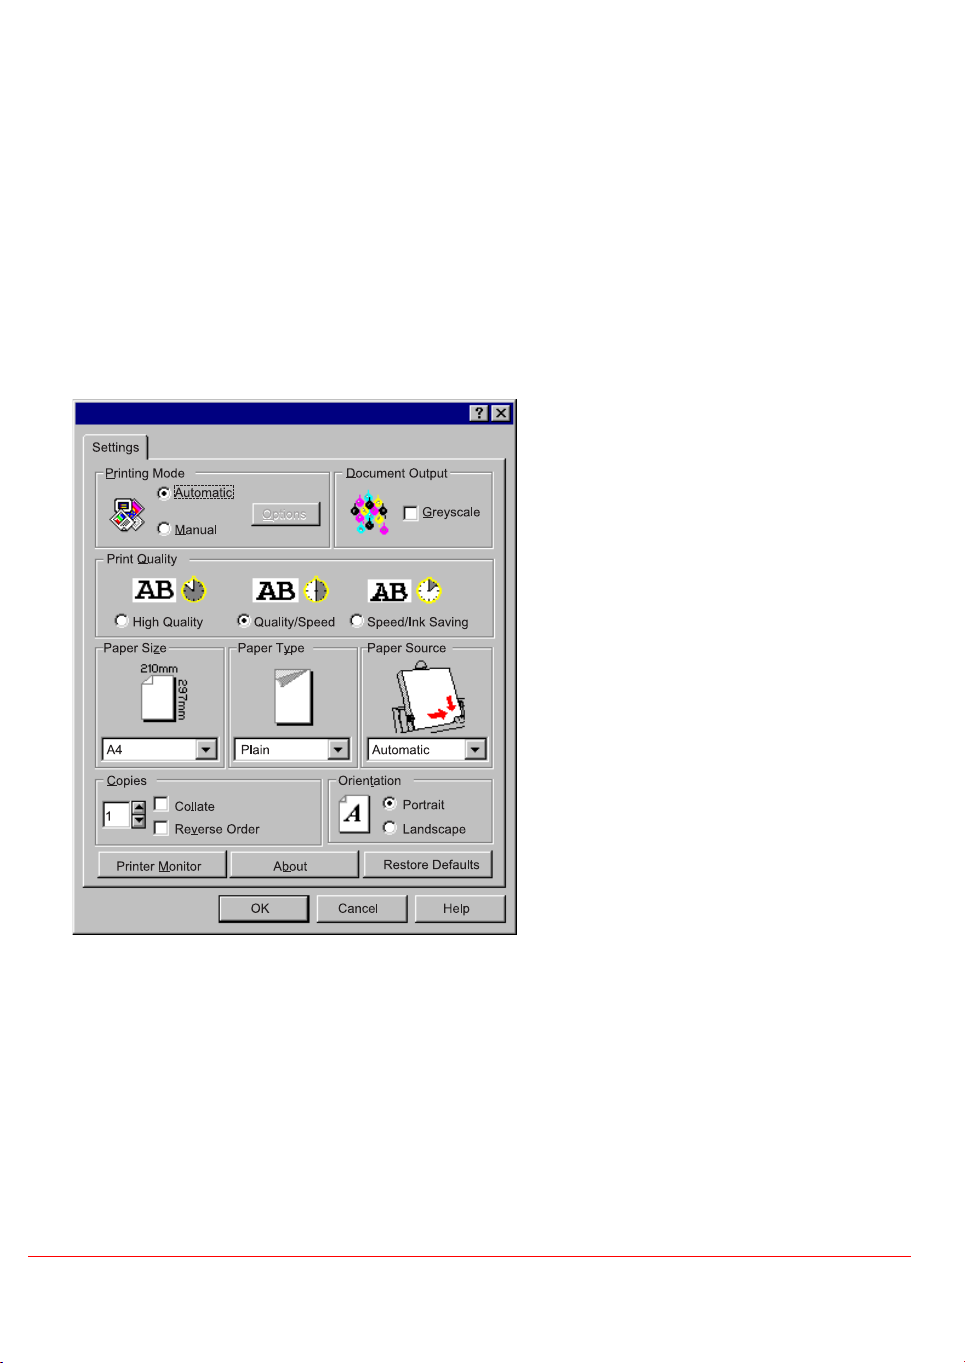
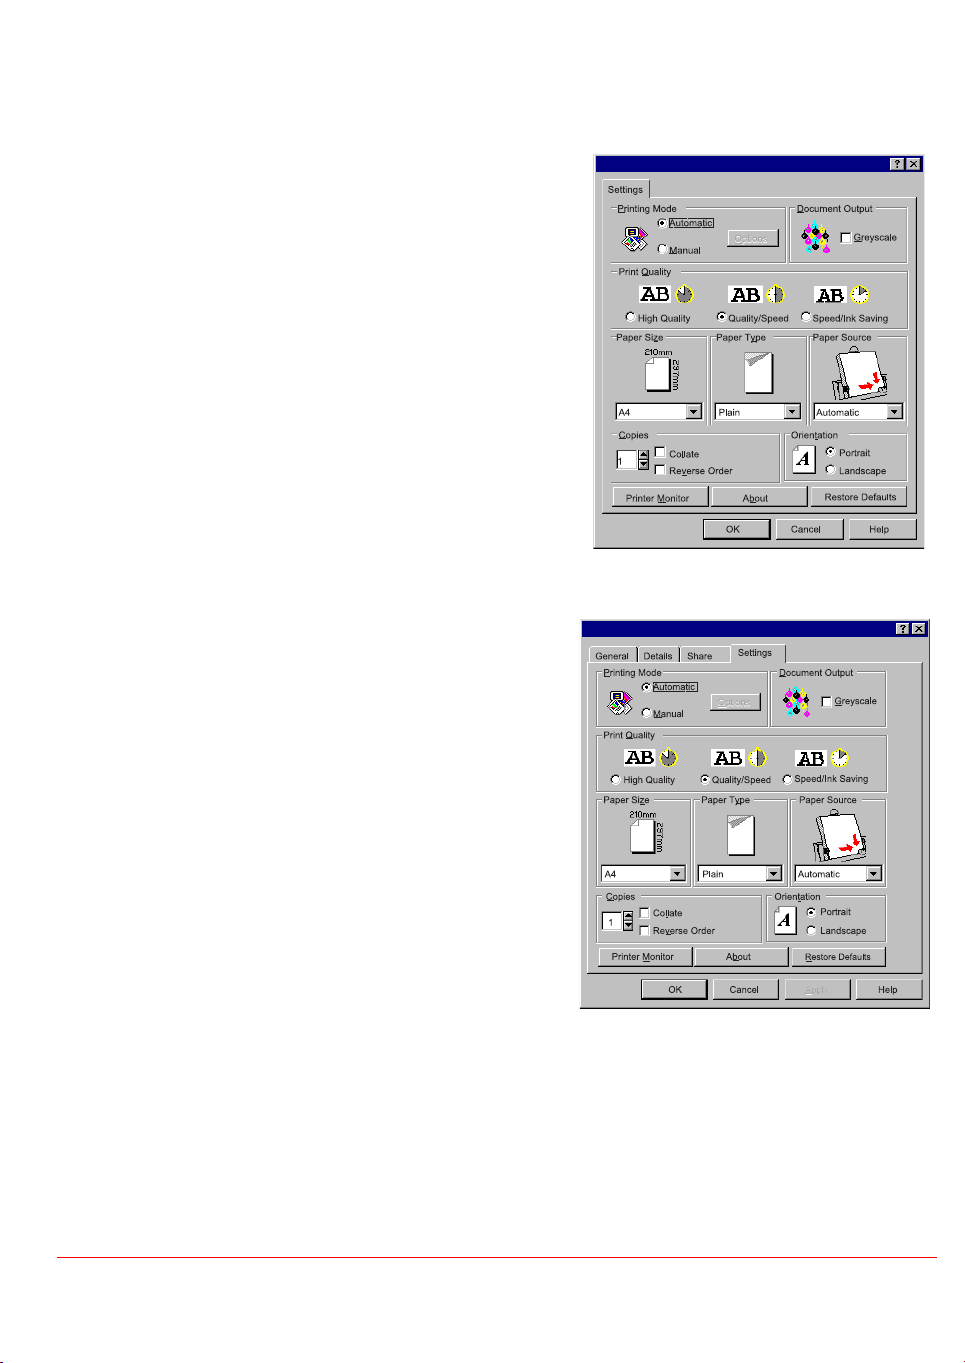
Settings
The
• define print quality
• adjust print colours and intensity
• select print supports and their size
• select the orientation of the printed page
• restore predefined settings.
card in the
Printer Properties
dialogue box allows to:
Printer Software 7
Page 12
Opening Printer Properties
Printer Properties can be opened from the application or from Windows.
Opening from the Application
Nearly all applications allow to open Printer Properties,
with the following procedure:
(or
File
menu of the application, select
printer
).
) button, depending on
1. From the
print
2. In the dialogue box that then opens, click on the
Properties (Set, Options
the application.
3. Modify settings values as needed.
Set
Opening from Windows
Printer Properties
Windows. In this case, the changed settings are
applied to the print processes of all applications
(unless they are changed in the application itself).
The opening procedure
is as follows:
1. Click on
Start
can be opened directly from
for Windows 95/98/2000/NT
and select
Settings
, then
Printers
.
Right click
2.
3. Click on
The opening procedure
instead is as follows:
1. Double click on the
2. Double click on the
3. Select la
on the printer icon.
Properties
Installed Printer
in the menu side bar menu.
for Windows 3.1/3.11
Control panel
Printers
icon.
icon.
and click on the
Set...
button.
8 Printer Software
Page 13
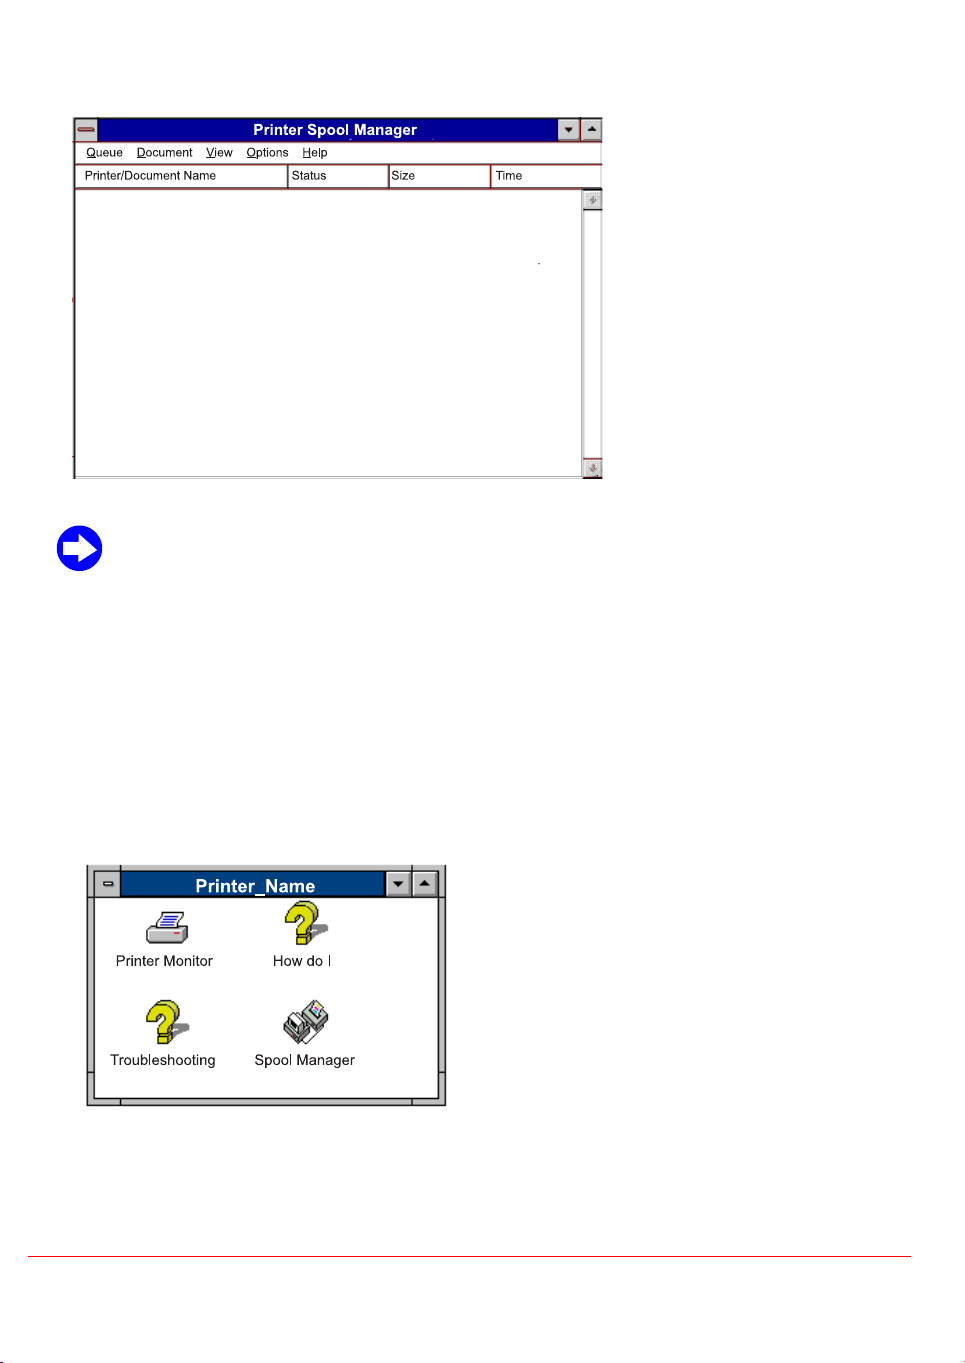
Spool Manager for Windows 3.1/3.11
Windows 95/98/2000 have their own Spool Manager (normally reached by double clicking
on the printer icon displayed on the task bar, on the bottom right side of the PC screen,
during printing jobs).
For Windows 3.1/3.11, the printer's software installs a specific Spool Manager, which improves
the performance of the standard (Windows 3.1/3.11) Print Manager and allows to:
• Cancel or interrupt print processes
• Display print processes in the queue
• Reinsert a print process in the queue
Opening the Spool Manager
1. Open the
2. Double click on the
3. Consult the
“Printer_Name”
Spool Manager
Spool Manager
Program group.
on-line help, clicking on the
icon.
Help
in the menu bar.
Printer Software 9
Page 14

On-line Help Guides
In addition to this manual, the following
On line help guide for the print driver
1.
Troubleshooting
2.
on line help guides
are available:
Accessing the on line help guide for the print driver
Direct access in Windows 95/98/2000/NT
1. Click on
2. Select
3. Click on the on-line help icon.
Programs
and then
Direct Access in Windows 3.1/3.11
1. Open the
“Printer_Name”
“Printer_Name”
Program group.
Double click on the
How do I
icon.
10 Printer Software
Page 15

Context-driven Access from the Driver Settings Tab
1. Open
Printer Properties
Opening Printer Properties
(see
).
2. Click on the?
or, select the parameter of the tab to be varied and press the F1 key on your computer's
keyboard
or (Windows 95/98/2000/NT only), select the parameter of the tab to be varied and click with
right button
the
or (Windows 95/98/2000/NT only), select the parameter of the tab to be varied, click on the
at the top right
button
at the bottom right-hand corner
of the mouse
of the tab, drag the ? on the selected parameter and click.
Context-driven Access from the Printer Monitor Tabs
1. Open the
2. Click on the ?
or, click on the
Printer Monitor
button
On line help guide button
at the bottom right, for each of the Printer Monitor tabs
Opening the Printer Monitor
(see
of the Printer Monitor
).
Printer Care tab
.
?
Printer Software 11
Page 16

Accessing the Troubleshooting on line help guide
Direct Access from Windows 95/98/2000/NT
1. Click on
2. Select
3. Click on the
Programs
and then
Troubleshooting
“Printer_Name”
icon
Direct Access from Windows 3.1/3.11
1. Open the
“Printer_Name”
Program group.
.
2. Double click on the
Troubleshooting
icon.
Context-driven Access from the Printer Monitor
1. Open the
2. Click on the
the
or, click on the
the first page of the Guide.
Printer Monitor
Troubleshooting button
problem associated to the error message displayed
Troubleshooting button
Opening the Printer Monitor
(see
of the Printer Monitor
of the Printer Monitor
).
Status tab
in the tab
Printer Care tab
, to be guided to solve
, to access
12 Printer Software
Page 17

The Print Head
The printer can use the colour print head, supplied with it, or the black one, which can be ordered
separately.
This chapter describes the following procedures:
Replacing the print head
•
Aligning the print head
•
Print head preservation
•
Cleaning nozzles automatically
•
Cleaning nozzles and print head contacts automatically
•
Cleaning the electrical contacts of the print head support
•
For best print results, never forget to
Installation
).
align the print head
Completing Print Head
(see
The Print Head 13
Page 18

Replacing the Print Head
When the print head has run out, or if you want to install a black print head instead of the colour
print head (or vice versa), you need to remove it from the printer.
To remove the print head from the printer:
1. Open the printer monitor
2. Click on the
3. Click on the
4. Open the printer lid, sliding it leftwards.
Printer Care tab
Change
Printer Care tab
.
button.
(see
1.
Opening the Printer Monitor
).
14 The Print Head
Page 19

5. Unlatch the print head, pushing on the latching lever (
upwards (3).
6. Remove the new print head from the package.
7. Gently remove the protective sticker from the print head nozzles and electrical contacts.
Take care not to touch the electrical contacts (gold plate) or the printing nozzles, and
do not set the print head down on them.
1, 2
). Extract the print head, pulling it
8. Insert the print head in its support (1) and snap it in (2): you will hear a clicking sound. Close
the printer lid, sliding it rightwards until it stops.
The Print Head 15
Page 20

Having installed the print head, the printer executes an initialization cycle that takes about
two minutes
.
9. To obtain the best printing quality, never forget to
print head installation
).
align the print head
(see also
Completing
Completing Print Head Installation
After installing a new print head, you always need to "notify" the printer's software, to obtain the
best possible print quality
Printer Care tab
To complete print head installation:
1. Open the Printer Monitor
2. Click on the
tab
.
3. Select the
New Head
for the installed print head
(the colour one in this
case).
.
Printer Care
button
and an
Printer Care tab
actual representation
Opening the Printer Monitor
(see
of ink level in the Printer Monitor
).
4. Run the
Print Head Alignment
procedure (
see below
).
16 The Print Head
Page 21

Print Head Alignment
The print head (black or colour) only
However, you can repeat the alignment operation to improve print quality, when it is no longer
satisfactory.
To align the print head:
1. Open the Printer Monitor
2. Load at least two sheets of paper into the printer (see
3. Click on the
tab
.
4. Click on the
Printer Care
Align
button.
Printer Care tab
needs to be aligned when installed for the first time
Opening the Printer Monitor
(see
Paper Loading
).
).
.
5. A confirmation message is displayed. Click on OK and follow the instructions displayed on the
tab.
(A series of three vertical bars - each marked by a number - is printed.
You need to choose the number corresponding to the three vertical bars with the best
alignment and type in the proposed dialogue box.
The result of the alignment is then printed.)
The Print Head 17
Page 22

Print Head Care and Preservation
• Keep the print heads in their sealed package until you need to use them.
• Before inserting the print head, remember to remove the protecting sticker.
• Take care not to get any ink on your clothes, because the ink is indelible.
DO NOT attempt to recharge the print head with ink: this would
print head and the printer.
• Do not shake the print head. If print quality is unsatisfactory, perform the cleaning operations
described in the
Cleaning the Print Head
section.
certainly damage
Cleaning the Print Head
The print head is automatically cleaned at regular intervals when the printer is on. This operation
keeps the print head's nozzles unclogged, to guarantee proper ink flow.
The automatic nozzle cleaning operation may fail to assure a satisfactory print quality and the
two following cases may occur:
1. missing dots or whole lines (characters and graphs not fully printed out), due to the clogging
of some print head nozzles
2. presence of ink streaks that "dirty" the printe pages, due to the accumulation of small
quantities of dust inside the printer.
In the first case (which could occur occasionally after the printer has been inactive for a rather
long time), the problem can be solved with the
Clean
function of the
In the second case, manually cleaning
or the electrical contacts of the print-head carriage
See also
Print Head Care and Preservation
Printer Care tab
.
the print head's nozzles and electrical contacts, and/
Print Head Nozzle Cleaning
, can eliminate the problem.
.
operation using the
the
18 The Print Head
Page 23

Cleaning the Print Head Nozzles
To clean the print head nozzles through the
1. Open the Printer Monitor
2. Click on the
tab
.
3. Click on the
The printer runs the print head
cleaning cycle: you will hear the
sound of the print head carriage
moving.
4. If you want to, at this point you can
run the
section), to check whether all nozzles
are clean.
If the nozzles are not yet clean,
repeat the cleaning operation.
5. If, after various attempts to clean the
nozzles, print quality is still not
satisfactory, remove the print head
from the printer, reinstall it and repeat
the nozzle cleaning cycle.
Printer Care
Clean
Print Test
button.
(see related
Printer Care tab
Clean
function of the
(see
1.
Printer Care tab
Opening the Printer Monitor
:
).
The Print Head 19
Page 24

Manually Cleaning Print Head Nozzles and Electrical Contacts
1. Following the procedure described in
head to be cleaned.
2. To clean the nozzles, moisten a paper tissue with distilled
water and drain any excess liquid.
Keeping the print head with the nozzles facing downwards, tap
it on the tissue pressing gently.
3. Repeat the operation several times in different places on the
tissue to clean the nozzles.
To loosen any ink clots, keep the moist tissue in contact with
the nozzle area for a few seconds. Then dry by tapping lightly.
4. Now clean the print head electrical contacts, using a lint-free
cloth, moistened with water. Wipe gently.
5. Reinsert the print head in the printer and shut the cover.
6. Repeat the
Print Test
.
Replacing the Print Head
, unlatch and extract the print
This cleaning operation MUST NOT be repeated systematically as it could damage the
print head. It should be considered SOLELY as a last resort before replacing the
COMPLETE print head.
20 The Print Head
Page 25

Cleaning the Print Head Carriage Electrical Contacts
If print quality is still not satisfactory even after the print head cleaning operations, clean also the
electrical contacts of the print head carriage.
1. Following the procedure described in
head from the carriage.
2. Disconnect the printer's power cord.
3. Clean the print head carriage contacts, using a clean, dry cloth. Wipe gently.
Replacing the Print Head
, unlatch and extract the print
4. Reinsert the print head in the printer and shut the lid.
If print quality is still unsatisfactory even after this last cleaning operation, replace the print head.
The Print Head 21
Page 26

Print Test from Printer Monitor
To run the print test from the Printer Monitor
1. Open the Printer Monitor
2. Click on the
tab
.
3. Click on the
The printer feeds a sheet of paper
and prints the nozzle test graph, a
series of horizontal lines, each
printed by the corresponding print
head nozzle.
4. Examine the nozzle test graph.
Ensure that the lines have no
breakes. A broken line indicates that
the corresponding nozzles are
clogged.
Printer Care
Print test
Printer Care tab
button.
Printer Care tab
Opening the Printer Monitor
(see
:
).
If the nozzles are clogged, you can run the
section).
Cleaning Print Head Nozzles
procedure (see related
22 The Print Head
Page 27

Printing on Common Paper
Loading the Paper
Paper can be loaded:
in the automatic feeder
1.
in the manual feeder
2.
this feeder takes precedence over those present in the automatic feeder
Loading the Paper in the Automatic Feeder
1. Pull the paper support fully rightward and rotate it
to the vertical position.
The paper support is optimised for standard
A4 and Letter paper formats
: you can load up to 50 sheets of ordinary paper
: you can use this option or insert a single sheet. The sheet inserted in
2. Move the side guide of the automatic feeder fully
leftward, keeping its lock pressed between your
thumb and index finger.
3. Carefully line up the sheets to be loaded.
4. Align the sheets to the right along the fixed line
and carefully insert them into the feeder until
they stop inside the printer.
Printing on Common Paper 23
Page 28

5. Keeping the lock of the moving guide pressed
between your thumb and index finger, move it
closer to the left edge of the sheets, without
blocking them.
Printer Settings
Check printer settings:
1. Open
2. Check the values of the set
3. Click on the OK button.
4. Start printing your document.
(*)
If you restore the default values of the parameters, the
Printer Properties
section.
parameters.
If you are colour printing on A4 size
paper, the optimal parameter values
are the default values, so just click
Restore Defaults (*)
on
set together with
Reverse Order
, following the instructions of the
.
for the
Copies
printed.
Opening Printer Properties
Print Quality Speed/Ink Saving
is
24 Printing on Common Paper
Page 29

Loading the Paper in the Manual Feeder
If you need to insert a series of sheets manually:
1. Ensure that
• Open
section.
• Select
• Click on the OK button.
2. Start printing your document.
Manual feeding
Printer Properties
Manual feeding
is selected in the
, following the instructions of the
.
Settings tab
of the printer driver:
Opening Printer Properties
3. A message in the
mode indicates that there is no paper
and the printer indicator LED is blinking
(more paper required).
Load the paper ensuring that the sheet
is perfectly positioned against the side
guide and against the driving rollers.
Push it in until it is "caught" by the
printer.
If you want to use the manual feeder
simply run the print job after loading the sheet (following the procedure described above).
Printer Monitor
for a single sheet
, when
Automatic feeding
is set,
Printing on Common Paper 25
Page 30

Printing on Other Supports
The printer can use different types of print supports, with different formats.
This chapter described the following procedures:
Printing on photographic paper
•
calendars, certificates, artistic graphics
Printing on transparent paper
•
projector
, to obtain excellent quality photographs, customised
, to make outstanding presentations with an overhead
Printing on glossy paper
•
colours, of photographic quality
Printing on coated paper
•
Printing transfers
•
Printing envelopes
•
Printing cards of various kinds
•
folders
Printing on customised paper formats
•
Printing on banners
•
, to obtain transfers for tee shirts, mouse pads, umbrellas
to obtain prints with vivid, brilliant and clearly distinguished
, to obtain high quality colour images, "computer art"
, to be loaded into the automatic feeder for address printing
, for season's greetings, place holders, menus, wine lists,
, if you want to print on non-standard paper formats
, to obtain panoramic photographs, calendars, coloured ornaments.
26 Printing on Other Supports
Page 31

Printing on Photographic Paper
1. Load up to 5 sheets of photographic paper in the automatic feeder, aligning them to the right
against the fixed guide.
2. Ensure that photographic paper parameters are selected in the Settings tab of the printer
driver:
• Open
• Select
• Click on the OK button of the
3. Start printing your document.
Printer properties
section.
Photographic Paper
Typ e
.
Settings tab
.
, following the instructions of the
Opening Printer Properties
Remove the document before printing other copies, or other types of documents, and let it
dry thoroughly aside, for best print quality.
Printing on Other Supports 27
Page 32

Printing on Transparent Paper
1. Load up to 5 sheets of
against the fixed guide.
2. Ensure that transparent paper parameters are set in Settings tab of the printer driver:
• Open
• Select
• Click on the OK button of the
Printer properties
section.
Transparent Paper
Typ e
.
Settings tab.
transparent
, following the instructions of the
paper in the automatic feeder, aligning it to the right
Opening Printer Properties
3. Start printing your document.
Remove the document before
printing other copies, or other
document types, and let it dry
thoroughly aside, for best print
quality.
28 Printing on Other Supports
Page 33

Printing on Coated Paper
1. Load up to 30 sheets of
against the fixed guide.
2. Ensure that coated paper parameters are set in the Settings tab of the printer driver:
• Open
• Select
• Click on the OK button of the
Printer properties
section.
Coated Paper Type
Settings tab.
coated
paper in the automatic feeder, aligning them to the right
, following the instructions in the
.
Opening Printer Properties
3. Start printing your document.
Remove the document before
printing other copies, or other
document types, and let it dry
thoroughly aside, for best print
quality.
Printing on Other Supports 29
Page 34

Printing on Glossy Paper
1. Load up to 5 sheets sheet of
right against the fixed guide.
2. Ensure that glossy paper parameters are set in the Settings tab of the printer driver:
• Open
• Select
• Click on the OK button of the
Printer properties
section.
Glossy Paper Type
Settings tab
.
glossy
, following the instructions of the
paper into the automatic feeder, aligning them to the
.
Opening Printer Properties
3. Start printing your document.
Remove the document before
printing other copies, or other
document types, and let it dry
thoroughly aside, for best print
quality.
30 Printing on Other Supports
Page 35

Printing on Tee Shirt Transfers
You can print images on cloth, with hot transfer from a special print support. Request hot transfer
paper from your retailer or purchase it in the best office or computer supply stores.
1. Load a transfer into the manual feeder.
Ensure that the transfer is perfectly
aligned in between the side guide and
against the driving rollers.
Push it all the way in until it is "caught" by
the printer.
The side to be printed must face
upwards.
2. Ensure that transfer parameters are selected in the Settings tab of the printer driver:
• Open
• Select
• Select
• Click on the OK button of the
3. Start printing.
4. Transfer the image onto the tee
shirt, following the instructions
enclosed with the transfers.
Printer properties
section.
Manual Paper
Source
Typ e
Settings tab
.
Transfer Paper
.
, following the instructions of the
.
Opening Printer Properties
Printing on Other Supports 31
Page 36

Printing Envelopes
.
envelopes
Envelope
in the automatic feeder, aligning them to the right with the longer
, following the instructions of the
Opening Printer Properties
1. Load up to five
side against the fixed guide (the envelope closing edge must be oriented down and to the
left).
2. Ensure that envelope parameters are selected in the Settings tab of the printer driver:
• Open
• Select your
Printer properties
section.
Format
Paper type changes
automatically from the
previously set one to that of
the envelopes.
• Click on the OK button of the
Settings tab.
3. Start printing your envelope(s).
32 Printing on Other Supports
Page 37

Printing Cards
1. Load up to ten
against the fixed guide.
2. Ensure that card parameters are selected in the Settings tab of the printer driver:
• Open
section.
• Select your
Paper Size
• Click on the OK button of the
Settings tab.
cards
into the automatic feeder, aligning them to the right with the longer side
Printer properties
card
's
.
, following the instructions of the
Opening Printer Properties
3. Start printing your card(s).
Printing on Other Supports 33
Page 38

Printing on Customised Paper Sizes
1. Load up to 50 sheets of ordinary paper in the automatic feeder, aligning it to the right against
the fixed guide.
2. In the Settings tab of the printer driver select the parameters for the customised paper size.
• Open
• Open the list of paper sizes by
• Click on the
• The dialogue box shown here
Printer properties
section.
clicking on the box.
User Defined
size.
will open.
Type the width and height for
your paper size.
, following the instructions of the
Opening Printer Properties
3. Click on the OK button of the Settings tab.
34 Printing on Other Supports
Page 39

Printing on Banners
The printer can handle continuous paper up to a length of one and a half meters (max 5
A4 sheets). However, in order to use the banners properly, your application must be able
to handle them too.
1. Ensure that banner parameters are selected in the Settings tab of the printer driver, and
specifically:
• Open
• Select
• Click on the OK button of the
2. Ready the continuous feed paper to be inserted into the printer:
Printer properties
section.
Banner
Settings tab.
, following the instructions of the
Paper Source.
Opening Printer Properties
• From the paper ream, rip out the number of sheets required to print the banner (up to 5 A4
size sheets).
• Tear away the perforated side strips, if there are any.
• Separate the sheets so as to prevent possible jams in the printer.
Printing on Other Supports 35
Page 40

3. Insert the starting edge of the banner
into the manual feeder.
Ensure that the banner is perfectly
aligned between the side guide and
against the driving rollers.
Push it all the way in until it is "caught"
by the printer.
Il nome file non è valido. The side
of the banner to be printed is the
one facing upwards.
4. Start printing your banner.
Continuous form printing takes a long time; it will require several minutes to
complete.
36 Printing on Other Supports
Page 41

Consumables
Olivetti consumables can be purchased in your local point of sale or from authorised Olivetti
dealer nearest you.
For information about accessories, you can call Olivetti Lexicon dealers directly, in individual
countries.
Print Heads
Print heads can be ordered with the following part numbers:
Type Part number
XP11
: black single-block print head, normal capacity
XP01
: black siingle-block print head, high capacity
XP13
: 4-colour single-block print head, normal capacity
XP03
: 4-colour single-block print head, high capacity
B0288 Q
B0217 G
B0315 A
B0261 L
We recommend you order the
B0251 J together with the print heads.
Garage
(print head container for periods of disuse) code
Print Supports
In order to obtain the best printing quality, both colour and black and white, use the print supports
that can be ordered with the following part numbers:
Type Part number
Olivetti Lexikon common paper
Olivetti Lexikon JP High Resolution coated paper
Olivetti Lexikon JP Premium High Resolution coated paper
Olivetti Lexikon JP High Resolution Transparencies
Olivetti Lexikon Photo Glossy (polyester) paper
Olivetti Lexikon JP Premium paper
Olivetti Lexikon JP Iron-on transfers
Olivetti Lexikon sticker labels
Olivetti Lexikon Business Cards
Olivetti Lexikon Greeting Cards
Olivetti Lexikon audio cassette cards
B0187 T
B0093 Y
B0249 Y
B0036 W
B0035 V
B0090 H
B0094 Z
B0185 Z
B0177 G
B0175 E
B0176 F
Consumables 37
Page 42

Technical Specifications
Printing Technique
Bubble ink jet, with waterproof ink.
Print Head
- 4-colour
- black
Printing Speed
Up to 7 pages per minute (ppm) with black ink print head, depending on the print mode, the
application program and/or computers used.
Paper Handling
Automatic (Automatic sheet feeder)
Manual
Automatic Feeder Capacity
2
• up to 50 sheets with 80 g/m
• up to 30 sheets of coated paper
• up to 10 cards with 100 g/m
• 1 sheet with weight > 90 g/m
• up to 5 sheets of glossy paper
• up to 5 transparent sheets
• up to 5 sheets of photographic paper
• up to 5 envelopes with 80 g/m
weight
2
weight
2
2
weight
Paper Types for Automatic Feeder
• allowed ordinary paper:64-120 g/m
recommended ordinary paper:70-90 g/m
• allowed envelopes:75-100 g/m
recommended envelopes:80 g/m
• allowed note cards:100-200 g/m
recommended note cards:100-135 g/m
• allowed continuous forms:70-80 g/m
recommended continuous forms:75 g/m
:
2
2
2
2
2
2
2
2
• Allowed transparencies (thickness):90-125 µm
Recommended transparencies (thickness):100-120 µm
• Iron-on transfers (for Tee shirts)
38 Technical Specifications
Page 43

Paper Sizes:
Individual Sheets
A4 (210 mm x 297 mm)
A5 (148.5 mm x 210 mm)
Letter (216 mm x 279.4 mm)
Legal (216 mm x 355.6 mm)
Executive (184 mm x 267 mm)
Cards
:
101,6 mm x 152.4 mm
127 mm x 203.2 mm
A6 (105 mm x 148.5 mm)
:
Envelopes
C5 (162 mm x 228.6 mm)
US C#10 (104.7 mm x 241.3 mm)
C6 (114 mm x 162 mm)
B5 (176 mm x 250 mm)
B6 (125 mm x 176 mm)
DL (110 mm x 220 mm)
:
Print Supports:
Ordinary paper
Special photographic paper
Glossy paper
Coated paper
Hot transfers for tee shirts
Envelopes
Sheet width:
- automatic feeder : 216 mm max
- manual feeder: 218 mm max
Graphic density:
High quality: up to 1200 x 1200 dpi
Quality / Speed: 600 x 600 dpi
Speed / Savings: 300 x 600 dpi
Interface:
Parallel (Centronics) and USB (Universal
Serial Bus)
Environmental Operating Conditions:
Temperature: 15 to 35 °C
Relative humidity: 20%-80%
Product certification:
USA and Canada
:
Electrical Data:
- 115 - 120 V +/- 10%; 50-60 Hz
- 220-240 V +6% -10%; 50-60 Hz
Physical characteristics:
Printer in operating condition
Height:
Width:
Depth:
Weight:
Print driver:
Operation in Windows 3.1x/95/98/2000/NT
operating system
Noise levels:
46 dB (High quality)
EU
:
:
Safety Standards Compliance:
cCSAus
Electromagnetic Compatibility:
FCC part 15 Class B Certified
Safety Standards Compliance:
- CE
- EN 60950 + A1, A2, A3, A4
- GS-TÜV
Electromagnetic Compatibility:
- CE
- EN 55022 Class B
- EN 50082-1 1997
- EN 61000-3-2
Technical Specifications 39
 Loading...