

Olimpia splendid CLIMA 16, CLIMA 16HP Maintenance Manual
Climatizzatore
Minisplit
Climatiseur
Minisplit
Minisplit
air conditioner
Klimaanlage
Minisplit
Climatizador
Minisplit
Minisplit
airconditioner
Istruzioni
per l’installazione,
uso e manutenzione
Instructions
pour l’installation,
l’emploi et l’entretien
Instructions
for installation,
use and maintenance
Handbuch
für Installation,
Gebrauch und Wartung
Instrucciones
para la instalación,
uso y mantenimiento
Aanwijzingen
voor de installatie,
het gebruik en het onderhoud

2
INTRODUZIONE
Vi ringraziamo per la fiducia
che ci avete accordato con
l’acquisto del Vostro
climatizzatore. Siamo certi che
avete operato una scelta giusta
perché siete entrati in possesso
di uno dei più moderni e raffinati
climatizzatori presenti sul
mercato. Le istruzioni che
seguiranno, Vi
permetteranno di sfruttare
appieno le qualità del Vostro
apparecchio. Seguitele quindi
con molta attenzione
attenendoVi scrupolosamente
alle indicazioni e soprattutto alle
avvertenze in modo da garantir-
Vi un’estate ricca del miglior
comfort, indispensabile per il
Vostro benessere.
INTRODUCTION
Merci de la confiance que vous
avez bien voulu nous accorder en
achetant votre climatiseur. Nous
sommes certains que vous avez
fait le bon choix car vous avez
maintenant un des climatiseurs les
plus modernes et raffinés que le
marche propose. Les
instructions contenues dans ce
manuel vous permettront
d’exploiter au mieux les qualités
de votre appareil. Suivez-les
attentivement et respectez
scrupuleusement les indications
et surtout les recommandations:
vous aurez ainsi la garantie d’un
été riche du meilleur confort,
indispensable à votre
bien-être.
FOREWORD
Congratulations. Of all the air
conditioners you could have
chosen, you chose our product.
We know this is a good choice
because it has made you the
proud owner of one of the most
modern, newest design air
conditioners available on the
market. The instructions in this
booklet will help you take full
advantage of everything this
machine can do. Read it carefully
and follow the instructions,
especially the “CAUTIONS”. This
way your summer will be much
more comfortable with the benefit
of cool air from your new
air conditioner.
VORWORT
Wir danken Ihnen für das
Vertrauen, das Sie uns durch
den Kauf des Klimagerätes
entgegengebracht haben.
Wir sind sicher, daß Sie richtig
gewählt haben, denn jetzt besitzen
Sie eines der modernsten und
praktischsten Klimageräte, die der
Markt zu bieten hat. Lesen Sie die
folgenden Anleitungen durch,
bevor Sie das Gerät benutzen.
Beachten Sie alle Hinweise, damit
Ihnen ein angenehmer,
komfortabler Sommer garantiert
ist, den Sie für Ihr Wohlbefinden
verdient haben.
INTRODUCCION
En primer lugar queremos
agradecerles la confianza
depositada en nosotros con la
compra de su acondicionador.
Podemos afirmar sin lugar a
dudas que han efectuado una
elección acertada, ya que han
adquirido uno de los más
modernos y refinados
acondicionadores de aire
presentes en el mercado. Las
instrucciones que siguen, les
permitirán aprovechar al máximo
las cualidades del aparato. Les
aconsejamos por lo tanto
respetarlas escrupulosamente
como así también observar
atentamente las advertencias
dadas, garantizándose de este
modo un verano rico del máximo
confort, indispensable
para su bienestar.
VOORWOORD
Wij danken u voor het
vertrouwen om te kiezen voor
onze airconditioner.
Wij zijn ervan overtuigd dat u de
juiste keuze hebt gemaakt. U
bent nu in het bezit van een zeer
moderne en praktische
airconditioner. Leest u deze
handleiding aandachtig door
alvorens het apparaat te
gebruiken. Volgt u nauwkeurig
de aanwijzigingen zodat u een
aangename koele zomer
tegemoet gaat met uw
airconditioner.
3
11
4
6
1
3
7
5
2
9
8
10
Fig. 1
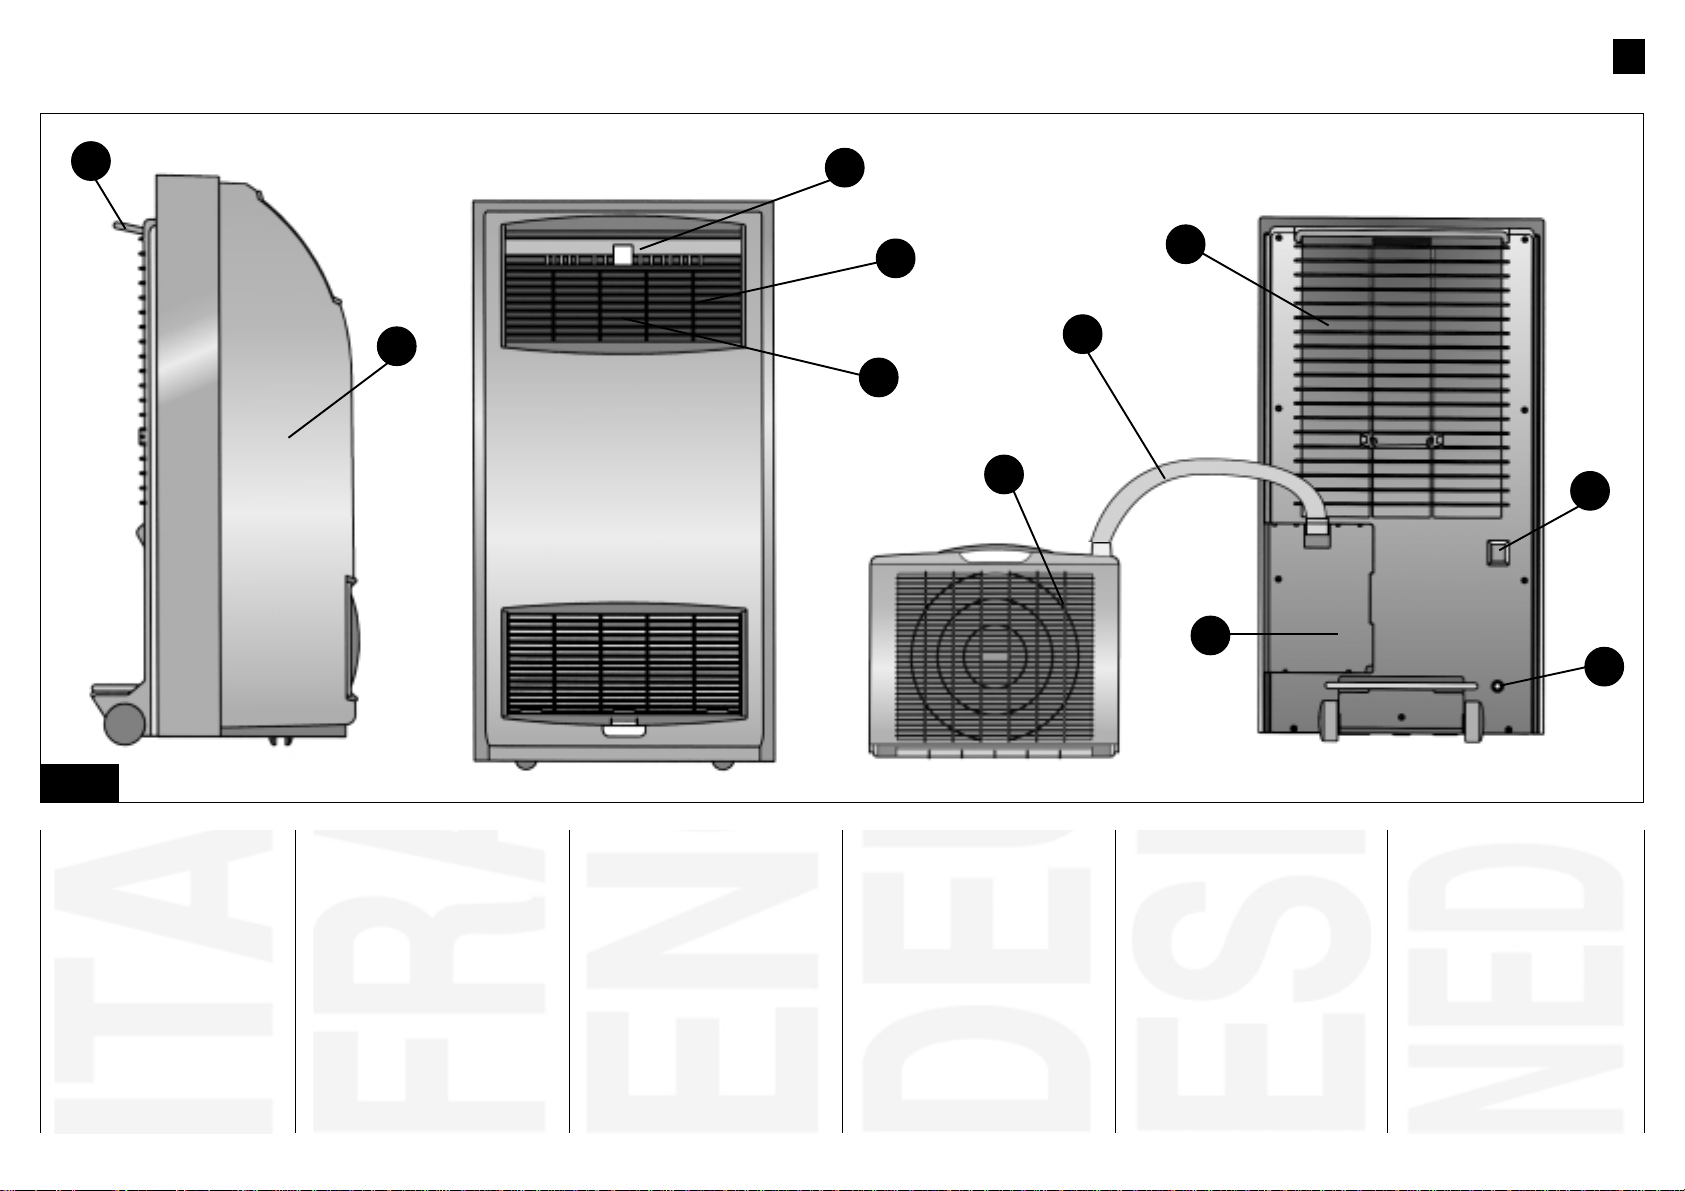
IDENTIFICAZIONE DELLE PARTI PRINCIPALI (Fig. 1)
1 - Unità interna.
2 - Unità esterna.
3 - Linea flessibile di collegamento.
4 - Pannello comandi.
5 - Griglia uscita aria.
6 - Sistema di regolazione flusso
aria.
7 - Filtro aria.
8 - Sportello di copertura attacchi
rapidi.
9 - Tasto di accensione generale.
10 - Tappo e raccordo per svuotamento completo dell'acqua di
condensa.
11 - Maniglia di trasporto.
IDENTIFICATION DES PRINCIPALES
PARTIES (Fig. 1)
1 - Unité intérieure.
2 - Unité extérieure.
3 - Raccord flexible de jonction.
4 - Panneau des commandes.
5 - Grille de sortie d’air.
6 - Dispositif de réglage du flux d’air.
7 - Filtre à air.
8 - Couvercle des prises rapides.
9 - Touche d’allumage géneral.
10 - Bouchon et raccord de vidange
totale de l’eau de condensation.
11 - Poignée de transport.
LIST OF MAIN COMPONENTS (Fig. 1)
1 - Inside unit.
2 - Outside unit.
3 - Connecting hose.
4 - Control panel.
5 - Air outlet grille.
6 - Air flow adjustment system.
7 - Air filter.
8 - Cover for quick connections.
9 - ON/OFF switch.
10 - Moisture emptying tube and plug.
11 - Carrying handle.
BESCHREIBUNG DER GERÄTETEILE (Abb. 1)
1 - Innengerät.
2 - Außengerät.
3 - Verbindungsschlauch.
4 - Bedienblende.
5 - Gitterabdeckung Luftauslaß.
6 - Luftstromregel-system.
7 - Luftfilter.
8 - Abdeckblende Schnellverbinder.
9 - Hauptschalter.
10 - Ablaßstöpsel für Kondenswasser.
11 - Tragegriff.
IDENTIFICACION DE LAS PARTES
(Fig. 1)
1 - Unidad interna.
2 - Unidad externa.
3 - Racor flexible de conexión.
4 - Panel de mandos.
5 - Rejilla de salida del aire.
6 - Sistema de regulación del caudal
del aire.
7 - Filtro aire.
8 - Puerta de protección de conexiones
rápidas.
9 - Interruptor de encendido general.
10 - Tapón y racor para la evacuación
completa del agua de condensación.
11 - Manilla de transporte.
ONDERDELENLIJST (Fig. 1)
1 - Binnenunit
2 - Buitenunit
3 - VerbindinWgsslang
4 - Bedieningspaneel functie
5 - Gekoelde lucht rooster
6 - instelling uitblaasrichting
7 - Luchtfilter
8 - Afdekplaat koppelingen
9 - Aan/uit schakelaar
10 - Afsluitdop condenswater
11 - Handgreep.

4
AVVERTENZE
• Assicuratevi che, tende o altri oggetti, non ostruiscano il filtro di aspirazione dell’aria posto sullo schienale del climatizzatore.
• Collegare il climatizzatore esclusivamente a prese elettriche dotate di
messa a terra.
• Per garantire una buona efficienza
del climatizzatore eseguite almeno
una volta all’anno una pulizia interna
rivolgendoVi ad un centro di assistenza.
• Non ostruite il flusso dell’aria nella
unità esterna ponendola troppo vicino a muri o vetri.
• Evitare di curvare o torcere eccessivamente il tubo di collegamento tra
le due unità.
• Il totale arresto del climatizzatore,
nonostante vi sia la normale alimentazione elettrica, può essere dovuto
all'intervento di una sicurezza interna che impedisce la fuoriuscita di
acqua. Prima di chiamare il centro
assistenza provate a drenare l'acqua contenuta nel CLIMATIZZATORE togliendo il tappo apposito (Fig.
1). Se l'inconveniente dovesse
riverificarsi fate controllare il Vs. climatizzatore da un tecnico specializzato.
• L'apparecchio non deve essere
utilizzato in locali adibiti a lavanderie.
• Installare gli apparecchi solo in
locali asciutti (protezione IP 20).
• Gli apparecchi non possono essere messi in funzione dove vi
sono materiali, vapori o liquidi pericolosi.
ATTENZIONE: Pericolo di esplosione od incendio.
• Installare gli apparecchi su superfici piane.
• Allorchè si decida di non utilizzare più un apparecchio di questo
tipo, si raccomanda di renderlo
inoperante tagliando il cavo di
alimentazione, dopo aver stac-
RECOMMANDATIONS
• Assurez-vous que les rideaux ou tout
autre objet ne bouchent pas le filtre
d’aspiration de l’air placé au dos du
climatiseur.
• Branchez le climatiseur uniquement
à des prises avec raccordement à la
terre.
• Pour un fonctionnement optimal de
votre climatiseur, il est important de
faire nettoyer l’intérieur de l’appareil
au moins une fois par an, par un centre
d’assistance specialisé.
• Ne gênez pas debit de l’air de l’unité
exterieure en la mettant trop pres de
murs et vitres.
• Evitez que les raccordements entre
les deux unités soit tordu ou forme des
coudes inutiles.
• Si le CLIMATISEUR s’arrête
complétement, malgré une alimentation électrique normale, ceci est peut
être dû à l’activation d’une sécurité
interne qui empêche l’eau de s’évacuer.
Avant d’appeler le centre d’assistance,
essayer de drainer l’eau contenue dans
le CLIMATISEUR en enlevant le
bouchon spécial (Fig. 1). Si
l’inconvénient se reproduit, faites contrôler l’appareil par un technicien
spécialisé.
• L'appareil ne doit pas être utilisé
dans les buanderies.
• Installer les appareils dans des
locaux secs uniquement (protection
IP 20).
• Les appareils ne peuvent être mis
en fonction dans des endroits où se
trouvent des matériaux, des vapeurs
ou des liquides dangereux.
ATTENTION: danger d'explosion ou
d'incendie.
• Installer les appareils sur des
surfaces planes.
• Si vous pensez ne jamais plus
utiliser cet appareil, nous vous conseillons de le rendre inopérant en
coupant le câble d’alimentation
après avoir débranché la fiche de la
prise de courant. De plus, nous vous
IMPORTANT NOTES
• Make sure that curtains or other
objects do not obstruct the air intake
filter on the back of the air conditioner.
• Only connect the air conditioner to
electrical sockets that have an earth.
• To guarantee efficient air conditioner
operation, have the unit cleaned internally once a year by your authorized
service centre.
• Do not obstruct the air flow in the
outside unit by placing it too close to
walls or windows.
• Do not bend or twist the connection
hose between the two units excessively.
• If the AIR CONDITIONER stops completely, even when the electrical supply
is functioning normally, this could be
due to the intervention of an internal
safety device which impedes the
outflow of water. Before calling the
service centre, try draining the water
from the unit by removing the air plug
(Fig. 1). If the problem persists, have
your air conditioner checked by a specialized technician.
• Do not use this equipment in
laundries.
• The equipment must only be
installed in a dry place (IP 20
protection).
• The equipment must not be
operated in areas where there are
dangerous materials, vapours or
liquids.
WARNING: Fire end explosion
hazard.
• Install the equipment on a flat
surface.
• When you decide to no longer use
an appliance of this type, you are
recommended to make it inoperative
by cutting the power cable, after
disconnecting the plug from the
power socket. You are also
recommended to make harmless the
parts of the appliance likely to
constitute a danger, especially for
children who could use the appliance
out of order for their games.
HINWEISE
• Achtung, der Luftansaugfilter auf der
Geräte-Rückseite darf nicht von
Gardinen oder anderen Gegenständen
verdeckt werden.
• Das Klimagerät nur an geerdete
Steckdosen anschließen.
• Voraussetzung für die einwandfreie
Funktion ist, daß Sie Ihr Gerät
mindestens einmal jährlich vom
Fachmann innen gründlich reinigen
lassen.
• Das Außengerät nicht zu nahe an
Wände oder Fenster aufstellen, damit
die Luftzirkulation nicht behindert wird.
• Den Verbindungsschlauch der beiden
Geräte nicht knicken oder verbiegen.
Sollte das Klimagerät trotz
regelmäßiger Stromversorgung nicht
anlaufen, so kann eine interne
Sicherung angesprochen haben, die
den Wasserauslauf verhindert. Vor
Inanspruchnahme des Kundendienstes versuchen, das im Gerät
enthaltene Wasser durch Abnahme des
Stöpsels (Abb. 1) auslaufen zu lassen.
Sollte dieses Problem wiederholt
eintreten, so ist das Gerät von einem
Techniker zu prüfen.
• Das Gerät darf nicht in den Räumen
verwndet werden, die als Wäscherei
dienen.
• Geräte nur in trockenen Räumen
aufstellen (scoutzart IP 20).
• Das Gerät darf nicht in Bereichen
betrieben werden in denen
gefährliche Güter, Dämpfe oder
Flüßigkeiten auftreten können.
ACHTUNG: Explosion- und
Brandgefähr.
• Gerät nur auf ebenen Flächen
aufstellen.
• Ein Gerät dieser Art ist bei
Nichtverwendung durch Schneiden
des Stromversorgungskabels nachdem der Stekcer aus der
Steckdose gezogen wurde - außer
Betrieb zu setzen. Es empfiehlt sich
überdies, die gefährlichen Teile
abzusichern, Kinder könnten mit
dem abgestellten Gerät spielen.
ADVERTENCIAS
• Controlar que cortinas u otros objetos
no obstruyan el filtro de aspiración del
aire, presente en el espaldar del
acondicionador.
• Conectar el acondicionador únicamente a tomas eléctricas provistas de
conexión a tierra.
• Para garantizar un correcto funcionamiento del acondicionador, efectuar
por lo menos una vez al año una
limpieza de la parte interna, dirigiéndose para ello a un centro de servicio
postventa.
• No obstruir el flujo de aire en la unidad
externa colocándola demasiado cerca
de muros o vidrios.
• Evitar curvar o torcer excesivamente
el tubo de unión entre las dos unidades.
• Si el ACONDICIONADOR se para
completamente a pesar de la normal
alimentación eléctrica, puede ser que
ello se deba a la activación de una
seguridad interna que impide la evacuación del agua. Antes de llamar al
centro de asistencia, trate de vaciar el
agua contenida en el ACONDICIONADOR quitando el tapón correspondiente
(Fig. 1). Si el inconveniente se repitiera
haga controlar su acondicionador por
un técnico especializado.
• El aparato no tiene que se utilizado
en ambientes destinados a
lavanderías.
• Instalar los aparatos sólo en
ambientes secos (protección IP 20).
• Los aparatos no pueden ser
puestos en funcionamiento en zonas
en las cuales hay materiales o
liquidos peligrosos.
ATENCIÓN: pleigro de explosión e
incendio.
• Instalar los aparatos en superficies
llanas.
• En caso de que se decida no utilizar
más un aparato de este tipo se recomienda volverlo inactivo cortando
el cable de la alimentación eléctrica
después de haber quitado el enchufe de la toma de corriente. Se
BELANGRIJKE
AANWIJZIGINGEN
• Draag zorg voor een goede
luchttoevoer aan zowel voor- als
achterzijde van het apparaat.
• Sluit het apparaat alleen aan op
geaarde stopcontacten.
• Om de goede werking te
garanderen dient u het apparaat
jaarlijks door de erkende vakman
te laten reinigen.
• Draag zorg voor een
ongestoorde luchttoevoer van de
buitenunit.
• Buig of verdraai de
verbindingsslang niet.
• Als de airconditioner stopt
ondanks juiste stroomvoorziening
kan dit veroorzaakt worden door
een interne beveiliging die de
condenswaterafvoer controleert.
Voor de servicedienst te
raadplegen kunt u zelf de
ontluchtingsplug verwijderen
zodat het water kan weglopen (fig
1). Als dit probleem zich
herhaald, laat dan het apparaat
controleren door de erkende
vakman.
• Het apparaat mag niet
gebruikt worden in wasserijen.
• Het apparaat mag alleen
gebruikt worden in droge
ruimtes (IP 20 protectie).
• Het apparaat mag niet
gebruikt worden in ruimtes met
gevaarlijke goederen, gassen
of vloeistoffen.
WAARSCHUWING: Brand- en
explosiegevaar
• Het apparaat opstellen op een
vlakke ondergrond.
• Als u het apparaat niet meer
wilt gebruiken maak het dan
onaansluitbaar door, nadat de
stekker uit het stopcontact is
gehaald, de kabel door te
snijden. Draag zorg voor
afscherming van gevaarlijke
delen. Kinderen kunnen met

5
cato la spina dalla presa di corrente. Si raccomanda inoltre di
rendere innocue quelle parti dell’apparecchio suscettibili di
costituire un pericolo, specialmente per i bambini che
potrebbero servirsi dell’apparecchio fuori uso per i propri giochi.
Attenzione!
Questo prodotto contiene gas refrigerante R-410A con caratteristiche di ODP=0 (potenziale impoverimento ozono). Alla fine del suo
utilizzo deve essere consegnato
agli appositi centri di raccolta.
Chiedere informazioni ai servizi di
gestione della nettezza urbana del
vostro comune.
recommandons de rendre inoffensives les parties de l’appareil
susceptibles de constituer un danger, spécialement pour les enfants
qui pourrait se servir de l’appareil
pour leurs jeux.
Attention!
Cet appareil contient du gaz
réfrigérant R-410A classé ODP = 0
(appauvrissement potentiel de la
couche d’ozone). A la fin de son
utilisation, il doit être remis à un
centre de traitement spécialisé.
Renseignez-vous auprès du service
de voirie de votre mairie.
Attention!
This product contains R-410A
refrigerant with O.D.P. = 0 (Ozone
Depletion Potential). When the
refrigerant has to be disposed of it
must be handed over to the
specialised centres. Ask your local
waste collection centre for
information.
Achtung!
Dieses Produkt enthält Kältemittel
R-410A mit den Eigenschaften
ODP=0 (Ozonzehrungspotential).
Wenn es nicht mehr verwendet wird,
ist es an die zuständigen
Sammelstellen auszuliefern.
Informationen können bei der
Straßenreinigungsverwaltung Ihrer
Gemeinde eingeholt werden.
recomienda además volver inactivas aquellas partes del aparato
susceptibles de constituir un peligro, especialmente para los niños
que podrían utilizar el aparato fuera
de uso para sus juegos.
¡Atención!
Este producto contiene gas refrigerante R-410A con características de
ODP=0 (potencial de
empobrecimiento del ozono).
Cuando ya no se utilice el aparato,
deberá entregarse a los específicos
centros de recogida. Soliciten
informaciones a los servicios de
gestión de la limpieza urbana de su
ayuntamiento.
het apparaat gaan spelen.
Let op!
Dit produkt bevat het ecologische
koelmiddel (gas) R-410A met een
ODP-karakteristiek (potentiële
ozonafbraak) = 0. Na gebruik dient
dit bij de betreffende instanties te
worden ingeleverd. Informeer bij
de reinigingsdienst in uw
gemeente.
1,8 mt.
6
NO
10 cm
Fig. 2
POSIZIONAMENTO ED INSTALLAZIONE
- UNITÀ INTERNA
Per ottenere dal climatizzatore la
massima efficacia di funzionamento
é fondamentale posizionarlo in ambienti aventi caratteristiche adeguate
alla sua potenzialità (superficie,
irraggiamento solare, ecc...).
In ogni caso Vi raccomandiamo di
dotare l’ambiente di mezzi idonei
(tapparelle, veneziane, ecc...) ad
eliminare l’irraggiamento solare
attraverso le vetrate e di tenere
chiuse, quanto più possibile, porte
e finestre. Il posizionamento del
Vs. climatizzatore deve essere effettuato tenendo conto delle seguenti
importanti indicazioni: l' unità interna andrà posta con la parte
posteriore sempre ad una distanza di almeno 20 cm da qualsiasi
MISE EN PLACE ET INSTALLATION
- UNITE INTERIEURE
Pour obtenir un fonctionnement optimal de votre climatiseur il est fondamental de l’installer dans des lo caux
ayant des caractéristiques adaptées à
la capacite de l’appareil (superficie,
rayonnement solaire, etc.).
Nous vous recommandons dans tous
les cas de prévoir dans le local des
solutions appropriées (stores ventilation, etc.) pour limiter le rayonnement
solaire à travers les vitres, mais aussi
de tenir les portes et les fenêtres le
plus possible fermées. Choisissez la
place de votre climatiseur en tenant
compte des indications suivantes: la
partie arrière de l’unité intérieure doit
être toujours placée à au moins 20 cm
de toute sorte d’obstacle (rideaux,
parois etc.) pouvant empêcher un bon
passage de l’air de la grille arrière avec
Fig. 3 Fig. 4
POSITIONING AND INSTALLING
- INDOOR UNIT
To get the best cooling performance
from your air conditioner, it is important
to match its cooling capacity with the
characteristics of the area to be cooled
(size, exposure to sunlight and so on).
Where possible, the room should be
fitted with blinds and ventilation systems to limit heating from sun exposure
as much as possible. Windows and
doors should also be kept closed where possible.
When selecting where to place your air
conditioner, bear in mind these pointers:
the indoor unit should be positioned so
that its back is at least 20 cm from any
obstacle (curtain, wall, etc.) that could
prevent good air flow through the rear
intake grille and its filter. Nothing should
obstruct the cooled air flow from the
front grille.
AUFSTELLUNG UND ANSCHLUSS
- INNENEINHEIT
Das Klimagerät funktioniert nur dann
optimal, wenn die Raumverhältnisse
(Raumgröße, Sonneneinstrahlung,
usw. ...) seiner Kapazität angepaßt
sind.
Wir empfehlen auf jeden Fall
entsprechende Vorkehrungen
(Sonnenschutz, Belüftung, usw.) zu
treffen, damit bei verglasten Wänden
die Sonneneinstrahlung in Grenzen
gehalten wird. Fenster und Türen
sollten möglichst geschlossen bleiben.
Bei der Aufstellung folgendes beachten:
Damit die Luftzirkulation am
rückwärtigen Gitter mit Filter nicht
behindert wird, muß die Rückwand der
inneren Einheit mindestens 20 cm von
anderen Gegenständen (Gardinen,
Wände, usw.) entfernt sein.
Auch die vordere Gitterabdeckung muß
COLOCACIÓN E INSTALACIÓN
- UNIDAD INTERNA
Para obtener la máxima eficacia de
funcionamiento del acondicionador,
resulta fundamental colocarlo en ambientes que posean características
adecuadas a su potencialidad (superficie, irradiación solar, etc.).
Aconsejamos dotar siempre el ambiente de los medios idóneos para limitar la
irradiación solar a través de las
superficies con vidrios y de mantener
cerradas lo más posible, puertas y
ventanas. La colocación de su acondicionador debe ser efectuada
considerando las importantes indicaciones que siguen: la unidad interna
deberá ser colocada con la parte
posterior siempre a una distancia de
por lo menos 20 cm de cualquier clase
de obstáculo (cortinas, paredes, etc.)
que pueda impedir un correcto fluir del
OPSTELLING EN INSTALLATIE
- BINNEN UNIT
Om een goede werking van het
apparaat te garanderen is het
belangrijk dat de koelcapaciteit
overeenkomt met de
warmtebelasting van het vertrek
waar het apparaat staat
opgesteld.
Aangeraden wordt directe
instraling van zonlicht in de
ruimte te voorkomen. Ramen en
deuren van vertrekken welke
uitkomen op de te conditioneren
ruimte dienen zoveel mogelijk
gesloten te blijven. Het apparaat
dient aan de achterzijde
tenminste 20 cm vrij van andere
voorwerpen te staan.
U dient zorg de dragen voor
ongehinderd in- en uitstromen
van de lucht.

7
ostacolo (tende, pareti, ecc.) che
possa impedire un buon passaggio dell’aria dalla griglia posteriore
con filtro.
Anche la griglia anteriore deve rimanere libera da qualsiasi ostacolo
che possa impedire l’uscita dell’aria.
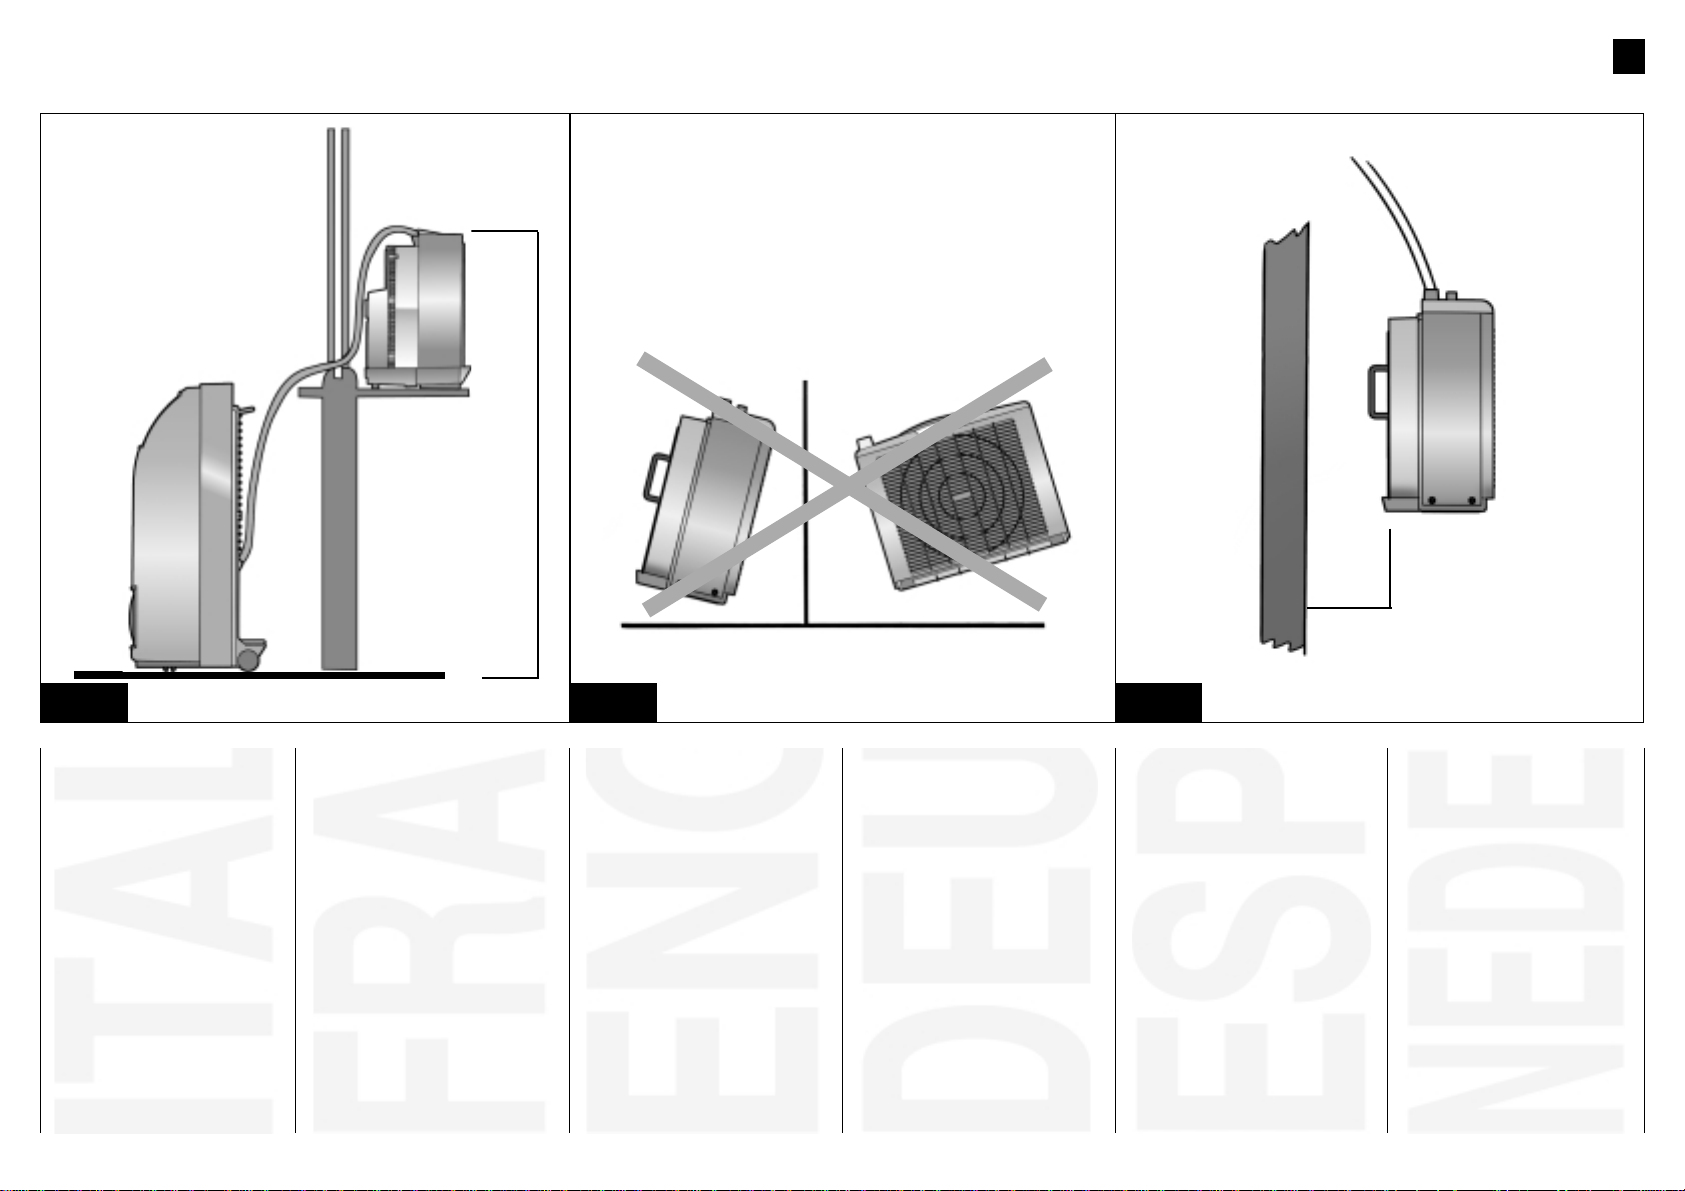
- UNITA’ ESTERNA
L’unità esterna deve sempre essere collocata al di fuori del locale
dove si trova il climatizzatore ad
esempio, su un davanzale o su un
balcone (Fig. 2).
L’unità esterna dovrà essere collocata in modo che il dislivello
massimo con quella interna sia di
1,8 m. Per evitare grosse fuoriuscite di acqua è indispensabile che
l’unità esterna sia assolutamente
livellata. (Fig. 3).
Nei climi più caldi, per ottenere un
miglior rendimento, consigliamo di
tenere l'unità esterna con la sua
parte posteriore distanziata di 10
cm da muri, vetri o altro, in modo
da consentire un ottimale flusso
dell'aria (Fig. 4).
AVVERTENZE:
1) L’UNITÀ ESTERNA NON DOVRÀ MAI RESTARE APPESA PER
IL SOLO TUBO DI COLLEGAMENTO.
filtre.
Même la grille avant doit être libre, de
façon à ce que l’air puisse sortir
librement.
- UNITE EXTERIEURE
L’unité extérieure doit toujours être
placée à l’extérieur du local où se trouve
le climatiseur, par exemple, sur un
rebord de fenêtre ou bien sur un balcon
(Fig. 2).
L’unité extérieure doit être placée de
façon à ce ce que la différence de
niveau maximum avec l’unité intérieure
soit de 1,8 m. Pour éviter les grosses
fuites d’eau, il est indispensable que
l’unité extérieure soit parfaitement
nivelée. (Fig. 3)
CONSEILS:
1) L’UNITÉ EXTÉRIEURE NE DOIT
JAMAIS RESTÉE UNIQUEMENT
SUSPENDUE PAR SON TUYAU DE
RACCORDEMENT.
2) PENDANT LE FONCTIONNEMENT
EN MODE DE CHAUFFAGE DU
MODÈLE CLIMA 16 HP, ÔTER LE
BOUCHON DE DRAINAGE DE L’EAU
DE CONDENSATION DE L’UNITÉ
EXTÉRIEURE.
- OUTDOOR UNIT
The outdoor unit must always be placed
outside the room where there is the air
conditioner, for example on a window
sill or on a balcony (Fig. 2).
The outdoor unit will have to be placed
so that the maximum difference in level
with the indoor unit is 1,8 m. To prevent
a lot of water coming out it is essential
for the outdoor unit to be absolutely
level (Fig. 3).
NOTICES:
1) THE OUTDOOR UNIT MUST
NEVER BE HUNG JUST BY ITS
CONNECTION HOSE.
2) WITH THE CLIMA 16 HP MODEL,
DURING HEATING OPERATION,
TAKE THE CONDENSATION WATER
DRAI-NAGE PLUG OUT OF THE
OUTDOOR UNIT.
frei zugänglich sein, damit die Luft
ungehindert zirkulieren kann.
- AUSSENEINHEIT
Die Ausseneinheit muß immer ausserhalb des Raumes installiert werden,
in dem sich die Klimaanlage befindet
(z.B. auf einem Balkon oder auf einem
Fensterbrett) (Abb. 2).
Die Ausseneinheit muß derart positioniert werden, daß der
Höhenunterschied zur Inneneinheit
maximal 1,8 m beträgt. Es ist unbedingt
erforderlich, daß die Ausseneinheit
perfekt nivelliert ist, um das Austreten
von größeren Wassermengen zu
vermeiden (Abb. 3).
WICHTIGE HINWEISE:
1) DIE AUSSENEINHEIT DARF
NIEMALS NUR AM
VERBINDUNGSSCHLAUCH
AUFGEHÄNGT WERDEN.
2) BEIM MODELL CLIMA 16 HP MUSS
WÄHREND DES HEIZBETRIEBS DER
KONDENSWASSERABLASSTÖPSEL AN DER AUSSENEINHEIT
ENTFERNT WERDEN.
aire por la rejilla posterior con filtro.
También la rejilla delantera debe
encontrarse libre de todo tipo de
obstáculo que pueda impedir la salida
del aire.
- UNIDAD EXTERNA
La unidad externa tiene que estar
colocada siempre fuera del ambiente
en el cual se encuentra el climatizador,
por ejemplo, en un umbral de una
ventana o en un balcón (Fig. 2).
La unidad externa tiene que ser
colocada de manera que el desnivel
máximo con el interior sea de 1,8 m.
Para evitar grandes pérdidas de agua
es indispensable que la unidad externa
esté absolutamente nivelada (Fig. 3).
OBSERVACIONES:
1) LA UNIDAD EXTERNA NO TIENE
QUE ESTAR COLGADA NUNCA
SÓLO POR EL TUBO DE CONEXIÓN.
2) EN EL MODELO CLIMA 16 HP,
DURANTE EL FUNCIONAMIENTO EN
CALEFACCIÓN QUITAR EL TAPÓN
DE VACIADO DEL AGUA DE
CONDENSACIÓN DE LA UNIDAD
EXTERNA.
- BUITEN UNIT
De buitenunit moet buiten het
vertrek, balkon of vensterbank,
worden opgesteld (Fig. 2).
Tussen de binnen- en buitenunit
mag maximaal 1,8 m
hoogteverschil bestaan. Om
wateroverlast te voorkomen het
buitendeel vlak opstellen (Fig. 3)
De buitenunit zoveel mogelijk vrij
van weersinvloeden plaatsen, om
beschadiging te voorkomen.
BELANGRIJK:
1) DE BUITENUNIT NOOIT
ALLEEN OPHANGEN AAN DE
FLEXIBELE LEIDING.
2) IN GEVAL VAN DE CLIMA 16
HP; TIJDENS VERWARMEN DE
CONDENSWATERSTOP UIT DE
BUITENUNIT VERWIJDEREN.
2) NEL MODELLO CLIMA 16 HP
DURANTE IL FUNZIONAMENTO
IN RISCALDAMENTO TOGLIERE
IL TAPPO DI DRENAGGIO DELL’ACQUA DI CONDENSA
DELL’UNITÀ ESTERNA.

Fig. 5
8
INSTALLAZIONE CON KIT DI
SERIE
Per il climatizzatore CLIMA 16 è
previsto di serie un kit per fissare
l’unità esterna. Seguendo le istruzioni allegate al kit, procedere al
montaggio della struttura, quindi
operare come segue:
a) Ritagliare dalla scatola del kit la
dima di foratura.
b) Usando la dima stessa, eseguire due fori nella zona di fissaggio
prescelta, tenendo presente che i
due fori devono essere perfettamente orizzontali.
c) Inserire i tasselli nei fori ed agganciare la struttura. Noi Vi
consigliamo l’utilizzo di tasselli a
squadra, in quanto permettono un
facile smontaggio del supporto unità
esterna.
d) Inserire sul supporto l’unità esterna
(Fig. 5).
INSTALLATION AU MOYEN DU KIT
STANDARD
Un Kit standard de fixation de l’unité
extérieure est prévu pour le climatiseur
CLIMA 16. Pour effectuer le montage
de la structure, suivre les instructions
données avec le Kit puis effectuer les
opérations suivantes:
a) Découper la dîme de perçage sur la
boîte contenant le Kit.
b) En s’aidant de cette dîme, percer
deux trous dans la zone de fixation
choisie, en faisant bien attention à ce
que les trous soient parfaitement
horizontaux.
c) Introduire les vis à expansion à
équerre et y accrocher la structure.
Nous vous conseillons d’utiliser des
vis à expansion à équerre car elles
permettent de démonter facilement le
support de l’unité extérieure.
d) Introduire l’unité extérieure sur le
support (Fig. 5).
INSTALLATION WITH STANDARD
KIT
For the CLIMA 16 air conditioner there
is a standard kit to fix the outdoor unit.
Following the instructions enclosed with
the kit, fit the structure, then proceed
as follows:
a) Cut the drilling template from the kit
box.
b) Using the template, make two holes
in the chosen fixing area, bearing in
mind that the two holes have to be
perfectly horizontal.
c) Insert the plugs into the holes and
hook on the structure. We recommend
using square plugs as they make it
easy to dismantle the outdoor unit
support.
d) Insert the outdoor unit onto the
support (Fig. 5).
INSTALLIERUNG MIT
SERIENMÄSSIGEM KIT
Für die Klimaanlage CLIMA 16 steht
serienmäßig ein Kit für die Befestigung
der Ausseneinheit zur Verfügung. Die
Struktur unter Beachtung der dem Kit
beiliegenden Anleitungen montieren
und folgendermaßen vorgehen:
a) Aus der Kitschachtel die Bohrungsschablone ausschneiden.
b) Mit Hilfe der Schablone zwei
Bohrlöcher im gewählten Befestigungsbereich erstellen; dabei
beachten, daß die beiden Bohrlöcher
perfekt horizontal sein müssen.
c) Die Dübel in die Löcher stecken und
die Struktur einhaken. Wir empfehlen
die Verwendung von Dübeln mit Haken,
um einen leichten Abbau der
Ausseneinheithalterung zu
gewährleisten.
d) Die Ausseneinheit in die Halterung
einsetzen (Abb. 5).
INSTALACIÓN CON JUEGO DE SERIE
Para el climatizador CLIMA 16 se ha
previsto de serie un juego para fijar la
unidad externa, siguiendo las
instrucciones adjuntas al juego, realizar
el ensamblaje de la estructura, luego
proceder de la siguiente manera:
a) Recortar de la caja del juego la
plantilla de perforación.
b) Usando la plantilla, realizar dos
agujeros en la zona de fijación
escogida, teniendo en cuenta que los
dos agujeros tienen que estar
perfectamente horizontales.
c) Colocar los tarugos en los agujeros
y enganchar la estructura. Nosotros
aconsejamos el empleo de tarugos de
escuadra ya que permiten un fácil
desmontaje del soporte de la unidad
externa.
d) Colocar en el soporte la unidad
externa (Fig. 5).
INSTALLATIE MET
STANDAARD KIT
U kunt de buitenunit van de CLIMA 16 monteren met de
standaard montage set, volg
daarvoor onderstaande
aanwijzigingen:
a) snij het boorpatroon uit de
doos van de montage set.
b) gebruik het boorpatroon om
twee gaten te boren, de gaten
perfect horizontaal maken.
c) monteer de ondersteuning
middels haken zodat een snelle
demontage mogelijk blijft.
d) plaats de buitenunit op de
ondersteuning (Fig. 5).

Fig. 6 Fig. 7
9
- LINEA FLESSIBILE
Il tubo di collegamento tra le due
unità dovrà essere fatto passare
tra i due battenti della finestra, i
quali, durante il funzionamento del
climatizzatore dovranno essere chiusi il più possibile (Fig. 6).
Nel caso si voglia operare una installazione “semifissa” che consenta
la chiusura completa dei battenti
della finestra occorrerà praticare
un foro rettangolare di dimensioni
40 mm di larghezza e 25 mm di
altezza nello stipite. Questo foro
può essere eseguito: nella parte
fissa, nella parte mobile, o nella
parte fissa e mobile del serramento (Fig. 7).
Per procedere ad un altro tipo di installazione (sfruttando la possibilità
di scollegare la linea di collegamento tra le due unità per poi inserirla
nel foro praticato nella parete) consultate il paragrafo “ISTRUZIONI
PER L’INSTALLAZIONE CON FORATURA DELLA PARETE”
- LIGNE FLEXIBLE
Le tuyau de raccordement entre les
deux unités devra passer entre les
deux battants de la fenêtre qui, pendant le fonctionnement du climatiseur,
devront être fermés le plus possible
(Fig. 6).
Si vous voulez realiser une installation
“demifixe” permeffant la fermeture totale des battants de la fenêtre, il faudra
percer, dans le montant, un trou
rectangulaire de 40 mm de large de
haut 25 mm. Ce trou pourra être percé:
seulement sur le bâti dormant ou seulement sur le châssis mobile, ou bien
dans la partie fixe et mobile du cadre
(Fig. 7).
Pour procéder à un autre type de pose
(en exploitant la possibilité de
déconnecter la ligne de branchement
entre les deux unités pour les monter
ensuite dans un trou percé au mur),
reportez-vous au paragraphe “POSE
PAR PERCAGE DU MUR”.
- FLEXIBLE LINE
The hose connecting the two units goes
under the two partially closed wings of
the window. When the unit is running,
the wings should be kept closed as
much as possible (Fig. 6).
If you want a "semi-permanent" installation to allow you to close the window
completely, cut a 40x25 mm rectangular hole in the window sill or frame. Drill
this hole either in the fixed part or in the
moving part, or in the fixed and moving
part of the window frame (Fig. 7).
If you wish to proceed with a different
kind of installation (taking advantage
of being able to disconnect the line
between the two units and passing it
through the hole in the wall) consult the
paragraph: “INSTALLATION
INSTRUCTIONS, DRILLING A HOLE
IN THE WALL”.
- BIGSAME LEITUNG
Der Verbindungsschlauch der beiden
Geräte wird zwischen den beiden
offenen Fensterflügeln nach außen
geführt. Das Fenster soll soweit wie
möglich geschlossen bleiben (Abb. 6).
Sollten Sie eine “halbfeste” Aufstellung
wählen, bei der das Fenster ganz zu
ist, müssen Sie eine 40 mm breite und
25 mm hohe Öffnung in den
Fensterrahmen bohren. Für die Öffnung
kann man folgende Positionen (Abb. 7)
wähien:
a) am festen Rahmen
b) am Flügel
c) am Fensterrahmen und am Fügel.
Eine weitere Installationsmöglichkeit
besteht darin, die Verbindungsleitung
der beiden Geräte abzutrennen und in
das Bohrloch einzuführen, das in der
Wand ausgeführt wurde. Diese Art von
Installation ist im Kapitel “ANLEITUNG
ZUR MONTAGE UNTER
DURCHBORHUNG DER WAND”
beschrieben.
- LíNEA FLEXIBLE
El tubo de conexión entre las dos
unidades deberá pasar entre las dos
hojas de la ventana, las que, durante la
marcha del acondicionador, deberán
permanecer cerradas lo más posible
(Fig. 6).
Si se desea realizar una instalación
“semifija” que permita el cierre total de
las hojas de la ventana, será necesario
efectuar un orificio rectangular en el
marco de 40 mm de anchura por 25
mm de altura. Dicho orificio puede ser
realizado sólo en la parte fija, sólo en la
parte móvil o bien sobre ambas partes
(fija y móvil) del cerramiento (Fig. 7).
Para proceder a otro tipo de instalación
(aprovechando la posibilidad de
desconectar la línea de conexión entre
las dos unidades para después
introducirlas en el orificio realizado en
la pared) lean el párrafo
“INSTRUCCIONES PARA LA
INSTALACIÓN CON ORIFICIO EN LA
PARED”.
- FLEXIBELE LEIDING
De verbindingsslang via het raam
naar buiten leiden. Zorg dat het
raam zover mogelijk gesloten
blijft (Fig. 6).
Voor een “semi-permanente”
installatie: maak een gat van
40x25 mm in het kozijn zodat het
raam gesloten kan blijven (Fig.
7).
Om het apparaat op een andere
manier te installeren (en daarbij de
mogelijkheid te benutten om de
verbindingsleiding tussen de beide
units los te koppelen en deze
vervolgens in het in de muur
geboorde gat te doen) moet u de
paragraaf “AANWIJZINGEN VOOR
DE INSTALLA TIE MET IN DE MUUR
GEBOORDE GATEN”.

10
ALLACCIAMENTO ELETTRICO
Prima di collegare il climatizzatore
assicurarsi che:
• La linea di alimentazione sia di
220-240V/50Hz.
• La linea di alimentazione sia
dotata di messa a terra e
dimensionata per una corrente di
spunto di 20A e protetta da un fusibile da 10AT.
• La presa abbia una portata di
almeno 10A a 250V.
Qualora non fosse compatibile con
la spina del climatizzatore sostituirla con una a norme CEI.
• Il conduttore di un’eventuale
prolunga abbia sezione almeno di
1,5 mm2.
• Il climatizzatore sia installato
secondo le normative nazionali.
• L’assorbimento del climatizzatore, sommandosi a quello degli altri
elettrodomestici, non provochi l’interruzione dell’impianto elettrico.
BRANCHEMENT ELECTRIQUE
Avant de brancher le climatiseur, vous
assurer que:
• la ligne d’alimentation ait une
tension de 220-240V/50Hz.
• La ligne d’alimentation soit
équipée d’une mise à la terre, qu’elle
soit dimensionnée pour un courant de
pic de 20A et protégée par un fusible
de 10AT.
• La prise ait une portée d’au moins
10A à 250V.
Dans le cas où la prise ne serait pas
compatible avec la fiche du climatiseur,
la remplacer par une autre aux normes
CEI.
• Le fil conducteur d’une éventuelle
rallonge ait une section d’au moins 1,5
mm2.
• Le climatiseur soit installé
conformément aux normes nationales.
• L’absorption du climatiseur
ajoutée à celle des autres appareils
électroménagers ne provoque pas
l’interruption du circuit électrique.
CONNECTION TO THE MAINS
Before connecting the air conditioner,
make sure that:
• The power supply is 220-240V/
50Hz.
The power line is grounded and rated
for a take-off current of 20A and
protected by a 10AT fuse.
• The socket must have a rating of
at least 10A at 250V.
If the socket and the plug of the
conditioner are not compatible, replace
the socket with one complying with CEI
standards.
• The lead of any extension must
have a cross-section of at least 1.5
mm2.
• The air conditioner must be
installed in compliance with national
regulations.
• The total power requirement of the
air conditioner and other household
appliances must not cause interruption
of the electrical system.
ELEKTRISCHER ANSCHLUSS
Vor Anschluß an das Stromnetz ist zu
kontrollieren:
• Die Versorgungsleitung muß 220240V/50Hz sein.
• Die Versorgungsleitung muß mit
Schutzleiter versehen, für
Stromspitzen von 20A ausgelegt,
sowie mit einer 10At-Sicherung
geschützt sein.
• Die Steckdose muß für
mindestens 10A und 250V ausgelegt
sein.
Sollte die Steckdose mit dem Stecker
der Klimaanlage nicht übereinstimmen,
ist diese mit einer den EU-Vorschriften
entsprechenden zu ersetzen.
• Die Versorgungsleitung einer
eventuellen Verlängerung muß einen
Querschnitt von 1,5 mm2 aufweisen.
• Die Klimaanlage muß
entsprechend der ortsgegebenen
Vorschriften installiert sein.
• Die Leistungsaufnahme der
Klimaanlage darf bei Zuschaltung der
anderen Haushaltsgeräte nicht die
Unterbrechung der Stromzufuhr
auslösen.
CONEXION ELÉCTRICA
Antes de conectar el climatizador
asegurarse que:
• La línea de alimentación sea de
220V-240V/50 Hz.
• La línea de alimentación conste
de protección de tierra y con capacidad
para una corriente inicial de 20A y
protegida por un fusible de 10AT.
• La toma tenga una capacidad de
por lo menos 10A a 250V.
En caso de que no fuera compatible
con el enchufe del climatizador
sustituirla con una según normas CEI.
• El conductor de una eventual
prolongación tenga una sección de por
lo mneos 1,5 mm2.
• El climatizador esté instalado
según las normativas nacionales.
• El consumo del climatizador
sumándose al de otros
electrodomésticos, no cause la
interrupción de la instalación eléctrica.
ELEKTRISCHE AANSLUITING
Voordat u de airconditioner aansluit
moet u controleren of:
• De voedingslijn een spanning
heeft van 220-240V/50Hz.
• De voedingslijn geaard is en
berekend is op een aanloopstroom
van 20A en beveiligd is met een
zekering van minimaal 10AT.
• Het stopcontact een capaciteit
heeft van minimaal 10A bij 250V.
Als de stekker niet geschikt is met
het oog op het stopcontact dan moet
de stekker vervangen worden door
een stekker die aan de CEI
voorschriften voldoet.
• De leiding van een eventueel
verlengsnoer een doorsnede van
minimaal 1,5 mm2 heeft.
• Door het stroomverbruik van de
airconditioner opgeteld bij het
stroomverbruik van andere
elektrische apparatuur de stroom
niet uitvalt.
 Loading...