

User's Manual
Convenient
1
print
functions
Matching
2
Colors
Advanced
Try using various functions
Using
Utility
3
Software
Network
4
Setup
Checking and
Changing Printer
5
Settings Using
the Control Panel
Appendix
Pro9541WT
Index

1
Manual Conguration
z
The following user manuals are enclosed with the product.
The e-manual is stored as software on DVD-ROM.
Step
Read this first
Opening the box and installing the printer
Set-up Guide
This guide uses illustrations to explain the
methods from opening the box to installation.
For the advanced setup guide, see the "Basic".
Preparing the printer to print
Basic
This guide describes the precautions for safe
use of the device. Make sure to read before use.
Further, basic uses from the device installation
methods to initial printing are also explained.
The device functions are described in the
appendix.
• Checking the product
• Parts nomenclature and functions
• Using the device to its fullest
• Installing the device
• Turning ON and OFF the power supply
• Test printing using the printer only
• Connecting to a PC
• Paper
• Printing
• Paper ejection
• Setting Power Save mode
• Setting auto power OFF
• Checking the print quantity,
consumables, remaining maintenance
unit quantity, and remaining service life
• Cancelling a print job
• Adding printers using LPD protocols
(TCP/IP)
• Table of control panel menu items
• Basic Windows procedures
• Printer specifications
Step
Read these guides as necessary
2
Try using various functions
Advanced (This manual)
This guide explains the various paper print methods
and how to use useful functions. Read to optimize the
printing environment or to adjust the color, etc., using
the enclosed utility software.
Further, this guide also explains the items that can be
set from the control panel, and the network settings.
Read for any points that are not understood, or for maintenance
Troubleshooting/Daily
Maintenance Manual
This manual explains the procedures for paper jams, and
troubleshooting method if an error message is displayed. This
manual also explains daily maintenance such as now to replace
consumables and maintenance units, and cleaning, etc.
Separate Volume Spot Color Guide
This guide explains how to check the printer
drivers, and how to print using Spot Color.
Make sure to read before use.
• Useful print functions
• Adjusting the color
• Using utility software
• Network settings
•
Checking and changing printer settings
using the control panel
• Troubleshooting
• Maintenance
• Consumables, maintenance products,
options, color management server,
etc.
• Control panel explanation
• Checking the printer drivers
• Table of printer driver functions
• Printing on color paper
• Printing on transparent film
• Specifying and printing Spot Color
toner using the applications
• Fine-tuning white
- 2 -
Reading the Manual
z
Symbols
Note
These are cautions and restrictions for the correct operation of the device. Make sure to read to avoid misoperation.
z
Memo
Knowledge of the information before using the device is useful and can act as a reference. Reading is recommended.
z
Reference
This are the reference pages. Read to learn detailed information and relevant information.
z
WARNING
Mishandling due to ignoring this display may cause death or serious injury.
z
CAUTION
Mishandling due to ignoring this display may cause personal injury.
z
Keys, Buttons, and Symbols
This chapter described the following keys, buttons, and symbols.
Inscription Explanation
The control panel buttons and 10-key pad are described below.
z
E.g.:
[OK] button [BACK] button
[ ] button/key
[Fn] key [CLEAR] key
Indicates your PC keyboard.
z
Describes the menu name on the liquid crystal panel.
[ ]
" "
> Describes the menu level of the device or PC.
z
Describes the PC menus, windows, and dialog box names.
z
Describes the messages and input text displayed in the liquid crystal
z
panel.
Describes the le and screen names on the PC.
z
Describes the reference title.
z
- 3 -

Illustrations
Screens
The device illustrations used herein show the
Pro9541WT model unless otherwise specied.
Illustrations may differ from the actual product.
The images of the control panel and PC used
herein are examples. The images may differ
from actual products and screens.
- 4 -

Inscriptions
The following inscriptions are used in this manual.
Pro9541WT
z
Microsoft
z
Microsoft
z
Mac OS X 10.10.5 or later
z
→
Pro9541
®
Windows® 10 64-bit Edition operating system version
®
Windows® 10 operating system version
→
Mac OS X
→
Windows 10
→
Windows 10 (64bit version)
The manuals enclosed with the printer use as examples Windows 10 in the case of Windows, and OS X
10.13 in the case of Mac OS X unless otherwise specied.
Depending on the OS and model used, descriptions in this manual may differ.
- 5 -

Contents
Contents
Manual Conguration ........................................................................... 2
Reading the Manual
Symbols .................................................................................................................. 3
Keys, Buttons, and Symbols....................................................................................3
Illustrations
Screens...................................................................................................................4
Inscriptions
............................................................................................................ 4
............................................................................................................ 5
............................................................................. 3
1 Convenient print functions ................................................. 11
Printer driver functions table ............................................................. 12
Functions explanation .......................................................................................... 12
Windows PS printer driver functions ..................................................................................... 12
Mac OS X PS printer driver functions
Printing on various papers ................................................................. 17
Printing on transparencies ................................................................................... 17
Printing on user-selected paper sizes (custom pages and lengthy printing)
Using custom media
............................................................................................. 24
Economy printing ............................................................................... 26
Printing multiple pages on a single sheet (multi-page printing) ........................... 26
.................................................................................... 14
......... 21
Test printing with toner economy (toner economy mode)
....................................27
Changing sizes to print ...................................................................... 28
Enlarging/reducing pages .................................................................................... 28
Clean printing .................................................................................... 30
Changing print quality (resolution) ...................................................................... 30
Printing text and lines sharply
Compensating ne lines........................................................................................ 32
Using printer fonts
Using PC fonts
............................................................................................... 33
...................................................................................................... 34
.............................................................................. 31
Printing print results so that people cannot see them ........................ 35
Entering passwords to print (Secure Print) ..........................................................35
Printing secret text (encrypted secure print)
.......................................................37
Correcting the Print Position on the Paper Using the Control Panel ... 39
Correcting the print start position ........................................................................39
Adjusting the Image Stretch (Print Length) Using the Control Panel ... 41
Adjusting the stretch of print results .................................................................... 41
Advanced print functions ................................................................... 43
Setting the page order .......................................................................................... 43
Printing documents in page order ........................................................................................43
- 6 -

Contents
Printing documents in reverse page order ............................................................................. 43
Printing single sheets manually ............................................................................ 45
Automatically selecting trays
Printing only covers from a separate tray (cover printing)
Stamping and printing (watermarks)
Collate (sort printing)
Outputting portrait and landscape alternately using batch printing
Saving data for repeat printing
Printing using registered forms (overlay printing)
Automatically switching trays
Using the printer buffer
Outputting to le without printing
Downloading PostScript les
Printing PostScript errors
Changing settings for mono printing
Changing the default printer driver settings
........................................................................................... 49
........................................................................................ 55
............................................................................... 46
................................... 47
...................................................................48
......................50
............................................................................. 51
...............................................52
.............................................................................. 53
........................................................................ 56
................................................................................ 57
..................................................................................... 57
.................................................................... 58
......................................................... 59
Deleting or updating printer drivers .................................................. 60
Deleting the printer drivers .................................................................................. 60
Updating the printer drivers
................................................................................. 61
2 Matching Colors ................................................................. 65
Matching colors using the control panel ............................................. 66
Manually compensating color drift ........................................................................ 66
Automatically compensating density and gradation
Manually compensating density
Fine-tuning density adjustment
Adjusting the color balance (density)
Adjusting the color balance
............................................................................ 67
............................................................................ 68
................................................................... 69
.................................................................................. 72
Matching Colors Using the Printer Drivers ......................................... 74
Color matching ..................................................................................................... 74
What is color matching? ..................................................................................................... 74
Color matching (recommended) ........................................................................... 74
Easy color matching (Ofce colors)
Color matching (GraphicPro)
Color matching (No Color Matching)
Changing black nish............................................................................................ 79
Printing using monochrome (black and white)
................................................................................ 77
...................................................................... 75
..................................................................... 78
..............................................66
.....................................................81
Rendering white lines between text and background inconspicuous
(black overprint)
Calibrating plate misalignment (trapping)
Simulating print effects
Printing using color analysis (classication printing)
.................................................................................................. 82
............................................................ 83
........................................................................................ 84
...........................................85
- 7 -

Contents
Disabling the Postscript Color Matching................................................................86
Matching Colors Using Utilities .......................................................... 87
PS Gamma Adjuster .............................................................................................. 87
Registering gamma (Windows) ............................................................................................ 87
Registering gamma (Macintosh)
Prole assistant .................................................................................................... 88
..........................................................................................88
Registering ICC proles
........................................................................................ 89
3 Using Utility Software ........................................................ 91
Utility software that can be used with the printer .............................. 92
Utilities table ........................................................................................................ 92
Windows/Macintosh common utilities ...................................................................................92
Windows utilities
Macintosh utilities
Installing utilities ................................................................................................. 93
Windows .......................................................................................................................... 93
Macintosh
........................................................................................................................94
Windows utilities ............................................................................... 95
Conguration Tool ................................................................................................ 95
Operations environment ..................................................................................................... 95
Installing
Registering devices
Device Info tab
Network Setting plug-in
Storage Manager plug-in
.........................................................................................................................95
............................................................................................................... 92
.............................................................................................................93
............................................................................................................97
.................................................................................................................98
.....................................................................................................98
.................................................................................................. 100
Change the Printer Display Language ................................................................. 102
Operations environment ................................................................................................... 102
Switching the control panel language
................................................................................. 102
Direct Network Printing Utility (LPR) .................................................................. 104
Operations environment ................................................................................................... 104
Starting up
Downloading les to the printer
Checking/deleting/transferring jobs
Checking the printer status
Adding printers
Automatically transferring jobs
Printing using multiple printers simultaneously
Starting the web browser
Adding comments
Setting IP addresses automatically
Uninstalling
..................................................................................................................... 104
......................................................................................... 104
................................................................................... 105
............................................................................................... 105
............................................................................................................... 106
.......................................................................................... 106
.................................................................... 107
................................................................................................. 108
........................................................................................................... 109
.................................................................................... 110
.................................................................................................................... 110
Network Extension ............................................................................................. 111
Operations environment ................................................................................................... 111
- 8 -

Contents
Checking the printer settings ............................................................................................ 111
Setting options automatically
Uninstalling
.................................................................................................................... 112
............................................................................................ 111
Mac OS X utilities ............................................................................. 113
Panel language setup ......................................................................................... 113
Setting the printer ........................................................................................................... 113
Network Card Setup Utility ................................................................................. 114
Setting IP addresses ........................................................................................................ 114
Making web settings
Finishing the Network Card Setup Utility
........................................................................................................ 114
............................................................................. 114
4 Network Setup ................................................................. 115
Network setting items ..................................................................... 116
Initializing network settings
Using DHCP
Setting the DHCP server ................................................................................................... 130
Setting the printer
...................................................................................... 130
........................................................................................................... 131
............................................................ 129
Using SNMP ..................................................................................... 133
About IPv6....................................................................................... 134
Checking IPv6 addresses .................................................................................... 134
Setting the network from the web browser ..................................... 135
Operations environment ..................................................................................... 135
Starting up
Logging in as an administrator
Items table
Changing administrator passwords
Checking printer status from the PC
Changing printer settings from the PC
Encrypting communications (SSL/TLS)
Printing using IPP
......................................................................................................... 135
........................................................................... 136
......................................................................................................... 137
.................................................................... 139
................................................................... 140
................................................................ 140
.............................................................. 141
.............................................................................................. 143
Encrypting communications (IPSec)
Using the access restriction function (IP lter) with IP addresses
Using the access restriction function with MAC addresses
Notifying errors using e-mail
Notifying errors periodically using e-mail
Using SNMPv3
Using IEEE802.1X
Changing EtherTalk printer names (Macintosh)
Changing EtherTalk zones (Macintosh)
Printing without printer drivers (Direct printing)
Printing PDF les ............................................................................................................. 167
Setting the server to print mail attachments
.................................................................................................... 160
............................................................................................... 162
.............................................................................. 155
................................................................... 145
.....................152
.................................. 153
........................................................... 157
.................................................. 166
............................................................... 166
............................................... 167
....................................................................... 168
- 9 -

Contents
5 Checking and Changing Printer Settings Using the Control
Panel
Printing printer information ............................................................. 170
............................................................................... 169
Printable report tables ........................................................................................ 170
Printing printer settings lists
Settings details ............................................................................................................... 171
Printing printer information lists ........................................................................ 172
Network information ........................................................................................................ 172
File list
Demo pages
Error log
Total print results
Total print results Printing print lists .................................................................. 175
Font list ......................................................................................................................... 175
Color prole list
User media list
Test prints
Registering custom sizes (irregular paper)......................................................... 177
Changing administrator passwords
Restricting button operations (panel lockout)
Restricting menu displays (menu lockout)
.......................................................................................................................... 173
................................................................................................................... 173
........................................................................................................................ 174
............................................................................................................ 174
.............................................................................................................. 175
................................................................................................................ 176
...................................................................................................................... 176
.............................................................................. 171
.................................................................... 179
................................................... 180
......................................................... 181
Checking print quantities ................................................................. 182
Checking remaining consumables and maintenance unit quantities
... 183
Table of setting items in the device setup screen............................. 184
Device setup screen ............................................................................................ 184
[Conguration]
[Print Information]
[Print Secure Job]
[Menus]
[Admin Setup]
[Print Statistics]
[Calibration]
[Boot Menu]
.............................................................................................................. 189
................................................................................................... 185
............................................................................................ 187
.............................................................................................. 188
.................................................................................................... 200
................................................................................................. 209
....................................................................................................... 210
....................................................................................................... 214
Appendix ............................................................................... 215
Character code table ........................................................................ 216
PostScript mode ................................................................................................. 216
Index .................................................................................... 219
- 10 -

1
Convenient
print functions
1
Convenient print
functions
2
Matching
Colors
Printer driver functions table …………… 12
Printing on various papers
Economy printing
…………………………… 26
Changing sizes to print
Clean printing
………………………………… 30
……………… 17
…………………… 28
Printing print results so that people
cannot see them
……………………………… 35
Correcting the Print Position on the Paper
Using the Control Panel
…………………… 39
Adjusting the Image Stretch
(Print Length) Using the Control Panel
Advanced print functions
………………… 43
… 41
the Control Panel
Software
Setup
Settings Using
3
Using Utility
4
Network
5
Changing Printer
Checking and
Appendix Index
Deleting or updating printer drivers
Note
This section uses [WordPad] for its Windows explanations, and [TextEditor] for its Mac OS X
z
explanations. Depending on the application, the screens and operations procedures may differ.
For detailed explanations of the printer driver and utility setup items, see "Online Help".
z
Due to printer driver and utility version upgrades, there may be differences from the descriptions
z
in this manual.
- 11 -
… 60
Printer driver functions table
Printer driver functions table
z
This section explains the convenient functions when printing from a PC.
1
impresión útiles
Funciones de
Reference
For detailed explanations of the printer driver setup items, see "Online Help".
z
2
los colores
Concordar
3
de utilidades
de software
Utilización
4
Cong de
red
5
impresora utilizando el
Comprobar y cambiar
la conguración de la
panel de control
Apéndice Índice
Functions explanation
This section describes functions of the PS printer
driver for Windows or Mac OS X.
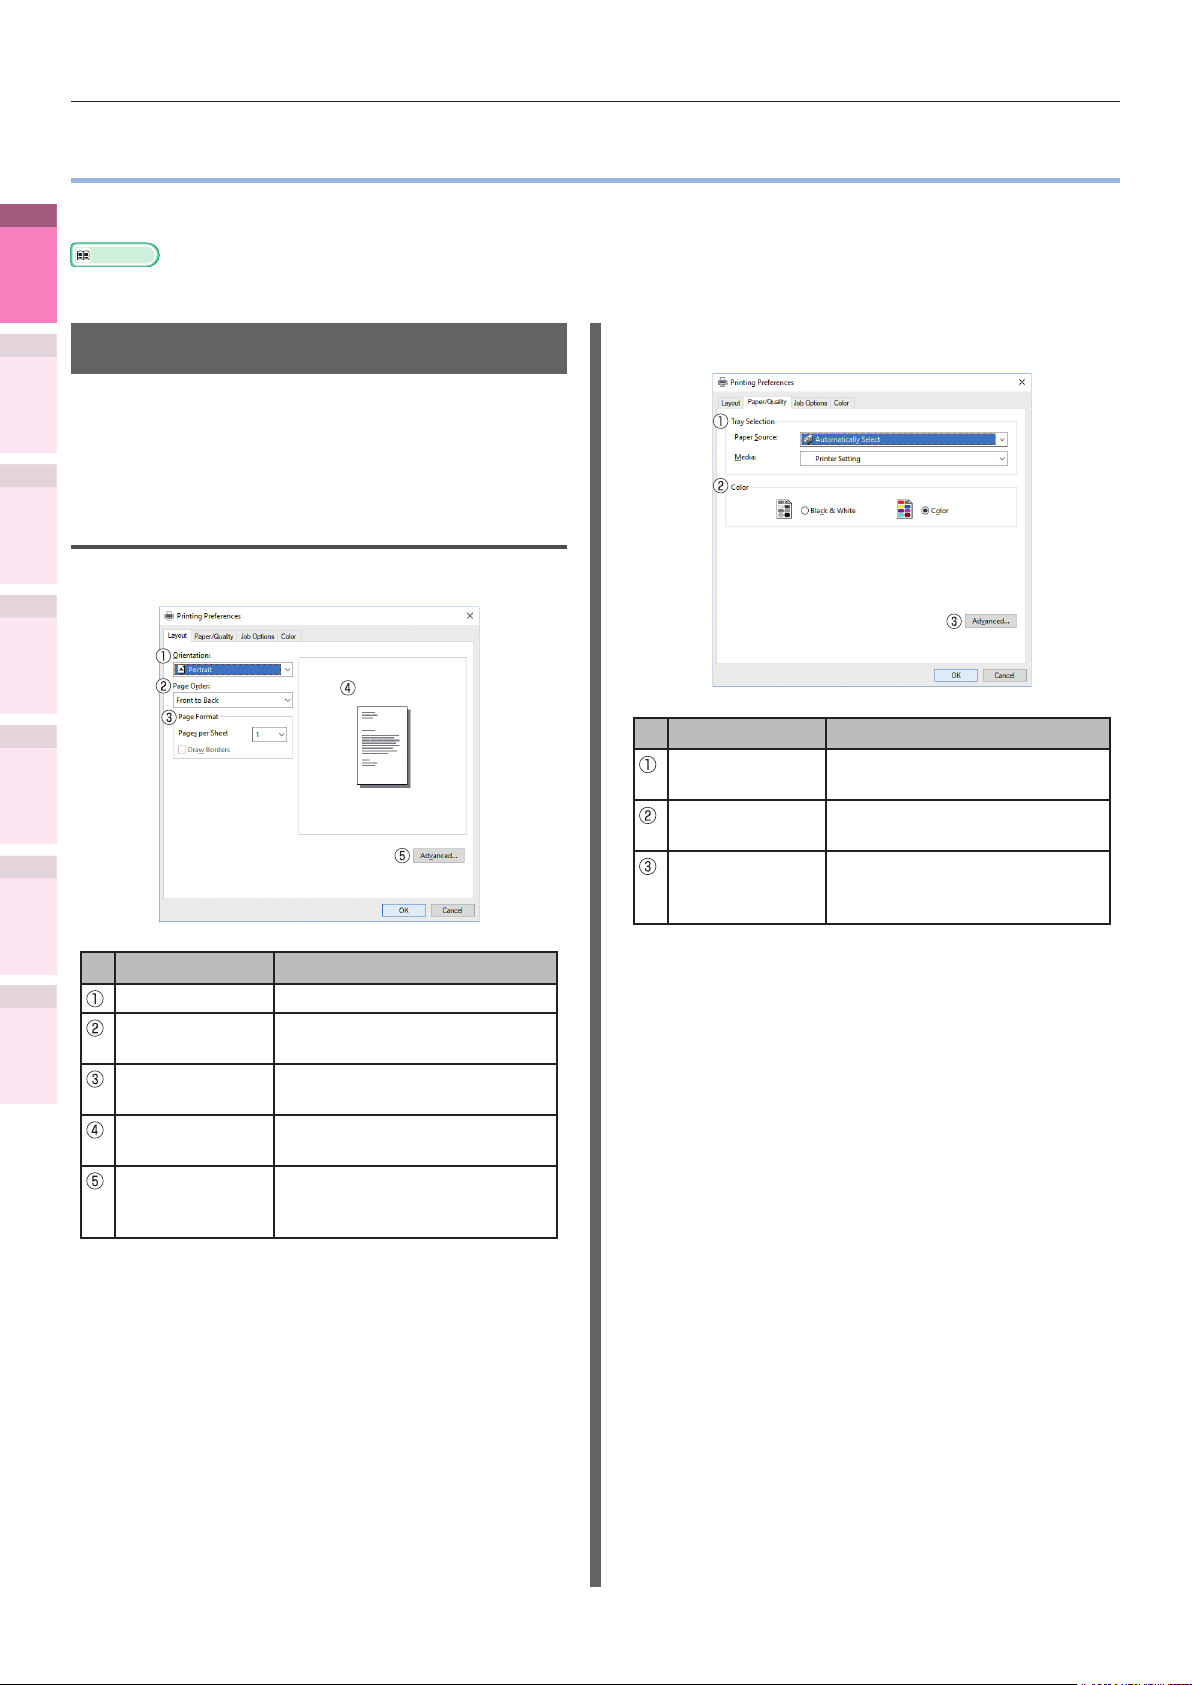
Windows PS printer driver functions
[Layout] tab
[Paper/Quality] tab
Item Explanation
Tray Selection Species the tray to feed the
paper.
Color Species color or
monochrome printing.
Advanced You can make more advanced
setups regarding the print
quality and paper size.
Item Explanation
Orientation Species the print orientation.
Page Order Species the order of the
document pages to be printed.
Page Format
Preview window Displays an image of the print
Advanced You can make more advanced
Species the number of pages to
be printed on 1 sheet of paper.
results.
setups regarding the print
quality and paper size.
- 12 -
Printer driver functions table
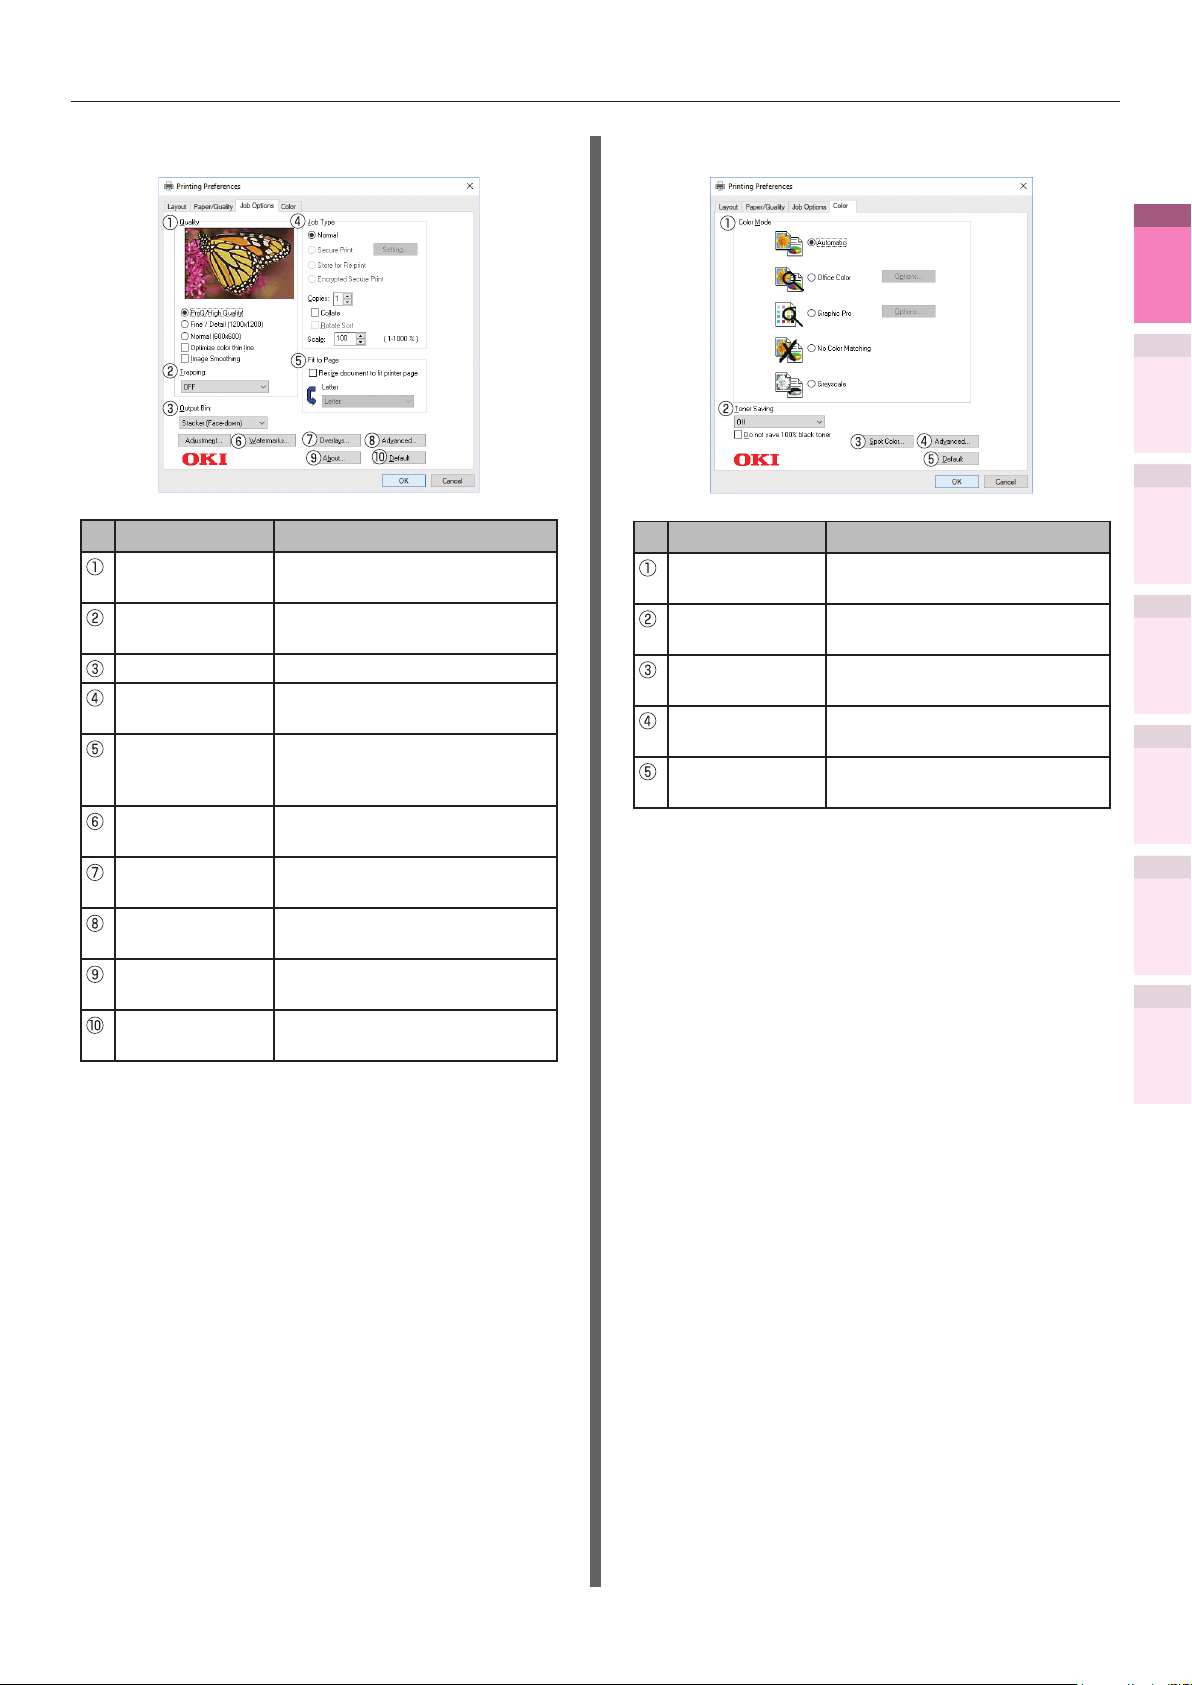
[Job Options] tab
Item Explanation
Quality Species the resolution
during printing.
Trapping
Output Bin Species the paper output bin.
Job Type Species the print format and
Fit to Page Species when printing by
Watermarks Species when implementing
Overlays Species when implementing
Advanced You can make other advanced
About Displays the printer driver
Default Restores the tab settings to
Set it when white or colored stripes
appear due to misalignment.
quantity to be printed.
converting the paper size of
the document to be printed.
stamp printing.
overlay printing.
print setups.
version information.
the default settings.
[Color] tab
Item Explanation
Color Mode Species color matching, etc.,
in color mode.
Toner Saving Species the print density
when economizing on toner.
Spot Color Species when implementing
Spot Color printing.
Advanced You can make other advanced
print setups.
Default Restores the tab settings to
the default settings.
1
impresión útiles
Funciones de
2
los colores
Concordar
3
de utilidades
de software
Utilización
4
Cong de
red
5
impresora utilizando el
Comprobar y cambiar
la conguración de la
panel de control
Apéndice Índice
- 13 -

Printer driver functions table
Mac OS X PS printer driver functions
1
impresión útiles
[TextEdit] panel
Funciones de
2
los colores
Concordar
3
de utilidades
de software
Utilización
4
Cong de
red
[Layout] Panel
Item Explanation
Printing header
and footer
Rewrap
contents to t
page
Enable to print page numbers,
dates, and text titles, etc.
Enable to print by aligning
to the text wrapping method
durign editing.
[Color Matching] panel
Item Explanation
ColorSync Species the ColorSync
function.
In printer Implements printer color
matching.
Prole Species the prole.
[Paper Handling] panel
5
impresora utilizando el
la conguración de la
panel de control
Apéndice Índice
Comprobar y cambiar
Item Explanation
Pages per Sheet Selects the number of pages
to be printed on 1 sheet of
paper.
Layout Direction Species the layout when
printing multiple pages on a
single sheet of paper.
Border Species the boundary line
type.
Two-Sided Species to use 2-sided
printing.
Reverse page
orientation
Flip horizontally Enable to print by reversing
Enable to print by reversing
the page orientation.
left and right.
Item Explanation
Pages to Print Species the pages to be
printed.
Page Order Species the order of the
pages to be printed.
Scale to t
Paper size
Destination
Paper Size
Scale down only Species to print by reducing
Prints by aligning to the paper
size. Some items may not be
printed correctly depending
on the setup.
Species to print by scaling to
match the size of the paper
to be output.
only to match the size of the
paper to be output.
- 14 -

Printer driver functions table
[Paper Feed] panel
Item Explanation
All Pages From Species the tray for the
paper feed. The tray is
selected automatically when
[Auto Select] is specied.
First Page From Select to print from the tray
that species the header page.
Remaining From Prints from the tray that
species the remaining pages.
[Cover Page] panel
[Spot Color] panel
Item Explanation
Usage Methods Species the range of Spot
Color printing.
Order of
superposition
Flip horizontally Sets when to print by
Specify the order of color and
white layering and white size
adjustment when printing the
white under. (white mode only).
reversing the horizontal
orientation so that the
document is as if reected in
a mirror.
1
impresión útiles
Funciones de
2
los colores
Concordar
3
de utilidades
de software
Utilización
4
Cong de
red
5
impresora utilizando el
Comprobar y cambiar
la conguración de la
panel de control
Apéndice Índice
Item Explanation
Print Cover
Page
Cover Page
Type
Species cover printing.
Species the text during
printing.
[Color] panel
Item Explanation
Grayscale Species to use monochrome
printing.
Color Species alignment to color
mode when printing in color.
- 15 -

Printer driver functions table
[Print Options] panel
1
impresión útiles
Funciones de
2
los colores
Concordar
3
de utilidades
de software
Utilización
4
Cong de
red
5
impresora utilizando el
la conguración de la
panel de control
Apéndice Índice
Item Explanation
Print Options Species alignment to the items
that have been set such as print
quality, paper type, etc.
Items Setup
Comprobar y cambiar
Trapping
Memo
This section uses [MemoPad] for its Windows explanations,
z
and [TextEditor] for its Mac OS X explanations.
Descriptions may differ depending on the applications and
printer drivers used.
Reference
For detailed explanations of the printer driver setup items,
z
see the printer driver "Online Help".
Species the setup items
conforming to the print setup tab.
Set it when white or colored stripes
appear due to misalignment.
- 16 -

Printing on various papers
z
Printing on transparencies
Memo
For the types of transparencies that can be used, see
z
"Usable Paper Types" in "Basic".
For the Multi-Purpose Tray preparations, see "Setting
z
paper in the Multi-Purpose Tray" in "Basic".
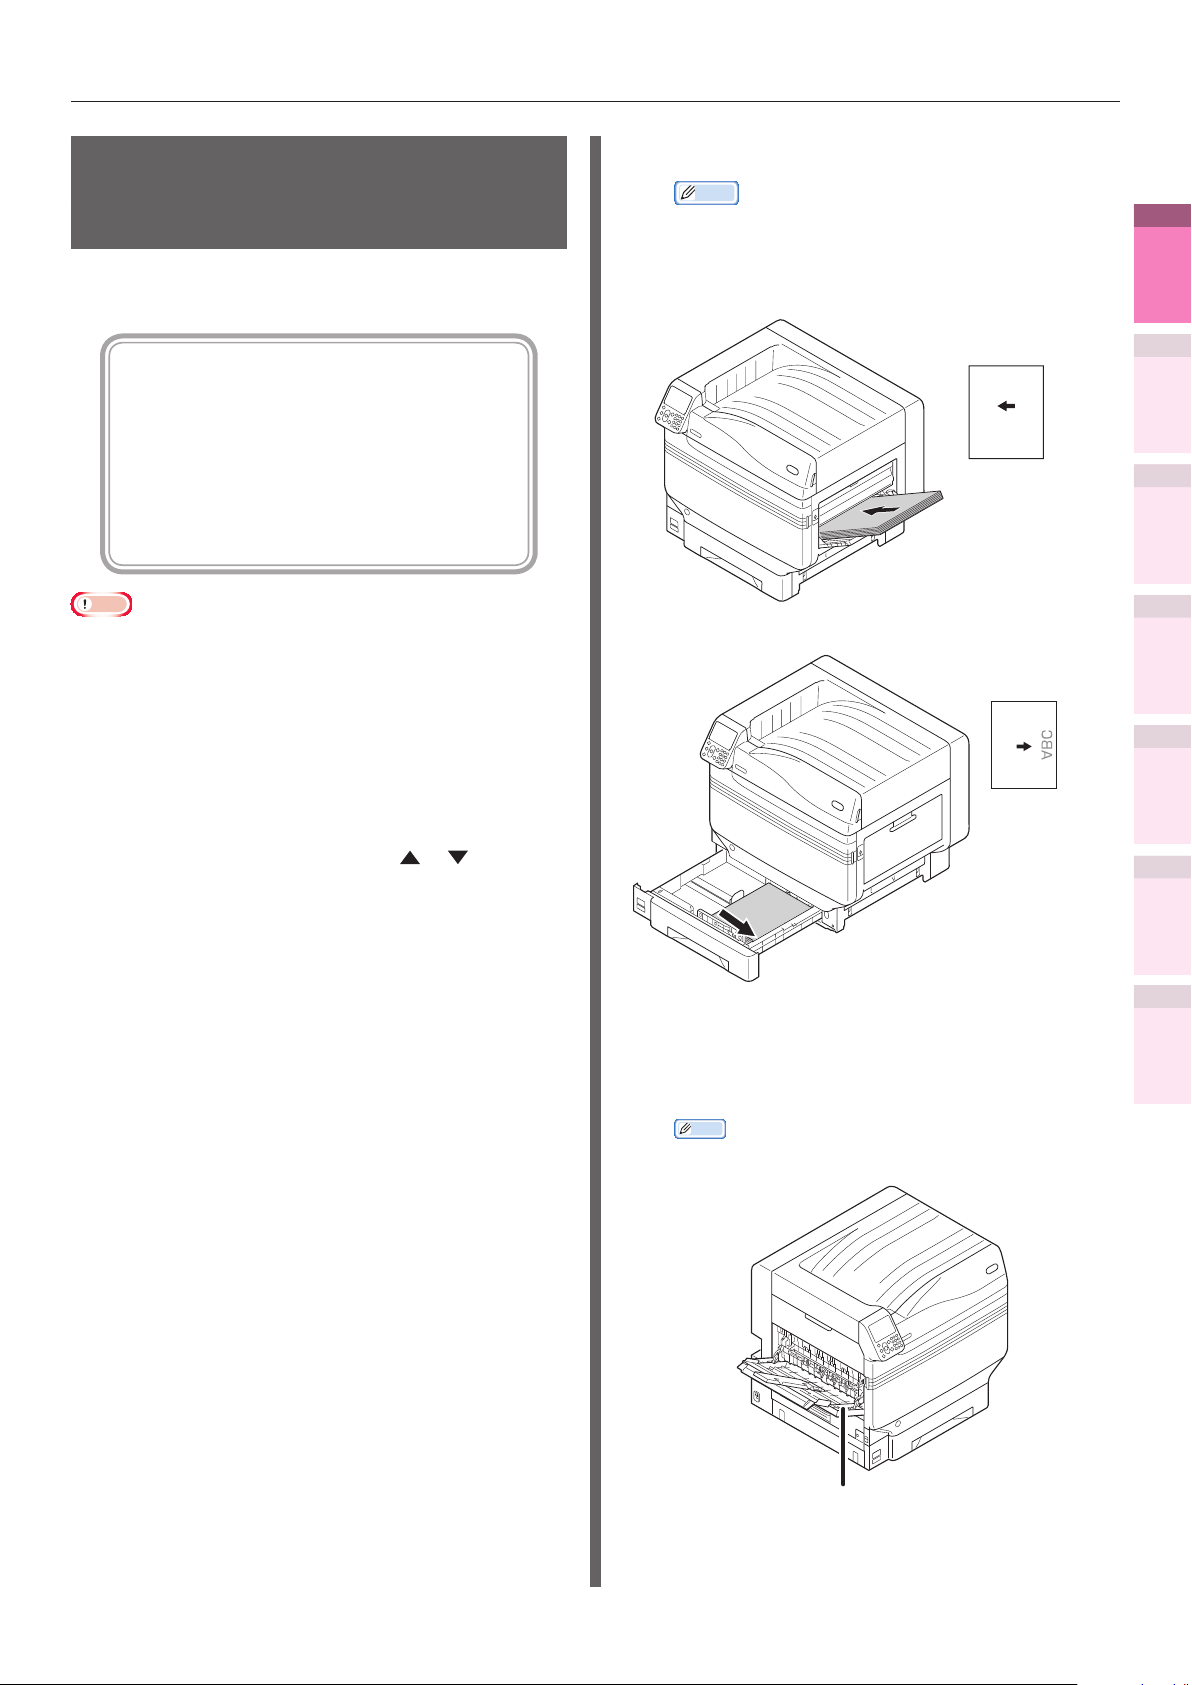
Set the paper.
1
Transparencies are printed from the MultiPurpose Tray or Tray 1.
Memo
You can print by manually feeding one page at a
z
time from the Multi-Purpose Tray. For details, see
"Printing single sheets manually" (P.45).
Note
Print speed will be slowed.
z
Setting in the Multi-Purpose Tray
Set the print surface face-up.
Setting the paper
orientation
Printing on various papers
Open the face-up stacker.
2
Output transparencies to the face-up
stacker.
Face-up stacker
Set the paper weight, paper size, and
3
paper type using the control panel.
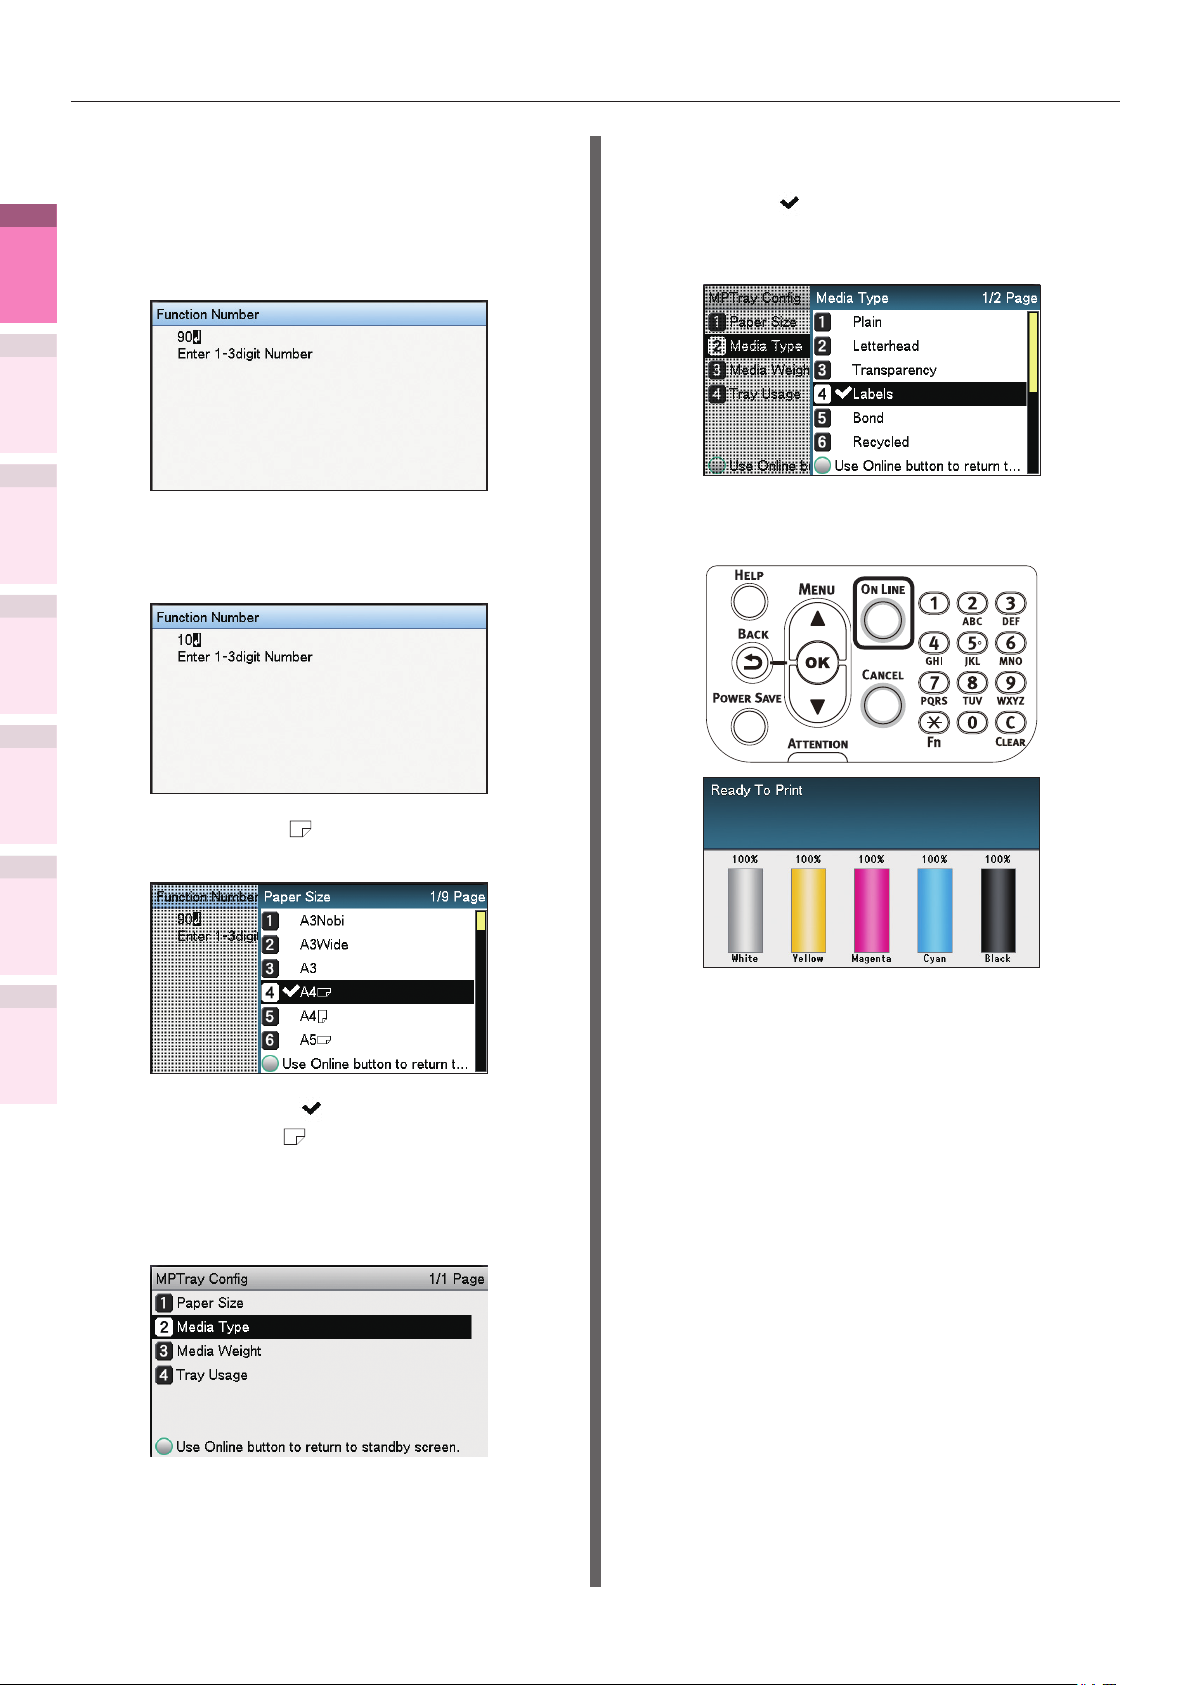
Press the [Fn] key.
(1)
The numerical values input screen
will be displayed.
1
impresión útiles
Funciones de
2
los colores
Concordar
3
de utilidades
de software
Utilización
4
Cong de
red
5
impresora utilizando el
Comprobar y cambiar
la conguración de la
panel de control
Setting in tray 1
Set the print surface face-down.
Setting the paper
ABC
orientation
Apéndice Índice
- 17 -
Printing on various papers
1
impresión útiles
Funciones de
2
los colores
Concordar
3
de utilidades
de software
Utilización
4
Cong de
red
Enter a number according to the
(2)
paper to be used.
Using the Multi-Purpose Tray
z
Press [9], [0], and press the [OK]
button.
Using tray 1
z
Press [1], [0], and press the [OK]
button.
Select [Transparency], and
(6)
press the [OK] button. Check
that
[Transparency], and press the
[BACK] button.
Press the [ON LINE] button to
(7)
return to the standby screen.
is displayed to the left of
5
impresora utilizando el
la conguración de la
panel de control
Apéndice Índice
Comprobar y cambiar
Select [A4 ], and press the [OK]
(3)
button.
Check that is displayed to the
(4)
left of [A4
button.
Select [Media Type], and press the
(5)
[OK] button.
], and press the [BACK]
Open the le to be printed.
4
Select [Size], [Source], and [Output
5
Bin] in the printer drivers to print.
- 18 -

Printing on various papers
Using Windows PS Printer Driver
Select [Page Setup] in the [File] menu.
1
Select [Portrait] or [Landscape] in
2
[Orientation], and click the [OK] button.
Select [Print] in the [File] menu.
3
Click [Advanced] (or [Preferences]).
4
Click [Advanced] in the [Paper/Quality]
5
tab.
Select [Transparency] in [Media]. Select
7
the paper tray in [Paper Source].
Select [Stacker (Face-up)] in [Output
8
Bin] in the [Job Options] tab, and click
[OK].
1
impresión útiles
Funciones de
2
los colores
Concordar
3
de utilidades
de software
Utilización
4
Cong de
red
5
impresora utilizando el
Comprobar y cambiar
la conguración de la
panel de control
Apéndice Índice
Select the paper size in [Paper Size] in
6
the "Advanced Options" screen.
Click [Print] in the "Print" screen to
9
print.
- 19 -

Printing on various papers
Using Mac OS X Printer Driver
1
1
impresión útiles
Funciones de
2
2
los colores
Concordar
3
de utilidades
de software
Utilización
4
Cong de
3
red
4
Select [Page Setup] in the [File] menu.
Select the printer model name in
[Format For], and select the paper
size in [Paper Size], and a suitable
orientation in [Orientation], and click
[OK].
Select [Print] in the [File] menu.
Check that the printer model name is
selected in [Printer].
Click the [Paper] button in the [Print
7
Options] panel, and select [Stacker
(Face-up)] from [Output Bin].
Click [Print] to print.
8
5
impresora utilizando el
la conguración de la
panel de control
Apéndice Índice
Comprobar y cambiar
Select the paper size in [Paper Size].
5
Select the paper tray in the [Paper
6
Feed] panel.
- 20 -
Printing on various papers
Printing on user-selected paper sizes (custom pages and lengthy printing)
Register the desired paper size in the printer
driver, and specify when printing.
[Sizes that can be fed from the MultiPurpose Tray (Settable custom sizes)]
Width: 64 to 330mm
Length: 89 to 1321mm
[Sizes
Purpose Tray]
Trays 1/2/3/4/5
Width: 99 to 330mm
Length: 147 to 457mm
Note
If printing smaller paper than width 99mm and length
z
147mm, feed from the Multi-Purpose Tray and output to
the face-up stacker.
Set the paper size to portrait length, and set in the device.
z
Not usable with some applications.
z
If feeding from the Multi-Purpose Tray, support the paper
z
manually for paper lengths that are not fully supported by
the paper supporter.
If feeding from the paper trays (tray 1, (optional)
z
trays 2 to 5), press the scroll buttons
the device control panel, and select [Menu]>[Tray
Conguration]>[Tray1 Cong]>[Paper Size]>[Custom].
If there is no paper in the tray, setting the function to
z
switch automatically to a tray in which paper of the same
size has been set, the default settings will be enabled
(i.e., the check box will be enabled). If the paper runs out
during printing, paper will feed from another tray. Disable
(i.e., uncheck) the check box when printing custom size
paper from a designated tray only.
can be fed from the Multi-
that
or on
Set the paper.
1
Memo
You can print by manually feeding one page at a
z
time from the Multi-Purpose Tray. For details, see
"Printing single sheets manually" (P.45).
Setting in the Multi-Purpose Tray
Setting the paper
Setting in the paper tray
If outputting to the face-up stacker,
2
open the face-up stacker.
orientation
ABC
Setting the paper
orientation
1
impresión útiles
Funciones de
2
los colores
Concordar
3
de utilidades
de software
Utilización
4
Cong de
red
5
impresora utilizando el
Comprobar y cambiar
la conguración de la
panel de control
Apéndice Índice
- 21 -
Set the print surface face-up to output.
Memo
You can output to the face-down stacker.
z
Face-up stacker

Printing on various papers
3
1
impresión útiles
Funciones de
2
los colores
Concordar
3
de utilidades
de software
Utilización
4
Cong de
red
Set the paper size and paper type using
the control panel.
Press the [Fn] key.
(1)
The numerical values input screen
will be displayed.
Enter a number according to the
(2)
paper to be used.
Using the Multi-Purpose Tray
z
Press [9], [0], and press the [OK]
button.
Select [X Dimension], and press
(5)
the [OK] button.
Press the scroll buttons or
(6)
to select a suitable size, and then
press the [OK] button.
5
impresora utilizando el
la conguración de la
panel de control
Apéndice Índice
Comprobar y cambiar
Using tray 1
z
Press [1], [0], and press the [OK]
button.
Select [Custom], and press the
(3)
[OK] button.
Check that is displayed to the
(7)
left of the selected size, and press
the [BACK] button.
Select [Y Dimension], and press
(8)
the [OK] button.
Press the scroll buttons or
(9)
to select a suitable size, and then
press the [OK] button.
Check that is displayed to the
(4)
left of [Custom], and press the
[BACK] button.
- 22 -
Check that is displayed to the
(10)
left of the selected size, and press
the [BACK] button.
Set the paper type and paper
(11)
weight as necessary.
Printing on various papers
Press the [ON LINE] button to
(12)
return to the standby screen.
Register the desired paper size in the
4
printer drivers to print.
Using Windows PS Printer Driver
Click [Start], and then select [Devices
1
and printers].
Right-click the [OKI (product name) (PS)]
2
icon, and select [Printing Preferences]>[OKI
(product name) (PS)].
Click [Advanced] in the [Layout] tab.
3
Select [PostScript Custom Page Size] in
4
[Paper Size].
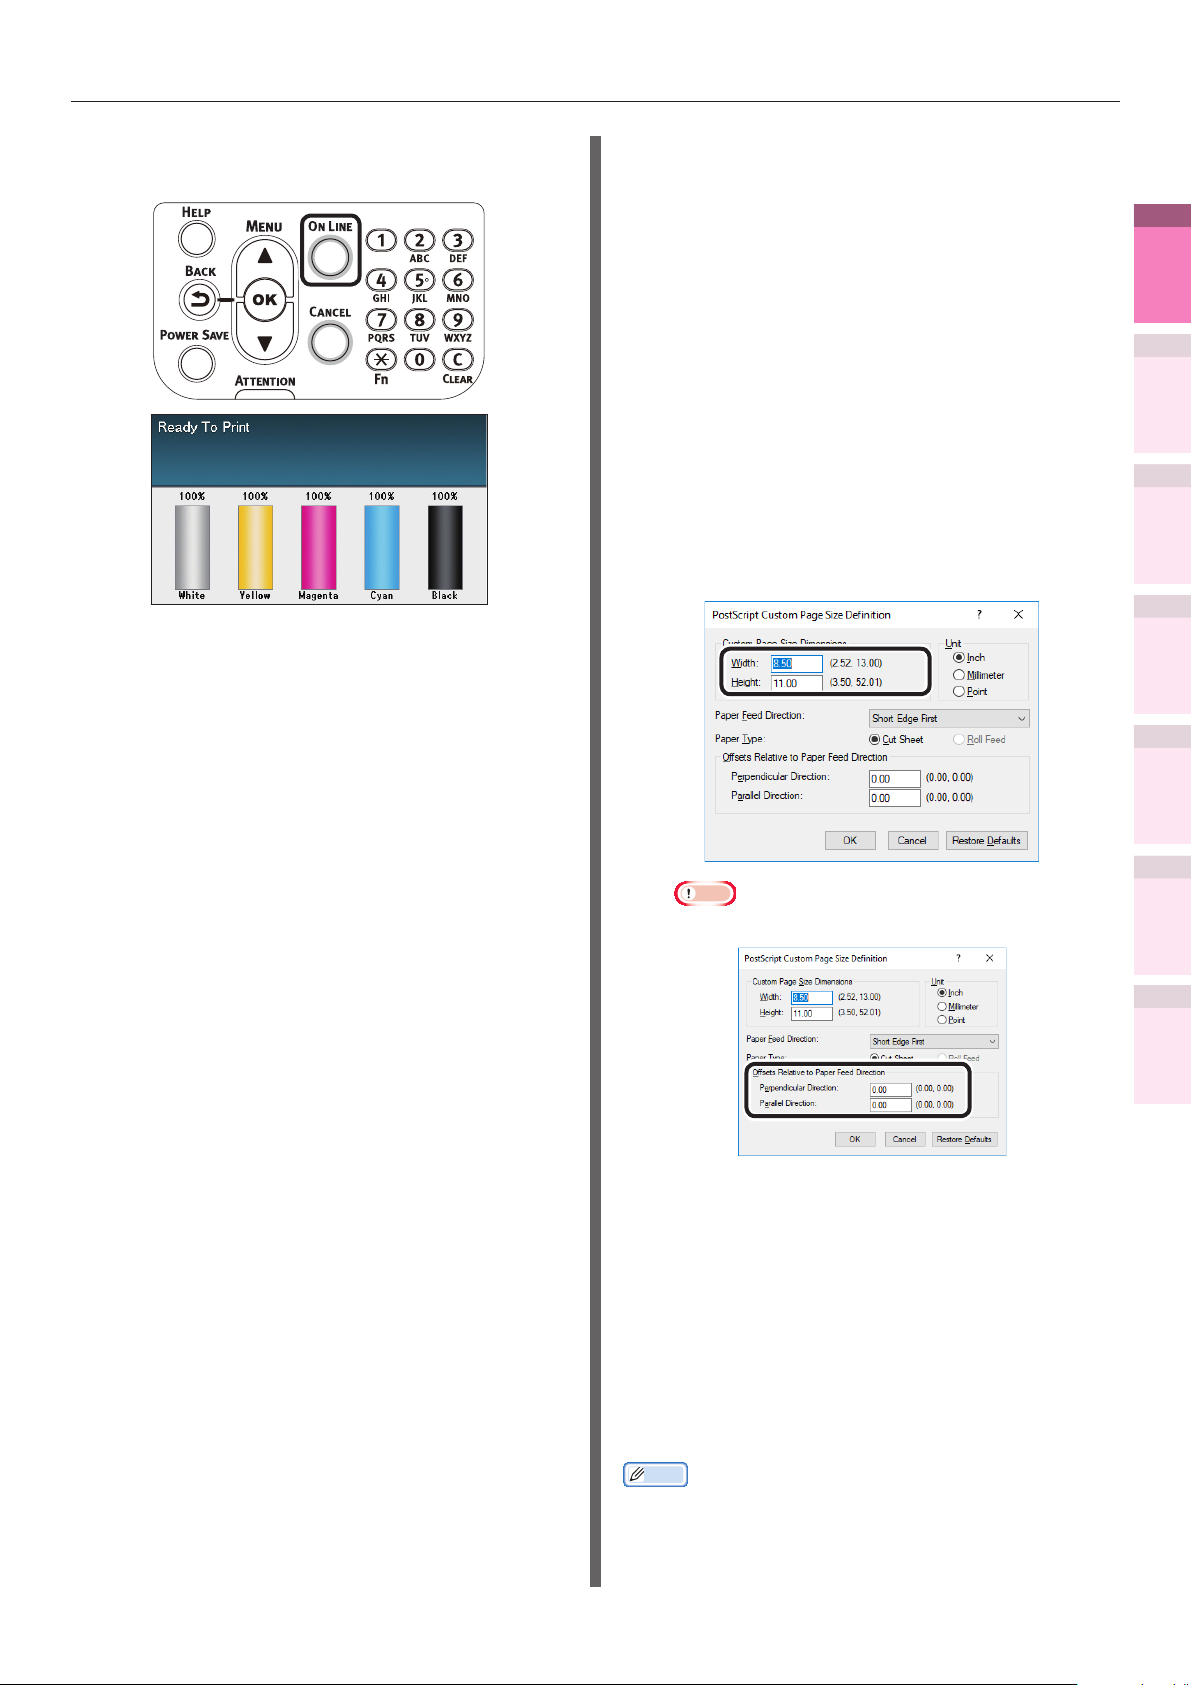
Enter the [Width] and [Height] in
5
the "PostScript Custom Page Size
Denition" screen.
1
impresión útiles
Funciones de
2
los colores
Concordar
3
de utilidades
de software
Utilización
4
Cong de
red
Note
"Offsets Relative to Paper Feed Direction" cannot be set.
z
Click [OK] until the "Printing
6
Preferences" screen closes.
Open the le to be printed.
7
Select [Print] in the [File] menu.
8
Specify the registered paper size to print.
9
5
impresora utilizando el
la conguración de la
panel de control
Apéndice Índice
Comprobar y cambiar
- 23 -
Memo
If printing is incorrect using large size paper from the PS
z
printer drivers, you can correct the printing by setting
"
Normal" in [Quality].

Printing on various papers
Using Mac OS X Printer Driver
Note
1
Custom sizes exceeding the printable range can be
z
impresión útiles
Funciones de
2
los colores
Concordar
entered using Mac OS X, but printing will be incorrect. Set
within the correct range.
If a custom paper size with the same paper size as
z
registered in the OS is specied, the paper may be
handled as regular paper.
1
2
3
de utilidades
de software
Utilización
3
4
Cong de
red
Open the le to be printed.
Select [Page Setup] in the [File] menu.
Select [Manage Custom Sizes] in [Paper
Size].
Using custom media
This setting is used in the following cases:
If a lateral stripe stands out in Heavy media, it
z
may be improved by setting [Custom media].
In this case, print speed will be slower.
When you want to print on OKI TRANSPARENCY
z
FILM.
Set the paper size and paper type using
1
the control panel.
Press the [Fn] key.
(1)
The number input screen appears.
5
impresora utilizando el
la conguración de la
panel de control
Apéndice Índice
Comprobar y cambiar
Click [+] in the "Custom Paper Sizes"
4
screen. Double-click [Untitled], and enter
a name in [Custom Paper Sizes]. Enter the
[Width] and [Height] page sizes.
Input the number depending on
(2)
the paper tray being used.
For the multi-purpose tray
z
Press [9] and [0], and press the
[OK] button.
For Tray1
z
Press [1] and [0], and press the
[OK] button.
Click [OK].
5
The created paper will be displayed at the
bottom of the [Paper Size] list in the [Page
Properties] panel.
Printing will be implemented.
6
- 24 -

Printing on various papers
Select the paper size, and press
(3)
the [OK] button.
Check that is displayed to the
(4)
left of the selected paper size, and
press the [BACK] button.
Select [Media Type], and press the
(5)
[OK] button.
Press the [ON LINE] button to
(7)
return to the standby screen.
1
impresión útiles
Funciones de
2
los colores
Concordar
3
de utilidades
de software
Utilización
4
Cong de
red
Select [HQFORUH1] - [HQFORUH5]
(6)
or [OKITRANSFILM], and press the
[OK] button.
Check that
is displayed to the
left of the selected [HQFORUH].
* In the default factory settings, paper types are set for
[HQFORUH1] - [HQFORUH5] as shown in the following
table.
Paper Type
Name
HQ_FOR_UH1 Plain Ultra Heavy1
Media Type Media Weight
5
impresora utilizando el
la conguración de la
panel de control
Apéndice Índice
Comprobar y cambiar
HQ_FOR_UH2 Plain Ultra Heavy2
HQ_FOR_UH3 Plain Ultra Heavy3
HQ_FOR_UH4 Plain Ultra Heavy4
HQ_FOR_UH5 Plain Ultra Heavy5
OKITRANSFILM OKI Special setting
- 25 -

Economy printing
Economy printing
z
1
impresión útiles
Funciones de
Printing multiple pages
on a single sheet (multipage printing)
2
You can print by reducing data for multiple pages
los colores
Concordar
on a single sheet.
3
de utilidades
de software
Utilización
4
Cong de
red
z
z
5
impresora utilizando el
Comprobar y cambiar
la conguración de la
panel de control
1 2
4
3
2
1
Note
This function reduces the data to print, so the center of
the paper may not be accurately aligned.
Not usable with some applications.
Using Windows PS Printer Driver
3 4
Memo
If using Windows 8.1/Windows 8/Windows 7/Windows
z
Server 2012 R2/Windows Server 2012/Windows Server
2008 R2/Windows Server 2008, make sure to set [Draw
Borders] as necessary. Further, you can also change the
page distribution using [Advanced]>[Page Layout per
Sheet].
Printing will be implemented.
5
Using Mac OS X Printer Driver
Open the le to be printed.
1
Select [Print] in the [File] menu.
2
Select [Pages per Sheet], [Layout
3
Direction], and [Border] in the [Layout]
panel.
Apéndice Índice
Open the le to be printed.
1
Select [Print] in the [File] menu.
2
Click [Advanced] (or [Preferences]).
3
Select the number of pages to pr
4
printed on a single page from [Pages
per Sheet] in the [Layout] tab.
Printing will be implemented.
4
- 26 -

Economy printing
Test printing with toner economy (toner economy mode)
You can print by economizing the toner
consumption amount by reducing the page print
density. Separately set whether to enable or
disable toner economy mode over 100% black.
Memo
You can suppress the amount of toner used by reducing
z
the toner density by selecting one of the following four
patterns as necessary.
– Printer setup: Follows the device setup.
– OFF: Prints using regular density without economizing
the toner.
– Save Level Low: Prints using medium light toner.
– Save Level Middle: Prints using light toner.
– Save Level High: Prints using considerably light toner.
[Toner Save] is enabled only if the print quality is specied
z
as [Normal].
Note
Toner save mode is not available for printing with white
z
toner.
Using Windows PS Printer Driver
Select the toner save amount from
4
[Toner Saving] in the [Color] tab.
Printing will be implemented.
5
Using Mac OS X Printer Driver
Open the le to be printed.
1
Select [Print] in the [File] menu.
2
Click the [Quality 2] button in the [Print
3
Options] panel, and select the toner
save amount from [Toner Saving].
1
impresión útiles
Funciones de
2
los colores
Concordar
3
de utilidades
de software
Utilización
4
Cong de
red
5
impresora utilizando el
Comprobar y cambiar
la conguración de la
panel de control
Apéndice Índice
Open the le to be printed.
1
Select [Print] in the [File] menu.
2
Click [Advanced] (or [Preferences]).
3
Printing will be implemented.
4
- 27 -

Changing sizes to print
z
1
impresión útiles
Funciones de
Enlarging/reducing pages
You can print on different paper sizes without
changing the print data.
2
los colores
Concordar
3
de utilidades
de software
Utilización
Changing sizes to print
A4
A6
Enable the [Resize document to t
6
printer page] check box in the [Job
Options] tab, and select the paper size
to be printed.
4
Cong de
red
5
impresora utilizando el
la conguración de la
panel de control
Apéndice Índice
Note
Not normally operable with some applications.
z
Using Windows PS Printer Driver
Comprobar y cambiar
Open the le to be printed.
1
Select [Print] in the [File] menu.
2
Click [Advanced] (or [Preferences]).
3
Click [Advanced] in the [Paper/Quality]
4
tab.
Select the paper size to be edited in
5
[Paper Size].
Printing will be implemented.
7
- 28 -

Using Mac OS X Printer Driver
Changing sizes to print
Open the le to be printed.
1
Select [Page Setup] in the [File] menu.
2
Select the printer model name in
3
[Format For], and select the paper size
to be edited in [Paper Size], and click
[OK].
Select [Print] in the [File] menu.
4
Enable the [Scale to t paper size]
5
in the [Paper Handling] panel, and
select the paper size to be edited using
"Destination Paper Size".
1
impresión útiles
Funciones de
2
los colores
Concordar
3
de utilidades
de software
Utilización
4
Cong de
red
5
impresora utilizando el
Comprobar y cambiar
la conguración de la
panel de control
Printing will be implemented.
6
Apéndice Índice
- 29 -

Clean printing
z
1
impresión útiles
Funciones de
Changing print quality (resolution)
Set [Quality] by aligning to the environment
2
used.
los colores
Concordar
Memo
If printing is incorrect using large size paper from the PS
z
printer drivers, you can correct the printing by setting
3
de utilidades
de software
4
Cong de
red
"
Select [ProQ / High Quality] to print using the highest
z
Utilización
printer quality.
By selecting [Optimize color thin line], characters and/or
z
lines with color will be printed sharply.
Clean printing
Normal" in [Quality].
– Select [Normal (600x600 dpi)] to print at low resolution.
This mode prioritizes print speed.
– [Fine/Detail(1200x1200 dpi)] is an intermediate mode
between [ProQ / High Quality] and [Normal (600x600 dpi)].
Using Mac OS X Printer Driver
Open the le to be printed.
1
Select [Print] in the [File] menu.
2
Click the [Quality 1] button in the [Print
3
Options] panel, and change [Quality].
5
impresora utilizando el
la conguración de la
panel de control
Apéndice Índice
Using Windows PS Printer Driver
Comprobar y cambiar
Open the le to be printed.
1
Select [Print] in the [File] menu.
2
Click [Advanced] (or [Preferences]).
3
Change [Quality] in the [Job Options]
4
tab.
Printing will be implemented.
4
Printing will be implemented.
5
- 30 -

Printing text and lines
sharply
Print colored text and lines sharply.
Memo
Not suitable for photo printing.
z
Using Windows PS Printer Driver
Open the le to be printed.
1
Select [Print] in the [File] menu.
2
Click [Advanced] (or [Preferences]).
3
Select [Optimize color thin line] in the
4
[Job Options] tab, and click [OK].
Using Mac OS X printer drivers
Open the le to be printed.
1
Select [Print] in the [File] menu.
2
Click [Quality 1] in the [Print Options]
3
panel, and enable the [Optimize color
thin line] check box.
Clean printing
1
impresión útiles
Funciones de
2
los colores
Concordar
3
de utilidades
de software
Utilización
4
Cong de
red
Printing will be implemented.
5
Printing will be implemented.
4
5
impresora utilizando el
la conguración de la
panel de control
Apéndice Índice
Comprobar y cambiar
- 31 -

Clean printing
Compensating ne lines
Using Mac OS X Printer Driver
You can prevent misaligned lines being printed
1
impresión útiles
when ultra-ne lines are specied from the
Funciones de
application. This function is normally ON.
z
2
los colores
Concordar
3
de software
Utilización
1
de utilidades
2
3
4
4
Cong de
red
5
impresora utilizando el
Comprobar y cambiar
la conguración de la
panel de control
Memo
Depending on the application, bar code and other intervals
will narrow. In this case, turn OFF the function.
Using Windows PS Printer Driver
Open the le to be printed.
Select [Print] in the [File] menu.
Click [Advanced] (or [Preferences]).
Click [Advanced] in the [Job Options]
tab.
Open the le to be printed.
1
Select [Print] in the [File] menu.
2
Click [Quality 1] in the [Print Options]
3
panel, and enable the [Adjust ultra ne
lines] check box.
Apéndice Índice
Enable the [Adjust ultra ne lines]
5
check box, and click [OK].
Printing will be implemented.
4
Printing will be implemented.
6
- 32 -

Clean printing
Using printer fonts
You can print by replacing the TrueType fonts
with the fonts stored in the device.
Note
The font replacement function stores the document
z
fonts, but font designs cannot be reproduced. If it is
necessary to print font designs accurately, disable the font
replacement function.
Some of the applications that use unique printer drivers
z
cannot use the font replacement function easily.
If using Windows PS printer drivers, PC administrator
z
privileges are required.
Cannot be used with Mac OS X printer drivers.
z
Using Windows PS Printer Driver
Click [Start], and then select [Devices
1
and Printers].
Right-click the [OKI (product name)
2
(PS)] icon, and select [Printer
Properties].
Select [Substitute with Device Font] in
9
[TrueType Font].
Printing will be implemented.
10
1
impresión útiles
Funciones de
2
los colores
Concordar
3
de utilidades
de software
Utilización
4
Cong de
red
5
impresora utilizando el
Comprobar y cambiar
la conguración de la
panel de control
Select the [Device Settings] tab.
3
Specify the printer font to be used
4
instead of TrueType fonts in [Font
Substitution Table].
To specify a font, click the TrueType font,
and select the replacement printer font
from the drop-down list.
Click [OK].
5
Select [Print] from the [File] menu.
6
Click [Advanced] (or [Preferences]).
7
Click [Advanced] in the [Layout] tab.
8
Apéndice Índice
- 33 -

Clean printing
Using PC fonts
You can output TrueType fonts to the screen
1
impresión útiles
display as is.
Funciones de
z
z
2
los colores
Concordar
3
de software
Utilización
1
de utilidades
2
3
4
Cong de
4
red
5
5
impresora utilizando el
Comprobar y cambiar
la conguración de la
panel de control
Note
Print time may be longer.
Cannot be used with Mac OS X printer drivers.
Using Windows PS Printer Driver
Open the le to be printed.
Select [Print] in the [File] menu.
Click [Advanced] (or [Preferences]).
Click [Advanced] in the [Layout] tab.
Select [Download as Softfont] in
[TrueType Font].
Apéndice Índice
Printing will be implemented.
6
- 34 -

Printing print results so that people cannot see them
Printing print results so that people cannot see them
z
Input the "Job Name" and "Job
Entering passwords to print (Secure Print)
(5)
Password" in the "JOB PIN" screen,
and click [OK].
1
impresión útiles
Funciones de
You can save print jobs to the device HDD, and
enter a password in the control panel to print.
To use this function, it is necessary to mount the
(optional) HDD to the device.
Note
If there is insufcient space on the option built-in
z
HDD storing the print jobs, "File system is full" will be
displayed, and printing will be disabled.
Using Windows PS Printer Driver
Open the le to be printed, and specify
1
[Secure Print].
Open the le to be printed.
(1)
Select [Print] in the [File] menu.
(2)
Click [Advanced] (or
(3)
[Preferences]).
Select [Secure Print] in [Job Type]
(4)
in the [Job Options] tab.
Request Job Name for each print job
z
When implementing printing, the
screen to enter the job name will be
displayed.
Job Password
z
Set using 4-digit gures.
Job Name
z
Set using up to 16 single-byte
alphanumeric characters.
Printing will be implemented.
(6)
If [Request Job Name for each print
job] is enabled, enter the "Job Name"
in the "Enter Job Name" screen, and
click [OK].
2
los colores
Concordar
3
de utilidades
de software
Utilización
4
Cong de
red
5
impresora utilizando el
Comprobar y cambiar
la conguración de la
panel de control
Apéndice Índice
- 35 -
Go to Step 2.
(7)
Note
If the user who started the secure print job has
z
forgotten that the job exists, or has forgotten the
password, the job will remain stored on the device
HDD. Use the Conguration Tool to delete secure
print jobs that have been left on the HDD. For
details, see "Deleting unnecessary jobs from the
HDD" (P.102).

Printing print results so that people cannot see them
1
impresión útiles
1
Funciones de
2
los colores
Concordar
3
de utilidades
de software
Utilización
4
Cong de
red
2
5
impresora utilizando el
Comprobar y cambiar
la conguración de la
panel de control
Using Mac OS X Printer Driver
Open the le to be printed, and specify
[Secure Print].
Open the le to be printed.
(1)
Select [Print] in the [File] menu.
(2)
Select [Secure Print] in [Job Type]
(3)
of the [Secure Print] panel.
Input [Job Name] and [Job
(4)
Password].
Print the le.
(5)
Go to Step 2.
(6)
Enter the password from the control
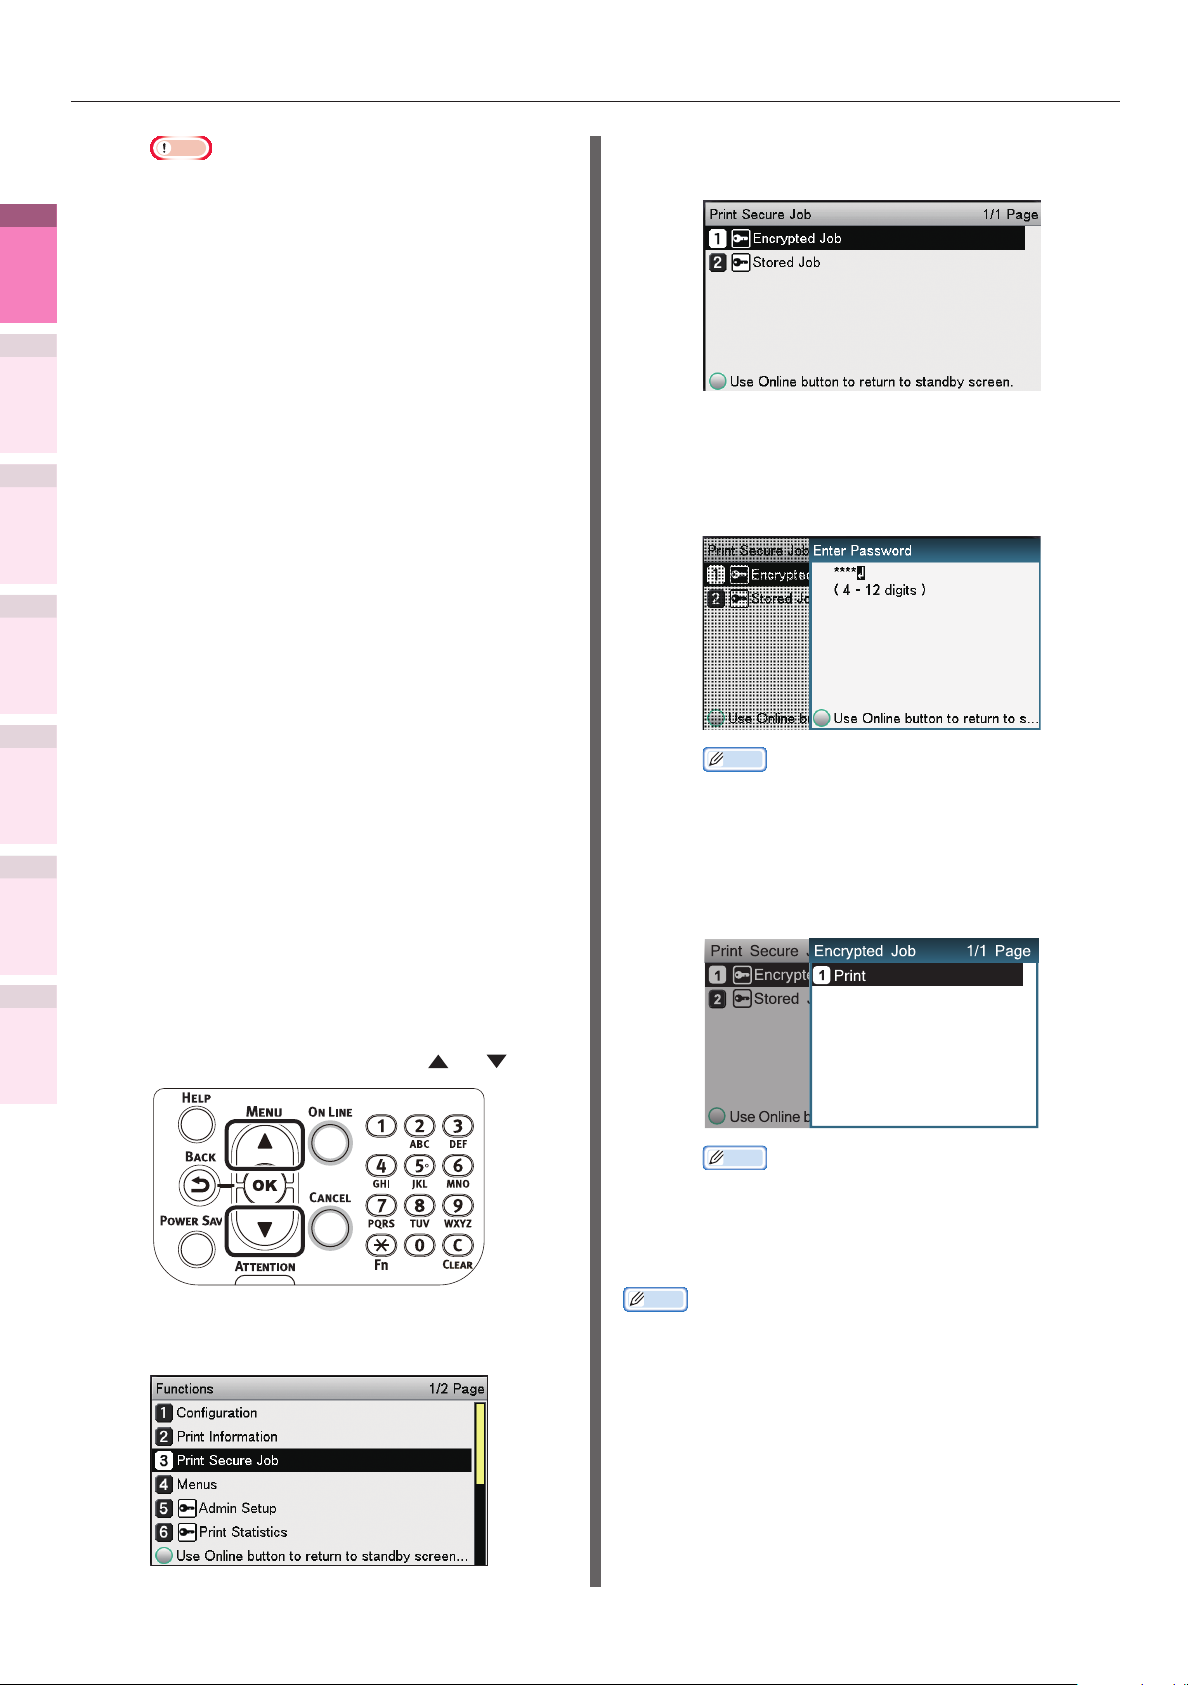
panel to print.
Press the scroll button or .
(1)
Use the 10-key pad to enter the
(4)
4-digit password for the job to be
printed to start the search.
Memo
If the password is entered incorrectly, press the
z
[BACK] button, and reset.
Press the [CANCEL] button to cancel the search.
z
Select [Print], and press the [OK]
(5)
button.
Apéndice Índice
Select [Print Secure Job], and
(2)
press the [OK] button.
Select [Stored Job], and press the
(3)
[OK] button.
Memo
Select [Delete], and press the [OK] button to
z
delete a job.
Use 10-key pad or the scroll
(6)
buttons
or to enter the print
quantity, and press the [OK]
button.
Reference
You can use the Conguration Tool to delete the secure
z
print job. For details, see "Deleting unnecessary jobs from
the HDD" (P.102).
- 36 -
Printing print results so that people cannot see them
Printing secret text (encrypted secure print)
The print job is encrypted before being sent
to the device. Consequently, leaks regarding
the print details can still be prevented even if
print data is stolen from the HDD or the device
communications process. Further, to strengthen
security even more, print jobs spooled on the
HDD are either printed, or deleted after a xed
period of time has elapsed.
To print, it is necessary to enter the password
using the control panel, so theft of the printed
matter can also be prevented.
To use this function, it is necessary to mount the
(optional) HDD to the device.
Note
Cannot be used with Mac OS X printer drivers.
z
If there is insufcient space on the built-in HDD storing
z
the print jobs, "File system is full" will be displayed, and
printing will be disabled.
If using Encrypted Secure Print, disable "Job Spool". For
z
details, see "Using the printer buffer" (P.55).
The [Print only encrypted secure print jobs] from the
z
[Device Settings] tab in Windows 8.1/Windows 8/Windows
7/Windows Server 2012 R2/Windows Server 2012/
Windows Server 2008 R2/Windows Server 2008 with
Windows PS printer drivers will be disabled.
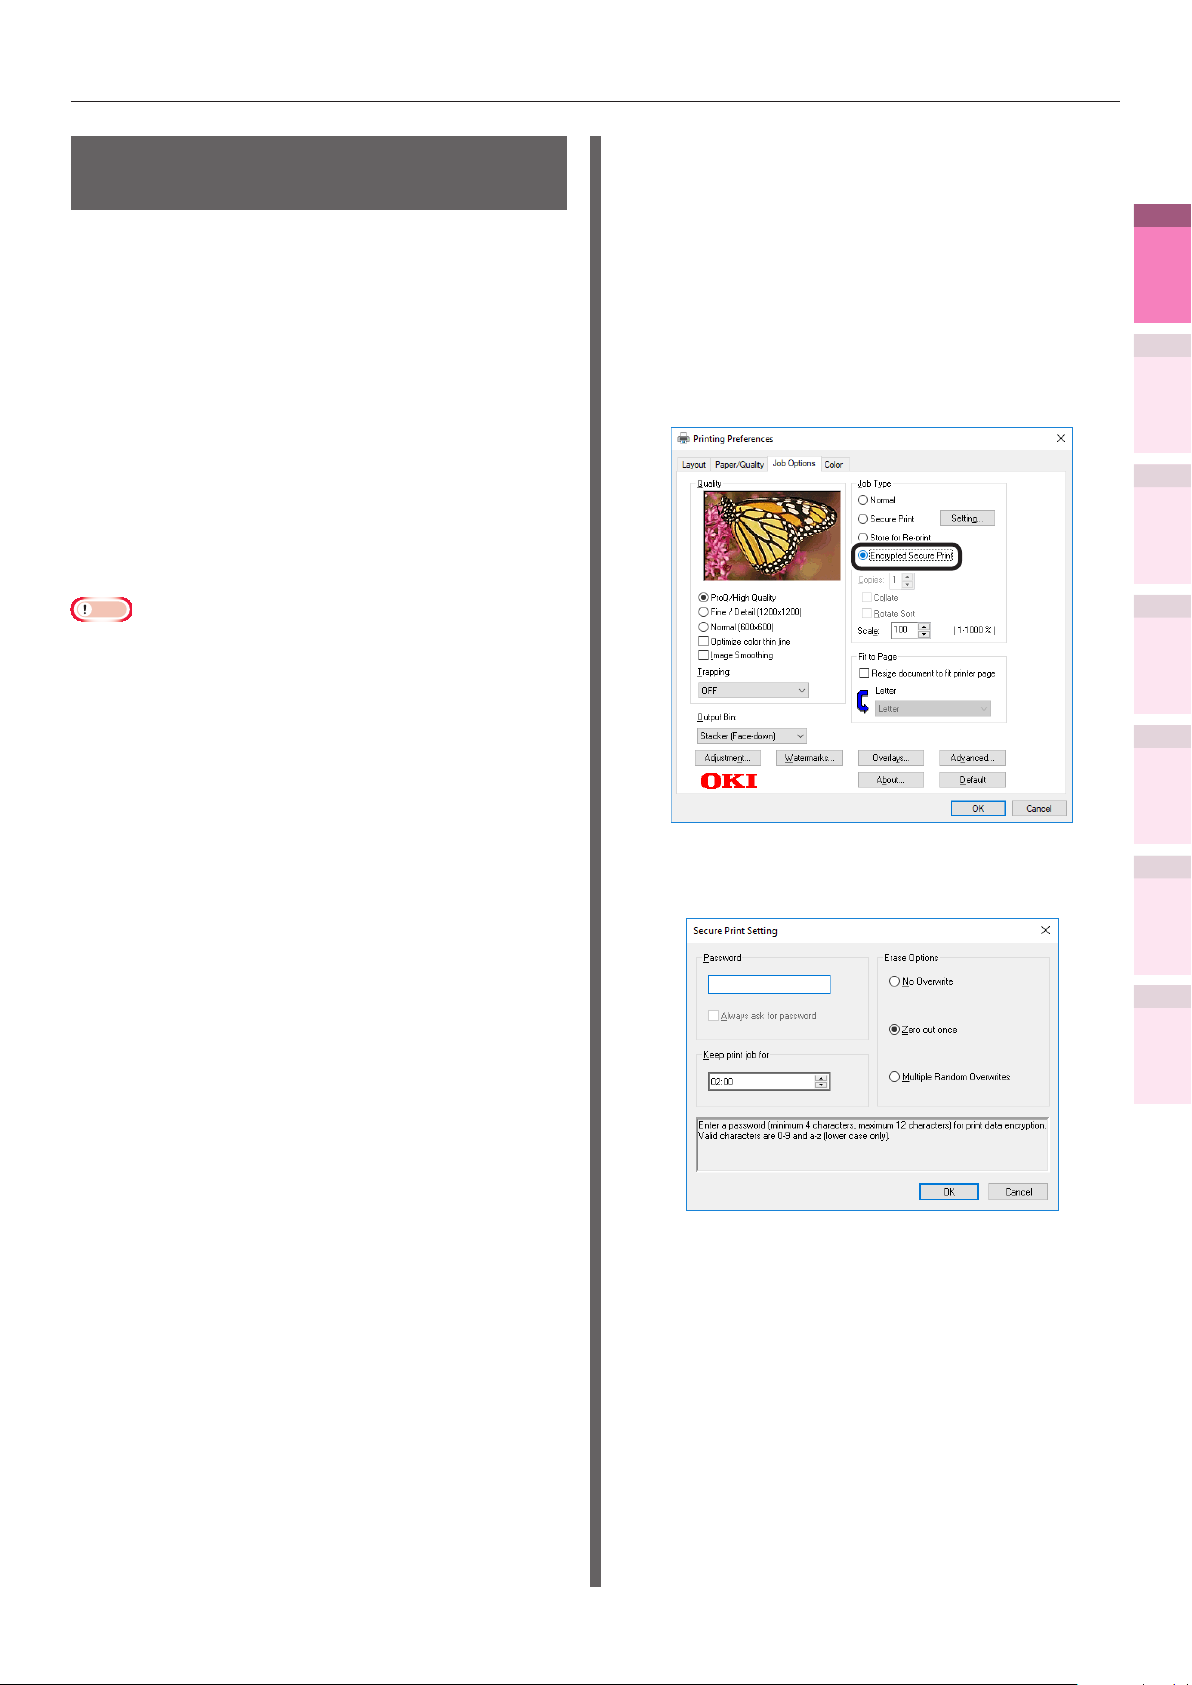
Open the le to be printed, and specify
1
[Encrypted Secure Print].
Open the le to be printed.
(1)
Select [Print] in the [File] menu.
(2)
Click [Advanced] (or [Preferences]).
(3)
Select [Encrypted Secure Print] in
(4)
[Job Type] in the [Job Options] tab.
Input the "Password" in the "Secure
(5)
Print Setting" screen, and click [OK].
1
impresión útiles
Funciones de
2
los colores
Concordar
3
de utilidades
de software
Utilización
4
Cong de
red
5
impresora utilizando el
Comprobar y cambiar
la conguración de la
panel de control
Apéndice Índice
- 37 -
Password
z
Set using 4 to 12 alphanumeric
characters.
Always ask for password
z
When implementing printing, the
screen to enter the password will be
displayed.
Printing print results so that people cannot see them
1
impresión útiles
Funciones de
2
los colores
Concordar
3
de utilidades
de software
Utilización
4
Cong de
red
5
impresora utilizando el
Comprobar y cambiar
la conguración de la
panel de control
Apéndice Índice
Note
This check box is disabled in Windows 8.1/
z
Windows 8/Windows 7/Windows Server 2012
R2/Windows Server 2012/Windows Server 2008
R2/Windows Server 2008. Enter the password in
the "JOB PIN" screen displayed when [JOB PIN]
is clicked.
Keep print job for
z
Set the period in which the print job is
stored on the device HDD from 5 mins,
to 23 hours 59 mins. Print jobs that
exceed the storage period are deleted
from the HDD automatically.
Erase Options
z
Specify the method when deleting
print jobs from the HDD.
– Easy method: Delete the print job from the le
system. This deletion method risks the print job
being recovered from the HDD, but it will delete
in the shortest time.
– Overwrite using 0x00: After overwriting the
specied data once, the print job is deleted. This
is a safer method compared to easy deletion, but
there is a risk that print jobs will be recovered
using special methods.
– Overwrite 3 times: Overwrites the print job
data 3 times before deleting. This is the safest
deletion method, but deletion takes time.
Printing will be implemented.
(6)
If [Always ask for password] is enabled, enter
the "Password" in the "Secure Print Setting"
screen, and click [OK].
Select [Encrypted Job], and press
(3)
the [OK] button.
Enter the print job password using
(4)
either the 10-key pad or the input
screen, and click the [OK] button
to start the search.
Memo
If the password is entered incorrectly, press the
z
[BACK] button, and reset.
Press the [CANCEL] button to cancel the search.
z
Select [Print], and press the [OK]
(5)
button.
Enter the password from the control
2
panel to print.
Press the scroll button or .
(1)
Select [Print Secure Job], and
(2)
press the [OK] button.
Memo
Select [Delete], and press the [OK] button to
z
delete a job.
All jobs that match the password will be printed
z
in the order they are received by the device.
Memo
After implementing Encrypted Secure Print, the les
z
used in printing are deleted using the specied deletion
method. While a le is being deleted, the message
"Deleting Encrypted Job" will be displayed.
If data is lost during transfer or data falsication is
z
detected, the message [To turn off the display, press OK]
will be displayed.
- 38 -

Correcting the Print Position on the Paper Using the Control Panel
Correcting the Print Position on the Paper Using
z
the Control Panel
Correcting the print start position
You can correct the print start position vertically
and horizontally on the paper for each tray.
Please refer to the following procedure.
Paper feed direction
Press the function number of the tray
2
you want to correct, and press the [OK]
button.
Memo
The corresponding function numbers for each tray are
z
listed below.
Target Tray Function No.
MPTray 220
Tray1 221
Tray2 222
Tray3 223
Tray4 224
Tray5 225
1
impresión útiles
Funciones de
2
los colores
Concordar
3
de utilidades
de software
Utilización
4
Cong de
red
5
impresora utilizando el
Comprobar y cambiar
la conguración de la
panel de control
Apéndice Índice
Paper feed direction
Press the [Fn] key.
1
The numerical values input screen will
be displayed.
Press the scroll button or to select
3
the item to correct.
Press the [OK] button.
4
- 39 -

Correcting the Print Position on the Paper Using the Control Panel
5
1
impresión útiles
Funciones de
2
los colores
Concordar
3
de utilidades
de software
Utilización
6
4
z
Cong de
red
impresora utilizando el
panel de control
5
Comprobar y cambiar
la conguración de la
z
z
z
Press the scroll button or to select
the adjustment amount, and press the
[OK] button. Check that
is displayed
to the left of the selected value.
Press the [ON LINE] button to return to
the standby screen.
Note
Y describes the paper feed direction and X describes its
orthogonal position.
Correct with [+] to widen the blank space in the X
direction, and [+] to widen the blank space in the Y
direction.
Readjustment might be necessary depending on the usage
conditions (temperature and humidity/media type).
This function corrects the position and does not improve
the writing start position (±2mm).
Apéndice Índice
- 40 -

Adjusting the Image Stretch (Print Length) Using the Control Panel
Adjusting the Image Stretch (Print Length) Using
z
the Control Panel
Adjusting the stretch of print results
You can adjust the stretch of print results on the
paper feed direction.
Please refer to the following procedure.
Paper feed direction
Paper feed direction
Press the function number of the tray
2
you want to adjust, and press the [OK]
button.
Memo
The corresponding function numbers for each tray are
z
listed below.
Tray Function No.
MPTray 220
Tray1 221
Tray2 222
Tray3 223
Tray4 224
Tray5 225
Press the scroll button or to select
3
[Y Scaling].
1
impresión útiles
Funciones de
2
los colores
Concordar
3
de utilidades
de software
Utilización
4
Cong de
red
5
impresora utilizando el
Comprobar y cambiar
la conguración de la
panel de control
Apéndice Índice
Press the [Fn] key.
1
The numerical values input screen will
be displayed.
Press the [OK] button.
4
- 41 -

Adjusting the Image Stretch (Print Length) Using the Control Panel
5
1
impresión útiles
Funciones de
2
los colores
Concordar
3
de utilidades
de software
Utilización
6
4
z
Cong de
red
impresora utilizando el
panel de control
5
Comprobar y cambiar
la conguración de la
z
z
z
z
Press the scroll button or to select
the adjustment amount, and press the
[OK] button. Check that
is displayed
to the left of the selected value.
Press the [ON LINE] button to return to
the standby screen.
Note
Adjust with [+] to enlarge the print result on the feed
direction of the paper and [-] to reduce.
Refer to "Correcting the print start position" (P.39) for
correcting the print start position of the paper edge.
Readjustment might be necessary depending on the usage
conditions (temperature and humidity/media type).
This function adjusts the scale of image and does not
improve the image scale precision (±1mm/100mm).
Over-enlarging the print result may stain the back of the
paper.
Apéndice Índice
- 42 -

Advanced print functions
z
Setting the page order
Extracts in page order when printing documents
with multiple pages.
There are two methods.
Printing documents in page order
The printed documents are output face-down.
Open the document to be printed.
1
Specify the face-down stacker as the
2
Output Bin to print.
Advanced print functions
Printing documents in reverse page order
The printed documents are output face-up.
Open the face-up stacker at the back of the device.
1
1
impresión útiles
Funciones de
2
los colores
Concordar
3
de utilidades
de software
Utilización
4
Cong de
red
Note
For paper weights with GSM 320 to 360g/m
z
275 to 310kg), custom size paper with a length less than
147mm, and transparencies, make sure to open the faceup stacker and output the documents face-up.
Face-down stacker
Face-up stacker
2
(ream weight
Face-up stacker
Open the paper supporter.
2
5
impresora utilizando el
la conguración de la
panel de control
Apéndice Índice
Comprobar y cambiar
- 43 -

Advanced print functions
3
1
impresión útiles
Funciones de
2
los colores
Concordar
3
de utilidades
de software
Utilización
4
1
Cong de
red
2
3
5
impresora utilizando el
Comprobar y cambiar
la conguración de la
panel de control
4
Rotate the auxiliary supporter in the
direction of the arrow into the lock position.
Supplementary
supporter
Using Windows PS Printer Driver
Open the le to be printed.
Select [Print] in the [File] menu.
Click [Advanced] (or [Preferences]).
Select [Stacker (Face-up)] in [Output
Bin] in the [Job Options] tab.
Using Mac OS X Printer Driver
Open the le to be printed.
1
Select [Print] in the [File] menu.
2
Click the [Paper] button on the [Print
3
Options] panel.
Select [Stacker (Face-up)] in [Output
4
Bin].
Select [Reverse] in [Page Order] in the
5
[Paper Handling] panel.
Apéndice Índice
Select [Front to Back] in [Page Order]
5
in the [Layout] tab.
Printing will be implemented.
6
Note
If the [Page Order] item is not displayed, right-click the
z
[OKI (printer name) (PS)] in the [Devices and Printers]
folder, and enable [Enable advanced printing features] in
[Printer Properties]>[Advanced] tab.
Printing will be implemented.
6
- 44 -

Advanced print functions
Printing single sheets
manually
You can print single pages individually by setting
the paper in the Multi-Purpose Tray. A message
to set the paper in the Multi-Purpose Tray will be
displayed on the control panel screen for each
page to be printed. To continue printing, select
[Restart print].
Set the paper in the Multi-Purpose Tray.
1
Open the le to be printed.
2
Set the manual printing using the
3
printer drivers, and press the [OK]
button on the control panel to print.
Using Windows PS Printer Driver
Open the le to be printed.
1
Select [Print] from the [File] menu.
2
Click [Advanced] (or [Preferences]).
3
Select the [Paper/Quality] tab.
4
Select [Multi-Purpose Tray] from [Paper
5
Source].
Click [Multipurpose tray is handled as
7
manual feed], and select [Yes] from the
drop-down list.
Click [OK].
8
Make other settings as necessary to
9
print.
When a message to set the paper in the
10
Multi-Purpose Tray is displayed in the
control panel LCD, set a single sheet,
and press the [OK] button.
When printing multiple-page
documents, the same message will be
displayed for each page.
Using Mac OS X Printer Driver
1
impresión útiles
Funciones de
2
los colores
Concordar
3
de utilidades
de software
Utilización
4
Cong de
red
5
impresora utilizando el
Comprobar y cambiar
la conguración de la
panel de control
Apéndice Índice
Click [Advanced].
6
Open the le to be printed.
1
Select [Print] from the [File] menu.
2
Open the [Paper Feed] panel, and select
3
[Multi-Purpose Tray] in [All Pages From].
- 45 -

Advanced print functions
4
1
impresión útiles
Funciones de
2
los colores
Concordar
3
de utilidades
de software
Utilización
4
Cong de
red
5
6
5
impresora utilizando el
Comprobar y cambiar
la conguración de la
panel de control
Click the [Feed] button in the [Print Options]
panel, and enable [Multipurpose tray is
handled as manual feed].
Make other settings as necessary to print.
When a message to set the paper in the
Multi-Purpose Tray is displayed in the
control panel LCD, set a single sheet,
and press the [OK] button.
Automatically selecting trays
The tray matching the paper size set using the
printer drivers (tray 1, (optional) trays 2 to 5, or
Multi-Purpose Tray) will be selected automatically
for printing.
Note
Set the paper size and paper type for tray 1, (optional)
z
trays 2 to 5, and the Multi-Purpose Tray using the control
panel. For detailed, see "Setting paper" in "Basic".
Using Windows PS Printer Driver
Open the le to be printed.
1
Select [Print] in the [File] menu.
2
Click [Advanced] (or [Preferences]).
3
Select [Automatically Select] in [Paper
4
Source] in the [Paper/Quality] tab.
Apéndice Índice
When printing multiple-page
documents, the same message will be
displayed for each page.
Printing will be implemented.
5
- 46 -

Using Mac OS X Printer Driver
Open the le to be printed.
1
Select [Print] in the [File] menu.
2
Select [Auto Select] in [All Pages From]
3
in the [Paper Feed] panel.
Printing will be implemented.
4
Advanced print functions
Printing only covers from a separate tray (cover printing)
When printing multiple-page documents, you can
print just the 1st page from a separate tray. Use
to create covers by changing the paper color and
weight of the 1st page.
Note
Cannot be used with Windows PS printer drivers.
z
Using Mac OS X Printer Driver
Open the le to be printed.
1
Select [Print] in the [File] menu.
2
Enable the [First Page From] in the
3
[Paper Feed] panel, and select each
paper feed method from [First Page
From] and [Remaining From].
1
impresión útiles
Funciones de
2
los colores
Concordar
3
de utilidades
de software
Utilización
4
Cong de
red
5
impresora utilizando el
Comprobar y cambiar
la conguración de la
panel de control
Printing will be implemented.
4
Apéndice Índice
- 47 -

Advanced print functions
Stamping and printing (watermarks)
1
impresión útiles
Funciones de
The details to be printed from the application can
be independently printed overlaying [Samples],
[Condential], etc.
2
los colores
Concordar
3
de utilidades
de software
Utilización
z
4
Cong de
red
impresora utilizando el
panel de control
5
Comprobar y cambiar
la conguración de la
z
z
Samples
Note
Cannot be used with Mac OS X printer drivers.
Using Windows PS Printer Driver
Note
The default settings print by overlaying watermarks on the
text and diagrams in the document. To print watermarks
under the text and diagrams, enable the [Background]
check box in the [Watermarks] dialog box.
Enable the [Background] check box to not print
watermarks depending on the application. In this case,
disable the [background] check box.
Click [New].
5
Enter [Text] in the "Watermarks"
6
screen, and set another [Size].
Apéndice Índice
Open the le to be printed.
1
Select [Print] in the [File] menu.
2
Click [Advanced] (or [Preferences]).
3
Click [Watermarks] in the [Job Options]
4
tab.
Click [OK].
7
Printing will be implemented.
8
- 48 -

Collate (sort printing)
Advanced print functions
Using Mac OS X Printer Driver
You can store print jobs in the device memory
and collate the printing.
Printing by specifying batches
x2
3
2
1
Printing without specifying batches
x2
3
2
1
Note
Not usable with some applications.
z
Using Windows PS Printer Driver
Note
Turn OFF the batch printing function in the application.
z
3
2
1
2
2
1
1
2
1
3
3
Open the le to be printed.
1
1
impresión útiles
Funciones de
Select [Print] in the [File] menu.
2
Disable [Collate pages] in the [Paper
3
Handling] panel or print dialog box, and
3
enter the print quantity in [Copies].
Click the [Paper] button in the [Print
4
Options] panel, and enable the [Collate]
check box.
2
los colores
Concordar
3
de utilidades
de software
Utilización
4
Cong de
red
5
impresora utilizando el
Comprobar y cambiar
la conguración de la
panel de control
Open the le to be printed.
1
Select [Print] in the [File] menu.
2
Click [Advanced] (or [Preferences]).
3
Enter the print quantity in [Copies] in the [Job
4
Options] tab, and enable the [Collate] check box.
Memo
If [Collate pages] is enabled in the [Print Handling]
z
panel, do not use the device memory when printing.
Printing will be implemented.
5
Apéndice Índice
Printing will be implemented.
5
- 49 -

Advanced print functions
Outputting portrait and landscape alternately using batch printing
1
impresión útiles
Funciones de
When outputting for each batch, you can output the pages in portrait and landscape orientations
alternately.
As you can output portrait and landscape alternately, it is easy to arrange print jobs with multiple
pages.
2
los colores
Concordar
3
de utilidades
de software
Utilización
4
Cong de
red
5
impresora utilizando el
Comprobar y cambiar
la conguración de la
panel de control
Apéndice Índice
3
1 2 3
Memo
To use the portrait and landscape output function, it is necessary to mount the (optional) HDD to the device.
z
Prepare the paper for portrait and landscape in the paper feed tray beforehand.
z
The usable paper sizes are described below.
z
– A4Wide, A4, A5, B5, letter, 16K (184 x 260mm), 16K (195 x 270mm), 16K (197 x 273mm)
Using Windows PS Printer Driver
Open the le to be printed.
1
Select [Print] in the [File] menu.
2
Click [Advanced] (or [Preferences]).
Using Mac OS X Printer Driver
1
2
3
Enter the print quantity in [Copies] in [Job
4
Options], and enable the [Collate] check box.
Enable the [Rotate Sort] check box.
3
2
1
3rd 2nd 1st
Open the le to be printed.
Select [Print] in the [File] menu.
Enter the print quantity in the print
quantity, and then click the [Paper]
button in the [Print Options] panel, and
enable the [Collate] and [Rotate Sort]
check boxes.
3
2
1
5
3
2
1
Printing will be implemented.
6
Printing will be implemented.
4
- 50 -
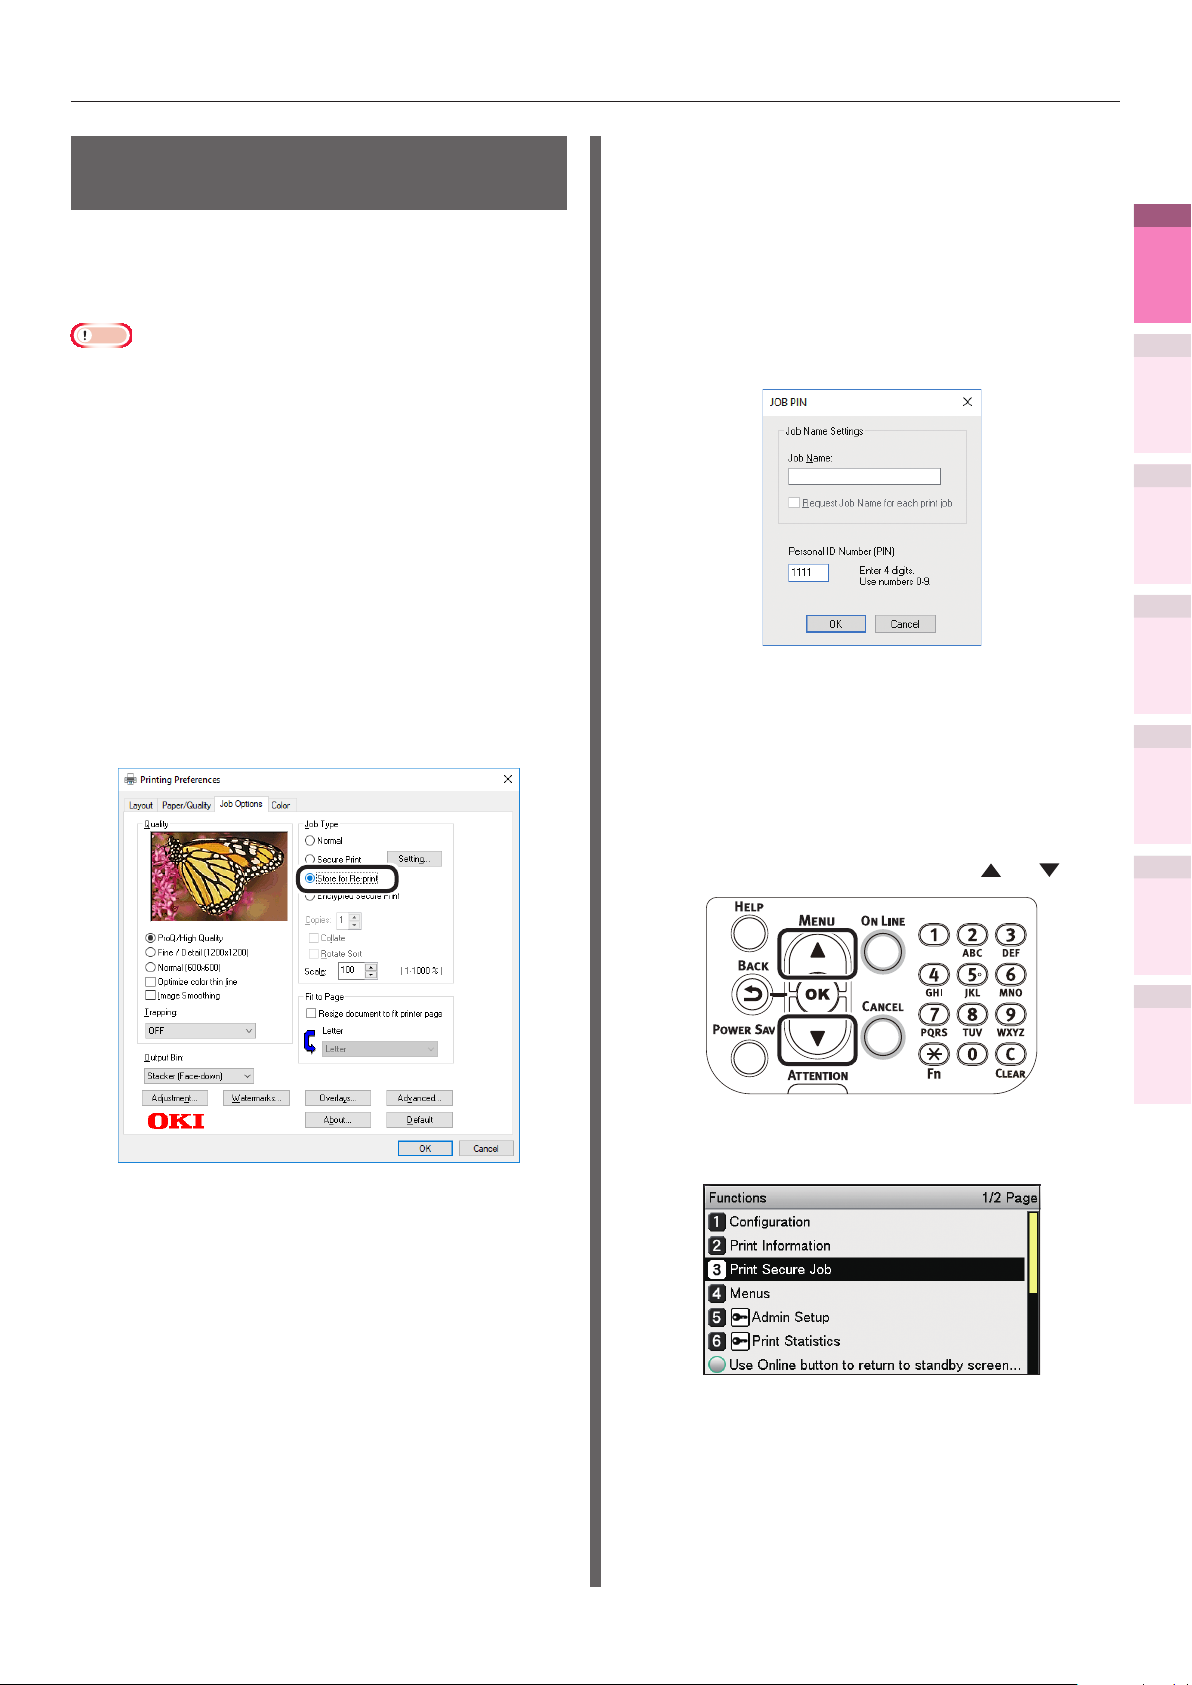
Saving data for repeat printing
You can save print data to the device HDD, and
enter a password in the control panel to repeat
printing several times.
Note
If there is insufcient space on the built-in HDD storing
z
the print jobs, "File system is full" will be displayed, and
printing will be disabled.
Cannot be used with Mac OS X printer drivers.
z
Save the job to the printer.
1
Open the le to be printed.
(1)
Select [Print] in the [File] menu.
(2)
Click [Advanced] (or
(3)
[Preferences]).
Select [Store for Re-print] in [Job
(4)
Type] in the [Job Options] tab.
Advanced print functions
Input the "Job Name" and
(5)
"Personal ID Number" in the "JOB
PIN" screen, and click [OK].
Request Job Name for each job
z
When printing is implemented, a screen to enter
the job name will be displayed.
Personal ID Number
z
Set using 4 digits.
Job Name
z
Set using up to 16 single-byte alphanumeric characters.
Printing will be implemented.
(6)
If [Request Job Name for each print
job] is enabled, enter the "Job Name"
in the "Job PIN" screen, and click [OK].
1
impresión útiles
Funciones de
2
los colores
Concordar
3
de utilidades
de software
Utilización
4
Cong de
red
5
impresora utilizando el
Comprobar y cambiar
la conguración de la
panel de control
Enter the password to print.
2
Press the scroll button or .
(1)
Select [Print Secure Job], and
(2)
press the [OK] button.
Apéndice Índice
- 51 -

Advanced print functions
1
impresión útiles
Funciones de
2
los colores
Concordar
3
de utilidades
de software
Utilización
Select [Stored Job], and press the
(3)
[OK] button.
Use the 10-key pad to enter the
(4)
4-digit password for the job to be
printed to start the search.
Printing using registered forms (overlay printing)
You can register forms, logos, etc., as forms to
the device, and overlay for printing.
Note
Cannot be used with Mac OS X printer drivers.
z
For how to set up the Conguration Tool, see
z
"Conguration Tool" (P.95).
If using Windows PS printer drivers, PC administrator
z
privileges are required.
Memo
Overlay is the form group. You can register 3 forms to 1
z
overlay. Forms and overlays are overlaid in the order of
registration.
4
Cong de
red
5
impresora utilizando el
la conguración de la
panel de control
Apéndice Índice
Comprobar y cambiar
Memo
If the password is entered incorrectly, press the
z
[BACK] button, and reset.
Select [Print], and press the [OK]
(5)
button.
Memo
Select [Delete], and press the [OK] button to
z
delete a job.
Using Windows PS Printer Driver
Create and register the form to the
1
device.
For details, see "Registering forms (form
overlay)" (P.101).
Register the form to the printer drivers
2
to print.
Click [Start], and then select
(1)
[Devices and Printers].
Right-click the [OKI (product name)
(2)
(PS)] icon, and select [Printing
Preferences]>[OKI (product name)
(PS)].
Select the [Job Options] tab.
(3)
Click [Overlays].
(4)
Use 10-key pad or the scroll
(6)
buttons
or to enter the print
quantity, and press the [OK]
button.
Reference
You can use the Conguration Tool to delete the secure
z
print job. For details, see "Deleting unnecessary jobs from
the HDD" (P.102).
- 52 -
Select [Use Overlays] from the
(5)
drop-down list, and click [New].
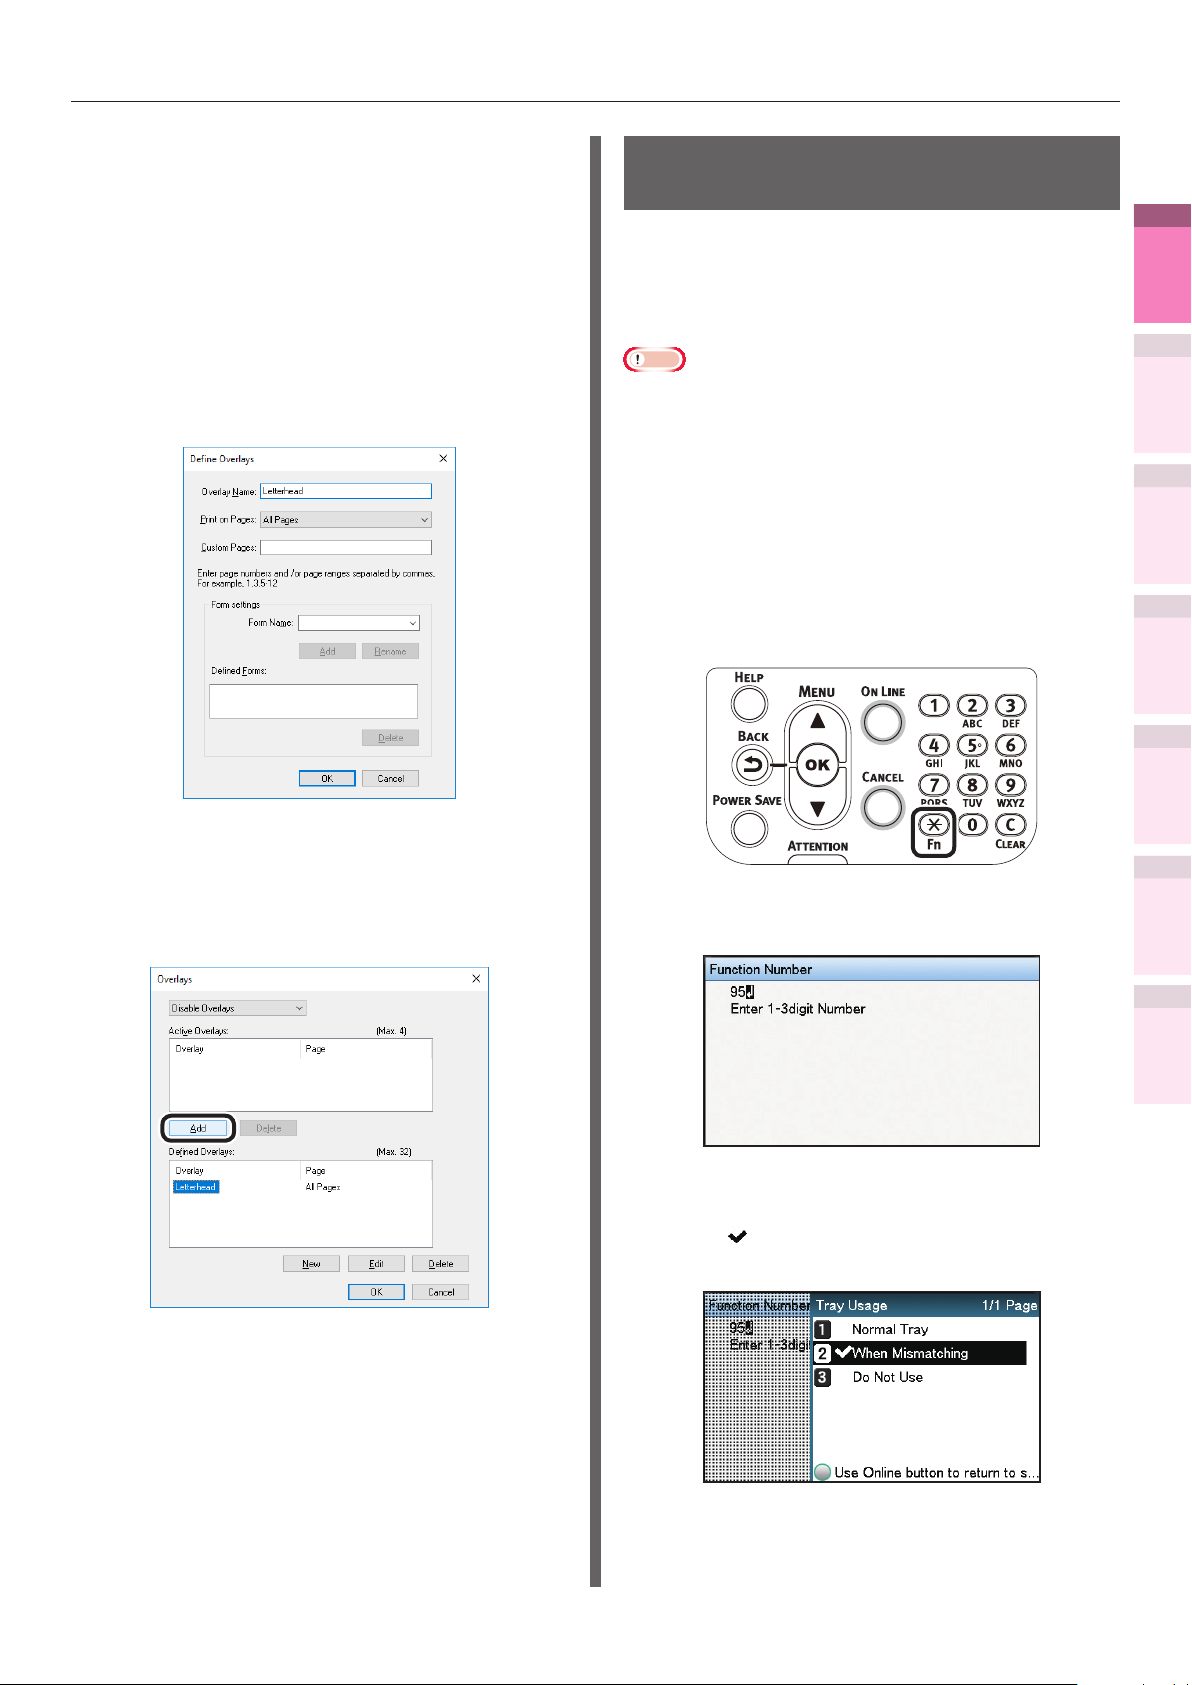
Enter the form name registered
(6)
using the Conguration Tool in
[Form Name], and click [Add].
Enter the [Overlay Name], and
(7)
select the page to which the
overlay will be applied using [Print
on Pages]. If specifying the page
to be applied, select "Form Name",
and enter the pages for application
in [Custom Pages].
Advanced print functions
Automatically switching trays
If the same paper is set in tray 1, (optional)
trays 2 to 5, and the Multi-Purpose Tray, you can
print continuously from other trays if paper in
the current print tray runs out.
Note
Match the paper tray paper weight, paper type, and the
z
Multi-Purpose Tray paper size, paper weight, and paper
type using the control panel. For detailed, see "Setting
Paper" in "Basic".
Set how to use the Multi-Purpose Tray
1
using the control panel.
Press the [Fn] key.
(1)
The numerical values input screen
will be displayed.
1
impresión útiles
Funciones de
2
los colores
Concordar
3
de utilidades
de software
Utilización
4
Cong de
red
Click [OK].
(8)
Select the overlay to be used from
(9)
the [Dened Overlays] list, and
click [Add].
Press functions numbers [9], [5],
(2)
and press the [OK] button.
Select [When Mismatching], and
(3)
press the [OK] button. Check that
is displayed to the left of [When
Mismatching].
5
impresora utilizando el
la conguración de la
panel de control
Apéndice Índice
Comprobar y cambiar
Click [OK].
(10)
Click [OK] to close the print setup
(11)
dialog box.
Open the le to be printed from the
(12)
application.
Printing will be implemented.
(13)
- 53 -
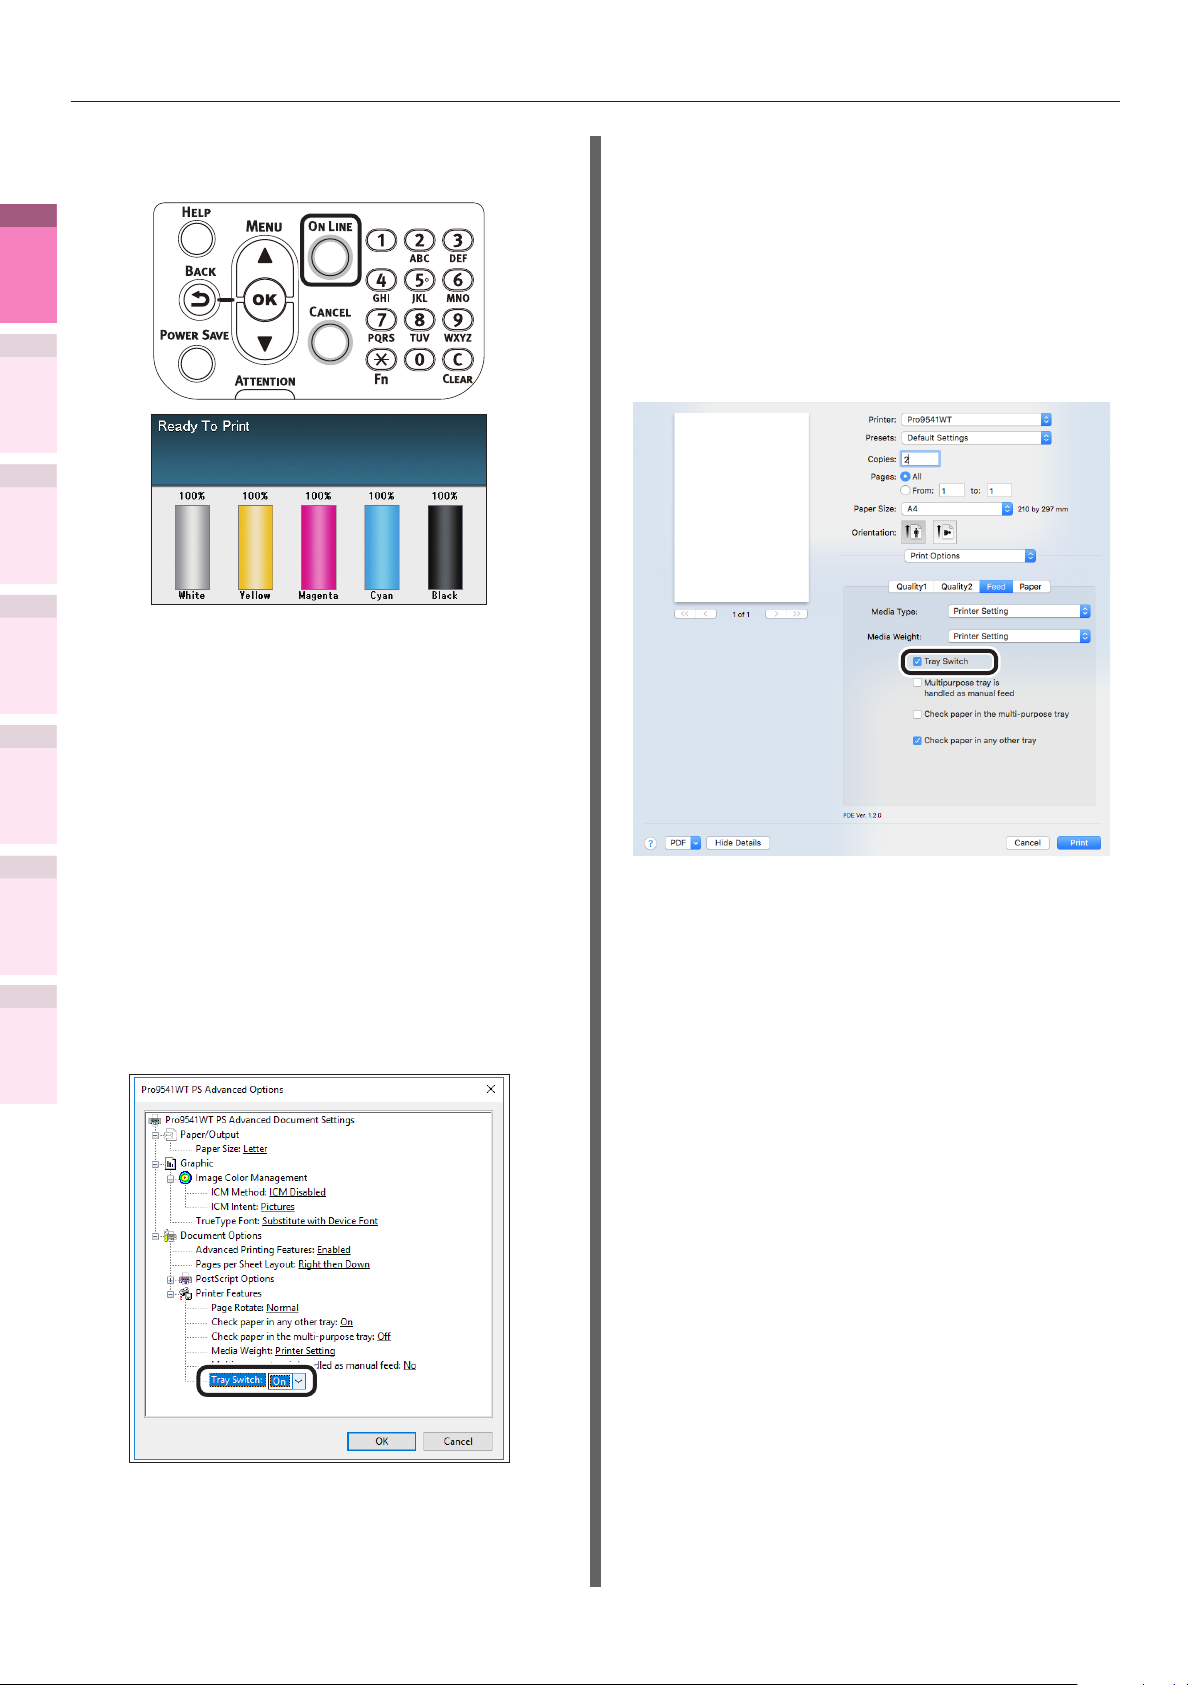
Advanced print functions
1
impresión útiles
Funciones de
2
los colores
Concordar
3
de utilidades
de software
Utilización
4
Cong de
red
2
Press the [ON LINE] button to
(4)
return to the standby screen.
Set [Auto Tray Switch] in the printer
overlay.
Using Mac OS X Printer Driver
Open the le to be printed.
1
Select [Print] in the [File] menu.
2
Click the [Feed] button in the [Print
3
Options] panel, and enable the [Tray
Switch] check box.
5
impresora utilizando el
la conguración de la
panel de control
Apéndice Índice
Using Windows PS Printer Driver
Comprobar y cambiar
Open the le to be printed.
1
Select [Print] in the [File] menu.
2
Click [Advanced] (or [Preferences]).
3
Click [Advanced Options] in the [Layout]
4
tab.
Select [On] in [Tray Switch].
5
Printing will be implemented.
4
Printing will be implemented.
6
- 54 -

Advanced print functions
Using the printer buffer
You can quickly free the printer from largequantity jobs and complex jobs by saving print
jobs to the device HDD.
Note
If there is insufcient space on the option built-in
z
HDD storing the print jobs, "File system is full" will be
displayed, and printing will be disabled.
The time to print completion will be slower than if not
z
spooling.
Cannot be used with Mac OS X printer drivers.
z
Memo
If the device is in print standby, print without using the
z
printer buffer.
Using Windows PS Printer Driver
Open the le to be printed.
1
Select [Print] in the [File] menu.
2
Click [Advanced] (or [Preferences]).
3
Click [Advanced] in the [Job Options]
4
tab.
Enable the [Job Spool] check box.
5
Printing will be implemented.
6
1
impresión útiles
Funciones de
2
los colores
Concordar
3
de utilidades
de software
Utilización
4
Cong de
red
5
impresora utilizando el
Comprobar y cambiar
la conguración de la
panel de control
Apéndice Índice
- 55 -
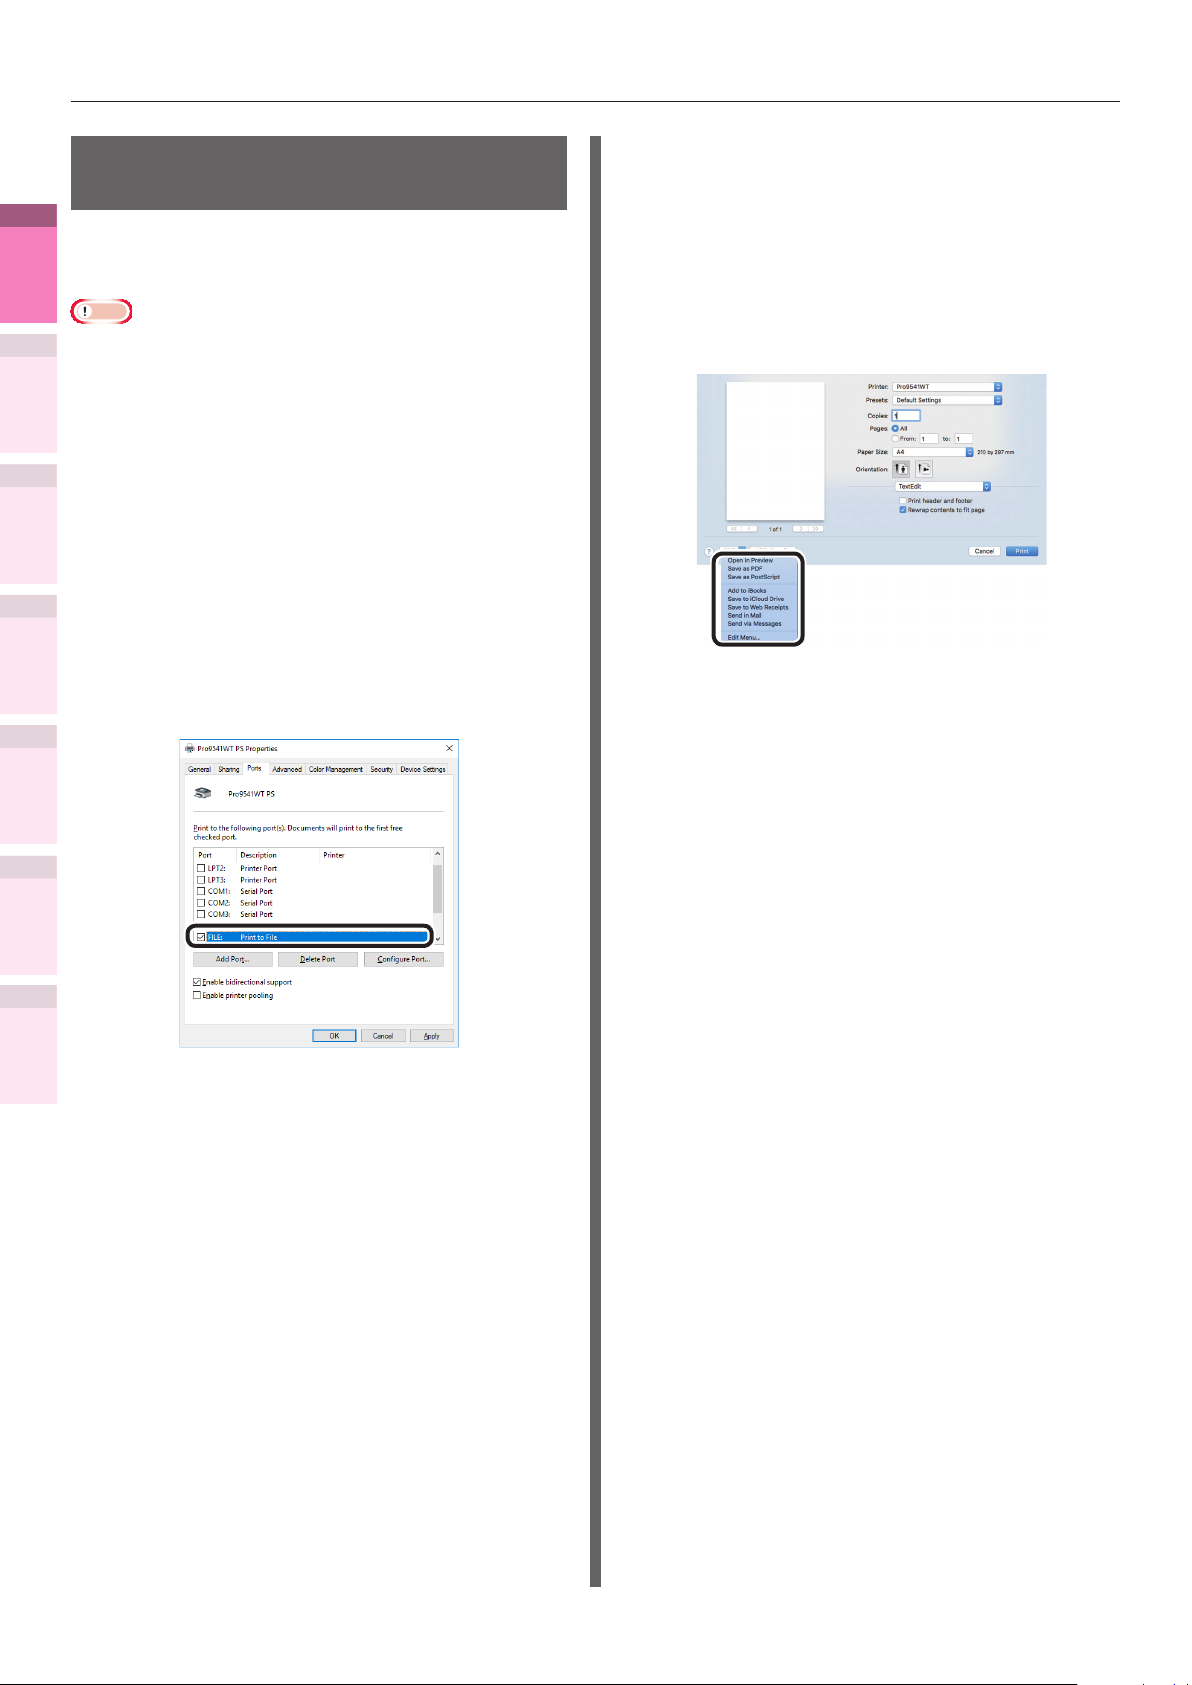
Advanced print functions
Outputting to le without
printing
1
impresión útiles
Funciones de
You can write and save to a le without printing
the print data.
Note
PC administrator privileges are required.
z
2
los colores
Concordar
Using Windows PS Printer Driver
Using Mac OS X Printer Driver
Open the le to be printed.
1
Select [Print] in the [File] menu.
2
Click [PDF], and select the save
3
method.
3
de utilidades
de software
Utilización
4
Cong de
red
5
impresora utilizando el
Comprobar y cambiar
la conguración de la
panel de control
Apéndice Índice
Click [Start], and then select [Devices
1
and Printers].
Right-click the [Pro9541WT(PS)] icon,
2
and select [Printing Preferences].
Select the [Ports] tab.
3
Select [FILE:] from the port table, and
4
click [OK].
Enter the le name to be saved
4
in [Name], and select the save
destination, and click [Save].
Printing will be implemented.
5
Printing will be implemented.
5
Enter the le name, and click [OK].
6
- 56 -

Advanced print functions
Downloading PostScript
les
PostScript les can be downloaded to the device
and printed.
Note
This function cannot be used when using TCP/IP networks
z
only.
Start the OKI LPR utility.
1
Select [Download] from the [Remote
2
print] menu.
Select the le to be downloaded, and
3
click [Open].
When the download has nished, the
PostScript le will be printed.
Printing PostScript errors
You can print the error details if a PostScript
error occurs.
Using Windows PS Printer Driver
Open the le to be printed.
1
Select [Print] in the [File] menu.
2
Click [Advanced] (or [Preferences]).
3
Click [Advanced] in the [Layout] tab.
4
Select [Yes] in [PostScript
5
Options]>[Send PostScript Error
Handler].
1
impresión útiles
Funciones de
2
los colores
Concordar
3
de utilidades
de software
Utilización
4
Cong de
red
5
impresora utilizando el
Comprobar y cambiar
la conguración de la
panel de control
Printing will be implemented.
6
Apéndice Índice
- 57 -

Advanced print functions
Changing settings for mono printing
1
impresión útiles
Funciones de
You can select a mono printing mode you want
to use.
2
1
los colores
Concordar
3
de utilidades
de software
Utilización
4
2
Cong de
red
5
impresora utilizando el
Comprobar y cambiar
la conguración de la
panel de control
Press the scroll button or .
Select [Admin Setup], and press the
[OK] button.
Select [Mono-Print Mode], and press
5
the [OK] button.
Check that is displayed to the left of
6
the selected mode.
Press the [ON LINE] button to return to
7
the standby screen.
Apéndice Índice
Enter the administrator password, and
3
press the [OK] button.
Memo
In the default factory settings, the administrator
z
password is [aaaaaa].
Select [Print Setup], and press the [OK]
4
button.
- 58 -

Changing the default printer driver settings
It is convenient to set frequently used settings
as the default settings.
Using Windows printer drivers
Click [Start], and then select [Devices
1
and Printers].
Advanced print functions
1
impresión útiles
Funciones de
2
los colores
Concordar
Right-click the [Pro9541WT(PS)] icon,
2
and select [Printing Preferences].
Check the settings, and click [OK].
3
Using Mac OS X Printer Driver
Open the le to be printed.
1
Select [Print] in the [File] menu.
2
Change the settings.
3
Select [Save Current Settings as Preset]
4
in [Presets], and enter a suitable
settings name in the "Save Preset"
window, and click [OK].
3
de utilidades
de software
Utilización
4
Cong de
red
5
impresora utilizando el
Comprobar y cambiar
la conguración de la
panel de control
Apéndice Índice
Click [Cancel].
5
Note
Select the settings name saved in [Preset] to print.
z
- 59 -

Deleting or updating printer drivers
Deleting or updating printer drivers
z
1
impresión útiles
Funciones de
Deleting the printer drivers
Using Windows
2
los colores
Concordar
Note
PC administrator privileges are required.
z
When Windows starts, restart the PC.
z
If a message asking whether to delete
8
the drivers only, or the drivers and
packages from the system, select to
delete drivers and packages, and click
[OK].
3
de utilidades
de software
Utilización
4
Cong de
red
5
impresora utilizando el
Comprobar y cambiar
la conguración de la
panel de control
Apéndice Índice
Click [Start], and then select [Devices
1
and Printers].
Right-click the [Pro9541WT(PS)] icon,
2
and select [Delete Device].
Note
If any print queues remain, select [Delete Print
z
Queue]>[Pro9541WT(PS)].
If a verication message is displayed,
3
click [Yes].
Note
If a message is displayed while the device is in use,
z
restart the PC, and implement Steps 1 and 2 again.
Select one of the icons in [Devices
4
and Printers], and click [Print Server
Properties] in the top bar.
Select the [Drivers] tab.
5
Click if [Change Driver Settings] is
6
displayed.
If a verication message is displayed,
9
click [Yes].
If the [Remove driver and driver
10
package] dialog box is displayed, click
[Cancel]>[OK].
Note
To cancel deletion, restart the PC, and implement
z
Steps 4 and 10 again.
Click [Close] in the [Print Server
11
Properties] dialog box.
Restart the PC.
12
Select the driver to be deleted, and
7
click [Remove].
- 60 -
Note
The Network Extension and PS Gamma Adjuster installed
z
together with the printer drivers are not deleted even if
the printer drivers are deleted.
If deleting the Network Extension and PS Gamma Adjuster,
delete from [Control Panel]>[Uninstall Program].

Using Mac OS X
Delete the printer name from the
1
printer list.
Select [Apple Menu]>[System
(1)
Preferences].
Click [Print & Scan]. Select the
(2)
printer name, and click [-].
Deleting or updating printer drivers
Updating the printer drivers
Using Windows
Note
PC administrator privileges are required.
z
When Windows starts, restart the PC.
z
Network connections
1
impresión útiles
Funciones de
2
los colores
Concordar
Close [System Preferences].
(3)
Delete (uninstall) using the installer.
2
Set the "Software DVD-ROM" in
(1)
your Macintosh.
Double-click the [OKI] icon.
(2)
Open the [Driver] folder.
(3)
Double-click [Uninstaller].
(4)
Follow the on-screen instructions to
(5)
enter the administrator password,
and click [OK] until the uninstaller
closes.
Click [Finish].
(6)
Remove the "Software DVD-ROM"
(7)
from the computer.
Set the "AutoPlay".
1
When the "play automatically" window
2
is displayed, click [Run Setup.exe].
When the "User Account Control"
3
window is displayed, click the [Yes]
button.
Read the "Software License Agreement",
4
and click the [Accept] button.
Read the "Environmental advice for
5
Users", and click the [Next] button.
Select the printer to be used, and then
6
click the [Next] button.
Select [USB connection], and click the
7
[Next] button.
Click [Custom Install].
8
Click [Switch to separate screen.].
9
Click the driver to be installed.
10
Click [Next] in the "Check before install"
11
screen.
If the "Check installation" screen is
12
displayed, select the printer to be
installed, and click [Next].
3
de utilidades
de software
Utilización
4
Cong de
red
5
impresora utilizando el
Comprobar y cambiar
la conguración de la
panel de control
Apéndice Índice
- 61 -

Deleting or updating printer drivers
13
1
impresión útiles
Funciones de
2
los colores
Concordar
3
de utilidades
de software
Utilización
4
Cong de
red
5
impresora utilizando el
Comprobar y cambiar
la conguración de la
panel de control
Apéndice Índice
14
Select the installation method, and click
the [OK] button.
Updating obsolete drivers, and installing
z
new drivers
Update the obsolete printer drivers, and
then install the new printer drivers. A
new printer icon will be created as "Copy
1" in addition to the icon for the obsolete
printer drivers.
Deleting obsolete drivers, and installing
z
new drivers
Delete the obsolete printer drivers and
printer icons, and then install the new
printer drivers.
Note
If multiple printer drivers have been installed,
z
delete all the printer drivers. If installing multiple
printer drivers, reinstall.
Click [Next] in the "Finish installation"
screen.
USB connections
Set the "AutoPlay".
1
When the "play automatically" window
2
is displayed, click [Run setup.exe].
When the "User Account Control"
3
window is displayed, click the [Yes]
button.
Read the "Software License Agreement",
4
and click the [Accept] button.
Read the "Environmental advice for
5
Users", and click the [Next] button.
Select the printer to be used, and then
6
click the [Next] button.
Select [USB connection], and click the
7
[Next] button.
Click [Custom Install].
8
Click [Switch to separate screen.].
9
Click the driver to be installed.
10
Click [Next] in the "Check before install"
11
screen.
- 62 -

Deleting or updating printer drivers
Select the installation method, and click
12
the [OK] button.
Updating obsolete drivers, and installing
z
new drivers
Update the obsolete printer drivers, and
then install the new printer drivers. A
new printer icon will be created as "Copy
1" in addition to the icon for the obsolete
printer drivers.
Deleting obsolete drivers, and installing
z
new drivers
Delete the obsolete printer drivers and
printer icons, and then install the new
printer drivers.
Using Mac OS X
Delete the device from the [Printer
1
List], and uninstall the printer software
using the installer. For details, see
"Deleting the printer drivers" (P.60).
Reinstall the printer software. See the
2
"Basic" for details.
1
impresión útiles
Funciones de
2
los colores
Concordar
3
de utilidades
de software
Utilización
4
Cong de
red
5
impresora utilizando el
Comprobar y cambiar
la conguración de la
panel de control
Note
If multiple printer drivers have been installed,
z
delete all the printer drivers. If installing multiple
printer drivers, reinstall.
Connect the printer to the PC. If a
13
screen prompting you to turn ON the
printer power supply is displayed,
connect the device and PC using a USB
cable, and turn ON the device.
Click [Complete] in the "Install
14
completed" screen.
Apéndice Índice
- 63 -

Deleting or updating printer drivers
Memo
1
impresión útiles
Funciones de
2
los colores
Concordar
3
de utilidades
de software
Utilización
4
Cong de
red
5
impresora utilizando el
la conguración de la
panel de control
Apéndice Índice
Comprobar y cambiar
- 64 -

2
Matching Colors
1
Convenient print
functions
2
Matching
Colors
Matching colors using the control
panel
……………………………………………… 66
Matching Colors Using the Printer
Drivers
Matching Colors Using Utilities
…………………………………………… 74
………… 87
the Control Panel
Software
Setup
Settings Using
3
Using Utility
4
Network
5
Changing Printer
Checking and
Appendix Index
- 65 -

Matching colors using the control panel
Matching colors using the control panel
z
1
Convenient print
functions
Manually compensating color drift
Automatically compensating density and gradation
Colors
Software
Setup
the Control Panel
Settings Using
2
3
4
5
Appendix Index
The printer compensates color drift automatically
according to the conditions of use. If the color
drift is a nuisance, you can also implement
Matching
compensation manually.
Press the [Fn] key.
1
Using Utility
Network
Changing Printer
Checking and
The numerical values input screen will
be displayed.
Press [3], [0], [1], and then press the
2
[OK] button.
The printer compensates density automatically
according to the conditions of use. To
compensate automatically, turn [On] the density
compensating matching setting.
In the default factory settings, density
compensating matching is implemented
automatically.
Press the scroll button or .
1
Select [Calibration], and press the [OK]
2
button.
Check that [Execute] has been selected,
3
and press the [OK] button.
The display will return to the standby
4
screen.
- 66 -
Select [Auto Density Mode], and press
3
the [OK] button.

Matching colors using the control panel
Select [On], and press the [OK] button.
4
Check that
[On].
Press the [ON LINE] button to return to
5
the standby screen.
is displayed to the left of
Manually compensating density
The printer can implement compensation
periodically using auto density compensation
mode, but if the print density is a nuisance, it
can also be compensated manually.
Memo
The density compensation adjustment values are set using [Cyan
z
density], [Magenta density], [Yellow density], [Black density],
and [White density] on the control panel.
Press the [Fn] key.
1
The numerical values input screen will
be displayed.
1
Convenient print
functions
2
Matching
Colors
3
Using Utility
Software
4
Network
Setup
Press [3], [0], [0], and press the [OK] button.
2
Check that [Execute] has been selected,
3
and press the [OK] button.
The display will return to the standby screen.
4
the Control Panel
5
Changing Printer
Settings Using
Appendix Index
Checking and
- 67 -
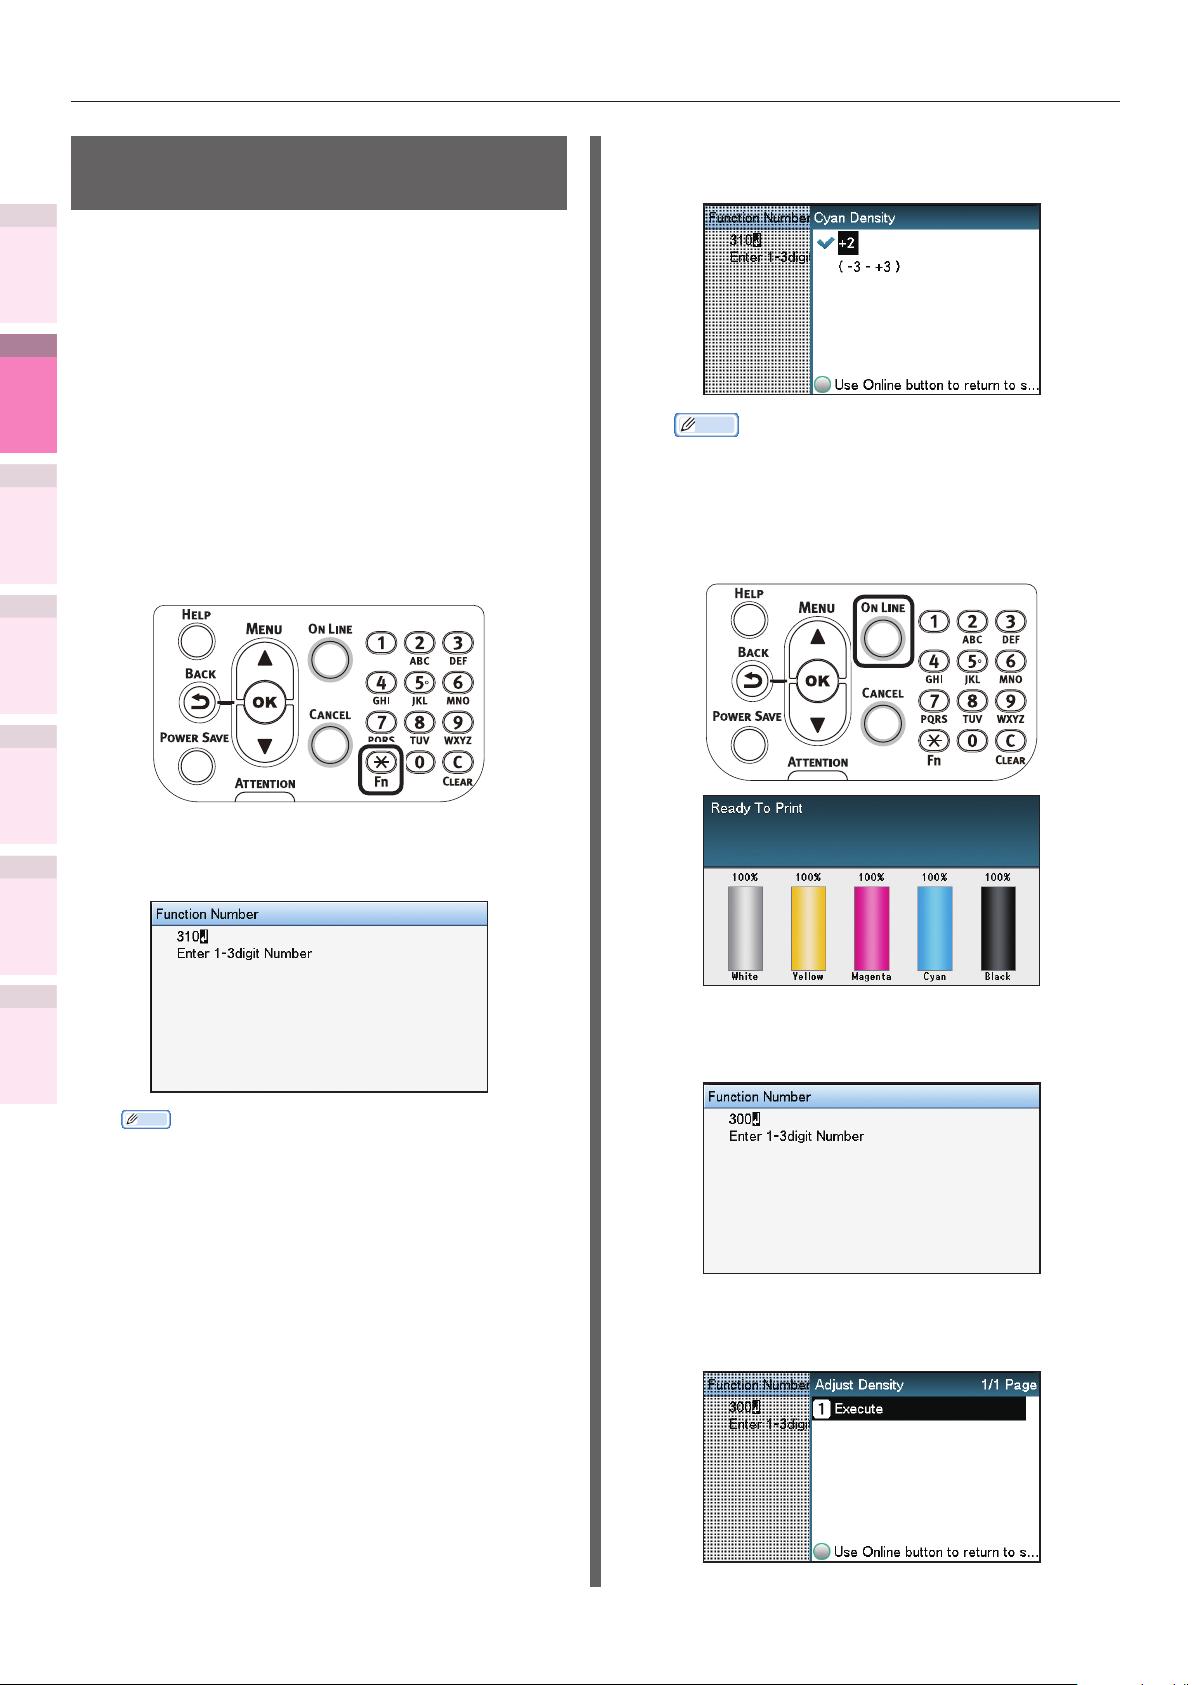
Matching colors using the control panel
Fine-tuning density adjustment
1
Convenient print
You can ne-tune the density according to the
functions
standard for density adjustment.
Adjust the density for each color wherever
needed from the print results.
2
Matching
This section explains the procedure for ne
Colors
adjustment of cyan. The procedure is also
applicable to other colors.
Increasing cyan after checking the print results
z
3
Using Utility
Software
4
Network
Setup
Press the [Fn] key.
1
The numerical values input screen will
be displayed.
Specify a larger value than the current
3
value, and press the [OK] button.
Memo
To increase the density, select +1 to +3, and to
z
decrease the density select -1 to -3.
Press the [ON LINE] button to return to
4
the standby screen.
the Control Panel
5
Changing Printer
Settings Using
Appendix Index
Checking and
Press [3], [1], [0], and press the [OK]
2
button.
Press the [Fn] key, [3], [0], [0], and
5
press the [OK] button.
Memo
The procedures for adjusting magenta, yellow, and
z
black are described below.
– To adjust magenta, press the [Fn] key, [3], [1],
[1], and [OK] buttons.
– To adjust yellow, press the [Fn] key, [3], [1], [2],
and [OK] buttons.
– To adjust black, press the [Fn] key, [3], [1], [3],
and [OK] buttons.
– To adjust white, press the [Fn] key, [3], [1], [4],
and [OK] buttons.
Check that [Execute] has been selected,
6
and press the [OK] button.
- 68 -
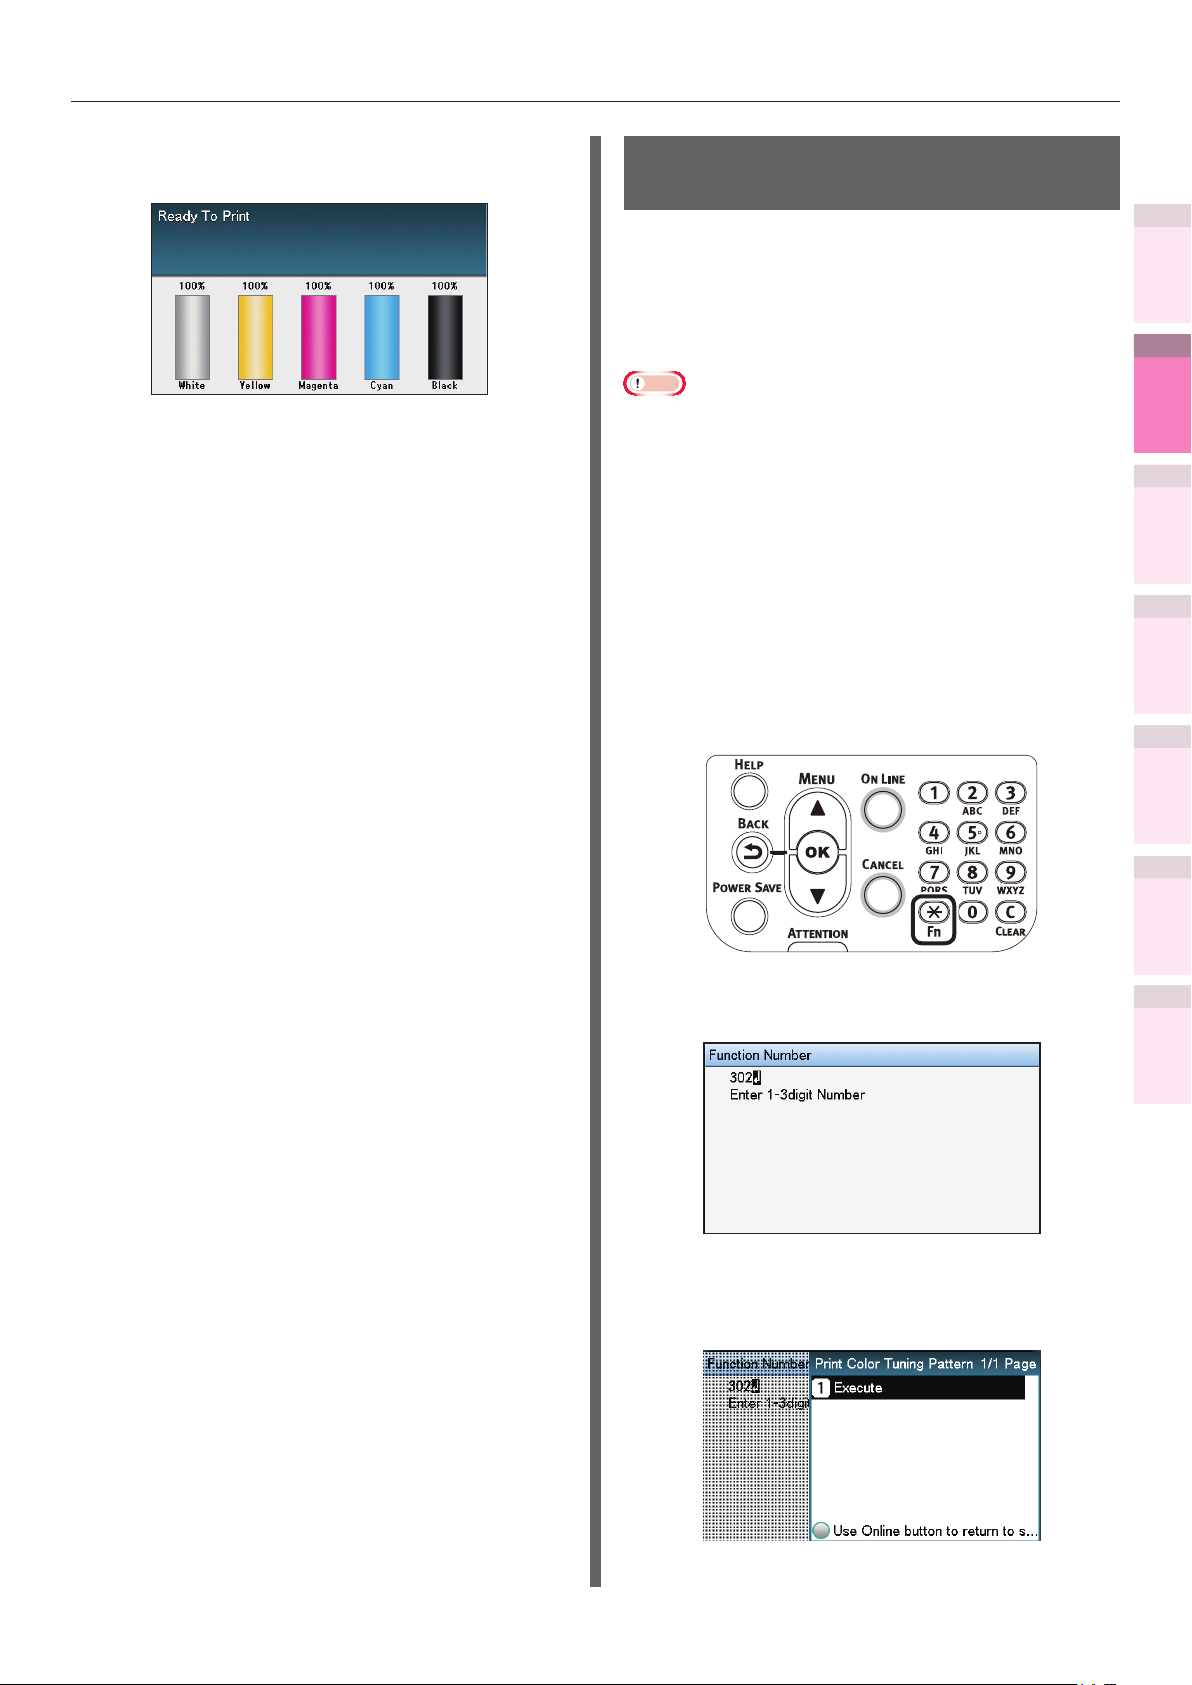
Matching colors using the control panel
The display will return to the standby
7
screen.
Printing will be implemented.
8
If the density is still incorrect, repeat steps
1 to 6.
Adjusting the color balance (density)
The printer can implement compensation
periodically using auto density compensation
mode, but implement this adjustment to adjust
the color balance in the intervals where auto
density compensation is insufcient.
Note
The densities of each color are mutually dependent, so it
z
is necessary to repeat the adjustments several times until
the correct color balance is reached.
The results of the basic [Base Color Tuning] are reected
z
in the settings in [Fine Color Tuning]. Consequently, if the
[Fine Color Tuning] are adjusted manually, these settings
will be reset, so be careful. The [Black Tuning] settings,
however, are not reset.
Printing color matching patterns.
1
Press the [Fn] key.
(1)
The numerical values input screen
will be displayed.
1
Convenient print
functions
2
Matching
Colors
3
Using Utility
Software
4
Network
Setup
5
the Control Panel
Changing Printer
Settings Using
Checking and
Press [3], [0], [2], and press the
(2)
[OK] button.
Check that [Execute] has been
(3)
selected, and press the [OK]
button.
Appendix Index
- 69 -

Matching colors using the control panel
1
Convenient print
functions
2
Matching
Colors
3
Using Utility
Software
4
Network
Setup
5
the Control Panel
Changing Printer
Settings Using
The color matching pattern will be
(4)
Press the scroll button or .
(1)
printed.
Use the print results for the color
2
matching pattern to check the current
color balance.
Select [Calibration], and press the
(2)
[OK] button.
Select [Base Color Tuning], and
(3)
press the [OK] button.
Checking and
Appendix Index
Check the numbers (A-1,2 to
(1)
O-1,2) of the pattern that seems
the most similar to the adjacent
CMY mixed colors part and
single color K part from among
the patterns distributed in the
"Highlight", "Mid-Tone", or "Dark"
areas.
Memo
If the pattern that seems most similar to the
z
adjacent CMY mixed colors part and single color
K part in the "Highlight", "Mid-Tone", or "Dark"
areas matches the "Current" on the left or the color
matching pattern, the color balance is normal and
does not require adjustment.
Use the print results for the color
3
matching pattern to adjust the color
balance.
Specify the number of the pattern
(4)
checked in the "Highlight" area,
and press the [OK] button.
Specify the number of the pattern
(5)
checked in the "Mid-Tone" area,
and press the [OK] button.
- 70 -
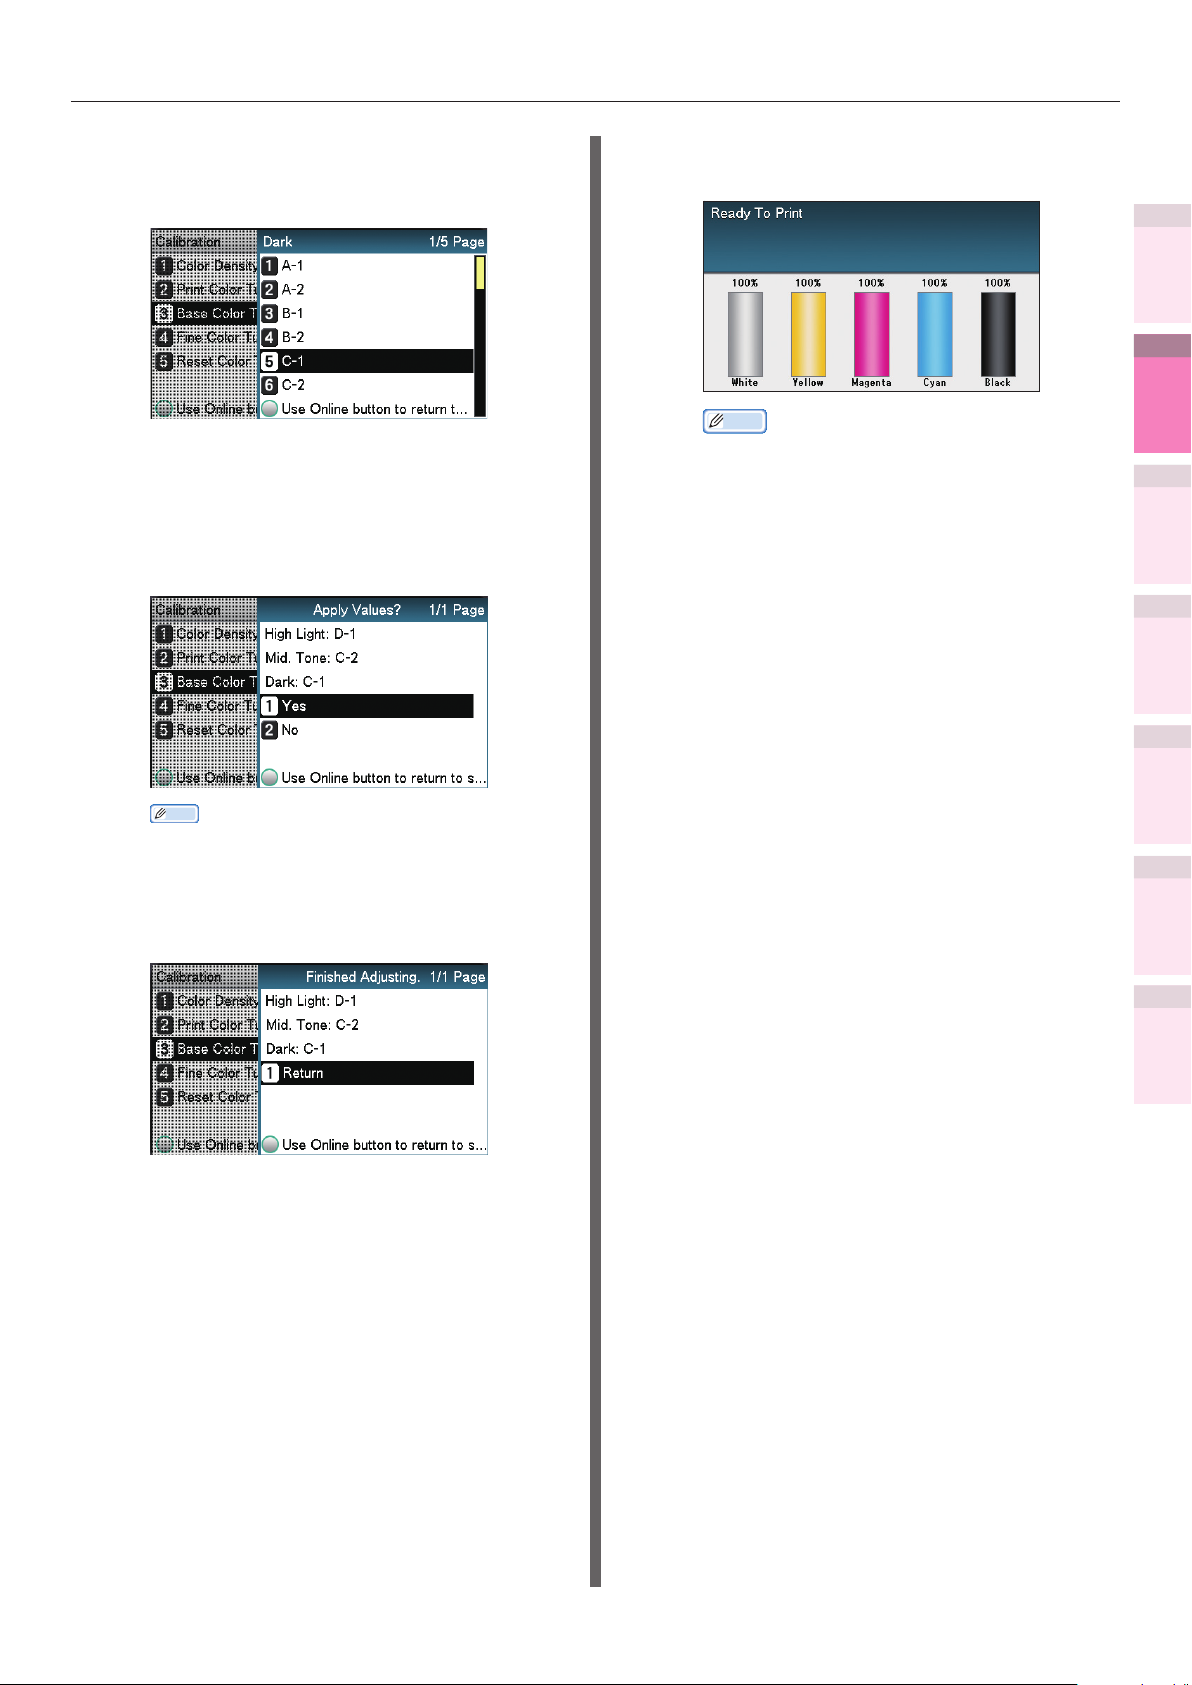
Matching colors using the control panel
Specify the number of the pattern
(6)
checked in the "Dark" area, and
press the [OK] button.
The pattern number specied in
(7)
each area will be displayed.
If the pattern number is correct,
select [Yes], and press the [OK]
button.
Memo
To respecify the pattern number select [No] to
z
return to the "Calibration" screen.
Select [Return], and press the [OK]
(8)
button.
The display will return to the
(9)
standby screen.
Memo
If the desired color balance is not obtained even
z
after implementing [Base Color Tuning], adjust
the CMY color balance watermarks manually
using [Adjusting the color balance]. For color
balance watermark adjustments, see "Adjusting
the color balance" (P.72).
If the overall tone is still too bright or too dark
z
even after implementing [Base Color Tuning],
adjust the black tone manually using [Fine
Color Tuning], and then implement [Basic color
Tuning] again. To brighten the overall tone,
adjust the black tone in [Fine Color Tuning] in
the - direction, and to darken the overall tone,
adjust the black tone in [Fine Color Tuning] in
the + direction.
Check the color balance adjustment
4
results.
Print the color matching patterns.
(1)
Use the print results for the color
(2)
matching pattern to check the
adjusted results.
1
Convenient print
functions
2
Matching
Colors
3
Using Utility
Software
4
Network
Setup
5
the Control Panel
Changing Printer
Settings Using
Appendix Index
Checking and
If the pattern that seems most
similar to the adjacent CMY mixed
colors part and single color K part
in the "Highlight", "Mid-Tone",
or "Dark" areas matches the
"Current" on the left or the color
matching pattern, the color balance
adjustment is complete.
Repeat Steps 1 to 3 according to
the checked results.
- 71 -
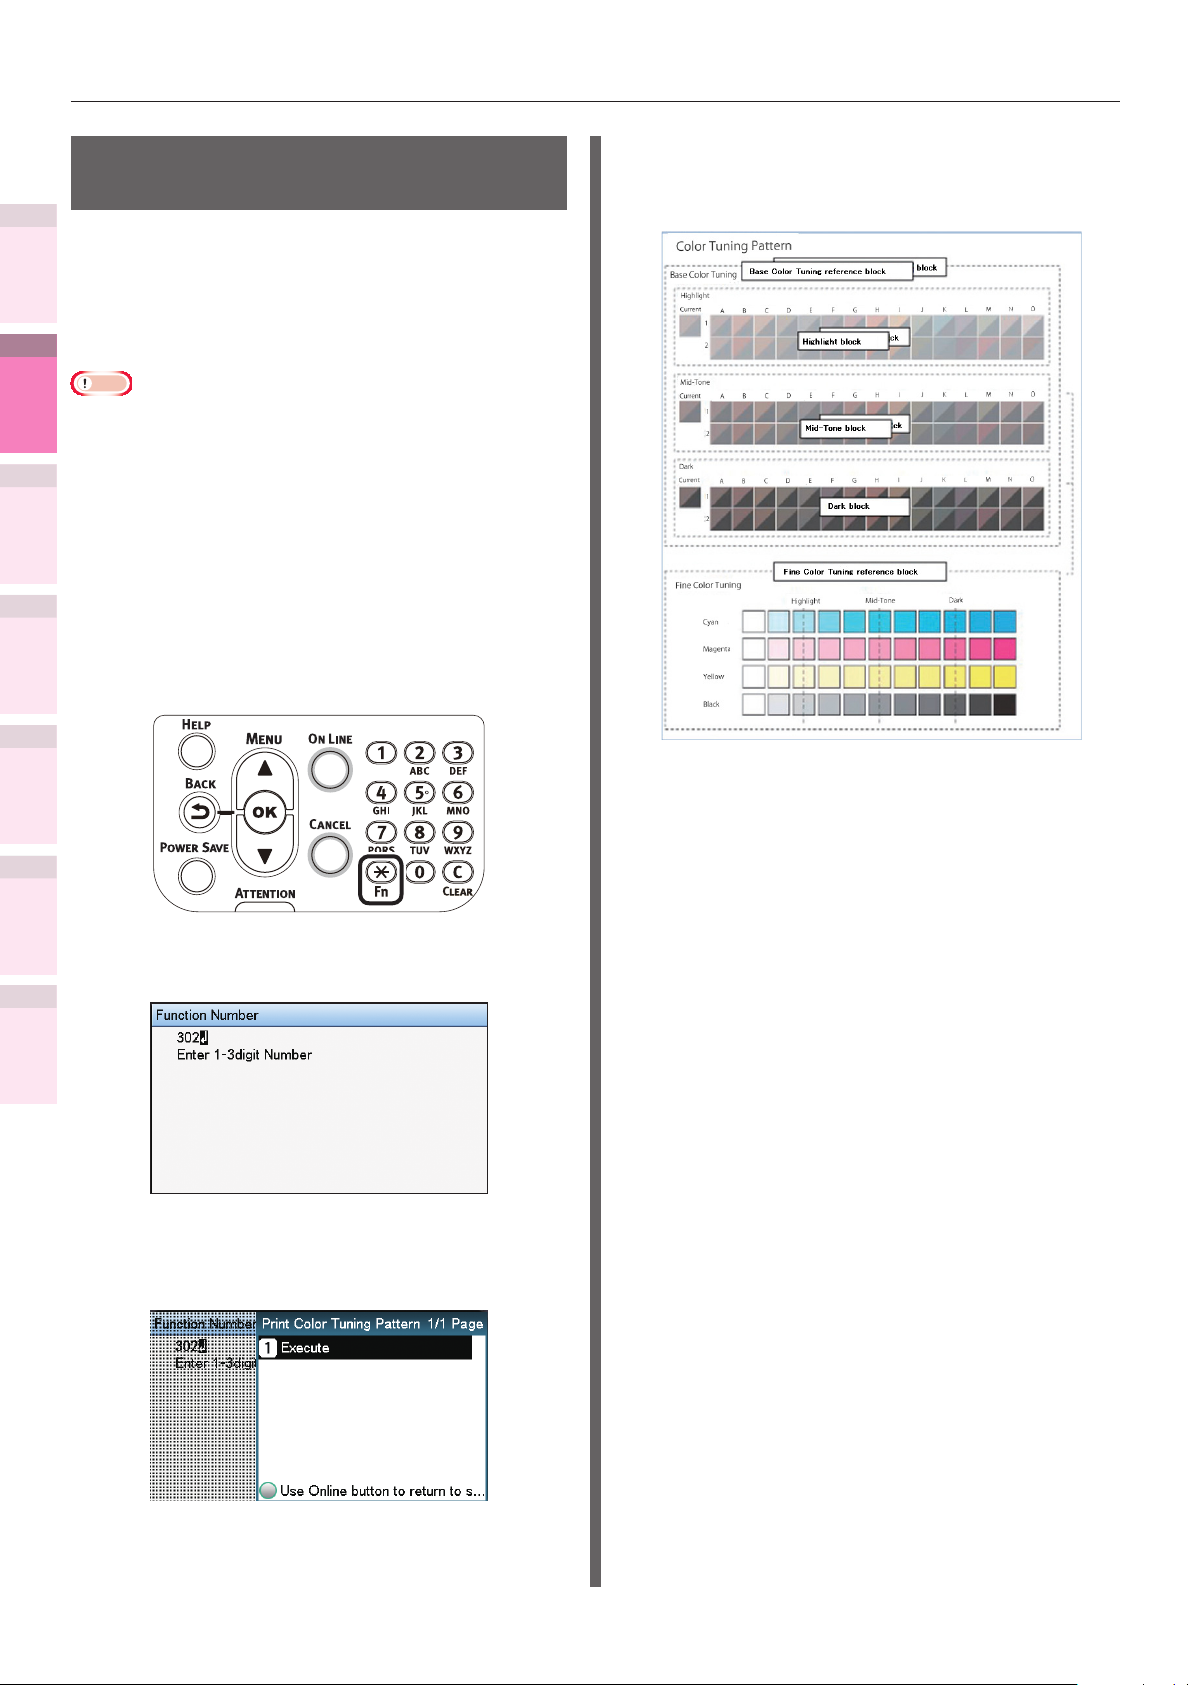
Matching colors using the control panel
Adjusting the color
balance
1
Convenient print
The printer can implement compensation
functions
periodically using auto density compensation
mode, but implement this adjustment to adjust
the color balance watermarks in the intervals
where auto density compensation is insufcient.
2
Matching
Colors
3
Using Utility
Software
4
Network
Setup
Note
The densities of each color are mutually dependent, so it
z
is necessary to repeat the adjustments several times until
the correct color balance is reached.
Printing is disabled if [Local print] in the (optional) print
z
job accounting is set to [Disable printing] or [Disable color
printing].
Print the color matching patterns.
1
Press the [Fn] key.
(1)
The numerical values input screen
will be displayed.
Use the print results for the color
2
matching pattern to check the current
color balance.
the Control Panel
5
Changing Printer
Settings Using
Appendix Index
Checking and
Check the area to be referenced
(1)
using "Fine Color Tuning".
The color matching pattern frames
are arranged in four vertical
columns and 11 horizontal rows.
The four vertical columns represent
Press [3], [0], [2], and press the
(2)
[OK] button.
from the top cyan, magenta,
yellow, and black, and are printed
as [Cyan], [Magenta], [Yellow] and
[Black].
The 11 horizontal rows represent
the color tone, and dotted lines
are printed under each text for
[Highlight], [Mid-Tone], and [Dark].
Use the print results for the color
Check that [Execute] has been
(3)
selected, and press the [OK]
button.
3
matching pattern to adjust the color
balance watermarks.
If adjusting the color balance, use
the control panel to specify the shade
(Highlight, Dark, and Mid-Tone) of each
color.
This section explains the procedure for
slightly darkening the cyan highlights.
Adjust the watermarks for colors other
than cyan in the same way.
The color matching pattern will be
(4)
printed.
- 72 -

Matching colors using the control panel
Press the scroll button or .
(1)
Select [Calibration], and press the
(2)
[OK] button.
Select [Fine Color Tuning], and
(3)
press the [OK] button.
Specify a larger value than the
(6)
current set value, and press the
[OK] button. Check that
displayed to the left of the specied
value.
Memo
To slightly increase the darkness, select +0.1
z
to +4.0, and to slightly decrease the darkness
select -0.1 to -4.0. The black adjustment range,
however, is +0.1 to +3.0 and -0.1 to -3.0.
Press the [ON LINE] button to
(7)
return to the standby screen.
is
1
Convenient print
functions
2
Matching
Colors
3
Using Utility
Software
4
Network
Setup
5
the Control Panel
Changing Printer
Settings Using
Checking and
Select [Cyan Tuning], and press
(4)
the [OK] button.
Select [Highlight], and press the
(5)
[OK] button.
Check the color balance adjustment
4
results.
Print the color matching patterns.
(1)
Use the print results for the color
(2)
matching pattern to check the
adjusted results.
Repeat Steps 1 to 3 according to the
checked results.
Appendix Index
- 73 -

Matching Colors Using the Printer Drivers
Matching Colors Using the Printer Drivers
z
1
Convenient print
functions
Color matching
Color matching (recommended)
Colors
Software
Setup
the Control Panel
Settings Using
2
3
4
5
Appendix Index
What is color matching?
It is important to manage the work processes
Matching
from data creation to output based on methods
with color consistency. For example, scanners,
digital cameras, and monitors, etc., express the
blending ratio to which the light of the three
colors "red", "blue", and "green" have been
Using Utility
added against the black as values over the RGB
color space (Additive mixture of colors).
Meanwhile, printers express the blending ratio of
the four toner colors "Cyan", "Magenta", "Yellow",
and "black" over white (white light) with the
Network
three reected colors "red", "blue", and "green"
excluded as values over the CMYK color space.
(Subtractive mixture of colors.).
The RGB color space and CMYK color space are
color spaces dependent on the printer used, and
Changing Printer
Checking and
so when converting the color spaces, the colors
will be different from the reproduced colors
unless consideration is given to the individual
printer characteristics.
Implementing color matching is recommended
for general documents. In general, use this
setting.
Using Windows PS Printer Driver
Open the le to be printed.
1
Select [Print] from the [File] menu.
2
Click [Advanced] (or [Preferences]).
3
Select [Automatic] in [Color Mode] in
4
the [Color] tab, and then click [OK].
To maintain color consistency from data creation
to output, it is necessary to consider the color
differences by device when converting colors.
This process is called "color matching". The
program that implements the color matching is
called the "color management system" (CMS).
The printer can use either printer driver color
matching or application color matching.
Note
Even if using color matching, the printed colors may
z
appear dark compared to the colors on the monitor. This
is because the range of colors that can be reproduced by
the device is narrower than the range of colors that can
be reproduced by the monitor, so even if color matching
is used, the vivid colors on the monitor cannot be
reproduced.
Printing will be implemented.
5
- 74 -

Using Mac OS X Printer Driver
Open the le to be printed.
1
Select [Print] from the [File] menu.
2
Select [Automatic] in the [Color] panel.
3
Matching Colors Using the Printer Drivers
Easy color matching
(Ofce colors)
Color matching is the optimum method supplied
for users who frequently use business documents
such as word processing software, spreadsheet
software, and presentation software. Color
matching is implemented for printers using the
colors expressed using RGB colors, which are
used with these software applications.
Color matching is implemented using a special
accelerator (ASIC) that is built into the printer.
When converting the RGB color space print data
to the printer CMYK color space, color matching
processing is applied.
Note
If installing ICC prole in Windows, click [Advanced] in the
z
[Layout] tab, and then select [Disable ICM] in [ICM Methods].
1
Convenient print
functions
2
Matching
Colors
3
Using Utility
Software
4
Network
Setup
Printing will be implemented.
4
the Control Panel
5
Changing Printer
Settings Using
Appendix Index
Checking and
- 75 -

Matching Colors Using the Printer Drivers
1
Convenient print
functions
2
Matching
Colors
3
Using Utility
Software
4
Network
Setup
5
the Control Panel
Changing Printer
Settings Using
Setup Items
[Color matching options]
z
Species the method for expressing the colors
processed using color matching.
Monitor - Auto
z
During color matching, represents
the color by the most ideal method
suiting the document to be printed,
emphasizing compatibility with the
monitor (color temperature 6500K). In
general, use this setting.
Monitor - Perceptual
z
During color matching, represents the
color by the method emphasizing the
gradation suiting the natural image of
photograph and compatibility with the
monitor (color temperature 6500K).
Monitor - Vivid
z
During color matching, represents the
color by the method emphasizing the
vividness suiting the images and text,
Checking and
and compatibility with the monitor
(color temperature 6500K).
Using Windows PS Printer Driver
Open the le to be printed.
1
Select [Print] in the [File] menu.
2
Click [Advanced] (or [Preferences]).
3
Select [Automatic] or [Ofce Color] in
4
[Color Mode] in the [Color] tab, and
then click [OK].
Appendix Index
Monitor - light
z
During color matching, represents the
color by the method emphasizing the
gradation suiting the natural image of
photograph and compatibility with the
monitor (color temperature 9300K).
Adobe RGB
z
Indicates while using the input device
with AdobeRGB color characteristics.
sRGB
z
The sRGB colors within the printer's
color gamut are printed without any
modication. Only colors that fall
outside the printer's color gamut are
matched with the outer shell. Suitable
for matching specic colors.
[CMYK Ink Simulation]
z
Select to simulate standard offset print
colors such as Japan Color, SWOP, and ISO
Coated on the device.
Select the target printer ink.
Note
If installing an ICC prole, click [Advanced] in the
z
[Layout] tab, and then select [Disable ICM] in [ICM
Methods].
Printing will be implemented.
5
[Black Finish]
z
Sets the black nish when printing in color.
Normally use Auto as is.
- 76 -

Using Mac OS X Printer Driver
Open the le to be printed.
1
Select [Print] in the [File] menu.
2
Select either [Automatic] or [Ofce
3
Color] in the [Color] panel.
Matching Colors Using the Printer Drivers
Color matching (GraphicPro)
If using DTP software, Graphic Pro is optimum.
You can specify simulation printing for a userselected CMYK output device.
If using an ICC prole for a user-selected
I/O device for color matching, it is necessary to
register the ICC prole to the device beforehand.
For how to register the ICC prole, see
"Registering ICC proles" (P.89).
Note
If installing ICC prole using Windows PS printer
z
drivers, click [Advanced] in the [Layout] tab, and
then select [Disable ICM] in [ICM Methods].
To register an ICC prole, it is necessary to
z
mount the (optional) HDD to the device.
1
Convenient print
functions
2
Matching
Colors
3
Using Utility
Software
4
Network
Setup
If [Ofce Color] is selected, change [Color
Match Using], [CMYK Ink Simulation], and
[Black Finish] as necessary.
Printing will be implemented.
4
Using Windows PS Printer Driver
Open the le to be printed.
1
Select [Print] from the [File] menu.
2
Click [Advanced] (or [Preferences]).
3
Select [Graphic Pro] in [Color Mode] in
4
the [Color] tab, and then click [OK].
the Control Panel
5
Changing Printer
Settings Using
Appendix Index
Checking and
- 77 -
Printing will be implemented.
5

Matching Colors Using the Printer Drivers
Using Mac OS X Printer Driver
1
Convenient print
functions
Open the le to be printed.
1
Select [Print] from the [File] menu.
2
Select [Graphic Pro] in the [Color]
3
2
Matching
Colors
panel.
Color matching (No Color Matching)
Implements printing using the specied colors as
is, without implementing color matching using
the printer drivers or device.
Select if implementing color matching using an
application.
Using Windows PS Printer Driver
the Control Panel
Software
Setup
Settings Using
3
Using Utility
4
Network
5
Changing Printer
Checking and
Appendix Index
Printing will be implemented.
4
Open the le to be printed.
1
Select [Print] from the [File] menu.
2
Click [Advanced] (or [Preferences]).
3
Select [No Color Matching] in [Color
4
Mode] in the [Color] tab, and then click
[OK].
- 78 -
Printing will be implemented.
5

Using Mac OS X Printer Driver
Matching Colors Using the Printer Drivers
Changing black nish
Open the le to be printed.
1
Select [Print] from the [File] menu.
2
Select [No Color Matching] in the [Color]
3
panel.
Printing will be implemented.
4
The nish for the black parts will be changed
when printing in color. This can be used when
the color mode in the printer driver settings is
[Ofce Color] or [Graphic Pro].
Setup Items
Black Finish
z
Auto
z
Creates black using the optimum
methods according to the document to
be printed. This setting can be selected
when the color mode is set to [Ofce
Color].
Composite Black (CMYK)
z
Synthesizes black using cyan,
magenta, yellow, and black toner.
The black is close to brown. Ideal for
photos.
True Black (K)
z
Prints black using black toner only.
Ideal for diagrams and documents.
When printing photos, the dark parts
are blackish.
1
Convenient print
functions
2
Matching
Colors
3
Using Utility
Software
4
Network
Setup
5
the Control Panel
Changing Printer
Settings Using
Checking and
Pure Black Text/Graphics
z
If black that is dened using the RGB
color space for text and graphics (R=0,
G=0, B=0), or black that is dened using
the CMYK color space (C=0, M=0, Y=0,
K=100%) has been specied, specify
whether to print using black (K) toner only.
ON
z
Prints the text and graphics specied
as black using black (K) toner only.
OFF
z
The text and graphics specied
as black are synthesized using
either black (K) toner only or CMYK
depending on the prole specied in
color matching.
Appendix Index
- 79 -

Matching Colors Using the Printer Drivers
1
Convenient print
functions
2
Matching
Colors
3
Using Utility
Software
4
Network
Setup
Using Windows PS Printer Driver
Open the le to be printed.
1
Select [Print] in the [File] menu.
2
Click [Advanced] (or [Preferences]).
3
Select [Ofce Color] or [Graphic Pro]
4
in [Color Mode] in the [Color] tab, and
then click [Advanced].
Select the black nish method from
5
[Black Finish]. Further, turn ON or OFF
[Pure Black Text/Graphics] in [Graphic
Pro] mode, and click [OK].
Using Mac OS X Printer Driver
Open the le to be printed.
1
Select [Print] in the [File] menu.
2
Select [Graphic Pro] in the [Color]
3
panel.
Select [ICC Prole Color Matching] in
4
[Select Mode], and click the [General]
button.
Select a suitable item using [Black
5
Finish] and [Pure Black Text/Graphics].
the Control Panel
5
Changing Printer
Settings Using
Appendix Index
Checking and
Printing will be implemented.
6
Printing will be implemented.
6
- 80 -

Printing using monochrome (black and white)
The color data is printed using grayscale (shades
of black and white) without touching the print
data.
Note
If implementing color printing after printing by specifying
z
"Monochrome", a delay may occur depending on the
temperature adjustment of the fuser unit.
Memo
Even if the cyan (blue), magenta (red), yellow toner
z
cartridge life has been reached, black&white printing can
be done by specifying "Mono".
However, if the paper weight is set to "Ultra Heavy4",
"Ultra Heavy5" or "Auto" and if the paper weight is
comparable to "Ultra Heavy4", "Ultra Heavy5", set "MonoPrint Mode" in "Admin Menu" to "Normal Mode".
See "Basic" for paper details.
z
Matching Colors Using the Printer Drivers
Using Mac OS X Printer Driver
Open the le to be printed.
1
Select [Print] in the [File] menu.
2
Select [Grayscale] in the [Color] panel.
3
1
Convenient print
functions
2
Matching
Colors
3
Using Utility
Software
4
Network
Setup
Using Windows PS Printer Driver
Open the le to be printed.
1
Select [Print] in the [File] menu.
2
Click [Advanced] (or [Preferences]).
3
Select [Grayscale] in [Color Mode] in
4
the [Color] tab, and then click [OK].
Printing will be implemented.
4
the Control Panel
5
Changing Printer
Settings Using
Appendix Index
Checking and
Printing will be implemented.
5
- 81 -
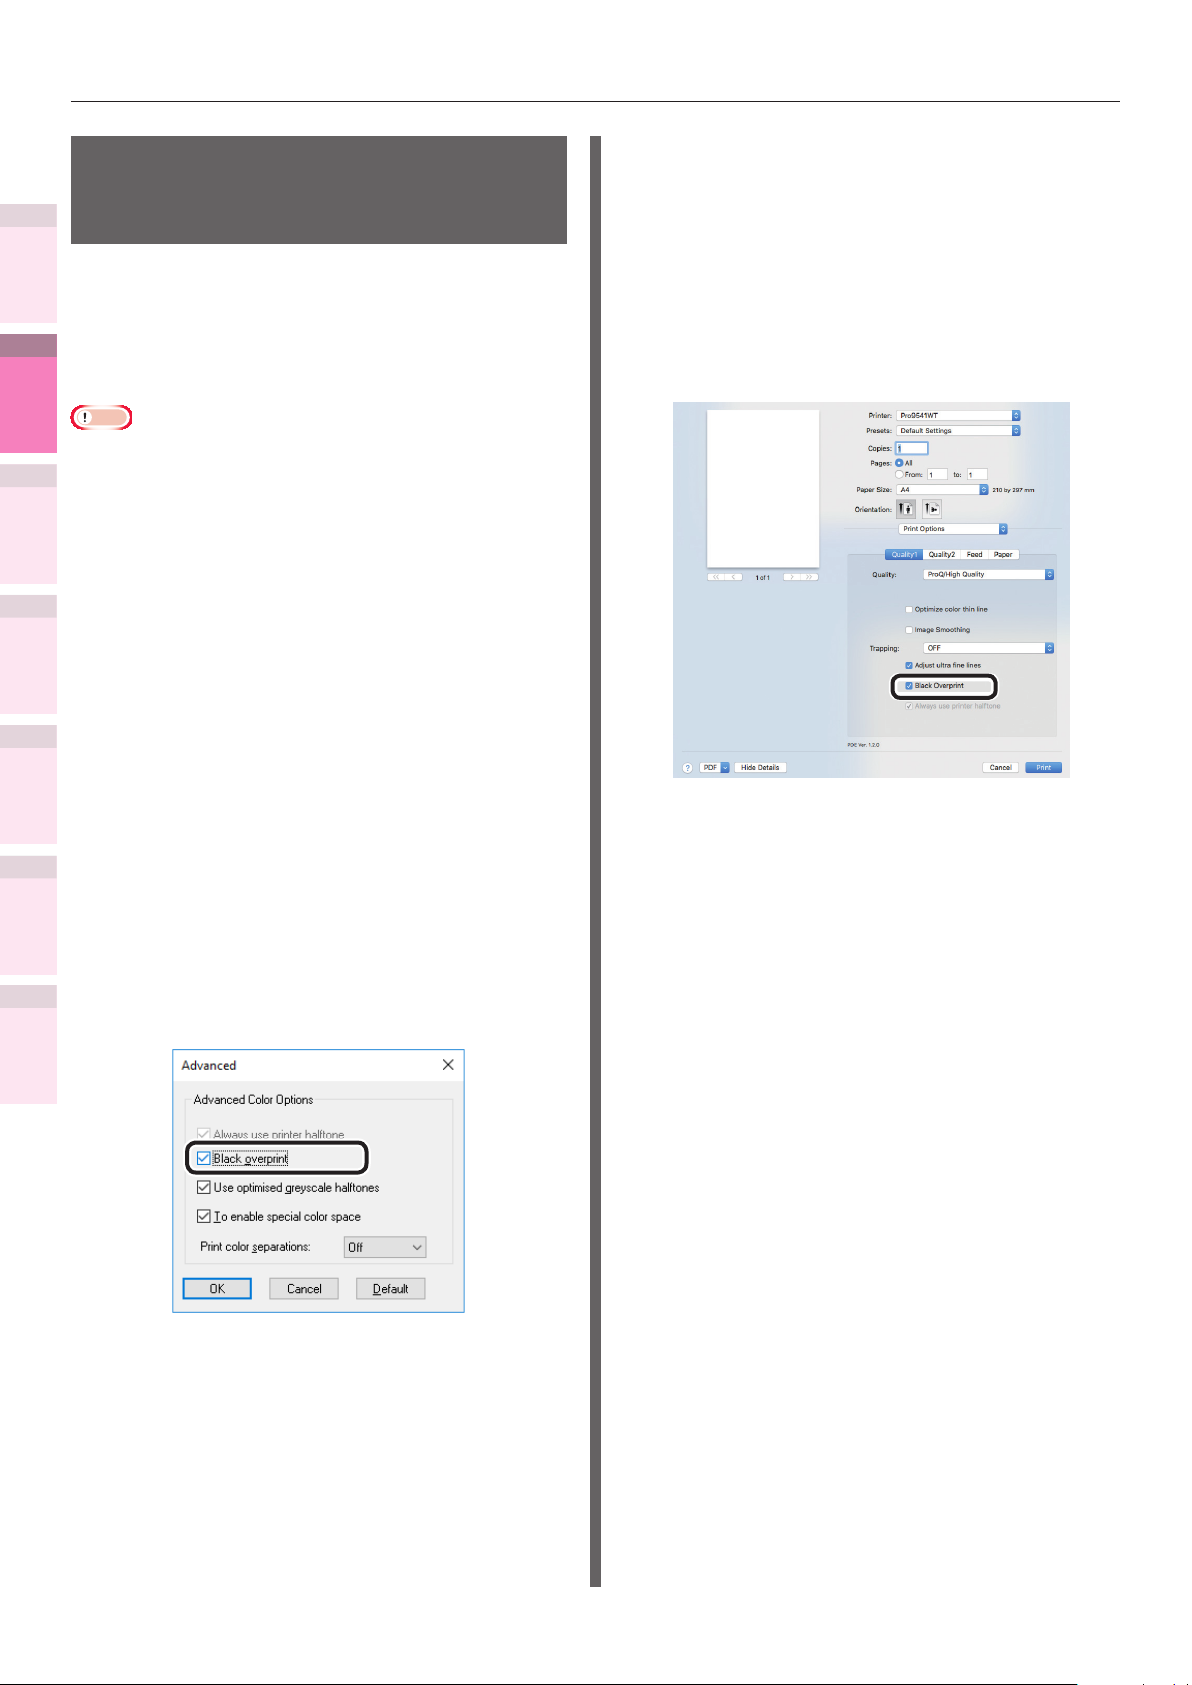
Matching Colors Using the Printer Drivers
Rendering white lines
between text and background
1
inconspicuous (black overprint)
Convenient print
functions
If imaging 100% black text on a colored
background, you can print (overprint) by
overlaying the text and background parts. Set if
2
there are gaps such as white lines, etc., in the
Matching
borders between the text and background.
Colors
Note
Not usable with some applications.
z
3
Cannot be used if the text is not 100% black, the text has
z
Using Utility
Software
4
Network
Setup
been rendered as graphics by selecting the outlines, or if
the text is an image.
If the background color is dark (the toner layer thickness
z
exceeds 240%), the toner may not be xed securely. For
example, if printing 100% black text on backgrounds
of 50% cyan, 50% magenta, or 50% yellow, the toner
layer thickness is 50+50+50+100=250%, which exceeds
240%.
Using Mac OS X Printer Driver
Open the le to be printed.
1
Select [Print] in the [File] menu.
2
Click [Quality 1] in the [Print Options]
3
panel, and enable the [Black Overprint]
check box.
the Control Panel
5
Changing Printer
Settings Using
Appendix Index
Using Windows PS Printer Driver
Checking and
Open the le to be printed.
1
Select [Print] in the [File] menu.
2
Click [Advanced] (or [Preferences]).
3
Click [Advanced] in the [Color] tab.
4
Enable the [Black overprint] check box,
5
and click [OK].
Printing will be implemented.
4
Printing will be implemented.
6
- 82 -
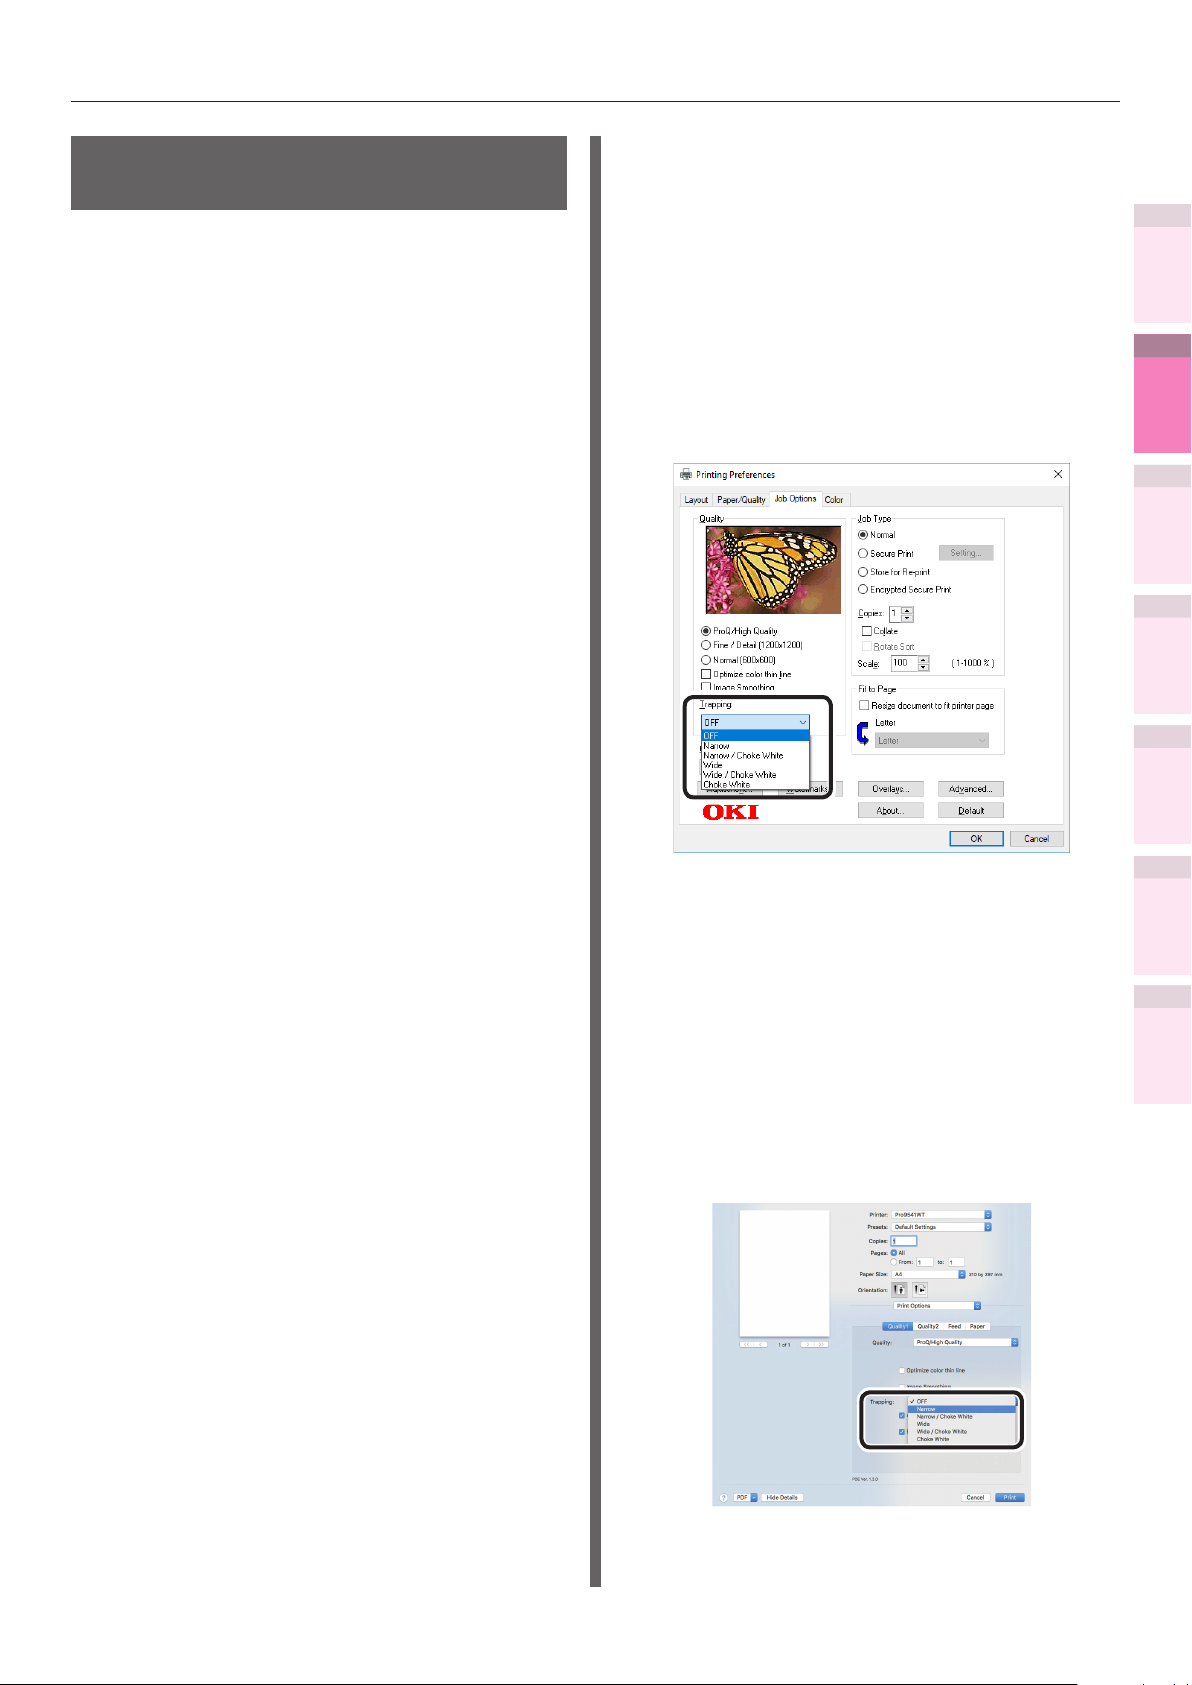
Calibrating plate misalignment (trapping)
Use if there are white or colored lines
between two overlapping objects due to print
misalignment.
Select one of the following settings as needed,
and print.
OFF
z
Do not perform trapping process.
Narrow
z
Extend the part to be printed with CMKY
toner.
Narrow/Choke White
z
Extend the part to be printed with CMKY
toner, and reduce the part to be printed
with white toner.
Matching Colors Using the Printer Drivers
Using Windows PS Printer Driver
Open the le to be printed.
1
Select [Print] in the [File] menu.
2
Click [Advanced] (or [Preferences]).
3
Select the print misalignment calibration
4
method using [Trapping] in the [Job
Options] tab, and click [OK].
1
Convenient print
functions
2
Matching
Colors
3
Using Utility
Software
4
Network
Setup
Wide
z
Except when [Narrow] is selected, extend
the part to be printed with CMKY toner.
Wide/Choke White
z
Except when [Narrow] is selected, extend
the part to be printed with CMKY toner, and
reduce the part to be printed with white
toner.
Choke White
z
Reduce the part to be printed with white
toner.
Printing will be implemented.
5
Using Mac OS X Printer Driver
Open the le to be printed.
1
Select [Print] in the [File] menu.
2
Click the [Quality 1] button in the [Print
3
Options] tab, and select the print misalignment
calibration method using [Trapping].
the Control Panel
5
Changing Printer
Settings Using
Appendix Index
Checking and
- 83 -
Printing will be implemented.
4
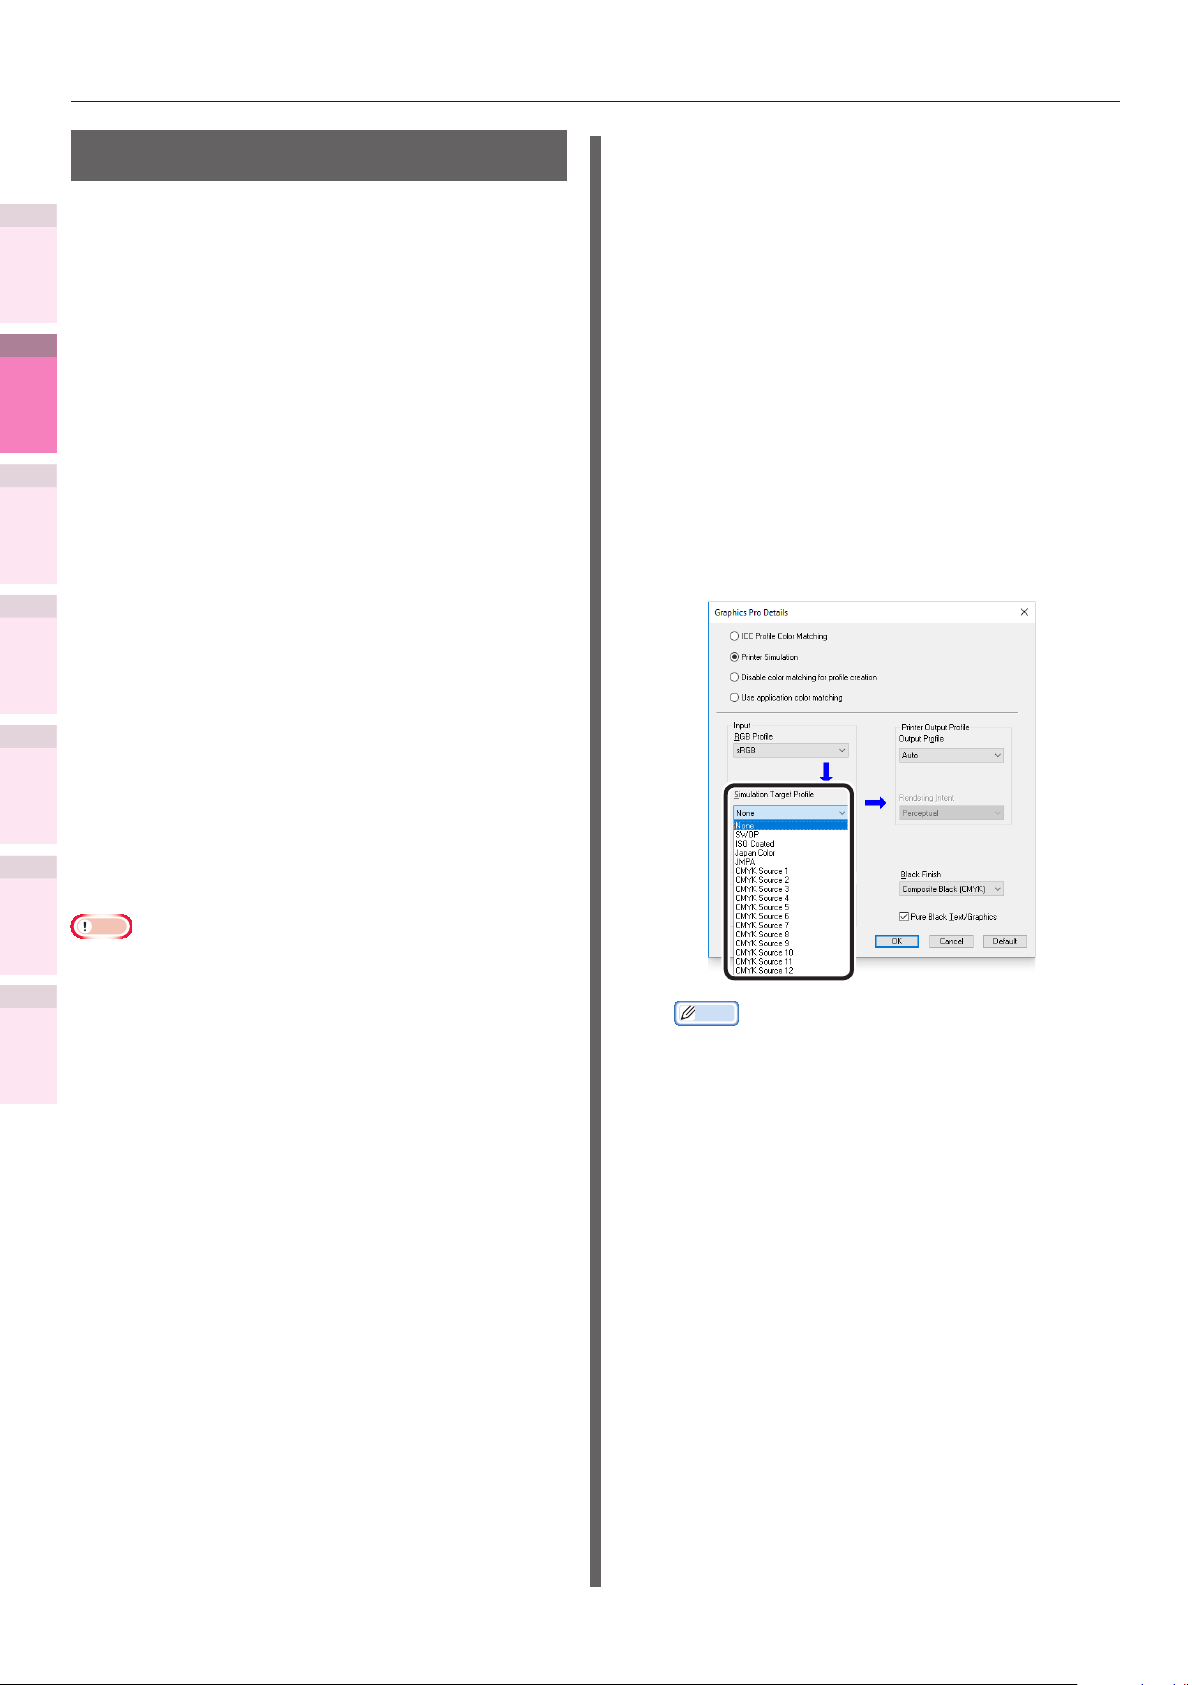
Matching Colors Using the Printer Drivers
Simulating print effects
Using Windows PS Printer Driver
1
Convenient print
functions
2
Matching
Colors
3
Using Utility
Software
4
Network
Setup
5
the Control Panel
Changing Printer
Settings Using
The ink characteristics used in offset printing,
etc., by adjusting the CMYK color data is
simulated by the device.
The ICC proles registered as standard are
described below.
RGB prole
z
– sRGB
– AdobeRGB
CMYK input prole
z
– SWOP
– ISO Coated
– Japan Color
– JMPA
CMYK link prole
z
– SWOP
– ISO Coated
Checking and
– Japan Color
Open the le to be printed.
1
Select [Print] in the [File] menu.
2
Click [Advanced] (or [Preferences]).
3
Select [Graphic Pro] in [Color Mode]
4
in the [Color] tab, and then click
[Advanced].
Select [Printer Simulation], and then
5
select the ink characteristics to be
simulated using [Simulation Target
Prole].
Appendix Index
– JMPA
– Classic-1
– Classic-2
Note
Cannot be used with Mac OS X printer drivers depending
z
on the application.
Enabled when [Color Mode] is set to either [Ofce Color]
z
or [Graphic Pro].
[Classic-1], [Classic-2] is a prole with a purpose to bring
z
the color closer to the conventional device. You can choose
from 2 types of proles according to your preference.
Memo
For business documents, etc., you can select [Ofce
z
Color] in the [Color] tab in Steps 4 and 5, and then
click [Advanced], and select the ink characteristics
to be simulated using [CMYK Input Prole].
Click [OK].
6
Printing will be implemented.
7
- 84 -
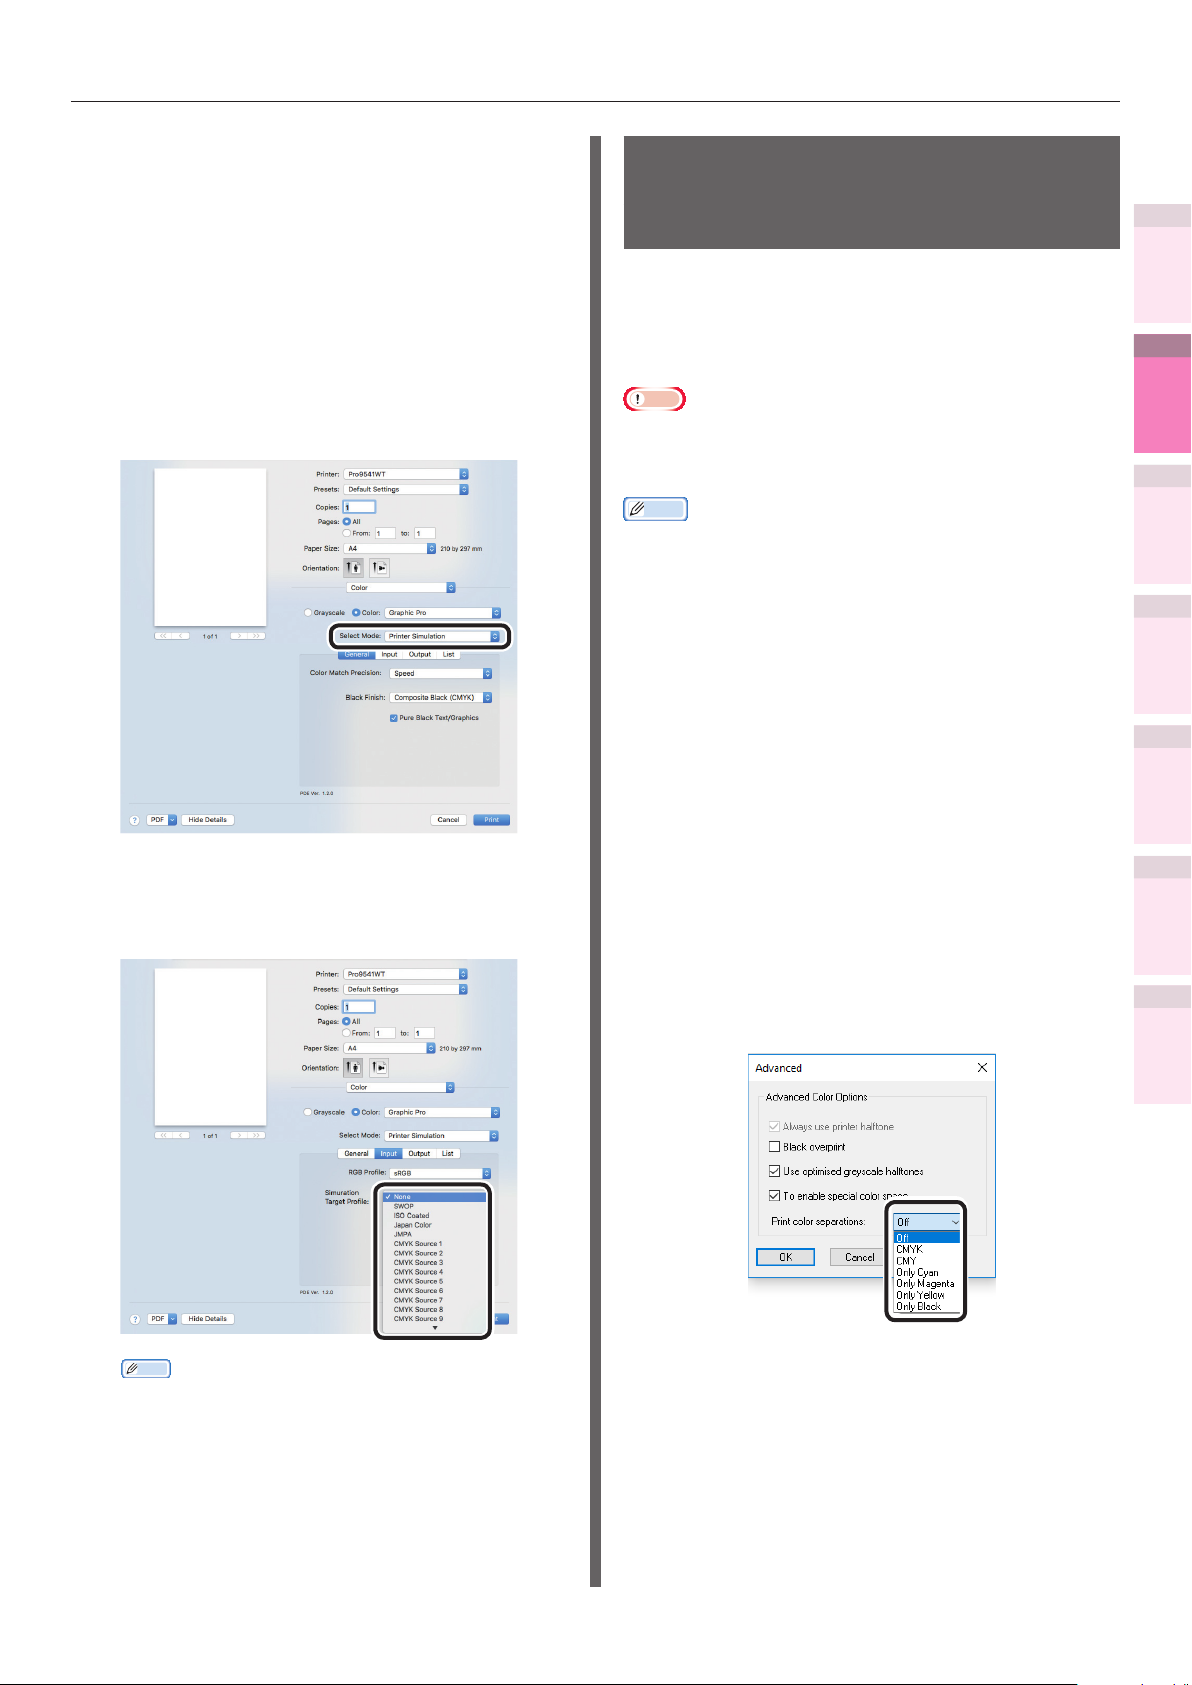
Using Mac OS X Printer Driver
Open the le to be printed.
1
Select [Print] in the [File] menu.
2
Select [Graphic Pro] in the [Color]
3
panel.
Select [Printer Simulation] in [Select
4
Mode].
Matching Colors Using the Printer Drivers
Printing using color
analysis (classication
printing)
You can implement color separation printing
of the four colors cyan, magenta, yellow, and
black even if the application does not have a
separation print function.
Note
If using Adobe Illustrator, use the application's separation
z
print function. Set the printer driver settings to No Color
Matching.
Memo
The Separations function is for creating under the print.
z
Use black toner to print each specied primary color.
There is no function for printing each primary color ink
separately.
Using Windows PS Printer Driver
1
Convenient print
functions
2
Matching
Colors
3
Using Utility
Software
4
Network
Setup
Click the [Input] button, and select the
5
ink characteristics to be simulated using
[Simulation Target Prole].
Open the le to be printed.
1
Select [Print] in the [File] menu.
2
Click [Advanced] (or [Preferences]).
3
Click the [Advanced] button in the
4
[Color] tab.
Select the colors to be printed
5
separately using [Print color
separations], and then click [OK].
the Control Panel
5
Changing Printer
Settings Using
Appendix Index
Checking and
Memo
For business documents, etc., you can select
z
[Ofce Color] in [Color Mode] when setting the
[Color Options] function in Steps 3, 4 and 5, and
then select the ink characteristics to be simulated
using [CMYK Ink Simulation] in the [Ofce Color]
functions settings.
Printing will be implemented.
6
Printing will be implemented.
6
- 85 -
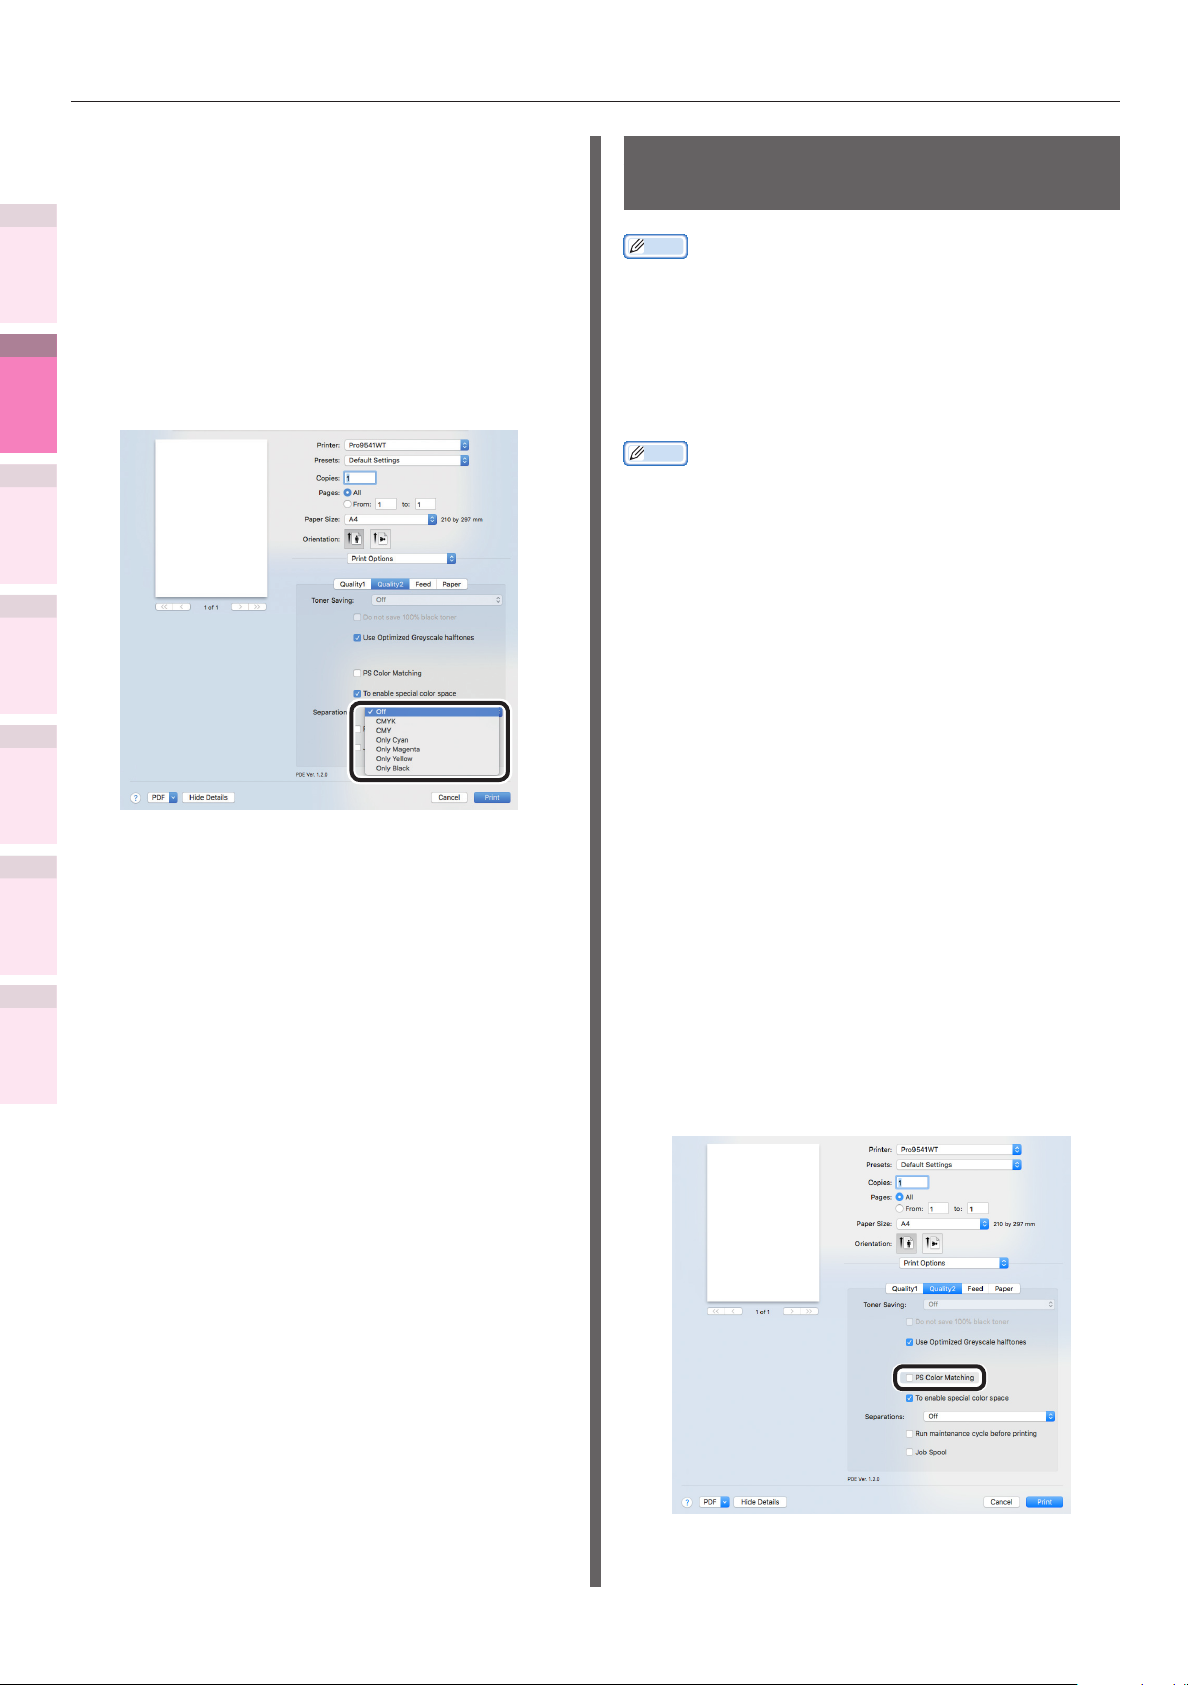
Matching Colors Using the Printer Drivers
Using Mac OS X Printer Driver
1
Convenient print
functions
Open the le to be printed.
1
Select [Print] in the [File] menu.
2
Click the [Quality 2] button in the
3
2
Matching
Colors
3
Using Utility
Software
4
Network
Setup
[Print Options] panel, and select the
colors to be printed separately using
[Separations].
Disabling the Postscript Color Matching
Memo
Can be used with Mac OS X printer drivers.
z
This is a function to disable the PostScript Color
Matching for RGB system color space.
If not conducting color matching, you can get
the same print result (color) as the initial state
setting of Windows.
Memo
PostScript Color Matching is a standard color matching
z
mechanism in PS that creates Generic RGB prole based
Color Space Array (CSA) for RGB entered data, converts
RGB to XYZ color space by CSA, and from that XYZ color
space converts into CMYK of printer by using the Color
Rendering Dictionary (CRD) installed in the printer.
Setup Items
the Control Panel
5
Changing Printer
Settings Using
Appendix Index
Un-checked
z
PostScript Color Matching is not conducted.
Checked
Checking and
Printing will be implemented.
z
PostScript Color Matching will be conducted.
Using Mac OS X Printer Driver
4
Open the le to be printed.
1
Select [Print] in the [File] menu.
2
Select [Quality 2] in the [Print Options]
3
panel.
Un-check [PS Color Matching].
4
- 86 -
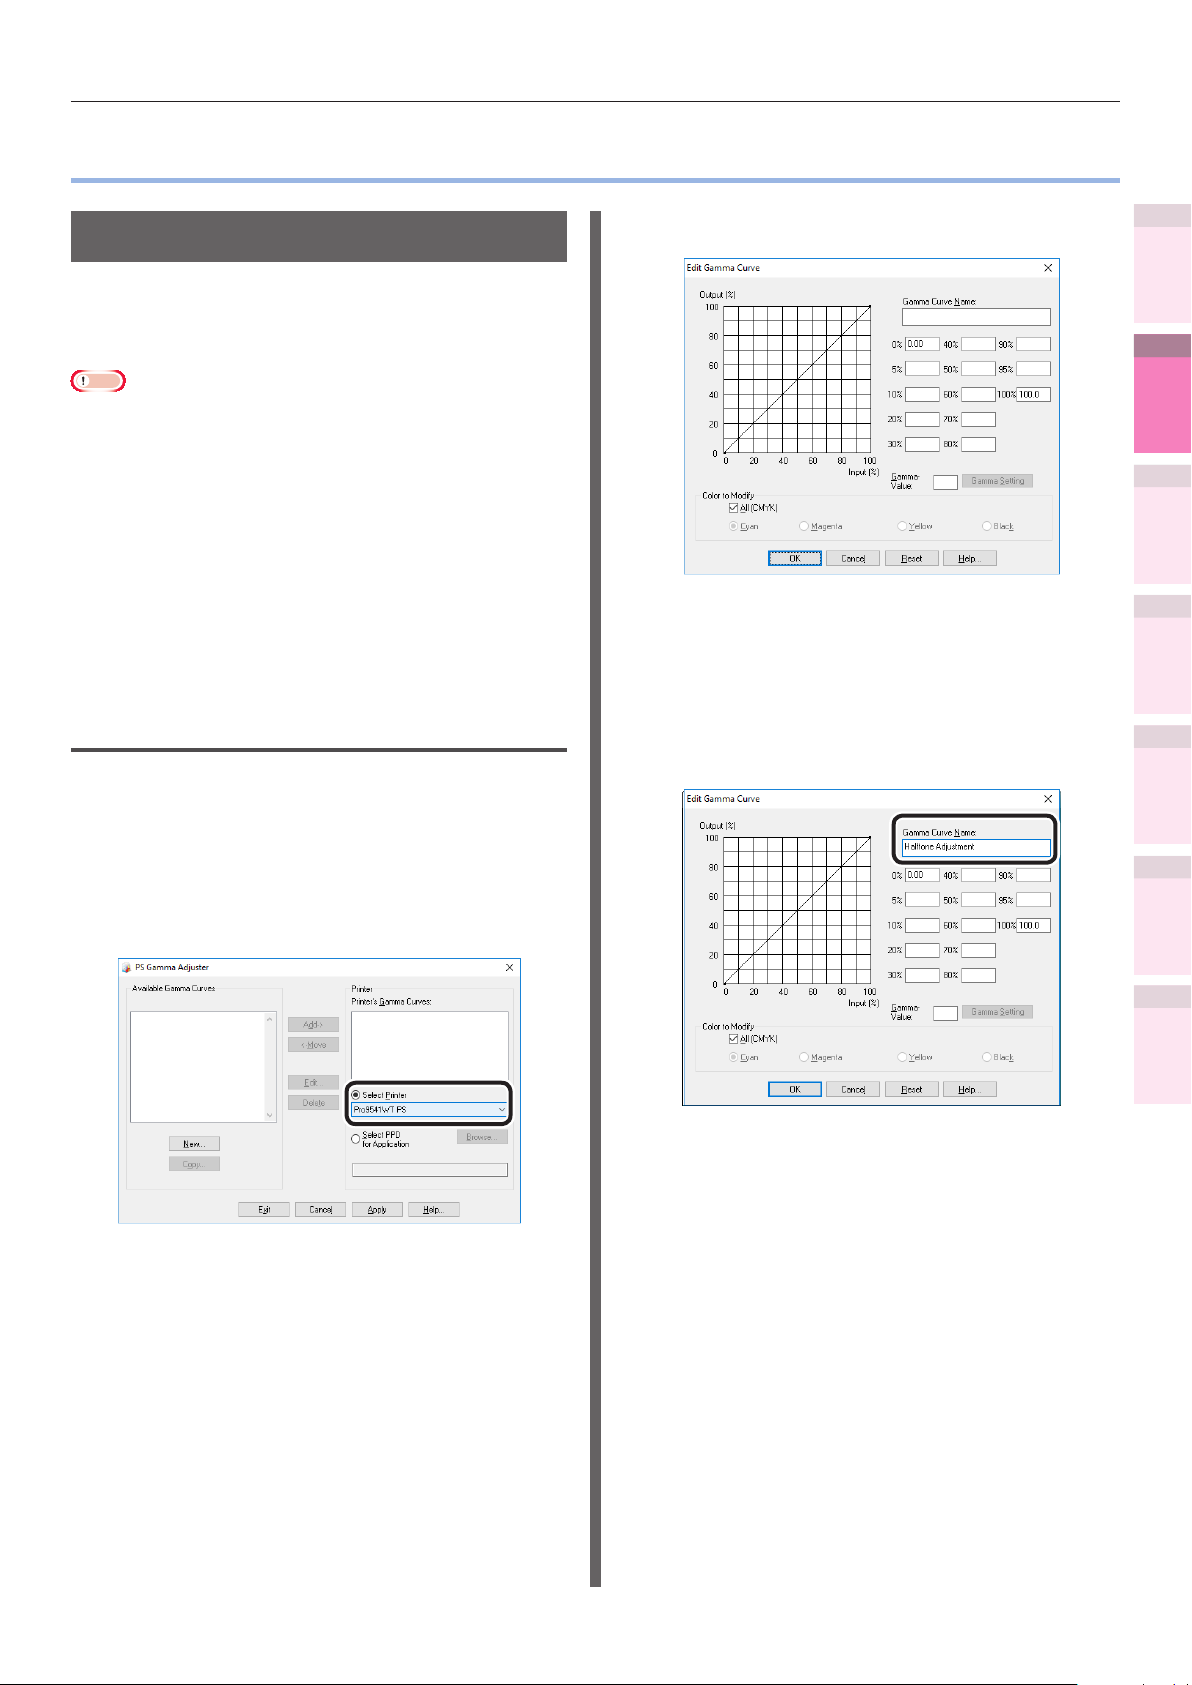
Matching Colors Using Utilities
z
PS Gamma Adjuster
You can adjust the halftone density of the CMYK
colors printed using the device. Use this function
if the photo or graphics colors are too dark.
Note
Using this function may make printing slower. To prioritize
z
speed, in Windows disable "Use printer halftone", and in
Macintosh select [No settings] in [Halftone adjustment].
If using Windows, the [Halftone adjustment] menu or its
z
contents may not be displayed in the [Color] tab of the
printer drivers. In this case, restart your PC.
If the application is used before the halftone adjustment
z
name has been registered, restart the application before
printing.
If multiple printers have been saved to the [Devices and
z
printers] folder, the registered halftone adjustment names
will be enabled for all printers of the same model.
4
Matching Colors Using Utilities
Adjust the halftone.
You can select the halftone adjustment
method from the graph line operations,
gamma value inputs, and density value
inputs to the text boxes.
1
Convenient print
functions
2
Matching
Colors
3
Using Utility
Software
4
Network
Setup
Registering gamma (Windows)
Select [Start]>[All Programs]>[OKI
1
Data]>[PS Gamma Adjuster]>[PS
Gamma Adjuster] to start the PS
Gamma Adjuster.
Select the device from [Select Printer].
2
Click [New].
3
Enter the settings name in [Gamma
5
Curve Name], and click [OK].
Click [Add].
6
Click [Apply].
7
The dialog box will be displayed.
Click [OK].
8
Click [Finish] to close the PS Gamma
9
Adjuster.
the Control Panel
5
Changing Printer
Settings Using
Appendix Index
Checking and
- 87 -
Matching Colors Using Utilities
1
Convenient print
functions
2
Matching
Colors
3
Using Utility
Software
4
Network
Setup
5
the Control Panel
Changing Printer
Settings Using
Registering gamma (Macintosh)
Start the PS Gamma Adjuster.
1
Click [Dene new halftone adjustment].
2
Adjust the halftone.
3
You can select the halftone adjustment
method from the graph line operations,
gamma value inputs, and density value
inputs to the text boxes.
Enter the settings name in [Halftone
4
adjustment name], and click [Save].
Close the PS Gamma Adjuster.
5
Select [Printers and scanners] in the
6
[System environment settings], and
then temporarily delete and then reregister the printer that implemented
Checking and
the registered adjustments.
Prole assistant
This section explains the prole assistant utility.
You can match the colors using the printer ICC
proles. ICC proles are used for overall color
management. To use this function, it is necessary
to register the ICC proles for the input devices
(monitors, scanners, digital cameras, etc.) in the
printer beforehand. To register an ICC prole,
use the prole assistant.
Note
The prole assistant is not enclosed on the "Software
z
DVD-ROM", so download it from the homepage.
If there are no proles in the input or output devices,
z
consult the device manufacturer or your dealer.
To register an ICC prole, it is necessary to mount the
z
(optional) HDD to the device.
Appendix Index
- 88 -

Matching Colors Using Utilities
Registering ICC proles
You can match the colors using the printer ICC
proles. ICC proles are used for overall color
management. To use this function, it is necessary
to register the ICC proles for the input devices
(monitors, scanners, digital cameras, etc.) in the
printer beforehand.
Note
If there are no proles in the input or output devices,
z
consult the device manufacturer or your dealer.
Windows
Use the Conguration Tool. For the
procedure details, see "Storage Manager
plug-in" (P.100).
Mac OS X
Note
The prole assistant is not enclosed on the "Software
z
DVD-ROM", so download it from the homepage.
Start the prole assistant.
1
Select the [Networks] or [USB] tab.
2
If the device is connected using USB, select
[USB]. If the device is connected using a
network, select [Networks].
Select the number of the prole to be
7
registered.
The registered numbers are underlined in
bold. If a registered number is selected, the
prole will be overwritten.
If necessary, enter a comment in the
8
[Comments] eld.
The comments are displayed in the prole
tables and the color prole list reports.
Click [Add].
9
Check that the registered proles are
10
displayed in the main window list, and
select [File] and then [Close].
Memo
Registered proles can be used in color matching for the
z
[Graphic Pro] functions.
Steps 2 and 3 are omitted when the prole assistant
z
utility is started subsequently, and the utility is connected
to the device that was last used. To change the connected
printer, select [Printer selection] in Step 4.
Reference
For how to print the color prole list, see "Color prole
z
list" (P.175).
1
Convenient print
functions
2
Matching
Colors
3
Using Utility
Software
4
Network
Setup
5
the Control Panel
Changing Printer
Settings Using
Appendix Index
Checking and
Select the device to be registered, and
3
click [Select].
Note
Not compatible with USB2.0. If using this utility
z
with USB, set the device USB baud rate to 12Mbps
to connect using USB1.1.
Click [Add] in the main window.
4
Select the prole to be registered, and
5
click [Select].
Memo
ICC proles are normally stored in the [Library]>
z
[ColorSync]>[Proles] folder.
If you cannot nd the ICC proles, consult your
device manufacturer.
Select the prole type.
6
- 89 -

Matching Colors Using Utilities
Memo
1
Convenient print
functions
2
Matching
Colors
3
Using Utility
Software
4
Network
Setup
the Control Panel
5
Changing Printer
Settings Using
Appendix Index
Checking and
- 90 -

3
Using Utility
Software
1
Convenient print
functions
2
Matching
Colors
Utility software that can be used with the
printer
Windows utilities
Mac OS X utilities
…………………………………………… 92
…………………………… 95
………………………… 113
the Control Panel
Software
Setup
Settings Using
3
Using Utility
4
Network
5
Changing Printer
Checking and
Appendix Index
- 91 -

Utility software that can be used with the printer
Utility software that can be used with the printer
z
1
Convenient print
functions
Utilities table
Windows/Macintosh common utilities
2
Matching
Colors
PS Gamma Adjuster Image density can be adjusted by
3
Using Utility
Software
Web browsers You can make all the settings in
4
Network
Setup
Utility name Explanation Operations environment
adjusting each of the CMYK colors and
the halftone density.
addition to checking the messages
displayed on the device, and the
network settings, etc.
Windows 10/Windows 8.1/
z
Windows 8/Windows 7/
Windows Server 2016/
Windows Server 2012 R2/
Windows Server 2012/
Windows Server 2008 R2/
Windows Server 2008
Mac OS X 10.10.5 to 10.13
z
PCs with Microsoft Internet
Explorer Ver. 6.0 or later,
Safari Ver. 3.0 or later, or
Firefox 3.0 or later installed.
Reference
pages.
Page 87
Page 135
the Control Panel
5
Windows utilities
Changing Printer
Settings Using
Checking and
Utility name Explanation Operations environment
Conguration Tool Registers and manages the device
network settings in the device HDD.
Appendix Index
Direct Network Printing Utility
(LPR)
Network Extension You can check the settings and set
TELNET You can set the device networks. Windows 10/Windows 8.1/
Further, form data can be registered
and deleted, and stored jobs
managed.
You can print using network
connections, manage print jobs, and
check the device status.
the optional congurations from the
printer drivers.
This utility is installed automatically
when the printer drivers are installed
using a network connection.
Windows 10/Windows 8.1/
Windows 8/Windows 7/
Windows Server 2016/
Windows Server 2012 R2/
Windows Server 2012/
Windows Server 2008 R2/
Windows Server 2008
Windows 10/Windows 8.1/
Windows 8/Windows 7/
Windows Server 2016/
Windows Server 2012 R2/
Windows Server 2012/
Windows Server 2008 R2/
Windows Server 2008
PCs operating using TCP/IP
Window 10/Windows 8.1/
Windows 8/Windows 7/
Windows Server 2016/
Windows Server 2012 R2/
Windows Server 2012/
Windows Server 2008 R2/
Windows Server 2008
PCs operating using TCP/IP
Windows 8/Windows 7/
Windows Server 2016/
Windows Server 2012 R2/
Windows Server 2012/
Windows Server 2008 R2/
Windows Server 2008
Reference
pages.
Page 95
Page 104
Page 111
-
- 92 -

Utility software that can be used with the printer
Utility name Explanation Operations environment
Change the Printer Display
Language
You can change the display language
of the control panel and menus.
Window 10/Windows 8.1/
Windows 8/Windows 7/
Windows Server 2016/
Windows Server 2012 R2/
Windows Server 2012/
Windows Server 2008 R2/
Windows Server 2008
Macintosh utilities
Utility name Explanation Operations environment
Prole assistant
Panel language setup You can change the display language
NIC settings tool Enables the network setup. Mac OS X 10.10.5 to 10.13
*1: Not included on the Software DVD-ROM. Download from the homepage.
Installing utilities
*1
Registers and manages ICC proles in
the device HDD. ICC proles are used
on color matching in [Graphic Pro]
mode in the drivers.
of the control panel and menus.
Mac OS X 10.10.5 to 10.13
Mac OS X 10.10.5 to 10.13
Read the Environmental advice for
5
Users, and click the [Next] button.
Reference
pages.
Page 102
Reference
pages.
Page 88
Page 113
Page 114
1
Convenient print
functions
2
Matching
Colors
3
Using Utility
Software
4
Network
Setup
5
the Control Panel
Changing Printer
Settings Using
Checking and
Windows
Install utility software by using the Software
DVD-ROM.
Connect the machine to a computer via a
network or USB interface.
Note
Check the status of this machine before installing.
z
–This machine is turned on.
–This machine is connected to a network with a network
cable and the IP address or other settings are set.
Set the "Software DVD-ROM".
1
When the "AutoPlay" window is
2
displayed, click [Launch Setup.exe].
Memo
When the "User Account Control" window is
z
displayed, click the [Yes] button.
Select [Network] or [USB]
6
corresponding to your connection
environment, and then click the [Next]
button.
If the [Windows Security Alert] dialog is
displayed, click the [Allow access] button.
Select the model name of this machine,
7
and then click the [Next] button.
Appendix Index
Select a language from the drop-down
3
list.
Read the License Agreement, and click
4
the [Accept] button.
- 93 -

Utility software that can be used with the printer
1
Convenient print
functions
2
Matching
Colors
3
Using Utility
Software
4
Network
Setup
Click [Custom Install].
8
Click [Separate Install].
9
Macintosh
You can copy a utility by dragging to any
location. You can also run a utility directly from
the "Software DVD-ROM".
Insert the "Software DVD-ROM" in the
1
computer.
Double-click [OKI]>[Utilities] folder.
2
Drag and drop to copy the utility folder
3
to be installed into the desired location.
Memo
Double-click the utility icon in the folder to launch.
z
the Control Panel
5
Changing Printer
Settings Using
Appendix Index
Checking and
Click a software to install.
10
Installation starts.
When the installation has nished, click
11
the [Finish] button.
- 94 -

Windows utilities
z
Conguration Tool
Conguration Tool is a utility that changes and manages the OKI device settings.
Windows utilities
1
Convenient print
functions
Conguration Tool has the following functions to easily set and manage multiple OKI devices.
Displays the device information
z
Registers and manages ICC proles
z
Registers and deletes form data
z
Manages saved jobs
z
Formats partitions
z
Changes HDD partition sizes
z
Initializes ash memory
z
Sets printer networks
z
Operations environment
PCs running Windows 10/Windows 8.1/Windows
8/Windows 7/Windows Server 2016/Windows
Server 2012 R2/Windows Server 2012/Windows
Server 2008 R2/Windows Server 2008 versions
Note
PC administrator privileges are required for the setup.
z
Internet Explorer 5.5 SP1 or later must be installed.
z
Installing
Set the "Software DVD-ROM".
1
When the "AutoPlay" window is
2
displayed, click [Launch Setup.exe].
Memo
When the "User Account Control" window is
z
displayed, click the [Yes] button.
the Control Panel
2
Colors
3
Software
4
Setup
5
Settings Using
Appendix Index
Matching
Using Utility
Network
Changing Printer
Checking and
Select a language from the drop-down
3
list.
Read the License Agreement, and click
4
the [Accept] button.
Read the Environmental advice for
5
Users, and click the [Next] button.
Select [Network] or [USB]
6
corresponding to your connection
environment, and then click the [Next]
button.
If the [Windows Security Alert] dialog is
displayed, click the [Allow access] button.
- 95 -

Windows utilities
1
Convenient print
functions
2
Matching
Colors
3
Using Utility
Software
4
Network
Setup
5
the Control Panel
Changing Printer
Settings Using
Select the model name of this machine,
7
and then click the [Next] button.
Click [Custom Install].
8
Checking and
Select the plug-in to be installed.
10
Network Setting plug-in
z
Restart the IP address settings and printer,
and display web pages. Added to the plugin menu when installed. For details, see
“Network Setting plug-in” (P.98).
Storage Manager plug-in
z
Includes functions such as ICC prole
registration and management functions,
form data registration and deletion
functions, and saved job management
functions, etc. Added to the plug-in menu
when installed. For details, see “Storage
Manager plug-in” (P.100).
Appendix Index
Click [Separate Install], and then click
9
[Conguration Tool].
Memo
Plug-ins can also be installed additionally later.
z
Specify the installation destination
11
folder.
In the factory settings, C:\Program Files\
Okidata\Conguration Tool is specied.
Click [Install].
12
When "Installation nished" is displayed,
13
click [Exit].
Memo
When the restart window is displayed, restart the PC
z
according to the window instructions.
- 96 -

Windows utilities
Registering devices
When using the Conguration Tool for the rst
time or introducing a new OKI device, register
the OKI device in the Conguration Tool.
Select [Start]>[OKI Data]>
1
[Conguration Tool] to start the
Conguration Tool.
Select "Register Device" in the "Tools"
2
menu to search for OKI devices that
can be registered.
When available devices are displayed,
3
select this machine, and click [Register].
Click [Yes] on a conrmation screen.
4
1
Convenient print
functions
2
Matching
Colors
3
Using Utility
Software
4
Network
Setup
Memo
To change the scope of the search, select
z
"Environment Settings" in the "Tools" menu, and
enter the range to be searched. Enter the range,
and click [OK].
the Control Panel
5
Changing Printer
Settings Using
Appendix Index
Checking and
- 97 -
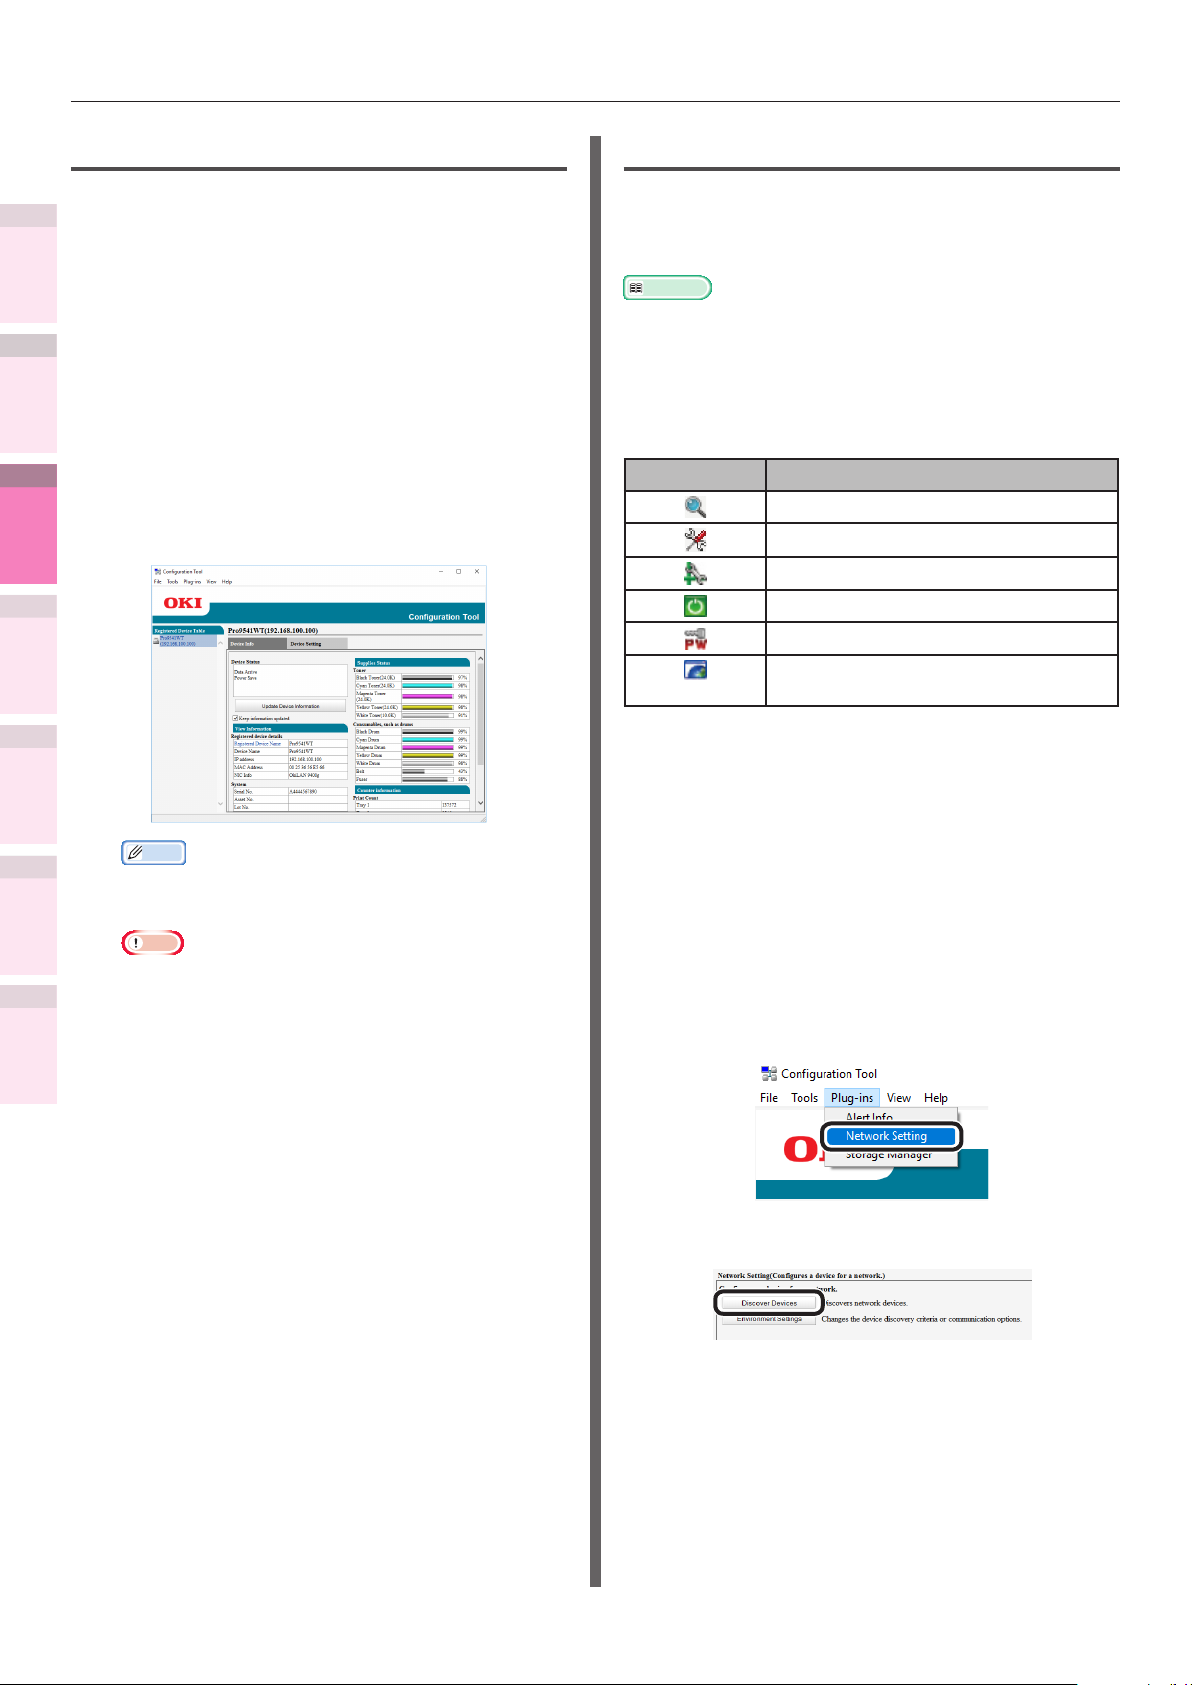
Windows utilities
Device Info tab
You can view the OKI device status and
1
advanced information.
Convenient print
functions
This function is available with the Conguration
Tool as standard.
2
Matching
Colors
Select [Start]>[OKI Data]>
1
[Conguration Tool] to start the
Conguration Tool.
Click the machine from "Registered
3
2
Software
Using Utility
Device Table".
Select the [Device Info] tab.
3
4
Network
Setup
Network Setting plug-in
The network can be set using the Conguration
Tool. Before making the settings, install the
Network Setting plug-in.
Reference
For how to set up the network, see the "Basic".
z
Icon types
The icon meanings are described below.
Icon Explanation
Searches for the device again.
Changes the search conditions.
Changes the device IP address.
Restarts the device.
Changes the network password.
Displays the web page for the
specied device.
the Control Panel
5
Changing Printer
Settings Using
Appendix Index
Searching for devices on the
Checking and
network
Memo
To change the information, click [Update Device
z
Information].
Note
The device status will be displayed if an OKI device
z
is connected to the network.
You can search for devices.
Select [Start]>[OKI Data]>
1
[Conguration Tool] to start the
Conguration Tool.
Select [Network Setting] from the
2
[Plug-ins] menu.
Select [Discover Devices].
3
- 98 -
The search results will be displayed.
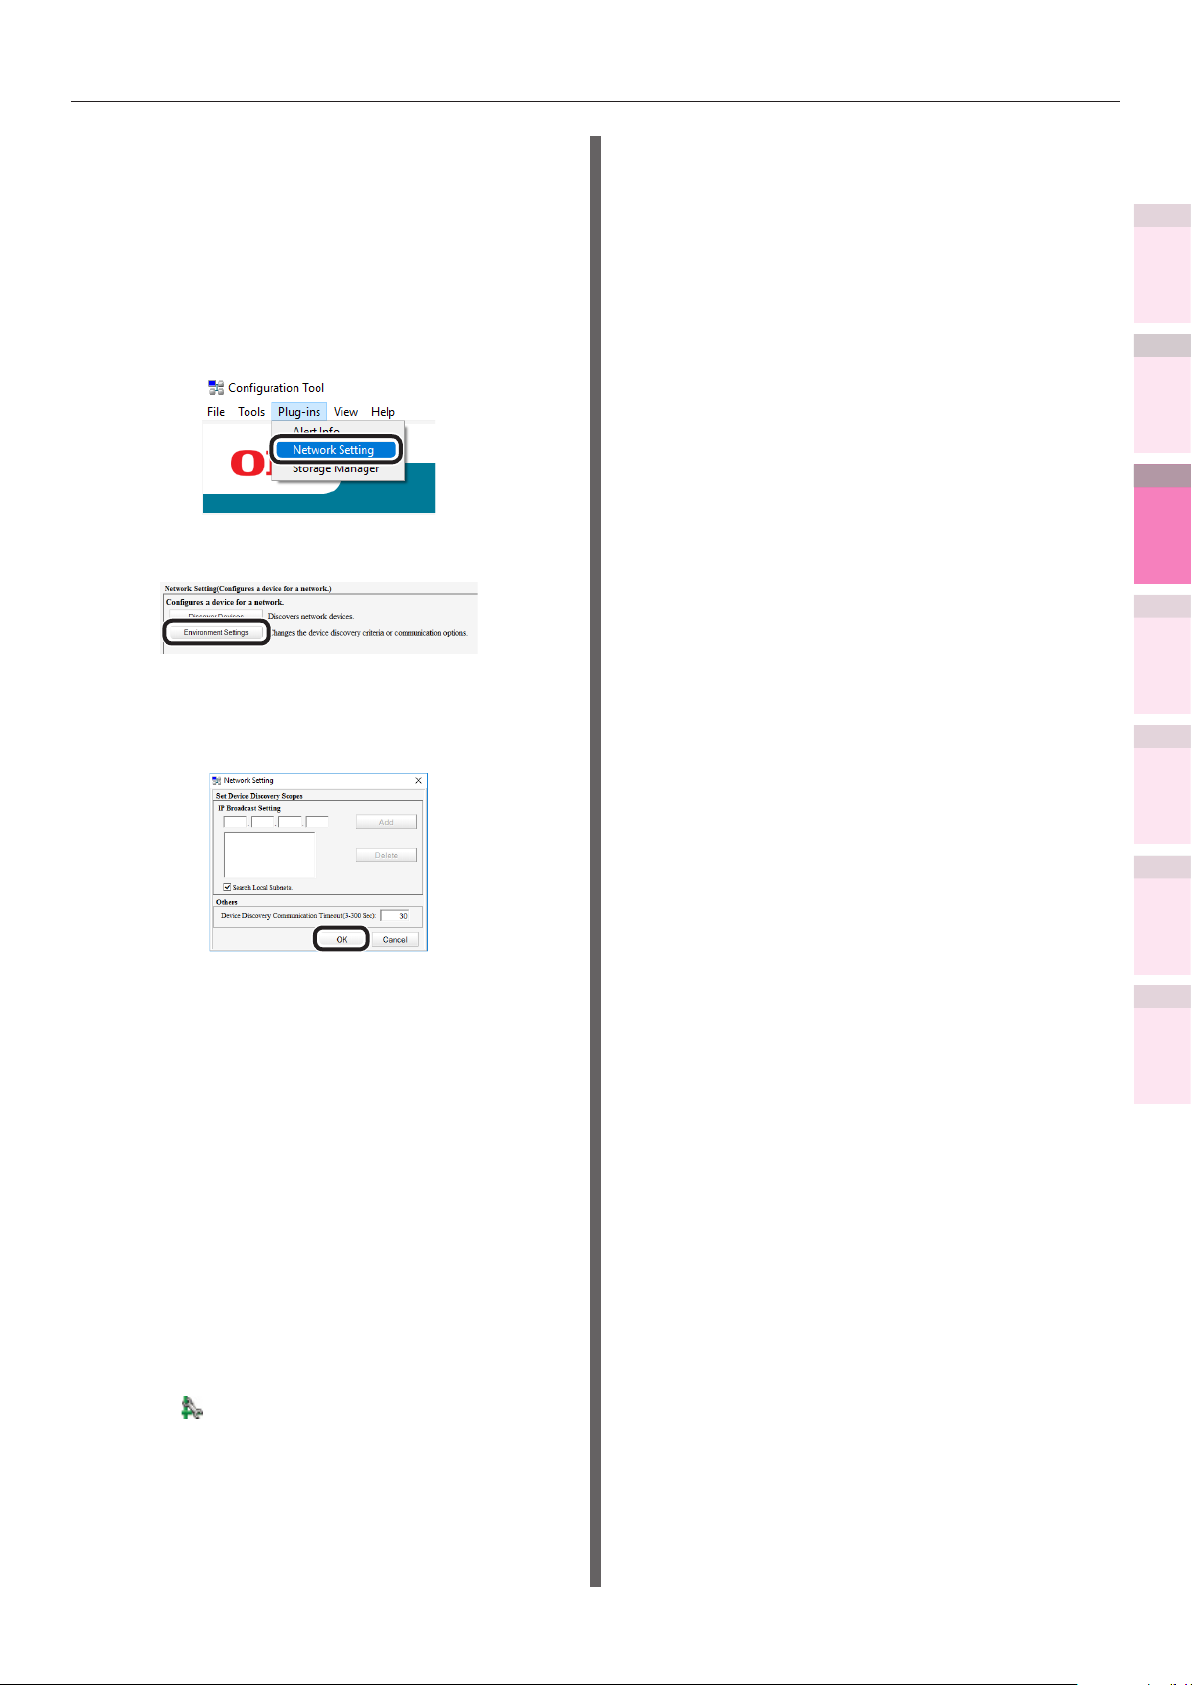
Windows utilities
Specifying the search conditions
Select [Start]>[OKI Data]>
1
[Conguration Tool] to start the
Conguration Tool.
Select [Network Setting] from the
2
[Plug-ins] menu.
Select [Environment Settings].
3
Specify the search conditions as
4
necessary, and click [OK].
Input the administrator password, and
8
click [OK].
The factory-set password is "999999".
Click [OK] to restart the device.
9
1
Convenient print
functions
2
Matching
Colors
3
Using Utility
Software
4
Network
Setup
5
the Control Panel
Changing Printer
Settings Using
Checking and
Changing IP addresses
You can change the device IP address.
Select [Start]>[OKI Data]>
1
[Conguration Tool] to start the
Conguration Tool.
Select [Network Setting] from the
2
[Plug-ins] menu.
Select [Discover Devices].
3
Select the device from the printer table.
4
Click .
5
Change the settings as necessary.
6
Click [Setup].
7
Appendix Index
- 99 -

Windows utilities
Storage Manager plug-in
Registering proles
1
Convenient print
functions
2
Matching
Colors
3
Using Utility
Software
4
Network
Setup
5
the Control Panel
Changing Printer
Settings Using
Storage Manager plug-in can manage jobs saved
on the device, and store the forms and fonts,
and ICC proles to be used in printing.
Note
The job management function does not support encrypted
z
card authentication jobs.
Icon types
The icon meanings are described below.
Icon Explanation
Creates new project
Opens projects
Saves projects
Saves projects as...
Adds les to a project
Deletes les from a project
Displays the ltering window for PCL
Checking and
form les
Creates download les
You can register and edit printer proles. Some
of the functions are explained below.
To register an ICC prole, it is necessary to
mount the (optional) HDD to the device.
Note
If using the prole registration and edit functions, install
z
the Storage Manager plug-in.
Reference
For how to install plug-ins, see “Installing” (P.95).
z
Select [Start]>[OKI Data]>
1
[Conguration Tool] to start the
Conguration Tool.
Select [Storage Manager] from the
2
[Plug-ins] menu.
Appendix Index
Sends download les
Sends projects
Sends les
Displays the job management
window
Displays the administrator functions
window
Click [ ] to create a new project.
3
Click [ ], and select the prole to be
registered, and click [Open].
4
The le is added to the project.
Click a prole.
5
Select the number of the prole to be
6
registered.
The numbers already used in the project
cannot be selected, and are displayed
against a yellow background.
If necessary, enter a comment in the
7
[Comments] eld.
Click the [OK] button to apply the
8
changes.
Select the machine from the bottom of
9
the Storage Manager Plug-in window.
- 100 -
Click [ ] to send the project associated
10
to the ICC prole that has been added
to the printer.
Check that the message “Command
11
Issued.” is displayed, and click [OK].
 Loading...