

User's Manual
Separate Volume Spot Color Guide
Pro9541WT

Contents
Contents
Control Panel Explanation .................................................................... 3
Standby Screen ...................................................................................................... 3
Menu table of Spot Color toner
...............................................................................4
Printer driver functions table ............................................................... 7
Printing on color paper
Color paper that can be used .................................................................................. 9
Printing using white toner only
Adjusting the usage amount of white toner
........................................................................ 9
..............................................................................9
.......................................................... 11
Printing on transparent lm ............................................................... 12
Transparent lms that can be used ....................................................................... 12
Setting transparent lm in the device
Preparing output destination of transparent lms
Mirror reverse printing
......................................................................................... 15
...................................................................12
................................................ 14
Printing by using applications to specify Spot Color toner ................. 17
Using Illustrator ................................................................................................... 17
Using Photoshop
................................................................................................... 19
Fine-tuning the white gradation ........................................................ 21
- 2 -
Control Panel Explanation
z
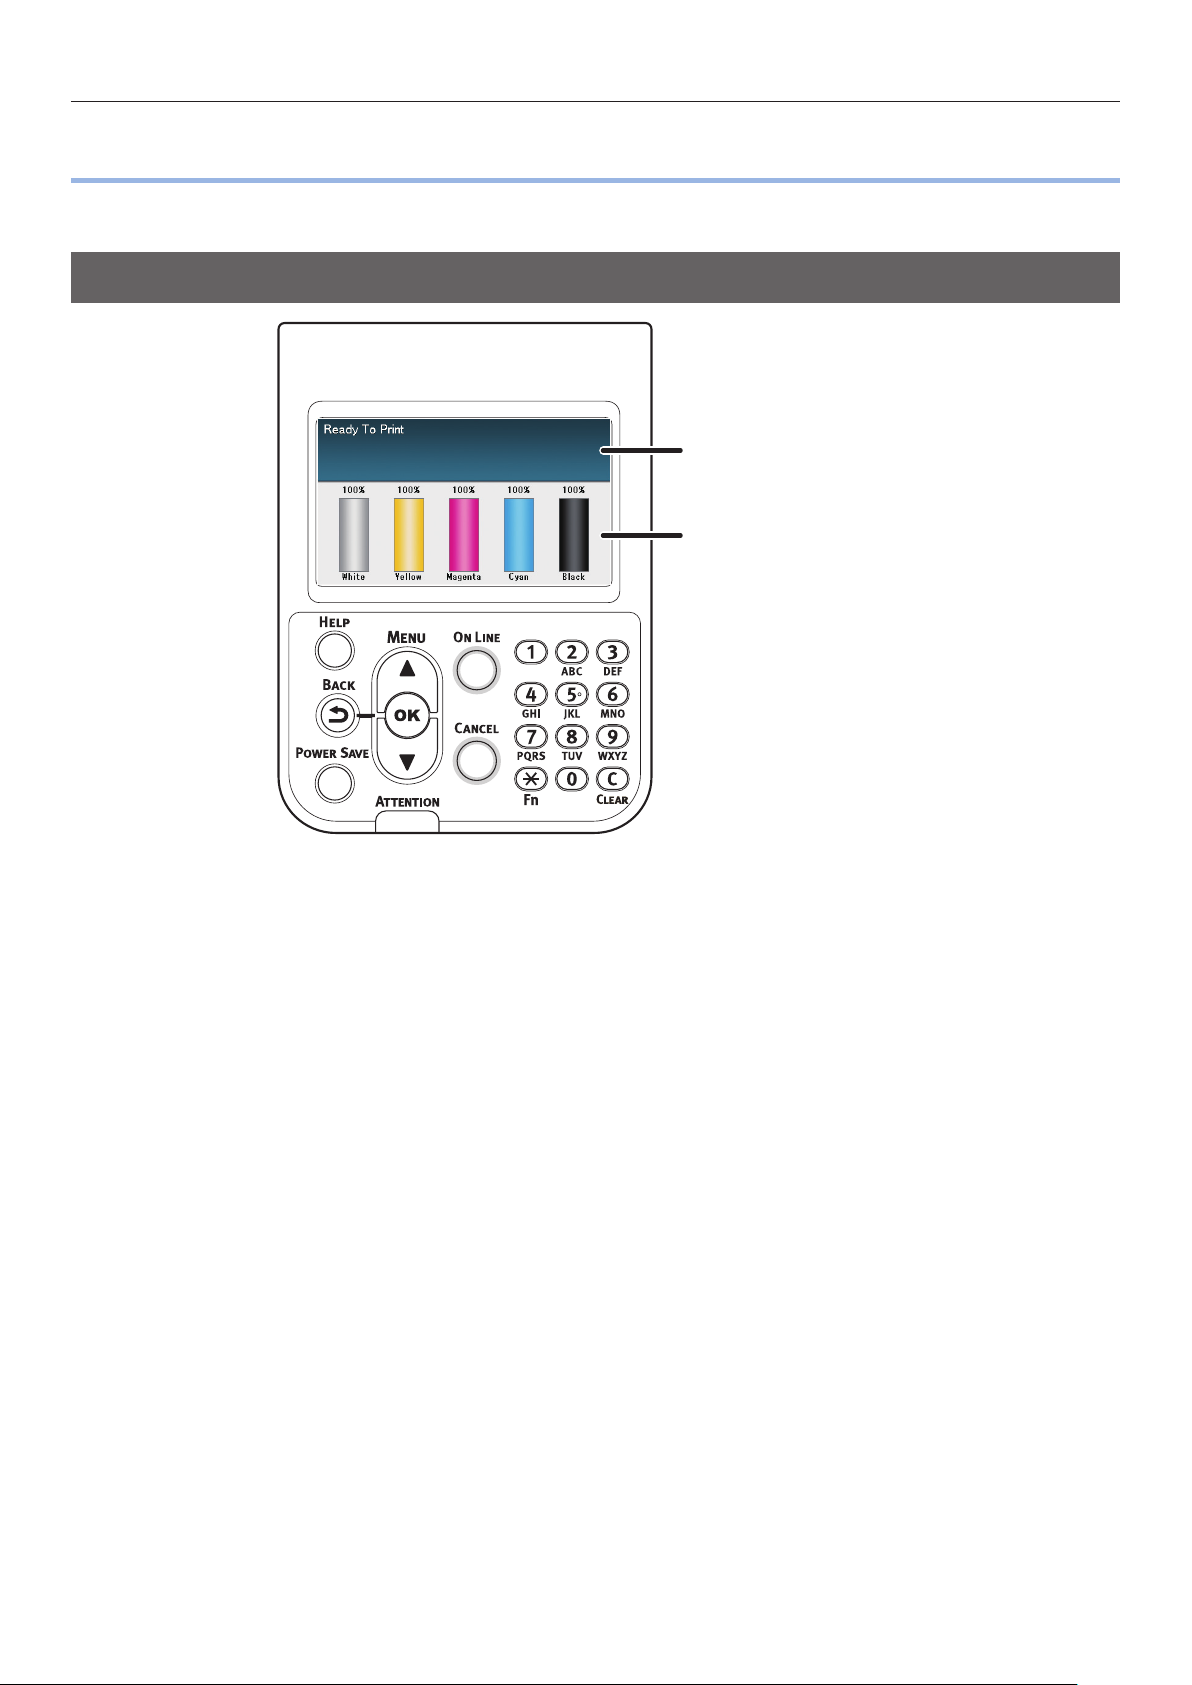
This section explains the control panel.
Standby Screen
Control Panel Explanation
Displays the printer status.
Displays the remaining
consumables quantities.
- 3 -
Control Panel Explanation
Menu table of Spot Color toner
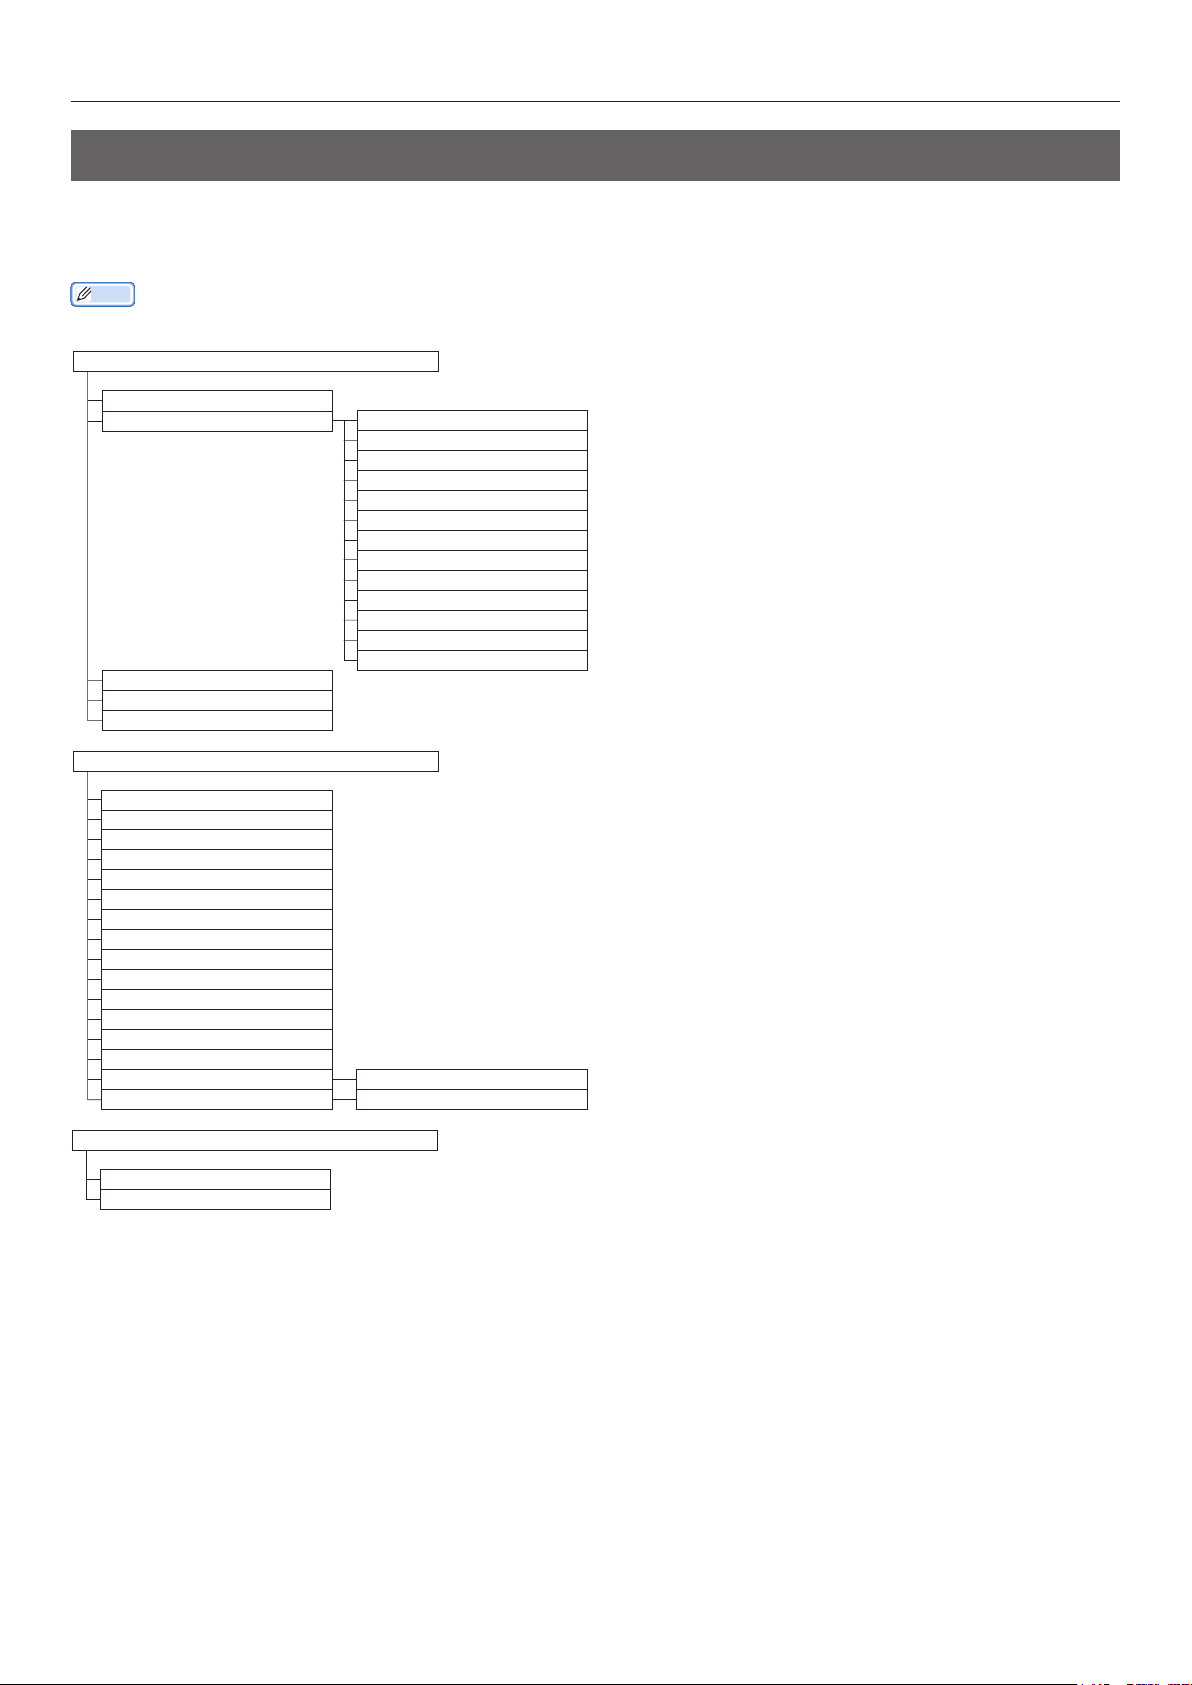
The printer menus for white toner are as described below.
Numbers following the letter F in the menu items indicate the function number.
Memo
For details of menus other than the Spot Color toner, see the "Basic".
z
Configuration
Tray Count
Supplies Life Cyan Toner
Magenta Toner
Yellow Toner
Black Toner
White Toner (n.nK)
Cyan Drum
Magenta Drum
Yellow Drum
Black Drum
White Drum
Waste Toner Box
Belt
Fuser
Network
Paper Size in Tray
System
Print Information
Configuration
Network
Demo Page
File List
PS Font List
PCL Font List
IBM PPR Font List
EPSON FX Font List
Usage Report
Error Log
Color Profile List
User Media List
Test Print-1
Test Print-2
Test Print-3 Print
Test Print-4 Print
Print Secure Job
Encrypted Job
Stored Job
- 4 -
Control Panel Explanation
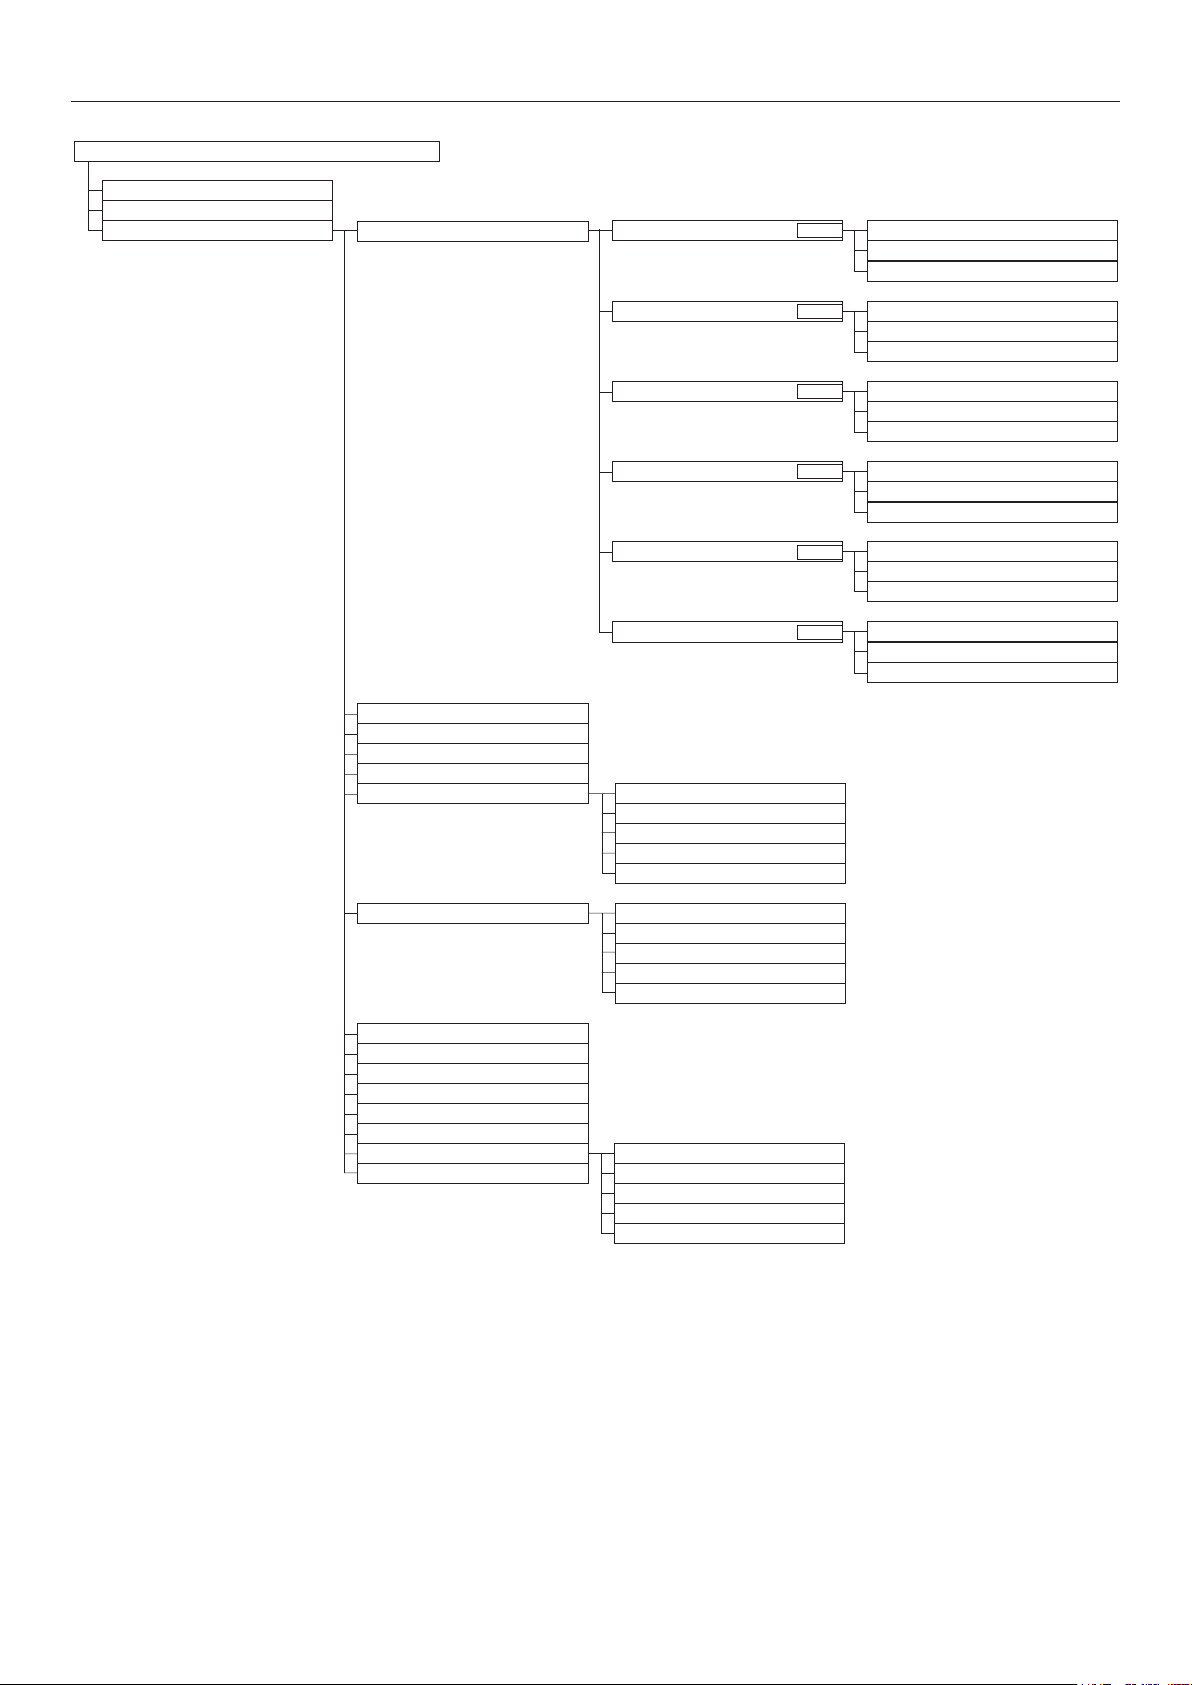
Menus
Tray Configuration
System Adjust
Print Adjust Print Position Adjust MPTray X Adjust (0.00mm)
F220
Y Adjust (0.00mm)
Y Scaling (0.00%)
Tray1 X Adjust (0.00mm)
F221
Y Adjust (0.00mm)
Tray2 *1 X Adjust (0.00mm)
F222
Y Scaling (0.00%)
Y Adjust (0.00mm)
Tray3 *1 X Adjust (0.00mm)
F223
Y Scaling (0.00%)
Y Adjust (0.00mm)
Tray4 *1 X Adjust (0.00mm)
F224
Y Scaling (0.00%)
Y Adjust (0.00mm)
Tray5 *1 X Adjust (0.00mm)
F225
Y Scaling (0.00%)
Y Adjust (0.00mm)
Y Scaling (0.00%)
Paper Black Setting
Paper Color Setting
Trans. Black Setting
Trans. Color Setting
SMR Setting Cyan
Magenta
Yellow
Black
White
BG Setting Cyan
Magenta
Yellow
Black
White
Drum Cleaning
Transfer Roller Cleaning
High Humid Mode
Moisture Control
Narrow Paper Speed
Print Mode
Transfer Setting Cyan Transfer Setting
DV Roller Cleaning Magenta Transfer Setting
Yellow Transfer Setting
Black Transfer Setting
White Transfer Setting
*1: Displayed when trays 2 to 5 are mounted.
- 5 -

Control Panel Explanation
Admin Setup
Network Setup
USB Setup
Print Setup
PS Setup
PCL Setup
XPS Setup
IBM PPR Setup
EPSON FX Setup
Color Setup Ink Simulation
UCR
CMY 100% Density
CMYK Conversion
Spot Color (White)
Panel Setup
Time Setup
Power Setup
Others Setup
Settings
Change Password
Print Statistics
JOB LOG
Supplies Report
Reset Main Counter
Reset Supplies Counter
Change Password
Calibration
Auto Density Mode
Auto BG Adjust Mode
Density Adjustment Media
Adjust Density
Adjust Registration
Heavy Media Adjust
Heavy Media Mode
Ultra Heavy Media Adjust Mode
Specific Media Feed Mode
Color Density Cyan Density
Magenta Density
Yellow Density
Black Density
White Density (0)
Print Color Tuning Pattern
Base Color Tuning
Fine Color Tuning
Reset Color Tuning
White Tuning
Boot Menu
Network Factory Defaults
HDD Setup
Storage Common Setup
Menu Lockout (Off)
Panel Lockout (Off)
F314
- 6 -
Printer driver functions table
Printer driver functions table
z
This section explains the white toner functions in the printer drivers.
Note
Plain and recycled under GSM 52 to 64g/m
z
white toner.
Using Windows PS Printer Driver
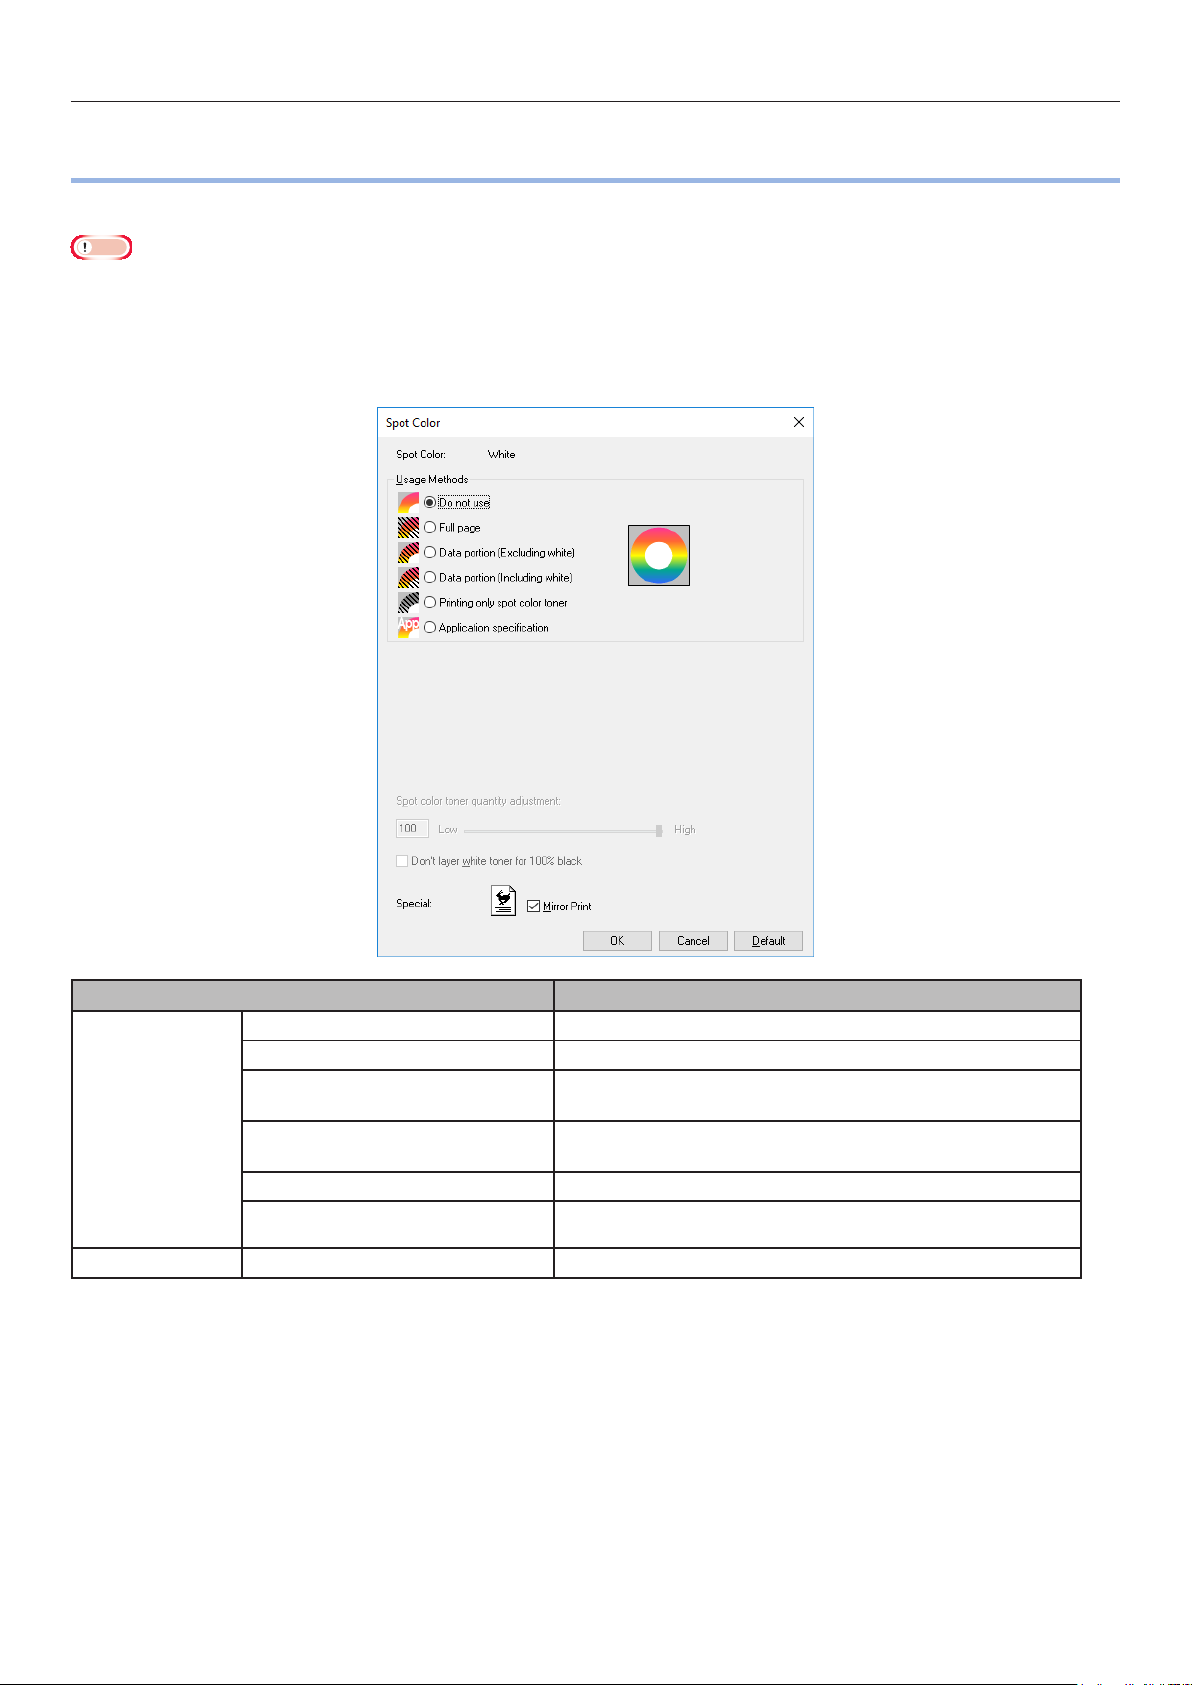
Click [Spot Color] in the [Color] tab to display the window for setting the white toner.
2
(ream weight under 45 to 55kg) are incompatible with Spot Color printing using
Item Explanation
Usage Methods Do not use Print without using white toner.
Full page Using white toner on whole printed pages.
Data portion (Excluding white) Using white toner in the data portions excluding the
white portions.
Data portion (Including white) Using white toner in the data portions including the
white portions.
Printing only spot color toner Printing using white toner only.
Application specication Applications can be used to specify white toner. This
Special Mirror Print Printing by reversing the horizontal orientation.
function is for PS printer drivers only.
- 7 -

Printer driver functions table
Using Mac OS X PS Printer Driver
Select the [Spot Color] panel to display the window for setting the Spot Color toner.
Item Explanation
Usage methods Do not use Print without using white toner.
Full page Using white toner on whole printed pages.
Data portion (Excluding white) Using white toner in the data portions excluding the
white portions.
Data portion (Including white) Using white toner in the data portions including the
white portions.
Printing only spot color toner Printing using white toner only.
Application specication Applications can be used to specify white toner. This
function is for PS printer drivers only.
Flip horizontally Printing by reversing the horizontal orientation.
- 8 -

Printing on color paper
z
Printing on color paper
Color paper that can be used
Use color paper that satises the following
conditions.
Pigments used to color the paper or ink that is
z
heat-resistant at 230ºC.
E-photo printer paper with the same paper
z
characteristics as plain paper
Printing using white toner only
Printing text and illustrations using only white
toner on color paper.
Note
Plain and recycled under GSM 52 to 64g/m
z
under 45 to 55kg) are incompatible with Spot Color.
Memo
Even if the cyan (blue), magenta (red), yellow toner
z
cartridge life has been reached, spot color printing can be
done by specifying "Print only with spot color".
(You cannot print if the black toner cartridge life is reached.)
Using Windows PS Printer Driver
Open the le to be printed.
2
(ream weight
1
Click [Page Setup] in the [File] menu.
2
Select the paper size and print
3
orientation, and click [OK].
Select [Print] in the [File] menu.
4
Click [Advanced] (or [Properties]).
5
Use [Paper Source] in the [Paper/
6
Quality] tab to select the tray to be
used.
Use [Media] to select the paper type to
7
be used, and click [Advanced].
Select suitable values from [Media
8
Weight] using the [Advanced Options]
screen, and click [OK].
- 9 -

Printing on color paper
Click [Spot Color] in the [Color] tab.
9
Select [Printing only spot color toner] in
10
[Usage Methods], and click [OK].
Using Mac OS X Printer Driver
Open the le to be printed.
1
Click [Page Setup] in the [File] menu.
2
Select the paper size and print
3
orientation using the page setup dialog
box, and click [OK].
Select [Print] in the [File] menu.
4
Use the [Source] panel to select the
5
tray to be used.
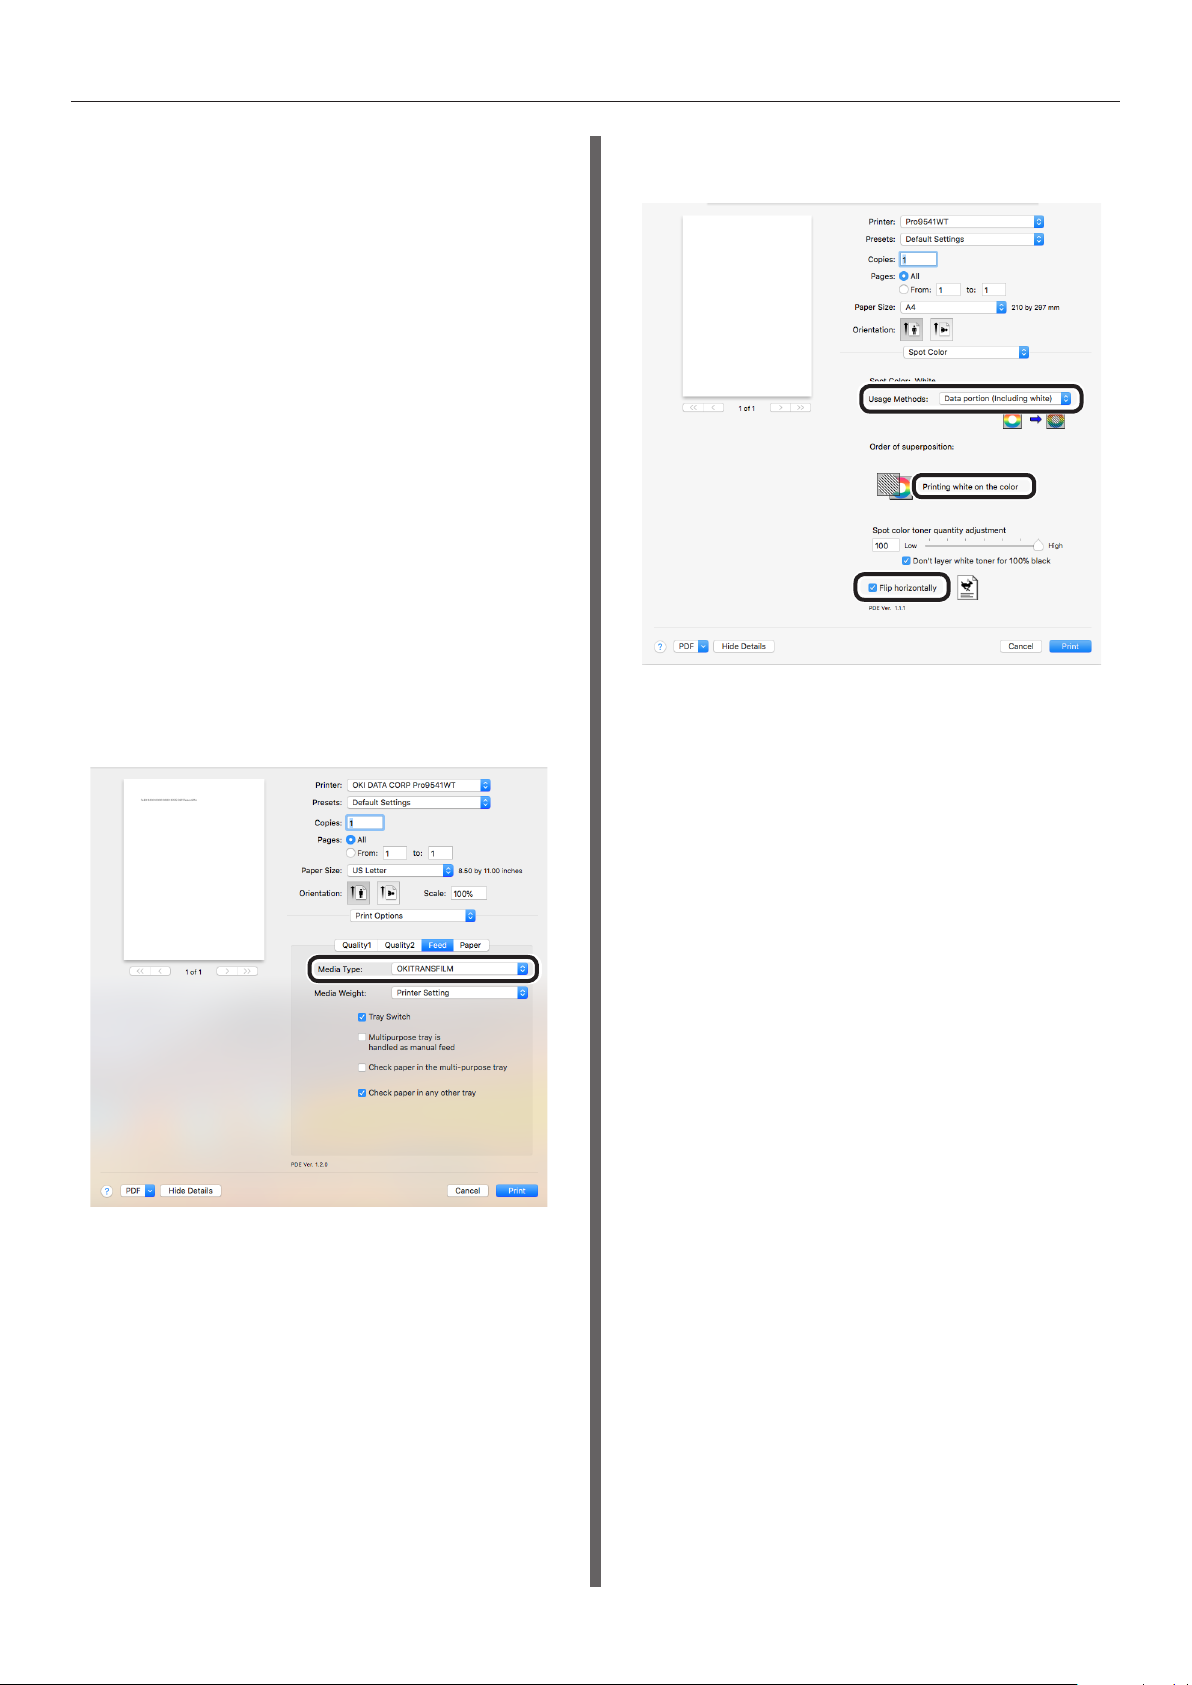
Click the [Feed] tab in the [Print
6
Options] panel, and select suitable
values using [Media Type] and [Media
Weight].
Select [Prints only spot color toner] in
7
[Usage Methods] in the [Spot Color]
panel.
Click [OK] to return to the [Print]
11
screen.
Click [Print] in the [Print] screen to
12
print.
Click [Print] to print.
8
- 10 -

Adjusting the usage amount of white toner
You can set the usage amount of white toner by the following procedure.
Memo
The density of the image printed using this function varies with the original document.
z
Printing on color paper
Using Windows PS Printer Driver
Open the le to be printed.
1
Select [Print] from the [File] menu.
2
Click [Advanced].
3
Select the [Color] tab.
4
Click the [Spot Color] button to open
5
the spot color dialog box.
Using Mac OS X
Open the le to be printed.
1
Select [Print] from the [File] menu.
2
Select the [Spot Color] panel.
3
Adjust the quantity of spot color toner.
4
If you do not want to overlap white toner
5
on parts printed with 100% black, check
[Don't layer white toner for 100% black].
Adjust the quantity of spot color toner.
6
If you do not want to overlap white toner
7
on parts printed with 100% black, check
[Don't layer white toner for 100% black].
Click [OK] to return to the [Print] screen.
8
Specify other settings as necessary, and
6
click [Print].
Memo
If advanced settings are not displayed in the print
z
dialog box, click [Show Details] on the bottom of
the screen.
- 11 -
Printing on transparent lm
Printing on transparent lm
z
Transparent lms that can
be used
Use transparent lm that satises the following
conditions.
Transparent lm used in e-photo printers or
z
dry PPC.
Film that is heat-resistant to 230ºC.
z
Paper of width 210mm min.
z
Thoroughly test the print quality and paper
z
traction beforehand, and check that there are
no impediments before use.
Note
Do not use shrink lm for soft packaging printing.
z
Light lm may have poor absorption, multiple feeding, and
z
paper jams.
Setting transparent lm in
the device
Note
Excellent clear lm cannot be set in Tray 1 or an
z
additionally provided tray (Option).
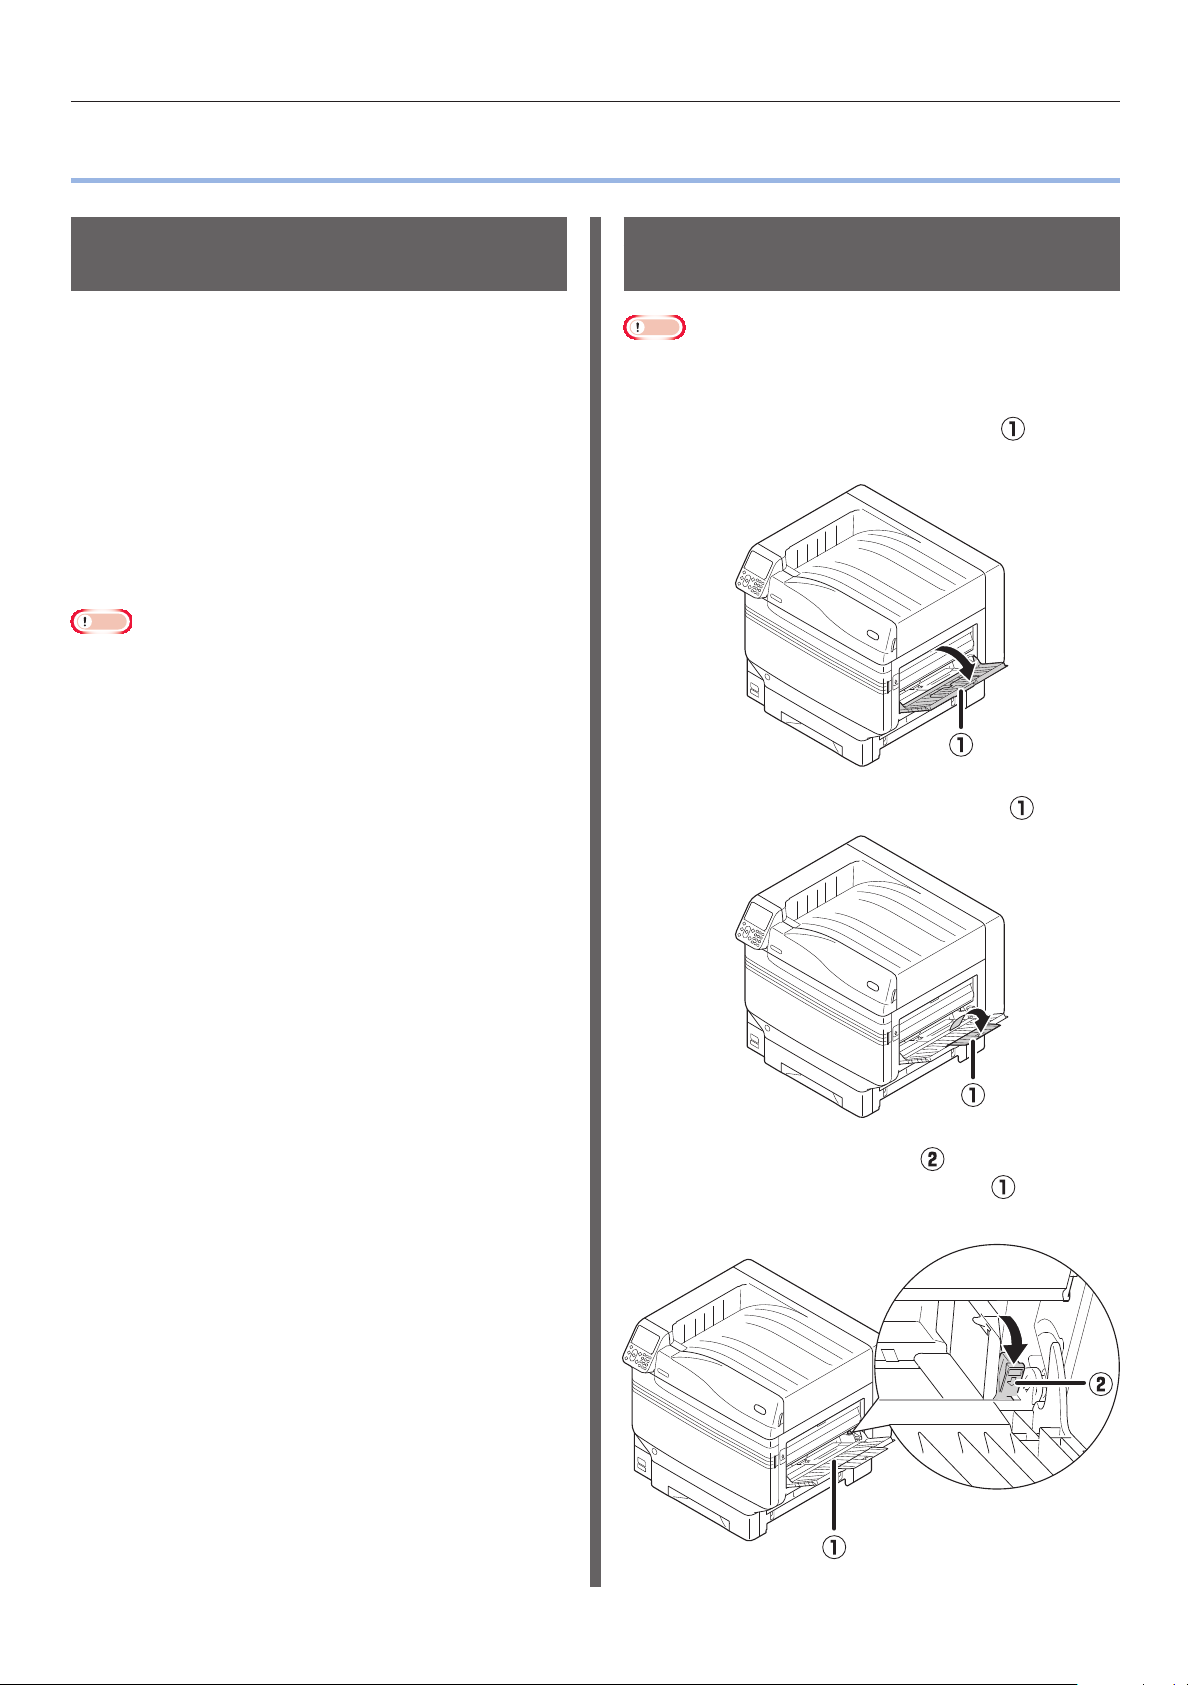
Open the multi-purpose tray ( )
1
towards you.
Open the auxiliary supporter ( ).
2
- 12 -
Pull the setting lever ( ) on the right
3
side of the paper supporter ( ) towards
you.
Printing on transparent lm
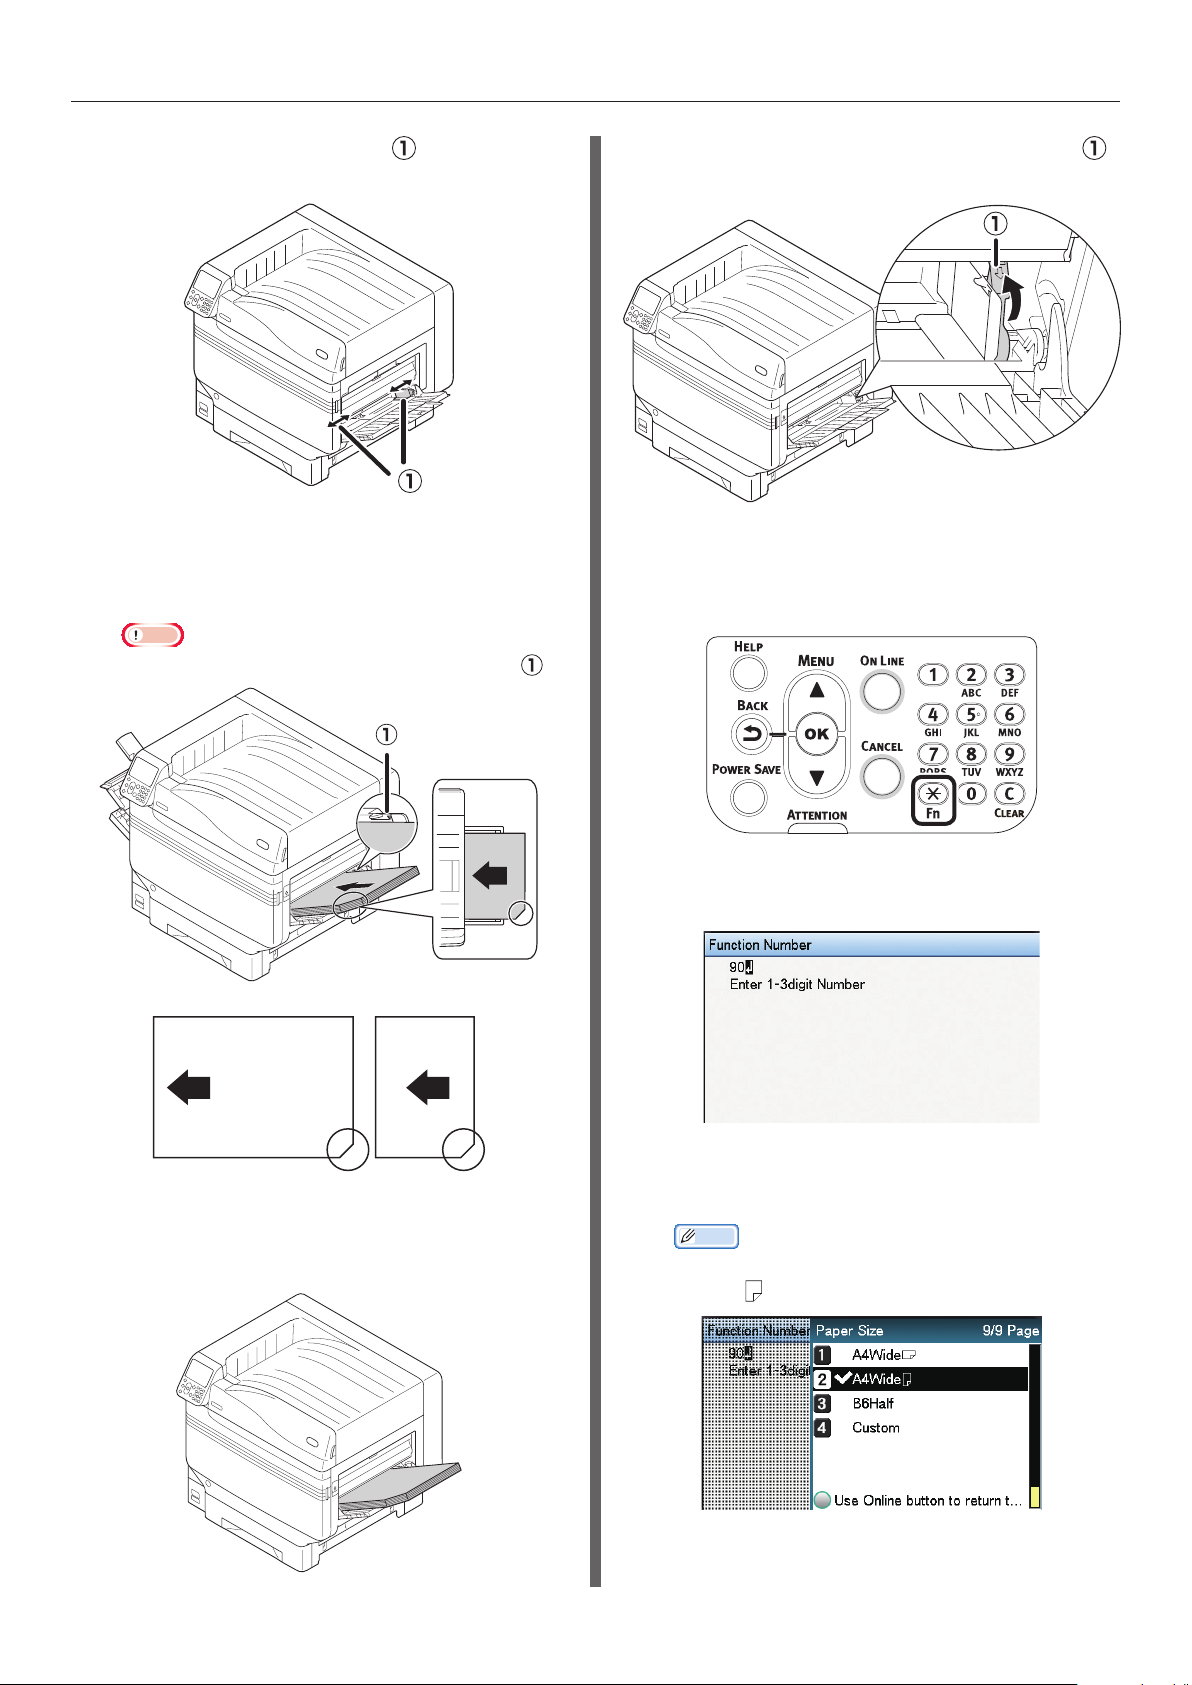
Adjust the paper guide ( ) to the width
4
of the paper that has been set.
Set the paper so the indentation mark
5
of the transparent lm is positioned as
shown in the diagram.
Note
Do not set the paper beyond the paper guide (
z
Release and return the setting lever ( )
7
to its original position.
Press the [Fn] key.
8
The numerical values input screen will
be displayed.
).
When using OKI TRANSPARENCY FILM
For A3 Nobi For A4 Nobi
Adjust the paper guide to t the width
6
of transparent lm that has been set.
Press [9] and [0], and press the [OK]
9
button.
Select the paper size, and press the
10
[OK] button.
Memo
When using an A4 Nobi transparent lm, select [A4
z
Wide
].
- 13 -

Printing on transparent lm
Check that is displayed to the left of
11
the selected paper size, and press the
[BACK] button.
Select [Media Type], and press the [OK]
12
button.
Select [OKITRANSFILM], and press the
13
[OK] button. Check that
to the left of [OKITRANSFILM].
is displayed
Preparing output destination
of transparent lms
Transparent lms will be output to the face-up
stacker.
Note
Multiple excellent transparent lms cannot be stacked in
z
the face-up stacker. Remove each printed transparent lm
after it is output, and then start the next print.
Open the face-up stacker ( ) located
1
on the left side of the device.
Press the [ONLINE] button to return to
14
the standby screen.
Open the paper supporter ( ) as
2
shown in the diagram.
Rotate the auxiliary supporter ( ) in
3
the direction of the arrow into the lock
position.
- 14 -

Printing on transparent lm
Mirror reverse printing
If printing on transparent lm, print in the order
color (CMYK) and then white, and print using
mirror reverse for correct appearance when
turned over.
Using Windows PS Printer Driver
Open the le to be printed.
1
Click [Page Setup] in the [File] menu.
2
Select the paper size and print
3
orientation, and click [OK].
Select [Print] in the [File] menu.
4
Click [Advanced] (or [Properties]).
5
Select [Stacker (Face-up)] from [Output
6
Bin] in the [Job Options] tab.
Click [Spot Color] in the [Color] tab.
9
Select [Data portion (Including white)]
10
in [Usage Methods].
For reverse printing, enable [Mirror
11
Print], and click [OK].
Select [Multi-Purpose Tray] in [Paper
7
Source] in the [Paper/Quality] tab.
Select [OKITRANSFILM] in [Media].
8
Click [OK] to return to the [Print]
12
screen.
- 15 -
Click [Print] in the [Print] screen to
13
print.
Printing on transparent lm
Using Mac OS X Printer Driver
Open the le to be printed.
1
Click [Page Setup] in the [File] menu.
2
Select the paper size and print
3
orientation using the page setup dialog
box, and click [OK].
Select [Print] in the [File] menu.
4
Select [Multipurpose Tray] in the
5
[Source] panel.
Select [Stacker (Face-up)] from [Output
6
Bin] in the [Paper] tab of the [Print
Options] panel.
Click the [Feed] tab in the [Print
7
Options] panel, and select
[OKITRANSFILM] in [Media Type].
For reverse printing, enable [Flip
9
horizontally].
Click [Print] to print.
10
Select [Data portion (Including white)]
8
in [Usage Methods] in the [Spot Color]
panel.
- 16 -

Printing by using applications to specify Spot Color toner
Printing by using applications to specify Spot
z
Color toner
Printing
Using Illustrator
This explanation uses Illustrator CS6 as an
example.
Adding Swatches
If using Spot Color (white), specify the swatches
added for the objects to be Spot Color printed.
Open the swatch panel, and select new
1
swatch.
Enter the name in [Swatch Name] as
2
shown below.
For white toner: SpotColor_White
If printing Spot Color, make the settings using
the application print dialog box.
Click [Advanced] from the menu on the
1
left of the print dialog box.
Select [Simulate] in [Overprints].
2
Select [Spot Color] in [Color Type].
3
Click [Print].
3
- 17 -

Printing by using applications to specify Spot Color toner
Using Windows
Select Windows PS printer
(1)
drivers, and click [Advanced] (or
[Properties]).
Click [Spot Color] in the [Color]
(2)
tab.
Select [Application specication] in
(3)
[Usage Methods], and click [OK].
Using Macintosh
Select the [Spot Color] panel.
(1)
Select [Application specication] in
(2)
[Usage Methods], and click [Print].
Implement printing.
(4)
Implement printing.
(3)
- 18 -

Using Photoshop
Printing by using applications to specify Spot Color toner
Printing
This explanation uses Photoshop CS6 as an
example.
Adding Spot Color Channels
If using Spot Color (white), specify the Spot
Color channels added for the objects to be Spot
Color printed.
Open the channel panel, and select a
1
new Spot Color channel.
Enter the name in [Name] as shown
2
below.
For white: SpotColor_White
Open the le that has been saved in
1
PDF format using Acrobat or Adobe
Reader.
Select [File]-[Print] to open the print
2
dialog box.
Click [Advanced].
3
Select [Color] from the menu on the
4
left of the print dialog box, and select
[Simulate overprint]. (If using Adobe
Reader, click [Advanced], and then
select [Simulate overprint].)
Click [OK] to return to the print dialog
5
box.
Saving in PDF Format
Spot Color printing directly from Photoshop
is not possible, so initially save the le in PDF
format.
- 19 -

Printing by using applications to specify Spot Color toner
Using Windows
Select Windows PS printer drivers, and click
1
[Advanced] (or [Properties]).
Click [Spot Color] in the [Color] tab.
2
Select [Application specication] in
3
[Usage Methods].
Using Macintosh
Select the [Spot Color] panel.
1
Select [Application specication] in
2
[Usage Methods].
Implement printing.
4
Implement printing.
3
- 20 -

Fine-tuning the white gradation
Fine-tuning the white gradation
z
Finely adjust the shade for each white highlight, dark, mid-tone gradation using the printer control
panel.
Memo
Displayed when using white toner.
z
This section explains the procedure for slightly
darkening the white highlights.
Press the scroll button or .
1
Select [Calibration], and press the [OK]
2
button.
For the white highlight value, specify a
5
larger value than the current set value,
and press the [OK] button. Check
is displayed to the left of the specied
value.
Memo
Increase the value to darken, and lower the value to
z
lighten.
Press the [ON LINE] button to return to
6
the standby screen.
that
Select [White Tuning], and press the
3
[OK] button.
Select [Highlight], and press the [OK]
4
button.
- 21 -

1-7-12 Toranomon, Minato-ku, Tokyo
105-8460, Japan
www.oki.com/printing/
47090702EE Rev2
 Loading...