

Page 1

PrintSuperVision
Configuration Guide
Page 2

P
REFACE
Every effort has been made to ensure that the information in this document is complete,
accurate, and up-to-date. The manufacturer assumes no responsibility for the results of
errors beyond its control. The manufacturer also cannot guarantee that changes in software
and equipment made by other manufacturers and referred to in this guide will not affect
the applicability of the inform a t ion in i t. Mention of software products manufactured by
other companies does not necessarily constitute endorsement by the manufacturer.
While all reasonable efforts have been made to make this document as accurate and helpful
as possible, we make no warranty of any kind, expressed or implied, as t o the accuracy or
completeness of the information contained herein.
07107101 iss.1 - Copyright © 2009 Oki Europe Ltd. All rights reserved.
Oki is a registered trademark of Oki Electric Industry Company, Ltd.
Oki Printing Solutions is a regis ter ed trademarks of Oki Data Corporation.
Microsoft, MS-DOS and Windows are registered trademarks of Microsoft Corporation.
Apple, Macintosh, Mac and Mac OS are registered trademarks of Apple Computer.
Other product names and brand names are registered trademarks or trademarks of their
proprietors.
Preface > 2
Page 3

C
ONTENTS
Preface . . . . . . . . . . . . . . . . . . . . . . . . . . . . . . . . . . . . . . . . . . . . . . . . . . .2
Contents . . . . . . . . . . . . . . . . . . . . . . . . . . . . . . . . . . . . . . . . . . . . . . . . . .3
Notes, cautions and warnings. . . . . . . . . . . . . . . . . . . . . . . . . . . . . . . . . .5
Introduction . . . . . . . . . . . . . . . . . . . . . . . . . . . . . . . . . . . . . . . . . . . . . . .6
New names/new editions . . . . . . . . . . . . . . . . . . . . . . . . . . . . . . . . . . . . .7
Installation . . . . . . . . . . . . . . . . . . . . . . . . . . . . . . . . . . . . . . . . . . . . . . . .8
Setup and configuration . . . . . . . . . . . . . . . . . . . . . . . . . . . . . . . . . . . . . .9
Selecting a default location/language. . . . . . . . . . . . . . . . . . . . . . . . . . . . 9
Optional easy configuration (PSV professional edition only) . . . . . . . . . . . .10
Selecting a database . . . . . . . . . . . . . . . . . . . . . . . . . . . . . . . . . . . . . . .10
Selecting a web server. . . . . . . . . . . . . . . . . . . . . . . . . . . . . . . . . . . . . .12
Assigning admin username and password . . . . . . . . . . . . . . . . . . . . . . . .12
Configuring your e-mail server for alerts . . . . . . . . . . . . . . . . . . . . . . . . .13
Registration . . . . . . . . . . . . . . . . . . . . . . . . . . . . . . . . . . . . . . . . . . . . .14
Check for security updates . . . . . . . . . . . . . . . . . . . . . . . . . . . . . . . . . . .15
Program: identifying version numbers . . . . . . . . . . . . . . . . . . . . . . . . . . .16
Getting started . . . . . . . . . . . . . . . . . . . . . . . . . . . . . . . . . . . . . . . . . . . .17
Context sensitive help . . . . . . . . . . . . . . . . . . . . . . . . . . . . . . . . . . . . . .17
User access levels . . . . . . . . . . . . . . . . . . . . . . . . . . . . . . . . . . . . . . . . .17
Adding a user/assigning individual user rights. . . . . . . . . . . . . . . . . . . . . .17
Importing a list of users. . . . . . . . . . . . . . . . . . . . . . . . . . . . . . . . . . . . .18
Creating user groups . . . . . . . . . . . . . . . . . . . . . . . . . . . . . . . . . . . . . . .18
Changing your password . . . . . . . . . . . . . . . . . . . . . . . . . . . . . . . . . . . .19
Grouping devices, adding maps and floor plans . . . . . . . . . . . . . . . . . . .20
Create or edit a group of devices. . . . . . . . . . . . . . . . . . . . . . . . . . . . . . .20
Adding a device to an existing group . . . . . . . . . . . . . . . . . . . . . . . . . . . .21
To add a device to an existing group . . . . . . . . . . . . . . . . . . . . . . . . . .21
To remove a device from an existing group . . . . . . . . . . . . . . . . . . . . .22
Adding maps and floor plans to a group. . . . . . . . . . . . . . . . . . . . . . . . . .23
Discovering devices. . . . . . . . . . . . . . . . . . . . . . . . . . . . . . . . . . . . . . . . .26
Discovery: add button . . . . . . . . . . . . . . . . . . . . . . . . . . . . . . . . . . . . . .26
Discovery: exclude button . . . . . . . . . . . . . . . . . . . . . . . . . . . . . . . . . . .28
Discovery: windows button. . . . . . . . . . . . . . . . . . . . . . . . . . . . . . . . . . .30
Discovery: schedule button . . . . . . . . . . . . . . . . . . . . . . . . . . . . . . . . . .30
Discovery: logs button. . . . . . . . . . . . . . . . . . . . . . . . . . . . . . . . . . . . . .31
Other discovery options . . . . . . . . . . . . . . . . . . . . . . . . . . . . . . . . . . . . .32
Show addresses . . . . . . . . . . . . . . . . . . . . . . . . . . . . . . . . . . . . . . . .32
Save DNS addresses . . . . . . . . . . . . . . . . . . . . . . . . . . . . . . . . . . . . .32
Start discovery . . . . . . . . . . . . . . . . . . . . . . . . . . . . . . . . . . . . . . . . .32
Configure timeouts . . . . . . . . . . . . . . . . . . . . . . . . . . . . . . . . . . . . . .32
Making discovery easier: importing IP addresses from a text file. . . . . . . . .33
Discovering network devices: professional edition: easy configuration . . . . .33
My printers. . . . . . . . . . . . . . . . . . . . . . . . . . . . . . . . . . . . . . . . . . . . . .34
Near me. . . . . . . . . . . . . . . . . . . . . . . . . . . . . . . . . . . . . . . . . . . . . . . .34
Configuring email alerts . . . . . . . . . . . . . . . . . . . . . . . . . . . . . . . . . . . . .35
Configuring email server . . . . . . . . . . . . . . . . . . . . . . . . . . . . . . . . . . . .36
Testing your email alert configuration . . . . . . . . . . . . . . . . . . . . . . . . .37
Configuring status events. . . . . . . . . . . . . . . . . . . . . . . . . . . . . . . . . . . .37
Customizing status codes. . . . . . . . . . . . . . . . . . . . . . . . . . . . . . . . . . . .39
Data collection interval . . . . . . . . . . . . . . . . . . . . . . . . . . . . . . . . . . . . . .42
Cloning . . . . . . . . . . . . . . . . . . . . . . . . . . . . . . . . . . . . . . . . . . . . . . . . . .43
Group configuration . . . . . . . . . . . . . . . . . . . . . . . . . . . . . . . . . . . . . . . .45
Contents > 3
Page 4

Configuring supplies ordering. . . . . . . . . . . . . . . . . . . . . . . . . . . . . . . . . 47
Search for a supply item . . . . . . . . . . . . . . . . . . . . . . . . . . . . . . . . . . . .47
Select printers, then items . . . . . . . . . . . . . . . . . . . . . . . . . . . . . . . . .47
Items for local printers. . . . . . . . . . . . . . . . . . . . . . . . . . . . . . . . . . . .48
All available items . . . . . . . . . . . . . . . . . . . . . . . . . . . . . . . . . . . . . . .48
Customize order . . . . . . . . . . . . . . . . . . . . . . . . . . . . . . . . . . . . . . . . . .48
Configuring the supplies list . . . . . . . . . . . . . . . . . . . . . . . . . . . . . . . . . .49
Default. . . . . . . . . . . . . . . . . . . . . . . . . . . . . . . . . . . . . . . . . . . . . . .49
Enabling/disabling on-line supplies ordering . . . . . . . . . . . . . . . . . . . . .50
Editing the supplies list . . . . . . . . . . . . . . . . . . . . . . . . . . . . . . . . . . .50
Selecting an alternative supplies list . . . . . . . . . . . . . . . . . . . . . . . . . .51
Disable ordering supplies . . . . . . . . . . . . . . . . . . . . . . . . . . . . . . . . . .51
Editing the supplies list (optional link) . . . . . . . . . . . . . . . . . . . . . . . . . . .52
Supplies ordering calendar . . . . . . . . . . . . . . . . . . . . . . . . . . . . . . . . . . .53
Reporting. . . . . . . . . . . . . . . . . . . . . . . . . . . . . . . . . . . . . . . . . . . . . . . . .54
Available reports. . . . . . . . . . . . . . . . . . . . . . . . . . . . . . . . . . . . . . . . . .54
Selecting report attributes . . . . . . . . . . . . . . . . . . . . . . . . . . . . . . . . . . .54
Toner changes report. . . . . . . . . . . . . . . . . . . . . . . . . . . . . . . . . . . . . . .55
Generating a toner changes report . . . . . . . . . . . . . . . . . . . . . . . . . . .55
Scheduling a toner changes report . . . . . . . . . . . . . . . . . . . . . . . . . . .56
Schedule log report . . . . . . . . . . . . . . . . . . . . . . . . . . . . . . . . . . . . . . . .56
Supplies usage report . . . . . . . . . . . . . . . . . . . . . . . . . . . . . . . . . . . . . .57
Printed pages report . . . . . . . . . . . . . . . . . . . . . . . . . . . . . . . . . . . . . . .58
Color/mono pages report . . . . . . . . . . . . . . . . . . . . . . . . . . . . . . . . . . . .59
Usage report. . . . . . . . . . . . . . . . . . . . . . . . . . . . . . . . . . . . . . . . . . . . .61
Exporting properties and attributes . . . . . . . . . . . . . . . . . . . . . . . . . . . . .62
Adding device attribute data. . . . . . . . . . . . . . . . . . . . . . . . . . . . . . . . . .63
Configuring a print device remotely . . . . . . . . . . . . . . . . . . . . . . . . . . . .64
Performing day to day tasks . . . . . . . . . . . . . . . . . . . . . . . . . . . . . . . . . .65
Viewing device status . . . . . . . . . . . . . . . . . . . . . . . . . . . . . . . . . . . . . .65
Quickly access a group of devices . . . . . . . . . . . . . . . . . . . . . . . . . . . . . .65
Changing the device properties displayed. . . . . . . . . . . . . . . . . . . . . . . . .66
Searching for a device . . . . . . . . . . . . . . . . . . . . . . . . . . . . . . . . . . . . . .67
Changing languages . . . . . . . . . . . . . . . . . . . . . . . . . . . . . . . . . . . . . . .67
Downloading Oki drivers . . . . . . . . . . . . . . . . . . . . . . . . . . . . . . . . . . . .68
Print to remote locations . . . . . . . . . . . . . . . . . . . . . . . . . . . . . . . . . . . .69
Creating a maintenance log / managing supplies inventory . . . . . . . . . . . .70
Creating a login log . . . . . . . . . . . . . . . . . . . . . . . . . . . . . . . . . . . . . . . .72
Clearing (deleting) logs . . . . . . . . . . . . . . . . . . . . . . . . . . . . . . . . . . . . .72
Public web services. . . . . . . . . . . . . . . . . . . . . . . . . . . . . . . . . . . . . . . . .73
Contents > 4
Page 5

N
OTES, CAUTIONS AND WARNINGS
NOTE
A note provides additional information to supplement the main text.
CAUTION!
A caution provides additional information which, if ignored, may
result in equipment malfunction or damage.
WARNING!
A warning provides additional information which, if ignored, may
result in a risk of personal injury.
Specifications subject to change without notice. All trademarks acknowledged.
Notes, cautions and warnings > 5
Page 6

I
NTRODUCTION
NOTE
This guide is written to cover all editions of PrintSuperVision and as such may
contain information about features that your edition does not support.
Example screenshots are used throughout this manual and as such some of
the features shown may not be available in your edition of PrintSuperVision.
PrintSuperVision (referred to as PSV throughout this document) is a Windows server
application designed for managing and monitoring network connected printing and copying
devices. The core application is server-based and is accessible from any browser enabled
device connected to the network. Popular browsers supported include Internet Explorer,
Mozilla and Opera.
The application is available in two editions: Professional Edition and Enterprise Edition.
The Professional Edition is a subset of the Enterprise edition and shares the s a m e m enu
structure and many of the same features. Notations will be made throughout the document
to indicate differences between the Enterprise and Professional Editions.
The only major feature in the Professional Edition that does not exist in the Enterprise
Edition is the single-user Easy Configuration option. The single user option can be installed
in a “non server configuration” on network-connected laptops and desktops.
The single-user Easy Configuration option allows users to check status of supply levels,
monitor consumable life remaining and printed page counts. The easy configuration option
is designed for very small offices and does not support the automatic delivery of device
Alerts through email.
Some of the common features of both PSV Professional and Enterprise Editions include:
> Discovers and configures devices
> Helps pinpoint devices on the network
> Assists in remote trouble shooting
> Automatically identifies device status and can email alerts
> Produces reports and automatically delivers them via email
> On-line supplies and consumable ordering (only available in the United States)
Introduction > 6
Page 7

N
EW NAMES/NEW EDITIONS
PSV Version 3.6 introduces two new editions that better support various size organizations.
> The Professional Edition is designed for small and mid-size organizations with just a
few or several hundred print/copy devices. It is generally installed on a centrally
located Windows server accessible from any browser-enabled device.
The professional edition also offers the choice to install a single-user “Easy
Configuration” option that does not require a server and can be installed on a XP or
Vista class Windows laptop or desktop that is connected to the network.
> The Enterprise Edition is designed to monitor and manage several thousand print/
copy devices within large organizations with features and functionality required by
sophisticated IT organizations.
Both editions have similar base functionality and a consistent look-and-feel. Each edit ion
supports 32 and 64-bit versions of Windows XP, Vista and Windows Server 2000/2003.
Upgrades can be easily performed from older versions of PrintSuperVision to version 3.6 or
from the Professional edition to the Enterprise Edition without loss of data.
NOTE
Upgrading from the Single-user Easy Configuration Option to the standard
Professional Edition requires re-installation.
New names/new editions > 7
Page 8
I
NSTALLATION
There are two methods to install PrintSuperVision, either:
> place the DVD in the appropriate drive and wait for it to auto-run. A standard
licensing agreement is presented.
> locate the executable file that was downloaded from the Oki website, and click on it.
A standard licensing agreement is presented.
If you agree with the license agreement click Next.
The PSV Enterprise Edition package contains the PrintSuperVision application, an optional
version of SQL Server 2005 Express Edition, an optional version of SQL Server Compact
Edition version 3.5 and the.NET 2.0 framework.
NOTE
The PSV Enterprise Edition installer will look for a compatible version of .NET
installed on the server during installation. If .NET 2.0 or higher is found, the
installer will not attempt to install the .NET framework. If an older version of
.NET is found (below version 2.0), PSV will install .NET 2.0.
The .NET Framework or SQL Compact Edition 3.5 is not included in the PSV Professional
Edition installer, both of which can be downloaded from the web.
For PSV Enterprise edition, select the desired components to install and click Next.
If the SQL modules listed in the screen above are not checked and therefore not installed,
you will still be able to use a built-in Microsoft Access database that installs automatically
with the PSV application.
PSV Professional Edition does not include SQL Server 2005 Express Edition as an optional
component.
Installation > 8
Page 9

S
ETUP AND CONFIGURATION
Immediately following installation, the PSV setup tool is launched. Follow the step by step
process to configure PrintSuperVision. Keep in mind that many of the configuration options
are also available from within the PSV application so it is not imperative to complete all
settings during the setup process.
You may also return to the PSV Setup Tool at any time. It is available from the Windows
Start menu by going to All Programs > PrintSuperVision > PrintSuperVision Setup.
NOTE
Certain changes using the PSV setup tool can only be made when the web
application and “PSV Engine” services are not running. For example, in order
to change the web server component from “embedded” to “IIS” the web
service application must not be running.
S
ELECTING A DEFAULT LOCATION/LANGUAGE
The PSV setup tool displays the location/language selection screen first.
1. Select a default location/language for all users.
2. Click Apply and Next.
Each user can later change his/her language preference from their browser. Use caution
when selecting the desired language since it is changed immediately (but will not be applied
until the user clicks Apply). If you are not familiar with the language selected, it may be
difficult to return to your native language.
NOTE
The location/language selected has an effect on enabling or disabling the OnLine supplies ordering feature in PSV. Selecting “United States” will enable the
On-Line ordering feature while selecting any other location disables the ability
to order supplies on-line from within the application. Refer to page 47.
Setup and configuration > 9
Page 10
O
PTIONAL EASY CONFIGURATION
The Features tab is not included in PSV Enterprise Edition.
After choosing a language and clicking Next you will be prompted to select the s ingle-user
“Easy” configuration or the standard server-based PSV Professional configuration located
in the Features Tab.
(PSV
PROFESSIONAL EDITION ONLY
)
Select the desired configuration and click Apply and Next.
S
ELECTING A DATABASE
The next step is to select the type of database you would like to use with Print SuperVision.
As mentioned previously, both editions of PrintSuperVision utilize a built-in Microsoft
Access database but you can choose other options as well.
If you do not wish to use the built in Acc ess database, PSV provides an option to install and
select SQL Compact Edition 3.5 (supported in the Pro version) as well as SQL Server 2005
Express edition from the Enterprise edition.
NOTE
SQL Compact Edition is not included in the PSV Professional installation. If SQL
Compact Edition is not installed on the server, PSV will prompt you to
download it from the Microsoft website.
The database section also allows you to apply the following options to a previously used
database:
> back up
> export
> erase
> copy
> trim data
1. Click the Data tab to view these options.
Setup and configuration > 10
Page 11
2. From the Setup tab, select the desired database from the dropdown menu and click
Apply.
If you already have SQL Compact Edition installed on your server, you still must go
through the following steps to “create” it.
3. After clicking Apply, you will be prompted to create a new database, Change an
existing one, or migrate your current database to a new one.
> For new PSV Installations click Create.
> To switch to an existing database without saving any data click Change.
> To create a new database and copy existing data to the new database click
Migrate.
Back at the main Database setup screen, PSV (Enterprise edition only) even allows
you to test the connection to the server by clicking the Test Connection button.
4. If “Running” appears in the Database Status box, you have successfully connected
to the desired database. Click Next to move to the next setup module.
Setup and configuration > 11
Page 12
S
ELECTING A WEB SERVER
PSV supports Microsoft IIS web server and an Embedded Web Server that is packaged with
the PSV application. It is strongly recommended to use IIS if you will be monitoring large
networks with hundreds or thousands of devices.
If IIS it is not installed on the target server/computer, it will not be vi sible in the Web Server
drop down box displayed below.
To install IIS (in XP):
1. Go to your Control Panel and select Add/Remove programs and Add/Remove
Windows components from the left sidebar.
2. Check the box associated with Internet Information Services and click Next.
When IIS is selected from the dropdown menu, an Authentication option displays. If you
select Integrated Windows Authentication from the dropdown list, PSV will automatically
use your Windows login domain name to log an admin into PSV.
Embedded Web Server:
As an alternative to using the IIS web server, you may select the embedded web server
that is included with PSV. The embedded server provides the same functionality as IIS but
performance can be affected when using it in large network installations.
NOTE
A TCP Port number must be selected that does not conflict with the TCP port
number used by other tools or protocols running on the same computer/
server. Add appropriate port number and click Next.
A
SSIGNING ADMIN USERNAME AND PASSWORD
New versions of PSV come with a single user account called “Ad min” which has all
Administrator Access rights. Enter a new Username and Password for the global
Administrator.
The Global Administrator can later add other administrators or standard users from within
the application.
Setup and configuration > 12
Page 13
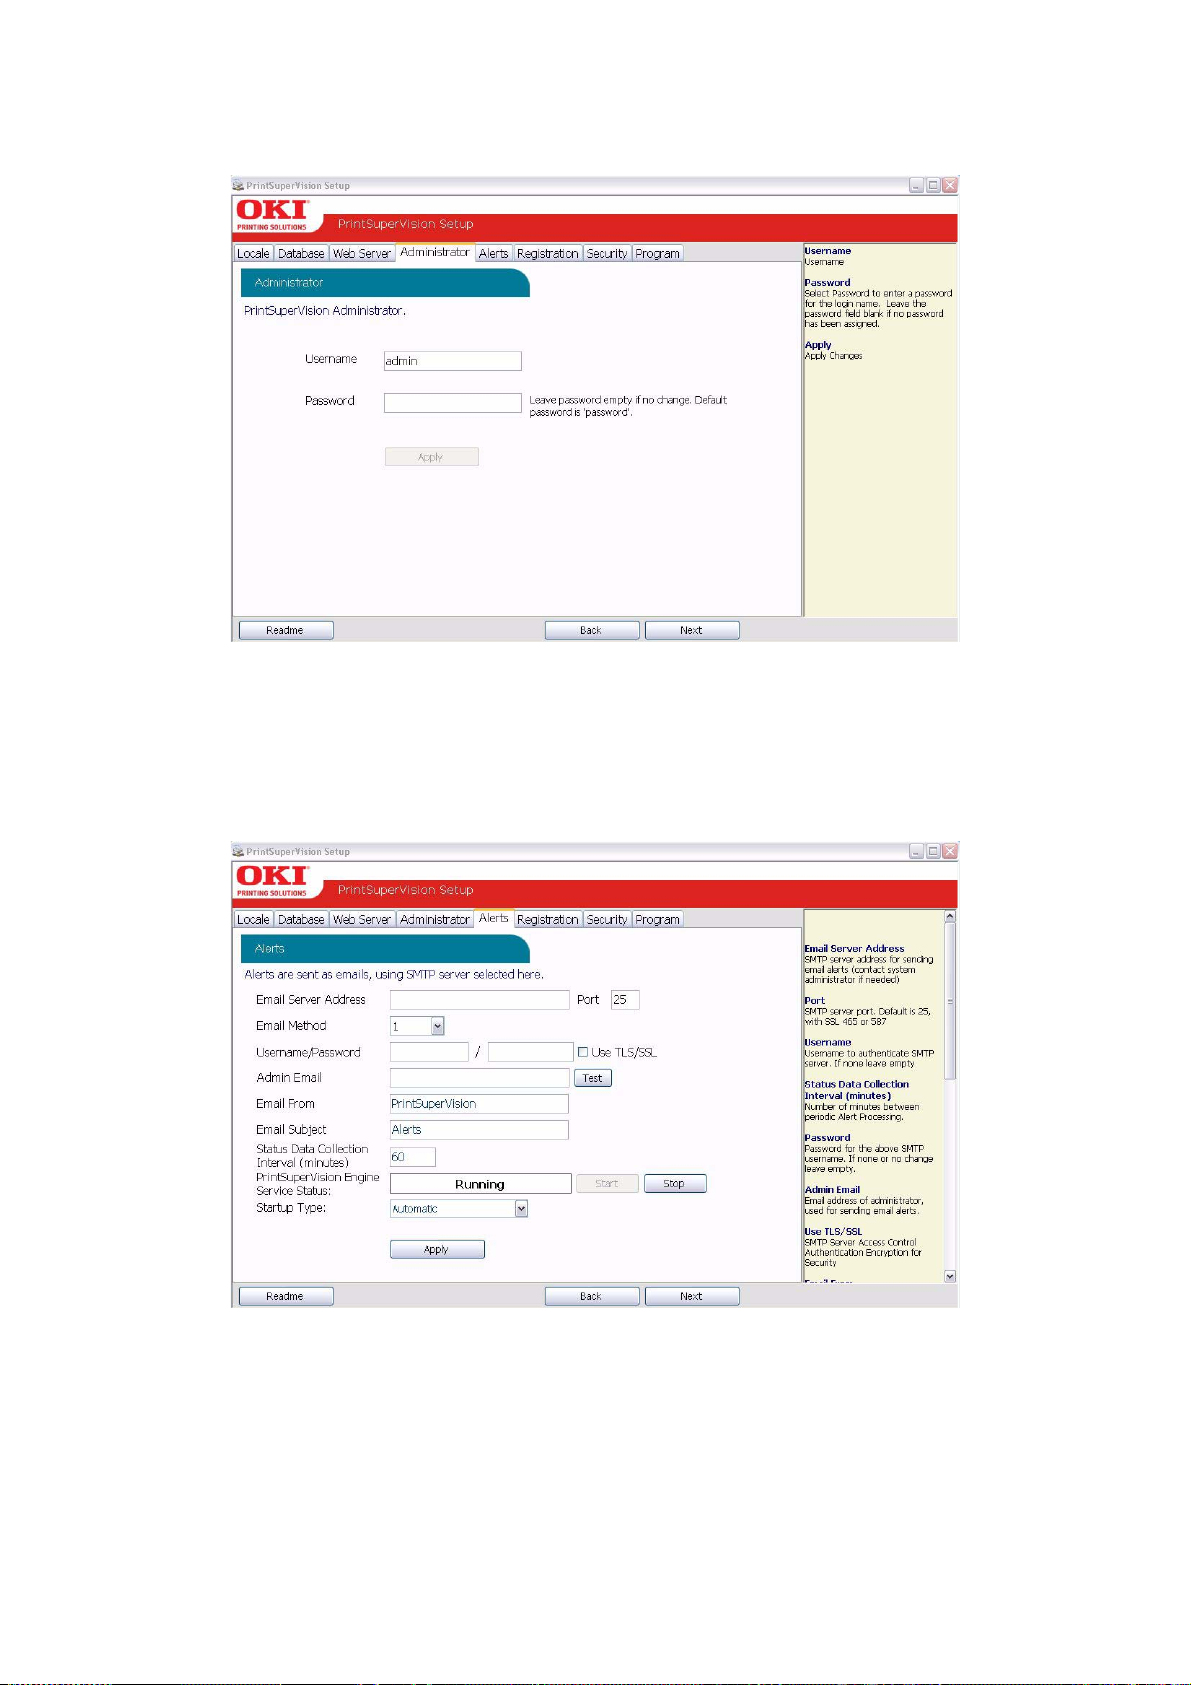
1. Click Apply after a new username and password have been created.
2. Click Next to go on to the next setup module.
C
ONFIGURING YOUR E-MAIL SERVER FOR ALERTS
In order for PSV to send out device related alerts via email, you must first enter the
necessary information such as the address of your email server, username, password, the
email address of the recipient, etc.
1. Enter the desired Email Server Address and SMTP server port (default port number
is 25 and 456 or 587 if using SSL/TLS).
2. Select the appropriate email sending method. PSV provides 4 methods that define
how the email message is sent:
> Method 1 - This is the Default setting. It uses a SMTP library from IP Works
> Method 2 - Permits streaming. Emails are sent without buffering once the
connection is established
Setup and configuration > 13
Page 14
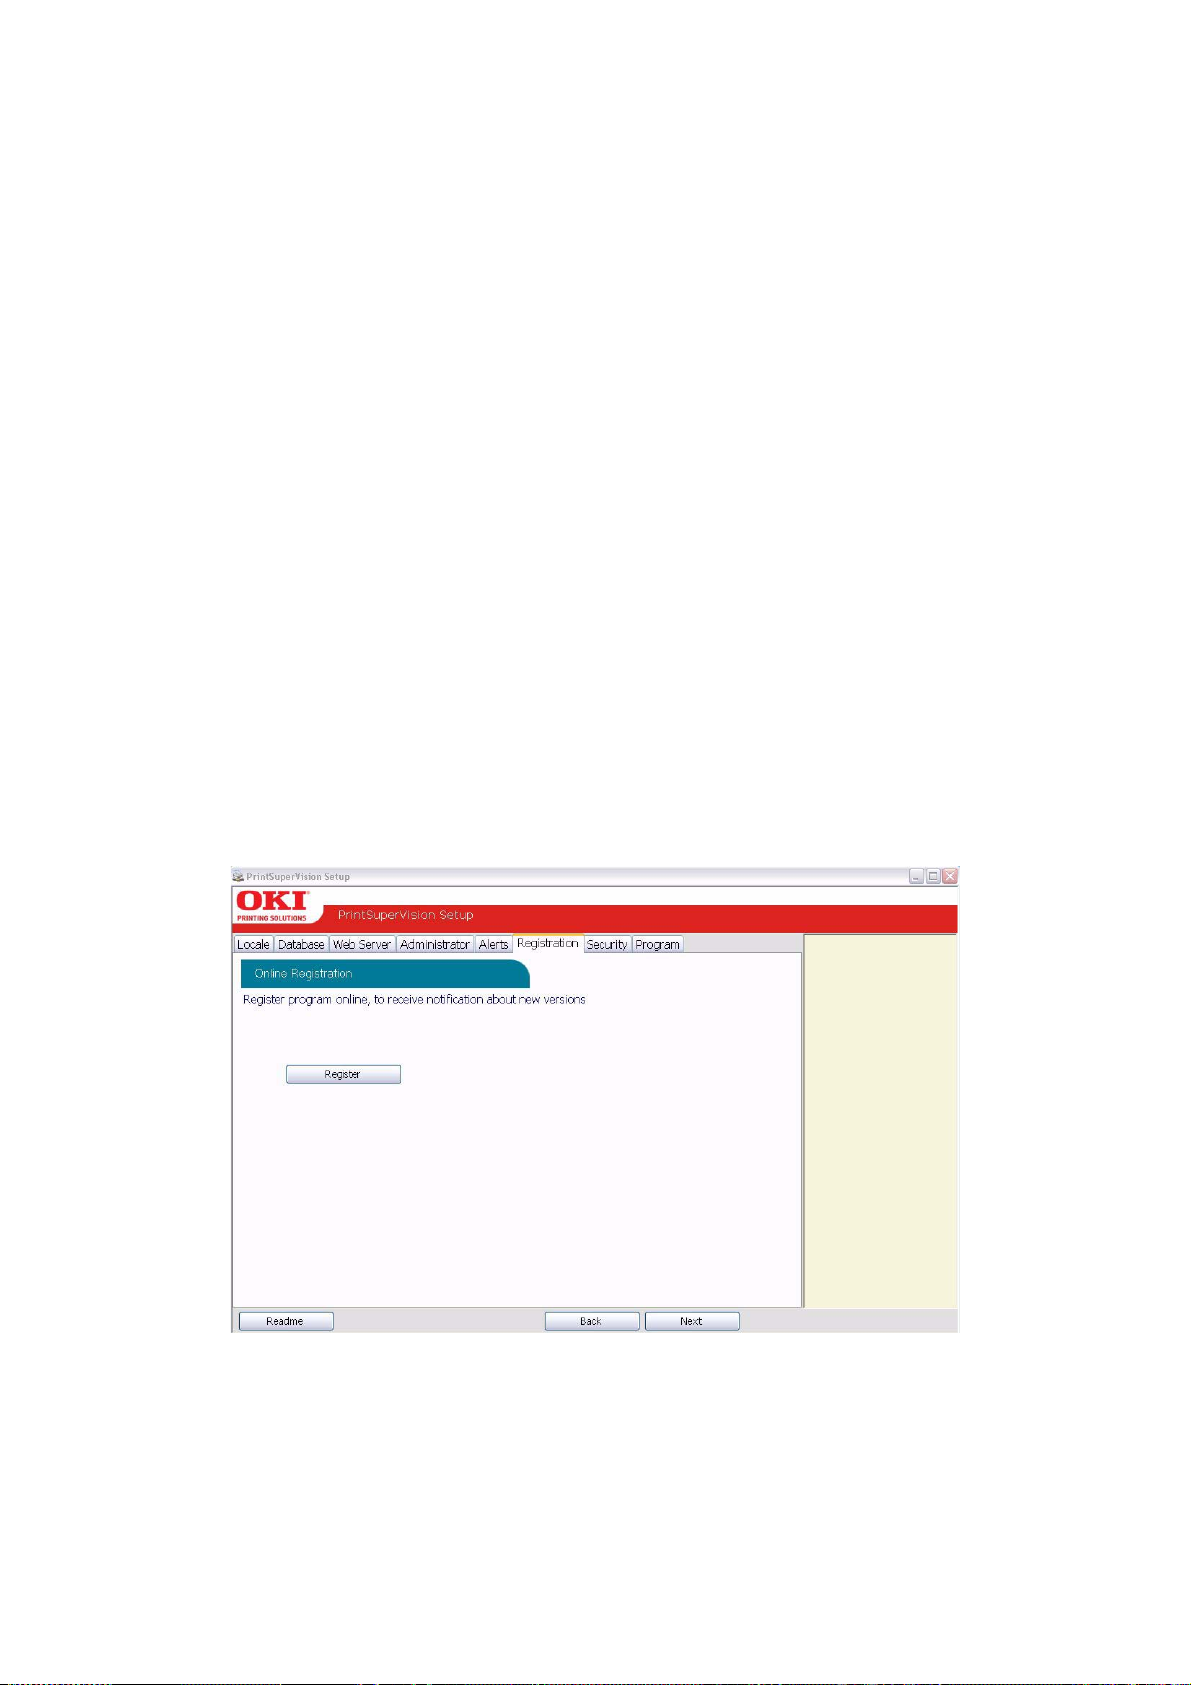
> Method 3 - Uses Webmail library from .NET 1.1
> Method 4 - Content of email is saved as a file attached to an email message
Method 1 is recommended, but you may try methods 2, 3 and 4 if emails are not
successfully sent using the default setting.
3. If your email server requires authentication, indicate the appropriate username and
password in the fields provided. Click the TLS/SSL checkbox if your organization
uses these communication protocols.
4. Enter the email address of the recipient in the Admin Email field.
5. PSV allows you customize the header and subject line of the email message. Add the
word PrintSuperVision to the Email From field and add the word Alerts to the
Email Subject field.
6. Indicate the interval time (in minutes) for PSV to wait to obtain device status. Set to
a larger number if network traffic is a concern. Set to a smaller number if you would
like more frequent updates reported from your print/copy devices.
The admin can start and stop the PrintSuperVision Service from the set up menu and
select whether the PSV Services should start automatically, manually or are disabled.
7. Test the email connection by clicking the Test button. PSV will attempt to send an
email to the account you specified.
8. If an email is received successfully, click Apply to save your settings.
9. Click Next to go to the next setup module.
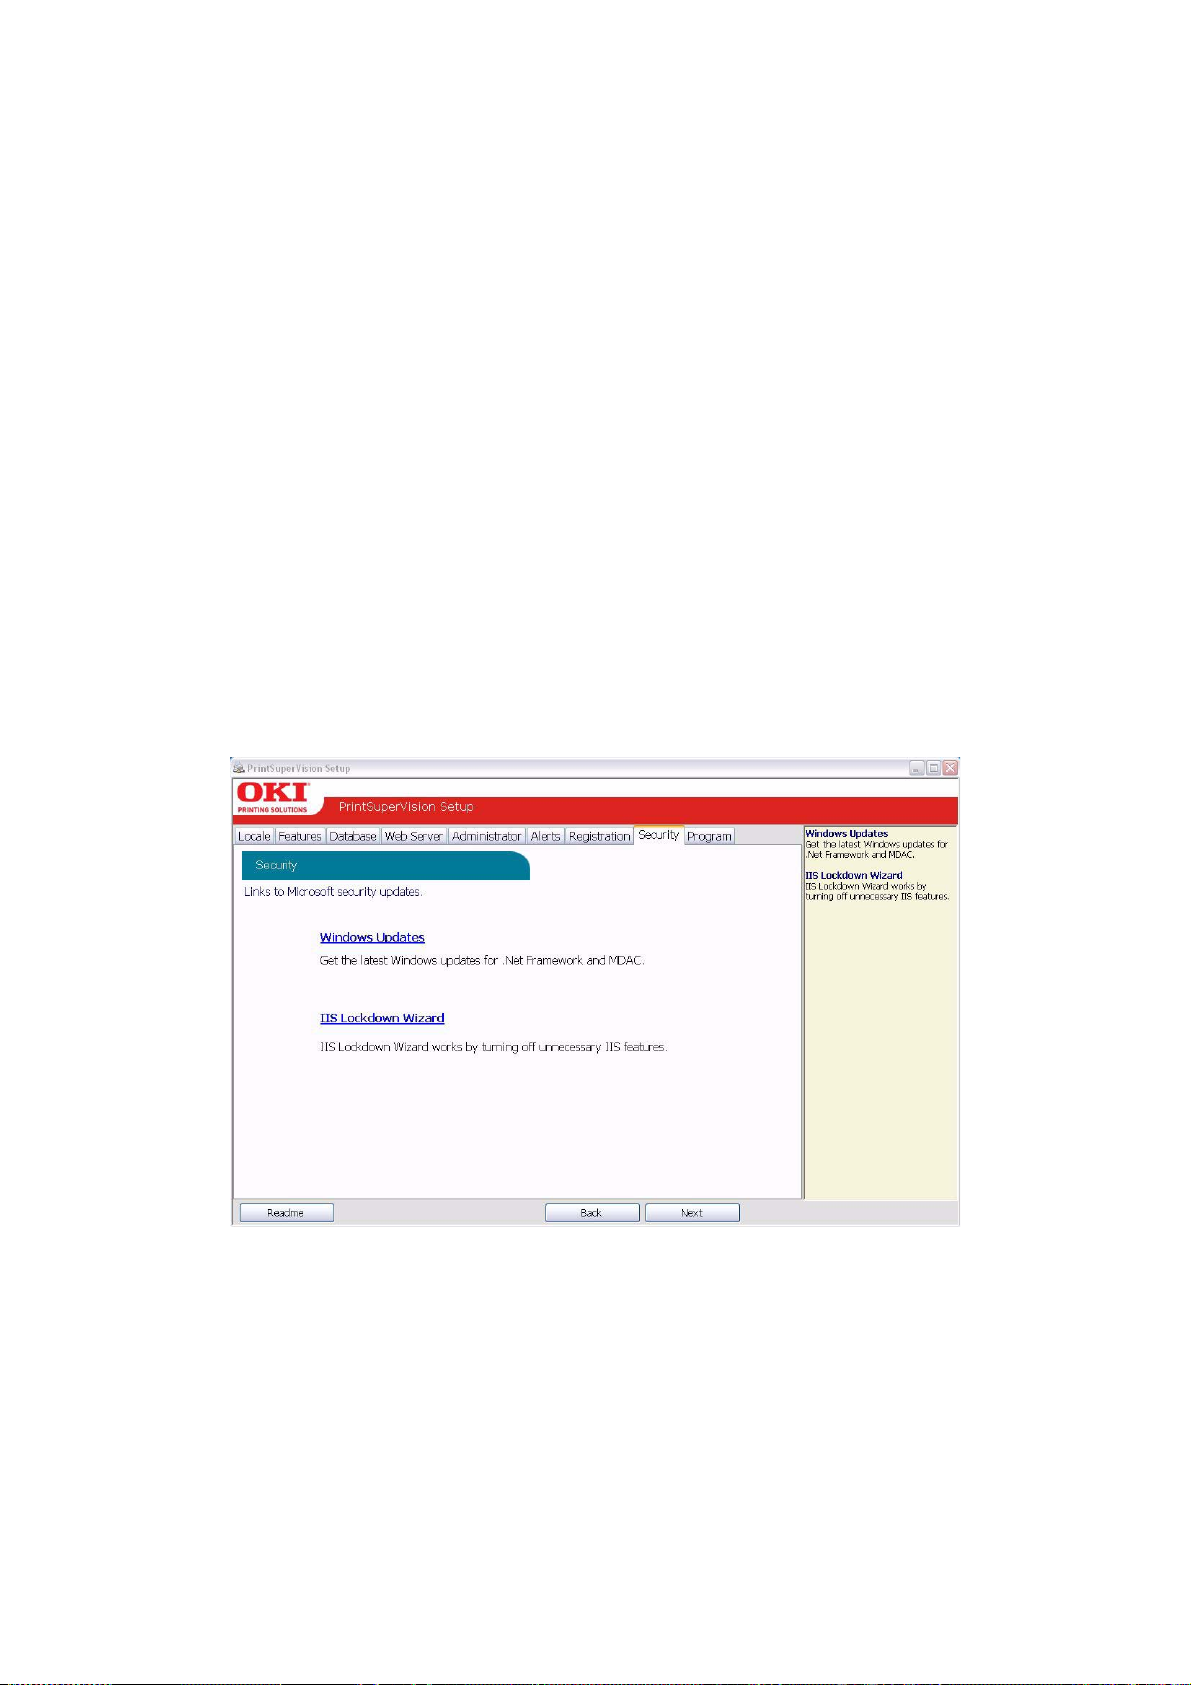
R
EGISTRATION
You can register your new PrintSuperVision software with Oki Europe or Oki Americas by
clicking the Register button.
Registering your name and email address with Oki Printing Solutions will help us keep you
informed of new product releases and PSV related information. All registration information
supplied is kept in strict confidence.
1. Select the appropriate language/location to register.
> Use the European locations if you are located in Europe.
> Use the Americas locations if you are located in North or South America.
Setup and configuration > 14
Page 15
2. Enter all user information including your email address.
3. Click Save.
A validation email will be sent to the email address indicated.
4. Click the validation link in the email message when you receive it and your
information will be registered.
5. Close the browser to return to the PSV Setup.
6. Click Next to go on to the next setup module.
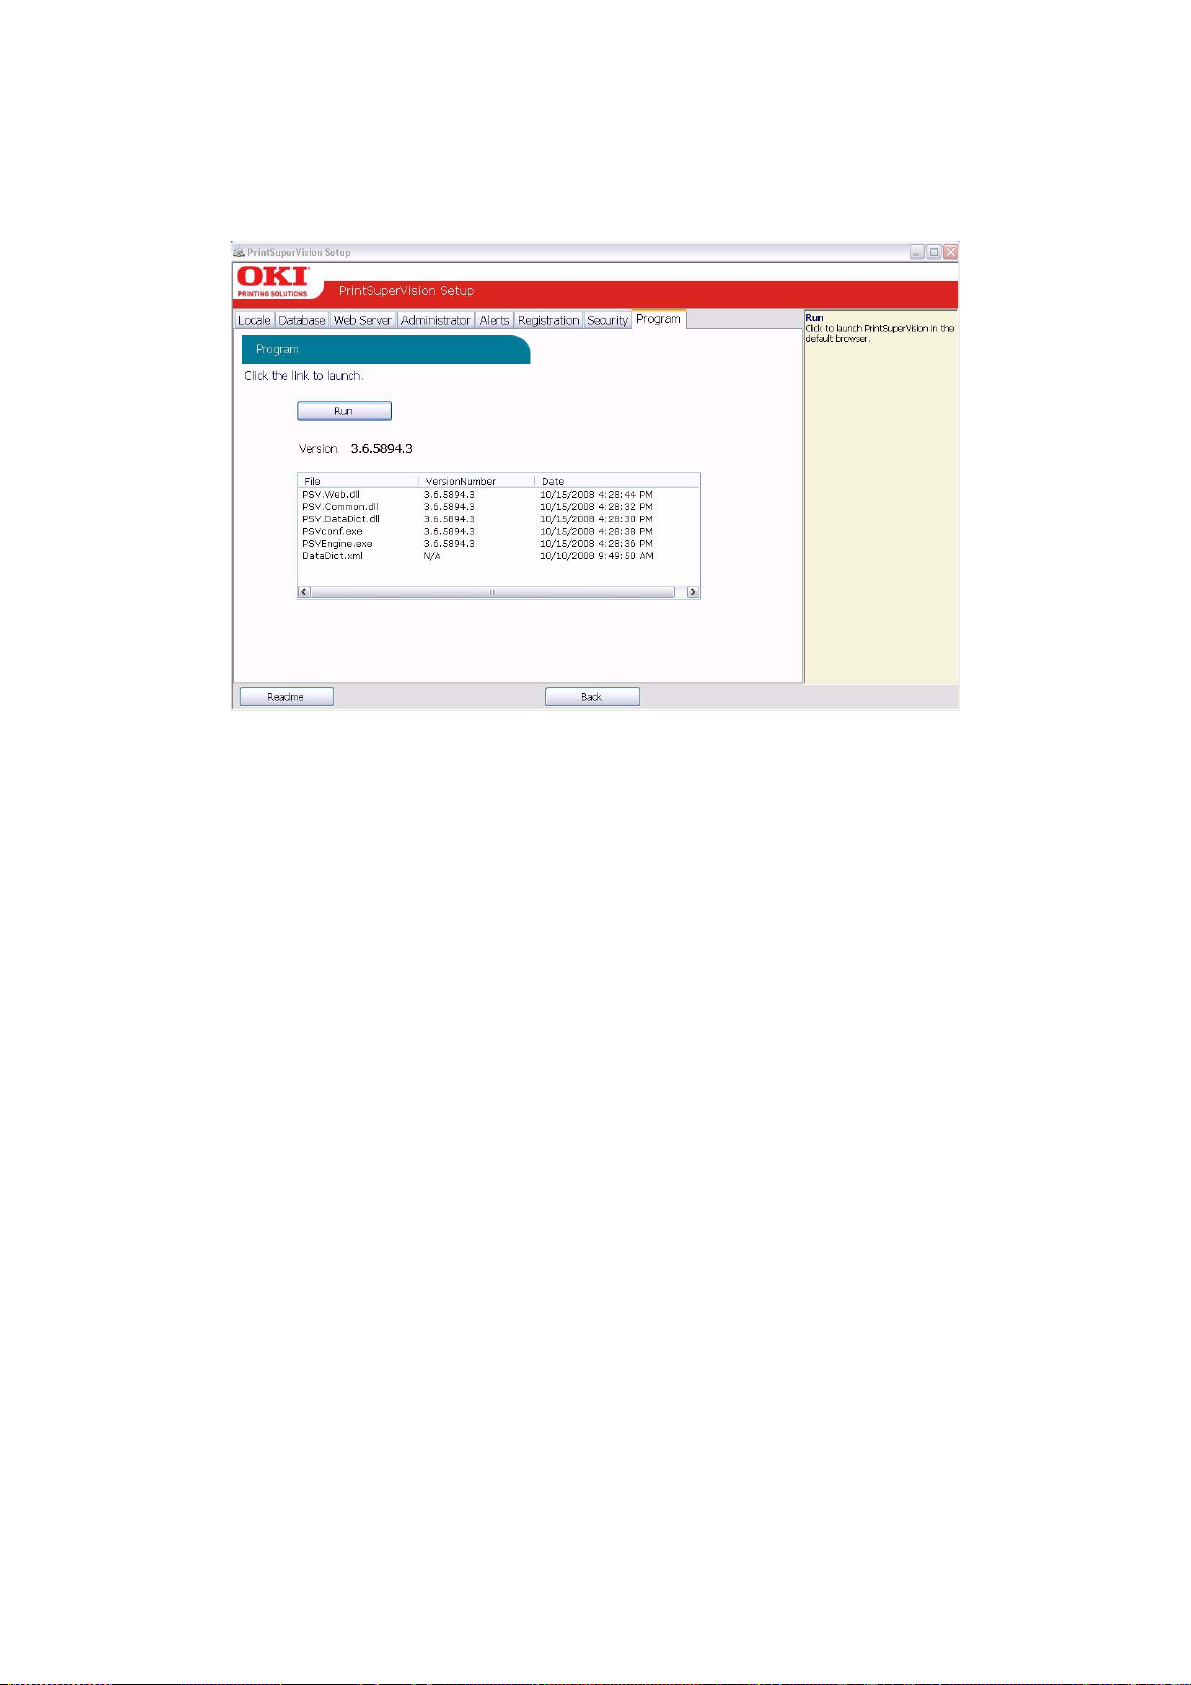
C
HECK FOR SECURITY UPDATES
PSV provides links to check for Microsoft security updates before completing the setup
process.
1. Click on the Windows Updates Link to go to:
http://update.microsoft.com/microsoftupdate/v6/default.aspx?ln=en-us
Or
Click the IIS Lockdown Wizard link to go to:
http://www.microsoft.com/downloads/details.aspx?FamilyID=dde9efc0-bb30-47eb9a61-fd755d23cdec&displaylang=en
The IIS Lockdown Wizard assists in turning off unnecessary features, thus reducing
attack surface available to attackers.
2. Click Next to go to the next setup module.
Setup and configuration > 15
Page 16
P
ROGRAM: IDENTIFYING VERSION NUMBERS
The Program tab is provided as a means to quickly identify the version numbers of each
major component in PrintSuperVision.
Click Run to complete the setup process and begin using the PSV application.
Setup and configuration > 16
Page 17
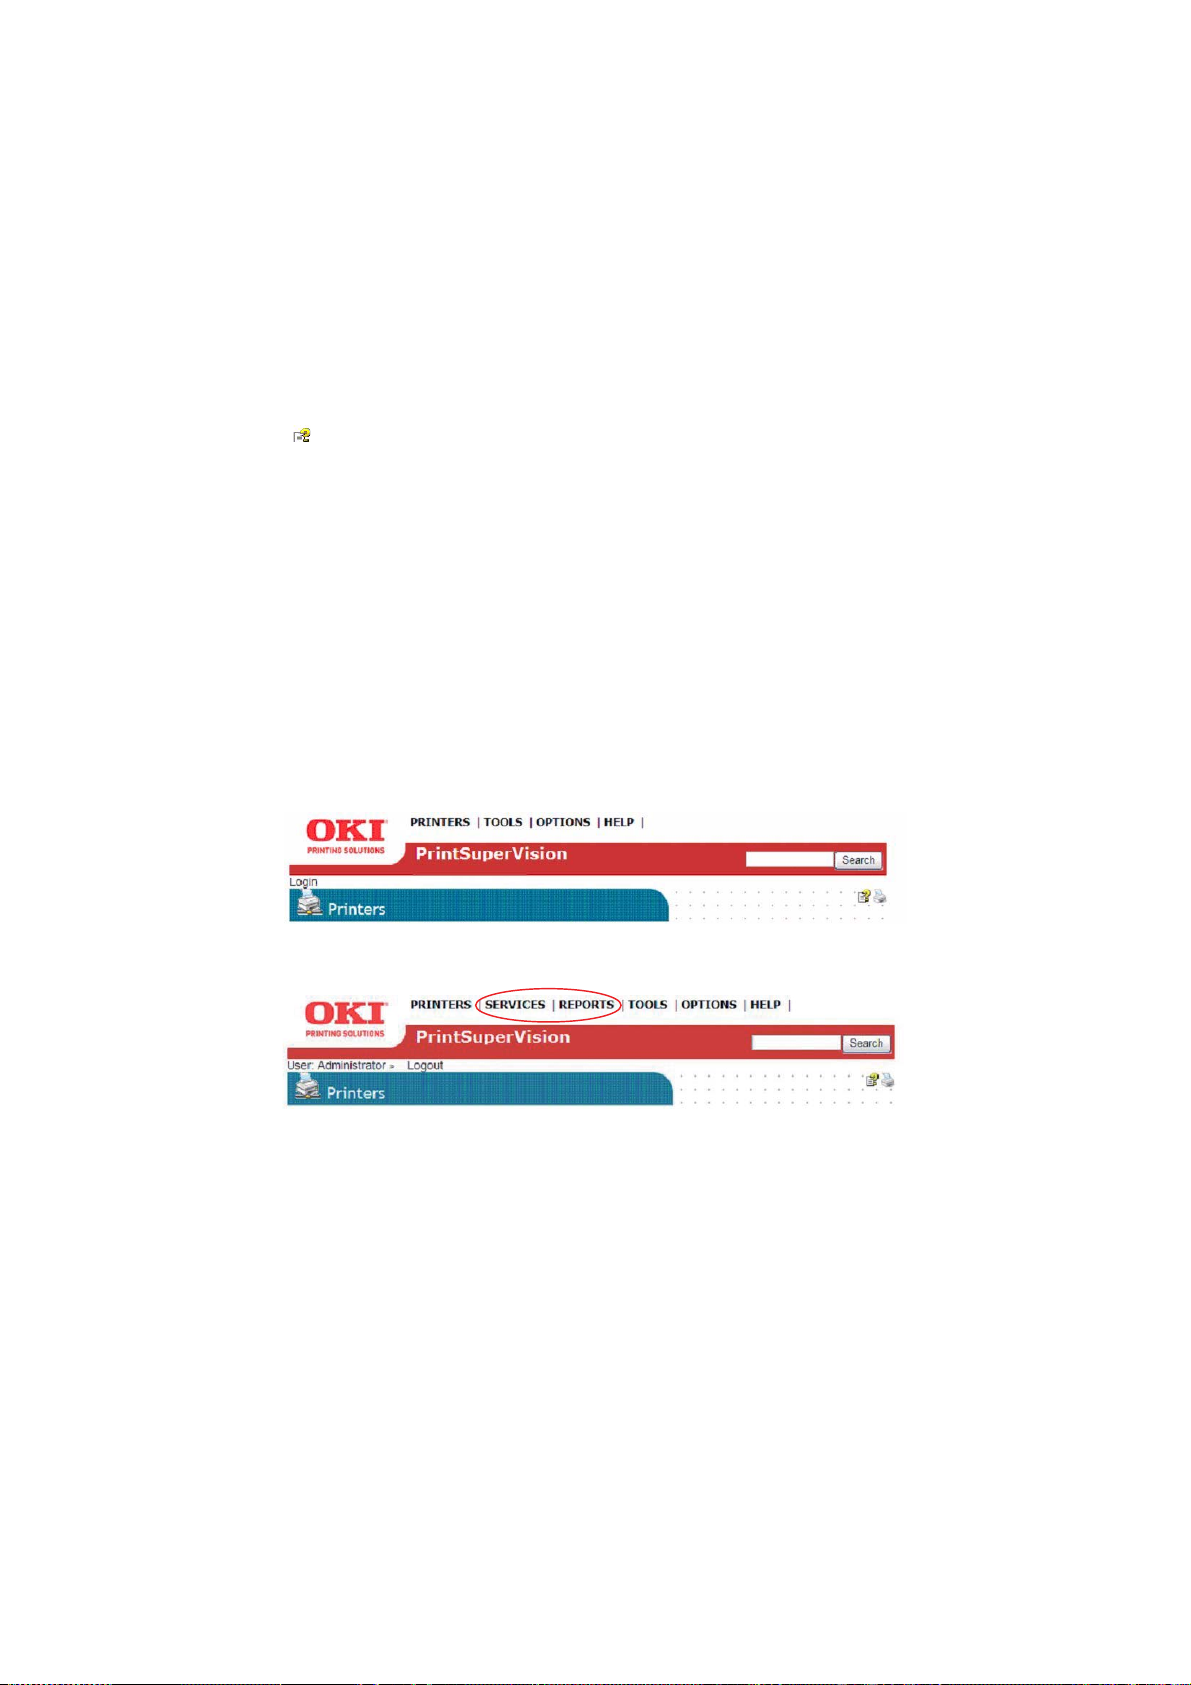
G
ETTING STARTED
Now that you have installed and configured PrintSuperVision, use any browser-enabled
computer or device connected to your network to access the PSV application.
Open your browser and type the IP address of the PSV server.
If you are the Global Administrator or have Admin rights, click Login, and type your user
name and password.
C
ONTEXT SENSITIVE HELP
Throughout the PrintSuperVision application, help is just a clic k away. For context sensitive
help, click the icon located in the upper right hand corner (next to the printer icon) on
every page.
U
SER ACCESS LEVELS
One of the first things to decide is the level of access rights to assign to each user. There
are 3 ways a user can access the PSV application from any browser:
> Without Logging into PSV.
> Logging in as a User.
> Logging in as an Administrator.
Be aware that certain menu options are only available to users with Admin rights that have
logged into PSV. See example below:
User is not logged in
User is logged in as an Administra t o r
If a user does not log in, the two areas that are not accessible are Reports and Services
and the following functionality will not be available:
> Cannot view, add, or configure Alerts.
> Cannot generate any type of report or configure email sending.
A
DDING A USER/ASSIGNING INDIVIDUAL USER RIGHTS
To add an individual user to the system:
1. Select Options from the main menu.
2. Click Users from the drop down box.
3. Click the Add User button and fill in the user's information. Make sure that you
include a password that contains at least 6 digits.
Getting started > 17
Page 18

4. Before clicking Save, assign the appropriate user rights by:
Selecting Administrator from the Add to Group drop down box.
Or
Leave blank For Standard User rights.
5. Click Save.
A list of users will be displayed. Notice that individuals with Admin rights are displayed
with a red line under the icon while those with Standard User rights are displayed with
a blue line under the icon.
NOTE
User attributes can be changed at any time by clicking the icon in the Edit
column and entering new information.
I
MPORTING A LIST OF USERS
It may also be helpful to take advantage of the Import Users feature to save time. You
can import users into the application from a text file using a comma separated format. The
fields available for data import are the same fields listed in the Add User section.
Fields cannot be left empty with the exception of Password. If password s are not supplied
in the text file, PSV will set i t to the word “password” by default.
1. Click Options > Users and select the Import Users button.
2. Select the Import Users button.
3. Specify the text file location or click Browse to locate the file.
4. Click the Import Users button.
PSV will add users one by one into the application. When complete, the number of
users imported successfully will be displayed as well as details of any errors that may
have occurred.
C
REATING USER GROUPS
In large organizations it may be helpful to organize users into groups based on admin
status, user status or by any number of criteria.
To create a group of users:
1. Click your browser's back button or select Options from the main menu.
2. Select User from the drop down box.
3. Click the User Groups button.
4. Click the Add User Group button.
5. Enter a name for the user group.
6. Click Save.
A list of groups will be displayed.
You will notice that the new group name is automatically added to the Add to Group drop
down menu when adding an individual user.
For convenience, the All Users button has been provided in the User Groups area to help
identify if an individual has been assigned to a group.
Getting started > 18
Page 19

C
HANGING YOUR PASSWORD
To change your password:
1. Select Options from the main menu.
2. Click Change Password.
3. Enter your current password, your new password and confirm the new password by
typing it again.
4. Click Change to save new password.
NOTE
Default User name and password is: admin, password.
Getting started > 19
Page 20
G
ROUPING DEVICES, ADDING MAPS AND FLOOR PLANS
Before discovering the devices on your network, it may be beneficial to create groups in
order to monitor and manage them in an efficient manner.
> A group can have attributes assigned to it such as location, contact person, SNMP
community and even images of maps and floor plans which are used to quickly
locate individual devices.
> Groups can be arranged in a hierarchy where a “parent group” can contain sub
groups. A device can also be a member of more than one group.
> Yo u ca n assign a subnet or a range of IP addresses (for discovery purposes) to a
group, and as an added convenience, a link to the discovery screen is provided when
groups are displayed.
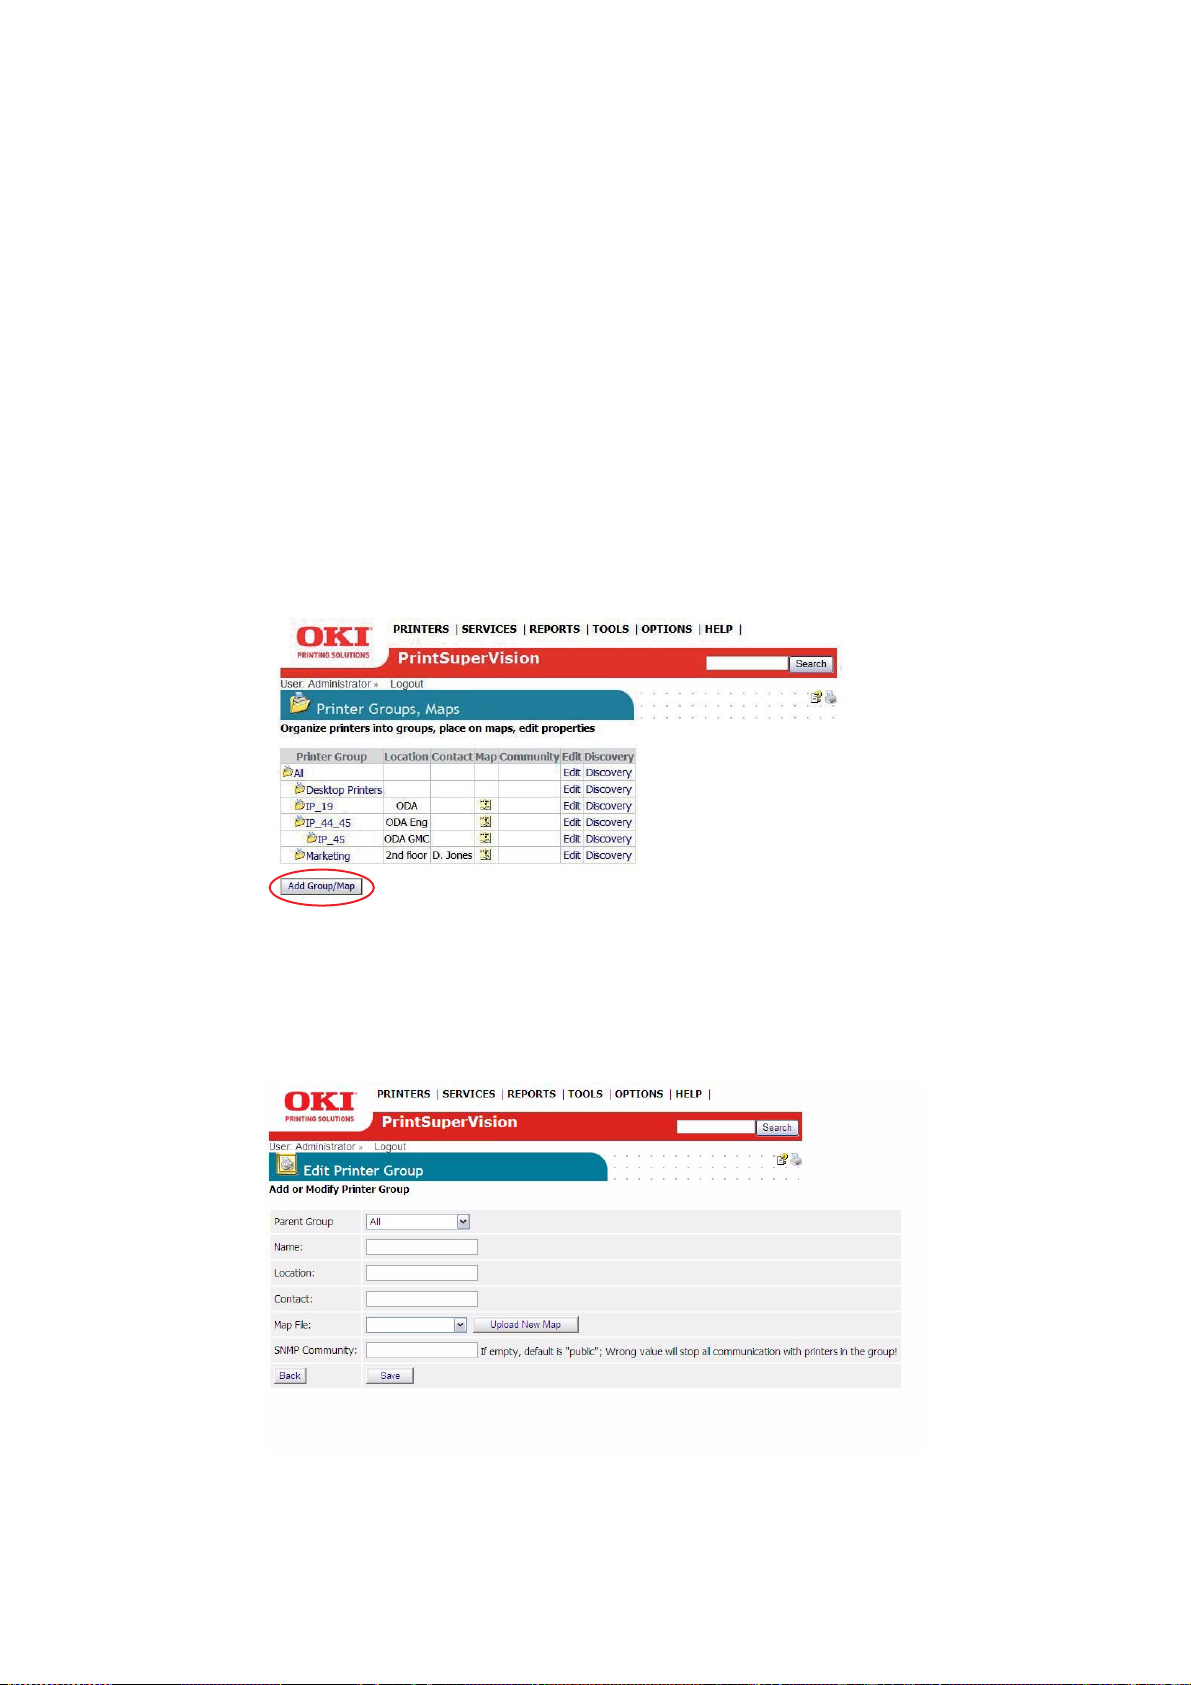
C
REATE OR EDIT A GROUP OF DEVICES
1. Click Printers from the main menu and Printer Groups,Maps from the drop down
menu to view a list of groups already created.
2. Click the Add Group/Map button to create a new group of devices.
3. Assign a Parent group, a group name, location, contact person responsible for the
group, a map or floor plan and the SNMP community.
See “Adding maps and floor plans to a group” on page 23 for more information on
assigning maps and floor plans to a group.
Grouping devices, adding maps and floor plans > 20
Page 21
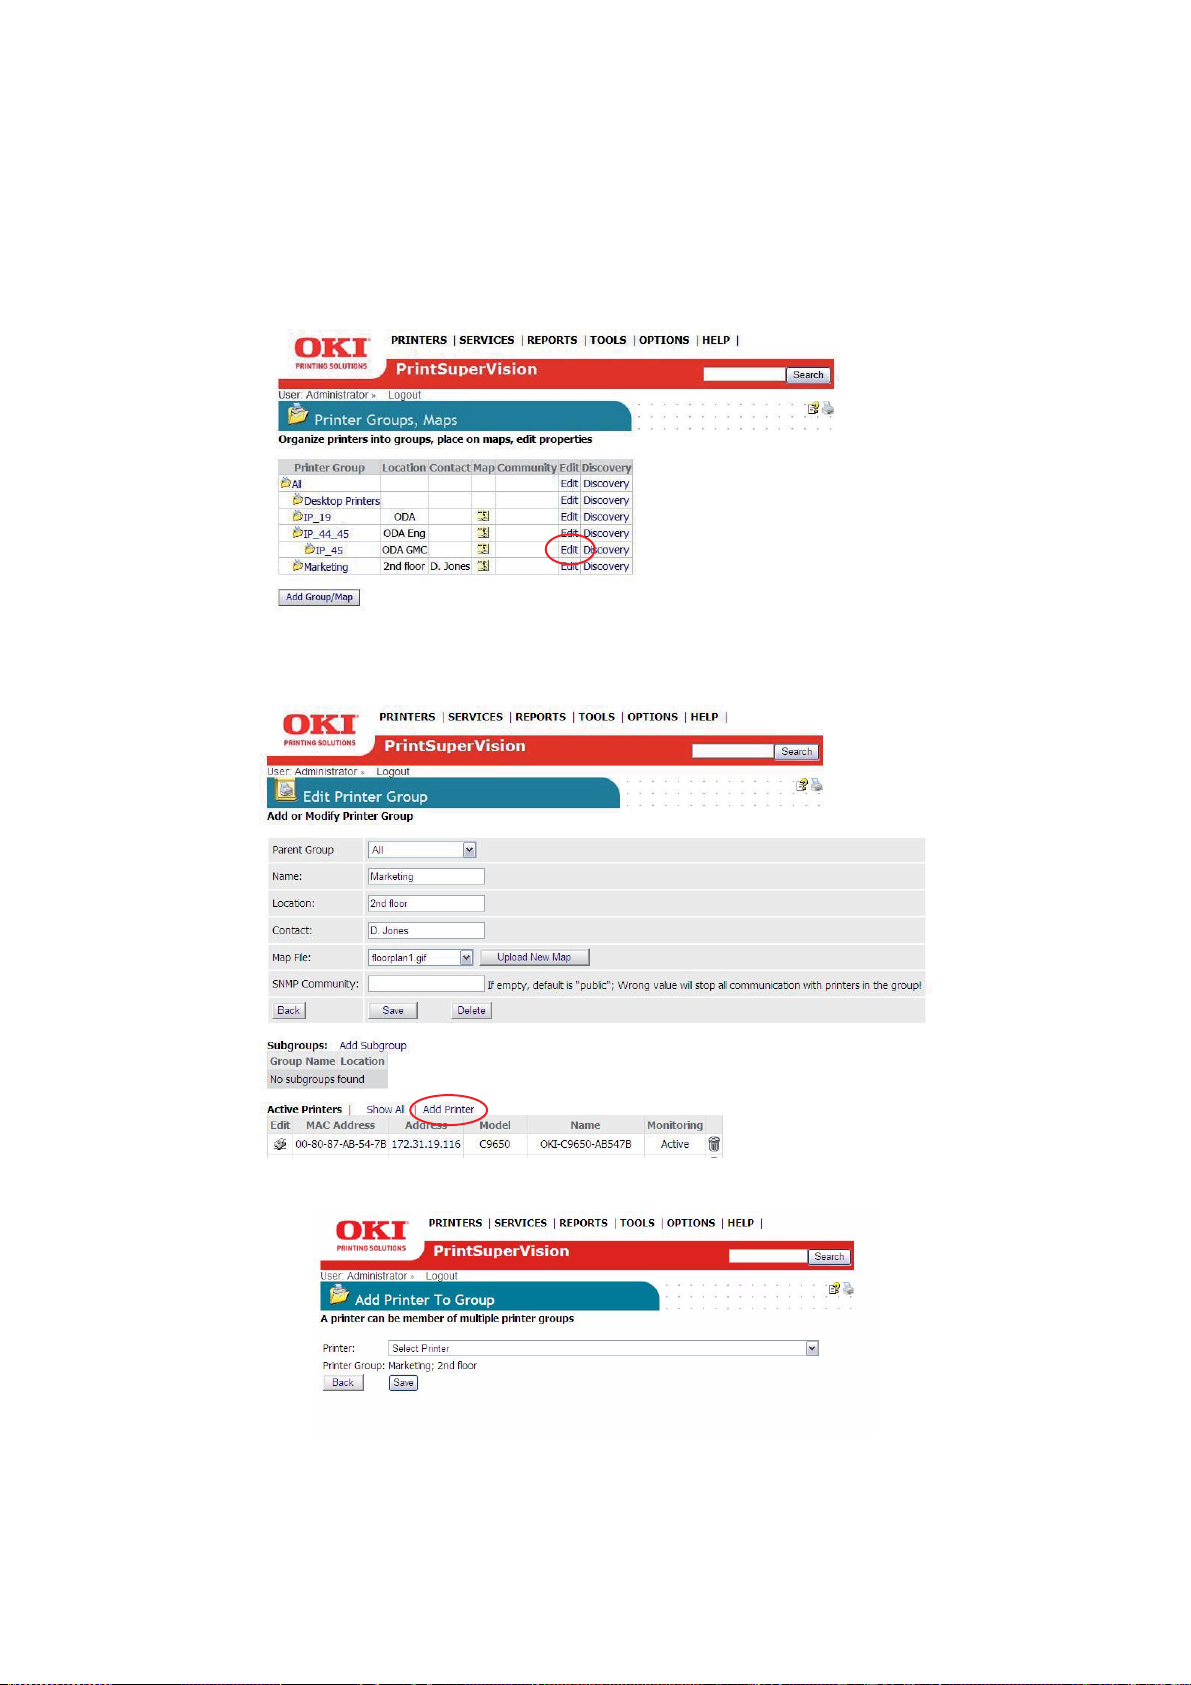
A
DDING A DEVICE TO AN EXISTING GROUP
TO
ADD A DEVICE TO AN EXISTING GROUP
1. Click Printers from the main menu and Printer Groups, Maps from the drop down
menu to view a list of groups already created.
2. Click Edit in the Edit Column.
3. Click Add Printer.
4. Select the appropriate device from the Printer drop down menu and click Save.
If the group was initially empty, you will see the added device listed after saving. If the
group already contained devices you will see an updated list of all devices in that group.
Grouping devices, adding maps and floor plans > 21
Page 22

TO
REMOVE A DEVICE FROM AN EXISTING GROUP
1. Click Printers from the main menu and Printer Groups , Maps from the drop down
menu to view a list of groups already created.
2. Click Edit in the Edit Column.
3. Click the Trash Can icon from the list of grouped devices displayed on the Edit
Printer Group screen.
Grouping devices, adding maps and floor plans > 22
Page 23
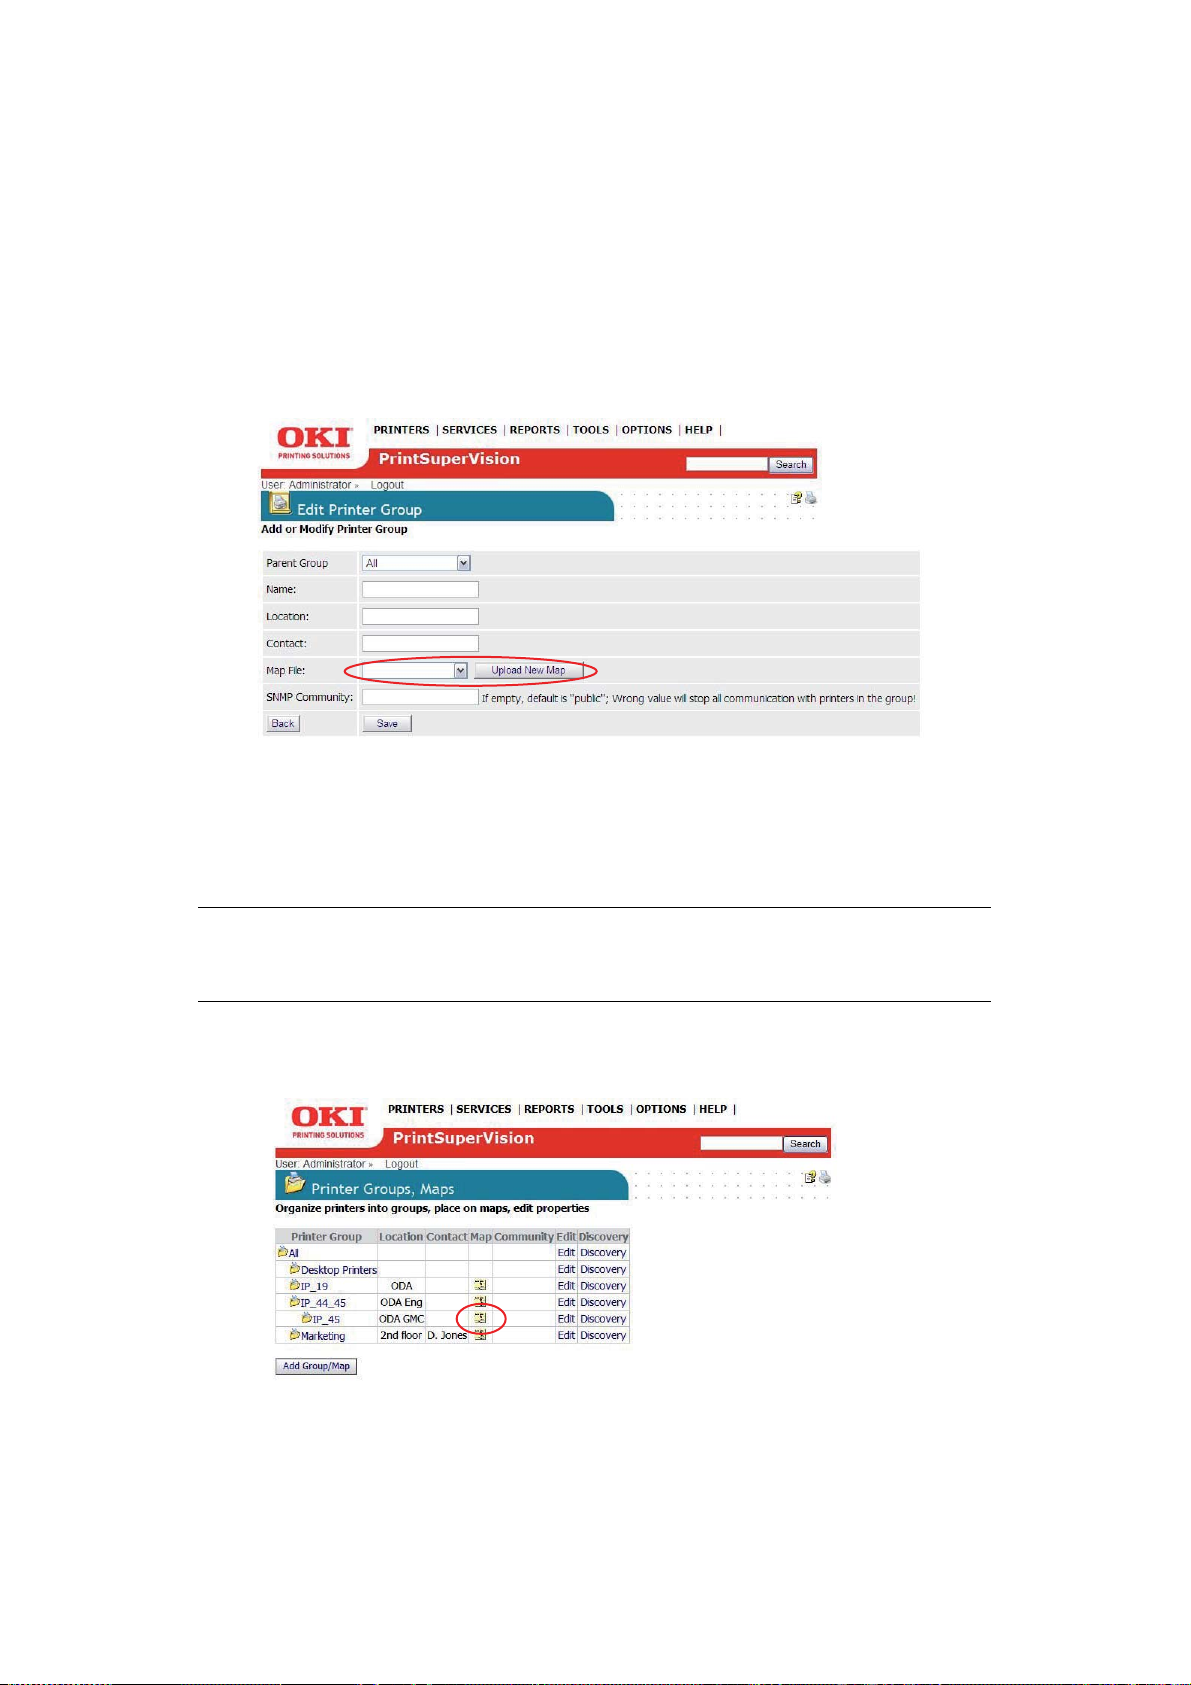
A
DDING MAPS AND FLOOR PLANS TO A GROUP
Groups can also have images of maps, floor plans, etc. assigned to them, which in turn
allows PSV to display the location of a device icon on an associated map or building floor
plan. Several popular image file formats for maps and floor plans are supported, such as
.gif, .jpg, .bmp, or .png.
You can assign a map or floor plan image to a new group as soon as you create the group
or you can add a map/floor plan image to an existing group at any time.
To add the image while creating the group:
1. Select Printers from the main menu and click Printer Groups, Maps.
2. Select a saved image file from the drop down menu and click Save or click Upload
New Map to browse for your desired image. Once your desired image has been
located, click Upload.
3. Place a device icon on the map or floor plan.
NOTE
Remember the individual device must be a member of a group before it can
be placed on the map.
4. Click Printers/Printer Groups from the main menu. If you have successfully
linked an image with a group, you will see an icon in the map column.
5. Click the map icon and the image will be displayed.
6. Click Place on Map and select a device from the drop down menu.
Grouping devices, adding maps and floor plans > 23
Page 24
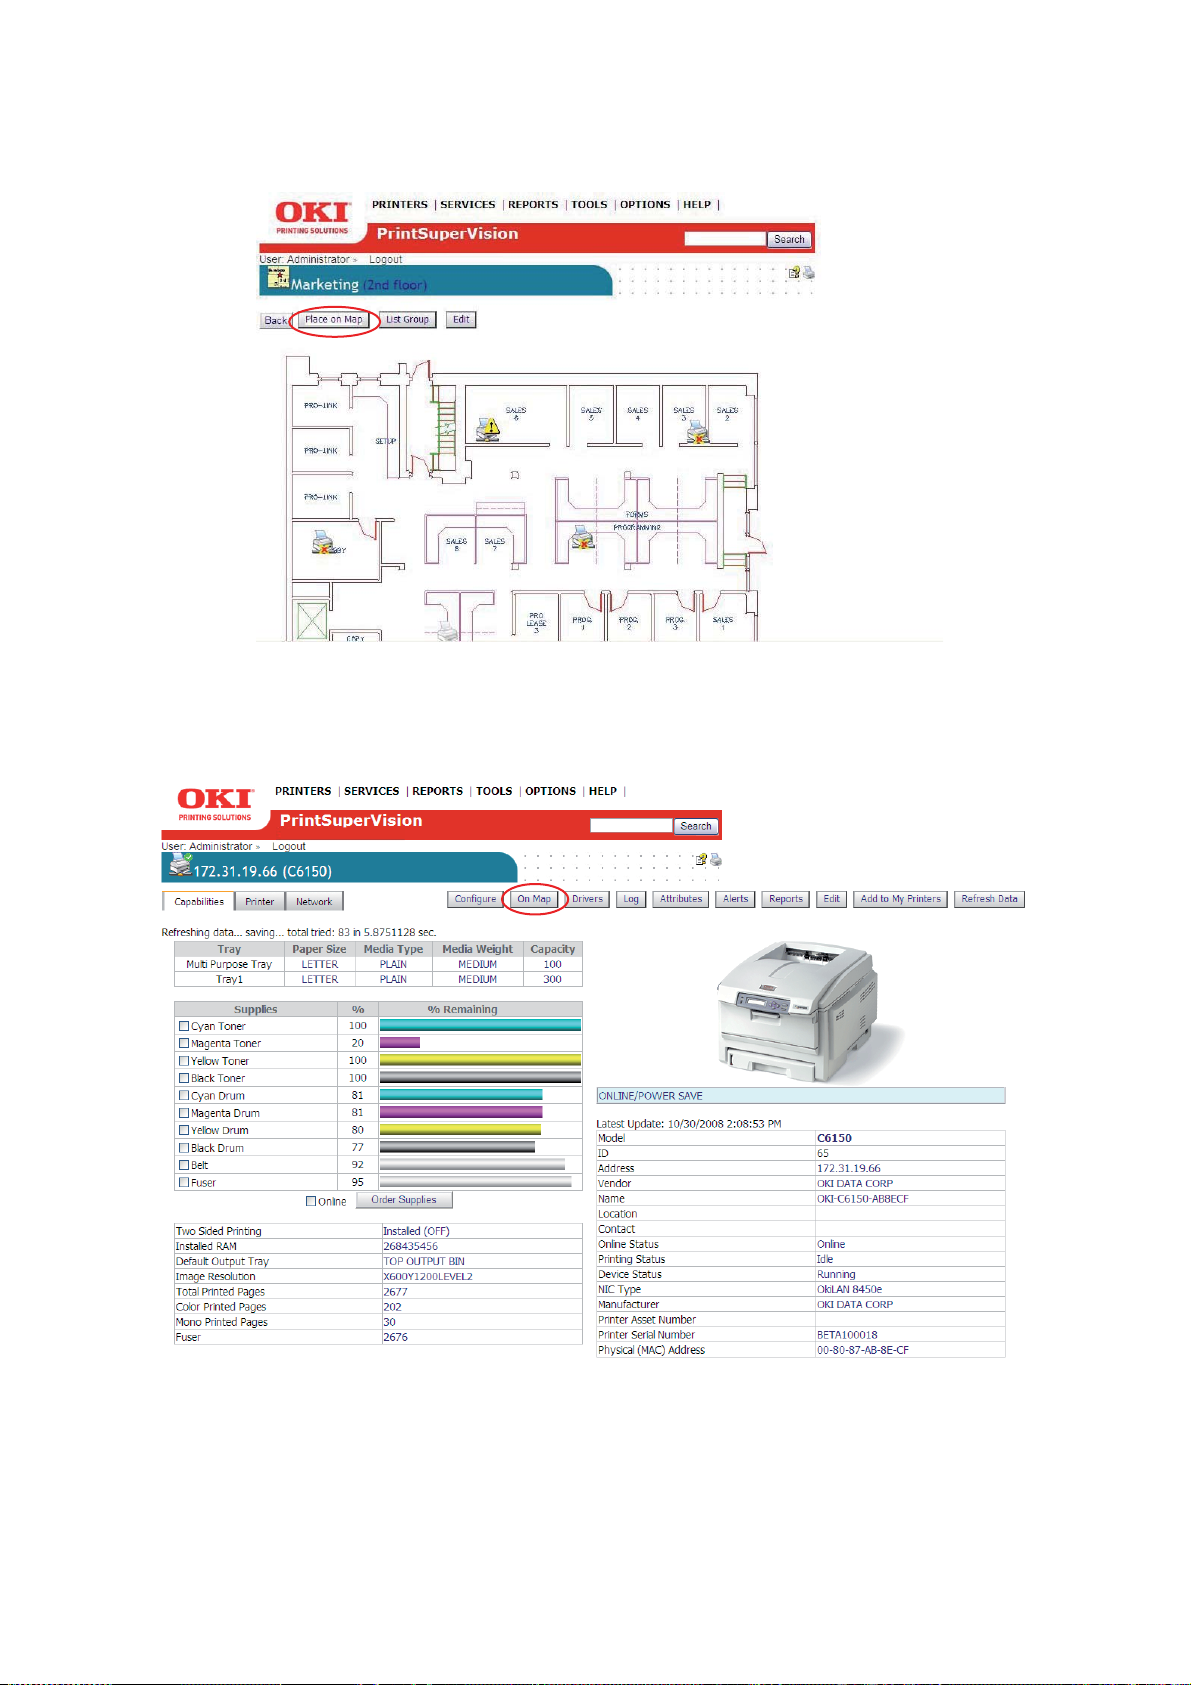
7. Click on the image and the device icon will be placed where your mouse pointer is
positioned.
To move the device icons at any time, click the Place on Map button and drag and drop
the icon to the desired location on the image. Left click once more to activate.
Remember, when viewing the map or floor plan, the interactive icons can be clicked at any
time to go directly to the device's status page.
Grouping devices, adding maps and floor plans > 24
Page 25

While on the Device Status Page, you can link back to the map or floor plan by clicking
the On Map button.
NOTE
If you return to the map or floor plan from the Device Status Page by clicking
the On Map button you will only see that device's icon on the image. To see
all devices on the map or floor plan, click Printers > Printer Groups, Maps
from the main menu and click the map icon associated with a particular group.
Grouping devices, adding maps and floor plans > 25
Page 26

D
ISCOVERING DEVICES
Click the Printers tab from the main menu and select Discovery from the drop down menu.
PSV is capable of discovering any device that is compliant with Public MIB Specification RFC
3805.
Click Start Discovery if you want to discover all of the compatible devices on your
network.
NOTE
For Enterprises with several hundred or even several thousand devices, it may
be time consuming to discover all devices at once. PSV provides the flexibility
to selectively discover individual subnets or ranges of IP Addresses by simply
selecting the appropriate check box and clicking Start Discovery.
D
ISCOVERY: ADD BUTTON
Click the Add button followed by IP Subnet or IP Range radio buttons to selectively discover
devices.
The Add button allows you to:
> Add an IP address of a device to the discovery database
> Create a discovery list based on IP subnet entered
Discovering devices > 26
Page 27

> Create a discovery list based on a range of IP addresses indicated
Click the IP Address radio button and click Next.
When adding a specific IP address to the discovery database, PSV provides an option to
assign the device to a specific group of devices and associate the group to a specific SNMP
community.
Enter an IP address, select a group name from the Printer Group drop down menu and
type the desired SNMP community. Click Add to save your changes.
Similar to adding a single IP Address to a database, click the IP Subnet or IP Range radio
buttons to create a discovery list for a specific IP Subnet or Range of IP addresses.
PSV also provides the option to assign a group name to the subnet or the IP address range
by selecting a pre-defined name from the group drop down menu or by clicking on the map/
group button if you would like to create a new Group name.
Enter the appropriate information and click Save.
Discovering devices > 27
Page 28

D
ISCOVERY: EXCLUDE BUTTON
Exclude provides the option to exclude a specific IP address or IP address range from the
discovery process.
1. Click the Exclude button and select either Exclude IP address or Exclude IP
range.
Notice that PSV displays all IP Addresses and IP Address Ranges that have been
excluded previously.
Discovering devices > 28
Page 29

2. Enter desired IP address to exclude and click Save or for IP Range, enter the range
of IP addresses to exclude and click Save.
3. To include an IP address or IP Address Range that was previously excluded, return
to the Discovery section, click the Exclude button, click the IP Address or range of
IP Addresses and click Delete.
Discovering devices > 29
Page 30

D
ISCOVERY: WINDOWS BUTTON
1. From the Discovery screen, click the Windows button.
The Windows button provides a list of devices that have been saved in the local
system's Windows Print Queue. The local system is defined as the desktop or server
that PSV is running on. Each device listed can be selectively saved to the discovery
database.
2. Tick the check boxes to select the devices to add to the discovery database.
3. Click the Start Discovery button.
PSV can create a group of devices called My Printers (accessible from the Printer tab in the
main menu) by clicking the Add to My Printers check box and then clicking Start
Discovery.
D
ISCOVERY: SCHEDULE BUTTON
Discoveries can be scheduled by clicking the Schedule button.
Indicate the appropriate date, time and a recurring interval that you desire for the
discovery to take place. An added feature is the ability to send the Admin an email message
Discovering devices > 30
Page 31

indicating the results of the discovery. Leave blank or indicate who the email should be sent
to. Click the Save button to save the Discovery schedule.
D
ISCOVERY: LOGS BUTTON
PSV records a log of all discoveries performed (and several other system activities) and
indicates whether the discovery was successful or not.
Click the Logs button to view the system activity log. To obtain just a Discovery log, select
Discovery from the Type drop down box, indicate time frame by entering desired dates
and click Show to display the log.
NOTE
This feature creates activity logs for all other activities supported in the drop
down box.
CAUTION!
Clicking Clear Log will delete all discovery log entries permanently.
Discovering devices > 31
Page 32

O
THER DISCOVERY OPTIONS
S
HOW ADDRESSES
Selecting Show Addresses displays a list of all IP addresses that PSV at tempts to discover
when a Discovery is performed.
S
AVE
DNS
ADDRESSES
Save DNS Addresses translates IP addresses to DNS names if possible, and saves them
in the PSV database. When a list of devices is displayed in other areas of PSV, you will see
the DNS address name displayed instead of the IP address. This is particularly helpful when
an organization uses DHCP.
S
TART DISCOVERY
Start Discovery begins the discovery process for all subnets and IP address ranges
selected.
C
ONFIGURE TIMEOUTS
The SNMP Get timeout value, which controls the length of time PSV will wait for a response
from the device before timing out can be adjusted. Keep in mind the greater the SNMP Get
timeout value, the longer the overall discovery will take.
The status icon timeout value sets the time interval that PSV waits for a response from a
device before turning the status icon gray (status icon is displayed in the Printers List).
Notice that after clicking Refresh, the status icons are returned to an active state. Enter a
desired value for each option and click Save.
After the discovery process is complete clicking the Printers button at the bottom of the
screen will display a list of the devices that were previously discovered with refreshed
status. Clicking the Discovery button takes you back to the main discovery screen.
Discovering devices > 32
Page 33
M
AKING DISCOVERY EASIER: IMPORTING
In large organizations, IT departments may have the IP addresses of t heir p r int and copy
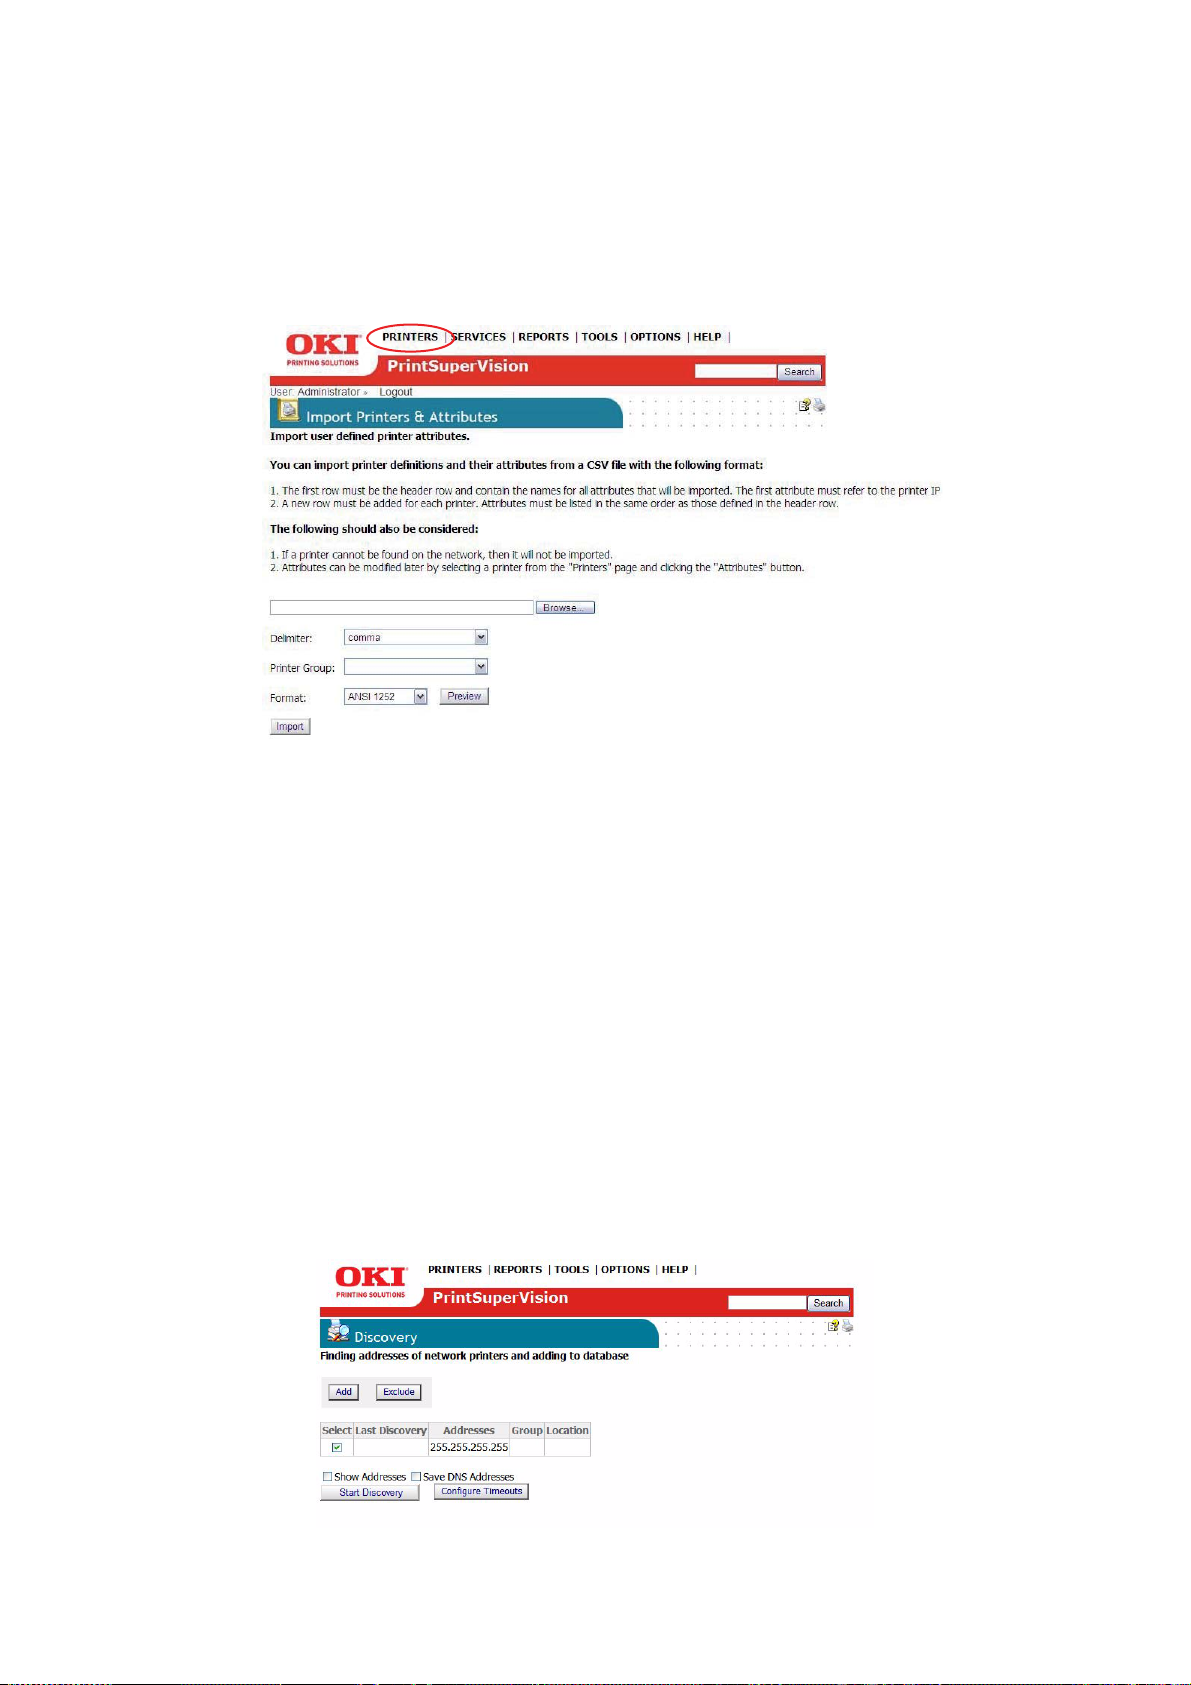
devices saved in a text file. If such a file exist s, you can use PSV's “ Import” feature to add
multiple devices with known IP addresses to the discovery database. This is done by simply
importing the text file.
1. From the main menu click Printers > Import Printers & Attributes.
IP
ADDRESSES FROM A TEXT FILE
2. Click Browse to locate and add the desired file. The text file should be formatted so
that one device address is on each line of the file. As an added feature you may
select the way the file is delimited by selecting comma, semi colon or tab.
3. Select an appropriate group name from the Printer Group dropdown box (or leave
blank). Click Preview to view the data before importing it or click Import to add
the imported devices immediately. For more information on Device Groups see
page 20.
The import feature can also be used to import attributes associated with the device that
are not ordinarily supported or not reported back from a device. This feature is di scussed
in more detail in the Adding Device Attributes section on page 63.
D
ISCOVERING NETWORK DEVICES: PROFESSIONAL EDITION: EASY CONFIGURATION
If you have installed the single-user “Easy Configuration” option from PSV Professional
Edition you will notice there are fewer discovery options.
Click Printers > Discovery from the main menu. The two discovery options available are:
Add Subnet and Exclude. Both features are identical in functionality to PSV Pro and PSV
Enterprise although more limited. See previous discussion for a complete description of
these features.
Discovering devices > 33
Page 34
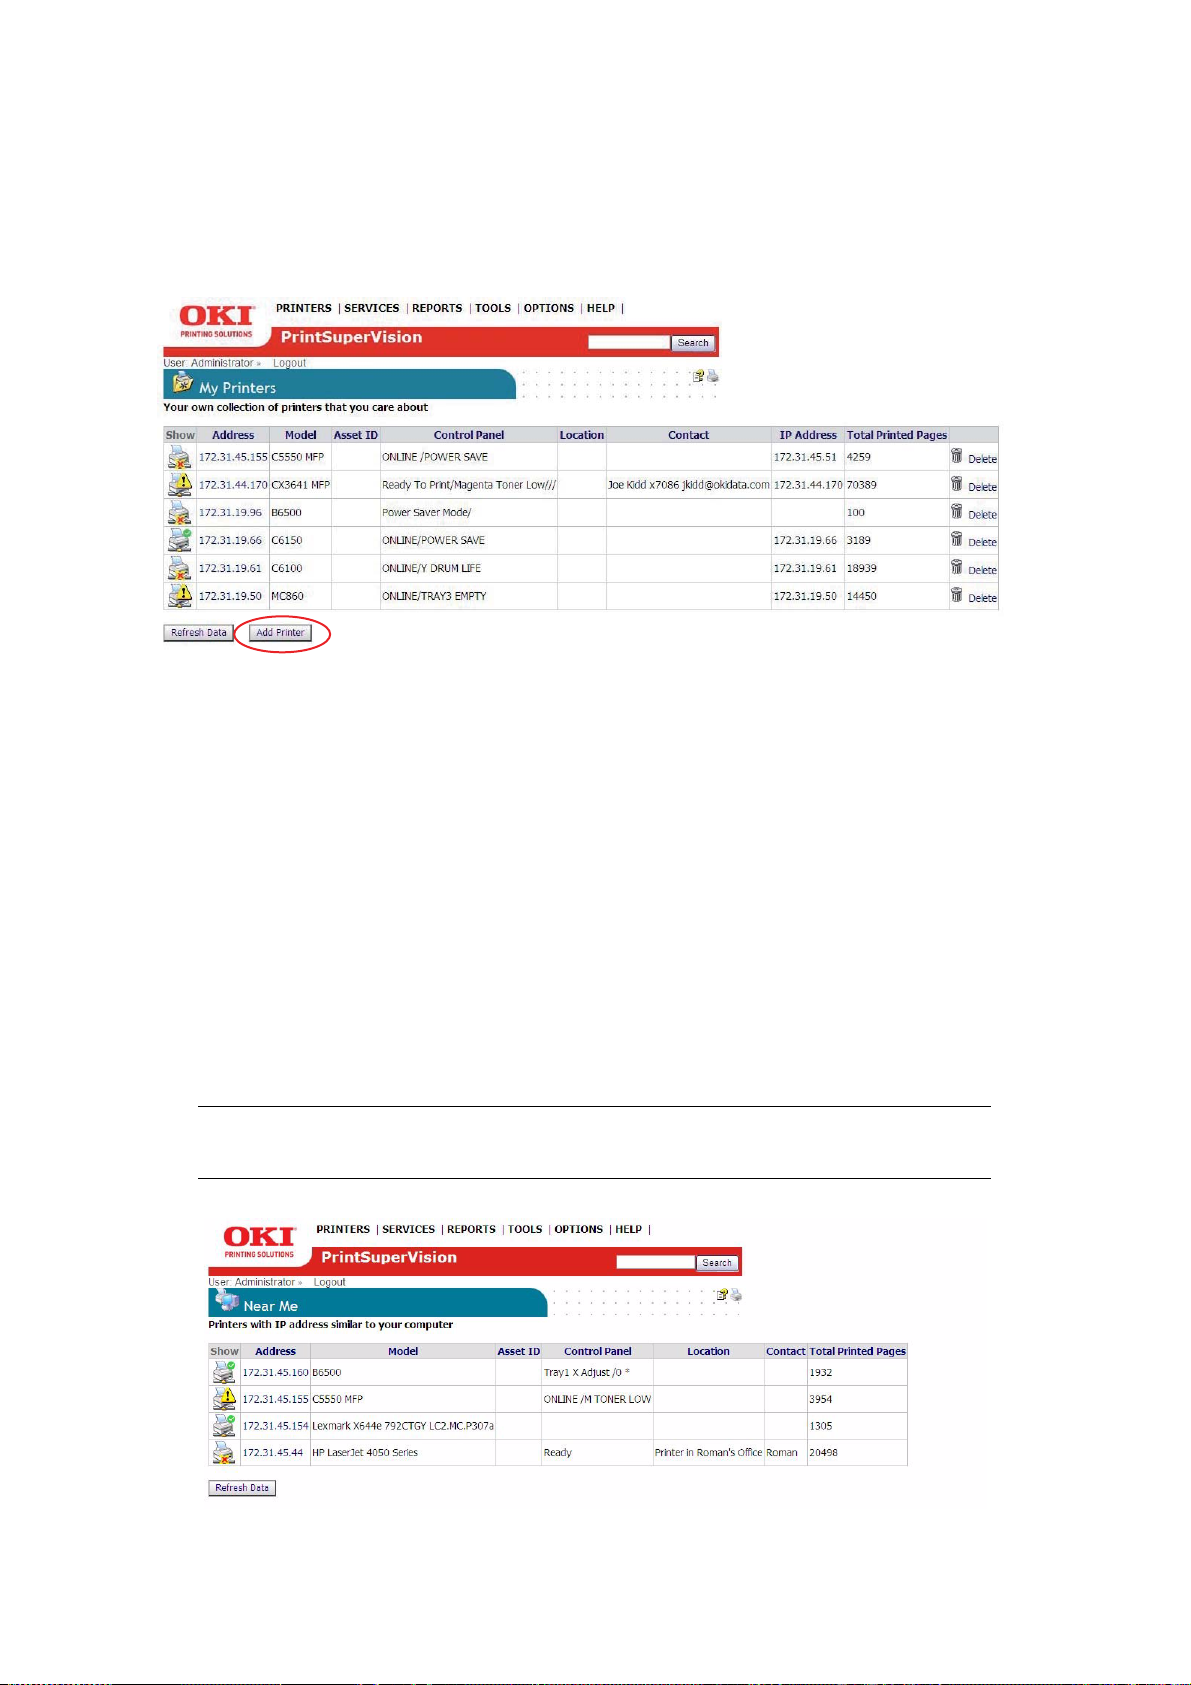
MY
PRINTERS
PSV offers users with Admin rights a grouping feature called “My Printers” which is an easy
way to view device status with minimal mouse clicks.
1. From the main menu select Printers > My Printers from the drop down menu. You
will see a list of devices that have been added to the My Printers group.
2. To add a device to the My Printers group, simply click Add Printer, choose the
desired device and click Save.
3. To delete a device, click the trash can icon listed in the right column.
N
EAR ME
Another time saving, grouping feature available in PrintSuperVision is called “Near Me”.
Near Me allows a user to quickly view the status of devices that are conceptually located
near the PC being used, without the need to configure or group devices.
PSV detects and locates devices that have similar network addresses to the client computer
(or browser enabled device) being used to access the PSV application and automatically
includes those devices in the Near Me group.
From the main menu select Printers > Near Me from the drop down menu. Device status
in the Near Me group will be displayed.
NOTE
Devices cannot be added or deleted from the Near Me group.
Discovering devices > 34
Page 35
C
ONFIGURING EMAIL ALERTS
Now that you have discovered devices on the network and logically organized them into
groups, the next step is to configure PSV (beyond what was originally configured in the
initial setup) to notify a helpdesk or network admin that a device has generated an alert.
Alert notifications are available in the Enterprise Edition and the server configuration of the
Professional Edition. Alerts are not available in the single-user Easy Configuration option of
the Pro Edition.
Only users with Admin rights can edit email alert configurations or set alerts for other users
or user groups. A non-Admin user however, may configure and view Alerts just for
themselves.
PSV uses email to deliver alert conditions. The email message can be sent to an individual
user or group of users. Each alert can be configured to be processed immediately upon
receiving updated status from the device, or processed at specified time intervals.
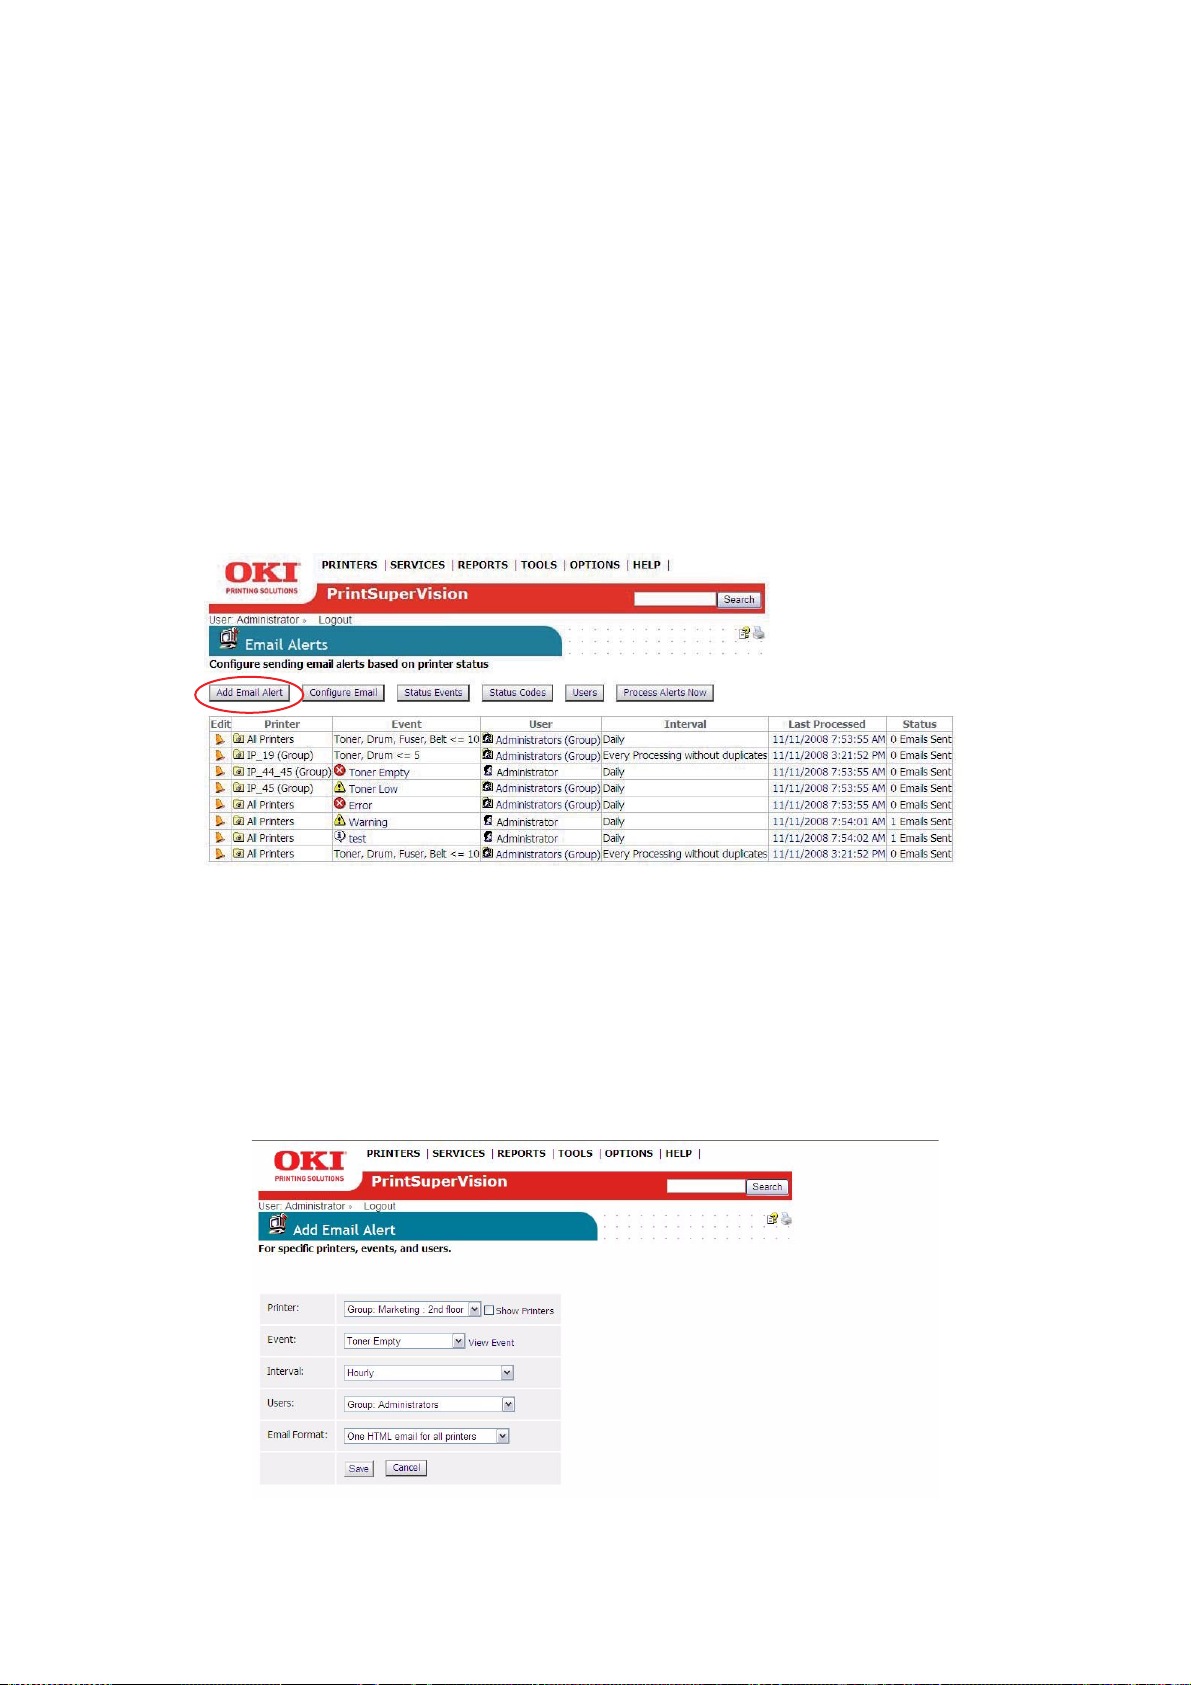
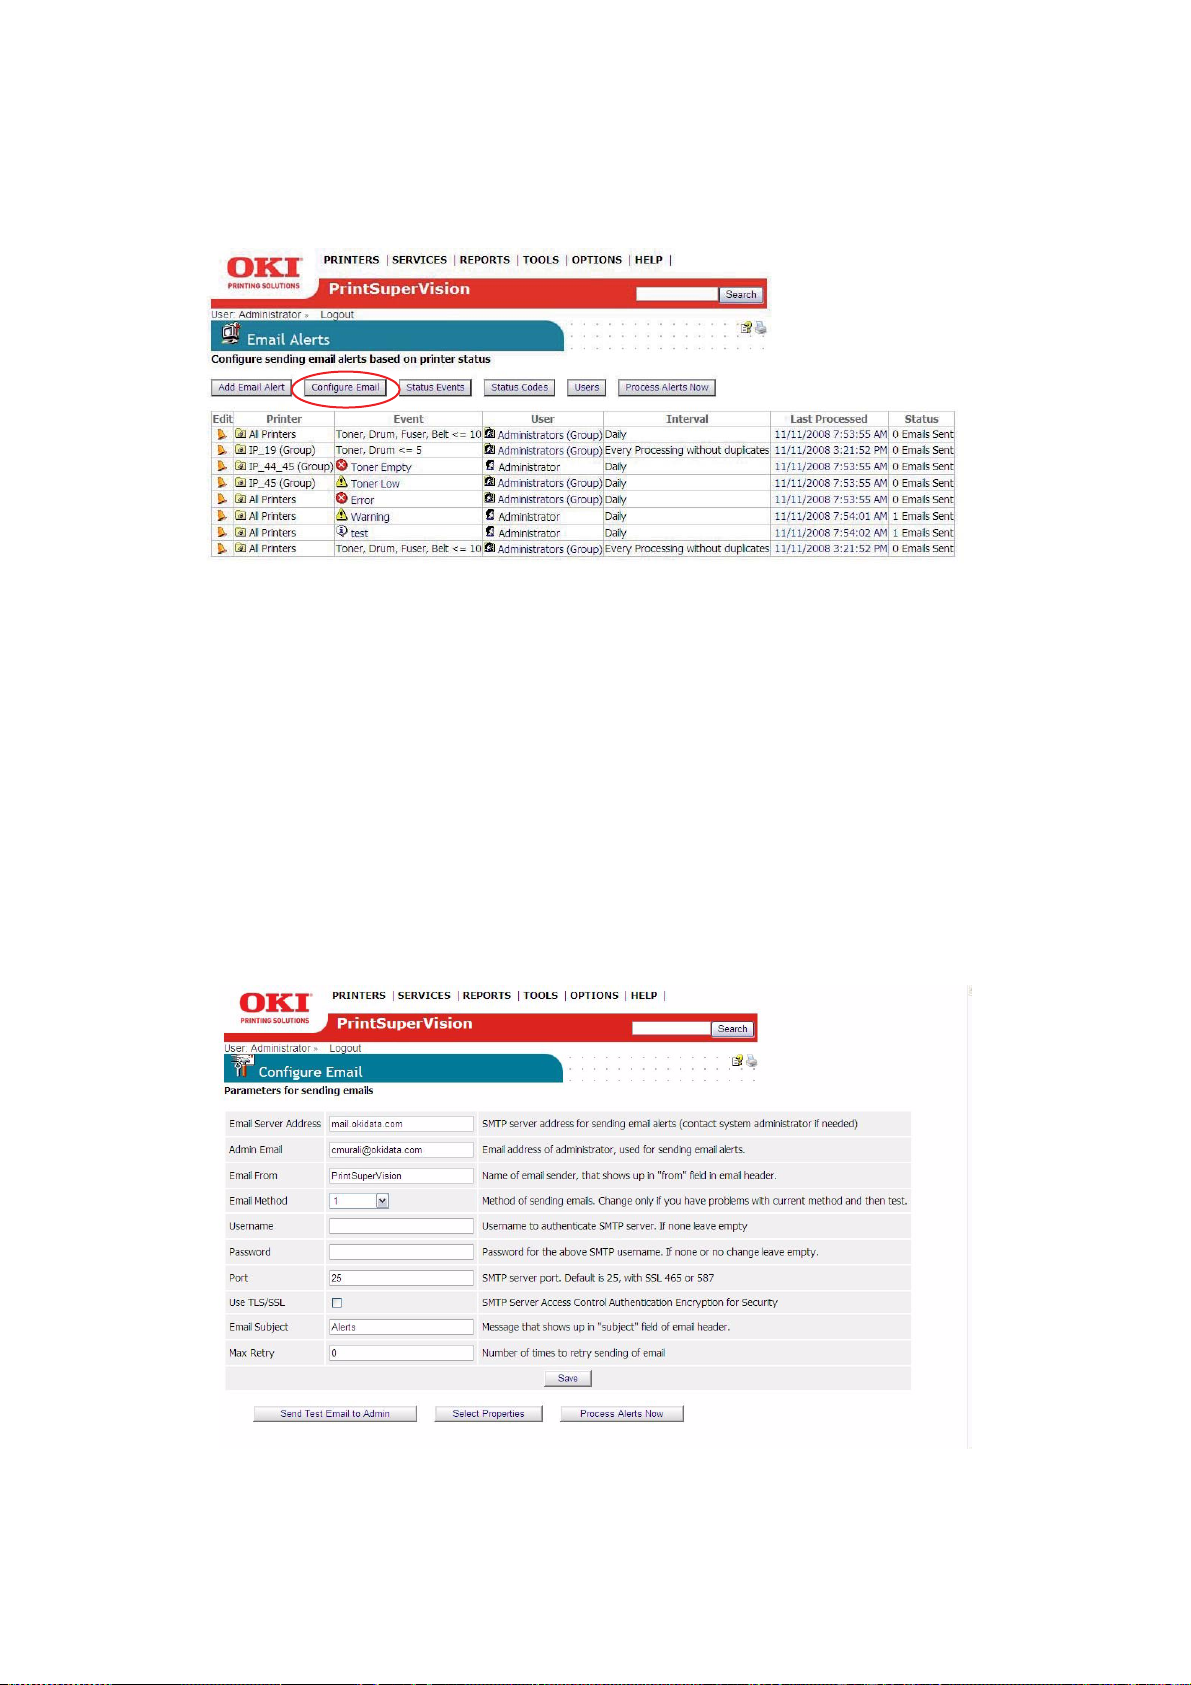
1. To add an email Alert, select Services > Email Alerts from the main menu.
2. Click the Add Email Alert button.
3. Adding an alert requires the following information:
> Select a device or a group of devices to monitor
> Select the Event (Alert) you wish to be notified of
> Select how frequently the Alert will be sent
> Select the user or group of users the Alert message will be sent to
> Select the format of email messages (text or html)
4. Click Save after the information has been entered.
Configuring email alerts > 35
Page 36
C
ONFIGURING EMAIL SERVER
To set the parameters for sending alerts in email:
1. Click the Configure Email button from the Email Alerts page.
2. Enter the following information and click Save:
> Address of the email server
> Administrator's email address
> Sender's name (placed in the From field in the email header)
> Email method
> Username and Password for authentication, if required
> SMTP Port
> TLS or SSL Encryption
> Subject of email message
> Maximum number of message attempts
Configuring email alerts > 36
Page 37
NOTE
To test whether the email configuration is correct, click the Send Test Email
to Admin button. PSV will attempt to send an email to the address specified.
For a description of Email Methods see installation/setup instructions
described earlier.
3. Click the Select Properties Button to customize the email message to include
additional device information in the Alert message.
4. Select all desired device information and click Save.
In addition to device-related parameters such as Location and Contact, PSV allows other
user specified attributes to be included in the alert email message such as telephone
number, postal code, or the contact's email address.
T
ESTING YOUR EMAIL ALERT CONFIGURATION
Click the Process Alerts Now button to make sure everything is configured properly. PSV
will process the alert and send an email message to the assigned recipient.
C
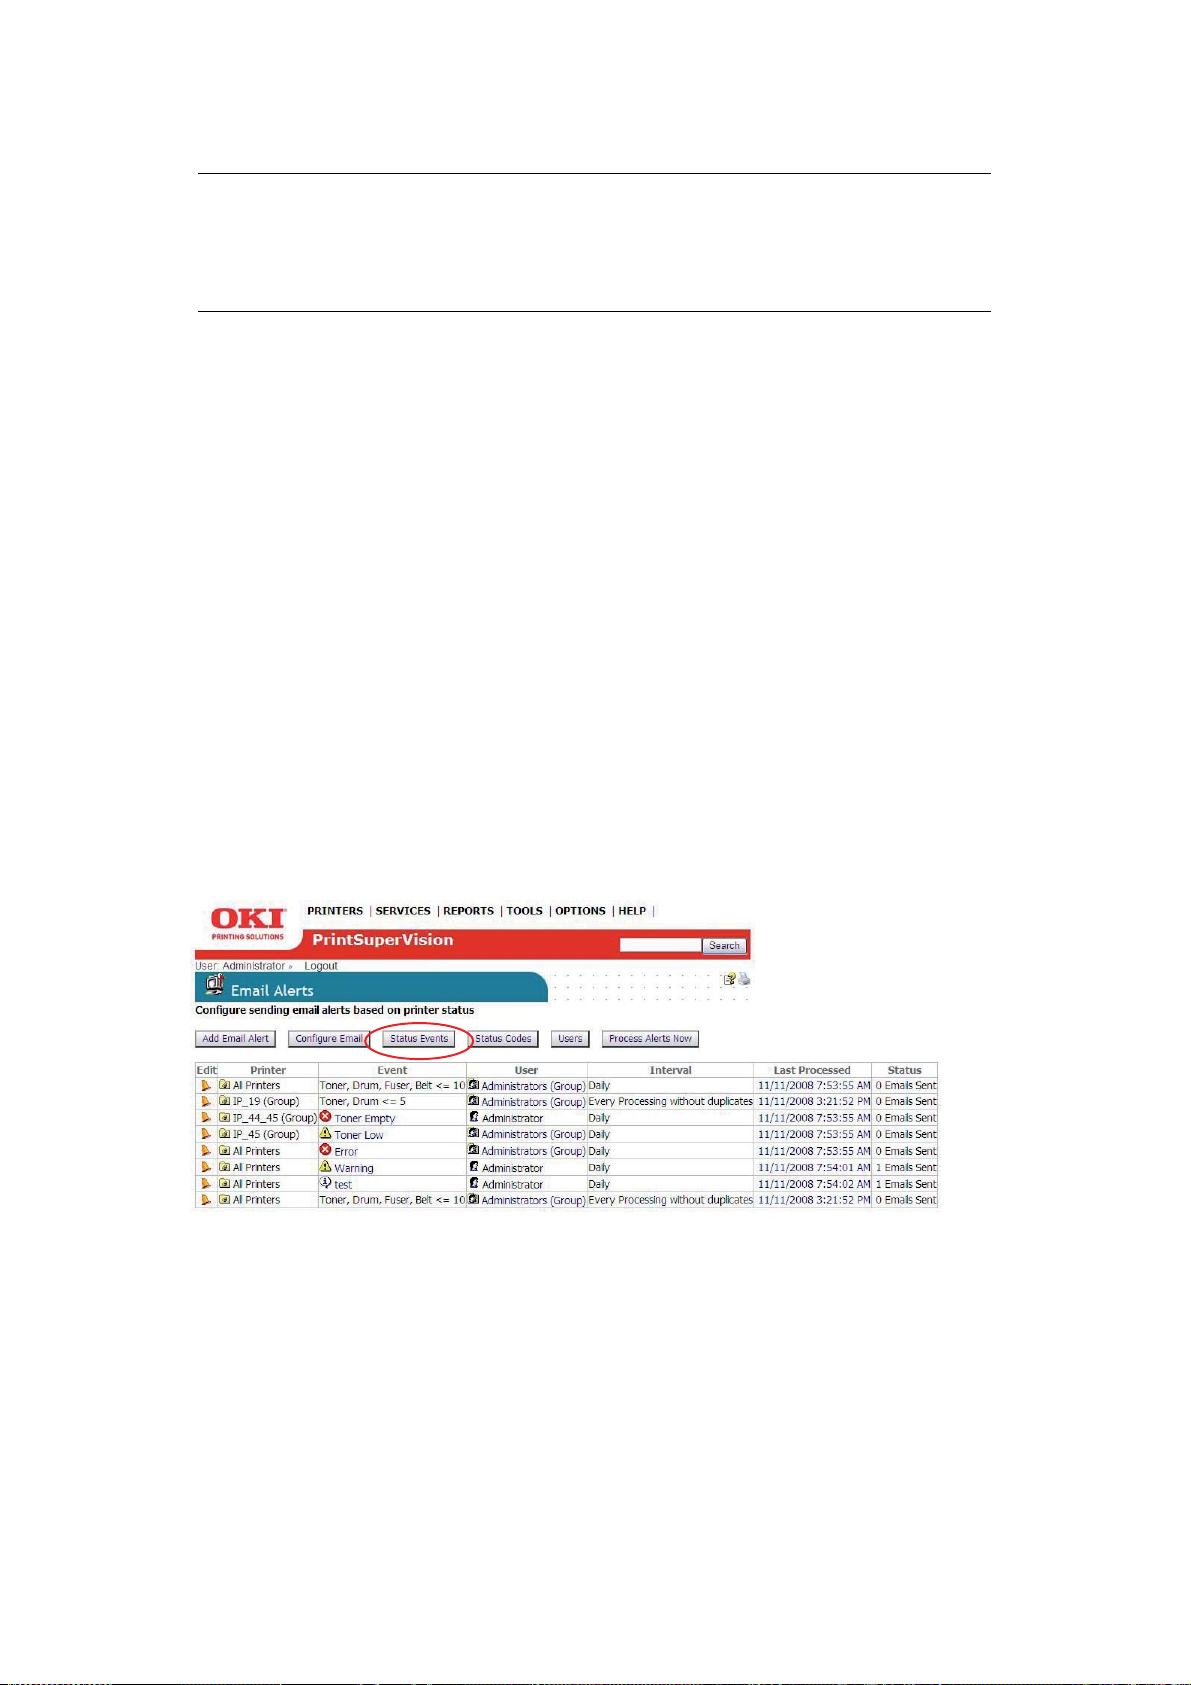
ONFIGURING STATUS EVENTS
PrintSuperVision allows you to customize cert ain Events that trigger notification emails. An
“Event” is different than a standard Alert condition where the print device generates the
Alert and PSV delivers the Alert in an email.
A customized Event can be created where a single condition or several conditions are
assigned to one custom Event. This can be useful if you only want to be notified when a
critical condition is met or when several conditions are met.
1. To add an event, go back to the Email Alerts page and click the Status Events
button.
Configuring email alerts > 37
Page 38
A list of default events is displayed:
2. You can click the name of the Event to see a li st of conditions included in that event
category.
NOTE
PrintSuperVision translates difficult to understand error codes displayed by
the device into meaningful descriptions.
3. Click the Add Event button and enter a unique name to the customized ev ent.
4. Assign a severity level to the event by selecting one of the options from the drop
down box. Select one or more conditions to assign to the event by selectin g the
check boxes in the left margin.
Configuring email alerts > 38
Page 39

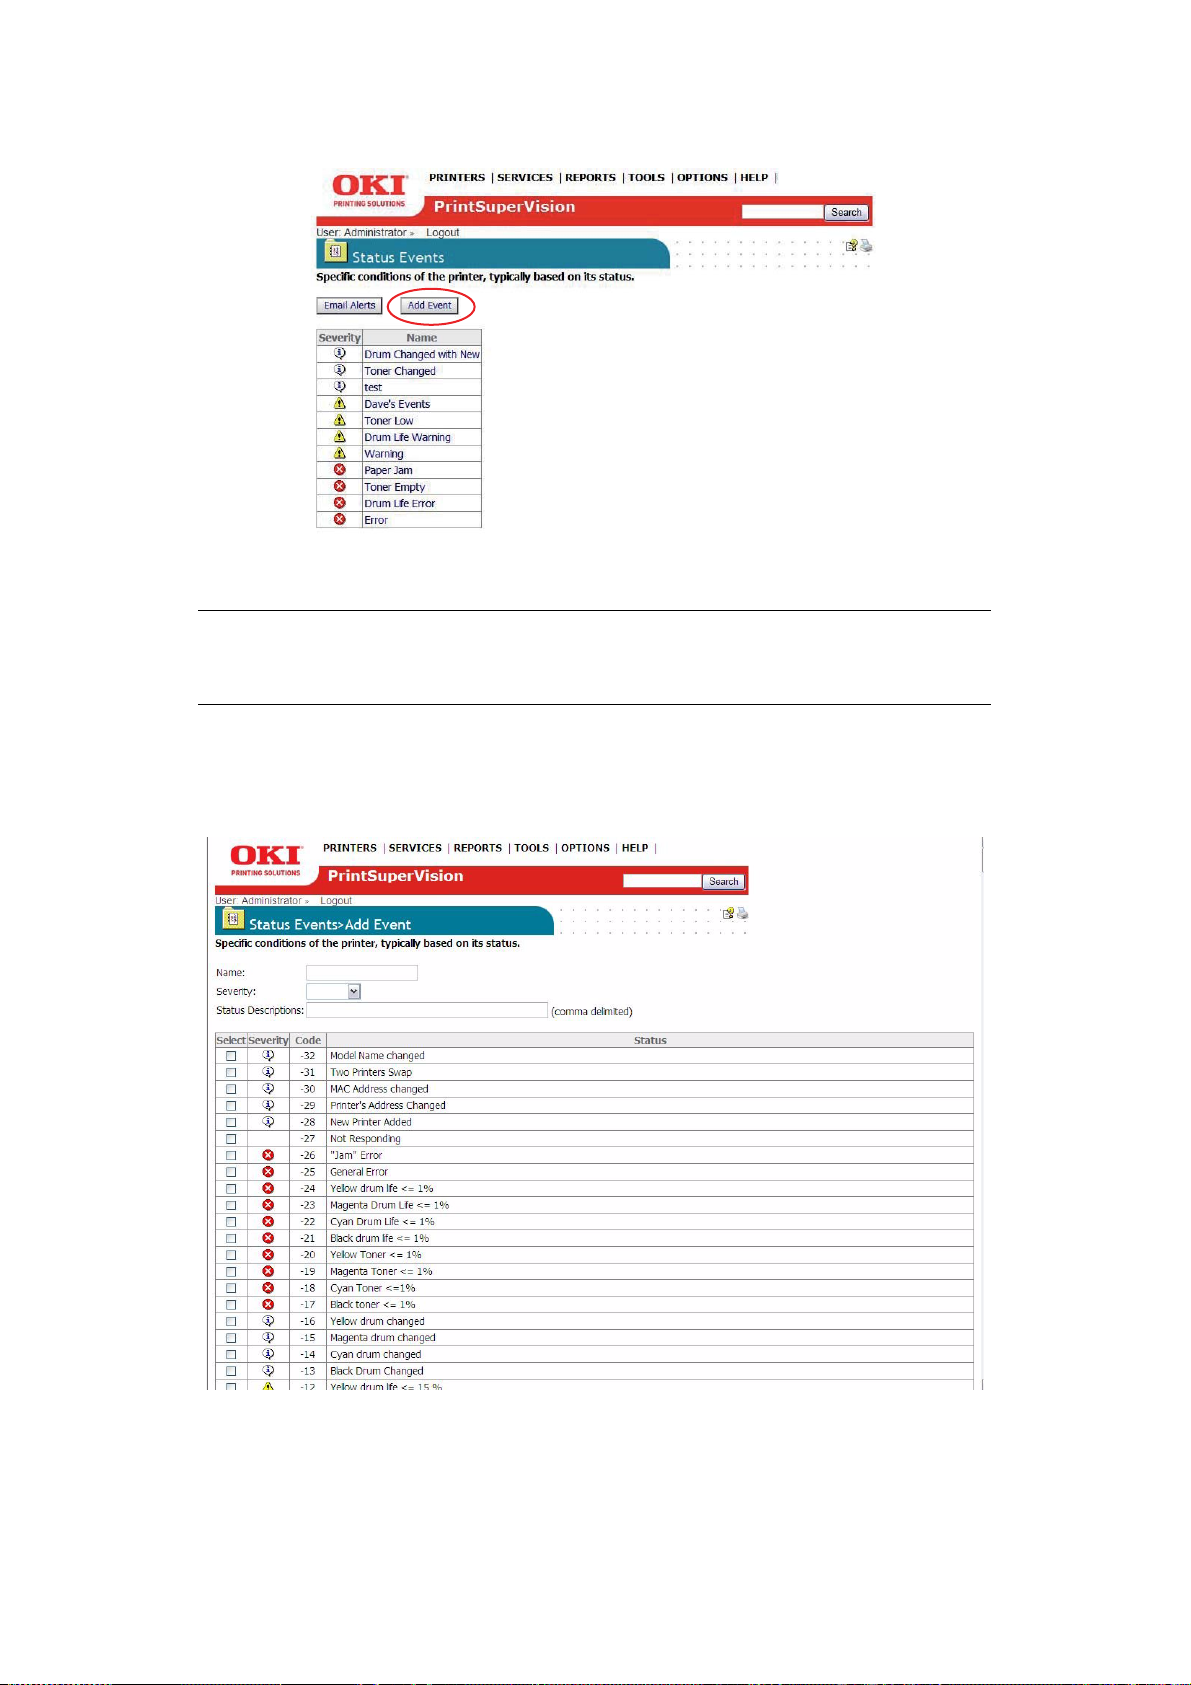
5. Click the Add Event button at the bottom of the page to sav e the customized Ev ent.
NOTE
Filling in the Status Description field is optional if the selected condition has
a related status code.
If a condition is not selected from the list, you can enter text in the Status Description
field and PSV will attempt to match that description with the text description the device
generates during an Alert condition.
NOTE
Keep in mind that the description being displayed on the device operator panel
must match the description you have entered exactly in order for PSV to
recognize the condition and act upon it.
C
USTOMIZING STATUS CODES
PSV also allows you to customize the severity level of any of the status code conditions. By
default, PSV has assigned a pre-defined severity level to each status code , but you may
decide that a code is too critical or not critical enough.
1. To modify status codes return to the Email Alerts main page and click the Status
Codes button.
Configuring email alerts > 39
Page 40
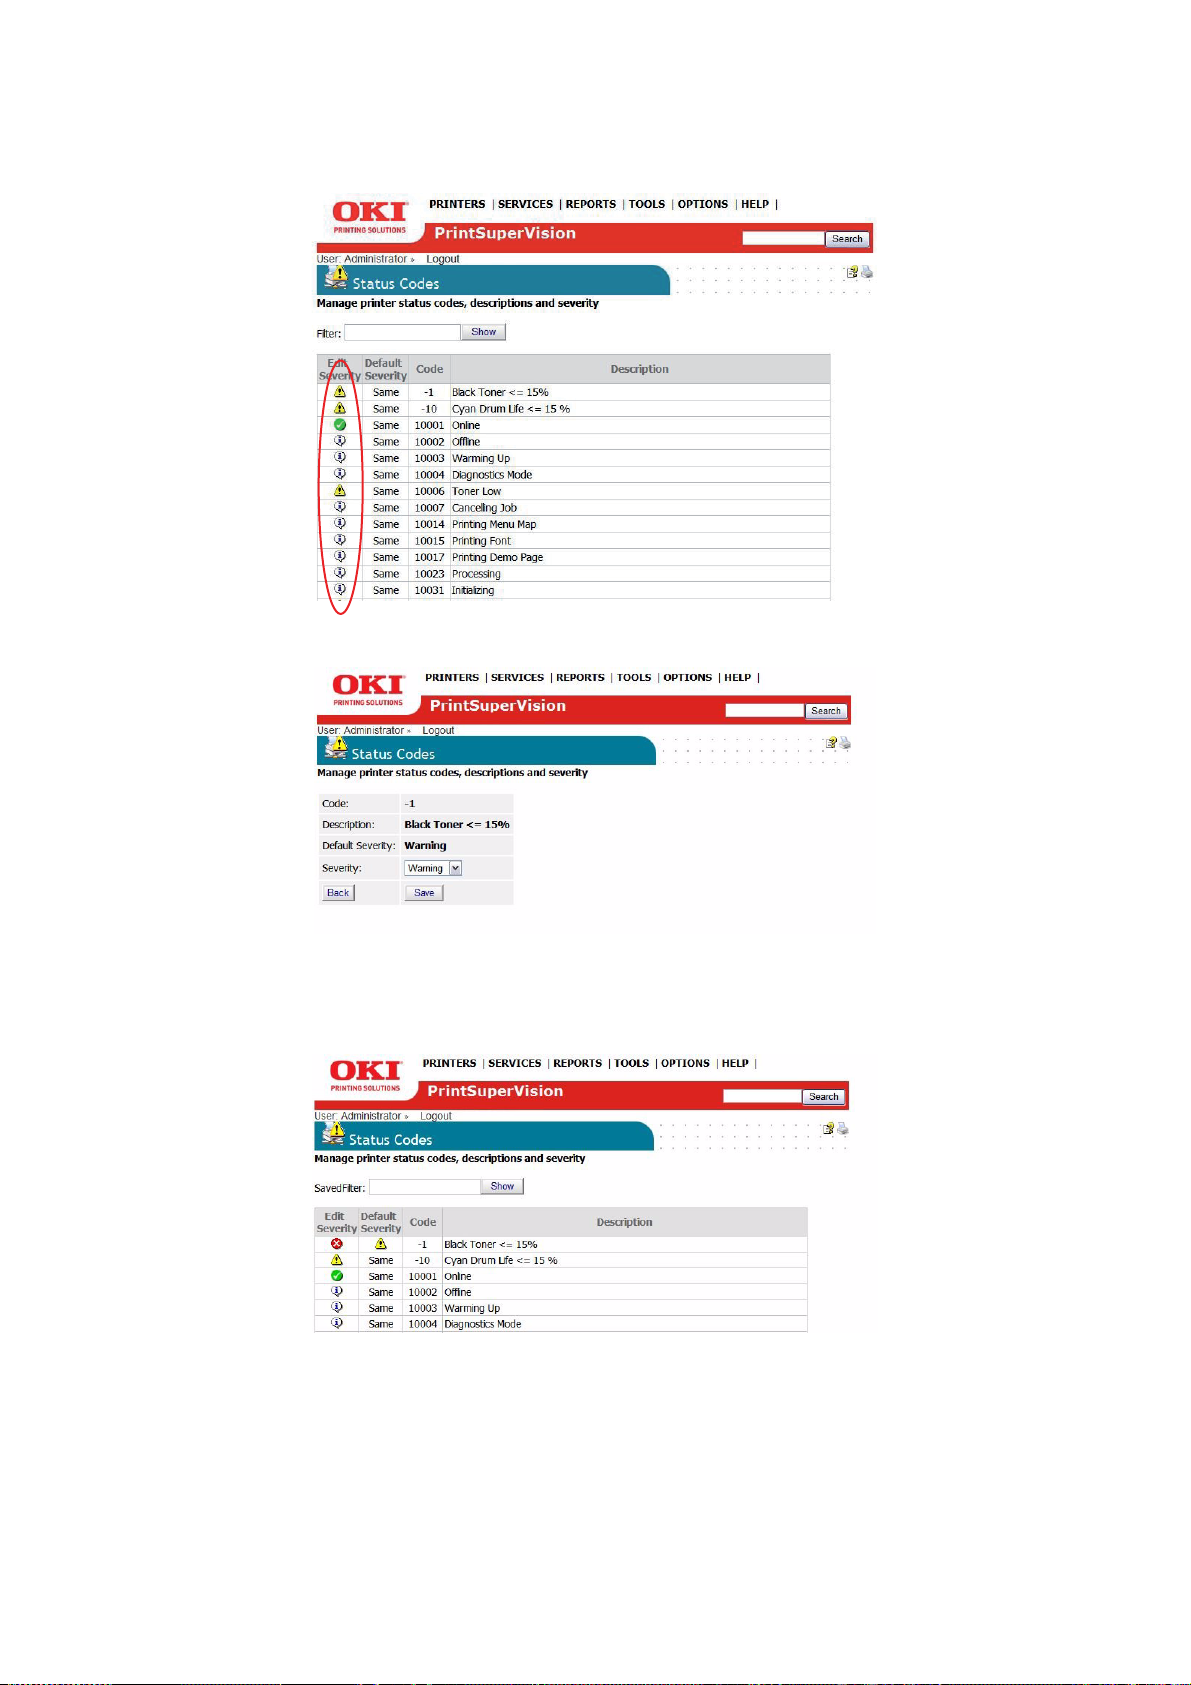
2. Scroll through the list of conditions or type in a filter (search) word to narrow your
choices.
3. Click on the severity icon listed in the Edit Severity column.
4. Select the new severity level from the drop down menu and click Save.
The default severity level and the changed severity level are displayed in the Status
Codes page.
5. Click your browsers back button to return to the Email Alerts main page.
Configuring email alerts > 40
Page 41

For convenience and quick navigation, a Users button and Process Alerts Now button
have been included on the Email Alerts page.
The User button provides a link to the Assi gned Users page and the Process Alerts Now
button processes any outstanding Alert conditions immediately.
Configuring email alerts > 41
Page 42

D
ATA COLLECTION INTERVAL
PSV periodically collects data from devices and saves it into a database, thereby enabling
PSV to create reports or generate Alerts. Users with Admin rights can configure the data
collection interval time in hours for basic usage information and in minutes for processing
Alerts.
To set the data collection interval:
1. Click Services > Data Collection Services from the main menu.
2. Indicate the desired data collection interval times and click Save.
To display a log of previous data collection activity for a selected date range, enter the
appropriate date and click Show. PSV will list all data collection activity from the date
indicated to the present date.
For added convenience, click the Collect Data Now button and specify options. Click the
Start button to begin processing.
Data collection interval > 42
Page 43

C
LONING
PSV Enterprise edition offers a time-saving feature called Cloning. Cloning is not available
in PSV Professional edition. Cloning allows multiple devices of the same type to be
configured remotely using the settings of an origin device.
Essentially, the cloning feature copies the device configuration settings of one device and
saves the same settings to a group of similar devices.
NOTE
Both the origin device and the target devices must be Oki branded devices and
must be the same make and model number.
1. Select Tools from the main menu and Cloning from the dropdown box.
2. Locate and select the device that will supply the configuration information to be
cloned. Click a radio button associated with a group of devices.
3. Click Next.
4. Select the radio button for the “origin” device and click Next.
5. Select a compatible “destination” device that will be configured with the same
parameters and click Next.
Cloning > 43
Page 44

6. Select properties to be clon ed and cl i ck the Start Cloning button.
PSV will apply the values of the selected properties to all destination devices indicated.
NOTE
PrintSuperVision will not check to ensure a compatible destination device is
selected. The origin device and all destination devices must be the same make
and model in order for cloning to successfully take place.
Cloning > 44
Page 45

G
ROUP CONFIGURATION
Only available in the PSV Enterprise edition, Group Configuration is a more advanced way
to configure devices remotely by using the parameters from one device to set up the
configuration of a group of similar devices.
Group configuration uses an XML file as a “Template” to remotely set up groups of devices.
Currently there are 2 sample templates included with PSV: one used for making paper
source settings and the other to change the web server password on a specific Oki
monochrome printer.
Additional templates that allow for group configuration to occur can be requested from Oki
Printing Solutions based on availability.
To use Group Configuration:
1. Click the Tools from the main menu and click Group Config from the drop down
box.
2. Select a template from the drop down menu, and click Select Template.
3. Select the Target Group of devices that will receive the new configuration. For a list
of devices in each group click Show Printers. Select the devices that will receive
the configuration by clicking the check boxes in the Select column.
The “paper source” configuration from the origin device can be modified before
applying the configuration to the group selected.
4. Make desired configuration changes and click Apply.
The other sample Group Configuration template changes a web server password on an Oki
B6300 monochrome printer.
1. Select the B6300 Password Change option from the drop down menu.
2. Enter a new password, verify it.
3. Click Continue.
Group configuration > 45
Page 46

The new password will be saved to each B6300 device in the selected group as well
as in the PSV database for future use and reference.
Group configuration > 46
Page 47

C
ONFIGURING SUPPLIES ORDERING
NOTE
The information contained in this chapter regarding on-line ordering is
applicable if you reside in the United States. However, this feature can still be
used to manually create a printable supplies order page, complete with the
necessary part numbers.
Both editions of PSV provide the option to order supplies on-line directly from the
application. An Admin has several options to help make the supplies ordering process as
easy and efficient as possible. We also understand that not every organization is setup to
order on-line, so an option to disable on-line ordering is also included.
Select Tools > Order Supplies from the main menu.
The options in the Order Supplies section help users:
> Search for supply item
> Create an order manually
> Configure the URL for all on-line ordering
> Edit PSV's database of supplies
> Disable on-line ordering
S
EARCH FOR A SUPPLY ITEM
To search for an item, click the search radio button, enter a description of a desired item
and click the Next button. PSV will search its database for related supply items.
S
ELECT PRINTERS, THEN ITEMS
1. Click the Select printers, then items radio button and click Next.
A list of monitored devices is displayed.
2. Select the desired device by clicking the check box and click the Next button.
A list of supply items related to the device will be displayed.
3. Add the desired order quantity and click Next > Order On-line.
The default e-commerce site is http://esales.okidata.com, which can be changed to
any e-commerce site. Refer to “Configuring the supplies list” on page 49.
Configuring supplies ordering > 47
Page 48

I
TEMS FOR LOCAL PRINTERS
Click this option for a list of supply items related to the devices that PSV is currently
monitoring. Use the list to obtain a description of the supply item and Oki part number
needed to place an order. Click Print at the bottom of the list to print it.
ALL
AVAILABLE ITEMS
Click this option to display and print the entire database of supply items.
1. Enter a quantity of the item desired.
2. Click the Next/Print button at the bottom of the list to generate and print a list of
selected items.
C
USTOMIZE ORDER
If on-line ordering is not allowed in your organization, you have the option to manually
create a printable supplies order page that contains the supply part number, description
and quantity desired.
1. Click the Customize Order option.
2. You c an add information to each supply order page by t yping information in the To:,
From:, Subject: and Text: fiel ds te mplate. Information typed will be added as a
header to each supply order page.
Configuring supplies ordering > 48
Page 49
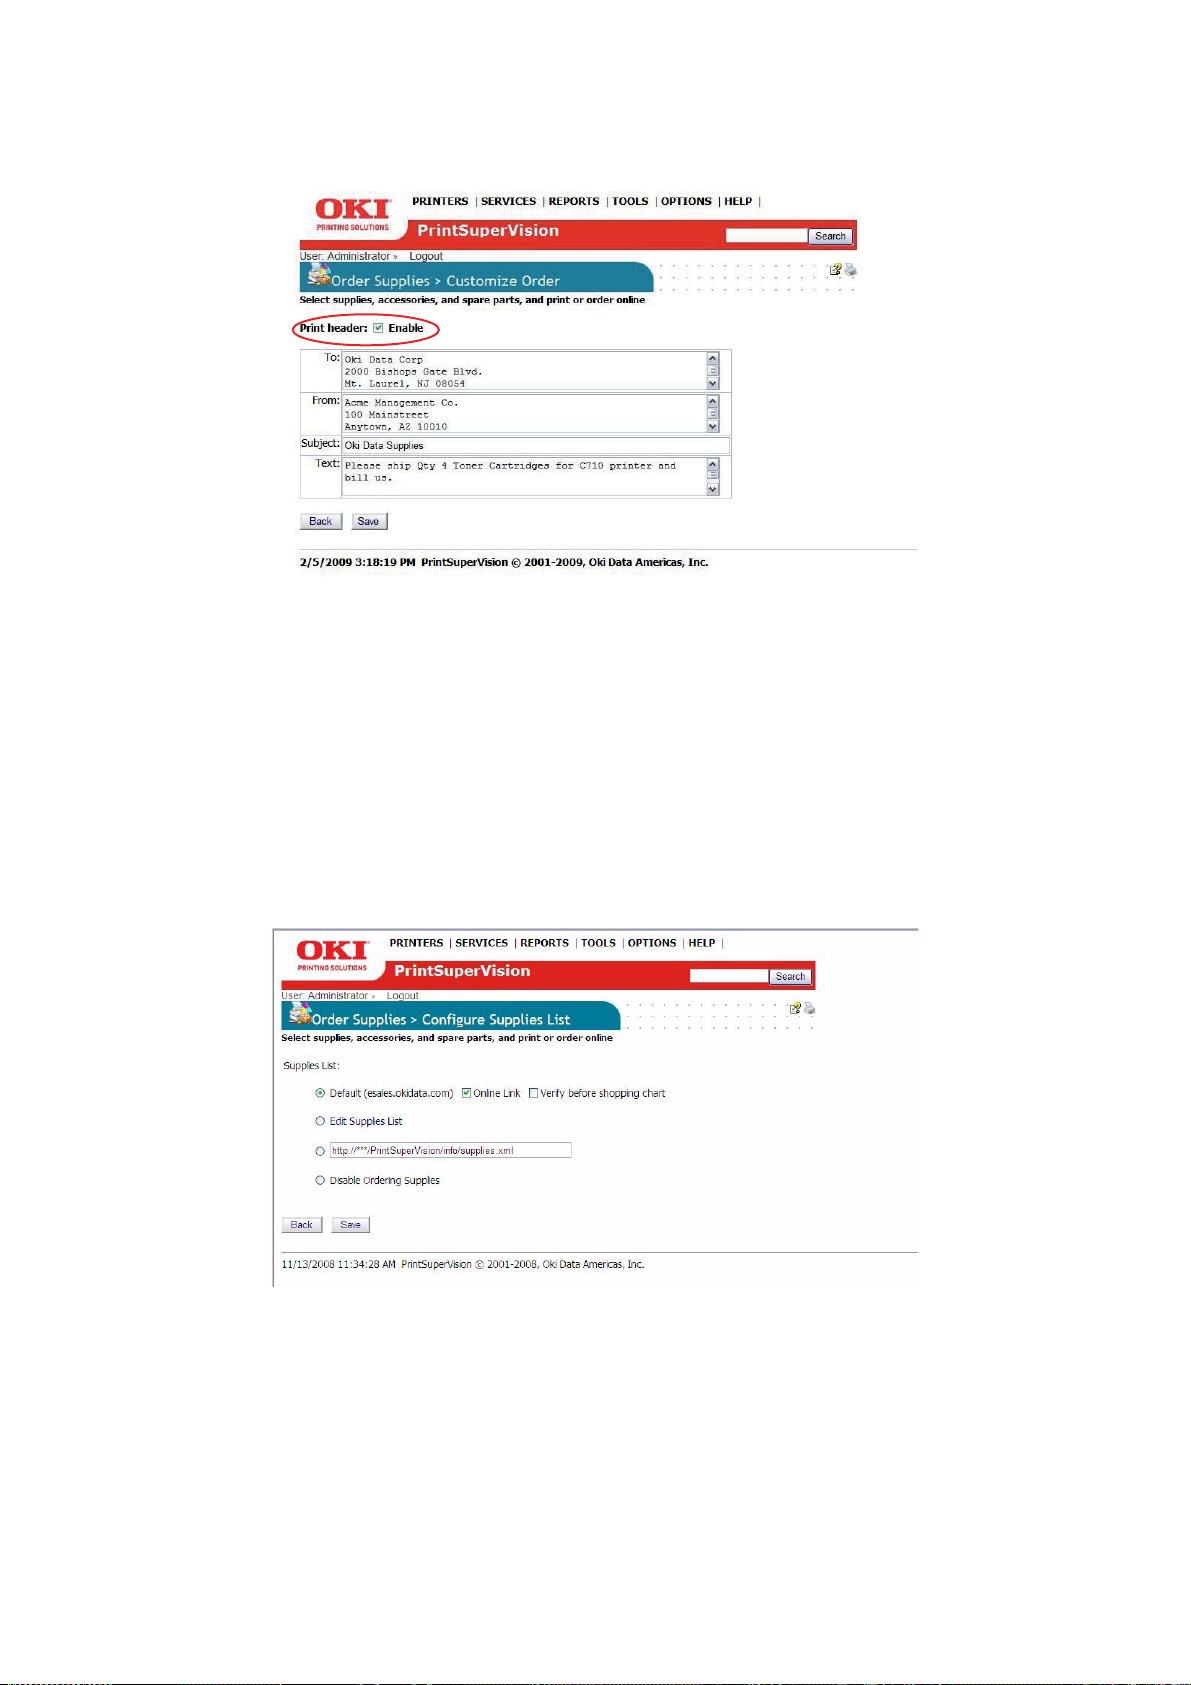
3. Select the Print Header Enable check box to add the pre-configured information to
each printable supplies order page.
4. Click Save to return to the Order Supplies page.
C
ONFIGURING THE SUPPLIES LIST
There are four options to configure the supplies list that is integrated into the PSV
application. You can:
> Use the existing supplies list which obtains its information from
http://esales.okidata.com
> Edit and add to the existing supplies list
> Point PSV to another list
> Disable supplies ordering entirely
D
EFAULT
Selecting Default continues to use the supplies list that is provided with the PSV application. As an added convenience you may want to allow your users to verify the ordering information before linking to an e-commerce shopping cart. Click the Verify before shopping cart check box for that option.
Configuring supplies ordering > 49
Page 50

E
NABLING/DISABLING ON-LINE SUPPLIES ORDERING
To enable on-line ordering select the Online Link check box. This will add the Order
Online button into the printer status page and allows users to order supplies on-line.
Unchecking the box removes the Order Online button system wide and eliminates the
ability to order supplies on-line.
E
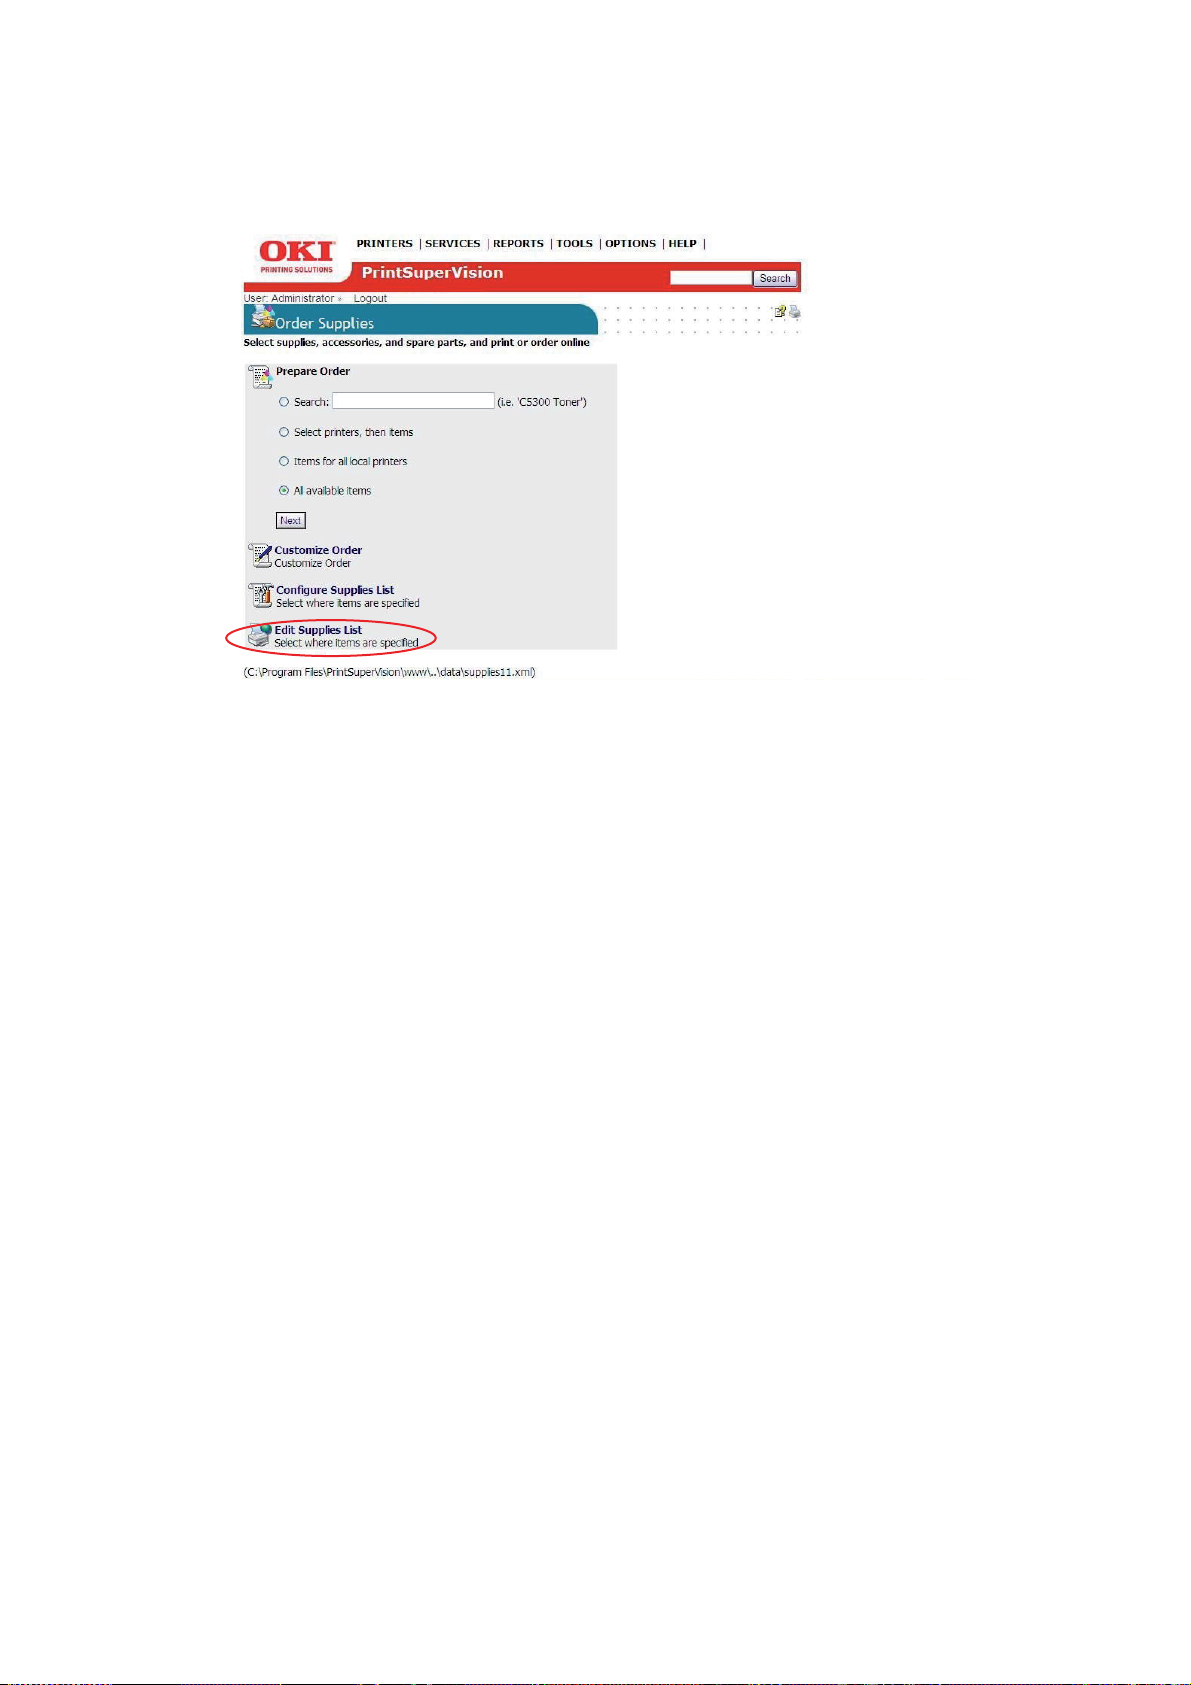
DITING THE SUPPLIES LIST
The default supplies ordering information list can also be customized. Editing the Supplies
List creates an additional XML file th at c o nt ai ns th e default supplies ordering informati o n
plus any edits or additions you make to the default file.
Selecting the Edit Supplies List radio button tells PSV to use your edited list (versus the
default list). Clicking on the Edit Supplies List link (displayed in blue) takes you to the
area where additions and edits can be made (refer to the following screenshot).
1. Click on the globe icon displayed in the Edit column to edit existing informa t ion or
scroll to the bottom of the list.
2. Click Add Item.
Configuring supplies ordering > 50
Page 51
3. Enter or edit the name and description of the supply item in the Name field. Since
PSV uses the contents of the Name field as search criteria, it is important to indicate
the model number of the device that the supply item is related to in that field.
4. If you plan to use a different e-commerce site than esales.okidata.com, enter the
appropriate web site address in the URL field. If the URL field is left blank, the supply
item will be unavailable to order on-line. The description of the supply it em however
will be available to print when creating a printed supplies order page described
earlier.
5. The Picture field is used to display an image of the supply item when viewing the
supplies list. Enter an appropriate link to the desired image. Leaving the field blank
will still display a description and part number of the item in the supplies list, but no
image will be displayed.
6. To edit the item's part number or SKU, enter the new number in the Code field.
7. Click the Save button to save your changes.
NOTE
This procedure must be replicated for each supply item if you intend to use an
e-commerce site other than http://esales.okidata.com. As an alternative to
editing each supply item manually, you may edit the Supplies List XML file that
PSV uses for this purpose. Locate the file in the following folder and perform
a global search and replace on the old/new URLs.
The XML file is stored in C:\Program
Files\PrintSuperVision\www\..\data\supplies18.xml
S
ELECTING AN ALTERNATIVE SUPPLIES LIST
You can also point PSV to any other compatible XML file that contains custom supply
descriptions and part numbers. Enter the appropriate URL of the file in the box and click
the associated radio button.
Use the XML file mentioned above as a template when creating a custom supplies list.
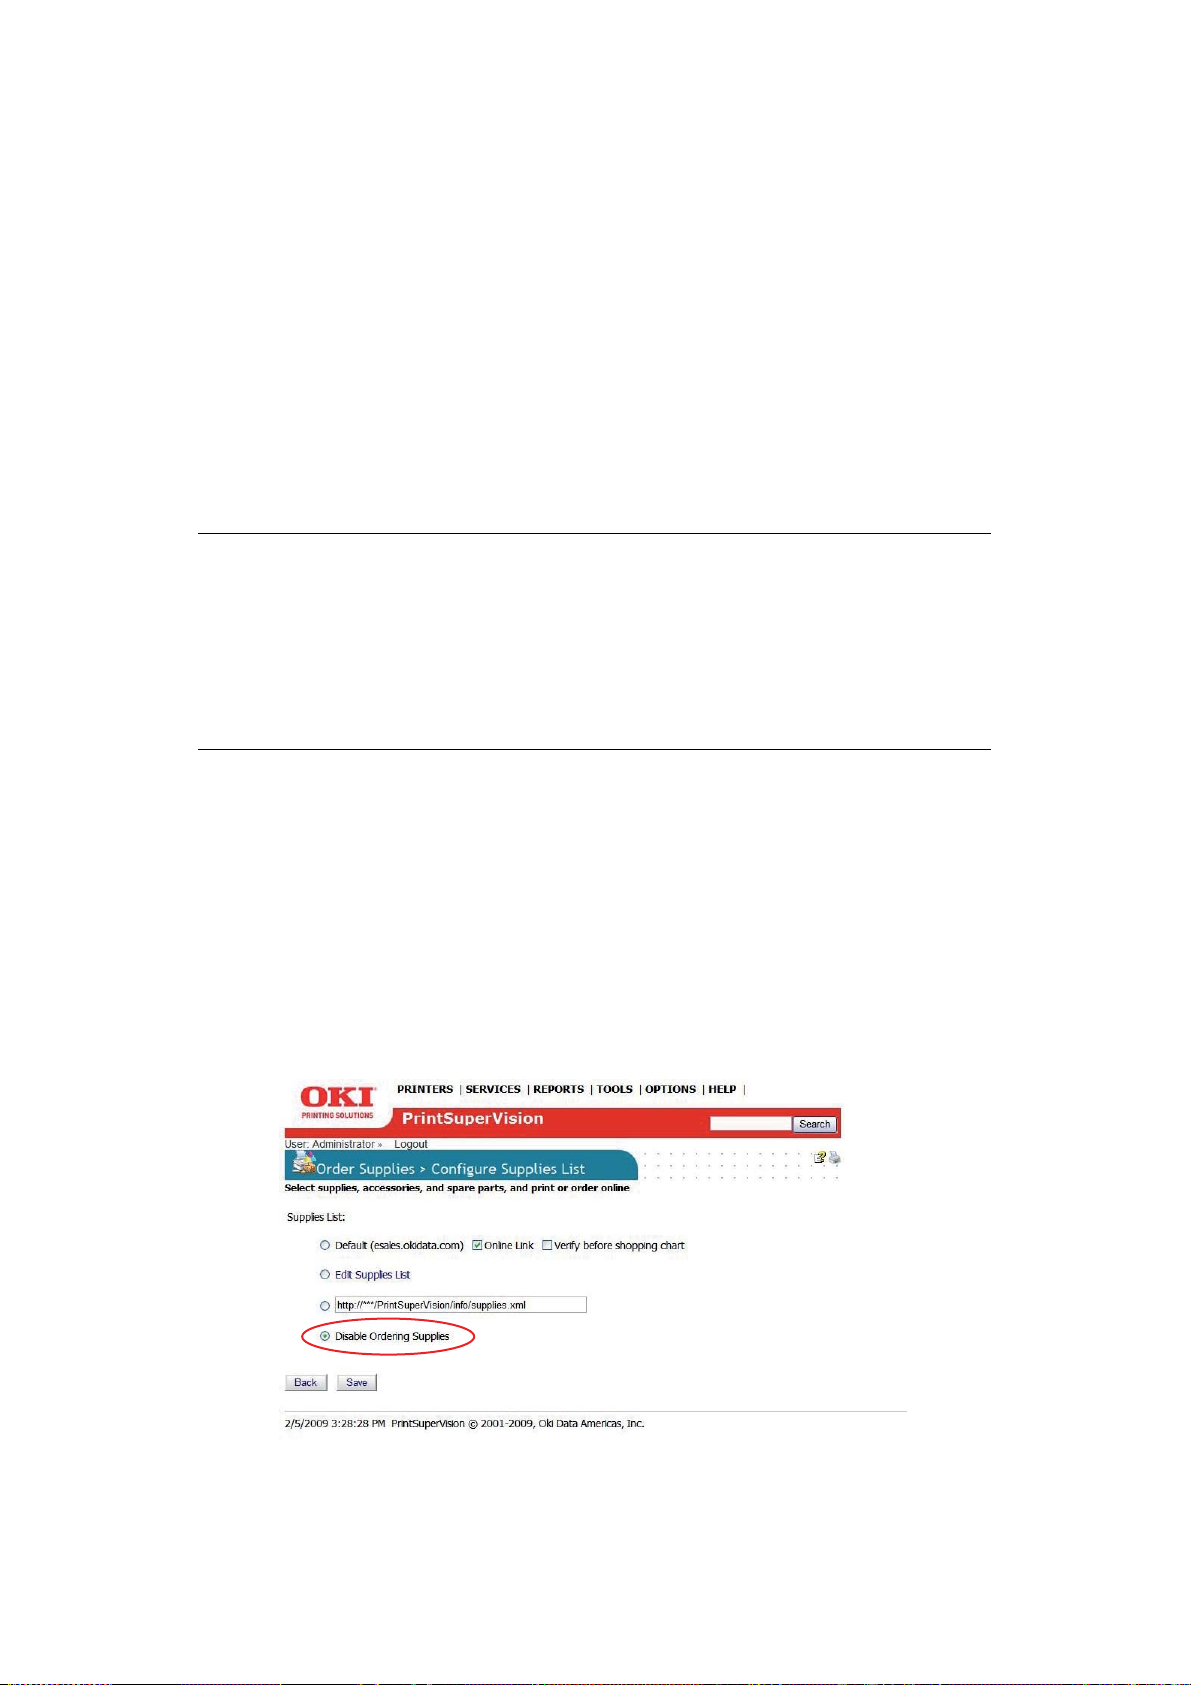
D
ISABLE ORDERING SUPPLIES
To completely disable the ability to order supplies either on-l ine or by manuall y pr inting a
supplies order page (see page 50), click the Disable Supplies Ordering button and click
Save.
Configuring supplies ordering > 51
Page 52
E
DITING THE SUPPLIES LIST (OPTIONAL LINK
The Edit Supplies List option provides a link to the same area previously described on
page 50. The link is provided for navigational convenience.
)
Configuring supplies ordering > 52
Page 53

S
UPPLIES ORDERING CALENDAR
To help you plan ahead when ordering supplies, PSV offers a monthly supplies calendar
view that indicates (based on historic usage) when a supply item will run out and when a
maintenance item needs to be replaced. And with your favorite picture, you can print the
calendar and hang it on the wall.
1. Click Tools from the main menu and Calendar from the drop down menu.
2. Select the Picture radio button if you wish t o display and/or print an imag e with the
calendar.
3. Select a date range for the calendar.
4. Select Show expected Empty from supplies report and Show maintenance
items if you wish to be reminded to both supplies and maintenance items (such as
fusers and transfer belts).
5. Click the Show Calendar button to generate your supplies ordering calendar.
Supplies ordering calendar > 53
Page 54
R
EPORTING
PSV can generate several reports that identify supplies use, predict toner replacement
dates, indicate pages printed and export device properties.
Most reports can be displayed or saved in various formats including:
> HTML
> XML
> Excel
> CSV
> Text files
Reports can be scheduled to be periodically generated and delivered by email.
Reports available depend on the PSV edition installed and user access rights.
A
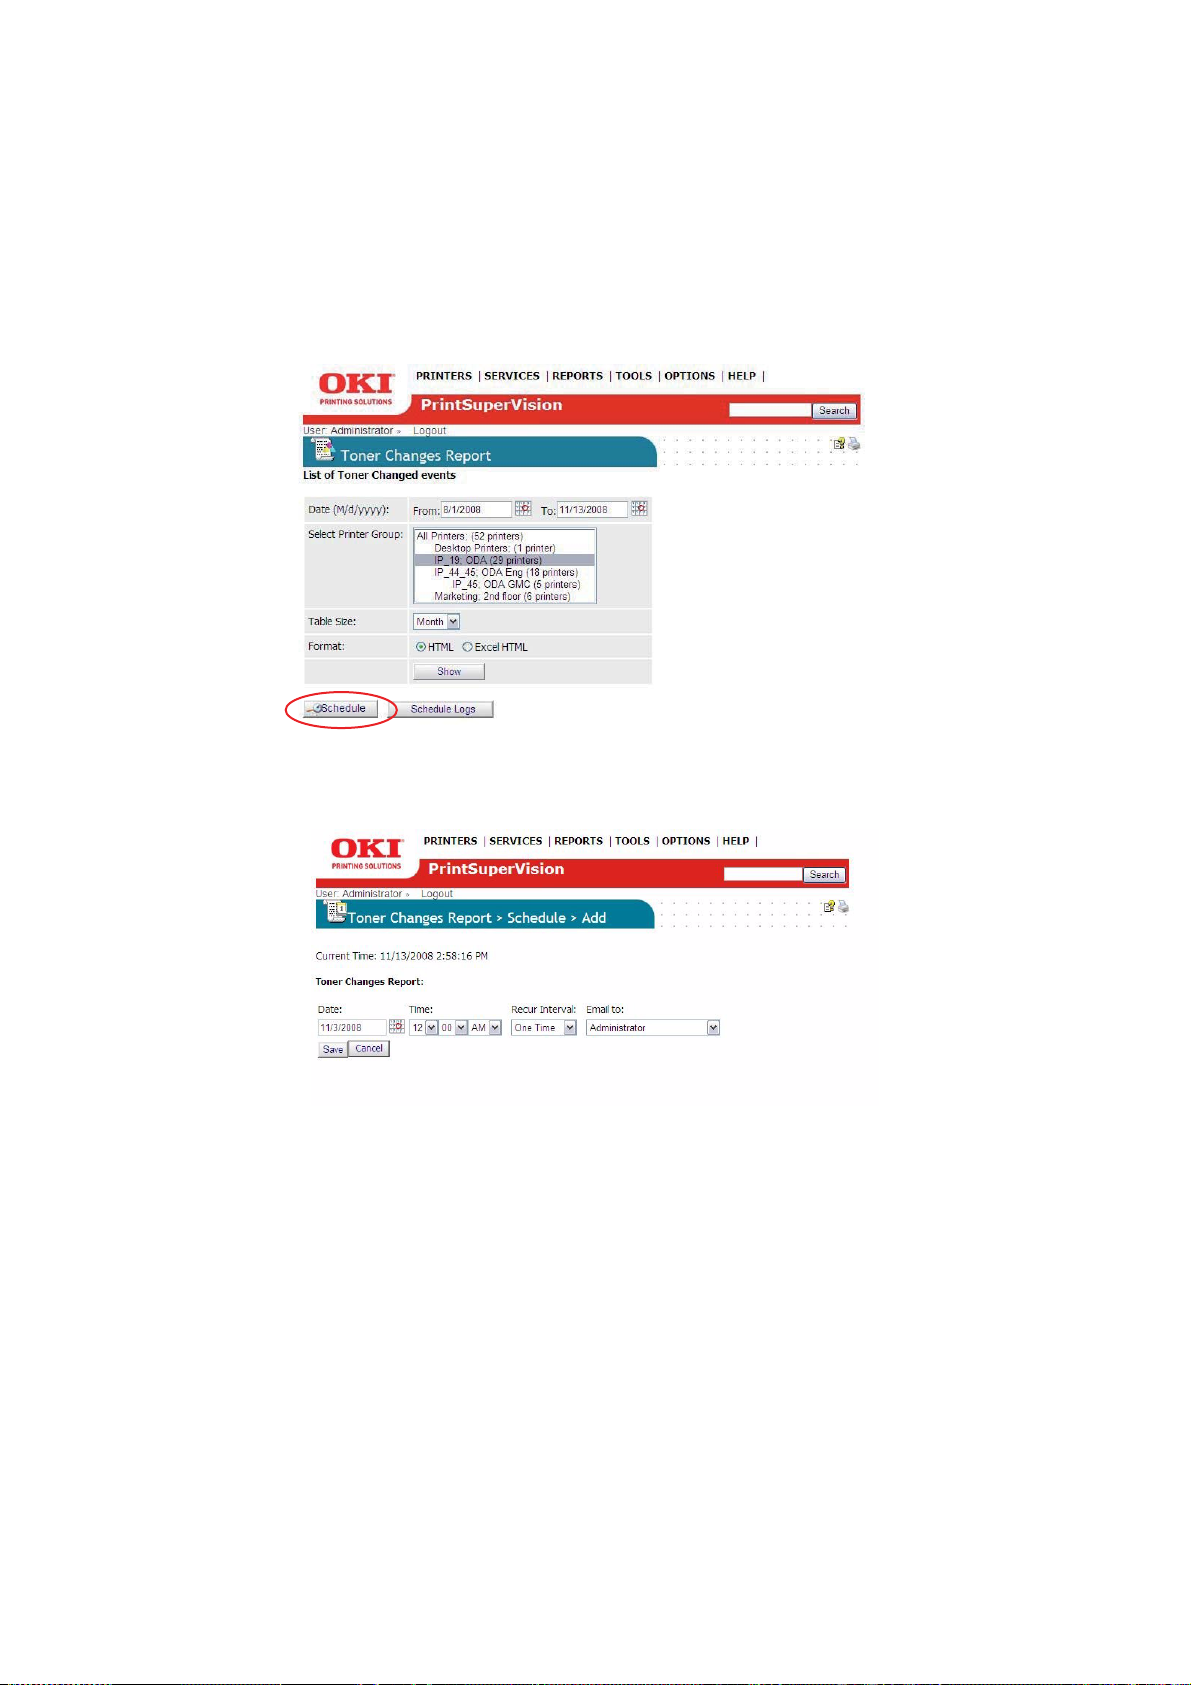
VAILABLE REPORTS
> Toner Changes Report (see page 55)
> Schedule Log Report (see page 56)
> Supplied Usage Report (see page 57)
> Printed Pages Report (see page 58)
> Color/Mono Pages Report (see page 59)
> Usage Report (see page 61)
S
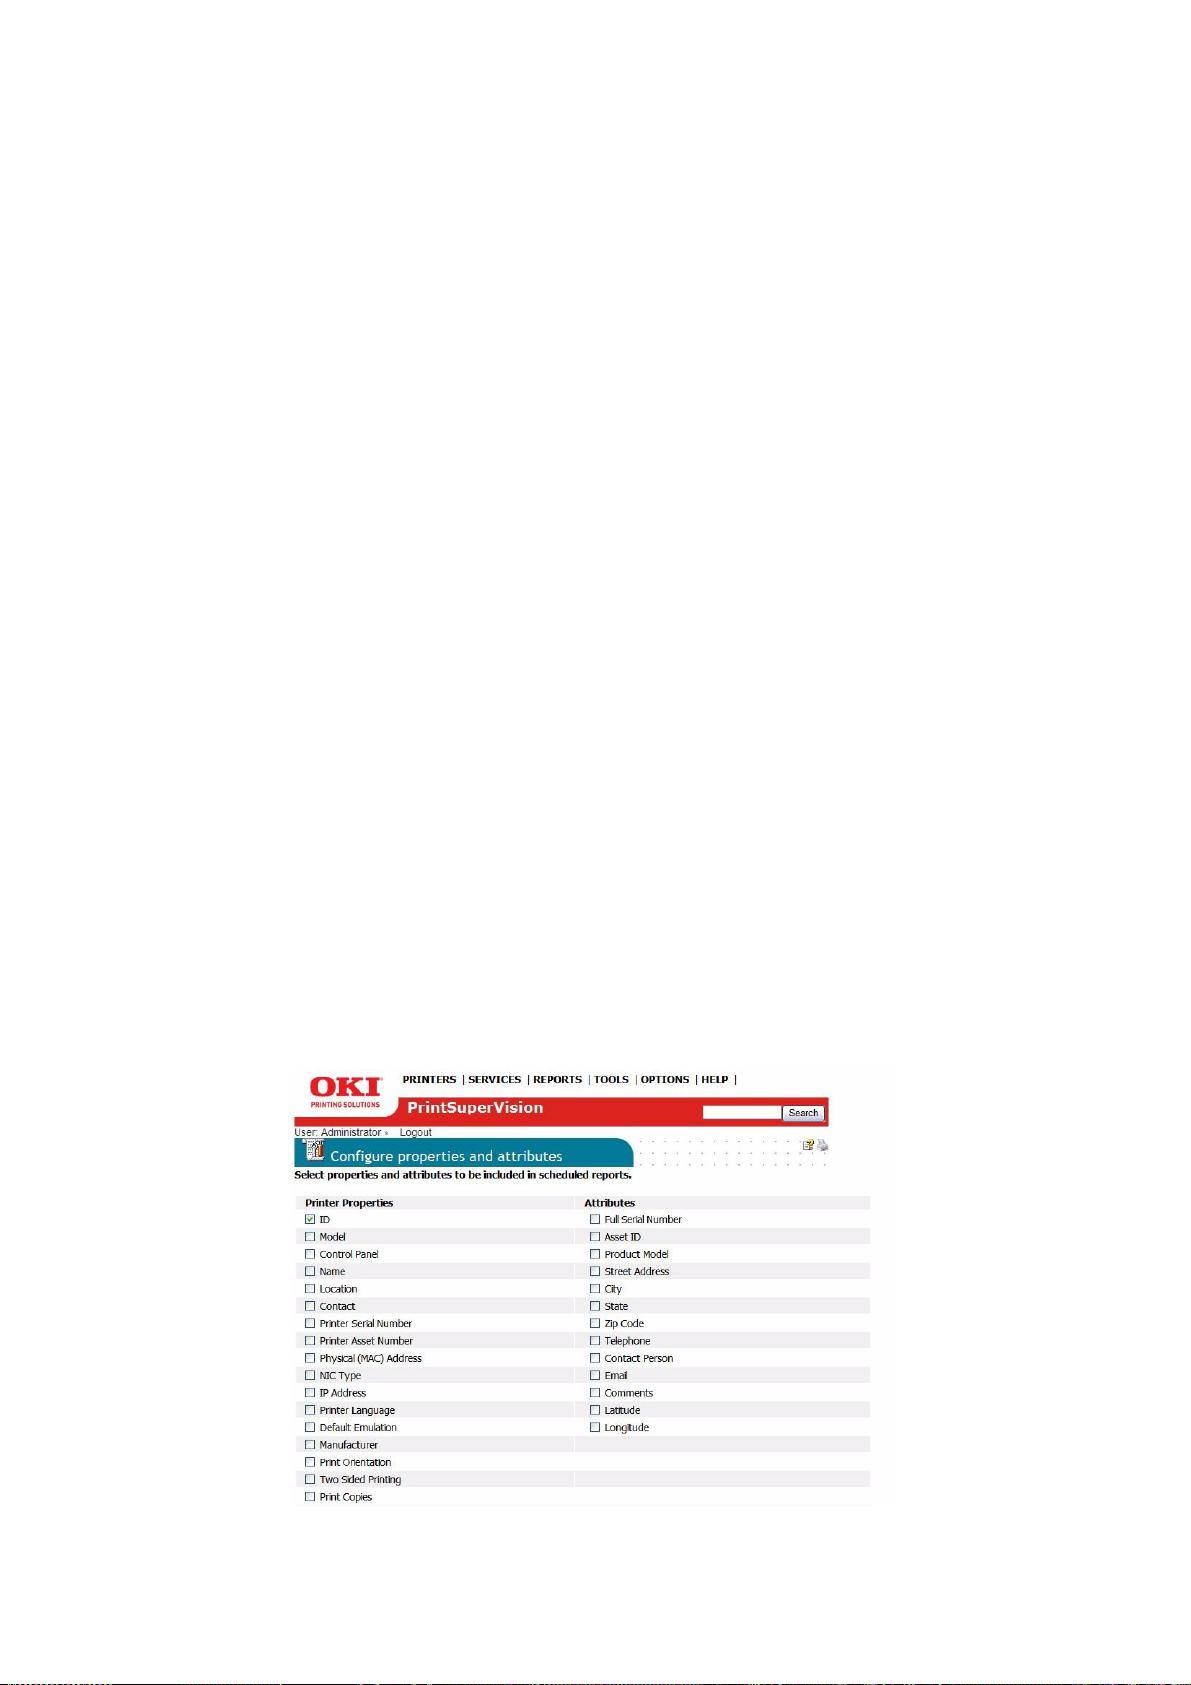
ELECTING REPORT ATTRIBUTES
Before selecting, configuring, and scheduling delivery of an individual report, you have the
option to add or delete the device attributes and properties that are available for reporting.
To select reporting attributes:
1. Select Reports from the main menu.
2. Click Configure Properties and Attributes from the drop down menu.
3. Select the desired device attributes that you want to include in all reports generated.
Reporting > 54
Page 55

4. Click the Save button at the bottom of the screen (not shown i n screen shot) to save
your selections.
T
ONER CHANGES REPORT
The “Toner Changes” Report shows the dates of the last toner cartridge replacement for a
group of devices and indicates if there was any toner remaining at the time of replacement.
This report is particularly helpful in identifying wasted toner as a result of changing the
cartridge too soon.
NOTE
The Toner Change Report is not available in the Professional Edition.
G
ENERATING A TONER CHANGES REPORT
1. Select Reports from the main menu and Toner Changes Report from the drop
down box.
2. Enter a range of dates or click on the calendar icons to select dates. Select a group
of devices to report on. Select a report format and the method to display results; b y
month or by various table sizes to make the data more readable.
3. Indicate either HTML or Excel format and click Show to generat e the report .
Reporting > 55
Page 56
Additional details for toner replacement are available by clicking the toner type links
(highlighted in blue). This presents a sub-report that can help you pinpoint toner remaining
at on a particular date.
S
CHEDULING A TONER CHANGES REPORT
A Toner Changes report can be scheduled to run periodically and configured to be sent via
email to an individual or group.
1. Click the Schedule button.
2. Select a starting date and time, select a recurring interval for the report to be
generated and sent, indicate email recipients and click Save.
The toner changes report will be generated and sent to the recipient on the dates and
times indicated.
S
CHEDULE LOG REPORT
The Schedule Log Report provides an activity status log.
1. Click Schedule Logs.
2. Enter a date range and select the desired activit y.
Reporting > 56
Page 57
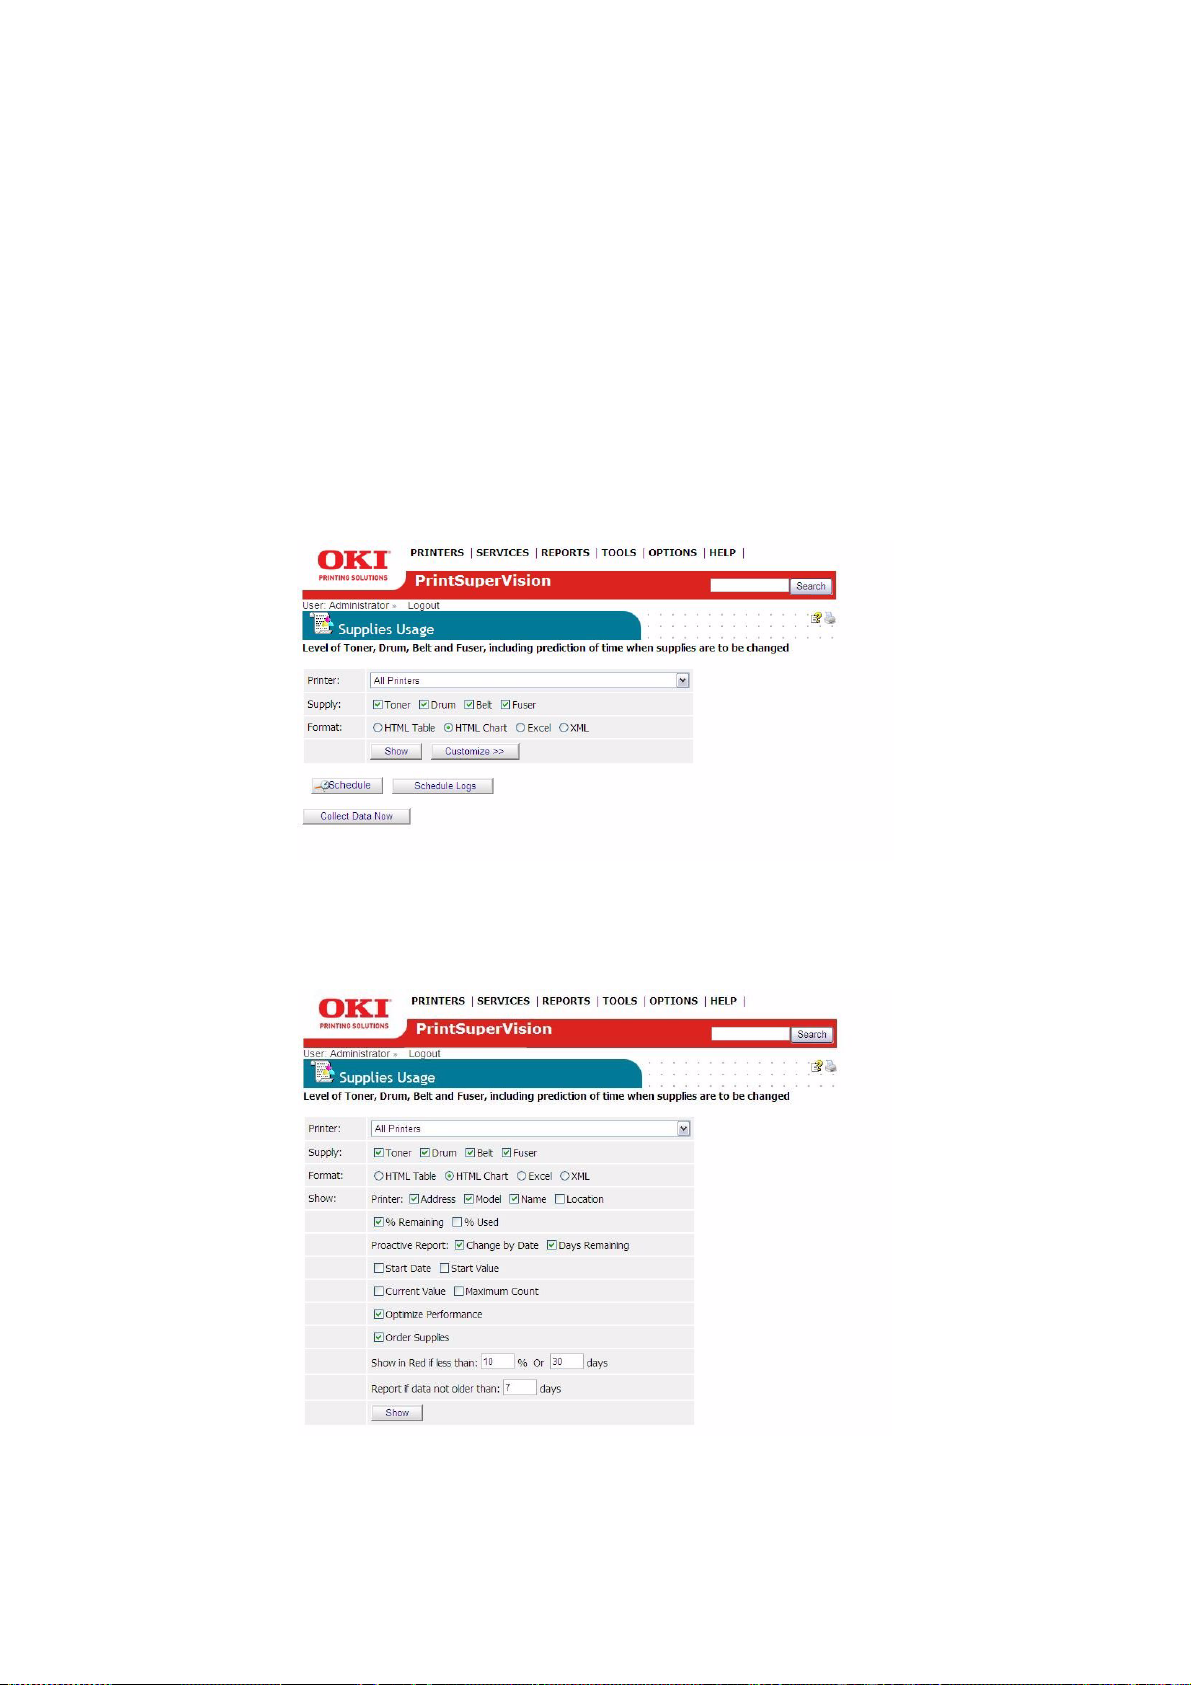
S
UPPLIES USAGE REPORT
The Supplies Usage report displays current levels of toner as well as drum, transfer belt
and fuser usage.
> The report can be created for a group of devices or a single device.
> Report data can be formatted into an HTML table, placed into an HTML based chart,
auto imported into Excel or presented in XML.
The Supplies Usage report helps you to plan your supply purchases by predicting when the
consumables will run out.
1. Select Reports from the main menu and select Supplies Usage.
2. Select an individual device or group of devices from the dropdown menu.
3. Select the supplies you wish to view and the desired format of the report.
4. Click the Show button to run the report.
After running the report with the default settings, you can also customize the report:
1. Click the Customize button to activate those features.
2. Select Change By Date and/or Days Remaining.
3. Click the Schedule button to schedule this report to run and be sent to a user via
email.
4. Click Schedule Logs to view a running log of scheduled events.
Reporting > 57
Page 58

P
RINTED PAGES REPORT
The printed pages report displays the number pages printed over a period of time by an
individual device or by a group of devices. Like all of PSV reports, you can use the
Configure Properties and Attributes feature prior to defining the parameters of the
report to add additional information to the report.
1. Select Reports from the main menu.
2. Select Printed Pages Report from the drop down box.
3. Select a single device or group of devices.
4. Enter a date range for the report.
5. Choose the desired format type.
6. Indicate whether you would like PSV to calculate average pages printed per day and
/or to include a graph or chart of the pages printed.
NOTE
If the Chart option is selected, the pages printed report can be graphed using
several different charting formats such as pie charts, bar graphs and line
graphs.
Reporting > 58
Page 59

7. Click the Show button to run the report. A sample report is displayed below.
8. The Printed Pages Report can also be schedul ed and sent to a user at predetermined
intervals. Click the Schedule button to configure the delivery frequency of the
report.
9. Click Schedule Logs for a running log of printed Pages Report events.
C
OLOR/MONO PAGES REPORT
The color/mono pages report displays the color and mono page counts and adjusts for
different paper sizes by displaying the equivalent A4/letter size page count in the total
printed pages area.
NOTE
This report is only available in the PSV Enterprise Edition.
1. From the main menu select Reports.
2. Select Color/Mono Pages Report from the drop down menu.
Reporting > 59
Page 60

3. Select an individual or group of printers.
4. Enter a desired date range.
5. Choose how the data should be displayed.
6. Click the Counter Values radio but ton to displa y mono , color and total pag e counts
as a snapshot on a particular day for a date range indicated.
NOTE
This mode will display counter values on every day of the date range
regardless of whether printing occurred on that day or not.
7. Click the Counter Changes radio button to view only the daily changes volume for
mono, color and total pages printed.
8. Click both Counter Values and Counter Changes for both.
Additional formatting options are available under the Details button such as:
> Averaging page counts over the number of days a device has been inactive
> Displaying page counts every time PSV has polled the device
> Displaying page counts from and to a specific date and time
9. Click Show to run the report.
10. Click the Schedule button to have the report sent to a user at predetermined
intervals.
11. Click the Schedule Logs button for a running log of the Color/Mono Pages Report
events.
Reporting > 60
Page 61

U
SAGE REPORT
Many devices from Oki Printing Solutions are capable of producing a Usage Report that is
generated and printed directly from the device. The Usage report tracks black and color
printed pages and displays page counts in A4/Letter size page equivalents (which is
generally required for pay-for-print scenarios).
PrintSuperVision provides remote access to the Usage Report. As an added convenience,
supplies and consumable status is also displayed in the Usage Report generated from
PrintSuperVision.
NOTE
In most Oki devices, the Usage Report feature can be disabled from the
operator panel on each device. If the Usage Report feature is disabled,
PrintSuperVision will be unable obtain the Usage Report page count
information.
As an alternative, an option is available in the Usage Report section of PrintSuperVision that
enables “engine counts” to be displayed rather than page count data. Engine counts are
used primarily for maintenance purposes and are referred to as “life counts” of the device.
To generate a Usage Report:
1. Select Reports from the main menu.
2. Select Usage Reports from the drop down box.
3. Select a group of devices and indicate the file format of the Usage report.
> Show Engine Counts is an option that displays life counter information but is
not needed if the Usage Report option is enabled in the device and is reporting
page count data to PrintSuperVision.
> The Collect Data option instructs PSV to obtain the latest information from the
device before the usage report is generated.
4. Click the Show button to generate a report.
> The Email Configuration button is provided as a navigational convenience and
is not necessary if your email system has already been configured.
> The Send Email Now button sends the report in Email immediately to the
recipient indicated in the drop down box.
Reporting > 61
Page 62

5. Click the Schedule button to have the report sent to a user at predetermined
intervals.
6. Click the Schedule Logs button for a running log of the Color/Mono Pages Report
events.
As an added convenience PrintSuperVison can enable the Usage Report option remotely on
some devices by clicking on the Enable Usage Report Feature. Select a group of devices
and click Start.
E
XPORTING PROPERTIES AND ATTRIBUTES
The Export Printers Data option allows you to save all device properties and attributes for
all devices PSV monitors. The data can be exported in several formats including Text, Excel,
CSV, XML, Compact XML and HTML.
1. Select Reports from the main menu.
2. Select Export Printers Data from the drop down box.
3. Select the desired format for the attribute/properties data.
4. Click Show.
Reporting > 62
Page 63

A
DDING DEVICE ATTRIBUTE DATA
PrintSuperVison allows a user to attach attributes to a device to help locate it, to determine
who is responsible for maintaining it, etc. The added attributes are not reported by the
device, so as a user you must manually enter data into the attribute fields.
To add attribute data:
1. Select Printers from the main menu.
2. Select Printers from the drop down menu.
3. Click on any status icon (printer icon in the left margin) to link to a print device's
status page.
4. Click the Attributes button.
5. Click Edit.
6. Enter data in any of the Attribute fields and click Save at bottom of the screen.
The user-entered attribute information can be included in several reports if the same
Attributes are selected from the Configure Properties and Attribute section listed under
Reports in the main menu.
NOTE
An Admin can also import a CSV file that already contains the desired
attributes associated with many devices at once.
1. Click Printers from the main menu.
2. Select Import Printers and Attributes.
3. Browse for an appropriate CSV file, indicate how the fields are delimited and click
Import.
Adding device attribute data > 63
Page 64

C
ONFIGURING A PRINT DEVICE REMOTELY
In addition to all of the configuration options that PSV provides, an Admin can always link
to the device's on-board web page remotely to make even more configuration settings.
1. From the main menu select Printers.
2. Click Printers from the drop down menu to display a list of print devices.
3. Click on the highlighted IP address of a device and enter the Username and
Password if required.
4. Once you have logged into the device's web server you can make various network
settings, email settings and maintenance settings that help to better manage your
fleet of print devices.
Configuring a print device remotely > 64
Page 65

P
ERFORMING DAY TO DAY TASKS
Depending on the degree of automati on set up during initial configuration, PSV can
essentially run in the background on autopilot and only alert you when a device needs
attention, or routinely deliver usage reports.
But there will always be situations where you need to access PSV to check the status of a
device, check the level of supplies or to manually run reports.
V
IEWING DEVICE STATUS
To view a list of devices that were previously discovered, select Printers from the main
menu and click either Printers, My printers, or Near Me.
> Printers provides a list of all discovered devices.
> My printers displays only the devices that you previously added to the My Printer
group.
> Near Me automatically displays the print devices that share similar IP addresses
with the computer you are using to access the PSV server. The Near Me option
cannot be customized.
When viewing a long list of devices, make sure to scroll to the bottom of the screen and
click the Refresh button to obtain the most recent status information on all devices
displayed.
You will notice after clicking Refresh, a teal color moves from line to line indicating that
the device status is being refreshed. Notice too that the printer icons in the left margin are
now color coded to quickly determine the status of the device.
Green indicates that the device is running fine, there are no Alerts and no supplies
need to be ordered.
Yellow indicates that an alert has been received, an error has been detected or a lower
level (less critical) action needs to be taken.
Red indicates that a critical error or serious Alert has been received and immediate
action is required.
The information icon indicates an event has occurred, such as toner or drum
replacement, cassette drawer is open or the device is printing. Generally no action is
required when the information icon is displayed.
The “no access” icon indicates that the device is disconnected from the network, or is
not responding.
At any time while viewing the list of devices you may click on the status icons in the left
margin and link directly to the status page of the individual device.
Q
UICKLY ACCESS A GROUP OF DEVICES
As an added convenience, a list of groups is displayed when “Printers” is selected from the
Printer menu. Highlight a group name and the devices associated with the group are
instantly displayed or use the Search option to locate a group.
Performing day to day tasks > 65
Page 66

C
HANGING THE DEVICE PROPERTIES DISPLAYED
At any time, you may customize the device properties you wish to display on the Printers
Page, with the exception of IP address which is always displayed.
1. Select Printers from the main menu.
2. Select Printers from the drop down menu.
3. Click the Select Properties link located just above the list of groups.
4. Select the properties that you wis h to display for each device. Notic e too that you
may select the device attributes that have been entered manually such as the city,
state or postal code that pertains to the location of the device.
5. Click on the desired check boxes.
6. Click Save at the bottom of the page.
Performing day to day tasks > 66
Page 67

S
EARCHING FOR A DEVICE
From the Printers Page you can use two methods to locate a particular device.
1. Click Models for a list of devices.
2. Select the model name of the device and click the Show button.
3. Use “Search” to type in the desired model name or number.
C
HANGING LANGUAGES
The language displayed in PrintSuperVision can be changed at any time without the need
to install language-specific versions of the application. To change language:
1. Select Options from the main menu.
2. Select Locale from the drop down box.
3. Click the appropriate radio button.
4. Click the save button.
The new language will be displayed.
NOTE
Version 3.6 has not been fully translated into all languages displayed.
Performing day to day tasks > 67
Page 68
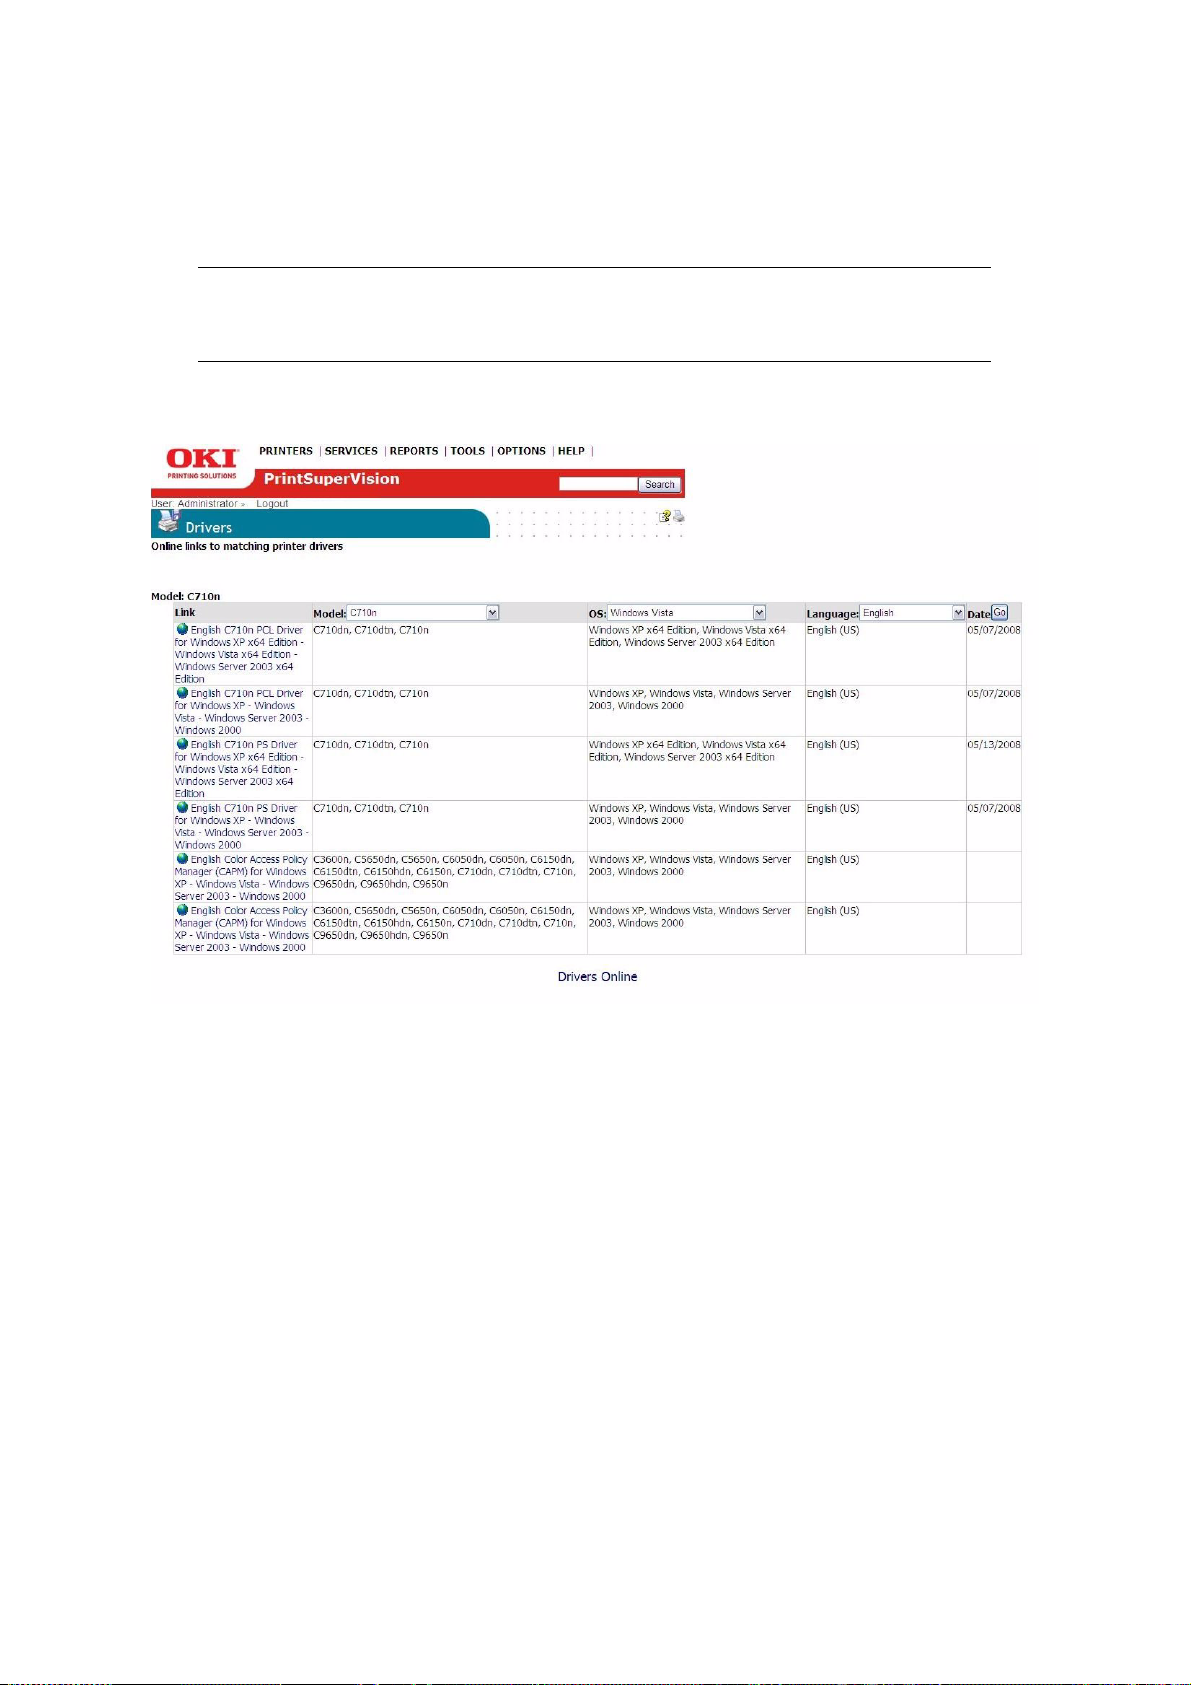
D
OWNLOADING OKI DRIVERS
PSV provides a built in search mechanism for Oki device drivers and quick li nks to download
a specific driver. This feature saves time by eliminating the need to navigate, locate, and
download drivers from the appropriate Oki website.
NOTE
The driver search and download feature is only available when United States/
English is selected as the Locale during setup.
1. Select Tools from the main menu.
2. Select Drivers from the drop down box.
3. Select the model, OS and Language of driver for which you are searching.
4. Click Go.
5. Click the link to the desired driver in the left column.
6. Click Run or Save the driver.
Performing day to day tasks > 68
Page 69
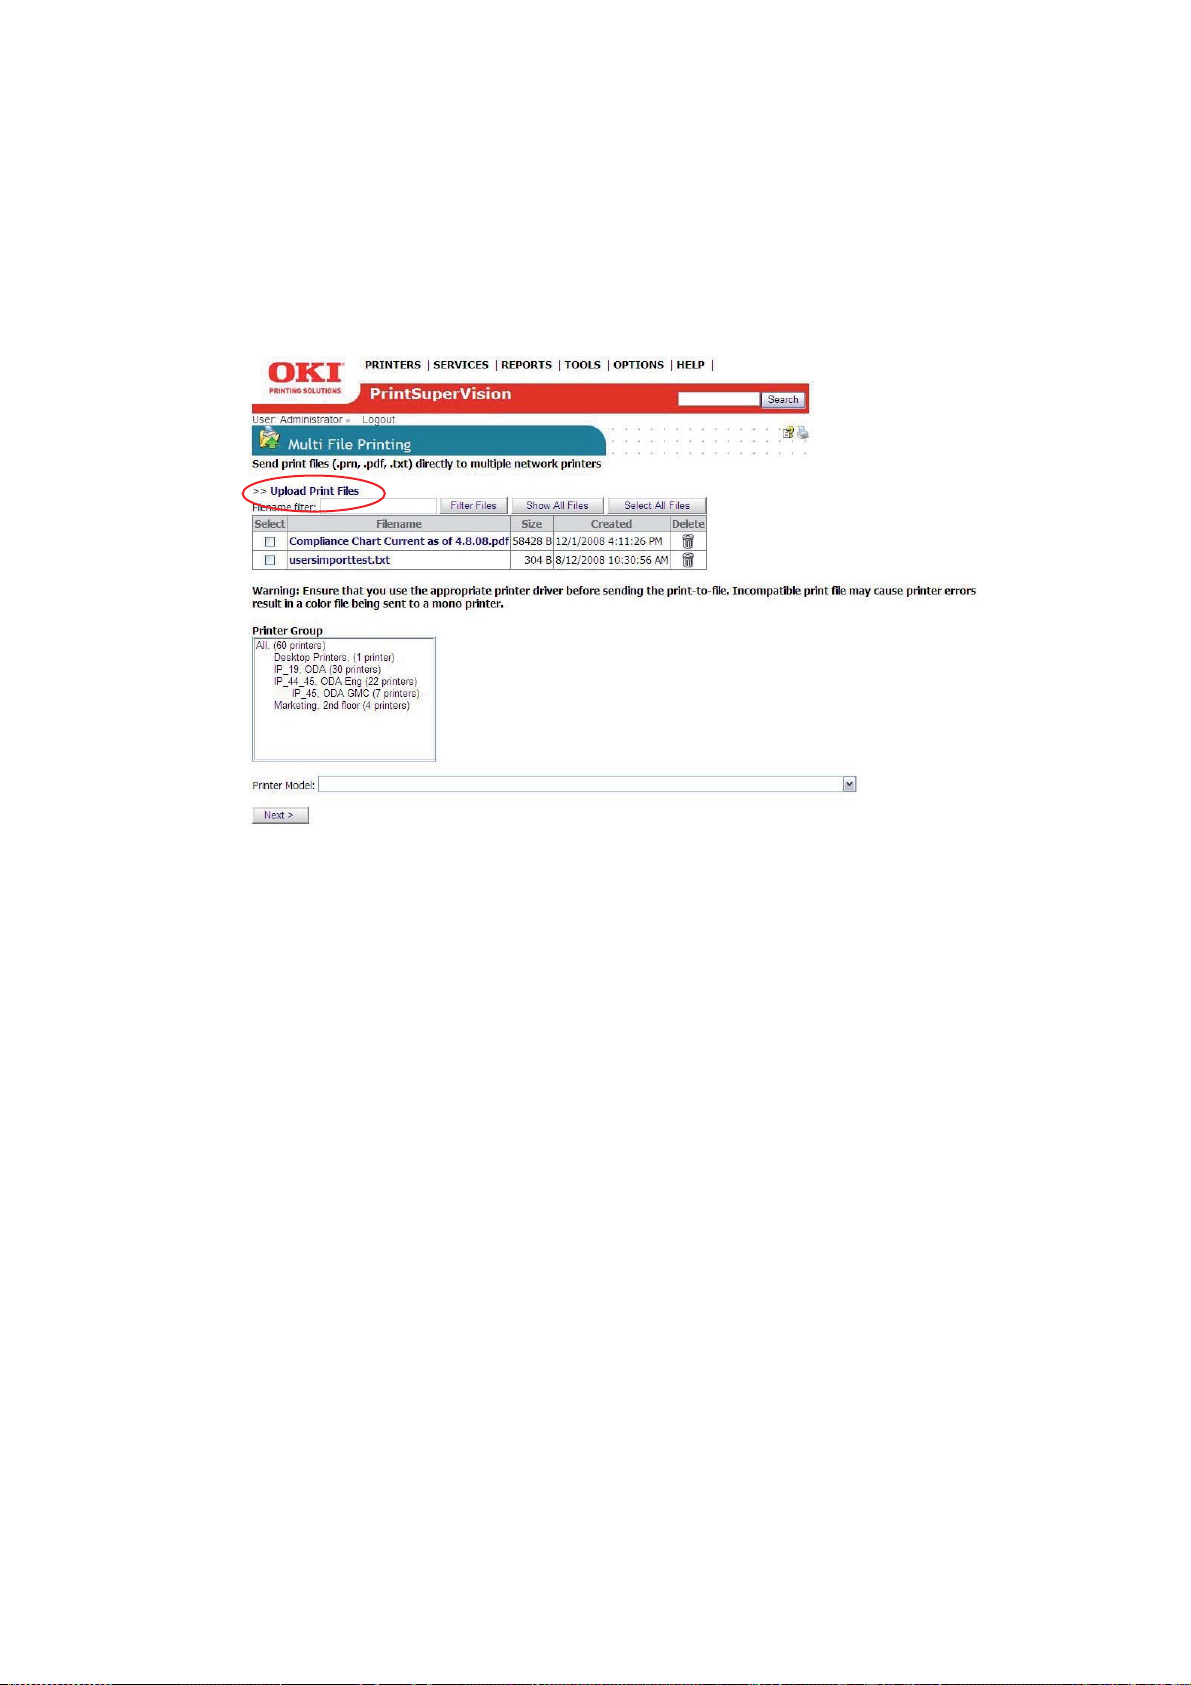
P
RINT TO REMOTE LOCATIONS
PrintSuperVision can send print jobs from a centralized location t o many remote devices at
one time. For example, an in-house graphic designer can create marketing material for
their branch offices and use PrintSuperVision's Multi-File Printing Feature to distribute
content electronically without the use of email.
1. Select Tools from the main menu.
2. Select Multi-file Printing from the drop down box.
3. Click Upload Print Files.
4. Click Browse to locate any PDF, PRN or TXT file.
5. Click the Upload button.
The file is now ready to be distributed to one or many devices at one time using FTP,
Port 9100 and/or LPR protocols.
6. Add more files by repeating the process or click Continue to return to the Multi-file
Printing main screen.
7. Select the desired file to send by clicking the checkbox. A Select All and Show All
button have been included for convenience. You can also filter individual file formats
by typing the format and clicking the Filter Files button.
Performing day to day tasks > 69
Page 70

C
REATING A MAINTENANCE LOG
The Maintenance Log feature allows you to keep track of services performed on individual
devices and acts as tool to help keep track of supply items kept in your inventory including
the price you paid for the item. All of the data in this area must be entered by the user.
1. Select Tools from the main menu.
2. Select Maintenance Log from the drop down box.
/
MANAGING SUPPLIES INVENTORY
The screen shown above is used for searching for specific supply items and service calls
that have been previously entered. Add various supply items and service calls before
attempting to generate a list.
To add supplies to your electronic storage cabinet, click the Supplies but ton.
Enter the Brand of device, model name, SKU of the supply item and select the type of
supply from the drop down menu. You can even enter the quantity that you are adding to
inventory and price paid for the item.
Performing day to day tasks > 70
Page 71
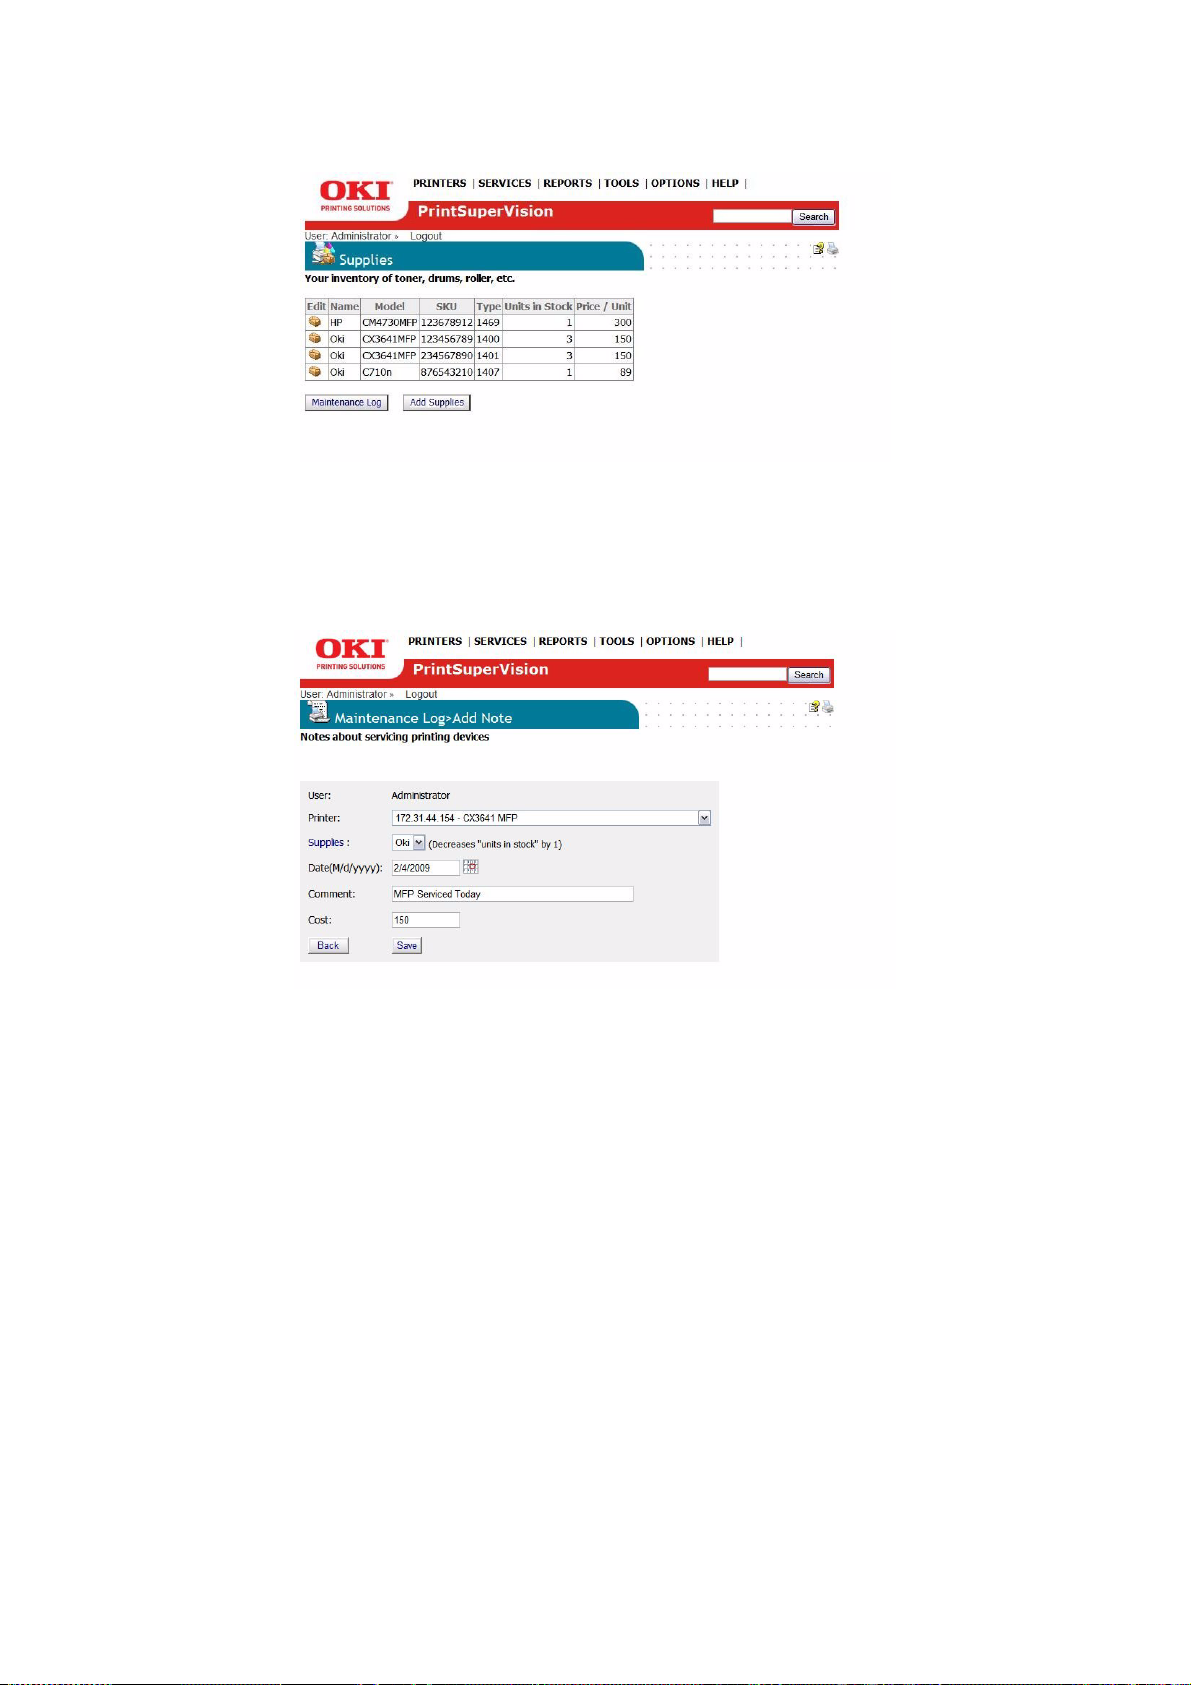
Click Save.
You may return to the electronic storage cabinet at any time to edit the items, reduce the
amount of inventory or delete the supply item. Click the brown box icon in the edit column
to edit supply items.
To record a service call, click the Maintenance Log button and you will return to the main
Maintenance Log screen. Click the Add Note button.
Select the appropriate device from the drop down list, enter the date the service occurred,
and add comments and the cost of the service. Click Save and a record of the service call
is saved.
Performing day to day tasks > 71
Page 72
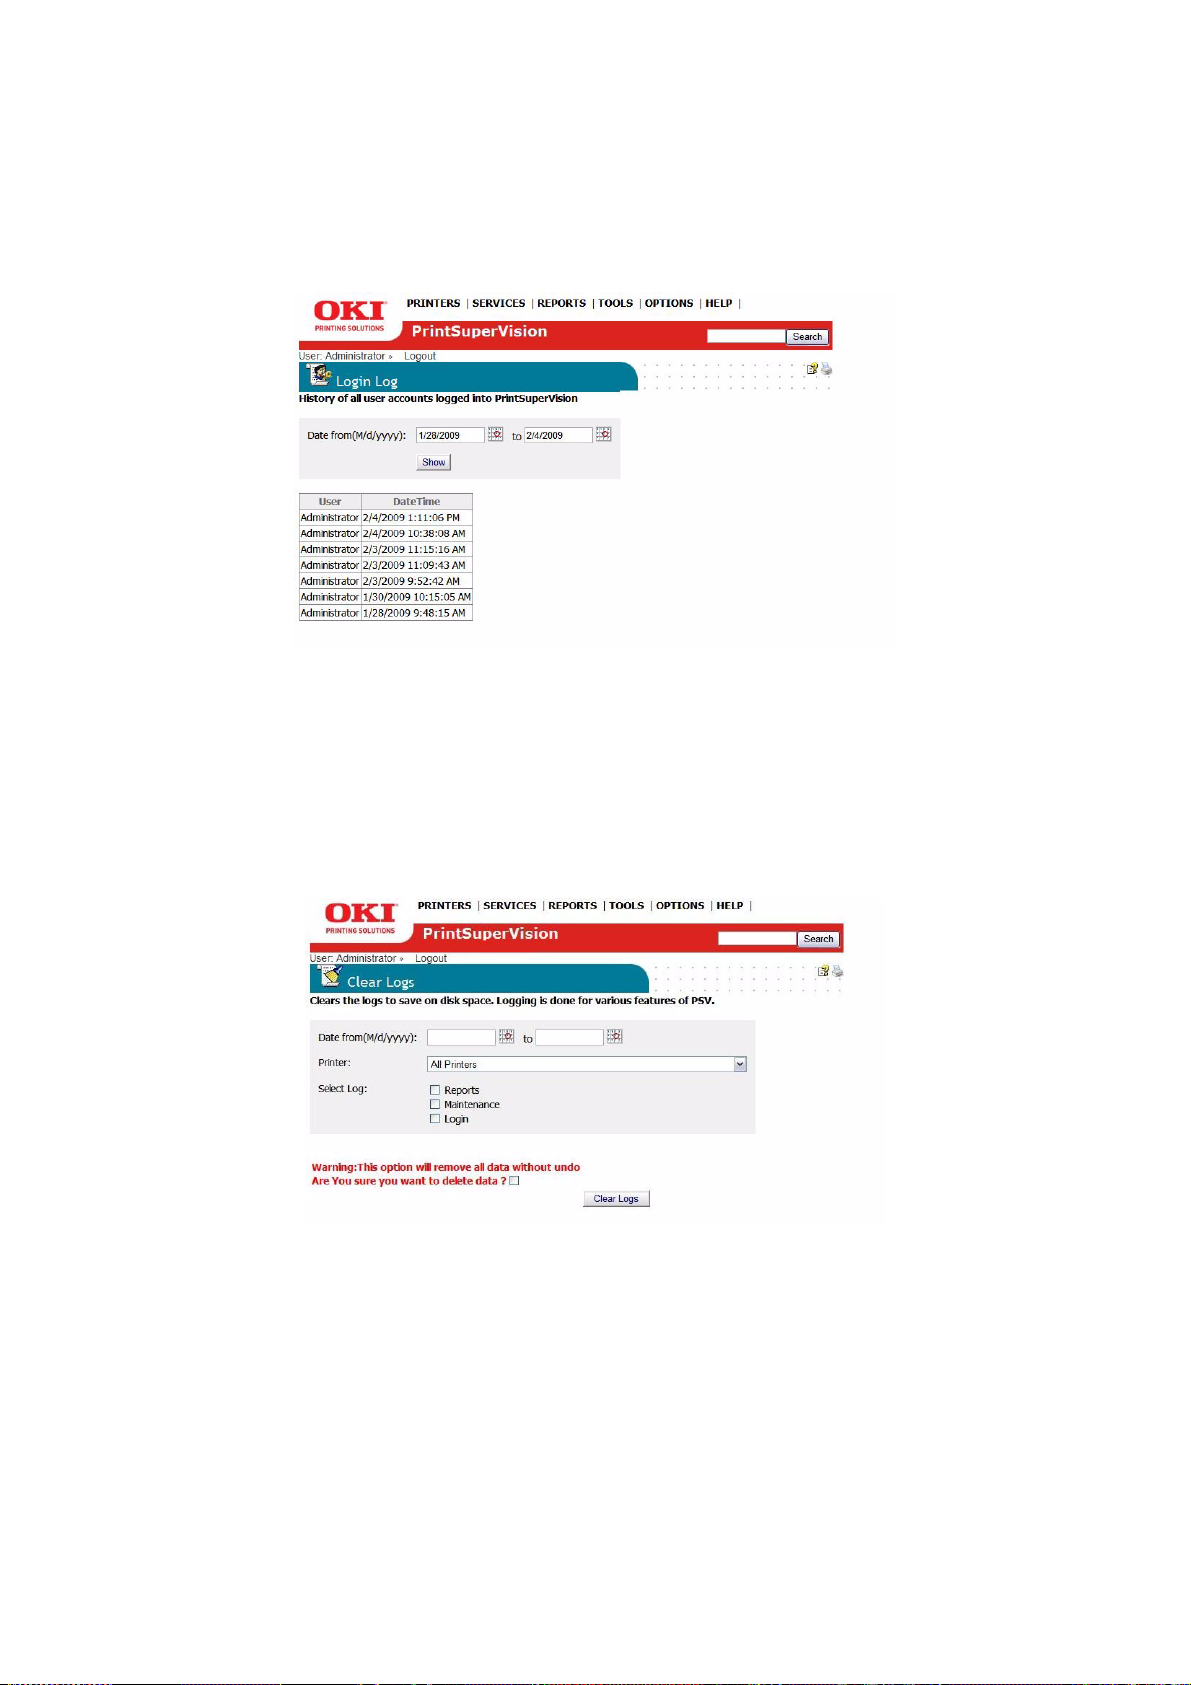
C
REATING A LOGIN LOG
The login log simply tracks who has logged into the system during a specific time interval.
1. Select Options from the main menu.
2. Select Login Log from the drop down box.
3. Enter the date interval and click Show.
C
LEARING (DELETING) LOGS
To save disk space you may choose to clear (delete) all report logs, maintenance logs and
login logs.
1. Select Options from the main menu.
2. Select Clear Logs from the drop down box.
3. Enter the date range, choose a specific device (or all devices) and indicate the type
of log to delete.
4. Click the warning check box then click the Clear Logs button to permanently delete.
Performing day to day tasks > 72
Page 73

P
UBLIC WEB SERVICES
PrintSupervision offers developers sample test applications and func tion calls to integrate
PSV with your other Enterprise applications.
1. Select Services from the main menu.
2. Select Public Web Services from the drop down box.
Six samples test applications are provided and explained below:
> AboutVersion - Shows the PSV version number
> Address2 printers - Provides the details of a specific device
> GetProperties - Shows device properties
> Printers - Provides a list of the devices along with device details
> Status Codes - Provides a list of Alert Status Codes, their descriptions, and their
severity level
> StatusSeverityNames - Shows available status name choices such as OK, Info,
Warning, Error
Public web services > 73
Page 74

Oki Europe Limited
Blays House
Wick Road
Egham
Surrey, TW20 0HJ
United Kingdom
Tel: +44 (0) 208 219 2190
Fax: +44 (0) 208 219 2199
www.okiprintingsolutions.com
 Loading...