

Page 1
PostScript® 3™
emulation Kit
Installation Instructions
PostScript 3 emulation Kit Part Number: 70049601
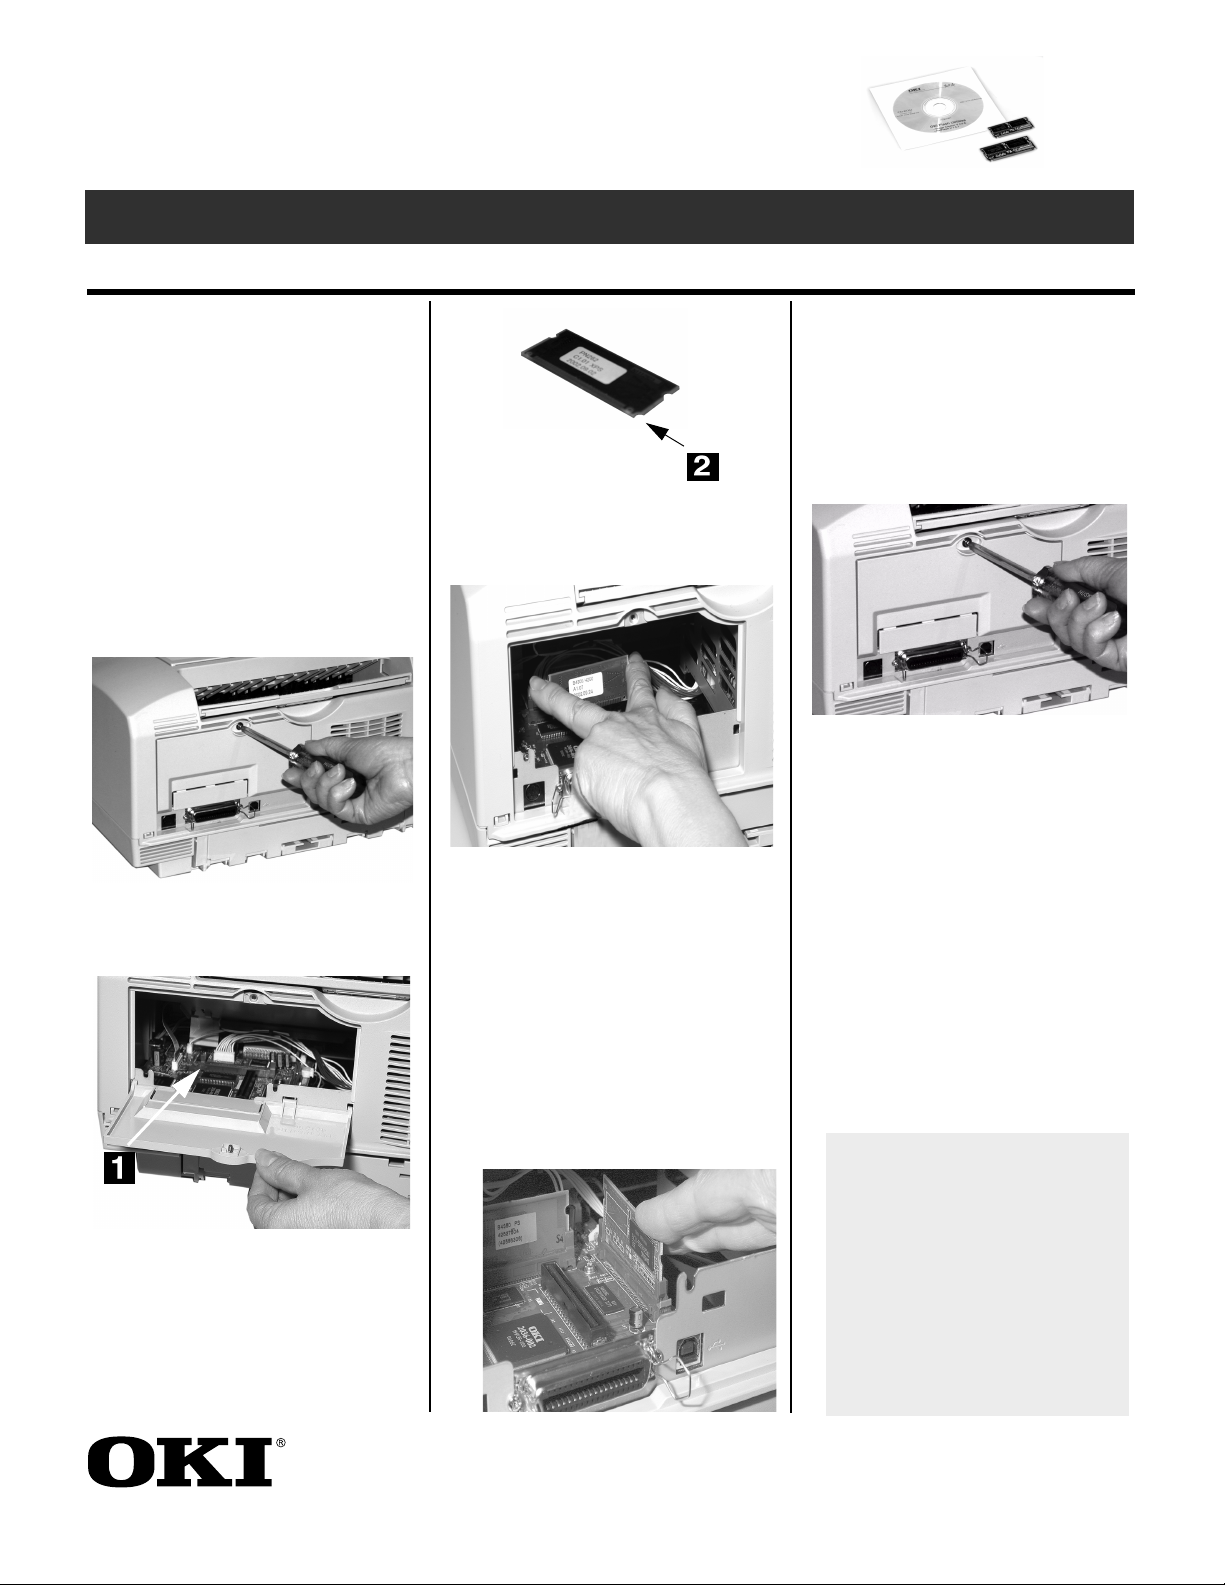
1. Unpack the cards and remove any
shipping materials. The
PostScript card is marked PS on
the label. The memory card is
marked 16MB on the label.
2. Turn off the printer, and remove
the power cord and interface
cable.
NOTE: If you have a network card
installed, remove it temporarily before
installing the PostScript option.
3. Loosen the access panel screw.
4.
Remove the access panel and locate
the PostScript connector (1).
5. Install the PostScript card:
a. Hold the card (make sure PS is
on the label) so that the notch
(2) is on the bottom right
corner.
b. Position the card into the
connector.
c. Press down on the card until it
snaps into place and the gold
contacts are fully inserted in
the connector.
6. Install the memory chip:
Insert the card with the notch
towards the front of the printer.
Press down on the card until it
snaps into place and the gold
contacts are fully inserted in the
connector.
7. Check to make sure that both
cards are fully inserted and
installed correctly.
8. Replace the access panel:
a. Align the panel tabs at bottom.
b. Swing the panel up and in place.
c. Tighten the screw.
9. Verify Installation
Print a Menu Map:
a. Press the Menu button one or
more times until INFO.MENU
appears on the display.
b. Press SELECT twice. The
MenuMap prints.
c. PSE Program version and Total
Memory Size 32 MB appears
in the header, and PRINT PSE
FONT in the Information
Menu. If not, check to be sure
that the cards are installed
correctly.
Your printer is factory set to AUTO
EMULATION (AUTO appears on
the printer display). In this setting
the printer will sample data and
automatically switch between
PostScript emulation and the other
emulations. If the printer is not set to
AUTO EMULATION, see the
User’s Guide for instructions to set
it in the printer Menu.
(Continued on back)
Oki Data Americas, Inc., Mt. Laurel, NJ 08054
http://www.okidata.com
58369502
Page 2

PostScript® 3™
emulation Kit
Installation Instructions
PostScript 3 emulation Kit Part Number: 70049601
Install the PostScript
Emulation
Printer Drivers
Windows
1. Make sure the cable is connected
to your printer and PC and your
>
Settings
OFF.
>
Printers
printer is turned
2. Place the OKI CD into your CD-
ROM drive.
3. Click Next to accept the terms of
the License Agreement.
4. Select your language.
5. Software Installation screen
appears. Click the Printer
Driver Installer button.
6. Follow the on-screen
instructions.
Reconfigure Memory in the
Printer Driver
1. Click
2. Right-click the printer icon and
3. Click Advanced.
4. Click Installable options.
5. Change memory configuration to
6. Click OK.
Start
click Properties.
32 MB.
Macintosh
OS 9.1+
1. Turn on the printer, then turn on
the computer.
2. Place the OKI CD into your CDROM drive.
3. Double-click the OKI CD icon
that appears on the desktop.
4. Open the MAC folder.
5. Double-click the PSDRV folder.
6. Select your language.
7. Double-click the OKI MAC
Installer PS icon.
8. Click Continue and accept the
license agreement.
9. Select MAC OS 9.1+. Click
10.When installation is complete,
click Quit.
Create the Desktop Printer for USB
1. Navigate to Applications/Mac OS
9 Utilities.
2. Double-click the Desktop Printer
Utility icon.
3. Highlight printer (USB) under
Create Desktop.
4. In the drop-down box, select
LaserWriter 8 and click OK.
5. Under PostScript Printer
.
Description (PPD) file, click
Change.
6. Make sure the Printer
Descriptions folder is selected in
the drop-down box.
7. Highlight your OKI printer
model, then click Select.
8. Under USB Printer Selection,
Click Change.
9. Highlight the OKI printer model
you have, click OK.
10.Click Create. Click Save.
11.Reconfigure Memory: Run Auto
Setup; set printer memory to
32MB.
Install
OS X.1+
1. Turn on the printer, then turn on
the computer.
2. Place the OKI CD into your CDROM drive.
3. Double-click the OKI CD icon
that appears on the desktop.
4. Open the MAC folder.
5. Double-click the PSDRV folder.
6. Select your language.
7. Click
.
8. Click Continue and accept the
9. Select the appropriate MAC OS
10.When installation is complete,
OKI Mac Installer PS
License Agreement.
X driver. Click Install.
click Quit.
Add the printer for USB:
1. Run the Print Center. Click
Printer.
2. Select OKI USB from the dropdown menu.
3. Reconfigure Memory: Go to
Printers > Show Info >
Installable Options; set printer
memory to 32MB.
Add the printer for a Network:
1. Run the Printer Center.
2. Click
3. Click Add Printer
4. Select OKI TCP/IP from the drop
5. Enter the IP address
6. Highlight the printer model from
7. Click Add.
8. Close the Print Center.
Printers
down menu.
the product list.
from the menu bar.
icon.
Add
Oki Data Americas, Inc., Mt. Laurel, NJ 08054
http://www.okidata.com
PostScript is a trademark of Adobe
Systems Inc.
 Loading...