

Page 1
MICROLINE
790/791
Printer Handbook
Page 2

Every effort has been made to ensure that the information in this document is complete, accurate and up-to-date. OKI assumes no responsibility for the results of errors
beyond its control. OKI also cannot guarantee that changes in software and equipment made by other manufacturers, and referred to in this handbook, will not affect
the applicability of the information in this manual. Mention of software products manufactured by other companies does not necessarily constitute endorsement by OKI.
OKI and MICROLINE are registered trademarks of OKI Electric Industry Company,
Ltd..
IBM and PC are registered trademarks of International Business Machines Corporation.
Epson is a registered trademark of Seiko Epson Corp. Lotus and 1-2-3 are registered
trademarks of Lotus Development Corporation. Microsoft and MS-DOS are registered trademarks and Windows is a trademark of Microsoft Corporation.
WordPerfect is a registered trademark of WordPerfect Corporation.
Page 3

Important Safety Instructions
Your OKI printer has been carefully designed to give you years of safe, reliable performance. As with all electrical equipment, however, there are a few basic precautions
you should take to avoid hurting yourself or damaging the unit:
• Read the setup and operation instructions in this manual carefully. Be sure to
save it for future reference.
• Read and follow all warning and instruction labels on the printer itself.
• Unplug the printer before you clean it. Use only a damp cloth; do not use liquid
or aerosol cleaners.
• Place your printer on a firm, solid surface. If you put it on something unsteady,
it might fall and be damaged; if you place it on a soft surface, such as a rug, sofa,
or bed, the vents may be blocked, causing it to overheat.
• To protect your printer from overheating, make sure no openings on the printer
are blocked. Don’t put the printer on or near a heat source, such as a radiator or
heat register. If you put the printer in any kind of enclosure, make sure it is well
ventilated.
• Do not put anything into the ventilation slots on the sides of printer, you could
get a shock or cause a fire.
• The printhead can get quite hot when it has been printing for a length of time.
Do not touch the printhead untill it has had a chance to cool off.
• Do not use your printer near water, or spill liquid of any kind into it.
• Be certain that your power source matches the rating listed on the back of the
printer. If you’re not sure, check with your dealer or with your local power company.
• Your printer has a grounded plug as a safety feature, and it will only fit into a
grounded outlet. If you can’t plug it in, chances are you have a non-grounded
ontlet; contact an electrician to have it replaced with a grounded outlet. Do not
use an adapter to defeat the grounding.
• To avoid damaging the power cord, don’t put anything on it or place it where it
will be walked on. If the cord becomes damaged or frayed, replace it immediately.
Page 4

• If you’re using an extension cord or power strip with the printer, make sure that
the total of the amperes required by all the equipment on the extension is less
than the extension’s rating. Generally, the total ratings of all equipment plugged
into any one power line should not exceed 15 amperes. Don’t exceed this unless
you know that the power line your equipment is plugged into has a rating above
15 amperes.
• Aside from the routine maintenance described in this handbook, don’t try to
service the printer yourself; opening the cover may expose you to shocks or
other hazards. Don’t make any adjustments other than those outlined in the
manual – you might cause damage requiring extensive repair work.
• If anything happens that indicates that your printer is not working properly or
has been damaged, unplug it immediately and follow the procedures in Chapter 5. These are some of the things to look for:
The power cord or plug is frayed or damaged.
Liquid has been spilled into the housing, or the printer has been exposed to
water.
The printer has been dropped or its cabinet has been damaged.
The printer doesn’t function normally when you’re following the operating
instructions.
• Screen jitter on your CRT may occur in an environment where the space between your printer and CRT is narrow (200 mm or less). In such cases, open up
the space.
Page 5

ontents
C
Introduction ............................................................................................................. 1
Chapter 1: Installation ........................................................................................... 3
Unpacking ................................................................................................................... 3
Removing Shipping Retainers........................................................................ 4
Installing Ribbon Cartridge ...................................................................................... 5
Making Connections ..................................................................................................6
Connection with Computer ............................................................................6
Connection with Power................................................................................... 8
Chapter 2: Loading Paper ...................................................................................... 9
Loading Single-Sheet Paper ....................................................................................11
Loading Rear-Feed Paper ........................................................................................14
Paper Handling......................................................................................................... 21
Tear Feature.....................................................................................................21
Forms Tear-off Feature ..................................................................................22
Paper Park Feature......................................................................................... 22
Switching Paper Paths ...................................................................................23
Chapter 3: Operation ............................................................................................ 25
Control Panel.............................................................................................................25
Print Mode .................................................................................................................27
Indicator Lights .............................................................................................. 27
Buttons .............................................................................................................28
Menu Mode ...............................................................................................................32
Sample Menu ..................................................................................................33
Summary of Menu Settings ..........................................................................34
Menu Mode Indicator Lights .......................................................................37
Menu Mode Buttons ......................................................................................37
Resetting Menu to Factory Defaults ............................................................38
Page 6

Performing Basic Tasks ............................................................................................39
Selecting Print Quality ..................................................................................39
Selecting Character Pitch .............................................................................. 40
Testing Your printer ....................................................................................... 42
Resetting Top of Form ...................................................................................45
Using Bar codes ..............................................................................................45
Chapter 4: Working with Software .................................................................... 49
Basic Terminology ....................................................................................................49
Printer Commands .........................................................................................49
Emulations ...................................................................................................... 50
Printer Drivers .......................................................................................................... 50
Compatible Printer Drivers (DOS) .............................................................. 50
Windows Printer Drivers ..............................................................................51
Chapter 5: Problem Solving, Maintenance, & Service...................................53
Problem Solving .......................................................................................................53
Maintenance ..............................................................................................................57
Replacing the Ribbon Cartridge................................................................... 57
Clearing Paper Jams ......................................................................................59
Cleaning the Housing ....................................................................................63
Accessories ................................................................................................................ 64
Replacement Parts.......................................................................................... 66
Appendix A: Specifications ................................................................................ 67
Appendix B: Menu Selections ............................................................................ 71
Explanation of Menu Items .....................................................................................74
Appendix C: Commands–Epson Emulation .................................................... 81
Appendix D: Commands–IBM Emulation .................................................... 101
Page 7

Appendix E: ASCII Character Codes .............................................................. 119
ASCII Character Sets .............................................................................................. 119
Code Page ................................................................................................................123
Appendix F: Interfacing .................................................................................... 125
Pin Assignments for Parallel Interface Signals .................................................. 125
Universal Serial Bus (USB) ....................................................................................126
Installing the Serial Interface ................................................................................127
Pin Assignments for Serial Interface Signals ......................................................129
Page 8

ntroduction
I
This Guide is arranged to help you get your new MICROLINE 790 or 791 printer set
up and running quickly as well as providing you with more detailed information for
future reference. Here’s how it’s organised:
• Chapter 1 (Installation) shows you how to get your printer ready to run and
how to connect it to your computer.
• Chapter 2 (Loading Paper) explains how to load paper for any of the two methods of paper feed.
• Chapter 3 (Operation) describes how to control your printer from the front panel.
It also explains how to change the defaults, how to test your printer and how to
use bar codes.
• Chapter 4 (Working with Software) gives you information on selecting a driver
and installing your printer on popular software packages.
• Chapter 5 (Problem Solving/Maintenance/Service) gives helpful hints on how
to solve common printer problems and how to maintain your printer in tip-top
shape.
• Appendices A through E contain a variety of reference material, including specifications, menu listings, lists of printer programming commands and ASCII
characters.
ML790/791 Printer Handbook 1
Page 9

2 Introduction
Page 10
hapter 1: Installation
C
This chapter explains how to unpack and install your new printer.
Unpacking
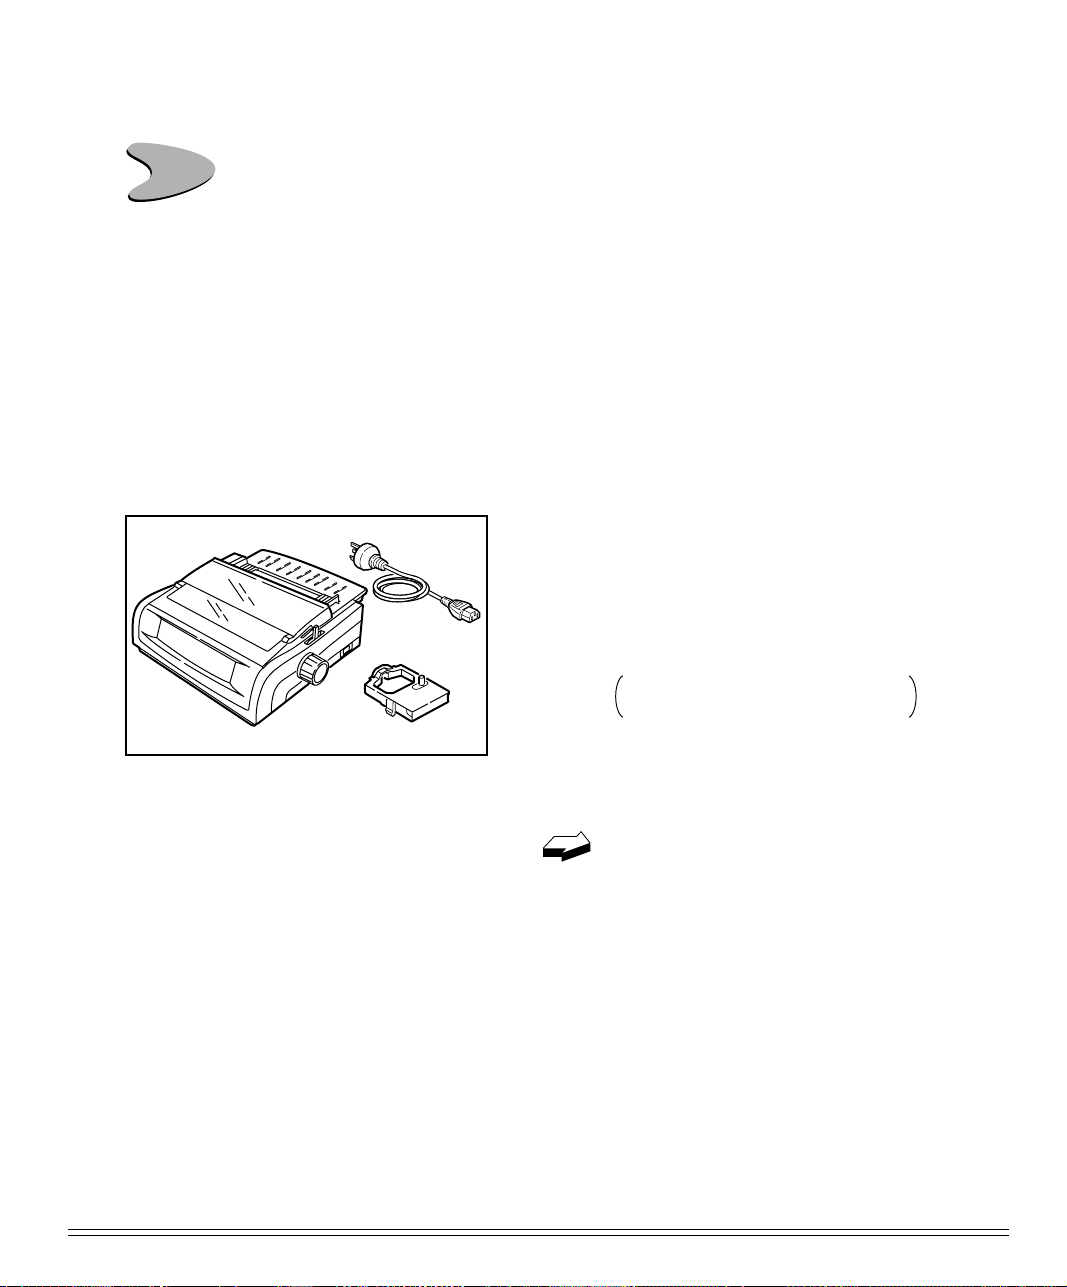
Unpack your printer and make sure you have the following items. If you are missing
any of these items, contact your dealer immediately for a replacement.
• Printer
• Ribbon cartridge
• AC cord
It is not included in case of
some models.
• Printer Handbook & Software on
CD-ROM.
Interface cable and paper are sold
separately.
ML790/791 Printer Handbook 3
Page 11
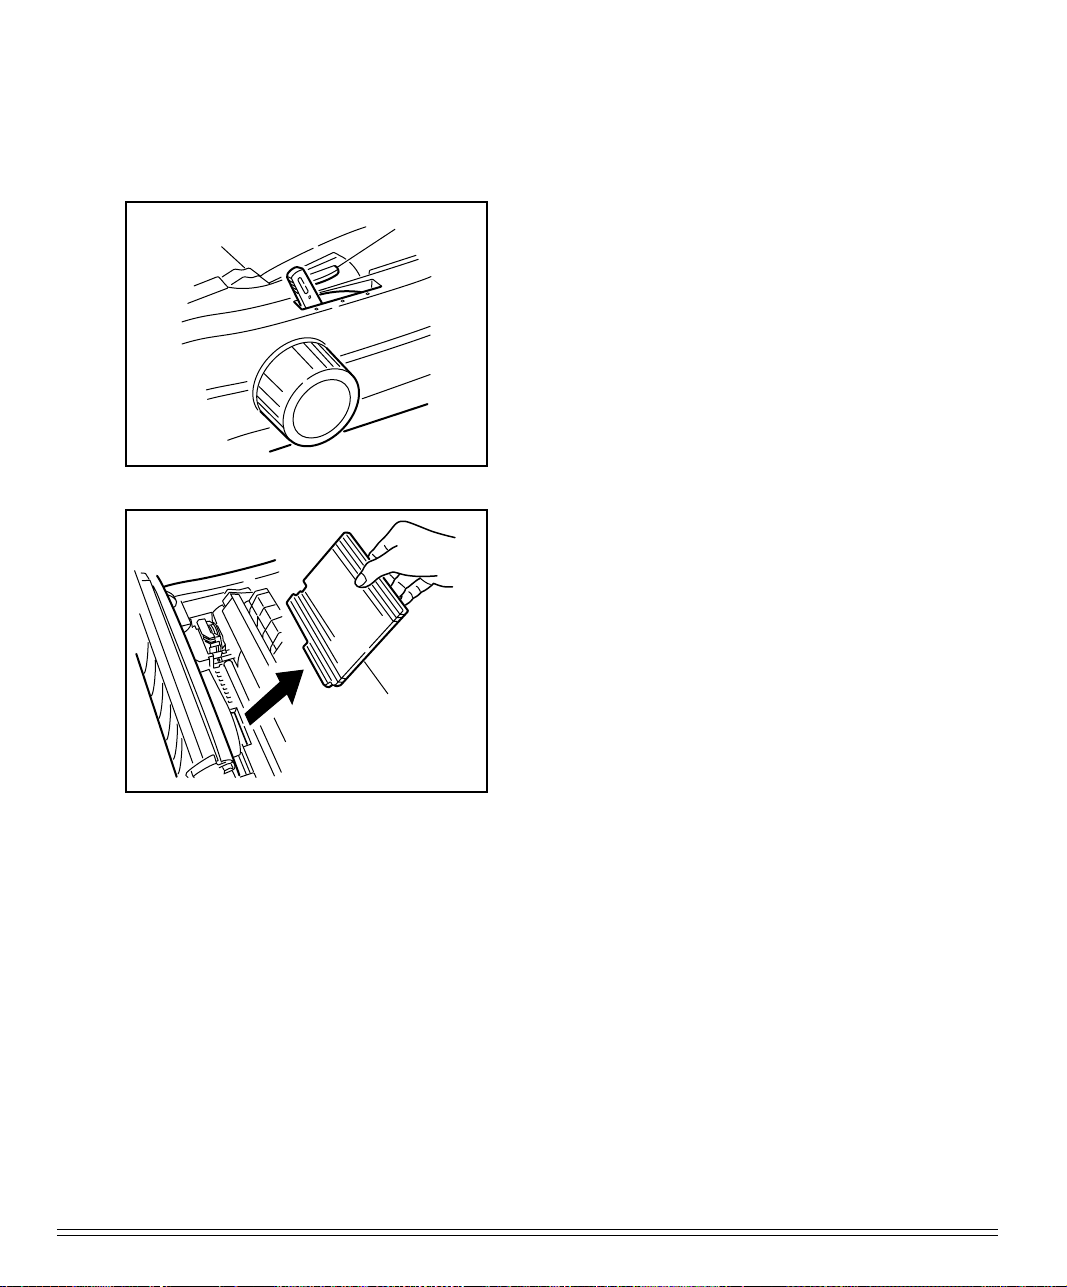
Removing Shipping Retainers
Tab
Shipping retainer
1. Open access cover by grasping tabs at
either end and lifting.
2. Remove printhead shipping retainer
(leave cover open for installation of ribbon).
4 Installation
Page 12
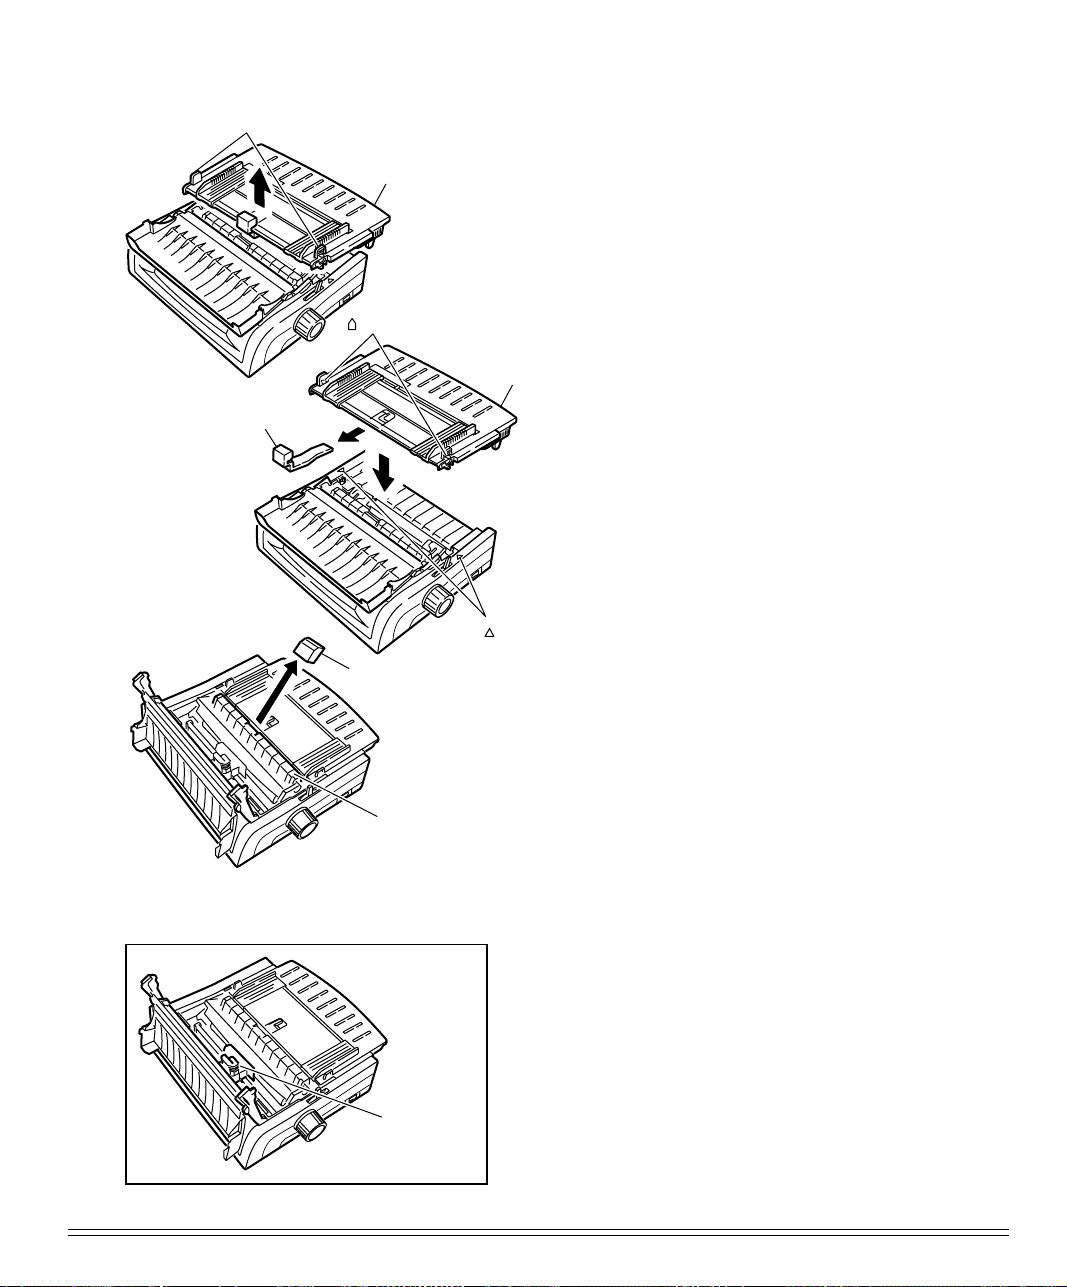
Knob
Paper
separator
3. Hold the knob and remove the paper
separator.
" "mark
Protictive
material
Protictive
material
Pull-up roller
assembly
Installing Ribbon Cartridge
4. Remove the protective material.
Paper
separator
5. Set and attach the post to the“∆”mark
of the upper cover and the paper separator.
" "mark
6. Remove the protective material from
the pull-up roller assembly.
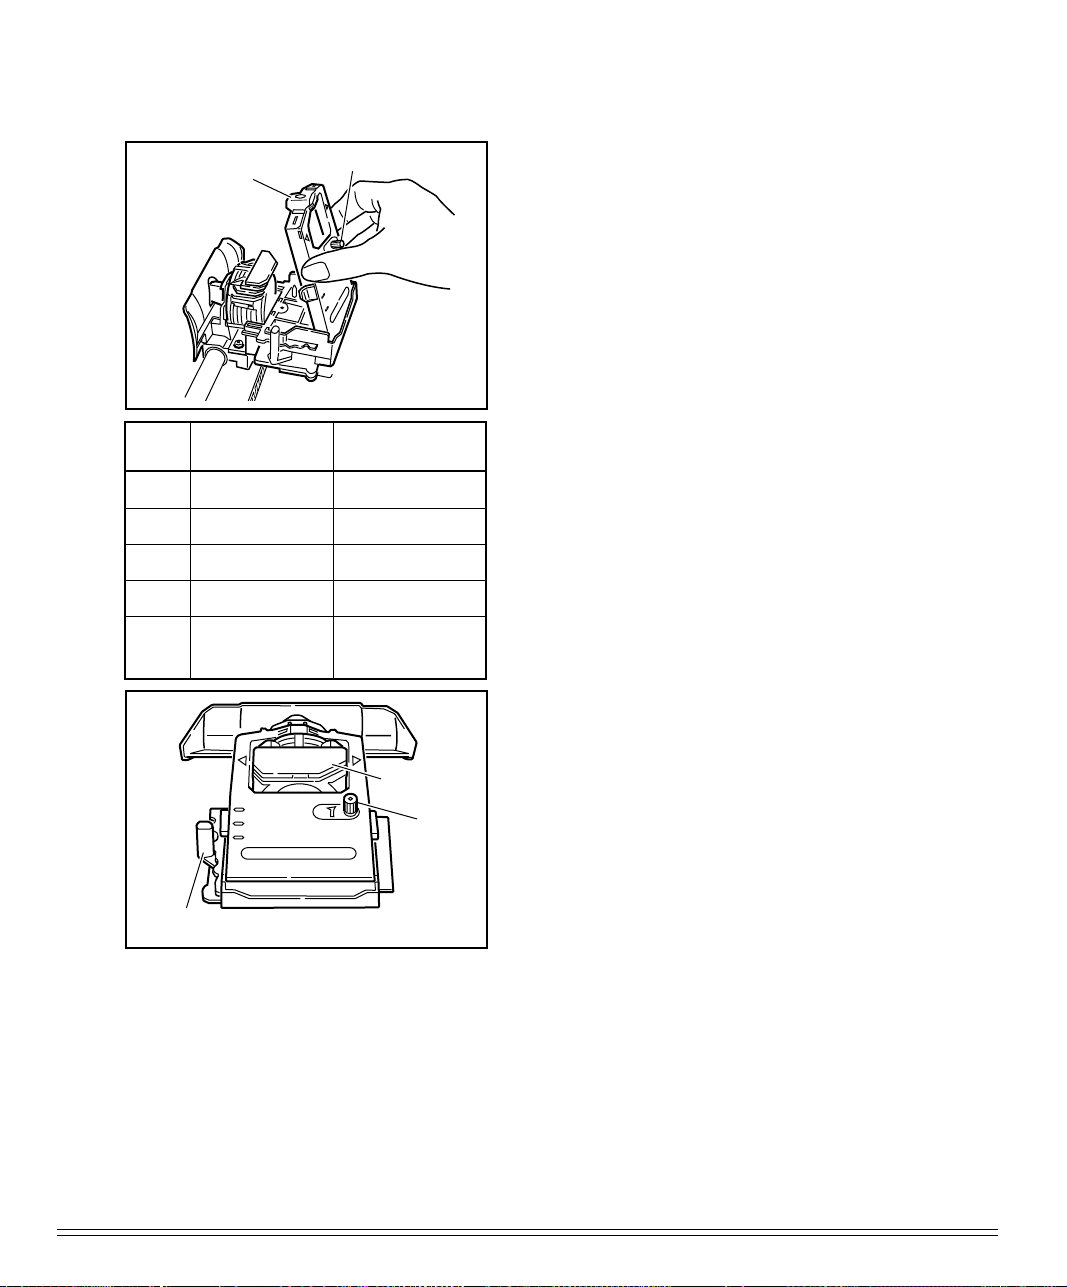
1. With access cover open, grasp printhead and slide it until it is centered on
platen.
2. Remove ribbon cartridge from its packaging.
Center
printhead
on platen
ML790/791 Printer Handbook 5
Important!
Leave the clear plastic rib-
bon shield on the cartridge!
Page 13
Setting
1
Ribbon
shield
Headgap lever
position
1
Knob
Number of
sheets
3. Holding ribbon cartridge with knob facing up and ribbon sheild facing platen,
fit grooves on either side at back end of
cartridge over pins on ribbon plate.
4. Lower front of cartridge over printhead
until it snaps into place, then turn knob
in direction of arrow (clockwise) to take
up ribbon slack.
1
2
3
2
3
2
3
5. The headgap lever by the side of cartridge
adjusts for different paper thicknesses.
Set it for the number of sheets in the
4
5
4
5
extra-thick paper
4
envelopes or
forms you’re using from 1 to 4; use setting 5 for envelopes or extra-thick paper. Adjust the setting up or down for
the best print quality.
M
Note: When the setting is set at 2~5, the
printer automatically slows down for better
Printhead
1
2
3
Knob
print quality with thicker multipart forms.
Important!
Be sure to use only ribbons
specifically for use with MICROLINE 790
series.
Headgap lever
For best results, use genuine OKI ribbons.
Making Connections
Connection with Computer
There instructions are for the standard parallel interface and USB interface. Instructions
for installation/connection of a serial interface are included with the serial interface accessory. For more information on the serial interface accessory, see Chapter 5.
6 Installation
Page 14
Pin assignments for the parallel, USB and the serial interfaces are listed in
appendix E.
You must supply the cable for connecting your printer to your computer.
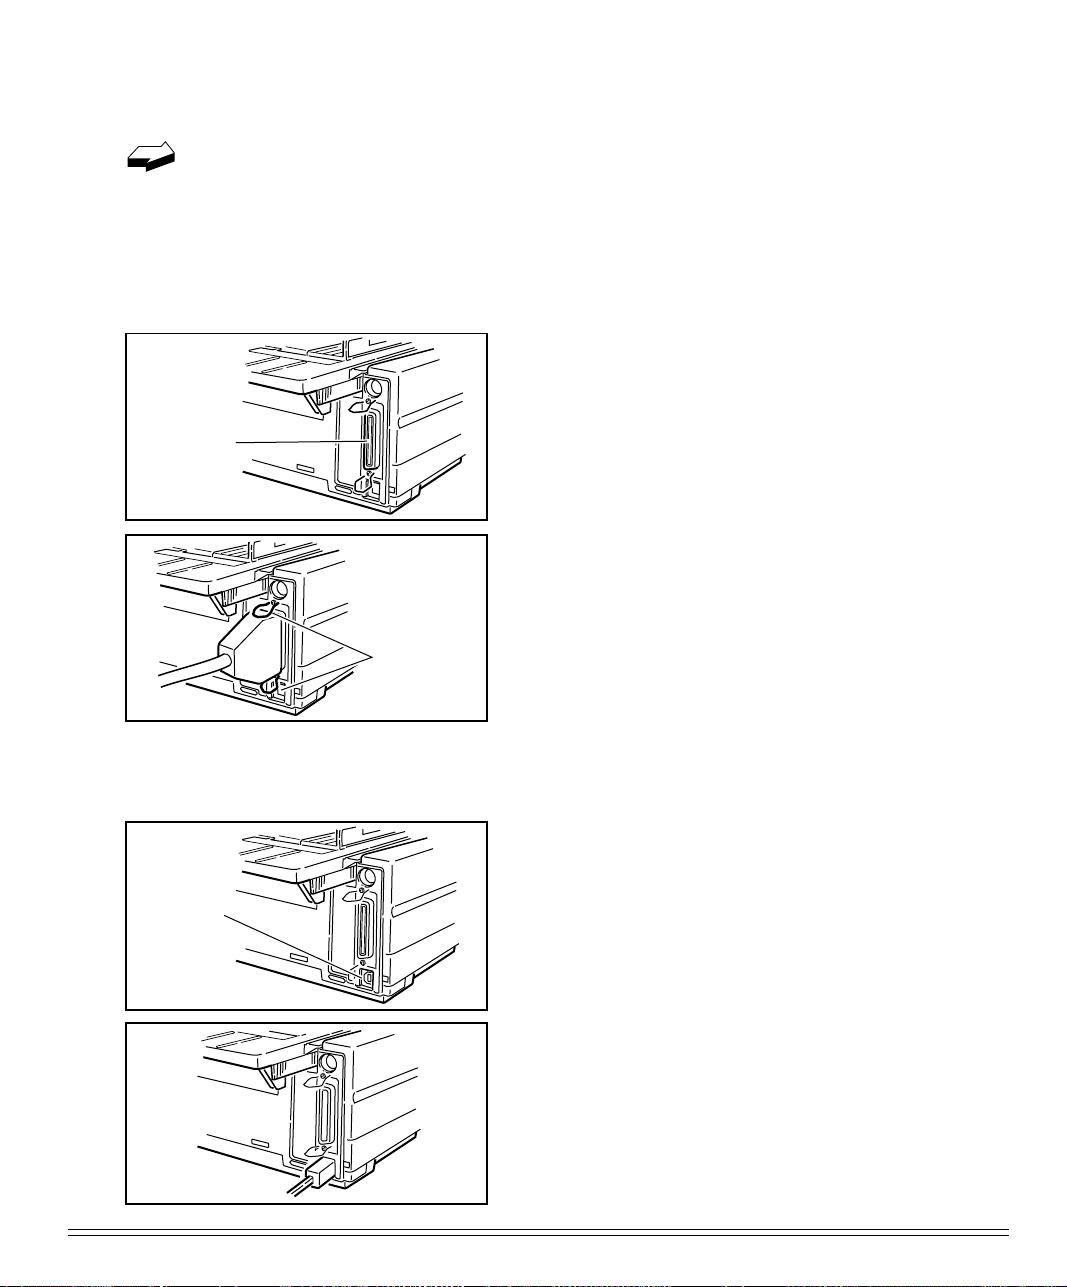
a. In the case of parallel interface cable
1. Make sure both printer and computer
are OFF.
2. Locate interface port on back of printer.
Interface
port
3. Plug parallel interface cable into port
and secure it in place with wire loops.
Wire loops
b. In the case of USB interface cable
1. Make sure both printer and computer
are OFF.
2. Locate interface port on back of printer.
USB port
3. Plug USB interface cable into port.
ML790/791 Printer Handbook 7
Page 15
Connection with Power
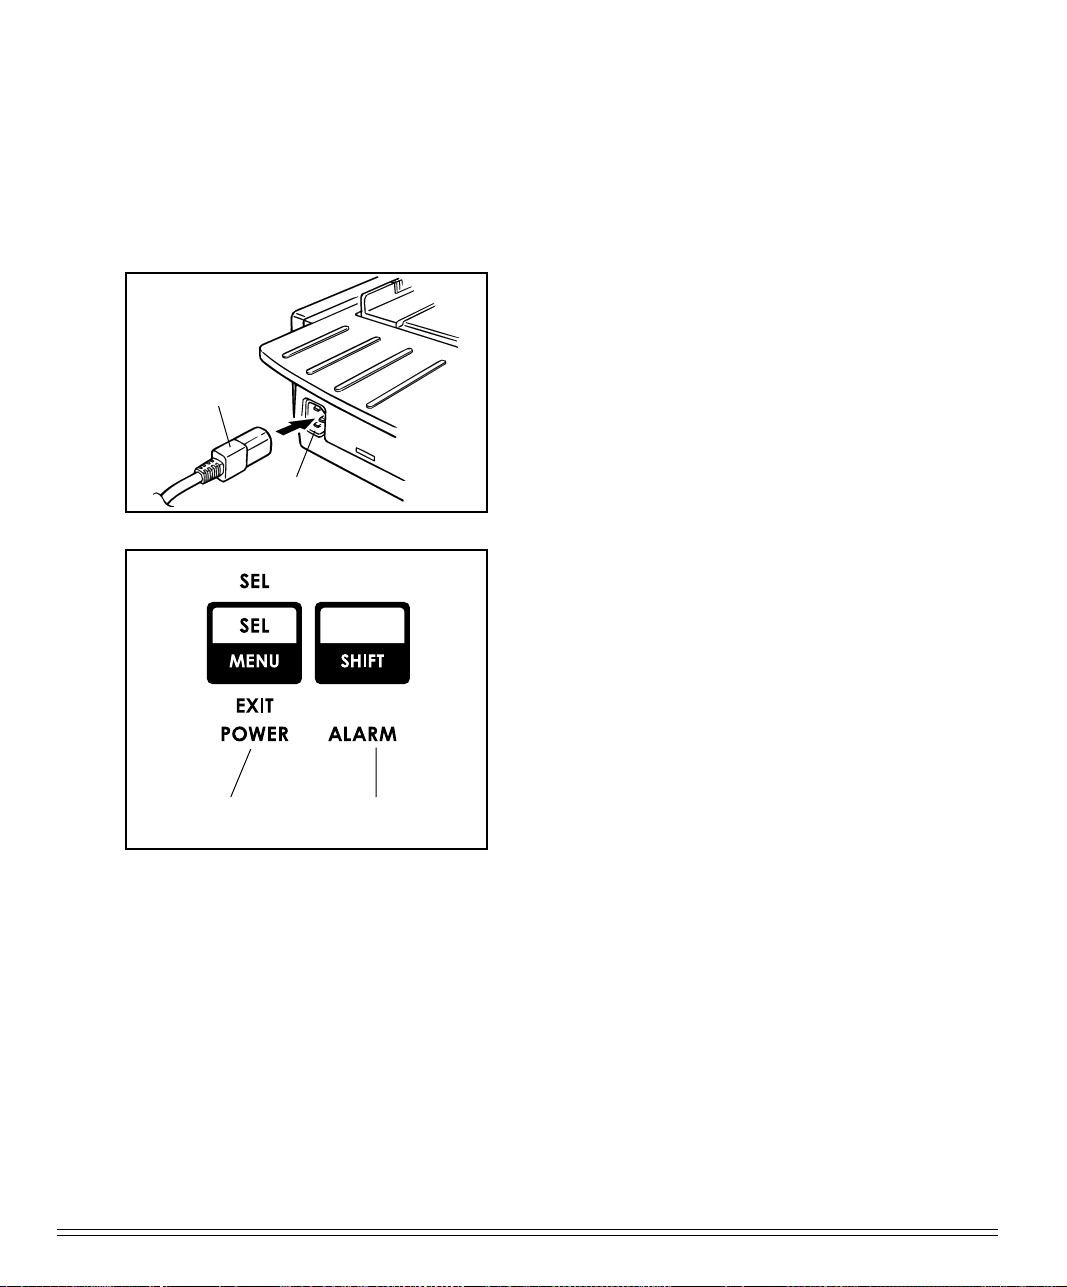
Power cord
Socket
1. Make sure both printer and computer
are OFF.
2. Plug power cord into back of printer.
Plug other end into grounded outlet.
3. Turn printer on. Printhead will cross
back and forth along platen, and
POWER light will come on. ALARM
light will also come on, but don’t be
concerned: it’s just telling you that there
is no paper loaded.
Power light Alarm light
You’re now ready to load paper—proceed
to Chaper2.
8 Installation
Page 16

hapter 2: Loading Paper
C
Your printer has provision for single-sheet paper feed from the top and for continuous-form paper feed from the rear. You can also install options: the Cut Sheet Feeder,
which holds a stack of 100 sheets for feeding from the top and the Push and/or Pull
Tractors for feeding continuous-form labels, heavy card stock or multi-part forms from
the bottom. See Chapter 5 for more information on these options.
Top Feed
• Single sheets (basis weight 14 to 24 lbs)
• Single envelopes
– 24-lb maximum
– 6.5” to 9.5” wide
• Transparencies (8.5 x 11”)
Rear feed (continuous forms only, thickness to 0.014” [0.36 mm])
• Single-part continuous forms
– 12 to 24 lb.
– Minimum 3” wide (*
1
)
• Carbonless, multi-part forms
– Original, plus 3 copies
– 9 to 11 lb
– Minimum 3” wide (*
• Interleaf, multi-part forms (with carbon paper)
– Original, plus 4 copies
– 10 to 12 lb paper, with 9 lb carbon
– Minimum 3” wide (*
(*1) Please change mentioned below centering Position within a set-up group fol-
lowing indication of 32 pages when a form of 3” wide is used by Rear Feed.
In the case of ML790 “Mode 1”.
In the case of ML791 “Mode 2”.
ML790/791 Printer Handbook 9
1
)
1
)
Page 17

Bottom feed (continuous forms only, thickness to 0.017” [0.44mm])
• Single-part continuous forms
– 12 to 24 lb
– Minimum 3” wide (*
2
)
• Carbonless, multi-part forms
– Original, plus 4 copies
– 9 to 11 lb
– Minimum 3” wide (*
2
)
• Interleaf, multi-part forms (with carbon paper)
– Original, plus 4 copies
– 10 to 12 lb paper, with 9 lb carbon
– Minimum 3” wide (*
2
)
• Continuous-feed envelopes
– 24 lb maximum
– 6.5” to 9.5” wide (envelope itself)
• Labels
– minimum 3” wide (*
2
)
– maximum 10”(ML790) or 16” (ML791) wide
• Card stock: papers up to 120 lb maximum
2
(*
) Please change mentioned below centering Position within a set-up group fol-
lowing indication of 32 pages when a form of 3” wide is used by Bottom Feed.
In the case of ML790 “Mode 1”.
In the case of ML791 “Mode 2”.
10 Loading Paper
Page 18
Loading Single-Sheet Paper
The single-sheet paper path is best for letterhead stationery, memos, and envelopes.
We also recommend it for printing graphs and charts because it provides the most
accurate control of the paper.
To load in single sheets of paper:
If you have any continuous-form paper in the paper path, you must press the
PARK button on the front panel to remove it from the path before lading single
sheets.
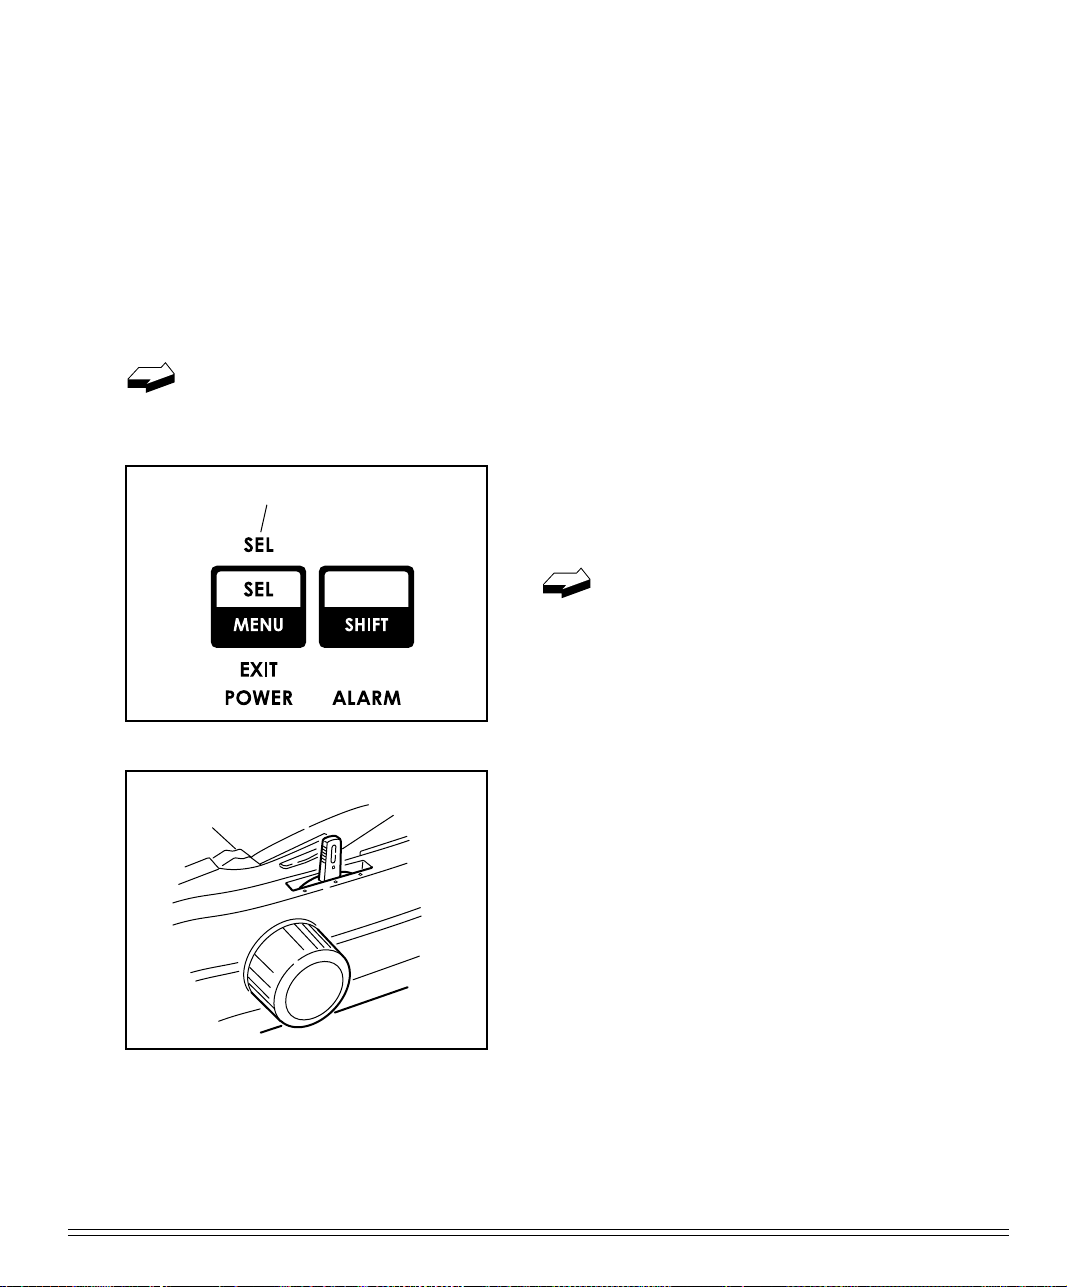
SEL light
Move
to"TOP"
1. Make sure printer is turned ON and
deselected (SEL light off – press SEL
button to deselect it necessary).
The ALARM light will remain on
until paper is loaded.
2. Move paper lever to position marked
“TOP”.
ML790/791 Printer Handbook 11
Page 19
Wire feed
guide
Paper
separator
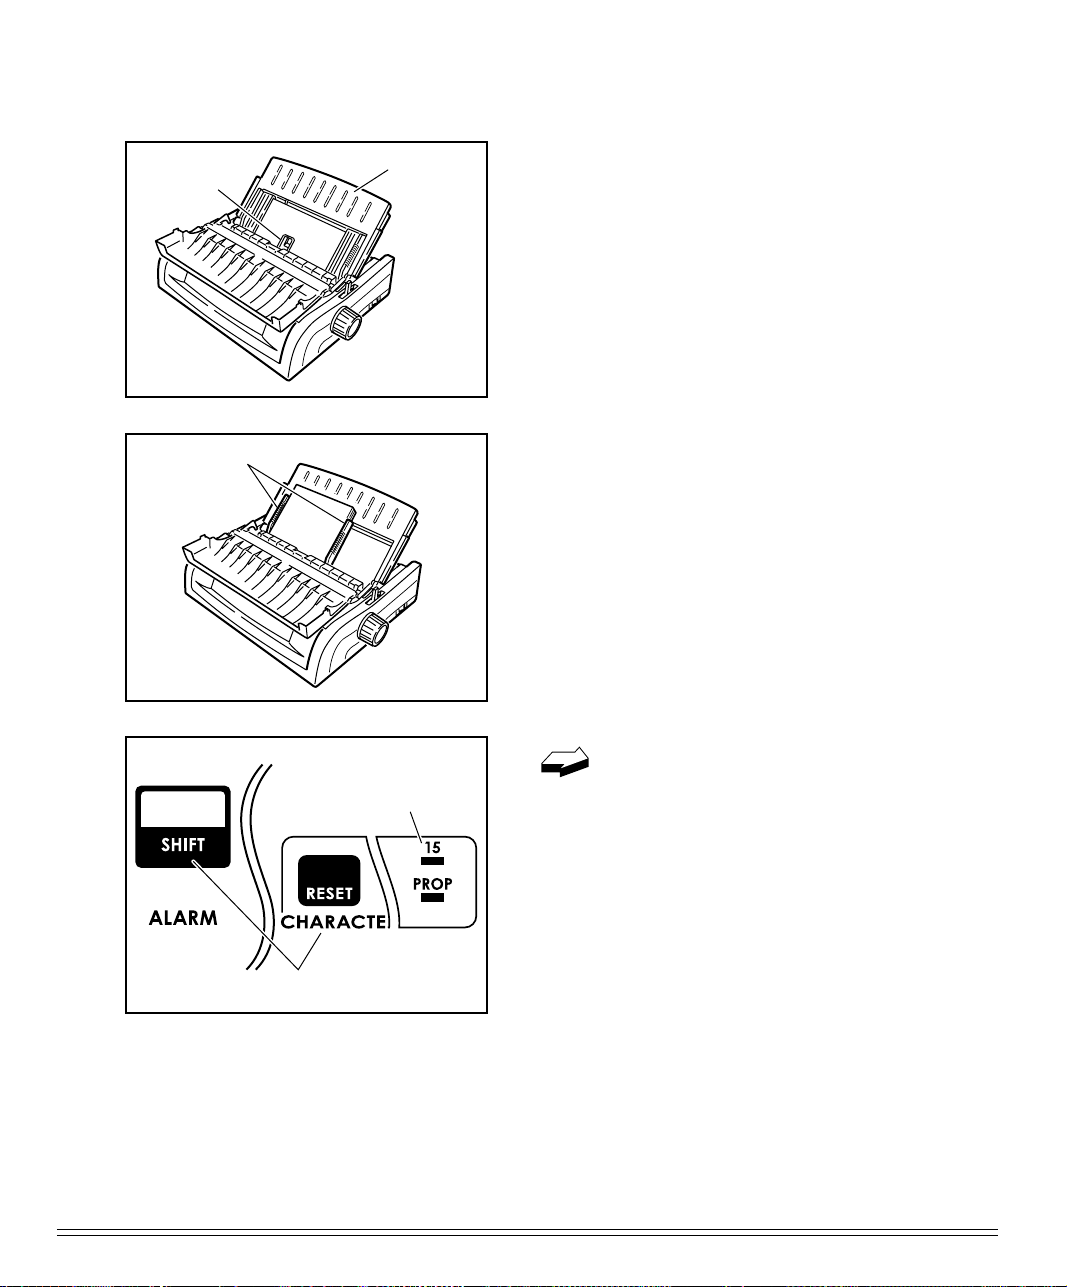
3. Grasp back of paper separator and unsnap it from housing, then swing it up
into single-sheet feed position, making
sure that wire feed guide is nestled in
separator.
Paper feed
guides
Press
Flashes
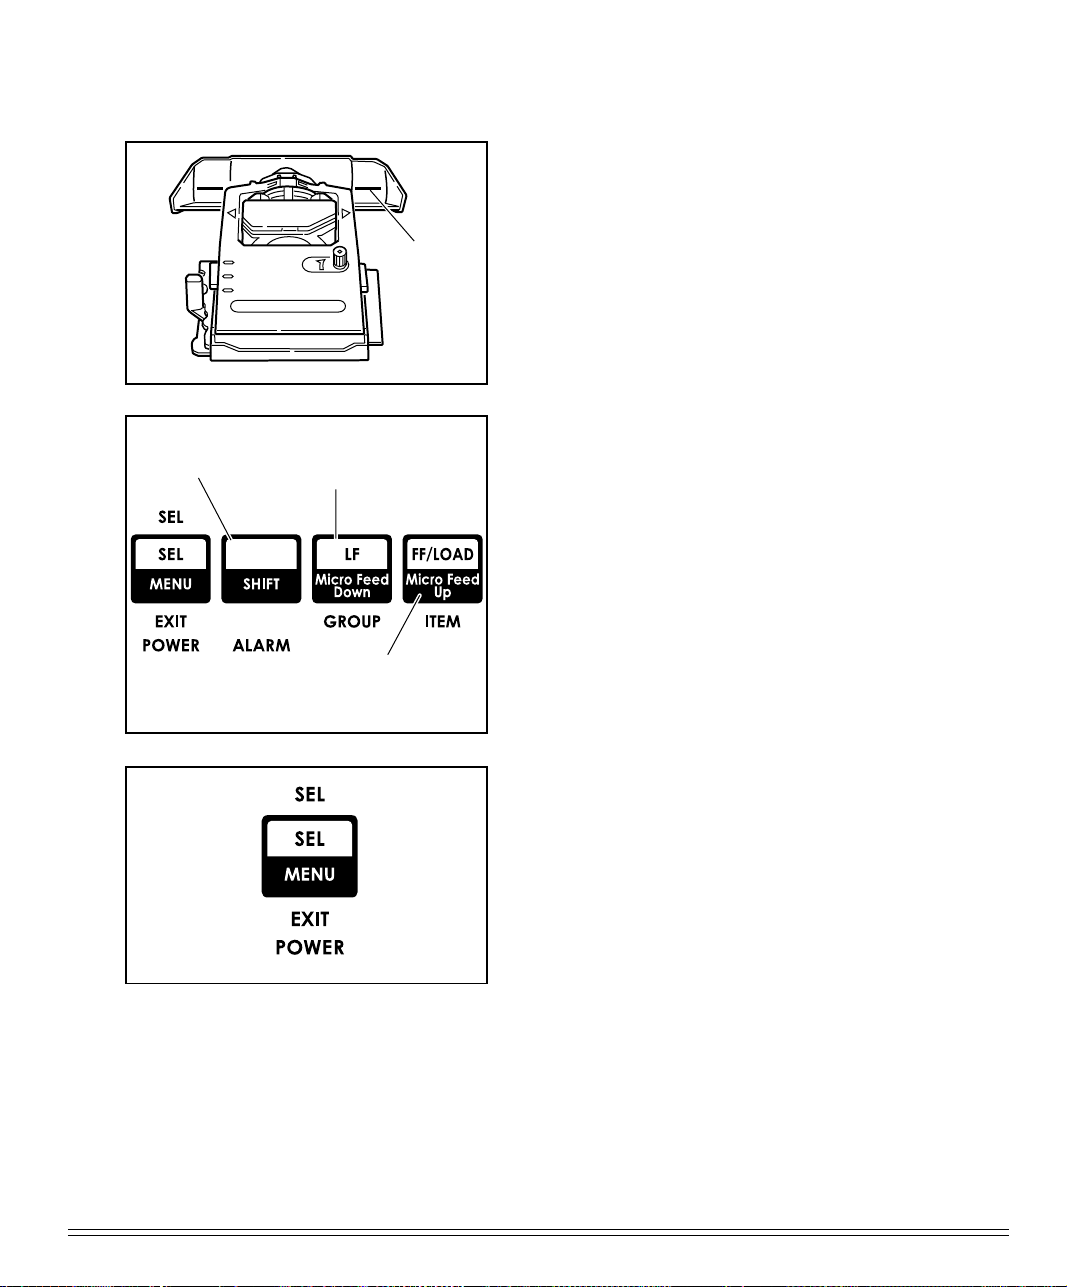
4. Adjust paper feed guides for width of
paper and drop sheet of paper into
separator. Paper will automatically
feed into printer.
If the sheet of paper doesn’t feed in
properly, the “15” light in the Character Pitch section at the bottom
right of the control panel will begin flashing. To correct this, press
the SHIFT and RESET buttons simultaneously, then reload the
sheet.
12 Loading Paper
Page 20
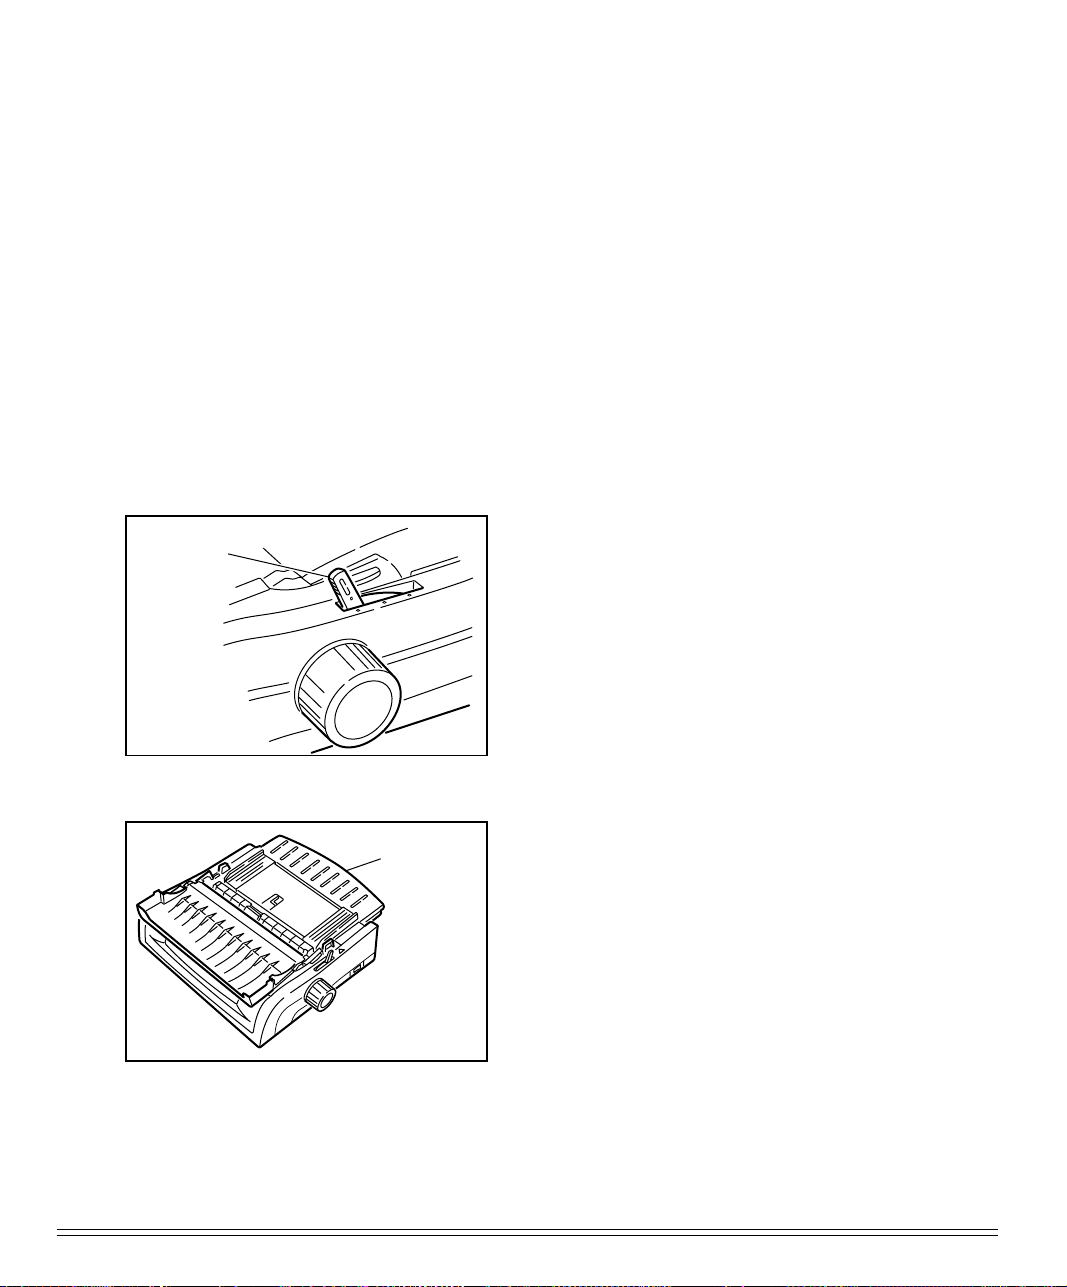
5. Baseline for Top of Form (TOF) on pa-
M
per is indicated by red line on clear plastic paper shield.
Hold
1
2
3
Press to feed
paper down in
micro increments
Press to feed
paper up in micro
increments
Baseline
6. If desired, change TOF setting using
control panel:
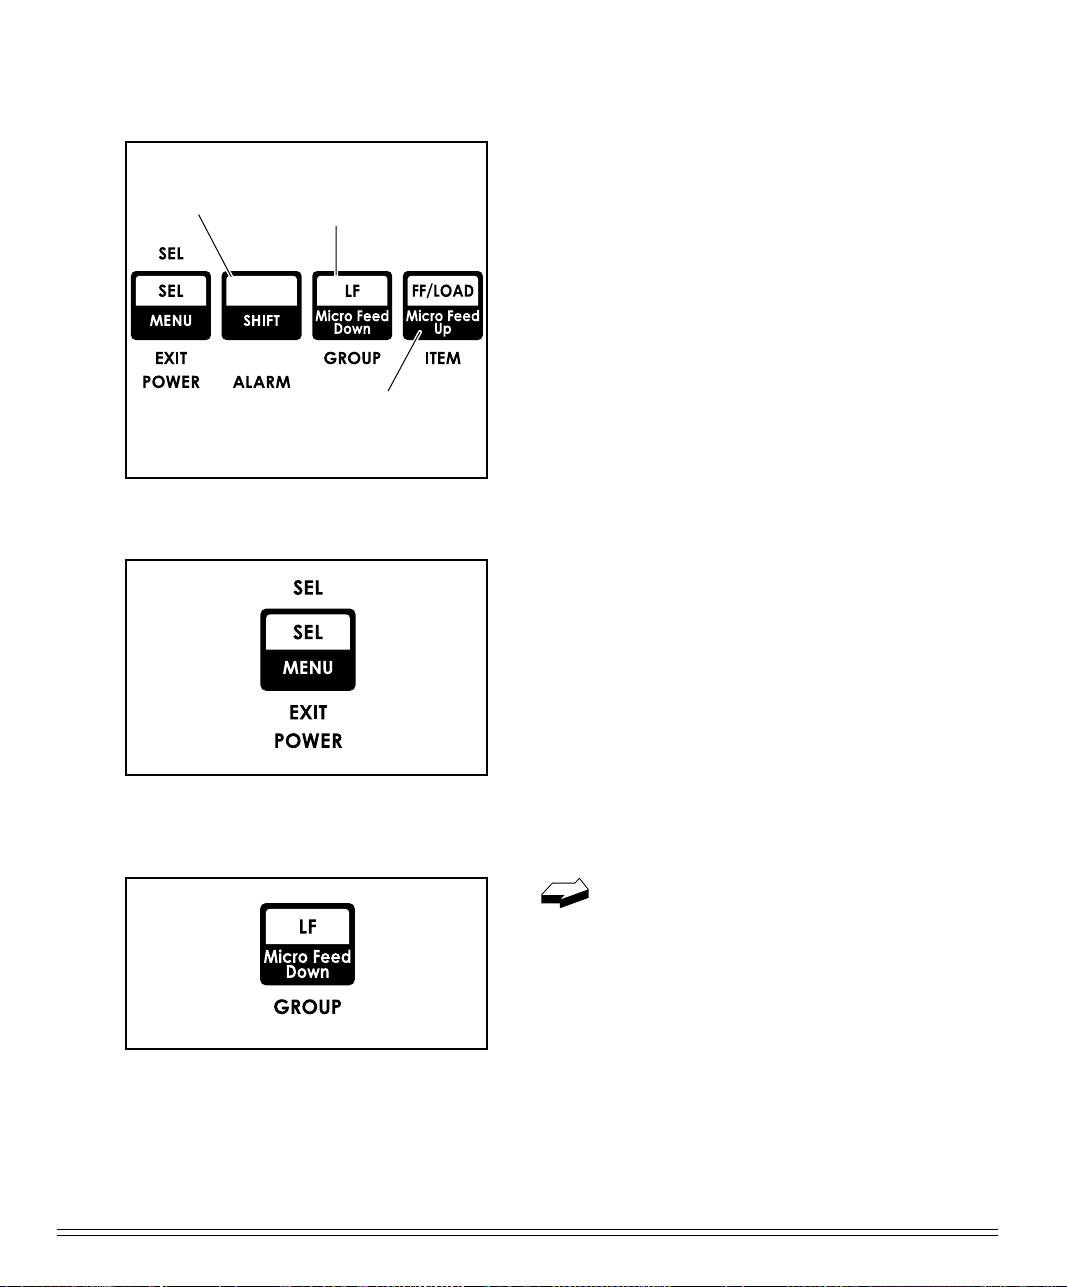
☛ to set TOF further down on page,
hold SHIFT button while pressing FF/
LOAD button: this will advance paper
up in micro increments
☛ to move TOF further up on page,
hold SHIFT button while pressing LF
button: this will advance paper down
in micro increments
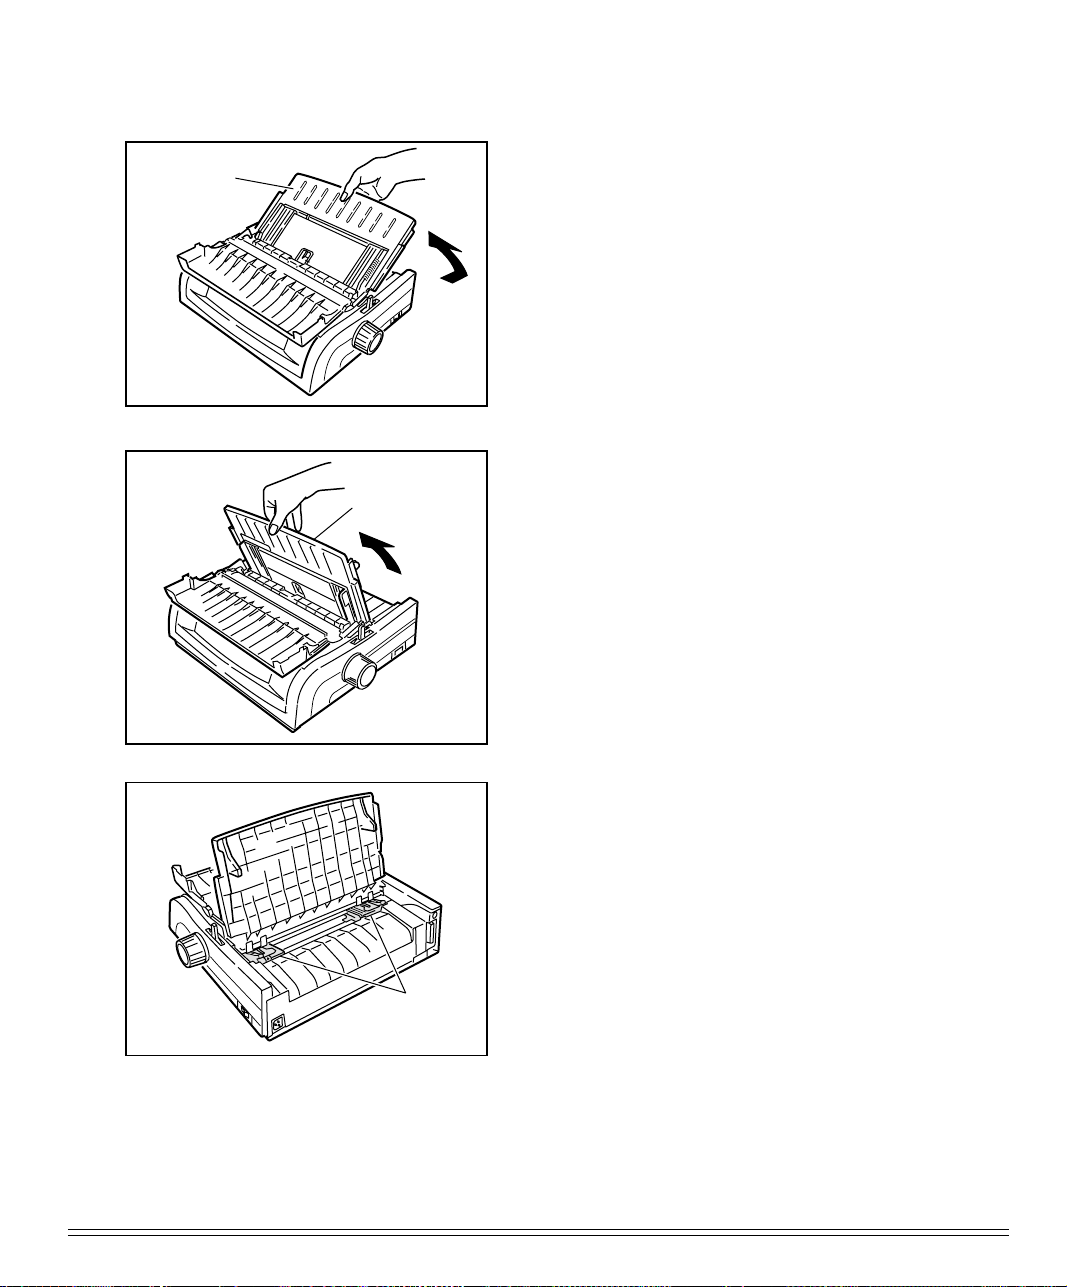
7. Press SEL button (SEL light will come
on).
ML790/791 Printer Handbook 13
Page 21
Loading Rear-Feed Paper
The rear-feed paper path is recommended for single-thickness, continuous fan-fold
paper when printing spreadsheets, long reports, etc. For graphics or charts, it’s best to
use the single-sheet paper path.
To load continuous-form paper from the rear:
1. If you have paper in paper path, be sure
to remove it before installing rear-feed
paper. To remove single sheet, press FF/
LOAD button. To remove bottom-feed
paper, press PARK button.
Position
"Rear"
Paper
separator
2. Move paper lever to position marked
“REAR”.
3. Open the access cover.
14 Loading Paper
Page 22
Paper
separator
Pull-up roller
assembly
4. Hold up the middle part of the paper
separator and pull upwards.
5. Rotate the paper separator forward and
stand against pull-up rolller assembly.
6. Locate tractors.
Tractors
ML790/791 Printer Handbook 15
Page 23
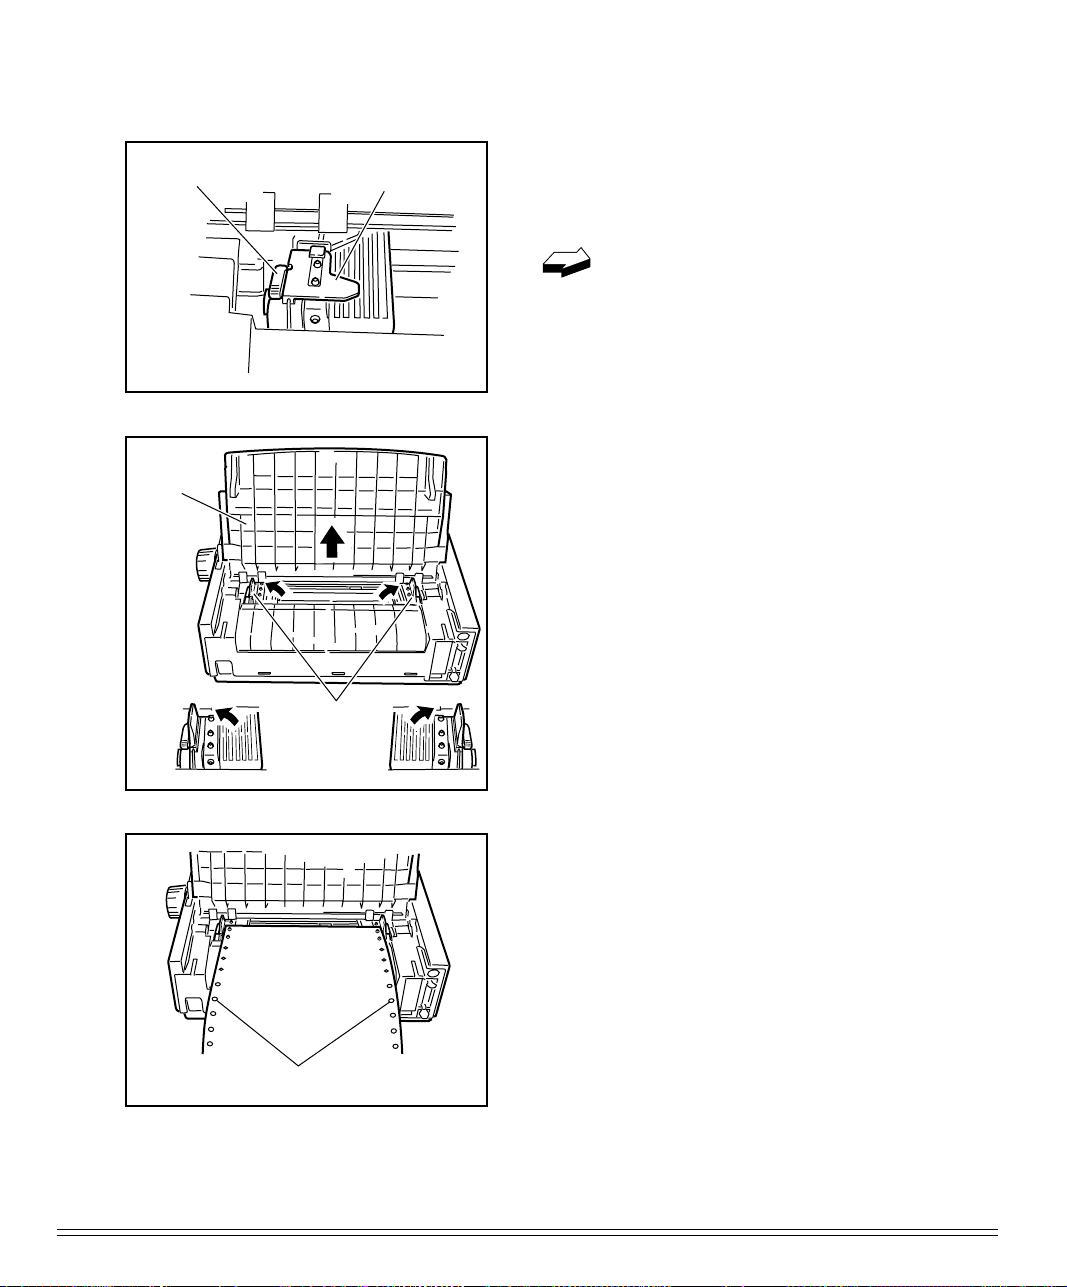
Lock lever
Tractor cover
7. Pull up on lock levers to release tractors. Position right-hand tractor for
width of paper you’re loading.
The movement of the left tractor is
limited to ensure that the paper
will always contact the paper sensor when loaded.
Paper
separator
8. Open the tractor cover, and raise the
paper separator.
Tractor cover
9. Pull paper, and place first two holes on
each side over tractor pins.
Please note that an equal number of paper holes must be engaged on either
tractor in order to ensure proper paper
feed.
Paper holes on pins
16 Loading Paper
Page 24
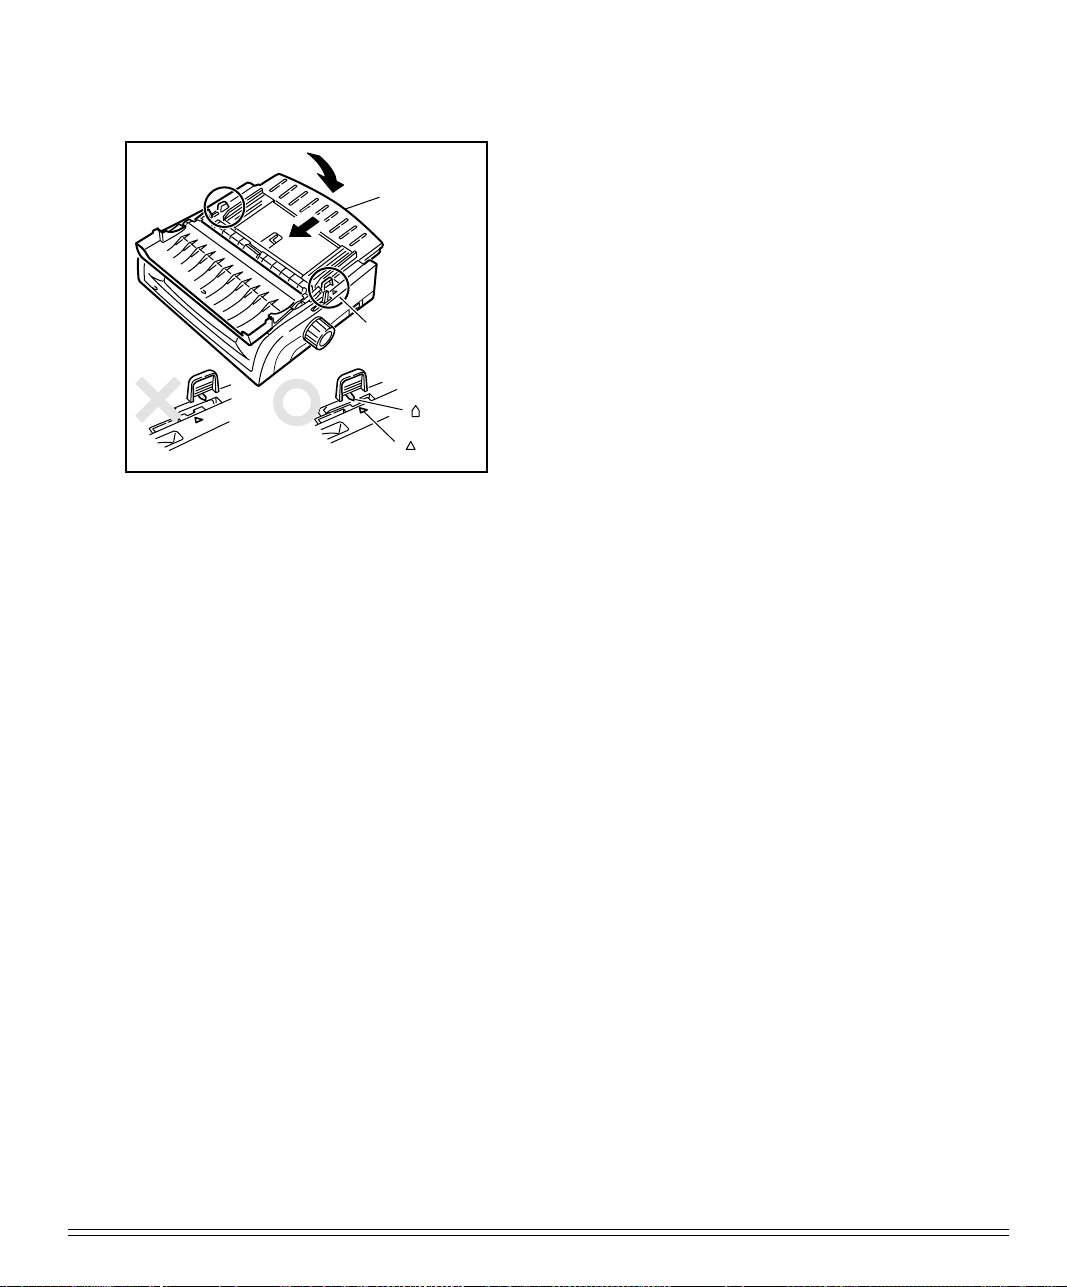
Paper
separator
Upper cover
" "mark
" "mark
10.Replace the paper separator and insert
until the paper separator and upper
cover marks align.
ML790/791 Printer Handbook 17
Page 25
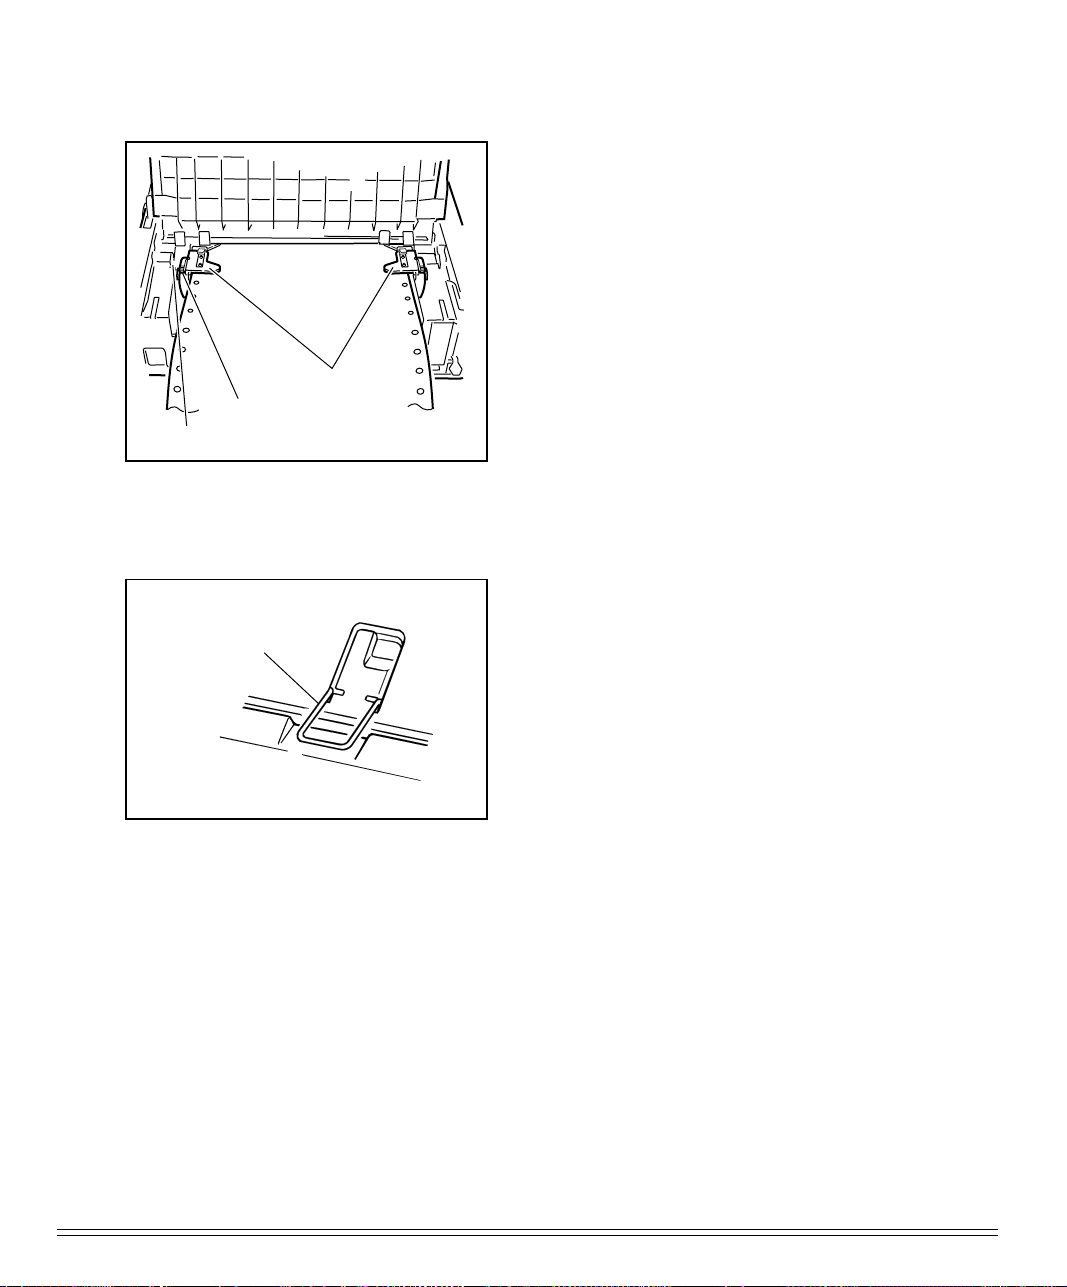
Lock lever
Reference marks
Wire feed guide
Tractor covers
11.Close tractor covers and adjust left tractor to position edge of paper: reference
marks on printer indicate left edge position for the two most common paper
sizes. When paper is properly aligned,
lock left tractor in place by pushing back
on lock lever.
12.Adjust right tractor so that paper holes
are centered on pins(careful – if paper
is stretched too tight or left too loose, it
can jam and cause problems), then lock
right tractor in place by pushing back
on lock lever.
13.Set Paper separator and swing wire feed
guide over to rest on pull-up roller assembly to prevent from curling back
into printer.
18 Loading Paper
Page 26
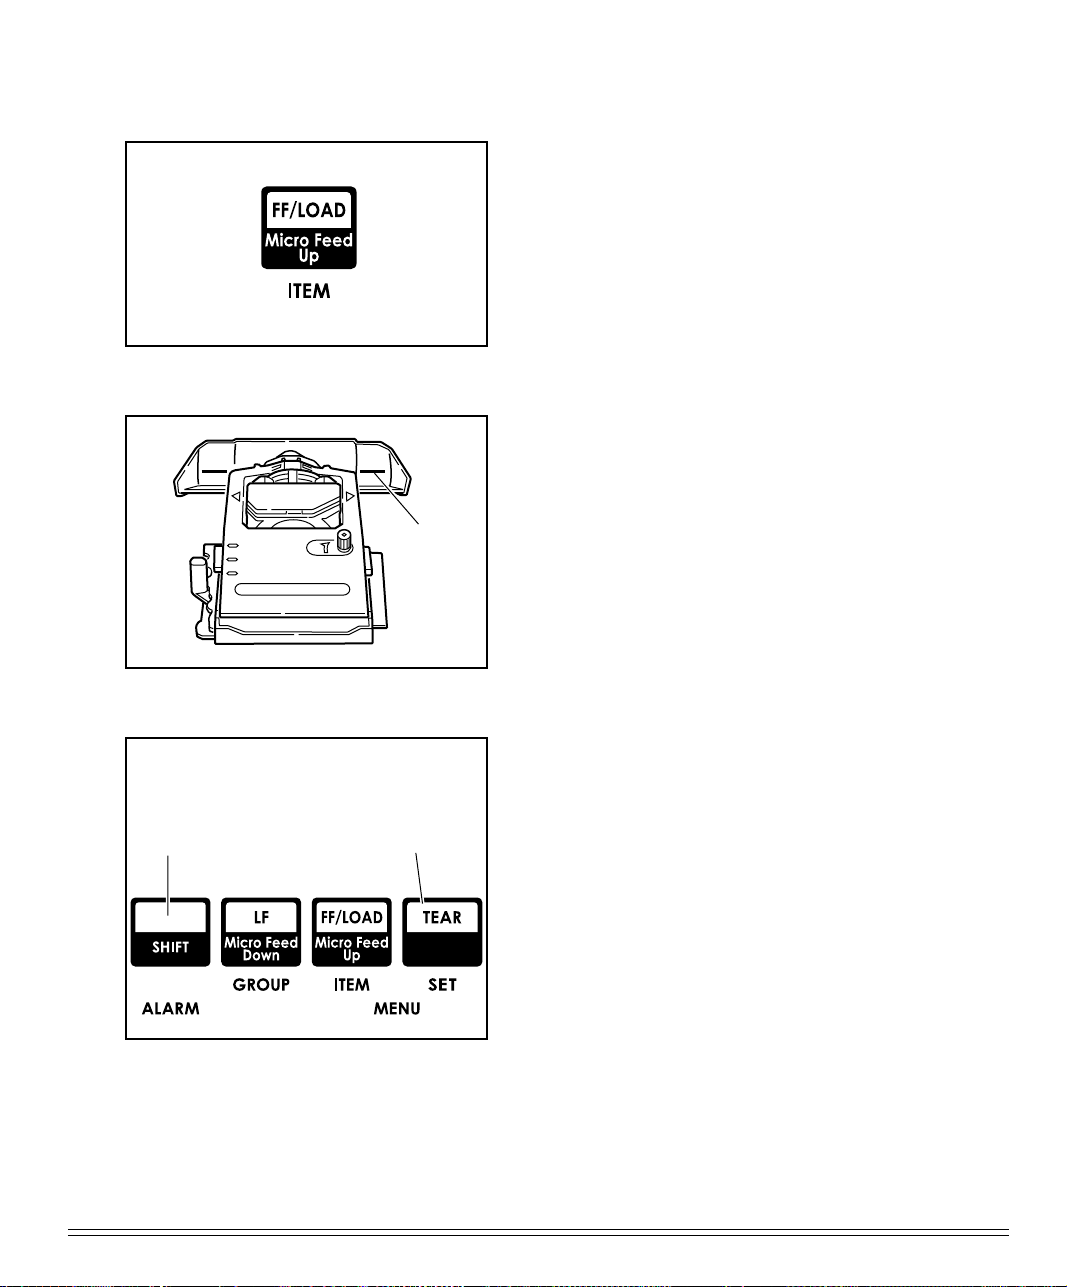
14.Push FF/LOAD button. Paper will automatically feed into printer and
ALARM light will go out.
15.Baseline for top of Form(TOF) on pa-
M
per is indicated by red line on clear plastic paper shield.
1
2
3
Press to hold the
paper before
releasing the TEAR
button.
Baseline
Press to bring
the paper down
to the print
position.
16.If desired, change TOF setting using
control panel:
If form tear off is being selected in the
printer menu, press the TEAR button
to bring the paper down to the print
position. Hold down the SHIFT button
and release the TEAR button.
☛ to set TOF further down on page,
hold SHIFT button while pressing FF/
LOAD button: this will advance paper
up in micro increments
ML790/791 Printer Handbook 19
Page 27
Hold
Press to feed
paper down in
micro increments
Press to feed
paper up in micro
increments
☛ to move TOF further up on page,
hold SHIFT button while pressing LF
button: this will advance paper down
in micro increments
17.Press SEL button (SEL light will come
on).
To temporarily change the Top of
Form setting for a particular print
job, deselect the printer and press
the LF button until you reach the
TOF position you want to use. The
printer will retain this setting until you turn it off.
20 Loading Paper
Page 28
Paper Handling
Your printer has several handy paper handling features:
• Tear
• Form Tear-off
• Paper Park
Tear Feature
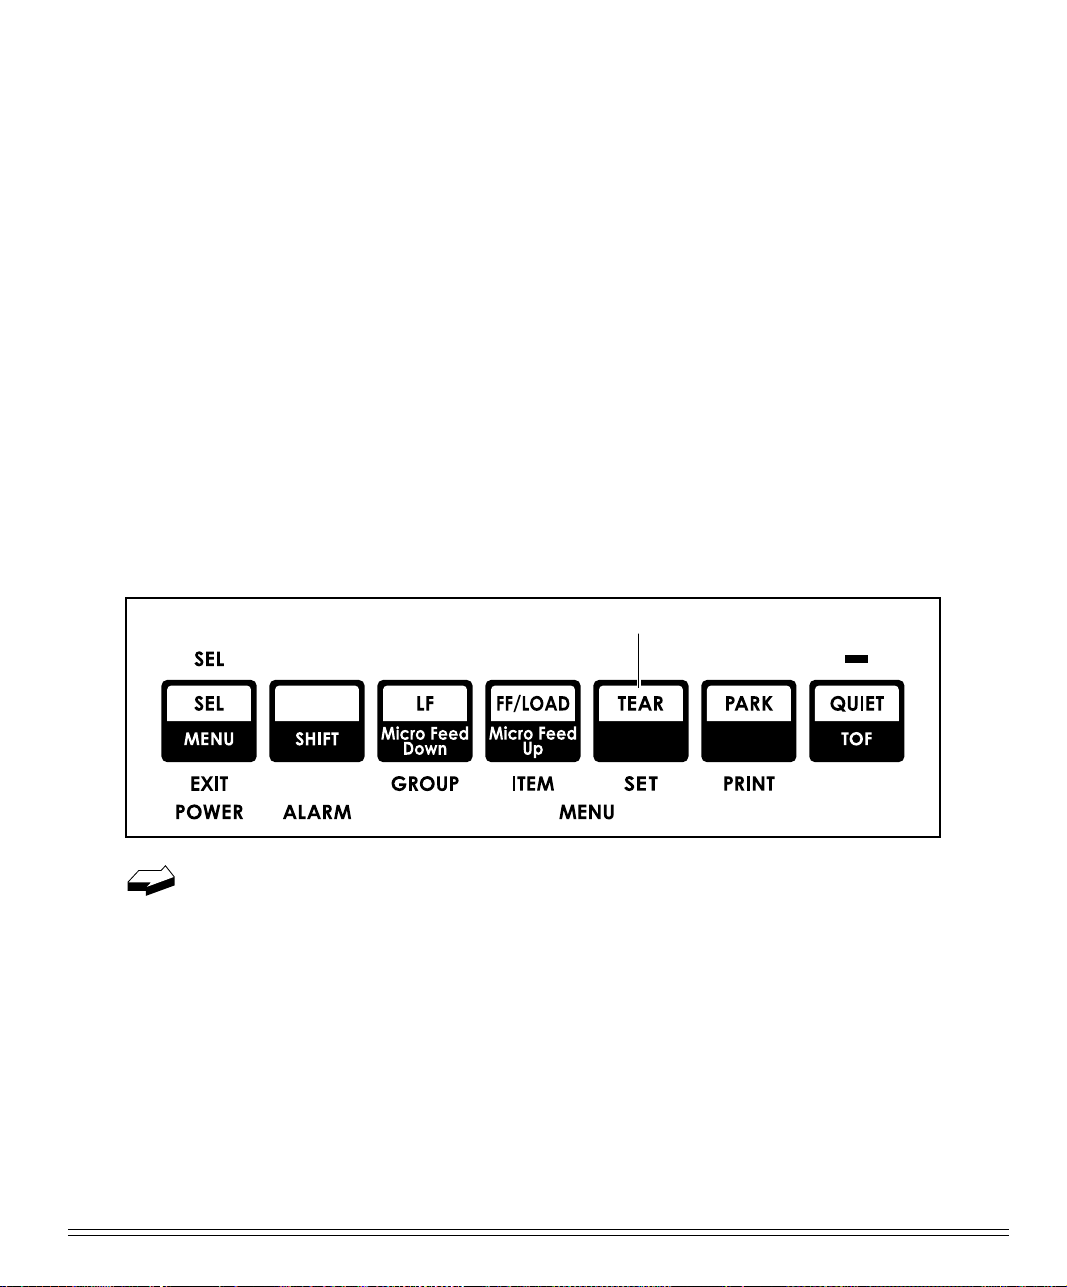
When you’re using continuous forms with either the built-in rear-feed tractor or the
optional bottom-feed push tractor, you can use this feature to advance the forms up to
the tear position so you can easily tear off a printed sheet without wasting paper or
readjusting the printer. To do this, simply press the TEAR button on the front panel.
Press
The tear feature can not be used when the optional pull tractor is installed.
ML790/791 Printer Handbook 21
Page 29
Forms Tear-off Feature
Caution!
The Forms Tear-off feature can be engaged to automatically move the paper up to the
tear position after the selected interval (500 milliseconds, one second, or two seconds).
The page will stay in the tear-off position until the printer receives data. It will then
move down to the initial printing position.
This feature is normally turned off. To activate it, enter the printer menu (see Menu
Mode in Chapter3) and choose one of the intervals.
Do not engage Forms Tear-off when printing on labels!
Some programs, such as high resolution graphics packages, pause occasionally while sending data to the printer. If the pause lasts more than the selected
interval, the paper will advance to the tear-off position until more data is
received. No data will be lost, but this extra paper movement can cause uneven print registration in graphics. If you have this problem, use the menu to
deactivate Forms Tear-off.
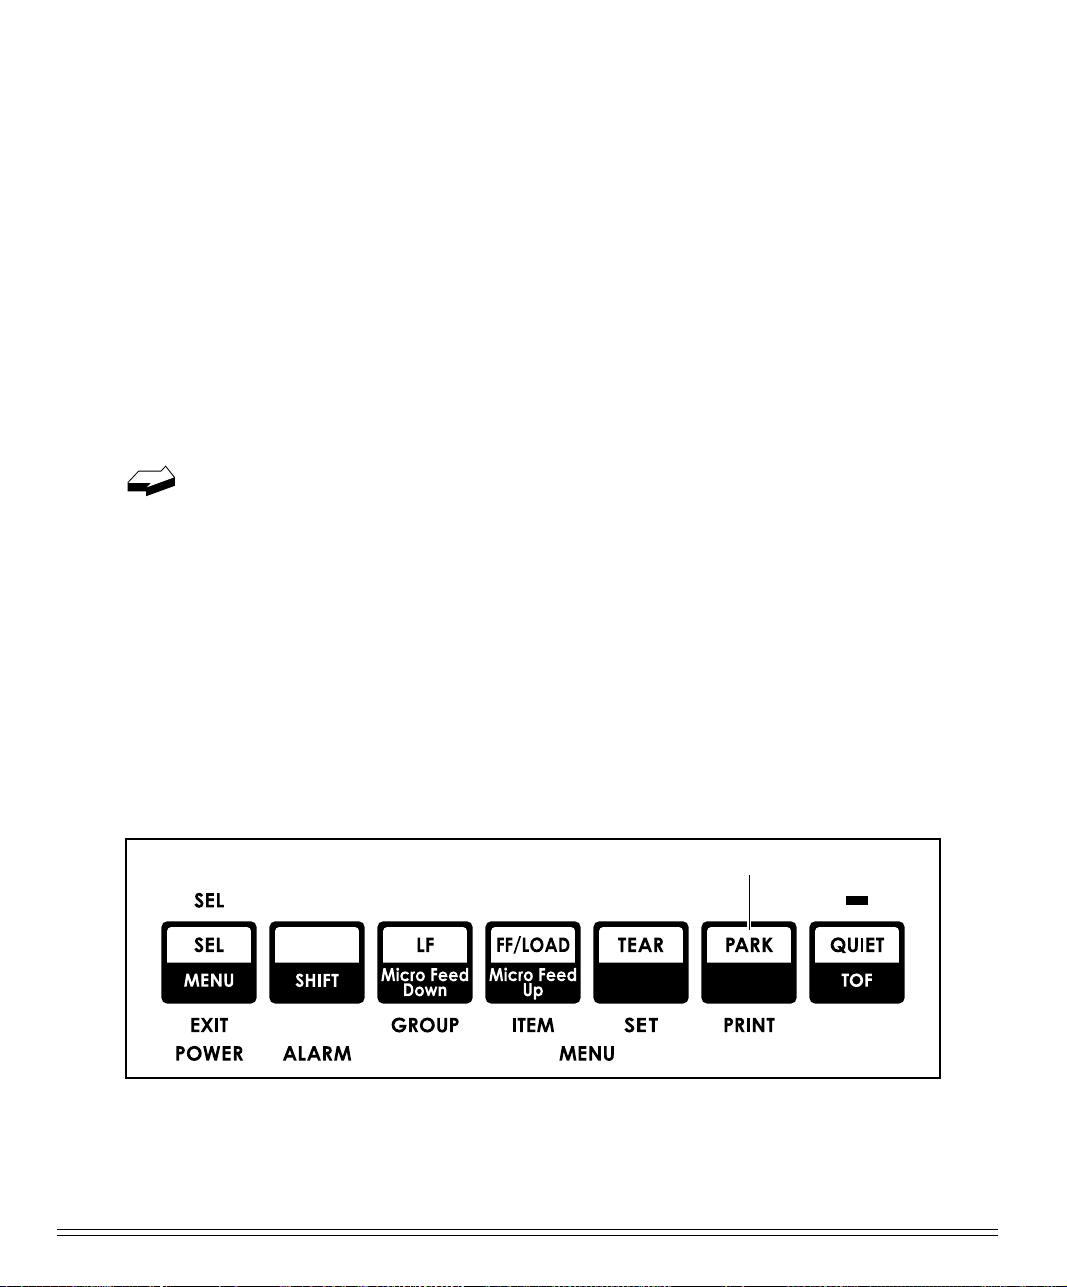
Paper Park Feature
If you have continuous-form paper loaded and you wish to switch to another paper
path, first tear off the printed pages, then simply press the PARK button. The continuous-form paper will immediately retract from the paper path.
Press
22 Loading Paper
Page 30

Switching Paper Paths
To switch from continuous-form feed from the rear or bottom (optional push or pull
tractor installed) of the printer to single-sheet feed from the top:
1. Tear off printed pages.
2. Press PARK button.
3. Swing wire guide up into paper separator, then pivot separator to upright position.
4. Move paper lever to position marked “TOP”.
5. Load single sheet paper into paper separator.
To switch from top feed to continuous-form tear or bottom (optional push or pull
tractor installed) feed:
1. Make sure no sheet is in paper path (press FF/LOAD to remove single sheet from
path).
2. Lower paper separator to continuous forms position and swing wire guide over
onto pull-up roller assembly.
3. Move paper lever to position marked “REAR” or “BOT”, as appropriate.
4. Press FF/LOAD button. Continuous-form paper will advance into print position.
ML790/791 Printer Handbook 23
Page 31

24 Loading Paper
Page 32
hapter 3: Operation
C
This chapter explains how to operate your printer. It also provides instructions on
how to change the default settings and how to perform basic tasks, including selecting typeface/print quality, selecting character pitch, testing your printer, and resetting Top of Form to the factory default.
Control Panel
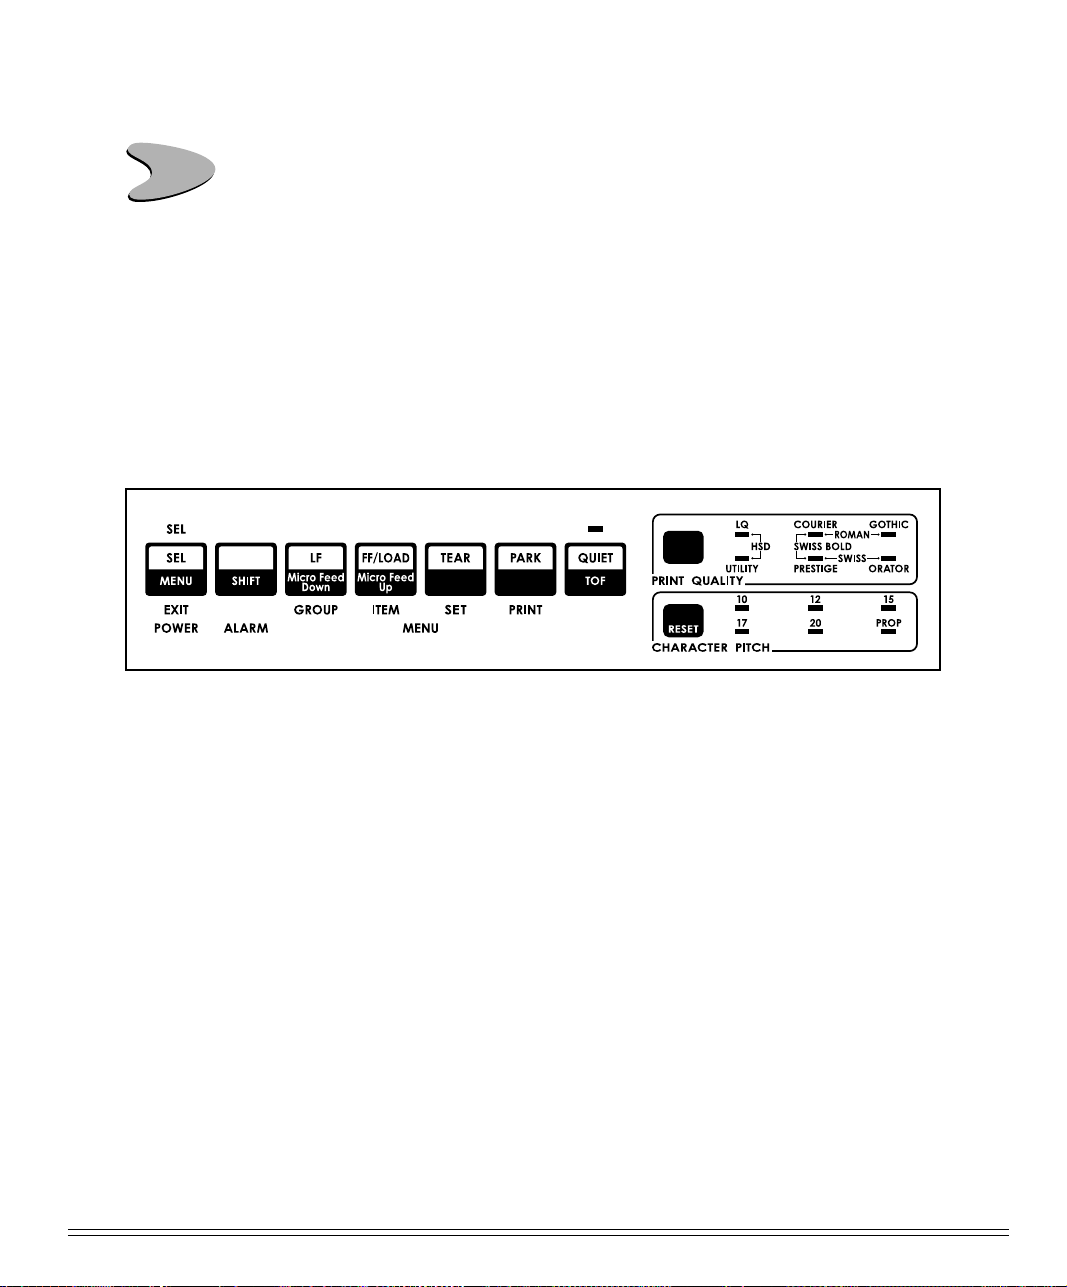
Your printer ’s front panel lets you control paper feeding, customize your printer ’s
defaults to your particular needs, and select print quality and character pitch.
Here’s a breakdown of the controls on the front panel:
ML790/791 Printer Handbook 25
Page 33
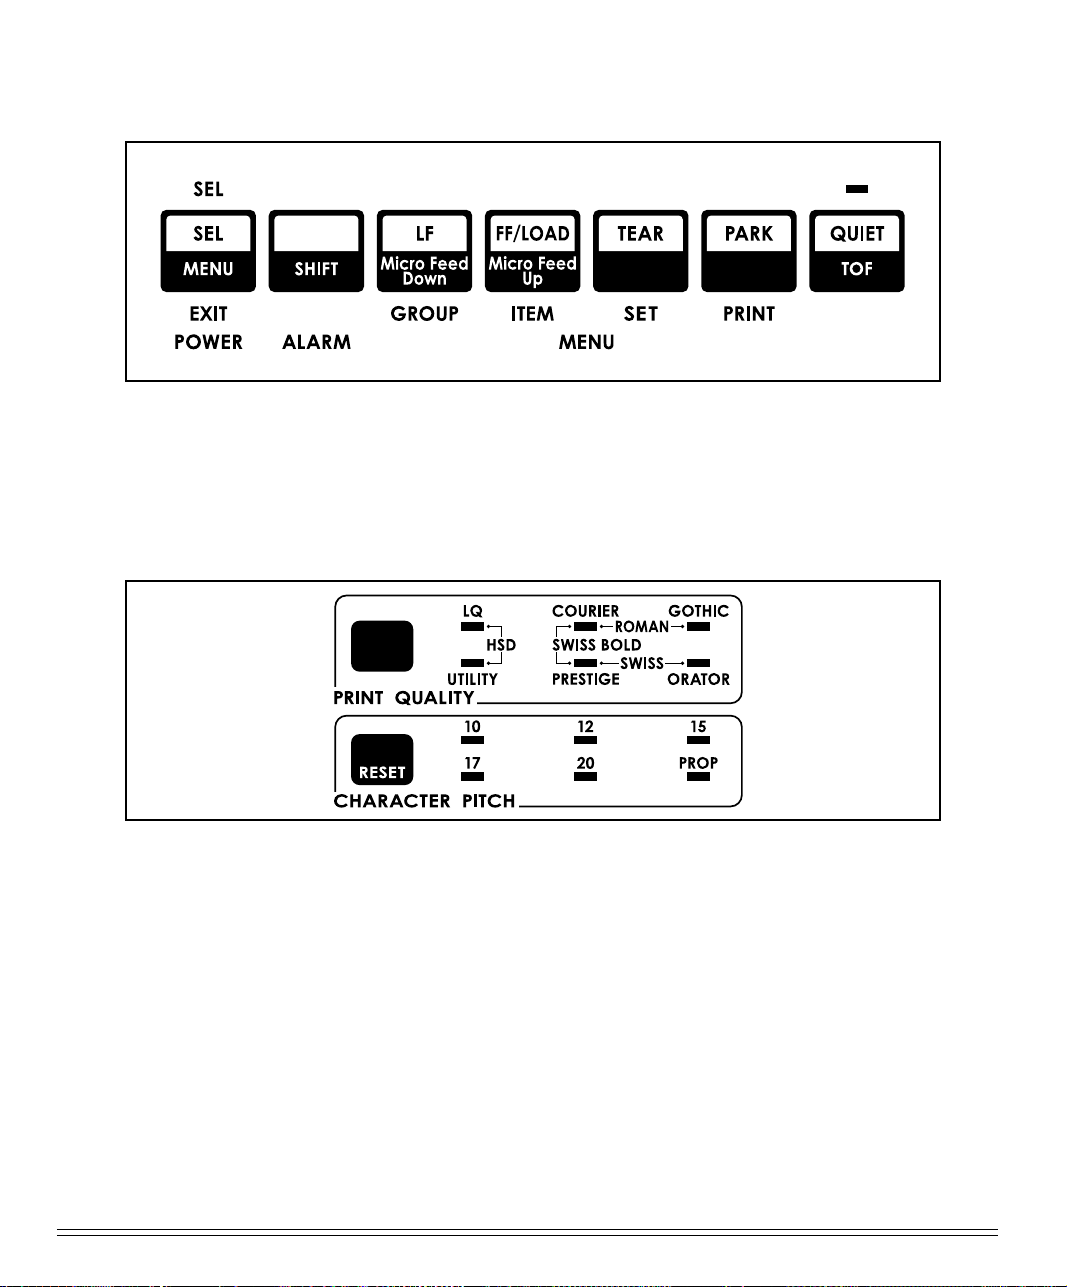
The seven buttons to the left on your control panel are multi-function buttons. In
routine printer operation, they are used to manipulate the paper, but you can also use
them to enter and make changes in the printer’s program menu.
The PRINT QUALITY and CHARACTER PITCH sections at the right on the front
panel are used to select the quality and size of the printing. See “Performing Basic
Tasks” later in this chapter for information on how to use these buttons.
Important!
be overridden by commands sent by the commercial software package from which
you’re printing a document. If you run into this problem, see Chapter 5 for information on how to correct it.
26 Operation
The print quality and character pitch set by means of the front panel can
Page 34
Print Mode
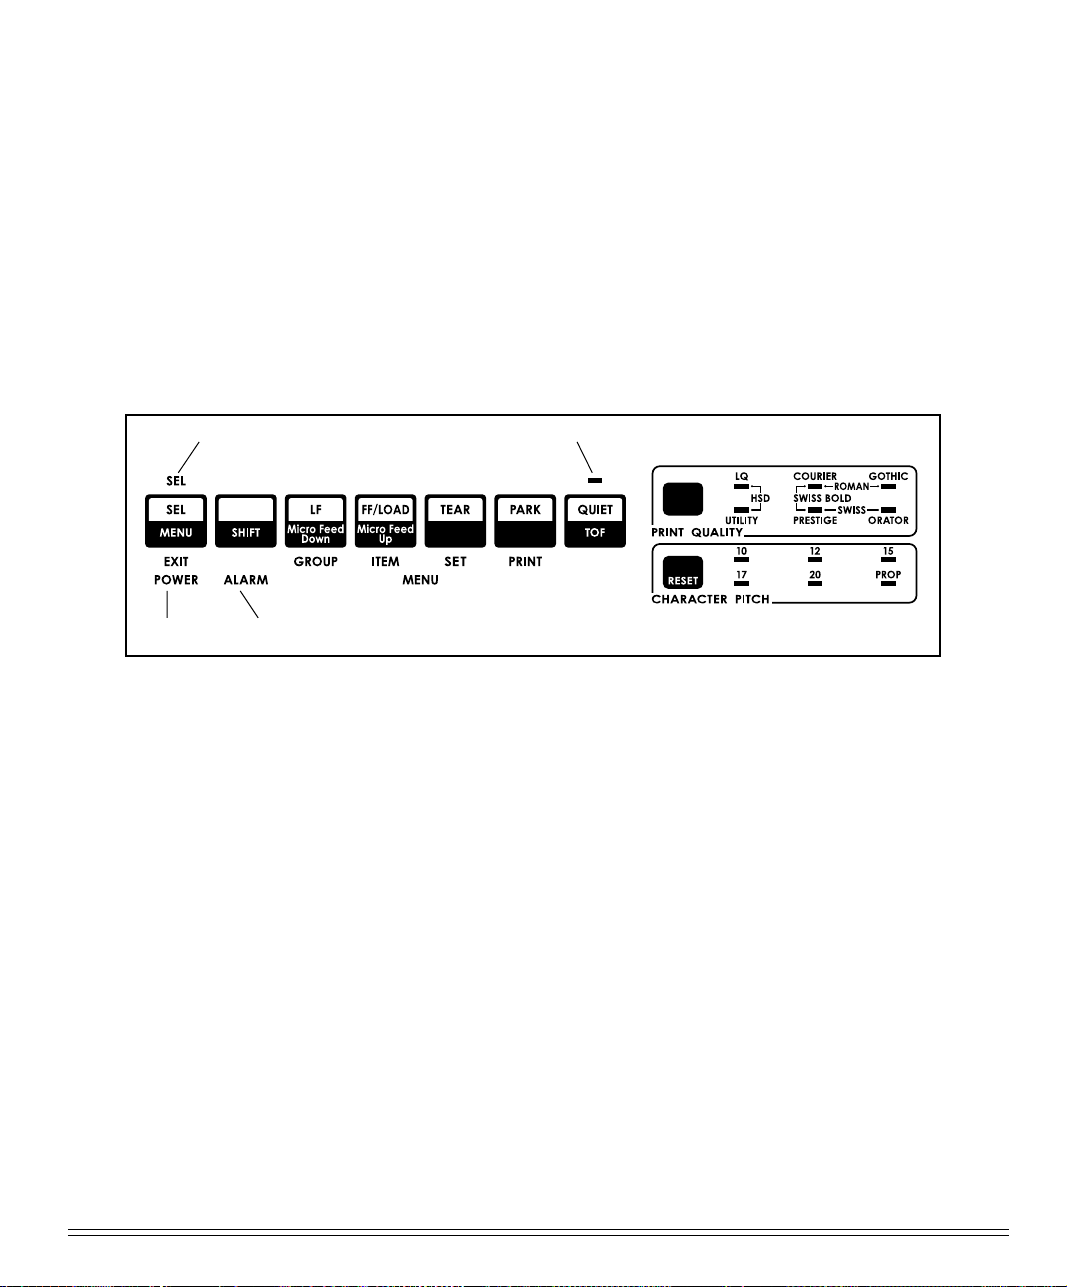
In its normal operating state, your printer’s front panel is in the Print Mode.
Indicator Lights
In the Print Mode, your printer has the following lights to indicate its status:
24
13
1. POWER light: Glows whenever printer is on.
2. SEL light: Glows when printer is selected, ready to receive data. Flashes when the
printer is in print suppress mode or power saving mode. Goes out when printer is
deselected (can’t receive data).
3. ALARM light: Glows when error condition exists, such as out of paper or paper
jam. Also glows when paper lever is set to wrong position.
Important!
Try turning the printer off, then on again; if the light is still flashing, contact your
service dealer (see Chapter 5 for more information on obtaining service).
4. QUIET light: Glows when printer is in QUIET state (printer selected or deselected).
ML790/791 Printer Handbook 27
If the ALARM light is blinking, an unrecoverable error condition exists.
Page 35
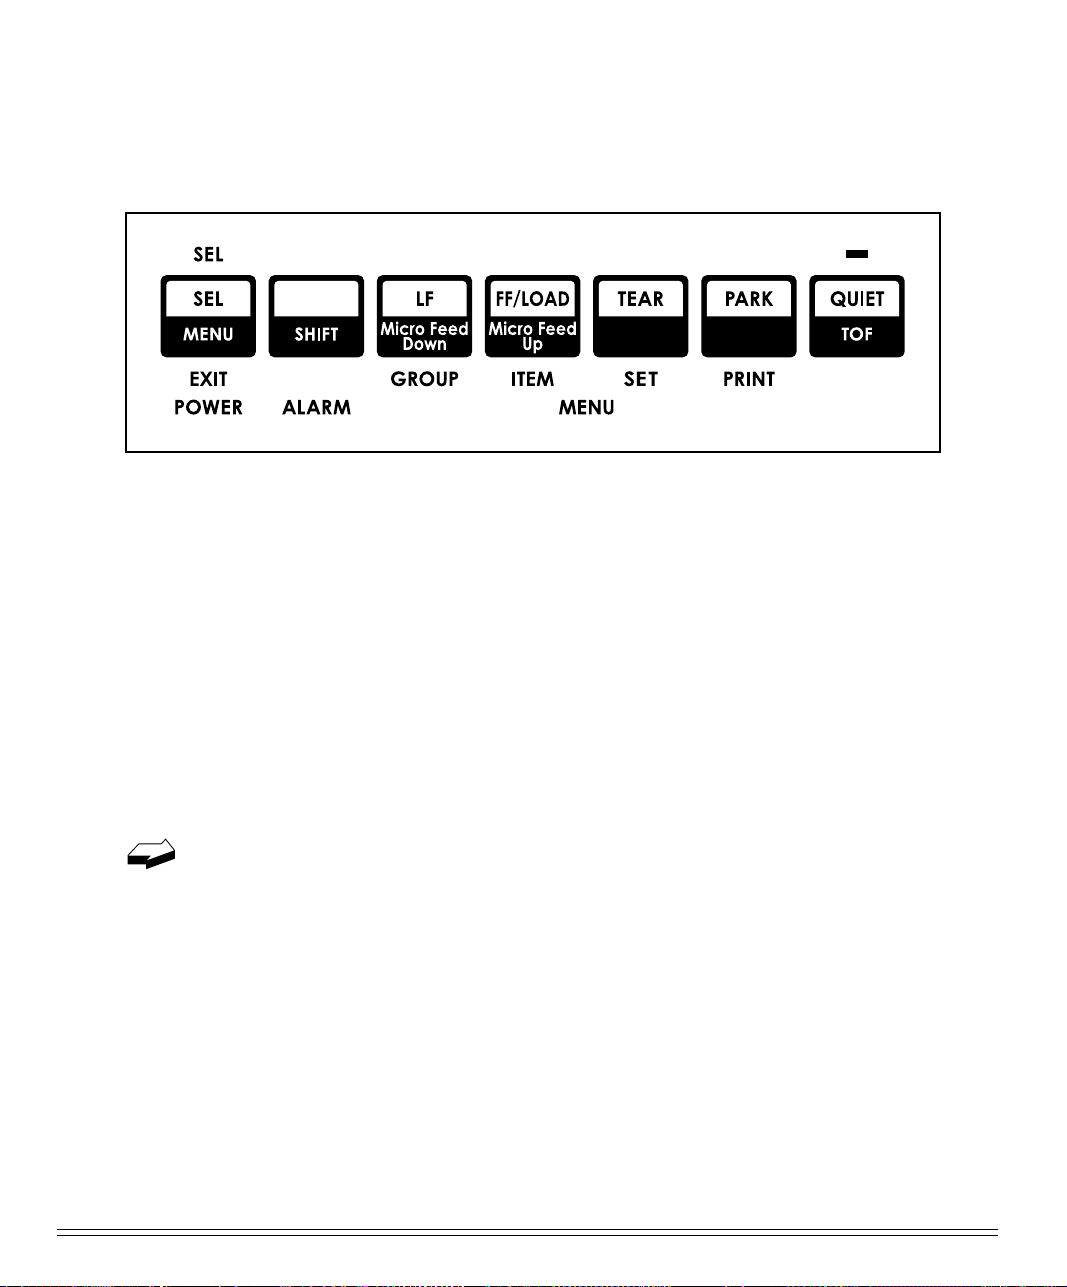
Buttons
When the printer is selected (SEL light on), only the functions marked at the top of the
bank of buttons (LF, FF/LOAD, TEAR, PARK, QUIET) are in effect. When the printer
is deselected (SEL light off), the functions marked at the bottom of the buttons (Micro
Feed Down, Micro Feed Up, TOF) can be accessed by means of the SHIFT button.
Each button can have several functions, depending on the mode in use (Print Mode
or Menu Mode), on whether or not the printer is selected and on whether or not the
optional Cut Sheet Feeder (CSF) is installed. Most buttons also have a different function if they are pressed while the printer is being turned on. In addition, different
combinations of two buttons can be used to access functions.
The various function available for each button are summarized in the table below.
The PRINT QUALITY and CHARACTER PITCH buttons are discussed under
“Performing Basic Tasks,” later in this chapter.
28 Operation
Page 36
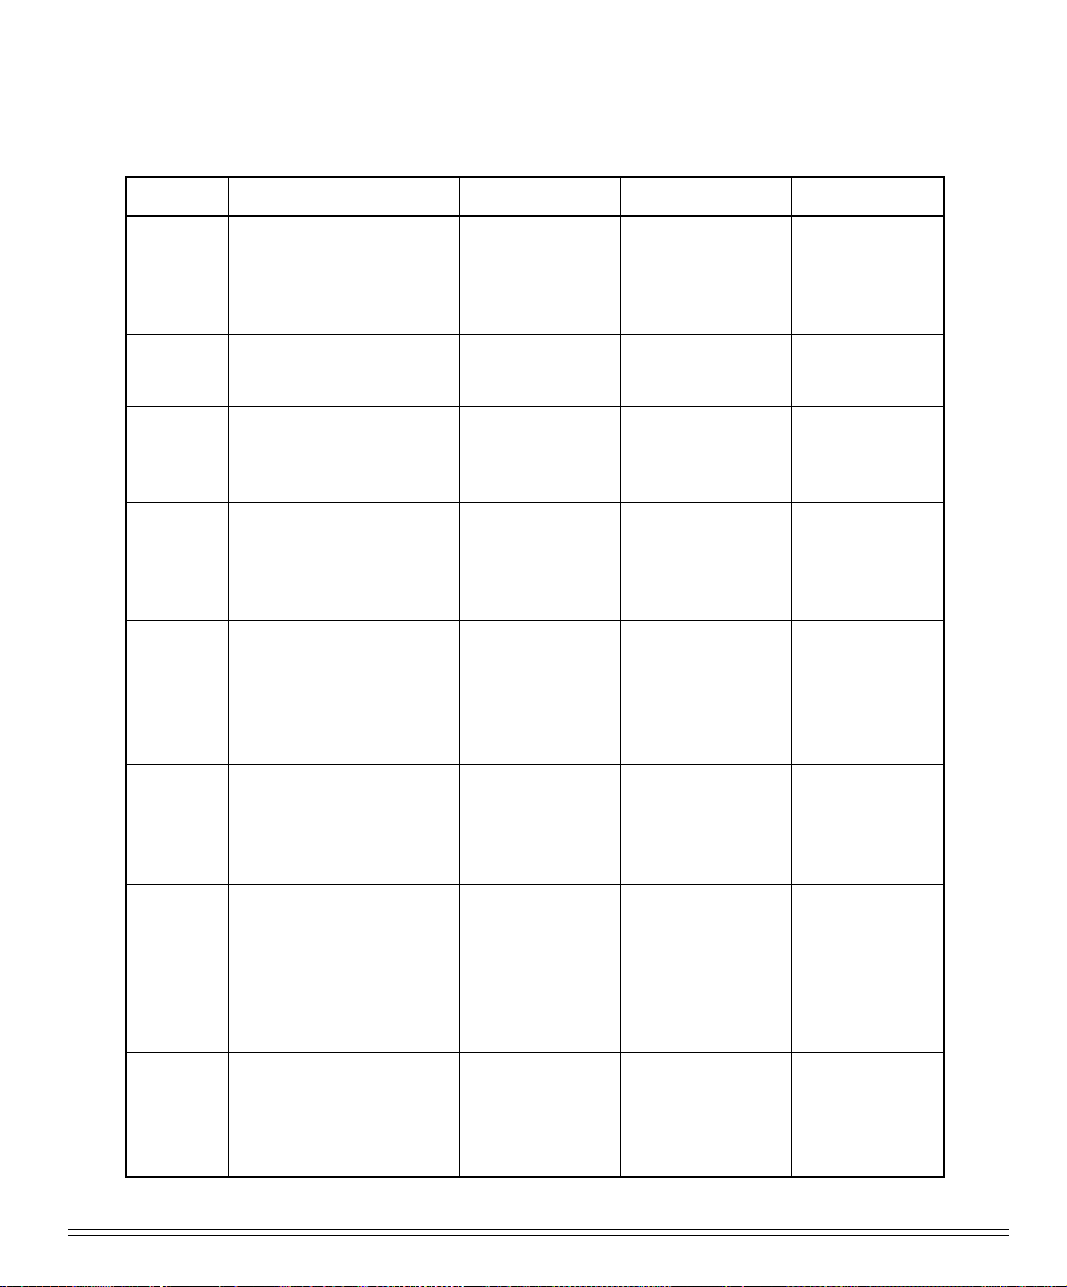
Summary of Front Panel Button Functions
Button Print Mode
SEL
Selects/deselects printer.
Resets Paper Out of Paper
Jam Alarm. Also ends Font
Test or Rolling ASCII test .
SEL +
Activates Menu Mode.
SHIFT
SHIFT
With printer deselected:
used with other keys to set
and store Top of Form.
LF
Advances paper Up one
line. Press and hold to advance by repetitive line
feeds.
LF+
SHIFT
With printer deselected,
moves Top of Form setting
up (paper moves down)
on page in micro increments.
Help on Power Up
Activates Menu
Mode.
Activates Menu
Mode.
N/A
Activates Font
Test.
Activates Font
Test.
With CSF Installed
Same as Print
Mode
Same as Print
Mode
Same as Print
Mode
Same as Print
Mode
Same as Print
Mode
Menu Mode
Resets Paper
Out Alarm.
Exits Menu
Mode.
N/A
Advances to
next Group in
Menu.
Goes back to
previous
Group in
Menu.
FF/LOAD
FF/LOAD
+SHIFT
Feeds in sheet of paper or
advances continuous-form
paper to print position.
With printer deselected,
moves Top of Form setting
down (paper moves up)
N/A
N/A
Inserts or Ejects
Page.
Same as Print
Mode
Advances to
next Item in
Menu.
Goes back to
previous Item
in Menu.
on page in micro increments.
TEAR
Moves continuous-feed
paper up for tear-off or
back down for printing
N/A
N/A
Advances to
next Value in
Menu.
(select/deselect states).
N/A : Not applicable.
ML790/791 Printer Handbook 29
Page 37
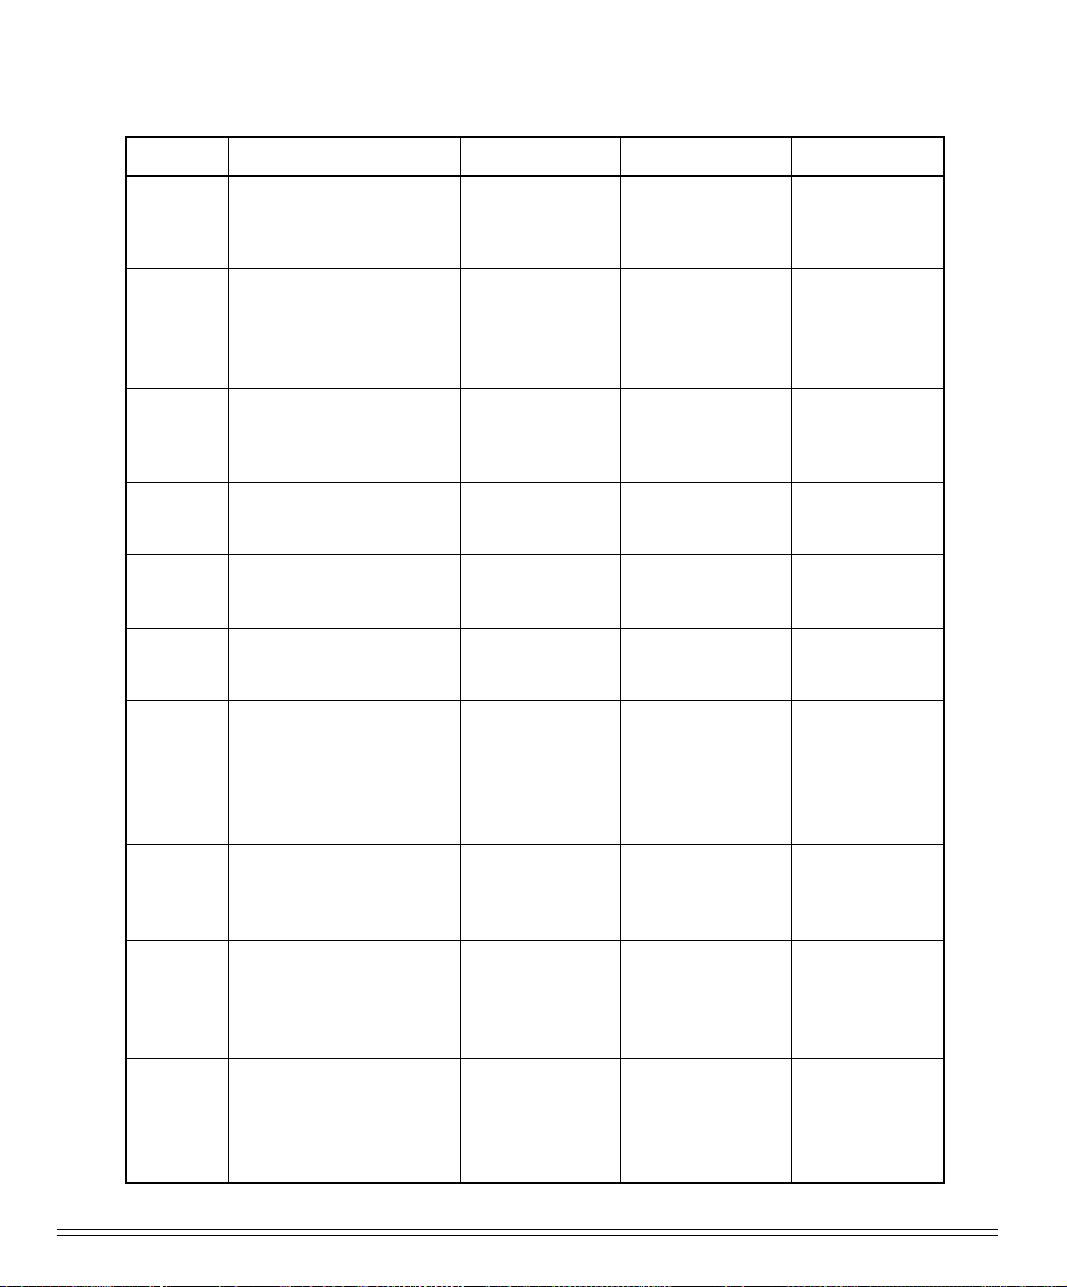
Button Print Mode
Help on Power Up
With CSF Installed
Menu Mode
TEAR+
SHIFT
PARK
PARK+
SHIFT
QUIET
QUIET+
SHIFT
PRINT
QUALITY
PRINT
QUALITY
+SHIFT
Move the print head to Reverse.
Parks continuous-form paper.
Move the print head to
Forward.
Activates/deactivates
QUIET mode.
Sets Top of Form.
Selects next Print Quality
mode.
Sets/Resets Incremental
Print mode.
N/A
N/A
N/A
Activates Rolling ASCII Test.
Activates Rolling ASCII Test.
N/A
N/A
Move the print
head to Reverse.
Ejects paper.
Move the print
head to Forward.
Activates/deactivates QUIET mode.
Sets Top of Form.
Selects next Print
Quality mode.
Sets/Resets Incremental Print
mode.
Goes back to
previous Value
in Menu.
Prints list of all
Menu settings
for current emulation.
Prints current
Group Menu
Setting.
N/A
N/A
N/A
Prints all Menu
settings, regardless of emulation/options
engaged.
CHARAC-
TER
Selects next pitch setting.
N/A
Selects next pitch
setting.
N/A
PITCH
CHARAC-
TER
PITCH+
With printer deselected,
resets printer.
N/A
With printer deselected, resets
printer.
N/A
SHIFT
FF/LOAD
+TEAR
N/A
Resets Menu
and Top of
N/A
N/A
Form to factory
default.
N/A : Not applicable.
30 Operation
Page 38
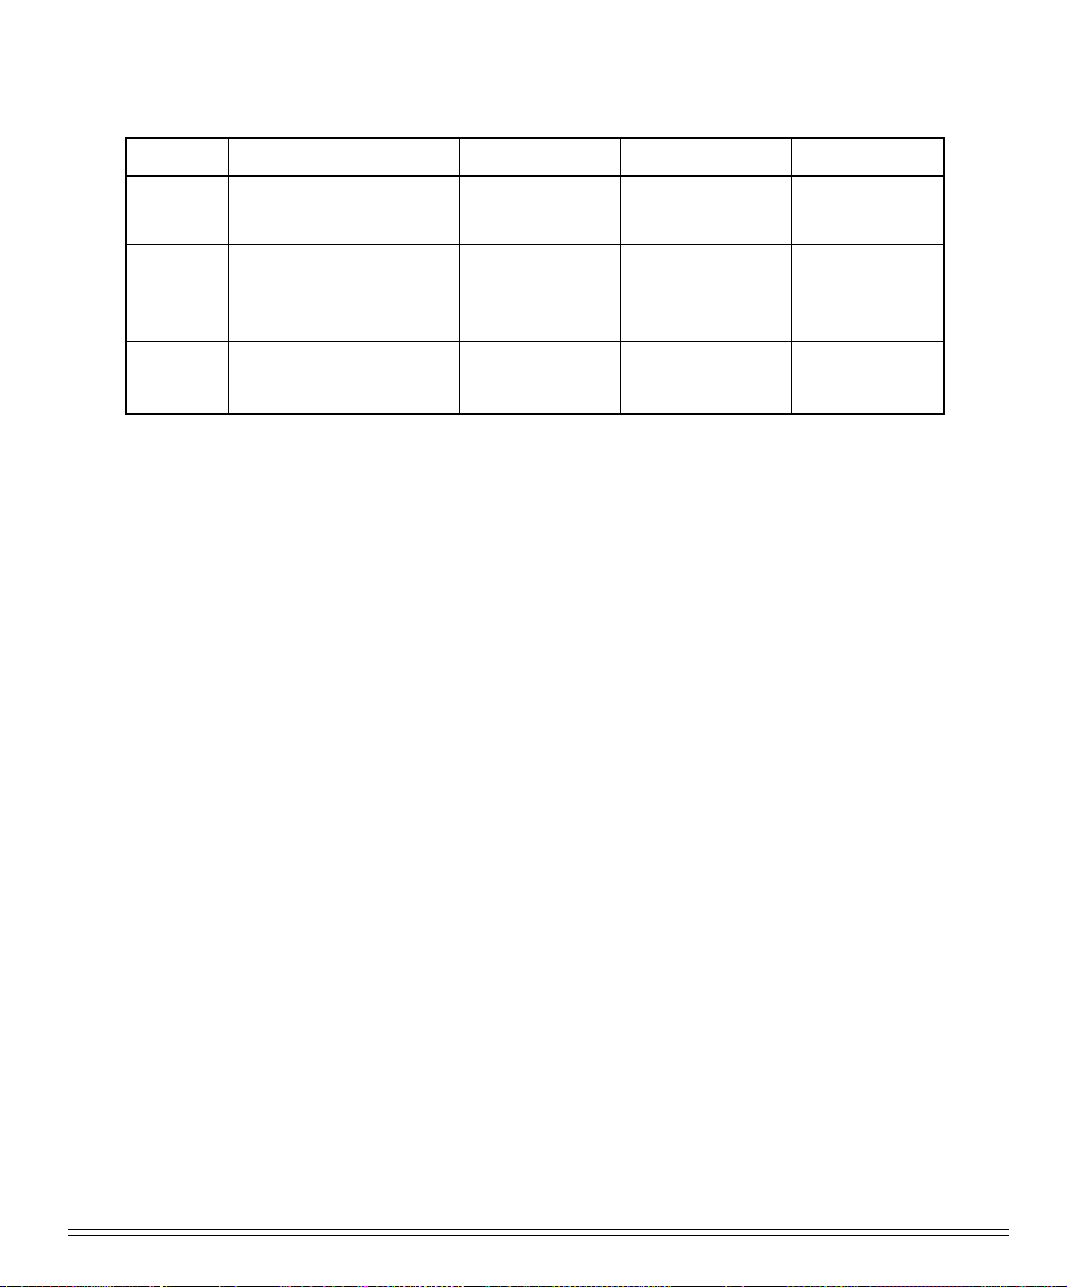
Button Print Mode
Help on Power Up
With CSF Installed
Menu Mode
SEL+LF
QUIET+
PARK
SEL+
FF/LOAD
N/A
N/A
N/A
Resets Menu to
factory default.
Resets Top of
Form to factory
default.
Activates hex
dump mode.
N/A
N/A
N/A
N/A
N/A
N/A
N/A : Not applicable.
ML790/791 Printer Handbook 31
Page 39

Menu Mode
When your printer is in the Menu Mode, you can use the front panel controls to change
the defaults for the printer parameters, including emulation, page length, line spacing, typeface, pitch, etc. For example, you might want to change the page length to 14
inches if you’re printing on legal-size documents, or to 3 inches if you’re printing on
labels or small cards.
To place your printer in the Menu Mode, hold the SHIFT button while pressing the
SEL button (printer either selected or deselected). The MENU light will come on and,
if the printer was selected, the SEL light will go out.
To exit the Menu Mode, hold the SHIFT button and press the SEL button. The MENU
light will go out and the SEL light will come on.
32 Operation
Page 40
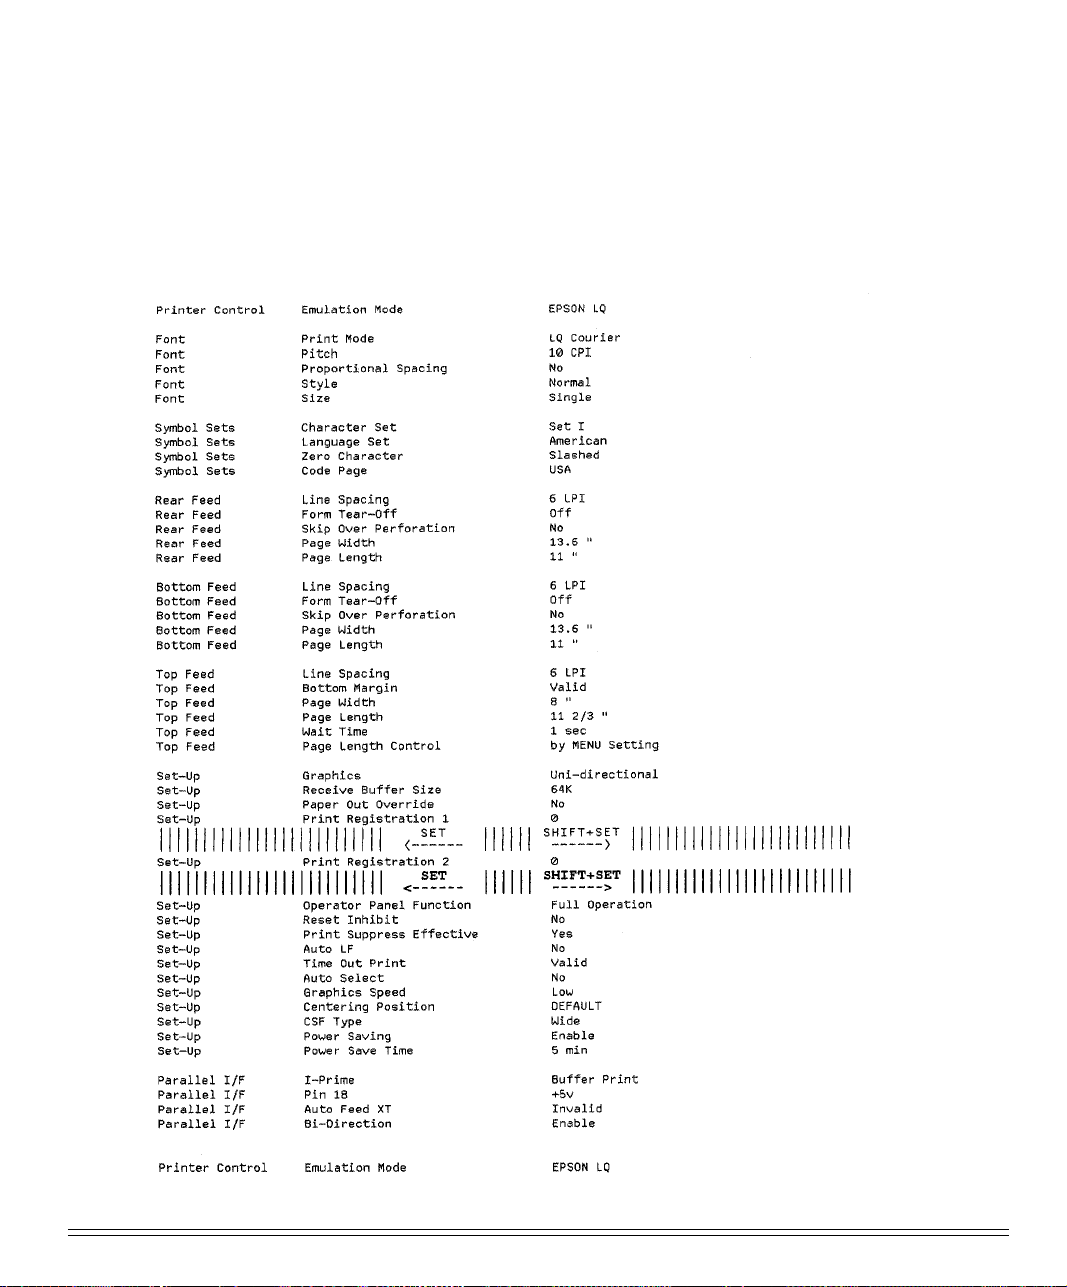
Sample Menu
The menu is made up of groups of parameters. Within each group is a list of items
and each of those items has several possible settings. Here’s a sample Menu printout.
The first column lists the groups; the second, items; the third, settings:
ML790/791 Printer Handbook 33
Page 41
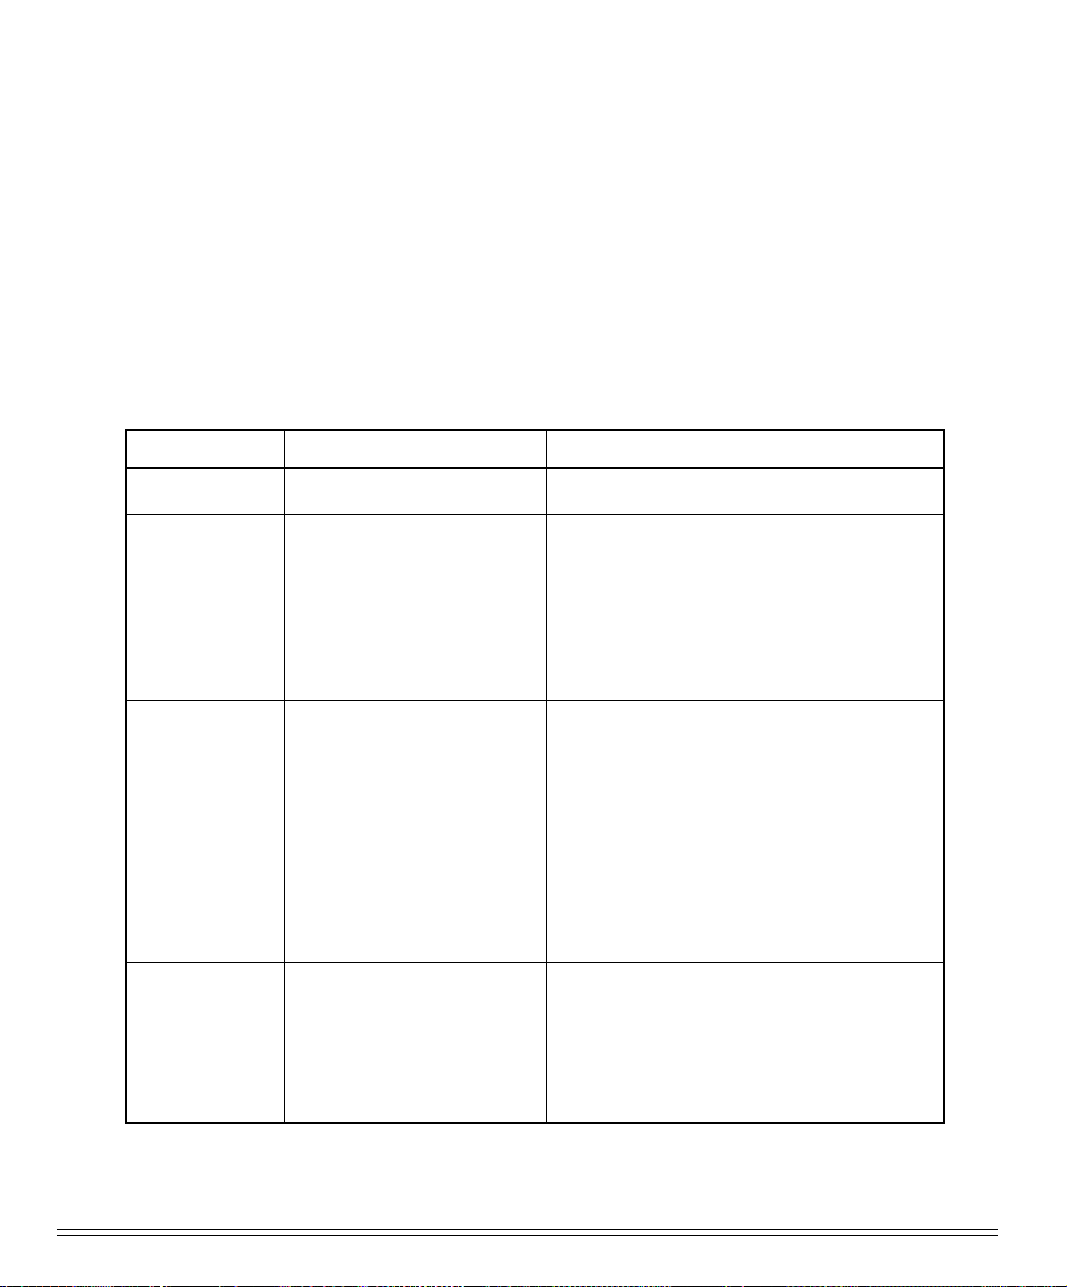
Summary of Menu Settings
The table below details the entries in the printer Menu as it comes from the factory.
The defaults are in bold face italic type.
Other entries will appear in the Menu depending on what options you have installed
and what emulation is engaged.
For a complete listing of all the available Menu selections, along with explanations for each
setting, see appendix B.
Group Item Setting
Printer Control
Font
Symbol Sets
Rear Feed
Emulation Mode
Print Mode
Pitch
Proportional Spacing
Style
Size
Character Set
Language Set
Zero Character
Code Page
Line Spacing
Form Tear-Off
Skip Over Perforation
Page Width*
Page Length
Epson LQ, IBM PPR, IBM AGM
LQ Courier, LQ Roman, LQ Swiss, LQ
Swiss Bold, LQ Orator, LQ Gothic, LQ
Prestige, Utility, HSD
10 cpi, 12 cpi, 15 cpi, 17.1 cpi, 20 cpi
No, Yes
Normal, Italics
Single, Double
Set I, Set II
American, French, German, Britishi, Dan-
ish I, Swedish, Italian, Spanish I, Japanese,
Norwegian, Danish II, Spanish II, Latin
American, French Canadian, Dutch, Publisher
Slashed, Unslashed
USA, Canada French, Multilingual, Portu-
gal, Norway, BRASCII, Abicomp, Multilingual 858, ISO 8859-15
6 LPI, 8 LPI
Off, 500 ms, 1 sec, 2 sec
No, Yes
13.6", 8"
2
11", 11
5.5", 6", 7", 8", 8.5"
/3", 12", 14", 17", 5", 3", 3.5", 4",
* ML791 only
34 Operation
Page 42
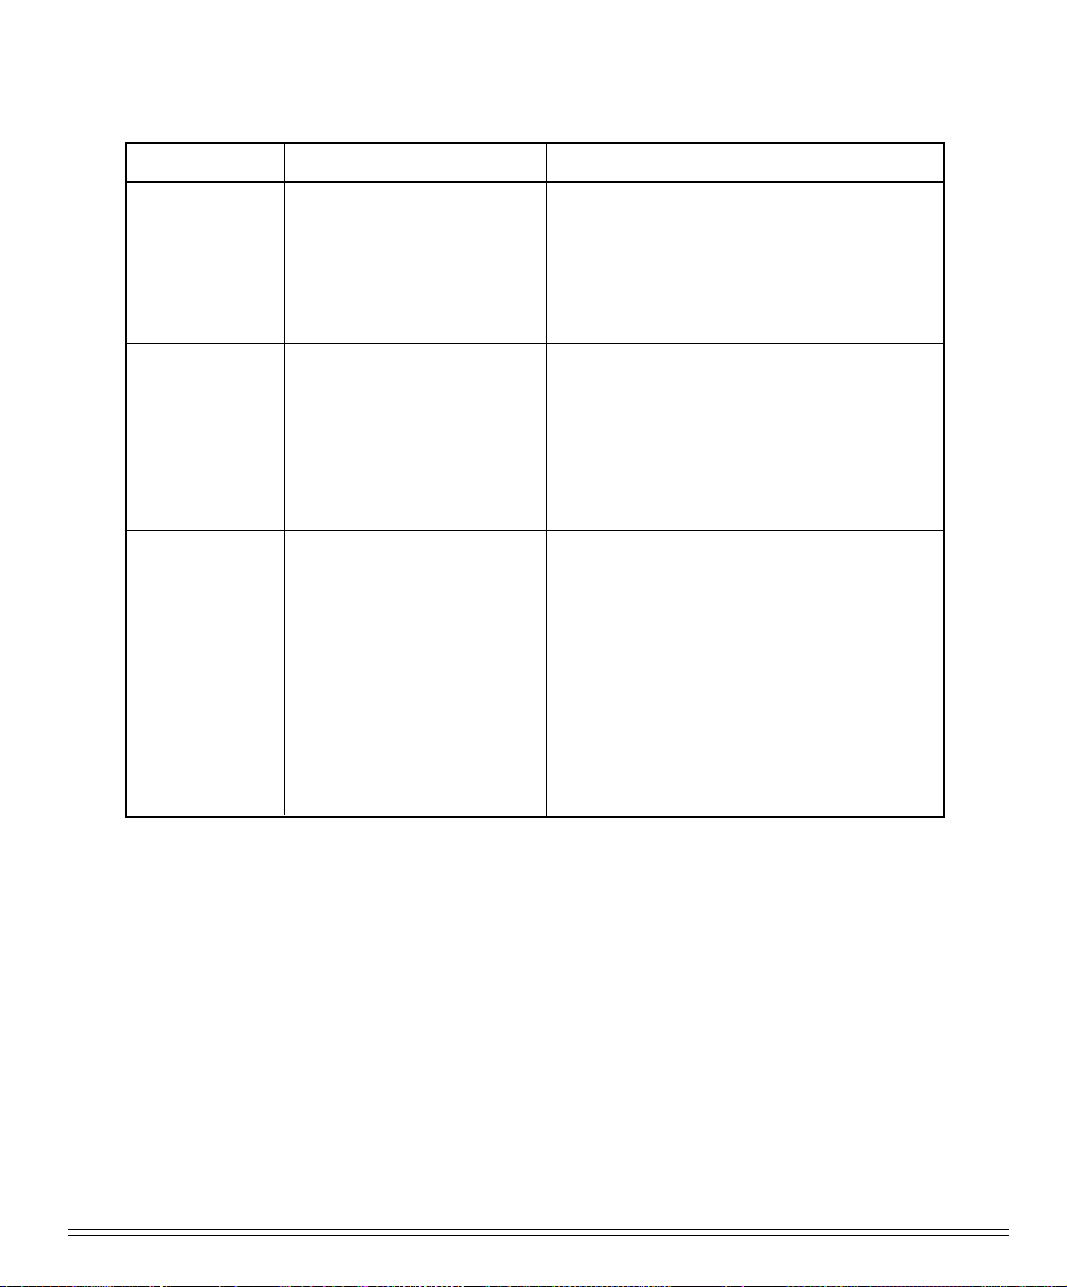
Group Item Setting
Bottom Feed
Top Feed
Set-Up
Line Spacing
Form Tear-Off
Skip Over Perforation
Page Width *
Page Length
Line Spacing
Bottom Margin
Page Width *
Page Length
Wait Time
Page Length Control
Graphics
Receive Buffer Size
Paper Out Override
Print Registration 1
Print Registration 2
6 LPI, 8 LPI
Off, 500 ms, 1 sec, 2 sec
No, Yes
13.6", 8"
11", 11 2/3", 12", 14", 17", 5", 3", 3.5", 4",
5.5", 6", 7", 8", 8.5"
6 LPI, 8 LPI
Valid, Invalid
8", 13.6"
11", 11 2/3", 12", 14", 17", 3", 3.5", 4", 5.5", 6",
7", 8", 8.5"
1 sec, 2 sec, 500ms
by Menu Setting, by Actual Page Length
Bi-directional, Uni-directional
64K, 128K, 1 Line, 32K
No, Yes
0, 0.05 mm Left, 0.10 mm Left, 0.15 mm Left,
0.20 mm Left, 0.25 mm Left, 0.25 mm Right,
0.25 mm Right, 0.15 mm Right, 0.10 mm Right,
0.05 mm Right
0, 0.05 mm Left, 0.10 mm Left, 0.15 mm Left,
0.20 mm Left, 0.25 mm Left, 0.25 mm Right,
0.25 mm Right, 0.15 mm Right, 0.10 mm Right,
0.05 mm Right
ML790/791 Printer Handbook 35
Page 43
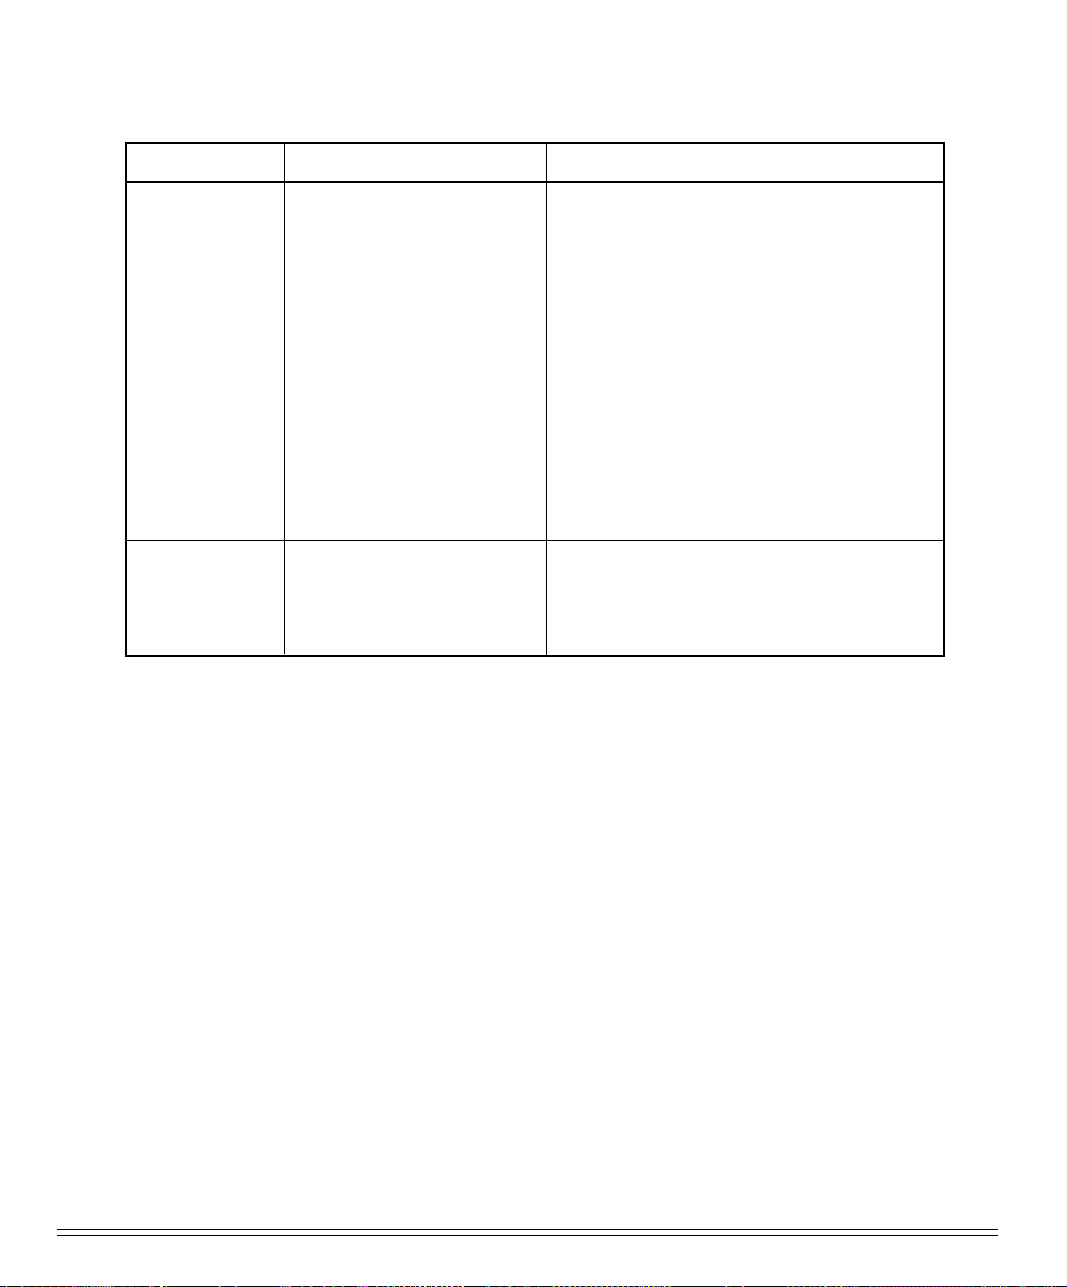
Group Item Setting
Set-Up
Parallel I/F
Operator Panel Function
Reset Inhibit
Print Suppress Effective
Auto LF
Auto CR *
1
SI Select Pitch (10 CPI) *
SI Select Pitch (12 CPI) *
Time Out Print
Auto Select
Graphics Speed
Centering Position
CSF Type *
Power Saving
Power Save Time
I-Prime
Pin 18
Auto Feed XT *
2
Bi-Direction
Full Operation, Limited Operation
No, Yes
Yes, No
No, Yes
No, Yes
1
17.1 CPI, 15 CPI
1
20 CPI, 12 CPI
Valid, Invalid
No, Yes
Low, High
DEFAULT, MODE 1, MODE 2
Wide, Narrow
Enable, Disable
5 min, 10 min, 15 min, 30 min, 60 min
Buffer Print, Buffer Clear, Invalid
+5V, Open
Invalid, Valid
Enable, Disable
* ML791 only
1
*
IBM mode Only
2
*
EPSON mode Only
36 Operation
Page 44
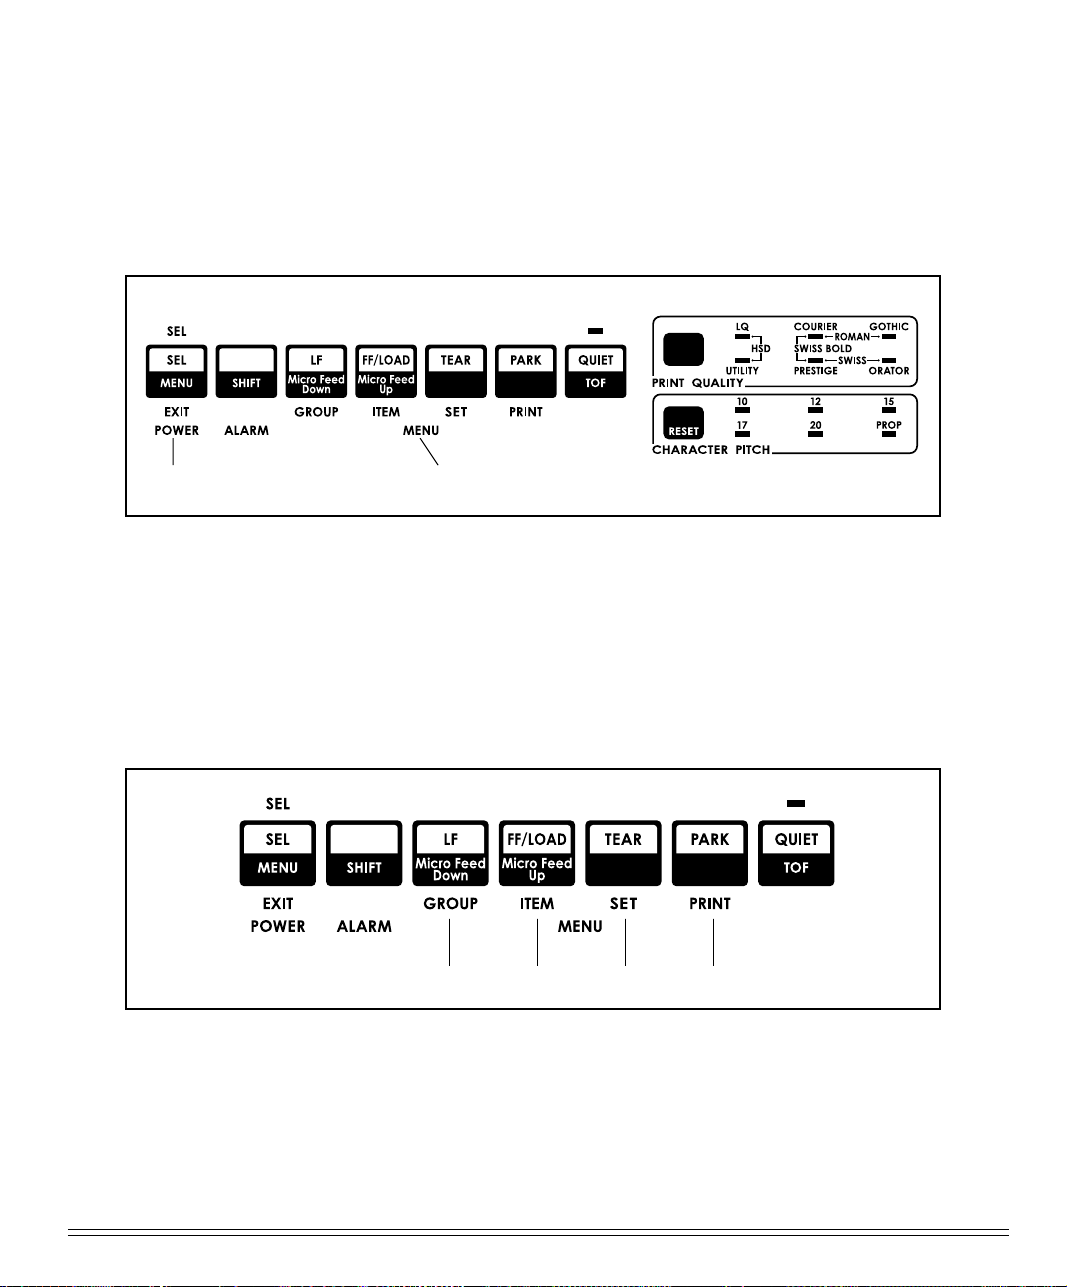
Menu Mode Indicator Lights
In the Menu Mode, the following lights indicate your printer’s status:
12
1. POWER light: Glows when printer is on.
2. MENU light: Glows when printer is in Menu Mode.
Menu Mode Buttons
1 2 3 4
ML790/791 Printer Handbook 37
Page 45
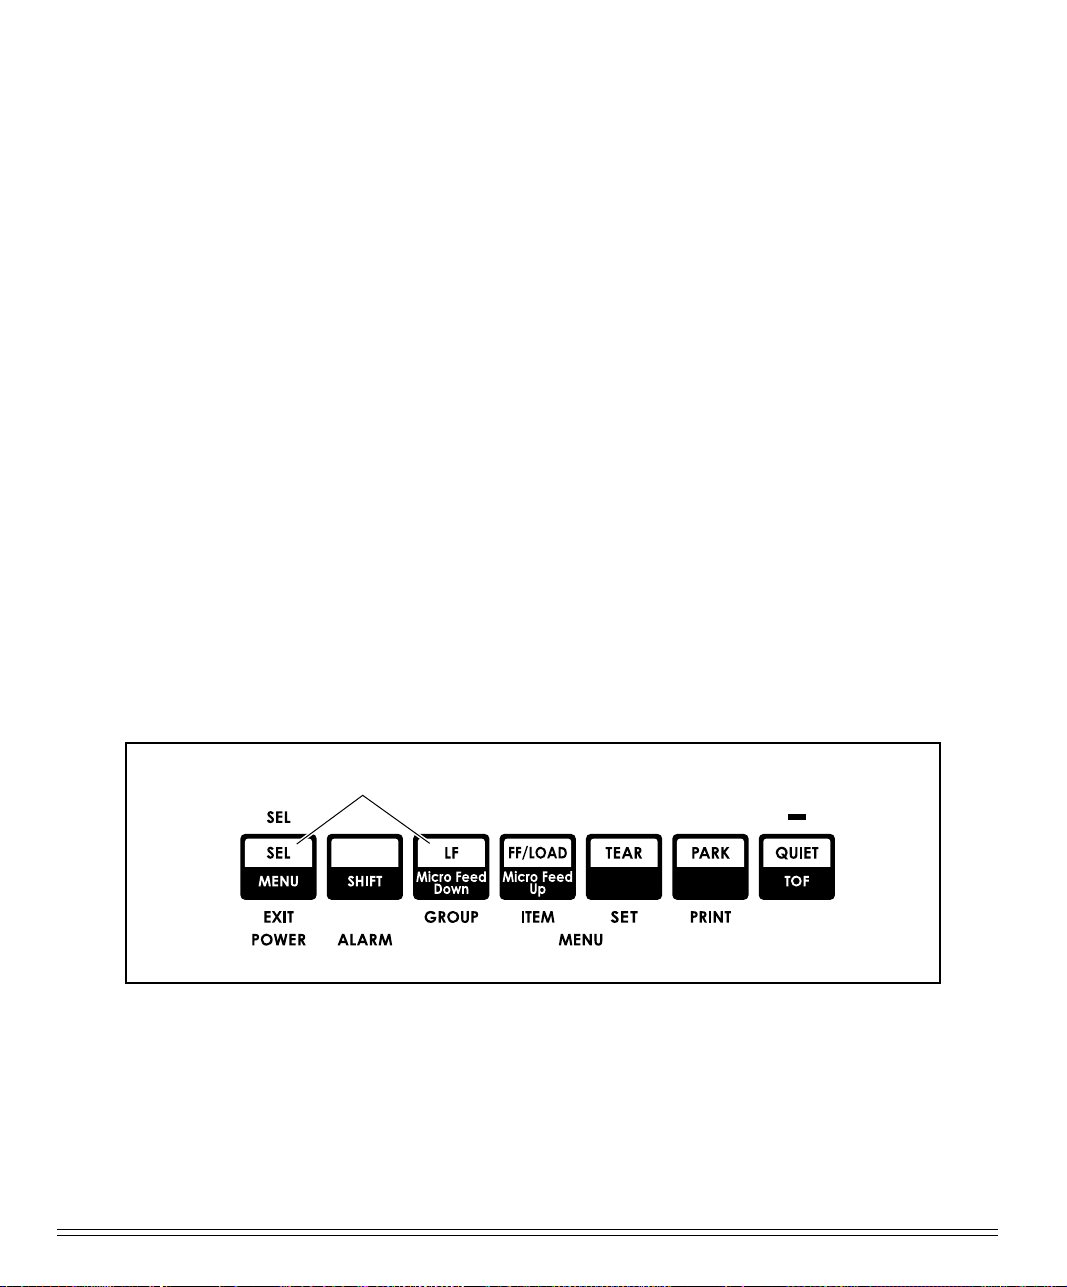
Here is a summary of the buttons active in the Menu Mode:
1. GROUP button: Press to scan through groups of listings. Each time you press the
GROUP button, a line will print, showing the next group in the Menu. To go back
one group, hold the SHIFT button while pressing the GROUP button.
2. ITEM button: Press to scan through items for a particular group. Each time you
press the ITEM button a line will print, showing the next item within the group. To
go back one item, hold the SHIFT button while pressing the ITEM button.
3. SET button: Press to change setting for the items. Each time you press the SET
button, a line will print across the page showing the next setting for that item.
Keep pressing the button until the setting you wish to engage appears. To go back
one setting, hold the SHIFT button while pressing the SET button.
4. PRINT button: Press to print out listing of current settings for each items, group
by group.
Resetting Menu to Factory Defaults
To reset your printer Menu to the factory settings, turn the printer off, then hold the
SEL and LF buttons while turning it back on again.
Hold while turning printer on
38 Operation
Page 46
Performing Basic T asks
Selecting Print Quality
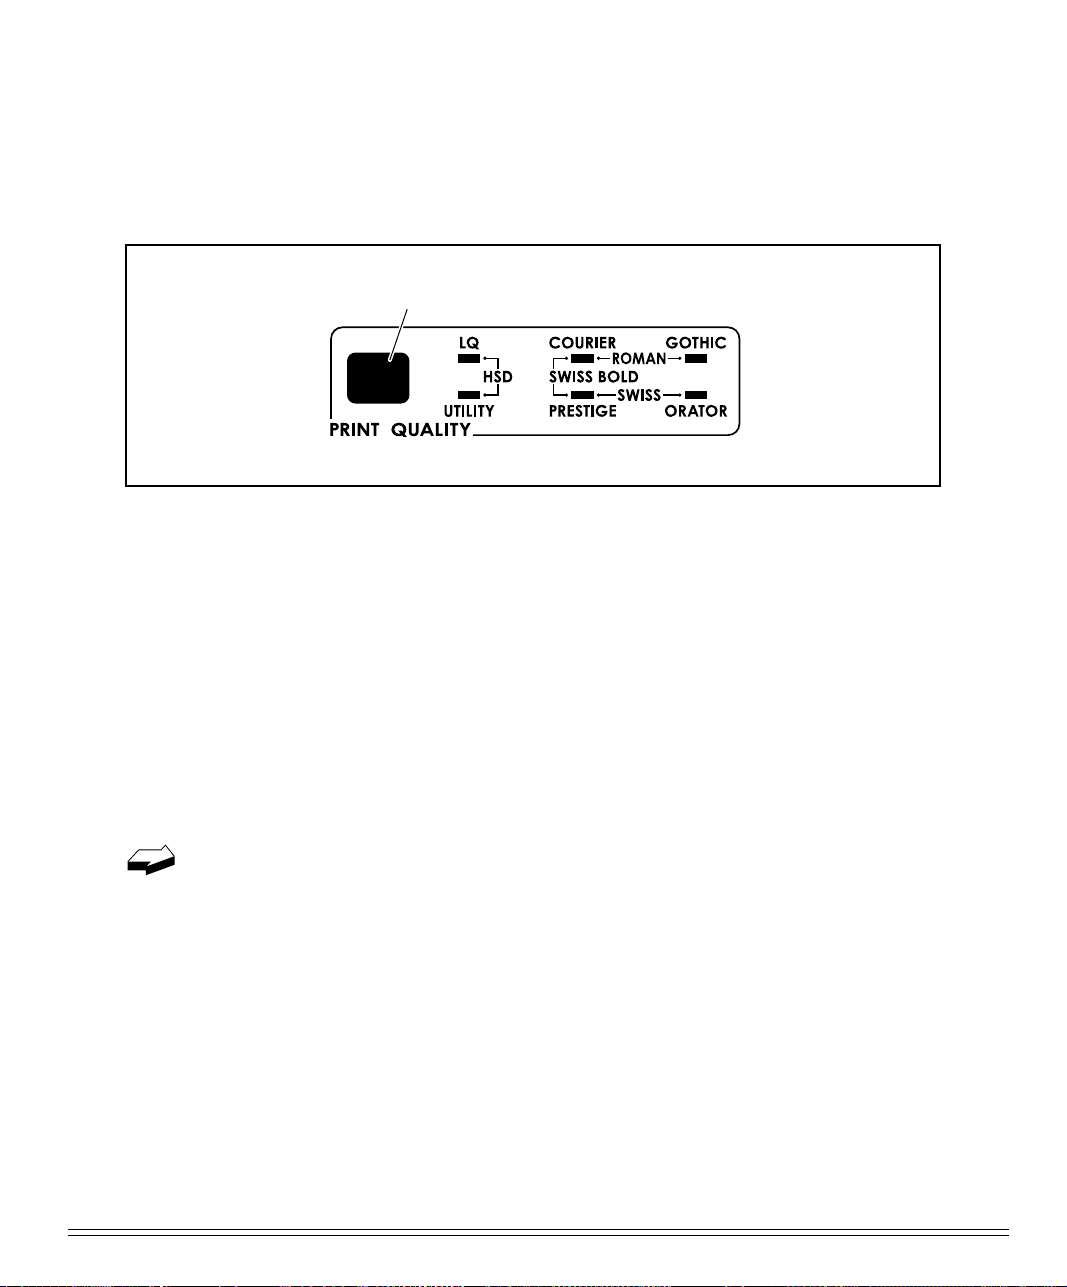
Print quality button
Your printer allows you to select from three print qualities: HSD, utility and letter
quality (LQ), HSD and Utility printing are in the Gothic typeface. The LQ printing is
of noticeably higher quality and offers you a choice of seven typefaces: Courier, Gothic,
Prestige, Orator, Swiss Bold, Roman and Swiss. To select the print quality/ typeface
you want, keep pressing the PRINT QUALITY button until the lights are lit beside the
combination you want. The LQ Roman, LQ Swiss Bold and LQ Swiss typefaces are
selected when the lights on either side are both lit.
For example, to select the LQ Roman typeface, press the PRINT QUALITY button
until the following lights appear:
Your printer also prints any of eight different bar codes accessible through
printer commands. For more information on bar codes, see the end of this chapter.
ML790/791 Printer Handbook 39
Page 47
Selecting Character Pitch
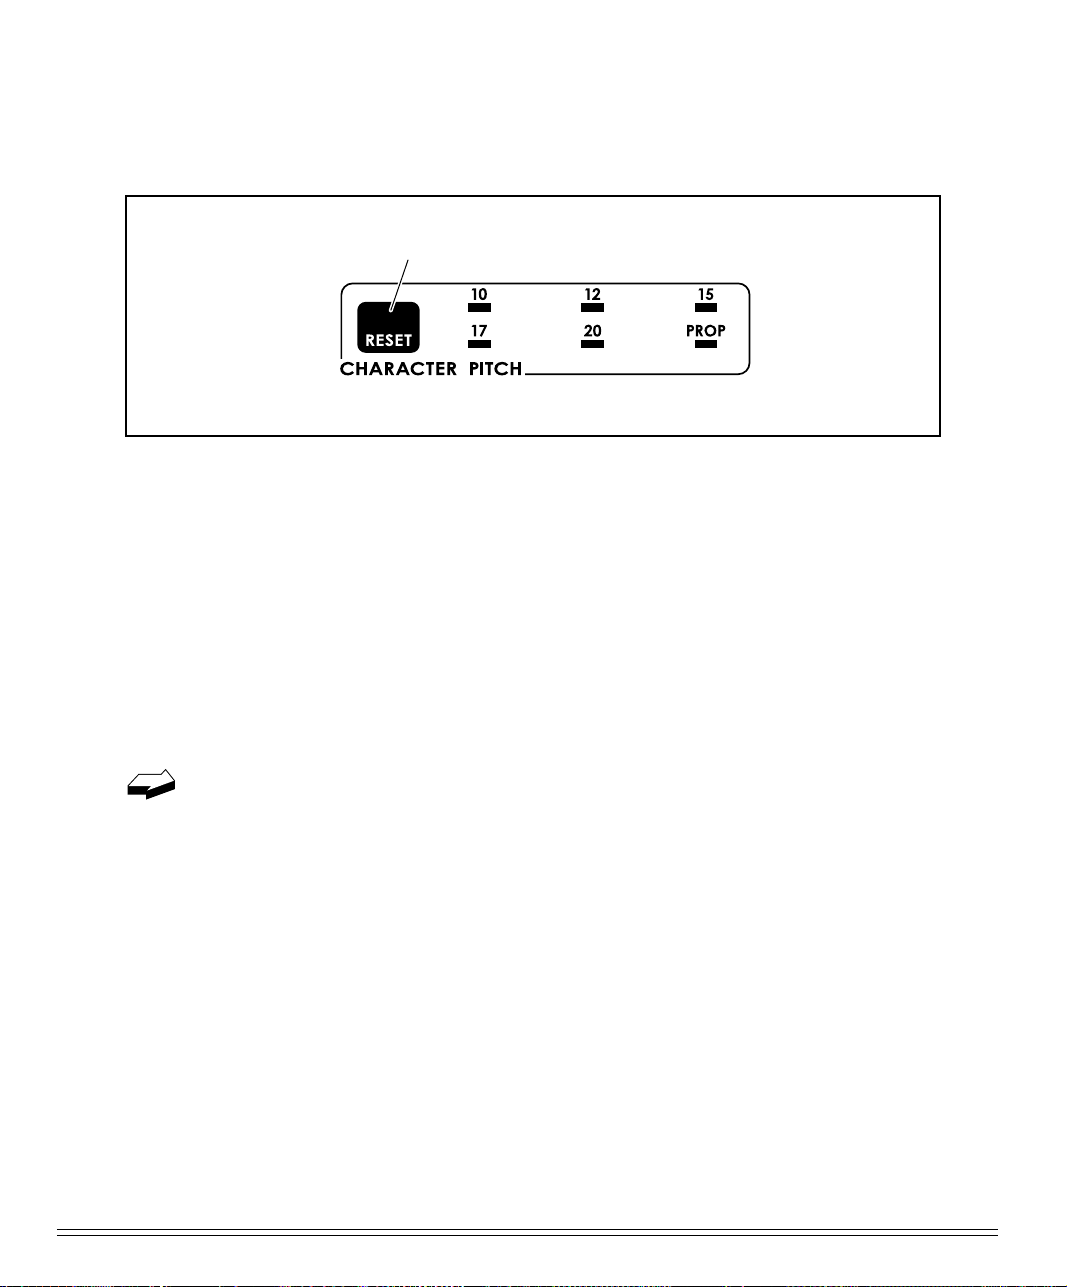
Character Pitch button
The character pitch determines the width of the individual characters and is measured in characters per inch (cpi). To select the character pitch, press the CHARACTER PITCH button successively until the light underneath the pitch you wish to engage is lit (10 cpi, 12cpi, 15cpi, 17cpi, 20cpi, or Proportional).
To reset the pitch to the user default (Menu Setting):
1. Be sure printer is deselected (SEL light out). If not, press SEL button.
2. Hold SHIFT button while pressing CHARACTER PITCH button.
If the SI command is received from your software, the character pitch selected
on the control panel will be overridden by the SI command.
40 Operation
Page 48
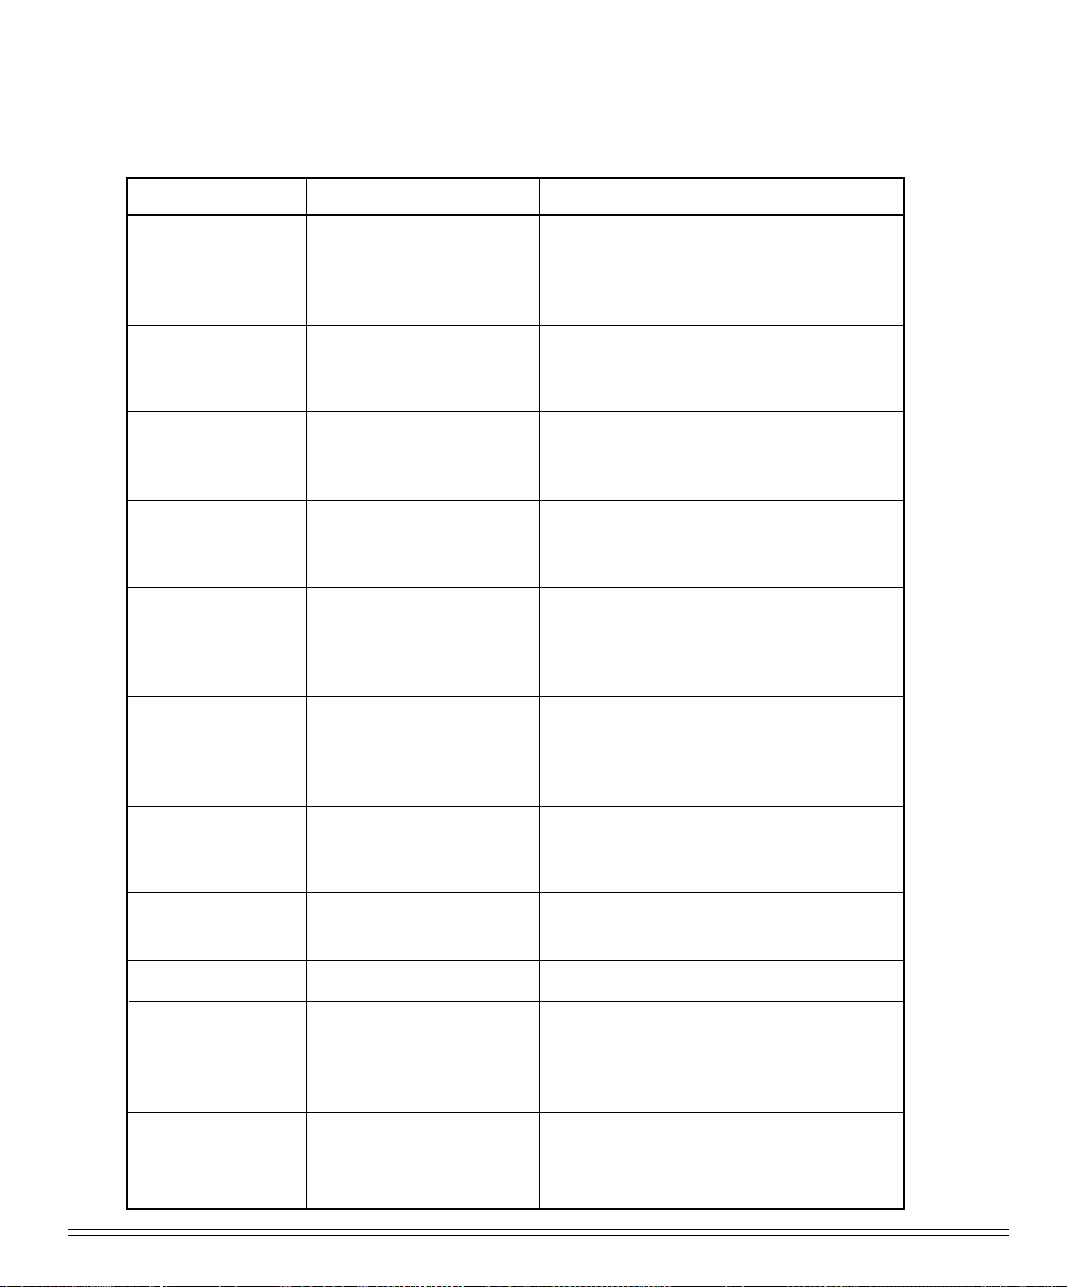
The table below summarizes the fonts available from your printer:
Typeface Spacing Style
LQ Courier
LQ Letter Gothic
LQ Prestige
LQ Orator
LQ Roman
LQ Swiss
10 cpi
12 cpi
Proportional
8 point
10 cpi
12 cpi
Proportional
10 cpi
12 cpi
Proportional
10 cpi
12 cpi
Proportional
10 cpi
12 cpi
Proportional
8 point
10 cpi
12 cpi
Proportional
8 point
Normal, superscript, subscript
Normal, superscript, subscript
Normal, superscript, subscript
Normal
Normal
Normal
Normal
Normal
Normal
Normal
Normal
Normal
Normal
Normal, superscript, subscript
Normal, superscript, subscript
Normal
Normal
Normal, superscript, subscript
Normal, superscript, subscript
Normal
Normal
LQ Swiss Bold
Utility Gothic
HSD Gothic
Barcode
Scalable fonts’
(LQ Courier, LQ
Roman< LQ Swiss)
10 cpi
12 cpi
Proportional
10 cpi
12 cpi
10 cpi
Code 39
UPC A, UPC E, EAN 8,
EAN 13, Interleaved 2 of
5, Code 128, Postnet
11 point~ 64 point
Normal
Normal
Normal
Normal, superscript, subscript
Normal, superscript, subscript
Normal
N/A
Normal
ML790/791 Printer Handbook 41
Page 49
T esting Y our printer
Your printer has three your can run: the Font Test, the Rolling ASCII Test, and the
Hexadecimal Dump Test.
Font Test
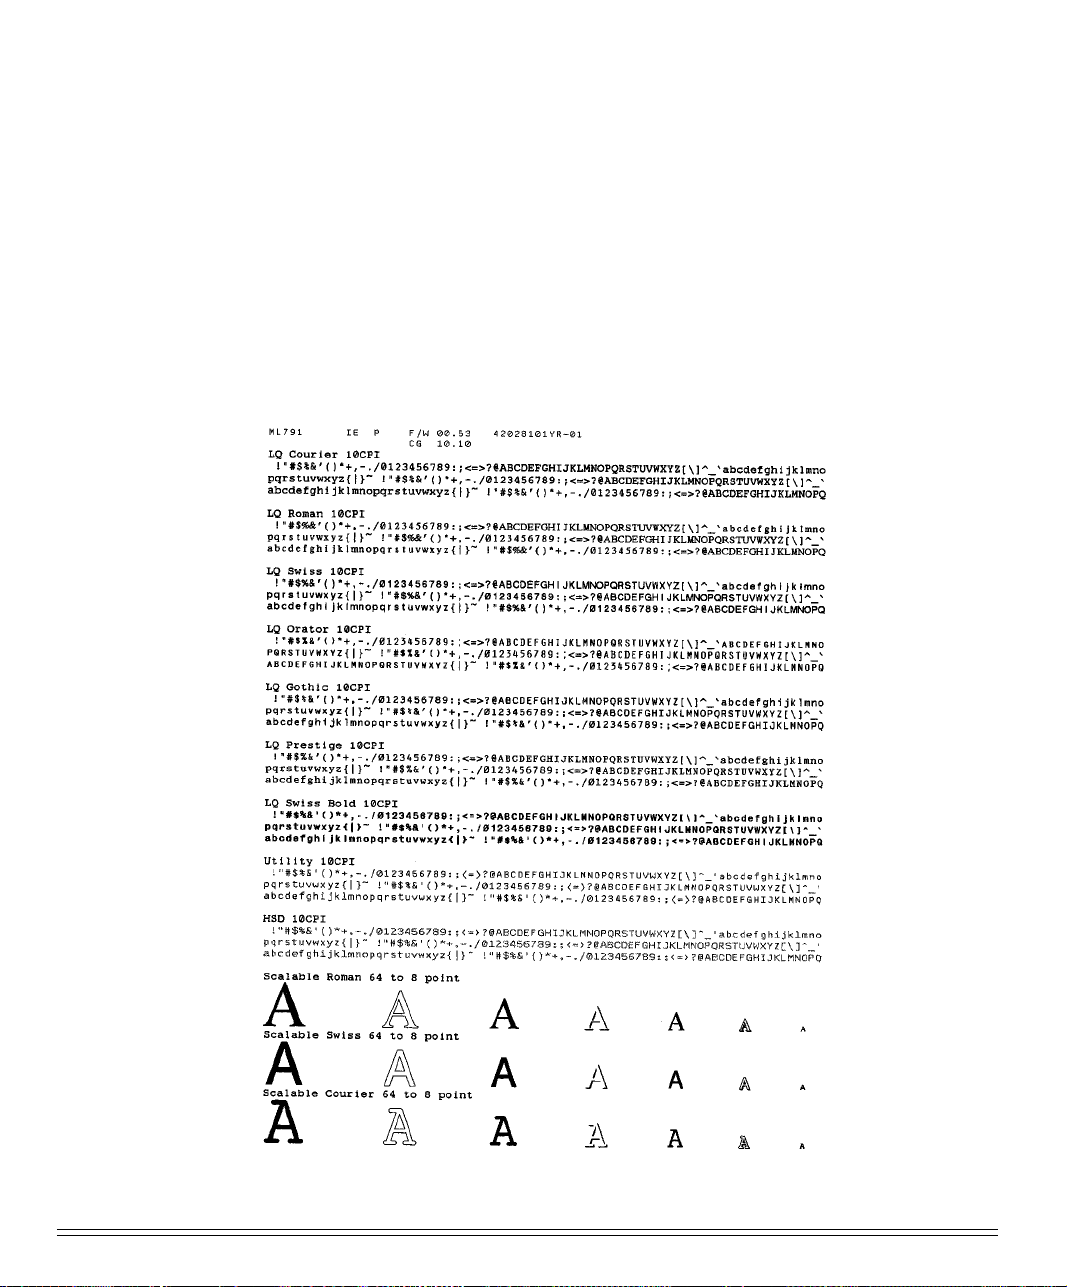
The Font Test provides a printout containing samples of available typefaces. Here’s a
portion of a Font Test printout:
42 Operation
Page 50
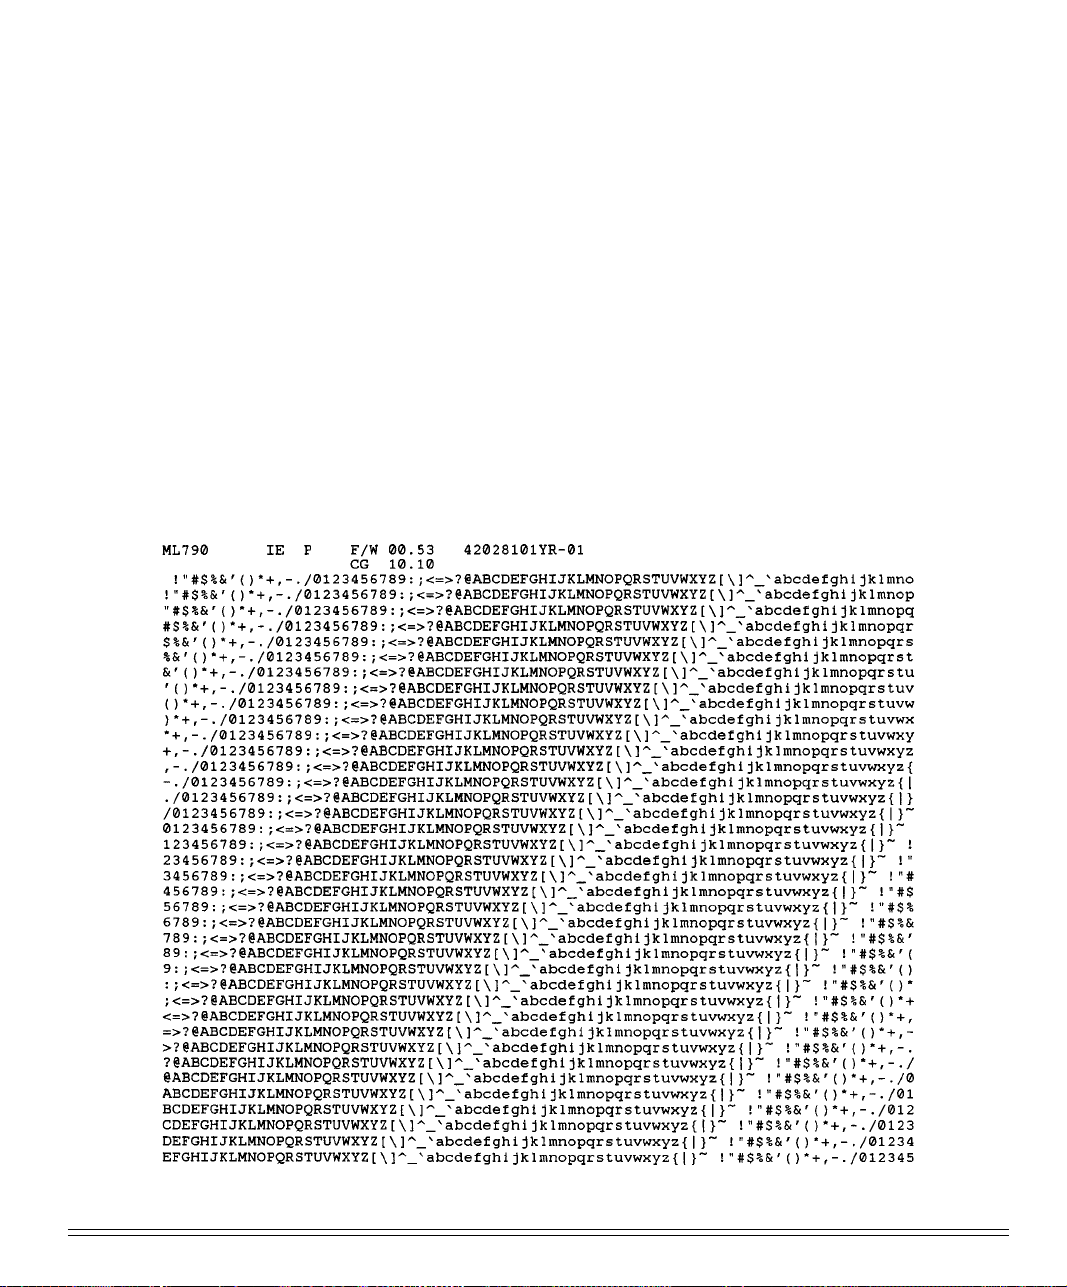
To run the Font Test:
1. Be sure paper is loaded.
2. Turn off printer.
3. Hold LF button for several seconds while turning printer on. (IF printer simply
turns on without starting to print, you didn’t hold down LF button long enough.)
Rolling ASCII Test
The Rolling ASCII Test produces a continuous printout of all ASCII characters. The
printing will continue until you stop it manually by pressing the SEL button. Here’s a
sample portion of a Rolling ASCII Test:
ML790/791 Printer Handbook 43
Page 51
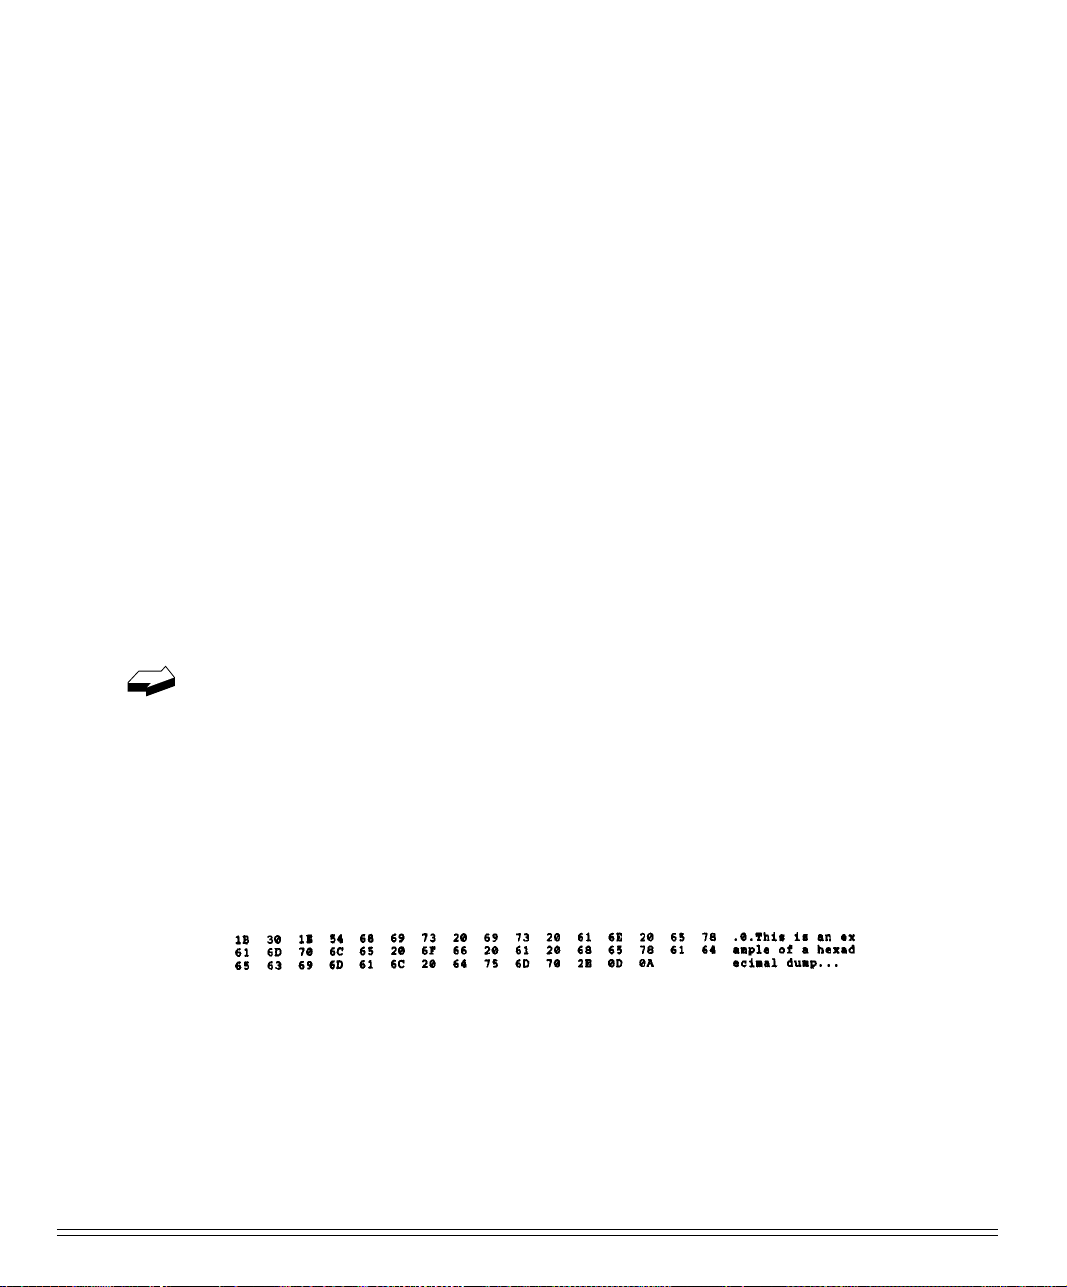
To activate the Rolling ASCII Test:
1. Be sure paper is loaded.
Caution!
2. Turn off printer.
3. Hold QUIET button for several seconds while turning printer on. (If printer simply turns on without starting to print, you didn’t hold down QUIET button long
enough.)
Hexadecimal Dump Test
If you want to test the data your computer is sending to the printer, you can place the
printer in the Hexadecimal Dump Mode. When the printer is in the Hex Dump Mode,
all data received, including text and printer commands, will be printed in both hexadecimal and ASCII format.
For example, this line of BASIC code:
LPRINT CHR$ (27);“0”;CHR$ (30);“This is an example of a hexadecimal
dump.”
For wide carriage Model 791, be sure you have wide paper loaded!
In the ASCII format, all non-printable characters will be represented by a period.
would print like this:
44 Operation
Page 52

To engage the Hexadecimal Dump Mode:
1. Be sure paper is loaded.
2. Turn off printer.
3. Hold SEL and FF/LOAD buttons for several seconds while turning on printer.
The printer will print the line “Hex Data Dump” and be ready to receive data in the
Hexadecimal Dump Mode. To run the test, simply send data to the printer while it is
in the Hexadecimal Dump Mode.
When you’re done, you can exit the Hexadecimal Dump Mode by either pressing the
SEL button or by turning the printer off, then on again.
Resetting T op of Form
To reset the Top of Form to the factory default:
1. Turn off printer.
2. Hold down QUIET and PARK buttons while turning printer back on.
Using Bar codes
Your MICROLINE 790/791 printer incorporates eight different bar codes:
• UPC A
• UPC E
• EAN 8
• EAN 13
• Code 39
• Code 128
• Interleaved 2 of 5
• Postnet
ML790/791 Printer Handbook 45
Page 53

You will find a list of the bar code printer commands for each emulation in appendix
C.
Here is a brief explanation of each of the available bar codes, along with a sample
printout for each one.
UPC A Bar Code
UPC (Universal Product Code) bar coding is used in the supermarket industry. UPC
A coding contains ten digits: the first five digits represent the manufacturer, the second five digits identify the product.
UPC E
UPC E bar coding is a six-digit variation of UPC A, used for labeling small items.
46 Operation
Page 54

EAN 8
EAN (European Article Numbering) bar coding is a variation of UPC coding. EAN 8
encodes eight digits.
EAN 13
EAN 13 encodes 13 digits and contains the same number of bars as UPC A. The thirteenth digit combined with the twelfth digit provides a code representing a country.
Code 39
Also known as 3 of 9 Code, code 39 is used in non-retail applications. Each character
has five bars and four spaces. Code patterns have been developed for 44 different
alphabetic, numeric and graphic characters.
ML790/791 Printer Handbook 47
Page 55
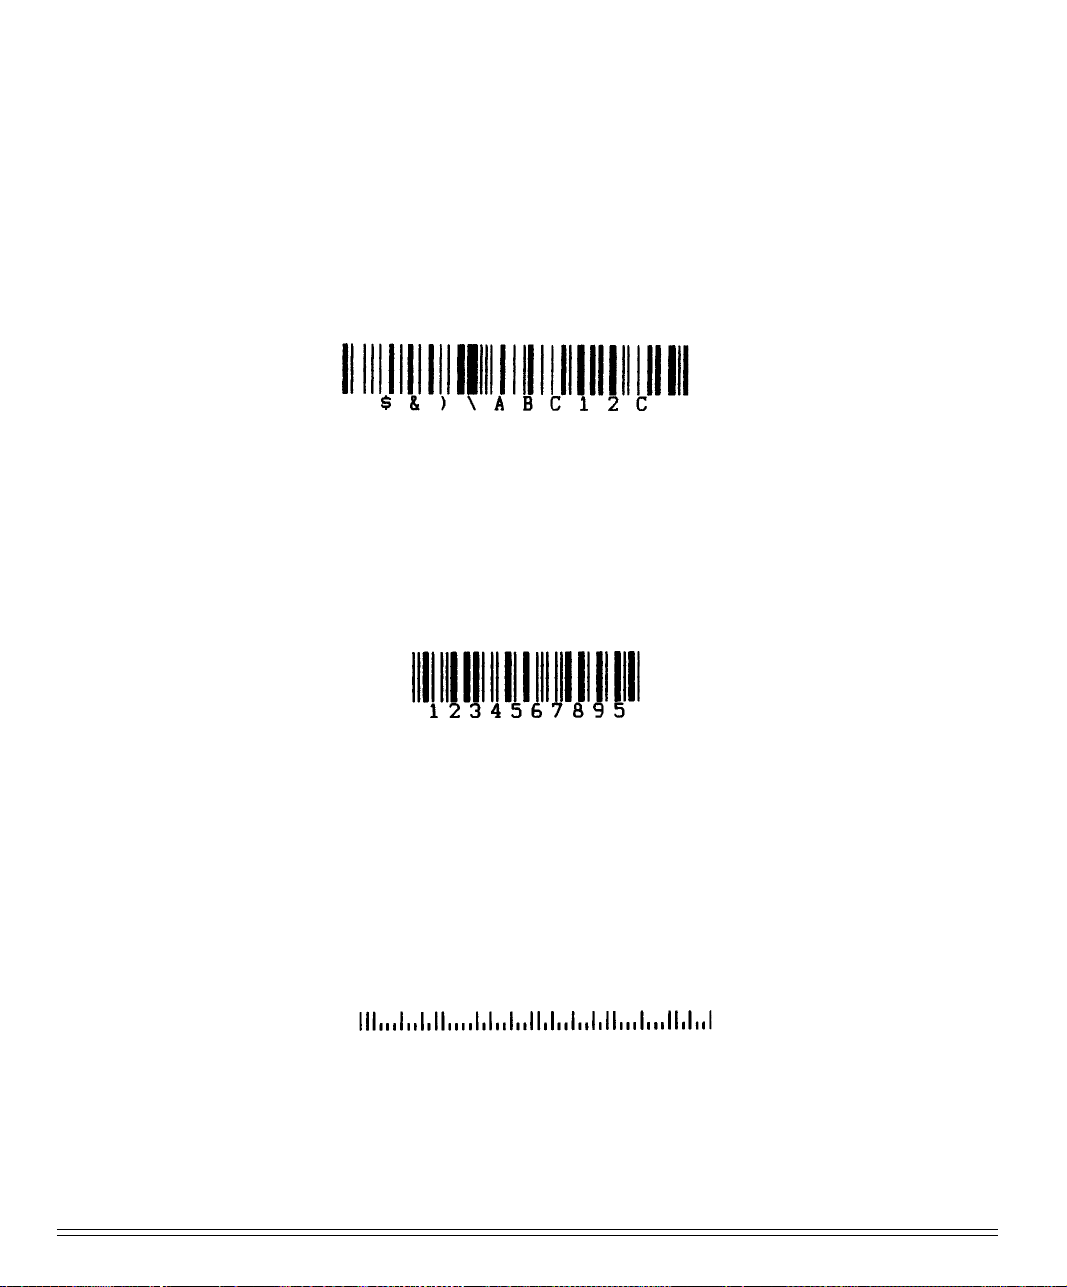
Code 128
Code 128 has 106 different characters, each of which can have any one of three different meanings depending on which code set (A, B, or C) is engaged. A special code at
the beginning indicates which set is engaged: three shift codes are also available for
use within the bar code to indicate a change in the code set engaged, as required.
Interleaved2 of 5
Inerleaved2 of 5 bar coding is used mainly in the distribution industry. Two digits are
encoded: one in the bars and one in the spaces.
Postnet
Postnet bar coding is used by the U.S. Post Office for sorting mail by automated equipment. It incorporates a coding system using five bars and four spaces for each digit.
48 Operation
Page 56

hapter 4: Working with Software
C
This chapter covers the fundamentals of setting up commercial software packages for
use with your printer. Be sure to read your software documentation carefully for more
details.
Basic T erminology
Before we start, let’s examine a few terms with which you may not be familiar.
Printer Commands
If you’re using commercial software with an appropriate printer driver (see
“Printer Drivers” below), the printer commands will normally be sent to the
printer by your software and you won’t even need to think about them.
Printer commands are signals sent by your PC to the printer which guide and control
its operation. Printer commands tell the printer what character pitch to use, what font
to use, what margins to use, whether to use single or double spacing, when to engage/disengage double width or double height printing, etc.
Printer commands can be sent in decimal, ASCII, or hexadecimal form. The values
(decimal/ASCII/hexadecimal) for each type of command depend on which emulation is active (see Appendix C for a listing of printer commands for each emulation).
With only a few exceptions, printer commands begin with the ESC character, decimal
27 (hexadecimal 1B), which serves as signal to the printer that what follows is to be
interpreted as a command rather than just a string of characters. Some printer commands expect you supply a numerical value, representing tab stops, line spacing, etc.
ML790/791 Printer Handbook 49
Page 57

Emulations
In order to eliminate hundreds of different sets of printer commands, most printers
emulate, or imitate, one of several general printers; i.e., they accept all of that printer’s
commands and behave as though they were the emulated printer.
Your printer has three emulations:
• IBM Proprinter
• IBM AGM
• Epson LQ (factory default)
Printer Drivers
Compatible Printer Drivers (DOS)
Many of the software packages you use will contain drivers 100% compatible with
your printer. For older software, however, it may be necessary to select a driver that
functions nearly the same as a driver specifically designed for your printer. This generally means that you will be selecting a driver that provides commands to access
most, but not all of the available functions; however, the commands that are available
will perform properly with your printer.
The table below summarizes the various drivers that will work with your printer.
They are listed in order by decreasing compatibility as you go down the list: select
one from as high up on the list as possible, based on what is available from among the
drivers supplied with your software. If you don’t see one from near the top of the list,
give the software manufacturer a call to see if they have added any drivers to those
supplied when you purchased your software. Software manufacturers are constantly
updating their lists of drivers to keep up with the printer market and they may very
well have one which will give maximum compatibility with your printer.
50 Working with Software
Page 58
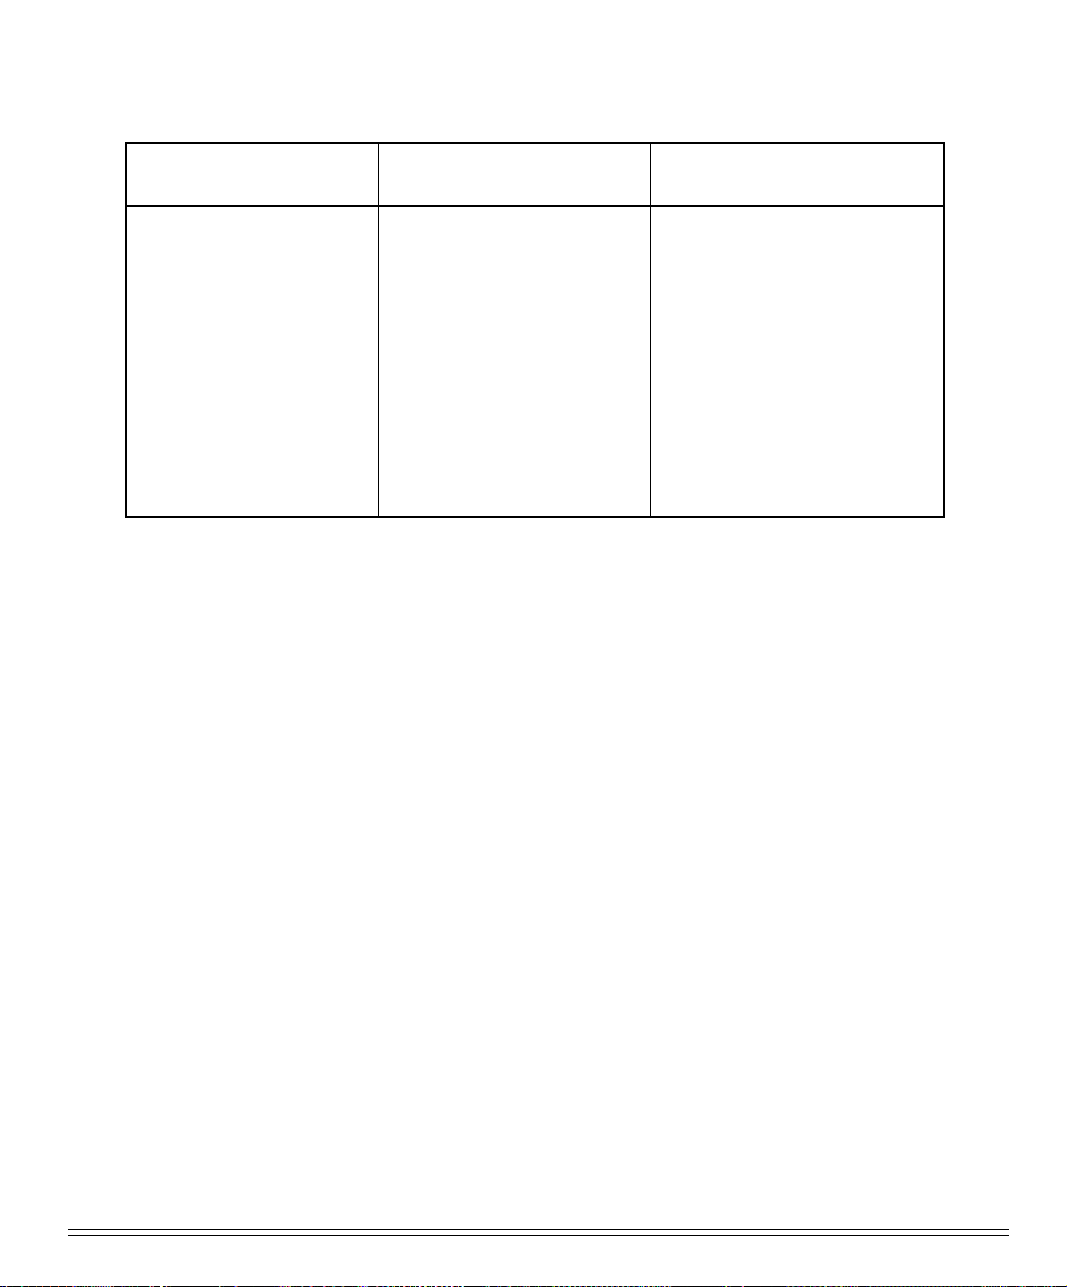
IBM Proprinter Emulation IBM X24e AGM/XL24e AGM
Emulation
Epson LQ
Emulation
Oki ML 590/1 IBM
IBM Proprinter
X24e/ XL24e
IBM Proprinter
X24/ XL24
IBM Proprinter
IBM Graphics Printer
Use this emulation only
when you’ve selected an IBM
Proprinter X24e/ XL24e driver and you need to use Epson
LQ high density graphics.
Oki ML 590/1 Epson
Epson LQ 870/ 1170
Epson LQ 850/ 1050
Epson LQ 860/ 2550
Epson LQ 2500
Epson LQ 1500
Epson LQ
Epson FX
Epson JX
Epson LX
Epson RX
Epson MX
Because there are some differences in characteristics such as speed or access to various features, you may wish to experiment with several differ ent drivers. If you must
select a driver that is not listed in the table, be sure to check it thoroughly for print
features such as boldface, underline and changes in pitch. Don’t be surprised if boldfaced items are printed twice, underlines are misplaced, wide spaces are left between
lines or the printer behaves chaotically (turn off the printer if the latter occurs). These
are all characteristics of an incompatible driver selection.
Windows Printer Drivers
T o use this printer on a W indows operating system, install the W indows printer driver ,
that is on the Printer Software CD-ROM provided with your printer, on your computer.
For information about which W indows systems are compatible with the printer drivers on the Printer Software CD-ROM and the installation procedur e open the Readme
file on the Printer Software CD-ROM.
ML790/791 Printer Handbook 51
Page 59

52 Working with Software
Page 60

hapter 5: Problem Solving,
C
Maintenance, & Service
This chapter provides solutions to some common printer problems and explains the
routine maintenance procedures that will help keep your printer in tip-top operating
condition. It also tells you how to order parts, consumables and accessories, and provides information on obtaining service for your printer. You will find your printer’s
warranty at the back of this Printer Handbook.
Problem Solving
What if …
…nothing happens when I turn on the printer?
The printer may not be plugged in. Check the power cord connection to the outlet
and to your printer. If you’re using a power strip, make sure it’s turned on. Check to
be sure that the fuse hasn’t blown or that the circuit breaker hasn’t tripped.
…the printer doesn’t print when the computer sends data?
The printer may be deselected. If the SEL light is out, press the SEL button to select the
printer.
The printer cable may not be securely connected. Check the cable to be sure that it is
properly connected to both the PC and the printer.
If you have installed the serial I/F board, check to be sure that the board is firmly
seated in the printer.
ML790/791 Printer Handbook 53
Page 61

…I’m getting strange symbols, incorrect fonts, etc., when I try to print a document?
The printer driver you have engaged does not agree with the emulation selected for
your printer.
To check the emulation selected, first make sure paper is loaded, then press the SEL
and SHIFT buttons simultaneously to enter the MENU on your printer. Next, press
the GROUP button: this will print the emulation selected.
If the emulation is not the one you want to use, press the SET button to change it to
the one you want before exiting the MENU (to exit, press SEL and SHIFT buttons).
If the emulation is correct, check your software documentation on how to select a
printer driver, then check to be sure that you have selected one of the drivers listed for
that emulation on page 50). The closer the driver is to the top of the list, the more
compatible it will be with your printer. If your software doesn’t have any of the indicated drivers available, check with the software manufacturer to see if they have added
any additional drivers since you purchased your software.
If you have embedded any printer commands in your software, check to be sure that
you entered them correctly.
…I’ve installed a brand new ribbon and the printing is smeared and streaked?
The plastic shield on the ribbon is either loose or missing. The shield must be left on
the ribbon when you are installing the cartridge. To remedy this situation, move the
printhead to the center of the platen (careful – printhead may be HOT!) and lift off the
ribbon cartridge. Check the ribbon shield. If it’s loose, secure it in place properly. If it’s
missing, locate it and reinstall it.
…ink smears on the paper when I print narrow columns?
This may be caused by excessive printhead travel from the centering position. Enter
the Menu and set the Centering Position to MODE 1 (see Menu Mode in Chapter 3).
For wide-carriage Model ML791, if MODE 1 doesn’t work, try setting the Centering
Position to MODE 2.
54 Ploblem Solving, Maintenance, & Service
Page 62

…there are dots missing in my printouts?
The head gap may not be set correctly. Try moving the head gap lever to a lower
setting. If that doesn’t help, the printhead may be damaged; call for service.
… the Alarm light is on and the Character Pitch 15 light is flashing?
This indicates a paper loading error. To stop the flashing light, press the SEL button.
Before trying to load paper in again, check to be sure that you have the paper lever in
the correct position (BOT, TOP, REAR) for the path you’re using.
Caution!
If the paper lever is in the correct position and you’re using rear feed, lift up the paper
separator and check to be sure that paper is properly on the tractors and has not
jammed up somehow.
If the paper lever is in the correct position and you’re using the optional bottom-feed
push tractor, check the bottom tractor unit to be sure that paper is properly on the
tractors and has not jammed up before entering the printer.
Once the paper is correctly loaded, press and release the SEL button, then hold the
SHIFT button and press the RESET (Character Pitch) button.
…I need to load paper, but the Alarm light is not on?
If the Alarm light is off, the printer thinks it has paper loaded. To correct this problem,
press and release the SEL button, then hold the SHIFT button and press the RESET
(Character Pitch) button. The Alarm light will come on and you’ll be able to load
paper.
Always turn the printer off before you turn the platen knob!
ML790/791 Printer Handbook 55
Page 63

…my word processor files don’t print the way I have the MENU and front panel set?
Before sending a file to the printer, many word processors send either an “initialization string” or an I-Prime signal to the printer.
The initialization storing contains codes that reset the printer to a default set of features: otherwise the printer might accidentally print using features set for a previous
job. These codes will override panel or MENU settings. To set your printer to ignore
the reset code, enter the printer MENU (hold SHIFT button while pressing SEL/MENU
button) and change the Reset Inhibit item (in the Set-Up group) to Yes. Please note
that while this will stop the reset code from resetting your printer, other codes in the
initialization string may still override the printer MENU and/ or front panel settings.
The I-Prime signal is sent over the parallel interface (pin 31) and will automatically
override any settings you have made using the front panel buttons. To eliminate this
problem, enter the program MENU (hold SHIFT button while pressing SEL/MENU
button) and change the I-Prime item (in the Parallel I/F group) to Invalid.
…the Print Quality and Character Pitch buttons on the front panel won’t work?
The Operator Panel Function item on the printer MENU can be used to disable these
buttons. If the printer is part of a customized system or if it is used by a number of
people, the system manager may have used this option to make sure the printer is
always set properly.
…static electricity causes the paper to stick?
In cold, dry weather, static charges can build up on continuous-form paper. This can
make the paper cling to the paper separator. If you have this problem during highvolume printing jobs, try moving the single sheet paper guides on the separator together so that the paper rests on the guides rather than on the separator itself.
56 Ploblem Solving, Maintenance, & Service
Page 64
Maintenance
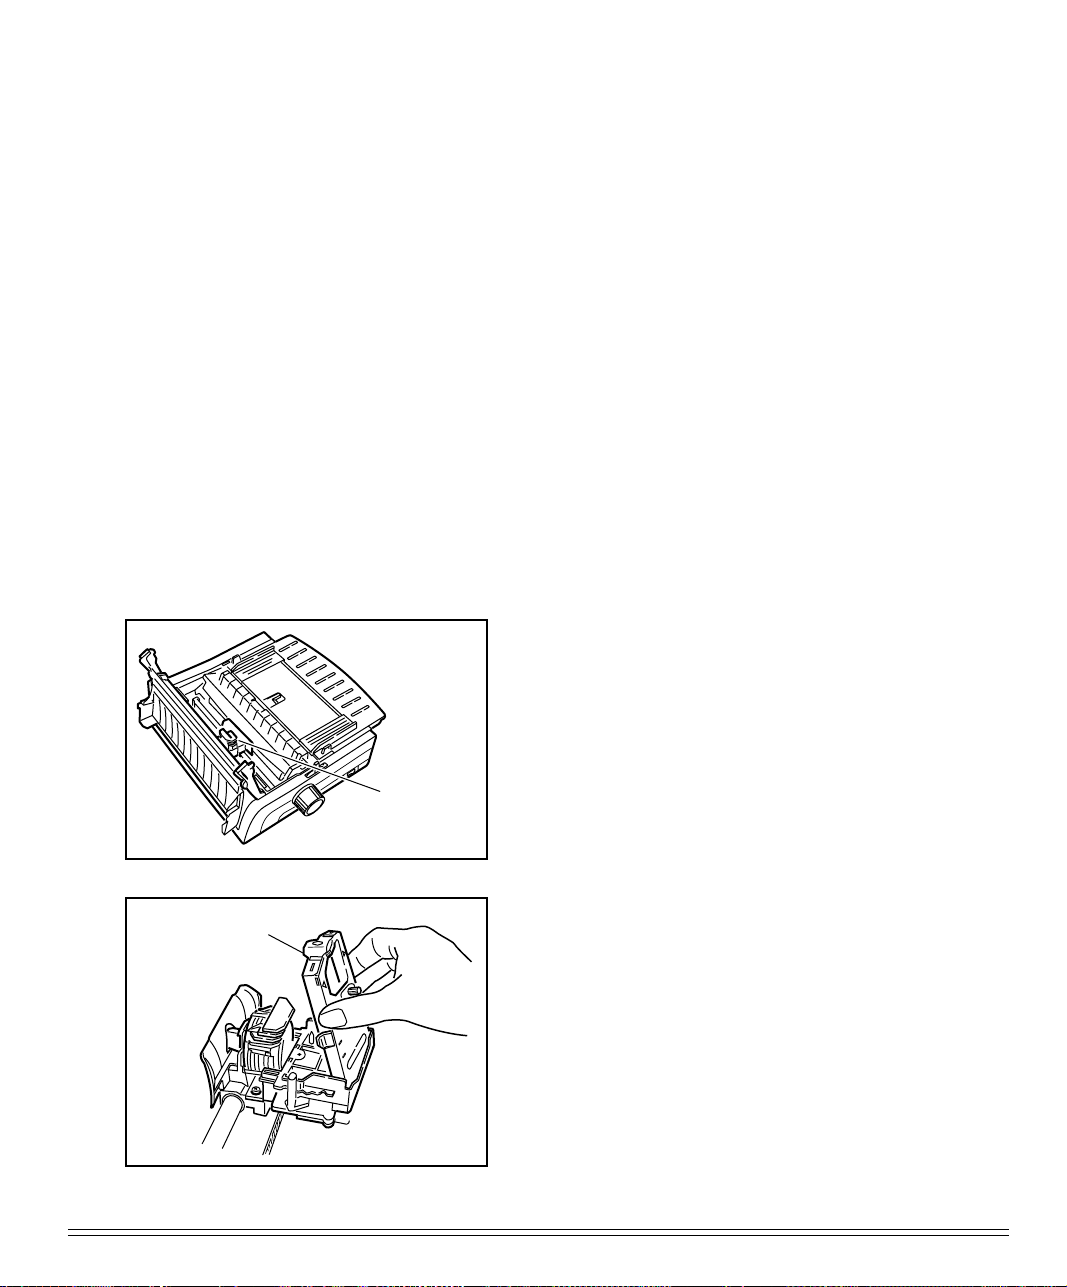
This section explains how to change ribbons, clear paper jams and clean your printer.
Replacing the Ribbon Cartridge
When replacing the ribbon, be sure to use only ribbons specifically for use with
MICROLINE 790 /791 Turbo printers. For best results,use genuine OKI ribbons.
1. Turn printer off.
2. Disengage and swing open access
cover.
Swing front end
up to remove
Center
printhead
Caution!
printhead: it may be hot!
3. Slide ribbon cartridge along until it is
centered on platen, being careful not to
touch printhead.
4. Swing front-end of cartridge up off
printhead, then lift cartridge out and
discard it.
Be careful not to touch the
ML790/791 Printer Handbook 57
Page 65
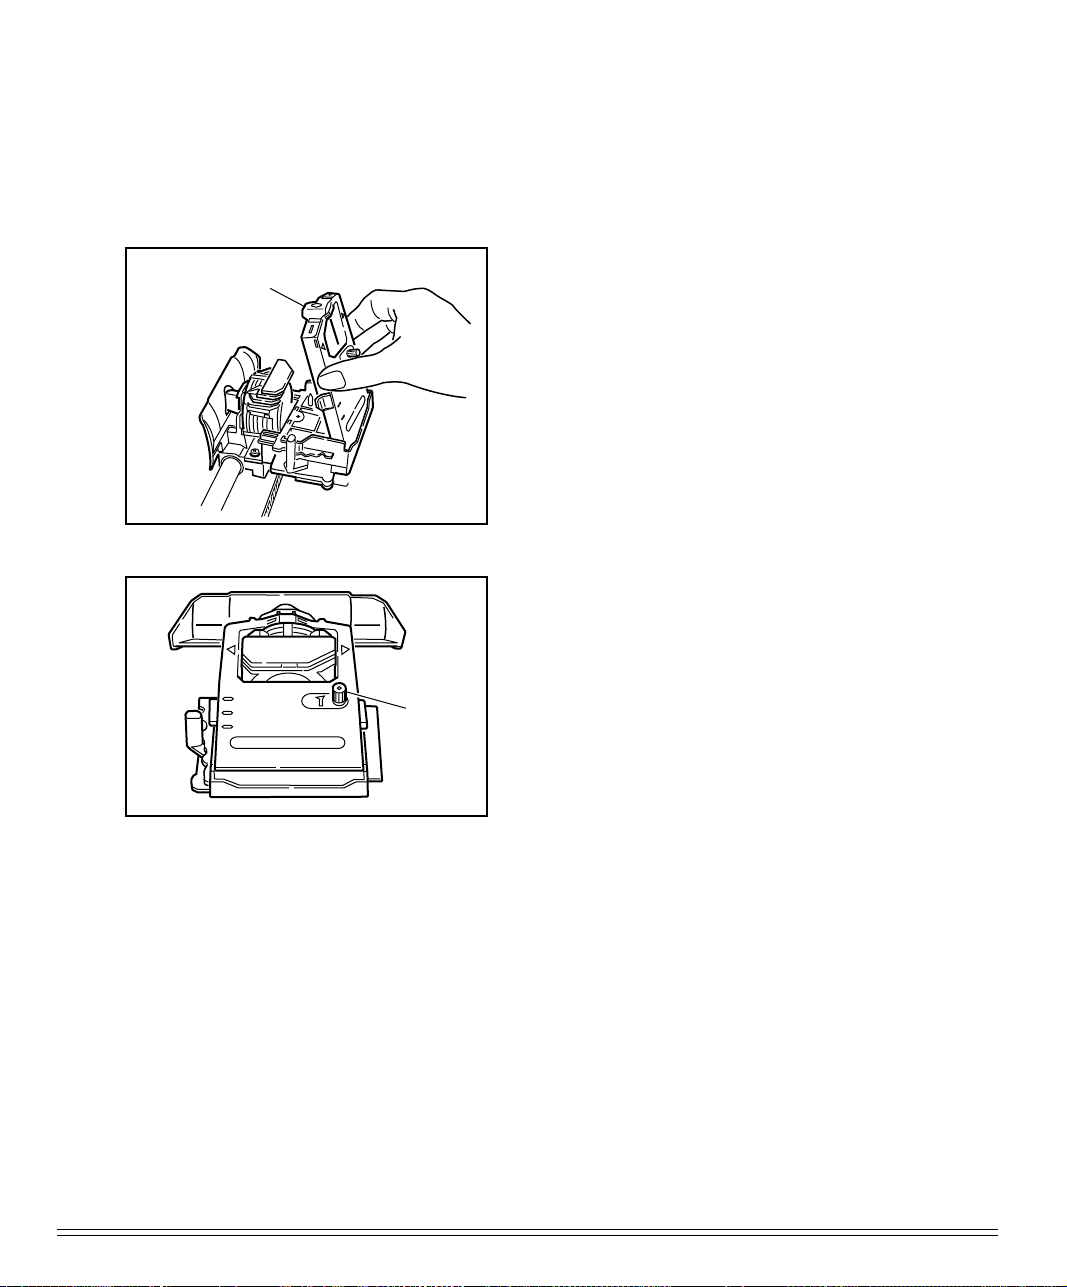
5. Remove new ribbon cartridge from its
packaging — do NOT remove clear
plastic ribbon shield!
Plastic shield
facing platen
M
1
2
3
6. Hold ribbon cartridge with knob facing
up and exposed portion of ribbon facing platen. Place flat end on ribbon
plate, fitting grooves over pins on plate.
7. Lower front end of cartridge over
printhead until it snaps into place. Turn
knob in direction of arrow (clock-wise)
to take up any slack in ribbon.
Knob
58 Ploblem Solving, Maintenance, & Service
Page 66
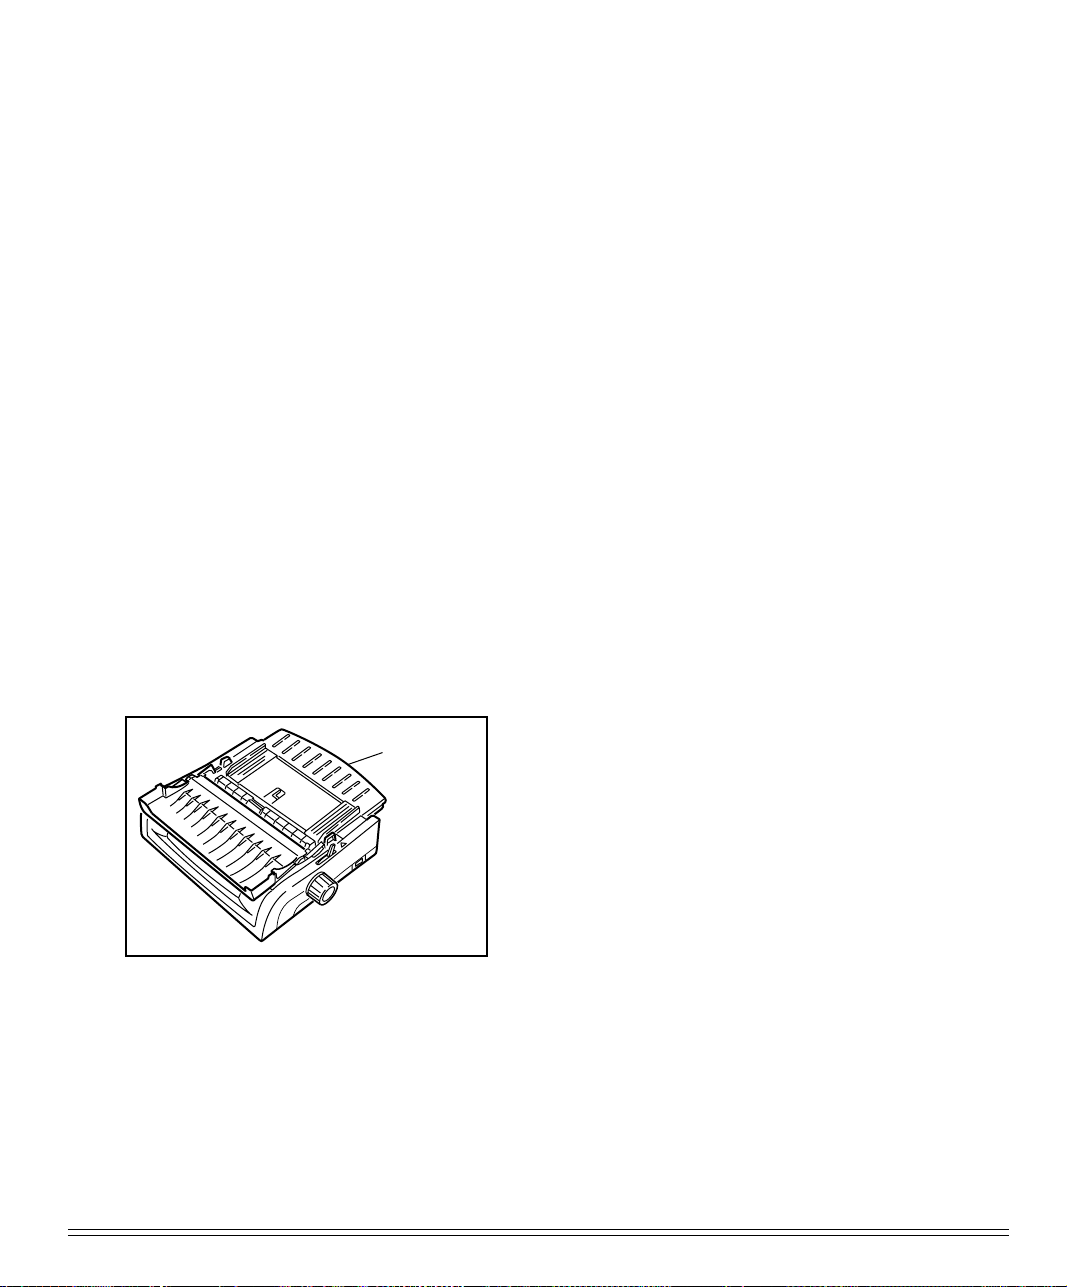
Clearing Paper Jams
Caution!
Always turn the printer off before you turn the platen knob!
Rear Feed Jams
To clear a rear-feed paper jam:
1. Turn off printer
2. Turn platen knob to back paper out of printer. Remove any ripped pieces of paper.
3. Reload paper, turn printer back on and press FF/LOAD button.
If your paper keeps jamming, the chances are excellent that you have bits of paper
stuck in the paper path. To eliminate this problem:
1. Turn off printer.
2. Use platen knob to back paper out of
printer.
Remove
Paper
separator
3. Remove the paper separator.
ML790/791 Printer Handbook 59
Page 67
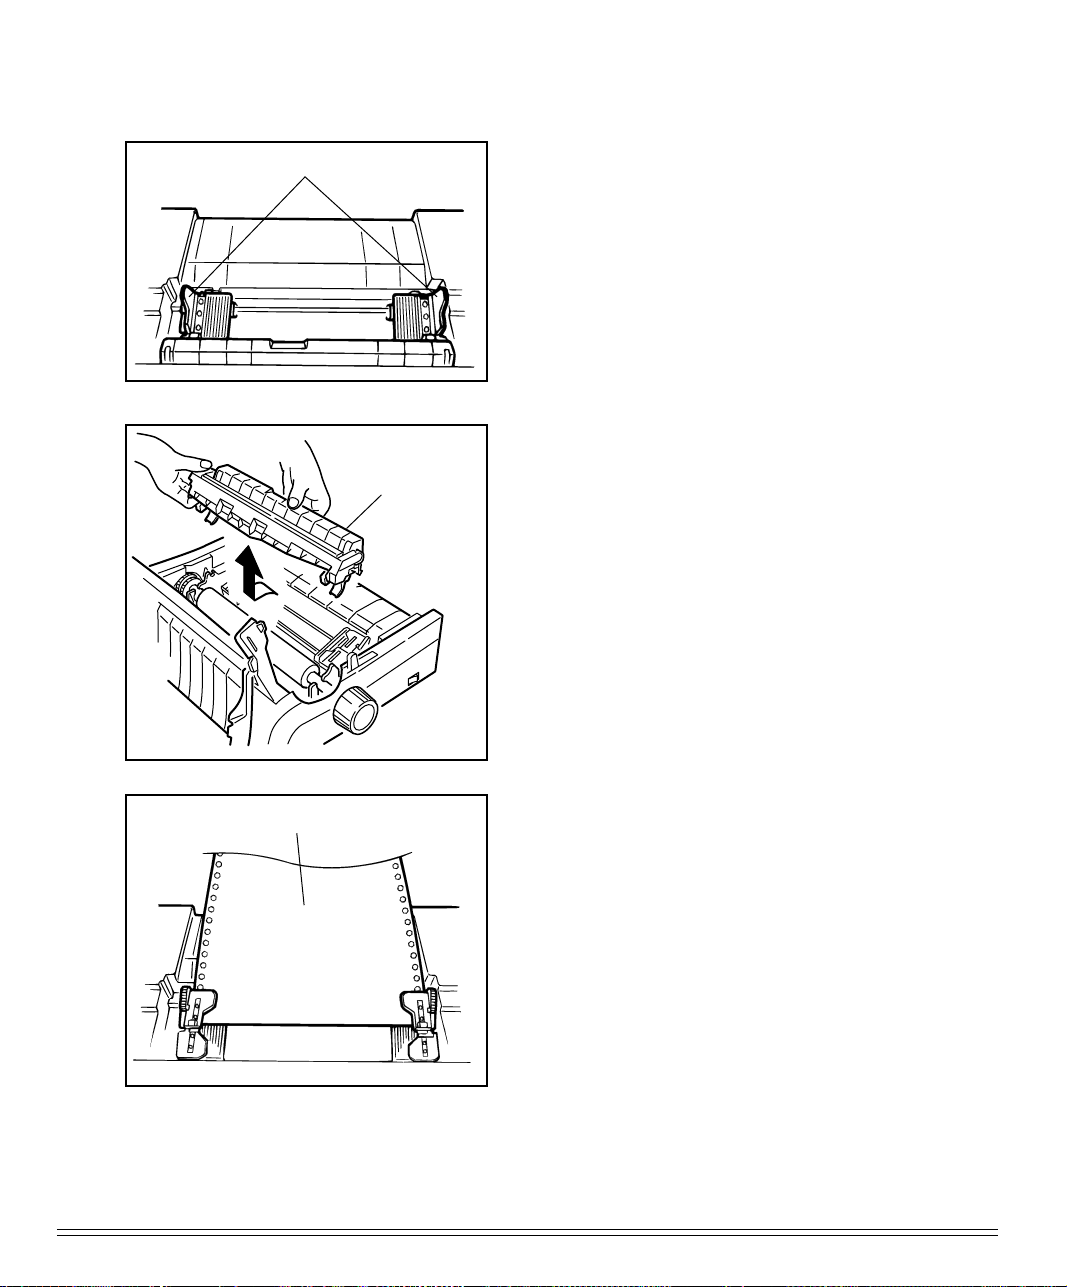
Tractor covers
Remove pull-up
roller assembly
4. Open tractor covers and remove paper
from printer.
5. Open access cover and lift off pull-up
roller assembly.
Note: Never attach or remove the pull-up roller
assembly when the paper separator is in the
standing state.
6. Fold some single-sheet, continuousfeed paper over three times to produce
page four sheets thick.
Quadruple-thick paper
tractor pins and close tractor covers.
8. Turn platen knob to draw quadruplethick paper around platen. This will
bring jammed pieces of paper up and
out so you can dispose of them.
9. Back quadruple-thick sheet out of
printer using platen knob.
60 Ploblem Solving, Maintenance, & Service
7. Load this quadruple-thick sheet onto
Page 68
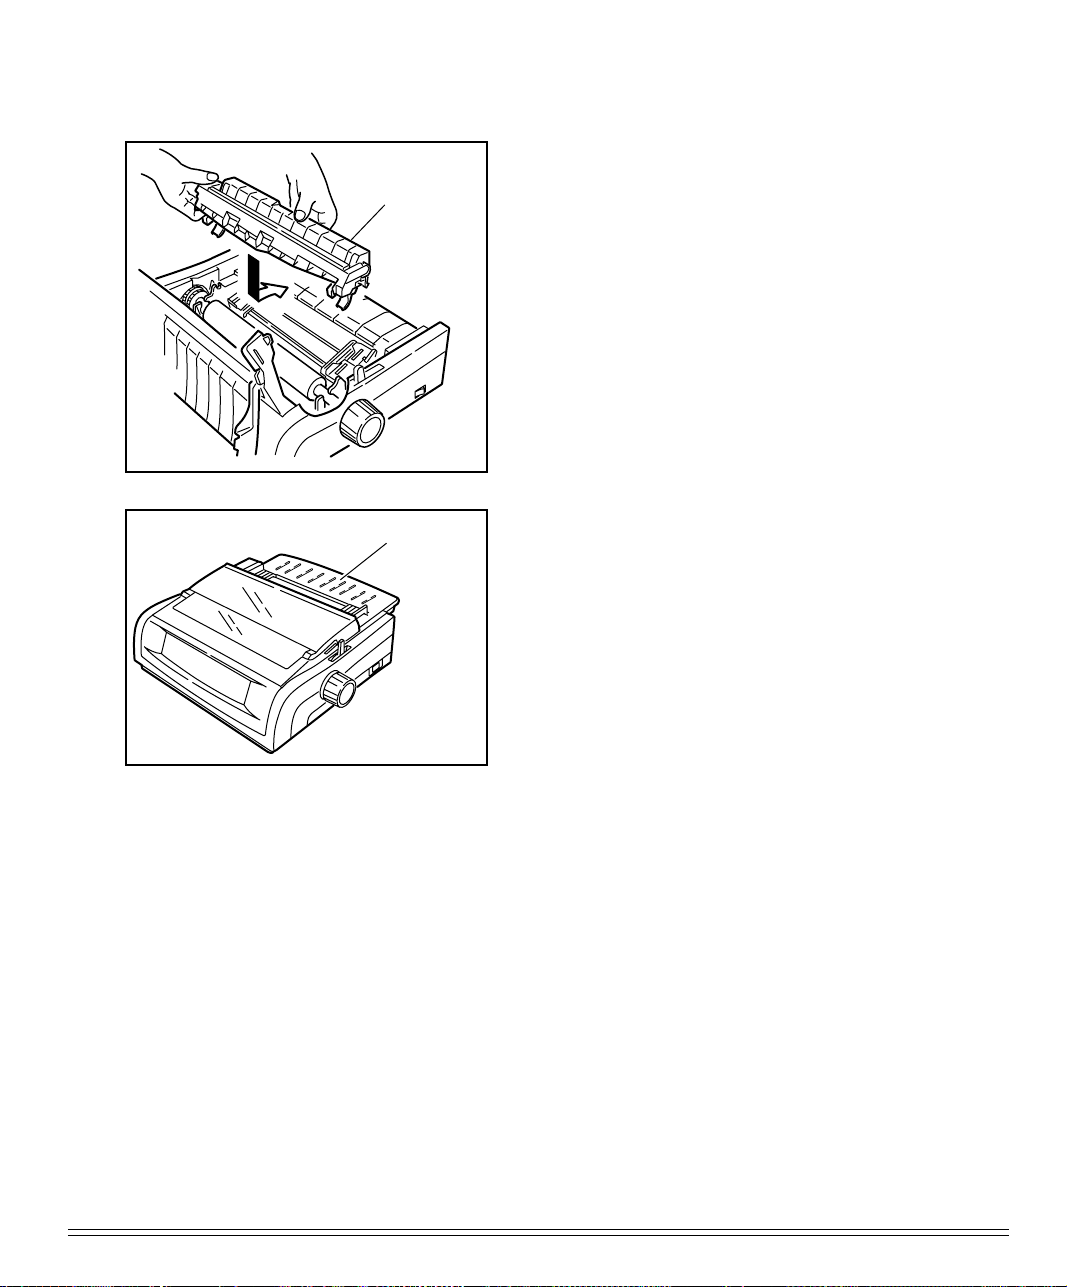
Replace pull-up
roller assembly
10.Replace pull-up roller assembly.
Note: When installing a pull-up roller assem-
bly, Shift the paper lever in agreement with the
“Rear” mark before the installation.
11.Reload regular paper (open tractor covers, place paper on pins, close tractor
covers).
Replace
paper
separator
12.Swing access cover and paper separator back into place.
13.Turn printer on and press FF/LOAD
button.
ML790/791 Printer Handbook 61
Page 69
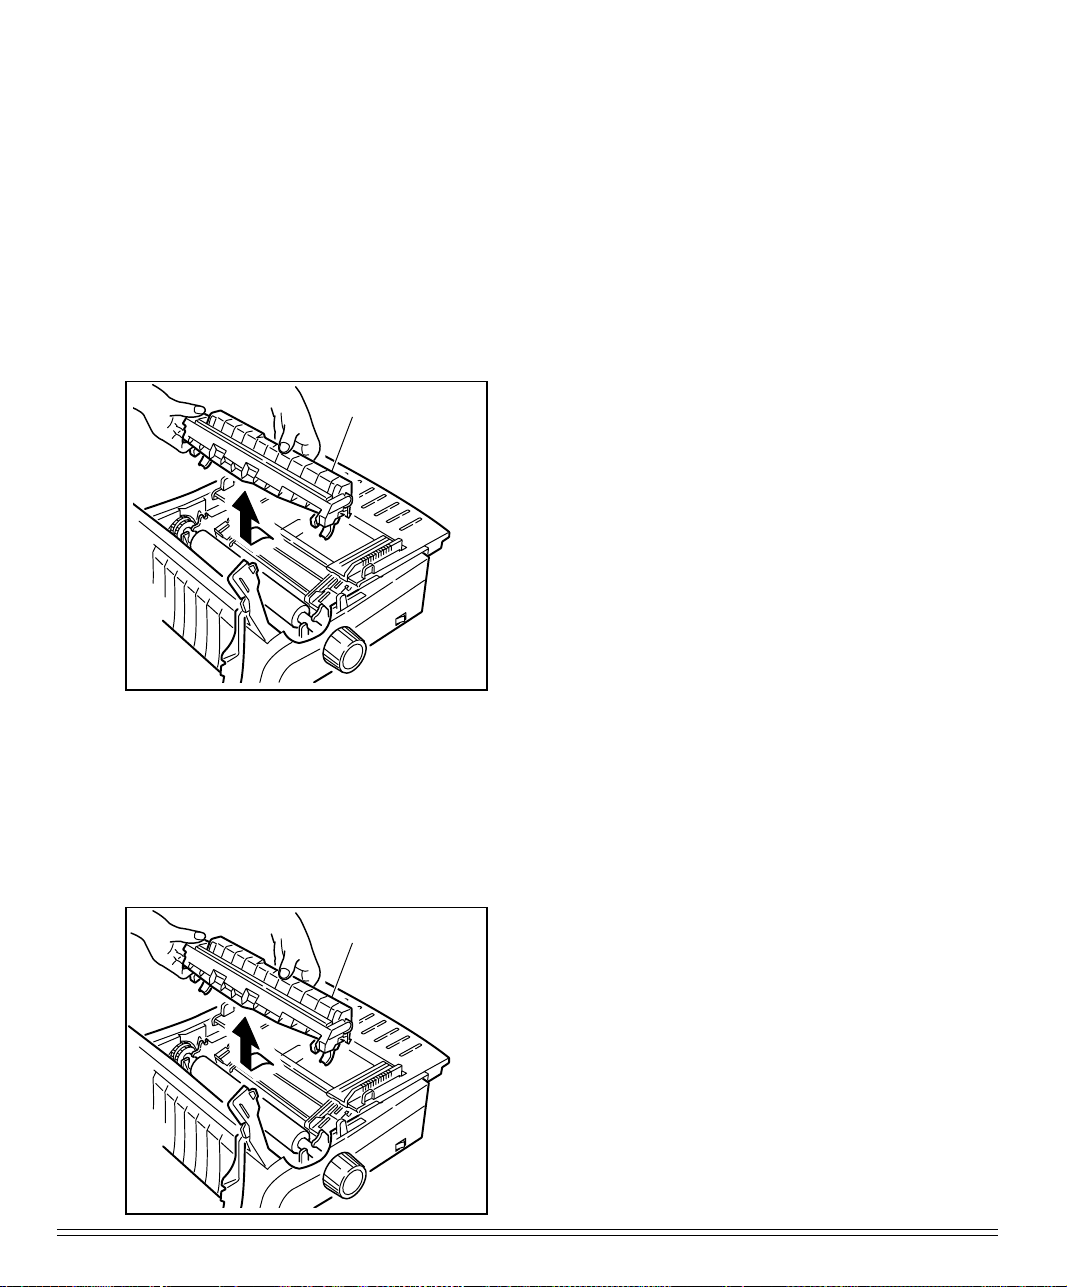
Single Sheet Feed Jams
To remove jammed single sheets of paper (top feed):
1. Turn printer OFF.
2. Rotate platen knob to back paper out
of carriage.
Lift off pull-up roller
assembly
Button Feed Jams
If bottom-feed paper jams:
Lift off pull-up roller
assembly
3. If necessary, open access cover and lift
off pull-up roller assembly to provide
access to remove any ripped pieces
from around carriage.
1. Turn off printer and use platen knob to
back paper out carefully.
2. Be sure to remove any shreds of paper
from printer before reloading paper.
(Open access cover and lift off pull-up
roller assembly to provide access to carriage area.)
62 Ploblem Solving, Maintenance, & Service
Page 70
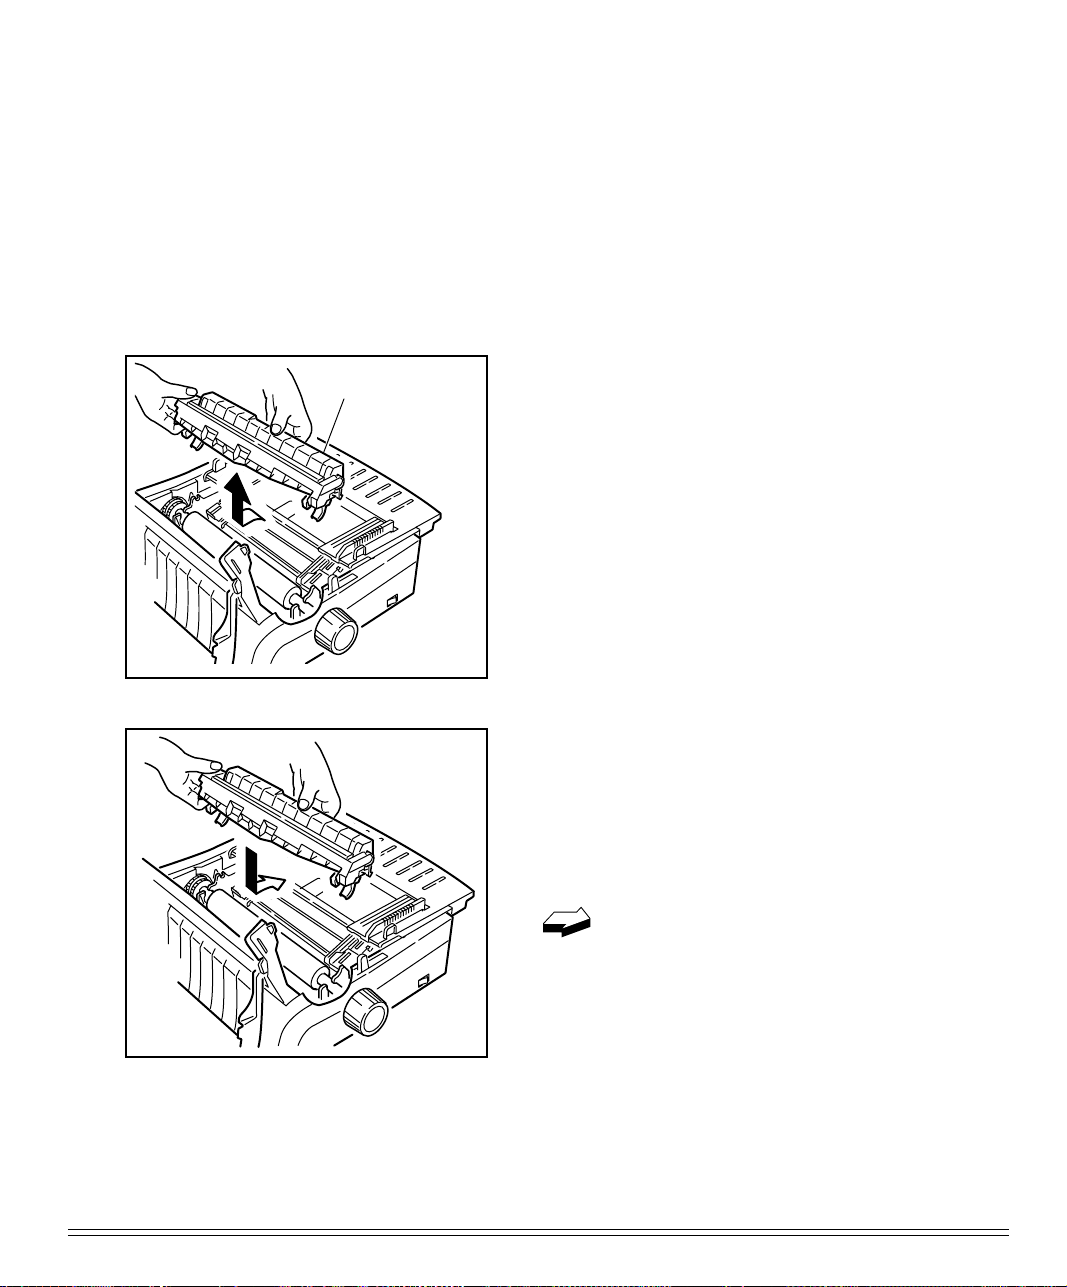
Cleaning the Housing
You should clean the printer every six months (or after about 300 hours of operation).
To do this:
1. Turn printer OFF and remove paper
from path.
Remove pull-up roller
assembly
2. Open access cover and remove pull-up
roller assembly.
3. Use clean, dry cloth to dust area around
carriage shaft and platen. Be sure to remove any loose particles of paper.
Note: The built-up of dust or paper powder in
the printer, which may be occurred by some
environmental settings or media used, may
cause a mulfunction, so execute cleaning according to how the printer is dirty.
4. Reinstall pull-up roller assembly and
close access cover.
Note: When installing a pull-up roller assem-
bly, Shift the paper lever in agreement with
the “Rear” mark before the installation.
Never use solvents or strong detergents on the cabinet–they could
damage the housing.
ML790/791 Printer Handbook 63
Page 71
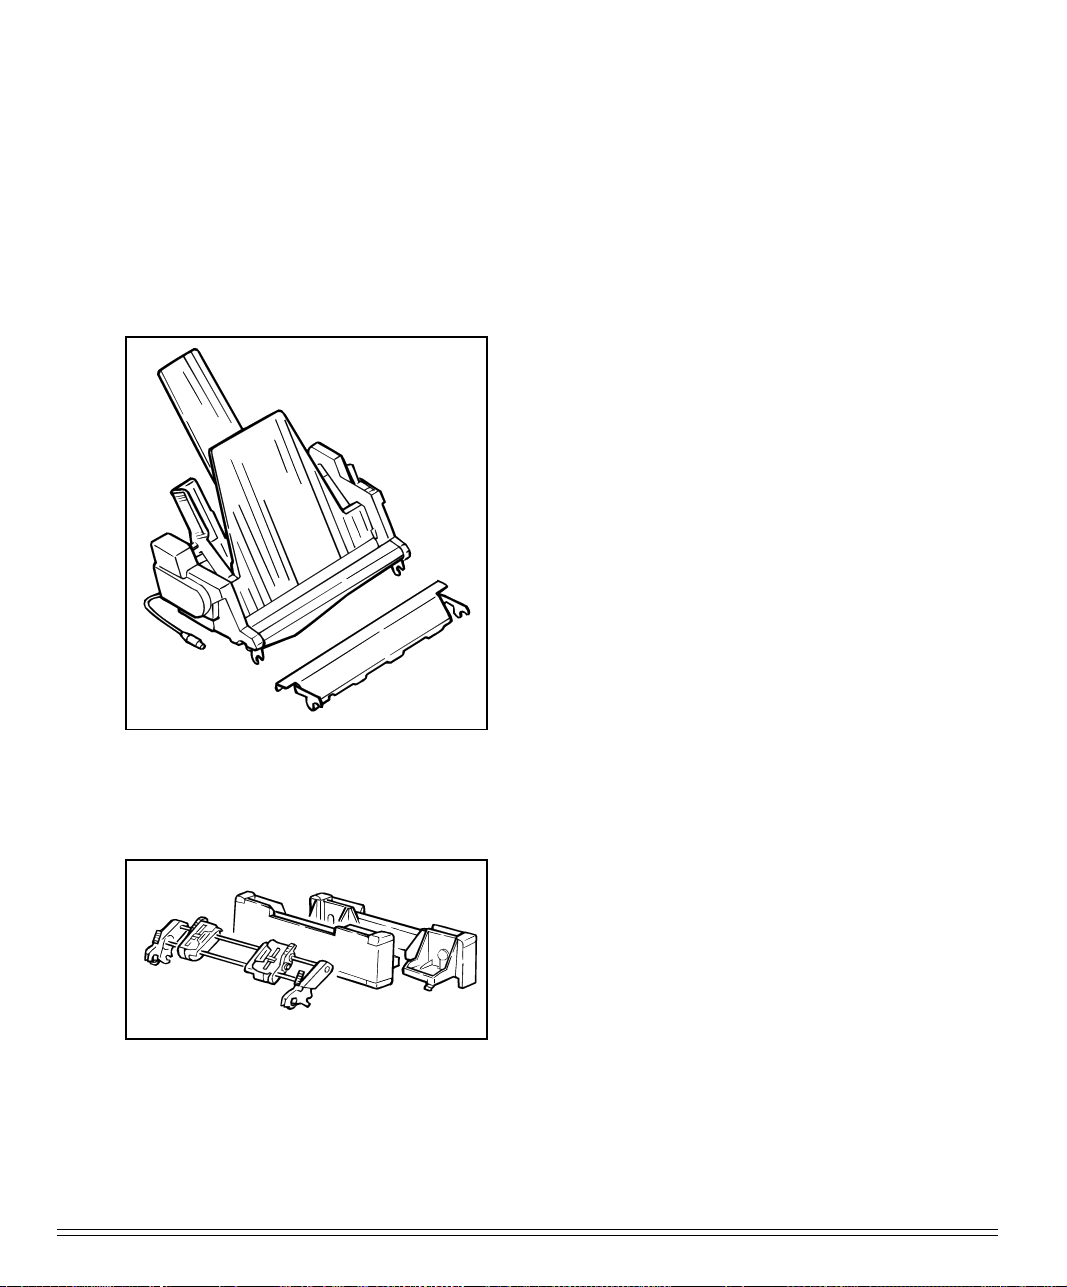
Accessories
You can add even more flexibility to your printer by means of the following optional
accessories.
Cut Sheet Feeder, Single-Bin and Dual-Bin
Mounts on the platen to provide continuous single-sheet paper feed. The bin will
hold up to 100 sheets of standard, 20-lb
paper. With cable for connection to printer.
Push Tractor, Bottom-Feed
Converts printer for feeding continuousform paper from the bottom. Use of bottom feed eliminates the curling which
takes place as rear-feed paper moves
around the platen. Bottom feed is ideal for
card stock, thick multi-part forms, labels
which could peel off and jam the unit if
fed in from the rear, etc.
Includes tractor, support legs for printer,
and metal tear bar.
64 Ploblem Solving, Maintenance, & Service
Page 72
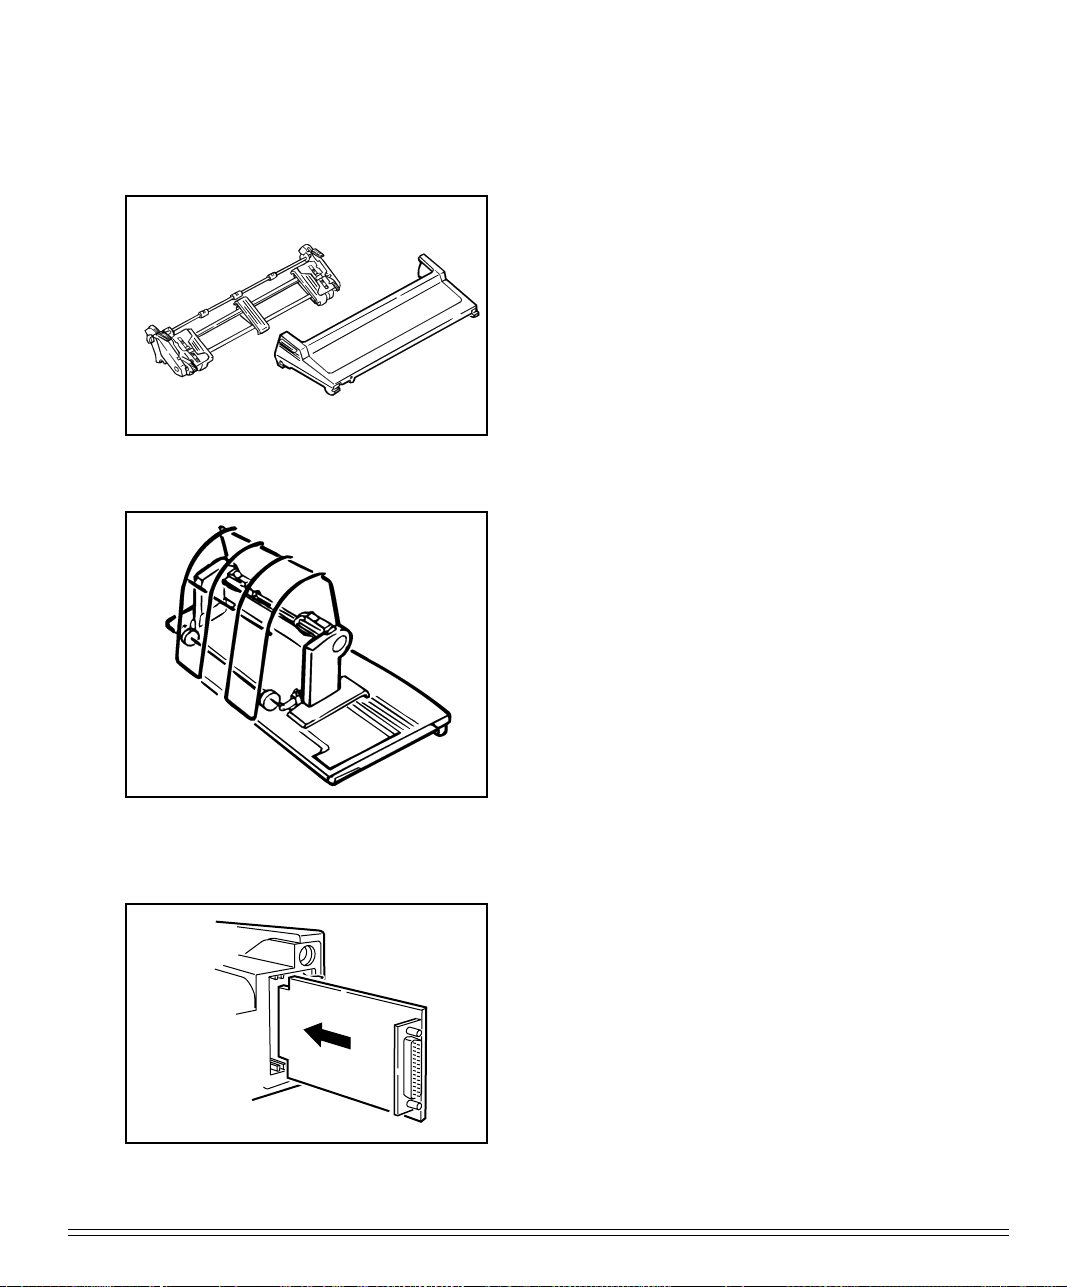
Pull Tractor, Top-Mount
Used for bottom-feed of labels or heavy
card stock, or in conjunction with the rearfeed tractor to provide more precise paper control when you’re using multi-part
forms. Includes cover for installation in
place of access cover.
Roll Paper Stand
Adapts ML 790 printer for use with rolltype paper (not supplied). Not usable on
ML 791.
Includes stand and support. With cable for
connection to printer.
Serial Interface
Includes serial interface board and locking piece for installation in printer next to
standard parallel interface. Without interface cable.
Note: The use of the locking piece to 790/791
should be impermissible due to the exclusiveness for other models.
ML790/791 Printer Handbook 65
Page 73
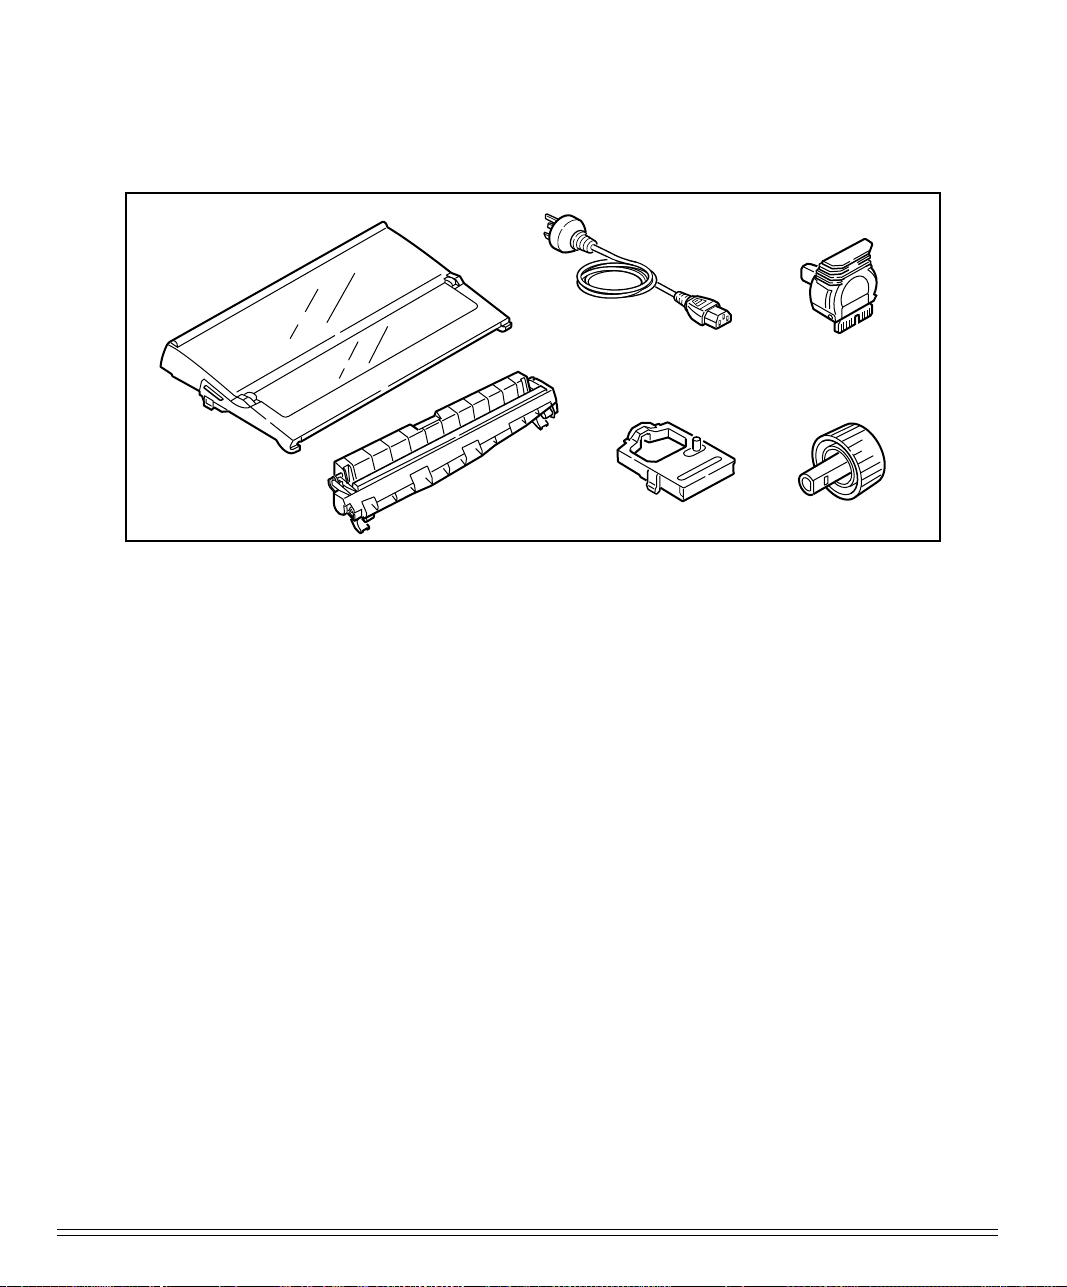
Replacement Parts
Replacement Part
Access Cover, ML 790
Access Cover, ML 791
AC Cord
Poll-up Roller Assembly, ML 790
Poll-up Roller Assembly, ML 791
Platen Knob
Printhead
Ribbon, Black
66 Ploblem Solving, Maintenance, & Service
Page 74

ppendix A: Specifications
A
Print Method Impact dot matrix
Printhead 24 pins, 0.20 mm diameter with thermal protec-
tion
Print Speed
Mode Characters per Second (CPS)
High Speed Draft (HSD) 10 cpi 420 cps
Utility 10 cpi 315 cps
12 cpi 378 cps
15 cpi 472 cps
17.1 cpi 269 cps
20 cpi 315 cps
Letter Quality (LQ) 10 cpi 105 cps
12 cpi 126 cps
15 cpi 157 cps
17.1 cpi 180 cps
20 cpi 210 cps
Characters per Line (CPL)
Setting ML790 ML791
10 cpi 80 cpl 136 cpl
12 cpi 96 cpl 163 cpl
15 cpi 120 cpl 204 cpl
17.1 cpi 137 cpl 233 cpl
20 cpi 160 cpl 272 cpl
Emulations Epson LQ, IBM Proprinter, IBM AGM
Interface Standard: Centronics parallel, USB
Optional: RS-232C serial
ML790/791 Printer Handbook 67
Page 75

Graphics Resolution: 360 x 360 dots per inch
Resident Font
Letter Quality Courier, Gothic, Prestige, Orator, Roman, Swiss,
Swiss Bold
Utility Gothic
Bar Code: Code 39, UPC A, UPC E, EAN 8, EAN 13, Inter-
leaved 2 of 5, Code 128, Postnet
Receive Buffer Size MAX 128K
Reliability
Mean Time Between 20000 hours at 25% duty cycle and 35%
Failures (MTBF) Page density
Mean Time to Repair (MTTR) 15 minutes
Printhead life 200 million characters average in 10 cpi utility
mode at 25% duty and 35% page density
Ribbon Life 4 million characters
(on average, 10 cpi utility)
68 Appendix A: Specifications
Page 76
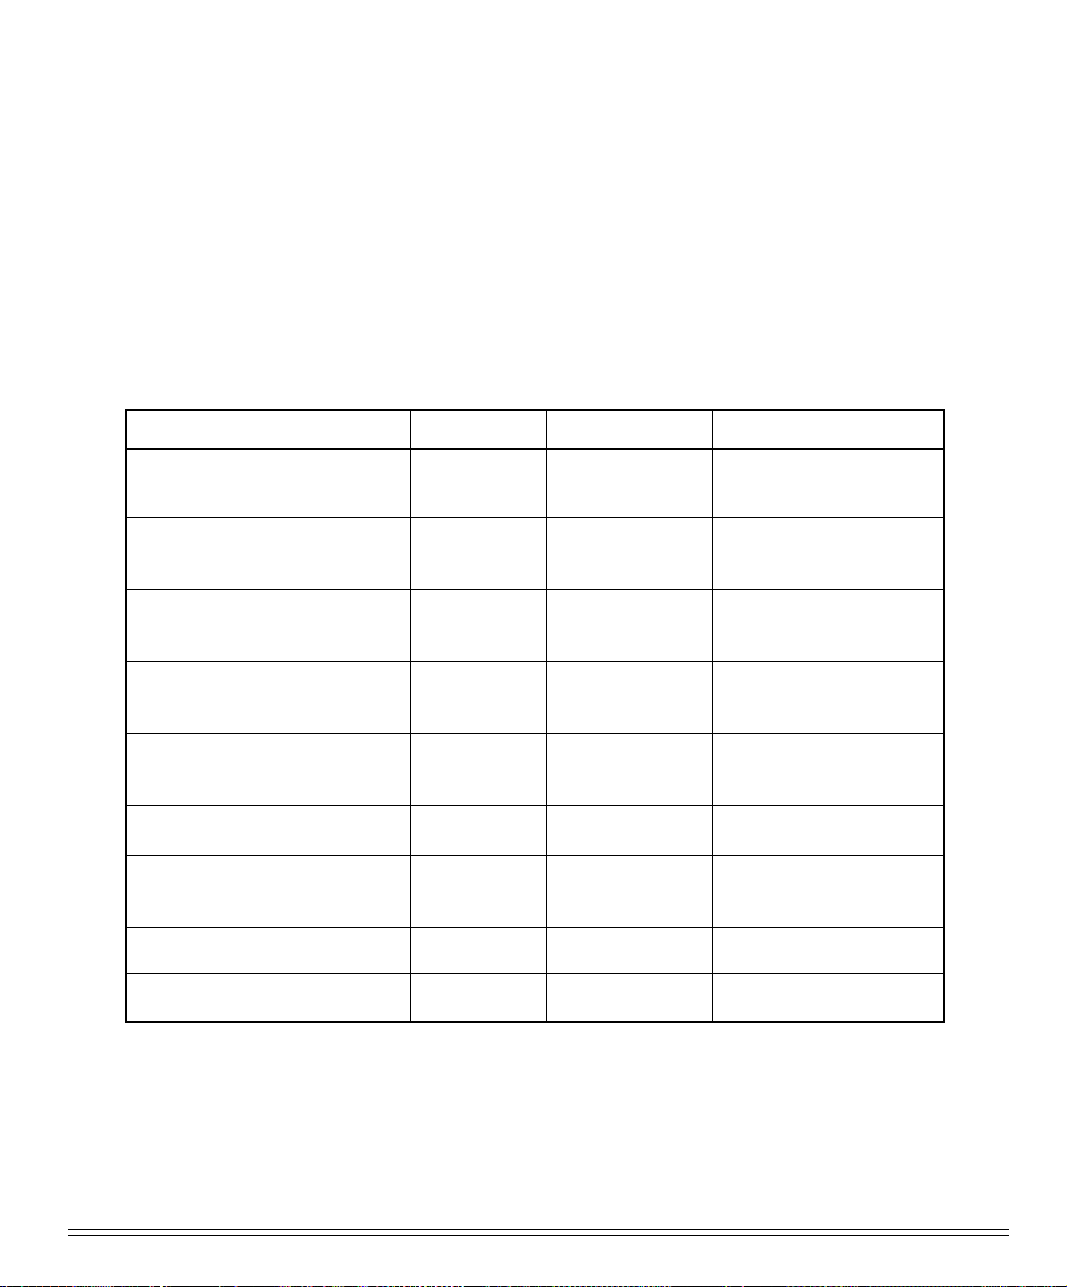
Paper Specifications
Width
Minimum 3”
Maximum ML 790: 10”
ML 791: 16”
Weight 12 to 24 lb.
Thickness
Rear feed 0.014”(0.36 mm)
Bottom feed 0.017”(0.44 mm)
Paper type Feed Width range
Cut sheets
Single-part continuous forms
Carbonless, multipart continuous form (orig. + 4 copies)
Interleaf, multipart continuous form (orig. + 4 copies)
Labels
Envelopes, single feed
Envelopes, continuous feed,
non-overlap type
Card stock
Transparencies
Top only
Rear, Bottom
Rear, Bottom
Rear, Bottom
Bottom only
Top
Bottom only
Bottom only
Top only
Weight
14 to 24 lb.
12 to 24 lb.
9 to 11 lb.
10 to 12 lb paper,
9 lb carbon
N.A.
24 lb. max.
24 lb. max.
120 lb. max
ML790: 7.2" to 8.5"
ML791: 7.2" to 14.3"
ML790: 3" to 10"
ML791: 3" to 16"
ML790: 3" to 10"
ML791: 3" to 16"
ML790: 3" to 10"
ML791: 3" to 16"
ML790: 3" to 10"
ML791: 3" to 16"
6.5" to 9.5"
6.5" to 9.5"
N.A.
8.5" x 11"
ML790/791 Printer Handbook 69
Page 77

Dimensions (W x D x H)
ML 790: 15.7 x 13.6 x 6 inch (398 x 345 x 153 mm)
ML 791: 21.7 x 13.6 x 6 inch (552 x 345 x 153 mm)
Weight
ML 790: 16.7 lb (7.6Kg)
ML 791: 21.1 lb (9.6Kg)
Environmental Requirements
Operating Temperature: 41 to 95˚F (5 to 35˚C)
Storage Temperature: 14 to 122˚F (-10 to +50˚C)
Operating Humidity: 20 to 80% RH
Storage Humidity: 5 to 95% RH
Electrical requirements 230 volts ac (+15%, -14%)
50/60 Hz (±2%)
Specifications subject to change without notice.
70 Appendix A: Specifications
Page 78
ppendix B: Menu Selections
A
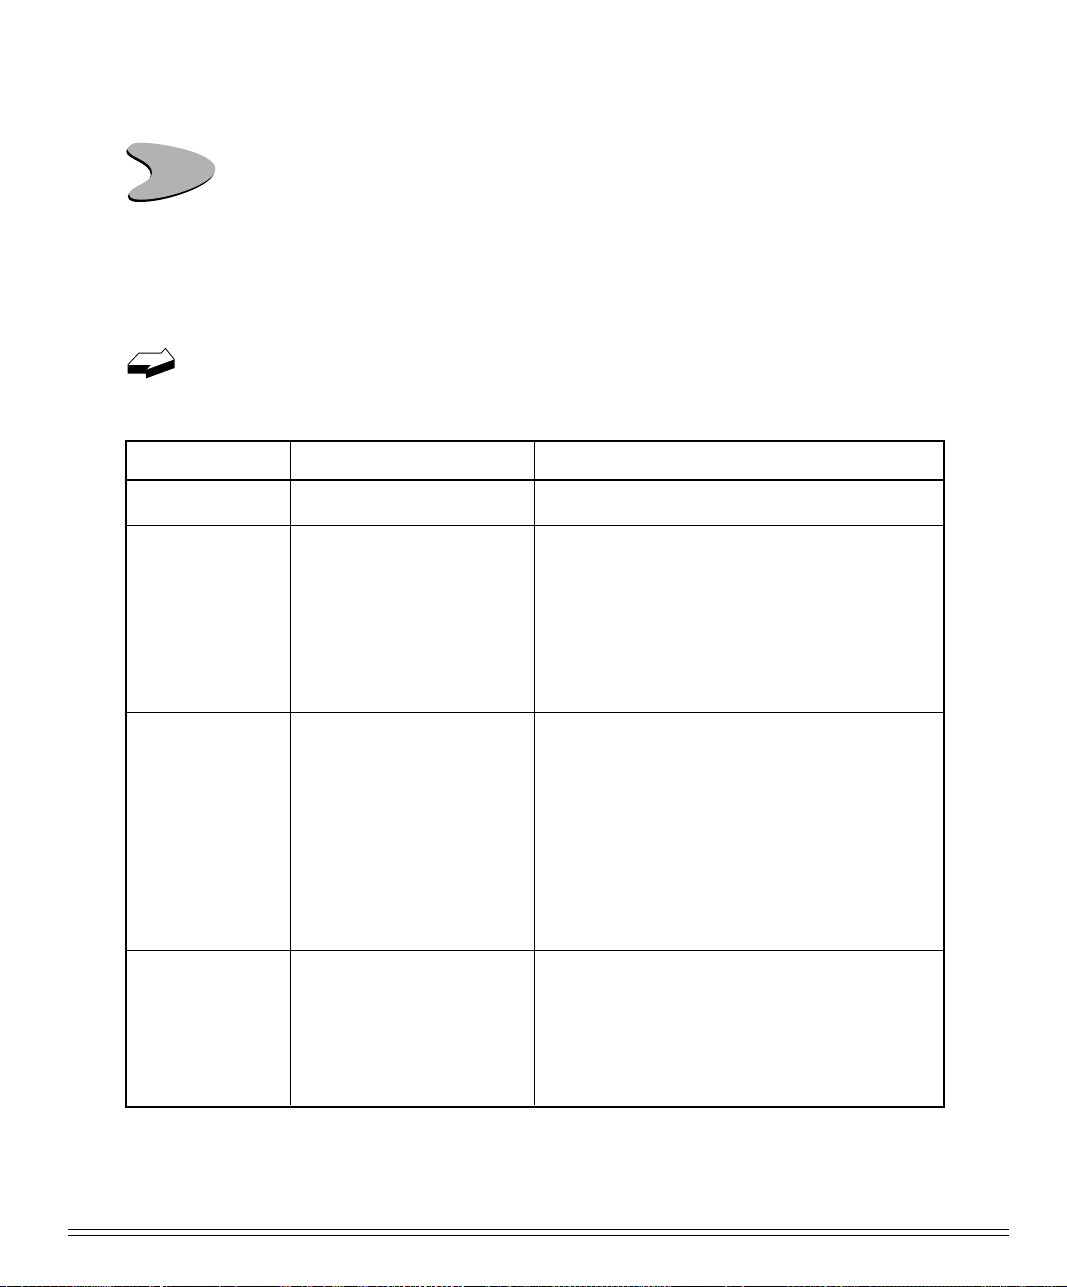
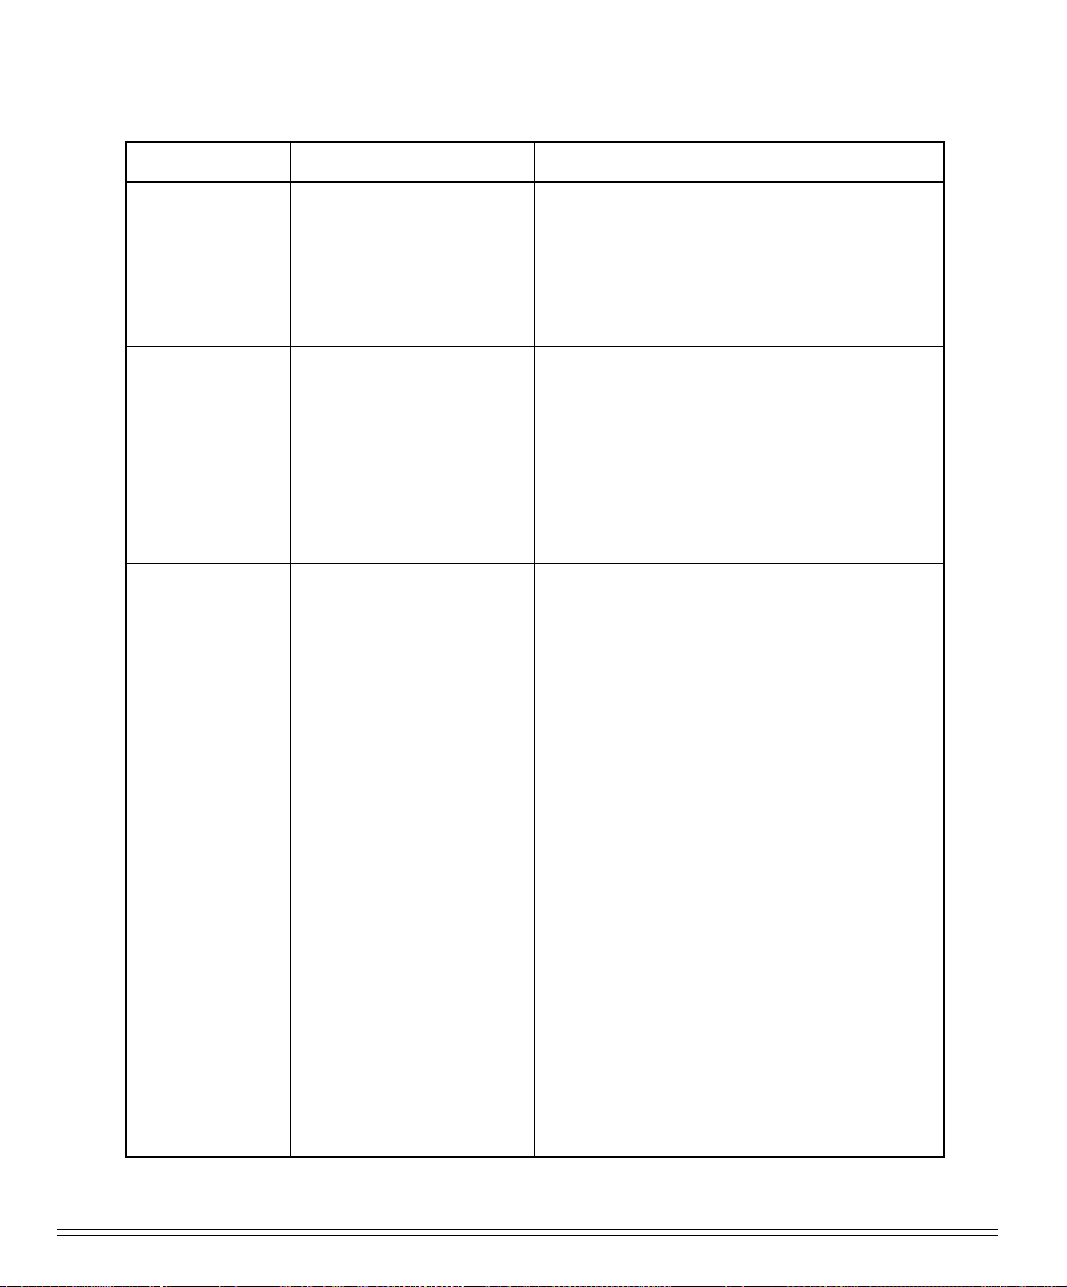
The menu selections for your printer are summarized below. Factory defaults are indicated in bold face italic. Explanations for each item follow the table.
The table below summarizes all possible menu settings available with your
printer. Which of these you will actually see when you are working in the
Menu depends on the active emulation and on the options installed.
Group Item Setting
Printer Control
Font
Symbol Sets
Rear Feed
Emulation Mode
Print Mode
Pitch
Proportional Spacing
Style
Size
Character Set
Language Set
Zero Character
Code Page
Line Spacing
Form Tear-Off
Skip Over Perforation
Page Width*
Page Length
Epson LQ, IBM PPR, IBM AGM
LQ Courier, LQ Roman, LQ Swiss, LQ Swiss
Bold, LQ Orator, LQ Gothic, LQ Prestige,
Utility, HSD
10 cpi, 12 cpi, 15 cpi, 17.1 cpi, 20 cpi
No, Yes
Normal, Italics
Single, Double
Set I, Set II
American, French, German, British, Danish
I, Swedish, Italian, Spanish I, Japanese, Norwegian, Danish II, Spanish II, Latin American, French Canadian, Dutch, Publisher
Slashed, Unslashed
USA, Canada French, Multilingual, Portu-
gal, Norway, BRASCII, Abicomp, Multilingual 858, ISO 8859-15
6 LPI, 8 LPI
Off, 500 ms, 1 sec, 2 sec
No, Yes
13.6", 8"
2
11", 11
6", 7", 8", 8.5"
/3", 12", 14", 17", 5", 3", 3.5", 4", 5.5",
ML790/791 Printer Handbook 71
Page 79
Group Item Setting
Bottom Feed
Top Feed
Set-Up
Line Spacing
Form Tear-Off
Skip Over Perforation
Page Width *
Page Length
Line Spacing
Form Tear-Off *
5
Bottom Margin
Page Width *
Page Length
Wait Time
Page Length Control
Graphics
Receive Buffer Size
Paper Out Override
Print Registration 1
Print Registration 2
Operator Panel Function
Reset Inhibit
Print Suppress Effective
Auto LF
Auto CR *
1
CSF Bin Select
SI Select Pitch (10 CPI) *
SI Select Pitch (12 CPI) *
Time Out Print
Auto Select
Graphics Speed
Centering Position
CSF Type *
6 LPI, 8 LPI
Off, 500 ms, 1 sec, 2 sec
No, Yes
13.6", 8"
2
11", 11
/3", 12", 14", 17", 5", 3", 3.5", 4", 5.5",
6", 7", 8", 8.5"
6 LPI, 8 LPI
Off, 500ms, 1 sec, 2 sec
Valid, Invalid
8", 13.6"
2
11", 11
/3", 12", 14", 17", 3", 3.5", 4", 5.5", 6",
7", 8", 8.5"
1 sec, 2 sec, 500ms
by Menu Setting, by Actual Page Length
Bi-directional, Uni-directional
64K, 128K, 1 Line, 32K
No, Yes
0, 0.05 mm Left, 0.10 mm Left, 0.15 mm Left,
0.20 mm Left, 0.25 mm Left, 0.25 mm Right,
0.25 mm Right, 0.15 mm Right, 0.10 mm Right,
0.05 mm Right
0, 0.05 mm Left, 0.10 mm Left, 0.15 mm Left,
0.20 mm Left, 0.25 mm Left, 0.25 mm Right,
0.25 mm Right, 0.15 mm Right, 0.10 mm Right,
0.05 mm Right
Full Operation, Limited Operation
No, Yes
Yes, No
1
No, Yes
1
No, Yes
Bin 1, Bin 2
17.1 CPI, 15 CPI
20 CPI, 12 CPI
Valid, Invalid
No, Yes
Low, High
DEFAULT, MODE 1, MODE 2
Wide, Narrow
72 Appendix B: Menu Selections
Page 80
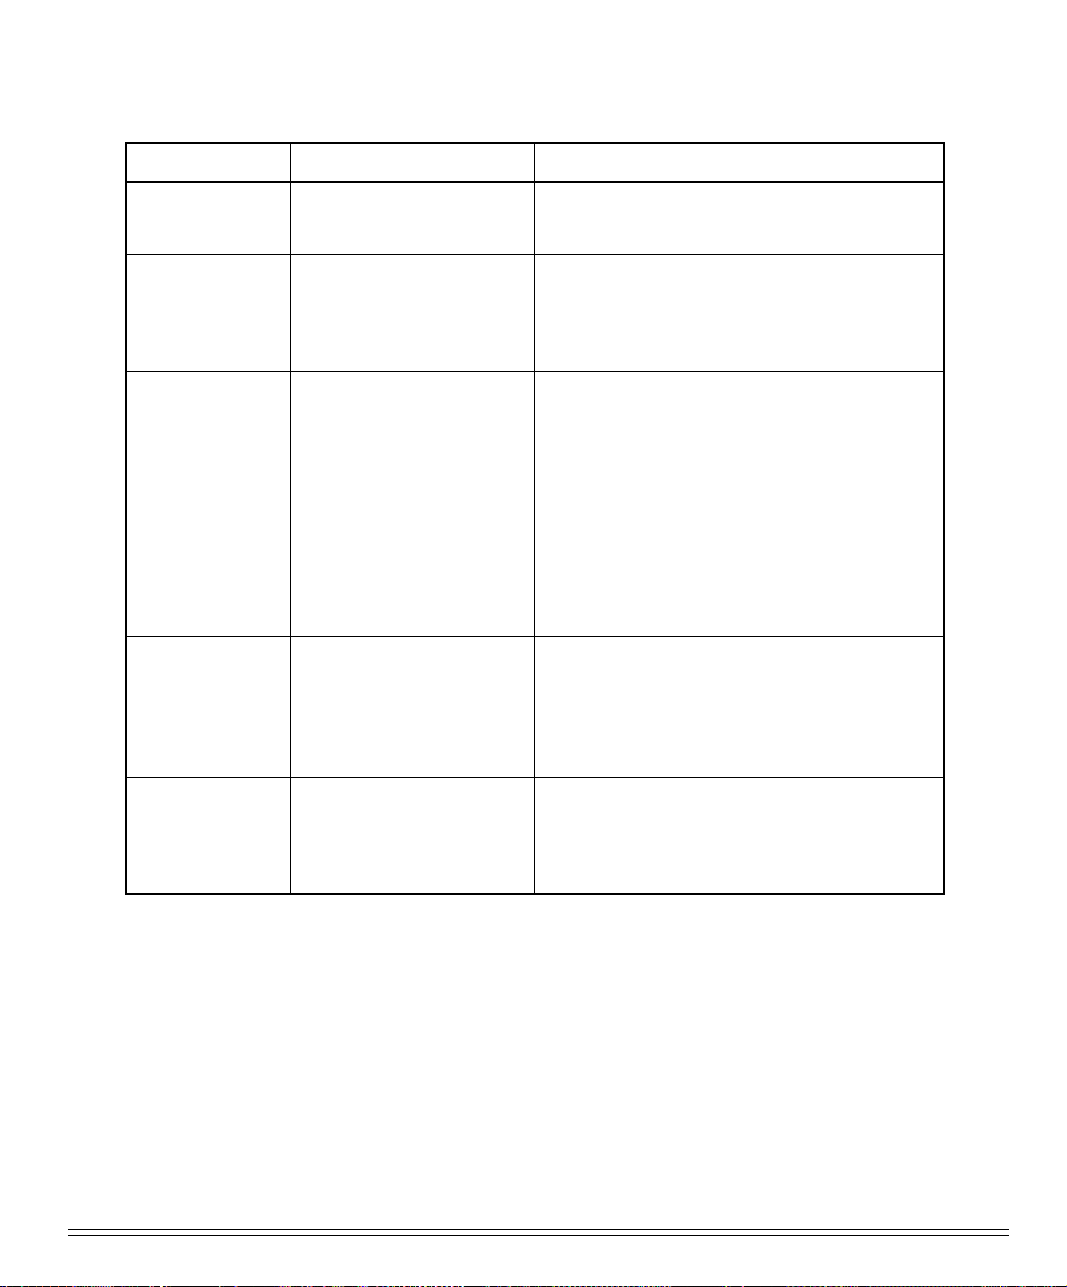
Group Item Setting
Set-Up
Parallel I/F
Serial I/F *
CSF Bin 1 *
Power Saving
Power Save Time
Enable, Disable
5 min, 10 min, 15 min, 30 min, 60 min
I-Prime
Pin 18
Auto Feed XT *
2
Bi-Direction
4
Parity
Serial Data 7/8 Bits
Protocol
Diagnostic Test
Busy Line
Baud Rate
Buffer Print, Buffer Clear, Invalid
+5V, Open
Invalid, Valid
Enable, Disable
None, Odd, Even
8 Bits, 7 Bits
Ready/Busy, X/On/X-Off
No, Yes
SSD-, SSD+, DTR, RTS
19200 bps, 9600 bps, 4800 bps, 2400 bps,
1200 bps, 600bps, 300 bps
DSR Signal
DTR Signal
Busy Time
3
Line Spacing
Bottom Margin
Page Width *
Page Length
Valid, Invalid
Ready on Power Up, Ready on Select
200 ms, 1 sec.
6 LPI, 8 LPI
Valid, Invalid
8", 13.6"
11", 11 2/3", 12", 14", 17", 3", 3.5", 4", 5.5", 6",
7", 8", 8.5"
CSF Bin 2 *
3
Line Spacing
Bottom Margin
Page Length
6LPI, 8LPI
Valid, Invalid
11", 11 2/3", 12", 14", 17", 3", 3.5", 4", 5.5", 6",
7", 8", 8.5"
* ML 791 only
*1Appears only when IBM Proprinter emulation is selected.
*2Appears only when Epson LQ emulation is selected.
*3Appears only when optional Cut Sheet Feeder Accessory is installed.
*4Appears only when optional Serial Interface is installed.
*5Applicable only when the Roll Paper Stand is installed.
ML790/791 Printer Handbook 73
Page 81

Explanation of Menu Items
These explanations are in alphabetical sequence to make it easier to look them up.
Many of the items will appear only with optional equipment installed, as noted below. You will find the items Line Spacing, Form Tear-Off, Skip Over Perforation and
Page Length appearing several times in the menu (once for each paper path).
Auto CR. IBM mode only. No (factory default) or Yes. Choose Yes to make your printer
automatically perform a carriage return when a LF is received at the end of the line.
Auto LF. No (factory default) or Yes. Change to Yes if your printer overprints. Keep
this set to No if your software adds a line feed when a carriage is received at the end
of a line. If your printout is consistently double spaced, set this item to No.
Auto Select. No (factory default) or Yes. Determines whether or not your printer will
automatically be selected after you load in paper. With the factory default (No) engaged, the printer will be deselected so that you can set the Top of Form. If you always use the same Top of Form setting, change this setting to Yes so that you don’t
have to press the SEL button to select the printer after loading paper.
Auto Feed XT. Epson mode only. Invalid (factory default) or Valid. In the Epson emulation, the XT signal on pin 14 of the parallel interface can control automatic line feed.
Some interface cables are wired in such a way that automatic line feed is always in
effect: the Auto Feed XT item eliminates this potential problem. The factory setting
causes the printer to ignore this signal; if your system uses pin 14 to control automatic
line feed, change the setting to Valid.
Baud rate. Appears only if optional Serial Interface is installed. Range from 19,200 to
300 bps: factory setting, 9600 bps. This item sets the transmission rate for the system.
Bi-Direction. Enable (factory default) or Disable. Enables or disables the bi-directional transmission (PnP) in Nibble mode.
Bottom Margin. Valid (factory default) or Invalid. Sets whether or not the printer will
ignore the bottom margin setting. Change the setting to Invalid if you want printer to
ignore the bottom margin setting. Be careful if you use this feature: it lets the printer
continue printing when there’s no more paper, which can cause loss of data and may
damage the printhead.
74 Appendix B: Menu Selections
Page 82

Busy Line. Appears only if optional Serial Interface is installed. SSD- (factory default), SSD+, DTR, RTS. If Ready / Busy protocol (factory default) is selected, you can
choose which line your system monitors for a busy signal:
SSD -9V, select SSD-
SSD +9V, select SSD+
DTR -9V, select DTR
RTS -9V, select RTS
Busy Time. Appears only if optional Serial Interface is installed. 200 ms (factory default) or 1 sec.
Sets the length of the busy signal when the Ready / Busy protocol (factory default) is engaged.
Centering Position. Used to limit Printhead travel when printing narrow columns.
Select Mode 1 for Model ML790; Select Mode 1 or Mode 2 for Model ML791.
Character Set. Choose IBM Set I (factory default) or IBM Set II.
Code Page. Choose USA (factory default), Canada French, Multilingual, Portugal,
Norway BRASCII, Abicomp, Multilingual 858, ISO 8859-15.
CSF Bin Select. Appears only if optional Dual-Bin Cut Sheet Feeder is installed. Choose
Bin 1 (factory default) or Bin 2.
CSF Type. Select Wide (default) or Narrow for CSF type.
Diagnostic Test. Appears only if optional Serial Interface is installed. No (factory de-
fault) or Yes. Select Yes if you want to perform a diagnostic test of the serial interface.
DSR Signal. Applies only when optional Interface is installed. Valid (factory default) or Invalid. Used with Ready / Busy protocol to select the way your system handles the DSR Signal.
DTR Signal. Applies only when optional Serial Interface is installed. Ready on Power
Up (factory default) or Ready on Select. Change to Ready on Select if the DTR signal
is required when the printer is selected; leave as Ready on Power Up if DTR signal is
required when printer is turned on.
ML790/791 Printer Handbook 75
Page 83

Emulation Mode. IBM PPR , IBM AGM, or Epson LQ (factory default). Selects the printer
command set you want your printer to use: IBM X24e or XL24e Proprinter, IBM X24e or
XL24e Alternate Graphics Mode (AGM), or Epson LQ 850/ 1050.
Form Tear-Off. Off (factory default), 500 ms, 1 sec, or 2 sec. Form Tear-Off advances
the paper to the perforation so that you can tear off a sheet of continuous-forms paper. You can turn this feature off, or you can select a time interval for the printer to
wait before advancing the paper.
Graphics. Bi-directional (factory default) or Uni-directional. Bi-directional graphics
print faster than uni-directional graphics, but uni-directional graphics have better print
registration. Bi-directional graphics printing can be optimized by adjusting the Print
Registration setting in the Menu.
Graphics Speed. Low (factory default) or High. Choose High speed for faster printing when optimum print quality is not an issue.
I-Prime. Buffer Print (factory default), Buffer Clear, or Invalid. Determines how the printer
will react to the I-Prime signal from your software. With the factory default engaged,
when the printer receives the I-Prime signal, it will print out the contents of the buffer
before resetting. Change the setting to Buffer Clear if you wish the printer to dump the
contents of its buffer immediately upon receiving the I-Prime signal. Change to Invalid if
you want the printer to ignore your software’s I-Prime signal. This will permit you to
enter settings through the printer’s control panel which will not be automatically overridden by the software’s settings when the I-Prime signal is sent.
Language Set. American (factory default), French, German, British, Danish I, Swedish, Italian, Spanish I, Japanese, Norwegian, Danish II, Spanish II, Latin American,
French Canadian, Dutch, or Publisher. Replaces certain symbols with special characters used in the respective foreign languages.
Line Spacing. 6 lpi (factory default) or 8 lpi. Choose 8 lines per inch for tighter line
spacing, to get more lines per page.
Operator Panel Function. Full Operation (factory default) or Limited Operation.
Change to Limited Operation to deactivate the PRINT QUARITY and CHARACTER
PITCH buttons on the control panel. Then you can control these features only through
your software. This can be useful when several people are using the printer and you
don’t want its settings changed.
76 Appendix B: Menu Selections
Page 84

Important!
the printer off, then hold down the SEL key while turning on the printer.
Page Length. 11” (factory default), 11 2/3”, 12”, 14”, 17”, 5”, 3”, 3.5”, 4”, 5.5”, 6”, 7”, 8”,
8.5”. Selects the length of the paper you’ll be using in your printer. This enables the
printer to keep track of the initial printing position on each page (Top of Form).
Page Length Control. Choose page length control system for SASF mode.
by Actual Page Length .....Control page length by actual physical page length.
by Menu Setting ................ Control page length by logical page length.
Page Width. Appears in Menu for wide-carriage model only. Choose a page width of
8” (factory default) or 13.6”.
Paper out Override. No (factory default) or Yes. The paper out detector senses when
less than an inch of paper remains in the printer and stops printing at that point.
Changing this setting to Yes overrides the detector so you can print closer to the bottom of the page if you’re using single sheets. Be careful if you use this feature: it lets
the printer continue printing when there’s no more paper, which can cause loss of
data and may damage the printhead.
Parity. Appears only if optional Serial Interface is installed. None (factory default),
Odd, or Even. Selects the type of parity your system uses.
This feature also prevents access to the Menu. To access the Menu, turn
Pin 18. +5V (factory default) or Open. Sets the signal on pin 18.
Pitch. 10 cpi (factory default), 12 cpi, 15 cpi, 17.1 cpi, or 20 cpi. Selects the character
width measured in characters per inch (cpi).
Power Save Time. 5 min (factory default), 10 min, 15 min, 30 min, 60 min. Sets the
time until the printer enters the power save mode. This setting is effective when the
power saving option is enabled.
Power Saving. Enable (factory default) or Disable. Enables or disables the power save
mode. When the power save mode is enabled, the printer enters the power save mode
when the time set in the Power Save Time option elapses while the printer is idle. The
SEL LED flashes and other LED turn off when the printer enters the power save mode.
ML790/791 Printer Handbook 77
Page 85

Print Mode. LQ Courier (factory default), LQ Roman, LQ Swiss, LQ Swiss Bold, LQ
Orator, LQ Gothic, LQ Prestige, HSD or Utility. Choose one of the LQ fonts for letter
quality printing; choose utility for high-speed printing.
Print Registration. 0 (factory default), 0.05 mm Left, 0.15 mm Left, 0.20 mm Left, 0.25 mm
Left, 0.25 mm Right, 0.20 mm Right, 0.15 mm Right, 0.10 mm Right, or 0.05 mm Right.
Change the setting as required to obtain the best registration for bi-directional printing.
Print Suppress Effective. Yes (factory default) or No. Enables/disables print suppress command. The factory default enables the print suppress command: the printer
will ignore all data it receives after it accepts the print suppress command. Change to
No to cause your printer to ignore the print suppress command.
Proportional Spacing. No (factory default) or Yes. Change to Yes to engage proportional spacing of characters.
Protocol. Appears only if optional Serial Interface is installed. Selects the type of protocol your system uses: Ready/Busy (factory default) or X-On/X-Off.
Receive Buffer Size. 64K (factory default), 128K, 1 Line, or 32K. Selects the amount of
memory devoted to holding received data. Choosing 1 Line will tie up your computer
during printing, but if you about the print job the printer will stop printing much sooner.
Reset Inhibit. No (factory default) or Yes. Change to Yes if you want your printer to
ignore the reset command sent by software. This will prevent your software reset
command from changing the settings you have made through the front panel controls or through printer commands. If you engage this feature, don’t forget that it will
also prevent your software from clearing out existing settings when you finish printing one document and switch to another.
Serial Data 7/8 Bits. Appears only if optional Serial Interface is installed. 8 Bits (factory default) or 7 Bits. Change to 7 bits if your system uses a 7-bit data format.
SI Select Pitch (10 CPI). IBM mode only. 17.1 CPI (factory default) or 15 CPI. Sets
what pitch (17.1 or 15 characters per inch) will be engaged when the printer control
panel is set for 10 cpi and the SI command is received.
SI Select Pitch (12 CPI). IBM mode only. 20 CPI (factory default) or 12 CPI. Sets what
pitch (20 or 12 characters per inch) will be engaged when the printer control panel is
set for 12 cpi and the SI command is received.
78 Appendix B: Menu Selections
Page 86

Size. Choose Single (factory default) or Double width and height printing.
Skip Over Perforation. No (factory default) or Yes. Change to Yes if you want the
printer to advance automatically to the next page when it comes within one inch of
the bottom of the page. If your software has its own page formatting controls, keep
this item set to No to avoid interface.
Style. Choose Normal (factory default) or Italics.
Time Out Print. Valid (factory default) or Invalid. When printing, if the printer doesn’t
receive any data, a line feed, or a form feed signal for awhile, it will automatically
dump out what’s in the print buffer. If your software spends a long time prossing
between feeding portions of data to the printer, you should change the setting to Invalid to keep your printer from inadvertently dumping the received data while it’s
waiting for more.
Wait Tine. 500 ms, 1 sec (factory default), or 2 sec. Sets the amount of the printer will
wait for more data before jumping from the print position up to the form tear off
position.
Zero Character. Slashed (factory default) or Unslashed. The factory default will cause
a slash to appear in zeros to distinguish them from the capital letter O. To disengage
the slashed zero, change this to Unslashed.
ML790/791 Printer Handbook 79
Page 87

80 Appendix B: Menu Selections
Page 88
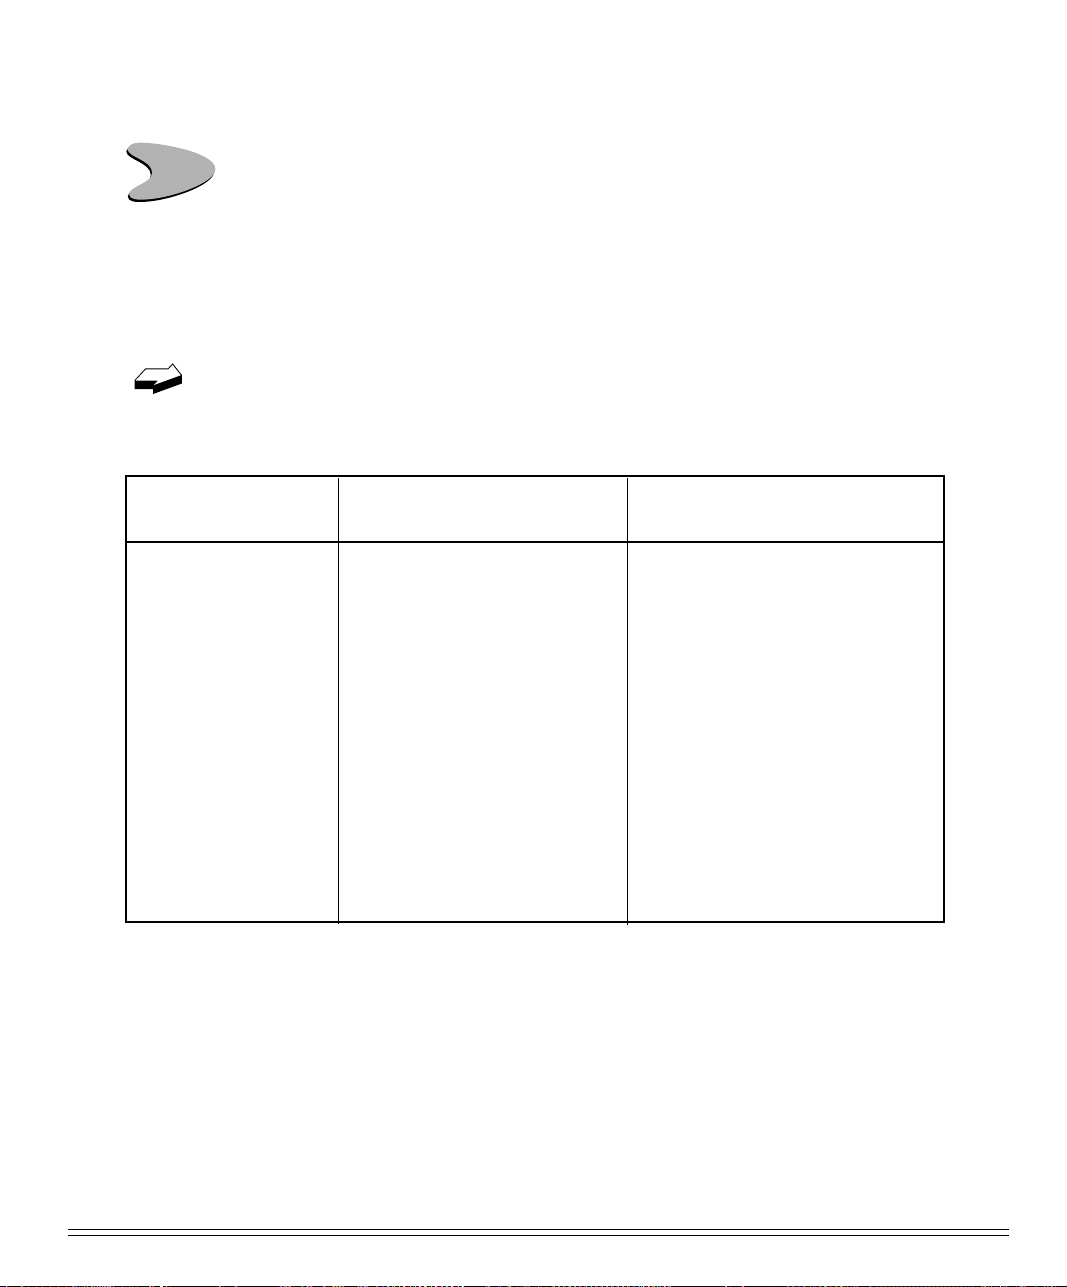
ppendix C: Commands–Epson Emulation
A
This appendix contains the commands for the Epson LQ emulation, grouped by function.
Normally the commands in this table override Menu settings. Except as noted,
these commands are cancelled and the printer returns to factory and Menu
settings when the printer receives an Initialization, Software I-Prime, or
Change Emulation command, or when it is turned off.
Epson
Function
Horizontal Control
Carriage Return
Set Horizontal Tabs
Horizontal Tab
Commands
(ASCII, Decimal, Hexadecimal)
ASCII: CR
Dec: 13
Hex: 0D
ASCII: ESC D n
Dec: 27 68 n
Hex: 1B 44 n
ASCII: HT
Dec: 9
Hex: 09
1 n2
1 n2
··· nk NUL
1 n2
··· nk 0
··· nk 00
Notes
Prints data in print buffer and performs
carriage return.
Sets horizontal tab stop positions.
n=position of tab stop–maximum one
less than # of characters per line
k=1 to 32; n
Default: every 8 columns
Once tabs are set, they remain the same
even if character pitch is changed.
Move to next horizontal tab stop
=0: clear tabs
1
ML790/791 Printer Handbook 81
Page 89
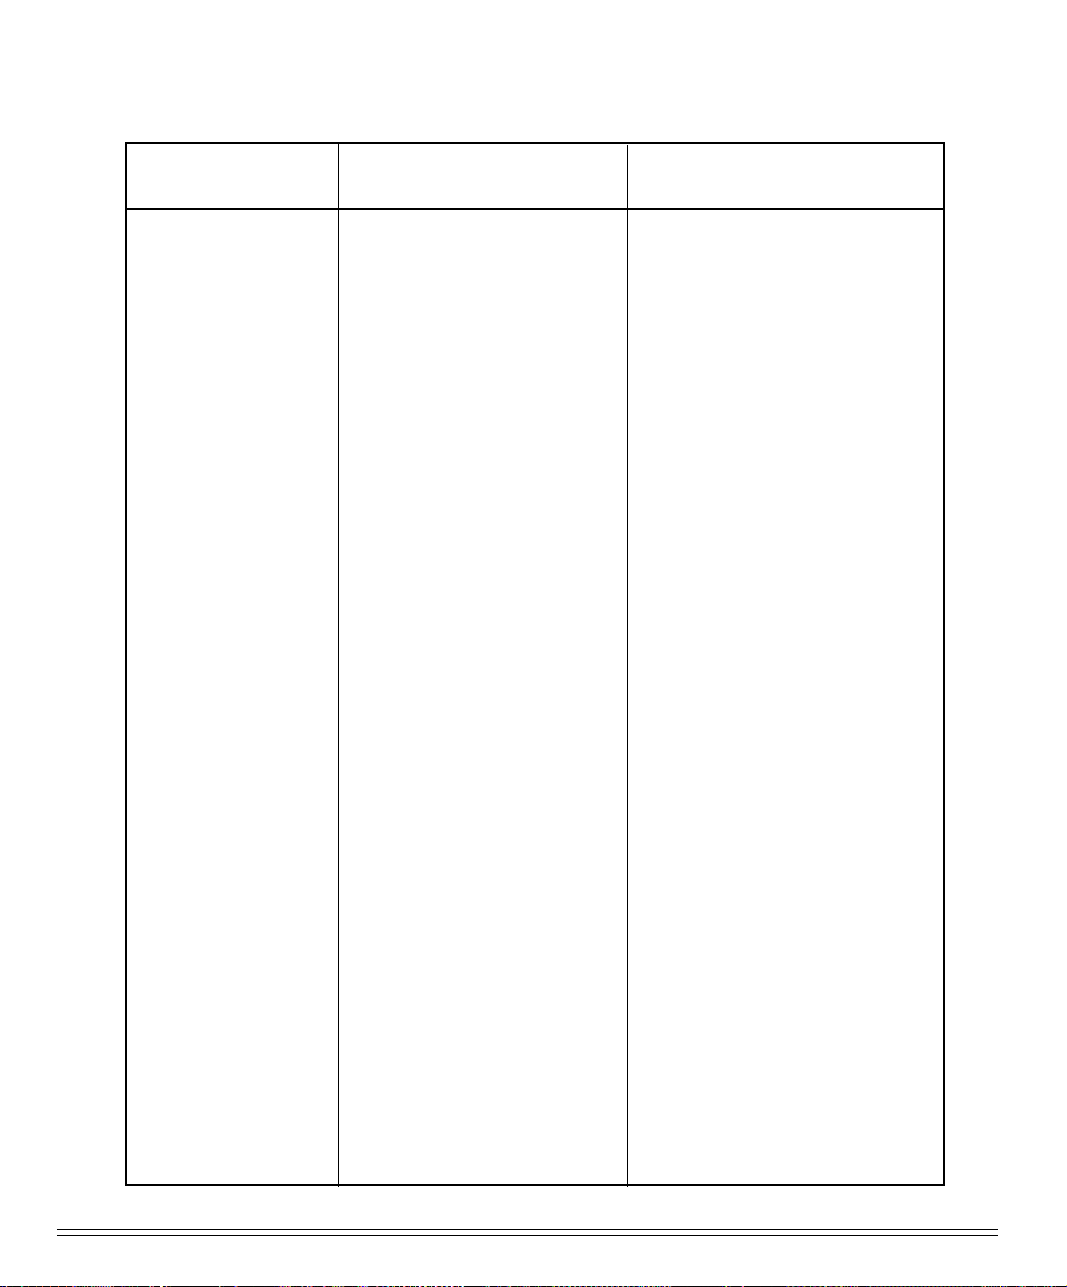
Epson
Function
Commands
(ASCII, Decimal, Hexadecimal)
Notes
Absoulte Horizontal
Position
Relative Horizontal
Position
ASCII: ESC $ n1 n
Dec: 27 36 n1 n
Hex: 1B 24 n1 n
2
2
ASCII: ESC \ n1 n
Dec: 27 92 n1 n
Hex: 1B 5C n1 n
2
2
2
Move to new horizontal position.
Amount of movement from left margin
is calculated as follows:
[n
+ (n2 x 256)] x (basic unit in inches),
1
where the basic unit is set by ESC (U, set
unit command. The default of the basic
unit is 1/60 inch.
n
=0 to 255
1
n
=0 to 255
2
n
=0: left margin
1=n2
Max. value: for 1/60 inch basic unit,
n
=48 n2=3(13.6" shift)
1
Space moved using this command will
not be underlined. DEL command will
not delete the skipped amount.
2
Move to new horizontal position, relative to present position. Amount of
movement is calculated as follows:
– (n
+ [n2x256] x (basic unit in inches),
1
where the basic unit is set by ESC (U, set
unit command. The default of the basic
unit with LQ is 1/180 inch, and with
UTL it is 1/120 inch.
n
=0 to 255
1
n
=0 to 255
2
n
=0: no movement
1=n2
+ moves to right; - moves to left
Set Print Position
ASCII: ESC DLE @ Pn A1 A2 P1 P2
P
3 P4
Dec: 27 16 64 [data]
Hex: 1B 10 40 [data]
OKI unique command. Sets next horizontal position of printhead.
Pn= number of parameter bytes to follow, range 0 to 255
A
= specifies whether motion is abso-
1
lute or relative: even-absolute from
left margin; odd=relative from present
position
A
= specifies direction of relative
2
movement: even= toward right margin
(forward); odd= toward left margin (reverse)
0 † P
, P2, P3, P4 † 9 representing
1
number of units to move (size of unit
depends on character pitch)
82 Appendix C: Printer Commands
Page 90
Epson
Function
Commands
(ASCII, Decimal, Hexadecimal)
Notes
Left Margin Set
Right Margin Set
Auto Justification
Unidirectional Print On/
Off
One-line Unidirectional
Printing
ASCII: ESC l n
Dec: 27 108 n
Hex: 1B 6C n
ASCII: ESC Q n
Dec: 27 81 n
Hex: 1B 51 n
ASCII: ESC a n
Dec: 27 97 n
Hex: 1B 61 n
ASCII: ESC U n
Dec: 27 85 n
Hex: 1B 55 n
ASCII: ESC <
Dec: 27 60
Hex: 1B 3C
Sets left margin n character spaces from
printhead home position; must be at least
5 spaces (5 cpi) to left of right margin.
n=0 to 255
n=0: home position
Sets right margin n character spaces
from printhead home position; must be
greater than the left margin.
n=1 to 255
n=0: command ignored
Justifies text according to the value of
n:
n=0: Left
n=1: Center
n=2: Right
n=3: Full (left & right)— use carriage
return only at end of paragraph.
Turns unidirectional (left to right only)
printing on and off.
n=1: Unidirectional printing On
n=0: Unidirectional printing Off (normal
bidirectional printing)
Turns on unidirectional (left to right)
printing for one line.
Backspace
Delete One Character
Vertical Control
1
/6-inch
Set
Line Spacing
1
Set
/8-inch
Line Spacing
ASCII: BS
Dec: 8
Hex: 08
ASCII: DEL
Dec: 127
Hex: 7F
ASCII: ESC 2
Dec: 27 50
Hex: 1B 32
ASCII: ESC 0
Dec: 27 48
Hex: 1B 30
Prints data in print buffer and moves
one character to the left according to the
current character pitch.
Deletes last character in print buffer.
Sets line spacing of
inch). This is standard typewriter spacing.
Sets line spacing of
inch).
1
/6-inch (6 lines per
1
/8-inch (8 lines per
ML790/791 Printer Handbook 83
Page 91
Epson
Function
Commands
(ASCII, Decimal, Hexadecimal)
Notes
Set n/60-inch
Line Spacing
n
Set
/
-inch
180
Line Spacing
n
Set
/
-inch
360
Line Spacing
Line Feed
n
/
-inch Line Feed
180
n
/
-inch Reverse Line
180
Feed
n
/
-inch Line Feed
360
ASCII: ESC A n
Dec: 27 65 n
Hex: 1B 41 n
ASCII: ESC 3 n
Dec: 27 51 n
Hex: 1B 33 n
ASCII: ESC + n or ESC [ n
Dec: 27 43 n or 27 93 n
Hex: 1B 2B n or 1B 5B n
ASCII: LF
Dec: 10
Hex: 0A
ASCII: ESC J n
Dec: 27 74 n
Hex: 1B 4A n
ASCII: ESC j n
Dec: 27 106 n
Hex: 1B 6A n
ASCII: ESC ] n
Dec: 27 93 n
Hex: 1B 5D n
Sets line spacing of n/60-inch.
n=0 to 255
n=0: no line feed.
Sets a line spacing of
n
/
-inch.
180
n=0 to 255
n=0: no line feed
Sets line spacing of
n
/
-inch. ESC [ n is
360
OKI unique command
n=0 to 255
n=0: no line feed
Prints buffer data and moves the printhead by the current line spacing value.
Cancels SO and ESC SO commands.
Executes one
n
/
-inch line feed with-
180
out changing line spacing.
n=0 to 255
n=0: no line feed, but initiates printing
Executes one
n
/
-inch reverse line
180
feed without changing line spacing.
n=0 to 255
n=0: no line feed, but initiates printing
OKI unique command. Executes
n
/
360
inch line feed without changing line
spacing.
n=0 to 255
n=0: no line feed, but initiates printing
-
Set relative vertical print
position
ASCII: ESC (v n
1 n2 m1 m2
Dec: 27 40 118 n1 n2 m1 m
Hex: 1B 28 76 n1 n2 m1 m
2
2
Performs carriage return in the forward
or reverse direction from the current
position.
n
=2, n2=0: specifies the number of
1
parameters (inbytes) to follow Amount
of carriage returns executed=– (m
+[m2
1
x256]) x (basic unit in inches) The basic
unit is set by set unit command ESC (U.
The default of basic unit is 1/360 inch.
Forward feeding exceeding approx. 46.2
inches and reverse feeding exceeding
approx. 0.5 inch are invalid. Reverse
feeding is invalid in raster graphics
mode.
84 Appendix C: Printer Commands
Page 92
Epson
Function
Commands
(ASCII, Decimal, Hexadecimal)
Notes
It is a print carriage return execution
command, which does not involve returning to previous settings following
the execution of this command.
Set absolute vertical print
position
Form Feed
Vertical Tab
Set Vertical Tab Stops
ASCII: ESC (V n1 n2 m1 m
Dec: 27 40 86 n1 n2 m1 m
Hex: 1B 28 56 n1 n2 m1 m
ASCII: FF
Dec: 12
Hex: 0C
ASCII: VT
Dec: 11
Hex: 0B
ASCII: ESC B n
Dec: 27 66 n
Hex: 1B 42 n
1 n2
ÆÆÆ nk 0
1 n2
ÆÆÆ nk 00
1 n2
ÆÆÆ nk NUL
2
2
2
Indicates the absolute position within
the paper size, and executes carriage return.
n1=2, n
=0: specifies the number of
2
parameters (in bytes) to follow Amount
of carriage returns executed=– (m1 + [m2
x 256]) x (basic unit in inches) The basic
unit is set by set unit command ESC (U.
The default of basic unit is 1/360 inch.
Forward feeding exceeding approx. 46.2
inches and reverse feeding exceeding
approx. 0.5 inch are invalid.
It is a print carriage return execution
command, which does not involve returning to pervious settings following
the execution of this command.
Prints data in buffer and advances paper
to next top of form. Canceles SO and
ESC SO command. With Cut Sheet
Feeder, inserts or ejects paper depending
on status of paper when command is issued.
Print buffer data and move to next vertical tab stop.
Sets vertical tab stops at specified lines
relative to Top of Form position.
k=1 to 16: number of tabs
n=1 to 255: line number where tab is to
be set.
n=0: clears tab setting for Vertical
Format Unit channel 0
ML790/791 Printer Handbook 85
Page 93
Epson
Function
Commands
(ASCII, Decimal, Hexadecimal)
Notes
Set Vertical Format Unit
(VFU)
Select Vertical Tab Channel
Set Page Length in Lines
Set Page Length in Inches
ASCII: ESC b m n
Dec: 27 96 m n
Hex: 1B 62 m n
1 n2 ÆÆÆ nk
1 n2 ÆÆÆ nk
1 n2 ÆÆÆ nk
ASCII: ESC / n
Dec: 27 47 n
Hex: 1B 2F n
ASCII: ESC C n
Dec: 27 67 n
Hex: 1B 43 n
ASCII: ESC C NUL n
Dec: 27 67 0 n
Hex: 1B 43 00 n
0
00
NUL
Programs up to 8 separate sets (channels) of vertical tab stops.
m=0 to 7: channel number (0 is default
set by ESC B command)
k=1 to 16: number of tab stops in channel
n=1 to 255: number of lines down from
Top of Form position
n=0: clear tab settings for channel m
Activates preprogrammed vertical tab
channel n. VT moves to stops in this
channel.
n=0 to 7: channel number (0 is default)
Sets page length in lines. Current position becomes top of form. Printer calculates page length vy multiplying current
line feed pitch by value entered for "n".
n=1 to 255.
Cancels Skip over Perforation setting.
Page length set by this command will
not change even if line spacing is
changed.
Sets page length in inches. Current position becomes top of form.
n=1 to 22.
Cancels Skip over Perforation setting.
Sets the page length to the currently seSet page length in defined
unit
ASCII: ESC (C n
1 n2 m1 m2
Dec: 27 40 67 n1 n2 m1 m
Hex: 1B 28 43 n1 n2 m1 m
2
2
lected paper mode.
n
=2, n2=0: specifies the number of
1
parameters (in bytes) to follow Amount
of carriage returns executed= – (m
[m
x 256]) x (basic unit in inches) The
2
+
1
basic unit is set by set unit command
ESC (U.
The default of basic unit is 1/360 inch.
Page length selection exceeding 22 in-
ches is invalid.
This command is invalid when
m
=0.
1=m2
Skip Over Perforation feature is deacti-
vated by this command.
86 Appendix C: Printer Commands
Page 94
Epson
Function
Commands
(ASCII, Decimal, Hexadecimal)
Notes
Set page format
Set Skip Over Perforation
area
(bottom margin)
Cancel Skip Over Perforation
Cut Sheet Feeder
Option
ASCII: ESC (c n
1 n2 t1 t2 b1 b2
Dec: 27 40 99 n1 n2 t1 t2 b1 b
Hex: 1B 28 63 n1 n2 t1 t2 b1 b
ASCII: ESC N n
Dec: 27 78 n
Hex: 1B 4E n
ASCII: ESC O
Dec: 27 79
Hex: 1B 4F
Set the top and bottom margins for the
2
2
currently selected paper mode.
n
=4, n2=0: specifies the number of
1
parameters (in bytes) to follow.
Top margin=(t
+ [t2 x256]) x (basic unit
1
in inches)
Bottom margin=(b
+[b2 x256]) x (basic
1
unit in inches)
The default of basic units 1/360 inch.
Skip Over Perforation feature is deactivated by this command.
Activates Skip Over Perforation feature
and sets it for n lines at the current line
spacing. When Perforation Skip area is
entered, printer will automatically feed
paper down to top of form on next page.
Once this command is entered, the Skip
Over Perforation setting will remain the
same even if line spacing is changed.
n=1 to 255
Deactivates Skip Over Perforation. Command overrides menu.
Cut Sheet Feeder Control
ASCII: ESC EM n
Dec: 27 25 n
Hex: 1B 19 n
Controls Cut Sheet Feeder accessory.
n=1: Select bin 1
n=2: Select bin 2 (if present)
n=73 (ASCII "I"): Insert sheet
Character Sets
Copy ROM Character Set
to RAM Character Set
ASCII: ESC : 0 n 0
Dec: 27 58 0 n 0
Hex: 1B 3A 00 n 00
n=82 (ASCII "R"): Eject sheet
Copies the designated character set to
the user defined set in RAM:
n=0: Roman
n=1: Swiss
n=2: Courier
n=3: Prestige
n=7: Orator
n=122: Swiss Bold
n=124: Gothic
n=126: MENU setting
ML790/791 Printer Handbook 87
Page 95
Epson
Function
Commands
(ASCII, Decimal, Hexadecimal)
Notes
Define Custom
Character(s)
Custom Character Set
On/ Off
Select International
Character Set
(set Code Page)
ASCII: ESC & 0 [data]
Dec: 27 38 0 [data]
Hex: 1B 26 00 [data]
ASCII: ESC % n
Dec: 27 37 n
Hex: 1B 25 n
ASCII: ESC R n
Dec: 27 82 n
Hex: 1B 52 n
Defines and stores in RAM up to 256
utility quality character patterns.
Custom character will be cleared by Initialize command, Software I-PRIME
command, Emulation Switch command,
I/F I-PRIME signal, or by turning the
printer off.
If Receive Buffer Size in MENU is Set to
23K, this command is Ignoved.
Engages/ disengages custom character
set.
n=0: Select custom character set
n=1: Select default character set
Select character set containing 15 special
characters used in foreign language
printing:
n=0: American n=26: Multilingual
n=1: French n=27: Norway
n=2: German n=28: Portugal
n=3: British n=42: Canada French
n=4: Danish I n=80: BRASCII
n=5: Swedish n=81: Abicomp
n=6: Italian n=82: ISO 8859-15
n=7: Spanish I n=83: Multilingual 858
n=8: Japanese
n=9: Norwegian
n=10: Danish
n=11: Spanish II
n=12: Latin American
n=13: French Canadian
n=14: Dutch
n=64: Publisher
Assign character table
ASCII: ESC (t n
27 40 116 n
Hex: 1B 28 74 n1 n2 d1 d2 d
1 n2 d1 d2 d3
1 n2 d1 d2 d3
Dec:
3
The character tables indicated by d2, d3 are
stored in the four types of areas indicated by
d1 (Character Table 0-3). From among the four
tables, one is selected by ESC t command.
n1=3, n2=0: specifies the number of parameters (in bytes) to follow
d1=0 to 3: stored character table number.
d2, d3=0, 0: Italic
d2, d3=1, 0: PC 437 (USA)
d2, d3=3, 0: PC 850 (Multilingual)
d2, d3=7, 0: PC 860 (Portugal)
d2, d3=8, 0: PC 863 (Canada-French)
d2, d3=9, 0: PC 865 (Norway)
d2, d3=25, 0: BRASII
d2, d3=26, 0: Abicomp
88 Appendix C: Printer Commands
Page 96
Epson
Function
Commands
(ASCII, Decimal, Hexadecimal)
Notes
Select Epson Character
Set
Print data as character table
Permit printing of upper
range control codes
Cancel printing of upper
range control codes
ASCII: ESC t n
Dec: 27 116 n
Hex: 1B 74 n
ASCII: ESC (^ n
Dec: 27 40 94 n
Hex: 1B 28 5E n
ASCII: ESC 6
Dec: 27 54
Hex: 1B 36
ASCII: ESC 7
Dec: 27 55
Hex: 1B 37
1 n2
1 n2
1 n2
[data]
[data]
[data]
Table selection is made from among
four character tables.
n=0: Character Table 0
n=1: Character Table 1
n=2: Character Table 2
n=3: Character Table 3
The tables designated by default are as
follows:
Character Table 0: Italic
Character Table 1: Table being selected
by "CodePage" in the MENU
Character Table 2: DLL character re-allocation.
Character Table 3: PC 437 (USA)
All [data] become printing data. All
codes of 01H-FF are treated as printing
data. 00H code is ignored as Null code.
The number of printing data (in bytes) to
follow are indicated by n
Number of printing data (in bytes)=n
[n
x 256]
2
and n2.
1
+
1
Enables printing of characters in upper
ASCII code range (128 to 159).
Cancels ESC 6 command.
Bar Code Command
Select Bar Code Type and
Size
ASCII: ESC DLE A m n
ÆÆÆ n
1
Dec: 27 16 65 m n1 ÆÆÆ n
Hex: 1B 10 41
m n1 ÆÆÆ n
m is number of parameters specified: 2,
8
8
8
4, 5, 6, 7, or 8
n
, n2 set bar code style as follows:
1
n
, n2=0, 1: EAN8
1
n
, n2=0, 2: EAN13
1
n
, n2=1, 0: UPC-A
1
n
, n2=1, 4: UPC-E
1
n
, n2=2, 0: CODE 39
1
n
, n2=3, 0: Interleaved 2 of 5
1
n
, n2=4, 0: Code 128
1
ML790/791 Printer Handbook 89
Page 97
Epson
Function
Commands
(ASCII, Decimal, Hexadecimal)
Notes
n3, n4 set vertical length of bars: normal
value is ([n
n
sets width of modules or black bars,
5
depending on style engaged.
n
sets spacing
6
n
sets ratio of wide element to narrow
7
element
n
: Specifies whether or not characters
8
are to be attached
n
=0: characters not attached
8
n
=1 or more: LQ characters attached
8
x 10] + n4) (15/
3
180
-inch)
Print Industrial Bar Code
Data
Print Postnet Bar Code
Data
Print Bar Code
ASCII: ESC DLE B m n [data]
Dec: 27 16 66 m n [data]
Hex: 1B 10 42 m n [data]
ASCII: ESC DLE C n [data]
Dec: 27 16 67 n [data]
Hex: 1B 10 43 n [data]
ASCII: ESC (B Ln Hn k m S v1 v2 c
DATA
Dec: 27 40 66 Ln Hn k m S v1 v2 c
DATA
Hex: 1B 28 42 Ln Hn k m S v1 v2 c
DATA
Prints bar code data.
m=amount of data (in bytes) to follow n
specifies Code 128 mode (when Code
128 is selected) as follows: n=65: Set A
n=66: Set B
n=67: Set C
n=amount of data (in bytes) to follow:
n=1 to 20
Data consists of single-digit numbers
(0 to 9).
Select Barcode type and Print Barcode.
Ln Hn: number of parameter, number of
parameter=Ln + Hn x 256
k: Barcode type 00=EAN13, 1=EAN8,
2=I20f5, 3= UPC-A, 4= UPC-E,
5=Code39, 6= Code128, 7= Postnet
m: module width (black and white bar),
2= 2 dots, 3= 3 dots, 4= 4 dots, 5= 5
dots (unit: 1/180")
s: adjustment of white bar, FDH=-3,
FEH=-2, FFH=-1, 00H=0, 01H=+1,
02H=+2, 03H=+3 (unit: 1/360")
v1, v2: specifies the height, height=
v1+v2x256 (unit: 15/180")
c: control information
bit0 check digit 0: no, 1= yes
bit1 human-readable character 0:
yes, 1= no
DATA: barcode data
90 Appendix C: Printer Commands
Page 98
Epson
Function
Print Features
Commands
(ASCII, Decimal, Hexadecimal)
Notes
Utility / LQ Selection
Select Draft Font
Select LQ Typeface
Select font by pitch and
point
ASCII: ESC x n
Dec: 27 120 n
Hex: 1B 78
ASCII: ESC y n
Dec: 27 121 n
Hex: 1B 79 n
ASCII: ESC k n
Dec: 27 107 n
Hex: 1B 6B n
ASCII: ESC X m n
Dec: 27 88 m n1 n
Hex: 1B 58 m n1 n
1 n2
2
2
n=0: Utility printing
n=1: NLQ printing
Select Draft Font type.
n= 0: Utility
n= 1: HSD
n=0: Roman
n=1: Swiss
n=2: Courier
n=3: Prestige
n=7: Orator
n=122: Swiss Bold
n=124: Gothic
n=126: MENU setting
Selects Multipoint (scalable font) mode.
Printable font is selected by character
pitch and point
Character pitch
m=0: unchanged
m=1: Proportional
m>5: m /360 inch
Point size=(n
Point size can be selected between a
minimum of 8 point to a maximum of 64
point.
+ [n2 x 256]) x 0.5 point
1
ML790/791 Printer Handbook 91
Page 99
Epson
Function
Commands
(ASCII, Decimal, Hexadecimal)
Notes
Proportional Spacing
Select 10 cpi Pitch (Pica)
Select 12 cpi Pitch (Elite)
Select 15 cpi Pitch
Select Compressed Print
Cancel Compressed Print
Set Character Spacing
Select horizontal motion
index (HMI)
ASCII: ESC p n
Dec: 27 112 n
Hex: 1B 70 n
ASCII: ESC P
Dec: 27 80
Hex: 1B 50
ASCII: ESC M
Dec: 27 77
Hex: 1B 4D
ASCII: ESC g
Dec: 27 103
Hex: 1B 67
ASCII: SI or ESC SI
Dec: 15 or 27 15
Hex: 0F or 1B 0F
ASCII: DC2
Dec: 18
Hex: 12
ASCII: ESC SP n
Dec: 27 32 n
Hex: 1B 20 n
ASCII: ESC c n
Dec: 27 99 n1 n
Hex: 1B 63 n1 n
1 n2
2
2
See also ESC ! n command.
n=1: Start proportional spacing
n=0: Stop proportional spacing
Normally, selects 10 cpi (Pica). In compressed mode, selects 17.1 cpi.
Normally, selects 12 cpi (Elite). In compressed mode, selects 20 cpi.
Selects 15 cpi pitch.
Pitch depends on current pitch selected:
10 cpi becomes 17.1 cpi
12 cpi becomes 20 cpi
Cancels 15 cpi print selected by SI or
ESC SI command.
Adds n dots of space (depending on the
current pitch) between characters.
n=0 to 127
Sets the amount of space between characters (HMI).
HMI= (n
The specification is invalid if HMI exceeds 3 inches.
The command is invalid when n
+ [n2 x 256])/ 360 inch.
1
1=n2
=0.
Select Italic Characters
Cancel Italics
ASCII: ESC 4
Dec: 27 52
Hex: 1B 34
ASCII: ESC 5
Dec: 27 53
Hex: 1B 53
See also ESC !, ESC 7.
Clears italic printing engaged by ESC 4
command.
92 Appendix C: Printer Commands
Page 100
Epson
Function
Commands
(ASCII, Decimal, Hexadecimal)
Notes
Score (Lines)
Selection
Turn Underlining on/ off
Start Superscript/
Subscript
Stop Superscript/
Subscript
Select Character Style
(normal, shadow, outline,
outline& shadow)
ASCII: ESC ( - j h l n
Dec: 27 40 45 j h l n1 n
1 n2
2
Hex: 1B 28 2D j h 0 l n1 n
ASCII: ESC - n
Dec: 27 45 n
Hex: 1B 2D n
ASCII: ESC S n
Dec: 27 83 n
Hex: 1B 53 n
ASCII: ESC T
Dec: 27 84
Hex: 1B 54
ASCII: ESC q n
Dec: 27 113 n
Hex: 1B 71 n
Selects underline, strike-through, or
overscore.
2
jand h specify amount of data to follow,
calculated as j + h x 256
n
= 1: Start underline
1
n
= 2: Start strike through
1
n
= 3: Start overscore
1
n
= 0: Cancel score mode selected by n
2
1
n2= 1: Start single continuous line
n
= 2: Start double continuous line
2
n
= 5: Start single dashed line
2
n
= 6: Start double dashed line
2
Underlines all text except tabs.
n= 1: Start underlining
n= 0: Stop underlining
n= 0: Start superscript
n= 1: Start subscript
n= 0: Normal
n= 1: Outline
n= 2: Shadow
n= 3: Outline with shadow
Start Emphasized
Printing
ASCII: ESC E
Dec: 27 69
Hex: 1B 45
Prints horizontally shifted double dots
in utility mode at half speed. See also
ESC ! command.
Override MENU until Initialize, Software I-PRIME or Change Emulation
command is received, or until printer is
turned off.
Stop Emphasized
Printing
ASCII: ESC F
Dec: 27 70
Clears emphasized printing engaged by
ESC E command.
Hex: 1B 46
Start Enhanced (Double
Strike) Printing
ASCII: ESC G
Dec: 27 71
Prints vertically shifted double dots in
two passes. See also ESC ! command.
Hex: 1B 47
ML790/791 Printer Handbook 93
 Loading...