

Page 1

Chapter 0
Copyright Information
Publications Department
OKIDATA
532 Fellowship Road
Mount Laurel, New Jersey 08054
OKIDATA is a registered trademark of Oki Electric Industry Company, Ltd.;
Marque déposée de Oki Electric Industry Company, Ltd.; Marca Registrada, Oki Electric Industry
Company, Ltd.
OKIPRO II, Micro Docs II, and Bar Codes Plus II are Trademarks of OKI Electric Inductry Company, Ltd.
Energy Star is a trademark of the United States Environmental Protection Agency
TrueType and AppleTalk are registered trademarks of Apple Computer Company
Hewlett-Packard, HP, and LaserJet are registered trademarks of Hewlett-Packard Company.
IBM is a registered trademark of International Business Machines Corp.
Microsoft and MS-DOS are registered trademarks and Windows is a trademark of Microsoft Corporation.
WordPerfect is a registered trademark of Novell, Inc.
Word and Works are registered trademarks of Microsoft Corporation.
Architext is a trademark of Architext, Inc.
Bitstream is a registered trademark and Fontware is a trademark of Bitstream, Inc.
Fontware is licensed to Bitstream, Inc., in West Germany, France, and the United Kingdom by Electronic Printing
Systems, Ltd.
Compugraphic is a registered trademark of Agfa Corporation
Intellifont is a registered trademark of Compugraphic Corporation.
Glyphix is a trademark of SWFTE International.
Portions of software ©1994-1995 Adobe Systems Incorporated. All Rights Reserved. Adobe is a trademark of
Adobe Systems Incorporated and may be registered in certain jurisdictions.
ZIP Code is a registered trademark of the United States Postal Service.
Page 2

Revision Information
Every effort has been made to ensure that the information in this document is complete, accurate, and
up-to-date. OKIDATA assumes no responsibility for the results of errors beyond its control. OKIDATA also
cannot guarantee that changes in software and equipment made by other manufacturers and referred to in this
guide will not affect the applicability of the information in it. Mention of software products manufactured by
other companies does not necessarily constitute endorsement by OKIDATA.
©Copyright 1995 by OKIDATA. All rights reserved.
First edition May, 1995.
Written and produced by the OKIDATA Publications Department. Please address any comments to:
Page 3

Important Safety Instructions
IMPORTANT SAFETY INSTRUCTIONS
Your OKIDATA printer has been carefully designed to give you years of safe, reliable performance. As
with all electrical equipment, however, there are a few basic precautions you should take to avoid
hurting yourself or damaging the printer:
- Read the setup and operating instructions in this handbook carefully. Be sure to save it for
future reference.
- Read and follow all warning and instruction labels on the printer itself.
- Unplug the printer before you clean it. Use only a damp cloth; do not use liquid or aerosol
cleaners.
- Place your printer on a firm, solid surface. If you put it on something unsteady, it may fall
and be damaged; if you place it on a soft surface, such as a rug, sofa, or bed, the vents
may be blocked, causing the printer to overheat.
- To protect your printer from overheating, make sure all openings on the printer are not
blocked. Dont put the printer on or near a heat source, such as a radiator or heat register.
If you put it in any kind of enclosure, make sure it is well ventilated
- Do not use your printer near water, or spill liquid of any kind into it.
- Be certain that your power source matches the rating listed on the back of the printer. If
you're not sure, check with your dealer or with your local power company.
- Your printer has a grounded, 3-prong plug as a safety feature, and it will only fit into a
grounded outlet. If you cant plug it in, chances are you have an older, non-grounded
outlet; contact an electrician to have the outlet replaced. Do not use an adapter to defeat
the grounding.
- To avoid damaging the power cord, dont put anything on it or place it where it will be
walked on. If the cord becomes damaged or frayed, replace it immediately.
- If you're using an extension cord or power strip with the printer, make sure that the total of
the amperes required by all the equipment on the extension is less than the extension's
rating. The total ratings of all equipment plugged into the outlet should not exceed 15
amperes.
- Do not poke anything into the ventilation slots on the printer; you could get a shock or
cause a fire.
- Aside from the routine maintenance described in this handbook, don't try to service the
printer yourself; opening the cover may expose you to shocks or other hazards. Don't make
any adjustments other than those outlined in the handbookyou may cause damage
requiring extensive repair work. See Problem Solving in this manual for information on how
to get your printer serviced by qualified OKIDATA technicians.
- If anything happens that indicates that your printer is not working properly or has been
damaged, unplug it immediately and follow the procedures in the Handbook for having
your printer serviced. These are some of the things to look for:
The power cord or plug is frayed or damaged.
Liquid has been spilled into the printer, or it has been exposed to water.
The printer has been dropped, or the cabinet is damaged.
The printer doesn't function normally when you're following the operating
instructions.
Page 4

Federal Communications Commission
Federal Communications Commission
Radio Frequency Interference Statement for 120-Volt Models
WARNING:
device, pursuant to Part 15 of the FCC Rules. These limits are designed to provide reasonable
protection against harmful interference in a residential installation. This equipment generates, uses
and can radiate radio frequency energy and, if not installed and used in accordance with the
instructions, may cause harmful interference to radio communications. However, there is no guarantee
that interference will not occur in a particular installation. If this equipment does cause harmful
interference to radio or television reception, which can be determined by turning the equipment off
and on, the user is encouraged to try to correct the interference by one or more of the following
measures:
Note: It is the responsibility of the user to obtain the required shielded cable in order to ensure
compliance of this equipment with FCC regulations
Changes or modifications not expressly approved by Okidata may void your authority to operate this
device.
This equipment has been tested and found to comply with the limits for a Class B digital
- Reorient or relocate the receiving antenna.
- Increase the separation between the equipment and receiver.
- Connect the equipment into an outlet on a circuit different from that to which the receiver
is connected.
- Consult the dealer or an experienced radio/TV technician for help.
.
Industry Canada
Radio Interference Statement for 120-Volt Models
This apparatus complies with the Class B limits for radio interference as specified in the Industry
Canada Radio Interference Regulations.
Cet appareil est conforme aux critères établis pour la Classe B en ce qui concerne les interférences
radio, tel que spécifié par Industry Canada dans les Règlements relatifs aux Interférences Radio.
Federal Communications Commission Department of Communications
Radio Frenquency Interference Statement for 230/240-Volt Models
WARNING:
device, pursuant to Part 15 of the FCC Rules. These limits are designed to provide reasonable
protection against harmful interference when the equipment is operated in a commercial environment.
This equipment generates, uses and can radiate radio frequency energy and, if not installed and used in
accordance with the instructions, may cause harmful interference to radio communications.
Operation of this equipment in a residential area is likely to cause harmful interference in which case
the user will be required to correct the interference at his own expense.
Note: It is the responsibility of the user to obtain the required shielded cable in order to ensure
compliance of this equipment with FCC regulations.
Changes or modifications not expressly approved by Okidata may void your authority to operate this
device.
This equipment has been tested and found to comply with the limits for a Class A digital
Page 5

Industry Canada
Radio Interference Statement for 230/240-Volt Models
This apparatus complies with the Class A limits for radio interference as specified in the Industry
Canada Radio Interference Regulations.
Cet appareil est conforme aux critères établis pour la Classe A en ce qui concerne les interférences
radio, tel que spécifié par Industry Canada dans les Règlements relatifs aux Interférences Radio.
Page 6

OL810e Features
Congratulations! You have selected a high speed printer with excellent paper handling and
outstanding print quality. Your printers features include:
- 8 PPM output
- True 600 dpi print resolution, plus 600 x1200 resolution for graphics
- HP LaserJet 4 compatibility (PCL5e)
- 2 MB of memory with Enhanced Memory Management, expandable to 34MB
- 35 PCL and 10 TrueType Scalable resident fonts, plus Bar Code fonts
- 250 sheet universal/legal paper tray and manual feed for envelopes and special
documents
- High speed bi-directional (IEEE1284) Centronics parallel interface
RS232C Serial interface
- Auto-interface switching for multi-port setups
- Font card slot for adding additional fonts
- Ozone-free operation and Energy Star compliance for saving power
- Custom drivers for major software applications
Page 7

Chapter 1
Select a Suitable Place for your Printer
Select a Suitable Place for your Printer
- A firm surface such as a table or desktop
- Space to open the cover and pull out the paper tray and the rear output extender
- Air circulation around the printer to prevent overheating
- A nearby power source
- Room temperature of 50° to 90°F (10° to 32°C).
- Relative Humidity of 20- 80%
- No direct sunlight
Page 8
Check the Contents
Check the Contents
Unpack your printer. The shipping box should contain:
- Okidata OL810e Printer (with Image Drum Cartridge installed)
- Software Support Driver Diskette
- Toner Cartridge
- Printer Handbook
- Black light- shield bag (for storing image drum if printer must be shipped)
- Power Cord
If you are missing anything, contact your dealer.
Page 9
Remove the Image Drum Protective Paper
Remove the Image Drum Protective Paper
Press the cover release button and lift the cover (1). Lift out the image drum cartridge.
the drums green surface
cartridge into the printer.
(2). Remove the protective paper from the image drum (3). Reinstall the
Do not touch
Page 10
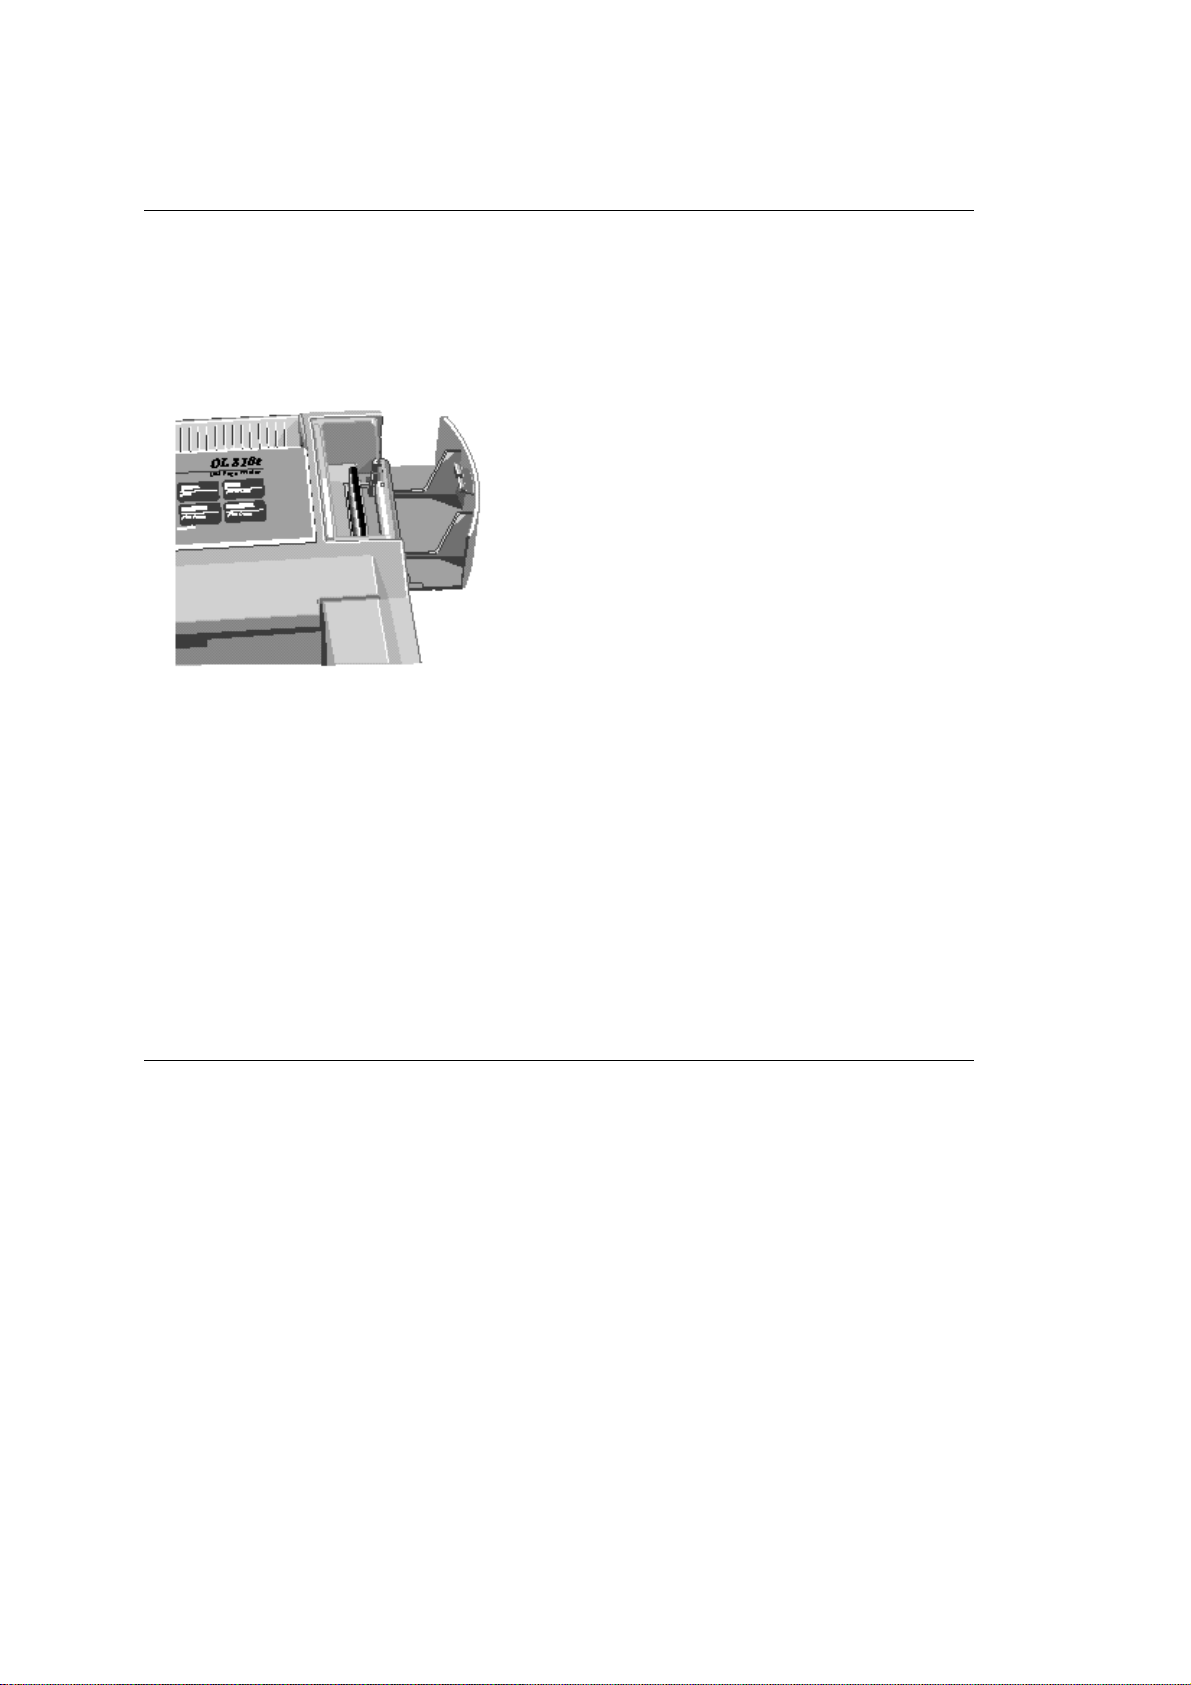
Remove Protective Film from the Control Panel
Remove Protective Film
LIft up the corner and peel the protective plastic film from the control panel.
Page 11
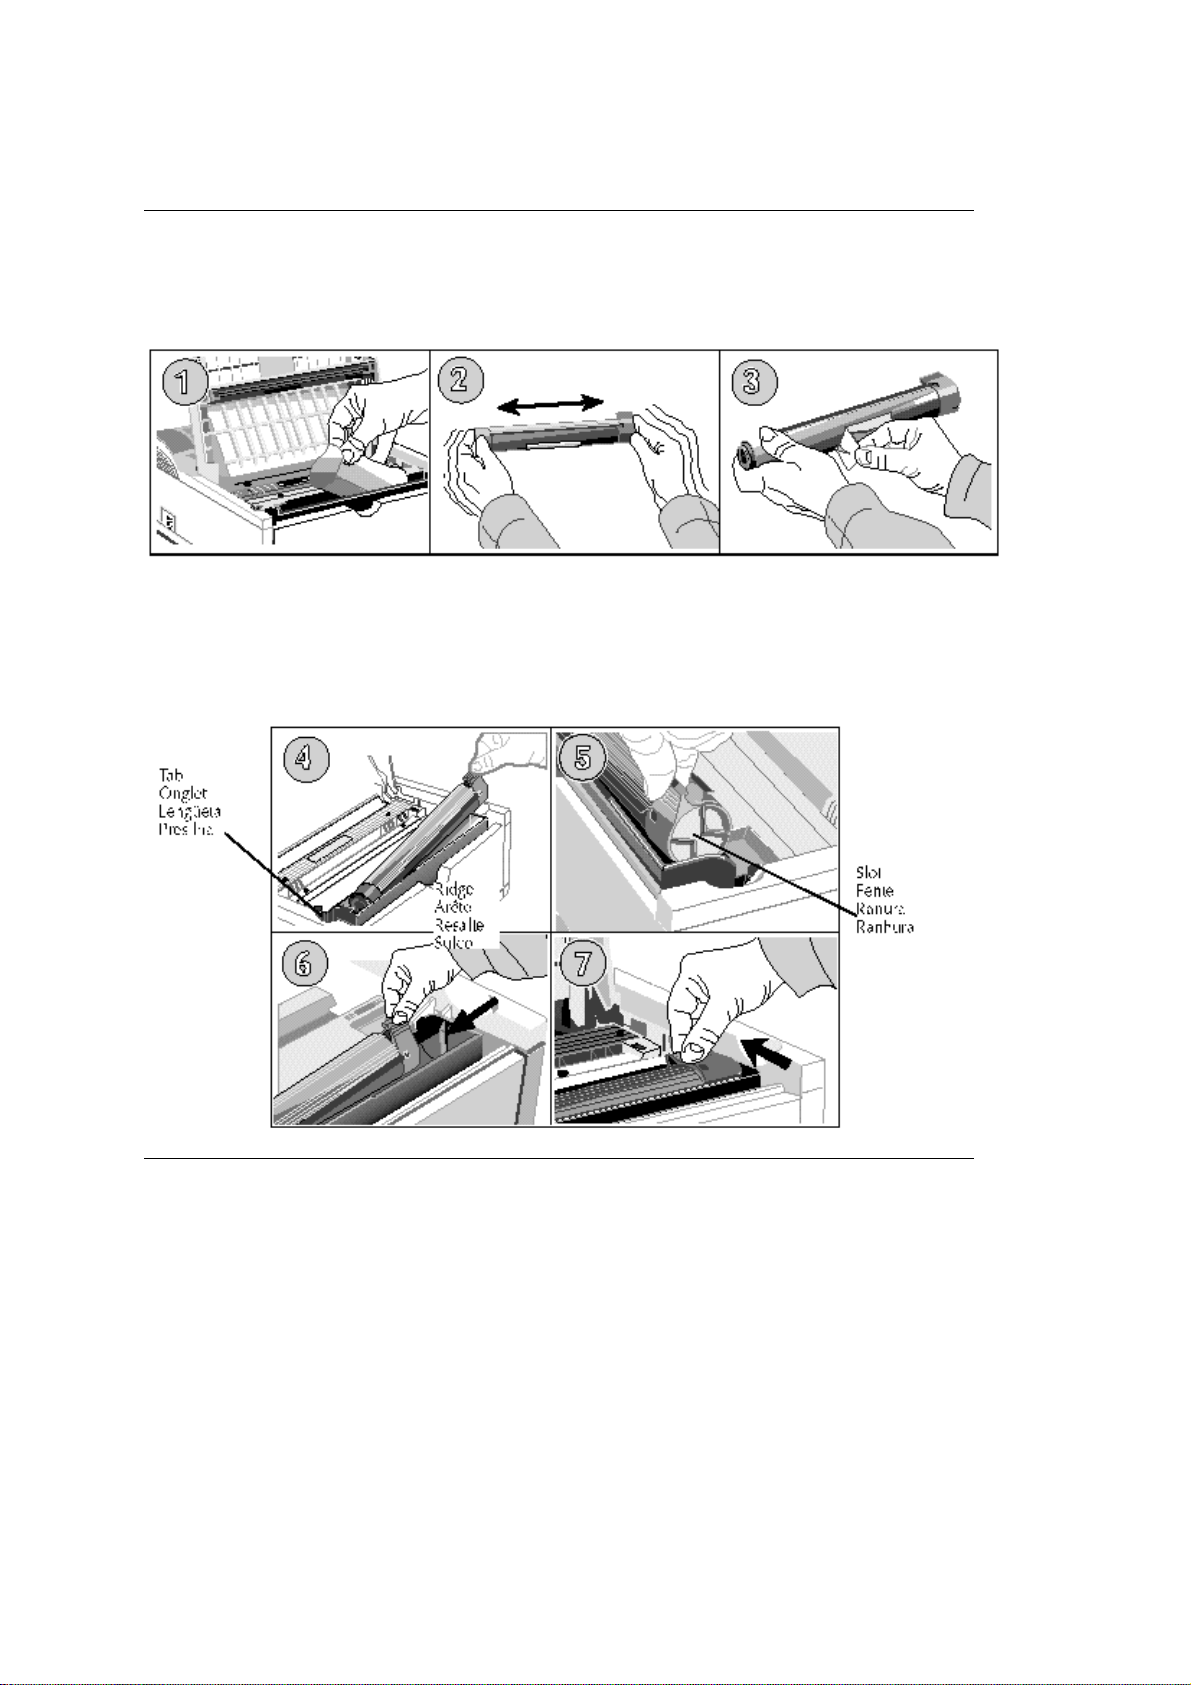
Installing Toner
Installing Toner
Remove the sponge (1). Unwrap the toner cartridge. Shake the cartridge to distribute the toner (2).
Peel tape off the bottom (3).
Grasp the blue lock lever and place the left side of the toner cartridge under the tab (4). Lower the
right side into the toner well, aligning the lock lever slot (5) with the ridge in drum cartridge (6). When
the cartridge is in place, push the lock lever forward until it stops (7). Lower the printer cover and
press to close.
Page 12
Choosing Paper
Choosing Paper
For best results, use paper that is smooth and of high quality.
Store paper in its ream wrapper until you are ready to use it, and keep it away from
moisture or other conditions that can cause it to wrinkle or curl.
Avoid printing on both sides of the paper for more than a few pages, or preprinted
documents that have been in a photocopier.
Try paper before you buy it in quantity.
When purchasing paper, use the following specifications for best results:
Smoothness/Grain 100 to 250 (Sheffield)/Long Grain
Basic Weight Paper cassette: 16 to 28 lb (60 to 105 g/m²)
Manual feed: 16 to 32 lb (60 to 120.5 g/m²)
Composition 100% chemical wood pulp and/or cotton
fiber
Caliper .003 to .007 inch (0.076 to 0.17 mm)
Curl In-ream: flat within 0.2 inch (5 mm)
Cut Edge Conditions/Finishing Cut with sharp blades, no visible fray.
Cut sheet to within ±0.3 inch (±0.8 mm) of
nominal ±0.20°square.
Fusing Compatibility Must not scorch, melt, offset, or release
hazardous emissions when heated to
392°F. (200°C) for 0.1 second.
Moisture Content 4% to 6% by weight
Packaging Polylaminated moisture-proof ream wrap
Wax Pick 12 minimum (Dennison)
Page 13
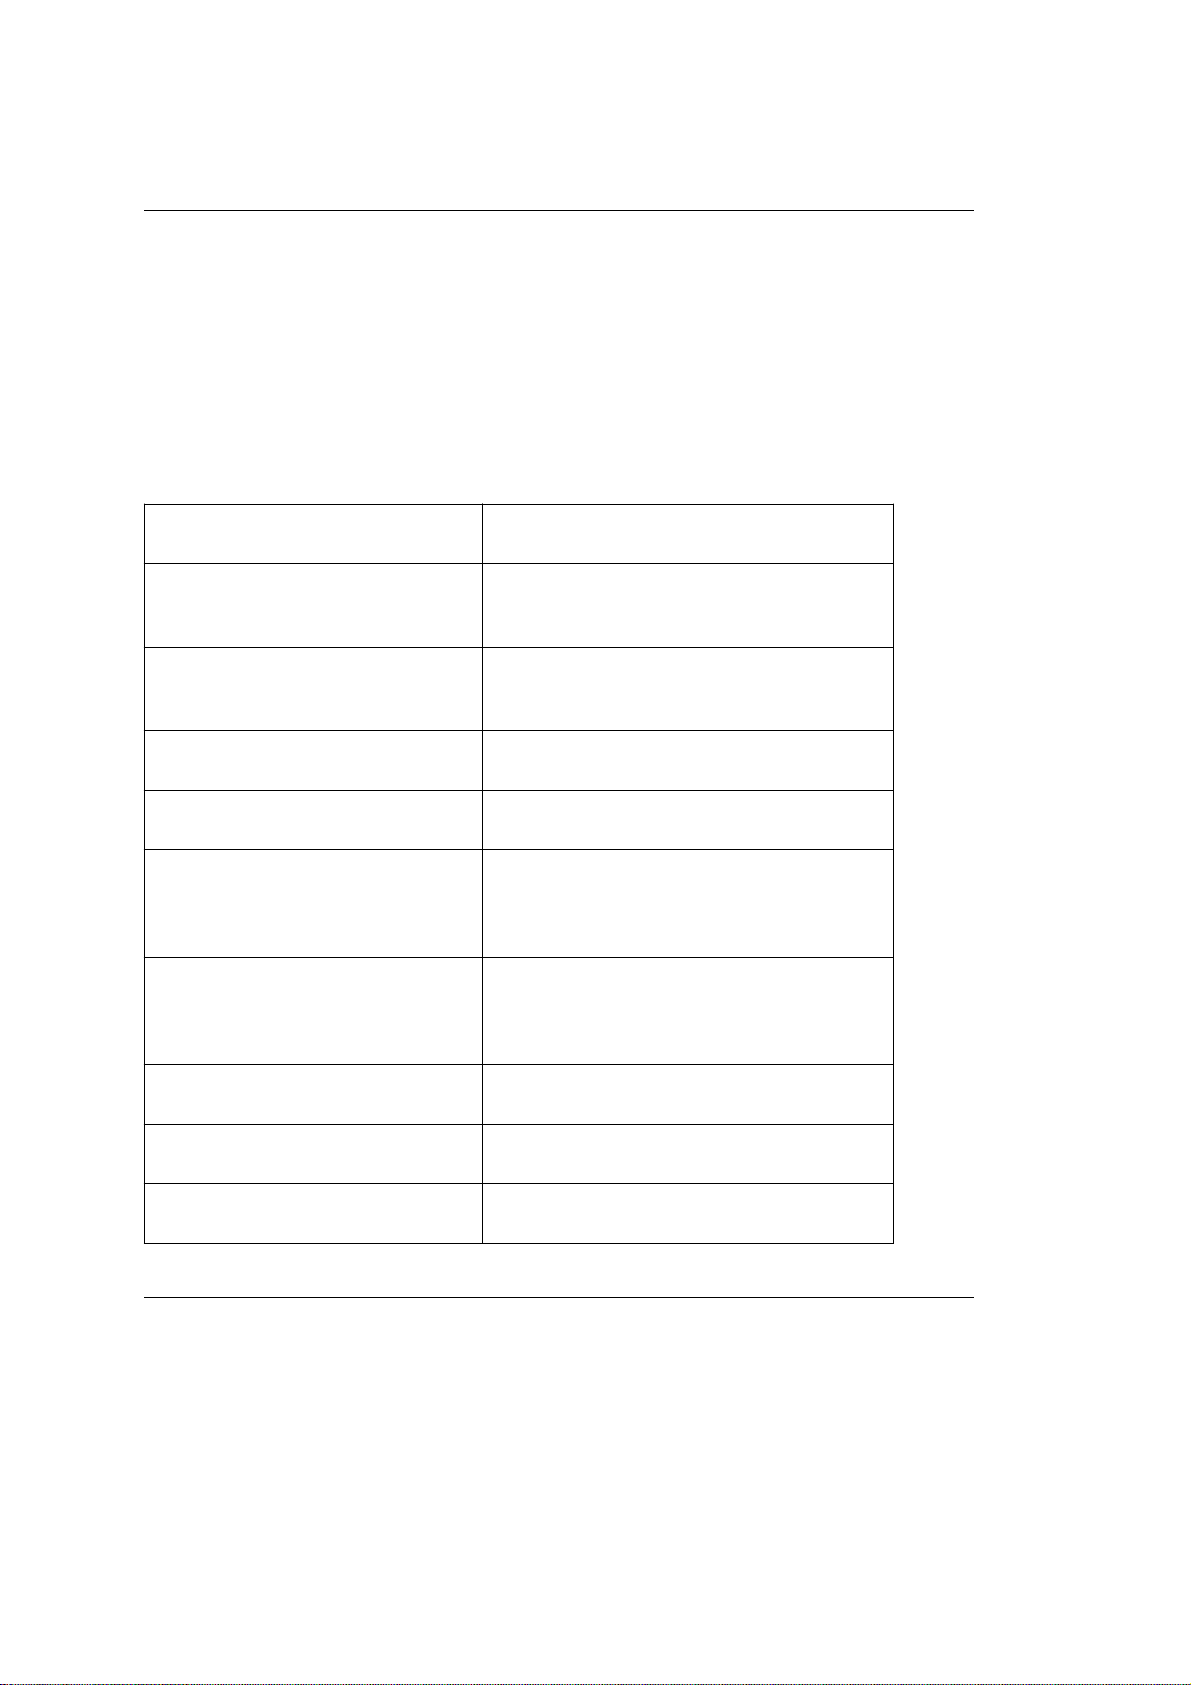
Loading Paper
Loading Paper
Slide the tray out of the printer (1). Adjust the tray guides for the correct paper size (2,3). Fan a
stack of paper and place it in the tray under the tabs. Do not fill above the PAPER FULL mark (4).
Place the tray back into the printer then push closed until the tray locks in place.
Note: The paper gauge indicates how much paper remains in the tray; you dont have to slide the tray out
to check.
Page 14
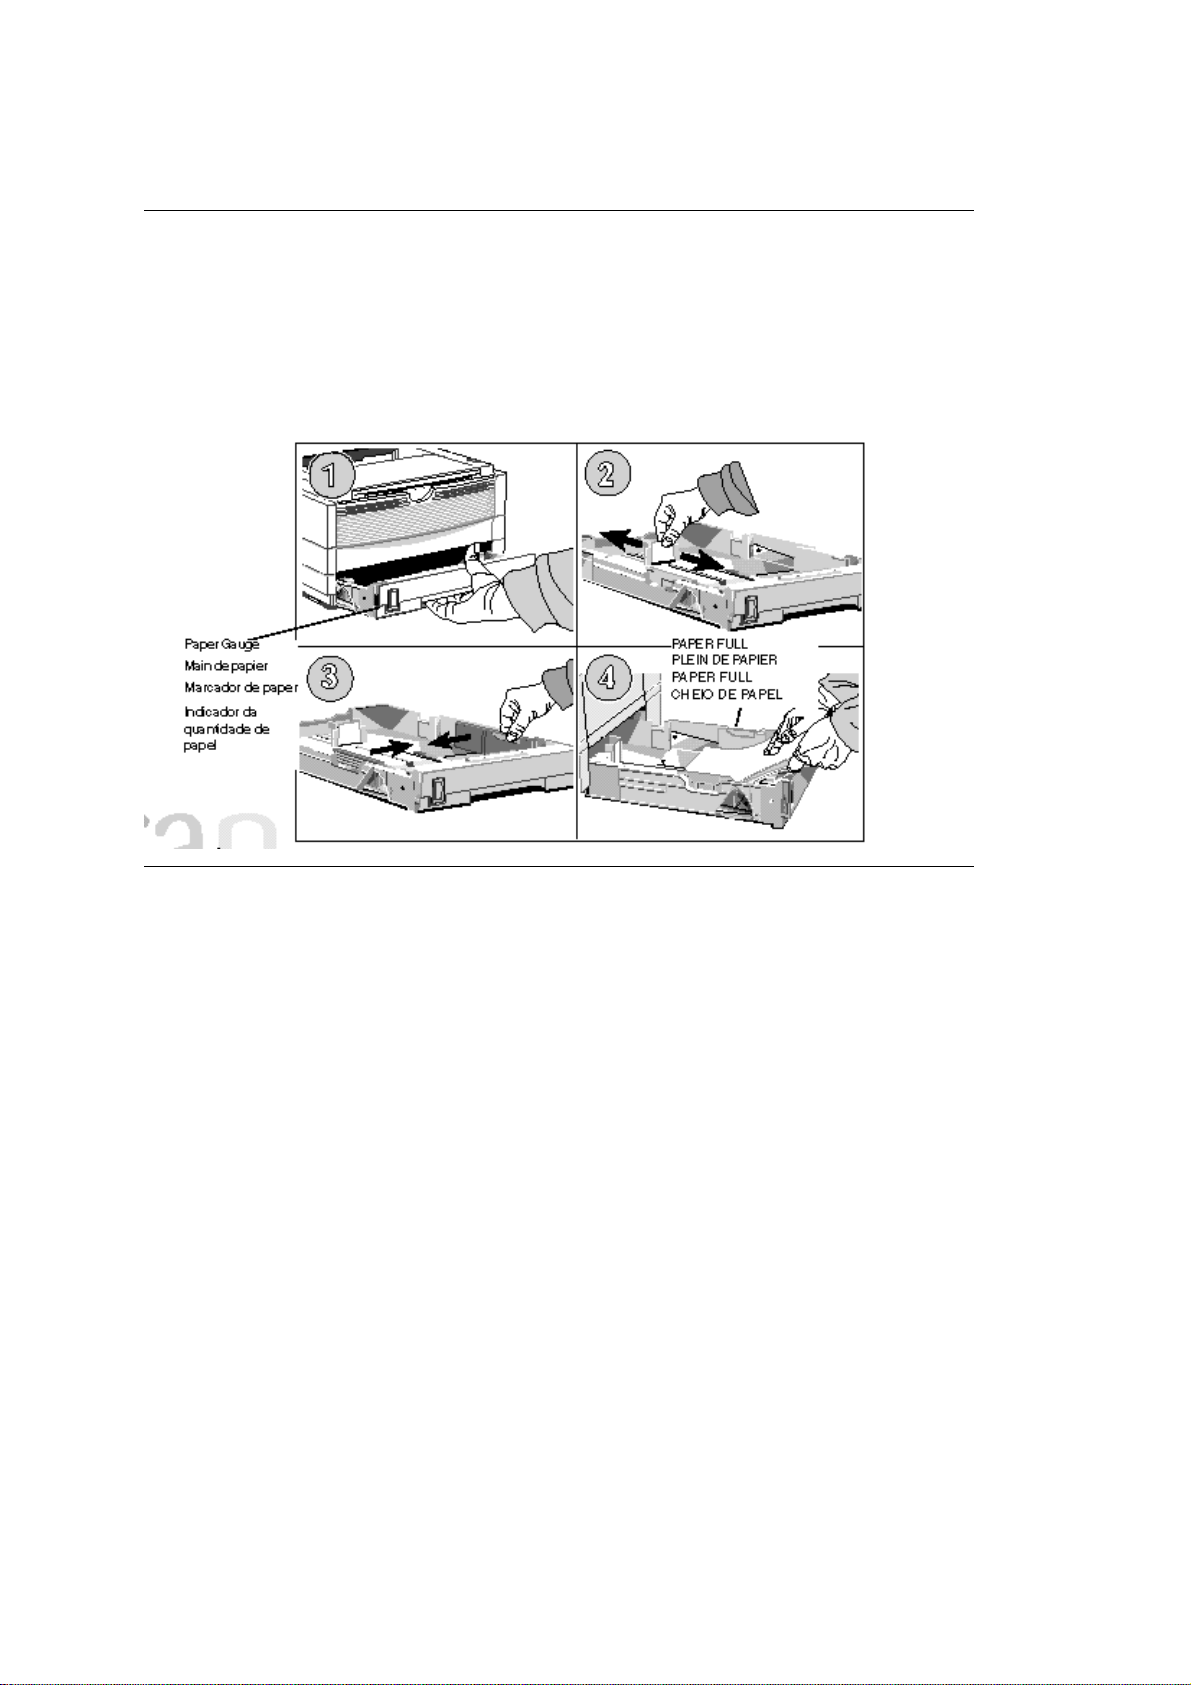
Paper Exit Paths - Top Paper Exit
Paper Exit Paths
Top Paper Exit
- Pull the front exit extender forward. Lift out the support bar.
- Printed pages exit face down
- Pages are stacked in the order printed
- Exit bin holds 150 sheets of 20-lb. paper
Note: Don't change paper paths while printing, paper jam may occur.
Page 15
Rear Paper Exit
Rear Paper Exit
- Pull out the rear exit extender until it locks in place. Lift out the support bar. To return to
top exit, close the support bar and push the rear exit extender firmly back in place, paper
will then exit into the top bin.
- Printed pages exit face up in reverse order
- Maximum output is 50 sheets of 20-lb. paper
- Use rear exit for printing on heavy paper, envelopes, labels, transparencies or odd size
paper
Note: Don't change paper paths while printing, paper jam may occur.
Page 16
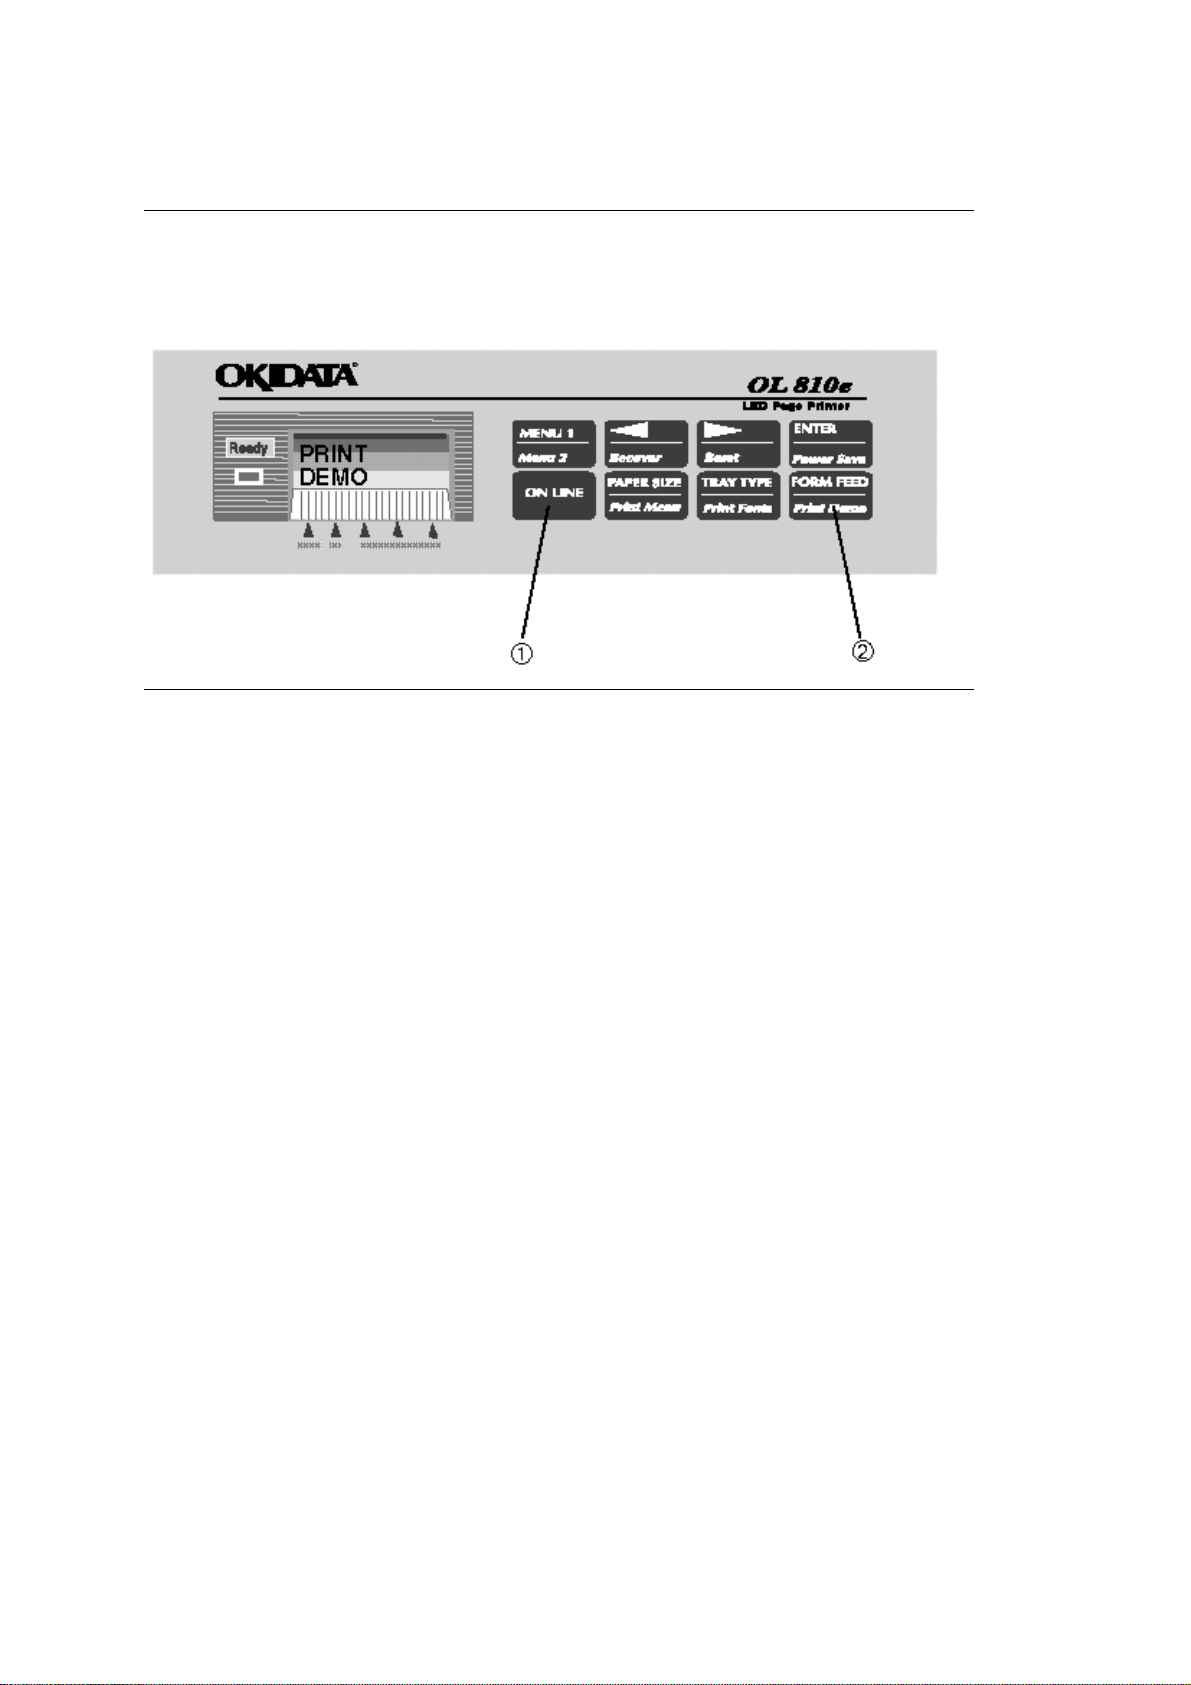
Printing a Demo Page
Printing a Demo Page
Press ON-LINE (1) until the READY light goes out. Press FORM FEED/PRINT DEMO (2) and hold
until
PRINT DEMO
appears. Demo pages will print.
Page 17
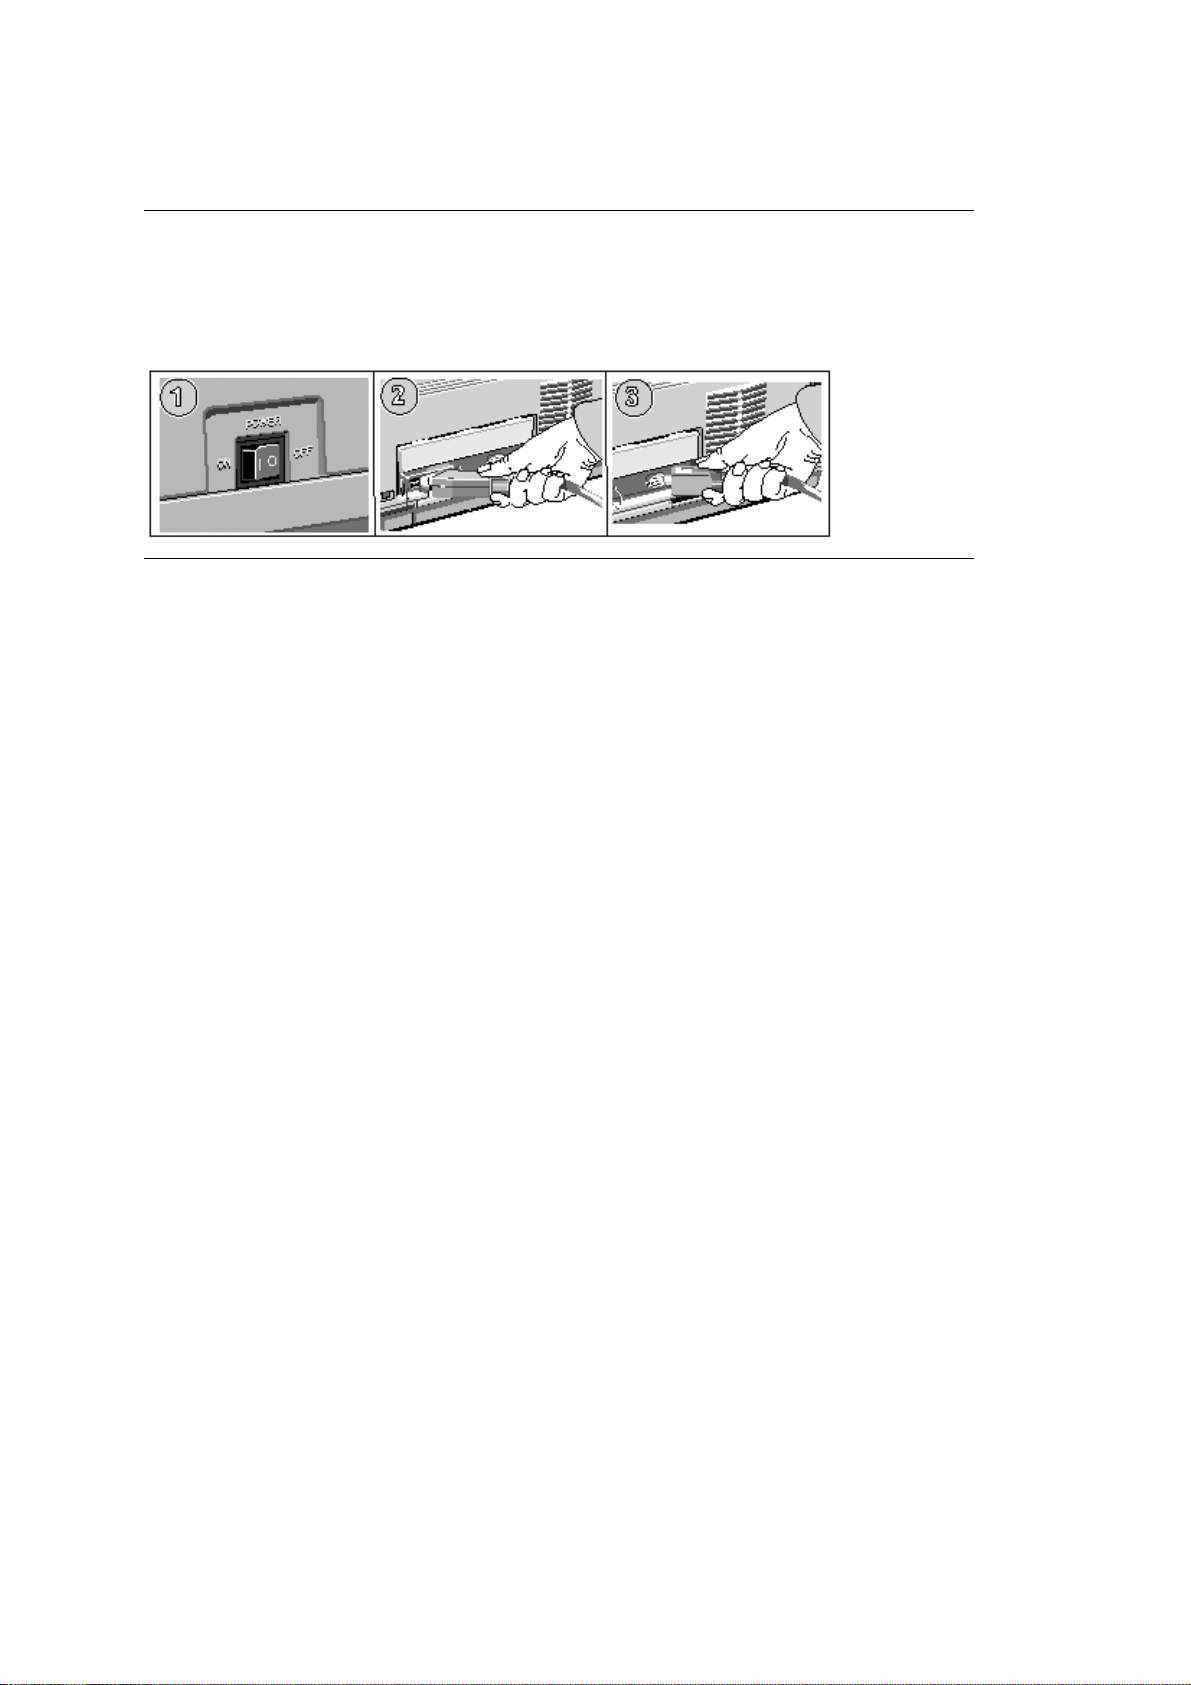
Turning on the Printer
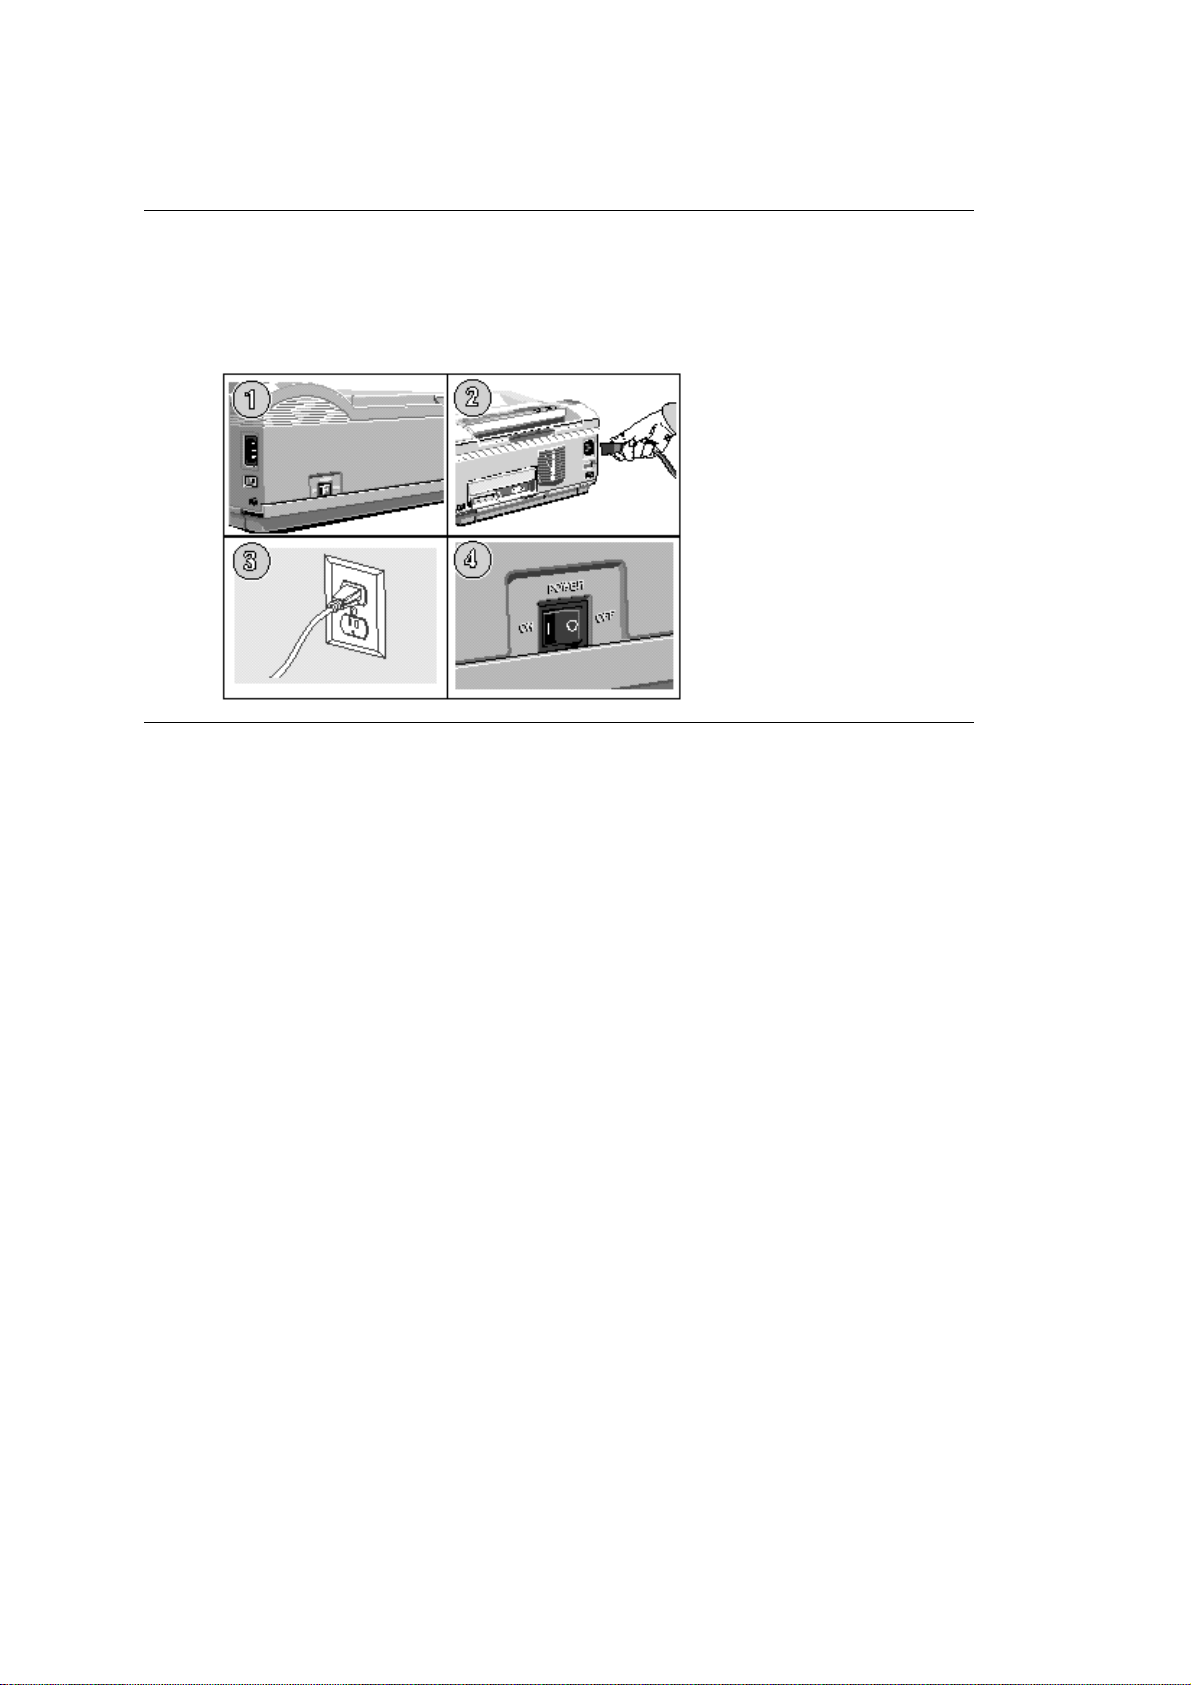
Turning on the Printer
Make sure the printer is off (1). Plug the cord into the printer first (2), then into a
Turn the printer on (4). It takes about 10 seconds for the printer to initialize, warm up, and display the
ON-LINE
message, telling you its ready to receive data.
grounded
outlet (3).
Page 18
Changing the Display Language
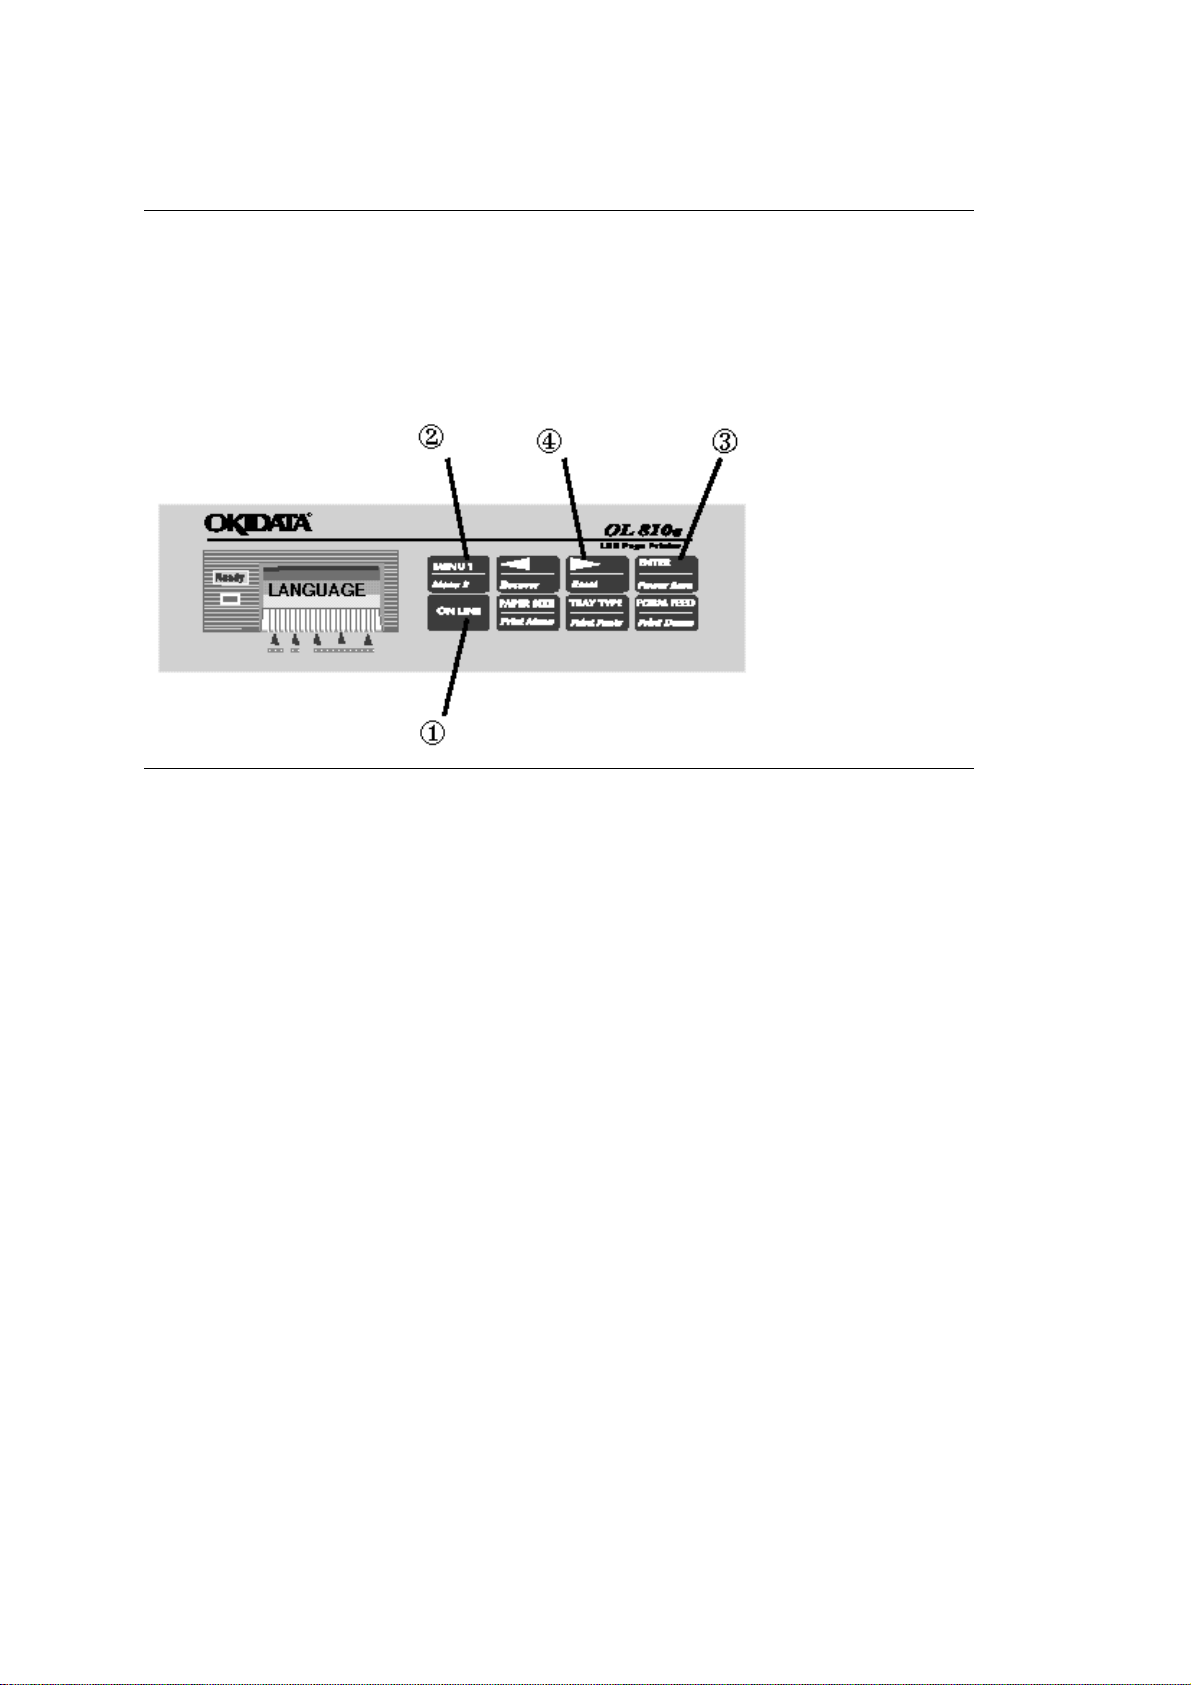
Changing the Display Language
To change the language on the panel display and menu printout:
Press ON-LINE (1) until the READY light goes out. Press and hold MENU1/Menu2 (2) until
MODE
ENTER/Power Save
until the language you want appears. Press ENTER/Power Save
displays. Press MENU1/Menu2
(3). The display now reads
(2) 10 times until the display reads
LANGUAGE ENGLISH*
(3). Press ON-LINE (1).
LANGUAGE.
. Press©/Reset (4)
PRINT
Press
Page 19
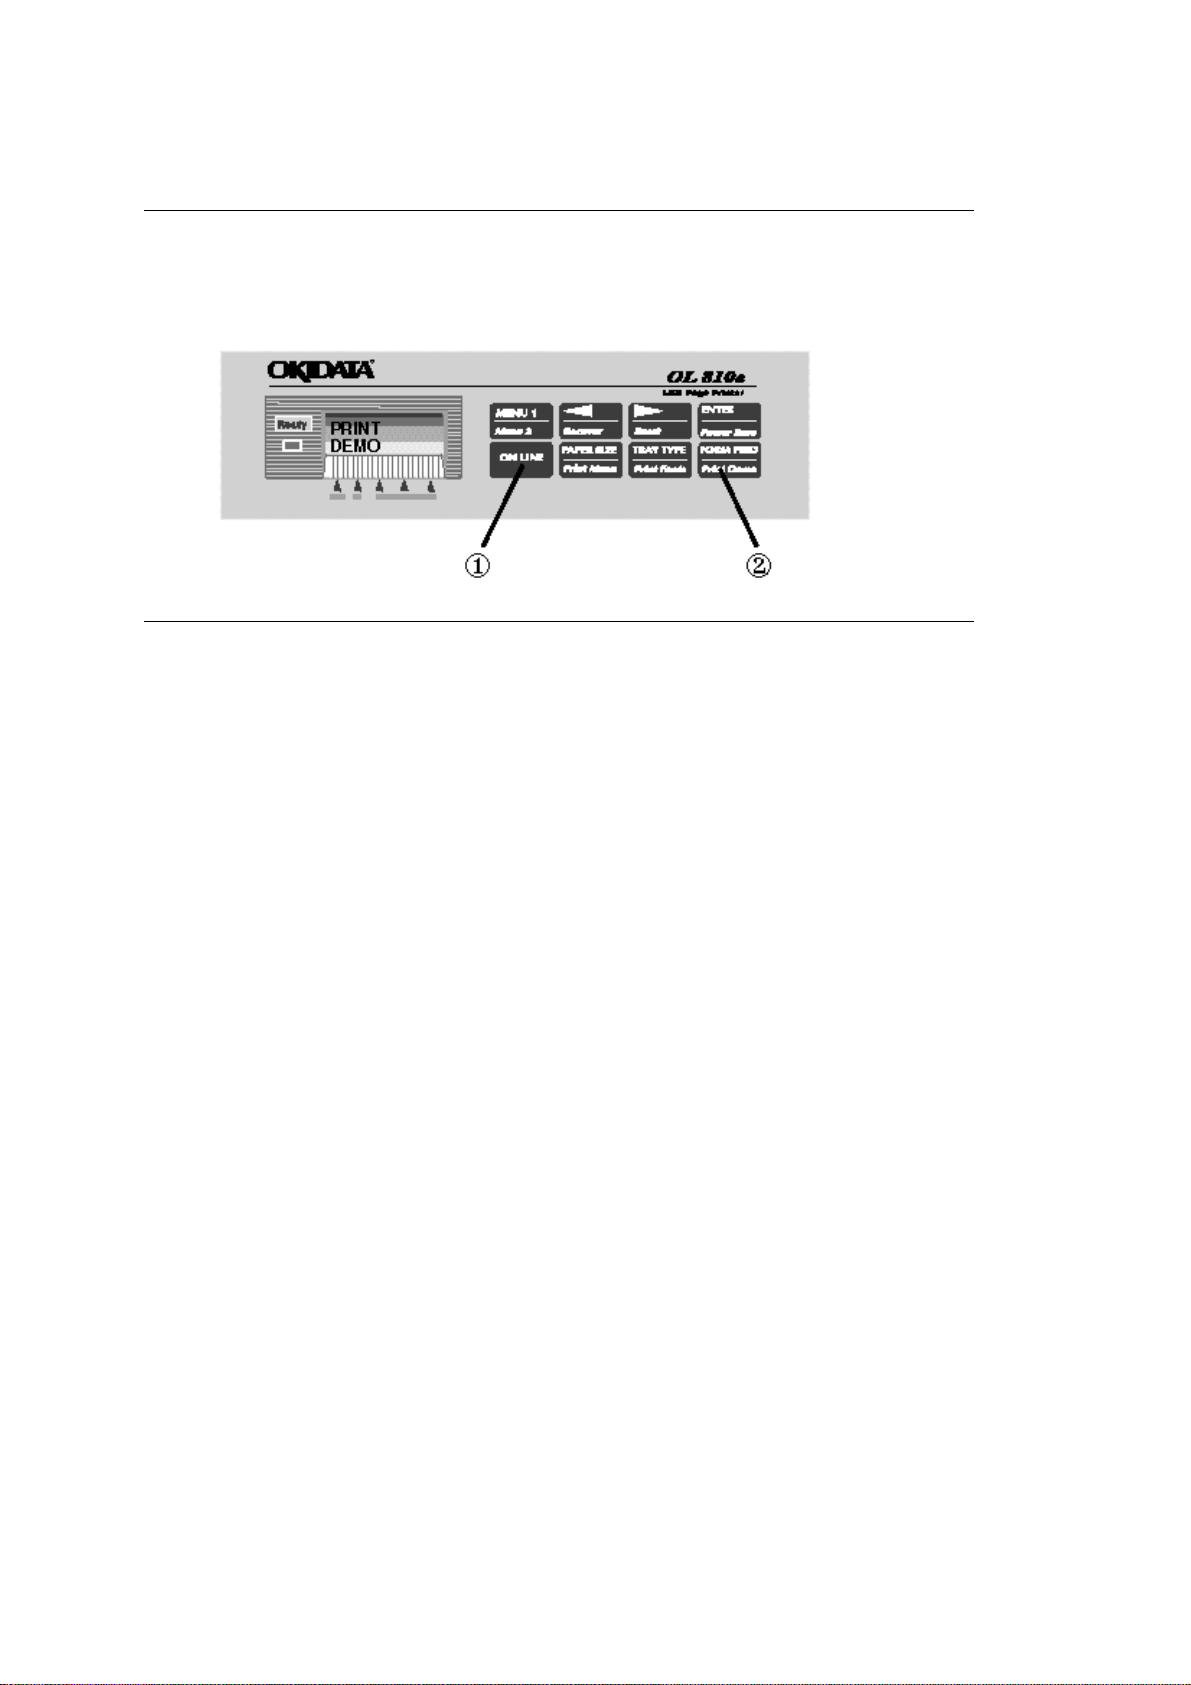
Printing a Demo Page
Printing a Demo Page
Press ON-LINE (1) until the READY light goes out. Press FORM FEED/PRINT DEMO (2) and hold until
PRINT DEMO
appears. The Demo pages will print.
Page 20

Interfacing with your Computer
Interfacing with your Computer
Your printer has both a high-speed, bi-directional parallel interface port and a RS232C serial interface
port. Which you use depends on your system and your needs. Your dealer can suggest the appropriate
cable.
To comply with FCC regulations, the cable must be
PC manual for details on cable requirements and interface ports on your computer.
See Appendix B (
) for information on using the RS232C serial interface.
shielded and UL and CSA approved. Consult your
Page 21
Connecting the Cable
Connecting the Cable
Make sure the printer and computer are off (1). Insert the printer end of the cable firmly into the
proper connector on the back of the printer (parallel, 2; serial, 3). Fasten the cable to the printer
securely. Connect the other end of the cable to the proper connector on your computer. Fasten
the cable securely to your computer.
Page 22

Automatic Interface Switching
Automatic Interface Switching
Your printer automatically detects which port is sending data and activates that interface. This means that
in most cases you don't have to do anything to set up the interface. Usually the default interface settings
wont need any changes.
Be sure to test the interface, especially if you're using the serial interface. If you have problems,
check the interface settings on your printers menu against the requirements in your computer manual.
See Using the Menus for information on how to reconfigure the interfaces using Menu 2(
).
Page 23
Chapter 2
The Ready Light
Operating your Printer
The Ready Light
On
Off
Blinking
Means
Printer is on-line, ready to
receive data; button
functions inactive (except
for ON-LINE).
Printer is off-line, cannot
receive data; button
functions active.
Printer is receiving data.
Page 24

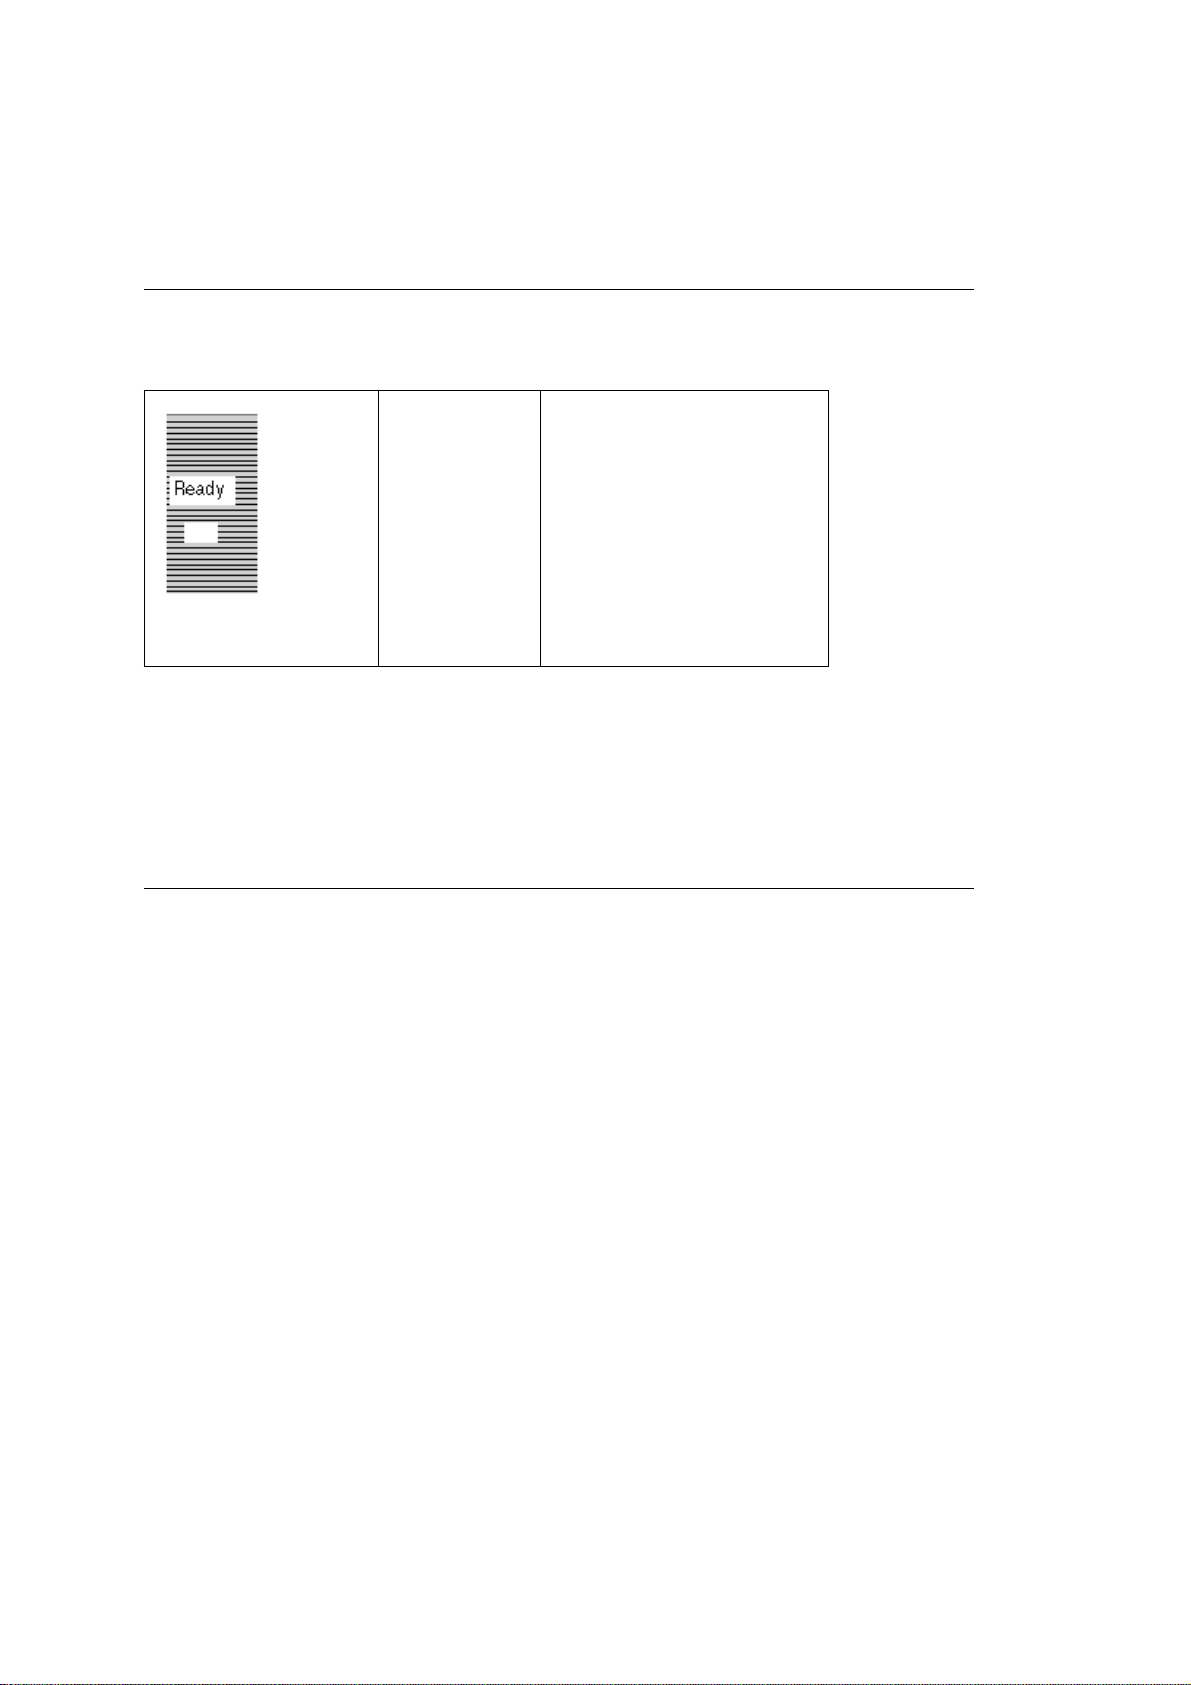
The Display Window
The Display Window
It tells you
- What the printer is doing during normal operation.
- When you need to add paper or change consumables.
- When there's something wrong with the printer.
See Problem Solving for a list of display messages (
).
Page 25
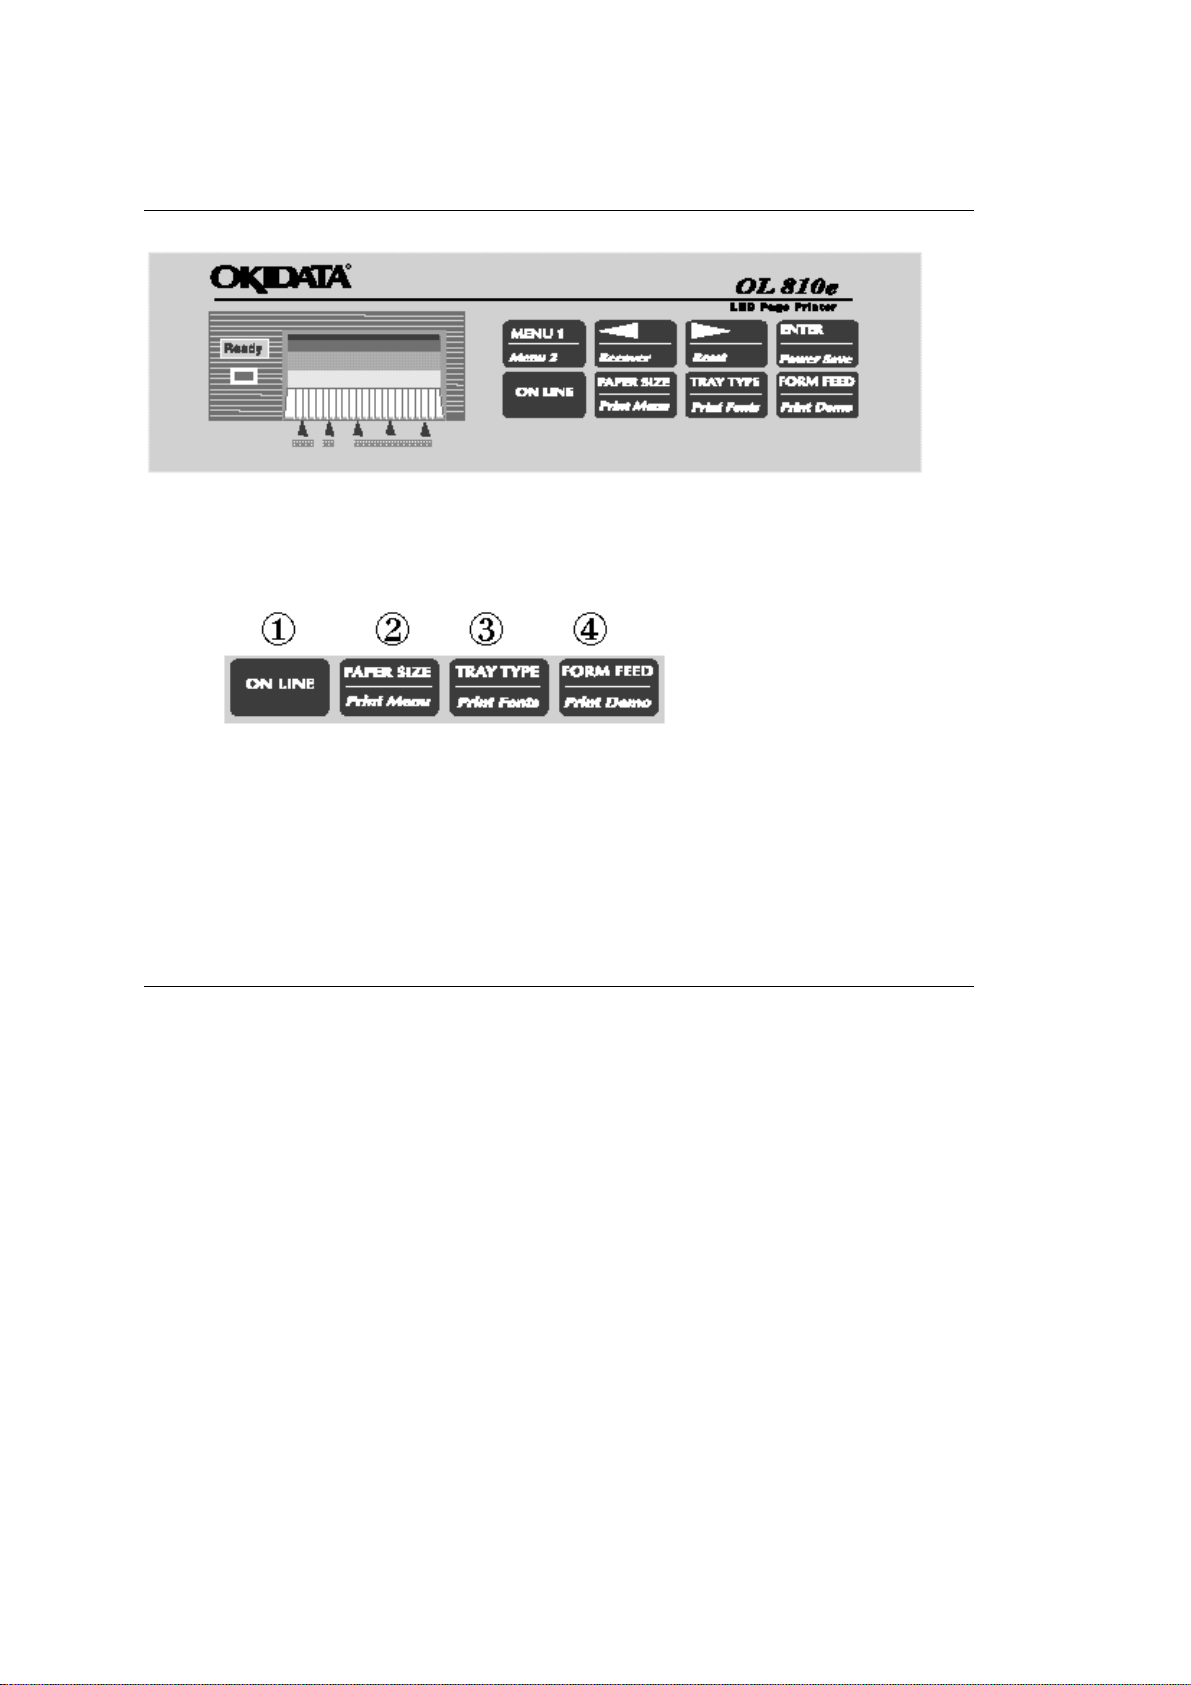
The Buttons
The Buttons
The buttons on the bottom row are described here. The buttons on the top row control the
printer menus; they will be described in "Using the Menus".
Except for the ON-LINE button, all of the buttons function only when the printer is off-line.
# 1)
# 2)
Printer Menu settings.
# 3)
of all resident, card, and soft fonts present.
# 4)
demo pages of printer features.
Press to switch printer between on-line/off-line state. Press to end menu session.
Press to enter the Paper Size Quick Menu. Press and hold to print the current
Press to enter the Tray Type Quick Menu. Press and hold to print a sample page
Press to print remaining data in buffer and eject a page. Press and hold to print the
Page 26

Using the Menus
Using the Menus
The printer menus let you change the settings for a number of the printers features. When you
change a printer menu setting, it becomes the default until you change it again. Your selections
stay in memory even when you turn off the printer.
If your software can control a feature that is also controlled in a printer menu, the software will
override the menu setting. Use your software to control printer features whenever possible. Many
of the features in Menu 1 can usually be controlled by software.
Page 27

Printing the Menu
Printing the Menu
Press ON-LINE to take the printer off-line.
Press and hold PAPER SIZE/Print Menu.
The printout includes:
- Menu 1 selections
- Menu 2 selections
- Factory default settings
- The current settings.
Page 28

Resetting Menus to Factory Settings
Resetting Menus to Factory Settings
The menus can be reset to the factory (default) settings in the Maintenance Menu.
See the instructions on entering the Maintenance Menu (
).
Page 29

Clearing the Buffer
Clearing the Buffer
If a selection is made from a menu while there is data in the buffer that has not yet been printed, or
while a DLL/Macro is present, the RESET TO SAVE message displays prompting you to press
the © /Reset button. All data in the buffer and any temporary soft fonts or macros will be cleared.
Page 30

The Printer Menus - Quick Menus
The Printer Menus - Quick Menus
Quick Menus allow direct access to three often-used features:
- Power Save
- Paper Size
- Tray Type
Accessing a Quick Menu
1. Press ON-LINE to place printer off-line.
2. Press button indicating the feature you want. Feature will display in the window.
3. Press --> /Reset repeatedly to see options.
4. Press ENTER to select option as the default.
5. Press ON-LINE to exit menu.
Quick Menu Settings
Factory default settings are shown in
Press this Button Item Options
ENTER/Power Save
(hold for 2 seconds)
PAPER SIZE/Print
Menu
PWR SAVE
TRAY 1
TRAY 2
(
Press
bold italic
Appears if installed
MENU
to see this
.
item)
MANUAL
(
Press
MENU
item
)
FEEDER
installed (Press
to see this
Appears if
MENU
to
see this item)
TRAY TYPE/Print
Fonts
MANUAL
0 SEC
, 8 MIN, DISABLE
LETTER
13 , A4 SIZE, A5 SIZE, A6 SIZE,
B5 SIZE
LETTER
13, A4 SIZE, A5 SIZE, A6 SIZE, B5
SIZE
LETTER
13, A4 SIZE, A5 SIZE, A6 SIZE, B5
SIZE, COM-9,COM-10, MONARCH,
DL ENV, C5 ENV
COM-10
ENV, C5 ENV, LETTER, EXEC,
LEGAL 14, LEGAL 13, A4 SIZE, A5
SIZE, A6 SIZE, B5 SIZE
OFF
, EXEC, LEGAL 14, LEGAL
, EXEC, LEGAL 14, LEGAL
, EXEC, LEGAL 14, LEGAL
, COM-9, MONARCH, DL
, ON
PAPER IN
(Press
MENU
to see this
item)
AUTOTRAY
Appears if
TRAY 2 is installed
(Press
item
MENU
)
to see this
TRAY1
FEEDER
OFF
,TRAY 2
, ON
if installed
if installed
,
Page 31

Page 32
Accessing & Menu 1 Settings
Accessing Menu 1
1. Press ON-LINE to take the printer off-line.
2. Press MENU 1 repeatedly to move through the categories. They appear on the display.
3. Press ENTER to pick a category (the default option displays).
4. Press <-- /Recover
5. Press ENTER to select your optionan asterisk (*) marks it as the default.
6. Press MENU 1 to see the next item in a category or move to the next category.
7. Press ON-LINE to leave the menu.
Menu 1 Settings
Factory default settings are shown in
Category Items Options Explanation
or --> /Reset to see more options. Stop at the one you want.
bold italic.
PRINTER
LANGUAGE
TRAY SELECT MANUAL
EMULATE
PAPER IN
AUTOTRAY
if tray 2 installed
EDIT SIZE EDT SIZE
Appears
HP4
OFF,
ON Select manual feed.
TRAY 1
TRAY 2
installed
FEEDER
Appears if
Appears if
Select paper tray.
Select.second paper
tray.
Select feeder.
installed
OFF,
ON Set On, printer will
switch to second
tray when first tray is
empty.
CASSETT,
EXEC, LEGAL 14,
LEGAL 13, A4 SIZE,
A5 SIZE, A6 SIZE, B5
SIZE, COM-9,
CON-10, MONARCH,
DL ENV, C5 ENV
LETTER,
Cassett=Paper size
in tray is identified by
paper sensors.
Eliminates having to
select paper size
manually.
PAPER SIZE TRAY 1 Select tray 1 paper
size.
LETTER
EXEC 7.25" X 10.5"
8.5" X 11"
Page 33
LEGAL 14 8.5" X 14"
LEGAL 13 8.5" X 13"
A4 SIZE 210 mm 297 mm
A5 SIZE 148 mm 210 mm
A6 SIZE 105 mm X 148 mm
B5 SIZE 176 mm X 250 mm
TRAY 2
installed
MANUAL
Appears if
LETTER
LEGAL 14, LEGAL 13,
A4 SIZE, A5 SIZE, A6
SIZE, B5 SIZE,
LETTER
LEGAL 14, LEGAL 13,
A4 SIZE, A5 SIZE, A6
SIZE, B5 SIZE
COM-9 3.875 X 8.875
COM-10 4.12" X 9.50"
MONARCH 3.87" X 7.50"
DL ENV 110 mm X 220 mm
C5 ENV 162 X 229 mm
, EXEC,
, EXEC,
Select paper size in
tray 2 if installed.
Select paper size for
manual feed.
Envelope
Envelope
Envelope
FEEDER
Appears if
installed
Category Items Options Explanation
COM-10,
MONARCH, DL ENV,
C5 ENV,
EXEC, LEGAL 14,
LEGAL 13, A4 SIZE,
A5 SIZE, A6 SIZE, B5
SIZE
COM-9
LETTER,
,
Select
envelope/paper size
in feeder.
Page 34

MEDIA TYPE TRAY 1MANUAL
TRAY 2
Appears if
installed
FEEDER
Appears if
installed
MEDIUM,
HEAVY, LIGHT, M.
LIGHT
M. HEAVY,
Specify paper weight
to improve
quality/toner fusing.
MEDIUM=20 lb
smoothM.
HEAVY=24-28 lb
smooth or textured
HEAVY=32 lb labels,
transparencies
LIGHT=16 lb
M. LIGHT=18 lb
PAPER SIZE
CHK
COPIES
FONTS &
SYMBOLS
SIZE CHK
FONT SRC
FONT NO.
ENABLE,
1
to 999 Select copies to print
RESDENT
DISABLE ENABLE=Paper size
selected in Software
must match size in
tray.
DISABLE=Printer
accepts any paper
size selected in
software.
for each document.
, CARD
Select font source
Appears if installed,
DLLSOFT
Appears if
loaded
I000
to I046 Select font by ID
number (see font
print sample). Prefix
indicates font
source: I=internal
(resident);
C=card; S=soft font.
.
FONT CPI
Appears if
selected font is
scalable/fixed spaced
10.00,
0.44 to 99.99
Adjust in .01 point
increments.
Select number of
characters printed in
a horizontal inch
(pitch) when
scalable font with
fixed
spacing is selected.
(72 points= 1 inch).
Character height
(point size) adjusts
accordingly.
Page 35
FONT HGT
Appears
if selected font is
scalable/proportional
spaced
12.00,
Adjust in .25 point
increments.
4.00 to 999.75
Select point size
(height) of
characters when
scalable font
with proportional
spacing is selected.
(72 points= 1 inch).
Horizontal spacing
adjusts accordingly.
SYMBOL
PAGE LAYOUT1 A4 WIDTH
BLNKSKIP
PAGE LAYOUT2 ORIENT
LINES/PG
ROMAN-8
Select Symbol Set.
60 sets are available.
78 COL
OFF
PORTRT
60 LNS
, 80 COL Use for A4 size
paper to select 78
columns or
condense 80
columns to fit
characters on a line.
, ON ON= printer will
ignore FF code
when buffer is
empty.
(Sometimes
software will print an
extra
blank page.)
, LANDSCP Select page
orientation.
, 5 to 128 LNS Select lines per
page.
HOST I/F
AUTO I/F
RS232C
, PARALLEL,
Select active
interface.
Page 36
Accessing & Menu 2 Settings
Accessing Menu 2
Choose options the same way as Menu 1. To enter Menu 2, press and hold
MENU 1/Menu 2 for 2 seconds.
Menu 2 Settings
bold italic
Factory default settings are shown in
Category Items Options Explanation
.
PRINT MODE MODE
MEMORY
USAGE
RST BUF
REC BUFF
FONT PROT
FREE MEM XXXXXKB Displays memory area available for
600 DPI,
DPI
v1200 DPI
AUTO,
360KB, 720KB,
1.08KB, 1.44KB
AUTO
20KB, 50KB,
100KB, 1MB
AUTO
100 KB to
1.1MB
300
180KB,
, 8KB,
, OFF,
Select print mode.
Reserves area in memory for page
size ; reduces print overuns.
Select amount of memory devoted
to holding received data; larger
setting
improves computer return to
application time.
Reserves a section of memory for
downloading fonts; improves printing
speed by saving previously created
fonts. Will take memory away from
total print buffer and REC BUFF.
downloading fonts. Reduce
RSTBUF/RECBUFF to increase free
area.
AUTO
OPERATION
AUTOCONT
OFF
, ON ON, software or data error will
cause printer to display error
message then continue to print; Set
OFF, printer will stop printing; press
RECOVER to continue.
Page 37
AUTOEJCT
OFF
, 1 SEC to
300 SEC
in 1
SEC
increments
When set to other than Off: if printer
doesn't receive data within the set
time, current page will print and
eject. Meant for use with software
that
doesn't issue Form Feed command
at end of last page. Set OFF, printer
won't print last page without a Form
Feed.
DARKNESS
CONTROL
POWER
SAVING
LOW TONER LOW TNR
DARKNESS
PWR SAVE
0
+1, +2, -2, -1 Control print density. Negative
,
values lighten, positive values
darken.
0 SEC
, 8 MIN,
DISABLE
ON
, OFF ON=When low toner is detected,
0 SEC=Reduces power
consumption at end of receive time.
8 MIN=Reduces power consumption
8 minutes after printer stops
receiving data, fuser heating
element shuts off; 30 seconds later
fan shuts
off. When printer receives data,
fuser
warms up before printing begins.
DISABLE=Fuser and fan are always
on, printer is ready to print at all
times.
TONER LOW displays, 100 more
sheets print; TONER EMPTY
displays, printing stops.
OFF=When low toner is detected,
TONER EMPTY displays, printing
stops. Install new toner cartridge to
resume printing.
TONER
SAVING
Category Items Options Explanation
TNR SAVE
DISABLE,
MEDIUM,
LIGHT
Use this feature to conserve toner
and reduce printing costs when
you are printing rough drafts or
proof copies.
Medium reduces toner by 30%,
light reduces toner by 50%.
Page 38
CLEARABLE
WARNINGS
CLR WRNG
ON
, JOB Warning message appears when
printer must reconfigure memory to
select most efficient way to print a
complex job.
ON=Message displays, press
RECOVER to clear.
OFF=Message clears when next
print job is received.
PARALLEL I/F SPEED
BI-DIRCT
I-PRIME
RS232C
SERIAL
FLOW CTL
BAUDRATE
HIGH
, MEDIUM HIGH=Data transfer speed
maximized.
MEDIUM=Select if data
transmission problems occur, or with
earlier
computers.
ENABLE
DISABLE
OFF
DTR HI
LO, XONXOFF,
RbstXON
9600
300, 600, 1200,
2400, 4800
,
, ON ON=I-Prime signal resets printer.
DTR
,
, 19200,
ENABLE=Select bi-directional
parallel communication.
Set
OFF, or if HOST I/F is set to AUTO
IF, printer ignores signal.
Select serial protocol.
Select transmission rate in bits per
second (bps).
DATABITS
PARITY
MIN BUSY
8 BITS
NONE
ODD
7 BITS Select serial interface data bit
,
, EVEN,
200 mSEC
SEC
,
1
format.
Select serial interface parity type.
Set length of busy signal when
Ready/Busy (DTR) protocol is
selected.
Page 39

LANGUAGE
ENGLISH
DEUTSCH
FRANCIS
ITALIAN
CASTLAN
SVENSKA
NORSK
DANSK
NEDERL
TURKCE
PORTUG
POLSKI
Select language displayed.
German
French
Italian
Spanish
Swedish
Norwegian
Danish
Dutch
Turkish
Portuguese
Polish
Page 40

Accessing & the Maintenance Menu Settings
Accessing the Maintenance Menu
Turn off the printer.
1. Press and hold MENU 1/Menu 2 and turn on the printer. USER MNT will display.
2. Press MENU 1/Menu 2
3. Press ENTER to invoke a function; or © /Reset
4. WARM UP will display briefly, then the printer will go on-line.
Maintenance Menu Settings
Category Function
MENU RESET Reset Level 1 menu to factory defaults.
HEX DUMP Print a hex dump of received data for diagnostics.To exit
DRUM CNT RESET Reset drum counter after replacing image drum cartridge.
repeatedly to move through the categories.
to see options, then press ENTER to select.
hex dump mode, power off printer.
OP MENU Select DISABLE to disable all control panel buttons
except ON-LINE.
X ADJUST Adjust horizontal print position in 0.25 mm increments;
+2.0
mm to -2.0 mm. Plus (+) indicates right movement, minus
(-) indicates left movement. Press ߧ /Recover or
© /Reset repeatedly to see options.
Y ADJUST Adjust vertical print position in 0.25 mm increments; +2.0
mm to -2.0 mm. Plus (+) indicates downward movement,
minus (-) indicates upward movement.
To leave the Maintenance Menu without making changes, press ON-LINE.
Page 41

When to Use Manual Feed
When to Use Manual Feed
Use manual feed to print:
- Paper heavier than 28 lbs.
- Envelopes
- Labels
- Transparencies
- Something you dont have in the tray, like a letterhead page
Its easiest to control manual feed through your software. You can also use the printer menu.
Page 42

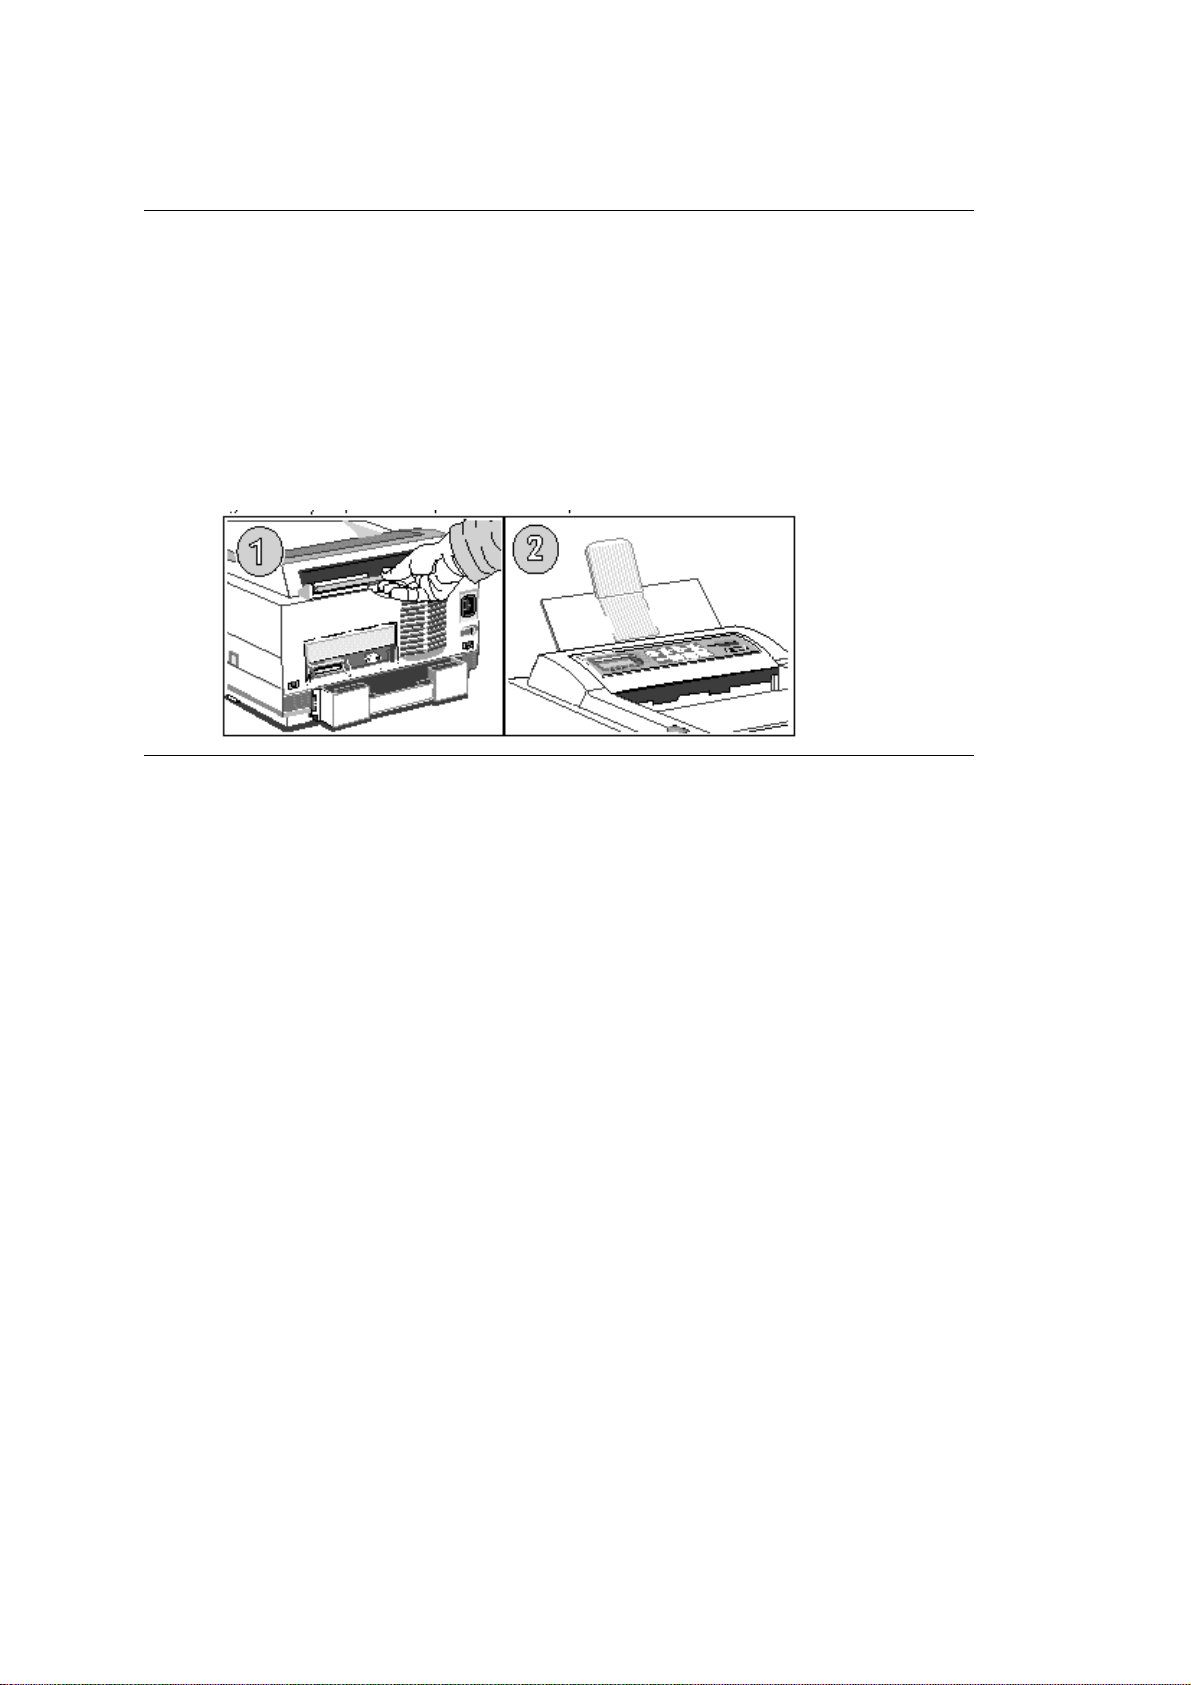
Using Manual Feed
Using Manual Feed
Set manual feed and paper size in your software. Pull down the manual feed tray. (1,2).
Adjust the guides (3). Insert a sheet (letterhead in first, facing up) until the printer grips it (4).
Issue the print command in your software.
Page 43

Selecting Envelopes
Selecting Envelopes
- No windows, metal clasps, or snaps they can damage the image drum.
- Paper no heavier than 28 lb.
- Sturdy construction.
- Smooth, even surface.
- Seams down the sides,not across the middle.
- Squared-off flaps that dont cover the print area.
- No self-sealing flaps.
Always use rear output when printing envelopes, transparencies, and adhesive labels.
Page 44

Printing Envelopes
Printing Envelopes
Set envelope size and landscape orientation in your software. Pull out the rear exit extender
until it locks (1). Lift out the support bar (2). Pull the manual feed tray down (3,4). Adjust the
guides (5). Insert the envelope
print command to your software.
flap down and to the left
until the printer grips (6). Issue the
Page 45

Transparencies and Adhesive Labels
Transparencies and Adhesive Labels
- Should be specifically made for laser printers or photocopiers.
- Must be able to withstand heat of 200°C for 0.1 second.
- Labels should cover the entire carrier sheetcarrier and adhesive must not be
exposed to any part of the printer.
- Use manual feed see the beginning of this chapter (
- Use rear paper output see Printing Envelopes (
).
).
Page 46

What is a Font?
What is a Font?
A font is a set of letters and other characters with a common design and style. The OL810e has resident
scalable fonts, which you can print in any size from 4 points to 999.75 points. It also has the bitmapped
Line Printer font, and the USPS Zip barcode font.
Page 47

Printing a Font Page
Printing a Font Page
1. Press ON-LINE to take printer off-line.
2. Press and hold TRAY TYPE/Print Fonts until PRINT FONTS displays.
3. The font page prints.
Page 48

Whats on the Font Page
Whats on the Font Page
The font page prints samples of every resident, card, and soft font in the printer. It also gives the
following information about each font:
- Font No.(Font ID): Use this number to select fonts in the printer menu.
- Font Name: The name of the font or typeface.
- Style: Upright or italic.Weight: Medium or bold.
- Pitch (CPI): Fixed or Proportional characters per inch.
- Point Size: Height for bitmapped; Scale = scalable fonts.
Page 49

Selecting Fonts in Your Software
Selecting Fonts in Your Software
The easiest way to select fonts is through your software program. Your software can send a printer
command that consists of a set of codes, one for each of the font characteristics. If your software
has the appropriate driver, you can specify the font you want, and it will send the necessary
commands to the printer. For detailed information on how to select fonts in your software package,
refer to your software documentation.
Page 50
Font Cards
Font Cards
These options add bitmapped fonts without taking up memory. Simply
turn off the printer and insert the card into the slot with the label facing
the inside of the printer. Then select Font Card in your
software printer driver see your software documentation for details.
Available cards:
OKIPRO II
ProCollection cartridge.
Bar Codes Plus II
characters, and Letter Gothic in three sizes; equivalent to HP Bar Codes & More cartridge.
MICRO DOCS II
San Marcos and Temple; equivalent to HP Microsoft Z1A cartridge.
Tax II
cartridge T.
(PN 70026501) Letter Gothic, Prestige, and San Marcos; equivalent to HP
(PN 70026201) Code 3 0f 9, EAN/UPC, USPS, OCR-A, OCR-B, line draw
(PN 70026401)
(PN 70026301) additional Swiss and Line Draw fonts for tax forms; equivalent to HP
Page 51

Soft Fonts
Soft Fonts
Downloaded fonts, also known as soft fonts, must first be created using a software package such
as Bitstream
®
Fontware, and are then downloaded to the printers memory. If your software
package supports soft fonts, theyre engaged just like resident or card fonts. Soft fonts are
removed from memory when the printer is turned off.
Remember that downloading fonts takes time and consumes printer memory. If you have
problems with insufficient printer memory, consider adding more memory. To compensate for
occasional problems, try switching to a smaller font, or remove fonts you are not presently using
from memory.
Page 52

Chapter 3
Maintaining Your Printer
Maintaining Your Printer
This chapater contains the following:
Toner Cartridge Life ....................................... ( )
When to Replace the Toner Cartridge ............... (
Image Drum Cartridge Life .............................. (
When to Replace the Image Drum Cartridge ..... (
Using a Cleaning Page ................................... (
)
)
)
)
Page 53

Toner Cartridge Life
Toner Cartridge Life
How long your toner cartridge lasts depends on the print density, the percentage of the page that
prints black.
- A typical letter has 3% to 5% print density, graphics usually have higher density.
- Higher print density means toner is used up faster.
- At 5% print density, a toner cartridge will print an average of 2,000 pages. Remember,
this is only an average actual results may vary.
The first toner cartridge in your new printer has to fill the drum reservoir and saturate the
developing roller with toner. Its normal that the first cartridge will produce about 1,000 pages.
Page 54

When to Replace the Toner Cartridge
When to Replace the Toner Cartridge
Replace the toner cartridge after TONER LOW displays in the control panel window. After TONER LOW
displays, the printer will print 100 more sheets, then display TONER EMPTY and stop
printing. Printing will resume when a new toner cartridge is installed.
Instructions for installing the new toner cartridge are included in the toner cartridge kit (Part Number
52107201).
Drum and Toner are consumables and as such are subject to a 90-day warranty.
Page 55

Image Drum Cartridge Life
Image Drum Cartridge Life
The life of an image drum depends on a number of factors, including temperature and humidity,
the type of paper you use, and the number of pages per job.
The image drum cartridge should last about 12,000 pages at one page per job,16,000 pages at
three pages per job, 18,000 pages at seven pages per job and 20,000 pages at fifteen pages per
job. These numbers are approximate since you wont print the same number of pages each time,
and environmental conditions and paper type used may vary.
Page 56

When to Replace the Image Drum Cartridge
When to Replace the Image Drum Cartridge
When the drum reaches 90% of its life, the CHG DRUM message displays. At this point, be sure
you have a new drum on hand so you can replace the old one as soon as the print quality
becomes faint or starts to deteriorate.
Follow the instructions in the new image drum cartridge kit (Part Number 56116801) to install your
new image drum cartridge and reset the image drum counter.
Drum and Toner are consumables and as such are subject to a 90-day warranty.
Page 57
Using a Cleaning Page
Using a Cleaning Page
This process removes residual impurities from printing surfaces.
pages
(a blank sheet will not be produced). The cleaning page helps reduce print quality
problems, such as repeating marks, blotching, and shading.
Set the printer off-line. Press §/Recover and © /Reset simultaneously and hold for 2 seconds.
CLEANING, MANUAL LETTER REQUEST
the manual feed tray (1). Pull the tray down (2). Adjust the guides (3). Insert a clean sheet of 8½ x 11
paper (4). The printer pulls it in and
OFF-LINE
displays. Press ON-LINE.
PRINT CLEANING
displays. Press the front of the printer to release
displays. The cleaning page prints, then
It runs automatically every ten
Page 58

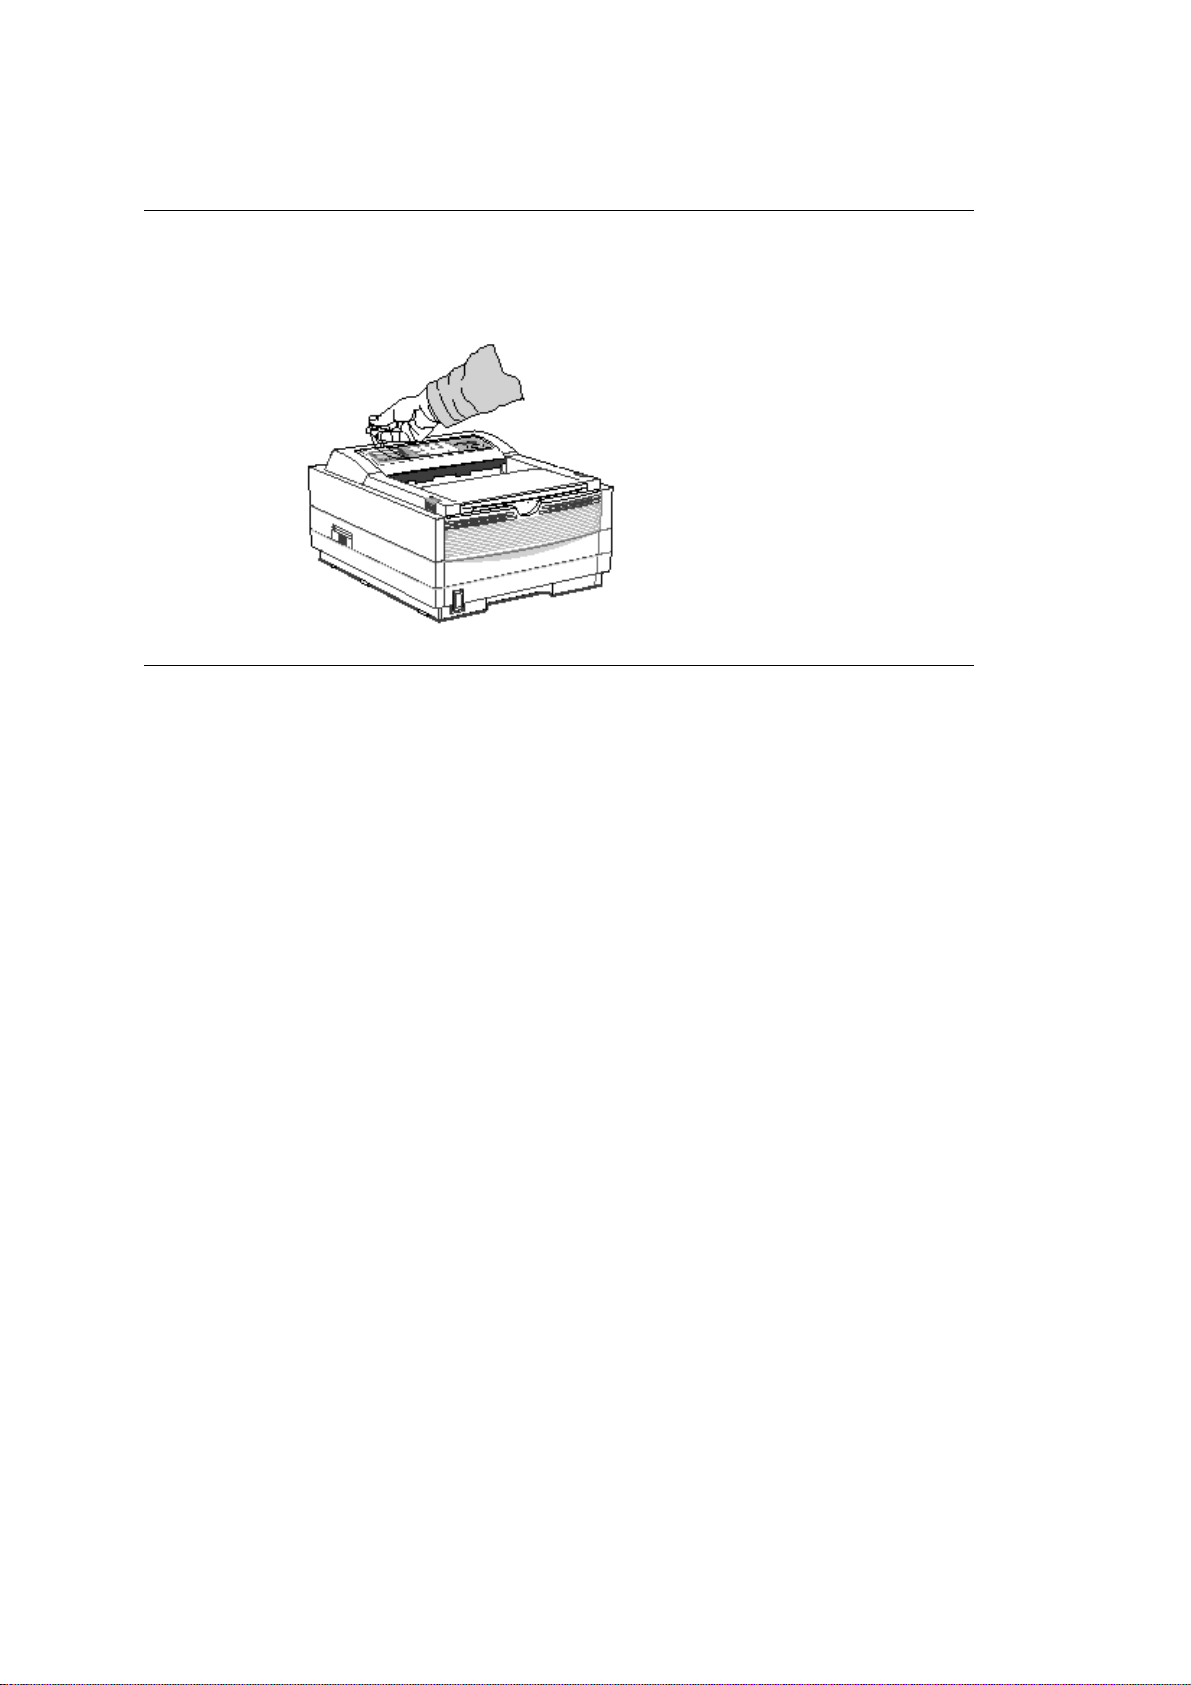
Cleaning the LED Array
Cleaning the LED Array
Clean the LED array each time you install a new toner cartridge, or if you have faded vertical areas or
light printing down a page.
The LED array is on the under side of the printer cover. Wipe it gently with the cleaning pad that came
with your toner cartridge. You can also use a clean, soft cloth with a small amount of rubbing alcohol on
it.
Page 59

Chapter 4
Problem Solving
{doclinks}
Page 60

Clearing Paper Jam Messages - Tray n Input Jam
Clearing Paper Jam Messages
TRAY n INPUT JAM
Slide the paper tray out of the printer (1). Remove the sheet that did not feed (2). Check the
remaining sheets to make sure theyre not wrinkled or stuck together. Replace the tray. Open and
close the cover to clear the message (3).
XXXX
Page 61

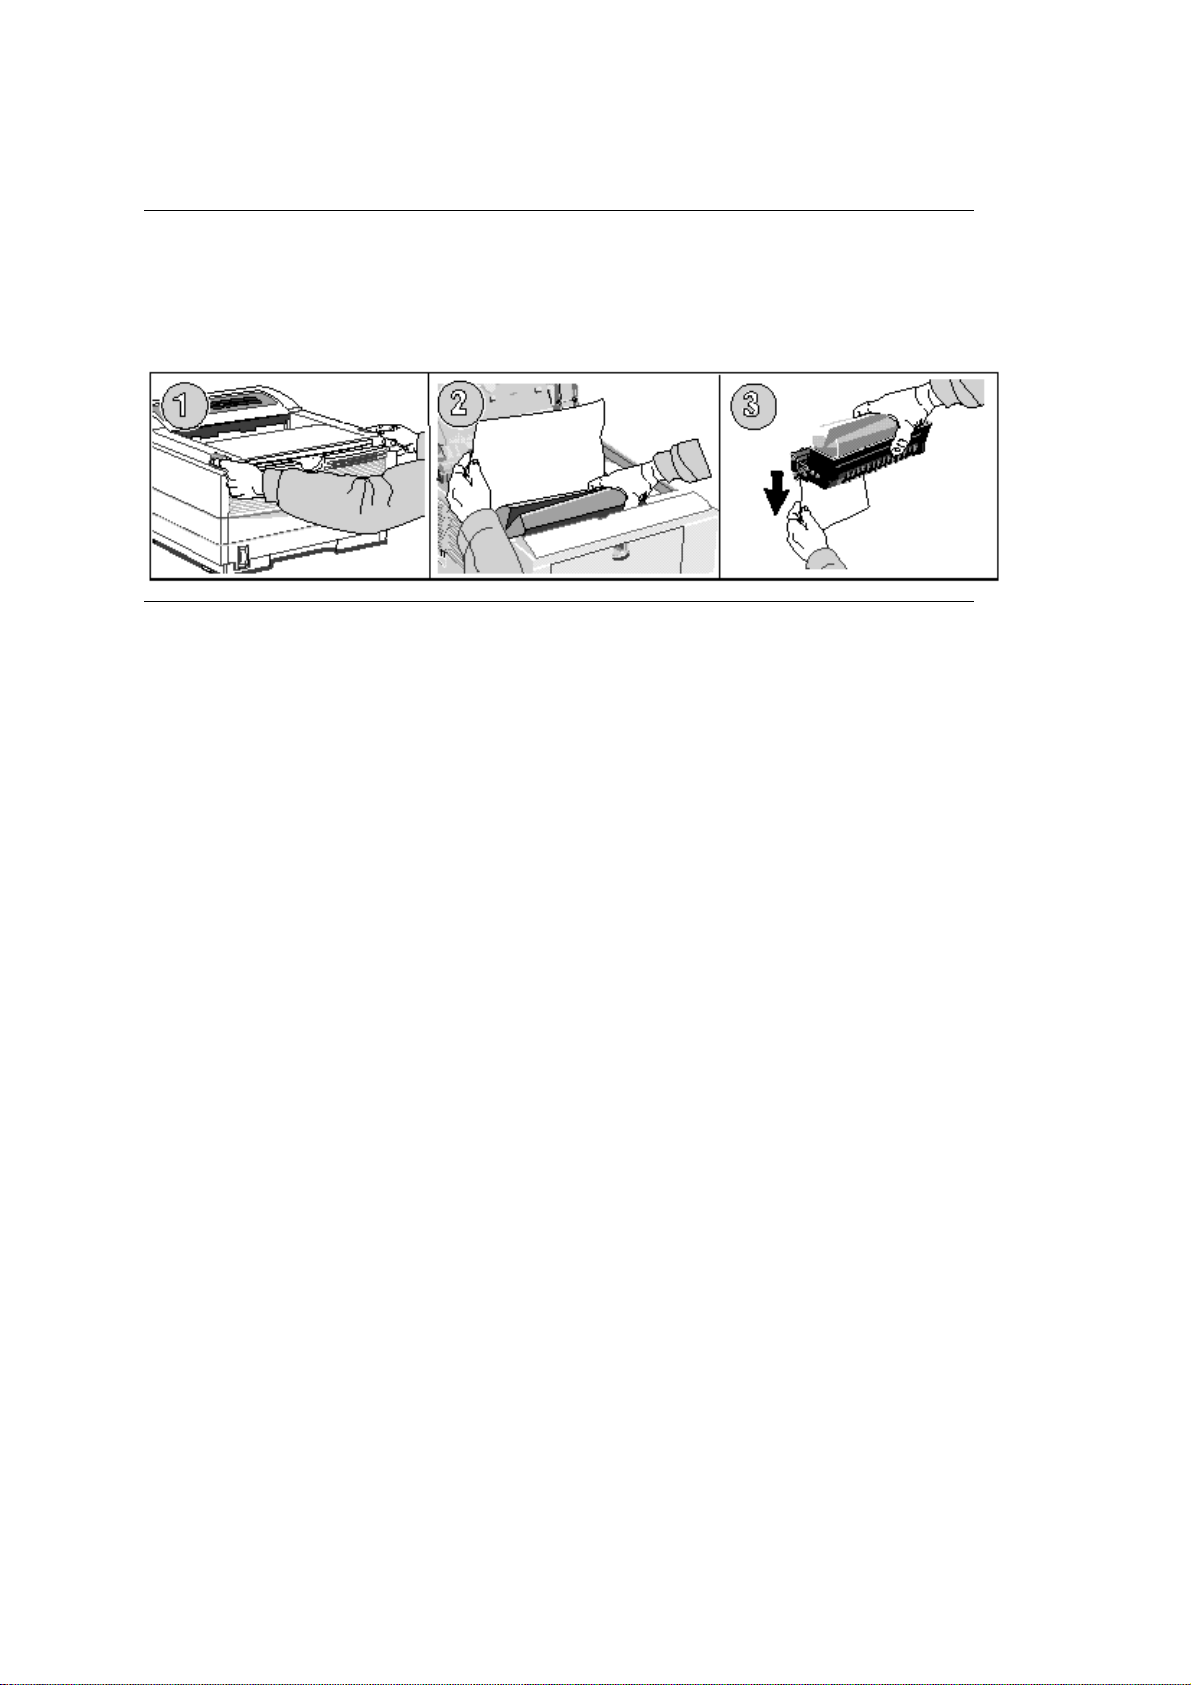
Tray n Feed Jam Or Paper Exit Jam (Top)
TRAY n FEED JAM or PAPER EXIT JAM (top)
Open the cover (1). Lift out the image drum (2). Be careful: the fuser unit at the back of the printer is
hot! Remove the jammed paper (3). Replace the image drum (4). Close the cover.
Page 62

Paper Exit Jam (Rear)
PAPER EXIT JAM (rear)
back
Lift the top cover (1). Pull the jammed paper out from the
front may damage the printer.
cleared and no pieces are left (3). Replace the image drum and close the cover (4).
Remove the image drum and look to make sure the paper is
of the printer (2). Pulling from the
Page 63

Repacking the Printer
Repacking the Printer
When shipping the printer, use the packing materials that came with it. Be sure to remove the
image drum cartridge with the toner cartridge (1). Put the image drum cartridge in the black bag
and store it in a dark place until your printer is returned (2).
toner cartridge in the printer may cause severe toner spillage.
Close the cover (3) and tape it shut (4). Remove and store the power cord and cables. Wrap the
printer in the plastic bag (5).
Put the four corner pieces in the box (6). Put the printer in the box and put the foam endcaps in
place (7). Close and tape the box (8).
Pack and ship any accessories separately in their own packages.
If the printer is shipped for service with the drum and toner installed, you may be assessed a
cleaning fee.
Shipping the printer with the drum and
Page 64
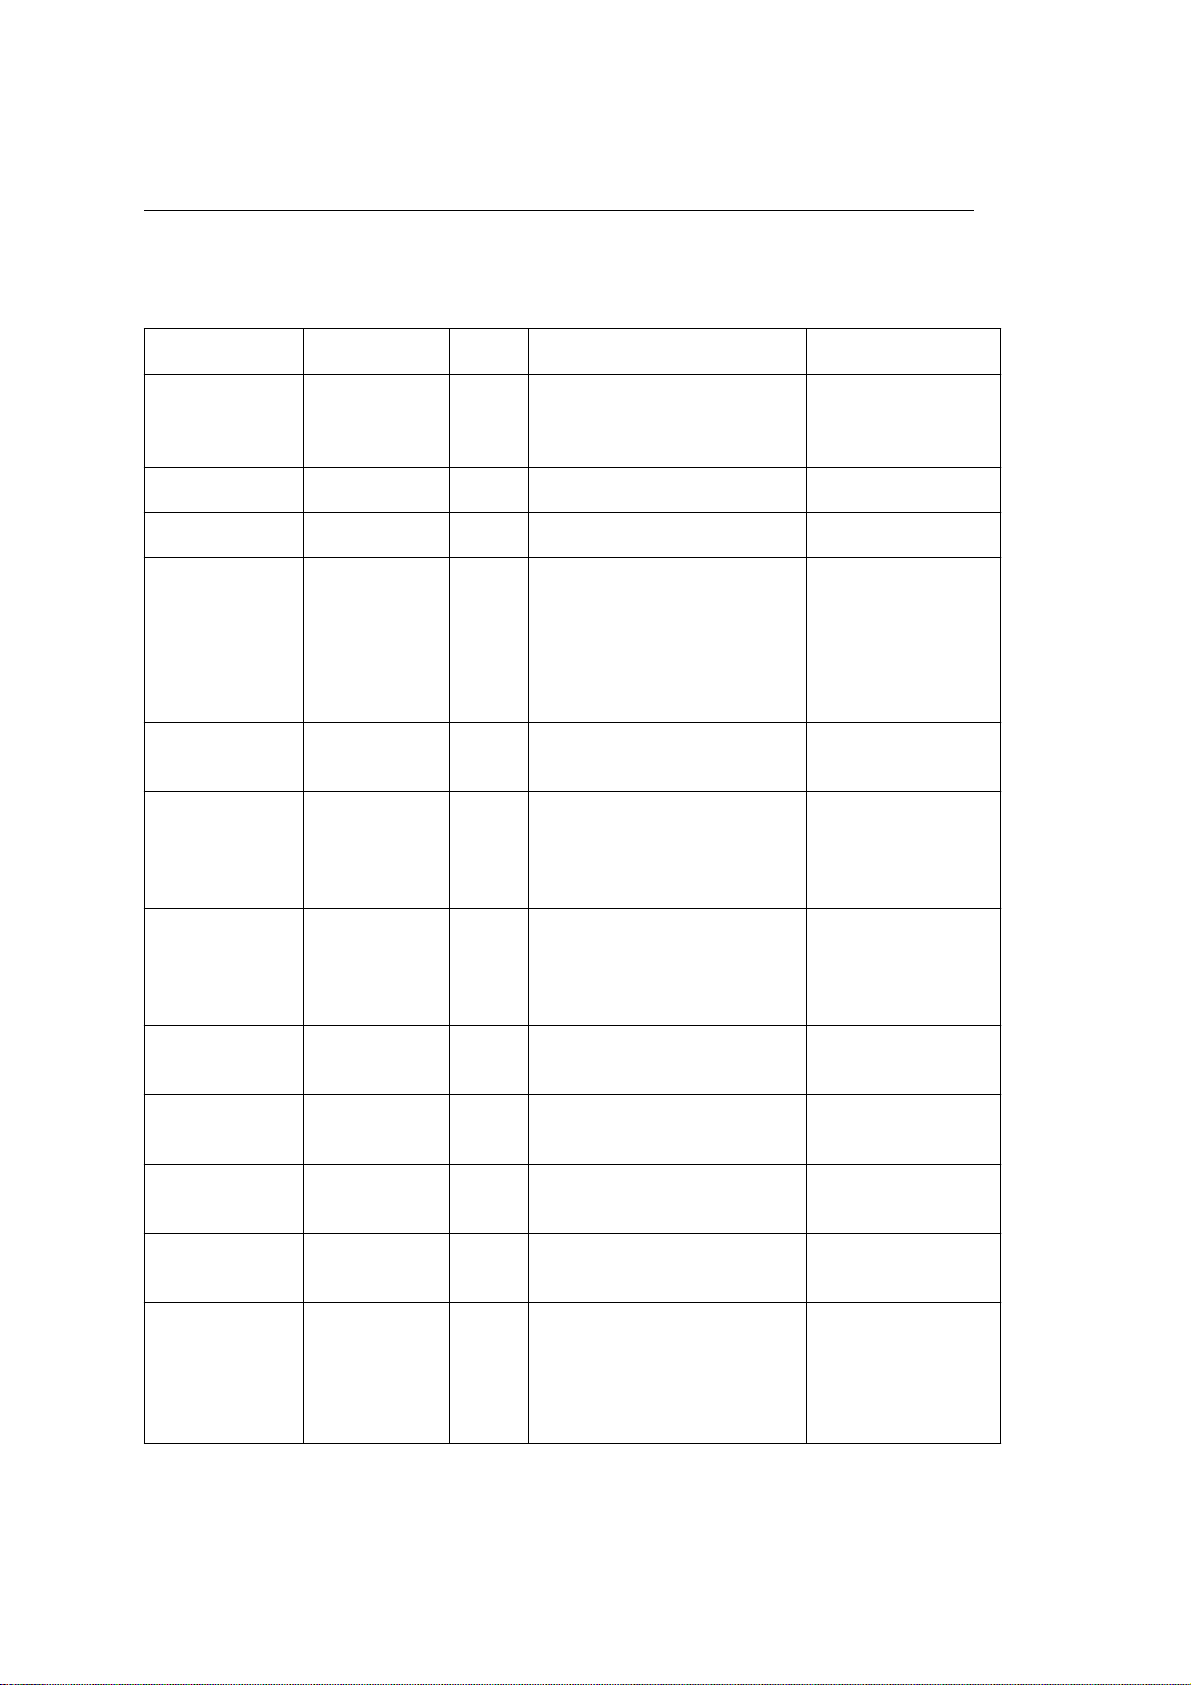
Printer Messages
Printer Messages
This table explains the messages that appear on the front panel display.
Category Message Lamp Explanation Action
System Status 88888888
88888888
INITIALIZING OFF Controller is being initialized. No action needed.
WARM UP ON Printer is warming up. No action needed.
ON-LINE
HP4*
ON-LINE
PWR SAVE
ON-LINE
HP4*
OFF-LINE
HP4*
DATA
HP4*
ON Displayed when power is
turned on. The lamp and
display light for 1 second.
ON Ready to receive data.
Second line alternates
between HP4* and PWR
SAVE when fuser and fan
are turned off by power save
function.
BLINKGoing Off-Line when
finished processing.
OFF Not on-line to receive data. Press ON-LINE to
ON Data remains in buffer. Press ON-LINE,
No action needed.
No action needed.
No action needed.
enable printer to
receive data.
No action needed.
FORM FEED,
ON-LINE to empty
buffer.
DATA
HP4*
PRINT
FONTS
PRINT
MENU
PRINT
DEMO
RESET OFF Data not yet printed is
BLINKData is being received. No action needed.
BLINKFont sample page prints. No action needed.
BLINKMenu page prints. No action needed.
BLINKDemo page prints. No action needed.
deleted from buffer, printer
initializes to user defaults.
Temporary DLL fonts are
deleted.
No action needed.
Page 65
RESET
TO SAVE
OFF Data or DLLs in buffer,
menu cannot be reset
automatically.
Press RESET
button to save
changes and exit
menu.
Maintenance
Menu Mode
CPYnn N/A Displayed when number of
copies is two or more, nn
indicates copies.
USER MTN OFF Maintenance Menu has
been accessed.
MENU
RESET
OFF Menu reset option has been
accessed.
HEX DUMP OFF Hex Dump option has been
accessed.
DRUM CNT
RESET
OFF Drum Counter Reset option
has been accessed.
No action needed.
Press MENU
button to see
categories.
Press ENTER to
reset Menus 1 & 2
to factory settings,
or press MENU to
see next category.
Press ENTER to
start hex dump of
received data, or
MENU for next
category. Power
OFF/ ON to exit
hex dump mode.
Press ENTER to
reset drum
counter, or press
MENU for next
category.
OP MENU OFF Control panel Enable/
Disable category accessed.
Change to Disable to
deactivate control panel;
Press NEXT + to
toggle
enable/disable then
press ENTER.
features can be controlled
only through software. To
reset, enter Maintenance
Menu.
Category Message Lamp Explanation Action
Cleaning/
Maintenance
xxxxx
TONER LOW
N/A Toner is running out.
Another message can
display on the first line.
Replace toner
cartridge when
print quality
deteriorates.
TONER SNS ON A fault occured in the toner
sensor; image drum
cartridge is not properly
installed.
Install/reinstall
image drum
cartridge. If not
cleared, contact
Service.
Page 66
xxxxx
CHG DRUM
N/A Drum near end of life.
Another message can
display on the first line.
Normal operations
continue. Replace
Image Drum
Cartridge when
print quality
deteriorates.
xxxxx
FUSER
COVER OFF Cover is open. Close cover.
PRINT
CLEANING
Paper Errors TRAY
PAPER
OUT
TRAY n
INPUT JAM
TRAY n
FEED JAM
PAPER
EXIT JAM n
N/A Fuser near end of life.
Another message can
display on the first line.
Normal operations
continue. When
print quality
deteriorates,
contact service to
replace fuser.
BLINKCleaning Page being
generated.
OFF Paper tray has run out of
See Cleaning Page
instructions (
Add paper.
paper.
OFF Paper jammed while being
supplied from the tray.
n=tray 1, 2.
See page 85 for
instructions(
OFF Paper jammed during
feeding inside printer.
n=tray 1, 2. See
page 84 for
instructions(
OFF Paper jammed at exit. n=tray1, 2. See
page 86 for
instructions(
).
).
).
).
Manual Paper
Feed Request
PAPER
SIZE ERR
xxxxx
PAPER
xxxxx
MANUAL
REQUEST
OFF Wrong size paper is in the
tray.
OFF Request to load specified
size paper in tray. Top line
of message may be any
valid paper size.
OFF Request that specified size
paper be loaded in manual
feed slot. Top line of
message may be any valid
paper size.
Check paper in
tray; check for too
much paper.
Open/Close top
cover to recover
and continue.
Ensure that paper
size in menu or
software matches
size you are using.
Insert requested
size paper.
Insert requested
size paper in
manual feed slot.
Page 67
Buffer
Overflow
REC
BUFFER
OVERFLOW
OFF Receive buffer is full. Press RECOVER
to continue. Check
flow control setting
in menu, cable
configuration.
PAGE BUF
OVERFLOW
OFF Page buffer is full. Press RECOVER
to continue.
Resend job
beginning with
page that did not
print. If problem
persists, set REC
BUFF=8K, FONT
PROT=OFF in
MENU 2 MEMORY
USAGE. Resend
job. If job still
cannot print,
additional memory
is required.
PRINT
OVERRUN
OFF Page is too complicated to
print.
Press RECOVER
to release error.
Set PAGE BUF to
larger value in
Menu 2.
Category Message Lamp Explanation Action
DLL BUFF
OVERFLOW
MACRO
OVERFLOW
Font Card
Messages
CARD
FORMAT
CARD
ERROR
OFF Data in the DLL buffer has
overflowed.
Press RECOVER
to continue.
Decrease amount
of DLL fonts
(Windows
TrueType) or install
more memory.
OFF Data in the Macro Buffer has
overflowed.
Press RECOVER
to continue.
Decrease Macro
size or install more
memory.
OFF Font card is not recognized. Remove card and
power on to
recover. NOTE:
Install and remove
card only with
power off.
OFF Card removed during Menu
or On-Line status.
Turn printer off,
reinstall card, turn
printer on.
Page 68

Controller
Errors
ERROR nn
aaaaaaaa
OFF Error occurred in controller.
nn = Exception Code.
aaaaaaaa = Error Address.
Turn printer off/on
to recover. If error
continues, contact
service.
ERROR nn OFF Indicates internal error. nn =
type of error.
Interface
Errors
HOST I/F
ERROR
OFF Error in serial I/F. Displayed
when parity error, framing
error or overun error is
detected.
Call Service if
turning the power
off and on does not
clear error.
Press RECOVER
to release error.
Check protocol of
host and printer.
Contact service.
Page 69
Print Quality Problems
Print Quality Problems
Before consulting a service representative regarding a print quality problem, check the table
below to see if there is a solution, or something you might have overlooked.
Symptom Problem Solution
Blank sheets
printed.
Entire page prints
faintly.
Page has gray
background.
Page prints all
black.
Page has
repetitive marks.
Image drum cartridge not properly
installed.
Empty or missing toner cartridge. Install new toner cartridge.
Empty toner cartridge. Pages get fainter
when toner is used up.
LED array is dirty. Clean LED array.
Static electricity, generally from dry,
cotton fiber papers, causes toner to
stick to background.
Hardware problem. Contact your service
Damaged image drum cartridge causes
repetitive marks every 1.6 inches due to
surface nicks and scratches.
Reinstall image drum cartridge.
Install new toner cartridge.
Change papers to an acceptable
laser bond or use a humidifier.
representative.
Install new image drum cartridge.
An oblong area of
faint print appears
on each page.
Vertical white
streaking or faint
areas on page.
Vertical black
lines.
Dropout caused by using paper
exposed to high humidity.
Toner is low and does not distribute
properly or the drum is worn out.
LED array dirty. Clean LED array.
Scratched image drum. Replace the image drum cartridge.
Is toner low? Replace toner cartridge.
Hardware problem. Contact service.
Change paper stocks, or use a
dehumidifier; check toner.
Replace toner cartridge. Check
drum and replace the drum, if
necessary. Contact service.
Page 70
Symptom Problem Solution
Fuzzy print Dirty LED array. Clean LED array.
Distorted print Paper path, lamp assembly, or fusing
unit problem.
Faded print after
installation.
Smeared or
blotched print.
Printed page is
light or blurred.
Bold characters
and dark lines are
smeared.
Print is darker
than usual.
Toner cartridge is not correctly installed. Install toner cartridge correctly.
Dirty or defective fuser assembly or
other hardware problem.
Is toner low? Replace toner cartridge.
Is paper meant for laser printers? Use recommended paper.
LED array is dirty. Clean LED array.
Toner is low. Install new toner cartridge.
Darkness setting is too high. Change darkness setting.
Generate Cleaning Page.
Contact service.
Generate Cleaning Page.
Contact service.
Pages curl
excessively
Printing on wrong side of paper. High
humidity.
Moisture in paper. Improper storage. Avoid storing paper in areas of
High Humidity. Recommended operating humidity:
Turn paper over in tray. Note arrow
on paper package. Install paper
print side down in tray.
excessive temperature changes
and humidity.
20-80%
Page 71

Software Problems
Software Problems
Software controls printing feaures. Make sure you have selected the right driver in your software.
See your software documentation for more information.
Symptoms Problem Solution
Blank pages
appear between
printed pages.
Cannot get justified
right margin with a
proportionally
spaced font.
Control codes not
operating correctly.
Data sent to printer
does not print, but
DATA message
appears.
Number of lines per page in software
is not equal to number of lines per
page of printer.
Right justification with proportional
fonts is a software feature.
Incorrectly entered control codes. Check for confusion of letter l
A form feed has not been sent. Press the ON-LINE button to
Many software packages
assume 66 lines per page; your
printer default is 60. Adjust
software accordingly, or set
LINES/Pg in Menu 1 to equal
lines per page in software.
Check your software manual to
see if this feature is supported.
with number 1, letter
number 0; make sure you are
using upper/ lower case
correctly; make sure font is
specified correctly and is
available.
take the printer off-line, then
press the FORM FEED button
to eject the final page, or send a
form feed command (decimal
character 12). If desired, set
AUTOEJCT in MENU2.
O
with
Data is sent to
printer, but nothing
happens. ON-LINE
message appears.
Symptoms Problem Solution
Last page of
document not
printed.
Wrong interface. Select correct interface.
No form feed provided at end of
document.
Press the ON-LINE button to
take the printer off-line, then
press the FORM FEED button
to eject the final page or send
the form feed code (decimal
character 12). If desired, set
AUTOEJCT in MENU 2.
Page 72

First line on page
won't print.
Tops of letters extend into
unprintable area, so none of them
print.
Set your software to print within
the printable area.
Graphics won't
position properly.
Parts of control
codes are printed
at the beginning of
documents.
Parts of
documents are
missing at the
edges of the
printed sheet.
Print job started
with italics,
changed to bold,
but italics still
output.
Printer ignores
control codes sent
prior to printing a
document.
Wrong reference point being used. Take your measurements from
the printable area, not from the
physical edges of the page.
Command sent is not a true printer
command, generally because the
ESC character was not sent.
Before sending control codes
through an application, make
sure the ESC character can be
entered, and is entered
properly.
Software is attempting to print
beyond the printer's maximum image
area.
Font selection is by priority, and italic
is "higher" than bold.
The application software
automatically sends a reset
Adjust software page margins to
printer's maximum margins (8"
X 10½" for standard sheets).
Turn italics off before turning
bold on.
Embed the control codes in the
text to be printed.
command before printing.
Garbage prints out. Incorrect driver is installed. Install an appropriate driver.
Printer's output is
below rated speed.
Delays are caused by software
formatting routines, graphics
For maximum speed, output
plain text.
downloads, and other
applicationspecific factors.
Size of top margin
increases with
each page printed.
Creeping text. Number of lines per
page in software is not equal to
number of lines per page of printer.
Many software packages
assume 66 lines per page, but
your printer's default is 60.
Adjust software accordingly, or
set LINES/ Pg in Menu 1 to
equal lines per page in software.
Strange symbols
appear during
normal printing.
Wrong symbol set. Make sure the symbol set
selected corresponds to symbol
set resident, in font card, or in
soft font.
Page 73

Page 74

Hardware Problems
Hardware Problems
Symptoms Problem Solution
Font card doesn't
work.
Graphic image
prints partly on one
page, partly on the
next.
Nothing happens,
but printer indicates
it is ready to receive
data.
Card may not be correctly installed. Reinstall card: 1. Turn off
printer.
2. Install font card, making sure
it
is firmly seated. 3. Turn printer
on.
Use the correct font selection
procedure.
Insufficient printer memory for this
image at this resolution.
Configuration error. Check cable connection; if
Change the resolution, reduce
the image size, or install more
memory in your printer.
Increase
PAGE BUF in Level 2 Menu.
serial, make sure appropriate
MODE command has been
used (PC). If more than one
printer is available, make sure
your printer has been selected.
Make sure your printer is
on-line.
Symptoms Problem Solution
Garbage prints. Incorrect cable configuration. (Also,
see Software Problems.)
Printer freezes or
displays error
message when
computer is
rebooted.
Odors Gases are given off by forms or
Booting the computer while the
printer is on can cause a
communications
error.
adhesives passing through the hot
fusing unit.
Check cable configuration,
continuity, and length.
Take printer off-line before
rebooting computer.
Make sure the forms you use
can withstand heating, and
provide adequate ventilation.
Page 75

Appendix A
Specifications
Print Speed
Print Method
Resolution
Memory
RAM 2MB with Enhanced Memory Management
ROM 6MB
Emulation
Communication
Interface
Fonts Bitmap typefaces:
Scalable Typefaces:
8 pages per minute
LED
300 X 300 dots per inch 600 X 600
600 X1200 (graphics)
32MB optional (user installable)
HP4 (PCL5e)
Bi-directional Parallel, RS232C serial (9 pin),
Automatic Interface Switching
Line Printer, USPS
PostNet Bar Code
CG Times, Courier,
CG Omega, Coronet, Claredon, Univers,
Antique Olive, Garamond, Marigold,
Albetus, Letter Gothic
TrueType Fonts
Symbol, Wingdings
Symbol sets
Paper Handling
Supply Universal/legal cassette250 sheet: Letter,
Output 150 sheets face down, 50 sheets face up
Manual feed Envelopes, Transparencies, Label stock,
Paper Weight
Auto Feed
Manual Feed
Noise Level
Operating 42 dBA
Standby 35 dBA
80 symbol sets
Executive, Legal 14, Legal 13, A4, A5, A6,
B5
heavy stock, odd sizes
16-28 lb
16-32 lb
: Arial, Times New,
Power Save/Quiet Mode 19 dBA
Page 76

Reliability
Toner Life 2,000 pages (letter), approx. 5% density
Image Drum Life 20,000 pages, continuous, 5% density;
16,000 pages, 3 pages/job, 5% density
Mean Time to Repair (MTTR) 20 minutes
Duty Cycle 8,000 pages per month
Physical
Characteristics
Width 12.8" ( 325mm)
Depth 14.6" (370mm)
Height 7.9" (200mm)
Weight 22 lb (9.9Kg)
Electrical
Voltage
Frequency
Power
Consumption
Power Save Mode approx. 13 watts or less
Idle approx. 40 watts or less
Typical operation approx. 130 watts or less
Maximium Peak approx. 550 watts
LED Display
AC Cord
Environmental
Requirements
Operating
Temperature
120 VAC +5.5% - 15%; 240 VAC model
available
50/60 HZ ±2%
8 characters each in 2 lines; 12 languages
available
5.9 ft. (1.8m) detachable
50 to 89.6F (10-32°C)
Storage
Temperature
Operating
Humidity
Storage Humidity 10-90% Relative humidity @ 35°C
14 to 109.4°F (20-43°C) maximum 1 year
(without drum and toner)
20-80% Relative humidity @ 25°C
Page 77

Interface Settings
Interface Settings
Your printer and computer interface settings must be the same. Use Menu 2 (
printer settings. These are the items that control the printers serial interface and their
default settings:
Flow Control: DTR Hi
Baud Rate: 9600
Data Bits: 8
Parity: None
Minutes Busy: 200 msec
) to change the
Page 78

Serial Cable Configurations
Serial Cable Configurations
The following are OL810e minimum required cable configurations.
PRINTER -
COMPUTER
9-pin connector - 25-pin
connector
2 RD 2 TD
3 TD 3 RD
4 DTR 6 DSR
5 GND 7 SG
7 RTS 5 CTS
PRINTER -
COMPUTER
9-pin connector - 9-pin
connector
2 RD 3 TD
3 TD 2
RD
4 DTR 6
DSR
5 GND 5
GND
7 RTS 8
CTS
PRINTER -
COMPUTER
9-pin connector - 25-pin
connector
with 25-pin adapter
2 TD 3 RD
3 RD 2 TD
4 RTS 5 CTS
7 SG 7 GND
20 DTR 6
DSR
Page 79

Appendix A
Serial Pin Assignments
Serial Pin Assignments
The O810e has a 9-pin serial connector. If your cable has a 25-pin connector on the printer end, see your
dealer for a 9-to-25-pin adapter.
Pin Signal Symbol Direction
1 Data Carrier Detect DCD -
2 Receive Data RD To Printer
3 Transmit Data TD From Printer
4 Data Terminal Ready DTR From Printer
5 Signal Ground SG -
6 Data Set Ready DSR To Printer
7 Request to Send RTS From Printer
8 Clear to Send CTS To Printer
9 Ring Indicator RI -
Shell Frame Ground - -
 Loading...