

Page 1

Page 2

Introduction i
Introduction
Page 3

ii Introduction
Note to Customers
Every effort has been made to ensure that the information in this document is
complete, accurate and up to date. Oki assumes no responsibility for errors beyond its
control and also can not guarantee that changes in software and equipment made by
other manufacturers, and referred to in this book, will not affect the information in this
manual.
© 1994 by Oki. All rights reserved.
Oki is a registered trademark of Oki Electric Industry Co. Ltd.
Oki LED Page Printer is a trademark of Oki Electric Industry Co. Ltd.
Hewlett-Packard and LaserJet are registered trademarks of Hewlett-Packard
Company.
Microsoft is a registered trademark of Microsoft Corporation.
Bitstream, Fontware, Swiss™ and Dutch™ are trademarks of Bitstream Inc.
Helvetica
AG and its subsidiaries.
CG Times
®
and Times® Roman and Univers® are registered trademarks of Linotype
®
is a registered trademark of Agfa Division, Miles Inc.
Page 4
Important Safety Instructions
Your printer has been carefully designed to perform safely and reliably. However, as
with all electrical equipment certain precautions should be allowed:
➢ Read all documentation supplied with and on the printer before commencing.
➢ Always disconnect the printer from the mains source before cleaning.
➢ Be certain that your power source matches the rating listed on the back of the
printer. If you are using an extension cord, ensure that the total rating does not
exceed 15 amperes.
➢ Your printer has an earthed 3-pin plug, DO NOT use this plug with a socket that
is not earthed.
➢ Ensure that all printer openings are kept open, if they become blocked the printer
will overheat.
➢ Use a damp cloth to clear up spilled toner, DO NOT use a vacuum cleaner.
➢ DO NOT make any adjustments, other than those outlined in this manual, it could
damage the printer.
➢ After the printer has been in use for a period of time the fuser unit becomes very
hot, avoid touching it, wait for the unit to cool down first.
Introduction iii
If you have persistent problems with your printer, switch off, disconnect from the
mains source and contact your dealer for assistance.
Important Wiring Instructions
The wires in the mains lead are coloured in accordance with the following code:
If the colours of the wires in the mains lead of this printer do not correspond with the
markings of the terminals of your plug, proceed as follows:
Green and Yellow must be connected to the terminal marked with the letter E (or the
safety earth symbol) or the terminal coloured Green or Green and Yellow. Brown
must be connected to the terminal marked with the letter L or coloured Red. Blue must
be connected to the terminal marked with the letter N or coloured Blue or Black.
Warning: This printer must be earthed.
Green and Yellow Earth
Blue Neutral
Brown Live
If you are in any doubt regarding the wiring, please contact a qualified electrician.
Page 5

iv Introduction
Table of Contents
Chapter 1: The Control Panel ...................................................................1-1
The Control Panel........................................................................................1-2
Printer Status ...............................................................................................1-2
Lamp Indications ......................................................................................... 1-2
Setting the Printer On and Off-line .............................................................1-3
Resetting the Printer .................................................................................... 1-3
Manual Paper Feed and Paper Tray Selection.............................................1-3
Front/Manual Paper Size and Envelope Feeder Paper Size Definition.......1-4
Power Saving Definition .............................................................................1-4
Auto Error – Override Printing....................................................................1-5
Darker/Lighter Print Quality .......................................................................1-5
Maintenance Menu Items ............................................................................1-5
Level-1 Menu Reset to factory default ........................................................1-5
Hex Dump Analysis.....................................................................................1-6
Cleaning Page .............................................................................................. 1-6
Drum Life Counter Reset ............................................................................1-7
Operation Panel Disable ..............................................................................1-7
Operation Panel Enable ...............................................................................1-7
Chapter 2: Controlling Your Printer ......................................................... 2-1
Controlling your Printer ..............................................................................2-2
The Printer Interface ....................................................................................2-2
Active Interface Selection (Level-1 Menu) .................................................2-2
Auto Time Out Print and Ejection...............................................................2-3
Resolution....................................................................................................2-4
Raster Buffer Size........................................................................................2-4
Full Page Print Guarantee for Complicated Documents .............................2-5
Receive Buffer Memory Size ......................................................................2-5
Font Cache Protection .................................................................................2-5
Selecting Fonts and Symbol Sets ................................................................2-6
Prevention of White Page Ejection..............................................................2-8
Changing Orientation, Lines/Page and Columns/Line................................2-9
Auto Error – Override Printing....................................................................2-10
Darker/Lighter Print Quality .......................................................................2-10
Power Saving Mode ....................................................................................2-11
Chapter 3: Font Basics...............................................................................3-1
Font Basics .................................................................................................. 3-1
Font Basics .................................................................................................. 3-2
What is a font?.............................................................................................3-2
Font Sources ................................................................................................3-3
Resident Fonts .............................................................................................3-3
Bitmapped Fonts .......................................................................................... 3-3
Scalable Fonts..............................................................................................3-3
Font Configuration ...................................................................................... 3-4
Using Font Cards.........................................................................................3-5
Using Soft Fonts .......................................................................................... 3-5
Command Selection of Fonts ......................................................................3-6
A Few Words About Fonts ..........................................................................3-7
Portrait/Landscape Mode.............................................................................3-7
Page 6

Introduction v
Symbol Set ..................................................................................................3-8
Spacing ...................................................................................................... 3-8
Pitch ...................................................................................................... 3-8
Point Size.....................................................................................................3-9
Style ...................................................................................................... 3-9
Stroke Weight .............................................................................................. 3-9
Typeface ...................................................................................................... 3-10
Example of font selection:...........................................................................3-10
Chapter 4: HP LaserJet IV Emulation ..................................................... 4-1
HP LJ IV Emulation Mode..........................................................................4-2
Printer Commands ....................................................................................... 4-3
Print Job Master Commands ....................................................................... 4-3
Page Formatting Commands .......................................................................4-5
Cursor Positioning ....................................................................................... 4-11
Font Selection .............................................................................................. 4-12
Soft Fonts Management Commands ........................................................... 4-14
Raster Graphics............................................................................................4-15
Vector Graphics ...........................................................................................4-16
Graphics Image Manipulation ..................................................................... 4-17
Macros ......................................................................................................4-20
Miscellaneous ..............................................................................................4-22
HP-GL/2 Commands ................................................................................... 4-23
Chapter 5: Printable Areas .........................................................................5-1
Printable Area for Each Paper Size ..............................................................5-2
Appendix A: Symbol Sets ........................................................................... A-1
Symbol Sets ................................................................................................. A-2
Appendix B: Interfacing.............................................................................B-1
Parallel Interfacing.......................................................................................B-2
RS-232C Serial Interfacing .........................................................................B-4
Appendix C: LCD Window Display Messages .......................................... C-1
LCD Window Display Messages .................................................................C-2
Page 7

Control Panel 1-1
Chapter 1
The Control Panel
Page 8
1-2 Control Panel
The Control Panel
The front panel is your direct link with the printer. It provides you with information
about the state of the printer through its indicator lights and message window, and
gives you control over printer functions through its buttons.
Note:
!
1.With the exception of the ON-LINE button, all buttons function only when
the printer is OFF-LINE (Ready lamp is off).
2.In order to select the functions indicated on the lower part of the buttons, you
need to hold it in for more than two seconds.
Printer Status
The Message Window
Your printer has a two line display that gives detailed information on the state of the
printer. It provides information, error conditions and malfunctions, and it is used
when setting the menu. The Setup Guide contains a complete listing of messages as
well as information about how to solve the most common problems.
Lamp Indications
Lamp Lamp on Flashing Lamp off
READY Indicates printer Indicates the following: Indicates the following:
(Amber) ready to receive data Force printing triggered Off-line mode.
in ON-LINE mode. by FORM FEED button. Initializing.
Fonts/Menu/Demo printing Warming up.
triggered by respective Error status.
buttons.
Image drum cleaning
triggered by + and - buttons.
In process of making image
data from received data.
MANUAL Procesing Manual Requesting paper in Manual feed not selected.
(Red) feed. Manual feed.
ATTENTION Indicates the following: Indicates the following: Normal status
(Red) Toner Low. Request action from user.
Toner Sensor. Occurence of ERROR.
Change Drum.
Fuser Life.
DATA Data processing Receiving data from host. No data.
(Amber)
Page 9

Setting the Printer On and Off-line
Pressing the ON-LINE button switches the printer between the on-line (selected) and
off-line (deselected) modes. When the printer is on-line (READY lamp on), it is ready
to receive data and print. When the printer is off-line (READY lamp off), it cannot
receive data. All other buttons can only be activated when the printer is off-line.
Resetting the Printer
Pressing the /Reset button for more than two seconds, while the printer is off-line,
ends any printing operation and clears some error conditions. Data is retained in the
buffer and the printer is returned on-line.
The printer can be reset to user default settings by holding the Reset button for more
than two seconds when the printer is off-line. All temporary soft (downloaded) fonts/
macro data are deleted, the permanent soft (downloaded) fonts/macro data remain in
the printer until the power is turned off.
Control Panel 1-3
Manual Paper Feed and Paper Tray Selection
The TRAY TYPE sub-menu can be selected directly by pressing the TRAY TYPE
button for less than two seconds, while in the off-line mode.You can select Tray Feed
Mode and Manual Feed Mode using the menu selection procedure.
Tray 1 paper feed is the factory default setting.
You will see the following messages displayed in the window:
MANUAL FEED
OFF* (or ON)
* indicates that this selection is the current default setting.
MENU 1
MENU 2
PAPER FEED
TRAY1* (TRAY2 if 2nd paper tray installed)
(Press)
(FRONT FEEDER)
(ENVELOPE FEEDER if envelope feeder installed)
* indicates that this selection is the current default setting.
MENU 1
MENU 2
(Press)
AUTO TRAY SWITCH
OFF* (or ON)
* indicates that this selection is the current default setting.
Page 10

1-4 Control Panel
Front/Manual Paper Size and Envelope Feeder Paper Size Definition
The paper size sub-menu can be selected directly by holding the PAPER SIZE button
for less than two seconds, while the printer is in the off-line mode. You can select the
size of paper or envelope using the menu selection procedure.
You will see the following messages displayed in the message window:
FRONT/MANUAL
A4 SIZE*
* indicates that this selection is the current default setting.
The sizes displayed are in the following order:
A5 SIZE A6 SIZE
B5 SIZE COM-9
COM-10 MONARCH
DL ENVELOPE C5 ENVELOPE
C4 ENVELOPE LETTER
EXECUTIVE LEGAL 14
LEGAL 13
ENVELOPE FEEDER (if feeder is installed)
DL ENVELOPE*
* indicates that this selection is the current default setting.
The sizes displayed are in the following order:
C5 ENVELOPE LETTER
EXECUTIVE LEGAL14
LEGAL13 A4 SIZE
A5 SIZE A6 SIZE
B5 SIZE COM-9
COM-10 MONARCH
Power Saving Definition
The POWER SAVE sub-menu can be selected directly by pressing the POWER
SAVE button for more than two seconds while the printer is in the off-line mode. You
can select the power saving definition using the menu selection procedure.
0 SEC is the factory default setting.
You will see the following message displayed in the message window:
POWER SAVING
0 SEC* (8 MIN or DISABLE)
* indicates that this selection is the current default setting.
Page 11

Auto Error – Override Printing
During normal printing if the AUTO CONT INUE, in the Level-2 menu, is set to ON,
if a software or data error occurs the printer will briefly display an error message, and
after a few seconds continue printing.
If the AUTO CONTINUE parameter is set to OFF, the factory default, when an error
is detected, the printer will stop printing. To resume printing the RECOVER button
must be pressed.
Darker/Lighter Print Quality
During normal printing darker or lighter print quality can be acheived by using the
DARKNESS CONTROL option in menu Level-2.
If you want darker print select +1 or +2 (darkest), if you want lighter print select -1 or
-2 (lightest).
Control Panel 1-5
Maintenance Menu Items
The printer Maintenance Menu Mode can be entered by switching on the printer while
holding the MENU1/Menu2 button. In this special mode, data received by the printer
can be analysed on the printed page, which will be in the form of a HEX dump.
You can reset all Level-1 menu items to the factory default setting when user default
settings become confused.
Also in this mode, the Image Drum life counter can be cleared when the Image Drum
unit has been replaced with a new one.
Level-1 Menu Reset to factory default
1. Switch on the printer while holding down the MENU1/Menu2 button. You will see
the message USR MNT (user maintenance) in the message window.
2. Press the MENU1/Menu2 button for less than two seconds to display the MENU
RESET message.
3. Press the ENTER/Power Save button to display the message MENU /RESET'NG
(resetting).
4. All the Level-1 menu items are now reset to the factory default setting, and the
printer is returned to the normal on-line mode.
Page 12
1-6 Control Panel
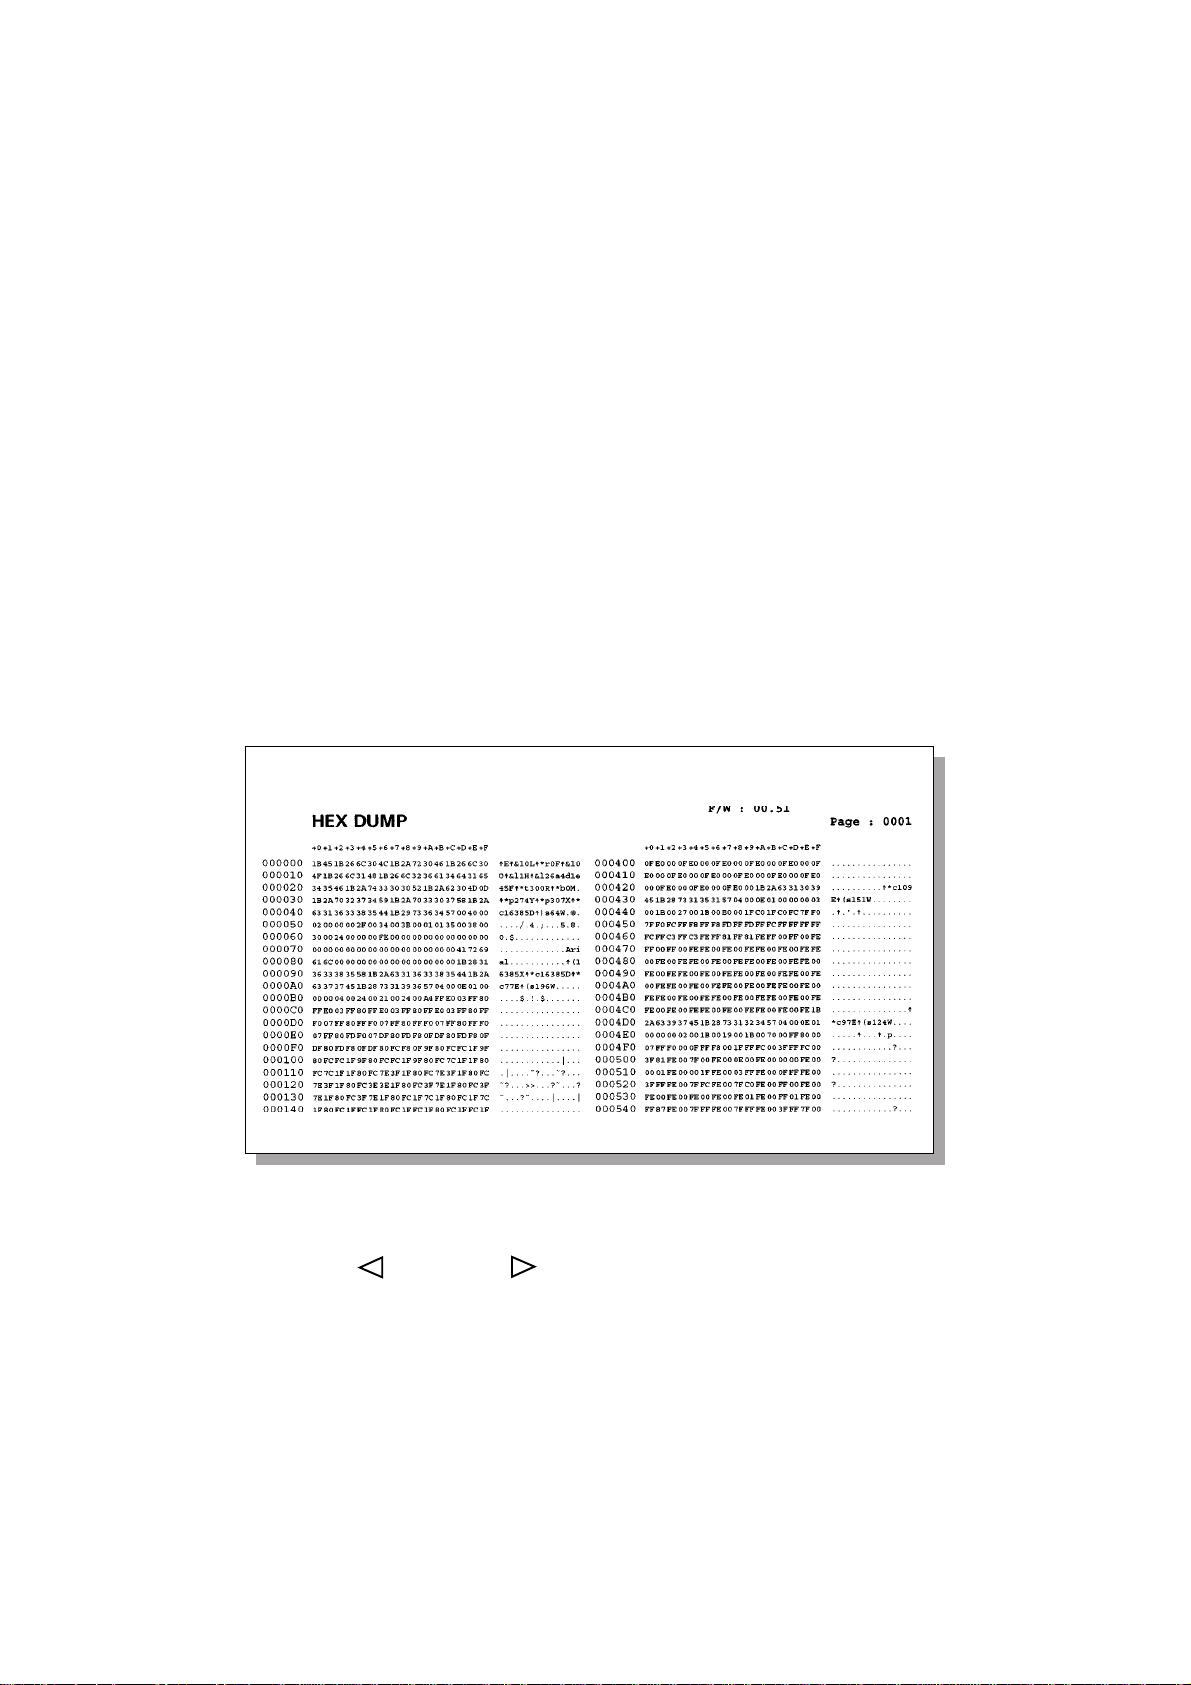
Hex Dump Analysis
1. Switch on the printer while holding the MENU1/Menu2 button. The USER MNT
(User Maintenance) message will be displayed in the window.
2. Press the MENU1/Menu2 button for less than two seconds twice to display HEX
DUMP, after MENU RESET.
3. Press the ENTER/Power Save button, the printer now displays the ON-LINE/HEX
DUMP message.
4. The printer will now print received data in HEX dump format.
5. To resume normal printing, switch off the printer, then switch it on again.
When the data sent to the printer reaches a full page, the printer will start printing. If
the data does not contain a full page, it will be necessary to place the printer off-line
and then press the Form Feed button to start printing.
Cleaning Page
When the analysis is finished, switch off the printer to exit the HEX dump mode.
OL1200ex LED Page Printer
1. Press the /Recover and /Reset buttons together while the printer is in the
off line mode.
2. The message DRUM CLEANING PAGE/MANUAL A4 will appear in the
message window, MANUAL A4 SIZE REQUEST will scroll right to left.
3. Insert a blank page in the manual feed tray and press the Form Feed button.
4. The printer will process the blank page and at the same time remove any traces of
toner from the image drum, after completion the printer will return to the ONLINE mode.
Page 13

Drum Life Counter Reset
1. Switch on the printer while holding the MENU1/Menu2 button. USER MNT (user
maintenance) will be displayed in the message window.
2. Press the MENU1/Menu2 button three times for less than two seconds. The
DRUM CNT/RESET (drum counter reset) message, will be displayed
3. Press the ENTER/Power Save button, DRUM CNT/RESET'NG (resetting) will be
displayed. After the counter has been reset, ON-LINE will be displayed in the
message window. The printer is now ready to receive data in the normal way.
Operation Panel Disable
To prohibit change to any menu item via the operation panel, follow these
instructions:
1. Switch on the printer while holding down the MENU1/Menu2 button. USER
MNT will be displayed in the message window.
Control Panel 1-7
2. Press the MENU1/Menu2 button four times for less than two seconds. OP MENU/
ENABLE* (operation panel enable – factory default) will be displayed in the
message window.
3. Press the
be displayed in the message window.
4. Press the ENTER/Power Save button to select the disable parameter, only if you
are sure, an asterisk (*), will appear next to your choice. Press the ON-LINE
button the printer then displays the ON-LINE message, and is now ready to receive
data in the normal way.
The MENU1/Menu2, TRAY TYPE/Print Fonts and PAPER SIZE/Print Menu
buttons are no longer effective for changing the menu.
Operation Panel Enable
To re-enable the operation panel, follow these instructions:
1. Switch on the printer while holding down the MENU1/Menu2 button. USER
MNT will be displayed in the message window.
2. Press the MENU1/Menu2 button four times for less than two seconds. OP MENU
DISABLE* (operation panel disable) will be displayed in the message window.
/Reset button, OP MENU/DISABLE (operation panel disable), will
3. Press the
displayed in the message window.
4. Press the ENTER/Power Save button to select the enable parameter, an asterisk
(*), will appear next to your choice. Press the ON-LINE button the printer then
displays the ON-LINE message, the menu items can then be changed in the normal
way.
/Reset button, OP MENU/ENABLE (operation panel enable), will be
Page 14

Controlling Your Printer 2-1
Chapter 2
Controlling Your Printer
Page 15

2-2 Controlling Your Printer
Controlling your Printer
The Printer Interface
The printer has a Centronics Parallel interface and a Serial RS-232C interface as
standard. The menu parameter AUTO I/F is selected as the factory default setting. In
this mode, the printer can receive data from both the parallel interface and the serial
interface, by polling each port in turn. The active interface is selected from the Level1 Menu.
Active Interface Selection (Level-1 Menu)
AUTO I/F: Auto Interface Polling between parallel and RS-232C ports.
The printer checks both ports to see if data is being sent, once
detected, the printer continues to receive data from this port.
The printer will recommence polling after having received no data for
a period of time, defined in the AUTO EJECT menu in Level-2 menu.
AUTO EJECT POLLING START
OFF (factory default) 15 seconds
15 SEC 15 seconds
30 SEC 30 seconds
1 MIN 1 minute
Note: While AUTO I/F is selected, the I-PRIME signal on the parallel
!
interface is always ignored.
PARALLEL: Only Centronics parallel interface is supported. The I-PRIME signal
control is activated using the Level-2 menu.
RS-232C: Only RS-232C serial interface is supported. The XON/XOFF and
ROBUST XON flow controls are EFFECTIVE.
Page 16

Controlling Your Printer 2-3
It is possible to select one of the three interface modes via the Level-1 menu as
follows:
1. Press the MENU1/Menu2 button for less than two seconds, when the printer is in
the off-line mode. You will see the message PRINTER LANGUAGE in the
message window.
2. Press the MENU1/Menu button ten times, for less than two seconds, the message
HOST INTERFACE will appear in the message window, after PAGE LAYOUT2.
3. Press the ENTER/Power Save button to display the message HOST I/F/AUTO
INTERFACE*, in the message window.
4. Press the
/Reset button until the required interface type is displayed,
PARALLEL, RS-232C, RS-422*, LOCALTALK* or OKI-HSP* (* if installed).
5. Press the ENTER/Power Save button to select the required interface type, an
asterisk (*), will appear next to your choice.
6. Press the ON-LINE button, the printer will return to the on-line state, ready to
receive data.
Auto Time Out Print and Ejection
In network environments, some systems do not send a full print job at once, but send
data intermittently to the printer. In this case other users can not access the printer.
However, some applications fail to complete a print run due to operational errors or
malfunctions. You can select the time out period to overcome this problem via the
AUTO EJECT item in the Level-2 menu. If the printer receives no data for more than
the specified time the remaining data in the buffer will be printed and the page ejected
automatically. If the AUTO EJECT option is set to off (factory default), the printer
will not start printing automatically, you must press the FORM FEED/Print Demo
button, for less than two seconds, when the printer is in the off-line mode.
1. Press the MENU1/Menu2 button for more than two seconds, when the printer is in
the off-line mode. You will see the message PRINT MODE in the message
window.
2. Press the MENU1/Menu2 button twice, for less than two seconds, the message
AUTO OPERATION will appear in the message window.
3. Press the ENTER/Power Save button to display the message AUTOCONTINUE/
OFF*, in the message window.
4. Press the MENU1/Menu2 button, for less than two seconds, the message AUTO
EJECT/OFF*, will appear in the message window.
5. Press the
/Reset button until the required parameter is displayed, 5 SECONDS
to 300 SECONDS.
6. Press the ENTER/Power Save button to select the required parameter, an asterisk
(*), will appear next to your choice.
7. Press the ON-LINE button, the printer will return to the on-line state, ready to
receive data.
Page 17

2-4 Controlling Your Printer
Resolution
Your printer utilises fine high resolution printing enabling it to produce printed output
of two types.
600dpi (Factory Default) 300dpi
Raster Buffer Size
If the print image data is of a complicated nature, for example complex text or large
graphics, it may be necessary to adjust the size of the Raster Buffer Size.
The options are:
AUTO (factory default, the printer automatically selects the size of the
180Kbytes
360Kbytes
1.08Mbytes (various sizes of memory buffer that are available)
:
2.16Mbytes
FUL LETTER (full letter size page)
FULL LEGAL (full legal size page)
FULL A4 (full A4 size page)
Raster Buffer which is appropriate for the data being processed)
:
Note: Care must be taken when allocating memory, to avoid other memory size
!
errors, specifically when accessing Macro Data, Soft Font Data or High
Resolution Graphics Data.
1. Press the MENU1/Menu2 button for more than two seconds, when the printer is in
the off-line mode. You will see the message PRINT MODE in the message
window.
2. Press the MENU1/Menu2 button once, for less than two seconds, the message
MEMORY USAGE will appear in the message window.
3. Press the ENTER/Power Save button, for less than two seconds, the message
RASTER BUFFER/AUTO will appear in the message window.
4. Press the
* When MEMORY OVERFLOW occurs, you must reduce this value.
!
When PRINT OVERRUN occurs, you must increase this value.
/Reset button until the required memory size* is displayed.
5. Press the ENTER/Power Save button to select the required memory size, an
asterisk (*), will appear next to your choice.
6. Press the ON-LINE button, the printer will return to the on-line state, ready to
receive data.
Page 18

Full Page Print Guarantee for Complicated Documents
The printer generates high resolution bitmapped graphics of all the received data prior
to printing. This process is faster than the actual mechanical printing process.
However, if the document is too complicated, the printer may display the error,
PRINT OVERRUN in the message window. This occurs because the printer
processing speed could not match the paper feed speed. The solution is to simplify the
document by reducing the formatted data, i.e. replace complicated graphics, reduce
the number of typefaces, etc.
However, by defining the menu parameter RASTER BUFFER/FULL A4, in the
Level-2 menu, you can guarantee to print a full page of A4, providing the optional
memory board is installed. In this instance, the printer starts printing after a full A4
page of bitmapped data has been generated
Receive Buffer Memory Size
Your printer has 2Mbytes RAM as standard. This memory is used for various tasks,
i.e. Receive Buffer, Raster Buffer, Macro Data Memory, Soft Font Down Line Load
Memory and Print Buffer. The memory size allocation is automatically controlled,
dynamically, according to the received data. Some users require to send all data to the
printer at once, thus enabling the system to be used for another job. This is possible
if you allocate more memory to the Receive Buffer. The maximum memory size
allocation is 1Mbyte, using the RECEIVE BUFFER item in the Level-2 menu.
Controlling Your Printer 2-5
The options are:
AUTO (factory default)
8Kbytes
20Kbytes
50Kbytes
100Kbytes
1Mbyte
Font Cache Protection
Scalable fonts are defined as a series of vectors, and as such cannot be directly printed.
Therefore, when your print job requests a scalable font of a certain size, the printer
must first convert (rasterize) this font into a form suitable for printing (bitmap).
Under normal circumstances this process has to be carried out every time the printer
starts a job after having been reset (usually at the beginning of a print job).
You can reserve some of the printers memory area as a protected font cache. (This is
a memory area not cleared by the reset command.) The size of this area can be
increased incrementally in 100 Kbytes from the Level-2 menu FONT
PROTECTION. The factory default is AUTO.
Page 19

2-6 Controlling Your Printer
You need not worry about a font overflowing the cache memory size; the font will still
be rasterized even if the cache setting is too small. The only consequence is that on
receiving the reset command, the part of the font outside the protected cache will be
cleared and will have to be regenerated the next time the font is selected.
The following operations will clear the protected font cache memory area.
1. Turning the printer off.
2. Holding down the RESET button for more than two seconds.
62 Characters 192 Characters
Point Size (ASCII) (Roman-8)
8 6 KB 18 KB
10 8 KB 24 KB
12 10 KB 30 KB
3. Changing the memory size on the Protected Cache.
The options are:
AUTO (factory default, the printer automatically allocates a portion of
the printers memory as a font cache).
OFF
100Kbyte
: (sets the size of the font cache)
1.4Mbyte
Selecting Fonts and Symbol Sets
You can define the font source from Resident (factory default), Optional Card and
DLL Soft (down line loadable), using the FONT SOURCE item in the Level-1 menu.
Before selecting these optional font sources, it is necessary to have previously
installed them. If they have not been installed they will not appear in the message
window.
You can choose the Font No. using the FONT No. item in the Level-1 menu. The font
numbers can be obtained by using the Print Fonts button to produce a sample of all the
available fonts and their ID numbers.
Note: The number can be found on the left side of the PRINT FONTS list and
!
also on the second line of the message window, in the FONT NO. item
I xxx in the resident fonts
C xxxin the Font Card (if installed)
S xxx in the downloaded soft fonts (if installed)
The font number can be looked for in the message window using the arrow buttons.
The symbol set can also be selected from the SYMBOL SET item in the Level-1
menu. There are 75 symbol sets available including, ECMA-94, PC-8, PC-850, etc.
ROMAN-8 is the factory default. For a complete list the available symbol sets refer
to Appendix A: Symbol Sets.
Page 20
Controlling Your Printer 2-7
1. Press the MENU1/Menu2 button for less than two seconds, when the printer is
in the off-line mode. You will see the message PRINTER LANGUAGE in the
message window.
2. Press the MENU1/Menu2 button seven times, for less than two seconds, the
message FONTS & SYMBOLS will appear in the message window, after
COPIES.
3. Press the ENTER/Power Save button to display the message FONT SOURCE/
RESIDENT* (factory default), in the message window.
4. Press the
/Reset button until the required font source is displayed.
5. Press the ENTER/Power Save button to select the required font source, an
asterisk (*), will appear next to your choice.
6. Press the MENU1/Menu2 button for less than two seconds, the message FONT
NO/I000* will be displayed in the message window.
7. Press the
/Reset button until the required font number is displayed.
8. Press the ENTER/Power Save button to select the required font number, an
asterisk (*), will appear next to your choice.
If you are using fixed pitch scalable fonts you can set the required characters per
inch (FONT PITCH) setting and the font height (FONT HEIGHT) setting by
using the following instructions. If however, you have selected Bitmap rather
than Scalable fonts neither of these messages will appear in the message
window.
9. Press the MENU1/Menu2 button for less than two seconds FONT PITCH/
10.00CPI* (factory default) will be displayed in the message window.
10. Press the
/Reset button until the required characters per inch setting is
displayed.
11. Press the ENTER/Power Save button to select the required CPI setting, an
asterisk (*), will appear next to your choice.
12. Press the MENU1/Menu2 button for less than two seconds FONT HEIGHT/
12.00* (factory default) will be displayed in the message window.
13. Press the
/Reset button until the required font height setting is displayed in
the message window.
14. Press the ENTER/Power Save button to select the required font height setting,
an asterisk (*), will appear next to your choice.
Page 21

2-8 Controlling Your Printer
15. Press the MENU1/Menu2 button for less than two seconds, the message
SYMBOL SET/ROMAN-8* (factory default), will be displayed in the
message window.
16. Press the
/Reset button until the required symbol set is displayed.
17. Press the ENTER/Power Save button to select the required symbol set, an asterisk
(*), will appear next to your choice.
18. Press the ON-LINE button, the printer will return to the on-line state, ready to
receive data.
Prevention of White Page Ejection
Many applications send the FF (form feed) code to the printer before sending the print
data, this action prints all data held in the printer buffer then ejects the page. This is
especially important for network users.
Note: The FF code may cause extra white pages if there is no data in the
!
printer buffer.
Prevention of blank page ejection can be defined by the item WHITE PAGE SKIP in
the Level-1 menu. The factory default is OFF. When ON is set the printer will ignore
the FF code only when DATA is not displayed in the message window, and there is
no data in the printer.
1. Press the MENU1/Menu2 button for less than two seconds, when the printer is in
the off-line mode. You will see the message PRINTER LANGUAGE in the
message window.
2. Press the MENU1/Menu2 button eight times, for less than two seconds, until the
message PAGE LAYOUT1 is displayed in the message window, after FONTS &
SYMBOLS.
3. Press the ENTER/Power Save, to display the message A4 PRINT WIDTH/78
COLUMN in the message window.
4. Press the MENU1/Menu2 button once for less than two seconds, the message
WHITE PAGE SKIP /OFF* will appear in the message window.
5. Press the
/Reset button for less than two seconds, the message WHITE PAGE
SKIP/ON will appear in the message window.
6. Press the ENTER/Power Save button to select this option, an asterisk (*), will
appear next to your choice.
7. Press the ON-LINE button, the printer will return to the on-line state, ready to
receive data.
Page 22

Changing Orientation, Lines/Page and Columns/Line
The printer is capable of changing orientation from portrait to landscape. You can
define the orientation using the item ORIENT (orientation) in the Level-1 menu.
When you change the orientation ensure that the margins and page lengths have been
changed both in the software application and the printer menu.
The factory default settings are as follows:
ORIENT (orientation): PORTRT (portrait)
LINES/PG (lines per page): 64 LNS (64 lines)
1. Press the MENU1/Menu2 button for less than two seconds, when the printer is in
the off-line mode. You will see the message PRINTER LANGUAGE in the
message window.
2. Press the MENU1/Menu2 button nine times, for less than two seconds, until the
message PAGE LAYOUT2 is displayed in the message window, after PAGE
LAYOUT1.
Controlling Your Printer 2-9
3. Press the ENTER/Power Save button, to display the message ORIENTATION/
PORTRAIT* in the message window.
4. If you want to print in landscape mode press the
/Reset button for less than two
seconds, the message ORIENTATION/LANDSCAPE will appear in the
message window.
5. Press the ENTER/Power Save button to select this option, an asterisk (*), will
appear next to your choice.
6. Press the MENU1/Menu2 button for less than two seconds, to display the
message LINES PER PAGE/64LINES* in the message window.
7. If you want to change the number of lines press the
/Reset button for less than
two seconds, the number of lines per page will appear in the message window in
the following sequence, 5, ...64, .......128.
8. Press the ENTER/Power Save button to select the required number, an asterisk
(*), will appear next to your choice.
9. Press the ON-LINE button, the printer will return to the on-line state, ready to
receive data.
Page 23

2-10 Controlling Your Printer
Auto Error – Override Printing
During normal printing if the AUTO CONTINUE, in the Level-2 menu, is set to ON,
if a software or data error occurs the printer will briefly display an error message, and
after a few seconds continue printing.
If the AUTO CONTINUE parameter is set to OFF, the factory default, when an error
is detected, the printer will stop printing. To resume printing the RECOVER button
must be pressed.
1. Press the MENU1/Menu2 button for more than two seconds, while the printer is
off-line, the message PRINT MODE will appear in the message window.
2. Pres the MENU1/Menu2 button twice, the message AUTO OPERATION will
appear in the message window.
3. Press ENTER/Power Save button to display the message AUTO CONTINUE /
OFF*.
4. Press the
5. Press the ENTER/Power Save button to select this parameter, an asterisk, (*), will
appear next to your choice.
6. Press the ON-LINE button to exit the menu mode and return the printer to its
normal on-line state, ready to print.
Darker/Lighter Print Quality
During normal printing darker or lighter print quality can be acheived by using the
DARKNESS CONTROL option in menu Level-2.
If you want darker print select +1 or +2 (darkest), if you want lighter print select -1 or
-2 (lightest).
1. Press the MENU1/Menu2 button for more than two seconds, while the printer is
off-line, the message PRINT MODE will appear in the message window.
2. Press the MENU1/Menu2 button three times for less than two seconds, the
message DARKNESS CONTROL, will appear, after AUTO OPERATION.
3. Press ENTER/Power Save button to display the message DARKNESS/0* (factory
default).
/Reset button to display the message AUTOCONTINUE/ON.
4. Press the
sequence, 0, +1, +2, -2, -1.
5. Press the ENTER/Power Save button to select the appropriate parameter, an
asterisk, (*), will appear next to your choice.
6. Press the ON-LINE button to exit the menu mode and return the printer to its
normal on-line state, ready to print.
/Reset button to step through available darkness settings in the
Page 24

Power Saving Mode
If, during the normal printing operation no data is received by the printer for a period
of time, the printer will cut the heating to the fusing unit. In power saving mode, the
power consumption and fan acoustic noise will be greatly reduced. However, the
printer will require a warming up period, prior to restarting the printing cycle.
1. Press the MENU1/Menu2 button for more than two seconds, while the printer is
off-line, the message PRINT MODE will appear in the message window.
2. Press the MENU1/Menu2 button four times for less than two seconds, the
message POWER SAVING, will appear, after DARKNESS CONTROL.
3. Press ENTER/Power Save button to display the message POWER SAVING/0
SEC* (factory default).
Controlling Your Printer 2-11
4. Press the
/Reset button to step through available settings in the sequence 0
SEC, 8MIN, DISABLE.
DISABLE prohibits power saving mode completely, 0 SEC or 8 MIN reduces the
fan rotation speed and switches off the fuser unit, when no data has been received
for more than the specified time.
5. Press the ENTER/Power Save button to select the appropriate parameter, an
asterisk, (*), will appear next to your choice.
DISABLE should be used if you are printing frequently, the printer is always ready
to print, and does not need to warm up.
0 SEC or 8 MIN should be used if printing requirements are very low, the printer
will switch off the fuser unit if no data is received for eight minutes, a warm up
period will be required prior to recommencement of printing.
6. Press the ON-LINE button to exit the menu mode and return the printer to its
normal on-line state, ready to print.
Page 25

Font Basics 3-1
Chapter 3
Font Basics
Page 26

3-2 Font Basics
Font Basics
What is a font?
!
Part of the reason that your printer is so versatile lies in the large number of fonts
available. A full complement of resident fonts serves many printing needs, and you
can add to your printer’s range with font cards or soft fonts supplied by other font
vendors. When these fonts are used correctly, they can greatly enhance the quality of
your work. While a complete understanding of fonts, typefaces and their
characteristics is not necessary for good document preparation, some knowledge can
go a long way towards making you proficient in their use.
A font is a collection of printing characteristics, all of which combine to produce a
distinctive style of print. Here are the characteristics, presented in descending order of
priority, that make up each of the fonts.
Note: Your printer emulates the Hewlett-Packard LaserJet Series IV printer.
Because of this, we are using Hewlett-Packard’s terminology here to describe
the method for specifying laser fonts. However, some typesetters use
somewhat different terms and definitions when specifying fonts.
Symbol set: In addition to a standard group of alphanumeric characters, each
symbol set contains characters and symbols used for special
purposes. The printer features special sets for technical, legal and
foreign language uses. Each font uses standard symbols, plus
symbols from one or more of these sets.
Spacing: Some fonts have fixed spacing, where the space assigned to each
character is uniform in width. Other fonts are proportionally
spaced, with narrow characters like (i) given less horizontal space
than wide characters like (w).
Pitch: Only used with fixed space fonts, pitch is a measure of character
width, representing the number of characters per inch (cpi). The
larger the number of characters per inch, the smaller the character
is.
Height: The height of the characters in a font is expressed in points. There
are 72 points to an inch. This measure, often called font size, is
used primarily with proportional fonts.
Style: The style of a font can be either upright or italic (slant).
Stroke weight: Stroke weight refers to the thickness of the lines in a font.
Typeface: The typeface of a font determines the shape of the strokes that
make up each character or symbol. Typefaces have standard
names like Courier and Gothic. This is the lowest priority
whenselecting a font.
Orientation: The way the text is printed on the page. Portrait orientation is
normal lengthwise printing while landscape printing appears
sideways on a page.
Page 27

Font Sources
Font Basics 3-3
Each of the fonts is defined by the values assigned to these characteristics. For
example, the factory default setting has the following values, in priority order:
Symbol Set: Roman-8 Highest Priority
Spacing: Fixed
Pitch: 10 CPI
Height: 12 Points
Style: Upright
Stroke weight: Medium
Typeface: Courier
Resolution: 600 dpi
Location: Resident
Orientation: Portrait Lowest Priority
There are three types of font that can be used with your printer. Resident fonts (which
come with your printer), optional Oki font cards and soft fonts, which are down loaded
from your computer (available from font vendors).
▲▲
▲
▲▲
Resident Fonts
Your printer supports all the fonts of HP LJ IV compatible bitmapped fonts and
scalable fonts.
Bitmapped Fonts
The font face of the character is directly stored in the font memory without any font
manipulation such as scaling, rotation or mirror reflecting. This type of font cannot be
modified. Landscape fonts are obtained by 90° rotation of the portrait fonts within the
printer controller.
Scalable Fonts
The original outline of the character is stored in vector format in the font memory; it
can be scaled to any size, rotated to any angle, and mirror images can be generated.
When you select a scalable font, the printer automatically generates a bitmapped
version by processing from the original outline, vector fonts data, before starting the
print.
This takes processing time. In order to keep a high printing speed, all the generated
fonts are stored in cache memory. When the same fonts are printed again, the font data
is directly loaded from this cache memory.
Note: If a document contains various different fonts, printer speed can be
!
increased by adding the optional expansion memory thereby increasing the
cache memory size.
Page 28

3-4 Font Basics
Font Configuration
Your printer contains 45 resident scaleable typefaces compatible with the HP LaserJet IV, as follows:
FONT SPACING
Albertus Medium.....................................................Proportional
Albertus Extra Bold ................................................. Proportional
Antique Olive Upright Medium .............................. Proportional
Antique Olive Upright Bold ....................................Proportional
Antique Olive Italic Medium ...................................Proportional
Clarendon Condensed.............................................. Proportional
Coronet .................................................................... Proportional
Courier Upright Medium......................................... Fixed
Courier Upright Bold............................................... Fixed
Courier Italic Medium .............................................Fixed
Courier Italic Bold ................................................... Fixed
Garamond Antiqua ..................................................Proportional
Garamond Halbfett .................................................. Proportional
Garamond Kursiv ....................................................Proportional
Garamond Kursiv Halbfett ......................................Proportional
Letter Gothic Upright Medium................................Fixed
Letter Gothic Upright Bold .....................................Fixed
Letter Gothic Italic Medium .................................... Fixed
Marigold ..................................................................Proportional
CG Omega Upright Medium ................................... Proportional
CG Omega Upright Bold.........................................Proportional
CG Omega Italic Medium .......................................Proportional
CG Omega Italic Bold ............................................. Proportional
CG Times Upright Medium ....................................Proportional
CG Times Upright Bold ..........................................Proportional
CG Times Italic Medium.........................................Proportional
CG Times Italic Bold ..............................................Proportional
Univers Upright Medium ........................................Proportional
Univers Upright Bold .............................................. Proportional
Univers Italic Medium.............................................Proportional
Univers Italic Bold ..................................................Proportional
Univers Condensed Upright Medium...................... Proportional
Univers Condensed Upright Bold ...........................Proportional
Univers Condensed Italic Medium .......................... Proportional
Univers Condensed Italic Bold................................Proportional
Arial Upright Medium ............................................. Proportional
Arial Upright Bold...................................................Proportional
Arial Italic Medium .................................................Proportional
Arial Italic Bold ....................................................... Proportional
Times New Upright Medium ...................................Proportional
Times New Upright Bold ........................................ Proportional
Times New Italic Medium.......................................Proportional
Times New Italic Bold .............................................Proportional
Wingdings................................................................Proportional
Symbol.....................................................................Proportional
Page 29

Using Font Cards
To obtain additional ready-made fonts, you can purchase the special font cards
available for your printer. Each card is designed to provide fonts needed for a special
purpose. The fonts in each card family are designed to be used together, to provide a
working environment for legal, secretarial, publications and other work situations.
Font cards work much the same as resident fonts. Selection is greatly simplified if the
software you are using contains a driver that provides immediate access to the card
fonts. If a suitable driver is not available, you may be able to use a driver for the HP
LaserJet Series IV that includes the cartridge fonts you want to use. When you install
a font card, its fonts will be listed on the font sample printout, along with their ID
numbers. If you change the Font Source menu selection to Card, the Font Select item
will list the card font ID numbers, so you can easily select them using the menu.
Note: Font cards for the Oki OL400, 410, 800 and 810 series printers cannot
!
be used in this printer.
Using Soft Fonts
Font Basics 3-5
Your printer also accepts downloadable bitmapped soft fonts in the Hewlett-Packard
format. This means that you have access to a wide range of font creation packages such
as Bitstream
©
Fontware™. Today, the range of soft fonts includes most of the popular
text fonts and a wide variety of headline styles. Although they are slightly less
accessible and somewhat more difficult to use than resident and card fonts, soft fonts
can round out your typeface library.
Use of soft fonts is greatly simplified if your software supports this feature. If it does
not, you may still be able to use soft fonts by resorting to some of the utilities that are
available for this purpose. These range from simple public domain programs that load
fonts to the printer (access the fonts with a printer command) to full-feature coresident printer control systems.
After you have downloaded soft fonts to the printer and made them permanent, they
will appear on the font sample printout, along with their ID numbers. If you change
the FONT SOURCE menu selection to DOWNLOADED, the FONT No. item will
list the soft font ID numbers, so you can easily select them using them using the menu.
When you are using soft fonts, you should be aware that they must be loaded into the
printer, which takes time and consumes available memory. This means that
documents may take longer to print, and certain combinations, particularly in
conjunction with graphics, may not be possible. Large type fonts take up large
amounts of memory. All of the characters in the set must be loaded into the printer,
even if only a few are actually used. Each character contains information on all of the
pixels in a 300 x 300 dpi grid. For 72 point type (1-inch high), that is quite a lot of
bytes!
If you often use soft fonts, especially large point sizes, the optional memory expansion
board should, ideally, be utilised.
Page 30

3-6 Font Basics
Command Selection of Fonts
Selection of a font by printer commands is quite simple if the font (resident, card or
downloaded) is available. Each font has an “escape sequence”, a string of characters
beginning with the escape character (decimal 27). The sequence actually specifies all
of the basic characteristics of the font.
Page 31

A Few Words About Fonts
The priority list is stored in the printer. When a font is selected the printer checks the
complete font priority list to ensure that the selected font is among those available (i.e.
a resident font, IC-Card font or soft font).
If the most recent priority list does not describe any available font, the printer
compares the font with the priority list starting at the highest level of priority. The
printer scans the current characteristics and compares them with the characteristics
defined by the user, starting with the highest level of priority.
If the printer discovers an unavailable font which is requested by the user, it
automatically changes to the nearest font which is currently available.
Example:
Font Basics 3-7
Symbol Set Roman-8 ESC(8U
Spacing Fixed ESC(s0P
Pitch 10 ESC(s10H
Height 12 point ESC(s12V
Style Upright ESC(s0S
Stroke Weight Normal ESC(s0B
Type Face Courier ESC(s3T
Location Resident ESC(
Orientation Portrait ESC&l0O
Portrait/Landscape Mode
ESC&l #O
This escape sequence selects the print orientation.
# can have the following values:
0 Portrait (default)
1 Landscape
2 Reverse Portrait
3 Reverse Landscape
Default Resident Font Characteristics:
The printer prints either from left to right across the width of the paper (Portrait mode)
or along the length of the paper (Landscape mode).
This sequence must be sent at the beginning of the relevant page. Changing the print
orientation causes the page length, top margin, text length, left margin, right margin,
HMI and VMI to default to their original values. If the requested orientation is the
same as the current orientation, this command will be ignored.
Page 32

3-8 Font Basics
Symbol Set
ESC(ID
Each symbol set contains characters and symbols which are used for specific
purposes. The printer supports special character sets for technical, legal and foreign
language purposes and additional character sets for graphics. Each font uses standard
symbols, as well as symbols from one or more of these sets.
Examples:
Symbol Set ID
Roman-8 8U
ECMA-94 Latin 10N
PC-8 (USA) 10U
PC-8 DAN/NOR 11U
UNITED KINGDOM 1E
IRV 2U
US ASCII 0U
Spacing
Pitch
ESC(s#P
This ESC sequence determines the spacing of the printed document. # may have one
of the following values:
Value Spacing
0 Fixed Spacing
1 Proportional Spacing
-1 Compressed Proportional Spacing
Some fonts have fixed spacing, i.e. the amount of space allotted to each character is
uniform. Other fonts are proportionally spaced i.e. narrow characters such as i are
allowed less horizontal space than wide characters, such as w.
ESC(s#H
This ESC sequence determines the print pitch. # represents the pitch in characters per
inch (cpi). For example:
10 cpi ESC(s10H
16.66 cpi ESC(s16.66H
This command is used only with fonts of fixed spacing. The pitch is the measure of
the character width, i.e. it represents the number of characters per inch (cpi). The
larger the number of characters per inch, the smaller the character.
A field value of up to two decimal places is acceptable here.
Page 33

Point Size
Style
Font Basics 3-9
ESC(s#V
This ESC sequence determines the primary font height. # represents the height. For
example:
7 point ESC(s7V
12 point ESC(s12V
14.4 point ESC(s14.4V
The height of the character in a font is expressed in points. There are 72 points in one
inch. This measurement is referred to as the Font Size, and is used primarily in relation
to proportional fonts.
Font size for scalable outline fonts are also defined by this sequence.
Stroke Weight
ESC(s#S
This ESC sequence is used to turn italics ON and OFF. # represents the following
values, for example:
Value Style
0 Italics OFF (Upright)
1 Italics ON
4 Condensed
5 Condensed Italic
8 Compressed or extra condensed
24 Expanded
32 Outline
64 Inline
128 Shadowed
160 Outline shadowed
ESC(s#B
This ESC sequence determines the stroke weight. # represents the following values.
For example:
Value Typeface
-1 to -7 Light
0 Medium
1 to 7 Bold
The stroke weight (light, medium or bold) refers to the thickness of lines in a font.
-7 Ultra light -3 Light 0 Normal
+3 Bold +7 Ultra Bold
Page 34

3-10 Font Basics
Typeface
ESC(s#T
This ESC sequence determines the typeface. # represents the following values. For
example:
Value Typeface
0 Line Printer
2 Elite
3 Courier
4 Swiss (similar to Helvetica
5 Dutch (similar to Times
®
)
®
Roman/CG Times)
6 Gothic
8 Prestige
52 Univers
The typeface of a font determines the shape of the strokes that make up each character
or symbol.
Example of font selection:
Escape sequence:
ESC&l0O ESC(8U ESC(s 0p 10h 12v 0s 0b 3T
a
b
c
d
e
f
g
h
a Orientation : Portrait
b Symbol Set : Roman-8
c Spacing : Fixed
d Pitch : 10 CPI
e Point Size : 12 point
f Style : Upright
g Stroke weight : Normal
h Typeface : Courier
Page 35

Font Basics 3-11
‘c - h’ are the Fonts Parameter Definition Command Group.
Escape sequences with the same beginning characters can be combined. To do this,
change the final letter of the first sequence from upper case to lower case and omit the
common characters. For example, combining proportional spacing, ESC(s1P, with
10 point character height, ESC(s10V , results in the following:
ESC(s1p10V
Keep in mind that there should be only one upper case letter in a combined sequence,
and that upper case letters must come at the end of the sequence. Also remember that
the commands are executed in the order in which they are given.
The following sample commands include the escape sequences that specify each
font’s characteristics. In some cases it is not necessary to change fonts, but shorten the
specifications. Firstly, make sure that the new font you have requested (bold or italic,
for example) is available. Secondly, remember that a higher priority font
characteristic will override a lower priority one. In both cases, an error in specifying
a font may give unexpected results.
Font Command Sequence
Courier 10 cpi (default) ESC&l0O ESC(8U ESC(s0p10h12v0s0b3T
Courier bold 10 cpi ESC&l0O ESC(8U ESC(s0p10h12v0s3b3T
Courier italic 10 cpi ESC&l0O ESC(8U ESC(s0p10h12v1s0b3T
Courier italic bold 10 cpi ESC&l0O ESC(8U ESC(s0p10h12v1s3b3T
Line Printer 16.6 cpi ESC&l0O ESC(8U ESC(s0p16.66h8.5v0s0b0T
CG Times 12 cpi ESC&l0O ESC(8U ESC(s1p10v0s0b4101T
CG Times 12 cpi bold ESC&l0O ESC(8U ESC(s1p10v0s3b4101T
CG Times 12 cpi italic ESC&l0O ESC(8U ESC(s1p10v1s 0b4101T
CG Times bold 14.4 point ESC&l0O ESC(8U ESC(s1p10v0s3b4101T
Univers 10 point ESC&l0O ESC(8U ESC(s1p10v0s0bt2
Univers bold 10 point ESC&l0O ESC(8U ESC(s1p10v0s3bt2
Univers italic 10 point ESC&l0O ESC(8U ESC(s1p10v1s0bt2
Univers 8 point ESC&l0O ESC(8U ESC(s1p10v1s3bt2
Note: The above fonts can be printed in landscape mode, you must place
!
the landscape orientation command at the beginning of the sequence
instead of the portrait command, as follows:
ESC&l0O to ESC&l1O
Page 36

HP LaserJet IV Emulation 4-1
Chapter 4
HP LaserJet IV Emulation
Page 37

4-2 HP LaserJet IV Emulation
HP LJ IV Emulation Mode
The HP LJ IV Emulation Mode supports PCL-5e (Printer Control Language). It also
supports Oki’s unique features.
This has been developed from word processing, document processing and desk-toppublishing applications. It is mainly used for managing documents. The commands in
this area are almost all made up of the ESC (decimal 27) sequence.
Your printer offers a host of features, and to make the most of its printing capabilities
you are recommended to choose the drivers which allow you to utilise theses features.
If your software contains the appropriate drivers you may never need to use printer
commands. Occasionally, it may be useful to change certain settings or features while
you are using software which does not directly support your printer.
There are several ways to send commands to your printer. The easiest way is to use a
programming language such as BASIC to send them directly to your printer as
character strings. If you use this method, you will have to send all the commands
before starting the application.
Note: Many software packages will cancel printer settings by sending a reset
!
command to the printer prior to printing. If your software does this and does
not give you the option of changing the initialization string , you will be unable
to pre-set the printer.
Another way of using printer commands is to embed them directly in the text that you
are printing or send them to the printer through some software function. The approach
you take will depend on the specific capabilities of your software. If you wish to enter
commands in this way then you should consult your software manual.
The following pages list the printer commands in ASCII, Decimal and Hexadecimal
format, i.e.
ESCE ..............................ASCII
027 069..........................Decimal
1B 45 .............................Hexadecimal
Page 38

Printer Commands
Print Job Master Commands
Theses commands are usually sent to your printer before the print job is started. They
are used to define the default environment, such as the number of copies left and top
offset for filling. (For more information refer to the HP LaserJet IV manual).
(a) Reset
ESCE
027 069
1B 45
This command restores the user default values and deletes all temporary fonts and
macros and then prints all the remaining data in the printer.
(b) Number of copies
ESC&l#X # = Number of copies (1 to 99)
027 038 108 # 088 (120) (Default value = 1)
1B 26 2C # 58 (78)
HP LaserJet IV Emulation 4-3
This command designates the number of copies. The command should be made before
closing the page and will affect subsequent pages.
(c) Multicopies Start (Oki Command)
ESC/m#S # = Number of copies
027 047 109 # 183 (115) (1 to 99 including original page)
1B 2F 6D # 53 (73) (Default = Off)
This command starts the printer printing multicopies of the current page until the
printer receives the Partial Multicopies Stop Command
(d) Multicopies Stop (Oki Command)
ESC/mE
027 047 109 069 (101)
1B 2F 6D 45 (65)
This command stops the multicopies printing.
Note: A single document of up to eight pages in length can be copied up to 99
!
times. # contains the number of copies. The pages that are to be copied must
be enclosed by a start and stop command.
(e) Copy Mark Print with page number (Oki Command)
ESC/m#M # = 0 no mark
027 047 109 # 077 (109) # = 1 COPY and running number is
1B 2F 6D # 4D (6D) printed.
If required the word COPY and the running number can be printed on the
copies.
On the first page, nothing will be printed. COPYxx appears in the upper right corner
(xx = 01 - 99 from the second page onwards).
Page 39

4-4 HP LaserJet IV Emulation
For example: to print 4 multicopies – with copy marks – of one document:
ESCE
ESC/m1M
ESC/m4S
print text page 1
print text page 2
print text page 3
ESC/mE
ESC/m0M
Example:
Text 1
Text 2
Text 3
Text 1
Text 2
Text 3
Text 1
Text 2
Text 3
Text 1
Text 2
Text 3
Original Set Copy-1 Set Copy-2 Set Copy-3 Set
Page 40

Page Formatting Commands
These commands are sometimes sent before each page of data to define the paper input
source, the paper size, orientation and the margins.
Once these commands have been received they will remain in operation until the next
set of commands are received.
(a) Paper Input
ESC&l#H # = 0 To print the current page
027 038 108 # 072 (104) and retain the current
1B 26 6C # 48 (68) input source.
HP LaserJet IV Emulation 4-5
# = 1 To feed paper from the upper
tray.
# = 2 To feed paper from the manual
feed.
# = 3 To feed an envelope from the
manual feed.
# = 4 To feed paper from the lower
tray.
# = 6 To feed paper from the multi
media paper feeder.
(b) Paper/Envelope Size
ESC&l#A # = 26 A4 Paper
027 038 108 # 065 (97) # = 25 A5 Paper
1B 26 6C # 41 (61) # = 24 A6 Paper
# = 100 B5 Paper
# = 1 Executive Paper
# = 2 Letter Paper
# = 3 Legal Paper 14
# = 9 Legal Paper 13
# = 80 Monarch Envelope
# = 81 COM-10 Envelope
# = 90 DL Envelope
# = 91 C5 Envelope
(Default = 26 A4 Paper)
This command designates the paper/envelope size. It is also possible to select paper
sizes from the operation panel manual selection.
Page 41

4-6 HP LaserJet IV Emulation
(c) Page Length
ESC&l#P # = Number of lines per page.
027 038 108 # 080 (112) (Default = 64)
1B 26 6C # 50 (70)
This command designates the logical page length in lines at the current line space
pitch.
Page length is set by the number of lines. So if you have an 11
2
¦3 inch page set at 6 lines
inch, the page length would be 70 lines. (Length of page in inches x current lpi
setting). A page length of 64 lines is the default setting of the printer . To set the page
length at 93 lines, (11
2
/3 inch paper x 8 lpi) insert 93 as a value of # and this is the
command
ESC&l93P
Maximum Page Length Values
Paper Size Portrait Landscape
6 lpi 8 lpi 6 lpi 8 lpi
A4 70 93 49 60
A5 49 66 34 45
B5 69 80 42 57
A6 34 45 19 25
LETTER 66 88 51 68
LEGAL 84 112 51 68
EXECUTIVE 60 80 43 58
If the printer is in the manual feed mode the paper size is set by the control panel and
this command is ignored. The command is also ignored if the size requested is outside
the allowable range. If the paper size selected is one inch the printer will not perform
an automatic skip over perforation. If the paper size selected is
1
/2 inch the top margin
is ignored as well.
(d) Orientation
ESC&l#O # = 0 Portrait
027 038 108 # 79 (111) # = 1 Landscape
1B 26 6C # 4F (6F) # = 2 Reverse Portrait
# = 3 Reverse Landscape
(Default=Portrait)
This command designates the printing directions on a physical page. It controls the
printing direction across the whole page. Using this command does not mean that it
is possible to print in multiple directions on any page. By setting the page length, the
top margin, the text length, left and right margins, horizontal motion index (HMI) and
vertical motion index (VMI) as defaults you will automatically disable the automatic
macro overlay. All the data received prior to this command will be printed and a form
feed and carriage return executed.
Page 42

HP LaserJet IV Emulation 4-7
(e) Print Direction
ESC&a#P # = 0 Portrait
027 038 097 # 08 70 (112) # = 90 90° Rotation in an anti -
1B 26 61 # 50 (90) clockwise direction.
# = 180 180° Rotation in an anti-
clockwise direction.
# = 270 270° Rotation in an anti-
clockwise direction.
This command will rotate everything that is printed subsequently. The new print
direction (which is set in 90°
increments in relation to the logical page) will continue
until a new command is sent to the printer.
(f) TEXT Length Setting
ES&l#F # = Number of lines
027 038 108 # 070 (102)
1B 26 6C # 46 (66)
This command designates the number of lines in the current line feed pitch.
If you wanted to print 55 lines on the page, the command would be: ESC&l55F
(g) Left Margin Setting
ESC&a#L # = Column number
027 038 097 # 076 (108) (Default = 0)
1B 26 61 # 4C (6C)
This command sets the left margin in the column at the current (HMI) to the left edge
of the text area.
To set the left margin column to 10 substitute 10 for the # in the left -hand margin
command above:
(h) Right Margin Setting
ESC&a#M # = Column number
027 038 097 # 077 (109)
1B 26 61 # 40 (60)
This command sets the right margin in the column number at the current HMI to the
right edge of the text area.
Page 43

4-8 HP LaserJet IV Emulation
1
1
1
1
1
1
1
1
1
1
1
1
1
1
1
1
1
1
1
1
1
1
1
1
The same can be done for the right margin. Remember the right margin cannot be less
than the left margin. The combination command which sets both left and right
margins at the same time is
ESC&a10l65M
Top
margin
Text
length
Bottom
Margin
Left margin
▲
▲
▲
▲
▲
▲
▲
▲
Right margin
▲
2345678901234567890
2345678901234567890
2345678901234567890
2345678901234567890
2345678901234567890
2345678901234567890
2345678901234567890
2345678901234567890
2345678901234567890
2345678901234567890
2345678901234567890
2345678901234567890
2345678901234567890
2345678901234567890
2345678901234567890
2345678901234567890
2345678901234567890
2345678901234567890
2345678901234567890
2345678901234567890
2345678901234567890
2345678901234567890
2345678901234567890
2345678901234567890
TEXT
Page Width
▲
▲
▲
Page
length
▲
▲
Page 44

HP LaserJet IV Emulation 4-9
(i) Clear Horizontal Margin
ESC9
027 057
1B 39
This command resets the right and left margins to the logical page right and logical
page left respectively.
(j) Perforation Skip
ESC&l#L # = 0 Disable
027 038 108 # 076 (108) # = 1 Enable
1B 26 6C # 4C (6C) (Default = Enable)
When enable is set, the perforation area (from the bottom margin on the current page
to the top margin on the next page) is automatically skipped at the bottom of the length
of text. If a fine line feed runs past the bottom margin given in the text length
command, the ESC&l1L command will allow the printer to automatically advance to
the start of the text at the top of the next page, ejecting the current page from the
printer.
The command, ESC&l0L will disable this feature.
Note: This command will interfere with any page length formatting that is
!
controlled by any software.
(k) Horizontal Motion Index (HMI)
ESC&k#H # = number of
027 038 107 # 072 (104) (Default = 12)
1B 26 6B # 4B (68)
This command designates the width of the columns.
10 CPI 12 HMI HMI =
12 CPI 10 HMI
120
CPI
15 CPI 8 HMI
20 CPI 6 HMI
1
/
inch increments
120
Page 45

4-10 HP LaserJet IV Emulation
(l) Vertical Motion Index (VMI)
ESC&l#C # = number of
1
/48 inch increments
027 038 108 # 067 (99) for line pitch
1B 26 6C # 43 (63) (Default = 8 (6LPI))
This command designates the height of the line pitch.
3 LPI 16 VMI VMI =
4 LPI 12 VMI
48
LP
6 LPI 8 VMI
8 LPI 6 VMI
(m) Line Spacing Command
ESC&l#D # = 1, 2, 3, 4, 6, 8, 12, 16, 24 and 48
027 038 108 # 068 (100) (Other values are ignored)
1B 26 6C # 44 (64) (Default = 6)
This command designates the number of lines printed per inch (LPI). When this
command is received during the formatting of a page, the current page formatting is
stopped automatically and a form feed is performed, followed by a carriage return.
However, the printer defaults to slightly different settings. Left and right margin
defaults are 0.25 inch but top and bottom defaults are 0.2 inch.
The page formatting commands lets you change the margins. You must remember
that these page formatting commands do not conflict with the software that you are
using. The problem is that most packages have their own page formatting included as
part of the program, sending additional codes to the printer (such as a skip over
perforation command) can result in irregular page breaks.
Page 46

Cursor Positioning
The cursor identifies the position where a command begins laying out page data. The
cursor can be moved anywhere on the logical page.
(a) Horizontal Column Positioning
This command moves the cursor to an absolute column on the same line. The column
width is defined by the current HMI # field with a + sign indicates the right direction
relatively from the current position, - sign indicates the left direction.
(b) Horizontal Decipoints Positioning
HP LaserJet IV Emulation 4-11
ESC&a#C # = Number of columns
027 038 097 # 067 (99)
1B 26 61 # 43 (63)
ESC&a#H # =
Number of Decipoints (1/
027 038 097 # 072 (104)
1B 26 61 # 48 (68)
720
inch)
This command moves the cursor to an absolute decipoints position horizontally.
(c) Horizontal Dot Positioning
1
/
ESC*p#X # = Number of dots (
300
inch)
027 042 112 # 088 (120)
1B 2A 70 # 58 (78)
This command moves the cursor to an absolute dot position (
1
/
DPI horizontally).
300
(d) Vertical Rows Positioning
ESC&a#R # = Number of rows
027 038 097 # 082 (114)
1B 26 61 # 52 (72)
This command moves the cursor to an absolute rows position in the same column. #
field with the + sign indicates the downwards direction from the current line, - sign
indicates the upwards direction.
(e) Vertical Decipoints Positioning
ESC&a#V # = Number of decipoints (
1
/
720
inch)
027 038 097 # 086 (118)
1B 26 61 # 56 (76)
This command moves the cursor to an absolute decipoints line position vertically.
(f) Vertical Dots Positioning
ESC*p#Y # = Number of dots (
027 042 112 # 089 (121)
1B 2A 70 # 59 (79)
This command moves the cursor to a relative dot position vertically.
1
/
300
inch)
Page 47

4-12 HP LaserJet IV Emulation
(g) Half Line Feed
ESC=
027 061
1B 3D
This command moves the cursor down one half of the current line spacing vertically
in the same column position.
(h) Line Termination
ESC&k#G # =
027 038 107 # 071 (103) # =
1B 26 6B # 47 (67) # =
This command designates how the printer interprets CR, LF and FF control codes.
(i) Push/Pop Cursor Positioning
ESC&f#S # = 0 Push (Store the cursor position)
027 038 102 # 083 (115) # = 1 Pop (Recall the cursor position)
1B 26 66 # 53 (73) (Default = 0)
0CR➧CR;LF➧LF;FF➧FF
1CR➧CR/LF;LF➧LF;FF➧FF
2CR➧CR;LF➧CR/LF;FF➧CR/FF
# =
3CR➧CR/LF;LF➧CR/LF;FF➧CR/FF
Font Selection
This command allows the current cursor position to be stored and the last cursor
position to be recalled from the stack.
A font is defined by a symbol set, spacing, height, pitch, style, stroke weight and
typeface.
In the printer there are three font data sources: internal resident fonts, optional card
fonts and downloadable soft fonts.
Your printer is capable of using two fonts at the same time. It does this by making one
font primary and the other secondary. To use a secondary font it is necessary to change
one character of the command line.
( Left parenthesis indicates the primary font
) Right parenthesis indicates the secondary font
By changing the left parenthesis ( ( ) to the right parenthesis ( ) ) in the font related
commands you will then be referring to the secondary font.
(a)Primary Symbol Set
For a list of Symbol Sets and their ASCII escape code refer to App A p.1–2.
(b) Primary Spacing
ESC(s#P # = 0 Fixed Spacing
027 040 115 # 080 (112) # = 1 Proportional spacing
1B 28 73 # 50 (90) # =-1 Condensed proportional
Spacing
(Default = 0)
This command specifies inter-character spacing.
Page 48

HP LaserJet IV Emulation 4-13
(c) Primary Pitch
ESC(s#H # = Number of Characters per inch .
027 040 115 # 072 (104) (Default = 10 (10CPI))
1B 28 73 # 48 (68)
This command designates the number of fixed space characters per inch horizontally
(16.66 CPI for line printing with fixed spacing Fonts: ESC(s16.66H).
(d) Primary Height
ESC( s # V (Default = 12)
027 040 115 # 086 (118)
1B 28 73 # 56 (76)
This command designates the character point size. One point is
1
¦72 inch. For a scalable
font the point size ranges from 0.25 to 999.75 in increments of 0.25 points.
(e) Primary Font
ESC ( s # S # = 0 Upright
027 040 115 # 083 (115) # = 1 Italic
1B 28 73 # 53 (73)
This command designates the posture width and structure of the font.
(f) Primary Font Stroke Weight
ESC(s#B # = -3 Light
027 040 115 # 066 (98) # = -2
1B 28 73 # 42 (62) # = -1
# = 0 Normal
# = 1
# = 2
# = 3 Bold
This command designates the thickness of the stroke of fonts.
(g) Primary Typeface
ESC(s#T # = Typeface Family
027 040 115 # 084 (116) (Default = 3 Courier)
1B 28 73 # 59 (74) # = 0 Line Printer
# = 2 Elite
# = 3 Courier
# = 6 Letter Gothic
# = 8 Prestige
# = 11 Presentation
# = 52 Univers
# = 110 OCR-B
# = 104 OCR-A
# = 4101 CG Times
Page 49

4-14 HP LaserJet IV Emulation
(h) Primary Font Setting
ESC(3@
027 040 051 064
1B 28 33 40
This command sets the primary font characteristics to the user default set.
(i) Underline enable
ESC&d#D # = 0 Fixed Position Underline
027 038 100 # 068 (100) # = 3 Floating Position Underline
1B 26 64 # 44 (64)
This command starts underlining text and continues to underline text until the
underline disable command is received. The floating underline position is determined
by the greatest underline distance data which each font has in its own descriptor,
among all the fonts on the current line
(j) Underline Disable
ESC&d@
027 038 100 064
1B 26 64 40
This command cancels the underline enable command and the printer stops
underlining.
(k) Transparent Print Data
ESC&p#Xdata # = Number of bytes in transparent
027 038 112 # 088 data print data.
1B 26 70 # 58 data (Default = 0)
This command will enable your printer to print out all the transparent print data, which
is usually unprintable.
Soft Fonts Management Commands
When you use downloaded soft fonts you will have to organise them, such as choosing
to save them in RAM, deleting or assigning ID numbers and setting up temporary
parameters.
(a) Font ID Assignment
ESC*c#D # = ID Number
027 042 099 # 068 (100) (Default = 0)
1B 2A 63 # 46 (66)
This command assigns an ID number for use when downloading selection and
deselection.
Page 50

HP LaserJet IV Emulation 4-15
(c) Font ID selection as primary
ESC(#X # = Font ID number
027 040 # 088 (120)
1B 28 # 58 (78)
This command designates the soft font (#) as Primary.
(d) Font Descriptor
ESC)s#W data # = Number of bytes in the font
027 041 115 # 087 data descriptor data.
1B 29 73 # 57 data (Data = Font descriptor data.)
(e) Character Descriptor
ESC(s#Wdata # = Number of bytes in the character
027 040 115 # 087 data descriptor and data.
1B 28 73 # 57 data
(Data = Character descriptor data.)
This character downloads the character descriptor and associated data to the printer.
Raster Graphics
(f) Character Code
ESC*c#E # = Character code in decimal
027 042 099 # 069 (101)
1B 2A 63 # 45 (65)
This command designates the character code for the next downloaded character.
Your printer is capable of printing images that have been sent to it in the form of a
binary data as raster images (images which are divided into dot rows.)
(a) Raster Graphics Resolution
ESC*t#R # = 75 75 x 75 dpi
027 042 116 # 082 (114) # = 100 100 x 100 dpi
1B 2A 74 # 52 (72) # = 150 150 x 150 dpi
# = 300 300 x 300 dpi
# = 600 600 x 600 dpi
(Default = 75)
This command designates the resolution of the raster data.
(b) Start Raster Graphics
ESC*r#A # = 0 Start raster graphics from
027 042 114 # 065 (97) default left graphics margin.
1B 2A 72 # 41 (61) # = 1 Start raster graphics margin in
the current column.
This command specifies the start position for the raster graphics and begins the raster
graphics data.
Page 51

4-16 HP LaserJet IV Emulation
(c) Raster Compression Mode
ESC*b#M # = 0 Unencoded
027 098 # 099 (109) # = 1 Run length encoded
1B 2A 62 # 4D 6D # = 2 Tagged Image File Format
This command designates the graphics data compression mode for the printer to
generate a raster graphics image from the received data.
(d) Transfer Raster Data
ESC*b#Wdata # = Number of bytes in the raster
027 042 098 # 087 data data.
1B 2A 62 # 57 data (Data = raster binary data)
This command sends a row of raster data to the printer.
(TIFF)
# = 3 Delta Row Compression
(Default = 0)
Vector Graphics
(e) End Raster Graphics
ESC*rB
027 042 114 66 (98)
1B 2A 72 42 (62)
This command designates the end of a raster graphic image.
To create an HP-GL/2 image in your document, you first need to enter the HP-GL/2
mode and draw your vector graphics.
(a) Enter the HP-GL/2 Mode
ESC%#B # = 0 Pen positioned at previous
027 037 # 066 (98) HP-GL/2 pen position.
1B 25 # 42 (62) # = 1 Pen will be positioned at the
current PCL cursor position.
This command places the printer in the HP-GL/2 mode and sets the start position of
the pen.
(b ) Return to PCL Mode
ESC%#A # = 0 Cursor returns to the previous
027 037 # 065 (97) PCL cursor position.
1B 25 # 41 (61) # = 1 Cursor returns to the present
HP-GL/2 pen position
This command returns the printer to PCL mode and determines the cursor position.
Page 52

HP LaserJet IV Emulation 4-17
(c) Plot Horizontal Size
ESC*c#K # = Horizontal size in inches.
027 042 099 # 075 (107)
1B 2A 63 # 4B (6B)
This command specifies the horizontal size of the drawing.
(d) Set Vertical Size
ESC*c#L # = Vertical size in inches.
027 042 099 # 076 (108)
1B 2A 63 # 4C (6C)
This command specifies the vertical size of the drawing.
(e) Set Anchor Point
ESC*c0T
027 042 048 084 (116)
1B 2A 63 30 54 (74)
This command sets the PCL Picture Frame anchor point to PCL cursor position. This
anchor point defines the upper left corner of the picture frame.
(f) Horizontal Picture Frame Size
ESC*c#X # = Horizontal size in decipoints
027 042 099 # 088 (120) (
1B 2A 63 # 58 (78)
This command specifies the horizontal size of the picture frame.
(g) Vertical Picture Frame Size
ESC*c#Y # = vertical size in decipoints (
027 042 099 # 089 (121) inch).
1B 2A 63 # 59 (79)
This command specifies the vertical size of the picture frame.
Graphics Image Manipulation
Some images and characters will be shaded or cross-hatched. You can create these
advanced graphics images in your own documents.
(a) Select Pattern
ESC*v#T # = 0 Solid Black
027 042 118 # 084 (116) # = 1 Solid White
1B 2A 76 # 54 (74) # = 2 Shading Pattern
1
/
inch)
720
1
/
# = 3 Cross Hatching Pattern
(Default = 0)
720
This command designates the type of pattern to be placed in your document.
Page 53

4-18 HP LaserJet IV Emulation
(b) Select Source Transparency
ESC*v#N # = 0 Transparent: The white
027 042 118 # 078 (110) pixels in the source are not
1B 2A 96 # 4E (6E) copied on to the destination.
This command designates the source images transparency mode.
(c) Select Pattern Transparency
ESC*v#O # = 0 Transparent: The white
027 042 118 # 079 (111) pixels in the pattern image are
1B 2A 76 # 4F (6F) not copied on to the destination.
# = 1 Opaque: The white pixels
in the source are copied in white
directly on to the destination.
# = 1 Opaque: The white pixels
in the pattern image are copied
directly on the destination.
(d) Horizontal Rectangle Size in Decipoints
ESC*c#H # =
Number of Decipoints (1/
027 042 099 # 072 (104)
1B 2A 63 # 48 (68)
This command designates the rectangle width in decipoints.
(e) Horizontal Rectangle Size in Dots
ESC*c#A # = Number of dots (
027 042 099 # 065 (97)
1B 2A 63 # 41 (61)
This command designates the rectangle width in dots.
(f) Vertical Rectangle Size in Decipoints
ESC*c#V # = Number of decipoints (
027 042 099 # 086 (118)
1B 2A 63 # 56 (76)
This command designates the rectangle height in decipoints.
(g) Vertical Rectangle Size in Dots
ESC*c#B # = Number of dots (
027 042 099 # 066 (98)
1B 2A 63 # 42 (62)
1
1
/
300
/
300
720
inch)
1
/
720
inch)
inch)
inch)
This command designates the rectangle height in dots.
Page 54

HP LaserJet IV Emulation 4-19
(h) Fill Rectangular Area
ESC*c#P # = 0 Black fill
027 042 099 # 080 (112) # = 1 Erase (white) fill
1B 2A 63 # 50 (70) # = 2 Shaded fill
# = 3 Cross Hatch Fill
# = 5 Current pattern fill
(Default = 0)
This command fills a rectangular area with the fill that has been selected for that area.
(i) Area Fill ID
ESC * c # G
027 042 099 # 071 (103)
1B 2A 63 # 47 (67)
When the shaded fill is selected:
# = 1 to 2 Shade A
# = 3 to 10 Shade B
# = 11 to 20 Shade C
# = 21 to 35 Shade D
# = 36 to 55 Shade E
# = 56 to 80 Shade F
# = 81 to 99 Shade G
# = 100 Shade H
Shade A 1-2% Shade B 3 -10% Shade C 11-20% Shade D 21-35%
Shade E 36-55% Shade F 56-80 % Shade G 81-99% Shade H 100%
Page 55

4-20 HP LaserJet IV Emulation
When a cross hatched fill is selected
# = 1 Pattern A
# = 2 Pattern B
# = 3 Pattern C
# = 4 Pattern D
# = 5 Pattern E
# = 6 Pattern F
Pattern D Pattern E Pattern F
Macros
Pattern A Pattern B Pattern C
A macro is a group of data which includes PCL commands and data created by users.
When a user regularly uses one group of data it can be stored in the printer by giving
it a Macro ID number.
How to create a macro in the printer :
(i) Assign Macro ID Number
(ii) Define Macro Start
(iii) Send a group of data as a macro
(iv) Define Macro Stop
How to call up a macro from the printer:
(v) Type Macro ID Number
(vi) Execute Macro
Page 56

HP LaserJet IV Emulation 4-21
(a) Macro ID
ESC&f#Y # = Macro ID Number
027 038 102 # 089 (121)
1B 26 66 # 59 (79)
This command specifies the ID number for subsequent macro commands ( (i) and (v)
on previous page).
(b) Macro Control
ESC&f#X # = 0 Start macro information
027 038 102 # 088 (120) (ii).
1B 26 66 # 58 (78) # = 1 Stop macro information
(iv).
# = 2 Execute Macro (vi).
# = 3 Call Macro.
# = 4 Enable Macro for
automatic overlay.
# = 5 Disable automatic overlay.
# = 6 Delete all macros.
# = 7 Delete all temporary
macros.
# = 8 Delete all macros specified
by ID numbers.
# = 9 Make Macro temporary
# = 10 Make Macro permanent
# = 41 Make DeskTop Macro
permanent
# = 51 Reset permanent DeskTop
Macro
Note: All macros will be lost when the printer is turned off.
!
Page 57

4-22 HP LaserJet IV Emulation
Miscellaneous
(a) End of line wrap
ESC&s#C # = 0 Enable end of line wrap.
027 038 115 # 067 (99) # = 1 Disable end of line wrap.
1B 26 73 # 43 (63) (Default = 1)
When enabled, CR-LF will be executed at the right-hand margin position
automatically. When disabled, a character exceeding the right-hand margin will be
clipped.
(b) Display Function
ESCY
027 089
1B 59
This command puts the printer into the Display Functions Mode. In this mode all
control codes will be printed (if the selected symbol set has these codes) normally.
ESCZ
027 090
1B 5A
This command disables the Display Functions Mode. All control codes will be
executed normally.
Page 58

HP-GL/2 Commands
Your printer can provide you with vector graphics printing through the HP-GL/2
command language. HP-GL/2 produces circles, arcs, lines, etc., in any shape, size and
angle, with relative ease. The HP-GL/2 commands are much simpler and quicker to
use than equivalent PCL raster image commands. A summary of HP-GL/2 commands
is shown below, for more technical information, please contact your nearest Oki
support centre.
In order to switch from HP-PCL mode to HP-GL/2 mode, the "Enter HP-GL/2 Mode"
command (ESC%#B) must be issued first. Each HP-GL/2 command starts with an
mnemonic, continues with parameters (most of them are optional), separators
(commas between parameters) and ends with a semicolon (command terminator), for
example:
Character Plot: CP Spaces, Lines;
HP LaserJet IV Emulation 4-23
(mnemonic) (parameter1) (paremeter2)
Select Primary Font ID
FI
Selects as primary the font that was being used in the PCL mode.
Select Secondary Font ID
FN
Selects as secondary the font that was previously selected in the PCL mode.
Specify Scalable or Bitmap fonts.
SB (n)
Specifies the typeface of fonts to be used for labels.
n = 0 Scalable Fonts
n = 1 Bitmap and scalable fonts
Define Transparency Mode
TR (n)
Defines how to copy the white area in the source image on to the destination image.
n = 0 Transparency mode is off.
n = 1 Transparency mode is on. (Default)
Select Screened Vectors
SV
Selects area fill type for lines, hatch lines, arcs, circles, polygon edges and wedges.
Arc Absolute
AA
Draws an arc using absolute co-ordinates.
Arc Relative
AR
Draws an arc using relative co-ordinates.
Page 59

4-24 HP LaserJet IV Emulation
Absolute Arc Three Point
AT
Draws an arc from the current pen position through two absolute points.
Plot Absolute
PA
Allows movement to absolute co-ordinate locations.
Plot Relative
PR
Enables movement relative to the current pen position.
Pen down
PD
Lowers the logical pen on to the page.
Pen Up
PU
Lifts the logical pen from the page.
Relative Arc Three Point
RT
Draws an arc from the current pen position through two relative points.
Polyline Encoded
PE
Encodes common HP-GL/2 commands to increase printer throughput.
Circle
CI
This command draws a circle with a specified radius.
Fill Rectangle Absolute
RA
Fills a specified rectangle with absolute co-ordinates.
Fill Rectangle Relative
RR
Fills a rectangle which has been specified with relative co-ordinates.
Edge Rectangle Absolute
EA
Outlines a rectangle specified with absolute co-ordinates.
Edge Rectangle Relative
ER
Outlines a rectangle specified with relative co-ordinates.
Fill Wedge
WG
Defines and fills a wedge shaped polygon.
Page 60

HP LaserJet IV Emulation 4-25
Edge Wedge
EW
Outlines a wedge shaped polygon.
Polygon Mode
PM
Allows the user to create their own polygons in the polygon buffer.
Fill Polygon
FP
Fills the polygon specified in the polygon buffer with the currently selected fill.
Edge Polygon
EP
Outlines the polygon resident in the polygon buffer.
Select Standard Font
SS
Selects the font designated by SD for printing labels.
Select Alternate Font
SA
Selects the font designated by AD.
Absolute Label Direction
DI
Specifies the slope of the labels independently of P1 and P2 positions.
Relative Label Direction
DR
Specifies the slope of labels relative to the P1 and P2 positions.
Absolute Character Size
SI
Specifies the absolute character size in centimetres.
Relative Character Size
SR
Specifies character size as a percentage of the P1/P2 distance.
Character Slant
SL
Specifies the slant as a tangent of an angle in the printed labels.
Extra Space
ES
Adjusts the space between characters and lines of text.
Page 61

4-26 HP LaserJet IV Emulation
Standard Font Definition
SD
Specifies the standard font for printing labels by kinds and values.
Kind 1: Symbol Set (specific definition number).
Kind 2: Font Spacing (fixed or proportional).
Kind 3: Pitch (character per inch).
Kind 4: Height (font point size).
Kind 5: Posture (upright or italic).
Kind 6: Stroke weight (thickness).
Kind 7: Typeface (specific definition number).
Alternate Font Definition
AD
Specifies the alternate font for printing labels by kinds and value.
Character Fill Mode
CF
Specifies how outline fonts are to be filled/described.
Label Origin
LO
Specifies the positioning of the characters within a label.
Label
LB
Prints attached text using the current font.
Define Label Terminator
DT
Defines label termination.
Character Plot
CP
Moves the pen the specified number of character cells from the present pen position.
Transparent Data
TD
Specifies whether control codes perform their function or are printed as characters.
Define Variable Text Path
DV
Specifies the direction of print in 90° increments from 0°, -90°, -180°, and -270°.
Line Type
LT
Selects the line pattern for line drawings.
Line Attributes
LA
Specifies the shape in which lines end and their joins are drawn.
Page 62

HP LaserJet IV Emulation 4-27
Pen Width
PW
Specifies a new pen width.
Pen Width Unit Selection
WU
Specifies whether pen width is specified in millimetres or as a percentage of P1/P2.
Select Pen
SP
Selects a pen to be used for plotting.
Symbol Mode
SM
Draws a character at each co-ordinate position.
Anchor Corner
AC
Specifies the starting point for fill patterns.
Raster Fill Definition
RF
Specifies a pattern for an area fill.
User Defined Line Type
UL
Defines a line pattern.
Scale
SC
Establishes a user unit co-ordinate system.
Input Window
IW
Sets up the soft clip window limits.
Input P1 and P2
IP
Establishes locations for the scaling points P1 and P2.
Input Relative P1 and P2
IR
Establishes P1 and P2 locations relative to the PCL Picture Frame.
Default Values
DF
Sets the most programmable features to default settings.
Initialize
IN
Sets all programmable features to default conditions.
Page 63

4-28 HP LaserJet IV Emulation
Rotate Co-ordinate System
RO
Rotates the co-ordinate system at a specified angle either 0, 90, 180, or 270 degrees.
Page 64

Printable Areas 5-1
Chapter 5
Printable Areas
Page 65

5-2 Printable Areas
Printable Areas
Printable Area for Each Paper Size
HP Emulation Print area.
Print quality guaranteed area is up to
8.5" (2550)
8.16" (2448)
1
/4 inch from the paper edges.
7.25" (2175)
6.91" (2073)
10.67" (3200)
9.17" (2750)
LETTER
4.12" (1237)
3.78" (1134)
COM-10
EXECUTIVE
11.0" (3300)
9.5" (2850)
10.17" (3050)
7.17" (2150)
3.87" (1162)
3.53" (1059)
MONARCH
10.5" (3150)
7.5" (2250)
8.32" (2496)
4.33" (1299)
3.99" (1197)
DL
6.38" (1913)
8.67" (2601)
6.04" (1812)
C5
9.01" (2704)
8.66" (2598)
Page 66

Printable Areas 5-3
11.35" (3405)
5.49" (1647
7.93" (2379)
8.27" (2480)
A4
4.13" (1240)
3.79" (1137)
5.83" (1748)
7.93" (2379)
5.49" (1647)
7.16" (2149)
6.82" (2046)
B5
(JIS)
A5
8.27" (2480)
10.12" (3035)
11.69" (3507)
A6
5.83" (1748)
9.78" (2934)
12.66" (3798)
12.256" (3676.8)
7.25" (2175)
6.91" (2073)
LEGAL 13"
9.016" (2704.8)
8.0" (2400)
C4
13.00" (3900)
12.756" (3826.8)
13.66" (4098)
8.543" (2562.9)
8.50" (2500)
8.16" (2448)
LEGAL 14"
3.875" (1162.5)
3.535" (1060.5)
COM-9
14.00" (4200)
8.875" (2662.5)
Note: The figures within ( ) indicate the number of 300 dpi resolution units.
!
Page 67

Symbol Sets A-1
Appendix A
Symbol Sets
Page 68

A-2 Symbol Sets
Symbol Sets
These symbol sets can be selected by the control codes or by the menu using the
control panel.
Menu Display Symbol Set Select String
ROMAN-8 ROMAN-8 ESC(8U
ECMA-94 ECMA-94 (Latin1) ESC(0N
PC-8 PC-8 ESC(10U
PC-8 DN PC-8 Dan/Norwegian ESC(11U
PC-850 PC-850 ESC(12U
Legal Legal ESC(1U
ISO-2 IRV ESC(2U
ISO 4 ISO-4 UK ESC(1E
ISO 6 ISO-6 ASCII ESC(0U
ISO 10 ISO-10 S/F ESC(3S
ISO 11 ISO-11 Swe ESC(0S
ISO 14 ISO-14 JASC ESC(0K
ISO 15 ISO-15 Ita ESC(0I
ISO 16 ISO-16 Por ESC(4S
ISO 17 ISO-17 Spa ESC(2S
ISO 21 ISO-21 Ger ESC(1G
ISO 25 ISO-25 Fre ESC(0F
ISO 57 ISO-57 Chi ESC(2K
ISO 60 ISO-60 Nor ESC(0D
ISO 61 ISO-61 Nor ESC(1D
ISO 69 ISO-69 Fre ESC(1F
ISO 84 ISO-84 Por ESC(5S
ISO 85 ISO-85 Spa ESC(6S
German German ESC(0G
Spanish Spanish ESC(1S
Dutch ISO Dutch ESC(90D
Roman Ex Roman Extension ESC(0E
Swdish 1 ISO Swedish1 ESC(91S
Swdish 2 ISO Swedish2 ESC(92S
Swdish 3 ISO Swedish3 ESC(93S
IBM-437 IBM-437 ESC(2038Z
IBM-850 IBM-850 ESC(2039Z
IBM-860 IBM-860 ESC(2037Z
IBM-863 IBM-863 ESC(2036Z
IBM-865 IBM-865 ESC(2035Z
PC Set 1 PC Set1 ESC(8Q
PC Ext US PC Ext US ESC(9Q
PC Ext D/N PC Ext D/N ESC(2033Z
PC2 US PC Set2 US ESC(2034Z
PC2 D/N PC Set2 D/N ESC(2032Z
VN Math Ventura Math ESC(6M
VN Intl Ventura International ESC(13J
VN US Ventura US ESC(14J
Page 69

Symbol Sets A-3
Menu Display Symbol Set Select String
PS Math PS Maths ESC(5M
PS Text PS Text ESC(10J
Math-8 Math-8 ESC(8M
Pi Font Pi Font ESC(15U
MS Publ Microsoft Publishing ESC(6J
DeskTop Desk Top ESC(7J
Win Cyr Cyrillic Windows ESC(9R
PC-852 PC-852 (East European Latin2) ESC(17U
Windows3.1 L5 Windows3.1 Latin5
Win Ltn 2 Windows3.1 Latin2 (East Europe)
PC-866 PC-866 (Cyrillic)
Win Grk Greek Windows 3.1
PC 869 PC-869 (Greek)
PC 855 PC-855 (Cyrillic)
CWI Hun CWI Hungarian
PC 857 PC-857 (Turkish)
ISO8859/2 L2 ISO8859/2 Latin2
ISO8859/9 L5 ISO8859/9 Latin5
MC Text MC Text
Turkish PC-8 Turkish PC-8
Windows3.0 L1 Windows3.0 Latin1
Windows3.1 L1 Windows3.1 Latin1
Wingdings Font Wingdings Font
Symbol Font Symbol Font
Hebrew NC Hebrew NC (862)
Hebrew OC Hebrew OC
Kamenicky<MJK> Kamenicky<MJK>
Polska Mazovia Polska Mazovia
Greek-437 Greek-437
Greek-437 Cy Greek-437 Cyprus
Greek-928 Greek-928
ISO8859/10 L6 ISO8859/10 Latin6
ESC(5T
ESC(9E
ESC(3R
ESC(2042Z
ESC(2041Z
ESC(2031Z
ESC(2044Z
ESC(2040Z
ESC(2N
ESC(5N
ESC(12J
ESC(9T
ESC(9U
ESC(19U
ESC(599L
ESC(19M
ESC(2020Z
ESC(2021Z
ESC(2022Z
ESC(2023Z
ESC(2024Z
ESC(2025Z
ESC(2026Z
ESC(2029Z
Page 70

A-4 Symbol Sets
Roman-8 (selected by 8U)
0123 6789 BCD
0
1
2
3
4
5
6
7
8
9
A
B
C
BS
HT
LF
FF
ESC
!
"
#
$
%
&
'
(
)
*
+
,
45 A EF
p
`
P
@
0
q
a
Q
A
1
r
b
R
B
2
s
c
S
C
3
t
d
T
D
4
u
e
U
E
5
v
f
V
F
6
w
g
W
G
7
x
h
X
H
8
y
i
Y
I
9
z
j
Z
J
:
{
k
[
K
;
|
l
\
L
<
—
´
Y
À
´
y
Â
˚
È
Ç
Ê
ç
Ë
Ñ
Î
ñ
Ï
¡
´
¿
`
¤
^
£
¨
~
¥
â
ê
ôÅØ·
û
á
é
ó
ú
à
è
ò
ù
ä
À
Ã
î
ã
Æ
å
Í
í
Ì
ø
æ
Ó
Ä
Ò
ì
Õ
Ö
õ
Ü
Sˇ
É
sˇ
µ
¶
3
/
4
—
1
/
4
1
/
2
a
o
«
D
E
F
CR
SO
SI
=
~
n
^
N
>
.
o
_
O
?
/
Ù
Û
£
§
ë
ƒ
ö
¢ü
ï
ß
Ô
Ú
Ÿ
ÿ
»
±
}
m
]
M
Page 71

"2BRbr ¢2Â
Òâì
´
y
0123456789
A
BCDE F
0
1
2
3
4
5
6
7
8
9
A
B
C
D
E
F
BS
HT
0@P`p °Àà
!1AQaq ¡
±
ÁÑáñ
#
$
%
&
'
(
)
LF *
+
FF '
3
4
5
6
7
8
9
:
;
<
C
D
E
F
G
H
I
J
K
L
S
T
U
V
W
X
Y
Z
[
\
c
d
e
f
g
h
i
j
k
l
s
t
u
v
w
x
y
z
{
|
£
¤
¥
|
§
¨
©
ª
«
¬
3
µ
¶
•
»
SI
SO
CR -
.
/
=
>
?
M
N
O
]
^
_
m
n
o
}
~
–
_
1
4
/
2
1
/
/
4
3
¿
Ä
Å
Æ
Ç
È
É
Ê
Ë
Ì
Í
Î
Ï
Ô
Õ
Ö
Ø
Ù
Ú
Û
Ü
´
ß
YY
Y
ä
å
æ
ç
è
é
ê
ë
ì
í
î
ï
ô
õ
ö
÷
ø
ù
ú
û
ü
ÿ
´
Ç
1
0
o
I
P
×
ã
ESC
ÃÓ ó
ECMA-94 Latin-1 (selected by 0N)
Symbol Sets A-5
Page 72

A-6 Symbol Sets
PC-8 US (selected by 10U)
0123 6789 BCD
0
1
2
3
4
5
6
7
8
9
A
B
C
D
▼
▼
..
..
♥
♦
♣
♠
!!
¶
§
→
←
↔
!
"
↕
#
$
%
&
↕
'
(
↑
)
↓
*
+
,
—
-
45 A EF
0
1
2
3
4
5
6
7
8
9
:
;
<
=
@
A
B
C
D
E
F
G
H
I
J
K
L
M
P
Q
R
S
T
U
V
W
X
Y
Z
[
\
]
`
a
b
c
d
e
f
g
h
i
j
k
l
m
p
q
r
s
t
u
v
w
x
y
z
{
|
}
Ç
ü
é
â
ä
à
å
ç
ê
ë
è
ï
î
ì
É
æ
Æ
ô
ö
ò
û
ù
ÿ
Ö
Ü
¢
£
¥
á
í
ó
ú
ñ
Ñ
a
o
¿
¬
¬
1
/
2
1
/
4
¡
α
Γ
π
Σ
σ
µ
τ
Φ
θ
Ω
δ
∞
φ
≡
±ß
≥
≤
⌠
⌡
÷
≈
°
•
.
√
n
2
E
F
>
?
N
O
.
▲
/
▼
^
_
n
o
~
Ä
Å
Pt
ƒ
·
«
»
∈
∩
Page 73

Interfacing B-1
Appendix B
Interfacing
Page 74

B-2 Interfacing
Interfacing
This appendix will help you design a SHIELDED parallel interface cable that
connects your printer to your computer. This requires, however, some knowledge of
electronics. If you are not technically oriented, we recommend that you purchase a
SHIELDED parallel interface cable from your dealer.
Parallel Interfacing
The printer requires a Centronics equivalent parallel cable with the following:
❏ Amphenol 57-30360 or AMP 552274-1 plug (or equivalent) with 36 pins.
❏ AMP 552073-1 (or equivalent) cover.
❏ Beldon (or equivalent) SHIELDED cable with twisted pair conductors. It cannot
exceed 1.8 metres in length and must be safety regulations approved. The cable
MUST be shielded.
Pin Description
Pin Signal Direction Description
1 Data strobe To printer Samples input data when changing from low level to
high level.
2-9 Data bits 1-8 To printer Indicates input data. High level indicates 1; low level
indicates 0.
10 Acknowledge From printer Indicates character input completion or function
operation end, low level indicates active.
11 Busy From printer Indicates data cannot be received at high level.
Data can be input at low level.
12 Paper end From printer High level indicates paper end.
13 Select From printer High level indicates select (on-line) condition.
14 0 V Signal ground.
15 Not used.
16 0 V Signal ground.
17 Chassis ground Chassis ground.
18 +5 V From printer +5 V supply (100mA maximum).
19-30
0 V Twisted pair returns for pins 1 through 11 .
31 Input prime To printer Controller of the printer is initialized at low level.
Low level indicates time more than 5 msec.
32 Fault From printer This signal goes from high to low, it is low when an
error condition occurs, such as paper end or off-line.
33 0 V Signal Ground.
34 Not used.
35 Set to high. Connected to + 5 V
through 3.3 K.
36 Not used.
Page 75

Connector pin configuration
Timing
PARALLEL DATA
(DATA BIT 1 to 8)
Interfacing B-3
DATA STROBE
0 to 0.5 µs
BUSY
100 µs ~
ACKNOWLEDGE
Note: The minimum value of TB (busy-on time) is 20 µs, and the maximum
!
value is the time spent for printing and paper feed.
1.63 µs
3.26 µs
Page 76
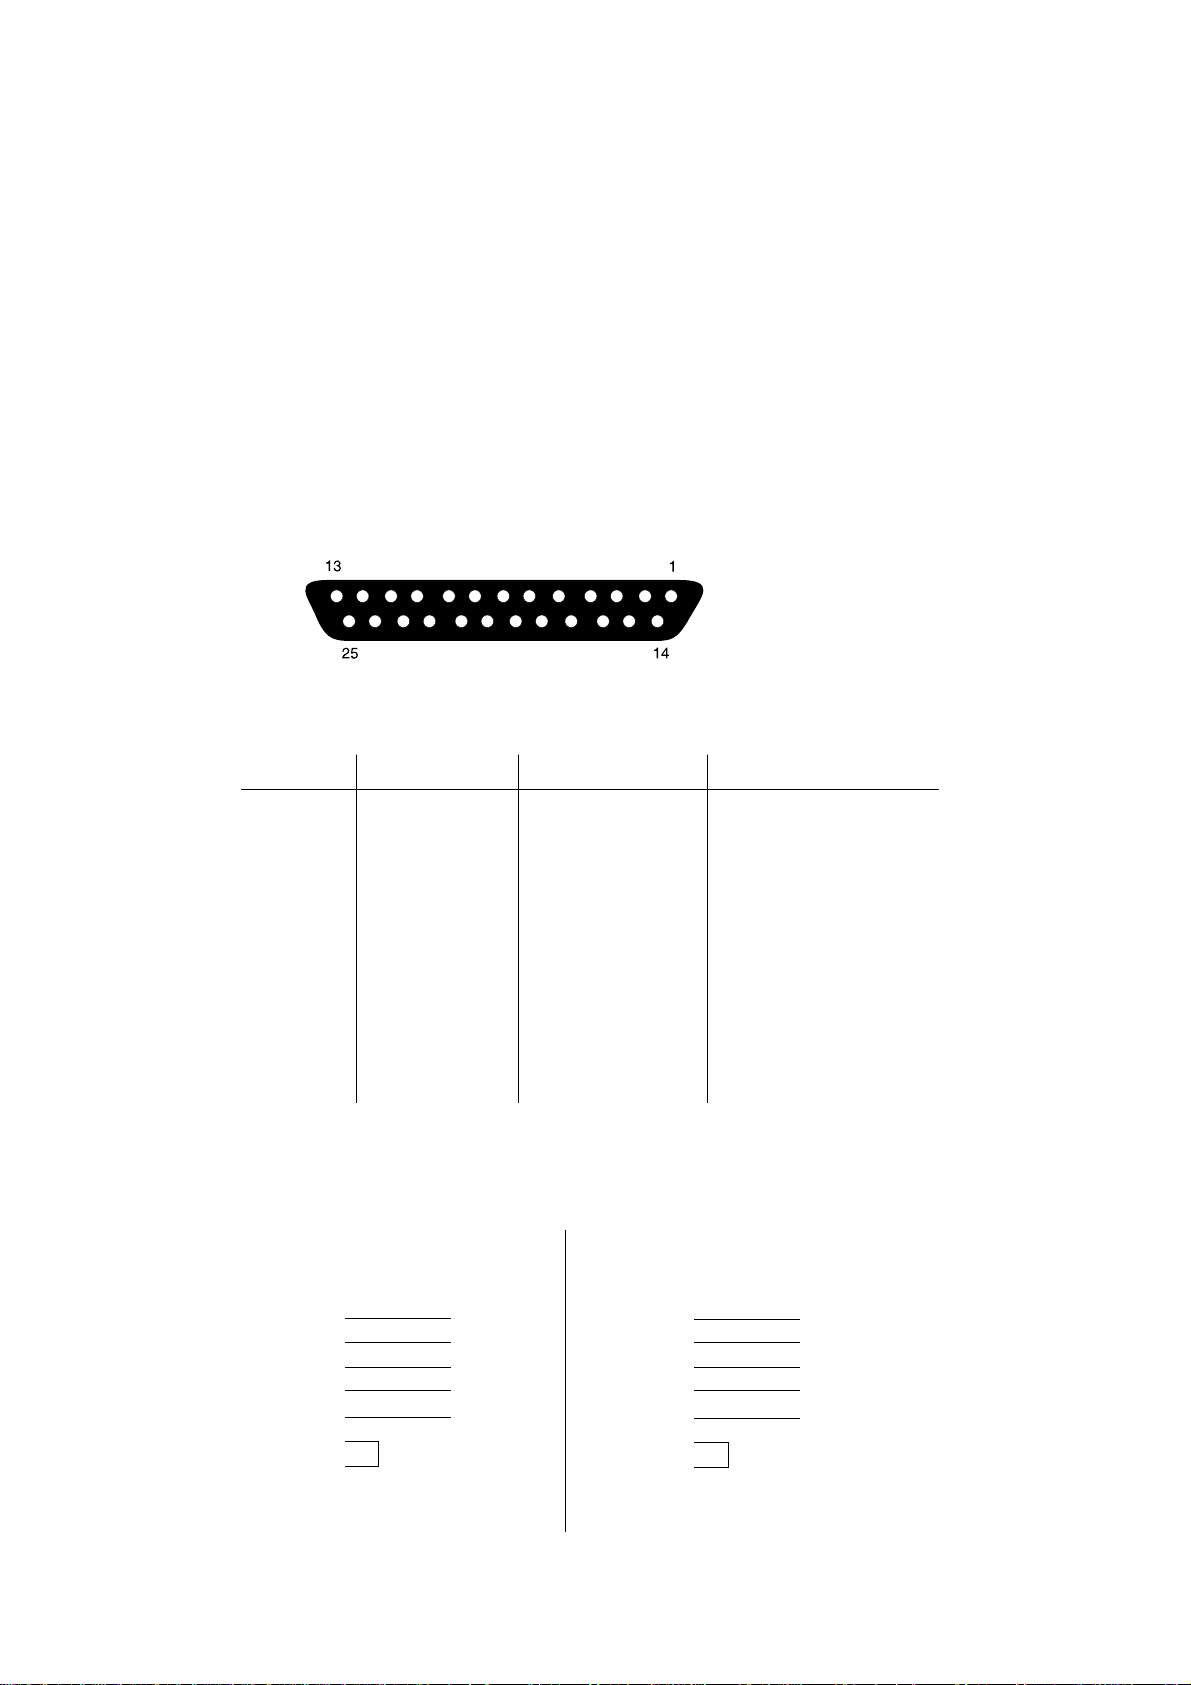
B-4 Interfacing
RS-232C Serial Interfacing
To construct a cable for an RS-232C serial configuration, you will need:
➢ SHIELDED cable with twisted pair conductors. Must be safety regulations
approved. The cable MUST be shielded.
➢ DB25 plug (printer end).
either
➢ DB25 socket (PC end if your PC has a 25-pin serial port)
or
➢ DB9 socket (PC end if your PC has a 9-pin serial port)
DB-25 Pin Configuration
Pin Assignment and Description Table
Pin Signal Direction Description
1 Frame ground – Frame ground
2 Transmitted data To printer Transmitted data
3 Received data From printer Received data
4 Request to send To printer Stay space level
5–
6–
7 Signal ground To printer Signal ground
9-17 NC – Not connected
18 +5V To printer +5V (if jumper installed)
19 NC – Not connected
20 DTR Data terminal ready
21-25 NC – Not connected
Interface Cable Connection Example:
a) IBM-PC (9-pin) Printer (25-pin) b) IBM PC (25-pin) Printer (25-pin)
Signal Pin Pin Signal Signal Pin Pin Signal
RD 2 2 TD RD 3 2 TD
TD 3 3 RD TD 2 3 R D
GND 5 7 GND GND 7 7 GND
DSR 6 20 DTR DSR 6 20 DTR
CTS 8 4 RTS CTS 5 4 RTS
CD 1 1 NC CD 8 8 NC
DTR 4 6 NC DTR 20 6 NC
RTS 7 8 NC RTS 4 8 NC
FG SHELL FG FG SHELL FG
▼
▼
▼▼
▼
▼
▼
▼▼
▼
Page 77

LCD Window Display Messages C–1
Appendix C
LCD Window Display Messages
Page 78

C–2 LCD Window Display Messages
5
1234
4
4
1234
4
1234
4
4
1234
4
1234
LCD Window Display Messages
Printer Status Messages
This chapter contains explanations of the different messages you will see, displayed
on one, or both lines in the LCD window of your printer.
Lamp Status Control Panel
: Blink
READY
: On
ON-LINE
: Off
234
: Undefined
Prty Message Status
READY
26 Indicates the printer is inON-LINE
26 Indicates the printer is in OFF-LINE
READY
READY
25 Ready ON: Indicates that there is
23
23
ON-LINE
HPIII
OFF-LINE
HPIII
DATA
HPIII
mode, HP III emulation.
mode.
data in the printer buffer.
Ready BLINK: Indicates that
the printer is receiving data.
24 Indicates that copy pages are being
READY
123
CPY nn/mm
printed.
nn = current page.
mm = total pages.
READY
25 Indicates that the printer is operating
23 Indicates that the amount of toner
123
123
READY
123
PWR SAVE
TONER LOW
in power saving mode.
left in the toner cartridge is low.
Print quality may be affected.
Page 79

LCD Window Display Messages C–3
4
4
4
4
4
Prty Message Status
22 The printer clears the remaining
READY
RESET
data in its buffer and resets the
menu to user default settings.
Temporary DLL/Macro data
is also cleared.
21 The printer will print a demo page.
READY
PRINT
DEMO
READY ON – Initiated by software
command.
READY BLINK – Initiated by
button.
21 The printer will print current menu
READY
PRINT
MENU
settings.
READY ON – Initiated by software
command.
READY BLINK – Initiated by
button.
21 The printers will print all the
READY
PRINT
23
FONTS
available fonts.
READY ON – initiated by software
command.
READY BLINK – initiated by
button.
20 Indicates that the printer has reached
READY
23
23
CHG DRUM
the end of its life (image drum).
Print quality may be affected.
19 Indicates that the printer and fuser
READY
123
123
FUSER
has reached the end of its life.
Print quality may be affected.
18 The printers fuser unit is warming
READY
WARM UP
up. When complete the printer goes
into on-line mode automatically.
During this process the printer can
receive data.
READY
17 The printer is asking you to insert
MANUAL
XXXXXXXX
requested size paper.
XXXXXXXX: (Paper Size)
SIZE REQUEST
Page 80

C–4 LCD Window Display Messages
Prty Message Status
17 The printer is asking you to insert
READY
TRAY 1
XXXXXXXX
16 Indicates that the paper tray is empty.
READY
TRAY 1
PAPER OUT
READY
15 The page buffer memory has
PAGE BUF
OVERFLOW
the correct size paper in the paper
tray.
XXXXXXXX: (Paper Size)
SIZE REQUEST
Tray 1: Upper Tray
Tray 2: Lower Tray
Feeder: Multi Media Feeder
overflowed because the page
contains too much data.
Press RECOVER to continue.
Install extra memory or reduce data
on page.
14 The macro memory has overflowed.
READY
13 The down line load memory has
12 The receive buffer memory has
11 Print processing speed could not
READY
10 Parity error, framing eror, overrun
READY
READY
READY
MACRO
OVERFLOW
DLL BUFF
OVERFLOW
REC BUF
OVERFLOW
PRINT
OVERRUN
HOST I/F
ERROR
Press RECOVER to continue.
Install extra memory or reduce
macro data on page.
overflowed. Press RECOVER to
continue.
Install extra memory or reduce down
line load font data.
overflowed. Press RECOVER to
continue. The PC ignores printer
busy signal in the interface, check
cable pin assignments.
follow the paper feed speed. Press
RECOVER to continue. Simplify
page formatting data or select
Page Protection menu.
error found on serial interface. Press
RECOVER to continue. Check
communication protocol PC to
printer.
READY
9 Wrong paper size found. Open and
PAPER
SIZE ERR
close printer cover to continue.
Check paper size or paper double
feed.
Page 81

LCD Window Display Messages C–5
Prty Message Status
READY
8 Paper jam found, when fed from
7 Paper jam found, during paper feed.
6 Paper jam is found in paper exit
READY
READY
PAPER
INPUT JAM
PAPER
FEED JAM
PAPER
EXIT JAM
paper tray. Check paper in the tray.
Open and close printer cover to
continue.
Remove misfed paper and close
printer cover to continue.
area. Open printer cover, remove
paper, close printer cover to continue.
READY
5 Cover is open. Press down firmly to
READY
4 Font card could not be read. Switch
3 Fontcard has been removed, o r
READY
READY
2 Abnormality found in the printer.
1 Abnormality found in the printer.
READY
COVER T2
OPEN
CARD
FORMAT
CARD
ERROR
ERROR (nn)
ERROR 0n
aaaaaaaa
close.
off printer and re-install fontcard.
installed during power on, to continue
switch printer off then on again.
Switch printer off then on again to
clear, if problem persists, contact
service representative.
Switch printer off then on again to
clear, if problem persists, contact
service representative.
READY
– Displayed in window for one second
88888888
88888888
after switching on power, for test
purposes.
Page 82

C–6 LCD Window Display Messages
Prty Message Status
– Printer is in initialization mode after
READY
INITIAL-
switching on, prior to on-line mode.
IZING
READY
– Printer is requesting RESET button
Note: For further information on the meaning of the (nn) part of the ERROR
message please refer to the following table.
!
Code (nn) Error
10 Program ROM check error
20 Font ROM check error
30 Resident RAM check error
RESET TO
SAVE
to be pressed for more than 2
seconds, to write new menu data to
EEPROM.
40 EEPROM check error
50 Option software ROM check error
60 Option RAM check error
70 Fan error
71 Fuser error
80 Operator panel I/F error
81 Optional Tray I/F Error
90 Watchdog timer time out
 Loading...