


Contents Table des matières
Warning . . . . . . . . . . . . . . . . . . . 4
Printing Basics . . . . . . . . . . . . . . 5
Exit Paths. . . . . . . . . . . . . . . . . . 6
Loading Print Media . . . . . . . . . . 8
Media Information . . . . . . . . . . 16
The Printer Menu . . . . . . . . . . . 19
Weight Settings. . . . . . . . . . . . . 19
Structure . . . . . . . . . . . . . . . . . 20
Changing Settings . . . . . . . . . . . 21
Secure Print . . . . . . . . . . . . . . . 22
Setting Power Save . . . . . . . . . . 23
Generating Reports . . . . . . . . . . 24
Duplex Printing . . . . . . . . . . . . 25
Control Panel Lights. . . . . . . . . 27
Error Messages . . . . . . . . . . . . 28
Clearing Paper Jams . . . . . . . . 30
Maintenance. . . . . . . . . . . . . . . 46
Replacement Supplies . . . . . . . 52
Service and Support. . . . . . . . . 54
Avertissement. . . . . . . . . . . . . .55
Impression : Notions de base . .56
Sorties. . . . . . . . . . . . . . . . . . . .57
Chargement des supports
d'impressio . . . . . . . . . . . . . . . 59
Information sur le support . . . .67
Menu de l’imprimante . . . . . . . . 70
Paramètres des grammages . . . . 70
Structure . . . . . . . . . . . . . . . . . 71
Modifier le paramètres . . . . . . . . 72
Impression confidentielle . . . . . . 73
Configuration de économie
d'énergie . . . . . . . . . . . . . . . . . 74
Rapports. . . . . . . . . . . . . . . . . . 75
Impression duplex . . . . . . . . . .76
Témoins du panneau de
commande . . . . . . . . . . . . . . . . 78
Messages d'erreur. . . . . . . . . . .79
Dégagé un bourrage . . . . . . . . .81
Entretien . . . . . . . . . . . . . . . . . .97
Fournitures de remplacement.103
Service et soutien . . . . . . . . . .105
2
59394801

Contenido Sumário
Advertencia . . . . . . . . . . . . . . 106
Impresión: básico . . . . . . . . . 107
Salida de la Impresora. . . . . . 108
Como cargar los medios. . . . . 110
Información sobre los medios 118
El Menú de Impresión . . . . . . 121
Ajustes del peso . . . . . . . . . . . 121
Estructura. . . . . . . . . . . . . . . . 122
Cambio de configuración . . . . . 123
Impresión segura . . . . . . . . . . 124
Configuración de ahorro
de energía . . . . . . . . . . . . . . . 125
Informes . . . . . . . . . . . . . . . . 126
Impresión Dúplex . . . . . . . . . 127
Luces del Panel de Control. . . 129
Mensajes de error . . . . . . . . . 130
Atascos de papel . . . . . . . . . . 132
Mantenimiento. . . . . . . . . . . . 148
Suministros de repuesto . . . . 154
Servicio & Soporte . . . . . . . . . 156
Aviso . . . . . . . . . . . . . . . . . . . .157
Impressão: básicos . . . . . . . . . 158
Percursos de saída . . . . . . . . . 159
Colocação da mídia . . . . . . . . .161
Informações sobre mídia . . . . 169
Menu da impressora . . . . . . . .172
Configurações da mídia . . . . . . 172
Estrutura . . . . . . . . . . . . . . . . 173
Altere as configurações. . . . . . . 174
Impressão segura . . . . . . . . . . 175
Configuração de economia
de energia . . . . . . . . . . . . . . . 176
Relatórios . . . . . . . . . . . . . . . . 177
Impressão duplex . . . . . . . . . .178
Luzes do painel de controle . .180
Mensagens de erro . . . . . . . . . 181
Eliminação de atolamentos de
papel . . . . . . . . . . . . . . . . . . . 183
Manutenção. . . . . . . . . . . . . . .199
Suprimentos de reposição . . . 205
Assistência Técnica e Suporte.207
3
Important safety warnings follow.
Be sure to read and observe all
safety warnings in this Handy
Reference.
Warning
4
Printing Basics
Print Trays
Important!
Print media must be able to withstand the
temperature and pressure of the fusing
process.
Trays 1-4
See page 8 for more information.
•Print Media
> Paper: 17 to 57 lb. US Bond, up
to 12.9" x 18"
Tray 1 Only:
>
Transparencies
Multi-Purpose (MP) Tray
See pages 11-12 for more information.
•Print Media
> paper/cards up to 87 lb. US
Bond, up to 12.9" x 18"
>Labels
> COM-10 envelopes
>Transparencies
> Banners (hand fed).
12.9'' wide by 17" to 47.25" long
• Straight-through side exit path only
(see page 7)
5
8.25" to
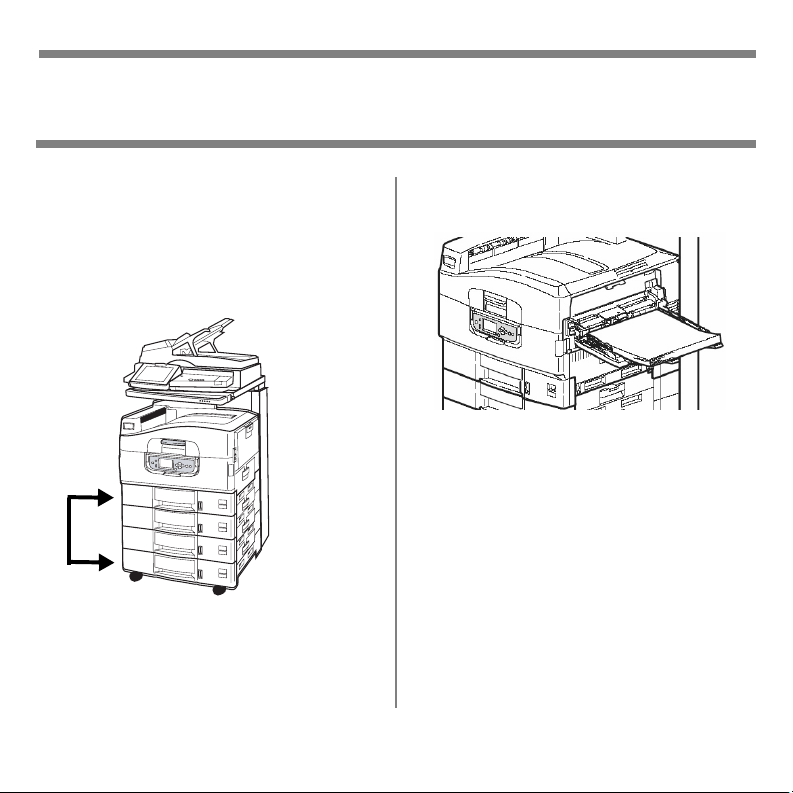
Exit Paths
Face Down (Top)
This is the tray that is normally used. The tray holds up to 500 sheets of 20-lb.
2
(75 g/m
Usable for paper up to 57 lb. US Bond
(216 g/m
The Face-Up exit tray (see next page)
must be used for special media or for
papers heavier than 57-lb. US Bond.
) paper.
2
).
6
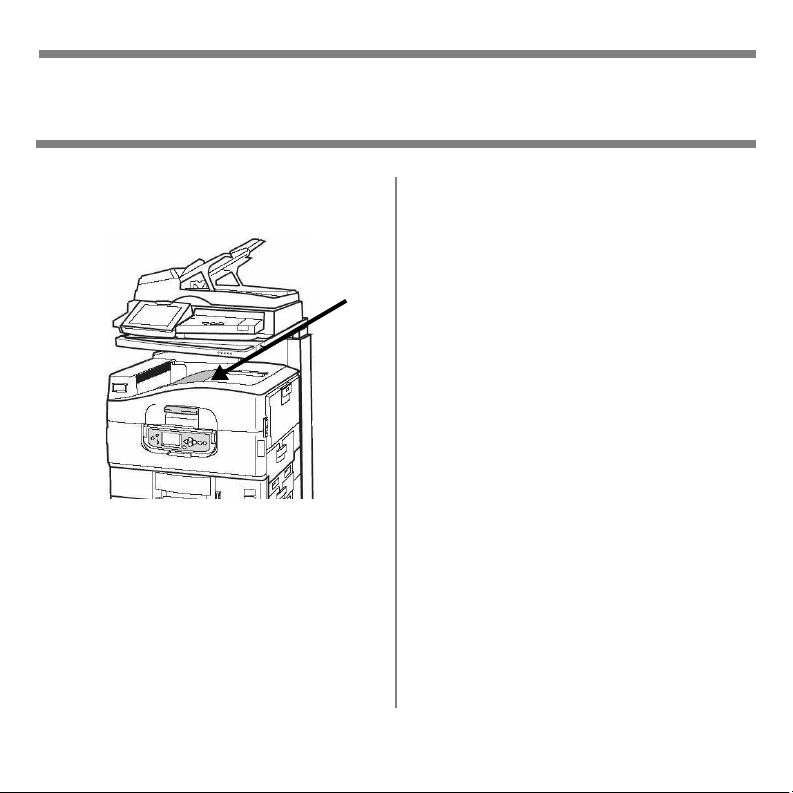
Exit Paths
Face Up (Side)
The side (face-up) exit tray provides a
straight-through print path. It holds up
2
to 250 sheets of 20-lb. (75 g/m
Use the straight-through path when
printing transparencies, labels and
heavy card stock (above 57 lb. US Bond
(216 g/m
Always use the side exit when printing
from the MP Tray.
2
).
) paper.
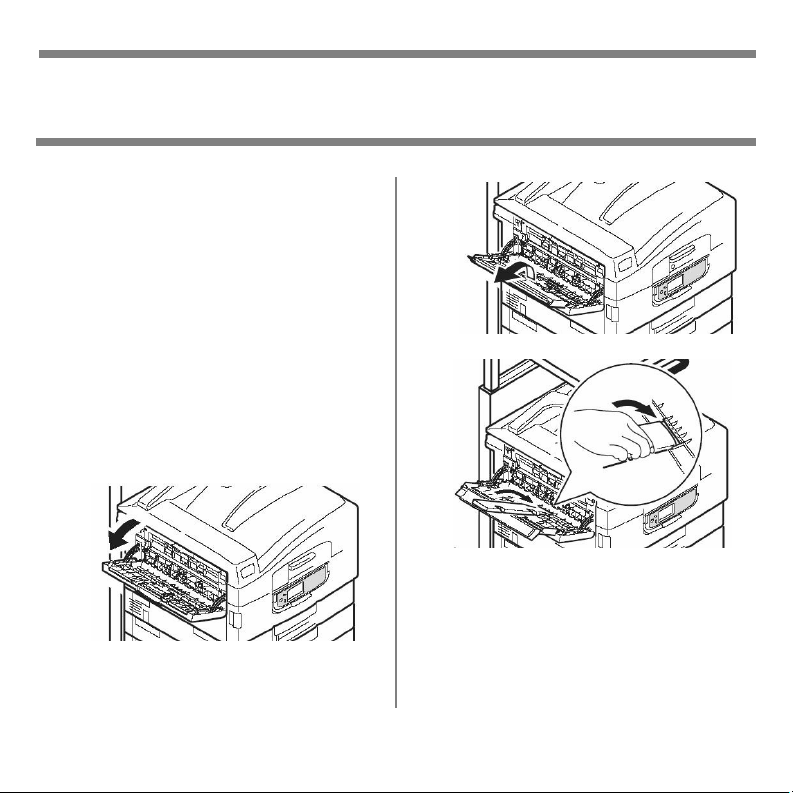
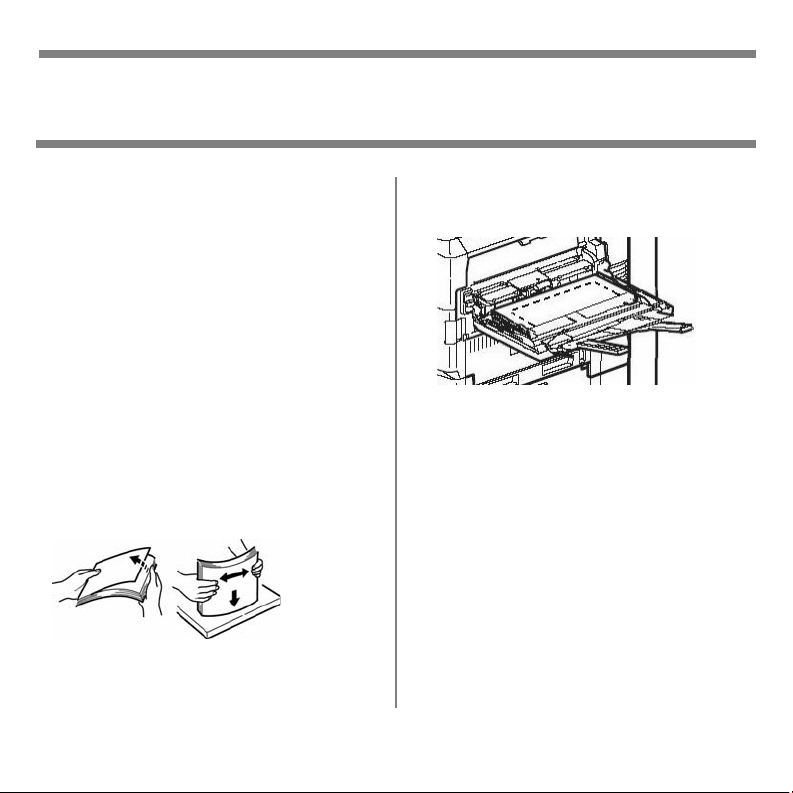
Opening the Face-Up Exit
Tray
1
4
2.
7
Loading Print Media
Trays 1-4 Media Specifications
Weight Range
Paper: 17 to 57 lb. US Bond (64 to 216 g/m2)
Tray 1 Only: Transparencies 0.10 to 0.11 mm thick
(recommended 3M
®
CG3720, OKI 52205701)
Standard Sizes:
Custom Sizes:
Capacity:
aSEF = short edge feed LEF = long edge feed
Paper, plain or glossy: Letter SEFa, Letter LEF*,
Legal-14, Legal-13.5, Legal-13, Tabloid, Executive, A4
SEF, A4 LEF, A5, A6, B4, B5 SEF, B5 LEF
Transparencies (Tray 1 only
Min.: 3.9" x 5.8"' (100 x 148 mm)
Max.: 12.9" x 18" (329 x 457 mm)
Must be defined in driver before printing: see your on-
line User’s Guide.
Paper:Tray 1 = 300 sheets 20-lb. (75 g/m2) paper
Trays 2-4 = 530 sheets 20-lb. (75 g/m2) paper
Transparencies (Tray 1 only
8
): Letter or A4 only.
): 200 sheets
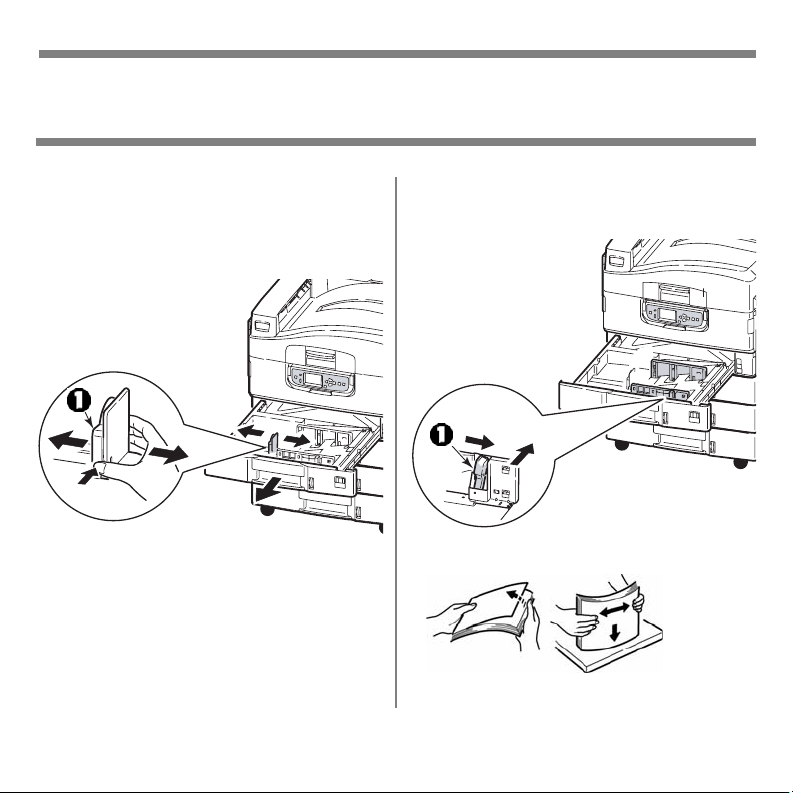
Loading Print Media
Trays 1-4
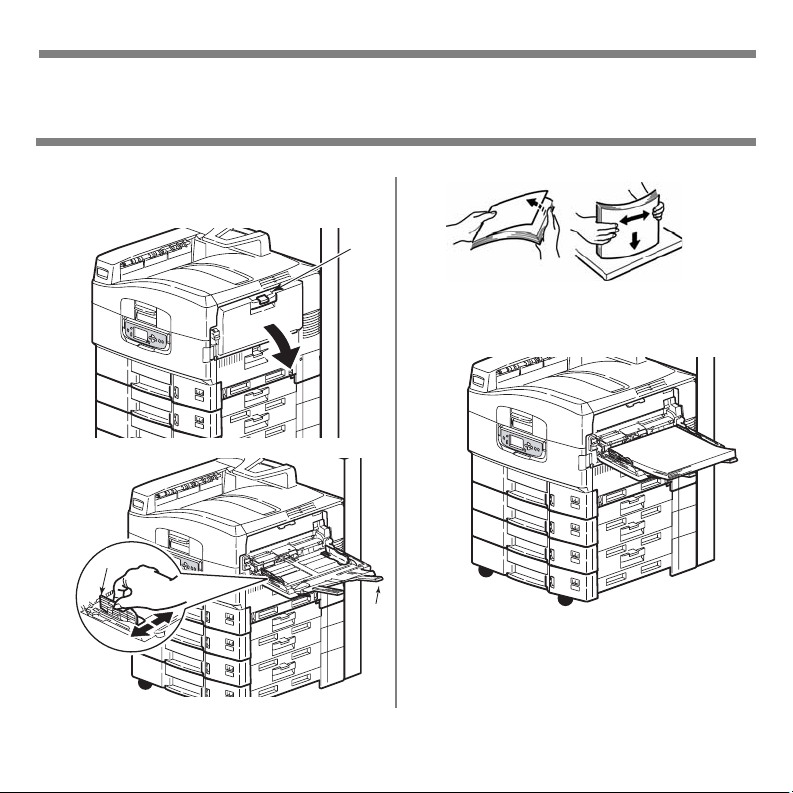
1. Pull out the tray and squeeze the
base of the side paper guide (!) to
adjust it for the size paper you are
using.
1
2. Push the front/back paper guide
release (1) to the right, then move
the guide forward or backward to fit
the size paper you are using.
3. Fan the paper.
fan_pap
er_F2_1
0.jpg
9
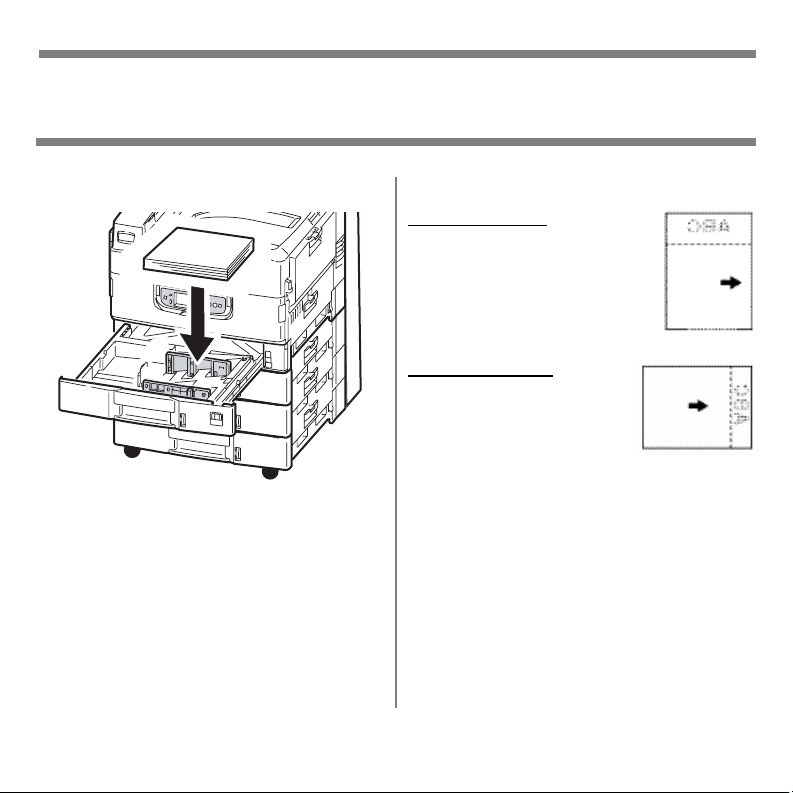
Loading Print Media
Loading Trays 1-4
4. Load the paper, print side down:
5. Check that the paper guides are
snug, but not tight, against the
paper.
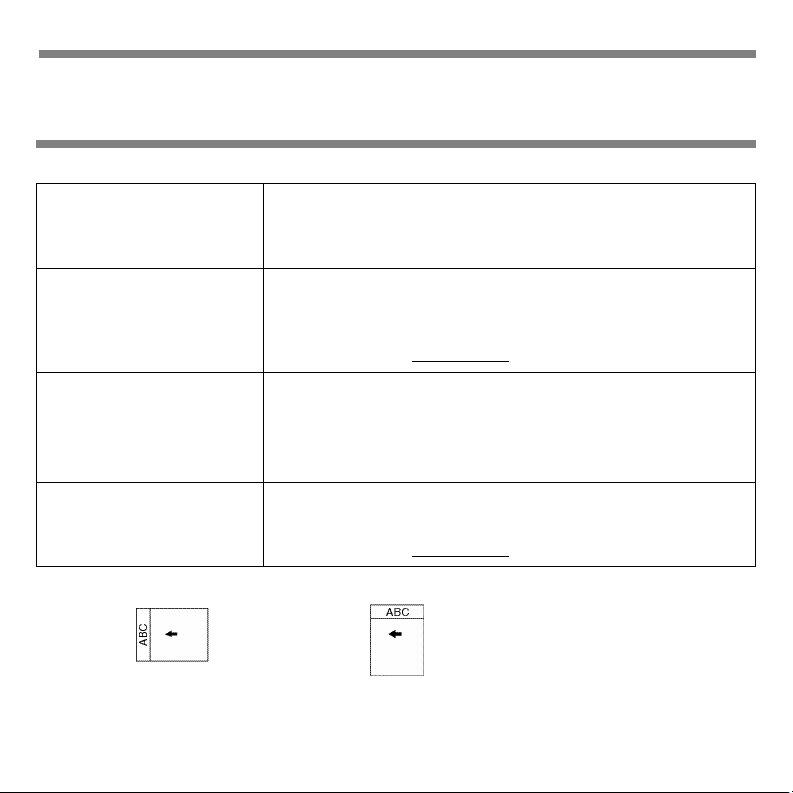
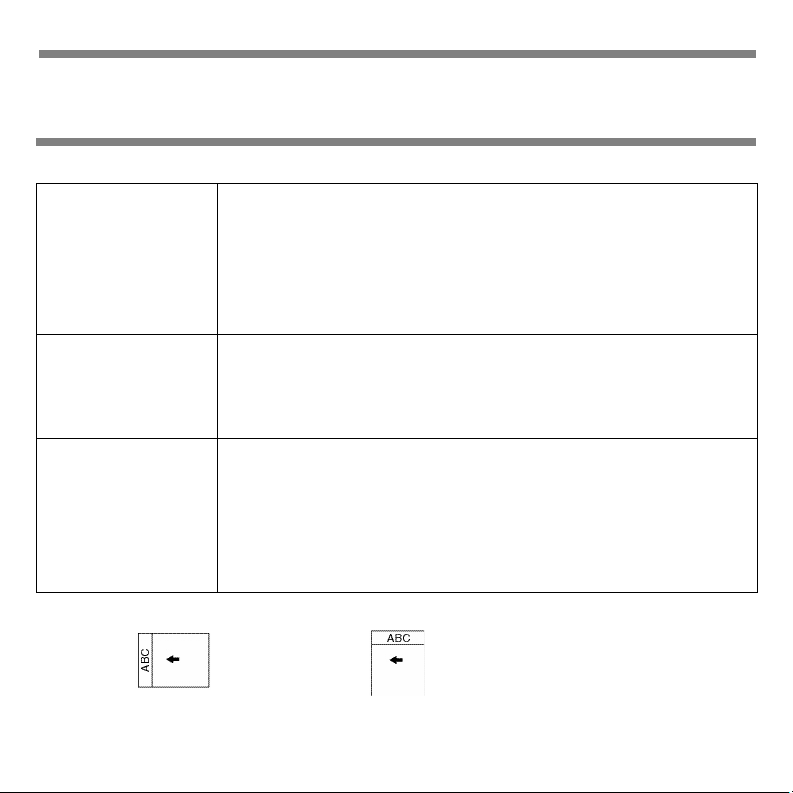
Note
: For Letterhead stationery:
Long edge feed
down, top toward
the back of the
printer.
Short edge feed
down, top to the
right:
10
—face
—face
Loading Print Media
MP Tray Media Specifications
Weight Range
Paper: 17 to 87 lb. US Bond (35 to 181 lb. Index, 64 to 330
2
metric)
g/m
Labels: 0.1 to 0.2 mm thick, including carrier sheet
(recommended Avery 5161, 7162, 7664, 7666)
Transparencies: 0.10 to 0.11 mm thick (recommended 3M
CG3720, OKI 52205701)
Standard Sizes:
Custom Sizes:
Must be defined in
driver before
printing: see your
on-line User’s
Guide.
a.SEF = short edge feed LEF = long edge feed
Paper: Letter SEFa, Letter LEF*, Legal-14, Legal-13.5,
Legal-13, Tabloid, Executive, A4 SEF, A4 LEF, A5, A6, B4, B5
SEF, B5 LEF, and COM-10, DL, C4 and C5 Envelopes.
Labels, Transparencies: Letter or A4 only
Simplex Duplex
Min.
2.5" x 4.1" [75 x 90 mm] 3.9" x 5.8"' (100 x 148 mm)
Max.
12.9" x 18" (328 x 457 mm) 12.9" x 18" (328 x 457 mm)
Banners: 8.25" to 12.9'' (210 to 328 mm) wide by 17" to
47.25" (432 mm to 1.2 m) long. Must be fed one sheet at a
time.
11
Loading Print Media
MP Tray Media Specifications
Takes:
• 230 sheets 20-lb. (75 g/m2) paper
• 100 sheets of labels (recommended Avery 5161, 7162, 7664,
7666)
•25 envelopes
• 100 Transparencies (recommended, 3M CG3720, OKI 52205701)
• Banners, hand-fed one at a time
12
Loading Print Media
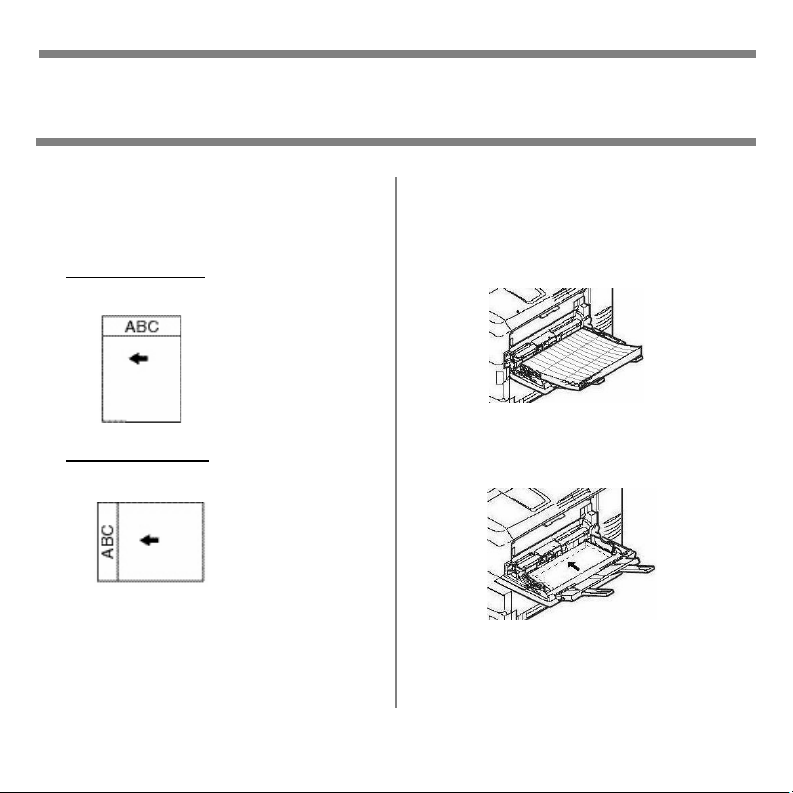
Loading the MP Tray
Loading Media, MP Tray
1
2
3
3
1
fan_paper_F2_10.jpg
4 Print side up.
2
13
Loading Print Media
Loading the MP Tray
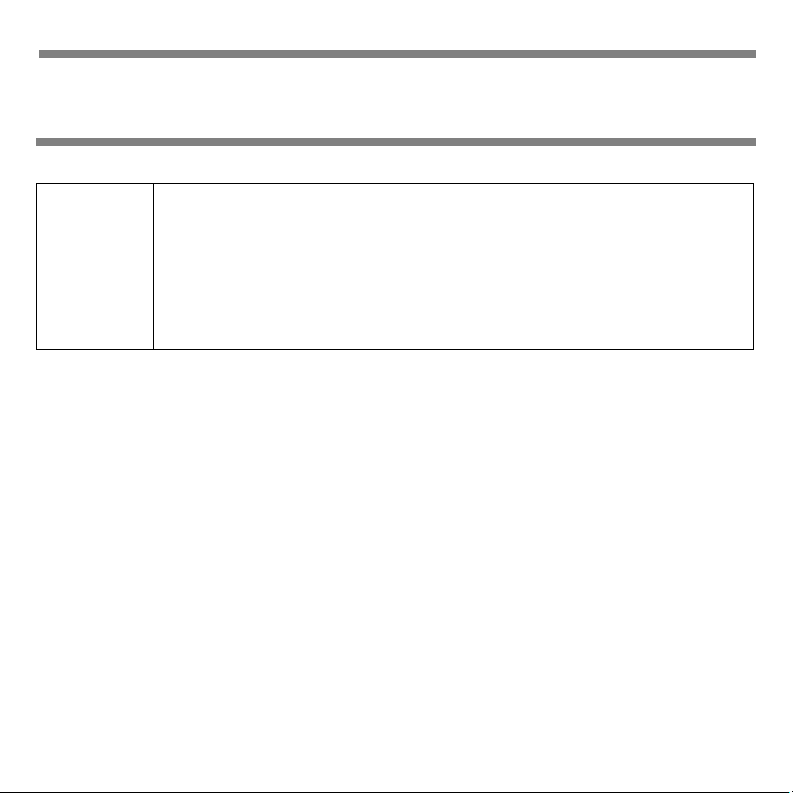
Note:
Letterhead Stationery
(Letter, A4 or B5):
•
Long edge feed
—aim top toward
the back of the printer:
•
Short edge feed
—aim the top into
the printer:
manl_le.jpg
manl_se.jpg
Note:
Labels & Transparencies:
•Print side up.
•Default = long edge feed.
C96_LoadP
aperMPTray
_Labels_cro
p.jpg
Envelopes:
•Flap side down, aimed into the
printer:
C96_Load
PaperMPTr
ay_Envelo
pels_crop.j
pg
14

Loading Print Media
Loading the MP Tray
Check the Media Size
Default = Letter Long Edge (Letter
LEF)
ENTER
1. Press
∇/Δ
keys
2.
3. Highlight
ENTER
4.
∇/Δ
keys
ENTER
∇/Δ
keys
5.
ENTER
∇/Δ
keys
6.
(labels and transparencies: only
Letter or A4). Press
7. Set the Media Type
(transparencies) or Media Weight
(labels, etc.), as described below.
.
→
Menus
. Press
Tray Configuration. Press
.
→ MP Tray Config
.
→ Paper Size
.
→
appropriate size
. Press
ENTER
ENTER
. Press
.
.
Transparencies: Set Media Type
a
∇/Δ
keys
→ Media Type. Press
ENTER
.
∇/Δ
keys
b
ENTER
c Press
mode.
Labels, Thick Paper, etc.: Set
Media Weight
a
∇/Δ
ENTER
∇/Δ
b
weight (see page 19). Press
ENTER
8. Press
mode.
15
→ Transparency. Press
.
ON LINE
keys
.
keys
.
ON LINE
to exit the Menu
→ Media Weight
→
appropriate media
to exit the Menu
. Press

Media Information
Standard Paper, Glossy Paper
Standard Paper_____________
Standard paper is the printer. default.
Do not use
• Heavily coated or smooth paper
• Embossed, rough, or heavily
textured paper
• Recycled paper
• Paper with cutouts, perforations, or
excessive paper dust.
• Odd shaped paper (not
rectangular).
• Carbon paper, thermal transfer
paper, ink-jet paper.
• Wet or damp paper.
Glossy Paper _______________
The following glossy papers have been
tested and are recommended:
• Mowhawk 37-101 Color Copy
Ultra-Gloss CIS 49 lb. US Bond
(188 g/m
• Oki 52208203 Gloss 32-lb. US Bond
(120 g/m
• Oki 52208901, 52208902 Ultra
Glossy 42 lb. US Bond (150 g/m
Glossy paper can be fed from any of
the paper trays (Trays 1-5, MP Tray).
If other glossy paper is used, it must
• be manufacturer approved for use
in dry toner based copiers or laser/
LED printers.
• withstand the temperature and
pressure of the fusing process.
• be 0.13 to 0.16 mm thick.
16
2
)
2
)
2
)

Media Information
Recycled, Banners, Labels, Cards
Recycled Paper _____________
Recycled paper must
• be manufacturer approved for use
in dry toner based copiers or laser/
LED printer.
• withstand the temperature and
pressure of the fusing process.
Banner Paper ______________
Banner paper should ideally be 34-lb.
US Bond (128 g/m
Source
•
•
•
= MP Tray
Size
= Custom
Media Type
= Ultra Heavy 1.
2
).
Labels ____________________
Caution!
Use labels designated for laser
printers.
Labels must cover the entire carrier
sheet. The adhesive must not be
exposed.
Recommended labels:
• Avery 5161 letter
• Avery 7162, 7664, 7666 A4
Select the following settings in the
driver:
•
Source
= MP Tray
•
Size
= Letter LEF,/SEF, A4 LEF/SEF
•
Type
= Labels
Media Size
•
PostScript
= Off: Windows® Adobe®
®
only
Thick Paper (Cards)__________
Caution!
To prevent damage to the printer, it is
very important to check the printer’s
media settings before printing on
thick paper.
Select the following settings in the
driver. See page 19 for paper weight
ranges for each of these settings.
Media Type
•
= Medium Heavy, Heavy,
Ultra Heavy 1, Ultra Heavy 2, Ultra
Heavy 3, or Ultra Heavy 4.
17

Media Information
Envelopes, Transparencies
Envelopes _________________
Important!
Never use envelopes with metal clasps,
snaps, windows, or V-flap seals:
Envelopes.jpg
Recommended envelopes:
• Oki 52206301 COM-10 premium
envelopes
Select the following settings in the
driver:
Source
•
•
= MP Tray
Size
= COM-10
Transparencies _____________
Caution!
Avoid office transparencies designed
for use by hand with marker pens.
These will melt in the fuser and cause
damage.
Select the following settings in the
driver:
Source
•
•
•
•
18
= Tray 1 or MP Tray
Size
= Letter lLEF, Letter SEF, A4
LEF, A4 SEF
Type
= Transparency
Media Size
PostScript
= Off: Windows® Adobe®
®
only.
The Printer Menu
Weight Settings
From, the menu (press
ENTER): Menus → Trayx Config → Media Weigh
Important!:
Printer driver settings override printer menu settings.
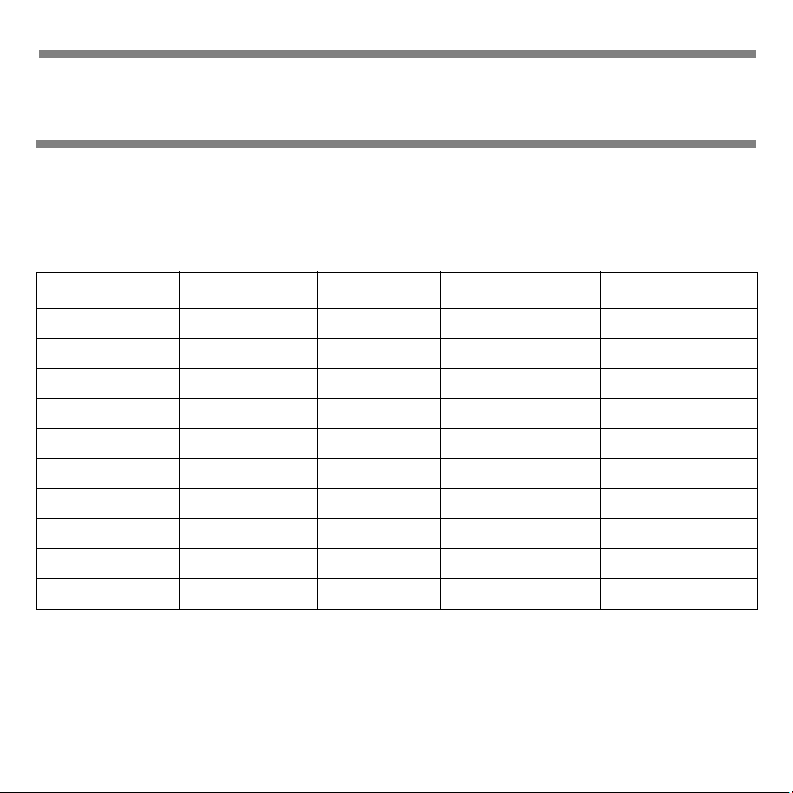
Setting Tray(s) US Bond Metric Index
Auto (default) All 17 to 57 lb.
Light All 17 to 18 lb.
Medium Light All 18 to 20 lb.
Medium All 20 to 28 lb.
Medium Heavy All 28 to 32 lb.
Heavy All 32 to 34 lb.
Ultra heavy 1 All 35 to 50 lb.
Ultra heavy 2 All 51 to 57 lb.
Ultra Heavy 3 MP Tray Only 57 to 71 lb.
Ultra Heavy 4 MP Tray Only 71 to 87 lb.
64 to 216 g/m
64 to 67 g/m
68 to 75 g/m
75 to 105 g/m
106 to 120 g/m
121 to 128 g/m
129 to 188 g/m
188 to 216 g/m
217 to 268 g/m
268 to 330 g/m
2
35 to 118.6 lb.
2
35 to 37 lb.
2
37 to 42 lb.
2
42 to 58 lb.
2
52 to 66 lb.
2
60 to 71 lb.
2
74 to 104 lb.
2
106 to 141 lb.
2
120 to 147 lb.
2
147 to 181 lb.
Note:
To determine if a paper weight is US Bond or Index, check the metric
equivalent. Example: 35 lb. US Bond = 132 g/m
2
; 35 lb. Index = 64 g/m2.
19
t.

The Printer Menu
Structure
For more information, see the on-line
User's Guide on the Documentation
CD provided with your printer or at
http://my.okidata.com
.
Basic Menu Structure
– Configuration
–Print Pages
– Suspend Printing
– Resume Printing
– Print Secure Job (Password
Protected)
–Menus
– Shut Down
– Admin Setup
– Tray Alignment
– Calibration
– Print Statistics (Password
Protected)
Printing the Configuration
Report
Print out the Configuration Report to
see a listing of the menu items and
their settings:
ENTER
1. Press
2.
∇/Δ
keys
3. Press
4.
∇/Δ
keys
5. Press
6. The report prints and the printer
goes back online.
20
.
→ Print Pages
ENTER
.
→ Configuration
ENTER
.
.
.
The Printer Menu
Changing Settings
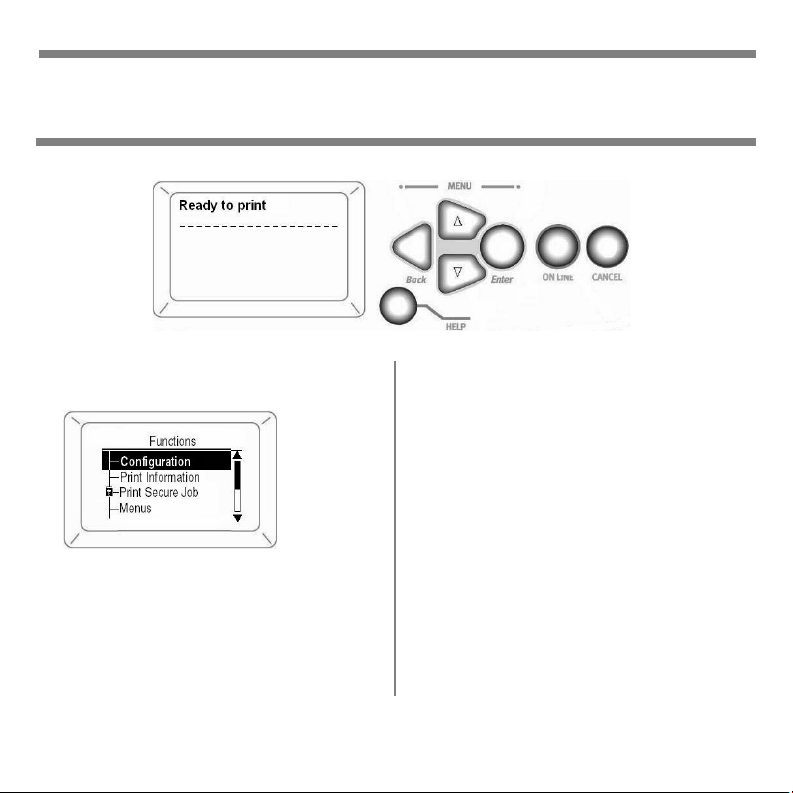
C96_ReadyT
oPrint.jpg
1. Press
2. Use the
3. Press
ENTER
to switch to the menu
mode.
∇
key to scroll down to the
Function you wish to change.
ENTER
.
C98_Functio
ns_Menu_a.
jpg
4. Use the
down to the item you wish to
change.
5. Use the
setting you wish to engage.
6. Press
An asterisk appears next to the
new setting.
7. Press
mode
21
∇, Δ
and
ENTER
∇/Δ
keys to move to the
ENTER
.
ON LINE
to exit the Menu
keys to drill

The Printer Menu
Secure Print
Applies only to models equipped with
the Hard Disk Drive (standard on
Model C9850hdn).
First the document is assigned a
password and processed to a print file
which is saved on the hard disk drive
(see the on-line User's Guide).
To Print the Document
1. Press
2.
3. Use the Δ and ∇ keys to scroll to
4. Repeat the previous step for each
5. Press
6. Highlight
ENTER
.
∇/Δ
keys
→ Print Secure
Job → Encrypted Job → Enter
Password
the number for the first digit in
your password. Press
digit in the password.
. Press
ENTER
Print
ENTER.
.
. Press
ENTER
ENTER
.
.
7. Use the
for
Secure Print: The document
prints and is deleted.
Store to HDD: The document
prints and remains stored until
you delete it.
8. The printer goes on line.
∇/Δ
keys to enter the value
Set Collating Amount
. Press
To Delete the Document
1. Follow steps 1 through 5 above.
∇/Δ
keys
2.
3. Select
4. Press
The printer goes on line.
22
→ Delete
Yes
to confirm the deletion.
ENTER.
. Press
ENTER.
ENTER.

The Printer Menu
Setting Power Save
Power Save sets how long the printer
waits before going into standby mode
(default = 60 min.).
Set the Time Interval
1. Press
2. Use the
3.
4. Highlight
5.
6. Press
ENTER
.
∇
key to scroll down to
Menus. Press
∇/Δ
keys
ENTER
.
ENTER
.
∇/Δ
keys
interval. Press
ON LINE
and exit the Menu mode.
ENTER
.
→ System Adjust
Power Save Time
→
select the time
ENTER
.
to save the setting
. Press
. Press
Disable Power Save
1. Press
2.
3.
4. Wait for Setup to run.
5.
6. Keep pressing
7.
8. Press
9. Press
10.Wait for the printer to initialize.
23
ENTER
.
∇/Δ
keys
→
Admin Setup
ENTER
.
∇/Δ
keys
→
Yes
. Press
Offline
appears on the display.
Setup
The
∇/Δ
ENTER
menu appears.
keys
→ Printer Setup
.
ENTER
until
∇/Δ
keys
Power Save
ON LINE
ENTER
appears.
→ Disable
.
to select
ENTER
. Press
repeatedly
. Press
Exit Setup
. Press
.
ENTER
.
.

The Printer Menu
Generating Reports
Printing Reports
1. Press
2.
3. Press
4.
5. Press
*Note:
ENTER
.
∇/Δ
keys
→ Print Pages
ENTER
.
∇/Δ
keys
print.
The report prints and the printer
goes back on line.
To print the Color Chart or Job Log
reports, you must have tabloid
paper loaded in Tray 1 or the MP
Tray.
ENTER
→
report you wish to
.
.
Available Reports
Which reports are available depends
in part on how your printer is
configured and which options are
installed.
Examples of reports:
•
PS Test Page
information.
• Configuration:
your printer’s configuration and
menu settings.
Color Charts:
•
CMY and RGB color charts.*
Job Log:
•
been printed.*
• PS Font or PCL Font List
•Demo Page
24
: general EFI Fiery
information on
EFI Fiery Pantone®,
log of jobs which have
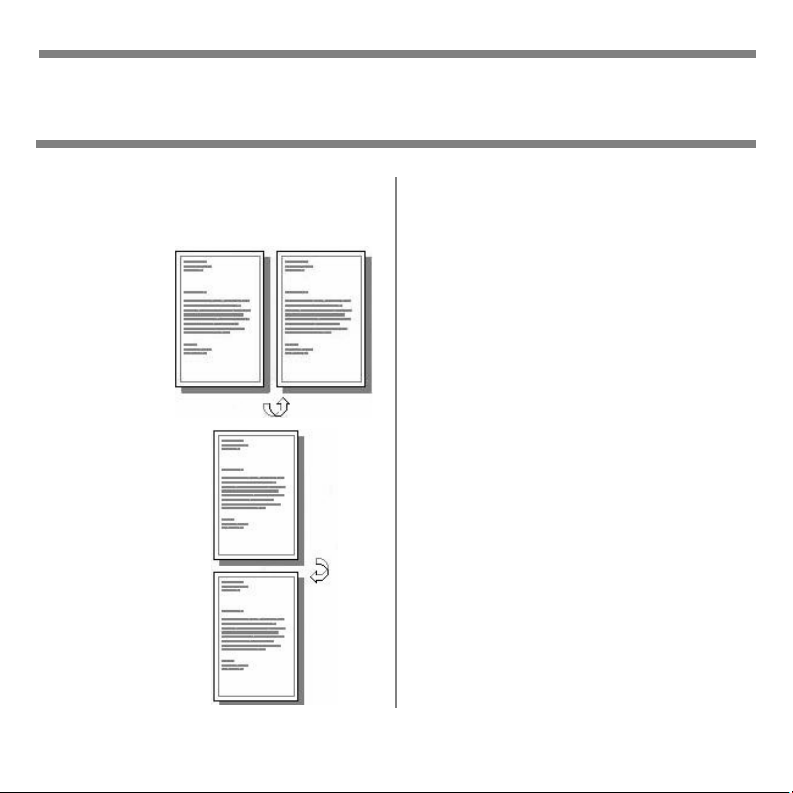
Duplex Printing
(Printing on Both Sides of the Page)
Long Edge versus Short
Edge
Long Edge
Short Edge
Specifications
Paper Weight
• All size papers: 17 to 32 lb. US
Bond (64 to 120 g/m
• Letter, Tabloid, A4 and A3 size
paper only: up to 50 lb. US Bond
(188 g/m
Note
If you experience curling with 20 or
24 lb. paper, switch to 28 lb.
Paper Feed
•Tray 1
• Optional Tray(s)
• Optional High Capacity Feeder
•MP Tray
Paper Exit
•Top exit tray
• Side exit tray
25
2
)
2
)
Duplex Printing
(Printing on Both Sides of the Page)
Paper Sizes*
•
Standard
Legal-14, Legal-13.5, Legal-13,
Tabloid, Tabloid Extra, Executive,
A3, A3 Wide, A3 Outsize, A4 SEF,
A4 LEF, A5, A6, B4, B5 SEF, B5 LEF.
Custom
•
(100 x 148 mm), maximum 12.9" x
18" (328 x 457.2 mm).
SEF = short edge feed
LEF = long edge feed
: Letter SEF*, Letter LEF,
: minimum 3.9" x 5.8"
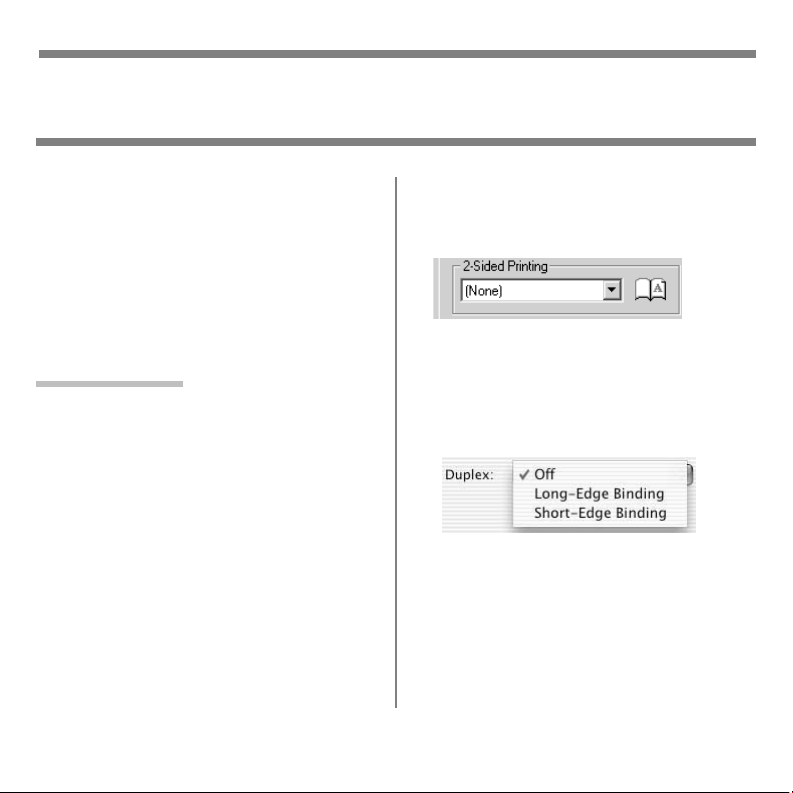
How to Print a File Using
the Duplexer
Open the file you wish to print and
click File
printer.
Windows
1. For all but Windows 2000, click
Properties or Preferences.
Otherwise go to step 2.
→
Print. Select the C9850
2. On the Setup tab, select Long Edge
or Short Edge under 2-Sided
Printing.
Macintosh
1. Under Presets, select Duplex.
2. Under Duplex, select Long-Edge
Binding or Short-Edge Binding.
26
Control Panel Lights
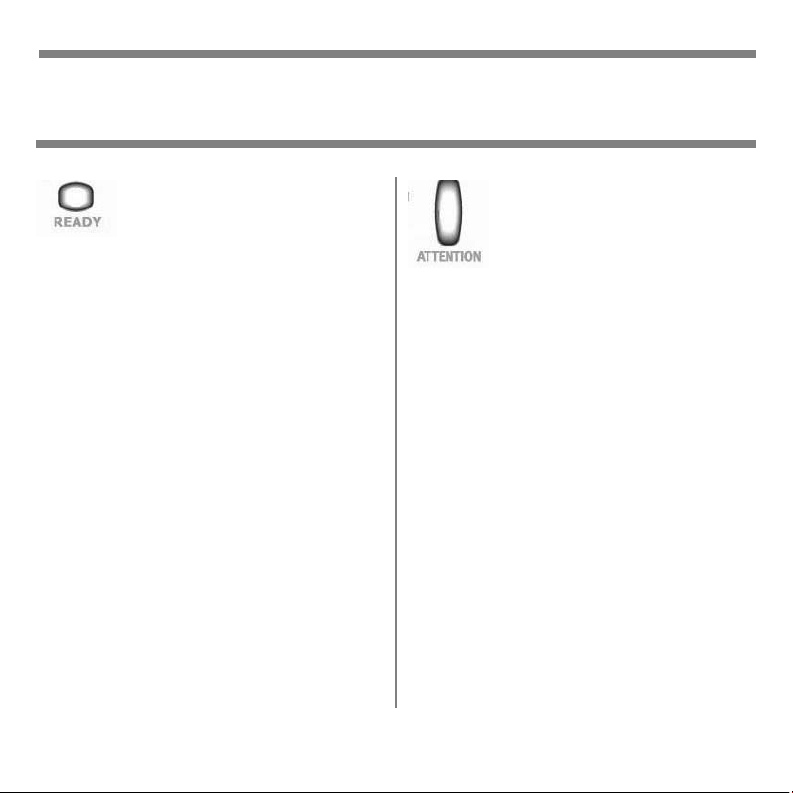
Ready
On
The printer is on line.
Off
The printer is off line.
Flashing
The printer is receiving data.
Attention
On:
Warning!
The printer needs attention, but will
continue to operate. An error message
displays:
Off
Normal.
Toner Low, Paper Near End
, etc.
Flashing:
The printer needs attention
immediately. An error message
displays:
27
Alarm!
Paper Jam, Tray1 Empty
, etc.
Error Messages
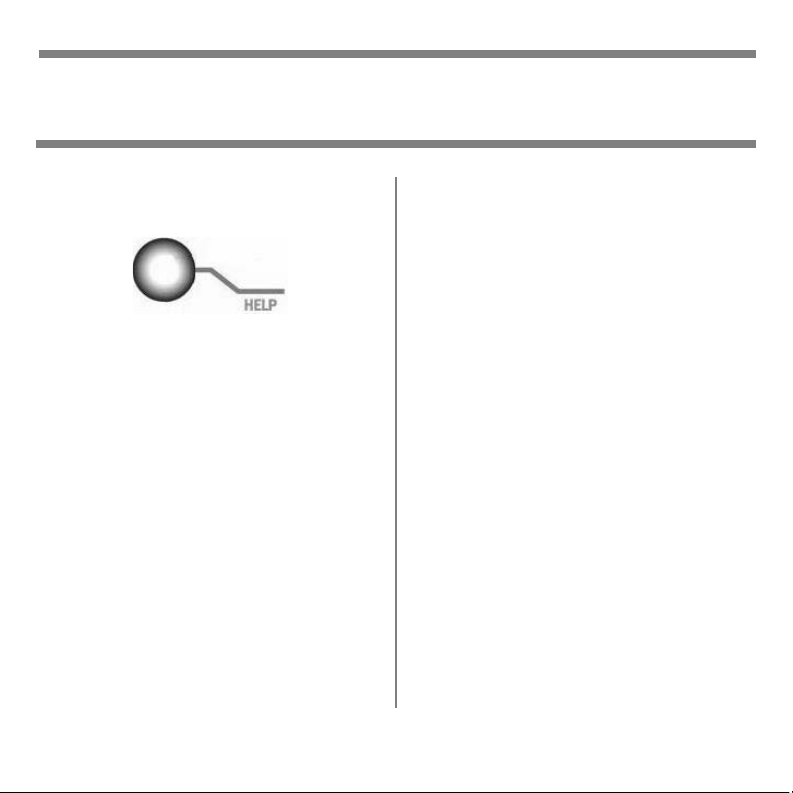
Help Button
Your printer has a built-in help
system.
When an error message appears on
the display, press
shows information that will help you
correct the error, including clearing
paper jams.
Use the
Help information.
For more information on clearing
paper jams, see pages 30, ff.
Note
∇/Δ
If you are experiencing frequent
paper jams, see the suggestions on
the next page.
HELP
. The display
keys to move through the
For more information on error
messages, see the on-line User's
Guide on the Documentation CD
provided with your printer or at
http://my.okidata.com
28
.
Frequent Paper Jams
If you are experiencing frequent paper
jams, check the following items.
• Is the printer level?
• Is the media you are using within
specification (see page 19)? Media
that is too light or too heavy will
often cause jams.
• Are the settings (printer and driver)
appropriate for the media being
used (see pages 16, ff.)?
• Do not use creased or curled
media.
• Remove the media from the tray.
Fan/ align the stack. Replace the
media.
fan_paper_
F2_10.jpg
• Envelopes are jamming. Make sure
the stack is properly aligned.
29
Envelopes must be loaded flap
down, top edge toward the printer.
• Clean the feed rollers: for more
information, see the on-line User's
Guide on the Documentation CD
provided with your printer or at
http://my.okidata.com
.
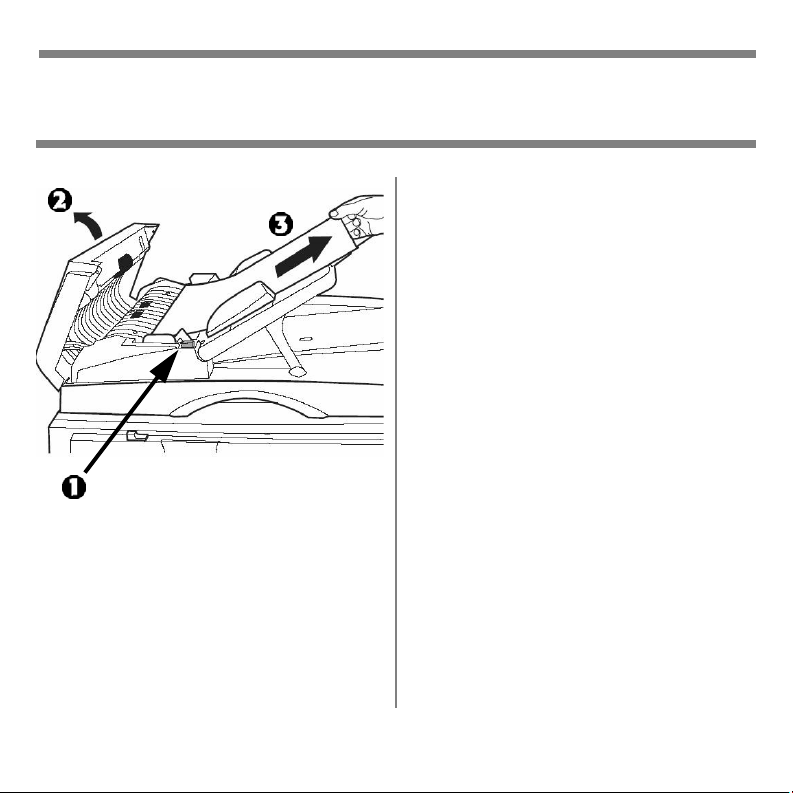
Clearing Paper Jams
Scanner (ADF) Jam
1. Press the release button (1) and lift
the ADF feed cover (
2. Pull out the sheet (
3. Close the ADF feed cover.
2
).
3
).
30

Clearing Paper Jams
Printer Tray Side Cover
Open Cover, Paper Jam
tttt Side Cover
There is a jam in one of the standard
paper trays (1 through 5) indicated by
tttt. The instructions below show
clearing a jam in Tray 1. The
procedure is similar for all the trays.
1. Squeeze the catch (1) and open the
side cover.
1
31

Clearing Paper Jams
Printer Tray Side Cover
2. Hold the tab (1) and turn the paper
guide outward.
2
3. Gently remove the jammed paper.
4. Turn the paper guide back inward
and close the side cover.
32

Clearing Paper Jams
Printer Side Cover
Open Cover Paper Jam
Side Cover
1. If the MP Tray is open, close it to
provide access to the side cover.
2. Pull the release lever (1) and open
the side cover.
2
3. Gently remove the jammed paper.
4. Close the side cover.
33

Clearing Paper Jams
Printer Top Cover
Open Cover, Paper Jam
Printer Top Cover
The scanner unit shelf includes
hydraulics to assist in moving the
shelf up and down.
NEVER OPERATE THE RELEASE
HANDLE (2) ON THE RIGHT SIDE OF
THE SHELF WITHOUT THE SCANNER
BOLTED TO THE SHELF.
1. Place one hand firmly on the front
handle (1) of the scanner shelf,
then carefully press the release
handle (2) so that the shelf lifts out
of the way.
34

Clearing Paper Jams
Printer Top Cover
2. Open the top cover. 3. Squeeze the basket handle (1) and
raise the drum basket.
1
Warning!
Be careful not to touch the fuser
unit which is HOT after printing.
The area is clearly marked.
35

Clearing Paper Jams
Printer Top Cover
4. Gently remove any jammed paper.
Caution!
Be careful not to touch the fuser
unit which may be hot after
printing. If the fuser unit is hot,
wait until it cools before
attempting to remove any
jammed paper.
5. If a sheet is jammed in the fuser,
push the fuser lock lever (1) and lift
out the fuser unit (2).
36

Clearing Paper Jams
Printer Top Cover
6. Pull up the jam release levers (1)
and remove the jammed paper.
5
7. Place the fuser unit back in the
printer and turn the lock lever to
lock it in place.
6
37

Clearing Paper Jams
Printer Top Cover
8. If paper is jammed near the exit,
open the face up stacker (1).
7
9. Open the side cover (paper exit)
and gently remove the jammed
sheet.
8
38

Clearing Paper Jams
Printer Top Cover
10.Close the side cover, then close the
face-up stacker.
11.Lower the image drum basket and
press down to lock it in place.
9
12.Close the top cover.
39

Clearing Paper Jams
Printer Top Cover
TO PREVENT ANY
POSSIBLE CRUSHING
OF FINGERS, KEEP
YOUR HANDS AWAY
FROM THE POSTS AT
THE BACK OF THE
SCANNER STAND
WHEN MOVING THE
SHELF DOWN.
13.Place one hand firmly on the front
handle of the scanner shelf, then
press the release handle and
carefully lower the scanner shelf,
making sure it locks in place.
40

Clearing Paper Jams
Duplexer Jam
Check Duplex Unit
Paper Jam
1. If you have the optional finisher
unit installed, push in on the lever
(1) and separate the finisher form
the printer.
1
2. Press the duplex cover release
button (1) and open the cover.
2
41

Clearing Paper Jams
Duplexer Jam
3. Gently pull out the jammed sheet. 4. Squeeze the duplex release levers
and pull out the duplexer.
42

Clearing Paper Jams
Duplexer Jam
5. Holding the front top cover by the
grip (1), push it gently inwards and
raise it.
4
6. Gently remove the jammed paper.
43

Clearing Paper Jams
Duplexer Jam
7. In a similar manner, check for and
clear any paper jammed under the
rear top cover.
8. Lower the two duplexer top covers.
44

Clearing Paper Jams
Duplexer Jam
9. Swing up the front cover for the
duplexer and push the duplexer
back into the printer.
10.If you have the optional finisher,
push it back into place on the
printer.
45

Maintenance
Cleaning the LED Heads
Clean the LED heads
• when you install a new toner
cartridge.
• if printed sheets show signs of
faded images, white stripes, or
blurred letters.
The scanner unit shelf includes
hydraulics to assist in moving the
shelf up and down.
NEVER OPERATE THE RELEASE
HANDLE (2) ON THE RIGHT SIDE OF
THE SHELF WITHOUT THE SCANNER
BOLTED TO THE SHELF.
1. Place one hand firmly on the front
handle (1) of the scanner shelf,
then carefully press the release
handle (2) so that the shelf lifts out
of the way.
46

Maintenance
Cleaning the LED Heads
2. Open the top cover about half way.
1
3. This allows access to the LED heads
(1) without the guards in the way.
C96_
Clean
4. Use the lens cleaner
supplied with the toner
cartridges (or a clean,
soft cloth) to gently
clean the LED heads.
47

Maintenance
Cleaning the LED Heads
5. Close the top cover.
TO PREVENT ANY
POSSIBLE CRUSHING
OF FINGERS, KEEP
YOUR HANDS AWAY
FROM THE POSTS AT
THE BACK OF THE
SCANNER STAND
WHEN MOVING THE
SHELF DOWN.
6. Place one hand firmly on the front
handle of the scanner shelf, then
press the release handle and
carefully lower the scanner shelf,
making sure it locks in place.
48

Maintenance
Cleaning the Tray 1 Feed Rollers
1. Remove items such as wrist
watches or bracelets so they do not
catch in the mechanism.
2. If a hard disk drive is installed in
the printer, press and hold the
SHUTDOWN/RESET button on the
control panel for 3 seconds and
wait for the display to tell you it is
okay to turn off the printer.
Otherwise go to the next step.
3. Turn the printer off.
49

Maintenance
Cleaning the Tray 1 Feed Rollers
4. Open Tray 1 side cover. 5. Remove Tray 1 from the printer.
50

Maintenance
Cleaning the Tray 1 Feed Rollers
6. Gaining access through the gap left
by tray 1, wipe the three paper
feed rollers (1) with a soft cloth
lightly moistened with water.
2
7. Replace tray 1.
8. Close the tray 1 side cover and turn
the printer on.
51

Replacement Supplies
Purchasing Information
Where to Purchase
• Consult the dealer where you
purchased your printer
• Consult an Oki Data Authorized
Sales or Service Dealer. For the
nearest dealer, call
1-800-654-3282.
• U.S., Puerto Rico, Guam, U.S.
Virgin Islands only: Order on the
Internet
• U.S. only: Order toll-free at
1-800-654-3282, using VISA
MasterCard
• Check office supply catalogs.
www.okidata.com
®
or AMEX®.
.
®
Part Numbers
Toner Cartridges
C96_Toner.jpg
Color OKI Part #
,
Black .......................... 43837112
Cyan........................... 43837111
Magenta...................... 43837110
Yellow......................... 43837109
52

Replacement Supplies
Image Drums
C96_Drum.jpg
Color OKI #
Black.......................... 42918104
Cyan .......................... 42918103
Magenta...................... 42918102
Yellow......................... 42918101
Other Items
C96_Fuser.jpg
C96_belt.jpg
1f.tif, 2f.tif
Item Oki #
Fuser ( ) .......... 42931701, 120V
........ 42931702, 230V
Transfer Belt ( ) ......... 42931601
Waste Toner Box .......... 42869401
53

Service and Support
• Visit our multilingual web site
www.okidata.com
•Visit
• Call 1-800-654-3282.
OKI is a registered trademark of Oki
Electric Industry Company, Ltd.
3M is a trademark or registered
trademark of 3M.
Adobe, and PostScript are trademarks
of Adobe Systems, Inc. which may be
registered in certain jurisdictions.
AMEX is a registered trademark of
American Express Co.
MasterCard is a registered trademark
of MasterCard International, Inc.
The Pantone trademark is the
property of Pantone, Inc.
VISA is a registered trademark of
Visa.
Xerox is a trademark of Xerox
Corporation.
54

Consignes de sécurité importantes
ci-après.
Lisez et observez attentivement toutes
les consignes de sécurité du présent
Guide de référence pratique.
Avertissement
55

Impression : Notions de base
Bacs
Importante!
Le support d'impression doit pouvoir
supporter la température et la pression du
procédé de fusion.
Bacs 1-4
Pour plus d’informations, consultez la
page 59.
• Support d'impression
> papier: 64 à 216 g/m2, jusqu'à
329 à 457 mm
> bac 1 uniquement : Transparents
Bac multifonction (MF)
Pour plus d’informations, consultez la
page 62-62.
• Support d'impression
>
papier/carton allant jusqu'à bond
312 g/m
> étiquettes
>enveloppes COM-10
> transparents
> bannières (alimentées à la main).
209.6 a 328 mm de largeur, 457 a
1200 mm de longueur
• use uniquement bac de sortie latéral
(consultez le page 58).
56
2
,
jusqu'à
329 à 457 mm

Sorties
Face vers le bas (Dessus)
Ce bac est celui normalement utilisé. Peut contenir jusqu'à 500 feuilles de 20
2
lb. (75 g/m
Peut contenir du papier bond US jusqu'à
57 lb. (216 g/m
Le bac de sortie face vers le haut (voyez
la page suivante) doit être utilisé pour
les supports spéciaux ou épais ou les
supports plus lourds que le papier bond
US de 57-lb.
).
2
).
57

Sorties
Face vers le haut (bac latéral)
Le bac de sortie latéral (face vers le
haut) fournit un circuit d'impression
droit. Peut contenir jusqu'à 250 feuilles
de 20-lb. (75 g/m2).
Utilisez un circuit d'impression droit
lorsque vous imprimez transparents,
étiquettes ou cartonné épais
(supérieures à 57 lb. (216 g/m2).
Utilisez toujours la sortie latéral (face
vers le haut) lorsque vous vous servez
du bac multifonctionnel.
Ouvrez le bac de sortie face
vers le haut
1
4
2.
58

Chargement des supports d'impressio
Spécifications du support bac 1-4
Grammage :
Papier :
Bac 1 uniquement : Transparents 0.10
17 à 57 lb. Bond US
(recommandé 3M® CG3720, OKI 5220570)
(64 à 216 g/m2)
à
0.11 mm d’ép
Les Formats
standards :
Les formats
personnalisés :
Capacité :
a SEF = alimentation sur bord court LEF = alimentation côté long
Papier, ordinaire ou glacé : lettre SEFa, lettre LEF*, légal-14,
légal-13.5, légal-13, tabloïde, Executive, A4 SEF, A4 LEF, A5,
A6, B4, B5 SEF, B5 LEF
Transparents (bac 1 unbiquement
Min.: 3.9 à 5.8 pouces (100 à 148 mm)
Max.: 12.9 à 18 pouces (329 à 457 mm)
Les formats personnalisés doivent être définis dans le pilote
d’imprimante avant l'impression: consultez le Guide de
l’utilisateur en ligne.
Papier : Bac 1 = 300 feuilles de 20 lb (75 g/m2)
Bacs 2-4 = 530 feuilles de 20 lb (75 g/m2)
Transparents (bac 1 uniquement
) : Lettre ou A4 uniquemen.
) : 200 feuilles
59

Chargement des supports d'impression
Bacs 1-4
1. Retirez le bac et poussez sur la
base du guide-papier latéral afin de
l'ajuster pour le format de papier
utilisé.
1
2. Poussez la détente du guide avant /
arrière (1) vers la droite, puis
déplacez le guide vers l'avant ou
l'arrière pour l'ajuster selon le
papier utilisé.
3. Aérez le papier.
fan_pap
er_F2_1
0.jpg
60

Chargement des supports d'impression
Bacs 1-4
4. Côté d'impression vers le bas :
5. Vérifiez si les guides-papier sont
bien ajustés, mais pas serrés
contre le papier.
Note
: Pour papier à en-tête :
Alimentation côté long
face vers le bas,
haut de page vers
l'arrière de
l'imprimante :
Alimentation côté
court
—face vers
le bas, haut de
page vers la
droite :
61
—

Chargement des supports d'impression
Paramètres de supportm : Bac MF
Grammage :
Les Formats
standards :
Les formats
personnalisés :
Doivent être définis
dans le pilote
d’imprimante avant
l'impression :
consultez le Guide
de l’utilisateur.
a. SEF = alimentation sur bord court LEF = alimentation côté long
Papier :
g/m
17 à
2
metric)
87 lb. Bond US, (35 à 181 lb. Index, 64 à 330
Étiquettes: De 0,1 à 0,2 mm d'épaisseur incluant l'endos
(recommandé Avery 5161, 7162, 7664, 7666)
Transparents: 0.10 à 0.11 mm d’ép (recommandé 3M
CG3720, OKI 52205701)
Papier : lettre SEFa, lettre LEF*, légal-14, légal-13.5,
légal-13, tabloïde, Executive, A4 SEF, A4 LEF, A5, A6, B4,
B5 SEF, B5 LEF, et COM-10, DL, C4 et C5 Enveloppes.
Étiquettes, Transparents: lettre ou A4 uniquement
Recto Recto verso
Min.
2.5" x 4.1 " [75 x 90 mm] 3.9" x 5.8"' (100 x 148 mm)
Max.
12.9" x 18" [297 x 457 mm] 12.9" x 18" (329 x 457 mm)
Bannières: 8.25" à 12.9'' (210 à 297 mm) de largeur, jusqu'à
17"
à
47.25" (432 mm à 1.2 m) de longueur. Les bannières
doivent être alimentées une à la fois..
62

Chargement des supports d'impression
Paramètres de supportm : Bac MF
Capacité :
• Papier : 230 feuilles de 20-lb. (75 g/m2)
• 100 étiquettes (recommandé Avery 5161, 7162, 7664,
7666)
•25 enveloppes
• 100 transparents (recommandé 3M CG3720, OKI
52205701)
• Bannières, alimentées à la main, une à la fois
63

Chargement des supports d'impression
Bac MF
Chargement des supports,
Bac MF
1
2
3
1
3
fan_paper_F2_10.jpg
4 Côté d'impression vers le haut.
2
64

Chargement des supports d'impression
Bac MF
Note:
Pour papier à en-tête (Lettre, A4
ou B5):
•
Alimentation côté long
—haut de
page vers l'arrière de
l'imprimante :
manl_le.jpg
•
Alimentation côté court
—haut de
page vers l'intérieur de
l'imprimante :
manl_se.jpg
Note:
Transparents et & étiquettes :
•le côté d'impression vers le haut.
•Défaut = alimentation côté long.
C96_LoadP
aperMPTray
_Labels_cro
p.jpg
Enveloppes:
•Rabat vers le bas, orientée vers
l'intérieur de l'imprimante :
C96_Load
PaperMPTr
ay_Envelo
pels_crop.j
pg
65

Chargement des supports d'impression
Bac MF
Vérifiez le format de support
Défaut = Lettre côté long (Letter LEF)
ENTER
1. Appuyez sur
2.
Touche
ENTER
3.
Mettez en surbrillance
Configuration [Config bac.]
sur
4.
Touche
[Config Bac MP]
5.
Touche
papier]
6.
Touche
(étiquettes et transparents:
sélectionnez Lettre ou A4)
sur
7. Configurez le type de support
(transparent) ou le Grammage du
support (étiquettes, etc.), tel
qu'indiqué ci-dessous.
∇/Δ →
.
ENTER
.
∇/Δ
s
∇/Δ → Paper Size [Format
. Appuyez sur
∇/Δ →
ENTER
..
.
Menus
. Appuyez sur
Tray
.
Appuyez
→ MP Tray Config.
.
Appuyez sur
ENTER
de format approprié
ENTER
.
. Appuyez
.
66
Configurez le type de support :
Transparents
a
Touche
média).
Touche
b
[Transparent]
cAppuyez sur
quitter le menu.
Configurez le grammage du
support : étiquettes, support
épais, etc.
a
Touche
média]
Touche
b
approprié (consulte le page 70).
Appuyez sur
8. Appuyez sur
menu
∇/Δ → Media Type
Appuyez sur
∇/Δ → Transparency
.
Appuyez sur
ON LINE
∇/Δ → Media Weight [Gram.
.
Appuyez sur
∇/Δs→
ENTER
ON LINE
.
ENTER
pour
ENTER
grammage
.
pour quitter le
(Type
.
ENTER
.
.

Information sur le support
Papier standard, papier glacé, papier recycle
Papier standard ____________
Le réglage par défaut.
Ne pas utiliser
• Support très enduit, glacé ou lisse
• Support gaufré, grossier ou très
texturé
• Papier recyclé
• Support avec découpes, perforations ou trop de poussière de papier.
• Papier de forme irrégulière (pas
rectangulaire).
• Du papier carbone, du papier
thermique., du papier à jet d'encre.
• Du papier mouillé ou humide.
Papier glacé_______________
Les papiers glacés ci-dessous ont fait
l'objet d'essais et sont recommandés:
• Mowhawk 37-101 Color Copy UltraGloss CIS 49 lb bond US (188 g/m
• Oki 52208203 Gloss 32-lb. bond US
(120 g/m
2
)
2
• Oki 52208901, 52208902 Ultra
Glossy 42 lb. bond US (150 g/m
Le papier glacé peut être alimenté
depuis n'importe quel bac de papier
(bacs 1 à 5 et bac MF).
Si vous utilisez d'autre papier glacé, il
doit
• être approuvé par le fabricant pour
l'utilisation dans les copieurs à toner
sec ou les imprimantes laser/DEL.
• pouvoir supporter la température et
la pression du procédé de fusion.
• avoir une épaisseur de 0,13 à 0,16
mm
Papier recyclé ______________
Papier recycle doit être
• être approuvé par le fabricant pour
l'utilisation dans les copieurs à
toner sec ou les imprimantes laser/
)
DEL.
• pouvoir supporter la température et
la pression du procédé de fusion.
67
2
)

Information sur le support
Bannières, étiquettes, papier épais,
Papier pour bannières _______
Idéalement, le papier bannière devrait
2
être bond US de 34 lb (128 g/m
Source
•
•
•
= Bac MF
Size [Format]
= Personnalisé
Media Type [Type de support]
).
= Ultra
Heavy 1 (Très lourd 1).
Étiquettes _________________
Attention!
imprimantes laser.
La page de support doit comporter
toutes les étiquettes. L'adhésif ne
doit pas être exposé.
Étiquettes recommandées:
• Avery 5161 lettre
• Avery 7162, 7664, 7666 A4
Effectuez les réglages suivants dans le
pilote:
Source
•
•
= Bac MF
Size [Format]
= Letter lLEF, Letter
SEF, A4 LEF, A4 SEF (Lettre côté
long, lettre côté court, A4 côté
long, A4 côté court)
Media Type [Type de support]
•
Étiquettes”)
(
•
Media Size [Format]
Windows
®
= Off (Non):
Adobe® PostScript®
= Labels
uniauement:
Papier épais________________
Attention!
Pour ne pas endommager
l'imprimante, vérifiez les réglages de
support de l'imprimante avant
d'imprimer sur du papier épais.
Effectuez les réglages suivants dans le
pilote. Voir page 70 pour plus
d'information description des
grammages de support.
Media Type [Type de support]
•
= Medium
Heavy, Heavy, Ultra Heavy 1, Ultra
Heavy 2, Ultra Heavy 3, or Ultra
Heavy 4 (Moyen lourd, Heavy,
Extra lourd 1, Extra lourd 2, ou
Extra lourd 3).
68

Information sur le support
Enveloppes, Transparents
Enveloppes ________________
Importante!
N'utilisez jamais des enveloppes avec
agrafes métalliques, fenêtres ou
fermetures à rabat en V :
Envelopes.jpg
Enveloppes recommandées :
• Oki 52206301 COM-10 enveloppes
de qualité supérieure
Effectuez les réglages suivants dans le
pilote :
Source
•
•
= Bac MF
Size [Format]
= COM-10
Transparents _______________
Attention!
Évitez d'utiliser des transparents
conçus pour être utilisés avec des
marqueurs. Ceux-ci peuvent fondre et
endommager l'unité de fusion de
l'imprimante.
Effectuez les réglages suivants dans le
pilote :
Source
•
•
•
•
69
= Bac 1 ou Bac MF
Size [Format]
SEF, A4 LEF, A4 SEF (Lettre côté
long, lettre côté court, A4 côté
long, A4 côté court)
Media Type [Type de support]
Transparency (Transparent)
Media Size [Format]
Windows
uniquement.
= Letter lLEF, Letter
=
®
= Off (Non):
Adobe® PostScript®

Menu de l’imprimante
Paramètres des grammages
Depuis le Menu (appuyez sur
→ Media Weight [Grammage]
bacx]
ENTER): Menus → Trayx Config [Config. de
.
Importante! : Les paramètres du pilote d'imprimante ont préséance sur les
paramètres du menu de l'imprimante.
Paramètre Bac(s) Bond US Metric Index
Auto (défaut) Toutes 17-57 lb.
Light (Léger) Toutes 17-18 lb.
Medium Light (Moyen léger) Toutes 18-20 lb.
Medium (Moyen) Toutes 20-28 lb.
Medium Heavy (Moyen épais) Toutes 28-32 lb.
Heavy (Épais) Toutes 32-34 lb.
Ultra heavy 1 (Très épais 1) Toutes 35-50 lb.
Ultra heavy 2 (Très épais 2) Toutes 51-57 lb.
Ultra Heavy 3 (Très épais 3) Bac MF 57-71 lb.
Ultra Heavy 4 (Très épais 4) Bac MF 71-87 lb.
64-216 g/m
64-67 g/m
68-75 g/m
75-105 g/m
106-120 g/m
121-128 g/m
129-188 g/m
188-216 g/m
217-268 g/m
268-330 g/m
2
2
2
2
2
2
2
2
2
2
35-119 lb.
35-37 lb.
37-42 lb.
42-58 lb.
52-66 lb.
60-71 lb.
74-104 lb.
106-141 lb.
120-147 lb.
147-181 lb.
Note: Pour déterminer si un grammage de papier est bond US ou Index, vérifiez
l'équivalent métrique : e.g., 35 lb. US Bond = 132 g/m
2
; 35 lb. Index = 64 g/m2.
70

Menu de l’imprimante
Structure
Structure des menus
– Configuration
– Print Pages [Imprimer pages]
– Suspend Printing [Suspendre
impression]
– Resume Printing [Reprisé
impression]
– Print Secure Job [Impr. Tâche
sécur.] (Protégé par mot de
passe)
–Menus
– Shut Down [Arrêter]
–Admin Setup [
– Tray Alignment [Alignement
du bac]
– Calibration [Calibrage]
– Print Statistics [Imprimir
statisq.] (Protégé par mot de
passe)
Config. admin]
Impression du rapport de
configuration
Imprimez le rapport de configuration
afin de voir la liste des articles de
menu et leurs réglages :
ENTER
1. Appuyez sur
2. Touches
les pages]
3. Appuyez sur
4. Touches
5. Appuyez surt
6. Le rapport est imprimé et
l’imprimante se remet en ligne.
71
∇/Δ → Print Pages [Imprimer
.
∇/Δ
.
ENTER
.
→ Configuration
ENTER
.
.

Menu de l’imprimante
Modifier le paramètres
1. Appuyez sur
mode Menu.
2. Utilisez la touche
la fonction à modifier.
3. Appuyez sur
ENTER
ENTER
pour activer le
∇
pour accéder à
.
4. Continuez d'appuyer sur les
touches
à l'élément que vous désirez
modifier.
5. Utilisez la touches
au réglage à sélectionner.
6. Appuyez sur
Un astérisque s'affiche à côté du
nouveau paramètre.
7. Appuyez sur
le menu.
72
∇, Δ
et
ENTER
ENTER
ON LINE
∇/Δ
.
pour quitter
pour accéder
pour accéder

Menu de l’imprimante
Impression confidentielle
S'applique uniquement aux imprimantes ayant un disque dur installé
(standard sur le modèle C9850hdn).
Le document se voit tout d'abord
attribué un mot de passe avant d'être
acheminé dans un fichier d'impression
qui est sauvegardé sur le disque dur
(affichage du Guide de l'utilisateur en
ligne).
Impression d'un document
1. Appuyez sur
2. Touches
sécur. Æ Fichier crypté Æ Entrer le
mot de passe
3. Utilisez les touches Δ et ∇ pour
parcou-rir les chiffres pour le
premier numéro du mot de passe.
Appuyez sur
4. Repeat the previous step for each
digit in the password.
5. Appuyez sur
surbrillance
ENTER
.
∇/Δ → Impr. Tâche
. Appuyez sur
ENTER
ENTER
, puis mettez en
Imprimir
ENTER.
.
.
ENTER
6. Appuyez sur
7. Utilisez les t
une valeur pour
assemblage
Impression confidentielle : Le
document s'imprime puis est
effacé.
Stocker sur le disque dur :
document s'imprime et est
conservé en mémoire jusqu'à ce
qu'il soit supprimé
8. L'imprimante se remet en ligne.
ouches ∇/Δ
. Appuyez sur
.
pour entrer
Définir nombre
ENTER.
.
Pour effacer le document
1. Suivez les étapes 1 à 5 ci-dessus
2. Touches
sur
3. Cliquez sur
suppression.
4. Appuyez sur
L'imprimante se remet en ligne.
73
∇/Δ → Supprimer
ENTER.
Oui
ENTER.
pour confirmer la
. Appuyez
Le

Menu de l’imprimante
Configuration de économie d'énergie
Économie d'énergie permet de
configurer le délai requis pour
l'imprimante avant de passer en mode
d'attente (défaut = 60 min).
Réglage du délai d'attente
1. Appuyez sur
2. Utilisez la touche
Menus
.
3. Touches
Système]
4. Mettez en surbrillance
Time [Délai attente]
ENTER
.
5. Touches
délai d'attente. Appuyez sur
6. Appuyez sur
mémoriser le réglage et quitter le
menu.
ENTER
.
∇
pour accéder
Appuyez sur
∇/Δ →
. Appuyez sur
∇/Δ →
S
ystem Adjust [Ajust.
. Appuyez sur
sélectionnez le
ON LINE
ENTER
ENTER
Power Save
pour
.
.
ENTER
Désactiver Économie
1. Appuyez sur
2. Touches
. Appuyez sur
admin].
3. Touches
ENTER
.
Hors ligne
4. Attendez le lancement de
l'installation.
Configuration
Menu
5. Touches
imprimante]
6.
Appuyez sur ENTER jusqu'à ce que
Power Save [Eco.énergie]
7. Touches
.
Appuyez sur
8. Appuyez sur
9. Appuyez sur
sélectionner
L'imprimante est réinitialisée.
74
ENTER
.
∇/Δ → Admin Setup [config
∇/Δ → Oui
s'affiche à l'écran
∇/Δ → Printer Setup [config.
. Appuyez sur
∇/Δ → Disable [Désactiver]
ENTER
.
ON LINE
ENTER
pour
Exit Setup [Quitter config.]
ENTER
.
. Appuyez sur
s’affiche.
ENTER
.
s'affiche
.
.
.

Menu de l’imprimante
Rapports
Impression de Rapports
1. Appuyez sur
2. Touches
Infos]
.
3. Appuyez sur
4. Touches
imprimer.
5. Appuyez sur
Le rapport est imprimé et
l’imprimante se remet en ligne.
*Note:
Pour imprimer le Journal des tâches
et les Nuanciers, du papier de
format tabloïde doit être placé dans
le bac 1 ou Bac MF.
ENTER
.
∇/Δ → Print Pages [Imprimer
ENTER
.
∇/Δ →
le rapport à
ENTER
.
Rapports Disponibles
Les rapports disponibles dépendent en
partie de la manière dont l'imprimante
est configurée et quelles options sont
installées.
Des exemples de rapports
PS Test Page [Page de test PS]
•
information générale sur EFI Fiery.
• Configuration:
généraux sur la configuration de
l'imprimante, en plus d'une liste
des paramètres de menu courants.
Color Charts [Nuanciers]:
•
Imprime les tableaux de nuanciers
EFI Fiery Pantone
Job Log:
•
ont été imprimés.*
• PS Font or PCL Font List [Liste
polices PS et PCL]
• Demo Page [Page de démo]
75
journal des travaux qui
renseignements
:
®
, CMY et RGB.*
:

Impression duplex
(Impression sur les deux côtés d'une page)
Grand côté c. petit côté
Grand côté
Petit côté
Spécifications
Grammage du papier
• Tous les formats de papier: 17 à
32 lb. US Bond (64 à 120 g/m
• Lettre, Tabloide, A4 et A3
uniquement: jusqu'à 50 lb. US
Bond (188 g/m
Note
Si le papier de 20 à 24 lb (64 à 90 g/
m2) roule, utilisez du papier de 28 lb
(105 g/m
Alimentation papier
•Bac 1
• Bacs optionnel
• L'alimentateur haute capacité
optionnel
•Bac MF
Sortie de papier
• Bac de sortie supérieur
• Bac de sortie latéral
76
2
)
2
).
2
)

Impression duplex
Formats de papier*
•
Standard
légal
Tabloïde, Tabloïde extra, Executive,
A3, A3 large, A3 hors format, A4
SEF, A4 LEF, A5, A6, B4, B5 SEF, B5
LEF.
Personnalisé
•
po (100 x 148 mm), maximum
12.9 x 18 po (328 x 457 mm).
SEF = alimentation côté court
LEF = alimentation côté long
: Lettre SEF*, Lettre LEF,
-14,
légal
-13.5,
légal
: minimum 3.9 x 5.8
-13,
Comment imprimer un fichier
avec le Duplexeur
Ouvrez le fichier à imprimer et cliquez
sur File [Fichier]
Sélectionnez l'imprimante.
Windows
1. Pour tous les systèmes sauf
Windows 2000, cliquez sur
→
Print [Imprimer].
Properties [Propriétés] ou
Preferences [Préférences].
2. Pour tous les systèmes sauf
Windows 2000, cliquez sur
Properties [Propriétés] ou
Preferences [Préférences].
Macintosh
1. Sous Presets [Préréglages], sélectionnez Duplex [Recto verso]
2. Sous Duplex [Recto verso],
sélectionnez Long-Edge Binding
[Reliure côté long] ou Short-Edge
Binding [Reliure côté court].
77

Témoins du panneau de commande
Ready
Allumé
L'imprimante est en ligne.
Éteint
L'imprimante est hors ligne.
Clignotant
L'imprimante reçoit des données.
Attention
Allumé :
L'imprimante a besoin d'une
attention, mais peut continuer à
fonctionne. Un message d'erreur
s'affiche :
Near End [Presque Fin Papier]
Éteint
Normal.
Avertissement!
Toner Low [Toner Bas], Paper
, etc.
Clignotant :
L'imprimante a besoin d'une attention
immédiate. Un message d'erreur
s'affiche :
Tray1 Empty [Bac1 Vide]
78
Alerte!
Paper Jam [Bourrage papier]
, etc.
,

Messages d'erreur
Le bouton Help
L'imprimante possède un système
d'aide intégrée.
Lorsqu'un message d'erreur s'affiche,
appuyez sur HELP. L'affichage indique
des renseignements qui vous aideront
à supprimer l'erreur, y compris
comment dégager les bourrages.
Utilisez les touches
les renseignements d'aide.
Pour plus d'information sur
l'élimination des bourrages, consultez
les pages 81, ff.
Note
Si vous avez souvent des
bourrages, consultez les
suggestions à la page suivante.
∇/Δ
pour parcourir
Pour plus d'information sur les
messages d'erreur, affichage du Guide
de l'utilisateur en ligne en ligne sur le
CD de documentation fourni avec
l'imprimante ou sur le
http://my.okidata.com (anglais
uniquement).
79

Bourrages fréquents
Lorsque des bourrages papier se
produisent souvent, vérifiez les
éléments suivants.
• L'imprimante est-elle de niveau?
• Le support utilisé est-il à l'intérieur
des spécifications (voir pages 9 à
17)? Des bourrages papier se
produiront souvent lorsque des
supports trop minces ou trop épais
sont utilisés.
• Les paramètres (imprimante et
pilote) sont-ils appropriés au type
de support utilisé (voir pages 9 à
16)?
• N'utilisez pas des supports
gondolés ou recourbés.
• Retirez le support du bac. Aérez et
aligner la pile. Remettez en place la
pile de support.
fan_paper_
F2_10.jpg
• Les enveloppes se bloquent dans
l'appareil. Assurez-vous que la pile
est bien alignée. Les enveloppes
doivent être chargées avec le rabat
vers le bas, partie supérieure vers
l'imprimante
• Nettoyez le cylindre d'alimentation
(consultez le page 100).
80

Dégagé un bourrage
Bourrage du scanner (CAD)
1. Appuyez sur le bouton de
2. Tirez la feuille (
3. Fermez le couvercle du CAD.
déverrouillage (1) et soulevez le
couvercle du CAD (2).
3
).
81

Dégagé un bourrage
Couvercle latéral de bac
Open Cover, Paper Jam
tttt Side Cover
Ouvrir capot, Bourrage papier
Couv. lat. tttt
Bac 1, ou l'un des bacs 2 à 5 (le cas
échéant), peut apparaître à la place
des caractères tttt du message du
panneau LCDécran. Dans cet exemple
Bac 1 est utilisé, la procédure est
identique pour les autres bacs.
1. Serrez la poignée (1) du capot
latéral du bac 1 et ouvrez le capot.
1
82

Dégagé un bourrage
Couvercle latéral de bac
2. Tirez le levier de déverrouillage (1)
et ouvrez le couvercle latéral.
2
3. Retirez soigneusement le papier
bourré
4. Remettez le guide de papier en
position et refermez le capot latéral
du bac.
83

Dégagé un bourrage
Couvercle latéral de l'imprimante
Open Cover Paper Jam
Side Cover
Ouvrir capot, Bourrage papier
Couv. lat.
1. Si le bac MF est ouvert, fermez-le
de manière à voir le couvercle
latéral
2. Tirez le levier de déverrouillage (1)
et ouvrez le couvercle latéral.
2
3. Retirez soigneusement le papier
bourré.
4. Fermez le couvercle latéral
84

Dégagé un bourrage
Capot supérieur de l'imprimante
Open Cover, Paper Jam
Printer Top Cover
Ouvrir capot, Bourrage papier
Capot supérieur
Le support comporte des mécanismes
hydrauliques pour déplacer l’étagère
de scanneur vers le haut ou le bas.
N’UTILISEZ JAMAIS LA POIGNÉE DE
DÉVERROUILLAGE (2) DU CÔTÉ
DROIT DE L’ÉTAGÈRE SANS QUE LE
SCANNEUR NE SOIT BOULONNÉ À
L’ÉTAGÈRE.
1. Tenez fermement la poignée avant
de la plate-forme du scanneur avec
une main (1), puis appuyez
lentement sur le levier de
déverrouillage de la plate-forme (2)
du scanneur pour soulever la
plateforme.
85

Dégagé un bourrage
Capot supérieur de l'imprimante
2. Serrez la poignée du capot
supérieur et ouvrez-le.
1
3. Serrez le levier du panier (1) et
soulevez le panier du tambour.
Avertissement!
Faites attention de ne pas
toucher l'unité de fusion qui est
CHAUDE après l'impression.
Cette zone est clairement
marquée..
86

Dégagé un bourrage
Capot supérieur de l'imprimante
4. Retirez soigneusement le papier
présent sur la ceinture.
Avertissement!
Faites attention de ne pas
toucher l'unité de fusion qui
peut être chaude après
l'impression. Si l'unité de fusion
est chaude, attendez qu'elle se
soit refroidie avant de tenter de
retirer le papier bloqué.
5. Si du papier est bourré dans l'unité
de fusion, repoussez le levier de
verrouillage (1) et soulevez l'unité
de fusion(2).
87

Dégagé un bourrage
Capot supérieur de l'imprimante
6. Tirez vers le haut les leviers de
déverrouillage (1) pour dégager le
papier coincé.
5
7. Replacez soigneusement l'unité de
fusion dans l'imprimante et tournez
le levier dans la direction indiquée
pour verrouiller l'unité de fusion.
6
88

Dégagé un bourrage
Capot supérieur de l'imprimante
8. S'il y a un bourrage papier près de
la sortie, ouvrez l'empileuse face en
dessus (1).
7
9. Ouvrez le capot latéral (sortie de
papier) (8) et retirez le bourrage
papier.
8
89

Dégagé un bourrage
Capot supérieur de l'imprimante
10.Fermez le capot latéral (sortie de
papier) puis l'empileuse face en
dessus.
11.Remettez le tambour en position et
assurez-vous qu'il est verrouillé.
9
12.Fermez le capot supérieur..
90

Dégagé un bourrage
Capot supérieur de l'imprimante
POUR ÉVITER
L’ÉCRASEMENT DES
DOIGTS, TENEZ LES
MAINS À L’ÉCART DES
TIGES DE MONTAGE À
L’ARRIÈRE DU
SUPPORT À SCANNEUR
LORSQUE VOUS
DÉPLACEZ L’ÉTAGÈRE
VERS LE BAS.
13.Tenez fermement la poignée avant
de la plate-forme du scanneur avec
une main, puis abaissez doucement
la plate-forme jusqu’à ce qu’elle se
verrouille en place.
91

Dégagé un bourrage
Unité recto verso
Check Duplex Unit
Paper Jam
Vérifier Recto-Verso
Bourrage papier
1. Si un Finisseur est ajouté à votre
imprimante, actionnez le levier (1)
de l'inverseur pour le séparer de
l'imprimante.
1
2. Appuyez sur le bouton de
déverrouillage du couvercle de
l'unité recto verso (1) et ouvrez le
couvercl.
2
92

Dégagé un bourrage
Unité recto verso
3. Retirez soigneusement le papier
bourré.
4. Actionnez les leviers et sortez
l'unité recto verso.
93

Dégagé un bourrage
Unité recto verso
5. En tenant le capot supérieur avant
par la poignée (1), repoussez-le
doucement vers l'intérieur et
soulevez-le.
4
6. Retirez le papier bourré.
94

Dégagé un bourrage
Unité recto verso
7. De la même manière, vérifiez s'il y
a un bourrage papier sous le capot
supérieur arrière et enlevez-le.
8. Fermez les deux capots.
95

Dégagé un bourrage
Unité recto verso
9. Soulevez le capot avant de l'unité
recto verso. Repoussez l'unité recto
verso en position.
10.Si vous avez retiré une unité
Finisseur pour accéder à l'unité
recto verso, replacez-la.
96

Entretien
Nettoyage de la matrice à DEL
Nettoyez les têtes à DEL :
•
chaque fois que vous remplacez une
cartouche de toner
•
si l'impression présente des signes
d'images estompées, de bandes
blanches ou de lettres flous
Le support comporte des mécanismes
hydrauliques pour déplacer l’étagère
de scanneur vers le haut ou le bas.
N’UTILISEZ JAMAIS LA POIGNÉE DE
DÉVERROUILLAGE (2) DU CÔTÉ
DROIT DE L’ÉTAGÈRE SANS QUE LE
SCANNEUR NE SOIT BOULONNÉ À
L’ÉTAGÈRE.
.
1. Tenez fermement d’une main la
poignée avant (1) de l’étagère du
scanneur, puis appuyez lentement
sur le levier de déverrouillage de
l’étagère (2) du scanneur pour
écarter l’étagère.
97

Entretien
Nettoyage de la matrice à DEL
2. Ouvrez le capot supérieur environ à
moitié.
1
3. Cela permet d’accéder facilement
aux têtes d’impression à DEL (1).
C96_
Clean
4. Puis utilisez le chiffon
fourni avec les
cartouches de toner (ou
un chiffon propre et
doux) pour essuyer
délicatement la tête
d'impression à DEL.
98

Entretien
Nettoyage de la matrice à DEL
5. Fermez le capot supérieur.
POUR ÉVITER
L’ÉCRASEMENT DES
DOIGTS, TENEZ LES
MAINS À L’ÉCART DES
TIGES DE MONTAGE À
L’ARRIÈRE DU
SUPPORT À SCANNEUR
LORSQUE VOUS
DÉPLACEZ L’ÉTAGÈRE
VERS LE BAS.
6. Tenez fermement d’une main la
poignée avant de l’étagère du
scanneur, puis appuyez lentement
sur le levier de déverrouillage de
l’étagère du scanneur pour abaisser
l’étagère jusqu’à ce qu’elle se
verrouille en place.
99

Entretien
Nettoyage des rouleaux d'alimentation de bac 1
1. Retirez les montres, bracelets et
autres éléments similaires qui
pourraient se prendre dans le
mécanisme.
2. Si un disque dur est installé dans
l'imprimante, appuyez et
maintenez enfoncé le bouton
d'arrêt/de réinitialisation sur le
panneau de commande pendant 3
secondes et attendez que
l'affichage confirme qu'il est permis
d'éteindre l'imprimante en toute
sécurité. Sinon, allez à la prochaine
étape.
3. Mettez l'imprimante hors tension..
100
 Loading...