

Page 1
Page 2

C
OPYRIGHT INFORMATION
Copyright © 2008 Oki Data Americas, Inc. All rights reserved.
D
OCUMENT INFORMATION
CX3641MFP Basic User’s Guide
PN 59308401
Revision 1.0
March, 2008
D
ISCLAIMER
Every effort has been made to ensure that the information in this document is complete,
accurate, and up-to-date. Oki assumes no responsibility for the results of errors beyond its
control. Oki also cannot guarantee that changes in software and equipment made by other
manufacturers and referred to in this guide will not affect the applicability of the
information in it. Mention of software products manufactured by other companies does not
necessarily constitute endorsement by Oki.
While all reasonable efforts have been made to make this document as accurate and helpful
as possible, we make no warranty of any kind, expressed or implied, as to the accuracy or
completeness of the information contained herein.
The most up-to-date drivers and manuals are available from the Oki web site:
http://www.okiprintingsolutions.com
T
RADEMARK INFORMATION
Oki, Oki Printing Solutions and Microline are registered trademarks of Oki Electric Industry
Company, Ltd.
EFI, Fiery, the Fiery logo, and Spot-On are registered trademarks of Electronics for
Imaging, Inc. in the U.S. Patent and Trademark Office.
Fiery Link, SendMe, and the EFI logo are trademarks of Electronics for Imaging, Inc.
Microsoft, MS-DOS and Windows are registered trademarks of Microsoft Corporation.
Apple, Macintosh, Mac and Mac OS are registered trademarks of Apple Computer.
Other product names and brand names are registered trademarks or trademarks of their
proprietors.
CAUTION!
This product complies with EN55022 Class B. However, when fitted
with the optional scanner and/or finisher, compliance to EN55022
is Class A. In a domestic environment this configuration may cause
radio interference, in which case the user may be required to take
adequate measures.
> 2
Page 3

E
MERGENCY FIRST AID
Take care with toner powder:
If swallowed, give small amounts of cold water and seek medical attention.
DO NOT attempt to induce vomiting.
If inhaled, move the person to an open area for fresh air. Seek medical
attention.
If it gets into the eyes, flush with large amounts of water for at least 15
minutes keeping eyelids open. Seek medical attention.
Spillages should be treated with cold water and soap to help reduce risk of
staining skin or clothing.
Emergency first aid > 3
Page 4

C
ONTENTS
Emergency first aid . . . . . . . . . . . . . . . . . . . . . . . . . . . . . . . . . . . . . . . . . .3
Contents . . . . . . . . . . . . . . . . . . . . . . . . . . . . . . . . . . . . . . . . . . . . . . . . . .4
Notes, cautions and warnings . . . . . . . . . . . . . . . . . . . . . . . . . . . . . . . . . .6
About this guide . . . . . . . . . . . . . . . . . . . . . . . . . . . . . . . . . . . . . . . . . . . .7
Introduction . . . . . . . . . . . . . . . . . . . . . . . . . . . . . . . . . . . . . . . . . . . . . . .8
Features summary . . . . . . . . . . . . . . . . . . . . . . . . . . . . . . . . . . . . . . . . 9
Optional accessories . . . . . . . . . . . . . . . . . . . . . . . . . . . . . . . . . . . . . 9
Getting to know your product . . . . . . . . . . . . . . . . . . . . . . . . . . . . . . . . .10
Identifying system units. . . . . . . . . . . . . . . . . . . . . . . . . . . . . . . . . . . . .10
Identifying major components . . . . . . . . . . . . . . . . . . . . . . . . . . . . . . . .11
Printer unit . . . . . . . . . . . . . . . . . . . . . . . . . . . . . . . . . . . . . . . . . . . .11
Scanner unit . . . . . . . . . . . . . . . . . . . . . . . . . . . . . . . . . . . . . . . . . . .13
Control panels. . . . . . . . . . . . . . . . . . . . . . . . . . . . . . . . . . . . . . . . . . . .14
Printer unit control panel . . . . . . . . . . . . . . . . . . . . . . . . . . . . . . . . . .14
Scanner unit control panel . . . . . . . . . . . . . . . . . . . . . . . . . . . . . . . . .15
Turning off/on. . . . . . . . . . . . . . . . . . . . . . . . . . . . . . . . . . . . . . . . . . . .17
Turning off . . . . . . . . . . . . . . . . . . . . . . . . . . . . . . . . . . . . . . . . . . . .17
Turning on . . . . . . . . . . . . . . . . . . . . . . . . . . . . . . . . . . . . . . . . . . . .18
Opening and closing the printer unit top cover . . . . . . . . . . . . . . . . . . . . .19
Paper recommendations . . . . . . . . . . . . . . . . . . . . . . . . . . . . . . . . . . . . .21
Paper input and output information . . . . . . . . . . . . . . . . . . . . . . . . . . . . .22
Trays and stackers . . . . . . . . . . . . . . . . . . . . . . . . . . . . . . . . . . . . . . . .23
Trays 1 to 4 . . . . . . . . . . . . . . . . . . . . . . . . . . . . . . . . . . . . . . . . . . .23
MP Tray . . . . . . . . . . . . . . . . . . . . . . . . . . . . . . . . . . . . . . . . . . . . . .23
Face-down stacker . . . . . . . . . . . . . . . . . . . . . . . . . . . . . . . . . . . . . .23
Face-up stacker . . . . . . . . . . . . . . . . . . . . . . . . . . . . . . . . . . . . . . . .23
Duplex unit. . . . . . . . . . . . . . . . . . . . . . . . . . . . . . . . . . . . . . . . . . . .24
Loading tray and stacker examples . . . . . . . . . . . . . . . . . . . . . . . . . . . . .25
Printer . . . . . . . . . . . . . . . . . . . . . . . . . . . . . . . . . . . . . . . . . . . . . . .25
Scanner unit . . . . . . . . . . . . . . . . . . . . . . . . . . . . . . . . . . . . . . . . . . .28
Printing . . . . . . . . . . . . . . . . . . . . . . . . . . . . . . . . . . . . . . . . . . . . . . . . . .30
What is a printer driver? . . . . . . . . . . . . . . . . . . . . . . . . . . . . . . . . . . . .30
PCL and PS compared . . . . . . . . . . . . . . . . . . . . . . . . . . . . . . . . . . . .30
Recommendations . . . . . . . . . . . . . . . . . . . . . . . . . . . . . . . . . . . . . . .31
How to access the driver screens . . . . . . . . . . . . . . . . . . . . . . . . . . . . . .31
Changing the driver defaults. . . . . . . . . . . . . . . . . . . . . . . . . . . . . . . .32
Changing the application’s driver settings. . . . . . . . . . . . . . . . . . . . . . .32
Using a PCL driver . . . . . . . . . . . . . . . . . . . . . . . . . . . . . . . . . . . . . . . . .33
Using a PS driver. . . . . . . . . . . . . . . . . . . . . . . . . . . . . . . . . . . . . . . . . .34
Setting the driver device options. . . . . . . . . . . . . . . . . . . . . . . . . . . . . . .35
Windows . . . . . . . . . . . . . . . . . . . . . . . . . . . . . . . . . . . . . . . . . . . . .35
Mac OS X . . . . . . . . . . . . . . . . . . . . . . . . . . . . . . . . . . . . . . . . . . . . .35
Copying . . . . . . . . . . . . . . . . . . . . . . . . . . . . . . . . . . . . . . . . . . . . . . . . . .36
Outline of procedure . . . . . . . . . . . . . . . . . . . . . . . . . . . . . . . . . . . . . . .36
Making simple copies . . . . . . . . . . . . . . . . . . . . . . . . . . . . . . . . . . . . . . .36
Increased paper saving . . . . . . . . . . . . . . . . . . . . . . . . . . . . . . . . . . . . .37
Scanning . . . . . . . . . . . . . . . . . . . . . . . . . . . . . . . . . . . . . . . . . . . . . . . . .38
Outline of scan to e-mail procedure . . . . . . . . . . . . . . . . . . . . . . . . . . . . .38
Scanning to e-mail . . . . . . . . . . . . . . . . . . . . . . . . . . . . . . . . . . . . . . . .39
Confirming e-mail transmission. . . . . . . . . . . . . . . . . . . . . . . . . . . . . . . .41
Faxing . . . . . . . . . . . . . . . . . . . . . . . . . . . . . . . . . . . . . . . . . . . . . . . . . . .42
Outline of walk-up faxing procedure . . . . . . . . . . . . . . . . . . . . . . . . . . . .42
Sending a fax . . . . . . . . . . . . . . . . . . . . . . . . . . . . . . . . . . . . . . . . . . . .42
Contents > 4
Page 5

Confirming fax transmission . . . . . . . . . . . . . . . . . . . . . . . . . . . . . . . . . .44
Optional accessories . . . . . . . . . . . . . . . . . . . . . . . . . . . . . . . . . . . . . . . .45
Order information . . . . . . . . . . . . . . . . . . . . . . . . . . . . . . . . . . . . . . . . .45
Installing accessories. . . . . . . . . . . . . . . . . . . . . . . . . . . . . . . . . . . . . . .45
Consumable Items . . . . . . . . . . . . . . . . . . . . . . . . . . . . . . . . . . . . . . . . .45
Order Information . . . . . . . . . . . . . . . . . . . . . . . . . . . . . . . . . . . . . . . . .45
Specifications . . . . . . . . . . . . . . . . . . . . . . . . . . . . . . . . . . . . . . . . . . . . .46
Printer unit . . . . . . . . . . . . . . . . . . . . . . . . . . . . . . . . . . . . . . . . . . . . . .46
Scanner unit . . . . . . . . . . . . . . . . . . . . . . . . . . . . . . . . . . . . . . . . . . . . .47
Index . . . . . . . . . . . . . . . . . . . . . . . . . . . . . . . . . . . . . . . . . . . . . . . . . . . .48
Service and Support . . . . . . . . . . . . . . . . . . . . . . . . . . . . . . . . . . . . . . . .49
Contents > 5
Page 6

N
OTES, CAUTIONS AND WARNINGS
NOTE
A note provides additional information to supplement the main text.
CAUTION!
A caution provides additional information which, if ignored, may
result in equipment malfunction or damage.
WARNING!
A warning provides additional information which, if ignored, may
result in a risk of personal injury.
For the protection of your product, and in order to ensure that you benefit from its full
functionality, this model has been designed to operate only with genuine Oki Printing
Solutions toner cartridges. These can be identified by the Oki Printing Solutions trademark.
Any other toner cartridge may not operate at all, even if it is described as “compatible”,
and if it does work, your product's performance and print quality may be degraded.
Specifications subject to change without notice. All trademarks acknowledged.
Notes, cautions and warnings > 6
Page 7

A
BOUT THIS GUIDE
The purpose of this guide is to provide you with a general appreciation of the capabilities
and advantages of the system and a brief introduction to:
> printing
> copying
> scanning
> faxing
About this guide > 7
Page 8
I
NTRODUCTION
Congratulations on choosing The CX3641MFP!
With print, scan, copy and fax functionality all in one, the CX3641MFP delivers everything
you would expect from a multi-functional product (MFP). But it also exceeds conventional
expectations: it prints and copies at extreme speeds; offers superb print quality; provides
a host of highly advanced features; is remarkably easy to use; brings all this together in
one reliable, hard-working system that you can confidently place at the heart of all your
communication needs and offers better value for money than any other high volume MFP
around.
This product is equipped as standard with the following:
> a printer hard disk to hold the powerful EFI imaging software and deal with other
features such as spooling and collation of output
> a printer duplex unit to allow you to print on both sides of a page
> a networking capability to allow the printer to be networked and shared by many
users
> a three-tray high capacity feeder (HCF) unit which augments the standard printer
paper tray by three additional 530-sheet paper trays for high volume printing
operations
> full MFP functionality of printing, scanning, copying and faxing
Introduction > 8
Page 9

F
EATURES SUMMARY
Major features of your product include:
> single-pass Digital LED Technology delivers high speed and superb reliability
> Multilevel technology and true 1200 x 1200 dpi resolution
> EFI Fiery technology to ensure high print quality and provide document
management capability
> 1GB RAM to support complex printing
> automatic color balance for consistent high quality color printing
> automatic media detect to ensure printer internal settings are optimal for printing
and avoiding potential paper jams
> media flexibility - wide range of paper sizes and weights from internal trays and
multi-purpose tray
> 36ppm color and 40ppm mono print speed
> 230 sheet multi-purpose input tray
> 2120 sheet paper input
> 500 sheets face down and 200 sheets face up paper output
> prints paper weights up to 307 gsm
> easy to use graphical display control panel
> multi-tasking to allow scanning one job while printing another to ensure greater
productivity
> comprehensive access control by password and panel lock
> 100 sheet Letter/A4 (50 sheet Tabloid/A3) automatic document feeder (ADF) for
scanner unit
> 30ppm color and 36ppm mono scan and copy speed
> easy to use color 21cm touch screen on scanner unit
> scan to e-mail, scan to FTP, scan to mailbox
> interactive scanning using SendMe™
O
PTIONAL ACCESSORIES
Refer to “Optional accessories” on page 45.
Introduction > 9
Page 10

G
ETTING TO KNOW YOUR PRODUCT
I
DENTIFYING SYSTEM UNITS
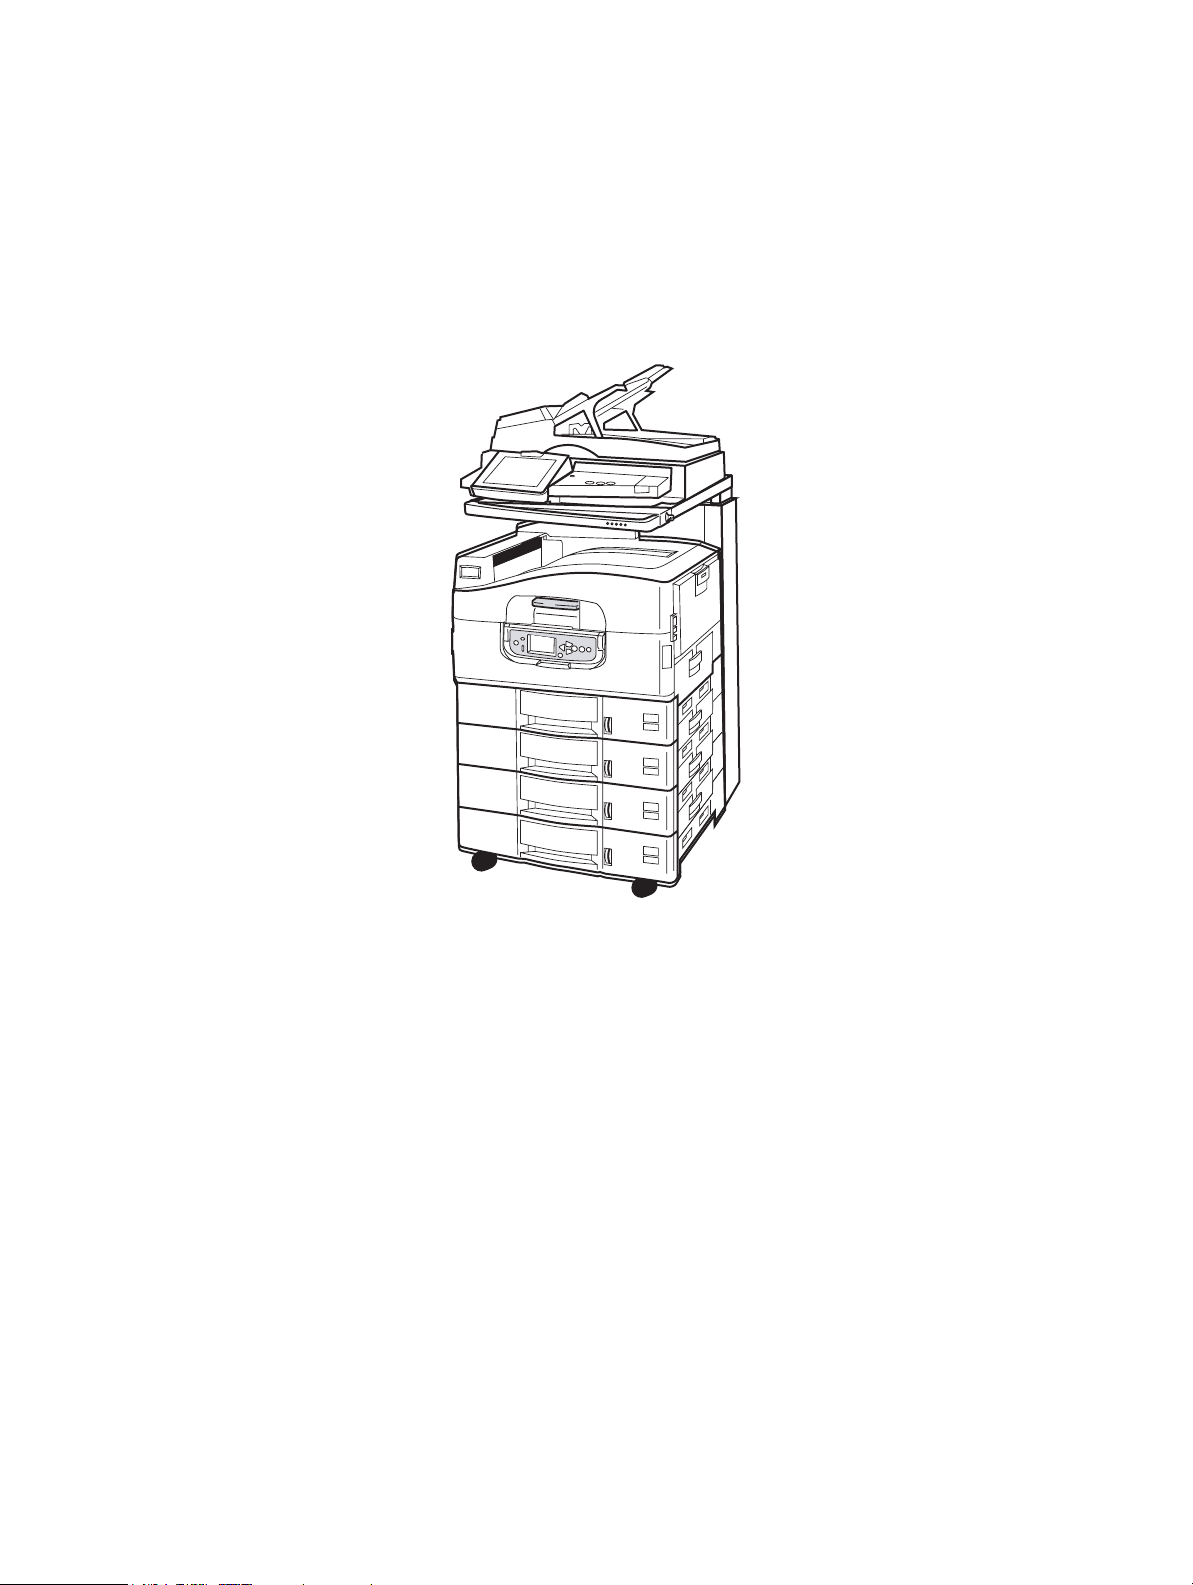
The major system units are identified below:
2
4
1a
1. Printer unit with standard input paper tray (Tray 1) (topmost) and additional threetray HCF (1a) giving four trays total.
2. Scanner unit complete with automatic document feeder (ADF) provides single page
flat bed (document glass) scanning or multi-page duplex document scanning from
the ADF.
3a
3
1
3. Scanner stand to support the scanner unit used normally in the lowered position but
able to be raised to allow access to the inside of the printer. Raising and lowering of
the scanner unit is by means of the scanner unit handle (3a).
4. Finisher unit (optional accessory) provides punching and stapling of the output.
Getting to know your product > 10
Page 11
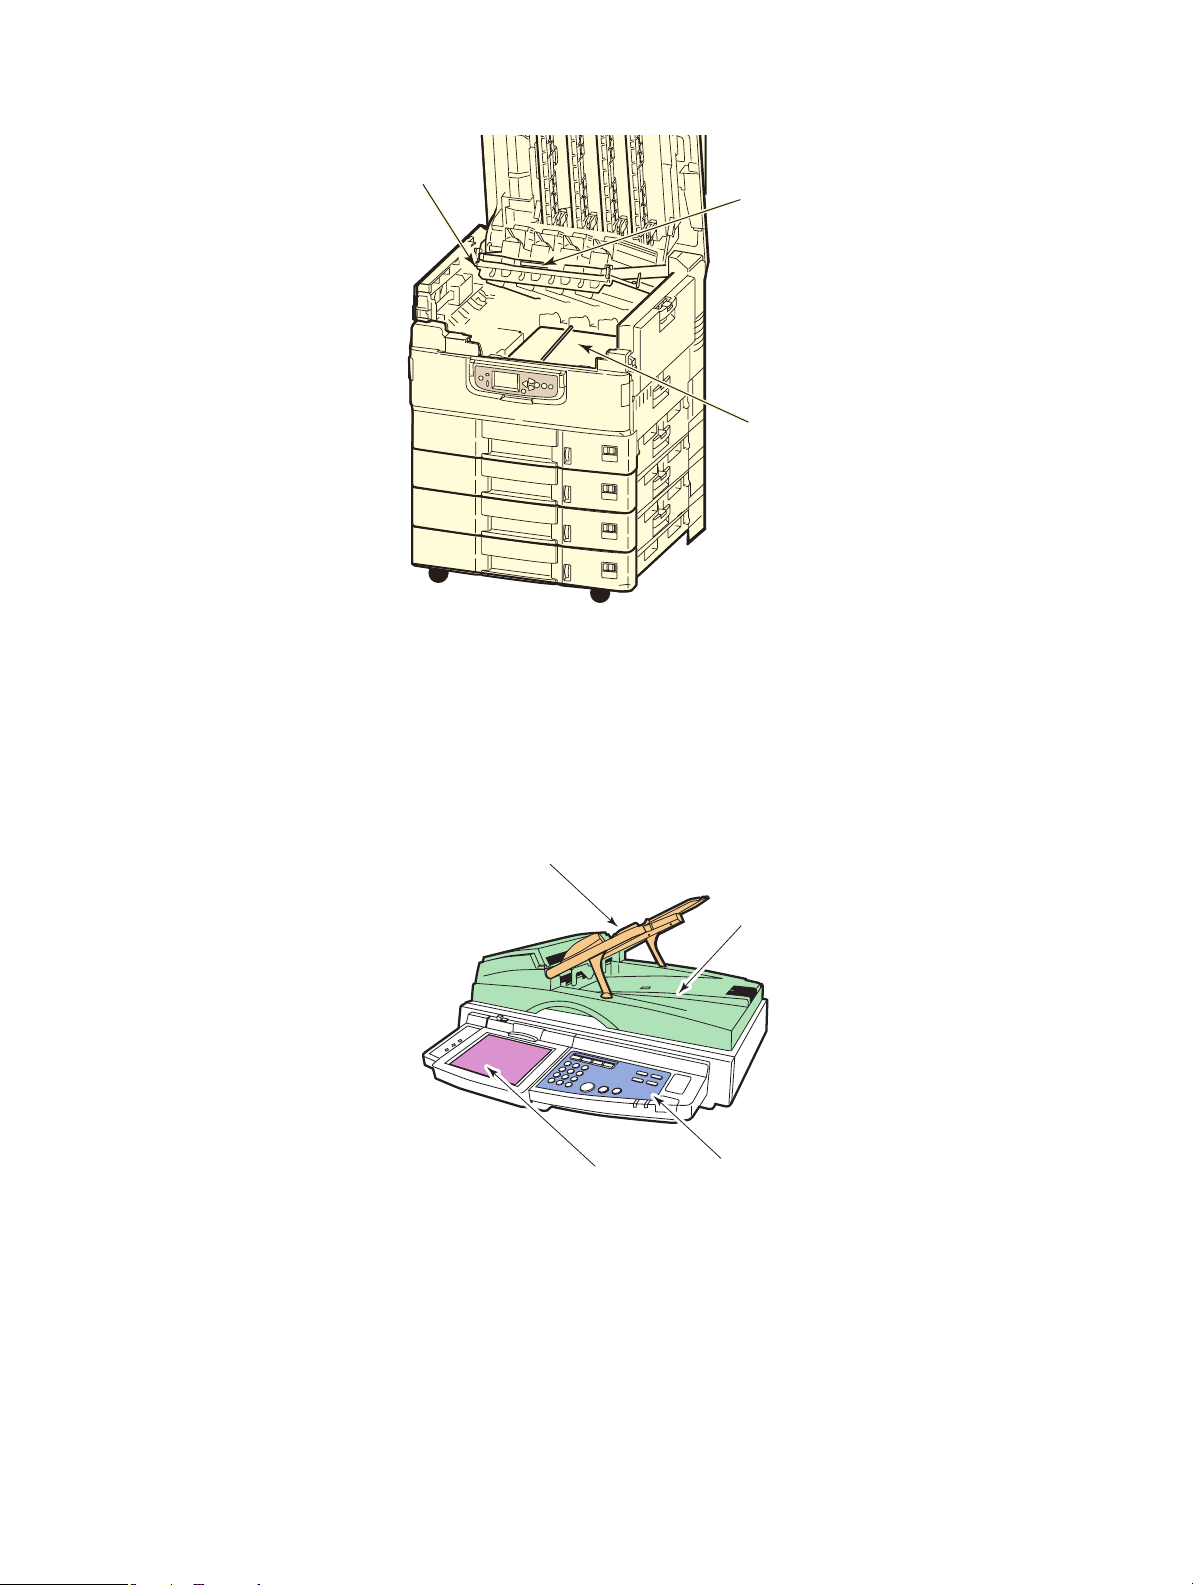
I
DENTIFYING MAJOR COMPONENTS
P
RINTER UNIT
4
5
3
2
1
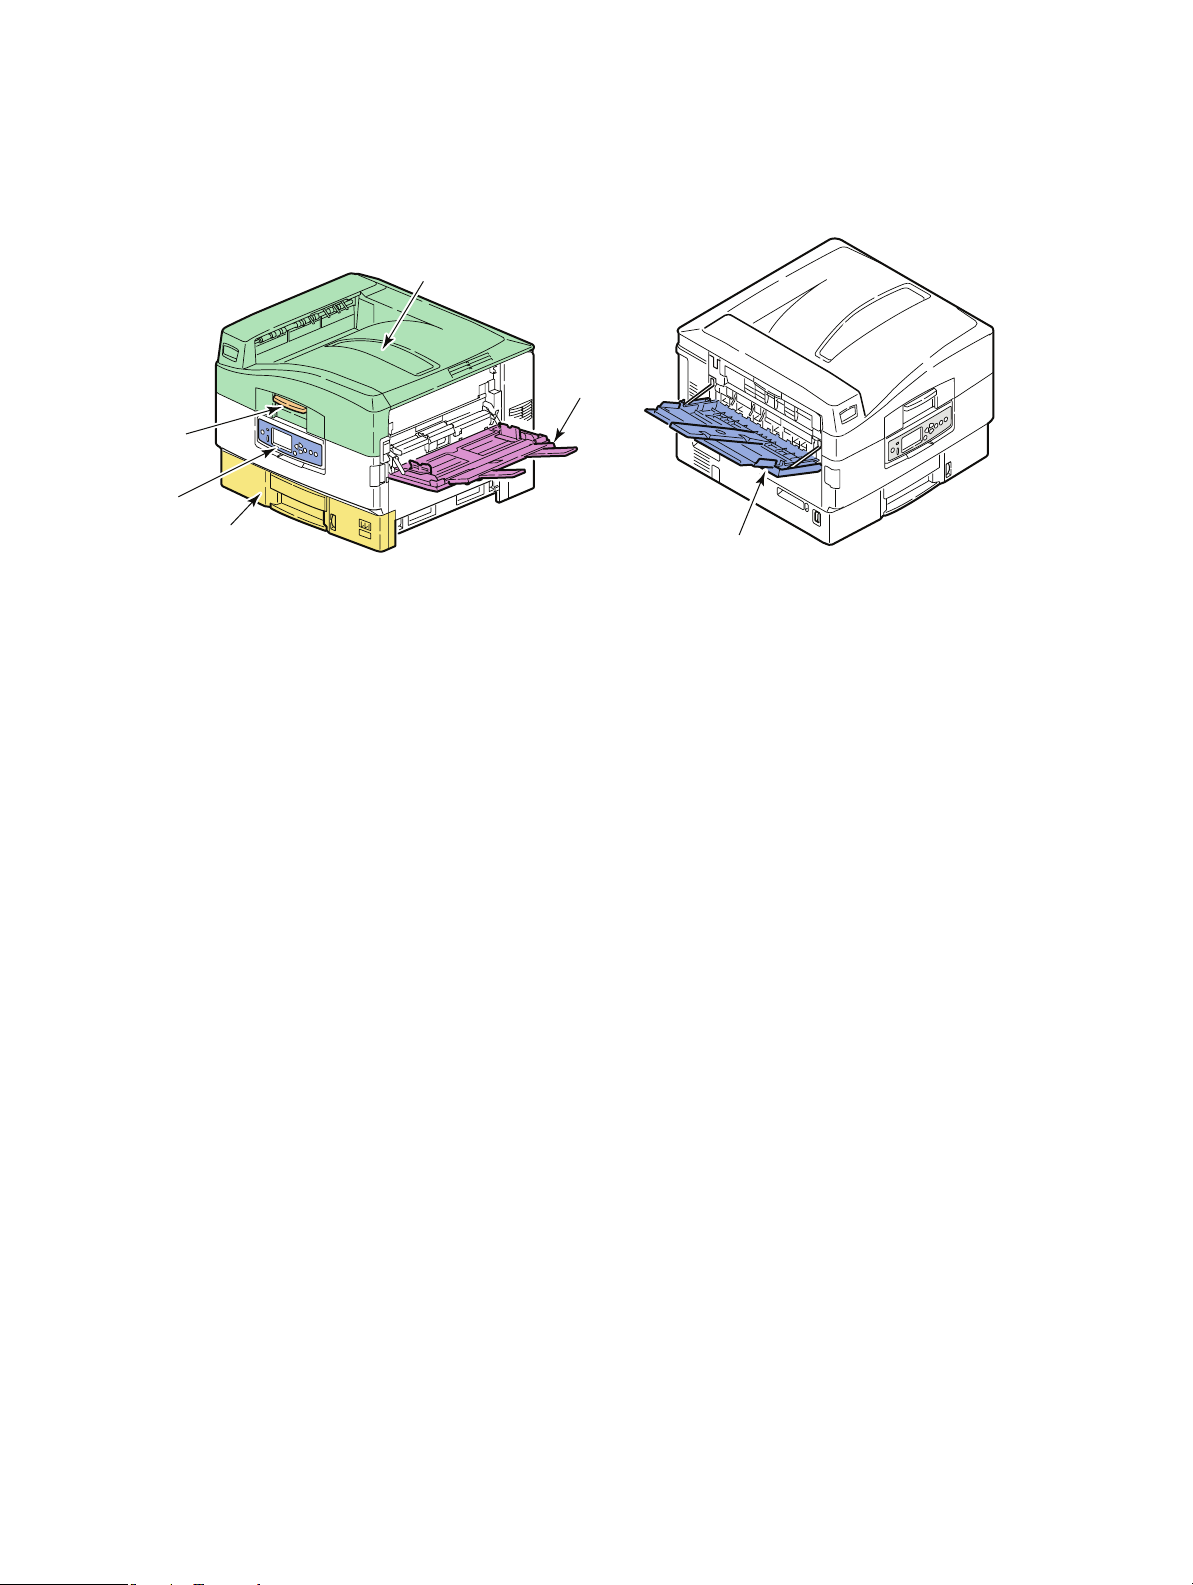
1. Tray 1 (paper tray) supplied with the printer to hold the paper (530 sheets
maximum) to be printed.
2. MP Tray (multi-purpose tray) to accommodate the input of a wide range of types and
sizes of media e.g. custom sizes, banner paper, envelopes, labels, transparencies.
3. Control panel to provide local control of the printer unit, indicate remaining toner life
and display troubleshooting information.
4. Top cover which serves as the face-down stacker to accommodate up to 500 printed
sheets (printed face down) and can also be raised to allow access to the inside of the
printer for replacing consumables or clearing internal paper jams.
5. Top cover handle to enable you to unlatch the printer top cover prior to opening it.
6. Face-up stacker to accommodate up to 200 printed sheets (with printed face up).
6
Getting to know your product > 11
Page 12
13
7
8
9
10
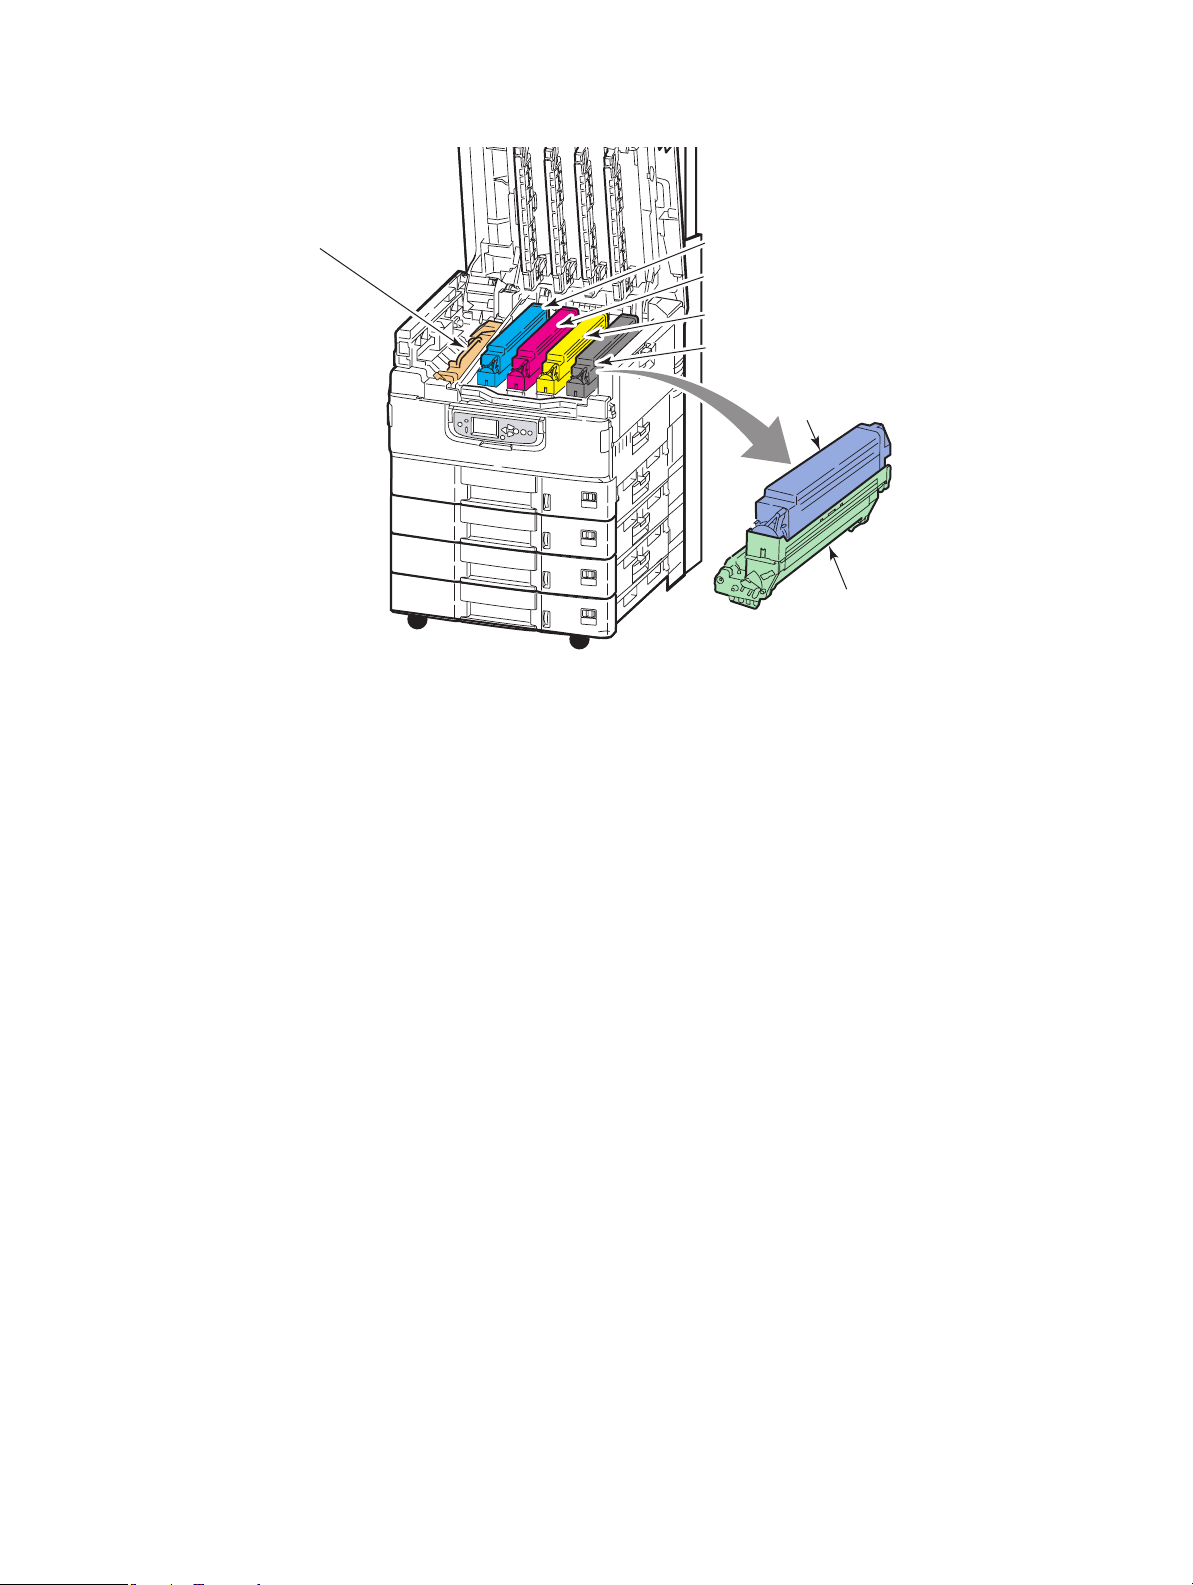
7. Image drum cartridge and toner cartridge (Cyan).
8. Image drum cartridge and toner cartridge (Magenta).
9. Image drum cartridge and toner cartridge (Yellow).
11
12
10. Image drum cartridge and toner cartridge (Black).
11. Toner cartridge.
12. Image drum cartridge.
13. Fuser unit to fuse the toner onto the paper to provide the required printed image.
Getting to know your product > 12
Page 13
14. Drum basket handle to unlatch and hold the drum basket.
15. Drum basket to enable all four image drums and toner cartridges to be lifted clear to
provide access to the belt unit for clearing paper jams, for example.
16. Belt unit to transport the paper under the toner/image drums.
S
CANNER UNIT
1
2
4
1. Automatic document feeder (ADF) to hold up to 100 Letter/A4 sheets (or 50 Tabloid/
A3 sheets) to be copied or scanned.
2. Document cover can be raised (complete with ADF) to allow access to the flat bed
(document glass) for copying or scanning one side (simplex) of a single document.
3. Control panel provides main functionality for copying, scanning and faxing
operations.
3
4. Touch screen display enables touch screen input and viewing of status information
for copying, scanning and faxing operations.
Getting to know your product > 13
Page 14
C
ONTROL PANELS
The two control panels, one on the scanner unit and one on the printer unit, are
complementary to each other and work together as component parts of the overall MFP.
Essentially, the printer control panel is associated with control and status of the printing
function while the scanner unit control panel is associated with control and status of the
copying, scanning and faxing functions.
NOTE
The printer unit control panel can be swivelled to 90° (maximum) upwards
from its base position for ease of use.
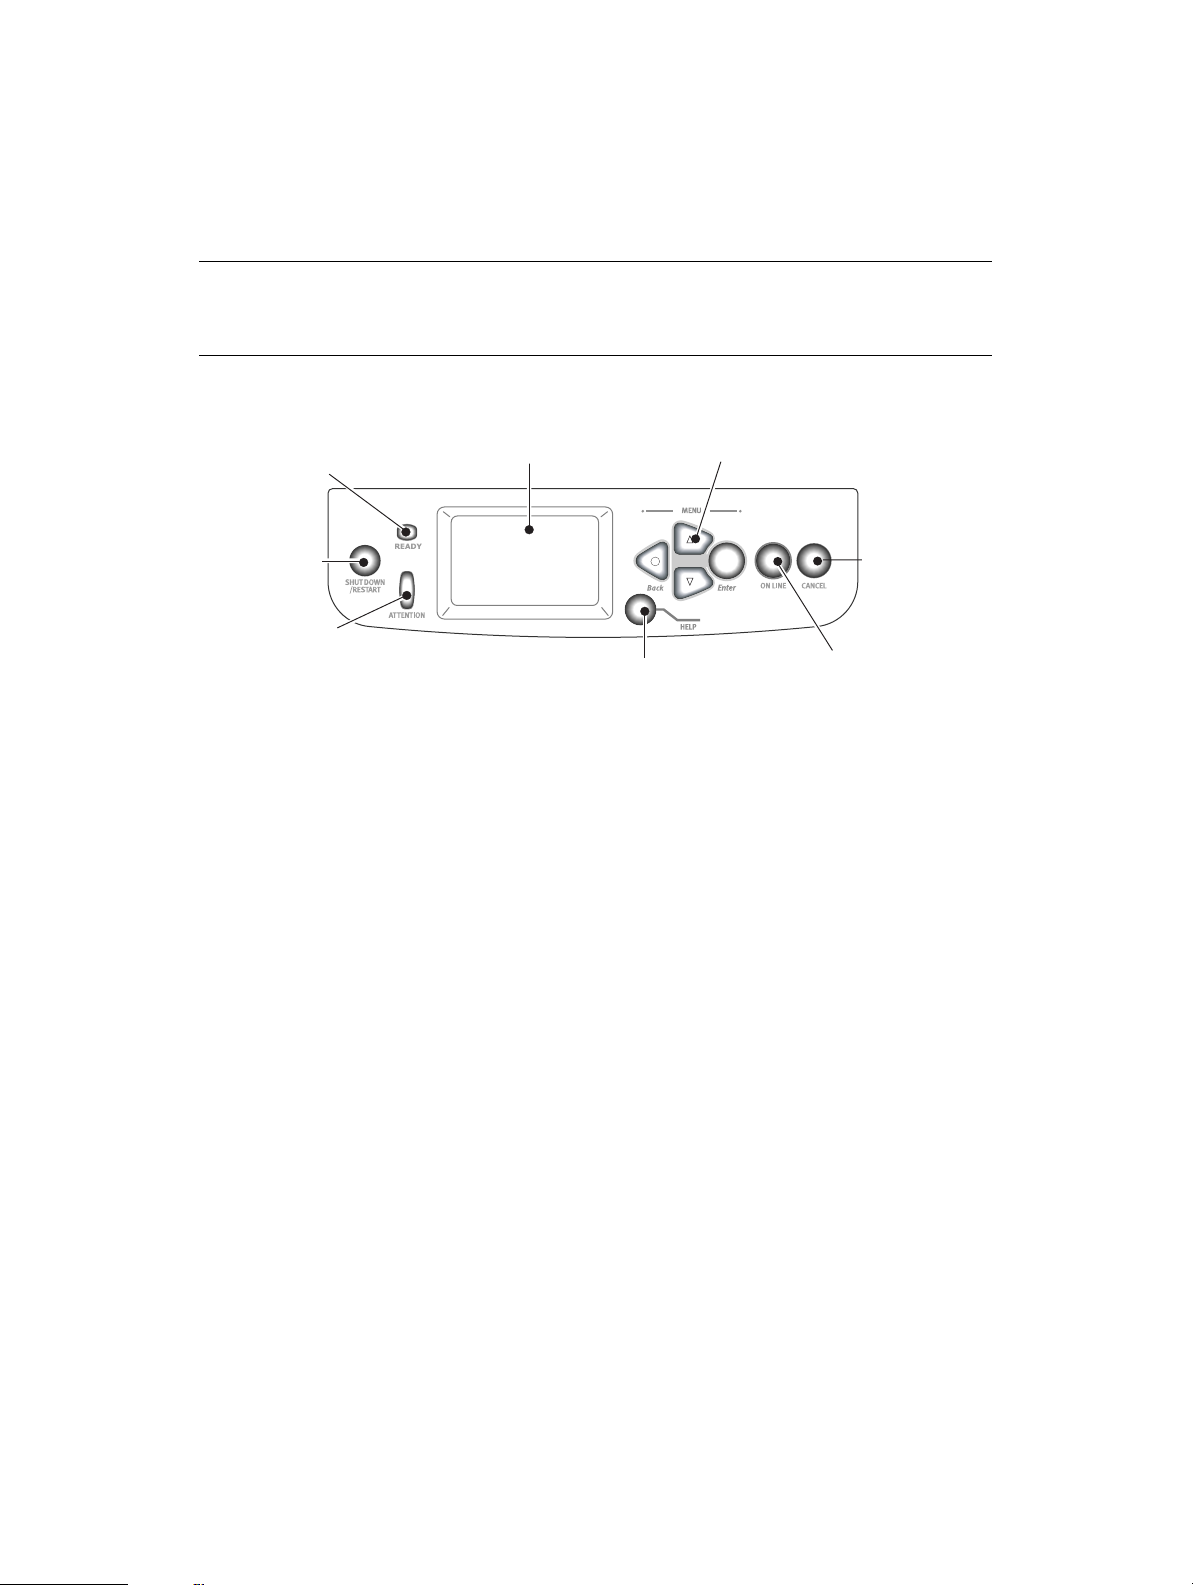
P
RINTER UNIT CONTROL PANEL
2
1
3
4
8
5
6
7
1. Shutdown/Restart button
Press and hold down for a soft shutdown. You can then press this button again for a
restart or use the Power switch to turn off the printer completely.
2. Ready light
On: indicates ready to print
Flashing: indicates processing print data
Off: indicates unable to receive data (offline)
3. Attention light
Off: indicates normal operation
Flashing: indicates error(s) present but printing can continue
On: indicates error(s) present and printing cannot continue
4. Display panel
Displays status and setup information for the printer and user help information in
your chosen language.
5. Menu buttons
These four buttons (Enter, up-arrow, down-arrow, back) enable you to set values in
a menu system to control printer operation. These settings can be over-ridden by
settings you make in application software.
6. Online button
Allows you to switch between online (printer unit ready to receive data) and offline
(printer unit not ready to receive data).
7. Cancel button
Cancels current print job.
Getting to know your product > 14
Page 15
8. Help button
Provides additional textual or image data to supplement what is displayed on the
display panel.
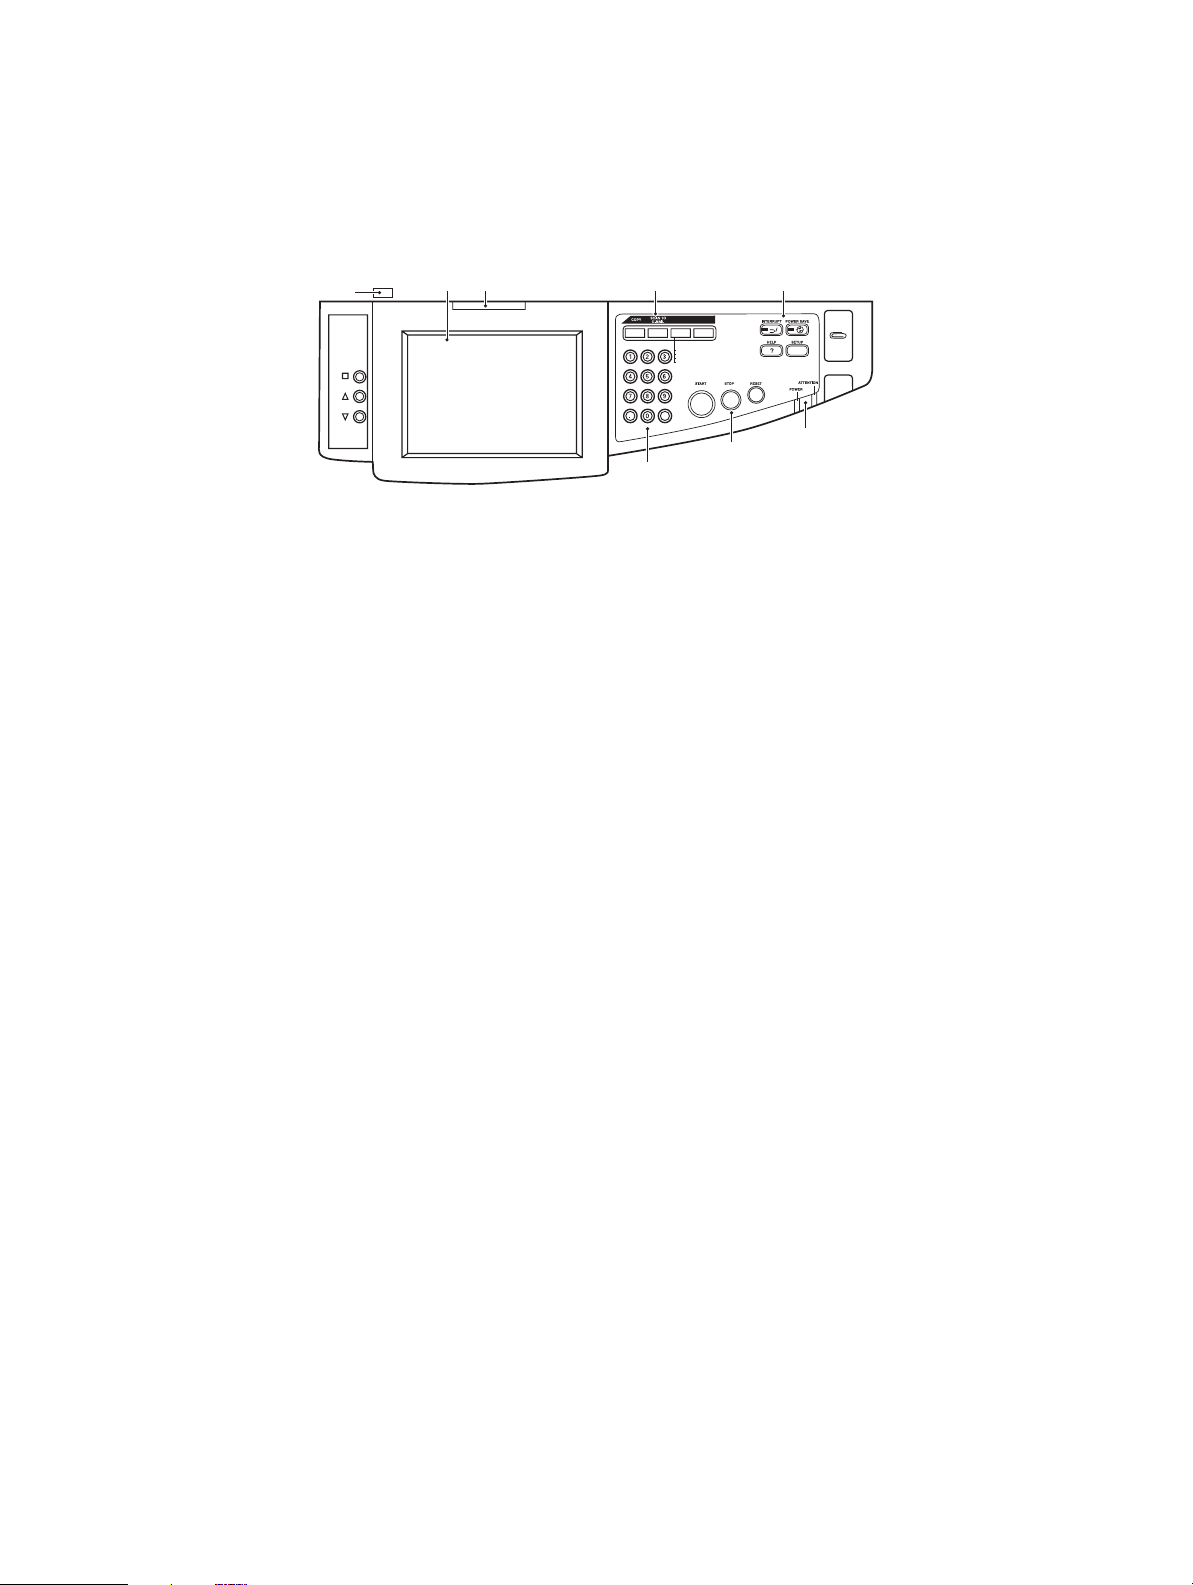
S
CANNER UNIT CONTROL PANEL
1 2 3
1b
1a
SCAN
TO NETWORK
TO MAILBOX
TO HOLD QUEUE
SEND ME
FAX
5
6
4
1. Touch screen display
Enables you to make selections associated with the copying and scanning functions
by touching the screen to press selected buttons. The screen can be tilted up for ease
of viewing by pulling on handle (1a) and it locks in position. Use the release control
(1b) to enable downward adjustments.
Be careful not to scratch the display with sharp or pointed objects e.g. a ballpoint pen
as this may impair the display.
2. Main function buttons
COPY: Pressing this button selects copy mode on the touch screen. This allows you
to control the copying process whereby documents to be copied are scanned in the
scanner unit (document glass or ADF) and the copies are automatically printed in the
printer unit.
SCAN TO E-MAIL: Pressing this button selects e-mail send mode on the touch
screen. This allows you to control the process whereby a document is scanned and
the scanned data is sent by e-mail as an attachment.
SCAN: Pressing this button gives access to several send modes on the touch screen.
These allow you to select and control the process whereby a document is scanned and
the scanned data is sent to one of: an FTP (file transfer protocol) server, a client PC
via SMB (server message block), a mailbox, a hold queue. It also allows you to
arrange for a document to be scanned from a remote PC or allows you to invoke
SendMe
TM
which enables you to scan a document, edit it and then send it as an
attachment by email.
FAX: Pressing this button selects fax send mode on the touch screen. This allows you
to control the process whereby a document is scanned and then the scanned data is
sent as a fax.
3. Auxiliary function buttons
INTERRUPT: Pressing this button switches the interrupt mode on, its LED being
illuminated when interrupt mode is on. If a long print job is in progress and you need
to make a copy, use this button to initiate the interrupt mode. It does not stop the
print job immediately, instead this job continues until you press the START button to
initiate your copy job. Once your copy job is complete the MFP automatically resumes
the original print job.
POWER SAVE: Pressing this button switches the scanner unit power save mode on
or off, its LED being illuminated when power save mode is on. If the scanner unit has
Getting to know your product > 15
Page 16

gone into power save mode as indicated by the touch screen being black and the LED
being illuminated, you can return to normal mode by pressing the POWER SAVE
button.
SETUP: Pressing this button selects setup mode for address books or reports, for
example.
HELP: Pressing this button displays help information on the touch screen.
4. Indicator lights
ATTENTION: Flashes when operator attention is required e.g after a paper jam has
occurred.
POWER: Is illuminated to show that the scanner unit is on.
5. STOP/START/RESET buttons
RESET: Pressing this button returns all settings of a selected function to their default
values, but does not stop any jobs that are already in progress.
STOP: Pressing this button stops the copying or scanning process.
START: Pressing this button starts the copying or scanning process.
6. Numeric keypad
Use the numeric buttons to enter, for example, number of copies or e-mail address.
The decimal point button allows you to enter the point in decimal numbers or in email addresses. Use the clear button to clear all entered text in a selected text box
on the touch panel.
Getting to know your product > 16
Page 17

T
URNING OFF/ON
CAUTION!
Do not turn off the scanner unit while scanning is in progress.
T
URNING OFF
1. Printer unit
Press and hold down the Shutdown/Restart button (1) on the control panel to start
the shutdown process.
1
2. Scanner unit
When the scanner unit display shows that shut down has been completed, turn off
the scanner unit at the power switch (1).
1
3. Use the On/Off switch to turn off the printer unit. Please wait as this may take a
short time.
Getting to know your product > 17
Page 18

T
URNING ON
1. Scanner unit
Turn on the scanner unit at the power switch (1).
1
NOTE
If the display panel shows that you can either turn off or restart the printer,
press Shutdown/Restart to turn on the printer.
2. If the printer is turned off (no power), use the On/Off switch to turn on the printer.
Please wait as this may take a short time.
3. Even if you are using your MFP only for printing, please ensure that the scanner unit
is turned on.
Getting to know your product > 18
Page 19

O
PENING AND CLOSING THE PRINTER UNIT TOP COVER
1. Operate the scanner stand lever (1) then raise the scanner to the limit of its travel.
Ensure the stand is locked into position.
1
2. To open the top cover, squeeze the top cover handle (1) to release the catch and
raise the cover.
1
CAUTION!
Open the top cover fully to ensure there is plenty of room and avoid
accidental damage to the printer.
Getting to know your product > 19
Page 20

3. To close the top cover, push gently (1) until the cover stops midway and then push
harder (2) to close the cover completely. Ensure that the cover is securely closed.
4. Operate the scanner stand lever (1) then guide the scanner to its lowest point.
Ensure the stand locks into position.
Getting to know your product > 20
Page 21

P
APER RECOMMENDATIONS
Your printer unit will handle a variety of print media, including a range of paper weights
and sizes, transparencies and envelopes. This section provides general advice on choice of
media, and explains how to use each type.
The best performance will be obtained when using standard weight 20-24 lb. (75 – 90g/
m²) paper designed for use in copiers and laser printers. Suitable types are:
> HammerMill
> Xerox
> Oki
Use of heavily embossed or very rough textured paper is not recommended.
Pre-printed stationery can be used, but the ink must not offset when exposed to the high
fuser temperatures used in the printing process.
Envelopes should be free from twist, curl or other deformations. They should also be of
the rectangular flap type, with glue that remains intact when subjected to hot roll pressure
fusing used in this type of printer. Window envelopes are not suitable.
Transparencies should be of the type designed for use in copiers and laser printers. In
particular, avoid office transparencies designed for use by hand with marker pens. These
will melt in the fuser and cause damage.
Labels should also be of the type recommended for use in copiers and laser printers, in
which the base carrier page is entirely covered by labels. Other types of label stock may
damage the printer due to the labels peeling off during the printing process. Suitable types
are:
®
®
Bright White, 32 lb US Bond
®
Laser Print Radiant, White 24 lb US Bond
4024, 20 lb US Bond
> Avery White Laser Label types 7162, 7664, 7666 (A4), or 5161 (Letter)
Paper recommendations > 21
Page 22

P
APER INPUT AND OUTPUT INFORMATION
The following table relates paper parameters to input trays (Tray 1 to Tray 4 (numbering
from the top) and MP Tray) and to output areas (Face-down stacker and Face-up stacker).
TYPE SIZE WEIGHT INPUT/
OUTPUT
Plain paper A3, A3 Nobi, A3
Wide, A4, A5, A6,
B4, B5, Letter,
Legal 13,
Legal 13.5,
Legal 14,
Executive, Tabloid,
Ta b l oi d E xtra
Custom
W: 100–328mm
L: 148 – 457.2mm
Custom
W: 79.2 – 328mm
L: 90 – 457.2mm
Banner
210 x 900mm
215 x 900mm
215 x 1200mm
297 x 900mm
297 x 1200mm
328 x 900mm
328 x 1200mm
Index card:
76.2 x 127mm
64 – 216g/m² Any Tray
Any Stacker
217 – 268g/m² MP Tray
Face-up Stacker
64 – 216g/m² Any Tray
Face-up Stacker
64 – 268g/m² MP Tray
Face-up Stacker
128g/m²
recommended
64 – 268g/m² MP Tray
MP Tray
Face-up Stacker
Face-up Stacker
Ultra Heavy Media:
A4, A3, A3 Nobi,
A3 Wide
Postcard – – Tray 1 or MP Tray
Envelope 120 x 235mm
90 x 205mm
235 x 120mm
235 x 105mm
240 x 332mm
216 x 277mm
119 x 197mm
210 x 297mm
324 x 229mm
229 x 162mm
220 x 110mm
225.4 x 98.4mm
241.3 x 104.8mm
190.5 x 98.4mm
Labels A4, Letter, B5 0.1 – 0.2mm MP Tray
Transparencies
Glossy paper
A4, Letter 0.1 – 0.11mm Tray 1 or MP Tray
269 – 300g/m² MP Tray
Face-up Stacker
Face-up Stacker
85g/m² MP Tray
Face-up Stacker
Based on
90g/m² paper
Face-up Stacker
Face-up Stacker
Paper recommendations > 22
Page 23

T
RAYS AND STACKERS
T
RAYS
1 TO 4
Tray 1 is the standard blank paper input tray and can hold up to 530 sheets of 80g/m²
paper. Trays 2 to 4 result in a total tray capacity of 2120 sheets of 80g/m² paper.
If you have identical paper stock loaded in another tray (for example Tray 2 or the MP
Tray), you can have the printer automatically switch to that other tray when the current
tray runs out of paper. This function can be enabled by driver settings when printing from
a Windows application or by a menu setting when printing from other applications.
MP T
RAY
The multi-purpose tray is used for media sizes additional to those of the standard trays,
heavier media weights and special media.
The multi-purpose tray can handle the same sizes as the standard trays but in weights up
to 300g/m². For very heavy paper stock use the face-up paper stacker. This ensures that
the paper path through the printer is almost straight.
The multi-purpose tray can hold up to 230 sheets of 80g/m² standard paper or 50 sheets
of 300g/m².
The multi-purpose tray can feed paper widths as small as 76.2mm and lengths up to
1200mm. For banner printing, recommended sizes are listed on page 22.
Use the multi-purpose tray for printing on envelopes and transparencies. Up to 100 sheets
of transparencies or 25 envelopes can be loaded at one time, subject to a maximum
stacking depth of 25mm.
Paper or transparencies should be loaded print side up and top edge into the printer. Do
not use the duplex (two-sided printing) function for transparencies.
F
ACE-DOWN STACKER
The face-down stacker on the top of the printer can hold up to 500 sheets of 80g/m²
standard paper, and can handle paper stocks from 64 – 216g/m². Pages printed in reading
order (page 1 first) will be sorted in reading order (last page on top, facing down).
F
ACE-UP STACKER
The face-up stacker should be opened and the tray extension pulled out when required for
use. (With the face-up stacker either open or closed, the driver setting of Face Down will
successfully direct prints to the Face-Down stacker.)
The face-up stacker can hold up to 200 sheets of 80g/m² standard paper and can handle
stocks up to 300g/m².
Always use this stacker and the multi-purpose feeder for paper stocks heavier than
216g/m².
Paper recommendations > 23
Page 24

D
UPLEX UNIT
This unit provides automatic two-sided printing on plain paper fed from Trays 1 – 4 or the
MP Tray.
WEIGHT SIZE TRAY
64 – 120g/m² A6,
A5,
B5,
B5LEF,
Executive,
A4,
A4LEF,
Letter,
LetterLEF,
Legal 13 in,
Legal 13.5 in,
Legal 14 in,
B4,
Tabloid,
Tabloid Extra,
A3,
A3 Wide,
A3 Nobi,
Custom size (100 –
328mm wide, 148 –
457.2mm long)
64 – 188g/m² A4, A4LEF, Letter,
Letter LEF, Tabloid, A3
NOTE
LEF means the paper is fed long edge first.
Tray s 1 - 4
MP Tray
MP Tray
Paper recommendations > 24
Page 25

L
OADING TRAY AND STACKER EXAMPLES
Although your machine is designed with problem-free operation in mind, it is important to
load the paper correctly to avoid paper jams:
> Always fan the paper then tap the edges of the stack on a flat surface to make it
flush before loading.
> Do not leave space between the paper and the guides and rear stopper.
> Do not overfill the paper tray. Capacity depends on the paper type.
> Do not load damaged paper.
> Do not load paper of different sizes or types at the same time.
Your machine is equipped with auto-media detect, so all you need to do is load the paper!
P
RINTER
Loading Trays 1 to 4
Tray 1 is used in the following example.
1. Pull out the tray and adjust the paper guides (1) to the required paper size.
1
2. Load the paper (face down and top edge towards the right for letterhead paper),
press the tab (2) on the paper guide and adjust the guides (3) for a snug fit to the
paper.
3
2
Paper recommendations > 25
Page 26

3. Gently push the tray back into the printer.
Using the MP Tray
1. Squeeze the handle (1) and open the multi-purpose tray.
1
2. Fold out the paper support section and swivel out the extension supports (2).
3. Adjust the paper guides (3) to the size of the required paper size.
3
2
4. Load the paper.
> For single-sided printing on letterhead, load the paper into the multi-purpose tray
with pre-printed side up and top edge into the printer unit.
> For two-sided (duplex) printing on letterhead, load the paper with pre-printed
side down and top edge away from the printer unit.
> Envelopes should be loaded face-up with long edge into the printer. Do not select
duplex printing on envelopes.
Paper recommendations > 26
Page 27

> Do not leave space between the paper and the guides.
> Do not exceed the paper capacity of approximately 230 sheets at 80g/m², 50
sheets at 300g/m², 100 transparencies or 25 envelopes. Maximum stacking
depth is 25mm.
Using the stackers
Face-down stacker: When the face-up stacker (1) on the left side of the printer is closed
(its normal position), paper is ejected to the face-down stacker on the top of the printer
unit.
1
Face-up stacker: The face-up exit path is used for heavy paper (cardstock etc.),
envelopes, transparencies, and labels.
1. Open the stacker (1).
1
Paper recommendations > 27
Page 28

2. Fold out the paper support section (2) and swivel out the extension supports (3).
2
3
S
CANNER UNIT
The ADF can handle up to 50 sheets of A3 paper (or 100 sheets of Letter/A4 paper), of
weight 60 – 105g/m².
The glass can handle paper sizes up to A3 and the document cover can be left open to
accommodate book thickness.
Use the glass and not the ADF for scanning documents that:
> have a smooth surface e.g. photographic, coated or glossy paper
> are folded, creased, curled or otherwise deformed
> are not rectangular
> have labels attached or have other surface unevenness
> are less then 100mm in width or less than 180mm in length. Such documents
may cause feed errors or skew in the ADF.
Loading the ADF
For documents of size Letter/A4, the following orientation is recommended:
> Copy Mode: document face up, top of the document away from the user
> Scan to E-Mail, FTP, Mailbox, Hold Queue, Remote Tool: document face up, top of
document to left of user
1. Ensure your document is free of staples and clips and has no ragged edges.
2. If you are loading multiple pages, fan the pages to avoid potential paper jams then
tap the edges of the stack on a flat surface to make it flush.
Paper recommendations > 28
Page 29

3. With the text face up, introduce the document far enough into the ADF to be able to
adjust the paper guide (1) to centre the document in the ADF.
1
4. Release the document gently into the ADF.
Loading the document glass (flatbed)
For documents of size Letter/A4, the following orientation is recommended:
> Copy Mode: document face down, top of the document toward the user
> Scan to E-Mail, FTP, Mailbox, Hold Queue, Remote Tool: document face down, top
of document to left of user
1. Open the document cover and place your document with text face down on the
glass, aligning it to the upper left corner of the glass.
2. Close the document cover.
Paper recommendations > 29
Page 30

P
RINTING
W
HAT IS A PRINTER DRIVER
?
A printer driver manages printing communication between your application and the printer.
It interprets the instructions generated by the application, merges those instructions with
printer-specific options you set and then translates all this information into a language that
the printer understands. Your printer is controlled by two types of driver - PCL (Printer
Control Language) and PS (PostScript language).
PCL
AND
PS
COMPARED
PCL and PS are both essentially languages used by your printer to convert data into a
finished print job. Each language has its advantages and disadvantages as outlined below.
PCL
PCL is a widely used printing language that is supported by many different Operating
Systems (e.g. Windows). This enables the same printer to work in many different
environments. PCL is device dependent, which means that PCL drivers use the printer
hardware for creating some of the printed data (usually graphics data like fill areas and
fonts). Because the printer completes the creation and processing of page data, your
computer processes the print job more quickly and efficiently. However, individual printers
may perform these tasks differently, giving you a slightly different output.
ADVANTAGES DISADVANTAGES
Fast print processing. The same print job may vary slightly from
Widely supported in many different
Operating Systems.
printer to printer.
Quality of graphics is dependent on the print
device.
Not supported in most Mac environments
PS
PS is also a common printing language and is used heavily in Mac platforms as well as for
graphic applications in other platforms. Unlike PCL, PS is device independent, which means
that the Postscript language creates all of the print data and does not rely on the printer
for print data. This ensures consistent output, even when printed on more than one type
of printer. Graphic objects will be consistent and, in some cases, of higher quality than PCL.
ADVANTAGES DISADVANTAGES
Graphic objects are often more detailed. Print processing can be slow.
The same print file should print identically
on all print devices.
Not found in as many platforms as PCL.
Print file and memory requirements are
larger.
Printing > 30
Page 31

R
ECOMMENDATIONS
NOTE
Both PCL and PS drivers are provided for Windows environments while only
the PS driver is provided for Mac environments.
Where you have the choice:
> Use the PCL driver for everyday, text-based office documents.
The PCL5c and PCL6 drivers supplied are very similar to each other. PCL6 produces
better print quality but it does not allow poster printing or watermark printing
whereas PCL5c does.
> Use the PS driver when printing PDF or image-heavy documents and when printing
from graphic applications like Illustrator, Photoshop or Quark.
H
OW TO ACCESS THE DRIVER SCREENS
How you access the driver screens depends on your computer and its operating system.
The driver screens are dialogue boxes offering a wide range of choices about how you want
to print your documents. Within Windows these dialogue boxes are tabbed, within Mac the
dialogue boxes use pop-up menus.
There are two ways to access the driver features from within Windows:
1. Directly from the Windows “Printers” folder (“Printers and Faxes” folder in
Windows XP).
If you choose this method any changes you make will become the driver defaults. This
means they will remain active for all your applications unless you specifically change
them from within the application’s Print dialogue.
2. From your application’s Print dialogue.
If you choose this method any changes you make will usually only last for as long as
the particular application is running, or until you change them again. In most cases,
once you quit the application the driver defaults will return.
NOTE
Settings made from the printer’s own control panel are the printer defaults.
They determine how your printer will behave unless you specify otherwise
from your computer.
The driver defaults override the printer defaults.
Application Print settings override both the printer defaults and the driver
defaults.
Printing > 31
Page 32

C
HANGING THE DRIVER DEFAULTS
Windows XP/2000
1. Click Start > Settings > Printers and Faxes to open the Printers and Faxes
window.
2. In the Printers and Faxes window, right-click on the appropriate printer driver icon,
and choose Printing Preferences from the context menu.
Windows Vista
1. Click Start > Control Panel > Printers to open the Printers and Faxes window.
2. In the Printers and Faxes window, right-click on the appropriate printer driver icon,
and choose Printing Preferences from the context menu.
C
HANGING THE APPLICATION’S DRIVER SETTINGS
Windows
1. In your application, open the file you want to print.
2. On the File menu, choose Print….
3. In the application’s Print dialogue, make sure the printer shown is the appropriate
one, and click Properties.
Mac OS X
1. In your application, open the file you want to print.
2. On the File menu, choose Print….
3. In the application’s Print dialogue, make sure the printer shown is the appropriate
one, and click Printer:.
Printing > 32
Page 33

U
SING A
When you click the Properties button from your application’s Print dialogue, the driver window opens
to allow you to specify your printing preferences for this document.
1.
PCL
DRIVER
1
2
3
4
5
6
7
Paper size should be the same as the page size of your document (unless you wish to
scale the printout to fit another size), and should also be the same as the size of
MFP
paper you will feed into the
.
2. You can choose the source of the paper to feed from the drop-down menu, or you
can click on the appropriate part of the screen graphic to select your preferred tray.
3. The setting for paper weight should match the type of paper on which you intend to
print.
4. A variety of document finishing options can be selected, such as normal one page
per sheet, or N-up (where N can be any number up to 16) for printing scaled down
pages at more than one page per sheet. Booklet printing prints two pages per sheet
on each side of the paper so that when folded they make up a booklet. Booklet
printing requires the duplex unit to be installed in your machine.
5. For two-sided printing, you can choose to flip the page by the long edge or the short
edge. Of course, this requires that a duplex unit be installed in your machine.
6. If you have changed some printing preferences before and saved them as a set, you
can recall them to avoid having to set them individually each time you need them.
7. A single on-screen button restores the default settings.
Printing > 33
Page 34

U
SING A
When you click the Properties button (Windows) or Printer: button (Mac) from your application’s
Print dialogue, the driver window opens to allow you to specify your printing preferences for this
document.
PS
1
DRIVER
3
2
1. Page orientation sets portrait (tall) or landscape (wide) page orientation. The
“rotated” rotates the paper through 90 degrees anti-clockwise.
2. You can specify how many pages to print on a sheet. Pages will be scaled to fit the
number you choose. If you choose booklet printing (requires duplex unit) two pages
will automatically be set, and pages will be printed with the correct pages opposite
one another so that folding the stacked printout produces a booklet.
3. When printing double sided pages (duplex unit required). You can flip the paper
either on its long edge or short edge.
4. Pages can be printed in forward or reverse order. If using the face down (top) paper
stacker, forward order is usually appropriate to ensure that pages are stacked in
numerical order. If using the face up (rear) paper stacker, reverse order would
normally stack your pages in numerical order.
5. Advanced options are also available, such as how to download TrueType fonts, and
whether advanced options such as booklet printing are available.
The printer driver contains extensive on-line help for these items to help you make the
most appropriate choices.
4
For more in-depth details on the driver features refer to the Fiery Manual Suite.
Printing > 34
Page 35

S
ETTING THE DRIVER DEVICE OPTIONS
This section explains how to ensure that your printer driver can utilize all of the hardware
features installed in your printer.
Accessories such as hard disk, duplex unit (two sided printing), additional paper trays, etc.,
will only be usable if the printer driver on your computer knows they are there.
In some cases the hardware configuration of your printer is automatically detected when
the driver is installed. However, it is advisable to check whether all of the available
hardware features are listed in the driver.
This procedure is essential if you subsequently add extra hardware features to your printer
after the drivers have been installed and set up.
NOTE
Remember that if your printer or MFP is shared between users on different
computers, the driver must be adjusted on each user’s machine.
To set the driver device options:
W
INDOWS
1. Access the driver’s Properties window.
2. Select the Device Options (PCL driver) or Installable Options (PS driver) tab.
PS driver
PCL driver
3. Set the options for any devices you have installed, including the correct number of
paper trays, finisher, duplex unit, etc.
In the PS driver click Add to move the option to the Installed Option list. This is not
necessary in the PCL driver.
4. In the PS driver click Apply to apply the changes. This is not necessary in the PCL
driver.
5. Click OK to close the window and save your changes.
MAC OS X
1. Open the Printer Setup Utility and ensure that your printer model is selected.
2. Choose Printers > Show Info > Installable Options.
3. Select all hardware options appropriate to your printer, then click Apply Changes.
Printing > 35
Page 36

C
OPYING
In the copying process, documents to be copied are scanned in the scanner unit (document
glass or ADF) and copies are automatically printed in the printer unit.
This section describes how to copy single-sided (simplex) or two-sided (duplex) Letter/A4
documents in color or black and white.
O
UTLINE OF PROCEDURE
1. Ensure the MFP is in Copy Mode.
2. Load the document(s) to be copied into the scanner unit.
3. Make your selections from the Copy Mode touch screen tab(s).
4. Press the START button to produce your copies.
M
AKING SIMPLE COPIES
NOTE
If the Access Control screen (1) is displayed on the touch screen panel, use
the numeric keys to enter your PIN and then press the Login button to display
the default Copy Mode screen.
1
If the LDAP Login screen (2) is displayed on the touch screen panel, press the
User ID button and use the soft keyboard to enter your user name. Press OK
to confirm. Press the Password button and use the soft keyboard to enter
your password. Press OK to confirm and then press the Login button to
display the default Copy Mode screen
To log out when you have finished, press the Logout button at the bottom left
of the Copy Mode screen or any other functional screen.
1. Copy Mode is the default function of the MFP. If your MFP is not already in Copy
Mode, press the COPY button on the scanner unit control panel to show the Copy
Mode screen.
2
Copying > 36
Page 37

2. Use the following table to guide you as to how to load the document(s) to be copied.
Refer to loading instructions on page 28 and page 29.
JOB SIMPLEX/DUPLEX GLASS/ADF
Single page Simplex Glass
Duplex ADF
Multi-page document
or many documents
Simplex ADF
Duplex ADF
3. At the Copy Mode touch screen:
NOTE
Unless you specifically need to change a setting, leave it at its default value
or AUTO.
3
2 1
(a) Press the Simplex/Duplex (1) button and select Simplex (1 to 1 side) or
Duplex (2 to 2 sides) for single-sided or two-sided copying respectively.
(b) Press the Color Mode (2) button and select Color or Black & White as required.
(c) Use the numeric keys adjacent to the touch screen to set the required number
of copies (3).
4. Press the START button to generate your copies at the printer unit.
I
NCREASED PAPER SAVING
For increased paper saving, consider as an example printing 2-up (i.e. two Letter/A4 sides
reduced onto one Letter/A4 side) and duplex which can reduce four single-sided Letter/A4
sheets to one two-sided Letter/A4 sheet. You can set 2-up in the N-up section on the Copy
Mode Details tab. To obtain the desired orientation of sides in the resulting sheet, ensure
that you select:
> the correct setting (Top/Top or Top/Bottom) while setting the Simplex/Duplex
function
> the correct orientation of paper in the ADF
in accordance with the icons that appear in the Simplex/Duplex and N-up panels
respectively.
Copying > 37
Page 38

S
CANNING
The scan functions outlined below are accessed via the SCAN button or the SCAN TO EMAIL button.
SCAN button:
> FTP Server: An original document is scanned and the data is sent to an FTP server.
> SMB (Server Message Block): An original document is scanned and the data is sent
to a client PC.
> Mailbox: An original document is scanned and the data is saved in a mailbox.
> Hold Queue: An original document is scanned and the data is saved in the hold
queue.
> Remote Tool: Under remote control, an original document is scanned and the data is
sent to a host PC.
> SendMe
image is edited if required before being sent by email as an attachment.
SCAN TO E-MAIL button:
Scan to e-mail: an original document is scanned and the data is sent by e-mail as an
attachment.
This section describes how to use the scan to e-mail function. For details on how to use the
SCAN button refer to the Advanced User’s Guide.
TM
(Interactive Scan): An original document is scanned then the scanned
O
UTLINE OF SCAN TO E-MAIL PROCEDURE
1. Press the SCAN TO E-MAIL button.
2. On the Address tab (set by default), enter address and sender details.
3. Select the Message Text tab and enter your subject and e-mail message.
4. Select the Attachments tab and define your attachment properties, using the
Advanced Settings features as required.
5. Place your document on the scanner unit and press START.
Scanning > 38
Page 39

S
CANNING TO E-MAIL
1. Press the SCAN TO E-MAIL button to display the E-mail Send Mode screen (the
Address tab is set by default).
1
6
7
8
2. Press the To (1) button and enter an e-mail address using one of the following
buttons:
> Address Book (2): select an e-mail address from your list of stored addresses
> LDAP (3): enter the user name or mail address to search
2
3
4
5
> Soft Keyboard (4): enter an e-mail address directly using the soft keyboard
> Fax Gateway (5): select a fax number from your list of stored gateway addresses
For example, using the Soft Keyboard
12
(a) Enter an address via the Soft Keyboard.
(b) Press the Add (1) button to add this address to the list.
(c) Repeat (a) and (b) as required to create the address list.
(d) Press the OK (2) button to place the list of addresses in the To destination field.
3. Repeat Step 2 as required with the cc (6) and Bcc (7) buttons on the Address tab.
4. If required, press the From (8) button and use either the Address Book (2) or Soft
Keyboard (4) button to enter your sender information then press the OK button.
Scanning > 39
Page 40

5. Tou c h th e Message Text tab.
1
2
(a) Press the Subject (1) button and enter an e-mail subject heading via the Soft
Keyboard then press the OK button.
(b) Press the Edit Message (2) button and enter your e-mail message via the Soft
Keyboard then press the OK button.
6. Tou c h th e Attachments tab.
1
6
7
2 3
4
5
(a) Press the File Name (1) button and enter a name for your scanned file via the
Soft Keyboard then press the OK button.
(b) Use the following features as required:
Resolution (2); 150, 200, 300, 400, 600dpi
Color Mode (3); Color, Grayscale, B&W
Original Orientation (4); Portrait, Landscape
Sides (5); Single, Top/Top, Top/Bottom
Allows you to define simplex or duplex and the duplex orientation of front and
back sides of a page for scanning.
URL Link (6); On, Off
Select Off to send the scanned image as an attachment. Select On to send the
scanned image as a URL.
(c) To access more advanced settings, you can press the Advanced Settings
button (7).
Scanning > 40
Page 41

7. Place the document to be scanned on the scanner unit glass or ADF.
8. Press the START button.
C
ONFIRMING E-MAIL TRANSMISSION
You can check the transmission status of e-mails from:
> Job Log screen: Press the Job Log button to display this screen.
> E-mail Log Report: To print this report, press the SETUP button on the scanner
unit control panel then press the Report button followed by the Print button
associated with E-mail Log.
Scanning > 41
Page 42

F
AXING
During the faxing process, documents to be faxed are scanned in the scanner unit
(document glass or ADF) and copies are automatically sent as a fax transmission.
Walk-up faxing means being able to send a fax from the scanner unit control panel of the
MFP. PC faxing means being able to send a fax from your PC provided the optional fax card
is installed.
This section describes how to fax single-sided (simplex) or two-sided (duplex) Letter/A4
documents in colour or black and white.
O
UTLINE OF WALK-UP FAXING PROCEDURE
1. Press the FAX button.
2. On the Address tab (set by default), enter the To destination address.
3. Select the Details tab and enter the From (sender) information and cover page
details.
4. Select the Properties tab and define your attachment properties.
5. Place your document on the scanner unit and press START.
S
ENDING A FAX
1. Press the FAX button to display the Fax Send Mode screen (the Address tab is set
by default).
1
2
2. Press the To (1) button and enter the destination information using one of the
following buttons:
(a) Short Cut (2): press a short cut button to select one of your most frequently
used numbers
(b) Phone Book (3): select a number from your stored phone book
(c) Group (4): select a group name from your list of stored groups
(d) LDAP (5): search using a user name or fax number
(e) Soft Keyboard (6): enter an address directly from the Soft Keyboard
3
4
5
6
Faxing > 42
Page 43

For example, using the Soft Keyboard
12
(a) Enter an address via the Soft Keyboard.
(b) Press the Add (1) button to add this address to the list.
(c) Repeat (a) and (b) as required to create the address list.
(d) Press the OK (2) button to place the list of addresses in the To destination field.
3. On the Details tab:
1
2
3
(a) Press the From (1) button and enter sender information in the From field via
the Soft Keyboard.
(b) Press the OK button.
(c) Press the Cover Page (2) button then press the Edit Message (3) button to
enter cover page information in the Cover Page field via the Soft Keyboard.
(d) Press the OK button.
Faxing > 43
Page 44

4. On the Properties tab:
1 2 3 4
Select from the following features as required:
NO FEATURE OPTIONS DESCRIPTION
5
1 Original Size Auto, 8.5x11,
8.5x11R, 8.5x13,
8.5x14, A4, A4R
2 Resolution Standard, Fine,
Photo
3 Sides Single, TOP / TOP,
TOP / BOTTOM
4Lighter/
Darker
5 Tx Time Allows you delay sending by entering a
Lighter / Darker
-5 to +5 by 1
Allows you to select the scanned
document size.
Allows you to specify the scanning
resolution for the document. This allows
automatic (pre-set) optimization of
image quality settings.
Allows you to define simplex or duplex
and the duplex orientation of front and
back sides of a page for scanning.
Allows you to select the brightness level.
specific time to transmit your fax.
5. Place the document to be scanned on the scanner unit glass or ADF.
6. Press the START button.
C
ONFIRMING FAX TRANSMISSION
You can check fax transmission status from:
FAX Log: To print this report, press the SETUP button on the scanner unit control
panel then press the Report button followed by the Print button associated with the
FAX Log Report.
Faxing > 44
Page 45

O
PTIONAL ACCESSORIES
O
RDER INFORMATION
The following table indicates the optional accessories available and corresponding order
number.
ITEM ORDER NUMBER
Finisher, 4-tray 70050701
Analog Fax Board, 33.6 G3 70056601
I
NSTALLING ACCESSORIES
Once your new accessory has been installed, you may need to update the Windows printer
driver so that the additional features are available to your Windows applications. Refer to
“Setting the driver device options” on page 35.
C
ONSUMABLE ITEMS
O
RDER INFORMATION
The following table indicates the consumable items available and corresponding order
number.
ITEM ORDER NUMBER
Toner, Yellow 42918985
Toner, Magenta 42918986
Toner, Cyan 42918987
Toner, Black 42918988
Image Drum, Yellow 42918169
Image Drum, Magenta 42918170
Image Drum, Cyan 42918171
Image Drum, Black 42918172
Fuser 120V 57102201
Fuser 230V 57102202
Transfer Belt 57102301
Waste Toner Box 57102401
Optional accessories > 45
Page 46

S
PECIFICATIONS
P
RINTER UNIT
ITEM SPECIFICATION
Dimensions 23.6x25x18.5 (599x633x471mm) (WxDxH)
Weight Without options, 76kg (167.5 lbs.)
Print speeds 36 ppm color; 40 ppm monochrome
Resolution 1200 x 1200 dpi (ProQ 4800 Multilevel
Emulations PCL 5c, PCL XL, SIDM, PostScript 3
Memory 1 GB (max.)
Paper input at 80g/m² Trays 1 – 4: 530 sheets Letter/A4 each
Paper weight 64 – 300g/m²
Paper output at <80g/m² Face-down stacker: 500 sheets
Interfaces USB 2.0, 10Base-T, 100Base-TX and
Techn o l o g y )
MP Tray: 230 sheets Letter/A4
Face-up stacker: 200 sheets
1000Base-T
Duty cycle 150,000 pages/month maximum
Toner life 15,000 Letter/A4 pages @ 5% coverage
Image drum life 30,000 Letter/A4 pages
Belt life 100,000 Letter/A4 pages
Fuser life 100,000 Letter/A4 pages
Waste toner container life 30,000 Letter/A4 pages
Power rating 220 – 240V AC, 50 Hz +/- 2%
Power consumption Operating: <1,500 W maximum, 780 W typical
Standby: 600 W maximum, 200 W typical
Power save: 34 W
Operating environment Operating: 10 – 32°/20 – 80%RH
Off: 0 – 43°C/10 – 90%RH
Noise level Operating: 57dBA maximum
Standby: 42dBA maximum
Power save: 28dBA maximum after 30 mins
background level
Specifications > 46
Page 47

S
CANNER UNIT
ITEM SPECIFICATION
Dimensions 26x27x14.5 (670x690x370mm) (WxDxH)
Weight Including ADF: 23.4kg (52 lbs.)
Power source
(AC adapter)
Power consumption Operating: 75 W maximum
Operating environment Operating: 10 – 35°C/10 – 85%RH
Scanning speed (ADF) 36cpm color, 40cpm mono (300x300dpi)
Scanning area (ADF) 30.0cm x 43.2cm maximum (A3)
Scanning area (glass) 29.7cm x 43.2cm maximum
Warm-up time <20secs (from 20 – 35°C)
Output resolution 600dpi
Bit depth Input: 48 bits
Image processor RAM 384MB
ADF pad life 100,000 scan pages
ADF roller life 200,000 scan pages
Input: 100 – 240V, 47 – 63Hz
Output: 24V DC, 4.0A
Standby: 48 W maximum
Power save: 8.1 W maximum
Storage: -20 – 70°C/10 – 90%RH
<30secs (from 10 – 20°C)
Output: 24 bits
ADF type Duplex ADF
ADF capacity <=100 sheets (Letter/A4, 80g/m²)
<=50 sheets (A3, 80g/m²)
Noise level Flatbed scanning: <=54dB
ADF scanning: <=54dB
Standby: <=45dB
Specifications > 47
Page 48

I
NDEX
A
accessories
installing
ordering ............................ 45
........................... 45
B
Booklet printing
PCL emulation
PostScript emulation......... 34
................... 33
C
cancel button ........................ 14
Consumables
ordering
consumables ......................... 45
............................ 45
D
display................................... 14
Duplex
selecting in Windows
Duplex printing ..................... 34
........ 33
H
help button............................ 15
I
indicator light
attention
ready ................................ 14
........................... 14
O
online button......................... 14
P
Page orientation
portrait or landscape
Paper
weight selection in Windows
33
paper
duplex printing
face-down stacker ............ 23
face-up stacker................. 23
inputs................................ 22
loading.............................. 25
MP tray ............................. 23
outputs ............................. 22
stackers ............................ 27
trays ................................. 23
Print order
face up/down stacker
Print settings
how to save
...................... 33
........ 34
................. 24
....... 34
R
recommended media ............ 21
S
shutdown/restart button ....... 14
specifications
printer
............................... 46
scanner ............................. 47
.
Index > 48
Page 49

S
ERVICE AND SUPPORT
Oki Data Americas, Inc.
In the U.S. and Canada, call
Tel:1-800-654-3282
(1 800 OKI DATA)
http://www.okiprintingsolutions.com
Service and Support > 49
 Loading...