

Page 1

CX2731 MFP
RT322
Setup Guide
Guide d’installation
Guía de Instalación
Guia de instalação
59408101 my.okidata.com
Page 2

-2-
Page 3

Setup Guide . . . . . . . . . . . . . . . . . . . . . . . . . . . . 7
Guide d’Installation . . . . . . . . . . . . . . . . . . . . . 55
Guía de Instalación. . . . . . . . . . . . . . . . . . . . . 109
Guia de instalação. . . . . . . . . . . . . . . . . . . . . . 160
English
Hardware Installation. . . . . . . . . . . 7
Package Contents. . . . . . . . . . . . . . . . . . 7
Prepare a Location . . . . . . . . . . . . . . . . . 7
Unpack the Machine . . . . . . . . . . . . . . . . 8
Turning the Machine On . . . . . . . . . . . . 11
Turning The Machine Off . . . . . . . . . . . . 11
Power Save Mode and Sleep Mode . . . . . 12
The Control Panel. . . . . . . . . . . . . . . . . 12
Load Print Media . . . . . . . . . . . . . . . . . 12
Printing the Configuration Report . . . . . . 16
Configuring the Tray Settings . . . . . . . . 16
Print Exits . . . . . . . . . . . . . . . . . . . . . . 17
Loading Documents for Scanning . . . . . . 18
Network Installation:
Making Connections and Installing
Printer Drivers . . . . . . . . . . . . . . . .20
Compatible Operating Systems . . . . . . . 20
Make the Network Connection . . . . . . . . 20
Locate the Setup Form . . . . . . . . . . . . . 22
Set the Administrative Password . . . . . . 22
Set Up the Network for Windows
Systems . . . . . . . . . . . . . . . . . . . . . . 22
Set up the Network for Macintosh
Systems . . . . . . . . . . . . . . . . . . . . . . 26
Setting Up User Authentication and
Access Control . . . . . . . . . . . . . . . . 40
General Information . . . . . . . . . . . . . . . 40
Before You Start . . . . . . . . . . . . . . . . . . 40
Windows Systems. . . . . . . . . . . . . . . . . 40
Mac Systems . . . . . . . . . . . . . . . . . . . . 41
Authentication by PIN . . . . . . . . . . . . . . 41
Authentication by User Name and
Password . . . . . . . . . . . . . . . . . . . . . . 44
Configuring the Machine for Faxing . 46
Basic Settings for Faxing . . . . . . . . . . . . 46
USB Installation. . . . . . . . . . . . . . . . 48
USB Connection . . . . . . . . . . . . . . . . . . 48
USB: Installing a Printer Driver
for Windows . . . . . . . . . . . . . . . . . . . . 50
USB: Installing a Printer Driver for Mac . . 51
Configuring the Machine for Network
Operation . . . . . . . . . . . . . . . . . . . .31
Enter the Machine’s IP Address
on the Setup Form . . . . . . . . . . . . . . . 31
Set Up Scan To Email and Internet Fax. . 31
Set Up Scan To Network PC. . . . . . . . . . 33
Profiles for Scan To Network PC . . . . . . . 38
-3-
Page 4

Français
Installation de matériel . . . . . . . . 55
Contenu de l’emballage. . . . . . . . . . . . . 55
Choisir un emplacement . . . . . . . . . . . . 55
Déballer l’appareil . . . . . . . . . . . . . . . . 56
Allumer l’appareil . . . . . . . . . . . . . . . . . 59
Éteindre l’appareil . . . . . . . . . . . . . . . . 59
Mode d’économie d’énergie et Mode
sommeil . . . . . . . . . . . . . . . . . . . . . . 60
Le panneau de commande. . . . . . . . . . . 60
Chargement du support d’impression . . . 60
Imprimer le Rapport
de configuration . . . . . . . . . . . . . . . . . 64
Configuration des paramètres du bac . . . 64
Sorties d’impression . . . . . . . . . . . . . . . 65
Chargement des documents à numériser 67
Installation en réseau :
Établir des connexions et installer
des pilotes d’imprimante . . . . . . . .69
Systèmes d’exploitation compatibles . . . 69
Réaliser la connexion réseau . . . . . . . . . 69
Trouver le formulaire
de configuration . . . . . . . . . . . . . . . . . 71
Définir le mot de
passe administrateur . . . . . . . . . . . . . 71
Configurer le réseau pour les systèmes
sous Windows . . . . . . . . . . . . . . . . . . 72
Configurer le réseau pour des systèmes
sous Macintosh. . . . . . . . . . . . . . . . . . 75
Configuration de l’Authentification de
l’utilisateur et du Contrôle d’accès. 91
Généralités . . . . . . . . . . . . . . . . . . . . . 91
Avant de commencer . . . . . . . . . . . . . . 91
Systèmes sous Windows . . . . . . . . . . . . 91
Systèmes sous Mac. . . . . . . . . . . . . . . . 93
Authentification par
PIN (NIP) . . . . . . . . . . . . . . . . . . . . . . 93
Authentification par Nom d’utilisateur
et Mot de passe . . . . . . . . . . . . . . . . . 96
Configuration du télécopieur . . . . . . 99
Les paramètres de base
pour télécopier . . . . . . . . . . . . . . . . . . 99
Installation USB. . . . . . . . . . . . . . . 102
Connexion USB. . . . . . . . . . . . . . . . . . 102
USB : Installer un pilote d’imprimante
pour Windows. . . . . . . . . . . . . . . . . . 103
USB : Installer un pilote d’imprimante
pour Mac . . . . . . . . . . . . . . . . . . . . . 105
Configuration de l’appareil pour une
exploitation en réseau . . . . . . . . . .81
Saisir l’adresse IP de l’appareil sur le
formulaire de configuration . . . . . . . . . 81
Configurer les fonctions de Numérisation
vers Courriel et Télécopie Internet . . . . 81
Configurer la fonction Scan to Network
PC (Numérisation vers PC en réseau) . . 83
Les profils de la fonction Scan to Network
PC (Numérisation vers PC en réseau) . . 89
-4-
Page 5

Español
Instalación de hardware. . . . . . . 109
Contenido de la caja . . . . . . . . . . . . . . .109
Prepare el lugar . . . . . . . . . . . . . . . . . .109
Desempacar la máquina . . . . . . . . . . . .110
Cómo encender el equipo . . . . . . . . . . .113
Cómo apagar la máquina . . . . . . . . . . .113
Modo de ahorro de energía y Modo de
suspensión . . . . . . . . . . . . . . . . . . . .114
El panel de control . . . . . . . . . . . . . . . .114
Cargar el medio de impresión . . . . . . . .114
Cómo imprimir el informe
de configuración. . . . . . . . . . . . . . . . .117
Establecer la configuración
de la bandeja . . . . . . . . . . . . . . . . . . .117
Salidas de impresión. . . . . . . . . . . . . . .119
Cómo colocar documentos
para escanear . . . . . . . . . . . . . . . . . .120
Instalación en redes:
Cómo hacer conexiones e instalar
los controladores de la impresora 122
Sistemas operativos compatibles . . . . . .122
Configurar la conexión
de red . . . . . . . . . . . . . . . . . . . . . . . .122
Buscar la página
de configuración. . . . . . . . . . . . . . . . .124
Configurar la contraseña
del administrador . . . . . . . . . . . . . . . .124
Configurar la red para sistemas
Windows . . . . . . . . . . . . . . . . . . . . . .125
Configurar la red para sistemas
Macintosh . . . . . . . . . . . . . . . . . . . . .129
Cómo configurar la autenticación
del usuario y el control de acceso 144
Información general . . . . . . . . . . . . . . 144
Antes de comenzar . . . . . . . . . . . . . . . 144
Sistemas Windows . . . . . . . . . . . . . . . 144
Sistemas Mac . . . . . . . . . . . . . . . . . . . 145
Autenticación por PIN . . . . . . . . . . . . . 146
Autenticación por nombre de usuario
y contraseña. . . . . . . . . . . . . . . . . . . 149
Cómo configurar la máquina
para
enviar fax . . . . . . . . . . . . . . . . . . . 151
Configuración básica para enviar
un fax . . . . . . . . . . . . . . . . . . . . . . . 151
Instalación con USB . . . . . . . . . . . . 153
Conexión USB . . . . . . . . . . . . . . . . . . 153
USB: Cómo instalar un controlador
de la impresora para Windows . . . . . . 154
USB: Cómo instalar un controlador
de la impresora para Mac . . . . . . . . . . 156
Cómo configurar la máquina para
su funcionamiento en red . . . . . . .134
Ingresar la dirección IP de
la máquina en la página
de configuración. . . . . . . . . . . . . . . . .134
Configurar Escanear a correo
electrónico y Fax en Internet . . . . . . . .134
Configurar Escanear a PC de red . . . . . .136
Perfiles para Escanear a PC de red . . . . .142
-5-
Page 6

Português
Instalação do hardware . . . . . . . 160
Conteúdo do pacote . . . . . . . . . . . . . . .160
Prepare o local de instalação . . . . . . . . .160
Desembalar a unidade . . . . . . . . . . . . .161
Ligar a unidade . . . . . . . . . . . . . . . . . .164
Desligar a unidade . . . . . . . . . . . . . . . .164
Modo de economia de energia e modo
de espera . . . . . . . . . . . . . . . . . . . . .165
O painel de controle . . . . . . . . . . . . . . .165
Carregar mídia de impressão . . . . . . . . .165
Impressão do Relatório
de configuração . . . . . . . . . . . . . . . . .169
Definição das configurações
de bandeja . . . . . . . . . . . . . . . . . . . .169
Saídas da impressora . . . . . . . . . . . . . .170
Colocação de documentos
para escanear . . . . . . . . . . . . . . . . . .171
Instalação em rede:
Conexões e instalação de drivers
de impressora . . . . . . . . . . . . . . . .174
Sistemas operacionais compatíveis. . . . .174
Fazer a conexão de rede . . . . . . . . . . . .174
Localizar o Formulário de configuração . .176
Definir a senha administrativa . . . . . . . .176
Configurar a rede para sistemas
Windows . . . . . . . . . . . . . . . . . . . . . .176
Configurar a rede para sistemas
Macintosh . . . . . . . . . . . . . . . . . . . . .180
Configuração da autenticação do
usuário e do controle de acesso . . 196
Informações gerais . . . . . . . . . . . . . . . 196
Antes de começar . . . . . . . . . . . . . . . . 196
Sistemas Windows . . . . . . . . . . . . . . . 196
Sistemas Mac . . . . . . . . . . . . . . . . . . . 198
Autenticação por PIN. . . . . . . . . . . . . . 198
Autenticação por nome de usuário
e senha . . . . . . . . . . . . . . . . . . . . . . 201
Configuração da máquina para fax 204
Configurações básicas para fax. . . . . . . 204
Instalação USB. . . . . . . . . . . . . . . . 206
Conexão USB . . . . . . . . . . . . . . . . . . . 206
USB: Instalação de um driver
de impressora para Windows . . . . . . . 208
USB: Instalação de um driver
de impressora para Mac . . . . . . . . . . . 209
Configuração da unidade
para operação em rede . . . . . . . . .186
Inserir o endereço IP da unidade no
formulário de configuração . . . . . . . . .186
Configurar opções de escanear
para e-mail e fax pela Internet. . . . . . .186
Configurar a opção de escanear
para PC de rede . . . . . . . . . . . . . . . . .188
Perfis de função de escanear para PC
de rede . . . . . . . . . . . . . . . . . . . . . . .194
-6-
Page 7
Hardware Installation
60 cm
23.6"
60 cm
23.6"
20 cm
8"
100 cm
39.5"
20 cm
8"
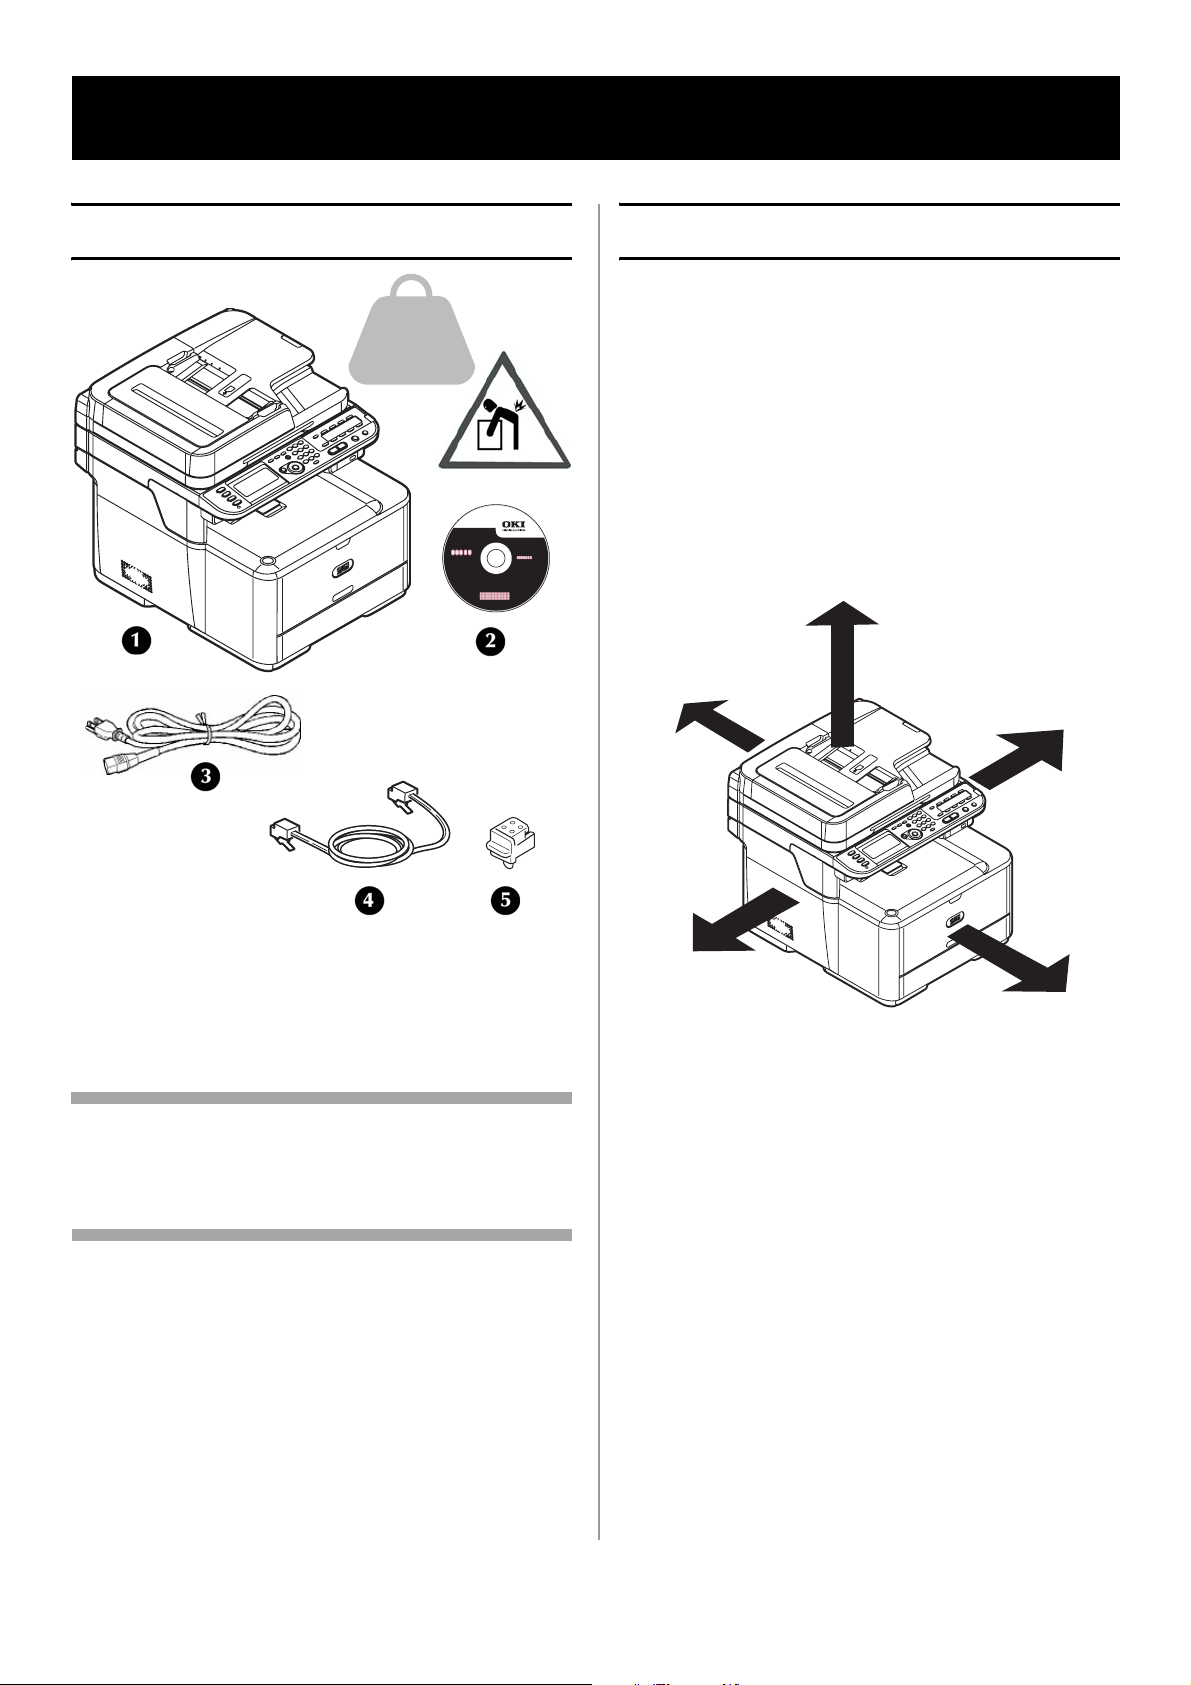
Package Contents
24 kg
53 lb.
Prepare a Location
Environmental Requirements
• Temperature Range: 50 to 89.6°F (10 to 32°C)
• Humidity: 20 to 80% RH (relative humidity)
If installing your machine where the humidity
is less than 30% RH, use a humidifier or
antistatic mat.
• Maximum wet bulb temperature: 77°F (25°C)
Be careful of condensation. It may cause a
malfunction.
Space Requirements
1 Machine
2 DVD
3 Power cable
4 Telephone cable
5 Telephone connector cover
Note
The Ethernet and USB cables are not supplied
with your machine and must be purchased
separately.
We recommend you keep the packing materials,
they are necessary to transport the machine.
Power Requirements
• 110-127 VAC, or 220-240 VAC
• 50/60 Hz
• 1100 watts maximum.
Important!
Do not connect this product to an
uninterruptible power supply (UPS).
If the power source is unstable, use a
voltage regulator.
7 - English
Page 8
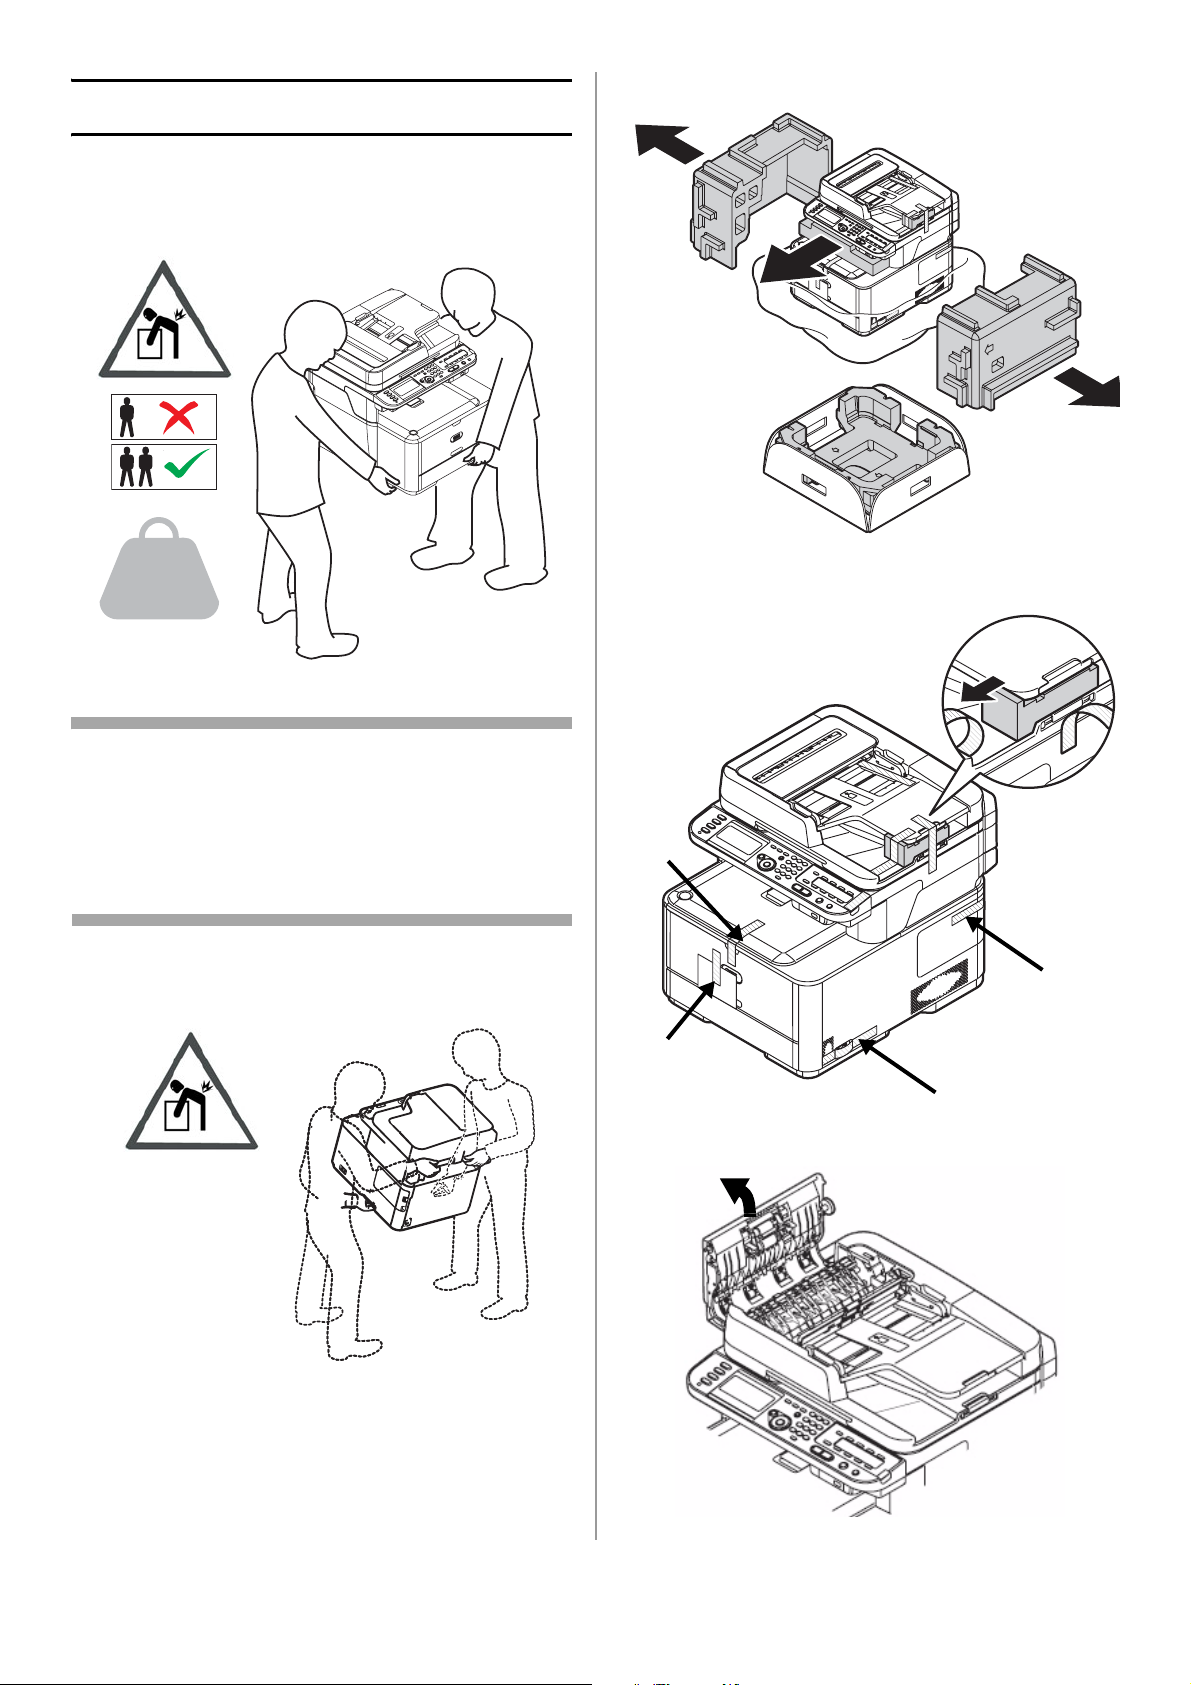
Unpack the Machine
Important!
At least two people are needed to lift the
machine safely.
2 Remove the outer packing materials.
24 kg
53 lb.
Note
The illustrations below are representative. The
actual tape/packing materials may differ
somewhat from those illustrated.
Keep the packing materials, they are necessary
to transport the machine.
1 Remove your machine from the box and place
it where it is to be installed.
3 Remove the external packing tape.
4 Open the ADF cover and remove any packing
materials.
8 - English
Page 9
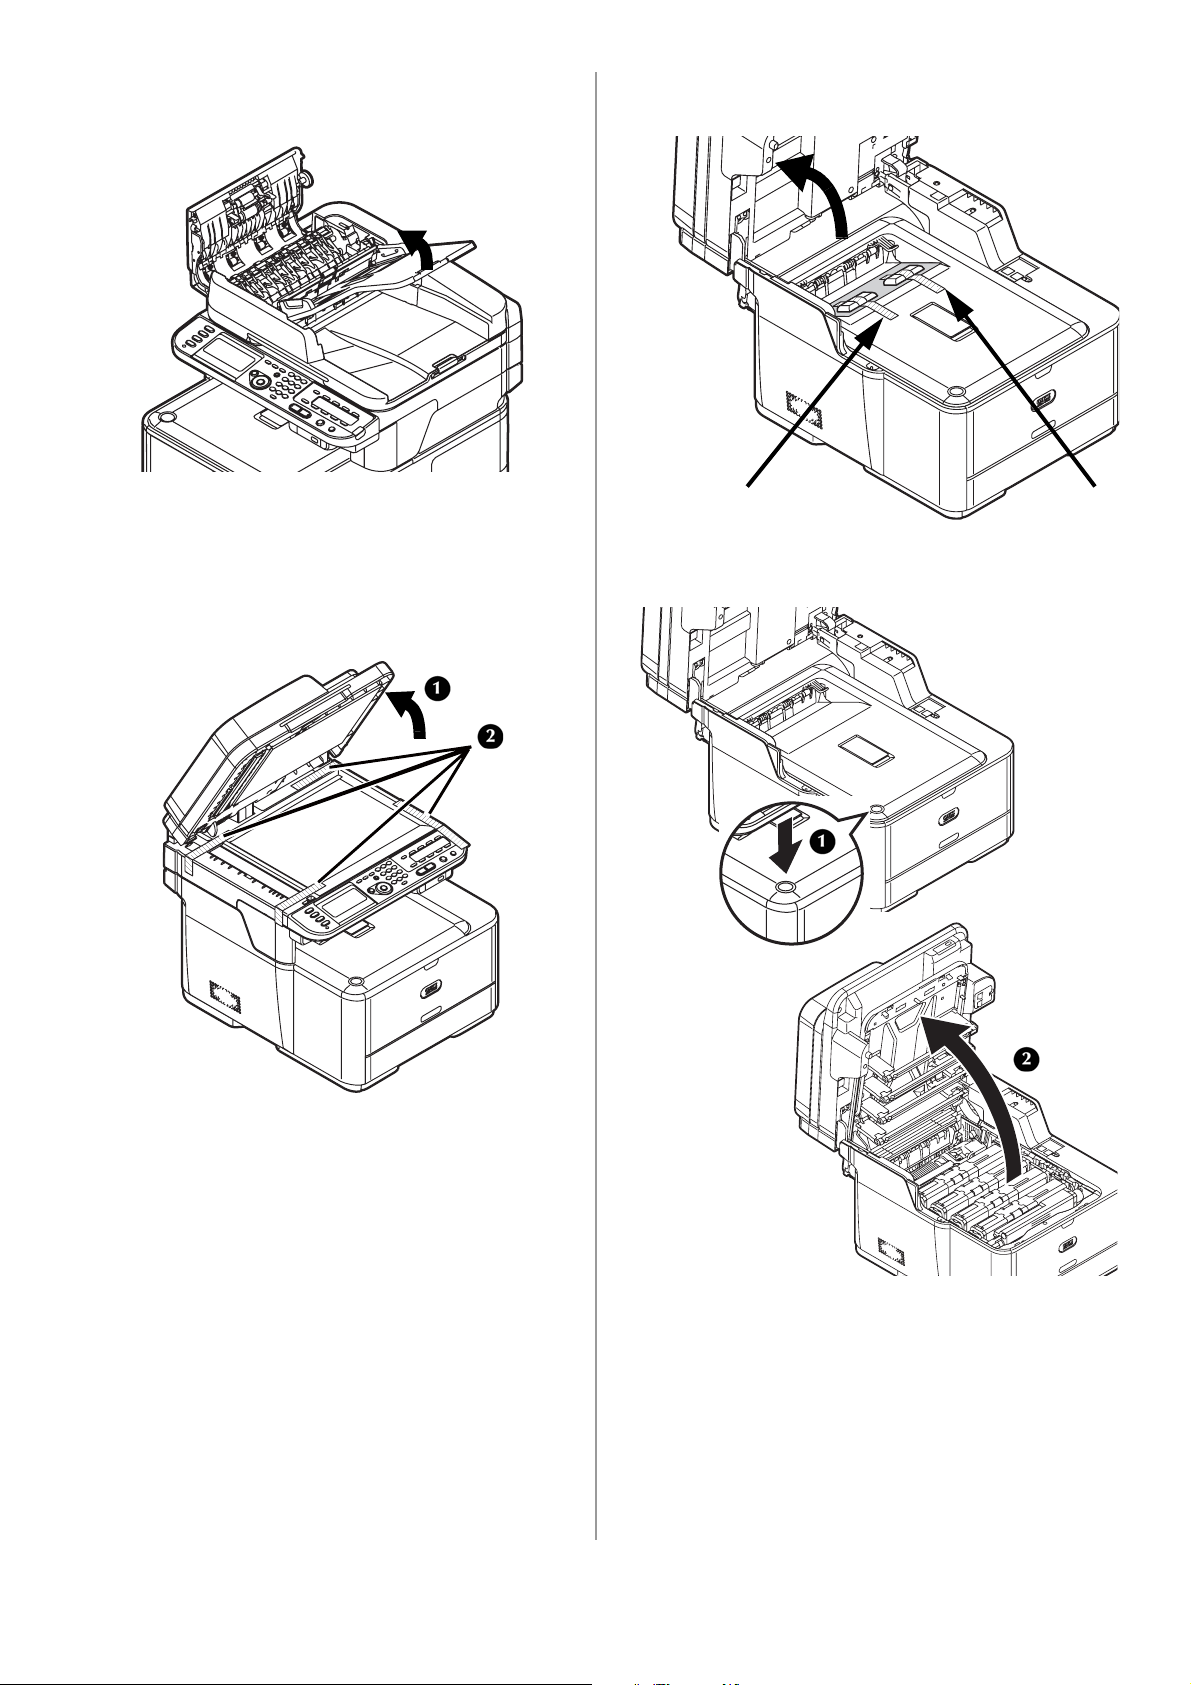
5 Lift the document tray and remove any
packing materials.
6 Lower the document tray and close the ADF
cover.
7 Open the document glass cover (1) and
remove the packing materials and protective
sheet.
9 Open the scanner unit and remove any
packing materials.
10 Press the cover release button (1) and open
the top cover (2).
8 Close the document cover.
Caution!
• The green tube on the image drum is very
delicate. Handle it carefully.
• Do not expose the image drum unit to
direct sunlight or very bright interior light
(approximately more than 1500 lux).
Even under the normal interior light, do
not leave the image drum exposed for
more than 5 minutes.
9 - English
Page 10
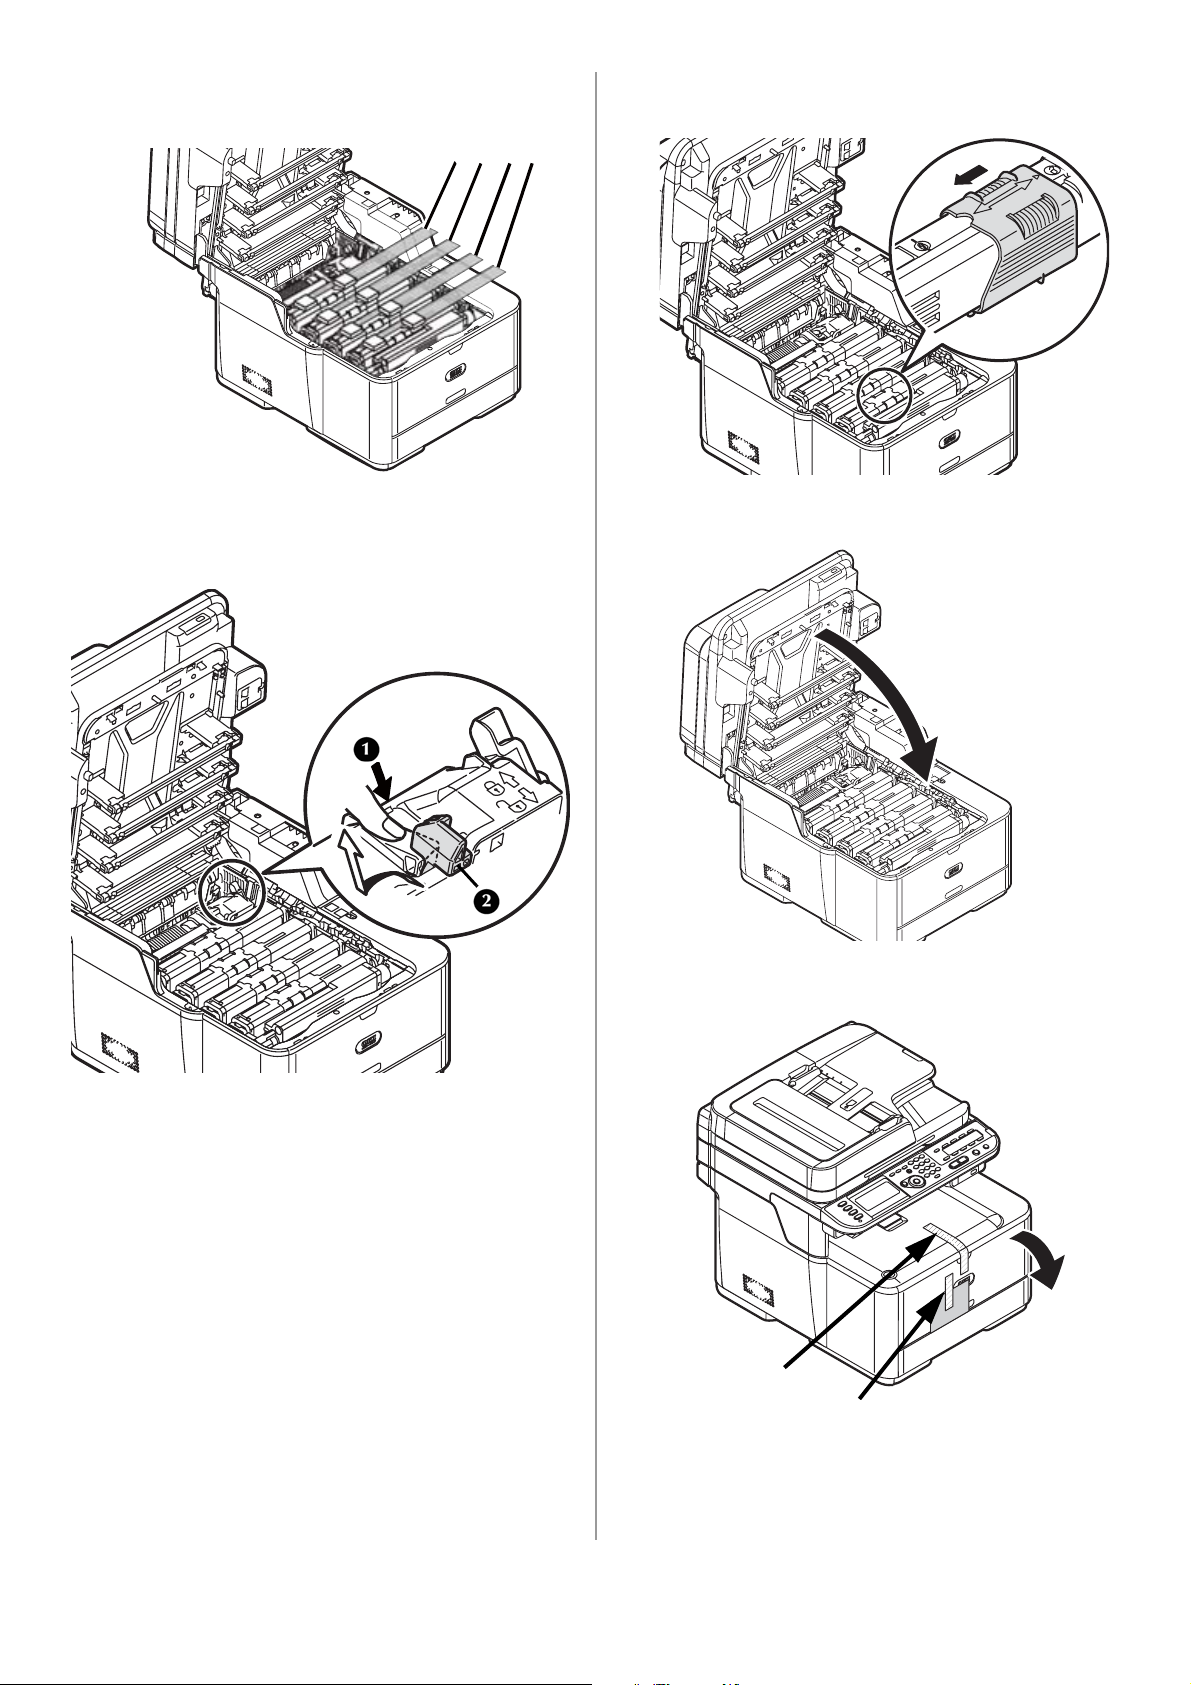
11 Remove the tape and packing materials from
the toner cartridges.
13 Slide the blue locking sleeve on each toner
cartridge to the left until it stops.
12 Press the blue lever (1) of the fuser unit in the
direction of the arrow and remove and store
the orange stopper (2).
2
14 Gently close the top cover and scanner unit.
15 Remove the tape on the MP Tray, then open
the tray.
Important!
Keep the orange stopper, it is necessary if
you ever need to transport the machine.
10 - English
Page 11
16 Remove the interior tape (1) and protective
sheet (2), then close the MP Tray.
3 Plug the power cable into a suitable grounded
outlet.
4 Make sure no documents are on the
document glass or ADF, and that the ADF
cover is closed.
5 Turn the printer on.
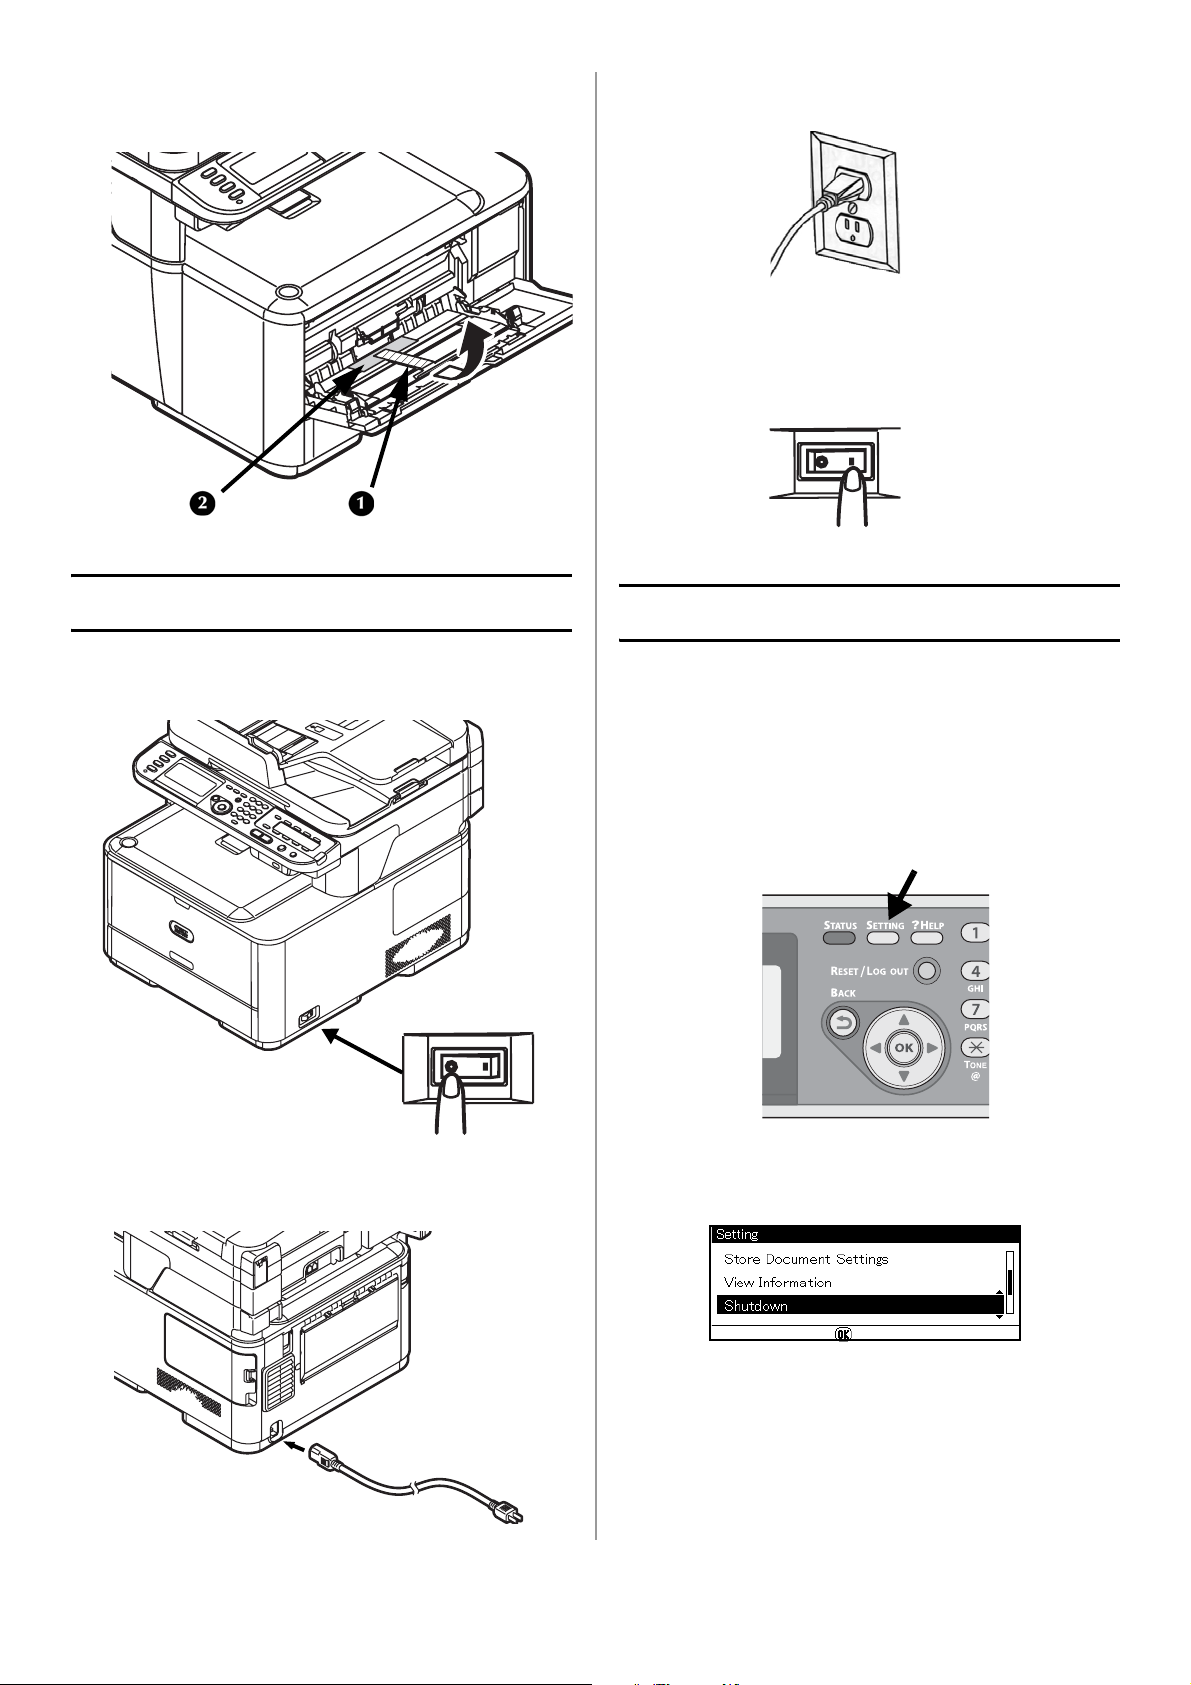
Turning the Machine On
1 Make sure the power switch (on the right side
of the machine) is off <O>.
2 Plug the power cable into the power socket on
the back of your machine.
Turning The Machine Off
Caution!
Do not turn off the power switch suddenly:
this can damage your machine. Always
follow the correct procedure to ensure that
no data is lost.
1 Press <SETTING> on the control panel.
2 Press the down arrow key repetitively to
select [Shutdown], then press <OK>.
3 When the confirmation message appears,
11 - English
press the right arrow key to select [Yes], then
press <OK>.
Page 12
4 When the screen prompting you to turn off
the power switch appears, turn the machine
off.
Power Save Mode and Sleep Mode
Note
See the on-line Basic User Guide on the DVD
supplied with your machine for more information.
Power Save Key
Load Print Media
For more information on print media, see the
on-line Basic User’s Guide on the DVD supplied
with your machine.
Available Trays
When your machine is not used for 30 minutes
(the factory default), it automatically enters a
power save mode to reduce the power
consumption.
You can enter (or exit) the power save mode
manually by pressing <POWER SAVE> on the
control panel.
The Control Panel
For information on
• the control panel
• entering/deleting text/data
see the on-line Basic User’s Guide on the DVD
supplied with your machine.
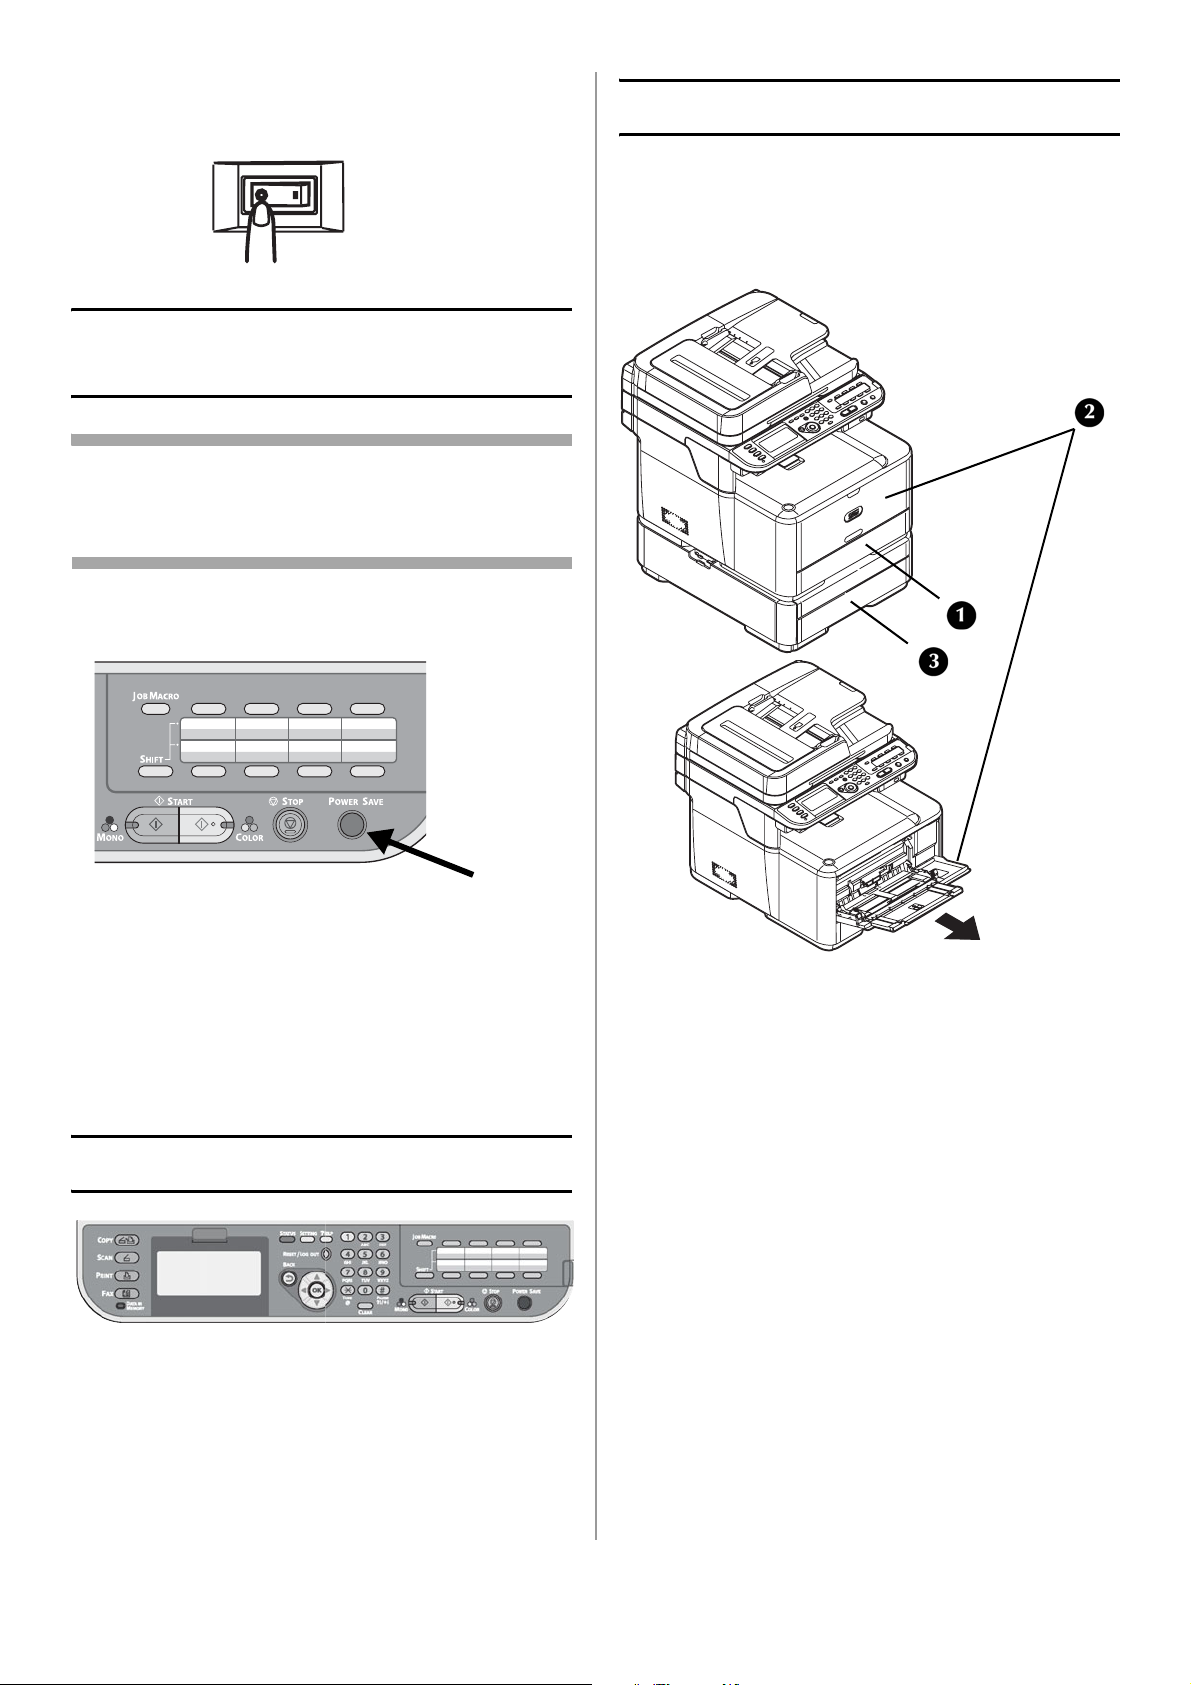
1 Tray 1
2 MP Tray
3 Tray 2 (optional)
12 - English
Page 13
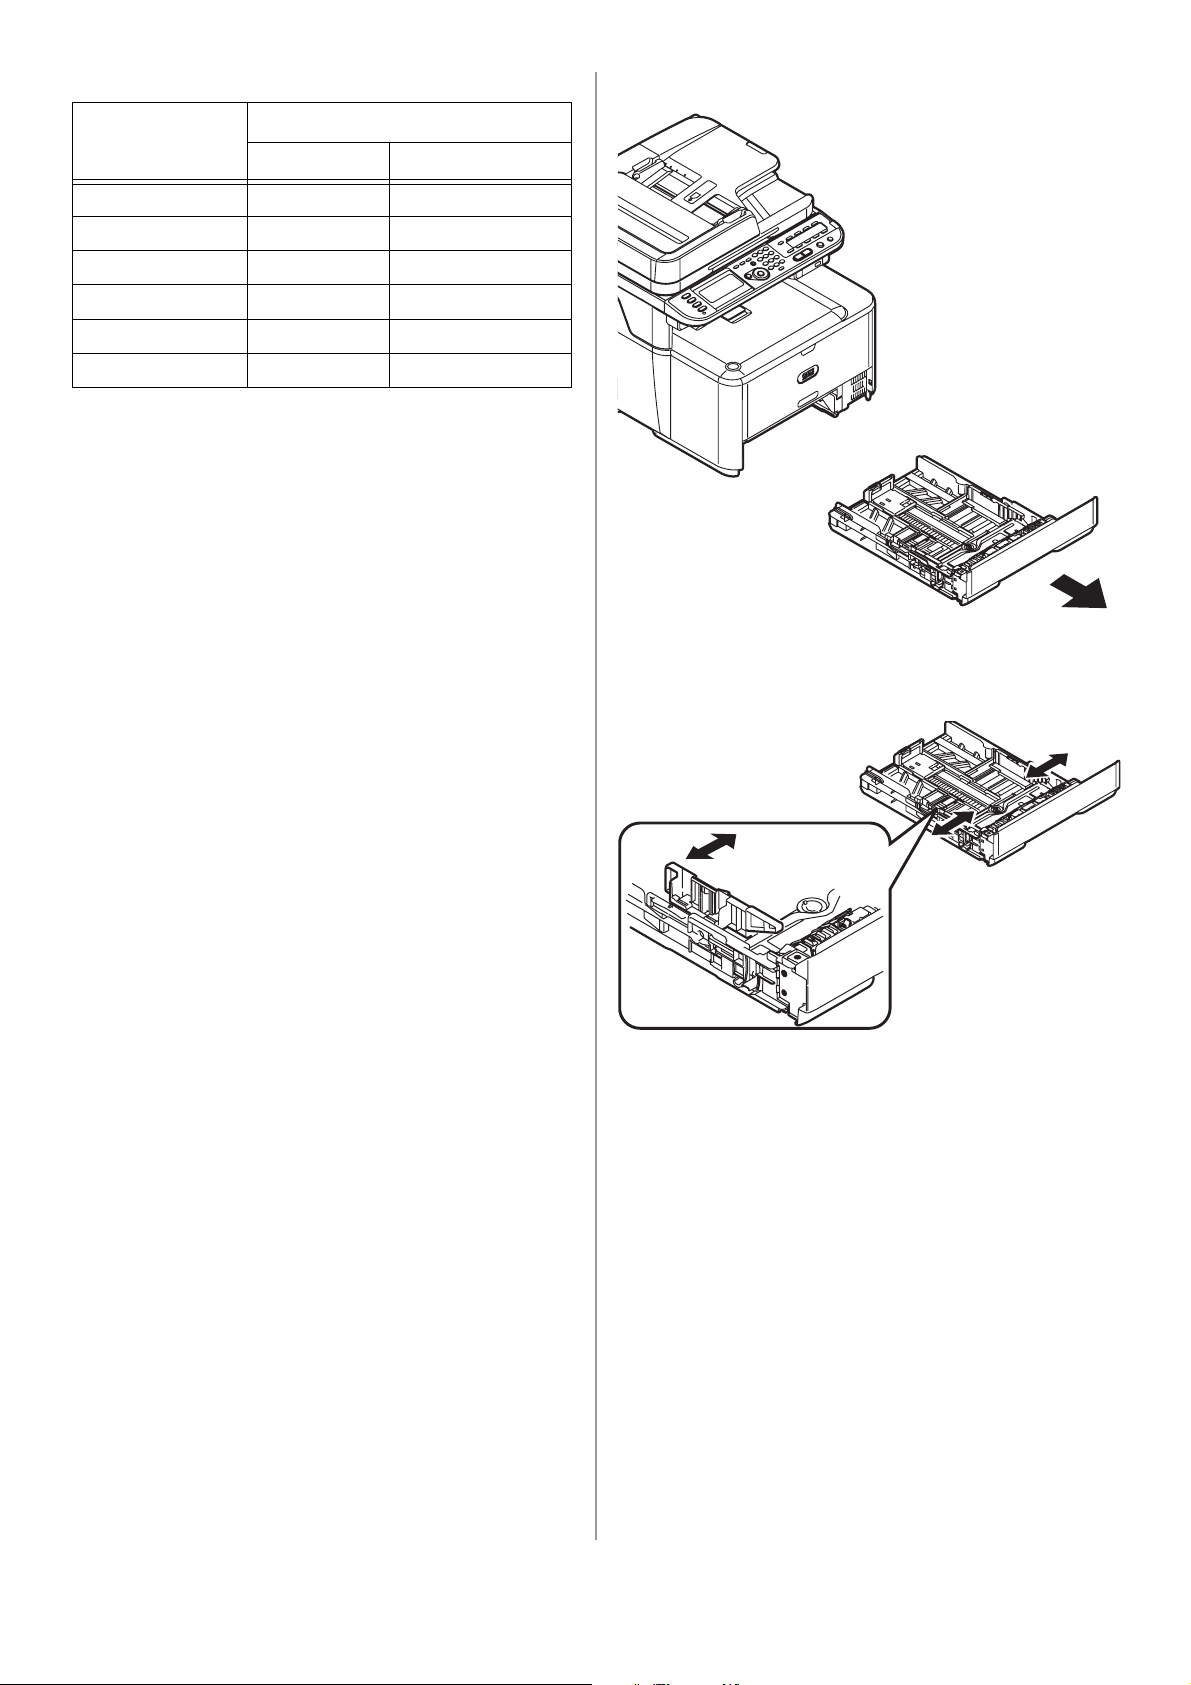
Selectable Weight Ranges
Weight Range,
Designation
Light 17 to 18 lb.
Medium Light 20 to 21 lb.
Medium 22 to 28 lb.
Heavy 28 to 32 lb.
Ultra Heavy1 32 to 47 lb.
Ultra Heavy2 47 to 58 lb.
US Bond Metric
64 to 74 g/m
75 to 82 g/m
83 to 104 g/m
105 to 120 g/m
121 to 176 g/m
177 to 220 g/m
2
2
2
2
2
2
Loading Paper: Tray 1 and Optional Tray 2
Tray 1
• Takes up to 250 sheets of 20-lb. US Bond (75
2
g/m
) paper
• Usable Sizes: Letter, Legal 13/13.5/14,
Executive, A4, A5, A6, B5, 16K, Custom
• Paper Weight range: 17 to 47 lb. US Bond (64
to 176 g/m
2
)
1 Pull out the paper tray.
2 Slide the paper width guides to the width of
paper to be loaded.
Tray 2 (optional)
• Takes up to 530 sheets of 20-lb. US Bond (75
2
g/m
) paper
• Usable Sizes: Same as Tray 1, but no A6
• Paper Weight range: same as Tray1
Important!
Before printing on custom size paper, you
must first define the size in the printer
driver. See page 16.
The following procedure shows loading paper in
Tray 1. The procedure for Tray 2 is the same.
13 - English
Page 14
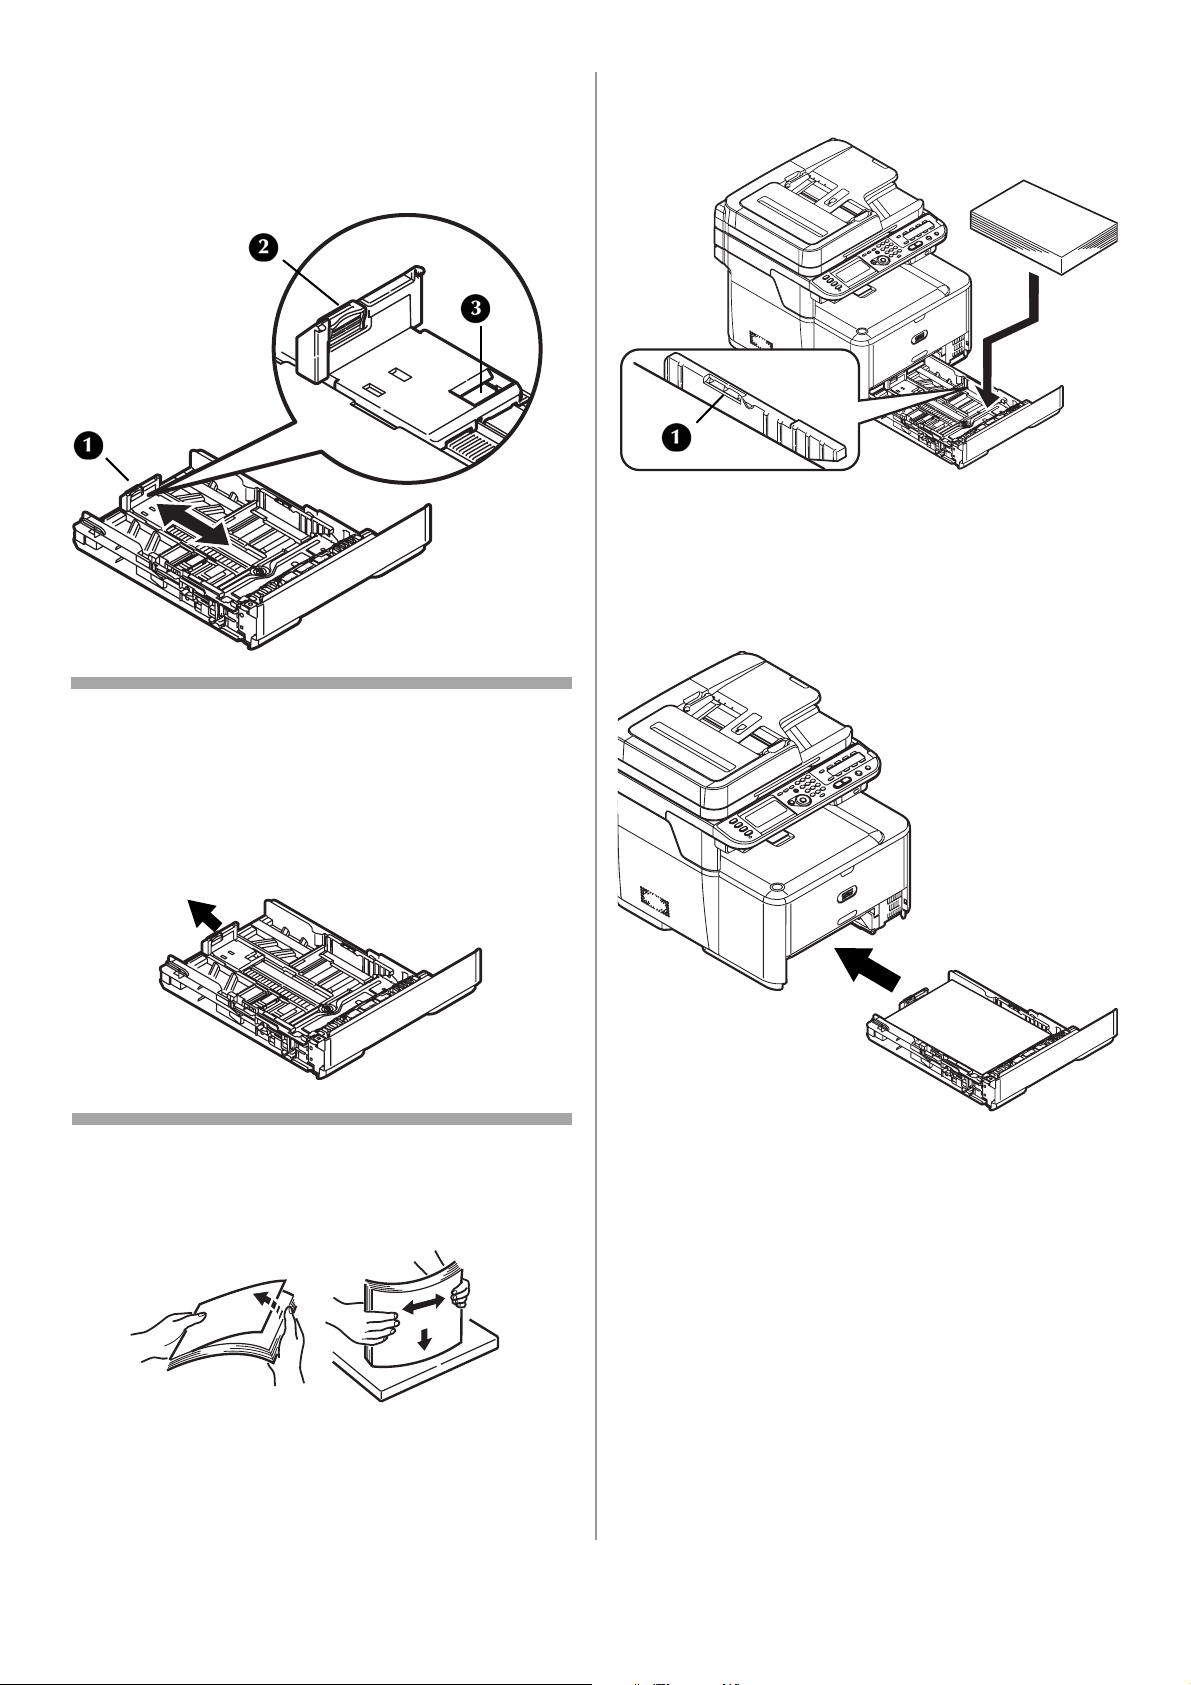
3 Adjust the paper stopper (1) for the paper
length: press down lightly on the blue release
lever (2), then slide the paper stopper to the
length of paper to be loaded. The length
selected will show in the view window (3).
5 Load the paper with the print side face down.
Keep the stack below the fill line (1).
6 Fine tune the paper width guides and the
paper stopper to be snug, but not tight,
against the paper.
7 Push the paper tray into the printer until it
stops.
Note
If you are loading legal paper, you must slide the
paper stopper out beyond the end of the tray. For
Legal 14 paper, slide it as far out as it will go
(about 2.5 inches, 64 mm). Settings for Legal 13,
Legal 13.5 and Legal 14 will appear in the stopper
window when it is properly positioned.
4 Flex the paper back and forth, and then fan it.
Straighten the edges of the paper stack on a
level surface.
8 Configure the tray settings in your machine’s
menu. See “Configuring the Tray Settings” on
page 16.
14 - English
Page 15
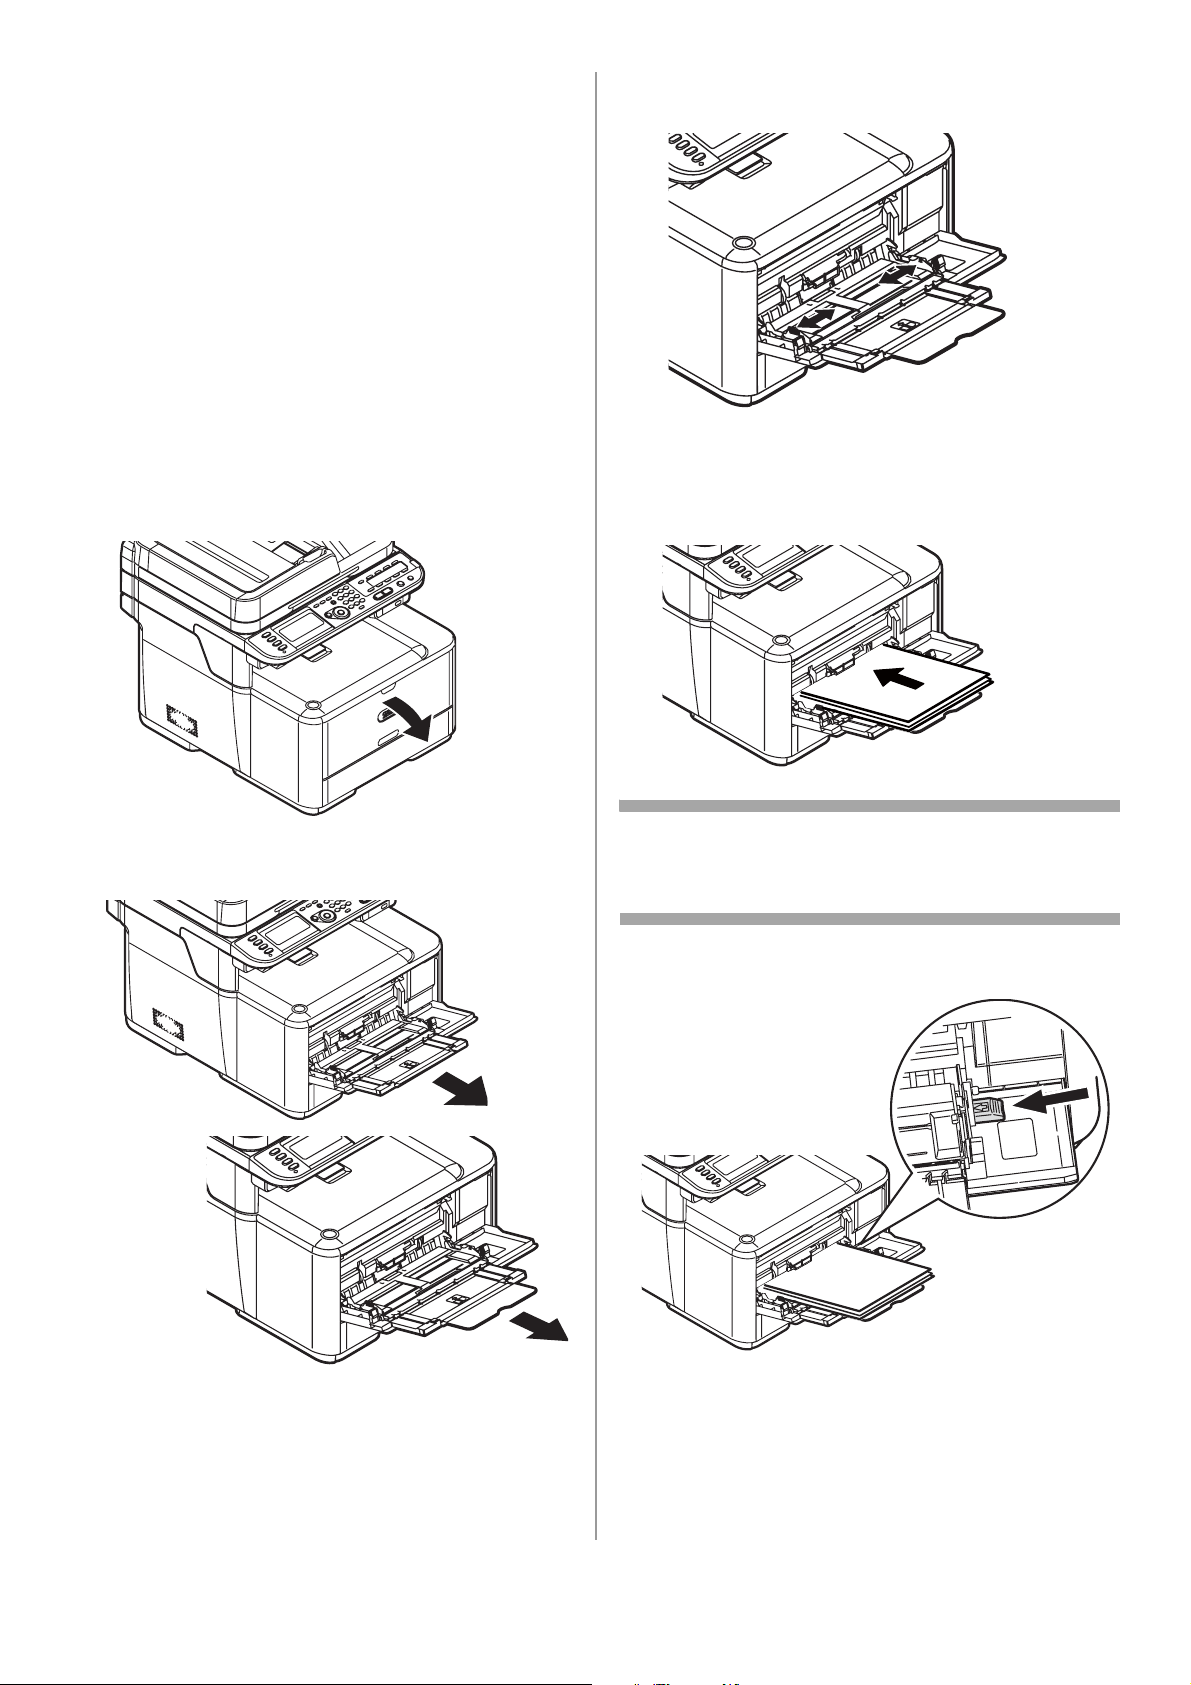
Loading Paper in the MP Tray
• Takes up to 100 sheets of 20-lb. US Bond (75
2
g/m
), up to 10 envelopes.
• Usable sizes: Letter; Legal 13/13.5/14'';
Executive; A4, A5, A6, B5; C5, DL, Com-9,
Com-10 and Monarch envelopes, 3'' x 5'' index
cards, photo paper sizes 4'' x 6'' or 5'' x 7'':,
banners up to 52'' (1320 mm) long, custom
• Paper weight range: 17 to 58 lb. US Bond (64
to 220 g/m
Important!
Before printing on custom size paper, you
must first define the size in the printer
driver. See page 16.
1 Lower the MP tray.
2
)
3 Adjust the paper feed guides to the width of
paper to be loaded.
4 Insert the paper with the print side face up
until its edge touches the paper feed
entrance, then fine tune the position of the
feed guides.
2 Pull out the paper support and the sub
support.
Note
Load envelopes with the short edge into the
machine, flap down and to the right.
5 Press the tray latch button.
6 Register the loaded paper on your machine.
See “Configuring the Tray Settings” on p. 16.
15 - English
Page 16
Note
• Do not load paper above the fill line.
• Do not load paper of different sizes, types
or weights at the same time.
• When adding paper, remove the paper on
the MP tray and straighten the edges of
both stacks of paper, and then load them
again.
• Do not put anything other than paper for
printing. Do not apply too much pressure
on the MP tray.
Printing the Configuration Report
4 Use the down arrow key to select [Paper
Size], then press <OK>.
5 Use the down arrow key to select the size of
the loaded paper, then press <OK>.
6 Use the down arrow key to select [Media
Type], then press <OK>.
7 Use the down arrow key to select the type of
media loaded, then press <OK>.
8 Use the down arrow key to select [Media
Weight], then press <OK>.
9 Use the down arrow key to select the weight
of the loaded paper, then press <OK>.
Custom Size Print Media
To load custom size paper, you need to register
the width and length of the paper before printing.
You can check the detailed information of your
machine, such as the settings and status, by
printing the configuration report.
1 Press <SETTING> on the control panel.
2 Use the down arrow key to select [Reports],
then press <OK>.
3 Use the down arrow key to select
[Configuration], then press <OK>.
4 When the confirmation message appears,
press the left or right arrow key to select
[Yes], then press <OK>.
Configuring the Tray Settings
Standard Size Print Media
Note
To scroll through the various selections on the
display, press the down arrow key repetitively.
\
Tray Available size range
Tray 1 Width :
4.1 to 8.5" (105 to 216 mm)
Length:
5.8 to 14.0" (148 to 356 mm)
Tray 2
(optional)
MP tray Width:
Width: same as Tray 1
Length:
8.3 to 14.0” (148 to 356 mm)
2.5 to 8.5" (64 to 216 mm)
Length:
5.0 to 52.0" (127 to 1321 mm)
Note
For tray 1 and tray 2, you can configure the
[Custom] setting only when [Paper Size] is set to
[Custom].
1 Follow steps 1 through 3 at the left.
2 Use the down arrow key to select [Custom],
then press <OK>.
3 Enter the desired value in the Width box using
the keypad.
1 Press <SETTING> on the control panel.
2 Use the down arrow key to select [Paper
Setup], then press <OK>.
3 Use the down arrow key to select the
applicable paper tray, then press <OK>.
4 Press the right arrow key to move to the
Length box, then enter the value using the
keypad.
5 Press <OK>.
16 - English
Page 17
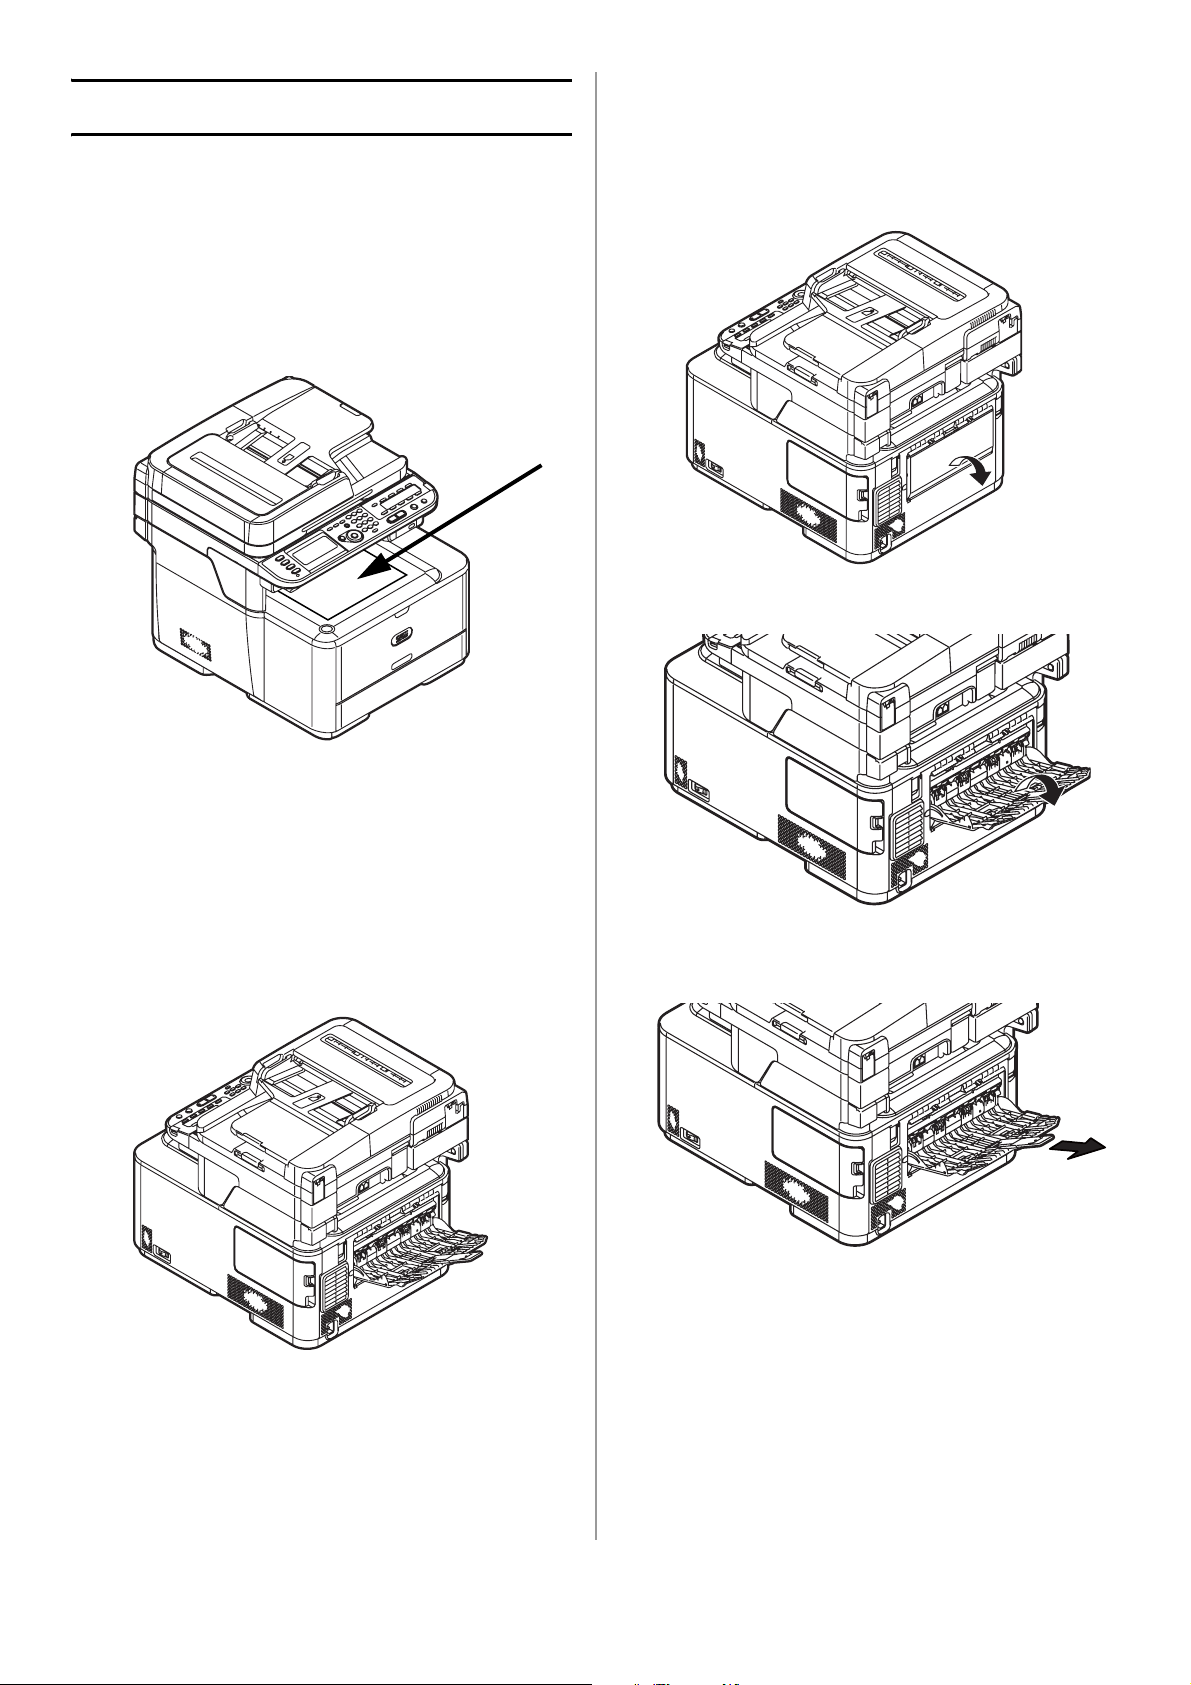
Print Exits
• Takes 100 sheets of 20-lb. US Bond (75 g/m
paper
• Takes 10 envelopes
2
)
Important!
Do not open or close the rear exit (face up
stacker) while the machine is printing as it
can cause a paper jam.
Using the Top Exit (Face Down Stacker)
1 Pull the rear exit on the back of the machine
and open it toward you.
2 Unfold the stacker.
The top exit (facedown stacker) is the default. It
is enabled when the rear exit is closed.
• Delivers documents with the print side face
down.
• Takes up to 150 sheets of 20-lb. US Bond (75
2
g/m
) paper.
Using the Rear Exit (Face Up Stacker)
3 Open the paper support.
The rear exit is enabled when it is opened.
• Delivers documents with the print side face up.
• Provides straight-through path required for
heavy paper, transparencies, envelopes, and
labels.
17 - English
Page 18
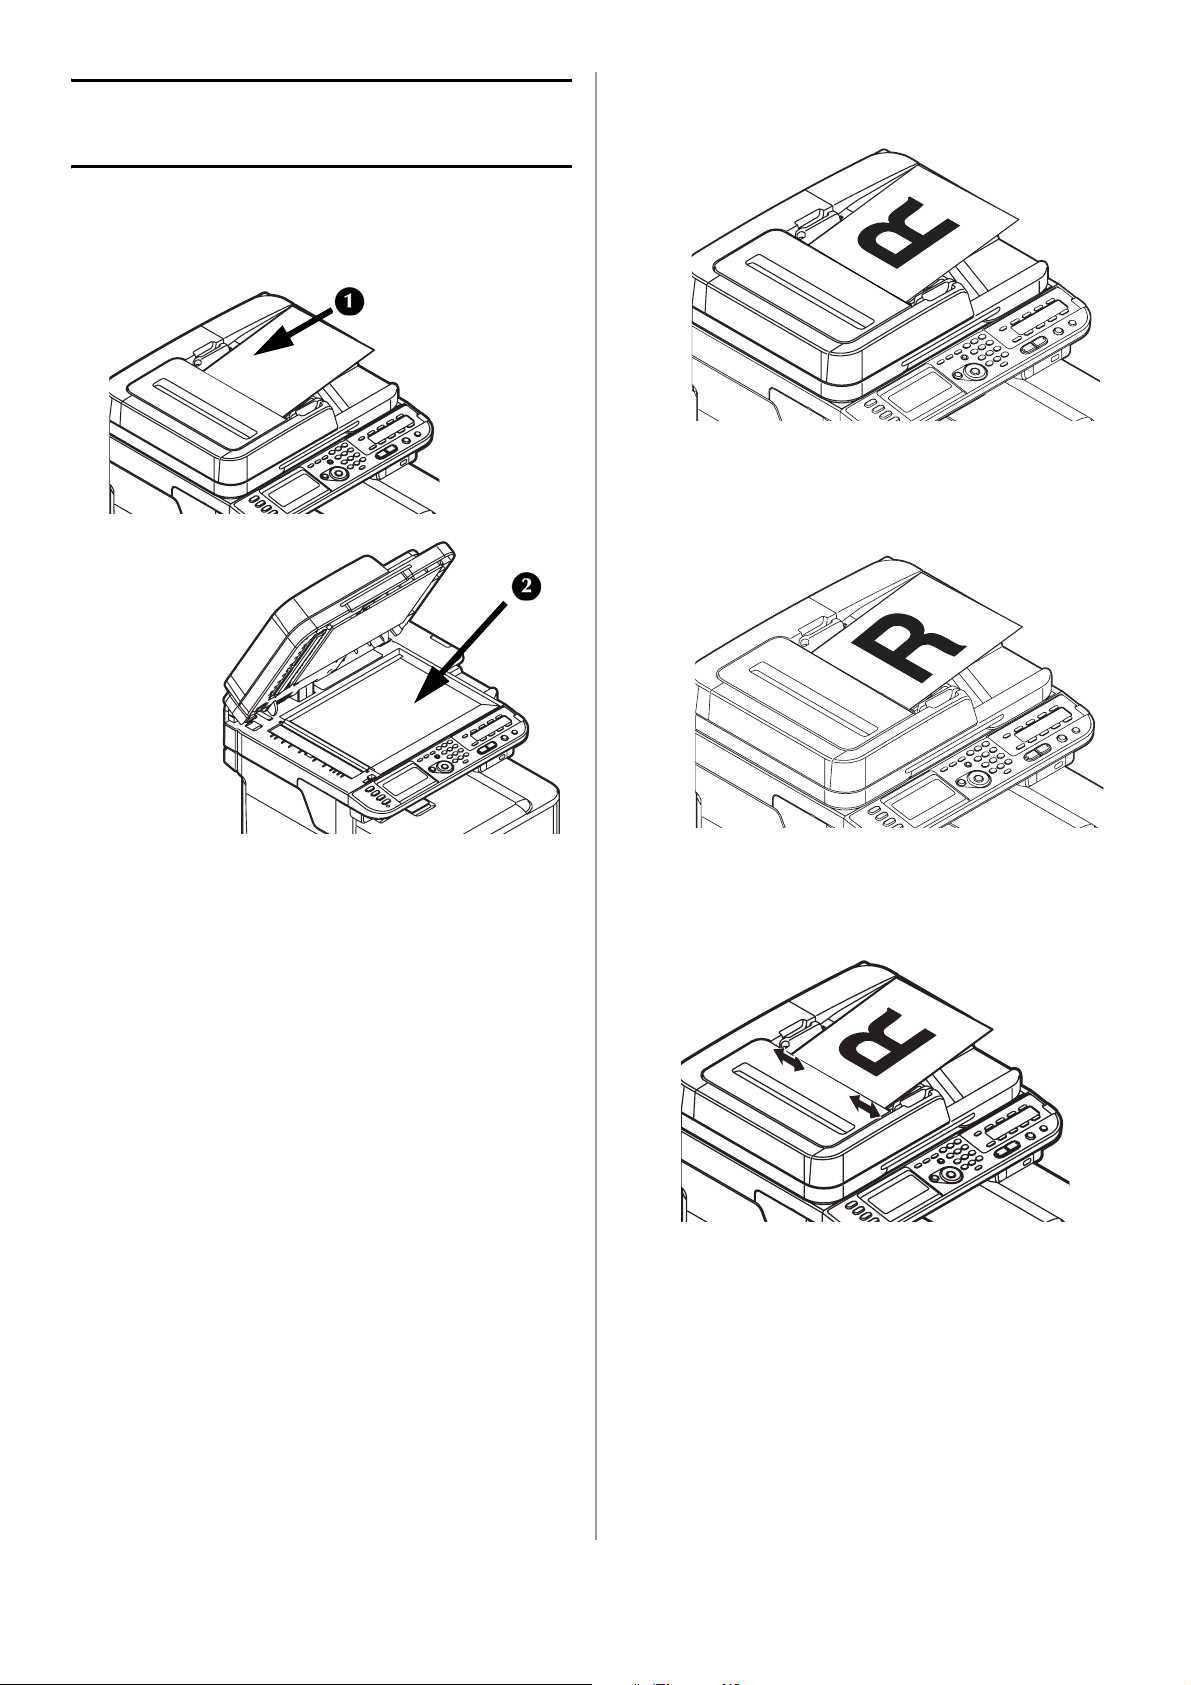
Loading Documents for Scanning
You can use the auto document feeder (1) or the
document glass (2) to load documents for
copying, scanning or faxing.
a) Load portrait documents with the top edge
in first.
b) Load landscape documents with the left
edge in first.
Document Requirements
For information on document requirements, see
the on-line Basic User’s Guide on the DVD
supplied with your machine.
Loading Documents on the Auto Document Feeder (ADF)
• Takes Letter, Legal 13/13.5/14, Executive, A4,
A5, A6, B5.
• Holds 50 sheets of 20-lb. US Bond (75 g/m
• Load documents face up.
Important!
Make sure that any glue, ink, or correction
fluid on documents is completely dry before
loading them.
1 Load the document(s) on the ADF.
2
)
2 Adjust the document guides to the width of
the pages.
18 - English
Page 19
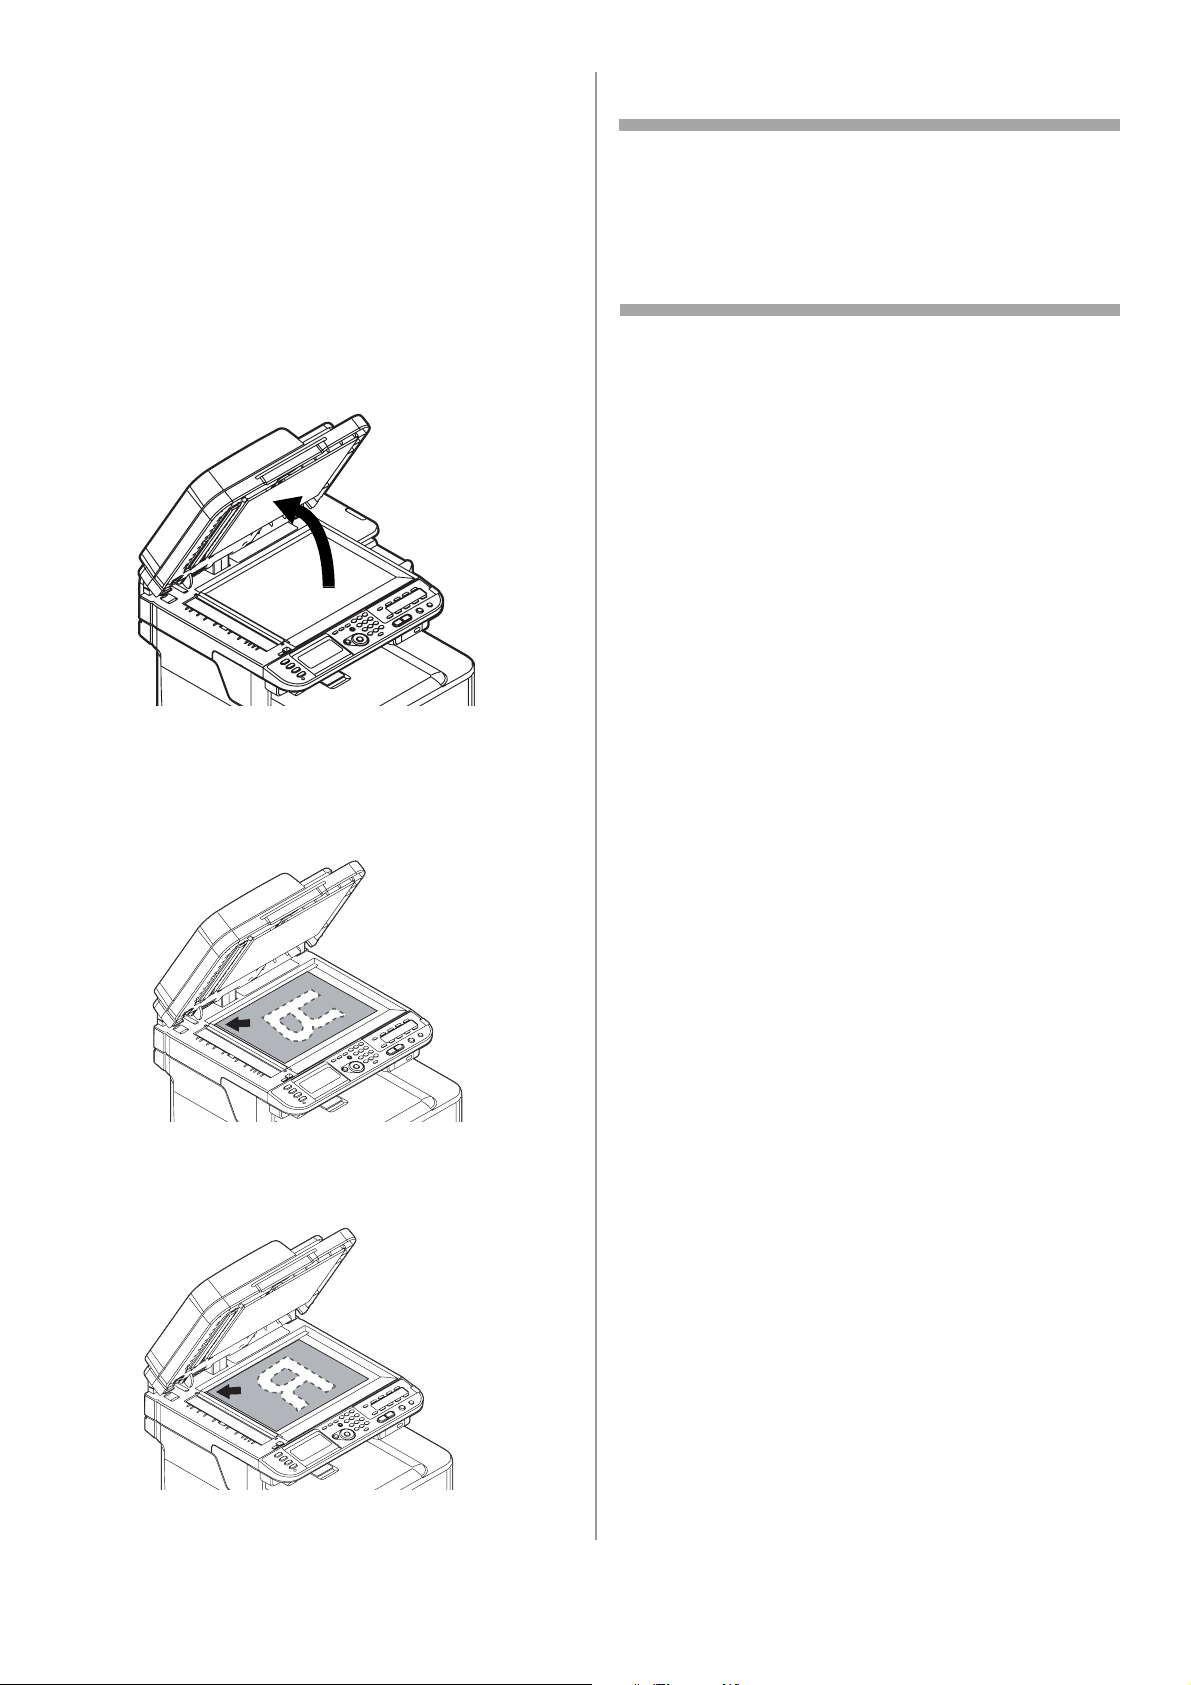
Loading Documents on the Document Glass
• Takes Letter, Executive, A4, A5, A6, B5
• Usable for documents up to 0.78-inch (20 mm)
thick
Important!
Make sure that any glue, ink, or correction
fluid on documents is completely dry before
loading them.
1 Lift and open the document glass cover.
3 Close the document glass cover gently.
Note
If you want to use [N-in-1], [Sort] or
[DuplexCopy] functions, change the [Document
Direction] setting according to the direction of
your document to get the output you want. The
default setting is [Portrait].
2 Place a document face down on the document
glass.
a) If your document is portrait, align its top
edge to the upper-left corner of the glass.
b) If your document is landscape, align its
right edge to the upper-left corner of the
glass.
19 - English
Page 20

Network Installation: Making Connections and Installing Printer Drivers
Compatible Operating Systems
Your machine supports the following operating
systems:
Windows
•Windows 7,
• Windows 7 64-bit Edition
• Windows Server 2008 R2 64-bit Edition
• Windows Server 2008
• Windows Server 2008 64-bit Edition
•Windows Vista
• Windows Vista 64-bit Edition
• Windows Server 2003
• Windows Server 2003 x64 Edition
•Windows XP
• Windows XP x64 Edition
• Windows 2000
Macintosh
• Mac OS X 10.3.9 to 10.6.
Important!
For Mac OS X 10.6 IntelPC users, install
Rosetta before installing the printer driver.
Make the Network Connection
Important!
You must connect your machine to a
network with a suitable Ethernet cable
before installing the printer driver.
Note
The Ethernet cable and hub are not included with
your machine. The Ethernet cable must be
category 5, twisted pair, straight.
1 Turn off your machine:
a) Press <SETTING> on the control panel.
b) Use the down arrow key to select
[Shutdown], then press <OK>.
c) When the confirmation message appears,
press the right arrow key to select [Yes],
then press <OK>.
2 Turn off the computer.
20 - English
d) When prompted to, turn the machine off.
Page 21
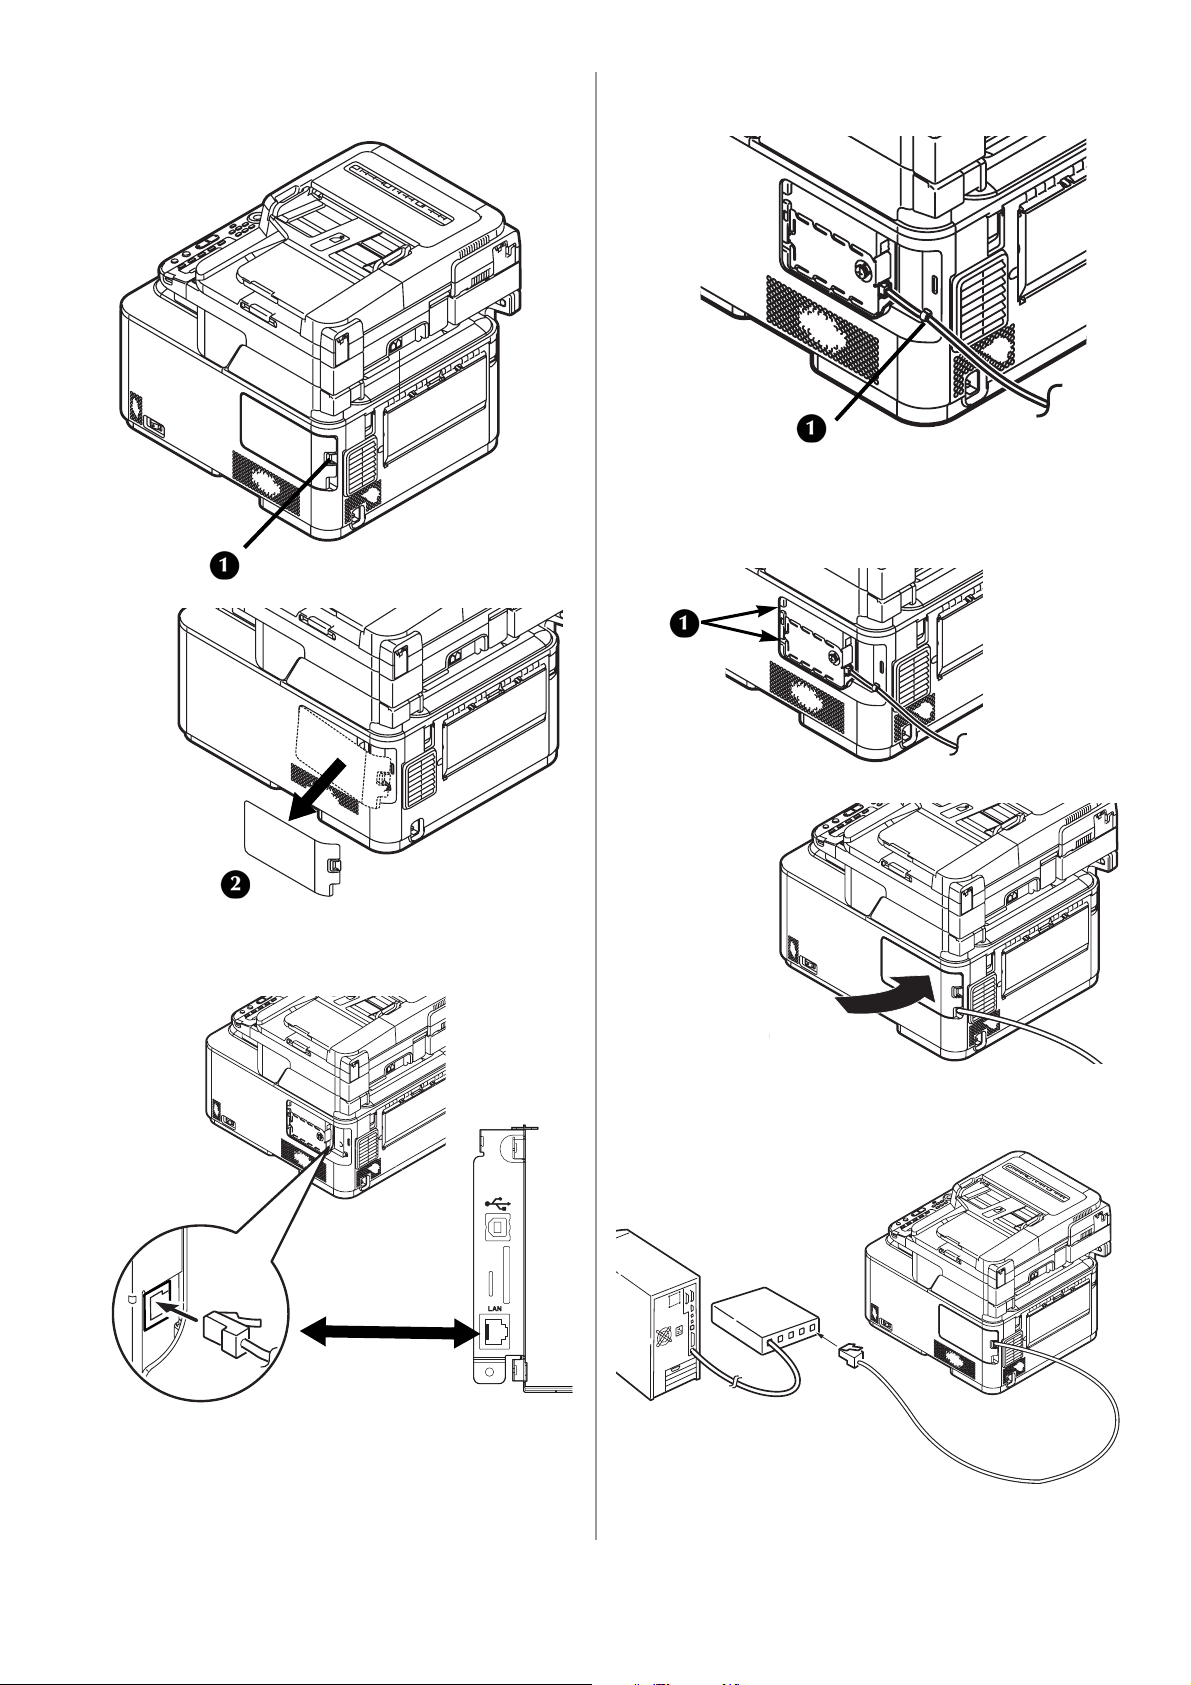
3 Depress the latch (1) on the right side of the
machine and remove the access cover (2).
5 Secure the Ethernet cable under the hook (1)
on the machine.
6 Fit the tabs on the side cover into the slots (1)
on the machine housing and snap the cover
back into place.
4 Plug one end of the Ethernet cable into the
LAN connection on the machine.
7 Connect the hub to a computer, then plug the
other end of the Ethernet cable into the hub.
21 - English
Page 22
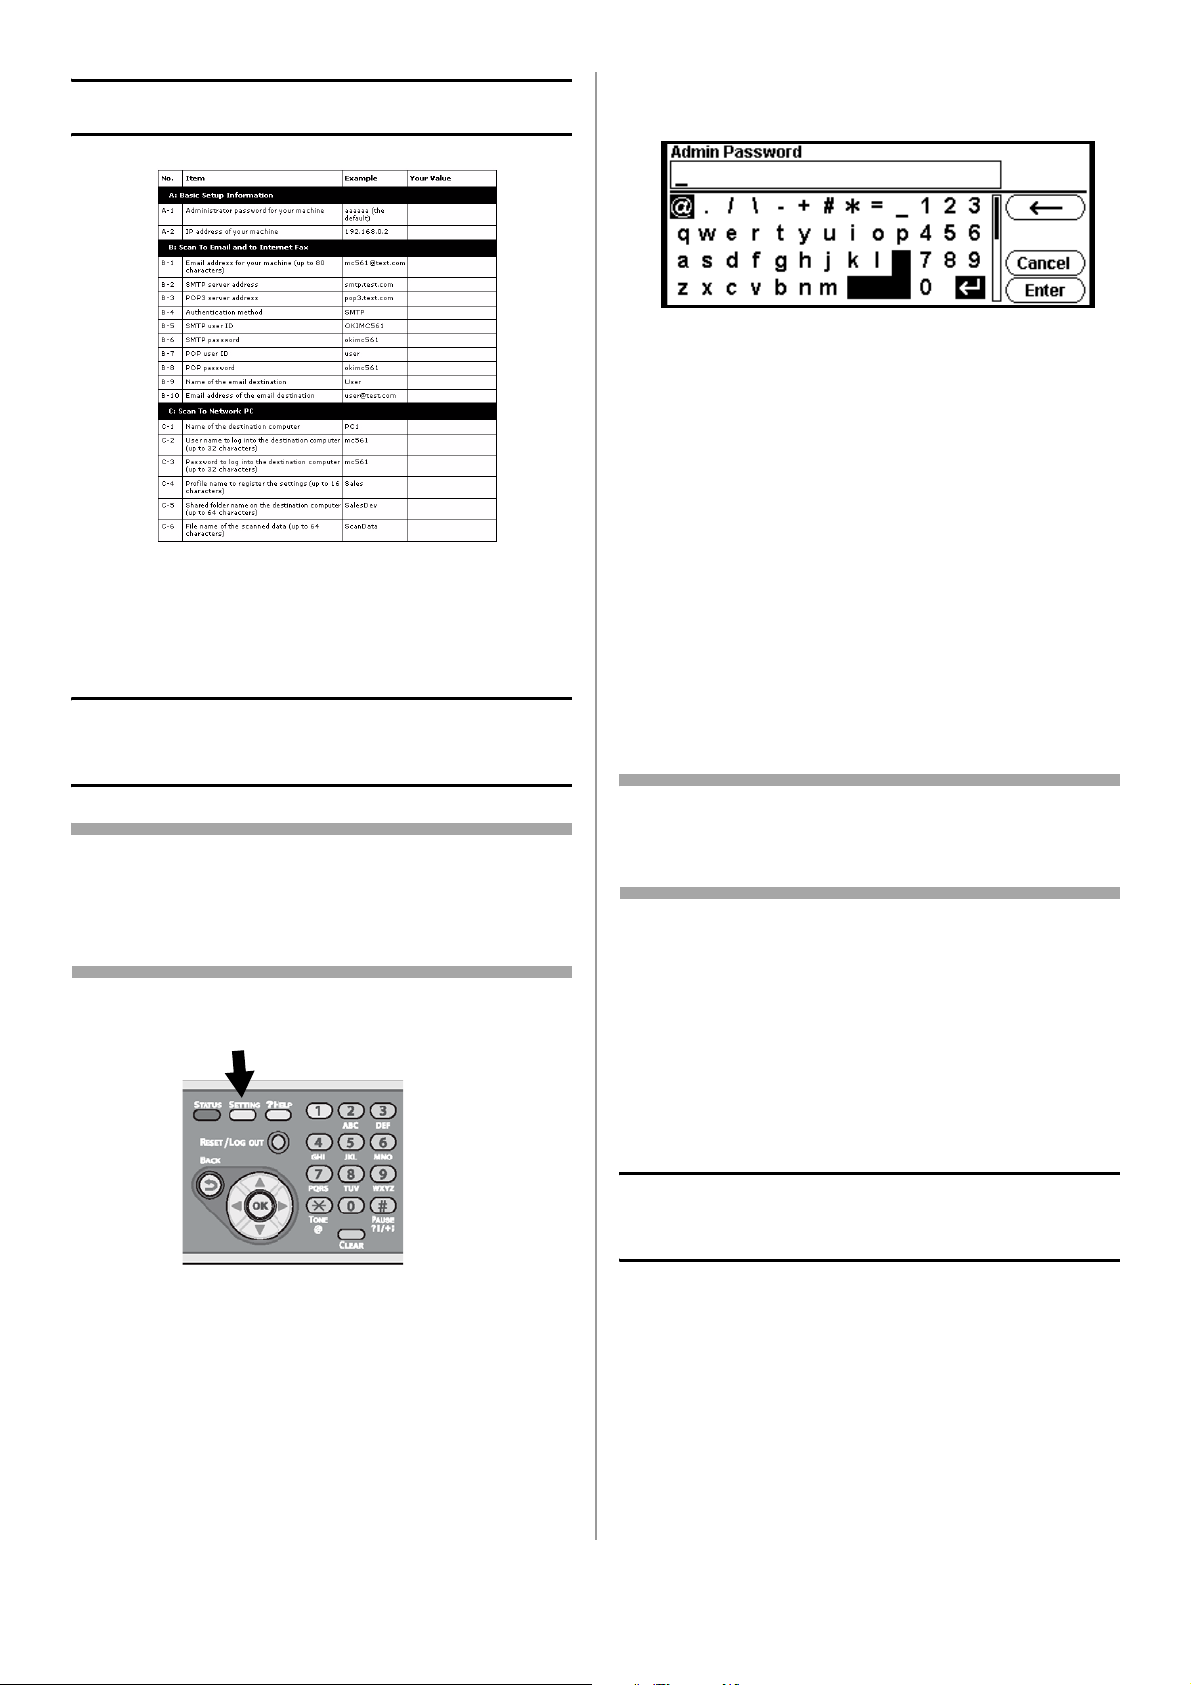
Locate the Setup Form
2 Use the down arrow key to select [Admin
Setup], then press <OK>.
3 Use the down arrow key to select [a], then
press <OK> six times to enter the default
password: aaaaaa.
4 Use the arrow keys to select [Enter] on the
display, then press <OK>.
5 Use the up arrow key to select
[Management], then press <OK>.
You will find a Setup Form on page 54. You can
use this form to record needed information about
your network settings, then refer to it when
setting up the machine for network operation.
Set the Administrative Password
Note
When using the arrow keys to make your
selections, press the key repetitively to go to the
selection.
1 Press <Setting> on the control panel.
6 Use the up arrow key to select [Admin
Password], then press <OK>.
7 Use the arrow keys to select the digits of your
password, pressing <OK> after each digit.
8 When done entering your new password, use
the arrow keys to select Enter on the display,
then press <OK>.
Note
The Admin Password must have at least six digits
and is case sensitive.
9 When you have entered all the digits, use the
arrow keys to select [Enter] on the display,
then press <OK>.
10 Use the left arrow key to back out to the main
screen.
11 Enter the Admin Password on line A-1 of the
Setup Form.
Set Up the Network for Windows Systems
To complete the network connection with a
Windows computer, first set IP addresses for the
computer and the machine, and then install
printer driver(s) on the computer.
22 - English
Page 23

Set Up the IP Address, if Necessary
If your network meets either of the following
conditions, an IP address is assigned to the
computer and to the machine automatically.
• If a DHCP or BOOTP server is on the network
Note
If you are configuring a small network consisting
of only your machine and a computer, set the IP
addresses as shown below (according to
RFC1918):
• Universal Plug-and-Play
If all the computers connected to the network
are
•Windows 7
•Windows Vista
•Windows XP
• Windows 2000
• Windows Server 2008 R2
• Windows Server 2008
• Windows Server 2003,
• or your router supports Universal Plugand-Play,
an IP address is automatically assigned to the
computer and to the machine even if a DHCP/
BOOTP server is not on the network.
If the network does not meet the conditions
above, or your network administrator or internet
service provider specifies a unique IP address for
the computer and your machine, set the IP
addresses manually.
General Information
• You must enter the administrator password to
complete this procedure.
• When setting an IP address manually, ask the
network administrator or your internet service
provider which IP address to use. If the IP
address is not set correctly, the network might
go down or Internet access could be disabled.
For the computer
IP address: 192.168.0.1 to 254
Subnet mask: 255.255.255.0
Default gateway: not used
DNS server: not used
For the machine
IP address Set: Manual
IP address: 192.168.0.1 to 254 (select a
different value from the
computer)
Subnet Mask: 255.255.255.0
Default Gateway: 0.0.0.0
Network Scale: Small
To set [N et work S ca le ]:
• Press <SETTING> on the control panel.
• Select [Admin Setup] > [Network Menu]
> [Network Setup] > [Network Scale].
Set Up Your Computer’s IP Address
Important!
If the IP Address for your computer is
already known, skip to the next section “Set
Up Your Machine’s IP Address.”
The procedure below uses Windows 7 as an
example. The screen images may differ
depending on the operating system.
1 Turn on the computer.
2 Click [Start] > [Control Panel] > [View
3 Select [Change adapter settings].
23 - English
network status and tasks].
• For Windows Server 2003, click [Start] >
[Control Panel] > [Network Connections] >
[Local Area Connection].
• For Windows XP, click [Start] > [Control
Panel] > [Network and Internet
Connections] > [Network Connections].
• For Windows 2000, click [Start] >
[Settings] > [Network and Dial-up
Connections].
Page 24
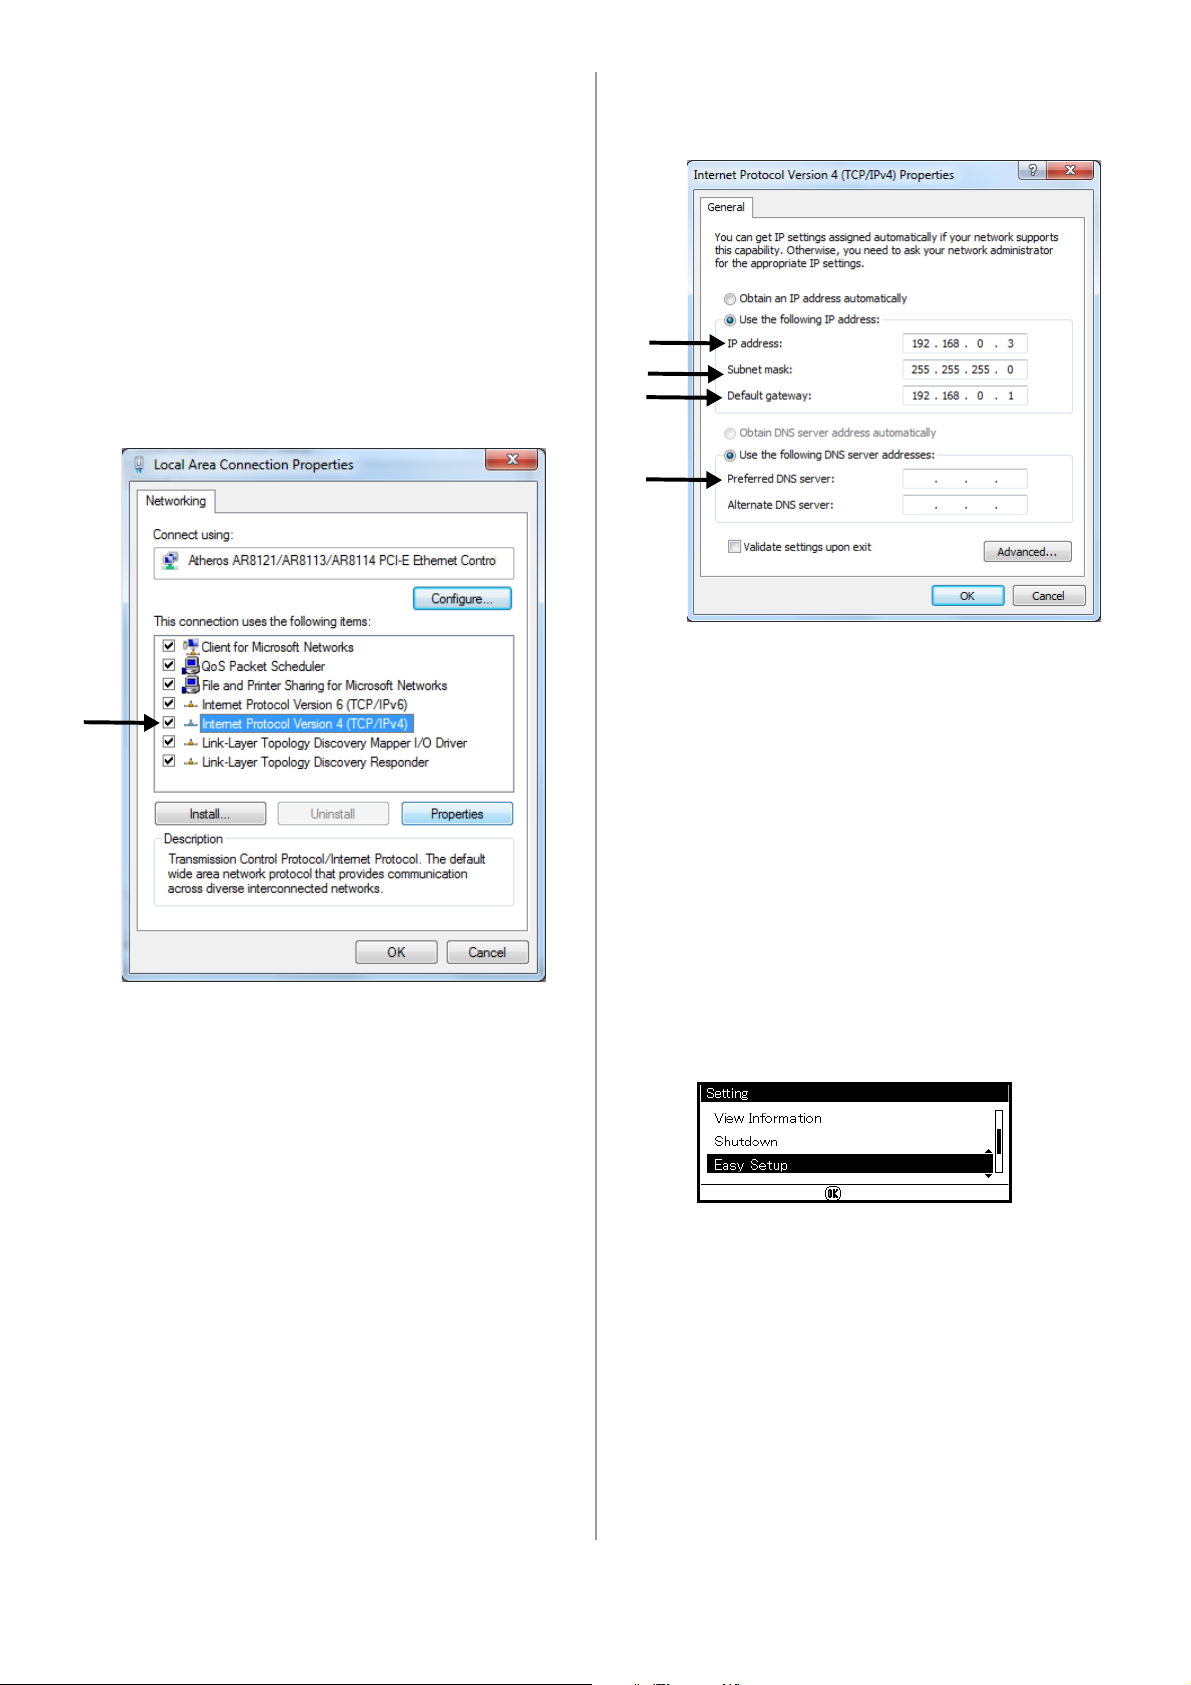
• For Windows Server 2008 and Windows
Vista, select [Manage network
connections].
• For Windows Server 2003, Windows XP,
and Windows 2000, skip this step.
4 Double-click [Local Area Connection].
• For Windows Server 2003, skip this step.
5 Click [Properties].
If the [User Account Control] dialog box
appears, click [Yes]. (For Windows Vista, click
[Continue])
6 Select [Internet Protocol Version 4 (TCP/
IPv4)] and then click [Properties].
.
7 If setting an IP address manually, enter the IP
address, subnet mask, default gateway and
DNS server, and then click [OK].
• For Windows Server 2003, Windows XP,
and Windows 2000, select [Internet
Protocol (TCP/IP)] and then click
[Properties].
• If obtaining an IP address from the DHCP
server automatically, select [Obtain an IP
address automatically] and then click [OK].
Important!
Do not enter a default gateway or DNS
server if unnecessary.
8 Close the open windows.
Set Up Your Machine’s IP Address
1 Turn on your machine.
2 Press <SETTING> on the control panel.
3 Use the down arrow key to select [Easy
Setup], then press <OK>.
4 Enter the administrator password. See line
5 Use the arrow keys to select [Enter], then
6 Use the down arrow key to select [Network
24 - English
A-1 on your Setup Form
press
<OK>.
Setting], then press the right arrow key.
Page 25

7 If setting an IP address manually, use the
down arrow key to select [Manual], then
press <OK>.
2 Place the DVD suppled with your machine in
the CD/DVD drive.
If obtaining an IP address automatically, select
[Auto], and skip down to “Install the Printer
Driver for Windows.”
8 Use the right arrow key to move from box to
box, entering the applicable information in
each box using the keypad, then press <OK>.
9 Enter the DNS server and WIN server if
necessary.
If they are unnecessary for your network
connection, press <OK> until the popup
message appears.
10 Press <OK>
to complete the setup.
Install the Printer Driver(s) for Windows
You can install multiple drivers at the same time.
Selectable drivers for each model:
•PCL
•PS
•FAX
When you install the drivers, the program also
automatically installs the TWAIN driver required
for scanning, as well as the Network Extension
and Color Swatch utilities.
Note
The procedure below uses Windows 7 as an
example. The actual procedure may differ
somewhat depending on the operating system.
The DVD auto runs. If it does not, double click
the OKI setup file in the DVD directory.
3 Select your language from the drop-down list
then click [Next].
4 Read the License Agreement, then click [I
Agree].
5 Under Driver Setup, click [Install Drivers].
Note
If the [User Account Control] dialog box
appears, click [Yes]. (For Windows Vista,
click [Continue]).
6 Read and observe the instructions, then click
[Next].
7 Click [Easy Installation (Network)].
Note
The Easy Installation selection is an easy
setup method. If you want to select a driver
to install manually, install a shared printer,
or use the Oki LPR Utility as a print method,
select [Custom Installation] and then follow
the instruction displayed on the screen.
8 Click [Next].
The device search starts.
9 Select the printer driver(s) you want to
install: PCL, PS, FAX.
10 If your machine is automatically detected and
displayed, select it, then click [Next].
If your machine is not displayed
search] to restart the device search.
, click [Restart
1 Make sure your computer is turned on and
connected to the machine via the network.
25 - English
Note
To specify the IP address manually, select
[IP address] and enter the IP address
assigned to your machine, then click [Next].
Installation of the driver(s) and utilities starts.
Page 26

Notes
• If the [Windows Security] dialog box
appears, click [Install this driver software
anyway].
• For Windows Server 2003 and Windows
XP, if the [Hardware Installation] dialog
box appears, click [Continue Anyway].
• For Windows 2000, if the [Digital
Signature Not Found] dialog box appears,
click [Yes].
11 Click [Finish] to complete the installation.
Notes
• To set a default printer, select the check
box of the driver you want. You can also
configure the printer settings of the
selected driver by clicking [Open property
dialog].
• If the dialog box prompting to restart the
computer appears, click [Yes]. The
computer automatically restarts.
Set up the Network for Macintosh Systems
To complete the network connection with a Mac
operating system, install a printer driver on the
computer and set your machine as a network
printer.
Install the Printer Driver for Mac
Only the PS driver is available for Mac systems.
Select the protocol for your network connection
from the following:
• Ethertalk
- for Mac 10.3.9 to 10.4.11, see below
- for Mac 10.5, see page 28.
• Bonjour (Rendezvous)
- for Mac 10.3.9 to 10.4.11, see page 28.
- for Mac 10.5 and 10.6, see page 30.
Important!
Disable the anti-virus software before
starting this procedure.
12 Windows 7: click [Start] > [Devices and
Printers].
Windows Server 2008 and Windows Vista:
click [Start] > [Control Panel] > [Printer].
Windows Server 2003 and Windows XP: click
[Start] > [Printers and Faxes].
Windows 2000: click [Start] > [Settings] >
[Printers].
13 Check that the OKI CX2731 MFP icon is
displayed.
• For Windows 7, if you have installed
multiple drivers, right-click the OKI CX2731
MFP icon and select one of the menu items,
and then check that all the printer drivers
installed are displayed in the submenu.
Using Ethertalk,
Mac OS X 10.3.9 to 10.4.11
Note
The procedure below uses Mac OS X 10.4.11 as
an example. The actual procedure may differ
somewhat depending on the operating system.
1 Make sure your machine and Mac are turned
on and connected.
2 From the Apple menu, select [System
Preferences].
3 Select [Network].
• For other Windows operating systems,
check that the icon representing each
driver is displayed.
14 Remove the DVD from the computer.
The installation is complete.
26 - English
Page 27
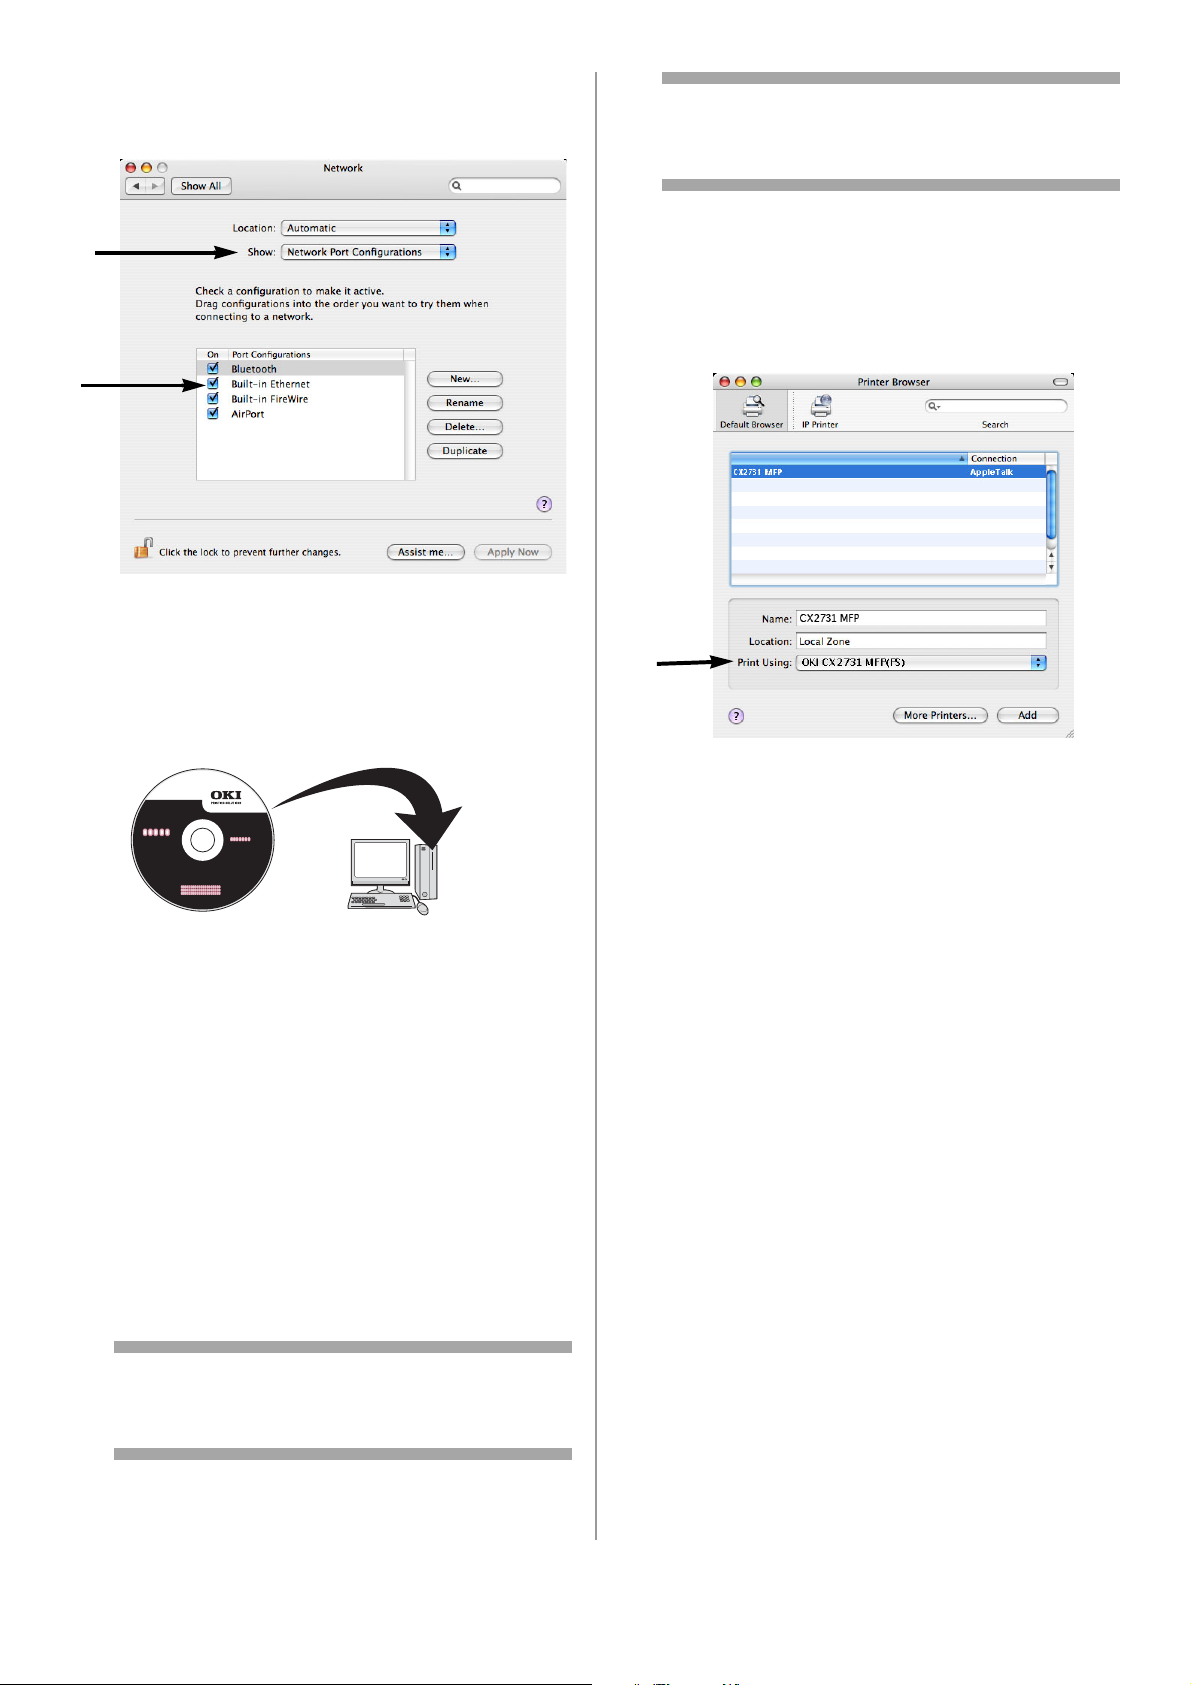
4 Select [Network Port Configurations] from
[Show], then check that [Built-in Ethernet] is
selected.
5 Select the [AppleTalk] tab, then check that
[Make AppleTalk Active] is selected.
Note
If the [You have no printers available] dialog
box appears, click [Add].
16 For Mac OS X 10.3.9, select [AppleTalk].
17 Select the name of your machine whose
[Connection] is [AppleTalk], and then check
that the name of your machine is displayed
under [Print Using].
6 Close [Network].
7 Insert the DVD supplied with your machine
into the computer.
8 Double-click the icon that appears on the
desktop.
9 Double-click the [Driver] folder, then the
[Printer] folder.
10 Double-click [Installer for Mac OSX].
11 Enter the administrator’s name and password,
and then click [OK].
12 Follow the instructions displayed on the
screen to complete the installation.
13 Remove the DVD from the computer.
14 From the [Go] menu, select [Utilities] and
then double-click [Printer Setup Utility].
18 For Mac OS X 10.3.9, select the name of your
machine and select [OKI] from [Print Model],
and then select [OKI CX2731 MFP(PS)] from
the list. Click [Add].
19 If the [Installable Options] window appears,
click [Continue] unless you have already
installed options. If you have installed
options, configure each option before clicking
[Continue].
20 Check that the name of your machine is
displayed in [Printer List], and then close the
window.
21 From the [Go] menu, select [Applications]
and then double-click [TextEdit].
22 Select [File] > [Page Setup].
23 Select the name of your machine from
[Format for].
24 Check that the name of your machine is
displayed correctly under [Format for].
25 Click [OK].
Note
If [Printer Setup Utility] is already running,
close it and open it again.
15 Click [Add].
The installation is complete.
27 - English
Page 28
Using Ethertalk
Mac 10.5 (Leopard)
1 Make sure that your machine and the Mac are
turned on and connected.
2 Insert the DVD supplied with your machine
into the computer.
3 Double-click the icon that appears on the
desktop.
4 Double-click the [Driver] folder, then the
[Printer] folder.
5 Double-click [Installer for MacOSX].
6 Enter the administrator’s name and password,
and then click [OK].
7 Follow the instructions displayed on the
screen to complete the installation.
8 Remove the DVD from the computer.
9 From the Apple menu, select [System
Preferences].
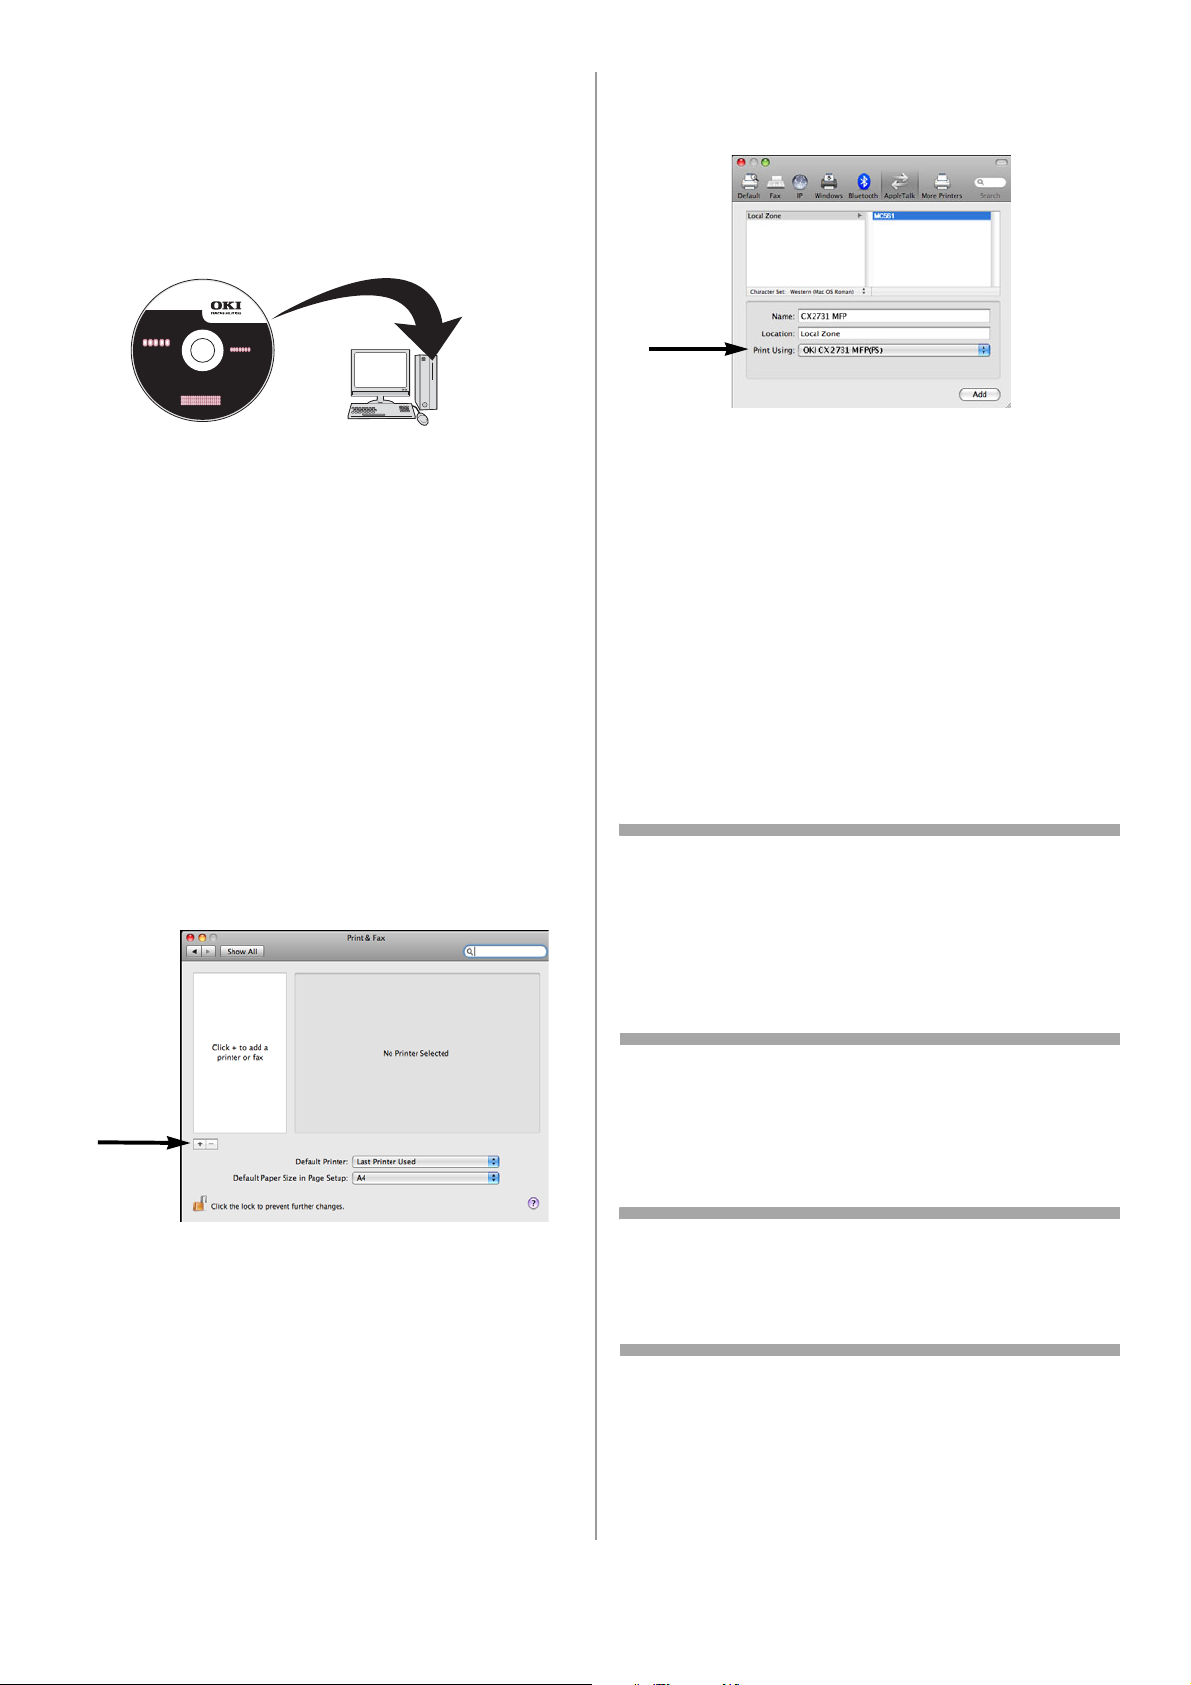
13 Select the name of your machine and then
check that the name of your machine is
displayed in [Print Using].
14 Click [Add].
15 If the [Installable Options] window appears,
click [Continue] unless you have already
installed options. If you have installed
options, configure each option before clicking
[Continue].
16 Check that your machine is displayed under
[Printers].
17 Check that the name of your machine is
displayed in [Kind] and then close [Print &
Fax].
The installation is complete.
10 Click [Print & Fax].
11 Click [+].
12 Click [AppleTalk].
Note
The name of your machine may not be displayed
if the printer driver does not read the PPD file
correctly.
In this case, click [-] to remove your machine
from [Print & Fax] and then redo the procedure
from step 10.
Using Bonjour (Rendezvous)
Mac 10.3.9 to 10.4.11
Note
The procedure below uses Mac OS X 10.4.11 as
an example. The actual procedure may differ
somewhat depending on the operating system.
1 Make sure that your machine and the Mac are
turned on and connected.
2 From the Apple menu, select [System
28 - English
Preferences].
Page 29
3 Select [Network].
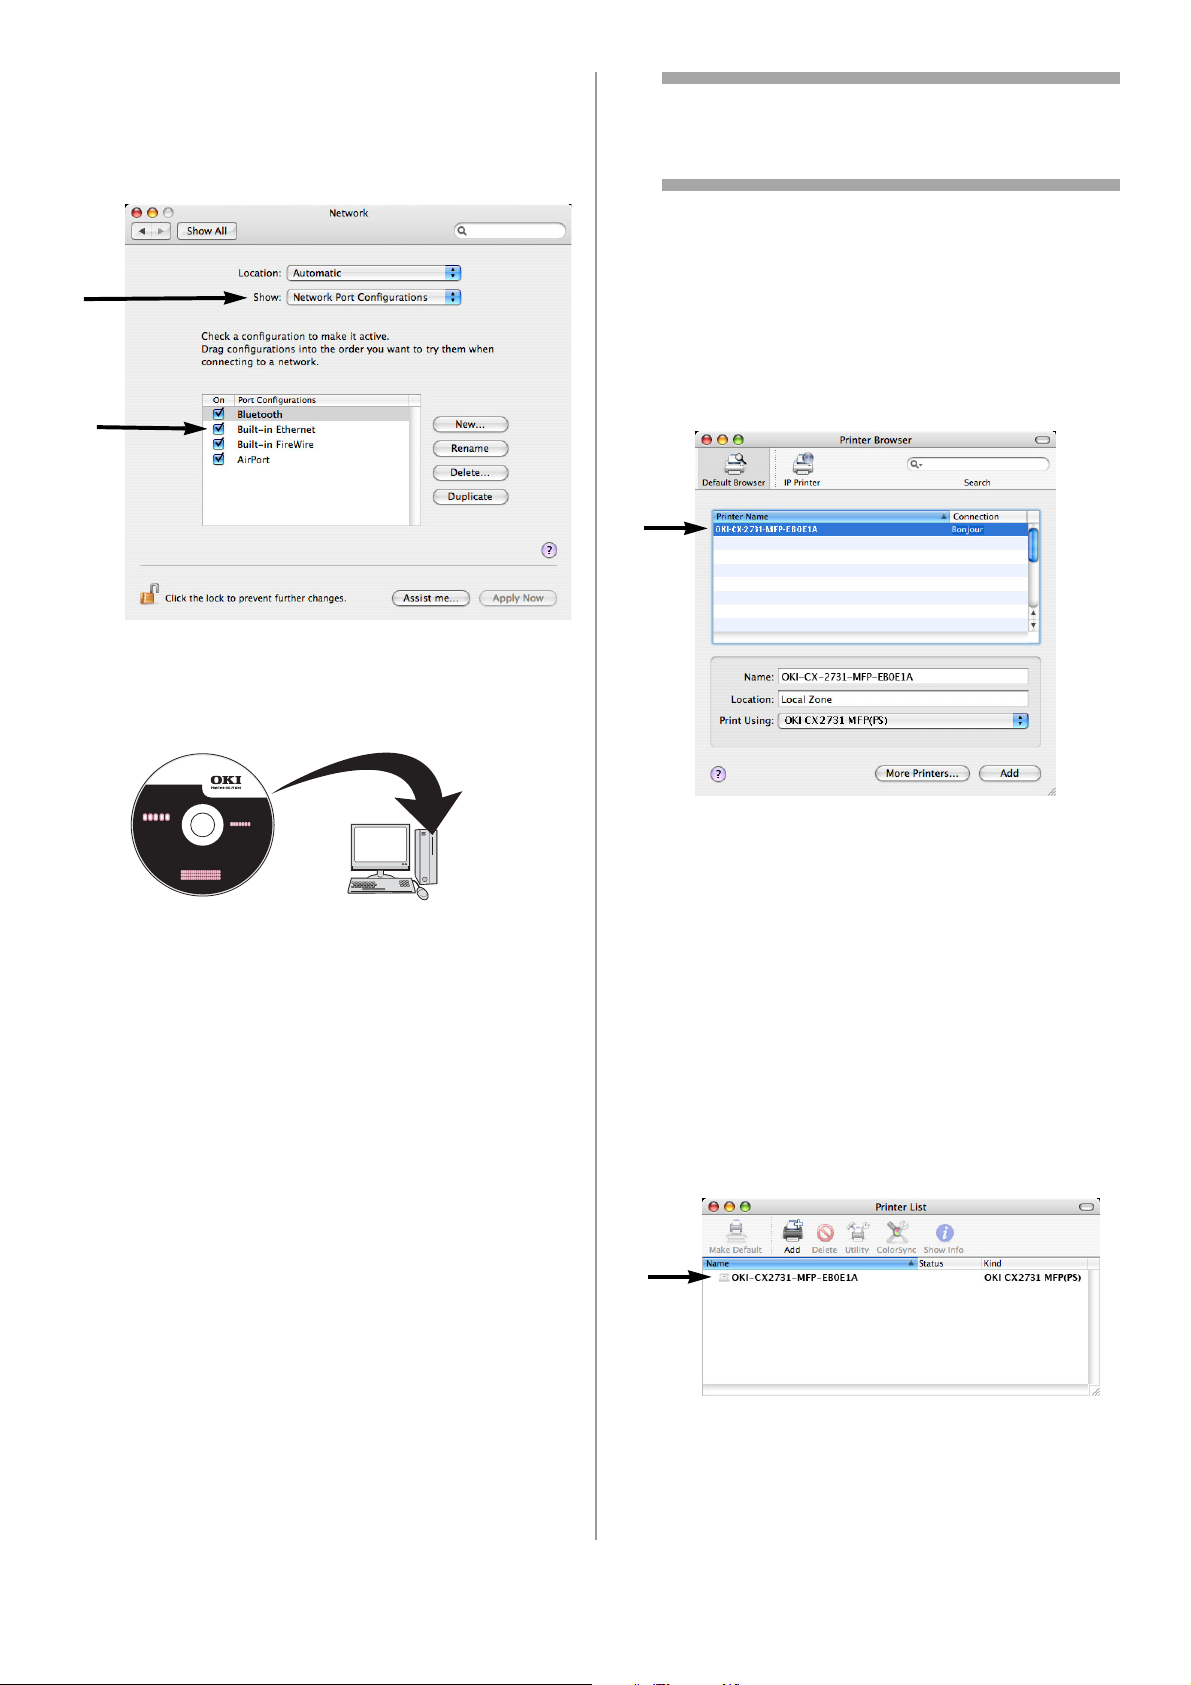
4 Select [Network Port Configurations] from
[Show], and then check that [Built-in
Ethernet] is selected.
Note
If the [You have no printers available] dialog
box appears, click [Add].
15 For Mac OS 10.3.9, select [Rendezvous].
16 Select the name of your machine whose
[Connection] is [Bonjour], and then check
that the name of your machine is displayed in
[Print Using].
Your machine is displayed with the last six
digits of the MAC address in the printer list.
5 Close [Network].
6 Insert the DVD supplied with your machine
into the computer.
7 Double-click the icon that appears on the
desktop.
8 Double-click the [Driver] folder, then the
[Printer] folder.
9 Double-click [Installer for Mac OSX].
10 Enter the administrator’s name and password,
and then click [OK].
11 Follow the instructions displayed on the
screen to complete the installation.
12 Remove the DVD from the computer.
17 For Mac OS X 10.3.9, select the name of your
machine and select [OKI] from [Print Model],
and then select [OKI CX2731 MFP(PS)] from
the list.
18 Click [Add].
19 If the [Installable Options] window appears,
click [Continue] unless you have already
installed options. If you have installed
options, configure each option before clicking
[Continue].
20 Check that the name of your machine is
displayed in [Printer List], and then close the
window.
13 From the [Go] menu, select [Utilities] and
then double-click [Printer Setup Utility].
Important!
If [Printer Setup Utility] is already running,
close it and open it again.
14 Click [Add].
29 - English
21 From the [Go] menu, select [Applications] >
[TextEdit].
22 Select the [File] menu > [Page setup].
Page 30
23 Select the name of your machine from
[Format for].
24 Check that the name of your machine is
displayed correctly under [Format for].
25 Click [OK].
The installation is complete.
Using Bonjour
Mac 10.5 and 10.6 (Leopard
and Snow Leopard)
Note
The procedure below uses Mac OS X 10.6 as an
example. The actual procedure may differ
somewhat depending on the operating system.
1 Make sure your machine and Mac are turned
on and connected.
2 Insert the DVD supplied with your machine in
the computer.
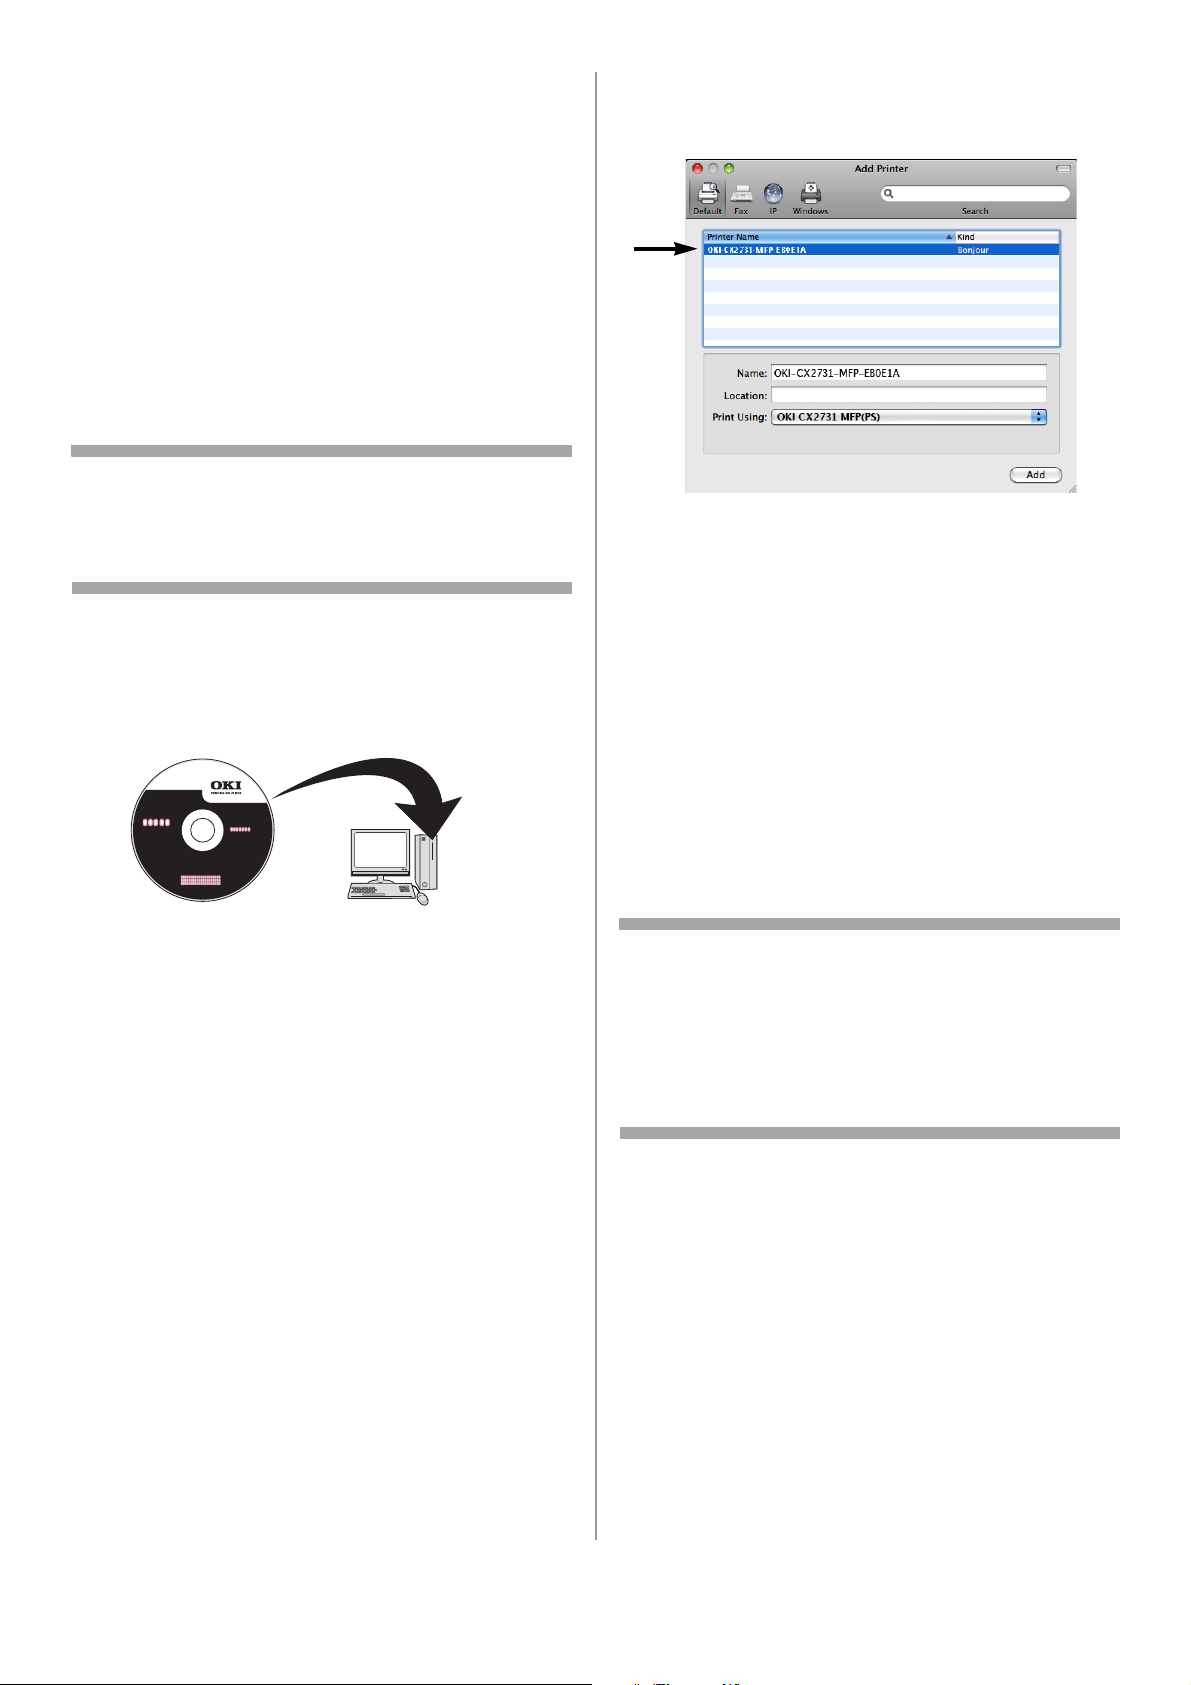
The name of your machine is displayed with
the last six digits of the MAC address in the
printer list.
14 Click [Add].
15 If the [Installable Options] window appears,
click [Continue] unless you have already
installed options.
If you have installed options, configure each
option before clicking [Continue].
16 Check that your machine appears under
[Printers].
3 Double-click the icon that appears on the
desktop.
4 Double-click the [Driver] folder, then the
[Printer] folder.
5 Double-click [Installer for MacOSX].
6 Enter the administrator’s name and password,
and then click [OK].
7 Follow the instructions displayed on the
screen to complete the installation.
8 Remove the DVD from the computer.
9 From the Apple menu, select [System
Preferences].
10 Click [Print & Fax].
17 Check that the name of your machine is
displayed in [Kind] and then close [Print &
Fax].
The installation is complete.
Note
The name of your machine may not be displayed
if the printer driver does not read the PPD file
correctly.
If this happens, click [-] to remove your machine
from [Print & Fax] and then add it again (go back
to step 9).
11 Click [+].
12 Click [Default].
13 Select the name of your machine whose
[Kind] is [Bonjour], then check that the name
of your machine is displayed in [Print Using].
30 - English
Page 31

Configuring the Machine for Network Operation
Functions such as
•Scan To Email
•Scan To Network PC
•Internet Fax
enable you to send scanned data to a computer
via the network connection. To use them, you
need to set up your machine and the computers
to which you want to send scanned data.
Enter the Machine’s IP Address on the Setup Form
Note
When using the arrow keys, press the key
repetitively to go to the selection.
Set Up Scan To Email and Internet Fax
Check the Email Settings of the Computer
• If a network administrator specifies the values
such as a mail server account, password and
email address for your machine, note them on
the Setup Form.
Note
The procedure below uses Windows Live Mail on
Windows 7. If you are using a different email
software, refer to the manual for that email
software.
1 Press <SETTING> on the control panel.
2 Use the down arrow key to select [View
Information], then press <OK>.
3 Use the down arrow key to select [Network],
then press <OK>.
4 Enter the IP address under [IPv4 address] on
line A-2 of the Setup Form.
1 Click [Start] > [Windows Live Mail].
2 Select the [Tools] menu > [Accounts].
If the menu bar is not displayed, click the
[Menus] icon and then select [Show menu
bar].
3 Select the default mail account and then click
[Properties].
4 On the [General] tab, enter the content of
[Name] and [E-mail address] on lines B-9 and
B-10 of the Setup Form.
31 - English
Page 32

5 Click the [Server] tab, and then enter each
setting in the corresponding lines of the Setup
Form.
• If the [My server requires authentication]
check box is selected, enter “SMTP” on line
B-4 of the Setup Form.
• If it is not selected, enter “POP” on line B-4.
6 Select the [My server requires authentication]
check box and click [Settings].
7 In the [Outgoing Mail Server] dialog box:
Set the Email Address for Your Machine
Enter an email address to be used by your
machine on line B-1 of the Setup Form.
• If the email address for your machine is
specified by the network administrator, enter
the email address on line B-1.
• If you are using an internet service provider,
obtain an email address for your machine from
the provider and then enter the email address
on line B-1.
• If the email address for your machine is neither
specified nor obtained, determine the email
address according to the value you entered on
line B-4 (authentication method):
- If B-4 is “SMTP”, determine an email address
and enter it on line B-1.
- If B-4 is “POP”, enter the same email
address as B-12 on line B-1.
• If you want your machine to receive email, you
must obtain an email address for your machine
from a network administrator or your internet
service provider.
Configure The Machine for Scan To Email and to Internet Fax
Set up the machine for Scan To Email and
Internet Fax using the information in the Setup
Form.
• If [Use the same settings as my incoming
mail server] is selected, enter
- the value from line B-7 on line B-5 and
- the value from line B-8 on line B-6
of the Setup Form.
• If [Log on using] is selected, enter
- the [Account name] on line B5 and
- The [Password] on line B-6
of the Setup Form.
Note
When using the arrow keys, press the key
repetitively to go to the selection.
Press the <SETTING> key on the control panel.
8 Use the down arrow key to select [Easy
Setup] and press <OK>.
9 Enter the administrator password, then use
the arrow keys to select [Enter] and press
<OK>.
32 - English
Page 33

10 Use the down arrow key to select [Email
Setting] and press the right arrow key.
11 Referring to the Setup Form:
a) Server Address: Press
then enter the information from line B-2.
b) Use the arrow keys to select [Enter], then
press
<OK>.
c) Your machine’s email address: Press
right arrow key, then enter the information
from line B-1.
d) Select [Enter], press
e) Authentication Method: Press
arrow key, then use the down arrow kwy
to select the method from line B-4.
f) Continue to follow the on-screen
instructions to enter the requested
information from section B of the Setup
Form.
g) When all the information has been
entered, “Email Setting was completed”
appears on the display, and the screen
returns to the Setup Menu.
12 When the setup menu screen appears, press
<OK>.
the right arrow key,
the
<OK>.
the right
folder on the computer by following the
procedure below.
• The CIFS protocol is used in this procedure.
Check the Name of the Computer
Check the name of the computer following the
procedure below, and fill it in on line C-1 of the
Setup Form.
Windows 7,
Windows Server 2008 R2,
Windows Server 2008
Windows Vista
Note
The procedure below uses Windows 7 as an
example. The display may differ depending on
the operating system.
1 Click [Start] > [Control Panel].
2 Select [System and Security].
For Windows Server 2008 and Windows Vista,
select [System and Maintenance].
3 Select [See the name of this computer] under
[System].
4 Note the name in [Computer name] on line
C-1 of the Setup Form.
The setup for Scan To Email and Internet Fax is
complete.
For details on how to use Scan To Email and
Internet Fax, see the Basic User Guide on the
DVD supplied with your machine.
Set Up Scan To Network PC
The Scan To Network PC function enables you to
send and save scanned images to the “shared
folder” of a computer on the network. To use this
function, register your machine on the computer
as a user and create a shared folder, and then
create a profile on your machine to register the
settings for the computer.
• Before starting the setup, get permission from
the network administrator to create a shared
5 Close the window.
Windows Server 2003
Windows XP
1 For Windows Server 2003, click [Start] >
[Control Panel] > [System].
For Windows XP, click [start] > [Control Panel]
> [Performance and Maintenance] >
[System].
33 - English
Page 34

2 Select the [Computer Name] tab and then
click [Change].
3 Note the name in [Computer name] on line
C-1 of the Setup Form.
4 Click [Cancel] to close the window.
Windows 7,
Windows Server 2008 R2,
Windows 2008,
Windows Vista
Windows 2000
1 Click [Start] > [Settings] > [Control Panel].
2 Double-click [System].
3 Select the [Network Identification] tab and
then click [Properties].
4 Note the name in [Computer name] on line
C-1 of the Setup Form.
5 Click [Cancel] to close the window.
Determine the Names of the Items Required for Scan To Network PC
Determine the names of the following items and
fill them in on lines C-2 to C-6 on the Setup Form.
• User name to log into the destination computer
(C-2)
• Password to log into the destination computer
(C-3)
• Profile name to register the settings on your
machine (C-4)
Note
The procedure below uses Windows 7 as an
example. The display may differ depending on
the operating system.
1 Click [Start] > [Control Panel].
2 Select [Add or remove user accounts].
3 Select [Create a new account].
4 Enter the information from line C-2 of the
Setup Form in the text box.
5 Ensure that [Standard user] is selected, and
then click [Create Account].
6 Click the icon of the user account created in
the previous step.
7 Select [Create a password].
8 Enter the information from line C-3 in [New
password] and [Confirm for new password],
then click [Create password].
• Shared folder name on the destination
computer (C-5)
• File name of the scanned data (C-6)
Configure the Computer for Scan To Network PC
Register your machine on the computer as a user
and then set up a shared folder to which scanned
images are sent and saved.
•Windows 7, see below
• Windows Server 2008 R2, see below
• Windows 2008, see below
• Windows Vista, see below
• Windows Server 2003, see page 35
• Windows XP, see page 36
• Windows 2000, see page 37
Important!
If the computer is in a domain, the
procedure of adding a user account may be
different from the procedure below. Refer to
the Microsoft Windows manual.
9 Close the control panel.
10 Create a new folder on the computer with the
name entered on line C-5.
Note
It is recommended to create a folder in the
local drive, not on the desktop or [My
Documents].
34 - English
Page 35

11 Right-click the folder created in step above
and select [Properties].
12 Select the [Sharing] tab and then click
[Share].
13 Select the user account created in step 5 from
the drop down box, and then click [Add].
20 Create a profile to complete the setup for
Scan To Network PC. See “Profiles for Scan To
Network PC” on page 38.
For Windows Server 2003
1 Click [Start] > [Administrative Tools] >
[Server Management].
2 Click [Users].
3 Select [Add a user].
4 Enter the value of C-2 in the [First name] text
box and then click [Next].
14 Select the user added in the previous step
and select the permission level, then click
[Share].
15 Click [Done].
16 Click [Advanced Sharing] on the [Sharing]
tab.
17 Click [Permissions].
18 Select the user added in step 13 and select
the [Allow] check box for [Full Control], then
click [OK].
19 Close the folder’s property dialog box.
5 Enter the value of C-3 in [Password] and
[Confirm password].
6 Select the [Cannot change password] and
then click [Next].
7 Click [Finish].
8 Click [Close].
9 Create a new folder on the computer with the
name entered on line C-5.
Note
It is recommended to create a folder in the
local drive, not on the desktop or [My
Documents].
35 - English
Page 36

10 Right-click the folder created in the step
above, and then select [Sharing and
Security].
11 On the [Sharing] tab, select [Share this
folder] and then click [Permissions].
12 Click [Add].
13 Enter the value of C-2 and then click [Check
Names].
4 Enter the value of C-2 in the text box and
click [Next].
5 Select [Limited] and click [Create Account].
14 Check that the value of C-2 is displayed, and
then click [OK].
15 Select the [Allow] check box for [Full Control],
and then click [OK].
16 Close the folder’s property dialog box.
17 Create a profile to complete the setup for
Scan To Network PC. See page 38.
For Windows XP
1 Click [start] > [Control Panel].
2 Double-click [User Accounts].
3 Select [Create a new account].
6 Click the icon of the user account created in
the step above.
7 Select [Create a password].
8 Enter the value of C-3 in [Type a new
password] and [Type the new password again
to confirm], and then click [Create Password].
9 Close the control panel.
10 Create a new folder on the computer with the
name entered on line C-5.
Note
It is recommended to create a folder in the
local drive, not on the desktop or [My
Documents].
11 Right-click the folder created in the step
above, and then select [Sharing and
Security].
12 Click [If you understand the security risks but
want to share files without running the
wizard, click here.].
13 Select [Share this folder] in Windows Firewall,
36 - English
and then click [OK].
Page 37

14 Select the [Share this folder on the network]
and [Allow network users to change my files]
check box, and then click [OK].
15 Select the [Allow] check box for [Full Control],
and then click [OK].
16 Create a profile to complete the setup for
Scan To Network PC. See page 38.
For Windows 2000
6 Double-click [User] and check that the user
created in step 4 is displayed.
Close the [Computer Management] window.
7 Create a new folder on the computer with the
name entered on line C-5.
Note
It is recommended to create the folder in the
local drive, not on the desktop or [My
Documents].
8 Right-click the folder created in step 6 and
then select [Sharing].
9 Select [Share this folder] and then click
[Permissions].
1 Right-click [My Computer] on the desktop and
then select [Manage].
2 In the right window, double-click [System
Tools] > [Local Users and Groups]. Right-click
[Users] and select [New User].
3 Enter the value of C-2 in [User name] and the
value of C-3 in [Password] and [Confirm
Password].
4 Select [User can not change password] and
[Password never expires], and then click
[Create].
10 Click [Add].
11 Select the user account created in step 4 and
then click [Add].
5 Click [Close] to close the [New User] dialog.
Note
If [User must change password at next
logon] is selected, clear it so that you can
select [User can not change password] and
[Password never expires].
37 - English
12 Check that the user account is displayed, and
then click [OK].
13 Select the [Allow] check box for [Full Control],
and then click [OK].
14 Ensure that the icon of the shared folder
changes into the icon with a hand, and then
close the window.
Page 38

15 Create a profile to complete the setup for
Scan To Network PC. See “Profiles for Scan To
Network PC” on page 38.
Profiles for Scan To Network PC
Register the information you configured on the
computer as a profile. This is necessary when you
perform Scan To Network PC with the computer.
12 Use the down arrow key to select [User
Name], then press <OK>.
13 Enter the information from line C-2 of the
Setup Form.
If domain management is done, enter
“C-2@domain name”.
14 Use the arrow keys to select [Enter], then
press <OK>.
15 Use the down arrow key to select [Password],
then press <OK>.
Creating a Profile
Note
When using the arrow keys, press the key
repetitively to go to the selection.
1 Press the <SETTING> key on the control
panel.
2 Use the down arrow key to select [Profile],
then press <OK>.
3 Use the down arrow key to select the profile
number you want to register, then press
<OK>
.
4 Use the down arrow key to select [Edit], then
press <OK>.
5 Use the down arrow key to select the profile
number you want to register, then press
<OK>.
16 Enter the information from line C-3 of the
Setup Form.
17 Use the arrow keys to select [Enter], then
press <OK>.
18 Use the down arrow key to select [File Name]
and then press <OK>.
19 Enter the information on line C-6 on the Setup
Form. You can enter up to 64 characters.
By adding “#n” to the end of the file name, a
serial number is automatically assigned to the
end of the name of sent files.
By adding “#d” to the end of the file name, a
date is automatically assigned to the end of
the name of sent files.
20 Use the arrow keys to select [Enter], then
press <OK>.
21 Configure other items if necessary.
22 Press
The setup for Scan To Network PC is complete.
For details how to use Scan To Network PC, see
the online Basic User Guide on the DVD supplied
with your machine.
<OK> to register the settings.
Modifying a Profile
6 Use the down arrow key to select [Profile
Name], then press <OK>.
7 Enter the information from line C-4 of the
Setup Form.
8 Use the arrow keys to select [Enter], then
press <OK>.
9 Use the down arrow key to select [Target
URL], then press <OK>.
10 Enter the value from lines C-1 and C-5 of the
Setup Form as “\\C-1\C-5”; e.g.,
\\PC1\SalesDev.
11 Use the arrow keys to select [Enter], then
press <OK>.
38 - English
Note
When using the arrow keys, press the key
repetitively to go to the selection.
1 Press the <SETTING> key on the control
panel.
2 Use the down arrow key to select [Profile] and
then press <OK>.
3 Use the down arrow key to select [Edit] and
then press <OK>.
4 Use the down arrow key to select the profile
you want to modify, then press
<OK>
.
Page 39

5 Use the down arrow key to select the item
you want to modify, then press
6 Modify the item.
7 Use the arrow keys to select [Enter], then
press <OK>.
8 If you want to modify more than one item,
repeat steps 5-7.
<OK>
.
9 Press
<OK> to register the settings.
Deleting a Profile
Note
When using the arrow keys, press the key
repetitively to go to the selection.
1 Press the <SETTING> key on the control
panel.
2 Use the down arrow key to select [Profile],
then press <OK>.
3 Use the down arrow key to select [Delete],
then press <OK>.
4 Use the down arrow key to select the profile
you want to delete, then press
5 Use the left arrow key
confirmation message.
to
<OK>
select [Yes] on the
.
6 If you want to delete more than one profile,
repeat steps 4 and 5.
7 Press
<OK>.
39 - English
Page 40

Setting Up User Authentication and Access Control
General Information
These functions are used to limit access to the
machine. This can help you save toner, paper and
wear and tear on the machine.
User Authentication and Access Control are
password protected and must be set up by the
System Administrator.
The following conditions are required to enable
these functions:
• The machine must be connected to a network.
• For networks with only Windows systems, the
Configuration Tool utility must be installed on a
computer on the network.
• For Macintosh systems, the Job Accounting
Client utility must be installed
User Authentication
User Authentication allows the System
Administrator to limit use of the machine to
people who have been assigned either
• a PIN (personal identification number)
or
• a user name and password.
This limitation applies to both walk-up use and
using the machine from a computer.
You can assign up to 100 PINs with or without
User Name and Password.
Before You Start
There are several ways to set up access control
for your machine:
• using software
• Using the web page
• through the control panel
This guide includes instructions for configuring
the machine using software.
For more information on using the web page or
the control panel, see the Advanced User’s Guide
at www.my.okidata.com.
Windows Systems
Loading the Configuration Tool
In order to set up User Authentication and Access
Control for Windows, you need to load the
Configuration Utility on your computer.
1 Make sure your computer is turned on and
connected to the machine, then place the
DVD suppled with your machine in the CD/
DVD drive.
Access Control
Access Control takes it a step further by allowing
the System Administrator to limit the type of
functions each person authorized to use the
machine can perform.
Access control can be applied to the following
functions:
• Copying (Color/Mono)
• Printing (Color/Mono)
• Printing from USB Memory
• Scanning to e-mail
• Scanning to network PC
• Scanning to USB memory
•Faxing
•Faxing via PC
• Internet Faxing
40 - English
The DVD auto runs. If it does not, double click
the OKI setup file on the DVD.
2 Select your language from the drop-down list
then click [Next].
3 Read the License Agreement, then click [I
Agree].
4 Click [MFP Software].
Page 41

5 Click [Install Configuration Tool].
6 Click [Install] and wait for the software to
install.
7 Select your machine model, then click [Next].
8 Click [Close].
7 To enter a new PIN number and set it up with
the desired access control, click the PIN icon.
To enter a new user with User ID, Password
and PIN number, click the New(User) icon.
8 Repeat the above step for each user on the
network.
9 When done, click the [Save to Device] icon.
The records you have entered are saved to the
machine.
Mac Systems
In order to set up User Authentication and Access
Control for Mac systems, see the Advanced User
Guide at www.my.okidata.com.
Authentication by PIN
Using the Configuration Tool to Set Up User Authentication/ Access Control
1 Make sure the computer and the machine are
connected through the network and that both
are turned on.
2 Click [Start] > [Programs] > [Okidata] >
[Configuration Tool] > [Configuration Too].
3 Click [Register Device] in the Tools drop-down
list.
4 Double click your machine model name.
The name appears in the [Registered Device
Table] on the left side of the screen.
Enabling PIN Access Control
Once you have finished setting up PINs and/or
User IDs/Passwords, you must enter the machine
menu and enable Access Control.
Access Control is password protected: you must
know the Admin Password to proceed.
Note
To scroll through the various selections on the
display, press the down (or up) arrow key
repetitively.
\
1 Press <SETTING> on the control panel.
2 Use the up arrow key to select [Admin Setup],
then press <OK>.
3 Enter your administrator password: use the
arrow keys to select the digits of the
password, pressing <OK> between digits.
4 When done entering your password, use the
arrow keys to select [Enter] on the display,
then press <OK>.
5 Use the up arrow key to select
[Management], then press <OK>.
6 Use the down arrow key to select [System
Setup], then press <OK>.
5 Double click your machine in the list, then
select the [User Setting] tab.
6 Click [PIN Manager], then enter the
administrator password and click <OK>.
7 Make sure that [Access Control] is selected,
then press <OK>.
8 Use the up arrow key to select PIN as the
method of Access Control, then press <OK>.
41 - English
Page 42

9 Use the left arrow key to back out to the main
screen
Access Control is enabled.
Walk Up Operation
Note
After a certain period of time, the machine
automatically logs out users.
Logging In
General Users
1 Enter your assigned PIN using the ten-key
pad on the control panel.
2 Press <OK>.
The main screen appears.
Administrator
1 Enter “000000” using the ten-key pad on the
control panel, then press <OK>
• The PIN of the administrator is “000000”.
You cannot change this value.
2 When the Admin Password screen appears,
enter the administrator password: use the
arrow keys to select the digits of the
password, pressing <OK> after highlighting
each digit.
Setting Up Operation From a Computer with Authentication by PIN
First, make sure the appropriate machine
driver(s) have been installed on the computer
using the DVD.
Second, install Job Accounting (client) software
on the computer. To do this, place the DVD
supplied with the machine in the computer drive
and follow the screen prompts to download the
Job Accounting software from the internet.
3 Use the arrow keys to select [Enter] on the
display, then press <OK>.
The main screen appears.
Logging Out
When you have finished using the machine, be
sure to log out.
1 Press the left arrow key until the main screen
appears.
2 Press <RESET/LOGOUT> on the control
panel.
The screen returns to the PIN entry prompt.
Note
The authentication type specified on the
computer overrides the one specified on the
machine.
Setting Up Windows Computers for
Printing
Note
This procedure use Windows 7 as an example.
The procedures and menus may differ depending
on the operating system you use.
1 Click [Start] > [All Programs] > [Okidata] >
[Print Job Accounting Client] > [Change Job
Accounting Mode].
42 - English
Page 43

2 On the [User Account Control] window, click
[Yes].
3 Select the printer driver you want in [Driver].
Setting Up Mac Computers for
Printing
4 Select the [Tab] check box and then click
[Change].
5 Click [OK].
6 From the [File] menu, select [Close].
7 Click [Start] and select [Devices and
Printers].
• For Windows Server 2008, click [Start] and
select [Control Panel] > [Printers].
• For Windows Vista, click [Start] and select
[Control Panel] > [Printer].
• For Windows Server 2003, click [Start] >
[Printers and Faxes].
• For Windows XP, click [start] > [Printers
and Faxes].
• For Windows 2000, click [Start] >
[Settings] > [Printers].
8 For each driver installed on the computer:
a) Right-click the OKI CX2731 MFP icon and
select [Printer properties] > [OKI CX2731
MFP (XXX*)].
*XXX = PCL, PS, or FAX
b) Select the [Job Accounting] tab.
c) Enter the user name in [User Name] and
the PIN in [Job Account ID].
Note
This procedure uses Mac OS X 10.6 (Snow
Leopard) as an example. The procedures and
menus may differ depending on the operating
system you use.
1 Insert the DVD supplied with your machine.
2 Double-click the OKI icon on the desktop.
3 Double-click [Utility] > [JA Client] > [Print
JobAccounting].
4 Click [New].
5 Enter the user name beside [UserName] and
the PIN beside [JobAccountingID].
d) Click [OK].
Printing from Windows
1 Open the file you wish to print.
2 Select [Print] from the [File] menu.
3 Select the printer driver, then click [Print].
6 Click [Save].
7 Click [save].
8 If prompted, enter the user password and
then click [OK].
Printing from a Mac
1 Open the file you want to print.
2 From the [File] menu, select [Print].
3 Select your machine and then click [Print].
Setting Up Windows Computers for
Faxing
Note
This procedure uses Windows 7 as an example.
The procedures and menus may differ depending
on the operating system you use.
43 - English
Page 44

1 Click [Start] > [All Programs] > [Okidata] >
[Print Job Accounting Client] > [Change Job
Accounting Mode]
2 On the [User Account Control] window, click
[Yes].
3 Select the fax driver in [Driver].
Note
To scroll through the various selections on the
display, press the down (or up) arrow key
repetitively.
\
4 Select the [Tab] check box and then click
[Change].
5 Click [OK].
6 From the [File] menu, select [Close].
7 Click [Start] and select [Devices and
Printers].
- For Windows Server 2008, click [Start] and
select [Control Panel] > [Printers].
- For Windows Vista, click [Start] and select
[Control Panel] > [Printer].
- For Windows Server 2003, click [Start] and
select [Printers and Faxes].
- For Windows XP, click [start] and select
[Printers and Faxes].
- For Windows 2000, click [Start] and select
[Settings] > [Printers].
8 Right-click the OKI CX2731 MFP icon and
select [Printer properties] > [OKI CX2731
MFP (FAX)].
9 Select the [Job Accounting] tab.
10 Enter the user name in [User Name] and the
PIN in [Job Account ID].
11 Click [OK].
Faxing from Windows
1 Press <SETTING> on the control panel.
2 Use the up arrow key to select [Admin Setup],
then press <OK>.
3 Enter your administrator password: use the
arrow keys to select the digits of the
password, pressing <OK> between digit
4 When done entering your password, use the
arrow keys to select [Enter] on the display,
then press <OK>.
5 Use the up arrow key to select
[Management], then press <OK>.
6 Use the down arrow key to select [System
Setup], then press <OK>.
7 Make sure that [Access Control] is selected,
then press <OK>.
8 Use the up arrow key to select User/Password
as the method of Access Control, then press
<OK>.
9 Use the left arrow key to back out to the main
screen
Access Control is enabled.
Operation from a Computer
1 Open the file you want to fax.
2 From the [File] menu, select [Print].
3 Select the fax driver, then click [Print].
Authentication by User Name and Password
Enabling User Name/Password Access Control
Access Control is password protected: you must
know the Admin Password to proceed.
44 - English
Note
The authentication type specified on the
computer overrides the one specified on the
machine.
Printing from Windows
Note
This procedure uses Windows 7 and NotePad as
an example. The procedures and menus may
differ depending on the operating system you
use.
1 Open the file you want to print.
2 From the [File] menu, select [Print].
Page 45

3 Select the printer driver you want in [Select
Printer] and click [Preferences].
4 Select the [Job Options] tab.
5 Click [User Auth].
6 Select the [Use User Authentication] check
box.
7 Enter the user name in [Username] and the
password in [Password].
Clicking [Use Windows Login] automatically
enters your login name
8 Click [OK].
9 Click [OK] and then click [Print].
on Windows.
5 Select the [Use User Auth] check box on the
[UserAuth] panel.
6 Enter the user name in [User Name] and the
password in [Password].
7 Click [Print].
Faxing From Windows
Note
This procedure uses Windows 7 and NotePad as
an example. The procedures and menus may
differ depending on the operating system you
use.
Printing from a Mac
Note
This procedure uses Mac OS X 10.6 as an
example. The procedures and menus may differ
depending on the operating system you use.
1 Open the file you want to print.
2 From the [File] menu, select [Print].
3 Select your machine’s printer driver.
4 Select [UserAuth] from the panel menu under
the [Printer] and [Presets] menus.
1 Open the file you want to fax.
2 From the [File] menu, select [Print].
3 Select your machine (fax driver) in [Select
Printer] and click [Preferences].
4 On the [Setup] tab, click [User Auth].
5 Select the [Use User Authentication] check
box.
6 Enter the user name in [Username] and the
password in [Password].
Note
Clicking [Use Windows Login] automatically
enters your login name on Windows.
7 Click [OK].
8 Click [OK] and then click [Print].
45 - English
Page 46

Configuring the Machine for Faxing
Connecting for Fax and Telephone
Basic Settings for Faxing
You must configure the following settings before
you transmit faxes.
Connecting a Telephone Line
Important!
Use only the telephone cable supplied with
your machine. Using a different cable may
cause a malfunction.
Connecting for Fax Only
1 Plug one end of the supplied telephone cable
into the LINE connection on the back of your
machine and the other end into an active
telephone jack.
1 Plug one end of the supplied telephone cable
into the LINE connection on the back of your
machine and the other end into an active
telephone jack.
2 Attach the supplied connector cover to the
TEL connection on the back of your machine.
2 Plug the telephone’s cable into the TEL
connection on the back of your machine.
46 - English
Page 47

Specifying Current Time and Sender Information
Note
You can set up the date and time automatically
using the Webpage. For details, refer to the
Advanced User’s Guide at www.my.okidata.com.
9 Use the up and down arrow keys to set the
current time (Hour, Minute, Seconds),
pressing the right arrow key to move to each
successive block. When done press <OK>.
“Date/Time Setting was completed” appears
on the display, then the Setup Menu screen
appears.
Specifying Sender Information
Specify the fax number and sender name for your
machine. The sender ID is printed on the top
edge of the fax when it is printed by the recipient.
Note
When using the arrow keys, press the key
repetitively to go to the selection.
1 Press <SETTING> on the control panel.
2 Use the down arrow key to select [Easy
Setup], then press <OK>.
3 If prompted, entire the Admin Password, then
use the arrow keys to highlight [Enter] and
press <OK>.
4 With [Date/Time Setting] highlighted, press
the right arrow key.
10 Press the down arrow key to select [Fax
Setting], then press the right arrow key.
11 Press <OK> to select [FAX number].
12 Use the keypad to enter the fax number of
your machine.
13 With [Enter] highlighted, press <OK>.
14 Press the right arrow to select [Sender ID].
15 Use the screen keypad to enter your ID, up to
22 digits. When the ID is entered, use the
arrow keys to highlight [Enter], then press
<OK>.
“Fax Setting was completed” appears on the
display, then the Setup Menu screen appears.
16 Press <OK> to complete the setup, then use
the left arrow key to back out to the main
screen.
5 Use the down arrow key to select the
appropriate time zone and then press the
right arrow key.
You can select the time zone between [-12:00]
and [+13:00] in 15 minute increments.
6 Use the down arrow key to select [Not
Summer Time] or [Now Summer Time] for
daylight saving, then press the right arrow
key.
7 Use the down arrow key to select [Manual],
then press the right arrow key.
8 Use the up and down arrow keys to set the
Year, Month and Day, pressing the right arrow
key to move to each successive block. When
done press <OK>.
47 - English
Page 48

USB Installation
USB Connection
1 Prepare a USB cable.
A USB cable is not supplied with your machine.
Use a USB 2.0 Hi-Speed cable for a USB 2.0
Hi-Speed connection.
2 Turn off your machine:
a) Press <SETTING> on the control panel.
b) Press the down arrow key repetitively to
scroll to [Shutdown], then press <OK>.
c) When the confirmation message appears,
press the right arrow key to select [Yes],
then press <OK>.
d) When the screen prompts you to turn off
the power switch, turn the machine off.
4 Depress the lock button (1) on the right side
of the machine and remove the access cover
(2).
3 Turn off the computer.
CAUTION!
Do not plug the USB cable into the network
connection. Doing so may cause a
malfunction.
48 - English
Page 49

5 Plug one end of the USB cable into the USB
connection on the machine.
7 Fit the tabs on the side cover into the slots (1)
on the machine housing and snap it back into
place.
6 Secure the USB cable under the hook (1) on
the machine.
For Windows installation, go to page
50.
For Macintosh installation, go to
page 51.
49 - English
Page 50

USB: Installing a Printer Driver for Windows
• You must be logged in as an administrator to
complete this procedure.
Note
The procedure below uses Windows 7 as an
example. The display may differ depending on
the operating system.
1 Turn off your machine:
a) Press <SETTING> on the control panel.
b) Press the down arrow key repetitively to
select [Shutdown], then press <OK>.
c) When the confirmation message appears,
press the right arrow key to select [Yes],
then press <OK>.
• For Windows Server 2003 and Windows XP, if
the [Install Hardware] dialog box appears, click
[Continue].
• For Windows 2000, if the [Digital Signature Not
Found] dialog box appears, click [Yes].
7 When the instruction prompting you to do so
appears, plug the USB cable into the
computer and turn on your machine.
d) When the screen prompts you to turn off
the power switch, turn the machine off.
2 Place the DVD suppled with your machine in
the CD/DVD drive.
The DVD auto runs. If it does not, double click
the OKI setup file in the DVD directory.
3 Select your language from the drop-down list
then click [Next].
4 Read the License Agreement, then click [I
Agree].
5 Under Driver Setup, click [Install Drivers
(CX2731 MFP)].
Note
If the [User Account Control] dialog box
appears, click [Yes]. (For Windows Vista,
click [Continue]).
8 Click [Next].
9 Follow the on-screen instructions to complete
the installation.
10 When the [Complete] screen appears, click
[Finish].
Check the Installation
1 Click [Start] > [Devices and Printers].
For Windows Server 2008 and Windows Vista,
click [Start] > [Control Panel] > [Printer].
For Windows Server 2003 and Windows XP,
click [Start] > [Printers and Faxes].
For Windows 2000, click [Start] > [Settings]
> [Printers].
2 Check that the OKI CX2731 MFP icon is
displayed.
For Windows 7, if you have installed multiple
drivers, right-click the OKI CX2731 MFP icon
and select one of the menu item, and then
6 Read and observe the instructions, then click
[Next].
Installation starts.
• If the [Windows Security] dialog box appears,
click [Install this driver software anyway].
50 - English
Page 51

check that all the printer drivers installed are
displayed in the submenu.
For other Windows operating systems, check
that the icon representing each driver is
displayed.
3 Remove the DVD from the computer.
The installation is complete.
Note
[Easy Installation (Local)] is an easy setup
method. If you want to select a driver to install
manually, select [Install printer driver
completely] and then follow the instruction
displayed on the screen.
2 Turn off the computer.
3 Plug the other end of the USB cable into the
computer’s USB interface connector.
4 Turn th e M ac on.
5 Insert the DVD supplied with your machine
into the computer.
USB: Installing a Printer Driver for Mac
Important!
• Only the PS printer driver is available for
the Mac.
• Disable the anti-virus software before
starting this procedure.
For Mac OS X 10.3.9 to 10.4.11
Note
The procedure below uses Mac OS X 10.4.11 as
an example.
1 Turn off your machine:
a) Press <SETTING> on the control panel.
b) Press the down arrow key repetitively to
scroll to [Shutdown], then press <OK>.
6 Double-click the [OKI] icon > [Driver] folder
> [Printer] folder.
7 Double-click [Installer for Mac OS X].
8 Enter the administrator’s name and password,
and then click [OK].
9 Follow the on-screen instructions to complete
the installation.
10 Remove the Driver/Manual DVD from the
computer.
11 From the [Go] menu, select [Applications] >
[Utilities], and then double-click [Printer
Setup Utility].
Important!
If [Printer Setup Utility] is already running,
close it and open it again.
c) When the confirmation message appears,
press the right arrow key to select [Yes],
then press <OK>.
d) When the screen prompts you to turn off
the power switch, turn the machine off.
51 - English
12 Click [Add].
If the [You have no printers available] dialog
box appears, click [Add].
Page 52

Note
If the name of your machine is already displayed,
select it and click [Delete], and then click [Add].
13 Select the name of your machine designated
USB, then check that the name of your
machine is displayed in [Print Using].
For Mac OS X 10.5 and 10.6
Note
The procedure below uses Mac OS X 10.6 (Snow
Leopard) as an example.
1 Make sure that your machine and the
computer are turned on and connected.
2 Plug the other end of the USB cable into the
computer’s USB interface connector.
14 Click [Add].
15 If the [Installable Options] window is
displayed, click [Continue].
If you have installed options before the driver
installation, configure each item and then
click [Continue].
16 Check that the name of your machine is
displayed in [Printer List], and then close the
window.
The installation is complete.
3 Insert the DVD supplied with the machine into
the computer.
4 Double-click the [OKI] icon > [Driver] folder
> [Printer] folder.
5 Double-click [Installer for MacOSX].
6 Enter the administrator’s name and password,
and then click [OK].
Follow the on-screen instructions to complete
the installation.
7 Remove the Driver/Manual DVD from the
8 From the Apple menu, select [System
9 Click [Print & Fax].
10 Click [+].
52 - English
computer.
Preferences].
Page 53

11 Select the name of your machine designated
USB, and then check that the name of your
machine is displayed in [Print Using].
12 Click [Add].
13 If the [Installable Options] window is
displayed, click [Continue].
If you have installed options before the driver
installation, configure each item and then click
[Continue].
14 Check that the name of your machine is
displayed in the printer list, and then close
[Print & Fax].
The installation is complete.
53 - English
Page 54

Setup Form
No. Item Example Your Value
A: Basic Setup Information
A-1 Administrator password for your machine aaaaaa (the
default)
A-2 IP address of your machine 192.168.0.2
B: Scan To Email and to Internet Fax
B-1 Email address for your machine (up to 80
characters)
B-2 SMTP server address smtp.test.com
B-3 POP3 server address pop3.test.com
B-4 Authentication method SMTP
B-5 SMTP user ID OKICX2731MFP
B-6 SMTP password okicx2731mfp
B-7 POP user ID user
B-8 POP password okicx2731mfp
B-9 Name of the email destination User
B-10 Email address of the email destination user@test.com
CX2731MFP@
test.com
C: Scan To Network PC
C-1 Name of the destination computer PC1
C-2 User name to log into the destination computer
(up to 32 characters)
cx2731mfp
C-3 Password to log into the destination computer
(up to 32 characters)
C-4 Profile name to register the settings (up to 16
characters)
C-5 Shared folder name on the destination computer
(up to 64 characters)
C-6 File name of the scanned data (up to 64
characters)
54 - English
cx2731mfp
Sales
SalesDev
ScanData
Page 55

Installation de matériel
60 cm
23.6"
60 cm
23.6"
20 cm
8"
100 cm
39.5"
20 cm
8"
Contenu de l’emballage
24 kg
53 lb.
Choisir un emplacement
Exigences environnementales
• Plage de températures : 10 °C à 32 °C (50 °F à
89,6 °F)
• Humidité : HR de 20 % à 80 % (humidité relative)
Si vous installez votre appareil dans un endroit où
le taux d’humidité est inférieur à 30 % d’HR,
utilisez un humidificateur ou un tapis antistatique.
• Température thermomètre humide max. :
25 °C (77 °F)
Prenez garde à la condensation. Elle peut
entraîner des défaillances.
Espace requis
1 Appareil
2 DVD
3 Cordon d’alimentation
4 Câble téléphonique
5 Couvercle du connecteur du téléphone
Remarque
Les câbles Ethernet et USB ne sont pas compris avec
votre appareil et doivent être achetés séparément.
Nous vous conseillons de conserver le matériel
d’emballage, nécessaire au transport de l’appareil.
Alimentation
• 110-127 V c.a ou 220-240 V c.a
• 50/60 Hz
• 1100 watts maximum
Important!
Ne jamais brancher ce produit sur un bloc
d’alimentation sans interruption (ASI).
Si la source de courant est instable, utilisez
un régulateur de tension.
55 - Français
Page 56

Déballer l’appareil
Important!
Un minimum de deux personnes est nécessaire
pour lever l’appareil en toute sécurité.
2 Retirez le matériau d’emballage extérieur.
24 kg
53 lb.
Remarque
Les illustrations ci-dessous sont représentatives.
Le véritable matériel, ruban adhésif ou
emballage, peut quelque peu différer de celui
indiqué sur les illustrations.
Conservez le matériel d’emballage, nécessaire au
transport de l’appareil.
1 Retirez l’appareil de sa boîte et placez-le à
l’endroit où il doit être installé.
3
Retirez le ruban adhésif externe de l’emballage.
4
Ouvrez le couvercle de l’alimentateur
automatique et retirez tout matériau d’emballage.
56 - Français
Page 57

5 Soulevez le bac à papier et retirez tout
matériau d’emballage.
6 Abaissez le bac à papier et fermez le
couvercle de l’alimentateur automatique.
7 Ouvrez le couvercle de la vitre à documents
(1) et retirez tout matériau d’emballage, ainsi
que le film protecteur.
9 Ouvrez le numériseur et retirez tout
matériau d’emballage.
10 Appuyez sur le bouton d’ouverture du capot
(1), puis ouvrez le capot (2).
8 Refermez le capot à documents.
Attention!
• Le tube vert sur la cartouche du tambour
d’impression est très fragile. Le manier
avec précaution.
• Ne pas exposer l’unité du tambour
d’impression aux rayons solaires ou à une
lumière d’intérieur très forte (environ
plus de 1500 lux). Même sous une lumière
d’intérieur normale, le tambour
d’impression ne doit pas être exposé plus
de 5 minutes.
57 - Français
Page 58

11 Retirez le ruban adhésif et le matériau
d’emballage des cartouches de toner.
13 Faites glisser le manchon bleu de verrouillage
sur chaque cartouche toner vers la gauche
jusqu’à son maximum.
12 Appuyez sur le levier bleu (1) de l’unité de
fusion dans la direction indiquée par la flèche,
retirez et conservez la butée orange (2).
2
14 Fermez délicatement le capot supérieur et
l’unité du numériseur.
15 Retirez le ruban adhésif sur le bac à papier
MF, puis ouvrez le bac.
Important!
Conservez la butée orange, elle sera nécessaire
si vous devez transporter l’appareil.
58 - Français
Page 59

16 Retirez le ruban adhésif intérieur (1) ainsi que
le film protecteur (2), puis fermez le bac à
papier MF.
Allumer l’appareil
2 Branchez le câble d’alimentation dans la prise
d’alimentation au dos de l’appareil.
3 Branchez le câble d’alimentation dans une
prise de courant mise à la terre.
1
Vérifiez bien que l’interrupteur d’alimentation
(sur le côté droit de l’appareil) est éteint <O>.
4 Vérifiez bien qu’aucun document ne se trouve
sur la vitre ni dans le CAD, et que le CAD
est fermé.
5 Allumer l’imprimante.
Éteindre l’appareil
Attention!
Ne pas éteindre l’interrupteur
d’alimentation subitement : ceci peut
endommager votre appareil. Toujours suivre
la procédure appropriée pour s’assurer
qu’aucune donnée ne soit perdue.
59 - Français
Page 60

1 Appuyez sur <SETTING> (Paramètre) sur le
panneau de commande.
2 Appuyez sur la touche fléchée vers le bas de
façon répétitive jusqu’à sélectionner
[Shutdown] (Arrêt), puis appuyez sur <OK>.
Touche d’économie d’énergie
Quand votre appareil reste inutilisé plus de
30 minutes (durée par défaut définie en usine),
il se met automatiquement en mode
d’économie d’énergie afin de réduire sa
consommation énergétique.
Vous pouvez entrer (ou quitter) le mode
d’économie d’énergie en appuyant sur <POWER
SAVE> (Économie d’énergie) sur le panneau de
commande.
3 Quand le message de confirmation s’affiche,
appuyez sur la touche fléchée vers la droite
jusqu’à sélectionner [Yes] (Oui), puis appuyez
sur <OK>.
4 Quand le message vous demandant
d’éteindre l’interrupteur d’alimentation
apparaît, éteignez l’appareil.
Mode d’économie d’énergie et Mode sommeil
Remarque
Pour plus de renseignements, reportez-vous au
Guide de base de l’utilisateur en ligne sur le CD
fourni avec votre appareil.
Le panneau de commande
Pour plus de renseignements sur
• le panneau de commande
• entrer/supprimer du texte ou des données
reportez-vous au Guide de base de l’utilisateur en
ligne sur le CD fourni avec votre appareil.
Chargement du support d’impression
Pour plus de renseignements relatifs au support
d’impression, reportez-vous au -Guide de base
de l’utilisateur en ligne sur le CD fourni avec
votre appareil.
60 - Français
Page 61

Plateaux disponibles
Chargement du papier : bac 1 ou bac 2 optionnel
Tray 1 (Bac 1)
• Peut contenir jusqu’à 250 feuilles de papier
bond US de 75 g/m
• Formats utilisables : lettre, Legal 13/13,5/14,
Executive, A4, A5, A6, B5, 16K, personnalisé
• Plage de grammages de support : bond US de
64 à 176 g/m
Bac 2 (optionnel)
• Peut contenir jusqu’à 530 feuilles de papier
bond US de 75 g/m
• Formats utilisables : identiques au bac 1 sauf
pour le format A6, non accepté.
• Plage de grammages de support : identique au
Bac 1.
Important!
Avant d’imprimer sur un papier à format
personnalisé, vous devez tout d’abord
définir le format dans le pilote de
l’imprimante. Voir page 65.
2
(20 lb).
2
(17 à 47 lb)
2
(20 lb).
1 Tray 1 (Bac 1)
2 MP Tray (Bac MF)
3 Bac 2 (optionnel)
Plages de grammage disponibles
Plage de grammages,
Description
Léger 17 à 18 lb.
Medium Light
(Mince moyen)
Medium (Moyen) 22 à 28 lb.
Lourd 28 à 32 lb.
ULTRA HEAVY1
(ULTRA LOURD1)
ULTRA HEAVY2
(ULTRA LOURD2)
Bond US Métrique
20 à 21 lb.
32 à 47 lb.
47 à 58 lb.
64 à 74 g/m
75 à 82 g/m
83 à 104 g/m
105 à 120 g/m
121 à 176 g/m
177 à 220 g/m
2
2
La procédure suivante indique comment charger
du papier dans le Bac 1. La procédure
s’appliquant au Bac 2 est identique.
1 Sortez le bac à papier.
2
2
2
2
61 - Français
Page 62

2 En les faisant glisser, ajustez les guides papier
à la largeur du papier à charger.
3 Ajustez la butée pour papier (1) à la longueur
du papier. Appuyez délicatement sur le levier
bleu de déverrouillage (2), puis faites glisser
la butée de papier à la longueur du papier à
charger. La longueur sélectionnée sera
indiquée dans la fenêtre d’aperçu (3).
Remarque
Si vous chargez du papier Legal, vous devez faire
glisser la butée pour papier en dehors du bac.
Pour du papier Legal 14, faites-la glisser aussi
loin que possible (environ 2,5 po, 64 mm). Les
paramètres pour le papier Legal 13, Legal 13,5 et
Legal 14 apparaîtront dans la fenêtre de butée
une fois bien positionné.
4 Pliez le papier d’un sens, de l’autre, puis
agitez-le. Réajustez les bords de la pile de
papier sur une surface plane.
5 Chargez le papier avec le côté d’impression
vers le bas. Maintenez la pile sous le trait
de remplissage (1).
6 Ajustez avec précision les guides papier et la
butée afin qu’ils touchent délicatement le
papier sans trop le serrer.
62 - Français
Page 63

7 Poussez le bac à papier au maximum
dans l’imprimante.
Charger du papier dans le bac MF
• Peut contenir jusqu’à 100 feuilles de papier
bond US de 75 g/m
10 enveloppes.
• Formats utilisables : lettre, Legal 13/13,5/14;
Executive; A4, A5, A6, B5, C5, DL, Com-9,
Com-10, enveloppes Monarch, 7,62 x 12,7 cm
(3" x 5"), cartes d’index, papier photo format
10 x 15 cm (4" x 6") ou 12 x 18 cm (5" x 7"),
bannières personnalisées jusqu’à 1320 mm
(52") de longueur.
• Plage de grammages de support : bond US de
64 à 220 g/m
Important!
Avant d’imprimer sur un papier à format
personnalisé, vous devez tout d’abord
définir le format dans le pilote de
l’imprimante. Voir page 65.
2
(20 lb), jusqu’à
2
(17 à 58 lb).
8 Configurer les paramètres du bac dans le
menu de votre appareil. Consultez
“Configuration des paramètres du bac” à
la page 64.
1 Abaissez le bac multifonction.
2 Retirez le support à papier et le sous-support.
63 - Français
Page 64

3 En les faisant glisser, ajustez les guides papier
à la largeur du papier à charger.
4 Insérez le papier avec le côté d’impression
vers le haut jusqu’à ce que ses rebords
touchent l’entrée de l’alimentation papier,
puis ajustez avec précision les guides papier.
Remarque
• Ne chargez pas de papier au-delà du trait
de remplissage.
• Ne chargez pas de papier de différents
formats, types ou grammage en
même temps.
• Quand vous ajoutez du papier, retirez le
papier déjà dans le bac MF, réajustez les
bords des deux piles de papier, puis
rechargez le tout.
• Ne pas mettre autre chose que du papier à
impression. Ne pas appliquer trop de
pression sur le bac MF.
Imprimer le Rapport de configuration
Vous pouvez vérifier des renseignements
détaillés concernant votre appareil, comme les
paramètres et le statut, en imprimant le Rapport
de configuration.
Remarque
Chargez les enveloppes avec le côté ouvert dans
l’appareil, face vers le bas et à droite.
5 Appuyez sur le levier de verrouillage du bac.
6 Enregistrez le papier chargé sur votre
appareil. Reportez-vous à “Configuration des
paramètres du bac” à la page 64.
1 Appuyez sur <SETTING> (Paramètre) sur le
panneau de commande.
2 Utilisez la touche fléchée vers le bas pour
sélectionner [Reports] (Rapports), puis
appuyez sur <OK>.
3 Utilisez la touche fléchée vers le bas pour
sélectionner [Configuration], puis appuyez
sur <OK>.
4 Quand le message de confirmation apparaît,
appuyez sur la touche fléchée vers la droite
ou vers la gauche jusqu’à sélectionner [YES]
(Oui), puis appuyez sur <OK>.
Configuration des paramètres du bac
Format de support standard
Remarque
Pour faire défiler les différentes sélections sur
l’affichage, appuyez sur la touche fléchée vers le
bas de façon répétitive.
\
1 Appuyez sur <SETTING> (Paramètre) sur le
64 - Français
panneau de commande.
Page 65

2 Utilisez la touche fléchée vers le bas pour
sélectionner [Paper Setup] (Configuration du
papier), puis appuyez sur <OK>.
3 Utilisez la touche fléchée vers le bas pour
sélectionner le bac, puis appuyez sur <OK>.
4 Utilisez la touche fléchée vers le bas pour
sélectionner [Paper Size] (Format du papier),
puis appuyez sur <OK>.
5 Utilisez la touche fléchée vers le bas pour
sélectionner le format du papier chargé, puis
appuyez sur <OK>.
6 Utilisez la touche fléchée vers le bas pour
sélectionner [Media Type] (type de support),
puis appuyez sur <OK>.
7 Utilisez la touche fléchée vers le bas pour
sélectionner le type de support chargé, puis
appuyez sur <OK>.
8 Utilisez la touche fléchée vers le bas pour
sélectionner [Media Weight] (grammage du
support), puis appuyez sur <OK>.
1 Suivez les étapes 1 à 3 à gauche.
2 Utilisez la touche fléchée vers le bas pour
sélectionner [Custom] (personnalisé), puis
appuyez sur <OK>.
3 À l’aide du clavier, saisissez la valeur désirée
dans la case Largeur.
4 Appuyez sur la touche fléchée vers la droite
pour vous déplacer jusqu’à la case Longueur,
puis saisissez la valeur à l’aide du clavier.
5 Appuyez sur <OK>.
Sorties d’impression
Important!
Ne jamais ouvrir ou fermer la sortie arrière
(empileuse face vers le haut) lorsque
l’appareil est en train d’imprimer, ceci
pouvant provoquer un bourrage papier.
9 Utilisez la touche fléchée vers le bas pour
sélectionner le grammage du papier chargé,
puis appuyez sur <OK>.
Format de support personnalisé
Pour charger du format papier personnalisé, vous
devez enregistrer la largeur et la longueur du
papier avant l’impression.
Bac Gamme de formats disponibles
Tray 1 (Bac 1) Largeur :
de 105 à 216 mm (5,1 à 8,5 in)
Longueur :
de 148 à 356 mm (5,8 à 14 in)
Bac 2
(optionnel)
MP Tray
(BAC MF)
Remarque
Pour les bacs 1 et 2, vous ne pouvez configurer le
paramètre [Custom] (personnalisé) que quand
[Paper Size] (format du papier) est établi sur
[Custom] (personnalisé).
Largeur : identique au Bac 1
Longueur :
de 148 à 356 mm (8,3 à 14,0 in)
Largeur :
de 64 à 216 mm (2,5 à 8,5 in)
Longueur :
de 127 à 1321 mm (5 à 52,0 in)
Utiliser la sortie supérieure (empileuse face vers le bas)
La sortie supérieure (empileuse face vers le bas)
est la sortie par défaut. Elle est activée quand la
sortie arrière est fermée.
• Elle imprime les documents le côté
d’impression vers le bas.
• Peut contenir jusqu’à 150 feuilles de papier
bond US de 75 g/m
2
(20 lb).
65 - Français
Page 66

Utiliser la sortie arrière (empileuse face vers le haut)
La sortie arrière est activée quand elle
est ouverte.
• Elle imprime les documents le côté
d’impression vers le haut.
• Elle permet un chemin de sortie
direct-nécessaire aux papiers lourds,
transparents, enveloppes et étiquettes.
• Peut contenir jusqu’à 100 feuilles de papier
bond US de 75 g/m
• Peut contenir 10 enveloppes.
2
(20 lb).
2 Dépliez l’empileuse.
3 Ouvrez le support papier.
1 Tirez la sortie arrière sur le côté de l’appareil
et ouvrez-la vers vous.
66 - Français
Page 67

Chargement des documents à numériser
Pour charger des documents à copier, numériser
ou faxer, vous pouvez utiliser l’alimentateur
automatique (1) ou la vitre (2).
a) Chargez le bord supérieur des documents
en portrait en premier.
b) Chargez le bord gauche des documents en
paysage en premier.
Critères liés aux documents
Pour plus de renseignements relatifs aux critères
liés aux documents, reportez-vous au -Guide de
base de l’utilisateur en ligne sur le CD fourni avec
votre appareil.
Charger des documents dans l’alimentateur automatique de document (CAD)
• Accepte Lettre, Légal 13/13,5/14, Executive,
A4, A5, A6, B5.
• Peut contenir jusqu’à 50 feuilles de papier bond
US de 75 g/m
• Chargez les documents face vers le haut.
Important!
Prenez soin de vérifier que la colle, l’encre
ou le liquide correcteur présents sur les
documents sont secs avant le chargement.
1 Chargez le(s) document(s) sur le CAD.
2
(20 lb).
2 Ajustez les guides document à la largeur
des pages.
67 - Français
Page 68

Charger des documents sur la vitre
• Accepte Lettre, Executive, A4, A5, A6, B5.
• Utilisable pour des documents allant jusqu’à
20 mm (0,78 in) d’épaisseur.
Important!
Prenez soin de vérifier que la colle, l’encre
ou le liquide correcteur présents sur les
documents sont secs avant le chargement.
1 Levez et ouvrez le capot de la vitre.
3 Refermez délicatement le capot de la vitre.
Remarque
Si vous souhaitez utiliser les fonctions
[N-in-1](N-en-1), [Sort] (trier) ou [DuplexCopy],
modifiez le paramètre [Document Direction]
(sens du document) selon le sens de votre
document pour obtenir la sortie souhaitée.
Le réglage par défaut est [Portrait].
2 Placez un document face vers le bas sur
la vitre.
a) Si votre document est en mode portrait,
alignez le haut avec le coin en haut à
gauche de la vitre.
b) Si votre document est en mode paysage,
alignez son bord droit avec le coin en haut
à gauche de la vitre.
68 - Français
Page 69

Installation en réseau : Établir des connexions et installer des pilotes d’imprimante
Systèmes d’exploitation compatibles
Votre appareil prend en charge les systèmes
d’exploitation suivants :
Windows
•Windows 7
• Windows 7, édition 64-bit
• Windows Server 2008, édition R2 64-bit
• Windows Server 2008
• Windows Server 2008, édition 64-bit
•Windows Vista
• Windows Vista, édition 64-bit
• Windows Server 2003
• Windows Server 2003, édition x64
•Windows XP
• Windows XP, édition x64
• Windows 2000
Macintosh
• Mac OS X 10.3.9 à 10.6
Important!
Pour les utilisateurs de Mac OS X 10.6
IntelPC, installer Rosetta avant d’installer le
pilote de l’imprimante.
Réaliser la connexion réseau
Important!
Vous devez connecter votre appareil à un
réseau équipé d’un câble Ethernet compatible
avant d’installer le pilote de l’imprimante.
Remarque
Le câble Ethernet et le concentrateur ne sont pas
fournis avec votre appareil. Le câble Ethernet doit
être de catégorie 5, droit, avec deux paires de
fils torsadés.
1 Éteignez votre appareil :
a) appuyez sur <SETTING> (Paramètre) sur
le panneau de commande.
b) Utilisez la touche fléchée vers le bas pour
sélectionner [Shutdown] (Arrêt), puis
appuyez sur <OK>.
c) Quand le message de confirmation
s’affiche, appuyez sur la touche fléchée
vers la droite jusqu’à sélectionner [Yes]
(Oui), puis appuyez sur <OK>.
d) Au signal, éteignez l’appareil.
2 Éteignez l’ordinateur.
69 - Français
Page 70

3 Abaissez le loquet (1) sur le côté droit de
l’appareil et retirez le couvercle d’accès (2).
5 Bien attacher le câble Ethernet sous le
crochet (1) de l’appareil.
6 Introduire les languettes du capot latéral dans
les fentes (1) du boîtier de l’appareil et
remettez le capot en place.
4 Branchez une extrémité du câble Ethernet
dans le port LAN de l’appareil.
7 Connectez le concentrateur à un ordinateur,
puis branchez l’autre extrémité du câble
Ethernet dans le concentrateur.
70 - Français
Page 71

Trouver le formulaire de configuration
Vous trouverez un formulaire de configuration à
la page 108. Vous pouvez utiliser ce formulaire
pour enregistrer les renseignements requis
concernant vos paramètres réseau, puis vous y
référer lors de la configuration de l’appareil pour
une exploitation en réseau.
Définir le mot de passe administrateur
2 Utilisez la touche fléchée vers le bas pour
sélectionner [Admin Setup] (Configuration
Administrateur), puis appuyez sur <OK>.
3 Utilisez la touche fléchée vers le bas pour
sélectionner [a], puis appuyez six fois sur
<OK> pour saisir le mot de passe par
défaut : aaaaaa.
4 Utilisez les touches fléchées jusqu’à ce
que [Enter] (entrer) s’affiche, puis appuyez
sur <OK>.
5 Utilisez la touche fléchée vers le haut pour
sélectionner [Management] (Gestion), puis
appuyez sur <OK>.
6 Utilisez la touche fléchée vers le haut pour
sélectionner [Admin Password] (Mot de passe
Administrateur), puis appuyez sur <OK>.
7 Utilisez les touches fléchées pour sélectionner
les chiffres de votre mot de passe en
appuyant sur <OK> après chaque chiffre.
8 Une fois la saisie de votre nouveau mot de
passe terminée, utilisez les touches fléchées
jusqu’à ce que [Enter] (entrer) s’affiche, puis
appuyez sur <OK>.
Remarque
Lors de l’utilisation des touches fléchées pour
faire vos sélections, appuyez à plusieurs reprises
sur la touche jusqu’à atteindre la sélection.
1 Appuyez sur <Setting> (Paramètre) sur le
panneau de commande.
Remarque
Le mot de passe Administrateur doit au moins
posséder six caractères et est sensible à la casse.
9 Une fois tous les caractères saisis, utilisez les
touches fléchées jusqu’à ce que [Enter]
(entrer) s’affiche à l’écran, puis appuyez
sur <OK>.
10 Utilisez la touche fléchée vers la gauche pour
revenir à l’écran principal.
11 Saisissez le mot de passe Administrateur sur
la ligne A-1 du formulaire de configuration.
71 - Français
Page 72

Configurer le réseau pour les systèmes sous Windows
Pour réaliser une connexion réseau avec un
ordinateur sous Windows, définissez tout d’abord
les adresses IP de l’ordinateur et de l’appareil,
puis installez le(s) pilote(s) de l’imprimante
sur l’ordinateur.
Configurer l’adresse IP, le cas échéant
Si votre réseau remplit l’une des conditions
suivantes, une adresse IP sera attribuée
automatiquement à l’ordinateur et à l’appareil.
• Si un serveur DHCP ou BOOTP se trouve sur
le réseau
• Universal Plug-and-Play
Si tous les ordinateurs connectés au réseau sont
•Windows 7
•Windows Vista
•Windows XP
• Windows 2000
• Windows Server 2008 R2
• Windows Server 2008
• Windows Server 2003,
• ou si votre router prend en charge
l’Universal Plug-and-Play,
une adresse IP est alors automatiquement
attribuée à l’ordinateur et à l’appareil, même si
un serveur DHCP/BOOTP n’est pas sur le réseau.
Si le réseau ne remplit pas les conditions
ci-dessus, ou si votre administrateur réseau ou
fournisseur de services Internet spécifie une
adresse IP unique pour l’ordinateur et l’appareil,
configurez les adresses IP manuellement.
Remarque
Si vous êtes en train de configurer un petit
réseau, se limitant à un appareil et à un
ordinateur, configurez les adresses IP comme
indiqué ci-dessous (selon RFC1918) :
Pour l’ordinateur
IP Address (Adresse IP) : 192.168.0.1 à 254
Subnet Mask
(Filtre d’adresse locale) : 255.255.255.0
Default Gateway
(Passerelle par défaut) :
DNS Server
(Serveur DNS) : non offert
Pour l’appareil
IP Address Set
(Jeu d’adresses IP) : Manuel
IP Address (Adresse IP) : 192.168.0.1 à 254 (sélectionnez
Subnet Mask
(Filtre d’adresse locale) : 255.255.255.0
Default Gateway
(Passerelle par défaut) :
Network scale
(Échelle de réseau) :
non offert
une valeur différente de celle
de l’ordinateur)
0.0.0.0
petite
Pour configurer [Network Scale] (Échelle de réseau) :
• appuyez sur <SETTING> (Paramètre) sur
le panneau de commande.
• Sélectionnez [Admin Setup] (Configuration
d’administrateur) > [Network Menu]
(Menu de réseau) > [Network Setup]
(Configuration Réseau) > [Network Scale]
(Échelle de réseau).
Généralités
• Vous devez saisir le mot de passe administrateur
pour terminer cette procédure.
• Lorsque vous configurez manuellement une
adresse IP, demandez à l’administrateur réseau
ou à votre fournisseur de services Internet,
quelle adresse utiliser. Si l’adresse IP n’est pas
correctement configurée, il se peut que le
réseau ralentisse ou que l’accès Internet
soit désactivé.
72 - Français
Configurer l’adresse IP de
votre ordinateur
Important!
Si vous connaissez déjà l’adresse IP de
votre ordinateur, passez directement à la
section suivante « Set Up Your Machine’s
IP Address » (Configurer l’adresse IP de
votre appareil).
La procédure suivante utilise Windows 7 à titre
d’exemple. Il se peut que les images à l’écran
diffèrent en fonction du système d’exploitation.
1 Allumez l’ordinateur.
2 Cliquez sur le bouton [Start] (Démarrer) >
[Control Panel] (Panneau de commande) >
[View network status and tasks] (Aperçu du
statut et des tâches réseau).
Page 73

• Sur Windows Server 2003, cliquez sur le
bouton [Start] (Démarrer) > [Control Panel]
(Panneau de commande) > [Network
Connections] (Connexions réseau) > [Local
Area Connection] (Connexion réseau local).
• Sur Windows XP, cliquez sur le bouton
[Start] (Démarrer) > [Control Panel]
(Panneau de commande) > [Network and
Internet Connections] (Connexions Réseau
et Internet) > [Network Connections]
(Connexions Réseau).
• Sur Windows 2000, cliquez sur [Start]
(Démarrer) > [Settings] (Paramètres) >
[Network and Dial-up Connections]
(Réseau et connexions téléphoniques).
3 Sélectionnez [Change adapter settings]
(Modifier les paramètres de l’adaptateur).
• Sur Windows Server 2008 et Windows Vista,
sélectionnez [Manage network connections]
(Gérer les connexions réseau).
• Sur Windows Server 2003, Windows XP et
Windows 2000, ignorez cette étape.
4 Double-cliquez sur [Local Area Connection]
(Connexion de réseau local).
• Pour le serveur Windows 2003, ignorez
cette étape.
• Sur Windows Server 2003, Windows XP et
Windows 2000, sélectionnez [Internet
Protocol (TCP/IP)] (Protocole Internet
(TCP/IP)), puis cliquez sur
[Properties] (Propriétés).
7 Si vous configurez une adresse IP
manuellement, entrez l’adresse IP, le filtre
d’adresse locale, la passerelle par défaut et le
serveur DNS, puis cliquez sur [OK].
5 Cliquez sur [Properties] (Propriétés).
Si la boîte de dialogue [User Account Control]
(Contrôle du compte utilisateur) s’affiche,
cliquez sur [Yes] (Oui). (Sur Windows Vista,
cliquez sur [Continue])
6
Sélectionnez [Internet Protocol Version 4 (TCP/
IPv4)] (Protocole Internet Version 4 (TCP/IPv4)),
puis cliquez sur [Properties] (Propriétés).
.
• Si vous obtenez une adresse IP du serveur
DHCP automatiquement, sélectionnez
[Obtain an IP address automatically]
(Obtenir une adresse IP automatiquement),
puis cliquez sur [OK].
Important!
Ne pas saisir de passerelle par défaut ou de
serveur DNS si ce n’est pas nécessaire.
8 Fermez les fenêtres ouvertes.
Configurer l’adresse IP de votre appareil
1 Allumez votre appareil.
2 Appuyez sur <SETTING> (Paramètre) sur le
panneau de commande.
3 Utilisez la touche fléchée vers le bas pour
sélectionner [Easy Setup] (Configuration
simplifiée), puis appuyez sur <OK>.
73 - Français
Page 74

4
Entrez le mot de passe administrateur. Voir la
ligne A-1 sur votre formulaire de configuration
5 Utilisez les touches fléchées jusqu’à
sélectionner [Enter] (entrer), puis appuyez
sur <OK>.
6 Utilisez la touche fléchée vers le bas pour
sélectionner [Network Setting] (Paramètre
réseau), puis appuyez sur la touche fléchée
vers la droite.
7 Si vous configurez une adresse IP
manuellement, utilisez la touche fléchée vers
le bas pour sélectionner [Manual] (Manuel),
puis appuyez sur <OK>.
Remarque
La procédure ci-dessous utilise Windows 7 à titre
d’exemple. Il se peut que la véritable procédure
diffère quelque peu en fonction du système
d’exploitation.
1 Vérifiez bien que votre ordinateur est allumé
et connecté à l’appareil par le réseau.
2 Placez le DVD fourni avec votre appareil dans
l’unité de CD/DVD.
Si vous obtenez une adresse IP
automatiquement, sélectionnez [Auto] et
passez directement à « Install the Printer
Driver for Windows » (Installer le pilote de
l’imprimante pour Windows).
8 Appuyez sur la touche fléchée vers la droite
pour passer d’une boîte à une autre en
saisissant les renseignements applicables à
chaque boîte à l’aide du clavier, puis appuyez
sur <OK>.
9 Saisissez le serveur DNS et le serveur WIN
si nécessaire.
S’ils ne sont pas nécessaires à votre connexion
réseau, appuyez sur <OK> jusqu’à ce que le
message éclair s’affiche.
10
Cliquez sur <OK> pour terminer la configuration.
Installer un ou des pilote(s) d’imprimante sous Windows
Vous pouvez installer plusieurs pilotes en même
temps. Les pilotes sélectionnables pour chaque
modèle sont les suivants :
•PCL
•PC
•FAX
Lorsque vous installez les pilotes, le programme
installe également automatiquement le pilote
TWAIN, nécessaire à la numérisation, ainsi que
l’extension réseau et les utilitaires Color Swatch.
Le DVD se met en marche seul. Si ce n’est pas
le cas, double-cliquez sur le fichier de
configuration OKI dans le répertoire du DVD.
3
Sélectionnez votre langue dans la liste
déroulante, puis cliquez sur [Next] (Suivant).
4 Lisez le Contrat de licence, puis cliquez sur
[I Agree] (J’approuve).
5 Sous la configuration du pilote, cliquez sur
[Install Drivers (CX2731 MFP)] (Installer les
pilotes (CX2731 MFP)).
Remarque
Si la boîte de dialogue [User Account Control]
(Contrôle du compte utilisateur) s’affiche,
cliquez sur [Yes] (Oui). (Sur Windows Vista,
cliquez sur [Continue]).
6
Lisez et observez les instructions, puis cliquez
sur [Next] (Suivant).
7
Cliquez sur [Easy Installation (Network)]
(Installation facile (Réseau)).
Remarque
La sélection d’installation facile est une
méthode de configuration aisée. Si vous
souhaitez sélectionner un pilote à installer
manuellement, installer une imprimante
partagée ou utiliser l’utilitaire Oki LPR comme
méthode d’impression, sélectionnez [Custom
Installation] (Installation personnalisée), puis
suivez les instructions s’affichant à l’écran.
74 - Français
Page 75

8 Cliquez sur [Next] (Suivant).
La recherche du périphérique démarre.
9 Sélectionnez le(s) pilote(s) que vous
souhaitez installer : PCL, PS, FAX.
10 Si votre appareil est détecté et s’affiche
automatiquement, sélectionnez-le, puis
cliquez sur [Next] (Suivant).
Si votre appareil n’est pas détecté
[Restart search] (Recommencer la recherche)
pour relancer la recherche.
, cliquez sur
Remarque
Pour spécifier l’adresse IP manuellement,
sélectionnez [IP address] (adresse IP) et
saisissez l’adresse IP de votre appareil, puis
cliquez sur [Next] (Suivant).
L’installation du ou des pilotes et des
utilitaires débute.
Remarques
• Si la boîte de dialogue [Windows Security]
(Sécurité Windows) s’affiche, cliquez sur
[Install this driver software anyway]
(Installer néanmoins ce logiciel pilote).
• Sur Windows Server 2003 et Windows XP, si
la boîte de dialogue [Hardware Installation]
(Installation matériel) s’affiche, cliquez sur
[Continue Anyway] (Continuer).
• Sur Windows 2000, si la boîte de dialogue
[Digital Signature Not Found] (Signature
numérique non-trouvée) s’affiche, cliquez
sur [Yes] (Oui).
Windows Server 2008 et Windows Vista :
cliquez sur le bouton [Start] (Démarrer) >
[Control Panel] (Panneau de commande) >
[Printer] (Imprimante).
Windows Server 2003 et Windows XP : cliquez
sur [Start] (Démarrer) >[Printers and Faxes]
(Imprimantes et télécopieurs).
Windows 2000
[Settings] (Paramètres) > [Printers] (Imprimantes).
13 Vérifiez bien que l’icône OKI CX2731 MFP
s’affiche.
• Sur Windows 7, si vous avez déjà installé
d’autres pilotes, cliquez avec le bouton droit
de votre souris sur l’icône OKI CX2731 MFP
et sélectionnez une des options du menu,
puis vérifiez que tous les pilotes de
l’imprimante installés sont affichés dans le
sous-menu.
• Pour les systèmes d’exploitation autres que
Windows, vérifiez que l’icône représentant
chaque pilote est affichée.
14 Retirez le DVD de l’ordinateur.
L’installation est terminée.
: cliquez sur [Start] (Démarrer) >
Configurer le réseau pour des systèmes sous Macintosh
11 Cliquez sur Finish (Terminer) pour
terminer l’installation.
Remarques
• Pour configurer une imprimante par défaut,
cochez la case correspondante au pilote
désiré. Vous pouvez également configurer
les paramètres de l’imprimante du pilote
sélectionné en cliquant sur [Open property
dialog] (Ouvrir dialogue propriété).
• Si une boîte de dialogue s’affiche et
demande de redémarrer l’ordinateur,
cliquez sur [Yes] (Oui). L’ordinateur
redémarre automatiquement.
12 Windows 7 : cliquez sur [Start] (Démarrer) >
[Devices and Printers] (Périphériques
et imprimantes).
75 - Français
Pour terminer la connexion réseau sous un
système d’exploitation Mac, installer un pilote
d’imprimante sur l’ordinateur et configurer votre
appareil en tant qu’imprimante réseau.
Installer le pilote d’imprimante sur Mac
Seul le pilote PS est disponible pour les systèmes Mac.
Sélectionnez le protocole de votre connexion réseau
à partir de ce qui suit :
• Ethertalk
- pour les Mac 10.3.9 à 10.4.11, voir ci-dessous.
- pour les Mac 10.5, voir page 77.
• Bonjour (Rendezvous)
- pour les Mac 10.3.9 à 10.4.11, voir page 78.
- pour les Mac 10.5 et 10.6, voir page 79.
Page 76

Important!
Désactiver le logiciel antivirus avant de
commencer cette procédure.
Sous Ethertalk,
Mac OS X 10.3.9 à 10.4.11
7 Insérez le DVD fourni avec votre appareil
dans l’ordinateur.
Remarque
La procédure ci-dessous utilise le Mac OS X
10.4.11 à titre d’exemple. Il se peut que la
véritable procédure diffère quelque peu en
fonction du système d’exploitation.
1 Vérifiez que votre appareil ainsi que votre Mac
sont bien allumés et connectés.
2 À partir du menu Apple, sélectionnez [System
Preferences] (Préférences système).
3 Sélectionnez [Network] (Réseau).
4 Sélectionnez [Network Port Configurations]
(Configurations des ports réseau) à partir de
[Show] (Afficher), puis vérifiez que [Built-in
Ethernet] (Ethernet intégré) est sélectionné.
8 Double-cliquez sur l’icône qui est affiché sur le
Bureau.
9
Double--cliquez sur le dossier [Driver] (Pilote),
puis sur le dossier [Printer] (Imprimante).
10 Double-cliquez sur [Installer for Mac OSX]
(Installateur pour Mac OSX).
11 Entrez le nom de l’administrateur et son mot
de passe, puis cliquez sur [OK].
12 Suivez les instructions qui s’affichent à l’écran
pour terminer l’installation.
13 Retirez le DVD de l’ordinateur.
14 À partir du menu [Go] (Aller), sélectionnez
[Utilities] (Utilitaires), puis double-cliquez sur
[Printer Setup Utility] (Utilitaire de
configuration d’imprimante).
Remarque
Si [Printer Setup Utility] (Utilitaire de
configuration d’imprimante) est déjà lancé,
fermez-le et ouvrez-le de nouveau.
5 Sélectionnez l’onglet [AppleTalk], puis vérifiez
que [Make AppleTalk Active] (Activer
AppleTalk) est sélectionné.
6 Fermez [Network] (Réseau).
15 Cliquez sur [Add] (Ajouter).
Remarque
Si la boîte de dialogue [You have no printers
available] (Aucune imprimante disponible)
s’affiche, cliquez sur [Add] (Ajouter).
16 Pour les Mac OS X 10.3.9,
sélectionnez [AppleTalk].
76 - Français
Page 77

17
Sélectionnez le nom de l’appareil dont la
[Connection] (Connexion) est [AppleTalk], puis
vérifiez que le nom de votre appareil s’affiche
bien dans [Print Using] (Imprimer en utilisant).
2 Insérez le DVD fourni avec votre appareil
dans l’ordinateur.
3 Double-cliquez sur l’icône qui est affiché sur le
Bureau.
4
Double-cliquez sur le dossier [Driver] (Pilote),
puis sur le dossier [Printer] (Imprimante).
5 Double-cliquez sur [Installer for Mac OSX]
(Installateur pour MAC OSX).
6 Entrez le nom de l’administrateur et son mot
de passe, puis cliquez sur [OK].
18 Pour les Mac OS X 10.3.9, sélectionnez le nom
de votre appareil et sélectionnez [OKI] à
partir de [Print Model] (Modèle d’impression),
puis sélectionnez [OKI CX2731 MFP(PS)] dans
la liste. Cliquez sur [Add] (Ajouter).
19 Si la fenêtre [Installable Options] (Options
installables) s’affiche, cliquez sur [Continue] à
moins que vous ayez déjà installé les options.
Si vous avez déjà installé des options,
configurez-les toutes avant de cliquer
sur [Continue].
20 Vérifiez que le nom de votre appareil soit bien
affiché dans [Printer List] (Liste des
imprimantes), puis fermer la fenêtre.
21 À partir du menu [Go] (Aller), sélectionnez
[Applications], puis double-cliquez
sur [TextEdit].
22 Sélectionnez [File] (Fichier)> [Page Setup]
(Configuration de la page).
23 Sélectionnez le nom de votre appareil à partir
de [Format for] (Formater pour).
24
Vérifiez que le nom de votre appareil s’affiche
correctement sous [Format for] (Formater pour).
7 Suivez les instructions qui s’affichent à l’écran
pour terminer l’installation.
8 Retirez le DVD de l’ordinateur.
9 À partir du menu Apple, sélectionnez [System
Preferences] (Préférences système).
10 Cliquez sur [Print & Fax] (Imprimer et
télécopier).
11 Cliquez sur [+].
12 Cliquez sur [AppleTalk].
25 Cliquez sur [OK].
L’installation est terminée.
Sous Ethertalk
Mac 10.5 (Leopard)
1 Vérifiez que votre appareil et que votre Mac
sont bien allumés et connectés.
77 - Français
Page 78

13 Sélectionnez le nom de votre appareil, puis
vérifiez que le nom de votre appareil s’affiche
dans [Print Using] (Imprimer en utilisant).
14 Cliquez sur [Add] (Ajouter).
15
Si la fenêtre [Installable Options] (Options
installables) s’affiche, cliquez sur [Continue] à
moins que vous ayez déjà installé les options. Si
vous avez déjà installé des options, configurezles toutes avant de cliquer sur [Continue].
16 Assurez-vous que votre appareil soit bien
affiché sous [Printers] (Imprimantes).
2 À partir du menu Apple, sélectionnez [System
Preferences] (Préférences système).
3 Sélectionnez [Network] (Réseau).
4 Sélectionnez [Network Port Configurations]
(Configurations des ports réseau) à partir de
[Show] (Afficher), puis vérifiez que [Built-in
Ethernet] (Ethernet intégré) est sélectionné.
17 Vérifiez que le nom de votre appareil soit bien
affiché dans [Kind] (Sorte), puis fermer
[Print & Fax] (Imprimer et télécopier).
L’installation est terminée.
Remarque
Il se peut que le nom de votre appareil ne soit
pas affiché si le pilote de l’imprimante ne lit pas le
fichier PPD correctement.
Dans ce cas, cliquez sur [-] pour supprimer votre
appareil de [
puis reprenez la procédure à partir de l’étape 10.
Print & Fax
] (Imprimer et télécopier),
Utilisation de Bonjour
(Rendezvous)
Mac 10.3.9 à 10.4.11
5 Fermez [Network] (Réseau).
6 Insérez le DVD fourni avec votre appareil
dans l’ordinateur.
7 Double-cliquez sur l’icône qui est affiché sur le
Bureau.
8
Double-cliquez sur le dossier [Driver] (Pilote),
puis sur le dossier [Printer] (Imprimante).
9 Double-cliquez sur [Installer for Mac OSX]
(Installateur pour MAC OSX).
10 Entrez le nom de l’administrateur et son mot
de passe, puis cliquez sur [OK].
Remarque
La procédure ci-dessous utilise le Mac OS X
10.4.11 à titre d’exemple. Il se peut que la
véritable procédure diffère quelque peu en
fonction du système d’exploitation.
1 Vérifiez que votre appareil et que votre Mac
sont bien allumés et connectés.
78 - Français
11 Suivez les instructions qui s’affichent à l’écran
pour terminer l’installation.
12 Retirez le DVD de l’ordinateur.
13 À partir du menu [Go] (Aller), sélectionnez
[Utilities] (Utilitaires), puis double-cliquez sur
[Printer Setup Utility] (Utilitaire de
configuration d’imprimante).
Page 79

Important!
Si [Printer Setup Utility] (Utilitaire de
configuration d’imprimante) est déjà lancé,
fermez-le et ouvrez-le de nouveau.
14 Cliquez sur [Add] (Ajouter).
Remarque
Si la boîte de dialogue [You have no printers
available] (Aucune imprimante disponible)
s’affiche, cliquez sur [Add] (Ajouter).
15 Pour les Mac OS 10.3.9,
sélectionnez [Rendezvous].
16
Sélectionnez le nom de l’appareil dont la
[Connection] (Connexion) est [Bonjour], puis
vérifiez que le nom de votre appareil s’affiche
bien dans [Print Using] (Imprimer en utilisant).
Votre machine s’affiche avec les six
derniers chiffres de l’adresse Max dans la
liste d’imprimantes.
20 Vérifiez que le nom de votre appareil soit bien
affiché dans [Printer List] (Liste des
imprimantes), puis fermer la fenêtre.
21 À partir du menu [Go] (Aller), sélectionnez
[Applications] > [TextEdit].
22 Sélectionnez le menu [File] (Fichier) >
[Page Setup] (Configuration de la page).
23 Sélectionnez le nom de votre appareil à partir
de [Format for] (Formater pour).
24
Vérifiez que le nom de votre appareil s’affiche
correctement sous [Format for] (Formater pour).
25 Cliquez sur [OK].
17
Pour les Mac OS X 10.3.9
de votre appareil et sélectionnez [OKI] à partir
de [Print Model] (Modèle d’impression), puis
sélectionnez [OKI CX2731 MFP(PS)] dans la
liste.
18 Cliquez sur [Add] (Ajouter).
19
Si la fenêtre [Installable Options] (Options
installables) s’affiche, cliquez sur [Continue] à
moins que vous ayez déjà installé les options. Si
vous avez déjà installé des options, configurezles toutes avant de cliquer sur [Continue].
, sélectionnez le nom
L’installation est terminée.
Utilisation de Bonjour
Mac 10.5 et 10.6 (Leopard et
Snow Leopard)
Remarque
La procédure ci-dessous utilise le Mac OS X 10.6
à titre d’exemple. Il se peut que la véritable
procédure diffère quelque peu en fonction du
système d’exploitation.
1 Vérifiez que votre appareil ainsi que votre Mac
sont bien allumés et connectés.
2 Insérez le DVD fourni avec votre appareil
dans l’ordinateur.
3 Double-cliquez sur l’icône qui est affiché sur le
4
79 - Français
Bureau.
Double--cliquez sur le dossier [Driver] (Pilote),
puis sur le dossier [Printer] (Imprimante).
Page 80

5 Double-cliquez sur [Installer for Mac OSX]
(Installateur pour MAC OSX).
6 Entrez le nom de l’administrateur et son mot
de passe, puis cliquez sur [OK].
7 Suivez les instructions qui s’affichent à l’écran
pour terminer l’installation.
8 Retirez le DVD de l’ordinateur.
9 À partir du menu Apple, sélectionnez [System
Preferences] (Préférences système).
10 Cliquez sur [Print & Fax] (Imprimer
et télécopier).
11 Cliquez sur [+].
12 Cliquez sur [Default] (Par défaut).
13 Sélectionnez le nom de l’appareil dont la
[Kind] (Sorte) est [Bonjour], puis vérifiez que
le nom de votre appareil s’affiche bien dans
[Print Using] (Imprimer en utilisant).
Le nom de votre machine s’affiche avec les
six derniers chiffres de l’adresse Max dans la
liste d’imprimantes.
Remarque
Il se peut que le nom de votre appareil ne soit
pas affiché si le pilote de l’imprimante ne lit pas le
fichier PPD correctement.
Dans ce cas, cliquez sur [-] pour supprimer votre
appareil de [Print & Fax] (Imprimer et télécopier),
puis ajoutez le de nouveau (retournez à l’étape 9).
14 Cliquez sur [Add] (Ajouter).
15 Si la fenêtre [Installable Options] (Options
installables) s’affiche, cliquez sur [Continue] à
moins que vous ayez déjà installé les options.
Si vous avez déjà installé des options,
configurez-les toutes avant de cliquer
sur [Continue].
16 Assurez-vous que votre appareil soit bien
affiché sous [Printers] (Imprimantes).
17 Vérifiez que le nom de votre appareil soit bien
affiché dans [Kind] (Sorte), puis fermer
[Print & Fax] (Imprimer et télécopier).
L’installation est terminée.
80 - Français
Page 81

Configuration de l’appareil pour une exploitation en réseau
Des fonctions telles que
• Numérisation vers Courriel
• Scan to Network PC (Numérisation vers PC
en réseau)
• Télécopie Internet
vous permettent d’envoyer et de numériser des
données vers un ordinateur par le biais d’une
connexion réseau. Pour les utiliser, vous devez
configurer votre appareil et les ordinateurs
vers lesquels vous souhaitez transférer les
données numérisées.
Saisir l’adresse IP de l’appareil sur le formulaire de configuration
Configurer les fonctions de Numérisation vers Courriel et Télécopie Internet
Vérifiez les paramètres de courriel de l’ordinateur
• Si un administrateur réseau indique des valeurs
telles qu’un compte de serveur courriel, un mot
de passe et un courriel, notez-les sur le
formulaire de configuration.
Remarque
La procédure ci-dessous utilise Windows Live Mail
sur Windows 7. Si vous utilisez un autre logiciel
de courriel, reportez-vous à son manuel.
Remarque
Lors de l’utilisation des touches fléchées, appuyez
à plusieurs reprises sur la touche jusqu’à
atteindre la sélection.
1 Appuyez sur <SETTING> (Paramètre) sur le
panneau de commande.
2 Utilisez la touche fléchée vers le bas pour
sélectionner [View Information] (Afficher les
renseignements), puis appuyez sur <OK>.
3 Utilisez la touche fléchée vers le bas pour
sélectionner [Network] (Réseau), puis
appuyez sur <OK>.
4 Entrez l’adresse IP sous [IPv4 address]
(adresse IPv4) sur la ligne A-2 du formulaire
de configuration.
1 Cliquez sur [Start] (Démarrer) > [Windows
Live Mail].
2 Sélectionnez le menu [Tools] (outils) >
[Accounts] (comptes).
Si la barre de menu ne s’affiche pas, cliquez
sur l’icône [Menus], puis sélectionnez [Show
menu bar] (Afficher la barre de menu).
3 Sélectionnez le compte courriel par défaut,
puis cliquez sur [Properties] (Propriétés).
4 Sur l’onglet [General] (Général), saisissez le
contenu dans [Name] (Nom) et [E-mail
address] (adresse électronique) sur les lignes
B-9 et B-10 du formulaire de configuration.
81 - Français
Page 82

5
Cliquez sur l’onglet [Server] (Serveur), puis
entrez chaque paramètre sur les lignes
correspondantes du formulaire de configuration.
• Si la case [My server requires authentication]
(Mon serveur nécessite d’être authentifié) est
cochée, entrez « SMTP » sur la ligne B-4 du
formulaire de configuration.
• Si elle n’est pas cochée, entrez « POP » sur
la ligne B-4.
6 Cochez la case [My server requires
authentication], puis cliquez sur
[Settings] (Paramètres).
7 Dans la boîte de dialogue [Outgoing Mail
Server] (Serveur réseau sortant) :
Configurer l’adresse électronique de votre appareil
Saisissez une adresse électronique à utiliser
par votre appareil sur la ligne B-1 du formulaire
de configuration.
• Si l’adresse électronique de votre appareil est
indiquée par l’administrateur réseau, entrez-la
sur la ligne B-1.
• Si vous utilisez un fournisseur de services
Internet, demandez-lui une adresse
électronique pour votre appareil, puis
saisissez-la sur la ligne B-1.
• Si l’adresse électronique de votre appareil n’est
ni spécifiée, ni obtenue, déterminez-la en
fonction de la valeur entrée en ligne B-4
(méthode d’authentification) :
- Si B-4 indique « SMTP », déterminez une
adresse électronique et saisissez-la sur la
ligne B-1.
- Si B-4 indique « POP », saisissez la même
adresse électronique que B-12 sur la ligne B-1.
• Si vous désirez que votre appareil puisse recevoir
des messages électroniques, vous devez obtenir
une adresse électronique pour votre appareil de
la part d’un administrateur réseau ou de votre
fournisseur de services Internet.
Configurer l’appareil à la fonction Numérisation vers Courriel et Télécopie Internet
Configurez la machine à la fonction Numérisation
vers Courriel et Télécopie Internet à l’aide des
renseignements disponibles sur le formulaire
de configuration.
• Si [Use the same settings as my incoming
mail server] (Utiliser les mêmes
paramètres pour mon serveur réseau
entrant) est coché, entrez
- la valeur de la ligne B-7 sur la ligne B-5 et
- la valeur de la ligne B-8 sur la ligne B6
du formulaire de configuration.
• Si [Log on using] (Connexion lors de
l’utilisation) est coché, entrez
- le numéro de compte [Account name]
sur la ligne B-5 et
- le mot de passe [Password] sur la
ligne B-6 du formulaire de configuration.
82 - Français
Remarque
Lors de l’utilisation des touches fléchées, appuyez
à plusieurs reprises sur la touche jusqu’à
atteindre la sélection.
Appuyez sur la touche <SETTING> (Paramètre)
sur le panneau de commande.
8 Utilisez la touche fléchée vers le bas pour
sélectionner [Easy Setup] (Configuration
simplifiée), puis appuyez sur <OK>.
Page 83

9 Saisissez le mot de passe administrateur, puis
utilisez les touches fléchées pour sélectionner
[Enter] (Entrer) et appuyez sur <OK>.
10 Utilisez la touche fléchée vers le bas pour
sélectionner [Email Setting] (Paramétrage du
courriel), puis appuyez sur la touche fléchée
vers la droite.
Configurer la fonction Scan to Network PC (Numérisation vers PC en réseau)
La fonction Scan to Network PC (Numérisation
vers PC en réseau) permet d’envoyer et de
sauvegarder des images dans le « dossier
partagé » de votre ordinateur sur le réseau. Pour
utiliser cette fonction, enregistrez votre appareil
sur l’ordinateur en tant qu’utilisateur et créez un
dossier partagé, puis créez un profil sur votre
appareil afin d’enregistrer les paramètres pour
l’ordinateur.
11
En se référant au formulaire de configuration :
a) Adresse du serveur : appuyez sur
fléchée vers la droite, puis saisissez les
renseignements de la ligne B-2.
b) Utilisez les touches fléchées jusqu’à
sélectionner [Enter] (entrer), puis appuyez
sur
<OK>
.
c) L’adresse électronique de votre appareil :
appuyez sur
puis saisissez les renseignements de la
ligne B-1.
d) Sélectionnez [Enter] (Entrer), puis appuyez
sur
<OK>
e) Méthode d’authentification : appuyez sur
touche fléchée vers la droite, puis utilisez la
touche fléchée vers le bas pour sélectionner
la méthode à partir de la ligne B-4.
f) Continuer de suivre les instructions
sur l’écran pour saisir les renseignements
requis de la section B du formulaire
de configuration.
g) Une fois tous les renseignements saisis, le
message « Email Setting was completed »
(le paramétrage du courriel s’est déroulé
avec succès) s’affiche et l’écran retourne au
menu de configuration.
12
Quand l’écran du menu de configuration
s’affiche, appuyez sur <OK>.
La configuration de la fonction Numérisation vers
Courriel et Télécopie Internet est terminée.
Pour de plus amples détails sur l’utilisation de la
fonction de Numérisation vers Courriel et Télécopie
Internet, reportez-vous au Guide de base de
l’utilisateur en ligne sur le DVD fourni avec
votre appareil.
la touche fléchée vers la droite,
.
la touche
la
• Avant de commencer la configuration, obtenez
la permission de l’administrateur de réseau de
créer un dossier partagé sur l’ordinateur en
suivant la procédure indiquée ci-dessous.
• Le protocole CIFS est celui utilisé dans
cette procédure.
Vérification du nom de l’ordinateur
Vérifiez le nom de l’ordinateur en suivant la
procédure indiquée ci-dessous et reportez-le sur
la ligne C-1 du formulaire de configuration.
Windows 7,
Windows Server 2008 R2,
Windows Server 2008,
Windows Vista
Remarque
La procédure suivante utilise Windows 7 à titre
d’exemple. Il se peut que l’affichage diffère en
fonction du système d’exploitation.
1 Cliquez sur le bouton [Start] (Démarrer) >
[Control Panel] (Panneau de commande).
2 Sélectionnez [System and Security] (Système
et sécurité).
Pour Windows Server 2008 et Windows Vista,
sélectionnez [System and Maintenance]
(Système et maintenance).
3 Sélectionnez [See the name of this computer]
(voir le nom de cet ordinateur) sous
[System] (système).
83 - Français
Page 84

4 Notez le nom dans [Computer name] (nom
de l’ordinateur) sur la ligne C-1 du formulaire
de configuration.
5 Fermez la fenêtre.
Windows Server 2003
Windows XP
1
Pour Windows Server 2003, cliquez sur le bouton
[Start] (Démarrer) > [Control Panel] (Panneau
de commande) > [System] (système).
Pour Windows XP, cliquez sur le bouton [Start]
(Démarrer) > [Control Panel] (Panneau de
commande) > [Performance and Maintenance]
(Performances et maintenance) >
[System] (système).
2 Sélectionnez l’onglet [Computer Name]
(Nom de l’ordinateur), puis cliquez sur
[Change] (Modifier).
3 Notez le nom dans [Computer name] (nom
de l’ordinateur) sur la ligne C-1 du formulaire
de configuration.
4 Cliquez sur [Cancel] (Annuler) pour fermer
la fenêtre.
Windows 2000
1 Cliquez sur le bouton [Start] (Démarrer) >
[Settings] (Paramètres) > [Control Panel]
(Panneau de commande).
Déterminer le nom des Options requises pour la fonction Scan To Network PC (Numérisation vers un PC en réseau)
Déterminez le nom des options suivantes et
reportez-les sur les lignes C-2 à C-6 du formulaire
de configuration.
• Nom d’utilisateur pour se connecter à
l’ordinateur de destination (C-2)
• Mot de passe pour se connecter à l’ordinateur
de destination (C-3)
• Nom de profil pour enregistrer les paramètres
sur votre appareil (C-4)
• Nom du dossier partagé de l’ordinateur de
destination (C-5)
• Nom de fichier des données numérisées (C-6)
Configurer l’ordinateur à la fonction Scan To Network PC (Numérisation vers PC en réseau).
Enregistrez votre appareil sur l’ordinateur en tant
qu’utilisateur, puis configurez un dossier partagé
dans lequel les images numérisées seront
envoyées et sauvegardées.
• Windows 7, voir ci-dessous
• Windows Server 2008 R2, voir ci-dessous
• Windows 2008, voir ci-dessous
• Windows Vista, voir ci-dessous
• Windows Server 2003, voir page 86
• Windows XP, voir page 86
• Windows 2000, voir page 87
Important!
Si l’ordinateur est dans un domaine, la
procédure d’ajout d’un compte d’utilisateur
peut être différente de la procédure
indiquée ci-dessous. Consultez le manuel de
Microsoft Windows.
2 Double-cliquez sur [Système] (Système).
3 Sélectionnez l’onglet [Network Identification]
(Identification du réseau), puis cliquez sur
[Properties] (Propriétés).
4 Notez le nom dans [Computer name] (nom
de l’ordinateur) sur la ligne C-1 du formulaire
de configuration.
5 Cliquez sur [Cancel] (Annuler) pour fermer
la fenêtre.
84 - Français
Windows 7,
Windows Server 2008 R2,
Windows 2008,
Windows Vista
Remarque
La procédure suivante utilise Windows 7 à titre
d’exemple. Il se peut que l’affichage diffère en
fonction du système d’exploitation.
Page 85

1 Cliquez sur le bouton [Start] (Démarrer) >
[Control Panel] (Panneau de commande).
2
Sélectionnez [Add or remove user
accounts] (Ajouter ou supprimer des
comptes d’utilisateurs).
3 Sélectionnez [Create a new account] (Créer
un nouveau compte).
4 Saisissez les renseignements de la ligne C-2
du formulaire de configuration dans la zone
de texte.
5 Assurez-vous que la case [Standard user]
(Utilisateur standard) est cochée, puis cliquez
sur [Create Account] (Créer un compte).
6 Cliquez sur l’icône du compte utilisateur crée
lors de l’étape précédente.
7 Sélectionner [Create a password] (Créer un
mot de passe).
8
Saisissez les renseignements de la ligne C-3
dans [New password] (Nouveau mot de passe)
et [Confirm for new password] (Confirmer le
nouveau mot de passe), puis cliquez sur
[Create password] (Créer le mot de passe).
12 Sélectionnez l’onglet [Sharing] (Partage), puis
cliquez sur [Share] (Partager).
13 Sélectionnez le compte utilisateur crée dans
l’étape 5 dans la liste déroulante, puis cliquez
sur [Add] (Ajouter).
9 Fermez le panneau de commande.
10 Créer un nouveau dossier sur l’ordinateur
avec le nom saisi sur la ligne C-5.
Remarque
Il est recommandé de créer un dossier dans
l’unité locale, et non sur le bureau ou dans
[My Documents] (Mes documents).
11 Cliquez avec le bouton droit de la souris sur le
dossier crée lors de l’étape précédente et
sélectionnez [Properties] (Propriétés).
14
Sélectionnez l’utilisateur ajouté lors de l’étape
précédente et choisissez le niveau de
permission, puis cliquez sur [Share] (Partager).
15 Cliquez sur [Done] (Effectué).
16 Cliquez sur [Advanced Sharing] (Partage
avancé) dans l’onglet [Sharing] (Partage).
17 Cliquez sur [Permissions].
18 Sélectionnez l’utilisateur ajouté lors de
l’étape 13 et cochez la case [Allow]
(Autoriser) pour un contrôle total [Full
Control], puis cliquez sur [OK].
19 Fermez la boîte de dialogue Propriétés
du dossier.
85 - Français
Page 86

20
Créez un profil pour terminer la configuration de
la fonction Scan To Network PC (Numérisation
vers PC en réseau). Consultez “Les profils de la
fonction Scan to Network PC (Numérisation vers
PC en réseau)” à la page 89.
Pour Windows Server 2003
1 Cliquez sur le bouton [Start] (Démarrer) >
[Administrative Tools] (Outils
d’administration) > [Server Management]
(Gestion du serveur).
2 Cliquez sure [Users] (utilisateur).
3
Sélectionnez [Add a user] (Ajouter un utilisateur).
4 Saisissez la valeur indiquée en C-2 dans la
zone de texte [First Name] (Prénom), puis
cliquez sur [Next] (Suivant).
9 Créer un nouveau dossier dans l’ordinateur
avec le nom saisi sur la ligne C-5.
Remarque
Il est recommandé de créer un dossier dans
l’unité locale, et non sur le bureau ou dans
[My Documents] (Mes documents).
10 Cliquez avec le bouton droit de la souris sur le
dossier crée lors de l’étape au-dessus, puis
sélectionnez [Sharing and Security] (Partage
et sécurité).
11 Sur l’onglet [Sharing] (Partage), sélectionnez
[Share this folder] (Partager ce dossier), puis
cliquez sur [Permissions].
5 Saisissez la valeur indiquée en C-3 dans
[Password] (Mot de passe) et [Confirm
password] (Confirmer mot de passe).
6 Sélectionnez [Cannot change password] (Ne
peut pas modifier le mot de passe), puis
cliquez sur [Next] (Suivant).
7 Cliquez sur [Finish] (Terminer).
8 Cliquez sur [Close] (Fermer).
12 Cliquez sur [Add] (Ajouter).
13
Saisissez la valeur indiquée en C-2, puis cliquez
sur [Check Names] (Vérifier les noms).
14 Vérifiez que la valeur indiquée en C-2
s’affiche, puis cliquez sur [OK].
15
Cochez la case [Allow] (Autoriser) pour un
contrôle total [Full Control], puis cliquez sur [OK].
16 Fermez la boîte de dialogue Propriétés
du dossier.
17
Créez un profil pour terminer la configuration de
la fonction Scan To Network PC (Numérisation
vers PC en réseau). Voir page 89.
Pour Windows XP
1 Cliquez sur le bouton [Start] (Démarrer) >
86 - Français
[Control Panel] (Panneau de commande).
Page 87

2 Double-cliquez sur [User Accounts]
(Comptes d’utilisateurs).
3 Sélectionnez [Create a new account]
(Créer un nouveau compte).
4
Saisissez la valeur indiquée en C-2 dans la zone
de texte, puis cliquez sur [Next] (Suivant).
Remarque
Il est recommandé de créer un dossier dans
l’unité locale, et non sur le bureau ou dans
[My Documents] (Mes documents).
11 Cliquez avec le bouton droit de la souris sur le
dossier crée lors de l’étape au-dessus, puis
sélectionnez [Sharing and Security] (Partage
et sécurité).
12 Cliquez sur [If you understand the security
risks but want to share files without running
the wizard, click here.] (Si vous comprenez
les risques liés à la sécurité, mais souhaitez
partager des fichiers sans utiliser l’assistant,
cliquez ici).
13 Sélectionnez [Share this folder] (Partager ce
dossier) dans le pare-feu de Windows, puis
cliquez sur [OK].
5 Sélectionnez [Limited] (Limité) et cliquez sur
[Create Account] (Créer un nouveau compte).
6 Cliquez sur l’icône du compte utilisateur crée
lors de l’étape au-dessus.
7 Sélectionner [Create a password] (Créer un
mot de passe).
8
Saisissez les renseignements de la ligne C-3
dans [Type a new password] (Taper un nouveau
mot de passe) et [Type the new password again
to confirm] (Retaper le nouveau mot de passe
pour le confirmer), puis cliquez sur [Create
password] (Créer un mot de passe).
9 Fermez le panneau de commande.
10 Créer un nouveau dossier dans l’ordinateur
avec le nom saisi sur la ligne C-5.
14 Cochez les cases [Share this folder on the
network] (Partager ce dossier sur le réseau)
et [Allow network users to change my files]
(Autoriser les utilisateurs du réseau à modifier
mes fichiers), puis cliquez sur [OK].
15
Cochez la case [Allow] (Autoriser) pour [Full
Control] (Contrôle total), puis cliquez sur [OK].
16
Créez un profil pour terminer la configuration de
la fonction Scan To Network PC (Numérisation
vers PC en réseau). Voir page 89.
Pour Windows 2000
1 Sur le bureau, cliquez avec le bouton droit de
la souris sur [My Computer] (Mon ordinateur),
puis sélectionnez [Manage] (Gérer).
2
Dans la fenêtre de droite, double-cliquez sur
[System Tools] (Outils système) > [Local Users
and Groups] (Utilisateurs locaux et groupes).
Cliquez avec le bouton droit de la souris sur
[Users] (Utilisateurs) et sélectionnez [New
User] (Nouvel utilisateur).
87 - Français
Page 88

3
Saisissez la valeur indiquée en C-2 dans [User
name] (Nom d’utilisateur) et celle indiquée en
C-3 dans [Password] (Mot de passe) et
[Confirm password] (Confirmer mot de passe).
9 Sélectionnez [Share this folder] (Partager ce
dossier), puis cliquez sur [Permissions].
4
Sélectionnez [User Can not change password]
(L’utilisateur ne peut pas modifier le mot de
passe) et [Password never expires] (Pas
d’expiration du mot de passe), puis cliquez sur
[Create] (Créer).
5
Cliquez sur [Close] (Fermer) pour fermer
la fenêtre de dialogue [New User]
(Nouvel utilisateur).
Remarque
Si [User must change password at next logon]
(L’utilisateur devra modifier le mot de passe
lors de la prochaine connexion) est coché,
supprimez-le afin de pouvoir sélectionner [User
can not change password] (L’utilisateur ne peut
pas modifier le mot de passe) et [Password
never expires] (Pas d’expiration
du mot de passe).
6
Double-cliquez sur [User] (Utilisateur) et vérifiez
bien que l’utilisateur crée à l’étape 4 s’affiche.
Fermez la fenêtre [Computer Management]
(Gestion de l’ordinateur).
7 Créer un nouveau dossier dans l’ordinateur
avec le nom saisi sur la ligne C-5.
Remarque
Il est recommandé de créer le dossier dans
l’unité locale, et non sur le bureau ou dans
[My Documents] (Mes documents).
10 Cliquez sur [Add] (Ajouter).
11 Sélectionnez le compte utilisateur crée à
l’étape 4, puis cliquez sur [Add] (Ajouter).
12 Vérifiez bien que le compte utilisateur
s’affiche, puis cliquez sur [OK].
13 Cochez la case [Allow] (Autoriser) pour
un contrôle total [Full Control], puis cliquez
sur [OK].
14 Assurez-vous que l’icône du dossier partagé
se soit changée en icône avec une main, puis
fermez la fenêtre.
15
Créez un profil pour terminer la configuration de
la fonction Scan To Network PC (Numérisation
vers PC en réseau). Consultez “Les profils de la
fonction Scan to Network PC (Numérisation vers
PC en réseau)” à la page 89.
8 Cliquez avec le bouton droit de la souris sur le
dossier crée lors de l’étape 6, puis
sélectionnez [Sharing] (Partage).
88 - Français
Page 89

Les profils de la fonction Scan to Network PC (Numérisation vers PC en réseau)
9 Utilisez la touche fléchée vers le bas pour
sélectionner [Target URL] (URL Cible), puis
appuyez sur <OK>.
10
Saisissez les valeurs indiquées sur les lignes
C-1 et C-5 du formulaire de configuration
comme « \\C-1\C-5 » par ex., \\PC1\SalesDev.
Enregistrer les renseignements que vous avez
configurés sur l’ordinateur comme profil. Ceci est
nécessaire quand vous effectuez la fonction Scan
To Network PC (Numérisation vers PC en réseau)
avec l’ordinateur.
Création d’un profil
Remarque
Lors de l’utilisation des touches fléchées, appuyez
à plusieurs reprises sur la touche jusqu’à
atteindre la sélection.
1 Appuyez sur la touche <SETTING>
(Paramètre) sur le panneau de commande.
2 Utilisez la touche fléchée vers le bas pour
sélectionner [Profile] (Profil), puis appuyez
sur <OK>.
11 Utilisez les touches fléchées jusqu’à
sélectionner [Enter] (entrer), puis appuyez
sur <OK>.
12 Utilisez la touche fléchée vers le bas pour
sélectionner [User Name] (Nom d’utilisateur),
puis appuyez sur <OK>.
13 Saisissez les renseignements indiqués dans la
ligne C-2 du formulaire de configuration.
Si la gestion du domaine est effectuée,
saisissez « C-2@domain name ».
14 Utilisez les touches fléchées jusqu’à
sélectionner [Enter] (entrer), puis appuyez
sur <OK>.
15 Utilisez la touche fléchée vers le bas pour
sélectionner [Password] (Mot de passe), puis
appuyez sur <OK>.
16 Saisissez les renseignements indiqués dans la
ligne C-3 du formulaire de configuration.
17 Utilisez les touches fléchées jusqu’à
sélectionner [Enter] (entrer), puis appuyez
sur <OK>.
3
Utilisez la touche fléchée vers le bas pour
sélectionner le numéro de profil que vous
souhaitez enregistrer, puis appuyez sur
4 Utilisez la touche fléchée vers le bas pour
sélectionner [Edit] (Afficher), puis appuyez
sur <OK>.
5 Utilisez la touche fléchée vers le bas
pour sélectionner le numéro de profil que
vous souhaitez enregistrer, puis appuyez
sur <OK>.
6 Utilisez la touche fléchée vers le bas pour
sélectionner [Profile Name] (Nom de profil),
puis appuyez sur <OK>.
7 Saisissez les renseignements indiqués dans la
ligne C-4 du formulaire de configuration.
8 Utilisez les touches fléchées jusqu’à
sélectionner [Enter] (entrer), puis appuyez
sur <OK>.
<OK>
18 Utilisez la touche fléchée vers le bas pour
sélectionner [File Name] (Nom de fichier),
puis appuyez sur <OK>.
19 Saisissez les renseignements indiqués sur la
ligne C-6 du formulaire de configuration. Vous
.
pouvez entrer jusqu’à 64 caractères.
Ajouter « #n » à la fin d’un nom de dossier,
attribuera automatiquement un numéro de
série à la fin du nom des dossiers envoyés.
Ajouter « #d » à la fin d’un nom de dossier,
attribuera automatiquement une date à la fin
du nom des dossiers envoyés.
20
Utilisez les touches fléchées jusqu’à sélectionner
[Enter] (entrer), puis appuyez sur <OK>.
21 Configurer les autres options si nécessaire.
22
Appuyez sur
La configuration de la fonction Scan To Network PC
(Numérisation vers PC en réseau) est terminée.
Pour de plus amples détails sur l’utilisation de la
fonction Scan To Network PC (Numérisation vers
PC en réseau), reportez-vous au Guide de base
de l’utilisateur en ligne sur le DVD fourni avec
votre appareil.
<OK>
pour valider les paramètres.
89 - Français
Page 90

Modification un profil
5 Utilisez la touche fléchée vers la gauche
pour
sélectionner [Yes] (Oui) sur le
de confirmation.
message
Remarque
Lors de l’utilisation des touches fléchées, appuyez
à plusieurs reprises sur la touche jusqu’à
atteindre la sélection.
1 Appuyez sur la touche <SETTING>
(Paramètre) sur le panneau de commande.
2 Utilisez la touche fléchée vers le bas pour
sélectionner [Profile] (Profil), puis appuyez
sur <OK>.
3 Utilisez la touche fléchée vers le bas pour
sélectionner [Edit] (Afficher), puis appuyez
sur <OK>.
4 Utilisez la touche fléchée vers le bas pour
sélectionner le profil que vous souhaitez
modifier, puis appuyez sur
5 Utilisez la touche fléchée vers le bas pour
sélectionner l’option que vous souhaitez
modifier, puis appuyez sur
6 Modifier l’option.
<OK>
<OK>
.
.
6 Si vous souhaitez supprimer plus d’un profil,
répétez les étapes 4 et 5.
7 Appuyez sur
<OK>.
7
Utilisez les touches fléchées jusqu’à sélectionner
[Enter] (entrer), puis appuyez sur <OK>.
8 Si vous souhaitez modifier plus d’une option,
répétez les étapes 5 à 7.
9
Appuyez sur
<OK>
pour valider les paramètres.
Suppression d’un profil
Remarque
Lors de l’utilisation des touches fléchées, appuyez
à plusieurs reprises sur la touche jusqu’à
atteindre la sélection.
1 Appuyez sur la touche <SETTING>
(Paramètre) sur le panneau de commande.
2 Utilisez la touche fléchée vers le bas pour
sélectionner [Profile] (Profil), puis appuyez
sur <OK>.
3 Utilisez la touche fléchée vers le bas pour
sélectionner [Delete] (Supprimer), puis
appuyez sur <OK>.
4 Utilisez la touche fléchée vers le bas pour
sélectionner le profil que vous souhaitez
supprimer, puis appuyez sur
<OK>
.
90 - Français
Page 91

Configuration de l’Authentification de l’utilisateur et du Contrôle d’accès
Le contrôle d’accès peut être appliqué aux
Généralités
Ces fonctions servent à limiter l’accès à l’appareil.
Ceci afin d’économiser les cartouches, le papier
et limiter l’usure de l’appareil.
L’authentification de l’utilisateur et le contrôle d’accès
sont protégés par un mot de passe et doivent être
configurés par l’administrateur du système.
Les conditions suivantes sont requises pour
activer ces fonctions :
• L’appareil doit être connecté à un réseau.
• Pour les réseaux seulement équipés de
systèmes Windows, l’utilitaire d’outil de
configuration doit être installé sur un
ordinateur du réseau.
• Pour les systèmes Macintosh, le Client de
comptabilisation des travaux doit être installé.
Authentification de l’utilisateur?
L’authentification de l’utilisateur permet à
l’administrateur du système de limiter l’utilisation
de l’appareil à des personnes qui se sont vues
attribuer soit
• un PIN (NIP - Numéro d’identification personnel)
ou
• un nom d’utilisateur et un mot de passe.
Cette limitation s’applique à la fois à une utilisation
physique de la machine ou depuis un ordinateur.
Vous pouvez attribuer jusqu’à 100 PIN (NIP),
avec ou sans nom d’utilisateur et mot de passe.
fonctions suivantes :
• Copies (couleur/monochromes)
• Impression (couleur/monochrome)
• Impression à partir d’une clé de mémoire USB
• Numérisation vers Courriel
• Scan to Network PC (Numérisation vers PC
en réseau)
• Numérisation vers clé de mémoire USB
• Télécopie
• Télécopie par PC
• Télécopie Internet
Avant de commencer
Il y a plusieurs façons de configurer le contrôle
d’accès à votre appareil :
• Par le biais d’un logiciel
• Par le biais de la page Web
• Par le panneau de commande
Ce guide comprend les instructions pour la
configuration de l’appareil en utilisant les
utilitaires du logiciel.
Pour plus d’information sur l’utilisation de la page
web ou du panneau de commande, reportez-vous
au Guide de l’utilisateur avancé disponible sur
www.my.okidata.com.
Le contrôle d’accès
Le contrôle d’accès est plus sophistiqué car il
permet à l’administrateur du système de limiter le
type de fonctions disponibles que chaque personne
autorisée à utiliser la machine peut effectuer.
91 - Français
Systèmes sous Windows
Chargement de l’outil de configuration
Afin de configurer l’authentification de l’utilisateur et
le contrôle d’accès sous Windows, vous devez installer
l’utilitaire de configuration sur votre ordinateur.
1 Vérifiez bien que votre ordinateur est allumé
et connecté à l’appareil, puis placez le DVD
Page 92

fourni avec votre appareil dans l’unité de
CD/DVD.
Le DVD se met en marche seul. Si ce n’est pas
le cas, double-cliquez sur le fichier de
configuration OKI du DVD.
2
Sélectionnez votre langue dans la liste
déroulante, puis cliquez sur [Next] (Suivant).
3 Lisez le Contrat de licence, puis cliquez sur
[I Agree] (J’approuve).
4 Cliquez sur [MFP Software] (Logiciel AMF).
5 Cliquez sur [Install Configuration Tool]
(Installer Outil de configuration).
2
Cliquez sur [Start] (Démarrer) > [Programs]
(Programmes) > [Okidata] > [Configuration
Tool] (Outil de configuration) > [Configuration
Too] (Outils de cofiguration).
3 Cliquez sur [Register Device] (Enregistrer
le périphérique) dans la liste - déroulante
dans Outils.
4 Double-cliquez sur le nom du modèle de
votre appareil.
Le nom s’affiche dans le tableau des
périphériques enregistrés [Registered Device
Table] à gauche de l’écran.
6 Cliquez sur [Install] (Installer) et attendez
que le logiciel s’installe.
7 Sélectionnez le modèle de votre appareil, puis
cliquez sur [Next] (Suivant).
8 Cliquez sur [Close] (Fermer).
Se servir de l’outil de configuration pour configurer L’authentification de l’utilisateur/Contrôle d’accès
1
Vérifiez que votre appareil et votre ordinateur
soient bien allumés et connectés par le réseau.
5 Dans la liste, double-cliquez sur votre
appareil, puis sélectionnez l’onglet [User
Setting] (Paramètres utilisateur).
6 Cliquez sur [PIN Manager] (Gestionnaire du
NIP), puis saisissez le mot de passe
administrateur et cliquez sur <OK>.
7 Pour saisir le numéro de PIN (NIP) et le
configurer avec le contrôle d’accès souhaité,
cliquez sur l’icône du PIN (NIP).
Pour saisir un nouvel utilisateur avec un code
utilisateur, un mot de passe et un numéro PIN
(NIP), cliquez sur l’icône New (User) (Nouvel
[utilisateur]).
8 Répétez l’étape ci-dessus pour chaque
utilisateur du réseau.
9 Une fois terminé, cliquez sur l’icône [Save to
Device] (Sauvegarder sur le périphérique).
Les résultats que vous avez entrés sont
sauvegardés dans l’appareil.
92 - Français
Page 93

Systèmes sous Mac
9 Utilisez la touche fléchée vers la gauche pour
revenir à l’écran principal.
Afin de configurer l’authentification de l’utilisateur et le
contrôle d’accès sous Mac
de l’utilisateur avancé disponible sur
www.my.okidata.com.
, reportez-vous au Guide
Authentification par PIN (NIP)
Activation du contrôle d’accès par PIN (NIP)
Une fois la configuration des PIN (NIP) et/ou des ID
utilisateurs/mots de passe, vous devez aller dans le
menu de l’appareil et activer le contrôle d’accès.
Le contrôle d’accès est protégé par un mot de
passe : vous devez connaître le mot de passe
administrateur pour continuer.
Remarque
Pour faire défiler les différentes sélections sur
l’affichage, appuyez sur la touche fléchée vers le
bas (ou vers le haut) de façon répétitive.
\
1 Appuyez sur <SETTING> (Paramètre) sur le
panneau de commande.
2 Utilisez la touche fléchée vers le haut pour
sélectionner [Admin Setup] (Configuration
Administrateur), puis appuyez sur <OK>.
3 Entrez votre mot de passe administrateur :
utilisez les touches fléchées pour sélectionner
les chiffres de votre mot de passe en
appuyant <OK> entre les chiffres.
4 Une fois la saisie de votre mot de passe
terminée, utilisez les touches fléchées jusqu’à
ce que [Enter] (entrer) s’affiche, puis appuyez
sur <OK>.
5 Utilisez la touche fléchée vers le haut pour
sélectionner [Management] (Gestion), puis
appuyez sur <OK>.
Le contrôle d’accès est activé.
Opération à l’appareil
Se connecter
Utilisateurs généraux
1 Saisissez le PIN (NIP) qui vous a été attribué
grâce au clavier de dix touches situé sur le
panneau de commande.
2 Appuyez sur <OK>.
L’écran principal s’affiche.
Administrateur
1 Saisissez « 000000 » grâce au clavier de dix
touches situé sur le panneau de commande,
puis appuyez sur <OK>.
•Le PIN (NIP) de l’administrateur est
« 000000 ». Vous ne pouvez pas modifier
cette valeur.
2 Lorsque l’écran Mot de passe administrateur
s’affiche, saisissez le mot de passe
administrateur : utilisez les touches fléchées
pour sélectionner les chiffres du mot de passe
en appuyant sur <OK> après la mise en
évidence de chaque chiffre.
3 Utilisez les touches fléchées jusqu’à ce
que [Enter] (entrer) s’affiche, puis appuyez
sur <OK>.
L’écran principal s’affiche.
Se déconnecter
Lorsque vous avez terminé d’utiliser l’appareil, ne
pas oublier de vous déconnecter.
1 Appuyez sur la touche fléchée vers la gauche
jusqu’à ce que l’écran principal s’affiche.
6 Utilisez la touche fléchée vers le bas pour
sélectionner [System Setup] (Configuration
du système), puis appuyez sur <OK>.
7
Vérifiez bien que Contrôle d’accès [Access
Control] est sélectionné, puis appuyez sur <OK>.
8 Utilisez la touche fléchée vers le haut pour
sélectionner PIN (NIP) comme méthode de
contrôle d’accès, puis appuyez sur <OK>.
93 - Français
Page 94

2 Appuyez sur <RESET/LOGOUT> (Remise
à zéro/Déconnexion) sur le panneau
de commande.
Remarque
Le type d’authentification spécifié sur l’ordinateur
est prioritaire à celui spécifié sur l’appareil.
Configurer les ordinateurs Windows
pour l’impression
L’écran revient au message de demande de
PIN (NIP).
Remarque
L’appareil déconnecte automatiquement les
utilisateurs après un certain délai.
Configurer un formulaire d’exploitation à partir d’un ordinateur avec une authentification par PIN (NIP)
Tout d’abord, en vous servant du DVD, contrôlez
que le(s) pilote(s) adéquat(s) ai(en)t été bien
installé(s) sur l’ordinateur.
Ensuite, installez le logiciel (client) de
comptabilisation des travaux sur l’ordinateur.
Pour cela, placez le DVD fourni avec l’appareil
dans l’unité de l’ordinateur et suivez les
messages qui s’affichent pour installer le logiciel
de comptabilisation des travaux depuis Internet.
Remarque
Cette procédure se sert de Windows 7 à titre
d’exemple. Il se peut que les procédures et les
menus diffèrent en fonction du système
d’exploitation que vous utilisez.
1
Cliquez sur [Start] (Démarrer) > [All Programs]
(Tous les programmes) > [Okidata] > [Print Job
Accounting Client] (Client de comptabilisation
des travaux d’impression) > [Change Job
Accounting Mode] (Modifier le mode de
comptabilisation des travaux).
2 Dans la fenêtre [User Account Control]
(Contrôle du compte utilisateur), cliquez sur
[Yes] (Oui).
3 Sélectionnez l’imprimante que vous souhaitez
définir dans [Driver] (Pilote).
4 Cochez la case [Tab] (Onglet), puis cliquez sur
[Change] (Modifier).
5 Cliquez sur [OK].
6 À partir du menu [File] (Fichier), sélectionnez
[Close] (Fermer).
7 Cliquez sur [Start] (Démarrer) et sélectionnez
94 - Français
[Devices and Printers] (Périphériques
et imprimantes).
• Sous Windows Server 2008, cliquez sur
[Start] (Démarrer) et sélectionnez [Control
Panel] (Panneau de commande) >
[Printers] (Imprimantes).
• Sous Windows Vista, cliquez sur [Start]
(Démarrer) et sélectionnez [Control
Panel] (Panneau de commande) >
[Printer] (Imprimante).
• Sous Windows Server 2003, cliquez sur
[Start] (Démarrer) > [Printers and Faxes]
(Imprimantes et Télécopies).
• Sous Windows XP, cliquez sur [Start]
(Démarrer) > [Printers and Faxes]
(Imprimantes et Télécopies).
• Sous Windows 2000, cliquez sur [Start]
(Démarrer) > [Settings] (Paramètres) >
[Printers] (Imprimantes).
Page 95

8 Pour chaque pilote installé sur l’ordinateur :
a) cliquez avec le bouton droit de la souris
sur l’icône OKI CX2731 MFP et
sélectionnez [Printer properties]
(Propriétés de l’imprimante) > [OKI
CX2731 MFP (XXX*)].
*XXX = PCL, PS, ou FAX
b) Sélectionnez l’onglet [Job Accounting]
(Comptabilisation des travaux).
c) Saisissez le nom d’utilisateur dans [User
Name] et le PIN (NIP) dans [Job Account
ID] (Code de comptabilisation des travaux).
1 Insérez le DVD fourni avec votre appareil.
2 Double-cliquez sur l’icône OKI qui figure sur
le bureau.
3 Double-cliquez sur [Utility] (Utilitaire) >
[JA Client] (Client JA) > [Print JobAccounting]
(Imprimer Comptabilisation des travaux).
4 Cliquez sur [New] (Nouveau).
5
Saisissez le nom d’utilisateur sous [User Name]
et le PIN (NIP) à côté de [Job Account ID] (Code
de comptabilisation des travaux).
d) Cliquez sur [OK].
Effectuer une impression à partir
de Windows
1 Ouvrez le fichier à imprimer.
2 Sélectionner [Print] (Imprimer) dans le menu
[File] (Fichier).
3 Sélectionnez le pilote d’imprimante, puis
cliquez sur [Print] (Imprimer).
Configurer les ordinateurs Mac
pour l’impression
Remarque
Cette procédure utilise le Mac OS X 10.6 (Snow
Leopard) à titre d’exemple. Il se peut que les
procédures et les menus diffèrent en fonction du
système d’exploitation que vous utilisez.
6 Cliquez sur [Save] (Sauvegarder).
7 Cliquez sur [Save] (Sauvegarder).
8 S’il vous est demandé, saisissez le mot de
passe utilisateur, puis cliquez sur [OK].
Effectuer une impression à partir
d’un Mac
1 Ouvrez le fichier à imprimer.
2 Dans le menu [File] (Fichier), sélectionnez
[Print] (Imprimer).
3 Sélectionnez votre appareil, puis cliquez sur
[Print] (Imprimer).
Configurer les ordinateurs Windows
pour la télécopie
Remarque
Cette procédure se sert de
Windows 7 à titre d’exemple. Il se peut que les
procédures et les menus diffèrent en fonction du
système d’exploitation que vous utilisez.
1
95 - Français
Cliquez sur [Start] (Démarrer) > [All Programs]
(Tous les programmes) > [Okidata] > [Print Job
Accounting Client] (Client de comptabilisation
des travaux d’impression) > [Change Job
Page 96

Accounting Mode] (Modifier le mode de
comptabilisation des travaux).
2 Dans la fenêtre [User Account Control]
(Contrôle du compte utilisateur), cliquez sur
[Yes] (Oui).
3 Sélectionnez le pilote de télécopie dans
[Driver] (Pilote).
4 Cochez la case [Tab] (Onglet), puis cliquez sur
[Change] (Modifier).
5 Cliquez sur [OK].
Authentification par Nom d’utilisateur et Mot de passe
Activation du contrôle d’accès par Nom d’utilisateur/Mot de passe
Le contrôle d’accès est protégé par un mot de
passe : vous devez connaître le mot de passe
administrateur pour continuer.
6 À partir du menu [File] (Fichier), sélectionnez
[Close] (Fermer).
7 Cliquez sur [Start] (Démarrer) et sélectionnez
[Devices and Printers] (Périphériques
et imprimantes).
- Sous Windows Server 2008, cliquez sur
[Start] (Démarrer) et sélectionnez
[Control Panel] (Panneau de commande) >
[Printers] (Imprimantes).
- Sous Windows Vista, cliquez sur [Start]
(Démarrer) et sélectionnez [Control
Panel] (Panneau de commande) >
[Printer] (Imprimante).
- Sous Windows Server 2003, cliquez sur
[Start] (Démarrer) et sélectionnez [Printers
and Faxes] (Imprimantes et Télécopies).
- Sous Windows XP, cliquez sur [Start]
(Démarrer) et sélectionnez [Printers and
Faxes] (Imprimantes et Télécopies).
- Sous Windows 2000, cliquez sur [Start]
(Démarrer) et sélectionnez [Settings]
(Paramètres) > [Printers] (Imprimantes).
8 Cliquez avec le bouton droit de la souris sur
l’icône OKI CX2731 MFP et sélectionnez
[Printer properties] (Propriétés de
l’imprimante) > [OKI CX2731 MFP (FAX)].
9 Sélectionnez l’onglet [Job Accounting]
(Comptabilisation des travaux).
10 Saisissez le nom d’utilisateur dans [User
Name] et le PIN (NIP) dans [Job Account ID]
(Code de comptabilisation des travaux).
11 Cliquez sur [OK].
Envoyer des télécopies à partir
de Windows
1 Ouvrez le fichier à faxer.
2 Dans le menu [File] (Fichier), sélectionnez
[Print] (Imprimer).
Remarque
Pour faire défiler les différentes sélections sur
l’affichage, appuyez sur la touche fléchée vers le
bas (ou vers le haut) de façon répétitive.
\
1 Appuyez sur <SETTING> (Paramètre) sur le
panneau de commande.
2 Utilisez la touche fléchée vers le haut pour
sélectionner [Admin Setup] (Configuration
Administrateur), puis appuyez sur <OK>.
3 Entrez votre mot de passe administrateur :
utilisez les touches fléchées pour sélectionner
les chiffres de votre mot de passe en
appuyant sur <OK> entre chaque chiffre.
4 Une fois la saisie de votre mot de passe
terminée, utilisez les touches fléchées jusqu’à
ce que [Enter] (entrer) s’affiche, puis appuyez
sur <OK>.
5 Utilisez la touche fléchée vers le haut pour
sélectionner [Management] (Gestion), puis
appuyez sur <OK>.
6 Utilisez la touche fléchée vers le bas pour
sélectionner [System Setup] (Configuration
du système), puis appuyez sur <OK>.
7 Vérifiez bien que Contrôle d’accès [Access
Control] est sélectionné, puis appuyez
sur <OK>.
8 Utilisez la touche fléchée vers le haut pour
sélectionner Utilisateur/Mot de passe comme
méthode de contrôle d’accès, puis appuyez
sur <OK>.
9 Utilisez la touche fléchée vers la gauche pour
revenir à l’écran principal.
Le contrôle d’accès est activé.
3 Sélectionnez le pilote de fax, puis cliquez
[Print] (Imprimer).
96 - Français
Page 97

Exploitation à partir d’un ordinateur
Effectuer une impression à partir
d’un Mac
Remarque
Le type d’authentification spécifié sur l’ordinateur
est prioritaire à celui spécifié sur l’appareil.
Effectuer une impression à partir
de Windows
Remarque
Cette procédure se sert de NotePad et de
Windows 7 à titre d’exemple. Il se peut que les
procédures et les menus diffèrent en fonction du
système d’exploitation que vous utilisez.
1 Ouvrez le fichier à imprimer.
2 Dans le menu [File] (Fichier), sélectionnez
[Print] (Imprimer).
3 Sélectionnez le pilote d’imprimante souhaité
dans [Select Printer], puis cliquez
[Preferences] (Préférences).
Remarque
Cette procédure utilise le Mac OS X 10.6 à titre
d’exemple. Il se peut que les procédures et les
menus diffèrent en fonction du système
d’exploitation que vous utilisez.
1 Ouvrez le fichier à imprimer.
2 Dans le menu [File] (Fichier), sélectionnez
[Print] (Imprimer).
3 Sélectionnez les pilotes d’imprimante de
votre appareil.
4 Sélectionnez [UserAuth] (Auth. utilisateur) à
partir du menu sous les menus [Printer]
(Imprimante) et [Presets] (Préréglages).
4 Cliquez sur l’onglet [Job Options] (Options
des travaux).
5 Cliquez sur [User Auth] (Auth. Utilisateur).
6 Cochez la case [Use User Authentication]
(Utiliser Authentification de l’utilisateur).
7 Saisissez le nom d’utilisateur sous [User
Name] et le mot de passe dans [Password].
Cliquer sur [Use Windows Login] (Utiliser le
nom utilisé pour l’ouverture des sessions
Windows) permet de saisir automatiquement
votre nom d’utilisateur
8 Cliquez sur [OK].
9 Cliquez sur [OK], puis sur [Print] (Imprimer).
sous Windows.
5 Cochez la case [Use User Auth] (Utiliser
Authentification de l’utilisateur) sur le
panneau [UserAuth] (Auth.Utilisateur)
6 Saisissez le nom d’utilisateur dans [User
Name] et le mot de passe dans [Password].
7 Cliquez sur [Print] (Imprimer).
97 - Français
Page 98

Envoyer des télécopies à partir
de Windows
Remarque
Cette procédure se sert de NotePad et de
Windows 7 à titre d’exemple. Il se peut que les
procédures et les menus diffèrent en fonction du
système d’exploitation que vous utilisez.
1 Ouvrez le fichier à faxer.
2 Dans le menu [File] (Fichier), sélectionnez
[Print] (Imprimer).
3 Sélectionnez le (pilote de fax) de votre
appareil dans [Select Printer]
(Sélectionner l’mprimante), puis cliquez sur
[Preferences] (Préférences).
4 Dans l’onglet [Setup], cliquez sur [User Auth]
(Authentification Utilisateur).
5 Cochez la case [Use User Authentication]
(Utiliser Authentification de l’utilisateur).
6 Saisissez le nom d’utilisateur sous [User
Name] et le mot de passe dans [Password].
Remarque
Cliquer sur [Use Windows Login] (Utiliser le
nom utilisé pour l’ouverture des sessions
Windows) permet de saisir automatiquement
votre nom d’utilisateur sous Windows.
7 Cliquez sur [OK].
8 Cliquez sur [OK], puis sur [Print] (Imprimer).
98 - Français
Page 99

Configuration du télécopieur
Connexion pour télécopieur
Les paramètres de base pour télécopier
Vous devez configurer les paramètres suivants
avant d’émettre des télécopies.
Raccordement d’une ligne téléphonique
Important!
N’utilisez que le fil téléphonique fourni avec
votre télécopieur. L’utilisation d’un autre fil
peut entraîner une défaillance.
Connexion pour télécopie uniquement
1 Insérez une extrémité du fil téléphonique
fourni dans la connexion LIGNE au dos de
l’appareil et l’autre dans une prise
téléphonique active.
et téléphone
1 Insérez une extrémité du fil téléphonique
fourni dans la connexion LIGNE au dos de
l’appareil et l’autre dans une prise
téléphonique active.
2
Fixez le couvercle du connecteur livré avec
l’appareil à la connexion TEL au dos de l’appareil.
2 Branchez le fil du téléphone dans la connexion
TEL, située au dos de l’appareil.
99 - Français
Page 100

Réglage de l’heure courante et renseignements relatifs à l’expéditeur
6 Utilisez la touche fléchée vers le bas pour
sélectionner [Not Summer Time] (heure
normale) ou [Now Summer Time] (heure
d’été) pour une économie d’énergie, puis
appuyez sur la touche fléchée vers la droite.
Remarque
Vous pouvez automatiquement définir l’heure et
la date en vous rendant sur la page Internet.
Pour connaître les détails, reportez-vous au
Guide d’utilisation avancé disponible sur
www.my.okidata.com.
Remarque
Lors de l’utilisation des touches fléchées, appuyez
à plusieurs reprises sur la touche jusqu’à
atteindre la sélection.
1 Appuyez sur <SETTING> (Paramètre) sur le
panneau de commande.
2 Utilisez la touche fléchée vers le bas pour
sélectionner [Easy Setup] (Configuration
simplifiée), puis appuyez sur <OK>.
7 Utilisez la touche fléchée vers le bas pour
sélectionner [Manual] (Manuel), puis appuyez
sur la touche fléchée vers la droite.
8
Utilisez les touches fléchées vers le haut et vers
le bas pour régler l’année, le mois et le jour, le
fait d’appuyer sur la touche fléchée vers la
droite fait passer successivement d’un bloc à
l’autre. Une fois terminé, appuyez sur <OK>.
9 Utilisez les touches fléchées vers le haut et
vers le bas pour régler l’heure courante
(heure, minute, seconde), appuyer sur la
touche fléchée vers la droite fait passer
successivement d’un bloc à l’autre. Une fois
terminé, appuyez sur <OK>.
Le message « Le paramétrage de l’heure/date
s’est déroulé avec succès » s’affiche, suivi du
menu Configuration.
Indication des renseignements relatifs
à l’expéditeur
Spécifier le numéro de télécopie et le nom
d’expéditeur de votre appareil. Le code de
l’expéditeur est indiqué en haut de la télécopie
imprimée par le destinataire.
3 Si demandé, entrez le mot de passe de
l’administrateur, puis utilisez les touches
fléchées pour mettre en surbrillance [Enter]
(entrer) et appuyez sur <OK>.
4 Une fois [Date/Time Setting] (Paramètre
date/heure) mis en surbrillance, appuyez sur
la touche fléchée vers la droite.
5 Utilisez la touche fléchée vers le bas pour
sélectionner le fuseau horaire adéquat, puis
appuyez sur la touche fléchée vers la droite.
Vous pouvez sélectionner un fuseau horaire
entre [-12:00] et [+13:00] en accroissements
de 15 minutes.
10 Utilisez la touche fléchée vers le bas pour
sélectionner [Fax Setting] (Paramétrage du
télécopieur), puis appuyez sur la touche
fléchée vers la droite.
11 Appuyez sur <OK> pour sélectionner
[FAX number] (Numéro du télécopieur).
12 À l’aide du clavier, saisissez le numéro de
votre télécopieur.
13 Une fois [Enter] (entrer) mis en surbrillance,
appuyez sur <OK>.
14 Appuyez sur la touche fléchée vers la
droite pour sélectionner [Sender ID] (code
de l’expéditeur).
15 Utilisez le clavier pour saisir votre code qui
peut comporter jusqu’à 22 caractères. Une
fois le code saisi, utilisez les touches fléchées
pour mettre en surbrillance [Enter] (entrer) et
appuyez sur <OK>.
100 - Français
 Loading...