

Page 1
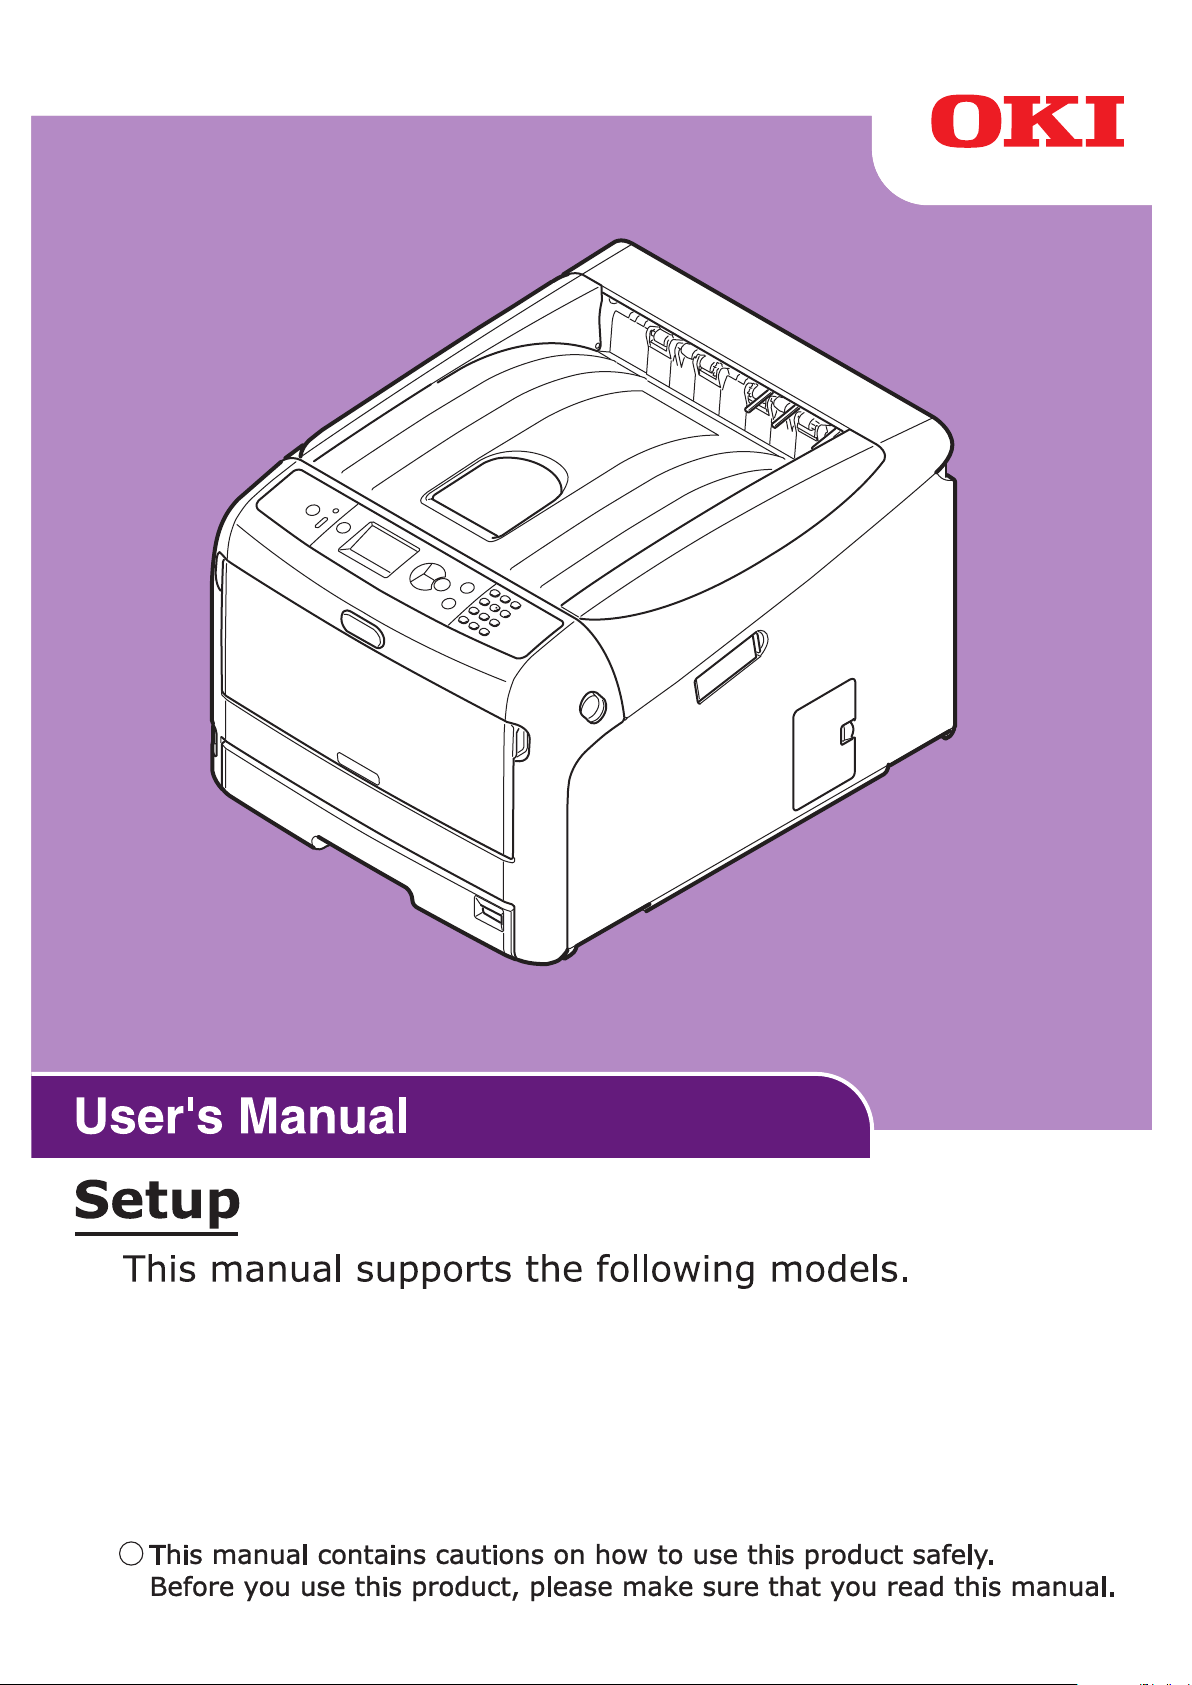
C813n
C823n/C823dn
C833n/C833dn
C843n/C843dn
ES8433
ES8443
- 1 -
Page 2
●● About the Product Warranty
Every effort has been made to ensure that the information in this document is complete, accurate,
and up-to-date. The manufacturer assumes no responsibility for the results of errors beyond its
control. The manufacturer also cannot guarantee that changes in software and equipment made by
other manufacturers and referred to in this guide will not affect the applicability of the information
in it. Mention of software products manufactured by other companies does not necessarily constitute
endorsement by the manufacturer.
While all reasonable efforts have been made to make this document as accurate and helpful as
possible, we make no warranty of any kind, expressed or implied, as to the accuracy or completeness
of the information contained herein.
All rights are reserved by Oki Data Corporation. You must not copy, transfer, translate, etc. the content
herein without authorization. You must obtain written permission from Oki Data Corporation before
doing any of the above.
© 2016 Oki Data Corporation
OKI is a registered trademark of Oki Electric Industry Co., Ltd.
Energy Star is a trademark of the United States Environmental Protection Agency.
Microsoft, Windows, Windows Server and Windows Vista are registered trademarks of Microsoft
Corporation.
Apple, Mac and OS X are registered trademarks of Apple Inc.
Other product names and brand names are registered trademarks or trademarks of their proprietors.
This product complies with the requirements of the Council Directives 2014/30/EU (EMC),
2014/35/EU (LVD), 2014/53/EU (RED), 2009/125/EC (ErP) and 2011/65/EU(RoHS),
as amended where applicable, on the approximation of the laws of the member states relating to
Electromagnetic Compatibility, Low Voltage, Radio & Telecommunications Terminal Equipment,
Energy related Products and Restriction on the use of certain Hazardous Substances in electrical
and electronic equipment.
The following cables were used to evaluate this product for EMC directive 2014/30/EU compliance,
and configurations other than this may affect that compliance.
cable type
Power 1.8
USB 5.0
LAN 15.0
length
(meters)
core shield
- 2 -
Page 3

.
c
o
m
/
●●(1(5*<67$5
Target countries of the ENERGY STAR program are the United States, Canada and Japan.
It is not applicable to other countries.
This product is compliant with ENERGY STAR v2.0 only.
●● Emergency rst aid
Take care with toner powder:
If swallowed, give small amounts of cold water and seek medical attention. DO
NOT attempt to induce vomiting.
If inhaled, move the person to an open area for fresh air. Seek medical attention.
If it gets into the eyes, ush with large amounts of water for at least 15 minutes
keeping eyelids open. Seek medical attention.
Spillages should be treated with cold water and soap to help reduce risk of
staining skin or clothing.
●
● Environmental information
p
r
i
n
w
w
w
i
k
o
.
t
i
n
g
/
- 3 -
Page 4
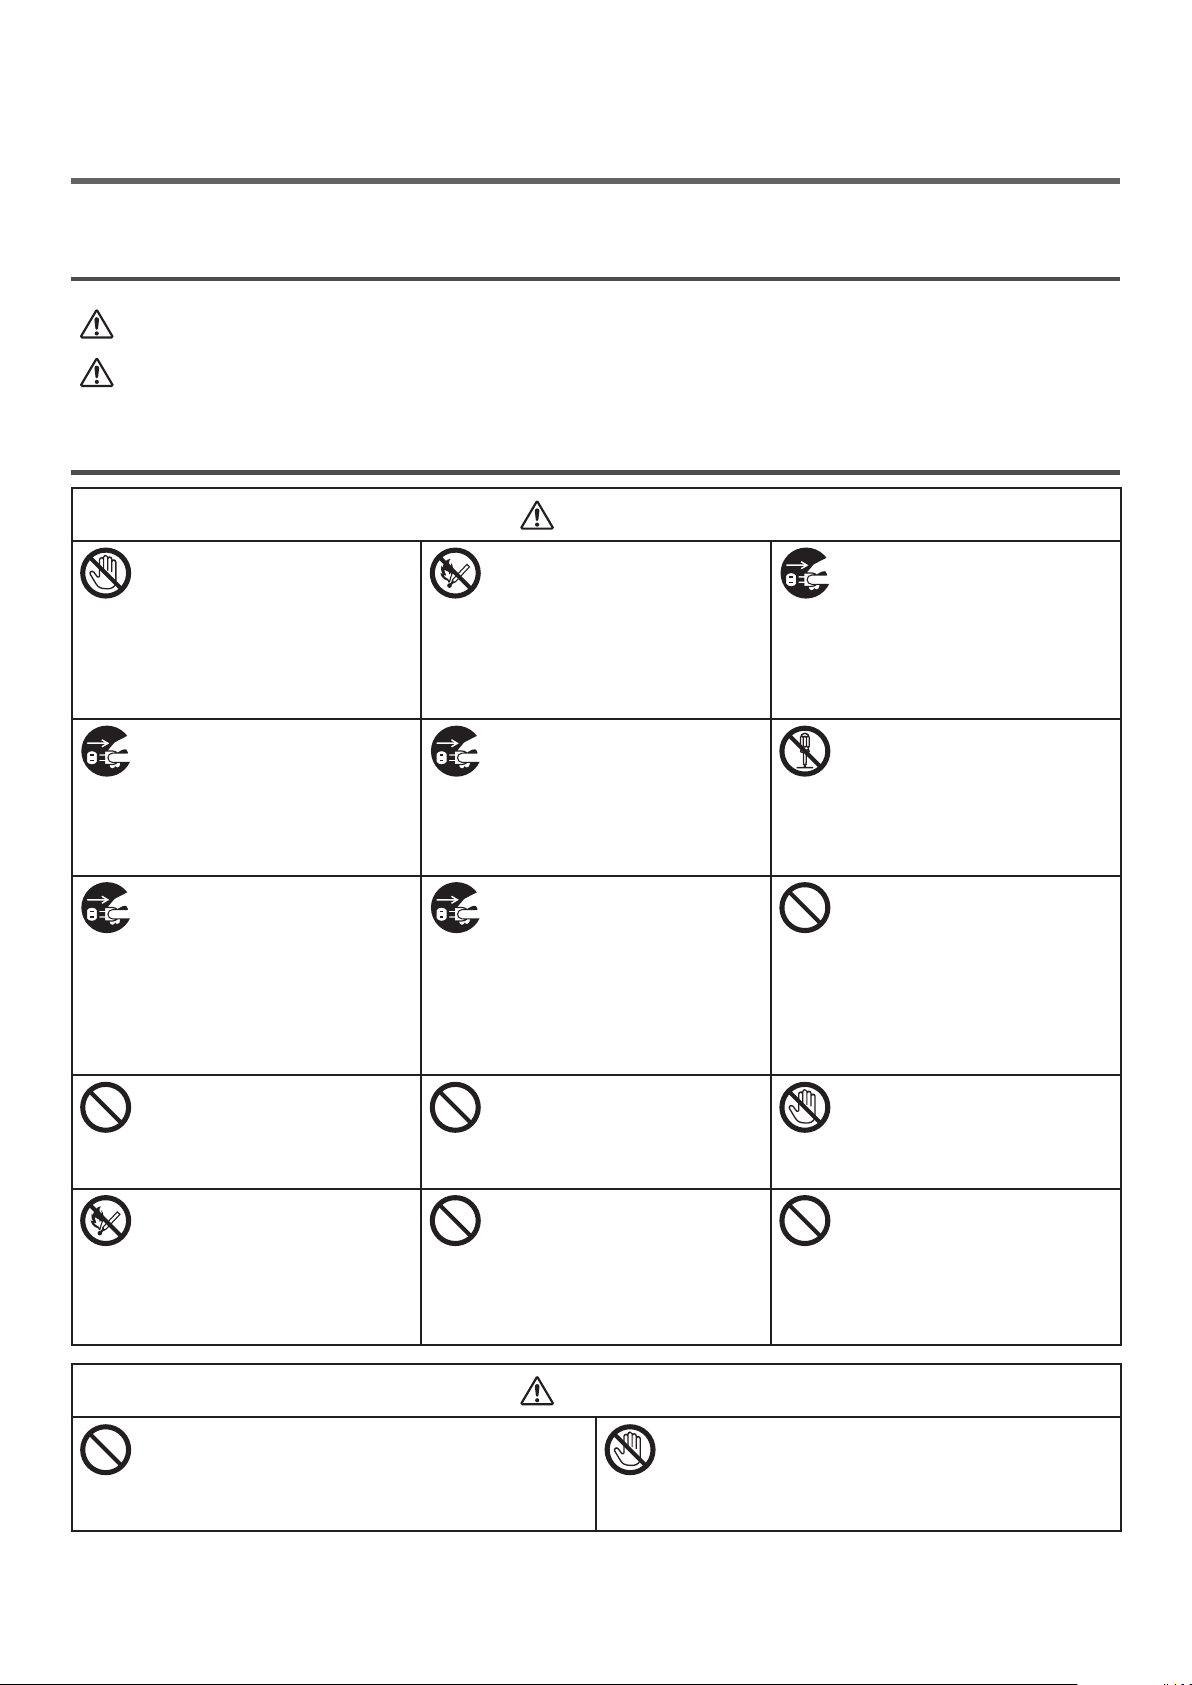
●● For Your Safety
WARNING
CAUTION
WARNING
CAUTION
Read the User’s Manual for your safety before using the product.
Cautions related to safety
A warning provides additional information which, if ignored, may result in a risk of personal
injury.
A caution provides additional information which, if ignored, may result in equipment
malfunction or damage.
General cautions
Do not touch the safety
switch inside the printer.
Doing so may cause electric
shock when high voltage
occurs. In addition, the
rotating gears may result in
injury.
Unplug the power cord and
contact a customer service
center if a liquid such as
water enters in the internal
parts of the printer.
Failure to do so may lead to
a re.
Unplug the power cord
and contact a customer
service center if the printer
is dropped or the cover is
damaged.
Failure to do so may cause
electric shock and/or re,
leading to injuries.
Do not insert materials in a
vent hole.
Doing so may cause electric
shock and/or re leading to
personal injuries.
Do not throw toner cartridges
and image drum cartridges
into re. Doing so may cause
dust explosion leading to
burns.
Do not use highly ammable
sprays near the printer. Doing
so may cause re as parts of
the printer are hot.
Unplug the power cord and
remove foreign materials
such as paper clips if they
fall inside the printer. Failure
to do so may cause electric
shock and/or re, leading to
injuries.
Unplug the power cord
periodically to clean plug
blades and base section
between the blades.
If the power plug remains
inserted for a long time, the
base section will get dusty,
and the plug may short
circuit, which may cause re.
Do not put a cup with liquids
such as water on the printer.
Doing so may cause electric
shock and/or re leading to
personal injuries.
Do not use a power cord, a
cable, or a ground wire other
than those that are indicated
in User's Manual.
Doing so may cause re.
Unplug the power cord
and contact a customer
service center if the cover
is unusually hot, smoking,
giving off an unusual odor,
or making strange noises.
Failure to do so may lead to
a re.
Do not operate and/or
disassemble the printer other
than as directed in User’s
Manual. Doing so may cause
electric shock and/or re,
leading to injuries.
Do not clean spilled toner
with a vacuum cleaner.
If cleaning spilled toner with
a vacuum cleaner, it may
catch re due to the sparks
from electric contact.
Toner spilled on the oor
should be wiped off with wet
cloth.
Do not touch the fuser and
other parts when opening the
cover of the printer.
Doing so may cause burns.
The operation of using UPS
(uninterruptible power
source) or inverters is not
guaranteed. Do not use
uninterruptible power source
or inverters.
Doing so may cause re.
Do not come closer to the paper’s exit area
when the power is turned on, while printing.
Doing so may result in personal injury.
Do not touch a damaged liquid-crystal display.
If liquid (liquid crystal) leaked from the liquid-
crystal display gets into the eyes or mouth, ush
with large amount of water. Follow the direction
from a doctor if necessary.
- 4 -
Page 5
●● Manual Composition
WARNING
CAUTION
The following manuals are included with this product.
● User’s Manual (Setup) ---- This document
Basic operations are described to aid understanding of this printer. The initial setup descriptions
including printer placement and the network initial setting are noted along with troubleshooting and
maintenance procedures.
●● About This Manual
Terms in this document
The following terms are used in this manual.
Note
● Indicates important information on operations. Make sure to read sections with this mark.
Memo
● Indicates additional information on operations. You should read sections with this mark.
Reference
● Indicates where to look when you want to know more detailed or related information.
● A warning provides additional information which, if ignored, may result in a risk of personal injury.
● A caution provides additional information which, if ignored, may result in equipment malfunction or
damage.
Symbols in this document
The following symbols are used in this manual.
Symbols Description
[ ] ● Indicates menu names on the display screen.
● Indicates menu, window, and dialog names on the computer.
" " ● Indicates messages and input text on the display screen.
● Indicates le names on the computer.
● Indicates reference titles.
< > button/key Indicates a hardware button on the operator panel or a key on the keyboard of the
computer.
> Indicates how to get to the item you want in the menu of this printer or the computer.
Your Printer
Indicates a printer you want to use or select.
- 5 -
Page 6

Notation used in this manual
The following notations may be used in this manual.
● C813n→ C813
● C823n/C823dn→ C823
● C833n/C833dn→ C833
● C843n/C843dn→ C843
● PostScript3 Emulation→ PSE, POSTSCRIPT3 Emulation, POSTSCRIPT3 EMULATION
®
● Microsoft
● Microsoft
● Microsoft
● Microsoft
● Microsoft
● Microsoft
● Microsoft
● Microsoft
● Microsoft
● Microsoft
● Microsoft
● Microsoft
● Microsoft
● Microsoft
● Microsoft
● Generic name for Windows 10, Windows 8.1, Windows 8, Windows Server 2012, Windows 7, Windows Vista, and
Windows Server 2008→ Windows
Windows® 10 64-bit Edition operating system→ Windows 10 (64bit version) *
®
Windows® 8.1 64-bit Edition operating system→ Windows 8.1 (64bit version) *
®
Windows® 8 64-bit Edition operating system→ Windows 8 (64bit version) *
®
Windows® 7 64-bit Edition operating system→ Windows 7 (64bit version) *
®
Windows Vista® 64-bit Edition operating system→ Windows Vista (64bit version) *
®
Windows Server® 2012 R2 64-bit Edition operating system→ Windows Server 2012 *
®
Windows Server® 2012 64-bit Edition operating system→ Windows Server 2012 *
®
Windows Server® 2008 R2 64-bit Edition operating system→ Windows Server 2008 *
®
Windows Server® 2008 64-bit Edition operating system→ Windows Server 2008 (64bit version) *
®
Windows® 10 operating system→ Windows 10 *
®
Windows® 8.1 operating system→ Windows 8.1 *
®
Windows® 8 operating system→ Windows 8 *
®
Windows® 7 operating system→ Windows 7 *
®
Windows Vista® operating system→ Windows Vista *
®
Windows Server® 2008 operating system→ Windows Server 2008 *
* If there is no special description, 64bit version is included in Windows 10, Windows 8.1, Windows 8, Windows 7,
Windows Vista, and Windows Server 2008. (64bit version and Windows Server 2008 R2 is included in Windows
Server 2008, Windows Server 2012 R2 is included in Windows Server 2012.)
If there is no special description, Windows 7 is used as Windows, Mac OS X 10.11 is used as Mac OS X, and
C833dn is used as the printer for examples in this document.
Depending on your OS, model or version, the description on this document may be different.
The diffusion of dust, ozone, styrene, benzene, TVOC, and ultrane particles conforms to the Eco Mark
155, “Printer” substance emission certication criteria. (Toner was tested by performing black and
white and color printing with Oki Data genuine toner cartridges according to the appendix S-M of the
Blue Angel RAL UZ-171:2012 test method.)
- 6 -
Page 7

Contents
About the Product Warranty .....................................................................2
ENERGY STAR ........................................................................................3
Emergency rst aid .................................................................................3
Environmental information .......................................................................3
For Your Safety ....................................................................................... 4
Manual Composition ................................................................................5
About This Manual ...................................................................................5
1. Setup ................................................................................. 10
Checking Products .................................................................................11
Checking Package Contents ...................................................................................... 11
Operator Panel .....................................................................................12
How to Use the Numeric Keypad ............................................................................... 12
How to Use the Function Key .................................................................................... 13
Names of Components ............................................................................................. 14
Available Options .................................................................................................... 15
Checking the Placement Environment ......................................................16
Placement Environment ........................................................................................... 16
Placement Space .................................................................................................... 16
Preparing Your Printer ............................................................................17
Unpacking ............................................................................................................. 17
Installing Consumables
Loading Paper
Turning On/Off the Power ......................................................................................... 20
Installing Options .................................................................................................... 23
Test Printing from the Printer .................................................................................... 30
........................................................................................................ 19
............................................................................................ 17
Connecting to a Computer ......................................................................31
Network Connection ................................................................................................ 32
Connecting in Wireless LAN (AP Mode) (Optional)
USB Connection ...................................................................................................... 42
When Adding Options .............................................................................................. 46
........................................................ 41
- 7 -
Page 8

Contents
2. Printing Basic Operation .................................................... 48
Supported Paper ...................................................................................48
How to Print from the Tray .....................................................................53
How to Print from the MP Tray ................................................................54
Printing in Custom Sizes ........................................................................58
Paper Output ........................................................................................ 62
Convenient Print Functions .....................................................................63
Canceling Printing .................................................................................64
Setting the Time that Elapses Before Entering the Power Save Mode ............65
Setting the Time that Elapses Before Entering the Deep Sleep Mode ............ 66
Constraints When in Deep Sleep Mode ....................................................................... 67
Settings for Turning Power Off Automatically (Auto Power Off) .................... 69
Setting the Auto Power Off ....................................................................................... 69
Setting the Time that Elapses Before Entering the Auto Power Off Mode ......................... 70
Setting the Buzzer ................................................................................71
3. Troubleshooting ................................................................. 72
When an Error Message Appears on the Display Screen
(When the ATTENTION Indicator Lights Up/Blinks) ..................................... 72
When Paper Jams Occurs/When an Error Message does not
Disappear Even After Jammed Paper is Removed .......................................73
When the Message for Replacement of Consumables or
Maintenance Unit Appears ...................................................................... 83
When the Message for Paper Replacement or Paper Size Error Appears ........ 86
Other Error Messages ............................................................................87
When You Cannot Print from the MP Tray .................................................. 92
Other Issues ........................................................................................93
Unable to Print from a Computer ............................................................................... 93
Unable to Install a Printer Driver Successfully ............................................................. 95
OS-Specic Constraints .......................................................................................... 96
Image Quality Issues .............................................................................................. 97
Feeding Issues ......................................................................................................100
Machine Issues ......................................................................................................101
- 8 -
Page 9

Contents
4. Maintenance .................................................................... 103
Replacing Consumables and Maintenance Units ....................................... 103
Replacing Toner Cartridges ......................................................................................104
Replacing the Image Drum ......................................................................................108
Replacing the Belt Unit ...........................................................................................111
Replacing the Fuser Unit .........................................................................................114
Cleaning ............................................................................................ 116
Cleaning the Surface of the Printer ...........................................................................116
Cleaning Paper Feed Rollers.....................................................................................116
Cleaning LED Heads ...............................................................................................118
Moving or Transporting Your Printer ....................................................... 120
Before Machine Disposal ...................................................................... 123
5. Appendix ......................................................................... 124
Menu List of the Operator Panel ............................................................ 124
Checking the Printer’s Status with the Display Screen .................................................124
Menu List of the Operator Panel ...............................................................................125
Specications ..................................................................................... 132
Index .................................................................................... 138
Contact Us ............................................................................ 139
- 9 -
Page 10
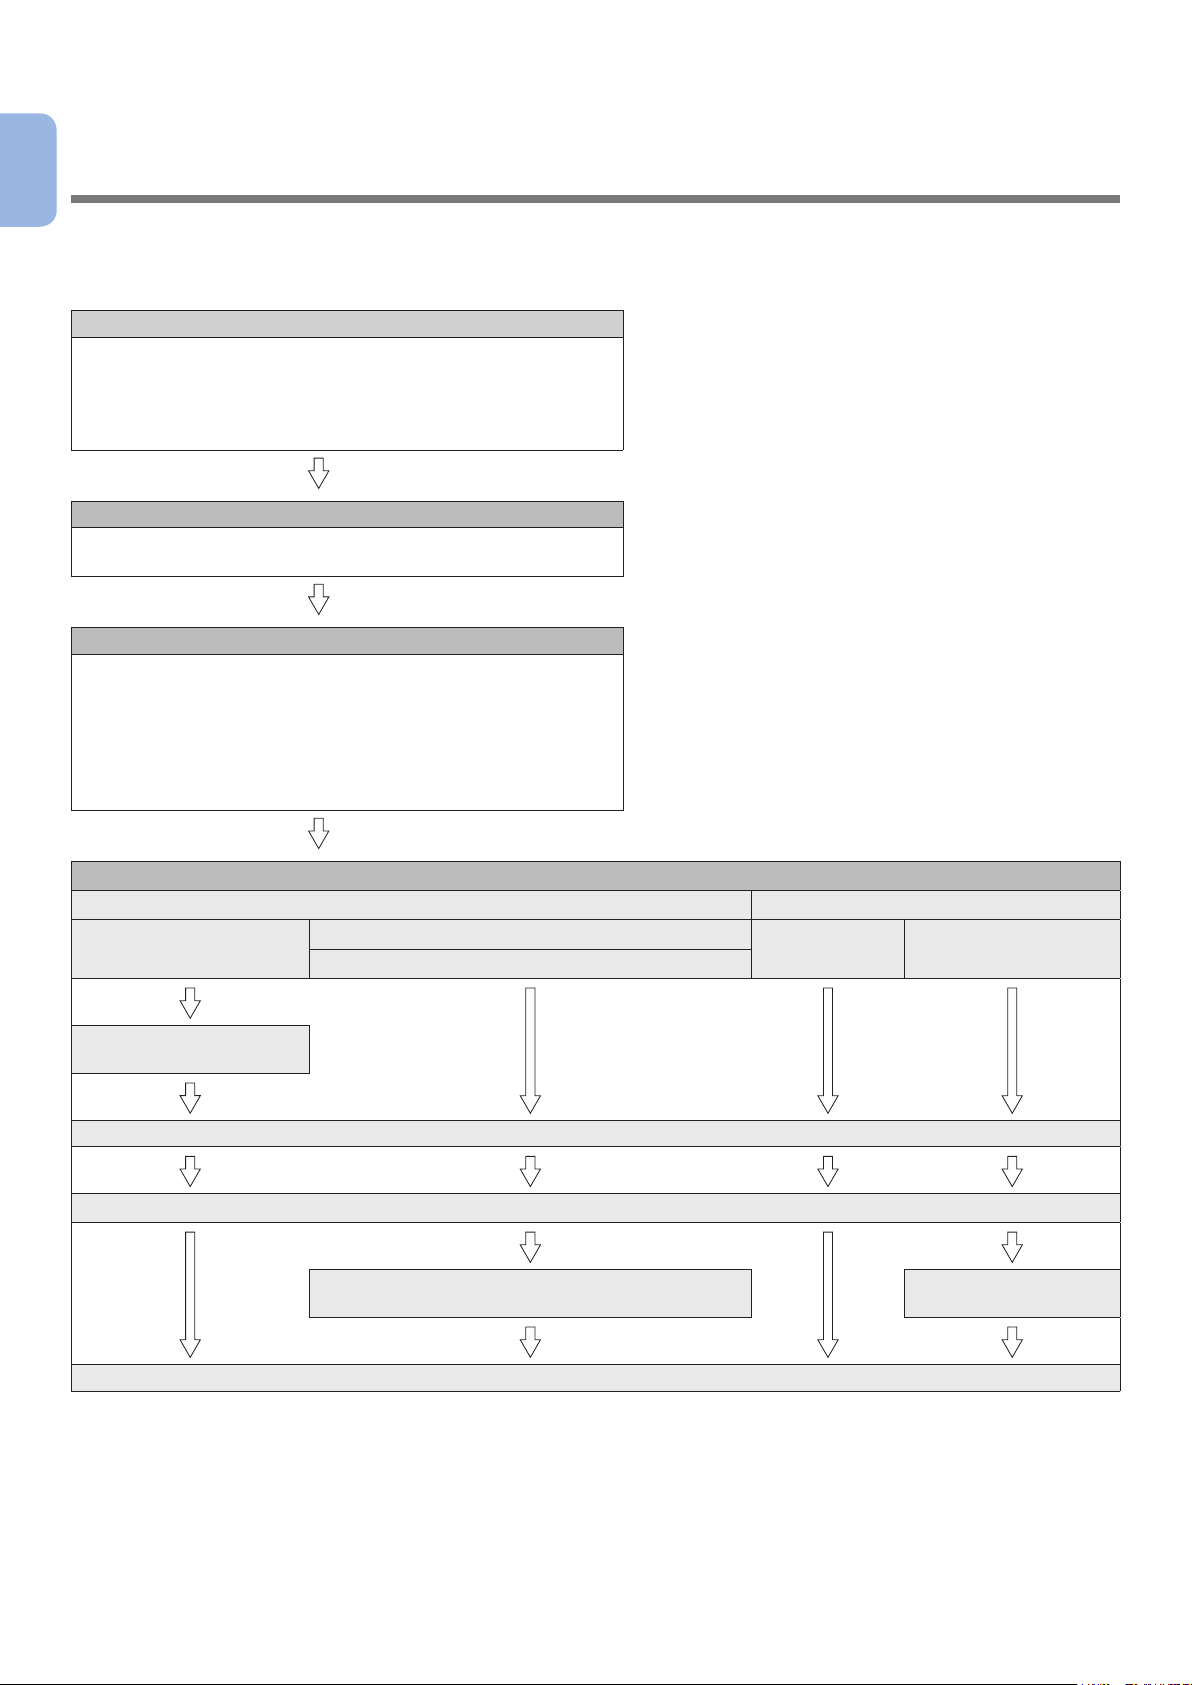
1. Setup
1
How to set up is explained in this chapter.
1. Setup
Setup Flow
1. Checking Products
● Checking package contents
● Checking names of the operator panel and how to
operate
● Checking names of product parts
● Checking options
2. Checking the Placement Environment
● Checking the placement environment
● Checking placement location
3. Preparing a Printer
● Unpacking
● Removing cushioning materials
● Installing consumables
● Loading paper
● Turning on/off the power
● Installing options
● Test printing from the printer
4. Connecting to a Computer
Connecting through network Connecting through USB
For Windows
Specifying an IP address
on the operator panel
For Macintosh
Connecting through Bonjour
Connecting to a computer
Installing a printer driver on a computer
Adding printers on a computer
Test printing from a computer
For Windows For Macintosh
Adding printers on a
computer
- 10 -
Page 11
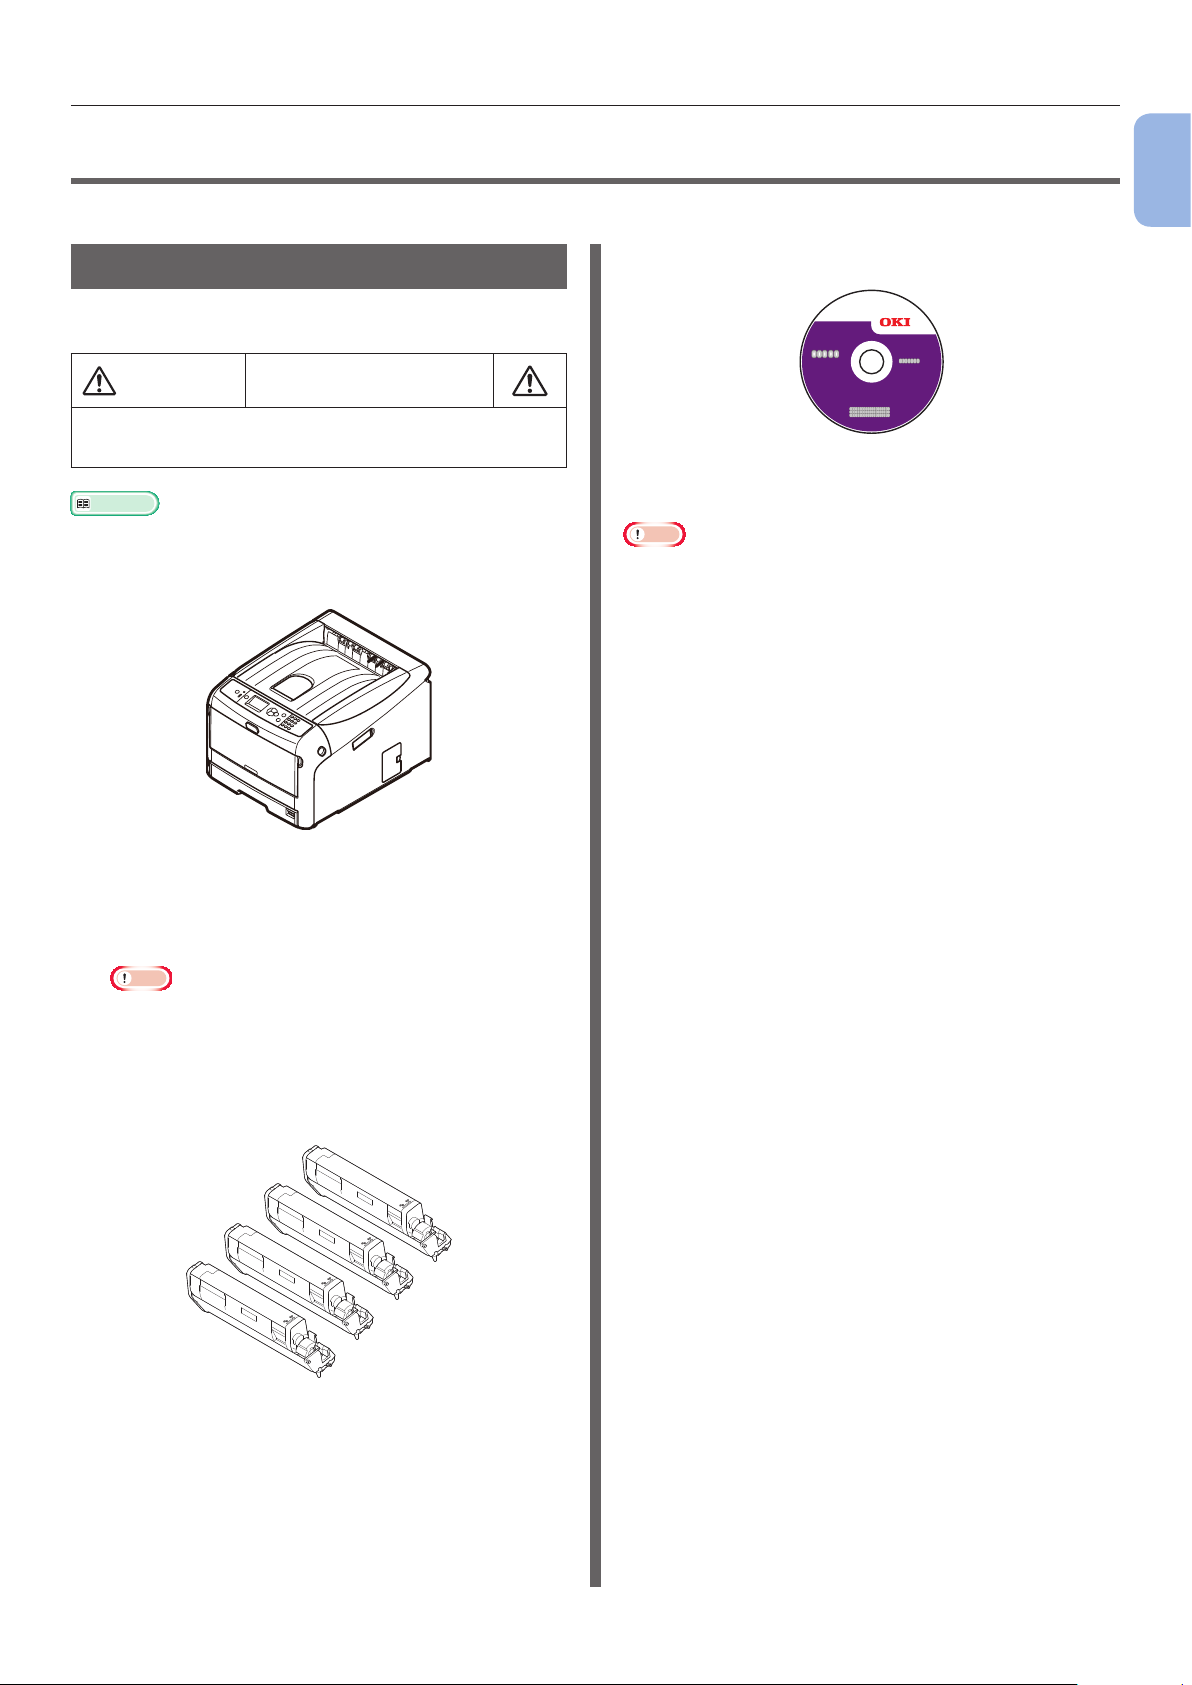
Checking Products
CAUTION
●● Checking Products
This section gives an overview of the printer.
Checking Package Contents
Check that you have everything shown below.
It may cause injury!
● At least two people are needed to lift the printer
safely because it weighs about 37 Kg or 40 Kg.
Reference
● For details on how to open the package, refer to
“Unpacking” P.17.
● Printer
1
1. Setup
● Software DVD-ROM
● AC cord
Note
● An Ethernet cable and USB cable are not supplied with
your printer. Procure them separately.
● Packaging and cushioning material are needed if
transporting the printer. Do not throw them away.
● Four image drums (black, yellow, magenta
and cyan)
● Four starter toner cartridges (black, yellow,
magenta and cyan)
Note
● For the C models, the starter toner cartridges are
installed in the image drums, which are installed in
the machine before shipment.
The starter toner cartridge is not installed in the ES
models. Install the toner cartridge that is included in
this machine. Refer to “Replacing the Image Drum”
P.108.
● Quick Guide
- 11 -
Page 12
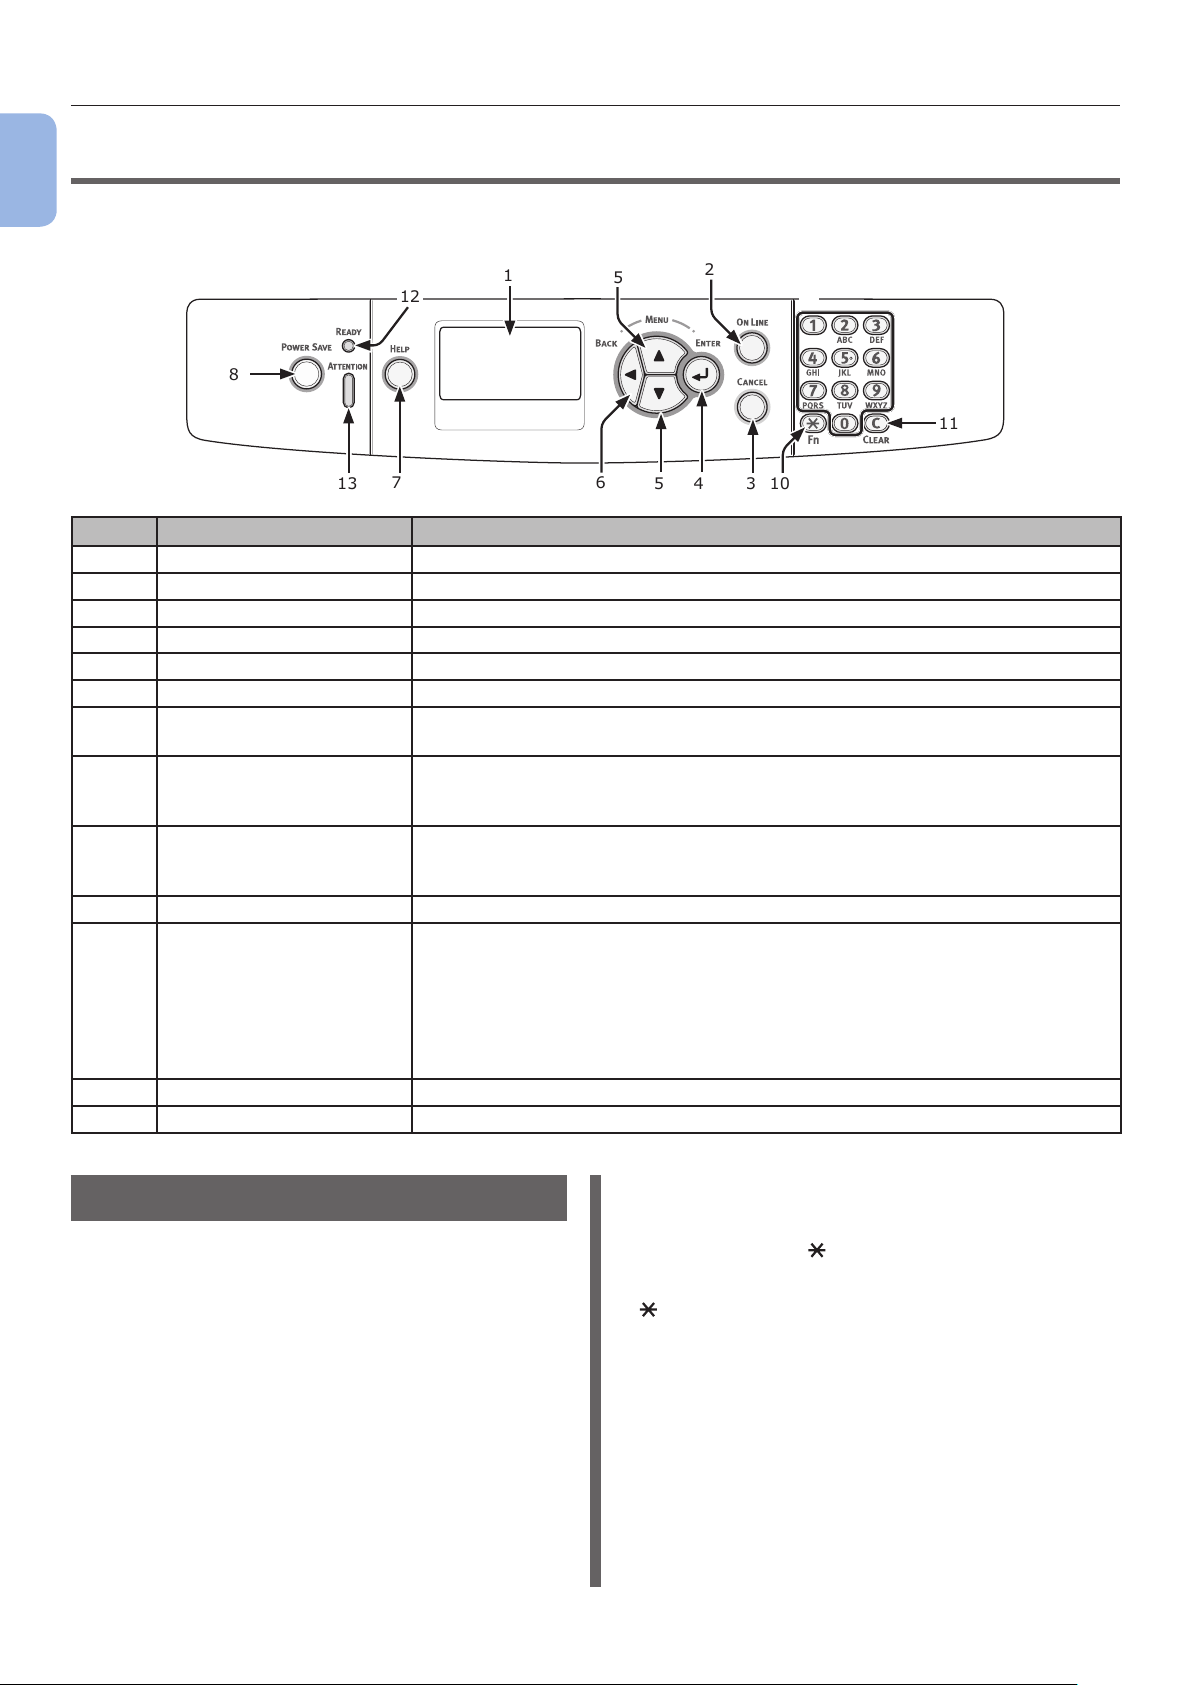
Operator Panel
1
●● Operator Panel
This section explains the names and functions of components on the operator panel and how to enter
text.
1. Setup
1
12
8
7
13
5
6
2
9
11
4
5
10
3
No. Name Function
1 Display screen Displays operating instructions and the status of the printer.
2 <ON LINE> button Switches between on line and off line modes.
3 <CANCEL> button Cancels the current print immediately.
4 <ENTER> button Conrms the highlighted item.
5 <SCROLL> button Selects the menu or scrolls the screen.
6 <BACK> button Returns to the previous screen.
7 <HELP> button Displays the help screen. To close, press the <HELP> button, <BACK>
button, or <CANCEL> button.
8 <POWER SAVE> button ● Enters or exits the power saving mode.
● Exits the deep sleep mode.
Lights up green in the power save mode and blinks green in the deep sleep mode.
9 Numeric Keypad ● Enters numbers.
● Enters alphabetical characters and symbols.
A password can be entered only with a numeric keypad.
10 <Fn> key Displays the equipment setting menu screen with a shortcut function.
11 <CLEAR> key Executes the following actions according to the entered items when pressed
or held down.
● Minimizes a setting value.
● Enters zero for a setting value.
● Deletes a character.
● Cancels a selected item.
Returns to the previous settings. Not available when entering an IP address.
12 <READY> indicator Lights up green in on line mode and turns off in off line mode.
13 <ATTENTION> indicator Lights up or blinks orange when an error occurs in the device.
How to Use the Numeric Keypad
Use to enter numbers and characters.
Each time a numeric key is pressed, entered
numbers or characters are changed cyclically in
the following order:
<1>: 1
<2>: 2
<3>: 3
<4>: 4
<5>: 5
<6>: 6
<7>: 7
<8>: 8
→ a → b → c → A → B → C → 2
→ d → e → f → D → E → F → 3
→ g → h → i → G → H → I → 4
→ j → k → l → J → K → L → 5
→ m → n → o → M → N → O → 6
→ p → q → r → s → P → Q → R → S → 7
→ t → u → v → T → U → V → 8
- 12 -
<9>: 9
→ w → x → y → z → W → X → Y → Z → 9
<0>: 0
The functions of <
> and <C> keys are the
followings:
>: Function key (Available only when the
<
standby screen is displayed.)
<C>: Deletes a character when entering a
password.
To enter “abc” for example,
press <2>
→ <2> → <2> → <ENTER> button → <2> →
→ <2> → <ENTER> button → <2>
<2> → <2> → <2> → <ENTER> button.
Page 13
Operator Panel
How to Use the Function Key
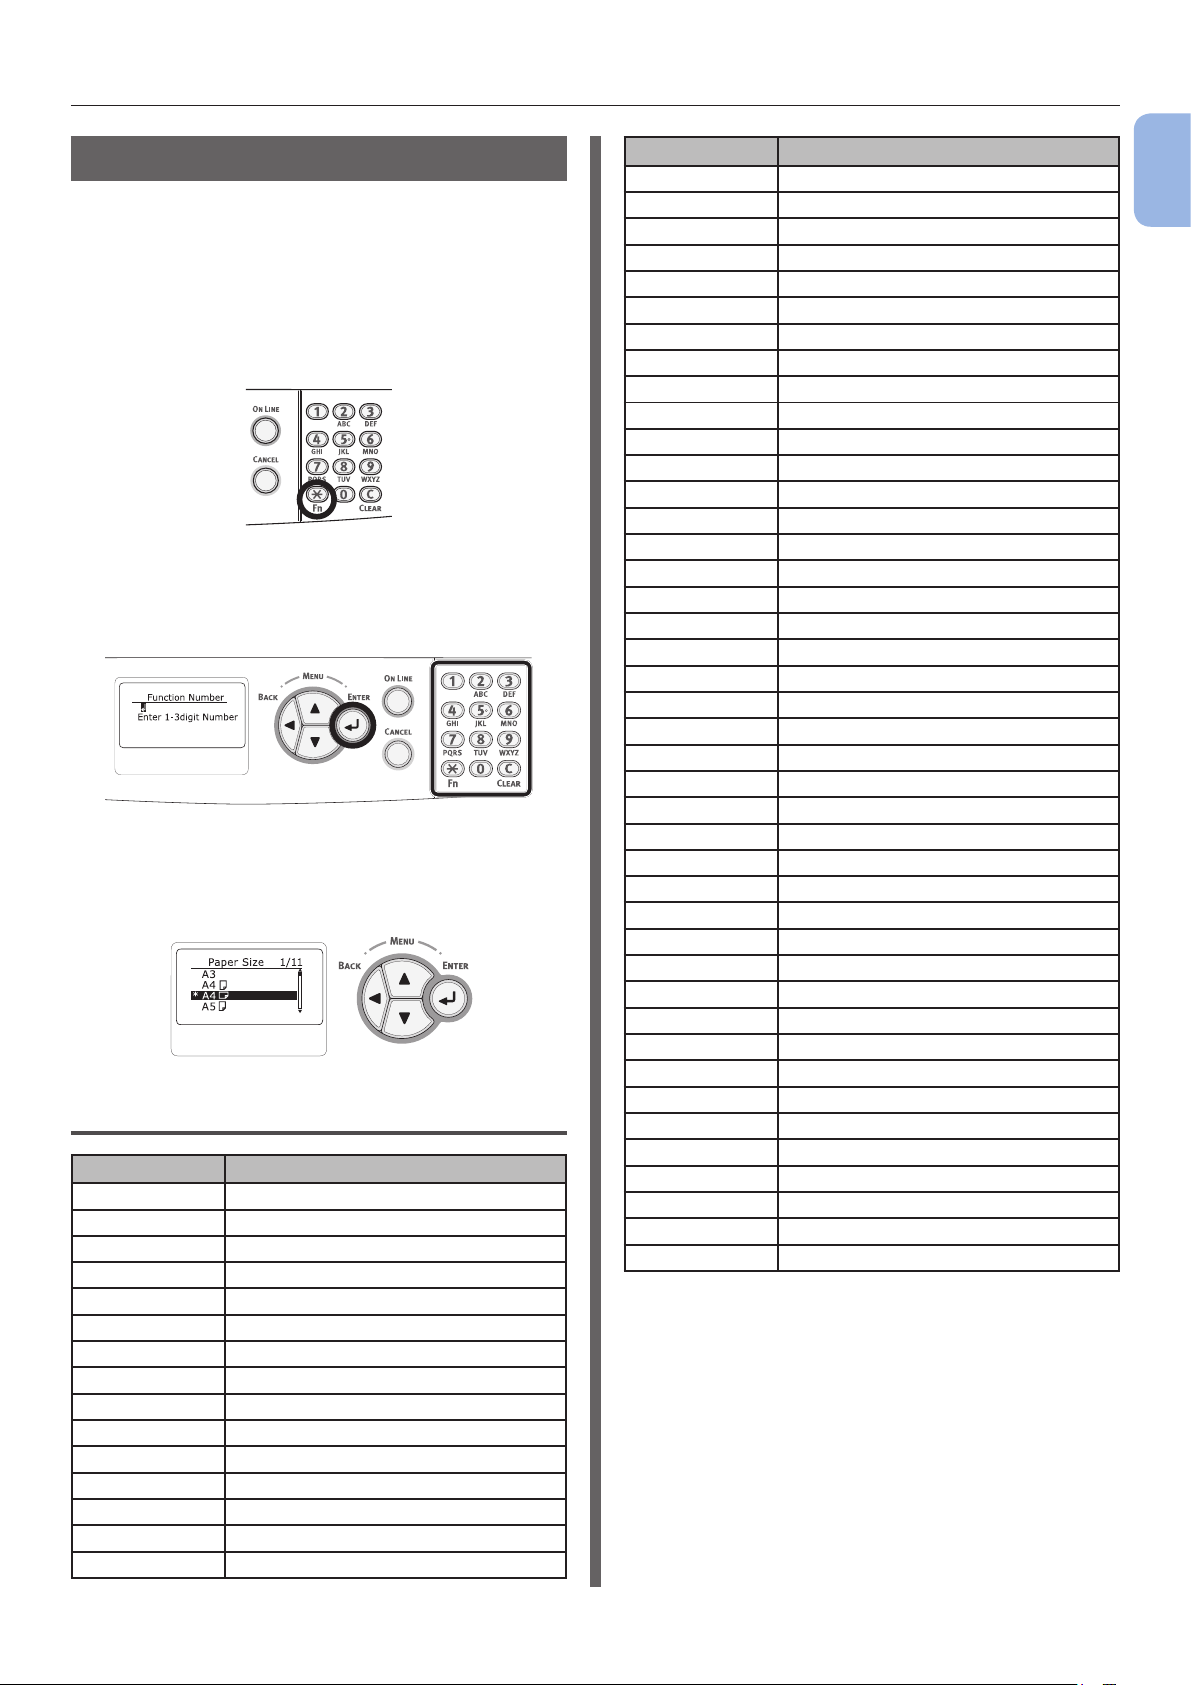
Press numeric keys after pressing the <Fn>
key when the message “Ready To Print”
appears on the display screen. The function
menu corresponding to the number entered is
displayed.
1 Press the <Fn> key.
2 Press the numeric keys (0-9) to display
the desired function item and press the
<ENTER> button.
3 The setting screen of the selected
function is displayed. Check or change
the settings.
Function Menu List
Function No. Function menu
1 Shared Print
2 Private Print
10 Paper Size (Tray 1)
11 X Dimension (Tray 1)
12 Y Dimension (Tray 1)
13 Media Type (Tray 1)
14 Media Weight (Tray 1)
20 Paper Size (Tray 2)*
21 X Dimension (Tray 2)*
22 Y Dimension (Tray 2)*
23 Media Type (Tray 2)*
24 Media Weight (Tray 2)*
30 Paper Size (Tray 3)*
31 X Dimension (Tray 3)*
32 Y Dimension (Tray 3)*
Function No. Function menu
33 Media Type (Tray 3)*
34 Media Weight (Tray 3)*
40 Paper Size (Tray 4)*
41 X Dimension (Tray 4)*
42 Y Dimension (Tray 4)*
43 Media Type (Tray 4)*
44 Media Weight (Tray 4)*
80 Paper Feed
90 Paper Size (MP Tray)
91 X Dimension (MP Tray)
92 Y Dimension (MP Tray)
93 Media Type (MP Tray)
94 Media Weight (MP Tray)
95 Tray Usage (MP Tray)
100 Conguration
101 Network
102 Usage Report
103 Error Log
200 Power Save Time
201 Sleep Time
202 Auto Power Off Time
210 Error Report
220 Print Position Adjust (MPTray)
221 Print Position Adjust (Tray 1)
222 Print Position Adjust (Tray 2)*
223 Print Position Adjust (Tray 3)*
224 Print Position Adjust (Tray 4)*
230 Paper Black Setting
231 Paper Color Setting
232 Trans. Black Setting
233 Trans. Color Setting
234 SMR Setting
235 BG Setting
236 Drum Cleaning
237 Hex Dump
300 Adjust Density
301 Adjust Registration
302 Print Color Tuning Pattern
310 Cyan Density
311 Magenta Density
312 Yellow Density
313 Black Density
* An error results when the option item selected
is not currently installed.
1
1. Setup
- 13 -
Page 14

Operator Panel
Names of Components
1
1. Setup
4
5
3
6
7
No. Name
1 Front cover
2 Front cover open lever
3 Operator panel
4 Power switch
5 Output tray
6 Multipurpose tray
7 Tray 1
8 Air vents
2
16
8
18
17
No. Name
8
1
9
16 Multipurpose tray
17 Paper set cover
18 Wireless LAN module cover
19
23
20
22
21
13
12
11
10
15
14
No. Name
9 Output tray open button
10 Toner cartridge
Image drum (K: black)
11 Toner cartridge
Image drum (Y: yellow)
12 Toner cartridge
Image drum (M: magenta)
13 Toner cartridge
Image drum (C: cyan)
14 Fuser unit
15 LED head (four heads)
Note
● In the case of the ES models, toner cartridges are not
installed in the Image drums.
No. Name
19 Rear output tray
20 AC power socket
21 Interface part
22 Access cover
23 Duplex unit (Only for the model of the name
with dn or ES)
● Interface part
24
25
26
No. Name
24 Accessory connector
25 USB interface connection
26 Network interface connection
- 14 -
Page 15

Operator Panel
Available Options
The following options are available for your
printer:
● Additional tray unit (tray 2/3/4)
● Additional RAM (256 MB or 512 MB)
● 16 GB SD memory card kit
● Wireless LAN module
Reference
● For details on how to install the options, refer to
“Installing Options” P.23.
● An SD memory card kit is used for functions such as a
storage for spooling when copying sectors, saving secure
print/encrypted print data, and as a storage destination
for form data. For information on secure print, encrypted
secure print and form data storage functions, please refer
to the User’s Manual (Advanced).
Note
● C813/C823 is available only Tray2.
1
1. Setup
- 15 -
Page 16

Checking the Placement Environment
WARNING
1
1. Setup
●● Checking the Placement Environment
Placement Environment
Your printer must be placed in the following
environment:
Temperature: 10 - 32°C
20%
Humidity:
Maximum
wet bulb
temperature:
Recommended
environment:
Note
● Be careful of condensation. It may cause a malfunction.
● If placing your printer in a location where the humidity of
the surrounding air is less than 30% RH, use a humidier
or antistatic mat.
- 80% RH
(relative humidity)
25°C
17 - 27°C, 50 - 70 % RH
Placement Space
Place your printer on a at surface that is wide
enough that the printer’s feet securely on the
surface.
Allow for enough room around your printer as
shown in the images below.
● Top view
20 cm
100 cm60 cm
● Do not install near high temperature or the re.
● Please do not install in a place from which a
chemical reaction is started (laboratory etc.).
● Do not install near the inammable solution, such
as alcohol and thinner.
● Do not install in the place which the small child's
hand reaches.
● Do not install in an unstable place (the shaky
stand, leaning place, etc.).
● Do not install in a place many humidity, dusty and
the place where direct rays hit.
● Do not install in the environment of briny air and
corrosive gas.
● Do not install in a place with much vibration.
● Do not install in a place where the ventilation hole
of the printer is closed.
CAUTION
● Do not place directly on a rug or carpet with long
strands.
● Do not install in a closed room with poor
ventilation and circulation.
● If you use the printer in a small room for a long
time, please make sure that you ventilate the
room.
● Install away from strong magnetic elds and
sources of noise.
● Install away from monitors or TVs.
20 cm
● Side view
70 cm
- 16 -
Page 17
Preparing Your Printer
CAUTION
●● Preparing Your Printer
This section explains how to unpack your printer and how to turn it on and off.
Unpacking
It may cause injury!
● At least two people are needed to lift the printer
safely because it weighs about 37 Kg or 40 Kg.
Note
● Be sure to use the consumables or maintenance units
provided with this printer at rst. Otherwise, the life of the
consumables or maintenance units may not be displayed
correctly, or you may not be able to use them later.
● The image drum (the green tube) is very delicate. Handle
it carefully.
● Do not expose the image drum to direct sunlight or very
bright interior light (approximately more than 1500 lux).
Even under the normal interior light, do not leave it for
more than 5 minutes.
● Packaging and cushioning material are needed if
transporting the printer. Do not throw them away.
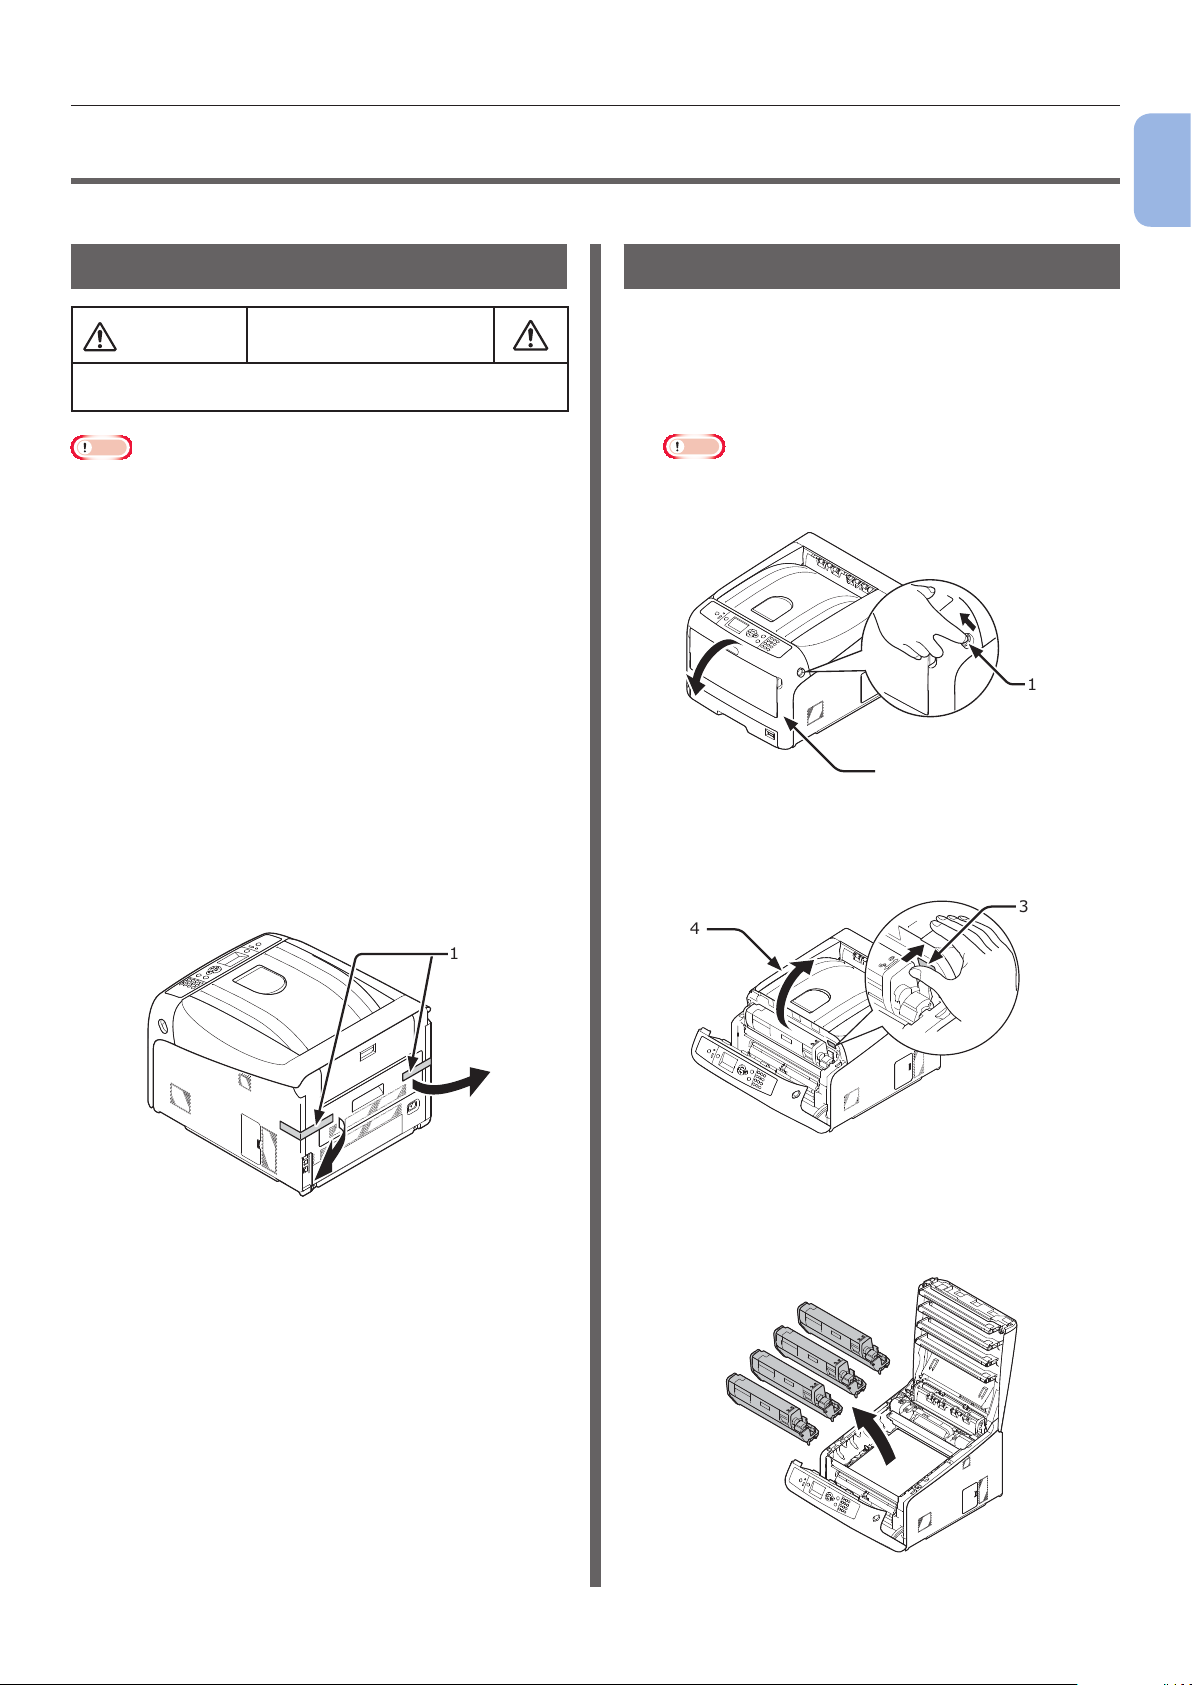
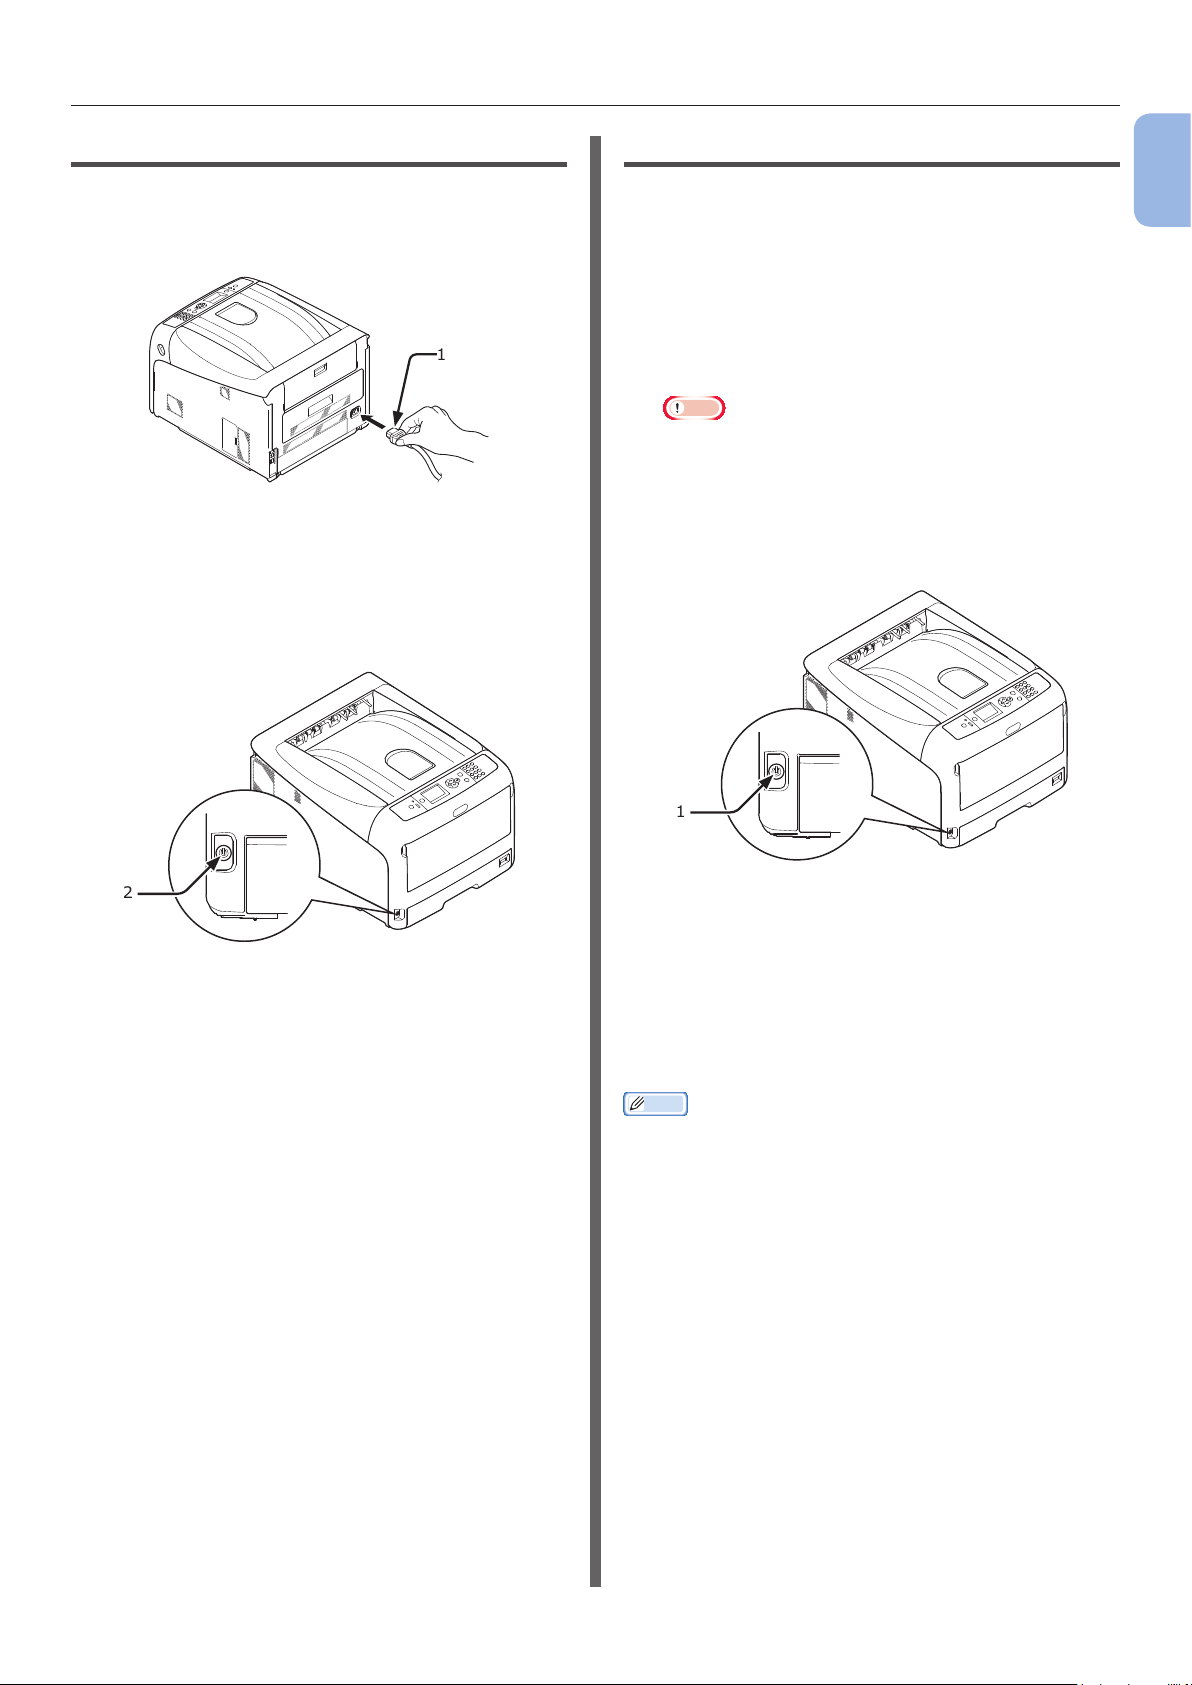
Installing Consumables
1 Insert your nger into the recess on
the right side of the printer and pull the
front cover open lever (1) to open the
front cover (2) forward.
Note
● Open the front cover gently. If opening rapidly, an MP
tray may open.
1
1. Setup
1
1 Remove your printer from the box and
remove all cushioning materials and the
plastic bag from your printer.
2 Remove the two strips of protective tape
(1) at the back of your printer.
1
2
2 Press the output tray open button (3)
and open the output tray (4).
3
4
3 Take out all four image drums from the
printer.
- 17 -
Page 18
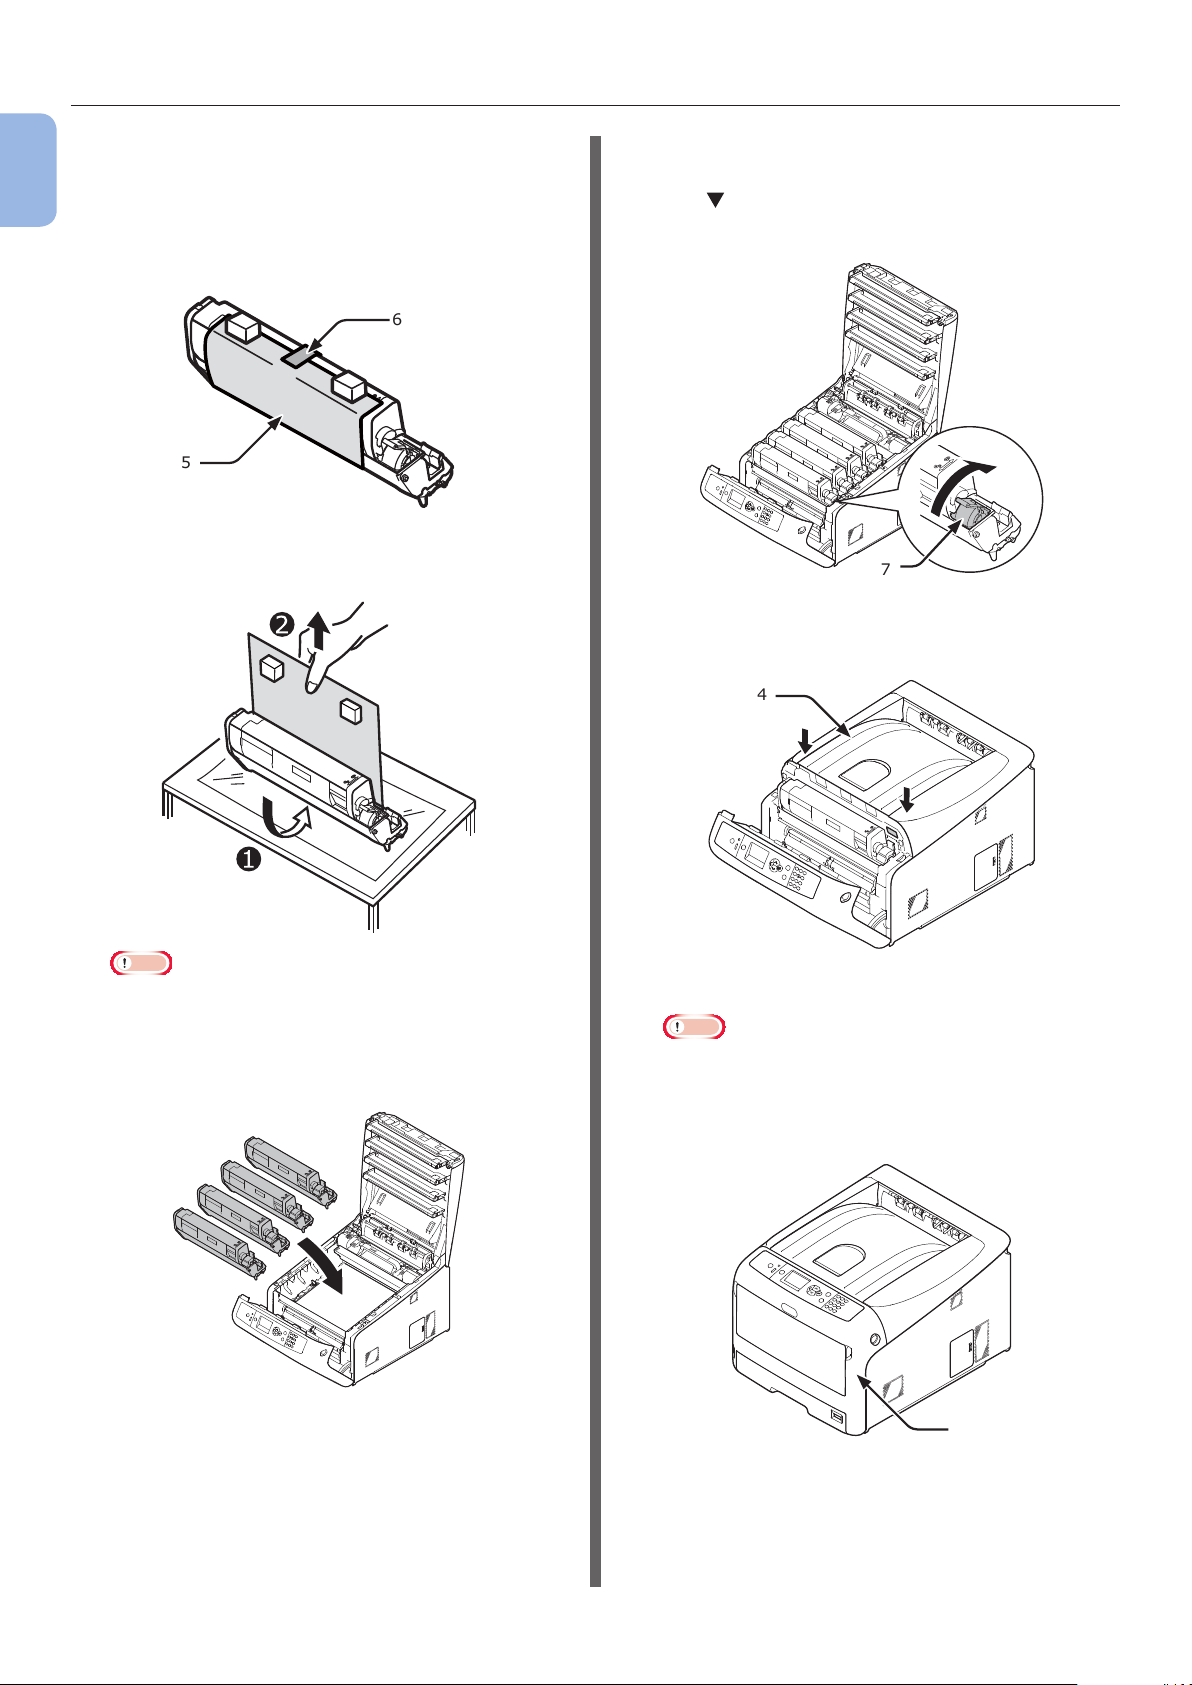
Preparing Your Printer
4 Remove the protective sheets from four
1
1. Setup
image drums.
(1) Place an image drum on a
newspaper. Remove a tape (6) stuck
on a protective sheet (5) and open it.
6
5
(2) Pull out a protective sheet to the
direction of the arrow.
6 Turn the blue lever (7) of the toner
cartridge backward until its top aligns on
the
Turn the levers of all four 4 toner cartridges.
mark.
7
7 Close the output tray (4) by pushing the
both sides of the cover rmly.
4
Note
● Do not turn the blue lever of the toner cartridge.
5 Put all four image drums back into a
printer.
8 Close the front cover (2).
Note
● The front cover cannot be closed securely if the
output tray is not closed.
● When the error message that the top or front cover
is open does not disappear from the operator panel’s
display screen, make sure they are closed securely.
2
- 18 -
Page 19
Preparing Your Printer
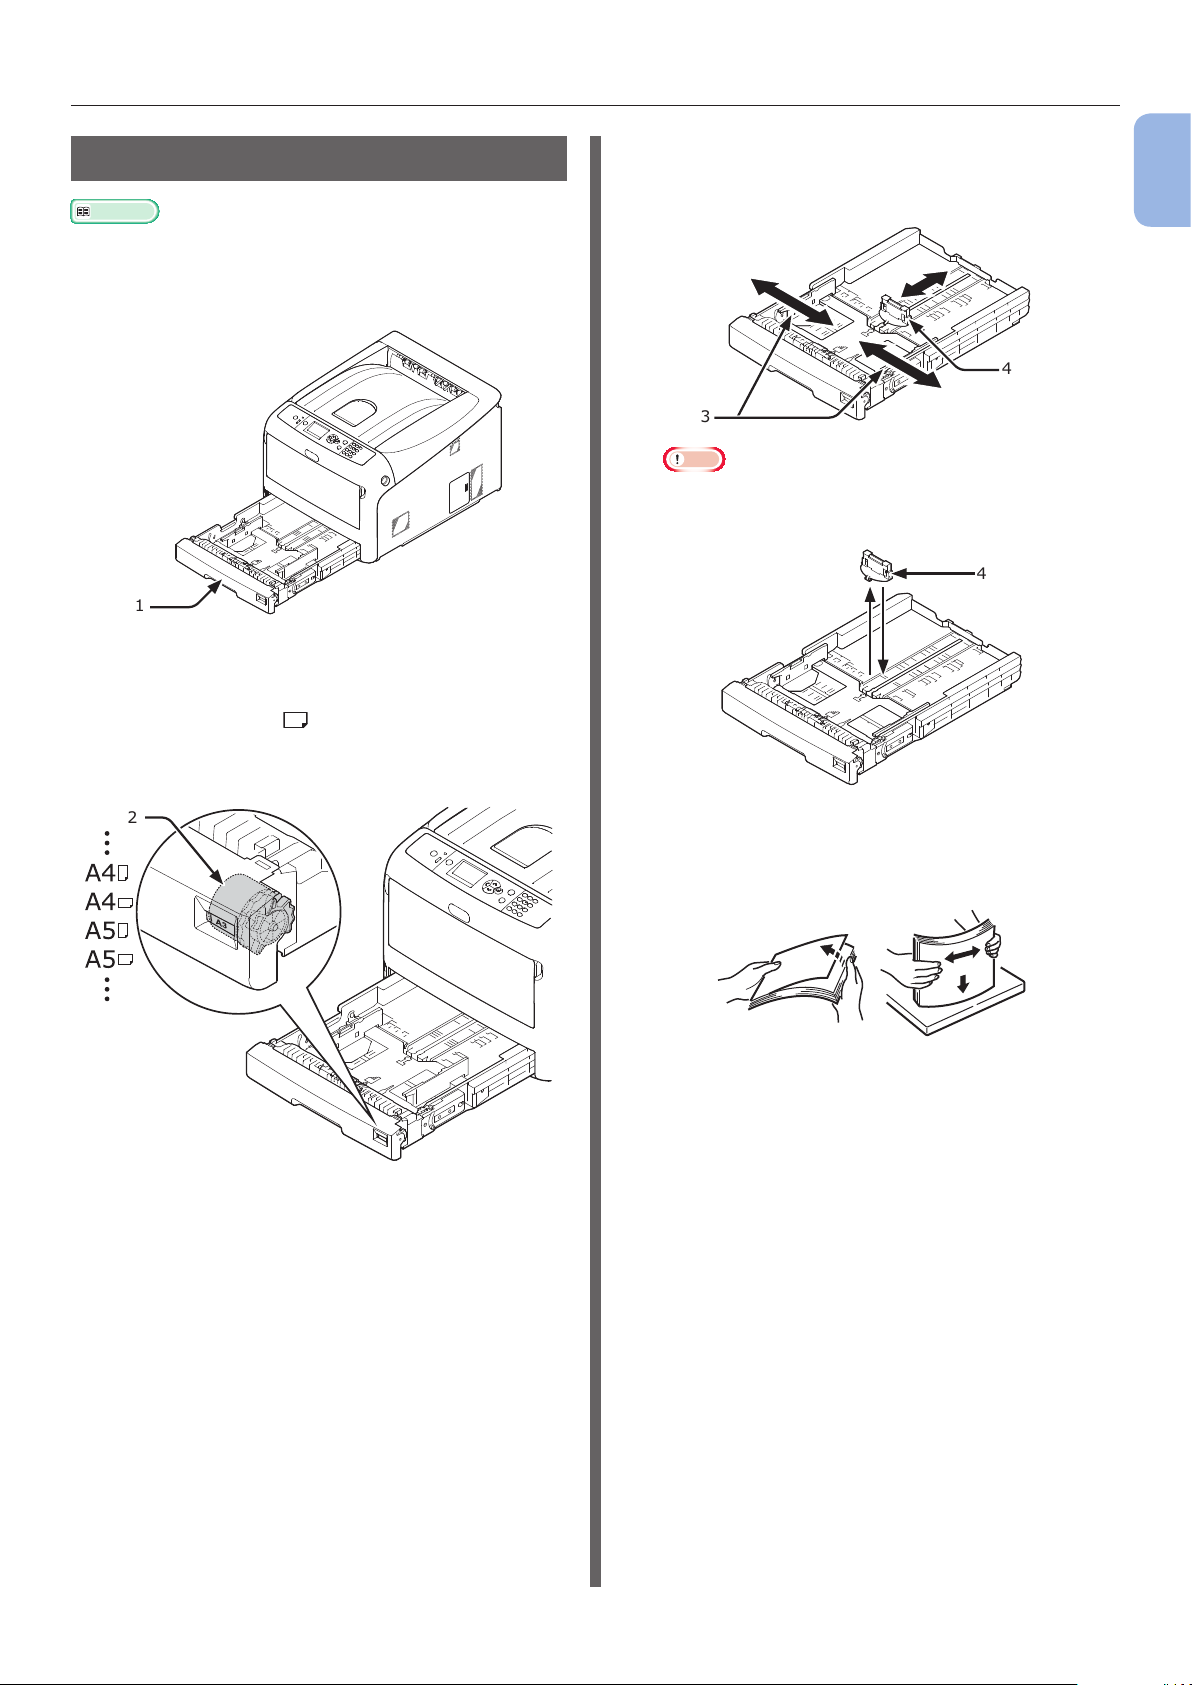
Loading Paper
Reference
● Please refer to “Supported Paper” P.48 for information
on how to load paper into the printer.
1 Pull out the paper tray (1).
1
2 Set the paper size dial (2) to match the
loading paper size.
Set the dial to [A4 ] when loading the A4 size
paper with a landscape orientation.
3 Slide the paper guide (3) and paper
stopper (4) to the size of paper to be
loaded.
4
3
Note
● When loading the A6 size paper, move the paper
stopper (4) forward and remove it once, then install
it on the metal part.
4
1
1. Setup
2
4 Flex paper back and forth, and then fan
it. Straighten the edges of the paper
stack on a level surface.
- 19 -
Page 20
Preparing Your Printer
WARNING
5 Load paper with the print side face down
1
1. Setup
and press it from above.
Note
● Do not load paper exceeding the [ ] mark (5) of the
paper guide.
5
6 Secure the loaded paper with the paper
guide.
7 Check if a size of loaded paper matches
the setting of paper size dial.
8 Return the paper tray to the printer.
Memo
● If loading a paper that you cannot select the
size with a paper size dial options, set the dial to
[Other], and then set a paper size on the operator
panel.
Turning On/Off the Power
Power Supply Conditions
The power supply must meet the following
conditions:
Voltage: 110 - 127 VAC (Range 99 - 140 VAC)
220 - 240 VAC (Range 198 - 264 VAC)
Frequency: 50/60 Hz ± 2%
Note
● If the power supply is unstable, use a voltage regulator.
● The maximum power consumption of this printer is
1400 W. Ensure that the power supply is sufcient to
operate this printer.
● We do not guarantee operation where an uninterruptible
power system (UPS) or inverter is used. Do not use an
uninterruptible power system (UPS) or inverter.
There is a risk of getting
an electric shock and/or
causing re.
● Be sure to turn off the power supply switch when
attaching or removing the AC cable and earth wire.
● Be sure to connect an earth wire to the grounding
terminal of exclusive use.
● Please do not connect with the ground of a water pipe,
a gas pipe, and a telephone wire, and a lightning rod by
any means.
● Make sure to connect with the ground terminal before
connecting the power cord to the power supply plug.
● Be sure to plug in and unplug the AC cable while holding
on to the power supply plug.
● Insert the AC cable plug completely into the wall socket
securely.
● Do not touch the power cord, or printer, if your hands
are wet.
● Install a power cord in the place which is not stepped on,
and do not place a thing on a power cord.
● Do not use the cord tied in a bundle.
● Please do not use the damaged power cord.
● Do not use multi-outlet adapters.
● Do not connect this printer and other electric products
to the same wall socket. If it connects simultaneously
with an air conditioner, copier, shredder, etc. Especially,
a printer may incorrect-operate by the electric
noise. When you connect with the same wall socket
unavoidably, please use a commercial noise lter or a
commercial noise cut transformer.
● Use the attached power cord and insert it directory with
the ground terminal. Do not use the power cord for other
product for the printer.
● Do not use an extension cord. When you use it
unavoidably, use the thing more than rated 15 A.
● Use of an extended code may not operate a printer
normally by AC voltage descent.
● During printing, do not shut off a power supply or do not
pull out a power supply plug.
● When you use it neither for consecutive holidays nor a
travel for a long time, pull out a power cord.
● Do not use attached power cord to the other products.
- 20 -
Page 21
Preparing Your Printer
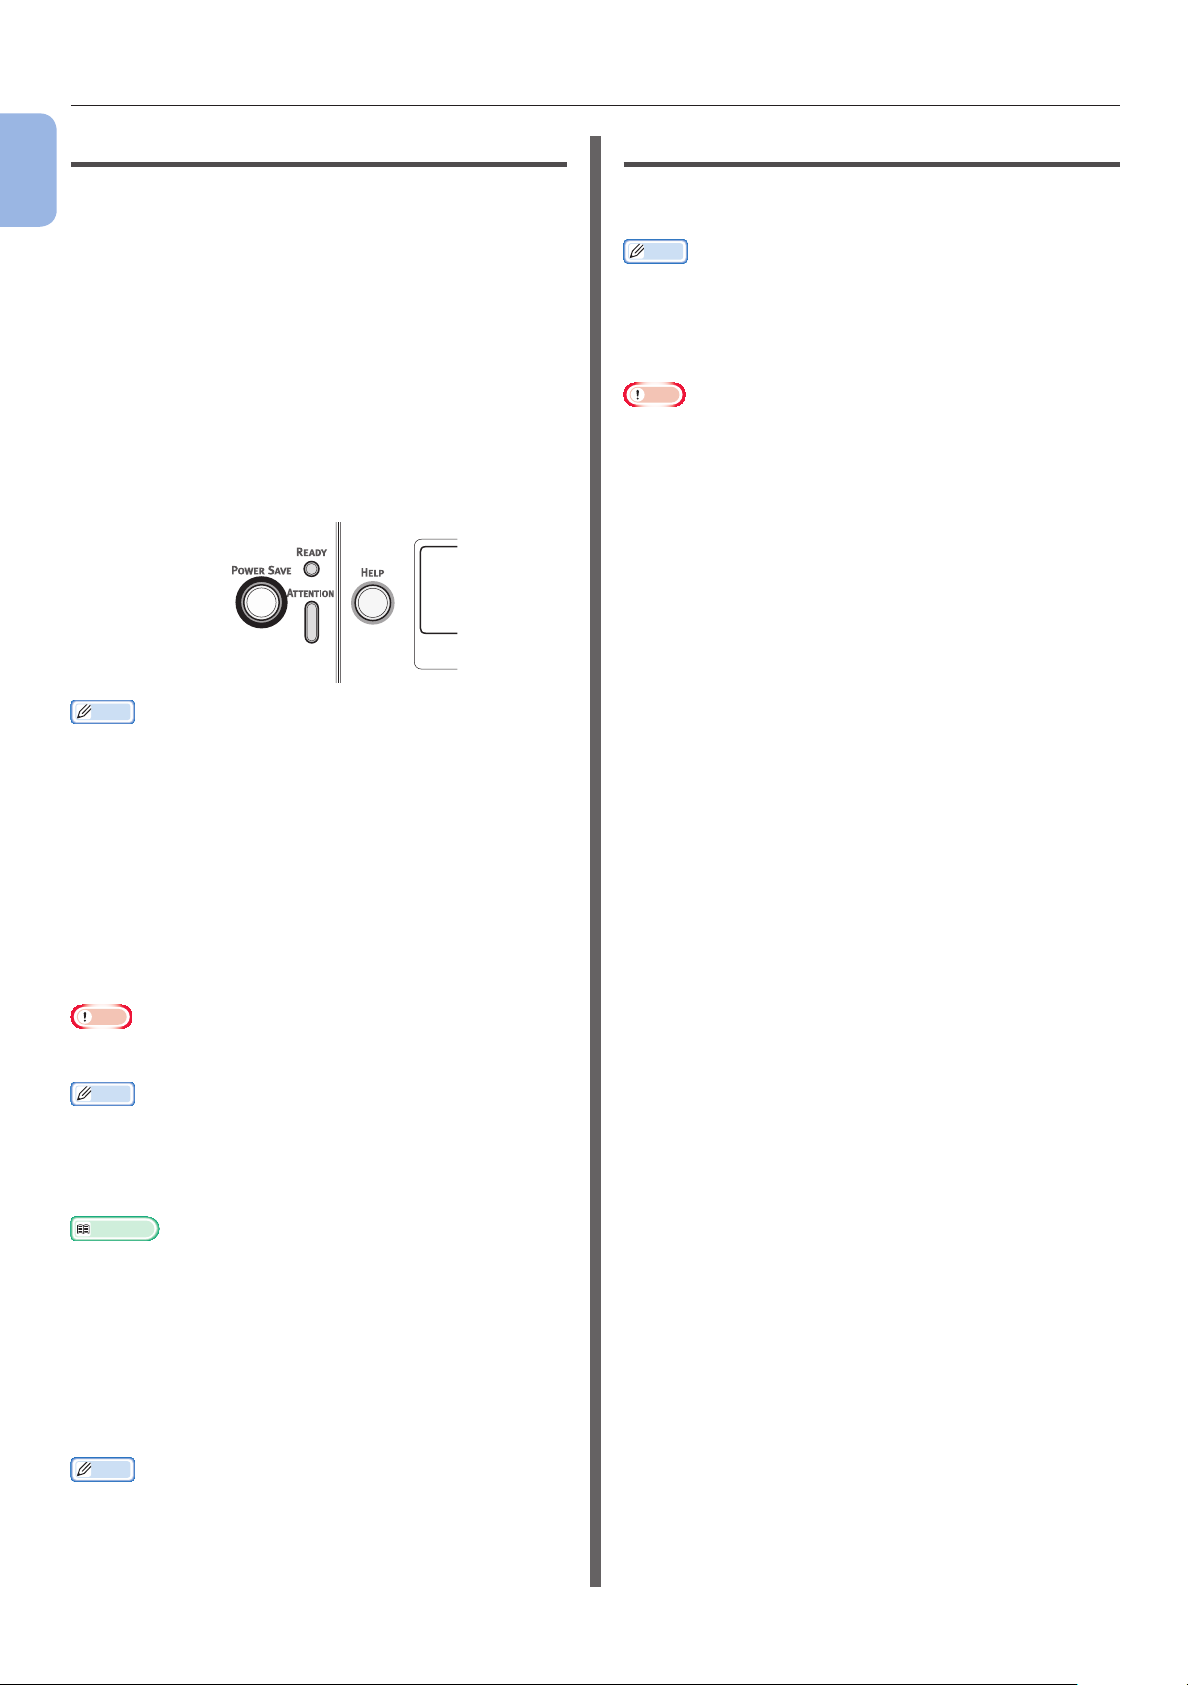
Turning On the Power
1
Plug the AC cord (1) into the AC power
socket of your printer.
1
2 Plug the AC cord into the electric socket.
3 Hold down the power switch (2) for
about 1 second to turn on the power.
Turning Off the Power
1
Hold down the power switch (1) for
about a second.
The message “Shutting down. Please wait.
Printer will turn off automatically” appears
in the operator panel, and the power switch
indicator blinks every 1 second. Then the printer
turns off automatically and the power switch
indicator goes out.
Note
● It may take about 5 minutes to turn off the power.
Wait until it turns off.
● Holding down the power switch for more than 5
seconds turns off printer forcibly. Only perform
this procedure when a problem occurs. For printer
problems, refer to “Other Issues” P.93.
1
1. Setup
2
The Power switch LED indicator lights up when
the printer turns on.
The message “Ready To Print” is displayed in
the operator panel once printer is ready.
1
When the Printer is Not Used for a
Long Time
When the printer is not used for a long time due
to consecutive holidays or when on vacation, or
when changing or attaching parts in repair or
maintenance, unplug the AC cord.
Memo
● The printer will not be functionally impaired even if left
unplugged for a long time (more than 4 weeks).
- 21 -
Page 22
Preparing Your Printer
Power Save Mode and Deep Sleep Mode
1
Two-phase power conservation enables you to
save on power consumed by the printer.
1. Setup
Power Save Mode
When your printer is not used for a certain
period of time, it automatically enters the power
save mode to reduce the power consumption.
You can enter the power save mode manually
by pressing the <POWER SAVE> button on the
operator panel.
The <POWER SAVE> button lights up green
while in this mode.
Memo
● By factory default, the time interval before entering the
power save mode is set to 1 minute. For how to change
the time that elapses before the printer enters the power
save mode, refer to “Setting the Time that Elapses Before
Entering the Power Save Mode” P.65.
Auto Power Off Function
When a certain period of time elapses after
printing, this printer will turn off automatically.
Memo
● The factory default setting for time that elapses before the
printer power turns off automatically is 4 hours.
● For how to change the time that elapses before the
printer power turns off automatically, refer to “Settings for
Turning Power Off Automatically (Auto Power Off)” P.69.
Note
● In the factory default setting, the auto power off mode
is disabled during network connection. To enable the
auto power off mode during network connection, refer to
“Settings for Turning Power Off Automatically (Auto Power
Off)” P.69.
Deep Sleep Mode
Your printer goes from the power save mode to
the deep sleep mode after a set period of time.
The <POWER SAVE> button blinks while in the
deep sleep mode.
Note
● The printer does not enter the deep sleep mode if an error
occurs.
Memo
● By factory default, the time interval before entering the
deep sleep mode is set to 15 minutes. For how to change
the time that elapses before the printer enters the deep
sleep mode, refer to “Setting the Time that Elapses Before
Entering the Deep Sleep Mode” P.66.
Reference
● For more detailed information on deep sleep mode, please
refer to the User’s Manual (Advanced).
Restoring a Printer from the
Power Saving Mode
To restore the printer from the power save
mode or the deep sleep mode, press the
<POWER SAVE> button on the operator panel.
Memo
● When the printer receives a print job from a computer or
other devices, it is restored automatically.
- 22 -
Page 23
Preparing Your Printer
Installing Options
This section explains how to install options on
your printer. The following options are available:
● Additional tray unit (Tray 2/3/4)
● Additional RAM (256 MB or 512 MB)
● 16 GB SD memory card kit
● Wireless LAN module
Note
● Be sure to turn off your printer and unplug the AC cord
and Ethernet or USB cable before installing options.
Installing options while your printer is turned on may
damage your printer and options.
Memo
● After installing options, set the option settings with a
printer driver. Refer to “When Adding Options” P.46.
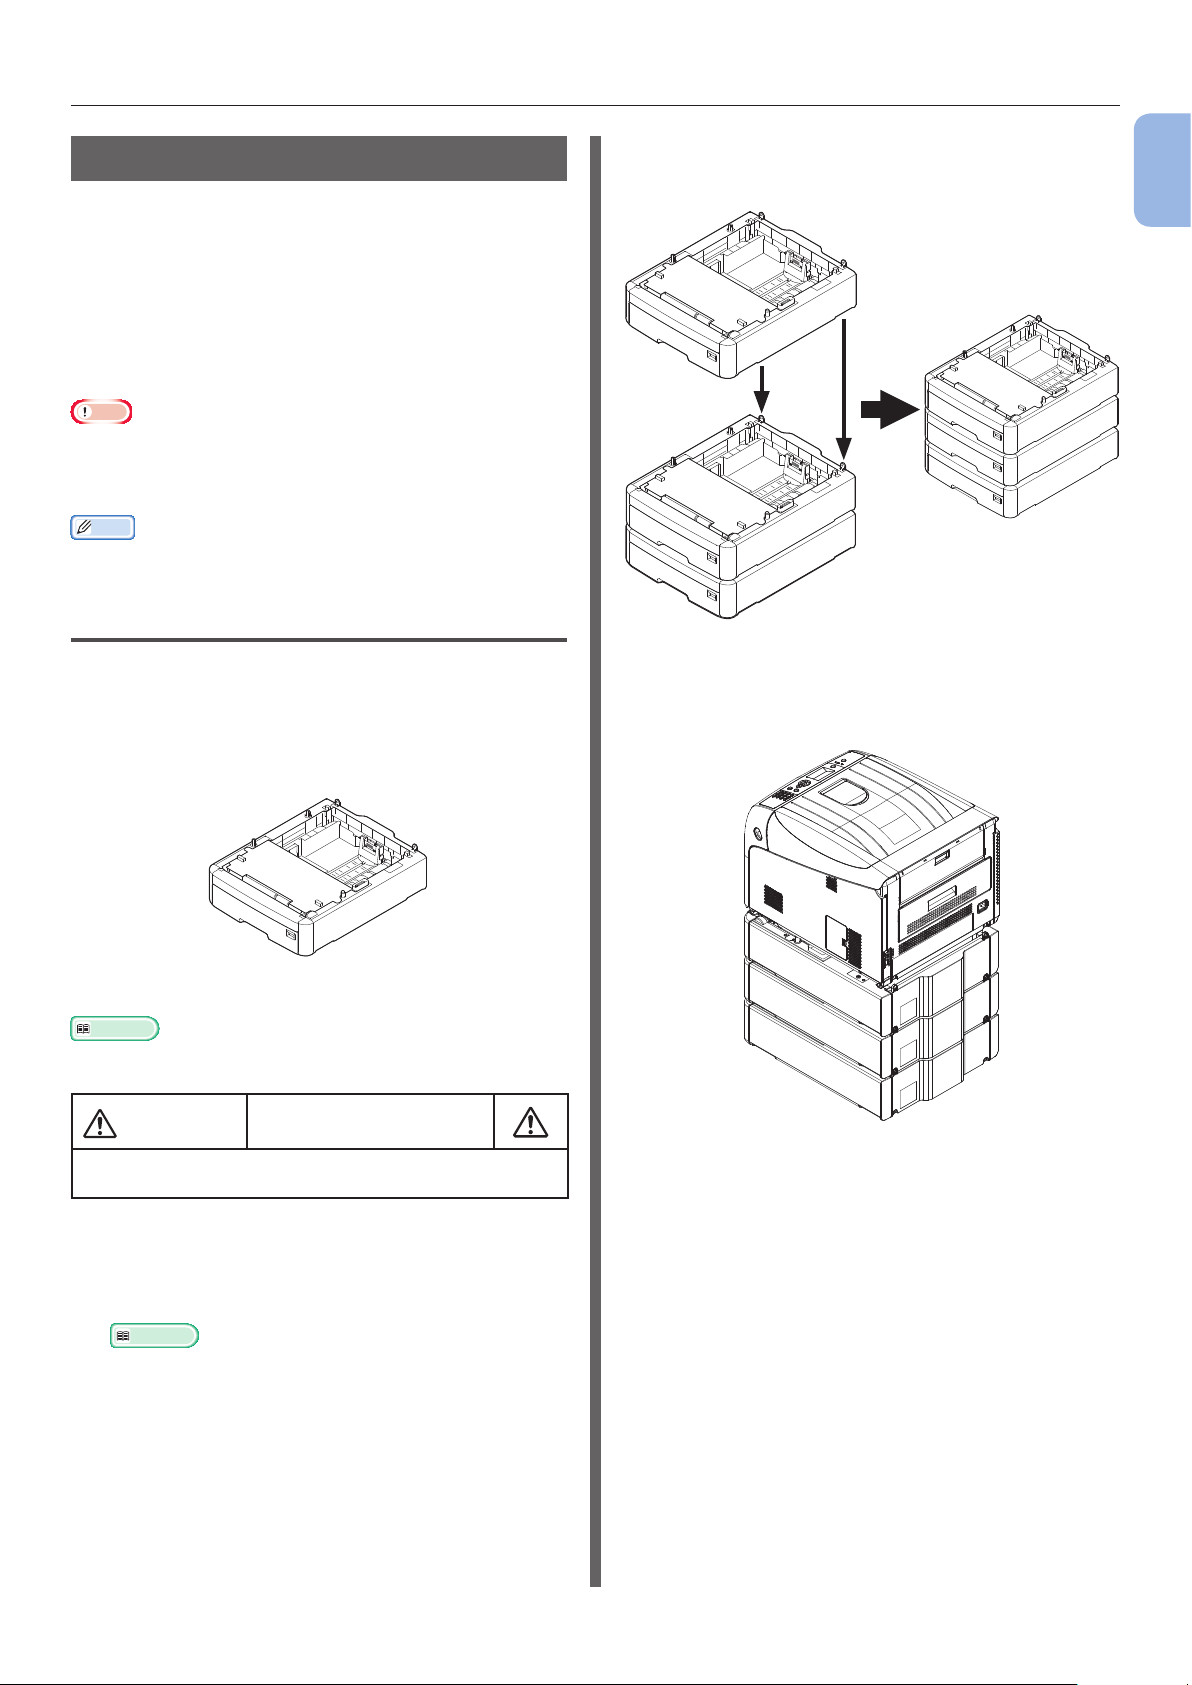
Installing an Additional Tray Unit
Install an optional additional tray unit when
you want to increase the paper capacity of your
printer. You can install up to three additional tray
units. After installation, you need to congure
the printer driver settings.
2 Stack an additional tray aligning a back
side of each tray.
3 Place a printer on the additional trays
gently aligning the back sides of a
printer and the additional trays.
1
1. Setup
N35110A
Reference
● For specications of the additional tray unit, refer to
“Supported Paper” P.48.
CAUTION
● At least two people are needed to lift the printer
safely because it weighs about 37 Kg or 40 Kg.
It may cause injury!
1 Turn off your printer, and then unplug
the AC cord and the Ethernet or USB
cable.
Reference
● “Turning Off the Power” P.21
4 Plug the AC cord and Ethernet or USB
cable into your printer, and then turn on
the power switch.
- 23 -
Page 24
Preparing Your Printer
1
1. Setup
● Do not apply force to the printer’s output tray
while it is open.
● Do not apply downward force to the paper tray
while it is pulled out.
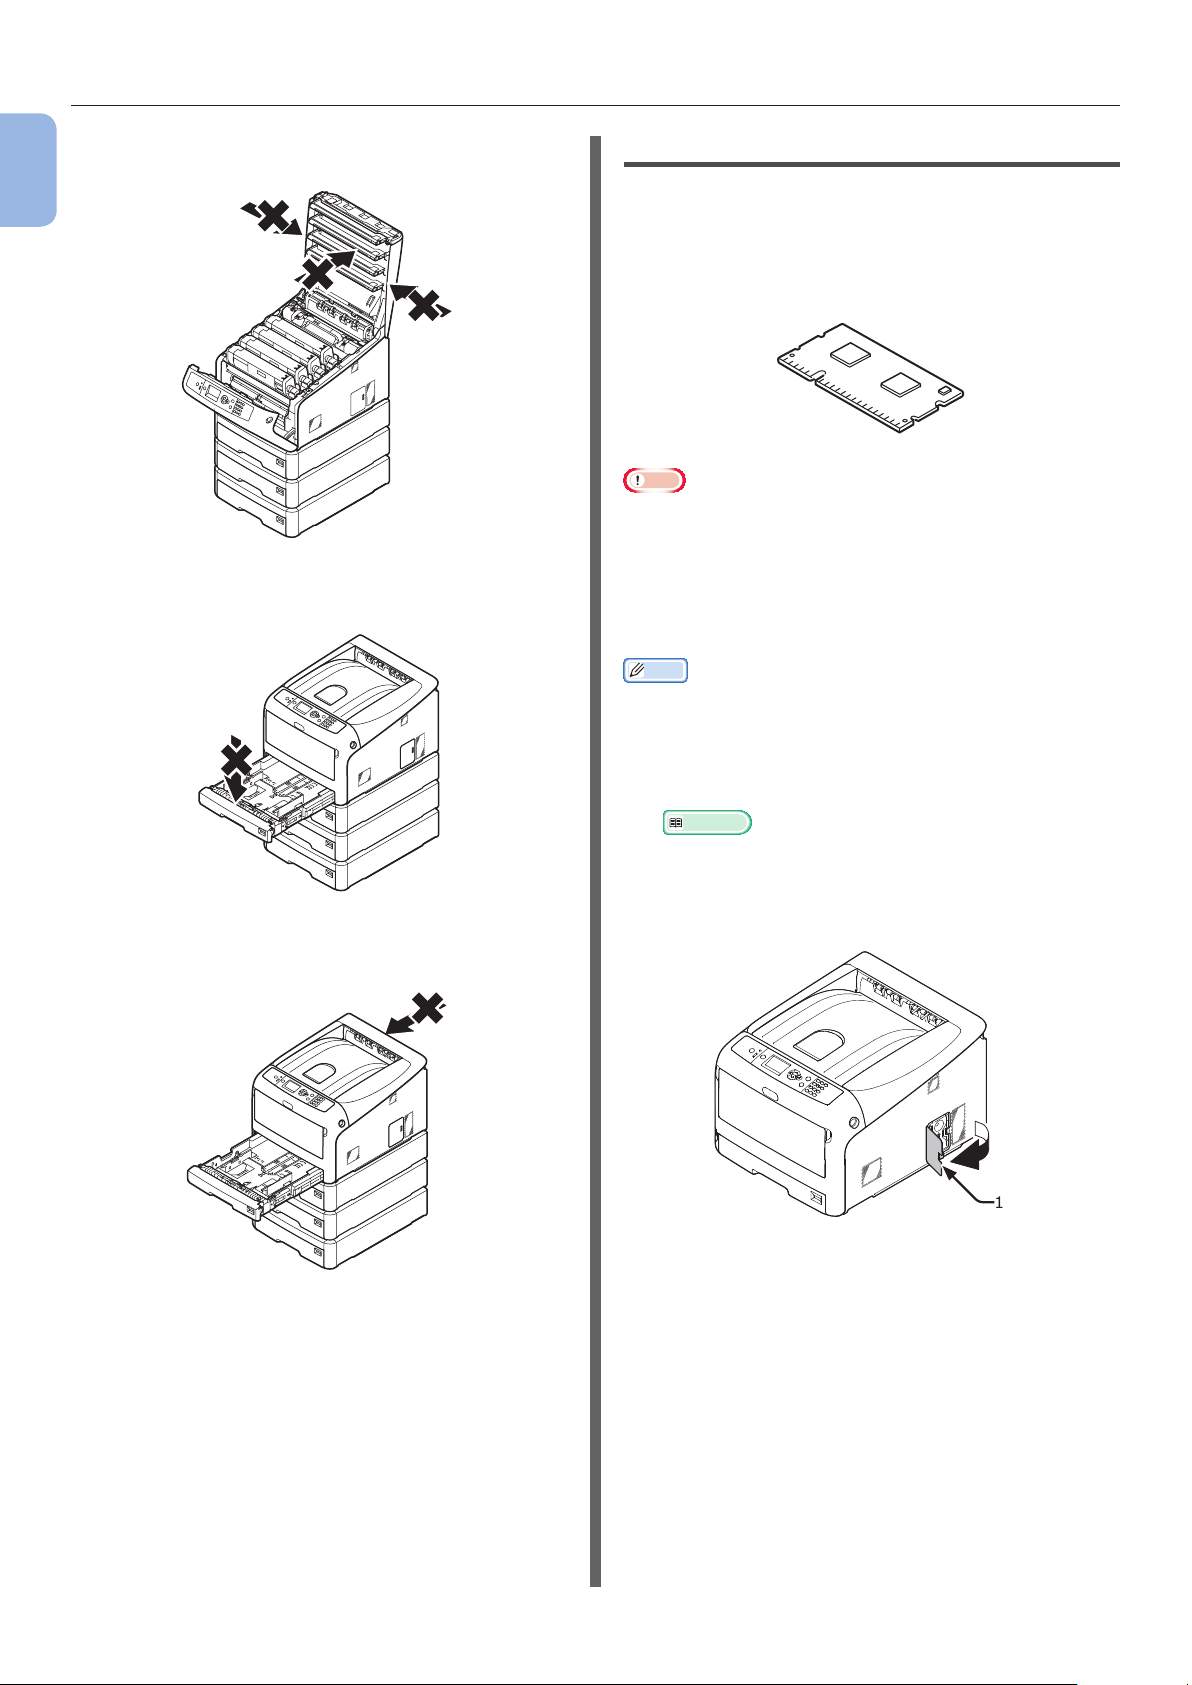
Installing Additional RAM
Install additional RAM to increase the memory
capacity of your printer in cases such as if
memory overow or the collate print errors
occur. Your printer supports 256 MB and 512 MB
RAM.
Note
● Use only genuine Oki Data products. The performance
cannot be guaranteed when using other products.
● The static electricity may damage parts. Discharge the
static electricity from your body by touching grounded
metallic parts, etc., before work.
● For C843/ES8443, it is necessary to replace the installed
256 MB RAM with a 512 MB RAM.
Memo
● For banner printing, installing additional memory is
recommended.
● Do not apply force to the printer from the back
while the paper tray is pulled out.
1 Turn off your printer, and then unplug
the AC cord and Ethernet or USB cable.
Reference
● “Turning Off the Power” P.21
2 Open the access cover (1) on the right
side of a printer.
1
- 24 -
Page 25
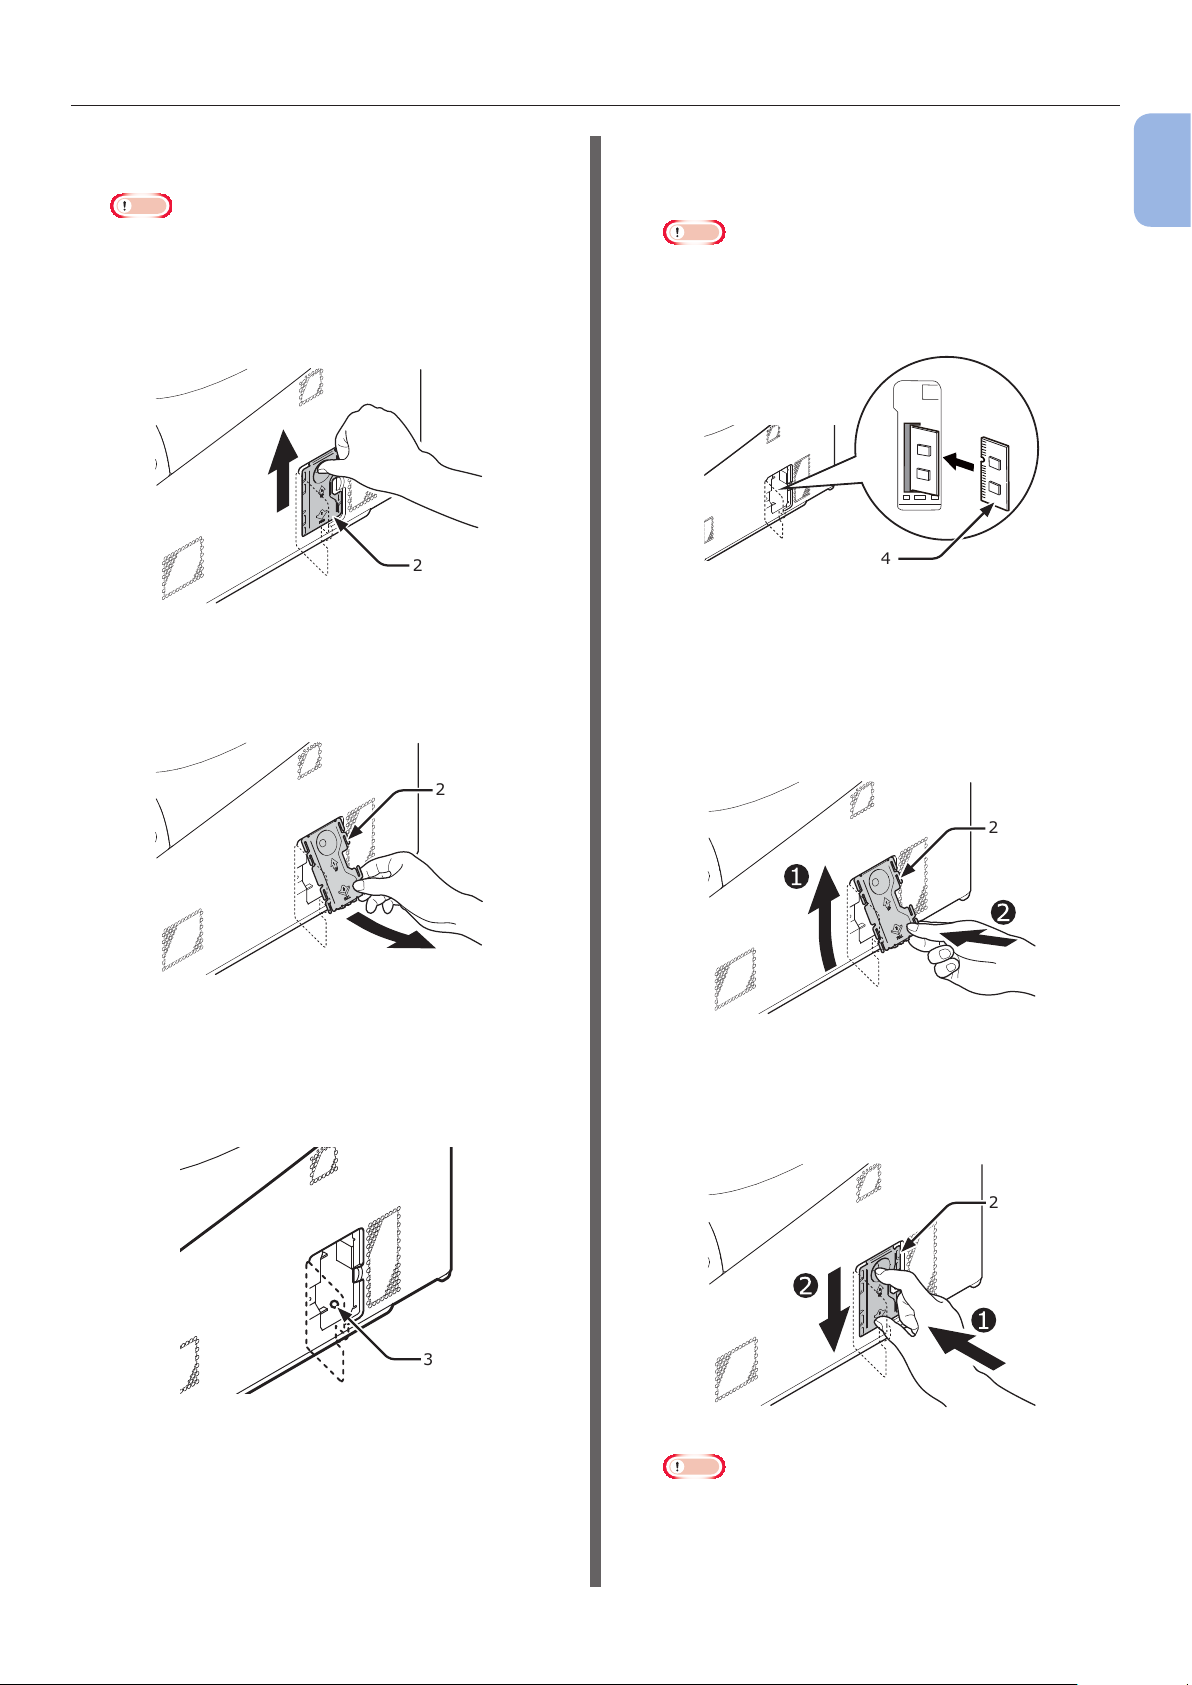
Preparing Your Printer
3 Slide the metal plate (2) upward to
remove.
Note
● If the SD memory card socket is attached, remove
the SD memory card.
(1) Put your nger in the recess of the
metal plate (2), and slide it upward.
2
(2) Pinch the lower part of the metal
plate (2), and pull it forward.
5 Insert the additional RAM (4) into the
slot and x it by pushing it toward the
printer.
Note
● Be sure to check a direction of an additional RAM.
The additional RAM has small dents on its connector,
which are tted with a connector of a slot.
4
6 Install the metal plate (2).
(1) First, insert the upper part of the
metal plate (2) in the printer, then
install the metal plate.
1
1. Setup
2
4 Make sure the LED (3) indicated by the
arrow turns off. If it is lit, wait until it
turns off.
3
2
(2) While holding the lower part of the
metal plate (2), slide the metal plate
downward and secure it.
2
- 25 -
Note
● Attach the SD memory card socket before installing
the metal plate if the SD memory card socket was
attached to the printer.
Page 26
Preparing Your Printer
7 Close the access cover (1).
1
1. Setup
1
8 Plug the AC cord and Ethernet or USB
cable into your printer, and then turn on
the power switch.
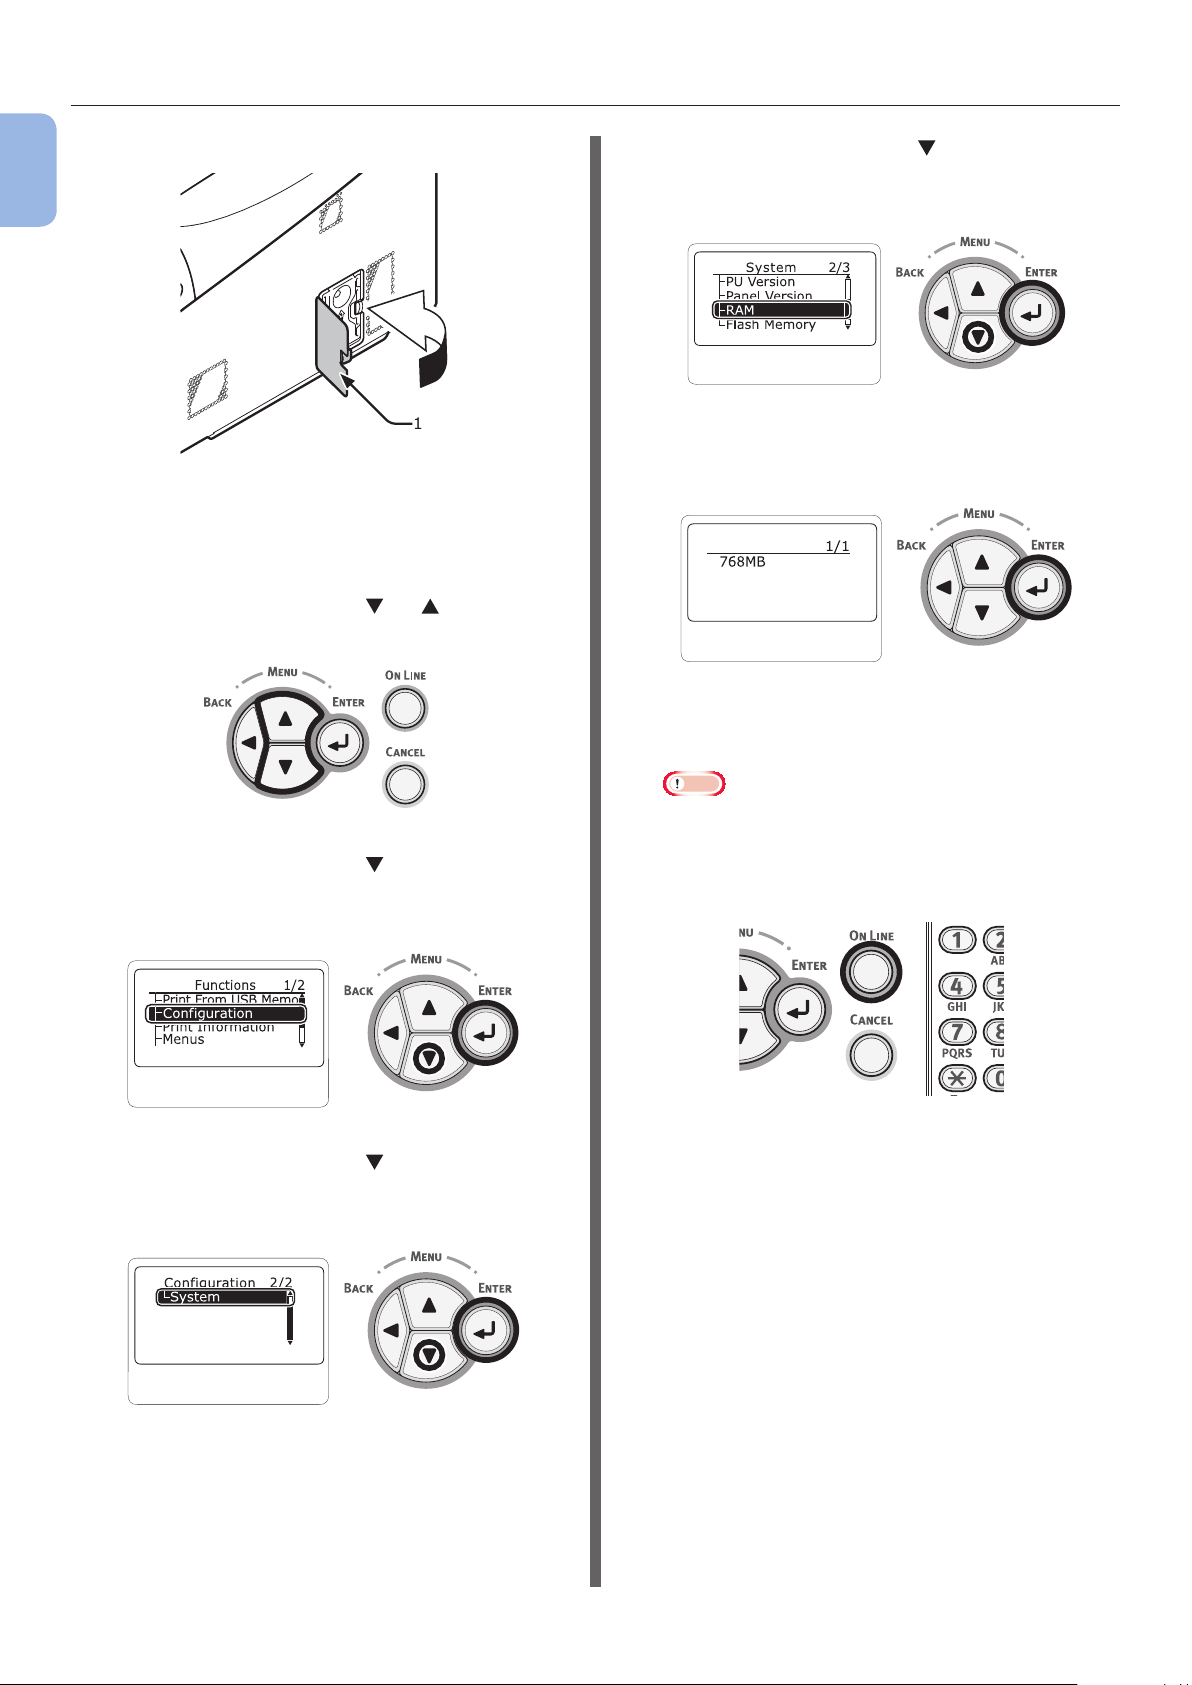
9 Press the scroll button or on the
operator panel.
10 Press the scroll button to select
[Conguration] and press the
<ENTER> button.
12 Press the scroll button several times to
select [RAM] and press the <ENTER>
button.
13 Check that the value of [RAM] has
increased.
RAM
- For memory expanded to 256 MB, it is
[512 MB]; for memory expanded to 512
MB, it is [768 MB].
Note
● If the value of [RAM] has not increased, turn off
your printer and unplug the AC cord and Ethernet or
USB cable, and then reinstall the additional RAM.
14 Press the <ON LINE> button.
11 Press the scroll button several times
to select [System] and press the
<ENTER> button.
- 26 -
Page 27
Preparing Your Printer
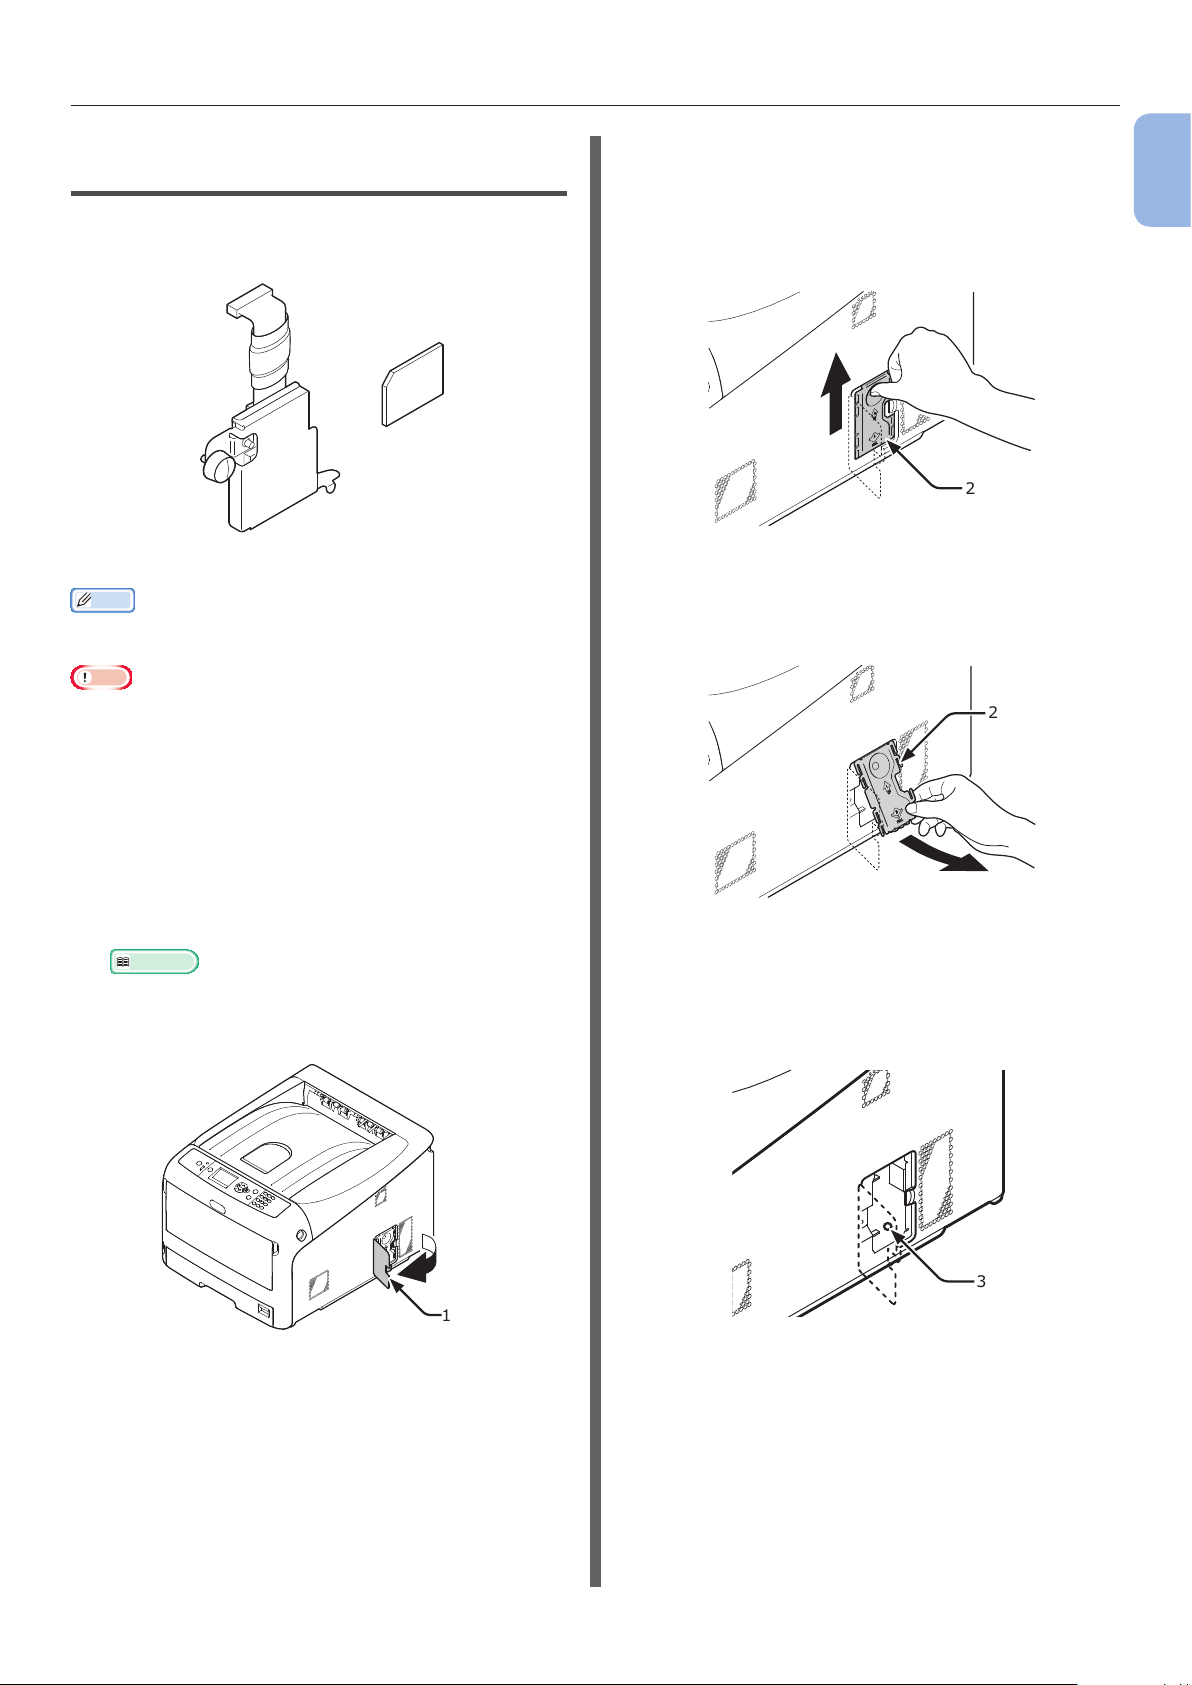
Installing the 16-GB SD Memory
Card Kit
For storing print data or a secure printing, install
the SD memory card kit.
SD memory card
SD memory socket
Memo
● The SD memory socket is attached to the SD memory
card.
Note
● Use only genuine Oki Data products. The performance
cannot be guaranteed when using other products.
● The static electricity may cause damage to the parts.
Discharge the static electricity in your body by touching
grounded metallic parts, etc. before work.
● You can not use the SD memory card with the protection
switch for accidental overwriting locked. Make sure to
release the lock.
3 Remove the metal plate (2) by sliding it
upward.
(1) Put your nger in the recess of the
metal plate (2), and slide it upward.
2
(2) Pinch the lower part of the metal
plate (2), and pull it forward.
2
1
1. Setup
1 Turn off your printer, and then unplug
the AC cord and Ethernet or USB cable.
Reference
● “Turning Off the Power” P.21
2 Open the access cover (1).
1
4 Make sure the LED (3) indicated by the
arrow turns off. If it is lit, wait until it
turns off.
3
- 27 -
Page 28
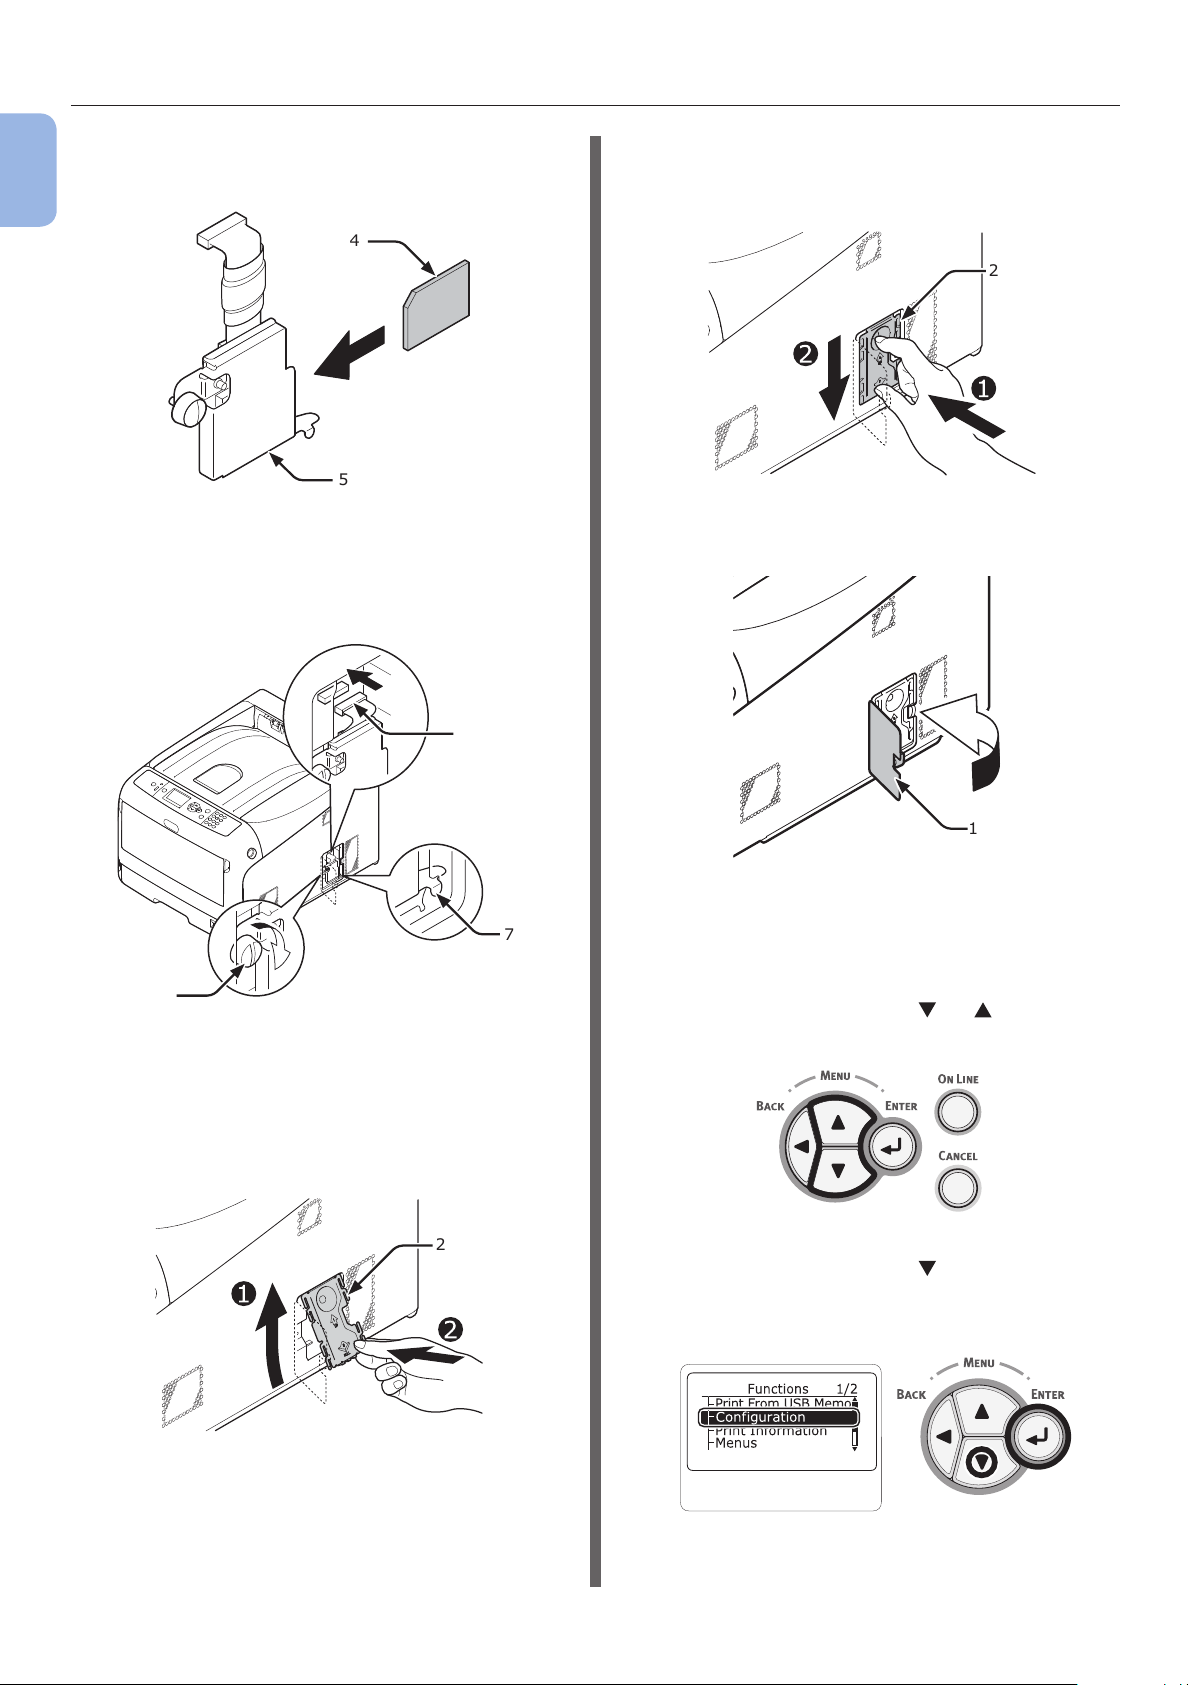
Preparing Your Printer
5 Install the SD memory card (4) into the
1
1. Setup
SD memory card socket (5).
4
5
6 Install the SD memory socket to the
printer with the screw (6) and tab (7) for
the SD memory card socket and attach
the connector (8).
(2) While holding the lower part of the
metal plate (2), slide the metal plate
downward and secure it.
2
8 Close the access cover (1).
6
7 Install the metal plate (2).
(1) First, insert the upper part of the
metal plate (2) in the printer, then
install the metal plate.
8
1
9 Plug the AC cord and Ethernet or USB
7
cable into your printer, and then turn on
the power switch.
10 Press the scroll button or on the
operator panel.
2
11 Press the scroll button to select
[Conguration] and press the
<ENTER> button.
- 28 -
Page 29
Preparing Your Printer
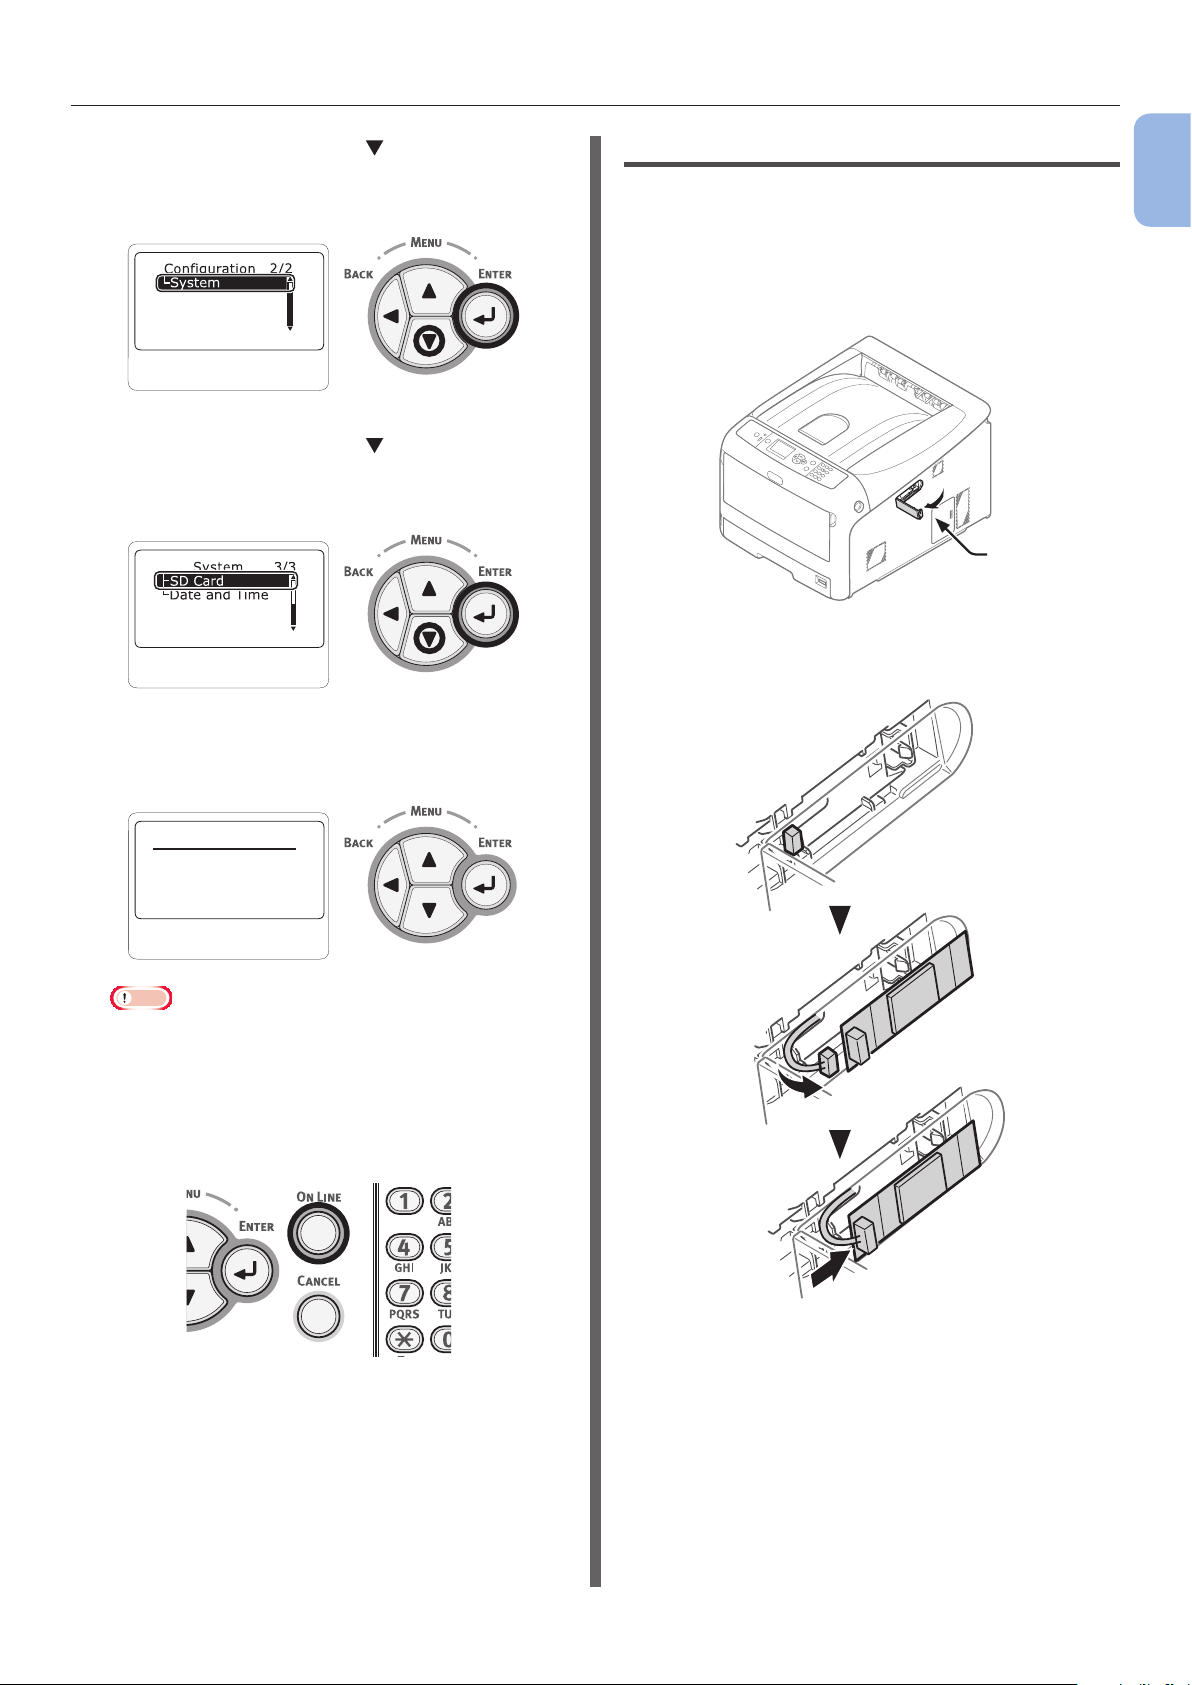
12 Press the scroll button several times
to select [System] and press the
<ENTER> button.
13 Press the scroll button several times
to select [SD Card] and press the
<ENTER> button.
Installing the Wireless LAN module
1
Turn off your printer, and then unplug
the AC cord.
2 Open the Wireless LAN module cover (1)
on the right side of a printer.
(1)
3 Pull out the connector, and plug it into
the Wireless LAN module.
1
1. Setup
14 Check that the value of [SD Card] is
[16 GB].
SD Card
15GB[F52]
Note
● [15 GB] may be displayed in [SD Card]. This is not
an error.
● If the value of [SD Card] has not increased, turn off
your printer and unplug the AC cord and Ethernet or
USB cable, and then reinstall the SD memory card.
1/1
15 Press the <ON LINE> button.
- 29 -
Page 30
Preparing Your Printer
4 Install the Wireless LAN module.
1
1. Setup
Test Printing from the Printer
Check that you can print with the printer.
Check the detailed settings and status of your
printer by printing the contents of the settings
(Conguration).
Note
● When a printer is in the power saving mode, press the
<POWER SAVE> button to restore from the mode.
1 Press the <Fn> key on the operator
panel.
2 Enter “100” using the numeric keypad
and press the <ENTER> button.
5 Close the Wireless LAN module cover.
6 Plug the AC cord.
7 Turn on your printer while pressing the
<ENTER> button.
8 Press the <ENTER> button.
9
Enter the administrator password, and
press the <ENTER> button.
The factory default password is “999999”.
10 Press the scroll button to select
[Wireless Module] and press the
<ENTER> button.
3 Press the <ENTER> button as
[Execute] is selected.
Configuration 1/1
Execute
4 After nishing a print of printer settings,
a setup for printing from a printer
completes.
Reference
● You can also print reports and lists for each function.
Refer to the User’s Manual (Advanced).
11 Press the scroll button to select
[Enable] and press the <ENTER>
button.
12 Press the <ON LINE> button.
- 30 -
Page 31

Connecting to a Computer
●● Connecting to a Computer
This section explains how to connect your printer to a computer and install a printer driver software
using the provided “Software DVD-ROM”.
Prepare a computer with a DVD drive.
Connection Method
You can select either of the following connection methods:
● “Network Connection” P.32
● “USB Connection” P.42
Product Requirements
Your printer supports the following operating systems:
● Windows 10/Windows 10 (64bit Version)
● Windows 8.1/Windows 8.1 (64bit Version)
● Windows 8/Windows 8 (64bit Version)
● Windows 7/Windows 7 (64bit Version)
● Windows Vista/Windows Vista (64bit Version)
● Windows Server 2012 R2
● Windows Server 2012
● Windows Server 2008 R2
● Windows Server 2008/Windows Server 2008 (x64 Version)
● Mac OS X 10.8.5 to 10.11
1
1. Setup
Types of Drivers
The types of the drivers that can be installed are as follows.
● For Windows
Type Description
PCL The PCL printer driver is suitable for printing of business documents.
PS The PS printer driver is suitable for printing of documents including PostScript fonts and EPS data.
● For Mac OS X
Type Description
PS The PS printer driver can be also used for normal printing. The PS printer driver do not support
C813/C823.
PCL The PCL printer driver can be also used for normal printing. The PCL printer driver support only
C813/C823.
Note
● Depending on the printer driver version or the version of Windows or Mac OS X, the description may be different.
- 31 -
Page 32

Connecting to a Computer
Network Connection
1
Perform the following procedure to connect your
1. Setup
printer to a computer via network.
Connecting an Ethernet Cable
Be sure to connect your printer to a network
with an Ethernet cable before driver installation.
1 Prepare an Ethernet cable (1) and a hub
(2).
Prepare an Ethernet cable (category 5, twisted
pair, straight) and a hub separately.
1
2 Turn off your printer and computer.
Reference
● “Turning Off the Power” P.21
Connecting in Wireless LAN
(Infrastructure Mode) (Optional)
Note
● In a wireless LAN environment, the machine enters sleep
mode, but does not enter deep sleep mode.
● Do not place any devices (especially microwave
ovens or digital cordless telephones) that emit weak
electromagnetic waves near the machine.
● Install the machine near a wireless LAN access point or
wireless device with no obstacles between them (the
distance should be within 30 m).
● Wireless connections may be difcult if there is any metal,
aluminum framed windows, or reinforced concrete walls
between the machine and the wireless LAN access point.
● Wireless LAN connections may have slower transmission
speeds, depending on the environment, than wired LAN
or USB connections. We recommend using a wired LAN or
a USB connection to print large amounts of data, such as
photographs.
2
3 Plug one end of the Ethernet cable into
the network interface connection (3) on
the back of the printer.
4 Plug the other end of the Ethernet cable
into the hub (2).
2
3
To choose a valid default gateway
Press the scroll button several times
1
to select [Admin Setup] and press the
<ENTER> button.
2 Enter the administrator password using
the numeric (0-9) keys, and press the
<ENTER> button.
The factory default password is “999999”.
3 Press the scroll button several times
to select [Network Setup] and press
the <ENTER> button.
4 Press the scroll button several times
to select [Enabling Default Gateway]
and press the <ENTER> button.
5 Press the scroll button to select
[Wireless(Infrastructure)].
- 32 -
6 Press the <ENTER> button.
Connecting Using WPS
If the wireless LAN access point supports WPS,
the connection to the wireless LAN can be made
easily by using the easy setup button (WPS
button).
Follow the procedure below for the setup.
Page 33

Connecting to a Computer
1 Conrm the position of the easy setup
button and when to press the button
by referring to the user manual of the
wireless LAN access point.
2 Conrm that the wireless LAN access
point has been activated and is
functioning normally.
3 Turn on the printer.
4 Press the scroll button several times
to select [Wireless(Infrastructure)
Setting], and then press the <ENTER>
button.
5 Enter the administrator password using
the numeric (0-9) keys, and press the
<ENTER> button.
The factory default password is “999999”.
6 Press the scroll button several times
to select [Automatic setup (WPS)],
and then press the <ENTER> button.
1 Conrm and write down the SSID and
encryption key by referring to the user
manual of the wireless LAN access point.
Memo
● The SSID is also called the network name, ESSID, or
ESS-ID.
● The encryption key is also called the network key,
security key, password, or pre-shared key.
2 Conrm that the wireless LAN access
point has been activated and is
functioning normally.
3 Turn on the printer.
4 Press the scroll button several times
to select [Wireless(Infrastructure)
Setting], and then press the <ENTER>
button.
5 Enter the administrator password using
the numeric (0-9) keys, and press the
<ENTER> button.
The factory default password is “999999”.
1
1. Setup
7 Select [WPS-PBC], and then press the
<ENTER> button.
8 Select [Yes], and then press the
<ENTER> button.
9 The Printer starts searching for wireless
LAN access points. During 2 minutes,
press the easy setup button for the
wireless LAN access point for a few
seconds.
Once “Connection successful” is displayed,
it indicates that the wireless LAN setup has
completed.
If “Connection failed” is displayed, repeat the
procedure from step 4.
If an antenna appears on the upper right corner
of the operator panel, it indicates that the
connection is successful.
Connecting by Selecting a Wireless
LAN Access Point from the Control
Panel
If the wireless LAN access point does not support
WPS, you can connect by selecting the wireless
LAN access point you want to use from those the
machine has detected. To do this, an encryption
key is required.
6 Press the scroll button several times to
select [Wireless Network Selection],
and then press the <ENTER> button.
7 The printer starts searching for wireless
LAN access points. Please wait.
8 A list of available wireless LAN access
point SSIDs are displayed. Press or ,
select a wireless LAN access point, and
press the <ENTER> button.
Note
● If only [Manual Setup] is displayed or the desired
wireless LAN network SSID is not displayed, follow
the procedure in “Connecting by Manual Setup from
Control Panel” to do the settings.
9 A screen opens in which to input the
encryption key appropriate to the
encryption procedure for the selected
wireless LAN access point; input the
encryption key.
Memo
● The encryption key differs depending on the wireless
LAN access point and security.
If [WPA Pre-shared Key] is displayed
Item Explanation
Encryption
method
Encryption key Enter the pre-shared key.
WPA/WPA2-PSK
- 33 -
Page 34
Connecting to a Computer
If [WEP Key] is displayed
1
1. Setup
Other settings
Item Explanation
Encryption
method
Encryption key Input the WEP key.
Item Explanation
Encryption
method
Encryption key Input is not necessary.
WEP
Disable
10 The SSID selected in step 7 and
the encryption method in step 8
are displayed as security in of the
conrmation screen. If the SSID is
the same as the one set up in step
select [ENTER]:Execute and press the
<ENTER> button.
Once “Connection successful” is displayed,
it indicates that the wireless LAN setup has
completed.
If “Connection failed” is displayed, repeat the
procedure from step 4.
If an antenna appears on the upper right corner
of the operator panel, it indicates that the
connection is successful.
Connecting by Manual Setup from
Control Panel
Congure the wireless LAN access point
information (SSID, encryption method, and
encryption key) manually, and connect to the
wireless LAN.
1,
4 Press the scroll button several times
to select [Wireless(Infrastructure)
Setting], and then press the <ENTER>
button.
5
Enter the administrator password,and
press the <ENTER> button.
The factory default password is “999999”.
6 Press the scroll button several times to
select [Wireless Network Selection],
and then press the <ENTER> button.
7 The printer starts searching for wireless
LAN access points. Please wait.
8 A list of available wireless LAN access
point SSIDs are displayed. Press or ,
select [Manual Setup] at the end of the
list, and press the <ENTER> button.
9 Input the SSID recorded in step 1, and
press the <ENTER> button.
Note
● It is case sensitive. Please enter it correctly.
10 Select the encryption method conrmed
in step 1, and press the <ENTER>
button.
Memo
● The encryption key differs depending on the wireless
LAN access point and security.
11 Input the encryption key recorded in
step 1, and press the <ENTER> button.
12 Press the <ENTER> button.
1 Check and write down the SSID, the
encryption method and the encryption
key by referring to the user manual of
the wireless LAN access point.
Note
● When the encryption method is WPA-EAP or WPA2-
EAP, congure from the printer’s web page.
Memo
● The SSID is also called the network name, ESSID, or
ESS-ID.
● The encryption key is also called the network key,
security key, password, or pre-shared key.
2 Conrm that the wireless LAN access
point has been activated and is
functioning normally.
3 Turn on the printer.
Once “Connection successful” is displayed,
it indicates that the wireless LAN setup has
completed.
If “Connection failed” is displayed, repeat the
procedure from step 4.
If an antenna appears on the upper right corner
of the operator panel, it indicates that the
connection is successful.
- 34 -
Page 35

Connecting to a Computer
Installing a Printer Driver
(for Windows)
To complete the network connection with a
Windows computer, rst set IP addresses for the
printer, and then install a printer driver on the
computer.
If there is no DHCP server or BOOTP server on
the network, you need to manually congure the
IP address on the computer or printer.
If your network administrator or internet service
provider species an unique IP address for the
computer and your printer, you need to set the
IP addresses manually.
Note
● You need to complete the network setting of the computer
before this procedure.
● To complete this procedure, you must be logged in as an
administrator.
● When setting an IP address manually, ask the network
administrator or your internet service provider which
IP address to use. If the IP address is set wrong, the
network may go down or Internet access may be disabled.
Memo
● If conguring a small network consisting of only your
printer and a computer, set IP addresses as shown below
(according to RFC1918).
For the computer
IP address : 192.168.0.1 - 254
Subnet mask : 255.255.255.0
Default gateway : not used
DNS server : not used
For the printer
IP address Set : Manual
IP address:
Subnet Mask : 255.255.255.0
Default Gateway : 0.0.0.0
Network Scale : Small
192.168.0.1 - 254 (select a
different value from that of the
computer)
First, Set the IP address of the printer.
1 Turn on the printer.
2 Press the scroll button or on the
operator panel.
3 Press the scroll button several times
to select [Admin Setup], and press the
<ENTER> button.
4 Enter the administrator password, using
the numeric (0-9) keys.
The factory default password is “999999”. Press
<ENTER> button after each character you input.
5 Press the <ENTER> button.
1
1. Setup
● To set [Network Scale], press the scroll button
and then select [Admin Setup] > [Network Setup] >
[Network Scale].
or
6 Check that [Network Setup] is selected
and press the <ENTER> button.
- 35 -
Page 36

Connecting to a Computer
7 Press the to select [IP Address Set],
1
1. Setup
and press the <ENTER> button.
8 If setting the IP address manually, press
the scroll button and select [Manual],
and press the <ENTER> button.
Proceed to the step 9.
If obtaining the IP address automatically, check
that [Auto] is selected, and press the <ENTER>
button.
Proceed to the step 15.
10 Enter the IP address using the numeric
(0-9) keys, and press the <ENTER>
button.
To move to the next box, press the <ENTER>
button.
11 Press the <BACK> button until
[Network Setup] is displayed.
Press the scroll button
[Subnet Mask], and press the
<ENTER> button.
to select
9 Press the <BACK> button until
[Network Setup] is displayed.
Press the scroll button to select
[IPv4 Address], and press the
<ENTER> button.
12 Enter the subnet mask in the same
manner of IP address.
To move to the next box, press the <ENTER>
button.
13 Press the <BACK> button until
[Network Setup] is displayed.
Press the scroll button to select
[Gateway Address], and press the
<ENTER> button.
- 36 -
Page 37

Connecting to a Computer
14 Enter the default gateway address and
press the <ENTER> button.
To move to the next box, press the <ENTER>
button.
After entering all settings, press the <BACK>
button.
Gateway Address
192 . 168. 0. 254
15 When the setup menu screen is
displayed, press the <ON LINE> button
to complete the network settings.
Next, install the printer driver on the
computer.
1 Insert the included “Software DVD-ROM”
into a computer.
2 When [AutoPlay] is displayed, click
[Run Setup.exe].
Memo
● If the [User Account Control] dialog box is
displayed, click [Yes].
1
1. Setup
3 Select a language from the drop-down
list.
4 Read the license agreement, and then
click [Accept].
5 Read [Environment advice], and then
click [Next].
6 Select [Network] in accordance to the
connection method of the machine and
computer, and then click [Next].
7 Select the model name of the machine,
and then click [Next].
- 37 -
Page 38

Connecting to a Computer
8 Click [Install Optional Software].
1
1. Setup
Installation starts.
Memo
● The following software is installed.
- PCL6 Printer Driver (Including Network Extension
and Color Swatch Utility)
- FAQ
● Install other software from Custom Install
9 Make sure that the software is
successfully installed, and then click
[Printing Test].
Select the printer for test printing, and the click
[Printing Test].
Make sure that the test printing was successful,
and then click [OK].
11 Click [Next].
If the following dialog box is displayed, click
[Yes].
12 Click [Exit].
10 Click [Complete].
- 38 -
Page 39

Connecting to a Computer
Installing a Printer Driver
(For Mac OS X)
To complete the network connection with a Mac
operating system, install a printer driver on the
computer and set your printer as a network
printer.
Note
● Disable the anti-virus software before starting this
procedure.
Install the Mac OS X PS printer
driver (Except C813/C823)
When the installation is complete, print a test
page in step 14.
1 Make sure that the machine and a
computer are connected and the
machine is turned on.
2 Insert the “Software DVD-ROM” into a
computer.
10 Select the machine where [Kind] is
[Bonjour], and then select [OKI C833
PS] from the [Use].
Connection Priner Name Kind
Network OKI-C833 (last 6 digits of
MAC address)
USB OKI DATA CORP C833 USB
Memo
● To change the name, enter a new name into
[Name:].
Bonjour
1
1. Setup
3 Double-click the [OKI] icon on the
desktop.
4 [Drivers] > [PS] > Double-click
[Installer for OSX].
5 Enter the administrator password, and
then click [OK].
Follow the on-screen instructions to complete the
installation.
6 Select [System Preferences] from the
Apple menu.
7 Click [Printers & Scanners].
8 Click [+], and select [Add Printer or
Scanner] when the menu is displayed.
11 Click [Add].
12 If the installable options conguration
screen is displayed, click [OK].
13 Make sure that the machine is added
to [Printers] and [OKI C833 PS] is
displayed for [Kind].
Note
● If [OKI C833 PS] is not displayed for [Kind]
correctly, click [-], delete the machine from
[Printers], and then newly perform steps 8 to 12.
9 Click [Default].
14 Click [Open Print Queue...].
15 Select [Print Test Page] from the
[Printer] menu.
- 39 -
Page 40

Connecting to a Computer
Install the Mac OS X PCL printer
1
1. Setup
driver (C813/C823 only)
When the installation is complete, print a test
page in step 14.
1 Make sure that the machine and a
computer are connected and the
machine is turned on.
2 Insert the “Software DVD-ROM” into a
computer.
3 Double-click the [OKI] icon on the
desktop.
4 [Drivers] > [PCL] > [C823] > Double-
click [Installer for OSX].
5 Enter the administrator password, and
then click [OK].
Follow the on-screen instructions to complete the
installation.
6 Select [System Preferences] from the
Apple menu.
7 Click [Printers & Scanners].
Memo
● To change the name, enter a new name into
[Name:].
11 Click [Add].
12 If the installable options conguration
screen is displayed, click [OK].
13 Make sure that the machine is added
to [Printers] and [OKI C823 PCL] is
displayed for [Kind].
8 Click [+], and select [Add Printer or
Scanner] when the menu is displayed.
9 Click [Default].
10 Select the machine where [Kind] is
[Bonjour], and then select [OKI C823
PCL] from the [Use].
Types of
Names
Network OKI-C823 (last 6 digits of
USB OKI DATA CORP C823 USB
Displayed in the
Connection
MAC address)
Methods
List
Bonjour
Note
● If [OKI C823 PCL] is not displayed for [Kind]
correctly, click [-], delete the machine from
[Printers], and then newly perform steps 8 to 12.
14 Click [Open Print Queue...].
15 Select [Print Test Page] from the
[Printer] menu.
- 40 -
Page 41

Connecting to a Computer
Connecting in Wireless LAN (AP Mode) (Optional)
The wireless LAN (AP mode) connects directly
to a wireless terminal (computer, tablet,
smartphone, etc.) without using a wireless LAN
access point.
Note
● You cannot enable wireless LAN (infrastructure) and
wireless LAN (AP mode) at the same time.
● Do not place any devices (especially microwave
ovens or digital cordless telephones) that emit weak
electromagnetic waves near the machine.
● Wireless connections may be difcult if there is any
metal, aluminum framed windows, or reinforced concrete
walls between the machine and the wireless terminal
(computer, tablet, smartphone, etc.).
● Wireless LAN connections may have slower transmission
speeds than wired LAN or USB connections, depending on
the environment. We recommend using a wired LAN or a
USB connection.
Preparing to use the wireless LAN
(AP mode)
Automatic Setup (Push Button)
If the wireless terminal (computer, tablet,
smartphone, etc.) supports WPS-PBC (push
button), then you can use the WPS button to
connect via wireless (AP mode).
Follow the procedure below to connect.
1 Conrm the position of the WPS button
in the user’s manual provided with the
wireless terminal (computer, tablet,
smartphone, etc.)
2 Turn on the printer.
3
Press the scroll button several times to
select [Wireless(AP Mode) Setting] ,
and then press the <ENTER> button.
4 Enter the Admin password using the
numeric (0-9) keys, and press the
<ENTER> button.
(The default password is 999999.)
1
1. Setup
The machine becomes a simple wireless access
point, and wireless terminals (computer, tablet,
smartphone, etc.) can connect directly to it.
Before you start, conrm that the wireless
device you are using supports the following
environment.
Item Value
Standard IEEE 802.11 b/g/n
Security WPA2-PSK (AES)
5 Select [Enable], and then press the
<ENTER> button.
6 Press the scroll button to select
[Automatic Setup (Push Button)],
and then press the <ENTER> button.
7 Select [Yes], and then press the
<ENTER> button.
8 Start WPS-PBC (push button) on the
wireless terminal (computer, tablet,
smartphone, etc.).
- 41 -
Page 42
Connecting to a Computer
Manual connections
1
If the wireless terminal (computer, tablet,
smartphone, etc.) does not support WPS-PBC
1. Setup
(push button), then you can input the machine’s
SSID and password into the wireless terminal
(computer, tablet, smartphone, etc.) to connect.
Follow the procedure below to connect.
1 Turn on the printer.
2 Press the scroll button several times to
select [Wireless(AP Mode) Setting],
and then press the <ENTER> button.
3 Enter the Admin password using the
numeric (0-9) keys, and press the
<ENTER> button.
(The default password is 999999.)
4 Select [Enable], and then press the
<ENTER> button.
5 Press the scroll button several times
to select [Manual Setup], and then
press the <ENTER> button.
6 Conrm the [SSID] and [Password]
that are displayed on the printer.
7 Input the printer’s [SSID] and
[Password] that were conrmed in step
7 for the wireless terminal (computer,
tablet, smartphone, etc.).
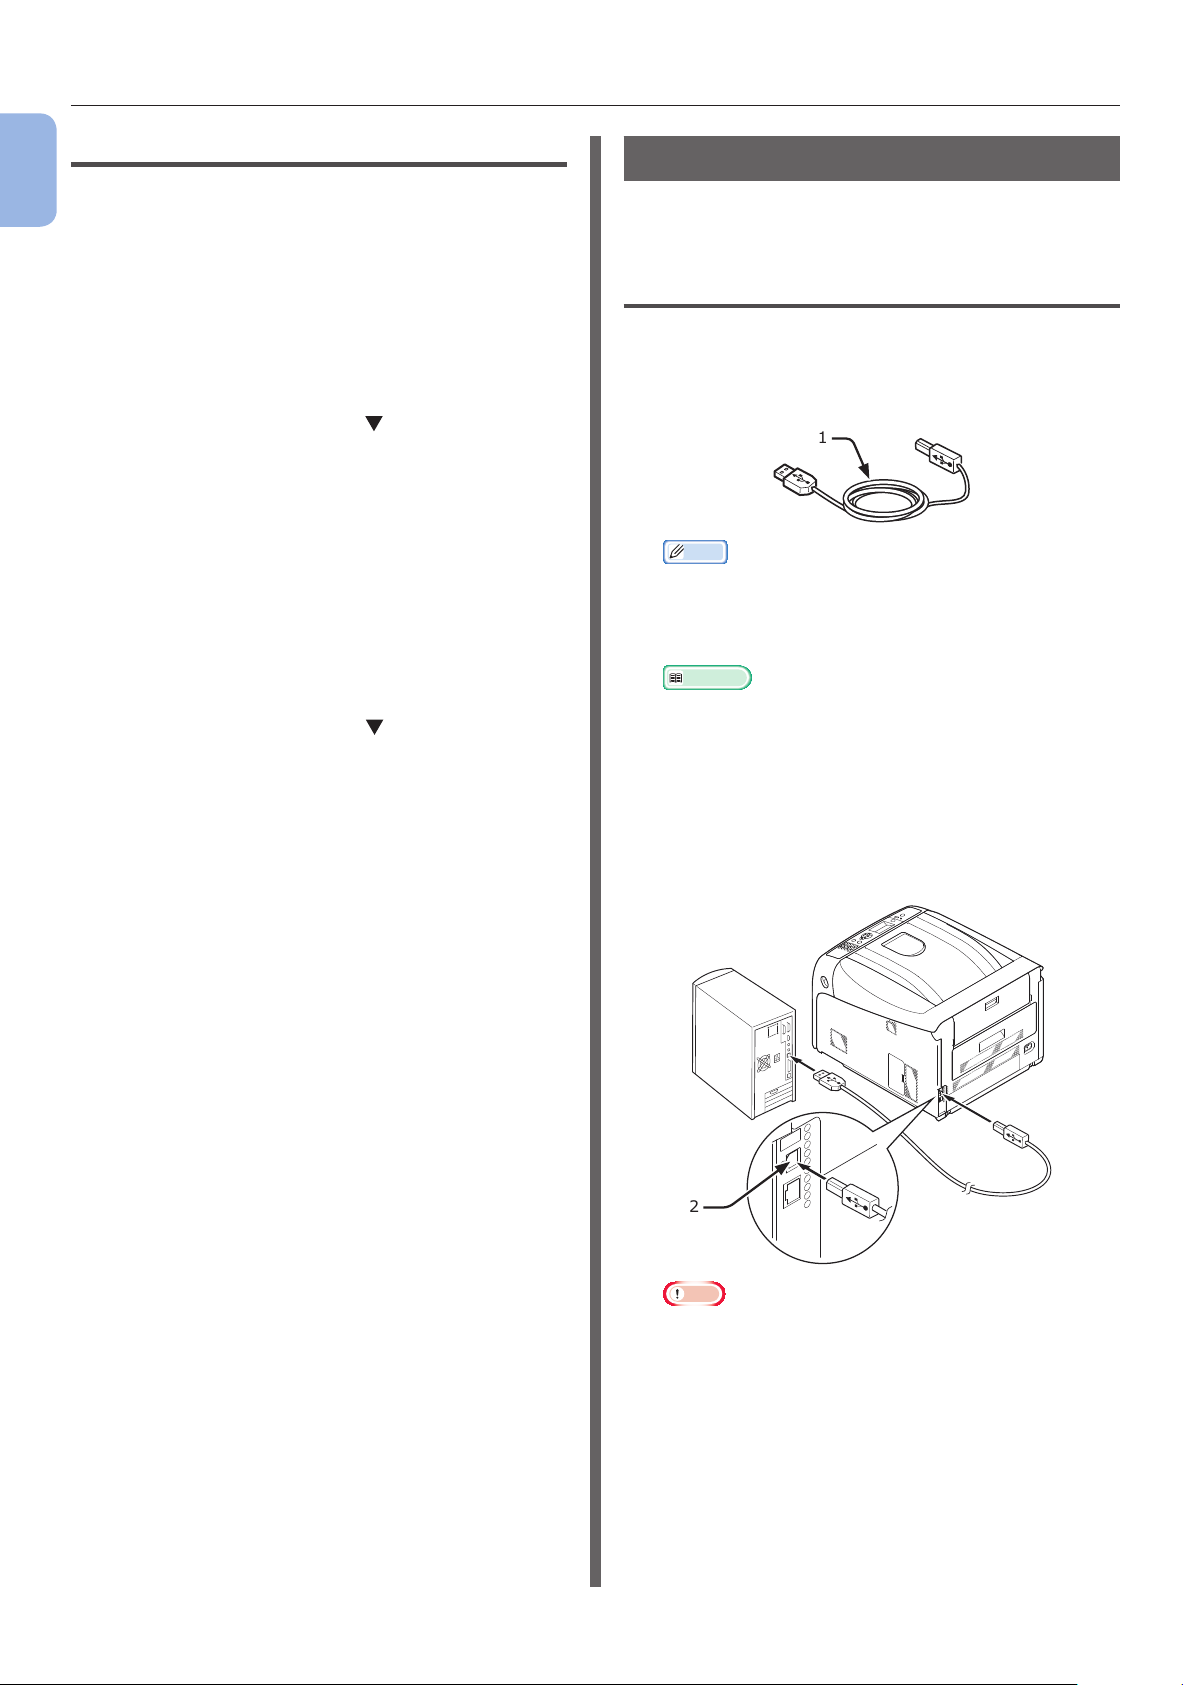
USB Connection
Perform the following procedure to connect your
printer to a computer via USB.
Connecting a USB Cable
1
Prepare a USB cable (1).
A USB cable is not supplied with your printer.
Prepare a USB 2.0 cable separately.
1
Memo
● Use a USB 2.0 Hi-Speed cable for a USB 2.0 Hi-
Speed connection.
2 Turn off your printer and the computer.
Reference
● “Turning Off the Power” P.21
3 Plug one end of the USB cable into the
USB interface connector (2) on the back
of the printer.
4 Plug the other end of the USB cable into
the computer’s USB interface connector.
- 42 -
2
Note
● Do not plug the USB cable into the network interface
connection. Doing so may cause a malfunction.
Page 43

Connecting to a Computer
Installing a Printer Driver
(For Windows)
Note
● You must be logged in as an administrator to complete
this procedure.
1 Insert the included “Software DVD-ROM”
into a computer.
2 When [AutoPlay] is displayed, click
[Run Setup.exe].
Memo
● If the [User Account Control] dialog box is
displayed, click [Yes].
8 Click [Install Optional Software].
1
1. Setup
Installation starts.
Memo
● The following software is installed.
- PCL6 Printer Driver (Including Color Swatch
Utility)
- FAQ
● Install other software from Custom Install.
9 Make sure that the software is
successfully installed, and then click
[Printing Test].
Select the printer for test printing, and the click
[Printing Test].
Make sure that the test printing was successful,
and then click [OK].
3
Select a language from the drop-down list.
4 Read the license agreement, and then
click [Accept].
5 Read [Environment advice], and then
click [Next].
6 Select [USB] in accordance to the
connection method of the machine and
computer, and then click [Next].
7 Select the model name of the machine,
and then click [Next].
10 Click [Complete].
- 43 -
Page 44

Connecting to a Computer
11 Click [Next].
1
1. Setup
If the following dialog box is displayed, click
[Yes].
3 Double-click the [OKI] icon on the
desktop.
4 [Drivers] > [PS] > Double-click
[Installer for OSX].
5 Enter the administrator password, and
then click [OK].
Follow the on-screen instructions to complete the
installation.
6 Select [System Preferences] from the
Apple menu.
7 Click [Printers & Scanners].
8 Click [+], and select [Add Printer or
Scanner] when the menu is displayed.
12 Click [Exit].
Installing a Printer Driver
(For Mac OS X)
Note
● Disable the anti-virus software before starting this
procedure.
Install the Mac OS X PS printer
driver (Except C813/C823)
When the installation is complete, print a test
page in step 14.
9 Click [Default].
10 Select the machine where [Kind] is
[USB], and then select [OKI C833 PS]
from the [Use].
Connection Priner Name Kind
Network OKI-C833 (last 6 digits of
MAC address)
USB OKI DATA CORP C833 USB
Memo
● To change the name, enter a new name into
[Name:].
Bonjour
1 Make sure that the machine and a
computer are connected and the
machine is turned on.
2 Insert the “Software DVD-ROM” into a
computer.
- 44 -
Page 45

Connecting to a Computer
Install the Mac OS X PCL printer
driver (C813/C823 only)
When the installation is complete, print a test
page in step 14.
1 Make sure that the machine and a
computer are connected and the
machine is turned on.
2 Insert the “Software DVD-ROM” into a
computer.
3 Double-click the [OKI] icon on the
desktop.
1
1. Setup
11 Click [Add].
12 If the installable options conguration
screen is displayed, click [OK].
13 Make sure that the machine is added
to [Printers] and [OKI C833 PS] is
displayed for [Kind].
Note
● If [OKI C833 PS] is not displayed for [Kind]
correctly, click [-], delete the machine from
[Printers], and then newly perform steps 8 to 12.
4 [Drivers] > [PCL] > [C823] > Double-
click [Installer for OSX].
5 Enter the administrator password, and
then click [OK].
Follow the on-screen instructions to complete the
installation.
6 Select [System Preferences] from the
Apple menu.
7 Click [Printers & Scanners].
8 Click [+], and select [Add Printer or
Scanner] when the menu is displayed.
14 Click [Open Print Queue...].
15 Select [Print Test Page] from the
[Printer] menu.
- 45 -
9 Click [Default].
10 Select the machine where [Kind] is
[USB], and then select [OKI C823 PCL]
from the [Use].
Types of
Names
Network OKI-C823 (last 6 digits of
USB OKI DATA CORP C823 USB
Displayed in the
Connection
MAC address)
Methods
Bonjour
List
Page 46

Connecting to a Computer
Memo
1
1. Setup
● To change the name, enter a new name into
[Name:].
11 Click [Add].
12 If the installable options conguration
screen is displayed, click [OK].
13 Make sure that the machine is added
to [Printers] and [OKI C823 PCL] is
displayed for [Kind].
When Adding Options
If options such as additional tray unit and/or
SD memory card kit have been installed, use
following procedures to change printer driver
settings.
For Windows PCL Driver
Click [Start] > [Devices and Printers].
1
2 Right-click the [OKI C833] icon and
select [Printer Properties]. (If you
have installed multiple printer drivers,
select [Printer Properties] >[OKI
C833 PCL6].)
3 Select the [Device Options] tab.
4 If using a network connection, select
[Get Printer Settings].
If using a USB connection, enter the
total number of trays excluding the
multipurpose tray in [Installed Paper
Trays]. For example, when three option
trays are installed, enter “4” as the trays
1, 2, 3 and 4 are available.
Note
● If [OKI C823 PCL] is not displayed for [Kind]
correctly, click [-], delete the machine from
[Printers], and then newly perform steps 8 to 12.
14 Click [Open Print Queue...].
15 Select [Print Test Page] from the
[Printer] menu.
5 Click [OK].
- 46 -
Page 47

Connecting to a Computer
For Windows PS Driver
Click [Start] > [Devices and Printers].
1
2 Right-click the [OKI C833] icon and
then select [Printer Properties]. (If
you have installed multiple printer
drivers, select [Printer Properties] >
[OKI C833 PS].)
3 Select the [Device Settings] tab.
4 If using a network connection, select
[Get installed options automatically]
under [Installable Options], and then
click [Setup].
If using a USB connection, select
an appropriate number of trays in
[Available Trays] under [Installable
Options].
5 Select the number of available trays in
[Available Tray], and then click [OK].
1
1. Setup
5 Click [OK].
For Mac OS X Driver
Select [System Preferences] from the
1
Apple menu.
2 Click [Printers & Scanners].
3 Select the name of your printer and then
click [Options & Supplies].
4 Select the [Options] tab.
- 47 -
Page 48

2. Printing Basic Operation
This chapter describes how to print documents from a computer.
2
●● Supported Paper
2. Printing Basic Operation
Supported Paper Types
For high-quality printing, be sure to use paper types that satisfy requirements such as those for
material quality, weight, and surface nish. Please use digital photo print paper.
If not using recommended paper, please check the print quality and the movement of the paper
sufciently beforehand to make sure that there are no problems. Your printer supports the following
types of paper.
Paper Type Paper Size mm (inch) Paper Weight
Plain paper A3 297 x 420 64 to 256 g/m
A4 210 x 297
A5 148 x 210
A6 105 x 148
B4 257 x 364
B5 182 x 257
B6 128 x 182
B6 Half 64 x 182
Tabloid (11 x 17)
Letter 215.9 x 279.4
(8.5 x 11)
Legal 13" 215.9 x 330.2
(8.5 x 13)
Legal 13.5" 215.9 x 342.9
(8.5 x 13.5)
Legal 14" 215.9 x 355.6
(8.5 x 14)
Executive 184.2 x 266.7
(7.25 x 10.5)
Statement (5.5 x 8.5)
8.5"SQ (8.5 x 8.5)
Folio 210 x 330.2
8K (260 x 368 mm) 260 x 368
8K (270 x 390 mm) 270 x 390
8K (273 x 394 mm) 273 x 394
16K (184 x 260 mm) 184 x 260
16K (195 x 270 mm) 195 x 270
16K (197 x 273 mm) 197 x 273
Custom Size Width:
64 - 297
Length:
90 - 1321
For duplex print, 64 to 220 g/m
Note
● If the paper size is set at A6, A5, or
with a paper width narrower than 148
mm (A5 width), the printing will be
slower.
64 to 256 g/m
2
2
2
- 48 -
Page 49

Supported Paper
Paper Type Paper Size mm (inch) Paper Weight
Envelope Nagagata #3 120 x 235 Envelopes should be 24lb paper, and
Nagagata #4 90 x 205
Nagagata #40 90 x 225
Yougata #0 120 x 235
Yougata #4 105 x 235
Kakugata #2 240 x 332
Kakugata #3 216 x 277
C4 229 x 324
C5 162 x 229
DL 110 x 220
Com-10 104.8 x 241.3
Index card Index card 76.2 x 127
(3 x 5)
Photo Photo (4 x 6 inch) (4 x 6)
Photo (5 x 7 inch) (5 x 7)
Hagaki Hagaki 100 x 148
Oufuku Hagaki Oufuku Hagaki 148 x 200
ap parts of envelopes should be folded.
Use paper that meets the following conditions*1:
2
2. Printing Basic Operation
● Paper that meets the conditions for plain paper.
● An ink used for a part printing is heat resistant (230°C).
Note
● When specifying a printing area, please take into account the differences of printing position as followings:
Print start position: ±2 mm, Paper skew: ±1 mm/100 mm, Image stretch: ±1 mm/100 mm
(when paper ream weight is 70 kg)
● This printer cannot print on an ink.
Use paper that meets the following conditions*2:
● A pigment or an ink used to color paper is heat resistant (230°C).
● Paper that has same characteristics with light paper and used for an electronic photo printer.
Paper Recommendations
Your printer will handle a variety of print media,
including a range of paper weights and sizes.
This section provides general advice on choice of
media, and explains how to use each type.
The best performance will be obtained when
2
using standard 75 - 90 g/m
use in copiers and laser printers.
Use of heavily embossed or very rough textured
paper is not recommended.
paper designed for
● Envelopes should be free from twist, curl or
other deformations. They should also be of the
rectangular ap type, with glue that remains
intact when subjected to hot roll pressure fusing
used in this type of printer. Window envelopes are
not suitable.
● Labels should also be of the type recommended
for use in copiers and laser printers, in which the
base carrier page is entirely covered by labels.
Other types of label stock may damage the printer
due to the labels peeling off during the printing
process.
CAUTION
Pre-printed stationery can be used, but the ink
must not offset when exposed to the high fuser
temperatures used in the printing process.
- 49 -
Page 50

Supported Paper
Storing Paper
Store paper under the following conditions to
maintain quality.
● Inside a cabinet or other dry and dark place
2
● On a at surface
● Temperature: 20°C
2. Printing Basic Operation
● Humidity: 50% RH (relative humidity)
Do not store in the following locations.
● Directly on the oor
● In direct sunlight
● Near the inside of an exterior wall
● On an uneven surface
● Where static electricity may be generated
● In places that are excessively hot or where
temperature rapidly changes
● Near a copier, air conditioner, heater, or duct
Note
● Do not unwrap the paper until you are ready to use the
paper.
● Do not leave paper unwrapped for a long period. Doing
so may result in paper handling and print quality issues.
● Depending on a media you use, usage conditions and a
storing conditions, a decrease in paper quality or curling
of the paper may occur.
- 50 -
Page 51

Supported Paper
Paper Loaded on the Tray
Your printer has two built-in trays (tray 1 and the MP tray) and an additional tray unit (tray 2/3/4).
Refer to the list below to check the supported paper and capacities of each tray.
Note
● Duplex printing can not be performed on paper indicated with an asterisk (*).
Tray Supported paper size Paper capacity Paper weight
Tray1 ● A3
● A4
● A5
● A6
● B4
● B5
● B6
● Tabloid
● Letter
● Legal 13”
● Legal 13.5”
● Legal 14”
● Executive
● Statement*
● 8.5”SQ
● Folio
● 8K (260 x 368 mm)
● 8K (270 x 390 mm)
● 8K (273 x 394 mm)
● 16K (184 x 260 mm)
● 16K (195 x 270 mm)
● 16K (197 x 273 mm)
● Custom Size
Tray2/3/4
(option)
● A3
● A4
● A5
● B4
● B5
● Tabloid
● Letter
● Legal 13”
● Legal 13.5”
● Legal 14”
● Executive
● 8.5”SQ
● Folio
● 8K (260 x 368 mm)
● 8K (270 x 390 mm)
● 8K (273 x 394 mm)
● 16K (184 x 260 mm)
● 16K (195 x 270 mm)
● 16K (197 x 273 mm)
● Custom Size
300 sheets
(when paper weight is 80 g/m
530 sheets
(when paper weight is 80 g/m
2
)
(64 to 82 g/m2)
● Medium Light
● Light
(83 to 90 g/m
2
)
● Medium
(91 to 105 g/m
2
)
● Heavy
(106 to 128 g/m
2
)
● Ultra Heavy1
(129 to 188 g/m
2
)
● Ultra Heavy2
(189 to 220 g/m
2
)
● Light
2
)
(64 to 82 g/m2)
● Medium Light
(83 to 90 g/m
2
)
● Medium
(91 to 105 g/m
2
)
● Heavy
(106 to 128 g/m
2
)
● Ultra Heavy1
(129 to 188 g/m
Note
2
)
● Weight of paper loaded on an
additional tray unit is 64 to
176 g/m
2
.
● The specied paper weight
of Ultra Heavy1 is described
as 129 to 188 g/m
2
, but the
printable weight is up to
176 g/m
2
.
2
2. Printing Basic Operation
- 51 -
Page 52

Supported Paper
Tray Supported paper size Paper capacity Paper weight
MP Tray ● A3
2
2. Printing Basic Operation
● A4
● A5
● A6*
● B4
● B5
● B6
● B6 Half*
● Tabloid
● Letter
● Legal 13”
● Legal 13.5”
● Legal 14”
● Executive
● Statement*
● 8.5”SQ
● Folio
● 8K (260 x 368 mm)
● 8K (270 x 390 mm)
● 8K (273 x 394 mm)
● 16K (184 x 260 mm)
● 16K (195 x 270 mm)
● 16K (197 x 273 mm)
● Index Card*
● Photo (4 x 6 inch)*
● Photo (5 x 7 inch)*
● Custom Size
● C4*
● C5*
● DL*
● Com-10*
● Hagaki*
● Oufuku Hagaki*
● 100 sheets
(when paper weight is 80 g/m
● 10 envelopes
● Light
2
(64 to 82 g/m
)
● Medium Light
(83 to 90 g/m
● Medium
(91 to 105 g/m
● Heavy
(106 to 128 g/m
● Ultra Heavy1
(129 to 188 g/m
● Ultra Heavy2
(189 to 220 g/m
● Ultra Heavy3
(221 to 256 g/m
2
)
2
)
2
)
2
)
2
)
2
)
2
)
- 52 -
Page 53

●● How to Print from the Tray
The following procedure explains how to load paper in tray 1 or tray 2/3/4 (option).
Memo
● This procedure explains to load paper in tray 1. The same procedure is applied to tray 2/3/4.
1 Pull out the paper tray (1).
1
4 Flex paper back and forth, and then fan
2 Set the paper size dial (2) to match the
size of the paper to be loaded.
Set the dial to [A4 ] when loading A4 size
paper in horizontal orientation.
Note
● When loading A6 size paper, move the paper stopper
(4) forward and remove it once, then install it on the
metal part.
it. Straighten the edges of the paper
stack on a level surface.
How to Print from the Tray
2
2. Printing Basic Operation
4
2
3 Slide the paper guide (3) and paper
stopper (4) to the size of paper to be
loaded.
5 Load paper with the print side face down
and press it from above.
Note
● Do not load paper exceeding the [ ] mark (5) of the
paper guide.
5
6 Secure the loaded paper with the paper
guide.
7 Check if a size of loaded paper matches
the setting of paper size dial.
8 Return the paper tray to the printer.
Memo
4
3
● If loading a paper that you cannot select the
size with a paper size dial options, set the dial to
[Other], and then set a paper size on the operator
panel.
9 Open a le you want to print, and print it.
- 53 -
Page 54

How to Print from the MP Tray
●● How to Print from the MP Tray
This procedure explains how to load paper in the MP tray.
Note
● Do not load paper of different sizes, types or weights at the same time.
2
● When adding paper, remove the paper on the MP tray and straighten the edges of both stacks of paper, and then load them
again.
● Do not put anything other than paper for printing in the MP tray.
2. Printing Basic Operation
1 Open the MP tray (1) forward by
inserting your ngers into the front
recesses (2).
2
2
1
2 Pull out the paper support (3) by holding
the center part of it.
3
3 Unfold the sub support (4).
4 Open the paper set cover (5).
5
5 Adjust the manual feeding paper guide
(6) to the width of paper to be loaded.
6
6 Insert the paper with the print side face
up.
Note
● Do not load paper exceeding the [ ] mark (7) of the
paper guide.
7
4
- 54 -
Page 55

How to Print from the MP Tray
When loading paper vertically or horizontally
ABC
Com-10, DL, C5
Memo
● When loading envelopes in the MP tray, load them face up
with the orientation noted below.
- Com-10, DL and C5 are loaded with the ap folded
and the ap should come to the top side in the feeding
direction.
- C4 is loaded with the ap folded and the ap should
come to the left side in the feeding direction.
Note
● The paper may be wrinkled or curled after printing.
● Use paper stored in proper temperature and humidity
conditions. Do not use paper that is curled or waved
because of humidity.
● Do not print on the back side of paper on which other
printer has printed.
● Curling of a postcard or an envelope may cause the ink
absorbing problem. Use paper that is not curled. Correct a
paper Curling within 2 mm.
● Printing an envelope with an adhesive ap bent cause the
ink absorbing problem.
ABC
C4
7 Close the paper set cover (5).
5
2
2. Printing Basic Operation
If always printing on same size or type paper
from the MP tray, register the paper on the
operator panel. If printing once, proceed to the
step 18.
Note
● When a printer is in the power saving mode, press
the <POWER SAVE> button to restore from the
mode.
● Make sure that the message “Ready To Print” is
displayed in the operator panel. If the message is not
displayed, press the <ON LINE> button.
8 Press the <Fn> key.
9 Enter “90” using the numeric keypad
and then press the <ENTER> button.
- 55 -
10 When [Paper Size] is displayed, select
the size of the loaded paper and then
press the <ENTER> button.
Reference
● If [Custom] is selected for [Paper Size], you need
to register the custom size. For how to register the
custom size, refer to “Printing in Custom Sizes”
P.58.
Page 56

How to Print from the MP Tray
11 Press the <BACK> button until
[MPTray Cong] is displayed.
2
2. Printing Basic Operation
12 Press the scroll button to select
[Media Type] and then press the
<ENTER> button.
13 Press the scroll button to select the
type of the loaded paper and then press
the <ENTER> button.
16 Press the scroll button to select the
weight of the loaded paper and then
press the <ENTER> button.
17 Press the <ON LINE> button to exit the
menu mode.
18 Open the le you want to print, and print
it by following the procedures below.
For Windows PCL Printer Driver
14 Press the <BACK> button until
[MPTray Cong] is displayed.
15 Press the scroll button to select
[Media Weight] and then press the
<ENTER> button.
1
From the [File] menu, select [Print].
2 Click [Preferences].
3 On the [Setup] tab, select a paper size
from [Size].
4 Select [Multipurpose Tray] from
[Source].
5 Start printing.
- 56 -
Page 57

For Windows PS Printer Driver
1
From the [File] menu, select [Print].
2 Click [Preferences].
3 Select the [Paper/Quality] tab.
How to Print from the MP Tray
2
4 Select [Multi-Purpose Tray] from
[Paper Source].
5 Click [Advanced].
6 Click [Paper Size] and select a paper
size from the drop-down list.
7 Click [OK].
8 Start printing.
For Mac OS X PS Printer Driver
1
From the [File] menu, select [Print].
2 Select a paper size from [Paper Size].
3 Select [Paper Feed] from the panel
menu.
4 Select [All pages From] and then select
[Multi Purpose Tray].
2. Printing Basic Operation
5 Start printing.
Memo
● If setting details are not displayed in the print dialog
box, click [Show Details] at the bottom of the
dialog box.
For Mac OS X PCL Printer Driver
1
From the [File] menu, select [Print].
2 Select a paper size from [Paper Size].
3 Select [Setup] from the panel menu.
4 Select [Multi Purpose Tray] from
[Paper Source].
5 Start printing.
Memo
● If setting details are not displayed in the print dialog
box, click [Show Details] at the bottom of the
dialog box.
- 57 -
Page 58

Printing in Custom Sizes
●● Printing in Custom Sizes
To load custom size paper, you need to register the width and length of the paper before printing. The
range of the sizes you can set differs according to the paper tray.
2
2. Printing Basic Operation
Tray Available size range
Tray1 Width:
105 to 297 mm (4.1 to 11.7 inches)
Length:
148, 182 to 431 mm
(5.8, 7.2 to 17.0 inches)
Tray 2/3/4
(Option)
MP tray Width:
Note
● [Custom] is displayed only when [Paper Size] is set to
[Custom].
● The available size range for duplex printing is the same as
that for tray 2/3/4.
Width:
148 to 297 mm (5.8 to 11.7 inches)
Length:
182 to 431 mm (7.2 to 17.0 inches)
64 to 297 mm (2.5 to 11.7 inches)
Length:
90 to 1321 mm (3.5 to 52 inches)
1 Press the scroll button or on the
operator panel.
4 Press the scroll button several times
to select [Tray Cong] of the paper
tray in which you loaded paper and then
press the <ENTER> button.
5 Check that [Paper Size] is selected and
press the <ENTER> button.
2 Press the scroll button several times
to select [Menus] and press the
<ENTER> button.
3 Check that [Tray Conguration]
is selected and press the <ENTER>
button.
6 Press the scroll button several times
to select [Custom] and then press the
<ENTER> button.
7 Press the <BACK> button.
- 58 -
Page 59

Printing in Custom Sizes
8 Press the scroll button to select
[X Dimension] and then press the
<ENTER> button.
9 Enter the paper width value using the
numeric keypad and then press the
<ENTER> button.
13 Press the <ON LINE> button to exit the
menu mode.
14 Specify a custom in the following
procedures.
For Windows PCL Printer Driver
1
Click [Start] and select [Devices and
Printers].
2 Right-click the
select the type of driver you want to
specify from [Printing preferences].
Your Printer
icon and
2
2. Printing Basic Operation
10 Press the <BACK> button.
11 Press the scroll button to select
[Y Dimension] and then press the
<ENTER> button.
12 Enter the paper length value using the
numeric keypad and then press the
<ENTER> button.
3 On the [Setup] tab, click [Paper Feed
Options].
4 Click [Custom Size].
5 Enter a name and the dimensions.
a Enter a name for the new size in the
[Name] box.
b Enter its dimensions in the [Width]
and [Length] boxes.
6 Click [Add] to save the custom paper
size to the list and then click [OK].
You can save up to 32 custom sizes.
7 Press [OK] until the [Printing
preferences] dialog box is closed.
8 Open the le you want to print.
9 Select the registered paper size and
start printing on the print dialog.
- 59 -
Page 60

Printing in Custom Sizes
For Windows PS Printer Driver
1
Click [Start] and select [Devices and
Printers].
2 Right-click the
2
Your Printer
icon and
select the type of driver you want to
2. Printing Basic Operation
specify from [Printing preferences].
3 On the [Layout] tab, click [Advanced].
4 Click [Paper Size] and select
[PostScript Custom Page Size] from
the drop-down list.
5 Enter the dimensions in the [Width] and
[Height] boxes, and press [OK].
Note
● [Offsets Relative to Paper Feed Direction] is not
available.
6 Press [OK] until the [Printing
preferences] dialog box is closed.
For Mac OS X Printer Driver
Note
● In the Mac OS X printer driver, paper size out of the
available range can be set, however, image is not correctly
printed. set paper size within available range.
1 Open the le you want to print.
2 From the [File] menu, select [Print].
3 Select [Manage Custom Sizes] from
[Paper Size]
4 Click [+] to add an item to the list of
custom paper sizes.
5 Double-click [Untitled] and enter a
name for the custom paper size.
6 Enter the dimensions in the [Width] and
[Height] boxes.
7 Click [OK].
7 Open the le you want to print from the
application.
8 Select [PostScript Custom Page Size]
for a paper size and start printing on the
printer driver.
8 Congure other settings if necessary and
then start printing.
Memo
● If setting details are not displayed in the print dialog
box, click [Show Details] at the bottom of the
dialog box.
- 60 -
Page 61

Printing in Custom Sizes
Open the le you want to print, and print
it in the following procedures.
For Windows PCL Printer Driver
1
From the [File] menu, select [Print].
2 Click [Preferences] or [Properties].
3 On the [Setup] tab, select a paper size
from [Size].
4 Select [Multipurpose Tray] from
[Source].
5 Start printing.
For Windows PS Printer Driver
1
From the [File] menu, select [Print].
2 Click [Preferences] or [Properties].
For Mac OS X PS Printer Driver
1
From the [File] menu, select [Page
Setup].
2 Select a paper size from [Paper Size]
and then click [OK].
3 From the [File] menu, select [Print].
4 Select [Paper Feed] from the panel
menu.
5 Select [All pages From] and then select
[Multi Purpose Tray].
6 Start printing.
For Mac OS X PCL Printer Driver
1
From the [File] menu, select [Page
Setup].
2
2. Printing Basic Operation
3 Select the [Paper/Quality] tab.
4 Select [Multipurpose Tray] from
[Paper Source].
5 Click [Advanced].
6 Click [Paper Size] and select a paper
size from the drop-down list.
7 Click [OK].
8 Start printing.
2 Select a paper size from [Paper Size]
and then click [OK].
3 From the [File] menu, select [Print].
4 Select [Setup] from the panel menu.
5 Select [Multi Purpose Tray] from
[Paper Source].
6 Start printing.
- 61 -
Page 62

Paper Output
●● Paper Output
Your printer outputs to the output tray or rear output tray. Paper types that can be outputted to each
stacker are as follows.
2
2. Printing Basic Operation
Output
Stacker
Output
Tray
Rear
Output
Tray
Note
● Do not open or close the rear output tray while printing as
it may result in a paper jam.
Supported
paper type
● Plain paper
● Recycled
paper
● Plain paper
● Recycled
paper
● Envelope
● Index card
● Label
Paper output
capacity
● 200 sheets (when
paper weight is less
than 80 g/m
● 100 sheets (when
paper weight is less
than 80 g/m
● 10 sheets (Ultra
Heavy paper and
envelopes)
Using the Output Tray
Paper is delivered with the print side face down,
stacked in the order printed.
Note
● Check that the rear output tray (1) on the rear side of the
printer is closed. If the rear output tray is open, paper is
always outputted to the rear output tray.
Using the Rear Output Tray
Paper is delivered with the print side face up,
stacked opposite the order printed.
2
)
1 Pull the rear output tray (1) on the rear
side of the printer and open it outward.
2
)
1
2 Unfold the paper support (2).
1
Memo
● Open the paper supporter (2) so that the printed papers
do not fall down from the output tray.
2
2
3 Open the sub support (3).
3
- 62 -
Page 63

Convenient Print Functions
12
34
12
34
●● Convenient Print Functions
The following convenient print functions are available. For details, refer to the User’s Manual
(Advanced).
Printing on Postcards, Reply
Postcards or Envelopes
Printing on Labels
Printing on Custom Size Paper
You can register customized paper sizes to the
printer driver so you can print on nonstandard
paper such as banners.
● Printing on custom size paper
A3
A4
Changing the Page Layout
You can change the page layout to multiple print,
booklet print and poster print etc.
●Multipie print ●Booklet print ●Poster print
12
11
9
7
Changing Print Quality
(Resolution)
You can change the print quality to suit your
needs.
Saving Toner
You can save toner by reducing printing density. A
toner saving can be set in 3 levels.
When printing in 100 % black, you can also
select the setting without a toner saving. Amount
of toner can be saved without affecting any
readability for small characters.
●Saving toner
Memo
● There are many convenient print functions in addition to
those above. Refer to the User’s Manual (Advanced).
2
2. Printing Basic Operation
5
3
1
Duplex Printing
You can print on both sides of a sheet of paper.
●Duplex prints
2
1
Scaling to Pages
You can print data formatted for one size page
onto a different size page without modifying the
print data.
Printing Color Data in
Monochrome
- 63 -
Page 64

Canceling Printing
●● Canceling Printing
Press the <CANCEL> button on the operator
panel to cancel print jobs being currently printed
or preparing for a print.
2
2. Printing Basic Operation
When you press the <CANCEL> button is
pressed, the following message appears.
To cancel printing, select [Yes] and then press
the <ENTER> button.
To proceed to printing, select [No]
press the <ENTER> button.
If a printer is not operated for about 3 minutes
while this message appears, the message will go
out and printing proceeds.
and then
- 64 -
Page 65

Setting the Time that Elapses Before Entering the Power Save Mode
●● Setting the Time that Elapses Before Entering the
Power Save Mode
Note
● When a printer is in the power saving mode, press the <POWER SAVE> button to restore from the mode.
● Check if the message “Ready To Print” appears. If the message is not displayed, press the <ON LINE> button.
2
1 Press the <Fn> key on the operator
panel.
2 Enter “200” using the numeric keypad
and then press the <ENTER> button.
3 Press the scroll button or to specify
the time and then press the <ENTER>
button.
Memo
● The power save time can be selected from the followings:
- [1 minute]
- [2 minutes]
- [3 minutes]
- [4 minutes]
- [5 minutes]
- [10 minutes]
- [15 minutes]
- [30 minutes]
- [60 minutes]
* Up to 30 minutes for C813/C823.
2. Printing Basic Operation
4 Press the <ON LINE> button.
- 65 -
Page 66

Setting the Time that Elapses Before Entering the Deep Sleep Mode
●● Setting the Time that Elapses Before Entering the
Deep Sleep Mode
Note
● When a printer is in the power saving mode, press the <POWER SAVE> button to restore from the mode.
2
● Check if the message “Ready To Print” appears. If the message is not displayed, press the <ON LINE> button.
2. Printing Basic Operation
1 Press the <Fn> key on the operator
panel.
2 Enter “201” using the numeric keypad
and then press the <ENTER> button.
3 Press the or to specify the time and
then press the <ENTER> button.
Memo
● The sleep time can be selected from the followings:
- [1 minute]
- [2 minutes]
- [3 minutes]
- [4 minutes]
- [5 minutes]
- [10 minutes]
- [15 minutes]
- [30 minutes]
- [60 minutes]
* Up to 30 minutes for C813/C823.
4 Press the <ON LINE> button.
- 66 -
Page 67

Setting the Time that Elapses Before Entering the Deep Sleep Mode
Constraints When in Deep Sleep Mode
This section explains constraints when in the deep sleep mode.
The printer may not enter the deep sleep mode if an error is displayed.
Printer Driver Utility Constraints
When the printer goes into the deep sleep mode, the following constraints apply to the printer driver
and utility functions.
When the printer goes into the deep sleep mode, press the <POWER SAVE> button on the control
panel and check that the screen displays the message “Ready To Print”.
If the message “Ready To Print” is displayed, the following constraints do not apply.
Method of resolving
OS Software Name
Windows Driver Installer If there is a connection with the
Constraints When in the
Deep Sleep Mode
network, you cannot automatically
get printer option information
when installing a driver.
other than to press the
<POWER SAVE>
button
-
2
2. Printing Basic Operation
- 67 -
Page 68

Setting the Time that Elapses Before Entering the Deep Sleep Mode
Network Function Constraints
In the deep sleep mode, the following
constraints apply to network functions.
2
Does Not Enter the Deep Sleep
Mode
In the following cases, a printer will not enter
2. Printing Basic Operation
the deep sleep mode.
● IPSec is enabled.
● A TCP connection is established.
E.g.: A connection is established with Telnet or
F T P.
When the transition time to enter Sleep mode
or Deep Sleep mode from Power Save mode
elapses and the connection is disconnected, the
machine enters Sleep mode.
● E-mail reception is enabled.
● Wireless LAN is enabled.
● Google Cloud Print is enabled.
Protocols with the Client
Functions Do Not Work
In the deep sleep mode, the following protocols
with client functions will not work.
● E-mail alerts
● SNMP Trap
● WINS
● SNTP
*1 Time that passes in the deep sleep mode is not included in the
interval for periodic notication by e-mail alert.
*2 Time that passes in the deep sleep mode is not included in the
intervals between WINS updates. Regular WINS updates are not
carried out in the deep sleep mode, so the names registered on the
WINS server may be deleted.
*3 Time that passes in the deep sleep mode is not included in the
interval between update for NTP servers.
*2
*3
*1
● LLTD is enabled.
● HUB Link Status is 1000BASE-T.
● IPv6 Global Address is assigned.
Cannot Print
In the deep sleep mode, you cannot print with
the following protocols.
● NBT
Cannot Search/Cannot Specify
Settings
In the deep sleep mode, you cannot search or
specify settings with the following functions or
protocols.
● NBT
● PnP-X
● UPnP
*
● MIB
* You can reference through some supported MIB in the deep sleep
mode (Get command).
- 68 -
Page 69

Settings for Turning Power Off Automatically (Auto Power Off)
●● Settings for Turning Power Off Automatically
(Auto Power Off)
Note
● In the factory default, a printer does not enter the auto power off mode while connecting to the network.
2
Setting the Auto Power Off
To enable the auto power off mode while
connecting to the network perform the following
procedure.
1 Press the scroll button or on the
operator panel.
2 Press the scroll button several times
to select [Admin Setup], and press the
<ENTER> button.
5 Press the scroll button several times
to select [Power Setup], and press the
<ENTER> button.
6 Press the scroll button several times
to select [Auto Power Off], and press
the <ENTER> button.
2. Printing Basic Operation
3 Enter the administrator password, using
the numeric (0-9) keys.
The factory default password is “999999”. Press
the <ENTER> button whenever inputting one
character.
4 Press the <ENTER> button.
7 Press the scroll button or to select
[Enable], and press the <ENTER>
button.
8 Press the <ON LINE> button to exit the
menu mode.
- 69 -
Page 70

Settings for Turning Power Off Automatically (Auto Power Off)
Setting the Time that Elapses Before Entering the Auto Power Off Mode
Note
● When a printer is in the power saving mode, press the
2
2. Printing Basic Operation
<POWER SAVE> button to restore from the mode.
● Check if the message “Ready To Print” appears. If the
message is not displayed, press the <ON LINE> button.
1 Press the <Fn> key on the operator
panel.
2 Enter “202” using the numeric keypad
and then press the <ENTER> button.
Memo
● The auto power off time can be selected from the
followings:
- [1 hour]
- [2 hours]
- [3 hours]
- [4 hours]
- [8 hours]
- [12 hours]
- [18 hours]
- [24 hours]
3 Press the scroll button or to specify
the time and then press the <ENTER>
button.
4 Press the <ON LINE> button.
- 70 -
Page 71

●● Setting the Buzzer
You can set the buzzer volume when a paper jam occurs.
Setting the Buzzer
1 Press the scroll button or on the
operator panel.
2 Press the scroll button several times
to select [Admin Setup], and press the
<ENTER> button.
3 Enter the administrator password, using
the numeric (0-9) keys.
The factory default password is “999999”. Press
the <ENTER> button whenever inputting one
character.
5 Press the scroll button several times
to select [Buzzer Setup], and press the
<ENTER> button.
6 Press the scroll button several times
to select [Paper Jam Error Buzzer
Volume], and press the <ENTER>
button.
7 Press the scroll button several times
to select a volume level, and press the
<ENTER> button.
2
2. Printing Basic Operation
4 Press the <ENTER> button.
8 Press the <ON LINE> button to exit the
menu mode.
- 71 -
Page 72

3. Troubleshooting
This chapter provides solutions to the problems you may encounter while operating your printer.
Memo
● Meanings of symbols in error messages:
- “%COLOR%” indicates Cyan (C), Magenta (M), Yellow (Y) or Black (K).
- “%TRAY%” indicates tray 1, tray 2, tray 3, tray 4 or the MP tray.
- “%COVER%” indicates a front cover or output tray.
3
3. Troubleshooting
- “%CODE%” indicates a code number displayed in 1 to 3 digits. A code number changes according to an error.
- “%MEDIA_SIZE%” indicates paper size.
- “%MEDIA_TYPE%” indicates a paper type.
● When the message “Please see Help for details” appears on the display screen, you can check an error code and remedy
error by pressing the <HELP> button on the operator panel.
●● When an Error Message Appears on the Display
Screen (When the ATTENTION Indicator Lights
Up/Blinks)
When a printer problem occurs, an error message appears on the display screen and the
<ATTENTION> indicator on the operator panel lights up or blinks. Check the error message and deal
with the problem according to the relevant procedure.
When
“Please see Help for details” appears on the display screen, press the <HELP> button to display a
remedy.
<HELP> button
<ATTENTION> indicator
××××
Please see HELP for details.
When “Please see Help for details” appears on the display screen,
press the <HELP> button to display a remedy. Help is not available
when this message is not displayed.
Message on the display screen
Display Screen when the <HELP> button is pressed
Error Code
××××
××××
Remedy
Scroll display upward
Scroll display downward
- 72 -
Page 73

When Paper Jams Occurs/When an Error Message does not Disappear Even After Jammed Paper is Removed
●● When Paper Jams Occurs/When an Error
Message does not Disappear Even After Jammed
Paper is Removed
When paper is jammed inside a printer or when an error message does not disappear even after
jammed paper is removed, an error message appears on the display screen.
Press the <HELP> button to display a remedy. Remove jammed paper according to the remedy
displayed or the relevant procedure described in the following list.
<HELP> button
3
Message on the display screen (rst line)
Message on the display screen (second line)
<ATTENTION> indicator
××××
××××
Please see HELP for details.
Press the <HELP> button to display a remedy.
Display Screen when the <HELP> button is pressed
Error Code
××××
Scroll display upward
Scroll display downward
Message displayed
Status Message on the Display Screen
after the <HELP>
button is pressed
Reference
Page
Error Code
Paper jams 1st Line Open Cassette 391, 392, 393, 394 page 82
2nd Line Paper Jam
3rd Line %TRAY%
1st Line Open Cover 372 page 75
2nd Line Paper Jam
3rd Line Front Cover
1st Line Open Cover 380 page 76
2nd Line Paper Jam
3rd Line Front Cover
1st Line Open Cover 390 page 81
2nd Line Paper Jam
3rd Line Front Cover
1st Line Open Cover 381, 385 page 77
2nd Line Paper Jam
3rd Line Output Tray
3. Troubleshooting
- 73 -
Page 74

When Paper Jams Occurs/When an Error Message does not Disappear Even After Jammed Paper is Removed
Message displayed
Status Message on the Display Screen
after the <HELP>
button is pressed
Error Code
Paper jams 1st Line Open Cover 382, 383 page 78
2nd Line Paper Jam
3rd Line Output Tray
1st Line Check Duplex Unit 370, 371, 373 page 74
2nd Line Paper Jam
3
3. Troubleshooting
When a jam occurs, the
media being printed
remains in the device.
1st Line Check Paper 400 page 76
2nd Line Paper Size Error
3rd Line %TRAY%
1st Line Check Paper 401 page 76
2nd Line Paper Multi Feed
3rd Line %TRAY%
1st Line Open Cassette 631, 632, 633, 634 page 82
2nd Line Paper Remain
3rd Line %TRAY%
1st Line Open Cover 637 page 81
2nd Line Paper Remain
3rd Line Front Cover
1st Line Open Cover 638 page 77
2nd Line Paper Remain
3rd Line Output Tray
1st Line Open Cover 639, 640 page 78
2nd Line Paper Remain
3rd Line Output Tray
1st Line Check Duplex Unit 641, 642 page 74
2nd Line Paper Remain
Reference
Page
Error Code 370, 371, 373, 641, 642
A paper jam has occurred around the duplex
unit.
1 Take out the duplex unit (1) by pulling
it obliquely upward while holding the
center recess on the back of printer.
1
2 Check for jammed paper inside the
printer. If jammed paper remains,
remove it.
- 74 -
Page 75

When Paper Jams Occurs/When an Error Message does not Disappear Even After Jammed Paper is Removed
3 Check for jammed paper in the duplex
unit. If jammed paper remains, pull it
out gently.
4 Open the upper duplex unit cover (2)
and check for jammed paper. If jammed
paper remains, pull it out gently and
close the cover.
2
5 Replace the duplex unit (1) into the
printer.
Error Code 372
A paper jam has occurred around the front
cover.
1 Insert your nger into the recess on
the right side of the printer and pull the
front cover open lever (1) to open the
front cover (2) forward.
3
3. Troubleshooting
1
2
2 Remove the jammed paper gently in
the direction of the arrow if an edge of
jammed paper can be seen, and then
go to step 8. If you cannot nd jammed
paper, go to step 3.
Task is complete.
1
3 Take out the duplex unit (3) by pulling
it obliquely upward while holding the
center recess on the back of printer.
3
- 75 -
Page 76
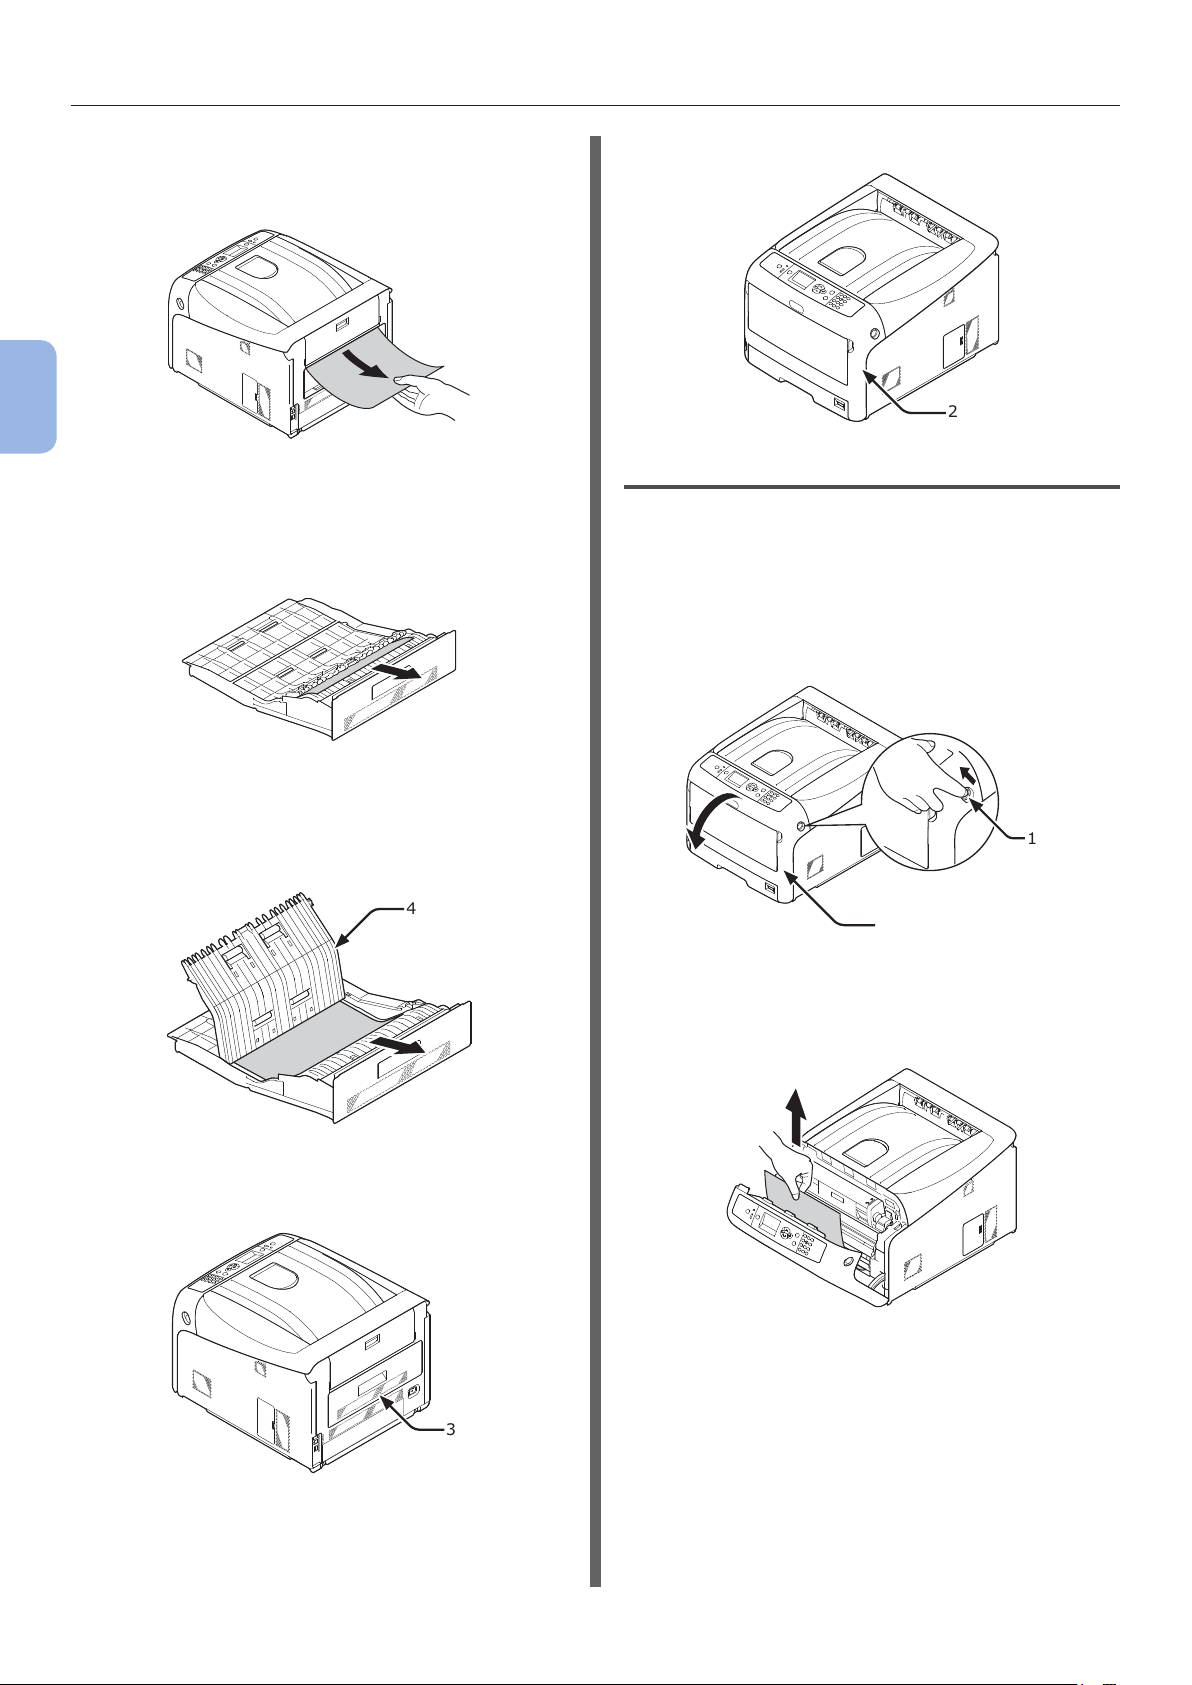
When Paper Jams Occurs/When an Error Message does not Disappear Even After Jammed Paper is Removed
4 Check for jammed paper inside a printer.
If jammed paper remains, remove it.
3
3. Troubleshooting
5 Check if paper remains in the duplex
unit. If jammed paper remains, pull it
out gently.
8 Close the front cover (2).
2
Error Code 380, 400, 401, 637
A paper jam has occurred around the front cover.
1 Insert your nger into the recess on
the right side of the printer and pull the
front cover open lever (1) to open the
front cover (2) forward.
6 Open the upper duplex unit cover (4)
and check for jammed paper. If jammed
paper remains, remove it, and close the
cover.
4
7 Replace the duplex unit (3) to the
printer.
1
2
2 Remove the jammed paper gently in the
direction of the arrow if you can see an
edge of jammed paper.
3
- 76 -
Page 77

When Paper Jams Occurs/When an Error Message does not Disappear Even After Jammed Paper is Removed
CAUTION
3 Close the front cover (2).
2
Task is complete.
Error Code 381, 385, 638
A paper jam has occurred under an image drum.
1 Insert your nger into the recess on
the right side of the printer and pull the
front cover open lever (1) to open the
front cover (2) forward.
3 Remove all four image drums and place
them on a at surface.
3
3. Troubleshooting
4 Cover the removed image drums with
paper so that the image drums are not
exposed to light.
1
2
2 Press the output tray open button (3)
and open the output tray (4).
Possible to get
burned.
● The fuser unit is extremely hot. Do not touch
it.
3
4
5 Pull out the jammed paper gently to the
rear of the printer (the direction of the
arrow) if an edge of jammed paper can
be seen.
Pull out the jammed paper gently while
lifting the release levers (5) on the fuser
unit if an edge of jammed paper cannot
be seen.
- 77 -
Page 78
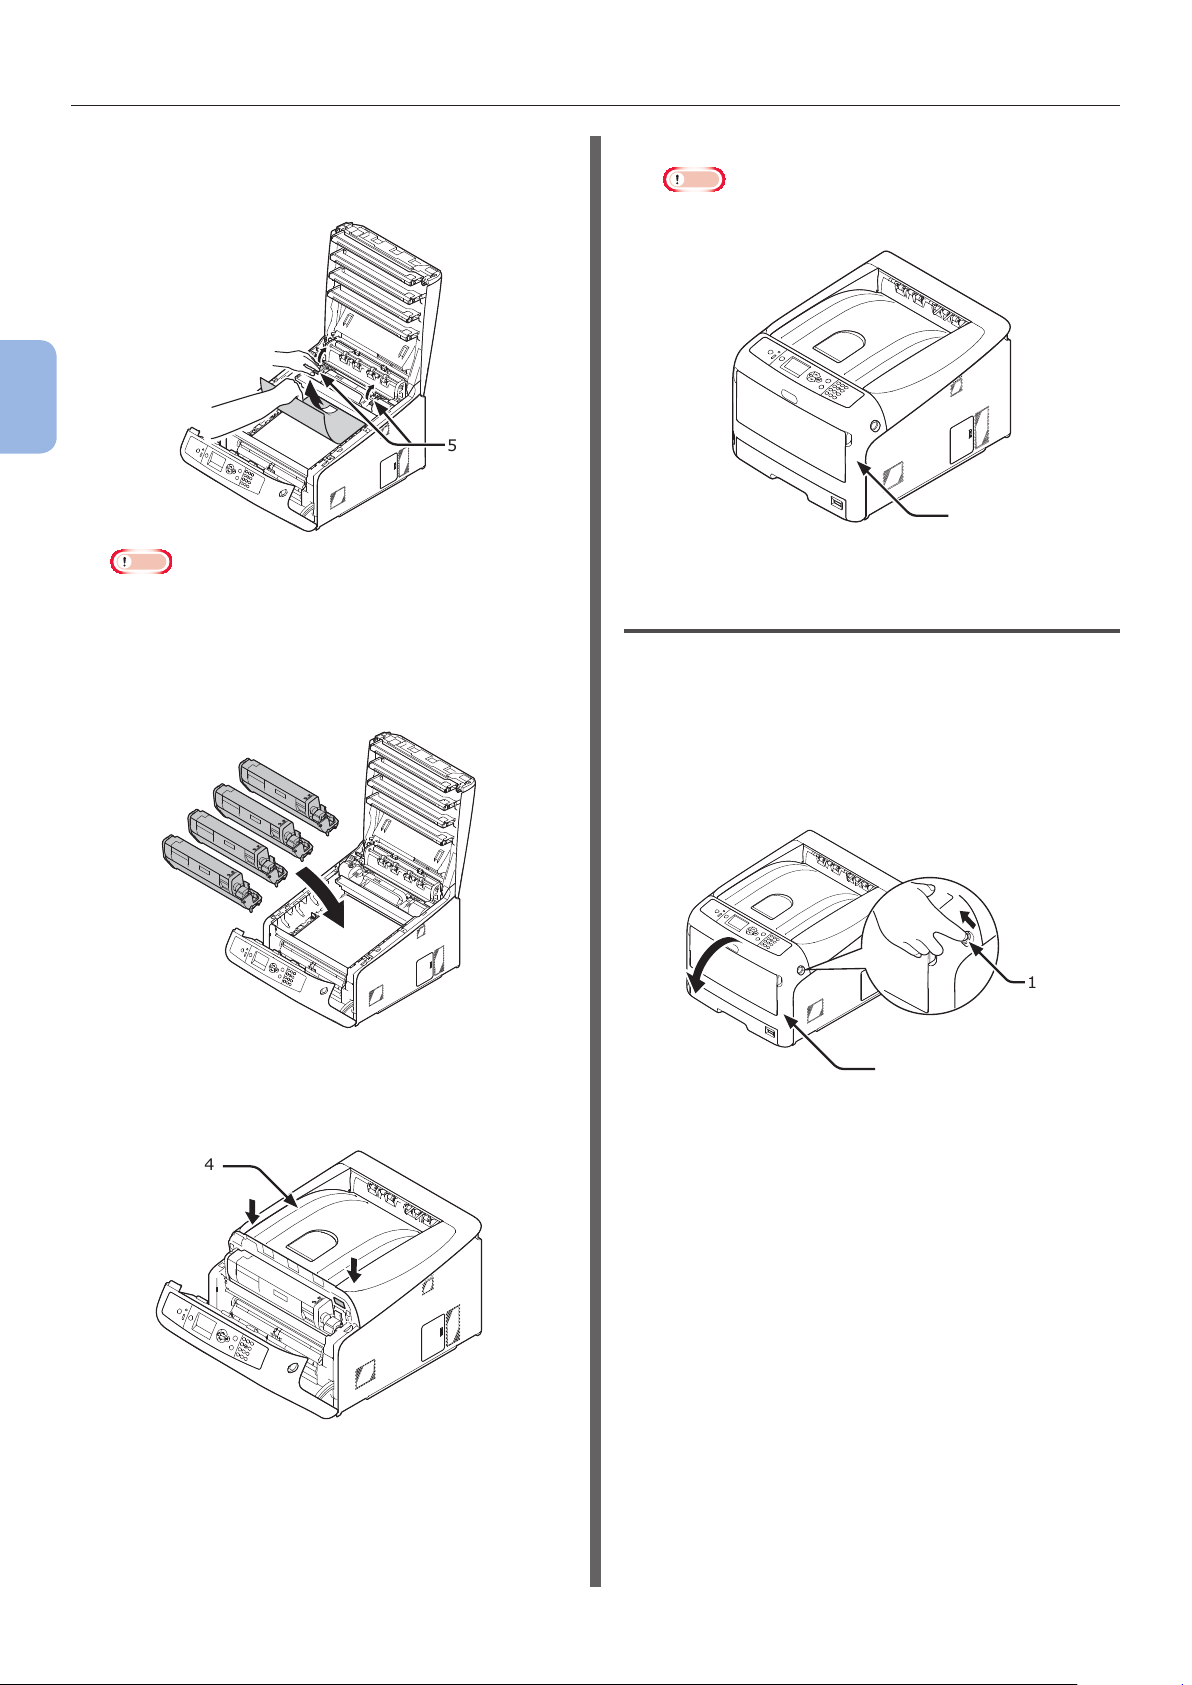
When Paper Jams Occurs/When an Error Message does not Disappear Even After Jammed Paper is Removed
If an edge of jammed paper still remains inside
the unit, pull out the jammed paper gently to the
rear of the printer.
3
3. Troubleshooting
Note
● In case of Error 385, take out the fuser unit and
remove the paper from it completely.
6 Return all four image drums into the
printer carefully.
8 Close the front cover (2).
Note
● The front cover cannot be closed if the output tray is
not closed securely.
5
2
Task is complete.
Error Code 382, 383, 639, 640
A paper jam has occurred around the fuser unit.
1 Insert your nger into the recess on
the right side of the printer and pull the
front cover open lever (1) to open the
front cover (2) forward.
7 Close the output tray (4) by pushing the
both sides of the cover rmly.
4
1
2
- 78 -
Page 79

When Paper Jams Occurs/When an Error Message does not Disappear Even After Jammed Paper is Removed
CAUTION
2 Press the output tray open button (3)
and open the output tray (4).
Possible to get
burned.
● The fuser unit is extremely hot. Do not touch
it.
3
4
3 Remove all four image drums and place
them on a at surface.
5 Remove the jammed paper remaining
inside of the unit.
3
3. Troubleshooting
6 Lift the left lock lever (5) of the fuser
unit forward.
5
4 Cover the removed image drums with
paper so that the image drums are not
exposed to light.
7 Hold the fuser unit handle (6) and lift
the fuser unit out of the printer.
6
- 79 -
Page 80

When Paper Jams Occurs/When an Error Message does not Disappear Even After Jammed Paper is Removed
8 Lift the release levers (7) on the fuser
unit, and pull out the jammed paper
forward gently.
7
3
3. Troubleshooting
9 Hold the fuser unit handle (6) and place
the fuser unit into the printer.
6
11 Return all four image drums into the
printer carefully.
12 Close the output tray (4) by pushing the
both sides of the cover rmly.
4
10 Push the left lock lever (5) of the fuser
unit backward.
5
13 Close the front cover (2).
Note
● Cannot close the front cover securely if the output
tray is not closed.
2
Task is complete.
- 80 -
Page 81

When Paper Jams Occurs/When an Error Message does not Disappear Even After Jammed Paper is Removed
Error Code 390, 637
A paper jam has occurred while feeding paper
from a paper tray.
1 If there is any paper on the MP tray, lift
the paper set cover (1) and take it out.
1
2 Insert your nger into the recess on
the right side of the printer and pull the
front cover open lever (2) to open the
front cover (3) forward.
2
3
4 Close the front cover (3).
3. Troubleshooting
3
5 If loading paper on MP tray, lift the
paper set cover (1) and set the paper
with the print side face up.
1
3
3 Remove the jammed paper gently by
pulling the edge of paper.
Remove the paper from the back gently
if the edge of paper cannot be seen.
6 Lower the paper set cover (1).
1
Task is complete.
- 81 -
Page 82

When Paper Jams Occurs/When an Error Message does not Disappear Even After Jammed Paper is Removed
Error Code 391, 392, 393, 394, 631,
632, 633, 634
A paper jam has occurred while feeding paper
from a paper tray.
Note
● If paper jams occur frequently, clean the paper feed
rollers. For details, refer to “Cleaning Paper Feed Rollers”
P.116.
This procedure uses Tray 1 as an example.
3
1 Gently pull out from the printer the tray
3. Troubleshooting
(1) for which an error is indicated.
4 Insert your nger into the recess on
the right side of the printer and pull the
front cover open lever (2) to open the
front cover (3) forward.
2
3
5 Close the front cover (3).
1
2 Remove the jammed paper.
3 Return the tray (1) to the printer.
3
Task is complete.
Memo
● Open and close the front cover after removing the
jammed paper otherwise the error indication do not
go out.
1
- 82 -
Page 83

When the Message for Replacement of Consumables or Maintenance Unit Appears
●● When the Message for Replacement of
Consumables or Maintenance Unit Appears
When the time to replace consumables or maintenance unit is close and replacement must be done,
the message “…Low”, “…Near Life”, “…Empty”, “ …Life”, “ Install…”, “ Replace…”, “Change…”
appears on the display screen and the <ATTENTION> indicator on the operator panel lights up or blinks.
Check the message and replace consumables and maintenance unit.
<HELP> button
××××
××××
××××
××××
Please see HELP for details.
Message on the display screen (rst line)
Message on the display screen (second line)
Message on the display screen (third line)
Message on the display screen (fourth line)
3
3. Troubleshooting
<ATTENTION> indicator
Press the <HELP> button to display a remedy.
Display Screen when the <HELP> button is pressed
Scroll display upwards
Scroll display downwards
××××
××××
Error Code
- 83 -
Page 84

When the Message for Replacement of Consumables or Maintenance Unit Appears
Memo
● “xxx” described on the list below changes according to the printer status.
Message displayed
Status Message on the Display Screen
after the <HELP>
button is pressed
Reference Page or
Remedy
Error Code
Toner Cartridge 1st Line xxx - Prepare a new toner
2nd Line %COLOR% Toner Low
3
3. Troubleshooting
Image Drums 1st Line xxx - Prepare new image drums,
1st Line xxx - page 104
2nd Line %COLOR% Toner Empty
1st Line Install Toner 410, 411, 412 page 106
2nd Line %COLOR% 413 page 104 (Black toner)
2nd Line %COLOR% Image Drum Near
Life
1st Line xxx - page 108
2nd Line %COLOR% Image Drum Life
1st Line xxx - page 108
2nd Line %COLOR% Image Drum Life,
%nnn% Pages Left
1st Line Install New Image Drum 350, 351, 352, 353 page 108
2nd Line Image Drum Life
3rd Line %COLOR%
1st Line Install New Image Drum 560, 561, 562, 563 page 108
2nd Line Image Drum Life
3rd Line %COLOR%
1st Line Install New Image Drum 564, 565, 566, 567 page 108
2nd Line Image Drum Life
3rd Line %COLOR%
4th Line To Exceed the Life, Press
Online Button
1st Line Install New Image Drum 680, 681, 682, 683 page 108
2nd Line Printing disabled due to low
threshold of Image Drum life.
3rd Line %COLOR%
cartridge, and replace the
old toner cartridge with new
one after a message for
replacement of consumables
or maintenance unit appears.
and replace the old image
drums with new ones after a
message for replacement of
consumables or maintenance
unit appears.
The number of pages you can
print is displayed in “nnn”.
If a toner remains, you can
continue to print by opening
or closing the front cover.
However, replace the image
drum soon. Otherwise, it may
cause a decrease in a printing
quality.
- 84 -
Page 85

When the Message for Replacement of Consumables or Maintenance Unit Appears
Message displayed
Status Message on the Display Screen
after the <HELP>
button is pressed
Reference Page or
Remedy
Error Code
Fuser Unit 1st Line xxx - Prepare a fuser unit, and
2nd Line Fuser Unit Near Life
1st Line xxx - page 114
2nd Line Change Fuser Unit
1st Line Install New Fuser Unit 354 page 114
2nd Line Fuser Unit Life
Belt Unit 1st Line xxx - Prepare a belt unit, and
2nd Line Belt Unit Near Life
1st Line xxx - page 111
2nd Line Change Belt Unit
1st Line Install New Belt Unit 355 page 111
2nd Line Belt Unit Life
replace the old fuser unit with
new one after a message for
replacement of consumables
or maintenance unit appears.
You can continue to print by
opening or closing the front
cover for a while. However
replace the fuser unit soon.
Otherwise, it may cause a
printer error or paper jam.
replace the old belt unit with
new one after a message for
replacement of consumables
or maintenance unit appears.
You can continue to print by
opening or closing the front
cover for a while. However
replace the belt unit soon.
Otherwise, it may cause a
printer error.
3
3. Troubleshooting
- 85 -
Page 86

When the Message for Paper Replacement or Paper Size Error Appears
●● When the Message for Paper Replacement or
Paper Size Error Appears
When the media type or media size loaded in a tray does not match the settings specied in the printer
driver, the message “Change Paper...” or “Check Paper...” appears on the display screen and the
<ATTENTION> indicator blinks.
Check the message and deal with the problem. Check the paper size and the settings, refer to “How to
Print from the Tray” P.53 or “How to Print from the MP Tray” P.54.
3
3. Troubleshooting
<ATTENTION> indicator
<HELP> button
××××
××××
××××
××××
Please see HELP for details.
Press the <HELP> button to display a remedy.
Message on the display screen (rst line)
Message on the display screen (second line)
Message on the display screen (third line)
Message on the display screen (fourth line)
Display Screen when the <HELP> button is pressed
Scroll display upward
Scroll display downward
××××
××××
Error Code
Message
displayed after
Status Message on the Display Screen
the <HELP>
button is
pressed
Error Code
Change Paper 1st Line Change Paper in %TRAY% 661, 662, 663, 664
2nd Line %MEDIA_SIZE%
3rd Line %MEDIA_TYPE%
4th Line Press ONLINE Button
1st Line Change Paper in MPTray 660
2nd Line %MEDIA_SIZE%
3rd Line %MEDIA_TYPE%
4th Line Press ONLINE Button
Paper Size does not match print data. 1st Line Change Paper in %TRAY% 461, 462, 463, 464
2nd Line %MEDIA_SIZE%
3rd Line %MEDIA_TYPE%
4th Line Press ONLINE Button
1st Line Change Paper in MPTray 460
2nd Line %MEDIA_SIZE%
3rd Line %MEDIA_TYPE%
4th Line Press ONLINE Button
- 86 -
Page 87

Other Error Messages
●● Other Error Messages
This section explains the causes and remedies for an error message and the function of the
<ATTENTION> indicator. An error message appears on the display screen of the operator panel.
To display an error code, press the <HELP> button on the operator panel.
Error Messages
Error
code
420 Press ONLINE Button for Restoration
Memory Overow
310
311
320
348
610
611
612
613
544
545
546
547
540
541
542
543
430
431
432
433
440
441
442
%COVER% Open
Please see HELP for details
Check Fuser Unit
Please see HELP for details
Check Data
Message Data Write Error<%CODE%>
Toner Not Installed
%COLOR%
Please see HELP for details
Check Toner Cartridge
Improper Lock Lever Position
%COLOR%
Please see HELP for details
Toner Sensor Error
%COLOR%
Please see HELP for details
Install Paper Cassette
%TRAY%
Please see HELP for details
Message
<ATTENTION>
indicator
Blinks The memory overowed.
Reduce the data amount. If that does not
work, reduce the size of the print data.
Blinks The cover is open.
Close the cover.
310 : Output tray
311 : Front cover
Blinks The fuser unit is not correctly installed.
Install the fuser unit correctly in a printer.
Lights up Writing of message data to be uploaded to a
printer has been failed.
Blinks The toner cartridge of the indicated color
is not installed correctly. Install the toner
cartridge correctly.
610 : Yellow (Y)
611 : Magenta (M)
612 : Cyan (C)
613 : Black (K)
Blinks The toner cartridge of the indicated color is
not locked properly.
Turn the blue lever on the right side of the
cartridge backwards until it stops.
544 : Yellow (Y)
545 : Magenta (M)
546 : Cyan (C)
547 : Black (K)
Blinks Something is wrong with the toner sensor of
the indicated color or the image drum is not
installed correctly.
Install the toner cartridge or image drum of
the indicated color correctly.
540 : Yellow (Y)
541 : Magenta (M)
542 : Cyan (C)
543 : Black (K)
Blinks A paper cassette is not in the indicated tray.
Insert the paper cassette into the indicated
tray.
If the cassette is already inserted in the
printer, pull out the cassette and set it again
to correctly locate it.
430, 440 : Tray1
431, 441 : Tray2
432, 442 : Tray3
433 : Tray4
Cause/Remedy
3
3. Troubleshooting
- 87 -
Page 88

Other Error Messages
Error
code
356 Install New Belt Unit
Belt Unit Life
Please see HELP for details
File System is Full Lights up The le system is full.
File System is Write Protected Lights up The le system to which you tried to write is
330 Check Belt Unit
3
3. Troubleshooting
491
492
493
494
490
694
695
696
697
340
341
342
343
Please see HELP for details
Deleting data Lights up The print data of private jobs are being
Print Restricted. Job Rejected
Press ONLINE Button
Color Restricted. Job Rejected
Press ONLINE Button
Color Restricted. Mono Printed
Press ONLINE Button
Erased Data Full Lights up Secret le to be erased are full.
Install Paper
%TRAY%
%MEDIA_SIZE%
Please see HELP for details
File Erasing Lights up Erasing a secret le.
Error Postscript Goes off A postscript error has occurred.
Image Drum Not Installed
%COLOR%
Please see HELP for details
Check Image Drum
%COLOR%
Please see HELP for details
Wait a Moment
Rebooting <n>
%COLOR% Toner Sensor Error Lights up Something is wrong with the toner sensor of
%COLOR% Toner Not Installed Lights up The toner cartridge of the indicated color
%TRAY% Empty Lights up The indicated tray is empty.
Message
<ATTENTION>
indicator
Blinks The belt unit is at the end of its life.
Replace it with a new belt unit.
write-protected.
Blinks The belt unit is not properly installed.
Reinstall it properly.
deleted.
Lights up A print job sent by a user who is not
authorized for printing is deleted.
Lights up A color print job sent by a user who is not
authorized for color printing is deleted.
Lights up A color print job sent by a user who is not
authorized for color printing is printed in the
mono-print mode.
Blinks The indicated tray is empty.
Load the indicated size paper.
491 : Tray1
492 : Tray2
493 : Tray3
494 : Tray4
490 : MPTray
Blinks The image drum of the indicated color is not
installed correctly. Install the image drum
correctly.
694 : Yellow (Y)
695 : Magenta (M)
696 : Cyan (C)
697 : Black (K)
Blinks The image drum of the indicated color is not
installed correctly. Install the image drum
correctly.
340 : Yellow (Y)
341 : Magenta (M)
342 : Cyan (C)
343 : Black (K)
Lights up The printer is restarting.
Please wait.
the indicated color or the image drum is not
installed correctly.
Install the toner cartridge or image drum of
the indicated color correctly.
is not installed correctly. Install the toner
cartridge correctly.
Load the paper.
Cause/Remedy
- 88 -
Page 89
Other Error Messages
Error
code
Unsupported USB Device Detected
Please detach it
Install Paper
MPTray
%MEDIA_SIZE%
Press ONLINE Button
%COLOR% Waste Toner Full.Replace Toner. Lights up Waste toner is full. Replace with a new toner
Collate Fail:Too Many Pages
Press ONLINE Button
File System Operation failed<nnn>
Press ONLINE Button
Power Off and Wait for a while
126:Condensing Error
Invalid Print Data Received
Press ONLINE Button
USB Hub Unsupported
Please detach it
Log Buffer is Full. Job Rejected
Press ONLINE Button
360 Install Duplex Unit
Please see HELP for details
nnn* Service Call
nnn: Error
nnn* Power Off/On
nnn:Error
PDL Error Occurred Varies Indicating that it has been occured an
Expired saved les have been deleted
Press ONLINE Button
Decode error occurred
Press ONLINE Button
Can not read the le
Press ONLINE Button
Message
<ATTENTION>
indicator
Goes off A USB device unsupported by a printer is
connected. Remove the device.
Goes off Manual Printing from the MP tray is
specied. Load the paper of the size
indicated in the MP tray, and then press the
<ON LINE> button.
cartridge of the indicated color.
Goes off A collate print error has occurred.
Reduce the data amount. If that does not
work, reduce the size of the print data.
Lights up A le access error has occurred.
Blinks A condensation has occurred inside a printer.
Turn the printer off and turn on again after
a while.
Lights up A job is deleted because its data are
detected to have been corrupted when
private jobs are printed.
Goes off A USB hub unsupported by a printer is
connected. Remove the hub.
Lights up Print data is deleted because the accounting
log buffer is full. Contact a printer
administrator and remove the log buffer.
Blinks A duplex unit is not installed correctly.
Install a duplex unit in a printer correctly.
When a duplex unit is already installed, pull
out the unit, and then install it again.
Blinks An error occurred inside the printer. Turn the
printer off and then on again.
Write down the error code and contact your
dealer if the same error occurs again.
Blinks A fatal error has occurred in a printer.
Turn the power off/on. Contact your dealer if
the same error occurs again.
internal processing error into the PDL
emulation.
It's a clearable warning. User should press
ENTER button for clearing the warning.
Lights up Indicates that an applicable job has been
automatically deleted as the retention period
for Private Job Print has expired.
Varies Indicates that an error has occurred during
analysis of image data input from an
external source.
This appears when an error has occurred
during analysis of TIFF or JPEG data in
USBMemoryPrint, DirectPrint, E-mailPrint
mode.
Varies Indicates that the USB memory is
disconnected while PrintFromUSBMemory
is running. Reading of the image le is
cancelled.
Cause/Remedy
3
3. Troubleshooting
- 89 -
Page 90

Other Error Messages
Error
code
Color toner empty. Job cancelled
Press ONLINE Button
Duplex Print Failed
Press ONLINE Button
E-mail receiving has been cancelled
3
Press ONLINE Button
3. Troubleshooting
Invalid Data
Press ONLINE Button
Error PDF
Press ONLINE Button
Invalid Password
Press ONLINE Button
PDF Cache Write Error
Press ONLINE Button
Job Type restricted
Job rejected
Press ONLINE Button
Please change SD Memory Card Lights up Indicates that machine requests a user to
415
Replace Toner
416
%COLOR% Waste Toner Full
Message
<ATTENTION>
indicator
Varies Noties the user that the color toner is
empty and that the received color data job
is cancelled.
Lights up For the paper setting that a duplex printing
is not possible, it was printed in simplex.
Lights up Indicates that Email receiving has been
canceled.
It has the following possibilities.
- The format of email that has received is
illegal or not supported.
- The attached le is illegal or not
supported.
- The attached le that has received is too
large, for example, le size exceeds 8MB.
- Network connection has disconnected.
Varies Invalid data was received. Press the On-line
switch and eliminate the warning. Displayed
when unsupported PDL command is received
or a spool command is received without SD
Card.
Varies It appears when a PDF le contains a syntax
error.
Varies Noties that the entered password does not
match the password set to encrypted PDF.
The le will not be printed unless the
passwords match.
Varies Noties that writing a PDF le to the cache
has failed.
When an SD card is not used, add memory
or an SD card.
When an SD card is used, increase free
space on the SD card.
Varies A job of a JobLimitation setting violation is
received, and when discarding the job, it's
indicated.
exchange old SD card device for new one
because the SD card device is life.
Blinks Indicates that a waste toner box represented
by %COLOR% has become full and needs to
be replaced.
Cause/Remedy
Please see HELP for details
480 Remove Paper
Output Tray
Please see HELP for details
519 Press ONLINE Button for Restoration
Receiving Data Timeout
Please see HELP for details
IPv4 Address is conicted
Change IPv4 Address
Getting target IP failed.
Please check DHCP settings.
Error 415 : Magenta
Error 416 : Cyan
(Does not occur for Black/Yellow.)
Blinks The printed paper is overlled on the paper
stacker of the printer unit.
Error 480 : Output Tray
Blinks When receiving data by Port9100, LPR, FTP,
IPP, WSD, or Email, a timeout occurred in
stream.
Varies IPv4 address is conicted.
Varies Indicates that DHCP server is not found out.
- 90 -
Page 91

Other Error Messages
Error
code
Wait a Moment
Network Initializing
Wait a moment
Network Conguration writing
709 Caution, unknown Consumable detected
Go to User Manual “Trouble Shooting” to
restore operation
Message
<ATTENTION>
indicator
Varies This appears when the NIC initialization is
occurred, as the setting was changed.
Blinks This appears during the NIC conguration
data is storing into the ash memory, as the
setting was changed.
Blinks You can use any consumables in your
product, but you must accept the risks of
using non-genuine consumables. If the use
of non-genuine consumables causes damage
to the product or results in your product
not functioning to its full specication, then
such damage or effect on the product is not
covered by warranty. To accept these risks
and to restore function;
1. Turn off your product
2. Press and hold the <CANCEL> button
and turn your product on
3.
After start up, release the <
button
Note
This operation will be recorded for future
reference.
Cause/Remedy
CANCEL
3
3. Troubleshooting
>
- 91 -
Page 92

When You Cannot Print from the MP Tray
●● When You Cannot Print from the MP Tray
If you print from the MP tray without moving down the paper set cover, the message “Install Paper
MPTray” appears on the display screen.
Check the message and deal with the problem. Refer to ”How to Print from the MP Tray” P.54.
3
3. Troubleshooting
Paper set cover
- 92 -
Page 93

Other Issues
●● Other Issues
This section explains the issues you may encounter while operating your printer and how to solve them.
Unable to Print from a Computer
Memo
● If the following information does not solve the issue, contact your dealer.
● For issues caused by an application, contact the manufacturer of the application.
General Causes
Common to Windows and Mac OS X
Cause Remedy Reference
The printer is turned off. Turn on the printer. page 21
An Ethernet or USB cable is unplugged. Check that the cable is plugged into the printer and
computer properly.
Something is wrong with a cable. Replace it with a new cable. The printer is off line. Press the <ON LINE> button. -
An error message is displayed on the
display screen of the operator panel.
The interface setting is disabled. Check the setting of the interface being used from the
Something is wrong with the print
function.
“Error Messages” or press the <HELP> button on the
operator panel.
operator panel.
Check if you can print the contents of the settings. page 30
-
page 87
Advanced
3
3. Troubleshooting
For Windows
Cause Remedy Reference
The printer is not set as the default
printer.
The output port for the printer driver is
incorrect.
A print job from another interface is in
progress.
“Invalid data” is displayed on the display
screen and printing cannot be done.
A print job is automatically canceled. If using Print Job Control, the print job is not authorized
Set the printer as the default printer. -
Select the output port to which the Ethernet or USB
cable is connected.
Wait until the print job is done. -
Press the scroll button or and select [Menus] >
[System Adjust] > [Timeout InJob], and then select
a longer time. The default setting is 40 seconds.
to print.
-
-
Advanced
- 93 -
Page 94

Other Issues
Network Connection Problems
Common to Windows and Mac OS X
Cause Remedy Reference
Using a crossover cable. Use a straight cable. The printer is turned on before a cable
was connected.
The hub and the printer are incompatible
or have some problem.
3
Not connected to the wireless LAN access
point.
3. Troubleshooting
Connect cables before turning on the printer. page 32
Press the scroll button or and select [Admin Setup] >
[Network Setup] > [HUB Link Setting], and then select
[10Base-T Half].
● When the device is connected to the wireless LAN
(Infrastructure mode), disable the wireless LAN (AP
mode).
● Check that the power switch of the wireless LAN
access point is turned on.
● Check settings of the wireless LAN access point, and
then perform manual setting or automatic setting.
● Restart the wireless LAN function.
● Select [Wireless Reconnection] from [Wireless
(Infrastructure) Setting].
● Put the device in an unobstructed view position near
the wireless LAN access point. (The recommended
distance is 30 m or less)
● If there is a wall, a metal item or a radio wave
generating device between this device and the
wireless LAN access point, communication failure may
occur.
-
-
For Windows
Cause Remedy Reference
IP address is incorrect. ● Check that the same IP address is set for the printer
and the printer's port setting on the computer.
● If using LPR Utility, check the IP address setting in
LPR Utility.
-
USB Connection Problems
Common to Windows and Mac OS X
Cause Remedy Reference
Unsupported USB cable is being used. Use a USB 2.0 cable. A USB hub is being used. Connect the printer directly to the computer. page 42
Printer driver is not installed correctly. Reinstall printer driver. page 43,
page 44
For Windows
Cause Remedy Reference
The printer is off line. Right-click the [OKI C833 *] icon on the [Devices and
Printers] folder, and then select [See print jobs] (If
the icons are grouped, select [See print jobs] > [OKI
C833 *]).
* Indicates the driver type. (ex. PCL6/PS/XPS)
In the dialog box, select the [Printer] menu and then
clear the check of [Use Printer Ofine].
A switch, buffer, extension cable or USB
hub is being used.
A driver for a different printer that uses a
USB connection has been installed.
Connect the printer directly to the computer. page 42
Delete the other printer driver from the computer. -
-
- 94 -
Page 95

Unable to Install a Printer Driver Successfully
Memo
● If the following information does not solve the issue, contact your dealer.
● For issues caused by an application, contact the manufacturer of the application.
USB Connection Problems
Other Issues
For Windows
Cause Remedy Reference
An icon of the printer is not created on
the [Devices and Printers] folder.
Only the rst printer driver is installed
even if multiple printer drivers are
selected to install.
The “Unable to install printer driver”
error message is displayed.
The printer driver is not installed correctly.
Reinstall the printer driver correctly.
Follow the procedure below to install the second and
subsequent printer drivers:
1. Insert the “Software DVD-ROM” into a computer.
2.
When [AutoPlay] is displayed, click [Run Setup.exe].
Memo
● If the [User Account Control] dialog box is displayed,
click [Yes].
3. Select a language from the drop-down list.
4. Read the license agreement, and then click [Accept].
5. Read Environmental advice for Users and click
[Next].
6. Select [Network] or [USB] corresponding to your
connection environment, and then click [Next].
If the [Windows Security Alert] dialog box is
displayed, click [Allow access].
7. Select the model name of this machine, and then
click [Next].
8. Click [Custom Install].
9. Click [Separate Install].
10. Click a driver to install.
Installation starts.
Use Plug-and-Play. Follow the procedure below.
1. Ensure that the printer and computer is turned off.
2. Connect a USB cable.
3. Turn on the printer.
4. Turn on the computer.
5. When the Found New Hardware Wizard is displayed,
follow the on-screen instructions to complete the
setup.
page 43
-
-
3
3. Troubleshooting
- 95 -
Page 96

Other Issues
OS-Specic Constraints
Constraints with Windows
Item Symptom Cause/Remedy
Printer drivers [Help] is not displayed. The [Help] function is not supported on PS printer drivers.
3
Color Correct
Utility
3. Troubleshooting
PS Gamma
Adjuster
The [User Account Control]
dialog appears.
The [User Account Control]
dialog appears.
The [Program Capability
Assistant] dialog appears.
The [User Account Control]
dialog appears.
The [Program Capability
Assistant] dialog appears.
When you launch an installer or utility, the [User Account
Control] dialog may appear. Click [Yes] or [Continue] to
run the installer or utility as an administrator. If you click
[No], the installer or utility does not start.
When you launch an installer or utility, the [User Account
Control] dialog may appear. Click [Yes] or [Continue] to
run the installer or utility as an administrator. If you click
[No], the installer or utility does not start.
If the [Program Capability Assistant] dialog appears
after an installation (including if you stop an installation
before it is completed), make sure to click [This program
installed correctly].
- 96 -
Page 97

Image Quality Issues
Memo
● If the following information does not solve your issues, contact your dealer.
Symptom Point to check Remedy Reference
Vertical lines appear.
Paper feed direction
Printed images are
fading vertically.
Paper feed direction
Printed images are light.
Printed images are
partially faded. Spots
and lines appear.
The toner is low. Replace the toner cartridge. page 104
The image drum is damaged. Replace the image drum. page 108
Foreign materials may be present
on the image drum.
The light-shielding lm of the
image drum is dirty.
The image drum is not installed
properly.
The LED heads are dirty. Wipe the LED heads with soft
The toner is low. Replace the toner cartridge. page 104
The paper is unsuitable. Use supported paper. page 48
The toner save is enabled. Change the toner save settings. The toner cartridge is not installed
properly.
The toner is low. Replace the toner cartridge. page 104
The paper is moist. Use paper stored in proper
The paper is unsuitable. Use supported paper. page 48
The paper is unsuitable.
The settings of media type and
weight are incorrect.
The paper is recycled.
The media weight setting is
unsuitable.
The paper is too moist or dry. Use paper stored in proper
[Paper Black Setting] or [Paper
Color Setting] is improperly
congured.
[Trans. Black Setting] or [Trans.
Color Setting] is improperly
congured.
Replace the image drum. page 108
Wipe the lm with a soft tissue
paper.
Install the image drum properly. page 108
tissue paper.
Install the toner cartridge properly. page 104
temperature and humidity
conditions.
Press the scroll button
and select [Menus] > [Tray
Conguration] > the paper tray
conguration you are using, and
then select the proper values
for [Media Type] and [Media
Weight]. Or, select a larger value
for [Media Weight].
Press the scroll button
and select [Menus] > [Tray
Conguration] > the paper tray
you are using, and then select a
larger value for [Media Weight].
temperature and humidity
conditions.
Press the scroll button
select [Menus] > [Print Adjust],
and then change the value of
[Paper Black Setting] or [Paper
Color Setting].
Press the scroll button or ,
select [Menus] > [Print Adjust],
and then change the value of
[Trans. Black Setting] or [Trans.
Color Setting].
or
or
or ,
Other Issues
-
page 118
page 48
page 48
page 48
page 48
-
-
3
3. Troubleshooting
- 97 -
Page 98

Other Issues
Symptom Point to check Remedy Reference
Horizontal lines
and spots appear
periodically.
Paper feed direction
3
3. Troubleshooting
White area of paper is
lightly stained.
If the interval of lines or spots
is about 94 mm (4 inches), the
image drum (the green tube) is
damaged or dirty.
If the interval of lines or spots is
about 40 mm (2 inches), foreign
materials may be present on the
image drum.
If the interval of lines or spots is
about 143 mm, there is damage to
the fuser unit.
The image drum has been exposed
to light.
The paper feed path is dirty. Print a few test copies. The paper contains static
electricity.
The paper is too thick. Use thinner paper. The toner is low. Replace the toner cartridge. page 104
Lightly wipe the image drum with
soft tissue paper.
Replace the image drum if it is
damaged.
Open and close the output tray,
and print again.
Change the fuser unit. page 114
Place the image drum back into
the printer and leave it for a few
hours. If that does not solve the
problem, replace the image drum.
Use paper stored in proper
temperature and humidity
conditions.
page 108
-
page 108
page 48
Periphery of letters is
smudged.
The entire paper area
is lightly stained when
printing on envelopes or
coated paper.
Toner comes off when it
is rubbed.
Glossiness is not
uniform.
The LED heads are dirty. Wipe the LED heads with soft
tissue paper.
The paper is unsuitable. Use recommended paper. The paper is moist. Replace it with new paper. page 48
The toner may be sticking to the
whole area of the envelope or
coated paper.
The settings of media type and
weight are incorrect.
The paper is recycled.
The media weight setting is
unsuitable.
The settings of media type and
weight are incorrect.
This is not a malfunction of the
printer.
Coated paper is not recommended.
Press the scroll button or
and select [Menus] > [Tray
Conguration] > the paper
tray conguration you are using,
and then select the proper
values for [Media Type] and
[Media Weight]. Or, select a
heavier weight in [Media Weight].
Press the scroll button
and select [Menus] > [Tray
Conguration] > the paper tray
conguration you are using, and
then select a heavier weight for
[Media Weight].
Press the scroll button or
and select [Menus] > [Tray
Conguration] > the paper
tray conguration you are using,
and then select the proper
values for [Media Type] and
[Media Weight]. Or, select a
heavier weight in [Media Weight].
or
page 118
-
page 48
page 48
page 48
- 98 -
Page 99

Symptom Point to check Remedy Reference
?
Color of the printed
image is not what you
expect.
Solid printing of CMY
100% is too light.
The toner is low. Replace the toner cartridge. page 104
The setting of [Black Finish] is
not suitable for the application.
The color adjustment has been
modied.
The color balance is out of
adjustment.
Color registration is out of
alignment.
[CMY100% Density] is set to
[Disable].
On the printer driver, select
[Composite Black (CMYK)]
or [True Black (K)] for [Black
Finish].
Do color matching from the printer
driver.
Press the scroll button
select [Calibration], and then
[Adjust Density].
Open and close the output tray.
Or, press the scroll button
and select [Calibration], and then
[Adjust Registration].
Press the scroll button
select [Admin Setup] > [Color
Setup] > [CMY100% Density],
and then select [Enable].
or and
or
or and
Other Issues
Advanced
Advanced
Advanced
Advanced
-
3
3. Troubleshooting
Dots appear.
Smears is printed.
The background of a
printed page is dark or
dirty.
Nothing is printed.
The paper is unsuitable. Use supported paper. page 48
When the interval of the dots
is about 94 mm (4 inches), the
image drum (the green tube) is
damaged or dirty.
The paper is moist. Replace it with new paper. page 48
The paper is unsuitable. Use supported paper. page 48
The printer may be malfunctioning. Contact your dealer. Back cover
Two or more sheets of paper are
fed simultaneously.
The printer may be malfunctioning. Contact your dealer. -
Lightly wipe the image drum with a
soft tissue paper.
Replace the image drum when it is
damaged.
Fan the paper well and load it
again.
page 108
page 53,
page 54
Patches appear.
The paper is moist. Replace it with new paper. page 48
The paper is unsuitable. Use supported paper. page 48
- 99 -
Page 100

Other Issues
Feeding Issues
Memo
● If the following information does not solve the issue, contact your dealer.
Symptom Point to check Remedy Reference
● The paper often
jams.
● Multiple sheets
3
are fed at once.
● The paper is fed
at an angle.
3. Troubleshooting
Paper does not feed
into the printer.
The printer does
not start processing
even though you
have removed the
jammed paper.
The paper gets
folded or wrinkled.
The printer is tilted. Place the printer on a at surface. page 16
The paper is too light or too heavy. Use the appropriate paper for the
The paper is moist or has a static
charge.
The paper is wrinkled, folded or
curled.
Something is already printed on the
back side of the paper.
The edges of the paper are not kept
even.
There is only one sheet of paper in
the tray.
You have added more paper with
paper already loaded in the tray.
The paper is loaded at an angle. For tray 1/2/3/4, adjust the paper
Envelopes are not correctly loaded. Load envelopes correctly. page 54
Paper, envelopes or labels of weight
between 177 and 220 g/m
in tray 1 and tray 2.
The setting of [Source] in the
printer driver is not correctly
specied.
You have specied manual feeding
on the printer driver.
- Open and close the output tray. -
The paper is moist or has a static
charge.
The paper is light. Press the scroll button
2
is loaded
page 48
printer.
Use paper stored in proper
temperature and humidity
conditions.
Use appropriate paper for the printer.
Fix the curled paper.
With tray 1/2/3/4, you cannot use
paper that has been printed.
Load it on the MP tray for printing.
Fan the paper and even up the
edges.
Load several sheets of paper. page 53,
Remove the already loaded paper,
stack it onto the new paper, even up
the edges and load the paper with
the old paper on top.
width guide and stopper to the
paper.
For the MP tray, adjust the paper
width guide to the paper.
Load the paper, envelopes or labels
of weight between 177 and 220 g/m2
on the MP tray, and use the face up
stacker.
Check the paper tray and select
the correct tray in [Source] in the
printer driver.
In the printer driver, clear the [Use
MP tray as manual feed] check
box on [Paper feed options].
Use paper stored in proper
temperature and humidity
conditions.
or and
then select [Menus] > [Tray
Conguration] > [%TRAY%
Cong] > [Media Weight].
Then, specify a lighter weight.
page 48
page 48
page 54
page 53,
page 54
page 54
page 53,
page 54
page 53,
page 54
page 48,
page 54
-
Advanced
page 48
page 48
- 100 -
 Loading...