

Page 1
Page 2

Page 3
Computer Connections & Software Install Guide
Installation Checklist
C5100
□ Network Install: Hardware..........................4
• Connect to the Network Port .............................4
□ Network Install: Software ...........................5
• TCP/IP ...............................................................5
□ Local Install: USB, Hardware .....................7
□ Local Install: USB, Software ......................8
• Windows 98 .......................................................8
• Windows Me......................................................9
• Windows 2000 .................................................10
• Windows XP ....................................................11
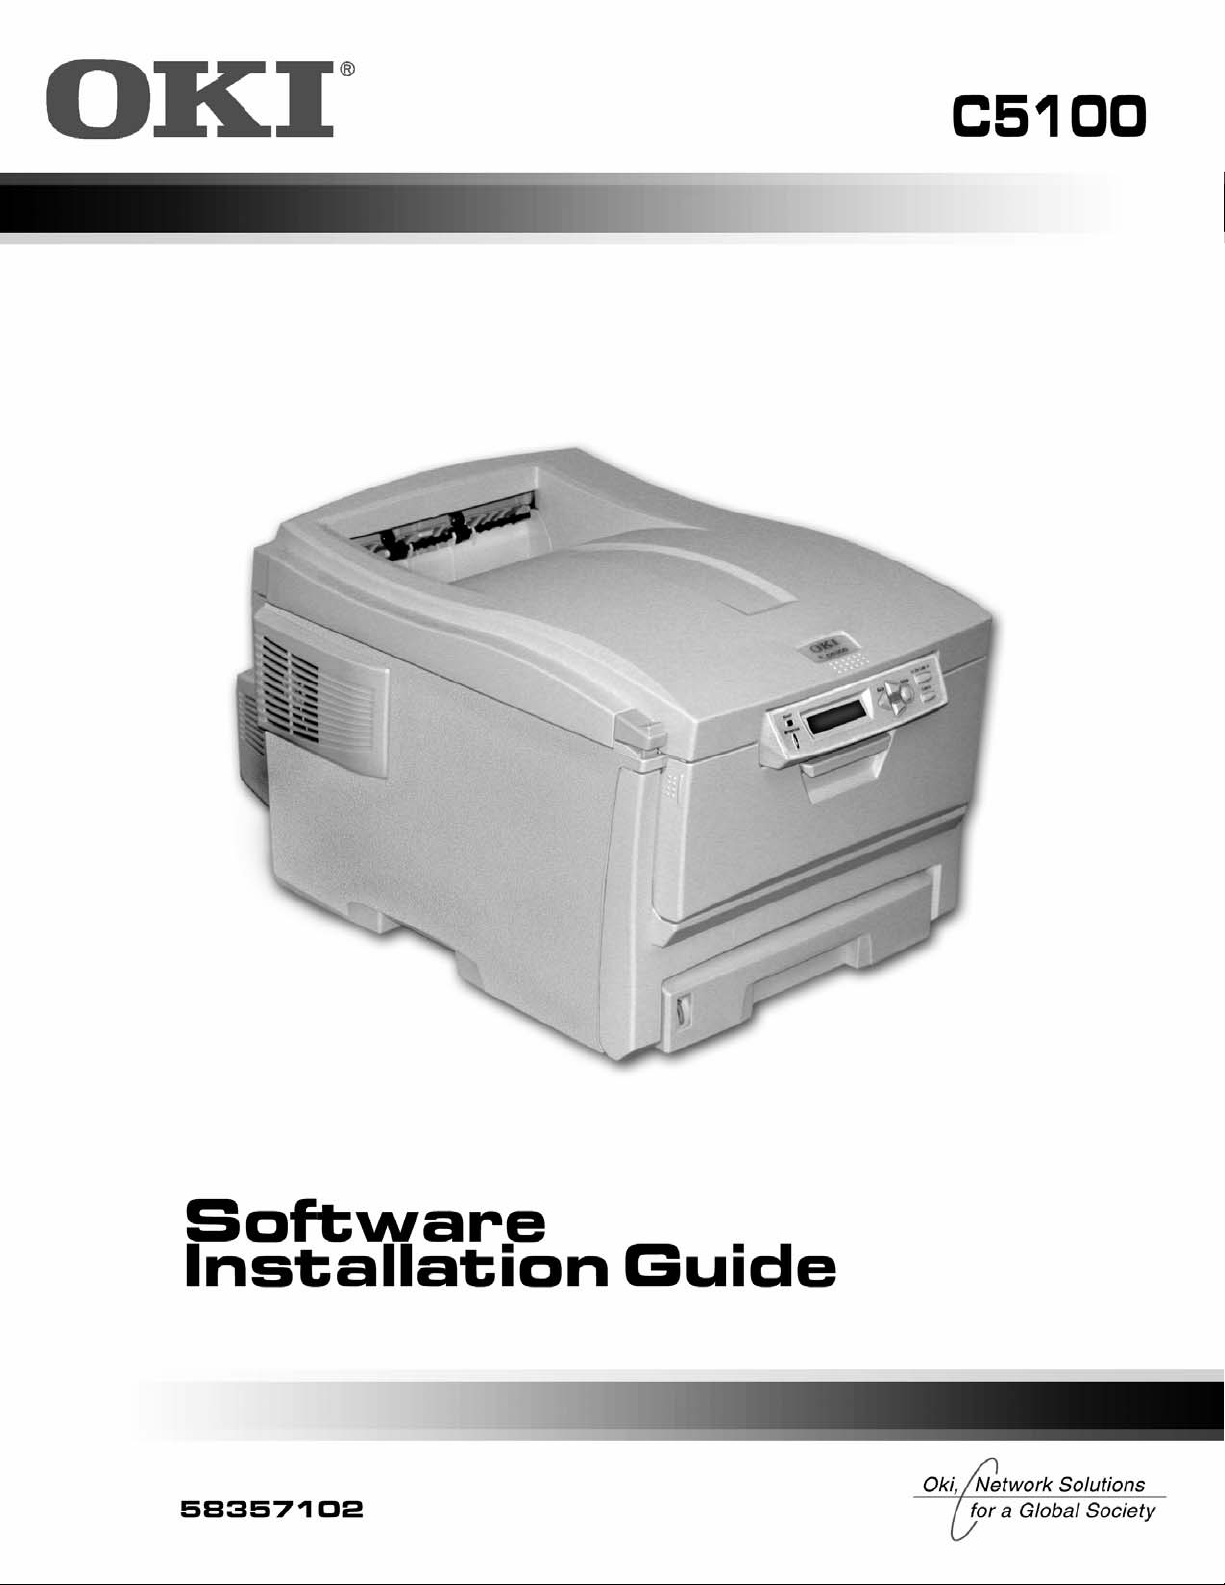
Important!
The C5100 printer can only be installed through
an Ethernet connection (1) or through a USB
connection (2):
It does not have a parallel port connector.
3
Page 4
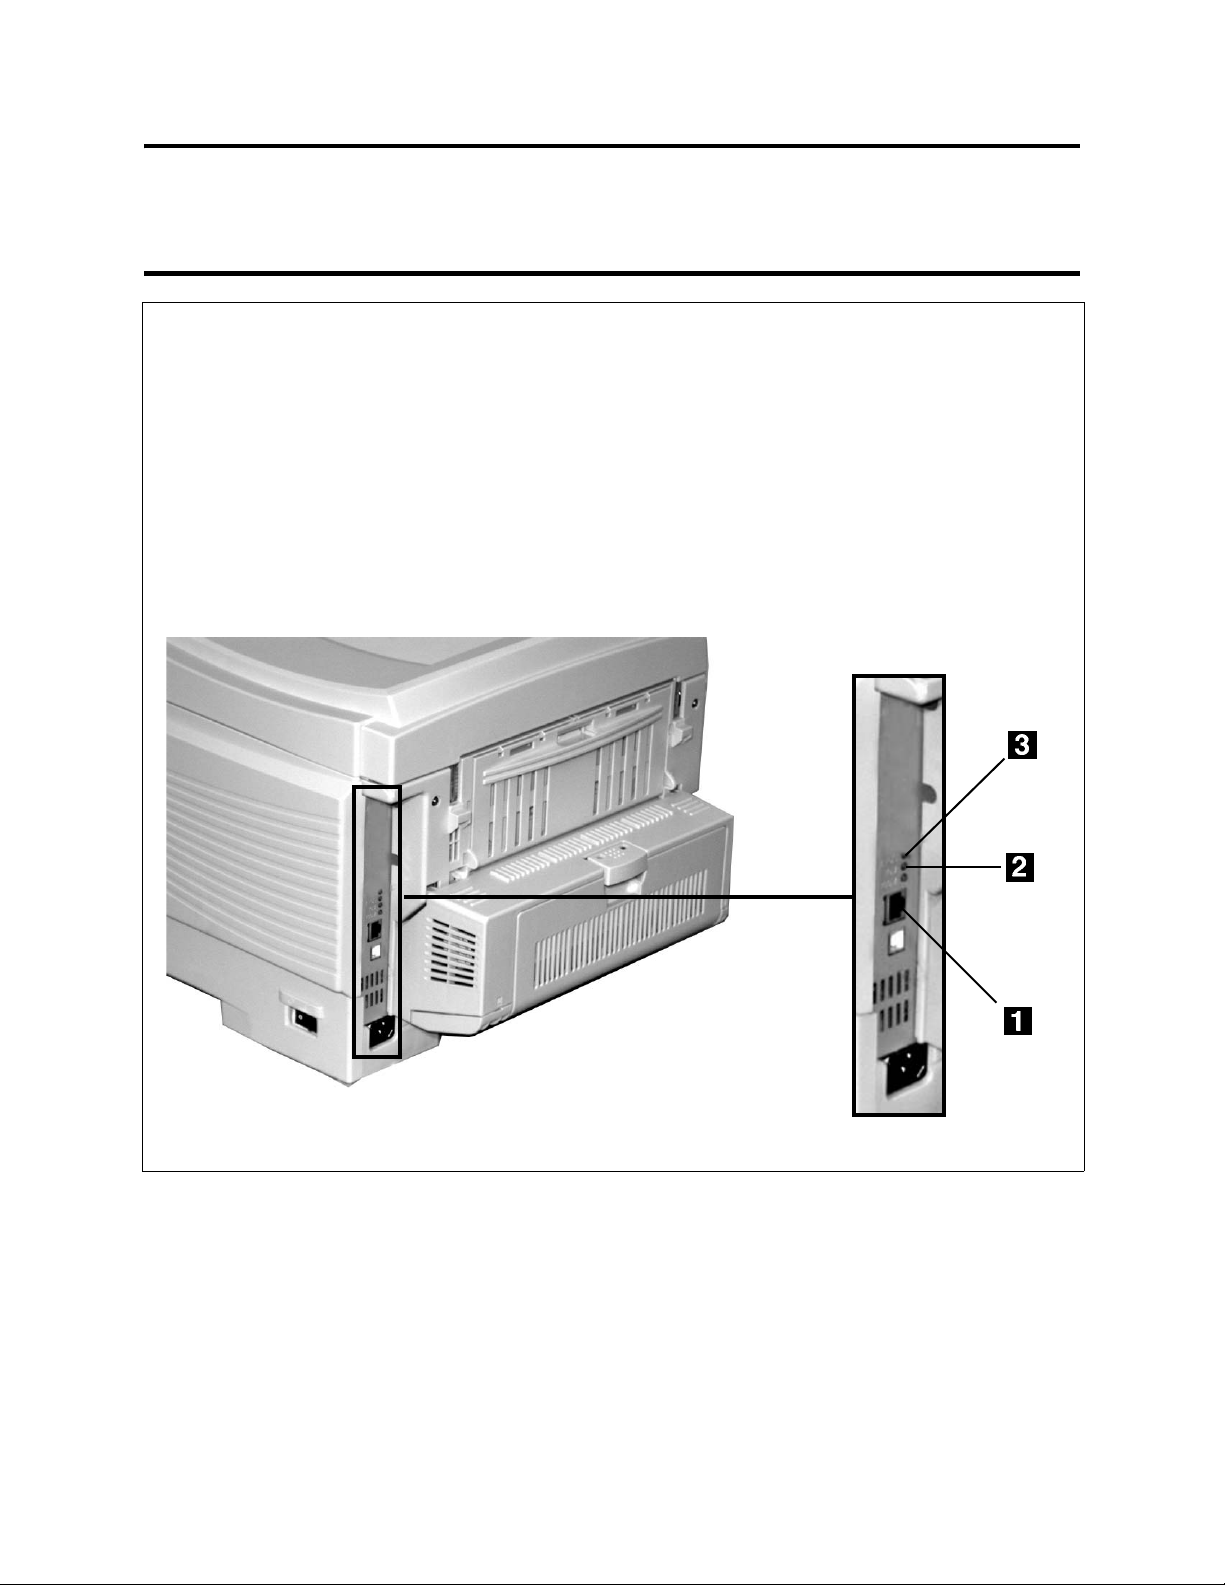
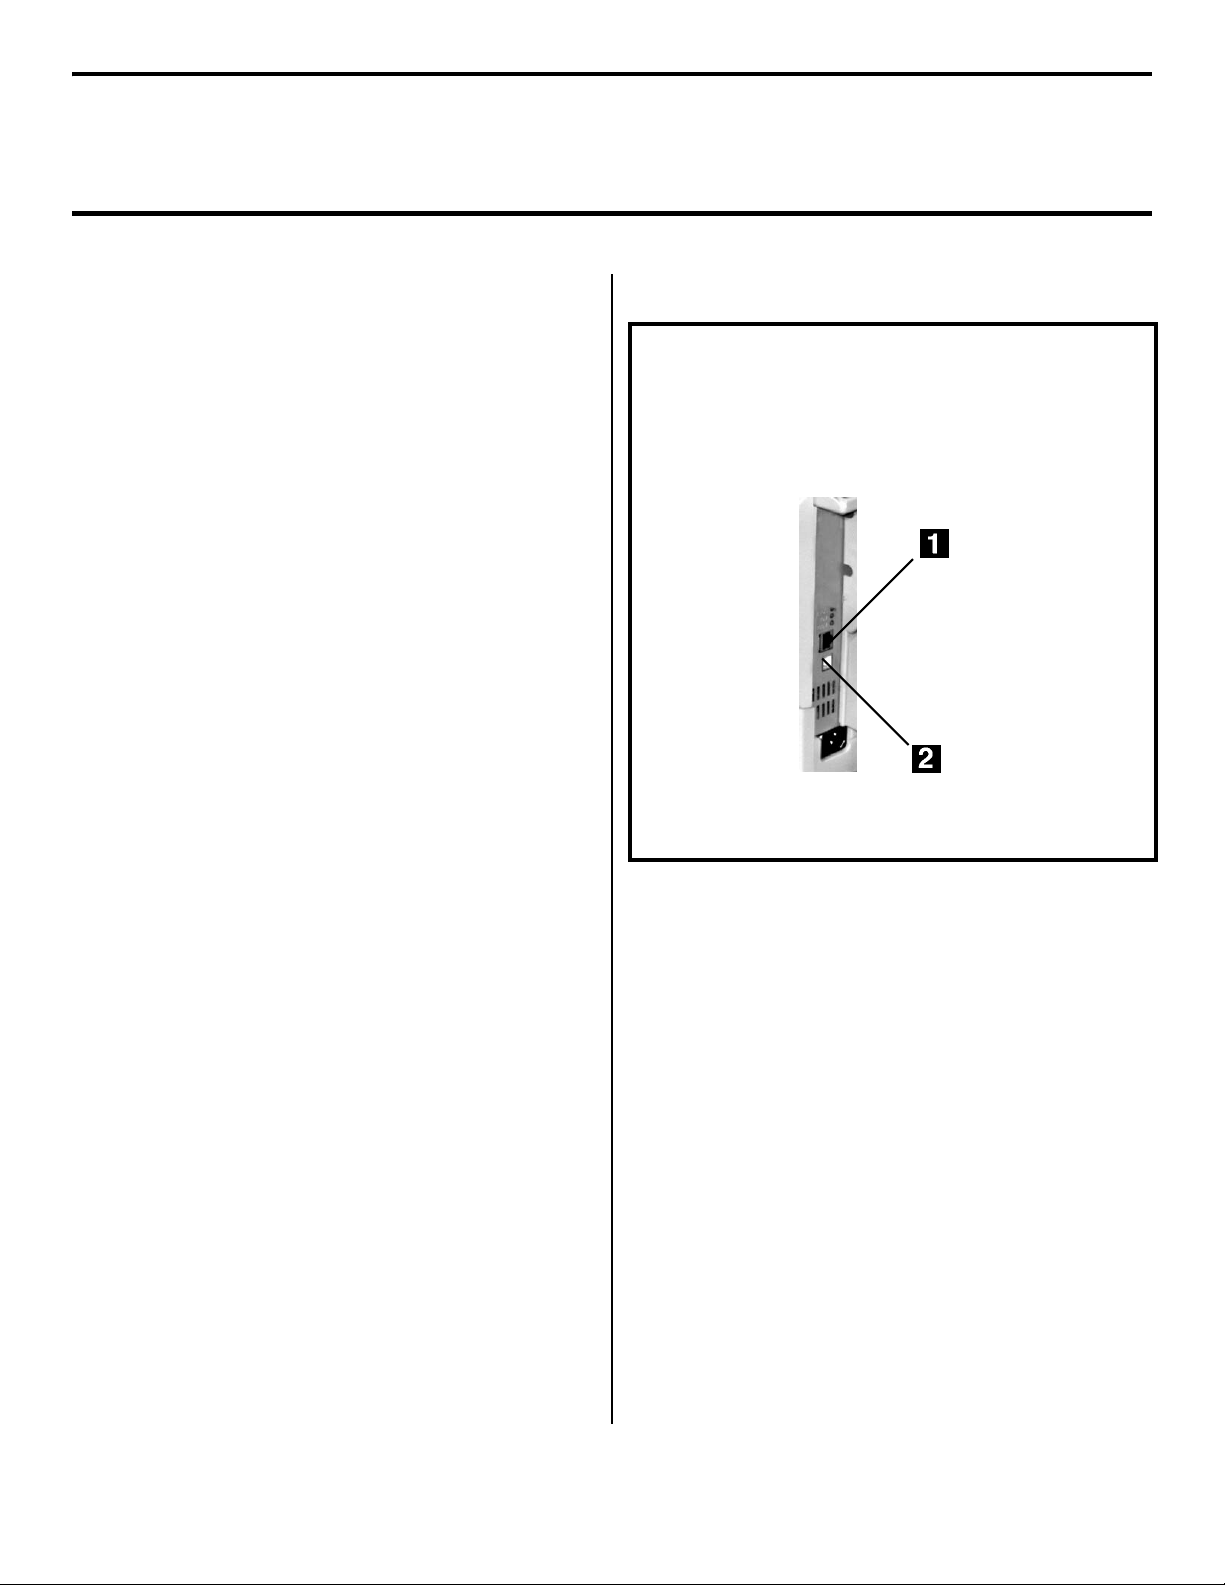
Network Install: Hardware
Connect to the Network Port
Note: No Ethernet
with two twisted wire pairs and an RJ45 plug.
□ Turn the printer off.
□ Remove the plug from the Ethernet port (1), then connect your Ethernet cable to the port.
□ Connect the other end of the cable to the network port.
□ Turn the printer on and wait for the print server’s STATUS light (2) to stop blinking.
□ Press the TEST button (3) on the print server. The Network Information configuration sheets print.
Keep these sheets handy: they contain information you need to set up the printer on your network.
®
cable is supplied with the printer. Use an Ethernet cable
4
Page 5

Network Install: Software
TCP/IP
Note: Installing a printer on a network is best handled by
someone familiar with networks (such as a network
Administrator).
For more detailed information, see the OkiLAN
User’s Guide on the Publications CD supplied with
your printer.
Install the Driver
Note: If you are not using DHCP, you need to obtain an IP
Address from your network Administrator and enter
it using the front panel:
• Press + until you see
display, then press ENTER.
• Press + until you see
display, then press ENTER.
• Press + to change the setting to
ENTER, then BACK.
• Press + to advance to the
press ENTER.
• Use the + and – to set each set of three digits in the
IP Address, pressing ENTER in between to go to the
next set of digits.
• Press BACK to engage the IP Address, then press
ON LINE.
□ Insert the Drivers CD supplied with your printer in the
CD-ROM drive. The CD will autorun. (If it doesn’t,
click Start
→ Run → Browse. Browse to your
CD-ROM drive, double-click Install.exe, click OK.)
□ The License Agreement appears, click Next.
□ The Menu Installer Software Installation window
appears. Select your language.
□ Click the Printer Driver Installer button.
□ The Local or network printer screen appears. Select
Network Printer, then click Next.
□ The Connection type screen appears. Select Directly to
the network ... and click Next.
NETWORK MENU on the
IP ADDRESS SET on the
MANUAL, and press
IP ADDRESS display, then
□ Follow the on-screen instructions to complete the
installation.
Note: In Windows XP, if the Windows Logo testing dialog
appears, click Continue Anyway—this driver is
Microsoft certified.
Network Client Distribution
To install the software on a network for network clients, the
software must be installed on all clients’ workstations. The
Network Installer utility automatically notifies client users
by email when a new printer is added to the network.
1. Install the Network Installer Utility:
□ In the Menu Installer, click the Network Software
button.
□ Click the Administration Tools button.
□ Click the Network Installer button and follow the
on-screen instructions
2. Set up existing server email accounts in Network
Installer.
3. Install the printer drivers:
□ Install the printer on the network as a shared printer.
The client drivers for the printer are automatically
copied as well.
□ Register the printer in Network Installer.
When the printer has been registered, Network Installer
sends an email to clients added to Network Installer
informing them that the printer is available on the network.
Each client can install the appropriate driver as follows:
• Windows 2000, XP, and NT 4.0 clients can install drivers
by opening the connectme.exe attachment to the email.
• Windows Me, 98, and 95 clients can install the drivers by
launching the Add Printer Wizard and following the
network administrator’s instructions for locating the
appropriate driver.
□ The TCP/IP Connection screen appears.
5
Page 6

Network Install: Software
TCP/IP (cont.)
Configuring the Print Server via
the Embedded Web Page
Note: For more detailed information, see the OkiLAN
User’s Guide on the Publications CD supplied with
your printer.
□ Activate your web browser (Netscape Navigator
version 4.0 or higher, or Microsoft
version 4.0 or higher), then enter the IP Address for the
printer (this will be found on the Network Information
configuration sheets generated when you press the Test
button on the back of the printer).
□ From this page you can
• Enable/disable protocols.
• Change the IP address, Subnet Mask and
default Gateway to meet the requirements for
your particular network environment.
□ When done, save and submit your changes to the print
server to make them permanent. When prompted, enter
the following:
• User Name = Root.
• Pa ss wo rd = Last 6 digits of the MAC Address
(this will be found on the Network
Information configuration sheets generated
when you press the Test button on the back of
the printer).
®
Internet Explorer®
®
Activating the Duplex Unit and
Second Paper Tray Options
If your printer has an optional duplex unit or second paper
tray installed, you must enter the driver and activate them.
□ Click Start → Settings → Printer.
□ Right click the printer icon.
Windows 2000, XP and NT 4.0:
□ Click Properties
□ Click the Device Settings tab.
□ Scroll down to Installable Options.
□ Click Duplex, then click Installed. Do the same
thing for Hard Disk. If you have the optional
second paper tray installed, click Available Tray
and select 2.
Windows Me, 98 and 95:
□ Click Printer Properties.
□ Click the Device Options tab.
□ Select Duplex Option Unit, Printer Hard Disk,
and select optional paper trays if installed.
□ Click OK, then close the Printers dialog box.
6
Page 7

Local Install: USB, Hardware
Note: No USB interface cable is supplied with the printer.
Use a USB cable that is compatible with USB specification 1.1 or 2.0.
• A USB interface will only operate using Windows 2000, Windows Me and Windows 98. Windows 95 and
NT 4.0 do not support USB.
• Printer operation is not assured if another USB compatible device is connected concurrently with it.
• If a USB hub is used, it must be connected directly to the computer.
□ Turn the printer off.
□ Connect the USB cable to the USB port on the computer, then connect it to the white USB port (1)—not the black
Ethernet port!—on the printer.
□ Install the drivers following the instruction for your operating system.
7
Page 8

Local Install: USB, Software
Windows 98
Install the Driver
□ Make sure the USB cable is connected to your printer
and PC and your printer is turned OFF.
□ Insert the driver CD supplied with your printer into your
CD-ROM drive. The CD will autorun. (If it doesn’t,
click Start
ROM drive and double-click Install.exe, click OK.)
□ The License Agreement appears. Click Next.
□ The Menu Installer Software Installation screen
appears. Select your language.
□ Click the Printer Driver Installer button.
□ Click Local printer. Click Next.
□ Select the USB port. Click Next.
□ Printer model and emulation displays. Click Next.
Printer drivers are installed.
□ Connect cable screen displays. Click Finish.
□ Switch your printer ON.
→ Run → Browse. Browse to your CD-
Install Printer Software
Utilities
□ On the Menu Installer screen, click the Productivity
Software button.
□ Install the utilities you want following the on-screen
instructions.
To access the utility programs from your desktop, click
→ Programs → Okidata.
Start
Activating the Duplex Unit and
Second Paper Tray Options
If your printer has an optional duplex unit or second paper
tray installed, you must enter the driver and activate them.
See page 5 for instructions on how to do this.
□ Add New Hardware wizard starts. Click Next.
□ Select “Search for the best driver for your device.”
Click Next.
□ Select CD-ROM drive. Clear other choices. Click Next.
□ The USB driver is located. Click Next. Click Finish.
Print a Test Page
□ Click Start→Settings→Printers.
□ Right-click OKI C5100.
□ Click Properties.
□ Click the Print Test Page button.
8
Page 9

Local Install: USB, Software
Windows Me
Install the Driver
□ Make sure the USB cable is connected to your printer
and PC and your printer is turned OFF.
□ Insert the driver CD supplied with your printer into your
CD-ROM drive. The CD will autorun. (If it doesn’t,
click Start
ROM drive and double-click Install.exe, click OK.)
□ The License Agreement appears. Click Next.
□ The Menu Installer appears. Select your language.
□ Click the Printer Driver Installer button.
□ Click Local printer. Click Next.
□ Select the USB port. Click Next.
□ Printer model and emulation displays. Click Next.
Printer drivers are installed.
□ Connect cable screen displays. Click Finish.
□ Switch your printer ON.
□ Add New Hardware wizard displays. Select “Specify
the location of the driver.” Click Next.
→ Run → Browse. Browse to your CD-
Install Printer Software
Utilities
□ On the Menu Installer screen, click the Productivity
Software button.
□ Install the utilities you want following the on-screen
instructions.
To access the utility programs from your desktop, click
→ Programs → Okidata.
Start
Activating the Duplex Unit and
Second Paper Tray Options
If your printer has an optional duplex unit or second paper
tray installed, you must enter the driver and activate them.
See page 5 for instructions on how to do this.
□ Select “Specify a location.” Clear removable media.
Click Browse.
□ Scroll down and click on your CD-ROM drive. Click
OK.
□ Click Next. The USB driver is located.
□ Click Next. Click Finish.
Print a Test Page
□ Click Start→Settings→Printers.
□ Right-click OKI C5100.
□ Click Properties.
□ Click the Print Test Page button.
9
Page 10

Local Install: USB, Software
Windows 2000
Install the Driver
□ Make sure the USB cable is connected to your printer
and PC and your printer is turned OFF.
□ Insert the driver CD supplied with your printer into your
CD-ROM drive. The CD will autorun. (If it doesn’t,
click Start
ROM drive and double-click Install.exe, click OK.)
□ The License Agreement appears. Click Next.
□ The Menu Installer appears. Select your language.
□ Click the Printer Driver Installer button.
□ Click Local printer. Click Next.
□ Select the USB port. Click Next.
□ Printer model and emulation displays. Click Next.
Printer drivers are installed.
□ Connect cable screen appears. Turn printer power ON.
□ Click Finish.
→ Run → Browse. Browse to your CD-
Install Printer Software
Utilities
□ On the Menu Installer screen, click the Productivity
Software button.
□ Install the utilities you want following the on-screen
instructions.
To access the utility programs from your desktop, click
→ Programs → Okidata.
Start
Activating the Duplex Unit and
Second Paper Tray Options
If your printer has an optional duplex unit or second paper
tray installed, you must enter the driver and activate them.
See page 5 for instructions on how to do this.
Print a Test Page
□ Click Start→Settings→Printers.
□ Right-click OKI C5100.
□ Click Properties.
□ Click the Print Test Page button.
10
Page 11

Local Install: USB, Software
Windows XP
Install the Driver
□ Make sure the USB cable is connected to your printer
and PC and your printer is turned OFF.
□ Insert the driver CD supplied with your printer into your
CD-ROM drive. The CD will autorun. (If it doesn’t,
click Start
ROM drive and double-click Install.exe, click OK.)
□ The License Agreement appears. Click Next.
□ The Menu Installer appears. Select your language.
□ Click the Printer Driver Installer button.
□ Click Local printer. Click Next.
□ Select the USB port. Click Next.
□ Printer model and emulation displays. Click Next.
Printer drivers are installed.
□ Connect cable screen displays. Switch your printer ON.
□ Click Finish.
→ Run → Browse. Browse to your CD-
Install Printer Software
Utilities
□ On the Menu Installer screen, click the Productivity
Software button.
□ Install the utilities you want following the on-screen
instructions.
To access the utility programs from your desktop, click
→ Programs → Okidata.
Start
Activating the Duplex Unit and
Second Paper Tray Options
If your printer has an optional duplex unit or second paper
tray installed, you must enter the driver and activate them.
See page 5 for instructions on how to do this.
Print a Test Page
□ Click Start→Settings→Printers & Faxes.
□ Right-click OKI C5100.
□ Click Properties.
□ Click the Print Test Page button.
11
Page 12

OKI is a registered trademark of Oki Electric Industry
Company, Ltd.
Ethernet is a registered trademark of Digital Equipment
Corporation.
Oki Data Americas, Inc., 2000 Bishops Gate Blvd., Mt. Laurel, NJ 08054-4620
Tel: 1-800-654-3282 (856) 235-2600 Fax: (856) 222-5320, www.okidata.com
© 2003 Oki Data Americas, Inc. 58357102
Microsoft, Internet Explorer and Windows are either
registered trademarks or trademarks of Microsoft
Corporation in the United States and other countries.
Netscape and Netscape Navigator are U.S. trademarks of
Netscape Communications Corporation.
 Loading...