

Page 1

Page 2
Every effort has been made to ensure that the information in this
document is complete, accurate, and up-to-date. The manufacturer
assumes no responsibility for the results of errors beyond its control.
The manufacturer also cannot guarantee that changes in software
and equipment made by other manufacturers and referred to in this
manual will not affect the applicability of the information in it. Mention
of software products manufactured by other companies does not
necessarily constitute endorsement by the manufacturer.
The most up-to-date information is available from the Oki Data web
site http://my.okidata.com.
Copyright © 2004. All rights reserved.
Oki is a registered trademark of Oki Electric Industry Company Ltd.
NERGY STAR is a registered trademark of the United States Environmental Protection
E
Agency.
Microsoft and Windows are registered trademarks of Microsoft Corporation.
Apple, Macintosh and Mac OS are registered trademarks of Apple Computers Inc.
Other product names and brand names are registered trademarks or trademarks
of their proprietors
.
Note
The screen shots in this manual are generic. When you see
XXX1, XXX2, etc., in a screen, they represent a specific model
number which will vary depending on which models are being
used in your system.
For example:
Fig01_oem_v11.tif
59363201 Rev. 1.2
Page 3

Contents
Introduction. . . . . . . . . . . . . . . . . . . . . . . . . . . . . . . . . . . . . . . . . . . . . . . .4
Overview . . . . . . . . . . . . . . . . . . . . . . . . . . . . . . . . . . . . . . . . . . . . . . . . . .6
Operating System Requirements . . . . . . . . . . . . . . . . . . . . . . . . . . . . . . 7
Server (Windows Only). . . . . . . . . . . . . . . . . . . . . . . . . . . . . . . . . . . . . .7
Client Computers (Windows or Macintosh) . . . . . . . . . . . . . . . . . . . . . .7
Installation . . . . . . . . . . . . . . . . . . . . . . . . . . . . . . . . . . . . . . . . . . . . . . . .8
Installing the Print Job Accounting Server Software . . . . . . . . . . . . . . .8
Installing the Print Job Accounting Client Software . . . . . . . . . . . . . .8
Server Software Capabilities. . . . . . . . . . . . . . . . . . . . . . . . . . . . . . . . 12
User Name Versus Account ID . . . . . . . . . . . . . . . . . . . . . . . . . . . . . . .13
User Name . . . . . . . . . . . . . . . . . . . . . . . . . . . . . . . . . . . . . . . . . . . . . . .13
Account ID . . . . . . . . . . . . . . . . . . . . . . . . . . . . . . . . . . . . . . . . . . . . . .13
Server Software . . . . . . . . . . . . . . . . . . . . . . . . . . . . . . . . . . . . . . . . . . .15
Starting the Server Software . . . . . . . . . . . . . . . . . . . . . . . . . . . . . . . . .15
Server Software Pull-Down Menus . . . . . . . . . . . . . . . . . . . . . . . . . . .16
Setting Up Automatic Email . . . . . . . . . . . . . . . . . . . . . . . . . . . . . . . . .19
Defining Printer Groups . . . . . . . . . . . . . . . . . . . . . . . . . . . . . . . . . . . .20
Registering Printers . . . . . . . . . . . . . . . . . . . . . . . . . . . . . . . . . . . . . . . .22
Changing Settings for a Registered Printer . . . . . . . . . . . . . . . . . . . . . .36
Setting Up Account IDs. . . . . . . . . . . . . . . . . . . . . . . . . . . . . . . . . . . . .37
Print Logs . . . . . . . . . . . . . . . . . . . . . . . . . . . . . . . . . . . . . . . . . . . . . . .50
Client Software . . . . . . . . . . . . . . . . . . . . . . . . . . . . . . . . . . . . . . . . . . . 61
Starting the Client Software . . . . . . . . . . . . . . . . . . . . . . . . . . . . . . . . .61
Setting the User Name and Account ID . . . . . . . . . . . . . . . . . . . . . . . .61
Checking the Status of Printers . . . . . . . . . . . . . . . . . . . . . . . . . . . . . 63
Troubleshooting . . . . . . . . . . . . . . . . . . . . . . . . . . . . . . . . . . . . . . . . . . 69
Known Problems / Solutions. . . . . . . . . . . . . . . . . . . . . . . . . . . . . . . . 70
Uninstalling Print Job Accounting . . . . . . . . . . . . . . . . . . . . . . . . . . . 71
- 3 -
Page 4
Print Job Accounting Utility
Introduction
The Print Job Accounting software, designed specifically for OKI printers
in a network environment, provides job accounting fea tures that allow you
to track printer usage, calculate printing costs, and specify access
available to each client (user).
Fig01_oem_v11.tif
Note
The screen shots in this User's Guide are generic. When you see
XXX1, XXX2, etc., in a screen, they represent a specific model
number which will vary depending on which models are being
used in your system.
Introduction - 4 -
Page 5

With Print Job Accounting, you can
• Control costs by limiting access to color printing for specific clients.
• Plan equipment allocation by monitoring exactly how much each client
prints.
• Set up billing for individual clients based on their recorded usage.
Note
This software saves acquired log data on the printer’s Hard Disk
Drive (optional on some models). If the printer does not have the
Hard Disk Drive, the acquired logs are saved to the Flash
memory.
The Flash memory is relatively limited as to how much
information can be stored on it.
The Hard Disk Drive has much greater memory capacity.
Therefore, we highly recommend that your printer be equipped
with a Hard Disk Drive for use with the Print Job Accounting
software.
- 5 - Introduction
Page 6
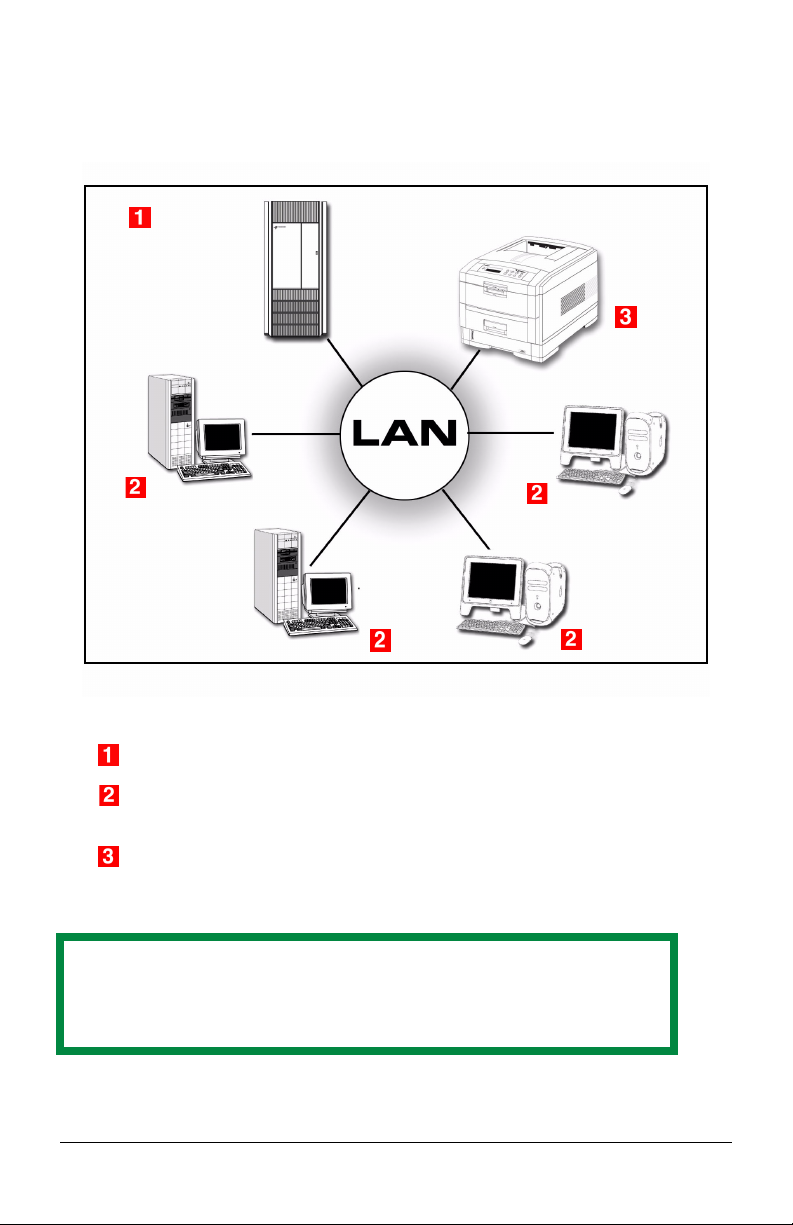
Overview
Sample Network Diagram
Server:
Windows XP,
2000, or NT 4.0
(SP6 or later)
Printer(s)
Client PCs:
Windows XP,
2000, Me, 98,
95, NT 4.0
(SP6 or later)
JA_Overview.jpg
Client Macs:
Macintosh
OS 8.x or 9.x
The Print Job Accounting utility requires
Server computer using an appropriate Windows operating system.
Client computers using Windows and/or Macintosh operating
systems.
Connection to the printer(s) to be managed; either a direct
connection (USB or Parallel) to the server, or a network TCP/IP
connection.
Note
Print Job Accounting does not operate in NetBEUI or NetWare
environments.
Overview - 6 -
Page 7

Operating System Requirements
Server (Windows Only)
The Print Job Accounting server software can be run under any of the
following Windows operating systems, with the latest Service Pack
installed.
• Windows XP
• Windows 2000
• Windows NT 4.0 (Service Pack 6 or later)
Client Computers (Windows or Macintosh)
The Print Job Accounting Client software can run under any of the
following operating systems:
Windows
• XP
• 2000
• Me
• 98
• 95
• NT4.0 (Service Pack 6 or later)
Macintosh (LaserWriter 8.7 required)
• OS 9.1+
• OS 10.2
• OS 10.3
- 7 - Operating System Requirements
Page 8

Installation
Cdhand.jpg
Installing the Print Job Accounting Server
Software
1. Place the driver CD supplied with your printer in the CD-ROM drive on
the Server computer and wait for the Menu Installer to open.
If the CD does not AutoPlay, click Start → Run → Browse. Browse
to your CD-ROM drive and double-click Install.exe, then click OK.
2. Click Next to accept the terms in the license agreement.
3. Select the language.
4. Click Network Software → Administration Tools → Job
Accounting → Server and follow the on-screen instructions.
5. If you want to create log reports using Excel, install the report tools.
Click Report Tools and follow the on-screen instructions.
Installing the Print Job Accounting Client
Software
Note
The printer driver(s) must also be installed on the Client
computers.
Windows Client Computers
1. Place the driver CD supplied with your printer in the CD-ROM drive
and wait for the Menu Installer to open.
If the CD does not AutoPlay, click Start → Run → Browse.
Browse to your CD-ROM drive and double-click Install.exe, then
click OK.
2. Click Next to accept the terms in the license agreement.
3. Select the language.
Installation - 8 -
Page 9
4. Click Network Software → Administration Tools → Job
Accounting → Client and follow the on-screen instructions.
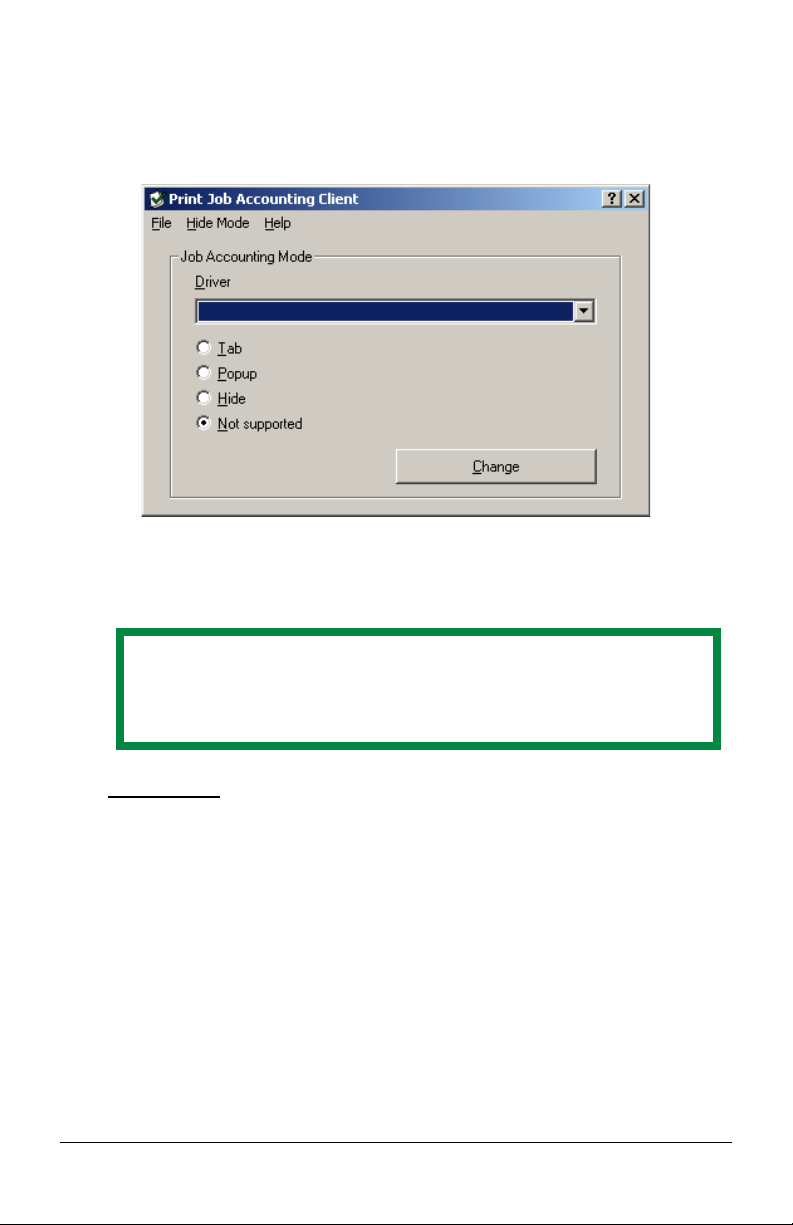
5. When the installation finishes, the following window appears. See
“Client Software” on page 61 for more information.
JA_PrintJobAccountingClient.bmp
Macintosh Client Computers
Note
Job Accounting cannot be used on Macintosh OS 10.1x
systems.
Mac OS 9.1+
Normally, the Oki Job Accounting software is automatically installed
when you install the OS 9.1+ printer driver.
To activate the Job Accounting Clie nt software once it is installed:
1. Select Print Desktop... on the File menu.
2. Ensure that your printer model is selected, then click General and
select Plug-in Preferences.
3. Open the Print Time Filters menu, then check Print Time Filters,
JobType and JobAccounting.
4. Click Save Settings, then click OK.
5. Click Cancel.
- 9 - Installation
Page 10
Mac OS 10.2
To install the Job Accounting Client software, see your printer’s
software installation guide.
To activate the Job Acccounting Client software once it is installed:
1. Before starting, have the Job Accounting ID assigned for you by
your System Administrator handy.
2. Click Go → Applications.
3. Double click the OKIDATA folder.
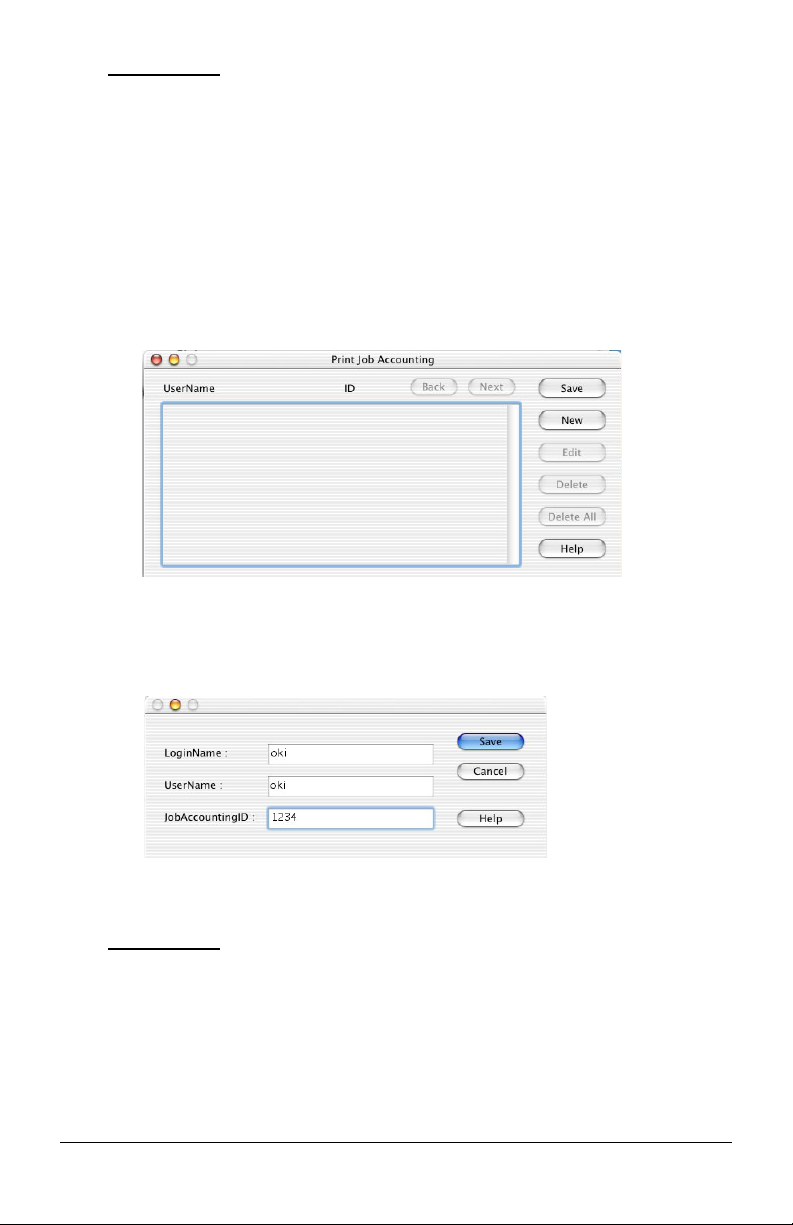
4. Double click the Print Job Accounting icon.
MacOS10.2A
ND3_JA_ID.
pdf
5. Click New, then enter your LoginName, UserName and
JobAccountingID (as established by the System Administrator)
and click Save..
6. Click Save.
Mac OS 10.3
To install the Job Accounting Client software, see your printer’s
software installation guide.
To activate the Job Acccounting Client software once it is installed:
1. Before starting, have the Job Accounting ID assigned for you by
your System Administrator handy.
Installation - 10 -
MacOS10.2AND3
_JA_Setup.pdf
Page 11
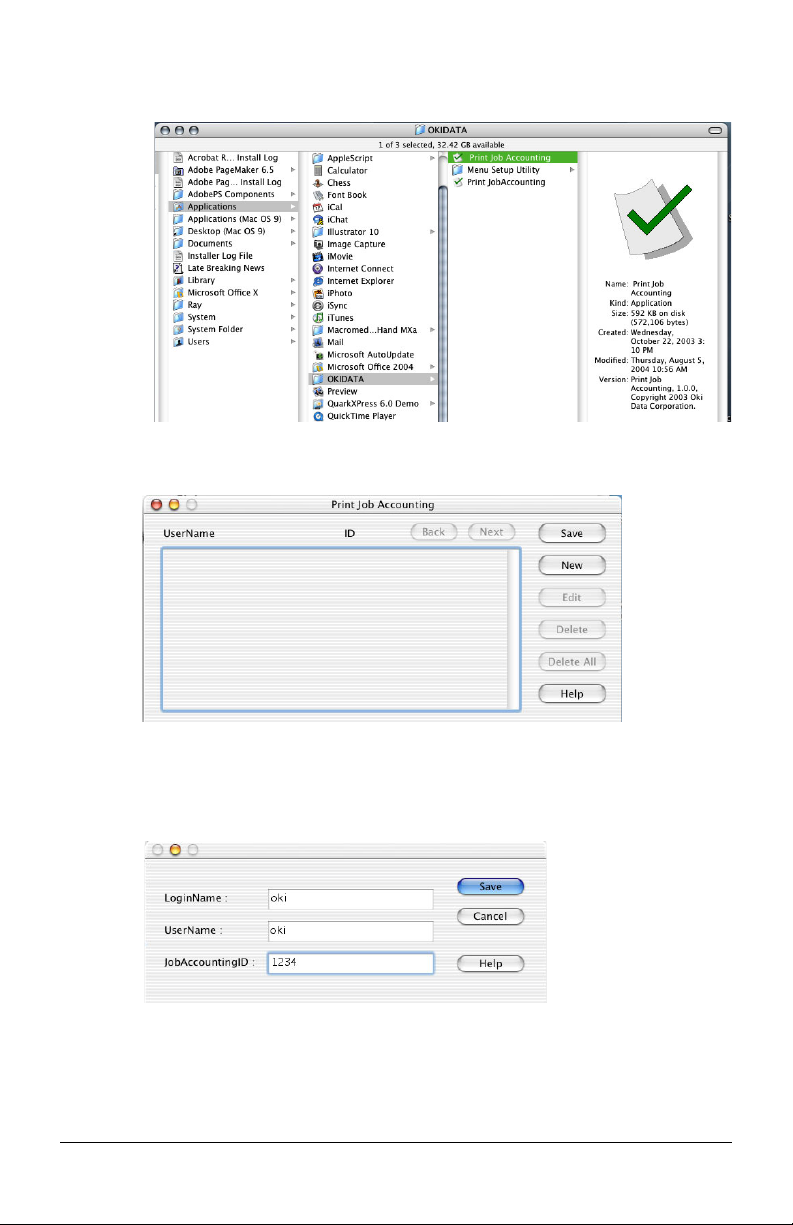
2. Click Go → Applications → OKIDATA → Print Job
Accounting.
MacOS10.
3_JA_Clie
ntInstall.pd
f
3. Double click the Print Job Accounting icon.
MacOS10.2A
ND3_JA_ID.
pdf
4. Click New, then enter your LoginName, UserName and
JobAccountingID (as established by the System Administrator)
and click Save..
MacOS10.2AND3
_JA_Setup.pdf
5. Click Save.
- 11 - Installation
Page 12

Server Software Capabilities
Use the Print Job Accounting server software
• to register printers and clients
• to set print limits
• to set up automatic generation of print logs.
• to set up automatic email of log reports to the Administrator
For Each Client, You Can
• Enable/disable print or color print.
• Set upper limits for items such as printed pages.
• Log selected items, including:
–Date
– User Name
– Printer Name
– Document Name
Note
The information on document names cannot be acquired
while printing from some Windows applications or from a
Macintosh.
– Number of Printed Pages broken down by color versus monochrome
– Paper Size
– Simplex or Duplex Printing
–etc.
• Set up an account, allowing printing only within the limits set.
For Each Printer, You Can
• Set fees by sheets, paper sizes, and so forth.
• Set (all) print enabled/disabled or color print enabled/disabled.
• Set upper limits for items such as printed pages.
• Set up an account, allowing printing only within the limits set.
• Set up Group(s) in which to include the printer
Installation - 12 -
Page 13

For Print Logs, You Can
• Export print logs as comma-separated value (.csv) files, which can be
imported into many commercially available spreadsheet programs.
• Automatically email print logs to the Administrator monthly on a
selected day.
• Customize items to be included in the log, setting them either manually
(see page 50) or using one of the multiple Microsoft
sheet macros provided (see page 54).
• Acquire a print log for print jobs sent from a client directly to a printer,
bypassing the print server.
• Accurately record printed pages through print logs even whe n a client
has cancelled his/her print jobs or paper jams have occurred.
®
Excel spread
User Name Versus Account ID
User Name
The User Name is displayed whenever print logs are displayed, and its
sole purpose is to make it easy to see who has been printing.
The User Name is assigned when creating an Account ID (see page 37).
It may be set up to represent an individual client or a group of clients, and
is associated with the Account ID number.
The User Name does not necessarily need to be the same as the Windows
Login User Name.
Account ID
The Account ID is the number Print Job Accounting actually uses to
identify clients. Account ID values of 1 through 1879048191 can be
assigned. Clients who do not have their own Account ID will be recognized
as Unregistered ID(0).
Normally an Account ID is assigned to each individual client. If the same
Account ID is assigned to different clients, all the print jobs they have made
will be added up as the same client when the System totals up.
Account IDs must be set for each individual registered printer connected
to the Server. The same Account ID can be set up for more than one
printer, with different limits set for each printer. Therefore, you can set
particular clients to have access only to certain printers.
- 13 - User Name Versus Account ID
Page 14

Examples of Account ID Scenarios:
To Permit Only Some Clients to Print:
In this case, you need not necessarily assign a n Account ID to each and
every client. You assign one only to those clients who are permitted to
print. All other clients will be recognized as Unregistered ID(0) and all
you have to do is to inhibit printing by Unregistered ID clients.
To Permit Only Some Clients to Print in Color:
Y ou can prevent any Unregistered ID clients from printing in color, in the
same way as above.
To Set Print Limits and Collect Print Logs by Department:
In this case, you need not necessarily assign a n Account ID to each and
every client. All you have to do is to assign an Account ID to each
department and specify the Group Name in place of User Name.
To Set Print Limits and Collect Print Logs for Each Client:
Here, you need to assign an Account ID to each individual client. Be
sure that you do not to assign the same Account ID to more than one.
client.
Note
All Account IDs must be set in the Server computer for each of
the Client computers that will be allowed to print to a specific
printer.
User Name Versus Account ID - 14 -
Page 15
Server Software
Starting the Server Software
Click Start → Programs → Okidata → Print Job
Accounting → Print Job Accounting.
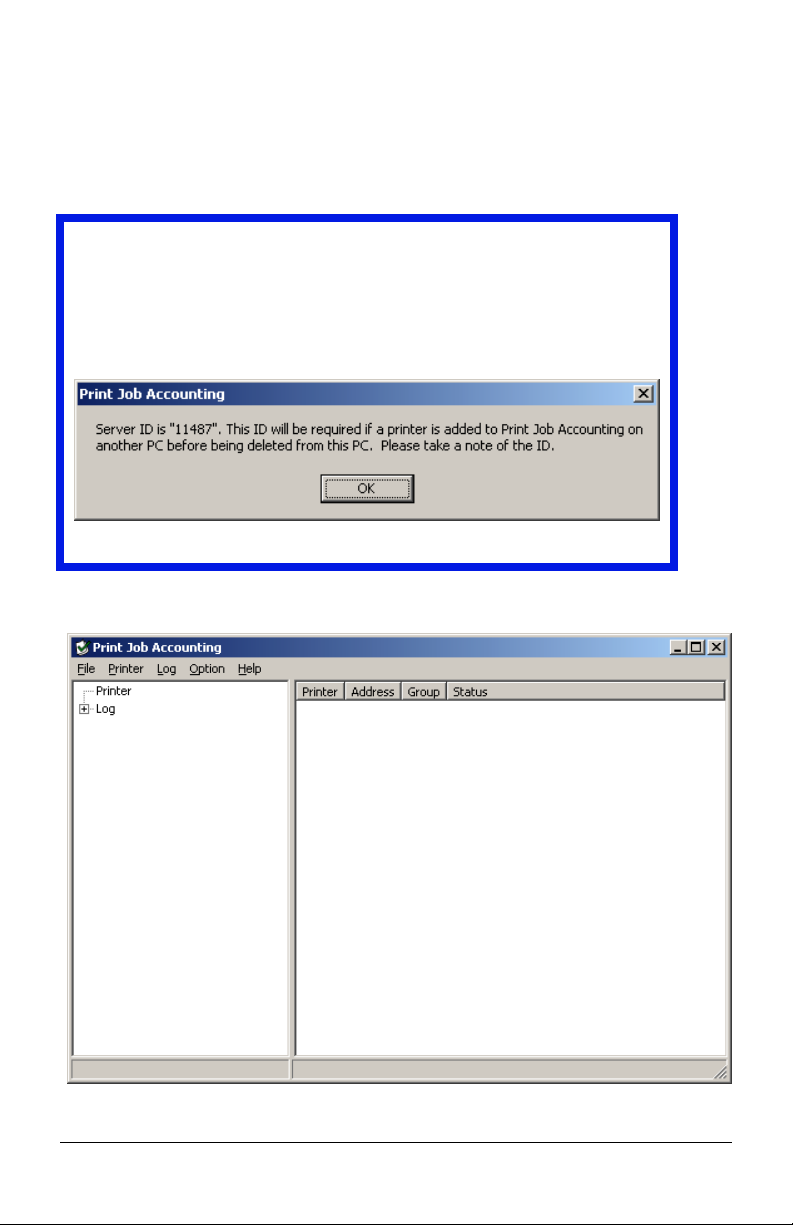
Important!
The first time you open the Server software, the following window
appears. Make a note of the Server ID for future use. You can
also find it by clicking Help → Server ID … from the main Job
Accounting Window.
JA_ServerID.bmp
The following window appears:
JA_OpeningScreen.bmp
- 15 - Server Software
Page 16
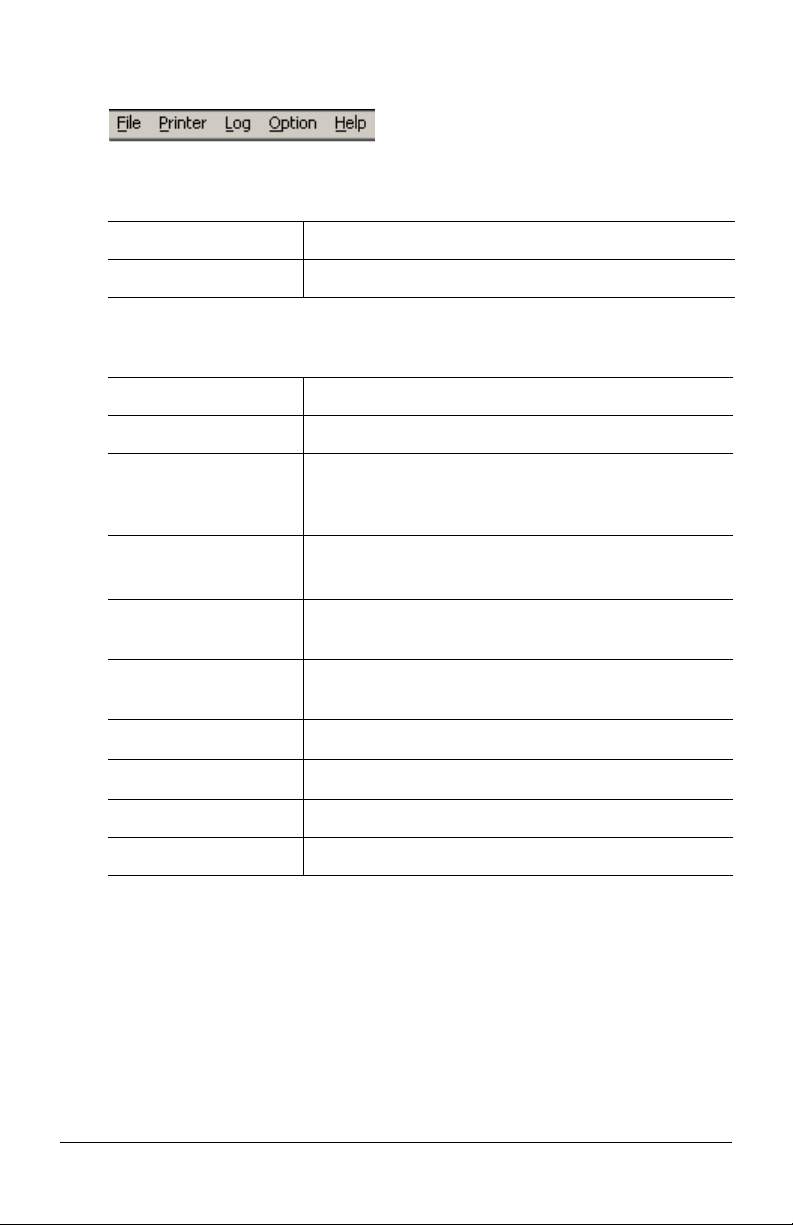
Server Software Pull-Down Menus
JA_ServerMenus.bmp
File Menu
Entry Function
Exit Close the application.
Printer Menu
Entry Function
Add a Printer Register a new printer.
Manages multiple
Set up multiple registered printers as a group.
printers as a group
…
Delete a Printer/
Printer Group
Change a Printer
a
Delete a registered printer or group of printers.
Add or delete registered printers from a group.
Group
Start/End Log
a
Start /e nd the process of acquiring informat io n for
logs from the printer at the set interval time.
Acquire a Log
a
Setting the Time
Acquire a print log saved in the printer.
a
Set the present time in the printer.
b
c
Define Fees … Set up and select fees.
Properties … Set the printer properties.
a. Before running, select the subject printer from the “Printer Tree” on the
left side of the window.
b. Select Log Menu → Refresh Display to update the information on the
log pane after having run this menu.
c. If the printer has been switched on and off, the correct time will not set in
the printer until the next time printer logs a re acquired. You need onl y do
this if the printer has been switched on and off in between a cqui si ti on of
logs.
Server Software - 16 -
Page 17

Log Menu
Entry Function
Display Logs
Display Total
a
a
Change the display from Total to Logs.
Change the display to
• Total per Printer
• Account ID or
•Month
Export Report
a
Logs
Export Logs
Export Total
a
a
Export the required fields for the report macro in a
.csv file.
Export the log as a .csv file.
Export totals as a .csv file, by
•Printer
• Account ID, or
•Month
Delete the log
a
Delete the selected log
Display Details Switches back and forth between displaying only
the default items in the log and displaying the
b
Display/Export
Item Settings
entire detailed list of items in the log.
Select the items to be shown or exported as part of
Log or Total display (see page 50 for more
information).
b
Refresh Display Refresh the display.
a. Before running, select the subject item from the “Log Tree” on the left side
of the window. If you select “Log,” all items will be subject to displaying/
exporting. If you select one printer, only that printer will be subject to
displaying.
b. Select Log Menu → Refresh Di splay to update the informatio n on the
log pane after having run this menu.
- 17 - Server Software
Page 18

Option Menu
Entry Function
Setup … Set up:
•mail server
• email address for Sender
• email address for Administrator
• where you wish to store logs
• closing date for logs (select the day of the month
which determines when logs are considered
previous month logs as opposed to current
month logs).
Help Menu
Entry Function
Server ID … Display Server ID.
Help … Display the Help Topics window with tabs
• Contents
• Index
•Find
Version Info … Display version information.
Server Software - 18 -
Page 19
Setting Up Automatic Email
To set up monthly automatic email of selected print log data to the
administrator, open the Job Accounting software, then:
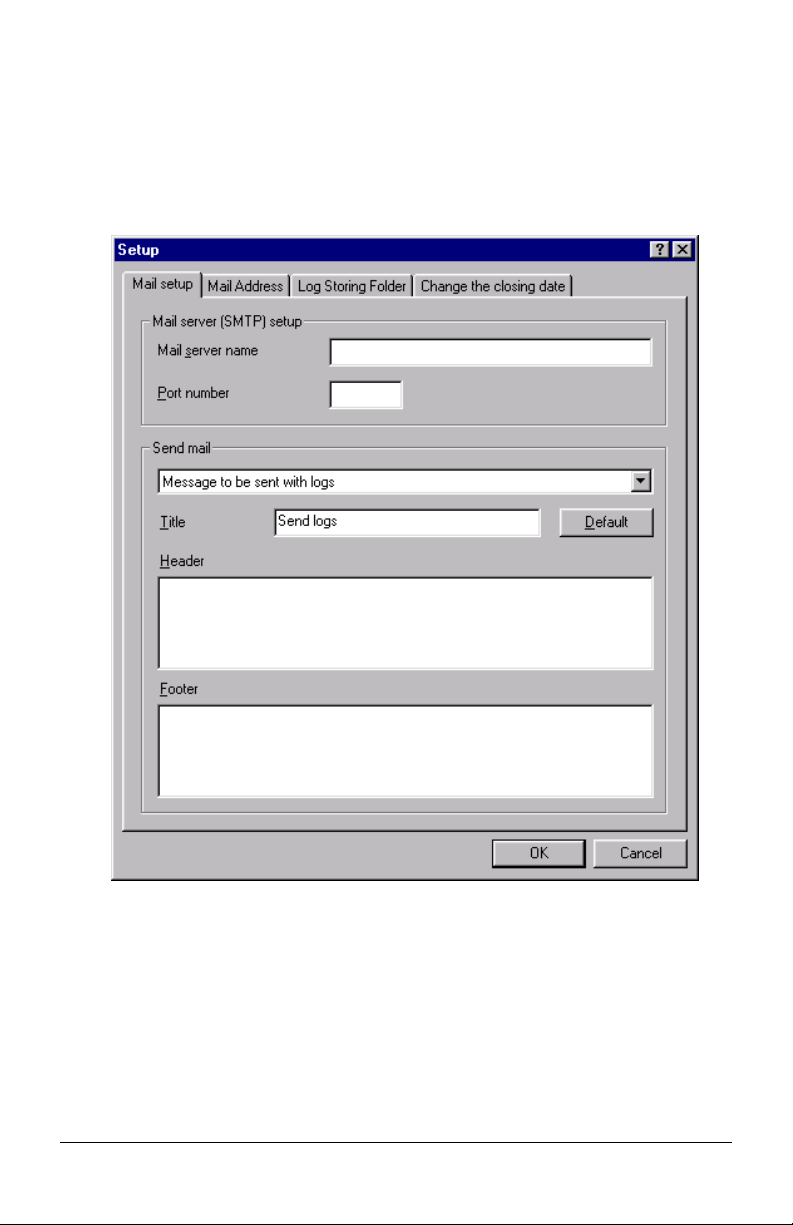
1. Click Option → Setup.
The following window appears:
JA_Email_Setup.bmp
2. Set up the general information on the Mail Setup tab, including the
mail server , when an email is to be sent, and the heade r and footer text
to be included with the email.
3. On the Mail Address tab, enter a name and email address for the
sender, and the name and email address for the administrator to
receive the emails.
- 19 - Server Software
Page 20
4. On the Log Storing Folder t ab, enter the path wher e the automatically
exported logs are to be stored.
5. On the Change the closing date tab, enter the day of the month on
which logs are to be closed. Log reports will automatically be emailed
to the administrator on the day after this.
6. Click OK.
Defining Printer Groups
If you wish to create groups of printers:
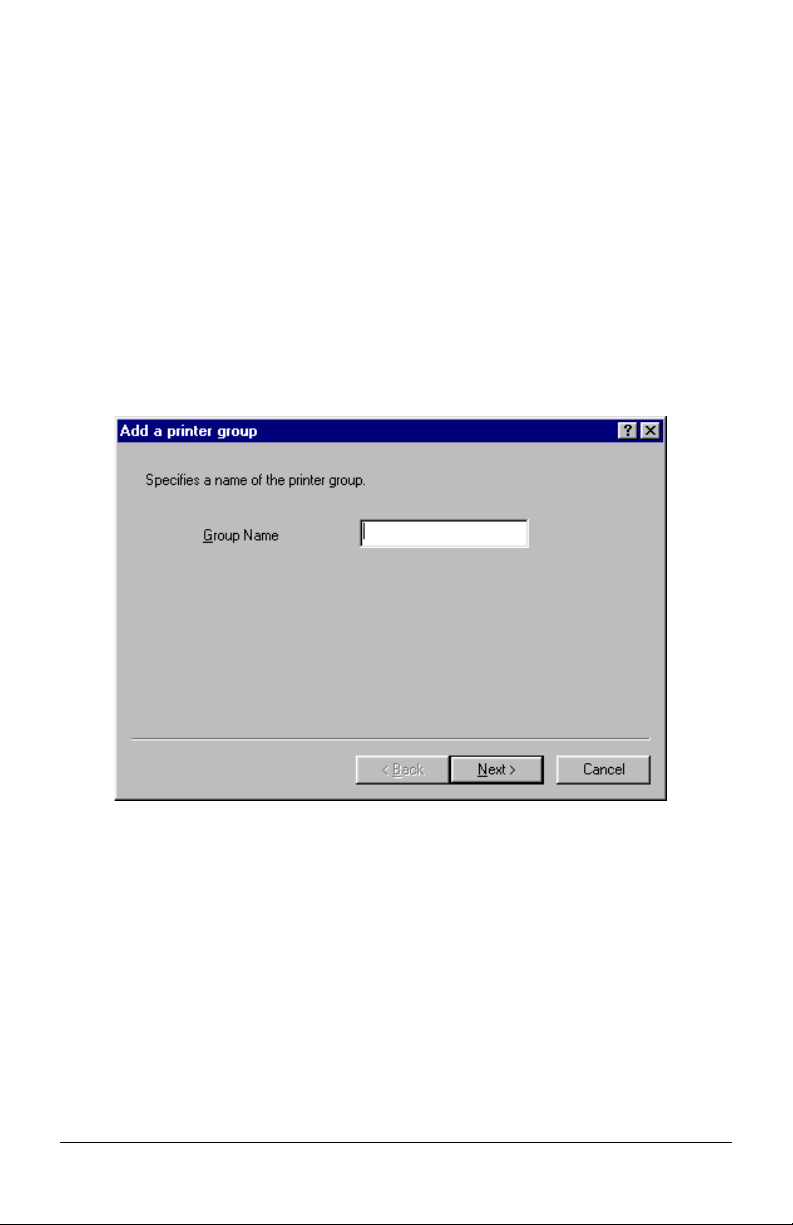
1. From the main Job Accounting window, click Printer → Manages
multiple printers as a group …
The following window appears:
JA_AddGroup1.bmp
Server Software - 20 -
Page 21
2. Enter the Group Name of your choice, then click Next.
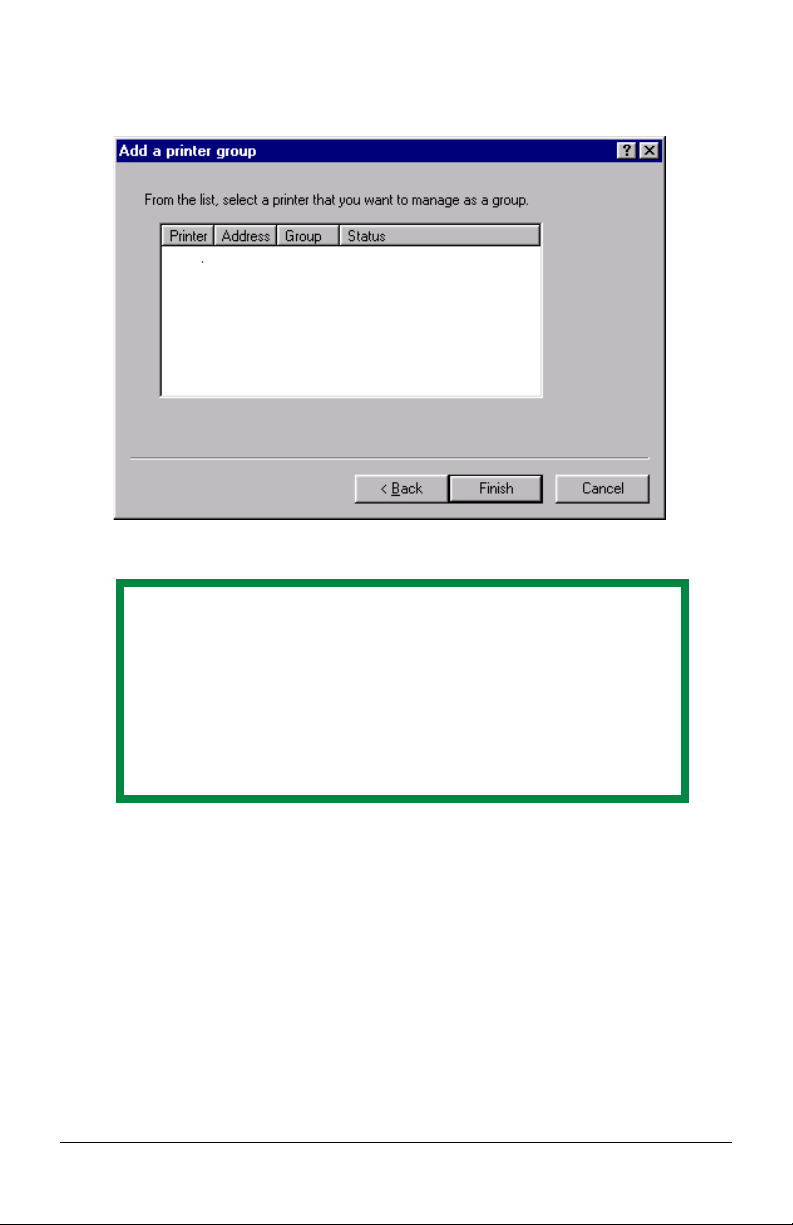
The following window appears:
JA_AddGroup2.bmp
Note
At this point, no printers have been registered, so none
appear in the box. Printers can be added to establis he d
Groups as they are being registered.
If you create a new group after registering printers, a list of
the registered printers will appear in the box and can be
highlighted for inclusion in the group.
3. Click Finish.
- 21 - Server Software
Page 22
Registering Printers
To use Print Job Accounting, you need to register printers to be managed
in the Server Software.
Before starting, check that the printers are powered up and properly
connected.
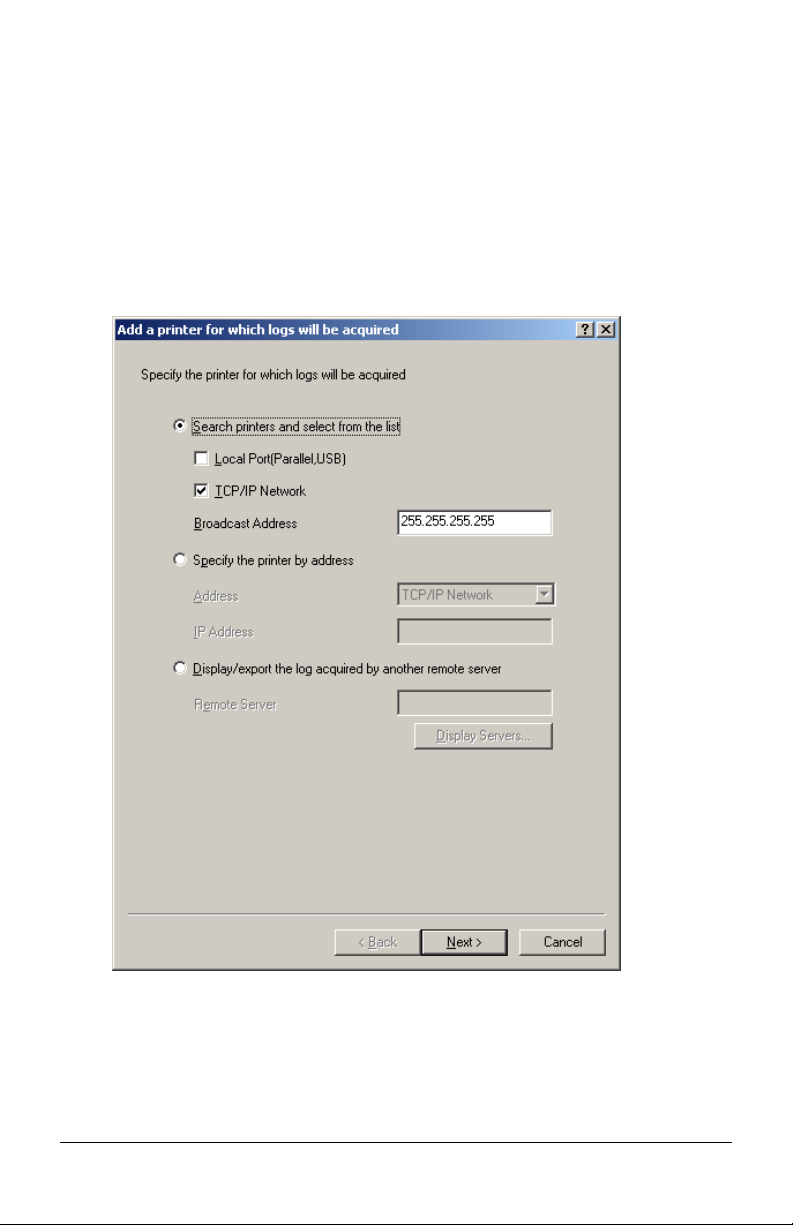
1. From the main Print Job Accounting window, click Printer → Add a
printer.
The following window appears:
JA_AddPrinter1.bmp
Server Software - 22 -
Page 23

2. Select the appropriate box(es).
Note
Only printers supported by this System will be found. If the
search is unsuccessful, check that the printers are turned
on, online and properly connected.
– To have the software search out local and/or network printers, select
Search printers and select Local Port and/or TCP/IP Network.
– To specify the printer address (local or network) manually, select
Specify the printer by address and fill in the appropriate information.
- 23 - Server Software
Page 24

3. Click Next and wait while the software searches for printers.
A window appears, showing a listing of all the printers found. For
example:
JA_AddPrinter2
.bmp
4. Select the printer you want to register from the list of printers searched
and click Next.
Server Software - 24 -
Page 25

The following window appears:
JA_AddPrinter3.bmp
- 25 - Server Software
Page 26

5. Set up the printer:
Printer Name
Type in a printer name containing up to 32 characters.
Printer Group
If the printer is to be included in a group, select the group here.
Note
Groups must first be defined using Printer → Manages
multiple printers as a group … in the main Job Accounting
window. See page 20.
Acquire Logs
You can designate the time to acquire logs in one of two ways:
• by an interval of up to 24 hours
If this value exceeds 24 hours, it is set to 24 hours.
or
• by up to five preset times per day
Select Interval, then click Change Time … to set times.
Fees
In the drop-down box, select a fee definition to be used. Some fee
settings are available with defaults.
To custom define settings for the printer, click Define fees … and then
click Add in the Defined Fees window.
Server Software - 26 -
Page 27

The following window appears:
JA_DefineFees.bmp
- 27 - Server Software
Page 28

• Pages Tab, Define Fees window
JA_FeesPages.bmp
– 聺 Page: Select to set a fee to be charged for each page printed
in color and for each page printed in mono.
– 聺 Sheet: Select to set a fee to be ch arged for each printed sheet.
In this case, the same fee will be charged for two-sided printing as
for one-sided printing.
Server Software - 28 -
Page 29

• Toner use amount Tab, Define Fees window
JA_FeesTonerUse.bmp
– 聺 Toner use amount: Select to set a standard feel per page for
color and for mono printing.
– Automatic calculation: Use this to set up automatic calculation
of fees for toner use and save it unde r th e nam e you e nter . On ce
the settings are saved, they can be used for other printers as well
by selecting the saved settings name in the Fees drop-down box
in either the “Add a printer for which logs will be acquired” window
(Printer → Add a Printer → [click a printer] → Next) or the
Option tab of the “Properties of printer from which logs are
acquired” window ([click a printer in the Printer Tree →
Printer → Properties → Option).
- 29 - Server Software
Page 30

• Drum use amount Tab, Define Fees window
JA_FeesDrumUse.bmp
– 聺 Drum use amount: Select to set a standard fee per page for
color and for mono printing.
– Automatic calculation: Use this to set up automatic calculation
of fees for drum use and save it u nde r th e nam e you e nter . On ce
the settings are saved, they can be used for other printers as well
by selecting the saved settings name in the Fees drop-down box
in either the “Add a printer for which logs will be acquired” window
(Printer → Add a Printer → [click a printer] → Next) or the
Option tab of the “Properties of printer from which logs are
acquired” window ([click a printer in the Printer Tree] →
Printer → Properties → Option).
• Printer Use Time Tab, Define Fees window
– 聺 Printer Use Time: Select to set a fee for each minute of print
time used.
Server Software - 30 -
JA_FeesPrinterUse.bmp
Page 31

• Size Tab, Define Fees window
JA_FeesSize.bmp
– 聺 Size: Select to set a fee per sheet printed which varies
depending on the size of media used. Click Change to set fees for
individual media sizes.
• Tray T ab, Define Fees window
JA_FeesTray.bmpJA_FeesTray.bmp
– 聺 Tray: Select to set a fee per sheet printed which varies
depending on the tray used. Click Change to set fees for individual
trays.
- 31 - Server Software
Page 32

• Media Type Tab, Define Fees window
JA_FeesMedia.bmp
– 聺 Media: Select to set a fee per sheet printed which varies
depending on the media used. Click Change to set fees for the
different media, including transparencies, labels, letterhead, card
stock, etc.
• Belt fuser use amount Tab, Define Fees window
– 聺 Belt, fuser use amount: Select to set a fee per page for b elt and/
or fuser usage.
– Automatic calculation: Use this to set up automatic calculation of
fees for belt and fuser use and save it under the name you enter.
Server Software - 32 -
JA_FeesBeltFuser.bmp
Page 33

Once the settings are saved, they can be used for other printers
as well by selecting the saved settings name in the Fees
drop-down box in either the “Add a printer for which logs will be
acquired” window (Printer → Add a Printer → [click a
printer] → Next) or the Option tab of the “Properties of pr int er
from which logs are acquired” window ([click a printer in the Printer
Tree] → Printer → Properties → Option).
• Finisher Tab, Define Fees window
JA_FeesFinisher.bmp
– 聺 Staple: Select to set a fee for each use of the stapler. Applies
only when the optional finisher is installed on applicable models.
Operation at log full
JA_AddPrinter_LogFull.bmp
Here you can set what the printer does when the buffer for log storing
becomes full and cannot store any more logs:
Cancel the job Cancels the jobs once the buffer is full.
Do not acquire the log Prints without acquiring logs once the buffer is
full.
Delete old logs
a. The default setting.
a
Deletes old logs and stores new logs.
- 33 - Server Software
Page 34

Inhibit the initialization of HDD
JA_AddPrinter_Inhibit.bmp
This controls whether or not the Hard Disk Drive (if installed) and the
Printer Flash (if installed) can be initialized. If initialization is inhibited, a
client cannot delete the log using the printer's front panel. Use this in
order to prevent the logs stored in the printer from being deleted.
Auto Export Logs
JA_AddPrinter_AutoExport.bmp
Sets whether or not, and how, log data will automatically be exported
when it is acquired.
Do not automatically
a
export
Automatically export
logs
Automatically export
logs for report.
Logs are not automatically exported.
Automatically exports logs in the format you
select (see page 50).
Automatically exports logs in a format which
works with the Microsoft Excel macro reports
(see page 54).
Mail logs to
administrator
b
Automatically exports logs in the format you
select (see page 50), then sends an email to the
Administrator with a copy of the log data
attached, at the end of the day following the
Closing date you specify.
Mail logs for report
to administrator
b
Automatically exports logs in a format which
works with the Microsoft Excel macro reports
(see page 54), then sends an email to the
Administrator with a copy of the report attached
at the end of the day following the Closing date
you specify.
a. The default setting.
b. To use this, you must first set up the email and closing date information:
(see page 19).
Server Software - 34 -
Page 35

Use Restrictions
JA_AddPrinter_Restrict.bmp
You can set usage limits for unregistered clients (data sent without ID)
and for local print (print from operator panel such as menu map or file
list). When "Disable Printing" is set, clients cannot change other
settings.
• Disable Printing: All printing is cancelled.
• Disable Color Printing: Color data printing is cancelled.
6. Click Finish.
The following window appears:
JA_ID_Registration.b
mp
7. Use this window to add User Account IDs for the printer. For more
information, see step 3, ff., under “Setting Up Account IDs” on p age37.
8. When done, click End, then OK.
- 35 - Server Software
Page 36

Changing Settings for a Registered Printer
1. From the main Print Job Accounting window, highlight the printer you
wish to change.
2. Click Printer → Properties.
The following window appears:
JA_PrinterProperties
.bmp
3. Make any desired changes in settings, on the various tabs:
• Printer tab: change printer name, address, group
• User tab: add new User IDs or change information for existing User
IDs.
• Option tab: modify log acquisition intervals/times, fees, Operation a t
Log Full, Inhibit initialization, Auto Export Logs, and Use
Restrictions.
4. Click OK.
Server Software - 36 -
Page 37

Setting Up Account IDs
Adding Account IDs for a Registered Printer
From the main Print Job Accounting window:
1. Double click the printer for which you wish to set up Account IDs.
The following window appears:
JA_PrinterProperties.bmp
- 37 - Server Software
Page 38
2. On the User tab, click Register.
The following window appears:
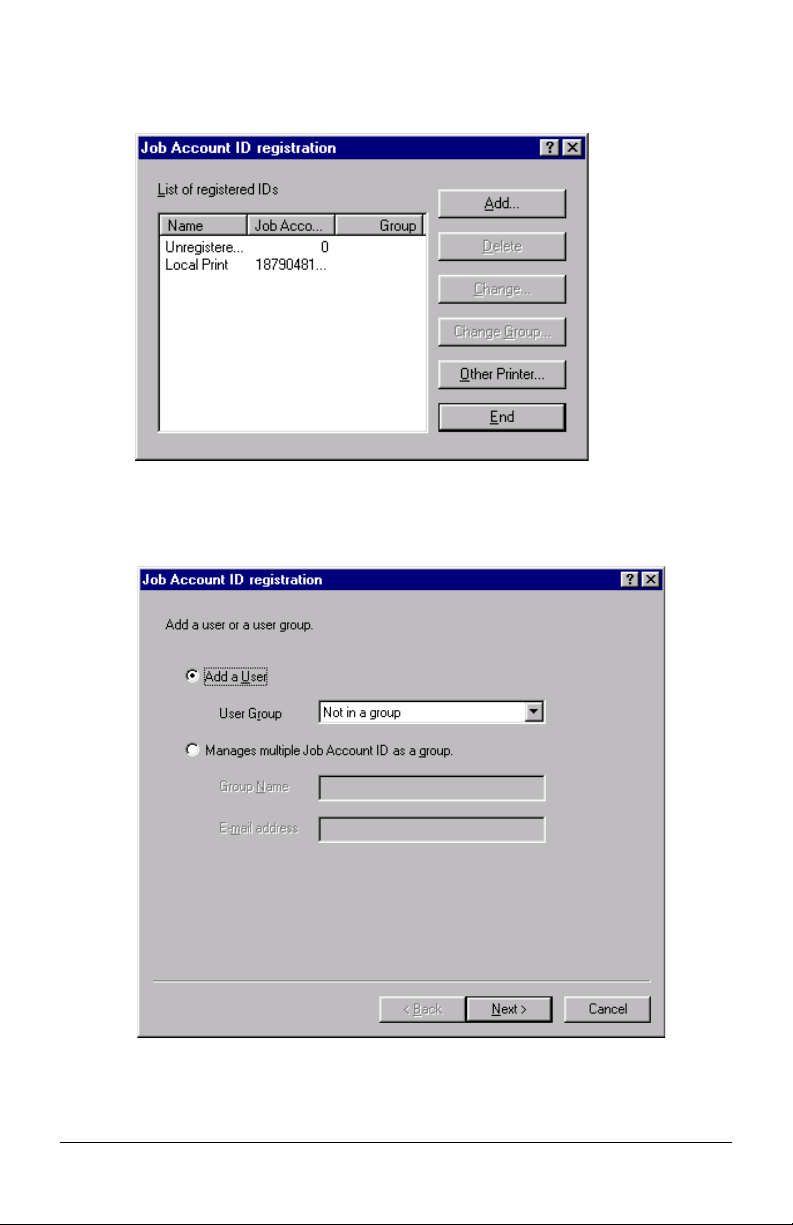
3. Click Add.
The following window appears:
JA_ID_Registration
.bmp
JA_AddID1.bmp
Server Software - 38 -
Page 39

4. Enter the appropriate selections, then click Next.
The following window appears:
JA_AddID2.bmp
5. Establish the new Account ID:
a. Enter the following information for the new Account ID:
– Account ID number
– Name.
– Email address: if the user will have limits set on their printing,
enter their email address so that they can be informed when
their limit is exceeded and again when printing is once more
available to them.
b. Click Add.
The new Name/ID appears in the box.
- 39 - Server Software
Page 40

c. Click Next.
The following window appears:
JA_AddID3.bmp
Notifies total result by e-mail
Select to send this User an email summarizing their monthly
usage of the printer.
Notifies by e-mail when Limit Value is exceeded
Select to alert this User by email when their set Limit Values have
been exceeded, as well as when the limits have been reset and
printing can be resumed.
Do not process Limit Value as a group
Restricts the set Limit Values to the particular user. Applies only
when the printer/user belongs to a group.
Server Software - 40 -
Page 41

d. Make your selections, then click Next.
The following window appears:
JA_AddID4.bmp
Disable Printing
All printing is cancelled. When this is selected, other settings
cannot be changed.
Disable Color Printing
This Account ID cannot print color data. If they submit a color
print job, it is automatically cancelled.
- 41 - Server Software
Page 42

e. Select any print restrictions for the Account ID, then click Next.
The following window appears:
JA_AddID5.bmp
f. Set limits per 24-hour period for the Account ID by any or all of
the following:
– Total pages
– Total dollars
– Total minutes
– Total staples used
Server Software - 42 -
Page 43

These limits will be checked at the selected interval or at the time
setting for the log.
Note
Whether the upper limits for a particular user have been
exceeded is checked only at the set interval time. If the
upper limits are exceeded between checks, printing
continues even though the limit has been exceeded. At the
next interval check, the User will be blocked from any
further printing until the next 24-hour period starts. If you
have so designated (see above), the User is informed by
email that they have exceeded their limits for that 24-hour
period.
g. Click Finish.
6. Repeat the previous step for each Account ID to be added.
7. Click End, then click OK.
- 43 - Server Software
Page 44

Importing Account IDs from a Registered Printer
Once you create an account ID for a registered printer, you can import
it into records for other registered printers/groups in the System. The
Account ID will bring with it the same settings such as usage limits, but
you can change the settings for the account on the newly assigned
printer (see below) once the record is imported.
From the main Print Job Accounting window:
1. Double click the printer or group for which you wish to import
Account IDs.
2. On the User tab, click Register.
The following window appears:
JA_AddID6.bmp
Server Software - 44 -
Page 45

3. Click Other Printer.
The following window appears:
JA_ImportUser.bmp
- 45 - Server Software
Page 46

4. From the Import Source list, select a printer or group from which
you want to import Account ID(s) and click Add.
Any IDs not already registered for the printer ap pear in the User box :
JA_AddID7.bmp
5. Click any Name/Account IDs that you do not wish to add and click
Delete, then click OK.
The selected Account ID(s) are imported into the List of registered
IDs for the printer.
Server Software - 46 -
Page 47

Changing Account ID Settings
From the main Print Job Accounting window:
1. Open the Printer Tree and double click the printer for which you
wish to change Account IDs.
2. On the User tab, click Register.
The following window appears:
JA_AddID6.bmp
- 47 - Server Software
Page 48

3. Click the Name for which you wish to change settings, then click
Change.
The following window appears:
JA_IDProperties1.bmp
4. Make any desired changes, then click OK.
5. Click End, then click OK.
Server Software - 48 -
Page 49

Deleting Account IDs
From the main Print Job Accounting window:
1. Open the printer tree and double click the name of the printe r/group
for which an Account ID is to be deleted.
2. On the User tab, click Register.
The following window appears:
JA_AddID6.bmp
3. Click the Name for the Account ID to be deleted, then click Delete.
4. Click Yes to confirm the deletion.
5. Click End, then click OK.
- 49 - Server Software
Page 50

Print Logs
Note
The Server computer must be running continuously, or at least
be running at the scheduled time(s) each day, for the software to
acquire the print job information.
Setting Up/Changing the Log Acquisition Interval
The log acquisition interval is normally set up when you register a printer
(see “Registering Printers” on page 22).
To change the log acquisition interval for a particular register ed p rinte r
or group:
1. From the main Job Accounting window, click Printer to open the
printer tree, then click the printer for which you wish to change the
acquisition interval.
2. Click Printer → Properties.
3. On the Options tab, make any desired changes under Acquire
Logs, then click OK.
Manually Setting Up Items Reported in the Log
To set up the items to be displayed in, or exported from, a log:
1. From the main Job Accounting window, click the printer/group for
which you wish to set up the log display.
2. Click Log → Display/Export Item Settings.
3. Click one of the following selections to set the items to be displayed
and the sequence in which they will be displayed:
Server Software - 50 -
Page 51

Log Display Items
Standard acquisition Log.
The following window appears:
Total Display Items
Listing of totals for a registered printer.
The following window appears:
JA_LogDisplayItems.bm
p
JA_TotalDisplayItems.b
mp
- 51 - Server Software
Page 52

Log Export Items
Items to be included in an exported log file.
The following window appears:
JA_LogExportItems.bmp
Total Export Items
Items to be included in an exported file containing a listing of
totals for a registered printer.
The following window appears:
Server Software - 52 -
JA_TotalExportItems.
bmp
Page 53

4. Make your selections:
a. Items to be included have a check mark in their box. To delete or
add an item, click the box next to it to toggle the check mark on
and off.
b. To change the position of the item in the log, click the name, then
click Up or Down.
5. Click OK.
- 53 - Server Software
Page 54

Using the Reports Tool
The Job Accounting software can be used with Microsoft Exce l to
generate log reports using one of nine pre-p rogrammed macros.
Installing the Reports Tool
1. Place the driver CD supplied with your printer in the CD-ROM drive on
the Server computer and wait for the Menu Installer to open.
If the CD does not AutoPlay , click Sta rt → Run → Browse. Browse to
your CD-ROM drive and double-click Install.exe, then click OK.
2. Click Next to accept the terms in the license agreement.
3. Select the language.
4. Click Network Software → Administration Tools → Job
Accounting → Reports Tool and follow the on-screen instructions.
Generating a Log Report Using Excel
1. Make sure the Print Job Accounting server software is open and
that a log has been acquired.
2. From the Start menu, click Okidata → Print Control → Open
Print Control Reports.
3. Click Enable Macros.
Excel opens. The following window appears over it:
JA_XL_Select_csv.bmp
4. Browse to the log file you wish to open then click Open.
Server Software - 54 -
Page 55

The file opens in Raw Data mode.
5. Select the worksheet you wish to view from the Change worksheet
drop-down list (e.g., Printer Usage).
The window changes to display the selected worksheet.:
JA_XL_PrinterUsage.bmp
6. To print the data, press Ctrl-P.
7. When done, click to close Excel.
- 55 - Server Software
Page 56

Available Excel Macros
Macro W hat is Included
Account Detail Detailed information of each job for every Account ID,
including:
• Account ID
• Job ID
•Date
• Document Name
• Paper Size
• Media Type
• Total Sheets
• Color Pages
• Mono Pages
• Total Costs
Note: T o limit the columns displayed, click Fields. To limit
the rows displayed, either limit the date range or click
Accounts.
Account Usage A chart of the data in the Account Summary worksheet.
Account Summary Summary of information for each account.
Printer Detail Detailed information for each job sent to each printer,
including:
• Printer Name
• Job ID
•Date
• Account ID
•User ID
• Duplex Pages
• Total Sheets
• Color Pages
• Mono Pages
• Total Costs
Note: T o limit the columns displayed, click Fields. To limit
the rows displayed, either limit the date range or click
Accounts.
Printer Usage A chart of data in the Printer Summary worksheet.
Server Software - 56 -
Page 57

Available Excel Macros
Macro W hat is Included
Printer Summary The following information for each printer for which data
is available:
• Printer Name
• Total Jobs
• Total Sheets
• Number of Color Pages Printed
• Number of Duplex Pages Printed (appears only when
optional duplex unit is installed)
• Total Costs Incurred (as calculated by the Print Job
Accounting software)
User Detail Detailed information for each job sent to the printer,
broken down by User ID, including:
•User ID
• Job ID
•Date
• Document Name
• Paper Size
• Media Type
• Total Sheets
• Color Pages
• Mono Pages
• Job Cost
User Usage Chart of data in the User Summary worksheet.
User Summary Includes the following for each User ID:
• Total Logs
• Total Sheets
• Color Pages
• Mono Pages
• Duplex Pages
• Total Count
- 57 - Server Software
Page 58

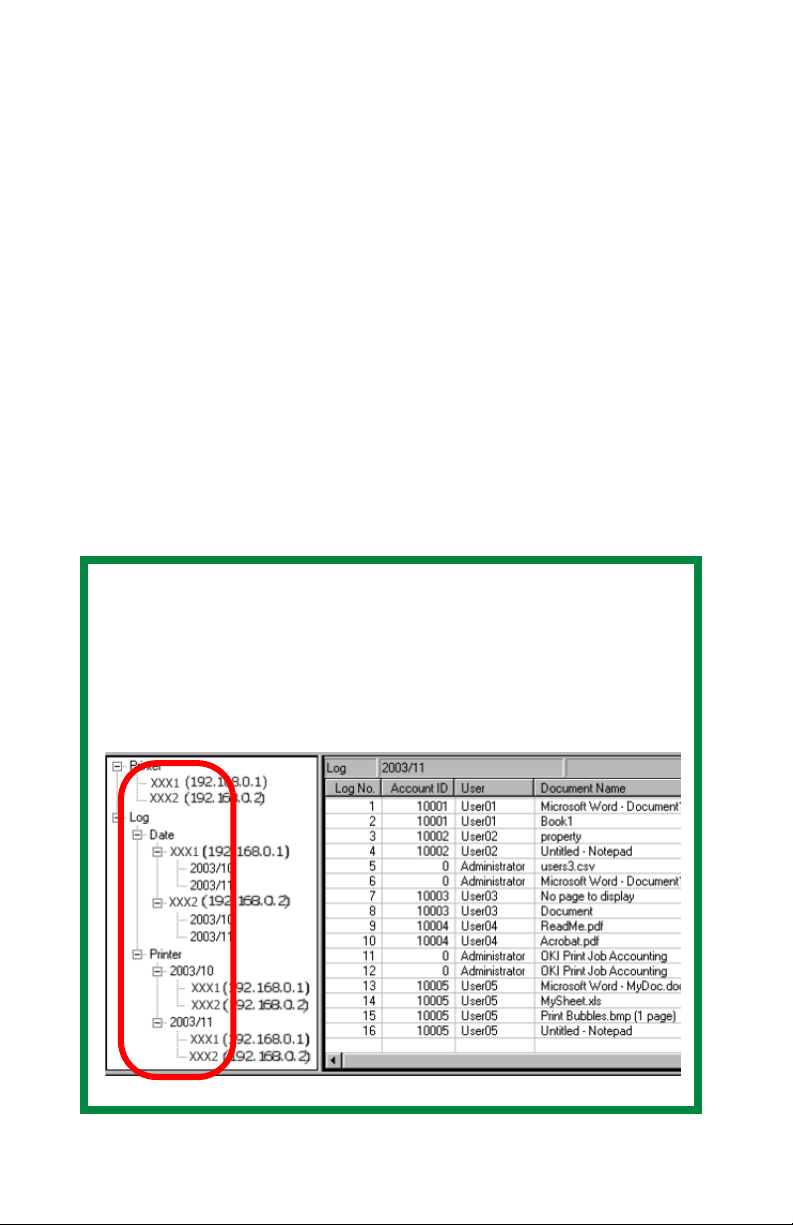
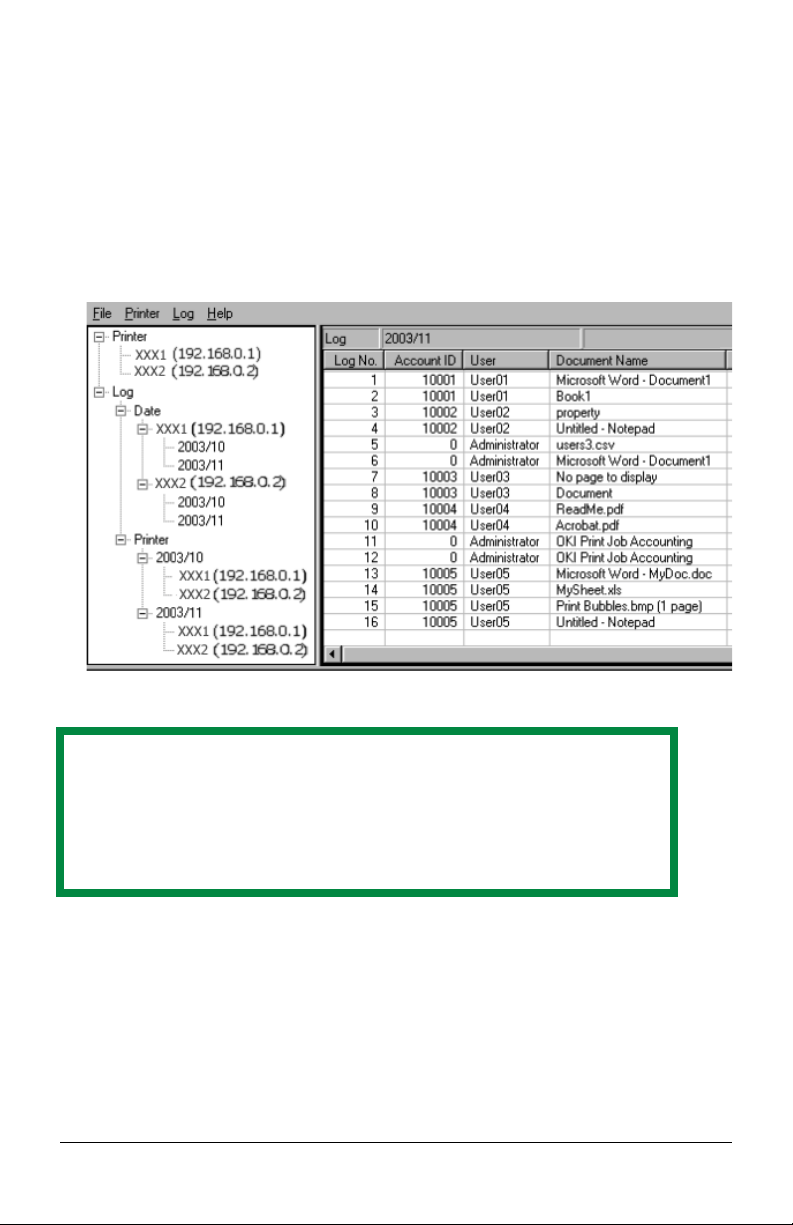
Viewing Acquired Logs
From the main Job Accounting window, click the [+] beside Log to
expand the Log Tree.
JA20_ViewAcquiredLog.bmp
8. Click the [+] beside the submenus to drill down to the log you wish
to view.
• Date Submenu
Lists the logs by date (year/month), then by registered printer.
• Printer Submenu
Lists the logs by registered printer, then date.
9. To view a log:
• Double-click an entry
or
• Click an entry, then click Log → Display Log.
Server Software - 58 -
Page 59

Reading Log Entries
The items displayed in Print Log are as follows:
Log Entries [in alphabetical order]
Column Description
1200dpi
a
1200x600dpi
a
Number of sheets printed in 1200 dpi
Number of sheets printed in 1200 x 600
dpi
600dpi
a
Number of sides printed in 600 dpi
Account ID User Account ID
Color Number of sides printed in color
Document Name Document Name
Duplex Print Simplex or Duplex
Envelope Feeder
a
Number of sheets fed from Envelope
Feeder
Log No. The ID of the job.
Media
a
Paper type used - Transparency etc.
Mono Number of sides printed in Monochrome
Multi-Purpose Tr ay
a
Number of sheets fed from Multi-
Purpose Tray
Off-line time during printing
a
Offline time during printing (if any)
a
Off-line time during processing
Offline time during processing (if any)
Pages Number of printed sides
Paper Size Paper size used
Paper Type
a
Paper type used - Light, Medium etc.
Sheets Number of sheets of paper
Staple Number of staples used
- 59 - Server Software
Page 60

Log Entries [in alphabetical order] (continued)
Column Description
Status Result - Printed, Rejected etc.
Time printing began
Time printing ended
a
a
Time the log acquisition started
Time the printing process started
Time the printing process ended
a
Time the log was acquired from the
printer (started)
Time the log was acquired
a
Time the log was acquired from the
printer (completed)
Time the process began
Time the process ended
a
a
Time the job processing started
Time the job processing ended
Total Sheets Number of sheets of paper
Tray1
Tray2
Tray3
Tray4
Tray5
a
a
a
a
a
Number of sheets fed from Tray1
Number of sheets fed from Tray2
Number of sheets fed from Tray3
Number of sheets fed from Tray4
Number of sheets fed from Tray5
User User Name
a. This item is not displayed by default. To display it, see “Manually Set ting
Up Items Reported in the Log” on page 50.
Server Software - 60 -
Page 61

Client Software
Starting the Client Software
On the client computer, click Start → Programs → Okidata → Print
Job Accounting Client → Change Job Accounting Mode.
Setting the User Name and Account ID
JA_Client.bmp
There are four Job Account Modes:
• Tab Mode
• Popup Mode
• Hide Mode
• [Not supported] Mode
Decide which mode you wish to use.
Tab Mode
In this mode, the tab for setting the User Name and Job Account ID will
be displayed under Job Account Printer Driver Property. This mode
should be selected when the computer is used by one person.
Popup Mode
In this mode, the dialog box for entering the User Name and Job
Account ID will be displayed every time printing is run. A printer client
enters their assigned User Name and Account ID to print. This mode is
useful if several people share the same compute r.
- 61 - Server Software
Page 62

Hide Mode
In this mode, the System Administrator creates an ID file that describes
the information on all clients. Next, each client clicks Import ID File on
their computer, then specifies this file.
Printer clients need not know anything about their own Account ID.
This ID file describes the information on each and every client in one
line, using the following format.
Login User Name, Account ID {User Name}
Login User Name User name entered when logging onto Windows.
Account ID Account ID corresponding to the user name.
{User Name} User name displayed in this System. This is
optional. If this is unspecified, the Login User
Name will be used as the User Name.
Use the extension ".csv" to save the file.
[Not supported] Mode
In this mode, all jobs to be printed will be recognized as Unregistered
ID(0).
Note
For print jobs recognized as Unregistered ID, you can set it so
they are permitted or refused for printing, but document names
will not be displayed on the print logs.
Server Software - 62 -
Page 63

Checking the Status of Printers
on the Network
1. Open Microsoft Internet Explorer.
2. Type in the IP address for the printer (e.g., http://192.168.0.1).
Note
To find the IP address for the printer, do any of the following:
• Open the Print Job Accounting software and select the
printer in the Printer Tree, then click
Printer → Properties.
• Use the printer’s front panel display to navigate to the
network menu (see your printer’s User’s Guide for
details).
• Print a list of menu settings (see your printer’s User’s
Guide for details).
- 63 - Server Software
Page 64

3. Press Enter.
The following Printer St atus window appears:
JA_WebStatus.bmp
Printer Status
The default opening screen. To see real-tim e pr int er stat us , click the
Update Status button.
Network Summary
Clicking this will bring up a window with detailed information about the
network, including
• General Settings
• NetWare
• TCP/IP
• JetAdmin
• LAN Server/DLC
• EtherTalk
Server Software - 64 -
Page 65

• Port Configuration
JA_WebNetworkSummary.bmp
Login as Admin
This brings up the “Enter Network Password” window. You must log in
before accessing the Printer Menu:
JA_WebEnterPassword.bmp
- 65 - Server Software
Page 66

Job Log
This displays the Print Job Log for the selected printer:
JA_WebJobLog.bmp
Server Software - 66 -
Page 67

Printer Menu
Once you are logged in as the Administrator, clicking this will bring up
the following window, throu gh which you can make changes in the
printer’s menu settings.:
JA_WebPrinterMenu1.bmp
The left pane cont ains a list of menu setting group s from which to select:
• Printer Summary
• General Settings
• Print and Media
• System and PCL
• Parallel and USB
• Memory
• System Adjust
• Finisher Menu (appears only if optional Finisher is installed)
The System Administrator can make changes in the menu settings
directly through the web page. For example:
1. Click Print and Media.
2. Make any changes desired.
- 67 - Server Software
Page 68

3. Scroll down to the bottom of the screen and click Submit Changes:
JA_WebPrinterMenu3.bmp
Server Software - 68 -
Page 69

Troubleshooting
Q. The printer I selected is not shown in the list when I click
Printer → Add a printer → Next.
A. If it is offline, the printer will not be shown. Check to see that the printer
is online.
There are times the printer is not shown during printing. Wait for a while
and try again. If it is still not shown, specify that printer's IP address in
the Specify the printer for which logs will be acquired window
before clicking Next.
Q. The content of Log Pane (right side of window) is not updated.
A. Click Log → Refresh Display.
Q. The following message was displayed: "Cannot connect to the
printer. Wait for a while and try again."
A. Check that the printer is not offline. This message is sometimes
displayed during printing. Try again later.
Q. The following message displays when I select Printer → Delete a
Printer: "Cannot delete while log is being acquired."
A. With the printer selected in the Printer Tree, click Printer → Start/End
Log to cancel the process by which print logs are acquired from the
printer. Then click Printer → Delete a Printer/Printer Group.
Q. The following message displays when I select Printer → Acquire
a Log: "This processing cannot do between acquisition of a Log."
A. A print log is already being acquired from the printer at this time.
- 69 - Server Software
Page 70

Known Problems / Solutions
1. When using Duplex printing with the PostScript driver, if the reverse
side is blank it is not counted as a page.
2. Installer installs a file for the currency unit according to the system's
standard Regional Setting. If the correct file is not installed, please
check the Regional Setting. If you wish to set to the system standard,
check "Set as system default local" under "Regional Setting."
3. Printing with Network Menu's "PRINT SETTING" is handled as an
unregistered client job, and will not be recognized as a local print job.
4. PostScript printer drivers (Macintosh) do not store document na mes in
the log.
5. In applications that create their own PostScript codes when using the
Windows PS driver, the Job Accounting command (Job Account ID,
user name) will not be output. Examples of such applications include
Adobe PageMaker and CorelDraw (when the "Use PPD" check bo x is
checked in the Print dialog box.)
6. If you print from Win2000 (Client) to Win2000 (Shared Printer Job
account Mode already set), you have to remove the check from the
"Enable advanced printing features" under the "Advanced" tab in the
shared printer's Properties. Removing the check, however, will disable
both the Booklet (PCL) and Page Order (PS) features.
Server Software - 70 -
Page 71

Uninstalling Print Job Accounting
Uninstall the Server Software
1. Select a printer in the left pane of the Server Software.
2. Select Start/end log from the Printer menu.
Important!
At this stage the Server Software stops acquiring print logs from
the printer at the set interval time. However, the printer will
continue logging until it is deleted. Be sure to perform step 3
"Delete a printer" without fail before uninstalling the Server
Software.
3. Select Delete a printer from the Printer menu.
You are prompted as to whether or not you wish to delete the print log
for the jobs that have been run by the printer you are deleting.
CAUTION!
Even if you select "No" at this point, unless you register the
printer again, the print log for those jobs cannot be
referenced.
If you need the log even after deletion of the printer, be sure
to select Export Logs from the Log menu, then save them in
the file before deleting the printer.
4. Click Start → Programs → Okidata → OKI Print Job
Accounting → Delete OKI Print Job Accounting.
Uninstall the Client Software
On each Client computer, click Start → Programs → Okidata → OKI
Print Job Accounting Client → Delete OKI Print Job Accounting
client.
- 71 - Server Software
Page 72

Oki Data Americas, Inc.
2000 Bishops Gate Blvd
Mount Laurel, NJ 08054-4620
Phone: (800) 654-3282 [(800) OKI-DATA]
http://www.okidata.com
 Loading...