

Ohlins MX, Enduro, Supermotard Owner's Manual

1
Owners Manual
Öhlins 48 mm front fork TM
MX/Enduro and Supermotard
Including:
Setting up
your bike
Fine-tuning
Service
the fork
General
handling set-up
Technical info
Spare parts

2
Safety signals
Important information concerning safety is
distinguished in this manual by the
following notations:
The Safety alert symbol means:
Caution! Your safety is involved.
WARNING!
Failure to follow warning instructions
could result in severe or fatal injury
to anyone working with, inspecting or
using the suspension, or to bystanders.
CAUTION!
Caution indicates that special precautions must be taken to avoid damage to the suspension.
NOTE!
This indicates information that is of
importance with regard to procedures.
Introduction
All of Öhlins advanced suspension products are
adapted to the brand and model. This means that
length, travel, spring, action and damping characteristics, are tested individually just for your
motorcycle.
Before installation
Öhlins Racing AB can not be held responsible for
any damage whatsoever to front fork or vehicle,
or injury to persons, if the instructions for fitting
and maintenance are not followed exactly.
Similarly, the warranty will become null and void
if the instructions are not adhered to.
© Öhlins Racing AB.
All rights reserved.
Any reprinting or unauthorized use
without the written permission of
Öhlins Racing AB is prohibited.
Printed in Sweden.
NOTE
Öhlins products are subject to continual improvement and development. Consequently, although
these instructions include the most up-to-date
information available at the time of printing, there
may be minor differences between your suspension and this manual. Please consult your Öhlins
dealer if you have any questions with regard to
the contents of the manual.
Contents
Safety signals ................................................ 2
Introduction ................................................... 2
Before installation .......................................... 2
Tuning the suspension ................................... 3
Design ........................................................... 3
Settings ......................................................... 4
Setting the spring preload ............................. 4
Fine tuning the bike ....................................... 5
Preload adjustment ....................................... 7
Changing springs .......................................... 9
Technical information ................................... 10
Spare parts .................................................. 11
General handling set-up .............................. 14
Maintenance ................................................ 15
3
Tuning the suspension
Motorcycle road holding qualities
All motorcycles are designed with a suspension
geometry that includes height and fork angle. The
changing of components can affect this and it is
therefore essential that both the rear and the front
ends match each other.
Changing to Öhlins suspension gives optimum
performance only when both the front fork and
the rear suspension interact properly. It is of the
greatest importance that the front and rear loaded
heights are within the specified values.
In the Mounting Instructions, see section:
Setting the spring pre-load.
In the legs there are also “air-springs“ (the air
trapped above the oil) that work together with
the “real“ spring. You adjust the air-spring by
raising or lowering the oil level in the legs.
By using different combinations of springs and
air-springs you can alter the characteristic of the
fork. For example, a soft spring in combination
with a small air-spring (high oil level) makes the
fork progressive; see Fine-tuning the bike.
Marking
All Öhlins front forks are marked. You will find the
part number on the inside of the fork bottom.
Design
Öhlins new upside-down (USD) front fork is
designed to combine the advantages of comfortable, safe conventional forks and rigid, light USD
forks. The result is a unique combination of being
rigid, precise in corners and during hard braking
yet comfortable, forgiving during “over-landing“
and in big bumps.
Your new Öhlins USD front fork has aluminium
outer legs and 48 mm steel inner legs, with a
polished surface for lowest possible friction.
The new USD fork features the Öhlins cartridge
damping system.
The fork is fully adjustable with external adjuster
for compression and rebound damping.
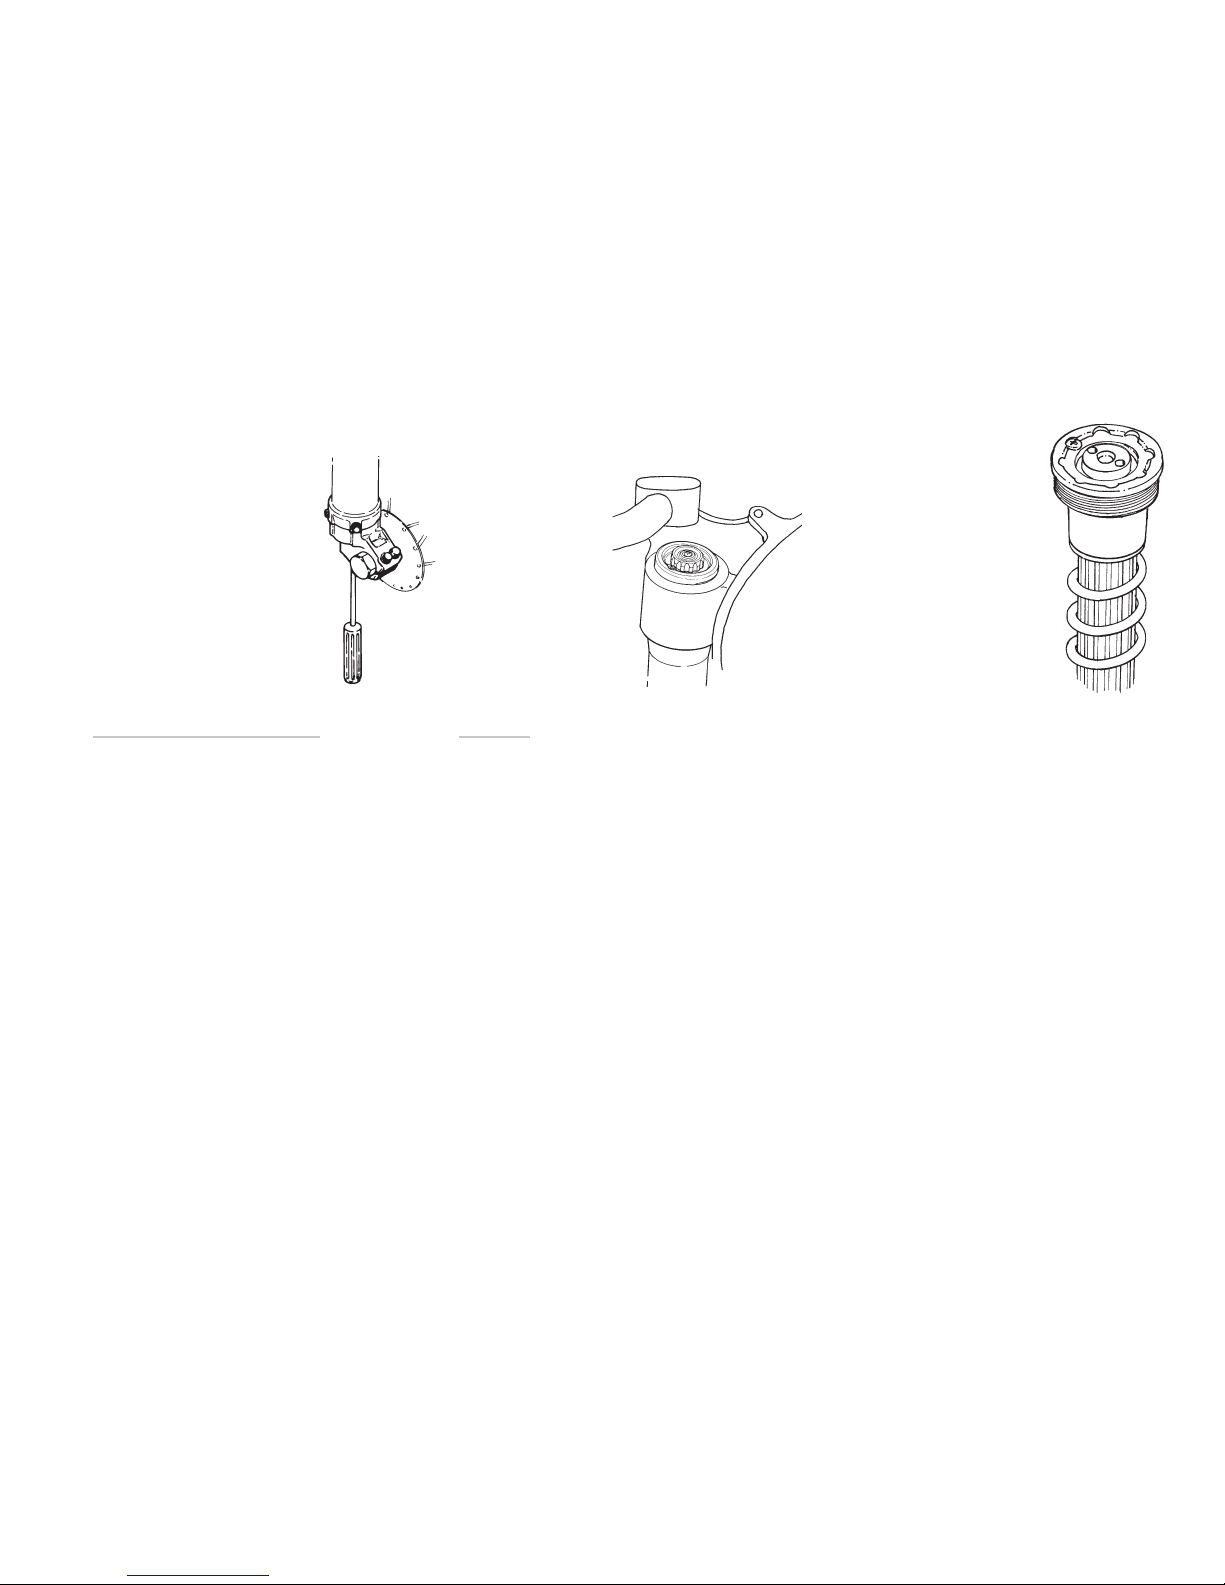
The compression adjuster is located at the bottom of the fork leg (Fig.1), the rebound adjuster
at the top (Fig.2).
Spring pre-load is adjusted with spring supports
of different heights (Fig.3), and optional springs
are available to suit different tracks and riders.
Recommended settings
The front fork in your kit is adjusted to the Öhlins
recommended setting for your bike. We advise
you to use this as your start setting.
1.
The compression adjuster is
located at the bottom of the
fork leg.
2.
The rebound adjuster
is located at the top of
the fork leg.
3.
Spring pre-load is adjusted
with different spring supports.
Optional springs are available.
4
Settings
Basic settings
Always ensure that the basic setting made by
Öhlins is correct. It is adapted to the make and
model (in its original state) and for a rider of
average weight.
WARNING
Incorrect spring action can produce a fork angle
that is too steep or too flat.This in turn will give a
tendency for oversteering or understeering, which
could seriously affect the handling characteristics
of the motorcycle.
The original setting of the front fork, when delivered
from Öhlins, should always be a base when the
settings are changed by use of the adjustment
devices.
Recommendations
The difference should not deviate from the
following sizes, if no other recommended settings
are given in the Mounting Instructions:
Free sag: (R1-R2), (F1-F2)
Rear: MX/Enduro/Supermotard 30±5 mm
Front: MX/Enduro/Supermotard 30±5 mm
Ride height: (R1-R3), (F1-F3)
Rear: MX 100±5 mm
Enduro/Supermotard 30% of the
total stroke
Front: MX/Enduro/Supermotard 80±5 mm
Setting the spring pre-load
Measuring
Pre-load on the spring/springs is very important,
because it affects the height of the motorcycle and
the fork angle. Consequently, handling characteristics
can be changed, even negatively. Proceed as follows
(it will be much easier if done by two persons):
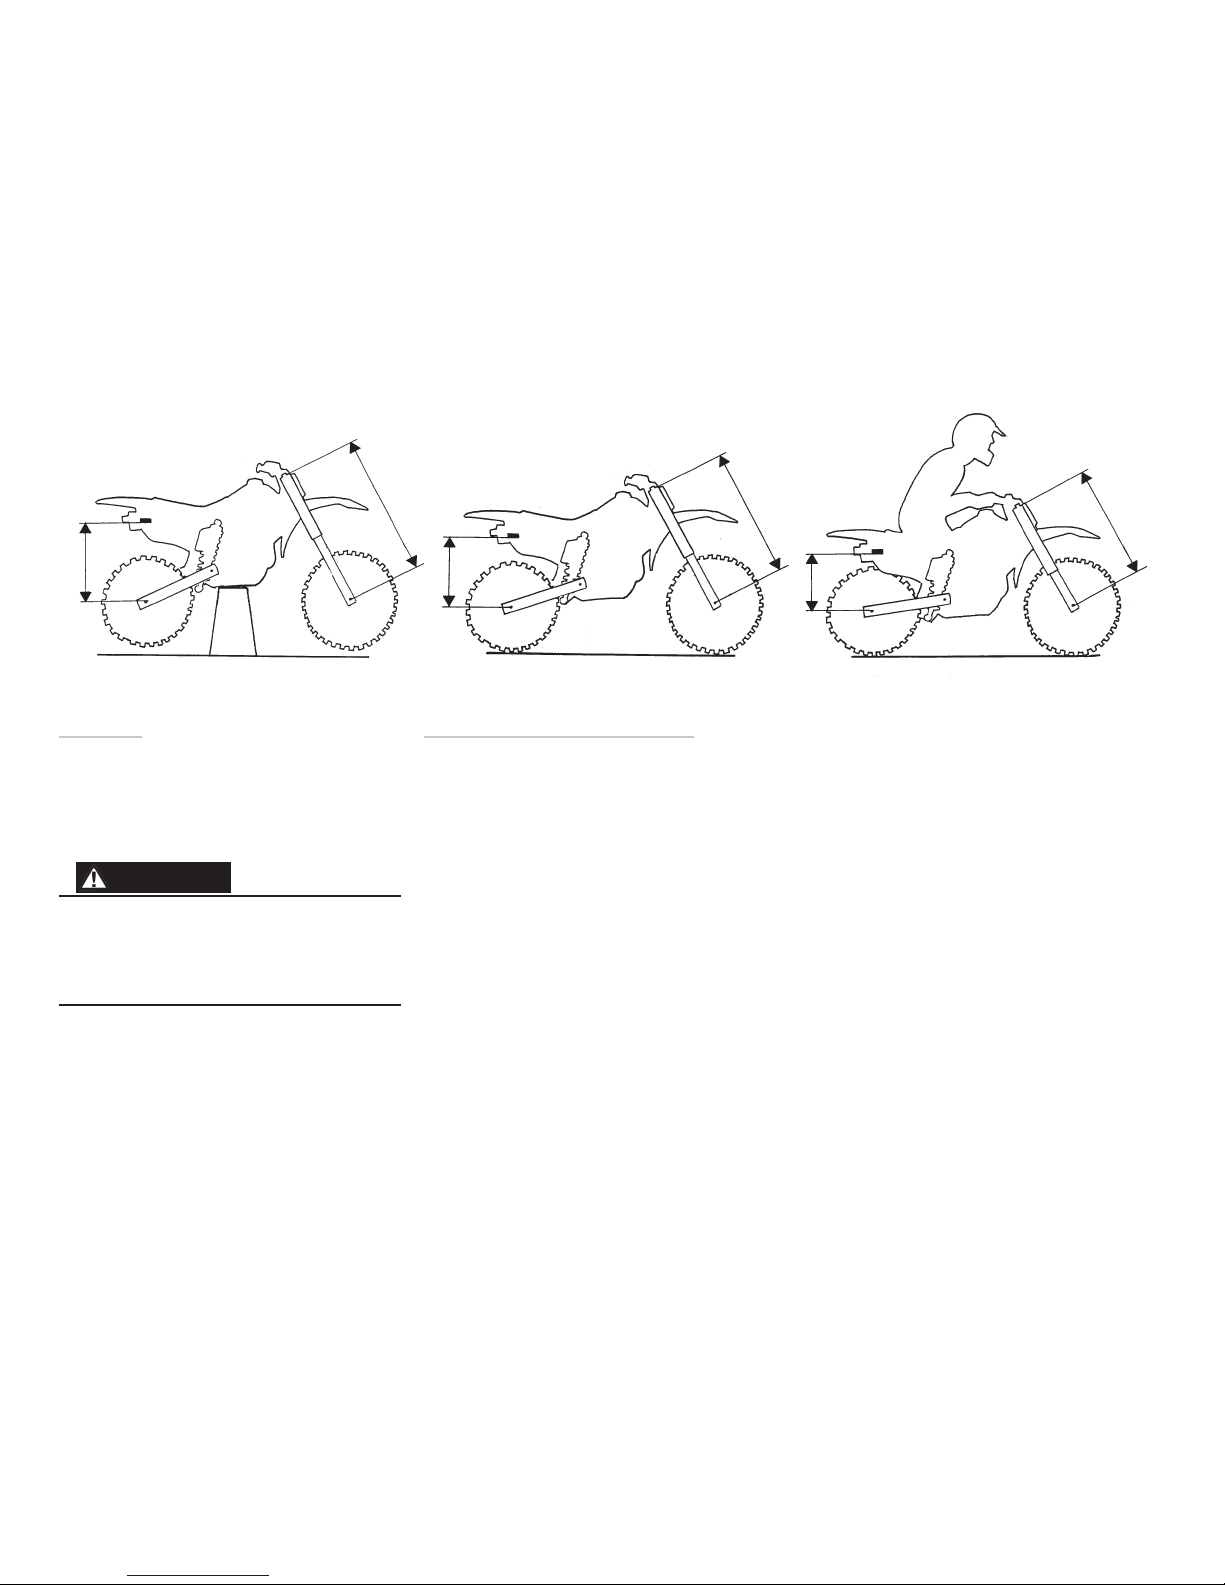
• Place the motorcycle on a stand, so the
front fork and the rear end are in fully
extended position.
• Measure the distance, eg. from the
lower edge of the rear mudguard or
from a point marked by a piece of tape,
immediately above the rear wheel axle,
to the wheel axle (R1).
• Make a similar measurement on the front axle,
e.g. from the bottom of the upper fork crown
to the front wheel axle (F1).
• Allow the motorcycle (without rider) to
apply load on the springs and repeat the
measuring procedure (R2, F2).
• Then take the same measurements with
the rider and equipment on the
motorcycle (R3, F3). It is important that the rider
has a correct riding posture, so that the
weight is balanced on the front and rear
wheel in the same way as when riding.
Bike on a stand.
F1
R1
Bike on the ground.
F2
R2
Bike with rider on.
F3
R3
5
Fine-tuning the bike
Learning how to use the adjusters will take time
but you quickly appreciate them once you know
the tricks. Even the specialists sometimes need
a specialist!
With the adjusters you optimize the suspension for your riding style and the track you are
competing on.
The same basic guidelines go for both the front
fork and the rear shock absorber.
Too much compression damping will give you a
harsh ride as your bike “jumps“ along the track.
With too much rebound damping your bike will
have difficulties with several bumps in a row. The
suspension will not extend fast enough between
bumps, your bike will ride lower and lower and
eventually the suspension will bottom!
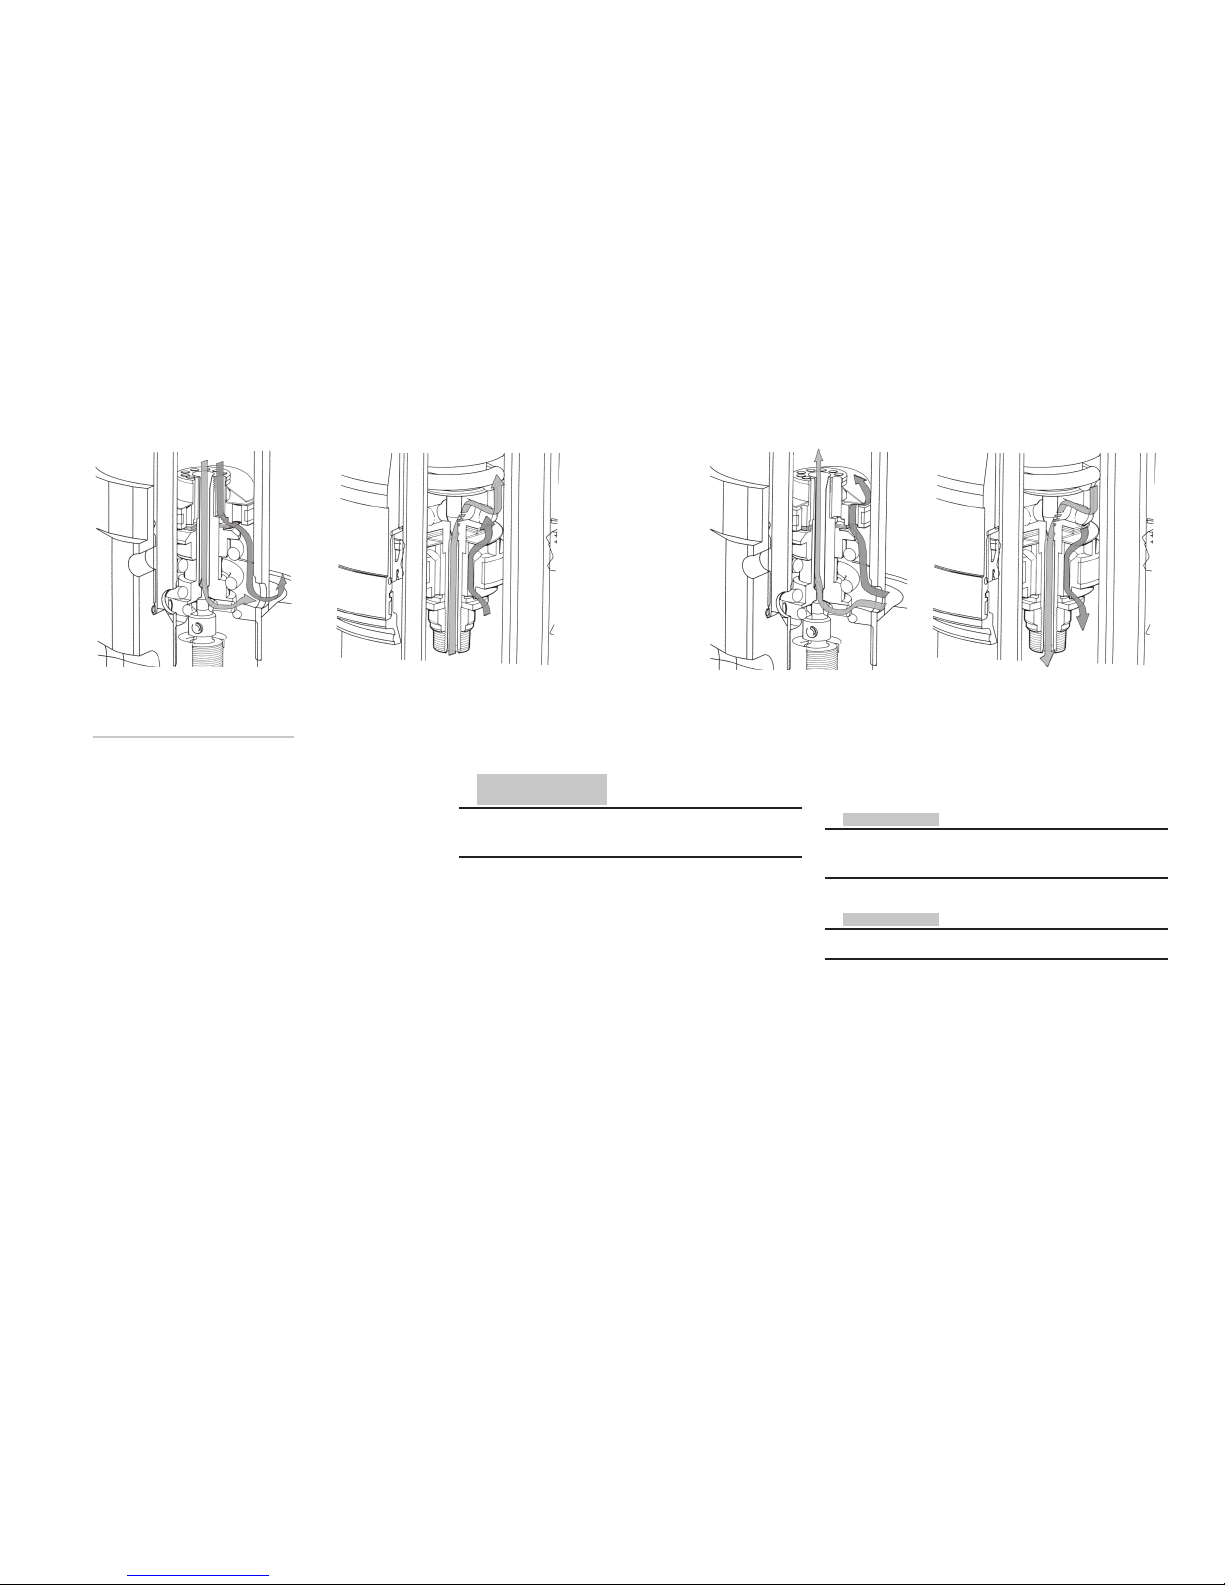
External adjusters
On the Öhlins front fork the adjusters are bleed
valves, completely separated from each other.
The compression bleed valve controls the flow
in the cartridge tube during the compression
stroke, the rebound bleed valve controls the flow
during the rebound stroke.
CAUTION!
Using too much force when closing the adjusters
will destroy important sealing surfaces.
learn how they effect the handling of your bike.
Make sure that you have the correct springs and
the correct spring pre-load before making any
adjustments. And always start with the Öhlins recommended settings.
Compression stroke Rebound stroke
Flow in compression valve Flow in rebound valve Flow in compression valve Flow in rebound valve
NOTE!
Higher click numbers give less damping force.
When making adjustments, keep notes, make
adjustments one at a time…and in small steps.
The adjusters should normally not be adjusted
in steps of more than 2 clicks at a time and not
outside the usable click range.
When you think you have made an improvement,
go back to what you started with and double
check to be sure. Pay attention to changes in
conditions like tires, temperatures etc.
NOTE!
See Mounting Instructions for recommended
settings.
Both the adjusters have a normal right-hand
thread.
Click position zero (0) is when the adjusters are
turned clockwise to fully closed.
The adjustment range, from fully closed until
maximum open valve (counter clockwise), is 20
clicks.
In order not to click in the wrong direction; always
first close the adjuster, then dial-in the new setting.
Making adjustments
To make improvements using the adjusters, it is
important to understand the function of the front
fork and the shock absorber and through testing
 Loading...