

Ohlins SD510, SD530 Mounting Instruction
This instruction and other documents can be downloaded from www.ohlins.com
© Öhlins Racing AB. All rights reserved. Any reprinting or unauthorized use without the written
permission of Öhlins Racing AB is prohibited. Printed in Sweden.
Mounting Instruction
Read the Öhlins Owner’s Manual before installing this product
I
n
s
t
a
l
l
i
n
g
a
s
h
o
c
k
a
b
s
o
r
b
e
r
t
h
a
t
i
s
n
o
t
a
p
p
r
o
v
e
d
b
y
t
h
e
v
e
h
i
c
l
e
m
a
n
u
f
a
c
t
u
r
e
r
m
a
y
a
f
f
e
c
t
t
h
e
s
t
a
b
i
l
i
t
y
o
f
y
o
u
r
v
e
h
i
c
l
e
.
I
n
s
t
a
l
l
i
n
g
a
s
h
o
c
k
a
b
s
o
r
b
e
r
t
h
a
t
i
s
n
o
t
a
p
p
r
o
v
e
d
b
y
t
h
e
v
e
h
i
c
l
e
m
a
n
u
f
a
c
t
u
r
e
r
m
a
y
a
f
f
e
c
t
t
h
e
s
t
a
b
i
l
i
t
y
o
f
y
o
u
r
v
e
h
i
c
l
e
.
I
n
s
t
a
l
l
i
n
g
a
s
h
o
c
k
a
b
s
o
r
b
e
r
t
h
a
t
i
s
n
o
t
a
p
p
r
o
v
e
d
b
y
t
h
e
v
e
h
i
c
l
e
m
a
n
u
f
a
c
t
u
r
e
r
m
a
y
a
f
f
e
c
t
t
h
e
s
t
a
b
i
l
i
t
y
o
f
y
o
u
r
v
e
h
i
c
l
e
.
I
n
s
t
a
l
l
i
n
g
a
s
h
o
c
k
a
b
s
o
r
b
e
r
t
h
a
t
i
s
n
o
t
a
p
p
r
o
v
e
d
b
y
t
h
e
v
e
h
i
c
l
e
m
a
n
u
f
a
c
t
u
r
e
r
m
a
y
a
f
f
e
c
t
t
h
e
s
t
a
b
i
l
i
t
y
o
f
y
o
u
r
v
e
h
i
c
l
e
.
Öhlins Racing AB, Box 722, S-194 27 Upplands Väsby, Sweden
Phone +46 8 590 025 00 Fax +46 8 590 025 80 www.ohlins.com
with set-up data
Kit Contents:
Part no. Pcs.
Steering damper SD510 1
X-ring 01027-09 1
Tool 04970-01 1
Tower 15503-01 1
Plug 15507-01 1
Washer 15528-01 3
Seal 15529-01 1
Bracket 15550-01 1
Seal washer 15551-01 1
Nut M30x1 15553-01 1
Owners Manual 07270-05 1
Before installing this product, check the contents of the
kit listed below. If anything is missing, please contact
your nearest Öhlins dealer.
Steering Damper SD510
for Honda 2008 Motocross/ Enduro
During storage and transportation, especially at high
ambient temperature, some of the oil and grease used for
assembling may leak and stain the packaging. This is in
no way detrimental to the product, wipe off the excessive
oil/grease with a cloth.
Mounting instruction SD510_2 Issued 2008-05-07 Öhlins Racing AB/ Annette Asph/ Ulf Ekengren
Safety Signals
Important information concerning safety is
distinguished in this manual by the following
notations:
WARNING!
Failure to follow these warning instructions could
result in severe or fatal injury to anyone working
with, inspecting or using the steering damper, or
to bystanders.
CAUTION!
Caution indicate s that speci al precau tions
must be taken to avoid damage to the steering
damper.
NOTE!
Indicates information that is of importance regarding mounting procedures.
11.
Check that the steering stops work as they
should. The damper should not act as a steering
stop since that can damage and possibly break
the steering damper. Tighten the upper triple
clamp bolt to recommended tightening torque.
12.
Install every removed part in reverse order.
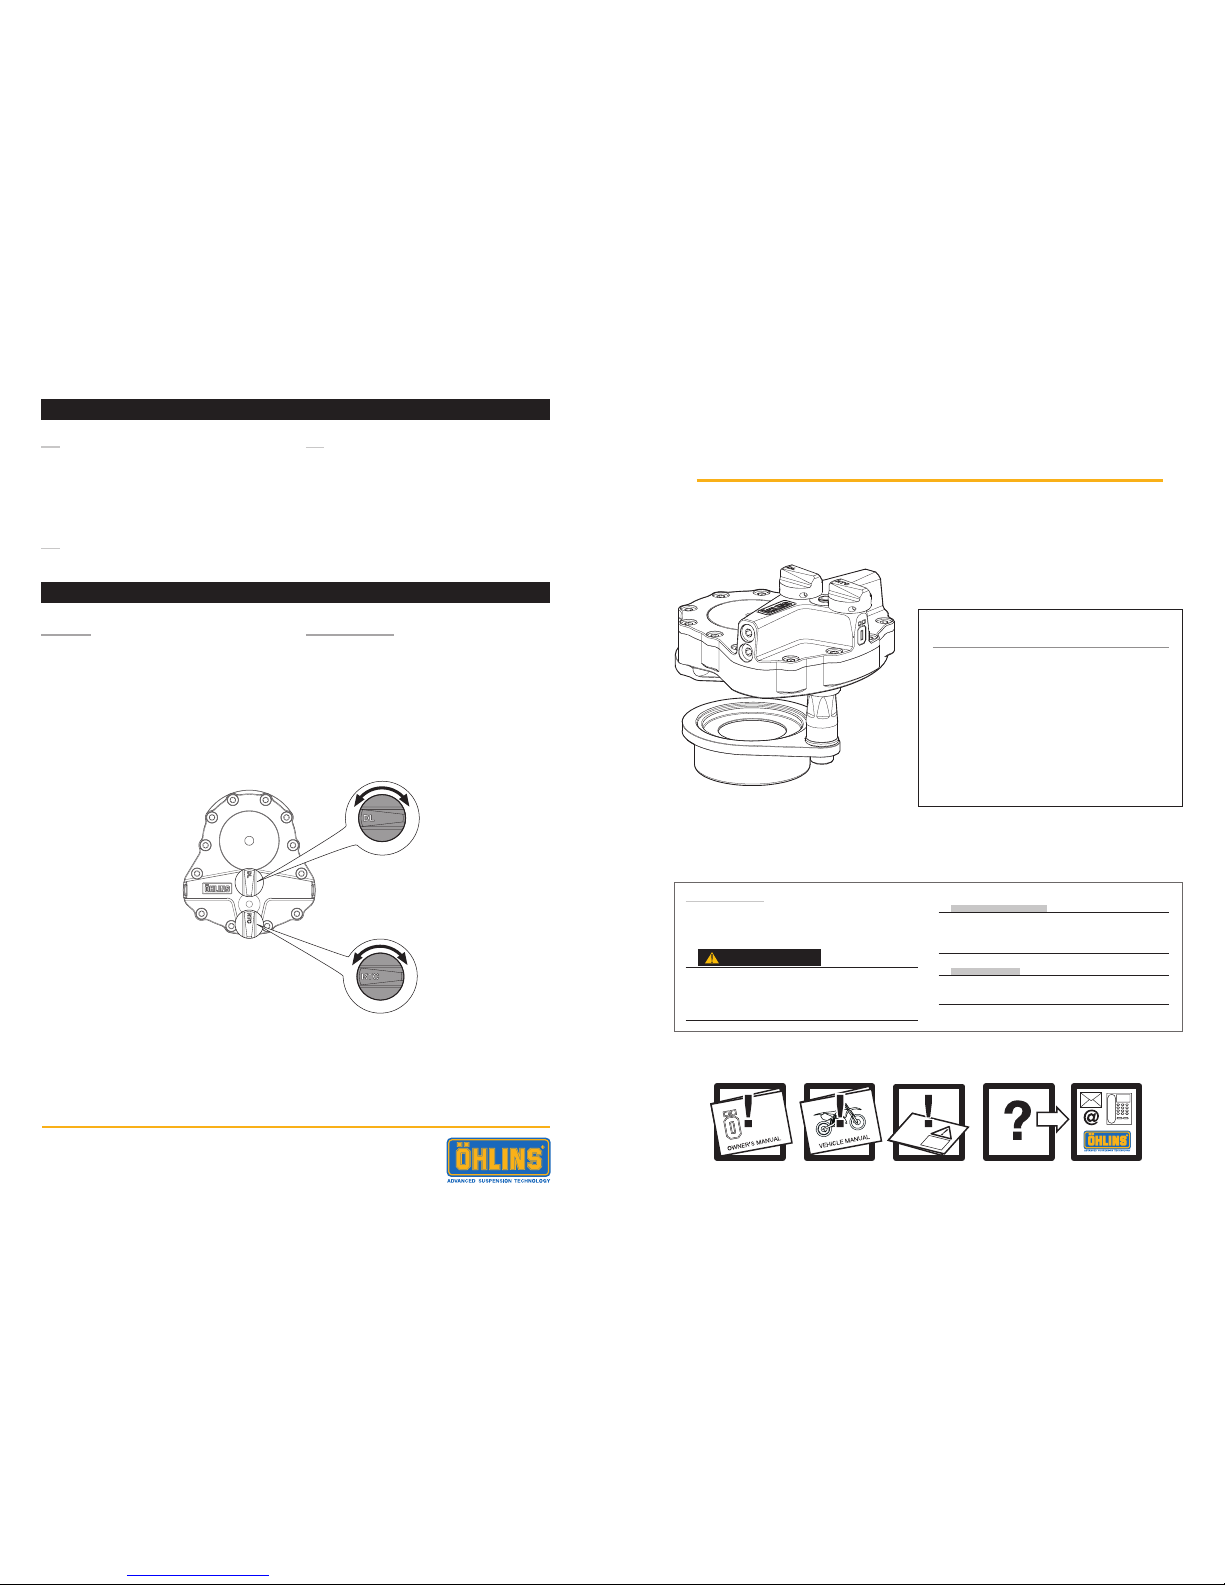
ADJUSTMENTS
Adjustments
Motocross:
DL valve 12 clicks
RTC valve 6 clicks
Enduro:
DL valve 12 clicks
RTC valve 8 clicks
Setting
The steering damper has two external adjusters.
The DL-valve (Damping Level) controls the
combined low and high speed flow.
The RTC-valve (Return To Centre) controls the
damping back to centre position [0].
Decrease
damping back
to centre
Decrease
damping
level
Increase
damping
level
Increase
damping back
to centre
-
+
+
-
DL valve
RTC valve
MOUNTING INSTRUCTION
13.
Finally install the centre lid by pressing it into
the hex opening. Use a M6 screw and a pair of
pliers if you must remove the lid. Note! Do not try
to remove the lid with a screwdriver - the lid will
break!
Your installation is finished - Enjoy your Öhlins
product!
Reset the adjusters according to following:
The adjusters have a normal right hand thread.
Turn the damping adjusters clockwise to fully
closed (pos. zero [0]). To open, turn counter
clockwise, and count the clicks until you reach
the recommended number.
For more information read your Öhlins Owner’s
manual.
MOUNTING INSTRUCTION
MOUNTING INSTRUCTION
WARNING!
It is advisable to have an Öhlins dealer install the
steering damper.
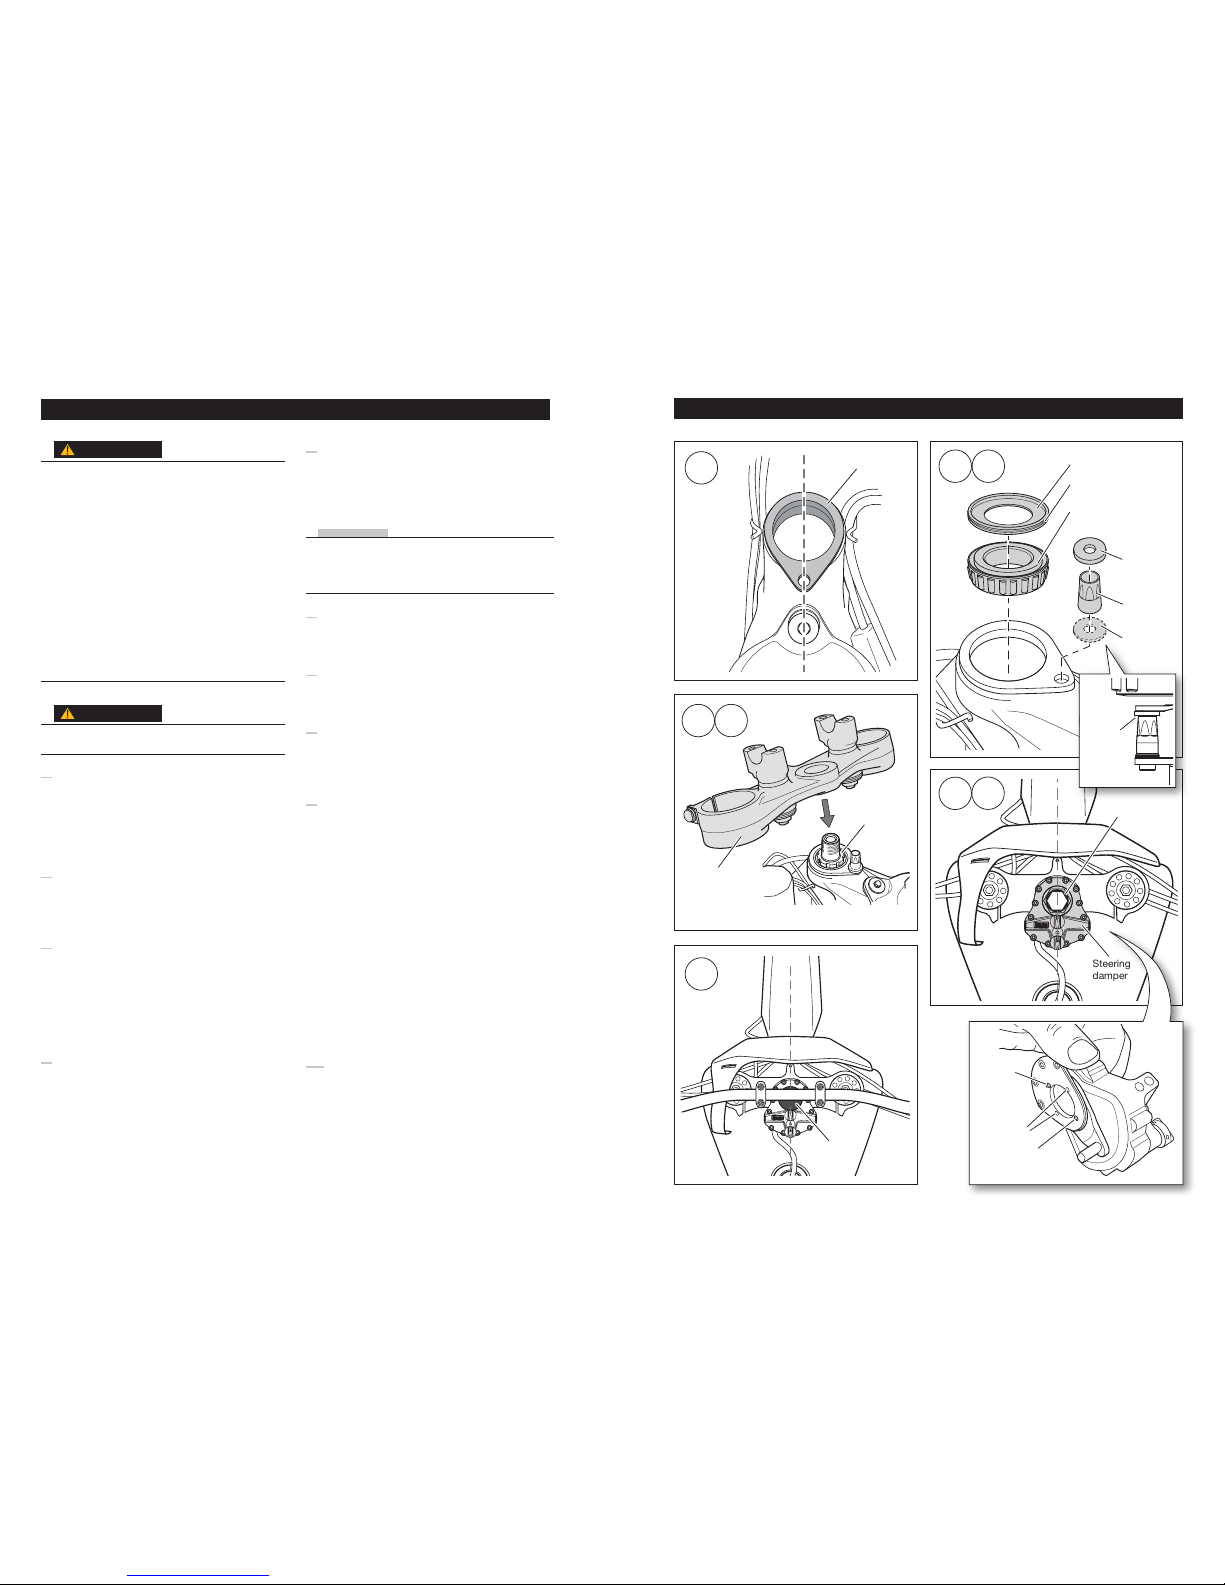
1.
Secure your vehicle and remove the front wheel,
front fork and triple clamps. Also remove the
original upper steering stem nut and washer (you
will not need those when using Öhlins steering
damper).
2.
Remove the outer ring of the upper steering
head bearing. Refer to your vehicles manual changing steering bearing.
3.
Replace the outer ring with the bracket provided.
The bracket is press fitted into the steering head.
It is of critical importance that the bracket is
mounted straight. It is possible to correct the
position by tapping it with a hammer after the
bracket is mounted.
4.
Apply some grease on the x-ring and install it (do
not twist it) in to the groove on the seal washer.
Grease and install the upper bearing and the
seal washer provided (the provided seal washer
replaces the original dust seal, if any). The flat
side of the seal washer should face towards the
bearing.
5.
Mount the tower in the bracket. If needed, use
washers between the tower and the bracket to
achieve the correct distance between the top of
the tower and the lever, see figure.
NOTE!
For some models the threads of the tower can
interfere with the frame. If necessary grind the threads
until it fits. The tower should just touch the seal
according to figure. Tighten the tower with 25 Nm.
6.
Use grease inside the tower to avoid the noise that
otherwise can occur.
7.
Replace the original lower steering stem nut and
washer with the one provided.
8.
Mount the triple clamps and fork legs. Tighten the
bolts on the lower triple clamp to recommended
tightening torque.
9.
Mount the steering damper. As with the bracket
it is of critical importance that the damper is
mounted centered and straight according to
figure. Since the two small pins will be pressed
down into the upper triple clamp when the upper
steering stem nut provided is tightened, it is
important to make sure the damper sits straight
before tightening.
If the damper is not aligned properly after the pins
have been pressed down into the triple clamp,
it may be necessary to remove the bracket that
holds those two pins that sits underneath the
damping housing. There are two extra holes there
so the position of the pins can be changed. The
pins are (loosely) press fitted into the bracket and
can easily be removed and then mounted again.
10.
Again make sure that the damper sits straight and
then tighten the upper steering stem nut to correct
torque according to your vehicles Owners manual.
Note! All threads on the upper steering stem nut
will not be used, that is correct as long as the nut
is tightened properly.
3
Bracket
Lower
steering
stem nut
7
X-ring
Steeering head
bearing
Upper triple
clamp
9
Tower
25 Nm
Seal
Washer
(if needed)
54
Steering
damper
13
Optional
pin holes
Pin
Centre lid
Seal washer
The tower
should just
touch the
seal.
10
Pin
WARNING!
1. Installing a steering damper, that is not
approved by the vehicle manufacturer, may
affect the stability of your vehicle. Öhlins
Racing AB cannot be held responsible for
any personal injury or damage that may occur
after fitting the steering damper.
2. Please study and make certain that you
fully understand all the mounting instructions
and the owner’s manual before handling this
steering damper kit. If you have any questions
regarding proper installa tion procedures,
contact an Öhlins dealer.
3. The vehi cle ser vice manual must be
referred to when installing the Öhlins steering
damper.
Continues on the last page
Upper
steering
stem nut
8
 Loading...