


ODYS Shark
Important Safety Instructions
1) Read these instructions.
2) Keep these instructions.
3) Heed all warnings.
4) Follow all instructions.
5) Do not use this apparatus near water.
6) Clean only with a dry cloth.
7) Do not block any ventilation op enings, install in accordance with
the instructions.
8) Do not install near any heat sources su ch as radiations, h eat
registers, stoves, or other apparatus (including amplifiers) that
produce heat.
9) Do not alter the safety purpose of the polarize d plug. If the
provided plug does not fit into your outlet, consult an electrician for
replacement.
10) Protected the power cord fr om being walked on or pinched
particularly at plugs, convenience receptacles, and the point where
they exit from the apparatus.
EN
11) Only use attachments/accessories specified by the manufacturer.
12) Unplug this apparatus during lighting storms or when unused for
long periods of time.
13) Refer all servicing to qualified service personnel. Servicing is
required when the apparatus has been damaged in any way, such
as damage to the power-supply cord or plug, liquid or other objects
have entered the apparatus, the apparatus has been exposed to
rain or moisture, the apparatus does not operate normally, or has
been dropped.
14) Removing the plug from the ma in outlet will completely disconnect
the device from its electrical source. While in use, the main out let
must be free of all obstruction to insure readily accessibility.
15) The ventilation openings should be fr ee at all times. Do not cover
the ventilation op enings with items, such as newspapers, tablecloth, curtains, etc.
16) Do not place items or open flames ( candles, etc) on this apparatus.
17) Attention should be drawn to the environmental aspects of battery
disposal.
18) Use this apparatus only in moderate climates.
WARNING: To reduce the risk of f ire or electric shock, do not expose this
apparatus to rain or moisture.
WARNING: The batteries should not be exposed to excessive heat such as
direct sunlight, fire or other heat so urces.
- 1 -
EN
ODYS Shark
The symbol indicates that dangerous voltages and risk of electric shock
are present within this unit.
The symbol indicates important operating and maintenance instructions
within the literature accompanying this un it.
The symbol indicates that this product incorporates double insulation
between hazardous m ains voltage and user accessible parts. When
servicing use on ly identical replacement parts.
CAUTION:
Should the apparatus be exposed to electrostatic
electricity, it may malfunction and mayrequire a reset.
Tips regarding environmental protection
At the end of its operating life, this product may not be
disposed of by way of your normal household waste.
Instead, it must be delivered to a collection point for
recycling electrical and electronic equipm ent. The icon
on the product, in the operating instructions or on the
packaging, indicates this.
The materials used in ma nufacturing this product are
recyclable, depending on their identifying markings. By
recycling this equipment, by recycling its components, or
through other procedures of re-using outdated
equipment, you are making an importa nt contribution to
the protection of our environment. Please ask you local
municipal administration for the location of the
corresponding recycling point.
Battery Recycling
In order to ensure the environmentally friendly disposal
of batteries, please do NOT dispose of used
batteries throug h normal household waste. Please take
the batteries to your local retail or community collection
point for recycling.
The following may be a n indication of a discharged
battery: The device cannot be switched on. The
device switches off automatically and "Battery Empty" is
shown in the display. The devi ce a nd or battery do not
function properly.
- 2 -

ODYS Shark
Support
URL: http://www.odys.de
See our website for the latest information concerning this product, other
products manufactured by our company and our company itself. If you have
questions or problems, please read the FAQs on our website or contact our
customer support service center: support@odys.de.
Appropriate use
Device is designed for playing music in commonly used formats and
transferring sound from a Music or Sound source to its speakers using a cable
or Bluetooth connection. It is exclusively meant for this purpose and must only
be used for the same.
This also includes paying attention to all information contained in this
operating manual, especially in the safety instructions. Any other usage is
considered to be improper and may lead to material damages and even
personal injuries. Moreover, it will result in the immediate loss of guarantee.
The manufacturer does not bear any lia bi l ity for damages caused due to
improper use.
This manual may not reflect your actual device’s operation. All
information is subject to change without prior notification. Please
follow your actual device’s operational procedures.
EN
- 3 -

Content
ODYS Shark
Content ............................................................................................. - 4 -
1 Specifications .......................................................................... - 5 -
2 PACKAGE CONTENTS .......................................................... - 5 -
EN
3 MAIN UNIT .............................................................................. - 5 -
4 REMOTE CONTROL .............................................................. - 6 -
5 POWER SUPPLY .................................................................... - 7 -
6 Setup the unit .......................................................................... - 7 -
6.1 SLEEP TIMER SETTING .................................................... - 7 -
6.2 HOW TO SET TIME ............................................................ - 7 -
6.3 TIMER SETTING ................................................................ - 7 -
7 USB & SD CARD PLAYBACK ................................................ - 8 -
8 BLUETOOTH OPERATING .................................................... - 9 -
8.1 Pairing ................................................................................. - 9 -
8.2 RE-CONNECT TO A BLUETOOTH AUDIO SOURCE ....... - 9 -
9 Basic Function ....................................................................... - 10 -
9.1 MUTE THE UNIT .............................................................. - 10 -
9.2 VOLUME LEVEL/TREBLE/BASS ADJUSTMENT ............ - 10 -
9.3 EQ EFFECTS .................................................................... - 10 -
9.4 PROFESSIONAL AUDIO MODES ................................... - 10 -
10 FM RADIO ............................................................................. - 10 -
10.1 TUNING THE FM RADIO ............................................. - 10 -
10.2 STORING YOUR FAVORITE RADIO STATION .......... - 11 -
11 CONNECTING WITH OTHER DEVICES ............................. - 11 -
11.1 AUDIO IN ...................................................................... - 11 -
11.2 LINE IN ..................... .................................................... - 11 -
11.3 OPTICAL INPUT ........................................................... - 12 -
12 TROUBLE SHOOTING ......................................................... - 12 -
13 Warranty condition ................................................................ - 13 -
- 4 -
ODYS Shark
6
1 Specifications
1) Compatible with bluetooth devices and other devices containing AUX
output connections.
2) Easy operation using the buttons located on the top of the device.
2 PACKAGE CONTENTS
ODYS Shark, Manual, Remote Control, 2 Wall mounting brackets, 2 feet,
Line-In Cable, AUX-In Cable
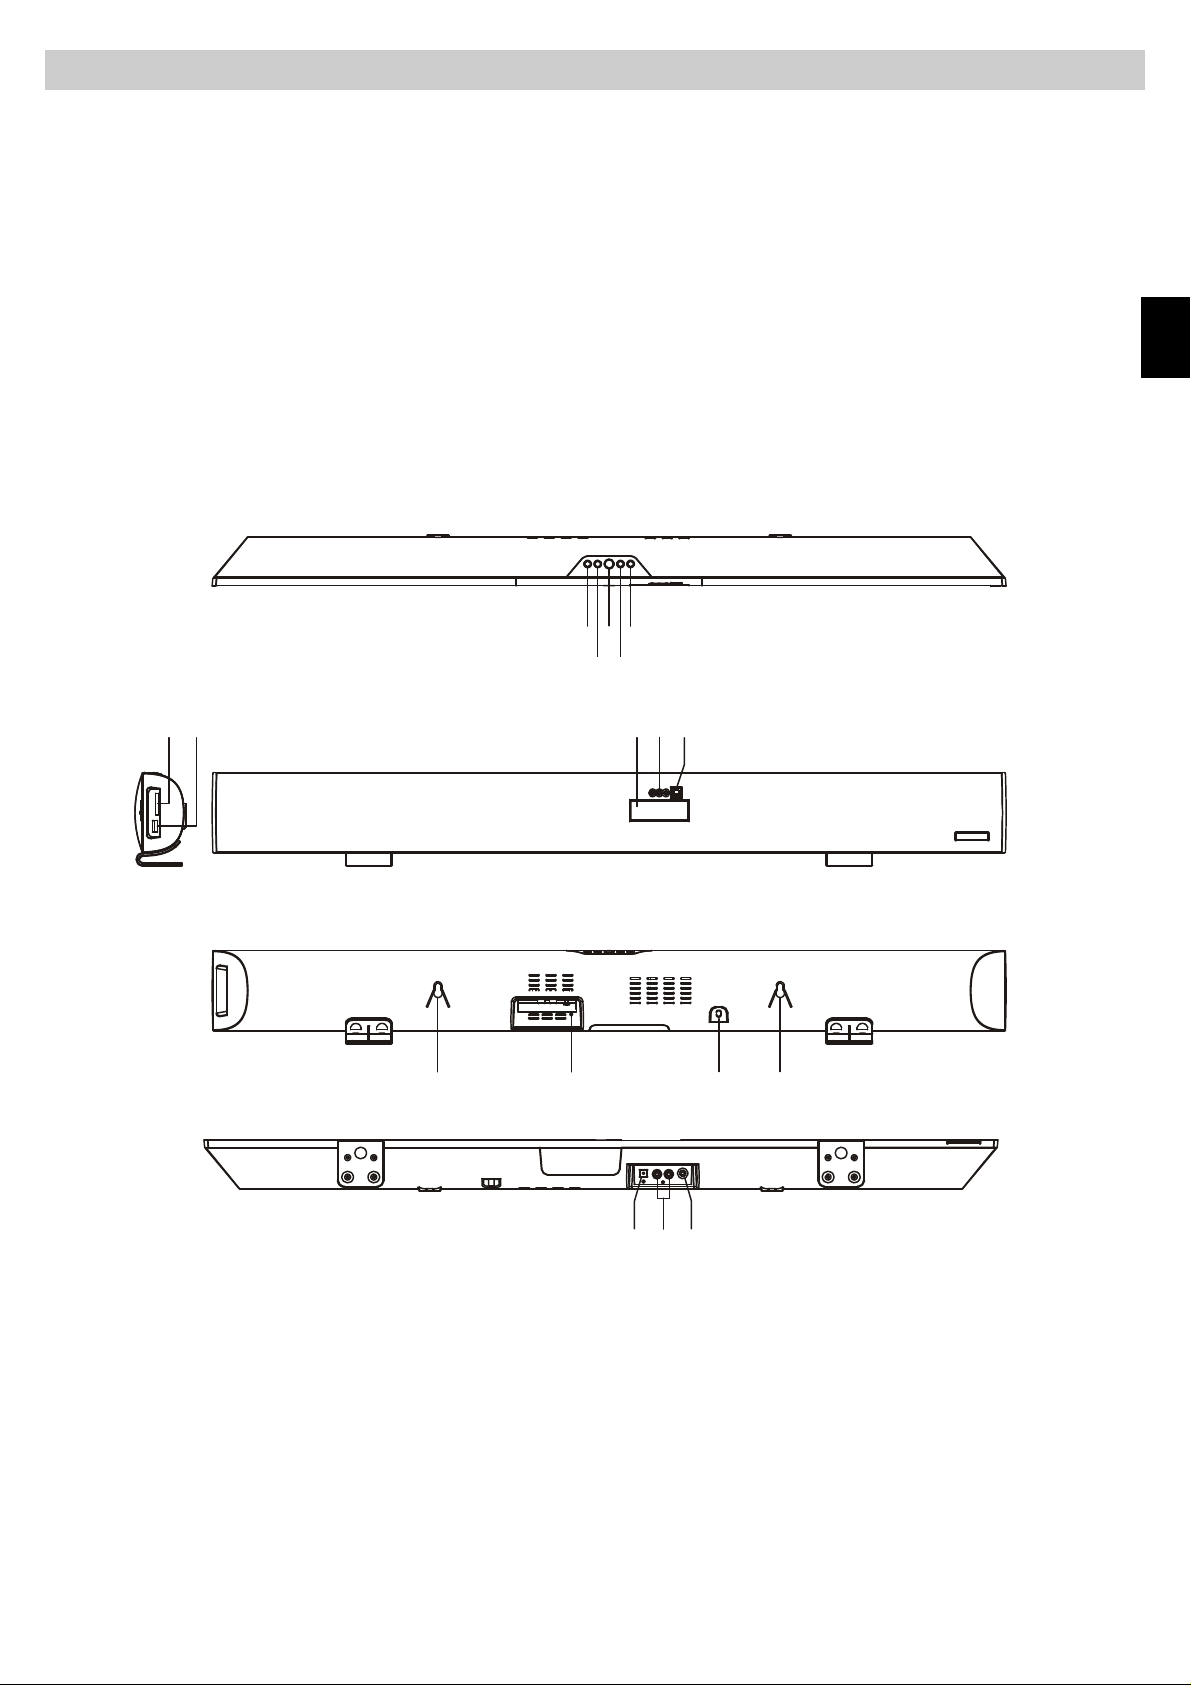
3 MAIN UNIT
12345
67
8910
EN
11 12 13 11
1. VOLUME - BUTTON
2. VOLUME + BUTTON
3. POWER BUTTON
4. MODE BUTTON
5. PAIR/PLAY/PAUSE BUTTON
6. SD CARD SLOT
7. USB PORT
8. LCD DISPLAY
151
14
9. BLUETOOTH INDICATOR
10. REMOTE SENSOR
11. HANGING HOLES
12. FM ANTENNA
13. AC CORD
14. OPTICAL IN JACK
15. AUX IN JACKS
16. LINE IN JACK
- 5 -

ODYS Shark
4 REMOTE CONTROL
EN
1
2
3
4
10
11
12
13
5
6
7
8
9
14
15
16
17
18
19
1. SLEEP BUTTON
2. MODE BUTTON
3. CLOCK BUTTON
4. TIMER BUTTON
5. NUMERIC BUTTONS
6. VOICE BUTTON
7. EQ BUTTON
8. BASS +/- BUTTONS
9. TREBLE +/- BUTTONS
10. MUTE BUTTON
Attention:
Connecting the device to the main power source while in operation may
cause damage to the amplifier and or DVD player.
11. POWER BUTTON
12. TUNING/SKIP/SEARCH BACKWARD
13. TUNING/SKIP/SEARCH FORWARD
14. MEM BUTTON
15. PAIR/PLAY/PAUSE BUTTON
16. MUSIC BUTTON
17. MOVIE BUTTON
18. VOL +/- BUTTONS
19. CH+/- BUTTONS
We recommend connecting a ll components, which includes the
SOUNDBAR to the main power supply before attempting to operate this
device.
Damage resulting from improper power use is not covered within the
guarantee guidelines.
- 6 -

ODYS Shark
5 POWER SUPPLY
Plug AC plug into the ou tlet socket on the unit for connecting the main power.
NOTE: If not any audio signal inputs to the unit in about 10 minutes, the unit
will enter to standby mode a utomatically (except at FM mode).
6 Setup the unit
6.1 SLEEP TIMER SETTING
You can set the sleep timer at power on modes as following instructions:
During playback, press the SLEEP button on the remote control repeatedly to
cycle through the sleep time options, Release the SLEEP button when your
desired sleep time shows on the screen. Once the sleep time is expired, the
unit will be switched off.
EN
During playback, press SLEEP button once to check the remaining sleep time.
6.2 HOW TO SET TIME
At the standby mode, press and hold the CLOCK button on the remote until
Hour flashes on the screen; use the TUNING/SKIP/SEARCH buttons on the
remote to adjust the hour and confir m your adjustment by pressing the
CLOCK button on the remote; Minute starts blinking on the screen, press the
TUNING/SKIP/SEARCH buttons on the remote to set the minute accordingly,
press the CLOCK button on the remote again to confirm your setting.
During playback, press and hold the CLOCK button on the remote to check
the current time.
Note: The time only could be set at standby mode.
6.3 TIMER SETTING
1. At standby mode, press an d hol d th e TIMER button on the remote. The
hour on the display will begin blinking on the screen with the flashing timer
icon “T”.
2. Press the TUNING/SKIP/SEARCH buttons on the remote to adjust the
hour.
3. Press the TIMER button to confirm. The minute on the display will begin
blinking.
4. Press the TUNING/SKIP/SEARCH buttons on the remote to adjust the
minute.
- 7 -

ODYS Shark
5. Press the TIMER button on the remote to confirm your setting.
6. After the set time is reached, the unit will power on to the radio
automatically.
7. The timer function can be deactivated or activated by short pressing the
TIMER button on the remote.
EN
7 USB & SD CARD PLAYBACK
1. Power on the un it, insert an USB or a SD card in to the unit.
2. Press MODE button repeatedly to switch to USB or card mode. The
playback will start automatically.
3. Press the TUNING SKIP/SEARCH FORWARD button on the remote to skip
to the next track; press and hold to search through the track forward.
4. Press the TUNING SKIP/SEARCH BACKWARD button on the remote to
skip to the previous track; press and hold to search through the track
backward.
- 8 -

ODYS Shark
8 BLUETOOTH OPERATING
8.1 Pairing
This unit can receive stereo audio signal from a BLUETOOTH stereo aud io
source device.
1. Power on the unit, switch to BLUETOOTH mode by pressing MODE button
repeatedly.
2. LED indicator rapid blinking while it is pairing.
3. Enable the Bluetooth of the Bluetooth audio source device.
4. Pair and connect to ODYS Shark (MIB668A) on the aud io source device. If
prompted for password, enter “0000”.
5. Pairing successful (LED indicator blue), ready to stream music.
6. During playback, press PLAY/PAUSE button to cease or resume the
playback.
EN
7. During playback, press TUNING/SKIP/SEARCH FORWARD button to skip
to the next track; press TUNING/SKIP/SEARCH BACKWARD button twice
to skip to the previous track.
8. During playback, press and hold TUNING/SKIP/SEARCH buttons to search
through the current track forward or backward.
Note:
Pairing mode is cancelled after 1.5 minutes.
Pairing the playback device with the ODYS SHARK is only possible when
the ODYS SHARK is in the pairing mode and the LED blinks blue.
The above are generic steps to pair a BLUETOOTH device, for more
specific instructions on BLUETOOTH connectivity for your device, please
consult your manufacturer’s manual.
8.2 RE-CONNECT TO A BLUETOOTH AUDIO SOURCE
If the device is already paired with the ODYS Shark, but became unconnected
even with both Bluetooth devices tu rned on. You can re-connect them by
following steps:
1. Press and hold the PAIR button on the unit or on the remote to re-link the
audio source device. The Bluetooth indicator will blink for about 1.5
minutes for connecting.
2. Select the ODYS Shark (MIB668A) on the audio source device for
connecting. Bluetooth indicator will turn to solid blue if the ODYS Shark
(MIB668A) and the device have been re-connected successfully.
3. You can also re-connect the ODYS Shark (MIB668A) by using Bluetooth
operation of the device to be connected.
- 9 -

ODYS Shark
9 Basic Function
9.1 MUTE THE UNIT
During playback, press the MUTE button on the remote to switch off the
audio. Press the button ag ai n to resume the audio.
EN
9.2 VOLUME LEVEL/TREBLE/BASS ADJUSTMENT
Press the VOLUME +/- buttons or TREBLE +/- buttons or BASS +/- buttons
on the remote to adjust the volume output level or treble effect or bass effect.
9.3 EQ EFFECTS
During playback, press EQ button on the remote repeated ly to cycle through
the EQ options; when your desired EQ effect shows on the screen, release
the button.
9.4 PROFESSIONAL AUDIO MODES
During playback, press the VOICE, MUSIC or MOVIE buttons on the remote
to switch among voice, music and movie audio modes for getting high sound
quality. The audio modes can reveal the characters and details of the sound
of the voice, music and movie and make you liked being there.
10 FM RADIO
10.1 TUNING THE FM RADIO
1. Power on the unit, switch to FM (RADIO) mode by pressing MODE button
repeatedly.
2. Press the TUNING/SKIP/SEARCH buttons on the remote to fine tune radio
station. Press and hold the TUNING/SKIP/SEARCH buttons on the remote
to auto search radio station forward or backward respectively (When a n
available station will be found, the unit will broadcast it immediately and the
searching will be stopped). During auto searching, press the
TUNING/SKIP/SEARCH buttons on the remote to stop the searching.
3. At radio mode, it is possible to access the frequency via numeric buttons on
the remote contro l. For example, press buttons 8, 9 and 8 to get to 89.8
MHz.
- 10 -

ODYS Shark
10.2 STORING YOUR FAVORITE RADIO STATION
1. During playback, press the MEM button on the remote for storing the
current station until a memory cell number flashes on the screen.
2. Use the CH+ or CH- buttons on the remote to select the corresponding
memory cell for storing the station.
3. Confirm your selection by pressing the MEM button on the remote.
4. During radio playback, press the CH+ or CH- buttons on the remote
repeatedly to recall the sto red stations.
11 CONNECTING WITH OTHER DEVICES
EN
11.1 AUDIO IN
1. Connect the Aux in jacks on the unit to audio source, for example, DVD
player with an RCA cable.
2. Power on the unit and the au dio devi ce.
3. Press the MODE button repeatedly to switch to AUX mode.
4. Use the native controls on the connected audio device to begin playing
music through the connected the unit.
11.2 LINE IN
Follow steps to connect the unit to another audio device:
1. Connect the device into the unit ‘s LINE IN jack with the LINE OUT cables.
2. Press POWER button to turn the unit on.
3. Press MODE button repeatedly to switch the unit to Line mode.
4. Power on the device and begin play.
- 11 -

ODYS Shark
11.3 OPTICAL INPUT
1. Connect a Digital Optical Audio Cable to the opti cal output on the audio
source and to OPTICAL IN on the unit.
2. Power on the unit and the au di o so ur ce.
3. Press MODE button repeatedly to switch to OPT in Mode.
4. Audio from the connected audio source will now be played through the unit.
EN
12 TROUBLE SHOOTING
Symptom Possible Cause Solution
Radio sound
distorted.
No radio sound. 1. The unit is not at tuner
No Sound at
Bluetooth
mode.
1. The stat io n is not tuned in.
2. There is a poor signal in
the area.
mode.
2. The volume has been
muted or is on the
minimum setting.
1. The unit is not connected
with the audio source
device.
2. The unit is placed out of
the range
3. The volume has been
muted or is on the
1. Fine tune the station.
2. Unwind the wire antenna
for best reception
1. Press MODE button
repeatedly until switching
to tuner.
2. Adjust the volume level or
press the MUTE button to
resume audio.
1. Follow the manual to
connect the audio source
device to the unit.
2. Relocate the unit within
Bluetooth operating range.
3. Adjust the volume level or
press the MUTE button to
Sound is
distorted at
Bluetooth/AUX/
Line in modes.
No sound at
AUX/Line in
modes.
minimum setting.
Sound source is distorted. If the original sound source of
1. The unit is not connected
the external appliance
properly.
2. The volume has been
muted or is on the
minimum setting.
resume audio.
the external device is poor
quality or with distortion and
noise, it will be easily noticed
with high-power speakers.
Try a different audio source
such as a music CD.
1. Follow the manual to
reconnect the audio
appliance to the unit.
2. Adjust the volume level or
press MUTE button to
resume audio.
- 12 -

ODYS Shark
13 Warranty condition
The following conditions comprise the requireme nts and scope of our warranty
conditions and do not affect our legal and contractual warranty obligations.
We offer a warranty on our products in accordance with the following
conditions:
1. ODYS products are covered by a 24 month warranty. We will resolve
damages or defects on ODYS products free of charge within 12 months of
the purchase date under the following warranty conditions. For any
damage or defect determined later than 12 months after th e purchase
date, proof of a manufacturing fault must be submitted for repair under
warranty.
The warranty does not cover batteries and other parts, which are
considered consumables, parts that break easily such as glass or plastic
or defects based on normal wear and te ar. There is no warranty obligation
in the event of marginal differences compared to the target appearance
and workmanshi p provided these have a negligible effect on the product's
fitness for use, in the event of damage caused by chemical or
electrochemical effects, by water or generally from abnormal conditions.
2. The warranty will be performed in such a way that we shall decide whether
to repair the defective parts or t o replace them with working parts free of
charge. AXDIA reserves the right to exchange the product for a
EN
replacement product of equal value if the product that is sent in cannot be
repaired within a reasonable time or at reasonable cost. The product can
also be exchanged for a different model of the same value. Requests
cannot be made for repairs to be carried out on site. Parts that have been
replaced or exchanged become our property.
3. The warranty claim does not apply if repairs or other work is carried out by
unauthorized persons or if our products are equipped with additional parts
or accessories that are not approved for our products.
4. Warranties that hav e b e e n activated do not cause the warranty period to
be extended, nor do they trigger a new warranty period. The warranty
period for any replacement parts installed ends with the warranty period
for the entire product.
5. Any other or further claims are excluded, especially those for replacement
due to damage caused outside of the product, provided there is no
obligatory legal liability. We therefore accept no liability for accidental,
indirect or other consequential damage of any kind, which leads to usage
restrictions, data loss, loss of earnings or interruption to business.
- 13 -

ODYS Shark
Asserting a warranty claim
1. To make use of the warranty service, you must contact the AXDIA Service
Center by e-mail, fax or phone (see below for contact details). You can
also use the service form on our website or on the back of the warranty
EN
conditions.
2. AXDIA Service Center will try to diagnose and solve your problem. If it is
determined that a warranty claim exists, you will be given an RMA number
(Return Material Authorization) and you will be asked to send the product
to AXDIA.
IMPORTANT: AXDIA will only accept parcels that have an RMA number.
Please observe the following when sending the product:
1. Send the product suitably packaged with carriage and insurance paid. Do
not enclose any accessories with the products (no cables, CD's, memory
cards, manuals, et c.), unless the AXDIA Service Centre specifies
otherwise.
2. Mark the RMA number on the outside of the package in such a wa y that it
is visible and clearly legible.
3. You must enclose a copy of the sales slip as proof of purchase.
4. Once AXDIA has received the product, it will me et its warranty obligations
in accordance with the warranty conditions and will return the product to
the sender with carriage and insurance paid.
Service outside of warranty
AXDIA can refuse any service claim made that is not covered by the warranty.
If AXDIA agrees to provide a service outside the warranty, the customer will
be invoiced for all repair and transport costs.
AXDIA will not accept any packages that have not first been approved by
AXDIA by means of an RMA (Return Material Authorization).
- 14 -
 Loading...