

Page 1

External Triggering Options Instructions
Overview
Ocean Optics USB2000, USB2000+, USB4000, HR2000, HR2000+, HR4000, Jaz, Maya, QE65000, NIR
Series, NIRQuest Series, S2000, and S1024DW Spectrometers provide several methods of acquiring data
(see table below). In the Normal mode, the spectrometer is “free running.” That is, the spectrometer is
continuously scanning, acquiring, and transferring data to your computer, according to parameters set in
the software. In this mode, however, there is no way to synchronize the scanning, acquisition, and transfer
of data with an external event. However, trigger pulses for synchronizing an external event with the
spectrometer are available.
To synchronize data acquisition with external events, other modes of acquiring data are available. Each
mode involves connecting an external triggering device to the spectrometer and then applying an external
trigger to the spectrometer before the software receives the data. The length of the integration time and
the source for the integration clock depend upon the mode chosen. All other acquisition parameters are set
in the software.
Also see the
HR4000 and USB4000 Shutter Mode Performance in Hardware Trigger Mode for more
information on external triggering with these spectrometers.
Triggering Mode Description Applicable Spectrometer(s)
Normal Spectrometer acquires spectra continuously. All
External Software Integration time is set in the software. Software
receives a trigger event and transmits spectra
obtained in the data acquisition cycle in which the
trigger occurred.
External Hardware Integration time set via chip in spectrometer (USB
Series/Jaz/HR Series/S2000 D Series) or jumpers
(S2000 series). Spectrometer waits for a sharp rise
in voltage on the trigger input pin, and then acquires
spectra until the voltage is removed.
External
Synchronization
Spectrometer acquires data from an external trigger
event (such as a push button) until the next time the
trigger is activated, at which time the spectrometer
ceases spectral acquisition and begins a new
acquisition. Integration time cannot be set, since the
trigger can fire at random intervals.
All
USB2000/USB4000/Jaz/
HR2000/HR2000+/HR4000/
S2000/S1024DW
USB2000+/USB4000/Jaz/
HR2000/HR2000+/HR4000/
S2000/S1024DW
200-00000-000-01-0310 1
Page 2
External Triggering Options Instructions
Triggering Mode Description Applicable Spectrometer(s)
Quasi-Real Time
Acquisition Mode
The integration clock is set to 4ms, which is the time
required to completely read out all the pixels. When
the software (user) requests a spectrum, the
integration clock waits for the current period to
expire, changes to the desired integration time set
via software commands, and then returns to 4ms.
With this approach, the start of the integration
period will always be within 4ms of the time when
the request for a spectrum is issued. No trigger
signal is required to operate in this mode.
QE65000, Maya2000,
Maya2000 Pro
IMPORTANT: Voltage Regulation
The maximum recommended voltage on the Triggering Pin is 5.5 V. If your triggering device exceeds
this voltage, you must regulate or condition the signal (via transistor buffering, transformer isolation or
opto-isolation, for example) or isolate the signal from the spectrometer.
Note
To use one of the External Triggering options, you must know the specifications and
limitations of the triggering device. The design of the triggering device may prevent you
from using one of the external triggering modes as it is described in these pages.
Consult the following images and table for information on which pin to connect to the triggering device
when using each triggering mode on the spectrometer.
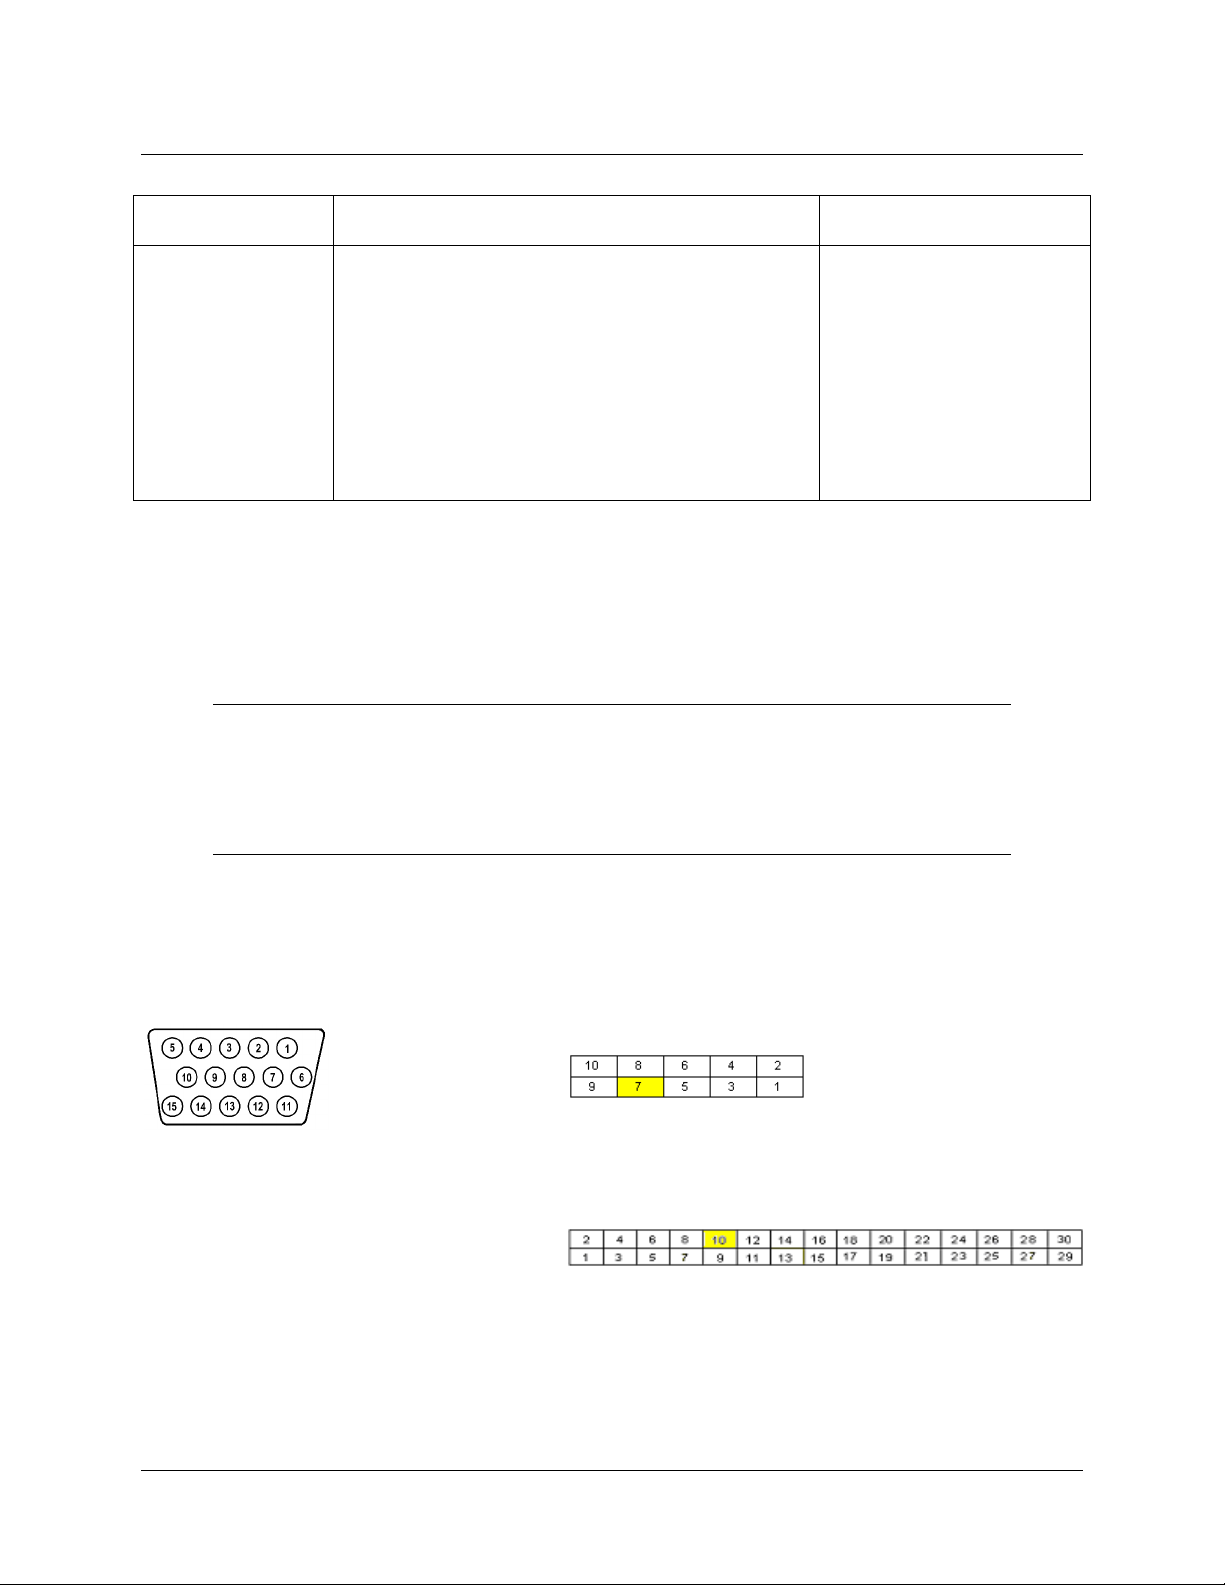
Pinout Diagrams for Ocean Optics Spectrometers
J2 (D-SUB-15) Accessory Connector on NIR
Series, S2000 and S1024DW Spectrometers
Pinout Diagram of 22-pin Connector on
USB2000+, USB4000, Jaz and HR2000
Spectrometers (be sure to also use Ground
Pin 6 when triggering)
Pinout Diagram of 10-pin Connector on USB2000
Spectrometer
Pinout Diagram of 30-pin Connector on HR2000+,
HR4000, JazNIRQuest Series, and QE65000
Spectrometers
2 200-00000-000-01-0310
Page 3

External Triggering Instructions
Trigger Input Pin Information for Ocean Optics
Spectrometers
Trigger Input Pin
Trigger Mode
External
Software
External
Synchronization
External
Hardware
S2000
S1024DW
8 10 7 10 8
5
4
QE65000
Not
Available
Not
Available
USB2000
USB2000+
USB4000
HR2000
Jaz
Not
Available
7 10
HR4000
HR2000+
Not
Available
NIR Series
NIRQuest
Series
Not
Available
Not
Available
Description
Asynchronous Mode Integration time specified in
software
Synchronous Mode - User
provides integration clock
Synchronous Mode Integration fixed by jumpers
External Triggering vs. Triggering an External
Event
There could be some confusion between the concepts of External Triggering and triggering an external
event. The following sections explain each of these concepts.
External Triggering
In External Triggering, an event outside the sampling system (such as a push button, lever activation, or
laser pulse) triggers the voltage level on the spectrometer’s trigger pin and instructs the spectrometer to
begin spectra acquisition.
Triggering an External Event
When triggering an external event, the spectrometer instructs an external device (typically a lamp such as
the PX-2 or the LS-450) to illuminate immediately prior to spectral acquisition.
200-00000-000-01-0310 3
Page 4

External Triggering Options Instructions
Level Triggering and Edge Triggering
In External Triggering, there are two modes of triggering available. The trigger mode in use determines
the kind of triggering that the system will use.
Level Triggering
Level triggering mode is only available when using External Software Triggering mode. In this mode, the
software monitors the A/D converter for an increase in the voltage level applied to the trigger pin. When
the appropriate increase in voltage is received (5 volts), the software instructs the spectrometer to acquire
spectra.
In this mode, the A/D converter will acquire data in intervals based on the integration time set in the
software. Thus, if a trigger occurs in the middle of an integration period, the software will retrieve the
spectra obtained for that entire integration period (before AND after the trigger event). Similarly, if a
trigger occurs immediately prior to the end of an integration period, the software will still retrieve the
spectra obtained during that integration period.
For example, if the integration time is 50 ms and the trigger event occurs 48 ms into the integration cycle,
the 2 ms following the trigger will be acquired, and the 48 ms prior to and including the trigger will be
acquired.
Edge Triggering
Edge triggering mode is available when using External Hardware and External Synchronization
Triggering modes. In both of these modes, the spectrometer monitors the trigger input pin for
in the voltage
voltage rise is received and the spectrometer “sees” the voltage peak caused by the increase, the
spectrometer acquires spectra and transmits the spectra to the software.
In External Hardware Triggering mode, the spectrometer begins an acquisition upon receiving trigger and
acquires for one integration cycle. In External Synchronization Triggering mode, however, data
acquisition continues until the next rise in voltage is “seen” by the spectrometer.
(which may or may not reach the 5 volt plateau) applied to the trigger pin. When this
rapid rise
4 200-00000-000-01-0310
Page 5

External Triggering Instructions
Integration Times Available with External
Triggering
The following table illustrates the integration times available with External Triggering modes:
Spectrometer External
Software
USB2000/HR2000 Set in Software 50 msec Cannot Manually
USB4000/USB2000+/Jaz/HR2000+/HR4000 Set in Software Set in Software Input by software
NIR Series Set in Software Not Available Not Available
NIRQuest Series Set in Software Not Available Not Available
S2000/S1024DW Set in Software Set on Jumpers Cannot Manually
S2000 D-Series Set in Software 55 msec Cannot Manually
QE65000 Set in Software Not Available Not Available
External
Hardware
External
Synchronization
Set
Set
Set
Software Support
The following table details External Triggering support capacity in all Ocean Optics software products:
Product Supported Not Supported
SpectraSuite
OOIBase
OOIBase32
OOIBase32 Platinum
OOIColor
OOI Driver Products
200-00000-000-01-0310 5
All Modes --
All Modes --
All Modes --
All Modes --
External Software and External Hardware External Synchronization
All Modes --
Page 6

External Triggering Options Instructions
Product Supported Not Supported
OOISensors
OOIIrrad
Palm Spec
External Software
External Software and External Hardware External Synchronization
External Software External Sync and External Hardware
External Synchronization and External
Hardware
Configuring External Triggering
External Software Trigger Mode
In this level-triggered mode, the spectrometer is “free running,” just as it is in the Normal mode. The
spectrometer is continually scanning and collecting data. With each trigger, the data collected up to the
trigger event is transferred to the software. If you continuously apply triggers (for example, by holding
down the button on via an external switch), this mode is equivalent to operating in the Normal mode.
In the External Software Trigger mode, you set the integration time (as well as all other acquisition
parameters) in the software. The source for the integration clock comes from the A/D converter.
If the software trigger is asserted during integration cycle n, the photons from this integration period will be read out and digitized at the start of
integration cycle n+1
External Software Triggering – Trigger Timing
When to Use the External Software Trigger Mode
Use the External Software Trigger mode if you:
Are using a continuous illumination source, and the light intensity is constant before, during, and
after the trigger.
Need to set the integration time in the software.
6 200-00000-000-01-0310
Page 7

Using the External Software Trigger Mode
► Procedure
1. Connect the line to the appropriate pin on the spectrometer:
USB2000, USB2000+, USB4000, Jaz, and HR2000 Spectrometers
Supply a line from Pin 7 of the Multi-pin Connector on the spectrometer to your triggering
device.
HR2000+, HR4000 and QE65000 Spectrometers
Supply a line from Pin 10 of the Multi-pin Connector on the spectrometer to your triggering
device.
NIR Series, S2000, and S1024DW Spectrometers
Supply a line from Pin 8 of the J2 Accessory Connector to the triggering device, and then connect
Pin 10 of the J2 Accessory Connector (ground) to the ground of the triggering device.
2. Set triggering in the software:
External Triggering Instructions
SpectraSuite
Use the External Trigger selection box on the Trigger toolbar to set the trigger mode of the
spectrometer to
Software.
OOIBase32
a. Click the Data Acquisition icon or select Spectrum | Configure Data Acquisition from
the OOIBase32 menu bar and set the acquisition parameters in the software
b. Select the
Software Trigger.
c. Enable the
after each trigger.
If you enable this function, OOIBase32 displays a file save dialog box after each trigger. To
avoid manually naming a file for each trigger, you can enable the Autoincrement Filenames
function from the
External Trigger page on the Configure Data Acquisition screen and select
Automatically save file on trigger box if you wish to save the data to a file
File | Autoincrement Filenames | Enabled option in the menu bar.
Note
200-00000-000-01-0310 7
Page 8

External Triggering Options Instructions
Once you select an external trigger mode, your computer will appear unresponsive. This
is normal, as the computer is waiting for a trigger. You must apply one more trigger to
the spectrometer after selecting a new trigger mode.
Since this is a level-triggered mode, the delay between the trigger pulse and spectrum acquisition varies,
depending on the speed at which the software polls the line and recognizes it is HIGH, as well as the
amount of time until the start of the next integration period.
External Synchronization Trigger Mode – S2000 and
S1024DW Spectrometers Only
In this edge-triggered mode, the spectrometer is idle until you apply the initial trigger to the spectrometer.
With each trigger, the spectrometer:
1. Stops taking its current scan (if applicable)
2. Transfers data to the software
3. Begins a new scan
4. Integrates until another trigger is applied
In the External Synchronization Trigger mode, the frequency of triggers to the spectrometer determines
the effective integration time. The effective integration time is the time between rising edges of signals
applied to Pin 5 of the J2 Accessory Connector. All other acquisition parameters are set in the software.
The source for the integration clock is the external triggering device itself, such as a periodic TTL signal.
External Synchronization Triggering – Trigger Timing
When to Use External Synchronization Trigger Mode
Use the External Synchronization Trigger mode if you:
Must synchronize your scans to an external clock source
Are using a lock-in amplifier
Are using a chopper
8 200-00000-000-01-0310
Page 9

External Triggering Instructions
Using the External Synchronization Trigger Mode
► Procedure
1. Supply a line from Pin 5 of the J2 Accessory Connector to the triggering device. (See figure in
Pinout Diagrams for Ocean Optics Spectrometers on page 2 for pin location.)
2. Connect Pin 10 of the J2 Accessory Connector (ground) to the ground of the triggering device.
3. Click the Data Acquisition icon or select
OOIBase32 menu bar and set the other acquisition parameters.
4. Select the External Trigger page on the Configure Data Acquisition screen and select
Synchronization.
5. Enable the
trigger.
If you enable this function, OOIBase32 displays a file save dialog box after each trigger. To avoid
manually naming a file for each trigger, you can enable the Autoincrement Filenames function
from the
Automatically save file on trigger box if you wish to save the data to a file after each
File | Autoincrement Filenames | Enabled option in the menu bar.
Spectrum | Configure Data Acquisition from the
Note
Once you select an external trigger mode, your computer will appear unresponsive. This
is normal, as the computer is waiting for a trigger.
External Hardware Trigger Mode – USB2000, USB2000+,
USB4000, Jaz, HR2000, HR2000+ and HR4000
Spectrometers
In this edge-triggered mode, the spectrometer is idle until you apply a trigger to the spectrometer. With
each trigger, the following events occur:
1. The spectrometer is cleared and then begins integrating
2. For USB2000 and HR2000: The spectrometer integrates for 50 milliseconds (you can contact
Ocean Optics if you require a different integration time)
For USB2000+, USB4000, Jaz, HR2000+ and HR4000: The integration time is selectable in
software
3. The data is transferred to the software; the spectrometer then sits idle waiting for the next trigger
200-00000-000-01-0310 9
Page 10

External Triggering Options Instructions
External Hardware Triggering – Trigger Timing
When to Use External Hardware Triggering Mode
Use the External Hardware Triggering mode if you:
Are using a pulsed excitation source or light source in your experiment (such as a laser or flash
lamp)
Are doing LIF (fluorescence with pulsed excitation) or phosphorescence experiments
Need to synchronize an acquisition with an external event
Using External Hardware Triggering Mode
Follow the steps below to enable External Hardware Triggering mode.
► Procedure
1. Supply a line from Pin 7 on the USB2000/USB2000+/Jaz//HR2000/USB4000 or Pin 10 on the
HR2000+/HR4000 of the Multi-pin Connector to your triggering device.
2. Set your acquisition parameters, such as integration time, in the software.
SpectraSuite
Use the External Trigger selection box on the Trigger toolbar to set the trigger mode of the
spectrometer to
OOIBase32
a. Select Spectrum | Configure Data Acquisition from the menu. Choose the External Trigger
tab and select Hardware Trigger.
External Hardware.
b. Enable the
trigger.
10 200-00000-000-01-0310
Automatically save file on trigger box to save processed data with each external
Page 11

External Triggering Instructions
If you enable this function, you will be presented with a file save dialog box with each
trigger.
To avoid manually naming a file for each trigger, you can enable the
Filenames
Choose a base name and starting index for the autoincremented files.
function by selecting File | Autoincrement Filenames | Enabled from the menu.
Autoincrement
Note
Once you select the External Hardware Trigger mode, your system may appear
unresponsive. However, the system is actually waiting for the trigger.
c. Activate your triggering device. The acquisition parameters, name of the window acquiring
data and trigger mode are displayed in the main status bar.
External Hardware Trigger Mode – S2000 and S1024DW
Spectrometers
In this edge-triggered mode, the spectrometer is idle until you apply a trigger to the spectrometer. With
each trigger, the spectrometer:
1. Clears its memory and then begins integrating
2. Integrates for a fixed period of time, determined by the jumpered pins on the spectrometer’s
circuit board
3. Transfers the data to the software
4. Waits for the next trigger
In the External Hardware Trigger mode, you set the integration time by positioning jumpers over pins on
the spectrometer’s circuit board. All other acquisition parameters are set in the software. The source for
the integration clock is the external triggering device itself. This mode is ideal for use with laser and other
short-pulse events.
External Hardware Triggering – Trigger Timing
200-00000-000-01-0310 11
Page 12

External Triggering Options Instructions
When to Use External Hardware Trigger Mode
Use the External Hardware Trigger mode if you:
Are using a pulsed excitation or light source in your experiment
Are doing LIF (fluorescence with pulsed excitation) or phosphorescence experiments
Are able to jumper the pins on Jumper Block 4 of the spectrometer’s electronic board
Need to synchronize an acquisition with an external event
Using the External Hardware Triggering Mode
► Procedure
Supply a line from Pin 4 of the J2 Accessory Connector to the triggering device. (See figure in Pinout
Diagrams for Ocean Optics Spectrometers on page 2 for pin location.)
1. Connect Pin 10 of the J2 Accessory Connector (ground) to the ground of the triggering
device.
2. Consult the charts below to determine the integration time. Identify the Spectrometer and
A/D converter you are using, and then choose the integration time.
S2000 Miniature Fiber Optic Spectrometer
Integration Time
Integration
ADC500, SAD500
(500 kHz Master Clock
Freq)
8.8 ms 4.4 ms 2.2 ms 8.8/F
27.5 ms 13.3 ms 6.7 ms 27.5/F
55 ms 27.5 ms 13.8 ms 55/F
137.5 ms 68.8 ms 34.4 ms 137.5/F
Fm = the master clock frequency in MHz; shorted = connected; open = disconnected
ADC1000
(1 MHz Master Clock
Freq)
ADC2000
(2 MHz Master Clock
Freq)
Time
Equation
Jumper Block 4
(JP4)
Pins 1-2 Pins 3-4
m
m
m
m
open open
open shorted
shorted open
shorted shorted
12 200-00000-000-01-0310
Page 13

S1024DW Miniature Fiber Optic Spectrometer
Jumper Block 4 (JP4)Integration Time
SAD500
(500 kHz Master Clock
Freq)
Integration Time
Equation
Pins 1-2 Pins 3-4
External Triggering Instructions
5 ms 1000/F
60 ms 12000/F
300 ms 60000/ F
655 ms 131070/ F
Fm = the master clock frequency in Hz (i.e., 200 kHz for the SAD500); shorted = connected; open = disconnected
m
m
m
m
open open
open shorted
shorted open
shorted shorted
► Procedure
1. Note the configuration of the pins in the Jumper Block 4 column of the chart.
2. Remove the spectrometer from its housing. Do not tamper with the optical bench.
(If you have more than one channel in your system, you may have to disconnect the
channels from one another. The master spectrometer is always on the bottom of a
multiple channel system.)
3. Locate Jumper Block 4 (JP4) in the center of the green circuit board, near the
optical bench. (See the figure to the right.) Jumper Block 4 consists of the first four
pins, which are numbered 1, 2, 3, and 4.
4. Using jumpers, configure the pins to match the integration time you selected.
For example, if you have an S2000 and an ADC1000 A/D Converter, you select
13.3 milliseconds as the integration time. To enable this, place a jumper over pins 3 and 4 to short
the pins, and leave pins 1 and 2 open.
5. Click on the Data Acquisition icon or select
Spectrum | Configure Data Acquisition from the
OOIBase32 menu bar, then set other acquisition parameters (averaging, boxcar smoothing, etc.)
in the software.
6. Select the
External Trigger page from the Configure Data Acquisition screen, and then select
Hardware Trigger.
200-00000-000-01-0310 13
Page 14

External Triggering Options Instructions
7. Enable the Automatically save file on trigger box if you wish to save the data to a file after each
trigger.
If you enable this function, OOIBase32 displays a file save dialog box after each trigger. To avoid
manually naming a file for each trigger, you can enable the Autoincrement Filenames function
from the
File | Autoincrement Filenames | Enabled option in the menu bar.
Note
Once you select an external trigger mode, your computer will appear unresponsive. This
is normal, as the computer is waiting for a trigger.
It is important to note that if you apply triggers faster than the fixed integration time, you will miss
acquisitions.
Cables
To configure external triggering functions with an Ocean Optics spectrometer, you may need one of the
following cables. To order any of these cables, contact an Ocean Optics Applications Sales Engineer.
14 200-00000-000-01-0310
 Loading...