

Page 1

Installation and Operation Manual
Document Number 013-RD000-000-02-201103
Offices: Ocean Optics, Inc. World Headquarters
830 Douglas Ave., Dunedin, FL, USA 34698
Phone 727.733.2447
Fax 727.733.3962
8 a.m.– 8 p.m. (Mon-Thu), 8 a.m.– 6 p.m. (Fri) EST
E-mail: Info@OceanOptics.com (General sales inquiries)
Orders@OceanOptics.com (Questions about orders)
TechSupport@OceanOptics.com (Technical support)
Page 2

Additional
Offices:
Regional Headquarters
Maybachstrasse 11
73760 Ostfildern
Phone 49-711 34 16 96-0
Fax 49-711 34 16 96-85
E-Mail Sales@Mikropack.de
Ocean Optics Asia
666 Gubei Road, Kirin Tower, Suite 601B, Changning District,
Shanghai, PRC. 200336
Phone 86.21.5206.8686
Fax 86.21.5206.8686
E-Mail Sun.Ling@OceanOptics.com
Ocean Optics EMEA
Sales and Support Center
Geograaf 24, 6921 EW DUIVEN, The Netherlands
Phone 31-26-3190500
Fax 31-26-3190505
E-Mail Info@OceanOptics.eu
Copyright © 2010 Ocean Optics, Inc.
All rights reserved. No part of this publication may be reproduced, stored in a retrieval system, or transmitted, by any means, electronic,
mechanical, photocopying, recording, or otherwise, without written permission from Ocean Optics, Inc.
This manual is sold as part of an order and subject to the condition that it shall not, by way of trade or otherwise, be lent, re-sold, hired out or
otherwise circulated without the prior consent of Ocean Optics, Inc. in any form of binding or cover other than that in which it is published.
Trademarks
All products and services herein are the trademarks, service marks, registered trademarks or registered service marks of their respective owners.
Limit of Liability
Every effort has been made to make this manual as complete and as accurate as possible, but no warranty or fitness is implied. The information
provided is on an “as is” basis. Ocean Optics, Inc. shall have neither liability nor responsibility to any person or entity with respect to any loss or
damages arising from the information contained in this manual.
Page 3

Table of Contents
About This Manual......................................................................................................... v
Document Purpose and Intended Audience..............................................................................v
What’s New in this Document ...................................................................................................v
Document Summary..................................................................................................................v
Product-Related Documentation ...............................................................................................vi
Upgrades.......................................................................................................................vi
Service..........................................................................................................................vi
Chapter 1: Introduction.....................................................................1
Product Overview..........................................................................................................1
Jaz Modules..................................................................................................................2
Features........................................................................................................................ 2
System Requirements...................................................................................................3
EEPROM Utilization ..................................................................................................................3
About SpectraSuite....................................................................................................................3
Sampling System Overview.......................................................................................................4
How Sampling Works............................................................................................................4
Interface Options...........................................................................................................4
Shipment Components..................................................................................................4
Additional Equipment Available.....................................................................................5
Chapter 2: Installing Jaz....................................................................9
Overview....................................................................................................................... 9
Installing SpectraSuite Software.................................................................................... 10
Installing the Jaz Unit ....................................................................................................10
Connecting Jaz to a Computer via USB....................................................................................10
Ethernet Connection..................................................................................................................11
Chapter 3: Operating Jaz..................................................................15
Overview....................................................................................................................... 15
Powering Your Jaz Unit.................................................................................................16
Jaz Menus.....................................................................................................................17
Main Menu.................................................................................................................................17
013-RD000-000-02-201103 i
Page 4

Table of Contents
Measurement Wizards...............................................................................................................21
Tools....................................................................................................................................22
*
JAZ-PX Menu ............................................................................................................................24
JAZ-INDY Menu ........................................................................................................................24
Storing Data on an SD Card..........................................................................................24
Chapter 4: Operating the JAZ-PX Module........................................25
JAZ- PX Module Overview.............................................................................................25
JAZ-PX Module Features..............................................................................................26
JAZ-PX Menu................................................................................................................27
JAZ-PX Menu Tree....................................................................................................................27
PX Menu Default Values ...........................................................................................................31
Getting Started with the JAZ-PX Module .......................................................................31
Setting JAZ-PX for Free Running Mode....................................................................................32
Setting JAZ-PX for Triggered Mode ..........................................................................................32
Operating JAZ-PX from SpectraSuite .......................................................................................33
Getting Started using JAZ-PX with SpectraSuite..................................................................33
Synchronizing a Spectrometer Module to a JAZ-PX Module (recommended).....................33
Chapter 5: Operating the JAZ-INDY Module....................................35
JAZ- INDY Module Overview......................................................................................... 35
JAZ-INDY Module Features...........................................................................................35
JAZ-INDY Menu............................................................................................................36
JAZ-INDY Menu Defaults ..........................................................................................................41
Calibrating the JAZ-INDY Module..................................................................................41
Calibrating the Voltage Outputs ................................................................................................42
Calibrating the Voltage Inputs ...................................................................................................43
Calibrating the 4-20mA Transmitter ..........................................................................................44
Calibrating the 4-20mA Receiver ..............................................................................................44
Operating JAZ-INDY from SpectraSuite........................................................................ 44
Chapter 6: Maintenance ....................................................................46
Overview....................................................................................................................... 46
Software Updates..........................................................................................................46
SpectraSuite..............................................................................................................................46
Jaz.............................................................................................................................................46
Jaz Troubleshooting......................................................................................................46
Jaz Connected to Computer Prior to SpectraSuite Installation.................................................46
Windows Operating Systems................................................................................................46
Mac Operating Systems........................................................................................................48
ii 013-RD000-000-02-201103
Page 5

3: Troubleshooting
Linux Operating Systems......................................................................................................48
Jaz Troubleshooting Tips ..........................................................................................................48
Replacing an LED Assembly in the JAZ-INTLED Module..............................................49
Parts Needed.............................................................................................................................50
LED Assembly Replacement Procedure...................................................................................50
Appendix A: Calibrating the Wavelength of Jaz..............................52
Overview....................................................................................................................... 52
About Wavelength Calibration.......................................................................................52
Calibrating the Spectrometer.........................................................................................53
Preparing for Calibration............................................................................................................53
Calibrating the Wavelength of the Spectrometer ......................................................................53
Saving the New Calibration Coefficients: USB Mode..................................................... 55
Appendix B: Specifications...............................................................56
Overview....................................................................................................................... 56
Index...................................................................................................59
013-RD000-000-02-201103 iii
Page 6

Table of Contents
iv 013-RD000-000-02-201103
Page 7

About This Manual
Document Purpose and Intended Audience
This document provides the users of Jaz with instructions for setting up, calibrating and performing
experiments with their Jaz unit.
What’s New in this Document
This version of the Jaz Installation and Operation Manual adds information for Overture spectrometer
operating software and clarifies the type of SD cards to use.
Document Summary
Chapter Description
Chapter 1: Introduction
Chapter 2: Installing Jaz
Chapter 3: Operating Jaz
Chapter 4: Operating the JAZ-PX
Module
Chapter 5: Operating the JAZ-
INDY Module
Chapter 6: Maintenance
Appendix A: Calibrating the
Wavelength of Jaz
Appendix B: Appendix B
Specifications
Contains descriptive information about Jaz and how sampling
works. It also provides a list of system requirements, interface
options, and shipment components.
Provides installation instructions.
Provides instructions for using Jaz without SpectraSuite
software. For information on using Jaz with SpectraSuite, see
the SpectraSuite manual (see
Documentation below).
Contains instructions for using the JAZ-PX module. Includes
menus and setup information.
Provides instructions for the JAZ-INDY module.
Contains recommended steps to isolate and correct common
problems. Also contains instructions for obtaining software
updates and replacing an LED in the JAZ-INTLED module.
Provides instructions for calibrating the Jaz spectrometer
module.
Contains technical specifications for the Jaz stack and its
individual modules.
Product-Related
013-RD000-000-02-201103 v
Page 8

About This Manual
Product-Related Documentation
You can access documentation for Ocean Optics products by visiting our website at
http://www.oceanoptics.com
document from the available drop-down lists. Or, use the Search by Model Number field at the bottom
of the web pag
Jaz Absolute Irradiance Installation and Operation Manual
JAZ-CBL-DB15 Accessory Cable Instructions
Jaz Battery Pack Instructions
Jaz Ethernet Ferrite Installation
JAZ-PX Lamp Module Engineering Note
Jaz Data Sheet
NeoFox and NeoFox Sport Installation and Operation Manual
Detailed instructions for Overture Spectrometer Operating Software are located at:
Detailed instructions for SpectraSuite Spectrometer Operating Software are located at:
e.
http://www.oceanoptics.com/technical/Overture.pdf
http://www.oceanoptics.com/technical/SpectraSuite.pdf
. Select Technical → Operating Instructions, then choose the appropriate
.
Engineering-level documentation is located on our website at Technical → Engineering Docs.
You can also access operating instructions for Ocean Optics products from the Software and Technical
Resources CD that ships with the product.
Upgrades
Occasionally, you may find that you need Ocean Optics to make a change or an upgrade to your system.
To facilitate these changes, you must first contact Customer Support and obtain a Return Merchandise
Authorization (RMA) number. Please contact Ocean Optics for specific instructions when returning a
product.
Service
Our Total Technical Service protection plans protect your spectrometer for one year for any contingency -
- no matter what the circumstances, including total loss. Under these plans, Ocean Optics will repair or
replace your instrument with no deductible or any other out-of-pocket expense required from you. HR
service plans include the following:
TTS-JAZ: Protects your Ocean Optics Jaz spectrometer for any contingency for 1 year. Provides
for full spectrom
In addition, we also have the WAVECAL-USB spectrometer maintenance and calibration service
available to recalibrate, clean and perform any adjustments necessary on your spectrometer.
eter replacement, if necessary. Limited to 1 full replacement per year.
Contact us to learn more about these great service plans.
vi 013-RD000-000-02-201103
Page 9

Chapter 1
Introduction
Product Overview
Jaz is a community of stackable, modular and autonomous component modules that combine to create a
community of smart sensing instruments that is unfettered by the limits of traditional optical sensing
instrumentation: a powerful microprocessor and onboard display eliminate the need for a PC; stackable,
autonomous instrument modules allow users to customize the system to their changing application needs;
and Ethernet connectivity plus SD card data storage capability facilitate remote operation.
Jaz is built on a platform that expands to include a light source, rechargeable lithium-ion battery and up to
8 spectrometer modules to make Jaz the first analytical instrument easily adaptable for the field, lab or
process environment. Jaz can also connect to a computer via the USB port. When connected through a
USB 2.0 or 1.1, the spectrometer draws power from the host computer. Jaz, like all USB devices, can be
controlled by our SpectraSuite software, a completely modular, Java-based spectroscopy software
platform that operates on Windows, Macintosh and Linux operating systems.
Jaz is extremely adaptable. It can be powered via battery, USB connection, over the Ethernet, or from a
power outlet. The Jaz display can be rotated 180 degrees in either direction and the faceplate itself can be
specified for either orientation. You can order the specific modules needed for your particular application
to be built in the Jaz stack, making Jaz a uniquely customizable scientific instrument and eliminating the
cost of unnecessary components.
Stack of Jaz Modules
013-RD000-000-02-201103 1
Page 10

1: Introduction
Jaz Modules
Jaz consist of a stack of individual spectroscopic instruments specified by the user to suit their unique
application. Modules available for the Jaz stack include the following:
Module Description
JAZ-S Spectrometer and grating (up to 8 can be configured in a stack)
JAZ-DPU Processor (CPU), OLED display and keypad
JAZ-E Ethernet and memory module. Includes one slot for an SD card (up to 2 GB).
JAZ-B Battery (lithium-ion) and memory module. Includes two slots for an SD card (up to 2 GB
each). A Jaz 50-Watt battery extender (JAZ-EXT-BP-50WH) is also available.
JAZ-INDY Industrial module enables communication with RS-232 and RS-485 data standards.
Offers both analog and digital inputs and outputs.
JAZ-PX Pulsed xenon light source
JAZ-UV-VIS Deuterium-tungsten halogen light source
JAZ-VIS-NIR Tungsten-halogen light source
JAZ-INTLED LED module that allows you to replace the following LED assmblies:
- JAZ-L640: 640 nm red LED
- JAZ-L590: 590 nm yellow LED
- JAZ-L450: 470 nm blue LED
- JAZ-L365: 365 nm UV LED
- JAZ-LWHITE: White LED
JAZ-NEOFOX Jaz NeoFox Sport oxygen sensing module for measuring percentage of oxygen.
A Jaz Combo consists of a combination of up to three JAZ-S spectrometer modules and a JAZ-DPU
module.
Features
Sony ILX511B 2048-element linear silicon CCD array detector
14 grating options, UV through shortwave NIR
Responsive from 200 to 1100 nm
Maximum Wavelength range 650 nm
Sensitivity of up to 75 photons/count at 400 nm; 41 photons/count at 600 nm
An optical resolution of ~0.3 to 10.0 nm (FWHM)
Integration times from 870 µ to 65 seconds
EEPROM storage for
Wavelength Calibration Coefficients
2 013-RD000-000-02-201103
Page 11

1: Introduction
Linearity Correction Coefficients
Absolute Irradiance Calibration (optional)
SD card data storage
Low power consumption of ~ 2.5 W
16 bit, 3MHz A/D Converter
20-pin connector for interfacing to external products
8-hour rechargable lithium-ion battery
Up to 3 spectrometer channels in a stack for simultaneous multipoint measurement
CE Certification
RoHS compliant
Ethernet IEEE 802.3 compliant 10/100
System Requirements
You can use the Jaz USB connectivity with any computer that meets the following requirements:
Operating system is one of the following:
Windows – 98/Me/2000/XP/Vista/Windows 7
Apple Macintosh – OS X version 10.0 or later
Linux – Red Hat 9 or later, Fedora (any version), Debian 3.1 (Sarge), and SUSE (9.0 or
later)
Ocean Optics’ Overture or SpectraSuite software application installed and configured for use.
EEPROM Utilization
An EEPROM memory chip in each JAZ-S spectrometer module contains wavelength calibration
coefficients, linearity coefficients, and a serial number unique to each individual spectrometer module.
The SpectraSuite software application reads these values directly from the spectrometer, enabling the
ability to “hot-swap” spectrometers between computers without entering the spectrometer coefficients
manually on each computer.
About SpectraSuite
Although Jaz is unique in that it can perform a number of spectroscopy measurements and display results
right on its display screen, SpectraSuite spectrometer operating software is also available to enhance Jaz’s
functionality. SpectraSuite is the latest generation of operating software for all Ocean Optics
spectrometers. It is a completely modular, Java-based spectroscopy software platform that operates on
Windows, Macintosh and Linux operating systems. The software can control any Ocean Optics USB
spectrometer and device, as well as any other manufacturer’s USB instrumentation using the appropriate
drivers.
013-RD000-000-02-201103 3
Page 12

1: Introduction
SpectraSuite is a user-customizable, advanced acquisition and display program that provides a real-time
interface to a variety of signal-processing functions. With SpectraSuite, you have the ability to perform
spectroscopic measurements (such as absorbance, reflectance, and emission), control all system
parameters, collect and display data in real time, and perform reference monitoring and time acquisition
experiments. Consult the SpectraSuite manual for hardware requirements when using SpectraSuite (see
Product-Related Documentation
).
Sampling System Overview
How Sampling Works
Ocean Optics components function in a sampling system as follows:
1. The user stores reference and dark measurements to correct for instrument response variables.
2. The light from the light source transmits through an optical fiber to the sample.
3. The light interacts with the sample.
4. Another optical fiber collects and transmits the result of the interaction to the spectrometer.
5. The spectrometer measures the amount of light and transforms the data collected by the
spectrometer into digital information.
6. The spectrometer passes the sample information to SpectraSuite.
7. SpectraSuite compares the sample to the reference measurement and displays processed spectral
information.
Interface Options
Jaz is field-portable and can collect data as a free-standing unit from the battery embedded in the stack.
The Jaz stack also has both USB and Ethernet port connectors, enabling you to connect the spectrometer
to a computer via a USB port or to the network via a connection from the Ethernet port to a Power Over
Ethernet (POE) bridge or a switch to the network (e.g., a network hub). Your Jaz stack receives power
from either connection, and both connections enable Jaz to be recognized by SpectraSuite software.
Shipment Components
Jaz is a scalable system, allowing you to design the instrument most appropriate for your application.
However, a typical Jaz system could consist of the following components:
Packing List
The packing list is inside a plastic bag attached to the outside of the shipment box (the invoice
arrives separately
spectrometer (such as the grating, detector collection lens, and slit). The packing list also includes
the shipping and billing addresses, as well as any items on back order.
). It lists all items in the order, including customized components in the
4 013-RD000-000-02-201103
Page 13

1: Introduction
Jaz Stack
Usually consists of up to eight spectrometer modules (JAZ-S), a CPU module (JAZ-DPU), a
battery/mem
Mini USB Cable (USB-CBL-MINI)
ory module (JAZ-B), and an Ethernet/SD module (JAZ-E).
Use this cable to connect your Jaz spectrometer module to a computer running on a Windows,
Mac or Linux opera
Ethernet Cable (if an Ethernet module is included)
ting system.
A 14-foot cable to connect the JAZ-E module to a bridge or switch to access the network.
Power Supply (USB-CBL-PS)
A 5 V power supply to provide an extra power source in addition to the battery, USB power and
POE (Power Over E
Wavelength Calibration Data Sheet
thernet).
Each spectrometer is shipped with a Wavelength Calibration Data Sheet that contains information
unique to your spe
ctrometer. SpectraSuite Operating Software reads this calibration data from
your spectrometer when it interfaces to a computer via the USB port.
Note
Please save the Wavelength Calibration Data Sheet for future reference.
Software and Technical Resources CD
Each order ships with the Ocean Optics Software and Resources CD. This disc contains software,
operating instructi
ons, and product information for all Ocean Optics software, spectrometers, and
spectroscopic accessories. You need Adobe Acrobat Reader version 6.0 or higher to view these
files. Ocean Optics includes the Adobe Acrobat Reader on the Software and Technical Resources
CD.
Ocean Optics softwa
re requires a password during the installation process. You can locate
passwords for the other software applications on the back of the Software and Technical
Resources CD package.
Additional Equipment Available
In addition to the Jaz Modules, the following software and accessories are available for use with Jaz. Visit
us at www.OceanOptics.com
JAZ-MNT-DIN3 rail-mounting kit
JAZ-MNT-WALL wall-mounting kit for mounting Jaz stacks with 3 or fewer modules
(excluding the DPU and end module) onto a wall.
for a complete list of products available for all of your spectroscopy needs.
JAZ-MOUNT Jaz side-mounting kit for 3 different orientations.
JAZ-CBL-DB15 accessory cable. See JAZ-CBL-DB15 Accessory Cable Instructions.
013-RD000-000-02-201103 5
Page 14

1: Introduction
JAZ-ADP-GPIO adapter for DPUs manufactured on January 1, 2008. See JAZ-CBL-DB15
Accessory Cable Instructions.
JAZ-PACK soft-sided Jaz carrying pack with adjustable shoulder strap (-S) or waist belt (-W).
JAZ-CASE-1450 black Jaz Pelican 1450 case.
JAZ-SOLAR solar battery supply with charger for an additional 4 hours of battery life.
JAZ-ULM-200 Jaz light measurement system for spectroradiometric analysis.
JAZ-PX Jaz PX pulsed xenon light source. See Chapter 4: Operating the JAZ-PX Module.
JAZ-EXT-BP-50WH battery pack (50 Watt-hour)
Accessory Lithium-ion external 5V power supply. See Jaz Battery Pack Instructions.
INTLED-KIT tool kit for changing LEDs in the JAZ-INTLED module. See Replacing an LED
Assembly in the JAZ-INTLED Module.
Jaz Light Meter convenient light-sensing tool containing the following:
Jaz Spectrometer containing reverse-orientation keypad, Grating 2 (200-850 nm), 2000-
series detector with 200-850 nm order-sorting filter and UV upgrade, L2 detector collection
lens, 10µm slit
JAZ-MOUNT side-mount module for hands-free operation
Battery module
Ethernet module with SD card
Direct-attach cosine corrector
JAZ-A-IRRAD software for irradiance measurements
Spectroradiometric calibration service (350-1000 nm)
JAZ-PACK-S carrying case with shoulder strap
JAZ-CASE-1450 Jaz Pelican case
Jaz EL 350 for VIS-NIR applications includes the following:
Jaz Spectrometer
Grating #2 (350-1000 nm)
Detector 350-1000 nm
INTSMA-25 (25mm slit)
L2 light collection lens
Battery module
SpectraSuite software
Jaz EL 200 for UV-VIS applications
Jaz Spectrometer
Grating #1 (200-850 nm)
Detector 200-850 nm
INTSMA-25 (25mm slit)
L2 light collection lens
Battery module
SpectraSuite software
6 013-RD000-000-02-201103
Page 15

Jaz EL 200-XR1 for both VIS/NIR and UV/VIS applications
Jaz Spectrometer
Grating #31 (200-1050 nm)
Detector 200-1050 nm
INTSMA-25 (25mm slit)
L2 light collection lens
Battery module
SpectraSuite software
Jaz-FL-365 for fluorescence applications
JAZ-COMBO
JAZ-L365 (365 mm LED module)
JAZ-B battery module
JAZ-E Ethernet module
Grating #2 (250-800 nm)
Detector 250-800 nm
INTSMA-200 (200mm slit)
L2 light collection lens
SpectraSuite software
Jaz-FL-450 for fluorescence applications
JAZ-COMBO
JAZ-L450 (450 mm LED module)
JAZ-B battery module
JAZ-E Ethernet module
Grating #3 (350-1000 nm)
Detector 350-1000 nm
INTSMA-200 (200mm slit)
L2 light collection lens
SpectraSuite Operating Software. See About SpectraSuite for more information.
1: Introduction
OmniDriver software driver package for Windows, Mac OSX and Linux operating systems.
JAZ-A-IRRAD absolute irradiance application.
Available on an SD card for onboard absolute irradiance measurements. See Jaz Absolute
Irradiance Insta
Jaz Scripting Language. Allows you to write scripts for your Jaz system to perform simple data
llation and Operation Manual for more information.
acquisition, processing and exporting of results to an SD card.
Jaz Application Programming Interface (API) enables 3
NeoFox Sport
rd
party development for Jaz.
Available as an additional module (JAZ-NEOFOX), when coupled with a probe, light source
module and spectrom
eter module, the NeoFox Sport offers a turnkey Oxygen and pH sensing
instrument, along with spectrometer functionality in a convenient handheld, portable device. See
NeoFox and NeoFox Sport Installation and Operation Manual for more information.
013-RD000-000-02-201103 7
Page 16

1: Introduction
Fibers
Light Sources
Integrated Sampling Systems
Cuvettes
Filter Holders
8 013-RD000-000-02-201103
Page 17

Chapter 2
Installing Jaz
Overview
Your Jaz unit is field-portable and can collect data as a free-standing unit from the battery embedded in
the stack. You also have two options for connecting Jaz to a computer to process the data you have
collected:
A USB connection directly to a computer running SpectraSuite.
An Ethernet connection to a computer network.
Note
Your Jaz unit receives power from either connection.
If you have purchased SpectraSuite software, you must install it prior to connecting Jaz Spectrometer to a
computer. The SpectraSuite software installation installs the drivers required for Jaz. If you do not install
SpectraSuite first, the computer will not properly recognize Jaz.
If you have already connected Jaz to a computer running on a Windows platform prior to installing
SpectraSuite, consult Jaz Connected to Computer Prior to SpectraSuite Installation
correcting a corrupt Jaz installation.
Caution
Connect all cables before powering-on your Jaz unit. Install Jaz in the following
order:
1. Connect the external power supply (if used).
2. Open SpectraSuite.
3. Connect the USB cable between Jaz and your computer (if used).
4. Press F5 to display Jaz in SpectraSuite.
for information on
013-RD000-000-02-201103 9
Page 18

2: Installing Jaz
Installing SpectraSuite Software
You can install SpectraSuite either from the CD you received or from the Ocean Optics website
(http://www.oceanoptics.com/technical/softwaredownloads.asp
If you already have SpectraSuite Core version 2.0.97 and OmniDriver Wrapper 2.0.52 or greater, just
perform a software update so that SpectraSuite recognizes your Jaz unit (see Software Updates
►
Procedure
1. Close all other applications running on the computer.
2. Double-click on the SpectraSuite.exe file located in SpectraSuite | bin folder (or
SpectraSuiteMac.sh for Mac users) to run the software executable. For a destination, navigate to
the C:\Program Files\OceanOptics folder.
).
).
3. Connect your Jaz unit to your computer (see Installing the Jaz Unit
4. Power-on your Jaz unit by pressing the Power button
5. For Windows PC users: The PC will launch the New Hardware Wizard. Follow instructions in the
Wizard so that your PC will properly recognize the Jaz unit.
6. Reboot your computer when requested.
7. To install on a Windows PC: Navigate to Install Ocean Optics Software | SpectraSuite |
Windows OS. The installation process begins.
8. To install on a Mac: Double-click on the CD icon and open the OceanOptics.html file to launch
the CD. Then, nav
on the newly selected .dmg file, and copy the SpectraSuite icon to Desktop or Applications.
9. To install on a Linux Platform: See the SpectraSuite Installation and Operation Manual for
full instructions.
10.
Follow the prompts on the Installation Wizard.
11. Click OK to restart your computer. You have now installed the SpectraSuite software.
Note the Jaz units th
igate to Install Ocean Optics Software | SpectraSuite | Mac OS. Double-click
at you have installed are listed in the Data Sources pane.
.
).
Installing the Jaz Unit
This section contains instructions for connecting Jaz directly to a computer through the USB port or to the
network through the Ethernet port.
Connecting Jaz to a Computer via USB
► Procedure
1. Connect the USB (B) cable that you received with your Jaz unit from the JAZ-DPU module to
your computer.
10 013-RD000-000-02-201103
Page 19

2: Installing Jaz
2. When first connecting Jaz to your computer, you must run the Hardware Wizard for your PC to
recognize the new hardware. For Mac users, this step is not necessary.
3. In SpectraSuite, select Spectrometer | Rescan Devices. Your Jaz unit should be recognized in
SpectraSuite’s Data
Sources pane as indicated by this icon:
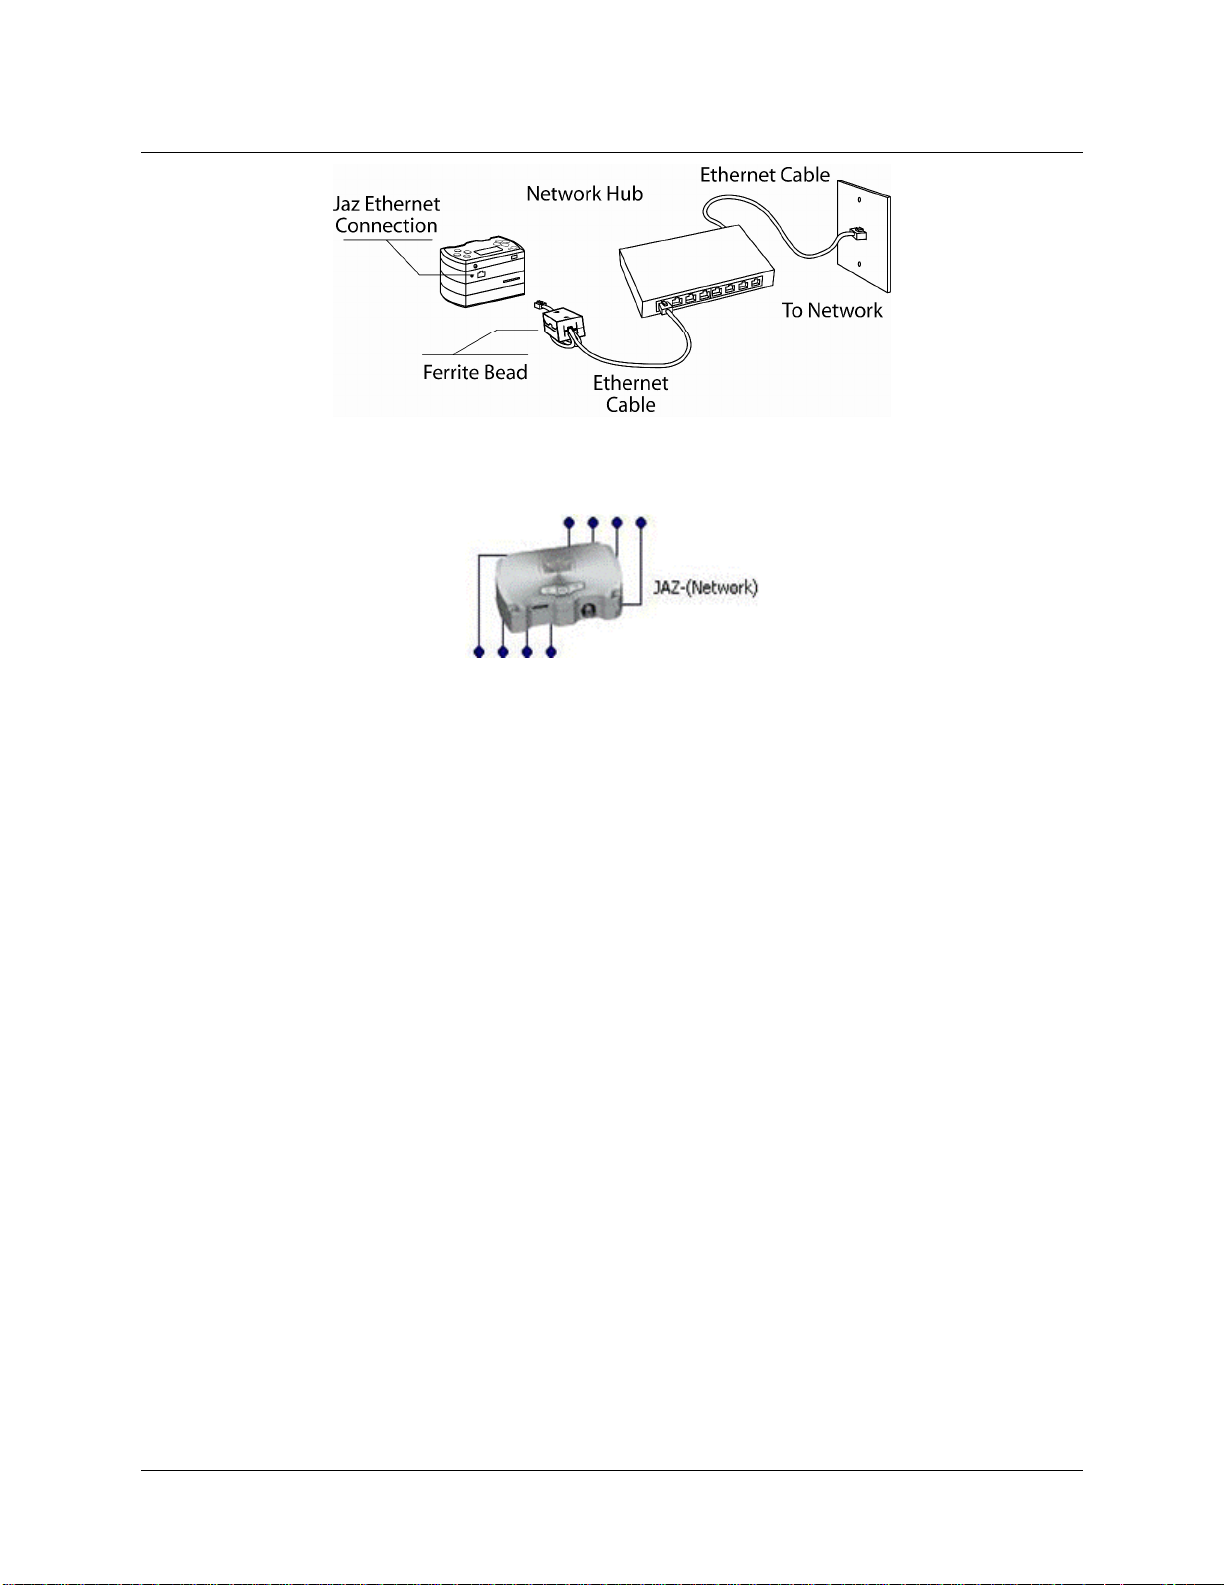
Ethernet Connection
You can connect Jaz to the network via the Ethernet port on the JAZ-E module. A ferrite is provided with
your JAZ-E Ethernet module to be used in the event that you experience interference with any electronic
devices.
►
Procedure
Follow the steps below to connect the port on the Jaz Ethernet & Memory module to a Power Over
Ethernet (POE) bridge or a switch to the network (e.g., an 8-port network hub):
1. Find the Ethernet cable and the ferrite that you received in your Jaz package.
2. Open the ferrite.
013-RD000-000-02-201103 11
Page 20

2: Installing Jaz
3. Place the ferrite on the Ethernet cable as close to the connector for the computer as possible.
4. Loop the Ethernet cable through the ferrite twice.
5. Snap the ferrite closed to lock it in place.
6. Plug the Ethernet cable into the Ethernet connector on the JAZ-E module, and then to a Power
Over Ethernet (POE) bridge or switch to the network (e.g., an 8-port network hub).
12 013-RD000-000-02-201103
Page 21
2: Installing Jaz
7. In SpectraSuite, select Spectrometer | Rescan Devices. Your Jaz unit should be recognized in
SpectraSuite’s Data Sources pane as indicated by this icon:
013-RD000-000-02-201103 13
Page 22

2: Installing Jaz
14 013-RD000-000-02-201103
Page 23

Chapter 3
Operating Jaz
Overview
Jaz is designed to perform a wide number of functions as a standalone instrument, untethered to a
computer. These functions include the following:
Power on/off the Jaz stack
Perform absorbance, reflectance and irradiance experiments and read the results on the Jaz
display screen
View and edit network settings
View battery charge
Set display backlight intensity
Update the flash memory and system information
Rotate the display screen 180 degrees
Set date and time
Control light source modules in the stack
The Jaz facepla
te providing you with your interface to the modules in your Jaz stack is shown below:
013-RD000-000-02-201103 15
Page 24

3: Operating Jaz
Powering Your Jaz Unit
The Jaz unit can be powered from the USB connection as well as from the Ethernet connection. You can
also power Jaz using the 5 VDC power supply cable and transformer that came with your unit.
Note
You can plug the power supply into your Jaz unit concurrently with the USB or Ethernet
connection without harming the equipment. This may even be necessary if the USB
connection does not supply sufficient power to drive the Jaz stack, or your Ethernet
connection is not over a POE-enabled switch/hub.
The Jaz stack contains a battery module that should allow for several hours of field operation before the
unit must be recharged. A power save feature dims the screen to 50% intensity, then darkens the screen
totally after 3 minutes of inactivity.
►
Procedure
1. Connect the power supply cable that you received with your Jaz unit from the unit’s power
connector on the JAZ-DPU module to a wall outlet.
2. Press the Power button ( ) in the center of the Jaz unit to power up the Jaz stack.
It can take the Jaz stack 2 – 3 seconds to power up.
16 013-RD000-000-02-201103
Page 25

4: Operating the JAZ-PX Module
Jaz Menus
Main Menu
Your Jaz unit is unique from other spectrometers in that it offers you an interactive menu screen to
perform various functions without the need of spectroscopy operating software. The menu order may
differ from the order shown on the following menus. Also, the functions available differ depending on
when the DPU in your Jaz stack was manufactured.
Jaz menu functions available for DPUs manufactured on January 1, 2008 include the following:
Spectrometer: Displays the Measurement Wizard. SeeMeasurement Wizards
for more
information.
Network: View and set the Jaz IP address, net mask gateway, and Name Server address.
Light Source: Provides control over the light source module, if included in the stack.
System Tools:
Downloads an update to the Jaz flash memory.
Rotates the screen orientation. Rotate-Save turns the screen display 180 degrees and saves
the screen orientation as the default. Rotate turns the screen display until Jaz is rebooted.
Adjusts the brightness of the OLED screen.
Displays the charge percentage of the battery module in the stack (if included).
Jaz menu function available for DPUs manufactured on January 1, 2008 include the following:
Serial Bus: Lets you select the specifics related to the serial bus(es) in your Jaz stack. For Jaz
stacks that conta
in a JAZ-INDY module, the Indy RS232 and Indy RS585 bus choices are
available in addition to the DPU RS232 serial bus.
File System: Allows you to manage SD cards in your Jaz stack.
Spectroscopy: Displays the Measurement Wizard. See Measurement Wizards
for more
information.
Network: View and set the Jaz IP address, net mask gateway, and Name Server address
System Tools:
Downloads an update to the Jaz flash memory.
Rotates the display screen orientation. Rotate-Save rotates the screen display 180 degrees
and saves the screen orientation as the default. Rotate rotates the screen display until Jaz is
rebooted.
Adjusts the brightness of the OLED screen.
Displays the charge percentage of the battery module in the stack (if included).
Light Source: Provides control over the light source module, if included in the stack.
Note
Jaz has a screen saver that blanks the display screen after a few minutes of inactivity.
Press any button other than Save (
performing that button’s function. The Save button actually performs a save before
redisplaying the screen.
013-RD000-000-02-201103 17
) on the faceplate to redisplay the screen without
Page 26

3: Operating Jaz
Jaz Main Menu (for DPUs dated January 1, 2008)
18 013-RD000-000-02-201103
Page 27

4: Operating the JAZ-PX Module
Jaz Main Menu (for DPUs dated January 1, 2008) (Continued)
013-RD000-000-02-201103 19
Page 28

3: Operating Jaz
Jaz Main Menu (for DPUs dated after January 1, 2008)
20 013-RD000-000-02-201103
Page 29

4: Operating the JAZ-PX Module
Jaz Main Menu (for DPUs dated after January 1, 2008)
Measurement Wizards
Jaz features shortcut wizards that are accessible via the Jaz keypad (icons on the navigation keys) for the
following measurements:
▲ Absorbance
# Reflection/Transmittance
● Irradiance
Press the button on the keypad that corresponds to the icon for the desired measurement (▲, #, or ●).
013-RD000-000-02-201103 21
Page 30

3: Operating Jaz
Tools
*
The Tools menu item provides additional functionality for manual setting of acquisition parameters,
retrieving information about the spectrometer module properties, and lamp set-up (if applicable).
(for DPUs dated January 1, 2008)
22 013-RD000-000-02-201103
Page 31

4: Operating the JAZ-PX Module
(for DPUs after January 1, 2008)
013-RD000-000-02-201103 23
Page 32

3: Operating Jaz
JAZ-PX Menu
The menu for the PX light source module allows you to control the strobe and triggering functions (JAZPX can operate in both free running and triggered modes), and set various parameters such as intensity
and number of flashes. This menu only appears if you have the JAZ-PX module installed in your Jaz
stack. See Chapter 4: Operating the JAZ-PX Module
on operating the JAZ-PX module.
for the JAZ-PX menu and more in-depth information
JAZ-INDY Menu
The menu for the JAZ-INDY module allows you to configure GPIO, Analog V out, and 4-20mA
excitation and Tx control. It also lets monitor Analog and Digital inputs and calibrate voltage
inputs/outputs, and the 4-20mA transmitter/receiver. This menu only appears if you have the JAZ-INDY
module installed in your Jaz stack. See Chapter 5: Operating the JAZ-INDY Module
menu and more in-depth information on operating the JAZ-INDY module.
for the JAZ-INDY
Storing Data on an SD Card
The JAZ-B and JAZ-E modules provide slots for up to 2 GB of storage on an SD card. The following are
procedures to ensure proper data storage on an SD card.
Note
For best results, we recommend SanDisk, Transcend and Kingston SD cards.
► Procedure
To store data on an SD card,
1. From the Jaz main menu, select File System | Find SD Cards. The Jaz screen then displays, SD
Card Search
2.
Take your measurements. This data is continuously streamed to the SD card found in Step 1.
►
Procedure
To release an SD card,
1. From the Jaz main menu, select File System | Release SD Cards. Jaz then informs you when it is
safe to remov
2. Remove your SD card from the Jaz module to access the stored data from your computer.
Finished.
e your SD card from the slot.
24 013-RD000-000-02-201103
Page 33

Chapter 4
Operating the JAZ-PX Module
JAZ- PX Module Overview
The Jaz PX lamp is a pulsed, short arc xenon lamp for UV-VIS applications such as absorbance,
bioreflectance, fluorescence and phosphorescence. The lamp has a specified pulse frequency of 200 Hz
(maximum 500 Hz) and spectral response from 190 – 1100 nm.
WARNING
The PX-2 produces ultraviolet radiation. Direct eye contact can cause permanent
eye damage. Always wear safety eyewear, and never look directly into the light
source.
The JAZ-PX module operates in both free running and triggered modes, allowing its pulses to coordinate
with other devices in the stack. The module contains an SMA connector to couple to other Ocean Optics
accessories such as optical fibers, cuvette holders, probes, etc. (see Additional Equipment Available
).
The JAZ-PX is ideal for field applications such as bioreflectance that require a high-intensity, low-power
light source. In fact, no external power supply is required to operate the JAZ-PX module. When used in
battery power mode, the lamp will operate for approximately 3 hours. An additional external power
supply is avialable through an optional 50 Watt-hour jaz battery extender (see Additional Equipment
Available).
For JAZ-PX module specifications, refer to Appendix B: Specifications.
Caution
The spectrometer module is especially sensitive to heating, so you should be aware
of the effects of heating on spectrometer modules when setting up an experiment,
particularly when using the JAZ-PX module. Since the JAZ-PX does not include a
fan and the Jaz metal housing has high thermal conductivity, heat generated by the
JAZ-PX will be conducted to other modules in the stack.
These effects are most prevalent in applications with long term, continuous
operation of the JAZ-PX at moderate to high flash rates. For short-duration
experiments, these thermal effects are not as prominent.Most significantly, heating
a spectrometer module will cause that spectrometer’s baseline (the measured
intensity when it is not exposed to light) to drift downwards.
The JAZ-PX Lamp Module Engineering Note
considerations and how to mitigate the effects of heating. See Product-Related
Documentation.
contains more information on thermal
013-RD000-000-02-201103 25
Page 34

4: Operating the JAZ-PX Module
JAZ-PX Module Features
The JAZ-PX module is very versatile and easy to operate. It features a configurable timing generator that
that can generate a high-precision lamp trigger and the capability of operating on battery power or with an
external power source.
The PX part of the PX Lamp menu on your Jaz stack provides you with the following features:
Strobe enable/disable
Lamp setup parameters
Flash rate
Lamp intensity
Number of flashes
Holdoff time
Flash timing controls
Forced trigger
Timing reset
Free Running mode
Run Forever mode (continuous trigger)
Flash output enable/disable
Trigger enable
Advanced settings
Read/write from/to the JAZ-PX module control registers
Power source (battery or external wall power)
In addition, the trigger source (internal or external) can be selected from the Jaz System Tools menu (see
Jaz Menus
).
Additional information for the JAZ-PX module is located on our website at Technical → Engineering
Docs. This information includes more in-depth descriptions of the various modes selectable from the
menu and a lam
26 013-RD000-000-02-201103
p stability graph.
Page 35

JAZ-PX Menu
JAZ-PX Menu Tree
4: Operating the JAZ-PX Module
013-RD000-000-02-201103 27
Page 36

4: Operating the JAZ-PX Module
28 013-RD000-000-02-201103
Page 37

4: Operating the JAZ-PX Module
Menu Tree Description
Menu Item Description
Strobe Enable /
Disable
Setup Enables you to manually configure the options for the device.
Parameters Contains the various numeric parameters that can be set for the JAZ-PX.
Flash Rate Sets the flash frequency (in microseconds) of the internal timing controller.
013-RD000-000-02-201103 29
Provides a quick way to prevent or allow the lamp to flash.
Page 38

4: Operating the JAZ-PX Module
Menu Item Description
Intensity Controls the discharge voltage (and thus the flash intensity) of the lamp. Select
400-600V. On battery power, the intensity is restricted to 400V.
Number of Flashes Sets the number of times that the lamp should flash after detecting a trigger event.
Holdoff Time Specifies how long the timing generator should wait after detecting a trigger event
before beginning to flash at the rate specified by the Flash Rate parameter.
Timing Controls Controls used to set the timing behavior of the JAZ-PX module.
Force Trigger An emulated trigger signal that can be used to force trigger events on the JAZ-PX
module at any time. Forcing a trigger causes a trigger event with the same
behavior as if the device detected a stack trigger. Force Trigger will not have any
effect when the device is in Free Running mode, but it is not masked by turning
Trigger Enable off.
Timing Reset Does not reset the timing parameters themselves. Instead, it resets the state of the
counters keeping track of timing in the hardware. This can be useful to “escape”
from long flash periods or large values set in the Number of Flashes parameter.
Free Running Puts the device into Free Running mode. In this mode, the timing generator simply
flashes the lamp at the rate that is specified by the Flash Rate parameter and
ignores trigger events.
Run Forever When enabled, the timing generator will enter Run Forever mode. In this mode, it
will ignore the Number of Flashes parameter setting and continue flashing forever
once it has received a trigger event. It will re-sync to any trigger events that are
detected during that time.
Output Enable When disabled, the lamp will not flash. When set to 1, the lamp will flash as
normal.
Trigger Enable When enabled, the timing generator will not detect trigger events that are
generated by the stack trigger. It will still detect timing events that are generated by
the forced trigger.
Advanced Settings Provides the advanced capability to set parameters and controls directly on the
device, bypassing the Jaz menus. It also contains the power management menu.
Write Register Allows you to write values directly to the control registers of the JAZ-PX module.
Read Register Allows you to write values directly to the control registers of the JAZ-PX module.
Power Mode Sets the power mode of the JAZ-PX module to either battery power or external
power. You must manually set the power mode to external power to access
intensities greater than 0 (400V) and flash rates higher than 200 Hz (5 msec).
Using the JAZ-PX module on Jaz battery power at flash rates greater than 200 Hz
can result in unexpected behavior.
30 013-RD000-000-02-201103
Page 39

4: Operating the JAZ-PX Module
PX Menu Default Values
When you first power-on the Jaz stack, the JAZ-PX module defaults to the following settings:
Setting Default Value
Parameters Menu
Flash Rate 200Hz (5 ms)
Intensity 400V
Number of Flashes 1
Holdoff Time 1 ms
Timing Controls Menu
Force Trigger No (N/A)
Timing Reset No (N/A)
Free Running Disabled
Run Forever Disabled
Output Enable Disabled
Trigger Enable Enabled
Advanced Settings Menu
Power Mode Battery Power
Getting Started with the JAZ-PX Module
You can control your JAZ-PX module from the Jaz PX menu (see JAZ-PX Menu) or from SpectraSuite
spectrometer operating software (if you have purchased SpectraSuite and have your Jaz unit attached to a
computer) (see Operating JAZ-PX from SpectraSuite
For most applications, the JAZ-PX module can be quickly configured for either Continuous Strobe mode
or triggered mode as described below. Also, see PXMenu Default Values
defaults.
).
for a list of JAZ-PX menu
More in-depth information concerning triggering is located in the JAZ-PX Lamp Module Engineering
note. See Product-Related Documentation
013-RD000-000-02-201103 31
.
Page 40

4: Operating the JAZ-PX Module
Setting JAZ-PX for Free Running Mode
In Free Running mode, the lamp simply flashes at a given rate and is not synchronized with any other
elements of the system. This mode is only suitable when the integration time is much longer than the flash
rate.
►
Procedure
1. To place the JAZ-PX module into Free Running mode, set PX Lamp | Setup | Timing Controls |
Free Running to Enable.
2.
Select the desired flash rate using PX Lamp | Setup | Parameters | Flash Rate. The default rate
is 200 Hz (5 m
3. Enable the strobe using PX Lamp | Enable Strobe.
sec).
Setting JAZ-PX for Triggered Mode
Some applications may require you to synchronize the various elements in the system to a system-wide
trigger signal. This mode would be comparable to the legacy “single strobe” mode in that the PX lamp
flashes can be synchronized to the spectrometer integration periods. However, the procedure below will
result in multiple synchronized flashes per integration period rather than just a single flash per integration
period.
►
Procedure
1. Set the JAZ-PX module to turn Strobe Enable on using PX Lamp | Enable Strobe. The lamp
will not begin to strobe until after you have set the internal trigger.
2. Set the Jaz DPU’s stack trigger using System Tools | Triggering | Internal | Set Rate. This
selects the DPU’s
rate for the JAZ-PX lamp. The lamp will begin to flash at this rate when you click
msec setting is recommended as a starting point.
internal timer as the source for the stack’s trigger and sets an appropriate flash
. The 10
Caution
Unpredictable behavior may occur at rates above 200 Hz (5 msec) on battery power.
3. Select the spectrometer module in the Jaz stack to associate with the JAZ-PX module using
Spectrometer | Module x | Lamp Control | Choose Lamp | PX | Module x. (The selected
spectrometer’s m
disabled for dark measurements on the associated spectrometer module in the Jaz Spectroscopy
menu.
odule number will appear in parentheses next to the PX.) This lamp will be
4. Set the selected spectrometer module to begin its integration period whenever it detects a stack
trigger (and is not currently in an integration period) using Spectroscopy | Module x | Tools |
Synchronization | Tr
igger | Mode | Hardware
.
4. Use the Jaz Spectroscopy menu to run your experiment.
32 013-RD000-000-02-201103
Page 41

4: Operating the JAZ-PX Module
Operating JAZ-PX from SpectraSuite
Although the JAZ-PX module’s internal timing cannot be set directly from SpectraSuite, this software can
still easily control the PX flash by selecting the appropriate triggering options. To control the JAZ-PX via
SpectraSuite, the JAZ-PX module should operate in Triggered mode (not Free Running mode) and use
the Jaz internal trigger to control its flash timing. Ideally, the Jaz internal trigger should also be used to
synchronize the lamp flashes to the integration periods of any spectrometers in the system. Additionally,
the output of the JAZ-PX can be quickly enabled or disabled via the Strobe/Lamp Enable check box
above the graph.
Getting Started using JAZ-PX with SpectraSuite
► Procedure
1. In SpectraSuite, right click on the Jaz icon and select Spectrometer Features.
2. In the Spectrometer Features dialog box, select the Internal Trigger tab.
Set the Trigger Source to Internal and select an internal trigger period of 10 ms. This setting
3.
will control the fla
sh rate of the lamp. To change the flash rate, you must adjust this setting.
Caution
Unpredictable behavior may occur at rates above 200 Hz (5 msec) on battery power.
4. Expand the menu beneath the Jaz spectrometer icon in the Data Sources pane and highlight:
Acquisition | Channel 0 | Int Time.
5.
Click the Strobe/Lamp Enable checkbox at the top of the screen.
Synchronizing a Spectrometer Module to a JAZ-PX Module (recommended)
► Procedure
1. Highlight the Acquisition |Channel x | Int Time line in the Data Sources pane for the channel
that you wish to synchronize.
2. Select the External Hardware menu item. Although this option is named External Hardware, it
really just selects the Jaz stack trigger as the trigger source for the JAZ-PX module. Since we
have set the stack trigger to be driven by the DPU’s internal trigger (Step 4 above), this internal
trigger will synchronize the PX and the start of the integration period. (Note that the length of the
integration period is still set by the Integration Period field.)
Caution
Set the stack trigger source to Internal (Step 3 above) before setting the
spectrometer’s trigger source to External Hardware or the spectrometer will freeze.
To return the spectrometer module to Free Running mode, you must assert a trigger
pulse through the Jaz external trigger, or you must restart the Jaz.
013-RD000-000-02-201103 33
Page 42

4: Operating the JAZ-PX Module
3. Set spectrometer integration time. The spectrometer’s integration time should be selected to
optimize the amount of light that is received.
34 013-RD000-000-02-201103
Page 43

Chapter 5
Operating the JAZ-INDY Module
JAZ- INDY Module Overview
The Jaz Indy is a multifunction module that allows the Jaz system to communicate with data standards
common to industrial applications – in particular, RS-232 and RS-485 – and provides both analog and
digital inputs/outputs. When combined with the Jaz triggering capabilities and multichannel capacity, the
Indy module makes Jaz an attractive optical-sensing option for multipoint sampling, reference monitoring
and other applications in process and lab environments.
The Jaz Indy Module is installed in the vertical Jaz stack and operates as part of the fully integrated
spectrometer system. The module has 4 analog I/Os software-configurable to -5 to +5 volts and 8 digital
I/Os. Data for analog inputs and outputs can be processed in values such as volts or counts. The module
complies with RoHS, CE and FCC Part 15, Class A requirements.
JAZ-INDY Module Features
Experiments connect directly to Indy module for analog and digital I/O
Enables Jaz to communicate with other devices via RS-232/RS-485 standards
Provides measurement and control for portable, laboratory and “light-industrial” setups
Installs in Jaz stack and can be mounted to DIN rail or a wall (with special accessories) or
anywhere with un
iversal ¼-20 threaded mount
013-RD000-000-02-201103 35
Page 44

5: Operating the JAZ-INDY Module
JAZ-INDY Menu
36 013-RD000-000-02-201103
Page 45

5: Operating the JAZ-INDY Module
013-RD000-000-02-201103 37
Page 46

5: Operating the JAZ-INDY Module
38 013-RD000-000-02-201103
Page 47

5: Operating the JAZ-INDY Module
013-RD000-000-02-201103 39
Page 48

5: Operating the JAZ-INDY Module
Menu Item Description
Menu Tree Description
Configure
GPIO Contains parameters for the 8 GPIO lines.
Set Direction Sets the operational direction for each of the GPIO lines to input or output.
Set Output
Values
Analog V Out Allows you to change each of the 4 voltage output settings from -5Vdc to +5Vdc.
4-20mA
Excitation
4-20mA Tx
Control
Monitor Inputs
Enables you to manually set options for the device.
If any GPIO lines are set to output, this menu item appears to allow you to set the
output value for each output GPIO to 0 (low) or 1.
Change the voltage value using the * (left)/ # (right) buttons. Change the -/+ sign
using the ▲ (Up)/ ● (Down) buttons, then press √ to accept your selection.
This selection affects the output of the 4-20mA current loop receiver. Select Enable
for the receiver to provide a voltage source for an external 4-20mA current loop. You
can choose to provide a 10Vdc or 20Vdc voltage.
Provides control of the 4-20mA current loop transmitter to source 4 – 20 mA into the
current loop. Control the value by adjusting the percentage of current flowing into the
current loop using the 4-20mA Tx% setting (0 – 100%). Use the ▲ (Up)/ ● (Down)
buttons to select the desired value, then press √ to accept your selection.
NOTE: This menu option will display only if an excitation voltage is connected to the
A current loop transmitter.
4-20m
Enables you to monitor the status of the Analog V, Analog Current and Digital inputs.
Analog V Select Analog V to monitor the four Analog-to-Digital input voltages (for channels 1,
2, 3 and 4), including the two differential readings. The two differential readings are
taken by subtracting Channel 1 from Channel 2, and Channel 3 from Channel 4.
Analog Current Displays the amount of current in the JAZ-Indy module’s 4-20mA receiver circuit.
The values shown are:
Current in mA,
Percentage of 4-20mA value (0 –100%), with 0% = 4mA and 100% = 20mA.
If current dips below 4mA, < appears next to the value. If current rises above
20mA, > appears. The percentage value will never display for input current
below 4 mA or above 20 mA.
Count is the digital value collected at the current-sense input of the Analog-
to-Digital converter (Channel 7).
Digital When enabled, the Digital Inputs sub menu shows the state of the GPIO lines
configured as inputs:
↑ indicates a TTL high input (Logic 1)
↓ indicates a TTL low input (Logic 0)
NOTE: Arrows are not shown for bits assigned as outputs.
40 013-RD000-000-02-201103
Page 49

Menu Item Description
5: Operating the JAZ-INDY Module
Module Info
Calibrate
Allows you to display the Indy module serial number where:
v = the CCA revision
xxxx = the 4-digit number of the device
Select to measure the following:
voltage out: in counts or volts
voltage in: in counts or volts
4 – 20 mA Transmit
4 – 20 mA Receive
See Calibrating the JAZ-INDY Module
for the calibration procedures.
JAZ-INDY Menu Defaults
When you first power-on the Jaz stack, the JAZ-INDY module defaults to the following settings:
Setting Default Value
GPIO Menu
Set Direction 1-8: Input
Set Output Values does not appear until one of the 1
bits is changed to Output
Analog V Out
V Output - 5.00
4-20mA Excitation
4-20mA Excitation 10 Volts (+)
4-20mA Tx Control
Set Value .0
Calibrating the JAZ-INDY Module
Your JAZ-INDY module is calibrated at the factory, but you can use the procedures in this section to
recalibrate the module so that it matches your equipment.
You can calibrate the following on the JAZ-INDY module:
Four voltage outputs
013-RD000-000-02-201103 41
Page 50

5: Operating the JAZ-INDY Module
Four single-ended voltage inputs and the two differential inputs
4-20mA transmitter
4-20mA receiver
Calibrating the Voltage Outputs
The JAZ-INDY module provides four analog voltage outputs on its 26-pin connector (outputs 14 are
mapped to pins 5, 14, 23, and 4 respectively, where pins 2, 12, or 15 can be used as analog ground).
►
Procedure
1. Connect an external, calibrated voltmeter (providing at least 5 total digits resolution) to each
output pin to calibrate it. No load should be connected to the output pin; it should be connected
to a voltmeter and nothing else.
2. Set the output voltage (in counts) until the voltmeter reads as close as possible to -4.5V. Record
this value to be used later.
3. Set the output voltage (in counts) until the voltmeter reads as close as possible to 0.0V. Record
this value to be used later.
4. Set the output voltage (in counts) until the voltmeter reads as close as possible to 4.5V. Record
this value to be used later.
5. Using the Jaz menu or SpectraSuite software (see Calibrating the 4-20mA Transmitter
The JAZ-INDY module provides a 4-20mA current controller that must be calibrated. There are only two
setpoints for this controller: 4mA and 20mA. The controller can be calibrated by passing the current
directly through a digital multimeter (ensure first that the meter is rated to withstand at least 30mA to
prevent damage). JAZ-INDY provides an excitation source that can be used to power the current
transmitter (pin 19). If you use this internal source, set it to 20V (this can be done in SpectraSuite) and
ground the output of the current loop (after passing through the multimeter) back to the JAZ-INDY
module (using any of the ground pins).
Calibrating the 4-20mA Receiver
Once the 4-20mA transmitter has been calibrated, it can be used to calibrate the receiver.
►
Procedure
1. Move the ground connection from the current loop used in calibrating the 4-20mA transmitter so
that it is instead connected to pin 11 (4-20 Sense).
2. Vary the current output of the 4-20mA transmitter until 4mA is reached.
3. In the Jaz menu, select Calibrate | 4-20 mA Rx | Minimum. Set the mA value, if needed, to 4.0
and then select Sample 4.0mA.
4.
Select Calibrate | 4-20 mA Rx | Maximum, then repeat this process for the 20mA setpoint.
Operating JAZ-INDY from SpectraSuite), select the voltage output to be calibrated:
6.
42 013-RD000-000-02-201103
Page 51

5: Operating the JAZ-INDY Module
a. Select Minimum, then change the voltage to -4.5 and set the counts to the value you
measured in Step 2.
b. Select Zero and enter the counts measured in Step 3.
c. Select Maximum, then change the voltage to 4.5 and set the counts to the value you measured
in Step 4.
7. Repeat this procedure for each of the output channels.
Calibrating the Voltage Inputs
Once the voltage outputs are calibrated, they can be used to calibrate the voltage inputs. These can be
found on pins 3, 13, 22, and 21. Note that the output voltage may sag slightly when connected to the
voltage inputs, so it is necessary to keep the voltmeter connected to the joined input and output pins to
compensate.
►
Procedure
1. Set the output voltage (in counts) until the voltmeter reads as close as possible to -4.5V.
2. Using the Jaz menu or SpectraSuite software (see Calibrating the 4-20mA Transmitter
The JAZ-INDY module provides a 4-20mA current controller that must be calibrated. There are only two
setpoints for this controller: 4mA and 20mA. The controller can be calibrated by passing the current
directly through a digital multimeter (ensure first that the meter is rated to withstand at least 30mA to
prevent damage). JAZ-INDY provides an excitation source that can be used to power the current
transmitter (pin 19). If you use this internal source, set it to 20V (this can be done in SpectraSuite) and
ground the output of the current loop (after passing through the multimeter) back to the JAZ-INDY
module (using any of the ground pins).
Calibrating the 4-20mA Receiver
Once the 4-20mA transmitter has been calibrated, it can be used to calibrate the receiver.
►
Procedure
1. Move the ground connection from the current loop used in calibrating the 4-20mA transmitter so
that it is instead connected to pin 11 (4-20 Sense).
2. Vary the current output of the 4-20mA transmitter until 4mA is reached.
3. In the Jaz menu, select Calibrate | 4-20 mA Rx | Minimum. Set the mA value, if needed, to 4.0
and then select Sample 4.0mA.
4.
Select Calibrate | 4-20 mA Rx | Maximum, then repeat this process for the 20mA setpoint.
Operating JAZ-I
a. Select Minimum, and change the voltage to -4.5V. Then select Sample at -4.50V. This will
update the counts automatically.
b. Set the output voltage (in counts) until the voltmeter reads 0.0V. Then select Calibrate |
Voltage In | #Z
013-RD000-000-02-201103 43
NDY from SpectraSuite), select the voltage input to be calibrated:
ero | #Sample at 0.00V from the Jaz menu.
Page 52

5: Operating the JAZ-INDY Module
c. Set the output voltage (in counts) until the voltmeter reads 4.5V. Then select Calibrate |
Voltage In | ●Maximum, set the voltage to 4.5V and select ●Sample at 4.5V.
6.
Repeat this procedure for each of the input channels.
Note
There are two special channels (Vin 1 – Vin 2 and Vin 3 – Vin 4) that are differential (the
hardware finds the difference between the corresponding input pins). To calibrate these,
You must use two voltage inputs at once and set them to opposite values (e.g., set one to
+4.5V, the other to -4.5V, to calibrate the differential input at +9V). The process is the
same as described above, except that the differential inputs should be calibrated at -9V,
0.0V, and 9V.
For the 0.0V measurement, set both of the voltage outputs being driven in to zero. For the
non-zero measurements, both voltage input/output pairs should be confirmed on the
external voltmeter prior to finishing the calibration.
Calibrating the 4-20mA Transmitter
The JAZ-INDY module provides a 4-20mA current controller that must be calibrated. There are only two
setpoints for this controller: 4mA and 20mA. The controller can be calibrated by passing the current
directly through a digital multimeter (ensure first that the meter is rated to withstand at least 30mA to
prevent damage). JAZ-INDY provides an excitation source that can be used to power the current
transmitter (pin 19). If you use this internal source, set it to 20V (this can be done in SpectraSuite) and
ground the output of the current loop (after passing through the multimeter) back to the JAZ-INDY
module (using any of the ground pins).
Calibrating the 4-20mA Receiver
Once the 4-20mA transmitter has been calibrated, it can be used to calibrate the receiver.
►
Procedure
1. Move the ground connection from the current loop used in calibrating the 4-20mA transmitter so
that it is instead connected to pin 11 (4-20 Sense).
2. Vary the current output of the 4-20mA transmitter until 4mA is reached.
3. In the Jaz menu, select Calibrate | 4-20 mA Rx | Minimum. Set the mA value, if needed, to 4.0
and then select Sample 4.0mA.
4.
Select Calibrate | 4-20 mA Rx | Maximum, then repeat this process for the 20mA setpoint.
Operating JAZ-INDY from SpectraSuite
The JAZ-INDY module offers the same menu selections on the Spectrometer Features screen:
44 013-RD000-000-02-201103
Page 53

5: Operating the JAZ-INDY Module
013-RD000-000-02-201103 45
Page 54

Chapter 6
Maintenance
Overview
This chapter contains Jaz software updates, maintenance and troubleshooting issues.
Software Updates
Ocean Optics is constantly striving for excellence and innovation in our products. Updates for both
SpectraSuite and Jaz software are available to ensure that you always have the most recent software.
SpectraSuite
SpectraSuite is updated frequently. You can download the latest version from the Ocean Optics website
www.oceanoptics.com
or use the Update Center in SpectraSuite (Tools | Update Center).
Jaz
Select System Tools | Flash Update from the Jaz menu to download Jaz updates.
Jaz Troubleshooting
The following sections contain information on troubleshooting issues you may encounter when using Jaz.
Jaz Connected to Computer Prior to SpectraSuite
Installation
Windows Operating Systems
If you connected Jaz to a computer prior to installing SpectraSuite on a Windows platform, you may
encounter installation issues that you must correct before your Ocean Optics device will operate properly.
Follow the applicable steps below to remove the incorrectly installed device, device driver, and
installation files.
013-RD000-000-02-201103 46
Page 55

6: Maintenance
Note
If these procedures do not correct your device driver problem, you must obtain the
Correcting Device Driver Issues document from the Ocean Optics website:
http://www.oceanoptics.com/technical/engineering/correctingdevicedriverissues.pdf
Remove the Unknown Device from Windows Device Manager
► Procedure
1. Open Windows Device Manager. Consult the Windows operating instructions for your computer
for directions, if needed.
2. Locate the Other Devices option and expand the Other Devices selection by clicking on the "+"
sign to the imm
ediate left.
Note
Improperly installed USB devices can also appear under the Universal Serial Bus
Controller option. Be sure to check this location if you cannot locate the unknown device.
.
3. Locate the unknown device (marked with a large question mark). Right-click on the Unknown
Device listing and select the Uninstall or Remove option.
4.
Click the OK button to continue. A warning box appears confirming the removal of the Unknown
Device. Click the OK button to confirm the device removal.
5.
Disconnect Jaz from your computer.
6. Locate the section in this chapter that is appropriate to your operating system and perform the
steps in the following Remove Improperly Installed Files
section.
Remove Improperly Installed Files
► Procedure
1. Open Windows Explorer.
4. Navigate to the Windows | INF directory.
Note
If the INF directory is not visible, you must disable the Hide System Files and Folders
and Hide File Extensions for Known File Types options in Windows Folder Options.
Access Windows Folder Options from Windows Explorer, under the Tools | Folder
Options menu selection.
013-RD000-000-02-201103 47
Page 56

6: Maintenance
5. Delete the OOI_USB.INF in the INF directory. If your computer is running either the Windows
2000 or XP operating system, you must also delete the OOI_USB.PNF file in the INF directory.
6.
Navigate to the Windows | System32 | Drivers directory.
Delete the EZUSB.SYS file.
7.
Reinstall your Ocean Optics application and reboot the system when prompted.
8.
9. Plug in the USB device.
The system is now able to locate and install the correct drivers for the USB device.
Mac Operating Systems
Since there are no device files for Jaz in a Mac operating system, you should not encounter any problems
if you installed the spectrometer before the SpectraSuite software.
Linux Operating Systems
For Linux operating systems, all you need to do is install the SpectraSuite software, then unplug and
replug in the spectrometer. Technically, the driver files for Linux simply give nonprivileged users
permission to use newly connected hardware. There isn’t any long-term harm to plugging in the device
before installing the software.
Jaz Troubleshooting Tips
The following table provides additional information for troubleshooting Jaz issues. If these suggested
solutions do not solve the problem, please contact us for Technical Support (also see Service
Problem Possible Cause(s) Suggested Solution(s)
Jaz does not initialize
correctly.
USB Jaz turns on and
then powers down before
it completes initialization
Jaz power LED doesn't
turn on (PoE, USB
operation or +5V power,
no battery).
Unit was powered on too quickly
after being powered off.
Only the Jaz-DPU (CPU module)
+ Jaz-S (spectrometer module)
can be powered over USB (unless
the unit also includes a battery).
While a JAZ-DPU + JAZ-E
(Ethernet) + JAZ-S might
sometimes power over USB, the
available USB power may not
always successfully power the Jaz
stack.
Jaz needs to power its internal
electronics before it can fully
power up.
Wait 10-15 seconds before powering
on Jaz.
Use the accessory +5V power
supply.
Wait 10 seconds after plugging in Jaz
before pressing the power button
).
48 013-RD000-000-02-201103
Page 57

Problem Possible Cause(s) Suggested Solution(s)
6: Maintenance
Jaz display blanks out Jaz has an automatic screensaver
that turns on 3 minutes after the
last key press.
I plugged in the Ethernet
connection after the Jaz
powered up, and now see
a "Network Unplugged"
message when "View
Settings" is selected.
Jaz does not
communicate with
SpectraSuite via USB.
Jaz can get an IP
address and can be
pinged over Ethernet, but
won’t otherwise
communicate.
Jaz needs to boot completely
before initiating USB
communication.
The battery is nearly empty,
causing Jaz to lose the
connection.
While any key press will bring back
the display, pressing the SAVE key
(floppy disk) is recommended since
other keys might cause an unwanted
command to be executed. A future
release of the firmware will ignore the
first key press when restoring the
display from screen-saver operation.
If you select #Edit Settings and select
Auto (DHCP), the Jaz will try again to
acquire a network address.
Restart Jaz and wait until it displays
the menu screen before starting (or
re-scanning devices) in SpectraSuite.
Plug Jaz into the wall power
receptacle or use the Power over
Ethernet capability.
Replacing an LED Assembly in the JAZ-INTLED
Module
The JAZ-INTLED module allows you to replace the LED assembly instead of replacing the entire module
when you want to switch out LEDs. The following LED assemblies are available for the JAZ-INTLED
module:
JAZ-L640: 640 nm red LED
JAZ-L590: 590 nm yellow LED
JAZ-L450: 470 nm blue LED
JAZ-L365: 365 nm UV LED
JAZ-LWHITE: White LED
You can also order a
INTLED-KIT.
ll five of these LED assemblies together (plus the JAZ-405 LED assembly) in the
013-RD000-000-02-201103 49
Page 58

6: Maintenance
Parts Needed
JAZ-INTLED module in your Jaz stack
Jaz LED assembly
Allen wrench (5/64”)
Three 2-56 screws (comes with LED assembly)
LED Assembly Replacement Procedure
► Procedure
To replace an LED assembly,
1. Disconnect power from the Jaz stack.
2. Power-down the Jaz stack by pressing the Power button (
3. Lightly hold pressure on the LED assembly to hold it into the LED module while loosening the
three 2-56 screws with the Allen wrench. You will feel some slight pressure from the springs
once the screws are loosened as they try to push the assembly out of the module.
4. Completely remove the screws and set them aside for use in the new LED assembly.
5. Pull the LED assembly straight out of the module.
6. Align the holes of the new LED assembly with the three holes on the LED module and gently
push the LED assembly straight in to the module. Do not
module.
7. Re-insert the three 2-56 screws into the holes and tighten them finger-tight in succession to hold
the LED assembly in place. Do not
over-tighten the screws.
).
force the LED assembly into the
8. Power-up your Jaz stack.
Caution
Always remove and insert the LED by gently pushing it straight into and pulling it
straight out of the module. Twisting the LED can result in breakage.
50 013-RD000-000-02-201103
Page 59

6: Maintenance
013-RD000-000-02-201103 51
Page 60

Appendix A
Calibrating the Wavelength of
Jaz
Overview
This appendix describes how to calibrate the wavelength of your spectrometer. Though each spectrometer
is calibrated before it leaves Ocean Optics, the wavelength for all spectrometers will drift slightly as a
function of time and environmental conditions. Ocean Optics recommends periodically recalibrating the
Jaz spectrometer.
About Wavelength Calibration
You are going to be solving the following equation, which shows that the relationship between pixel
number and wavelength is a third-order polynomial:
= I + C1 p + C2 p2 + C3 p
p
Where:
= the wavelength of pixel p
I = the wavelength of pixel 0
= the first coefficient (nm/pixel)
C
1
= the second coefficient (nm/pixel2)
C
2
= the third coefficient (nm/pixel3)
C
3
You will be calculating the value for I and the three Cs.
3
013-RD000-000-02-201103 52
Page 61

A: Calibrating the Wavelength of Jaz
Calibrating the Spectrometer
Preparing for Calibration
To recalibrate the wavelength of your spectrometer, you need the following components:
A light source capable of producing spectral lines
Note
Ocean Optics’ HG-1 Mercury-Argon lamp is ideal for recalibration. If you do not have an
HG-1, you need a light source that produces several (at least 4-6) spectral lines in the
wavelength region of your spectrometer.
A Jaz spectrometer module
An optical fiber (for spectrometers without a built-in slit, a 50-
A spreadsheet program (Excel or Quattro Pro, for example) or a calculator that performs third-
order linear reg
ressions
m fiber works best)
Note
If you are using Microsoft Excel, choose Tools | Add-Ins and check AnalysisToolPak
and AnalysisTookPak-VBA.
Calibrating the Wavelength of the Spectrometer
► Procedure
Perform the steps below to calibrate the wavelength of the spectrometer:
1. Place SpectraSuite into Scope mode and take a spectrum of your light source. Adjust the
integration time (or the A/D conversion frequency) until there are several peaks on the screen that
are not off-scale.
2. Move the cursor to one of the peaks and position the cursor so that it is at the point of maximum
intensity.
3. Record the pixel number that is displayed in the status bar or legend (located beneath the graph).
Repeat this step for all of the peaks in your spectrum.
4. Use the spreadsheet program or calculator to create a table like the one shown in the following
figure. In the first column, place the exact or true wavelength of the spectral lines that you used.
In the second column of this worksheet, place the observed pixel number. In the third column,
calculate the pixel number squared, and in the fourth column, calculate the pixel number cubed.
013-RD000-000-02-201103 53
Page 62

A: Calibrating the Wavelength of Jaz
Independent
Variable
True Wavelength (nm) Pixel # Pixel #
253.65
296.73
302.15
313.16
334.15
365.02
404.66
407.78
435.84
546.07
576.96
579.07
696.54
706.72
727.29
738.40
751.47
175
296
312
342
402
490
604
613
694
1022
1116
1122
1491
1523
1590
1627
1669
Dependent
Variables
30625
87616
97344
116964
161604
240100
364816
375769
481636
1044484
1245456
1258884
2223081
2319529
2528100
2647129
2785561
2
1067462648
1389928896
1412467848
3314613771
3532642667
4019679000
4306878883
4649101309
Pixel #
5359375
25934336
30371328
40001688
64964808
117649000
220348864
230346397
334255384
3
Values Computed
from the Regression
Output
Predicted
Wavelength
253.56
296.72
302.40
313.02
334.19
365.05
404.67
407.78
435.65
546.13
577.05
579.01
696.70
706.62
727.24
738.53
751.27
Difference
0.09
0.01
-0.25
0.13
-0.05
-0.04
-0.01
0.00
0.19
-0.06
-0.09
0.06
-0.15
0.10
0.06
-0.13
0.19
5. Use the spreadsheet or calculator to calculate the wavelength calibration coefficients. In the
spreadsheet program, find the functions to perform linear regressions.
If using Quattro Pro, look under Tools | Advanced Math
If using Excel, look under Analysis ToolPak
6. Select the true wavelength as the dependent variable (Y). Select the pixel number, pixel number
squared, and the p
ixel number cubed as the independent variables (X). After executing the
regression, you will obtain an output similar to the one shown below. Numbers of importance are
noted.
Regression Statistics
Multiple R 0.999999831
R Square 0.999999663 R Squared
Adjusted R Square 0.999999607
Standard Error 0.125540214
Observations 22
Intercept
Coefficients
Standard Error
Intercept 190.473993 0.369047536 First coefficient
X Variable 1 0.36263983 0.001684745
X Variable 2-1.174416E-05 8.35279E-07
X Variable 3-2.523787E-09 2.656608E-10 Second coefficient
Third coefficient
54 013-RD000-000-02-201103
Page 63

A: Calibrating the Wavelength of Jaz
7. Record the Intercept, as well as the First, Second, and Third Coefficients. Additionally, look at
the value for R squared. It should be very close to 1. If not, you have most likely assigned one of
your wavelengths incorrectly.
Keep these values at hand.
Saving the New Calibration Coefficients: USB
Mode
Ocean Optics programs wavelength calibration coefficients unique to each Jaz spectrometer module onto
an EEPROM memory chip in Jaz.
You can overwrite old calibration coefficients on the EEPROM if you are using Jaz via the USB port.
►
Procedure
To save wavelength calibration coefficients using the USB mode, perform the following steps:
1. Ensure that Jaz is connected to the computer and that you have closed all other applications.
2. Point your browser to http://www.oceanoptics.com/technical/softwaredownloads.asp
scroll down to Microcode. Select USB EEPROM Programmer.
3.
Save the setup file to your computer.
4. Run the Setup.exe file to install the software. The Welcome screen appears.
Click the Next button. The Destination Location screen appears.
5.
Accept the default installation location, or click the Browse button to specify a directory. Then,
6.
click the Next button. The Program Manager Group screen appears.
7.
Click the Next button. The Start Installation screen appears.
Click the Next button to begin the installation. Once the installation finishes, the Installation
8.
Complete screen appears.
9.
Click the Finish button and reboot the computer when prompted.
Navigate to the USB EEPROM Programmer from the Start menu and run the software.
10.
Click on the desired Jaz device displayed in the left pane of the USB Programmer screen.
11.
Double-click on each of the calibration coefficients displayed in the right pane of the USB
12.
Programmer screen and enter the new values acquired in Steps 5 and 6 of the Calibrating the
Wavelength of the Spectrometer section in this appendix.
13. Repeat Step 12 for all of the new values.
14. Click on the Save All Values button to save the information, and then Exit the USB Programmer
software.
and
The new wavelength
spectrometer module
013-RD000-000-02-201103 55
calibration coefficients are now loaded onto the EEPROM memory chip on the Jaz
Page 64

Appendix B
Specifications
Overview
This appendix contains specification information for the Jaz stack and its individual modules.
Specification Value
Power Consumption 250 mA @ 5 VDC
Computer interface USB in JAZ-DPU module
Ethernet in JAZ-E module
Computer requirements IBM-compatible PC with Pentium or better microprocessor
32 MB RAM (16 MB)
Windows 98/Me/2000/XP, Mac OS X and Linux when using the USB
interface on desktop or notebook PCs.
Operating software SpectraSuite (for an additional $199)
Fiber optic connector SMA 905 to single-strand optical fiber
Spectrometer Module (JAZ-S)
Grating Options 14 different gratings, UV through Shortwave NIR
Detector 2048-element linear silicon CCD array; L2 Collection Lens
Wavelength range 200-1100 nm; maximum 650 nm
Entrance aperture 5, 10, 25, 50, 100 or 200 µm wide slits or fiber (no slit)
AgPlus Mirrors Provide reflectivity >95% over the visible and NIR wavelength range and
over a wide range of angles of incidence
Signal-to-noise ratio 250:1
Integration time
Data transfer rate USB: 60 scans per second
870 µs to 65 seconds
Ethernet: 20 scans per second
013-RD000-000-02-201103 56
Page 65

B: Specifications
Specification Value
Optical resolution ~0.3-10.0 nm FWHM
Dark noise 50 RMS counts
Dynamic range 1300:1
OLED Display Module (JAZ-DPU)
OLED Display 128 x 64 OLED
Keypad Pushbutton functions; functionality can be rotated 180º
Onboard computer Embedded processor with data processing and storage capability
Ethernet & Memory Module (JAZ-E)
Ethernet 100 Mbps; IEEE 802.3-compliant 10/100
Data Storage Via SD card
Battery & Memory Module (JAZ-B)
Type Rechargable lithium-ion
Life 8 hours before recharging
L450 Blue LED Light Source (JAZ-L450)
Type LS-450 LED
VIS-NIR Light Source Module (JAZ-VIS-NIR)
Type Tungsten-halogen
Bulb life (estimated) 1100 hours
UV-VIS Light Source Module (JAZ-UV-VIS)
Type Deuterium-tungsten-halogen
Pulsed Xenon Lamp Module (JAZ-PX) (tested at 200 Hz flash rate, 400V intensity, in Triggered mode
at 1 flash per period)
Operation time 2.5 hours (typical) on internal battery
Flash rate 200 Hz maximum
Optical stability 1% (stability will decrease at frequencies above 200 Hz)
013-RD000-000-02-201103 57
Page 66

B: Specifications
Specification Value
Lamp life Minimum: 108 flash (Number of flashes before intensity is reduced to 50%.
Lamp behavior is not characterized beyond lamp life
Typical: 5x10
Power Average : 2.5W ; Peak : 3W
Spectral range 190 – 1100 nm
Industrial Communications Module (JAZ-INDY)
Standards RS-232 and RS-435
9
58 013-RD000-000-02-201103
Page 67

Index
A
Adobe Acrobat Reader, 5
B
buttons, 15
C
calibrate
4-20mA receiver, 42, 43, 44
4-20mA transmitter, 42, 43, 44
voltage inputs, 43
voltage outputs, 42
calibration, 5, 52
preparing for, 53
procedure, 53
calibration coefficients
saving in USB mode, 55
D
document
audience, v
purpose, v
summary, v
E
EEPROM, 3
Ethernet
cable, 5
connection, 11
F
faceplate, 15
features, 2
free running, 32
I
installation, 9
Ethernet connection, 11
Jaz, 10
SpectraSuite, 10
USB connection, 10
Interface, 4
J
JAZ-INDY
SpectraSuite, 44
JAZ-INDY menu, 24
JAZ-INDY module
calibrating, 41
calibrating 4-20mA transmitter, 42, 43, 44
calibrating voltage inputs, 43
calibrating voltage outputs, 42
default values, 41
features, 35
menu description, 40
menus, 36
overview, 35
JAZ-PX menu, 24
JAZ-PX module
default values, 31
features, 26
free running, 32
getting started, 31
menu description, 29
menus, 27
overview, 25
triggered mode, 32
with SpectraSuite, 33
L
LED assembly, 49
013-RD000-000-02-201103 59
Page 68

Index
M
Main menu, 17
maintenance, 46
measurement wizards, 21
memory chip, 3
menus, 17
JAZ-INDY, 24, 36
JAZ-PX, 24, 27
Main, 17
modules, 2
O
operation, 15
Options
Interface, 4
service, vi
shipment components, 4
Software and Resources Library CD, 5
specifications, 56
SpectraSuite, 3, 46
JAZ-INDY, 44
with JAZ-PX module, 33
System Requirements, 3
T
triggered mode, 32
troubleshooting, 46, 48
Linux systems, 48
Mac systems, 48
Windows systems, 46
U
P
packing list, 4
passwords, 5
power, 16
supply, 5
product overview, 1
product-related documentation, vi
S
Sampling
System, 4
SD card, 24
upgrades, vi
USB, 10
cable, 5
connection, 10
W
Wavelength Calibration
about, 52
Data File, 5
Data Sheet, 5
what's new, v
wizards
measurement, 21
60 013-RD000-000-02-201103
 Loading...