

Page 1
User Guide
www.objectiflune.com
Page 2

©2010 Objectif Lune Inc - 2 -
Page 3

Table of Contents
Table of Contents
Table of Contents 3
About PrintShop Mail 7
Getting Started 9
Installing PrintShop Mail 9
Before you start 9
Installing in Windows 9
Installing on Mac OS 10
Upgrading PrintShop Mail 10
Installing the Hardware Key 11
The PrintShop Mail program interface 13
The PrintShop Mail Program Window 13
PrintShop Mail Toolbars 14
Standard Toolbar 15
Text Formatting Toolbar 15
Objects Toolbar 16
Text Link Toolbar 16
Tools Toolbar 17
View Toolbar 18
Database Toolbar 18
Dockable Panels 19
Layouts Panel 19
Variables Panel 20
Data Fields Panel 21
Warnings Panel 21
Fonts Panel 22
Verification Result Panel 22
Properties Panel 23
Object Group 23
Frame Group 24
Printing Group 24
Text Properties 25
Image Properties 26
Layout Properties 29
Variables Properties 30
Barcode Properties 31
DirectSmile Properties 32
Manipulating Objects 33
Selecting Objects 33
Moving and Resizing Objects 34
Copying Objects 35
Aligning Objects 35
Arranging Objects 36
Locking Objects 36
©2010 Objectif Lune Inc - 3 -
Page 4
Table of Contents
Linking Text Objects 37
Anchored Objects 37
Formatting Text 39
Text Style 39
PrintShop Mail Fonts 40
Paragraph Style 40
The Preferences Window 44
Program Settings 45
Color Settings 46
Print Job Settings 49
Repetition Settings 50
Imposition Settings 53
PrintShop Web Settings 54
PlanetPress Suite 55
Default Settings 57
Layout Basics 58
Guide Lines 58
Folding Lines 59
Bleed Margin 60
Crop Marks 61
Supported Image Formats 61
Windows Shortcuts 61
Macintosh Shortcuts 64
Working with PrintShop Mail Documents 67
Create a New Document 67
PrintShop Mail Templates 68
Specify the Layout Size 68
Specify Spot Colors 70
Open a Database 71
Supported Database Formats 73
Delimited Text Files 73
Objects in PrintShop Mail 75
Text Object 75
Add Static and Variable Images 75
Place PDF 77
Barcode Object 78
DirectSmile plug-in 82
Working With Variables 83
Use Layout Conditioning 83
Use Layout Repetition 84
Select Paper Trays 85
Number of copies 87
Verify a Document 90
Save a Document 91
Publishing Documents 92
©2010 Objectif Lune Inc - 4 -
Page 5
Table of Contents
Printing Basics 102
Print Preview 103
Print Technologies 103
Page Setup 109
Subset Finishing 110
Any Output Engine 110
Print To Web 111
Automated Printing 112
Using Expressions 121
The Expressions Editor 121
Building Expressions 122
The Expression Assistant 123
Result and debugging 124
Variable Dependencies 125
Expression Operators 125
Mathematical Operators: 125
Comparison Operators: 126
Other Operators: 126
Favorite Expressions 126
Inserting a Salutation 127
Custom Serial Numbers 127
Padding a string 128
Functions Overview 128
Barcode Functions 130
Layout Functions 139
Logical Functions 140
Number Functions 143
String Functions 147
License Agreement 155
Contact Information 157
Trademarks 159
Index 161
©2010 Objectif Lune Inc - 5 -
Page 6

©2010 Objectif Lune Inc - 6 -
Page 7
About PrintShop Mail
About PrintShop Mail
Developed to simplify the production of variable data printing (VDP) jobs, PrintShop Mail Design is the perfect application for
digital print operations and is a standalone application.
Pre-designed PDF or EPS files are imported into the application and variable information from a database file is overlaid by a
simple drag-and-drop operation. Business rules can be added, and the data can be formatted and sorted using an expression
wizard.
On the output side, PrintShop Mail Design caches static elements of the print job, which results in an optimized print stream
thatminimizes network congestion, decreases ripping time and allows digital printers to run near or at rated speed.
A VDP assembly technology, PrintShop Mail Design removes the need to use plug-ins to graphics design tools. Users can
simply take the provided designs and overlay the variable data and variable images.
For more information about the possibilities of PrintShop Mail, please visit http://www.printshopmail.com/
©2010 Objectif Lune Inc - 7 -
Page 8

©2010 Objectif Lune Inc - 8 -
Page 9
Getting Started
Getting Started
Installing PrintShop Mail 9
Upgrading PrintShop Mail 10
Installing the Hardware Key 11
This section will get you started with the installation and setup of PrintShop Mail, as well as its activation procedure.
Installing PrintShop Mail
Before you start
If you are installing PrintShop Mail on a computer with Windows 2000, XP, 2003 or Vista, make sure you are logged in with full
administrative rights before running the installation program.
Installing in Windows
Your installation file may have been delivered digitally or downloaded through our website. In this case, "CD-Rom"
refers to the download location of the software and "Setup.exe"refers to a file that may be called "PrintShopMail
Suite 7.exe"
1. Locate the setup.exe file on the CD-ROM.
2. Double click this file to start the installation wizard.
The installer loads the setup (this may take a few minutes).
3. Select the language you want to use for the installation then click OK.
4. If your computer is missing prerequisites necessary for PrintShop Mail to be installed, a dialog appears and indicates
thatthey will be installed.
5. Click Next to download and install the required components.
6. A warning is displayed indicating that PrintShop Mail Web will be installed with a demo license, if it is installed. Click OK
to dismiss the message.
7. Click Next. The License Agreement page is shown.
8. When you have read and understood the license agreement, click on I accept the terms of the license agree-
ment. Click Next.
You must accept the terms of the license agreement to continue.
9. Check the features that you want to install with PrintShop Mail. You cannotunselect PrintShop Mail itself, but can choose
not to install its optional components. If you want to install PrintShopMail Web, check that option. Click Next.
10. The Destination Folder screen displays the drive and folder where PrintShop Mail will be installed. To install the soft-
ware elsewhere, click Change... and navigate to the desired folder.
11. The Program Folder name determines the name that appears in the Start Menu. Keep the default name or change the
name as desired, then click Next.
12. Click Next to start copying the files and install the software. The Setup Wizard starts installing the files.
When the copying is complete, the final window appears.
You may check Check for Updates to check for updates after the installation has finished (recommended).
13. Click Finish to complete the installation of PrintShop Mail.
©2010 Objectif Lune Inc - 9 -
Page 10
Getting Started
Installing on Mac OS
PrintShop Mail 5.4 is supported on Macintosh Operating System 10.4.11 and later (including Operating System 10.5).
1. Locate the PrintShop Mail 5.4.x.dmg file on the CD-ROM or download location.
2. Double click on this file.
3. Select the language you want to use for the installation.
4. Read the license agreement and select " Agree". (If you select " Disagree" , the installation will be canceled).
5. A window will be displayed " Opening PrintShop Mail 5.4.x.dmg".
6. You can drag the PrintShop Mail icon to the Applications folder or to any other location on your computer.
Upgrading PrintShop Mail
The hardware key contains the license information of the PrintShop Mail application.
To view the license information, select Help/Credit Information.
To use certain features in PrintShop Mail, your license must be upgraded before you are allowed to use this feature. This count
for the amount of credits, CARE, automated printing and multi user licenses.
Credits
Unlimited or Production version, allows unlimited records to be printed.
Limited or Standard version, allows 200,000 records to be printed.
CARE
The care date determines which PrintShop Mail version is licensed. Each PrintShop Mail version has an own release date,
whichis compared withyour care date. Ifyour care date is equal or newer than the releasedate, the application will run as
licensed, otherwise the application will run in demo mode.
Cross Platform
All current PrintShop Mail dongles are cross platform and any user that has a valid OLCare contract can request a voucher for
a cross platform license.
PrintShop Mail upgrade options
The Upgrade options are only enabled when the PrintShop Mail hardware key is attached to the computer where the upgrade
procedure is performed.
To upgrade your hardware key
From the Help menu, you can select from three different upgrade menu items:
l Voucher:If you have a PrintShop Mail voucher number, click on the "Voucher" option. A PrintShop Mail voucher web
page will open. Here you need to enter the voucher number and some additional information to confirm the request.
l Upgrade request:If you want to add credits, upgrade the version, add OL CARE or another option, click on the
"Upgrade" option. The PrintShop Mail Upgrade page will open. Here you select the options you want and some additional information to confirm the request.
l Activate dongle:If you have received an Authorization code back from your voucher or upgrade request (by email),
you have to copy that code into the Activate dongle screen. Then click "Activate".
©2010 Objectif Lune Inc - 10 -
Page 11
Getting Started
Installing the Hardware Key
Without a hardware key, also known as "Dongle", PrintShop Mail runs in Designer mode. In this mode, all PrintShop Mail functions are available, but you can only print up to 25 records per session and a watermark is printed over each layout output.
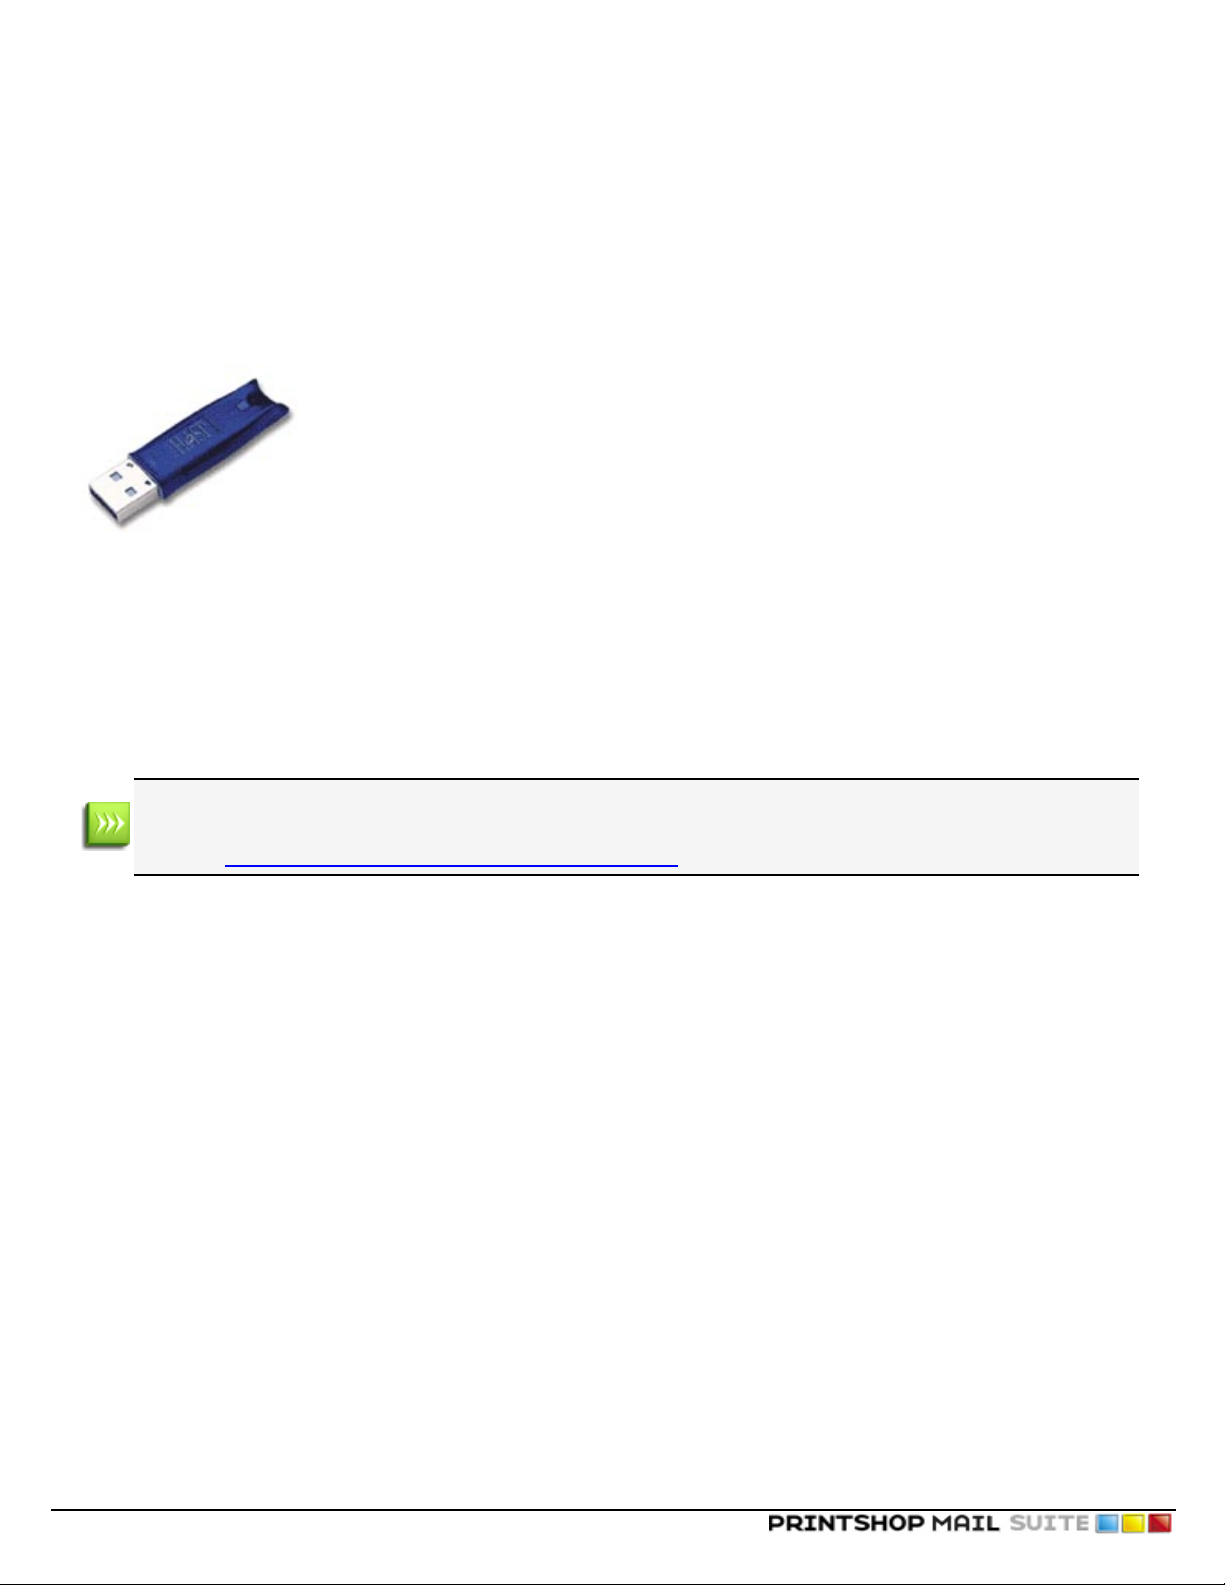
This is a picture of the USB hardware key (though your key may differ slightly in appearance).
Figure 1-0: The Hardware Key
You can use each crediton your hardware key to print one record.
To install the hardware key
Windows
Attach the hardware key to the USB port on your computer.
Though Windows should recognize your key by default and install it without intervention, in some cases it may not be
able to do so. In these cases, you will need to manually download and install the Aladdin HASP key drivers, available
online at: http://www.aladdin.com/support/hasp/enduser.aspx
To view the amount of credits available on the hardware key:
1. Start PrintShop Mail.
2. From the Help menu, select Credit Information.
Mac OS
Attach the hardware key to the USB port on your computer.
1. Start PrintShop Mail
2. From the Help menu, select Install Dongle Software...
3. Follow the instructions on the screen
To view the amount of credits available on the hardware key:
1. Start PrintShop Mail.
2. From the Help menu, select Credit Information.
©2010 Objectif Lune Inc - 11 -
Page 12

©2010 Objectif Lune Inc - 12 -
Page 13
The PrintShop Mail program interface
The PrintShop Mail program interface
The PrintShop Mail Program Window 13
PrintShop Mail Toolbars 14
Dockable Panels 19
Properties Panel 23
Manipulating Objects 33
Formatting Text 39
The Preferences Window 44
Layout Basics 58
Supported Image Formats 61
Windows Shortcuts 61
Macintosh Shortcuts 64
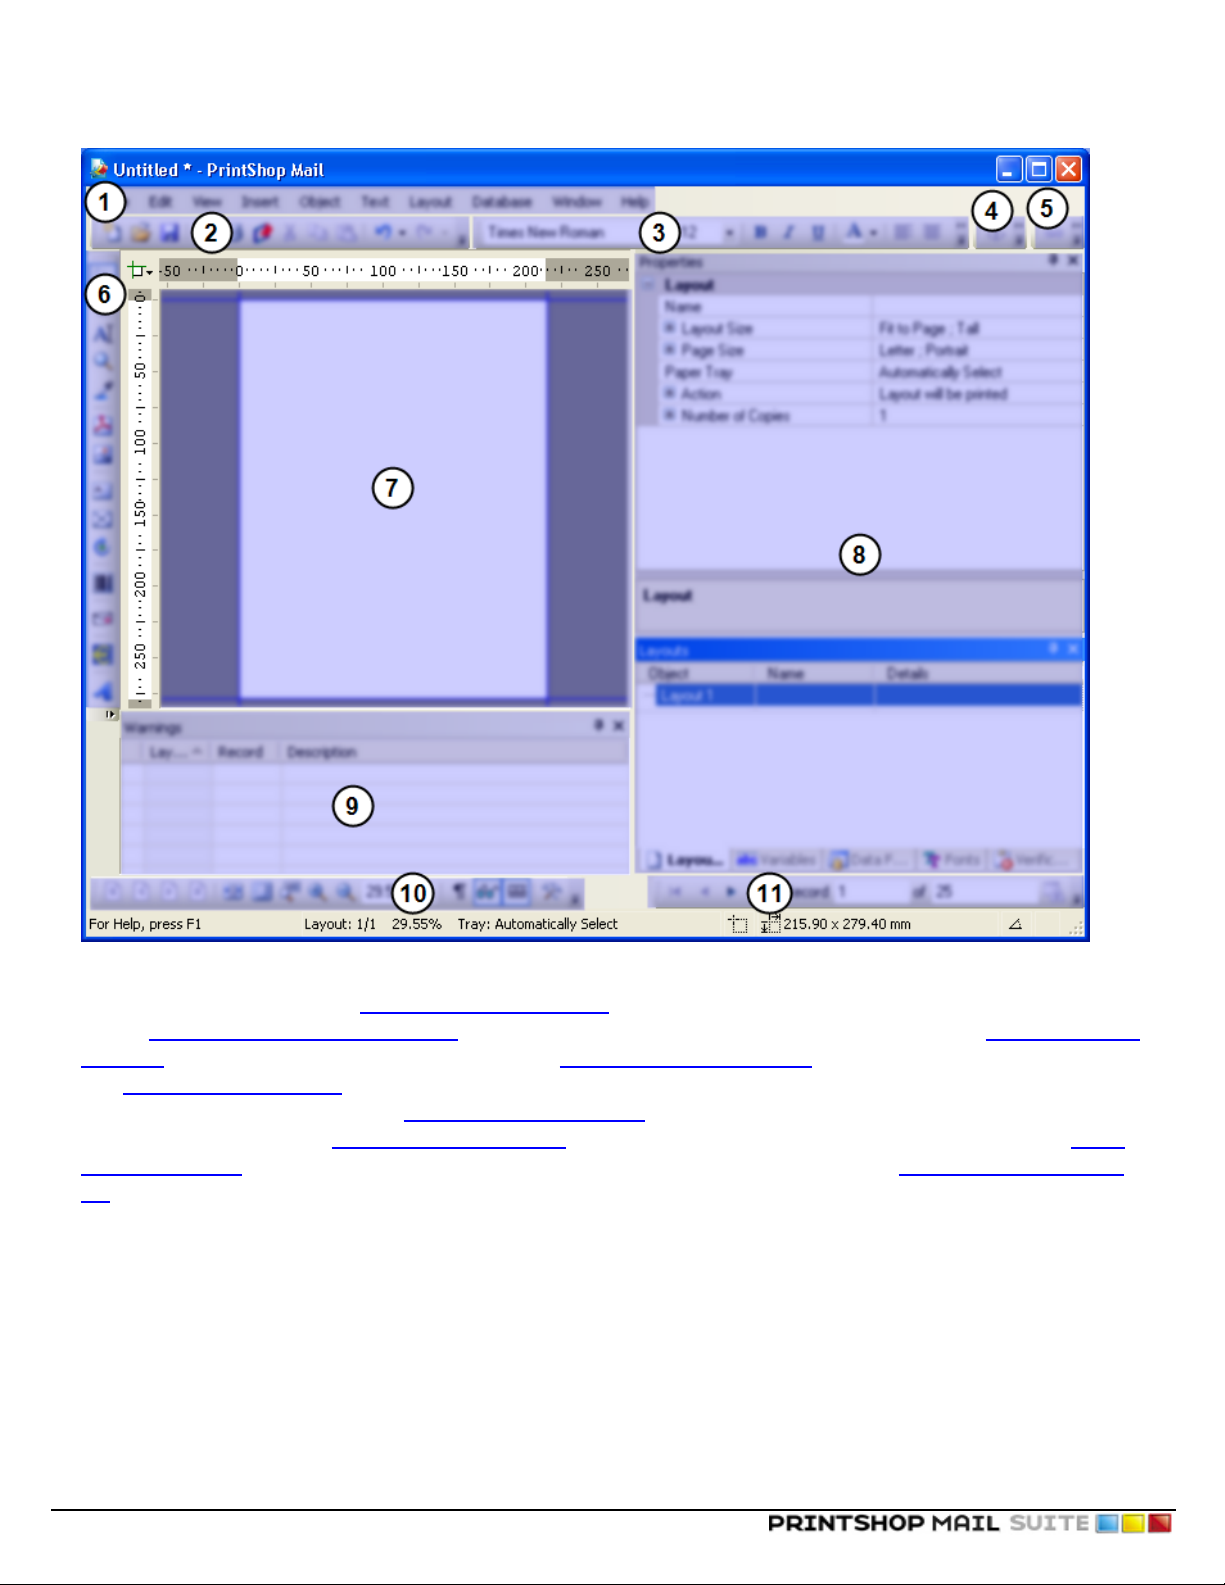
The PrintShop Mail Program Window
The PrintShop Mail Program Window is divided into multiple sections:
©2010 Objectif Lune Inc - 13 -
Page 14
The PrintShop Mail program interface
Figure 1-0: The PrintShop Mail Program Window and its components:(1) The Menu contains all of the useable menus referred
to in this documentation. (2) The "Standard Toolbar" (page 15) lets you manipulate documents as well as clipboard functions.
(3)The "Text Formatting Toolbar" (page 15) lets you set text and paragraph styles and formatting. (4) The "Objects Toolbar"
(page 16) lets you manipulate object properties. (5)The "Text Link Toolbar" (page 16) lets you set links for text objects. (6)
The "Tools Toolbar" (page 17) lets you add and manipulate objects in your document. (7)The Layout area is where your doc-
ument and its objects appear. (8)The "Dockable Panels" (page 19) display various utilities such as your layouts, variables,
data fields and more. (9)The "Warnings Panel" (page 21) displays warnings about errors in your document. (10)The "View
Toolbar" (page 18) lets you change how you see your document by zooming in and out. (11)The "Database Toolbar" (page
18) lets you navigate through the records in your database.
PrintShop Mail Toolbars
The PrintShop Mail Program Window contains multiple toolbars that can be moved and customized. This section looks at each
toolbar and its buttons.
Main (Top)Toolbar:
©2010 Objectif Lune Inc - 14 -
Page 15
l Standard Toolbar
l Text Formatting Toolbar
l Objects Toolbar
l Text Link Toolbar
Objects Toolbar:
l Tools Toolbar
Bottom Toolbar:
l View Toolbar
l Database Toolbar
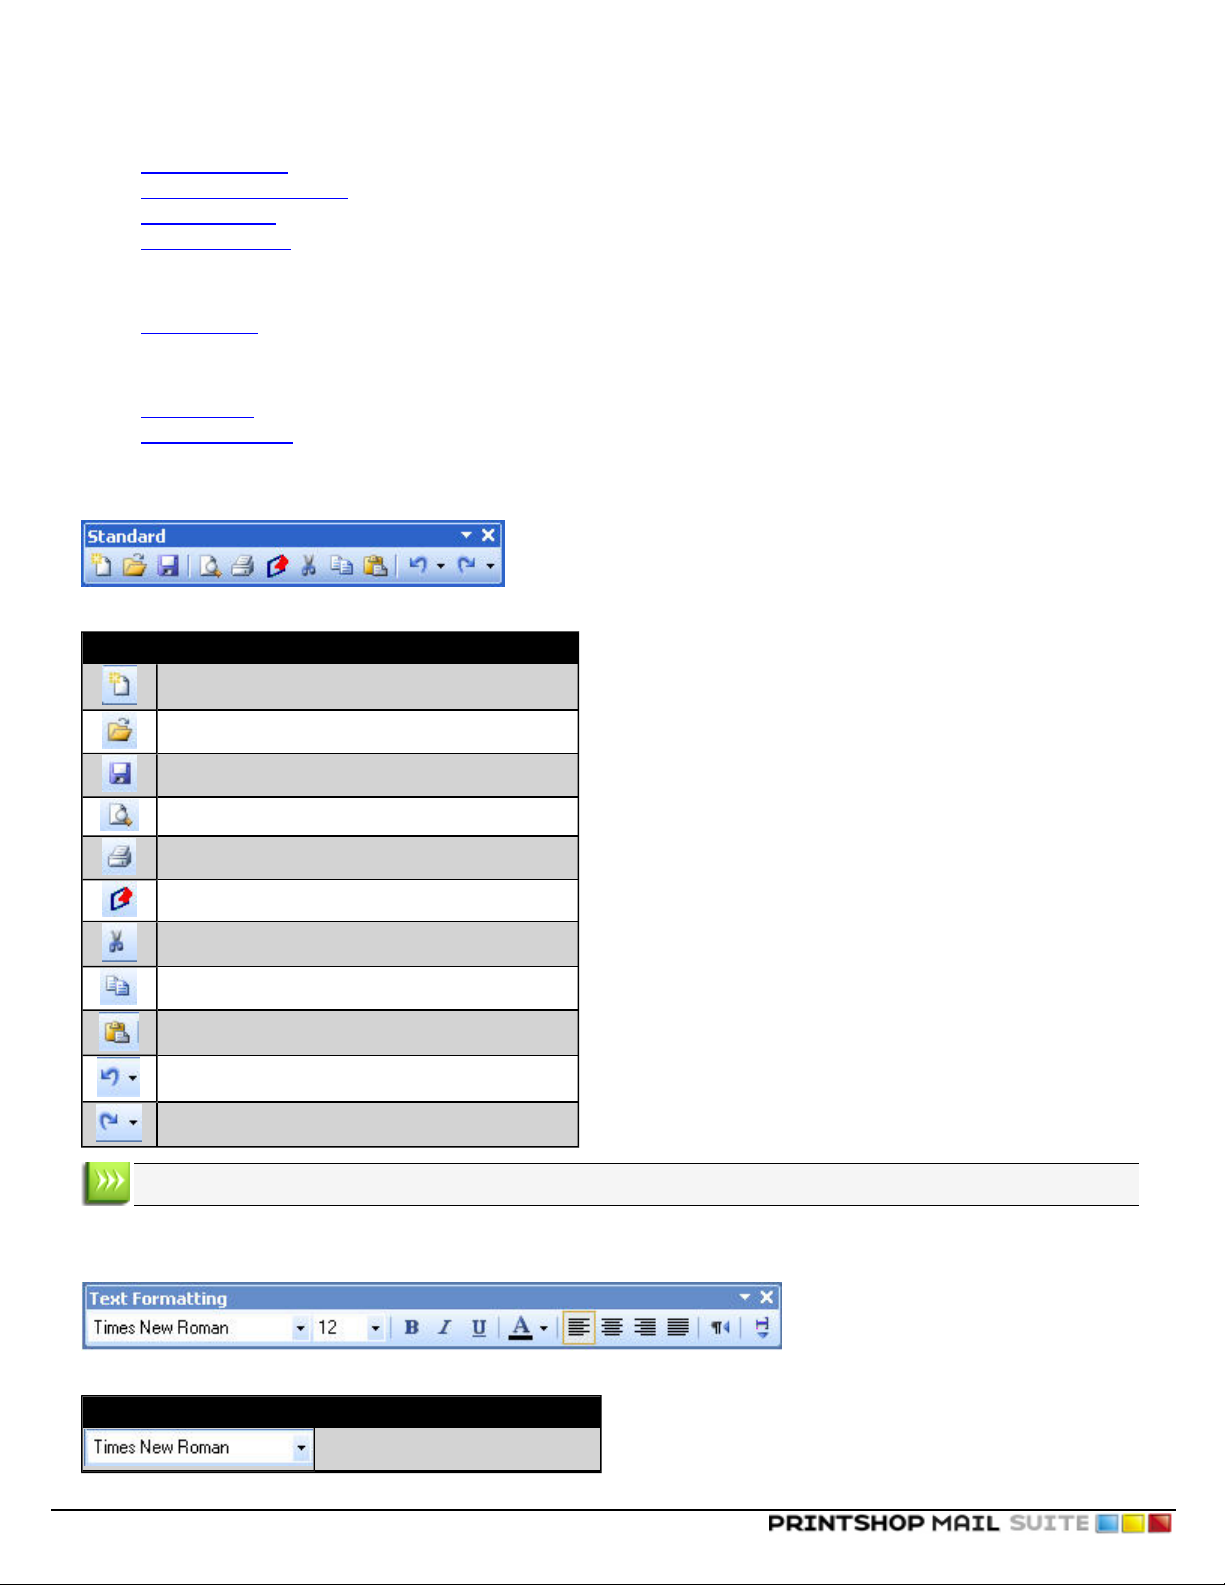
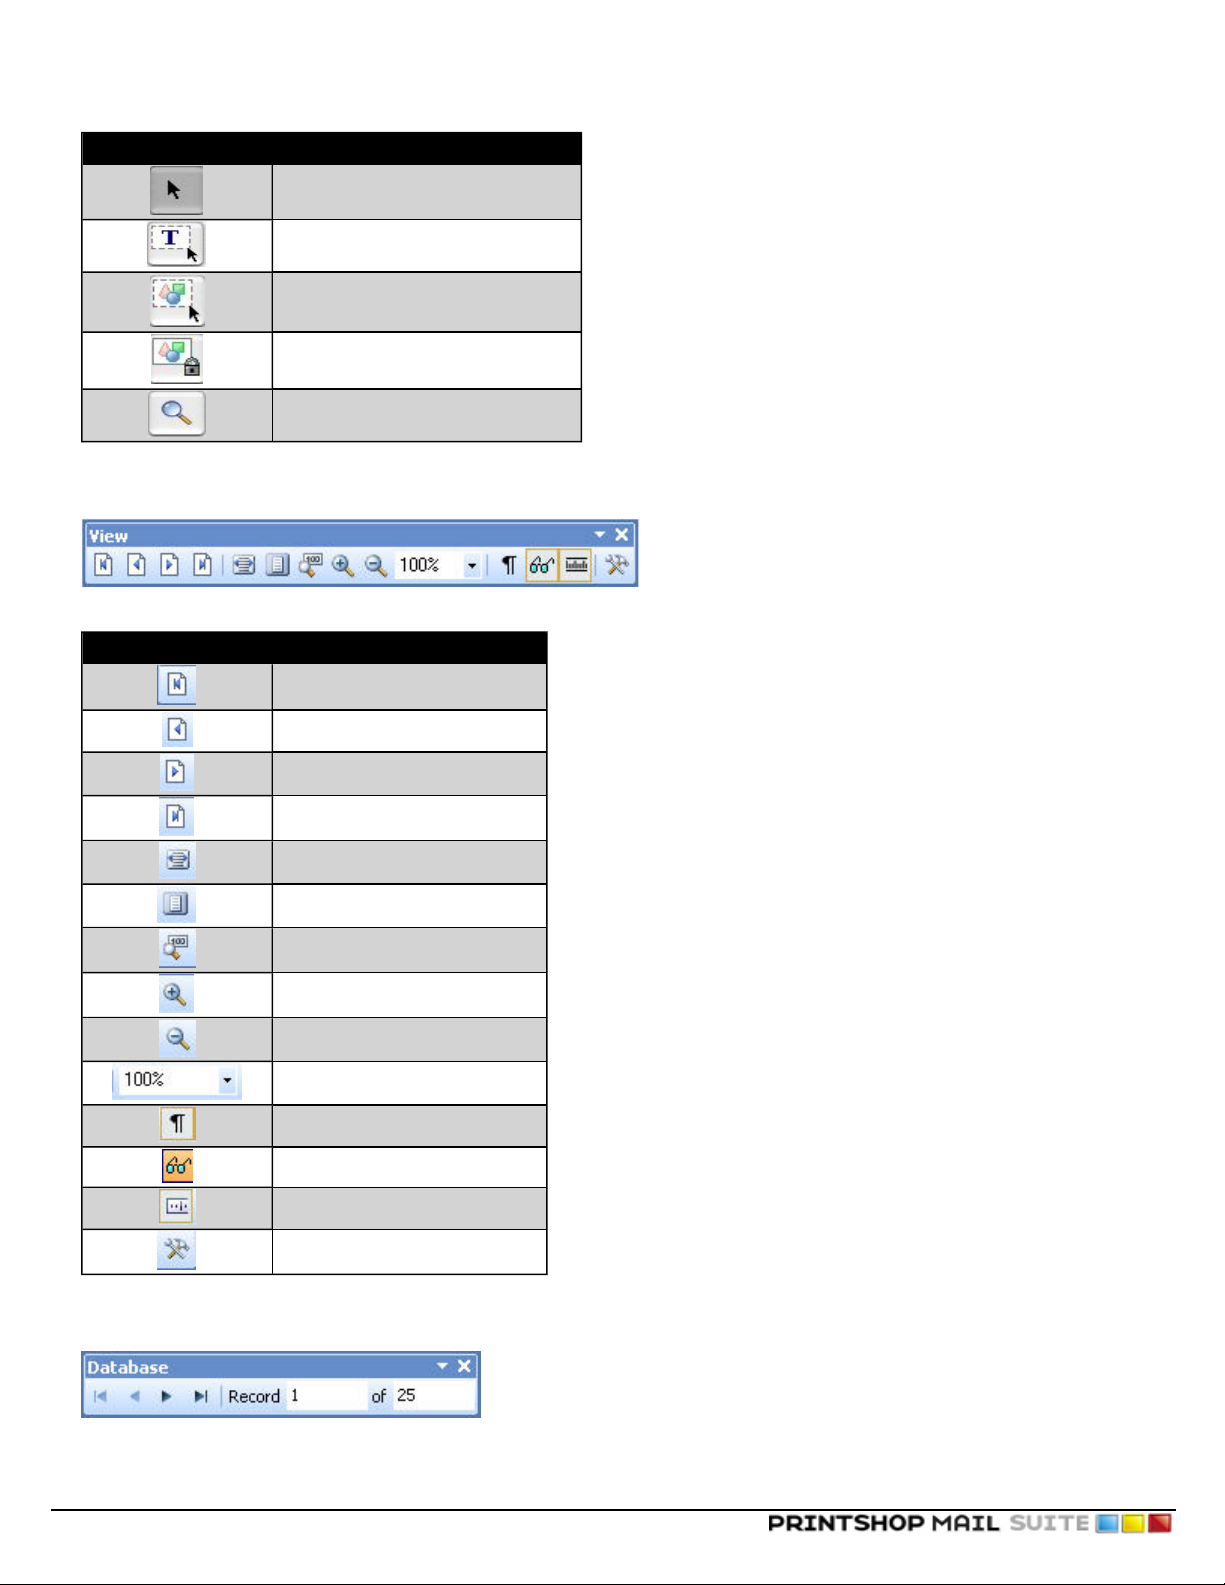
Standard Toolbar
Figure 1-0: The Standard Toolbar and its button.
Button Function
The PrintShop Mail program interface
Create a new document, based on a blank layout.
Open an existing document.
Save your current document.
Preview the current document.
Print the current document.
Publish templates to PrintShop Web.
Cut the selected object(s).
Copy the selected object(s).
Paste the selected object(s).
Undo the last action.
Redo the last action.
To undo or redo multiple actions at one time, click the drop-down button next to the arrow.
Text Formatting Toolbar
Figure 1-0: The Text Formatting Toolbar and its button.
Click this button... To do this...
Select the font name
©2010 Objectif Lune Inc - 15 -
Page 16
Click this button... To do this...
Select the font size.
Make the selection bold.
Make the selection italic.
Underline the selection.
Select the font color.
Left align text.
Center text.
Right align text.
Justify text.
Change the text to "Right to Left".
Vertical Layout
The PrintShop Mail program interface
Objects Toolbar
Figure 1-0: The Objects Toolbar and its button.
Click this button... To do this...
Add or Remove anchor.
Align left edges to the left edge of the last selected object.
Align right edges to the right edge of the last selected object.
Align top edges to the top edge of the last selected object.
Align bottom edges to the bottom edge of the last selected object.
Rotate the object 90 degrees counter-clockwise.
Rotate the object 90 degrees clockwise.
Select the fill color.
Specify the border width (or no border).
Specify the border style
Select the border color.
Text Link Toolbar
©2010 Objectif Lune Inc - 16 -
Page 17
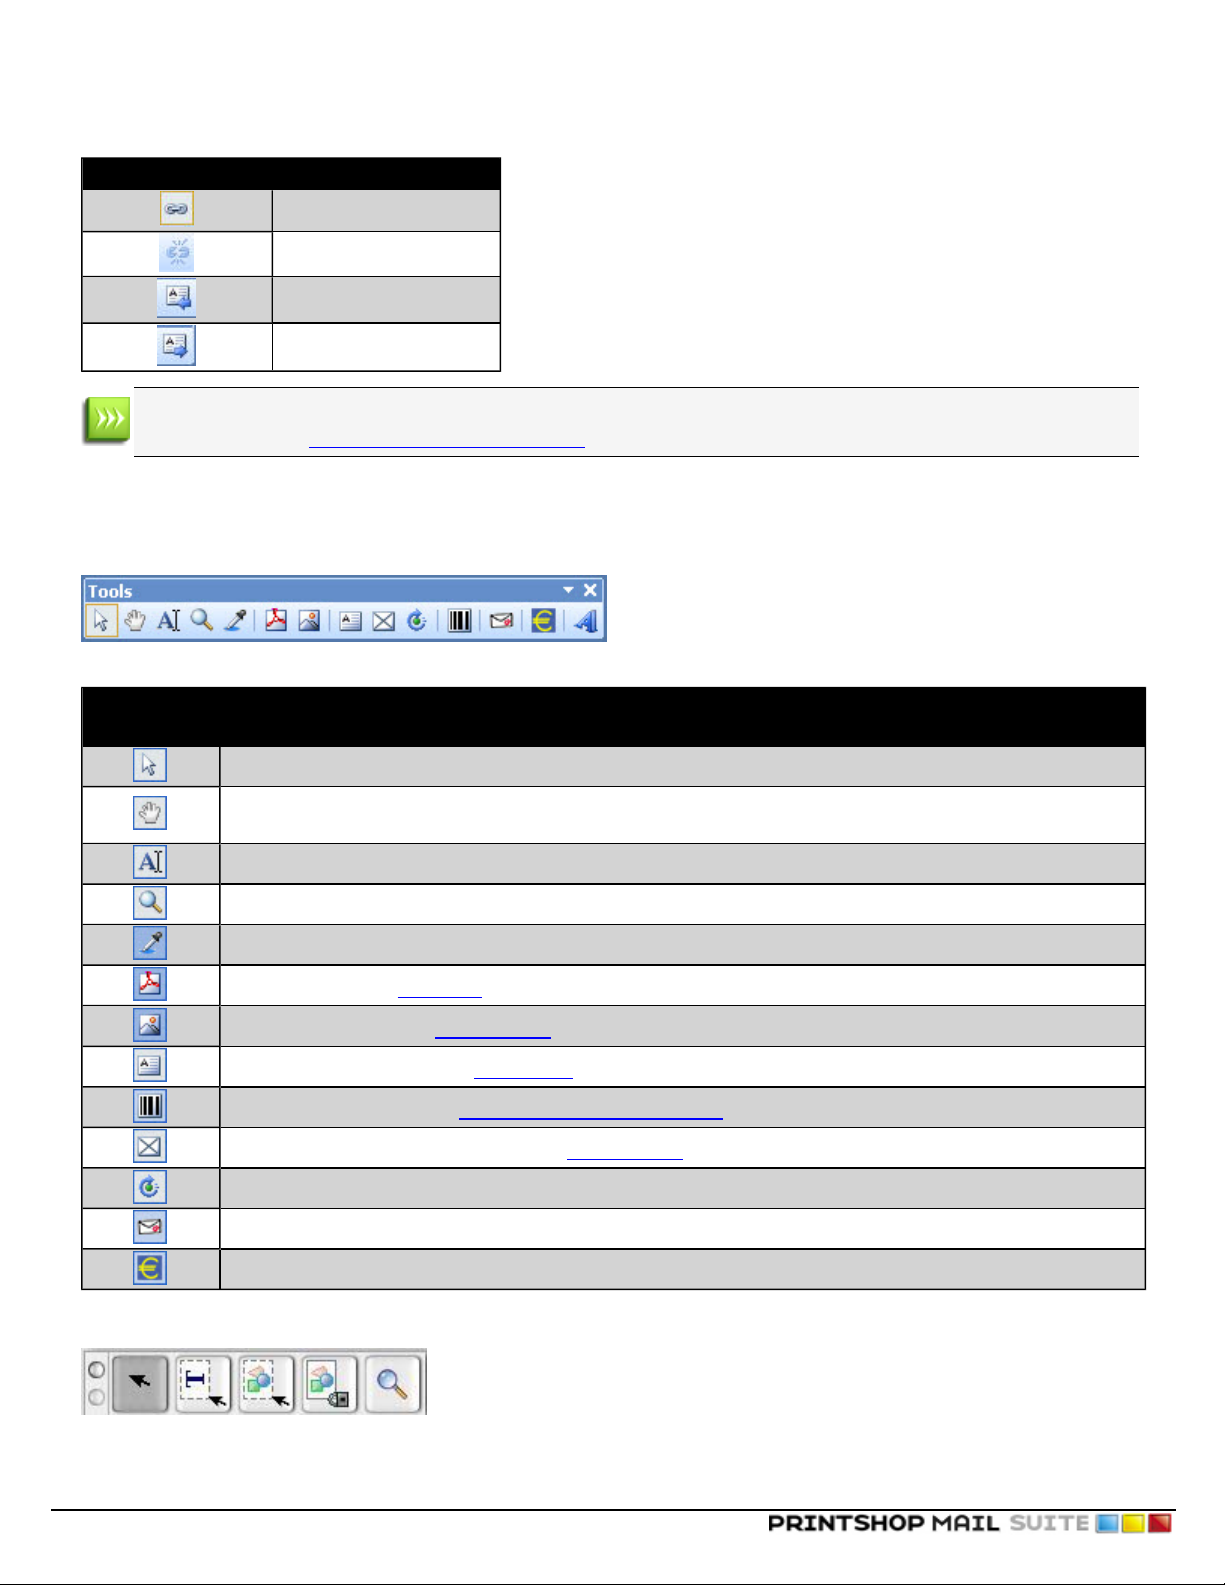
Figure 1-0: The Text Link Toolbar and its button.
Click this button... To do this...
Create Forward Text Link.
Break Forward Text Link.
Select Previous Text Box.
Select Next Text Box.
Not only can multiple text boxes can be linked together with text flowing between them, they can also be linked
across layouts. See "Linking Text Objects" (page 37) for more details.
Tools Toolbar
Windows
The PrintShop Mail program interface
Figure 1-0: The Tools Toolbar and its button.
Click this button...
To do this...
Select the Selecttool. Click on an object to select it.
Select the Pan tool. You can then click and hold within the design area and move the mouse to pan the area in
all directions (best used when zoomed in).
Select the edit text tool. Click on an existing text object to edit it (same effect as double-clicking a text object).
Select the zoom tool left click to zoom in, right click or hold down CTRL to zoom out.
Pick a Fill, Text, or Border color based on the RGB values of any pixel on the screen.
Place a PDF file. See Place PDF.
Place a static image. See Image Object.
Select the place text tool. See Text Object.
Place a barcode object. See "Barcode Properties" (page 31).
Select the place variable image tool. See Image Object.
Rotate the selected object to any angle by dragging the mouse cursor.
Place a DirectSmile object.
Place AcceptGiro object.
Mac OS
Figure 1-0: The Tools Toolbar and its button in Mac OS.
©2010 Objectif Lune Inc - 17 -
Page 18
Click this button... To do this...
Select the tool.
Select the edit text tool.
Select the place variable image tool.
Place a static image.
Select the zoom tool.
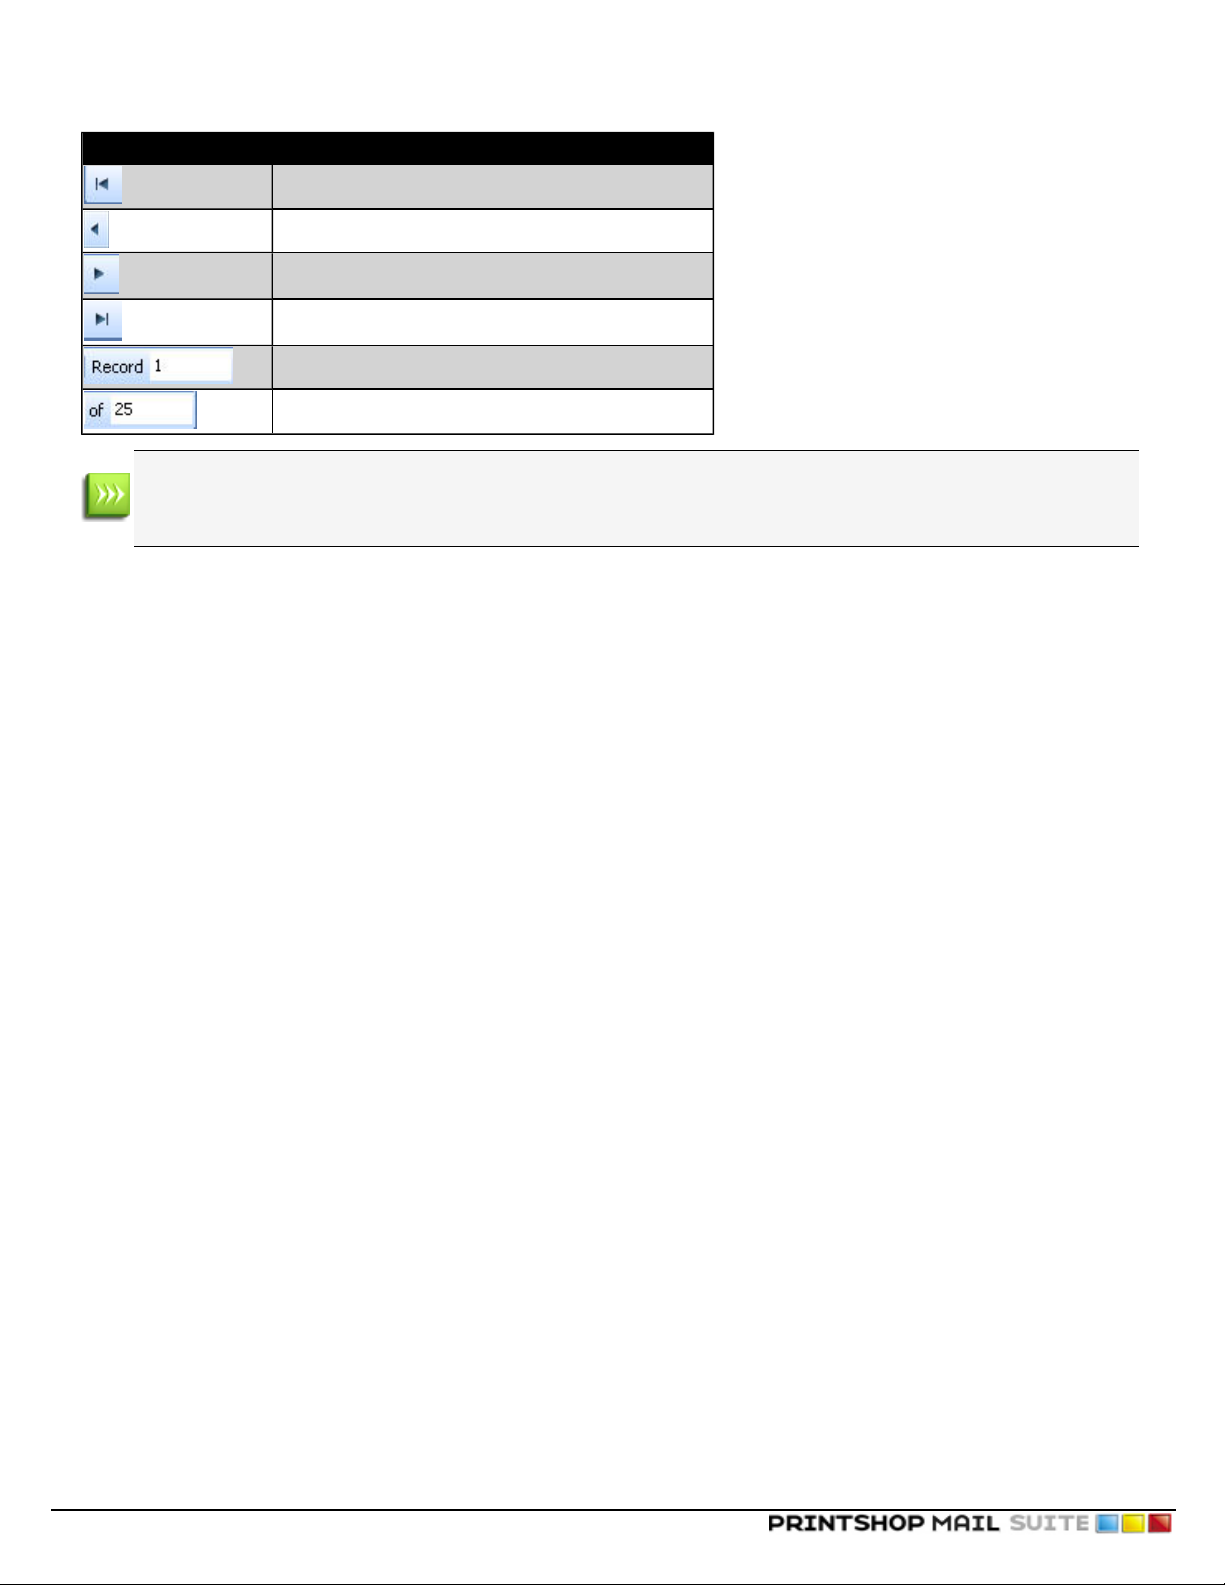
View Toolbar
Figure 1-0: The View Toolbar and its button.
Click this button... To do this...
The PrintShop Mail program interface
Go to the first layout.
Go to the previous layout.
Go to the next layout.
Go to the last layout.
Fit Layout Width
Display Whole Layout
Display the Layout Actual Size
Zoom In
Zoom Out
Specify the zoom level
Show or hide Formatting Marks.
Toggle Preview mode.
Show or hide the rulers.
Show or hide a specific toolbar.
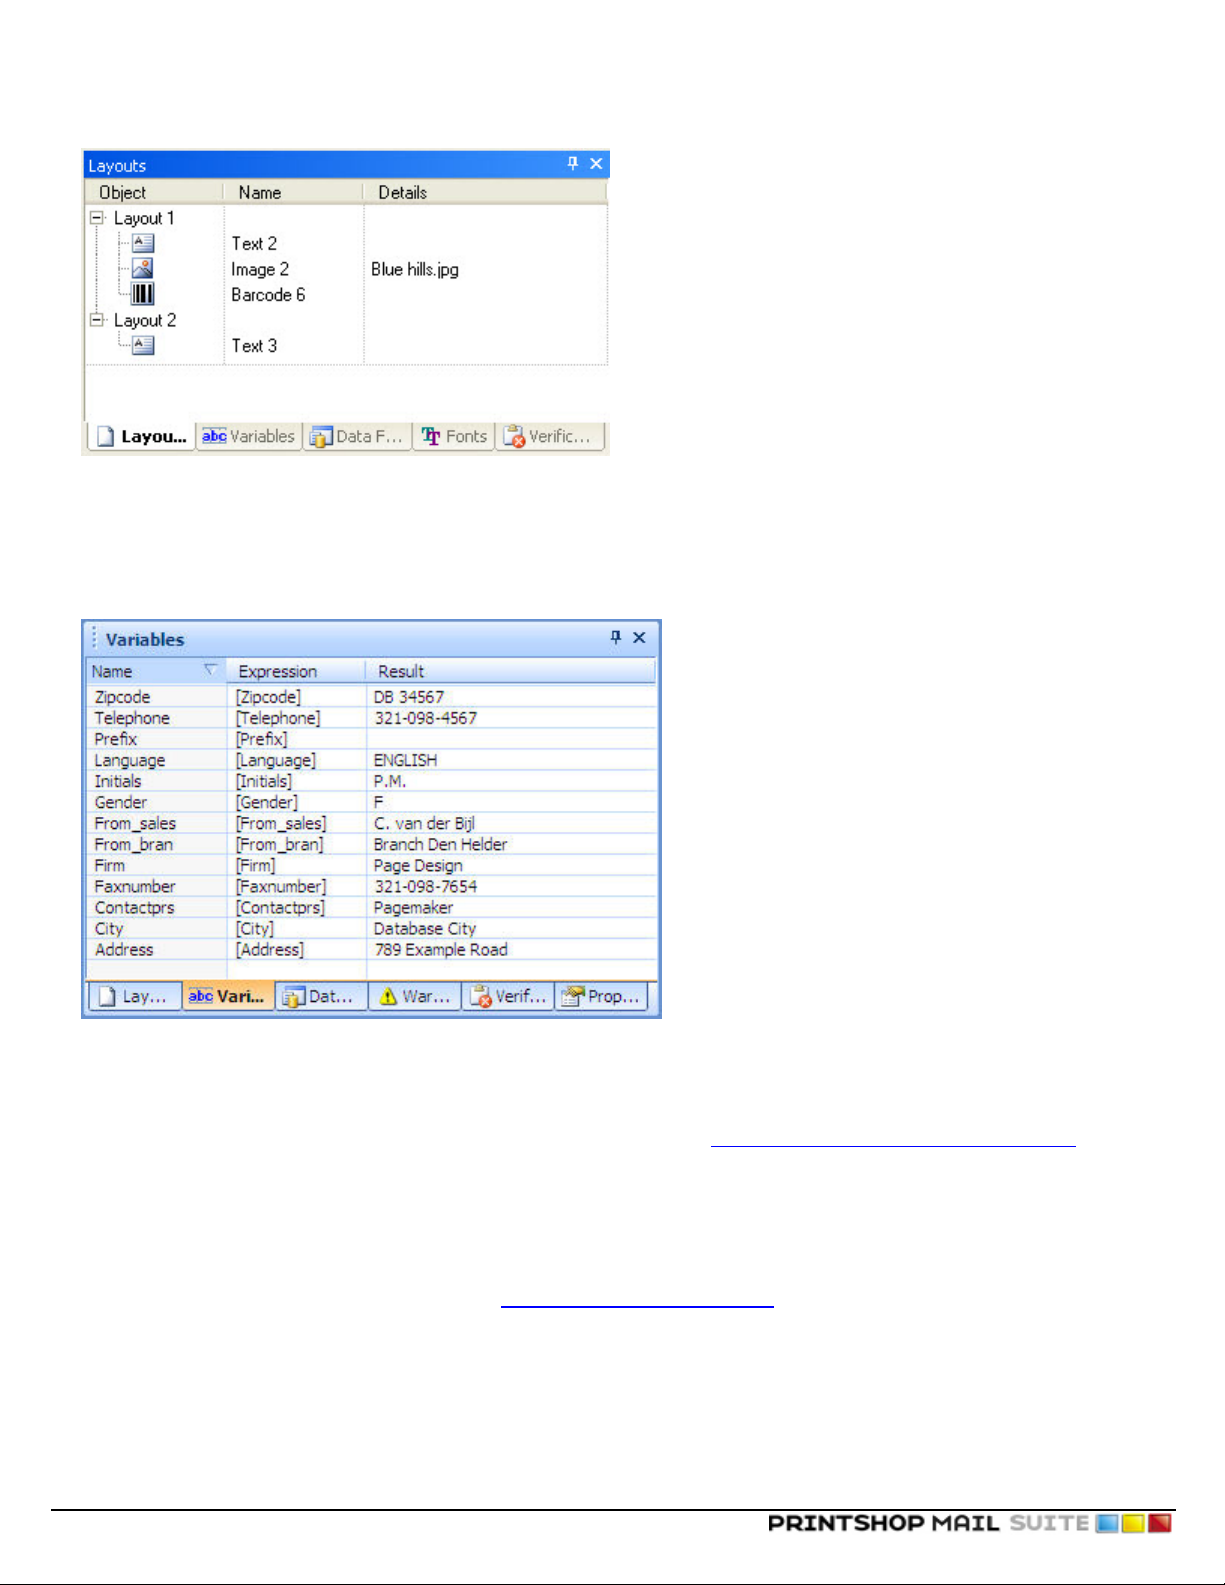
Database Toolbar
Figure 1-0: The Database Toolbar and its button.
©2010 Objectif Lune Inc - 18 -
Page 19
The PrintShop Mail program interface
Click this button... To do this...
Go to the first record.
Go to the previous record.
Go to the next record.
Go to the last record.
Go to the current record.
Display the total number of records in the database.
The Total number of records edit box is read-only when a database is open.
When no database is open, you can change the total number of records, in the Database toolbar. To do this, enter the
desired number of records and press Enter.
Finding a Record
Though notpart of the Database Toolbar, a very useful feature for open databases is the Find Record feature. This feature is
available from the Database menu, or via its shortcut key (CTRL+F). It is only available when a database is open, and will be
grayed out otherwise.
The find record dialog appears with the following options:
l Find what:Enter a term (word, phrase, character)to search for.
l Look in:Click the drop-down to select the database field in which to search.
l Match whole word only:Only match if the word is separated. For example, if this is selected the word tom would
not be found in the word tomatoes. If it is not selected, words part of others will be matched.
l Match case:Click to force a match only if each letter of the word is in the same case. For example, if this is selected,
Tom will not be matched with tom or ToM. Otherwise, the search is case insensitive.
l Direction:Select whether to look forward in the records (down)or backwards in previous records (up).
l Find Next:Click to find the next occurrence of the search term.
l Cancel:Closes the dialog.
Dockable Panels
The PrintShop Mail Program makes it easy to view the correct information precisely when you need it, by dividing that information into different panels. These panels will change depending on the situation.
These panels can be undocked and moved in order to customize the interface to your liking.
Layouts Panel
The Layouts panel contains the layout(s) and their object(s). The objects are listed as a part of the layout in a tree view.
©2010 Objectif Lune Inc - 19 -
Page 20
The PrintShop Mail program interface
Figure 1-0: The Layout Panel, showing two layouts and a few objects.
Variables Panel
The Variables panel shows the list of variables, the Name, Expression and calculated Result.
Figure 1-0: The Variables panel, showing the name, expression and result for each variable.
To edit a variable:
1. Double click on the variable. This will open the Expressions Editor ("The Expressions Editor" (page 121)).
2. Modify the expression, then click OK.
To edit a variable's properties and change its category:
1. Click on the variable.
2. Click on the Window menu, then Properties.
3. Change the properties of the variable (see "Variables Properties" (page 30))
To copy a variable's expression:
1. Right-click on the variable.
2. Click Copy Expression.
3. Right-click on another variable where you want to paste the expression.
4. Click Paste Expression.
©2010 Objectif Lune Inc - 20 -
Page 21
The PrintShop Mail program interface
For detailed information about how to format variables, see "Variables Properties" (page 30).
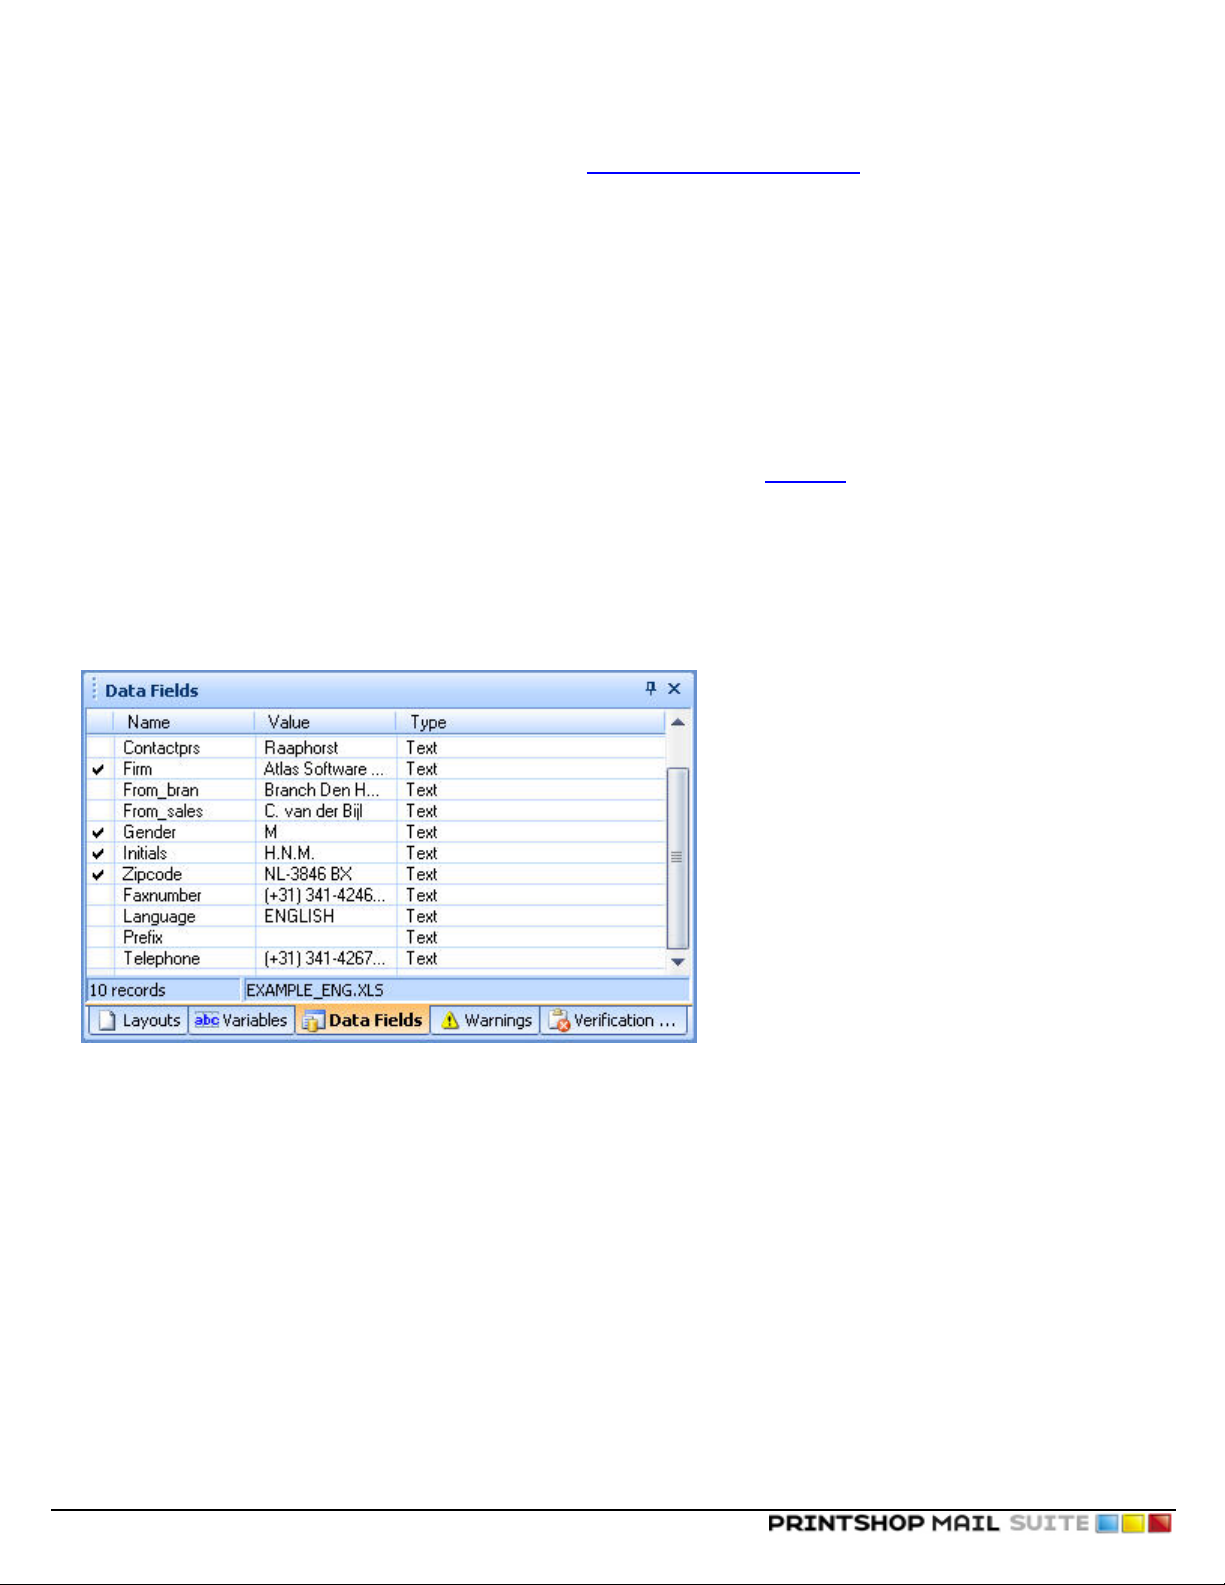
Data Fields Panel
The Data Fields panel will show the field names , database name of the opened database and the number of records it contains.
The entries you will find in the Data Fields panel in PrintShop Mail, represent data fields thatoccur in the document. These
fields are either referred to in expressions (for variables or layout conditions, without the need to directly being linked to a
database), or they refer to actual database fields (when the document is already linked to a specific database).
When a data field is used in the PrintShop Mail document, it will have a check mark in the Data Fields panel.
You can browse the records in the database by clicking the browse buttons in the Database toolbar, or by making the following
selections from the Database menu:
l First Record (ALT+Up)
l Previous Record (ALT+Left)
l Next Record (ALT+Right)
l Last Record (ALT+Down)
l Record...Allows you to select a specific record.
Figure 1-0: The Data Fields panel, showing the name, value and type of each of your database fields.
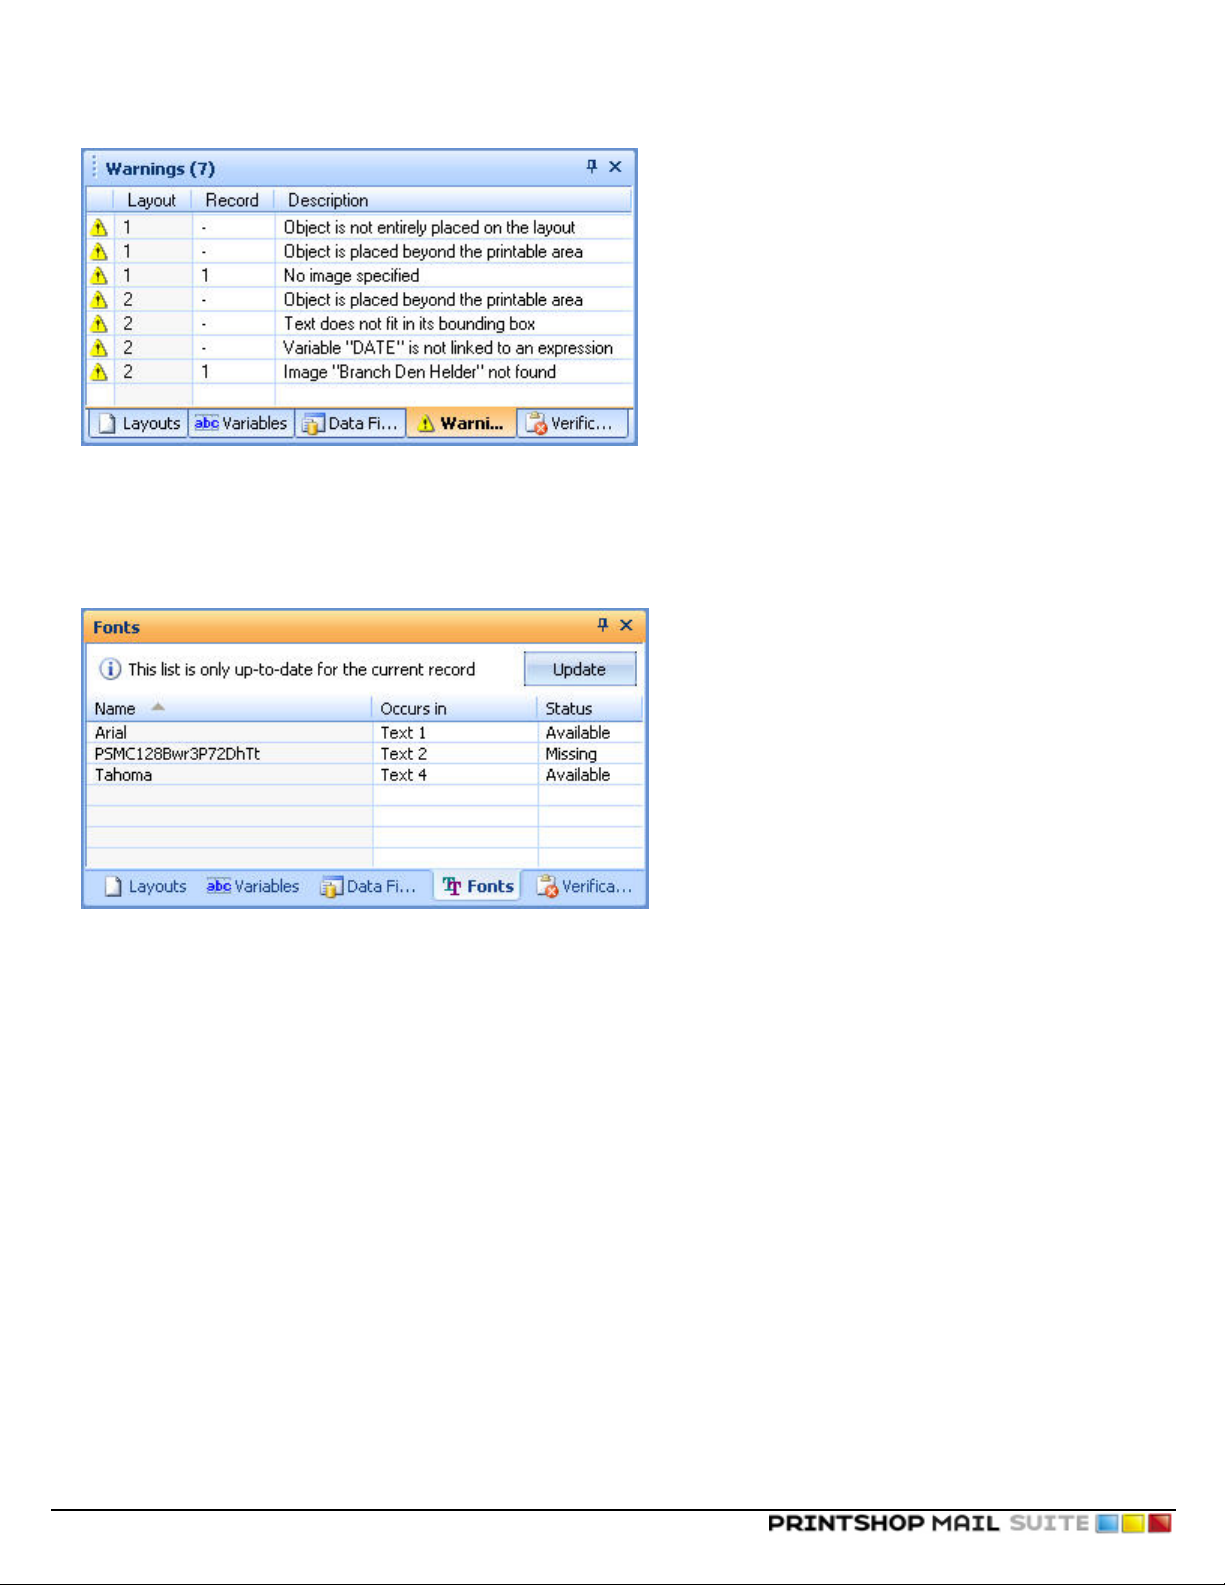
Warnings Panel
While you are working, PrintShop Mail will dynamically check for any possible errors on the layout and will display any occurring errors in the Warnings panel.
©2010 Objectif Lune Inc - 21 -
Page 22
The PrintShop Mail program interface
Figure 1-0: The Warnings Panel, showing any warning that occurs in your document.
Fonts Panel
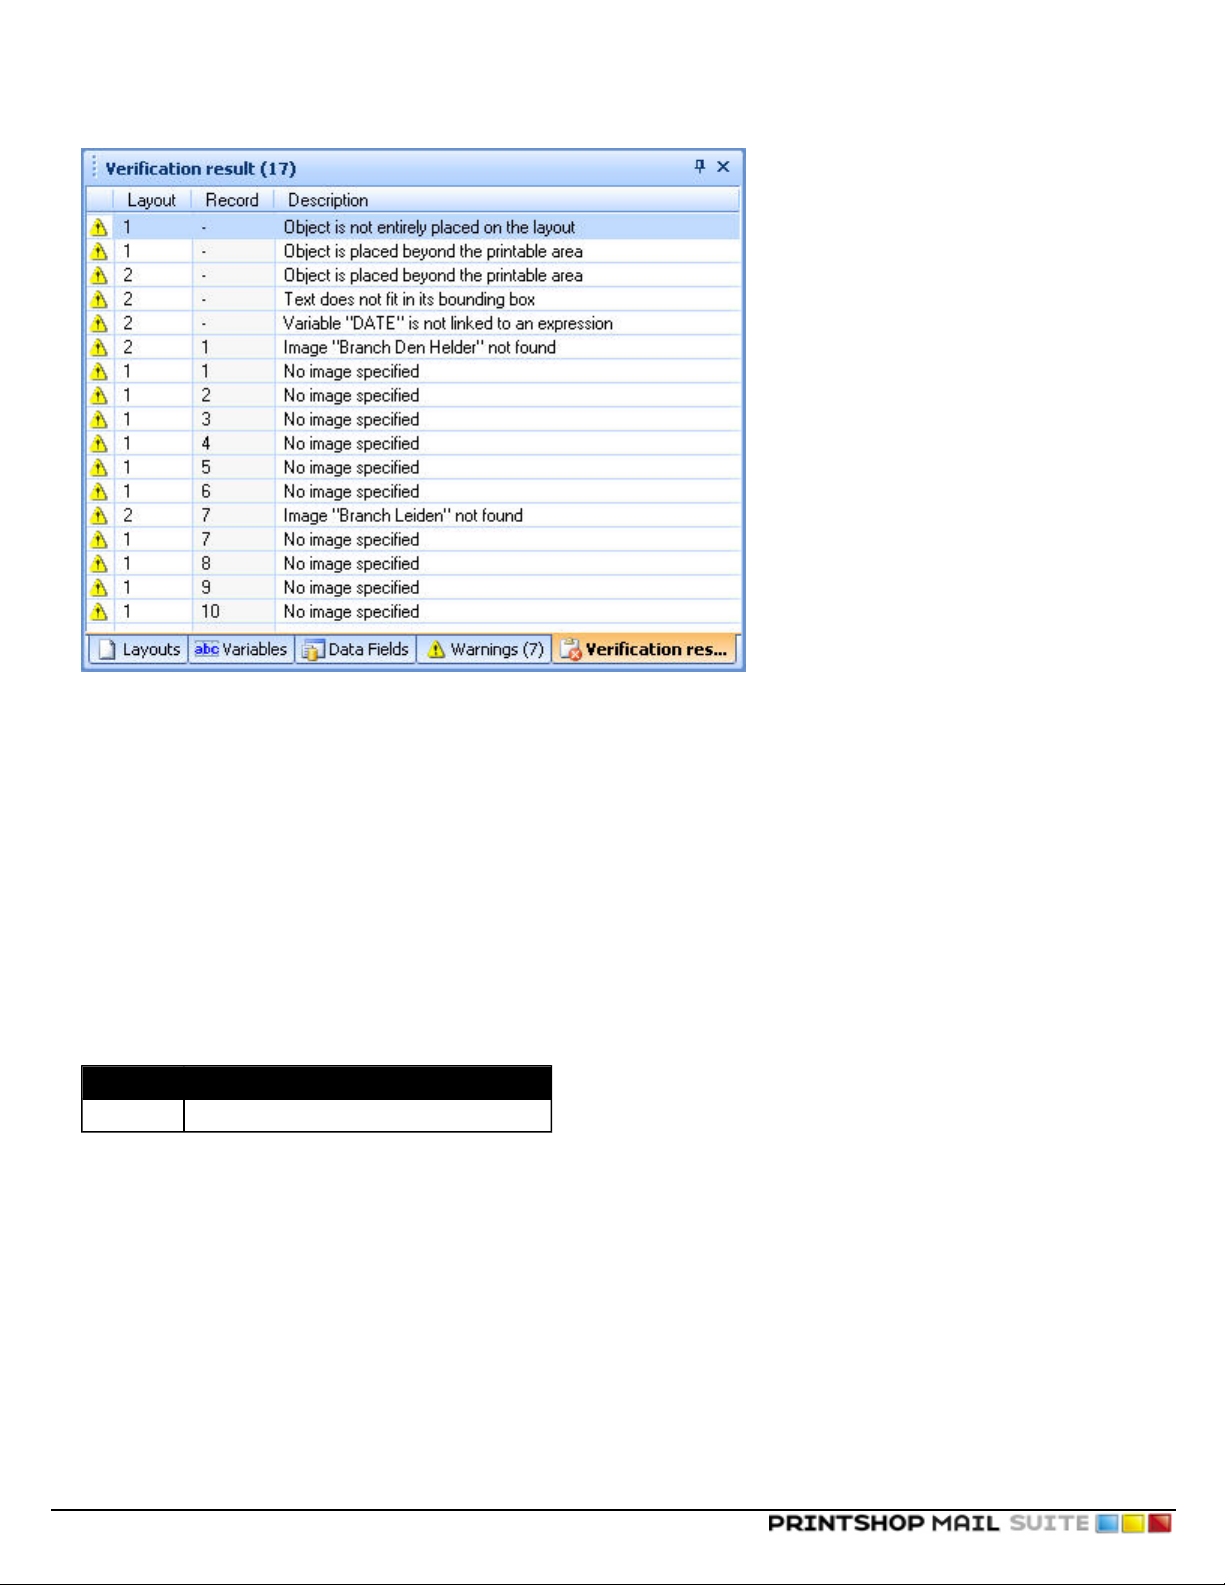
The Fonts panel will show the fonts used in the PrintShop Mail document and any missing font.
Figure 1-0: The Fonts Panel, showing any all the fonts used in your document.
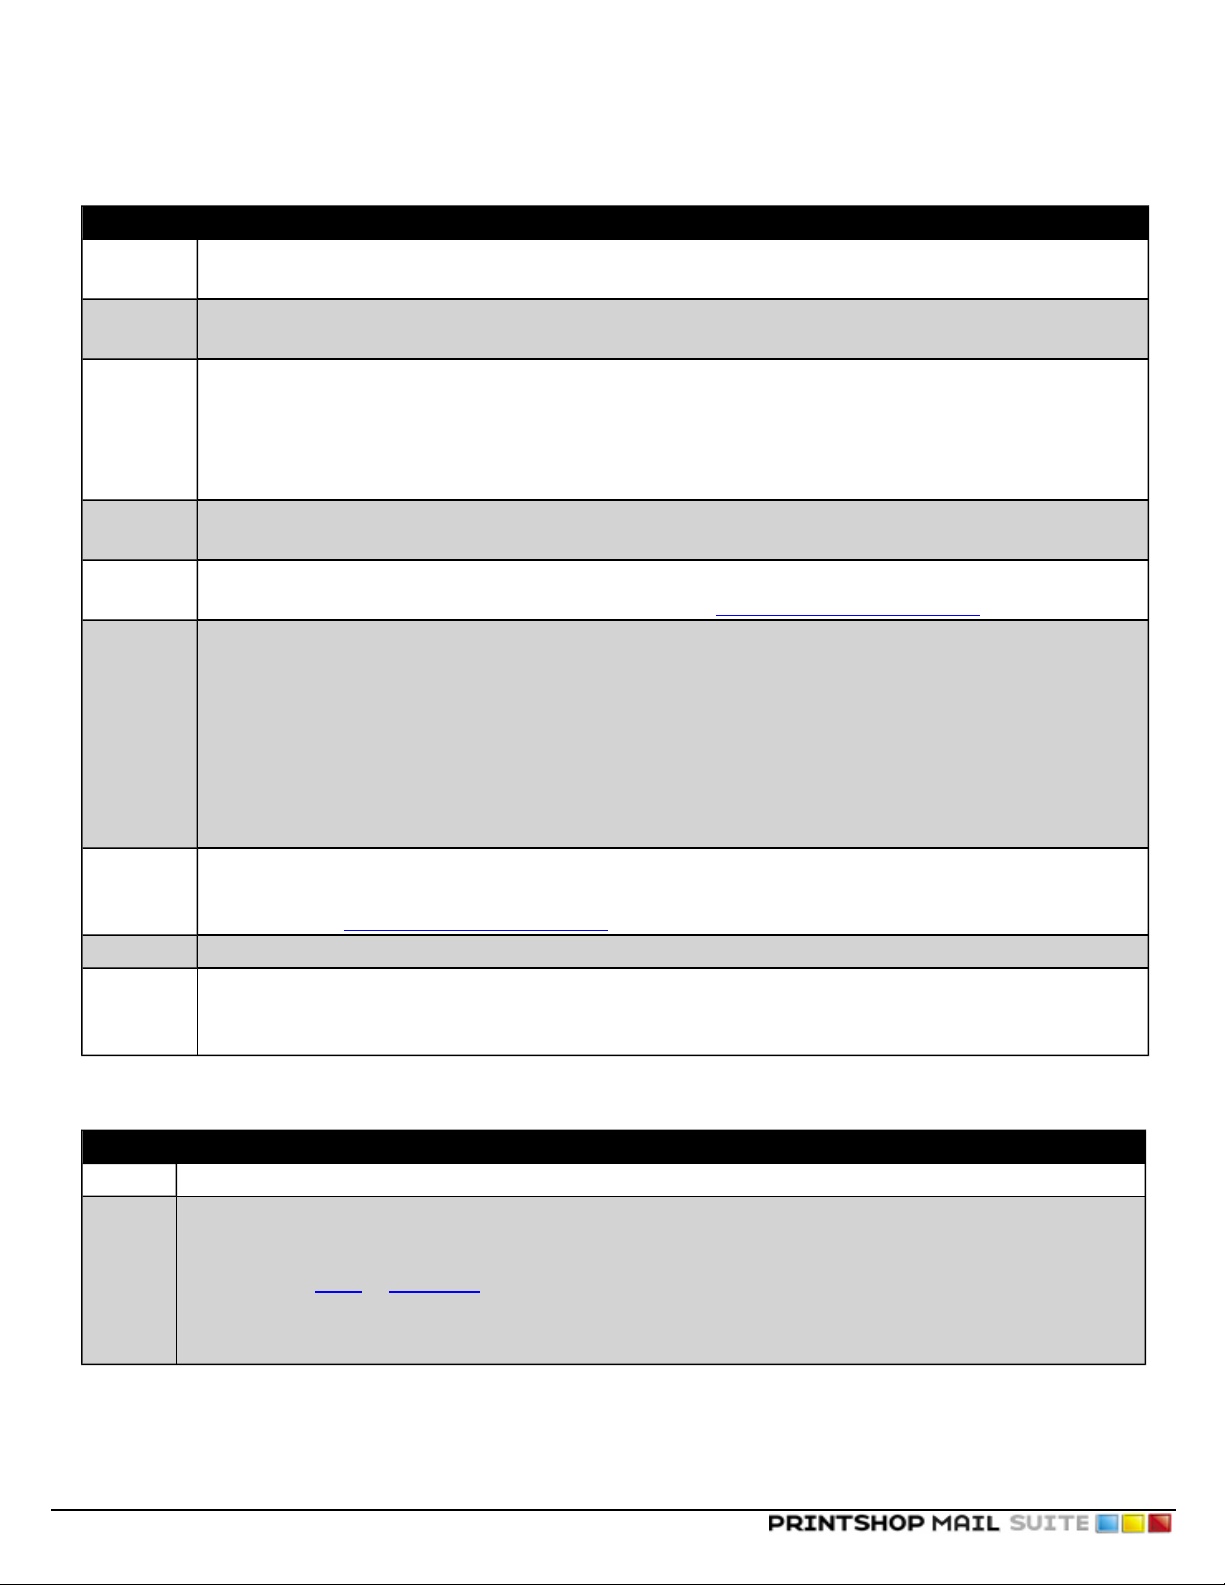
Verification Result Panel
When you select from the Layout menu, Verify Document a progress bar will be displayed, showing the amount of records being checked. The warnings for the whole document will be listed in the Verification Result panel.
©2010 Objectif Lune Inc - 22 -
Page 23
The PrintShop Mail program interface
Figure 1-0: The Verification Results Panel, showing the results of the Verify Document procedure.
It is possible to save messages displayed in the Warnings panel and the Verification Results panel by right clicking on
the message and Copy/Paste the text to a text file.
Properties Panel
You can change the properties for any object in the Properties Panel.
These properties are grouped as follows:
Object Group
Option Description
Name The unique name that identifies an object.
The following limitations apply to "objects name":
l No white spaces leading or trailing.
l Maximum 255 characters.
l Not editable when multiple objects are selected.
©2010 Objectif Lune Inc - 23 -
Page 24
Frame Group
Option Description
Lock Position
Bounding
Box
Snap
Frame to
Content
(Windows
Only)
Border
Size
Border
Color
Locks the position, size and rotation attributes of this object.
Displays the dimensions of the bounding box using the location of the top left corner, and the height and width.
These values can also be entered manually.
Snaps the frame to the proportions of the content.
When this option is set to "Yes", the object’s bounding box (frame) will automatically resize to the dimensions
of the image or resize vertically to accommodate larger amounts of variable text that would otherwise not fit in
the text box. When set to "No", a verification warning will be shown, when variables do not fit in the box.
Note: When using text linking, Snap Frame to Content is only allowed for the last object in the chain.
Change the border size. You can choose from hairline width, or a pixel width (1-12px). You can also create a
Custom Size.
You can choose one of the standard colors, or create your own custom RGB, CMYK, Gray or Spot color for the
border. To learn more about PrintShop Mail Spot Colors click "Specify Spot Colors" (page 70).
Choose the border style. The following options are available:
The PrintShop Mail program interface
Border
Style
(Windows
Only)
l Solid ——————
l Square dot......
l Dash — — — — —
l Dash Dot — - — - — -
l Long Dash —— —— ——
l Long Dash Dot —— - —— -
l Long Dash Dot Dot —— - - —— - -
The fill color can be transparent, or it can be set to a solid fill color. The standard Windows palette is available,
Fill Color
but you can also create your own custom RGB, CMYK, Gray or Spot color. To learn more about PrintShop Mail
Spot colorsclick "Specify Spot Colors" (page 70).
Rotation Shows the current rotation applied to the item.
Master Object: Master object name to anchor to.
Anchor
Horizontal: Horizontal aspect of the master object to anchor to.
Vertical: Vertical aspect of the master object to anchor to.
Printing Group
Option Description
Print Specifies whether the object will be printed or previewed only.
Global
Scope
for
PPML
(images
only)
Specifies whether an image should get Global Scope. Images with a Global Scope can be reused on the printer
across multiple PPML or PPML/VDX jobs. When set to "Yes" images will be stored in a specified Environment and
can be reused in others print jobs. This property will be ignored for other technologies.
©2010 Objectif Lune Inc - 24 -
Page 25
The PrintShop Mail program interface
Text Properties
The Text Properties lets you change all of the properties for any text object in your document. The options available are different in the Windows and Mac OS versions of the software.
To open the text properties in Windows
1. Click on the text object of which you want to display the properties.
2. Click in the Window menu, then click Properties.
3. The Properties window appears or, if it is already present, is brought to the front and selected.
To open the text properties in Mac OS
1. Click on the text object of which you want to display the properties.
2. Click on Items, then Show Object Properties. You can also right-click on the text object and select Show Object Properties from the drop-down menu.
3. The Object Properties dialog appears.
Available Options
All objects share some properties. To see these shared properties (the "Object", "Frame"and "Printing"groups), see Prop-
erties Panel.
©2010 Objectif Lune Inc - 25 -
Page 26
The PrintShop Mail program interface
Content Group
Option Description
Alignment horizontal Horizontal Text alignment (Left, Centered, Right, Justified).
Alignment vertical Vertical text alignment (Top, Centered, Bottom)
Copy fitting is a feature that will automatically shrink text by reduc-
ing the font size when there is more text than the text box can hold.
The font size will be reduced to the font size needed to fit the text in
the text box. However, text will not be shrunk beyond the specified
minimum font size. When the text needs to be resized, all text will be
resized step by step until the text fits or the minimum font size is
reached.
Minimum font size: When Copy Fitting is enable, the minimum
Copy fitting
Remove Empty Lines
Vertical Layout
size the font can reach is 1, by default the minimum font size is 8.
Allow line breaks is a feature which automatically replaces some
of the blank spaces between words by line breaks, in a way that each
line fits in the viewable window. In PrintShop Mail "Allow line breaks"
is set to Yes by default.
When Copy Fitting is set to "Yes", individual words can be broken due
to word wrap.
When Copy Fitting is set to "No", text only fit if the individual words
are not broken. Text will break on spaces only.
Note: Copy Fitting is notallowed for linked objects.
This setting allows you to remove empty lines in a text box.
When set to "No", empty lines will be shown in the text box. This is
useful where the variable is for instance an address and some records in the database have empty fields. If you select this function the
empty lines caused by the empty field(s) will be preserved.
When set to "Yes", both empty lines which are caused by empty
fields in the database and white lines which are manually inserted will
be removed.
When set to "Only in variables", all empty lines will be removed in the
variables only, static empty lines will be preserved.
This setting is specifically designed for vertical text with Asian characters which need to be printed vertically, other characters will
simply be rotated 90°.
This feature is supported under Windows XP, Windows 2003 and Windows Vista.
Mac OS Note: The "Remove Empty Lines" feature can be switched on using a checkbox in the Expression Editor
Window.
Image Properties
The Image Properties lets you change all of the properties for any image object in your document. The options available are
different in the Windows and Mac OS versions of the software.
©2010 Objectif Lune Inc - 26 -
Page 27
The PrintShop Mail program interface
To open the image properties in Windows
1. Click on the object of which you wantto display the properties.
2. Click in the Window menu, then click Properties.
3. The Properties window appears or, if it is already present, is brought to the front and selected.
To open the image properties in Mac OS
1. Click on the object of which you wantto display the properties.
2. Click on Items, then Show Object Properties. You can also right-click on the object and select Show Object Properties
from the drop-down menu.
3. The Object Properties dialog appears.
Available Options
All objects share some properties. To see these shared properties (the "Object", "Frame"and "Printing"groups), see "Prop-
erties Panel" (page 23).
©2010 Objectif Lune Inc - 27 -
Page 28
The PrintShop Mail program interface
Content Group
Set this option... To specify...
Alignment horizontal Horizontal alignment of the images (Left, Centered, Right).
Alignment vertical Vertical alignment of the images (Top, Centered, Bottom).
Here you can specify options on how the image is resized relative to
the bounding box.
Original size: The image is always shown in its original size, regardless of the size of the frame. Original size resets the image content to
Scale (Windows)
Clipping (Mac OS)
Image Filename
Image Folder
Search Subfolders
Page Number
Two Color
(Windows only)
100%.
Fit in Frame: The image will be resized to fill the frame, maintaining
the image aspect ratio, showing the actual scale percentage of the
image. Images are not clipped.
Crop to Frame: Proportionally scales the images filling the entire
frame. Images may be clipped.
Displays the image filename. The contents can only be changed
through the Expression Editor.
This points to the path where the variable images are stored. Clicking
on the icon allows you to browse to a different search folder.
Specify whether PrintShop Mail should only look for files in subfolders.
When set to "No" PrintShop Mail will only look in the current folder.
When set to "Yes" PrintShop Mail will look in subfolders as well.
The PDF page number represents the page number in the original PDF
file, ranging from one to the number of pages in the PDF. An image
object can be linked to a single PDF file. As a PDF can contain multiple
pages you can specify the page(s) to be used in your document
through an expression (TOTALPAGES),in that case you can use variable pages within that PDF file. If the page number refers to a non
existing page, a warning will be shown in the warnings panel:"Page
number X is invalid; this file contains Y pages only.
Convert to Two Colors: When set to "No" images will shown it's
original color. Setting this option to "Yes" will convert the image to two
colors.
Background Color: Convert background color to specified color.
Foreground Color: Convert foreground color to specified color.
The following limitations apply to "Two Color" option for images:
l The Two Color option does not support the image format EPS.
l Two Color option will be disabled when using the Print Technology specific options, OPI, APR and Do no send images
(VIPP).
l The Print Technology PPML support the Two Color option, when you check "Embed Images in PDF" in the Print Dialog.
PrintShop Mail for Windows preserves the color space in images format EPS, TIFF and JPEG. To learn more about
Color Management, click "Color Settings" (page 46).
PrintShop Mail for Macintosh converts the color space that is embedded in the image to the color space of the printer
driver. You can check the color space of the printer driver, selecting from the File menu, Print/ColorSync.
©2010 Objectif Lune Inc - 28 -
Page 29
The PrintShop Mail program interface
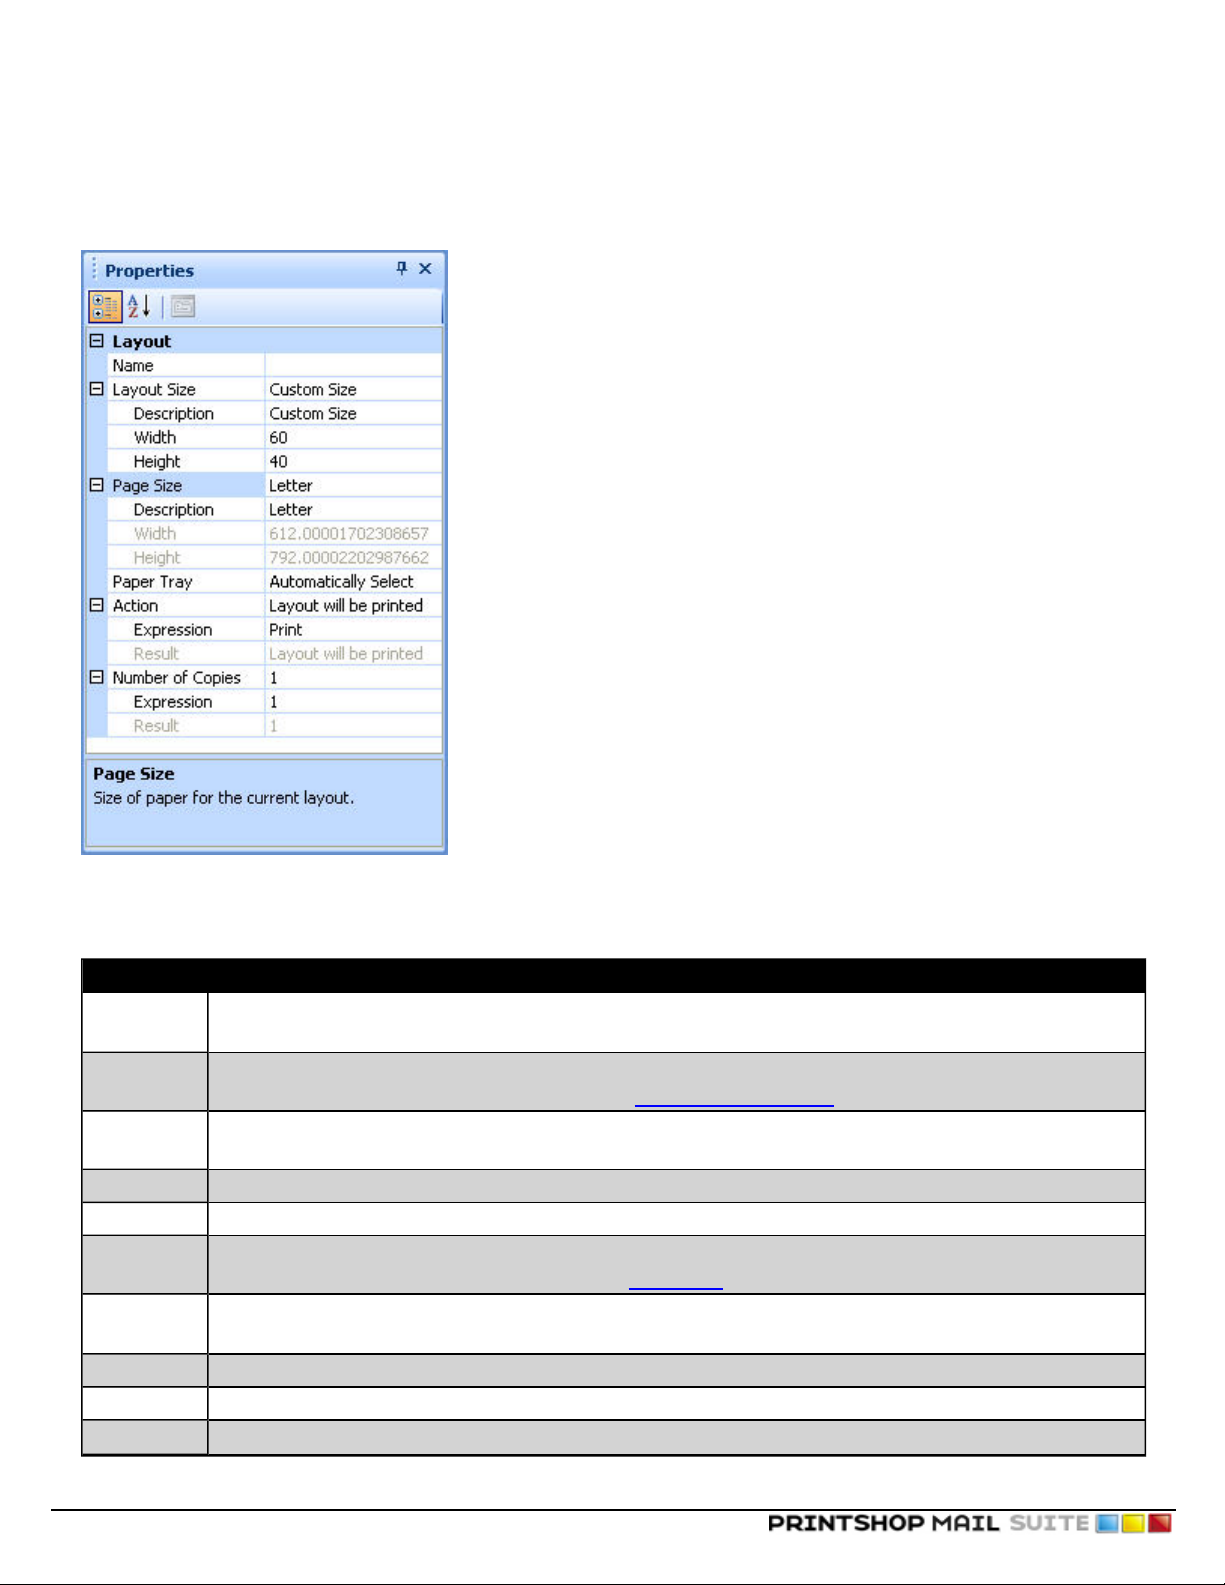
Layout Properties
When you select a layout in the Layouts panel, the following properties will be displayed.
Figure 1-0: The Layout Properties Panel, which lets you set your layout properties.
Option Description
Layout
Name
Layout Size
Description
Width Enter custom width. This setting is editable if you select "Custom Size".
Height Enter custom height. This setting is editable if you select "Custom Size".
Paper Size
Description
Width The width of the page.
Height The height of the page.
Paper Tray
Name of the selected layout.
Size of the selected layout.
More information about this topic , can be found in Specify the Layout Size.
Select a standard size: Fit to Page (Default), Fit to Objects, Custom Size, A3, A4, A5, B5, US Letter, US Legal.
Size and orientation of the paper for the current layout.
More information about this topic can be found in Page Setup.
Select the paper size for the selected layout. The paper size depends on the printer driver selected in the Page
Setup dialog.
If your printer supports different paper trays and your document consists of multiple layouts, you can send dif-
©2010 Objectif Lune Inc - 29 -
Page 30
The PrintShop Mail program interface
Option Description
ferent layouts to different trays.
More information about this topic can be found in Select Paper Trays
Action
Number of
copies
The action to be performed for this layout, PRINT, BLANK or SKIP.
More information about this topic can be found in Use Layout Condition.
Number of copies to be printed for the selected layout, must be at least one.
More information about this topic can be found in Number of Copies.
Variables Properties
The Variables Properties lets you change all of the properties for any variable used in your document. This panel is only available in the Windows version of PrintShop Mail.
To open the variables properties
1. Open the Variables panel. To do this, click the Window menu, then click Variables.
2. Click on the variable of which you wantto change the properties.
3. Click in the Window menu, then click Properties.
4. The Properties window appears or, if it is already present, is brought to the front and selected.
Available Options
Variable Group:
l Name:This value can only be changed for global variables (it cannotbe changed for variables created by objects, or
typed in a text box).
l In Use:This value cannot be changed, it displays whether or not the variable is used by any text object.
Format Group:
l Category:Sets the category of the variable. Changing the category will change the rest of the available options.
Text Category:This category does not have any options. Text variables have no special formatting and are displayed as-is.
Email Category:This category does not have any options. Email variables will only accept values that correspond to a valid
email address:[identifier]@[domain].[tld]
Date Category:This category is used for dates used in your documents, and has the following options:
l Locale:Specify the locale and language used for the date.
l Date Format:Specify the exact format of the date (available options depends on the locale)
Currency Category:This category is used for amounts in your local currency, and has the following options:
l Locale:Specify the locale and language used for the currency display.
l Currency Symbol:Specify what symbol will be used for currency.
l Positive Format:Specify how positive currency amounts will be displayed.
l Negative Format:Specify how negative currency amount will be displayed.
l Decimal Symbol:Specify what character is used to separate the amount with its decimals (for example, dollars and
cents)
l Decimal Places:Specify how many decimal places to display after the decimal symbol. Note that the amount will be
rounded to the last decimal displayed.
l Digit Grouping Symbol:Specify what character is used to separate groupings (for example, a space or comma to
separate thousands, millions, billions)
l Digit Grouping:Specify how many digits to group together (for example, 3 for north-American currencies).
©2010 Objectif Lune Inc - 30 -
Page 31

The PrintShop Mail program interface
Number Category: This category is used to display numbers. It has the same options as the currency, except for the following options:
l Positive Format is not displayed
l Currency Symbol is not displayed
l Leading Zeroes is added:Specify how many leading zeroes to add at the end of the decimal places, up until the
number specified by the decimal places option.
Barcode Properties
The Barcode Properties lets you change all of the properties for any barcode object in your document. The options available
are different in the Windows and Mac OS versions of the software.
To open the barcode properties in Windows
1. Click on the object of which you wantto display the properties.
2. Click in the Window menu, then click Properties.
3. The Properties window appears or, if it is already present, is brought to the front and selected.
To open the barcode properties in Mac OS
1. Click on the object of which you wantto display the properties.
2. Click on Items, then Show Object Properties. You can also right-click on the text object and select Show Object Properties from the drop-down menu.
3. The Object Properties dialog appears.
Available Options
All objects share some properties. To see these shared properties (the "Object", "Frame"and "Printing"groups), see Prop-
erties Panel.
Content Group
The Content group options may change depending on the barcode. The greatest majority of barcodes have the following options only.
Option Description
The expression used as data for the barcode. Please refer to the doc-
Data
umentation for your barcode reader or the barcode itself to learn
which information is supported for any particular barcode. See "The
Expressions Editor" (page 121)
Encoding
Select the encoding type, either String or Hexadecimal. Refer to
the barcode reader documentation to know what option to choose.
Horizontal: Select whether the barcode itself is aligned at the left,
Alignment
center or right of the barcode object.
Vertical:Select whether the barcode itself is aligned at the bottom,
center or top of the barcode object.
Barcode Group
The Barcode group options may change depending on the barcode. The greatest majority of barcodes have the
©2010 Objectif Lune Inc - 31 -
Page 32

following options only.
Option Description
Specifies the barcode type that will be printed. For a list of available
Type
Module Width
Align to Pixel Raster
Dot Gain Compensation
Quiet Zone
Human Readable Text
Font Size
Check Digit Method
barcodes in PrintShop Mail, see "Barcodes Supported by PrintShop
Mail" (page 79).
Specifies the width of the barcode object (and not the barcode itself).
It can be automatic or manually entered.
Aligns and resizes the barcode in order to correctly fit your print area.
This ensures a more precise output at the printer since the barcode
bars will now precisely fit within your printer's output resolution.
Dot gain occurs when ink bleeds or spreads as it is absorbed by
paper, enlarging the pixels. The amount of dot gain varies for each
printer and depends on ink coverage on the printing press. You can
compensate for the effect by specifying a value between 0 and 100 for
the Dot Gain Compensation property (0 disables the feature).
The quiet zone is the blank margin on either side of the barcode that's
used to tell the barcode reader where a barcode's symbology starts
and stops. You can specify any value in points in this box.
Indicates whether you want a human-readable (alphanumerical)
string to appear below or above the barcode, or none at all. This
option is only visible on barcodes that support human-readable text.
Specifies the font size for the human-readable text, when it is available.
Specifies the check digit method to calculate the barcode's check digit.
Select Automatic to use the default for this barcode, or select another
check digit method. Refer to your barcode reader's documentation to
know which option to enter here.
The PrintShop Mail program interface
Mac OS Note: PrintShop Mail 5 for Mac OSstill uses fonts to create its barcodes.
DirectSmile Properties
The DirectSmile Properties lets you change all of the properties for any DirectSmile object in your document. The options available are different in the Windows and Mac OS versions of the software.
To open the DirectSmile properties in Windows
1. Click on the object of which you wantto display the properties.
2. Click in the Window menu, then click Properties.
3. The Properties window appears or, if it is already present, is brought to the front and selected.
Available Options
All objects share some properties. To see these shared properties (the "Object", "Frame"and "Printing"groups), see Prop-
erties Panel.
©2010 Objectif Lune Inc - 32 -
Page 33

DirectSmile Group
Option Description
The IP, network computer name or domain name of a server where
Host
DirectSmile Generator is installed. Clicking on this opens the DirectSmile Editor window.
The image set used to generate the image, from a list of available sets
Image Set
on the DirectSmile Generator server. Clicking on this opens the
DirectSmile Editor window.
These expressions determine the text that will appear in the DirectS-
Text on Layer X
mile image that is being generated. The number of available properties (X) is determined by the image set and will be one or more.
Some DirectSmile templates may not be designed to support all characters of a language. In this case, a warning may
pop up, or the generated image may contain no personalization.
The PrintShop Mail program interface
Manipulating Objects
You can manipulate objects that are on the page easily using the tools in this section. For more information on the different
types of objects you can use, see "Objects in PrintShop Mail" (page 75).
Selecting Objects
There are several ways to select objects.
l Select a first object then press SHIFT or CTRL while clicking on another object on the layout.
l Drag a selection box (lasso) around more than one object.
l From the Edit menu, choose Select All or press CTRL+A (Windows)or Command+A(Mac OS)
To select underlying objects
If you cannot select an object with a mouse click because it is covered by another object, repeatedly press the TAB key to
cycle through the objects on the visible layout.
Press SHIFT+TAB to select the previous object.
To extend a selection
There are several ways to extend a selection. You can:
l Press and hold SHIFT or CTRL to ensure that any active selection is not cleared.
l To extend the current selection, press and hold SHIFT while left clicking on additional objects.
l To toggle an object selection state, press and hold CTRL while left clicking on the object.
You can also combine the use of SHIFT and CTRLwith the lasso object to add multiple objects at once.
©2010 Objectif Lune Inc - 33 -
Page 34

The PrintShop Mail program interface
Moving and Resizing Objects
To move objects using the mouse
Windows
1. Select one or more objects.
2. Left click on the selection and drag it to the new location.
While dragging, the objects will be snapped to any nearby guide line.
Mac OS
1. Select one or more objects.
2. Click on the selection, hold down the mouse and drag it to the new location.
To move objects using the keyboard
Windows
1. Select one or more objects.
2. Use the arrow keys on your keyboard to nudge the selection to a new location on the layout. (Each nudge offsets the
objects by one pixel.)
To move objects by entering the new coordinates (to place an object at a specific location)
Windows
1. Select the object.
2. In the Properties panel/ Bounding box, enter the desired Left and Top position.
Mac OS
1. Select the object.
2. From the Item menu, select Show Object Properties, or press Shift and double click.
3. In Position, enter the X and Y coordinates.
4. Click OK.
To resize an object using the mouse
1. Select the object.
2. (Windows): Left click on one of the sizing handles.
(Mac OS): Click on the sizing handles and hold down the mouse button.
3. Drag the handle to resize the object.
For static images, resizing always maintains the original aspect ratio of the image. For any other object, resize proportionally by holding down the CTRL key while dragging. While dragging, the sides of the objects that you are resizing will be snapped to any nearby guide line.
To resize an object by entering the new dimensions
Windows
1. Select the object.
2. In the Properties panel/ Bounding box, enter the new Width and Height.
©2010 Objectif Lune Inc - 34 -
Page 35

The PrintShop Mail program interface
Snap Frame to Content
Snap the frame to the proportions of the content.
When this option is set to "Yes", the object bounding box (frame) will automatically resize according to its contents. In case of
an image it will resize to the dimensions of the image. In case of text (static or variable) it will resize vertically to accommodate larger amounts of text that would otherwise not fit in the text box. When set to "No", a verification warning will be
shown at printing time, when objects do not fit in the box.
When you have linked text boxes, Snap Frame to Content will only work for the last text box in the chain.
Mac OS
1. Select the object.
2. From the Item menu, select Show Object Properties, or press Shift and double click.
3. In Position, enter the new Width and Height.
4. Click OK.
Copying Objects
To copy objects using the mouse
1. Right click and drag one or more selected objects to another location.
2. Release the mouse button.
3. On the menu, choose Copy Here to create duplicates of the selected objects.
To copy objects using the clipboard
1. Select one or more objects.
2. From the Edit menu, select Copy or press CTRL+C in Windows, COMMAND+C in Mac OS.
To paste an object in the clipboard
1. Go to the layout where you want to paste the object.
2. From the Edit menu, select Paste or press CTRL+V in Windows, COMMAND+V in Mac OS.
You can paste the contents of the clipboard to any layout, even in a separate instance of PrintShop Mail .
To paste objects to multiple layouts
If your document consists of more than one layout, you can create multiple copies throughout your document. Choose either:
l Edit, then Paste To and then Entire Document to paste the contents of the clipboard to every layout in your doc-
ument.
l Edit, then Paste To and then Remainder of Document to paste to the remainder of your document (for example,
to every layout, starting with the next layout).
If the current layout happens to be the last layout in your document, the option Remainder of Document is not
available.
Aligning Objects
You align the edges of the objects in the selection to the object LAST selected. You can align to the left, right, top or bottom
edges of the object.
©2010 Objectif Lune Inc - 35 -
Page 36

To align objects:
l In Windows:
1. Select the objects which you want to align, ending with the object you want to align to.
2. Either use one of the alignment buttons in the Tools toolbar, or go to the Object menu then Align Edges and
click one of the options.
l In Mac OS:
1. Hold down the Shift key while you select the objects you wish to align, or draw a box (lasso) that encloses all
objects that need to be aligned.
2. From the Item menu, select Align.
3. Select one of the available options from the submenu. (see figure below)
Mac OSAlignment options:
Alignment Option Description
Left Edges To align the selected objects along their left edges.
Right Edges To align the selected objects along their right edges.
Top Edges To align the selected objects along their top edges.
Bottom Edges To align the selected objects along their bottom edges.
Horizontal Centers To align the selected objects along their horizontal edges.
Vertical Centers To align the selected objects along their vertical edges.
The PrintShop Mail program interface
If you don't know which object you selected last, for example if you selected everything with Select All or pressing
CTRL+A, reselect the object to align to, while holding down the SHIFT key.
Arranging Objects
You can move objects in front or behind each other.
1. Select the object.
2. From the Object menu, select Arrange. You can also right click on the selection and select an option from the sub-
menu under Arrange.
3. Select the appropriate option:
l Bring to Front: To move the object in front of all other objects.
l Bring Forward: To move the object one position forward.
l Send Backward: To move the object one position backward.
l Send to Back: To move the object behind all other objects.
Locking Objects
Locking an object, protects it from accidental changes in size or position. The text in a text box remains editable, however.
To lock an object
1. In Windows:
l Select the object.
l From the Object menu, select Lock Position. Alternately, right click the object and choose Lock, or from the
Properties panel change Lock Position to Yes.
©2010 Objectif Lune Inc - 36 -
Page 37

The PrintShop Mail program interface
2. In Mac OS:
l Select the object.
l From the Item menu, select Show Object Properties, click on Unlocked. Alternately, from the Item
menu selectLock Position.
To unlock an object
1. In Windows:
l Select the locked object.
l From the Object menu, select Unlock Position. Alternately, right click the object and choose Unlock, or
from the Properties panelchange Lock Position to No.
2. In Mac OS:
l Select the object.
l From the Item menu, select Show Object Properties, click on Locked. Alternately, from the Item menu
select Unlock Position.
Linking Text Objects
Multiple text object can be linked together in order to have text overflow between them.
Text objects can be linked within a page, but they can also be linked between pages (Page Overflow).
To link text objects
1. Make sure the destination text object(s) to which you want your text to flow towards already exists.
2. Select the first text object.
3. From the Text menu, select Create Forward Link, or on the Text Link toolbar, click the Create Text Link button.
4. Point with the mouse cursor to the text object where you want your text to overflow towards (the destination object).
When you move the mouse over a text object which can be linked to, the border of this object will become green if it is possible to link to this object, and red if this is not possible.
Anchored Objects
Anchored objects are items, such as images or text boxes, that are connected to each other in such a way that a change in position or size of the Master object will affect the position of any number of Child objects.
An example use of this technique is to add a signature at the bottom of a letter. If the letter has a height that changes between
records, the text box could potentially be too small (the signature is too far down)or too large (the text goes over the signature). This can happen if, for example, your text box contains a variable that displays the content of a database field with
text that can vary in size. Using the Anchor tool, you can force the signature (Child)to lock to the bottom of your text box
(Master), moving up and down as the height of the text object changes.
©2010 Objectif Lune Inc - 37 -
Page 38

The PrintShop Mail program interface
Figure 1-0: Two anchored objects:(1)the Anchor Master, (2) Distance between the Master and Child, (3) Anchored Child.
To anchor two object through the "Objects Toolbar" (page 16)
1. Select the object to be anchored (anchor Child).
2. In the Object toolbar, click on the “Add or Remove Anchor” button.
3. Move the mouse over another object (anchor Master).
4. Left click on this object thatserves as anchor Master to link the two objects together.
To anchor two object through the "Properties Panel" (page 23)
1. Select the object to be anchored (anchor Child).
2. In the Properties panel, click on the Anchor property, to expand the Master Object property.
3. Select the name of the anchor Master object.
When anchoring objects, the object will be highlighted in green if it is a valid anchor Master or in red if it is not.
To remove anchoring through the "Objects Toolbar" (page 16)
l Select the anchored object (anchor Child).
l In the Objects toolbar, click on the “Add or Remove Anchor” button, to remove the anchor.
To remove anchoring through the "Properties Panel" (page 23)
l Select the anchored object (anchor Child).
l In the Properties panel, click on the Anchor property, to expand the Master Object property.
l From the drop down menu, select the “empty” option.
AChild object can only have one Master, but a Master can have more than one Child. To change the Master of a Child
object, start by removing the anchor for the Child, then add a new anchor to the other Master.
Anchor settings
Anchor settings can be changed in the Properties panel of the object.
Horizontal anchors:
l Left: The anchor Child position will be relative to the left side of the anchor Master.
l Right: The anchor Child position will be relative to the right side of the anchor Master.
©2010 Objectif Lune Inc - 38 -
Page 39

The PrintShop Mail program interface
l Width: The anchor Child width will be relative to the widthof the anchor Master.
Vertical anchors:
l Top: The anchor Child position will be relative to the top side of the anchor Master.
l Bottom: The anchor Child position will be relative to the bottom side of the anchor Master.
l Height: The anchor Child height will be relative to the height of the anchor Master.
Default Setting:
These defaults will be selected when you first create the anchor between a Child and Master, depending on the position:
l If the anchored Child is positioned to the left of the anchor Master, the Horizontal positionwill be set to Left.
l If the anchored Child is positioned to the right of the anchor Master, the Horizontal position will be set to the Right.
l If the anchor Master is positioned under the Child, the Vertical position will be set to Top.
l If the anchor Master is positioned above the Child, the Vertical position will be set to Bottom.
When resizing or moving an anchored Child, it is possible to modify the distance between two anchored objects.
When an anchor Master object is deleted, the link between the Master and Child objects is broken. In the Properties panel of
the Child object, Master Object property, will get the suffix “Unresolved”. To re-establish the anchor, you can either link the
Child to a new Master, or create a new object and call it the same name as the previous Master.
Formatting Text
Text formatting in PrintShop Mail can be applied in three different ways. You can apply styles directly to part of your text (see
"Text Style" (page 39)), apply formatting to a paragraph (see "Paragraph Style" (page 40)), or use "Rich Text File"formatting
by using the Text_File function and an external .RTFfile (see "TEXT_FILE" (page 153)).
Text Style
You can change the text style (for example, font name, size, color, and style properties) of any part of the text in a text object
or for multiple text objects.
PrintShop Mail offers multiple ways of formatting your text. These styles can be combined for better control.
l Bold (example)
l Underlined (example)
l Italic (example)
l Superscript (
l Subscript (
l Strikethrough (example)
You can also modify the following text properties:
l Font: Change the fonts using available system fonts (see PrintShop Mailk Fonts section below)
l Font Size: Allows you to make the fonts look bigger or smaller.
l Font Color:Allows you to change the color of a font.
example
example
)
)
To change the styles and properties, first select either a text object, multiple text objects, or any number of characters within a
text object. Then use one of the following options:
©2010 Objectif Lune Inc - 39 -
Page 40

The PrintShop Mail program interface
l In Windows:
l The Text menu allows you to change the following styles: Font Size, Bold, Italic, Underline, Font Color.
l The Font dialog (menu Text -> Font...) allows you to change the following styles: Font, FontSize, Bold,
Italic, Underline, Font Color, Superscript, Subscript, Strikethrough
l The Font toolbar allows you to change the following styles: Font, Font Size, Bold, Italic, Underline, Font Color
In Mac OS:
l
l The Text menu allows you to change the following styles: Kerning, Baseline (subscript/superscript), Bold,
Italic, Underline, Font Color.
l The Fonts dialog (menu Text, Font, Show Fonts) allows you to change the following styles: Font, Font
Size, Bold, Italic, Underline.
l The Font Toolbar allows you to change the following styles: Font, FontSize, Bold, Italic, Underline, Font
Color.
You can also use keyboard shortcuts to control some of the styles:
l CTRL+B (Windows) or COMMAND+B (Mac OS): triggers Bold
l CTRL+I (Windows) or COMMAND+I (Mac OS): triggers Italic
l CTRL+U (Windows) or COMMAND+U (Mac OS): triggers Underline
Note: The text style of a variable depends on the style of the first delimiter, the character marking the beginning of a variable.
(Applying style to variable = apply style to first marker)
Note: The precision of a font size is up to 0.5 points. For example, a font size of 10.5 points is allowed, but 10.3 is rounded to
the nearest half (10.5).
PrintShop Mail Fonts
PrintShop Mail, just like any other software on your system, enables you to use any font installed in your system folders. Additionally (in Windows only), PrintShop Mail can also read any font file located in the same folder as the PrintShop Mail Document, or a Fonts subfolder located in the same folder as the PrintShop Mail Document.
Windows Only:Font reading priority: If you have fonts of the same name in all three possible locations, the priority in which
PrintShop Mail reads the fonts is as such: Fonts in the same folder as the document are checked first. Fonts in the Fonts subfolder are checked second. Fonts in your operating system fonts folder are checked last.
Fonts can always be used by multiple PrintShop Mail Documents.
Paragraph Style
A paragraph is a contiguous range of characters sharing formatting properties such as:
l Alignment
l Margins
l Indentation
l Tab stops
l Formatting marks
l Copy Fitting
Paragraphs are separated by carriage returns. To start a new paragraph, press ENTER while you are typing text.
To align text
To apply alignment to all paragraphs in one or more text objects:
©2010 Objectif Lune Inc - 40 -
Page 41

The PrintShop Mail program interface
1. Select the objects.
2. (Windows): Click an alignment button in the Text Formatting toolbar. Alternatively in the Properties Panel, select
Alignment.
(Mac OS): Click an alignment button in the Text Formatting toolbar. Alternatively from the Text menu, select Align-
ment.
To apply text alignment for a specific paragraph:
1. Double click in a text object to enter Edit mode.
2. Select a paragraph.
3. (Windows): Click an alignment button in the Text Formatting toolbar. Alternately, from the Text menu, select Par-
agraph. In the dialog box, you can specify alignment, margins and first line indentation values. An appearance sample
is provided to preview the current settings.
(Mac OS): Click an alignment button in the Text Formatting toolbar. Alternatively from the Text menu, select Align-
ment.
Text direction
To apply text direction.
1. Double click in the text box to enter in Edit mode.
2. In the Text Formatting toolbar, click on the Right to Left button.
Windows
About tab stops
Tab stops enable you to line up text to the left, right or center.
You can select the following tab stops:
Left Tab Text extend to the right from the tab stop.
©2010 Objectif Lune Inc - 41 -
Page 42

The PrintShop Mail program interface
Center Tab Text is centered at the tab stop.
Right Tab Text extends to the left from the tab stop until the tab's space is filled, and then the text extends to the right.
To set and change tab stop positions
To change default tab stop positions:
1. From the Text menu, select Default Tab Stops.
2. Choose your interval value.
3. Click OK.
To set and remove custom tab stop positions, there are two methods available:
l Use the Tab Stops dialog box.
l Use the horizontal ruler.
To use the Tab Stops dialog box:
1. Double click in a text object to enter Edit mode.
2. Select a paragraph.
3. From the Text menu, select Tab Stops.
Tab stop positions are relative to the left side of the text object.
4. To add a position, type a value in the edit box and click Set.
5. To add alignment, you can select:
Left: Left text extends to the right from the tab stop.
Center: Center text is centered at the tab stop.
Right: Right text extends to the left from the tab stop until the tab's space is filled, and then the text extends to the
right.
6. To remove a position and alignment, select it in the list box and click Clear.
Formatting marks
PrintShop Mail enables you to control whether formatting marks are hidden or visible in text objects. Formatting marks are
newlines, tabs, and spaces. By default, after starting PrintShop Mail, all formatting marks will be hidden.
You can tell PrintShop Mail to show formatting marks by selecting from the View menu Formatting Marks, or by using the
button "Show or Hide Formatting Marks" on the View toolbar. This works as a toggle for all text objects.
©2010 Objectif Lune Inc - 42 -
Page 43

The PrintShop Mail program interface
Formatting marks are just a visual aid, they will not be printed. The marks will scale to the zoom factor of your document, and
they will scale to the font size of the surrounding text. They will also be visible while you're editing text.
New line symbol: 
Space symbol: .
Tab symbol: (right arrow)
Copy Fitting
Copy fitting is a feature that will automatically shrink text by reducing the font size, when there is more text than the text box
can hold. The font size will be reduced to the font size needed to fit the text in the text box. However, text will not be shrunk
beyond the specified minimum font size. When the text needs to be resized, all text will be resized step by step until the text
fits or the minimum font size is reached.
Minimum font size
When Copy Fitting is enabled, the minimum font size the font can reach is 1; by default the minimum font size is 8. The downsizing of the text in the box stops if one of the containing font sizes reaches the minimum value or if the text fits.
Allow line breaks
By default the Allow line breaks feature is set to Yes.
When Allow line breaks is set to "Yes", the texts only fit if the individual wordsare notbroken. Text will break on spaces
only. It can occur that lines are broken at spaces, but individual wordswon't bebroken.
When Allow line breaks is set to“No”, the textwon'tbreak at spaces, only at returns. The text will be downsized until it fits
(or gives a warning if it still doesn’t fit)
To change this option:
1. Select the text box. If you have multiple text boxes, you can select all of them.
2. In the Properties Panel/ Content, select Copy Fitting.
3. Set Reduce Font Size to Yes.
4. Change the Minimum Font Size to the desired value.
Mac OS
To change Paragraph settings
You can set the space between lines of text by using the Spacing pop up menu on the PrintShop Mail ruler when a text box is
in edit mode.
To set the line spacing, double click on the text object and select the text you want to adjust and choose Single, Double, or
Other from the Spacing pop up menu.
If you chose Other, choose options for:
l Line height: Distance from the top of a line to the top of the line below it.
l Inter-line spacing: Distance from the bottom of a line to the top of the line below it.
l Paragraph spacing: Distance from the bottom of a paragraph to the top of the first line in the paragraph below it.
©2010 Objectif Lune Inc - 43 -
Page 44

The PrintShop Mail program interface
To change default tab stop positions:
You can set margins, paragraph indentation, and text tabs by using the ruler in the edit mode of the text box.
There are four kinds of tab stops and two types of margins, each indicated by a differently shaped icon:
l A right facing triangle indicates a tab stop at which text will be left justified.
l A diamond indicates a tab stop at which text will be centered.
l A left facing triangle indicates a tab stop at which text will be right justified.
l A circle indicates a decimal tab stop at which numbers will be justified around a decimal point.
l A downward facing triangle indicates a page margin.
l A horizontal rectangle indicates the indentation of the first line of a paragraph.
To use the horizontal ruler:
1. Left click on the horizontal ruler to add a paragraph marker.
The marker type depends on the state of the paragraph marker button in the intersecting area of the two rulers (topleft).
2. Left click the paragraph marker button to cycle through all possible paragraph marker types, including first line indentation, or right click this button to select a marker type from the menu.
Note: You can also use the horizontal ruler to specify left and right margins. To do this, left click on the position of either the
left or right side of the text box and drag the margin to the desired location.
Copy Fitting
To change this option:
1. Select the text box.
2. From the Item menu, select Show Objects Properties.
3. In the Object Properties, change Copy Fitting to Yes.
4. Change the Minimum Font Size to the desired value.
The Preferences Window
The Preferences window lets you set up preferences and settings for PrintShop Mail as well as for the currently opened document. This section demonstrates each section of the Preferences window and its features.
©2010 Objectif Lune Inc - 44 -
Page 45

Program Settings
To specify program preference settings
1. (Windows): From the Edit menu (CTRL+K), select Preferences.
(Mac OS): From the PrintShop Mail menu (Command,), select Pref-
erences .
2. In the left pane, click the Program Settings icon.
The PrintShop Mail program interface
About general preferences
Set this option... To do this...
Variable Markers Specify the characters that delimit (enclose) the variables in your text objects. See
Measurement in Select the unit of measurement for PrintShop Mail.
Items without database Specify the total number of records when no database is open.
Interface language (Windows
Only)
Interface theme (Windows
Only)
Panels fade out (Mac OS
Only)
©2010 Objectif Lune Inc - 45 -
Specify which language you want to use.
Specify the appearance of the application user interface. It is possible to choose from:
Classic, Blue, Aqua.
When inactive, panels from the Window menu fade out, moving the mouse over a
panel fades it back in.
Page 46

About layout appearance preferences
Set this option... To do this...
Bleed Specify color.
Folding lines Specify color.
Crop marks (Mac OS Only) Specify color.
Printable area
Guide lines
Magnetic strength
Generate EPS for vertical
text objects(Mac OS Only)
Specify the order in which the printable areas are drawn, relative to the objects. Top specifies that the areas are always visible, Bottom that they are obscured by objects.
Specify the order in which the guide lines are drawn, relative to the objects. Top specifies
thatthe lines are always visible, Bottom that they are obscured by objects.
Define guide line sensitivity when moving or resizing objects. When the cursor comes
within the specified pixel range on either side of a guide line the object snaps to it.
During printing, PostScript for vertical text object is generated in an alternative way.
Color Settings
The PrintShop Mail program interface
Color Management compares the color space in which a color was created to the color space in which the same color will
be outputted, and makes the necessary adjustments to represent the color as consistently as possible.
PrintShop Mail Color Management is designed to accurately display the same on-screen color as the color on the printed
output. When you install PrintShop Mail, the color space profiles (Adobe ICC Profiles) will be installed in "Windows\System32\spool\drivers\color\" . When staring PrintShop Mail, the application will load the profiles allowing you to
define colors for the different objects placed in your document.
PrintShop Mail handles the Color Management at two levels:
1. PrintShop Mail originated colors. The colors defined in PrintShop Mail for objects, like border color, fill color and text
color.
2. PrintShop Mail Embedded Color Management. The colors defined for certain image file types, like TIFF, EPS, JPG
Note: PrintShop Mail does not change the Color Management of your image, if your image files have embedded color profiles,
these colors will not be overruled by PrintShop Mail’s Color Management.
You can enable Color Management in the PrintShop Mail Preferences, by defaultthis option is off. Once the Color Management is enabled it is possible to change the working spaces profiles, which allows for colors to be adjusted.
©2010 Objectif Lune Inc - 46 -
Page 47

The PrintShop Mail program interface
The default working space color profiles settings are:
RGB: sRGB
CMYK: U.S Web Coated (SWOP) v2
Gray: Gamma 1.8
Rendering: Absolute colorimetric
For example
Suppose you have a colored text box with the following CMYK values:
l Cyan: 100 %
l Magenta: 0%
l Yellow: 0%
l Black: 0%
These values are an indication of the color intended to be printed, but because of the different monitors, printers, inks, types of
paper these values may yield a different color on the printed output.
To avoid this, Color Management translates colors with the help of color profiles.
©2010 Objectif Lune Inc - 47 -
Page 48

The PrintShop Mail program interface
To enable Color Management:
From the Edit menu, select Preferences or press Ctrl+K and click on the Colors icon.
1. Check the option “Enable colormanagement”.
2. In the working space section select your desired color profile.
3. Click Apply.
The colored object will change slightly depending on the chosen color profile, but in the Properties panel the CMYK values for
thatcolor will stay the same.
Rendering
Rendering is the process of converting one color space to another color space. The result of choosing a rendering intent
depends on the content of documents and on the profiles used to specify color spaces. Some profiles produce identical results
for different rendering intents. Differences between rendering intents are apparent only when you print a document or convert
it to a different color space.
The following rendering intent options are available:
l Absolute colorimetric
l Perceptual
l Relative colorimetric
l Saturation
In a Color Management workflow, you can use the precision of color profiles to soft proof your document directly on the monitor. You can display an on-screen preview of how your document’s colors will look when reproduced on a particular output
device. The reliability of the soft proof depends upon the quality of your monitor, the profiles of your monitor and output
devices. To preview how the color will look when printed, select Print Preview and click ColorSoft proof.
Soft proof colors show the color profile defined in the Color Management.
Note: This feature is enabled when Color Management is activated.
Color Management for on-screen preview is different from Color Management reproduced in a particular output device. You
have more control over the appearance of the document on a particular output device than with on-screen preview, because
your document may appear on a wide range of possible uncalibrated monitors and video display systems which limits control
over the color consistency.
To control the color consistency it is possible to assign a color profile to the monitor. In a workflow such a profile would be provided by the monitor manufacturer or the profile would be created using specialized equipment that measures the monitor's
color space.
To provide a practical means for color consistence you can change the monitor color profile to match your output device. To do
this:
Windows 2000 and Windows XP
1. In the Control Panel, select Display.
2. Click on the Setting tab.
3. Click on Advanced
4. Select the “Color Management” tab.
5. Click on Add, to add the desired monitor color profile for your documents
Note: You need to restart PrintShop Mail for the changes to take effect.
Windows Vista
©2010 Objectif Lune Inc - 48 -
Page 49

The PrintShop Mail program interface
1. In the Control Panel, select Personalization.
2. Select Display Settings from the list.
3. Click on the Advanced Setting tab.
4. Select the “Color Management” tab.
Here you can add color profiles for each device on your system (monitor and printers).
5. Click on the Advanced tab and from the drop down menus select the desired color profiles.
Print Job Settings
To specify print job preference settings
1. (Windows): From the Edit menu (CTRL+K), select Preferences.
(Mac OS): From the PrintShop Mail menu (Command,), select Pref-
erences .
2. In the left pane, click the Print Job Settings icon.
©2010 Objectif Lune Inc - 49 -
Page 50

The PrintShop Mail program interface
About print job preferences
Set this option... To do this...
Print Margins are empty spaces all around the page. The margin (top, bottom, left, right) is
usually the empty space between where the page is cut and the layout area of the page.
PrintShop Mail allows you to make changes to the print margin for all layouts in the document. It
is possible to:
Print Margins
Technology
Print report page Specify that a report page is printed at the end of the job.
Send custom error
handler (Windows
only)
l Center (Windows only): Where the layout(s) will be centered on the paper.
l Offset: Where you can specify different values for each print margin: Top-Bottom (Y off-
set) and Left-Right (X offset).
l Note: PrintShop Mail supports different paper sizes within one document. Print Margins
settings will be applied to the whole document.
Select which printtechnology is used to optimize your PostScript output. See "Printing Basics"
(page 102) for more information on these options.
Specifies whether a Postscript error will generate a custom error page containing tips on how to
solve the problem. Leave this box unchecked if you want your printer to handle any errors.
Repetition Settings
Use these settings bellow for Multi-up printing. See How to Use Layout Repetition for more information.
To specify repetition preference settings
1. (Windows): From the Edit menu (CTRL+K), select Preferences .
(Mac OS): From the PrintShop Mail menu, select Preferences .
2. In the left pane, click the Repetition Settings icon.
©2010 Objectif Lune Inc - 50 -
Page 51

The PrintShop Mail program interface
©2010 Objectif Lune Inc - 51 -
Page 52

About repetition preferences
Set this option... To do this...
Specify how the actual multi-up is done. The number
between parentheses indicates the maximum number of
repetitions possible with the current layout and print settings.
Layout Repetition
l Horizontal repetition: Specify the amount of lay-
outs positioned in the horizontal direction (number of
columns).
l Vertical repetition: Specify the amount of layouts
positioned in the vertical direction (number of rows).
Spacing between layouts
Specify the horizontal and vertical distance between each
layouts when using layoutrepetition.
Shows the repetition order on the page. When the defined
Repetition Preview
Horizontal and Vertical repetition does not fit on the page,
the layouts on the left and bottom are represented with a
dash line.
Specify the priorities (1,2,3) and direction (Left to Right,
Right to Left , Top to Bottom, Bottom to Top, Front to Back,
Back to Front) in which the records in your document are
going to be printed. You can specify:
The PrintShop Mail program interface
Priorities
Mirroring
l Left to Right, Right to Left: Influences the hor-
izontal repetition.
l Top to Bottom, Bottom to Top: Influences the
vertical repetition.
l Front to Back, Back to Front: Allows printing
Through-the-stack
Specify that the positions of the layouts on the back of each
page should match de positions of the layouts on the front of
each page. In effect, the layout positions on the back will
mirror the layouts in front of the page.
l Based on driver settings: The document will be
printed duplex according to the settings in the printer
driver, provided the driver supports this.
l Flip on long edge: Layouts in the back side of the
page will be mirrored through the long edge of the
page.
l Flip on short edge(Windows only): Layouts in
the back side of the page will be mirrored through
the short edge of the page.
l Simplex: The document does not require mirroring
of the layouts.
PrintShop Mail for Windows supports mixed layout sizes, except when layout repetitionis used. When using layout
©2010 Objectif Lune Inc - 52 -
Page 53

repetition, the first layout size will be the layout size for the complete document.
Imposition Settings
The PrintShop Mail program interface
To open the Impositions preference dialog:
1. (Windows): From the Edit menu (CTRL+K), select Preferences.
(Mac OS): From the PrintShop Mail menu (Command,), select Pref-
erences .
2. In the left pane, click the Imposition Settings icon.
Available options:
l Bleed Margins: This specifies bleed margins (see "Bleed Margin" (page 60))
l Page Level (Windows Only): To add bleed to the page, the bleed is positioned around a set of layouts, thus
keeping the layout size the same as before.
l None: No bleed margin will be used.
l Include in Job: To subtract the bleed margin from your layout, the bleed is positioned around each layout,
thus keeping your layout size the same as before.
l Width: To set the width of the bleed margin.
l Crop Marks: Specify crop marks settings (see "Crop Marks" (page 61)). This option is only available if the Bleed Mar-
gins is not set to None.
l None: No crop marks will be drawn.
l Standard: One line will be indicated for each trim position.
l Japanese: Two lines will be indicated for each trim position.
l Double Sided: When using duplex and you select this option the crop marks will be printed in both sides of the
paper.
l Gap size: Specify gap size as the distance between the actual crop mark and the edge of the layout.
l Color (Windows Only): It is possible to select a color for the Crop marks.
l Folding Lines:Specify the length of folding lines. (See "Folding Lines" (page 59))
l Center Layouts on page (Mac OSOnly):Select this option to center layouts on the physical paper.
©2010 Objectif Lune Inc - 53 -
Page 54

The PrintShop Mail program interface
PrintShop Web Settings
Note: Use the settings bellow to fill in the URL and the login account for your company Web Server. See Publishing Doc-
uments, for more information about creating and publishing PrintShop Mail documents to PrintShop Web.
To specify PrintShop Web Preference settings
1. From the Edit menu (CTRL+K), select Pref-
erences.
2. In the left pane, click the Publish to Web
icon.
©2010 Objectif Lune Inc - 54 -
Page 55

The PrintShop Mail program interface
About PrintShop Web preferences
Set this option... To do this...
Server address
(URL)
Login (Username
and Password)
Test Connection...
Also publish database
Specify the company Web Server.
Specify the username and password assigned by the administrator to log in the company Web Server.
If you do not have an account, please contact your Web server's administrator.
To establish a connection with the publication server.
To add the opened database to the published document.
PlanetPress Suite
PlanetPress Suite settings
PlanetPress Watch is a powerful printing software for transforming and distributing print jobs from virtually any host. Transforming and distributing print jobs allows for automated local and remote printing, integrated PDF generation for archiving,
emailing and faxing.
Options for the PlanetPress Suite can be added to a PrintShop Mail output job through the Preferences panel, which enables
you to send PrintShop Mail output to a location or queue that is being watched by PlanetPress Watch. This makes that PrintShop Mail output can be further processed to be archived or emailed or sent by fax.
For example, PDF files can be automatically generated and mailed to addresses defined by the customer.
Defining fields in PrintShop Mail
1. Create a PrintShop Mail document.
2. From the File menu, select Preferences,click on the Publish to Web icon.
Make sure the Server address and login settings are empty.
3. Click on the PlanetPress Suite icon.
4. Define the output type for your document.
©2010 Objectif Lune Inc - 55 -
Page 56

The PrintShop Mail program interface
Set this
option...
Fax
Email
PDF Bookmark
Archive
5. Click on the Publish to Web icon in the Standard toolbar or from the File menu select the submenu Publish to
Web.
6. When you click Finish in the Publish to Web dialog, a window will be opened to save the document as a zip file.
To do this...
Number: Specify the fax number from the data fields of the currently opened database or the var-
iable you created.
Description: Specify the description from the data fields of the currently opened database or the
variable you created.
Number: Specify the email address from the data fields of the currently opened database or the
variable you created.
Subject: Specify the email subject from the data fields of the currently opened database or the variable you created.
Body text: Specify the email content from the data fields of the currently opened database or the
variable you created.
Create a standard PDF bookmark.
Name: Defines a descriptive name for the archive or for the item to be archived.
Variable: Specify a data field of the currently opened database or the variable you created.
©2010 Objectif Lune Inc - 56 -
Page 57

The PrintShop Mail program interface
7. PlanetPress Watch captures the PostScript file (zip fle) and routes it to the appropriate device to output the document.
For more information about PlanetPress Watch, please visit http://www.objectiflune.com/
Default Settings
When you start PrintShop Mail, it always opens with a blank document that uses default settings for the layout sizes and other
preferences. You can change those preferences so that new blank documents will have your own, custom settings. This can
be a time saver if you often create new documents and have to set your preferences each time.
To modify the default preferences:
1. Close your currently opened document by clicking on the File menu then selecting Close.
2. Open the Preferences menu:
l In Windows:From the Edit menu, select Preferences (or use the CTRL+Kkeyboard shortcut)
l In Mac OS:From the PrintShop Mail menu, select Preferences (or use the +, keyboard shortcut)
3. Make the changes you want to any of the sections of the preferences.
4. Click OKin the preferences window to save the changes.
Starting from now, any new document that you create will use these preferences. To change the default settings in the future,
simply repeat these steps.
To reset PrintShop Mail to its default settings
You can reset the preferences to the defaultsettings that were in effect when you first installed PrintShop Mail.
1. Close PrintShop Mail
2. Double-Click on the PrintShop Mail icon on your desktop, or click on it from the Start Menu, Programs, PrintShop
Mail Suite 7
3. Immediately when the Splash Screen appears, press and hold the CTRLand SHIFTkeys on your keyboard.
The following dialog is displayed:
4. Check the settings that you want to reset to the defaults:
l Window positions:Resets all of the windows and panels to their original, default locations and states.
l Toolbar configuration:Resets the position, order and appearance of all the toolbars and their buttons to
their original defaults.
l Preferences:Resets all of the Preferences to their original defaults, except for the language of the interface.
5. Click OK to apply the reset and open PrintShop Mail.
©2010 Objectif Lune Inc - 57 -
Page 58

Layout Basics
A PrintShop Mail document can consist of multiple layouts.
To insert a layout
1. From the Layout menu, select Insert.
2. Choose where you want to insert the layout.
3. Click OK.
To see your current layouts:
l In Windows: Open the "Layouts Panel" (page 19) from the Window menu.
l Mac OS:Select Show Document Layouts from the Window menu.
To duplicate a layout
1. Go to the layout which needs to be duplicated.
2. From the Layout menu, select Duplicate.
Alternatively (Windows): in the Layouts Panel, right click on the layout you want to duplicate and from the submenu
select Duplicate.
Alternatively (Mac OS):in the Layout Panel, click on the layout you want to duplicate, then click on the plussign at
the lower right corner of the panel.
The PrintShop Mail program interface
To remove a layout
1. Go to the layout which needs to be removed.
2. From the Layout menu, select Remove.
Alternatively (Windows): in the Layouts Panel, right click on the layout you want to remove and from the submenu
select Remove.
Alternatively (Mac OS):in the Layout Panel, click on the layout you want to remove, then click on the minussign at
the lower right corner of the panel.
To change the layout size and orientation
1. From the Layout menu, select Size.
2.
3. Make the appropriate changes.
Under Windows, you can apply the changes to:
l Selected Layout
l Current Layout
l This point forward
l Whole document
Under Mac OS, PrintShop Mail does not support multiple layout sizes within one document.
Guide Lines
Guide lines are non printing grid lines to help you to arrange and position objects. Moving or resizing objects to within a certain
distance of a guide line causes the selection to snap to the line.
©2010 Objectif Lune Inc - 58 -
Page 59

The PrintShop Mail program interface
To add a guide line
Windows
1-Insert from the Insert menu
From the Insert menu, select Guide line
Select Horizontal or Vertical line.
Drag the mouse to the exact position where you want to place the guide line and left click on it.
2-Insert from the Ruler
Right click on the ruler. The contextual menu will show “Guide line” and “Folding line”.
Select Guide Line.
Use the horizontal ruler to add a vertical guide, and the vertical ruler to add a horizontal guide. Left clicking on a ruler
adds either a guide line or a folding line, depending on the icon displayed in the top left corner of your work area.
Mac
From the View menu, select Layout Ruler. Select either a horizontal or vertical guide line.
Note: When you drag a guide line, its default behavior is to snap to any existing objects. You can change this behavior by
selecting or clearing the Guides Snap to Objects option in the View menu .
To set the "snap to" distance
Set the distance required for objects to snap to guide lines in Program settings, under Magnetic strength. The indicated number
of points is the distance from the guide, within which an object will be drawn to the guide position.
To modify a Guide line position
1. Select the Guide line.
2. Right click on it.
3. From the menu select “Position”.
The window will show the current coordinates of the Guide line.
4. Enter the new coordinates for the line position.
To remove a guide line
It is possible to remove a guide line by dragging it to an invalid location outside the layout. The drag cursor is updated to reflect
whether releasing the mouse button will move or remove the folding line. Alternatively right click on the guide line and from
the menu select " Remove" .
Folding Lines
You can use folding lines to determine where to fold documents. Folding lines are printed on the visible part of the document
(the part that will remain when the document is cut to the right size, for example they are also printed when there is no bleed
margin). Unlike guide lines, folding lines are part of the print output, they are printed on either side of the document.
©2010 Objectif Lune Inc - 59 -
Page 60

The PrintShop Mail program interface
To add a folding line
Windows
1-Insert from the Insert menu
From the Insert menu, select Folding line
Select Horizontal or Vertical line.
Drag the mouse to the exact position where you want to place the folding line and left click on it.
2-Insert from the Ruler
Right click on the ruler. The contextual menu will show “Guide line” and “Folding line”.
Select Folding Line.
Use the horizontal ruler to add a vertical line, and the vertical ruler to add a horizontal line. Left clicking on a ruler adds
either a guide line or a folding line, depending on the icon displayed in the top left corner of your work area.
Mac
From the View menu, select Layout Ruler. Select either a horizontal or vertical guide line.
To change a folding line:
l Length - Use the Imposition settings dialog box to change the length of the folding line. The overlay length of a folding
line specifies the length on the visible part of your document (for example, excluding any bleed margin).
l Color - Use the Program settings dialog box to change the color of the folding line.
To modify a folding line position
1. Select the Folding line.
2. Right click on it.
3. From the menu select "Position"
The window will show the current coordinates of the folding line.
4. Enter the new coordinates for the line position.
To remove a folding line
It is possible to remove a folding line by dragging it to an invalid location outside the layout. The drag cursor is updated to
reflect whether releasing the mouse button will move or remove the folding line. Alternatively right click on the folding line and
from the menu select " Remove" .
Bleed Margin
A bleed margin is a part of your layout that is printed to the edge of a finished page.
Once a page is reproduced on press, the bleed margin is removed.
In PrintShop Mail, your total layout size (as seen in Size in the Layout menu) includes the bleed margin. To learn how to set
bleed margins, see "Imposition Settings" (page 53).
©2010 Objectif Lune Inc - 60 -
Page 61

The PrintShop Mail program interface
When applying a Custom size to a layout and the bleed margin selected is at Page Level, the bleed is not displayed at
the edge of the paper, but around the set of layouts.
Once you specified the Bleed Margin, check the "Crop marks" option and specify the Gap size, which is the distance between
the crop marks and the edge of the document.
Crop Marks
Crop marks are printed lines that make it easier to trim the document to its finished size after the bleed margin is removed.
Crop marks are only printed if the layout includes a bleed margin.
To learn how to add crop marks, please see "Imposition Settings" (page 53).
Supported Image Formats
These are the supported graphical formats and associated filename extensions:
Graphics Format Filename Extension
Encapsulated PostScript EPS or EPSF
Windows Bitmap BMP
Portable Document Format (*) PDF
JPEG File Interchange Format JPG, JPE or JPEG
Tagged Image File Format (**) TIF or TIFF
Windows MetaFile WMF
PNG PNG
GIF GIF
l (*) Microsoft Word documents (DOC, DOCX) are converted to PDF.
l (**) PrintShop Mail fully supports LZW-compression.
The Mac version of PrintShop Mail uses QuickTime to handle image files. The supported image file formats therefore
depend on your version of QuickTime. For a list of image file formats you can visit www.apple.com.
Windows Shortcuts
The following keyboard shortcuts can be used to save some time by using the keyboard instead of reaching for the mouse.
File Menu
Menu Action
New Blank Document Ctrl+N
New PDF Based Document Ctrl+Shift+N
Open Ctrl+O
Close Ctrl+W
©2010 Objectif Lune Inc - 61 -
Page 62

Menu Action
Save Ctrl+S
Save As... Ctrl+Shift+S
Page Setup Ctrl+Shift+P
Print Preview Ctrl+F2
Print Ctrl+P
Exit Ctrl+Q
EditMenu
Menu Action
Undo Ctrl+Z
Redo Ctrl+Y
Cut Ctrl+X
Copy Ctrl+C
Paste Ctrl+V
Select All Ctrl+A
Preferences Ctrl+K
The PrintShop Mail program interface
View Menu
Menu Action
Preview F2
Zoom In Ctrl++
Zoom Out Ctrl+-
Actual Size Ctrl+Alt+0
Whole Layout Ctrl+0
Rulers Ctrl+R
Object Borders Ctrl+H
Insert Menu
Menu Action
PDF Ctrl+Shift+W
Image File Ctrl+Shift+E
Variable Text Ctrl+Shift+T
Image Box Ctrl+Shift+G
Text Menu
Menu Action
Italic Ctrl+I
Bold Ctrl+B
Underline Ctrl+U
©2010 Objectif Lune Inc - 62 -
Page 63

Editing Text (advanced)
Action Keys
Change bullet style Ctrl+Shift+L
Line spacing = 1 lines Ctrl+1
Line spacing = 2 lines Ctrl+2
Line spacing = 1.5 lines Ctrl+5
Select font name Ctrl+Shift+F
Increase fontsize Ctrl+Shift+>
Decrease font size Ctrl+Shift+<
Increase character spacing Ctrl+Shift+]
Decrease character spacing Ctrl+Shift+[
Reset character spacing Ctrl+Space
Database Menu
Menu Action
Open Ctrl+D
Close Ctrl+Shift+D
First Record Alt+Up
Previous Record Alt+Left
Next Record Alt+Right
Last Record Alt+Down
Find Record Ctrl+F
The PrintShop Mail program interface
Window Menu
Menu Action
Layouts Ctrl+1
Variables Ctrl+2
Database Ctrl+3
Warnings Ctrl+4
Verification Result Ctrl+5
Properties Ctrl+6
Fonts Ctrl+7
Help Menu
Menu Action
Help Topics F1
©2010 Objectif Lune Inc - 63 -
Page 64

Macintosh Shortcuts
PrintShop Mail Menu
Menu Action
Preferences Command,
Hide PrintShop Mail Command + H
Hide Others Alt + Command + H
Quit PrintShop Mail Command + Q
File Menu
Menu Action
New Command + N
New PDF based Document.. Shift + Command + N
Open Command + O
Close Command + W
Save Command + S
Save As... Shift + Command + S
Page Setup Shift + Command + P
Print... Command + P
Print Record Alt + Shift + Command + P
Print Report Page Alt + Command + P
The PrintShop Mail program interface
EditMenu
Menu Action
Undo Command + Z
Redo Shift + Command + Z
Cut Command + X
Copy Command + C
Paste Command + V
Delete Backspace
Select All Command + A
Spelling Command:
Check Spelling Command;
View Menu
Menu Action
Toolbar Alt + Command + T
Preview Command + Y
Layout Rulers Alt + Command + R
Zoom in Command + +
©2010 Objectif Lune Inc - 64 -
Page 65

Menu Action
Zoom out Command + -
Actual size Command + =
Insert Menu
Menu Action
Image File Shift + Command + E
Variable Text Shift+ Command + T
Variable Image Shift + Command + G
Item Menu
Menu Action
Lock Position Command + L
Unlock Position Shift + Command + L
Show Object Properties Command + Return
The PrintShop Mail program interface
Text Menu
Menu Action
Show Fonts Command + T
Copy Font Alt + Command + C
Paste Font Alt + Command + V
Style Bold Command + B
Style Italic Command + I
Style Underline Command + U
Copy Tabruler Command + 8
Paste Tabruler Command + 9
Show Colors Shift + Command + C
Layout Menu
Menu Action
First Alt + Shift + Command + Left
Next Shift + Command + Right
Previous Shift + Command + Left
Last Alt + Shift+ Command + Right
Go To... Command + J
Database Menu
Menu Action
Open Alt + Command + O
Close Alt + Command + W
First Record Alt + Left
Next Record Command + Right
©2010 Objectif Lune Inc - 65 -
Page 66

Menu Action
Previous Record Command + Left
Last Record Alt + Right
Window Menu
Menu Action
Minimize Command + M
Show Database Command + 1
Show Variables Command + 2
Show Layout Conditions Command + 3
Show Fonts Command + 4
Show Document Layouts Command + 5
Show Warnings Command + 6
Help Menu
Menu Action
PrintShop Mail Help Command + ?
The PrintShop Mail program interface
©2010 Objectif Lune Inc - 66 -
Page 67

Working with PrintShop Mail Documents
Working with PrintShop Mail Documents
Create a New Document 67
Specify the Layout Size 68
Specify Spot Colors 70
Open a Database 71
Create a New Document
You can create a new PrintShop Mail document either from a blank document, a template, or a PDFfile. By default, PrintShop
Mail always starts with a blank document with a default size.
To start with a blank document
1. Open the File menu
2. Select New
3. Select Blank Document
You can also create a new blank document by use the CTRL+N(Windows)and +N (Mac OS) keyboard shortcuts.
The size of this blank layout is set to Fit to Page. For more information on layout sizes, see "Specify the Layout Size" (page
68).
To create a new document from a PDF:
1. Open the File menu.
2. Select New.
3. Select PDF-based document.
4. Browse to the PDFfile you want to use for your document.
5. Click Open.
You can also use the keyboard shortcut CTRL+SHIFT+Nin Windows to create a new PDF-Based document.
PrintShop Mail will automatically create one layout per page in your PDF, so if your document has 5 pages you will now have a
PrintShop Mail document with 5 layouts. Each layout size is the same as the size of the page in the PDF. PDF pages are treated
as separate objects. It is possible to scale the PDF pages around on the layout.
You can also use a Microsoft Word (.doc)document in PrintShop Mail. If you select a Word document, it is automatically converted into PDFformat and treated as a PDFthroughoutyour design. If the original Word document is modified, PrintShop Mail
will notify you that the document has changed and will ask if you want to update the PDF in your PrintShop Mail document.
To create a new document from a template:
1. Open the File menu.
2. Select New.
3. Select Template-based document.
4. Browse to the template file you want to use
5. Click Open.
In order to use a template you have to first create one. Please see "PrintShop Mail Templates" (page 68).
©2010 Objectif Lune Inc - 67 -
Page 68
Working with PrintShop Mail Documents
PrintShop Mail Templates
PrintShop Mail allows you to create PrintShop Mail templates. Templates are PrintShop Mail documents that you can design for
later use, for example for Publishing to PrintShop Web. These templates contain the (background) layout and the document
settings.
To create a template
1. Create a PrintShop Mail document either by opening an existing blank one, opening an existing document, or creating a
new template-based document.
2. Make any modifications to the document that you desire in your template
3. From the File menu, select Save as Template.
PrintShop Mail templates are saved with the extension ".PSMT". By default PrintShop Mail templates will be saved in the Tem-
plate folder which is located in the PrintShop Mail application folder.
Modifying the template
It is possible to modify PrintShop Mail templates to change the document settings or content.
1. From the File menu, select Open Template.
2. Make the desired changes.
3. From the File menu select Save As Template.
A template does not save the link to the database you may have used in the designed stage of the PrintShop Mail document.
Specify the Layout Size
Windows
A PrintShop Mail document may consist of one or more layouts, which can be of different sizes. PrintShop Mail for Windows supports multiple layout sizes within one document.
To access the layout size properties:
1. Select the layout of which you want to change the layout size from the "Layouts Panel" (page 19).
2. Open the Properties Panel by clicking on Window, the selecting Properties.
3. Click on the Layout Size option in the Properties Panel. This triggers the [...] button next to the layout size.
4. Click on the [...] button to open the Layout Size options
5. Modify the options you want
6. Click OKto save the changes.
PrintShop Mail for Windows Layout Size Options
Setting Description
Select the layout size from the following options:
l Fit to Page:Fits the layout so it corresponds exactly to the Page Size.
Size
l Fit to Objects:The layout will start at the top-left of the page and will resize itself dynamically to fit all the
objects on the page until the lower-rightmost corner of the lower-rightmost object.
l Custom Size: Lets you specify any custom size.
l A3/A4/Legal/Letter/etc:Lists all of the paper sizes available in the printer that is currently selected in
©2010 Objectif Lune Inc - 68 -
Page 69

Working with PrintShop Mail Documents
Setting Description
the Page Setup dialog.
Width Enter custom width. This setting is editable if you select "Custom Size".
Height Enter custom height. This setting is editable if you select "Custom Size".
Shape Select either Tall or Wide.
Current Layout:Will apply only to the currently selected layout.
Apply to
Mac OS
A PrintShop Mail document may consist of one or more layouts, all having the same size. There are two ways to specify the layout size and orientation.
Automatic Layout Size
This point forward:Will apply to this layout and any located after it.
Whole document: Will apply to all of the layouts including this one.
PrintShop Mail for Windows supports mixed layout sizes, except when layout repetitionis used. When using layout
repetition, the first layout size will be the layout size for the complete document. See "Repetition Settings" (page 50).
You can choose to base your layout size on the currently selected paper size in the Print Setup dialog, by selecting Layout
Size Automatic in the Layout menu. This will cause PrintShop Mail to dynamically resize your layouts to fit on the paper,
even when you are using layout repetition.
Fixed Layout Size
You can specify a fixed layout size in the Layout Size dialog. This will force your layout size to stay the same, independent of
the currently selected printer and paper size.
PrintShop Mail for Mac OS Layout Size Options
Setting Description
Size
Select a standard size for the PrintShop Mail document, A4, A5, B5, US Letter, US Legal. Select Custom Size to
enter customized settings.
Width Enter custom width. This setting is editable if you select "Custom Size".
Height Enter custom height. This setting is editable if you select "Custom Size".
Orientation Selecteither Tall or Wide.
©2010 Objectif Lune Inc - 69 -
Page 70

Working with PrintShop Mail Documents
Specify Spot Colors
Spot Colors are special premixed inks used instead of, or in addition to CMYK inks. Spot Colors are used in offset printing to
reduce printing cost or to provide solid colors that can not be exactly reproduced using process colors (such as CMYK). For
example to be able to print colors like gold and silver, some printers can accommodate an extra toner or cartridge filled with
thatdedicated ink.
Spot Colors are only available in PrintShop Mail for Windows, and are not currently available in the Mac OSversion.
PrintShop Mail allows you to enable Spot colors in order to print the document with the desired colors.
To open the Spot Color dialog
1. From the Edit menu, select Spot Colors.
The Spot Color window is shown
2. Spot Color " Name": A descriptive name is defined here.
3. Separation"Name": The name of the ink/cartridge as known on the device (printer/RIP). This must be identical to the
name configured on the device.
4. Alternate color: The Alternate color will be used at printing if the Spot Color is not available on the device and it
will be used as the displayed color on the screen preview at design time. This color may be complete different from the
actual Spot Color
To add a new Spot Color
1. Click the New button.
2. Type the Separation name.
©2010 Objectif Lune Inc - 70 -
Page 71

Working with PrintShop Mail Documents
3. Select the desired Alternatecolor from the drop down list or create a Custom color.
4. Click Save.
Spot Colors are saved with the current document. The Spot Color will not be saved as an application setting.
To remove a Spot Color
1. Select the Spot Color you want to remove
2. Click the Remove button.
If a Spot Color is currently used in your document, it cannot be deleted, only modified.
To modify an existing Spot Color
1. Select the Spot Color you want to modify
2. Change the name, separation and alternate color as desired.
3. Click Save.
Spot Colors in EPS files
Spot Colors defined in EPS files are recognized and loaded in the Spot Color dialog as though it is defined in the document
itself. If a Spot Color defined in an EPS file has the same name as an already existing Spot Color definition but is in fact a different Separation, a warning will be shown. As a result the used Spot Color will be sent to the printer (unmodified) and depending on the availability of the Spot Color on the printer, the Spot Color or the Alternate color will be printed.
Limitations
There are some limitations based on the printer and PrintShop Mail capabilities.
l The number of Spot colors used in a document is limited to the printer capabilities.
l PrintShop Mail cannot determine if a Spot Color is available on the device.
l Support for EPS with DCS (Desktop Color Separation) is limited to one separation in the DCS. If the EPS exceeds this lim-
itation, PrintShop Mail will return a warning: "«filename».eps is a color separated file and might not print correctly."
l When verifying a document, the verification results show all used Spot Colors in the document.
Open a Database
A database is a file or service that contains data that you can use in your document. PrintShop Mail can read a database one
record at a time and use the fields on that line in your text as variables. A field is a single piece of information, a record is one
complete set of fields and a file is a collection of records. Traditional databases are organized by fields, records and files.
To open a database file:
1. From the Database menu, select Open.
2. Browse for a database file (see "Supported Database Formats" (page 73)).
3. Select the database and click on Open.
If you open a delimited text file (such as CSVor Tab-Delimited files), you will be presented with the Open Delimited
Text File dialog (Windows Only). See Delimited Text Files.
©2010 Objectif Lune Inc - 71 -
Page 72

Working with PrintShop Mail Documents
To open a database through ODBC (Windows Only):
1. From the Database menu, select Open.
2. Click on ODBCData Sources on the left.
3. Select an ODBCData Source on the right and click on Open.
ODBC Data Sources can be created via the Windows Control Panel / Administrative Tools / ODBC Data Sources. For
more information on creating ODBC Data Sources, please refer to the Microsoft Windows documentation.
PrintShop Mail only supports one active table at a time. If a database contains multiple tables, you will be presented with the
Select Table dialog.
To select a specific table or view in your database, simply click on it in the list of available tables in the Select Table dialog.
You can also use an SQLquery in order to display custom data. This is only available with database formats that support SQL
queries (Access, SQL, Excel)
To sort the database
In Windows:
1. Select from the menu Database : Sort > Edit.
2. Specify your sort conditions by selecting a database field from the drop down menu and specifying the sort order.
3. Click OK.
In Mac:
1. Open the Database floater and click the Edit button next to Sort checkbox.
2. Select a database field in the list to the left and press Add button to copy it to the Sort Order list to the right. Double
clicking the field name has the same effect. Repeat the steps with all the fields that you want to use as further sort keys.
3. It is possible to specify the Sort Order per selected field, which is either Ascending or Descending by selecting a
sort key in the list to the right and dragging it up or down, or remove a sort key by selecting it and clicking Clear, or
double click the sort key.
4. Press Sort to sort the database and Ready to close the dialog.
To filter the database
In Windows:
1. Select from the menu Database: Sort> Edit.
2. Select up to 4 filter criteria, by selecting the database field to compare, the type of comparison to do (see list below)
and what value to compare it too.
Available types of comparison:
l Contains:Database field contains the string indicated.
l Equals:Database field is exactly equal to the string indicated.
l Does not equal:Database field is not exactly equal to the string indicated.
l Is less than:Database field is numerically smaller than the number indicated.
l Is less than or equal to:Database field is numerically smaller or equal to the number indicated.
l Is greater than:Database field is numerically larger than then number indicated.
l Is greater than or equal to:Database field is numerically larger or equal to the number indicated.
l Is empty:Database field is empty
l Is not empty:Database field is not empty (contains any character, even a space)
l Starts with:Database field starts with he string indicated.
©2010 Objectif Lune Inc - 72 -
Page 73

Working with PrintShop Mail Documents
3. At the end of each criteria, select if you want to combine all the conditions together (And)or if any condition can be true
for the record to appear (or).
4. Click OK.
In Mac OS:
l Open the Database window and click Edit button next to the Filter checkbox.
l Enter an expression of which the result can only be true or false.
l Select Filter from the Database menu or click the Filter checkbox in the database window to apply your filter set-
tings. Selecting or deselecting the filter option, toggles between using the entire database or using only the filtered records. The filter option is enabled only when the database is currently open.
Data Fields: For the purpose of publishing PrintShop Mail documents to PrintShop Web, you can design a PrintShopMail document with or without linking it to a database. The entries you will find in the Data Fields panel in PrintShop Mail, represent data fields that occur in the document. These fields are either referred to in expressions (for
variables or layout conditions, without the need to be directly linked to a database), or they refer to actual database
fields (when the document is already linked to a specific database). Data Field Properties are relevant for Publishing
to PrintShop Web. For more information about Data Fields, see Publishing Documents.
Supported Database Formats
These are the supported database formats and associated file name extensions:
Database Format File Name Extension Note
dBase DBF
Extensible Markup Language
XML See XML Database Format
Microsoft FoxPro DBF, DBC (Windows Only)
Microsoft Access
MDB, MDA, MDE, ACCDB, ACCDA,
ACCDE
(Windows Only)
Microsoft Excel XLS, XLSX, XLSB, XLSM
Paradox DB (Windows Only)
Text TXT or CSV
See "Delimited Text Files" (page
73)
Oracle/SQL Through ODBC connection (Windows Only)
Delimited Text Files
PrintShop Mail supports opening any text file that is delimited with a special character. Generally these files are CSVfiles
(Comma Separated Value), but can also be tab-delimited, pipe-delimited, etc.
When you open a delimited text file using the Database, Open menu, you are presented with the Open Delimited Text File
dialog.
©2010 Objectif Lune Inc - 73 -
Page 74

Working with PrintShop Mail Documents
1. Encoding: Select the encoding that is used in the text file. PrintShop Mail detects the encoding automatically. In most
cases, you can leave this setting as its default. If you know that the text file was created using a different encoding that
the encoding that you are using on your computer, you should change this setting to match it. For example, if your computer is set to use encoding 1251(Cyrillic, Windows), but you know that the file was created by using encoding
1252(Western European, Windows), you should change it to 1252.
2. Separator: Select the character that separates values in your text file. If the character is not listed, select the Other
check box, and then type the character in the box that contains the cursor.
3. Create field names: If no field names are part of the database, PrintShop Mail can add the field names for you. The
field names have the following structure Field <<number>>, where the number is formatted as three digits with
leading zeros starting at 1 (such as Field1, Field2, etc).
Delimited Text File Limitations:
l The maximum number of fields supported is 255 for all types of delimited text files. Any row beyond 255 is ignored by
PrintShop Mail.
l The first line in your text file should contain the field names.
l Field names should only contain alphanumeric characters and underscores.
l The records should be listed on the following lines.
l The field separator is either a tab, a comma, a space, a semicolon or a user-defined character (not alphanumeric or
underscore) and these separators cannot be used in field contents.
l If a field contains a field separator character, it should be enclosed in double quotes in order to be treated as one string.
l Two adjacent field separators imply that an empty field is placed between them.
l The record separator is a newline character.
l Any missing fields at the end of a line are left empty.
©2010 Objectif Lune Inc - 74 -
Page 75

Objects in PrintShop Mail
Objects are pieces or components that you place in your PrintShop Mail document to display some sort of data on your page.
Objects include text, images, barcodes and others.
To learn how to manipulate objects, see "Manipulating Objects" (page 33).
Text Object
You can display text on your page using a mix of static and variable text. Variable text is generally constructed using pieces
from your database, sometimes using conditions to control what text appears and when.
To add a text object to your document:
1.
Click on the Text Object button in the Tools toolbar ( )
2. Using your mouse, create a box on the document by clicking and holding the mouse button where you want one corner
to be, then moving the mouse to where you want the opposite corner and letting go of the button.
3. Start typing your text using static text and variables (see "Working With Variables" (page 83)).
4. You can apply styles and formatting to your paragraphs and text. See "Text Style" (page 39) and "Paragraph Style"
(page 40)).
5. Click outside of the text object to see the result as it will appear.
You can also create a text box of the default size by dragging a Database Field onto your page. This creates a text
box that contains one variable with the same name as your data field, and that variable will have the data field as an
expression.
Add Static and Variable Images
In PrintShop Mail, image objects can contain either static or variable images. Using variable images with PrintShop Mail allows
you to personalize your documents with pictures.
Note: For a list of supported image formats, see Supported Image Formats.
About static images
Static images are not linked to a variable, which means that they are always associated with the same image file throughout
your whole document.
To insert a static image
1. Click on the Image Object button in the Tools toolbar.
2. Using your mouse, create a box on the document by clicking and holding the mouse button where you want one
corner to be, then moving the mouse to where you want the opposite corner and letting go of the button.
3. In the dialog box, browse to the image to insert.
4. Click Open.
You can also insert the Image Object via the Insert ->Image File menu. This create the Image Object at the top-left
corner of the document.
©2010 Objectif Lune Inc - 75 -
Page 76

Images added to the document will be within an area called the Bounding Box. You do not manipulate the image directly but
rather its bounding box. Images will always fit within the bounding box and their image ratio will not change. For example, if
you resize the bounding box horizontally to make it wider, the image will center itself but not be bigger. If you resize the box
vertically afterwards, then the image will grow to fit. The initial size of an image depends on its resolution. PrintShop Mail
assumes an image resolution of 96 DPI (Dots Per Inch), except for EPS (72 DPI) and TIFF files. The resolution of a TIFF image
is stored in the file itself.
About variable images
Variable images are linked to variables in the same way as variable text. The result of the expression associated with a variable image should be an image file name.
To insert a variable image
1. Click on the Insert Image Box button in the Tools toolbar.
2. Using your mouse, create a box on the document by clicking and holding the mouse button where you want one
corner to be, then moving the mouse to where you want the opposite corner and letting go of the button.
To set the variable image folder and file name
1. Double-click on the variable image box.
2. Browse to the folder where you want to look for images.
3. Double-click on one of the images.
4. Open the Variables tab and double-click on the variable that corresponds to the name of the image object you just
created (such as Image1, Image2, Image3).
5. Use the Expression Editor to determine what image will appear. The result of the expression must be the actual file
name of the image in the same folder, including the extension (.jpg, .png, etc). See "Building Expressions" (page 122).
Technically, both image objects are the same - we offer both for the convenience of adding the one that will offer the
correct dialog box. Both image types are cached using your print technology, where each individual image is cached
once and referred to multiple times.
Examples of Variable Image documents
Example: Image filename is "As is".
If your database contains a field that already has the name of the image you want do display including the extension, you can
refer to it directly in the image's expression. For example, if your database has a field called "Car Pic", you could simply use
the expression [Car Pic] in your expression.
ZIP CAR CAR PIC
91335 Mustang Mustang.jpg
75038 Explorer Explorer.jpg
60173 Windstar Windstar.jpg
33351 Explorer Explorer.jpg
Result:
©2010 Objectif Lune Inc - 76 -
Page 77

Example: Condition triggered by the contents of a data field.
If your database contains a small trigger that can be used to dynamically determine what image will be displayed, you can use
a condition in the expression to determine what image will be shown depending on that trigger. For example, if you have a
field called "Car Type"that contains either A, B or C which refer to a specific car type, you can use that.
ZIP CAR CAR TYPE
91335 Mustang A
75038 Explorer B
60173 Windstar C
33351 Explorer B
Expression
IF([CAR TYPE] = "A", "Mustang.jpg",
IF([CAR TYPE] = "B", "Explorer.jpg",
IF([CAR TYPE] = "C", "Windstar.jpg","")))
Place PDF
You can insert a PDF file as a static PDF object or as a variable image object. As a variable image object allows for using variable pages within a (single) PDF document.
To insert a PDF image as a static PDF object, you can:
1. Drag and drop a PDF file to your layout, or
2. From the File menu, select New PDF based document, or
3. In the Tools toolbar, click the Insert PDF button, or from the Insert menu, select PDF...
To insert a PDF file as a variable image object, you can:
1. In the Tools toolbar, click the Insert Image File button, or from the Insert menu, select Image File.
2. In the Tools toolbar, click the Insert Image Box button, or from the Insert menu, select Image Box.
Note: An image object can be linked to a single PDF file. As PDF files can contain multiple pages you can specify the page(s)
to be used in your document through an expression, in this way you can use variable pages within that PDF file.
Mac OS
1. In the Tools toolbar, click the Place Variable Image button and drag a rectangle to the desired size on your layout,
or from the Insert menu, select Variable Image.
2. Double click the name of your variable image in the Variables window, to display the Expression Editor.
3. In the Expression Editor, define an expression or select a database field that contains the image filename.
Note: PrintShop Mail for Macintosh converts the color space that is embedded in the image to the color space of the printer
driver. You can check the color space of the printer driver, selecting from the File menu, Print/ColorSync.
©2010 Objectif Lune Inc - 77 -
Page 78

Barcode Object
The most commonly known barcodes are composed of a sequence of vertical bars and spaces varying in width. Some barcodes use start and stop characters, which are defined as patterns of bars and spaces that tell the barcode reader where the
code begins and ends. Others have a checksum, which is an integer value that the reader can use to verify the integrity of the
barcode data. Some include human readable characters below the bars.
With PrintShop Mail you can add a variety of barcodes to your documents. For detailed descriptions of each one of the options
offered by specific barcodes, or for background information on barcodes, refer the documentation provided by individual barcode suppliers.
To add a barcode:
1. Create a new document or open an existing document.
2. Click the Barcode tool in the toolbar to insert a new barcode. The barcode object shows a default barcode.
To change the barcode properties, see "Barcode Properties" (page 31).
For a list of supported barcodes in PrintShop Mail, see "Barcodes Supported by PrintShop Mail" (page 79).
©2010 Objectif Lune Inc - 78 -
Page 79

Barcodes Supported by PrintShop Mail
Linear Bar Codes (1D)
Name Description
CodaBar 2 Widths CodaBar (2 Width), CodaBar2
Code11 Code 11, Code-11
Code 2OF5 Data Logic Code 2 of 5 Data Logic Version
Code 2OF5 IATA Code 2 of 5 IATA Version (International Air Transport Association)
Code 2OF5 Industry Code 2 of 5 Industry Version
Code 2OF5 Interleaved Code 2 of 5 Interleaved (alias ITF or Code 2/5 IL),
Code 2OF5 Matrix Code 2 of 5 Matrix (alias 2of5 Standard)
Code 2OF5 Standard Code 2 of 5 (identical with Code 2 of 5 Matrix)
Code 39 Code 3 of 9 alias Code-39
Code 39 Full ASCII Code 3 of 9 Extended Version (ASCII)
Code 93 Code 93
Code 93 Full ASCII Code 93 Extended Version (ASCII)
Code128 Code-128 all sub sets and Compressed Mode
Code128A Code 128 Subset A
Code128B Code 128 Subset B
Code128C Code 128 Subset C
EAN13 EAN-13 (also JAN or IAN),
EAN13 P2 EAN-13 (also JAN or IAN) with 2 digit add-on
EAN13 P5 EAN-13 (also JAN or IAN) with 5 digit add-on
EAN14 EAN-14 (GTIN coded with EAN-128 symbology)
EAN8 EAN-8 (also JAN or IAN)
EAN8P2 EAN-8 (also JAN or IAN) with 2 digit add-on
EAN8P5 EAN-8 (also JAN or IAN) with 5 digit add-on
EAN128 EAN-128 alias UCC-128 alias GS1-128
Flattermarken Flattermarken
GS1-128 GS1-128, identical to EAN-128 / UCC-128
GS1-DataBar
GS1-DataBar Symbologies: all variants of GS1 DataBar are supported (GS1 DataBar is based upon
RSS)
ISBN ISBN
ITF-14 ITF14, Code 2of 5 Interleaved (14 digits)
LOGMARS DOD Logmars, Department of Defense Logmars
MSI MSI Barcode variants with different check digits
NVE-18 NVE 18 (Nummer der Versandeinheit)
Pharmacode OneTrack
Pharmacode TwoTrack
Pharmacode One Track (1 Track)
Pharmacode Two Track (2 Track)
©2010 Objectif Lune Inc - 79 -
Page 80

Name Description
PLANET 12 Digit Planet Code 12 digits (Postal Alpha Numeric Encoding Technique)
PLANET 14 Digit Planet Code 14 digits
Plessey Plessey Code Unidirectional
Plessey Bidirectional Plessey Code Bidirectional
PZN Pharma Zentralnummer (Deutschland)
RSS Expanded EAN/UCC RSS Expanded (Reduced Space Symbology)
RSS Limited EAN/UCC RSS Limited (Reduced Space Symbology)
RSS-14 EAN/UCC RSS14 (Reduced Space Symbology)
RSS-14 Truncated EAN/UCC RSS14 Truncated (Reduced Space Symbology)
RSS-14 Limited EAN UCC RSS14 Limited (Reduced Space Symbology)
GS1 DataBar
Expanded
GS1 DataBar Expanded (Reduced Space Symbology)
GS1 DataBar GS1 DataBar / RSS14 (Reduced Space Symbology)
GS1 DataBar Truncated
GS1 DataBar Truncated (Reduced Space Symbology)
GS1 DataBar Limited GS1 DataBar Limited (Reduced Space Symbology)
SSCC-18 SSCC 18 Shipping Container Code
Telepen Telepen
Telepen Alpha Telepen Alphanumerisch
UCC/EAN-128 UCC/EAN 128
UCC-128 UCC 128
UPC12 / UPCA UPC 12 (alias UPC-A),
UPC-A UPC A (alias UPC-12),
UPC-A P2 UPC Version A with 2 digit add-on
UPC-A P5 UPC Version A with 5 digit add-on
UPC-E UPC Version E
UPC-E P2 UPC Version E with 2 digit add-on
UPC-E P5 UPC Version E with 5 digit add-on
UPCSCC UPC Shipping Container Code (refer to ITF14, SCC-14)
Postal Codes (1D)
Australian Post Custom Australian Post Standard Customer, Customer2, Customer 3
Australian Post Redirect Australian Post Redirection
Australian Post Reply Paid Australian Post Reply Paid
Australian Post Routing Australian Post Reply Routing
DPD Code German Parcel Service Label Code
DP Identcode Deutsche Post Identcode
DP Leitcode Deutsche Post Leitcode
Japanese Postal Japanese Postal Barcode
Italian Postal Italian Postal Code (based on 2of5 IL)
©2010 Objectif Lune Inc - 80 -
Page 81

KIX Dutch Postal Barcode
Korean Postal Authority Korean Postal Barcode
RoyalMail 4State (RM4SCC) Royal Mail 4 State Barcode (RM4SCC)
USPS OneCode (4-CB) USPS OneCode (4-CB) alias USPS 4-State Customer Barcode
USPS PostNet5 USPS PostNet ZIP (5 digits) withcheck digit computation
USPS PostNet6 USPS PostNet ZIP+CD (6 digits)
USPS PostNet9 USPS PostNet ZIP+4 (9 digits) with check digit computation
USPS PostNet10 USPS PostNet ZIP+4+CD (10 digits)
USPS PostNet11 USPS PostNet ZIP+4+2 (11 digits) with check digit computation
USPS PostNet12 USPS PostNet ZIP+4+2+CD (12 digits)
Two-Dimensional (2D) Codes
Codablock-F CodablockF (Stacked Code128), used by HIBC
Data Matrix
Data Matrix (ECC200 standard with error correction), Auto Compaction
MaxiCode Maxi Code (used by UPS®)
MicroPDF417 Micro PDF-417, MicroPDF
PDF417 PDF-417 (all encodation modes with auto compaction)
PDF417 Truncated PDF-417 Truncated Version
QR-Code QRCode (Quick Response Code) (mostly used in Asia)
Aztec Code Aztec Code
RSS-14 Stacked EAN/UCC RSS14 Stacked
RSS-14 Stacked Omnidir EAN/UCC RSS14 Stacked Omnidirectional
RSS Expanded Stacked EAN/UCC RSS Expanded Stacked
GS1 DataBar Stacked GS1 DataBar Stacked
GS1 DataBar Stacked Omnidir GS1 DataBar Stacked Omnidirectional
GS1 DataBar Expanded Stacked GS1 DataBar Expanded Stacked
EAN-UCC Composite Variants (2D)
RSS-14 Composite Component CC-A / CC-B
RSS-14 Stacked Composite Component CC-A / CC-B
RSS-14 Stacked Omnidirectional Composite Component CC-A / CC-B
RSS Limited Composite Component CC-A / CC-B
RSS Expanded Composite Component CC-A / CC-B
RSS Expanded Stacked Composite Component CC-A / CC-B
EAN 13 Composite Component CC-A / CC-B
EAN 8 Composite Component CC-A / CC-B
UPC A Composite Component CC-A / CC-B
UPC E Composite Component CC-A / CC-B
UCC/EAN128 Composite Component CC-A / CC-B / CC-C
GS1 DataBar Composite Variants (2D)
GS1 DataBar Composite Component CC-A / CC-B
©2010 Objectif Lune Inc - 81 -
Page 82

GS1 DataBar Stacked Composite ComponentCC-A / CC-B
GS1 DataBar Stacked Omnidirectional Composite Component CC-A / CC-B
GS1 DataBar Limited Composite Component CC-A / CC-B
GS1 DataBar Expanded Composite Component CC-A / CC-B
GS1 DataBar Expanded Stacked Composite Component CC-A / CC-B
Related Symbologies
With the listed symbologies you can generate also the following variants:
l USS Code 39
l AIAG
l HIBC
l USS Code 128
l UCC-128
l ISBT-128
l SCC-14
l JAN
l Bookland
l ISSN
l USS ITF 2-5
l I-2/5
l ITF-14
l SSC-14
l DUN14
l USPS
l DOD Logmars (Department of Defense Logmars)
l UPC SCS (UPC Serial Shipping Symbol)
DirectSmile plug-in
Despite the fact that the integration of DirectSmile with PrintShop Mail benefits from state-of-the-art optimization and speed
improvements techniques, the generation of personalized images can still consume considerable amount of computer
resources. Therefore, DirectSmile must run on a separate computer than the one where PrintShop Mail is installed in order to
spread computer resources. System responsiveness may be affected dependent upon system specifications and number and
complexity of images used.
The DirectSmile plug-in should be installed and available by default. If not, please re-install PrintShop Mail and check
the DirectSmile plugin option.
If the connection between PrintShop Mail and DirectSmile is lost, images can no longer be requested nor received. It is therefore very important to verify the connection settings and make sure the PrintShop Mail document has access to the DirectSmile
server. The same holds true when using DirectSmile in a multiple users environment as well as when printing PrintShop Mail
documents with PrintShop Mail Web.
To insert a DirectSmile object on the page:
l Click the DirectSmile icon in the Tools toolbar.
l Double-Click the object that is added to the page.
l Type in the Server name and select an image set.
l Click Open.
The properties of a DirectSmile object are available in DirectSmile Properties.
©2010 Objectif Lune Inc - 82 -
Page 83

Working With Variables
Variables are basically words that contain data, which can be used throughout your document in any text object. You can have
as many variables as you want in your text, and they can be re-used as many times as you want. Changing the expression
(content)of one variable will change its result in each place it is used.
Variables can be created manually by typing its name in a text object, automatically by dragging a data field on your document, or automatically by objects that you add.
To create a variable manually:
1. Create a new text object in your layout or use an existing text object.
2. Type in a variable name, surrounded by the variable delimiter (by default, this is the @ symbol). For example: @FIRS-
TNAME@ , or @Last Name@ .
3. Click outside of the text object. The variable appears in the "Variables Panel" (page 20).
To create a variable from a data field:
1. Open the "Data Fields Panel" (page 21).
2. Click on a data field and hold your mouse button.
3. Move your mouse to where you want the contents of the data field to appear.
4. Let go of the mouse button. Avariable with the same name as the data field appears in the "Variables Panel" (page 20).
To assign database fields to the variables
The next step is to connect the variables to fields in the database. To do this,
1. (Windows): Double click on a variable in the Variables Panel to display the Expression Editor, or right click on
the text object and select the variable in the Edit Expression submenu.
(Mac OS): Double click on a variable in the Variables floater.
2. Double click on the database field to which to associate the variable.
3. Click OK to close the window.
Use Layout Conditioning
Use layout conditioning to conditionally skip certain pages of your document or to leave them blank during the printing process. The PRINT and BLANK commands will not influence the amount of pages printed.
There are three options for applying a condition to a layout:
l PRINT: The layout will be printed (default).
l BLANK: A BLANK page will be printed instead of the layout.
l SKIP : The layout will be skipped and the next layout will take its place.
To specify layout conditioning
Select the layout for which you want to set the condition:
l (Windows): It is possible to specify layout condition in three ways:
1. From the Layout menu, select Edit Condition.
2. Right click on the layout and select Edit Layout Condition.
3. In the Layouts panel, select the layout and click on Action to Edit Condition.
©2010 Objectif Lune Inc - 83 -
Page 84

l (Mac OS):
1. From the Windows menu, select Show Layout Conditions.
2. From the Windows menu, select Show Variables and click on Layout Conditions.
Use Case Example
You want to print a one page newsletter or promotional letter, but you want to use a different page (different colors or images,
for example)for your clients depending if they are male or female. Luckily, your database contains a field that says "M"for
male clients and "F"for female clients.
The following expression can be used on the layout that is meant for your male clients:
IF( [GENDER] = "M", Print, Skip)
In plain words, "If the GENDER field is equal to "M", print the page, otherwise skip it".
The expression for your female audience will be very similar:
IF( [GENDER] = "F", Print, Skip)
FreeForm and FreeForm 2 print technologies do not fully support layout conditioning and do not allow you to conditionally Skip layouts. When SKIP is used, a BLANK page will be printed instead.
Note: When you use layout condition SKIP for your PrintShop Mail documents with multiple layouts, or when you have applied
variable Number of Copies, this may cause that the size of the record sets (the number of actual printed layouts per record)
will be different per record set. This in turn may cause that some record sets will be split across different stacks.
When should Layout Conditions be applied?
l Output of multiple versioned documents within one PrintShop Mail file.
l Sending a different promotional coupon to clients that have purchased more or less than a specific amount (perhaps
when sending a "thank you for your previous purchase"letter)
l Inserting blank pages
Note: For more information on expressions, see Expression Overview.
Use Layout Repetition
PrintShop Mail can print multiple layouts on a single page that is larger than the layout itself, which is useful for printing
address stickers, postcards and business cards. This concept is sometimes referred to as Multi-Up or N-Up, where Nis the
number of layouts in a page (e.g. 2-up, 4-up, 8-up, etc). The technique can also be used to save "clicks"on printers that
charge you each time a physical page is ejected, by placing multiple copies or records on a single, larger sheet.
This is done by using the Layout Repetition settings in the PrintShop Mail Preferences dialog(see "Repetition Settings" (page
50)).
Use Cases and examples:
l You can print 10 business cards on a single Letter-sized thick paper by creating a layout that is 3.5" wide by 2"high,
with 2 horizontal repetitions and 5 vertical repetitions.
l You can use half as many physical pages ("clicks")on your printer by using an 8.5"x11" layout, repeated twice hor-
izontally on a Tabloid-sized page.
l You can print postcards 4-up (2 horizontal, 2 vertical)on a Tabloid page.
©2010 Objectif Lune Inc - 84 -
Page 85

Cut &Stack (aka Through-the-Stack) in Simplex mode
You can use the repetition settings to re-order the output so it creates stacks. This is useful when you are cutting the stack at
printout, in order to retain the precise order of the records. For example, if you are printing 500 "tickets"4-up using a
"COUNTER" (page 144)function to display a serial number, you would probably want to keep the order as 1-500.
To do this, you can set the first priority settings to be (1) on Front to back, the second to be (2) on Top to bottom and
finally (3) on Left to right. This way the first record is printed on the top-left of the first page, the second record on the topleft of the first page, etc. Record 126 will be on the top-right of the first page, and 500 will be at the bottom-right of the last
page.
When you cut the output stack in 4, you can then simply order them in the order of: top-left, top-right, bottom-left then bottom-right stacks, and this will retain your 1-500 order.
Cut &Stack and Duplex mode
If you are creating a PrintShop Mail document with two layouts per record and Cut &Stack, you will need to use the Front to
back option in priority 1 as described above, or else your "back"layout would end up besides your front one instead of on the
back of the page. In order for this system to work correctly, you need to make sure that every record always generates two
layouts.
When duplexing, you also need to remember to correctly select the proper Mirroring setting to the same option as your Duplexing option on the printer, so the layouts on the back are correctly ordered. For example, if you printin Short-Edge Duplex in
your printer, select Flip onShort-Edge in the Mirroring option.
When you use layout condition SKIP for your PrintShop Mail documents with multiple layouts, or when you have
applied variable Number of Copies, this may cause the size of the record sets (the number of actual printed layouts
per record) to be different per record set. This in turn may cause some record sets to be split across different stacks.
To avoid this, always make sure that the number of layouts per record is correct (you can use conditional "blank"
layouts to do this).
Select Paper Trays
If your printer supports different paper trays and your document consists of multiple layouts, you can send different layouts to
different trays.
To associate a layout with a paper tray
Windows
1. From the File menu select Page Setup, or right click on the layout and choose Page Setup. Alternatively in the
Properties panel, select Page Size.
©2010 Objectif Lune Inc - 85 -
Page 86

2. From the Tray box, select the desired paper tray.
3. In the Apply to box select:
Current layout: layout or layouts selected in the Properties Panel.
This point forward: current layout and all layouts below it.
Whole document: all layouts in the document.
4. Click OK.
If your printer supports more trays but they are not available in the Page Setup window, use the following steps to select a tray
in the Advanced properties of the printer driver:
1. From the File menu select Page Setup, or right click on the layout and choose Page Setup.
2. Click on the Advanced tab.
3. In the Printer Document Properties select Advanced.
4. In the Printer Advanced Options select Printer Features.
The options outline above, must be repeated for each layout, if each layout need a different tray.
Another way to associate a layout with a paper tray is by selecting the layout in the Layouts panel, then select the Paper Tray
property and choose the desired tray from the drop down menu.
©2010 Objectif Lune Inc - 86 -
Page 87

Mac OS
From the Layout menu, select Paper Tray. Depending on the selected PPD, a list with the available trays will be displayed.
Number of copies
PrintShop Mail allows you to print a number of copies per page. The Expression Editor can be used to generated multiple
copies of each page in your document.
To setup the number of copies
l Select the Layouts panel.
l Select the desired layout and click on Number of Copies, to open the Expression Editor.
©2010 Objectif Lune Inc - 87 -
Page 88

Number Text String
Once the Expression Editor is open:
1. Double click on the VAL function from the function list. The expression will be pasted into the Expression Edit field.
2. Select the string value of the database field containing the number of copies.
Non-numerical Text String
©2010 Objectif Lune Inc - 88 -
Page 89

In this case, the data field does not contain a number string, but it does have a field to be used as "Trigger".
In the expression "IF([TRIGGER]="A",VAL("12"),IF([TRIGGER]="B",VAL("8"),VAL("1"))) ", the field name "TRIGGER" has
either an "A" or a "B" in it. The number of copies for "A" would be 12, and the number of copies for "B" would be 8. At the end
of the expression, you need to add VAL("1"), because the function must result in a numeric value.
Note: When you use layout condition SKIP for your PrintShop Mail documents with multiple layouts, or when you have applied
variable Number of Copies, this may cause that the size of the record sets (the number of actual printed layouts per record)
will be different per record set. This in turn may cause that some record sets will be split across different stacks.
You can also print multiple copies of your document by entering the desired number of copies in the Print Dialog. To do this:
l On the File menu, click Print.
l In the Number of copies box, enter the number of copies you want to print.
To print a complete copy of the document before the first page of the next copy is printed, select the Collate check box. If you
prefer to printall copies of the first page and then print all copies of subsequent pages, clear the check box.
Limitations
l The output result will be one copy if a single zero ("0") is used in any part of the Expression.
l For multi-page documents, you need to set the number of copies per each individual page.
©2010 Objectif Lune Inc - 89 -
Page 90

l Number of copies can not be used in combination with Layout Repetition.
l Number of copies can not be used when FreeForm Print Technology is selected, use FreeForm 2 instead.
Verify a Document
Before printing, you can verify your document for possible problems.
To perform document verification
PrintShop Mail performs the following checks at Layout level:
l Are any images or PDF files missing?
l Are all items placed within the printable area?
l Does a text object contain more text than the text box can hold?
l Are there fonts missing in your system that are referred to in the document?
When you select Verify Document from the Layout menu, a progress bar will be displayed, showing the amount of records being checked. The warnings for the whole document will be listed in the Verification Results panel.
Verify document checks the document at two levels:
l Layout level: Warnings at layout level will show the warning with the layout number in the Warnings panel.
l Record level: Warnings at record level will show the warning with the layout number and record number in the
Warnings panel.
Verify document will be stopped when 1000 warnings are found or when you press the Cancel button on the progress bar.
Here is a list of a few possible messages:
©2010 Objectif Lune Inc - 90 -
Page 91

Error Message Possible Solution
Object is placed beyond the printable area Move the object on the layout so it is directly on the page
Object is not entirely placed on the layout Move the object on the layout so it is completely on the page
Text file not found Verify the expression that creates the filename used by the TEXT_FILEfunction.
Variable X is not linked to an expression Check the Variables Panel for any variable that does not have an expression.
Text does not fit in its bounding box
Image X not found Verify the file name or expression that calls the images file in your Image box.
Error loading image
Page number X is invalid; this PDF only
contains Y pages
Variable X: argument Y is invalid Verify the expression for the variable.
Variable X: barcode input string Y is
invalid
Variable X: date format Y is invalid Verify the date format for the variable.
X contains at least one TrueType font that
is not embedded in the PDF
Variable X: database field Y not found Verify the database field name in the variable's expression.
Verify the text box where the error occurs. Either make the text box bigger, or
use Text Links to flow the text into another text box.
Verify that the image you are calling is a valid type supported by PrintShop Mail
and that it is not corrupted.
Verify the expression used to choose the page displayed by the PDF, and that
the PDFname is the correct one.
Verify the expression for the barcode object and make sure it corresponds to
what the barcode is expecting.
Recreate the PDFin order to embed all the TrueType fonts.
You can save any error message in theVerification Results panel or the Warnings panel. To do so, right-click on the
message and select Copy. You can then paste it somewher else, for example by emailing it to technical support.
Save a Document
When saving a document, it is recommended to use one folder for the document file and its supporting files that is, the image
files and the database. The reason for this is because the supporting files for a PrintShop Mail document are not included in the
document file. This file only contains references, stored as paths relative to the documentfolder.
For example:
If you save your document in...
"C:\My Documents"
and it contains an image...
"C:\My Documents\Images\Car.tif",
the reference to this image is stored as...
"Images\Car.tif"
If you move the Documents folder and its subfolders to another drive, PrintShop Mail will still be able to locate the image.
Windows Note: PrintShop Mail 6.1 documents can be opened in all PrintShop Mail 6.X versions (downward/upward compatibility). You can import PrintShop Mail 98, 4.x, 5.x and 6.x documents into new versions of PrintShop Mail, but PrintShop
©2010 Objectif Lune Inc - 91 -
Page 92

Mail 98, 4.x and 5.x will not be able to interpret documents saved by the new version of PrintShop Mail . If you try to overwrite
an existing PrintShop Mail 98/4.x/5.x/6.x document in the new PrintShop Mail format, PrintShop Mail will issue a warning.
Mac OS Note: You can open PrintShop Mail documents created in PrintShop Mail 4.3.X or older, but PrintShop Mail 4.3.x will
not be able to interpret documents saved by the new version of PrintShop Mail. If you open an existing PrintShop Mail 4.3.x document in the new PrintShop Mail format, PrintShop Mail will issue a warning, asking you whether you really want to save this
document as soon as you close the document, even if you have not changed anything.
When opening PrintShop Mail documents from versions 4.3.6 or 4.2.9 (Japanese language) in PrintShop Mail 5, the following
settings might be lost:
-Format settings in DATE and TODAY expressions will not be converted automatically; this settings can be rest manually.
-Variable images will be opened with an empty expression.
-Leading between lines setting can not be converted, this setting can be reset manually. Variables embedded in an EPS (@variable@) is not supported.
-Transparency will be converted to white, this setting can be reset manually.
-The COUNTER function will be converted using an end value of 2.000.000.
If you wish to use documents made in earlier versions of PrintShop Mail than versions 4.3.6/4.2.9 (Japanese language) before
you open them in PrintShop Mail 5.x.
To save your documents
You can save a PrintShop Mail documentin three ways:
1. As a PrintShop Mail document, with the extension ".PSMD".
From the File menu, select Save as.
2. As a PrintShop Mail template, with the extension ".PSMT".
From the File menu, select Save as Template. For further guidance in saving PrintShop Mail templates, see Create a
New Document.
3. Save for Output archived in a "ZIP" file which contains all files used in the PrintShop Mail document.
From the File menu, select Save for Output.
When selecting Save for Output, PrintShop Mail collects and copies all the files needed into a compressed folder. The
collected data includes the PrintShop Mail document, static and variable images, database, fonts and a summary file
which shows a list of all the copied image file names.
To revert to the last saved version of the document, select Revert from the File menu.
Publishing Documents
PrintShop Web is an easy to use, powerful and open Web to print application that allows for printing over the Web.
PrintShop Mail allows to prepare and add documents to PrintShop Web. PrintShop Mail documents are used as the basis for
print jobs, meaning that it is possible to reuse the documents by uploading new databases. The designer can publish (upload)
an existing or new document and customers will be able to use PrintShop Web to order print jobs based on this document. Print
jobs can be previewed and validated before they are submitted to the printer.
How to create PrintShop Mail documents for publishing
You, "the designer" create documents and templates in PrintShop Mail.
When the document is ready for publishing, you can start the upload process by clicking on Publish to PrintShop Web
selecting the File menu or clicking the Publish to PrintShop Web button in the Standard toolbar.
©2010 Objectif Lune Inc - 92 -
Page 93

You can design a document with or without linking it to a database. The variable data in the document preview in PrintShop
Web will be based upon Data Fields that you assign in PrintShop Mail.
Note: Keep in mind that when you design a template, the template does not save the link to the database.
Data Fields are representatives for the variable data that can be provided either directly through a database that you link to
a PrintShop Mail document, or through any other data source, for example a database which is uploaded by a PrintShop Web
client or a web form.
The entries you will find in the Data Fields panel in PrintShop Mail, represent data fields thatoccur in the document. These
fields are either referred to in expressions (for variables or layout conditions, without the need to directly being linked to a
database), or they refer to actual database fields (when the document is already linked to a specific database).
When a data field is used in the PrintShop Mail document, it will have a check mark in the Data Fields panel.
Example
The Type column displays the type of data in the data field. "Default" means that at the moment no data source is available for
this field. Once there is a data source available, the Type column will display the data type for that field, as specified in the
data source, like number, text, etc.
Example
By selecting a Data Field, you can view and edit its properties:
©2010 Objectif Lune Inc - 93 -
Page 94

Name: A unique identifier. You can not modify this value here.
Default Value: You can set a Default Value here, this will be a string value that will be displayed in PrintShop Web, once the
document is published, as a placeholder when no data source is available (yet) for this Data Field. You will find this string value
back in PrintShop Web, after the document has been selected (before the stage where a data source is provided).
Note: When no database is (yet) available, this Default Value will be displayed as the current value in the Data Fields panel
and in the text object in the layout, in case the data field is in use in the document:
How to create a Data Field without opening a database?
1. Create a variable: @variable@.
2. Enter the Expression Editor by double clicking on the @variable@ in the Variables panel.
3. Type: [My data field].
4. Click OK.
Now you will find the data field back in the Data Fields panel.
Remarks: You can define a Remark here, this will be a string value that will be displayed in PrintShop Web once the document is published. You can use this, for example, to give clients a hint about this variable data field.
Source: The data source can be either "Database", a database uploaded by the PrintShop Web client, or "User input", data
provided by for example a web form.
Note:These Data Fields properties are only relevant for PrintShop Web, they will not affect the behavior of PrintShop Mail.
How to publish documents from PrintShop Mail
Publishing PrintShop Mail documents to PrintShop Web can be done from PrintShop Mail directly.
When publishing documents the first time, you will need to specify the URL and the login account for your company Web
Server.
1. Launch PrintShop Mail.
2. From the Edit menu, select Preferences and click the PrintShop Web icon. To tell PrintShop Mail how to log on to
your company Web Server, specify:
URL: The Web address of your company.
Login : The user name and password assigned by the administrator.
©2010 Objectif Lune Inc - 94 -
Page 95

Once you have specify all the necessary information to login to your company Web server, you can start publishing documents
to PrintShop Web. The connection can be tested clicking the Test Connection button. It verifies only if all three options
(URL, Username, Password) are valid. If no PrintShop Web Server address has been defined in the PrintShop Mail Pref-
erences, the document and its attributes (images and fonts) will be saved in a zip archive (Publish to zip) for later publishing.
1. From the File menu, select Publish to PrintShop Web or click the Publish to PrintShop Web button in the
Standard toolbar.
©2010 Objectif Lune Inc - 95 -
Page 96

Before publishing PrintShop Mail documents, a document designer can add a note containing Operator Instructions
about for example, duplex settings, paper weight etc.
2. A dialog Publish to PrintShop Web opens.
3. Select the Publication Type where you want to place the document.
©2010 Objectif Lune Inc - 96 -
Page 97

In PrintShop Web documents are organized within Publications Types. Publication Types are a way to mark a document
as being in a particular category (such as envelop, business cards, invitation etc). Each Company can have a range of
Publication Types. Within the Company each Publication Type is unique. Each Publication Type can contain one or multiple documents.
When a customer of a company logs on to the PrintShop Web web site all Publication Types available for that Company
will be shown.
4. Click Next.
5. On the next dialog click the Show Browser button to display the folder containing the image files.
©2010 Objectif Lune Inc - 97 -
Page 98

Note: Adding files is only necessary when variable images and txt/rtf files are used. If the document does not contain
variable images or txt/rft files, the wizard will take you to step 7.
6. Select the additional files for the document and click the Add button.
©2010 Objectif Lune Inc - 98 -
Page 99

Note: In this dialog, you can choose to add variable image and .txt/.rtf files that belong to the document. The PrintShop Mail document, its used fonts and static images are added automatically.
7. Click Next.
©2010 Objectif Lune Inc - 99 -
Page 100

8. Click Finish to publish the document.
9. Once the message Successfully uploaded the new document appears, click OK.
Note: It is possible to upload documents made in older versions of PrintShop Mail WE to PrintShop Web through PrintShop Mail
5.2 and higher.
PrintShop Mail shows a list of warnings prior uploading the PrintShop Mail document to PrintShop Web.
The following features are checked:
Fonts
Only freely distributable fonts will be added automatically. A warning message will be displayed about fonts that need license
before publishing. You need to verify if the necessary licenses are available to add the fonts that need licenses. It is possible to
choose to upload the licensed fonts directly to avoid a manual upload of the fonts at the PrintShop Web server.
PrintShop Mail version
PrintShop Mail verifies if the version used at the PrintShop Web server is the same or if the document needs to be converted.
List of used plugins
When publishing a PrintShop Mail document which contains plugin objects, the availability and the version of the plugin will be
checked with the PrintShop Web server before publishing.
©2010 Objectif Lune Inc - 100 -
 Loading...