

Page 1
User Guide
Version:2019.1
Page 2

Page 3
User Guide
Version 2019.1
Last Revision:2019-06-10
Objectif Lune, Inc.
2030 Pie-IX, Suite 500
Montréal, QC, Canada, H1V 2C8
+1 (514) 875-5863
www.objectiflune.com
All trademarks displayed are the property of their respective owners.
© Objectif Lune, Inc. 1994-2019. All rights reserved. No part of this documentation may be
reproduced, transmitted or distributed outside of Objectif Lune Inc. by any means whatsoever
without the express written permission of Objectif Lune Inc. Inc. Objectif Lune Inc. Inc. disclaims
responsibility for any errors and omissions in this documentation and accepts no responsibility
for damages arising from such inconsistencies or their further consequences of any kind.
Objectif Lune Inc. Inc reserves the right to alter the information contained in this documentation
without notice.
Page 4

Table of Contents
Table of Contents 4
Welcome to PlanetPress Workflow 2019.1 11
Notes in this guide 11
Installation and setup 13
System Requirements 13
Operating System (64-bit only) 13
Minimum Hardware Requirements 13
Environment considerations 14
Terminal Services 14
Virtual environments 14
32-bit or 64-bit? 15
Antivirus considerations 15
Backup considerations 16
Microsoft Office compatibility 17
Setting up the working environment 17
Network considerations 17
Local and network rights 17
Account requirements 18
Mapped drives 18
Network ports used by each service 19
Known Issues 21
Microsoft patch causing handling of XLS to fail 21
Other known issues 22
About PlanetPress Fax 24
About PlanetPress Image 25
Preferences 26
Basics 27
Related tools and resource files 27
Features 29
About Workflow Configurations 29
Creating a new configuration 30
Open a PlanetPress Workflow configuration file 31
Saving and sending a Workflow Configuration 31
Page 4
Page 5

Exit PlanetPress Workflow Configuration program 34
Workflow Configuration resource files 35
Connect resources 35
PlanetPress Design documents 39
PrintShop Mail documents 44
About data 45
About documents and variable data 45
Job file 46
Job file names and output file names 47
Data selections 48
About data emulation 54
Sample Data 64
Metadata 69
Working with JSON 80
Data Repository 84
Structure 84
Accessing the Data Repository 85
Where to find the Data Repository 87
Debugging and error handling 87
About error handling 87
Using the On Error tab 88
Creating and using Error processes 89
Accessing the Logs 91
Resubmit backed up input files to a process 92
Debugging your PlanetPress Workflow process 95
About printing 98
OL Connect print jobs 99
PlanetPress Suite print jobs 100
PlanetPress Workflow printer queues 100
Shared printer queue properties 101
Windows Output printer queue 103
LPR Output Printer Queue 104
FTP Output Printer Queue 106
Send to Folder printer queue 107
Load balancing 108
Associating PlanetPress Design documents and PlanetPress printer queues 109
Triggers 110
Page 5
Page 6

Objectif Lune Printer Driver (PS) 111
About processes and subprocesses 114
Processes 114
Startup processes 115
Subprocesses 115
Creating a process 116
Importing processes 118
Activating or deactivating a process 119
Process properties 120
About branches and conditions 125
Converting a branch to a subprocess 126
Running a process on desktop 127
Saving and sending a Workflow Configuration 127
Using Scripts 131
Run Script task 131
APIs 132
The Script Editor and XSLT Editor 132
SOAP Server API Reference 138
The Watch Object 145
Data Repository API 161
Stopping execution 181
Special workflow types 183
HTTP Server Workflow 184
PDF Workflow 191
PlanetPress Capture Workflow 195
Database considerations (ODBC) 201
Workflow processes in a Connect Send solution 231
About Tasks 232
Adding tasks 233
Editing a task 234
Task properties 235
Input tasks 239
Action Tasks 301
Data Splitters 381
Process Logic tasks 404
Connector Tasks 423
PlanetPress Capture 464
Page 6
Page 7

Metadata Tasks 489
OL Connect Send 510
OL Connect tasks 524
Output Tasks 574
Unknown tasks 595
About variables 596
Job Info variables 597
Standard variables 598
Local variables 603
Global variables 605
Variable task properties 607
Special workflow types 609
PlanetPress Capture 610
About PlanetPress Fax 638
About PlanetPress Image 639
Workflow processes in a Connect Send solution 640
ZUGFeRD 641
About related programs and services 651
Available Input services 651
Available Output services 652
Start and stop PlanetPress Workflow Service 653
Users and configurations 654
Workflow Services 655
Preferences 658
Other preferences and settings 659
General appearance preferences 659
Object Inspector appearance preferences 660
Configuration Components pane appearance preferences 661
Colors 661
Options 661
Default configuration behavior preferences 662
Notification Messages behavior preferences 662
Preferences 663
Sample Data behavior preferences 665
Preferences 665
Network behavior preferences 666
Preferences 666
Page 7
Page 8

PlanetPress Capture preferences 667
PlanetPress Capture Server/Client 668
PlanetPress Document Manager 668
PlanetPress Capture ODBC Settings 670
PlanetPress Capture Pen Management Tool 673
PlanetPress Capture License Management 675
OL Connect preferences 676
PDF text extraction tolerance factors 677
General and logging preferences 679
Messenger plugin preferences 680
Preferences 681
HTTP Server Input plugin preferences 1 681
Preferences 682
HTTP Server Input plugin preferences 2 685
LPD Input plugin preferences 687
Preferences 687
NodeJS Server Input plugin preferences 1 688
NodeJS Server Input plugin preferences 2 690
NodeJS Server Input plugin preferences 3 691
Serial Input plugin preferences 692
Preferences 692
Telnet Input plugin preferences 693
Preferences 693
PlanetPress Fax plugin preferences 694
Preferences 694
Captaris RightFax options 696
FTP Output Service preferences 697
Options 697
PlanetPress Image preferences 698
LPR Output preferences 701
Options 701
PrintShop Web Connect Service preferences 703
Editor Options 703
The user interface 708
Customizing the Workspace 709
Dock and undock areas of the Program Window 709
Show or hide areas of the program window 711
Page 8
Page 9

Combine and attach areas 711
Resize the program window areas 716
Change the Interface language 717
PlanetPress Workflow Button 718
Options 718
Configuration Components pane 719
Components Area Sections 719
Process properties 722
PlanetPress Design document properties 727
Moving and copying configuration components 729
Renaming objects in the Configuration Components Pane 732
Reordering objects in the Configuration Components pane 733
Grouping Configuration Components 734
Expanding and collapsing categories and groups in the Configuration Components
pane
Deleting something from the Configuration Components pane 735
Dialogs 736
735
Access Manager 736
Activate a printer 742
Advanced SQL Statement Dialog 743
Data Repository Manager 744
The Data Selector 747
The File Viewer 751
Data Selector display preferences 752
PDF Viewer 754
Process properties 756
Update document 761
Virtual Drive Manager 761
Workflow Services 762
The Debug Information pane 764
The Message Area Pane 765
The Object Inspector pane 766
Editing properties 766
The Plug-in Bar 767
Categories 767
Settings & Customization 768
The Process area 769
Page 9
Page 10

Cutting, copying and pasting tasks and branches 770
Highlight a task or branch 772
Disabling tasks and branches 772
Moving a task or branch using drag-and-drop 773
Redo a command 774
Removing tasks or branches 774
Replacing tasks, conditions or branches 775
Resizing the rows and columns of the Process area 775
Undo a command 776
Zoom in or out within Process Area 776
The Quick Access Toolbar 776
Adding buttons 777
Removing buttons 777
Moving the toolbar 777
The PlanetPress Workflow Ribbon 777
The Task Comments Pane 780
Knowledge Base 782
Legal Notices and Acknowledgements 783
Copyright Information 789
Page 10
Page 11

Welcome to PlanetPress Workflow
Note
Important information that deserves your attention.
Tip
Information that may help you use PlanetPress Workflow better or that suggests an easier method.
2019.1
This PDF documentation covers version 2019.1. To view the documentation of previous
versions please refer to the PDF files available in the Downloads section of our website:
http://www.objectiflune.com/OL/Download/DownloadCenter.
Workflow is the heart of all of our solutions. Working in conjunction with PlanetPress Connect,
PlanetPress Capture, CaptureOnTheGO, PlanetPress Imaging, PlanetPress Fax, and a variety
of plugins, it helps improve your communications processes. Processes such as
communication creation, interaction, distribution and even maintenance.
Workflow is the "super dispatcher". It caters for inputs from a huge variety of sources, such as
email, web pages, databases, individual files (PDF, csv, XML, etc), print streams, FTP, Telnet
and ERP systems. This data can then be analyzed, modified, stored, verified, routed and used
as triggers for other processes from entirely within Workflow. Finally it is passed to one of our
other products (or not) to be outputted in multiple ways (printed, emailed, posted, archived, sent
to third party solutions, etc..).
Consider Workflow as a set of buildings blocks that enable you to build your own customized
automated processes which will fit your environment and not the other way around. Create
processes that will save you time and money!
Notes in this guide
Notes are used throughout this guide to draw your attention to certain information.
Page 11
Page 12

Warning
Information that is potentially critical to using PlanetPress Workflow.
Technical
Background information.
Page 12
Page 13

Installation and setup
Note
Windows Vista, Windows 8.0, Windows 2003 Server and earlier versions of Windows are
not supported by PlanetPress Workflow.
This chapter describes the different considerations that are important in regards to the
installation and use of PlanetPress Workflow.
l "System Requirements" below
l "Environment considerations" on the facing page
l "Setting up the working environment" on page17
l "Known Issues" on page21
System Requirements
These are the system requirements for PlanetPress Workflow 2019.1.
Operating System (64-bit only)
l Microsoft Windows 2008 R2 Server
l Microsoft Windows 2012/2012 R2 Server
l Microsoft Windows 2016 Server
l Windows 7
l Microsoft Windows 8.1
l Microsoft Windows 10 (Pro and Enterprise versions only)
Minimum Hardware Requirements
l NTFS Filesystem (FAT32 is not supported)
l CPU Intel Core i7-4770 Haswell (4 Core)
Page 13
Page 14

l 8GB RAM (16GB Recommended)
l Disk Space: At least 10GB (20GB recommended)
Environment considerations
This page is intended to provide technical information about the environment in which
PlanetPress Workflow is intended to run.
Terminal Services
PlanetPress Workflow does not support Terminal Services environment as possible under
Windows 2000, 2003 and 2008. This is to say, if Terminal Services is installed on the server
where PlanetPress Workflow is located, unexpected behaviors may occur and will not be
supported by our company. Furthermore, using PlanetPress Workflow in a Terminal Service
environment is probably an infringement of our End-User License Agreement.
Terminal Services may also be referred to as Terminal Server or Remote Administration Mode
(Windows Server 2003 and 2008).
Single-User Remote Desktop Protocol (RDP) (where only one person can use RDP at a time)
is supported for PlanetPress Workflow version 6.2 and higher, however it is only supported in
Windows XP or Windows 2003. While later versions of Windows may not cause issues when
accessing PlanetPress Workflow through RDP, these combinations are no longer tested and
may not be functional.
Virtual environments
PlanetPress Workflow supports the following virtual environments:
l VMWare Environments. This includes VMWare Player, VMWare Workstation as well as
VMWare ESX Server.
l VMWare VMotion. This means the virtual machine hosting PlanetPress Workflow can be
automatically moved from one ESX server to another in a clustered installation.
l Microsoft Hyper-V/Azure infrastructure environments.
PlanetPress Workflow is not officially supported on any other virtual machines such as Virtual
PC, Parallels, Bochs, Xen, etc. While running PlanetPress Workflow on these virtual machines
Page 14
Page 15

may work, and they are properly detected by PlanetPress Suite 7.5.1 and higher, we have not
Warning
The PlanetPress Workflow End-User License Agreement (EULA) specifies that a
PlanetPress Workflow software license may only be used on a single virtual or physical
PC at a time. While copying a virtual machine for backup purposes is acceptable, running
two instances of the same machine, using the same serial number, is strictly prohibited.
tested them and cannot offer support for them.
About PlanetPress Suite
In previous versions of PlanetPress Suite, not all virtual environments were supported:
l PlanetPress Suite 6 and higher support VMWare Environment.
l PlanetPress Suite 7.1 and higher also support VMotion.
l PlanetPress Suite 7.5.1 and higher started supporting Hyper-V virtualization in addition to
the previous environments.
32-bit or 64-bit?
PlanetPress Suite version 7.1.3 and higher, as well as PlanetPress Connect, support a 64-bit
operating system. However, PlanetPress Workflow remains 32-bits in this environment, which
means that for all intents and purposes there is no difference between those two environments
as far as PlanetPress Workflow is concerned.
Antivirus considerations
PlanetPress Workflow generates a very large amount of temporary data on your hard disk,
especially when manipulating or creating PDF files. This can sometimes cause issues when
any other software is trying to access the temporary files at the same time as PlanetPress
Workflow and its components are trying to read, write, create or delete those files.
If you experience these issues you may want to temporarily disable your antivirus "live", "daily"
or "deep" scans for the following folders and processes:
Page 15
Page 16

Warning
Disabling any antivirus scanning permanently on any folder or program is not
recommended, and Objectif Lune cannot be held reliable for any consequence of
disabling your antivirus or whitelisting the folders or executables listed here, or any other
change in your antivirus protection setup!
l On Windows 7/2008:
Note
C:\Windows\Temp\ is used by multiple software which may cause risks on your computer.
However, PlanetPress Workflow may use this folder as temporary storage, especially in the case of
creating PDF files. We do not recommend disabling scan on this folder, unless you notice
performance issues when generating PDFs, and then only as a test.
l C:\ProgramData\Objectif Lune\PlanetPress Workflow 8\
l C:\Users\planetpress\AppData\Local\Temp\ (where planetpress is the user under
which Workflow is configured)
l C:\Users\planetpress\Connect (where planetpress is the user under which Workflow
is configured)
l On all systems:
l C:\Windows\Temp\
l Processes:
l PPAlambic.exe
l ServerService.exe
l PPWatchService.exe
l PPImageService.exe
l MessengerService.exe
Backup considerations
For similar reasons, it is important to know that backup software can also access files while
copying them to a remote backup location, so you should make sure that no PlanetPress
Workflow process is working during your backups.
Page 16
Page 17

Microsoft Office compatibility
The Microsoft Office 2010 line of products, other than Pro and Enterprise, has not been certified
for use with PlanetPress Workflow. Some of its products may not be compatible with the
connectors included in the Suite.
Setting up the working environment
After installation, the working environment needs to be set up before you start using Workflow.
This involves:
l Configuring PlanetPress Workflow Services (see "Workflow Services" on page762).
l Setting up the Workflow Configuration tool. You can configure a variety of options, from
how the application itself looks or behaves, to plugin specific options. These are
accessible through the Preferences button under the PlanetPress Workflow Button, or via
the key combination Ctrl+Alt+P. (see "Preferences" on page658).
l Activating the printer, in order to output PlanetPress Design documents (see "Activate a
printer" on page742 and "PlanetPress Design documents" on page39). This applies to
PlanetPress Suite only.
Network considerations
While PlanetPress Workflow is typically installed on a server machine that is only accessed by
one single user such as an IT person, multiple users logging on to that machine is a possibility
(except with terminal servers, see "Environment considerations" on page14). Because each
user may have different local and network rights, it may be important to consider the
implications in regards to PlanetPress Workflow. To change the service log on information, see
"Workflow Services" on page762.
Local and network rights
Programs, such as PlanetPress Workflows and all its services, must identify themselves in
order to be granted permission to perform operations on the computer on which they run as well
as on other computers accessible via a network connection. On a given workstation, you can
configure your PlanetPress Workflow to use either the local system account or any specific user
Page 17
Page 18

account. When you do this, you grant PlanetPress Workflow and all its services the same rights
associated with the selected account.
When you are running PlanetPress Workflow Configuration program on a workstation, if it is
associated with an account that is different from your account, the following icon is displayed in
the lower right corner of PlanetPress Workflow Configuration program: . The icon reminds you
that the logon information is different for the PlanetPress Workflow services, and that some
network resources may not be accessibly by PlanetPress Workflow when running a live
configuration.
Account requirements
PlanetPress Workflow and its services require administrator rights to run on any given
computer and must therefore be associated with an account that has such rights.
We recommend creating a network or domain account specifically for the PlanetPress
Workflow services, which has administrator credentials on the machine where it is installed,
and is given proper rights for any network resources your configuration may request.
Mapped drives
Mapped drives (for example, drive X: leading to \\server\public\) are always user-specific and
are created at logon. This means that mapped drives are typically not available by the
PlanetPress Workflow services when running a live configuration. Furthermore, while the
mapped drives are not shared, they are still limited to one map per computer, meaning if one
user maps the X: drive, a different user (or a service) will not be able to map it again.
This creates a limitation in PlanetPress Workflow: if you create a mapped drive as a user, you
will not have access to this mapped drive while running as a service unless you log off, and
then have PlanetPress Workflow Tools map the drive using a Run Script action inside a Startup
Process.
We strongly recommended that instead of using mapped drives, you use full UNC paths for
your network drives. PlanetPress Workflow Tools can automatically convert mapped paths to
UNC paths. For more information, please see "Network behavior preferences" on page666.
Page 18
Page 19
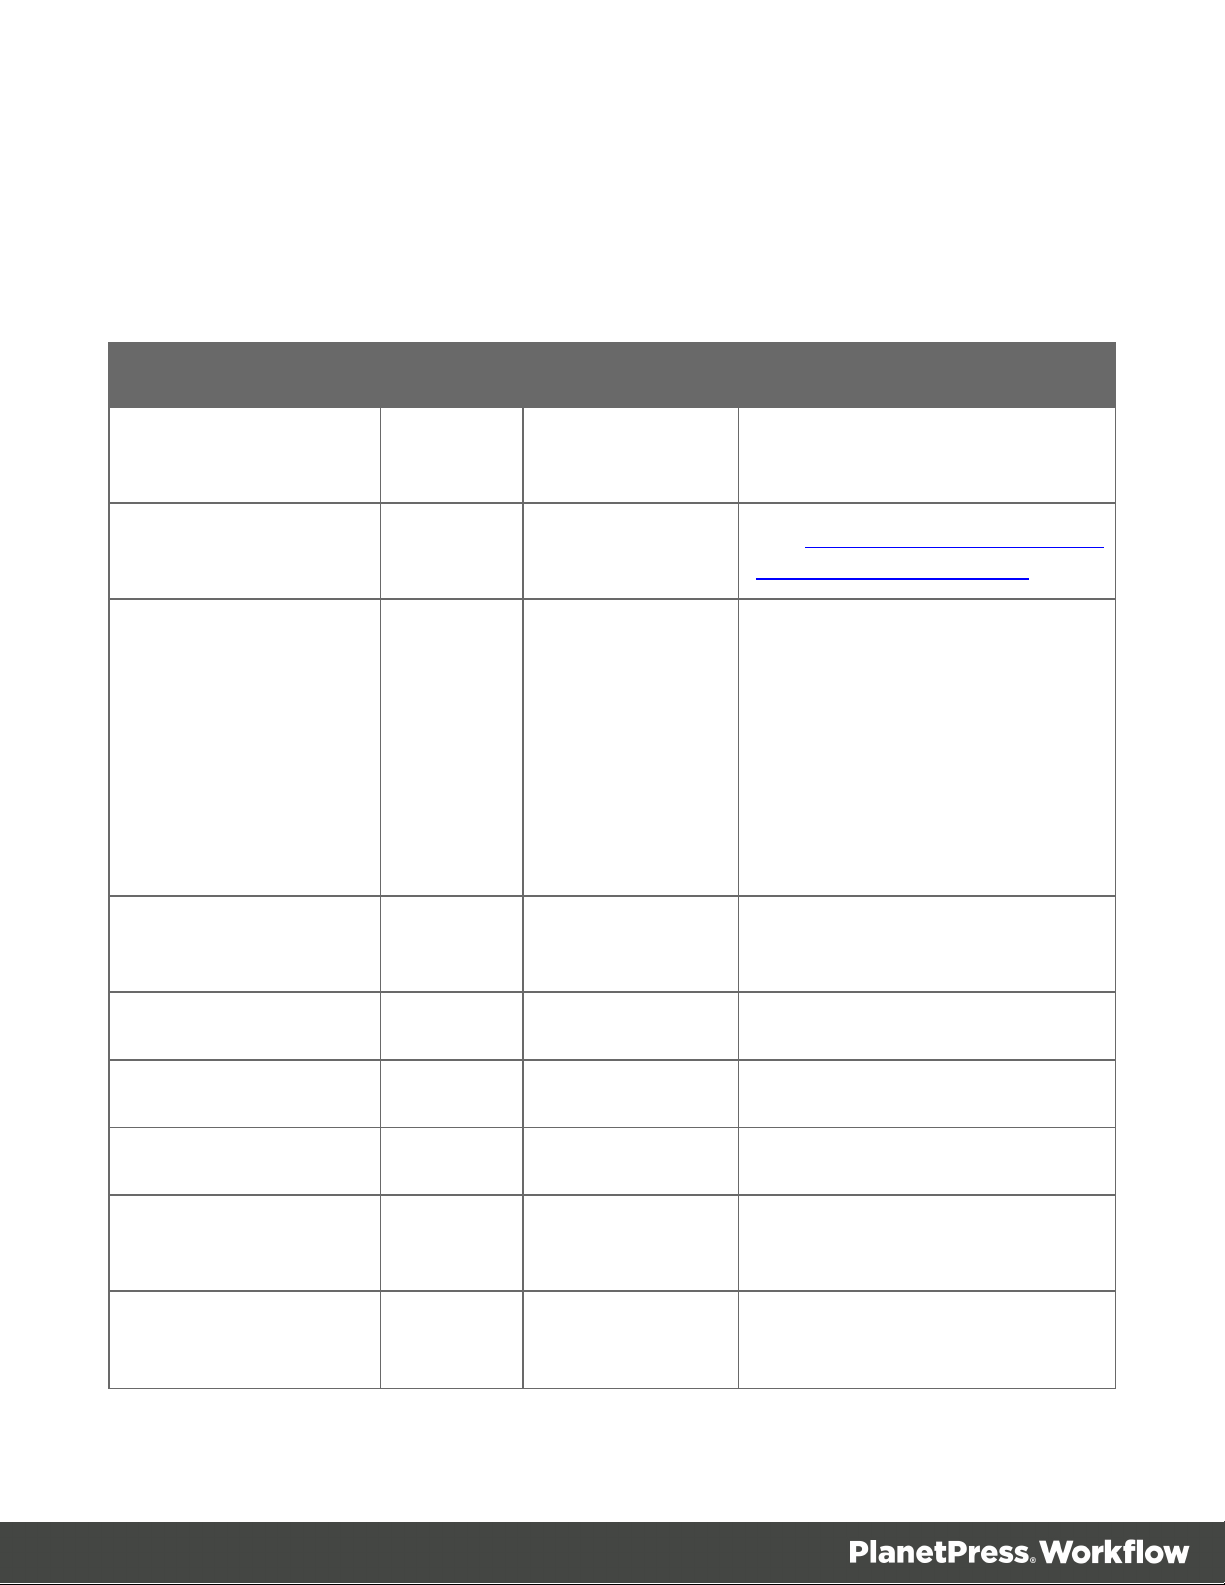
Network ports used by each service
The port configuration for each PlanetPress Workflow component is described in the following
table. The port number assignments comply with Internet standards. If PlanetPress Workflow
component is not active, the port is not used.
Component Protocol Local Port Remote Port
Email Input (POP3
TCP Default
1
mode)
Email Input (Outlook
TCP see Remote Port See Network Ports Used by Key
mode)
Folder Capture TCP/UDP Default
1
LPD Input TCP 515 (listening
port)
110
Microsoft Server Products
Standard Windows file and
printer sharing ports2:
l UDP 137, 138; TCP 139
(NetBIOS over TCP/IP
(NetBT))
l UDP 445; TCP 445 (SMB
over TCP/IP)
N/A
FTP Input TCP Default
Telnet Input TCP Default
FTP Output TCP Default
Email Output (SMTP
TCP Default
mode)
Email Output (Outlook
mode)
TCP See Email Input
(Outlook mode)
1
1
1
1
21
9100 (configurable)
21
25
See Email Input (Outlook mode)
Page 19
Page 20
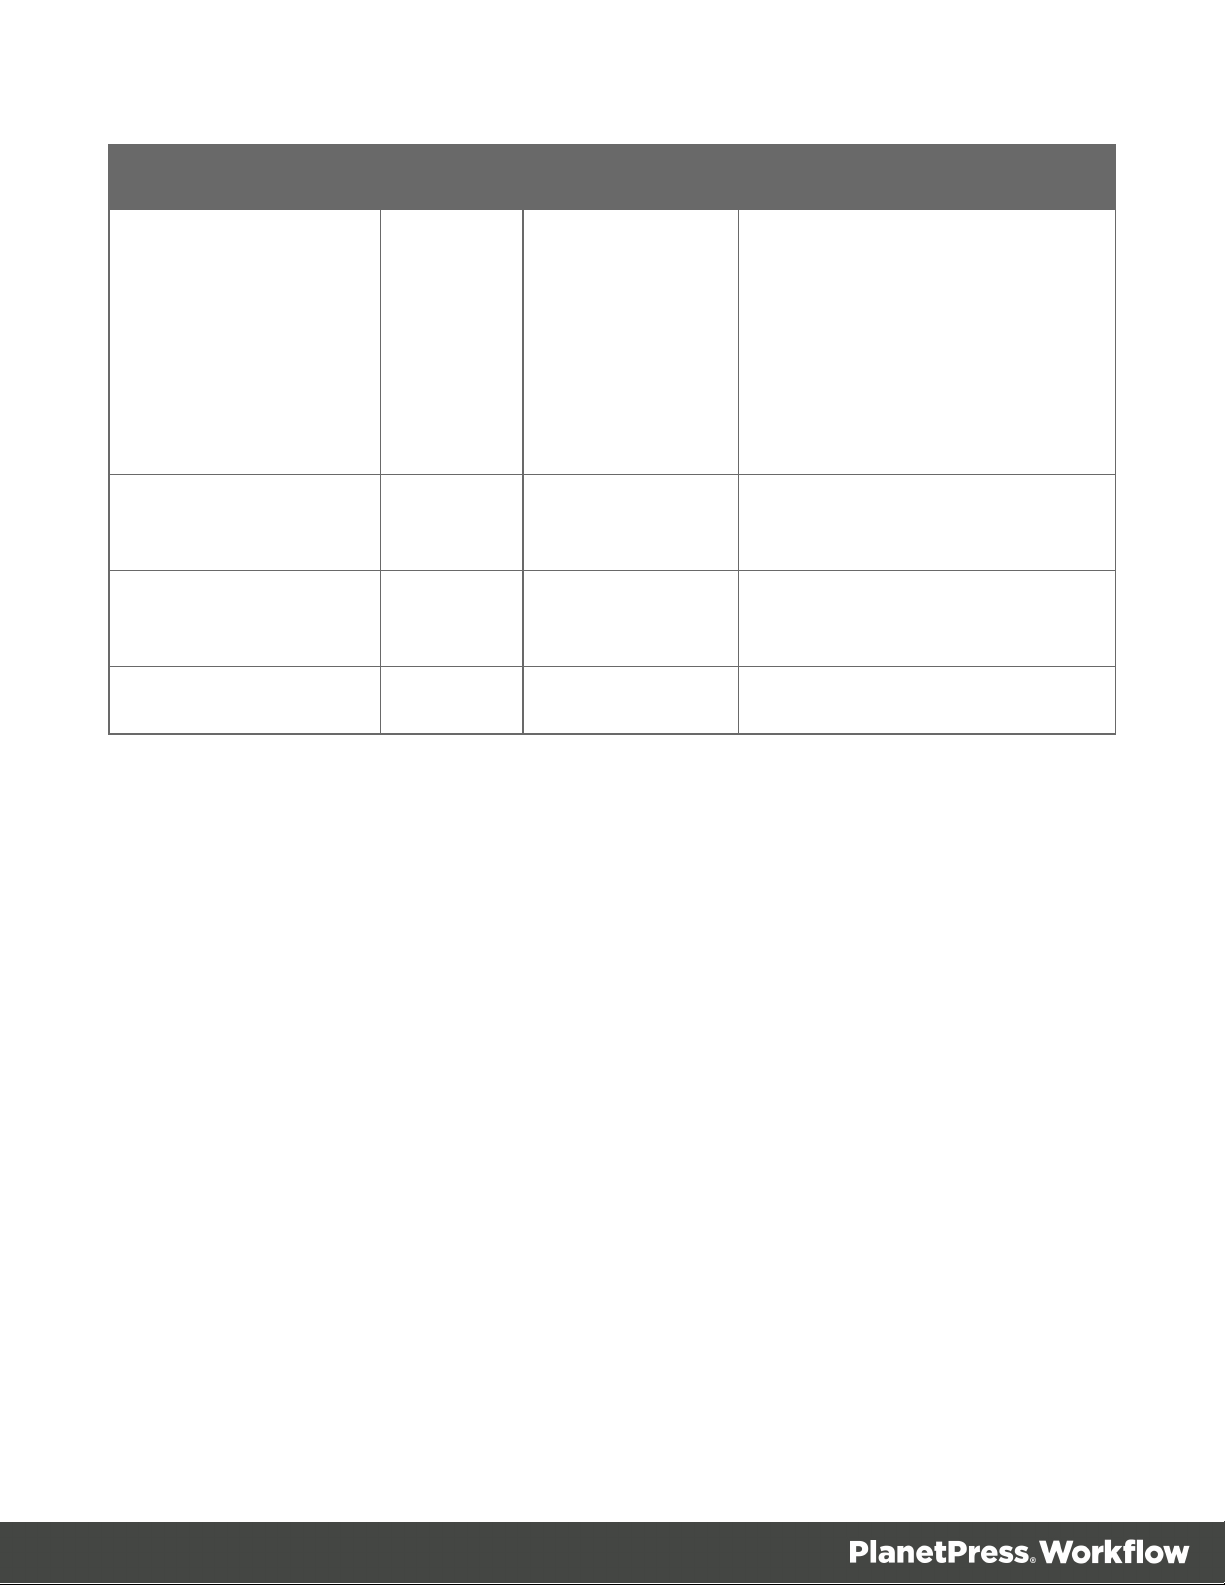
Component Protocol Local Port Remote Port
Send to Folder
Windows Queue
TCP
Default
1
Standard Windows file and
printer sharing ports2:
Output
l 137, 138 and/or 139
(NetBIOS over TCP/IP
(NetBT))
l 445 (SMB Over TCP/IP)
LPR Output TCP Default or 721 to
3
731
PlanetPress
Database
TCP or
UDP
Unknown
SNMP Condition UDP Default
1
Value is greater than 1024 and is assigned by Windows XP. This is the default.
4
1
515
Unknown
161
4
2
Windows NT 4.0 uses NetBIOS over TCP/IP for file and printer sharing, while Windows 2000,
Windows XP, and Windows Server 2003 may be configured to use NetBIOS over TCP/IP or
SMB over TCP/IP. The operating system may use additional ports. Refer to the Windows
documentation for further information.
3
If the “No source port range restriction” option is checked (recommended), see footnote a. If
the option is unchecked, the local port will be chosen from a range going from 721 to 731.
4
Contact your DBMS vendor to determine which ports are used by the ODBC driver for
accessing a network database.
Page 20
Page 21

Known Issues
Microsoft patch causing handling of XLS to fail
Some recent Windows updates from Microsoft have impacted the handling of XLS sources in
PReS\PlanetPress Workflow 8.
The Microsoft updates concerned are as follows:
l KB4041693 for Windows 8.1 and Windows Server 2012 R2
l KB4041681 for Windows 7 and Windows Server 2008 R2
l KB4041690 for Windows Server 2012 (no service pack)
Installing these updates may cause the application to fail when attempting to open or load XLS
files via a plugin or in a script. The following error message may appear: “Unexpected error
from external database driver (1). (Microsoft JET Database Engine)".
Suggested resolution
Uninstall the Microsoft patches and wait for the issue to be fixed in a subsequent Microsoft
patch.
Workarounds
l For the Lookup in Microsoft Excel Documents plugin (found in the Connectors tab of the
plugin bar): Open the original .xls file and save it with the .xlsx format. That will force the
Excel Lookup plugin to switch drivers.
l For the Database Query plugin (found in the Actions tab of the plugin bar) and when
using Excel/Access in PlanetPress Design: Change the ODBC driver used for Excel files
from JET to ACE (change the Data Source). As an example: in Windows 10: Change the
Excel File ODBC driver from ODBCJT32.dll to ACEODBC.dll. (Naming may vary from
versions of the OS but the basics stay the same.) Important: Before switching from JET to
ACE, install the latest MS Access Database Engine 2016 Redistributable
(https://www.microsoft.com/en-us/download/details.aspx?id=54920). Otherwise, using
ACE in one or more self-replicating processes in a Workflow configuration can cause
Workflow to crash.
Page 21
Page 22

In the meantime Objectif Lune would like to apologize to any customers affected by this
problem and for any inconvenience caused. For more information, please contact your local
support team.
Other known issues
l Anoto Pen Director 2.8 is not supported on Windows Server 2012 and Windows 10.
l 22356: Using the PT-PT setting to perform ICR on AlphaNumeric fields may not work
properly. If you encounter the issue, use the PT-BR setting instead, or use another
PlanetPess Field in your document design.
l 21962: Barcode scanner task may have issues reading 2-D barcodes printed/scanned
with low resolution. Make sure the scans and the original printed output are at least
300DPI (600 or better recommended)
l 21405: When printing through a Windows printer driver on Windows Server 2008 or
Windows Server 2008 R2, the Job Owner setting is ignored. This is caused by a
documented issue in those two Operating Systems. Microsoft has provided no reason nor
workaround for the problem, therefore PlanetPress Workflow cannot circumvent the issue.
l Under Windows 2000, the SharePoint output task does not work with SharePoint 2010.
Under the same OS, the PlanetPress Capture ICR does not work due to the .NET 3.5
requirement.
l
21465: The SharePoint Output task does not validate the field contents. That's
Sharepoint's responsibility.
l
20143: The Metadata to PDI task encodes the XML using the default system encoding,
not the document's. In addition, it does not discriminate between index names written in
different cases (e.g. Name vs. name).
l Printing PDF files in passthrough mode using a Windows Printer Driver task causes jobs
to be processed sequentially rather than in parallel. This is caused by a 3rd party library
used in the printing process. Possible workarounds are to use a PlanetPress document to
call the PDF files as dynamic images, or to use the PDF file as the Data File for a
PlanetPress Document.
l
JobInfo #4 in the Windows Input Queue task (the original document name set by the
printing application) replaces any non-alphanumeric character with underscores in order
to filter out any invalid characters. Consequently, if the path contains slashes or colons,
those will be replaced with underscores.
Page 22
Page 23

l
When the PlanetPress Capture database is set to MS Access, it is considered good
practice to have a single process generate Patterns for documents because the Access
engine may lock the other process out of the database as the first process updates it.
l After the initial installation, the PlanetPress Workflow Configuration tool may display an
error message the first time you launch it if you had already sent a PlanetPress Workflow
Document to it. You can safely ignore this message, you will simply have to manually
start the PlanetPress Messenger service from the Workflow console for this one time only.
To avoid getting the error altogether, make sure you launch the PlanetPress Workflow
tool once before sending any document to it.
l
13554: In the LaserFiche connector, when selecting a different template after filling up
the fields and then going back to the first template, the values entered in the fields are
lost. They have to be entered again.
l When loading a Workflow configuration that includes references to Windows printers, the
output task may fail to recognize the printer if the printer driver has changed between the
moment the configuration was set up and the moment it was loaded. This is unlikely to
occur, but it could, for instance, happen when importing a Version 7 configuration file into
Version 8. To circumvent the issue, open the output task's properties, make sure you
reselect the proper printer, close the task and send the configuration again.
l
The HTTP/SOAP service may fail when both it and the Workflow service are logged on
using 2 non-local users or 2 local users with different privileges. To resolve the issue,
make sure both services use the same logon credentials.
l
13559: The WordToPDF task, when run under the LocalSystem account, may seem to
hang if the installation of MS-Word wasn't properly completed for the LocalSystem
account. If the task seems to take longer than it does when run in Debug mode, this may
be the case. You can confirm this behavior by opening up the Windows Task Manager
and checking whether the MSIExec application is running. In order to complete the
installation of MS-Word for the LocalSystem account, follow these steps:
1. Open a command-line window (CMD.exe)
2. Type "AT 10:56 /INTERACTIVE CMD.EXE" (replace 10:56 with the next upcoming
minute on your system)
3. At the specified time, a new command-line window opens. In it, navigate to Word
Installation folder, then type Winword Follow the instructions to complete the
installation
4. Re-start PlanetPress Workflow and test your process.
Page 23
Page 24

l
The WordToPDF task relies on MS-Word to perform its functions. However, MS-Word
sometimes displays confirmation dialogs when it encounters a situation requiring user
input. Such dialog windows cannot be displayed when PlanetPress Workflow runs as a
service. As a result, the process may seem to hang because it is awaiting user input on a
window that isn't displayed. The only way to resolve this situation is to kill the
PlanetPress Workflow service. To avoid these types of issues from occurring, it is
imperative that the configuration for the WordToPDF task be tested thoroughly in Debug
mode prior to sending it into production. In particular, the connection to the database must
be validated.
l
The WordToPDF task requires the default system printer to be set to a queue that uses
the PlanetPress printer driver. If you change the default system printer or if you import a
PlanetPress Workflow configuration file from another PC that includes an instance of the
WordToPDF task, you must review the properties of each instance of the task and click
OK to validate its contents. A new printer queue will be created if required and the default
printer will be reset properly. If you do not perform these steps, running the configuration
will result in several error messages being logged and the task failing.
l The preferences for the PrintShop Mail Web connector may not be saved properly if you
set them and close the PlanetPress Workflow Configuration tool without first sending the
configuration to the service. Make sure you send the configuration before exiting from the
Configuration tool.
l
13009: With Outlook 2010, the Send Email functionality requires that the service be run
with administrative credentials in the domain. In addition, both Outlook and the
PlanetPress Workflow Configuration tool must *not* be running while the service is.
l The Microsoft Office 2010/2013/2016 and 365 line of products has not been certified for
use with PlanetPress Workflow. Some of its products may not be compatible with the
connectors included.
l
Barcodes produced in printer-centric mode may have a slightly different aspect from
those produced in Optimized PostScript mode. This is due to the different types of 3rd
party libraries being used to generate the barcodes. However, all barcodes scan correctly.
About PlanetPress Fax
PlanetPress Fax is a service that can be used to output data and documents via a faxing
software, such as Windows Fax (available with Windows 2000, XP, and Microsoft Windows
Page 24
Page 25

Server™ 2003) or Symantec WinFax PRO, as well as via a faxing server, such as Captaris
Note
Because of technical limitations, the minimum time required to generate a PlanetPress Fax
document is approximately 10 times longer on Windows 2000 than on Windows XP/2003.
RightFax. Note that it is these applications that do the actual faxing.
l
Windows 2000: PlanetPress Fax Output tasks set to use Windows Fax under Windows
2000 may fail when no one is logged on to the system running PlanetPress Fax.
l
Windows XP: Windows Fax may not work properly after the Windows XP Service Pack 2
(SP2) has been installed (refer to Microsoft Customer service for more information on this
issue). Also note that Windows Fax may take as much as three times more time to send
faxes under Windows XP.
PlanetPress Fax can be installed on any computer on your network and process all requests
coming from tasks performed by PlanetPress Workflow on other workstations. You may choose
to run it on every computer where PlanetPress Workflow is running, but you may also choose to
run it on computers more or less dedicated to PlanetPress Fax.
Since the faxing program must always be running and ready to receive requests from
PlanetPress Workflow, it should be included in the Windows Startup group.
PlanetPress Fax can associate a different fax number with each page it sends via the faxing
software. For this to happen, two things are required: each record must have a fax number
specified in the job file and that fax number must be tagged as such in PlanetPress Design (in
the PlanetPress Design User Guide, refer to the section documenting Data Selections, which
includes explanations on the available PlanetPress Fax options). When the data and the
document are merged, the fax number associated with each record becomes available to
PlanetPress Fax that can then pass it on to the faxing software.
About PlanetPress Image
PlanetPress Image is a multi-threaded service that can generate image files in PDF, JPEG and
TIFF format. As PlanetPress Workflow and PlanetPress Image are compliant with AutoStore,
DocAccel and KYOcapture, these formats can also be used.
Page 25
Page 26

The generated files can be archived and, depending on whether you use a PlanetPress Image
Note
All raster images, such as GIFs or JPEGs, generated by PlanetPress Image are portrait
oriented.
Note
The minimum time required to generate a PlanetPress Image document is approximately 10 times
longer on Windows 2000 than on Windows XP/2003.
Output task or a Digital Action task, sent via email. Note that you can use PlanetPress Search,
another program included in PlanetPress Workflow, to search through archived PDF files.
PlanetPress Image can be installed on any computer on your network and can process
requests coming from tasks performed by PlanetPress Workflow on other workstations. You
may choose to run it on every computer where PlanetPress Workflow is running, but you may
also choose to run it on computers more or less dedicated to PlanetPress Image. Note that in
the case of Digital Action tasks, PlanetPress Workflow and the PlanetPress Image service
must be running on the same computer.
Preferences
In addition to the job-specific PlanetPress Image properties that you configure in the task’s
Properties dialog box, there are configurable options common to all PlanetPress Image
Outputs processed by a given computer; see "PlanetPress Image preferences" on page698.
Note that those options are specific to each PlanetPress Image installation and that they are
immediately applied.
Page 26
Page 27

Basics
PlanetPress Workflow is a tool to automate the processing, distribution and printing of your
business documents. Once installed on the server, it can be set up to automate all tasks related
to document processing (see "Setting up the working environment" on page17).
When you're all set up, you can start using the Workflow Configuration tool, assuming that you
have already done research on the processes that need to be automated.
Working with Workflow implies the following basic steps:
1.
Creating a Workflow configuration
A Workflow configuration consists of a number of processes, of which each has an input
task, output task and possibly a number of tasks in between. See: "About Workflow
Configurations" on page29.
2.
Debugging the configuration
Debugging is the act of running through your process, either step by step or as a whole,
directly from the PlanetPress Workflow Configuration Tool, in order to detect and resolve
issues with your process. Debugging a process requires providing a sample data file.
See: "Debugging and error handling" on page87.
3.
Sending it to the Server (and testing it again)
As you are working on your configuration, you can save that configuration file as a file on
your local hard drive. Saving a configuration file never replaces the current PlanetPress
Workflow service configuration. To do this, you must use the Send Configuration
command; see "Sending a configuration" on page128.
Related tools and resource files
Workflow serves as automation tool in a number of distinct products. Some of the tasks that can
be used in a Workflow configuration only work with product-specific files. The tools that you
need in order to produce those files depend on the product that you are using:
l
PlanetPress Connect users will use the other Connect modules - Designer and
DataMapper - to create the templates, data mapping configurations and print presets
used by OL Connect tasks. The user guides of these modules can be found here:
http://help.objectiflune.com/en/PlanetPress-connect-user-guide/2019.1/.
l
PlanetPress Suite users may use documents made with PlanetPRess Design. For the
user guide, see http://help.objectiflune.com/en/planetpress-design-user-guide/.
Page 27
Page 28

The product-specific files need to be sent to, or imported into, Workflow before they can be
used in conjunction with a task (see "Workflow Configuration resource files" on page35). They
become visible in the "Configuration Components pane" on page719.
Page 28
Page 29

Features
PlanetPress Workflow are input driven applications designed to output data in a variety of ways
through diverse means to various applications and devices. PlanetPress Workflowcan be used
as simple go between, passing along input data to output devices, but it can also perform
various types of data processing. You can combine the various PlanetPress Workflow services
to set up versatile automated processes to print jobs as well as generate other types of output.
PlanetPress Workflow processes act as sorts of dispatchers. On the one hand, they retrieve
data and control plugins that retrieve data from watched locations, and on the other hand they
send data and control plugins that send data to various devices, for printing or to generate
documents that can then be emailed or faxed. PlanetPress Workflow can also perform a variety
of operations on the data using its action plugins.
In fact, the PlanetPress Workflow plugin based architecture enables almost limitless
customization. You can create or purchase compatible plugins, drop them in any of
PlanetPress Workflow plugin folder and use them to perform other operations. You can even
find free unsupported plugins on the Objectif Lune Web site.
PlanetPress Workflow are service applications, or if you will, applications that continuously run
on a given computer and that perform actions automatically. Those actions are defined in a
PlanetPress Workflow configuration. A given computer can only run one PlanetPress Workflow
configuration at a time. The PlanetPress Workflow Service Console may be used to monitor the
services running on a given computer.
About Workflow Configurations
PlanetPress Workflow Configurations are service applications, or if you will, input driven
applications that continuously run on a given computer and perform actions automatically.
Those actions are defined in a PlanetPress Workflow configuration file. A configuration file
consists of a set of processes, subprocesses, variables, (optional) documents and printer
queues, that work together within the PlanetPress Workflow Service. A process can be used as
simple go between, passing along input data to an output device or folder, but it can also
perform various types of data processing.
You can combine the various PlanetPress Workflow input, action and output tasks to set up
versatile automated processes to print jobs as well as generate other types of output (emails,
web pages, files...).
Page 29
Page 30

Note
A PlanetPress Workflow configuration must be composed of at least one process, but it
may include as many as 512.
PlanetPress Workflow cannot work without a valid configuration, and a PlanetPress Workflow
session running on a given computer can only use one configuration at a time.
For a configuration created in the PlanetPress Workflow Configuration tool to actually be
executed by PlanetPress Workflow, it must be sent to the PlanetPress Workflow Service. When
you do this, your PlanetPress Workflow forgets its previous configuration and starts executing
the tasks included in the new configuration.
When you start the PlanetPress Workflow Configuration tool, it either opens the configuration
file that is active on the PlanetPress Workflow service, or starts with no configuration at all,
depending on your preferences (see "Configuration Components pane appearance
preferences" on page661).
You can always create a new configuration or open an existing one (see "Creating a new
configuration" below and "Open a PlanetPress Workflow configuration file" on the next page).
The following pages provide information on different parts of a PlanetPress Workflow
configuration:
l "About processes and subprocesses" on page114
l "About Tasks" on page232
l "About data" on page45
l "About variables" on page596
l "Workflow Configuration resource files" on page35
Creating a new configuration
To create a new configuration, choose New from the PlanetPress Workflow Button.
By default, when you create a new configuration, PlanetPress Workflow automatically creates a
process that includes a "Folder Capture" on page248 initial input task and a "Send to Folder"
on page594 output task by default. You can then edit and save your new configuration.
Page 30
Page 31

The default input task and output task depend on your preferences ("Default configuration
Note
You can also open a configuration file from a previous version of PlanetPress Workflow
by changing the File Type selector to the desired version (for example, .pw7 for
PlanetPress Watch /Server configurations from Version 7).
behavior preferences" on page662).
If the active configuration file is currently opened, and if it includes unsaved modifications,
PlanetPress Workflow asks you whether to send the configuration to the PlanetPress Watch
service before creating the new configuration. Select the Always send without prompting for
confirmation option to automatically send the edited version of the configuration.
If a file that is different from the default configuration file is currently opened, and if it includes
unsaved modifications, PlanetPress Workflow asks you whether to save the configuration
before creating the new configuration. Select the Always save without prompting for
confirmation option to automatically save any unsaved work.
Open a PlanetPress Workflow configuration file
To open a configuration file:
1.
From the PlanetPress Workflow button, choose Open. The Open dialog box appears.
2.
Navigate to the configuration file you want to open, select it and click Open.
If the currently opened configuration file includes unsaved modifications, the PlanetPress
Workflow Configuration program asks you whether to send the configuration to the PlanetPress
Workflow service before opening the selected configuration. Select the Always send without
prompting for confirmation option to automatically send the edited version of the
configuration to the PlanetPress Workflow Service before opening any other configuration file
(See "Saving and sending a Workflow Configuration" on page127).
Saving and sending a Workflow Configuration
The core of the PlanetPress Suite workflow tools is the PlanetPress Watch service which, once
started, constantly runs in the background to perform the tasks included in its current
Page 31
Page 32

configuration file. The PlanetPress Workflow Configuration tool lets you create, edit, save and
send configuration files.
As you are working on your configuration, you can save that configuration file as a file on your
local hard drive.
Saving a configuration file never replaces the current PlanetPress Watch service configuration.
To do this, you must use the Send Configuration command.
When the PlanetPress Workflow Configuration program sends a configuration, the PlanetPress
Workflow service is stopped and restarted, if it is currently running, and the new configuration
starts being applied immediately.
Saving a configuration
Files created and edited using PlanetPress Workflow can be saved as PlanetPress Workflow
configuration files anywhere on your computer or even a network location.
To save the current configuration:
l
From the PlanetPress button, choose Save.
l If you were editing the current PlanetPress Watch service configuration or if you were
editing a new configuration file, you are prompted with the Save As dialog instead.
To save the current configuration under a new name:
l
From the PlanetPress button, choose Save As.
l Browse to the location where you wanted to save the file, enter the new name of the
configuration in the File name box and click Save.
Sending a configuration
PlanetPress Workflow Configuration saves entire configurations in the form of a single file. Like
any other file, configuration files may be saved and reopened, as well as renamed as desired.
Simply saving a configuration has no effect on the configuration actually used by the
PlanetPress Workflow when it is started. To change any currently active configuration, you
must use the Send Configuration command.
Page 32
Page 33

When you use the Send command, the PlanetPress Workflow Configuration program uses the
Note
.OL-workflow files are equivalent to .pp7 files made with older versions of PlanetPress Workflow.
They contain the processes and such used by Workflow.
Note
When you send a configuration to your PlanetPress Workflow service, all its active
processes are applied; see also:"Activating or deactivating a process" on page119.
currently opened configuration (Any_name.OL-workflow) to overwrite the PlanetPress Workflow
Service's current configuration (ppwatch.cfg).
If the PlanetPress Workflow Service is running when you send a new configuration, it stops and
restarts automatically with the new configuration. If the service is stopped before sending the
configuration, it will not restart automatically.
Sending a Configuration to the local server
1. Open the configuration you want to use as PlanetPress Workflow’s new configuration.
2. Edit the configuration, if required.
3.
When the configuration is ready to be used, from the PlanetPress Workflow button,
choose Send Configuration, then Send Local.
Sending a Configuration to a remote server
1. Open the configuration you want to use as PlanetPress Workflow’s new configuration.
2. Edit the configuration, if required.
3.
When the configuration is ready to be used, from the PlanetPress Workflow button,
choose Send Configuration, then Send Remote.
A list of available PlanetPress Workflow servers on the local network appears.
4. Put a checkmark next to each server where the configuration should be sent.
5.
Click OK.
Page 33
Page 34

If a server is grayed out, this may mean you do not have access to send a configuration
Note
If PlanetPress Workflow service is paused when you send a new configuration, it will not
stop and restart. Since PlanetPress Workflow service reads its configuration file when it
starts up, when you resume processing, PlanetPress Workflow service will continue
using the old configuration.
Note
Closing PlanetPress Workflow Configuration program does not stop any of PlanetPress Workflow
services or processes.
remotely to it. For more information, please see "Access Manager" on page736.
Exit PlanetPress Workflow Configuration program
Once you are done using the PlanetPress Workflow Configuration program, you can close it.
You may exit the PlanetPress Workflow Configuration program in any of the following ways:
l
From the PlanetPress Workflow Button, choose Exit.
l
Click the X at the top-right corner of PlanetPress Workflow Configuration program.
l
Press ALT+F4 on your keyboard.
l
Right-click on the PlanetPress Workflow Configuration program button in your task
bar, and select Close.
If the default configuration file is currently opened, and if it includes unsaved modifications, the
PlanetPress Workflow Configuration program asks you whether to send the configuration to the
PlanetPress Workflow service before exiting. Select the Always send without prompting for
confirmation option to automatically send the edited version of the configuration before exiting.
If the default configuration does not include any active process, the PlanetPress Workflow
Configuration program asks you whether to continue.
Page 34
Page 35

If a file different from the default configuration file is currently opened, and if it includes unsaved
modifications, the PlanetPress Workflow Configuration program asks you whether to save the
configuration before exiting. Select the Always save without prompting for confirmation
option to automatically save any unsaved work before exiting.
Workflow Configuration resource files
Workflow serves as automation tool in a number of distinct products. Some of the tasks that can
be used in a Workflow configuration will work with product-specific resource files:
l
PlanetPress Connect Resources are files created with one of the other Connect modules
- the Designer and DataMapper (see "Connect resources" below).
l
PlanetPress Suite users may use PlanetPress Design documents (see "PlanetPress
Design documents" on page39) in PlanetPress Workflow processes.
l
PrintShop Mail Suite users may use PrintShop Mail documents to create output using
the "PrintShop Mail" on page461 task (see "PrintShop Mail documents" on page44).
These product-specific files need to be sent to (or imported into) Workflow before they can be
used in conjunction with a task. This chapter explains how to do that. Imported files become
visible in the "Configuration Components pane" on page719.
Connect resources
Connect resources are files created with Connect's Designer or DataMapper (see "Connect
resources" above). They are visible in The Configuration Components pane and are added
by using the Send to Workflow option from the PlanetPress Connect Designer's File menu.
The available resources are:
l
Data Mapping Configurations: Data mapping configurations are used with the Execute
Data Mapping task to extract data from the job file.
For each data mapping configuration in the list, the following two items appear within
them:
l
Data Model: Displays the data model used in the data mapping configuration.
Double-click on the data model to view it in your default XML viewer (generally,
Internet Explorer).
Page 35
Page 36

l
Tip
Double-click on a sample data file to use it as a sample data file for the active
process.
Sample Data File(s): Displays a list of sample files that are included in the data
mapping configuration. (See also: "Sample Data" on page64.)
l
Document Templates: Templates can be used in content creation tasks: "Create Email
Content" on page531, "Create Web Content" on page551 and "Create Print Content" on
page547.
l
Job Presets: Job Presets can be used in the "Create Job" on page535 task to filter and
rearrange print content items.
l
Output Presets: Output Presets contain settings for Print output. They can be used in the
"Create Output" on page537 task.
For more information about the different file types, see Connect's Online Help:
l Data mapping configurations
l Data model
l Templates
l Job Presets
l Output Presets
Importing Connect resource files
Connect resource files are added by using the Send to Workflow option from the PlanetPress
Connect Designer's File menu; see Sending files to Workflow in Connect's Online Help.
They can also be imported into PlanetPress Workflow as follows:
1.
Click the PlanetPress Workflow button.
2.
Choose Import, then Import Connect Content. The Import dialog box appears.
3.
In the File type box, select the desired file type.
4.
Navigate to the document you want to import, select it and click Open.
Page 36
Page 37

When you select a package file, the individual resources contained within that package will be
Tip
You can import multiple files at once.
Note
Package files are not saved anywhere. The individual resources contained within the
package are extracted and placed in the folders noted above.
imported.
Resource Save location
Any resource sent to PlanetPress Workflow from PlanetPress Connect is saved locally at the
following location: %PROGRAMDATA%\Objectif Lune\PlanetPress Workflow 8\PlanetPress
Watch\OLConnect
Resources are saved in their appropriate folder:
l
DataMapper contains the data mapping configurations (.OL-datamapper)
l
JobCreation contains the Job Presets (.OL-jobpreset)
l
OutputCreation contains the Output Presets (.OL-outputpreset)
l
Template contains the templates (.OL-template)
Resource archives
From version 8.2, PlanetPress Workflow maintains an archive of previous versions of
resources, in the following location: %PROGRAMDATA%\Objectif Lune\PlanetPress Workflow
8\PlanetPress Watch\OLConnect\Archive , each in their own folder:
l
datamapper contains archives of the data mapping configurations (.OL-datamapper)
l
jobcreation contains archives of the Job Presets (.OL-jobpreset)
l
outputcreation contains archives of the Output Presets (.OL-outputpreset)
Page 37
Page 38

l
template contains archives of the templates (.OL-template)
l
workflow contains archives of Workflow configurations received by the server.
The archives are saved using the template named followed by a timestamp. A maximum of 30
of each instance of a resource is kept (meaning if you have 10 different templates, a maximum
of 300 files will be present in the archive\template folder). Older archives are deleted
automatically as new archives are created.
Using Connect Resources in tasks
A number of OL Connect tasks (see "OL Connect tasks" on page524) let you select a Connect
resource file to be used with the task. The selection list will appear on one or more of the tabs in
the Task Properties dialog that appears when you add a task to a process (see "Adding tasks"
on page233).
For information about the options in the selection list, see Selecting a resource file in task
properties.
Using attached data files
When sending a Connect data mapping configuration from the Designer to PlanetPress
Workflow, all data files used in the document are automatically sent to PlanetPress Workflow
along with the data mapping configuration. These data files appear under the data mapping
configuration in the Connect section of the Configuration Components.
Setting an attached data file as a sample data file in a process
The attached data file can be used as a sample data file in a process. This sets the emulation
of the process ("About data emulation" on page54) and makes it possible to debug it (see
"Debugging your PlanetPress Workflow process" on page95).
1.
Make sure the Connect Resources section is visible by clicking the button if it
appears.
2. Expand the data mapping configuration (name.OL-datamapper) by clicking the button.
3.
Right-click on the data file, then click Set as sample data file.
Viewing an attached data file
1.
Make sure the Connect Resources section is visible by clicking the button if it
appears.
Page 38
Page 39

2. Expand the data mapping configuration (name.OL-datamapper) by clicking the button.
Note
Double-clicking on the data file does the same thing as right-clicking on it an then
selecting Set as sample data file. Clicking Cancel instead of OK after viewing will
prevent this action from being taken.
3. Double-click on the data file to open the data selector (see "The Data Selector" on
page747).
Saving an attached data file to disk
1.
Make sure the Connect Resources section is visible by clicking the button if it
appears.
2. Expand the document (name.ptk) by clicking the button.
3.
Right-click on the data file, then click Save sample data file.
PlanetPress Design documents
A PlanetPress Design document is a file created with the Design module of PlanetPress
Suite.
Design documents are used to produce an output, merged with data (i.e. the job file). They
contain static data such as logos, addresses and graphic formatting, as well as placeholders for
data. Documents may also contain conditions and programming logic.
For more information about PlanetPress Design documents, please see the PlanetPress
Design User Guide.
Generating output with PlanetPress Design documents
PlanetPress Design documents are typically selected in certain Output tasks designed to
merge data with a Design document, but they can also appear in other tasks that produce
formatted data such as the Digital Action task and the Add Document task.
If a task lets you select a PlanetPress Design document to be used with the task, the selection
list will appear on one or more of the tabs in the Task Properties dialog that appears when you
add the task to a process (see "Adding tasks" on page233).
Page 39
Page 40

For information about the options in the selection list, see Selecting a resource file in task
properties.
Printer-centric printing
PlanetPress Design lets you send documents to printers as well as to PlanetPress Workflow
servers.
l If you send a document to printers only and not to any PlanetPress Workflow server, you
will not be able to see this document in the PlanetPress Workflow Configuration program.
To let PlanetPress Workflow know that the document is available, you will have to add a
printer resident document to your PlanetPress Workflow configuration (see "Adding
printer resident documents to the Configuration Components Pane" below).
l If you send a document to PlanetPress Workflow servers only and not to any printer, you
will be able to see this document in the Configuration Components Pane of the
PlanetPress Workflow Configuration program, but it will not be directly available on any
printer.
l If you send a document to PlanetPress Workflow servers and to printers, you will be able
to see this document in the Configuration Components Pane of the PlanetPress Workflow
Configuration program and it will be available on the printers.
Fonts used in Design documents
The fonts used in PlanetPress Design documents installed on PlanetPress Workflow
workstations should be available locally. To install TrueType fonts, use the standard Windows
procedure. To install PostScript fonts, use the Install PostScript Font command in the
Workflow ribbon (see "The PlanetPress Workflow Ribbon" on page777).
Adding printer resident documents to the Configuration Components Pane
By default, the Documents group displayed in Configuration Components pane of the
PlanetPress Workflow Configuration program includes all those documents that are available
on your local PlanetPress Workflow server. Those documents that are not available on your
local PlanetPress Workflow server, but that are either available on printers or on other
PlanetPress Workflow servers must be added to the list, otherwise you will not be able to use
them in your PlanetPress Workflow configuration.
To add a resident document to the Configuration Components pane:
Page 40
Page 41

1.
In the PlanetPress WorkflowConfiguration Components pane, right-click PPS/PSM
Documents and choose Insert > Insert Resident Document. The Add Resident
Document dialog box is displayed.
2. Enter the document’s name. Note that the name you enter must exactly match the actual
document name or PlanetPress Workflow will not be able to use it on the printer or remote
PlanetPress Workflow server.
3.
Click OK.
Importing PlanetPress Design documents
This procedure describes how to import PlanetPress Design documents into PlanetPress
Workflow. Importing documents can be useful when transferring configurations between
PlanetPress Workflow installations.
To import documents into PlanetPress Workflow:
1.
Click the PlanetPress Workflow button.
2.
Choose Import, then Import PlanetPress Document. The Import PlanetPress Design
Document dialog box appears.
3.
In the File type box, select the desired file type.
4.
Navigate to the document you want to import, select it and click Open.
The document is imported and displayed in the Configuration Components pane under
PPS/PSM Documents. This physically installs the documents to the Documents folder relative
to the install folder of PlanetPress Workflow.
Using files attached to PlanetPress Design documents
Data files
When sending a PlanetPress Design Document from PlanetPress Design to PlanetPress
Workflow, all data files used in the document are automatically sent to PlanetPress Workflow
along with the Design document. These data files appear under the document in the PPS/PSM
Documents section of the Configuration Components.
Page 41
Page 42

Setting an attached data file as a sample data file in a process
Note
Double-clicking on the data file does the same thing as right-clicking on it an then
selecting Set as sample data file. Clicking Cancel instead of OK after viewing will
prevent this action from being taken.
The attached data file can be used as a sample data file in a process. This sets the emulation
of the process ("About data emulation" on page54) and makes it possible to debug it (see
"Debugging your PlanetPress Workflow process" on page95).
1.
Make sure the PPS/PSM Documents section is visible by clicking the button if it
appears.
2. Expand the document (name.ptk) by clicking the button.
3.
Right-click on the data file, then click Set as sample data file.
Viewing an attached data file
1.
Make sure the PPS/PSM Documents section is visible by clicking the button if it
appears.
2. Expand the document (name.ptk) by clicking the button.
3. Double-click on the data file to open the data selector (see "The Data Selector" on
page747).
Saving an attached data file to disk
1.
Make sure the PPS/PSM Documents section is visible by clicking the button if it
appears.
2. Expand the document (name.ptk) by clicking the button.
3.
Right-click on the data file, then click Save sample data file.
Metadata
When a Design document uses Metadata, it can also be attached with the document. One
Metadata file is generated for each data file attached to the Design document. Metadata does
Page 42
Page 43

not appear in the Configuration Components pane but it follows the data file and can be viewed
from the Metadata tab whenever the data file is viewed through the Data Selector.
Document Preview
When sending a PlanetPress Design document from PlanetPress Design to PlanetPress
Workflow, a PDF Preview of the job's output is automatically sent to PlanetPress Workflow
along with the Design document. This preview appears under the PPS/PSM Documents
section of the Configuration Components pane.
The PDF contains the result of a preview with the active data file (for all data pages) run as an
Optimized PostScript Stream.
Viewing the Document Preview
1.
Make sure the PPS/PSM Documents section is visible by clicking the button if it
appears.
2.
Expand the document (name.ptk) by clicking the button. The Document Preview has
the same name as the document but with a PDF extension.
3.
Right-click on the Document Preview, then click Open in PDF Viewer.
Saving the Document Preview to disk
1.
Make sure the PPS/PSM Documents section is visible by clicking the button if it
appears.
2.
Expand the document (name.ptk) by clicking the button. The Document Preview has
the same name as the document but with a PDF extension.
3.
Right-click on the Document Preview, then click Save PDF File.
Viewing PlanetPress Design document properties
To view the properties of a PlanetPress Design document, do one of the following:
l
In the Configuration Components pane, under PPS/PSM Documents, click any Design
document (under PPS/PSM Documents) to display its properties in the Object Inspector.
Page 43
Page 44

l
In the Configuration Components pane, under PPS/PSM Documents, double-click any
Design document to display its properties in the PlanetPress Design Document
Options dialog box.
For a list of all properties, see "PlanetPress Design document properties" on page727.
The PlanetPress Workflow Configuration tool lets you view a number of the properties
associated with the PlanetPress Design documents you use, but most of those properties are
set in PlanetPress Design and cannot be edited using the PlanetPress Workflow Configuration
program.
The Document name of printer-resident documents can be changed using PlanetPress
Workflow Configuration program simply because it is initially set using that program.
The properties available via the Printer Settings tab define how documents are printed. They
are also set using the PlanetPress Workflow Configuration program and are retained when
documents are assigned to printer queues. They can be edited by selecting documents within
the PPS/PSM Documents category of the Configuration Components pane, which changes
the document’s default printer settings, or within the Printer Queues category, which changes
the document properties on the selected queue.
PrintShop Mail documents
PrintShop Mail documents are documents made with PrintShop Mail (Suite, not Connect).
These documents may be imported into Workflow to create output with the "PrintShop Mail" on
page461 task.
Importing PrintShop Mail documents
This procedure describes how to import variable content documents created in PrintShop Mail
(Suite, not Connect) into PlanetPress Workflow.
1.
Click the PlanetPress Workflow button.
2.
Choose Import, then Import PrintShop Mail Document. The Import PrintShop Mail
Document dialog box appears.
3.
Navigate to the document you want to import, select it and click Open. The document is
imported and displayed in the Configuration Components pane. This physically installs
Page 44
Page 45

the documents to the Documents folder relative to the install folder of PlanetPress
Note
Null characters present in the data may not be displayed properly when using the
PlanetPress Workflow Configuration tool, and they may also be printed differently by
different printers. To ensure consistency, you should consider filtering out such
characters.
Workflow.
For help on importing PrintShopMail Connect templates, see "Connect resources" on
page35.
About data
Data is what drives your business, and our software. We define data as anything that is
obtained through an Input task and used within the process itself. Once the data is obtained, it
becomes the job file that is passed from one task to another and generally used to generate
output (see "Job file" on the facing page).
Data can be manipulated using the tasks in the process, used as comparison for conditions and
loops, complemented with data from other sources, and used to generate your output. It
originates from many different sources (as many as the input tasks support), parts of it can be
stored in variables, and it is always accessible by the task that currently handles it.
Data is referred to in tasks using data selections; see "Data selections" on page48. Data
selections let you use data in file names, for example, or store them in a variable or in the Data
Repository for use later on.
While creating a process, you will need a sample data file to make data selections from it and to
debug the process with it. For more information about sample data files see "Sample Data" on
page64.
About documents and variable data
"Variable data" is data that is meant to be merged with a document or template.
Page 45
Page 46

In PlanetPress Connect, variable data is usually retrieved from a data file (the job file) using
the OLConnect Execute Data Mapping task. This task uses a data mapping configuration file,
created with the DataMapper, to produce a record set. A data mapping configuration contains a
data model. Any Connect template constructed using the same data model can be merged with
the resulting record set by an OLConnect Create Content task.
In PlanetPress Suite, Design documents are typically associated with an Output task.
PlanetPress Workflow dispatches captured data (the job file) to PlanetPress Design documents
directly. It is therefore critical that a process and a document use the same emulation (see
"About data emulation" on page54). PlanetPress Suite users are advised to review the
PlanetPress Design User Guide, especially the Selecting an Emulation section.
Job file
Whichever source it may come from, a serial port, an e-mail message, or an LPR request, for
instance, and whatever its format, data entering a PlanetPress Workflow process via an Input
task is always referred to as a data file. When a data file enters a process, it becomes the job
file.
'Job file' however is a more general term, that can refer to data files as well as other types of
files traveling through a process. Image files, for example, can be passed from task to task in
order to be downloaded to a printer. So files traveling within a process are referred to as job
files.
A single job file can be the source of multiple job files. This is the case, for example, when a
process includes multiple branches, as each branch is given a duplicate copy of the job file
(see " About branches and conditions" on page125). This is also the case when a job file is
split into multiple smaller files by a Splitter Action task, for instance (see "Data Splitters" on
page381).
It is important to note that job files may be used as a helpful debugging resource (see
"Debugging and error handling" on page87).
Job file names are generated automatically and stored in the %f system variable (see "Job file
names and output file names" on the next page).
Actual data and sample data
The actual data is the dynamic data captured by PlanetPress Workflow at run-time. The sample
data file is a static sampling of the run-time data (see "Sample Data" on page64).
In the PlanetPress Workflow Configuration program, you use sample data files to create, edit
Page 46
Page 47

and debug PlanetPress Workflow configurations (see "Debugging your PlanetPress Workflow
process" on page95).
Job file names and output file names
When an Input task sends a new data file down a process, it gives it an internal file name
referred to as the job file name (associated with the %f variable). The new job file typically
keeps the same name until the end of the process.
l If the job file comes to a branch in the process, PlanetPress Workflow makes a copy of the
job file and gives the new file a new job file name.
l If the job file is processed by a Splitter action task, the task typically creates a number of
new files which are all given new job file names.
Since these files are generated and managed by PlanetPress Workflow, you should not
actually pay too much attention to their names.
Many Output tasks, on the other hand, let you determine exactly how you want the files they
generate to be named. In the case of Send to Folder output tasks, for example, output files are
saved under their job file names by default (using the variable %f), but you may use a static
(MyOutput.txt, for example) or variable name (%O_Invoices, for instance) of your choosing.
Variables such as %o (original file name) bring up the issue of file overwriting. If the process
receives two source files with the same name, the second output file may overwrite the first one.
This may be what you want, but otherwise you may consider using another variable, such as
%u (unique 13-character string).
When choosing naming schemes for output files, consider the following:
l For the benefit of users who must identify files, be it in a folder or on a printer queue,
consider using names that are as meaningful and as precise as possible.
l Some devices or applications may use file name extensions to know what to do with
incoming files.
Since variable properties can be entered in the boxes where you specify the folder and file
names, you can use variables (see "About variables" on page596), data selections (see "Data
selections" on the facing page) and static text. You could, for example, use the following:
ClientID_@(1,1,1,1,14,KeepCase,Trim)_StatMonth_%m.
Page 47
Page 48

One last consideration regarding output file names has to do with standard JPEG and TIFF files
Note
You can change the name of a previously named file using a Rename action task (see "Rename"
on page358).
Note
The Get (...) Value options will also open the Data Selector or the Data Repository
generated by PlanetPress Image. When an output job contains multiple pages, multiple JPEG
or TIFF files are generated (one image per file), each one identified by a sequence number
appended to its name (this is managed by your PlanetPress Workflow). A three page job to be
called Invoice, for example, will generate three JPEGs or TIFFs called Invoice0, Invoice1 and
Invoice2. Note that this does not apply to multiple TIFFs, which can include multiple images in
a single file.
Data selections
A data selection could be compared to an address. It indicates a location within a data file or
database: the job file (see "Job file" on page46), Metadata file (see "Metadata" on page69), or
"Data Repository" on page84.
Data selections can be used in many task property fields and are always evaluated at run-time
so they are always dynamic and depend on the job file that is currently being processed.
There are several types of data selections you can use, depending on which emulation you are
using, whether or not Metadata have been created by a previous task in the process, and
whether or not data have been entered in the Data Repository.
Adding a data selection
A data selection can be used in any task property that may contain a variable (see "Variable
task properties" on page236). These properties are recognizable by their colored field label
(maroon, by default).
Right-click the property field and choose Get Data Location or Get Metadata Location to
open the Data Selector (see "The Data Selector" on page747) or Get Repository Location to
open the Data Repository Manager (see "Data Repository Manager" on page744).
Page 48
Page 49

Manager, but once selected, the value becomes static and does not change between
each data page and job file.
After opening a sample of the data (see "Choosing a sample data file" on page65) and/or
Metadata, you can easily make a selection.
It is also possible to manually enter a data selection, or to change it after making a selection
with the mouse pointer.
Data selections can also be used in a PlanetPress Design document that is being merged with
the data (for example in a printed output); for more information, see PlanetPress Design User
Guide.
Wild card parameter "?"
Data/Metadata selection functions accept a wildcard parameter "?", indicating the function
operates on all nodes (not just one) of a given level.
Examples
In a PDF emulation, the format of a selected region could be:
l
region(?,0.59375,2.21875,1.85416,2.51041,KeepCase,NoTrim)
In this case “?” represents the current physical data page processed by the task.
In the following rule, the Metadata selection function loops through all datapages in a job,
comparing their index in the document to a value:
l
(GetMeta(SelectedIndexInDocument[0], 11, Job.Group[?].Document
[?].Datapage[?]) Equal 0
In the following rule, the question mark in the text-based data selection represents the
current page number:
l
(@(?,1,1,1,9,KeepCase,NoTrim) IS EQUAL TO Page 1 of)
Text-based data selections
Text-based selections are used for text data files such as Line Printer, ASCII and Channel Skip
emulations. The selection refers to a rectangular selection that may contain multiple lines, rows,
columns on a given page.
Page 49
Page 50

Syntax
@(page number, from line, to line, from column, to column, case option, trim option)
Here is a breakdown of the syntax (all options are mandatory):
l
@(): Always surrounds a data selection.
l
Page Number: The data page number from which you want the data selection to grab the
data. If you want to get data from each page individually, this has to be done after a
splitter.
l
From Line: The starting line of the data selection.
l
To Line: the last line of the data selection.
l
From Column: the leftmost character position of the data selection.
l
To Column: the rightmost character position of the data selection.
l
Case Options: This can be one of three options:
l
KeepCase: Keeps the current uppercase and lowercase letters as they are.
l
UpperCase: Converts all letters to their uppercase equivalent.
l
LowerCase: Converts all letters to their lowercase equivalent.
l
Trim Option: Can either be "Trim" if you want to trim empty spaces before and after the
data selection or "NoTrim" if you want to retain the extra spaces.
Database data selections
These selections are used for database-driven data files such as Database and CSV
emulations. The selection refers to a specific field on any given data page.
Syntax
field(record set number, child number, field name, treatment of character case, treatment of
empty trailing cells)
Here is a breakdown of the syntax (all options are mandatory):
l
field(): Always surrounds database field selections.
l
Record Set Number: The data page (or "record") of the data selection.
l
Child Number: Line Number in the record (if there are multiple lines returned for one
single record).
Page 50
Page 51

l
Field Name: The name of the field you want to retrieve.
l
Case Option: This can be one of three options:
l
KeepCase: Keeps the current uppercase and lowercase letters as they are.
l
UpperCase: Converts all letters to their uppercase equivalent.
l
LowerCase: Converts all letters to their lowercase equivalent.
l
Trim Option: Can either be "Trim" if you want to trim empty spaces before and after the
data selection or "NoTrim" if you want to retain the extra spaces.
Data Repository lookups
The Data Repository selections are made through the lookup function. Selections are done
from the data located in the "Data Repository Manager" on page744. The lookup function
returns the value of a single key, which is always a string.
Syntax
lookup(group, return key, lookup key, lookup value)
Here is a breakdown of the syntax (all arguments are mandatory):
l
group: The name of the group in which to retrieve the value. Does not need to be
surrounded by quotes.
l
return key: The name of the key where the information you want to retrieve is located.
Does not need to be surrounded by quotes.
l
lookup key: The name of the key in the group with which to look up the value. The return
key of the KeySet in which the lookup key's value matches the lookup value will be
returned.
l
lookup value: A string surrounded by quotes which will be used in the lookup.
The lookup syntax is akin to a SQL SELECT statement and could be loosely translated to:
SELECT [return key] FROM [group] WHERE [lookup key] = [lookup value];
PDF data selections
These selections are used for PDF data files. The selection refers to a specific area of any
given page of the PDF by using precise region coordinates (in inches).
Page 51
Page 52

Note that when adding a metadata field, if you perform a multi-line data selection on a PDF
Tip
To get a sample of the metadata file, debug your process and step through it until the
option View Metadata gets enabled. This happens when metadata have been created by
a task in the process. Open the metadata viewer and save the metadata file to use it as a
metadata sample file in the Data Selector.
region, only the first line of that region will be set to the metadata field.
Syntax
region(page, left, top, right, bottom, case option, trim option)
Here is a breakdown of the syntax (all options are mandatory):
l
region(): Always surrounds PDF data selections.
l
Page: The page of the PDF from which to retrieve the data.
l
Left: Exact horizontal position (in inches) that defines the left of the selection region.
l
Top: Exact vertical position (in inches) that defines the top of the selection region.
l
Right: Exact horizontal position (in inches) that defines the right of the selection region.
l
Bottom: Exact vertical position (in inches) that defines the bottom of the selection region.
l
Case Option: This can be one of three options:
l
KeepCase: Keeps the current uppercase and lowercase letters as they are.
l
UpperCase: Converts all letters to their uppercase equivalent.
l
LowerCase: Converts all letters to their lowercase equivalent.
l
Trim Option: Can either be "Trim" if you want to trim empty spaces before and after the
data selection or "NoTrim" if you want to retain the extra spaces.
Metadata selections
Metadata selections are used with any type of emulation, as long as a metadata file was
created by a previous task in the process.
Syntax
GetMeta(Field Name [, Option Flags, Metadata Path])
Page 52
Page 53

Here is a breakdown of the syntax:
Note
Metadata Index/Count values are zero-based: the first element in any collection
has an index of 0 and the last element's index corresponds to the collection's length
minus 1.
l
GetMeta(): Always surrounds metadata selections.
l
Field/Attribute Name: specifies the name of the field (or attribute, if the GetAttribute
option flag is set) to retrieve (see "Metadata" on page69).
l
Option Flag (optional): Sets the options for the selection (see table below).
l
Metadata Path (optional): Defines the precise path where the Metadata Field is located.
Option flags
The flag value to enter should be the sum of all desired flags. So, a value of 11, which is 8+2+1,
means that behavior 8, 2 and 1 are applied.
A value of 0 means 'no flag'.
Name Value Behavior
GetAttribute 1 Search for the name argument in the attribute collection
instead of the default field collection. See: "Metadata" on
page69.
NoCascade 2 Search only the level specified by the path argument
(defaults to Page level when path argument is empty),
instead of default behavior, which recursively goes up from
the Page level to the Job level.
FailIfNotFound 4 Raise an error and crash the job is the specified name is
not found instead of returning an empty string.
SelectedNodesOnly 8 Returns values from selected nodes only (i.e. ignores
unselected nodes).
Page 53
Page 54

XML data selections
XML data selections are used to retrieve an element's name, value or count from an XML file.
Syntax
xmlget(XPath[, Value option, Case option, Trim option])
Here is a breakdown of the syntax:
l
xmlget(): Always surrounds a data selection.
l
Value Options:
l
Count: The number of elements on the same level in the same node that have the
same name.
l
Name: The element's name.
l
Value: The element's value.
l
Case Options: This can be one of three options:
l
KeepCase: Keeps the current uppercase and lowercase characters as they are.
l
LowerCase: Converts all characters to their lowercase equivalent.
l
UpperCase: Converts all characters to their uppercase equivalent.
l
Trim Options: Enter "Trim" if you want to trim empty spaces before and after the data
selection or "NoTrim" to retain the extra spaces.
About data emulation
An emulation specifies how to interpret a data file. It is basically the method through which
PlanetPress Workflow parses and displays the data. If the emulation is set to CSV (comma
separated values), for instance, commas encountered in the data will typically be considered as
value separators. The way data selections are made depends on the emulation (see "Data
selections" on page48).
Every Workflow process has its own data emulation setting, which depends on the sample data
file you choose.
A process's data emulation is only visible in the Workflow configuration tool when using the
Data Selector e.g. to select a sample data file, but it is always set to one (Line Printer, by
default).
Page 54
Page 55

A process's emulation can be changed either by choosing another sample data file (see
Note
Even during debugging, selecting a sample data file with a different format will cause the
emulation of a process to change. In order to avoid errors, change the emulation back to
the format of the original input file before using the process again.
"Choosing a sample data file" on page65) or by inserting a "Change Emulation" on page316
task in the process.
Changing the emulation is particularly important if you want to make a data selection in a file
after it has been changed to another format (see "Data selections" on page48).
Stabilizing data
All emulations, except the database, PDF and XML emulations, let you perform operations on
the data to stabilize it. The following options are available in both the "Change Emulation" on
page316 task and "The Data Selector" on page747.
Add/remove characters: Enter the number of characters to add to, or remove from, the head of
the data stream, or use the spin buttons to increment or decrement the value. Positive values
add characters; negative values remove characters. This is useful when one or more characters
of input data precede the start of the first data page. Note that certain control characters can be
problematic. For example, the NUL character (hexadecimal 00) cannot be removed from the
head of the data stream, and a backspace (hexadecimal 08) can cause unpredictable behavior.
The Hex Viewer can be useful in helping determine the control characters that appear at the
head of the data stream. (To open the Hex Viewer, select Debug > View as Hex, in the menu.)
Note that you cannot add characters in a CSV. Further note that if you remove characters in a
CSV emulation, you should ensure that you do not inadvertently remove field or text delimiters.
Add/remove lines: Enter the number of lines to add to, or remove from, the head of the data
stream, or use the spin buttons to increment or decrement the value. Positive values add lines;
negative values remove lines. This is useful when one or more lines of input data precede the
start of the first data page. Note that you cannot add lines in either a CSV or user defined
emulation.
Lines per page: Enter the number of lines each data page contains, or use the spin buttons to
increment or decrement the value.
Page 55
Page 56

Pages in buffer: Enter the number of data pages you want the data page buffer to contain, or
use the spin buttons to increment or decrement the value.
Read in binary mode (ASCII emulation only): Select to read the data file in binary mode. You
select this if you intend to run a PlanetPress Design document on a printer queue that is set to
binary mode. In binary mode, the printer reads the end of line characters (CR, LF, and CRLF)
as they appear in the data stream and does not perform any substitution. A printer that does not
support binary mode or is not running in binary mode replaces any CR, LF, or CRLF that
appears at the end of a line of data with a LF. Note, however, that it replaces a line feed
followed by a carriage return (LFCR) with two LFs. Binary mode is the recommended printer
mode when you use an ASCII emulation.
Cut on FF character: Select to have a new data page when a form feed character is
encountered in the data stream. If you select Cut on FF character, you have two conditions that
signal the end of a data page: the form feed character and the number of lines set in the Lines
per page box.
Emulation specific options
Various emulation specific options can be set for most emulations, with the exception of the line
printer and database emulations. For more information about a specific emulation type, see:
l "ASCII emulation" on the next page
l "Channel skip emulation" on page58
l CSV emulation
l "Database emulation" on page68
l "Line printer emulation" on page60
l "PDF emulation" on page61
l "XML Emulation" on page63
Emulations in PlanetPress Design
The Data Selector in Workflow is essentially the same as the one used in PlanetPress Design.
When you create a document in PlanetPress Design, you choose a sample data file and
specify the emulation to use for the chosen data. Within PlanetPress Workflow, the same
emulation tools as in PlanetPress Design are available throughout your process, using the
Data Selector. One notable exception however is that User-Defined Emulation is not available
Page 56
Page 57

because it uses PlanetPress Talk code, which is not available within the PlanetPress Workflow
Note
ASCII emulation is only used when merging ASCII data with a PlanetPress Design document.
When choosing an ASCII sample data file to be merged with a Connect template, select Text
emulation (see "Text-based emulation" on page62).
Configuration program.
The emulation that is used in your process can change during the process, and can be different
than the one used in any PlanetPress Design document used in your process. PlanetPress
Design Documents use their own emulations, as defined in the document itself from
PlanetPress Design.
For more information about emulations in PlanetPress Design see PlanetPress Design User
Guide.
ASCII emulation
ASCII emulation tells the process to treat the input data as a stream of ASCII characters. The
data stream is read one character at a time, a line is constructed, and that line is added to the
data page buffer.
In this emulation, you can define how to handle carriage returns that are not followed by line
feeds and how to handle tabs. You can also define whether you want any Hewlett Packard
Printer Control Language (HP PCL) escape sequences to be removed.
Using an ASCII file on a printer
If an ASCII file gets sent to a printer (which is possible in a PlanetPress Suite solution), you
need to know if your printer supports binary mode as this is the recommended mode for ASCII
emulation. On printers that support binary mode, you can switch the printer to binary mode
using the printer keypad or by sending the appropriate PostScript code to the printer.
In binary mode, the printer reads the end of line characters (carriage return [CR], line feed [LF],
and carriage return followed by a line feed [CRLF]) as they appear in the data stream and does
not perform any substitution. A printer that does not support binary mode or is not running in
binary mode replaces any CR, LF, or CRLF that appears at the end of a line of data with a LF.
A form feed signals the end of a data page in ASCII emulation. If no form feed occurs in the data
stream, the emulation adds data to the data page buffer until the buffer is full.
Page 57
Page 58

ASCII emulation options
Note
Channel skip emulation is only used when merging line printer data with a PlanetPress Design
document.
l
Tab on carriage return: Select this option to fix formatting problems caused by isolated
CR characters found within the data. When this option is selected, isolated CR characters
are spaces, as defined in the Number of spaces in the tab box below. Note that this option
is available only when the Read in binary mode option is selected.
l
Number of spaces in the tab: Enter the number of spaces you want the application
to use when an isolated carriage return character is found within the data. This
number typically corresponds to the maximum column number. If your data is
formatted so as to occupy a maximum of 120 characters on each line, enter a value
of 120 in this box, so when an isolated CR character is found, the data following the
CR character will appear starting from column 121. Note that this option is available
only when the Tab on carriage return option is selected
l
Number of spaces per tab: Enter the number of spaces you want to use when actual
TAB characters are found within the data.
l
Remove HP PCL escapes: Select if you want all Hewlett Packard Printer Control
Language escape sequences to be removed from the data.
Channel skip emulation
Channel skip emulation is a variant of line printer emulation. It tells the process to read the data
stream one line at a time, and to treat the first character of each line as a code that indicates
how to position the line of data in the data page buffer.
By default, in channel skip emulation, the integer 1 signals the end of a data page. You can
change this default when you set up the emulation.
Note that if a given value is used for multiple channels, the result may be different at design
time, or when a PlanetPress Design document is previewed or printed.
Also note that Split on FormFeed (FF) is not supported with the Channel Skip emulation in
Optimized PostScript Stream mode or when printing using a Windows driver.
Page 58
Page 59

CSV emulation options
l
Text delimiter: Enter the character that starts and ends the data in each field of the
record. If you do not set a text delimiter and the data in a field contains the character you
set as the delimiter, the data is split into two fields. If you want to use a backslash
character (\) as a delimiter, you must precede it with another backslash character (thus
you would enter \\). You can also specify an ASCII character using its octal value
preceded by a backslash (for example, \041 is the exclamation mark character [!]).
l
Force one record per page: Select to force a single record per data page. If you clear
the selection, a record may be split across data pages if necessary. If you want to avoid
splitting a record across data pages, yet have several records in the buffer, select Force
one record per page, and set the Pages in buffer option to the number of records you want
the buffer to hold.
l
Delimiter: Enter the character that separates the fields of each record in the input data. If
you want to use a tab as a delimiter, select Set tab as field delimiter. If you want to use a
backslash character (\) as a delimiter, you must precede it with another backslash
character (thus you would enter \\). You can also specify an ASCII character using its
octal value preceded by a backslash (for example, \041 is the exclamation mark character
[!]).
l
Set tab as field delimiter: Select to define a tab as the character that separates the fields
of each record in the input data. Clear to use the Delimiter box to define that character.
Database emulation
The Database emulation differs from other emulation types. With other emulations, data is
pushed either to PlanetPress Workflow processes running on servers, or to PlanetPress
Design documents residing on a printer. But in the case of the Dababase emulation, data must
be pulled from the data source: a query must be performed on the database to extract the
relevant data.
When generating output from the design tool (which is the Designer in Connect, or Design in
PlanetPress suite) one can open the document and then use the Data Selector to select a
database. By making a connection to the database, its structure can be accessed and it
becomes possible to determine how data is to be pulled into the document.
In a Workflow process, the database query has to be performed automatically. This can be
performed by the "Database Query" on page326 Action task. The task generates a data file
that it passes to the following task, be it another Action task, or any Output task. For help on
setting up the database emulation see: "Choosing a database sample file" on page66.
Page 59
Page 60

Note
You can also use the PlanetPress Workflow Database Action task to get data from a
database, and output in multiple different formats such as CSV. See "Database Query"
on page326.
Bear the following in mind:
l The person or plugin performing the query must have full access to the database.
l The data is extracted at the time of the query. A new query must be performed whenever
the data needs to be updated.
l Any changes to the structure of the database may have an impact on automated data
querying tasks.
l You must have the proper ODBC driver installed to use this emulation.
Database emulation supports SQL ANSI 92 or higher, and supports the following data types:
string, integer, floating point, all date formats, and text-only MEMO. It does not support any
binary data types such as Binary Large Object (BLOB), images, sound files, and MEMO data
that includes binary data.
Database emulation requires version 2.5 or higher of Microsoft Data Access Components
(MDAC), including JET 4.0, and you can save database emulation configurations to a file.
Database emulation options
For help on setting up a database emulation see: "Choosing a database sample file" on
page66.
Note for PlanetPress Suite users: For information about setting up a database emulation in a
Design document, please see the relevant page in the PlanetPress Design User Guide.
Line printer emulation
Line printer emulation tells the process to treat the input data as data destined for a line printer.
In this emulation, a form feed signals the end of a data page. If no form feed occurs in the data
stream, the emulation adds lines to the data page buffer until the buffer is full.
Line printer emulation offers the best overall performance of all the emulations.
Page 60
Page 61

Note
Line printer emulation is only used when merging line printer data with a PlanetPress Design
document.
When choosing a line printer sample data file to be merged with a Connect template, select Text
emulation (see "Text-based emulation" on the facing page).
Line printer emulation options
Note
Protected PDF and PDF of versions above 1.7 are not supported by PlanetPress Workflow.
The line printer emulation does not have any options other than the general text-based
emulation options (see "Text-based emulation" on the facing page).
PDF emulation
The PDF emulation allows you to capture data from fully composed documents in a PDF
format.
PDF emulation slightly differs from other emulations: with other emulations, data is read either
one line at a time or one character at a time, while PDF emulation processes the input data
from the PDF file in such a fashion that every PDF page becomes a full data page.
PDF emulation options
The PDF emulation does not have any options - that is, there is nothing to set up when opening
a PDF data file.
In the Preferences there is a number of options that affect how words, lines and paragraphs are
detected in the PDF when creating data selections. You will find these options when you select
Workflow > Preferences > PDF Text Extractor. For more information see "PDF text extraction
tolerance factors" on page677.
Page 61
Page 62

Text-based emulation
Text-based emulations display your data in plain text in the Data Selector and the Data Pane,
one line at a time, up to the limit you specify in the emulation properties (by default, 66 lines).
This is especially useful for legacy systems (such as AS/400 computers) that send data as text
meant for older line printers using pre-printed forms. The emulation options are used to make
sure your data is stable.
Stabilizing data is the process of defining the size of the data page and where the first data
page occurs in the data stream. A stable data page is critical to obtain accurate results. When
you stabilize your data, you also need to consider the internal structure of each data page. The
internal structure of each data page must also be stable to make the data selections you use
reliable (see "Data selections" on page48). Ideally, a given piece of data occupies the same
position across all data pages, or provides some stable characteristic that makes it possible to
locate it on every data page.
Text-based emulation options
The following properties are available for the text-based emulations (Line Printer, ASCII,
Channel Skip and CSV) to help stabilize the data:
l
Add/remove characters: Enter the number of characters to add to, or remove from, the
head of the data stream, or use the spin buttons to increment or decrement the value.
Positive values add characters while negative values remove characters. Further note
that if you remove characters in a CSV emulation, you should ensure that you do not
inadvertently remove field or text delimiters.
l
Add/remove lines: Enter the number of lines to add to, or remove from, the head of the
data stream, or use the spin buttons to increment or decrement the value. Positive values
add lines while negative values remove lines.
l
Lines per page: Enter the number of lines each data page contains, or use the spin
buttons to increment or decrement the value. A higher value means more lines will be
displayed on each data page. Note that increasing the value for this setting increases the
amount of RAM used by the application and may exceed the system’s capacity. Since the
Show used cells option also uses up some RAM, consider removing this option (see
"Data Selector display preferences" on page752) to reduce system load.
l
Pages in buffer: Enter the number of data pages you want the data page buffer to
contain, or use the spin buttons to increment or decrement the value. Putting more pages
in the buffer multiples the lines shown and is only useful in specific cases.
Page 62
Page 63

Note for PlanetPress Suite users: You should also consider using the N-Up Object if you
Note
Characters referenced using the ϧ syntax are limited to values ranging from 000 (�) to
256 (Ā).
Note
When XML data is merged with PlanetPress Design documents on a printer DOCTYPE and
ENTITY tags are ignored.
want to display multiple data pages; see thePlanetPress Design user guide.
l
Cut on FF character: Select to have a new data page when a form feed character is
encountered in the data stream. If you select the Cut on FF character option, there are two
conditions that signal the end of a data page: the form feed character and the number of
lines set in the Lines per page option. Note that the Cut on FF character takes
precedence over the Lines per page option.
l
Read in binary mode: Select this option to force the printer to read the incoming data in
binary mode. Use this option with the ASCII emulation to fix problems related to line
spacing caused by LFCR character pairs found within the data. Use it with the ASCII
emulation and with the Tab on carriage return option to fix problems related to data
formatting caused by isolated CR characters found within the data. This option can only
be used with the ASCII emulation.
Note for PlanetPress Suite users: You cannot select this option if the Design document is
to be installed on a printer that cannot run in binary mode.
l
Data encoding: Select the appropriate encoding for the sample data file. You may look at
the data in the Data Pane (non-English characters especially, if any) to see how the your
selection affects the data.
XML Emulation
XML data emulations allow you to capture data emanating from web databases, e-mail
fulfillment, e-commerce, and general XML database engines. In XML emulation, the data
elements in markup language format are organized in a folder view with a root node and sublevel nodes.
Page 63
Page 64

XML emulation options
Note
Even during debugging, selecting a sample data file with a different format will cause the
l
Cache XML data: When this option is selected, PlanetPress Workflow Server only
reloads the data if the size or modified date of the XML file changes. When this option is
not selected, the XML data will be reloaded into memory every time that a plugin works on
the data file. Caching the XML data will make subsequent tasks run faster (as loading an
XML file can take a long time) but will also use up more memory since that memory isn't
released in between tasks. For single runs the performance gain is less noticeable than in
loops (either through a splitter, a Loop task or a Metadata filter) where the XML file would
be loaded repeatedly.
For information about XML emulation options in PlanetPress Design documents, see the
PlanetPress Design user guide.
Sample Data
This topic covers issues relating to the sample data used in your PlanetPress Workflow
configuration.
A sample data file makes it possible to:
l Create a process that retrieves dynamic data from a data file. Once a sample data file is
available, you can use it to make data selections in a process (see "Data selections" on
page48).
l Debug a process (see "Debugging your PlanetPress Workflow process" on page95).
Choosing a sample file sets the process's emulation to the chosen format (see "About data
emulation" on page54). The only other way to change a process's emulation is by inserting a
"Change Emulation" on page316 task in it.
Changing the emulation is particularly important if you want to make a data selection in a file
after it has been converted to another format or when the job file has changed (see "Data
selections" on page48). To interpret a sample data file correctly, a process must have the
corresponding emulation setting.
Page 64
Page 65

emulation of a process to change. In order to avoid errors, change the emulation back to
the format of the original input file before using the process again.
Choosing a sample data file
In order to create your PlanetPress Workflow process, the sample data you are going to use
has to correspond precisely to the job files that will be treated by that process, at least in terms
of structure.
The sample data file should have a relatively small number of records (generally less than a
hundred) in order to be processed quickly, while your actual data may be much larger and take
more time to process. The sample data file should also contain at least one of every exception
you may want to detect, or data used for a specific condition. For example, if you wanted to filter
out any data for clients in Canada, you would want to use a data file that has at least one client
from Canada, to test whether your process filters it out correctly.
To choose a sample data file:
1.
Click the Debug tab in the PlanetPress Workflow Ribbon.
2.
Click on Select in the Data group.
3.
Use the Data Selector to choose your sample data file and emulation options (see "The
Data Selector" on page747).
4.
Click OK on the Data Selector.
Alternatively, if a resource file available in the configuration contains the necessary data file, it
can be attached to the process easily:
1. Expand the relevant resource files folder (Connect Resources or PPS/PSM Documents)
by clicking the button.
2. Expand the file by clicking the button.
3.
Right-click on the data file, then click Set as sample data file or simply double-click on
the data file.
For example, to use a sample data file included in a Connect data mapping configuration:
select Connect Resources > Data Mapping Configurations > [your data mapping
configuration], right-click a data file and choose Set as sample data file.
Page 65
Page 66

Tip
Double-clicking on the data file does the same thing as right-clicking on it an then
selecting Set as sample data file. Clicking Cancel instead of OK after viewing will
prevent this action from being taken.
Choosing a database sample file
Note
Since the Workflow tool is a 32-bit application, it can only use 32-bit ODBC
data sources. Make sure you use the proper Windows application (ODBC
Data Sources (32-bit)) to create and manage data sources that can be used in
Workflow.
To choose a database sample file:
1. Open the Data Selector (see "The Data Selector" on page747).
2.
From the Emulation drop-down list, select Database.
3.
Next to the Sample data file field, click the Configure Database button.
4. Associate a database.
l
Microsoft Access Database or dBase file: In Database, enter the path of the
Microsoft Access database or dBase file, or click the Browse button to the right of
the box to navigate to, the database file. Recall that a Microsoft Access database file
bears the extension .mdb, and a dBase file bears the extension .dbf. If the file is a
dBase file, you must specify the folder that contains the .dbf file. The folder in this
case is considered to be the database, while each individual .dbf file is a table in the
database. Once you enter the path, the Table/query name box updates to reflect the
tables and queries available in the selected database.
l
ODBC Data Source: In ODBC Data Source, click to connect to an ODBC Data
Source. Use the Select Data Source dialog box that appears to select an existing
Data Source or set up a new one. When you exit the Select Data Source dialog box,
the Database box updates to display the connection string it uses to connect to the
database, and the Table/query name box updates to reflect the tables and queries
available in the selected database.
Page 66
Page 67

5.
Click Edit SQL to create the SQL query by hand to define the SQL query that retrieves the
data your document requires.
6. Set the properties that define a record set:
l
Condition: Select the condition that signals the end of a record set. Three
possibilities exist: create a new record set for each record, create a new record set
after every x records, or create a new record set when the value of a specific field
changes.
l
Sort on condition field: Select this if the condition you set is to create a new record
set when the value of a specific field changes, and you want to sort the records
before applying that condition.
l
Maximum records per record set: Set either the number of records in each record
set, or the maximum number of records in a record set. An individual record set can
contain a maximum of 4000 records.
7. Set the number of records you want to include in the sample data file. The number of
records you set should provide a reliable sample to ensure your document executes
properly with any of the data it may encounter at runtime.
l
All: Select to include all records in the database in the sample data file.
l
Records: Select to define the range of records you want to include in the sample
data file.
Entering an SQL query
1.
In the Database Connection dialog box, click Edit SQL.
2.
If necessary, click Show Tables to display, in the Tables area, a list of the tables
available in the database.
3. In the SQL Query Entry area, enter the SQL query. The following two sample queries both
retrieve all the fields in the Orders table. The second sorts the resulting records on the
Date field.
SELECT * FROM [Orders]
SELECT * FROM [Orders] ORDER BY [Date]
4.
Click Test SQL to verify the query you entered is a valid SQL query.
5. Define whether you want PlanetPress Design to automatically enclose table names and
field names in square brackets.
Page 67
Page 68

Alternate syntax(not recommended): Select to prevent PlanetPress Design from
automatically enclosing the names of any database tables and fields that appear in the
SQL query in square brackets when it exits the advanced SQL Statement dialog box.
6.
Client side cursor: Select to download result sets to client computer running the SQL
query. Under some circumstances, client side cursors may be slightly less efficient than
server-side cursors, but they may also provide additional functionality, depending on the
type of query that is issued.
7.
Click OK to return to the Database Connection dialog box.
Opening a previously used data file
PlanetPress Workflow also keeps the last 9 used data files in memory, which you can reopen to
use in the same process, or in a different one.
To reopen a sample data file:
1.
Click the Debug tab in the PlanetPress Workflow Ribbon.
2.
Click on Reopen Data File in the Data group.
3. Click on one of the data files in the list.
4.
Use the Data Selector to change the emulation options if necessary.
5.
Click OK on the Data Selector.
Database emulation
The Database emulation differs from other emulation types. With other emulations, data is
pushed either to PlanetPress Workflow processes running on servers, or to PlanetPress
Design documents residing on a printer. But in the case of the Dababase emulation, data must
be pulled from the data source: a query must be performed on the database to extract the
relevant data.
When generating output from the design tool (which is the Designer in Connect, or Design in
PlanetPress suite) one can open the document and then use the Data Selector to select a
database. By making a connection to the database, its structure can be accessed and it
becomes possible to determine how data is to be pulled into the document.
In a Workflow process, the database query has to be performed automatically. This can be
performed by the "Database Query" on page326 Action task. The task generates a data file
that it passes to the following task, be it another Action task, or any Output task. For help on
setting up the database emulation see: "Choosing a database sample file" on page66.
Page 68
Page 69

Note
You can also use the PlanetPress Workflow Database Action task to get data from a
database, and output in multiple different formats such as CSV. See "Database Query"
on page326.
Bear the following in mind:
l The person or plugin performing the query must have full access to the database.
l The data is extracted at the time of the query. A new query must be performed whenever
the data needs to be updated.
l Any changes to the structure of the database may have an impact on automated data
querying tasks.
l You must have the proper ODBC driver installed to use this emulation.
Database emulation supports SQL ANSI 92 or higher, and supports the following data types:
string, integer, floating point, all date formats, and text-only MEMO. It does not support any
binary data types such as Binary Large Object (BLOB), images, sound files, and MEMO data
that includes binary data.
Database emulation requires version 2.5 or higher of Microsoft Data Access Components
(MDAC), including JET 4.0, and you can save database emulation configurations to a file.
Database emulation options
For help on setting up a database emulation see: "Choosing a database sample file" on
page66.
Note for PlanetPress Suite users: For information about setting up a database emulation in a
Design document, please see the relevant page in the PlanetPress Design User Guide.
Metadata
Metadata is a hierarchical structure describing a job. Simply put, Metadata is data about data
or, in other words, information tagged to data. Depending on the type of job, the Metadata
includes information about the job, the data file, items in the Connect database, a PlanetPress
Page 69
Page 70

Design document, 'User defined information' (sometimes created by regular tasks) and in some
Note
Applications or plugins created in PlanetPress Suite 6 and using Metadata will need to
be updated for use in version 2019.1. No backward compatibility mode is available.
Warning
When a user-defined emulation (created in PlanetPress Design) is used with Metadata,
results and behavior are unknown and unsupported. For instance, refreshing the
Metadata file may cause the document to crash and/or corrupt. For this reason, it is
strongly advised to create backup copies of your documents beforehand.
cases page properties and page counts.
Some of the Action and Output tasks produce, alter, or use the Metadata. In addition to that,
PlanetPress Workflow provides a whole series of plugins to create and edit Metadata during a
Workflow process (see "Metadata Tasks" on page489). The things that you have to know in
order to use the Metadata tasks effectively are set out in another topic: Working with Metadata.
You can also manipulate the Metadata in your process via scripts using the Metadata API. See
Metadata API Reference.
Metadata structure
The hierarchical structure of the Metadata is composed of a number of basic levels for adding
information to a job. These levels are, from top to bottom:
l
Job: A file that contains one or more groups.
l
Group: A logical and ordered group of documents (ex: all invoices for a specific customer
number; all documents going to the same address, etc.).
l
Document: A group of one or more ordered data pages intended to the same recipient
from the same source (ex: invoice).
l
Data page: One atomic unit of content that produces zero, one or more pages.
l
Page: One side of a physical paper sheet.
Page 70
Page 71

When Metadata is produced for a given job, a hierarchical (i.e. tree-like) structure is created,
Note
Any operation that modifies the data with regards to the structure (ex: remove pages, alter
the data, etc.) makes the Metadata obsolete and so it must be recreated or refreshed; see
Working with Metadata.
composed of the above elements in the following order: Job > Group(s) > Document(s) >
Datapage(s) > Page(s). For example:
Metadata in OL Connect jobs
In PlanetPress Suite, all levels in the Metadata hold information about an actual job. In
Connect, that isn't the case. The Metadata file created and maintained by OL Connect tasks
looks the same, but contains less information. Only the first three levels in the Metadata hold
information about the job: Job, Group and Document. A Group has information about a
record set in the Connect database and a Document has information about one record in that
set. This information appears under User defined information instead of under Production
information. The Data Model fields are added into the Document level.
Although Data page and Page nodes are visible in the Metadata file, they don't contain any
actual job related information in this case.
Page 71
Page 72

The Metadata related plugins (see "Metadata Tasks" on page489) can be used in conjunction
Note
The presence of some finishing attributes depends on the PlanetPress Design document
and target device used when producing the job.
with OL Connect tasks nonetheless; see How Metadata will or can affect the output.
Metadata elements
Each Metadata node (i.e. Job, Group, Document, etc.) is described with a series of elements,
that is, system-defined attributes or user-defined fields holding static or dynamic information
about the node they are attached to. Each element has a name and a value. More specifically,
here is a definition of these 2 types of elements:
l
Attribute: A read-only, system-defined element which holds certain information about a
certain node in the Metadata structure. This information can be static (e.g. the size of a
physical page) or evaluated on-the-fly (e.g. the number of documents in a group).
Attributes are non-repetitive (i.e. name is unique) and do not persist through Metadata
recreation.
l
Field: A read-write, user-defined element which holds custom information about a certain
node in the Metadata structure. Fields are repetitive (i.e. the same field may appear
multiple times) and persist through Metadata recreation.
In addition to attributes and fields, each node of type Group, Document or Datapage has a
Boolean property called 'selected' that indicates whether or not to produce the pages under that
node. By default, this property is set to true for all nodes. This property is not visible in the
Metadata file, but it can be used in a Script task via the Metadata API.
Metadata attributes reference
The Metadata attributes are categorized as either Production, Finishing or Index/Count.
Production attributes describe the production of the job and/or Metadata (e.g. path and name
of the datafile, date at which Metadata was created, etc.)
Finishing attributes describe the finishing intent (e.g. page dimensions, page orientation,
duplex mode, etc.).
Page 72
Page 73

Index/Count attributes are not part of the original Metadata file. They are evaluated
Note
Metadata Index/Count values are one-based when viewed in the user interface: the first
element in any collection has an index of 1 and the last element's index corresponds to
the collection's length. However, in the API and in Metadata selections, they are zero-
based: the first element in any collection has an index of 0 and the last element's index
corresponds to the collection's length minus 1. This means the zero-based value has to
be used when retrieving Metadata (see also: "Metadata selections" on page52 and Rule
Interface).
Note
In the Metadata file created for an OL Connect job:
l Only three levels are filled with actual data about the job: Job, Group and
Document.
l Only Index and Count attributes are actually used.
dynamically, based on the content of the Metadata.
In the following table, the last 5 columns indicate at which level the corresponding attribute is
available. This also depends on the type of job, however.
Attribute Description Categor
y
J
Gro
o
up
Docum
ent
b
DataEncoding (optional)
Name of the
Producti
on
X X X
character
encoding.
DataFile (optional) Path
and name of
the data file
Producti
on
X X X
Datap
age
Pa
ge
Page 73
Page 74

Attribute Description Categor
y
used by the
PlanetPress
Design
Document.
J
Gro
o
up
b
Docum
ent
Datap
age
Pa
ge
Date Date the
Metadata was
created in ISO
format.
Time Time the
Metadata was
created in ISO
format.
Title Title of the
source
document.
Producer Name of the
software that
created the
Metadata.
Producti
on
Producti
on
Producti
on
Producti
on
X X X
X X X
X X X
X X X
Creator Name of the
software that
created the
source of the
Metadata.
TargetDevice Name of the
device for
which the
Metadata and
associated
Producti
on
Producti
on
X X X
X X X
Page 74
Page 75
Attribute Description Categor
y
data is
intended.
J
Gro
o
up
b
Docum
ent
Datap
age
Pa
ge
Dimension Two floating-
point values
separated by a
colon
indicating the
media size in
typographical
points (ex:
612:792).
Orientation "Rotate0",
"Rotate90",
"Rotate180" or
"Rotate270",
indicating
respectively
portrait,
landscape,
rotated portrait
and rotated
landscape.
Finishin
g
Finishin
g
X X X X X
X X X X X
Side "Front" or
"Back";
indicates
whether the
page is on the
front or the
back of the
paper sheet.
This attribute
is a "best
Finishin
g
X
Page 75
Page 76

Attribute Description Categor
y
effort" and is
devicedependent.
J
Gro
o
up
b
Docum
ent
Datap
age
Pa
ge
Duplex "None",
"DuplexTumbl
e" or
"DuplexNoTu
mble";
indicates a
change of the
duplex status.
InputSlot Device-
dependent
identifier of the
media source.
OutputBin Device-
dependent
identifier of the
media
destination.
Finishin
g
Finishin
g
Finishin
g
X X X X X
X X X X X
X X X X X
Weight Device-
dependent
weight of the
media.
MediaColor Device-
dependent
color of the
media.
MediaType Device- Finishin X X X X X
Finishin
g
Finishin
g
X X X X X
X X X X X
Page 76
Page 77

Attribute Description Categor
y
J
Gro
o
up
b
Docum
ent
Datap
age
Pa
ge
dependent
type of the
media.
Index Index/C
IndexInDocument Returns the
Absolute index
of the node
within all the
nodes under
the parent
Document.
IndexInGroup Returns the
Absolute index
of the node
within all the
nodes under
the parent
Group.
g
ount
Index/C
ount
Index/C
ount
X X X X
X X
X X X
IndexInJob Returns the
Absolute index
of the node
within all the
nodes under
the parent Job.
Count Index/C
DocumentCount Index/C
Index/C
ount
ount
ount
X X X X
X X X X
X
Page 77
Page 78

Attribute Description Categor
y
J
Gro
o
up
b
Docum
ent
Datap
age
Pa
ge
DatapageCount Index/C
ount
PageCount Index/C
ount
SelectedCount Index/C
ount
SelectedDocument
Count
SelectedDatapage
Count
SelectedPageCoun
t
SelectedIndexInDo
cument
Returns the
Absolute index
of the node
within all the
selected
nodes under
the parent
Document.
Index/C
ount
Index/C
ount
Index/C
ount
Index/C
ount
X X
X X X
X X X X
X
X X
X X X
X X
SelectedIndexInGroupReturns the
Absolute index
of the node
within all the
selected
nodes under
the parent
Group.
Index/C
ount
X X X
Page 78
Page 79

Attribute Description Categor
y
J
Gro
o
up
b
Docum
ent
Datap
age
Pa
ge
SelectedIndexInJob Returns the
Absolute index
of the node
within all the
selected
nodes under
the parent Job.
NumCopies Indicates how
many times the
job is set to
execute, as set
when printing
using a
Windows
driver.
Author Name of the
user who
printed the job
initially, as
available in
the spool file,
and as the first
job info of the
Windows
capture input.
Index/C
ount
Index/C
ount
Producti
on
X X X X
X
X
Metadata in PlanetPress Design
PlanetPress Design includes a complete set of Metadata-related functionality, which can be
referred to as Metadata Tools. These tools can be used to generate Metadata, retrieve or define
Metadata elements, and build the Metadata structure of a PlanetPress Design document. For
information about these tools see the user guide: PlanetPress Design 7.6 User Guide.
Page 79
Page 80

Working with JSON
In online processes, it is common to send data to and retrieve data from a server. That data is
often exchanged in JSON format. JSON is short for JavaScript Object Notation. It is a way to
store information in a structured and easy-to-read format. It is often referred to as "XML without
nodes" and it is designed for exchanging data.
Refer to the following online resources for more information on JSON and its syntax:
l www.json.org
l www.w3schools.com
JSON support in Workflow tasks and scripts
PlanetPress Workflow offers JSON support in and via the following tasks:
l The "XML/JSON Conversion" on page379 task converts an XML job file to JSON or a
JSON job file to XML.
l OL Connect Content Creation tasks ("Create Email Content" on page531, "Create Print
Content" on page547 and "Create Web Content" on page551) and the OL Connect
"Create Preview PDF" on page541 task accept JSON data as input.
l
When the OL Connect "Retrieve Items" on page567 task is set to output Records in
JSON, it outputs a JSON Record Data List (see "Types of JSON in Workflow" below).
l The OL Connect Send "Get Data" on page510 task can output its results to a JSON file.
In scripts written in any JSON-aware language (including JavaScript), JSON is obviously
supported.
Certain methods in the "Data Repository API" on page161 accept or return JSON data.
Types of JSON in Workflow
Workflow tasks that support JSON accept or output one or two of the following types of JSON:
l
a regular JSON string, containing a JSON object or an array of JSON objects
representing records. If a value in a record object is a string, it is considered to be a field
value. If a value in a record object is a JSON object, it is considered to be a nested table
with detail records. For examples, see "JSON string samples" on page544.
Page 80
Page 81

l
a JSON Record Data List (see the REST API Cookbook). A JSON Record Data List is a
proprietary JSON object type. It includes a schema entry with information about the types
of all fields at the beginning of the record, and the data set with values after the schema.
This structure allows for easy handling of REST API return values through scripting in
Workflow or in the Designer; see "JSON Record Data List example" on the facing page.
JSON string examples
The following JSON string samples show various techniques to incorporate data in a JSON
string.
A simple JSON structure holding the first and last name of a person:
{
"first": "Peter",
"last": "Parker"
}
A JSON string with references to local variables and a Job Info variable (see "About
variables" on page596):
{
"first":"%{first}",
"last":"%{last}",
"email":"%2"
}
A JSON string containing a local variable and various Data Repository selections (see "Data
Repository lookups" on page51):
{
"jobid":"%{jobid}",
"account":"lookup(OLCS_jobs, account, jobid, '%{jobid}')",
"datafile_name":"lookup(OLCS_jobs, datafile_name, jobid, '%
{jobid}')",
"pages":"lookup(OLCS_jobs, pages, jobid, '%{jobid}')",
"documents":"lookup(OLCS_jobs, documents, jobid, '%{jobid}')",
"recordsetid":"lookup(OLCS_jobs, recordsetid, jobid, '%{jobid}')"
}
An example where the entire JSON string is provided in a Job Info variable:
%1
Page 81
Page 82

A JSON string constructed with information retrieved from an XML job data file (see "XML data
selections" on page54):
{
"first":"xmlget('/request[1]/values[1]/first
[1]',Value,KeepCase,NoTrim)",
"last":"xmlget('/request[1]/values[1]/last
[1]',Value,KeepCase,NoTrim)",
"email":"xmlget('/request[1]/values[1]/email
[1]',Value,KeepCase,NoTrim)"
}
A JSON string that contains nested data:
{
"name":"Peter Parker",
"email":"parkerp@localhostcom",
"ExtraData":"foobar",
"detail": [{"id":"inv123","ExtraData":"hello"},
{"id":"456","ExtraData":"world"}]
}
JSON Record Data List example
A JSON Record Data List describes a list of data fields (as name/value pairs), a data table
schema and nested data records (if any) for one or more data records. Below is an example of
such a JSON Record Data List.
[
{
"schema": {
"columns": {
"ID": "STRING",
"Date": "DATETIME"
},
"tables" : {
"detail": {
"columns": {
"ItemTotal": "CURRENCY",
"ItemShipped": "FLOAT",
"ItemOrdered": "BOOLEAN"
}
},
"detail2": {
Page 82
Page 83

}
}
},
"id": 3678077,
"datasetid": 2392921,
"fields": {
"ID": "CU19762514",
"Date": 1331096400000
},
"tables": {
"detail": [{
"id": 3678078,
"fields": {
}
},
{
"id": 3678079,
"fields": {
}
}],
"detail2": [{
"id": 3678080,
"fields": {
}
},
{
"id": 3678081,
"fields": {
}
}]
"columns": {
"ItemUnitPrice": "CURRENCY",
"ItemOrdered": "INTEGER"
}
"ItemTotal": "2300.00",
"ItemShipped": 2.0,
"ItemOrdered": false
"ItemTotal": "29.99",
"ItemShipped": 1.0,
"ItemOrdered": "false"
"ItemUnitPrice": "1150.00",
"ItemOrdered": 2
"ItemUnitPrice": "29.99",
"ItemOrdered": 1
Page 83
Page 84

}
}
]
Values could be retrieved in JavaScript as follows:
var foo = record.fields.ID;
var bar = record.tables.detail[0].fields.ItemTotal;
Data Repository
The Data Repository is a permanent structure to store data that can then be reused, modified or
augmented at a later time, by different processes.
This feature was introduced in version 8.5.
The Data Repository is especially useful in situations where data needs to be kept in between
processes. A few examples:
l An HTTP-based authentication process, once it has validated user credentials, could
store session information (unique ID, user name, session starting time) into the repository.
All other related processes could then look into the repository to determine if a new
request is received from an already authenticated user, if the session has expired, what
the user name is, etc.
l Data comes in and is merged into a Capture OnTheGo template and stored in the Data
Repository. The end-user augments the data (using the COTG as a data-entry system).
The process that receives the augmented data could look into the Data Repository to
retrieve the original data (or the ID of the original data records) in order to augment,
modify or delete it.
Structure
As can be seen in the "Data Repository Manager" on page744, the Data Repository consists of
Groups, Keys and KeySets.
Feature Name Description Equivalent Database Terminology
Group A Group is defined by its Keys
(columns), and may contain 0 or
Table
Page 84
Page 85

Feature Name Description Equivalent Database Terminology
more KeySets (rows) within it.
Key A Key is defined only by its name.
The Data Repository only supports
STRING values and any data
inserted into it is converted to
string automatically. The maximum
size of a single key is 1 billion
bytes.
KeySet A group may contain as many
KeySets (rows), which contain
variable data, as necessary. A
KeySet is inserted using the "Push
to Repository" on page356 task.
Lookup A method of retrieving one or more
KeySets from a group in the data
repository.
Column/Field
Row/Record
Query
Accessing the Data Repository
Via plugins
Storing data in the Data Repository
Data can be stored in the Data Repository using the Push to Repository task (see "Push to
Repository" on page356).
Retrieving data from the Data Repository
In any Workflow task where variable data is allowed (recognisable by the maroon field labels),
information can be retrieved from the Data Repository using a Lookup function. Right-click a
field with a maroon label and select Get Repository Location. This will bring up the "Data
Repository Manager" on page744. Select a Group, Key and KeySet entry to determine which
value or values should be retrieved at runtime; then click OK. The Lookup Function Syntax,
displayed at the bottom left of the Data Repository Manager, will be copied into the field.
Page 85
Page 86

The syntax is of the Lookup function is:
Note
Value_To_Matchcan be a static string, a jobInfo or a variable, but not a data selection.
For the Value_To_Match parameter, the single-quotes surrounding the value are
mandatory even if the value is dynamic.
Tip
The Data Repository Manager displays, at the bottom left, the syntax used for accessing a specific
value.
Note
Lookup()returns NODATA when the group and/or key does not exist.
In previous versions of the software, trying to do a look-up in a non-existent group and/or key
would cause an error. This change in behavior may affect any Workflow configuration that uses an
on error process related to invalid groups/keys.
Lookup(Group_Name, Key_To_Retrieve, Key_To_Match, 'Value_To_Match')
This function may also be used anywhere else where the contextual menu gives access to it.
You could, for example, use it on the General tab of the Create File task, to fill in the value of a
key/value pair in a JSON string.
Scripts
In a script you can access the Data Repository using the "Data Repository API" on page161.
For a quick start, turn to this How-to: Interacting with the Data Repository API.
Data Repository Manager
At design-time, the Data Repository Manager may be used to insert or remove Groups, Keys
and KeySets; see "Data Repository Manager" on page744.
Page 86
Page 87

Where to find the Data Repository
In case the Repository contains valuable information that must not be lost in case of a hardware
failure, create a backup of the repository.
By default, the Data Repository is located in the following folder:
%ProgramData%\Objectif Lune\PlanetPress Workflow 8\PlanetPress Watch\Repository.
It is also possible to create a Repository at a custom location; see ConnectionString.
Debugging and error handling
This chapter touches on two subjects that are intrinsically linked, though their use is different.
Debugging is the act of running through your process, either step by step or as a whole,
directly from the PlanetPress Workflow Configuration tool, in order to detect and resolve issues
with your process.
Error handling, on the other hand, occurs when your configuration has been sent to
PlanetPress Workflow services, and are running in "production" mode. The automated
handling of errors within your processes will have a large impact on recovering from errors as
they happen during production.
About error handling
When your process is running, or during debugging, it may happen that the task that is currently
running causes an error, and the task fails. For example, when trying to save to a folder that
does not exist, or printing to a printer that cannot be found.
When such an error occurs, in most cases you would want to be aware of it and to take certain
actions in order to correct or report the error. This is where our error handling features come in
handy.
Most of the tasks, branches and conditions included in your process can have their own error
handling behavior, with the exception of Comments, the Input Error bin task, and older legacy
tasks from previous versions of Workflow that did not have error handling.
Page 87
Page 88

By default, when an error occurs, the task is skipped and the unmodified job file is passed on to
the next task. You can overwrite this behavior by changing the options of the On Error tab of
the process - which sets the default error handling behavior for all the tasks in that process - or
of an individual task.
Using the On Error tab
Whenever an error is triggered either during debugging or when a process runs in production,
the settings specified in the On Error tab of the task that generated the error will be used to
determine a course of action.
On Error Tab
The On Error tab is common to all tasks and processes. It can be found in the Task Properties
Dialog.
By default, any Action task, Branch, Splitter or Condition that generates an error will simply be
ignored, and the task just under it (not within a branch) will be given control of the job file
without any modification. Any initial input task that generates an error will stop the process from
running as a whole, and Output tasks will not generate output. The On Error tab can be used to
overwrite the default behaviors.
l
Send to Process: Check this option to send the job file to an error management process.
l
Error Process drop-down: Enabled only when the Send to Process option is checked.
Lists any process of which the initial input task is the Input Error Bin task.
l
Action: In the initial input tasks, this group is disabled and defaults to Stop Process. In
all other tasks where the On Error tab is present, the following options are available:
l
Default: By default, the task is ignored as if it did not exist and the error is logged
before continuing the branch or process; the job file is passed on to the next task in
the process. When an error occurs in a loop (or in a plugin that acts like a loop), the
loop may log the error, terminate the current iteration and proceed with the next
iteration.
l
Stop Branch: If the task is in a branch of the process, the branch is stopped and the
job file is returned to the process after the branch. The branch will not produce any
output. If the task is not on a branch, the entire process will be stopped.
l
Stop Process: The process is stopped and no more processing is done. No further
output is produced.
Page 88
Page 89

l
Log Message: Check this option to enable logging a custom error message in the
PlanetPress Workflow log file and in the Windows Application Events.
l
Message: Enabled only when the Log Message option is checked. Enter a message that
will be logged in the PlanetPress Workflow log file. You can use any variables available
in PlanetPress Workflow to customize the message.
l
Store the message in variable: Select in which jobinfo, local or global variable you
want to store the message content.
l
ID: Enter an error ID. This ID will be visible in the Windows Event Viewer. However, the
ID is not visible in the PlanetPress Workflow log file.
l
Store the ID in variable: Select in which jobinfo, local or global variable you want to
store the error ID.
l
Reset to defaults: Resets all options in this tab to their default values.
When storing the message or ID, if they are stored in a jobinfo they will be available in any
error handling process where errors are being forwarded. If your process continues after the
error, the contents of the variables selected in this window will be available to the rest of your
process, or as long as they are not overwritten.
All error codes are listed in the knowledge base of PlanetPress Workflow. Though some error
messages are specific to a task in particular, others may apply to any and all tasks because
they are related more to the system than to PlanetPress Workflow itself. Some examples would
be W3813, W3830, W3991, W4005. These correspond to issues such as not having any space
to write files, permission errors on folders or files, etc.
Creating and using Error processes
An Error process is a special type of process that never runs on its own, and cannot be called
using the GoSub or Send to Process tasks. It can only be used in the On Error tab of a task in
your process, and will be triggered if the Send to Process option is checked in that tab and an
Error process is selected in the drop-down list.
To create an Error process, simply replace the initial input task by the InputErrorBin Input task,
and that process automatically becomes able to handle error jobs sent to it. It is up to you,
however, to decide how that error job will be handled.
For example, you could place the job file in a specific folder, then send an email to a supervisor
indicating that a job has failed. Or you could update a database with an error status so that it
Page 89
Page 90

appears on a customer's online order. You could also zip the order up and send it to an
Note
Local variables in the process are not sent to error processes, even if the error process has a variable
of the same name.
administrator, while simultaneously advising the person that sent the job that it failed.
You can have as many error processes as you can normal processes - that is, you are limited to
512 processes, subprocesses, startup processes and error processes combined.
Information available in an Error process
The following information is available from within your Error process when it is triggered.
l A series of variables containing information about the error, the task that triggered it and
the process that contained it (see below). These are "Standard variables" on page598.
l "Job Info variables" on page597 (%1 to %9).
l The data file as it was before starting the task.
l Global variables (which are, of course, available anywhere).
Error handling variables
The error handling variables are read only and are filled by the On Error mechanism.
They can be accessed anywhere, but they only appear in the contextual menu of a task
property field when the current process is an error-handling process (that starts with the Error
Bin Input task). See also: "Variable task properties" on page607.
Variable Name
%{error.process} Name of the process where the error was triggered.
%{error.tasktype} The type of task that triggered the error
%
The name of the task that triggered the error
{error.taskname}
Page 90
Page 91

Variable Name
%
The position of the task in the process
{error.taskindex}
%{error.errormsg} The error message, as entered in the OnError tab of the task.
This is the same message as appears in PlanetPress Workflow Log
file.
%{error.errorid} The error ID, as entered in the OnError tab of the task.
This is the same ID that appears in the Windows Event Viewer.
Accessing the Logs
If your process is running live in the PlanetPress Workflow Service, you have two ways of
seeing what is happening now or what has happened in the past.
Viewing running processes
To view what processes are running and processing data as it happens:
1.
In the PlanetPress Workflow Ribbon, click on the Tools tab, then select Service Console
in the Services group. The PlanetPress Workflow Service Console opens.
2. Click on the service you want to check, including:
l PlanetPress Workflow
l LPD Server
l Telnet Capture
l Serial Capture
l HTTP/SOAP Server
l LPR Client
l FTP Client
l PlanetPress Image
l PlanetPress Fax
l PlanetPress Messenger
Page 91
Page 92

3. When any job or file is processed by the selected service, the processing logs will be
Note
The information that is displayed here is the same as in PlanetPress Workflow logs and
depends on the logging level that you set in the "General and logging preferences" on
page679 and on the 'Minimal logs' option in the "Process properties" on page756.
Note
The PlanetPress Image and PlanetPress Fax logs are available in different folders. From
the Watch folder, go up one level then go in either folders, under which you will find the
Log folder for that specific software within the suite.
displayed in the window on the right.
Viewing logs for jobs that have already processed
The logs for jobs that have already processed are available in the following folder:
C:\ProgramData\Objectif Lune\PlanetPress Workflow 8\PlanetPress Watch\Log
You can access this folder more quickly by using this procedure:
1. From PlanetPress Workflow Configuration software, press CTRL+SHIFT+ALT+F4
simultaneously. The PlanetPress Workflow working folders are opened.
2.
Double-click on the folder called Log.
3. There are multiple logs displayed here, including:
l ppwYYYYMMDD.log - PlanetPress Workflow logs, including the year, month and
day of the log (from midnight to midnight).
Resubmit backed up input files to a process
Each Input task includes an option that lets you back up input files. This option is not selected
by default, since it has the potential to generate a very large number of backup files. To turn on
the backup option of an Input task, simply open its properties, go to the Other tab and check the
Page 92
Page 93

Backup input files option, then type in a unique file name for the backup file (this should be
variable; see "Variable task properties" on page236).
But if, for a given input task, you did select this option and something goes wrong and an
original input file is lost or corrupted, you will have the option to use the Resubmit Job
command to pull the backed up input file into the process.
Granted that you have backup copies of the files polled by an Input task, you may resubmit
them as required. The PlanetPress Workflow Configuration tool gives you the option to
resubmit them as they were submitted originally (polled by the initial input task) or to submit
them to those tasks located on the index you select.
The numbers on the left in the Process area indicate the task index.
In the above image, the Folder Capture task is on level 1 and the Text condition is on level 4.
Here's how to resubmit backed up input data files.
1.
In the PlanetPress Workflow Ribbon, go to the Tools tab then click Resubmit Job in the
Services group. The File Resubmission dialog box is displayed.
2.
From the Process box, select the process for which you want to resubmit the backed up
input files.
3.
From the Task index box, select the index level to which you want the data to be sent.
The index is the position in the process where you want to submit the job file. The
numbers on the left in the Process area indicate the task index.
Page 93
Page 94

4. In the list of backed up input files, select the file you want to resubmit (see "Knowing what
Warning
The From page and To page boxes are only useful for Printer Queue (or printer
capture) Input tasks. They will not function for other types of inputs. In these cases,
the complete backup job is submitted.
to resubmit" below).
5.
Using the From page and To page boxes, select the data pages that you want to
resubmit. (Data pages refers to blocks of data between natural delimiters in a data file,
such as lines in a CSV file.) If you want to resubmit all the data pages from the selected
input file, enter 0 in both boxes.
6.
Click Send to resubmit the data.
7. To resubmit backed up input files for the same process or for a different one, repeat step 2
to step 6.
8.
To close the File Resubmission dialog box, click Close.
Knowing what to resubmit
When something goes wrong with an output job, a print job for instance, and printouts are lost,
you need to know the name of the job in order to resubmit the input. This refers to the name
used internally by PlanetPress Workflow and generated by the Input task using parameters
defined within the task. The name of the job file can be found in the logs (see The PlanetPress
Workflow Service Console). To simplify file identification, you should consider using names
that include both the name of the original input file (if any) plus some details such as the current
date and time.
In addition it may be useful to know the number of each failed page. If a job contains 1000
documents and if documents 1 to 950 were printed correctly, you might not need to resubmit the
entire job, but only the input data for the 50 last documents. However this is only useful if the
relationship between the input data and actual output documents is easy to determine.
For help on how to include (data) page numbers in a PlanetPress Suite Design document, or
page numbers in a Connect template, please see PlanetPress Design User Guide or Connect
Online Help, respectively.
Page 94
Page 95

Debugging your PlanetPress Workflow process
Note
The sample job file should generally be the exact same format as the data that the
process will receive when PlanetPress Workflow is processing the job at run-time.
After designing a process, which is to add the different tasks, branches and conditions to the
process and configuring them (see "About processes and subprocesses" on page114), you
can test whether or not the process and configuration actually work.
Once you have created and fully debugged all your processes, you will be ready to send it to
PlanetPress Workflow service. See "Saving and sending a Workflow Configuration" on
page127.
Prerequisites
Before you can start debugging, these are the prerequisites.
l There must not be any "Unknown tasks" on page595 in the process.
l A sample data file must be selected; see "Choosing a sample data file" on page65.
About the Debug mode
When debugging your process, it is important to keep in mind that:
l
The initial Input task is never executed. The sample data file is used instead of the initial
run. This is to prevent "live" data from being retrieved by the initial input task while
debugging is being done. If, however, the initial task is critical to the process, it can be
executed by copying the initial input task and pasting it as a secondary input task (the first
Action task to actually run in the process). Do not forget, however, to remove this
duplicate task before saving the configuration!
l If any task makes an operation on the system (for example, capturing files, sending data,
printing, etc), it is actually executed, not simulated.
l
Any task is executed with the permissions of the user that is currently running the
PlanetPress Workflow Configuration tool. When running in Service mode, the user
configured in the Configure Services dialog is used instead. If the credentials are
Page 95
Page 96

different, a job that runs in debug mode may fail at run-time if the permissions are not
available to the Service. Please see "Workflow Services" on page762 for more details.
Running in Debug mode
Debugging can be run in different ways:
l
From the Debug tab, click on Run. This executes the complete process, step by step,
until it is completed.
l
From the Debug tab, click on Step. This executes only the first task in the process and
waits for further action. While stepping through a process (using Step, not Run),
breakpoints may be used and given steps may be passed, using the buttons on the
Debug ribbon (see below).
l
Right-click on any task in the process and click Run from Here or Step from Here.
These actions are the same as using the debug Step and Run buttons, but will execute
the process only starting from that task forward.
Double-click on any task to change its properties. If you change the properties of a task before
you step through it, those new properties will be used when the task is executed. Note that you
cannot modify the process itself while in debug mode (you cannot add, delete or move tasks,
change branches and conditions, etc).
Look at the Messages Area pane to see any message generated by the tasks that run (See "
The Message Area Pane" on page765).
Use the Debug Information pane to see the current value of any variable in your process or
globally, or to evaluate custom expression. See "The Debug Information pane" on page764.
Use the Object Inspector - one of the panes alongside the Debug Information pane - on the
process to enter sample job information as required.
The Debug ribbon provides the following buttons:
l
Click on Skip to ignore the next task or branch and go to the subsequent one. The job file
is not modified in any way.
l
Click on View as Text in the Data group of the Debug tab to view the current job file
using a text editor (Notepad by default).
Page 96
Page 97

l
Click on View as PDF to view the current job file in Adobe Acrobat if it is present (this will
work only for PDF job files).
l
Click on View Metadata to open the data selector and see the current state of the
process' Metadata.
l
Click on View as Hex to view the current job file in the internal Hex editor.
l
Click on the Stop button to stop the debugging process. If you use Run, Step or Skip
after stopping the process, debugging starts over from the top.
l
Use the Set Breakpoint button to tag the currently selected task, branch or condition as a
breakpoint. When you click Run in your process, the process will execute every task until
it reaches a breakpoint and will stop just before the task that is set as a breakpoint.
l
Use the Ignore button to disable the task, branch or condition that is currently selected. If
you disable a branch or condition, all tasks inside that branch or condition are ignored
including the output. Note that if you set a task, branch or condition to be ignored, it will
also be ignored at run-time, providing you sent the configuration to the service.
Debugging and Emulation changes
One of the cases where debugging is most useful is whenever the job file is converted to
another type of emulation, or if a new data file of a different emulation is used somewhere in the
process. For example, if a process starts with a Line Printer data file and then converts it into a
PDF, it is not possible to select anything from the PDF to be used as (variable) task property,
because the Line Printer emulation is active by default. The debugging features can easily
resolve this limitation.
The first method is used if your process has all the required tasks, but data selections after an
emulation change are necessary.
l Step through the process until you have reached the point after the emulation or data
change.
l Make the necessary data selections (see "Data selections" on page48). Any data
selection used in task properties after this point will use the new emulation.
l Continue stepping through each task until the end of the process to debug it.
This method does not allow you to add, remove or move tasks, however.
The second method can be used when that is required.
Page 97
Page 98

l Step through the process in Debug mode until you reach the emulation or data change.
l
Click on View as Text (or View as PDF if your data is PDF at this point) in the Data group
of the Debug tab.
l In the viewer that appears, save the file to a location on your hard drive.
l Stop the process, and select the file you saved as your process's sample data file (see
"Choosing a sample data file" on page65).
l If you need to continue debugging your process after the emulation change, you can still
do it by using Skip on all the tasks until the emulation change, inclusively. Then use Step
or Run to continue debugging.
Lastly, PlanetPress Workflow has an option that can be used in conjunction with the previous to
avoid skipping through large processes:
l
Step through the process until the emulation or data change, as in the first method.
l
Save the data file locally and then select it as your sample data file, as with the second
method.
l
Instead of skipping through each task, use the Run from here or Step from here options,
either from the Debug tab or by right-clicking on the task where you want to start the
process.
About printing
To print a document you can either use an Output task, or a combination of "PlanetPress
Workflow printer queues" on page100 and the Printer Queue Output task. Decisive factors, in
addition to the printer that you're using, are:
l The type of job (Connect, or PlanetPress Suite).
l
The features that you want to use. When you associate a single Printer Queue Output
task with multiple printer queues, you have the option of using load balancing or not (see
"Load balancing" on page108).
l The file type. Printer Queues can only handle PostScript and PDF files.
Printing can be done locally or remotely. The spool file is sent to the printer by the Output task
itself, or by Workflow if the file is placed in a Workflow Printer Queue.
Printer-centric printing - which means that a document and data are merged on a printer - is
Page 98
Page 99

only supported with PlanetPress Design documents, and requires that this feature be available
on the printer.
OL Connect print jobs
There are two OL Connect tasks designed to create print output based on a Connect Designer
template: the "Create Output" on page537 task, and the "All In One" on page524 task, which
combines 4 different OL Connect tasks, including the Create Output task, within a single one.
Both tasks can produce many different types of files and distribute them to many different
printers, or to a folder.
Print options
The file type, printer model, output type (a folder, LPR queue or Windows printer), and print
options and settings are normally contained in an Output Creation Preset. Output Creation
Presets are created in the Connect Designer and can be used with any Connect template (see
Output Creation Preset and Print Options in Connect's Online Help). For some options, such as
grouping documents and splitting jobs, a Job Creation Preset is required as well (see Job
Creation Preset in the Connect Online Help).
Presets have to be sent to or imported into Workflow before they can be used in a Workflow
process.
Alternatively, the All in One and Create Output tasks can send the spool file back to the
Workflow process, instead of to the destination defined in the Output Creation Preset. (To
achieve this, select the Handle through Workflow option in the task properties.)
Back in the process the output file may be sent to a folder using the Send to Folder task, or to a
Workflow Printer Queue via the Output to Printer Queue task.
Here are a few reasons why you might want to use the Handle through Workflow option:
l Additional flexibility. Printer Queues have load balancing options that allow to distribute
the printing load and make the process faster and more efficient. Print jobs may, for
example, be split equally among several printers, or they may be split according to each
printer’s capacity and speed. (See "PlanetPress Workflow printer queues" on the facing
page.)
l Archiving. If the output file is a PDF, the file can be sent to an Archiving solution before it
is sent to the printer.
l Easier debugging. If the output file is a PDF, for example, you can open it inside Workflow
once it has been sent back to the process (see "Debugging your PlanetPress Workflow
process" on page95).
Page 99
Page 100

Using a Printer Queue requires creating the appropriate Printer Queue in the Workflow
Configuration tool first.
In the Output to Printer Queue task, select No document to let the spool file pass through it.
PlanetPress Suite print jobs
In PlanetPress Suite, the printer model and settings are defined in the Design document itself
(see "PlanetPress Design documents" on page39).
Print output is normally generated by an Output task that merges a PlanetPress Design
document with a data file (i.e. the job file). This can be either the "Print using a Windows driver"
on page581 Output task, or the "Printer Queue Output" on page583 Output task.
The latter has to be combined with at least one Printer Queue, and to ensure that the print
output is actually sent to the intended printer, you also have to:
l Create a matching Printer Queue in Workflow (see "PlanetPress Workflow printer
queues" below).
l Associate the document with that Printer Queue (see "Associating PlanetPress Design
documents and PlanetPress printer queues" on page109).
Printer-centric printing
Alternatively the merging of the document and data can take place inside a printer (if the printer
is suitable for it). In that case, PlanetPress Workflow sends one of two things to a printer: a file
that contains only the data to the selected Printer Queue, along with a trigger that specifies
which document the printer should use to merge the data. The document must already be
present on the printer’s hard disk or memory, otherwise printing will fail; ora file that contains
the data and the document to the selected Printer Queue. Since the data and the document with
which it must be merged are both sent to the printer, printing should never fail.
PlanetPress Workflow printer queues
The printer queues displayed in the Configuration Components pane of the PlanetPress
Workflow Configuration program are not to be confused with Windows printer queues. When
you start building a PlanetPress Workflow configuration it contains no printer queues. If you
want Workflow to dispatch spool files to printer queues, you have to create queues in Workflow
and set each one’s properties.
Printer Queue types
The PlanetPress Workflow Configuration program lets you create four types of printer queues:
Page 100
 Loading...