

Page 1

Trigger And Data Capture Guide
www.objectiflune.com
Page 2

©2014 Objectif Lune Inc - 2 -
Page 3

Copyright Information
Copyright Information
Copyright © 1994-2014 Objectif Lune Inc. All Rights Reserved.
No part of this publication may be reproduced, transmitted, transcribed, stored in a retrieval system, or translated into any
other language or computer language in whole or in part, in any form or by any means, whether it be electronic, mechanical,
magnetic, optical, manual or otherwise, without prior written consent of Objectif Lune Inc.
Objectif Lune Inc.disclaims all warranties as to this software, whether expressed or implied, including without limitation any
implied warranties of merchantability, fitness for a particular purpose, functionality, data integrity or protection.
PlanetPress and PrintShop Mail are registered trademarks of Objectif Lune Inc.
PostScript and Acrobat are registered trademarks of Adobe Systems Inc.
Pentium is a registered trademark of Intel Corporation.
Windows is a registered trademark of Microsoft Corporation.
Adobe, Adobe PDF Library, Adobe Acrobat, Adobe Distiller, Adobe Reader, Adobe Illustrator, Adobe Photoshop, Optimized
Postcript Stream, the Adobe logo, the Adobe PDF logo are either registered trademarks or trademarks of Adobe Systems Incorporated in the United States and/or other countries.
Trademarks of other companies mentioned in this documentation appear for identification purposes only and are the property
of their respective companies.
Title PlanetPress Suite User Guide
Revision 2014-03-28
©2014 Objectif Lune Inc - 3 -
Page 4

©2014 Objectif Lune Inc - 4 -
Page 5

Table of Content
Table of Content
Copyright Information 3
Table of Content 5
Overview 7
Icons used in this guide 7
Other Documentation 7
Capturing Data 9
Sample Data File 9
Spool File 9
Capture Sample Data for a Document You Install on a Printer 10
Capture Sample Data for a Document You Install in your PlanetPress Suite Workflow Tool 10
Capture Sample Data in Windows NT 11
Capture Sample Data in Windows 2000/Server 2003/XP 12
Capture Sample Data in Windows Host Using a Novell Print Server 12
Capture Sample Data in UNIX (Solaris) 13
Capture Sample Data using an AS/400 Systems 14
Capture Sample Data From a Serial Port 16
Creating Triggers 19
Trigger 19
Trigger Syntax 20
Techniques for Inserting Triggers 21
Implement a Trigger under Novell 3.x 21
Implement a Trigger under Novell 4.x and 5.x with NDS or Bindery Printers 29
Implement a Trigger under Windows with TCP/IP 35
Implement a Trigger under BSD Printing Systems (BSDi, FreeBSD, Linux) 36
Implement a Trigger under UNIX System V (Solaris) 38
Implement a Trigger and Configure an AIX 4.3 Printer 38
Implement a Trigger under VMS 50
Implement a Trigger with AS/400 Systems 54
Prepare SAP Device Type for PlanetPress Design 60
Implement a Trigger under HP 3000 66
Special Printer Requirements 69
HP Printers with Flash Memory 69
Lexmark Printers 69
Printers with Automatic Emulation Switching 70
ASCII Conversion Table 71
CL Program for AS/400 Systems 75
Index 79
©2014 Objectif Lune Inc - 5 -
Page 6

©2014 Objectif Lune Inc - 6 -
Page 7

Overview
Overview
This PDF documentation covers version 7.2. To view the documentation of previous versions please refer to the PDF files
available in the Downloads section of our website:
http://www.objectiflune.com/OL/Download/DownloadCenter.
Icons used in this guide
Some icons are used throughout this guide in order to catch your attention to certain particular information.
Notes: This icon shows you something that complements the information around it. Understanding notes is not critical but may be helpful when using PlanetPress Suite.
Warnings: This icon shows information that may be critical when using PlanetPress Suite. It is important to pay
attention to these warnings.
Technical: This icon shows technical information that may require some technical knowledge to understand.
Other Documentation
For other related documentation , please see the drop-down menu at the top-right corner of this page.
©2014 Objectif Lune Inc - 7 -
Page 8

©2014 Objectif Lune Inc - 8 -
Page 9

Capturing Data
This chapter provides procedures for capturing data on different platforms.
In this chapter, you learn to:
l "Capture Sample Data for a Document You Install on a Printer" (page 10)
l "Capture Sample Data for a Document You Install in your PlanetPress Suite Workflow Tool" (page 10)
l "Capture Sample Data in Windows NT" (page 11)
l "Capture Sample Data in Windows 2000/Server 2003/XP" (page 12)
l "Capture Sample Data in Windows Host Using a Novell Print Server" (page 12)
l "Capture Sample Data in UNIX (Solaris)" (page 13)
l "Capture Sample Data using an AS/400 Systems" (page 14)
l "Capture Sample Data From a Serial Port" (page 16)
In addition, you will be able to answer the following questions:
l "Sample Data File" (page 9)
l "Spool File" (page 9)
Capturing Data
Sample Data File
What is a sample data file?
The sample data file is a text file that contains a representative sample of the input data destined for the document, as that
input data arrives at a printer or a PlanetPress Suite process. You use a data capture process to create a sample data file.
You create your document based on the contents of this sample data file. Whether the document you create executes properly, and under all circumstances, with the input data it receives when it executes depends on how accurately the sample data
file represents that input data. The two criteria for a reliable sample data file are:
1. It includes all possible variations on the data that the document may encounter when it executes.
A sample data file that does not take into account all possible variations on the data can have serious consequences.
For example, if you design a cheque based on an amount field of a certain length, and one of the records in the input
data exceeds that length, the result is a cheque with an incorrect amount.
Things to check for variation include field lengths, the location of decimal points in numeric data, and whether or not a
field always contains data.
2. It exactly represents the input data at the moment that data arrives at the printer or PlanetPress Suite process. A difference of a single character can result in a document that does not produce accurate results.
If your sample data file does not meet this criteria, you end up creating a document that executes with a different input
data structure than the one for which you designed it.
Spool File
What is a spool file?
A spool file is a file containing a job destined for a specific printer. When you print a file, the application you use to print writes
a file to the spool folder for that printer. The system monitors this folder. When a file appears in the folder, it sends that file to
the printer, and deletes it from the spool folder.
It is common to use a spool file as the sample data file for a document you intend to install on a printer.
©2014 Objectif Lune Inc - 9 -
Page 10

Capturing Data
Capture Sample Data for a Document You Install on a Printer
This procedure describes the general steps involved in capturing sample data for a document you intend to install on a printer.
If you are using database emulation, you capture sample input data at the time you set up the emulation.
An understanding of the general procedure for capturing a reliable sample data file can help you understand and navigate the
platform-specific instructions.
To capture data for a document you install on a printer:
1. Determine the input data you need.
Determine all the variations of input data you need to include in the sample data file, and the query that retrieves that
input data. This is specific to your database and computing environment.
2. Determine the type of connection that exists between the host on which the input data resides and the printer on which
the document will execute.
In general there are three types of connections:
l Direct connection. The printer is either directly connected to the host on which the input data resides, or the host
can directly address it on a network.
l Serial connection. The printer and the host are connected by a serial cable.
l Print server. The printer is connected to a print server. The host sends print jobs to the print server.
3. Capture the representative sample of input data.
In general you set up a process to intercept a print job on its way to the printer. You then send the representative sample of data to the printer. The process you set up intercepts the job and saves the spool file as the sample data file. For
example, if your host can address the printer directly, you could use the following method:
l Pause printing on the printer on which you intend to install the document. This tells the printer driver not to send
any files that it finds in the spool folder for this printer, to the printer. If you print to a printer after you pause it, a
spool file appears in that printer’s spool folder and remains there until you re-enable printing on that printer.
l Send the representative sample of input data to the printer on which you intend the document to execute. This
creates a spool file.
l Retrieve the spool file.
l Restart printing on the printer you paused.
Capture Sample Data for a Document You Install in your PlanetPress
Suite Workflow Tool
This procedure describes the general steps involved in capturing sample data for a document you intend to install in your PlanetPress Suite Workflow Tool. An understanding of the general procedure for capturing a reliable sample data file helps you
understand and navigate the platform-specific instructions.
It assumes you have a general understanding of what a PlanetPress Suite process is, and how it works. See the PlanetPress
Workflow Tools User’s Guide for further information.
Note that if you are using database emulation, you capture sample input data at the time you set up the emulation.
To capture data for a document you install in your PlanetPress Suite Workflow Tool:
1. Determine the input data you need.
Determine all of the variations of input data you need to include in the sample data file, and the query that retrieves that
input data. This is specific to your database and computing environment.
©2014 Objectif Lune Inc - 10 -
Page 11

Capturing Data
2. Determine the input mode you intend to use when you execute your document in your PlanetPress Suite Workflow
Tool.
The input modes you can use for data capture include Windows printer driver, lpd queue, directory, email, and serial
capture. The input modes available depend on your platform and the type of connection that exists between the host on
which the input data resides and the host on which PlanetPress resides. For example, to use a Windows queue, your
input data must reside on the same host on which you are running your PlanetPress Suite Workflow Tool. Consult the
PlanetPress Workflow Tools User’s Guide for complete descriptions of all input modes.
3. Map exactly how your input data will travel from source to destination when you execute the completed document.
You must replicate this path exactly when you capture data, or define how you intend to compensate for any deviations
from it during document design.
4. Capture the sample of input data.
What follows is a general outline of the procedure. Consult the specific data capture procedure for your platform, and
the PlanetPress Workflow Tools User’s Guide for help setting up PlanetPress Suite processes.
l Create a PlanetPress Suite process to accept the data through the input mode you specify and save the result as
a file in a folder.
l Send the representative sample of input data to your PlanetPress Suite Workflow Tool using the input mode you
specified in the PlanetPress Suite process you set up for the data capture.
l Retrieve the file from the output folder.
Capture Sample Data in Windows NT
You perform this procedure on the machine that controls the printer, not on the workstation.
To perform data capture under Windows NT:
1. In the Windows Start menu, choose Settings, then choose Printer.
The Printers window appears.
2. Right-click on the printer on which you intend to execute your document and choose Pause printing.
3. In the application you use to manipulate the input data, send the data you want to capture to the printer you selected in
step 2
The printer driver creates a printer spool file containing the representative data sample.
4. In the Windows Start menu, choose Run.
The Run dialog box appears.
5. In the Run dialog box, in the Open box, enter CMD.
A DOS Command Prompt window appears.
6. In the DOS Command Prompt window, change directory to the spool folder:
cd C: \winnt\system32\spool\printer
7. Copy the spool file (.spl) you just created to a floppy or to another folder.
The *.spl file contains your data.
8. Close the DOS session.
9. In the Windows Start menu, choose Settings, then choose Printer.
The Printers window appears.
10. Right-click on the printer you paused and choose Pause printing.
The spooler sends the job to the printer.
©2014 Objectif Lune Inc - 11 -
Page 12

Capturing Data
Capture Sample Data in Windows 2000/Server 2003/XP
You perform this procedure on the machine that controls the printer, not on the workstation.
1. In the Windows Start menu, choose Settings, then choose Printer.
The Printers window appears.
2. Right-click on the printer on which you intend to execute your document and choose Pause printing.
3. In the application you use to manipulate the input data, send the data you want to capture to the printer you selected in
step 2
The printer driver creates a printer spool file containing the representative data sample.
4. In the Windows Start menu, choose Run.
The Run dialog box appears.
5. In the Run dialog box, in the Open box, enter COMMAND.(
A DOS Command Prompt window appears.
6. In the DOS Command Prompt window, change directory to the spool folder:
cd C: \windows\spool\printer
7. Copy the spool file (.spl) you just created to a floppy or to another folder.
The *.spl file contains your data.
8. Close the DOS session.
9. In the Windows Start menu, choose Settings, then choose Printer.
The Printers window appears.
10. Right-click on the printer you paused and choose Pause printing.
The spooler sends the job to the printer.
Capture Sample Data in Windows Host Using a Novell Print Server
This procedure describes how to capture data for a document you intend to execute using a Novell print server.
To capture data on a Windows host that uses a Novell print server:
1. Start the NetWare Administrator.
2. In the NetWare Administrator window, double-click the print server in the list of printers. For the purposes of this
procedure, the print server is the optra1650s-nds.
The Print Server dialog box for that print server appears.
3. Click Status.
The Status dialog box appears.
4. Note the values of the Volume and ID fields and then click Close.You use these values later to navigate to the print
queue.
5. In the Print Server dialog box double-click the print queue for the print server. The print queue is the file whose file
name ends in the letters pq. For example, the print queue for the optra1650s-nds print server is optra1650s-nds-pq.
The Print Queue dialog box for that print server appears.
6. Disable Allow service by current print server and click OK.
7. To verify the print server is paused, print a test page and verify the spool file remains in the print queue. You can print a
test page by clicking Print Test Page in the General tab of the print queue properties dialog box for this print
©2014 Objectif Lune Inc - 12 -
Page 13

queue.You can then verify the file remains in the print queue by navigating to the print queue in Windows Explorer and
verifying there is a spool file for the test page. The spool file has a .Q extension. You use the Volume and ID information
you noted in step 4 to determine the path of the print queue.
8. Send your input data to the print server.
9. Retrieve the spool file for the input data from the print queue.
In Windows Explorer, navigate to the print queue for the print server. Use the Volume and ID information you noted in
step 4 to determine the path of the print queue. The spool file has a .Q extension.
10. Double-click the spool file to open it and verify the contents are what you expect.
Capture Sample Data in UNIX (Solaris)
Create a Virtual Printer
To create a virtual printer:
1. In the File Manager, choose File and then OpenTerminal.
2. Use the following commands to open the Hosts file:
Capturing Data
cd /etc
vi ./hosts
In the Hosts file, add the IP address of the printer, or the IP address of the workstation on which your PlanetPress Suite
3.
Workflow Tool is installed, and assign a name to that IP address. For example:
192.xxx.yyy.zzz printdestination
4. Save the Hosts file as follows:
Press ESCAPE.
Enter :wq
Assign a Print Queue to a Virtual Printer
To assign a print queue to a virtual printer:
1. Use the command:
lpadmin -p queuename -I any -s printdestination
Where:
-p queuename specifies the name of this queue
-I any specifies no data formatting (i.e.: Text Only)
-s printdestination specifies the name of the virtual printer
Send Data to the Print Queue
To send data to the print queue:
l Use the command:
lp -d queuename data_filename
©2014 Objectif Lune Inc - 13 -
Page 14
Capturing Data
Note that you must create a PlanetPress Watch process before you send data from UNIX to the workstation running your PlanetPress Suite Workflow Tool.
PlanetPress Suite Configuration
To set up your PlanetPress Suite Workflow Tool to capture data sent using LPR:
1. In PlanetPress Watch Configuration, create a new PlanetPress Suite process by choosing Insert | New Process.
2. In the Process area, click the unknown task in the upper-left corner at the beginning of the data stream.
3. Choose Insert | Input
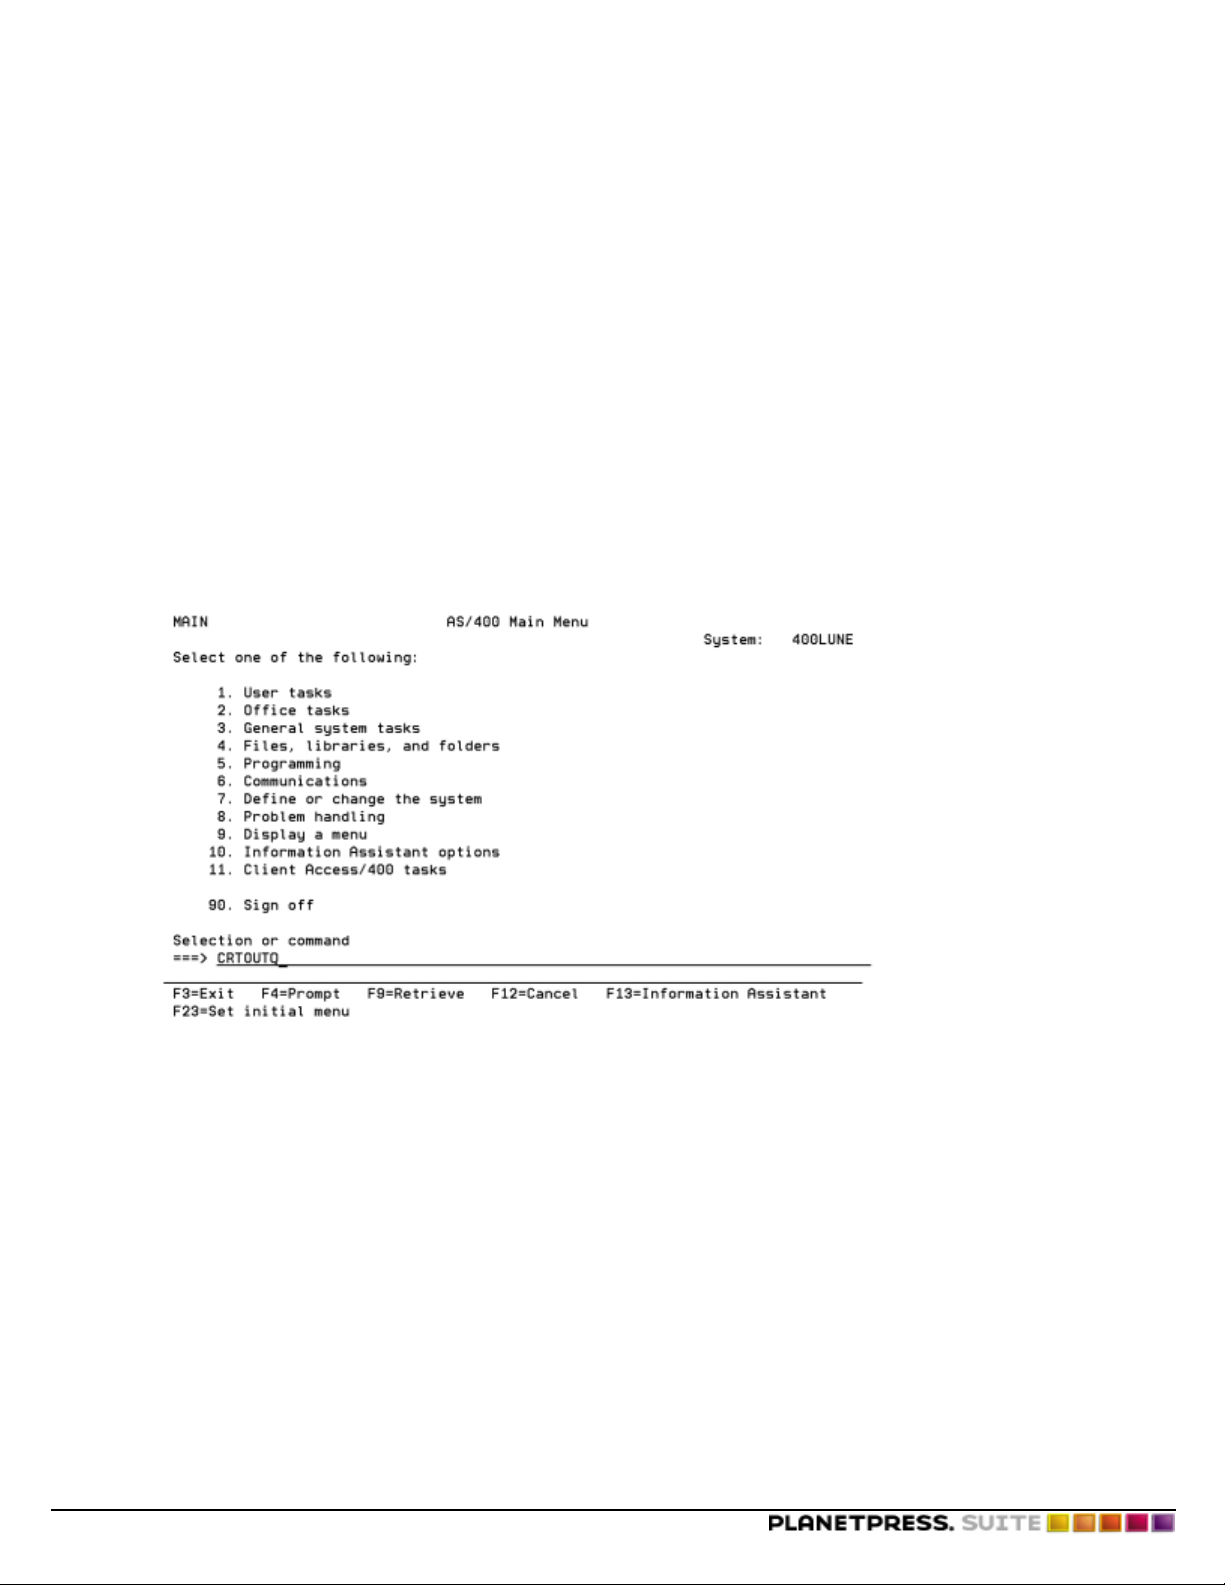
Capture Sample Data using an AS/400 Systems
Generic Output
To create a generic output queue on an AS/400:
1. In the AS/400 main menu, enter the create output queue command CRTOUTQ and press F4.
2. In the Change Output screen, in the Output queue field, enter an output queue name. In this example, the name
entered is OUTQ1.
©2014 Objectif Lune Inc - 14 -
Page 15
3. Press F10 followed by F9 to display the Remote Printer Queue parameter.
4. Enter the following information:
l In the Remote system field, enter the string *INTNETADR.
l In the Remote printer queue field, enter the name of the remote printer queue, enclosed in single quotes.
The remote printer queue is the one located on the machine that will receive the input data. In this example,
‘PRINTER1’ is the remote printer queue name.
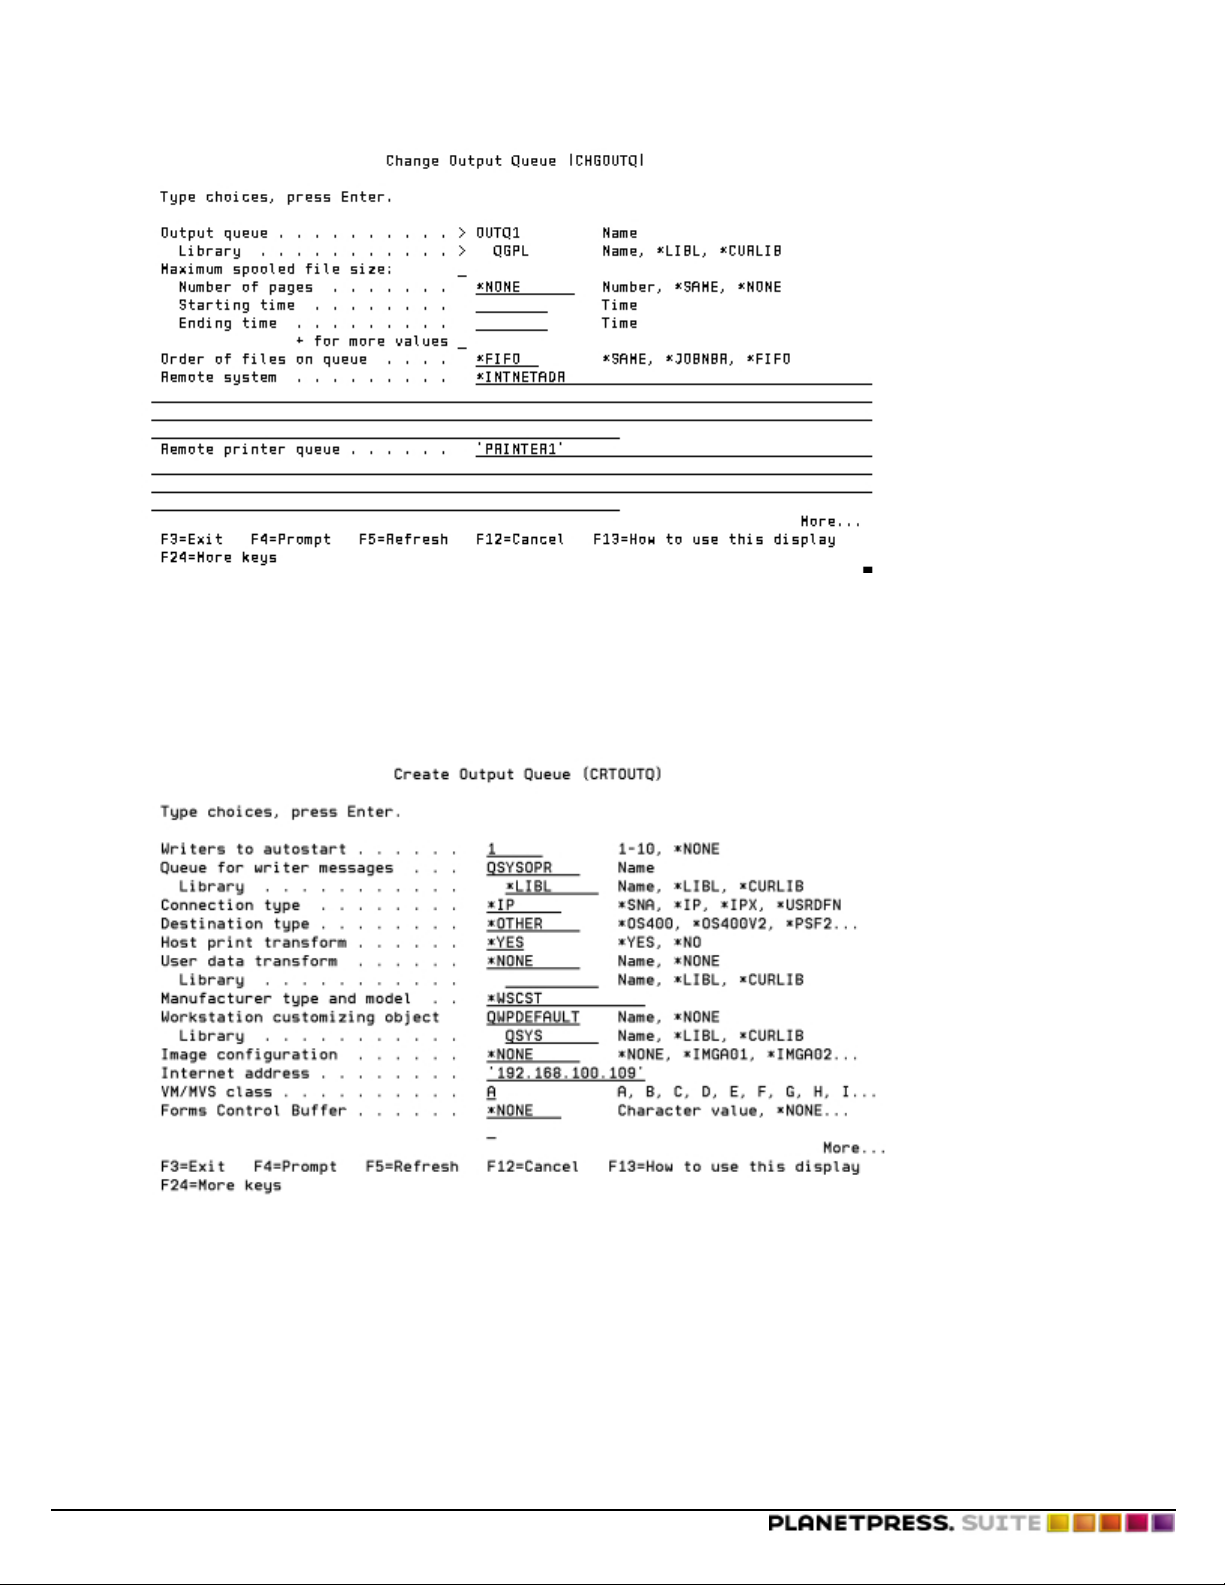
5. Press PAGE DOWN to display the Create Output Queue screen.
Capturing Data
6. Complete the fields with the following values. Unless otherwise specified, you must enter these values exactly as they
appear here.
Writers to autostart: 1
Connection type: *IP
Destination type: *OTHER
Host print transform: *YES
Manufacturer type and model: *WSCST
WS customizing object: QWPDEFAULT
Library: QSYS
©2014 Objectif Lune Inc - 15 -
Page 16
Capturing Data
Internet address: The IP address of the workstation to which you will send the data. In this example, the address is
192.168.100.109.
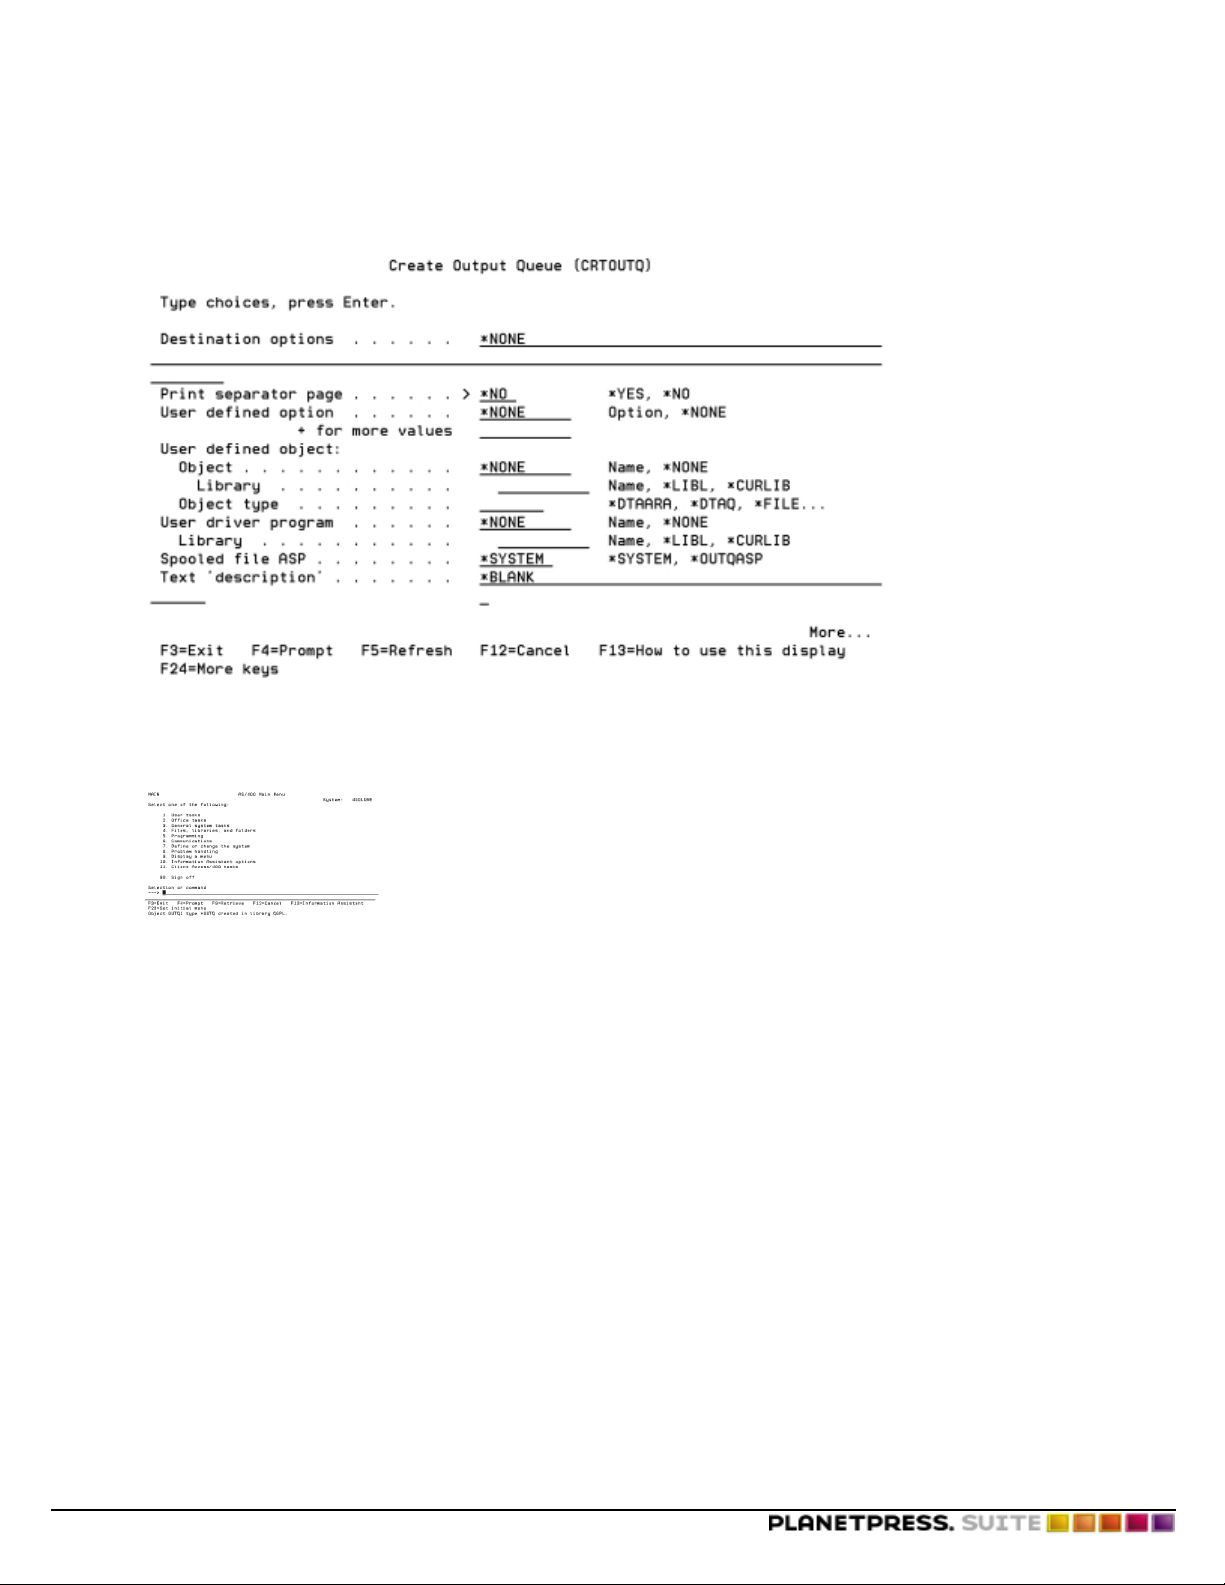
7. Press PAGE DOWN.
The next page of the Create Output Queue screen appears.
8. If you want to prevent a separator page from printing, enter *NO in the Print separator page field. Leave all other fields
untouched.
9. Press ENTER to create the new generic output queue.
A confirmation message appears at the bottom of the main menu.
Capture Sample Data From a Serial Port
This procedure describes how to use Microsoft’s Hyperterminal to capture serial data. Refer to the PlanetPress Workflow
Tools User’s Guide for information on capturing serial data using PlanetPress Suite Workflow Tool’s Serial input task.
1. 1. In the Windows Start menu, choose Programs | Accessories | HyperTerminal.
If necessary, install Windows HyperTerminal.
The Connection Description dialog box appears.
©2014 Objectif Lune Inc - 16 -
Page 17
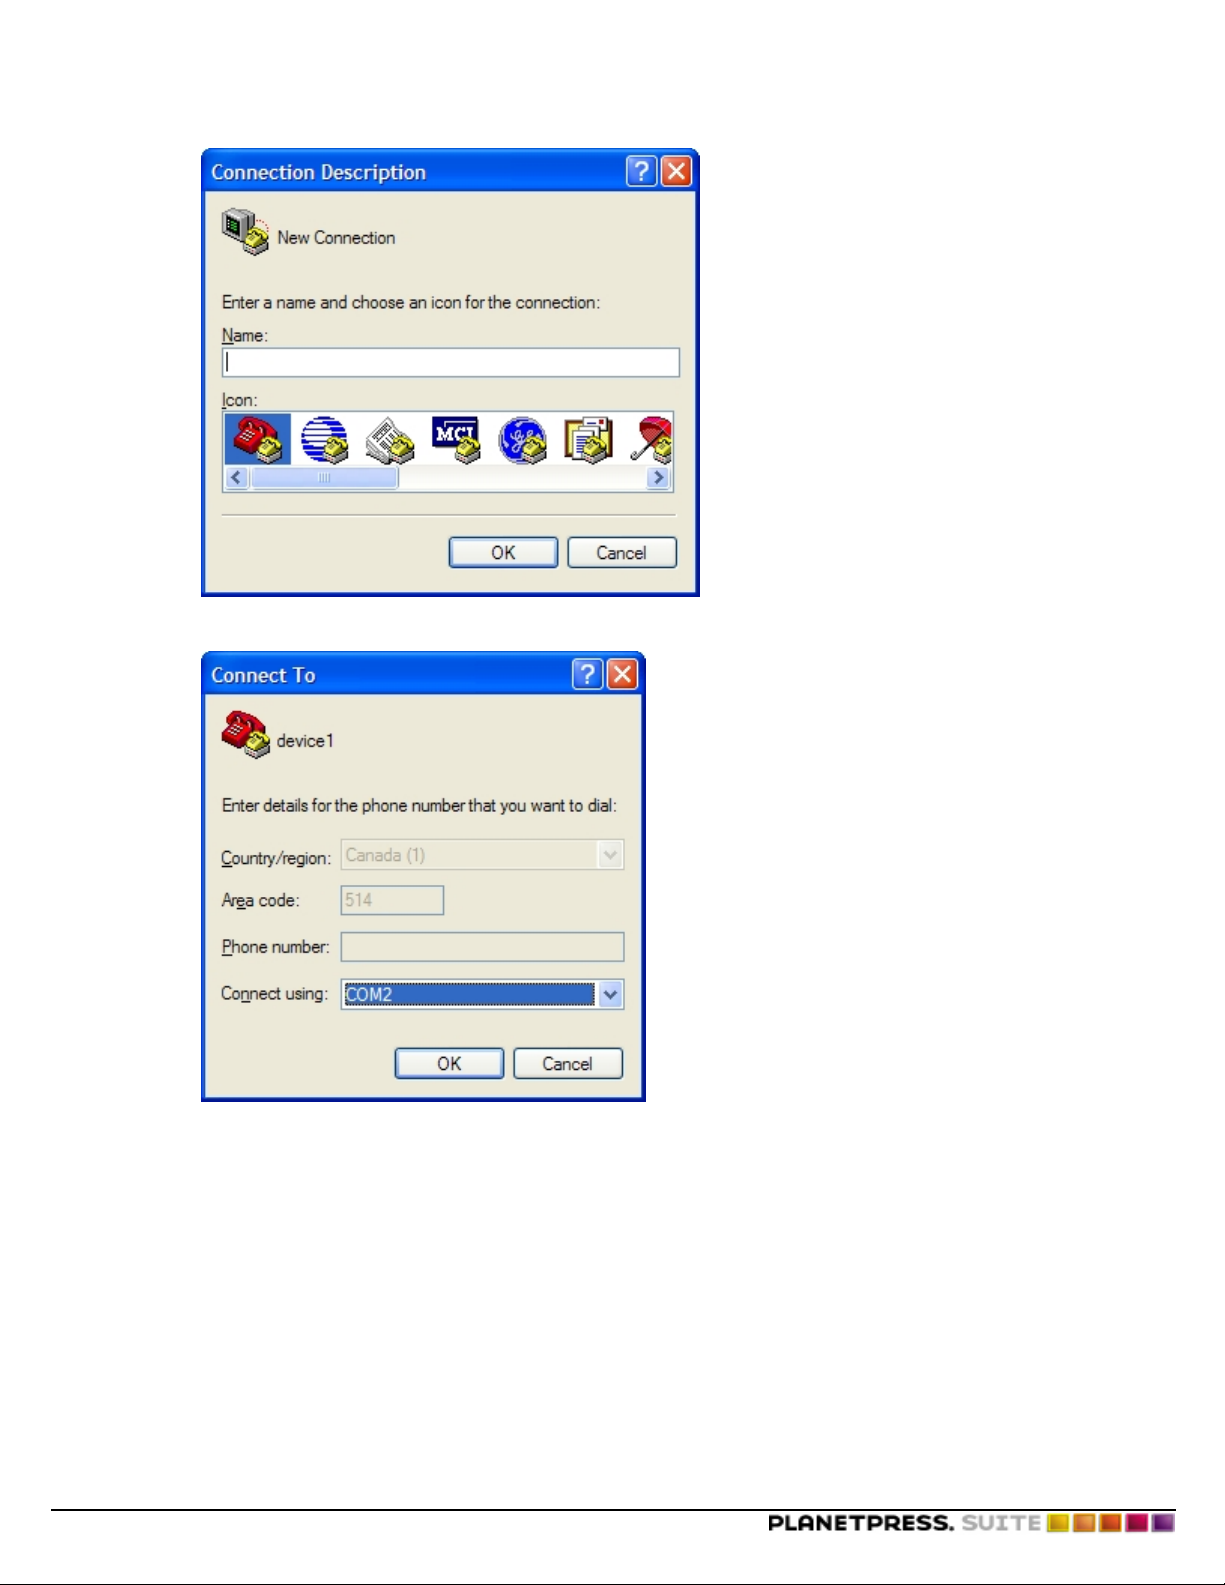
2. In the Name box, enter a name for the connection and click OK.
The Connect To dialog box appears.
Capturing Data
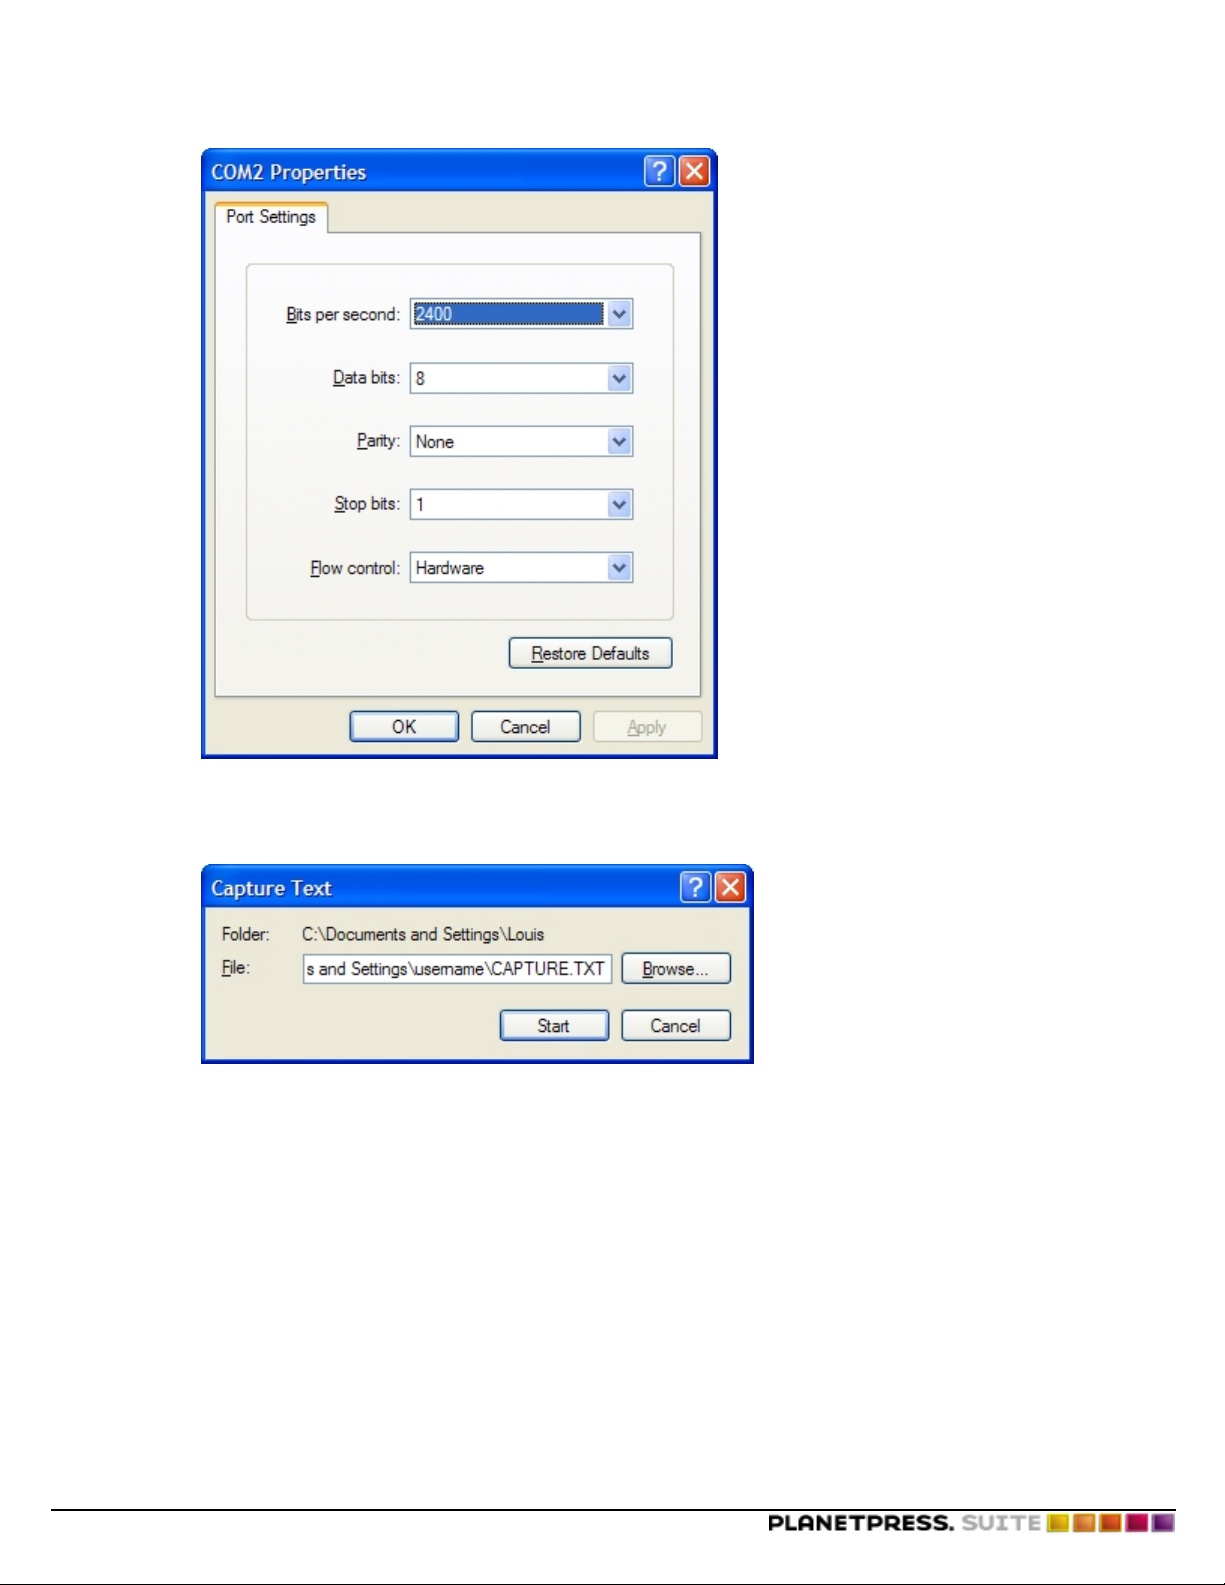
3. Select COM 1 or COM 2 and click OK. If you need to determine which COM port the printer uses, open the Control Panel, then open Modems and click Diagnostics. In most cases you select COM2. The remaining steps of this
procedure assume you selected COM2.
The COM2 Properties dialog box appears.
©2014 Objectif Lune Inc - 17 -
Page 18
Capturing Data
4. Adjust the COM2 Properties and click OK.
A HyperTerminal window for this connection appears.
5. In the menu for the HyperTerminal window, choose Transfer | CaptureText.
The Capture Text dialog box appears.
6. The file name that appears in this dialog box is Capture.txt. If this file does not exist, you will need to create it
(this is the text file that will be used as the capture file).
7. Click Start.
8. Send the input data to the printerusing the procedure you would usually use to print the data.
9. When the print command completes, return to the HyperTerminal window for this connection and choose Trans-
fer | Capture
©2014 Objectif Lune Inc - 18 -
Page 19

Creating Triggers
Creating Triggers
This chapter describes platform-specific procedures for creating a trigger and inserting it at the head of a data stream.
A job consists of a document, a trigger, and data. If you are not using any PlanetPress Suite Workflow Tool, you must manually create the appropriate trigger, add it to the head of the data stream, and send the result to the printer on which the document resides. The procedure for creating the trigger and adding it to the head of the data stream is platform-dependent.
In this section, you learn to:
l "Implement a Trigger under Novell 3.x" (page 21)
l "Implement a Trigger under Novell 4.x and 5.x with NDS or Bindery Printers" (page 29)
l "Implement a Trigger under Windows with TCP/IP" (page 35)
l "Implement a Trigger under BSD Printing Systems (BSDi, FreeBSD, Linux)" (page 36)
l "Implement a Trigger under UNIX System V (Solaris)" (page 38)
l "Implement a Trigger and Configure an AIX 4.3 Printer" (page 38)
l Implement a Trigger under VMS
l "Implement a Trigger with AS/400 Systems" (page 54)
l "Prepare SAP Device Type for PlanetPress Design" (page 60)
l "Implement a Trigger under HP 3000" (page 66)
In addition, you will be able to answer the following questions:
l "Trigger" (page 19)
l "Trigger Syntax" (page 20)
l "Techniques for Inserting Triggers" (page 21)
Trigger
What is a trigger?
A trigger is two lines of PostScript that immediately precedes the input data and performs two functions: it puts the printer in
PostScript mode, and tells the printer which document to launch. A trigger “triggers” the execution of a document.
You execute a document installed on a printer by sending a trigger to the printer, followed by the input data. If you execute
your document in a PlanetPress Suite Workflow Tool, this tool inserts the trigger. If you execute your document directly on a
printer, you must manually insert the trigger at the head of the data stream.
Printer-Specific Control Characters
You can precede a trigger with printer-specific control characters. The most common reason to do so is to ensure the printer
receives the job you send it as a new job.
A printer expects each job that it handles to end with a special character that tells the printer it has reached the end of the input
data. Until the printer receives this special character, it continues to process all input it receives as part of that job. If there is
no input, the printer waits for a defined period of time, then times out and proceeds to the next job. If a new job arrives during
the period of time the printer is waiting for input, the printer does not recognize it as a new job; rather it processes it as input
for the current job.
It is thus common practice to include an end of job character at the beginning of the trigger to ensure that the printer recognizes your job as a new print job. For certain printers <CTRL D> or ASCII 04 is a valid end of job character, while more
recent printers require a Printer Job Language (PJL) sequence such as <ESC>%-12345X<CR><LF>.
As an example, the following trigger includes <CTRL D> as an end of job character:
<CRTL-D>%!PS-Adobe <CR>
©2014 Objectif Lune Inc - 19 -
Page 20

Creating Triggers
run INVOICE <CR><LF>
Trigger Syntax
What is the syntax of a trigger?
In all syntax descriptions in this section, italics denote a variable, square brackets indicate the element is optional, <CR>
denotes a carriage return and <LF> denotes a line feed.
The general syntax for the first line of the trigger is the same for all triggers:
[ printer-specific_commands ] %!PS-Adobe <CR>
The first line of the trigger uses the string “%!PS-Adobe” to put the printer in PostScript mode. It may also include printerspecific commands.
The syntax of the second line of the trigger depends on where the document is installed in the printer: on the hard drive, in
RAM, or in flash memory. The second line, written in PostScript, tells the printer the name and location of the document, and
launches the document. If you are using version numbers in your documents, this line also contains the version number.
Trigger Syntax for Documents Installed on a Hard Disk
The general syntax of a trigger for a document that resides on the printer’s hard drive is:
[ printer-specific_commands ] %!PS-Adobe <CR>
[[ (location_of_document) ] run ] name_of_document <CR><LF>
The simplest example of a trigger for a document named INVOICE that resides on the printer’s hard drive excludes the location of the document. If a trigger does not specify the location of the document, the printer assumes it is on the hard disk.
%!PS-Adobe <CR>
run INVOICE <CR><LF>
An equivalent trigger that makes the location of the INVOICE document explicit:
%!PS-Adobe <CR>
(INVOICE) run INVOICE <CR><LF>
If the printer has more than one hard disk you must include the name of the hard disk. In this example, the name of the hard
disk is “presswork” and the name of the document is INVOICE.
%!PS-Adobe <CR>
(%presswork%INVOICE) run INVOICE <CR><LF>
Trigger Syntax for Documents Installed in RAM
The general syntax of a trigger for a document that resides in the printer’s RAM is:
[ printer-specific_commands ] %!PS-Adobe <CR>
name_of_document <CR><LF>
An example of the trigger for a document named FORMLETTER that resides in the printer’s RAM:
%!PS-Adobe <CR>
FORMLETTER <CR><LF>
©2014 Objectif Lune Inc - 20 -
Page 21

Creating Triggers
Trigger Syntax for Documents Installed in Flash Memory
The general syntax of a trigger for a document that resides in the printer’s flash memory is:
[ printer-specific_commands ] %!PS-Adobe <CR>
(%flash%name_of_document) run name_of_document <CR><LF>
An example of the trigger for a document named PAYROLL that resides in the printer’s flash memory:
%!PS-Adobe <CR>
(%flash%PAYROLL) run PAYROLL <CR><LF>
Techniques for Inserting Triggers
What are the common techniques for inserting a trigger?
How you create and insert a trigger is operating system dependent. There are many ways to insert a trigger manually. Four
common techniques are:
1. Manually concatenating two files
In this technique you add a trigger by concatenating two files where the first contains the trigger and the second contains the input data. You send the concatenated file to the printer using the DOS Copy command or the file transfer protocol (FTP).
2. Setting up the print server to automatically insert triggers
This technique works with a print server running either Novell or Windows NT. You create a print queue or print device
for each document installed in the printer, and associate the appropriate trigger for the document with the queue you
set up for it. All queues point to the same physical printer. When you send a job to that queue, the server automatically
inserts the trigger associated with that queue before it forwards the printer job to the printer.
3. Setting up the host to automatically insert triggers
This is the same technique as setting up the print server to automatically insert triggers. The only difference here is that
you set up the queues on the host on which the input data resides. The host inserts the trigger ahead of the spool file
when it sends the print job to the printer. This technique does not work with all hosts.
4. Including the trigger in application output
In this technique you modify the output of the application that generates the print file so that it adds a trigger for the
appropriate document. It is important to understand that this hampers your ability to print these jobs using other
printers since two additional lines are added to the print file.
Implement a Trigger under Novell 3.x
Unless otherwise indicated, always press ENTER at the end of a command. Note that you can exit any window or command
area at any time by pressing ESCAPE.
To install a trigger:
1. Log on to the server, and enter Supervisor and printdef.
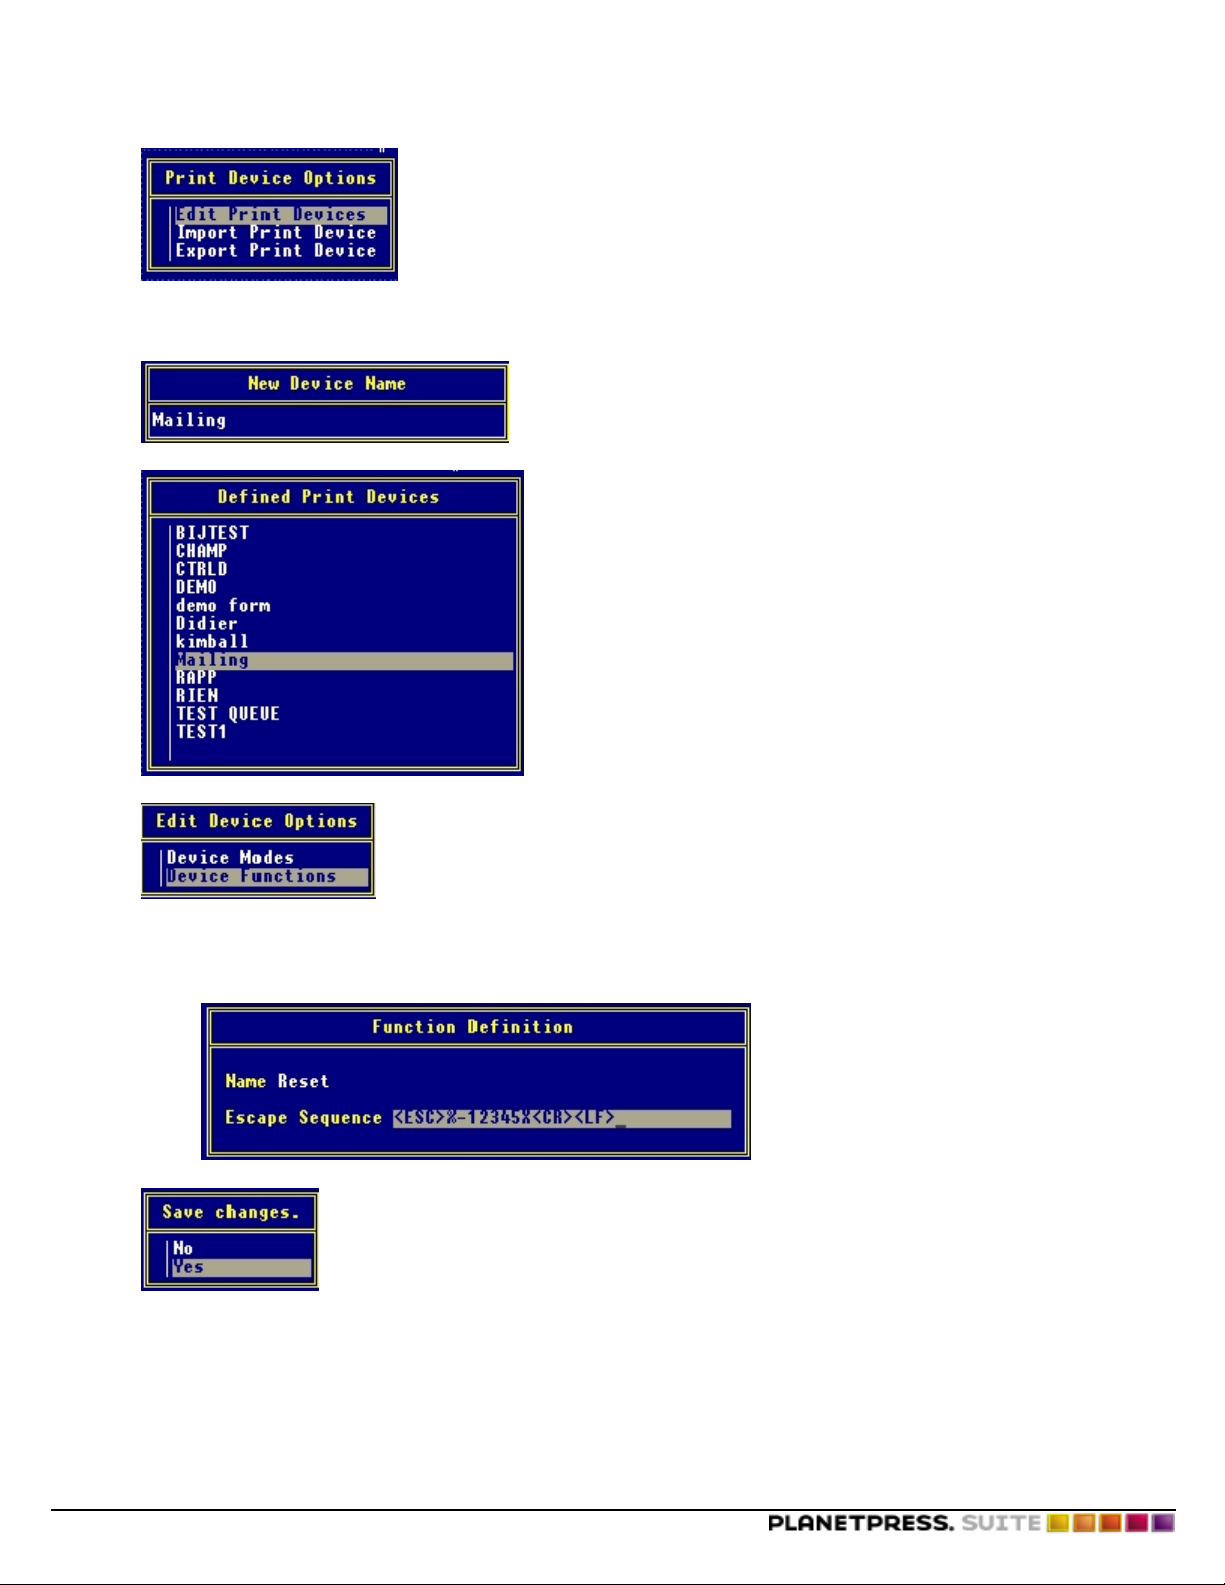
2. In the PrintDef Options dialog box, select Print Devices.
3. In the Print Device Options dialog box, select Edit Print Devices.
©2014 Objectif Lune Inc - 21 -
Page 22
Creating Triggers
4. Press INSERT.
5. In the New Device Name dialog box, enter the name of the document you want to execute. For this example, enter
Mailing.
6. In the Defined Print Devices dialog box, select Mailing and press ENTER.
7. In the Edit Device Options dialog box, select Device Functions.
8. Press INSERT.
9. In the Function Definition dialog box, enter the following information:
l In the Name field, enter Reset
l In the Escape Sequence field, enter the following sequence: <ESC>%-12345X<CR><LF>
10. Press ESCAPE. In the Save Changes dialog box, select Yes and press ENTER to save the changes.
11. In the Mailing Functions dialog box, press INSERT.
©2014 Objectif Lune Inc - 22 -
Page 23
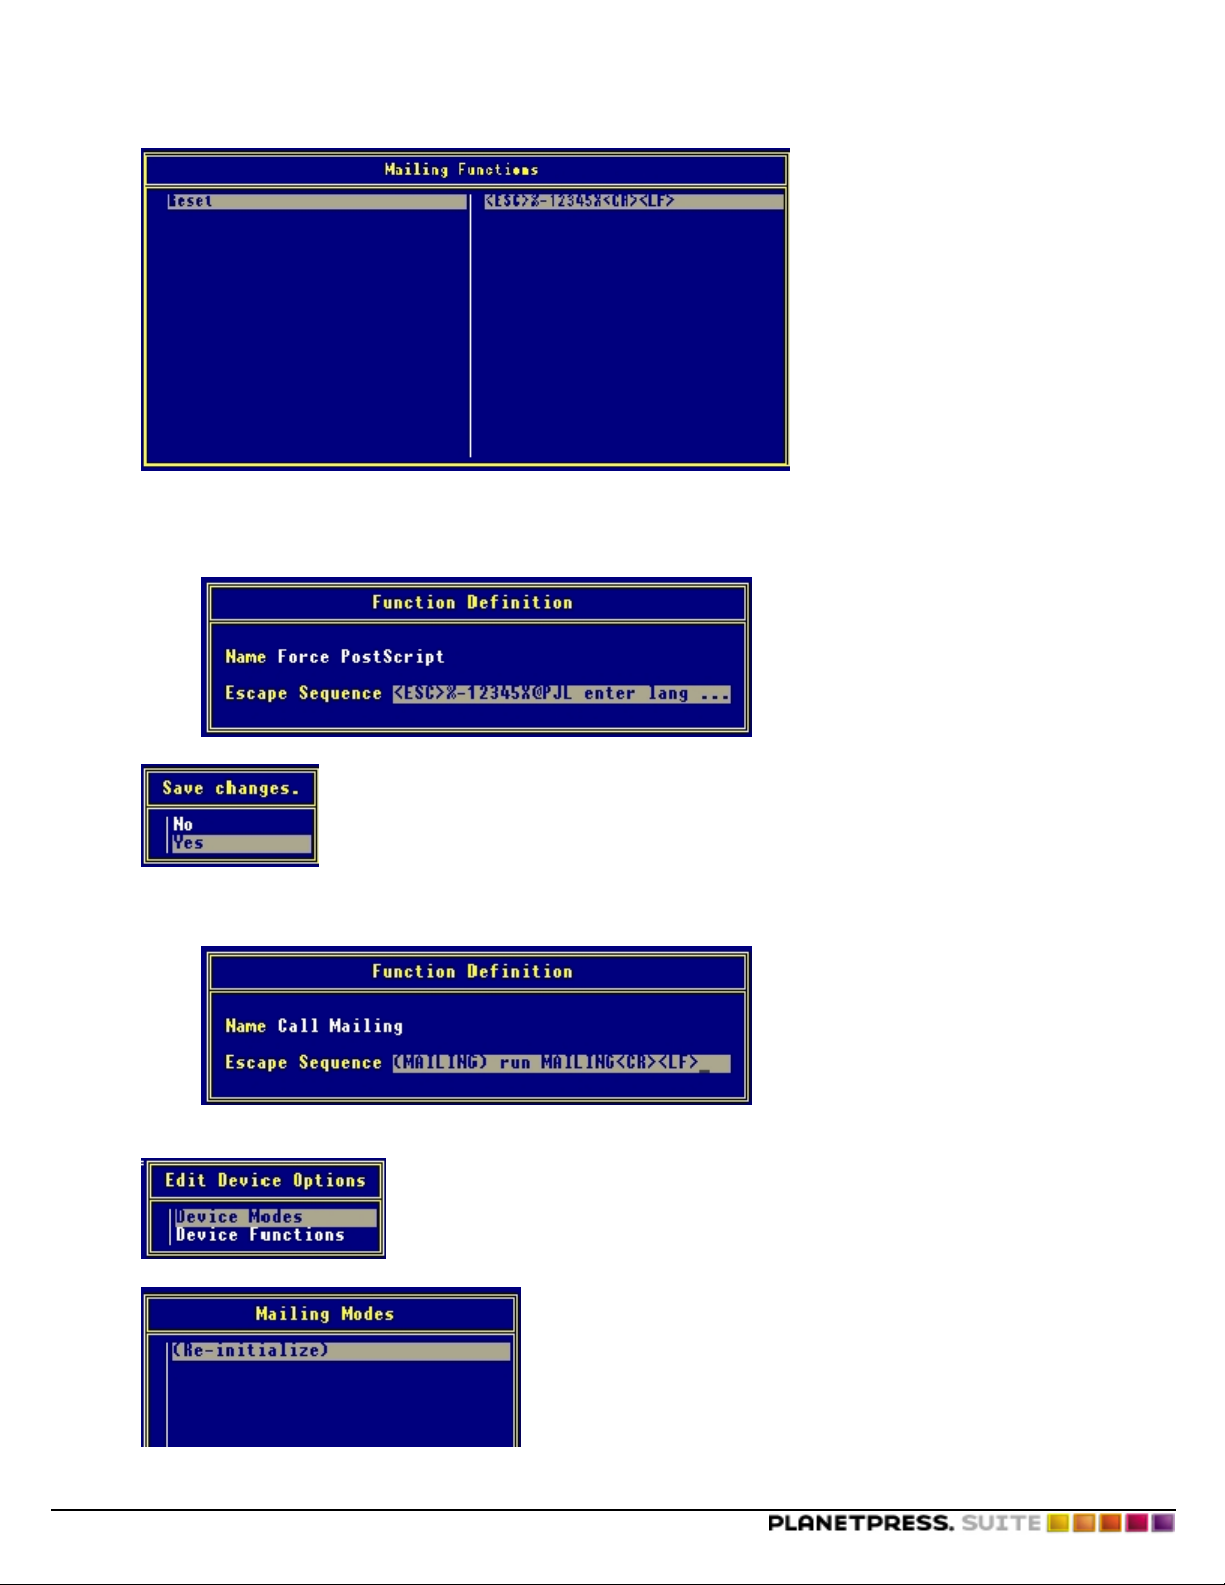
12. In the Function Definition dialog box, enter the following information:
l In the Name field, enter Force PostScript
l In the Escape Sequence field, enter the following sequence: <ESC>%-12345X@PJL enter language = Post-
Script <CR><LF>
Creating Triggers
13. Press ESCAPE. In the Save Changes dialog box, select Yes and press ENTER to save the changes.
14. In the Function Definition dialog box, enter the following information:
l In the Name field, enter Call Mailing
l In the Escape Sequence field, enter the following sequence: (MAILING) run MAILING<CR><LF>
15. Press ESCAPE. In the Save Changes dialog box, select Yes and press ENTER to save the changes.
16. Press ESCAPE again. In the Edit Device Options dialog box, select Device Modes.
The Mailing Modes dialog box appears.
17. In the New Mode Name dialog box, press INSERT and enter Call Mailing.
©2014 Objectif Lune Inc - 23 -
Page 24
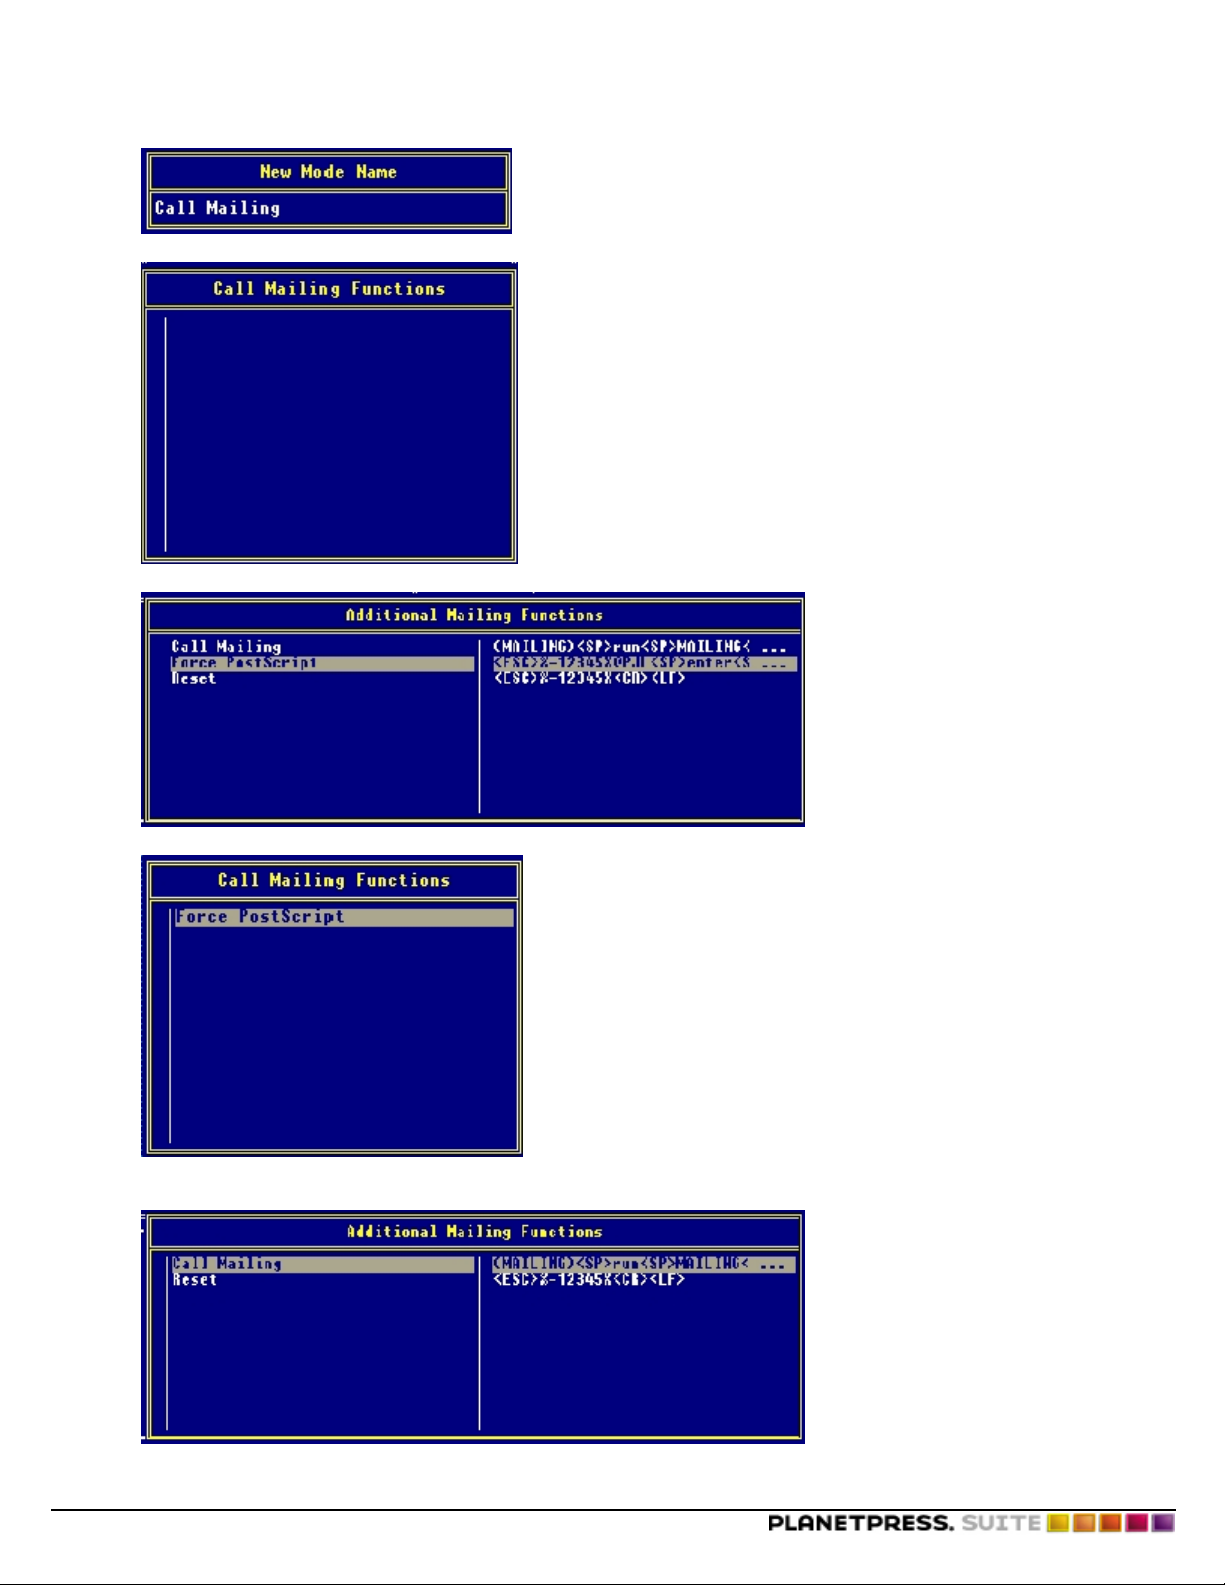
18. In the Call Mailing Functions dialog box, press INSERT.
19. In the Additional Mailing Functions dialog box, select Force PostScript and press ENTER.
Creating Triggers
20. The Call Mailing Functions dialog box should display Force PostScript.
21. Press INSERT.
22. In the Additional Mailing Functions dialog box, select Call Mailing.
23. Press ENTER.
©2014 Objectif Lune Inc - 24 -
Page 25

24. Press ESCAPE to return to the Mailing Modes dialog box.
25. In the Mailing Modes dialog box, select (Re-initialize).
26. In the (Re-initialize) Functions dialog box, press INSERT.
27. In the Additional Mailing Functions dialog box, select Reset and press ENTER.
Creating Triggers
28. The (Re-initialize) Functions dialog box displays Reset.
29. In the Exit PrintDef dialog box, select Yes to save the changes.
30. In the Exit Options dialog box, select Save Data Base, then EXIT.
31. Press ESCAPE several times to exit Printdef.
32. In DosPrompt, enter Printcon.
33. In the Available Options dialog box, select Edit Print Job Configurations.
©2014 Objectif Lune Inc - 25 -
Page 26

Creating Triggers
34. Press INSERT.
35. In the Enter new name field, enter Mailing.
36. Press ENTER.
37. In the Edit Print Job Configuration "Mailing" dialog box, adjust only the following settings. Leave all others
untouched.
Options: Settings
Print Queue: Printer where the intelligent document resides
Device: Mailing
Mode: Call Mailing
Print Banner: No
38. Press ESCAPE and save the changes.
To test the trigger installation:
1. In DosPrompt, enter pconsole to access pconsole.
2. In the Available Options dialog box, select Print Queue Information and press INSERT.
3. In the New Print Queue Name field, enter MAILING.
4. In the Print Queues dialog box, select Mailing and press ENTER.
5. In the Print Queue Information dialog box, select Current Queue Status.
©2014 Objectif Lune Inc - 26 -
Page 27

Creating Triggers
6. In the Current Queue Status dialog box, select No for the Servers can service entries in queue option.
7. Press ESCAPE several times to exit pconsole.
8. In the DOS prompt, enter the following line:
/l=2 represents the LPT port to which the printer is connected. In this example, it is LPT2.
9. Return to pconsole.
10. In the Available Options dialog box, select Print Queue Information.
11. In the Print Queues dialog box, select Mailing.
12. In the Print Queue Information dialog box, select Print Queue ID. The following dialog box appears.
13. Make a note of the Object ID.
©2014 Objectif Lune Inc - 27 -
Page 28

Creating Triggers
14. Press ESCAPE several times to exit pconsole.
15. In DOS, enter the following to create a sample spool file:
c:\>dir>lpt2
16. In the drive on which the Sys Volume is mounted, enter the following lines:
Y:\>cd system
Y:\SYSTEM>dir *.qdr
A list of all printer queues, including the one you just created, appears. The new printer queue has the same name as the
Object ID noted earlier.
17. Enter the following:
Y:\SYSTEM>cd 2F00000B.qdr
Y:\SYSTEM>2F00000B>dir
The following appears.
18. Using the information located in the directory, enter the last line. In this case:
Y:\SYSTEM\2F00000B.QDR>type oo2f0001.q :more
19. If no error occurs, the trigger and printer queue test is successful. The trigger appears at the start of the file.
In the pconsole > Print Queue Information > Current Queue Status dialog box, change Servers can service
20.
entries in queue to Yes.
©2014 Objectif Lune Inc - 28 -
Page 29

Creating Triggers
Implement a Trigger under Novell 4.x and 5.x with NDS or Bindery Printers
It is important to create a "Print Device" for the "Organizational Unit" containing the printer you use to print the document. The
"Print Job Definition" must be done for the "User" object, that is, for the "Organizational Unit" containing the "User" object used
to do the "Capture".
To create a print device:
1. Start the Netware Administrator (z:\win32\nwadmn32.exe).
2. Right-click Organizational Unit and choose Details.
The Organizational Unit: Printers dialog box appears.
3. Click Print Devices (Non NDPS).
4. Click Create.
The Create New Device dialog box appears.
5. In the Create New Device dialog box, enter a descriptive name for the printer on which you intend to print the document, then click OK or press ENTER.
©2014 Objectif Lune Inc - 29 -
Page 30

6. Select the newly created print device and click Modify.
7. You must now create three functions and a mode.
Create the first function
8. Click Create Function.
The Create New Function dialog box appears.
9. In the Create New Function dialog box, enter the following information:
l In the Function name box, enter reset.
l In the Control sequence box, enter <ESC>%-12345X<CR><LF>
10. Click OK.
Create the second function
11. Return to the Create New Function dialog box.
12. In the Create New Function dialog box, enter the following information:
l In the Function name box, enter Force Postscript.
l In the Control sequence box, enter <ESC>%-12345X@PJL enter language = Post-
Script<CR><LF>
Creating Triggers
13. Click OK.
Create the third function
14. Return to the Create New Function dialog box.
15. In the Create New Function dialog box, enter the trigger information. For example, if the name of the document
you want to execute is MAILING, and it exists on the hard drive of the printer, you would enter the following:
l In the Function name box, enter call mailing.
l In the Control sequence box, enter (MAILING) run MAILING.
16. Click OK.
©2014 Objectif Lune Inc - 30 -
Page 31

Define the mode
17. In the Modify Existing Device dialog box, click Create Mode.
Creating Triggers
18. In the Name box, enter a meaningful name. For this example, enter Mailing.
19. Select the three functions you just created, in the following order: reset, Force Postscript, call mailing. For each function, select it in the Device functions list, then click Add Below. The order in which you select the functions is important.
20. Click OK.
The Print Device is created with its functions and mode.
21. Create the Print Job Definition. You must create the Print Job Definition in the Organizational Unit that contains the
user's object or the object used by the user. For this example, the users in the Organizational Unit will be able to use
the Print Job Definition. Right-click Organizational Unit, and choose Details.
The Organizational: ol dialog box appears.
©2014 Objectif Lune Inc - 31 -
Page 32

Creating Triggers
22. Click Print Job Configuration (Non NDPS).
23. Click New.
The Print Job Configuration dialog box appears.
24. In the Print Job Configuration dialog box, enter the following:
l In the Print job name box, enter a descriptive name. For this example, enter Mailing.
l Clear the Print banner and From feed boxes.
l In the Printer/Queue box, enter the printer on which you intend to execute the document. The queue can be
NDS or Bindery.
l In the Device box, select the name of the device you created.
©2014 Objectif Lune Inc - 32 -
Page 33

l In the Mode box, select the name of the mode you created.
Creating Triggers
25. Close the Netware Administrator.
26. You must now configure the client's (user's) portion. First, use the Capture command to direct the network printer to a
port such as LPT1. You must also use the J option in the command to include your "job definition". The following command works with the above example:
CAPTURE Q=.OPTRA1650-NDS-PQ.PRINTERS.OL J=MAILING NB NFF TI=20
In this command, the J option indicates the name of the Print Job, NB signifies No Banner, NFF signifies No Form Feed,
and TI specifies the time-out value in seconds (in this case, 20 seconds). If you use this command, be sure to substitute
the Print Job name and the printer name with the ones that apply to your job.
27. Once you execute the Capture command (either locally or via Novell scripts), you must create a new printer in the
user's Windows using the Generic Text pilot that points towards the local LPT1 port. You create the new printer as follows:
©2014 Objectif Lune Inc - 33 -
Page 34

Creating Triggers
Users that perform the capture (with the J option) and have a generic printer pointing towards the LPT1 port can use
the document configured in the Print Job Configuration.
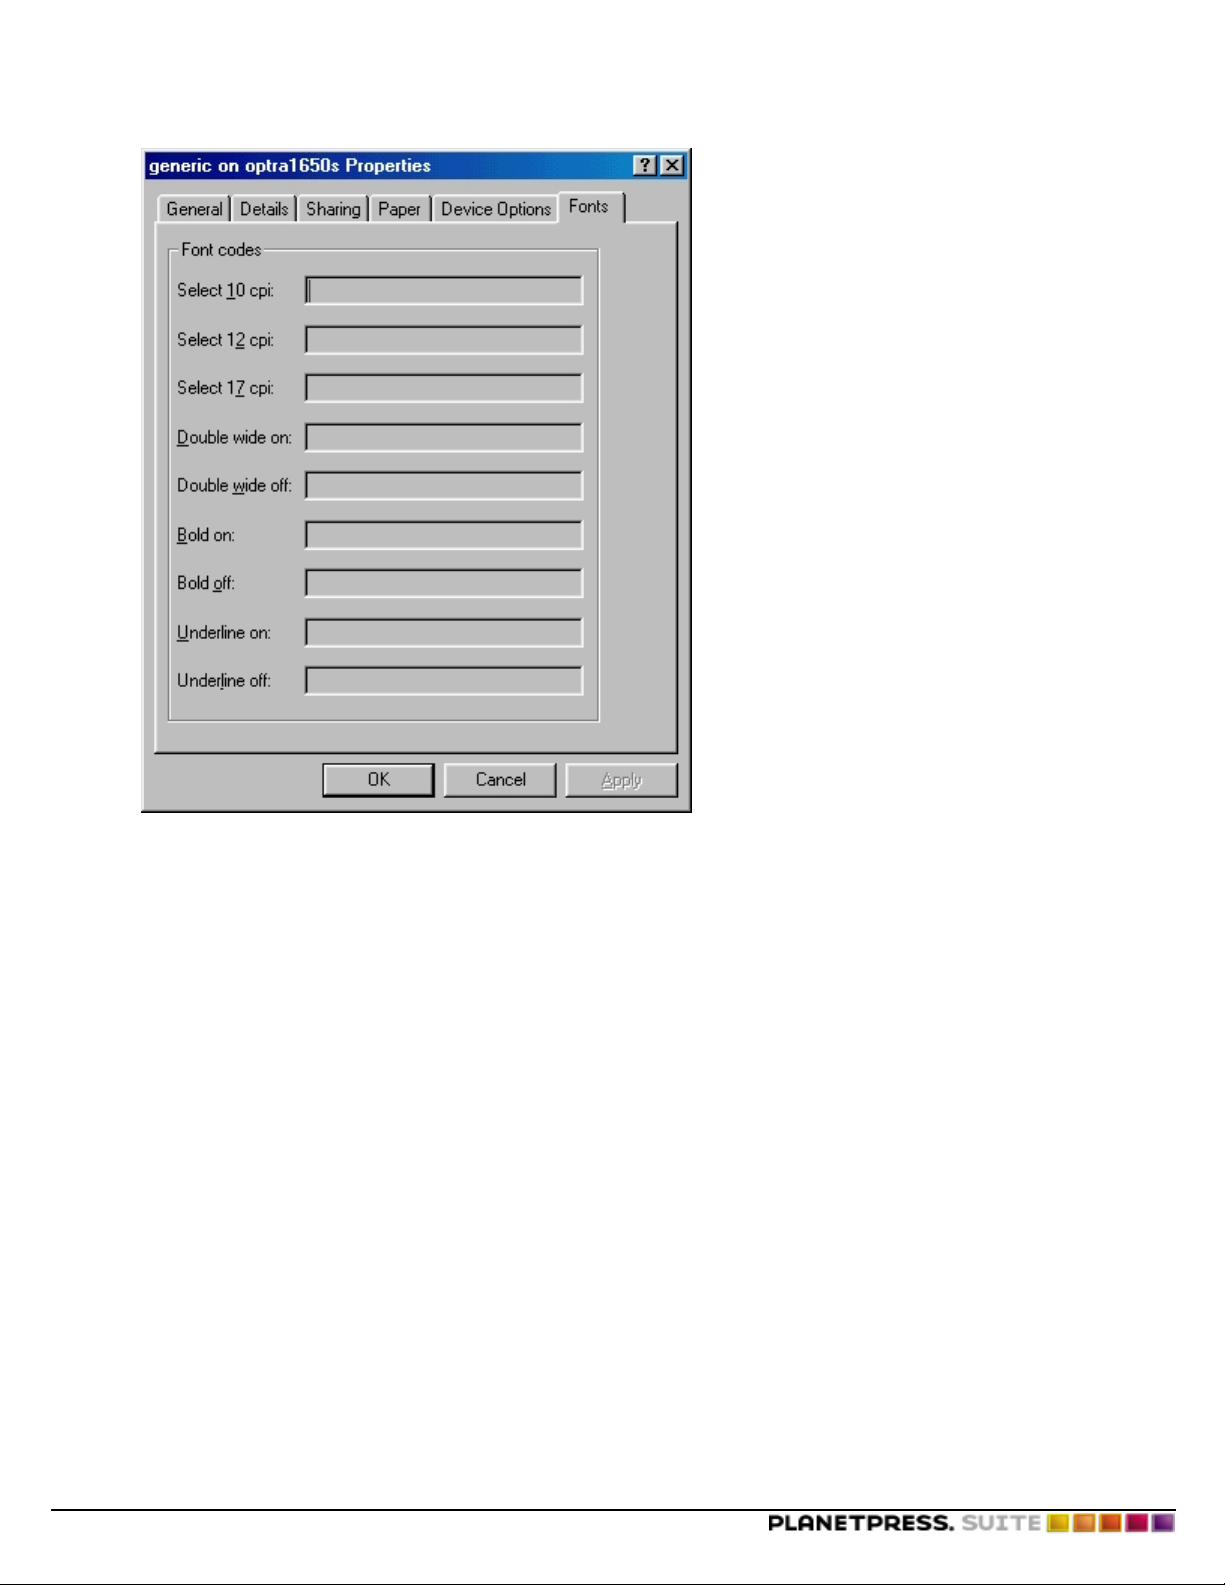
Note that certain versions of Windows have Generic Text pilots that can cause a well known problem: text aligned vertically instead of horizontally. To solve this problem, access the printer's properties. In the Fonts tab, add a space in
every Font codes section.
©2014 Objectif Lune Inc - 34 -
Page 35
Creating Triggers
Implement a Trigger under Windows with TCP/IP
These instructions use a separator page which adds the trigger to any job going through a specific text-only printer queue.
This is useful in the case of legacy software or systems that can only print through text-based printers and where no control is
possible over the contents of the job file.
Step 1 - Create a printer queue
Windows 2000/XP/2003
1. Click Start, then Printers and Faxes. Alternatively, this location can be found in the Control Panel.
2. Double-click on Add Printer. Click Next on the first page of the Add Printer Wizard.
3. Keep the Local printer attached to this computer option but uncheck the automatically detect and install
my Plug and Play printer box, then click Next.
4. Select Create a new port , then select the StandardTCP/IP Port option. Click Next.
5. Click Next in the new wizard dialog.
6. Type in the printer's IPaddress or network name (for example, 192.168.100.213 or 10.0.0.163) then click Next (the
Port Name will fill itself).
7. Leave the Device Type to Generic Network Card, then click Next and Finish.
8. Select the Generic manufacturer and the Generic / Text Only printer.
9. Enter a printer name. This printer can be local only or shared on a network and will be unique to the document it
triggers.
10. If the printer is to be shared on the network, enter a Share name, then click Next.
11. Select whether you want to print a test page, then click Next, then Finish.
Windows Vista/7
©2014 Objectif Lune Inc - 35 -
Page 36

Creating Triggers
1. Click Start, then Devices and Printers.
2. Click on Add a printer
3. Click on Add a local printer
4. Select Create a new port , then select the StandardTCP/IP Port option. Click Next.
5. Type in the printer's IPaddress or network name (for example, 192.168.100.213 or 10.0.0.163) then click Next (the
Port Name will fill itself).
6. Wait for the TCP/IPport detection to finish, leave the Device Type to Generic Network Card, then click Next.
7. Select the Generic manufacturer and the Generic / Text Only printer.
8. Enter a printer name. This printer can be local only or shared on a network and will be unique to the document it
triggers.
9. If the printer is to be shared on the network, enter a Share name, then click Next.
10. Check if you want to set the printer as default on the system, then click Finish when you're done.
Step 2 - Create a separator page
The separator page feature in Windows is generally used to add a page containing text between print jobs, often to identify
them. Because the separator page is sent as-is to the printer, however, even printer commands such as postscript will be
executed on the printer. Separator pages are the same for all versions of Windows, but selecting them is slightly different.
1. Open Notepad by clicking Start, Run, typing notepad.exe and clicking OK.
2. Enter the following 2 lines in the Notepad window:
\N
\FSEPARATOR.TRG
3. Go in the File menu then click Save. The name of the file should be SEPARATOR.SEP , and its location should be in
C:\WINDOWS\SYSTEM32\
4. Create a new file by going in File, New.
5. Enter the following 2 lines:
%!PS-Adobe
(MYFORM)run MYFORM
6. Save the file as SEPARATOR.TRG , also in C:\WINDOWS\SYSTEM32\
In the previous instructions, change both the trigger name (MYFORM)as well as a unique name for the SEPand TRGfile
names, especially if you intend to have more than one. Once this is done, follow these instructions to add the trigger to any job
printed through the chosen printer:
1. Right-click on the printer that was just created and click Properties in Windows 2000/XP/2003 , or Printer Prop-
erties in Windows Vista/7/2008.
2. In the Advanced tab, click Separator Page
3. Click Browse and browse to C:\WINDOWS\SYSTEM32\. Open the SEPARATOR.SEP file and OK.
Implement a Trigger under BSD Printing Systems (BSDi, FreeBSD, Linux)
The procedure here describes trigger implementation for UNIX systems using a BSD-like printing system (lpr, lpq, /etc/printcap). It assumes you are logged on as root.
To install a BSD printing system:
1. Create a text-only print queue entry in /etc/printcap and a spool directory.
If your system has a tool to create a print queue, use it to create a text-only queue. Make sure no input filter is used
(i.e. there is no if: command in the printcap entry). If you do not have such a tool, you must create the printcap
entry and a spool directory by hand. See To create a printcap entry by hand: and To create a spool directory by hand:.
2. Create an input filter for the trigger. The input filter is a shell script that inserts the trigger in front of the print job. You
should give the script the name of the document. In this example, we have a document named MAILING on the hard
©2014 Objectif Lune Inc - 36 -
Page 37

Creating Triggers
disk of the printer. We name the script mailing.scr and place it in the spool directory.
3. Edit the input filter using a text editor. For example, to edit it in the vi text editor, we issue the command:
vi /var/spool/lpd/mailing.scr
Enter the following lines in the text editor:
#!/bin/sh
/bin/echo "%!PS-Adobe"
/bin/echo "(MAILING) run MAILING"
cat -
/bin/echo -e \004
The first echo turns the printer to PS mode. The second echo calls the document. Edit them to reflect the name and location of
your document. Enter all other lines exactly as shown above. Although the echo \004 is not required, it is recommended as it
signals the end of the job to the PostScript printer. Be sure you use the echo program, and not the command internal to your
shell. The echo internal to your shell might not support the escape characters the echo program supports. The echo program is
usually located in /bin.
4. Save your changes and exit the text editor.
Set the permissions on the input filter file so that it can be executed from root. Use the chmod command as follows, replac-
5.
ing mailing.scr with the name of your input filter file:
chmod 755 /var/spool/lpd/mailing.scr
6. Edit the printcap file to add the input filter to the queue definition. Your entry should now look like this:
mailing:\
:sd=/var/spool/lpd/mailing:\
:mx#0:\
:sh:\
:lp=/dev/lp1:\
:if=/var/spool/lpd/mailing.scr:
It is important to add a backslash to a line before adding a new line, and to add a colon at the end of each new line.
7. Save the changes and exit the printcap file.
You have created your trigger. To print data on the MAILING document, use the queue "mailing". For example:
lpr -Pmailing data.txt
To create a printcap entry by hand:
1. Open the /etc/printcap file with a text editor. For example, you might open it with the vi text editor by issuing the
command
vi /etc/printcap
Enter the following at the end of the /etc/printcap file. Change the queue name and spool directory to reflect your instal-
2.
lation. This printcap entry is for a text-only printer on device lp1 named mailing, that uses the spool directory
/var/spool/lpd/mailing.
©2014 Objectif Lune Inc - 37 -
Page 38

Creating Triggers
mailing:\
:sd=/var/spool/lpd/mailing:\
:mx#0:\
:sh:\
:lp=/dev/lp1:
If you want to send the print job to a remote LPD server, use rm= to specify the remote print server, and rp= to specify the
remote queue name. You specify the remote print server in the rm field using either the IP address or host name. For example:
mailing:\
:sd=/var/spool/lpd/mailing:\
:mx#0:\
:sh:\
:rm=192.168.100.147:\
:rp=default:
To create a spool directory by hand:
l Use the following command, replacing mailing with the name you want to use for the spool directory.
mkdir /var/spool/lpd/mailing
Implement a Trigger under UNIX System V (Solaris)
Refer to "Capture Sample Data in UNIX (Solaris)" (page 13) to create a print queue for UNIX and capture data.
Implement a Trigger and Configure an AIX 4.3 Printer
Add a Physical or Virtual Printer
To add a physical or virtual printer in series:
1. Log in as dyadm.
2. Execute SmitPrinter.
3. Select Print Spooling.
©2014 Objectif Lune Inc - 38 -
Page 39

Creating Triggers
4. Select Add a Print Queue.
5. Select Local.
©2014 Objectif Lune Inc - 39 -
Page 40

Creating Triggers
6. Select Other, regardless of the type of printer.
7. Select Generic, regardless of the type of printer.
©2014 Objectif Lune Inc - 40 -
Page 41

Creating Triggers
8. Select parallel or rs232.
9. Select the appropriate adapter(s).
©2014 Objectif Lune Inc - 41 -
Page 42

Creating Triggers
.
10. Enter the following values:
ASCII: Name of virtual printer that prints from operating systems.
GL Emulation: Laser printer configured on a workstation and used for Windows printing.
Port number: Number of ports on the serial communication card.
Baud rate: Port speed.
Parity: Parity type.
Flow control: Printer's protocol type.
Printer time out: Time a printer can time-out before being DOWN.
State to be configured at boot time: Always be at AVAILABLE.
To add a physical or virtual printer connected to a Jet Direct:
©2014 Objectif Lune Inc - 42 -
Page 43

Creating Triggers
1. In the /etc/hosts file, enter the IP address and print server name.
2. Follow step 1 through step 5 in To add a physical or virtual printer in series:. In step 5 select hpJetDirect.
3. Select Other, regardless of the type of printer.
4. Select Generic, regardless of the type of printer.
©2014 Objectif Lune Inc - 43 -
Page 44

Creating Triggers
5. Select Do NOT make this system a BOOT/TFTP server.
6. Enter the following values:
ASCII: Name of printer for AIX, Basic and Informix printing.
GL Emulation: Laser printer configured on a workstation and used for Windows printing.
HOSTNAME: Name entered in the /etc/hosts file.
Port number: For JetDirect: 9100. For a three-port: Port 1 = 9100, Port 2 = 9101, Port 3 = 9102.
©2014 Objectif Lune Inc - 44 -
Page 45

Creating Triggers
To add a physical or virtual printer configured on another server:
1. In the /etc/hosts file, enter the IP address and print server name.
2. Follow step 1 through step 5 in To add a physical or virtual printer in series:.
3. Select Remote.
4. Select Local Filtering.
©2014 Objectif Lune Inc - 45 -
Page 46

Creating Triggers
5. Select Other.
6. Select Generic.
©2014 Objectif Lune Inc - 46 -
Page 47

Creating Triggers
7. Enter the following values:
ASCII: Name of printer for AIX, Basic and Informix printing.
GL emulation: Laser printer configured on a workstation and used for Windows printing.
HOSTNAME: Name entered in the /etc/hosts file.
Queue name: Name of the printing queue on the other server.
Backend time-out: Length of time, in seconds, the AIX server waits for information from the printer before disconnecting the printer. The recommended value is 30.
To add a new print queue on an existing device:
1. Follow step 1 through step 8 in To add a physical or virtual printer in series:.
2. Select one of the following options:
©2014 Objectif Lune Inc - 47 -
Page 48

Creating Triggers
Add new printer: To create a new printer, select Add new printer. Return to step 8 in To add a physical or virtual
printer in series:.
Existing printer: To edit a new queue on the lp printer/device, select the appropriate printer.
3. Enter the name of the new printer.
To modify the attributes of virtual printers:
1. Log in as dyaddm.
2. Execute Smit Printer.
3. Select Programming Tools.
©2014 Objectif Lune Inc - 48 -
Page 49

Creating Triggers
4. Select Change / /Show Printer Attribute Database (Virtual Printers).
5. Select the virtual printer to modify.
©2014 Objectif Lune Inc - 49 -
Page 50

Creating Triggers
6. Change the following attributes for the ASCII printers only:
J: !
Z: !
_j: !
_l: 0
_w: 255
cr: %Iac
Implement a Trigger under VMS
To create a text library:
©2014 Objectif Lune Inc - 50 -
Page 51

1. The following is an example of a command used to create a text library.
2. The following displays the details of the text library.
Creating Triggers
A. VMS executable file (similar to a DOS batch file)
3. The following displays details of the information in the text library.
A. Name of the text library (.TLB extension) B. Documents in the library
©2014 Objectif Lune Inc - 51 -
Page 52

4. The following displays details of a port configuration for a LAT device:
Creating Triggers
5. The following displays details of a port configuration for type Decserver 90LT:
©2014 Objectif Lune Inc - 52 -
Page 53

Creating Triggers
©2014 Objectif Lune Inc - 53 -
Page 54

Creating Triggers
Implement a Trigger with AS/400 Systems
TCP/IP Printing
When you implement a trigger for AS/400 systems, it is important to retrieve, edit and create a Workstation Customizing
Object (WSCST). In the following procedure, LUNE is the WSCST name. It is recommended that you use a descriptive name
such as the name of your document (for example, INVOICE or CHECK).
To retrieve the WSCST source:
1. At the command line, enter RTVWSCST and press ENTER.
2. At the Device type line, enter *TRANSFORM and press ENTER.
The following window appears.
3. Enter the following data:
Manufacturer type and model: *NONE.
Source member: Name of the source to retrieve.
Source file: Location in which to store the source file member.
Library: Location in which to store the source files.
Type description: Short text description of the source file. This description should be unique.
4. Press ENTER.
A confirmation message appears.
Member SRCLUNE added to file QTXTSRC in OBJLUNE.
©2014 Objectif Lune Inc - 54 -
Page 55
Creating Triggers
To edit the WSCST source:
1. At the command line, enter STRSEU and press F4.
The following window appears.
2. Enter the source file name. For this example, QTXTSRC.
3. Enter the library name. For this example, OBJLUNE.
4. Press ENTER.
The following window appears.
©2014 Objectif Lune Inc - 55 -
Page 56

Creating Triggers
5. In the Opt column, enter 2 and press ENTER.
The following window appears.
6. Replace INITPRT DATA = ' 00 ' X. by the following INIT string:
:INITPRT
DATA =
'1B252D31323334355840504A4C20656E746572206C616E67756167'X
'65203D20506F73747363726970740D0A'X
©2014 Objectif Lune Inc - 56 -
Page 57
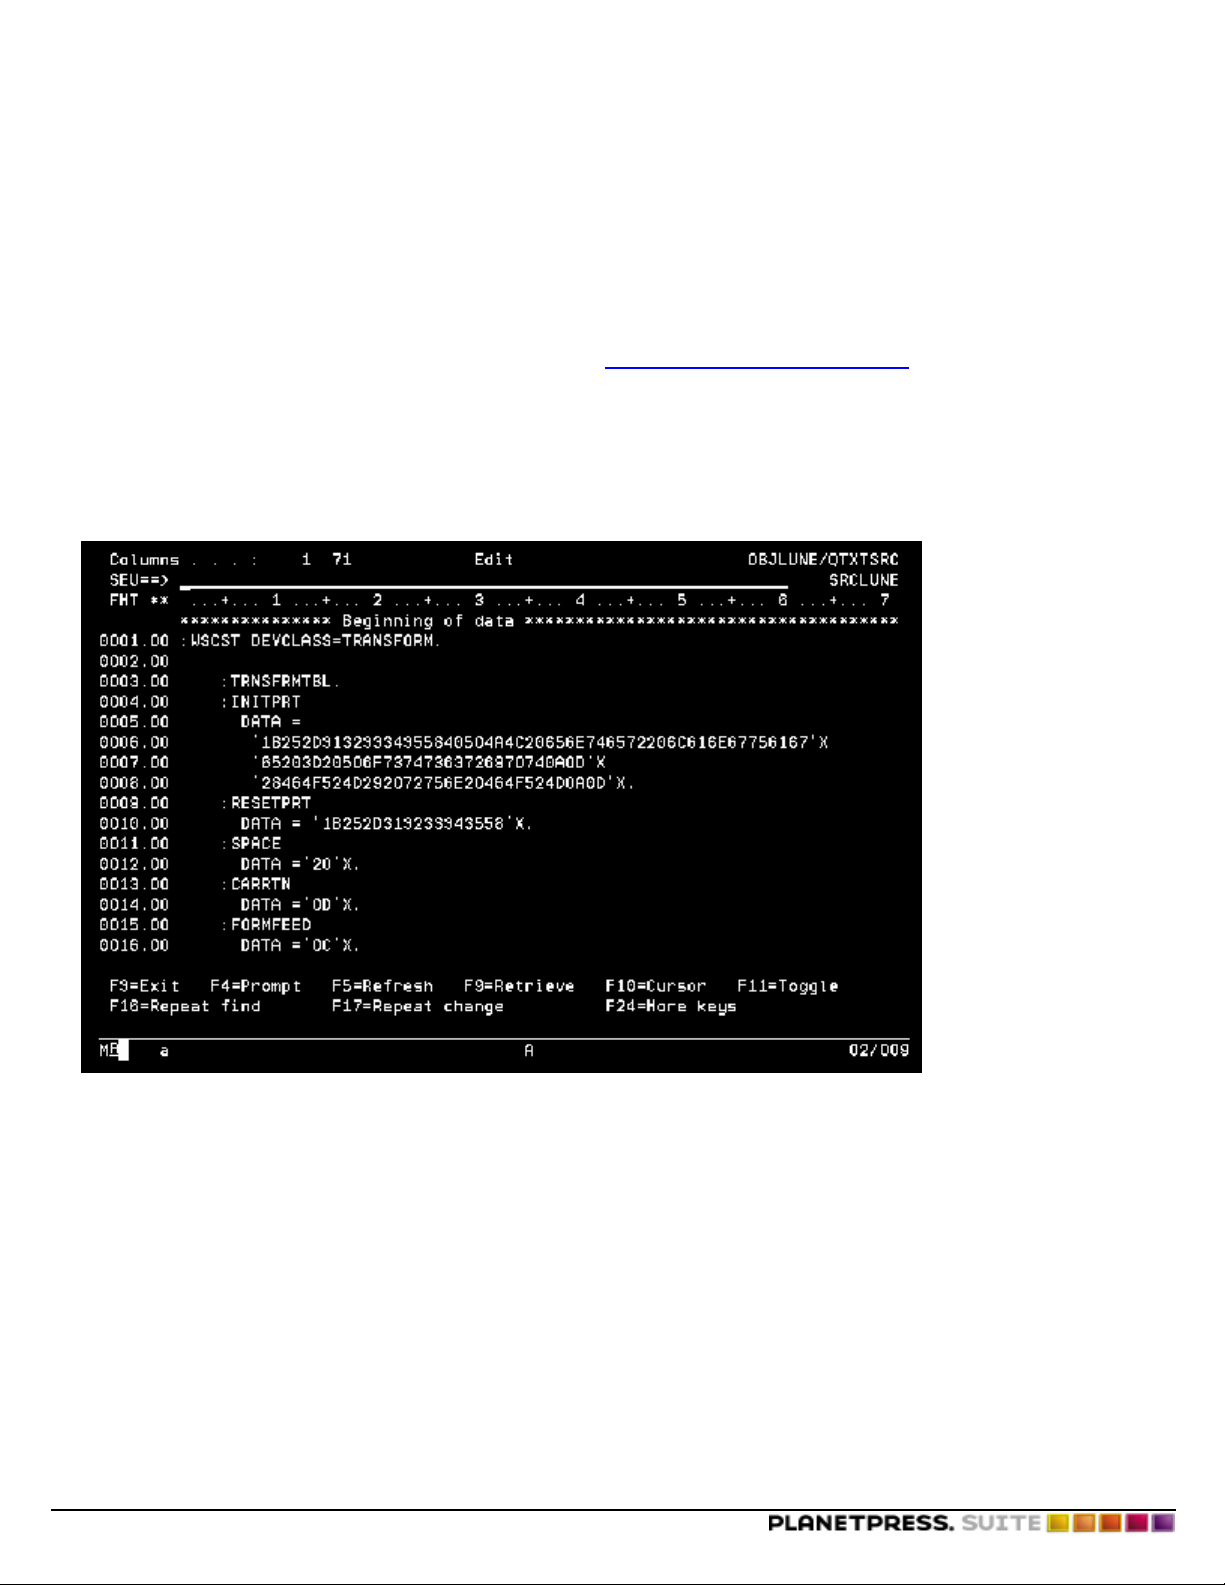
Creating Triggers
'28464F524D292072756E20464F524D0D0A'X.
The INITPRT string is the hexadecimal representation of the trigger. In the example, the trigger is:
<ESC>%-12345X@PJL ENTER LANGUAGE=POSTSCRIPT
(FORM) run FORM
In the example, the name of the document is FORM. Note: The bold characters in the INITPRT string are the letters FORM in
hexadecimal (where 46=F, 4F=O, 52=R and 4D=M). Consult "ASCII Conversion Table" (page 71) for help translating your
trigger into hexadecimal.
7. Enter the RESETPRT DATA as displayed in the following window:
:RESETPRT
DATA ='1B252D313233343558'X.
The INITPRT string is the hexadecimal representation of the following trigger:
<ESC>%-12345X@PJL ENTER LANGUAGE=POSTSCRIPT
(FORM) run FORM
8. Press ENTER.
The following confirmation message appears:
Member SRCLUNE in file OBJLUNE/QTXTSRC changed with 19 records.
©2014 Objectif Lune Inc - 57 -
Page 58

Creating Triggers
9. Press F3 to save the new WSCST.
The following window appears.
10. In the Change/create member line, enter Y, and press ENTER to confirm the save.
The following confirmation message appears.
Member SRCLUNE in file OBJLUNE/QTXTSRC changed with 19 records.
©2014 Objectif Lune Inc - 58 -
Page 59

Creating Triggers
To create the WSCST:
1. At the command line, enter CRTWSCST and press F4.
The following window appears.
2. Press F10 to display additional parameters.
3. Enter the name of the workstation customizing object that you want to create, and the library name for the customizing
object (the one previously changed).
4. In the Additional Parameters section, enter the following:
Source file: Enter the name of the source QTXTSRC.
©2014 Objectif Lune Inc - 59 -
Page 60

Library: Enter the name of the library containing the source file.
Replace object: Enter *YES or *NO to indicate whether or not this name should replace an object with the same name.
The following confirmation message appears.
The object LUNE customization has successfully been created.
Creating Triggers
If the creation of the WSCST was not successful, verify that the hexadecimal code for the INITPRT and RESETPRT strings is
correct. Once you create the WSCST, you can use it in an output queue.
Prepare SAP Device Type for PlanetPress Design
PlanetPress is a PC-based software that merges output data from the source system. In order for PlanetPress to work with
SAP, you must make changes to the spool device type.
To modify the spool device type in SAP:
1. Run SPAD and select Full Administration.
The Spool Administration: Initial Screen window appears.
©2014 Objectif Lune Inc - 60 -
Page 61

Creating Triggers
2. Click the red pencil icon to change to edit mode.
3. In the Device types section, click Page formats.
4. In the Page Formats window, select LETTER or another format from the list.
5. Select Copy from to copy LETTER to a new format.
6. Enter ZLETTER.
7. Select both Portrait and Landscape orientations.
8. Assign the appropriate width and length values to the paper size.
9. Click the left-pointing checkmark in the toolbar to return to the previous window.
10. Click Formats and create a new format.
11. Enter the name ZLETTER again.
12. In the Spool Administration: Format Type (Change) window, assign the LETTER page format created in step 4
to the new format ZLETTER.
©2014 Objectif Lune Inc - 61 -
Page 62

Creating Triggers
13. Click the left-pointing checkmark in the toolbar to return to the previous window.
14. Click Device types to display the list of device types.
15. Select For dev. types and Copy device type from the Utilities menu.
16. Copy device type ASCIIPRI to ZASCIIxx (where xx is a number). Verify the Use references box is cleared.
17. Click the left-pointing checkmark in the toolbar to return to the previous window.
18. Double-click the ZASCIIxx device type to display the corresponding window.
©2014 Objectif Lune Inc - 62 -
Page 63

Creating Triggers
19. Click Formats.
The Spool Admin.: List of Formats for Device Types (Change) window appears.
©2014 Objectif Lune Inc - 63 -
Page 64

Creating Triggers
20. Click the paper icon to add a new format to the list.
The Spool Admin.: List of Formats for Device Types (Change) dialog box appears.
21. In the Format box, select ZLETTER.
22. Click the checkmark and close the window.
The Spool Administration: Maintain Format for Device Type window appears.
©2014 Objectif Lune Inc - 64 -
Page 65

Creating Triggers
23. Double-click Printer initialization.
The Print init. window appears.
24. Enter the following PJL codes provided byPlanetPress.
©2014 Objectif Lune Inc - 65 -
Page 66

Creating Triggers
25. Save changes.
26. Assign the device type to the output device that you use to print documents.
PJL codes are now set up in SAP to control the output from SAP and merge it with the document created and installed in
the printer's memory using PlanetPress.
Implement a Trigger under HP 3000
To create a trigger on an HP 3000:
©2014 Objectif Lune Inc - 66 -
Page 67

1. Enter the required information in the appropriate fields.
Creating Triggers
2. Click Save Data.
3. Enter ENVPP01.HPENV.SYS (for environment PlanetPress 01) for the environment file. Be careful with the special characters.
4. Enter a name for the document. For example, ARRANGL.
The sample job should appear as follows:
!JOB P20A07B,…,FICHIER;INPRI=7
!…
!…
!FILE OUT=TAXEANG;DEV=402,1;ENV=ENVPP05.HPENV.SYS
!FILE IN=FACTANG
!FCOPY FROM=*IN;TO=*OUT
!…
!…
!EOJ
©2014 Objectif Lune Inc - 67 -
Page 68

©2014 Objectif Lune Inc - 68 -
Page 69

Special Printer Requirements
Special Printer Requirements
This appendix describes requirements specific to individual printers.
This appendix describes the following special printer requirements:
l "HP Printers with Flash Memory" (page 69)
l "Lexmark Printers" (page 69)
l "Printers with Automatic Emulation Switching" (page 70)
HP Printers with Flash Memory
If an HP printer has only flash memory, the storing command in the flash memory is the same as if the document was stored
on a hard drive (with this type of printer, the default is the hard drive). If the HP printer has both flash memory and a hard
drive, you can use either one or the other storing command, according to your needs.
Lexmark Printers
Set a Port for Binary Mode on the Optra+/Optra S
On the Optra +/ Optra S printers, you can set binary mode by changing a printer device parameter in order to accept binary
data. Specifically, you can set the /Filtering parameter to /None. This means that <CTRL+D> and other values will be passed
to the PostScript interpreter as data instead of commands. The device parameter resides in non-volatile RAM, so you only
need to send the file once. The following are samples of PostScript files that cause the printer to switch the port from ASCII to
binary mode.
To set a parallel or INA port for binary data:
1. To switch to binary mode, enter the following (ASCII off):
%!PS
true 0 startjob
currentsystemparams /CurInputDevice get
<< /Filtering /None >> setdevparams
2. To switch to ASCII mode, enter the following (Binary off):
%!PS
true 0 startjob
currentsystemparams /CurInputDevice get
<< /Filtering /InterpreterBased >> setdevparams
Note that these files are port specific. Thus if you send the files to the printer using its parallel port, only the parallel port is
affected.
©2014 Objectif Lune Inc - 69 -
Page 70

Special Printer Requirements
Also note that Optra S 81.10 base code does not support the /Filtering parameter. Base code 85.21 and later in all Optra SC
and Optra K code versions do support the /Filtering parameter. Optra + base code 52.04 and later releases all support switching from binary to ASCII mode.
Printers with Automatic Emulation Switching
A <CTRL+D> character on the first line of a trigger normally indicates the end of one job and the beginning of another. This
prevents mixups in print jobs.
Some printers implement an Automatic Emulation Switching (Auto Switch) feature that automatically recognizes what emulation it requires to process a job. In this case, when the file containing your trigger is in ASCII, the printer does not recognize
the first few lines as a PostScript program (your trigger). Instead it makes the printer enter ASCII emulation. To prevent this,
you must modify the trigger as follows to force the printer to switch to PostScript.
<ESC>%-12345X
<ESC>%-12345X@PJL JOB
@PJL ENTER LANGUAGE = POSTSCRIPT
%!PS-Adobe
(INVOICE) run INVOICE
©2014 Objectif Lune Inc - 70 -
Page 71

ASCII Conversion Table
ASCII Conversion Table
This appendix provides a table for converting among ASCII, hexadecimal, decimal and octal values.
Dec Hx Oct Char
0 00 000 NUL (null)
1 01 001 SOH (start of heading)
2 02 002 STX (start of text)
3 03 003 ETX (end of text)
4 04 004 EOT (end of transmission)
5 05 005 ENQ (enquiry)
6 06 006 ACK (acknowledge)
7 07 007 BEL (bell)
8 08 010 BS (backspace)
9 09 011 TAB (horizontal tab)
10 0A 012LF (NL line feed, new line)
11 0B 013VT (vertical tab)
12 0C 014FF (NP form feed, new page)
13 0D015CR (carriage return)
14 0E 016SO (shift out)
15 0F 017 SI (shift in)
16 10 020 DLE (data link escape)
17 11 021 DC1 (device control 1)
18 12 022 DC2 (device control 2)
19 13 023 DC3 (device control 3)
20 14 024 DC4 (device control 4)
21 15 025 NAK (negative acknowledge)
22 16 026 SYN (synchronous idle)
23 17 027 ETB (end of trans. block)
24 18 030 CAN (cancel)
25 19 031 EM (end of medium)
26 1A 032SUB (substitute)
27 1B 033ESC (escape)
28 1C 034FS (file separator)
29 1D035GS (group separator)
30 1E 036RS (record separator)
31 1F 037 US (unit separator)
32 20 040 SPACE
33 21 041 !
34 22 042 "
35 23 043 #
36 24 044 $
37 25 045 %
38 26 046 &
39 27 047 '
40 28 050 (
41 29 051 )
©2014 Objectif Lune Inc - 71 -
Page 72

Dec Hx Oct Char
42 2A 052*
43 2B 053+
44 2C 054,
45 2D05546 2E 056.
47 2F 057 /
48 30 060 0
49 31 061 1
50 32 062 2
51 33 063 3
52 34 064 4
53 35 065 5
54 36 066 6
55 37 067 7
56 38 070 8
57 39 071 9
58 3A 072:
59 3B 073;
60 3C 074<
61 3D075=
62 3E 076>
63 3F 077 ?
64 40 100 @
65 41 101 A
66 42 102 B
67 43 103 C
68 44 104 D
69 45 105 E
70 46 106 F
71 47 107 G
72 48 110 H
73 49 111 I
74 4A 112J
75 4B 113K
76 4C 114L
77 4D115M
78 4E 116N
79 4F 117 O
80 50 120 P
81 51 121 Q
82 52 122 R
83 53 123 S
84 54 124 T
85 55 125 U
86 56 126 V
87 57 127 W
ASCII Conversion Table
©2014 Objectif Lune Inc - 72 -
Page 73

Dec Hx Oct Char
88 58 130 X
89 59 131 Y
90 5A 132Z
91 5B 133[
92 5C 134\
93 5D135]
94 5E 136^
95 5F 137 _
96 60 140
97 61 141 a
98 62 142 b
99 63 143 c
100 64 144d
101 65 145e
102 66 146f
103 67 147g
104 68 150h
105 69 151i
106 6A 152 j
107 6B 153 k
108 6C 154 l
109 6D155m
110 6E 156n
111 6F 157 o
112 70 160p
113 71 161q
114 72 162r
115 73 163s
116 74 164t
117 75 165u
118 76 166v
119 77 167w
120 78 170x
121 79 171y
122 7A 172 z
123 7B 173 {
124 7C 174 |
125 7D175}
126 7E 176~
127 7F 177 DEL
ASCII Conversion Table
©2014 Objectif Lune Inc - 73 -
Page 74

©2014 Objectif Lune Inc - 74 -
Page 75

CL Program for AS/400 Systems
CL Program for AS/400 Systems
This appendix provides the CL program you use with AS/400 systems.
PGM PARM(&WATCHPRTFN &WATCHPRTFL &OUTPUTQS +
&OUTPUTQSLB &OUTPUTQD &OUTPUTQDLB +
&TRIGGERFN &TRIGGERLIB)
/*************************************************************************/
/* WATCH */
/* THIS PROGRAM IS USED TO INTERCEPT SPOOLFILES FROM AN OUTPUT QUEUE AND */
/* TO INSERT A TRIGGER. A NEW FILE IS CREATED WITH THE TRIGGER PREPENDED */
/* TO THE DATA OF THE ORIGINAL SPOOL FILE. THIS NEW FILE IS THEN */
/* TRANSFERRED TO THE DESTINATION OUPTUT QUEUE. */
/* */
/* AUTEUR : STEVE FLEURY */
/* CIE : OBJECTIF LUNE INC. */
/* DATE : 12 JUILLET 2000 */
/* */
/*************************************************************************/
/*************************************************************************/
/* DECLARATION: VARIABLES AND FILES */
/*************************************************************************/
/* */
/* &OUTPUTQS : OUTPUT QUEUE TO WATCH */
/* &OUTPUTQD : OUTPUT QUEUE OF DESTINATION */
/* &TRIGGERFN : FILE NAME FOR THE TRIGGER */
/* &TRIGGERLIB: LIBRARY NAME FOR THE TRIGGER FILE */
/* &SPLFNAME : NAME ATTRIBUTE OF SPOOLFILE */
/* &SPLFUSER : USER ATTRIBUTE OF SPOOLFILE */
/* &SPLFSTS : STATUS ATTRIBUTE OF SPOOLFILE */
/* &SPLFJOB : JOB ATTRIBUTE OF SPOOLFILE */
/* &SPLFNB : NUMBER ATTRIBUTE OF SPOOLFILE */
/* &WATCHPRTFN: NAME OF PRINTER FILE USED TO CREATE THE NEW SPOOLFILE */
/* &WATCHPRTFL: NAME OF THE LIBRARY OF PRTFILE */
/* */
/*************************************************************************/
DCL VAR(&OUTPUTQS) TYPE(*CHAR) LEN(10)
DCL VAR(&OUTPUTQSLB) TYPE(*CHAR) LEN(10)
DCL VAR(&OUTPUTQD) TYPE(*CHAR) LEN(10)
DCL VAR(&OUTPUTQDLB) TYPE(*CHAR) LEN(10)
DCL VAR(&TRIGGERFN) TYPE(*CHAR) LEN(10)
DCL VAR(&TRIGGERLIB) TYPE(*CHAR) LEN(10)
DCL VAR(&SPLFNAME) TYPE(*CHAR) LEN(10)
DCL VAR(&SPLFUSER) TYPE(*CHAR) LEN(10)
DCL VAR(&SPLFSTS) TYPE(*CHAR) LEN(3)
DCL VAR(&SPLFJOB) TYPE(*CHAR) LEN(10)
DCL VAR(&SPLFNB) TYPE(*CHAR) LEN(6)
DCL VAR(&WATCHPRTFN) TYPE(*CHAR) LEN(10)
DCL VAR(&WATCHPRTFL) TYPE(*CHAR) LEN(10)
DCLF FILE(OBJLUNE/WATCHWORK)
/*************************************************************************/
©2014 Objectif Lune Inc - 75 -
Page 76

CL Program for AS/400 Systems
/* CREATE THE TEMPORARY FILE NEEDED DURING THE PROGRAM */
/*************************************************************************/
CRTPF FILE(QTEMP/TRANSITF) RCDLEN(200) +
TEXT('file to build the new spoolfile')
MONMSG MSGID(CPF7302) /* file already exists */
/*************************************************************************/
/* TAKE A SNAPSHOT OF THE OUTPUT QUEUE IN A FILE AND SEND IT IN THE */
/* WORKFILE FILE. THIS WILL ALLOW US TO MANIPULATE THE CONTENT. */
/*************************************************************************/
WRKOUTQ OUTQ(&OUTPUTQSLB/&OUTPUTQS) OUTPUT(*PRINT)
CPYSPLF FILE(QPRTSPLQ) TOFILE(OBJLUNE/WATCHWORK) +
SPLNBR(*LAST)
DLTSPLF FILE(QPRTSPLQ) SPLNBR(*LAST)
/*************************************************************************/
/* READ THE CONTENT OF THE WORKFILE TO DETERMINE IF THERE ARE SPOOLFILES */
/* TO BE TREATED. IF THE SPOOLFILE STATUS IS NOT RDY THIS IS BECAUSE */
/* WE ARE IN THE HEATHER LINES OR THE STATUS IS HLD OR SAV, ETC... */
/*************************************************************************/
BEGIN: RCVF
MONMSG MSGID(CPF0864) EXEC(GOTO CMDLBL(END)) /* eof +
of file encountered */
IF COND(%SST(&WATCHWORK 36 3) *NE RDY) THEN(GOTO +
CMDLBL(BEGIN)) /* bypass of heathers and +
non ready spools */
CHGVAR VAR(&SPLFNAME) VALUE(%SST(&WATCHWORK 2 10))
CHGVAR VAR(&SPLFUSER) VALUE(%SST(&WATCHWORK 13 10))
CHGVAR VAR(&SPLFSTS) VALUE(%SST(&WATCHWORK 36 3))
CHGVAR VAR(&SPLFJOB) VALUE(%SST(&WATCHWORK 82 10))
CHGVAR VAR(&SPLFNB) VALUE(%SST(&WATCHWORK 93 6))
/*************************************************************************/
/* CREATION OF NEW SPOOLFILE FROM THE TRIGGER AND DATA FROM THE */
/* SPOOLFILE IN TRANSIT. THE PROCEDURE IS THE FOLLOWING: */
/* - COPY THE TRIGGER INTO A TEMP FILE. */
/* - APPEND THE SPOOLFILE INTO THE TEMP FILE */
/* - CREATE A SPOOLFILE FROM THIS PHYSICAL FILE */
/*************************************************************************/
CPYF FROMFILE(&TRIGGERLIB/&TRIGGERFN) +
TOFILE(QTEMP/TRANSITF) FROMMBR(*ALL) +
MBROPT(*REPLACE) FMTOPT(*NOCHK)
CPYSPLF FILE(&SPLFNAME) TOFILE(QTEMP/TRANSITF) +
JOB(&SPLFNB/&SPLFUSER/&SPLFJOB) MBROPT(*ADD)
CPYF FROMFILE(QTEMP/TRANSITF) +
TOFILE(&WATCHPRTFL/&WATCHPRTFN) +
PRINT(*COPIED) FMTOPT(*NOCHK)
CHGSPLFA FILE(&WATCHPRTFN) SPLNBR(*LAST) +
OUTQ(&OUTPUTQDLB/&OUTPUTQD)
/*************************************************************************/
/* ERASE THE TEMPORARY SPOOLFILES CREATED BY THE COPY OPERATIONS. */
/*************************************************************************/
DLTSPLF FILE(QSYSPRT) SPLNBR(*LAST) SELECT(*CURRENT +
*OUTQ)
GOTO BEGIN
©2014 Objectif Lune Inc - 76 -
Page 77

END
CL Program for AS/400 Systems
©2014 Objectif Lune Inc - 77 -
Page 78

©2014 Objectif Lune Inc - 78 -
Page 79

Index
©2010 Objectif Lune Inc - 79 -
 Loading...