

Page 1

Trigger and Data Capture Guide
Page 2

Page 3

Page 4

Copyright Information
Copyright © 1994-2007 Objectif Lune Inc. All Rights Reser ved.
No part of this pub lication may be reproduced, transmitted, transcribed, stored in a retrieval system, or translated into any other language or computer language in
whole or in par t, in any form or by any means, wh ether it be electronic, mechanical, magnetic, optical, manual or otherwise, without prior written consent of Objectif Lune Inc.
Objectif Lune Inc. disclaims all warranties as to this software, whether expressed or implied, including without limitation any implied warranties of merchantability,
fitness for a particular purpose, functionality, data integrity or protection.
PlanetPress is a registered trademark of Objectif Lune Inc.
PostScript and Acrobat are registered trademarks of Adobe Systems Inc.
Pentium is a registered trademark of Intel Corporation.
Windows is a registered trademark of Microsoft Corporation.
Adobe, Adobe PD F Library, Adobe Acrobat, Adobe Distiller, Adobe R eader, Adobe Illustrator, Adobe Pho toshop, Optimized Postcri pt Stream, the Adobe logo, the
Adobe PDF logo are either registered trademarks or trademarks of Adobe Systems Incorporated in the United States and/or other countries.
Trademarks of other companies mentioned in this documentation appear for identification purposes only and are the property of their respective companies.
Title Trigger and Data Capture Guide
Revision 6.1 8/17/07
Page 5

OBJECTIF LUNE PLANETPRESS SUITE
END USER LICENSE AGREEMENT
AND LIMITED WARRANTY
IMPORTANT - READ CAREFULLY
1. LICENSE AGREEMENT AND LIMITED WARRANTY AGREEMENT. - This End User License Agreement (“EULA”) and Limited Warranty (hereinafter collectively the
“License Agreement”) constitute a legal agreement between you (either as a physical, legal person (e.g. corporation) or a partnership) and Objectif Lune Inc.
(“Objectif Lune”) for the software product identified as PlanetPress® Suite, including all companion products, components, patches, updates and upgrades, and also
including any computer software, PostScript® programs, media and all accompanying on-line or printed documentation (collectively the “Software”). The Software
also includes Adobe® Technology and related documentation, and any upgrades, modified versions, additions and copies thereof.
2. BINDING EFFECT. - BY INSTALLING, COPYING, OR OTHERWISE USING THE SOFTWARE, YOU, AS NON-EXCLUSIVE SUB LICENSEE, ACCEPT TO BE AND YOU ARE BOUND BY
ALL OF THE TERMS AND CONDITIONS OF THIS LICENSE AGREEMENT. IF YOU ARE THE ORIGINAL PURCHASER OF THE SOFTWARE AND DO NOT AGREE WITH THE TERMS
AND CONDITIONS OF THE LICENSE AGREEMENT, PROMPTLY RETURN THE UNUSED SOFTWARE TO THE PLACE FROM WHICH YOU OBTAINED IT FOR A FULL REFUND. BY
YOUR ACCEPTANCE OF THE TERMS AND CONDITIONS OF THIS LICENSE AGREEMENT AS MENTIONED ABOVE, OBJECTIF LUNE GRANTS YOU THE RIGHT TO USE THE SOFTWARE IN THE MANNER HEREIN PROVIDED.
3. COPYRIGHTS. - This Software is owned by Objectif Lune or its suppliers and is protected by the Copyright Act (Canada), any copyright law and international copyright treaties. Therefore, you must treat this Software like any other copyrighted material (e. g., a book), except that you may, for example, make one copy of the
Software solely a) for backup or archival purposes or b) if it is essential for the compatibility of the computer program, or transfer the Software to a single hard disk,
provided you keep the original solely for backup or archival purposes and that such copy is not installed or used on any other computer.
4. PROPERTY AND INTELLECTUAL PROPERTY RIGHTS. - All Objectif Lune’s libraries, source code, byte code executables and any other files (collectively the “files”)
remain Objectif Lune’s exclusive property. Regardless of any modifications that you make, you may not distribute any files (particularly but not limited to Objectif
Lune source code and other non-executable files) except those that Objectif Lune has expressly designated. Nothing in this License Agreement permits you to derive
the source code of files provided to you in executable form only, or to reproduce, modify, use or distribute the source code of such files. This L icense Agreement does
not grant you any intellectual property rights in the Software.
5. TRANSFER. - You may transfer the Software only on a permanent basis, provided you retain no copies except as provided in Section 3 and the recipient or transferee shall be bound by the terms of this License Agreement. Except as provided in this License Agreement, you may not transfer, rent, lease, lend, copy, modify,
adapt, translate, sublicense or time-share in any manner the Software or any part hereof.
6. TRADE SECRET. - You acknowledge that the Software in source code, its structure and organization form remains a confidential valuable trade secret of Objectif
Lune or its suppliers and therefore you agree not to modify the Software or attempt to reverse engineer, decompile or disassemble or other wise attempt to discover
the source code of the Software.
7. UPGRADED VERSION. - If you have purchased an upgrade version of the Software, this version constitutes a single product with and forms part of the Software.
Any transfer of an upgrade version of the Software can be made only in accordance with this License Agreement.
8. SCOPE OF USE. - You agree to use the Software for your own customary business or personal purposes on only one device (physical or virtual computer system). If
you need to use the Software on more than one device, you must purchase additional licenses. Contact Objectif Lune for applicable royalties payable and licensing
terms. Please refer to th e appropriate following sections 9 o r 10 “ADDI TIONAL LICENSE TERMS” for “Variable Content D ocuments” or - for “Optimized PostScript and
Windows Printing outputs”.
9. ADDITIONAL LICENSE TERMS FOR VARIABLE CONTENT DOCUMENTS. - If the Software can or will generate or create or modify Postscript programs called “Variable
Content Documents” (VCD), any VCD generated by the Software is licensed on a per “licensed output device” basis (including, without limitation, printers, Adobe
Acrobat Distiller, Aladdin Ghostscript, etc.). This means that any VCD generated by the Software can be used by any number of users as long as they use the VCD on
only that single licensed output device. If you need to use the VCD on more than one output device, you must purchase additional licenses. In case of cluster printing
systems (multiple print engines attached to a single Raster Image Processor (RIP), each print engine needs to be licensed individually. Contact Objectif Lune for the
applicable royalties payable and licensing terms for distribution of any VCD.
10. ADDITIONAL LICENSE TE RMS FOR OPTIMIZED POSTSCRIPT AND WINDOWS PRI NTING OUTPUTS.- Section 9 does not apply for PlanetPress Server’s “Optimized Postscript” or “Windows Printing”.
11. TERM. - This license is effective until terminated. Objectif Lune has the right to terminate your license immediately if yo
of this Agreement. Upon ter mination, you must destroy the original and any copy of the Software and cease all use of all the trademarks mentioned herein.
12. LIMITED WARRANTY. - Objectif Lune warrants that the Software media will be free from defects in materials and workmanship, for a period of ninet y (90) days
from the date of its purchase.
You must repor t all errors and return the Software to the location where you bought it with a copy of your receipt within such period to be eligible for warranty service.
u fail to comply with any one of the terms
Page 6

Objectif Lune’s and its suppliers’ liability and the exclusive remedy shall be, at Objectif Lune’s sole option, either (a) return of the price paid, or (b) repair or replacement of the Software if it does not meet Objectif Lune’s Limited Warranty and if returned to Objectif Lune with a copy of your receipt. No warranty is given by Objectif Lune for and in the name of any of its suppliers.
DO NOT RETURN ANY PRODUCT UNTIL YOU HAVE CALLED THE OBJECTIF LUNE CUSTOMER CARE DEPARTMENT AND PREVIOUSLY OBTAINED A RETURN AUTHORIZATION
NUMBER.
This Limited Warranty is void if failure of the Software results from accident, abuse or misapplication. Any replacement of the Software media will be warranted for
the remainder of the original warranty period or thirty (30) days, whichever is longer. Outside Canada, neither these remedies nor any product support services
offered by Objectif Lune are available without proof of purchase from a duly authorized non-Canadian source.
OBJECTIF LUNE DOES NOT AND CANNOT WARRANT THE PERFORMANCE OR RESULTS YOU MAY OBTAIN BY USING THE SOFTWARE. THIS LICENSE AGREEMENT STATES THE
SOLE AND EXCLUSIVE REMEDIES FOR OBJECTIF LUNE’S BREACH OF WARRANTY, EXPRESS OR IMPLIED, AS TO MERCHANTABILITY, NON-INFRINGEMENT OF THIRD PARTY
RIGHTS, OR FITNESS FOR A PARTICULAR PURPOSE.
For further warranty information, you may contact your nearest Objectif Lune representative. Contact information can be found at www.objectiflune.com.
13. LIMITATION OF LIABILIT Y. - IN NO EVENT SHALL OBJECTIF LUNE OR ITS SUPPLIERS BE LIABLE FOR ANY SPECIAL, INCIDENTAL, INDIRECT OR CONSEQUENTIAL DAMAGES WHATSOEVER (INCLUDING, WITHOUT LIMITATION, DAMAGES FOR LOSS OF BUSINESS, LOSS OF PROFITS OR SAVINGS, BUSINESS INTERRUPTION, LOSS OF BUSINESS INFORMATION OR ANY OTHER PECUNIARY LOSS) ARISING OUT OF THE USE OF OR INABILITY TO USE THE SOFTWARE OR THE PROVISION OF OR THE FAILURE TO
PROVIDE SUPPORT SERVICES, EVEN IF OBJECTIF LUNE HAS BEEN ADVISED OF THE POSSIBILITY OF SUCH DAMAGES. IN ANY CASE, OBJECTIF LUNE’S ENTIR E LIABILITY
UNDER ANY PROVISION OF THIS LICENSE AGREEMENT SHALL BE LIMITED TO THE GREATER OF: A) THE AMOUNT PAID FOR THE PURCHASE OF THE SOFT WARE OR B)
CAD $25.
14. WARNING ? HIGH RISK ACTIVITIES. - THE SOFTWARE IS NOT FAULT-TOLERANT AND IS NOT DESIGNED, MANUFACTURED OR INTENDED FOR USE OR RESALE AS ONLINE CONTROL EQUIPMENT IN HAZARDOUS ENVIRONMENTS REQUIRING FAIL-SAFE PERFORMANCE, SUCH AS, WITHOUT LIMITATION, IN THE OPERATION OF NUCLEAR
FACILITIES, AIRCRAFT NAVIGATION OR COMMUNICATION SYSTEMS, AIR TRAFFIC CONTROL, DIRECT LIFE SUPPORT MACHINES OR WEAPONS SYSTEMS, IN WHICH THE
FAILURE OF THE SOFTWARE COULD LEAD DIRECTLY TO DEATH, PERSONAL INJURY, OR SEVERE PHYSICAL OR ENVIRONMENTAL DAMAGE (“HIGH RISK ACTIVITIES”).
OBJECTIF LUNE AND ITS SUPPLIERS SPECIFICALLY DISCLAIM ANY EXPRESS OR IM PLIED WARRANT Y OF FITNESS FOR HIGH RISK ACTIVITIES.
15. GENERAL PROVISIONS. - This License Agreement may only be modified in writing by a duly authorized officer of Objectif Lune. If any or part of any provision of
this License Agreement is, by final judgment, found void or unenforceable, the remainder shall remain valid and enforceable according to its terms. Even if any remedy provided is determined to have failed for its essential purpose, all limitations of liability and exclusions of damages herein set forth shall remain in full force and
effect.
16. GOVERNING LAW. This License Agreement is governed by the laws in force in the Province of Québec (Canada) and parties hereby elect domicile in judicial district
of Montréal, Québec, Canada. This Agreement is not governed by the United Nations Convention on Contracts for the International Sale of Goods (CISG), the application of which being expressly exclud ed.
17. U.S. GOVERNMENT RESTRICTED RIGHTS. - If a Licensed Application i s acquired under the terms of a proposal or agreement with the United States Government or
any contractor therefor, the Licensed Application is subject to the following restricted rights notice: “This Software is commercial computer software provided with
RESTRICTED RIGHTS. Use, duplication, or disclosure by the U.S. Government is subject to restrictions as set forth in subparagraph (c)(1)(ii) of the Rights in Technical
Data and Computer Software clause at DFARS 252.227-7013 , FAR 52.227-17 Alternate III (g)(3), or subparagraphs (c)(1) and (2) of the Commercial Computer Software -- Restricted Rights at 48 CFR 52.227-19, as applicable, and their successor provisions. Contractor/Manufacturer is Objectif Lune Inc., Montréal, Québec, Canada, H1V 2C8.
18. U.S. EXPORT RULES. - You agree that the Software will not be shipped, transferred or exported into any country or used in any manner prohibited by the United
States Export Administration Act or any other export laws, restrictions or regulations (collectively the “Export Laws”). In add
export controlled items under the Export Laws, you represent and warrant that you are not a citizen of or otherwise located within an embargoed nation (including,
without limitation, Iran, Iraq, Syria, Sudan, Libya, Cuba, North Korea and Serbia) and that you are not otherwise prohibited under the Export Laws from receiving the
Software. All rights to use the Software are granted on condition that such rights are forfeited if you fail to comply with the terms of this paragra ph.
ition, if the Software is identified as
Page 7

Table of Contents
1 Capturing Data 1
Overview. . . . . . . . . . . . . . . . . . . . . . . . . . . . . . . . . . . . . . . . . . . . . . . . . . . . . . . . . . . . . . . . . . . . . . . . . . . . . . . . . . . . . . . . . . . . . . . . 1
Key Concepts . . . . . . . . . . . . . . . . . . . . . . . . . . . . . . . . . . . . . . . . . . . . . . . . . . . . . . . . . . . . . . . . . . . . . . . . . . . . . . . . . . . . . . . . . . . . 2
Detailed Directions . . . . . . . . . . . . . . . . . . . . . . . . . . . . . . . . . . . . . . . . . . . . . . . . . . . . . . . . . . . . . . . . . . . . . . . . . . . . . . . . . . . . . . . 3
Capture Sample Data for a Document You Install on a Printer. . . . . . . . . . . . . . . . . . . . . . . . . . . . . . . . . . . . . . . . . . . . . . 3
Capture Sample Data for a Document You Install in PlanetPress Watch. . . . . . . . . . . . . . . . . . . . . . . . . . . . . . . . . . . . . . 4
Capture Sample Data in Windows NT . . . . . . . . . . . . . . . . . . . . . . . . . . . . . . . . . . . . . . . . . . . . . . . . . . . . . . . . . . . . . . . . . . 5
Capture Sample Data in Windows 2000/Server 2003/XP . . . . . . . . . . . . . . . . . . . . . . . . . . . . . . . . . . . . . . . . . . . . . . . . . . 6
Capture Sample Data in Windows Host Using a Novell Print Server . . . . . . . . . . . . . . . . . . . . . . . . . . . . . . . . . . . . . . . . . 7
Capture Sample Data in UNIX (Solaris) . . . . . . . . . . . . . . . . . . . . . . . . . . . . . . . . . . . . . . . . . . . . . . . . . . . . . . . . . . . . . . . . . 8
Capture Sample Data using an AS/400 Systems . . . . . . . . . . . . . . . . . . . . . . . . . . . . . . . . . . . . . . . . . . . . . . . . . . . . . . . . . 10
Capture Sample Data From a Serial Port . . . . . . . . . . . . . . . . . . . . . . . . . . . . . . . . . . . . . . . . . . . . . . . . . . . . . . . . . . . . . . . . 14
2 Creating Triggers 17
Overview. . . . . . . . . . . . . . . . . . . . . . . . . . . . . . . . . . . . . . . . . . . . . . . . . . . . . . . . . . . . . . . . . . . . . . . . . . . . . . . . . . . . . . . . . . . . . . . . 17
Key Concepts . . . . . . . . . . . . . . . . . . . . . . . . . . . . . . . . . . . . . . . . . . . . . . . . . . . . . . . . . . . . . . . . . . . . . . . . . . . . . . . . . . . . . . . . . . . . 18
Detailed Directions . . . . . . . . . . . . . . . . . . . . . . . . . . . . . . . . . . . . . . . . . . . . . . . . . . . . . . . . . . . . . . . . . . . . . . . . . . . . . . . . . . . . . . . 21
Implement a Trigger under Novell 3.x. . . . . . . . . . . . . . . . . . . . . . . . . . . . . . . . . . . . . . . . . . . . . . . . . . . . . . . . . . . . . . . . . . 21
Implement a Trigger under Novell 4.x and 5.x with NDS or Bindery Printers. . . . . . . . . . . . . . . . . . . . . . . . . . . . . . . . . . 31
Implement a Trigger under Windows NT 4.0 with TCP/IP . . . . . . . . . . . . . . . . . . . . . . . . . . . . . . . . . . . . . . . . . . . . . . . . . 39
Implement a Trigger under BSD Printing Systems (BSDi, FreeBSD, Linux). . . . . . . . . . . . . . . . . . . . . . . . . . . . . . . . . . . . 47
Implement a Trigger under UNIX System V (Solaris). . . . . . . . . . . . . . . . . . . . . . . . . . . . . . . . . . . . . . . . . . . . . . . . . . . . . . 49
Implement a Trigger and Configure an AIX 4.3 Printer . . . . . . . . . . . . . . . . . . . . . . . . . . . . . . . . . . . . . . . . . . . . . . . . . . . . 51
Implement a Trigger under VMS . . . . . . . . . . . . . . . . . . . . . . . . . . . . . . . . . . . . . . . . . . . . . . . . . . . . . . . . . . . . . . . . . . . . . . 66
Implement a Trigger with AS/400 Systems . . . . . . . . . . . . . . . . . . . . . . . . . . . . . . . . . . . . . . . . . . . . . . . . . . . . . . . . . . . . . 69
Prepare SAP Device Type for PlanetPress Design. . . . . . . . . . . . . . . . . . . . . . . . . . . . . . . . . . . . . . . . . . . . . . . . . . . . . . . . . 85
Implement a Trigger under HP 3000 . . . . . . . . . . . . . . . . . . . . . . . . . . . . . . . . . . . . . . . . . . . . . . . . . . . . . . . . . . . . . . . . . . . 91
i
Page 8

toc
Appendix A: Special Printer Requirements 93
HP Printers with Flash Memory . . . . . . . . . . . . . . . . . . . . . . . . . . . . . . . . . . . . . . . . . . . . . . . . . . . . . . . . . . . . . . . . . . . . . . . . . . . . . 93
Lexmark Printers . . . . . . . . . . . . . . . . . . . . . . . . . . . . . . . . . . . . . . . . . . . . . . . . . . . . . . . . . . . . . . . . . . . . . . . . . . . . . . . . . . . . . . . . . 93
Printers with Automatic Emulation Switching . . . . . . . . . . . . . . . . . . . . . . . . . . . . . . . . . . . . . . . . . . . . . . . . . . . . . . . . . . . . . . . . 94
Appendix B: ASCII Conversion Table 95
ASCII Conversion Table . . . . . . . . . . . . . . . . . . . . . . . . . . . . . . . . . . . . . . . . . . . . . . . . . . . . . . . . . . . . . . . . . . . . . . . . . . . . . . . . . . . . 95
Appendix C: CL Program for AS/400 Systems 101
CL Program for AS/400 Systems . . . . . . . . . . . . . . . . . . . . . . . . . . . . . . . . . . . . . . . . . . . . . . . . . . . . . . . . . . . . . . . . . . . . . . . . . . . . 101
ii
Page 9

This chapter provides procedures for capturing data on different platforms.
Overview
In this section, you learn to:
• “Capture Sample Data for a Document You Install on a Printer” on page 3
• “Capture Sample Data for a Document You Install in PlanetPress Watch” on page 4
Capturing Data
• “Capture Sample Data in Windows NT” on page 5
• “Capture Sample Data in Windows 2000/Server 2003/XP” on page 6
• “Capture Sample Data in Windows Host Using a Novell Print Server” on page 7
• “Capture Sample Data in UNIX (Solaris)” on page 8
• “Capture Sample Data using an AS/400 Systems” on page 10
• “Capture Sample Data From a Serial Port” on page 14
In addition, you will be able to answer the following questions:
• “What is a sample data file?” (p. 2)
1
Page 10

1
Capturing Data
• “What is a spool file?” (p. 2)
Key Concepts
Sample Data File
What is a sample data file?
The sample data file is a text file that contains a representative sample of the input data destined for the
document, as that input data arrives at a printer or a PlanetPress Watch process. You use a data capture
process to create a sample data file.
You create your document based on the contents of this sample data file. Whether the document you
create executes properly, and under all circumstances, with the input data it receives when it executes
depends on how accurately the sample data file represents that input data. The two criteria for a reliable
sample data file are:
1. It includes all possible variations on the data that the document may encounter when it executes.
A sample data file that does not take into account all possible variations on the data can have serious
consequences. For example, if you design a cheque based on an amount field of a certain length, and
one of the records in the input data exceeds that length, the result is a cheque with an incorrect
amount.
Things to check for variation include field lengths, the location of decimal points in numeric data, and
whether or not a field always contains data.
2. It exactly represents the input data at the moment that data arrives at the printer or PlanetPress Watch
process. A difference of a single character can result in a document that does not produce accurate
results.
If your sampl e data file d oes no t meet this c riteria, you end up creat ing a d ocume nt that exe cutes with
a different input data structure than the one for which you designed it.
Spool File
What is a spool file?
A spool file is a file containing a job destined for a specific printer. When you print a file, the application you
use to print writes a file to the spool folder for that printer. The system monitors this folder. When a file
appears in the folder, it sends that file to the printer, and deletes it from the spool folder.
It is common to use a spool file as the sample data file for a document you intend to install on a printer.
2
Page 11

Detailed Directions
Capture Sample Data for a Document You Install on a Printer
This procedure describes the general steps involved in capturing sample data for a document you intend
to install on a printer. If you are using database emulation, you capture sample input data at the time you
set up the emulation.
An understanding of the general procedure for capturing a reliable sample data file can help you
understand and navigate the platform-specific instructions.
To capture data for a document you install on a printer:
1. Determine the input data you need.
Determine all the variations of input data you need to include in the sample data file, and the query
that retrieves that input data. This is specific to your database and computing environment.
2. Determine the type of connection that exists between the host on which the input data resides and
the printer on which the document will execute.
In general there are three types of connections:
Detailed Directions
• Direct connection. The printer is either directly connected to the host on which the input data resides,
or the host can directly address it on a network.
• Serial connection. The printer and the host are connected by a serial cable.
• Print server. The printer is connected to a print server. The host sends print jobs to the print server.
3. Capture the representative sample of input data.
In general you set up a process to intercept a print job on its way to the printer. You then send the
representative sample of data to the printer. The process you set up intercepts the job and saves the
spool file as the sample data file. For example, if your host can address the printer directly, you could
use the following method:
• Pause printing on the printer on which you intend to install the document. This tells the printer driver
not to send any files that it finds in the spool folder for this printer, to the printer. If you print to a
printer after you pause it, a spool file appears in that printer’s spool folder and remains there until you
re-enable printing on that printer.
• Send the representative sample of input data to the printer on which you intend the document to
execute. This creates a spool file.
3
Page 12

1
Capturing Data
• Retrieve the spool file.
• Restart printing on the printer you paused.
Things to Remember
• As a rule you want to capture the data as close to the printer as possible since the data file may undergo
several transformations as it makes its way through drivers, spoolers, or physical devices. If your printer
is not yet connected, you will need to anticipate how it will fit into your network configuration. For
example, will it be connected to a print ser ver or addressed directly by the host? What protocol will it use?
Capture Sample Data for a Document You Install in PlanetPress Watch
This procedure describes the general steps involved in capturing sample data for a document you intend
to install in PlanetPress Watch. An understanding of the general procedure for capturing a reliable sample
data file helps you understand and navigate the platform-specific instructions.
It assumes you have a general understanding of what a PlanetPress Watch process is, and how it works.
See the PlanetPress Watch User’s Guide for further information.
Note that if you are using database emulation, you capture sample input data at the time you set up the
emulation.
To capture data for a document you install in PlanetPress Watch:
1. Determine the input data you need.
Determine all of the variations of input data you need to include in the sample data file, and the query
that retrieves that input data. This is specific to your database and computing environment.
2. Determine the input mode you intend to use when you execute your document in PlanetPress Watch.
The input modes you can use for data capture include Windows printer driver, lpd queue, directory,
email, and serial capture. The input modes available depend on your platform and the type of
connection that exists between the host on which the input data resides and the host on which
PlanetPress resides. For example, to use a Windows queue, your input data must reside on the same
host on which you are running PlanetPress Watch. Consult the PlanetPress Watch User’s Guide for
complete descriptions of all input modes.
3. Map exactly how your input data will travel from source to destination when you execute the
completed document.
You must replicate this path exactly when you capture data, or define how you intend to compensate
for any deviations from it during document design.
4
Page 13

Detailed Directions
4. Capture the sample of input data.
What follows is a general outline of the procedure. Consult the specific data capture procedure for your
platform, and the PlanetPress Watch User’s Guide for help setting up PlanetPress Watch processes.
• Create a PlanetPress Watch process to accept the data through the input mode you specify and save
the result as a file in a folder.
• Send the representative sample of input data to PlanetPress Watch using the input mode you
specified in the PlanetPress Watch process you set up for the data capture.
• Retrieve the file from the output folder.
Capture Sample Data in Windows NT
You perform this procedure on the machine that controls the printer, not on the workstation.
To perform data capture under Windows NT:
1. In the Windows Start menu, choose Settings, then choose Printer.
The Printers window appears.
2. Right-click on the printer on which you intend to execute your document and choose Pause printing.
3. In the application you use to manipulate the input data, send the data you want to capture to the
printer you selected in step 2.
The printer driver creates a printer spool file containing the representative data sample.
4. In the Windows Start menu, choose Run.
The Run dialog box appears.
5. In the Run dialog box, in the Open box, enter CMD.
A DOS Command Prompt window appears.
6. In the DOS Command Prompt window, change directory to the spool folder:
cd C: \winnt\system32\spool\printer
7. Copy the spool file (.spl) you just created to a floppy or to another folder.
The *.spl file contains your data.
8. Close the DOS session.
5
Page 14

1
Capturing Data
9. In the Windows Start menu, choose Settings, then choose Printer.
The Printers window appears.
10. Right-click on the printer you paused and choose Pause printing.
The spooler sends the job to the printer.
Capture Sample Data in Windows 2000/Server 2003/XP
You perform this procedure on the machine that controls the printer, not on the workstation.
1. In the Windows Start menu, choose Settings, then choose Printer.
The Printers window appears.
2. Right-click on the printer on which you intend to execute your document and choose Pause printing.
3. In the application you use to manipulate the input data, send the data you want to capture to the
printer you selected in step 2.
The printer driver creates a printer spool file containing the representative data sample.
4. In the Windows Start menu, choose Run.
The Run dialog box appears.
5. In the Run dialog box, in the Open box, enter COMMAND.(
A DOS Command Prompt window appears.
6. In the DOS Command Prompt window, change directory to the spool folder:
cd C: \windows\spool\printer
7. Copy the spool file (.spl) you just created to a floppy or to another folder.
The *.spl file contains your data.
8. Close the DOS session.
9. In the Windows Start menu, choose Settings, then choose Printer.
The Printers window appears.
10. Right-click on the printer you paused and choose Pause printing.
The spooler sends the job to the printer.
6
Page 15

Detailed Directions
Capture Sample Data in Windows Host Using a Novell Print Server
This procedure describes how to capture data for a document you intend to execute using a Novell print
server.
To capture data on a Windows host that uses a Novell print server:
1. Start the NetWare Administrator.
2. In the NetWare Administrator window, double-click the print server in the list of printers. For the
purposes of this procedure, the print server is the optra1650s-nds.
The Print Server dialog box for that print server appears.
3. Click Status.
The Status dialog box appears.
4. Note the values of the Volume and ID fields and then click Close.You use these values later to navigate
to the print queue.
5. In the Print Server dialog box double-click the print queue for the print server. The print queue is the
file whose file name ends in the letters pq. For example, the print queue for the optra1650s-nds print
server is optra1650s-nds-pq.
The Print Queue dialog box for that print server appears.
6. Disable Allow service by current print server and click OK.
7. To verify the print server is paused, print a test page and verify the spool file remains in the print queue.
You can print a test page by clicking Print Test Page in the General tab of the print queue properties
dialog box for this print queue. You can then verify the file remains in the print queue by navigating to
the print queue in Windows Explorer and verifying there is a spool file for the test page. The spool file
has a .Q extension. You use the Volume and ID information you noted in step 4. to determine the path
of the print queue.
8. Send your input data to the print server.
9. Retrieve the spool file for the input data from the print queue.
In Windows Explorer, navigate to the print queue for the print server. Use the Volume and ID
information you noted in step 4. to determine the path of the print queue. The spool file has a .Q
extension.
10. Double-click the spool file to open it and verify the contents are what you expect.
7
Page 16

1
Capturing Data
Capture Sample Data in UNIX (Solaris)
Create a Virtual Printer
To create a virtual printer:
1. In the File Manager, choose File and then Open Ter mi na l.
2. Use the following commands to open the Hosts file:
cd /etc
vi ./hosts
3. In the Hosts file, add the IP address of the printer, or the IP address of the workstation on which
PlanetPress Watch is installed, and assign a name to that IP address. For example:
192.xxx.yyy.zzz printdestination
4. Save the Hosts file as follows:
Press ESCAPE.
Enter :wq
Assign a Print Queue to a Virtual Printer
To assign a print queue to a virtual printer:
1. Use the command:
lpadmin -p queuename -I any -s printdestination
Where:
-p queuename specifies the name of this queue
-I any specifies no data formatting (i.e.: Text Only)
-s printdestination specifies the name of the virtual printer
8
Page 17

Detailed Directions
Send Data to the Print Queue
To send data to the print queue:
•Use the command:
lp -d queuename data_filename
Note that you must create a PlanetPress Watch process before you send data from UNIX to the
workstation running PlanetPress Watch.
PlanetPress Watch Configuration
To set up PlanetPress Watch to capture data sent using LPR:
1. In PlanetPress Watch Configuration, create a new PlanetPress Watch process by choosing Insert | New
Process.
2. In the PlanetPress Watch Process area, click the unknown task in the upper-left corner at the beginning
of the data stream.
3. Choose Insert | Input | LPD Input.
The LPD Input’s Properties dialog appears.
4. In the LPD Queue name text box, enter the name of the print queue you defined (see “Assign a Print
Queue to a Virtual Printer” on page 8).
5. Click OK.
An LPD input replaces the unknown task at the beginning of the PlanetPress Watch process, which
captures the data sent from the UNIX computer. In PlanetPress Watch Configuration, you then
configure the rest of the tasks that process this incoming data, including where and how it is output.
You then send the configuration to PlanetPress Watch to run. Refer to the PlanetPress Watch User’s
Guide for more information about its LPR client and LPD ser ver ser vices, and for setting up PlanetPress
Watch processes.
9
Page 18
1
Capturing Data
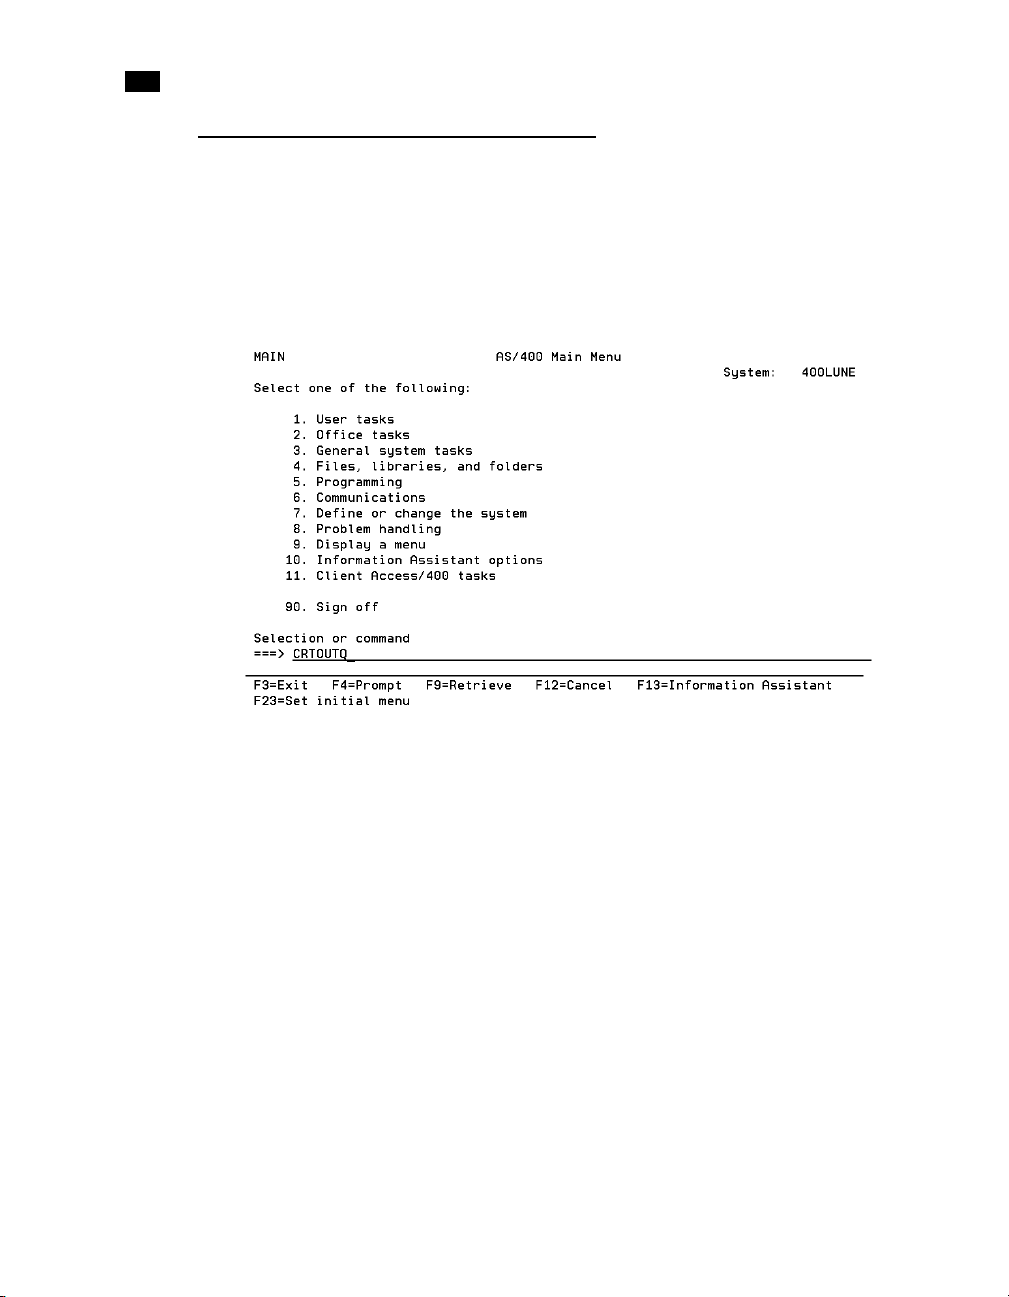
Capture Sample Data using an AS/400 Systems
Generic Output
To create a generic output queue on an AS/400:
1. In the AS/400 main menu, enter the create output queue command CRTOUTQ and press F4.
10
Page 19
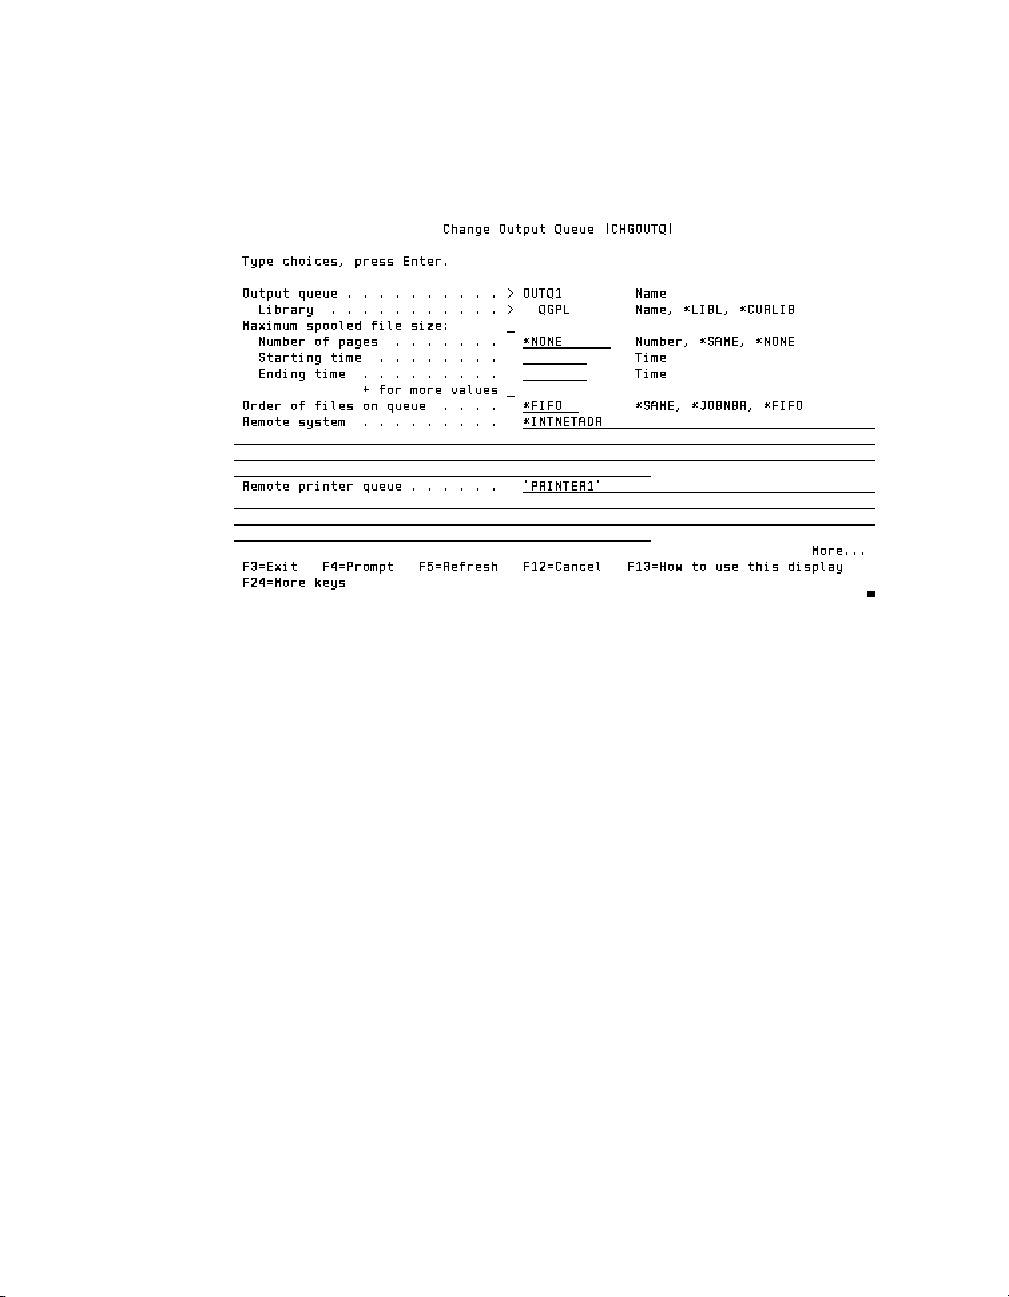
Detailed Directions
2. In the Change Output screen, in the Output queue field, enter an output queue name. In this example,
the name entered is OUTQ1.
3. Press F10 followed by F9 to display the Remote Printer Queue parameter.
4. Enter the following information:
• In the Remote system field, enter the string *INTNETADR.
• In the Remote printer queue field, enter the name of the remote printer queue, enclosed in single
quotes. The remote printer queue is the one located on the machine that will receive the input data.
In this example, ‘PRINTER1’ is the remote printer queue name.
11
Page 20
1
Capturing Data
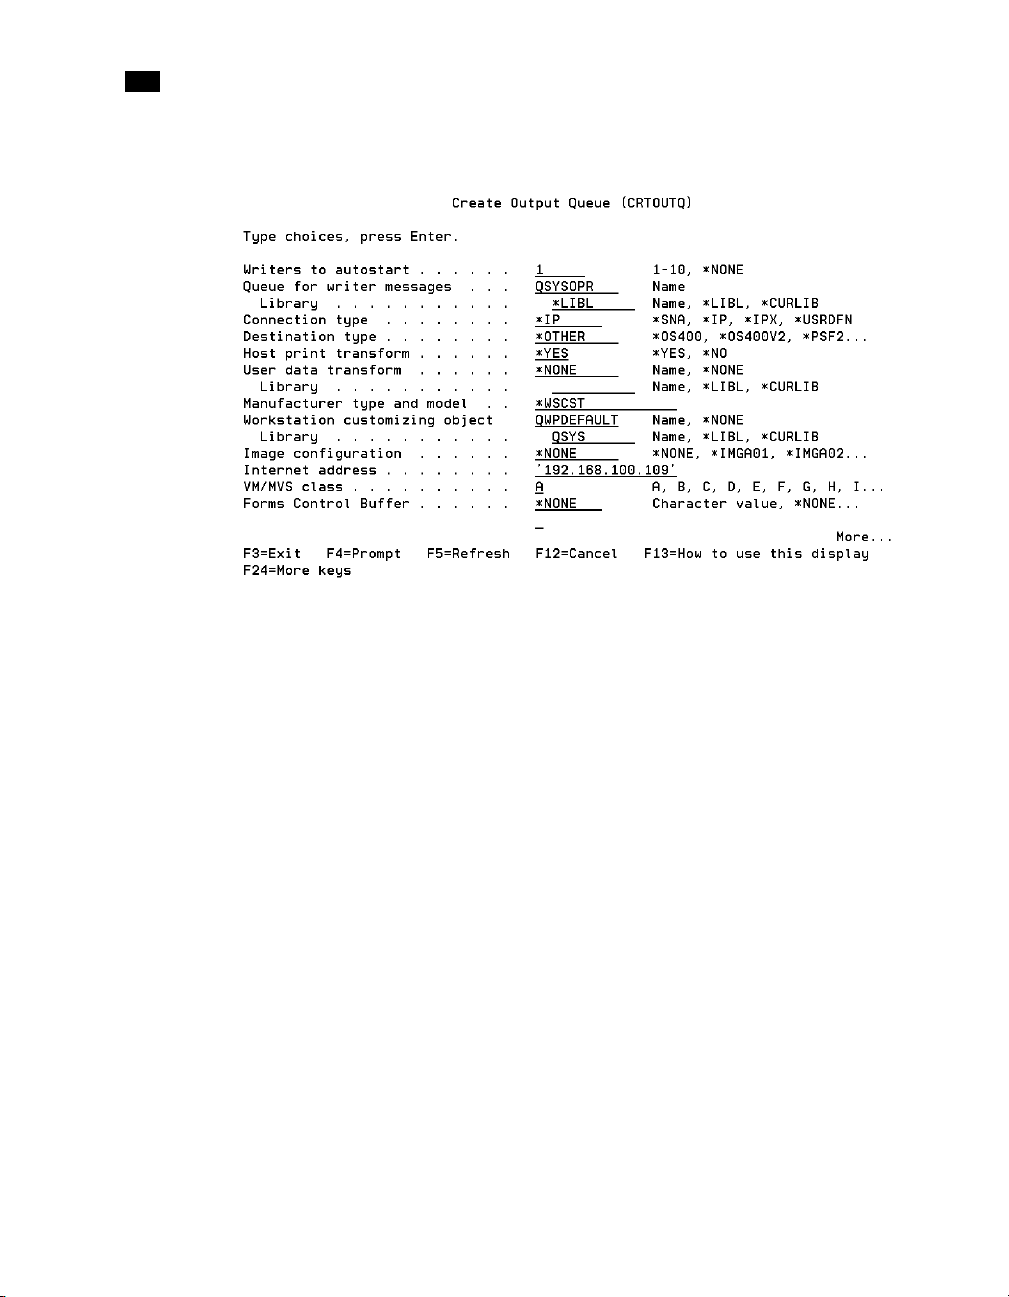
5. Press PAGE DOWN to display the Create Output Queue screen.
6. Complete the fields with the following values. Unless otherwise specified, you must enter these values
exactly as they appear here.
Writers to autostart: 1
12
Connection type: *IP
Destination type: *OTHER
Host print transform: *YES
Manufacturer type and model: *WSCST
WS customizing object: QWPDEFAULT
Library: QSYS
Internet address: The IP address of the workstation to which you will send the data. In this example,
the address is 192.168.100.109.
7. Press PAGE DOWN.
Page 21
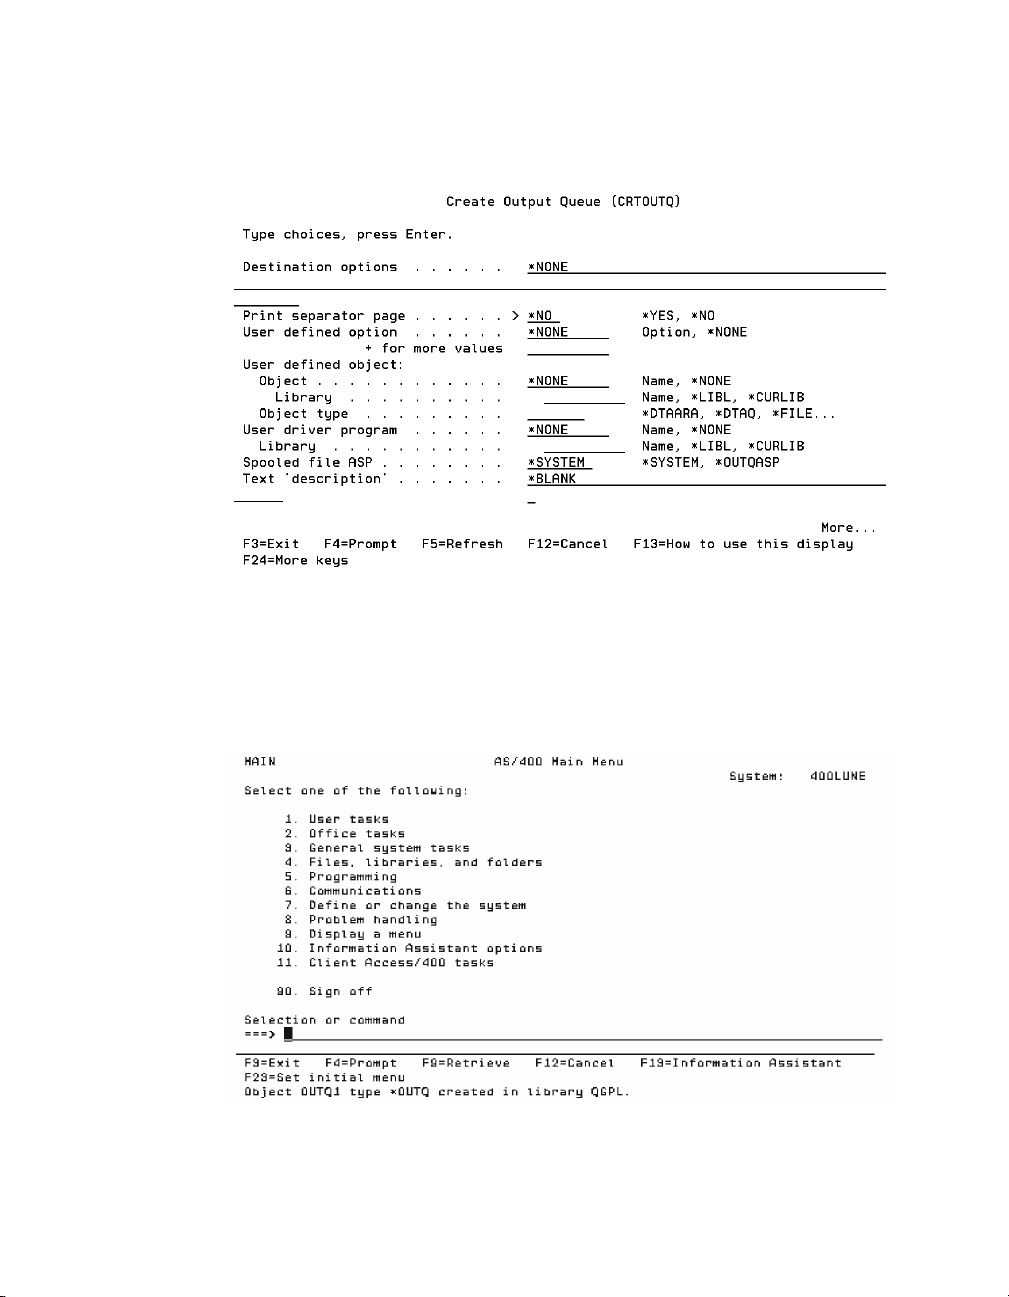
Detailed Directions
The next page of the Create Output Queue screen appears.
8. If you want to prevent a separator page from printing, enter *NO in the Print separator page field.
Leave all other fields untouched.
9. Press ENTER to create the new generic output queue.
A confirmation message appears at the bottom of the main menu.
13
Page 22
1
Capturing Data
Capture Sample Data From a Serial Port
This procedure describes how to use Microsoft’s Hyperterminal to capture serial data. Refer to the
PlanetPress Watch User’s Guide for information on capturing serial data using PlanetPress Watch’s Serial
input.
To set the serial data capture parameters:
1. In the Windows Start menu, choose Programs | Accessories | HyperTerminal.
If necessary, install Windows HyperTerminal.
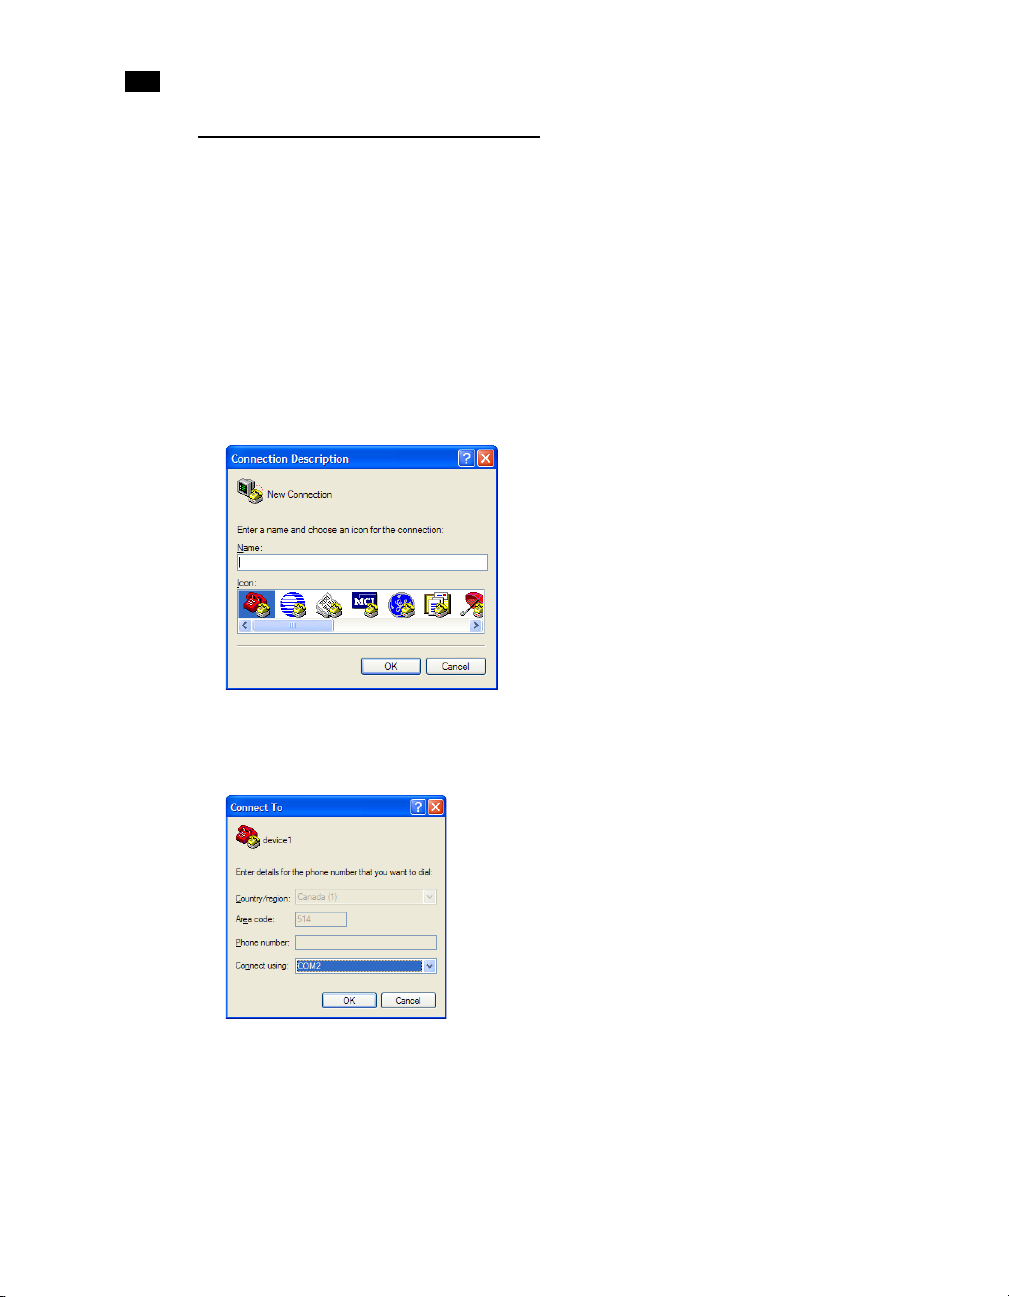
The Connection Description dialog box appears.
14
2. In the Name box, enter a name for the connection and click OK.
The Connect To dialog box appears.
3. Select COM 1 or COM 2 and click OK. If you need to determine which COM port the printer uses, open
the Control Panel, then open Modems and click Diagnostics. In most cases you select COM2. The
remaining steps of this procedure assume you selected COM2.
Page 23

The COM2 Properties dialog box appears.
4. Adjust the COM2 Properties and click OK.
A HyperTerminal window for this connection appears.
5. In the menu for the HyperTerminal window, choose Tra nsf er | Capture Te xt .
The Capture Text dialog box appears.
Detailed Directions
6. The file name that appears in this dialog box is Ca pture.tx t. If this file does not exist, you will need to
create it (this is the text file that will be used as the capture file).
7. Click Start.
8. Send the input data to the printerusing the procedure you would usually use to print the data.
9. When the print command completes, return to the HyperTerminal window for this connection and
choose Tra ns fer | Capture Tex t | Stop.
The input data you sent to the printer appears in the HyperTerminal window and is saved in the
Captu re.txt file.
10. The Capt ure.txt file is the sample data file you use to create your document.
15
Page 24

1
Capturing Data
16
Page 25

Creating Triggers
This chapter describes platform-specific procedures for creating a trigger and inserting it
at the head of a data stream.
Overview
A job consists of a document, a trigger, and data. If you are not using PlanetPress Watch, you must
manually create the appropriate trigger, add it to the head of the data stream, and send the result to the
printer on which the document resides. The procedure for creating the trigger and adding it to the head of
the data stream is platform-dependent.
In this section, you learn to:
• “Implement a Trigger under Novell 3.x” on page 21
• “Implement a Trigger under Novell 4.x and 5.x with NDS or Bindery Printers” on page 31
• “Implement a Trigger under Windows NT 4.0 with TCP/IP” on page 39
• “Implement a Trigger under BSD Printing Systems (BSDi, FreeBSD, Linux)” on page 47
• “Implement a Trigger under UNIX System V (Solaris)” on page 49
• “Implement a Trigger and Configure an AIX 4.3 Printer” on page 51
• “Implement a Trigger under VMS” on page 66
• “Implement a Trigger with AS/400 Systems” on page 69
17
Page 26

2
Creating Triggers
• “Prepare SAP Device Type for PlanetPress Design” on page 85
• “Implement a Trigger under HP 3000” on page 91
In addition, you will be able to answer the following questions:
• “What is a trigger?” (p. 18)
• “What is the syntax of a trigger?” (p. 19)
• “What are the common techniques for inserting a trigger?” (p. 20)
Key Concepts
Trigger
What is a trigger?
A trigger is two lines of PostScript that immediately precedes the input data and performs two functions:
it puts the printer in PostScript mode, and tells the printer which document to launch. A trigger “triggers”
the execution of a document.
You execute a document installed on a printer by sending a trigger to the printer, followed by the input
data. If you execute your document in PlanetPress Watch, PlanetPress Watch inserts the trigger. If you
execute your document directly on a printer, you must manually insert the trigger at the head of the data
stream.
18
Printer-Specific Control Characters
You can precede a trigger with printer-specific control characters. The most common reason to do so is to
ensure the printer receives the job you send it as a new job.
A printer expects each job that it handles to end with a special character that tells the printer it has reached
the end of the input data. Until the printer receives this special character, it continues to process all input
it receives as part of that job. If there is no input, the printer waits for a defined period of time, then times
out and proceeds to the next job. If a new job arrives during the period of time the printer is waiting for
input, the printer does not recognize it as a new job; rather it processes it as input for the current job.
It is thu s common practi ce to include an end of job character at the beginning of the trigger to ensu re that
the printer recognizes your job as a new print job. For certain printers <CTRL D> or ASCII 04 is a valid end
of job character, while more recent printers require a Printer Job Language (PJL) sequence such as
<ESC>%-12345X<CR><LF>.
Page 27

Key Concepts
As an example, the following trigger includes <CTRL D> as an end of job character:
<CRTL-D>%!PS-Adobe <CR>
run INVOICE <CR><LF>
Trigger Syntax
What is the syntax of a trigger?
In all syntax descriptions in this section, italics denote a variable, square brackets indicate the element is
optional, <CR> denotes a carriage return and <LF> denotes a line feed.
The general syntax for the first line of the trigger is the same for all triggers:
[ printer-specific_commands ] %!PS-Adobe <CR>
The first line of the trigger uses the string “%!PS-Adobe” to put the printer in PostScript mode. It may also
include printer-specific commands.
The syntax of the second line of the trigger depends on where the document is installed in the printer: on
the hard drive, in RAM, or in flash memor y. The second line, written in PostScript, tells the printer the name
and location of the document, and launches the document. If you are using version numbers in your
documents, this line also contains the version number.
Trigger Syntax for Documents Installed on a Hard Disk
The general syntax of a trigger for a document that resides on the printer’s hard drive is:
[ printer-specific_commands ] %!PS-Adobe <CR>
[[ (location_of_document) ] run ] name_of_document <CR><LF>
The simplest example of a trigger for a document named INVOICE that resides on the printer’s hard drive
excludes the location of the document. If a trigger does not specify the location of the document, the
printer assumes it is on the hard disk.
%!PS-Adobe <CR>
run INVOICE <CR><LF>
An equivalent trigger that makes the location of the INVOICE document explicit:
%!PS-Adobe <CR>
(INVOICE) run INVOICE <CR><LF>
If t he printe r has more t han on e hard dis k you must inclu de the name o f the h ard dis k. In t his examp le, the
name of the hard disk is “presswork” and the name of the document is INVOICE.
%!PS-Adobe <CR>
(%presswork%INVOICE) run INVOICE <CR><LF>
19
Page 28

2
Creating Triggers
Trigger Syntax for Documents Installed in RAM
The general syntax of a trigger for a document that resides in the printer’s RAM is:
[ printer-specific_commands ] %!PS-Adobe <CR>
name_of_document <CR><LF>
An example of the trigger for a document named FORMLETTER that resides in the printer’s RAM:
%!PS-Adobe <CR>
FORMLETTER <CR><LF>
Trigger Syntax for Documents Installed in Flash Memory
The general syntax of a trigger for a document that resides in the printer’s flash memory is:
[ printer-specific_commands ] %!PS-Adobe <CR>
(%flash%name_of_document) run name_of_document <CR><LF>
An example of the trigger for a document named PAYROLL that resides in the printer’s flash memory:
%!PS-Adobe <CR>
(%flash%PAYROLL) run PAYROLL <CR><LF>
20
Techniques for Inserting Triggers
What are the common techniques for inserting a trigger?
How you create and insert a trigger is operating system dependent. There are many ways to inser t a trigger
manually. Four common techniques are:
1. Manually concatenating two files
In this technique you add a trigger by concatenating two files where the first contains the trigger and
the second contains the input data. You send the concatenated file to the printer using the DOS Copy
command or the file transfer protocol (FTP).
2. Setting up the print server to automatically insert triggers
This technique works with a print server running either Novell or Windows NT. You create a print queue
or print device for each document installed in the printer, and associate the appropriate trigger for the
document with the queue you set up for it. All queues point to the same physical printer. When you
send a job to that queue, the server automatically inserts the trigger associated with that queue before
it forwards the printer job to the printer.
Page 29

3. Setting up the host to automatically insert triggers
This is the same technique as setting up the print server to automatically insert triggers. The only
difference here is that you set up the queues on the host on which the input data resides. The host
inserts the trigger ahead of the spool file when it sends the print job to the printer. This technique does
not work with all hosts.
4. Including the trigger in application output
In this technique you modify the output of the application that generates the print file so that it adds
a trigger for the appropriate document. It is important to understand that this hampers your ability to
print these jobs using other printers since two additional lines are added to the print file.
Detailed Directions
Implement a Trigger under Novell 3.x
Unless otherwise indicated, always press ENTER at the end of a command. Note that you can exit any
window or command area at any time by pressing ESCAPE.
Detailed Directions
To install a trigger:
1. Log on to the server, and enter Supervisor and printdef.
2. In the PrintDef Options dialog box, select Print Devices.
3. In the Print Device Options dialog box, select Edit Print Devices.
4. Press INSERT.
21
Page 30

2
Creating Triggers
5. In the New Device Name dialog box, enter the name of the document you want to execute. For this
example, enter Mailing.
6. In the Defined Print Devices dialog box, select Mailing and press ENTER.
7. In the Edit Device Options dialog box, select Device Functions.
22
8. Press INSERT.
9. In the Function Definition dialog box, enter the following information:
• In the Name field, enter Reset
• In the Escape Sequence field, enter the following sequence: <ESC>%-12345X<CR><LF>
Page 31

Detailed Directions
10. Press ESCAPE. In the Save Changes dialog box, select Yes and press ENTER to save the changes.
11. In the Mailing Functions dialog box, press INSERT.
12. In the Function Definition dialog box, enter the following information:
• In the Name field, enter Force PostScript
• In the Escape Sequence field, enter the following sequence: <ESC>%-12345X@PJL enter language
= PostScript <CR><LF>
13. Press ESCAPE. In the Save Changes dialog box, select Yes and press ENTER to save the changes.
14. In the Function Definition dialog box, enter the following information:
• In the Name field, enter Call Mailing
23
Page 32

2
Creating Triggers
• In the Escape Sequence field, enter the following sequence: (MAILING) run MAILING<CR><LF>
15. Press ESCAPE. In the Save Changes dialog box, select Yes and press ENTER to save the changes.
16. Press ESCAPE again. In the Edit Device Options dialog box, select Device Modes.
The Mailing Modes dialog box appears.
24
17. In the New Mode Name dialog box, press INSERT and enter Call Mailing.
18. In the Call Mailing Functions dialog box, press INSERT.
Page 33

Detailed Directions
19. In the Additional Mailing Functions dialog box, select Force PostScript and press ENTER.
20. The Call Mailing Functions dialog box should display Force PostScript.
21. Press INSERT.
22. In the Additional Mailing Functions dialog box, select Call Mailing.
23. Press ENTER.
24. Press ESCAPE to return to the Mailing Modes dialog box.
25
Page 34

2
Creating Triggers
25. In the Mailing Modes dialog box, select (Re-initialize).
26. In the (Re-initialize) Functions dialog box, press INSERT.
27. In the Additional Mailing Functions dialog box, select Reset and press ENTER.
26
28. The (Re-initialize) Functions dialog box displays Reset.
29. In the Exit PrintDef dialog box, select Ye s to save the changes.
Page 35

30. In the Exit Options dialog box, select Save Data Base, then EXIT.
31. Press ESCAPE several times to exit Printdef.
32. In DosPrompt, enter Printcon.
33. In the Available Options dialog box, select Edit Print Job Configurations.
34. Press INSERT.
35. In the Enter new name field, enter Mailing.
Detailed Directions
36. Press ENTER.
37. In the Edit Print Job Configuration "Mailing" dialog box, adjust only the following settings. Leave all
others untouched.
Options: Settings
Print Queue: Printer where the intelligent document resides
Device: Mailing
Mode: Call Mailing
27
Page 36

2
Creating Triggers
Print Banner: No
38. Press ESCAPE and save the changes.
To test the trigger installation:
1. In DosPrompt, enter pconsole to access pconsole.
2. In the Available Options dialog box, select Print Queue Information and press INSERT.
28
3. In the New Print Queue Name field, enter MAILING.
4. In the Print Queues dialog box, select Mailing and press ENTER.
Page 37

Detailed Directions
5. In the Print Queue Information dialog box, select Current Queue Status.
6. In the Current Queue Status dialog box, select No for the Servers can service entries in queue
option.
7. Press ESCAPE several times to exit pconsole.
8. In the DOS prompt, enter the following line:
/l=2 represents the LPT port to which the printer is connected. In this example, it is LPT2.
9. Return to pconsole.
10. In the Available Options dialog box, select Print Queue Information.
29
Page 38

2
Creating Triggers
11. In the Print Queues dialog box, select Mailing.
12. In the Print Queue Information dialog box, select Print Queue ID. The following dialog box appears.
30
13. Make a note of the Object ID.
14. Press ESCAPE several times to exit pconsole.
15. In DOS, enter the following to create a sample spool file:
c:\>dir>lpt2
16. In the drive on which the Sys Volume is mounted, enter the following lines:
Y:\>cd system
Y:\SYSTEM>dir *.qdr
A list of all printer queues, including the one you just created, appears. The new printer queue has the
same name as the Object ID noted earlier.
17. Enter the following:
Y:\SYSTEM>cd 2F00000B.qdr
Y:\SYSTEM>2F00000B>dir
Page 39

Detailed Directions
The following appears.
18. Using the information located in the directory, enter the last line. In this case:
Y:\SYSTEM\2F00000B.QDR>type oo2f0001.q :more
19. If no error occurs, the trigger and printer queue test is successful. The trigger appears at the start of the
file.
20. In the pconsole > Print Queue Information > Current Queue Status dialog box, change Servers
can service entries in queue to Ye s .
Implement a Trigger under Novell 4.x and 5.x with NDS or Bindery Printers
It is important to create a "Print Device" for the "Organizational Unit" containing the printer you use to
print the document. The "Print Job Definition" must be done for the "User" object, that is, for the
"Organizational Unit" containing the "User" object used to do the "Capture".
To create a print device:
1. Start the Netware Administrator (z:\win32\nwadmn32.exe).
31
Page 40

2
Creating Triggers
2. Right-click Organizational Unit and choose Details.
The Organizational Unit: Printers dialog box appears.
32
3. Click Print Devices (Non NDPS).
4. Click Create.
The Create New Device dialog box appears.
5. In the Create New Device dialog box, enter a descriptive name for the printer on which you intend to
print the document, then click OK or press ENTER.
6. Select the newly created print device and click Modify.
7. You must now create three functions and a mode.
CREATE THE FIRST FUNCTION
8. Click Create Function.
The Create New Function dialog box appears.
9. In the Create New Function dialog box, enter the following information:
• In the Function name box, enter reset.
Page 41

• In the Control sequence box, enter <ESC>%-12345X<CR><LF>
10. Click OK.
CREATE THE SECOND FUNCTION
11. Return to the Create New Function dialog box.
12. In the Create New Function dialog box, enter the following information:
• In the Function name box, enter Force Postscript.
• In the Control sequence box, enter <ESC>%-12345X@PJL enter language =
PostScript<CR><LF>
Detailed Directions
13. Click OK.
CREATE THE THIRD FUNCTION
14. Return to the Create New Function dialog box.
15. In the Create New Function dialog box, enter the trigger information. For example, if the name of the
document you want to execute is MAILING, and it exists on the hard drive of the printer, you would
enter the following:
• In the Function name box, enter call mailing.
33
Page 42

2
Creating Triggers
• In the Control sequence box, enter (MAILING) run MAILING.
16. Click OK.
DEFINE THE MODE
17. In the Modify Existing Device dialog box, click Create Mode.
34
18. In the Name box, enter a meaningful name. For this example, enter Mailing.
Page 43

Detailed Directions
19. Select the three functions you just created, in the following order: reset, Force Postscript, call mailing.
For each function, select it in the Device functions list, then click Add Below. The order in which you
select the functions is important.
20. Click OK.
The Print Device is created with its functions and mode.
21. Create the Print Job Definition. You must create the Print Job Definition in the Organizational Unit
that contains the user's object or the object used by the user. For this example, the users in the
Organizational Unit will be able to use the Print Job Definition. Right-click Organizational Unit, and
choose Details.
35
Page 44

2
Creating Triggers
The Organizational: ol dialog box appears.
22. Click Print Job Configuration (Non NDPS).
23. Click New.
The Print Job Configuration dialog box appears.
24. In the Print Job Configuration dialog box, enter the following:
• In the Print job name box, enter a descriptive name. For this example, enter Mailing.
• Clear the Print banner and From feed boxes.
• In the Printer/Queue box, enter the printer on which you intend to execute the document. The queue
can be NDS or Bindery.
• In the Device box, select the name of the device you created.
36
Page 45

• In the Mode box, select the name of the mode you created.
25. Close the Netware Administrator.
Detailed Directions
26. You must now configure the client's (user's) portion. First, use the Capture command to direct the
network printer to a por t such as LPT1. You must also use the J option in the command to include your
"job definition". The following command works with the above example:
CAPTURE Q=.OPTRA1650-NDS-PQ.PRINTERS.OL J=MAILING NB NFF TI=20
In this command, the J option indicates the name of the Print Job, NB signifies No Banner, NFF signifies
No Form Feed, and TI specifies the time-out value in seconds (in this case, 20 seconds). If you use this
command, be sure to substitute the Print Job name and the printer name with the ones that apply to
your job.
37
Page 46

2
Creating Triggers
27. Once you execute the Capture command (either locally or via Novell scripts), you must create a new
printer in the user's Windows using the Generic Text pilot that points towards the local LPT1 port. You
create the new printer as follows:
38
Users that perform the capture (with the J option) and have a generic printer pointing towards the
LPT1 port can use the document configured in the Print Job Configuration.
Page 47

Detailed Directions
Note that certain versions of Windows have Generic Text pilots that can cause a well known problem:
text aligned vertically instead of horizontally. To solve this problem, access the printer's properties. In
the Fonts tab, add a space in every Font codes section.
Implement a Trigger under Windows NT 4.0 with TCP/IP
Use this procedure when you print from a Windows NT 4.0 application or from Windows NT 4.0 itself. First
determine the network protocol (TCP/IP, NetBios, or IPX/SPX).
Use Microsoft TCP/IP Printing
To set the network protocol:
1. In the Windows Start menu, choose Settings | Control Panel.
2. In the Control Panel, double-click Network.
39
Page 48

2
Creating Triggers
The Network dialog box appears.
40
3. In the Services tab, click Add.
The Select Network Service dialog box appears.
4. In the Select Network Service dialog box, select Microsoft TCP/IP Printing and click OK.
5. Reboot your PC.
Page 49

Install a New LPR Printer
To install a new LPR printer in Windows NT:
1. In the Windows Start menu, choose Settings | Printers.
The Printers window appears.
2. In the Printers window, double-click Add Printer.
The Add Printer Wizard dialog box appears.
Detailed Directions
3. Select My Computer and click Next.
4. In the next window, select Add Port.
41
Page 50

2
Creating Triggers
The Printer Ports dialog box appears.
5. In the Printer Ports dialog box, double-click LPR Port.
The Add LPR Compatible Printer dialog box appears.
42
6. In the Name or address of server providing lpd box, enter the printer's TCP/IP address.
7. If the printer has multiple ports, add a queue name in the Name of printer or print queue on that
server box.
8. Click OK.
Page 51

Detailed Directions
The Add Printer Wizard window appears.
9. Select the TCP/IP address you entered in the Add LPR Compatible Printer dialog box. Note that if you
have several documents installed on the same printer, it is important to install a printer in Windows NT
for each document.
10. Click Next.
11. In the Manufacturers list, select Generic, and in the Printers list, select Generic / Text Only.
12. Click Next.
43
Page 52

2
Creating Triggers
13. In the Printer name box, enter the name given to the intelligent document. In this example, the
printer's name is Mailing.
14. Click Next.
15. Select Shared and enter the document name in the Share Name box (Mailing for this example).
44
16. Select all applicable operating systems.
Create a Trigger
To create a trigger:
1. In the Windows NT System32 directory, double-click the Notepad application icon.
Page 53

Detailed Directions
The system32 window appears.
2. In a new Notepad file, enter the name of your document file immediately after the \F (no space). For
this example, enter:
\N
\FMAILING.TRG.
3. Save this file in the system32 directory under the same name given to your document (with the suffix
.sep (a Page separator under Windows NT)). For this example, MAILING.sep.
4. Open another file in Notepad and enter the trigger described in the Introduction section.
%!PS-Adobe
(MAILING) run MAILING
5. Save this file in the system32 directory as mailing.trg.
Add a Trigger to the Data
To add the trigger to the data:
1. In the Windows Start menu, choose Control Panel | Printers.
The Printers window appears.
2. Right-click the printer you added (in this example, Mailing) and choose Properties.
45
Page 54

2
Creating Triggers
The Mailing Properties dialog box appears.
46
3. In the General tab, click Separator Page.
The Separator Page dialog box appears.
4. Click Browse and select mailing.sep.
5. Click Open.
The trigger is now installed for Windows NT.
Page 55

Detailed Directions
Implement a Trigger under BSD Printing Systems (BSDi, FreeBSD, Linux)
The procedure here describes trigger implementation for UNIX systems using a BSD-like printing system
(lpr, lpq, /etc/printcap). It assumes you are logged on as root.
To install a BSD printing system:
1. Create a text-only print queue entry in /etc/printcap and a spool directory.
If your system has a tool to create a print queue, use it to create a text-only queue. Make sure no input
filter is used (i.e. there is no if : command in the printcap entry). If you do not have such a tool, you must
create the printcap entry and a spool directory by hand. See “To create a printcap entry by hand:” on
page 48 and “To create a spool directory by hand:” on page 49.
2. Create an input filter for the trigger. The input filter is a shell script that inserts the trigger in front of
the print job. You should give the script the name of the document. In this example, we have a
document named MAILING on the hard disk of the printer. We name the script mailing.scr and place it
in the spool directory.
3. Edit the input filter using a text editor. For example, to edit it in the vi text editor, we issue the
command:
vi /var/spool/lpd/mailing.scr
Enter the following lines in the text editor:
#!/bin/sh
/bin/echo "%!PS-Adobe"
/bin/echo "(MAILING) run MAILING"
cat -
/bin/echo -e \004
The first echo turns the printer to PS mode. The second echo calls the document. Edit them to reflect
the name and location of your document. Enter all other lines exactly as shown above. Although the
echo \004 is not required, it is recommended as it signals the end of the job to the PostScript printer.
Be sure you use the echo program, and not the command internal to your shell. The echo internal to
your shell might not support the escape characters the echo program supports. The echo program is
usually located in /bin.
4. Save your changes and exit the text editor.
47
Page 56

2
Creating Triggers
5. Set the permissions on the input filter file so that it can be executed from root. Use the chmod
command as follows, replacing mailing.scr with the name of your input filter file:
chmod 755 /var/spool/lpd/mailing.scr
6. Edit the printcap file to add the input filter to the queue definition. Your entry should now look like this:
mailing:\
:sd=/var/spool/lpd/mailing:\
:mx#0:\
:sh:\
:lp=/dev/lp1:\
:if=/var/spool/lpd/mailing.scr:
It is important to add a backslash to a line before adding a new line, and to add a colon at the end of
each new line.
7. Save the changes and exit the printcap file.
You have created your trigger. To print data on the MAILING document, use the queue "mailing". For
example:
48
lpr -Pmailing data.txt
To create a printcap entry by hand:
1. Open the /etc/printcap file with a text editor. For example, you might open it with the vi text editor by
issuing the command
vi /etc/printcap
2. Enter the following at the end of the /etc/printcap file. Change the queue name and spool directory to
reflect your installation. This printcap entry is for a text-only printer on device lp1 named mailing, that
uses the spool directory /var/spool/lpd/mailing.
mailing:\
:sd=/var/spool/lpd/mailing:\
:mx#0:\
:sh:\
:lp=/dev/lp1:
Page 57

Detailed Directions
If you want to send the print job to a remote LPD server, use rm= to specify the remote print server,
and rp= to specify the remote queue name. You specify the remote print server in the rm field using
either the IP address or host name. For example:
mailing:\
:sd=/var/spool/lpd/mailing:\
:mx#0:\
:sh:\
:rm=192.168.100.147:\
:rp=default:
To create a spool directory by hand:
• Use the following command, replacing mailing with the name you want to use for the spool directory.
mkdir /var/spool/lpd/mailing
Implement a Trigger under UNIX System V (Solaris)
Refer to “Capture Sample Data in UNIX (Solaris)” on page 8 to create a print queue for UNIX and capture
data.
Create a Script File
The following procedure describes how to create a script file for UNIX. This script transfers the data to the
printer and adds the trigger for the document.
To create a script file:
1. Type the following commands:
cd /etc/lp/interfaces
lpadmin -p myscriptfile -I any -v /dev/null
Note that -v /dev/null instructs UNIX to delete the file after the script uses it.
2. Enable the script by issuing the following commands. You must be logged in as an administrator.
su
enable myscriptfile
accept myscriptfile
49
Page 58

2
Creating Triggers
exit
Edit a Script File
To edit a script file:
1. Issue the following commands:
cd /etc/lp/interfaces
vi ./myscriptfile
2. In the vi text editor, use the dG command to delete all default text inside the script file.
3. Enter the following text inside your script file:
#!/bin/sh
#
options=$5
shift 5
for FILE in $*
do
50
cat /etc/lp/interfaces/mytrigger $FILE | lp -d queuename
-t $FILE
done
exit 0
4. Save your script file and exit the editor (press ESCAPE, then enter :wq).
5. Set the permissions on the script file as follows:
chmod 755/etc/lp/interfaces/myscriptfile
Create the Trigger File
To create a trigger file for UNIX:
1. Issue the following commands:
cd /etc/lp/interfaces
vi ./mytrigger
2. In the vi text editor, use the dG command to delete all default text inside the script file.
Page 59

Detailed Directions
3. Enter the following text inside your trigger file. It assumes your document resides on the hard drive of
the printer. In this example, MYDOCUMENT is the name of the document. This name appears on the
confirmation sheet that prints when you install the document on the printer's hard drive.
%!PS-Adobe
(MYDOCUMENT) run MYDOCUMENT
4. Save your script file and exit the editor (press ESCAPE, then enter :wq).
Submit a Print Request Using a Trigger
To submit a print request using a trigger:
• Issue the following command to run the script file and launch the printing process:
lp -d myscriptfile data_filename
Implement a Trigger and Configure an AIX 4.3 Printer
Add a Physical or Virtual Printer
To add a physical or virtual printer in series:
1. Log in as dyadm.
2. Execute Smit Printer.
51
Page 60

2
Creating Triggers
3. Select Print Spooling.
4. Select Add a Print Queue.
52
Page 61

5. Select Local.
6. Select Other, regardless of the type of printer.
Detailed Directions
53
Page 62

2
Creating Triggers
7. Select Generic, regardless of the type of printer.
8. Select parallel or rs232.
54
Page 63

9. Select the appropriate adapter(s).
10. Enter the following values:
ASCII: Name of virtual printer that prints from operating systems.
Detailed Directions
.
GL Emulation: Laser printer configured on a workstation and used for Windows printing.
Port number: Number of ports on the serial communication card.
Baud rate: Port speed.
Parity: Parity type.
Flow control: Printer's protocol type.
Printer time out: Time a printer can time-out before being DOWN.
55
Page 64

2
Creating Triggers
State to be configured at boot time: Always be at AVAILABLE.
To add a physical or virtual printer connected to a Jet Direct:
56
1. In the /etc/hosts file, enter the IP address and print server name.
Page 65

Detailed Directions
2. Follow step 1. through step 5. in “To add a physical or virtual printer in series:” on page 51. In step 5.
select hpJetDirect.
3. Select Other, regardless of the type of printer.
57
Page 66

2
Creating Triggers
4. Select Generic, regardless of the type of printer.
5. Select Do NOT make this system a BOOT/TFTP server.
58
6. Enter the following values:
ASCII: Name of printer for AIX, Basic and Informix printing.
Page 67

Detailed Directions
GL Emulation: Laser printer configured on a workstation and used for Windows printing.
HOSTNAME: Name entered in the /etc/hosts file.
Port number: For JetDirect: 9100. For a three-port: Port 1 = 9100, Port 2 = 9101, Port 3 = 9102.
To add a physical or virtual printer configured on another server:
1. In the /etc/hosts file, enter the IP address and print server name.
2. Follow step 1. through step 5. in “To add a physical or virtual printer in series:” on page 51.
59
Page 68

2
Creating Triggers
3. Select Remote.
4. Select Local Filtering.
60
Page 69

5. Select Other.
6. Select Generic.
Detailed Directions
7. Enter the following values:
ASCII: Name of printer for AIX, Basic and Informix printing.
61
Page 70

2
Creating Triggers
GL emulation: Laser printer configured on a workstation and used for Windows printing.
HOSTNAME: Name entered in the /etc/hosts file.
Queue name: Name of the printing queue on the other server.
Backend time-out: Length of time, in seconds, the AIX server waits for information from the printer
before disconnecting the printer. The recommended value is 30.
62
To add a new print queue on an existing device:
1. Follow step 1. through step 8. in “To add a physical or virtual printer in series:” on page 51.
2. Select one of the following options:
Add new printer: To create a new printer, select Add new printer. Return to step 8. in “To add a
physical or virtual printer in series:” on page 51.
Page 71

Existing printer: To edit a new queue on the lp printer/device, select the appropriate printer.
3. Enter the name of the new printer.
Detailed Directions
63
Page 72

2
Creating Triggers
To modify the attributes of virtual printers:
1. Log in as dyaddm.
2. Execute Smit Printer.
3. Select Programming Tools.
64
Page 73

4. Select Change / /Show Printer Attribute Database (Virtual Printers).
5. Select the virtual printer to modify.
Detailed Directions
6. Change the following attributes for the ASCII printers only:
J: !
65
Page 74

2
Creating Triggers
Z: !
_j: !
_l: 0
_w: 255
cr: %Iac
66
Implement a Trigger under VMS
To create a text library:
1. The following is an example of a command used to create a text library.
Page 75

2. The following displays the details of the text library.
A
A. VMS executable file (similar to a DOS batch file)
3. The following displays details of the information in the text library.
Detailed Directions
A
B
A. Name of the text library (.TLB extension) B. Documents in the library
67
Page 76

2
Creating Triggers
4. The following displays details of a port configuration for a LAT device:
5. The following displays details of a port configuration for type Decserver 90LT:
68
Triggers for Systems 36 and 3270
You must execute this procedure from the application you use to process the data.
Page 77

Detailed Directions
To install a trigger:
1. Enter the following lines, substituting INVOICE for the name of your document. These lines initialize
the printer in PostScript language and call the appropriate document (INVOICE in this example). They
must precede the data stream.
&%1B%-12345X@PJL
@PJL EOJ
&%1B%-12345X
&%1B%-12345X@PJL
@PJL ENTER LANGUAGE = POSTSCRIPT
%!PS-Adobe
INVOICE
Implement a Trigger with AS/400 Systems
TCP/IP Printing
When you implement a trigger for AS/400 systems, it is important to retrieve, edit and create a
Workstation Customizing Object (WSCST). In the following procedure, LUNE is the WSCST name. It is
recommended that you use a descriptive name such as the name of your document (for example, INVOICE
or CHECK).
To retriev e the WSCST s our ce:
1. At the command line, enter RTVWSCST and press ENTER.
2. At the Device type line, enter *TRANSFORM and press ENTER.
69
Page 78

2
Creating Triggers
The following window appears.
70
3. Enter the following data:
Manufacturer type and model: *NONE.
Source member: Name of the source to retrieve.
Source file: Location in which to store the source file member.
Library: Location in which to store the source files.
Type description: Short text description of the source file. This description should be unique.
4. Press ENTER.
Page 79

A confirmation message appears.
Member SRCLUNE added to file QTXTSRC in OBJLUNE.
Detailed Directions
To edit the WSCST source:
1. At the command line, enter STRSEU and press F4.
71
Page 80

2
Creating Triggers
The following window appears.
2. Enter the source file name. For this example, QTXTSRC.
72
3. Enter the library name. For this example, OBJLUNE.
4. Press ENTER.
Page 81

The following window appears.
5. In the Opt column, enter 2 and press ENTER.
The following window appears.
Detailed Directions
73
Page 82

2
Creating Triggers
6. Replace INITPRT DATA = ' 00 ' X. by the following INIT string:
:INITPRT
DATA =
'1B252D31323334355840504A4C20656E746572206C616E67756167'X
'65203D20506F73747363726970740D0A'X
'28464F524D292072756E20464F524D0D0A'X.
The INITPRT string is the hexadecimal representation of the trigger. In the example, the trigger is:
<ESC>%-12345X@PJL ENTER LANGUAGE=POSTSCRIPT
(FORM) run FORM
In the example, the name of the document is FORM. Note: The bold characters in the INITPRT string are
the letters FORM in hexadecimal (where 46=F, 4F=O, 52=R and 4D=M). Consult “ASCII Conversion
Table” on page 95 for help translating your trigger into hexadecimal.
7. Enter the RESETPRT DATA as displayed in the following window:
:RESETPRT
DATA ='1B252D313233343558'X.
74
The INITPRT string is the hexadecimal representation of the following trigger:
<ESC>%-12345X@PJL ENTER LANGUAGE=POSTSCRIPT
Page 83

(FORM) run FORM
8. Press ENTER.
The following confirmation message appears:
Member SRCLUNE in file OBJLUNE/QTXTSRC changed with 19
records.
Detailed Directions
9. Press F3 to save the new WSCST.
75
Page 84

2
Creating Triggers
The following window appears.
10. In the Change/create member line, enter Y, and press ENTER to confirm the save.
76
Page 85

Detailed Directions
The following confirmation message appears.
Member SRCLUNE in file OBJLUNE/QTXTSRC changed with 19
records.
To create the WSCST:
1. At the command line, enter CRTWSCST and press F4.
77
Page 86

2
Creating Triggers
The following window appears.
2. Press F10 to display additional parameters.
78
3. Enter the name of the workstation customizing object that you want to create, and the library name
for the customizing object (the one previously changed).
4. In the Additional Parameters section, enter the following:
Source file: Enter the name of the source QTXTSRC.
Library: Enter the name of the library containing the source file.
Replace object: En ter *YES or * NO to i ndicate w hethe r or no t this name s hould replace a n obje ct with
the same name.
Page 87

Detailed Directions
The following confirmation message appears.
The object LUNE customization has successfully been created.
If the creation of the WSCST was not successful, verify that the hexadecimal code for the INITPRT and
RESETPRT strings is correct. Once you create the WSCST, you can use it in an output queue.
Use the WSCST in an Output Queue
Note that the following procedure is the same as the one described in the Capturing Data section of this
guide, except for 3 information lines.
To use the WSCST in an output queue:
1. Create the output queue using the CRTOUTQ command.
79
Page 88

2
Creating Triggers
2. In the first screen, do not change anything.
3. In the second screen, enter the following:
Manufacturer type and model: *WSCST
80
WS customizing object: Name of the WSCST that you have just created (LUNE in our example).
Page 89

Library: *LIBL
4. In the third screen, enter the following:
Text description: Short text describing the WSCST used with the output queue.
Detailed Directions
81
Page 90

2
Creating Triggers
You can now use the output queue with the new WSCST to trigger execution of your document. The
next step is to create an LPD queue in PlanetPress Watch.
Twinax Printing
This section explains how to configure your system to print with a Twinax connection. You use the CL
program provided in this guide (see “CL Program for AS/4 00 System s” on page 101) t o intercept s pool f iles
from a source output queue and insert a trigger in each of the files before transferring them to the
destination output queue.
The source output queue must not be linked to a physical printer since the CL program needs to intercept
the spool files from this queue before they are transferred to the final output queue, which is linked to a
physical printer. Therefore, the AS/400 system administrator must transfer the user output queue to the
source output queue.
The parallel Twinax converter you use must be configured manually in 4214 printer type. Once configured,
connect a screen to it and select Generic Printer. Before doing this procedure, consult your protocol
converter instruction manual.
To set the End of Job string in your document in PlanetPress Design:
1. Open your document in PlanetPress Design.
82
2. Choose Format | Document.
The Document dialog box appears.
3. In the Document dialog box, click Compilation Options.
4. Select Use End of Job keyword.
5. In the End of Job keyword box, enter the following string:
%%EODOCUMENT
In the PostScript language, %% corresponds to a comment, and the rest of the string (EODOCUMENT)
is a variable.
6. Click OK to exit the Document dialog box.
To set the configuration on an AS/400:
1. Create the following library:
CRTLIB OBJLUNE
Page 91

Detailed Directions
2. Create a permanent file (one file per document, each with a unique name). This name must be
WATCHWORK in the OBJLUNE library. WATCHWORK is hard coded in the CL program included in this
guide.
CRTPF FILE(OBJLUNE/WATCHWORK) RCDLEN(132)
3. Create a file to contain the string you entered in the Document dialog box (%%EODOCUMENT in our
example), and the appropriate trigger:
CRTPF FILE(&TRIGGERLIB/&TRIGGERFN) RCDLEN(300)
Replace &TRIGGERLIB and &TRIGGERFN with the appropriate names for your system.
4. In this file, enter the following. You can use the STRDFU command to do this.
%%EODOCUMENT
%!PS-Adobe
(INVOICE) run INVOICE
5. Create a printer file. You use this file to create the final spool file:
CRTPRTF FILE(&WATCHPRTFL/&WATCHPRTFN) DEVT YPE(*SCS)
Replace &WATCHPRTFL and &WATCHPRTFN with the appropriate names for your system. Note that this
printer file is standard: 66 lines/page, 6 lines/inch, and 132 characters/line. If a printer file is not
standard, you must create it according to your requirements.
6. Copy the CL WATCH program on your AS/400 system (see “CL Program for AS/400 Systems” on page
101).
7. Compile the program. This makes it possible to use it as a PGM WATCH object in the OBJLUNE library.
8. Program the work using a specialized software (i.e., Robot) or automatic scheduler provided with the
AS/400 system. The CALL format of the WATCH program must be done as follows:
CALL PGM(OBJLUNE/WATCH) PARM('&watchprtfn &watchprfl &outputqs &outputqslb &outputqd
&outputqdlb &triggerfn &triggerlib')
Where:
*** &watchprtfn: Printer file used to create the final spool file.
*** &watchprtfl: Library of the printer file used to create the final spool file.
*** &outputqs: Print queue (source).
83
Page 92

2
Creating Triggers
*** &outputqslb: Library of the print queue (source).
*** &outputqd: Final print queue (destination after the spool file has been modified).
*** &outputqdlb: Library of the final print queue (destination after the spool file has been modified).
*** &triggerfn: Physical file, which contains the string used for the trigger.
*** &triggerlib: Library or file where the trigger is located.
To schedule the program under AS/400:
• Enter the following command:
ADDJOBSCDE JOB(WATCH) CMD(CALL PGM(OBJLUNE/WATCH) PARM('&watchprtfn &watchprfl
&outputqs &outputqslb &outputqd &outputqdlb &triggerfn &triggerlib')
FRQ(*WEEKLY) SCDDATE (*NONE) SCDDAY(*ALL) SCDTIME('23:00')JOBD(JOBDLIB/JOBD)
USER(USRPRF)
Replace the following by the appropriate values for your system:
*** &watchprtfn: Name of the printer file used to create the final spool file.
84
*** &watchprtfl: Name of the library of the printer file used to create the final spool file.
*** &outputqs: Name of the print queue (source).
*** &outputqslb: Name of the library of the print queue (source).
*** &outputqd: Name of the final print queue (destination after the spool file has been modified).
*** &outputqdlb: Name of the library of the final print queue (destination after the spool file has
been modified).
*** &triggerfn: Name of the physical file that contains the string used for the trigger.
*** &triggerlib: Name of the library or the file where the trigger is located.
*** &JOBDLIB: Name of the library that contains the job description used for this command.
*** &USRPRF: Name of the user profile used to run this command.
Important! The user profile must have rights to access both print queues, and to write in the OBJLUNE
library (temporary file).
Page 93

Detailed Directions
Prepare SAP Device Type for PlanetPress Design
PlanetPress Design is a PC-based software that merges output data from the source system. In order for
PlanetPress Design to work with SAP, you must make changes to the spool device type.
To modify the spool device type in SAP:
1. Run SPAD and select Full Administration.
The Spool Administration: Initial Screen window appears.
2. Click the red pencil icon to change to edit mode.
3. In the Device types section, click Page formats.
4. In the Page Formats window, select LETTER or another format from the list.
5. Select Copy from to copy LETTER to a new format.
6. Enter ZLETTER.
7. Select both Por trait and Landscape orientations.
8. Assign the appropriate width and length values to the paper size.
85
Page 94

2
Creating Triggers
9. Click the left-pointing checkmark in the toolbar to return to the previous window.
10. Click Formats and create a new format.
11. Enter the name ZLETTER again.
12. In the Spool Administration: Format Type (Change) window, assign the LETTER page format created
in step 4. to the new format ZLETTER.
86
13. Click the left-pointing checkmark in the toolbar to return to the previous window.
14. Click Device types to display the list of device types.
15. Select For dev. types and Copy device type from the Utilities menu.
16. Co py de vice type ASCI IPRI to ZA SCII xx (w here xx is a num ber) . Verify th e Use references box is cleared.
17. Click the left-pointing checkmark in the toolbar to return to the previous window.
Page 95

18. Double-click the ZASCIIxx device type to display the corresponding window.
Detailed Directions
19. Click Formats.
87
Page 96

2
Creating Triggers
The Spool Admin.: List of Formats for Device Types (Change) window appears.
88
20. Click the paper icon to add a new format to the list.
The Spool Admin.: List of Formats for Device Types (Change) dialog box appears.
21. In the Format box, select ZLETTER.
22. Click the checkmark and close the window.
Page 97

The Spool Administration: Maintain Format for Device Type window appears.
Detailed Directions
23. Double-click Printer initialization.
The Print init. window appears.
89
Page 98

2
Creating Triggers
24. Enter the following PJL codes provided byPlanetPress Design.
90
25. Save changes.
26. Assign the device type to the output device that you use to print documents.
PJL codes are now set up in SAP to control the output from SAP and merge it with the document
created and installed in the printer's memory using PlanetPress Design.
Page 99

Implement a Trigger under HP 3000
To create a trigger on an HP 3000:
1. Enter the required information in the appropriate fields.
Detailed Directions
2. Click Save Data.
3. Enter ENVPP01.HPENV.SYS (for environment PlanetPress Design 01) for the environment file. Be
careful with the special characters.
4. Enter a name for the document. For example, ARRANGL.
The sample job should appear as follows:
!JOB P20A07B,…,FICHIER;INPRI=7
!…
!…
91
Page 100

2
Creating Triggers
!FILE OUT=TAXEANG;DEV=402,1;ENV=ENVPP05.HPENV.SYS
!FILE IN=FACTANG
!FCOPY FROM=*IN;TO=*OUT
!…
!…
!EOJ
92
 Loading...