

Page 1

PlanetPress Search
User Guide
www.objectiflune.com
Page 2

©2010 Objectif Lune Inc - 2 -
Page 3

Copyright Information
Copyright Information
Copyright © 1994-2011 Objectif Lune Inc. All Rights Reserved.
No part of this publication may be reproduced, transmitted, transcribed, stored in a retrieval system, or translated into any
other language or computer language in whole or in part, in any form or by any means, whether it be electronic, mechanical,
magnetic, optical, manual or otherwise, without prior written consent of Objectif Lune Inc.
Objectif Lune Inc.disclaims all warranties as to this software, whether expressed or implied, including without limitation any
implied warranties of merchantability, fitness for a particular purpose, functionality, data integrity or protection.
PlanetPress and PrintShop Mail are registered trademarks of Objectif Lune Inc.
PostScript and Acrobat are registered trademarks of Adobe Systems Inc.
Pentium is a registered trademark of Intel Corporation.
Windows is a registered trademark of Microsoft Corporation.
Adobe, Adobe PDF Library, Adobe Acrobat, Adobe Distiller, Adobe Reader, Adobe Illustrator, Adobe Photoshop, Optimized
Postcript Stream, the Adobe logo, the Adobe PDF logo are either registered trademarks or trademarks of Adobe Systems Incorporated in the United States and/or other countries.
Trademarks of other companies mentioned in this documentation appear for identification purposes only and are the property
of their respective companies.
Title PlanetPress Search User Guide
Revision 2012-05-03
©2010 Objectif Lune Inc - 3 -
Page 4

©2010 Objectif Lune Inc - 4 -
Page 5

Table of Content
Table of Content
Copyright Information 3
Table of Content 5
Overview 7
Icons used in this guide 7
Other Documentation 7
Understanding PlanetPress Search 9
Search Profile 9
Search Database 10
PDI File 10
The PlanetPress Search Program 11
Start PlanetPress Search 11
The PlanetPress Search Program Window 11
The Search Toolbar 12
The Search Panel 13
Basic Search 13
SQLSearch 14
The Search Results Panel 15
Set User Options 15
Change Language 17
Exit PlanetPress Search 17
Search Profiles And Databases 19
Create a New Search Profile that Uses an SQL Server Database 19
Create a New Search Profile that Uses an Access Database 20
Create a New Search Profile that Uses an Oracle Database 21
To create a search profile connected to an Oracle database 21
Create a New Search Profile that Uses a MySQL Database 22
Build the Contents of a Database for the First Time 22
Rebuild the Contents of a Database 24
Refresh the Contents of a Database 25
Save a Search Profile 26
Load a Search Profile 26
Edit a Search Profile 26
Copy or Rename a Search Profile 27
Delete a Search Profile 27
Determine the Currently Loaded Search Profile 27
Delete a Database 27
Searching in PlanetPress Search 29
Search 29
Search Result 29
Detailed Directions 31
Change the View on Search Results 31
Select Search Results 33
View the PDF Associated with a Search Result 34
©2010 Objectif Lune Inc - 5 -
Page 6

Table of Content
Create a PDF of Search Result Pages 34
Print PDF Pages Referenced by Search Results 34
Print a Summary of the Search Results List 35
Copy Information from the Results List 35
Advanced Concepts 37
Sharing A Profile On The Network 40
Database Structure 40
Command Line Rebuild and Refresh 41
The Command 41
Parameters 41
Example Usage 42
Notes 42
Database Considerations in a Network Installation 42
©2010 Objectif Lune Inc - 6 -
Page 7

Overview
Overview
This PDF documentation covers version 7.4. To view the documentation of previous versions please refer to the PDF files
available in the Downloads section of our website:
http://www.objectiflune.com/OL/Download/DownloadCenter.
Icons used in this guide
Some icons are used throughout this guide in order to catch your attention to certain particular information.
Notes: This icon shows you something that complements the information around it. Understanding notes is not critical but may be helpful when using PlanetPress Search.
Warnings: This icon shows information that may be critical when using PlanetPress Search. It is important to pay
attention to these warnings.
Technical: This icon shows technical information that may require some technical knowledge to understand.
Other Documentation
For other related documentation , please see the drop-down menu at the top-right corner of this page.
©2010 Objectif Lune Inc - 7 -
Page 8

©2010 Objectif Lune Inc - 8 -
Page 9

Understanding PlanetPress Search
Understanding PlanetPress Search
This chapter explains how PlanetPress Search works and how to configure it to search one or more PlanetPress Image
archives.
There are three key points to understand with respect to how PlanetPress Search works:
1. Every search you perform is done on a search database that PlanetPress Search builds from the information in the
PDI files generated by PlanetPress Image.
Although the PDI file contains all the information PlanetPress Search needs to perform a search, PlanetPress Search
uses databases to eliminate the need to open and search individual PDI files, making searches faster and more efficient. See "Search Database" (page 10) for help understanding databases.
2. You define the contents of a search database.
You specify the PlanetPress Image folders you want to include in the search database.
3. You can have as many search databases as you need.
For each search database you want to build, you first create a search profile and then build the database. A search
profile can reference exactly one search database, so each search database you want to build requires a separate
search profile. See "Search Profile" (page 9) for a complete description of search profiles.
Note that since PlanetPress Search searches the database and not the PDF and PDI files themselves, if the PDF files indexed in
the search database change, you must update the database to ensure searches yield accurate results. For example, if you
have a document that executes in PlanetPress Image on a weekly basis, you would also update the search databases that contain the index information for that document on a weekly basis. See "Search Database" (page 10) and in particular "Updating a
Search Database: Refresh vs. Rebuild" (page 25).
Also note that you can configure PlanetPress Image to automatically add information to an existing search database when it
executes a document. If a record for the document already exists in the database, PlanetPress Image adds the index information to the database. If the document does not yet exist in the database, PlanetPress Image adds a new record for the document along with the index information for the document, to the database. This is useful when you want to eliminate the need
to refresh or rebuild the database from within PlanetPress Search. Consult the PlanetPress Workflow Tools User Guide
for more information on this feature.
In a network installation of PlanetPress Search, it is common to want to restrict access to search databases in order to ensure
the integrity of search results. See "Database Integrity in a Network Installation" (page 42).
Search Profile
A search profile is a file that contains information about a search database. PlanetPress Search uses the search profile to determine what database to search, and how to connect to that database. It also consults the search profile for information related
to updating and searching the database.
A search profile is a distinct file from the search database, and can exist in any folder. Search profiles use the .prf file name
extension. The ppsearch.prf file in the PlanetPress Search program folder is the default search profile.
There are several important points to understand with respect to search profiles:
l A search profile references exactly one search database. You can create many search profiles that reference the same
database but a single search profile cannot reference more than one database.
l You can create as many search profiles as you require.
l Create a Database During the Load of a Search Profile
©2010 Objectif Lune Inc - 9 -
Page 10

Understanding PlanetPress Search
Search Database
A search database, sometimes referred to simply as a database, is what PlanetPress Search searches when you perform a
search. The database contains the index information for the documents in one or more PlanetPress Image archive folders. You
create, update, and search a database through a search profile.
PDI File
You create the index terms for a document in PlanetPress using data selection objects. Each data selection object contains at
most one index term, and the name of the index term is the name you define for it in the data selection object. A document can
contain any number of index terms.
When PlanetPress Image executes a document, it gathers all the index terms you defined in the document and saves them in a
PDI file. It creates one PDI file for each PDF file it generates. The PDI file bears the same name as the PDF file. For example if
the PDF file is invoice.pdf, the corresponding PDI file is invoice.pdi. The PDI file is an ASCII file. Note that you can use the
Digital action in a PlanetPress Suite Workflow Tool to produce a PDI file in XML format (rather than the native format PlanetPress Image generates). However PlanetPress Search reads only the native format produced by PlanetPress Image.
PlanetPress Search uses the information in the PDI files to build its search databases.
©2010 Objectif Lune Inc - 10 -
Page 11

The PlanetPress Search Program
The PlanetPress Search Program
Start PlanetPress Search 11
The PlanetPress Search Program Window 11
The Search Toolbar 12
The Search Panel 13
Basic Search 13
SQLSearch 14
The Search Results Panel 15
Set User Options 15
Change Language 17
Exit PlanetPress Search 17
Start PlanetPress Search
Since version 7.3, PlanetPress Search is a standalone software that can be installed individually or as part of the PlanetPress
Suite along with other software in the suite. This procedure describes how to start PlanetPress Suite in version 7.3 and higher:
1. Log on to the computer where you want to use PlanetPress Search.
2.
In the Start menu, click on (All)Programs, PlanetPress Suite 7 and click PlanetPress Search.
(Alternatively, you can double-click on the PlanetPress Search icon on your desktop.)
The main PlanetPress Search window will then open.
To start PlanetPress Search in earlier versions of PlanetPress Suite
1. Log on to the computer where you want to use PlanetPress Search.
2. In the Start menu, click on (All)Programs, then locate your installation of Adobe Reader. This can be either Adobe Acrobat Standard, Adobe Acrobat Reader, etc.
3.
In the Adobe product you launched, click on the icon in the toolbar.
The PlanetPress Search Program Window
The PlanetPress Searchprogram window is divided into 4 distinct sections:
l The Program Toolbars
l The Search Panel
l The Results Panel
l The PDFViewer
©2010 Objectif Lune Inc - 11 -
Page 12
The PlanetPress Search Program
You use the Search Configuration area to configure and launch a search. The currently loaded search profile determines what
search database is available in the Search Configuration area. See "Determine the Currently Loaded Search Profile" (page 27)
for help determining which search profile is currently loaded. The Document box near the top of the Search Configuration area
contains a list of all documents in that database.
The contents of the Search Configuration area depend on the type of search selected in the Search type box (Basic or SQL).
The Search type box at the top of the Search Configuration area determines how you define the search criteria for a search. If
you select SQL, the Search Configuration area changes to accept an SQL statement.
See "Perform a Search Using a Basic Query" (page n) and "Perform a Search Using an SQL Query" (page n) for help defining
searches using Basic and SQL search types, respectively.
The Results area displays the results of the last search you performed. You use it to examine and select search results. You
can hide the Search Configuration area to increase the size of the Results area. See "Change the View on Search Results"
(page 31).
The Search Toolbar
The PlanetPress Search toolbar offers a few shortcuts that simplifies the use of the most common features of PlanetPress
Search.
From left to right, the default icons visible in the toolbar are:
©2010 Objectif Lune Inc - 12 -
Page 13

The PlanetPress Search Program
l New:Click to display a submenu where you can create a new search profile.
l Open:Click to open an existing Search Profile.
l Save:Click to save the current Search Profile.
l Save As:Click to save the current Search Profile as a new file.
l Print:Click to print the search results (only active when search results are available).
l Copy Selected Nodes:Click to copy the selected search results to the Windows Clipboard.
l Sort Ascending:Sort the Search results in Ascending order (by the Primary Sort Order).
l Sort Descending:Sort the Search Results Pane in descending order (by the Primary Sort Order).
l Clear Results:Clear the Search Results pane.
l Preferences:Open the User Options dialog.
l Language: Opens the Language Change dialog.
l Help:Opens the PlanetPress Search User Guide (this site).
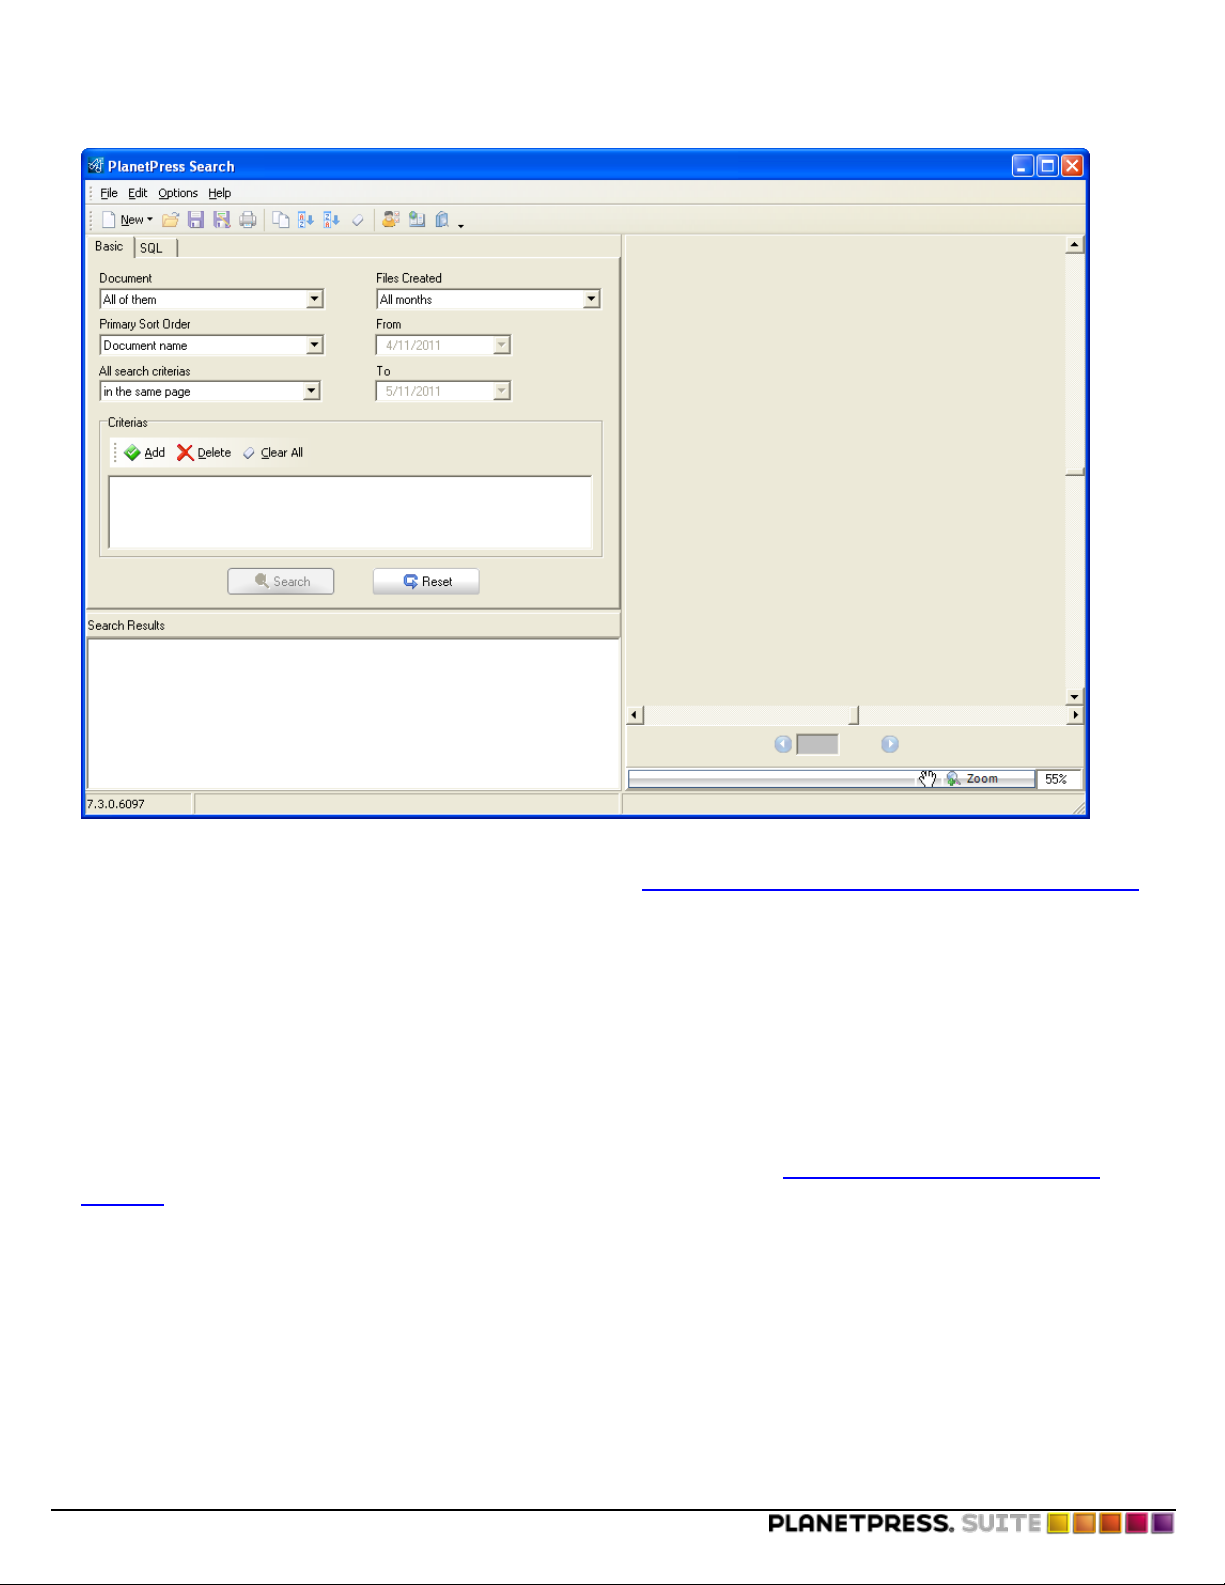
The Search Panel
The Search Panel provides two different methods for searching through your Search Database.
If the Search Database is empty, you will not be able to click the Search button, and the SQLtab will remain empty.
Basic Search
The Basic Search panel is used to provide an easy to use search functionality while remaining flexible in
its use. This procedure describes
how to perform a search using a
Basic query to define the search criteria. Basic query is useful for users
that are unfamiliar with Structured
Query Language (SQL) or find it
more convenient to define the query
without using SQL. PlanetPress
Search constructs the SQL query
from the set of search criteria
defined using the drop-down lists and
the Criteria Dialog.
To perform a basic search:
1. Make sure a search profile
has been loaded. For details,
see Load a Search Profile.
2. Select the Basic tab from the Search Panel.
3. Select the appropriate options from the drop-down menus:
l Document:Select from a list of available document titles located in the Search Database to filter the results for
a specific document title, or select All of them to ignore the document title. The Document title refers to the PlanetPress Talk IDin the document's properties in PlanetPress Design (see Set up a document)
©2010 Objectif Lune Inc - 13 -
Page 14

The PlanetPress Search Program
l Primary Sort Order:Determines how the search results will be sorted (results are always ascending). The 3
available options are:
l Document name:Sorts by the name of the document (the same as the ones seen in the Document
drop-down above). Note that selecting this option when filtering by document results in no sorting at all.
l Date:Sorts by document creation date.
l PDFName: Sorts by the PDFfile name.
l All search criteria:Determines whether the search criteria should be true only within a single Page of the
PDF file, or anywhere in the pages.
l Files Created:Filters the results by date. Use the drop-down to select a pre-determined setting (such as
"Today"or "Last six months" for example)or select Custom to enable the From and To options to manually
set the date filter. When selecting a pre-determined setting, the From and To box below will display the actual
dates that the period corresponds to.
l From/To:Use these boxes to specify the start and end dates, respectively, when you select Custom in the
Files created box. You can enter dates in these boxes in two ways. You can click in the box and modify the
date, or you can click the arrow on the right of the edit box to display a calendar that reflects the date that currently appears in the edit box. Use the arrows at the top of the calendar to navigate through the months, and
click on a date to select it. When you select a date, the calendar disappears and the edit box displays the
selected date.
4. Add search criteria to your search (see below).
5. Click Search to initiate the search or Reset to reset all the options to their defaults.
The Search button is only enabled if there is at least one PDFin the Search Database that is currently used.
Adding a Search Criterion
While some filtering and sorting is made through the Document and Files Created options, searches are mainly defined
through a set of criteria which are defined in the Criteria box.
1. Click the Add button. A new criterion line appears.
2. Enter or select the information in the 3 options of the criterion line:
l Search Field (Left): Select which field to search from. Each field present in the PDFdocument will be listed here,
along with the PDFName entry (which is automatically present).
l Search Operator (Center):Select from a list of possible operators such as Start With, End With, Equal To, Con-
tains, Greater Than, etc.
SQLSearch
Once search parameters are selected in the Basic tab, clicking on the "SQL"view displays the SQLequivalent of the
Basic search options and criteria.
©2010 Objectif Lune Inc - 14 -
Page 15

The SQLSearch Panel is used to give
much more control and power while
creating a search query. It is
assumed that some knowledge of
SQLQueries is available to the user
before he attempts to use this tab.
To search using the SQLtab:
1. Enter your SQLquery in the
SQLQuery box
2. Click Search to execute the
query.
The default search query for an
Access Search Database (which
returns all PDFs in the database)is
this:
The PlanetPress Search Program
SELECT DISTINCTROW Table_
PDF.PDF_ID, Table_PDF.Doc_ID,
Table_PDF.Path_ID, Table_
PDF.PDF_Name, Table_PDF.Number_Pages, Table_PDF.Creation_Date FROM Table_PDF WHERE ( 1 = 1 ) GROUP BY Table_
PDF.PDF_ID, Table_PDF.Doc_ID, Table_PDF.Path_ID, Table_PDF.PDF_Name, Table_PDF.Number_Pages, Table_PDF.Creation_Date ORDER BY Table_PDF.Doc_ID , Table_PDF.Creation_Date
The Search Results Panel
The Search Results Panel displays the results for any search that is made from The Search Panel.
Set User Options
You can set a number of user options in PlanetPress Search. With the exception of two user options, Use default profile (in
Program startup options) and Database access for new profiles (in Search options), all user options apply to the currently loaded search profile and are saved with it. Each time you load a search profile, the user options settings adjust to
reflect those of the newly loaded profile.
Note that if the file containing the search profile is read-only, you cannot save any of the modifications you make to the user
options settings. In this case, any changes you make to the user options settings are available only until you load a different
profile or exit PlanetPress Search. It is common to make search profiles read-only in a network installation. See "Database
Considerations in a Network Installation" (page 42).
Here are the user options available in this dialog:
Program startup options tab
l Select document: Select the document that appears in the Select document box in the Search Configuration area of
the PlanetPress Search Program window by default when PlanetPress Search loads this search profile. Select None if
you do not want PlanetPress Search to display any document when it loads this search profile. This option applies only
©2010 Objectif Lune Inc - 15 -
Page 16

The PlanetPress Search Program
to the currently loaded search profile.
l Filter date: Select the date filter that appears by default when PlanetPress Search loads this search profile. The date
filter appears in the Date boxes in the Search Configuration area of the PlanetPress Search Program window, and constrains the search to PDFs created during the specified time period. Select None to include all PDFs.
l Use default profile: Select to specify a search profile to load on startup. Use either the edit box or Browse button
that appear to specify the search profile. Clear to load the last used search profile on startup. If you have never created
a search profile (for example, if this is the first time you are starting PlanetPress Search), PlanetPress Search loads the
default search profile, PSearch4.prf, located in the PlanetPress Search program folder.
Printing options tab
l Printer to use:Select the printer to use when you print from PlanetPress Search, with this search profile loaded.
Search options tab
l Multi-page mode: Select to set the total number of pages when generating a PDF with the search result when you
view, print, or save that result. Use the spin box to set the number of pages. For example, consider that you have Multipage mode selected and set to 2, and you print a search result that appears on page 15 of the PDF. The printed result
consists of two pages: page 15 and 16 of the PDF. This setting applies to the currently loaded search profile.
l Open PDF after creation: Select to have PlanetPress Search automatically open a PDF that it creates from search
results. This setting applies to the currently loaded search profile.
l Database access for new profiles
l Use Windows NT integrated security: Select to use the same user name and password on the SQL database as
you use to log on to the computer on which you are running PlanetPress Search. You use this option when you create a
new search profile for an SQL Server database. PlanetPress Search requires this information to construct the connection string for the database. It saves the connection string in the DatabaseDirectory of the search profile.
l Logon with User ID/Password: Select to specify the user name and password to use with the database, in the
User ID and Password boxes. You use this option when you create a new search profile for an SQL Server database.
PlanetPress Search requires this information to construct the connection string for the database. It saves the connection
string in the DatabaseDirectory of the search profile, encrypting the password before saving it. The value that appears
by default in the edit box for this option is the last one saved to a profile.
Database options tab
This tab sets the options for creating, rebuilding, and refreshing the database associated with this search profile. Note that if
the search profile has its ReadOnly entry set to 1 (as for example in a network installation), these options are not available in
the User Options dialog box.
l Connection timeout: Adjust to set the number of seconds PlanetPress Search waits for a response from the data-
base before reporting a connection failure.
l Refresh databases: Select the frequency of automatic database refreshes for the database associated with this
search profile. Each time PlanetPress Search loads a search profile, it can automatically refresh the database associated with that search profile. Select Never to prevent a database refresh when PlanetPress Search loads this search
profile. Select Every time to refresh the database every time you load this search profile. Select Once a day to limit the
database refresh to once every 24 hours (for example, if you load this search profile 6 times in a 24 hour period, PlanetPress Search only refreshes the database associated with it once during that period). Select Every time to refresh
the database every time you load this search profile.
l Enforce global table creation: Select this option if you are using an SQL database.
l Escape strings:Select this option if you are using a MySQLdatabase.
To restore default user options settings:
From the User Options didalog, click on Reset All. This will reset the user options for the currently loaded search profile.
©2010 Objectif Lune Inc - 16 -
Page 17

The PlanetPress Search Program
Change Language
This procedure describes how to change PlanetPress Search’s display language .
To change the PlanetPress Search display language:
1. Choose Options | Select Language.
2. Select the new language.
3. You can also enable Use System Default Locale to mirror your language settings, as defined in the Regional and Language Options of the Windows Control Panel.
Exit PlanetPress Search
This procedure describes how to exit PlanetPress Search.
To exit PlanetPress Search:
l Choose File | Exit.
PlanetPress Search updates the currently loaded search profile and exits.
©2010 Objectif Lune Inc - 17 -
Page 18

©2010 Objectif Lune Inc - 18 -
Page 19

Search Profiles And Databases
Search Profiles And Databases
In order to give the ability to search your document archives, PlanetPress Searchmust use a database in the background, with
which it connects using a Profile. While you may have multiple profiles on one or more computers connecting to a single database, a search profile can only connect to a single database.
This chapter explains how to set up and manage profiles and databases.
Create a New Search Profile that Uses an SQL Server Database 19
Create a New Search Profile that Uses an Access Database 20
Create a New Search Profile that Uses an Oracle Database 21
To create a search profile connected to an Oracle database 21
Create a New Search Profile that Uses a MySQL Database 22
Build the Contents of a Database for the First Time 22
Rebuild the Contents of a Database 24
Refresh the Contents of a Database 25
Save a Search Profile 26
Load a Search Profile 26
Edit a Search Profile 26
Copy or Rename a Search Profile 27
Delete a Search Profile 27
Determine the Currently Loaded Search Profile 27
Delete a Database 27
Creating a Search Database
When you create a search database, you first define the set of PlanetPress Image folders you want to include in the database,
and whether you want to include their subfolders. PlanetPress Search then examines the FormName entry in all the PDI files
in those folders, and creates a record in the database for each distinct document referenced by the FormName entry. The
value of the FormName entry, minus the file name extension, also becomes the name of the record for that document in the
database. For example, if the FormName entry is survey.ps4, the corresponding database record bears the name
survey. See "PDI File Structure" (page 43) for a description of the FormName entry.
After PlanetPress Search creates a record for each distinct document it found in the folders, you populate each record with the
index information found in the PDI files for that document. See Build the Contents of a Database for the First Time.
Create a New Search Profile that Uses an SQL Server Database
This procedure describes how to create a search profile that uses an SQLServer database.
Pre-Requisites for SQLServer database connectivity:
©2010 Objectif Lune Inc - 19 -
Page 20

Search Profiles And Databases
l An SQLServer driver must be installed on the system (this is available by default in any supported version of Windows)
l The currently logged on user must have access to the SQLServer instance through the network.
l A database must be created on the SQLServer. It is suggested to call the database Search.
l Ausername and password must be defined in the user options and this username must have access to the SQLServer
and its Search database (see Set User Options).
To create a new search profile that references an SQLServer database:
1. In PlanetPress Search, choose File | New | SQLServer Profile.
2. In the Server name dialog, type in the server name or IPAddress of your SQLServer, then click OK. If the SQLServer
has an instance name, it should also be entered after a backslash (for example:localhost\SQLEXPRESS)
3. In the Database name dialog, type in the name of the database to be used, then click OK.
PlanetPress Search will now attempt to logon to the server and database specified.
4. If the connection is successful, a Save As dialog appears. Use this dialog to save the Search Profile file to a specific location on the hard drive. While a network path or mapped drive can be typed in manually in this dialog, it is strongly recommended to use a search profile on a local drive, for performance reasons.
PlanetPress Search, when opened, will automatically load the default search profile (ppsearch.prf)located in
C:\Documents and Settings\(current login username)\Application Data\Objectif
Lune\PlanetPress Suite X\PlanetPress Search\ . If the search profile is located somewhere
else, it will need to be opened manually each time PlanetPress Search is opened.
Once your profile is created, additional actions may be done on the profile:
l To share a profile on the network between multiple users, see Sharing A Profile On The Network.
l To edit the profile manually to change additional options, see Search Profile Contents Line by Line.
Create a New Search Profile that Uses an Access Database
The procedures here describe how to create a new search profile that uses an Access Database.
If you are creating a new search profile in a network installation, make sure you log on with the appropriate privileges to be
able to save and edit the search profile. In network installations, restrictions on who can create and/or edit search profiles
may be imposed to ensure the integrity of PlanetPress Search databases. See "Database Considerations in a Network Instal-
lation" (page 42).
Though an Access Database can be located on a network drive, it should never be shared between multiple search
profiles or multiple users. Doing so will most likely corrupt the Access database or simply not work as Access databases are meant for nonconcurring use.
To create a new search profile that references a Microsoft Access database:
1. In PlanetPress Search, choose File | New | Access Profile.
The New Profile dialog box appears.
2. In the New Profile dialog box, navigate to the folder in which you want to save the new search profile, enter the
name under which you want to save the new search profile and click Save.
PlanetPress Search prompts you to specify a folder in which to create the database.
3. Click OK and use the Select Directory dialog box that PlanetPress Search displays to select the folder in which to create
the database. You can enter the path in the Selected folder box, or use the Current drive and Folders list to navigate to
the folder.
In a standalone installation, the folder must be one for which the user has both read and write access. For optimum performance in this case, a folder on the local drive is recommended.
©2010 Objectif Lune Inc - 20 -
Page 21

Search Profiles And Databases
In a network installation, the folder must be one to which all users have read access. It is not necessary for the folder to
be mapped on individual user computers but they must be able to access it through its Universal Naming Convention
(UNC) file name (\\servername\sharename\path\filename).
The default folder for the database is the PlanetPress Search program folder.
4. In the Select Directory dialog box, click OK.
If the folder you selected already contains a database, PlanetPress Search prompts for confirmation to delete it (PlanetPress Search reserves the name archives.mdb for all the Microsoft Access databases it creates; thus it cannot
create a new database in a folder that already contains an archives.mdb file). Click Yes to delete the existing database and create the new one, or click No to cancel the operation and return to the Select Directory dialog box to select
a different folder.
If the folder you specified does not exist, PlanetPress Search prompts for confirmation to create it. Click OK to have
PlanetPress Search create the new folder and create the new database in that folder, or Cancel to return to the Select
Directory dialog box and select another folder.
Once PlanetPress Search creates the empty Microsoft Access database, archives.mdb, in the database folder, it
updates the search profile to point to that database, and returns control to the PlanetPress Search Program window.
5. If necessary, adjust the options for this search profile. See "Set User Options" (page 15).
6. Build the database for the new search profile. See "Build the Contents of a Database for the First Time" (page 22).
7. Choose File | Save to save the search profile.
Create a New Search Profile that Uses an Oracle Database
The procedures here describe how to create a new search profile that uses an Oracle Database.
Because of how Oracle works, the computer where the Search profile is located must be on the same local network
as the Oracle server.
Pre-Requisites for Oracle database connectivity:
l An Oracle driver must be installed on the system.
l The currently logged on user must have access to the Oracle database through the network.
l A database must be created on the Oracle server. It is suggested to call the database Search.
l Ausername and password must be defined in the user options and this username must have access to the Oracle
server and its Search database (see Set User Options).
To create a search profile connected to an Oracle database
1. Open PlanetPress Search.
2. Go to File, New, Oracle Profile...
3. Enter the name of the Oracle database, provided by the database administrator then click OK.
4. Browse to the location you want to save the search profile (prf file).
5. Enter a name for the profile then click Save.
Once your profile is created, additional actions may be done on the profile:
l To share a profile on the network between multiple users, see Sharing A Profile On The Network.
l To edit the profile manually to change additional options, see Search Profile Contents Line by Line.
©2010 Objectif Lune Inc - 21 -
Page 22

Search Profiles And Databases
Create a New Search Profile that Uses a MySQL Database
This procedure describes how to create a search profile that uses an MySQL database.
Pre-Requisites for MySQL database connectivity:
l A MySQL driver must be installed on the system (available on MySQL.com)
l The currently logged on user must have access to the MySQLserver through the network.
l A database must be created on the MySQLserver. It is suggested to call the database Search.
l Ausername and password must be defined in the user options and this username must have access to the
MySQLserver and full privileges on the Search database (see Set User Options).
To create a new search profile that references a MySQLserver database:
1. In PlanetPress Search, choose File | New | MySQL Profile.
2. In the Server name dialog, type in the server name or IPAddress of your MySQLserver, then click OK.
3. In the Database name dialog, type in the name of the database to be used, then click OK.
PlanetPress Search will now attempt to logon to the server and database specified.
4. If the connection is successful, a Save As dialog appears. Use this dialog to save the Search Profile file to a specific location on the hard drive. While a network path or mapped drive can be typed in manually in this dialog, it is strongly recommended to use a search profile on a local drive, for performance reasons.
PlanetPress Search, when opened, will automatically load the default search profile (ppsearch.prf)located in
C:\Documents and Settings\(current login username)\Application Data\Objectif
Lune\PlanetPress Suite X\PlanetPress Search\ . If the search profile is located somewhere
else, it will need to be opened manually each time PlanetPress Search is opened.
Once your profile is created, additional actions may be done on the profile:
l To share a profile on the network between multiple users, see Sharing A Profile On The Network.
l To edit the profile manually to change additional options, see Search Profile Contents Line by Line.
Build the Contents of a Database for the First Time
The procedure here describes how to build the contents of a database for the first time. You also use this procedure if you
want to modify the list of archive folders an existing database includes.
The procedure assumes the search profile that references the database you want to build is loaded in PlanetPress Search and
permits rebuilds of its database. In a network installation, it is common for the administrator to control database updates. See
"Database Considerations in a Network Installation" (page 42).
To build the contents of a database for the first time:
1. If necessary, choose Options | User Options, click Databaseoptions, and adjust the settings for the database. In
particular, you may want to adjust the Unattended database creation/update option. See "Set User Options" (page 15).
2. Choose Options | Set Search Folders and use the Search Folders Configuration dialog box that appears to select
the PlanetPress Image archive folders to include in the database.
Note that in a network installation, you should verify that each folder you include is accessible to all users of this search
profile. If a folder is not accessible, users cannot view any search result that references a PDF in that folder.
©2010 Objectif Lune Inc - 22 -
Page 23

Search Profiles And Databases
A. Navigator pane B. Archive folders list C. Add arrow D. Remove arrow
Navigate TO A FOLDER
Navigatorpane: Use to navigate to each folder you want to include in the database.
add OR REMOVE archive folderS
Add arrow: Use to add a folder to the Archivefolders list. Click the folder you want to add then click the Add arrow.
You can also add a folder by clicking a folder in the Navigator pane and dragging it to the Archive folders list.
Remove arrow: Use to remove a folder from the Archivefolders list. Click the folder you want to remove then click
the Remove arrow. You can also remove a folder by double-clicking it in the Archive folders list.
SPECIFY HOW TO HANDLE SUBFOLDERS
Search subfolders: Select to recursively include all subfolders PlanetPress Search finds in the folder, in the database.
Clear to have PlanetPress Search exclude any subfolders it finds in the folder, from the database.
Ignore file date: Select to have PlanetPress Search read the contents of all PDI files in the folder, regardless of their creation date, when it refreshes the database. Clear to have PlanetPress read only those PDI files whose creation date is
more recent than the date of the last refresh of this database. You use this option to reduce the time required to refresh
the database, particularly when only a few PDI files have changed since the last refresh.
3. Once you have selected all the folders to include in the database, in the Search Folders Configuration dialog box,
click OK.
PlanetPress Search examines the archive folders you specified and for each document it finds, creates a record in the
database. If you cleared the Unattended database creation/update option in the Database options of User Options, PlanetPress Search displays a message if it encounters an error. Click OK to continue.
©2010 Objectif Lune Inc - 23 -
Page 24

Search Profiles And Databases
4. In PlanetPress Search, choose Options | RebuildDatabase.
PlanetPress Search prompts you to confirm the build.
5. Click Yes to confirm.
PlanetPress Search populates each record in the database with the information from all of the PDI files associated with
the document referenced by that record.When it completes this operation, the newly built database is available for
searching.
If you cleared the Unattended database creation/update option in the Database options of User Options, PlanetPress
Search prompts you for confirmation to continue if it encounters an error.
Updating a Search Database from PlanetPress Workflow
You can configure PlanetPress Image to automatically update an existing search database when it executes a document. If a
record for the document already exists in the database, PlanetPress Image adds the index information to the database. If the
document does not yet exist in the database, PlanetPress Image adds a new record for the document along with the index
information for the document, to the database. This is useful when you want to eliminate the need to refresh or rebuild the
database from within PlanetPress Search. Consult the PlanetPress Workflow Tools User Guide for more information on
this feature.
Rebuild the Contents of a Database
This procedure describes how to rebuild the contents of an existing database. You rebuild a database to ensure it accurately
reflects the current state of the archive folders it references. You refresh a database if the only change in any of the archive
folders is that more files have been added since the previous rebuild or refresh. See "Refresh the Contents of a Database"
(page 25).
If you want to modify the set of archive folders the database uses, see Build the Contents of a Database for the First Time.
To rebuild the contents of a database:
1. Load one of the search profiles that reference the database you want to rebuild. See "Load a Search Profile" (page 26).
The search profile you load must permit rebuilds of its database. In a network installation, it is common for the administrator to control database updates. See "Database Considerations in a Network Installation" (page 42).
2. If necessary, choose Options | User Options, click Databaseoptions, and adjust the settings for the database.
See "Set User Options" (page 15).
3. In PlanetPress Search, choose Options | RebuildDatabase.
PlanetPress Search prompts you to confirm the rebuild.
©2010 Objectif Lune Inc - 24 -
Page 25

Search Profiles And Databases
4. Click Yes to confirm.
PlanetPress Search populates each record in the database with the information from all of the PDI files associated with
the document referenced by that record. When it completes this operation, the newly rebuilt database is available for
searching.
Refresh the Contents of a Database
The procedure here describes how to refresh a database from PlanetPress Search.
A refresh of a database can only add information on new files added to archive folders since the last refresh or rebuild of the
database. It cannot remove information from the database and thus cannot reflect deletions of, or modifications made to,
PDFs already included in the database. For example, if you delete a PDF file from the archive folder and then refresh the database, the entries for that PDF remain in the database, and can appear in search results, even though their associated PDF file
is no longer available for viewing or printing.
If you want to be certain that the database reflects the current state of the archive folders it references, you should rebuild the
database. See "Rebuild the Contents of a Database" (page 24).
You can clear the Ignore file date option in the Search Folders dialog box to have PlanetPress read only those PDI files whose
creation date is more recent than the date of the last refresh of this database. This reduces the time required to refresh the
database, particularly when only a few PDI files have changed since the last refresh.
You can automatically refresh a database when you load it in PlanetPress Search. See "Set User Options" (page 15), and in par-
ticular, the Refresh databases option in the Database options. The LastUpdate entry in the search profile records the date of
the last refresh or rebuild of the database.
To refresh a database from PlanetPress Search:
1. If necessary, load one of the search profiles that reference the database you want to refresh. The search profile you
load must permit database refreshes and rebuilds. In a network installation, it is common to restrict permission to
update databases to the database administrator. See "Database Considerations in a Network Installation" (page 42).
2. In PlanetPress Search, choose Options | RefreshDatabase.
PlanetPress Search refreshes the database.
Updating a Search Database: Refresh vs. Rebuild
If the contents of an archive folder change, you must either refresh or rebuild the search databases that reference those
archive folders to make the changes available in PlanetPress Search.
A refresh of a database can only add information on new files added to archive folders since the last refresh. It cannot remove
any information from the database. This means that files deleted from an archive folder continue to appear as entries in the
search database, even though the associated PDF source files are no longer available for viewing or printing. In this case you
must rebuild the database to have it reflect the current state of the archive folders.
©2010 Objectif Lune Inc - 25 -
Page 26

Search Profiles And Databases
A rebuild of a search database rebuilds it from scratch. Thus when you rebuild a database, you can change the archive folders
you want to include in the database.
See "Refresh the Contents of a Database" (page 25) and "Rebuild the Contents of a Database" (page 24) for help refreshing
and rebuilding a database.
Save a Search Profile
You can save the currently loaded search profile at any point. It is important to understand that PlanetPress Search also automatically saves the currently loaded search profile both when you switch to a different profile and when you exit PlanetPress
Search. Thus for example, if you save a search profile and subsequently modify the user options for that search profile, PlanetPress Search automatically saves those subsequent modifications when you load a different profile or exit PlanetPress
Search.
To save the currently loaded search profile:
l Choose File | Save to update the contents of the search profile.
Note that you can also choose File | SaveAs to save the contents of the search profile to a different file. In this case,
PlanetPress Search saves the contents of the currently loaded profile and then immediately loads the contents of the
newly saved file. This is one way to create a new profile.
Load a Search Profile
This procedure describes how to switch to another search profile during a PlanetPress Search session. Recall that you can
have a single search profile loaded at any one time in PlanetPress Search. When you switch search profiles, PlanetPress
Search replaces the currently loaded search profile with the one you select.
To switch search profiles during a PlanetPress Search session:
l Do one of the following:
l If the search profile to which you want to switch is among the last five loaded, choose File and choose that pro-
file in the list of recently used search profiles that appears below the Save As menu item.
l Choose File | Open, and in the Open Profile/Database dialog box that appears, navigate to the search pro-
file you want to load and click Open.
PlanetPress Search replaces the currently loaded search profile with the search profile you selected. The name
of newly loaded search profile now appears as the topmost item in the list of recently used search profiles in the
PlanetPress SearchFile menu.
Note that if PlanetPress Search cannot establish the connection to the database specified in the profile, it displays an error message. Click OK to return to the PlanetPress Search Program window.
Edit a Search Profile
Recall that with the exception of the ReadOnly and ShrinkToFit entries, all entries in a search profile are either set through
the PlanetPress Search user interface or maintained automatically by PlanetPress Search. Unless you need to edit one of these
two entries, or for some reason cannot set an entry to the value you want through the user interface (for example, if you need
to customize the connection string set in the DatabaseDirectory entry), it is recommended that you make modifications
through the PlanetPress Search user interface.
To edit a search profile:
1. Verify that the search profile you want to edit is not currently loaded in PlanetPress Search. PlanetPress Search only
reads the contents of a search profile when it loads it, and only updates the contents of the currently loaded search profile when it either switches to a new profile during a session or exits completely. Thus, if you open the currently loaded
©2010 Objectif Lune Inc - 26 -
Page 27

Search Profiles And Databases
search profile in a text editor and edit it, PlanetPress Search overwrites those edits when you switch to a new profile or
exit PlanetPress Search.
2. Open the search profile in a text editor, make the necessary modifications, save the file and exit the text editor.
Note that whether you can save the modified profile depends on the permissions set on the folder and file containing
the search profile.
Copy or Rename a Search Profile
The procedures here describe how to copy and rename a search profile.
To copy a search profile:
l Do one of the following:
l Create a New Search Profile from an Existing One
l In Windows, navigate to the search profile, copy it, and then paste it into the new location.
To rename a search profile:
l In Windows, navigate to the search profile and rename it.
Delete a Search Profile
This procedure describes how to delete a search profile from Windows; you cannot delete a search profile from PlanetPress
Search. Note that deleting a search profile does not delete the database associated with that search profile. See "Delete a Data-
base" (page 27).
To delete a search profile:
1. Verify that the search profile is not currently loaded in PlanetPress Search. If the search profile you delete is loaded in
PlanetPress Search at the time you delete it, it will reappear when you load a different profile in PlanetPress Search, or
exit PlanetPress Search altogether. PlanetPress Search always writes out the currently loaded search profile when it
loads a new profile, or when it exits.
2. In Windows, navigate to the folder containing the search profile and delete the search profile. Recall that a search profile bears the file name extension .prf.
Note that whether you can delete the search profile depends on the permissions set on the folder containing it.
Determine the Currently Loaded Search Profile
This procedure describes how to determine which search profile is currently loaded.
To determine the currently loaded search profile:
l Choose File and locate the list of recently used search profiles, below the Save As menu item.
The topmost search profile is the one that is currently loaded.
Delete a Database
You cannot delete a PlanetPress Search database from PlanetPress Search. This procedure describes the general steps
required to delete a PlanetPress Search database from outside PlanetPress Search.
You can delete the contents of a database by removing all archive folders from its list of archive folders and then rebuilding
it.
To delete a PlanetPress Search database:
©2010 Objectif Lune Inc - 27 -
Page 28

1. Verify that no search profile references the database you want to delete.
2. Do one of the following:
l If the database is a Microsoft Access database, in Windows, navigate to the folder containing the database and
delete the database file archives.mdb. Whether or not Windows can delete the database depends on the permissions set on the database file and the folder that contains it.
l If the database is an SQL Server database, see the database administrator.
Search Profiles And Databases
©2010 Objectif Lune Inc - 28 -
Page 29

Searching in PlanetPress Search
Searching in PlanetPress Search
This chapter explains how to define and launch a search. It also explains what a search result is in PlanetPress Search and the
operations you can perform on search results.
Once you have a search profile that references a search database, you are ready to perform a search in PlanetPress Search.
In this section, you learn to:
l "Perform a Search Using a Basic Query" (page n)
l "Perform a Search Using an SQL Query" (page n)
l Change the View on Search Results
l "Select Search Results" (page 33)
l "View the PDF Associated with a Search Result" (page 34)
l "Create a PDF of Search Result Pages" (page 34)
l "Print PDF Pages Referenced by Search Results" (page 34)
l "Print a Summary of the Search Results List" (page 35)
l "Copy Information from the Results List" (page 35)
In addition, you will be able to answer the following questions:
l "Search" (page 29)
l What is a search result in PlanetPress Search?
Search
What is a search in PlanetPress Search?
A search in PlanetPress Search is performed on a search database. See "Understanding PlanetPress Search" (page n).
You can search the index information of a single document (a single record in the search database) or of all documents (all records in the search database). If you search the index information of all documents, you can search only identically named
index terms common to all the documents.
PlanetPress Search provides two ways to define the search query it uses to perform a search: Basic and SQL.
l Use a Basic query if you are unfamiliar with Structured Query Language (SQL) or find it more convenient to define the
query without using SQL. In this case, PlanetPress Search uses the set of search criteria you define to construct the SQL
query.
l "Perform a Search Using a Basic Query" (page n)
Search Result
What is a search result in PlanetPress Search?
A search result in PlanetPress Search is a pointer to the page of the PDF file that satisfies the search criteria defined for the
search. Each search result contains:
l The name and creation date of the PDF file that contains the search result, as well as the page number on which the
search result appears.
l In a Basic search, for each of the index terms in the document, the value of that index term on that page of the PDF. If
you search all documents in the database, the search result includes only identically named index terms that are common to all the documents. In an SQL search, for each of the index terms referenced by the SQL query, the value of that
©2010 Objectif Lune Inc - 29 -
Page 30

Searching in PlanetPress Search
index term on that page of the PDF. If you search all documents in the database, the search result includes only identically named index terms common to all the documents.
PlanetPress Search presents the set of search results as a Results list. The first level of the list represents individual documents
in the search results.
A. Results list B. Single search result
If you search on all documents in a database, expand a document in the Results list to display the results for that particular document.
You use the Results area to view, print, or save the PDF pages associated with one or more search results. See "View the PDF
Associated with a Search Result" (page 34), "Create a PDF of Search Result Pages" (page 34), and "Print PDF Pages Ref-
erenced by Search Results" (page 34).
You can also print a summary of the Results list, or copy information for one or more results from the Results list and paste it
into an external application. See "Print a Summary of the Search Results List" (page 35), and "Copy Information from the
Results List" (page 35).
©2010 Objectif Lune Inc - 30 -
Page 31

Searching in PlanetPress Search
You can increase the size of the Results area within the PlanetPress Search Program window. See "Change the View on Search
Results" (page 31).
Detailed Directions
The section includes the following procedures:
l "Perform a Search Using a Basic Query" (page n)
l "Perform a Search Using an SQL Query" (page n)
l Change the View on Search Results
l "Select Search Results" (page 33)
l "View the PDF Associated with a Search Result" (page 34)
l "Create a PDF of Search Result Pages" (page 34)
l "Print PDF Pages Referenced by Search Results" (page 34)
l "Print a Summary of the Search Results List" (page 35)
l "Copy Information from the Results List" (page 35)
Change the View on Search Results
This procedure describes how to hide the Search Configuration area of the PlanetPress Search Program window (and thereby
increase the size of the Results area).
To show or hide the Search Configuration area:
l Click the Show/Hide button in the upper left of the PlanetPress Search Program window.
A. Show/Hide button
PlanetPress Search toggles the view to hide or reveal the Search Configuration area.
©2010 Objectif Lune Inc - 31 -
Page 32

Searching in PlanetPress Search
Search Configuration area revealed
©2010 Objectif Lune Inc - 32 -
Page 33

Searching in PlanetPress Search
Search Configuration area hidden
Select Search Results
This procedure describes how to select one or more search results in the Results area.
To select one or more search results:
1. If you performed a search on all documents in the database, expand the document in the Results area that you want to
select search results from.
PlanetPress Search displays the results below the document in the Results list.
2. In the Results list, click a search result.
PlanetPress Search highlights that search result.
You can add search results to the selection by doing either of the following:
l CTRL+click a search result to add it to the selection. CTRL+click the same search result a second time to
remove it from the selection.
l SHIFT+click a search result to add it and all the search results that appear between it and the previously
©2010 Objectif Lune Inc - 33 -
Page 34

selected search result.
PlanetPress Search highlights each search result you add.
For example:
View the PDF Associated with a Search Result
This procedure describes how to display the PDF page associated with a search result.
To view the PDF associated with a search result:
l Do one of the following:
l Double-click the search result.
l Click the search result and choose File | Open PDF.
l Click the search result and, in the Results list, right-click and choose OpenPDF.
PlanetPress Search opens the PDF associated with the search result (if it is not already open), and displays the
page referenced by the last search result selected in the Results list.
Searching in PlanetPress Search
Create a PDF of Search Result Pages
This procedure describes how to create a PDF of all pages referenced by the Results area. For example, if a search yields 10
results, the PDF you create contains 10 pages.
To create a PDF of search results:
1. Verify the Multi-page option in the Search options of the User Options dialog box is set as you require. Recall that the
Multi-page option determines whether PlanetPress Search includes additional pages with each of the pages referenced in the Results list. See "Set User Options" (page 15).
2. If you performed a search on all documents in the database, expand the document in the Results area that you want to
select search results from.
3. Select one of the search results you want to include in the PDF. See "Select Search Results" (page 33).
4. Choose File | Create PDF or, in the Results list, right-click and choose CreatePDF.
PlanetPress Search displays the Save New PDF File dialog box.
5. In the Save New PDF File dialog box, specify the path for the PDF file you want to create and click Save.
PlanetPress Search creates the new PDF file. If you have the Open PDF after creation option selected (see the Search
options described in "Set User Options" (page 15)), Adobe Acrobat Reader displays the newly created PDF.
Things to Remember
l "Set User Options" (page 15)
Print PDF Pages Referenced by Search Results
You can print the PDF page associated with a single search result, the PDF pages associated with selected search results, or
the PDF pages associated with all search results.
To print PDF pages referenced by search results:
©2010 Objectif Lune Inc - 34 -
Page 35

Searching in PlanetPress Search
1. Verify that the Printer to use option (in the User Options dialog box, Printing options) is set to the printer you want to
use, and that the Multi-page option (in the User Options dialog box, Search options) is set as you require. Recall that
the Multi-page option determines whether PlanetPress Search includes additional pages with each of the pages referenced by the Results list, and, if so, how many. See "Set User Options" (page 15) if necessary.
2. If you performed a search on all documents in the database, expand the document in the Results area that you want to
select search results from.
3. Do either of the following:
l To print all PDF pages referenced by search results in the Results list, first click in the Results list, then choose
File | Print All Pages, or right-click in the Results list and choose PrintAllPages.
l "Select Search Results" (page 33)
PlanetPress Search opens the PDF associated with each search result, retrieves the page (or pages if the Multipage option is set) associated with each search result, and sends all the pages it retrieves to the printer selected
in the User Options dialog box.
Things to Remember
l "Set User Options" (page 15)
Print a Summary of the Search Results List
This procedure describes how to print a summary of the Results list. The summary contains the search criteria that produced
these results, the paths of the archive folders referenced by the database associated with the search profile used to perform
the search, and one line per search result. Each search result line contains the name and creation date of the PDF the search
result references, and the page number of that PDF on which the search result occurs.
To print a summary of the list of search results:
1. Verify that the Printer to use option (in the User Options dialog box, Printing options) is set to the printer you want to
use. See "Set User Options" (page 15).
2. If you performed a search on all documents in the database, expand the document in the Results area that you want to
select search results from.
3. Click in the Results area.
4. Choose File | PrintResults or right-click in the Results list and choose PrintResults.
PlanetPress Search sends the summary of the Results list to the printer selected in the User Options dialog box.
Things to Remember
l "Set User Options" (page 15)
Copy Information from the Results List
You can copy the information that appears in the Results list to the Windows Clipboard, for subsequent pasting into an external
application. For example, you might copy the information and paste it into an email message or Word® document.
You can copy the information for one, some, or all of the search results. When you copy information for a search result, PlanetPress Search copies all the information that appears in the Results list for that search result. You cannot restrict the copy to
only part of the information for a search result.
To copy information from the Results list:
1. If you performed a search on all documents in the database, expand the document in the Results area that you want to
select search results from.
2. Select one or more search results in the Results list. See "Select Search Results" (page 33) if necessary.
3. Choose Edit | Copy Row Data or right-click in the Results list and choose Copy Row Data.
©2010 Objectif Lune Inc - 35 -
Page 36

Searching in PlanetPress Search
PlanetPress Search copies the information for each of the selected results to the Windows Clipboard.
4. In an external application, use the Paste command to paste the contents of the Windows Clipboard into that application.
©2010 Objectif Lune Inc - 36 -
Page 37

Advanced Concepts
Advanced Concepts
Sharing A Profile On The Network 40
Database Structure 40
Command Line Rebuild and Refresh 41
The Command 41
Parameters 41
Example Usage 42
Notes 42
Database Considerations in a Network Installation 42
Search Profile Contents Overview
A search profile contains two categories of information: information about the search database itself and information about
searches on that database.
1. Search database information
l The path of the folder that contains the database (in the case of an Access database) or the connection string to
use to connect to the database (in the case of an SQL Server database); the connection string includes the user
name and password to use on the SQL database
l The number of PlanetPress Image archive folders included in the database, the paths for each of these, and
whether or not the database includes the contents of any subfolders it finds in those folders
l The default field size the database uses for index terms
l The date and time PlanetPress Search last refreshed or rebuilt the database
l Whether the search profile permits rebuilds and refreshes of its database
l When to perform an automatic database refresh (the search profile also includes the date PlanetPress Search
last loaded the search profile, in order to determine whether a refresh is necessary at the time PlanetPress
Search loads the search profile)
l How to treat errors during database creation, rebuilding, and refreshing
l Which document, of those in the search database, to display by default when PlanetPress Search loads the
search profile
2. Search information
l The time period to which to constrain the search
l The case sensitivity of searches
l Whether or not to automatically open any PDFs you create from search results
l Whether to include any of the pages that follow the page of the PDF on which a search result occurs, in the
search result when you view, print, or save it to a file
l The printer to use when you print search results
l The Adobe® Acrobat® Reader® setting that shrinks any oversized pages in the search results to fit the paper
size defined in the printer properties, when you print search results
Search Profile Contents Line by Line
The following describes each of the entries in a search profile, line by line as they appear in the search profile, and explains
where PlanetPress Search obtains the value associated with that entry. See "Set User Options" (page 15) for more complete
descriptions of any of the options you set through the User Options dialog box.
©2010 Objectif Lune Inc - 37 -
Page 38

Advanced Concepts
Note that with the exception of the ReadOnly and ShrinkToFit entries, all entries are either set through the PlanetPress
Search user interface, or maintained automatically by PlanetPress Search. Unless you need to edit one of these two entries (as
is the case in a network installation where you edit the ReadOnly entry to prevent database refreshes and rebuilds), or for
some reason need to edit the DatabaseDirectory entry (for example, to edit the parameters of a connection string), it is recommended that you make modifications through the PlanetPress Search user interface. For more information about network
installations, see "Database Considerations in a Network Installation" (page 42).
Entry: Description
[General]
ReadOnly
AutoDateFilt
AutoForm
AutoRefresh
LastRun
CaseSensitiveSearch
MultiPage
AutoOpen
PrinterName
ShrinkToFit
LastUpdate
DefaultFieldSize
Check Subdirectories
DefaultOperator
Ignore File Date=0
MDBIndexes=0
DatabaseDirectory
Introduces the General section of the search profile.
Indicates whether the search profile permits rebuilds and refreshes of its search database. A value of 0 indicates the search profile permits rebuilds and refreshes of the database; a value of 1 indicates it does not.
When it is set to 1, the Set search folders, Refresh database, and Rebuild database menu items, as well as
the User Options Database options are unavailable in the PlanetPress Search user interface. Set auto-
matically by PlanetPress Search, or by a user editing the search profile directly to create
a search profile that does not permit rebuilds or refreshes of its databases (for example,
in a network installation).
Defines the default date filter for this search profile. Set in User Options, Program startup options,
Filter date.
Defines the default document to display when PlanetPress Search loads the search profile. Set in User
Options, Program startup options, Select document.
Defines the database refresh option. Set in User Options, Database options, Refresh databases.
Records the date PlanetPress Search last used this search profile. Automatically maintained by Plan-
etPress Search.
Defines the case sensitivity of the search. Set in User Options, Search options, Search is case sensitive.
Specifies the number of subsequent pages to include with a search result. Set in User Options, Search
options, Multi-page mode.
Specifies whether to automatically open PDFs you create in PlanetPress Search. Set in User Options,
Search options, Open PDF after creation.
Specifies the printer to use with this search profile. Set in User Options, Printing options, Printer
to use.
Instructs Adobe Acrobat Readerto shrink any oversize pages that you print, to fit the paper size defined in
the printer properties. Never adjusted.
Records the date and time PlanetPress Search last refreshed or rebuilt the search database associated with
this search profile. Automatically maintained by PlanetPress Search.
Specifies the default field size to use in the search database for each index term. Set in User Options,
Database options, Default field size option.
Determines whether PlanetPress Search includes any subfolders it finds in the archive folders, in the search
database. Set when you define the archive folders.
Determines the operator that appears by default in each search criterion. (0=starts with, 1=ends with,
2=is, 3=is not, 4=contains, 5=does not contain, 6=is greater than, 7=is less than).
Automatically set by PlanetPress Search to the last operator used in a query.
Determines whether PlanetPress Search considers the date of individual PDI files when it refreshes the
search database. Set when you define the archive folders.
Applies only to Access databases, and indicates whether the database uses Access indexes.
Set in User Options, Database options, Build field indexes.
Specifies the path of the folder that contains the search database in the case of a Microsoft Access database,
or the connection string for the database in the case of an SQL Server database. The connection string
includes the user name and password to use when connecting to the database. The password is encrypted
©2010 Objectif Lune Inc - 38 -
Page 39

Entry: Description
before being saved in the search profile.
PlanetPress Search prompts you for path to an Access database when you create a new
search profile, or attempt to load a search profile that does not yet have a database associated with it. In the case of SQL Server databases, it prompts you for the information
from which to construct a connection string when you create a new search profile. In
this case, the user name and password for the connection string are set in User Options,
Search options, Database access for new profiles.
Records the number of archive folders included in the search database. Automatically set by Plan-
PathListCount
etPress Search when you create the search database associated with this search profile
and define the list of archive folders you want the database to include.
Specifies the number of seconds PlanetPress Search waits for a response from the database before report-
DatabaseTimeout
ing a connection failure.
Set in User Options, Database options, Connection timeout.
[PathList]
Introduces the list of paths for the archive folders included in this search database.
Specifies a path of one of the archive folders included in the search database. Automatically set by
Path1
PlanetPress Search when you create the search database associated with this search profile and define the list of archive folders you want the database to include.
Advanced Concepts
Sample Search Profile
The following is a sample search profile for an Access database. The presence of the MDBIndexes entry and the fact that the
DatabaseDirectory entry is a path and not a connection string indicate the search profile references an Access database.
[General]
ReadOnly=0
AutoDateFilt=6
AutoForm=
AutoRefresh=0
LastRun=2002/08/29
CaseSensitiveSearch=0
MultiPage=0
AutoOpen=0
PrinterName=Default Printer
ShrinkToFit=1
LastUpdate=2002/09/29 9:58:19 AM
DefaultFieldSize=20
Check Subdirectories=0
DefaultOperator=4
MDBIndexes=0
DatabaseDirectory=F:\sales
PathListCount=1
©2010 Objectif Lune Inc - 39 -
Page 40

Advanced Concepts
DatabaseTimeout=300
[PathList]
Path1=F:\sales\letters
Sample Connection Strings
The following are sample DatabaseDirectory entries that contain connection strings for an SQL Server database. The first in
each pair presents the case where the user name and password on the database is the same user name and password the
user uses to log on to their computer and run PlanetPress Search. The second in each pair presents the case where the user
name and password on the database is different from the user name and password the user uses to log on to their computer
and run PlanetPress Search.
DatabaseDirectory=Provider=SQLOLEDB.1;Integrated Security=SSPI;Persist Security Info=False;Data Source=SQLServ01
DatabaseDirectory=Provider=SQLOLEDB.1;Persist Security Info=False;User ID=bob;Password=qo5F8DgsYTk;Data
Source=w2k-websvr
Sharing A Profile On The Network
If you are creating a search profile for a network installation, either exit PlanetPress Search or switch to a different search profile (see Things to Remember for an explanation of why this is necessary), then open the search profile you just created in a
text editor such as TextPad and make the following modifications:
l Set the value of the ReadOnly entry to 1 (ReadOnly=1) to prevent refreshes and rebuilds of the database through this
search profile.
l Adjust the DatabaseDirectory entry if necessary. It is recommended that you use the UNC name (\\serv-
ername\sharename\path\filename). This eliminates the problem of different users mapping the same drive to
different drive letters. For example, use DatabaseDirectory=\\MyServer\MyDbase rather than DatabaseDirectory=G:\\MyDbase.Note that if you do use drive letters, a plus sign (+) in place of the drive letter indi-
cates the database is on the same drive as the search profile that references it. For example:
DatabaseDirectory=+:\\MyDbase.
Once you complete the modifications, save the file and exit the text editor. You may also want to review "Database Con-
siderations in a Network Installation" (page 42) and verify the appropriate permissions are set to ensure the integrity of
both the search profile and the database it references.
Database Structure
To produce valid SQL statements you will need to understand the contents of the database tables and their relationships to one
another.
For more information submitting an SQL Search Type, see "Perform a Search Using an SQL Query" (page n).
©2010 Objectif Lune Inc - 40 -
Page 41

Advanced Concepts
PlanetPress Search database structure.
Tables Values and Relationships
Table_
Doc_#
Table_
Document
Table_
Index
Table_
PDF
Table_
Path
PlanetPress Search index values (INDEX_#) are associated with the page number (Page_Number) in the PDF
(PDF_ID) they appear in. Each of the PlanetPress documents that generate a PDF which PlanetPress Search can
query has a unique Table_Doc_# table.
PlanetPress documents are associated to a unique Doc_ID integer. The integer is then included in the Table_Doc_#
table naming convention generated for the document.
Index_Id integers are associated to their labels (Index_Name) as defined in the PlanetPress documents. The integer
is then included in the INDEX_# field naming convention generated for the Table_Doc_# table.
PDF_ID integers are associated to a Doc_ID integer provided by the Table_Document table, and a Path_ID
integer in the Table_Path table.
Path_ID integers are associated to the Path of each of the PDFs that are included in the database.
Command Line Rebuild and Refresh
In PlanetPress Search version 7.3 and higher, it is possible to use the PlanetPress Search executable to refresh and rebuild
your database directly from the command line.
The Command
ppsearch.exe (-rebuild|-refresh) ["c:\path\to\profile.prf"]
Parameters
l ppsearch.exe :Full path to the ppsearch executable, which is normally "C:\Program Files\PlanetPress
Suite 7\PlanetPress Search\PPSearch.exe". On 64-bit systems, "Program Files"becomes "Program Files
(x86)".
©2010 Objectif Lune Inc - 41 -
Page 42

Advanced Concepts
l (-rebuild|-refresh):Mandatory. Use -rebuild to empty the database and rescan all PDFs in the search folders, or -
refresh to scan for any new PDFs in the search folders and add them to the database.
l ["c:\path\to\profile.prf"]:Optional. Specifies the search profile to be used. If no profile is specified, the default profile
for the currently logged on user (C:\Documents and Settings\lachance\Application Data\Objectif
Lune\PlanetPress Suite 7\PlanetPress Search\ppsearch.prf)will be used.
Example Usage
ppsearch.exe -rebuild "c:\planetpress\searchprofiles\userinvoices.prf"
Notes
l If your database requires a username and password, the credentials set in the PlanetPress Search User Options for the
currently logged on user will be used.
l In order to call ppsearch.exe directly without using the full path, you can add this path in your system. This page
describes how to add to your path variable (it is the same in all versions of Windows).
Database Considerations in a Network Installation
In a standalone installation, PlanetPress Search exists on the local machine and the individual user creates the search profiles
they require. A standalone configuration is common when a single user performs searches. In most circumstances a standalone configuration offers better performance than a network installation. For optimal performance in a standalone configuration, Access databases are recommended.
In a network installation, PlanetPress Search exists on a network and is accessible to the users on that network. A network
installation is common when many users perform searches. SQL Server databases offer the best performance in network
installations.
Database Integrity in a Network Installation
In a network installation, it is common to want to restrict permission to refresh and rebuild a search database to the database
administrator. For example, if any user can refresh or rebuild a database, and one user launches a search just after another
user initiates a rebuild of the database, the first user may unwittingly obtain inaccurate search results.
There are three things an administrator must control to restrict access to the databases PlanetPress Search creates.
1. Search profile permissions on the search database
The ReadOnly entry in a search profile controls whether that profile permits updates on its database. You set this entry
to 1 to disable all the rebuild and refresh features available through the PlanetPress Search user interface when that
search profile is loaded. You must open the profile in Windows to edit the ReadOnly entry; you cannot modify it through
the PlanetPress Search user interface.
2. Windows permissions on search profiles
If users have write permission on the file containing the search profile in Windows, they can edit that profile either
through the PlanetPress Search user interface or by opening the file directly.
A user could thus open the file in Windows and edit the ReadOnly entry to permit database updates from that search
profile. They could also modify the file from PlanetPress Search, for example, changing the printer PlanetPress Search
uses when it prints search results from searches accomplished with that profile. Even in an environment where users
are trusted not to edit the ReadOnly entry, it may be preferable to ensure the contents of the search profile do not
change unpredictably.
3. Windows permissions on the search database
Even if the ReadOnly entry is set to prevent database updates and the file containing the search profile is read-only, a
user could create a new search profile that accesses the database, by creating the profile from scratch, or by loading a
©2010 Objectif Lune Inc - 42 -
Page 43

Advanced Concepts
search profile that prevents database updates, saving it out under a different name or in a different folder, and editing
the ReadOnly entry to permit database updates. The only way to prevent this is to ensure users cannot write to the
database from outside PlanetPress Search.
Restricting Database Access in a Network Installation
The following illustrates how an administrator might implement the control of search database access, and thereby ensure the
integrity of the searches performed on that database.
1. The administrator takes responsibility for creating all the search profiles available to users, and for placing those profiles in a folder accessible to all users.
2. The administrator sets the ReadOnly entry of every search profile they create to 1 to prevent updates of the databases
those profiles reference.
3. The administrator, in the case of search profiles that reference SQL Server databases, ensures the user name and password set in the connection string permit all users of the search profile to access the database. See "Set User Options"
(page 15), and in particular, the Database access for new profiles option in Search options.
4. The administrator sets the necessary database and/or folder permissions to prevent users from writing to the database, and from editing the search profiles that access those databases.
5. The administrator takes responsibility for performing the necessary refreshes and rebuilds of each database. They
could create a separate profile that permits database updates and that they use when they need to refresh or rebuild a
database, and set up and publish a regular maintenance schedule for the databases so that users know when databases may be undergoing updates.
PDI File Structure
Note that you never edit a PDI file. Examining its contents, however, can be useful in a debugging situation where you want to
verify the values it contains are the ones you expect.
The PDI format described here is in the native format PlanetPress Image generates and PlanetPress Search reads. If you are
examining a PDI file in XML format, you should not have difficulty locating the information described here, in the XML file.
Each entry in the PDI file has the syntax:
~<name>=<value>
For example, the entry:
~FormName=conference.ps4
has the name FormName and the value conference.ps4. A PDI file uses the following entries:
Name: Value:
The name you defined in PlanetPress for the database record for the document. This is the name of the record PlanetPress Search creates for this document in any search database it builds that contains the doc-
~SearchDBName
ument. If you did not define a name for the database record, PlanetPress Image sets this entry to the value
of the
~FormName
entry. This is the name you see in the Document box when you set up a search.
The name of the converted document (in your PlanetPress Suite Workflow Tool Documents folder) that Plan-
etPress Image executed to generate this PDI and its associated PDF.
PlanetPress Search uses the value of this entry to determine which of the PDF files in a PlanetPress Image
archive folder were generated from the same document. If you did not define a name for the database rec-
~FormName
ord for this document (see the
~SearchDBName
description), it also uses this value as the name of the record it
creates for this document in any search database it builds that contains the document. For example, consider
two PDI files, report1.pdi and report2.pdi. Neither of these documents had a name defined for their data-
base record during document design in PlanetPress. Both of their FormName entries have the value
report.ps4. In this case, PlanetPress Search would create a database record called report and include the
©2010 Objectif Lune Inc - 43 -
Page 44

Name: Value:
information from both PDI files in that record.
The name, minus the file name extension, of this PDI file (and its corresponding PDF file). You set this name
~ArchiveFile
in your PlanetPress Suite Workflow Tool when you configure the PlanetPress Image output task.
The type of file (PDF, TIFF, or JPEG) generated by PlanetPress Image. Note that although PlanetPress Image
can generate image files of type TIFF and JPEG, you cannot use PlanetPress Search to search an archive of
~ArchiveMethod
these image files. Consult the PlanetPress Workflow Tool User Guide for further help understanding this fea-
ture of PlanetPress Image.
~Time
~Date
The time that PlanetPress Image created this PDI file, expressed as hours:minutes:seconds.
The day that PlanetPress Image created this PDI file, expressed as year/month/day.
The name of an index term used in the PDF file. You specify this name when you create the index term in
~IndexName:<field
length>
PlanetPress. PlanetPress Image makes a list of the names of all index terms used in the PDF, and places
them in the first part of the PDI file. The field length is either the length of the data selection you created in
PlanetPress, or the default field size you set in PlanetPress Search, whichever is greater.
~FieldName
<values>
The name of an index term, followed by a list of the values this term takes on, on a given page of the PDF
file.
The page number of the PDF file that contains all the FieldName entries above it and below the preceding
~Page
page number.
Advanced Concepts
Sample PDI File
The following is a sample PDI file, in native format, created when PlanetPress Image executed the document hr_worksheet.ps4 on October 30, 2003, at 1:58 PM. The name of the PDI file is hr_worksheet.pdi and the PDF file it indexes is
hr_worksheet.pdf. The document defined three index terms: name, department, and years. The PDF file contains three
pages.
~SearchDBName=hr_worksheet.ps4
~FormName=hr_worksheet.ps4
~ArchiveFile=hr_worksheet
~Time=13:58:02
~Date=2003/10/30
~IndexName:20=name
~IndexName:20=department
~IndexName:20=years
~FieldName=name
Gimbo Downing
~FieldName=department
Accounting
~FieldName=years
1980
1995
2002
~Page=0
~FieldName=name
Debra Bo
~FieldName=department
Accounting
~FieldName=years
1992
1997
2000
~Page=1
~FieldName=name
©2010 Objectif Lune Inc - 44 -
Page 45

Chu Chin
~FieldName=department
Marketing
~FieldName=years
1993
1998
2001
~Page=2
Advanced Concepts
©2010 Objectif Lune Inc - 45 -
Page 46

©2010 Objectif Lune Inc - 46 -
 Loading...