

Page 1

User Guide
www.objectiflune.com
Page 2

Page 3

Copyright Information
Copyright Information
Copyright© 1994-2011 Objectif Lune Inc. All Rights Reserved.
No part of this publication may be reproduced, transmitted, transcribed, stored in a retrieval system, or translated into any
other language or computer language in whole or in part, in any form or by any means, whether it be electronic, mechanical,
magnetic, optical, manual or otherwise, without prior written consent of Objectif Lune Inc.
Objectif Lune Inc.disclaims all warranties as to this software, whether expressed or implied, including without limitation any
implied warranties of merchantability, fitness for a particular purpose, functionality, data integrity or protection.
PlanetPress and PrintShop Mail are registered trademarks of Objectif Lune Inc.
PostScript and Acrobat are registered trademarks of Adobe Systems Inc.
Pentium is a registered trademark of Intel Corporation.
Windows is a registered trademark of Microsoft Corporation.
Adobe, Adobe PDF Library, Adobe Acrobat, Adobe Distiller, Adobe Reader, Adobe Illustrator, Adobe Photoshop, Optimized
Postcript Stream, the Adobe logo, the Adobe PDF logo are either registered trademarks or trademarks of Adobe Systems Incorporated in the United States and/or other countries.
Trademarks of other companies mentioned in this documentation appear for identification purposes only and are the property
of their respective companies.
Title PlanetPress Workflow User Guide
Revision 2014-09-24
Page 4

Page 5

Table of Content
Table of Content
Copyright Information 3
Table of Content 5
Overview 15
Icons used in this guide 15
Other Documentation 15
Getting Started 17
Environment Considerations 17
Terminal Services 17
Virtual Environments 17
32-Bit or 64-Bit? 17
Antivirus Considerations 18
Backup Considerations 18
Microsoft Office Compatibility 18
Network Considerations 18
Local and Network Rights 19
Account Requirements 19
Mapped Drives 19
Network Ports used by each service 19
Activate Your Printers 20
PlanetPress Suite Workflow Tools Service Logon 21
Understanding PlanetPress Suite Workflow Tools 23
The Nature of PlanetPress Suite Workflow Tools 23
The Three Flavors of the PlanetPress Suite Workflow Tools 23
Terms and Definitions 23
About Configurations 24
About Processes 25
About Subprocesses 25
About Tasks 25
About Branches and Conditions 26
About Data 26
About Data Selections 27
AboutData Emulation 27
Emulations in the PlanetPress Workflow Tools: 27
About Related Programs and Services 28
Available Input Services 28
Available Output Services 28
About Documents 29
About Printing 29
The PlanetPress Suite Workflow Tools Configuration Program 31
Start the PlanetPress Suite Workflow Tools Configuration Program 32
The PlanetPress Button 32
Page 6

Table of Content
Create a New Configuration 33
Open a PlanetPress Suite Configuration File 33
Saving and Sending a Configuration 33
Save your Configuration 34
Send your Configuration 34
Import Processes from Another Configuration File 35
Import Documents 36
Import PrintShop Mail Documents 36
Change the Interface Language 36
Exit the PlanetPress Suite Workflow Tools Configuration Program 37
The Quick Access Toolbar 37
The PlanetPress Suite Ribbon 38
Start and Stop the PlanetPress Suite Workflow Tools Service 39
The Configuration Components Pane 40
Access Process Properties 41
Add a PlanetPress Suite Process 44
Manipulate Local Variables 44
Activate or Deactivate a Process 45
Convert a Branch to a Subprocess 46
Manipulate Global Variables 46
View Document Properties 47
Use Data and Metadata Files Attached to Documents 48
Use Attached Document Preview 49
Add Resident Documents in the Configuration Components Pane 49
Associate Documents and PlanetPress Watch Printer Queues 50
Using the Clipboard and Drag & Drop 50
Rename Objects in the Configuration Components Pane 52
Reorder Objects in the Configuration Components Pane 52
Grouping Configuration Components 53
Expand and Collapse Categories and Groups in the Configuration Components Pane 54
Delete Objects and Groups from the Configuration Components Pane 54
The Process Area 54
Zoom In or Out within Process Area 54
Adding Tasks 55
Adding Branches 55
Edit a Task 55
Replacing Tasks, Conditions or Branches 56
Remove Tasks or Branches 56
Task Properties Dialog 56
Cutting, Copying and Pasting Tasks and Branches 57
Moving a Task or Branch Using Drag-and-Drop 58
Ignoring Tasks and Branches 59
Resize Rows and Columns of the Process Area 59
Selecting Documents in Tasks 59
Highlight a Task or Branch 60
Undo a Command 60
Page 7

Table of Content
Redo a Command 60
The Plug-in Bar 60
The Object Inspector Pane 61
Toggle the Run on Desktop Property 62
The Debug Information Pane 62
The Message Area Pane 63
Customizing the Program Window 63
Dock and Undock Areas of the Program Window 64
Show or Hide Areas of the Program Window 64
Combine and Attach Areas 65
Resize the Program Window Areas 68
Preferences 68
General User Options 69
Object Inspector User Options 69
Configuration Components Pane User Options 70
Default Configuration User Options 70
Notification Messages Preferences 70
Sample Data User Options 72
Network User Options 72
PlanetPress Capture User Options 73
PDF Text Extraction Tolerance Factors 78
Logging User Options 79
Messenger User Options 79
HTTP Server Input User Options 80
HTTPServer Input 2 User Options 80
LPD Input Preferences 81
Serial Input Service User Options 82
Telnet Input User Options 82
PlanetPress Fax User Options 83
FTP Output Service User Options 84
PlanetPress Image User Options 84
LPR Output User Options 86
PrintShop Web Connect Service User Options 87
Editor Options 87
Other Dialogs 90
Advanced SQL Statement dialog 90
Access Manager 91
SOAPAccess 93
PDF Viewer 94
The PlanetPress Suite Service Console 96
Add or Delete Document Instances 97
Virtual Drive Manager 98
Working With Variables 99
Types of Variables 99
Job Info Variables 99
Page 8

Table of Content
Standard Variables 100
Available Standard Variables 100
The %i Loop Count Variable 101
Data in PlanetPress Suite Workflow Tools 103
Choosing a Sample Data File 103
The Data Selector 103
Metadata tab 105
Metadata 106
Using the Metadata Data Selector 111
Using the File Viewer 112
Choosing a Database Type Sample Data File 112
Data Selections in PlanetPress Workflow Tools 112
Text-Based Data Selections 112
Database Data Selections 113
PDF Data Selections 113
Metadata Selections 114
Data File and Job File 114
Actual Data and Sample Data 115
Job File Names and Output File Names 115
Task Properties Reference 117
Input Tasks 119
Initial Input Tasks 119
Secondary Input Tasks 119
Merge PDF Files 120
Create File 122
Email Input 123
Folder Capture 125
Folder Listing 127
FTP Input 128
HTTP Client Input 130
HTTP Server Input 131
Input Error Bin 132
Input SOAP 133
LPD Input 135
Serial Input 136
PrintShop Web Connect 137
Telnet Input 138
WinQueue Input 139
Action Tasks 143
Add Document 143
Add/Remove Text 144
Advanced Search and Replace 145
Barcode Scan 147
Change Emulation 150
Create PDF 151
Page 9

Table of Content
Decompress File(s) 153
Digital Action 154
Download to Printer 159
External Program 160
Load External File 161
Mathematical Operations 162
Open XSLT 163
PlanetPress Database 164
Rename 167
Run Script 168
Send Images to Printer 169
Search and Replace 171
Send to Folder 172
Set Job Infos and Variables 173
SOAP Client Plug-in 173
Standard Filter 175
Translator 176
Windows Print Converter 177
Data Splitters 179
About Using Emulations with Splitters 179
Database Splitter 180
Emulated Data Splitter 181
In-Stream Splitter 183
Generic Splitter 184
PDF Splitter 187
XML Splitter 188
Process Logic Tasks 191
Branch 191
Comment 192
File Name Condition 192
File Size Condition 193
Go Sub 193
Loop 194
Run Script 195
Send to Process 196
SNMP Condition 197
Text Condition 198
Time of Day Condition 200
Connector Tasks 201
Create MRDX 201
Input from SharePoint 202
Laserfiche Repository Output 203
Lookup in Microsoft® Excel® Documents 206
Microsoft® Word® Documents To PDF Conversion 208
Output to SharePoint 210
About PlanetPress Fax 213
Page 10

Table of Content
PlanetPress Fax 213
Captaris RightFax Configuration 214
About PlanetPress Image 217
PlanetPress Image 217
Overview of the PDF/A and PDF/X Standards 223
PrintShop Mail 224
PlanetPress Capture 226
Capture Condition 226
Capture Fields Generator 229
Capture Fields Processor 230
Capture PGC Splitter 232
Find Capture Documents 234
Get Capture Document 236
PGC to PDF Converter 237
Metadata Tasks 239
Create Metadata 239
Embed/Extract PlanetPress Suite Metadata 240
Metadata Fields Management 241
Metadata File Management 242
Metadata Filter 243
Metadata Level Creation 244
Metadata Sequencer 245
Metadata Sorter 246
Metadata to PDI 247
Metadata-Based N-Up 247
Rule Interface 248
Sort Parameters 250
Pick Parameters 250
All In One 251
Output Tasks 253
Delete 253
FTP Output 254
Print Using a Windows Driver 255
Printer Queue Output 256
Send Email 257
Send to Folder 260
SOAP Client Plug-in 260
Variable Properties 262
Unknown Tasks 263
Masks 264
Date and Time Format 264
Special Workflow Types 265
Special Workflows 265
PDFWorkflow 265
PlanetPress Capture Workflow 265
Page 11

Table of Content
HTTPServer workflow 265
PlanetPress Capture Workflow 265
The PlanetPress Capture workflow 266
The Examples 267
PlanetPress Capture Glossary 267
General Considerations 269
Security Considerations 270
20,000 Patterns 271
THE NUMBERS 271
EXAMPLE 272
EXTENDING 272
CONTAMINATION 273
SAFEGUARDS 274
CONCLUSION 274
Anoto penDirector 274
PlanetPress Mobile Application 275
PlanetPress Capture Implementation Restrictions 276
Printer limitations 276
Black ink close to patterns 276
Paper quality 277
Pattern sizes 277
Distance between patterns 278
Basic Functional Capture Workflow 278
Capture Post Processing Workflow 279
Capture Web Manager Workflow 280
Installation 281
Explanation 281
Considerations 281
HTTP Server Workflow 281
Important Configuration, Setup and Options 282
Request/Process/Response cycle 283
Example HTTPWorkflows 284
HTTP PDF Invoice Request 284
Breakdown of this URL: 284
Process Illustration 284
Task Breakdown 285
HTTP Brochure Request 285
Resources 285
Installation 285
Task Breakdown 285
PDF Workflow 286
Examples 287
Daily Sales Report from PDF Files 287
Resources 287
Task Breakdown 287
Page 12

Table of Content
Printer Queues and Documents 289
PlanetPress Suite Workflow Tools Printer Queues 289
Shared Printer Queue Properties 289
Windows Output Printer Queue 290
LPR Output Printer Queue 290
FTP Output Printer Queue 291
Send to Folder Printer Queue 292
PlanetPress Suite Workflow Tools and PlanetPress Design Documents 293
Variable Content Document File Formats: PTZ, PTK and PS 293
PlanetPress Suite Workflow Tools and Printshop Mail Documents 294
Triggers 294
Load Balancing 295
Location of Documents and Resources 297
Debugging and Error Handling 299
Debugging your PlanetPress Suite Process 299
Debugging and Emulation changes 300
About Error Handling 301
Using the On Error tab 301
Creating and Using Error Processes 301
Accessing the Logs 302
Resubmit Backed Up Input Files to a Process 303
Knowing What to Resubmit 304
Using Scripts 305
The Script Editor and XSLT Editor 305
Use the Editor 306
Import and Export Scripts 306
Find Strings in a Script 306
Find and Replace Strings in a Script 307
Go to a Line in a Script 308
Toggle Bookmarks 308
Jump to Bookmarks 309
SOAP Server API Reference 309
SOAP API - SubmitJob 309
SOAP API - PostJob 310
SOAP API - GetProcessList 310
SOAP API - GetProcessTaskList 311
SOAP API - GetSOAPProcessList 312
SOAP API - PostJobInfoStruc 312
SOAP API - SubmitJobInfStruc 313
The Watch Object 313
Watch.ShowMessage 314
Watch.ExecuteExternalProgram 315
Watch.GetJobFileName 315
Watch.GetOriginalFileName 316
Page 13

Table of Content
Watch.GetMetadataFilename 316
Watch.InputBox 317
Watch.GetJobInfo 318
Watch.SetJobInfo 318
Watch.GetVariable 319
Watch.SetVariable 319
Watch.ExpandString 320
Watch.Log 320
Watch.Sleep 321
Script.ReturnValue 322
Stopping Execution 323
Index 325
Page 14

Page 15
Overview
Overview
This PDF documentation covers version 7.4. To view the documentation of previous versions please refer to the PDF files
available in the Downloads section of our website:
http://www.objectiflune.com/OL/Download/DownloadCenter.
Icons used in this guide
Some icons are used throughout this guide in order to catch your attention to certain particular information.
Notes: This icon shows you something that complements the information around it. Understanding notes is not critical but may be helpful when using PlanetPress Workflow.
Warnings: This icon shows information that may be critical when using PlanetPress Workflow. It is important to pay
attention to these warnings.
Technical: This icon shows technical information that may require some technical knowledge to understand.
Other Documentation
For other related documentation , please see the drop-down menu at the top-right corner of this page.
Page 16

Page 17
Getting Started
Getting Started
This chapter describes how to install the PlanetPress Suite Workflow Tools and how to set up your working environment.
Environment Considerations
This page is intended to provide technical information about the environment in which PlanetPress Workflow is intended to
run.
Terminal Services
PlanetPress Suite does not support Terminal Services environment as possible under Windows 2000, 2003 and 2008. This is to
say, if Terminal Services is installed on the server where PlanetPress Suite is located, unexpected behaviors may occur and
will not be supported by our company. Furthermore, using PlanetPress Suite in a Terminal Service environment is probably an
infringementof our End-User License Agreement.
Terminal Services may also be referred to as Terminal Server or Remote Administration Mode (Windows Server 2003 and
2008).
Single-User Remote Desktop Protocol (RDP)(where only one person can use RDPat a time) is supported for PlanetPress Suite
version 6.2 and higher, however it is only supported in Windows XP or Windows 2003. While later versions of Windows may
not cause issues when accessing PlanetPress Suite through RDP, these combinations are no longer tested and may not be functional.
Virtual Environments
Both PlanetPress Suite 6 and PlanetPress Suite 7 officially support VMWare Environment. This includes VMWare Player,
VMWare Workstation as well as an ESXVMWare Installation.
PlanetPress Suite 7.1 and higher also support VMotion, which means the virtual machine hosting PlanetPress Suite can be
automatically moved from one ESXserver to another in a clustered installation.
PlanetPressSuite 7.5.1 and higher started supporting Hyper-V virtualization in addition to the previous environments.
PlanetPress Suite is not officially supported on any other virtual machines such as Virtual PC, Parallels, Bochs, Xen, etc. While
running PlanetPress on these virtual machines may work, and they are properly detected by PlanetPress Suite 7.5.1 and
higher, we have not tested them and cannot offer support for them.
The PlanetPress Suite End-User License Agreement (EULA) specifies that a PlanetPress Suite software license may
only be used on a single virtual or physical PC at a time. While copying a virtual machine for backup purposes is
acceptable, running two instances of the same machine, using the same serial number, is strictly prohibited.
32-Bit or 64-Bit?
PlanetPress Suite version 7.1.3 and higher support 64-Bit operating system. However, our application remains 32-bits in this
environment, which means that for all intents and purposes there is no difference between those two environments as far as
PlanetPress Suite is concerned.
Page 18

Getting Started
Antivirus Considerations
PlanetPress Suite Workflow Tools generates a very large amount of temporary data on your hard disk, especially when manipulating or creating PDF files. This can sometimes cause issues when any other software is trying to access the temporary files
at the same time as PlanetPress Workflow and its components are trying to read, write, create or delete those files.
If you experience these issues you may want to temporarily disable your antivirus "live", "daily"or "deep"scans for the following folders and processes:
Disabling any antivirus scanning permanently on any folder or program is not recommended, and ObjectifLune cannot be held reliable for any consequence of disabling your antivirus or whitelisting the folders or executables listed
here, or any other change in your antivirus protection setup!
l On Windows 2000/2003/XP:
l C:\Documents and Settings\All Users\Application Data\Objectif Lune\PlanetPress Suite 7\
l C:\Documents and Settings\planetpress\Local Settings\Temp\ (where planetpress is the user under which
Watch is configured)
l On Windows Vista/7/2008:
l C:\ProgramData\Objectif Lune\PlanetPress Suite 7\
l C:\Users\planetpress\AppData\Local\Temp\ (where planetpress is the user under which Watch is configured)
l On all systems:
l C:\Windows\Temp\
l Processes:
l PPAlmbic.exe
l PPWatchService.exe
l PPImage.exe
l PPMessenger.exe
Note: C:\Windows\Temp\ is used by multiple software which may cause risks on your computer. However, PlanetPress Workflow may use this folder as temporary storage, especially in the case of creating PDF files. We do not recommend disabling
scan on this folder, unless you notice performance issues when generating PDFs, and then only as a test.
Backup Considerations
For similar reasons, it is important to know that backup software can also access files while copying them to a remote backup
location, so you should make sure that no PlanetPress Workflow process is working during your backups.
Microsoft Office Compatibility
The Microsoft Office 2010 line of products has not been certified for use with PlanetPress Suite. Some of its products may not
be compatible with the connectors included in the Suite.
Network Considerations
While PlanetPress Suite Workflow Tools is typically installed on a server machine that is only accessed by one single user such
as an ITperson, multiple users logging on to that machine is a possibility (except with terminal servers, see Environment Con-
siderations). Because each user may have different local and network rights, it may be important to consider the implications
in regards to the PlanetPress Suite Workflow Tools. To change the service logon information, see PlanetPress Suite Workflow
Tools Service Logon.
Page 19

Getting Started
Local and Network Rights
Programs, such as PlanetPress Suite Workflow Tools and all its services, must identify themselves in order to be granted permission to perform operations on the computer on which they run as well as on other computers accessible via a network connection. On a given workstation, you can configure your PlanetPress Suite Workflow Tools to use either the local system
account or any specific user account. When you do this, you grant the PlanetPress Suite Workflow Tools and all its services the
same rights associated with the selected account (except for PlanetPress Messenger Service which always runs on the Local
System account).
When you are running the PlanetPress Suite Workflow Tools Configuration program on a workstation, if it is associated with an
account that is different from your account, the following icon is displayed in the lower rightcorner of the PlanetPress Suite
Workflow Tools Configuration program: . The icon reminds you that the logon information is different for the PlanetPress
Suite services, and that some network resources may not be accessibly by PlanetPress Suite when running a live configuration.
Account Requirements
PlanetPress Suite Workflow Tools and its services require administrator rights to run on any given computer and must therefore be associated with an account that has such rights.
We recommend creating a network or domain account specifically for the PlanetPress Suite services (typically called
"planetpress"or "ppress"), which has administrator credentials on the machine where it is installed, and is given proper rights
for any network resources your configuration may request.
Mapped Drives
Mapped drives (for example, drive X: leading to \\server\public\)are always user-specific and are created at logon. This
means that mapped drives are typically not available by the PlanetPress Suite services when running a live configuration. Furthermore, while the mapped drives are not shared, they are still limited to one map per computer, meaning if one user maps
the X: drive, a different user (or a service)will not be able to map it again.
This creates a limitation in the PlanetPress Suite Workflow Tools:if you create a mapped drive as a user, you will not have
access to this mapped drive while running as a service unless you log off, and then have PlanetPress Workflow Tools map the
drive using a Run Script action inside a Startup Process.
We strongly recommended that instead of using mapped drives, you use full UNCpaths for your network drives. PlanetPress
Suite Worfklow Tools can automatically convert mapped paths to UNCpaths. For more information, please see Network User
Options.
Network Ports used by each service
The port configuration for each PlanetPress Suite Workflow Tools component is described in the following table. The port
number assignments comply with Internet standards. If the PlanetPress Suite Workflow Tools component is not active, the
port is not used.
Component Protocol Local Port Remote Port
Email Input (POP3 mode) TCP Default
Email Input (Outlook mode) TCP see Remote Port See Microsoft Knowledge Base article 278339
Folder Capture TCP/UDP Default
1
1
110
Standard Windows file and printer sharing ports2:
l UDP 137, 138; TCP 139 (NetBIOS over
TCP/IP (NetBT))
Page 20

Component Protocol Local Port Remote Port
l UDP 445; TCP 445 (SMB over TCP/IP)
LPD Input TCP 515 (listening port) N/A
FTP Input TCP Default
Telnet Input TCP Default
FTP Output TCP Default
Email Output (SMTP mode) TCP Default
Email Output (Outlook mode) TCP
See Email Input (Outlook
mode)
1
1
1
1
21
9100 (configurable)
21
25
See Email Input (Outlook mode)
Standard Windows file and printer sharing ports2:
Send to Folder Windows Queue
Output
TCP Default
LPR Output TCP Default or 721 to 731
PlanetPress Database
TCP or
UDP
Unknown
SNMP Condition UDP Default
1
l 137, 138 and/or 139 (NetBIOS over TCP/IP
(NetBT))
l 445 (SMB Over TCP/IP)
3
4
1
515
Unknown
161
4
Getting Started
1. Value is greater than 1024 and is assigned by Windows XP. This is the default.
2. Windows NT 4.0 uses NetBIOS over TCP/IP for file and printer sharing, while Windows 2000, Windows XP, and Windows Server 2003 may be configured to use NetBIOS over TCP/IP or SMB over TCP/IP. The operating system may use
additional ports. Refer to the Windows documentation for further information.
3. If the “No source port range restriction” option is checked (recommended), see footnote a. If the option is unchecked,
the local port will be chosen from a range going from 721 to 731.
4. Contact your DBMS vendor to determine which ports are used by the ODBC driver for accessing a network database.
Activate Your Printers
The Activate a Printer dialog lists the existing activated printers on the system and lets you add new activations.
Printer activations are normally given to you by the activations department electronically, including a file that will automatically add all your printers in this dialog.
The printer list displays the following information
l License Number:Reference number of the activation, linked to your customer account.
l Magic Number:The magic number generated by the printer. If the magic number is incorrect, your jobs will output
with a watermark on that printer.
l Activation Code:The activation code generated by your license number and magic number. If the activation code is
incorrect, your jobs will output with a watermark on that printer.
l Printer Name (Optional):Name and/or model of the printer.
l Comments (Optional):Comments about the printer.
The following buttons are available in this dialog:
l Add:Brings up the Printer Activation dialog. This dialog lets you enter the information for the printer (see previous sec-
tion), then click OKto save the new activation.
l Delete:Removes the currently selected activation from the list.
l Web Activation:Click to access the online activation manager on our website.
Page 21

Getting Started
l OK:Save changes and exit.
l Cancel:Exit without saving changes.
You can also double-click on any existing activation to edit it.
PlanetPress Suite Workflow Tools Service Logon
To be able to run and to have access to local files as well as to files available on other computers in your network, PlanetPress
Suite applications and services must identify themselves using a local or network account.
The first time you start the PlanetPress Suite Workflow Tools Configuration program, the application automatically asks you to
choose an account (see procedure below).
You can also manually start this procedure from the PlanetPress SuiteWorkflow Tools by following this procedure:
1. Click on the Tools tab in the PlanetPress Suite Workflow Tools Ribbon, then click Configure Services.
2. Set the PlanetPress Suite applications permissions as required:
l Local System account: Select to run all the PlanetPress Suite Services (including PlanetPress Suite Workflow
Tools, PlanetPress Fax, and PlanetPress Image) under the Local System account. The Local System account is
distinct from the Administrator account. It requires no username or password, and its privileges may exceed
those of the user currently logged in. Running under this account rather than a user account prevents problems
thatmay arise if the user lacks a permission the service requires. If a configuration relies on any resources
mapped to a particular user, such as mapped network drives or shared printers, they are unavailable. It is recommended that you create a configuration for a particular user. Clear Local System account to run all the PlanetPress Suite Services under the account you specify. Use the options that become available when you clear
Local System account to enter the accountinformation—you must enter a valid user name and password to use
Microsoft Outlook as your email client for Email input and Send email output tasks.
l Display network domains and usernames: Select to have PlanetPress Suite Workflow Tools Con-
figuration search for existing domains and display the domains it find in the Domain box, and the usernames in
those domains in the Username box. Although this is useful if you do not know the domain name and username
of the account you wantto specify, it can also be very time-consuming if there are many domains.
l Domain: Select the domain in which the user account resides, or enter the name of the domain manually.
l Username: Enter the name of the user account.
l Password: Enter the password for the user account you specified in the Username box.
l Confirm password: Enter the password you entered in the Password box.
l Services start automatically: Select to start the required PlanetPress Suite Workflow Tools automatically.
3. Click OK.. PlanetPress Suite Workflow Tools applies the user account information to all the services (PlanetPress Suite
Workflow Tools, PlanetPress Fax, PlanetPress Image, LPD input, Serial input, Telnet input, FTP output, LPR output),
thatrun on this computer (with the exception of PlanetPress Suite Messenger, which always runs under the Local System account).
The PlanetPress Suite Workflow Tools Configuration program does not test usernames and passwords, but merely associates
them with the services that require them. If you enter a bad username or password, these services will be denied access to
the selected account.
The account you choose will be used by PlanetPress Suite Workflow Tools and all its services, as well as by PlanetPress Fax
and PlanetPress Image (only PlanetPress Suite Messenger is not affected, since it always uses the Local System account). If
you install PlanetPress Fax or PlanetPress Image on the same computer after performing this procedure, you will have to perform it once again, so as to choose the same account for all the installed applications.
Page 22

Page 23

Understanding PlanetPress Suite Workflow Tools
Understanding PlanetPress Suite Workflow Tools
PlanetPress Suite Workflow Tools are input driven applications designed to output data in a variety of ways through diverse
means to various applications and devices. PlanetPress Suite Workflow Tools can be used as simple go betweens, passing
along input data to output devices, but it can also perform various types of data processing.
This chapter explains how you can combine the various PlanetPress Workflow Tools services to set up versatile automated
processes to print jobs as well as generate other types of output.
The Nature of PlanetPress Suite Workflow Tools
The PlanetPress Suite Workflow Tools act as sorts of dispatchers. On the one hand, they retrieves data and controls plugins
thatretrieve data from watched locations, and on the other hand they send data and controls plugins that send data to various
devices, for printing or to generate documents that can then be emailed or faxed. PlanetPress Suite Workflow Tools can also
perform a variety of operations on the data using its action plugins.
In fact, the PlanetPress Suite Workflow Tools plugin based architecture enables almost limitless customization. You can create
or purchase compatible plugins, drop them in any of the PlanetPress Suite Workflow Tools plugin folder and use them to perform other operations. You can even find free unsupported plugins on the Objectif Lune Web site.
PlanetPress Suite Workflow Tools are service applications, or if you will, applications that continuously run on a given computer and that perform actions automatically. Those actions are defined in a PlanetPress Suite Workflow Tools configuration.
To create and manage PlanetPress Suite Workflow Tools configurations, you use one of three possible applications called PlanetPress Watch Configuration, PlanetPress Office Configuration and PlanetPress Production Configuration. A given computer
can only run one PlanetPress Suite configuration at a time. The PlanetPress Suite Service Console may be used to monitor the
services running on a given computer.
The Three Flavors of the PlanetPress Suite Workflow Tools
The term Workflow Tools is a general name that includes all three flavors of the tools:
l PlanetPress Watch
l PlanetPress Office
l PlanetPress Production
To view an explanation of the Workflow Tools and their different flavors, please see the following PDFdocument:
http://www.objectiflune.com/OL/lib/en-CA/Documents/Brochure/OL-PPS-DSWORKFLOW.pdf
Throughout this document, unless we are referring to a specific version of the Workflow Tools, we will always use the term
Workflow Tools.
Terms and Definitions
The following terms and definitions will be used throughout this help file. We invite you to get familiar with them to simplify the
understanding of the documentation.
Page 24

Understanding PlanetPress Suite Workflow Tools
l PlanetPress Suite Workflow Configuration (or "Configuration"):The Configuration is a physical file opened by
the PlanetPress Suite Workflow Tools and it contains all of the elements (tasks, processes, documents and printer
queues)that drive your workflow.
l Process:A single workflow within the Configuration. Aprocess begins with a single input task, contains one or more
tasks and/or branches, and terminates with one or more output tasks.
l Task:A single block in a process (also known as a plugin). Tasks can be used for input, output or manipulation. Some
tasks gather data, others output data in different locations.
l Trunk:The main "branch"of a process. If a process does not have any branch or condition, that process contains one
initial input and one output on a single trunk.
l Branch:A branch in a process means your workflow will stop, follow the branch up until its output, and then return to
the main trunk to continue processing. Each additional branch in your process means you will need an additional output
task also.
l Condition:Acondition is a type of branch where the workflow will only go one way - either in the branch, or in the
main trunk. If a condition is true, the branch is followed. If the condition is false, the main trunk is followed.
l Job Info:Alocal variable that is called by its numbered id, from 0 to 9. There are only 10 job infos. Job infos are nor-
mally used to communicate information from the PlanetPress Suite Workflow Tools to a PlanetPress Design document,
either in printer outputs or connectors such as Image or Fax.
l Variables:A variable is a name that refers to specific information that is kept in the computer memory. Avariable can
be modified via programming or certain tasks, and are generally accessible anywhere in your process (except certain
locations).
l Job:The processing of one or more job files, through one or more processes.
l Job File:The physical file that is generated (or obtained)through a process' input task. The job file can be of multiple
formats including plain text, CSV, databases, XMLand PDFs.
l Sample File/Sample Data:Aphysical file that contains the data used to create your process, including examples of
any data that you need to rely on (such as texts for conditions, or data for variables). The sample file should be limited
in size to speed up processing time while designing your process.
l Emulation:Afilter used to read the job file that is used in your process. Emulation lets you read different types of files
ranging from text-only line printer data to more complex PDFand XMLfiles, as well as database files.
About Configurations
PlanetPress Suite Workflow Tools configuration files are defined as a set of processes, subprocesses, variables, documents
and printer queues, that work together within the PlanetPress Suite Workflow Tools Service.
PlanetPress Suite Workflow Tools cannot work without a valid configuration and a PlanetPress Suite Workflow Tools session
running on a given computer can only use one configuration at a time. Once you have created a configuration, you must “send”
it to the PlanetPress Suite Workflow Tools Service. When you do this, your PlanetPress Suite Workflow Tool forgets its previous configuration and starts executing the tasks included in the new configuration.
A PlanetPress Suite configuration must be composed of at least one process, but it may include as many as 512.
For a configuration created in PlanetPress Suite Workflow Tool Configuration to actually be executed by PlanetPress Suite
Workflow Tool, it must be sent to its PlanetPress Suite service.
See the following pages for information on differentparts of the PlanetPress Suite Workflow Tools Configuration:
l For information about Processes, see About Processes.
l For information about Subprocesses, see About Subprocesses.
l For information about Global Variables, see Working With Variables.
Page 25

Understanding PlanetPress Suite Workflow Tools
About Processes
Aprocess is a single workflow within the configuration. Aprocess begins with a single input task, contains one or more tasks
and/or branches, and terminates with one or more output tasks. In its simplest form, a process can simply retrieve data from
a given folder and save it in a different folder. In most cases, though, processes are more elaborate and configurations, which
may include many processes, can be extremely complex.
The available processes in your PlanetPress Suite Workflow Tools Configuration are listed in the The Configuration Com-
ponents Pane. Processes in a configuration will always run concurrently. You can schedule processes to run only at certain
times or intervals (see Access Process Properties).
There are three types of processes available to you:
l A Normal process will run as soon as an input file is available through its input task or, if it is scheduled not to run at
thattime, will start processing as soon as the schedule permits it.
l Startup processes are processes that run only once before every other process in a given configuration. They can
be used to perform operations that need to be completed once before the configuration can actually be run, such as to
map network drives. You may only have one single startup process in your configuration.
l Subprocesses are processes which can be called by any other process from any action task. They can be used to per-
form and reuse redundant operations that may need to be executed numerous times. For more information on subprocesses, see About Subprocesses.
Regular and startup processes can be set to be Active (process runs normally)or Inactive (process will not run at all). An inactive process will display in the Configuration components as red and strike-through. Inactive processes can be useful for
designing new processes in a live configuration, since the process does not execute there is no danger is submitting it to the
PlanetPress Suite Workflow Tools Service.
About Subprocesses
Subprocesses are special processes that can be called by any other process. These act exactly as subroutines in pro-
gramming languages, allowing users to reuse existing processes by sharing them to the whole configuration file. They can
thus be used to perform redundant operations that may need to be executed numerous times; for instance, archiving a copy of
a zipped file received as the input job file, then decompressing it before sending the unzipped version of it back to the calling
process .
Whenever a PlanetPress Suite process calls a subprocess, the main process (the caller) will wait for the called subprocess to
finish its execution before carrying on with its own. This means the subprocess feature is synchronous with the main process.
This also means the calling process actually appends the subprocess to its own workflow.
About Tasks
A task is a plug-in or a block that is used to build PlanetPress Suite Workflow Tools processes. Tasks can do multiple things
depending on the type of task and where they are placed. You can add as many tasks as you like to your processes and order
them in any way you can.
There are different types of tasks:
Page 26

Understanding PlanetPress Suite Workflow Tools
l Input Task:Will either capture data from a specific location, or wait for input from a service or other computer to
start processing.
l Action Task:Will manipulate the data in any number of ways. An action task is any task that is not an input or output
task or a branch or condition.
l Output Task:Will output data to a specific location or send to a different service or computer.
Some tasks have a multi purpose and can be used as either an input, action or output task or any combination. These multi purpose tasks are indicated as such in the task description and can be found in the most relevant section of the available tasks.
For more information on the tasks available to you in the PlanetPress Suite Workflow Tools, see the following pages:
l Input Tasks
l Action Tasks
l Process Logic Tasks
l Metadata Tasks
l Output Tasks
l About PlanetPress Fax
l About PlanetPress Image
About Branches and Conditions
While some processes can simply start with an input task, manipulate the data with a few action tasks and finish with an output
task, in some cases you may want to have more control over the flow of your process. For example, you may want multiple
outputs, such as printing to multiple printers as well as generating a PDFand emailing it. To do this, you will need branches.
You may also want to detect certain criteria in your data and act differently depending on that data, such as sending a fax only
when a fax number is found, or printing to a different printer depending on who send you a print job. To do this, Conditions are
used.
Branches
A branch is effectively a doubling of your job file. As your job file goes down the process, when it encounters a branch it will go
in that branch, process all tasks up to the output, and return to the main trunk to continue processes. You can have branches
within branches, and all branches must have an output. For more information on branches, see Branch.
A branch is represented as a crossing .
Conditions
Acondition will either execute the branch it creates or the main trunk, but never both. As your job file goes down the process,
when it encounters a condition it will verify whether that condition results in a "true"or "false"value. If the result is true, it
goes in the branch, processes all tasks up to the output, and the process finishes. If the result is false, it goes down the main
trunk and continues processing until the process finishes. For more information on conditions, see Conditions.
A conditional branch (or condition) is shown as a crossing with a red diamond over it
About Data
Data is what drives your business, and our software. We define data as anything that is obtained through an Input Task and
used within the process itself. Once the data is obtained, it becomes the job file that is passed from one task to another and
Page 27
Understanding PlanetPress Suite Workflow Tools
generally used to generate output.
Data can be manipulated using the tasks in the process, used as comparison for conditions and loops, complemented with data
from other sources, and used to generate your output. It originates from many different sources (as many as the Input Tasks
support), parts of it can be stored in variables, and is always accessible by the task that currently handles it.
Data is referred to using Data Selections either from the PlanetPress Suite Workflow Tools or a PlanetPress Design Document
thatis being merged with the data (for example in a printed output).
For more information about Data, please see the chapter Data in PlanetPress Suite Workflow Tools.
Null characters present in the data may not be displayed properly when using the PlanetPress Suite Workflow Tools
Configuration program, and that they may also be printed differently by different printers. To ensure consistency, you
should consider filtering out such characters.
About Data Selections
A data selection could be compared to an address. It indicates a location within a data file using coordinates. The PlanetPress
Suite Workflow Tools Configuration program includes a tool called the Data Selector that helps you make data selections. The
Data Selector does two things:
l It uses the current emulation (either the emulation chosen when the sample data file was selected, or the one chosen in
the last Change Emulation action task appearing above the current task) to format the data.
l It displays the formatted data to let you make selections easily using the mouse pointer.
The Data Selector is essentially the same as the one used in PlanetPress Design.
AboutData Emulation
Emulations are like filters that can be used to read the data. When you create a document in PlanetPress Design, you choose a
sample data file and specify the emulation to use for the chosen data. The emulation setting you choose will typically always
be associated with that document. If you choose a CSV (comma separated values) file and specify the corresponding emulation, for instance, commas encountered in the data will typically be considered as value separators.
Within the PlanetPress Suite Workflow Tools, the same emulation tools as PlanetPress Design are available throughout your
process, using the Data Selector. One notable exception however is that User-Defined Emulation is notavailable because it
uses PlanetPress Talk code, which is not available within the PlanetPress Suite Workflow Tools Configuration Program.
The emulation that is used in your process can change during the process, and can be different than the one used in any PlanetPress Design document used in your process. PlanetPress Design documents use their own emulations, as defined in the document itself from PlanetPress Design.
Emulations in the PlanetPress Workflow Tools:
l Line Printer
l ASCII
l CSV
l Channel Skip
l Database
Page 28

Understanding PlanetPress Suite Workflow Tools
l XML
l PDF
PDFEmulation, also called Document Input, is only available in PlanetPress Production and PlanetPress Office. If used
in PlanetPress Watch, it will cause a watermark to appear in any output.
For more information about each emulation and how to use them, please consult the PlanetPress Design User Guide.
About Related Programs and Services
Services are programs that run in the background and automatically perform tasks that often do not require any user interaction. With the exception of PlanetPress Suite Workflow Tools Configuration, all the programs used by PlanetPress Suite
Workflow Tools are run as service applications. PlanetPress Suite Workflow Tools can thus use them as required without the
need for any user interaction.
Although you can manually start and stop any service running on your computer, most of the basic services used by the system are started and stopped automatically. In the case of PlanetPress Suite Workflow Tools and their related services, you typically use a command included in your PlanetPress Suite Workflow Tools Configuration program to start and stop most
services. Opening and closing your PlanetPress Suite Workflow Tools Configuration program has no effect on these services.
Available Input Services
Input services are used to pull in data files. The input services used by PlanetPress Suite Workflow Tools are:
l LPD (Line Printer Daemon) Input service: Inputs data sent from an LPR client. The LPD/LPR printing protocol
is a common way to send print jobs that, in turn, use the TCP/IP protocol to communicate through the network.
l PrintShop Mail Web Capture service: Monitors print requests from a PrintShop Web server.
l Serial Input service: Monitors a single serial port for incoming data. Note that all Serial input tasks use the same
serial port (set in the user options of the PlanetPress Suite Workflow Tools Configuration program).
l Telnet Input service: Monitors multiple telnet ports for incoming data. Note that each Telnet input task has its own
telnet port number (set in each task).
l HTTP/SOAP Server service: Monitors web pages and web sites as well as SOAP servers.
Available Output Services
Output services are used to output jobs. The output services used by PlanetPress Suite Workflow Tools are:
l FTP Output service: Places output jobs on a server via the FTP protocol.
l LPR (Line Printer Requester) Output service: Sends jobs to an LPD server or LPD compatible printers. The
LPD/LPR printing protocol is a common way to send print jobs that, in turn, use the TCP/IP protocol to communicate
through the network.
l PlanetPress Image: Outputs jobs as PDF files or in a variety of image formats. You can also use PlanetPress Image
to archive and/or email the files it creates. You can use PlanetPress Search to search the PDF files PlanetPress Image
creates. You can install multiple instances of the PlanetPress Image service on your network, and have PlanetPress
Suite Workflow Tools send jobs to one or more of these instances. Each instance of PlanetPress Image can generate
PDFs or images and dispatch them from the host on which it runs. See About PlanetPress Image.
l PlanetPress Fax: Outputs jobs as faxes. You use PlanetPress Fax as an interface to WinFax PRO or Windows Fax, to
send faxes you create from documents. You can install multiple instances of the PlanetPress Fax service on your network, and have PlanetPress Suite Workflow Tools send jobs to one or more of these instances. Each instance of
Page 29

Understanding PlanetPress Suite Workflow Tools
PlanetPress Fax can generate faxes and dispatch them from the host on which it runs, using a local faxing program,
such as WinFax PRO, Captaris RightFax or Windows Fax. See About PlanetPress Fax.
l PrintShop Mail:Used to generate documents using PrintShop Mail databases and documents. Communicate with it
through the PrintShop Mail and PrintShop Mail 7 Connector Tasks. See PrintShop Mail.
l Laserfiche:Used as a repository for electronic documents. Communicate with it through the Laserfiche Repository
Output Task. See Laserfiche Repository Output.
l PlanetPress Capture:Used to generate and process files using Anoto patterns. Communicate with it through the
PlanetPress Capture tasks such as the Anoto Ink Processor and the Anoto Pattern plugins.
Services must use an account to be granted the permission to use the system’s resources and objects. This information is
included in the service's configuration and most services use the Local System Account, which is granted access to all the
system’s resources. All input and output services used by PlanetPress Suite Workflow Tools run under the same account. For
more information on services and system permissions, refer to Windows documentation. For more information on how to configure the account used by the services, see PlanetPress Suite Workflow Tools Service Logon.
The PlanetPress Suite Service Console, included in the PlanetPress Suite Workflow Tools Configuration program, can be used
to monitor, start and stop PlanetPress Suite Workflow Tools services (see About Processes, "Users and Configurations" (page
n) and "PlanetPress Suite Service Console" (page n)).
About Documents
A Document is a file sent to the PlanetPress Workflow Tools by PlanetPress Design and is used to produce an output when
merged with data. ADocument can be an invoice, a report, a receipt or anything else, but by itself it is empty and without any
variable data.
Document are typically selected in Output Tasks, but can also appear in other tasks that produce formatted data such as the
Digital Action task and the Add Document task.
Documents contain static data such as logos, addresses and graphic formatting, as well as placeholders for data. Documents
can also contain conditions and programming logic. For more information about PlanetPress Design documents, please see the
PlanetPress Design User Guide.
About Printing
To print a document using the PlanetPress Suite Workflow Tools, you can either use the Print using a Windows Driver output
task, or use a combination of a printer queue and a Printer Queue output task. These tasks are created and defined using Plan-
etPress Suite Workflow Tool Configuration program.
The following types of printer outputs are available in the PlanetPress Suite Workflow Tools Configuration program:
l Local printing:
l Windows output queues let you send jobs to a local printer. See Windows Output Printer Queue.
l Send to Folder output queues let you save jobs to a local or network folder from which they can be picked up
and printed. See Send to Folder Printer Queue.
l Remote printing:
l FTP output queues let you upload jobs to an FTP site from which they can be picked up and printed. See FTP Out-
put Printer Queue.
Page 30

Understanding PlanetPress Suite Workflow Tools
l LPR output queues let you send print jobs to remote printers via TCP/IP using the LPR/LPD protocol. See LPR
Output Printer Queue.
l Windows Driver Printing:
l The Print using a Windows Driver output task lets you send a job to any printer installed on the com-
puter, using its own drivers. In this particular case, the printer does not need to be a PostScript printer. See Print
Using a Windows Driver.
PlanetPress Suite Workflow Tools provides you with three main printing scenarios:
1. Send output data to be printed as is: PlanetPress Suite Workflow Tools sends a file containing only the data to
the selected queue.
2. Send output data to be merged with a document on the printer: PlanetPress Suite Workflow Tools sends
one of two things:
l A file that contains only the data to the selected printer queue. The document with which the data must be
merged must be presenton the printer’s hard disk, otherwise printing will fail.
l A file that contains the data and the document to the selected printer queue. Since the data and the document
with which it must be merged are both sent to the printer, printing should never fail.
l In both cases, the document+data merging process takes place inside the printer.
3. Send output data already merged with a document:PlanetPress Suite Workflow Tools sends a file that contains the document already merged with the data to the selected printer queue. The document+data merging process
therefore never takes place inside the printer.
In PlanetPress Suite Workflow Tools Configuration, you may associate a single Printer Queue output task with multiple Printer Queues. If you do so, you have the option of using load balancing or not (see Load Balancing).
Page 31

The PlanetPress Suite Workflow Tools Configuration Program
The PlanetPress Suite Workflow Tools Configuration Program
This chapter centers on the PlanetPress Suite Workflow Tools Configuration program, which you use to create and edit your
configurations.
The basic user interface elements are as follows:
1. The PlanetPress Suite Button. See The PlanetPress Button.
2. The Quick Access Toolbar. See The Quick Access Toolbar.
3. The Ribbon Tabs. See The PlanetPress Suite Ribbon.
4. A Group within the Ribbon
5. The Process area. See The Process Area.
6. A specific link (aka a "component", "button"or "link").
7. The Dockable panels including The Plug-in Bar, The Object Inspector Pane and The Debug Information Pane.
8. The status bar. This displays your current software version and status of the PlanetPress Service.
9. The Configuration Components Pane. See The Configuration Components Pane.
10. The Messages area Pane. See The Message Area Pane.
Page 32

The PlanetPress Suite Workflow Tools Configuration Program
You can customize the appearance of the PlanetPress Workflow Tools Configuration programs to your needs. See Customizing
the Program Window.
Start the PlanetPress Suite Workflow Tools Configuration Program
This procedure explains how to start the PlanetPress Suite Workflow Tools Configuration program, which is different from
starting PlanetPress Suite Workflow Tools service itself (see Start and Stop the PlanetPress Suite Workflow Tools Service).
To start the PlanetPress Suite Workflow Tools Configuration program:
l In the Windows Start menu, choose Programs | PlanetPress Suite N | PlanetPress Watch/Of-
fice/Production N Configuration. (Where N represents the current PlanetPress Suite installation version
number.)
The PlanetPress Suite Workflow Tools Configuration Program window appears and the default configuration
(ppwatch.cfg) is opened.
If this is the first time you open your PlanetPress Suite Workflow Tools Configuration after installation, the PlanetPress
Suite Services configuration dialog box appears, where you enter the username and corresponding password under
which your configuration’s services run.
The PlanetPress Button
The PlanetPress Button replaces the File menu from previous versions, and provides access to the File menu options. The
color of the button itself can show you at a glance what flavor of PlanetPress Workflow is currently licensed on the
machine:Yellow for Watch, Light Orange for Office, Dark Orange for Production.
The available menu options of the PlanetPress Button are:
l New:Closes the configuration thatis currently opened and creates a new configuration, with a single example process
and no printer queues. See Create a New Configuration.
l Open: Displays the dialog to open an existing configuration file.
l Save: Saves the current configuration. If the file is new and has not yet been saved, or if the configuration is the loaded
directly from the service, the Save As dialog is displayed instead. See Save your Configuration.
l Save As: Saves the current configuration under a new name. It does not overwrite any existing configuration file,
unless an existing file is selected and overwritten manually by the user.
l Import:
l Configuration Components:Displays the Import Processes dialog, letting you import processes and other
components from other existing configuration files. See Import Processes from Another Configuration File.
l PlanetPress Document:Displays the dialog to import a PlanetPressDocument to be added to the list in the
components area.
l PrintShop Mail Document:Displays the dialog to import a PrintShop Mail Document to be added to the list
in the components area.
l Send Configuration: Sends the current configuration to the PlanetPress Watch service. See Send your
Configuration.
l Close: Closes the configuration that is currently opened and creates a new configuration, with a single example proc-
ess and no printer queues. Closing the current configuration is the same as creating a new one.
l Recent Documents: Displays a list of the 9 most recently opened configuration files. Click on any of them to open it.
l Select Language: Click to display the language selection dialog, which changes the PlanetPress Workflow interface
language. See Change the Interface Language.
Page 33

The PlanetPress Suite Workflow Tools Configuration Program
l Preferences: Displays the Options dialog. See Preferences.
l Exit: Closes PlanetPress Workflow. See Exit the PlanetPress Suite Workflow Tools Configuration Program.
When using the New, Open, Close, Recent Documents and Exit menu options, if your currentconfiguration has not
been saved after modifications, a dialog will open asking if you want to save, not save, or cancel the action and return to the
current configuration.
Create a New Configuration
When you start PlanetPress Workflow, it always opens the configuration file that is active on the PlanetPress Watch service
(ppwatch.cfg). If you create a new configuration, PlanetPress Workflow automatically creates a process that includes a
Folder Capture initial input task and a Send to Folder output task. You can then edit and save your new configuration.
To create a new configuration, chooseNew from the PlanetPress Button.
If the active ppwatch.cfg file is currently opened, and if it includes unsaved modifications, PlanetPress Workflow asks you
whether to send the configuration to the PlanetPressWatch service before creating the new configuration. Select the Always
send without prompting for confirmation optionto automatically send the edited version of the configuration.
If a file different from the default configuration file is currently opened, and if it includes unsaved modifications, PlanetPress
Workflow asks you whether to save the configuration before creating the new configuration. Select the Always save with-
out prompting for confirmation option to automatically save any unsaved work.
Open a PlanetPress Suite Configuration File
While the PlanetPress Workflow Tool Configuration program always loads the default and current configuration
(ppwatch.cfg), you may sometimes need to open a Workflow Tool configuration file ([file name].pw7) that is not the current one, for example to load a previous backup or a configuration file saved from another computer. This procedure will show
you how.
1. From the PlanetPress Suite Button, chooseOpen.
The Open dialog box appears.
2. Navigate to the configuration file you want to open, select it and click Open.
If the default configuration file (ppwatch.cfg) is currently opened, and if it includes unsaved modifications, the PlanetPress
Suite Workflow Tools Configuration program asks you whether to send the configuration to the PlanetPress Suite Workflow
Tools service before opening the selected configuration. Select the Always send without prompting for confirmation
option to automatically send the edited version of the configuration before opening any other configuration (see Saving and
Sending a Configuration).
You can also open a configuration file from a previous version of PlanetPress Workflow Tool by changing the File
Type selector to the desired version (for example, .pw6 for PlanetPress Watch/Server configurations from Version 6)
Saving and Sending a Configuration
The core of the PlanetPressSuite workflow tools is the PlanetPress Watch service which, once started, constantly runs in the
background to perform the tasks included in its current configuration file. PlanetPress Workflow lets you create, edit and save
configuration files.
As you are working on your configuration, you can save that configuration file as a file on your local hard drive with the pw7
extension (see Save your Configuration).
Page 34

The PlanetPress Suite Workflow Tools Configuration Program
Saving a configuration file never replaces the current PlanetPress Watch service configuration. To do this, you must use the
Send Configuration command (see Send your Configuration).
Save your Configuration
Files created and edited using PlanetPress Workflow can be saved as PlanetPress Suite configuration files ([file name].pw7)
anywhere on your computer or even a network location. Saving a configuration file never replaces the current PlanetPress
Watch service configuration file. To do this, you must use the Send Configuration command (see Send your
Configuration).
To save the current configuration:
l From the PlanetPress Button, choose Save.
l If you were editing the current PlanetPressWatch service configuration or if you were editing a new configuration file,
you are prompted with the Save As dialog instead.
To save the current configuration under a new name:
l From the PlanetPress Button, choose Save As.
l Browse to the location where you wanted to save the file, enter the new name of the configuration in the File name box
and click Save.
Send your Configuration
The PlanetPress Suite Workflow Tools Configuration saves entire configurations in the form of a single file. Like any other file,
configuration files may be saved and reopened, as well as rename as desired. Simply saving a configuration has no effect on
the configuration actually used by the PlanetPress Suite Workflow Tools when it is started. To change any currently active configuration, you must use the Send Configuration command.
When you use the Send command, the PlanetPress Suite Workflow Tools Configuration program uses the currently opened
configuration (Any_name.pw7) to overwrite PlanetPress Suite Workflow Tools service's current configuration
(ppwatch.cfg).
If the PlanetPress Suite Workflow Tools service is running when you send a new configuration, it stops and restarts automatically with the new configuration. If the service is stopped, it will notstart automatically.
To send a PlanetPress Suite Workflow Tools Configuration to the local server:
1. Open the configuration you want to use as PlanetPress Suite’s new configuration.
2. Editthe configuration, if required.
3. When the configuration is ready to be used, from the PlanetPress Suite Button, choose Send Configuration,
then Send Local.
To send a PlanetPress Suite Workflow Tools Configuration to a remote server:
1. Open the configuration you want to use as PlanetPress Suite’s new configuration.
2. Editthe configuration, if required.
3. When the configuration is ready to be used, from the PlanetPress Suite Button, choose Send Configuration,
then Send Remote.
Alist of available PlanetPress Workflow servers on the local network appears.
4. Put a checkmark next to each server where the configuration should be sent.
5. Click OK.
Page 35

The PlanetPress Suite Workflow Tools Configuration Program
If a server is greyed out, this may mean you do not have access to send a configuration remotely to it. For more information,
please see Access Manager.
Note that if PlanetPress Suite Workflow Tools service is paused when you send a new configuration, it will not stop
and restart. Since PlanetPress Suite Workflow Tools service reads its configuration file when it starts up, when you
resume processing, PlanetPress Suite Workflow Tools service will continue using the old configuration.
Import Processes from Another Configuration File
You can import individual processes or groups of processes from a PlanetPress Suite configuration file without having to import
the contents of the entire configuration file. PlanetPress Suite Configuration imports everything necessary to run the processes, including configured tasks and configuration components.
To import components from another configuration file:
1. From the PlanetPress Suite Button, choose Import | Configuration Components.
The Import dialog appears.
2. Navigate to the PlanetPress Workflow Tool configuration file containing the processes or groups of processes you want
to import.
3. Select the file, then click Open.
The Import Configuration dialog appears displaying all the processes and/or process groups, as well as the Subprocesses, Global Variables, PlanetPress Design documents and Printer Queues in the selected configuration file.
4. In the list, select the components you want to import. The PlanetPress Suite Workflow Tools Configuration program lets
you open and import any of the following:
l Complete PlanetPress Watch 4 to 6 configurations, as well as PlanetPress Suite Workflow Tools 7 configurations.
l Specific processes from Version 6 and 7 configurations, including their local variables.
l Specific subprocesses from any PlanetPress Suite 7 Workflow Tools configurations.
l Specific global variables from PlanetPress Suite 7 Workflow Tools configurations.
l Specific PlanetPress or PrintShop Mail documents.
l Specific Printer Queues.
5. Check "Overwrite existing components with same name" if you want processes with existing names to be
overwritten by those in the imported configuration, or uncheck it to duplicate those processes under a new dynamic
name.
6. Click OK to start the import.
PlanetPress Suite Workflow Tools Configuration imports the selected objects and automatically renames duplicate
items in the imported configuration. If the currentand imported configurations both include a startup process, the one
in the imported configuration will become a standard process.
Important considerations
l When importing a PlanetPress Suite Workflow Tools configuration file, your PlanetPress Design and PrintShop Mail doc-
ument are not physically imported as they are not part of the configuration file itself. In order for the documents to be
available, you will need to send each document from PlanetPress Design and PrintShop Mail (see their respective documentation for details).
l If you import a PlanetPress Suite Workflow Tools configuration that contains a PlanetPress Image or PlanetPress Fax
output task, you must update the task’s properties and refresh the host name. Otherwise, when PlanetPress Suite
Workflow Tools will attempt to output the file, an error will be generated.
Page 36

The PlanetPress Suite Workflow Tools Configuration Program
Import Documents
This procedure describes how to import variable content documents created in PlanetPress Design. Importing documents can
be useful when transferring configurations between PlanetPress Suite Workflow Tools installations.
To import documents into PlanetPress Suite Workflow Tools:
1. Choose File | Import Documents.
The Import PlanetPress Design Documentdialog box appears.
2. In the File type box, select the desired file type.
3. Navigate to the document you want to import, select it and click Open.
The document is imported and displayed in the Configuration Components Pane. This physically installs the documents to the
Documents folder relative to the install folder of PlanetPress Suite Workflow Tools.
Import PrintShop Mail Documents
This procedure describes how to import variable content documents created in PrintShop Mail. Importing documents can be
useful when transferring configurations between PlanetPress Suite Workflow Tools installations.
To import documents into PlanetPress Suite Workflow Tools:
1. Click the PlanetPress Suite Button.
The Import PrintShop Mail Document dialog box appears.
2. Choose Import, then PrintShop Mail Documents.
3. Navigate to the document you want to import, select it and click Open.
The document is imported and displayed in the Configuration Components Pane. This physically installs the documents
to the Documents folder relative to the install folder of PlanetPress Suite Workflow Tools.
Change the Interface Language
PlanetPress Suite Workflow Tools can be used in multiple languages, and the list of available languages grows as we translate
the software. The first time you use PlanetPress Suite Workflow Tools, it starts in the language used for the installation. You
may change this setting as often as you like, but you need to restart the application every time you do so.
To change the language used by the PlanetPress Suite Workflow Tools Configuration program:
1. Click the PlanetPress Suite Button, then click Select Language.
The Select Language dialog box appears. This box lists all the languages that can be used by PlanetPress Suite Workflow Tools as well as the "Use System Default Locale"checkbox,.
2. Select the desired language and option.
3. Click OK.
Use System Default Locale: Select to mirror your language settings, as defined in the Regional and Language Options of
the Windows Control Panel. This option is typically used to enter and process information in non-European languages. It is only
enabled when English is selected as the program language.
If you plan to enter and process information in non-European languages, you should know that PlanetPress Suite uses
codepages when storing and retrieving information (a codepage is a mapping used to convert back and forth the
letters and numbers used by humans to the numeric characters used by computers). By default, codepage 1252 is
used for Latin languages (good for Afrikaans, Basque, Catalan, Danish, Dutch, English, Faroese, Finnish, French, Galician, German, Icelandic, Indonesian, Italian, Malay, Norwegian, Portuguese, Spanish, Swahili and Swedish) and
Page 37

The PlanetPress Suite Workflow Tools Configuration Program
codepage 932 is used for Japanese.
Exit the PlanetPress Suite Workflow Tools Configuration Program
Once you are done using PlanetPress Suite Workflow Tools, you can close the configuration program. It is important to note
thatclosing the PlanetPress Suite Workflow Tools Configuration Program does not stop any of the PlanetPress Suite Workflow
Tools services or stop processing.
You may exit the PlanetPress Suite Workflow Tools Configuration Program in any of the following ways:
l From the PlanetPress Suite Button, choose Exit.
l Click the Xat the top-right corner of the PlanetPress Suite Workflow Tools Configuration Program
l Press ALT+F4 on your keyboard.
l Right-click on the PlanetPress Suite Workflow Tools Configuration Program button in your task bar, and select Close.
If the default configuration file (ppwatch.cfg) is currently opened, and if it includes unsaved modifications, the PlanetPress
Suite Workflow Tools Configuration program asks you whether to send the configuration to the PlanetPress Suite Workflow
Tools service before exiting. Select the Always send without prompting for confirmation option to automatically
send the edited version of the configuration before exiting.
If the default configuration does not include any active process, the PlanetPress Suite Workflow Tools Configuration program
asks you whether to continue.
When the PlanetPress Suite Workflow Tools Configuration program sends a configuration, the PlanetPress Suite Workflow
Tools service is stopped and restarted, if it is currently running, and the new configuration starts being applied immediately.
If a file different from the default configuration file is currently opened, and if it includes unsaved modifications, the PlanetPress Suite Workflow Tools Configuration program asks you whether to save the configuration before exiting. Select the
Always save without prompting for confirmation option to automatically save any unsaved work before exiting.
The Quick Access Toolbar
The PlanetPress Suite Workflow Tools Quick Access Toolbar is displayed, by default, on the right side of the PlanetPress Suite
Button and provides one-click shortcuts to commonly used functions and features. You can add as many buttons as you want
to the Quick Access Toolbar and remove them at will.
To add a new button to the Quick Access Toolbar:
1. Locate the button you want to add in one of the tabs of the Ribbon
2. Right-Click on the button
3. Select Add to Quick Access toolbar.
To remove a button from the Quick Access Toolbar:
1. Locate the button you want to remove in the Quick Access Toolbar.
2. Right-click on the button
3. Select Remove From Quick Access toolbar.
To move the Quick Access Toolbar below or above the Ribbon:
1. Right-click on the Quick Access Toolbar, or click on the downwards arrow at the rightmost end of the Quick Access Toolbar.
Page 38

The PlanetPress Suite Workflow Tools Configuration Program
2. Click on Show Quick Access Toolbar Below the Ribbon or Show Quick Access Toolbar Above the Rib-
bon, depending on where you want it.
The Quick Access Toolbar buttons cannot be moved or re-ordered. If you wish to re-order them, you will need to
remove all the buttons and re-add them in the desired order.
The PlanetPress Suite Ribbon
The PlanetPress Watch/Office/Production Ribbon replaces the main menu and toolbars of previous versions, and centralizes
commands, organizing them into a set of Tabs, each Tab containing Groups of Controls. Eachtab on the Ribbon displays
the commands that are most relevant to a given feature set. For instance, the Objects tab in PlanetPress Design is used to
draw any of the supported objects.The built-in Ribbon and Quick Access Toolbar contain commands that are frequently
used and convenient to keep close at hand. You can minimize the Ribbon, and choose the position of the Quick Access
Toolbar, as well as the commands it displays.
You can minimize the Ribbon by right-clicking on it and selecting Minimize the Ribbon.
You can also customize the Ribbon's color scheme in the Preferences window.
PlanetPress Suite Workflow Tools Configuration program Ribbon has five tabs: the Home tab, the View tab, the Debug
tab, the Tools tab and the Help tab. Each one of these tabs contains a series of groups, each group holding a number of controls.
l The Home tab includes the Clipboard, Processes, Variables, Documents and Printer Queues groups.
l The Clipboard group contains the typical Windows-based editing controls: Cut, Copy, Paste, Select All,
Delete.
l The Processes group contains workflow controls, allowing to insert new processes of any type as well as con-
trols to converts, activate or branches processes.
l The Variables group contains two controls to insert either a Global variables available throughout the entire
configuration, or Local variables available to the current process only.
l The Documents group contains the document controls, used to insert, refresh, update or delete documents
and document instances.
l The Printer Queues group contains controls to set up printer queues of any type, as well as replace any exist-
ing queues.
l The View tab includes the Arrange, Navigate and Show/Hide groups.
l The Arrange group contains the Group/Ungroup and Sort by Name and Order controls, allowing to reor-
der objects in the Configuration Components Pane. It also includes the Undo/Redo controls, as well as
a Rename control, to modify a given component's name.
l The Navigate group contains a Processes control to select any existing process of the currently loaded con-
figuration, as well as a Highlight control to mark a given node, a Zoom Out for a quick overview of the cur-
rently selected process, and Go to Child/Go to Parent to move around a given process logical nodes
(branches or conditions).
l The Show/Hide group contains four controls to display or hide any of the four panes; the Configuration
Components Pane, the Object Inspector pane, the Message Window pane, the Debug Info pane and
the Plug-in bar.
l The Debug tab includes the Data, Debug and Debug Messages groups.
l The Data group allows to associate a sample data file to the currently selected process, as well as update or
replace it, and display it in its text/PDF or Hexadecimal format.
Page 39

The PlanetPress Suite Workflow Tools Configuration Program
l The Debug group contains the debugger's controls, allowing to execute a process step by step, skipping over
or ignoring certaintasks, as well as setting up breakpoints and resetting variables values. This group also
includes the Send Configuration button, necessary to push the current configuration to the PlanetPress Suite
Workflow Tools service.
l The Debug Messages group contains two controls to either Clear or Save the contents of the Messages
pane.
l The Tools tab includes the Managers, Services and Test Page groups.
l The Managers group contains:
l The Install PostScript Font control allows to install a PostScript font into your PlanetPress Suite instal-
lation.
l The Virtual Drive Manager control loads the Virtual Drive Manager.
l The Access Manager control loads the Access Manager, allowing to grant/remove permissions to
hosts.
l The Check for updates control, used to update the current PlanetPress Suite version.
l The Launch Upgrade Wizard control, used when migrating from a previous PlanetPress Suite ver-
sion.
l The Services group contains:
l The Services Status control allows to start, pause and stop the PlanetPress Suite Workflow Tools serv-
ice.
l The Configure Services control loads the PlanetPress Suite Services dialog to configure the user
account PlanetPress Suite should use.
l The Service Console button opens the The PlanetPress Suite Service Console, allowing to monitor
real-time information on the configuration execution.
l The Test Page group contains:
l The PS Test Page control allows to print a Status Page for the selected Printer Queue. Note that if no
printer queue is selected in the Configuration Components pane, the control is disabled.
l The Text Test Page control allows to print a raw text test page for the selected Printer Queue. Note
thatif no printer queue is selected in the Configuration Components pane, the control is disabled.
l The Help tab includes the Help and Activation groups.
l The Help group contains the User Guide, the Reference Guide and the About controls, used to access
online documentation and version informations.
l The Activation group contains the Software Activation and the Printer Activation controls, used to
enter activation codes for either the software or a given device.
l The Licence group contains a link to the PlanetPress Capture License Management.
Start and Stop the PlanetPress Suite Workflow Tools Service
As with most Windows services, PlanetPress Suite Workflow Tools can be started and stopped automatically when a Windows
session is opened and closed. The other option is to start, stop or pause the PlanetPress Suite Workflow Tools manually using
the PlanetPress Suite Workflow Tools Configuration program.
The current PlanetPress Suite Workflow Tools status is always displayed in the lower-right corner of the PlanetPress
Suite Workflow Tools Configuration program window.
To start PlanetPress Suite Workflow Tools services via the PlanetPress Suite Workflow Tools Configuration program:
l Click Tools in the PlanetPress Suite Ribbon.
l Click Start Service in the Services Status group.
A progress bar is displayed while your PlanetPress Suite Workflow Tools is being started.
Page 40

The PlanetPress Suite Workflow Tools Configuration Program
To stop your PlanetPress Suite Workflow Tools services via the PlanetPress Suite Workflow Tools Configuration program:
l Click Tools in the PlanetPress Suite Ribbon.
l Click Stop Service in the Services Status group.
When you stop or pause PlanetPress Suite Workflow Tools, it immediately stops bringing new files into its processes,
but it keeps on performing tasks until all the files which are currently under process have been completely processed.
To pause your PlanetPress Suite Workflow Tools service via the PlanetPress Suite Workflow Tools Configuration program:
l Click Tools in the PlanetPress Suite Ribbon.
l Click Pause in the Services Status group.
The PlanetPress Suite Workflow Tools service temporarily stops performing jobs. Note that if you send a new configuration when PlanetPress Suite Workflow Tools is paused, it will continue using the old configuration when you
resume processing until you stop and restart it.
To resume your PlanetPress Suite Workflow Tools service after pausing it:
l Click Tools in the PlanetPress Suite Ribbon.
l Click Resume in the Services Status group.
The PlanetPress Workflow Tool service starts performing jobs again.
The Configuration Components Pane
The Configuration Components Pane displays processes, subprocesses, variables, documents and printer queues. It also lets
you add any of these components using the right-click menu.
Components Area Sections
l Processes:Displays a list of processes in your configuration. Right-click on a process to access a drop-down menu
thatoffers these choices:
l Insert Process:Inserts a new process with a default input and output task.
l Insert Startup Process:Inserts a new process as a Startup Process. This option is only available if there is
no existing startup process in your configuration.
l Insert Local Variable:Inserts a new local variable.
l Cut, Copy, Paste:Controls the clipboard.
l Delete: Deletes the process from the configuration.
l Rename: Renames the process.
l Active: Triggers whether the process is active (runs in service mode)or inactive (does not run in service
mode). Inactive processes never trigger their input task or any other tasks.
l Startup: Triggers whether the process is a startup process (runs before any other process). This option is only
available if there is no existing startup process in your configuration.
l Group, Ungroup: Triggers grouping functionality.
l Properties...: Displays the process' properties, for scheduling and error handling.
l Subprocesses: Displays a list of subprocesses in your configuration. Right-click on a subprocess to access a drop-
down menu that offers these choices:
l Insert Subprocess:Inserts a new process with a default inputand output task.
l Insert Local Variable: Inserts a new local variable.
l Cut, Copy, Paste:Controls the clipboard.
l Delete: Deletes the subprocess from the configuration.
l Rename: Renames the subprocess.
Page 41
The PlanetPress Suite Workflow Tools Configuration Program
l Group, Ungroup: Triggers grouping functionality.
l Properties...: Displays the process' properties for error handling.
l Global Variables:Displays a list of variables that are shared between all your processes. Right-click on a Global Var-
iable to access a drop-down menu that offers these choices:
l Insert Global Variable:Creates a new global variable
l Cut, Copy, Paste:Controls the clipboard.
l Delete: Deletes the global variable from the configuration.
l Rename: Renames the global variable.
l Reset: Resets the global variable to its default value. Useful if one of your process is modifying the global var-
iable's value and you want to return it to its original default value.
l Group, Ungroup: Triggers grouping functionality.
l Properties...:Displays the properties, which lets you set a default value for the global variable.
l Documents: Displays a list of PlanetPress Design and PrintShop Mail Design document that have been imported into
PlanetPress Suite Workflow Tools. Right-click on a document to access a drop-down menu that offers these choices:
l Insert Resident Document:Inserts a new Resident Document, which is a placeholder for a PlanetPress
Design document that resides exclusively on the printer.
l Cut, Copy, Paste:Controls the clipboard.
l Delete: Deletes the document from the configuration, as well as the Workflow Tools Working Folders.
l Refresh:Regenerates a PostScript Cache from the original document's PTKfile.
l Group, Ungroup: Triggers grouping functionality.
l Properties...:Displays the properties, which lets you see the form information and select its default printing
behaviors.
l Printer Queues:Displays a list of printer queues in your configuration. Right-Click on a printer queue to access a
drop-down menu that offers these choices:
l Insert Printer Queue: Creates a new printer queue in your configuration.
l Replace Printer Queue By:Replaces the currently selected printer queue with a new one.
l Cut, Copy, Paste:Controls the clipboard.
l Delete: Deletes the printer queue from the configuration.
l Rename: Renames the printer queue.
l Group, Ungroup: Triggers grouping functionality.
l PSTest Page: Prints a test page in PostScript format. Useful for validating whether the printer supports Post-
Script.
l Text Test Page:Prints a text-only test page on the printer.
l Properties...:Displays the printer queue properties.
Deleting a component that is currently used by a process will cause this process to stop working and trigger an error,
until the task that causes the error is removed, or changed to point to another existing component.
Access Process Properties
To have access to the properties of a process or subprocess:
l Right-Click on the Process in the Configuration Components Area.
l Select Properties.
You can also double-click on the process to show its options.
Subprocesses do not have the "General Tab" which is only used for scheduling, but they do have the Information Tab.
PlanetPress Suite Workflow Tools Process Options properties are as follows:
Page 42

The PlanetPress Suite Workflow Tools Configuration Program
General tab
l Active: Select to make the process active. Clear to prevent this process from running when you send the configuration
to PlanetPress Suite Workflow Tools.
l Startup process: Select to make this process a startup process.
l Self-Replicating Process:Check this if you want the process to replicate itself in the background when multiple
input files are received simultaneously. When this is checked, the input task polls its source once, determines the
number of files to process, then replicates itself up to the maximum allowed and treats the files simultaneously. The initial process runs again once it has completed itself and replicates again as necessary, until all files have been processed.
l Max percentage of threading (%):Determines how many processes you may have running at the same time.
This is a percentage of the maximum number of threads specified in the Messenger User Options. For example if the
maximum number of thread is 10 and you specify 50%here, a maximum of 5 replications will occur (the original process +4 copies).
l As soon as possible: Select to have the process run continuously. Clear to enable the Time Grid to fine-tune the
schedule of the process.
l Day(s) to keep backup: Indicate the number of days to keep backups of jobs processed by input tasks. Note that
backups will only be kept for those input tasks that have the Keep backup file option selected and that they are
required to resubmit input files.
l Polling interval: Enter the frequency (in seconds)at which the process should verify if there are new jobs to proc-
ess. The polling interval also applies to scheduled tasks that only run on certain times. For example, if your process
polls every 30 seconds on a task that's only scheduled to run one hour per week, it will capture the input 120 times during that period. Note that the polling interval is ignored when multiple files are present in the input and will be used only
when there are no longer any files to process.
l Month: Select the month of the year when the process should be run or select All months to have the process run all
year long. This option is disabled when "As soon as possible"is checked.
l Week of month / by date: Select the desired option for the time grid. Note that any selection you make in this box
will be interpreted based on the selection made in the Month box. If you chose All months in the Month box and Last in
the Week of month / by date box, then the process will run on the last week of every month. If you chose January in
the Month box and First in the Week of month / by date box, then the process will run only on the first week of January.
l Select Date to display dates on the grid’s top ruler.
l Select any of the other options to display days on the top ruler.
l Select All weeks to have the process run every week.
l Select First, Second, Third or Fourth to have the process run on the first, second, third or fourth week.
l Select Last to have the process run only on the last week.
l Time division: Select the duration of each daily segment in the time grid. If you select 00:15, each segment will rep-
resent only 15 minutes and each day will be made up of 96 blocks (4 blocks per hour times 24 hours). If you select
24:00, each segment will represent an entire day.
l Poll once per activity period: Select to perform this process’ initial input task no more than once for each set of
contiguous blocks (blocks that are on the top of one another). Choosing this option overrides the polling interval option.
By default since the Time Grid blocks are divided by hours, this option will make your polling happen once every hour.
The Time Grid
The PlanetPress Suite Workflow Tools Process Options dialog box includes a time grid that lets you set exactly when you want
a process to run. The grid is composed of blocks thatrepresent time periods on a given day. To activate the Time Grid, the "As
soon as possible"option must be unchecked.
In the Time Grid, a blue block will indicate that the process is active within that time block. While blocks mean the process will
not be active.
Page 43
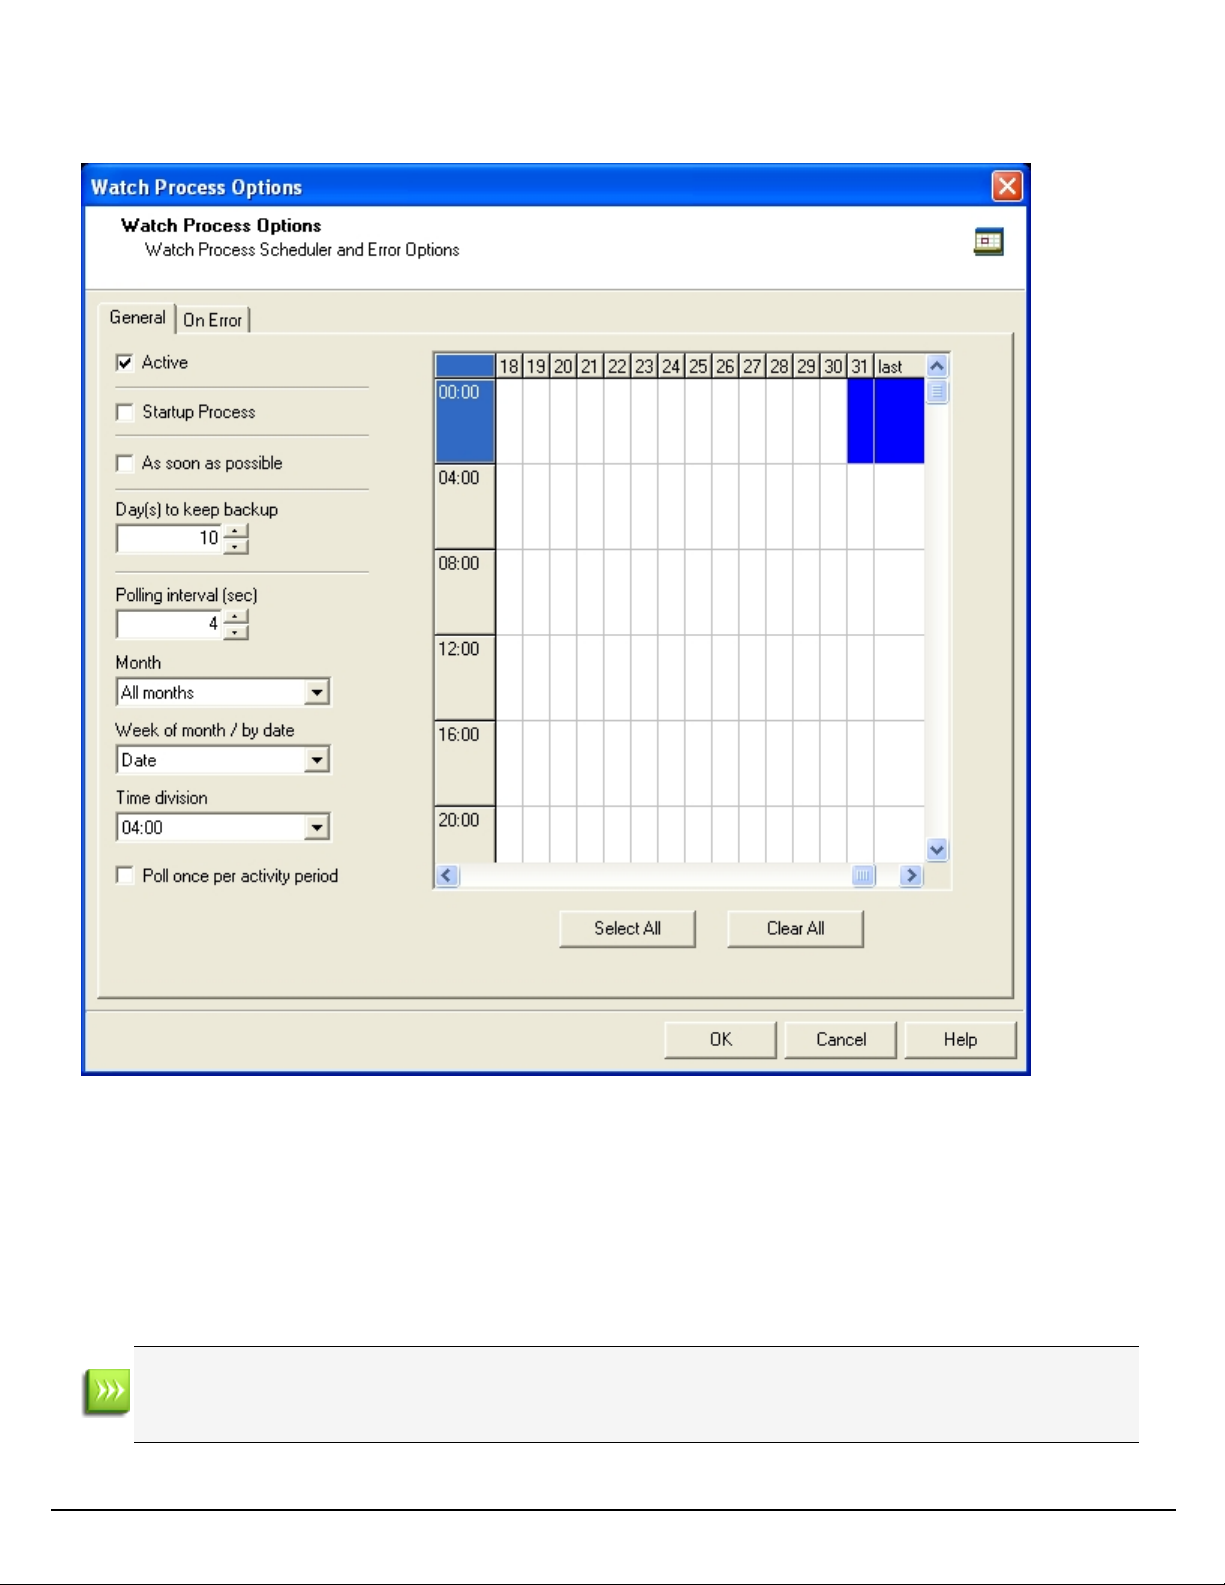
The PlanetPress Suite Workflow Tools Configuration Program
l Click on any block to select/deselect it.
l Click and drag from one block to another to toggle all blocks between the two.
l Shift-click on any block to toggle all blocks from the top-left corner of the grid to the block you click.
l To select all of the time segments for a given day or date, click the day or date on the top grid ruler. To deselect all of
the time segments for a given day or date, CTRL+click the day or date on the top grid ruler.
l To select all the days or dates for a given time segment, click the time segment on the left grid ruler. To deselect all the
days or dates for a given time segment, CTRL+click the time segment on the left grid ruler.
l To select the entire grid, use the Select All button located below the grid. To deselect the entire grid, use the Clear
All button located below the grid.
"Toggle" means turn on when it's off and vice-versa, when selecting multiple blocks in one command. This means if
you select a certain number of blocks in the Time Grid and then use the shift+click or drag method, blocks that are on
will turn off.
Page 44

The PlanetPress Suite Workflow Tools Configuration Program
Changes made to the system time can have adverse effects on the processes managed by PlanetPress Suite Workflow Tools. When changing from daylight saving time to standard time, for example, if PlanetPress Suite Workflow
Tools starts a given process at 2:00AM, and if the system time is then taken back to 1:00AM, the application will start
a new instance of the same process when the system time reaches 2:00AM for a second time. So, when you manually
change the system time, be aware that it may have an effect on PlanetPress Suite Workflow Tools and its processes.
And for those cases when you know the system time will change automatically, you may consider creating special
schedules.
Information Tab
The Information tab lets you enter information that is not critical to your process but may help others (or yourself in the
future)to understand what the process does. It offers two boxes:
l Description: Aone-line box to give a title or short description to your process.
l Comments:A multi-line box to give more detailed information, for example the file format expected, explanation of
the system in general.
Add a PlanetPress Suite Process
You can create a new process in a two different ways:
l In the Ribbon, go to the Home tab and click the Process button in the Processes group.
l In the Configuration Components Pane, right-click on any process or the Processes folder and select Insert
Process.
Regardless of the method, a new process is created with a default name (Process1, Process2, etc), Input Task and Output
Task. The defaults are configurable in the Default Configuration User Options screen.
The same methods can be used to create a new Startup process:
To add a PlanetPress Suite startup process:
l In the Ribbon, go to the Home tab and click the Startup Process button in the Processes group.
l In the Configuration Components Pane, right-click on any process or the Processes folder and select Insert
Startup Process.
You can only have one Startup Process in any given configuration and cannot add more.
Considerations:
l While your configuration is limited to a maximum of 512 processes, any given process can have as many tasks as nec-
essary.
l A given process may include output tasks that generate files used by input tasks from other processes.
l When you send a configuration to your PlanetPress Suite Workflow Tool service, all its active processes are applied.
l Each process’ schedule determines when its initial input task can be performed.
l Other tasks included in the process are performed regardless of schedule, granted that the previous task was per-
formed.
Manipulate Local Variables
For information about Global Variables see Global Variables.
Page 45

The PlanetPress Suite Workflow Tools Configuration Program
Local Variables are set at the level of the Process and are not shared with any other process or instance of that process. Local
variables can be used anywhere that accepts variables by using it's namee, surrounded by curly brackets and preceded by a
percent sign (for example:%{myLocalVariable}).
When the process ends, the local variable forgets whatever value was given to it by the process and goes back to its default
value. Local variables are generally used to keep information that is useful for the process itself but not to any other process or
instance of the process. For example, you could store the current order IDfor the process, a name or an email. You can have
as many local variables as you want in any given process.
To add a local variable, you can use one of two methods:
l Select the process where you want to add the variable.
l Click on the Home tab of the PlanetPress Suite Ribbon, then click Local Variable in the Variables group.
l Right-click on the process in the Configuration Components area, then click on Insert Local Variable.
Shared tasks
These procedures can be used on both local and global variables.
To delete a variable
l Right-click on the variable name in the Configuration Components Area and click Delete.
To rename a variable:
l Right-click on the variable name in the Configuration Components Area.
l Click Rename
l Type in the new name of the variable, then press Enter on your keyboard.
While renaming a variable will correctly rename all references to it in task properties or wherever else it is used in a task, it
will not change the references in any script within a Run Script task. Deleting a variable, on the other hand, does not delete any
reference to it. In both the case where a script refers to a variable and it is renamed, or in the case of deleting a variable, any
task or script that refers to it will cease to function and will generate an error.
You can set the value of a variable within your process in two ways:
l Use the Set Job Info and Variable action task. See Set Job Infos and Variables.
l You can use Scripts. See the chapter Using Scripts.
Variables may be used as variable properties in variable property boxes (see Variable Properties).
Activate or Deactivate a Process
All processes are Active by default, but you may make any PlanetPress Suite process Inactive as required. Because making a
process active or inactive is a change in the configuration, to make the change effective you will have to send the edited configuration to your PlanetPress Suite Workflow Tools service (see Send your Configuration).
To activate or deactivate a process:
l Right-click the process in question in the Configuration Components Pane
l Click Active to disable or enable the process.
l Send your configuration.
If you try to send a configuration that contains only inactive processes, the PlanetPress Suite Workflow Tools Configuration program will ask you to confirm the operation (this can be changed in the Notification User Options).
Page 46

The PlanetPress Suite Workflow Tools Configuration Program
Convert a Branch to a Subprocess
To allow for maximum flexibility and backward compatibility with the subprocess feature, the Convert to subprocess
option lets users transform existing processes easily. This option is available whenever a Branch task is selected; right-clicking on it will display the contextual menu, which holds the Convert to subprocess option.
Selecting this option automatically creates a new subprocess, takes the branch and all of its children tasks and inserts it in the
new subprocess, including the branch task itself. In the main process, the branch is removed and replaced with a GoSub
action task referring to the newly created subprocess.
Note: The Branch tasks options Backup job file, Backup job information and Backup emulation, are also auto-
matically passed to the Subprocess, which means that, if the subprocess needs to use a different emulation than the calling
process, a Change Emulation task is required.
If any task converted into a subprocess was previously using local variables, these variables must be removed or transferred
to global variables or job information to be usable in the newly created subprocess.
Manipulate Global Variables
For information about Local Variables see Local Variables.
Global Variables are set at the level of the Configuration file and are shared between all processes and tasks. Global variables
can be used anywhere that accepts variables by using it's name preceded by "global."and surrounded by curly brackets (for
example:%{global.myGlobalVariable}).
Global variables are generally used to keep information that applies to multiple locations but need to be changed easily. For
example, a lot of uses use them to set a server's IP, a printer name, or folder location that is used by multiple processes. This
is useful when moving the configuration file to another installation of the Workflow Tools where this information is different, or
to quickly modify specific information if something changes on the server. You can have as many global variable as you want
in any given configuration.
To add a global variable from the Configuration Components Pane:
1. Right-Click on Global Variables
2. Click Insert, then Insert Global Variable.
The new variable will appear as GlobalVar or GlobalVarX (the name is automatically incremented).
To add a global variable from the Ribbon:
1. Click on the Home tab of the PlanetPress Suite Ribbon
2. Click Global Variable in the Variables group.
The new variable will appear as GlobalVar or GlobalVarX (the name is automatically incremented).
To set the value of a global variable from the Configuration Components Pane:
1. Double-click on the global variable in the Configuration Components Pane.
(Right-clicking then clicking Properties also works)
2. Enter the new value for your global variable
3. Click OK to save the new value.
Shared tasks
These procedures can be used on both local and global variables.
To delete a variable
Page 47

The PlanetPress Suite Workflow Tools Configuration Program
l Right-click on the variable name in the Configuration Components Area and click Delete.
To rename a variable:
l Right-click on the variable name in the Configuration Components Area.
l Click Rename
l Type in the new name of the variable, then press Enter on your keyboard.
While renaming a variable will correctly rename all references to it in task properties or wherever else it is used in a task, it
will not change the references in any script within a Run Script task. Deleting a variable, on the other hand, does not delete any
reference to it. In both the case where a script refers to a variable and it is renamed, or in the case of deleting a variable, any
task or script that refers to it will cease to function and will generate an error.
You can set the value of a variable within your process in two ways:
l Use the Set Job Info and Variable action task. See Set Job Infos and Variables.
l You can use Scripts. See the chapter Using Scripts.
Variables may be used as variable properties in variable property boxes (see Variable Properties).
View Document Properties
The PlanetPress Suite Workflow Tools Configuration programs let you view a number of the properties associated with the
PlanetPress Design documents you use, but most of those properties are set in PlanetPress Design and cannot be edited using
the PlanetPress Suite Workflow Tools Configuration program.
The Document name of printer-resident documents can be changed using the PlanetPress Suite Workflow Tools Configuration
program simply because it is initially set using that program.
The properties available via the Printer Settings tab define how documents are printed. They are also set using the PlanetPress
Suite Workflow Tools Configuration program and are retained when documents are assigned to printer queues. They can be
edited by selecting documents within the Documents category, which changes the document’s default printer settings, or
within the Printer Queues category, which changes the document properties on the selected queue .
To view the properties of a document, do one of the following:
l Click any document to display its properties in the Object Inspector.
l Double-click any document to display its properties in the PlanetPress Design Document Options
dialog box.
Document Properties Options
Identification Tab
The information here is read-only and gives you information on the document.
l Document: The file name of the document, as entered in PlanetPress Design. This is the name of the file saved in
PlanetPress Design, or the name you give it when you add a printer-resident document in your PlanetPress Suite Workflow Tools Configuration. It may have a PTK extension (if it has been sent to PlanetPress Workflow from PlanetPress
Design), or a PS extension (if it is printer-resident).
l Version: The version of the PlanetPress Suite Workflow Tools in which the document was originally created. Printer-
resident documents are identified as such.
l Document name: The name of the document as entered in PlanetPress Design. You can enter a name for printer-
resident document here; the name does not have to match the name given it in PlanetPress Design. Since this property
Page 48

The PlanetPress Suite Workflow Tools Configuration Program
is used in the trigger to identify the document when the PlanetPress Suite Workflow Tools sends a job to be merged on
a printer, the document name must exactly match the name of the document installed on the printer.
l Description: The description of the document as entered in PlanetPress Design.
l Last modified:The date and time the document was last uploaded to PlanetPress Workflow Tools.
Printer Settings Tab
l Trigger Type:Select whether you want a normal trigger configuration to be used, or a custom trigger that you man-
ually enter.
l Custom Trigger Box (appears only when Custom Trigger is selected in Trigger type):Lets you enter the exact
trigger you want to use. This trigger must absolutely be in standard postscript language.
l Run mode group
l Printer centric: Select to send the document along with the trigger and data to the component that generates
fax documents.
l Optimized PostScript Stream: Select to merge the selected document with the data received by this task
before sending it to the component that generates fax documents. Some PlanetPress Design features, such as
the Time and Date PlanetPress Talk functions, require that this option be selected.
l Document location group (enabled only when using Printer-Centric mode)
l PlanetPress Suite Workflow-based:Select if the PlanetPress Design document is in the PlanetPress Suite
Workflow Tools. This option should be selected if your document is updated oftenand you are sending it to the
Workflow Tools instead of the printer directly.
l On printer hard disk:Select if the PlanetPress Design document is on the printer's hard drive.
l In printer flash memory:Select if the PlanetPress Design document is on the printer's flash memory.
l RAM:Select if the PlanetPress Design document is on the printer's RAM (Random AccessMemory).
l Document Update group (enabled only when using printer-centric mode and the document is on the printer)
l Automatically update:PlanetPress Workflow Tools will send a new version of the document to the printer
automatically if the document has been changed since it was last used. If unchecked, you will have to manually
update the document on the printer from the Update Instances button or by sending the document to the printer
from PlanetPress Design.
l Confirm Update:Check if you want a confirmation page to be printed stating the document has been
updated, when it happens. This options is disabled if Automatically update is not selected.
l Update Instances:Clicking this button brings up a dialog box thatlets you manually update any document on
any printer.
l Printer-Specific folder:This option lets you enter a manual location where the documents should reside in the
printer's memory. This option is only available if the document is Printer Centric, and the Document location is
either On printer hard disk or In printer flash memory.
Use Data and Metadata Files Attached to Documents
This feature was introduced in PlanetPress Suite 7.3.
Data Files
When sending a PlanetPress Design Document from PlanetPress Design to PlanetPress Workflow, all data files used in the document are automatically sent to PlanetPress Workflow along with the Design Document. These data files appear under the
Design Document in the Documents section of the Configuration Components.
To set an attached data file as a sample data file in a process:
1. Make sure the Documents section is visible by clicking the button if it appears.
2. Expand the document (name.ptk) by clicking the button.
3. Right-click on the data file, then click Set as sample data file.
Page 49

The PlanetPress Suite Workflow Tools Configuration Program
To view an attached data file:
1. Make sure the Documents section is visible by clicking the button if it appears.
2. Expand the document (name.ptk) by clicking the button.
3. Double-click on the data file to open the data selector.
Double-clicking on the data file does the same thing as right-clicking on it an then selecting Set as sample data
file. Clicking Cancel instead of Ok after viewing will prevent this action from being taken.
To save an attached data file to disk:
1. Make sure the Documents section is visible by clicking the button if it appears.
2. Expand the document (name.ptk) by clicking the button.
3. Right-click on the data file, then click Save sample data file.
Metadata
When a Design Document uses Metadata, it can also be attached with the document. One Metadata file is generated for each
data file attached to the Design Document. Metadata does not appear in the Configuration Components but it follows the data
file and can be viewed from the Metadata tab whenever the data file is viewed through the Data Selector.
Use Attached Document Preview
When sending a PlanetPress Design Document from PlanetPress Design to PlanetPress Workflow, a PDFPreview of the job's
output is automatically sent to PlanetPress Workflow along with the Design Document. This preview appears under the Design
Document in the Documents section of the Configuration Components.
The PDFcontains the result of a preview with the active data file (for all data pages) run as an Optimized PostScript Stream.
To view the Document Preview:
1. Make sure the Documents section is visible by clicking the button if it appears.
2. Expand the document (name.ptk) by clicking the button.
The Document Preview has the same name as the document but with a PDFextension.
3. Right-click on the Document Preview, then click Open in PDFViewer.
To save the Document Preview to disk:
1. Make sure the Documents section is visible by clicking the button if it appears.
2. Expand the document (name.ptk) by clicking the button.
The Document Preview has the same name as the document but with a PDFextension.
3. Right-click on the Document Preview, then click Save PDFFile.
Add Resident Documents in the Configuration Components Pane
By default, the Documents group displayed in Configuration Components Pane of the PlanetPress Suite Workflow Tools Configuration program includes all those documents that are available on your local PlanetPress Suite Workflow Tools server.
Those documents that are not available on your localPlanetPress Suite Workflow Tools server, but that are either available on
printers or on other PlanetPress Suite Workflow Tools servers must added to the list, otherwise you will not be able to use
them in your PlanetPress Suite Workflow Tools configuration.
To add a resident document in the Configuration Components Pane:
Page 50

The PlanetPress Suite Workflow Tools Configuration Program
1. In the PlanetPress Suite Workflow Tools Configuration Components Pane, click the Documents icon and choose Insert
| Resident Document.
The Add Resident Document dialog box is displayed.
2. Enter the document’s name. Note that the name you enter must exactly match the actual document name or Plan-
etPress Suite Workflow Tools will not be able to use it on the printer or remotePlanetPress Suite Workflow Tools
server.
3. Click OK.
Associate Documents and PlanetPress Watch Printer Queues
One of the basic information stored in a PlanetPress Suite Workflow Tools printer queue is the list documents associated with
the printer queue. Also stored in the printer queue are the properties of each document associated with the queue.
To assign documents to PlanetPress Suite Workflow Tools printer queues:
1. In the Documents group of the Configuration Components Pane, select either a single document or a group of documents.
2. Drag the selected documents over a PlanetPress Suite Workflow Tools printer queue.
The selected document or the group of documents is associated with the printer queue. Each document keeps its
default properties.
To break the association between a document and a given printer queue:
l Select the document as displayed under the printer queue in question and press Delete.
To break the association between a document and multiple printer queues:
1. Select the document as displayed under one of the printer queues in question and from the right-click menu choose
Delete Instances.
The Delete Document Instances dialog box appears.
2. In the Printer Queue list, select all those printer queues for which you want the printer queue—document association
to be broken.
3. Click OK.
To modify the settings of a document assigned to a printer queue:
The settings available in this window are the same as the Printer Settings dialog of a document properties in the Documents list
of the Configuration Components Area, but they are specifically for this document on this printer queue. See View Document
Properties for more details.
l Double-click on the document located within a printer queue.
The Document Properties dialog appears.
Using the Clipboard and Drag & Drop
Moving configuration components in the Configuration Components Pane is very easy and can either be done with the mouse
(drag & drop), the Ribbon menus (clipboard buttons)or the keyboard (clipboard keyboard shortcuts).
If you simply wish to change the order in which objects appear in a category or group of the Configuration Components, refer
to Reorder Objects in the Configuration Components Pane.
As you drag a configuration component, your mouse cursor will change to indicate the action you are performing, as well as
whether the location where the cursor is can accept the configuration component you are dragging. If you try to drag a configuration component in a location that is not accepted, the cursor changes to a "prohibited"icon. If you are moving a
Page 51

The PlanetPress Suite Workflow Tools Configuration Program
configuration component to a valid location, the mouse cursor displays the normal cursor along with a small dotted box. If you
are copying a configuration component to a valid location, the mouse cursor displays the normal cursor along with a small
dotted box and a plus (+)sign.
The PlanetPress Suite Workflow Tools Mouse Cursors
Normal Mouse Pointer Move Mouse Pointer Copy Mouse Pointer Prohibited Mouse Pointer
Moving Configuration Components
Moving components using Drag & Drop:
l Click on the component and hold the mouse button.
l Move the component to the location where you want to drop it.
l Let go of the mouse button.
Moving components using the clipboard buttons:
l Click on the component you want to move.
l Go to the Home tab of the Ribbon.
l Click on Cut in the Clipboard group.
l Click on the new location where you want the component.
l Click on Paste in the Clipboard group.
Moving components using the mouse contextual menu:
l Right-click on the component you want to move.
l Click on Cut in the contextual menu.
l Right-click on the new location where you want the component.
l Click on Cut in the contextual menu.
Moving components using the keyboard shortcuts:
l Click on the component you want to move.
l Do CTRL+X(cut)on your keyboard.
l Click on the new location where you want the component.
l Do CTRL+V(paste)on your keyboard.
Copying components.
You can make a copy of any component in the Configuration Components Pane, with the only exception being Documents (of
which you can only have one copy). Copying components is done using the same methods as moving them, with the following
differences:
l To move components using the clipboard buttons and contextual menu, replace "Cut"by "Copy". Otherwise the meth-
ods are the same.
l To move components using the keyboard shortcuts, replace "CTRL+X"by "CTRL+C". Otherwise the method is the
same.
Moving and Copying Details:
l When moving configuration components, a horizontal line appears where the component will be dropped if the location
is valid. At the end of this line will be small "dents". If thesedents are on top of the line, the component will be placed at
the same level (group)as the component before it. If the dents are at the bottom, the component will be placed at the
Page 52

The PlanetPress Suite Workflow Tools Configuration Program
same level (group)as the component after it.
l If you move an object in the Configuration Components Pane on top of a group, the group name turns maroon (in the
default color scheme)to indicate the object will be moved in the group after all the existing objects currently in that
group.
l Moving a configuration component does not change the order in which the components are used. However they can
affect your process if, for example, you move a local variable from one process to another and the local variable is still
used in the first process.
l You can also copy multiple components by selecting more than one then using the methods described above. However,
you can only select multiple components from within the same folder. You cannot, for example, select a Subprocess
along with a Process and move them together. Also, you cannot select multiple components if they are not in the same
group or if one is in a group and the other is not.
l You can also copy and move groups that have been created in the Configuration Components Pane.
l Dropping documents onto printer queues does not move the documents, but rather assigns them to these queues (see
PlanetPress Suite Workflow Tools Printer Queues).
Rename Objects in the Configuration Components Pane
You can rename processes, groups, and printer queues in the Configuration Components Pane. PlanetPress Design Documents (ptk/ptz files) are different and cannot be renamed or modified using the PlanetPress Suite Workflow Tools. You can,
on the other hand, change the name of printer-resident documents.
Note that names cannot begin with a number. They can only contain the following ASCII characters: underscore, upper
and lower case letters of the alphabet, all digits 0 through 9. If you enter an invalid name, you will be prompted to correct
it (unless if the corresponding option has been turned off).
To rename a process, printer queue or group in the Configuration Components Pane:
1. In the Configuration Components Pane, right-click the name of an object or group and choose Rename from the popup menu.
The name of the object or group is highlighted and ready to be edited.
2. Type the new name over the existing name and press ENTER.
PlanetPress Suite Workflow Tools Configuration renames the object or group.
To rename a resident document:
1. In the Documents section of the Configuration Components Pane, double-click a printer-resident document.
The PlanetPress Design Document Options dialog box is opened.
2. In the Document name box, enter the new document name and click OK.
PlanetPress Suite Workflow Tools rename the resident document.
Reorder Objects in the Configuration Components Pane
There are multiple ways you can reorder objects in the Configuration Components Pane. Commands available from the rightclick menu let you reorder selected objects, as well as alphabetically reorder objects listed directly under a category or appearing within a group. You can also use the clipboard controls and drag &drop methods described in Using the Clipboard and Drag
& Drop to copy and move objects and tasks.
To reorder selected objects in the Configuration Components Pane:
Page 53

The PlanetPress Suite Workflow Tools Configuration Program
1. Click an object or group.
2. In the PlanetPress Suite Ribbon, go to the View tab then click Order in the Arrange group, then select one of the following:
l Up One Level to move the item one level up in the hierarchy. If the item is already the top object in the cat-
egory, or within a group, this command has no effect.
l Down One Level to move the item one level down in the hierarchy. If the item is already the bottom object in
the category, or within a group, this command has no effect.
l To Top Level to move the item to the top level in the hierarchy. This moves the item to the top of the category
or to the top of the group. If the item is already the top object in the category, or within a group, this command
has no effect.
l To Bottom Level to move the item to the bottom level in the hierarchy.
To alphabetically reorder objects in the Configuration Components Pane:
l Click the either a category (Processes, Global Variables, Documents, or Printer Queues) or a group
l In the PlanetPress Suite Ribbon, go to the View tab.
l In the Arrange group, select Sort by Name.
Grouping Configuration Components
Groups help you organize processes, documents, and printer queues. For example, you may create the Invoices, Checks and
Reports groups in the Processes section and associate individual processes with each one of these groups.
You group items only within their own category. Thus you can only group processes with other processes, documents with
other documents, and printer queues with other printer queues. In the documents category, you can only group documents
with others of the same version and type. For example, you can only group documents from PlanetPress Design (files with a
PTK extension) with other PTK files, not with printer-resident documents.
You can also use groups to quickly assign multiple documents to multiple printer queues. By dragging a group of documents to
a printer queue, you assign all the documents in the group to that queue.
To add a group in the Configuration Components Pane:
l In the Configuration Components Pane, click a category and choose View | Arrange | Group.
A new group is added at the end of the category.
To add objects to an existing group:
l Drag-and-drop the objects onto the group.
The objects are added as the last objects in the group.
To remove objects from a group:
l Drag-and-drop the objects out of the group.
The objects are removed from the group. If the group becomes empty, you are prompted to confirm the deletion of the
group.
To add selected objects to a new group:
1. Select multiple objects that are not part of a group
2. Press CTRL+G. A new group is added and the selected items are moved to that new group.
To ungroup selected objects:
Page 54

The PlanetPress Suite Workflow Tools Configuration Program
1. Select objects in a group.
2. Press CTRL+U.
Expand and Collapse Categories and Groups in the Configuration Components Pane
You can expand and collapse the Processes, Global Variables, Documents and Printers Queues categories, and groups, in the
Configuration Components Pane.
To expand or collapse categories or groups in the Configuration Components Pane:
l Click the expand/collapse button to the left of the item.
Delete Objects and Groups from the Configuration Components Pane
Delete objects and groups from the Configuration Components Pane.
To delete a process, document, or printer queue:
l Click a process, document, or printer queue, then press DELETE.
In the case of processes and printer queues, the object is deleted. If there is only one process in the configuration, you cannot
delete it; there must be at least one process in the configuration. If you delete the last configured process, a process with two
unknown tasks remains.
In the case of documents, you are first prompted to confirm the deletion. You can turn off this prompt in the Notification Messages User Options.
To delete a group of processes, documents, or printer queues:
l Click a process group, documents group, or printer queue group, then press DELETE.
In the case of process groups and printer queue groups, the group and all its members are deleted. In the case of documents,
you are first prompted to confirm the deletion of each member of the group. You can turn off this prompt in the Notification
Messages User Options.
The Process Area
The Process area, which is always available and visible, holds all the tasks, branches, conditions and comments that make up
the selected process. The Process area is built like an invisible grid divided by rows (horizontal)and columns (vertical). When
adding a new Action Task, a new row is added. When adding a Branch or Condition, a new column appears (unless there is
already a column at that level).
The first task of any process, also called the initial input task, always appears in the first box in the upper left corner. When
you create a new process, this first task is always followed by the default output task in the following box.
Zoom In or Out within Process Area
You can do a zoom out in the PlanetPress Suite Process area to see more tasks at the same time. In zoom out mode, you can
perform the exact same functions as in normal view mode.
To zoom in or out on the PlanetPress Suite Process Area:
Page 55

The PlanetPress Suite Workflow Tools Configuration Program
l Click on the View tab of the Ribbon.
l Click on Zoom Out in the Navigate group to zoom out, and Zoom In to zoom in.
Adding Tasks
You can add as many tasks as you wantto your process by using the Plug-in Bar in the PlanetPress Suite Workflow Tools program.
To insert a task:
1. Open the Plug-in Bar by clicking on its tab. If you can't see the Plug-in Bar tab, click on the View tab in the Ribbon and
make sure the Plug-in Bar is highlighted in the Show/Hide section.
2. Locate the task you want to add to your process. You can navigate between the different task categories by clicking the
icons at the bottom of the Plug-in Bar.
3. Using your mouse, click and drag the task in your process at the place you want to insert it.
4. Depending on where you place your mouse, you may see thatyou can replace or insert existing tasks, or not place it at
thatlocation at all.
5. When you drop the task in the desired location, a dialog box containing the available task properties is displayed.
6. Set the task properties as required and click OK to close the dialog box.
There are a few things to keep in mind when dropping tasks:
l You can insert input tasks anywhere in the process except in output task locations.
l When you add an output task, a new branch leading to that new task is added above the selected task or branch,
except when replacing an existing output task.
l Dropping a task on top of another one replaces it.
l Dropping a task between two tasks will insert it at thatlocation.
l You cannot add a task above the initial input task of a process, since new tasks are always added above a selected task
or branch.
Adding Branches
The PlanetPress Suite Workflow Tools Configuration program offers two different commands when it comes to adding new
branches to a process:
You can add a new branch, by dragging and dropping a branch, from the Process Logic category of the Plug-in Bar, into your
process. Branches can be added using the Adding Tasks method.
You can add a new branch that contains all of the tasks below the point where you insert the branch. To do this, right-click on
the first task that you want to include in the branch, and select Branch From Here... . An unknown task will be created as an
output below the branch.
Edit a Task
To edit a task, you simply need to access and change its properties. You may even do it while your process is in Debug mode
(see "About the Debug Mode" (page n)).
To edit a task:
1. In the PlanetPress Suite Workflow Tools Process area, double-click the task icon.
A dialog box containing the available task properties is displayed.
2. Editthe task properties as required. Click specific tabs to see all the properties associated with the task.
3. Click OK to close the dialog box and save the new properties.
Page 56

The PlanetPress Suite Workflow Tools Configuration Program
Replacing Tasks, Conditions or Branches
You can replace existing tasks either by dropping a new task on it, or by pasting another task over it.
To replace an existing task with a new task, see Adding Tasks
To replace an existing task with another existing task or its properties, see Cutting, Copying and Pasting Tasks and Branches
You cannot replace a task by a branch or a condition. Trying to paste or drop a branch or condition over a task will
insert it before the task instead. The contrary is also true, you cannot replace a branch or condition with a task.
When you replace a task, you lose all the properties you set in this task.
Remove Tasks or Branches
To remove any task or branch (except input and output tasks), use one of the following methods
l Click on the task or branch you want to delete, go to the Home tab of the PlanetPress Suite Workflow Tools Ribbon and
click on the Delete button in the Clipboard group.
l Click on the task or branch you want to delete, and press the Delete (or "Del")key on your keyboard.
l Right-click on the task or branch you want to delete, and select Delete from the menu.
When you remove a branch, all the tasks located in that branch are also deleted. When you delete a task, only that task is
deleted.
You cannot use the Delete option to remove an input or output task, but you can right-click on them and click Cut
instead. This replaces the task with an unknown task(see UnknownTasks)
To delete the path below a branch crossing (instead of the path to the right of the branch):
l Press Shift+CTRL+Delete.
l From the right-click menu, choose Edit | Delete| Delete Below the Branch.
Task Properties Dialog
Any task you add to your PlanetPress Suite Workflow Tools process must be configured using its properties dialog box. Each
task's Properties Dialog will give you the options to configure that specific, individual task. Properties of one task do not
directly affect the properties of another task, however there are some software preferences that may affect tasks in one way
or another (see Preferences)
l Each task has its own set of tabs available, though some tabs are common to most tasks.
l Most tasks have the "General"tab which lets you configure the main task properties for that specific task.
l All tasks except for the InputErrorBin, Run Script, Open XLSTand Comment tasks have an "On Error" tab that lets you
manage errors generated by the task.
l All initial Input tasks have the "Other"tab which lists job infos and lets you back up the job file.
The "On Error"tab thatis common to almost all tasks contain the following options
l Send to Process: Check this option to send the job file to an error management process.
l Error Process drop-down:Enabled only when the Send to Process option is checked. Lists any process of which the
initial input task is the Input Error Bin task.
Page 57

The PlanetPress Suite Workflow Tools Configuration Program
l Action Group:This group is disabled in the initial input tasks and defaults to Stop Process. In all other tasks where
the On Error tab is present, the following options are available:
l Ignore:The task is ignored as if it did not exist, and the job file is passed on to the next task in the process.
l Stop Branch:If the task is in a branch of the process, the branch is stopped and the job file is returned to the
process after the branch. The branch will not produce any output.
l Stop Process:The process is stopped and no more processing is done. No further output is produced.
l Log Message:Check this option to enable logging a custom error message in the PlanetPress Suite Workflow Tools'
log file.
l Message:Enabled only when the Log Message optionis checked. Enter a message that will be logged in the Plan-
etPress Suite Workflow Tools' log file. You can use any variables available in PlanetPress Workflow to customize the
message.
l ID:Select the error IDyou want to attribute to the error log.
l Reset to defaults:Resets all options in this tab to their default values.
The error management system(the "on error"tab and the "error bin input"task), however, are only triggered when there is
an error within the task functionality - that is, a plugin error. These kinds of errors are triggers if the plugin cannot communicate with a service, another task, if the plugin crashes, etc.
Cutting, Copying and Pasting Tasks and Branches
Using cut and paste, and copy and paste, you can move as well as duplicate tasks and branches within a given process as well
as between different processes.
To cut and paste tasks or branches:
1. In the PlanetPress Suite Workflow Tools Process area, select the task or branch you want to cut and paste.
2. From the Home tab in the Ribbon, choose Cut (or Right-Click and select Cut from the drop-down menu).
3. To paste the task or branch to a different process, select that process.
4. Select the task or branch crossing above which you want the task or branch to be pasted.
5. From the Home tab in the Ribbon, choose Paste (or Right-Click and select Paste from the drop-down menu).
To copy and paste tasks or branches:
1. In the PlanetPress Suite Workflow Tools Process area, select the task or branch you want to copy and paste.
2. From the Home tab in the Ribbon, choose Copy (or Right-Click and select Copy from the drop-down menu).
3. To paste the task or branch to a different process, select that process.
4. Select the task or branch crossing above which you want the task or branch to be pasted.
5. From the Home tab in the Ribbon, choose Paste (or Right-Click and select Paste from the drop-down menu).
There are a few things to keep in mind when pasting tasks:
l When you cut a task or branch, it disappears from the Process Area but is kept in your clipboard until it is pasted some-
where else.
l You can cut or copy a task or branch from one process and paste it in another process or subprocess.
l When you cut an input or output task, it is replaced with an unknown task, that you will need to replace with another
task for the process to be functional.
l If you cut one task or branch, then cut another one, the first one is lost and replaced by the second. Remember how-
ever that you can always undo the command to retrieve it (see Undo a Command).
l Tasks and branches will always appear on top (in other words, before)the task or branch where you paste it. The only
exceptions are input and output tasks whichcan only be pasted on top of unknown tasks.
Instead of pasting the actual task or branch, you can simply paste the properties of the task or branch.
Page 58

The PlanetPress Suite Workflow Tools Configuration Program
To copy and paste Properties of a task or branch:
1. Copy or Cut a task or branch of which you want to have the properties.
2. Select the task or branch where you want to paste the properties
3. From the Home tab in the Ribbon, choose Paste Properties (or Right-Click and select Paste Properties from the
drop-down menu).
You can only paste the properties of an input task on the initial inputtask of your process. Similarly you can only paste
the properties of an output task on another output task.Also, you cannot paste the properties of a task on a branch
and vice-versa.
Lastly, you can paste only the properties of the On Errortab of any task or branch on another one.
To copy and paste the On Error properties of a task or branch:
1. Copy or cut a task or branch from which you want the On Error properties.
2. Select the task or branch where you want to paste the On Error properties.
3. From the Home tab in the Ribbon, choose Paste On Error (or Right-Click and select Paste On Error from the drop-
down menu).
Moving a Task or Branch Using Drag-and-Drop
When you want to move a given task or branch, the simplest way is to use drag-and-drop. Using the mouse, you can drag and
drop tasks and branches only within a given process. To move tasks and branches between different processes, see Cutting,
Copying and Pasting Tasks and Branches.
When you move a task or branch using drag and drop, it typically moves from its original location to a position immediately preceding the target onto which you dropped it. But if you drop an input task over an unknown input task, the moved task will
replace the unknown task. The same will happen if you drag an output task over an unknown output task. Note that it is impossible to drag-and-drop any task over a configured initial input or output task.
To move a task or branch using drag and drop:
1. In the PlanetPress Suite Workflow Tools Process area, click the icon of the task or branch you want to move.
2. While holding down the mouse button, drag the icon task or branch over another task or branch.
3. Release the mouse button to drop the dragged item.
The dropped task or branch is moved above the item over which it was dropped.
To duplicate a task or branch, the same method applies but with a slight difference:
1. In the PlanetPress Suite Workflow Tools Process area, click the icon of the task or branch you want to duplicate.
2. While holding down the mouse button, press and hold down the CTRLkey and drag the icon task or branch over
another task or branch.
3. Release the mouse button to drop the dragged item and release the CTRLkey.
The dropped task or branch is copied above the item over which it was dropped.
When you move a branch, all its tasks are also moved. When you move a conditional branch, all the tasks appearing on the
True side of the condition are also moved.
You cannot drag a task or branch over an initial input task. Any input task thatis dragged and dropped over an unknown initial
input task will replace it. The same is true of an output task that is dragged and dropped over an unknown output task.
Page 59

The PlanetPress Suite Workflow Tools Configuration Program
Ignoring Tasks and Branches
PlanetPress Suite Workflow Tools lets you ignore individual tasks, branches or conditions.
l When a task is disabled, it is not executed when the process is run in debug mode (see About the Debug Mode) or by
the PlanetPress Suite Workflow Tool Service.
l When a branch is disabled, the whole branch including the tasks inside that branch are ignored and not executed. In the
case of conditional branches, this means that the tasks appearing on the True side are not executed.
A task, branch or condition that was previously disabled out can be re-enabled at any time.
To disable or enable a task or branch:
1. In the PlanetPress Suite Workflow Tools Process area, click the icon of a task or branch.
2. From the Debug tab in the Ribbon, click Ignore.
If the task or branch was enabled, it is now disabled, and vice versa.
Resize Rows and Columns of the Process Area
Resize the rows and columns of the PlanetPress Suite Workflow Tools Process area in which tasks are located to better visualize the organization of your process.
To resize rows and columns of the PlanetPress Suite Workflow Tools Process area:
l In the PlanetPress Suite Workflow Tools Process area, place your cursor over the separator line dividing each section
of row or column rulers.
l When the cursor changes appearance, click and drag up or down to resize rows, or left or right to resize columns.
A dashed line appears as you drag indicating the new separation. The row or column, with all its tasks, moves accordingly.
Selecting Documents in Tasks
The properties dialog box of some action and output tasks let you select documents. Depending on where the document selection list appears you will have access to all the documents or only the documents installed on a printer queue.
In most cases, you have three options:
l You can choose not to use any document (only in certain cases). This means no document is merged with the data and
the job file is sent as is.
l You can choose a specific document from the list of installed documents. The document is merged with the data to gen-
erate output.
l You can choose a variable document (see below)
Variable Document Name
The Variable Document feature is used to dynamically determine which document is merged with the data in your output. The
document name can come from any of the variable properties (see Variable Properties). Note that if the data contains an
extension, it will be replaced by .ptk.
To use a variable document:
l Click on the %o entry in the document list
l Type the variable properties or use the right-click menu to insert the correct variable properties.
l Click OKon the dialog.
At runtime, if PlanetPress Workflow Tools cannot find the document name generated by those variables, the task will fail.
Page 60

The PlanetPress Suite Workflow Tools Configuration Program
Highlight a Task or Branch
The Highlight command lets you toggle the background color of selected tasks and branches. Note that the highlight color may
be changed via the PlanetPress Suite Workflow Tools Configuration preferences.
To highlight a Process Area square:
l Use the mouse pointer to select a given square.
l In the PlanetPress Suite Button, click the View tab.
l Select Highlight from the Navigate group.
To remove the highlight, repeat the procedure.
Undo a Command
The undo command lets you undo most commands performed with the PlanetPress Suite Workflow Tools Configuration program.
To undo a command:
l From the Quick Access Toolbar, choose Undo.
Redo a Command
The Redo command can be used to redo commands that were just undone using the Undo command. For example, if you used
the Undo command three times in a row and immediately thereafter decided to redo those commands, you could use the Redo
command three times in a row to redo those commands. Note that all commands in PlanetPress Suite Workflow Tools Configuration can be redone.
To redo a command:
l From the Quick Access Toolbar, choose Redo.
The Plug-in Bar
The PlanetPress Suite Workflow Tools offer a constantly increasing number of plugins, while always allowing third party plugins to be installed and set up to be used by the PlanetPress Suite Workflow Tools. The PlanetPress Suite Plug-in Bar lists the
available plugin in any of the PlanetPress Suite Workflow Tools, and is divided into categories, which users can customize at
will.
A"Plug-In"is normally something that is added to a software and, while most of the PlanetPress Plug-ins are installed by
default, some may be added so the term is correct. However, because the plug-ins are always expected to execute some sort
of task, they are always referred to, in this documentation, as "tasks", except in the specific case of importing a new plug-in or
customizing the Plug-in bar.
Categories
The default categories lists plug-ins according to what type of task each achieve. Therefore, when first starting your PlanetPress Suite Workflow Tools Configuration program, the following categories are used:
Page 61

The PlanetPress Suite Workflow Tools Configuration Program
l Inputs
l Actions
l Outputs
l Data splitters
l Metadata Related
l Process logic
l Connectors
Note that an Uncategorized category is dynamically created if your PlanetPress Suite Workflow Tools finds any plug-in that
would not be part of the existing Plug-in bar. User-defined plug-ins and third party application plug-ins falls into such a category.
Settings & Customization
The Plug-in bar can be customized according to your needs and the plug-ins you most frequently used.
You can use the horizontal dark blue bar separating the plug-in area and the list of categories to change how many plug-in categories are displayed as the full-width bar with the title, and how much are displayed as the icon only. Move the bar up to display more full-width categories, down to display them more as icons.
Furthermore, the Plug-in bar can be customized using the Popup indicator control ( ). Customizing the Plug-in bar is
mostly for third party or legacy plug-ins.
Using the contextual menudisplayed by the Popup indicator, you can:
l Insert, delete and rename custom categories.
l Move categories up or down.
l Import third party or legacy plug-ins.
l Move plug-ins from one custom category to another (that you cannot move default plug-ins from the default categories,
you can only copy them)
l Copy plug-ins from one custom category to another by holding the CTRL key.
l Delete plug-ins from any custom category by using the Delete key.
l Revert to default Plug-in bar by selecting Reset to default.
To import a plugin:
1.
Click on the Popup control ( )
2. Click on Import Plugin
3. Browse to the location of the plugin DLLfile
4. Click on Open.
5. New plugins appear in the Uncategorized category.
The Object Inspector Pane
The Object Inspector displays the properties of the object selected in the Configuration Components Pane (not the Process
Area, however). You can edit some of these properties directly from the Object Inspector, simply by clicking on the property.
To edit properties of processes, documents, and printers in the Object Inspector:
l In the Configuration Components Pane, select a process, a document (either a document in the Documents category or
a document assigned to a printer queue) or a printer queue.
The selected object’s properties appear in the Object Inspector.
l In the Object Inspector, click an editable property.
Page 62

The PlanetPress Suite Workflow Tools Configuration Program
l Depending on the values that can be entered for the selected property, edit the value by typing a one or by selecting a
new one from the drop-down list.
If you select multiple objects in the Configuration Components window, some properties that are shared between
those objects can be changed in the Object Inspector. Changing a property changes it for all the selected objects.
The Object Inspector also displays information about the Job File while it is being processed in Debug mode. Seeing how files
change as they travel down a process can provide valuable debugging information. You can even change some of the job information from the Object Inspector (such as Job Infos)while in debugging.
When you select a group (folder), no information is displayed in the Object Inspector, because what is really selected is the
group heading and not the items included in the group.
Toggle the Run on Desktop Property
Since PlanetPress Suite Workflow Tools configurations are typically meant to run without user interaction, all of their processes are set to run in the background by default. In some cases, such as when a dialog box must appear or user input is
required, you may make any process run on your desktop instead of as a service.
Generally this will happen only when calling a third-party software using the Run External Program plugin, but is also valid if
using a Script that generates a dialog that someone must click or interact with.
The term "Desktop"is defined as the desktop of the user logged on to the computer where the PlanetPress Suite
Workflow Tools is installed. These dialogs cannot be displayed on any other computer.
To toggle a process’ Run on Desktop property:
1. Select an active process in the Configuration Components Pane.
2. In the Object Inspector Pane, change the Run on desktop property from False to True, or vice versa.
The Debug Information Pane
The Debug Information Pane displays the current values of variables and other information useful in debugging processes
(see Debugging and Error Handling).
The Debug Information Pane is divided in 4 sections:
l Job Information: Displays the Job Info variables, as well as the job's filename, size, last edit date and presence of
metadata(see Job Info Variables)
l Local Variables:Displays all the variables local to this process (see Manipulate Local Variables).
l Global Variables: Displays all the variables global to this configuration (see Manipulate Local Variables).
l Evaluate Expression:Lets you enter a custom expression and displays its value at runtime.
You can use the Evaluate Expression section to see the result of any combination of variable properties (see Variable Prop-
erties). To add a new expression, simply right-click in the window and select Add Expression.
Click in the box on the left to edit the expression and add any variable properties or static text you want, and click outside of
the box to save it. Once saved, the Value column displays the expression's result.
The contextual (right-click)menu displays the following items when at least one expression is present:
Page 63

The PlanetPress Suite Workflow Tools Configuration Program
l Copy Value (only when right-clicking an existing expression):Places the resulting value of the expression in your clip-
board.
l Revalue all: Refreshes the value of all the expressions.
l Add Expression:Creates a new expression.
l Delete Expression (only when right-clicking an existing expression):Remove the selected expression.
l Clear Expression List: Removes all expressions.
Deleting an expression or clearing the expression list cannot be undone!
The Message Area Pane
The Messages area is used in Debug mode to indicate the status of your PlanetPress Suite process as the sample data file is
processed and used to generate output. When your PlanetPress Suite Workflow Tools runs in Debug mode, the Messages area
displays useful processing and error information.
Messages are displayed in different colors (debug levels)in the Message area.
l Messages in Red are critical and are normally critical errors in the plugin.
l Messages in Orange are warnings.
l Messages in Gray are job info and variable changes.
l Messages in Black are debug information and processing information.
There are various actions you can execute in the Message area. Here they are:
l Click any line to select it.
l While a line is selected, press Delete on your keyboard or right-click on the line and select Delete to delete the line.
l While a line is selected, press CTRL+Xon your keyboard or right-click on the line and select Cut to place the line in
the clipboard.
l Press CTRL+C on your keyboard or right-click on the line and select Copy to place a copy of the line in the clipboard.
l Press CTRL+A on your keyboard or right-click on any line and select Select All to select all the lines in the Message
Area.
l Right-click anywhere in the Message Area and select Clear Messages to clear the contents of the Message Area.
l Right-click anywhere in the Message Area and select Save to File to display a dialog box that lets you save a copy of
the MessageArea content to a text file.
The Message Area will only display information while running in Debug mode. It does notdisplay information from other running services, and will not display the log of any process running in a live configuration (submitted to the PlanetPress Suite
Workflow Tools Service).
To learn more about debugging a process, refer to Debugging and Error Handling.
Customizing the Program Window
You can combine and attach the Configuration Components Pane, Messages area and Object Inspector into a single secondary
window that can be docked to and undocked from the main PlanetPress Suite Workflow Tools Configuration program window.
Combining and attaching areas can facilitate the management of your screen real estate. It lets you reposition multiple areas
in a single operation.
Page 64

The PlanetPress Suite Workflow Tools Configuration Program
Note that since the Process area must remain in the main PlanetPress Suite Workflow Tools Configuaration Program window,
it cannot be combined and attached in this fashion.
Dock and Undock Areas of the Program Window
The Configuration Components Pane, the Object Inspector, and the Messages area can be displayed in windows that are
attached to the Program window (docked position) or that float above it (undocked position). You dock a window when you
attach it to the Program window, and you undock it when you detach it from the Program window.
The Configuration Components Pane, the Object Inspector and the Messages area can each be displayed inside its own window, whether docked or undocked, but they can also be displayed attached or combined inside the same window.
l When separate areas are displayed simultaneously, they appear in different sections of the Program window.
l When attached areas are displayed simultaneously, they appear side-by-side or above one another inside sub-win-
dows.
l When combined areas are displayed simultaneously, they overlap one another inside the same window. Tabs let you
switch from one area to the other.
To undock an area of the Program window:
l Do one of the following:
l Click either a title bar (separate or attached areas) or a tab (combined areas) displaying the name of the Con-
figuration Components Pane, the Object Inspector or the Messages area and move the mouse pointer so as to
drag the area away from its docked position. As you drag, a rectangle is displayed to show the landing position.
Release the mouse button when the rectangle is in a floating position (not attached to the Program window).
l Double-click either a title bar (separate or attached areas) or a tab (combined areas) displaying the name of the
Configuration Components Pane, the Object Inspector or the Messages area. The area will jump from a docked
to an undocked position and vice-versa.
To dock an area of the Program window:
l Do one of the following:
l Click either a title bar (separate or attached areas) or a tab (combined areas) displaying the name of the Con-
figuration Components Pane, the Object Inspector or the Messages area and move the mouse pointer so as to
drag the area away from its current undocked position. As you drag, a rectangle is displayed to show the landing
position. Release the mouse button when the rectangle is in a docked position (attached to the Program window).
l Double-click either a title bar (separate or attached areas) or a tab (combined areas) displaying the name of the
Configuration Components Pane, the Object Inspector or the Messages area. The area will jump from an
undocked to a docked position and vice-versa.
Show or Hide Areas of the Program Window
You can choose to hide or display any of the customizable areas in the PlanetPress Workflow Tools program. Hidden areas will
still contain the same information but will not be visible.
To show or hide a Program window area:
l In the PlanetPress Suite Ribbon, click the Viewtab.
l From the Show/Hide group, click on any area name to hide or display it.
A"highlighted"(orange)button means the area is displayed somewhere on your screen(s). Adim (blue)button means the
area is hidden.
Page 65

The PlanetPress Suite Workflow Tools Configuration Program
The Process Area is always visible and cannot be hidden.
Combine and Attach Areas
The Configuration Components Pane, the Object Inspector, and the Messages area can be attached or combined to one
another and share the same space. However they are displayed, you can always drag, dock, or undock any area as desired.
You can also switch among areas when they are combined, as well as maximize or minimize areas when they are attached.
For more information, refer to Customizing the Program Window.
The following procedures will show a number of things you can do to change the way information is displayed by the PlanetPress Suite Workflow Tools Configuration program.
To combine areas:
l Click either a title bar (separate or attached areas) or a tab (combined areas) displaying the name of the Configuration
Components Pane, the Object Inspector or the Messages area and move the mouse pointer. As you drag, a rectangle is
displayed to show the landing position. Drag the rectangle directly over another area and release the mouse button
when the shape of a tab appears at the bottom of the rectangle.
To switch between combined area:
l At the bottom of the combined area, click the tab of the area you want to bring to the top. If all the tabs are not dis-
played, use the left and right arrows to navigate between them.
The left and right arrows lets you show hidden tabs.
To reorder tabs in a combined area:
Page 66
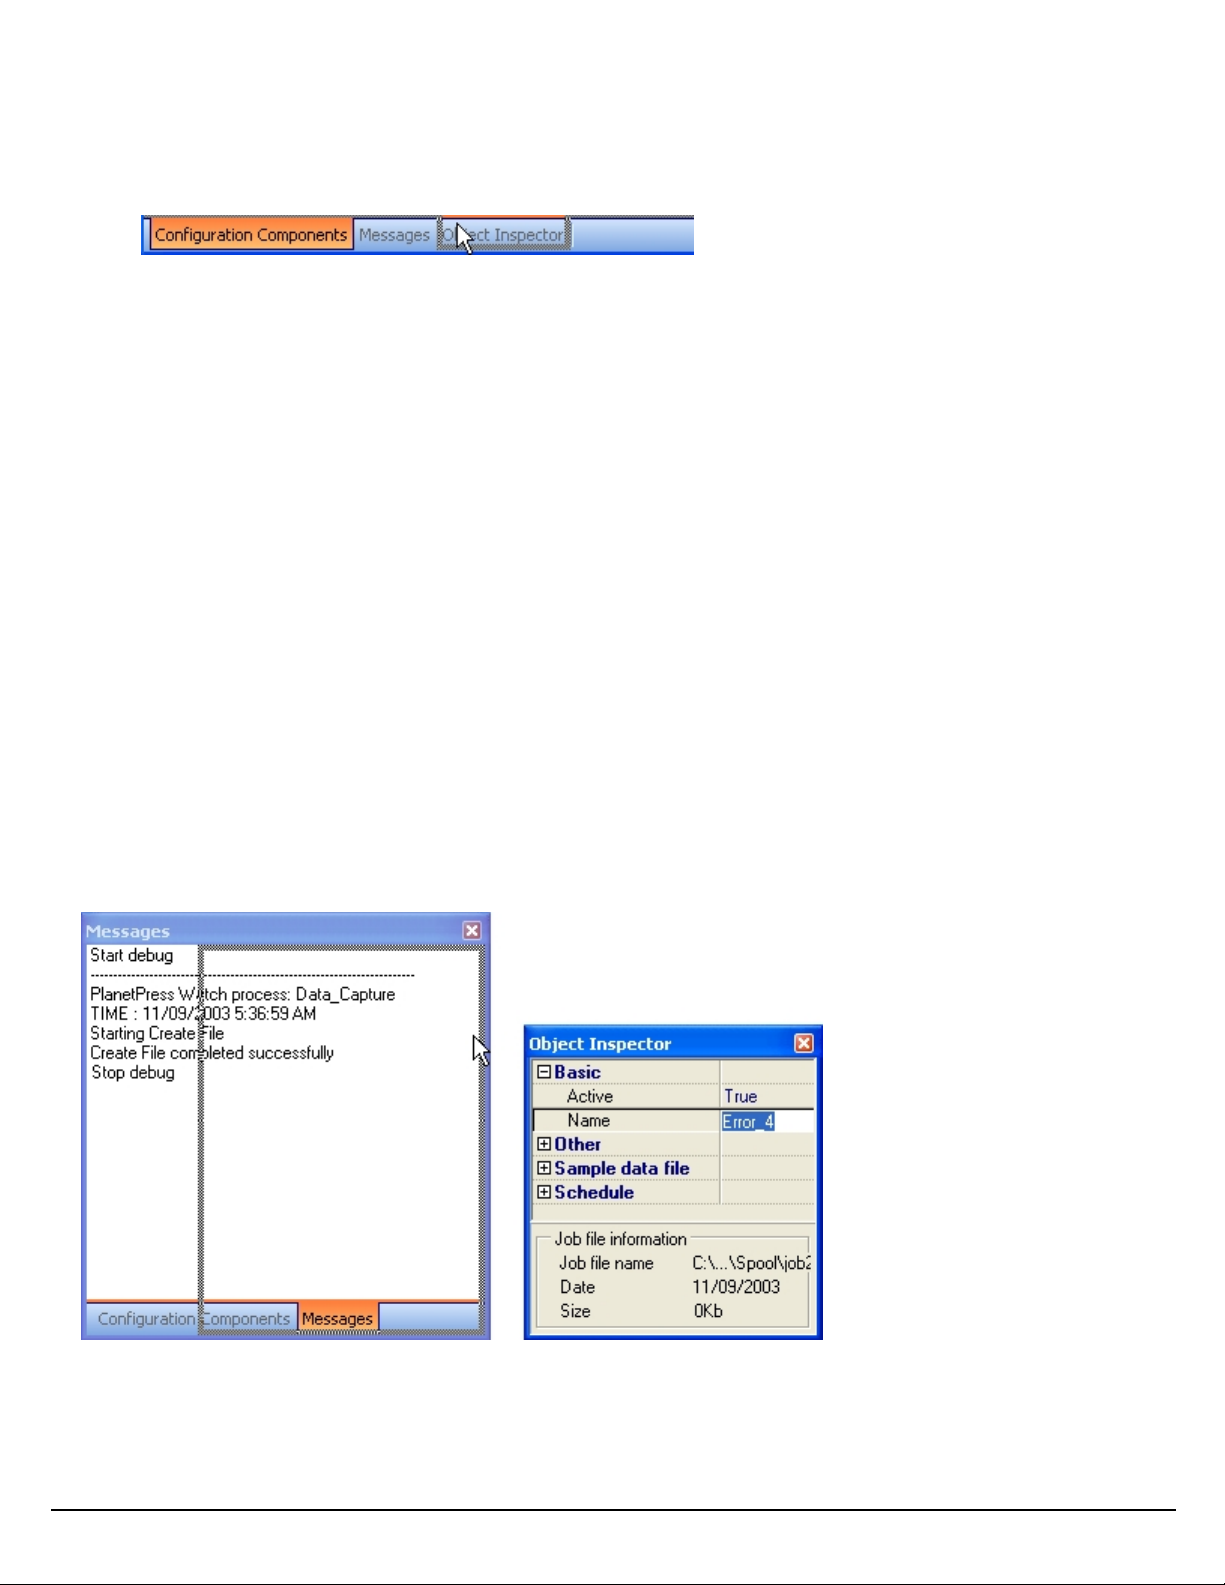
The PlanetPress Suite Workflow Tools Configuration Program
l At the bottom of the combined area, click the tab of the area you want to move, drag it to the left or right and drop it at
the desired position.
Dragging a combined area to new position.
To take an area out of a combined area:
l Do one of the following:
l Click the tab displaying the name of the area you want to take out and move the mouse pointer so as to drag the
area away from the combined area. As you drag, a rectangle is displayed to show the landing position. Release
the mouse button when the rectangle is away from the combined area.
l Double-click the tab of the area you want to take out of the combined area. The area will jump outside of the
combined area.
To attach areas:
Click either a title bar (separate areas) or a tab (combined areas) displaying the name of the Configuration Components
1.
Pane, the Object Inspector or the Messages area and move the mouse pointer.
As you drag, a rectangle is displayed to show the landing position.
Drag around to the edges of another area and release the mouse button when the rectangle appears to the left or right, or
2.
above or below the other area. The rectangle should not display a tab at its bottom, otherwise the areas will not be
attached but rather combined.
Note that you can attachan area to a group of combined areas, as well as change combined areas into attached areas. When
attaching previously combined areas, you may find it easier to do it in two steps: begin by taking the area out of the combined
area and then try attaching it.
3. Resize each part of the new group as desired.
Attaching an area to a group of combined areas. The rectangle showing the landing position is not tabbed and the area will
therefore be moved next to the combined area.
To maximize or restore attached areas:
Page 67
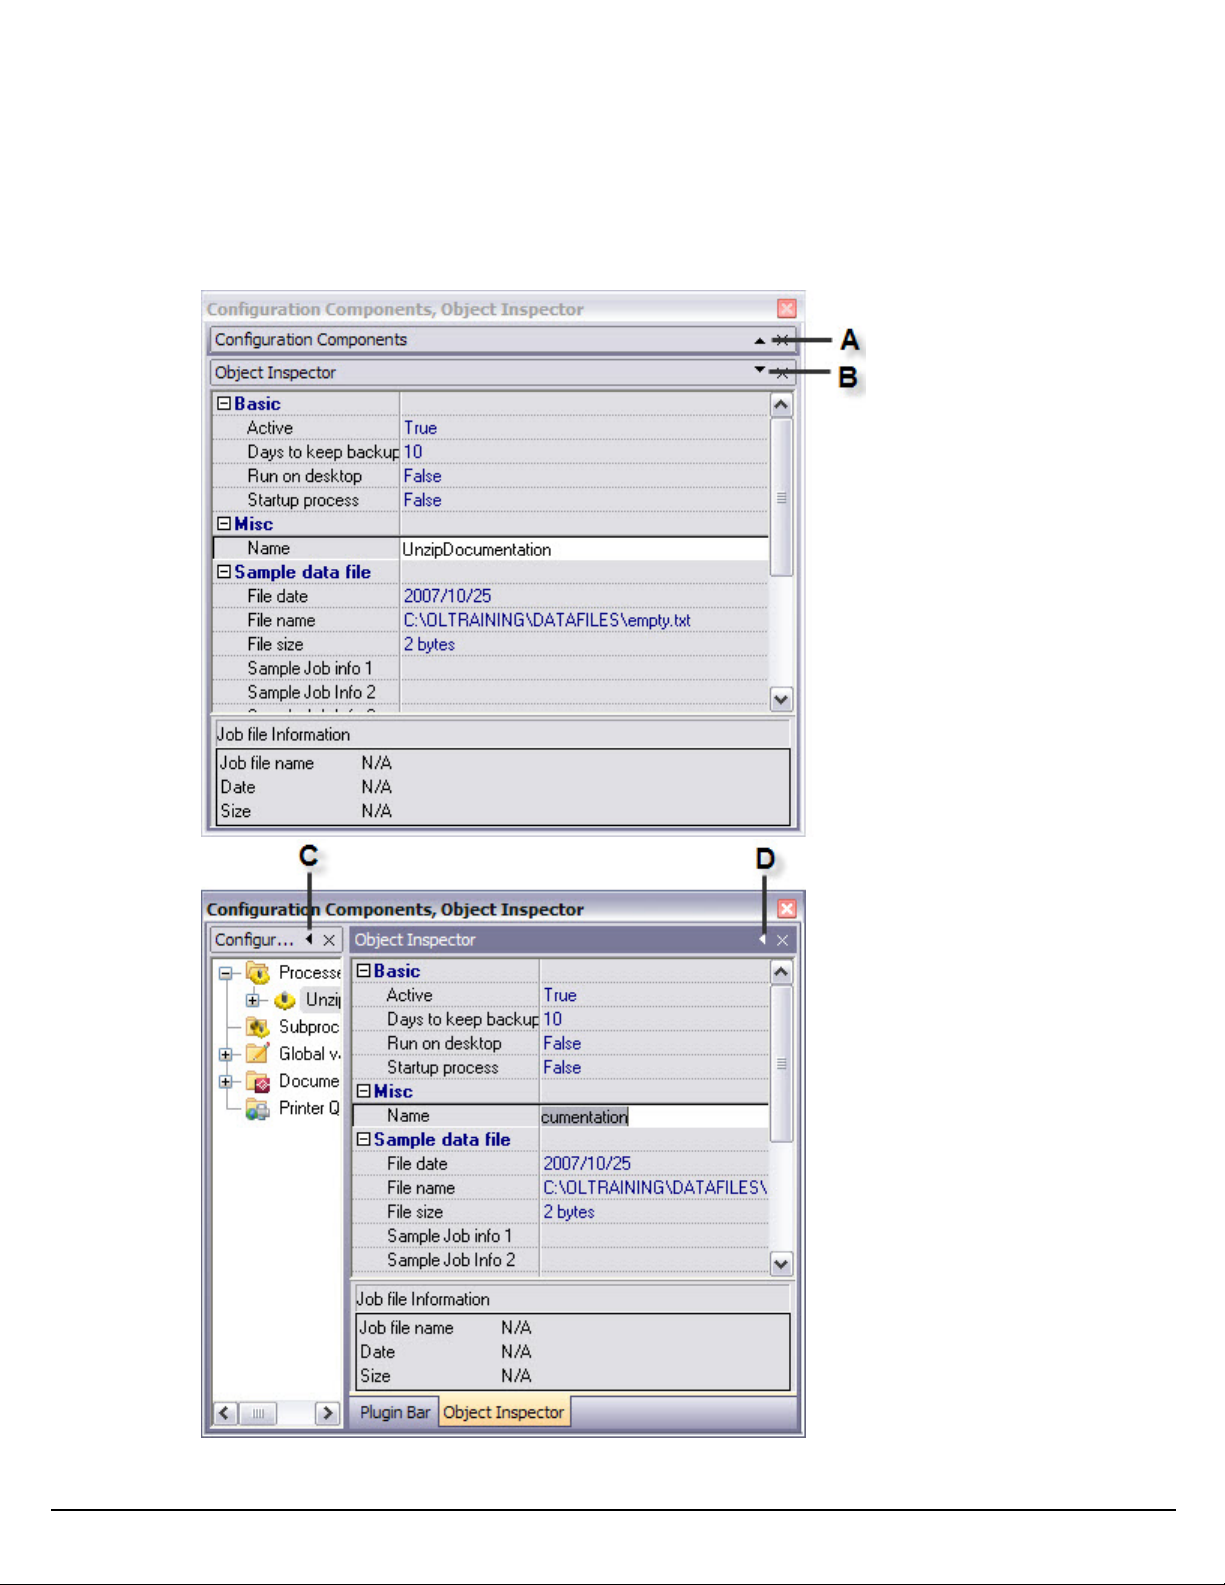
l Do one of the following:
l To maximize a vertically attached area, click the upward pointing arrow on its title bar.
l To restore a vertically attached area, click the downward pointing arrow on its title bar.
l To maximize a horizontally attached area, click the left pointing arrow on its title bar.
l To restore a horizontally attached area, click the right pointing arrow on its title bar.
The PlanetPress Suite Workflow Tools Configuration Program
Page 68

The PlanetPress Suite Workflow Tools Configuration Program
A) Click to maximize this area. B) Click to restore this currently maximized area. C) Click to maximize this area.
D) Click to restore this currently maximized area.
To take an attached area out of a group:
l Do one of the following:
l Click the title bar displaying the name of the attached area you want to take out and move the mouse pointer so
as to drag the area away from the group. As you drag, a rectangle is displayed to show the landing position.
Release the mouse button when the rectangle is away from the group.
l Double-click the title bar of the area you want to take out. The area will jump outside of the group.
Resize the Program Window Areas
You can adjust the layout of the Program window by resizing one of the Program window areas.
This also applies to resizing a combined area (see Combine and Attach Areas).
To resize a Program window area:
l Move the pointer to the edge of an area you want to resize to display the resize pointer, then click and drag to resize the
area.
Preferences
The PlanetPress Suite Workflow Tools Configuration program lets you configure a variety of options, from how the application
itself looks or behaves, to plugin specific options.
Most of the PlanetPress Suite Workflow Tools preferences are located in the PlanetPress Suite Workflow Preferences window,
accessible through the Preferences button in the PlanetPress Suite Button. Those preferences are:
l Appearance:
l General User Options
l Object Inspector User Options
l Configuration Components Pane User Options
l Behavior:
l Default Configuration User Options
l Notification Messages Preferences
l Sample Data User Options
l Network User Options
l Plug-in:
l Logging User Options
l Messenger User Options
l HTTP Server Input User Options
l LPD Input Preferences
l Serial Input Service User Options
l Telnet Input User Options
l PlanetPress Fax User Options
l FTP Output Service User Options
l PlanetPress Image User Options
l LPR Output User Options
l PrintShop Web Connect Service User Options
Unless otherwise noted, preferences are saved automatically and applied immediately.
Page 69

The PlanetPress Suite Workflow Tools Configuration Program
Other Preferences and Settings:
l The PlanetPress Suite Services dialog lets you select the account that the PlanetPress Suite Workflow Tools Service
uses to communicate on the server and the network. See PlanetPress Suite Workflow Tools Service Logon.
l You can change the appearance of the RunScript and XSLTEditor through the Editor Options dialog.
General User Options
The available general user options are as follows:
Ribbon Color Scheme Group
l Blue:Sets the general interface color scheme to a blue color.
l Silver:Sets the general interface color scheme to a silver (gray)color.
l Black:Sets the general interface color scheme to a black (coal)color.
Colors group
l Variable properties: Select a color for the labels identifying variable property boxes.
l Debug: Select the color applied to the PlanetPress Suite Workflow Tools Process area background when in Debug
mode.
l Highlighted tasks and branches: Select the background color for highlighted tasks and branches in the Process
Area’s invisible grid.
l Disabled tasks and branches: Select the background color for disabled tasks and branches in the Process Area’s
invisible grid.
Inactive process
l Color: Select the color to use to identify inactive processes in the Configuration Components Pane.
l Bold: Select to use a bolded font to display inactive processes.
l Underline: Select to use an underlined font to display inactive processes.
l Italic: Select to use an italic font to display inactive processes.
l Strikethrough: Select to use a strikethrough font to display inactive processes.
Object Inspector User Options
The available Object Inspector user options are as follows:
Colors group
l This window lets you set the color of individual Object Inspector elements. To change the color of a given element,
select it in the list box above and then choose a color from the drop-down list below.
Option group (right)
l Vertical line 3D: Select to display the vertical line between property names and their values using a 3-dimensional
effect.
l Use groups: Select to organize the display of properties into groups. Clear the selection to display properties in alpha-
betical order. When the Object Inspector displays properties in groups, it displays an expand/collapse button to the left
of the name of the group for expanding or collapsing the group.
l Sunken active property: Select to use a recessed effect to display the currently selected property.
l Border active property: Select to display a border around the currently selected property.
l Show lines: Selectto display lines between elements.
Page 70

The PlanetPress Suite Workflow Tools Configuration Program
l Line style: Select a style for the lines.
l Reset to default: Click to reset all the Object Inspector options to their default values.
Configuration Components Pane User Options
The available Configuration Components Pane user options are as follows:
Colors group
l This window lets you set the color of individual Configuration Components Pane elements. To change the color of a
given element, select it in the list box above and then choose a color from the drop-down list below.
Options Group (Right)
l Line Style: Select the style (dotted or solid)of the line that connects the different objects in the Configuration Com-
ponents Pane.
l Selection rectangle:Select whether your selection rectangle (used to select multiple objects by dragging a rec-
tangle around multiple objects)will be displayed as a dotted line rectangle, or a blended rectangle (normally a blue rectangle with darker blue border).
l Button Style: Select whether to show the expansion links as either an arrow (points right for a closed tree, down for
an open tree)or a square (shows a minus symbol for an open tree, plus symbol for a closed tree).
l Show Tree Lines:Check to choose whether or not to display the lines that connect the different objects in the Con-
figuration Components Pane.
l Show Grid Lines:Check to choose whether or not to display grid lines between each object in the Configuration Com-
ponents Pane.
l Hot track:Check to choose whether or not to display the object in the Configuration Components Pane under the
mouse cursor as being underlined.
l Reset To Defaults:Click to reset all the Configuration Components Pane user options to their default values.
Default Configuration User Options
The available Default Configuration user options are as follows:
Use default configuration group
l Use default configuration:Check to use default input and output tasks when you create a new process. If this
group is not selected, each new process you will add will begin and end with unknown tasks.
l Default input task: Select an input task to use as the default input task when you add a new process. Click the Con-
figure button located to the right of this box to set the properties of the selected input task.
l Default output task: Select an output task to use as the default output task when you add a new process. Click the
Configure button located to the right of this box to set the properties of the selected output task.
l Enable Undo/Redo functionality: Select this option to enable or disable the Undo functionality. Disabling the
Undo/Redo functionality frees up a lot of memory and may thus speed up your system.
l Auto Save every: Select to enable the Auto Save functionality. The auto save delay is set in the box below (in min-
utes).
Notification Messages Preferences
Notification Messages preferences control the display of certain messages and prompts within PlanetPress Workflow.
The available Notification Messages preferences are as follows:
Page 71

The PlanetPress Suite Workflow Tools Configuration Program
l User mismatch: Select to have PlanetPress Workflow display a prompt when a different user opens the application.
l Task deletion: Select to prompt for confirmation when deleting a task.
l Document deletion: Select to have PlanetPress Workflow prompt for confirmation when deleting a document.
l Group of documents deletion: Select to have PlanetPress Workflow prompt for confirmation when deleting a
group of documents from the Configuration Components Pane.
l Empty group deletion: Select to have PlanetPress Workflow prompt for confirmation to delete a group when you
remove the last of its member objects. If you clear this option, groups are automatically deleted when their last
members are removed.
l Invalid name: Select to have PlanetPress Workflow warn you when you try to rename an object in the Configuration
Components incorrectly. Names can include letters, numbers, and underscores; the first character of a name cannot be
a number.
l Printer queues document group update: Select to have PlanetPress Workflow prompt you when adding a doc-
ument to a group under the Documents category in the Configuration Components Pane. You are only prompted if the
group of documents is assigned to one or more printer queues. PlanetPress Workflow can add the new document to all
assigned groups under the Printer Queues category automatically.
l Configuration send with wrong user: Select to have PlanetPress Workflow prompt for confirmation when you
are sending a configuration while logged onto the computer as a user other than the one associated with the PlanetPress Watch service.
l Configuration save: Select to have PlanetPress Workflow prompt you to save the currentconfiguration when exit-
ing the software or before opening another configuration file.
l Configuration send: Select to have PlanetPress Workflow prompt you to send the current configuration to run in the
PlanetPress Watch service when exiting software or before opening another configuration file.
l Nothing to configure: Select to have PlanetPress Workflow notify you when you try to set properties for a task that
does not have any properties. For example, the Error Bin input has no properties because it only inputs jobs sent to it
through On Error properties of tasks in other processes. When you attempt to edit its properties, it displays the "nothing
to configure" message when this option is selected.
l No registry: Select to have PlanetPress Workflow notify you if it cannot find an install location in the registry. In such
cases, the path of the currently running software executable is used as the install path.
l PlanetPress Watch 3 documents and job commands transfer: Selectto have PlanetPress Workflow display
a prompt when you import a configuration from PlanetPress Watch 3 that allows you to transfer documents and job
commands.
l Plugin not found: Select to have PlanetPress Workflow display a prompt when you import a configuration, and one
or more of the plugins used in the configuration are not found on the computer running the software.
l Prompt on configuration overwrite: Select to have your PlanetPress Workflow prompt for confirmation when a
configuration is aboutto overwrite a file with the same name.
l Prompt on no active process to send: Select to have your PlanetPress Workflow prompt for confirmation when
attempting to send a configuration although no processes are active.
l Prompt on overwrite of a document: Select to have your PlanetPress Workflow prompt for confirmation when a
document that is being imported using File | Import Document is about to overwrite an existing document.
l Prompt on Document overwrite when service is running: Select to have PlanetPress Workflow prompt for
confirmation when a document that is being imported using File | Import Document is about to overwrite an existing document. The only difference between this option and the previous option is that this option will warn the user that
the document about to be overwritten may currently be used by the PlanetPress Watch service.
l Prompt on Importing a non PlanetPress Document: Select to have PlanetPress Workflow prompt for con-
firmation when a documentthat is not a valid PlanetPress document is about to be imported. This may occur if a nonPlanetPress document will inadvertently have a PPX or PSI file extension.
l Prompt on Resetting Document Attributes: Select to have your PlanetPress Workflow prompt for confirmation
when importing a hidden or read-only document using the File | Import document command. By confirming the
import, you allow PlanetPress Workflowto reset the document’s attributes to ’Visible’ and ’Read and Write’.
Page 72

The PlanetPress Suite Workflow Tools Configuration Program
l Prompt on Emulation Change:Select to have PlanetPress Workflow prompt when the default process emulation
is being changed. The last emulation selected when debugging a process is the one the process begins with.
l Prompt on Form Refresh:Select to have PlanetPress Workflow prompt for confirmation when recompiling the Post-
Script (PSx)version of a PlanetPress Document. Refreshing PlanetPress Documents that are currently in use can lead to
unexpected results.
l Prompt on Saving with Unknown Task:Select to have PlanetPress Workflow prompt for confirmation when sav-
ing a configuration file or sending the configuration to the PlanetPress Watch service, when any process contains
Unknown Tasks. If an Unknown Task is present, such as when a process was created with a PlanetPress Workflow
licence that is not the same as the current one, the settings for this task will be lost when saving or sending to the service.
l Display Generic Splitter Found Message:Select to have PlanetPress Workflow prompt when a Generic Splitter
task is found in any of the configuration's processes. The Generic Splitter task is maintained because of its historical purpose but should no longer be used since it can almost always be replaced by more specialized and efficient splitters.
l Warn on Component Rename:Select to have PlanetPress Workflow prompt for action when configuration com-
ponents, such as processes, are imported from an external configuration file. Imported components can overwrite
existing components, or be renamed automatically with unique names.
Sample Data User Options
Sample Data user options control the way the Data Selector displays the sample data file.
The available sample data user options are as follows:
l Select Font: Click to access the Fontdialog box to select the font in which the Data Selector displays the sample data
file.
l Default text editor: Contains the complete path and name of the executable file of the application used as the
default text editor. For Windows Notepad, only the executable name (Notepad.exe) is required.
l Browse button:Click the browse button to navigate to your executable instead of typing the path and executable
name, then click OK.
Network User Options
Network user options let you Configure NetWare® Login user options, so that the PlanetPress Suite Workflow Tools can
access your Novell® NetWare network. The following procedure also lets you choose the Universal Naming Convention
(UNC), which removes inconsistencies when accessing paths on Novell and other networks.
The available network user options are as follows:
NetWare Login group
l NetWare Login: Check to enable the user options PlanetPress Suite Workflow Tools requires to access NetWare
resources. When you select this option, you must enter values in the Username, Password, and Tree boxes below
to properly log in to NetWare (the other properties are optional).
l Username: Enter your NetWare username. This is the user the PlanetPress Suite Workflow Tools service uses to log
in to NetWare at runtime. The service accesses resources as configured for this user.
l Password: Enter the NetWare password corresponding to the user you entered in the Username text box.
l Tree: Enter the Netware Directory Services (NDS) tree where the user resides. This is the user you entered in
the Username text box. Click Trees to navigate to the desired tree. You must enter a value for the Tree text
box.
l Context: Enter the context on the NDS tree where the user you enter in the Username text box resides.
Page 73

The PlanetPress Suite Workflow Tools Configuration Program
l Server: Enter the server where the NDS tree you entered in the Tree text box resides. You do not have to spec-
ify a server if there is only a single configured server on your network. Click Servers to navigate to the desired
server on which the NDS tree containing the user resides.
Expand folder paths in UNC (Universal Naming Convention) format: Select to expand all paths used in the configuration to UNC. This converts map drives such as “f:\, to absolute paths referenced from a server in the format “\\servername\shared-resource-pathname”. When you select this option, the next time you configure a task after editing properties
and clicking OK in its properties dialog box, entered paths are expanded to UNC format.
You can leave the Context box empty if there is a single root context on your NDS tree, if you can perform a contextfree login, or if you enter a server name in the Server box. PlanetPress Suite Workflow Tools and PlanetPress Image
use the same security context when connected to a NetWare server and they each use one connection. Also note that
using erroneous Tree or Context information may cause PlanetPress Suite Workflow Tools and its services to crash.
PlanetPress Capture User Options
PlanetPress Capture User Options lets you change the PlanetPress Capture options relative to your Workflow server. This is
where you set up your server and database and is also where you manage pens, documents and licenses.
The available PlanetPress Capture user options are:
l Mode: Choose between Server and Client mode. Client and Server mode are used for multi-server architectures. See
PlanetPress Capture Server/Client.
l Port: Select the port used to connect two servers together. The default value is 5864.
l Document and Pattern Database group
l Status:Displays the status of the database.
l Use ODBCDatabase:Check to ignore the default location for the Microsoft Access database (MDB) and use
an ODBCconnection to your own database location instead.
l ODBCSettings: Click to open the PlanetPress Capture ODBC Settings dialog.
l Test Connection:Click to verify the connection to the ODBCDatabase.
l Reset Database:Click to reset the database to its original status.
l Manage Documents...:Click to open the PlanetPress Capture Document Manager.
l Pen Database group
l Register pens on first use:Check if you want any new pen that sends a PGC to be added to the pen data-
base. Newly registered pens will not have any Pattern Sequence or owner information.
l Manage Pens...:Click to open the PlanetPress Capture Pen Management Tool dialog.
l License Manager...: Click to open the PlanetPress Capture License Management dialog.
PlanetPress Capture Server/Client
PlanetPress Capture can be set to be either in Server or Client mode from the PlanetPress Capture User Options.
In Server mode, all pen licenses are stored locally. Other clients can connect to this server to validate pens. This allows all pen
licenses to be managed locally.
In client mode, no pen license information is stored locally. All pens are therefore validated against the server specified in the
Host address field displayed when the Client option is selected. Note that this validation occurs for every ink file (i.e. PGC file)
the local system processes, which may cause a slight delay for the operation depending on the connection speed and latency
between the two systems.
Also, note that the Server/Client mode is only used for managing pen licenses and has no impact on the Capture Database
itself. The database can be stored locally or remotely, regardless of the Server/Client mode specified.
Page 74

The PlanetPress Suite Workflow Tools Configuration Program
PlanetPress Capture Document Manager
The PlanetPress Capture Document Manager dialog is used to manage all the documents present in the PlanetPress Capture
database that are currently open.
This window has the following options and controls:
l Documents lookup group
l Filter by:Select what information you want to look for in the documents database.
l Document ID:Search using the Document ID, a unique and automatic identifier attributed to each doc-
ument by the Capture Field Generator task.
l Document Title:Search in document title as specified in the Capture Field Generator task.
l Production date (YYYY-DD-MM):Search using the date at which the document was generated
using the Capture Field Generator task.
l Pen user (by description):Search using the description field in the Pen Database.
l Pen user (by serial number):Search using the pen's serial number in the Pen Database.
l Pattern Sequence:Search using the Pattern Sequence in the Document Database.
l Template Name:The name of the document, corresponding to the name entered in the PlanetPress
Design document properties.
l PatternID:Search using the pattern's identification number. This can be printed on each document
next to the Anoto Statement (see PlanetPress Design User Guide).
l Content Status:Search using the status of the document, whether it is Open, Closed, Complete, Par-
tial or in Error.
l Operator:Select how to do the comparison
l Equal:The mask and database information are exactly the same.
l Not equal:The mask and database information are different.
l Less than:If the mask and database information are both numbers, the mask will be a smaller
number.
l Greater than:If the mask and database information are both numbers, the mask will be a larger
number.
l Less than or equal to:If the mask and database information are both numbers, the mask will either
be smaller or equal to the database information.
l Greater than or equal to:If the mask and database information are both numbers, the mask will
either be larger or equal to the database information.
l Contains:The mask is contained within the database information, at any location within the infor-
mation.
l Does not contain:The mask is not contained within the database information.
l Mask:Enter the text or number to compare with the database information.
l Search:Click to start the search.
l Manage documents group
l Document list:Displays the results from the search in 3 columns:
l Document Title:Displays the title of the document as specified in the Capture Field Generator task
l Production date:Displays the date and time on which the document was added to the Capture Data-
base.
l More info:Avariable column that displays additional information about the search results, such as the
Pen ID or Pattern ID.
l Select all:Click to select all the documents in the list.
l Select none:Click to deselect all of the documents in the list.
l View documents:Click to view all the documents along with any ink already present on them. Each PDFis
opened, in sequence, in the "PDF Viewer" (page 1).
l Close documents:Click to close the document and release the pattern it uses.
Page 75

The PlanetPress Suite Workflow Tools Configuration Program
This will prevent the document to be further updated, may cause errors when docking any pen that
signed the printed version of the document. This cannot be undone.
PlanetPress Capture ODBC Settings
This dialog is used to set up the connection to a PlanetPress Capture Database through an ODBCconnection.
To access this dialog, see PlanetPress Capture User Options.
The ODBCSettings dialog
The following settings are available:
l Name:Click to displays and choose from a drop-down of each DSN(Data Source Name)available on the system,
along with it's source (User DSNor System DSN) and the driver it uses (database type).
l Type:Click to display a drop-down of supported database types. This must correspond to the database type of the
DSNchosen in the previous option.
l Username:If the database is secured with a username and password, enter the username here.
l Password:If the database is secured with a username and password, enter the password here.
In order for the database connection to be functional, you must ensure that the database Type correspond exactly to
the one used by the DSN, and is part of the supported database types.
Database Considerations (ODBC)
On 64-bit operating systems, the ODBCData Sources created by the Data Source (ODBC)icon in the Administrative
Tools will not appear here, as PlanetPress Suite is 32-bit and cannot access the 64-bit data sources. In order to create
an ODBCconnection visible by PlanetPress, you will need to access the 32-bit version of the ODBCmanager, available in C:\Windows\SysWOW64\odbcad32.exe .
The following considerations should be kept in mind while working with ODBCDatabases in PlanetPress Suite.
l All databases
l User Rights:During normal operation, Read/Write to tables should be sufficient. However, during the initial
setup, the Create/Drop tables rights is necessary.
Page 76

l Minimum 100MBof database size is required as a minimum, but the space requirement is dependant on the
implementation. The more active documents in the database, the more space is used - note that this progression is rather linear.
l Regular database maintenance is required, such as database compacting, is required by a system admin-
istrator.
l It is recommended to create an ITprocess that backs up the database regularly.
l The recommended ideal setup is a dedicated SQLServer PC, accessed by PlanetPress Workflow through an
ODBCconnection on the local network.
l Microsoft Access
l Database file (mdb)must be local to the PlanetPress Workflow computer. It cannotbe located on a network
drive or another server.
l Total database size is limited to 4GBof data.
l Total size of a single table is 2GB.
l May be unstable in large implementations.
l MySQL
l Database can be in any location, but performance will depend on the speed of the connection between Plan-
etPress and the MySQLserver.
l MySQL's performance has been slower than SQLServer and SQLServer Express during our tests.
l By default, MySQLis configured not to allow any SQLrequest larger than 16 megs.
l In the event where 2 requests are made simultaneously on the same record, MySQLwill queue one of the
requests and execute it once the first one is done. In extremely rare cases this may cause a timeout on very
large requests.
l MSSQL(Microsoft SQLServer)
l All versions of the SQLServer are supported, including all Express versions.
l Database can be in any location, but performance will depend on the speed of the connection between Plan-
etPress Production and the SQLserver.
l In the event where 2 requests are made simultaneously on the same record, SQLServer will drop the most com-
plex request. Resubmitting the PGCfor processing should resolve this issue. This, however, should happen only
rarely.
l When configuring the ODBCconnection, your must use the Microsoft version of the driver, and not the Native
SQLversion of the driver. This is due to a technical limitation of the native driver that interferes with the Plan-
etPress Suite database requests.
The PlanetPress Suite Workflow Tools Configuration Program
PlanetPress Capture Pen Management Tool
The Pen Management Tool screen is used to manage the pens that are registered in the PlanetPress Capture Database. The
number of Anoto Digital Pens you may register on this screen depends on the licenses available within your PlanetPress Capture License.
This window has the following options and controls:
l Top Toolbar:
l Read PGCFile:Click to display a file open dialog. Browse to an existing PGCfile, and open it. PlanetPress Cap-
ture will read the serial number from the PGCfile and register the pen.
l Print Pen Activation File:Click to print a page containing a special pattern. Any pen that writes on this pat-
tern and is then docked will be registered in the database.
l Save Pen Data into Database:Once all your pens are entered in this window, click to save the list of pens
in the database.
l Pen Data List: Displays a list of registered pens and those pens you just added.
l Pen ID:The serial number of pen, as written on the Anoto Digital Pen.You can double-click this area to edit the
Pen ID if necessary.
Page 77

The PlanetPress Suite Workflow Tools Configuration Program
l Pattern Sequence:The pattern sequence the pen is assigned to. You can double-click this area and edit the
pattern sequence as required.
l UserID:The name of the user assigned to this pen. You can double-click this area to edit the user ID. This can
also be custom information.
l Bottom Toolbar:
l
Button:Click to add a new line in the Pen Data List, then edit the information on this new line.
l
Button:Place a checkmark on the line of any pen you wish to remove from the database, then click this but-
ton.
l Search in column Pen ID: Enter a search term for a Pen ID, then click the Search button. The Pen Data List
will highlight any pen containing your search term.
To register a new pen manually
1.
Click on the icon
2. Enter the Pen ID (located on the pen after the word "Serial:")
3. If necessary, enter an optional pattern sequence and User ID(identifier of who will use the pen).
To register a pen using the registration pattern
1. Click on the Print pen activation file button in the top toolbar of this dialog.
2. Use the Windows Print dialog to printto the desired printer.
3. Write or make a line on the printed pattern.
4. Dock the pen in its cradle.
5. Click on the Read PGCFile button in the top toolbar of this dialog.
6. If necessary, enter an optional pattern sequence and User ID for each pen.
Multiple pens can be registered at once simply by writing on the registration pattern and then docking each pen before clicking
the Read PGCfile button.
If the pen that is being registered already exists in the pen database, the "Replace User ID (Description) dialog appears, with
the following options:
l Pen ID:Displays the Pen ID (serial number)to identify the pen
l Old desc.:Displays the content of the User ID field for the pen as it is now.
l New desc.:Type the new description to identify the pen
l Replace:Click to save the modification to the description
l No Change:Click to save the registration without modifying the description.
l Modify:Click to enable edits in the Old desc. field. The current information can then be modified. After modifications,
click Apply to save the changes and exit the dialog.
l Cancel:Click to cancel any modifications to the pen registration.
PlanetPress Capture License Management
The PlanetPress Capture License Management window is used to manage the pen pack available in the installation of PlanetPress Capture. Each Pen Pack contains a limited number of pens that can be registered in the Capture Database. When the
number of pens have been reached, new pens can no longer be registered.
If no pen pack is available, PlanetPress Capture functions in Demo Mode. In Demo mode, only one (1)pen can be registered
in the pen management window. Also, the Capture Fields Generator will be unable to produce more than 8 documents with a
pattern instead of the full 20,000 patterns.
To add a pen pack, PlanetPress Workflow must be activated using a PlanetPress Production licence. if PlanetPress Production is in trial mode, no pen pack can be added because the Pen Pack uses the serial number.
This window has the following options and controls:
Page 78

The PlanetPress Suite Workflow Tools Configuration Program
l PlanetPress Capture Pen Licenses group
l Import License...:Click to open the Import License dialog. Browse to a PPLIC(PlanetPress License) file on
your computer and open it to import the license. The PPLICoverwrites your current license, however it may contain more than one Pen Pack (your previous one and one you just purchased)and will display them individually.
l License List: Displays the licenses that have been added to this system.
l Pen License:The identification of the Pen Pack.
l Quantity Of Pens:The number of pens that can be registered with this pack.
l PlanetPress Production group
l Server Type: The type of server installed, normally PlanetPress Production Server.
l Total pens:The total number of available pens on this server, each Pen Pack being added together.
PDF Text Extraction Tolerance Factors
When extracting text from a PDF(for example, through a data selection), a lot more happens in the background than what can
be seen on the surface. Reading a PDFfile for text will generally return text fragments, separated by a certain amount of
space. Sometimes the text will be shifted up or down, spacing will be different, etc. In some cases, every letter is considered
to be a different fragment.
Text formatting features such as kerning, bold, exponential, etc, may cause these fragments to be considered as separate
even if, to the naked eye, they obviously belong together.
The PDFText Extraction Tolerance Factors is used to modify the behavior of data selections made from PDFdata files from
within PlanetPress Workflow. Each factor available in this window will determine if two fragments of text in the PDFshould be
part of the same data selection or not.
The default values are generally correct for the greatest majority of PDF data files. Only change these values if you
understand what they are for.
Delta Width
Defines the tolerance for the distance between two text fragments, either positive (space between fragments)or negative
(kerning text where letters overlap). When this value is at 0, the two fragments will need to be exactly one beside the other
with no space or overlap between them.
When this value is at 1, a very large space or overlap will be accepted. This may case "false positives" and separate words
and text blocks may be considered as a single word if the value is too high.
Accepted values range from 0 to 1. The default value is 0.3, recommended values are between 0.05 and 0.30.
Delta Height
Defines the tolerance for the height and position difference between two target fragments. The higher the number, the more
difference between the fragment's height(the tallest font character's height)will be accepted and the more vertical distance
between fragments are accepted. Exponents, for example, are higher and lower.
When this value is 0, no vertical shift is accepted between two fragments. When the value is 1, the second text fragment can
be shifted by as much as the height of the first fragment.
Accepted values range from 0 to 1. The default value is 0.15, recommended values are between 0.00 and 0.50.
Font Delta Height
Defines the tolerance for the difference in average height of fonts in the two target fragments. The higher the number, the
more difference in average font heights will be accepted. The average font height is bigger in text written in uppercase than
Page 79

The PlanetPress Suite Workflow Tools Configuration Program
text written in lowercase.
At 0, the font size must be exactly the same between two fragments. At 1, a greater variance in font size is accepted.
Accepted values range from 0 to 1. The default value is 0.65, recommended values are between 0.60 and 1.00.
Gap
Defines how spaces between two fragments are processed. If the space between two fragments is too small, the text extraction will sometimes eliminate that space and count the two fragments as a single word. To resolve this, the Gap setting can be
changed. The lower this value, the higher the chance of a space being added between two characters. A value too low may
add spaces where they do not belong.
Accepted values range from 0 to 0.5. The default value is 0.3, recommended values are between 0.25 and 0.40.
Logging User Options
Logging user options control the level of detail added to the PlanetPress Suite Workflow Tools log file. Since log files cover 24
hours of operation, choosing to log every task performed by PlanetPress Suite Workflow Tools may result in the creation of
excessively large files.
Changing the logging options also affects the logs displayed in the PlanetPress Suite Service Console .
The available Logging user options are as follows:
l Log level group
l Startup and shutdown: Select to only track when the PlanetPress Suite Workflow Tools service is started
and stopped.
l Task success and failure: Select to only track whentasks in the processes running in a PlanetPress Suite
Workflow Tools configuration succeed and fail.
l Task success and failure with details: Select to track when the tasks in processes running in PlanetPress
Suite Workflow Tools succeed and fail, with details. Details can include why tasks fail and how successful tasks
are executed.
l All events with details: Select to log everything that happens in PlanetPress Suite Workflow Tools. This
includes when it starts and stops, the success and failure of tasks, and details on the success and failure of
tasks.
l Delete log files after: Select how many days log files are kept before being deleted.
Messenger User Options
Apart from enabling communication between the various parts of PlanetPress Suite, the PlanetPress Suite Messenger also manages local instances of the PlanetPress Suite Alambic.
The available Messenger user options are as follows:
l PlanetPress Alambic options group
l Let me set up how many instances to run: Select this option if you want to limit the number of instances
of the Alambic that PlanetPress Suite Workflow Tools can run. Then enter the number of instances, a value ranging from 1 to 32, in the box below. When this option is not selected, PlanetPress Suite Workflow Tools starts a
minimum of three instances and a maximum of eight, based on the number of CPUs available on the server.
Note that this does affects self-replicating processes. Self-replicating processes will create threads in the PlanetPress Workflow service, while Alambic threads are under the PlanetPress Messenger service.
Page 80

The PlanetPress Suite Workflow Tools Configuration Program
l Close inactive instances after: If you want the PlanetPress Suite Messenger to close inactive instances of
the Alambic after a given number of minutes, enter a value in this box. Enter a value of ”0” if you do not want the
PlanetPress Suite Messenger to terminate idle instances of the Alambic.
l Logging options group
l Delete log files after: Enter the number of days after which to delete the PlanetPress Suite Messenger serv-
ice logs. Each log covers a 24-hour period and is kept in the Log folder, whichis located in the PlanetPress Suite
installation folder.
l Verbose log: Select this option if you want the log to contain a maximum amount of information.
HTTP Server Input User Options
HTTP server input user options control the server protocol aspects of the PlanetPress Suite Workflow Tools HTTP Server input
tasks. This is where you enable and configure secure communication for the HTTP Server.
The available HTTP Server user options are as follows:
l Protocol options group
l Port: Select the TCP port to use. The default port is 8080, the official HTTP alternate port, so as not to interfere with
the standard HTTP port (80). To block any regular HTTPtraffic (for example if only using HTTPSconnections) the port
can be set to 0.
l Time out: Set the timeout period in seconds. The default value is 120 seconds.
l Verbose log: Select to enable to keep a verbose log. Note that a communication log is generated whether or not this
option is selected. If you use a secure connection, the log will contain extra information.
l Omit attachments as CDATAnode in the XMLenvelope:Select to remove any attachments from the actual
XMLdata file. Generally the attachments are both saved on disk and included within the XMLenvelope. This option
removes them from the envelope, but they remain accessible through their direct path. This option has no incidence on
any other option of this task.
l Enable server for SSLrequests:Check this option to enable secure data exchange over the Web. This enables the
boxes below and lets you specify your secure communication settings.
l Root certificate: Enter the absolute path to the Root Certificate. The file generally ends with a .crt extension
and is obtained from a Certificate Provider such as Thawte or Verisign. If the Root Certificate and Certificate file
are identical, this is considered a self-signed certificate, which is considered unsecured by most browsers.
l Certificate: Enter the absolute path to the site Certificate. The file generally ends with a .crt extension and is
provided by a certificate provider, or through the use of certificate generators such as openssl or makecert.com.
l Key: Enter the absolute path to the Private Key File. This file generally ends with a .key extension.
l Password: Enter the password (or passkey) for the Private Key File. Please note that this password is
encrypted within the PlanetPress Workflow server and is not saved in plain text.
l Encryption protocol: Choose your cryptographic protocol (SSLor TSL). This is determined by the software
thatgenerated the keys.
l Disable SOAPServer:Check to disable all SOAPServer functionality.
SSL is used to accept secured, encrypted requests from web clients and requires a certificate delivered by an
approved authority. SSLcan also be called HTTPS, though that is a misnomer. For more information on SSLand how
to purchase a certificate, please see Q10694 on SSL.com.
HTTPServer Input 2 User Options
The HTTPServer Input 2 user options are used to enable serving static HTTPresources, as part of an HTTPServer workflow.
These resources are referred to within the HTMLresponse file and do not pass through a process to get served so the process
Page 81

The PlanetPress Suite Workflow Tools Configuration Program
is very quick. Static resources are especially useful for additional formatting of HTMLfiles such as JS(Javascript) scripts,
CSSfiles and images, since they are not dynamic and generally shared between multiple dynamic files.
The available HTTP Server 2 user options are as follows:
l Serve HTTPresource:Check to activate static resource serving.
l Resource action name: Enter a name that will be simulated as a folder in your HTTPstructure. For exam-
ple, if you enter images in this box, you would refer to any files in this folder as href="images/file.ext" .
l Resource folder:Type it the path of the folder where your resources are located, or click the Browse button
and choose the folder in the browse dialog.
Subfolders are accepted in the structre, so if your resource folder contains a folder called faces, you could refer to a
file in this folder as href="images/faces/johnsmith.jpg".
LPD Input Preferences
LPD input preferences control certain functions of the PlanetPress Suite Workflow Tools LPD Server service, which in turn has
an impact on LDP input tasks performed by PlanetPress Suite Workflow Tools on a given computer. The LPD Server service
receives jobs using TCP/IP from LPD servers.
For information on the properties set in individual LDP input tasks, refer to “LPD Input Task Properties”.
The available LPD input preferences are as follows:
l Protocol options group
l Log all Winsock and network messages: Select to have PlanetPress Suite Workflow Tools keep a log of
all Winsock and other network messages that occur through the LPD service. These are messages related to
jobs being sent from other systems through LPR, and being received by PlanetPress Suite Workflow Tools via
LPD. Since these messages can accumulate, you have the option of not logging them. Log files are kept in the
Log folder, which is located in the PlanetPress Suite installation folder. They are named lpddate.log, where
date is the current date in the yyyymmdd numerical format. Note that changing this option also affects the log
displayed in the PlanetPress Suite Service Console.
l No source port range restriction: Select to remove any restrictions on the port of the LPR client computer
thatPlanetPress Suite Workflow Tools accepts data files from. Clear to have PlanetPress Suite Workflow Tools
only accept data files sent from ports ranging between 721 and 731 on the LPR client computer.
l Strict RFC 1179 control file: Select to disable control file extensions the LPD service implements for some
flavors of UNIX and LPR. This enforces the basic Line Printer Daemon protocol.
l Enable BSD compatibility mode: Select to have the LPD service emulate a BSD UNIX server. Although RFC
1179 is supposed to describe the BSD LPD/LPR protocol, and the LPD input in PlanetPress Suite Workflow Tools
is RFC1179-compliant, there are some incompatibilities between the RFC and the BSD implementation. This
option compensates for some of these incompatibilities. If you are not sure about the source of your output,
clear this option.
l LDP settings group
l Timeout (sec): Set the time in seconds the PlanetPress Suite process waits for the transfer of bytes in the data
file before ending the transfer of this file. The default value for the Time-out property is 7200 seconds (2 hours).
On a time-out, partially received data files are not passed to the rest of the process; the LPD input resets and is
ready to receive further data files. Log messages include the time-out duration.
Page 82

The PlanetPress Suite Workflow Tools Configuration Program
Serial Input Service User Options
Serial input user options control certain functions of the PlanetPress Suite Workflow Tools Serial Capture service, which in turn
has a direct impact on all Serial input tasks performed by PlanetPress Suite Workflow Tools on a given computer.
The available Serial input user options are as follows:
l Serial settings group
l Serial port: Select the port of the computer where the Serial input is connected to (COM1 through COM8).
l Baud rate: Select the baud rate of the Serial input. The baud rate is the number of bits transferred per second.
The transferred bits include the start bit, the data bits, the parity bit (if defined), and the stop bits.
l Data bits: Select the number of data bits defining the incoming data file on this serial port. The data bits trans-
ferred through a serial port represent the data content. This excludes the start, parity, and stop bits: these are
bits defining the beginning and end of each unit of transferred data, as well as error detection provided by the
parity bit. The majority of serial ports use between five and eight data bits. Binary data is typically transmitted
as eight bits. Text-based data is transmitted as seven bits or eight bits. If the data is based on the ASCII character set, a minimum of seven bits is required. If an eighth bit is used, it must have a value of 0. If the data is
based on the extended ASCII character set, eight bits must be used.
l Parity: Select the type of parity used for error detection. The parity transfers through the serial connection as a
single bit. It is used to verify that each set of data bits transfers correctly. It is then stripped away before the
data file passes through the rest of the PlanetPress Suite Workflow Tools process. Select None to ignore all parity bits; no error detection occurs.
l Stop bits: Since most serial ports operate asynchronously, the transmitted byte must be identified by start and
stop bits. The start bit indicates when the data byte is about to begin and the stop bit(s) indicates when the data
byte was transferred. The start bit is always 0 to mark the beginning of the byte, but the stop bit can be a single
1, or two bits each with a value of 1.
l Time-out: Set the time in seconds the PlanetPress Suite Workflow Tools process waits for the transfer of bytes
in the data file before ending the transfer of this file. On a time-out, partially received data files are not passed to
the rest of the process; the Serial input resets, ready to receive further data files.
l Job delimiters: Enter the strings that tell PlanetPress Suite Workflow Tools the data file being retrieved through the
Serial input is complete. Each line in the Job delimiters text box is a different delimiter. You can enter as many delimiters as you want, one per line. The three default delimiters that appear are three of the most commonly recognized
end of a file delimiters.
l Log (verbose): Select to keep a log of errors and other information related to the Serial input. Since these messages
can accumulate, you have the option of not logging them.
Telnet Input User Options
The Telnet input user option controls the log of the PlanetPress Suite Workflow Tools Telnet Capture service. Since PlanetPress Suite Workflow Tools lets you monitor multiple Telnet inputs simultaneously, the port setting for all Telnet input tasks
cannot be set in the user options.
The available Telnet input user options are as follows:
Protocol options group
l Log all Winsock and network messages (very verbose): Select to have PlanetPress Suite Workflow Tools
keep a log of all Winsock and other network messages that occur from the Telnet input. These messages are related
to files sent from other systems using a telnet connection. Since these messages can accumulate, you have the option
of not logging them.
Page 83

The PlanetPress Suite Workflow Tools Configuration Program
l Use Job Delimiters:Check this option if your Telnet input is a single stream that can contain multiple jobs. The box
lets you enter one or more possible delimiters (separated by a line return), either a direct string(such as
%%EOJOB)or an ascii character (\001). For a list of ascii characters, see http://www.asciitable.com/.
PlanetPress Fax User Options
PlanetPress Fax user options control certain functions of the PlanetPress Fax service, which in turn has a direct impact on all
PlanetPress Fax output tasks performed on a given computer. Bear in mind that PlanetPress Fax output tasks included in a
given PlanetPress Watch configuration can be performed by a PlanetPress Fax installation running on a different computer, typically one that runs only PlanetPress Fax and the faxing application that actually sends the fax. When you change the user
options on a given computer, only that computer is affected. So you should consider changing the PlanetPress Fax user options
on the computer that actually performs the PlanetPress Fax output tasks.
The changes you make to the PlanetPress Fax user options are stored in the PlanetPress Fax configuration file. They will be
applied when PlanetPress Fax is started.
The available PlanetPress Fax user options are as follows:
l Delete log after: Enter the number of days after which to delete the PlanetPress Fax service log. Each log covers a
24-hour period and is kept in the Log folder, which is located in the PlanetPress Suite installation folder (on the computer that actually performs the PlanetPress Fax output tasks).
l Fax service: Select the faxing program to which PlanetPress Fax sends its documents for faxing. Each faxing program
has its own options and changing this option also changes the options below to reflect the following:
WinFax Pro option
l Dialing format: Select how you want PlanetPress Fax to read the fax number in the data selection and send it to Win-
Fax PRO. The dialing format you select here must be identical to the one you set in WinFax PRO; a discrepancy
between the two may result in WinFax PRO dialing incorrect fax numbers. Select Default to have PlanetPress Fax set
the dial prefix, long distance prefix, area code, and fax number according to the content of the data selection, and send
the result to WinFax PRO. WinFaxPRO sets the dial prefix, long distance, prefix, and area code, and fax number to the
ones it receives from PlanetPress Fax. If any of the values it receives from PlanetPress Fax are empty, it uses its own
default values. For example, if the data selection did not contain a dialing prefix, WinFax PRO uses its default dialing prefix. Select Dial as entered to limit PlanetPress Fax to removing any spaces or parentheses that appear in the data selection, and sending the result to WinFax PRO. WinFax PRO dials the result exactly as it receives it from PlanetPress Fax.
Note that WinFax Pro scales fax pages with the following minimum settings:
l Raster width: 1728 dpi
l Raster height: 2158 dpi
l Raster resolution: 196 dpi
Windows Fax options
l Report Failures: Select to have PlanetPress Fax generate a report whenever the maximum number of retries for a
single fax is exceeded. The error generated by the Windows Fax Service is also logged in the report. Note that when
PlanetPress Fax is unable to send a fax because an empty fax number is used as the only recipient for a document, a
failure will not be reported but an error will be logged.
l Report Success: Select to have PlanetPress Fax generate a report whenever one of the faxes in the PlanetPress Fax
Job reaches its destination successfully or at least as far as the Windows Fax service is concerned.
l Report Folder: Enter or select the location of the report file. PlanetPress Fax generates report file names auto-
matically with the filename extension PFX. The report file is copied to the specified Report folder only after all fax transmissions in a PlanetPress Fax job are completed or have exceeded the maximum number of retries. This folder can
Page 84

The PlanetPress Suite Workflow Tools Configuration Program
then be used as an input for a PlanetPress Watch process for monitoring the status of PlanetPress Fax jobs. The postscript (PS) file for the job is also copied with the report file and can be printed, sent by e-mail, or archived as specified
by the PlanetPress Watch process.
l Expand folder paths in UNC (Universal Naming Conventions) format: Select to have PlanetPress Fax use
complete network server path names (\\servername\sharename\path\filename). This naming convention works well
with Windows operating systems, Novell NetWare, and other operating systems when using a local naming system
(such as the DOS naming system in Windows) would result in “File not found” error messages.
l Dialing options: Click to set the appropriate options as required. Since these options are specific to the faxing pro-
gram, refer to the faxing program’s documentation for more information.
Captaris RightFax options
l RightFax Printer: Select a RightFax printer. A RightFax printer is a fax driver that makes it possible to send faxes
automatically. This printer will output faxes without prompting the user for fax addressing information. For more information, refer to Captaris RightFax documentation.
l Activation: Click to enter activation codes for the PlanetPress Image service installed on the same computer as Plan-
etPress Watch. If you have already activated the PlanetPress Image service from its Control Panel applet, this is
reflected when you open the activation dialog box by clicking this button.
l Check for updates: Click to access the Objectif Lune website to search for updates to PlanetPress Image. You are
guided through the updating process with the PlanetPress Suite Update Service wizard.
l About: Click to display an About dialog box for PlanetPress Fax. This dialog box contains information such as the ver-
sion number, whether the software is activated or the number of days remaining in the trial.
l Select Language: Click to select a different interface language for the PlanetPress Fax Configuration applet. Note
thatthis button is not displayed if you edit the PlanetPress Fax options directly (not via PlanetPress Watch Configuration
program).
FTP Output Service User Options
FTP output user options control certain functions of the FTP Client service, which in turn has a direct impact on all FTP output
tasks performed by PlanetPress Suite Workflow Tools on a given computer.
The available FTP output user options are as follows:
l Protocol options group
l Log all Winsock and network messages: Select to have PlanetPress Suite Workflow Tools keep a log of
all Winsock and other network messages that occur through the FTP output. These messages are related to jobs
sent from PlanetPress Suite Workflow Tools to a server via an FTP output, which in turn uses the FTP output
service. Log files are kept in the Log folder, which is located in the PlanetPress Suite installation folder. They are
named ftpdate.log, where date is the current date in yyyymmdd numerical format. Note that changing this
option also affects the log displayed in the PlanetPress Suite Service Console.
l Interval: Select the interval (in seconds) at which the FTP service is to dispatch jobs from the ftpPut folder to
the FTP sites.
l Back up job on error: Select to move the job file to a local folder ftpPut\error if an error occurs while send-
ing a job via the FTP output. This folder is relative to your install folder.
l FTP Port: Select the port number that you want PlanetPress Suite Workflow Tools to use for all FTP output
tasks. The recommended port is 21 (the default setting).
PlanetPress Image User Options
PlanetPress Image user options control certain functions of the PlanetPress Image service, which in turn has a direct impact on
all PlanetPress Image output tasks performed on a given computer. These include error and logging options, PlanetPress
Page 85

The PlanetPress Suite Workflow Tools Configuration Program
Search database options, as well as networking and email options.
Bear in mind that PlanetPress Image output tasks included in a given PlanetPress Suite Workflow Tools configuration can be
performed by a PlanetPress Image installation running on a different computer, typically one that runs only PlanetPress
Image. When you change the user options on a given computer, only that computer is affected. So you should consider changing the PlanetPress Image user options on the computer that actually performs the PlanetPress Image output tasks.
The changes you make to the PlanetPress Image user options are stored in the PlanetPress Image configuration file (ppim-
age.cfg). They will be applied when PlanetPress Image is started.
The available PlanetPress Image user options are separated in four different sections:
PlanetPress Image 1 or logging tab
l Administrator’s address(es): Enter one or more system administrator email addresses to which error and other
messages related to the creation of PDFs/images by PlanetPress Image are sent. Separate multiple email addresses
with semi-colons (;).
l Send to the administrator group
l Daily log: Select to send an email to the administrator every day at midnight (according to the local system
clock) reporting the daily activity of PlanetPress Image. The log is sent to all addresses you enter in the Administrator’s address(es) text box.
l Error Log: Select to send an email that includes the current error log to the administrator when an error
occurs. The error log is sentto all addresses you enter in the Administrator’s address(es) text box.
l Error file: When enabled, sends an e-mail with an attachment of the offending file when an error occurs in the
PlanetPress Image output task. Additionally, a backup of the job is created in the Error folder, which is located in
the PlanetPress Suite installation folder.
l Name or address not resolved: Select to send an email to the administrator when a name or address in the doc-
ument selected to be used in PlanetPress Image cannot be resolved.
l Delete log after: Enter the number of days to wait before deleting the log of the generated PlanetPress Image out-
put. Each log file covers a single 24-hour period and is kept in the Log folder, which is located in the PlanetPress Suite
installation folder. This log may be on the local computer running PlanetPress Suite Workflow Tools or on another computer on your network.
l Activation: Click to enter activation codes for the PlanetPress Image service installed on the same computer as Plan-
etPress Suite Workflow Tools. If you have already activated the PlanetPress Image service from its Control Panel
applet, this is reflected when you open the activation dialog box by clicking this button.
l Check for updates: Click to access the Objectif Lune website to search for updates to PlanetPress Image. You are
guided through the updating process with the PlanetPress Suite Update Service wizard.
l About: Click to display an About dialog box for PlanetPress Image. This dialog box contains information such as the
version number, whether the software is activated or the number of days remaining in the trial.
l Select Language: Click to select a different interface language for the PlanetPress Image Configuration applet. Note
thatthis button is not displayed if you edit the PlanetPress Image options directly (not via PlanetPress Suite Workflow
Tools Configuration program).
PlanetPress Image 2 or database tab
Add PDF to PlanetPress Search database group:Select to populate a PlanetPress Search database using the doc-
uments created by PlanetPress Image and to activate the related options. Refer to the PlanetPress Search User Guide for more
information on this PlanetPress Suite software.
l Database type: Select the type of the database in which you want to create a table (Access, or SQL Server).
l Connection time-out: Enter the time, in seconds, that the connection to the database is maintained while no action
is taking place before the connection is severed.
Page 86

The PlanetPress Suite Workflow Tools Configuration Program
l Database directory: Enter the path of the directory in which the Access database is located, or use the Browse but-
ton to navigate to, and select, the directory. This option is available only when you select Access database in the Database type box.
l Data source name: Enter the name of the computer on which the database runs. This option is available only when
you select SQL Server database or Oracle database in the Database type box.
l Use default database: Select to use the default database associated with your user profile on that SQL Server or
Oracle database. Clear to enter the name of the database in the box that appears.
l Use Windows NT Integrated security: Select to use your Windows user name and password to log onto the SQL
database.
l User ID: Enter the user id required to access the database to which you are adding new PDI files from the generated
PDF files. If you are using an SQL database, enter the login name you chose when you configured the SQL database
(refer to the “Using PlanetPress Search with an SQL Server Database” section of the PlanetPress Search User Guide).
l Password: Enter the password required to access the database.
l Test Connection: Click to verify that PlanetPress Image can connect to the specified database.
l Enforce global table creation: Select this option, as it ensures that all database users are granted access to the
database. This option is available only when you select SQL database in the Database type box.
PlanetPress Image 3 or network tab
The options in this section are identical to the ones in the Network User Options section. However, they determine how Plan-
etPress Image will interact with your Novell NetWare system, not the PlanetPress Suite Workflow Tools Service.
PlanetPress Image 4 or login tab
l Use Microsoft Outlook: Select to use Microsoft Outlook on the host computer running PlanetPress Image to send
the error messages to the administrators. The host computer must be running Outlook, and PlanetPress Suite Workflow
Tools must have access to Outlook. Outgoing emails appear in the outbox of Outlook, and is sent whenever Outlook is
set to send email.
l Use SMTP mail group:Check to activate this group’s options and to use Simple Mail Transfer Protocol (SMTP) to
send the error messages to the administrators. Note that if you select this option, you will be required to enter information in the Name, Email address and Outgoing mail (SMTP) boxes.
l Name: Enter the name of the user sending the error messages to the administrators.
l Organization: Enter the name of the organization of the user sending the error messages to the admin-
istrators.
l Email address: Enter the email address of the user sending the error messages to the administrators.
l Reply address: Enter the reply address that recipients use to reply to the error messages.
l Outgoing mail (SMTP): Enter the IP address of the server that PlanetPress Suite Workflow Tools uses to
send the emails via SMTP.
l Server requires authentication: Select if the outgoing server used to send the emails via SMTP requires
authentication. Note that if you select this option, you will be required to enter information in the Account name
and Password boxes below.
l Account name: Enter the account name of the user on the server to be able to send emails via SMTP.
You must select Server requires authentication to enable this field.
l Password: Enter the password corresponding to the Account name of the user on the server to be able
to send email via SMTP. You must select Server requires authentication to enable this field.
LPR Output User Options
LPR output user options control certain functions of the LPR Client service, which in turn has a direct impact on all LPR output
tasks performed by PlanetPress Suite Workflow Tools on a given computer.
The available LPR output user options are as follows:
Page 87

l Protocol options group
l Log all Winsock and network messages: Select to have PlanetPress Suite Workflow Tools keep a log of
all Winsock and other network messages that occur through the LPR output. These messages are related to jobs
being sent from PlanetPress Suite Workflow Tools to an LPD or LPD-compatible printer. Logs are kept in a Log
folder relative to your install folder. They are named lprdate.log, where date is the current date in yyyymmdd
numerical format. Note that changing this option also affects the log displayed in the PlanetPress Suite Service
Console.
l Print banner pages between jobs: Select to print banner pages between each job processed and output
from the LPR output. The banner page includes details of the job being printed, including the job file name and
the user name on the host computer running the LPR output client.
l No source port range restriction: Select to remove any restrictions on the port PlanetPress Suite Work-
flow Tools uses to send the job file via the LPR/LPD protocol. Clear to restrict the port used to send the job to
one in the range between 721 and 731.
l Print up to: Select the maximum number of files that can be simultaneously sentto print by the LPR output
service.
l Error handling group
l Max. retry period: Select the maximum time period, in hours, within which PlanetPress Suite Workflow Tools
attempts to dispatch the job using the LPR output before giving up. Note that entering a maximum retry period
of 0 hours disables retries altogether.
l Retry interval: Select the interval, in seconds, at which time PlanetPress Suite Workflow Tools attempts to dis-
patch the job using the LPR output. This takes place only within the Max. retry period, after which the attempt
ends.
l Keep a backup when error occurs: Select to move the job file to a local folder relative to your install folder
called pplpr\error in the case of an error.
l LPR settings group
l Time-out: Set the time in seconds the PlanetPress Suite Workflow Tools process waits when it sends jobs
using the LPR protocol. The default value for the Time-out property is 7200 seconds (2 hours). On a time-out,
partially sent data files are not passed to the rest of the process; the LPR output resets and is ready to send further data files. Log messages include the time-out duration.
l Polling interval (seconds): Select the period of time—the default is 4 seconds—for which PlanetPress Suite
Workflow Tools is to wait when it finishes dispatching jobs to the LPR printer queues before polling the LPR output folder again.
The PlanetPress Suite Workflow Tools Configuration Program
PrintShop Web Connect Service User Options
PrintShop Web Connect service preferences control the credentials to log into the PrintShop Web server.
The available preferences are as follows:
l Username: Enter the username of a valid PrintShop Web user, mostly operators.
l Password: Enter the password associated with the username on the PrintShop Web server.
It is also mandatory to send your configuration to your PlanetPress Suite Workflow Tools service since the PrintShop
Web credentials are included in the *.cfg file (See Send your Configuration), which is updated every time the con-
figuration is sent to the service via the Send configuration button.
Editor Options
The Script Editor is used to edit scripts used in Run Script and the XSLT Editor is used to editscripts used in Open XSLT action
tasks. Most of the options listed below are valid for both editors. Those options which are only valid for a specific editor are
Page 88

The PlanetPress Suite Workflow Tools Configuration Program
identified as such.
The available Script Editor and XSLT Editor options are as follows:
l Editor
l Auto indent mode: Select to automatically position the insertion pointer under the first non-blank character
of the preceding line when you press ENTER.
l Insert mode: Select to use Insert mode and clear to use Overwrite mode. In Insert mode, when you enter
text, existing text shifts to accommodate it. In Overwrite mode, text you enter overwrites existing text. You can
also press INSERT to toggle between the two modes.
l Use tab character: Select to use the tab character instead of spaces to represent tabs in the program file.
Clear to use spaces to represent tabs. You must clear the Smart tab option to use this option.
l Smart tab: Select to use smart tabs. A smart tab advances with reference to the preceding line. It advances to
align with the first non-blank character it encounters on the preceding line, from its current position forward.
You must clear the Use tab character option to use Smart tabs.
l Optimal fill: Select to optimize the indent of every auto-indented line by minimizing the number of space
and/or tab characters it uses. You must select both Auto indent mode and Use tab character to use this option.
l Backspace unindents: Select to move the insertion pointer to the previous indentation level when you press
BACKSPACE. This is useful when you enter a block of code such as a for loop; you enter the for statement,
advance one indentation level to enter the body of the for loop, then press BACKSPACE to enter the end for statement. You must select Auto indent mode to use this option.
l Cursor through tabs: Select to move one by one through the spaces of tabs using the left or right arrow
keys. Clear to have the arrow keys treat the tab as a single character. You must select Use tab character to use
this option.
l Group undo: Select to set the undo feature of the Editor to undo the last group of editing commands entered.
An editing command is defined as a mouse click, a press on ENTER, or a press on any other key. A group of editing commands is a sequence of a single type of editing command. Clear to set the undo feature to undo only the
last command entered.
l Cursor beyond EOF: Select to make it possible to position the pointer beyond the end of the program file.
Clear to prevent this. If you clear Insert mode and select Cursor beyond EOF, you can only overwrite the existing lines of the program; you cannot add lines to it.
l Cursor beyond EOL: Select to make it possible to position the pointer beyond the end of the line. Clear to pre-
vent this.
l Keep trailing blanks: Select to preserve any blank spaces occurring at the end of a line. Clear to remove
those blank spaces.
l Persistent blocks: Select to have any text you enter immediately after selecting a block of code appended to
thatblock of code as part of the selection. When you select this option, you can also use the arrow keys to move
within the code without affecting the selected code. You must select the Enable selection option to use the Persistent blocks option.
l Overwrite blocks: Select to have any text you enter immediately after selecting a block of code replace that
block of code. You must clear Persistent blocks and select Enable selection for this option to have an effect.
l Enable selection: Select to permit the creation of selections in the Code area. If selected, you can create a
selectionby clicking and dragging the pointer over a portion of code, or by double-clicking to highlight the word
or line under the pointer (the Double click line option determines whether a word or line highlights). You can cut,
copy, paste, and print selections. If you also select Enable dragging, you can drag selections to reposition them
in the code.
l Enable dragging: Select to permit dragging and dropping a selection to reposition it in the program. This
option works only if you also select Enable selection.
Page 89

l Enable search highlight: Select to highlight the search term match found in the code when you perform a
l Double click line: Select to highlight the complete line of code when you double-click that line. Clear to high-
l Find text at cursor: Use to set the behavior of the Find dialog box. Select to automatically copy the word
l Block indent: Enter the number of spaces to jump for each block indent. The default is 2 and the maximum is
l Tab stops: Use to set the number of spaces to advance when you enter a tab character or to set a series of tab
l Display
l Display options group
l Margin and gutter group
The PlanetPress Suite Workflow Tools Configuration Program
search. Clear to prevent the highlighting. In both cases, the pointer appears after the last character of the
search term match.
lightonly the word under the pointer.
under the pointer into the Text to find box when you open the Find dialog box. Clear to prevent the copy. If no
previous search terms appear in the Text to find drop-down list, the Editor performs the copy regardless of
whether this option is selected or cleared.
16. The Block indent typically should agree with the tab stops in the Tab stops option. Perform a block indent by
selecting a region of code and pressing CTRL+SHIFT+I (to indent the code to the right) or CTRL+SHIFT+U (to
move the code to the left).
stops. Enter a single integer to set the number of spaces to advance with each tab. Enter a sequence of two or
more integers, each separated by a space, to specify tab stops. The sequence must be in ascending order. Tab
stops are measured in number of space characters. For example, a value of 20 places the tab stop at the 20th
space character. You can also use the drop-down list to select a previously entered value.
l Editor font: Use to select the font the Editor uses to display the program code. Select the Use mono-
space fonts only option to restrict the fonts available to fixed width fonts. A preview of the selected font,
at the selected Size, appears in the Sample box.
l Size: Use to select the font size the Editor uses to display the program code. A preview of the selected
font, at the selected size, appears in the Sample box.
l Use monospace fonts only: Select to display only fixed width fonts in the Editor font drop-down list.
Every character in a fixed width font occupies the same amount of space.
l Sample: Displays a preview of the font selected in the Editor font option, at the size selected in the Size
option.
l Right margin: Select to display a vertical gray bar as a right margin indicator. Use the Right margin
position drop-down list to set the position of this indicator. This indicator is an on-screen visual reference
only. It does not print, and does not enforce word wrap on lines that exceed the number of characters set
for it. It can be useful to indicate the right margin of the printed page, making it easy to determine
whether a line of code extends beyond the printable area of the page.
l Right margin position: Enter the position of the right margin indicator, in number of characters, rel-
ative to the left margin. For example, if you enter 80, the distance from the left margin to the right margin
indicator is 80 characters. Use the drop-down list to select a previously-entered margin position.
l Gutter: Select to have the Editor display a gutter between the Commands and Code areas. Use the
Gutter width option to set the width of the gutter. Select the Line numbers on gutter option to display line
numbers in this area.
l Gutter width: Enter the width, in pixels, of the gutter. Use the drop-down list to select a previously-
entered gutter width.
l Line numbers on page: Select to display code line numbers at the left edge of the Code area. If you
clear both this and the Line numbers on gutter option, no line numbers appear alongside the lines of
code.
l Line numbers on gutter: Select to display code line numbers in the gutter between the Commands
and Code areas. Selecting this option has effect only if you selected the Gutter option. If you clear both
this and the Line numbers on gutter option, no line numbers appear alongside the lines of code.
Page 90

l Color
l Mapping: Selecta mapping for the content of the script in the script editor—the mapping is used as well when
l Element list box: Select a script element in the Element list box, then edit the background and foreground
l Foreground: Selectthe color that the element highlighted in the Element list box is displayed with in the Script
l Background: Select the background color that the element highlighted in the Element list box is displayed with
l Attributes group
The PlanetPress Suite Workflow Tools Configuration Program
the script appears in the text box of the Run Script actions properties dialog. Each mapping (Default, Classic,
Ocean, Twilight) includes pre-set color values and attributes for each script element as listed in the Elements list
box. After selecting a mapping, you can edit individual elements to change their pre-sets by selecting them in
the Element list box and editing their values.
color with which it is displayed, and/or its formatting attributes. Each element recognized for each scripting language, for example, a URL in a JavaScript script, is displayed with the properties you set.
Editor.
in the Script Editor. The color is used to highlight the element as if it was selected with the cursor.
l Bold: Select to bold the element highlighted in the Element list box when it is displayed in the Script
Editor.
l Italic: Select to italicize the element highlighted in the Element list box when it is displayed in the Script
Editor.
l Underline: Select to underline the element highlighted in the Element list box when it is displayed in the
Script Editor.
Other Dialogs
These dialogs are either accessible from the preferences or from different parts of PlanetPress Suite.
Advanced SQL Statement dialog
The AdvancedSQLStatement dialog is available by clicking the Edit SQLbutton from the Database Action Task. You can enter
a custom SQLquery in this dialog, using the language supported by the database you select in the Database Action Task.
The dialog is separated in two parts:
l The left part displays the available tables in your database. Click the Show Tables button to display them.
l The right part displays a default SQLstatement which you can modify at your leisure.
l The bottom part displays the following options:
l Alternate syntax:Select to prevent automatically enclosing the names of any database tables and fields that
appear in the SQL query in square brackets when it exits the advanced SQL Statement dialog box. The alternate
syntax may be required for some database types.
l Client-side Cursor:When this option is enabled, the complete result set is downloaded before processing
starts, and changing records is done by PlanetPress. This is generally faster for queries returning a small
number of results ; otherwise the start of the record processing can be delayed since the whole recordset must
be downloaded.
MySQL, using ODBC 5.0, must be set to use a client-side cursor.
Microsoft Access will always work better when using a Server-Side cursor.
l Expect record set:Check if you are expecting a result from the database after executing the SQLquery. If
the query is expecting a record set in return and does not return one, the task will trigger an error.
l Test SQLbutton:Verify the SQLstatement's validity.
Page 91

The PlanetPress Suite Workflow Tools Configuration Program
Access Manager
The Access Manager controls what rights are granted to other machines (clients and servers)on the same network. It grants
access to functions such as sending documents and jobs to the server.
Messenger communications (between different part of the PlanetPress Suite)is limited to within the same Class
Csubnet. This means that PlanetPress Workflow on 192.168.1.23 cannot send a job to a PlanetPress Image on
192.168.100.54. This limitation has been removed in PlanetPress Suite 7.3 and higher.
To open the Access Manager
l Open PlanetPress Design or PlanetPress Workflow Configuration Tool.
l In the Ribbon, go in Tools | Managers | Access Manager.
The Access Manager dialog box is displayed. It lists all IPand IPranges that have PlanetPress Design, PlanetPress Suite
Workflow Tools, PlanetPress Fax or PlanetPress Image installed in the same network.
To manually add a new entry in the list
l Open the Access Manager
l Make sure you are in the Messenger tab.
l In the IPaddress box, enter the IPaddress of the remote machine.
l
Click on the button.
l Add the necessary permissions
l Click OK
l Restart the Messenger service.
Page 92

The PlanetPress Suite Workflow Tools Configuration Program
The format of the IP address must be one of the following:
l 127.0.0.1: The local computer. Typically this IP should have all the accesses checked.
l 255.255.255.255: Everyone on the same subnet. This is equivalent to hard-coding the current subnet, such
as 192.168.1.255 or 10.0.0.255.
l 192.168.0.42 : A single IP address. This can be any valid address on the same subnet.
l 10.0.255.255:Any IPin the 10.0.X.X range.
To automatically detect machines on the network and add them
l Make sure the machine you want to detect is turned on and the Messenger service is started
l Click on the Refresh button under the list
l Add the necessary permissions to the detected machines
l Click OK
l Restart the Messenger service.
To remove an entry in the list
l Remove all checkmarks from the entry
l Click OK
l Restart the Messenger service
The following considerations are to be understood when using the Access Manager to configure IPlimitations:
l Each permission type (column)is evaluated from top to bottom (column per column)in the order they are vis-
ible in the Access Manager window. This means that wide ranges should always be at the top to increase performance. For example, if you accept HTTPconnections from any IP, the first entry should be
255.255.255.255 with the Allow checkmark in the HTTPInput box. PlanetPress does not continue processing
after it has found an "Allow" checkmark. There is no concept of "Deny", meaning if any "Allow"permission is
given, there is no way to later remove it for certain IPs or IPranges.
l The configuration of the Access Manager is saved in a file on the hard drive which can be edited manually.See
Access Manager hosts.allow File.
l HTTP, FTPand SOAPcommunication is not limited to the local subnet on any version where these plugins
appear.
l Any change to the Access Manager requires a restart of the Messenger server which can be done in The Plan-
etPress Suite Service Console.
To modify permissions
Permissions are given simply by adding and removing options in the permission grid. Access to the services installed on this
computer is granted or denied by checking the corresponding boxes next to the listed IP ranges. For each IPrange, the following information is displayed:
l Host name: The name of those computers on which PlanetPress Suite software are currently installed or whichhave
been manually added.
l IP address: The IPaddress or IPaddress range to give permission to.
l Permissions
l HTTP Input:Grants access to send HTTP Requests to this server.
l LPD Input: Grants access to send LPD Queue jobs to this server.
l Send Job: Grants access to the selected computer or server to send jobs to PlanetPress Fax and PlanetPress
Image installed on this server.
Page 93

The PlanetPress Suite Workflow Tools Configuration Program
l Send Document: Grants access to the remote computer to send new or updated PlanetPress Design Doc-
uments to this server.
l Send Config:Grants access to the remote computer to overwrite the configuration on the local PlanetPress
Workflow service
In order for the changes made here to be effective, you will need to restart the PlanetPress Messenger service. This
can be done via the PlanetPress Suite Service Console.
SOAPAccess
The SOAPtab of the Access Manager controls access from SOAP clients to local processes and SOAPprocesses. Each username entered in this dialog can have access to one or more processes.
To add a new SOAPuser
l
Click on the button.
l Enter the following information in the Username section for the new entry that was created:
l Username:An alphanumerical username for the user.
l Password:A password to protect the user. Note that the password will always revert to ********(8
stars)when clicking outside of this box - that is normal and is meant to protect the length of the password as
much as its contents.
Page 94

The PlanetPress Suite Workflow Tools Configuration Program
l Administrator:Choose the permission type
l User:Can access none, some, or all of the processes, selected individually in the Permissions section.
l Admin: Has access to all processes and features. When this option is selected, the Permission section is
greyed out an all options are selected in it.
l Disabled:Has access to nothing. The result is the same as not having this user defined at all, but has
the advantage that a disabled user can be reactivated with a simple click.
l Define the permissions for the user (see below).
l Click OKto save the changes.
To define or change the permissions for a SOAP User
The Permissions section of the SOAPtab displays all of the processes that are available in the live configuration (the one that
the PlanetPress service uses). To change or define the permissions:
l In the top Username section, click on the username of which to modify permissions.
l Place a checkmark in each process that the user should have access to.
l Check Monitoring(read) to give permission to the GetProcessList and GetProcessTaskList actions for SOAP.
l Monitoring(write) is currently not implemented.
l Click OKto save the changes.
In order for the changes made here to be effective, you will need to restart the PlanetPress Messenger service. This
can be done via the PlanetPress Suite Service Console.
PDF Viewer
The PDFViewer, introduced in PlanetPress Workflow Tools 7.3 in some areas and expanded for use throughout the configuration tool, displays any PDFused in the configuration or process. Because this PDFviewer is integrated with the suite, it is
not necessary to have any third-party tools such as Adobe Acrobat installed on the operating system.
The PDFViewer is not currently standalone and cannot be used to display PDFs outside of PlanetPress Workflow.
Page 95
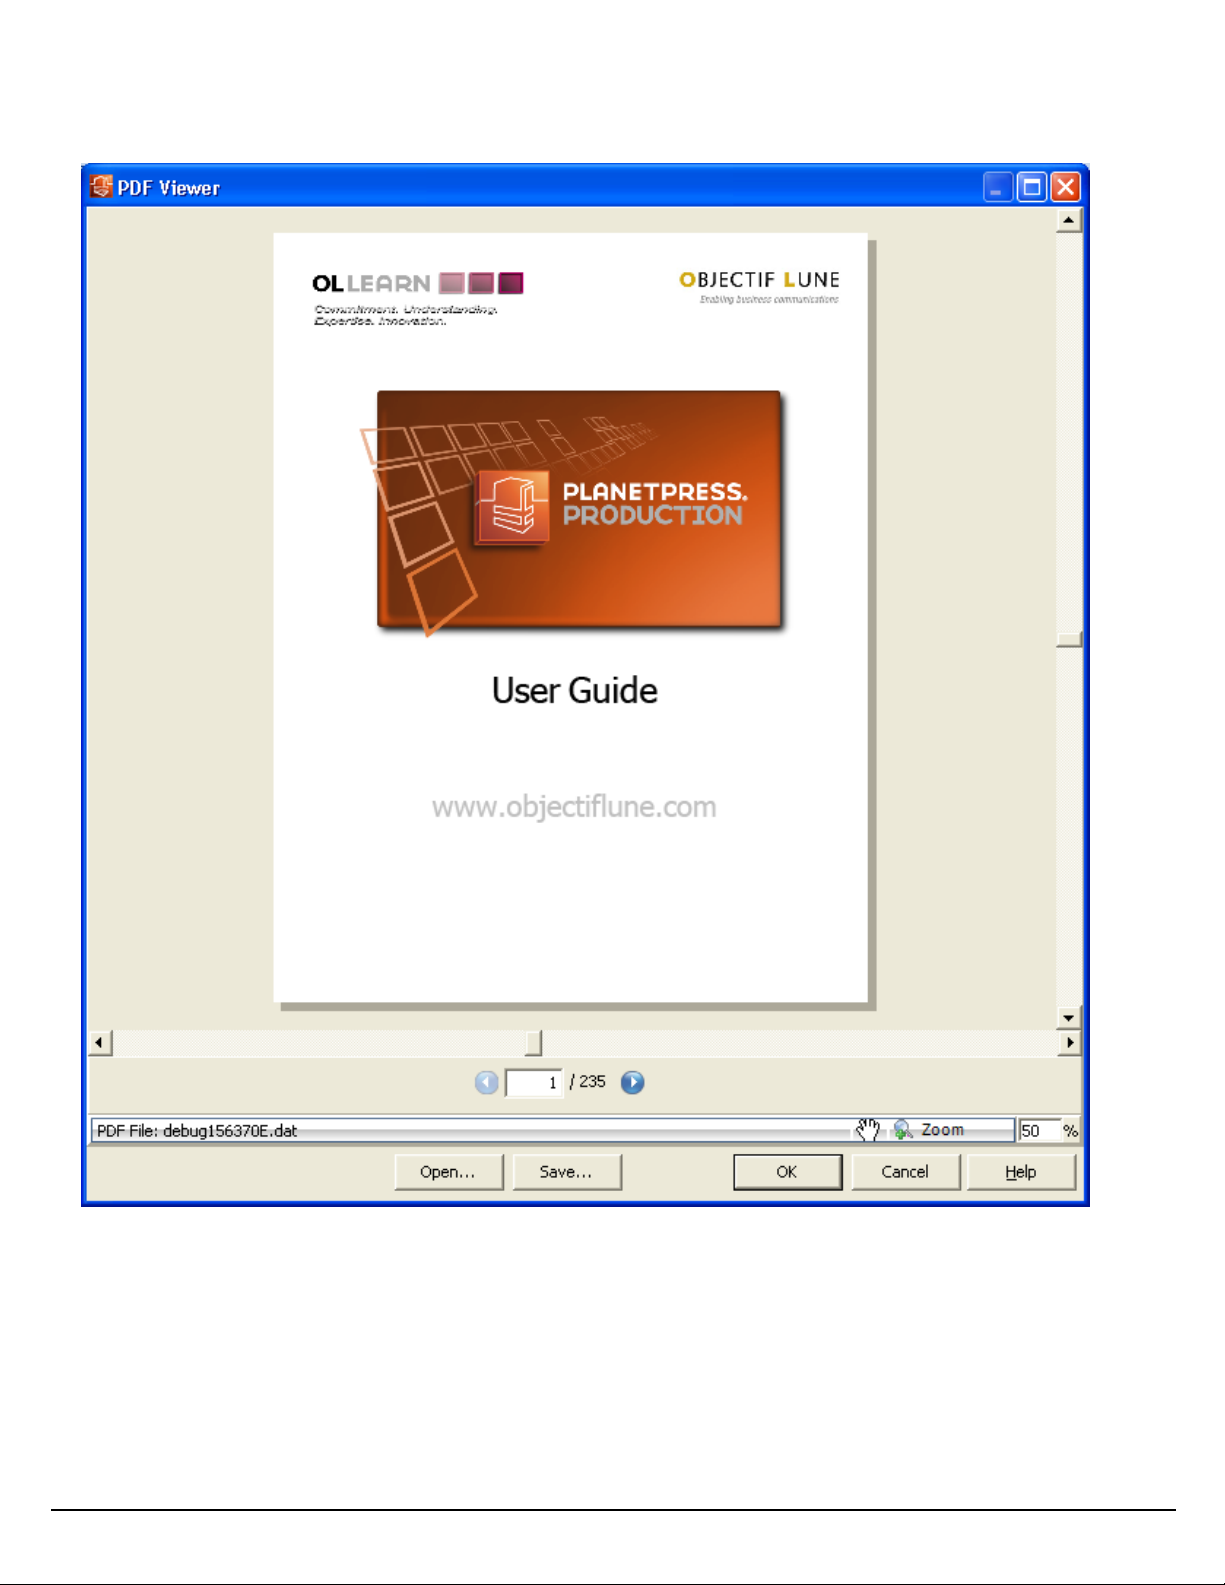
The PlanetPress Suite Workflow Tools Configuration Program
The PDFViewer
The PDFViewer is accessible through one of the following methods:
l In the Documents section of theConfiguration Components pane, expand a document present in the list. Then, right-
click on the document's Preview, and click Open in PDFViewer.
l Click View as PDFin the Debug toolbar. This will show the current data file in the viewer (assuming it is a PDF). If the
viewer is opened during debugging, the current state of the PDF will be displayed (instead of the original data file).
l In the PlanetPressCapture Document Manager dialog, select at least one document from the database and click on
View Documents.
The top area of the PDFViewer displays the PDF, while the bottom area contains a few controls:
Page 96

The PlanetPress Suite Workflow Tools Configuration Program
l Open: Click to browse for a PDFto open in the PDFViewer. Note that this will not change the data file used in the proc-
ess.
l Save:Click to browse for a location and name to save the currently active PDFin the viewer.
l Right Arrow:Click to view the next page of the PDF.
l Left Arrow: Click to view the previous page of the PDF.
l Page Selection:Type a page number and hit Enter on your keyboard to jump to that page.
l Zoom: Click to view a drop-down list of pre-set zoom percentage, or automatic zoom fit options. Or, type in a zoom
percentage and hig Enter on your keyboard to set the zoom level. Note that you can also use CTRL+ScrollWheel (on
your mouse)to zoom in and out, SHIFT+ScrollWheel to scroll left and right, and ScrollWheel to scroll up and down.
The PlanetPress Suite Service Console
The PlanetPress Suite Service Console is a centralized service console and log viewer in one. You can use it to individually start
and stop PlanetPress Suite services, as well as to view current and past log files for each service.
The Service Console has changed greatly since version 7.4. If you are still using an older version of PlanetPress,
please see the user manual for your version instead.
Controlling Services
The left part of the PlanetPress Suite Service Console displays a list of the PlanetPress Suite services and is used to control
these services.
To start a stopped service:
1. Right-click on the service.
2. Click on Start.
3. Look in the Log window on the right to see the service starting.
To stop a service that is running:
1. Right-click on the running service.
2. Click on Stop.
If the service is currently processing a file (if a process is running, output is being generated, job being received, etc),
the service will wait for this action to complete before stopping.
To pause a service temporarily:
1. Right-click on the running service.
2. Click on Active to remove the checkmark.
If the service was currently processing a file, the service will wait for this action to complete before pausing. Once
paused, the service is still "started"but will wait until it is activated again before processing jobs. This is very useful if
you want to receive jobs from external services (such as with the LPDServer)but not process them right away.
To kill (force quit)a service:
1. Right-click on the running service.
2. Click on Kill.
3. Click OKto confirm on the warning.
If the service is currently processing a file, execution will stop and the action will not complete. If the action was partially completed (for example writing a large file), the partial action is not undone. As this may lead to corrupted or
incomplete files, it is strongly advised not to kill a service unless it is absolutely necessary to do so.
Page 97

The PlanetPress Suite Workflow Tools Configuration Program
Viewing log files
The second major role of the Service Console is to view and browse log files. The Service Console can both view existing log
files, or monitor the log file for the current day and update the view in real time.
When a service is selected on the left pane, its log file (if any exists for the current day)is displayed. The log displays in a tree
fashion. The log itself is the root, and each session (the time between the start and stop of a service)is listed. Under each session, each time a process runs, a new branch is created and it can be expanded to see each action within that process.
The log viewer for the current day is always live, meaning it updates automatically as the log file is updated by the appropriate
service.
Viewing older log files
To open an existing, older log file:
1. In the File menu, click on Open.
2. Browse to the location of the log file you want to open
3. Click on the log file and click Open.
The log file is added, by name, at the end of the list of PlanetPress Suite services. Clicking on it opens the log file in the
viewer. Right-clicking on the file brings a menu from which the log file can be refreshed, or removed from the list.
The log viewer for existing log files does not refresh automatically since log files for older days do not generally change. The
display of the sessions, processes and tasks is the same.
The log viewer as described here was introduced in version 7.4 of PlanetPress Suite. Though it should be able to open
log files from older versions of PlanetPress Suite, the results are not guaranteed. Some log files may not display properly in this view.
Searching through the active log file
When a log file is active in the log viewer, it can be searched by going in the Search menu, then clicking Find. After entering a
search term and selecting the options (Match case and Direction), clicking Find Next will display the first result for the search
term.
When a search is started, using F3 on the keyboard or clicking Search then Search again will find and highlight the next
available result.
Add or Delete Document Instances
Update Document Instance to Printers dialog
The Update Document dialog lets you update your PlanetPress Design documents on your printers where those documents
are used in Printer-Centric mode. It displays the following information in the list of installed printer documents:
l Printer Queue:Displays in which printer queue the document is present
l Printer Group:If available, displays in which printer group the document is located.
l Document:Displays the name of the document
l Location:Displays the location(printer or workflow)of the document
Select any document in the list (use CTRL+Click or SHIFT+Click to select multiple document or use the Select All button) and
click OK to update these documents.
To add any document to this list, you need to assign them to a printer queue. See Associate Documents and PlanetPress Watch
Printer Queues.
Page 98

The PlanetPress Suite Workflow Tools Configuration Program
Virtual Drive Manager
When you use the Send images to printer action in a given process, you have the option of, at the same time, sending the
images to the virtual drive (a local storage folder used by PlanetPress Suite applications) of any computer included in your network. You need to do this, for instance, if you plan to run documents that contain dynamic images on those computers (using
the Optimized PostScript Stream option). You can then use the Virtual Drive Manager to see the images that were downloaded to your computer as well as to delete them from your virtual drive.
To add images to the virtual drive, use either of the following methods:
l Send a single resource file to the printer:see Download to Printer.
l Send one or more images to the printer:see Send Images to Printer.
l Use PlanetPress Design:see the PlanetPress Design User Guide.
To delete images from your virtual drive:
1. In the PlanetPress Suite Ribbon, Go to the Tools tab, then click on Virtual Drive Manager.
The Virtual Drive Manager dialog box is displayed. It lists all the images currently stored in your computer’s virtual
drive.
2. Select the images you want to delete.
3. Press the Delete key.
Page 99

Working With Variables
Working With Variables
A Variable is basically a keyword that points to specific location in your computer's memory. This location contains data that
you decide to place in it, by assigning that data to the variable name. This chapter will help you learn about these variables and
how you can use them.
Types of Variables
There are 3 types of variables that can be used in the PlanetPress Suite Workflow Tools:
l Global Variables are available by all processes and tasks within the configuration, and any modification made to
them affects all tasks and configurations. For more information see Manipulate Global Variables.
l Local Variables are specific to an instance of a process. That is to say, when a process changes the information in a
local variable, it changes it only for that process and only for that specific instance of the process. For more information
see Manipulate Local Variables.
l Job Infos are also specific to an instance of a process, however their use is different. Just after an initial or secondary
input task, Job Infos contain information about the job file itself. Job Infos are also, by default, accessible by PlanetPress Design documents used throughoutyour process. They are generally used to gather information from the input
task, or transfer information to your PlanetPress Design document.
All the variables in the PlanetPress Suite Workflow Tools are considered strings, even if the information itself can be a number.
There are no other types of variables (such as arrays, floating point numerical values or boolean) in PlanetPress Suite Workflow Tools.
Job Info Variables
Job Infos have two main uses. First, they contain information on any job file that comes out of the initial input task or any secondary input tasks. The number of job infos as well as their definition can be seen in the Other tab of any input task. Secondly, they are transmitted, unless otherwise configured, directly to any PlanetPress Design document used within your
process and can be directly accessed by that document, so they can be used to transfer complementary information to your
document that is not contained within your data file.
You can also access global and local variables from your document using the ExpandString()function in the PlanetPress Talk language. For more information, please see the PlanetPress Design User Guide and the PlanetPress Talk
Reference Guide.
There are only 9 Job Infos available numbered from 1 to 9. They can be accessed directly anywhere that accepts variable
properties by using the number of the variable preceded by a percentsign (For example, %2 or %9).
You can set the value of a job info within your process in two ways:
l Use the Set Job Info and Variable action task. See Set Job Infos and Variables.
l You can use Scripts. See the chapter Using Scripts.
Considerations on Job Infos:
l While the initial job infos are created by the input task, they can be overwritten by the Set Job Info and Variables Action
Task, by a Script, or by any secondary input task in the process. Whenever you use a job info in your process, make
Page 100

Working With Variables
sure it contains the value that you want, and not one that has been overwritten by another task.
l Job infos sent to the document are global to that document, meaning the values do not change between data files. This
means that if your data file contains multiple data pages for different clients, your job infos cannot be used to send information to the document.
l Job infos are in limited quantity and are slowly being deprecated when transferring data to your document. You should
probably consider using Metadata, or Local Variables.
Standard Variables
Standard Variables, also known as "system variables", are variables that are created and managed directly by PlanetPress
Suite Workflow Tools. Those variables are read-only and cannot be modified. They provide information about the job, process, and the PlanetPress Suite Workflow Tools environment.
Available Standard Variables
Variable Name Example value when interpreted
%c
%F Job File Path and Name C:\Program Files\PlanetPress Suite 7\PlanetPress Watch\Spool\job1D80328.dat
%f
%z Job File Size in bytes. 34134
%o Original File Name invoice_june2nd.txt
%O
%y Current Year 2010
%m Current Month (numeric) 06
%M Current Month (text) June
%L Current Month(short text) JUN
%d CurrentDay (numeric) 16
%D Current Day (text) Monday
%l Current Day (short text) MON
%h Current Hour 18
%n Current Minute 03
%s Current Second 41
%u
%t Current Temporary Folder
%e Current Metadata Filename job00ZAIZ2C4FXON16CE6C566.dat.meta
%E
%w Current process name. My Process
%i
Content of your job file in its
original format.
Job File Name including the file
extension.
Original File Name Without
Extension
Unique 13-char string (will be
different every time it is used)
Current Metadata Path and Filename
Current Loop Iteration Index
(always the innermost loop)
n/a
job1D80328.dat
invoice_june2nd
0ZIS4CW8U47VI00
C:\Documents and Settings\All Users\Application Data\Objectif Lune\PlanetPress
Suite 7\PlanetPress Watch\Spool\6.tmp\
C:\Documents and Settings\All Users\Application Data\Objectif Lune\PlanetPress
Suite 7\PlanetPress Watch\Spool\5.tmp\job00ZAIZ2C4FXON16CE6C566.dat.meta
2
 Loading...