

Page 1

REST API Cookbook with
Working Examples
Version:1.6
Page 2

Page 3

REST API Cookbook with Working Examples
Version 1.6
Last Revision:17/01/2017
Objectif Lune, Inc.
2030 Pie-IX, Suite 500
Montréal, QC, Canada, H1V 2C8
+1 (514) 875-5863
www.objectiflune.com
All trademarks displayed are the property of their respective owners.
Page 4

© Objectif Lune, Inc. 1994-2017. All rights reserved. No part of this documentation may be
reproduced, transmitted or distributed outside of Objectif Lune Inc. by any means whatsoever
without the express written permission of Objectif Lune Inc. Objectif Lune Inc. disclaims
responsibility for any errors and omissions in this documentation and accepts no responsibility
for damages arising from such inconsistencies or their further consequences of any kind.
Objectif Lune Inc. reserves the right to alter the information contained in this documentation
without notice.
Page 4
Page 5

Table of Contents
Table of Contents 5
Welcome to the PlanetPress Connect REST API Cookbook 7
Technical Overview 8
Workflow & Workflow Processes 9
Workflow Components 16
Workflow Operations 20
JSON Structures 21
Working Examples 33
Getting Started 34
Server Security & Authentication 43
Working with the File Store 48
Working with the Entity Services 78
Working with the Workflow Services 99
REST API Reference 211
Authentication Service 215
Content Creation Service 220
Content Item Entity Service 232
Page 5
Page 6

Content Set Entity Service 243
Data Record Entity Service 256
Data Set Entity Service 271
Data Mapping Service 281
Content Creation (Email) Service 297
File Store Service 308
Content Creation (HTML) Service 329
Job Creation Service 338
Job Entity Service 352
Job Set Entity Service 362
Output Creation Service 372
All-In-One Service 388
Copyright Information 400
Legal Notices and Acknowledgments 401
Page 6
Page 7

Welcome to the PlanetPress Connect REST API Cookbook
This guide is aimed at technically experienced users who wish to learn and use the REST API
available in PlanetPress Connect version 1.6.
The PlanetPress Connect REST API consists of many services that expose access to a
number of areas including workflow, data entity management and file store operations.
These services can be used to perform various interactions with the PlanetPress Connect
server such as:
l Upload & Manage Data Files, Data Mapping Configurations & Design Templates in File
Store
l Create, Manage & Find Data Entities internal to the PlanetPress Connect Server
l Create & Monitor Processing Operations within the Workflow
The REST API also supports added security to restrict unauthorized access to the services.
This guide is broken down into three sections:
l Technical Overview - Overview of the concepts and structures used in PlanetPress
Connect and the REST API
l Working Examples - Working examples of the PlanetPress Connect REST API in action
(HTML5 & JavaScript/jQuery)
l REST API Reference - A complete reference to the PlanetPress Connect REST API &
Services
It is recommended that the technical overview section be read first, followed by the working
examples, using the REST API reference for greater detail on implementing any specific
example.
Page 7
Page 8

Technical Overview
This section provides an overview of the concepts and structures used within PlanetPress
Connect and the REST API.
l Workflow & Workflow Processes
l Workflow Components
l Workflow Operations
l JSON Structures
Page 8
Page 9

Workflow & Workflow Processes
In PlanetPress Connect there are four main workflow processes: Data Mapping, Content
Creation, Job Creation, and Output Creation.
There is also an additional workflow process, named All-In-One, which embodies all four other
workflow processes in a singular process.
The following flowchart illustrates the primary workflow in PlanetPress Connect:
Page 9
Page 10
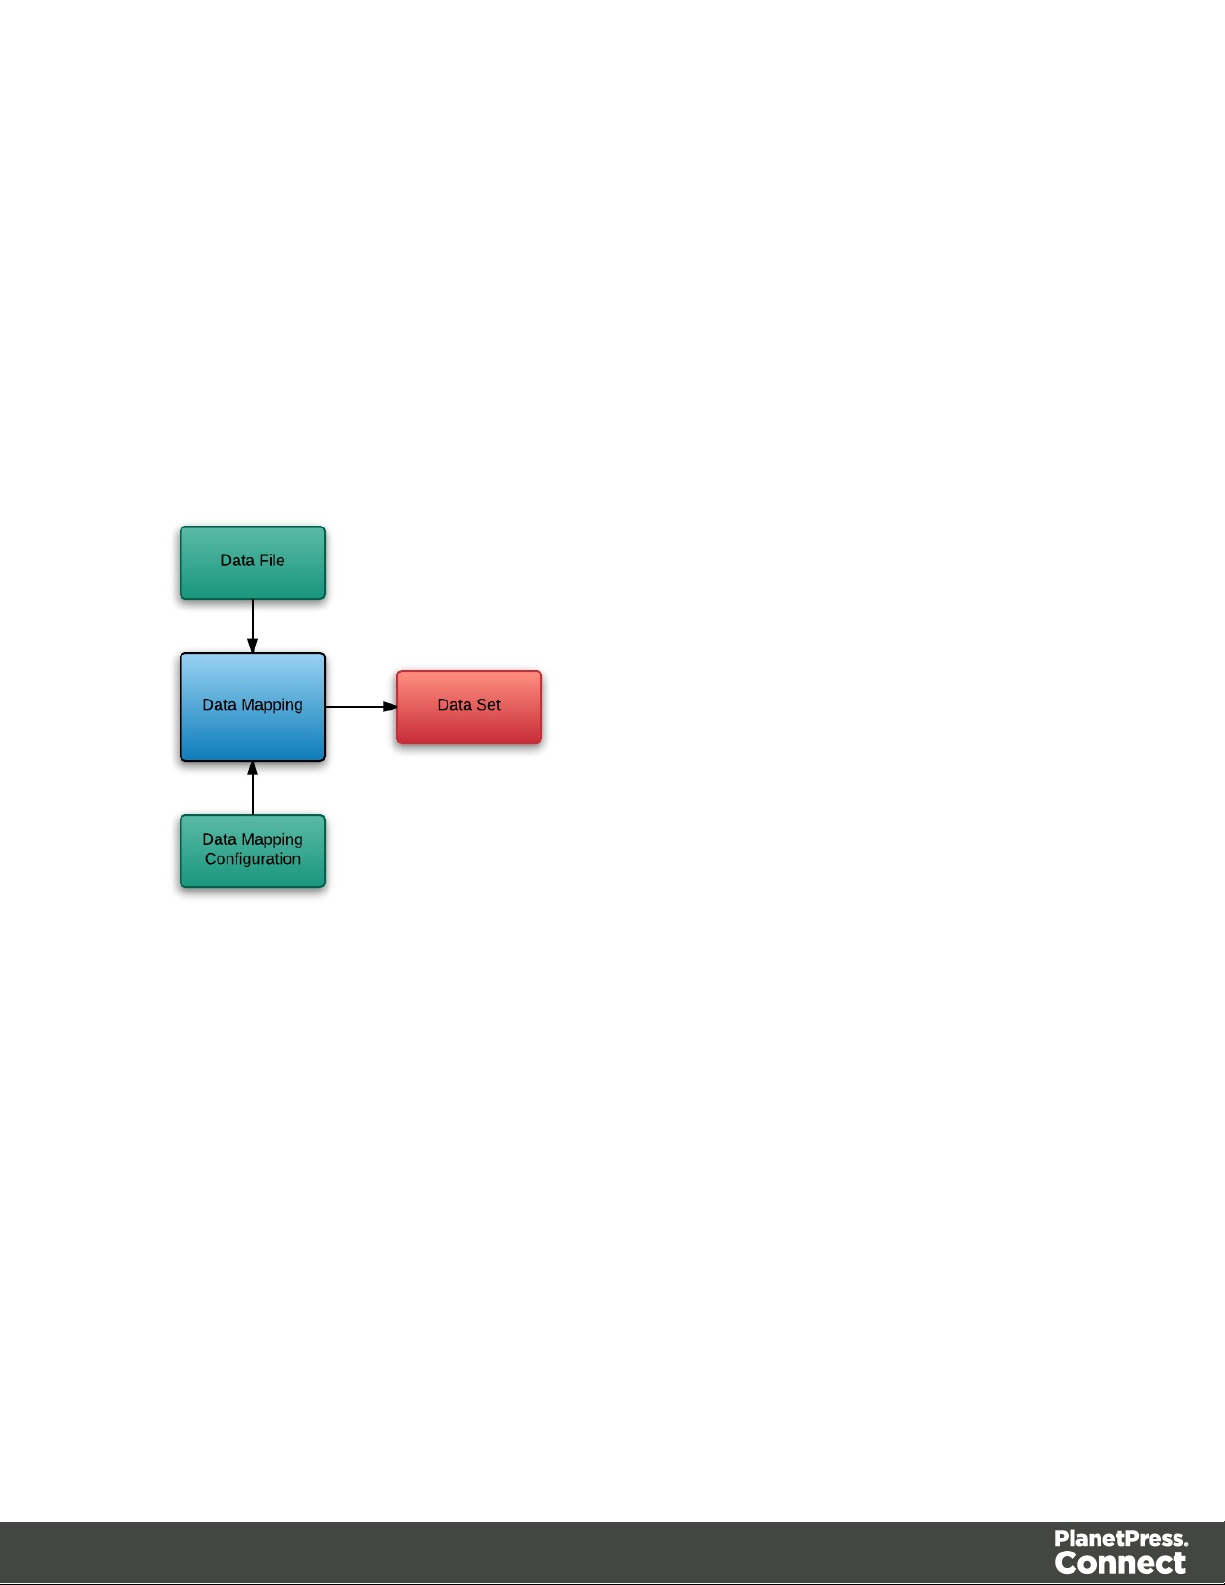
Data Mapping
The Data Mapping process involves taking a data file or source, applying a data mapping
configuration to it, and producing a structured set of data or data records (a Data Set). This
process can also produce a data set from a PDF/VTfile using its internal meta data instead of a
data mapping configuration.
The following flowchart illustrates the standard workflow for the Data Mapping process:
The following flowchart illustrates the alternative workflow for the Data Mapping process when
using PDF/VT data files specifically:
Page 10
Page 11

Page 11
Page 12
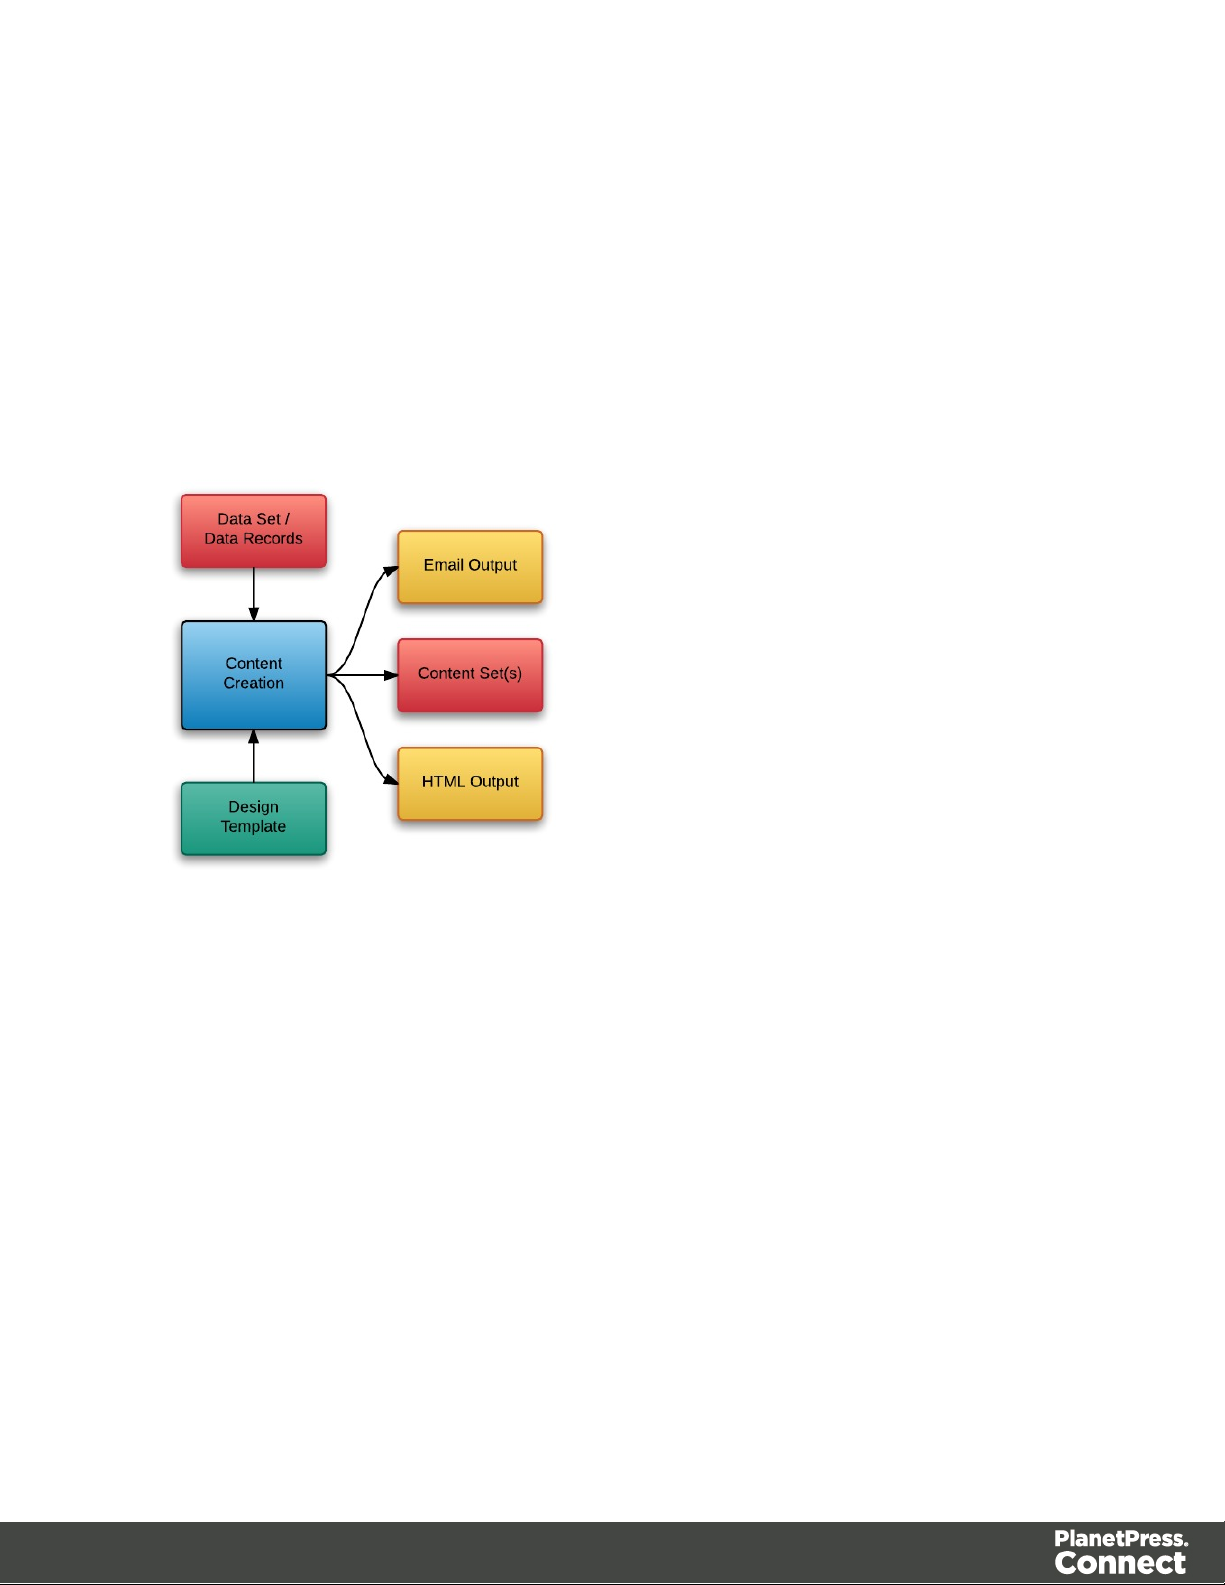
Content Creation
The Content Creation process involves taking a number of data records (from a Data Set)
combining it with a suitable design template, and producing a set or sets of content (Content
Sets). If the content is for the email or web context then output can be published at this stage.
The following flowchart illustrates the standard workflow for the Content Creation process:
Page 12
Page 13
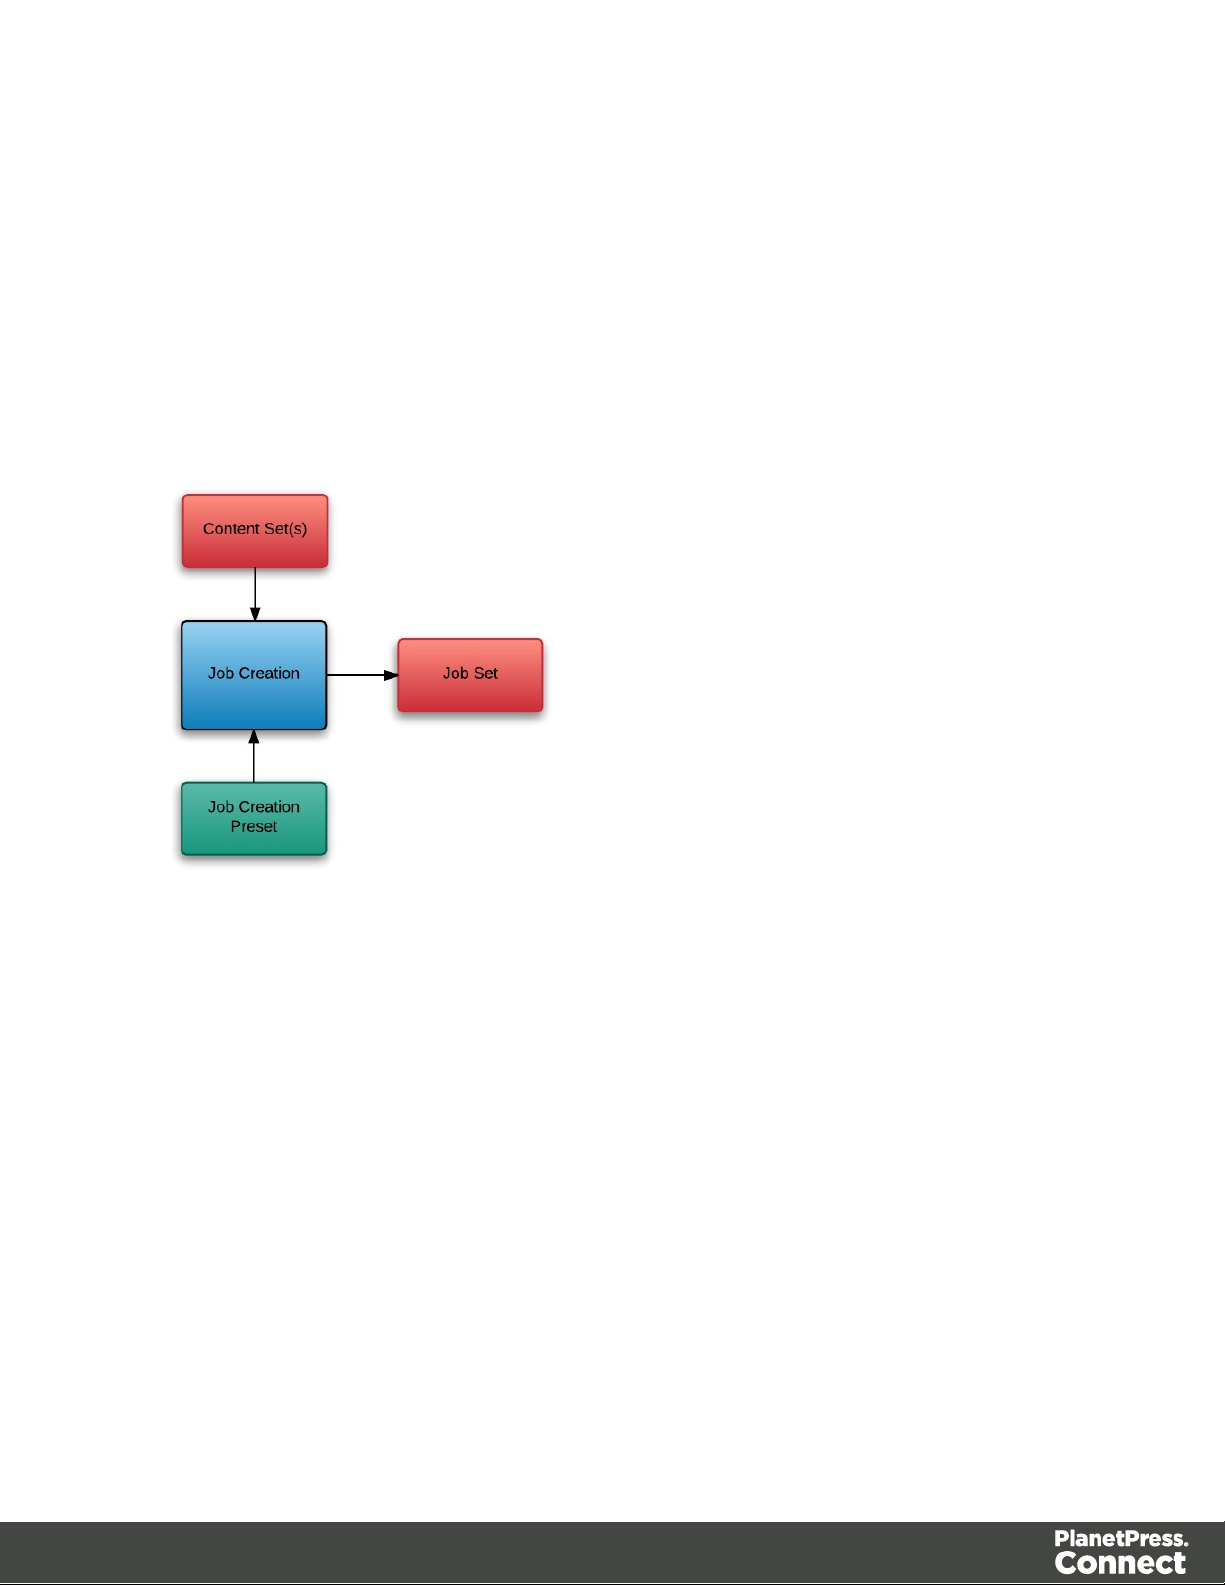
Job Creation
The Job Creation process involves taking one or more content sets and applying a preset for
organising/sorting/grouping them into sets of logical jobs (a Job Set). This includes data
filtering and finishing options.
The following flowchart illustrates the standard workflow for the Job Creation process:
Page 13
Page 14
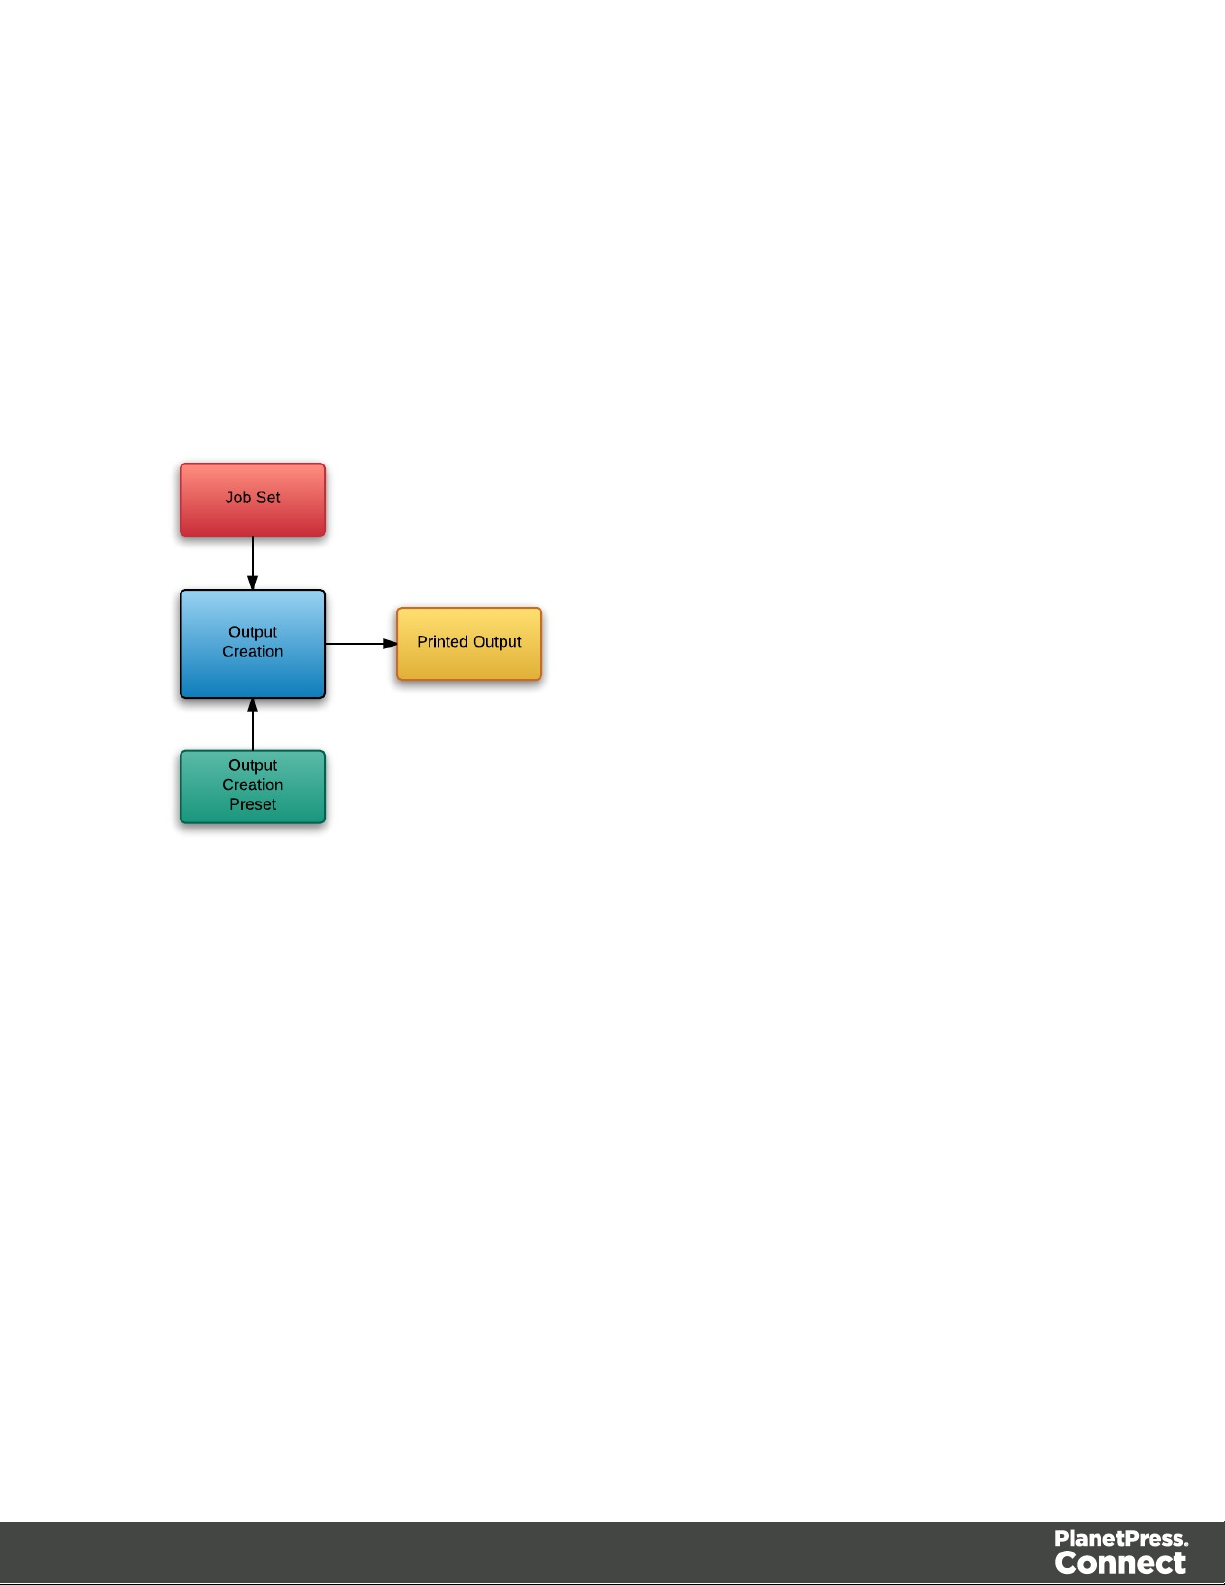
Output Creation
The Output Creation process involves taking a set of jobs, applying a preset and generating the
printed output.
The following flowchart illustrates the standard workflow for the Output Creation process:
Page 14
Page 15

All-In-One
The following flowchart illustrates the potential inputs, outputs and workflows for the All-In-One
process:
Page 15
Page 16

Workflow Components
Each process in the overall PlanetPress Connect workflow takes a series of inputs and
produces output. These can be divided into Input Components and Data Entities.
Page 16
Page 17

Input Components
Input components are used as input to a specific workflow process. The following table lists the
types of input components used in the PlanetPress Connect workflow:
Name Relevant Workflow
File Name Examples
Process
Data File Data Mapping l Promo-EN-10.csv
l Promo-EN-10000.csv
l PDFVT-Data.pdf
Data Mapping
Configuration
Data Mapping l Promo-EN.OL-datamapper
l Transact-EN.OL-
datamapper
Design Template Content Creation l letter-ol.OL-template
l invoice-ol-transpromo.OL-
template
Job Creation Preset Job Creation l Promo-EN-JC-Config.OL-
jobpreset
Output Creation Preset Output Creation l FX4112_Hold_Config.OL-
outputpreset
l Promo-EN-OC-Config.OL-
outputpreset
Page 17
Page 18
Data Entities
There are many data entity types used by PlanetPress Connect, but not all entities can be
accessed through the REST API. The main types to be aware of when working with the API are
Data Sets, Data Records, Content Sets, Content Items, Jobs Sets and Jobs. The following table
lists these entity types in greater detail:
Entity Description
Data
Set &
Data
Records
Content
Sets &
Content
Items
The data set is the artefact produced by a data mapping operation. It holds the
data that was mapped out of the input data file. A data mapping operation
produces a single data set, which contains as many data records as there are
documents. Each data record contains a collection of data values. The data
records in the data set form the master record, or document record, which
typically contains document recipient information. The master record can also
contain a collection of data tables, which form the detail records that hold data
such as invoice line items. Each data table contains a collection of data records,
where each data record contains a collection of data values and a collection of
data tables, and so on.
The content set is the artefact produced by a content creation operation. It holds
all the pages that were produced by the operation. A content creation operation
produces one or more content sets, which contain as many content items as
there were data records given at the start of the operation. Because the data
records used may have different data set owners, a content set cannot be linked
to a single data set, but rather content items are linked to data records. A content
item is further divided in content sections and content pages.
Job Set
& Jobs
The job set is the artefact produced by a job creation operation. It consists in a
hierarchical structure that divides documents is various structures and basically
decides which documents are to be printed and in which order. A job creation
operation creates a single job set with contains a series of containers where
every level contains one or more of the next level down: jobs, job segments,
document sets, documents and document pages. The last level in the chain, the
document pages, contains a single content item. Hence, at the job creation
level, a document may consist of one or more content items.
Page 18
Page 19

Data entities can be produced as output from a workflow process and can then be used as
input to another workflow process.
Page 19
Page 20

Workflow Operations
Each individual process in the overall workflow process can potentially be a long running
operation.
Accordingly, an initial HTTP request is submitted to initiate the workflow operation, then
additional requests are required to monitor progress and retrieve the final result. All the required
detail is included in the HTTP response headers of the initial request, including the URIs that
should be used for further processing
A successful request will return a response that will include the headers listed in the following
table:
Header Description
operationId The unique id of the operation being processed
Link Contains multiple link headers which provide details on which URI to use to
retrieve further information on the operation:
l Header with rel="progress" - The URL to use to check the progress of
the operation
l Header with rel="result" - The URL to use to retrieve the result of the
operation
l Header with rel="cancel" - The URL to use to cancel the operation
A request made to the progress URI during processing will return a progress percentage value
of 0 to 100, and finally the value of ‘done’ once the operation has completed.
A request made to the cancel URI during processing will immediately cancel the operation.
A request made to the result URI after processing has completed will return the final result of
the operation.
This approach is replicated across most workflow based services as demonstrated in the
Working with the Workflow Services page of the Working Examples section.
Page 20
Page 21

JSON Structures
The following table lists the various JSON structures used by the PlanetPress Connect REST
API:
Name Example
JSON
Identifier
JSON
Identifier
(Named)
JSON
Identifier List
JSON
Identifier (with
createOnly
flag)
{
"identifier": 12345
}
{
"identifier": "Promo-EN-1000.csv"
}
{
"identifiers": [ 12345, 23456, 34567 ]
}
{
"identifier": 12345,
"createOnly": true
}
JSON
Identifier List
(with
createOnly
flag)
JSON
Name/Value
List
(Properties
Only)
{
"identifiers": [ 12345, 23456, 34567 ],
"createOnly": true
}
[
{
"name": "start",
"value": "2015-01-01 00:00:00T-0500"
},
{
Page 21
Page 22

Name Example
}
]
"name": "end",
"value": "2015-12-31 23:59:59T-0500"
JSON
Name/Value
List
JSON
Name/Value
Lists
{
"id": 12345,
"properties": [
{
"name": "start",
"value": "2015-01-01 00:00:00T-0500"
},
{
"name": "end",
"value": "2015-12-31 23:59:59T-0500"
},
]
}
[
{
"id": 12345,
},
"properties": [
{
"name": "start",
"value": "2015-01-01 00:00:00T-0500"
},
{
"name": "end",
"value": "2015-12-31 23:59:59T-0500"
},
]
Page 22
Page 23

Name Example
{
}
]
"id": 23456,
"properties": [
{
"name": "start",
"value": "2015-01-01 00:00:00T-0500"
},
{
"name": "end",
"value": "2015-12-31 23:59:59T-0500"
},
]
JSON Record
Content List
{
"id": 12345,
"table": "record",
"fields":[
{
"name": "ID",
"value": "CU00048376"
},
{
"name": "Gender",
"value": "M."
},
{
"name": "FirstName",
"value": "Benjamin"
},
{
"name": "LastName",
"value": "Verret"
Page 23
Page 24

Name Example
]
}
}
JSON Record
Content Lists
[
{
"id": 12345,
"table": "record",
"fields":[
{
"name": "ID",
"value": "CU00048376"
},
{
"name": "Gender",
"value": "M."
},
{
"name": "FirstName",
"value": "Benjamin"
},
},
{
{
"name": "LastName",
"value": "Verret"
}
]
"id": 23456,
"table": "record",
"fields":[
{
"name": "ID",
"value": "CU01499303"
Page 24
Page 25

Name Example
}
},
{
"name": "Gender",
"value": "Miss"
},
{
"name": "FirstName",
"value": "Dianne"
},
{
"name": "LastName",
"value": "Straka"
}
]
JSON Content
Item Identifier
List
]
{
"identifiers": [
{
"item": 12345,
"record": 54321
},
{
"item": 23456,
"record": 65432
},
{
"item": 34567,
"record": 76543
}
]
}
Page 25
Page 26

Name Example
JSON Data
Record
Identifier
JSON
Identifier List
(with Email
Parameters)
{
"record": 12345
}
{
"identifiers": [
12345,
23456
],
"host": "mail.company.com",
"user": "johns",
"password": "password5",
"sender": "john.smith@company.com",
"useAuth": true,
"useStartTLS": false,
"useSender": true,
"attachWebPage": true,
JSON Job Set
Structure
"attachPdfPage": true
}
{
"jobs": [
{
// First Job in JobSet
"segments": [
{
// First JobSegment in first Job
"documentsets": [
{
// First DocumentSet in
first JobSegment in first Job
Page 26
Page 27

Name Example
Document in first DocumentSet in first JobSegment in
first Job
[
DocumentPages in first Document in first DocumentSet
in first JobSegment in first Job
"contentitem": 111
"documents": [
{
// First
"documentpages":
{
// First
},
{
//
Second DocumentPages in first Document in first
DocumentSet in first JobSegment in first Job
"contentitem": 222
}
]
},
{
// Second
Document in first DocumentSet in first JobSegment in
first Job
"documentpages":
[
{
// First
DocumentPages in second Document in first
Page 27
Page 28

Name Example
Job
first JobSegment in second Job
}
]
},
{
// Second Job in JobSet
"segments": [
{
// First JobSegment in second
"documentsets": [
{
// First DocumentSet in
"documents": [
{
// First
Document in first DocumentSet in first JobSegment in
second Job
"documentpages":
[
{
// First
DocumentPages in first Document in first DocumentSet
in first JobSegment in second Job
"contentitem": 789
}
]
}
]
}
]
}
]
Page 28
Page 29
Name Example
JSON HTML
Parameters
List
JSON All-InOne
Configuration
{
"section": "Section 1",
"inline": "ALL"
}
{
"datamining":
{
"identifier": "Promo-EN-1000.csv",
"config": "Promo-EN.OL-datamapper"
},
"contentcreation":
{
"config": "letter-ol.OL-template"
},
"jobcreation":
{
JSON Page
Details
Summary
"config": "4567"
},
"outputcreation":
{
"config": "5678",
"createOnly": true
},
"printRange":
{
"printRange": "1-3, 6, 10"
}
}
{
Page 29
Page 30
Name Example
"pages": [
{
"count": 200,
"media": {
"name": "Plain A4 Paper",
"size": "A4",
"width": "210mm",
"height": "297mm"
}
},
{
"count": 108,
"media": {
"name": "Plain Letter Paper",
"size": "Letter",
JSON Page
Details List
"width": "8.5in",
"height": "11in"
}
}
]
}
[
{
"id": 12345,
"pages": [
{
"count": 2,
"media": {
"name": "Plain A4 Paper",
"size": "A4",
"width": "210mm",
"height": "297mm"
Page 30
Page 31

Name Example
},
{
}
},
{
"count": 1,
"media": {
"name": "Plain Letter Paper",
"size": "Letter",
"width": "8.5in",
"height": "11in"
}
}
]
"id": 23456,
"pages": [
{
"count": 2,
"media": {
}
},
{
"count": 2,
"media": {
"name": "Plain A4 Paper",
"size": "A4",
"width": "210mm",
"height": "297mm"
"name": "Plain Letter Paper",
"size": "Letter",
"width": "8.5in",
"height": "11in"
}
}
Page 31
Page 32

Name Example
Page 32
Page 33

Working Examples
This section provides a number of working examples that demonstrate the use of the various
resources and methods available in the PlanetPress Connect REST API.
For help on getting started with the PlanetPress Connect REST API Cookbook and the working
examples, see the Getting Started page.
l Server Security & Authentication
l Working with the File Store
l Working with the Entity Services
l Working with the Workflow Services
Page 33
Page 34

Getting Started
This guide provides many working examples to help illustrate the correct use of a given
API/method. To achieve this, the guide uses HTML5 & JavaScript/jQuery syntax, and thus,
some basic experience and knowledge of these technologies is assumed.
HTML5: http://www.w3schools.com/html/
jQuery: https://jquery.com/
Help on installing and getting started with the working examples can be found on the
Requirements & Installation and Structure of the Working Examples pages.
Important notes on general use of the working examples can be found in the HTML Input
Placeholders & Multiple Value Fields and Display of Working Example Results pages.
If you have server security settings enabled on your PlanetPress Connect server then the Using
the Working Examples with Server Security page should be read also.
Page 34
Page 35

Requirements & Installation
Warning
If using Internet Explorer, you may find issues when using the working examples with
PlanetPress Connect's Server Security Settings set to enabled.
The working examples use HTML5 Local Storage to facilitate authentication and certain
simplicity / ease-of-use (across browser tabs). Depending on how your Internet Explorer
security settings are configured, you may experience issues if the security level of your
zone is set too high.
Essentially, the security zone needs to have the security option Userdata persistence
(under Miscellaneous) set to enabled. Without this option enabled, the working
examples will not function correctly when using them with PlanetPress Connect's Server
SecuritySettings set to enabled.
After running the Authenticate/Login to Server working example to re-authenticate, you
should only need to refresh existing pages in order for the authentication credentials
(token) to be picked up. In the case of Internet Explorer, you may need to restart the
browser for the changes to be picked up.
If all else fails, disabling of the Sever Security Settings in the PlanetPress Connect
Server Preferences should avoid issues with running the various examples on Internet
Explorer.
It is recommended that you use a modern web-browser other than Internet Explorer
when running the working examples.
Requirements
To use the PlanetPress Connect REST API Cookbook with Working Examples source you will
require the following:
1. A working installation of PlanetPress Connect
2. Any modern web browser able to display HTML5
1
1
Any recent version of Mozilla Firefox, Google Chrome, or Opera with support for HTML5 should be
suitable for running the working examples contained in this guide. Versions of Internet Explorer 10+ may
also be suitable in some cases.
Page 35
Page 36

Installation
Note
You can access the PlanetPress Connect REST API Cookbook with Working Examples
source locally by entering the following URL in your web browser:
http://localhost:9340/serverengine/html/cookbook/index.html
The working examples source comes pre-installed with PlanetPress Connect and can be
located in a sub-directory of your existing PlanetPress Connect installation directory.
To locate the source on Windows:
1. Open up Windows Explorer and navigate to the PlanetPress Connect installation
directory followed by its plugins sub-directory.
2. Find the com.objectiflune.serverengine.rest.gui directory and navigate to its www sub-
directory
3. You should now be exploring the following or similar location:
C:\Program Files\Objectif Lune\OL
Connect\plugins\com.objectiflune.serverengine.rest.gui_1.X.XXXXX.XXXXXXXXXXXX\www
4. The www directory contains a cookbook sub-directory, which contains all of the working
examples source. You should find a directory structure matching that shown on the
Structure of the Working Examples page.
Page 36
Page 37

Structure of the Working Examples
The working examples are designed to be complete examples, and will generally consists of
one HTML5 file paired with a JavaScript/jQuery module which can be found in the
examples/<service-name>/js/ sub-directory.
Where any frequent or boilerplate functionality is commonly used across the examples, this has
been moved to the common/js/common.js JavaScript/jQuery module.
The examples make use of this module for functionality such as setting up the example, and
displaying output results.
Page 37
Page 38

The examples also make use of some simple CSS classes as defined in
common/css/styles.css and HTML snippets for the presentation of output results.
Page 38
Page 39

HTML Input Placeholders & Multiple Value Fields
In the working examples, HTML input elements make use of the placeholder attribute to help
provide some indication of the type and format of the value expected to be entered / specified.
The following table lists examples of placeholders commonly used in the working examples:
HTML Expected Type Example Values
Single ID Value
Single ID or Name Value (File Name)
One or More ID Values (comma
separated)
Name (Text) Value
Numerical Range
l 2341
l 3
l 2341
l Promo-EN-1000.csv
l 2341, 2342
l 3456
l ol-admin
l Section 2
l 1, 2, 3
Email Address Value
Server Hostname Value
l 1-5
l 1, 2, 3-5, 6
l john.smith@contoso.com
l mailbox.contoso.com
Page 39
Page 40

Display of Working Example Results
Note
In some examples the same result will displayed in both plain and JSON structure based
formats. This is to assist ease-of-use when working with outputs of one example that will
be needed as an input to another example.
When a working example is run, any results will be displayed in a Results area that will appear
below the working example existing HTML interface.
For example:
Page 40
Page 41

A working example can be run multiple times, and each time the results will be appended
below allowing you to compare the output of varying inputs. The Clear button can be selected
at any time to clear all existing results.
Page 41
Page 42
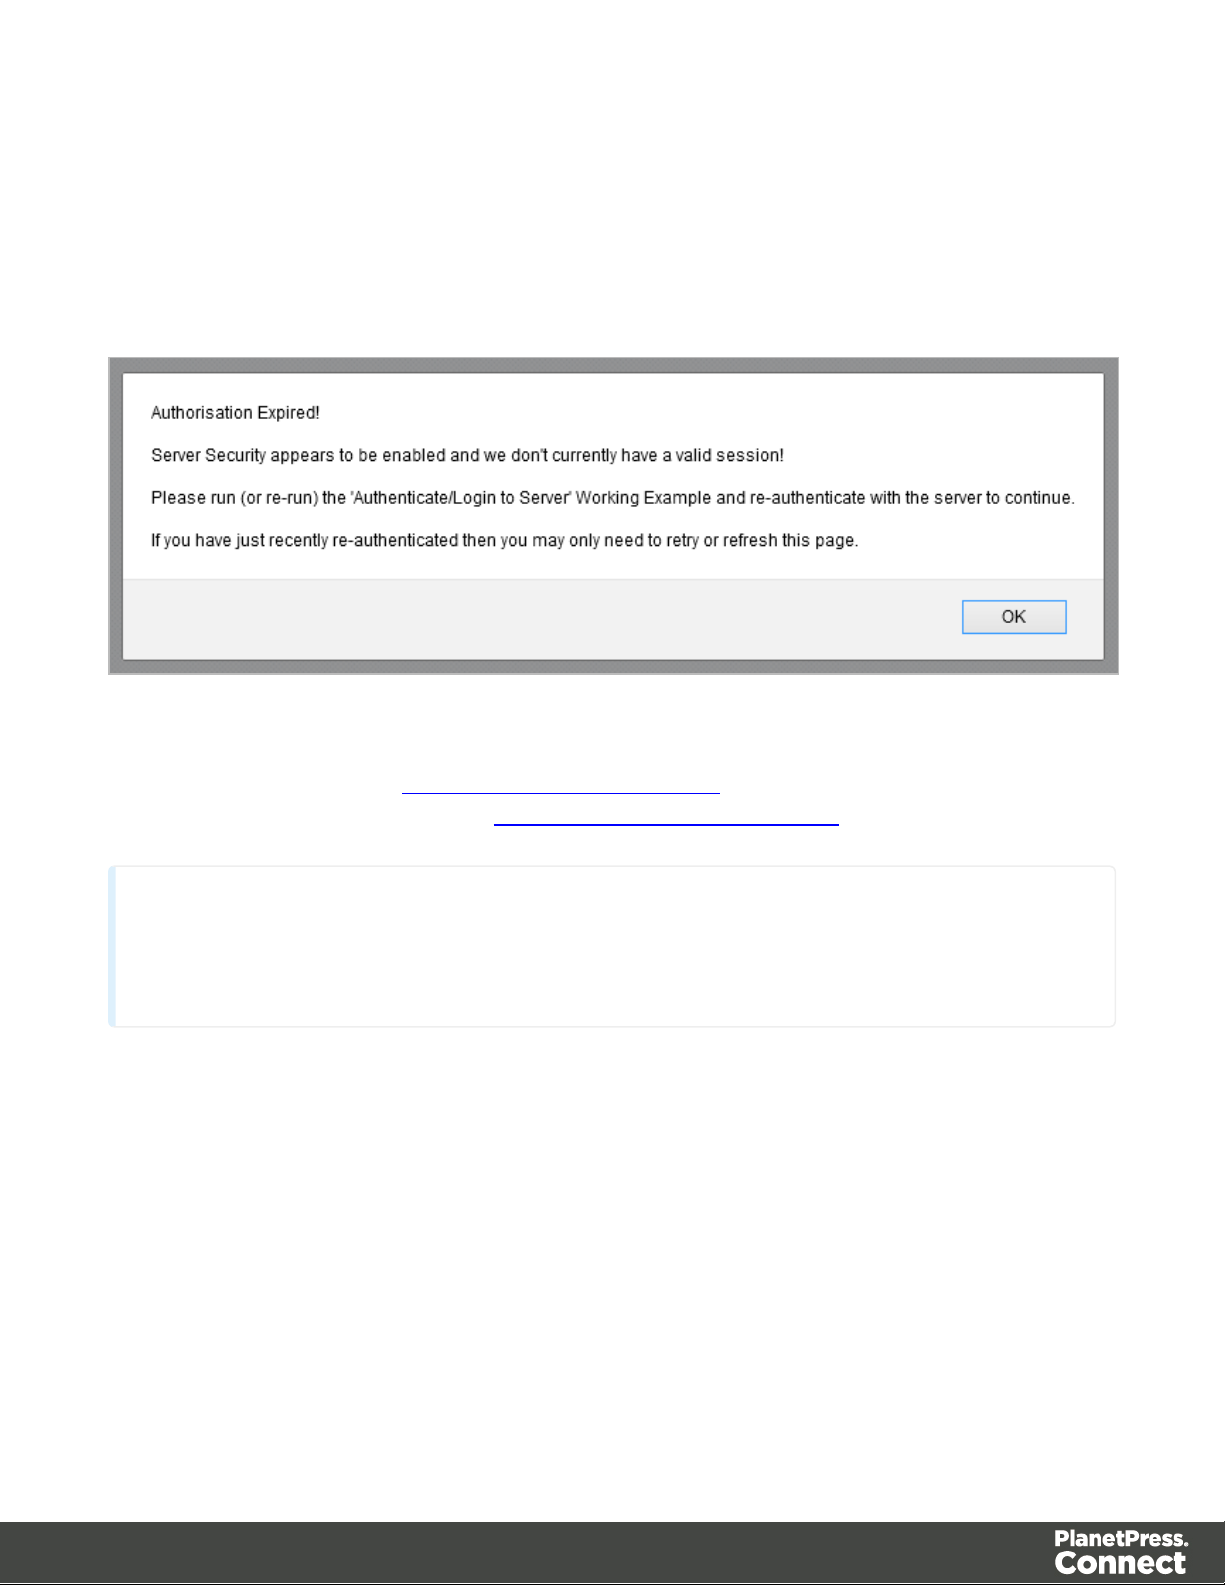
Using the Working Examples with Server Security
Note
Once re-authenticated, you shouldn’t see this dialog box again for as long as your
session remains active.
If you have the Server Security Settings set to enabled in your PlanetPress Connect Server
Preferences, then you may see the following dialog box initially display when working with the
examples:
In the event of this dialog box, just follow the instructions and either refresh the page or reauthenticate by running the Authenticating with the Server (Authenticate/Login to Server)
working example covered under the Server Security & Authentication section.
Page 42
Page 43

Server Security & Authentication
Note
A complete listing including these examples can be found in the index.html file located
at the root of the working example source code which contains links to all working
examples.
This section consists of a number of pages covering various useful working examples:
1. Authenticating with the Server
See the Authentication Service page of the REST API Reference section for further detail.
Page 43
Page 44

Authenticating with the Server
Problem
Your PlanetPress Connect Server is configured to use server security, and you want to
authenticate with the server to obtain the correct access to make future requests.
Solution
The solution is to create a request using the following URI and method type to authenticate with
the server via the Authentication REST service:
Authenticate/Login to Server
Example
HTML5
auth-login-server.html
<!DOCTYPE html>
<html>
<head>
<meta charset="utf-8">
<title>Authenticate/Login to Server Example</title>
<script src="../../common/lib/js/jquery-
1.11.3.min.js"></script>
<script src="../../common/js/common.js"></script>
<script src="js/auth-login-server.js"></script>
<link rel="stylesheet" href="../../common/css/styles.css">
</head>
<body>
<h2>Authentication Service - Authenticate/Login to Server
Example</h2>
<form>
<fieldset>
<legend>Inputs</legend>
<div>
<label for="username">Username:</label>
<input id="username" type="text"
placeholder="Username" required>
</div>
/rest/serverengine/authentication/login
POST
Page 44
Page 45

<div>
<label for="password">Password:</label>
<input id="password" type="password"
placeholder="Password" required>
</div>
<div>
<input id="submit" type="submit"
value="Submit">
</div>
</fieldset>
</form>
</body>
</html>
JavaScript/jQuery
auth-login-server.js
/* Authentication Service - Authenticate/Login to Server Example */
(function ($) {
"use strict";
$(document).ready(function () {
setupExample();
$("form").on("submit", function (event) {
+ password);
event.preventDefault();
var username = $("#username").val(),
password = $("#password").val();
$.ajax({
beforeSend: function (xhr) {
var base64 = "Basic " + btoa(username + ":"
xhr.setRequestHeader("Authorization", base64);
},
type: "POST",
url: "/rest/serverengine/authentication/login"
}).done(function (response) {
displayStatus("User '" + username + "'
Page 45
Page 46

Authenticated Successfully");
displayResult("Authorization Token", response);
setSessionToken(response);
}).fail(function (xhr, status, error) {
displayStatus("Authentication of User '" + username
+ "' failed!");
displayResult("Status", xhr.status + " " + error);
displayResult("Error", xhr.responseText);
setSessionToken(null);
});
});
});
}(jQuery));
Screenshot & Output
Usage
To run the example simply enter your credentials into the Username and Password fields and
select the Submit button.
Once selected, a request containing the credentials will be sent to the server and the result will
be returned and displayed to the Results area.
Page 46
Page 47

If authentication was successful then the response will contain an Authorization Token that
can be then used in the submission of future requests to the server.
Discussion
Firstly, we define an event handler that will run in response to the submission of the HTML form
via the selection of the Submit button.
When our event hander function is called, we then obtain the value of the Username and
Password fields. We define two variables, username to hold the value of the Username text
field and password to hold the value of the Password text field.
Next we construct an jQuery AJAX request which will be sent to the Authentication REST
service:
Method type and url arguments are specified as shown earlier.
We specify a beforeSend argument containing a function that will add an additional
Authorization header to the request to facilitate Basic HTTP Authentication. The value of
the Authorization request header is a Base64 digest of the username and password
variables.
When the request is successful or done, a request response is received and the content of that
response is passed as the function parameter response. In the example, we then display the
value of this parameter which should be the new Authorization Token which can then be used
in the submission of future requests to the server.
This is achieved by placing the value of the Authorization Token in the auth_token request
header of a future request. In the example the common function setSessionToken is used to
facilitate this function for all future working example requests.
Further Reading
See the Authentication Service page of the REST API Reference section for further detail.
Page 47
Page 48

Working with the File Store
Note
A complete listing including these examples can be found in the index.html file located
at the root of the working example source code which contains links to all working
examples.
This section consists of a number of pages covering various useful working examples:
1. Uploading a Data File to the File Store
2. Uploading a Data Mapping Configuration to the File Store
3. Uploading a Design Template to the File Store
4. Uploading a Job Creation Preset to the File Store
5. Uploading an Output Creation Preset to the File Store
See the File Store Service page of the REST API Reference section for further detail.
Page 48
Page 49

Uploading a Data File to the File Store
Problem
You want to upload a data file to the File Store so that it can be used as part of a Data Mapping
operation.
Solution
The solution is to create a request using the following URI and method type to submit the data
file to the server via the File Store REST service:
Upload Data File
Example
HTML5
fs-datafile-upload.html
<!DOCTYPE html>
<html>
<head>
<meta charset="utf-8">
<title>Upload Data File Example</title>
<script src="../../common/lib/js/jquery-
1.11.3.min.js"></script>
<script src="../../common/js/common.js"></script>
<script src="js/fs-datafile-upload.js"></script>
<link rel="stylesheet" href="../../common/css/styles.css">
</head>
<body>
<h2>File Store Service - Upload Data File Example</h2>
<form>
<fieldset>
<legend>Inputs</legend>
<div>
<label for="datafile">Data File:</label>
<input id="datafile" type="file" required>
</div>
</fieldset>
<fieldset>
/rest/serverengine/filestore/DataFile
POST
Page 49
Page 50

</fieldset>
<fieldset>
value="Submit">
</fieldset>
</form>
</body>
</html>
<legend>Options</legend>
<div>
<label for="named">Named:</label>
<input id="named" type="checkbox">
</div>
<div>
<label for="persistent">Persistent:</label>
<input id="persistent" type="checkbox">
</div>
<legend>Actions</legend>
<div>
<input id="submit" type="submit"
</div>
JavaScript/jQuery
fs-datafile-upload.js
/* File Store Service - Upload Data File Example */
(function ($) {
"use strict";
$(document).ready(function () {
setupExample();
$("form").on("submit", function (event) {
event.preventDefault();
if (!checkSessionValid()) { return; }
var file = $("#datafile")[0].files[0],
named = $("#named").is(":checked"),
persistent = $("#persistent").is(":checked");
var settings = {
Page 50
Page 51

type: "POST",
url:
"/rest/serverengine/filestore/DataFile?persistent=" + persistent,
data: file,
processData: false,
contentType: "application/octet-stream"
};
if (named) { settings.url += "&filename=" + file.name;
}
$.ajax(settings).done(function (response) {
displayStatus("Request Successful");
displayInfo("Data File '" + file.name + "' Uploaded
Successfully");
displayResult("Managed File ID", response);
}).fail(displayDefaultFailure);
});
});
}(jQuery));
Screenshot & Output
Page 51
Page 52

Usage
Note
Only one Managed File in the file store can be associated with a specific name. If two
files are uploaded to the file store under the same name, then only the most recently
uploaded file will be associated with (or can be referenced using) that name.
To run the example simply select the Browse button and then select the data file you wish to
upload using the selection dialog box.
Next you can specify the following options to use with the upload of the data file:
l Named - allow this file to be identified/referenced by its Managed File Name as well as its
Managed File ID
l Persistent - make this file persistent in the file store
Once the file and options are selected, simply select the Submit button to upload the file to the
server's file store and the resulting Managed File ID for the data file will be returned and
displayed to the Results area.
Discussion
Firstly, we define an event handler that will run in response to the submission of the HTML form
via the selection of the Submit button.
When our event handler function is called, we then obtain a reference to the local data file
previously selected. This is achieved by getting the first value of the files attribute of the HTML
element with the ID of datafile (in this case a file type input HTML element) and storing it in a
variable file.
We also obtain boolean values for the Named and Persistent options (both checkbox type
input HTML elements) and store them in the named and persistent variables respectively.
Next we construct a jQuery AJAX request which will be sent to the File Store REST service.
We use an object called settings to hold the arguments for our request:
Method type and url arguments are specified as shown earlier, with the addition of a
Page 52
Page 53

persistent query parameter which specifies whether the file is to be persistent in the file
store when uploaded.
We specify the variable file as the data or contents of the request, a contentType argument
of "application/octet-stream", and because we are sending file data we also specify a
processData argument set to false.
If the Named option is checked in our form, and the named variable is true, then a filename
query parameter is also added which contains the file name of the file selected (file.name).
Lastly, the settings object is passed as an argument to the jQuery AJAX function ajax and the
request is executed.
When the request is successful or done, a request response is received and the content of that
response is passed as the function parameter response. In the example, we then display the
value of this parameter which should be the new Managed File ID of the data file in the file
store.
Further Reading
See the File Store Service page of the REST API Reference section for further detail.
Page 53
Page 54

Uploading a Data Mapping Configuration to the File Store
Problem
You want to upload a data mapping configuration to the File Store so that it can be used as part
of a Data Mapping operation.
Solution
The solution is to create a request using the following URI and method type to submit the data
mapping configuration to the server via the File Store REST service:
Upload Data Mapping
Configuration
Example
HTML5
fs-datamapper-upload.html
<!DOCTYPE html>
<html>
<head>
<meta charset="utf-8">
<title>Upload Data Mapping Configuration Example</title>
<script src="../../common/lib/js/jquery-
1.11.3.min.js"></script>
<script src="../../common/js/common.js"></script>
<script src="js/fs-datamapper-upload.js"></script>
<link rel="stylesheet" href="../../common/css/styles.css">
</head>
<body>
<h2>File Store Service - Upload Data Mapping Configuration
Example</h2>
<form>
<fieldset>
<legend>Inputs</legend>
<div>
<label for="datamapper">Data Mapping
Configuration:</label>
<input id="datamapper" type="file" required>
/rest/serverengine/filestore/DataMiningConfig
POST
Page 54
Page 55

</fieldset>
<fieldset>
</fieldset>
<fieldset>
value="Submit">
</fieldset>
</form>
</body>
</html>
</div>
<legend>Options</legend>
<div>
<label for="named">Named:</label>
<input id="named" type="checkbox">
</div>
<div>
<label for="persistent">Persistent:</label>
<input id="persistent" type="checkbox">
</div>
<legend>Actions</legend>
<div>
<input id="submit" type="submit"
</div>
JavaScript/jQuery
fs-datamapper-upload.js
/* File Store Service - Upload Data Mapping Configuration Example
*/
(function ($) {
"use strict";
$(document).ready(function () {
setupExample();
$("form").on("submit", function (event) {
event.preventDefault();
if (!checkSessionValid()) { return; }
var file = $("#datamapper")[0].files[0],
Page 55
Page 56

named = $("#named").is(":checked"),
persistent = $("#persistent").is(":checked");
var settings = {
type: "POST",
url:
"/rest/serverengine/filestore/DataMiningConfig?persistent=" +
persistent,
data: file,
processData: false,
contentType: "application/octet-stream"
};
if (named) { settings.url += "&filename=" + file.name;
}
$.ajax(settings).done(function (response) {
displayStatus("Request Successful");
displayInfo("Data Mapping Configuration '" +
file.name + "' Uploaded Successfully");
displayResult("Managed File ID", response);
}).fail(displayDefaultFailure);
});
});
}(jQuery));
Page 56
Page 57

Screenshot & Output
Note
Only one Managed File in the file store can be associated with a specific name. If two
Usage
To run the example simply select the Browse button and then select the data mapping
configuration you wish to upload using the selection dialog box.
Next you can specify the following options to use with the upload of the data mapping
configuration:
l Named - allow this configuration to be identified/referenced by its Managed File Name as
well as its Managed File ID
l Persistent - make this configuration persistent in the file store
Page 57
Page 58

files are uploaded to the file store under the same name, then only the most recently
uploaded file will be associated with (or can be referenced using) that name.
Once the configuration and options are selected, simply select the Submit button to upload the
configuration to the server's file store and the resulting Managed File ID for the data mapping
configuration will be returned and displayed to the Results area.
Discussion
Firstly, we define an event handler that will run in response to the submission of the HTML form
via the selection of the Submit button.
When our event handler function is called, we then obtain a reference to the local data mapping
configuration previously selected. This is achieved by getting the first value of the files
attribute of the HTML element with the ID of datamapper (in this case a file type input HTML
element) and storing it in a variable file.
We also obtain boolean values for the Named and Persistent options (both checkbox type
input HTML elements) and store them in the named and persistent variables respectively.
Next we construct a jQuery AJAX request which will be sent to the File Store REST service.
We use an object called settings to hold the arguments for our request:
Method type and url arguments are specified as shown earlier, with the addition of a
persistent query parameter which specifies whether the configuration is to be persistent in
the file store when uploaded.
We specify the variable file as the data or contents of the request, a contentType argument
of "application/octet-stream", and because we are sending file data we also specify a
processData argument set to false.
If the Named option is checked in our form, and the named variable is true, then a filename
query parameter is also added which contains the file name of the configuration selected
(file.name).
Page 58
Page 59

Lastly, the settings object is passed as an argument to the jQuery AJAX function ajax and the
request is executed.
When the request is successful or done, a request response is received and the content of that
response is passed as the function parameter response. In the example, we then display the
value of this parameter which should be the new Managed File ID of the data mapping
configuration in the file store.
Further Reading
See the File Store Service page of the REST API Reference section for further detail.
Page 59
Page 60

Uploading a Design Template to the File Store
Problem
You want to upload a design template to the File Store so that it can be used as part of a
Content Creation operation.
Solution
The solution is to create a request using the following URI and method type to submit the
design template to the server via the File Store REST service:
Upload Design Template
Example
HTML5
fs-designtemplate-upload.html
<!DOCTYPE html>
<html>
<head>
<meta charset="utf-8">
<title>Upload Design Template Example</title>
<script src="../../common/lib/js/jquery-
1.11.3.min.js"></script>
<script src="../../common/js/common.js"></script>
<script src="js/fs-designtemplate-upload.js"></script>
<link rel="stylesheet" href="../../common/css/styles.css">
</head>
<body>
<h2>File Store Service - Upload Design Template
Example</h2>
<form>
<fieldset>
<legend>Inputs</legend>
<div>
<label for="designtemplate">Design
Template:</label>
<input id="designtemplate" type="file"
required>
/rest/serverengine/filestore/template
POST
Page 60
Page 61

</fieldset>
<fieldset>
</fieldset>
<fieldset>
value="Submit">
</fieldset>
</form>
</body>
</html>
</div>
<legend>Options</legend>
<div>
<label for="named">Named:</label>
<input id="named" type="checkbox" checked>
</div>
<div>
<label for="persistent">Persistent:</label>
<input id="persistent" type="checkbox">
</div>
<legend>Actions</legend>
<div>
<input id="submit" type="submit"
</div>
JavaScript/jQuery
fs-designtemplate-upload.js
/* File Store Service - Upload Design Template Example */
(function ($) {
"use strict";
$(document).ready(function () {
setupExample();
$("form").on("submit", function (event) {
event.preventDefault();
if (!checkSessionValid()) { return; }
var file = $("#designtemplate")[0].files[0],
named = $("#named").is(":checked"),
Page 61
Page 62

persistent = $("#persistent").is(":checked");
var settings = {
type: "POST",
url:
"/rest/serverengine/filestore/template?persistent=" + persistent,
data: file,
processData: false,
contentType: "application/zip"
};
if (named) { settings.url += "&filename=" + file.name;
}
$.ajax(settings).done(function (response) {
displayStatus("Request Successful");
displayInfo("Design Template '" + file.name + "'
Uploaded Successfully");
displayResult("Managed File ID", response);
}).fail(displayDefaultFailure);
});
});
}(jQuery));
Page 62
Page 63

Screenshot & Output
Note
Only one Managed File in the file store can be associated with a specific name. If two
files are uploaded to the file store under the same name, then only the most recently
Usage
To run the example simply select the Browse button and then select the design template you
wish to upload using the selection dialog box.
Next you can specify the following options to use with the upload of the design template:
l Named - allow this template to be identified/referenced by its Managed File Name as well
as its Managed File ID
l Persistent - make this template persistent in the file store
Page 63
Page 64

uploaded file will be associated with (or can be referenced using) that name.
Once the template and options are selected, simply select the Submit button to upload the
template to the server's file store and the resulting Managed File ID for the design template will
be returned and displayed to the Results area.
Discussion
Firstly, we define an event handler that will run in response to the submission of the HTML form
via the selection of the Submit button.
When our event handler function is called, we then obtain a reference to the local design
template previously selected. This is achieved by getting the first value of the files attribute of
the HTML element with the ID of designtemplate (in this case a file type input HTML element)
and storing it in a variable file.
We also obtain boolean values for the Named and Persistent options (both checkbox type
input HTML elements) and store them in the named and persistent variables respectively.
Next we construct a jQuery AJAX request which will be sent to the File Store REST service.
We use an object called settings to hold the arguments for our request:
Method type and url arguments are specified as shown earlier, with the addition of a
persistent query parameter which specifies whether the template is to be persistent in the
file store when uploaded.
We specify the variable file as the data or contents of the request, a contentType argument
of "application/zip", and because we are sending file data we also specify a processData
argument set to false.
If the Named option is checked in our form, and the named variable is true, then a filename
query parameter is also added which contains the file name of the template selected
(file.name).
Lastly, the settings object is passed as an argument to the jQuery AJAX function ajax and the
request is executed.
Page 64
Page 65

When the request is successful or done, a request response is received and the content of that
response is passed as the function parameter response. In the example, we then display the
value of this parameter which should be the new Managed File ID of the design template in the
file store.
Further Reading
See the File Store Service page of the REST API Reference section for further detail.
Page 65
Page 66

Uploading a Job Creation Preset to the File Store
Problem
You want to upload a job creation preset to the File Store so that it can be used as part of a Job
Creation operation.
Solution
The solution is to create a request using the following URI and method type to submit the job
creation preset to the server via the File Store REST service:
Upload Job Creation
Preset
Example
HTML5
fs-jcpreset-upload.html
<!DOCTYPE html>
<html>
<head>
<meta charset="utf-8">
<title>Upload Job Creation Preset Example</title>
<script src="../../common/lib/js/jquery-
1.11.3.min.js"></script>
<script src="../../common/js/common.js"></script>
<script src="js/fs-jcpreset-upload.js"></script>
<link rel="stylesheet" href="../../common/css/styles.css">
</head>
<body>
<h2>File Store Service - Upload Job Creation Preset
Example</h2>
<form>
<fieldset>
<legend>Inputs</legend>
<div>
<label for="jcpreset">Job Creation
Preset:</label>
<input id="jcpreset" type="file" required>
/rest/serverengine/filestore/JobCreationConfig
POST
Page 66
Page 67

</fieldset>
<fieldset>
</fieldset>
<fieldset>
value="Submit">
</fieldset>
</form>
</body>
</html>
</div>
<legend>Options</legend>
<div>
<label for="named">Named:</label>
<input id="named" type="checkbox">
</div>
<div>
<label for="persistent">Persistent:</label>
<input id="persistent" type="checkbox">
</div>
<legend>Actions</legend>
<div>
<input id="submit" type="submit"
</div>
JavaScript/jQuery
fs-jcpreset-upload.js
/* File Store Service - Upload Job Creation Preset Example */
(function ($) {
"use strict";
$(document).ready(function () {
setupExample();
$("form").on("submit", function (event) {
event.preventDefault();
if (!checkSessionValid()) { return; }
var file = $("#jcpreset")[0].files[0],
named = $("#named").is(":checked"),
Page 67
Page 68

persistent = $("#persistent").is(":checked");
var settings = {
type: "POST",
url:
"/rest/serverengine/filestore/JobCreationConfig?persistent=" +
persistent,
data: file,
processData: false,
contentType: "application/xml"
};
if (named) { settings.url += "&filename=" + file.name;
}
$.ajax(settings).done(function (response) {
displayStatus("Request Successful");
displayInfo("Job Creation Preset '" + file.name +
"' Uploaded Successfully");
displayResult("Managed File ID", response);
}).fail(displayDefaultFailure);
});
});
}(jQuery));
Page 68
Page 69

Screenshot & Output
Note
Only one Managed File in the file store can be associated with a specific name. If two
files are uploaded to the file store under the same name, then only the most recently
Usage
To run the example simply select the Browse button and then select the job creation preset you
wish to upload using the selection dialog box.
Next you can specify the following options to use with the upload of the job creation preset:
l Named - allow this preset to be identified/referenced by its Managed File Name as well
as its Managed File ID
l Persistent - make this preset persistent in the file store
Page 69
Page 70

uploaded file will be associated with (or can be referenced using) that name.
Once the preset and options are selected, simply select the Submit button to upload the preset
to the server's file store and the resulting Managed File ID for the job creation preset will be
returned and displayed to the Results area.
Discussion
Firstly, we define an event handler that will run in response to the submission of the HTML form
via the selection of the Submit button.
When our event handler function is called, we then obtain a reference to the local job creation
preset previously selected. This is achieved by getting the first value of the files attribute of the
HTML element with the ID of jcpreset (in this case a file type input HTML element) and storing
it in a variable file.
We also obtain boolean values for the Named and Persistent options (both checkbox type
input HTML elements) and store them in the named and persistent variables respectively.
Next we construct a jQuery AJAX request which will be sent to the File Store REST service.
We use an object called settings to hold the arguments for our request:
Method type and url arguments are specified as shown earlier, with the addition of a
persistent query parameter which specifies whether the preset is to be persistent in the file
store when uploaded.
We specify the variable file as the data or contents of the request, a contentType argument
of "application/xml", and because we are sending file data we also specify a processData
argument set to false.
If the Named option is checked in our form, and the named variable is true, then a filename
query parameter is also added which contains the file name of the preset selected
(file.name).
Lastly, the settings object is passed as an argument to the jQuery AJAX function ajax and the
request is executed.
Page 70
Page 71

When the request is successful or done, a request response is received and the content of that
response is passed as the function parameter response. In the example, we then display the
value of this parameter which should be the new Managed File ID of the job creation preset in
the file store.
Further Reading
See the File Store Service page of the REST API Reference section for further detail.
Page 71
Page 72

Uploading an Output Creation Preset to the File Store
Problem
You want to upload an output creation preset to the File Store so that it can be used as part of a
Output Creation operation.
Solution
The solution is to create a request using the following URI and method type to submit the output
creation preset to the server via the File Store REST service:
Upload Output Creation
Preset
Example
HTML5
fs-ocpreset-upload.html
<!DOCTYPE html>
<html>
<head>
<meta charset="utf-8">
<title>Upload Output Creation Preset Example</title>
<script src="../../common/lib/js/jquery-
1.11.3.min.js"></script>
<script src="../../common/js/common.js"></script>
<script src="js/fs-ocpreset-upload.js"></script>
<link rel="stylesheet" href="../../common/css/styles.css">
</head>
<body>
<h2>File Store Service - Upload Output Creation Preset
Example</h2>
<form>
<fieldset>
<legend>Inputs</legend>
<div>
Preset:</label>
/rest/serverengine/filestore/OutputCreationConfig
<label for="ocpreset">Output Creation
<input id="ocpreset" type="file" required>
POST
Page 72
Page 73

</fieldset>
<fieldset>
</fieldset>
<fieldset>
value="Submit">
</fieldset>
</form>
</body>
</html>
</div>
<legend>Options</legend>
<div>
<label for="named">Named:</label>
<input id="named" type="checkbox">
</div>
<div>
<label for="persistent">Persistent:</label>
<input id="persistent" type="checkbox">
</div>
<legend>Actions</legend>
<div>
<input id="submit" type="submit"
</div>
JavaScript/jQuery
fs-ocpreset-upload.js
/* File Store Service - Upload Output Creation Preset Example */
(function ($) {
"use strict";
$(document).ready(function () {
setupExample();
$("form").on("submit", function (event) {
event.preventDefault();
if (!checkSessionValid()) { return; }
var file = $("#ocpreset")[0].files[0],
named = $("#named").is(":checked"),
Page 73
Page 74

persistent = $("#persistent").is(":checked");
var settings = {
type: "POST",
url:
"/rest/serverengine/filestore/OutputCreationConfig?persistent=" +
persistent,
data: file,
processData: false,
contentType: "application/xml"
};
if (named) { settings.url += "&filename=" + file.name;
}
$.ajax(settings).done(function (response) {
displayStatus("Request Successful");
displayInfo("Output Creation Preset '" + file.name
+ "' Uploaded Successfully");
displayResult("Managed File ID", response);
}).fail(displayDefaultFailure);
});
});
}(jQuery));
Page 74
Page 75

Screenshot & Output
Note
Only one Managed File in the file store can be associated with a specific name. If two
files are uploaded to the file store under the same name, then only the most recently
Usage
To run the example simply select the Browse button and then select the output creation preset
you wish to upload using the selection dialog box.
Next you can specify the following options to use with the upload of the output creation preset:
l Named - allow this preset to be identified/referenced by its Managed File Name as well
as its Managed File ID
l Persistent - make this preset persistent in the file store
Page 75
Page 76

uploaded file will be associated with (or can be referenced using) that name.
Once the preset and options are selected, simply select the Submit button to upload the preset
to the server's file store and the resulting Managed File ID for the output creation preset will be
returned and displayed to the Results area.
Discussion
Firstly, we define an event handler that will run in response to the submission of the HTML form
via the selection of the Submit button.
When our event handler function is called, we then obtain a reference to the local output
creation preset previously selected. This is achieved by getting the first value of the files
attribute of the HTML element with the ID of ocpreset (in this case a file type input HTML
element) and storing it in a variable file.
We also obtain boolean values for the Named and Persistent options (both checkbox type
input HTML elements) and store them in the named and persistent variables respectively.
Next we construct a jQuery AJAX request which will be sent to the File Store REST service.
We use an object called settings to hold the arguments for our request:
Method type and url arguments are specified as shown earlier, with the addition of a
persistent query parameter which specifies whether the preset is to be persistent in the file
store when uploaded.
We specify the variable file as the data or contents of the request, a contentType argument
of "application/xml", and because we are sending file data we also specify a processData
argument set to false.
If the Named option is checked in our form, and the named variable is true, then a filename
query parameter is also added which contains the file name of the preset selected
(file.name).
Lastly, the settings object is passed as an argument to the jQuery AJAX function ajax and the
request is executed.
Page 76
Page 77

When the request is successful or done, a request response is received and the content of that
response is passed as the function parameter response. In the example, we then display the
value of this parameter which should be the new Managed File ID of the output creation preset
in the file store.
Further Reading
See the File Store Service page of the REST API Reference section for further detail.
Page 77
Page 78

Working with the Entity Services
Note
A complete listing including these examples can be found in the index.html file located
at the root of the working example source code which contains links to all working
examples.
This section consists of a number of pages covering various useful working examples:
1. Finding all the Data Sets in the Server
2. Finding the Data Records in a Data Set
3. Finding all the Content Sets in the Server
4. Finding the Content Items in a Content Set
5. Finding all the Job Sets in the Server
6. Finding the Jobs in a Job Set
See the Data Set Entity Service, Content Set Entity Service and Job Set Entity Service pages
of the REST API Reference section for further detail.
Page 78
Page 79

Finding all the Data Sets in the Server
Problem
You want to obtain a list of all the previously generated Data Sets contained in the PlanetPress
Connect Server potentially for use in a Content Creation operation.
Solution
The solution is to create a request using the following URI and method type and submit it to the
server via the Data Set Entity REST service:
Get All Data Set Entities
Example
HTML5
dse-get-all-datasets.html
<!DOCTYPE html>
<html>
<head>
<meta charset="utf-8">
<title>Get All Data Sets Example</title>
<script src="../../common/lib/js/jquery-
1.11.3.min.js"></script>
<script src="../../common/js/common.js"></script>
<script src="js/dse-get-all-datasets.js"></script>
<link rel="stylesheet" href="../../common/css/styles.css">
</head>
<body>
<h2>Data Set Entity Service - Get All Data Sets
Example</h2>
<form>
<fieldset>
<legend>Inputs</legend>
<div>
<label for="submit">No Input Required</label>
<input id="submit" type="submit"
value="Submit">
</div>
/rest/serverengine/entity/datasets
GET
Page 79
Page 80

</fieldset>
</form>
</body>
</html>
JavaScript/jQuery
dse-get-all-datasets.js
/* Data Set Entity Service - Get All Data Sets Example */
(function ($) {
"use strict";
$(document).ready(function () {
setupExample();
$("form").on("submit", function (event) {
event.preventDefault();
if (!checkSessionValid()) { return; }
$.ajax({
type: "GET",
url: "/rest/serverengine/entity/datasets"
}).done(function (response) {
displayStatus("Request Successful");
displayHeading("Data Set IDs");
displaySubResult("Plain", jsonIDListToPlain
(response));
displaySubResult("JSON Identifier List",
jsonPrettyPrint(response));
}).fail(displayDefaultFailure);
});
});
}(jQuery));
Page 80
Page 81

Screenshot & Output
Usage
To run the example simply select the Submit button to request a list of the all the data sets
currently contained within the server.
The resulting list will then be returned and displayed to the Results area in both Plain list and
JSON Identifier List formats.
Further Reading
See the Data Set Entity Service page of the REST API Reference section for further detail.
Page 81
Page 82

Finding the Data Records in a Data Set
Problem
You want to obtain a list of all the previously generated Data Records contained within a
specific Data Set potentially for use in a Content Creation operation.
Solution
The solution is to create a request using the following URI and method type and submit it to the
server via the Data Set Entity REST service:
Get Data Records for Data
Set
Example
HTML5
dse-get-datarecords.html
<!DOCTYPE html>
<html>
<head>
<meta charset="utf-8">
<title>Get Data Records for Data Set Example</title>
<script src="../../common/lib/js/jquery-
1.11.3.min.js"></script>
<script src="../../common/js/common.js"></script>
<script src="js/dse-get-datarecords.js"></script>
<link rel="stylesheet" href="../../common/css/styles.css">
</head>
<body>
<h2>Data Set Entity Service - Get Data Records for Data Set
Example</h2>
<form>
<fieldset>
<legend>Inputs</legend>
<div>
placeholder="1234" required>
/rest/serverengine/entity/datasets/{dataSetId}
<label for="dataset">Data Set ID:</label>
<input id="dataset" type="text"
GET
Page 82
Page 83

</div>
<div>
<input id="submit" type="submit"
value="Submit">
</div>
</fieldset>
</form>
</body>
</html>
JavaScript/jQuery
dse-get-datarecords.js
/* Data Set Entity Service - Get Data Records for Data Set Example
*/
(function ($) {
"use strict";
$(document).ready(function () {
setupExample();
$("form").on("submit", function (event) {
event.preventDefault();
if (!checkSessionValid()) { return; }
var dataSetId = $("#dataset").val();
$.ajax({
type: "GET",
url: "/rest/serverengine/entity/datasets/" +
dataSetId
}).done(function (response) {
displayStatus("Request Successful");
displayHeading("Data Record IDs for Data Set '" +
dataSetId + "'");
displaySubResult("Plain", jsonIDListToPlain
(response));
displaySubResult("JSON Identifier List",
jsonPrettyPrint(response));
}).fail(displayDefaultFailure);
Page 83
Page 84

});
});
}(jQuery));
Screenshot & Output
Usage
To run the example simply enter the Data Set ID and select the Submit button to request a list
of the all the data records contained within the specific data set in the server.
Page 84
Page 85

The resulting list will then be returned and displayed to the Results area in both Plain list and
JSON Identifier List formats.
Further Reading
See the Data Set Entity Service page of the REST API Reference section for further detail.
Page 85
Page 86

Finding all the Content Sets in the Server
Problem
You want to obtain a list of all the previously generated Content Sets contained in the
PlanetPress Connect Server potentially for use in a Job Creation operation.
Solution
The solution is to create a request using the following URI and method type and submit it to the
server via the Content Set Entity REST service:
Get All Content Set Entities
Example
HTML5
cse-get-all-contentsets.html
<!DOCTYPE html>
<html>
<head>
<meta charset="utf-8">
<title>Get All Content Sets Example</title>
<script src="../../common/lib/js/jquery-
1.11.3.min.js"></script>
<script src="../../common/js/common.js"></script>
<script src="js/cse-get-all-contentsets.js"></script>
<link rel="stylesheet" href="../../common/css/styles.css">
</head>
<body>
<h2>Content Set Entity Service - Get All Content Sets
Example</h2>
<form>
<fieldset>
<legend>Inputs</legend>
<div>
<label for="submit">No Input Required</label>
<input id="submit" type="submit"
value="Submit">
</div>
/rest/serverengine/entity/contentsets
GET
Page 86
Page 87

</fieldset>
</form>
</body>
</html>
JavaScript/jQuery
cse-get-all-contentsets.js
/* Content Set Entity Service - Get All Content Sets Example */
(function ($) {
"use strict";
$(document).ready(function () {
setupExample();
$("form").on("submit", function (event) {
event.preventDefault();
if (!checkSessionValid()) { return; }
$.ajax({
type: "GET",
url: "/rest/serverengine/entity/contentsets"
}).done(function (response) {
displayStatus("Request Successful");
displayHeading("Content Set IDs");
displaySubResult("Plain", jsonIDListToPlain
(response));
displaySubResult("JSON Identifier List",
jsonPrettyPrint(response));
}).fail(displayDefaultFailure);
});
});
}(jQuery));
Page 87
Page 88

Screenshot & Output
Usage
To run the example simply select the Submit button to request a list of the all the content sets
currently contained within the server.
The resulting list will then be returned and displayed to the Results area in both Plain list and
JSON Identifier List formats.
Further Reading
See the Content Set Entity Service page of the REST API Reference section for further detail.
Page 88
Page 89

Finding the Content Items in a Content Set
Problem
You want to obtain a list of all the previously generated Content Items contained within a
specific Content Set potentially for use in a Job Creation operation.
Solution
The solution is to create a request using the following URI and method type and submit it to the
server via the Content Set Entity REST service:
Get Content Items for
Content Set
Example
HTML5
cse-get-contentitems.html
<!DOCTYPE html>
<html>
<head>
<meta charset="utf-8">
<title>Get Content Items for Content Set Example</title>
<script src="../../common/lib/js/jquery-
1.11.3.min.js"></script>
<script src="../../common/js/common.js"></script>
<script src="js/cse-get-contentitems.js"></script>
<link rel="stylesheet" href="../../common/css/styles.css">
</head>
<body>
<h2>Content Set Entity Service - Get Content Items for
Content Set Example</h2>
<form>
<fieldset>
<legend>Inputs</legend>
<div>
placeholder="1234" required>
/rest/serverengine/entity/contentsets/{contentSetId}
<label for="contentset">Content Set ID:</label>
<input id="contentset" type="text"
GET
Page 89
Page 90

</div>
<div>
<input id="submit" type="submit"
value="Submit">
</div>
</fieldset>
</form>
</body>
</html>
JavaScript/jQuery
cse-get-contentitems.js
/* Content Set Entity Service - Get Content Items for Content Set
Example */
(function ($) {
"use strict";
$(document).ready(function () {
setupExample();
$("form").on("submit", function (event) {
event.preventDefault();
if (!checkSessionValid()) { return; }
var contentSetId = $("#contentset").val();
$.ajax({
type: "GET",
url: "/rest/serverengine/entity/contentsets/" +
contentSetId
}).done(function (response) {
displayStatus("Request Successful");
displayHeading("Content Item IDs for Content Set '"
+ contentSetId + "'");
displaySubResult("Plain",
jsonContentItemIDListToTable(response));
displaySubResult("JSON Content Item Identifier
List", jsonPrettyPrint(response));
}).fail(displayDefaultFailure);
Page 90
Page 91

});
});
}(jQuery));
Screenshot & Output
Page 91
Page 92

Usage
To run the example simply enter the Content Set ID and select the Submit button to request a
list of the all the content items contained within the specific content set in the server.
The resulting list will then be returned as a list of Content Item and Data Record ID pairs which
will be displayed to the Results area in both Plain table and JSON Content Item Identifier List
formats.
Further Reading
See the Content Set Entity Service page of the REST API Reference section for further detail.
Page 92
Page 93

Finding all the Job Sets in the Server
Problem
You want to obtain a list of all the previously generated Job Sets contained in the PlanetPress
Connect Server potentially for use in a Output Creation operation.
Solution
The solution is to create a request using the following URI and method type and submit it to the
server via the Job Set Entity REST service:
Get All Job Set Entities
Example
HTML5
jse-get-all-jobsets.html
<!DOCTYPE html>
<html>
<head>
<meta charset="utf-8">
<title>Get All Job Sets Example</title>
<script src="../../common/lib/js/jquery-
1.11.3.min.js"></script>
<script src="../../common/js/common.js"></script>
<script src="js/jse-get-all-jobsets.js"></script>
<link rel="stylesheet" href="../../common/css/styles.css">
</head>
<body>
<h2>Job Set Entity Service - Get All Job Sets Example</h2>
<form>
<fieldset>
<legend>Inputs</legend>
<div>
<label for="submit">No Input Required</label>
<input id="submit" type="submit"
value="Submit">
</div>
</fieldset>
/rest/serverengine/entity/jobsets
GET
Page 93
Page 94

</form>
</body>
</html>
JavaScript/jQuery
jse-get-all-jobsets.js
/* Job Set Entity Service - Get All Job Sets Example */
(function ($) {
"use strict";
$(document).ready(function () {
setupExample();
$("form").on("submit", function (event) {
event.preventDefault();
if (!checkSessionValid()) { return; }
$.ajax({
type: "GET",
url: "/rest/serverengine/entity/jobsets"
}).done(function (response) {
displayStatus("Request Successful");
displayHeading("Job Set IDs");
displaySubResult("Plain", jsonIDListToPlain
(response));
displaySubResult("JSON Identifier List",
jsonPrettyPrint(response));
}).fail(displayDefaultFailure);
});
});
}(jQuery));
Page 94
Page 95

Screenshot & Output
Usage
To run the example simply select the Submit button to request a list of the all the job sets
currently contained within the server.
The resulting list will then be returned and displayed to the Results area in both Plain list and
JSON Identifier List formats.
Further Reading
See the Job Set Entity Service page of the REST API Reference section for further detail.
Page 95
Page 96

Finding the Jobs in a Job Set
Problem
You want to obtain a list of all the previously generated Jobs contained within a specific Job
Set potentially for use in a Output Creation operation.
Solution
The solution is to create a request using the following URI and method type and submit it to the
server via the Job Set Entity REST service:
Get Jobs for Job Set
Example
HTML5
jse-get-jobs.html
<!DOCTYPE html>
<html>
<head>
<meta charset="utf-8">
<title>Get Jobs for Job Set Example</title>
<script src="../../common/lib/js/jquery-
1.11.3.min.js"></script>
<script src="../../common/js/common.js"></script>
<script src="js/jse-get-jobs.js"></script>
<link rel="stylesheet" href="../../common/css/styles.css">
</head>
<body>
<h2>Job Set Entity Service - Get Jobs for Job Set
Example</h2>
<form>
<fieldset>
<legend>Inputs</legend>
<div>
placeholder="1234" required>
</div>
/rest/serverengine/entity/jobsets/{jobSetId}
<label for="jobset">Job Set ID:</label>
<input id="jobset" type="text"
GET
Page 96
Page 97

<div>
<input id="submit" type="submit"
value="Submit">
</div>
</fieldset>
</form>
</body>
</html>
JavaScript/jQuery
jse-get-jobs.js
/* Job Set Entity Service - Get Jobs for Job Set Example */
(function ($) {
"use strict";
$(document).ready(function () {
setupExample();
$("form").on("submit", function (event) {
event.preventDefault();
if (!checkSessionValid()) { return; }
var jobSetId = $("#jobset").val();
$.ajax({
type: "GET",
url: "/rest/serverengine/entity/jobsets/" +
jobSetId
}).done(function (response) {
displayStatus("Request Successful");
displayHeading("Job IDs for Job Set '" + jobSetId +
"'");
displaySubResult("Plain", jsonIDListToPlain
(response));
displaySubResult("JSON Identifier List",
jsonPrettyPrint(response));
}).fail(displayDefaultFailure);
});
});
Page 97
Page 98

}(jQuery));
Screenshot & Output
Usage
To run the example simply enter the Job Set ID and select the Submit button to request a list of
the all the jobs contained within the specific job set in the server.
The resulting list will then be returned and displayed to the Results area in both Plain list and
JSON Identifier List formats.
Further Reading
See the Job Set Entity Service page of the REST API Reference section for further detail.
Page 98
Page 99

Working with the Workflow Services
Note
A complete listing including these examples can be found in the index.html file located
at the root of the working example source code which contains links to all working
examples.
This section consists of a number of pages covering various useful working examples:
1. Running a Data Mapping Operation
2. Running a Data Mapping Operation (Using JSON)
3. Running a Data Mapping Operation for PDF/VT File (to Data Set)
4. Running a Data Mapping Operation for PDF/VT File (to Content Set)
5. Running a Content Creation Operation for Print
6. Running a Content Creation Operation for Print By Data Record (Using JSON)
7. Running a Content Creation Operation for Email By Data Record (Using JSON)
8. Creating Content for Web By Data Record
9. Creating Content for Web By Data Record (Using JSON)
10. Running a Job Creation Operation (Using JSON)
11. Running an Output Creation Operation
12. Running an Output Creation Operation (Using JSON)
13. Running an Output Creation Operation By Job (Using JSON)
14. Running an All-In-One Operation (Using JSON)
See the Data Mapping Service, Content Creation Service, Content Creation (Email) Service,
Content Creation (HTML) Service, Job Creation Service, Output Creation Service and All-InOne Service pages of the REST API Reference section for further detail.
Page 99
Page 100

Running a Data Mapping Operation
Problem
You want to run a data mapping operation to generate a Data Set using a data file and a data
mapping configuration as inputs.
Solution
The solution is to make a series of requests using the following URIs and method types to
submit, monitor progress and ultimately retrieve the result of the data mapping operation. There
is also the option of cancelling an operation during processing if required. These requests can
be submitted via the Data Mapping REST service:
Process Data Mapping
Get Progress of
Operation
Get Result of Operation
Cancel an Operation
Example
HTML5
dm-process.html
<!DOCTYPE html>
<html>
<head>
<meta charset="utf-8">
<title>Process Data Mapping Example</title>
<script src="../../common/lib/js/jquery-
1.11.3.min.js"></script>
<script src="../../common/js/common.js"></script>
<script src="js/dm-process.js"></script>
/rest/serverengine/workflow/datamining/{configId}/
{dataFileId}
/rest/serverengine/workflow/datamining/getProgress/
{operationId}
/rest/serverengine/workflow/datamining/getResult/
{operationId}
/rest/serverengine/workflow/datamining/cancel/
{operationId}
POST
GET
POST
POST
Page 100
 Loading...