

Page 1

Installation Guide
Version 1.5
Page 2

Connect Send Installation Guide
OBJECTIF LUNE Inc.
2030 Pie-IX, Suite 500
Montréal, QC, Canada, H1V 2C8
http://learn.objectiflune.com
© 2016 Objectif Lune Incorporated. All rights reserved.
Page 3

Table of Contents
System Requirements .................................................................................. 1
Plug-In ............................................................................................................................. 1
Printer Driver .................................................................................................................. 1
HTTP ................................................................................................................................ 1
Browser ........................................................................................................................... 1
Prerequisites ................................................................................................ 1
Overview...................................................................................................... 2
Feature List ...................................................................................................................... 2
Installing OL Connect Send Printer Driver .................................................... 3
Setup Process – New Installation .................................................................................... 3
Modifying an Existing Installation ................................................................................... 8
Shared Printers.............................................................................................................. 10
Managing multiple OLCS printers ................................................................................. 10
Installing OL Connect Send Plug-Ins ........................................................... 12
Overview ....................................................................................................................... 12
Setup Process ................................................................................................................ 12
Re-installing Plug-Ins ..................................................................................................... 15
Keeping the OLCS database after uninstall ................................................................... 15
OL Connect Send Plug-In ............................................................................ 16
Configuring the plug-in ................................................................................................. 16
Main steps in using OLCS .............................................................................................. 18
License Modes .............................................................................................................. 19
Incoming Print Jobs and the License ............................................................................. 20
Security ......................................................................................................................... 21
Database Connection .................................................................................................... 21
Timeout ......................................................................................................................... 22
Compatibility ................................................................................................................. 22
Known Issues ................................................................................................................. 22
OL Connect Send Job Information Plug-In .................................................. 24
Page 4

Overview ....................................................................................................................... 24
The Plug-In Settings ...................................................................................................... 25
OL Connect Send Get Data Plug-In ............................................................. 29
General Tab ................................................................................................................... 29
On Error Tab .................................................................................................................. 32
Comments Tab .............................................................................................................. 32
Create Preview PDF Plug-In ........................................................................ 33
Overview ....................................................................................................................... 33
Data Mapper Tab .......................................................................................................... 33
Content Creation Tab .................................................................................................... 35
OL Connect Proxy Tab ................................................................................................... 35
On Error Tab .................................................................................................................. 35
Comments Tab .............................................................................................................. 35
Troubleshooting ......................................................................................... 36
Click Charge License Renewal .................................................................... 38
Click Charge Licensing of OLCS...................................................................................... 38
Moving the OLCS Database ........................................................................................... 39
Page 5

System Requirements
Plug-In
The OL Connect Send (OLCS) Plug-In is designed to work with the workflow module (Workflow)
of PlanetPress Connect and PReS Connect (Connect) which means it will run on any operating
system by those products.
Printer Driver
The OLCS Printer Driver is compatible with 32 and 64 bit versions of Windows 7, 8.0, 8.1 and 10.
HTTP
Communications between the Printer Driver and the Plug-In is achieved using HTTP. It is
therefore necessary to ensure that HTTP interaction between all Printer Driver and server
machines is enabled.
Browser
After print job submission, further interaction between the OLCS Printer Driver and Workflow is
achieved using HTML. Browsers support and process HTML in different ways and so it is
important to be aware of possible browser compatibility issues when creating interactive web
pages.
Prerequisites
Below is a list of components required to use OLCS:
PlanetPress Connect v1.5 or PReS Connect v1.5
Workflow v8.5
OL Connect Send
o OL Connect Send Printer Driver
o OL Connect Send Plug-in
An OLCS license (required for interaction to take place)
Page 1
Page 6

Overview
OLCS is an application with two components. The first is a Windows printer driver and the
second includes a set of Workflow plug-ins. These two components work together – they cannot
be used on their own.
OLCS allows for PostScript files to be received over the internet from any Windows Desktop
application. It can be used in unlicensed mode and licensed mode.
Unlicensed mode (default) allows users to push documents to OL Connect Send. They will
receive a pop-up tray confirming whether the job was received or not. No web interaction is
possible.
Licensed mode causes the OLCS printer driver to request a web page which will be displayed in
the user’s browser in order to allow them to enter job specific information. The information
from this web page can be used to tell Connect Workflow what to do next.
OLCS, in licensed mode, can be used to create custom interactive workflows from a centralized
location, yet has the ability to be deployed and installed very easily.
Features List
Allows free of charge non-interactive printing over the internet
Can be licensed in User mode so that specific users (domains/workstations) can print
and receive an interactive web page during the job submission process. The number of
jobs that can be printed is unlimited.
Can be licensed in Credit mode so that any user can print from anywhere and receive
an interactive web page during the job submission process – in this mode Connect Send
requires credits which are reduced after each job received by the server.
General:
o Compresses PostScript files during transmission to minimize bandwidth
Unlicensed mode
o Non-interactive job submission
o Free to use
o SysTray confirmation for job transmission
Licensed mode
o Interactive job submission possible
o Launches the user’s default browser to display web content produced by a
Connect server
o Database containing domain, workstation ID, document information and page
count information
Page 2
Page 7

Installing OL Connect Send Printer Driver
Setup Process – New Installation
The following section describes the installation process for the OLCS Printer Driver
Note
If the Taskbar Notifier is left running on a machine the installer cannot be (re-) started. An
error message will be displayed by Windows.
The Taskbar Notifier must be closed before switching to a different user account on the
same machine, unless the current user is still logged in.
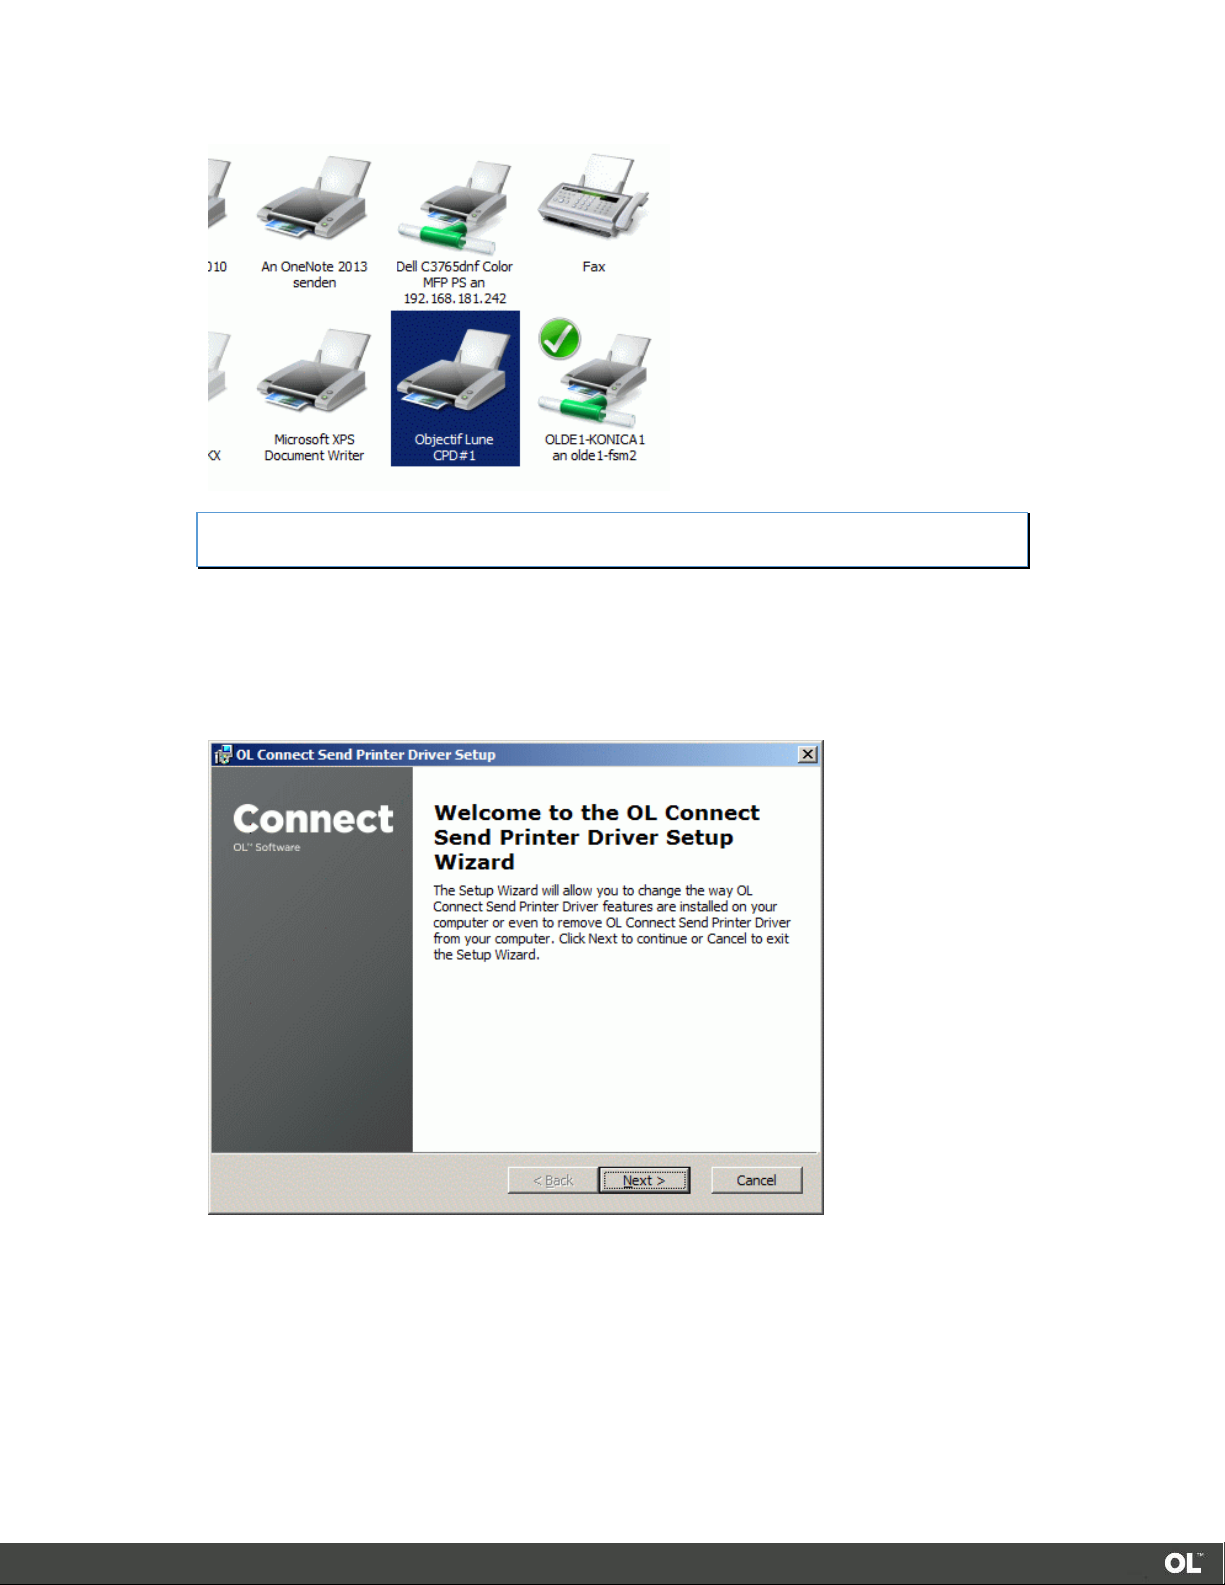
1. Starting the installation
When starting the OLCS Printer Driver Setup, this first screen appears, containing basic
information. Click Next to proceed.
The next screen shows the EULA. Please read and accept it to proceed further by pressing Next.
2. Server URL Settings
The Server URL screen allows the host (IP address or name) name for Workflow to be entered.
This is the server that will capture and process print jobs. The HTTP communication port (default
8080)* should be set too.
Page 3
Page 8
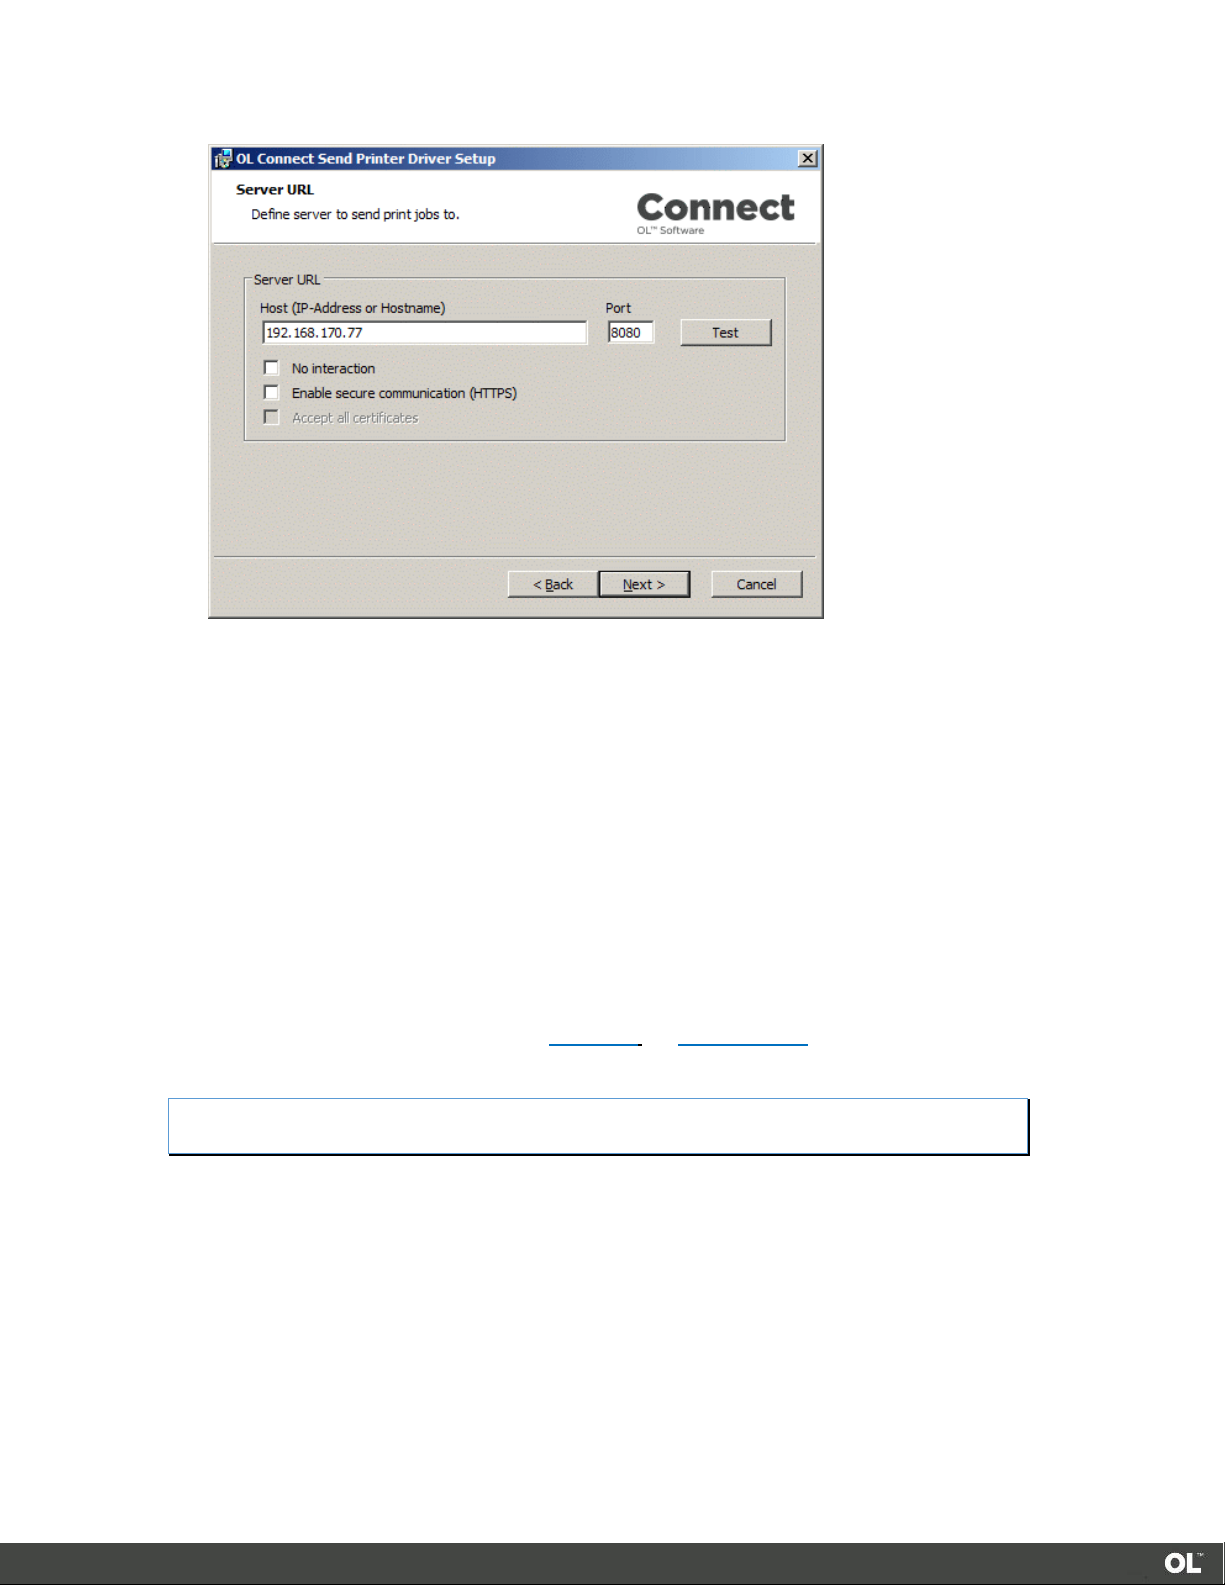
If Workflow is active, the Test button can be used to validate the connection. (It does not check
if the OLCS plug-in is installed and answering.)
If the No interaction checkbox is enabled, it will cause this printer to send jobs to the server
without requesting an HTML response. Use this mode to deliver print jobs without further
interaction. When enabled, a web browser window will not be opened, but SysTray messages
will pop up indicating job transmission success or failure.
Enable secure communication (HTTPS): When selecting this option, the Printer Driver and
Workflow will communicate using the secure HTTPS protocol (data transfer is secured and
encrypted).
Accept all certificates: When HTTPS is selected, by default the Printer Driver will only accept
valid certificates on Workflow. If a self-signed certificate is sufficient for the transfer the root
validation of the certificate can be switched off.
For additional information about secure file transfer, HTTPS certificates and how to request a
countersigned certificate, please see SSL HowTo and Apache SSL/TLS respectively.
When done click Next to continue.
* 8080 is the default port for communications with Workflow, but it can be changed. It can be checked
in the Workflow preferences under “Plug-in” – “HTTP Server Input 1” – “Protocol options” – “Port”.
Page 4
Page 9

Page 5
Page 10

3. Printer Name and Logging
In the Printer name and logging screen you can set a name for the printer you wish to
create and setup the logging level.
Printer name
The setup program will check if a printer with the same name and number already
exists. If so, the number is automatically increased until no matching printer name is
detected. This then becomes the proposed printer name in this dialog.
As opposed to the other settings, the printer name can’t be changed after installation.
Logging
OLCS creates a log file per printer per day. The number of log messages can be set by
choosing the log level. Available log levels are:
DEBUG:
recommended to have the log level set to DEBUG for a long periods, as this will have an
impact on the driver's processing speed. This mode will include INFO, WARN and ERROR
messages too.
INFO
installation to supervise the operation of the driver. This mode will include WARN and
ERROR messages too.
WARN:
files may be empty: this is by design and indicates, that the printer and the driver work as
expected. This mode will include ERROR messages too.
Logs all messages and is intended to be used only for bug research. It is not
: Logs initialization messages. Administrators may choose this level for an initial
This is the default level and should be used for production use. In this mode log
Page 6
ERROR
intended for machines where OLCS has been working error free for several weeks.
When done click Next to continue.
: For users familiar to OLCS, this log level reduces the overhead to a minimum. It is
Page 11
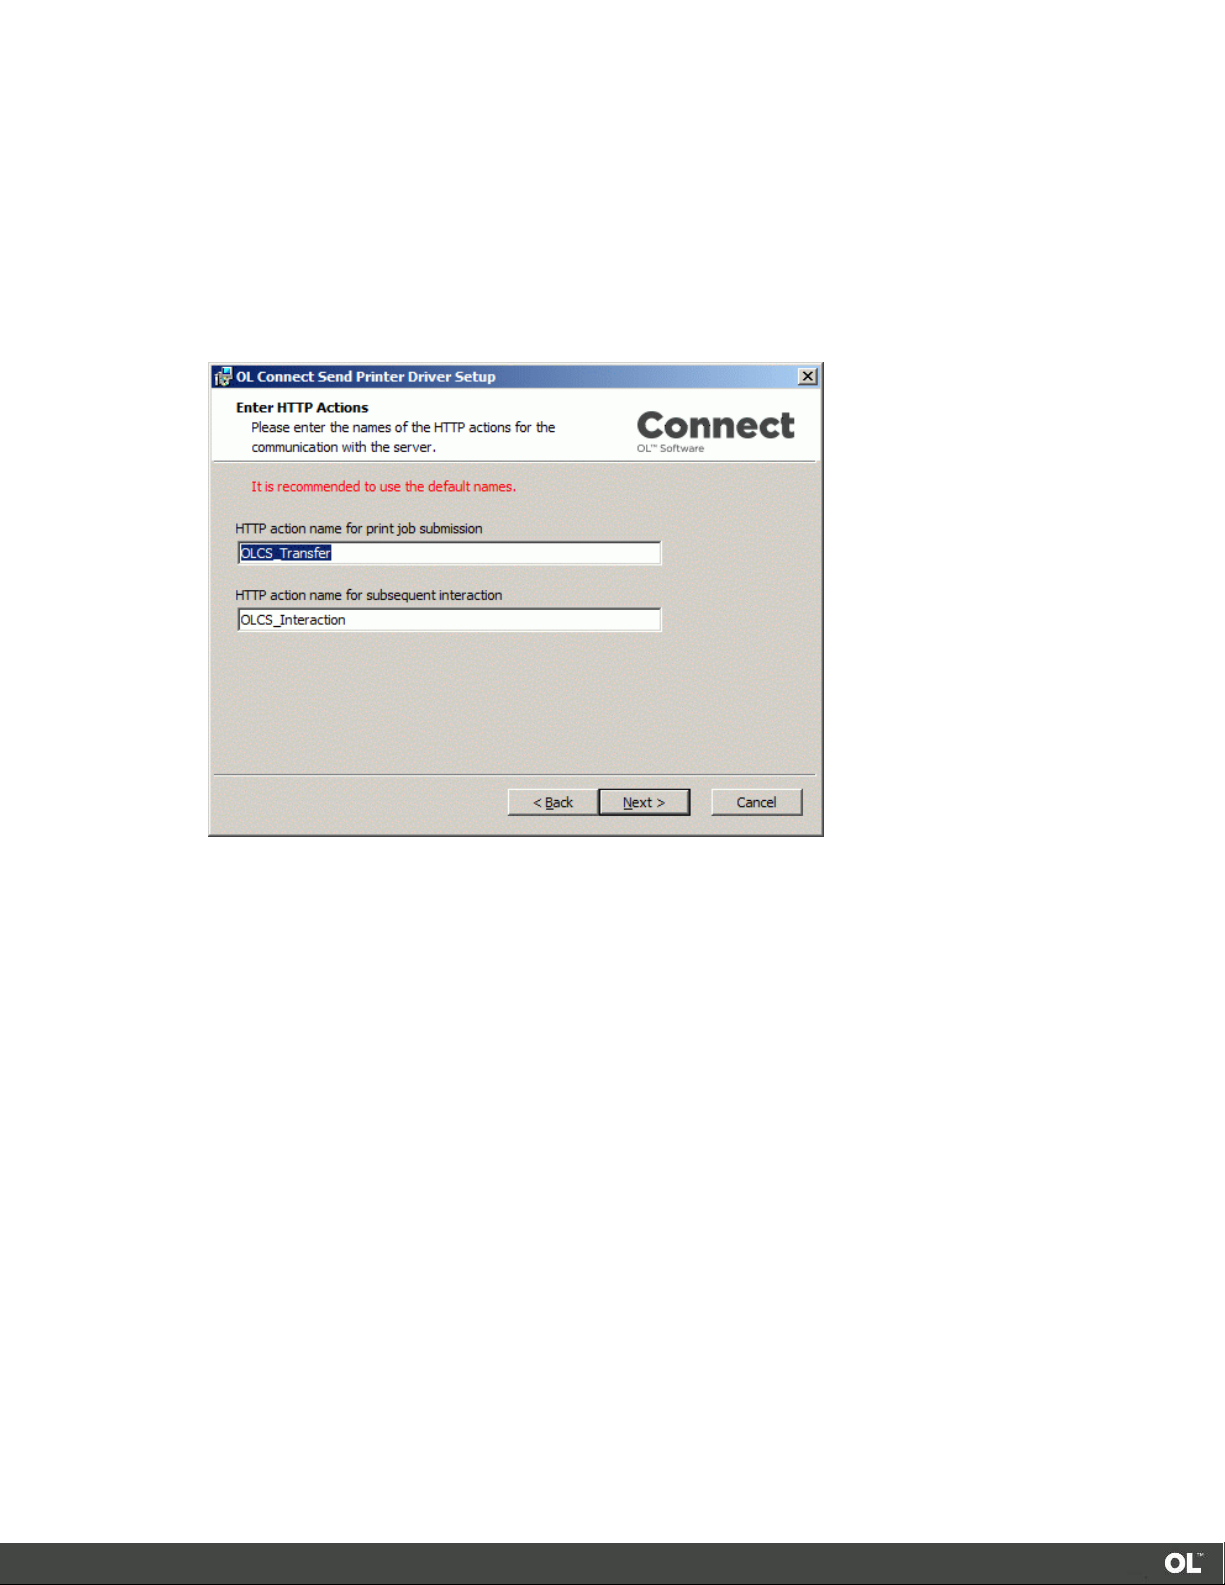
4. Communication Settings
The next screen contains communication settings.
In order to deliver jobs to Workflow, an HTTP Action name for print job submission needs to be
setup.
If OLCS is licensed and/or interactive mode is enabled (or required), then an HTTP Action name
for subsequent interaction is required.
The names of these HTTP action can be changed, but they must match the relevant Workflow
settings.
When done click Next to continue.
5. Finishing the installation
At this point Setup has collected the required information to install the printer driver and create
it. The next screen will ask you to continue by clicking the Install button.
A progress bar is shown, while the installation process is running.
After a successful installation, the Finish dialog is shown. Click Finish.
Your OLCS printer driver has now been installed:
Page 7
Page 12
Once a printer driver is installed, a SysTray application is also installed. It displays information
relating to the preparation and transfer of each print job.
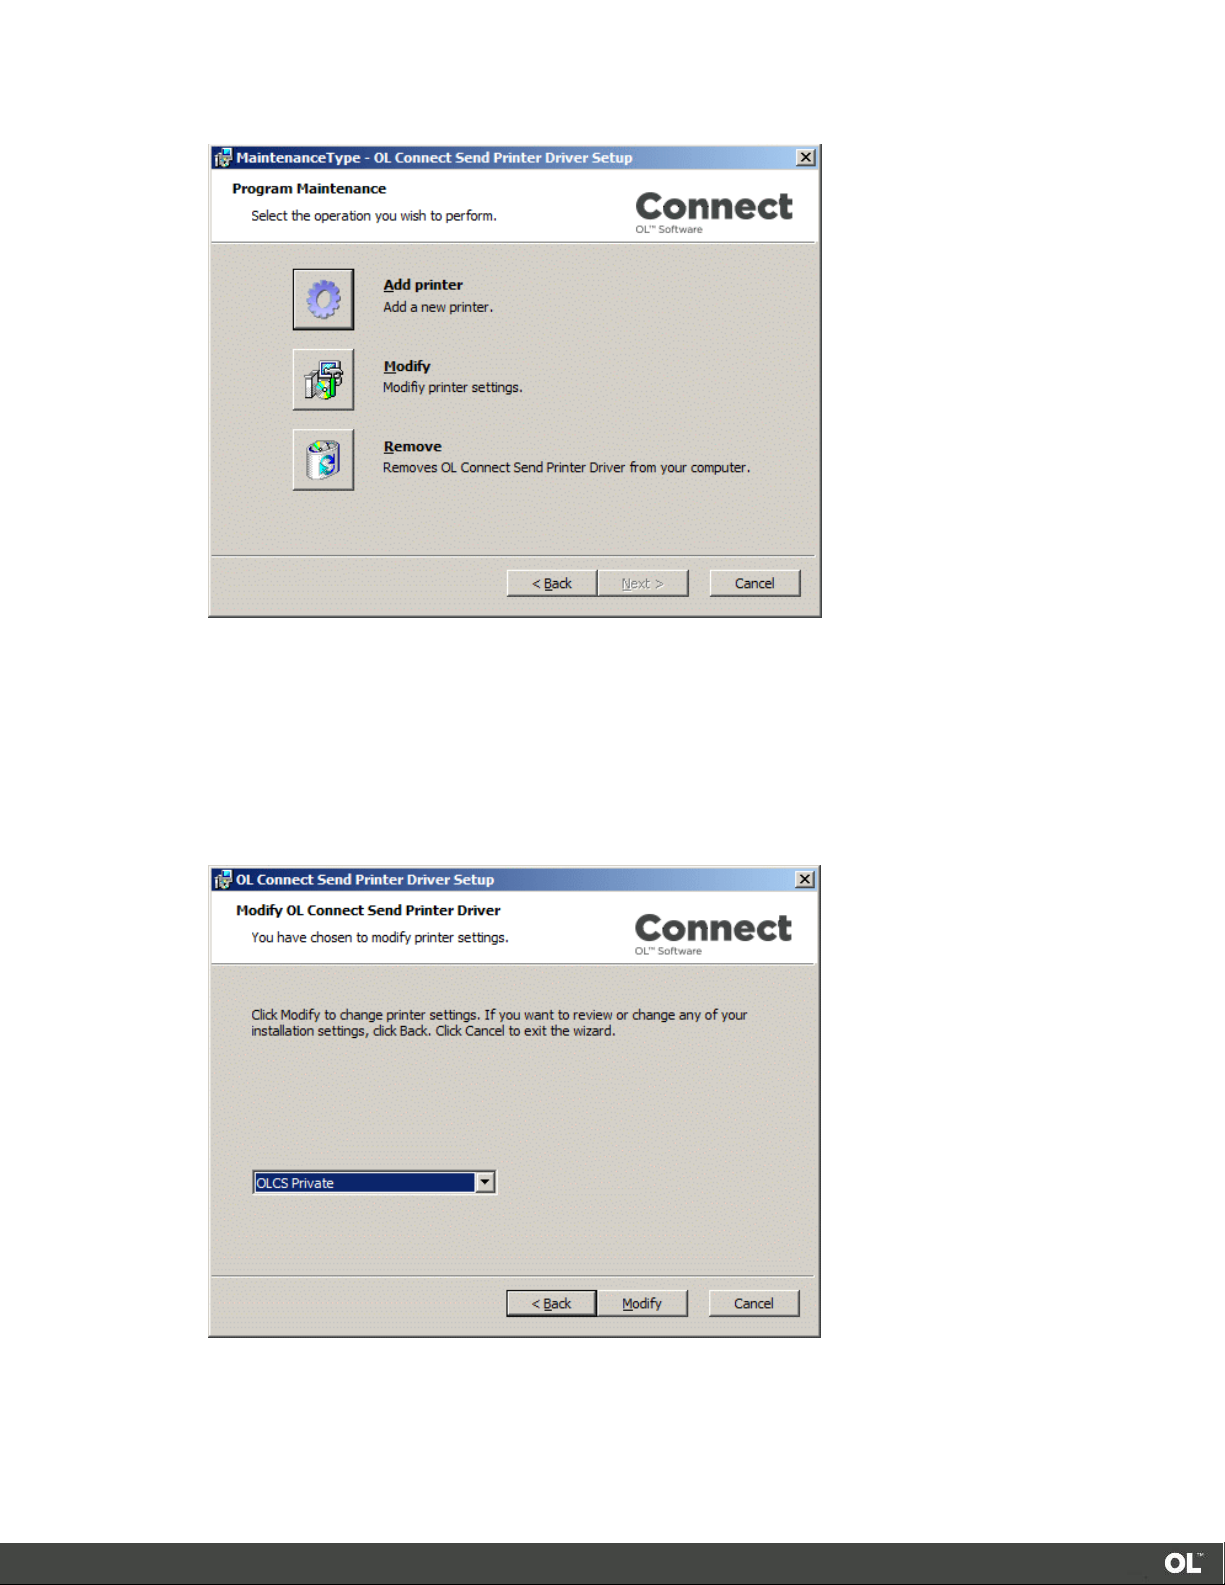
Modifying an Existing Installation
To install an additional printer, modify a printer or delete a printer, run the installer again.
The installer will detect that it’s not being used for the first time and will present a different
screen.
Clicking the Next button will bring you to the selection page where you can decide to:
Page 8
Install a new printer
Modify the settings of an existing printer
Delete one or all existing printers
Page 13
Adding a New Printer
Allows you to create a new OLCS printer. The wizard pages are the same as for a new
installation. Each printer can have its own settings.
Modifying the Printer Settings
Depending on the number of printers already installed, you will either see the Wizard window or
a dialog box from which you must select the printer you wish to modify.
The wizard pages are the same again, so you can modify any of the values (e.g. if the host name
has changed), except for the printer name which is grayed out and locked.
Page 9
Page 14

Removing the Printer Driver
Depending on the number of OLCS printers installed, you will either get a selection box to
identify which printer to remove, or you can just delete the only one.
Shared Printers
The OLCS Printer Driver is not a shareable driver. This is because the browser interaction
cannot be routed through the print server to the end user's desktop. Also a shared printer
would transfer the print server's machine name, user name, domain etc.., thus invalidating the
intended behavior.
So, OLCS Printer Driver must be installed on each dedicated machine.
Managing multiple OLCS printers
Newer versions of Windows automatically group all printers that use the same driver under one
single entry in the "Devices and Printers" dialog of the control panel. This means that if multiple
printers have been set up with OLCS, only the first one will show up in this page.
Many, many forum entries worldwide complain about this "feature" reporting "invisible
printers". Microsoft has documented this behavior here: https://support.microsoft.com/en-
us/kb/2015694.
Each printer can be managed individually however, by using the context menu of the printer and
selecting the relevant context:
Page 10
Page 15

Page 11
Page 16

Installing OL Connect Send Plug-Ins
Overview
The OL Connect Send Plug-In installer adds three Connect Send plug-ins and one Connect plug-in
to Workflow:
OL Connect Send
OL Connect Send Job Info
OL Connect Send Get data
Create Preview PDF.
The OL Connect Send plug-in is an output plug-in that must be added to a job transfer process.
OL Connect Send Job Info and Create Preview PDF can be used in an interactive process that
may be started when a job has been received.
OL Connect Send Job Data allows OLCS users (admins, accounting personnel, print masters ...) to
get info about all jobs received with OLCS on a dedicated machine.
The plug-ins are described in detail in the following chapters. The next section describes the
installation process for the OLCS Plug-Ins.
Setup Process
This installer was provided as a pre-release of Connect Send for Connect 1.5. A few
additional steps will be required when you will be upgrading to Connect 1.6.
IMPORTANT
Before upgrading to Connect 1.6 and as a precautionary measure, the OLCS plug-ins
already installed using this Setup Process must first be uninstalled using Windows
Control Panel. Here are the steps to follow:
1- Make a backup of Connect Send database:
a. Copy the content found in C:\programdata\objectif lune\cpd\ to a safe
place. Do not copy any of the other sub folders found under
C:\programdata\objectif lune\.
2- Uninstall the OLCS Plug-Ins from the Control Panel / Programs and Features:
a. Open Windows Control Panel
b. Click Program and Features:
Page 12
Page 17

c. Select OL Connect Send Plug-in and click Uninstall:
d. Do the same (previous step) for OL Connect Send Printer Driver
3- Proceed with the Connect 1.6 upgrade
IMPORTANT
Installing the OLCS Plug-In from a shared drive on Windows 10 will fail. This is an issue
of the underlying msi and can currently not be fixed. It is therefore recommended to
copy the setup file to a local folder on Windows 10 and run the setup from there.
Page 13
Page 18

When starting the OLCS Plug-In Setup, this first screen appears, containing basic information.
Click Next to proceed.
The next page shows the EULA. Please read and accept it and proceed by clicking on Next.
The next page will ask you to continue by clicking on Install.
Page 14
A progress bar is shown, while the installation process is running.
After the successful installation the finish dialog is shown. Click Finish.
The plug-ins are now installed in Workflow in the Uncategorized window:
Page 19

In Connect 1.6 (Workflow 8.6) the three Connect Send plug-ins will be installed in Workflow in
the Connect Send tab. The Create Preview PDF plug-in will be added to the Connect tab.
Re-installing Plug-Ins
When installing OLCS plug-ins version 1.0.5.44 or higher on a machine, where OLCS plug-
ins version 1.0.5.43 or lower are installed, a proper uninstall of the existing OLCS plug-ins has to
be done before starting the installation of the new plug-ins. Otherwise the new setup will not
work properly.
Keeping the OLCS database after uninstall
When uninstalling OLCS plug-ins, this will also remove the database including all job information
collected until that date. The database, however, can be retained by making a copy before it is
uninstalled and then copying it back after the new installation.
The OLCS database is called “OLCSDB.script” and can be found under
"%ProgramData%\Objectif Lune\CPD"
Page 15
Page 20

OL Connect Send Plug-In
The OL Connect Send plug-in appears in the Plug-In Bar area of Workflow under Uncategorized.
The OL Connect Send plug-in is an output plug-in that must be added to a Workflow job transfer
process that starts with an HTTP Server Input. It is recommended to add a Change Emulation
task before the OLCS Plug-in to guarantee accurate incoming data recognition. The OLCS plug-in
is the last task in the process. It returns a reply from the OLCS plug-in back to the OLCS Printer
Driver in order to notify the user that the job has been received successfully (or failed if an error
occurred).
One Job Transfer Process
It is strongly recommended that a single job transfer process for all Printer drivers is created,
using the domain or machine’s or user information to divert to any follow-up processes.
This single transfer process can be set to "Self Replicating", so that parallelization is possible.
Configuring the plug-in
To configure the Connect Send plug-in, right-click it after adding it to the Workflow process, and
click Properties.
Page 16
Page 21

Information
Workflow
Variable
When licensed
When unlicensed
Job ID
%1
Job ID
Job ID
License status for
this job
%2
"Licensed"
"Unlicensed"
Username 1
%3
The username
"na"
IP Address 1
%4
The IP Address
The IP Address
The color of the property names in the OL Connect Send Properties dialog indicates that these
fields can contain variables.
Workflow variables
To facilitate using job related information for the creation of the target folder and file name/s,
the OLCS plug-in maps job relevant information to the standard Workflow variables (%1 to %8).
The following mappings apply:
Page 17
Page 22

No. of Pages 1
%5
Number of pages of the
job
Number of pages of the
job
No. of Copies 1
%6
Number of copies set by
the user
Number of copies set by
the user
Domain Name 1
%7
The Domain Name
"na"
Machine Name 1
%8
The Machine Name
"na"
1
) These values originate from the Printer Driver machine.
The variables can and should be used to create dynamic file and folder names for each print job.
This enables separating "licensed" and "unlicensed" jobs and/or storing the files by domain,
machine and even user name.
File extension
If the output file name does not include an extension, the default extension “.ps” is added
automatically. The plug-in will also create a Workflow metadata file with the same name
containing basic information about the job.
Main steps in using OLCS
If OLCS is unlicensed, the plug-in stores the incoming job in the target folder using the specified
file name, but it does not save any information in the database. The client will receive a message
in its SysTray confirming the unlicensed status, and the printer driver will not request another
web page.
In licensed mode, the plug-in will store all relevant information about each job in the database.
This database is a HSQLDB and is installed automatically. Subsequent Workflow processes can
use the information in the database for additional processing.
The main steps in using OLCS are:
1. A user prints a document to a printer using the OLCS printer driver.
2. The print job is captured by the printer driver code, zipped up, and if applicable, split into
multiple chunks.
3. These chunks are transferred to the
Send plug-in.
4. The plug-in communicates with the printer driver to ensure that all data has been received
correctly.
5. The plug-in combines all the chunks into a .7z and then unpacks it to the original print job.
This is a Postscript file.
6. The plug-in stores the print job at a specified location with a specified name.
7. The plug-in creates a Workflow metadata file for the print job, containing basic job
information. (See License Modes – Basic Mode, below.)
8. The plug-in (if licensed) stores all job related info in a database.
9. The plug-in returns a status message to the client, indicating a successful or failed job
transfer.
10. The plug-in sends the license status to the Printer Driver.
Workflow
process and received by the OL Connect
Page 18
Page 23

11. The Printer Driver (if licensed and interactive) will launch a browser window and send an
HTTP request to
displayed in the browser.
If the plug-in is not licensed, this HTTP request is suppressed and the Printer Driver will
not launch a browser window.
12. The Printer Driver will display status information using the SysTray.
Workflow
. The result of the receiving interactive process will be
License Modes
OLCS can operate in three different modes but they cannot be mixed on a single Connect
system. The three modes are: Basic, User and Click charge.
Note
As long as Workflow is still running in the default trial period of 30 days, OLCS will behave
as if it was licensed.
Basic Mode
Basic mode is free to use. This is the default mode and an OLCS license is NOT required.
Operationally speaking basic mode will function as an “unlicensed” system.
The plug-in will capture and store basic job information in a Workflow metadata file:
User name
IP address
Number of pages
Number of copies
Original name of the document
These values originate from the client machine.
User Mode
User mode requires a license for each domain submitting jobs. A domain license can be
obtained to allow 10, 25, 50, 100, 200 or unlimited (Enterprise) users to print. Each domain
needs its own domain/user license, but multiple domains/users licenses can be added to a single
Connect system to allow job submissions from multiple domains.
The user mode license is actually bound to the world wide unique combination of domain and
machine name. This means multiple users sharing a single machine will be counted as a single
user by the license.
For each incoming job, the domain and machine’s name (Unique User Slot Identifier or UUSI)
are combined and matched against the license. The following checks are done:
1. If the
2. If the
already exists, the job is accepted.
UUSI
does not exist then,
UUSI
If one is available, this new
reduced. The job will be accepted.
If one is not free, the system will check to see if there is any
been used during the last 30 days. If found, it will be replaced by the new user
and the job will be accepted.
will be added and the number of free user slots
UUSI
that has not
UUSI
Page 19
Page 24

If one is not available, it will still be accepted, but only in
client will get a message indicating that the job was received in unlicensed
mode.
No page count checking is done for this mode.
unlicensed mode
. The
Click Charge Mode
Where the domain & number of users is unknown at the point of sales – for example a public
service driven by users creating their own accounts via the web for onboarding documents, the
click charge license can be used. It allows any number of domains and users to submit jobs into
the Connect system, providing credits are available.
1. This mode enables the second HTTP Get from the Printer Driver, so that a web page
(which could include a preview of the document) request is processed by Connect. For
each job received, the plug-in records key data in the database.
2. One click equals one page (any size) of the submitted print job. The number of copies (if
used) is recorded in the database, but not used for click calculations.
3. The click charge for all incoming jobs is counted upon receipt, but if a job fails for any
reason, then the click count is restored as if the job was not received.
4. Each incoming job is checked to see if the number of pages will result in remaining credits.
If so, the job will be accepted, otherwise it will be dropped and a message will be sent to
the Printer Driver in the SysTray.
5. All jobs from any IP, user, domain or machine will be allowed, if there are credits available.
6. New click charge licenses are added to Connect. Each new click charge buy will be
reflected by an additional entry in the license file itself, indicating the newly
purchased credit amount. The license check algorithm sums up all entries.
Example: A customer purchases a click charge license on 1st January 2016 with a credit of
100,000 pages. At the end of March, they determine that their remaining credits (20,000)
won’t be sufficient for some big jobs they are expecting and so they purchase another
100,000 credits. The issue date of the new credits is 1st June 2016. The new credit balance
will be 120,000
Incoming Print Jobs and the License
Each incoming print job is checked against the license to determine if it can be handled in
licensed mode or in unlicensed mode. Here are some examples to clarify this:
Scenario 1
is licensed in Click-charge mode with 10,000 pages. They have already used 9,870 credits,
OLCS
so 130 are left.
Case 1: A job comes in with 40 pages. This job can be handled in LICENSED mode, so this
is a "licensed job".
Case 2: A job comes in with 243 pages. This is more than 130. This job is handled in
UNLICENSED mode (reduced metadata and no database entries). This is an "unlicensed
job".
Page 20
Page 25

Scenario 2
Perpetual license with domain = "some.phantasy.com" and number of licensed users = 100.
Case 1: A job comes in from the domain “some.phantasy.com” and from a machine
named "KATERKARLO". The domain is right and this is the first job, so KATERKARLO is
added to the
Case 2: Meanwhile many, many users have printed from that domain, so all 100
(Unique User Slot Identifiers) are full (100 different machine names are in the list). A
user sends a job from a machine named "MICKEYMOUSE". This machine name is NOT in
the list. Connect checks the existing
the longest amount of time. Let us say, this machine has the name "DAISYDUCK".
o
Option 1: DAISYDUCK hasn’t sent a print job in the last 12 days. Since this is less
than 30 days the
MICKEYMOUSE is processed in UNLICENSED mode.
o
Option 2: DAISYDUCK hasn’t sent a print job in the last 42 days. Since this is
more than 30 days the
MICKEYMOUSE is processed in LICENSED mode.
Case 3: A job comes in from domain "starship.enterprise.it". This domain is not licensed,
so this job is considered an “unlicensed job” and will be processed in UNLICENSED
mode.
and handled in LICENSED mode.
UUSI
UUSI’s
UUSI cannot
UUSI will
be released and so the incoming job from
UUSI
to see which one has not sent a print job for
be released and so the incoming job from
’s
Security
In order to provide security when printing over the internet, OLCS includes several protective
features.
HTTPS Communication
The Printer Driver can be set to use HTTPS for any job transfer. To do this Workflow must also
be set to use HTTPS. This topic is covered briefly in the “Server URL Setting” section in this
document (new Printer Driver installation), but full details can be found in the Workflow
documentation.
Job Origin
Each print job will include unique information about the machine it has been sent from. This
unique machine ID is calculated with a proven method and will be transferred encrypted and
enhanced. The enhancement will result in a different encrypted machine ID per print job, so that
spoofing can be detected. On the server side, if spoofing is detected a respective messages will
be created.
Users can set up Workflow processes and filters to accept only specific jobs from known
machine IDs, thus enhancing security.
Database Connection
The OLCS plug-in works with a database to store all relevant job information. This database is a
“HyperSQL Database” (HSQLDB. See https://en.wikipedia.org/wiki/HSQL_Database_Engine). It is
installed as a service with the name “OL Connect Send DBServer” (the internal service name is
“OLCSServer”).
Page 21
Page 26

Communication between the plug-in and the database occurs using port 9001 (the default port
for HSQLDB). However, there may be situations where this port is already blocked by another
application and may need to be changed.
Several database settings can be modified by creating an ini file. This file must be named
“OLCSSvc.ini” and stored in the same folder as the executable OLCSSvc.exe, located under
“%CommonProgramFiles(x86)%\Objectif Lune\<Workflow Name>\Plugins\CPD”.
By adding the entry “DBPort = <new port number>” under [HSQLDBSETTINGS] and then
restarting the service, the communication port is changed.
Note: Workflow has to be restarted after such a modification.
Timeout
During a job transfer from the Printer Driver to Workflow, a timeout could occur (indicated by a
log entry like “ERROR: sendBinaryContents: Could not open request. Reason: 12002”). In this
case, the timeout for the HTTP service in Workflow needs to be increased. We recommend
using a value of more than 5 minutes (>600 seconds).
Additionally, the timeout in the browser on the client side should be enhanced. Please see the
help pages for your browser about how to do this.
Compatibility
The OLCS components communicate with each other by using a well-defined and versioned
protocol. As long as these components use the same protocol version, the job transfer will work
even if the plug-ins themselves are changed. The protocol version can be found in the third part
of the version number of both components; i.e. if plug-in shows version 1.0.5.11221, the “5”
indicates protocol version 1.5 (omitting the leading 1).
Any Printer Driver can communicate with any plug-in, as long as this third version number part is
identical.
Known Issues
Paper size vs Printer page size
It is important to ensure that paper size settings match the printer driver settings. If this is not
done, it’s possible that the print job transferred to Connect Send may include some extra white
space on the page. In interactive mode, this can be seen, but in non-interactive mode the job
will be processed without notification.
OLCS Plug-In and Connect on the same machine
OLCS Plug-Ins are installed with Workflow; however Connect may be installed on another
machine. Where Workflow and Connect are installed on the same machine there is a chance
that interference between the OLCS's internal database and Connect may occur causing the
browser popup to be blocked. This can be fixed by applying a startup wait to the Connect
Service. If the issue occurs during runtime, restarting the Connect Server Service will
fix the issue.
Page 22
Page 27

OLCS Plug-In and Printer Driver on the same machine
When running the printer driver and plug-in on the same machine the host name must be
“127.0.0.1” instead of “localhost”, otherwise the communication between the two won’t work.
Plug-In's temp folders not removed when file transfer is complete
When a file is sent to the server after the transfer is complete, the clean-up routine does not
remove the folder leaving an empty folder on disk.
A solution might be to manually remove those empty folders on a regular basis or create a
Workflow Process to automate the deletion of these empty folders after business hours. These
temporary folders can be found here:
C:\ProgramData\Objectif Lune\PlanetPress Workflow 8\PlanetPress Watch\CPD\Temp
Data mapping from resulting PS/PDF files can be corrupted
If a saved PDF copy is used rather than the raw mail merge, an error occurs during the data
mapping stating that there was an “error retrieving character data”. Adobe Acrobat (and some
other software) bypasses the printer driver API to print text and uses the API’s PostScript Passthrough instead. So no PDF preview appears in the web template.
Page 23
Page 28

OL Connect Send Job Information Plug-In
Overview
Creating an interactive process for incoming print jobs using OLCS requires that the relevant
information about the respective job is available and can be used in Workflow.
Job Information retrieval is made easy with the OLCS Job Info plug-in. It is installed along with
the OLCS plug-in and appears besides it in the Plug-In Bar area of Workflow under
Uncategorized.
Page 24
Typically, it is used in the interaction process just after the initial HTTP Server Input plug-in. The
Job Info plug-in gets all relevant information for the dedicated print job using the Unique Job ID.
Unique Job ID: Whenever an OLCS Printer Driver is sending a print job to the OLCS plug-in, it
creates a unique ID string composed from 10 upper- and lowercase letters and digits e.g.
“ri0zZdluLp”. This Job ID is used in any communication between the Printer Driver and the plug-in
and is the leading identification element for this particular job. All job related information is
stored in the underlying database and linked together by this Job ID.
Note:
The OLCS Job-Info plug-in gets data from the OLCS database which means it only works
when Connect is in LICENSED mode.
Page 29

The Plug-In Settings
To configure the plug-in, right-click it after adding it to the Workflow process, and click
Properties.
General Tab
Three different settings affect the general behavior of the plug-in:
Where to get the Print Job ID
When to continue with the next step
Where to store the job information details
Page 25
Page 30

Select Job ID Source
The plug-in can be used in a generic way. Whenever information about a specific print job is
required, it can be retrieved as long as the related job ID is known. However, the plug-in has
been implemented so that it can also be used in the “OLCS_Interaction” process. It can get the
job ID from the incoming data of the HTTP Server Input plug-in.
Read from HTTP Input Data
When this option is selected, the plug-in analyzes the incoming data and if it can find the
job ID at the expected location, it uses it for further processing.
Read from Variable
When selecting this option, any existing Workflow variable can be chosen via the
dropdown field. In this case the plug-in reads the Job ID from that variable.
Select Returning Type
Depending on this setting the plug-in gets status information about the job before it has arrived
or it gets information after the job has been completely received.
Immediately
By choosing this option, the Job Info plug-in will return as quickly as it can, providing it
can find a matching job ID in the database. It is important to know that it will wait until
information about the job is available. If no matching Job ID is found, the plug-in will
wait for 5 seconds and then raise an error, which can be acted upon using the On Error
tab settings.
When selecting this option, the Status ID information has to be checked. A Status ID
value of 1 or 6 indicates a fully processed job. Any value between 2 and 5 (inclusive)
means that the job is still in progress.
When Job Is Processed
When this option is checked, the plug-in will query the database until the Status ID
value is 1 or 6. If the status does not become 1 or 6 within the time defined via the
Timeout (sec) input field, the plug-in will raise an error (see above).
Select Output Type
XML Data to Workflow
This will result in an XML file containing all job related data becoming the new Workflow
job file. In this case, the incoming data file of the HTTP Server Input plug-in is
overwritten and lost.
Write to Variables
Allows print job information to be stored in Workflow variables by using a simple
dropdown list. In this case, the HTTP Server Input data will be kept as Workflow job file.
If the same Workflow variable is assigned more than once, the plug-in will give a
warning and will not close until the issue is fixed.
Another warning message will be shown to indicate that not all job information has
been assigned to variables. This warning can be ignored if required.
Page 26
Page 31

Database Tab
Please refer to the Database Connection section in the OL Connect Send Job Information plug-in
chapter.
On Error Tab
Please refer to the Using the On Error tab paragraph from the Workflow documentation.
Comments Tab
Please refer to the Comments tab paragraph from the Workflow documentation.
Returned Information
For each job received by the main OLCS plug-in the following values will be available.
Please keep in mind that the OLCS Job-Info plug-in gets data from the OLCS database which
means it only works when Connect Send is in LICENSED mode.
Job UID
Date/Time stamp
database. It is stored in UTC format plus time zone indicator inside the database.
It will differ from the time stamp logged by the Printer Driver as well as by the
plug-in. Note: The Printer Driver machine time stamp in the Printer Driver log may
significantly differ this value.
Number of Copies
(intended number of copies required for the print job).
Some applications do not use the general print job information to define the number of
copies. In such (rare) cases, the
user entered in the print dialog. For example: "IrfanView" does not use the regular Copies
indicator, but instead sends the same job as many times as indicated by
dialog.
Number of pages
calculated by the Windows spooler, when processing the printing order. Please be aware
that some applications do an implicit reformatting of jobs if the intended paper size does
not match the paper size as selected in the print dialog. This may lead to the fact that the
number of pages, as calculated by the spooler and reported by
value as shown to the user in the application itself.
User name
produce the print job. It is not - in all cases - the user name of the user who is currently
logged into the system.
Original file name
spooling system. It is taken from the name as it arrives in the spooler. Some applications
: This is the 10 (ten) character long
Unique Job Identifier
string.
: This is the time when the matching job was initially created in the
: This is the value set by the Printer Driver for the number of copies
Number of Copies
sent in the job can differ from what the
Copies
: This is the number of pages for one copy of the print job. This value is
, can differ from that
OLCS
: This is the Windows user name of the user who started the application to
: This is the "file name" as sent from the application to the Windows
main
OLCS
in its print
Page 27
Page 32

add info to the name (like Notepad++) while others don’t (like Adobe Reader).
only use what it gets from the spooler. It does not interact with the applications itself.
Original file size
Domain (workgroup) name
: The size of the print job - NOT the size of the document file.
: The name of the domain or workgroup the printing user
belongs to. This is not necessarily the name of the domain the machine itself belongs to.
Domain / Workgroup Indicator
: This domain name is the real domain name or only a
workgroup name. For explanations about domains, domain names, users, user names,
user domains, logged on users vs. application running users, machine names etc. please
refer to the respective Windows help pages or ask your system administrator.
Machine name
: The name of the machine the OLCS printer driver is running on as
retrieved by the respective Windows API.
Machine GUID
: The "Magic Number" of the machine on which the job was produced. It
can be used as an additional identification mark to validate the origin of the job.
OLCS
can
Page 28
Page 33

OL Connect Send Get Data Plug-In
General Tab
This plug-in allows OLCS users (admins, accounting personnel, print masters ...) to get info about
all jobs received with OLCS on a dedicated machine. It allows queries of the OLCS Database to
be made for the production of reports.
All job info that could be retrieved will be written to a temporary results file that is then passed
on as the new Workflow job file. It can be used right after the Job Info plug-in in the same
Workflow configuration. It could for example be saved using a "Send to Folder" plug-in.
Filter Options
Filters are required for:
Start and end date (down to minutes)
Domain(s)
User(s)
Machine name(s)
Page 29
Page 34

2016-07-12
It is possible to only define a date without a time
2016-%m-%d
Standard Workflow variables for year, month and day are allowed
2016-07-12
11:00
From and To dates may also have a time indicator (24 hour notation,
separator from the date is a space character, separator between hour and
minute is a colon)
Except for start and end dates, it is possible to pass a list of multiple search criteria, separated
with semicolons, containing:
Workflow variables
Job variables
Names.
Important hint: No spaces are allowed around the listed names resp. before or after a
semicolon.
Example
A valid user name search string would be:
%\{global.User};helen;%1;george napier
This would look for all entries, where the username is:
as currently stored in the global Workflow variable User
"helen"
as stored in the job variable number 1
equals "george napier" (case insensitive)
The search criteria in this case is an OR.
If search criteria are entered in multiple input fields, all of them are combined with {{AND}}.
Example: Domain name is defined as {{objmtl.objectiflune.com}} and username as
{{rentel}}, then the result will only contain all the print job information for
objmtl.objectiflune.com where the username is "rentel".
Date and Time Definitions
Both date and time entries must be notated in UTC format. During runtime, the dates are
checked and, if any other date/time notation is used, a Workflow error log entry is created.
UTC notation is described here: https://www.cl.cam.ac.uk/~mgk25/iso-time.html.
It is possible to define the same date for From Date/Time as for To Date/Time. In this case, the
result will be all jobs between 0:00 and 23:59 of that date.
Valid date/time entries:
Operators
Searches are case-insensitive.
Searches with multiple entries in one criteria: OR
Page 30
Page 35

Searches with entries in different criteria: AND
Results
For each job that matches the search criteria, the following information will be put in the
resulting data file:
Job UID
Date/Time stamp
Number of copies
Number of pages
User name
Original file name
Original file size
Domain (workgroup) name
Domain / Workgroup Indicator
Machine name
Machine GUID
Results File Format
The following result file formats are selectable:
1.
XML
2.
JSON
3.
CSV. (Separator = semicolon (0x3B), string indicator = quote (0x22).)
Note that this file is not automatically saved to disk. The retrieved job info is written to a
temporary results file that will be passed on as the new Workflow job file. It can be used right
after the Job Info plug-in inside the Workflow configuration. To save the results file, use a "Send
to Folder" plug-in and configure that appropriately.
Returned Information
For each job received by the main OLCS plug-in the following values will be available.
Please keep in mind that the OLCS Job-Info plug-in gets data from the OLCS database which
means it only works when Connect is in LICENSED mode.
Job UID
Date/Time stamp
database. It is stored in UTC format plus time zone indicator inside the database.
It will differ from the time stamp logged by the Printer Driver as well as by the
plug-in. Note: The Printer Driver machine time stamp in the Printer Driver log may
significantly differ this value.
Number of Copies
(intended number of copies required for the print job).
Some applications do not use the general print job information to define the number of
copies. In such (rare) cases, the
user entered in the print dialog. For example: "IrfanView" does not use the regular Copies
indicator, but instead sends the same job as many times as indicated by
dialog.
: This is the 10 (ten) character long
: This is the time when the matching job was initially created in the
: This is the value set by the Printer Driver for the number of copies
Number of Copies
Unique Job Identifier
sent in the job can differ from what the
string.
Copies
main
OLCS
in its print
Page 31
Page 36

Number of pages
: This is the number of pages for one copy of the print job. This value is
calculated by the Windows spooler, when processing the printing order. Please be aware
that some applications do an implicit reformatting of jobs if the intended paper size does
not match the paper size as selected in the print dialog. This may lead to the fact that the
number of pages, as calculated by the spooler and reported by
, can differ from that
OLCS
value as shown to the user in the application itself.
Username
: This is the Windows username of the user who started the application to
produce the print job. It is not - in all cases - the username of the user who is currently
logged into the system.
Original filename
: This is the "file name" as sent from the application to the Windows
spooling system. It is taken from the name as it arrives in the spooler. Some applications
add info to the name (like Notepad++) while others don’t (like Adobe Reader).
only use what it gets from the spooler. It does not interact with the applications itself.
Original file size
Domain (workgroup) name
: The size of the print job - NOT the size of the document file.
: The name of the domain or workgroup the printing user
belongs to. This is not necessarily the name of the domain the machine itself belongs to.
Domain / Workgroup Indicator
: This domain name is the real domain name or only a
workgroup name. For explanations about domains, domain names, users, user names,
user domains, logged on users vs. application running users, machine names etc. please
refer to the respective Windows help pages or ask your system administrator.
Machine name
: The name of the machine the Printer Driver is running on as retrieved by
the respective Windows API
Machine GUID
: The "Magic Number" of the machine on which the job was produced. It
can be used as an additional identification mark to validate the origin of the job.
OLCS
can
On Error Tab
Please refer to the Using the On Error tab paragraph from the Workflow documentation.
Comments Tab
Please refer to the Comments tab paragraph from the Workflow documentation.
Page 32
Page 37

Create Preview PDF Plug-In
Overview
The Create Preview PDF was created to generate a PDF preview for a single record as fast as
possible. This preview is typically used for previews embedded in web pages. The process does
not involve the Output Engine and therefore the result does not have output optimizations
applied. Omitting this optimization step scrapes of another few milliseconds in the rendering
process resulting in even faster PDF creation times. The data source could be set to a
DataMapping configuration. As stated the preview returns a PDF for a single record. When
providing multiple records the preview is created based on the first record.
The plugin makes the PDF available to the process as the job data file. This file could be written
to a publicly accessible location (for example the _iRes folder) so that path could be served back
to the browser allowing the web page to embed the PDF data for online viewing.
The user interface of the plug-in consists of the following tabs:
Data Mapper
Content Creation, similar to
OL Connect Proxy
On Error
Comments
All in One
Data Mapper Tab
The
Data Mapper
Data mapping configuration
tab can have one of the following source options:
Page 33
Page 38

Standard Data mapping configuration option as seen in the
All in One
JSON string
Alternatively, one could set the data source to the JSON string option. In web
environments, it is common to send and retrieve data from a server using an AJAX
request (typically invoke from within JavaScript). In this scenario, the data is often
exchanged in JSON format. JSON is short for JavaScript Object Notation. It is a way to
store information in a structured and easy to read format. It is often referred to as xml
without nodes and meant for exchanging data. The following shows a simple JSON
structure holding the first and last name of a person.
{
"first": "Peter",
"last": "Parker"
}
When the ‘keys’ in the above sample (e.g. first and last) have matching data fields
names, in our template the personalization scripts of the template will have access to
the data. The JSON string samples below show various techniques on how to
incorporate JSON data in your data source.
When selected, a text area is shown allowing the user to enter a JSON string.
The JSON string may contain variables, globals, job infos and lookups as seen in
the
The user can use a single variable assuming that the respective variable contains
Value
field of the
Set Job Info and Variables
plugin.
a JSON string.
In case the JSON string is not a valid JSON object, the plugin will error out with
an explicit message.
plugin.
Page 34
JSON string samples
A hard-coded JSON string:
{
"first":"Peter",
"last":"Parker",
"email":"pparker@localhost.com"
}
A JSON string with references to local variables and Job Info 2:
{
"first":"%{first}",
"last":"%{last}",
"email":"%2"
}
A JSON string containing a local variable and various lookups:
{
"jobid":"%{jobid}",
"account":"lookup(OLCS_jobs, account, jobid, '%{jobid}')",
"datafile_name":"lookup(OLCS_jobs, datafile_name, jobid, '%{jobid}')",
"pages":"lookup(OLCS_jobs, pages, jobid, '%{jobid}')",
Page 39

"documents":"lookup(OLCS_jobs, documents, jobid, '%{jobid}')",
"recordsetid":"lookup(OLCS_jobs, recordsetid, jobid, '%{jobid}')"
}
An example where the entire JSON string is provided in Job Info 1:
%1
Constructing the JSON string by retrieving information from a XML job data file.
{
"first":"xmlget('/request[1]/values[1]/first[1]',Value,KeepCase,NoTrim)",
"last":"xmlget('/request[1]/values[1]/last[1]',Value,KeepCase,NoTrim)",
"email":"xmlget('/request[1]/values[1]/email[1]',Value,KeepCase,NoTrim)"
}
Content Creation Tab
Please refer to the Content Creation tab paragraph from the Workflow documentation.
OL Connect Proxy Tab
Please refer to the Connect Proxy Tab paragraph from the Workflow documentation.
On Error Tab
Please refer to the Using the On Error tab paragraph from the Workflow documentation.
Comments Tab
Please refer to the Comments tab paragraph from the Workflow documentation.
Page 35
Page 40

Troubleshooting
If you find that you cannot solve an issue here are a few things to check.
1. Check if the
Workflow
that the service is running. If not, uninstall and then reinstall the
reinstallation, make sure that the service is running.
2. Switch
printer driver: run OLCS Printer Driver Setup from "Programs and Features". Please, refer
to the chapter Installing OL Connect Send Printer Driver.
3. Before running a new print, please clean up the OLCS printer’s temp and logs folders.
They are located under:
%ProgramData%\Objectif Lune\CPD\Temp\<OLCS Printer Name>
and
%ProgramData%\Objectif Lune\CPD\Log\<OLCS Printer Name>
It is very important to remove all files from the Temp folder, otherwise the OLCS printer
will retry sending these again and again.
4. When running the printer driver and plug-in on the same machine the host name must be
“127.0.0.1” instead of “localhost”, otherwise the communication between the two won’t
work.
5. It has been seen, in some cases, that using two instances of the
Workflow
printer driver and redo them from scratch.
strongly recommended to use only one single process with the OLCS plug-in and set this
to “Self Replicating”. Any further processing can be managed by the follow-up processes.
Using two or more
(re-)starting
6. Sometimes, the license cannot be successfully activated due to the fact that the license
file is locked, blocked or under the control of a specific user account. In this case the
Software Activation Tool
could not be activated. The
of this error and close without displaying it. Please double check if the license with the
OLCS
and clicking on the small i button. This will open the license overview window. A valid
OLCS
activation has failed. In this case you need to activate manually by replacing the existing
license file with the new one:
and the plug-in. The service is called
OLCS
processes could lead to an error. Delete all the processes using the OLCS
branch has successfully been activated by reopening the
license will have a respective entry at the end of the list. If this is not the case, the
a. Rename the new license file with the OLCS enhancement to
“OLConnect1.OLConnectLicense”.
b. Stop any Connect and Workflow services.
Remove the existing “OLConnect1.OLConnectLicense” from
c.
“%ProgramData%\Objectif Lune\OL Connect\licenses”.
d. Put the new license at that location.
e. Restart any Connect services you stopped. You may notice that removing the
existing license may be forbidden and you need to allow it explicitly. It may even
be that you need to log on as an administrator to delete the file.
Database service is running on the machine where you have installed
OLCS
OL Connect Send DBServer
OLCS
printer driver logging to “DEBUG”. This can be done by modifying the OLCS
OLCS
Please do not use copy & paste.
OLCS
Workflow
plug-ins in
.
of Connect will show a message telling you that the license
Software Activation Tool
Workflow
has been known to cause an error when
of Workflow will silently take note
Software Activation Tool
. Make sure
plug-in. After
plug-in in different
It is also
Page 36
Page 41

Important: This is not an issue with OLCS, but with the Connect and/or Workflow version
and under which user it has been installed. This issue will occur with any license activation
on such machines.
If none of the above mentioned should help, then collect all relevant information before
contacting support or dev:
The
Lune\CPD\Log\<OLCS Printer Name>”
Printer Driver log files (located under
OLCS
“%ProgramData%\Objectif
on that machine/s, where the Printer Driver has
been installed)
The
plug-in log files (located under
OLCS
“%ProgramData%\Objectif Lune\CPD\Log”
on
that machine, where the plug-in has been installed and where Workflow is running)
Your Workflow configuration plus all relevant documents and externally required files
A step-by-step description of what was done so far and what did lead to the issue(s).
Page 37
Page 42

Click Charge License Renewal
This chapter deals with such cases and scenarios which require a Workflow license renewal and
what must be taken care of if this license contains an OLCS Click Charge license.
Current license
with a new one. This current license file will or has already become invalid due to one of
the scenarios outlined below. Invalidation is usually related to the fact that the magic
number of the current license no longer matches the new magic number.
WF machine
the licensed
Original Click charge
: This is the existing license which needs to be renewed and/or replaced
: The machine/computer where the customer in question runs
plug-ins and for which his current license is valid.
OLCS
: The collection of all
click charge entries in the current license.
OLCS
Workflow
and
Click Charge Licensing of OLCS
All click charge license related information of OLCS is tracked in the OLCS database. At any given
moment, the consumed click charge credits can be calculated from the database and compared
against the licensed click charge credits.
This information is additionally logged in a hidden secret encrypted file so that deleting the
OLCS database will not result in a click charge reset.
Possible Scenarios
Scenario 1: The customer has modified some hardware on the WF machine. This hardware
modification results in a new magic number but has no impact on that specific disk where the
OLCS database is located.
In this case, a new license can be issued to the customer with the original click charge.
Scenario 2: The customer has modified hardware on the WF machine including that specific disk
where the OLCS database is located but he still has access to the old hard disk with the OLCS DB.
In this case, the customer mandatory has to copy the OLCS DB files to the new location.
See the section on the next page, called “Moving the OLCS DataBase”.
If the customer has done this, he can get the new license file with the original click charge.
Scenario 3: The customer has moved or wants to move to another (new) computer, but still can
access the disk of the old computer.
Same as Scenario 2.
Scenario 4: The customer has to move to a different machine because the WF machine has
crashed. However he still has access to the old machine’s hard disk.
Same as Scenario 2.
Scenario 5: Like in scenario 4, but the crash is so serious that there is no more access to the old
disk.
Page 38
Page 43

In this case, there is no chance at all to recover the OLCS DB nor the secret file. The
account manager for this customer must therefore clarify the amount of OLCS pages to be
activated for this customer.
Moving the OLCS Database
All OLCS DB files are located under:
%ProgramData%\Objectif Lune\CPD
All files have a name following the pattern “OLCSDB*.*” (The OLCSDB.log file can be deleted
before the move/copy action).
Before copying the files, all related applications and services need to be stopped:
1.
Connect
2.
Workflow
3.
Workflow
Services (this can be done by using the
Configuration Tool
Service Console
Workflow
Service Console)
4. OLCS Database Service (“OL Connect Send DBServer”)
Step by step
Install Workflow on the new machine and stop all applications and services listed above.
Delete all OLCSDB*.* files under %ProgramData%\Objectif Lune\CPD on the new machine.
Put all OLCSDB files from the old machine into %ProgramData%\Objectif Lune\CPD on the
new machine.
Start OLCS Database Service and Watch Service.
Page 39
 Loading...