


 Loading...
Instruction Manual
pH 5+ pH/°C pH 6+ pH/°C/mV
Ion 6+ pH/°C/mV/Ion
Technology Made Easy ...
68X576801 Rev 0 07/2011
Table of Contents
1. |
INTRODUCTION ......................................................................... |
1 |
|
2. |
GETTING STARTED................................................................... |
2 |
|
|
Description of Keypad Functions............................................................................... |
2 |
|
|
Description of LCD Annunciators .............................................................................. |
3 |
|
|
Inserting & Removing the Rubber Armor / Stand....................................................... |
4 |
|
|
Inserting New Batteries ............................................................................................. |
4 |
|
|
Connecting Electrodes and Temperature Sensor...................................................... |
5 |
|
|
Powering the Meter On ............................................................................................. |
5 |
|
3. |
CALIBRATION............................................................................ |
6 |
|
|
3.1 |
pH Calibration .................................................................................................... |
6 |
|
|
pH Calibration Procedure ................................................................................... |
7 |
|
|
Changing the pH Buffer Group........................................................................... |
8 |
|
|
Resetting User Calibrated Values ...................................................................... |
9 |
|
3.2 |
Ion Calibration (Ion 6+ only) ............................................................................. |
10 |
|
|
Ion Calibration Procedure (Ion 6+ only)............................................................ |
10 |
|
3.3 |
Millivolt (mV) Calibration (6+ only).................................................................... |
12 |
|
3.4 |
Temperature Calibration................................................................................... |
13 |
|
|
With Temperature Probe (Automatic Temperature Compensation).................. |
13 |
|
|
Without Temperature Probe (Manual Temperature Compensation) ................. |
14 |
4. |
MEASUREMENT ...................................................................... |
15 |
|
|
Taking Measurements............................................................................................. |
15 |
|
|
Holding & Releasing a Reading .............................................................................. |
15 |
|
5. |
TROUBLESHOOTING .............................................................. |
16 |
|
6. |
SPECIFICATIONS .................................................................... |
17 |
|
7. |
REPLACEMENTS AND ACCESSORIES ................................. |
18 |
|
8. |
WARRANTY.............................................................................. |
20 |
|
9. |
RETURN OF ITEMS.................................................................. |
20 |
|

Instruction Manual |
pH 5+, pH 6+, Ion 6+ |
1. INTRODUCTION
Thank you for selecting our pH 5+, pH 6+, or Ion 6+ portable meter. This microprocessor-based handheld instrument is both economical and easy to use.
The pH 5+ measures pH and temperature (oC).
The pH 6+ and Ion 6+ measure pH, mV (ORP) and temperature (oC).
The Ion 6+ can also measure direct ion concentration of various ions (mono and divalent) using an ion selective electrodes (ISE). The mV mode is also useful for ISEs.
The 5+/6+ series meters advance our popular 5/6 series meters that were introduced in 1998.
Each meter includes alkaline “AAA” batteries, a rubber armor / stand, and instruction manual. Please refer to Section—7 Replacements and Accessories for information on additional accessories and calibration solutions.
We take great pride in every instrument we manufacture and hope this one serves you well.
If you are viewing an electronic PDF version of this manual, look forbold and underlined hyperlinks in the Table of Contents and elsewhere. Clicking on them will immediately take you to the corresponding location in the manual.
*Find other helpful tips listed in grey boxes like this one!
1
Instruction Manual |
pH 5+, pH 6+, Ion 6+ |
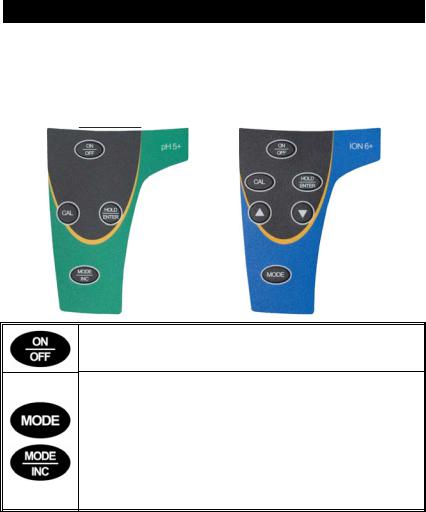
2. GETTING STARTED
Description of Keypad Functions
The pH 5+ and pH 6+ have four keys, while the Ion 6+ has six keys on its splash-proof keypad as shown here:
pH 5+ / pH 6+ |
Ion 6+ |
Powers the meter on and off. Upon power on, the meter automatically begins in the measurement mode that was last used.
MODE: Selects measurement modes (pH, mV, Ion (Ion6+ only), & Temperature).
With meter off, press and hold  or
or  to access the (buffer), (calibration), and (electrode) setup menus
while powering on. Press  or
or  again to change setup menus.
INCREMENT: (INC) for Temperature setting and calibration.
2
Instruction Manual |
pH 5+, pH 6+, Ion 6+ |
CALIBRATE: Press to begin calibration of the selected mode. Press again during calibration to abort calibration and return to measurement mode without confirming any values.
During setup mode, function is similar to “escape” or “go back”, returning to the previous screen.
With meter off, press and hold  to select the reset menu ( ) while powering on.
Increase value or scroll up in Setup or Cal modes.
Decrease value or scroll down in Setup or Cal modes.
HOLD: Freezes measured reading—indicated by “HO”. Press again to resume live reading.
ENTER: Confirms values in calibration mode. Confirms selections in setup mode.
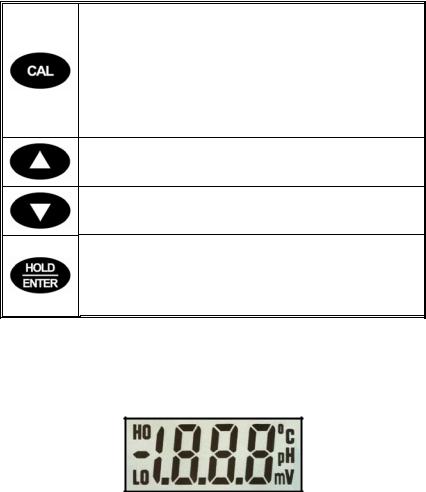
Description of LCD Annunciators
The custom LCD consists of 3½-digit segments which uses annunciators for pH, mV or oC (Temperature). No annunciator is shown in Ion mode. Other annunciators include “HO” (when HOLD function is activated) and “LO” (low battery condition).
3

Instruction Manual |
pH 5+, pH 6+, Ion 6+ |
Inserting & Removing the Rubber Armor / Stand
Before removing the meter from the rubber armor, disconnect any electrodes. Push out from the bottom edges of meter until it is completely out of boot.
To insert meter into the armor, slide in from the top of meter before pushing the bottom edges of meter into position. Tilt the stand at the back of meter for table top usage as desired.
Inserting New Batteries
The “LO” annunciator alerts you when battery power is running low. Power off the meter before removing the batteries. After removing the rubber armor, push the battery cover in the direction of the arrow and lift up—no screwdriver is required. Note the polarity of batteries before inserting into position.
4

Instruction Manual |
pH 5+, pH 6+, Ion 6+ |
Connecting Electrodes and Temperature Sensor
Align the BNC connector slots with the posts of meter’s socket and rotate connector clockwise until it locks—do not force. To remove, rotate the connector in counterclockwise direction until it unlocks, and slide the connector off the socket. Insert the mini phono jack of temperature sensor into the socket on the meter. Unplug the phono jack to perform measurements without temperature compensation (25° C default).
BNC connector of |
2.5 mm Phono plug |
pH, ORP, or Ion |
for temperature |
Selective Electrode |
measurement |
Powering the Meter On
Press  . All LCD segments will display momentarily during the self-diagnostic test, before scrolling the model number, software revision, pH buffer group, and number of pH calibration points selected before returning to the measurement mode:
If a temperature probe is not connected, either 25.0oC (factory default) or the last calibrated temperature value is used. If a temperature probe is connected, the current measured temperature is used.
Note: The Ion 6+ will display “ - - - ” in Ion concentration mode if the meter has not been calibrated or if the meter has been reset. See Section 3—Ion Calibration.
“ ” (Over range) and “ ” (Under range) indicates the reading exceeds the maximum or minimum measurement range. See Section 6—Specifications. However, the most likely reason for these error messages is that the electrode is not connected or broken.
5
Loading...