


Oakton C401, C301, C201, C101, C102 Instruction Manual
...Instruction Manual
C401 / 301 / 201 / 101 / 102 / 103 / 104 / 105
Waterproof Portable Colorimeter
68X357704 Rev 2 05/08
Technology Made Easy ...
Part of Thermo Fisher Scientific
Preface
This manual functions in two ways: first as a step by step guide to help you operate the waterproof C401/301/201/101/102/103/104/105 Colorimeter; second, it serves as a handy reference guide.
It contains basic instructions that you must follow during the operation, care and maintenance of the instrument. The safety protection provided by this equipment may be impaired if it is used in a manner not described in this manual. It is recommended that all operators should read this manual prior to working with this instrument.
Eutech Instruments/ Oakton Instruments cannot accept any responsibility for damage or malfunction to the meter caused by improper use of the instrument.
The information presented in this manual is subject to change without notice as improvements are made, and does not represent a commitment on the part of Eutech Instruments Pte Ltd/ Oakton Instruments.
Note: Eutech Instruments Pte Ltd/ Oakton Instruments reserves the right to make improvements in design, construction, and appearance of our products without notice.
Copyright © 2004 All rights reserved.
Eutech Instruments Pte Ltd
Oakton Instruments
Rev. 2 05/08
TABLE OF CONTENTS
1 |
INTRODUCTION........................................................................................................................ |
1 |
|
|
1.1 |
UNPACKING C401/301/201/101/102/103/104/105 COLORIMETER AND ACCESSORIES............................. |
2 |
|
1.2 |
DISPLAY................................................................................................................................................. |
3 |
|
1.3 |
KEYS AND FUNCTIONS ............................................................................................................................ |
4 |
|
1.4 |
BATTERY INSTALLATION .......................................................................................................................... |
5 |
2 |
MEASUREMENT ....................................................................................................................... |
6 |
|
|
2.1 |
GENERAL INFORMATION.......................................................................................................................... |
6 |
|
2.2 |
PREPARATION OF SAMPLE VIAL .............................................................................................................. |
7 |
|
2.3 |
MEASUREMENT PROCEDURE .................................................................................................................. |
7 |
|
2.4 |
CHLORINE, FREE & TOTAL (0 – 6PPM CL2)............................................................................................... |
9 |
|
Chlorine, Free & Total Measuring Hints & Tips ........................................................................................... |
11 |
|
|
2.4.1 |
Sample Collection .......................................................................................................................... |
11 |
|
2.4.2 |
Sample Measurement.................................................................................................................... |
11 |
|
2.4.3 |
Interferences .................................................................................................................................. |
11 |
|
2.4.4 Accuracy Check / User Calibration ................................................................................................ |
13 |
|
|
2.4.5 |
Chemistry....................................................................................................................................... |
14 |
|
2.5 |
CYANURIC ACID (5-90 PPM) .................................................................................................................. |
15 |
|
Cyanuric Acid Measuring Hints & Tips ........................................................................................................ |
17 |
|
|
2.5.1 |
Sample Collection .......................................................................................................................... |
17 |
|
2.5.2 |
Sample Measurement.................................................................................................................... |
17 |
|
2.5.3 |
Interferences .................................................................................................................................. |
17 |
|
2.5.4 Accuracy Check / User Calibration ................................................................................................ |
17 |
|
|
2.5.5 |
Chemistry....................................................................................................................................... |
18 |
|
2.6 |
PH (5.9-8.2 PH UNITS).......................................................................................................................... |
19 |
|
pH Measuring Hints & Tips.......................................................................................................................... |
21 |
|
|
2.6.1 |
Sample Collection .......................................................................................................................... |
21 |
|
2.6.2 |
Sample Measurement.................................................................................................................... |
21 |
|
2.6.3 |
Interferences .................................................................................................................................. |
21 |
|
2.6.4 Accuracy Check / User Calibration ................................................................................................ |
21 |
|
|
2.6.5 |
Chemistry....................................................................................................................................... |
22 |
|
2.7 |
CHORINE DIOXIDE (0 – 11.4 PPM CLO2) ................................................................................................ |
23 |
|
Chlorine Dioxide Measuring Hints & Tips.................................................................................................... |
25 |
|
|
2.7.1 |
Sample Collection .......................................................................................................................... |
25 |
|
2.7.2 |
Sample Measurement.................................................................................................................... |
25 |
|
2.7.3 |
Interferences .................................................................................................................................. |
25 |
|
2.7.4 Accuracy Check / User Calibration ................................................................................................ |
27 |
|
|
2.8 |
BROMINE (0 – 13.5PPM BR2)................................................................................................................. |
29 |
|
Bromine Measuring Hints & Tips................................................................................................................. |
31 |
|
|
2.8.1 |
Sample Collection .......................................................................................................................... |
31 |
|
2.8.2 |
Sample Measurement.................................................................................................................... |
31 |
|
2.8.3 |
Interferences .................................................................................................................................. |
31 |
|
2.8.4 Accuracy Check / User Calibration ................................................................................................ |
33 |
|
|
2.9 |
OZONE (0 – 4.1 PPM O3)....................................................................................................................... |
34 |
|
Ozone Measuring Hints & Tips.................................................................................................................... |
36 |
|
|
2.9.1 |
Sample Collection .......................................................................................................................... |
36 |
|
2.9.2 |
Sample Measurement.................................................................................................................... |
36 |
|
2.9.3 |
Interferences .................................................................................................................................. |
36 |
|
2.9.4 Accuracy Check / User Calibration ................................................................................................ |
38 |
|
3 |
CALIBRATION......................................................................................................................... |
39 |
|
|
3.1 |
CALIBRATION PROCEDURE.................................................................................................................... |
39 |
|
3.2 |
CHLORINE, FREE & TOTAL, CHLORINE DIOXIDE, BROMINE AND OZONE .................................................. |
40 |
|
3.3 |
CYANURIC ACID.................................................................................................................................... |
43 |
|
3.4 |
PH ....................................................................................................................................................... |
46 |
|
3.5 |
RESTORING FACTORY CALIBRATION...................................................................................................... |
49 |
4 |
TROUBLESHOOTING GUIDE................................................................................................. |
51 |
|
5 |
ROUTINE MAINTENANCE...................................................................................................... |
52 |
|
|
5.1 |
VIALS – HANDLING, CLEANING AND CARE .............................................................................................. |
52 |
6 |
ACCESSORIES ....................................................................................................................... |
53 |
|
7 |
SPECIFICATIONS ................................................................................................................... |
54 |
|
8 |
WARRANTY............................................................................................................................. |
56 |
|
9 |
RETURN OF ITEMS................................................................................................................. |
56 |
|

Introduction
C401/301/201/101/102/103/104/105 Colorimeter
1 INTRODUCTION
Thank you for selecting the waterproof portable C401/301/201/101/ 102/103/104/105 Colorimeter. Depending on the model selected, the C401/301/201/101/102/103/104/105 Colorimeter series allows you to measure up to seven parameters - namely the Free Chlorine, Total Chlorine, Cyanuric Acid, pH, Chlorine Dioxide, Bromine and Ozone of an aqueous sample in the field. You have one of the following models:
•C101: pH measurement
•C102: Cyanuric Acid measurement
•C103: Chlorine Dioxide measurement
•C104: Bromine measurement
•C105: Ozone measurement
•C201: Free Chlorine and Total Chlorine measurement
•C301: Free Chlorine, Total Chlorine and pH measurement
•C401: Free Chlorine, Total Chlorine, Cyanuric Acid and pH measurement
1

Introduction
C401/301/201/101/102/103/104/105 Colorimeter
1.1Unpacking C401/301/201/101/102/103/104/105 Colorimeter and Accessories
The table below indicates the items that you should find in your Colorimeter shipment.
|
Item |
Qty |
C401 |
C301 |
C201 |
C101 |
C102 |
C103 |
C104 |
C105 |
1. |
Colorimeter with 4 “AAA” |
1 |
● |
● |
● |
● |
● |
● |
● |
● |
|
batteries |
|||||||||
|
|
|
|
|
|
|
|
|
|
|
2. |
Instruction Manual |
1 |
● |
● |
● |
● |
● |
● |
● |
● |
|
|
|||||||||
|
|
|
|
|
|
|
|
|
|
|
3. |
Instrument Carrying Case |
1 |
● |
● |
● |
● |
● |
● |
● |
● |
|
|
|||||||||
|
|
|
|
|
|
|
|
|
|
|
4. |
Empty Vial |
4 |
● |
● |
● |
● |
● |
● |
● |
● |
|
|
|||||||||
|
|
|
|
|
|
|
|
|
|
|
5. |
pH Indicator (Phenol Red) |
1 |
● |
● |
|
● |
|
|
|
|
|
Kit |
|
|
|
|
|
||||
6. |
Cyanuric Acid Reagent Kit |
1 |
● |
|
|
|
● |
|
|
|
7. |
Chlorine, Free (DPD) |
1 |
● |
● |
● |
|
|
● |
|
|
|
Reagent Kit |
|
|
|
|
|||||
8. |
Chlorine, Total (DPD) |
1 |
● |
● |
● |
|
|
|
● |
● |
|
Reagent Kit |
|
|
|
||||||
9. |
Chlorine Dioxide (Glycine) |
1 |
|
|
|
|
|
● |
|
|
|
Reagent Kit |
|
|
|
|
|
|
|
Remove C401/301/201/101/102/103/104/105 Colorimeter from the packing carton. Carefully inspect all items to ensure that no visible damage has occurred during shipment. If the items you received do not match your order, please contact your nearest distributor immediately.
WARNING: Extra care should be taken when unpacking, opening, and handling the sample vials. Surface scratches or finger smudges on the vial surface may cause measurement errors. Handle these items by their caps only.
Batteries provided with the meter package are to be installed prior to use. See Section 1.4 Battery Installation on page 5.
In the next page, Figure 1 depicts the meter. The three main components of the instrument are the sample well, the display, and the keypad. The following sections will describe the functionality of the display and the keypad. The proper use of the instrument will be discussed in later sections.
2

Introduction
C401/301/201/101/102/103/104/105 Colorimeter
Sample Vial
Sample Well
Meter Index
Liquid Crystal Marking
Display
Keypad
Figure 1: Parts of C401/301/201/101/102/103/104/105 Colorimeter
1.2 Display
All the LCD segments and annunciators that can appear on the display are shown in Figure 2. The display is used for reporting the colorimeter reading, communicate error messages and provide guidance for the operation of the instrument.
Calibration Mode |
Battery Indicator |
Annunciator |
CAL
ppm Units of pH
  Measure
14-segment Liquid Crystal Display
Figure 2: Customized LCD when switched on
3
Introduction
C401/301/201/101/102/103/104/105 Colorimeter
1.3 Keys and Functions
The keypad has four keys: ON/OFF, MODE, ZERO and READ/ENTER.
Keys |
Functions |
|
|
|
|
|
||
ON/OFF |
- Powers on and shuts off the meter. With the auto switch-off feature |
|||||||
|
the meter automatically shuts off 10 minutes after last key press. |
|||||||
MODE |
- Selects the test to be performed. |
|||||||
|
- Selects the calibration point in an incremental circular manner during |
|||||||
|
calibration. |
|
|
|
|
|
||
ZERO |
- Blanks the instrument (sets the meter to zero) before chemical |
|||||||
|
reagent is added. |
|
|
|
|
|
||
|
- Initiates the calibration mode when used with the ON/OFF key. |
|||||||
|
- Aborts the calibration process without saving. |
|||||||
|
- Exits the calibration mode. |
|
|
|
|
|
||
READ / |
- Initiates the measurement of the sample after the chemical reagent |
|||||||
ENTER |
has been added. |
|
|
|
|
|
||
- Confirms the test selection. |
|
|
|
|
|
|||
|
|
|
|
|
|
|||
|
|
|
|
|
|
|
|
|
|
|
|
|
WATERPROOF |
||||
|
|
|
READ |
|
|
|
|
|
|
|
|
ENTER |
|
|
|
|
|
|
|
ZERO |
|
ON |
|
|
||
|
|
|
OFF |
|
||||
|
|
|
|
|
|
|||
|
|
|
MODE |
|
|
|
|
|
|
|
|
|
|
|
|
|
|
|
|
|
|
|
|
|
|
|
Figure 3: C401/301/201/101/102/103/104/105 Keypad
4
Introduction
C401/301/201/101/102/103/104/105 Colorimeter
1.4 Battery Installation
Four AAA-sized batteries are included in your meter’s packaging:
1.Use a Philips screwdriver to remove the two screws holding the battery cover. See Figure 4 : Battery Installation.
2.Remove the battery cover.
3.Insert the batteries. Follow the diagram inside the cover for correct polarity.
4.Replace the battery cover onto its original position using the two screws removed earlier.
5.The meter is now ready to operate.
Philips Screws
Battery cover
Four 'AAA'-sized batteries
Figure 4 : Battery Installation
NOTE: Dispose used batteries in accordance with your local regulations.
5

Measurement
C401/301/201/101/102/103/104/105 Colorimeter
2 MEASUREMENT
2.1 General Information
The waterproof C401/301/201/101/102/103/104/105 Colorimeter allows you to measure up to seven parameters - namely the pH, Cyanuric acid, Free Chlorine, Total Chlorine, Chlorine Dioxide, Bromine and Ozone of a sample and reports the results in appropriate units (ppm or pH). Each specific measurement has its own range as listed in the specifications.
The meter will go through a power sequence as shown below.
Meter’s Model Number |
Meter’s Revision Number |
Measurement Mode Selection |
Figure 5: Example of C401 Colorimeter power up sequence
An accurate colorimeter measurement depends on good measurement techniques. Factors such as clean sample vials, positioning of vial in the sample well, using a vial with a light shield cap, meter calibration, handling of meter, and others, have to be taken into consideration.
NOTE: Do not pour liquid directly into the sample well of the instrument. Always use a vial. The instrument will only accurately measure the sample when vials sealed with the black caps are used. The black cap serves as both seal and a light shield.
NOTE: Do not attempt to clean the sample well. The optics may be damaged.
NOTE: This instrument is designed to measure solutions contained in the custom made glass vials and therefore the use of other type of sample vials or sample cells may result in inaccurate measurements.
NOTE: Reagents’ MSDS can be obtained from http://www.eutechinst.com/techtips/msds.htm
6
Measurement
C401/301/201/101/102/103/104/105 Colorimeter
2.2 Preparation of Sample Vial
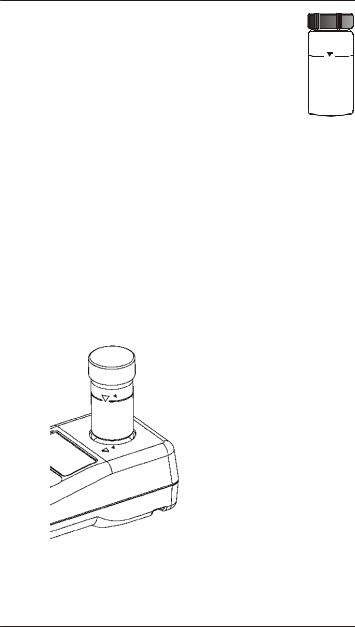
1.Obtain a clean and dry sample vial (Figure 6).
2.Take care to handle the sample vial by the top.
3.Rinse the vial with approximately 10 ml of the sample water, capping the vial with the black screw cap and gently inverting it several times. Discard the used sample and repeat the rinsing procedure two more times.
Figure 6:
4. Fill the rinsed vial with the remaining portion (approximately Sample Vial 10 ml) of the grab sample up to the mark indicated in the
vial. Cap the vial with the supplied black screw cap.
5.Wipe the vial with a soft, lint-free cloth. Ensure that the outside of the vial is dry, clean and free from smudges.
6.You are now ready to place the vial into the meter for measurement.
2.3 Measurement Procedure
1.Place C401/301/201/101/102/103/104/105 Colorimeter on a flat and level surface.
2.Place the sample vial inside the sample well and align the vial’s mark with the meter’s index mark. See Figure 8.
Align index mark on the sample vial with  the index mark on the colorimeter and push till it is fully
  snapped in
IMPORTANT: Place meter on a flat and level surface. DO NOT hold it on
hands while operating the meter. It may lead to inaccurate readings
Figure 8: Sample vial index alignment to the meter's index mark
3.Push the vial until it is fully snapped in.
7

Measurement
C401/301/201/101/102/103/104/105 Colorimeter
4.Turn on the meter by pressing the ON/OFF key.
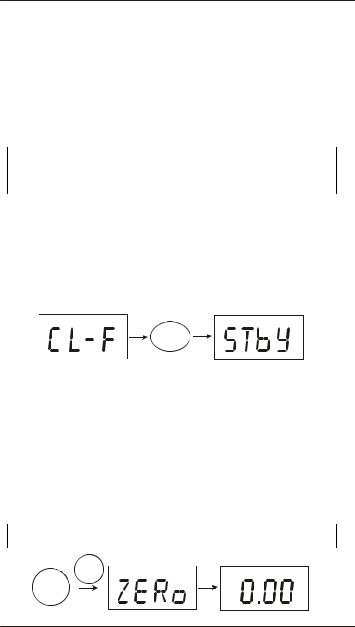
5.For the single-parameter colorimeter, the display will momentarily show the test to be performed before switching directly to [STbY] as that of step 6. For the multi-parameter colorimeter, the display will indicate the last test performed. Press the MODE key to make selection on the desired test to be performed.
6.Press the READ/ENTER key to confirm your selection. The meter will display [STbY] indicating it is ready to accept a measurement or a blanking.
7.Press the ZERO key to perform the blanking of the meter. If the user chooses to skip this step, the meter will use the last value of the blank for the next calculation.
8.Remove the sample vial used for blanking from the instrument and add the appropriate reagent to it. Cap the vial and follow the appropriate instructions (including the time required to develop the color) for each type of reagents.
9.Place the vial with the developed color into the sample well and align the ▼ mark on the vial with the ▲ mark on the instrument, and press it down until it snaps fully into the optical holder.
10.Press the READ/ENTER key. The meter will display the reading in appropriate units within 3 seconds.
11.To repeat the measurement of the same sample, repeat steps 7-11. Ideally, step 7 should not be skipped, but the user may do so if testing the same sample.
8
Measurement: Chlorine, Free & Total
C401/301/201Colorimeter
2.4 Chlorine, Free & Total (0 – 6ppm Cl2)
•DPD method1 for Free Chlorine - applicable to water, treated water, estuary water and seawater.
•DPD method1 for Total Chlorine - applicable to water, treated water, wastewater, estuary water and seawater.
The DPD Method is USEPA accepted for reporting drinking water analyses (Free and Total Chlorine) and wastewater analyses2 (Total Chlorine only).
Note: 1Adapted from “Standard methods for the Examination of Water and Wastewater.”
Note: 2Procedure is equivalent to USEPA method 330.5 for wastewater and Standard Method 4500-Cl G for drinking water.
1.Switch the meter on by pressing the ON/OFF key.
2.Press the MODE key repeatedly until [CL – F] is displayed (for Free Chlorine determination) or [CL – T] is displayed (for Total Chlorine determination).
3.Press the READ/ENTER key to confirm the desired test parameter. The meter will read [STbY] indicating it is in stand-by mode, waiting for either blanking or measurement.
READ
ENTER
Free Chlorine test selection
4.Select a clean and dry vial, un-screw the cap and fill with sample water to the line on the vial. Replace the cap, ensuring it is screwed on finger tight to the vial.
5.Ensure the outside of the vial is clean, dry and absent of any marks or finger-prints. Gently push the vial fully into the sample well of the instrument, whilst aligning the ▼ mark on the vial with the ▲ mark on the meter.
6.Press the ZERO key to initiate blanking of the meter. The display will show [ZERo] while blanking is taking place.
Note: The meter will store and use the last blanking (or zero) value, even if it is turned off, or if the batteries are removed.
|
ZERO |
Blanking |
|
Sample |
ppm |
9

Measurement: Chlorine, Free & Total
C401/301/201Colorimeter
7.Remove the vial from the meter and add into it the content of one Chlorine, Free (DPD) Reagent Sachet (for Free Chlorine determination) or the content of one Chlorine, Total (DPD) Reagent Sachet (for Total Chlorine determination).
8.Replace the cap, ensuring it is screwed on finger tight to the vial. Invert the vial repeatedly for approximately 20 seconds, until the powder has dissolved.
Note: A small amount of the powder may remain un-dissolved in the vial, but this will not affect the measurement.
Add content of one Chlorine, Free (DPD) Reagent Sachet |
Invert vial approximately 20 |
(for Free Chlorine determination) or one Chlorine, Total |
seconds until powder dissolves |
(DPD) Reagent Sachet (for Total Chlorine determination). |
|
9.Gently push the vial back fully into the sample well of the meter, whilst again aligning the ▼ mark on the vial with the ▲ mark on the meter.
10.For Free Chlorine determination, press the READ/ENTER key within two minutes from the time the DPD Free reagent was added to the vial.
11.For Total Chlorine determination, wait for two minutes and then press the READ/ENTER key within four minutes from the time the DPD Total reagent was added to the vial.
12.The meter will flash either [CL-F] or [CL-T], depending on which test is being performed, whilst the measurement is taken. It will then display the Chlorine concentration in parts per million (ppm) Cl2.
|
READ |
|
|
|||
Free |
ENTER |
|
|
|||
Chlorine |
|
|
|
|
|
ppm |
|
|
|
|
|
||
Sample |
|
|
|
|
|
|
|
|
|
|
|
|
|
|
|
|
|
|
||
|
|
|
|
|
||
|
|
Free Chlorine determination |
||||
10

Measurement: Chlorine, Free & Total
C401/301/201Colorimeter

 Chlorine, Free & Total Measuring Hints & Tips
2.4.1 Sample Collection
Chlorine determination must take place as soon as possible after the sample is taken or else low results may be obtained.
Plastic containers should not be used to collect the sample because these may have a high chlorine demand which will lead to low reading results. It is advisable to wash the container with sample water before the sample is collected.
Avoid agitating the sample excessively as this may also lead to low results.
2.4.2 Sample Measurement
If the pink color forms and then rapidly fades, this is an indication that the chlorine concentration may be very high. If this is the case, dilute the sample with de-ionized water and retest. Multiply the result by the dilution factor used.
Example: if the sample was diluted 2:1 with de-ionized water (i.e. 1 part sample water to 1 part de-ionized water), the result is multiplied by 2 to give the true concentration of the original sample.
Note: Results obtained by this method will not be as accurate as stated in this manual because some chlorine will be lost in the dilution process.
After use, the vial should be cleaned thoroughly to avoid contaminating the next sample. Do not use household cleaners as these may have a chlorine demand which will lead to low results on subsequent tests.
After testing Total Chlorine, give extra attention to cleaning the vial as any residual reagent will affect any subsequent Free Chlorine tests. It is advisable to use separate vials for Free and Total Chlorine.
2.4.3 Interferences
Acidity:
Greater than 250ppm CaCO3 may cause interference. To remove this interference, neutralise a separate sample to pH6-7 using 1N Sodium Hydroxide. Record the volume used and add the same volume of 1N Sodium Hydroxide to the sample before carrying out the above test procedure. Use a multiplication factor to correct for the dilution of the sample.
11

Measurement: Chlorine, Free & Total
C401/301/201Colorimeter
Alkalinity:
Greater than 250ppm CaCO3 may cause interference. To remove this interference, neutralise a separate sample to pH6-7 using 1N Sulphuric Acid. Note the volumes used and add the same volume of 1N Sulphuric Acid to the sample before carrying out the above test procedure. Use a multiplication factor to correct for the dilution of the sample.
Hardness:
No effect at less than 2000ppm CaCO3.
Monochloramine:
Monochloramine will cause a gradual increase in the Free Chlorine result over time. Take the test result within 1 minute of adding the reagent sachet to avoid these errors.
Oxidants, including Bromine, Chlorine Dioxide, Iodine and Ozone:
These will interfere with the test method at all levels. It is recommended that an alternative test method is used if more than any two of these species are present.
Oxidised Manganese or Oxidised Chromium:
All levels will cause interference. To remove this interference:
1.Test a 10ml sample as described in the above procedure.
2.Adjust the pH of a separate 10ml sample to pH6-7 using 1N Sodium Hydroxide or 1N Sulphuric Acid.
3.Add 1 drop of 20% Potassium Iodide Solution; swirl to mix and then wait 60 seconds.
4.Add 3 drop of 5g/l Sodium Arsenite Solution and swirl to mix.
5.Use this as the sample in the above test procedure and make a note of the result. Use a multiplication factor to correct for the dilution of the sample.
6.Subtract the result obtained in step 5 from the result obtained in step 1 to give the true result.
7.Correcting for dilution: To correct for any reagent added to the sample to neutralise it, a dilution correction factor must be used:
Final Volume ÷ Initial Sample Volume = Correction Factor
The final volume can be calculated by adding together the initial
12

Measurement: Chlorine, Free & Total
C401/301/201Colorimeter
sample volume and the volume of neutralising reagent used:
Final Volume = Initial Sample Volume + Volume of Neutralising
Reagent.
The result from a test can then be multiplied by the Correction Factor to give the true result.
If reagents are added from the supplied dropper bottles, then 25 drops is equal to 1ml.
Example:
50ml sample is neutralised using 50 drops of 1N Sulphuric Acid, and each drop is 0.04 ml.
Initial Sample Volume = 50ml
Volume of Neutralising Reagent added = 50drops X 0.04 ml= 2ml
Final Volume = 50ml + 2ml = 52ml
Correction Factor = 52/50 = 1.04
A test result of 1.00ppm would then become 1.00ppm X 1.04 = 1.04ppm
2.4.4 Accuracy Check / User Calibration
Producing chlorine standards is a difficult procedure that should only be attempted by trained laboratory staff. Details of preparation techniques are not provided in this document.
The prepared chlorine standard may be used to check the accuracy of the meter or to re-calibrate the meter. In almost all cases it is recommended to use the default factory calibration.
To check the accuracy of the meter: Prepare a standard solution of known concentration within the range of the instrument. It is advisable to prepare a standard near to the concentration value usually tested with the meter. Use this standard in place of the sample water in the above test method. Repeat the measurement 5-7 times with different sachets and average the results. The result obtained should be approximately the value of the standard used (please refer to instrument’s specifications for data on meter precision and accuracy).
To re-calibrate the meter: All instruments are factory calibrated and user calibration is not recommended. However, if a Chlorine standard can be prepared, measured accurately and qualified by a different method (titration, for example) or another instrument of higher precision and accuracy, then a Chlorine standard in the 4.1-5.0 ppm Cl2 range can be used. Please refer to Section 3.2 Chlorine, Free & Total, Chlorine Dioxide,
13

Measurement: Chlorine, Free & Total
C401/301/201Colorimeter
Bromine and Ozone, for details.
2.4.5 Chemistry
Chlorine exists in water as Un-Combined (Free) Chlorine and Combined Chlorine. The concentration of Free Chlorine can be determined directly and the concentration of Combined Chlorine may be calculated by subtracting the concentration of Free Chlorine from that of Total Chlorine.
In the Free Chlorine test method Un-Combined Chlorine reacts directly with DPD (N,N-diethyl-p-phenylenediamine) in a conditioned sample to give a pink color. In the Total Chlorine test method Combined Chlorine reacts with potassium iodide to form tri-iodide ions. The tri-iodide ions and the Free Chlorine present react with DPD in a conditioned sample to give a pink color.
The depth of the pink color produced is proportional to the concentration of Chlorine. The amount of 525nm light absorbed by the pink color is accurately measured by the meter and then converted into the Chlorine concentration.
14
 Loading...