

Oakley GMT User Manual
®
GMT INSTRUCTION MANUAL 01
GMT
The Oakley GMT wristwatch combines the precision of quartz calibration with an intuitive design that
navigates time around the globe. A simple adjustment of the World City hand is all that’s needed for
local time to display automatically. Dual alarm modes are set with the ease of specialized controls and
a dedicated alarm dial face. A pure sapphire crystal is treated with anti-reflective coating and sealed
over the high-contrast display. Engineered with the ergonomics of a spinal column, the highest grade
of surgical stainless steel is crafted into stout links of solid metal. The digitally rendered geometry
curls around your wrist for maximized comfort and fit.
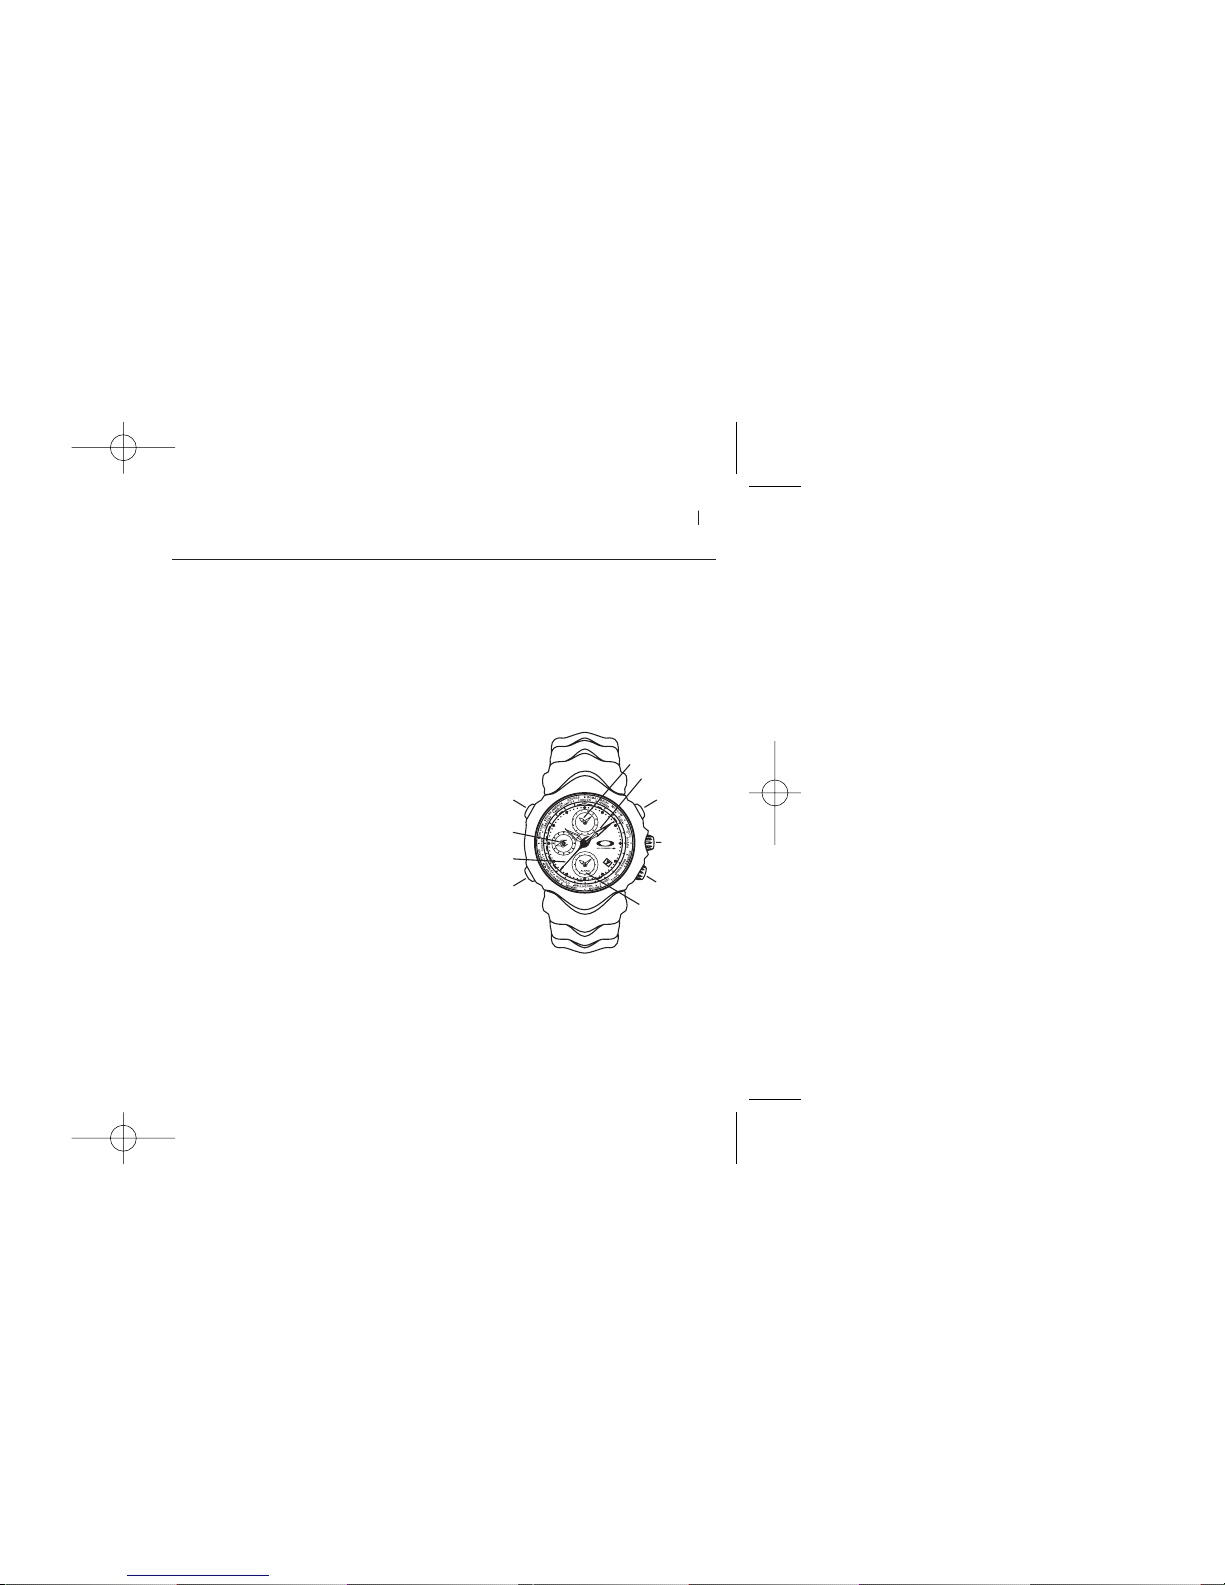
NAVIGA TING THE WATCH FACE
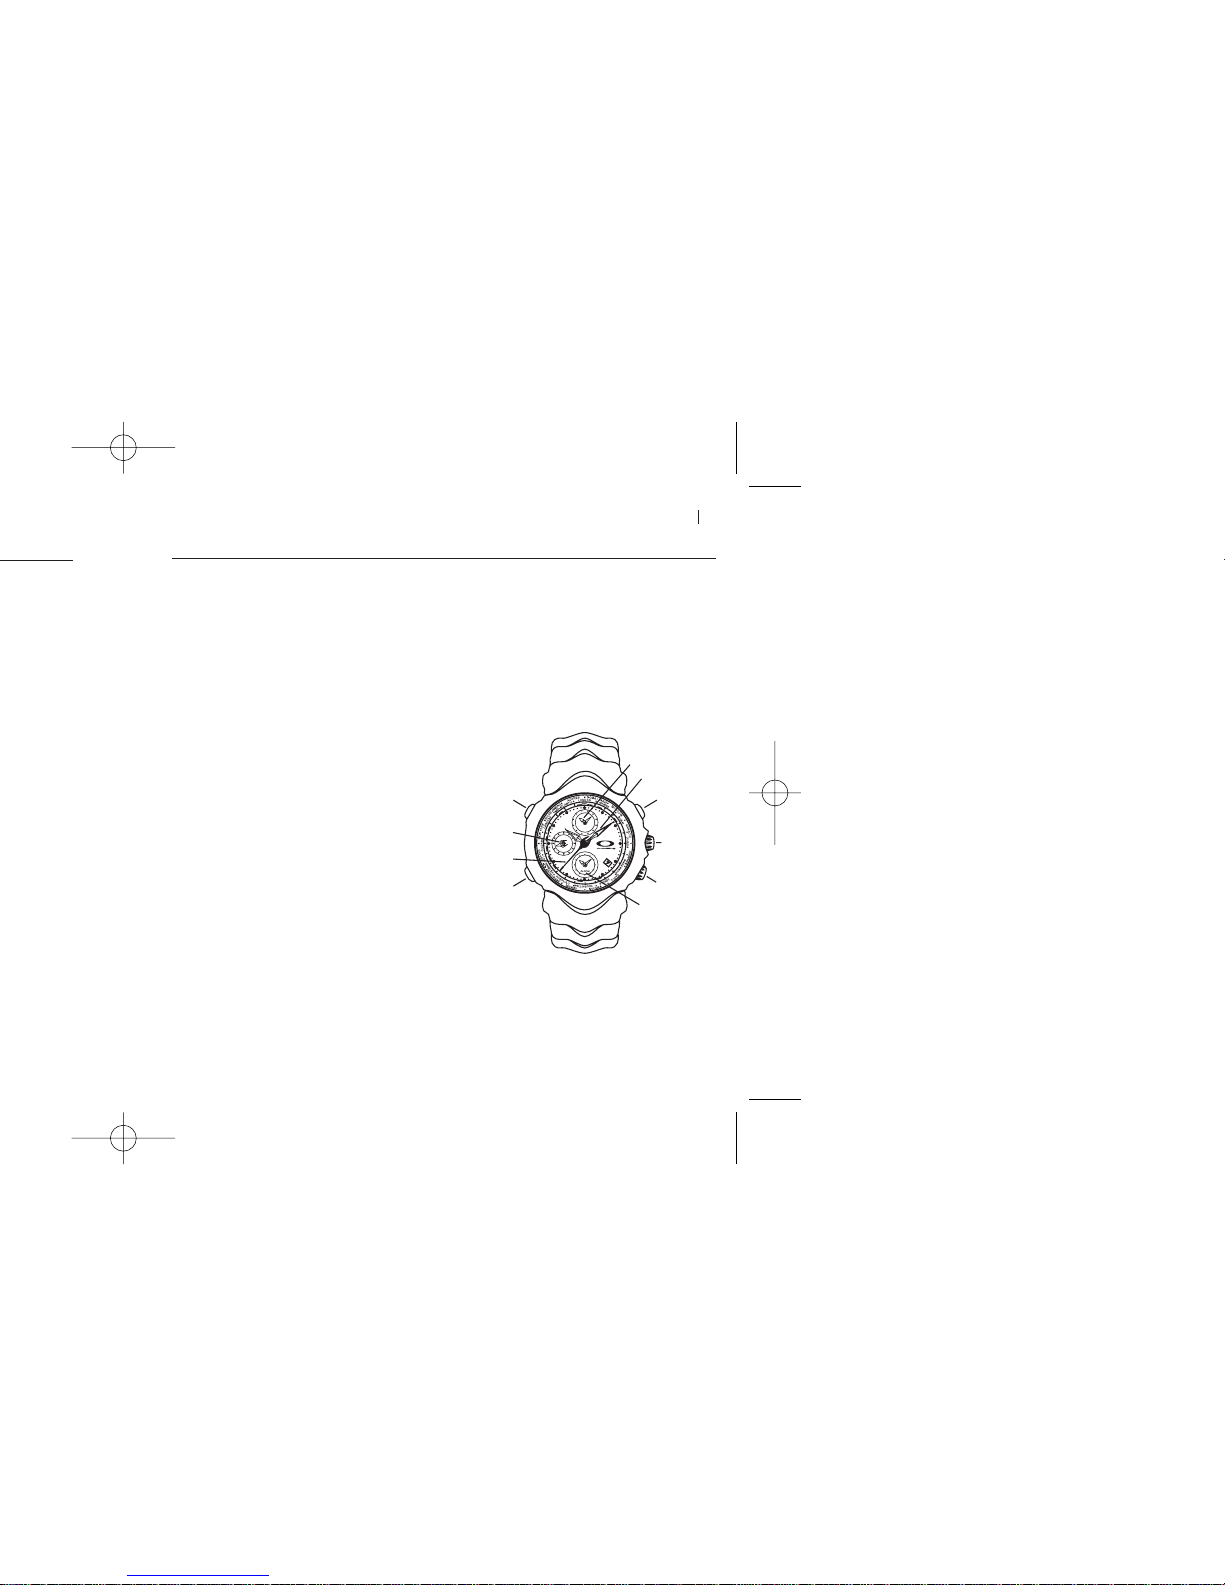
The main dial face has a World City hand for
selecting any of the 24 geographic time zones of
the world. When the World City hand is set, the
small upper dial face shows the current local
time in the city you are visiting. The main dial
face has hour and minute hands for showing the
current time in your home city, and the small dial
face at the left shows the current time in
seconds. The small lower dial face shows the
alarm time setting.
BUTTON B BUTTON A
SECOND HAND
MAIN CROWN
LOCAL TIME
HOME TIME
ALARM CROWN
ALARM TIME
WORLD CITY
HAND
ALARM BUTTON

GMT INSTRUCTION MANUAL 03
SETTING THE TIME AND DATE
After the watch is set for the first time with the procedure described on the previous page, future
adjustment of time and date settings can be made by doing the following.
click position.
TO SET THE TIME:
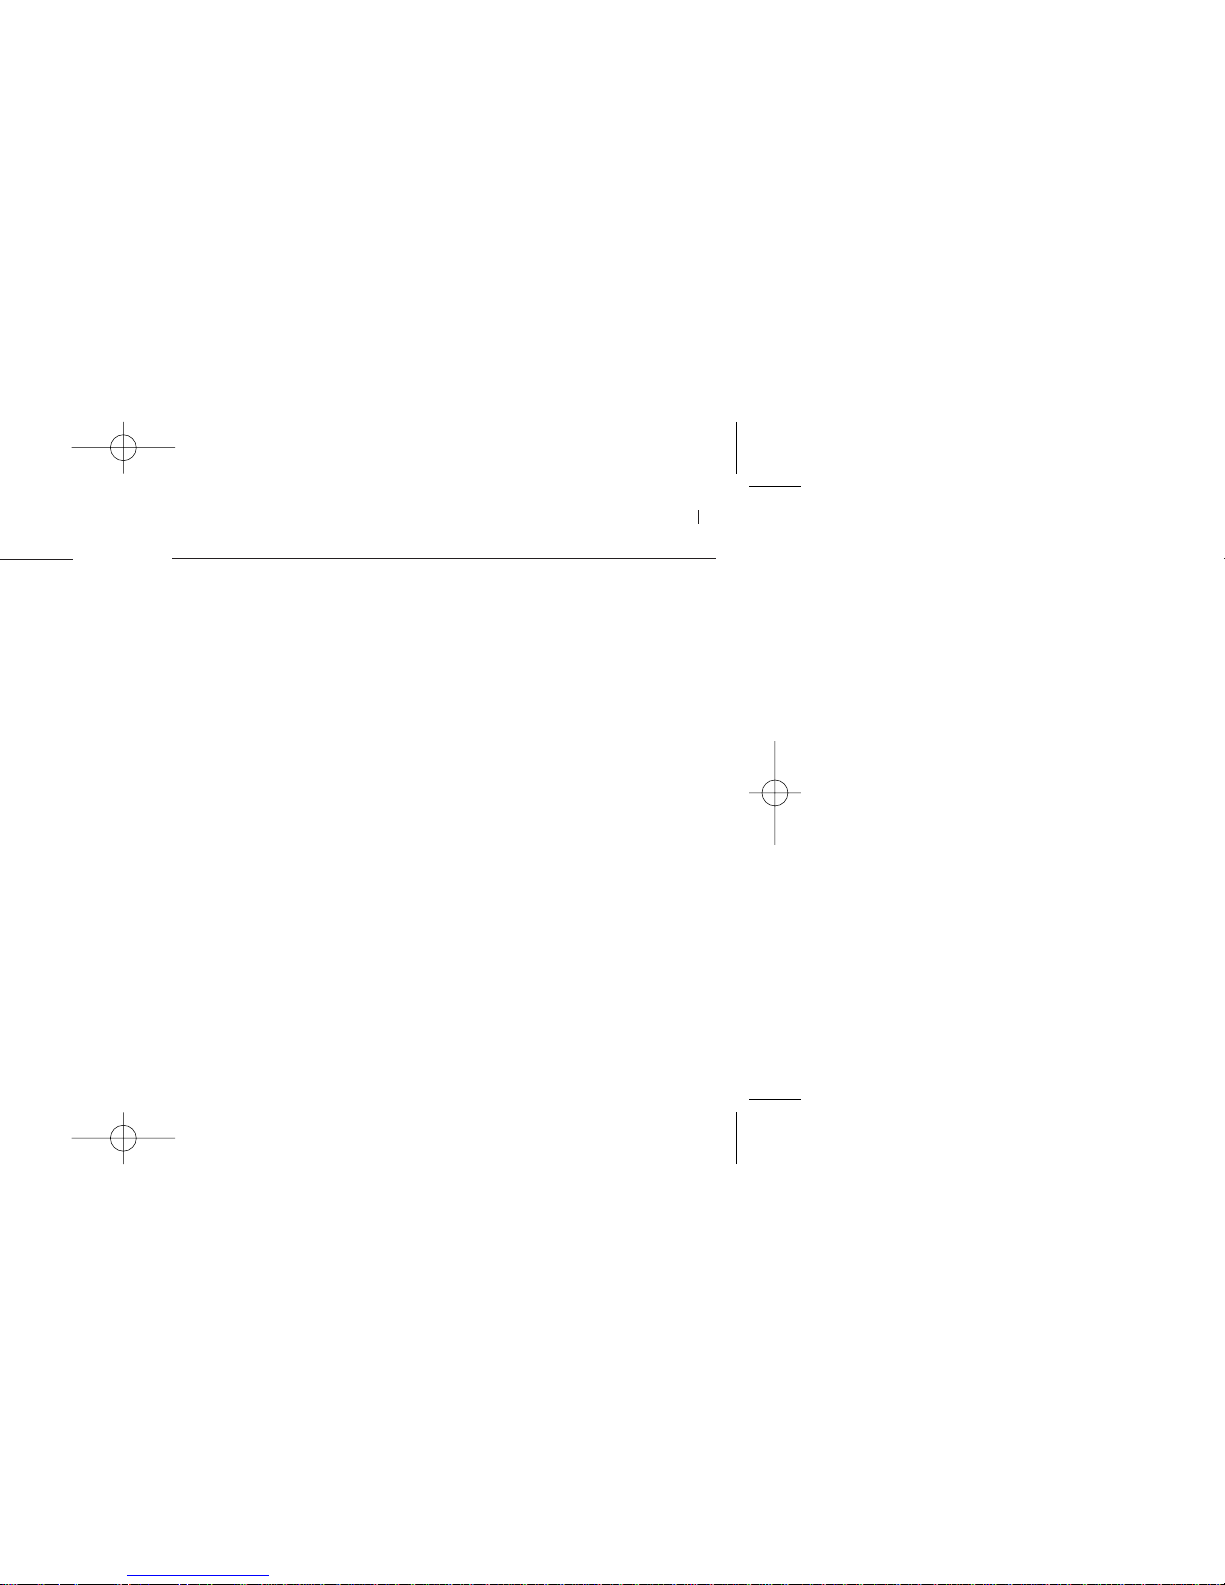
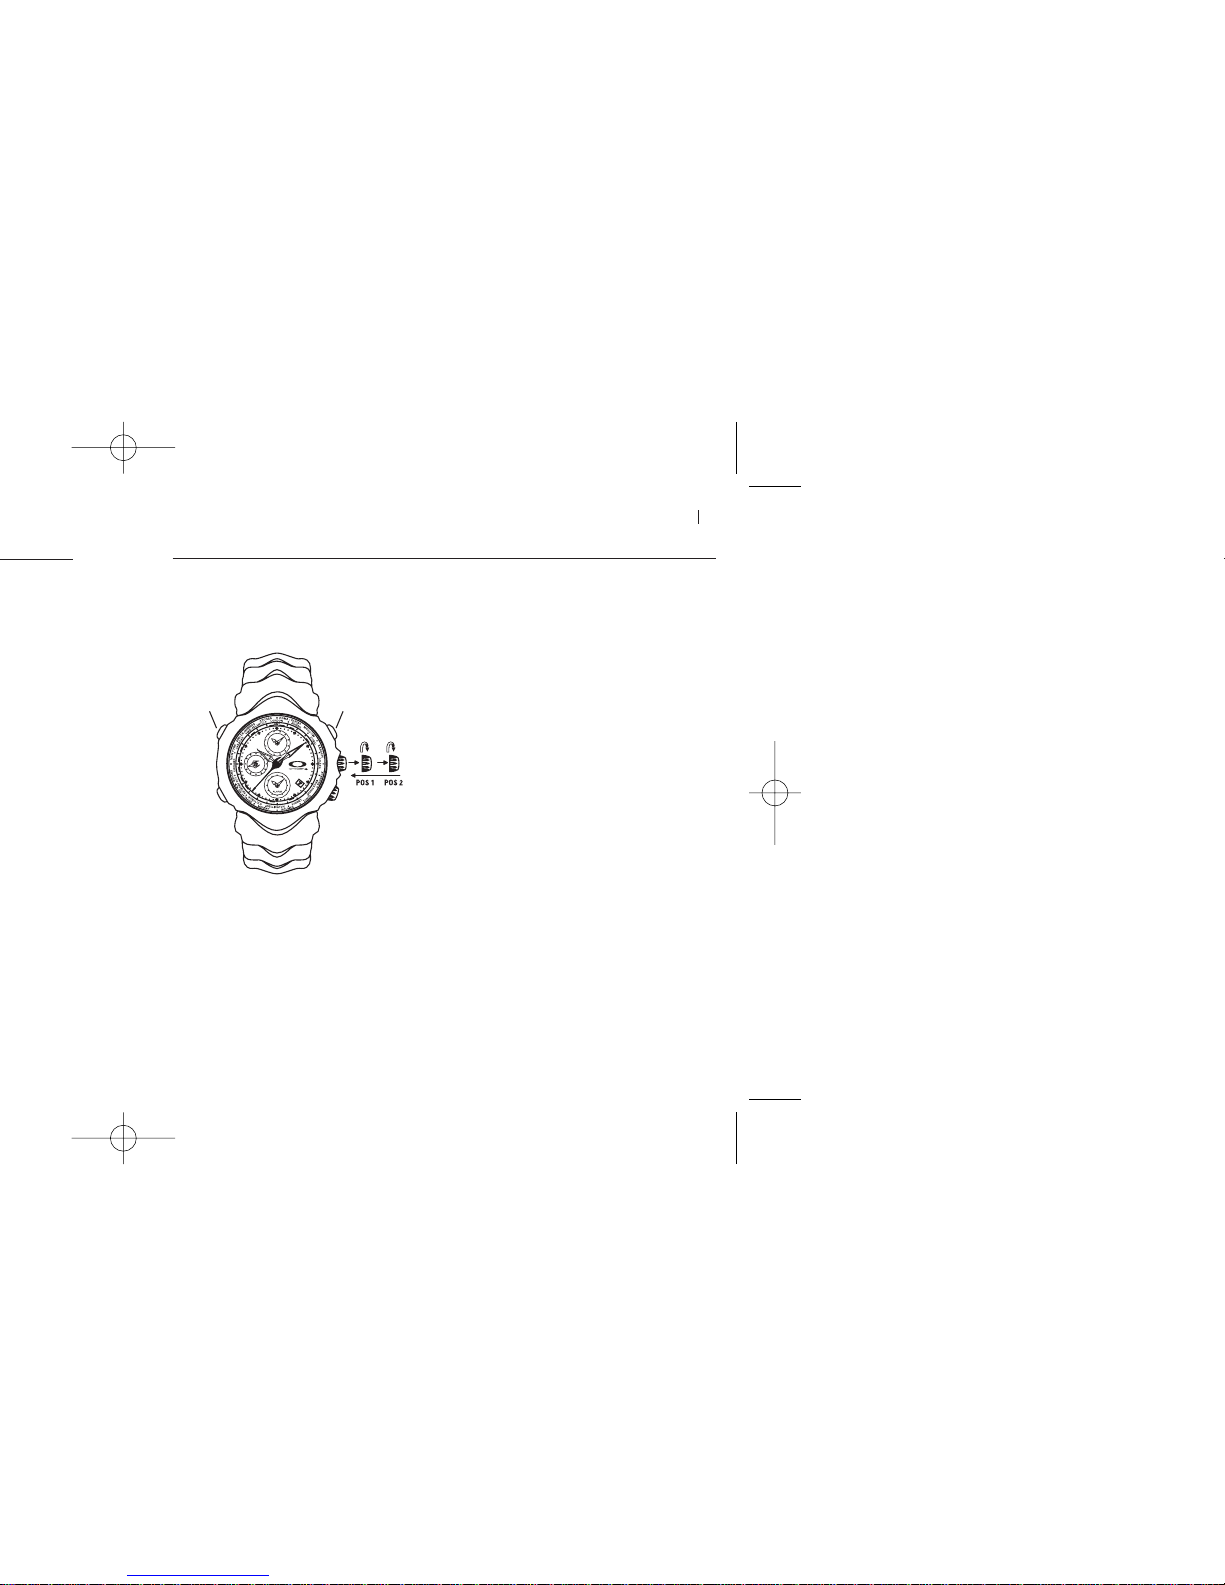
1. Pull the main crown out to the
second
click position.
2. Turn the main crown clockwise or counterclockwise
to set the hour and minute hands.
To set the minute hand precisely, advance the
hand to 5 minutes or more past the desired time,
then turn it back to the desired time.
3. Push the main crown back in to the normal position.
When setting the time, note the following:
• The watch will resume running when the main crown
is pushed back in, so use this to set the watch to the
precise second: Wait until the second hand (in the
small dial face at the left) points straight up before
pulling the main crown to set the time. With the
second hand stopped at this zero position, restart the
watch by pushing the main crown back in when the
precise minute is reached.
(
)
TO SET THE DATE:
1. Pull the main crown out to the
first
click position.
2. Turn the main crown clockwise until the desired date
appears in the date window.
3. Push the main crown back in to the normal position.
When setting the date, note the following:
• It is necessary to reset the date at the end of months
that have fewer than 31 days.
• Avoid resetting the date between 9:00 PM and 3:00
AM. Doing so may cause the date display to change
at noon instead of midnight. If it is necessary to reset
the date during that time period, follow the
instructions under “SETTING THE WATCH FOR
THE FIRST TIME.”

SETTING LOCAL TIME FOR A WORLD CITY (con’t)
GMT INSTRUCTION MANUAL 05
The local time display (the small upper dial face) can be
used to show Daylight Saving Time. Some countries
apply this system to make the best use of daylight
during summer. This “summer time” system advances
local clock settings by one hour during specific months.
TO DISPLAY DAYLIGHT SAVING TIME:
1. Make sure the main crown is pushed in to the
normal position.
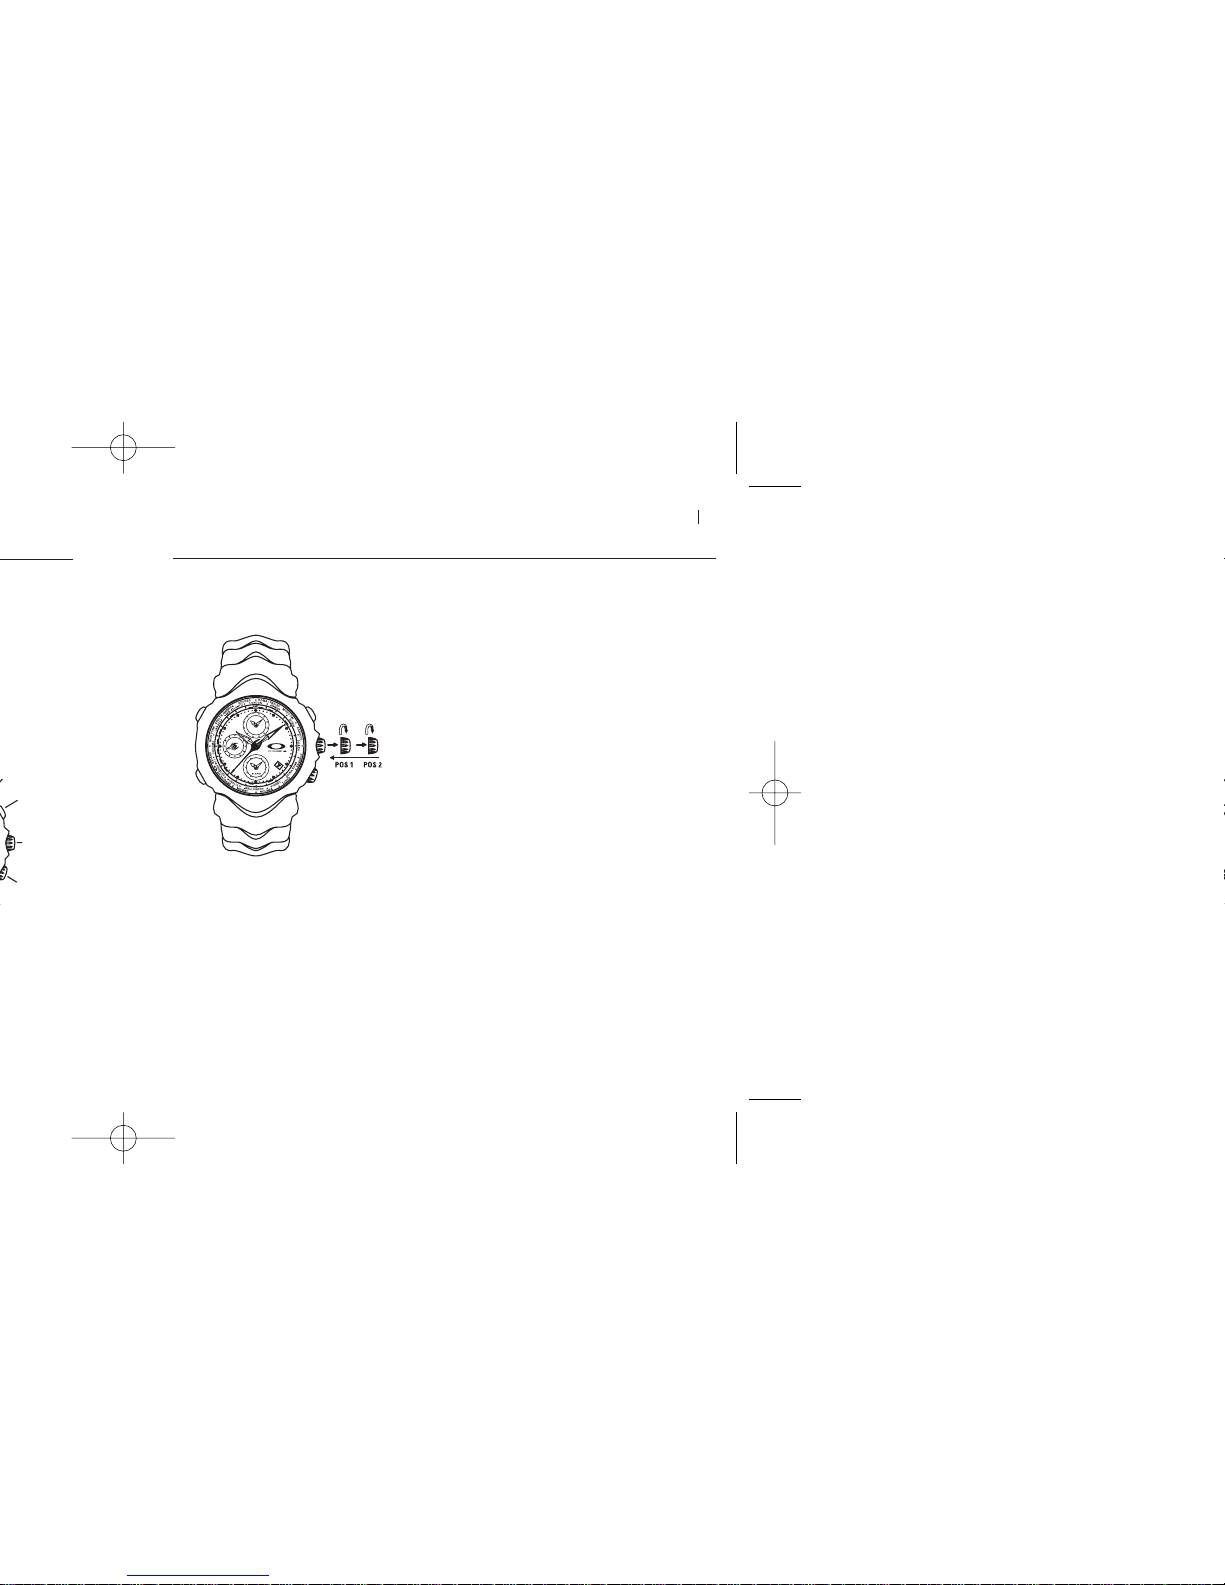
2. Press Button A or Button B to set the World City hand
to the desired city on the bezel.
3. Press Button A to advance the World City hand
clockwise to the next city on the bezel.
The local time display is advanced by one hour from
the regular time to indicate Daylight Saving Time.
Because time zones differ by full hours, the local time
display automatically changes in full hour increments
when the World City hand is adjusted. It may be
necessary to synchronize the minute hand in the local
time display with the minute hand in the home time
display (the main dial face). The local time hands can be
set manually by doing the following:
TO MANUALLY SET THE LOCAL TIME HANDS:
1. Make sure the main crown is pushed in to the
normal position.
2. Press Button A or Button B to set the World City hand
to the desired city on the bezel.
3. Pull the main crown out to the first click position and
use Button A or Button B to adjust the hands in the
local time display. (The buttons move the hands in
opposite directions. Press and hold a button to
advance the hands rapidly).
4. Push the main crown back in to the normal position.

GMT INSTRUCTION MANUAL 07
USING THE ALARM (con’t)
3. If you do not wish to use the alarm within the next
12 hours, press the alarm crown back in to the
normal position.
The alarm hands display the home time but the alarm
setting remains stored in memory for future use.
TO ENGAGE THE STANDARD ALARM:
• Pull the alarm crown out to the
first
click position.
A chime sounds and the alarm hands indicate the
designated alarm time. Leave the alarm crown in this
position to keep the alarm engaged.
TO DISENGAGE THE STANDARD ALARM:
• The alarm will sound at the designated time for 20
seconds. To stop the alarm sound, press any button.
• To disengage the alarm, push the alarm crown back
in to the normal position. The alarm hands will
display the home time.
When using the alarm, note the following:
• If the alarm crown is pulled out to the second click
position, a warning beep will sound. If the alarm
crown is not pushed back in before the warning beep
ends, the designated alarm time is cancelled and the
alarm hands must be synchronized again. Follow the
instructions under “TO SYNCHRONIZE THE ALARM
HANDS” before resetting the alarm.
The second alarm mode is a single-time alarm. It can
be set to sound at one designated time within the
next 12 hours. When the single-time alarm sounds,
the alarm setting is automatically erased from
memory and the alarm hands go back to showing
home time.
click position.
TO SET THE SINGLE-TIME ALARM:
1. Make sure the alarm crown is pushed in to the
normal position.
2. Press the alarm button (lower left side) to set the
alarm time.
Each press of the alarm button will advance the
alarm time by one minute. Press and hold the button
to advance the hands rapidly.
TO ENGAGE THE SINGLE-TIME ALARM:
• The single-time alarm is engaged automatically
when the alarm button is pressed to set the alarm
time. No further action is necessary.
TO DISENGAGE THE SINGLE-TIME ALARM:
• The alarm will sound at the designated time for 20
seconds. To stop the alarm sound, press any button.
• To disengage the single-time alarm before it sounds,
pull the alarm crown out to the first click position then
push it back in to the normal position. (Or press the
alarm button to set the alarm hands to the home time).
When using the single-time alarm, note the
following:
• The alarm time is not permanently stored in memory. To
use the single-time alarm again, the desired alarm time
must be set again.
• The alarm cannot be set for more than 12 hours
ahead of the current time.
click position.
click position.
GMT INSTRUCTION MANUAL 09
LOW BATTERY INDICATOR
The miniature battery that powers the watch is designed to last approximately two years. However, because the
battery is inserted at the factory for extensive performance checks, its actual life, once in your possession, may
be less.
When the battery is running low, the small second hand will move in two-second intervals. If this occurs, the
watch will continue to display time accurately but the battery should be replaced as soon as possible.
Note: The alarm will not sound if the battery is running low. This is necessary to extend the remaining battery life).
TO REPLACE THE BATTERY:
• Battery replacement may be performed only by an Authorized Oakley service center. Any attempt to open the
watch case by persons other than Authorized Oakley Service Professionals will void the product warranty.
Within the United States, call Oakley global headquarters at 1-800-403-7449 to find an Authorized Oakley
Timepiece Dealer or Service Professional near you. Customers outside the United States should contact their local
Authorized Oakley Timepiece Dealer or visit our Web site at www.oakley.com for the number of the nearest
Oakley distributor.
• After the battery is replaced, reset the watch by following all instructions listed under “TO RESET THE WORLD
CITY HAND.” (See “FINE TUNING THE INSTRUMENT”).
BAND ADJUSTMENT
If links need to be added or removed from the band, the adjustment should be done by an Authorized Oakley
Timepiece Dealer. Do not attempt to shorten the band by removing links yourself, as this may result in damage to
the bracelet.
SAFEGUARDING
WATER EXPOSURE
Rated at 10-bar hydrophobic, the timepiece may be worn during bathing, swimming and shallow diving. It is not
designed for scuba or saturation diving. Before exposing the timepiece to moisture, be sure both crowns are pushed
in fully against the casing. Do not pull out either crown or push any button if the timepiece is wet. If used in
seawater, rinse the timepiece with fresh water and dry completely.
TEMPERATURE
For precision timekeeping, normal operating temperature is -10°C to 60°C (14°F to 140°F).
MAGNETISM
Strong magnetic fields can have an adverse affect on the timepiece. Keep it away from magnetic objects.
CHEMICALS
The timepiece may become discolored or damaged if exposed to cosmetic spray, detergents, adhesives, solvents, or
paints.
SHOCK WAVE
Although the timepiece resists shock damage, impact against hard surfaces may cause damage.
PERIODIC MAINTENANCE
To ensure that the chassis, crown, crystal seal and gasket remain resistant to water exposure, it is recommended
that the timepiece be inspected once every two to three years by an Authorized Oakley Service Center.
GMT INSTRUCTION MANUAL 11
GMT INSTRUCTION MANUAL 13
HOW TO MAKE A WARRANTY CLAIM
Within the United States, call the Oakley Global Headquarters number listed below. Please have your purchase
information ready. Customers outside the United States should contact their local Authorized Oakley Timepiece
Dealer or use the list below to call the nearest Oakley headquarters.
Oakley Global Headquarters, USA: 1 (800) 403-7449
Oakley Africa: +27 41 501 0200
Oakley Brasil Ltda.: 0800-770-7822 ou 0xx11-4197-9999 (Grande São Paulo e celular)
Oakley Canada: 1-877-625-5396
Oakley Europe:Benelux, France, Italia, Scandinavia: 00 800 62 55 39 00
• España: 900 953 398 • Portugal: 800 833 121 • Sverige: 020 79 1037
Oakley GMBH: Germany, Austria and Poland: +49-89-99650-4181
Oakley Japan: 0120 009 146
Oakley México: 52) 55 59503643
Oakley South Pacific (Australia): 1 800 637 001
Oakley South Pacific (New Zealand): 0800 696 255
Oakley UK: 01462 475400 Eire customers: 00 353 4439557
MANUAL DE INSTRUCCIONES GMT 15
CORONA
PRINCIPAL
HORA DE ORIGEN
CORONA DE
ALARMA
HORA DE ALARMA
AJUSTE DEL RELOJ POR PRIMERA VEZ
Siga estas instrucciones para ajustar el reloj por primera vez. El procedimiento es necesario para sincronizar la
función de cambio de fecha con la medianoche.
1. Saque la corona principal hasta la posición que
indica el
primer clic.
2. Gire la corona principal para que la fecha avance hasta
la
fecha de ayer.
3. Cuando el segundero de la esfera pequeña de la
izquierda alcance la posición cero (señala verticalmente
hacia arriba), saque la corona principal hasta la
posición indicada por el
segundo clic.
4. Gire la corona principal para que avancen el horario
y el minutero. Continúe girando hasta que la fecha
cambie a la fecha de hoy, y a partir de ahí continúe
girando hasta alcanzar la hora actual.
(Si la hora actual es PM, avance la manecilla horaria
una vuelta completa hasta superar el mediodía antes
de alcanzar la hora actual de la tarde).
5. Presione la corona principal para fijarla en su
posición normal.
MANUAL DE INSTRUCCIONES GMT 17
AJUSTE DE HORA LOCAL PARA UNA CIUDAD DEL MUNDO
La esfera pequeña superior muestra la hora local actual para cualquiera de las 24 zonas horarias del mundo.
Sobre el bisel del reloj está escrito el nombre de una ciudad representativa para cada una de estas zonas. La
manecilla World City en la esfera principal sirve para seleccionar la zona horaria deseada.
[AJUSTE DE HORA LOCAL PARA UNA CIUDAD DEL MUNDO CONTINUACIÓN PÁGINA SIGUIENTE]
AJUSTE DE HORA LOCAL PARA UNE CIUDAD DEL MUNDO:
1. Asegúrese de que la corona principal está en
su posición normal.
2. Pulse el botón A o B repetidamente para situar la
manecilla World City dirigida a la ciudad sobre el
bisel que represente la zona horaria deseada. (Los
botones mueven la manecilla en sentidos opuestos.
Si mantiene pulsado un botón, la manecilla se
moverá más rápido).
Las manecillas de la esfera pequeña superior
avanzarán automáticamente para mostrar la hora
local de la ciudad seleccionada.
Cuando consulte la hora local, tenga en cuenta lo siguiente:
• La hora local (en la esfera pequeña superior) es una
esfera de 24 horas. Los números del 1 al 12 indican
la hora desde la 1 AM hasta las 12 del mediodía. Los
números más altos que el 12 indican la hora PM, al
estilo militar. (Por ejemplo: las 4 PM son 4 horas
después de las 12 del mediodía, por lo que se
muestran como las "16". La medianoche es 12 horas
después del mediodía, por lo que se muestra como
las "24”).
• Cada una de las ciudades que aparecen sobre el
bisel representa una zona horaria diferente. Si la
ciudad que busca no aparece en el bisel, deberá
elegir la ciudad del bisel que se encuentre dentro de
la misma zona horaria que el lugar que visita.
BOTÓN B BOTÓN A
MANUAL DE INSTRUCCIONES GMT 19
USO DE LA ALARMA
Hay dos modos de alarma: alarma estándar y alarma única.
Antes de utilizar la función de alarma, las manecillas de la alarma (sobre la esfera pequeña inferior) deben estar
sincronizadas con las manecillas de la hora de origen (en la esfera principal).
SINCRONIZACIÓN DE LAS MANECILLAS DE ALARMA :
1. Saque la corona de alarma (la corona inferior) hasta la
posición señalada por el
segundo clic
. Oirá sonar una
señal aguda.
2. Gire la corona de alarma para situar las manecillas (en la
esfera pequeña inferior) en la misma posición que las
manecillas de la ora de origen (en la esfera principal).
3. Presione la corona de alarma hasta su posición normal.
Para lograr un ajuste preciso, espere hasta que el
segundero (en la esfera pequeña de la izquierda)
señale verticalmente hacia arriba antes de presionar la
corona. Así podrá ajustar las manecillas de la alarma
con una exactitud de un segundo.
Una vez que las manecillas de la alarma están
sincronizadas con las manecillas de la hora de origen se
puede ajustar la alarma. La primera función disponible es
la de alarma estándar. Es la que puede ajustarse para
que suene a una hora predeterminada en intervalos de
12 horas. La hora fijada para la alarma se conserva en
memoria para usos posteriores.
AJUSTE DE LA ALARMA ESTÁNDAR:
1. Saque la corona de alarma hasta la posición
señalada por el
primer clic
.
(Si hace esto con una diferencia de menos de un
minuto en la sincronización entre las manecillas de
la hora de alarma y las de la hora de origen, hará
que la alarma suene. Para detenerla, pulse
cualquier botón).
2. Pulse el botón de alarma (lado izquierdo inferior) para
ajustar la hora de alarma
[USO DE LA ALARMA CONTINUACIÓN PÁGINA SIGUIENTE]
BOTÓN DE
ALARMA
MANUAL DE INSTRUCCIONES GMT 21
AFINADO DE PRECISIÓN
El diseño del reloj incorpora dos procedimientos para inicializarlo. Estos procedimientos no suelen ser necesarios
durante una utilización normal.
Si la manecilla World City no apunta con precisión a las marcas de las ciudades sobre el bisel, puede reiniciar la
manecilla mediante el siguiente procedimiento.
REINICIAR LA MANECILLA WORLD CITY:
1. Saque la corona principal hasta la posición señalada
por el
segundo clic
.
2. Pulse los botones A o B para ajustar la manecilla World
City hasta la posición de las 12 en punto, verticalmente
hacia arriba. (Los botones mueven la manecilla en
sentidos opuestos. Si mantiene pulsado un botón, la
manecilla avanza más rápido).
3. Presione la corona principal hasta su posición normal.
4. Ajuste la hora y la fecha mediante el procedimiento
"AJUSTE DEL RELOJ POR PRIMERA VEZ.”
5. Ajuste la manecilla World City mediante el
procedimiento "AJUSTE DE LA HORA LOCAL PARA
UNA CIUDAD DEL MUNDO.”
6. Reinicie la alarma si lo desea.
Si las manecillas del reloj se mueven incorrectamente, debe
reiniciar el circuito informático mediante el siguiente
procedimiento. (Nota: el segundero pequeño comienza
automáticamente a moverse con intervalos de 2 segundos
para indicar que la batería está casi agotada. En este caso no
es necesario reiniciar el circuito del reloj. Consulte
"INDICADOR DE BATERÍA BAJA" para obtener más detalles).
REINICIAR EL CIRCUITO INFORMÁTICO:
1. Saque la corona principal hasta la posición del
segundo clic.
2. Pulse los botones A y B simultáneamente.
3. Presione la corona principal para devolverla a su
posición normal.
4. Siga las instrucciones del procedimiento "REINICIAR
LA MANECILLA WORLD CITY (EN LA PARTE “AFINADO
DE PRECISIÓN”).
BOTÓN B BOTÓN A

LIMPIEZA
Utilice un paño seco y limpio para eliminar cualquier tipo de humedad adherida a la carcasa o el brazalete. Al estar
fabricado en acero inoxidable de alto grado, el brazalete puede ensuciarse a causa del polvo y la transpiración al
contacto con la piel. El descuido en la limpieza del reloj y la carcasa puede producir irritaciones en la piel.
COMPOSICIÓN
Carcasa ..................................................................................................................................................Acero Inoxidable
Tapa posterior ........................................................................................................................................Acero Inoxidable
Brazalete ................................................................................................................................................Acero Inoxidable
Cierre......................................................................................................................................................Acero Inoxidable
Cristal........................................................................................................................Zafiro con tratamiento anti-reflejos
ESPECIFICACIONES
Frecuencia del cristal del oscilador ..............................................................................................32 768 Ciclos por seg.
Sistema motor ..................................................................................................Motor de salto (componente cuádruple)
Precisión a temperatura normal ................................................................................+/- 15 seg./mes desde 5ºC a 35ºC
Rango de temperatura operativo................................................................................................................-10ºC a +60ºC
Resistencia al agua ....................................................................................................................................10 bar (100m)
Batería....................................................................................................................................................Lithium SR927W
Duración de la batería ..........................................................................................................................Aprox. dos años*
*La duración de la batería puede variar en función del uso. Consulte el apartado “INDICADOR DE BATERÍA BAJA” para obtener más
información acerca de la batería.
MANUAL DE INSTRUCCIONES GMT 23

GARANTÍA OAKLEY
Todos los relojes Oakley genuinos están garantizados por un año a partir de la fecha de compra contra defectos de
fabricación. La cobertura de esta garantía sólo es válida contra la presentación de un documento de prueba de
compra entregado por un Distribuidor de Relojes Autorizado Oakley.
IMPORTANTE
Esta garantía limitada no cubre el cristal, la correa o brazalete, o los accesorios adjuntos. No cubre el rallado
producido por el uso, ni los daños producidos por el agua en modelos que no son hidrófobos, así como tampoco cubre
los daños producidos por desastres naturales tales como el fuego, las inundaciones o los terremotos. Oakley se
reserva el derecho a rechazar cualquier responsabilidad bajo esta garantía para reparaciones de daños producidos
por un uso inadecuado o abusivo evidente, incluidos los defectos producidos por apertura del mecanismo o por
servicio de reparación realizado en lugar distinto a un Centro de Servicio Autorizado Oakley. Esta garantía no afecta
a los derechos legales específicos de los consumidores.
Nota: la batería sólo puede ser reemplazada por un Distribuidor de Relojes Autorizado Oakley. Cualquier intento de
abrir la carcasa por personas ajenas al Servicio Profesional Autorizado Oakley invalidará la garantía del producto.
REGISTRO
La mejor prueba de autenticidad es la tecnología avanzada que incorpora cada uno de los relojes Oakley. Al registrar
su reloj por correo o en línea a través de la página web www.oakley.com, conseguirá una credencial más firme al
permitirnos documentar su compra.
CÓMO RECLAMAR LA GARANTÍA
Para ser acreedor de servicio cualificado bajo los términos de esta garantía, es necesario presentar una prueba de
compra, que muestre claramente la fecha de compra y el nombre del Distribuidor de Relojes Autorizado Oakley,
cuando se reclame una reparación bajo el periodo de garantía.
Esta garantía no afecta a los derechos establecidos por la legislación sobre consumo aplicable en cada país.
MANUAL DE INSTRUCCIONES GMT 25
GMT - MANUEL D'INSTRUCTIONS 27
GMT
La montre GMT d’Oakley associe la précision d’un calibrage au quartz à un design intuitif conçu pour indiquer
précisément l’heure sous tous les fuseaux horaires du globe. Un simple ajustement de l’aiguille World City suffit
en effet pour afficher automatiquement l’heure locale. Deux modes d’alarme peuvent être programmés en un
instant grâce à des boutons spécifiques et un cadran qui leur est dédié en façade. Réalisé en saphir pur, le verre
bénéficie d’un traitement anti-reflets et protège de manière parfaitement étanche un afficheur à fort contraste.
Sculptés en acier inoxydable de la plus haute qualité, des segments métalliques d’une extrême résistance
composent un bracelet offrant l’ergonomie d’une colonne vertébrale. Développée numériquement, la géométrie de
ce chef d’œuvre enrobe votre poignet avec un maximum de confort comme de maintien.
INDICATIONS DU CADRAN PRINCIP AL
Le cadran principal comporte une aiguille World City
qui permet de sélectionner un des 24 fuseaux horaires
terrestres. Une fois l’aiguille World City calibrée, le
petit cadran supérieur affiche l’heure en cours dans la
ville que vous visitez. Le cadran principal comporte
également une aiguille des heures et une aiguille des
minutes qui indiquent l’heure en cours dans la ville où
vous résidez tandis que le petit cadran situé à gauche
indique les secondes de l’heure courante. Le petit
cadran inférieur indique l’heure à laquelle l’alarme
est programmée.
BOUTON B BOUTON A
AIGUILLE DES
SECONDES
REMONTOIR
PRINCIPAL
HEURE LOCALE
(dans une ville du monde)
HEURE EN COURS
(dans la ville de résidence)
REMONTOIR
D'ALARME
HEURE D'ALARME
AIGUILLE
WORLD CITY
BOUTON
D'ALARME
REGLAGE DE LA DATE ET DE L’HEURE
Après avoir réglé la montre pour la première fois en suivant les instructions ci-dessus, vous pourrez de nouveau
effectuer le réglage de la date et de l’heure en procédant comme suit.
POUR REGLER L’HEURE:
1. Tirez le remontoir principal jusqu’au
deuxième
clic.
2. Faites tourner le remontoir principal dans le sens des
aiguilles d’une montre ou dans le sens inverse des
aiguilles d’une montre afin d’ajuster les aiguilles des
heures et des minutes sur l’heure en cours.
Pour ajuster précisément l’aiguille des minutes, faites
avancer l’aiguille de 5 minutes ou plus après l’heure
désirée puis faites-la revenir à l’heure désirée.
3. Repoussez le remontoir principal dans sa position initiale.
Lors du réglage de l’heure, merci de prendre note:
• La montre recommencera à fonctionner lorsque le
remontoir sera repoussé contre le boîtier, utilisez
donc ceci pour régler l’heure en cours à la seconde
près : Attendez que la pointe de l’aiguille des
secondes (située dans le petit cadran à gauche) soit
dirigée vers le haut avant de tirer le remontoir
principal pour régler l’heure. Une fois l’aiguille des
secondes stabilisée sur la position zéro, réactivez la
montre en repoussant le remontoir principal lorsque
la minute précise est atteinte.
(
)
POUR REGLER LA DATE:
1. Tirez le remontoir principal jusqu’au
premier
clic.
2. Tournez le remontoir principal dans le sens des aiguilles
d’une montre jusqu’à ce que la date désirée apparaisse
dans la fenêtre.
3. Repoussez le remontoir principal dans sa position initiale.
Lors du réglage de la date, merci de prendre note:
• Il est nécessaire de réinitialiser la date à la fin de
tous les mois comptant moins de 31 jours.
• Ne réinitialisez pas la date entre 9 heures du soir et
3 heures du matin. En procédant ainsi, l’afficheur
pourrait en effet changer de date à midi au lieu de
minuit. Si vous devez impérativement réinitialiser la
date durant cette période horaire, suivez les
instructions figurant dans la partie “REGLAGE DE LA
MONTRE LORS DE SA PREMIERE UTILISATION.”
GMT - MANUEL D'INSTRUCTIONS 29
premier
clic.
GMT - MANUEL D'INSTRUCTIONS 31
REGLAGE DE L'HEURE LOCALE DANS UNE VILLE DU MONDE (Suite)
L’afficheur de l’heure locale (petit cadran supérieur)
peut être utilisé pour visualiser l’heure d’été. Utilisé par
certains pays, ce système vise à l’exploitation maximale
de la période lumineuse de la journée en avançant
l’heure locale d'une heure durant des mois spécifiques.
POUR AFFICHER L’HEURE D’ETE:
1. Assurez-vous que le remontoir principal est bien
repoussé contre le boîtier.
2. Appuyez sur le Bouton A ou le Bouton B afin de
positionner l’aiguille World City sur la ville désirée de
la lunette.
3. Appuyez sur le Bouton A afin de faire avancer l’aiguille
World City dans le sens des aiguilles d’une montre
jusqu’à la ville suivante de la lunette.
L’afficheur de l’heure locale est en avance d’une heure
sur l’heure réelle afin d’indiquer l’heure d’été.
Le temps dans chaque fuseau horaire diffère d’un
nombre entier d’heures : c’est pourquoi l’affichage de
l’heure locale évolue par intervalles d’une heure lorsque
l’aiguille World City est ajustée. Il peut s’avérer
nécessaire de synchroniser l’aiguille des minutes de
l’heure locale avec l’aiguille des minutes du cadran
principal. Les aiguilles de l’heure locale peuvent être
ajustées manuellement en procédant comme suit:
POUR AJUSTER MANUELLEMENT LES AIGUILLES DE
L’HEURE LOCALE:
1. Assurez-vous que le remontoir principal est bien
repoussé contre le boîtier.
2. Appuyez sur le Bouton A ou le Bouton B afin de
positionner l’aiguille World City sur la ville désirée de
la lunette.
3. Tirez le remontoir principal jusqu’au premier clic et
utilisez le Bouton A ou le Bouton B pour ajuster les
aiguilles dans le cadran de l’heure locale. (Les
boutons activent l’aiguille dans des sens opposés.
Appuyez et maintenez le bouton enfoncé pour faire
avancer l’aiguille plus rapidement).
4. Repoussez le remontoir principal dans sa position initiale.
 Loading...