

Oakley DETONATOR User Manual

®
04-00774_DETONATOR Manual 2/2/05 3:46 PM Page 1
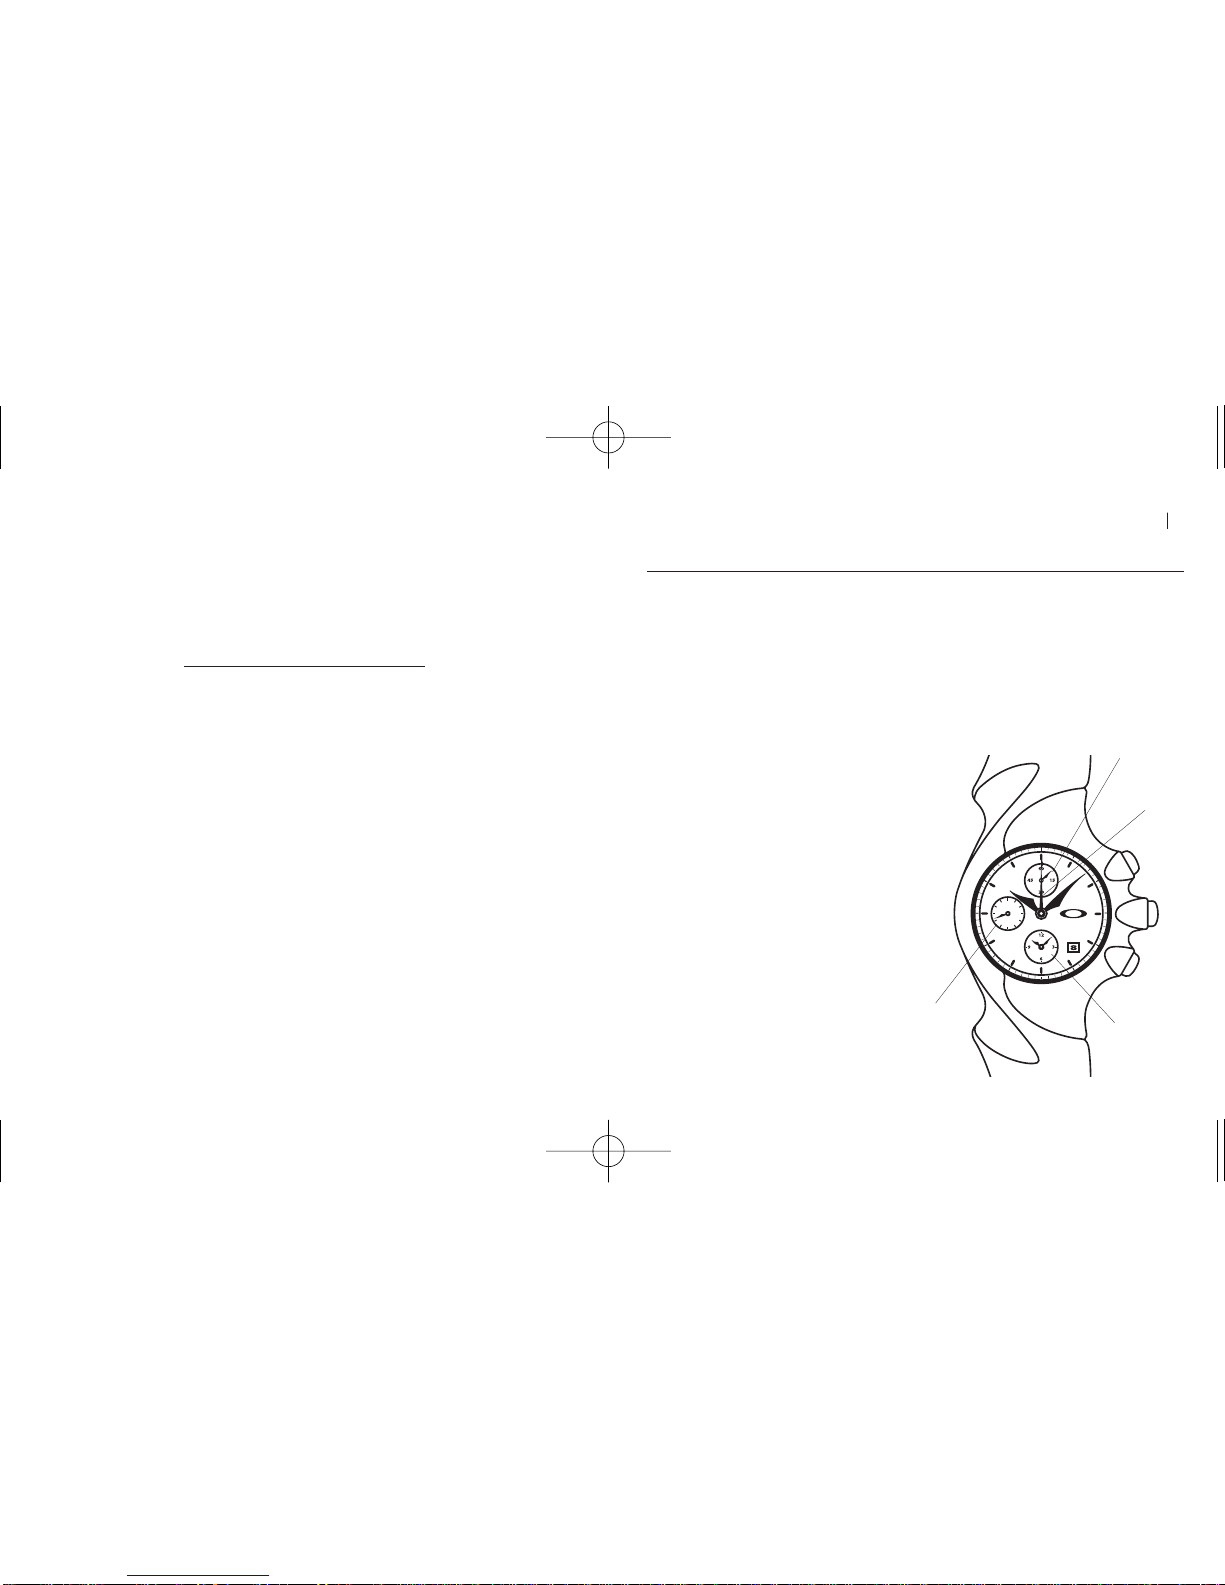
TABLE OF CONTENTS
ENGLISH 1-15
SPANISH 16-30
FRENCH 31-45
ITALIAN 46-60
PORTUGESE 61-75
GERMAN 76-90
MAGYAR 91-105
JAPANESE 106-121
©2005 Oakley, Inc. U.S. Patent D498682S
DETONATOR
Blending sculptural forms into a unified geometry, Oakley’s 4-D design language takes the
measure of moments into an entirely new time frame. Detonator™is a true analog chronograph
with the digital pulse of a quartz-tuned engine. Its precision stopwatch measures elapsed time
and split times in 1/5-second intervals. Built for human logic, it refines the tedious and
complicated procedure of alarm setting to a simple, intuitive operation. The instrument is
engineered with durable high-impact stainless steel and includes an Unobtainium
™
watchband
for the perpetual comfort of a precise fit, a mineral glass crystal with anti-reflective coating, a
date display and a three-year battery.
DETONATOR INSTRUCTION MANUAL 01
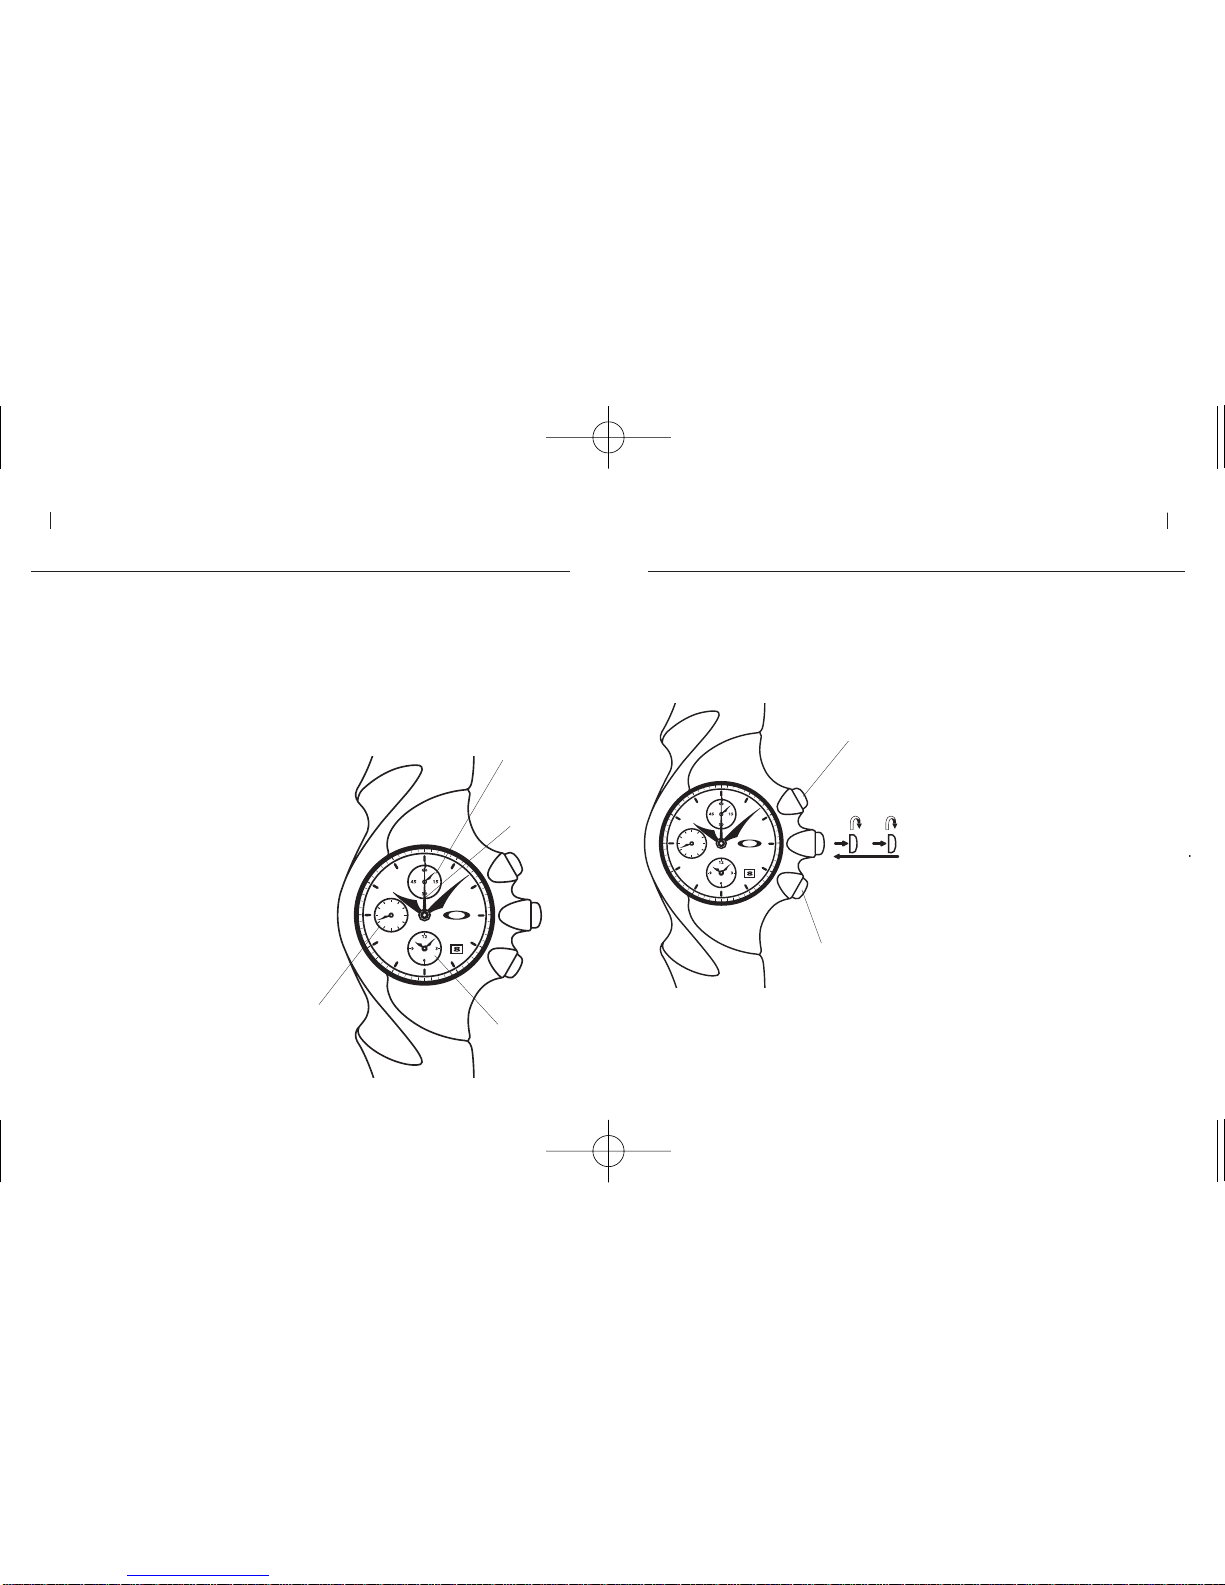
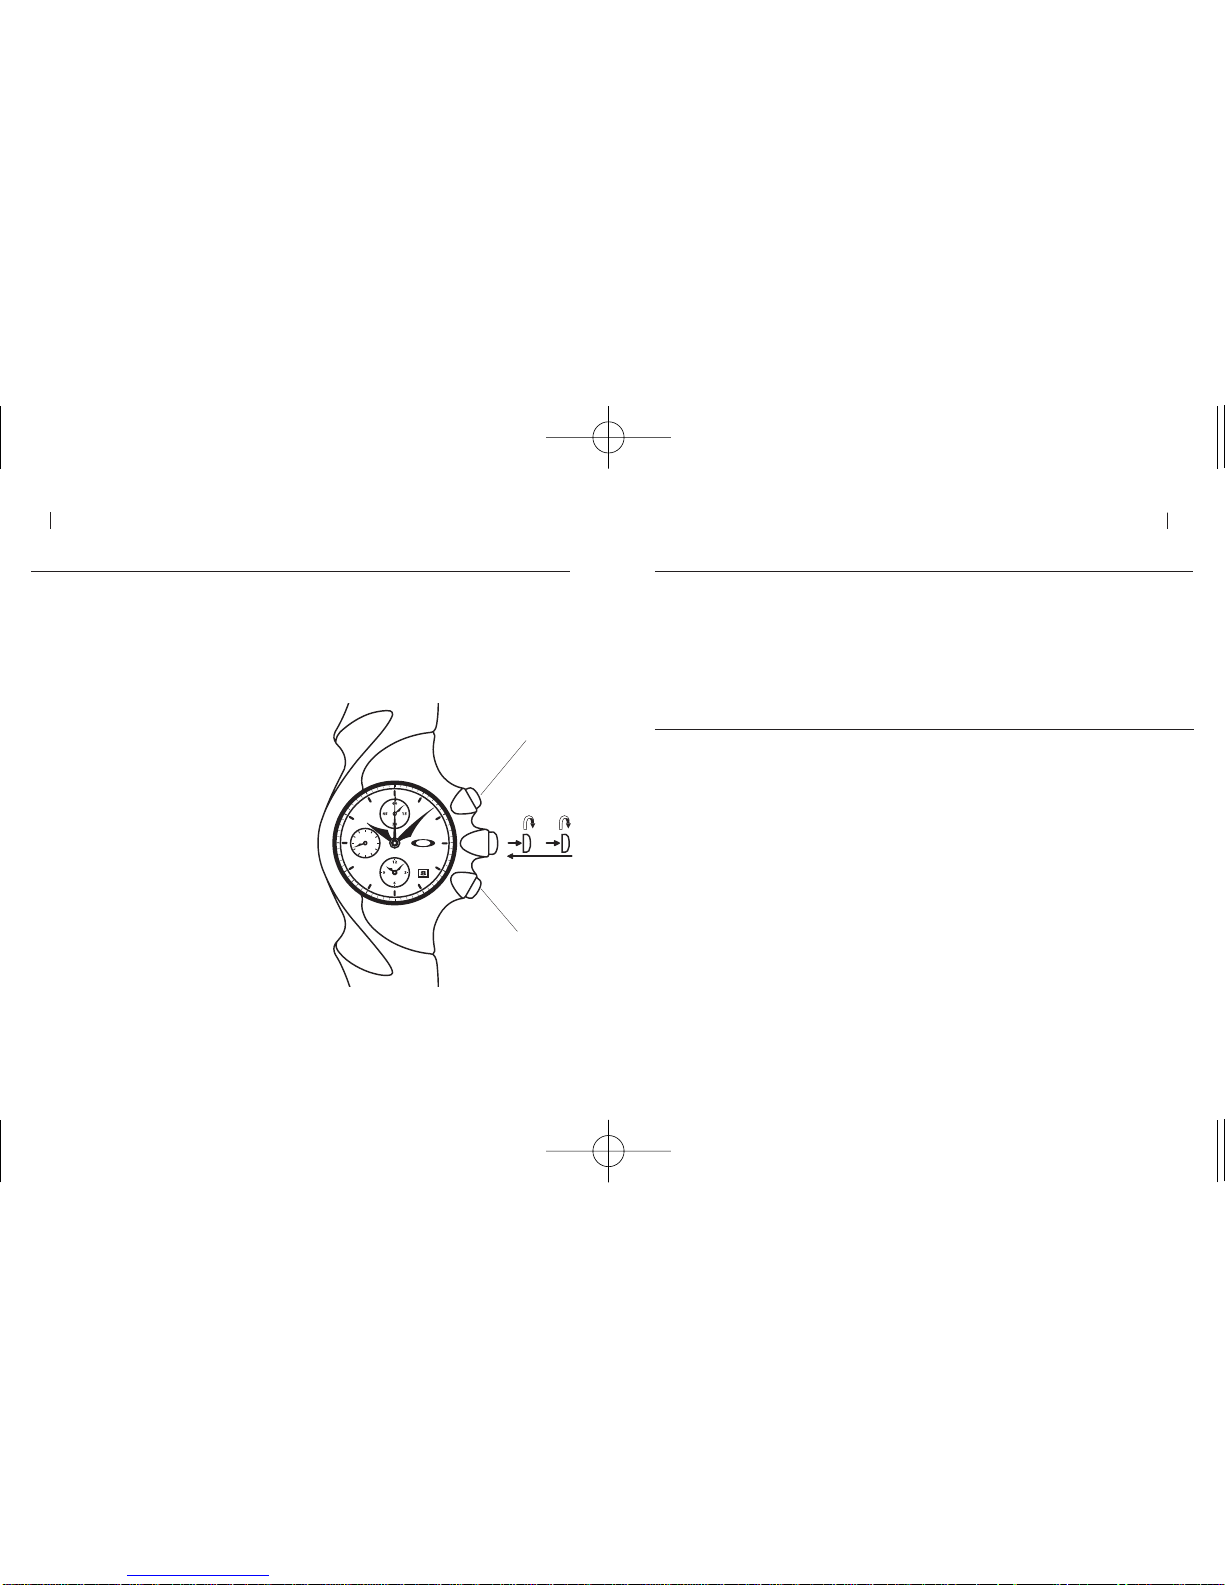
NAVIGATING THE WATCH FACE
The main dial face includes an hour hand and
minute hand for showing the current time, and
a chronograph hand that moves in increments
of 1/5 second. The small upper dial face is
part of the chronograph, and measures
minutes. The small dial face at the left shows
the current time in seconds. The small lower
dial face shows the alarm time.
ALARM
MINUTES
SECONDS
CHRONOGRAPH
HAND
04-00774_DETONATOR Manual 2/2/05 3:46 PM Page 2

02 DETONATOR INSTRUCTION MANUAL
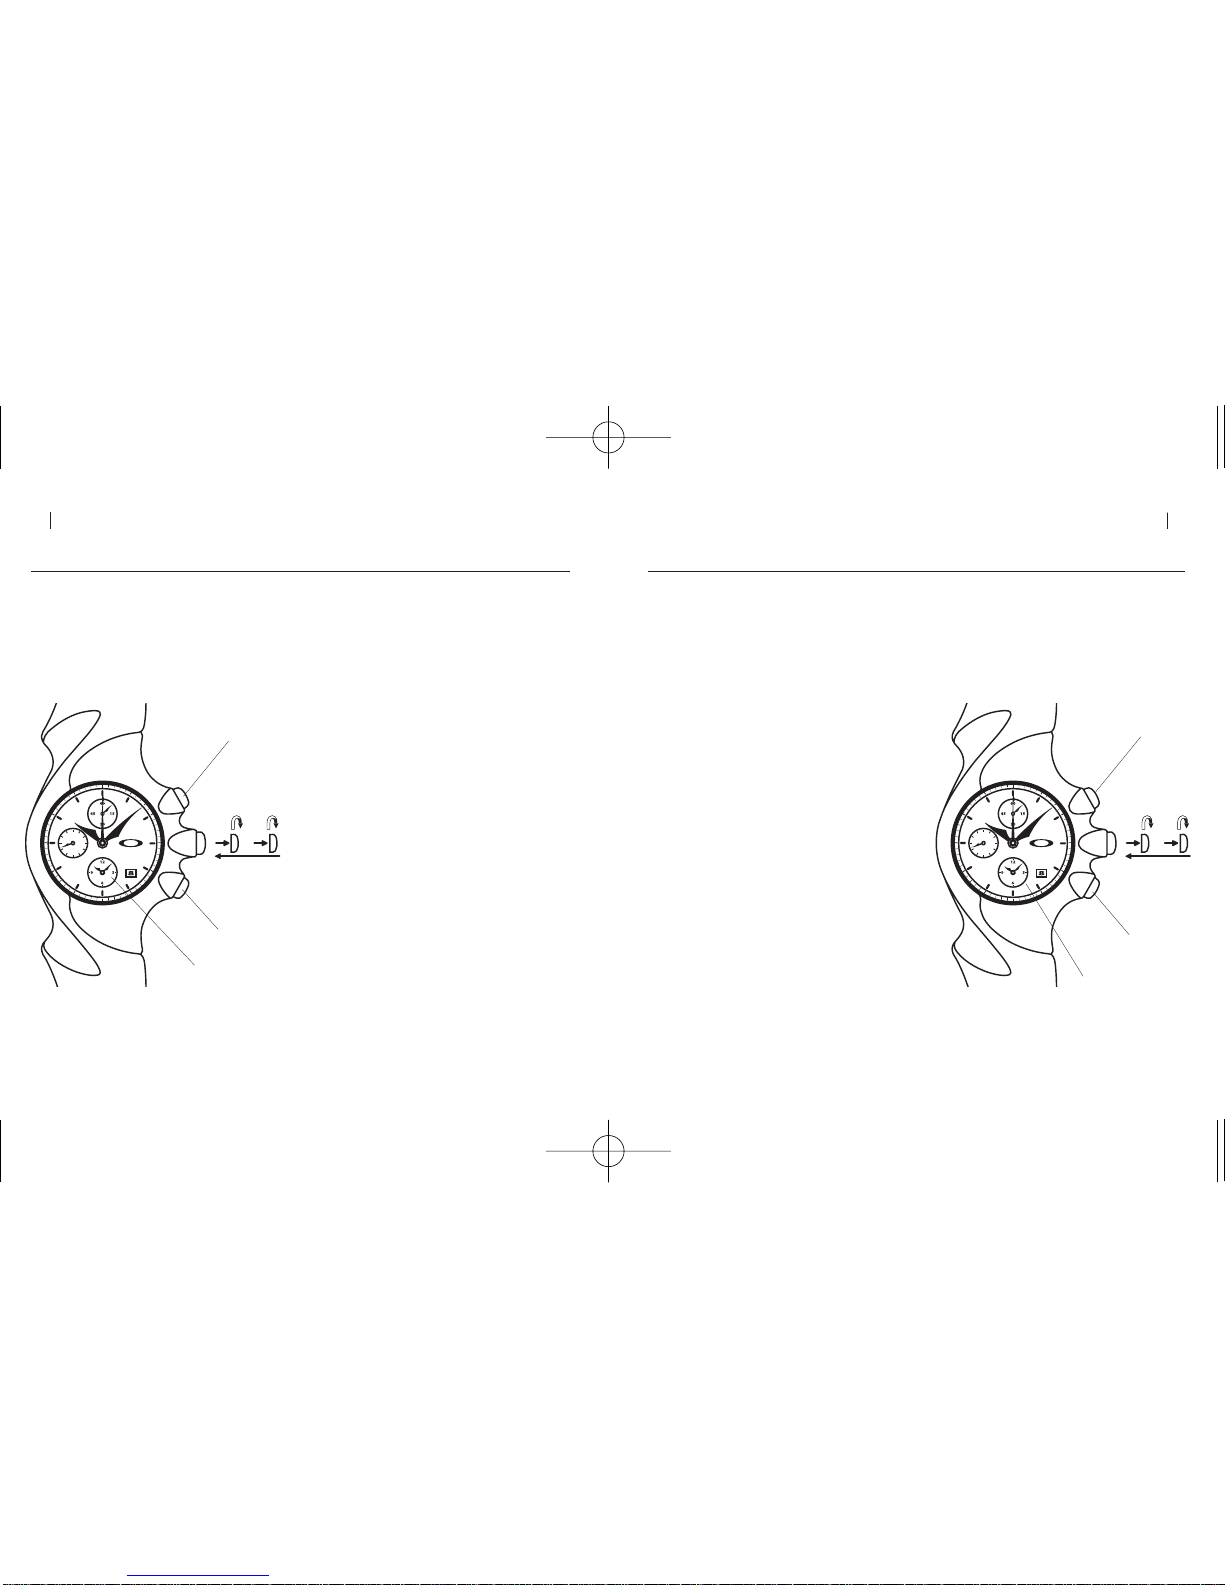
TO SET THE DATE AND TIME:
1. Pull the crown out to the first click position.
2. Turn the crown so the date advances, and
set it to yesterday’s date.
3. When the hand in the small dial face at the left
reaches the zero position (points straight up),
pull the crown out to the second click position.
4. Turn the crown so the minute and hour hands
move forward. Continue turning until the date
display changes to today’s date, then continue
until the current time is reached. (If the current
time is PM, advance the hour hand past the
noon position before stopping on the current
time.) When setting the minute hand, advance
the hand to 5 minutes or more past the desired
time, then turn it back to the desired time.
5. Press button (b) repeatedly to advance the alarm
hands to the current time. Press and hold button
(b) to advance the alarm hands rapidly.
6. Push the crown back in to the normal position.
SETTING THE DATE AND TIME
The crown can be pulled out to two click positions. The first position is for setting the current
date and the alarm time. The second position is for setting the current time. When pulling the
crown out to the first or second click positions, pull it gently and slowly.
DETONATOR INSTRUCTION MANUAL 03
SETTING THE DATE AND TIME (cont.)
WHEN SETTING THE DATE AND TIME,
NOTE THE FOLLOWING
• The watch will resume running when the
crown is pushed back in to the normal
position, so use this to set the watch time to
the precise second of current time.
• It is necessary to reset the date at the end of
February and all months that have fewer
than 31 days.
• Do not reset the date between 9:00 PM and
1:00 AM. Doing so may prevent the date
display from changing properly.
• Pulling the crown out to the second click
position will automatically reset the
chronograph hand to zero.
• If the alarm has been set and the crown is
pulled out to the second click position, the
alarm hands will automatically reset to the
current time and the alarm will disengage.
[SETTING THE DATE AND TIME CONT. ON NEXT PAGE]
B
B
A
A
04-00774_DETONATOR Manual 2/2/05 3:46 PM Page 2
POS 1 POS 2
POS 1 POS 2

04 DETONATOR INSTRUCTION MANUAL
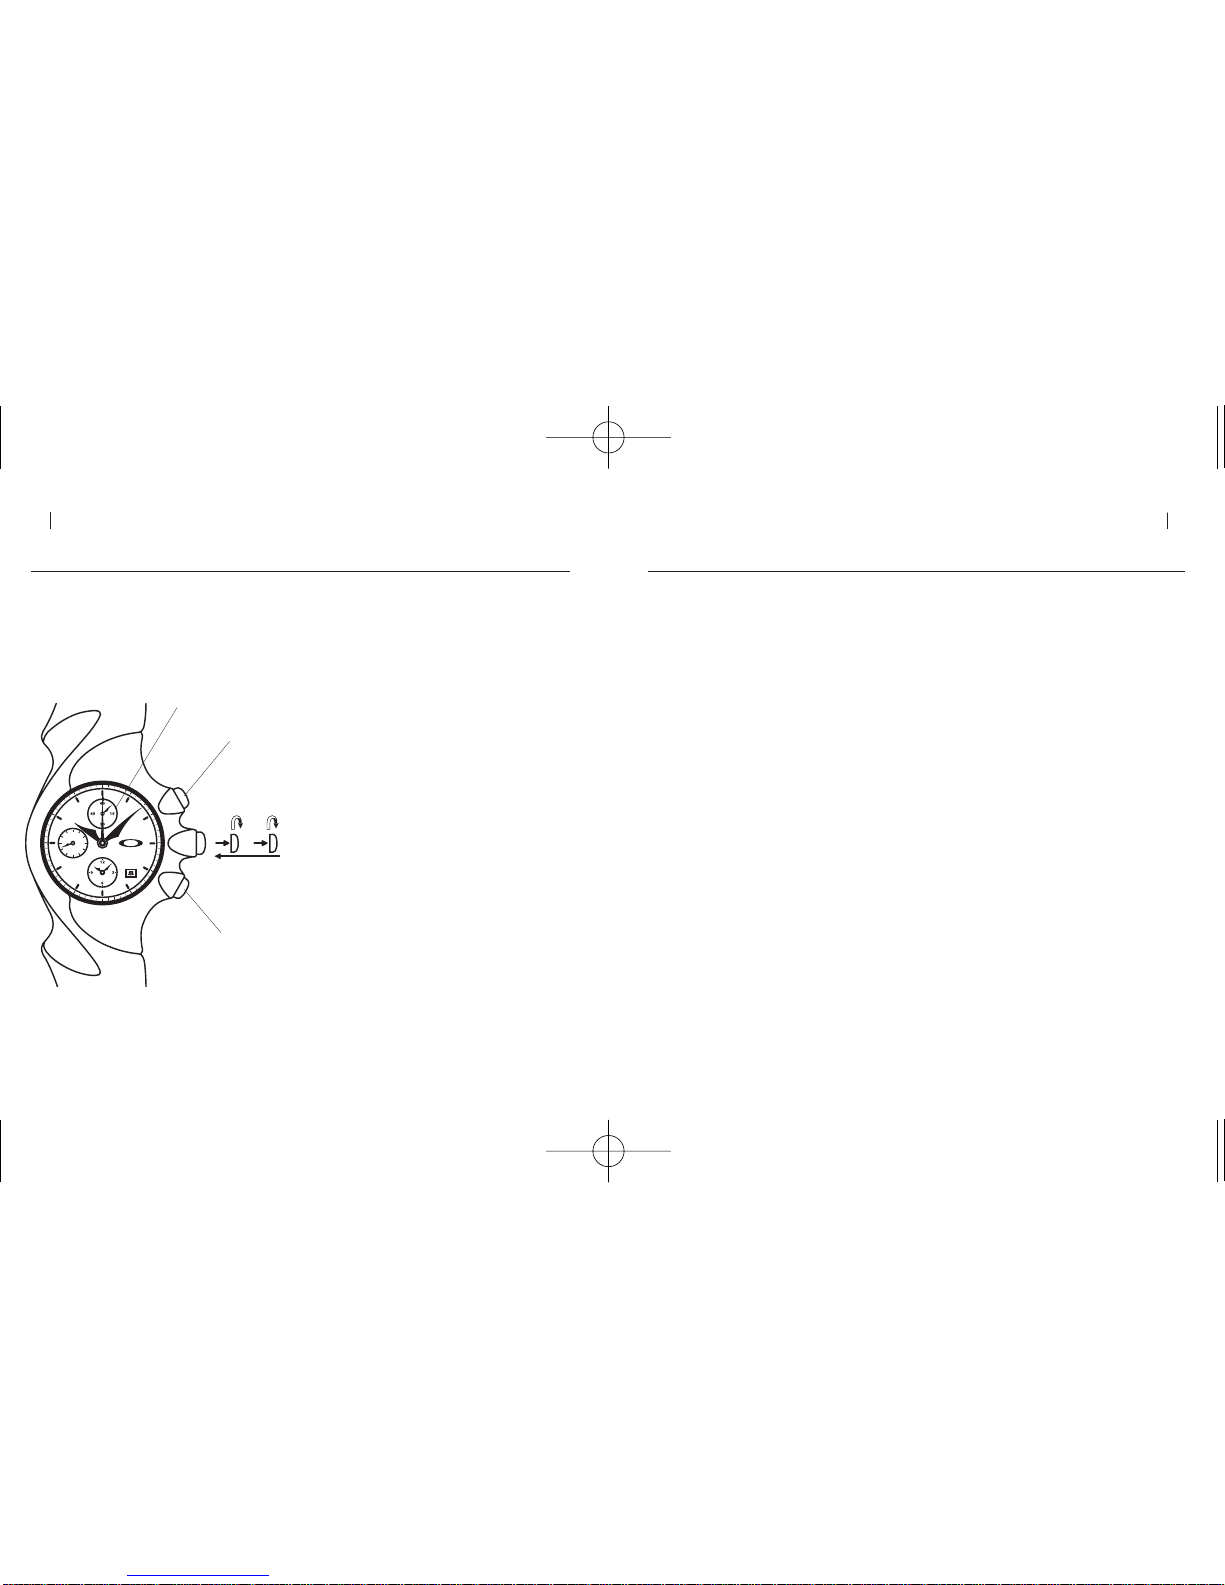
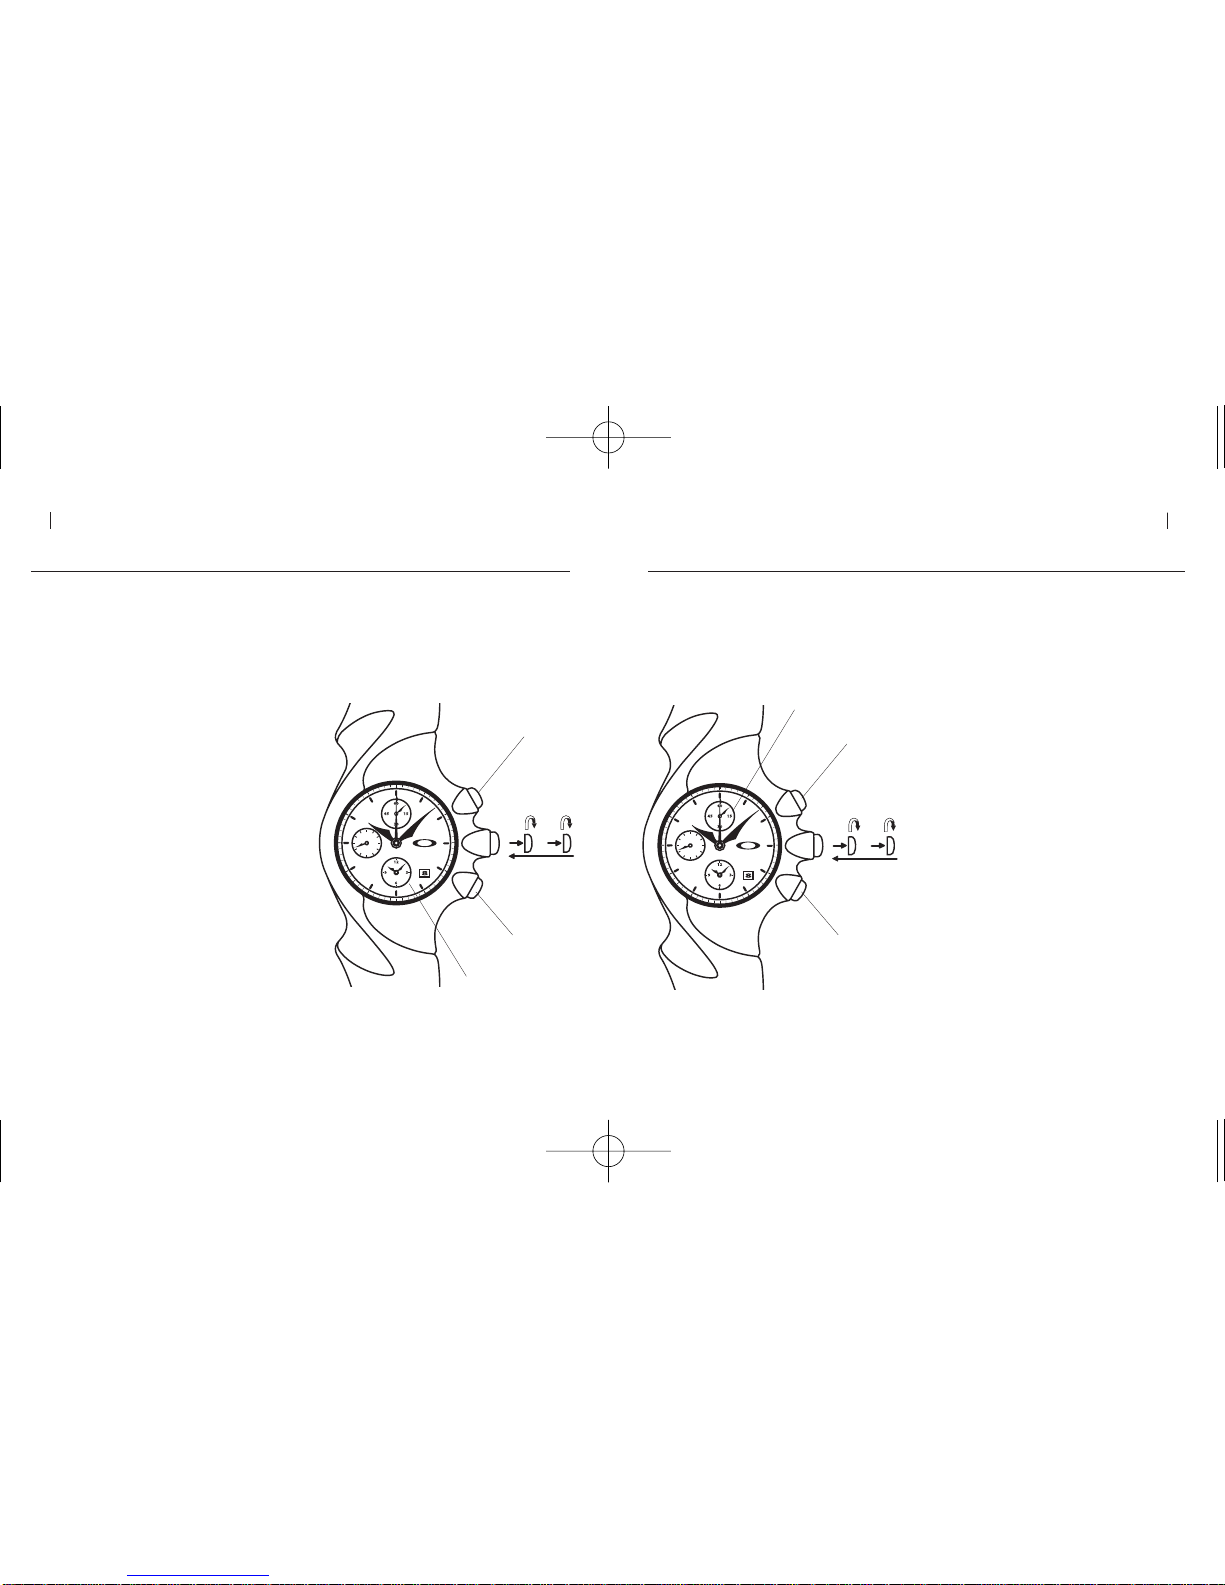
TO RESET THE WATCH TIME AND
SYNCHRONIZE THE ALARM:
1. When the hand in the small dial face at the left
reaches the zero position (points straight up),
pull the crown out to the second click position.
2. Turn the crown to reset the watch to the
current time. When setting the minute hand,
advance the hand to 5 minutes or more past
the desired time, then turn it back to the
desired time.
3. Press button (b) repeatedly to advance the
alarm hands to the current time. Press and hold
button (b) to advance the alarm hands rapidly.
4. Push the crown back in to the normal position.
DETONATOR INSTRUCTION MANUAL 05
SYNCHRONIZING THE ALARM (cont.)SYNCHRONIZING THE ALARM
The small lower dial face shows the alarm time setting. Before the alarm is used for the first
time, it must be synchronized with the current time. The instructions under “SETTING THE
DATE AND TIME” will achieve this. If the main hands of the watch are reset to adjust for the
current time, the alarm hands must be synchronized again by doing the following:
WHEN SETTING THE TIME AND
SYNCHRONIZING THE ALARM, NOTE
THE FOLLOWING
• If the date also needs to be reset, use the
instructions under “SETTING THE DATE AND
TIME” instead of the instructions to the left.
• The watch will resume running when the
crown is pushed back in to the normal
position, so use this to set the watch time to
the precise second of current time.
• Pulling the crown out to the second click
position will automatically reset the
chronograph hand to zero.
[SYNCHRONIZING THE ALARM CONT. ON NEXT PAGE]
B
A
B
A
04-00774_DETONATOR Manual 2/2/05 3:46 PM Page 4
POS 1 POS 2 POS 1 POS 2
SETTING THE ALARM
When the alarm is not set, the alarm hands show the current time to indicate the alarm is not
active. Setting the alarm hands to a specific time will automatically activate the alarm
function, and the alarm will sound at the set time. The alarm can be set to sound at only one
designated time, which must be within the following 12 hours.
STOPPING AN ALARM
To stop a sounding alarm, press button (a) or button (b). If neither button is pressed, the alarm
will automatically stop sounding after 20 seconds. After an alarm stops sounding, the alarm
hands will continue to show the current time to indicate the alarm has been disengaged. To
prevent a set alarm from sounding, do the following:
06 DETONATOR INSTRUCTION MANUAL
DETONATOR INSTRUCTION MANUAL 07
ALARM
ALARM
B
A
B
A
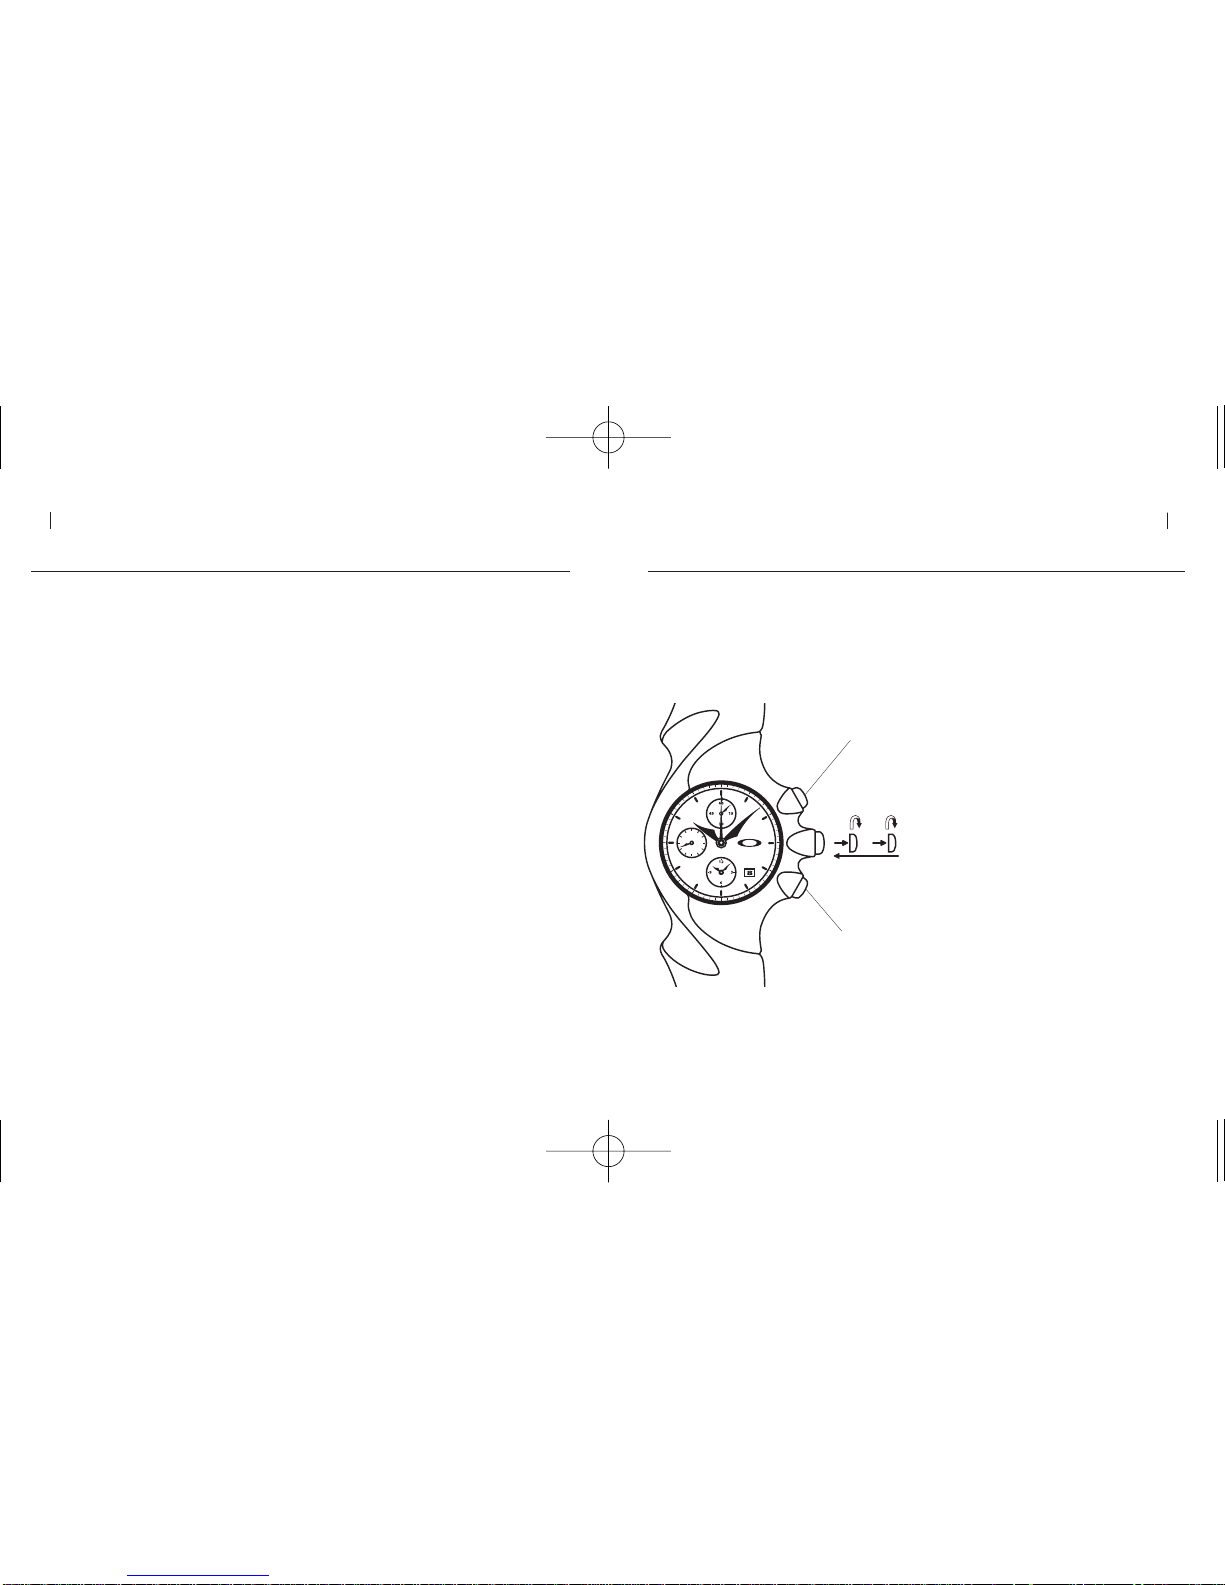
TO SET THE ALARM:
1. Pull the crown out to the first click position.
2. Press button (b) repeatedly to advance the
alarm hands to the desired time. Press and
hold button (b) to advance the alarm hands
rapidly. If button (b) is pressed continuously,
the alarm hands will advance until they stop
on the current time. Release the button and
press it again to continue advancing the
alarm hands.
3. Push the crown back in to the normal position.
WHEN USING THE ALARM, NOTE
THE FOLLOWING:
• The alarm can be set in one-minute increments.
• While the chronograph is active, the alarm has
a different sound. This is not a malfunction.
• When the three-year battery is running low,
the alarm will not sound, even if it is
engaged. This is necessary to extend the
remaining battery life. It is not a malfunction.
TO CANCEL AN ALARM:
1. Pull the crown out to the first click position.
2. Press and hold button (b) until the alarm hands
stop at the current time. (If the alarm hands do
not stop at the current time shown on the main
watch face, follow the procedures under
“SYNCHRONIZING THE ALARM”)
3. Push the crown back in to the normal position.
WHEN CANCELING AN ALARM, NOTE
THE FOLLOWING:
• If the alarm is properly synchronized (as
described above), pulling out the crown to
the second click position will cause the
alarm hands to advance and stop at the
current time, which deactivates the alarm.
However, the watch stops when the crown
is in this position, so the above procedure is
preferred because it avoids the need to
reset the watch time.
04-00774_DETONATOR Manual 2/2/05 3:46 PM Page 6
POS 1 POS 2 POS 1 POS 2
08 DETONATOR INSTRUCTION MANUAL
DETONATOR INSTRUCTION MANUAL 09
USING THE CHRONOGRAPH
The long narrow hand on the main dial face is part of the chronograph. It advances at intervals
of 1/5 second. The small upper dial face is also part of the chronograph. It measures elapsed
time in minutes for up to one full hour. After one hour, it starts counting again from zero.
WHEN USING THE CHRONOGRAPH,
NOTE THE FOLLOWING:
• Before using the chronograph, be sure the
crown is fully pushed in to the normal
position and the chronograph hands are in
the zero position.
• If the chronograph hands do not return to the
zero position when the chronograph is reset
by pressing button (b) as described below,
follow the procedure under “ADJUSTING
THE CHRONOGRAPH HANDS”.
TO MEASURE ELAPSED TIME:
1. Press button (a) to start the chronograph.
2. Press button (a) to stop the chronograph.
3. Press button (b) to reset the chronograph.
MINUTES
B
A
TO MEASURE ACCUMULATED TIME:
1. Press button (a) to start the chronograph.
2. Press button (a) to stop the chronograph.
3. Press button (a) to restart the chronograph.
(The chronograph will continue measuring
time from its stopped position.)
4. Press button (a) to stop the chronograph.
5. Press button (b) to reset the chronograph.
TO MEASURE SPLIT TIMES:
1. Press button (a) to start the chronograph.
2. Press button (b) to show the current split
time. (The chronograph hand will stop
moving but the timing mechanism will
continue to operate without pause.)
3. Press button (b) to release the chronograph
hand. (The chronograph hand will move
quickly to the current timing position while
continuing to accurately measure the total
elapsed time.)
4. Press button (a) to stop the chronograph.
5. Press button (b) to reset the chronograph.
USING THE CHRONOGRAPH (cont.)
TO MEASURE TWO COMPETITORS:
1. Press button (a) to start the chronograph.
2. Press button (b) when the first competitor
finishes. (The chronograph hands will
stop moving so you can read the finish
time of the first competitor, but the timing
mechanism will continue to operate as
the second competitor continues.)
3. Press button (a) when the second
competitor finishes.
4. Press button (b) to display the finish time
of the second competitor.
5. Press button (b) to reset the chronograph.
04-00774_DETONATOR Manual 2/2/05 3:46 PM Page 8
POS 1 POS 2

10 DETONATOR INSTRUCTION MANUAL
TO ADJUST THE POSITIONS OF THE
CHRONOGRAPH HANDS:
1. Pull the crown out to the second click position.
2. Press and hold button (a) for two seconds.
The chronograph minute hand will advance
one full rotation to indicate that it can now
be adjusted. Press button (b) repeatedly
until the chronograph minute hand is set to
zero (the 12-o’clock position). Press and hold
button (b) to advance the hand rapidly.
3. Press and hold button (a) for two seconds.
The chronograph 1/5-second hand will
advance one full rotation to indicate that it
can now be adjusted. Press button (b)
repeatedly until the chronograph 1/5-second
hand is set to zero (the 12-o’clock position).
Press and hold button (b) to advance the
hand rapidly.
4. Push the crown back in to the normal position.
DETONATOR INSTRUCTION MANUAL 11
ADJUSTING THE CHRONOGRAPH HANDS (cont.)ADJUSTING THE CHRONOGRAPH HANDS
Under normal conditions, the chronograph minute hand and 1/5-second hand are reset to zero
(the 12-o’clock position) by using the watch buttons. In some instances, such as during the initial
setup of the watch, it may be necessary to manually adjust these hands to the zero position.
WHEN ADJUSTING THE POSITIONS OF
THE CHRONOGRAPH HANDS, NOTE
THE FOLLOWING:
• The procedure is necessary only when the
chronograph hands do not reset to zero
when the watch buttons are used.
• While the crown is in the second click
position, pressing button (a) for two-second
intervals will cycle the function of button (b)
among three adjustment modes: (1) Setting
the zero position of the chronograph minute
hand, (2) Setting the zero position of the
chronograph 1/5-second hand, (3) Setting
the position of the alarm hands.
[ADJUSTING THE CHRONOGRAPH HANDS CONT. ON NEXT PAGE]
B
A
B
A
04-00774_DETONATOR Manual 2/2/05 3:46 PM Page 10
POS 1 POS 2
POS 1 POS 2

DETONATOR INSTRUCTION MANUAL 13
12 DETONATOR INSTRUCTION MANUAL
SAFEGUARDING
WATER EXPOSURE
The watch is rated at 10-bar hydrophobic (water resistance to a depth of 100 meters). It may be
worn during bathing, swimming or shallow diving. It is not designed for scuba or saturation
diving. Before exposing the watch to moisture, be sure the crown is fully lowered to the normal
position (pressed against the watch casing). Do not pull out the crown if the watch is wet. If used
in seawater, rinse the watch with fresh water and dry completely.
TEMPERATURE
The operating temperature range for precision timekeeping is -5ºC to +50ºC (23ºF to 122ºF).
MAGNETISM
Strong magnetic fields can harm the watch mechanism. Keep the watch away from magnetic
objects, including television screens and stereo speakers.
CHEMICALS
The watch may become discolored or damaged if exposed to cosmetic spray, detergents,
adhesives, solvents or paints.
SHOCK WAVE
Although the watch is engineered for durability, impact against hard surfaces may cause damage.
PERIODIC MAINTENANCE
To ensure that the case, crown, crystal seal, and gasket maintain water resistance, it is
recommended that the watch be inspected every two to three years at an Authorized Oakley
Service Center.
COMPOSITION
Band........................................................................Unobtainium
™
Buckle......................................................................Stainless Steel
Case ........................................................................Stainless Steel
Case Back Cover ....................................................Stainless Steel
Crystal ....................................................................Hard coat mineral glass with anti-reflective coating
SPECIFICATIONS
Frequency of crystal oscillator................................32,768 cycles per sec.
Accuracy at normal temperature 25ºC (77ºF) ........+/- 20 sec./mo.
Operating temperature range ................................-5ºC to +50ºC (23ºF to 122ºF)
Water resistance ....................................................10 bar (100m)
Display ....................................................................Composite analog readout
Battery ....................................................................Lithium SR927W
Battery life ..............................................................Approx. three years*
Low battery indicator: When the battery is running low, the small second hand will move in twosecond intervals. If this occurs, the watch will continue to display time accurately but the battery
should be replaced as soon as possible. Note that the alarm will not sound if the battery is
running low. This is necessary to extend the remaining battery life.
*Battery life varies according to usage. A projected life of three years is based on chronometer usage of less than
two hours per day and alarm sounding of 20 seconds a day or less.
04-00774_DETONATOR Manual 2/2/05 3:46 PM Page 12
OAKLEY WARRANTY POLICY
All authentic Oakley chronometers are warranted against manufacturer defects for one year from the
date of purchase. Coverage is valid only with proof of purchase from an Authorized Oakley Dealer.
IMPORTANT
This limited warranty does not cover the glass crystal, strap/band/bracelet, or attachments.
Scratches to the case caused by use are not covered, nor is moisture damage if the timepiece is
a non-hydrophobic model, nor is damage caused by natural disaster such as fire, flood or
earthquake. We reserve the right to relinquish all responsibility under this guarantee for repair
of damage when misuse or abuse is evident, including defects related to tampering or servicing
done by agents other than Authorized Oakley Service Facilities. This warranty does not affect
specific legal rights of the consumer.
REGISTRATION
The cutting-edge technology within each Oakley timepiece serves as validation for its
authenticity. By registering your timepiece via mail or online at www.oakley.com, you provide
further credentials by allowing us to document your purchase. To qualify for service under the
above guarantee, valid proof of purchase — which clearly shows the purchase date and the
name of the Authorized Oakley Dealer — must be presented if a repair claim is made during the
warranty period.
14 DETONATOR INSTRUCTION MANUAL
DETONATOR INSTRUCTION MANUAL 15
HOW TO MAKE A WARRANTY CLAIM
Within the United States, call the Oakley Global Headquarters number listed below. Please
have your purchase information ready. Customers outside the United States should contact
their local Authorized Oakley Timepiece Dealer or use the list below to call the nearest
Oakley headquarters.
Oakley Global Headquarters, USA: 1 (800) 403-7449
Oakley Africa: +27 41 501 0200
Oakley Brasil Ltda.: 0800-770-7822 ou 0xx11-4197-9999 (Grande São Paulo e celular)
Oakley Canada: 1-877-625-5396
Oakley Europe:Benelux, France, Italia, Scandinavia: 00 800 62 55 39 00
• España: 900 953 398 • Portugal: 800 833 121 • Sverige: 020 79 1037
Oakley GMBH: Germany, Austria and Poland: +49-89-99650-4181
Oakley Japan: 0120 009 146
Oakley México: 52) 55 59503643
Oakley South Pacific (Australia): 1 800 637 001
Oakley South Pacific (New Zealand): 0800 696 255
Oakley UK: 01462 475400 Eire customers: 00 353 4439557
04-00774_DETONATOR Manual 2/2/05 3:46 PM Page 14
MANUAL DE INSTRUCCIONES DETONATOR 17
16 MANUAL DE INSTRUCCIONES DETONATOR
DETONATOR
Al mezclar formas escultóricas en una geometría unificada, el lenguaje de diseño Oakley 4-D
toma la medida del tiempo con el patrón de la nueva era. Detonator
™
es un genuino cronógrafo
analógico con impulso digital por motor de cuarzo. Su cronómetro de precisión mide tiempos
transcurridos y tiempos parciales en intervalos de 1/5 de segundo. Al estar construido según la
lógica del ser humano, simplifica el complicado y tedioso ajuste de alarmas y lo convierte en
una única e intuitiva operación. Este instrumento desarrollado con acero inoxidable de alta
resistencia a impactos, incorpora brazalete de Unobtainium
™
para perpetuar la comodidad de
un ajuste preciso, cristal mineral con tratamiento anti-reflejos, visor de fecha y batería con tres
años de autonomía.
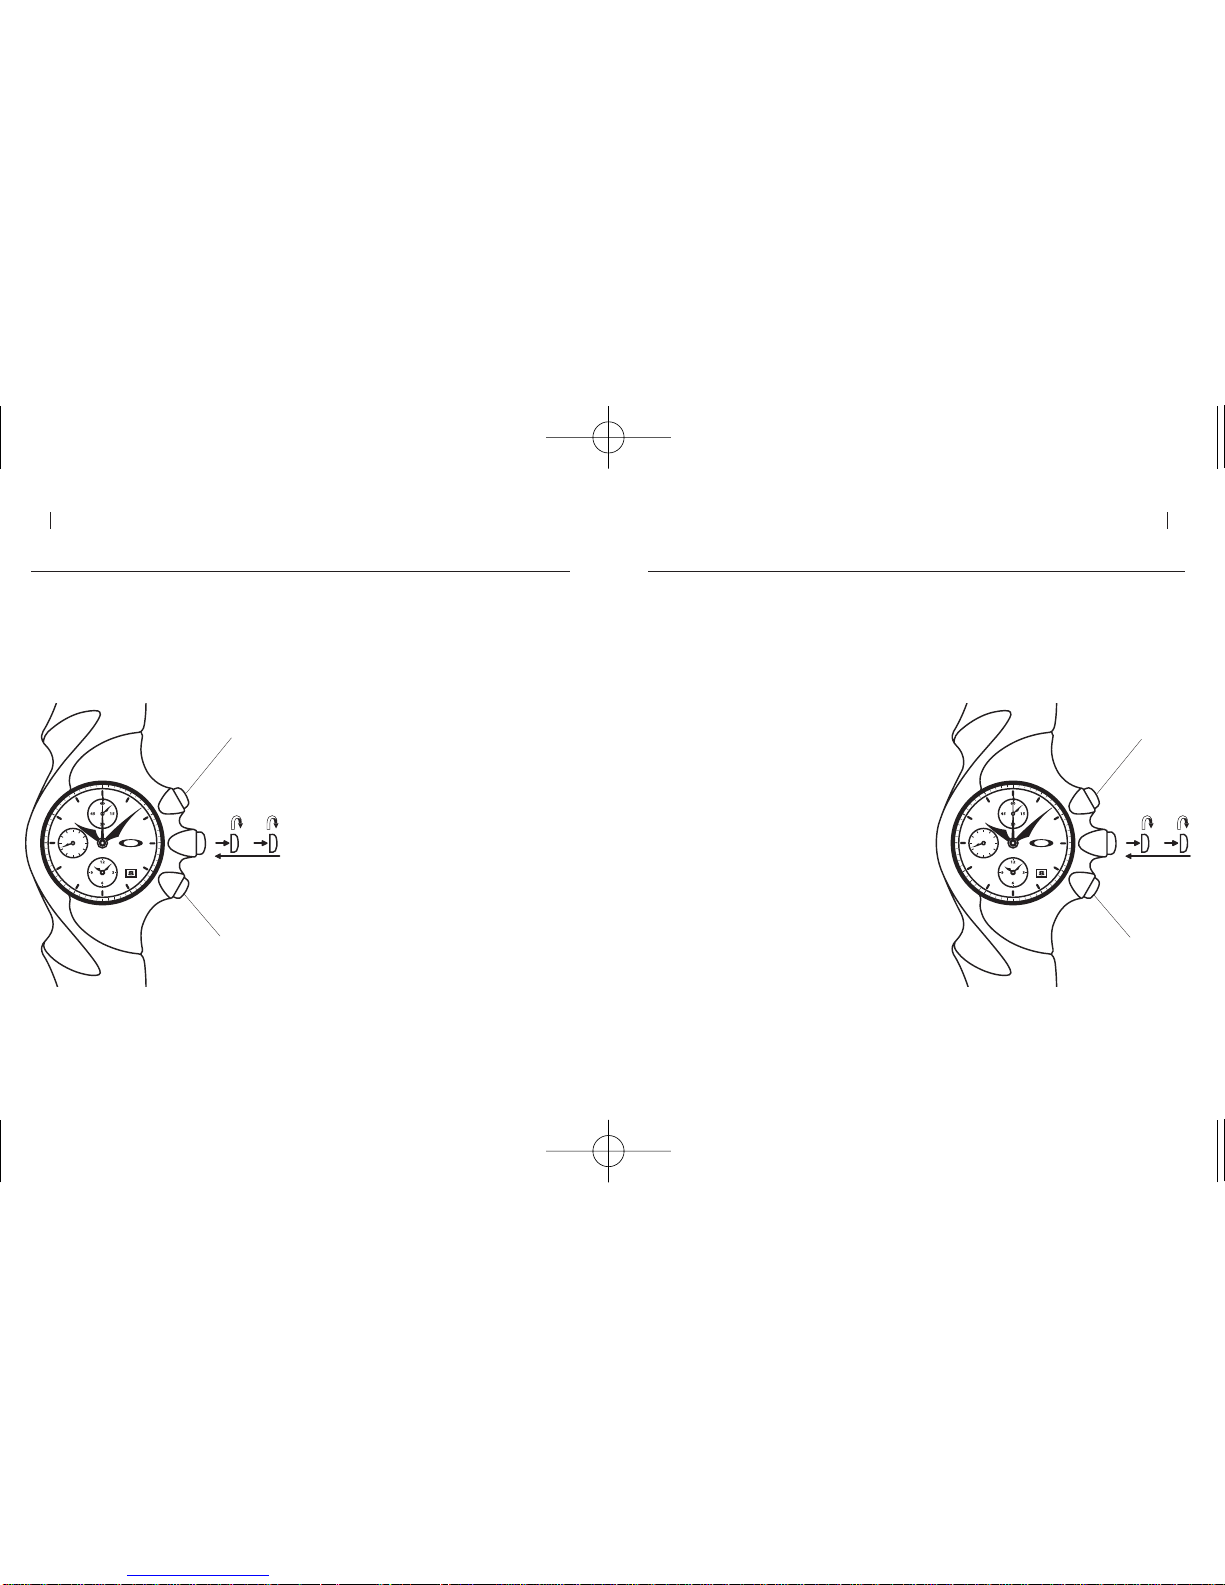
NAVEGACIÓN ALREDEDOR DE LA ESFERA
La esfera principal incluye manilla horaria y
minutero para mostrar la hora en curso, y un
segundero cronógrafo que salta en intervalos
de 1/5 de segundo. La esfera pequeña superior
forma parte del cronógrafo y mide minutos. La
esfera pequeña izquierda muestra el tiempo
actual en segundos. La esfera pequeña inferior
muestra la hora de la alarma.
ALARMA
MINUTOS
SEGUNDOS
MANECILLAS
CRONÓGRAFO
PARA AJUSTAR FECHA Y HORA:
1. Tire de la corona hasta que ajuste con un clic en la
primera posición.
2. Gire la corona para que la fecha avance hasta la fecha de ayer.
3. Cuando la manecilla de la esfera pequeña izquierda
alcance la posición cero (recta hacia arriba) tire de la
corona hasta la segunda posición.
4. Gire la corona de modo que adelanten el horario y el
minutero. Continúe girando hasta que el visor de fecha
cambie a la fecha actual, y a continuación continúe
girando hasta alcanzar la hora en curso (si ajusta la hora
después del mediodía, el horario deberá pasar una vez
por mediodía antes de alcanzar la hora correcta). Al
ajustar el minutero, primero adelante hasta cinco
minutos más tarde de la hora actual para después
retroceder hasta dicha hora.
5. Presione el botón (b) repetidamente para hacer avanzar
las manecillas de la alarma hasta la hora actual (Presione
y mantenga presionado el botón (b) para que las
manecillas de la alarma avancen rápidamente).
6. Presione la corona para que vuelva a su
alojamiento normal.
AJUSTE DE FECHA Y HORA
La corona puede extraerse hasta dos posiciones señaladas con un clic. La primera posición sirve para
ajustar la fecha actual y la hora de alarma. La segunda posición sirve para ajustar la hora actual. Al tirar
de la corona para situarla en la primera o segunda posición, debe hacerse suavemente y con cuidado.
["AJUSTE DE FECHA Y HORA" CONTINUA PÁGINA SIGUIENTE]
B
A
04-00774_DETONATOR Manual 2/2/05 3:46 PM Page 16
POS 1 POS 2
POS 1 POS 2
PARA RE-AJUSTAR LA HORA DEL
RELOJ Y SINCRONIZAR LA ALARMA:
1. Tire de la corona hasta la segunda posición
cuando la manecilla de la esfera pequeña
izquierda alcance la posición cero
(apuntando recta hacia arriba).
2. Gire la corona hasta ajustar el reloj con la
hora actual. Al ajustar el minutero,
adelántelo hasta 5 minutos después de la
hora precisa, para luego hacerlo retroceder
hasta la posición correcta.
3. Presione el botón (b) repetidamente
para que avancen las manecillas de la
alarma hasta la hora actual (Presione y
mantenga presionado el botón (b) para
que las manecillas de la alarma
avancen rápidamente).
4. Empuje la corona hasta su posición normal.
SINCRONIZACIÓN DE LA ALARMA
La esfera pequeña inferior muestra el ajuste de la hora de alarma. Antes de poder utilizar la alarma
por primera vez, debe ajustarla con la hora actual. Las instrucciones bajo el título "AJUSTE DE FECHA
Y HORA" explican cómo hacerlo. Cada vez que se ajustan las manecillas de la esfera principal debe
repetirse la sincronización de las manecillas de la alarma mediante el siguiente procedimiento:
["SINCRONIZACIÓN DE LA ALARMA" CONTINUA PÁGINA SIGUIENTE]
B
A
AJUSTE DE FECHA Y HORA (cont.)
AL AJUSTAR LA FECHA Y LA HORA
TENGA EN CUENTA QUE:
• El reloj recuperará la medida del tiempo en
el momento en que la corona vuelva a su
posición normal, por lo que puede utilizar
esta característica para ajustar el reloj con
la hora exacta al segundo.
• Es necesario ajustar la fecha manualmente
al final de febrero y de todos los meses que
tienen menos de 31 días.
• No ajuste la fecha entre las 9 de la noche y
la 1 de la madrugada. Así evitará cambios
de fecha no deseados en el visor.
• Al tirar de la corona hasta la segunda
posición el segundero cronógrafo se sitúa
automáticamente en la posición cero.
• Si tira de la corona hasta la segunda
posición después de ajustar la alarma, la
alarma se situará automáticamente en la
hora actual y se desactivará.
B
A
MANUAL DE INSTRUCCIONES DETONATOR 19
18 MANUAL DE INSTRUCCIONES DETONATOR
04-00774_DETONATOR Manual 2/2/05 3:46 PM Page 18
POS 1 POS 2
POS 1 POS 2

PARA AJUSTAR LA ALARMA:
1. Tire de la corona hasta la primera posición.
2. Presione el botón (b) repetidamente para que avancen
las manecillas de la alarma hasta la hora elegida
(Presione y mantenga presionado el botón (b) para que
las manecillas de la alarma avancen rápidamente). Si
mantiene presionado el botón (b) continuamente, las
manecillas de la alarma avanzarán hasta detenerse
en la hora actual. Para que avancen de nuevo, deberá
soltar el botón y volver a presionarlo.
3. Empuje la corona hasta su posición normal.
CUANDO UTILICE LA ALARMA TENGA EN
CUENTA QUE:
• La alarma puede ajustarse con incrementos de un minuto.
• Mientras que el cronógrafo está activo la alarma tiene
un sonido diferente. No se trata de un error de
funcionamiento.
• Cuando la batería de tres años comienza a
agotarse la alarma deja de funcionar, incluso si
está activada. Lo hace para alargar al máximo la
energía que todavía queda en la batería. No se
trata de un error de funcionamiento.
AJUSTE DE LA ALARMA
Mientras que la alarma no está activa, las manecillas de la alarma señalan la hora actual para
indicar que está inactiva. Al desplazar las manecillas de la alarma a una posición determinada la
función de alarma se activa automáticamente para que la alarma suene a la hora elegida. La alarma
puede programarse para sonar a una única hora, comprendida dentro de las 12 horas siguientes.
ALARMA
B
A
20 MANUAL DE INSTRUCCIONES DETONATOR
MANUAL DE INSTRUCCIONES DETONATOR 21
SINCRONIZACIÓN DE LA ALARMA (cont.)
AL AJUSTAR LA HORA Y SINCRONIZAR LA
ALARMA TENGA EN CUENTA QUE:
• Si además de la hora también tiene que
ajustar la fecha, utilice las instrucciones
bajo el título "AJUSTE DE FECHA Y HORA"
en lugar de estas instrucciones.
• El reloj recuperará la medida del tiempo en
el momento en que la corona vuelva a su
posición normal, por lo que puede utilizar
esta característica para ajustar el reloj con
la hora exacta al segundo.
• Al tirar de la corona hasta la segunda
posición el segundero cronógrafo se sitúa
automáticamente en la posición cero.
B
A
04-00774_DETONATOR Manual 2/2/05 3:46 PM Page 20
POS 1 POS 2
POS 1 POS 2
22 MANUAL DE INSTRUCCIONES DETONATOR
MANUAL DE INSTRUCCIONES DETONATOR 23
DETENER UNA ALARMA
Para detener el sonido de la alarma presione el botón (a) o el botón (b). Si no pulsa ningún
botón, la alarma se detendrá automáticamente al cabo de 20 segundos. Cuando termina de
sonar la alarma, las manecillas de la alarma vuelven a mostrar la hora actual para señalar que
está desactivada. Para evitar que suene una alarma programada:
PARA CANCELAR LA ALARMA:
1. Tire de la corona hasta la primera posición.
2. Presione y mantenga presionado el botón (b) hasta
que las manecillas de la alarma se detengan en la
hora actual (Si las manecillas de la alarma no se
detienen en la hora actual que muestra la esfera
principal, debe seguir el procedimiento
"SINCRONIZACIÓN DE LA ALARMA").
3. Empuje la corona hasta su posición normal.
CUANDO CANCELE UNA ALARMA TENGA EN
CUENTA QUE:
• Si la alarma ha sido correctamente programada (tal
y como se describe más arriba), al tirar de la corona
hasta la segunda posición provocará que las
manecillas de la alarma avancen hasta detenerse
en la posición de la hora actual, lo que desactivará
la alarma. En cualquier caso, el reloj se detiene
cuando la corona se encuentra en la segunda
posición, por lo que, para evitar tener que ajustar
la hora de nuevo, se recomienda utilizar el
procedimiento descrito anteriormente.
ALARMA
B
A
USO DEL CRONÓGRAFO
La manecilla más larga y delgada de la esfera principal forma parte de un cronógrafo que
avanza a intervalos de 1/5 de segundo. La esfera pequeña superior también forma parte del
cronógrafo. Mide en minutos el tiempo transcurrido hasta completar una hora. Superados los
sesenta minutos, vuelve a contar los minutos desde cero.
CUANDO UTILICE EL CRONÓGRAFO
TENGA EN CUENTA QUE:
• Antes de utilizar el cronógrafo asegúrese de
que la corona se encuentra completamente
presionada hasta la posición normal y que
las manecillas del cronógrafo se encuentran
a cero.
• Si las manecillas del cronógrafo no regresan
a la posición cero cuando se reajusta el
cronógrafo pulsando el botón (b) tal y como
se describe más abajo, utilice el
procedimiento "AJUSTE DE LAS
MANECILLAS DEL CRONÓGRAFO".
PARA MEDIR EL TIEMPO TRANSCURRIDO:
1. Presione el botón (a) para poner en marcha
el cronógrafo.
2. Presione el botón (a) para detener el cronógrafo.
3. Presione el botón (b) para poner a cero el cronógrafo.
MINUTOS
B
A
04-00774_DETONATOR Manual 2/2/05 3:46 PM Page 22
POS 1 POS 2
POS 1 POS 2
MANUAL DE INSTRUCCIONES DETONATOR 25
24 MANUAL DE INSTRUCCIONES DETONATOR
PARA MEDIR EL TIEMPO ACUMULADO:
1. Presione el botón (a) para poner en marcha
el cronógrafo.
2. Presione el botón (a) para detener el cronógrafo.
3. Presione el botón (a) para poner a cero el
cronógrafo. (El cronógrafo continuará midiendo
tiempo desde la última posición parada)
4. Presione el botón (a) para detener el cronógrafo.
5. Presione el botón (b) para poner a cero el cronógrafo.
PARA MEDIR TIEMPOS PARCIALES:
1. Presione el botón (a) para poner en marcha
el cronógrafo.
2. Presione el botón (b) para mostrar el tiempo
parcial actual. (La manecilla del cronógrafo se
detendrá pero el tiempo seguirá contando sin
pausa para el cronometraje)
3. Presione el botón (b) para liberar la manecilla
del cronógrafo. (La manecilla del cronógrafo se
moverá rápidamente hasta alcanzar el
momento actual, mientras continúa con la
medida precisa del tiempo transcurrido).
4. Presione el botón (a) para detener el cronógrafo.
5. Presione el botón (b) para poner a cero el cronógrafo.
USO DEL CRONÓGRAFO (cont.)
PARA MEDIR TIEMPOS DE DOS
COMPETIDORES:
1. Presione el botón (a) para poner en marcha el
cronógrafo.
2. Presione el botón (b) cuando finalice el
primer competidor. (Las manecillas del
cronógrafo se detendrán para que pueda
leer el último tiempo del primer competidor,
pero el cronometraje continuará mientras el
segundo competidor no haya terminado).
3. Presione el botón (a) cuando el segundo
competidor finalice.
4. Presione el botón (b) para mostrar el último
tiempo del segundo competidor.
5. Presione el botón (b) para poner a cero
el cronógrafo.
PARA AJUSTAR LA POSICIÓN DE LAS
MANECILLAS DEL CRONÓGRAFO:
1. Tire de la corona hasta la segunda posición.
2. Presione y mantenga presionado el botón (a)
durante dos segundos. El minutero del cronógrafo
avanzará una rotación completa para indicar que
está en posición de ajuste. Presione el botón (b)
repetidamente hasta que el minutero del
cronógrafo esté a cero (la posición de las 12 en
punto). (Presione y mantenga presionado el botón
(b) para que la manecilla avance rápidamente).
3. Presione y mantenga presionado el botón (a)
durante dos segundos. La manecilla de 1/5 de
segundo del cronógrafo avanzará una rotación
completa para indicar que se encuentra en posición
de ajuste. Presione el botón (b) repetidamente
hasta que la manecilla de un 1/5 de segundo del
cronógrafo esté a cero (la posición de las 12 en
punto). (Presione y mantenga presionado el botón
(b) para que la manecilla avance rápidamente).
4. Empuje la corona hasta su posición normal.
AJUSTE DE LAS MANECILLAS DEL CRONÓGRAFO
Bajo condiciones normales, tanto el minutero del cronógrafo como el segundero de 1/5 de
segundo se sitúan a cero (la posición de las 12 en punto) al utilizar los botones del reloj. En
algunos casos, como al ajustar por primera vez el reloj, puede ser necesario que ajuste
manualmente estas dos manecillas hasta su posición cero.
["AJUSTE DE LAS MANECILLAS DEL CRONÓGRAFO" CONTINUA PÁGINA SIGUIENTE]
B
A
04-00774_DETONATOR Manual 2/2/05 3:46 PM Page 24
POS 1 POS 2
MANUAL DE INSTRUCCIONES DETONATOR 27
26 MANUAL DE INSTRUCCIONES DETONATOR
AJUSTE DE LAS MANECILLAS DEL CRONÓGRAFO (cont.)
CUANDO AJUSTE LA POSICIÓN DE
LAS MANECILLAS DEL CRONÓGRAFO
TENGA EN CUENTA QUE:
• El procedimiento sólo es necesario cuando
las manecillas del cronógrafo no se ponen a
cero al utilizar los botones del reloj.
• Mientras que la corona está en la segunda
posición hacia afuera, se puede presionar el
botón (a) con intervalos de dos segundos
para rotar las funciones del botón (b) entre
tres modos de ajuste: (1) ajuste a posición
cero del minutero del cronógrafo; (2) ajuste a
posición cero de la manecilla de 1/5 de
segundo del cronógrafo; (3) ajuste de la
posición de las manecillas de la alarma.
B
A
COMPOSICIÓN
Correa ....................................................................Unobtainium
™
Cierre ......................................................................Acero Inoxidable
Carcasa....................................................................Acero Inoxidable
Tapa posterior de la carcasa..................................Acero Inoxidable
Cristal......................................................................Cristal mineral de alta resistencia con
tratamiento anti-reflejos
ESPECIFICACIONES
Frecuencia de oscilación del cristal ......................32,768 ciclos por seg.
Precisión a una temperatura normal de 25ºC ........+/- 20 seg./mes
Temperatura de funcionamiento............................de -5ºC a +50ºC
Resistencia al agua ................................................10 bar (100 m.)
Pantalla ..................................................................Lectura analógica compuesta
Batería ....................................................................Lithium SR927W
Duración de la batería............................................Tres años aprox.*
Indicador de batería baja: cuando la batería está baja de carga el segundero pequeño se mueve
con saltos de 2 segundos. Esto indica que el reloj puede seguir funcionando pero la batería debe
ser reemplazada lo antes posible. La alarma no sonará mientras la batería esté baja de carga
para alargar al máximo la carga restante.
*La duración de la batería depende del uso que se haga. La duración de tres años se ha programado para una
utilización del cronómetro inferior a 2 horas diarias y 20 diarios o menos de sonido de alarma.
04-00774_DETONATOR Manual 2/2/05 3:46 PM Page 26
POS 1 POS 2
CONSERVACIÓN
EXPOSICIÓN AL AGUA
Al estar regulado para ser hidrófobo hasta 10 bares (100 metros), el reloj puede llevarse durante
el baño, así como para nadar o practicar el buceo a pulmón en poca profundidad. No está
diseñado para buceo con escafandra o a gran profundidad. Antes de poner el reloj en contacto
con el agua debe asegurarse de que la corona está firmemente ajustada con la carcasa. No saque
la corona si el reloj está mojado. Cuando se moje con agua de mar, debe aclarar el reloj con agua
dulce y secarlo completamente.
TEMPERATURA
Para que el reloj mantenga la precisión horaria debe funcionar en un rango de temperaturas de
entre -5º C y +50º C.
MAGNETISMO
Los campos magnéticos fuertes pueden dañar el mecanismo del reloj. Manténgalo alejado de
los objetos magnéticos, entre los que se incluyen los monitores de televisión y los altavoces.
AGENTES QUÍMICOS
El reloj puede decolorarse o deteriorarse en contacto con aerosoles cosméticos, detergentes,
adhesivos, disolventes o pinturas.
ONDAS DE CHOQUE
Aunque el reloj está diseñado para resistir impactos, los golpes contra una superficie dura pueden
producir averías.
MANTENIMIENTO PERIÓDICO
Para garantizar que tanto el chasis como la corona, el sellado del cristal y la junta mantienen su
estanqueidad en contacto con el agua, es recomendable que el reloj sea revisado en un Centro
de Servicio Autorizado Oakley cada 2 o 3 años.
MANUAL DE INSTRUCCIONES DETONATOR 29
28 MANUAL DE INSTRUCCIONES DETONATOR
GARANTÍA OAKLEY
Todos los cronómetros Oakley genuinos están garantizados por un año a partir de la fecha de compra
contra defectos de fabricación. La cobertura de esta garantía es válida con la presentación de un
documento de prueba de compra en un Distribuidor Autorizado Oakley.
IMPORTANTE
Esta garantía limitada no cubre el cristal, la correa o brazalete, o los accesorios adjuntos. No
cubre el rallado producido por el uso, ni los daños producidos por el agua en modelos que no son
hidrófobos, así como tampoco cubre los daños producidos por desastres naturales tales como el
fuego, las inundaciones o los terremotos. Oakley se reserva el derecho a rechazar cualquier
responsabilidad bajo esta garantía para reparaciones de daños producidos por un uso
inadecuado o abusivo evidente, incluidos los defectos producidos por apertura del mecanismo
o por servicio de reparación realizado en lugar distinto a un Servicio de Reparación Autorizado
Oakley. Esta garantía no afecta a los derechos legales específicos de los consumidores.
REGISTRO
La mejor prueba de autenticidad es la tecnología avanzada que incorpora cada uno de los relojes
Oakley. Al registrar su reloj por correo o en línea a través de la página web www.oakley.com,
conseguirá una credencial más firme al permitirnos documentar su compra. Para tener derecho
al servicio bajo la garantía expresada más arriba es imprescindible la presentación de un
documento de compra (que debe mostrar claramente la fecha de compra y el nombre del
Distribuidor Autorizado Oakley) si es necesaria una reparación durante el periodo de garantía.
04-00774_DETONATOR Manual 2/2/05 3:46 PM Page 28

MANUEL D'INSTRUCTIONS DETONATOR 31
30 MANUAL DE INSTRUCCIONES DETONATOR
DETONATOR
En réunissant des formes sculpturales au sein d’une géométrie unique monocorps et néanmoins
articulée, le langage de design 4-D d’Oakley fait entrer la mesure du temps dans une nouvelle
dimension totalement inédite… La montre Detonator
™
est un véritable chronographe
analogique bénéficiant des impulsions numériques d’un moteur qui fonctionne avec la précision
du quartz. Son chronomètre de haute précision mesure le temps écoulé et les temps
intermédiaires par intervalles de 1/5ème de seconde. Grâce à cet instrument entièrement
développé selon la logique de la machine humaine, la procédure habituellement fastidieuse de
réglage de l’alarme devient une opération aussi simple qu’intuitive. Forgée dans un acier
inoxydable haute-résistance, la Detonator
™
intègre un bracelet en Unobtainium™offrant le
confort perpétuel d’un maintien de haute précision, une glace en verre minéral avec traitement
antireflets, un afficheur consacré à la date et une pile offrant trois ans d’autonomie.
INDICATIONS DE LA FACE AVANT
Le cadran principal comporte une aiguille des
heures et une aiguille des minutes qui
indiquent l’heure en cours ainsi qu’une aiguille
de chronographe se déplaçant par intervalles
de 1/5ème de seconde. Le petit cadran
supérieur fait partie du chronographe et
mesure les minutes. Le petit cadran situé à
gauche indique l’heure courante en secondes.
Le petit cadran inférieur indique l’heure à
laquelle l’alarme est programmée.
ALARME
MINUTES
SECONDES
AIGUILLE
CHRONOGRAPHE
CÓMO RECLAMAR UNA GARANTÍA
Desde dentro de los Estados Unidos, llame a nuestras oficinas centrales al número escrito
abajo con su información de compra. Los clientes de fuera de los Estados Unidos deben
ponerse en contacto con su Distribuidor Autorizado de Relojes Oakley o referirse a la lista
abajo para llamar a su sede central Oakley.
Oakley Global Headquarters, USA: 1 (800) 403-7449
Oakley Africa: +27 41 501 0200
Oakley Brasil Ltda.: 0800-770-7822 ou 0xx11-4197-9999 (Grande São Paulo e celular)
Oakley Canada: 1-877-625-5396
Oakley Europe:Benelux, France, Italia, Scandinavia: 00 800 62 55 39 00
• España: 900 953 398 • Portugal: 800 833 121 • Sverige: 020 79 1037
Oakley GMBH: Germany, Austria and Poland: +49-89-99650-4181
Oakley Japan: 0120 009 146
Oakley México: 52) 55 59503643
Oakley South Pacific (Australia): 1 800 637 001
Oakley South Pacific (New Zealand): 0800 696 255
Oakley UK: 01462 475400 Eire customers: 00 353 4439557
04-00774_DETONATOR Manual 2/2/05 3:46 PM Page 30

MANUEL D'INSTRUCTIONS DETONATOR 33
32 MANUEL D'INSTRUCTIONS DETONATOR
POUR REGLER LA DATE ET L’HEURE:
1. Tirez le remontoir jusqu’au premier clic.
2. Tournez le remontoir et réglez la date sur celle du
jour précédent.
3. Lorsque l’aiguille du petit cadran situé à gauche
atteint la position zéro (pointe dirigée vers le haut),
tirez le remontoir jusqu’au deuxième clic.
4. Faites tourner le remontoir jusqu’à ce que les aiguilles
des minutes et des heures avancent. Continuez
jusqu’à ce que la date du jour soit affichée dans le
cadran puis jusqu’à ce que l’heure en cours soit
atteinte. (Si l’heure en cours se situe dans l’après-midi
ou en soirée, faites avancer l’aiguille des heures
jusqu’à passer l’indication de midi avant de l’arrêter
sur l’heure en cours.) Lorsque vous réglez les minutes,
faites avancer l’aiguille de 5 minutes ou plus après
l’heure désirée puis faites-la revenir à l’heure désirée.
5. Appuyez sur le bouton (b) de manière répétée pour
faire avancer les aiguilles de l’alarme sur l’heure en
cours. [Maintenez le bouton (b) enfoncé pour faire
avancer les aiguilles de l’alarme plus rapidement.]
6. Repoussez le remontoir contre le boîtier.
REGLAGE DE LA DATE ET DE L’HEURE
Le remontoir peut coulisser vers l’extérieur sur deux positions différentes (repérables par un “clic”).
La première position permet le réglage de la date et de l’alarme. La seconde permet de régler
l’heure en cours. Lorsque vous faites coulisser le remontoir, veillez à le manipuler avec délicatesse.
[SUITE DE "REGLAGE DE LA DATE ET DE L’HEURE" SUR LA PAGE SUIVANTE]
B
A
REGLAGE DE LA DATE ET DE L’HEURE (suite)
LORS DU REGLAGE DE LA DATE ET DE
L ’HEURE, MERCI DE PRENDRE EN COMPTE
LES POINTS SUIVANTS:
• La montre recommencera à fonctionner
lorsque le remontoir sera repoussé dans sa
position normale : utilisez ceci pour régler
l’heure en cours à la seconde près.
• Il est nécessaire de réinitialiser la date à la
fin du mois du février comme de tous les
mois comptant moins de 31 jours.
• Ne réinitialisez pas la date entre 9 heures du
soir et 1 heure du matin. Ceci pourrait en
effet empêcher l’afficheur de changer
correctement de date.
• Tirer le remontoir jusqu’au second clic
remettra automatiquement l’aiguille du
chronographe à zéro.
• Si l’alarme a été réglée et que le remontoir est
tiré sur la seconde position, les aiguilles de
l’alarme s’ajusteront automatiquement sur
l’heure en cours et l’alarme sera désactivée.
B
A
04-00774_DETONATOR Manual 2/2/05 3:46 PM Page 32
POS 1 POS 2
POS 1 POS 2
MANUEL D'INSTRUCTIONS DETONATOR 35
34 MANUEL D'INSTRUCTIONS DETONATOR
SYNCHRONISATION DE L’ALARME (suite)
LORS DU REGLAGE DE L’HEURE ET DE LA
SYNCHRONISATION DE L’ALARME,
MERCI DE PRENDRE EN COMPTE LES
POINTS SUIVANTS:
• Si la date doit également être réglée, suivez
les instructions figurant sous “REGLAGE DE
LA DATE ET DE L’HEURE” au lieu de celles
mentionnées ci-dessus.
• La montre recommencera à fonctionner
lorsque le remontoir sera repoussé dans sa
position normale : utilisez ceci pour régler
l’heure en cours à la seconde près.
• Tirer le remontoir jusqu’au second clic
remettra automatiquement l’aiguille du
chronographe à zéro.
B
A
POUR REGLER L’HEURE ET
SYNCHRONISER L’ALARME:
1. Lorsque l’aiguille du petit cadran situé à
gauche atteint la position zéro (pointe
dirigée vers le haut), tirez le remontoir
jusqu’au deuxième clic.
2. Faites tourner le remontoir pour régler la
montre sur l’heure en cours. Lorsque vous
réglez les minutes, faites avancer l’aiguille
de 5 minutes ou plus après l’heure désirée
puis faites-la revenir à l’heure désirée.
3. Appuyez sur le bouton (b) de manière
répétée pour faire avancer les aiguilles de
l’alarme sur l’heure en cours. [Maintenez le
bouton (b) enfoncé pour déplacer les
aiguilles de l’alarme plus rapidement.]
4. Repoussez le remontoir contre le boîtier.
SYNCHRONISATION DE L’ALARME
Le petit cadran inférieur indique le réglage de l’heure d’alarme. Avant d’utiliser l’alarme pour
la première fois, celle-ci doit être synchronisée avec l’heure en cours. Pour ce faire, suivez les
instructions figurant sous “REGLAGE DE LA DATE ET DE L’HEURE”. Si les aiguilles principales
de la montre sont déplacées pour être réglées sur l’heure courante, les aiguilles de l’alarme
doivent être à nouveau synchronisées en procédant comme suit:
[SUITE DE "SYNCHRONISATION DE L’ALARME" SUR LA PAGE SUIVANTE]
B
A
04-00774_DETONATOR Manual 2/2/05 3:46 PM Page 34
POS 1 POS 2
POS 1 POS 2
 Loading...