

Page 1

Page 2

Page 3

TABLE OF CONTENTS
ENGLISH 1-08
ESPAÑOL 00-00
FRANCAIS 00-00
ITALIANO 00-00
PORTUGUÊS 00-00
MAGYAR 00-00
DEUTSCH 00-00
JAPANESE 00-00
©2009 Oakley, Inc. U.S. Patent(s) Pending.
Page 4

Page 5
12 GAUGE™ INSTRUCTION MANUAL 5
a b
12 GAUGE
Technology has a purity all its own, and we captured it in the gauges of this time machine. Oakley 12-Gauge
combines the precision of scientific instrumentation with the refinement of Swiss Made 13-jewel movement and
the authenticity of original Oakley art. An onboard chronograph offers accumulated and interval timing, and like the
integrated audible alarm, it comes with a dedicated sub dial. Accessed by a separate crown, an internal bezel can be
rotated for displaying a second time zone or utilized as a countdown timer, and a tachymeter scale measures speed
based on travel time and distance.
The case is crafted with the durability of impact forged 316L stainless steel. Two screw-down crowns maintain water
resistance against pressure equivalent to a depth of 330 feet (100m). Protected by a pure sapphire crystal with antireflective coating, the eight-hand display includes an easy-to-read date indicator. This time machine is optimized
with a 48-month battery and matched with your choice of stainless steel bracelet or Unobtainium
®
rubber strap.
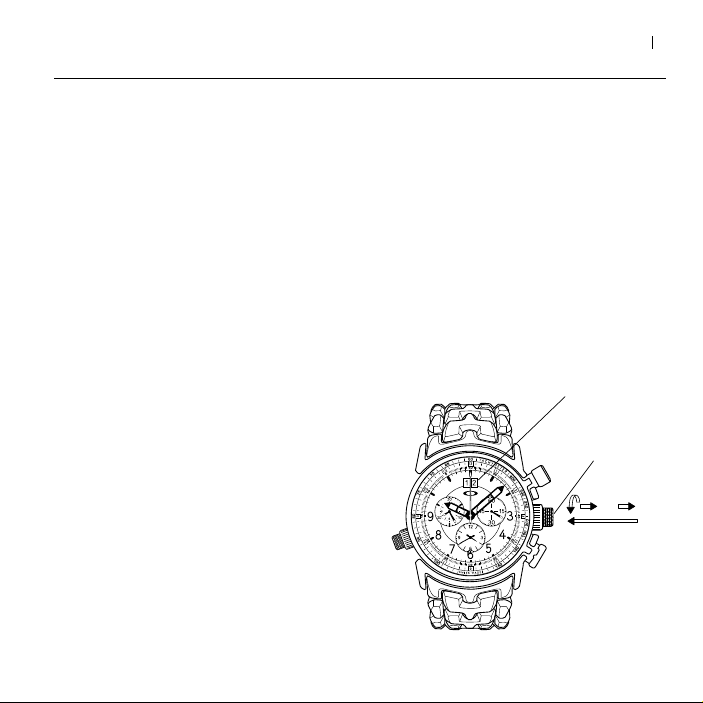
SETTING THE DATE AND TIME
Your Oakley timepiece has two crowns, and both are
made with a screw-down design that provides added
protection against moisture. The main crown (3 o’clock
position) can be pulled out to two click positions for
setting the date and time.
To set the date and time the first time (or to reset the
date and time after the battery is changed), do the
To set the exact second, wait until the hand on the
second-counting sub dial (at the right of the main dial
face) reaches “60” before you pull out the crown to the
second click position (b). Set the time then wait until
the exact second is reached before pushing the crown
back in.
DATE
following:
1. Unscrew the main crown from the case. Pull the
crown out to the first click position (a).
MAIN CROWN
2. Turn the crown clockwise until yesterday’s date
appears.
3. Pull the crown out to the second click position (b).
4. Turn the hands forward until today’s date appears,
then continue forward until the current time is
reached. If the current time is in the afternoon or
evening, move the hour hand all the way around the
dial to pass 12 noon.
5. Push the crown back in. Gently turn the crown
clockwise until it screws back into the case. Be
careful not to over tighten the crown, as this will
damage the mechanism.
™
Page 6

6 12 GAUGE™ INSTRUCTION MANUAL
TO ADJUST THE TIME AND DATE FOR SUBSEQUENT SETTINGS, USE THESE SHORT PROCEDURES
TO SET THE TIME
1. Pull the main crown out to the second click position (b).
2. Turn the crown clockwise until you reach the correct
time.
3. Push the crown back in. Gently turn the crown
clockwise until it screws back into the case. Be careful
not to over tighten the crown, as this will damage the
mechanism.
TO SET THE DATE
1. Pull the main crown out to the first click position (a).
2. Turn the crown clockwise until you reach the correct
date.
If the current time is between 9 PM and midnight,
set the date to the following day. (This is necessary
to ensure the date display will normally change at
midnight instead of 12 noon.)
3. Push the crown back in. Gently turn the crown
clockwise until it screws back into the case. Be careful
not to over tighten the crown, as this will damage the
mechanism.
Setting the date too quickly can result in the incorrect date
being displayed. To restore synchronization, gradually
turn the crown to go through the range of date settings
(from 01 to 31) when performing the instructions above.
IMPORTANT: The alarm has its own timekeeping
mechanism. Whenever the time on the main display
is adjusted, it is necessary to adjust this separate
mechanism to keep the alarm synchronized. Do the
following:
TO SYNCHRONIZE THE ALARM
1. Pull the main crown out to the second click position (b).
2. Press and hold button “B” for at least 2 seconds. (The
minute hand on the lower sub dial will jump forward
one minute.)
3. Press button “B” to set the current time on the lower
sub dial:
Short press (less than 1 second) will advance the time
by the minute.
Medium press (1 to 2 seconds) will advanced the
time by the hour.
Long press (more than 2 seconds) will advance the
time continuously until the button is released.
4. Push the crown back in. (The lower sub dial will change
to display the alarm time.) Gently turn the crown
clockwise until it screws back into the case. Be careful
not to over tighten the crown, as this will damage the
mechanism.
To set the exact second, wait until the hand on the
second-counting sub dial (at the right of the main dial
face) reaches “60” before you pull out the crown to
the second click position (b). Synchronize the alarm
time then wait until the exact second is reached before
pushing the crown back in.
Page 7

12 GAUGE™ INSTRUCTION MANUAL 7
a b
USING THE ALARM
The lower sub dial shows the alarm time. The alarm can be set a maximum of 12 hours before the desired alarm time.
When the alarm time is reached, a sound is emitted for 20 seconds. If the alarm button is not pressed, this sound is
repeated after two minutes. (Note: While the chronograph is in operation, the alarm cannot be used.)
TO SET THE ALARM TIME
1. Press and hold button “B” for at least 2 seconds. (The
minute hand on the lower sub dial will jump forward
one minute.)
2. Set the alarm time by pressing button “B”:
Short press (less than 1 second) will advance the
alarm time by the minute.
Long press (more than 2 seconds) will advance the
Chronograph
Hour And Minutes
Counter
Chronograph
Second Hand
Date
Button A
Seconds
Counter
alarm time continuously until the button is released.
Secondary
TO SWITCH THE ALARM ON / OFF
Briefly press button “B”.
Two beeps indicate the alarm is switched on.
One beep indicates the alarm is switched off.
Crown
Button B
Alarm
Counter
Page 8

8 12 GAUGE™ INSTRUCTION MANUAL
USING THE CHRONOGRAPH
THE CHRONOGRAPH INCLUDES THREE SEPARATE HANDS:
• Thenarrowhandonthemaindialfacecountsseconds.Onefullrotationis60seconds.
• Thelargerhandonthesubdialattheleftcountsminutes.Onefullrotationis30minutes.
• Thesmallerhandonthesubdialattheleftcountshours.Onefullrotationis12hours.
THE CHRONOGRAPH IS CONTROLLED WITH TWO PUSH BUTTONS:
• Button“A”stopsandstartsthetimer.
• Button “B” has several functions. It is used to pause the display at the current split time (also called
“intermediate time”). It is also used to make the chronograph hands move forward to the ongoing time being
measured. Finally, it is used to reset the chronograph hands to the zero position.
Before using the chronograph, ensure the main crown is fully against the case and not at one of the click positions
used for setting time and date. The three chronograph hands should align precisely at the zero position. If they do
not, see the section Adjusting the Chronograph Hands.
TO MEASURE ADDED TIME
Added time (cumulative time) is a measure of how much time has passed without including pauses. This feature lets
you exclude the time intervals you do not want to measure.
Start timing
Press button “A”.
Stop timing temporarily
Press button “A” to stop timing temporarily.
Press button “A” again to continue timing.
Continue to use button “A” to add additional time intervals to the total measure of time. When using button “A”
only, the time that passes while the chronograph hands are not moving IS NOT ADDED to the total measure of time.
See below if you wish to include this “split time” in the total measure of time.
Reset
While timing is stopped, press button “B”.
Page 9

12 GAUGE™ INSTRUCTION MANUAL 9
TO MEASURE SPLIT TIME
Split time (intermediate time) is a measure of the current time total, taken without stopping the timing circuit. The
hands pause so you can read them, then they catch up to the ongoing time total.
Start timing
Press button “A”.
Pause the hands but continue timing
Press button “B” to pause the chronograph hands and read the current time total.
Although the hands are no longer moving, time is still being measured.
Press button “B” again to move the hands to the currently running time total.
Continue to use button “B” to pause the hands when desired. Time continues to be measured.
Stop timing and display the final time total
While the hands are moving, press button “A” to fully stop timing and display the total time measured.
Reset
While timing is stopped, press button “B”.
Page 10

10 12 GAUGE™ INSTRUCTION MANUAL
USING THE ROTATING BEZEL
This timepiece has an internal rotating bezel. The bezel is adjusted with the secondary crown (8 o’clock position).
The crown is a screw-down design that provides added protection against moisture. After it is unscrewed from the
case, the crown can be pulled out to a click position for rotating the bezel.
The adjustable bezel has three ring scales. Each scale is used for a separate function. To perform countdown timing,
use the inner ring scale with the minute hand. To indicate a second time zone, use the middle ring scale with the
hour and minute hands on the main dial face. Use the outer ring scale as a tachymeter to compute speed based on
travel time.
TO USE THE BEZEL FOR COUNTDOWN TIMING
1. Unscrew the secondary crown from the case. Pull the crown out to the click position.
2. Turn the crown to rotate the bezel so that a desired countdown time total (shown on the inner ring scale of the
bezel) is aligned with the minute hand.
3. Push the crown back in. Gently turn the crown clockwise until it screws back into the case. Be careful not to over
tighten the crown, as this will damage the mechanism.
During the countdown time interval, read the remaining time by seeing where the minute hand points on the inner
ring scale of the bezel.
When the minute hand reaches the zero position on the bezel (which is the “60” mark), the countdown time
interval is complete.
TO USE THE BEZEL FOR A SECOND TIME ZONE
1. Unscrew the secondary crown from the case. Pull the crown out to the click position.
2. Turn the crown to rotate the bezel so that the hour hand points to the current hour in the second time zone, as
indicated by the middle ring scale on the bezel.
3. Push the crown back in. Gently turn the crown clockwise until it screws back into the case. Be careful not to over
tighten the crown, as this will damage the mechanism.
You can now read the time for two time zones. Use the numbers on the main dial face for the first time zone. Use
the numbers in the middle ring scale of the bezel for the second time zone.
Page 11

12 GAUGE™ INSTRUCTION MANUAL 11
TO USE THE BEZEL AS A TACHYMETER
First, ensure the rotating bezel is positioned correctly. The “60” mark on the outer ring scale should be at the top of
the main dial face (12 o’clock position). If necessary, adjust the bezel by doing the following:
1. Unscrew the secondary crown from the case. Pull the crown out to the click position.
2. Turn the crown to rotate the bezel until the “60” mark on the outer ring scale is at the 12 o’clock position.
3. Push the crown back in. Gently turn the crown clockwise until it screws back into the case. Be careful
not to over tighten the crown, as this will damage the mechanism.
You are now ready to compute speed based on travel time. Speed can be measured in miles per hour, kilometers
per hour, or another unit of measure per hour. Only speeds above “60” can be measured. To compute speed, do
the following:
Start timing at a marker
When you reach a distance marker (such as a mile or kilometer marker), press button “A”.
Stop timing at the next marker
When you reach the next distance marker (after traveling 1 mile or 1 kilometer), press button “A” to stop timing.
The hand that counts seconds now points to your speed on the tachymeter scale. (Example: If mile markers were
used and the hand now points to “65”, your speed is 65 mph.)
Reset
While timing is stopped, press button “B”.
Page 12

12 12 GAUGE™ INSTRUCTION MANUAL
ADJUSTING THE CHRONOGRAPH HANDS
When the chronograph is reset with button “B,” the three chronograph hands return to the zero position. If these
hands do not align precisely with the zero position (such as after a battery change), use the following procedure
to adjust them.
TO ADJUST THE CHRONOGRAPH HANDS
1. If the chronograph hands currently show a measured time, use button “B” to reset them near the zero position.
Note that the hands must be stopped before using button “B” to reset them. If necessary, use button “A” to stop the
hands.
2. Unscrew the main crown from the case. Pull the crown out to the second click position (b).
3. Push button “A” and button “B” simultaneously and keep them pressed for at least 2 seconds.
4. Adjust the chronograph hands by doing the following:
•Press button “A” to adjust the chronograph hand that counts seconds. (Press and hold the button for
continuous movement.)
•Pressbutton“B”tofinishwith that hand andmoveonto theotherhands.
•Pressbutton“A”toadjustthechronographhandsthatcountminutesandhours.(Pressandholdthebutton
for continuous movement.)
5. Push the crown back in. Gently turn the crown clockwise until it screws back into the case. Be careful not to over
tighten the crown, as this will damage the mechanism.
Page 13

12 GAUGE™ INSTRUCTION MANUAL 13
POWER SAVING MODE
When the timepiece is not in use, the battery life can be prolonged by pulling the crown out to the second click
position (b). This will stop the hands and reduce power consumption by approximately 70%.
BATTERY REPLACEMENT
The miniature battery that powers the timepiece is designed to last approximately 48 months. However, because
the battery is inserted at the factory for extensive performance checks, its actual life, once in your possession,
may be less.
Battery replacement may be performed only by an Authorized Oakley Service Center. Any attempt to open the watch
case by persons other than Authorized Oakley Service Professionals will void the product warranty.
Within the United States, call Oakley global headquarters at 1-800-403-7449 to find an Authorized Oakley Timepiece
Service Professional near you. Customers outside the United States should contact their local Authorized Oakley
Timepiece Dealer or visit the Oakley website at www.oakley.com for the number of the nearest Oakley distributor.
Page 14

14 12 GAUGE™ INSTRUCTION MANUAL
BAND ADJUSTMENT
METAL BRACELET MODEL
If links need to be added or removed from the band, the adjustment should be done by an Authorized Oakley
Timepiece Dealer. Do not attempt to shorten the band by removing links yourself, as this may result in damage to
the bracelet.
RUBBER STRAP MODEL
The strap adjustment should be done by an Authorized Oakley Timepiece Dealer. Do not attempt to shorten the
rubber strap yourself, as this may result in damage.
CLEANING
Failure to keep the case and band clean may result in a skin rash. Use a soft, clean cloth to wipe off any moisture
that adheres to the case or band.
Page 15

12 GAUGE™ INSTRUCTION MANUAL 15
COMPOSITION
CASE MECHANICS .................................................................................................................... Internal rotating bezel
CASE BODY ...........................................................................................................................................Stainless steel
CASE BACK ...........................................................................................................................................Stainless steel
MANUFACTURING ................................................................................Impact forged, high-precision CNC machined
CRYSTAL ............................................................................................................Sapphire with anti-reflective coating
CROWNS ......................................................................................................Screw-down design for water resistance
STAINLESS STEEL BRACELET MODEL
BRACELET COMPOSITION .........................................................................................Stainless steel and Carbon Fiber
CLOSURE ..................................................................................................................Stainless steel deployment clasp
UNOBTAINIUM
STRAP COMPOSITION ..................................................................................................... Oakley Unobtainium
®
RUBBER STRAP MODEL
®
rubber
ATTACHMENT .............................................................................................................Stainless steel attachment link
CLOSURE ..................................................................................................................Stainless steel deployment clasp
Page 16

16 12 GAUGE™ INSTRUCTION MANUAL
SPECIFICATIONS
MOVEMENT ..............................................................................................................................Swiss Made, 13 jewel
TYPE OF OSCILLATOR ....................................................................................................................... Quartz tuning fork
FREQUENCY OF OSCILLATOR .....................................................................................................32,768 cycles per sec.
ACCURACY ..................................................................................................................................-10 /+20 sec. per mo.
THERMAL OPERATING MIN ...........................................................................................................................0ºC (32ºF)
THERMAL OPERATING MAX. .....................................................................................................................50ºC (122ºF)
WATER RESISTANCE ...............................................................................10 bar; equivalent to depth of 100m / 330ft
BATTERY ......................................................................................................................................Silver oxide: No. 395
BATTERY ENDURANCE ...................................................................................................................Approx. 48 months
Page 17

12 GAUGE™ INSTRUCTION MANUAL 17
SAFEGUARDING
WATER EXPOSURE
Prior to exposing the timepiece to water, ensure both crowns are pushed fully down against the case then turn
them clockwise to tighten their water seal. Rated at 10-bar hydrophobic, the timepiece may be worn during bathing,
swimming and shallow diving. It is not designed for scuba or saturation diving. Do not pull out either crown or use the
buttons if the timepiece is wet. If used in seawater, rinse the timepiece with fresh water and dry completely.
TEMPERATURE
For precision timekeeping, normal operating temperature is 0°C to 50°C (32°F to 122°F).
MAGNETISM
Strong magnetic fields can have an adverse effect on the timepiece. Keep it away from magnetic objects.
CHEMICALS
The timepiece may become discolored or damaged if exposed to cosmetic spray, detergents, adhesives, solvents,
or paints.
SHOCK WAVE
Although the timepiece resists shock damage, impact against a hard surface may cause damage to the movement
or crystal.
PERIODIC MAINTENANCE
To ensure that the case, crowns, crystal seal, and gasket remain resistant to water exposure, it is recommended that
the timepiece be inspected once every 2 to 3 years by an Authorized Oakley Service Center.
Page 18

18 12 GAUGE™ INSTRUCTION MANUAL
OAKLEY WARRANTY POLICY
All authentic Oakley timekeeping instruments are warranted against manufacturer’s defects for two full years from
the date of purchase. Coverage is valid only with proof of purchase from an Authorized Oakley Timepiece Dealer
IMPORTANT
This limited warranty does not cover the crystal, strap/band/bracelet, or attachments. The deterioration of leather
components is not covered, nor are scratches to the case caused by use, nor is moisture damage if the timepiece is
a non-hydrophobic model, nor is damage caused by natural disaster such as fire, flood, or earthquake. We reserve
the right to relinquish all responsibility under this guarantee for repair of damage when misuse or abuse is evident,
including defects related to tampering or servicing done by agents other than Authorized Oakley Service Facilities.
This warranty does not affect specific legal rights of the consumer.
To qualify for service under the above guarantee, valid proof of purchase - which clearly shows the purchase date
and the name of the Authorized Oakley Timepiece Dealer - must be presented if a repair claim is made during the
warranty period.
REGISTRATION
The cutting-edge technology within each Oakley timepiece serves as validation of its authenticity. By registering
your timepiece via mail or online at www.oakley.com, you provide further credentials by allowing us to document
your purchase.
HOW TO MAKE A WARRANTY CLAIM
Within the United States, telephone our global headquarters at 1 (800) 403-7449 with your purchase information.
Customers outside the United States should contact their local Authorized Oakley Timepiece Dealer or visit the
Oakley website at www.oakley.com for the number of the nearest Oakley distributor.
Swiss Made
Swiss Movement
Page 19

12 GAUGE™ INSTRUCTION MANUAL 19
HOW TO MAKE A WARRANTY CLAIM
Oakley Global Headquarters, USA: 1 (800) 403-7449
Oakley Africa: +27 41 501 0200
Oakley Brasil Ltda.: 0800-770-7822 ou 0xx11-4197-9999 (Grande São Paulo e celular)
Oakley Canada: 1-877-625-5396
Oakley Europe: +44 1462 475 400
Oakley Japan: 0120 009 146
Oakley México: 52) 55 59503643
Oakley South Pacific (Australia): 1 800 637 001
Oakley South Pacific (New Zealand): 0800 696 255
 Loading...