

Page 1

AN12398
Quick start guide to SE050 Visual Studio projects
Rev. 1.1 — 20 June 2019 Application note
534611
Document information
Information Content
Keywords SE050, Plug & Trust, Visual Studio projects
Abstract This application note explains how to run the Microsoft Visual studio projects
examples included in SE050 Plug & Trust middleware.
Page 2

NXP Semiconductors
Revision history
Revision history
Revision
number
1.0 2019-06-08 First document release
1.1 2019-06-20 Update of board figures
Date Description
AN12398
Quick start guide to SE050 Visual Studio projects
AN12398 All information provided in this document is subject to legal disclaimers. © NXP B.V. 2019. All rights reserved.
Application note Rev. 1.1 — 20 June 2019
534611 2 / 36
Page 3

NXP Semiconductors
1 Read this first
This section lists the hardware and software required before starting this document.
1.1 Required hardware
The following hardware will be used throughout the document:
1. OM-SE050ARD development kit:
AN12398
Quick start guide to SE050 Visual Studio projects
Table 1. OM-SE050ARD development kit details
Part number 12NC Content Picture
OM-SE050ARD 935383282598 SE050 development
board
2. FRDM-K64F board:
Table 2. FRDM-K64F details
Part number 12NC Content Picture
FRDM-64F 935326293598 Freedom
1.2 Required software
• Windows laptop.
development platform
for Kinetis K64, K63
and K24 MCUs
AN12398 All information provided in this document is subject to legal disclaimers. © NXP B.V. 2019. All rights reserved.
Application note Rev. 1.1 — 20 June 2019
534611 3 / 36
Page 4

NXP Semiconductors
2 Prepare your laptop
This section explains how to get your laptop prepared to execute the SE050 Plug & Trust
middleware. To do it, you need to install the following software tools:
1. Visual Studio Community 2017
2. CMake
3. Python 2.7.15 version 32 bit
2.1 Install Visual Studio Community 2017
Visual Studio is Microsoft's fully-featured IDE for Android, iOS, Windows, web, and cloud.
Visual Studio 2017 introduces rich support for CMake, including cross-platform CMake
projects. To install Visual Studio 2017:
1. Go to Visual Studio site.
2. Select (1) Windows and click on Community 2017 in the Download Visual Studio
button as shown in Figure 1:
AN12398
Quick start guide to SE050 Visual Studio projects
Figure 1. Download Visual Studio IDE
3. An *.exe installer will download to your laptop. Double click on the installer file and
follow the setup wizard until the installation is completed. This process might take a
few minutes. Figure 2 shows Visual Studio installation wizard as an example:
AN12398 All information provided in this document is subject to legal disclaimers. © NXP B.V. 2019. All rights reserved.
Application note Rev. 1.1 — 20 June 2019
534611 4 / 36
Page 5

NXP Semiconductors
4. As part of the Visual Studio setup, it is mandatory that you enable the installation of
AN12398
Quick start guide to SE050 Visual Studio projects
Figure 2. Visual Studio IDE installation wizard
Desktop development with C++. Select (1) Desktop development with C++ and
(2) click install as shown in Figure 3:
Figure 3. Select desktop development with C++
5. Visual C++ Tools for CMake is installed by default as part of the Desktop development
with C++ workload. This process might take several minutes. Figure 4 shows Visual
Studio installation wizard as an example:
AN12398 All information provided in this document is subject to legal disclaimers. © NXP B.V. 2019. All rights reserved.
Application note Rev. 1.1 — 20 June 2019
534611 5 / 36
Page 6

NXP Semiconductors
AN12398
Quick start guide to SE050 Visual Studio projects
Figure 4. Install desktop development with C++
6. After the installation is completed, you might be asked to reboot your system as
shown in Figure 5:
Figure 5. Visual Studio installation - reboot
2.2 Install CMake
CMake is an open-source, cross-platform family of tools that helps you build C/C++
projects on multiple platforms using a compiler-independent method. It has minimal
dependencies, requiring only a C++ compiler on its own build system. SE050 middleware
leverages on CMake to generate native makefiles and workspaces that can be used in
the compiler environment of your choice. To install CMake:
1. Go to CMake downloads page: https://cmake.org/download/
AN12398 All information provided in this document is subject to legal disclaimers. © NXP B.V. 2019. All rights reserved.
Application note Rev. 1.1 — 20 June 2019
534611 6 / 36
Page 7

NXP Semiconductors
2. Scroll down and select your binary distribution. For this guide, the binary distribution is
AN12398
Quick start guide to SE050 Visual Studio projects
Windows as shown in Figure 6:
Figure 6. Download CMake
3. Double click on the downloaded installer file. Windows Defender SmartScreen might
pop-up the wizard shown in Figure 7:
Figure 7. Execute CMake installer
4. If that is your case: Click (1) on More info and then (2) click on Run anyway as
shown in Figure 7:
AN12398 All information provided in this document is subject to legal disclaimers. © NXP B.V. 2019. All rights reserved.
Application note Rev. 1.1 — 20 June 2019
534611 7 / 36
Page 8

NXP Semiconductors
5. The CMake installation wizard will open. Click (1) Next and (2) accept the End-User
AN12398
Quick start guide to SE050 Visual Studio projects
Figure 8. Run the CMake installer
License Agrement as shown in Figure 9:
Figure 9. CMake installation wizard
6. As part of the CMake setup, (1) Add Cmake to the system PATH for all users and
(2) click Next as shown in Figure 10:
AN12398 All information provided in this document is subject to legal disclaimers. © NXP B.V. 2019. All rights reserved.
Application note Rev. 1.1 — 20 June 2019
534611 8 / 36
Page 9

NXP Semiconductors
AN12398
Quick start guide to SE050 Visual Studio projects
Figure 10. Add CMake path
7. Select a destination folder, (1) click Next and then (2) click Install as shown in
Figure 11:
Figure 11. Install CMake
8. Wait a few seconds until the installation is completed and click Finish as shown in
Figure 12:
AN12398 All information provided in this document is subject to legal disclaimers. © NXP B.V. 2019. All rights reserved.
Application note Rev. 1.1 — 20 June 2019
534611 9 / 36
Page 10

NXP Semiconductors
2.3 Install Python
Use these screenshots to install Python 2.7 in your Windows machine:
AN12398
Quick start guide to SE050 Visual Studio projects
Figure 12. Complete CMake installation
1. Go to https://www.python.org/downloads/release/python-2715/ to download Python
v.2.7.15 32 bit version. Make sure you download Python v2.7.15 32 bit version.
Python v3 is not supported and neither is the 64 bit version as shown in Figure 13:
Figure 13. Download Python 2.7.15 32 bit version
2. Double click on the downloaded installer file.
3. Follow the setup wizard as indicated in Figure 14:
a. Select install for all users and click Next button.
b. Leave the default destination directory and click Next button.
AN12398 All information provided in this document is subject to legal disclaimers. © NXP B.V. 2019. All rights reserved.
Application note Rev. 1.1 — 20 June 2019
534611 10 / 36
Page 11

NXP Semiconductors
4. Complete the setup wizard as indicated in Figure 15:
AN12398
Quick start guide to SE050 Visual Studio projects
Figure 14. Install Python 2.7.15 32 bit for Windows (I)
a. In the Customize Python 2.7.15 wizard, leave the defaults and click Next button.
b. Wait a few seconds until the installation is completed and click Finish button
Figure 15. Install Python 2.7.15 32 for Windows (II)
5.
To complete the setup, we need to set the Python environment variables. Open
the environment variables menu in your laptop. For that, you can do as shown in
Figure 16:
a. Type environment variables in your Windows Search menu.
b. Click on Edit the system environment variables.
c. On the System Properties window, click on environment variables button.
AN12398 All information provided in this document is subject to legal disclaimers. © NXP B.V. 2019. All rights reserved.
Application note Rev. 1.1 — 20 June 2019
534611 11 / 36
Page 12

NXP Semiconductors
AN12398
Quick start guide to SE050 Visual Studio projects
Figure 16. Open your environment variables menu
6. Find the PATH variable and click Edit as shown in Figure 17:
Figure 17. Find PATH environment variable
7. You want to add Python to this PATH variable. Follow these steps:
AN12398 All information provided in this document is subject to legal disclaimers. © NXP B.V. 2019. All rights reserved.
Application note Rev. 1.1 — 20 June 2019
534611 12 / 36
Page 13

NXP Semiconductors
AN12398
Quick start guide to SE050 Visual Studio projects
a. Click New button.
b. Add C:\Python27 as shown in Figure 18 (this is the default Python installation
path. If you install Python in a different path, you should add the path to your
Python installation).
c. Click OK button.
d. Click OK button again.
Figure 18. Add Python to your PATH environment variable (I)
8. You also want to add Python\Scripts to this PATH variable. Follow these steps:
a. Click New button.
b. Add C:\Python27\Scripts as shown in Figure 19(this is the default Python
installation path. If you install Python in a different path, you should add the path to
your Python installation).
c. Click OK button
d. Click OK button again.
Figure 19. Add Python to your PATH environment variable (II)
AN12398 All information provided in this document is subject to legal disclaimers. © NXP B.V. 2019. All rights reserved.
Application note Rev. 1.1 — 20 June 2019
534611 13 / 36
Page 14
NXP Semiconductors
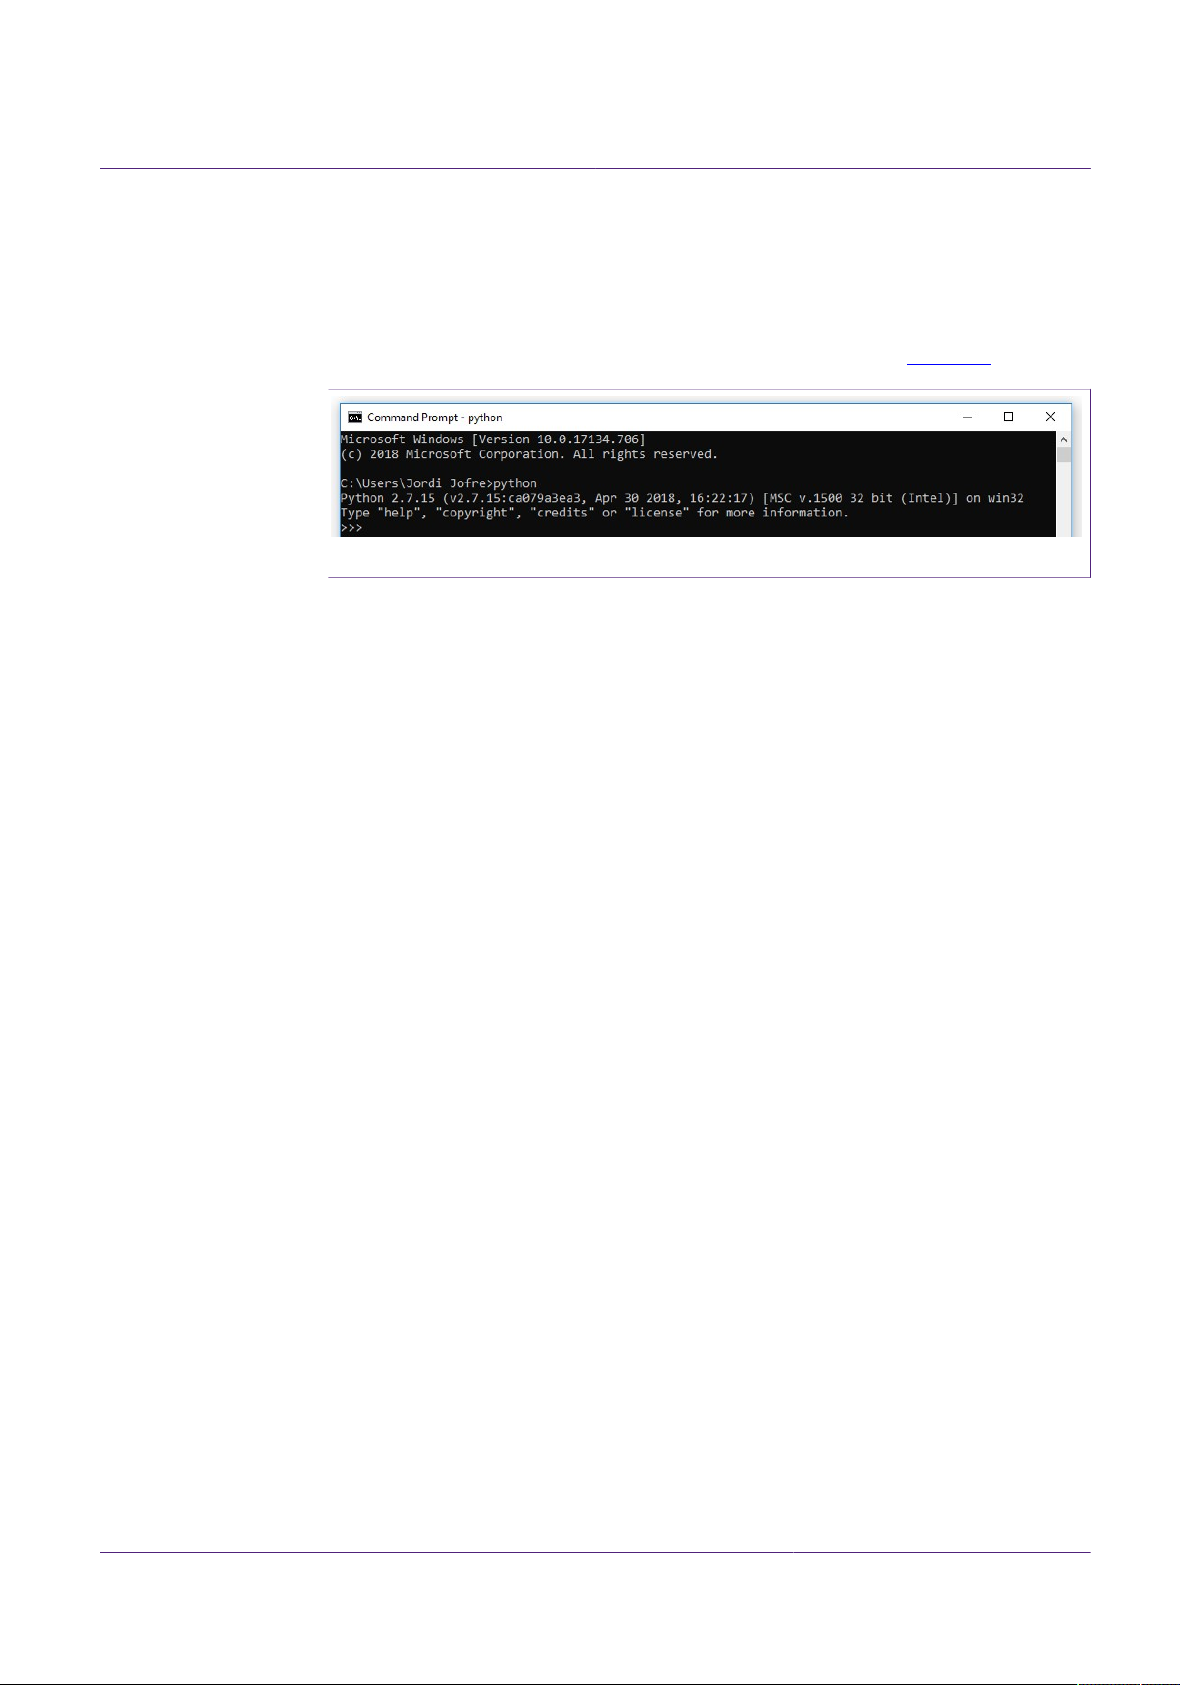
9. To verify that Python was successfully installed in your Windows machine and that
AN12398
Quick start guide to SE050 Visual Studio projects
environment variables have been configured correctly, you can:
a. Open a Command Prompt
b. Send: > python
c. Check that Python is recognized in your machine as shown in Figure 20
Figure 20. Verify Python installation
Note: If your command prompt returns the error: 'python' is not recognized as an
internal or external command, operable program or batch file, it is recommended to
review the environment variables configuration.
AN12398 All information provided in this document is subject to legal disclaimers. © NXP B.V. 2019. All rights reserved.
Application note Rev. 1.1 — 20 June 2019
534611 14 / 36
Page 15
NXP Semiconductors
3 Prepare your host platform
This section explains how to get your board ready to execute the SE050 Visual Studio
projects from a Windows machine. You only need to follow the steps related to the MCU
platform you choose for evaluation purposes.
3.1 Prepare your FRDM-K64F board
This section explains how to get your FRDM-K64F board ready to execute the SE050
Visual Studio projects included in SE050 Plug & Trust middleware. For that, you need to
go through the following steps:
1. Install FRDM-K64F SDK.
2. Update FRDM-K64F with DAPLIink firmware.
3. Flash VCOM software to FRDM-K64F.
4. Hardware setup for FRDM-K64F.
3.1.1 Install FRDM-K64F SDK
AN12398
Quick start guide to SE050 Visual Studio projects
The FRDM-K64F board SDK is required to compile, build and debug MCUXpresso
project examples. To install the FRDM-K64F into your MCUXpresso development
environment, follow these steps:
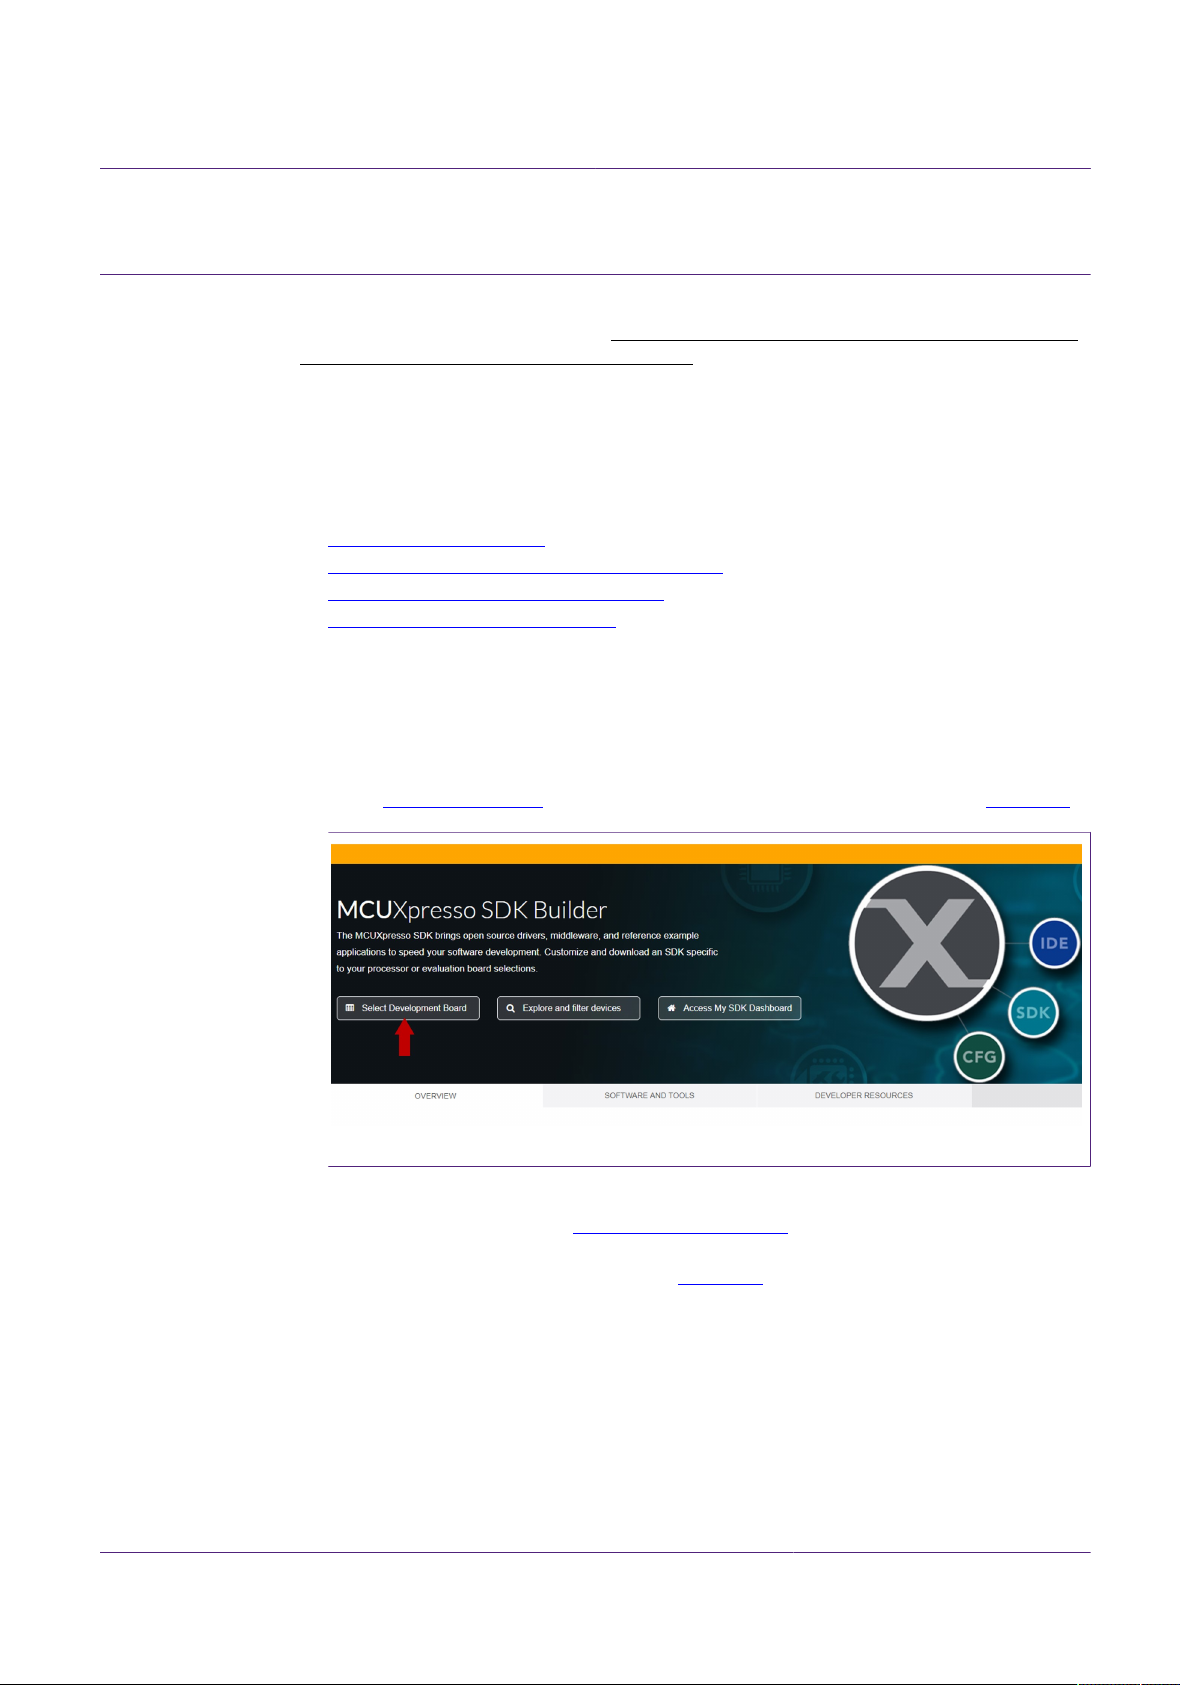
1. Go to MCU SDK Builder and click Select Development Board as shown in Figure 21:
Figure 21. Select development board
2. You might be asked to sign-in with your NXP account again. If that is the case, type
your credentials as done in Install MCUXpresso IDE
3. Select (1) FRDM-K64F board from the drop-down list and click (2) Build
MCUXpresso SDK button as shown in Figure 22:
AN12398 All information provided in this document is subject to legal disclaimers. © NXP B.V. 2019. All rights reserved.
Application note Rev. 1.1 — 20 June 2019
534611 15 / 36
Page 16

NXP Semiconductors
4. In the next screen, click Download SDK button as shown in :
AN12398
Quick start guide to SE050 Visual Studio projects
Figure 22. Select FRDM-K64F development board
Figure 23. Download FRDM-K64F board SDK
5. Accept the software terms and conditions (Figure 24):
AN12398 All information provided in this document is subject to legal disclaimers. © NXP B.V. 2019. All rights reserved.
Application note Rev. 1.1 — 20 June 2019
534611 16 / 36
Page 17

NXP Semiconductors
AN12398
Quick start guide to SE050 Visual Studio projects
Figure 24. Accept FRDM-K64F board SDK software terms and conditions
6. To import the SDK into your MCUXpresso environment, (1) drag and drop the SDK
zip file in the Installed SDKs section in the bottom part of the MCUXpresso IDE and
(2) click OK as shown in Figure 25:
Figure 25. Import FRDM-K64F board SDK into MCUXpresso environment
7. If the SDK is successfully imported, you should see it listed in the Installed SDK
window as shown in Figure 26:
AN12398 All information provided in this document is subject to legal disclaimers. © NXP B.V. 2019. All rights reserved.
Application note Rev. 1.1 — 20 June 2019
534611 17 / 36
Page 18

NXP Semiconductors
AN12398
Quick start guide to SE050 Visual Studio projects
Figure 26. FRDM-K64F board SDK imported
3.1.2 Update FRDM-K64F board with DAPLink firmware
Arm Mbed DAPLink is an open-source software project that enables programming and
debugging application software running on Arm Cortex CPUs. DAPLink runs an opensource bootloader and enables developers with drag-and-drop programming, a serial port
and CMSIS-DAP based debugging.
Note: To debug MCUXpresso project examples, we need to flash FRDM-K64F with
DAPLink firmware. If your FRDM-K64F board already includes DAPLink firmware, you
can skip these steps.
To flash DAPLink firmware, follow these steps:
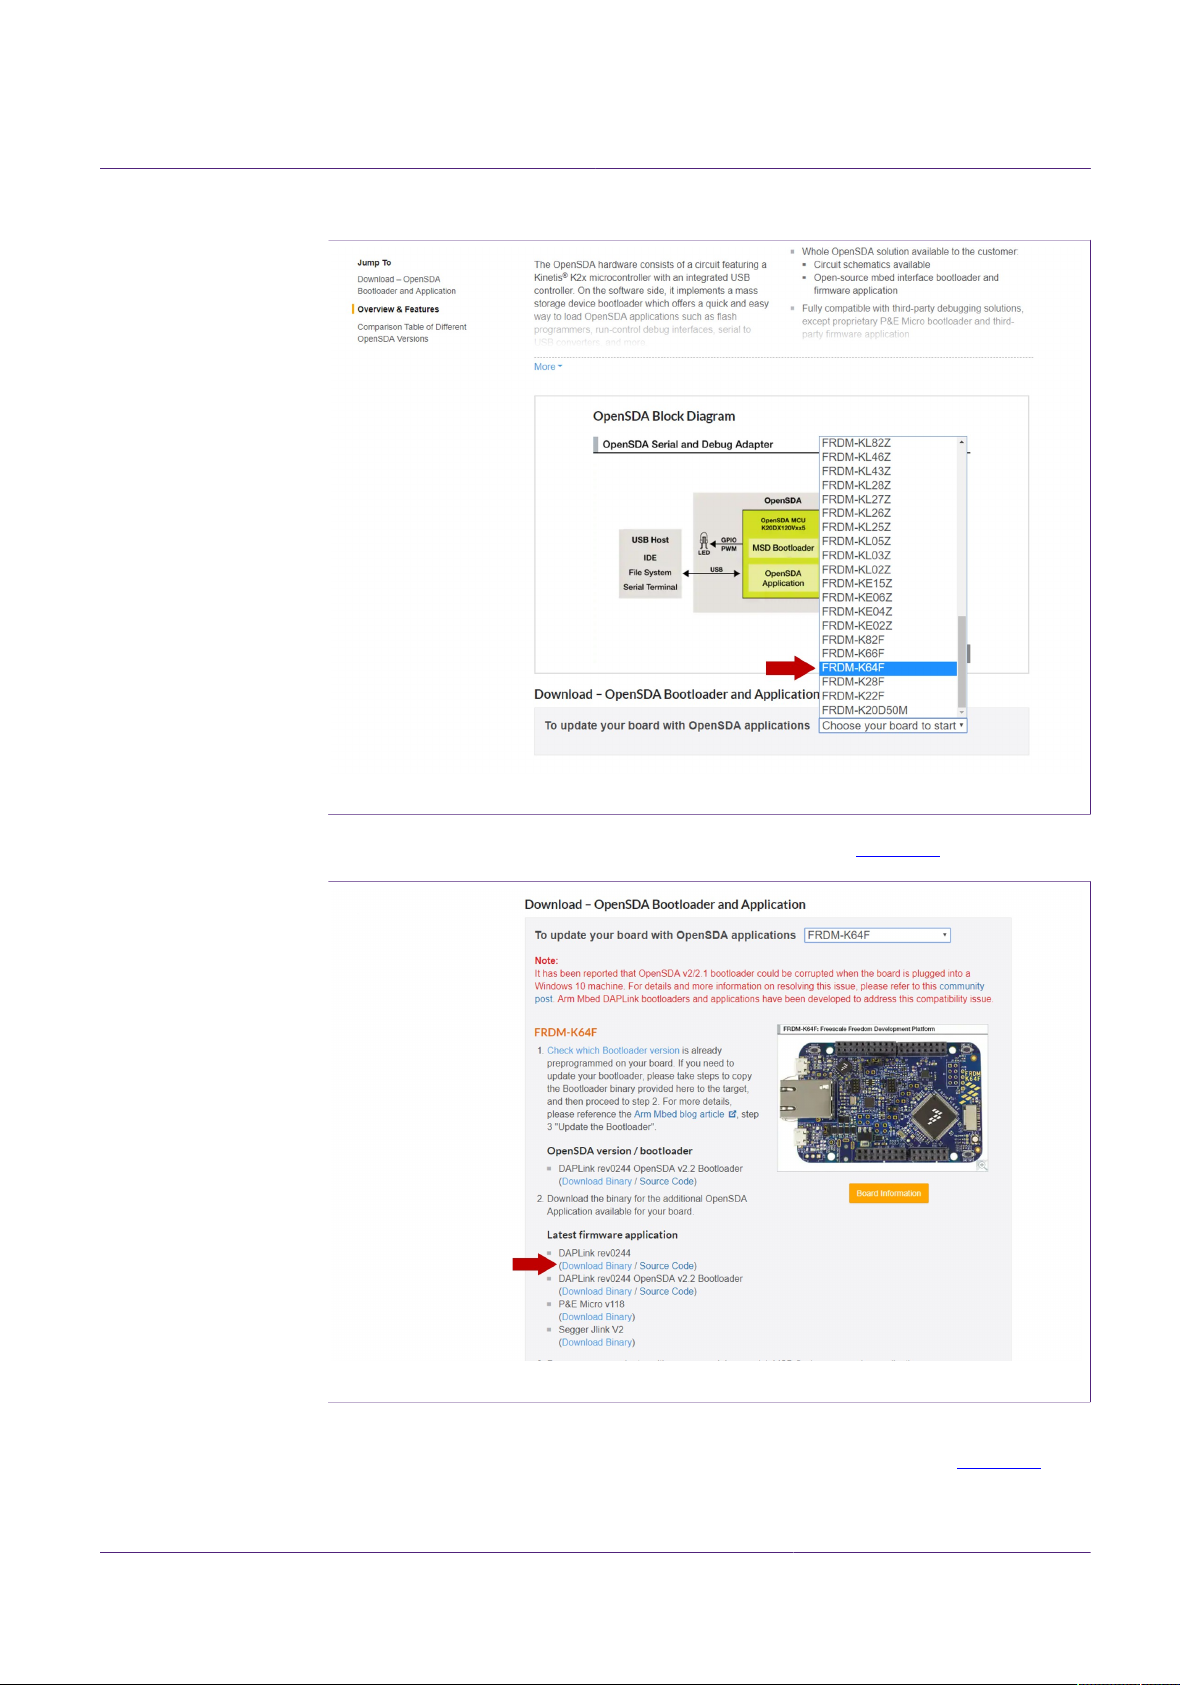
1. Go to NXP OpenSDA site
2. Scroll down and select FRDM-K64F board from the Download - OpenSDA bootlader
and application drop down list as indicated in Figure 27:
AN12398 All information provided in this document is subject to legal disclaimers. © NXP B.V. 2019. All rights reserved.
Application note Rev. 1.1 — 20 June 2019
534611 18 / 36
Page 19
NXP Semiconductors
AN12398
Quick start guide to SE050 Visual Studio projects
Figure 27. DAPLink firmware update - select board
3. Download the latest DAPLink firmware version as shown in Figure 28:
Figure 28. DAPLink firmware update - select board
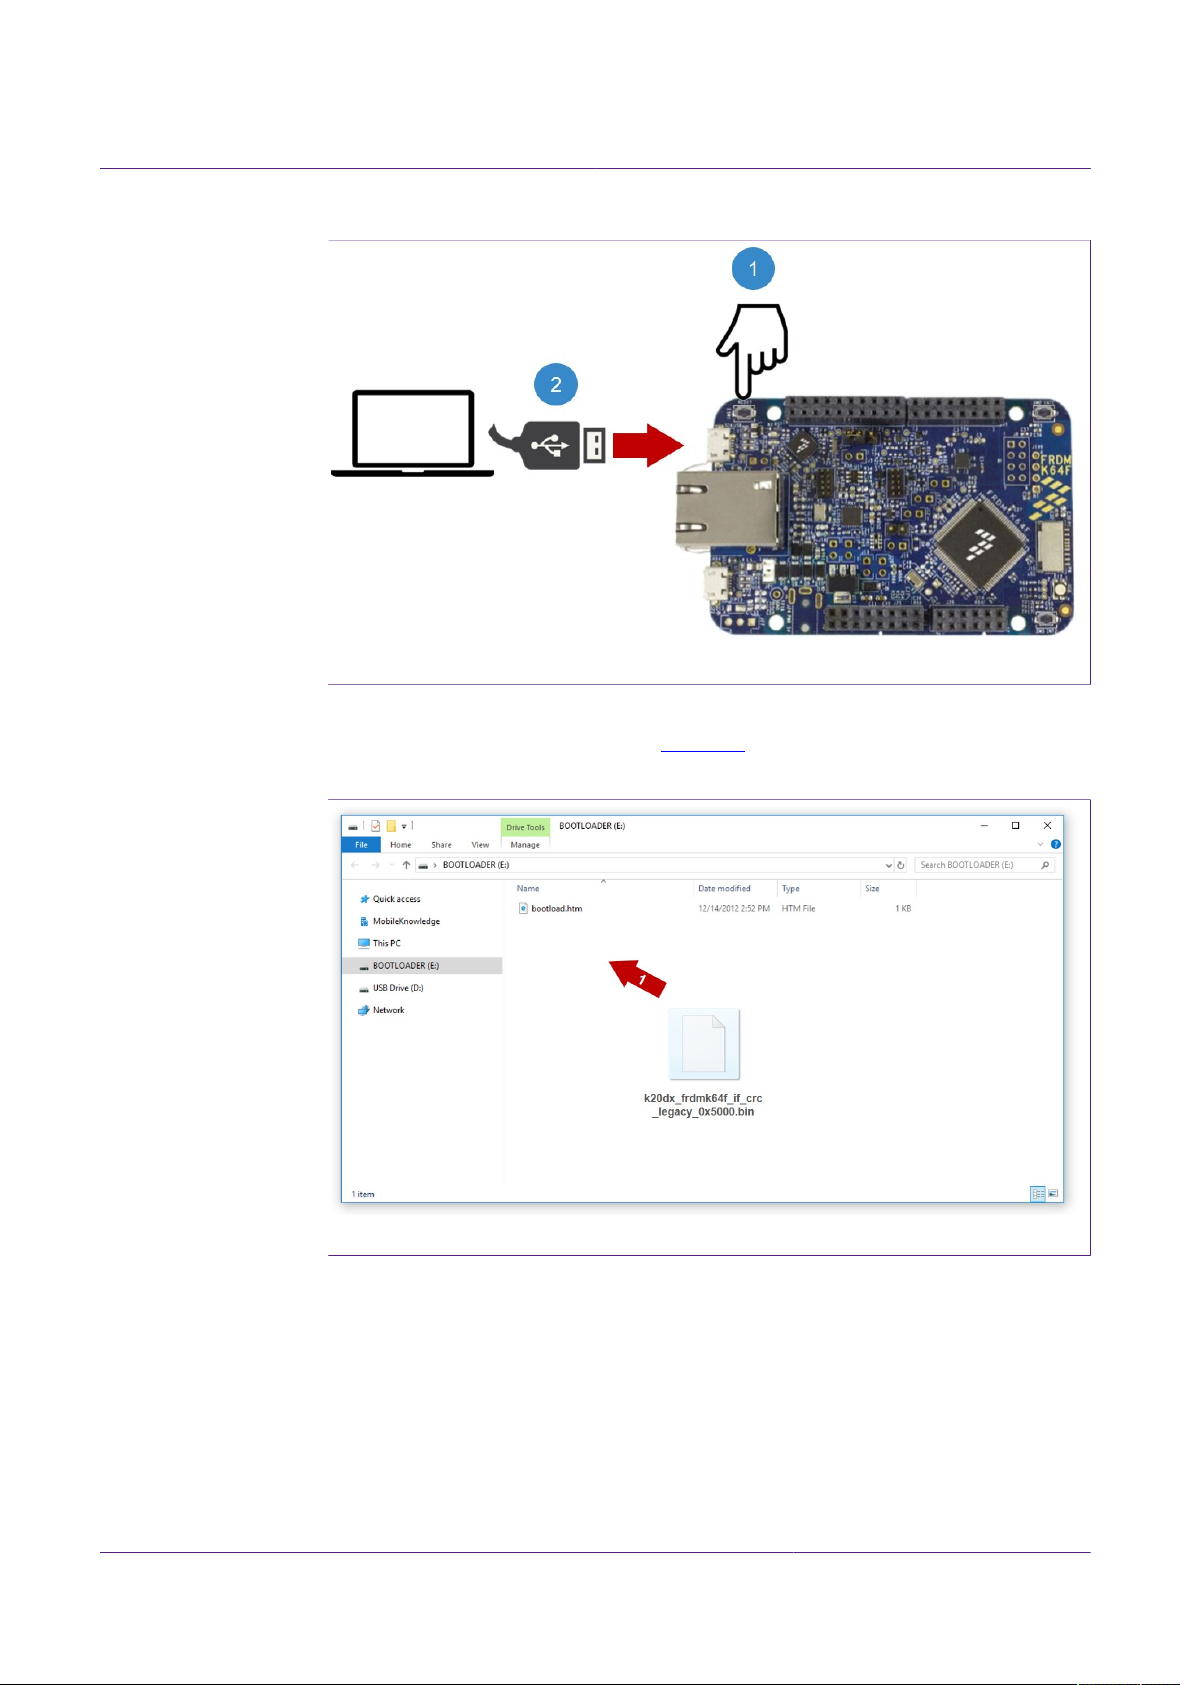
4. Start the board's bootloader mode. To do so, (1) keep reset button pressed while (2)
connecting the USB cable to the SDA USB port and release it after 1s (Figure 29):
AN12398 All information provided in this document is subject to legal disclaimers. © NXP B.V. 2019. All rights reserved.
Application note Rev. 1.1 — 20 June 2019
534611 19 / 36
Page 20
NXP Semiconductors
AN12398
Quick start guide to SE050 Visual Studio projects
Figure 29. Enter bootloader mode
5. Drag and drop or copy and paste the binary file into the BOOTLOADER drive from
your computer file explorer as shown Figure 30. The FRDM-K64F will automatically
un-mount after the drag and drop operation.
Figure 30. Enter bootloader mode
6. Un-plug and re-plug the USB cable from the SDA USB port without keeping reset
button pressed.
7. Check the category Ports (COM & LTP) from your computer Device Manager to
ensure that new devices have been properly detected and their driver correctly
installed by your computer OS.
AN12398 All information provided in this document is subject to legal disclaimers. © NXP B.V. 2019. All rights reserved.
Application note Rev. 1.1 — 20 June 2019
534611 20 / 36
Page 21

NXP Semiconductors
AN12398
Quick start guide to SE050 Visual Studio projects
Figure 31. Enter bootloader mode
3.1.3 Flash FRDM-K64F with VCOM software
3.1.3.1 Flash FRDM-K64F with VCOM software
The VCOM software allows the FRDM-K64F board to be used as a bridge between the
Windows machine and the SE050 and enables the execution of the SE050 ssscli tool
and other utilities from the laptop. To flash the VCOM software into the FRDM-K64F,
follow these steps:
1. Unplug and plug again the USB cable to the openSDA USB port as shown in
Figure 32:
Figure 32. Unplug and plug OpenSDA port
2. When you plug the board, your laptop should recognize the board as an external drive
as shown in Figure 33:
AN12398 All information provided in this document is subject to legal disclaimers. © NXP B.V. 2019. All rights reserved.
Application note Rev. 1.1 — 20 June 2019
534611 21 / 36
Page 22

NXP Semiconductors
3. Flash the VCOM software to FRDM-K64F. The VCOM software binary can be found
AN12398
Quick start guide to SE050 Visual Studio projects
Figure 33. FRDM-K64F drive
in the SE050 middleware package, inside the simw-top\binaries folder as shown
in Figure 34:
Figure 34. VCOM binary folder
4. Drag and drop or copy and paste the a7x_vcom-T1oI2C-frdmk64f-SE050x.bin
file into the FRDM-K64F drive from your computer file explorer as shown in Figure 35:
AN12398 All information provided in this document is subject to legal disclaimers. © NXP B.V. 2019. All rights reserved.
Application note Rev. 1.1 — 20 June 2019
534611 22 / 36
Page 23

NXP Semiconductors
5. The serial and VCOM ports should be recognized by your Device Manager. To check
AN12398
Quick start guide to SE050 Visual Studio projects
Figure 35. Drag and drop VCOM binary
that the ports are recognized, follow the steps indicated in Figure 36:
a. Unplug the USB cable from the OpenSDA USB port.
b. Plug the USB cable to the OpenSDA USB port.
c. Check that the serial port is recognized in the category Ports (COM & LTP). In
this document, it is recognized as USB Servial Device (COM7) but this naming
might change depending on your computer. Therefore, it is important that you
identify which device is recognized at the moment you plug the SDA USB port to
the computer.
d. Plug the USB cable to the K64F USB port.
e. Check that the VCOM port is recognized in the category Ports (COM & LTP).
In this document, it is recognized as Virtual Com Port (COM8) but this naming
might change depending on your computer (e.g. It could also appear named as
USB Serial Device). Therefore, it is important that you identify which device is
recognized at the moment you plug the K64F USB port to the computer.
AN12398 All information provided in this document is subject to legal disclaimers. © NXP B.V. 2019. All rights reserved.
Application note Rev. 1.1 — 20 June 2019
534611 23 / 36
Page 24

NXP Semiconductors
AN12398
Quick start guide to SE050 Visual Studio projects
Figure 36. Check VCOM and serial ports
3.1.4 Hardware setup for FRDM-K64F
The hardware setup consists of two steps:
1. Mounting the boards, as described in Section 3.1.4.1
2. Configuring OM-SE050ARD jumpers, as described in Section 3.1.4.2
3.1.4.1 Mounting the boards
1. Disconnect the boards from your laptop (in case you have them connected).
2. Connect the OM-SE050ARD board on top of the FRDM-K64F using the Arduino
connectors as shown in Figure 37:
Figure 37. Arduino connectors of OM-SE050ARD and FRDM-K64F boards
3. Double check that the two boards are connected as shown in Figure 38:
AN12398 All information provided in this document is subject to legal disclaimers. © NXP B.V. 2019. All rights reserved.
Application note Rev. 1.1 — 20 June 2019
534611 24 / 36
Page 25

NXP Semiconductors
AN12398
Quick start guide to SE050 Visual Studio projects
Figure 38. OM-SE050ARD mounted in FRDM-K64F board
3.1.4.2 Jumper configuration
1. Make sure the jumper settings in your OM-SE050ARD board are configured as shown
in Figure 39
Figure 39. Jumper configuration for FRDM-K64F
For more information about the OM-SE050ARD jumper settings, refer to AN12395 OM-
SE050ARD hardware overview .
AN12398 All information provided in this document is subject to legal disclaimers. © NXP B.V. 2019. All rights reserved.
Application note Rev. 1.1 — 20 June 2019
534611 25 / 36
Page 26
NXP Semiconductors
Quick start guide to SE050 Visual Studio projects
4 Run SE050 Plug & Trust middleware test examples
This section details the steps required from the moment you download SE050 Plug
& Trust middleware until you are able to run an SE050 Plug & Trust middleware test
example.
4.1 Download SE050 Plug & Trust middleware
The SE050 Plug & Trust middleware stack includes several MCUXpresso project
examples for cloud service onboarding. To download SE050 Plug & Trust middleware:
1. Download SE050 Plug & Trust middleware from www.nxp.com/se050.
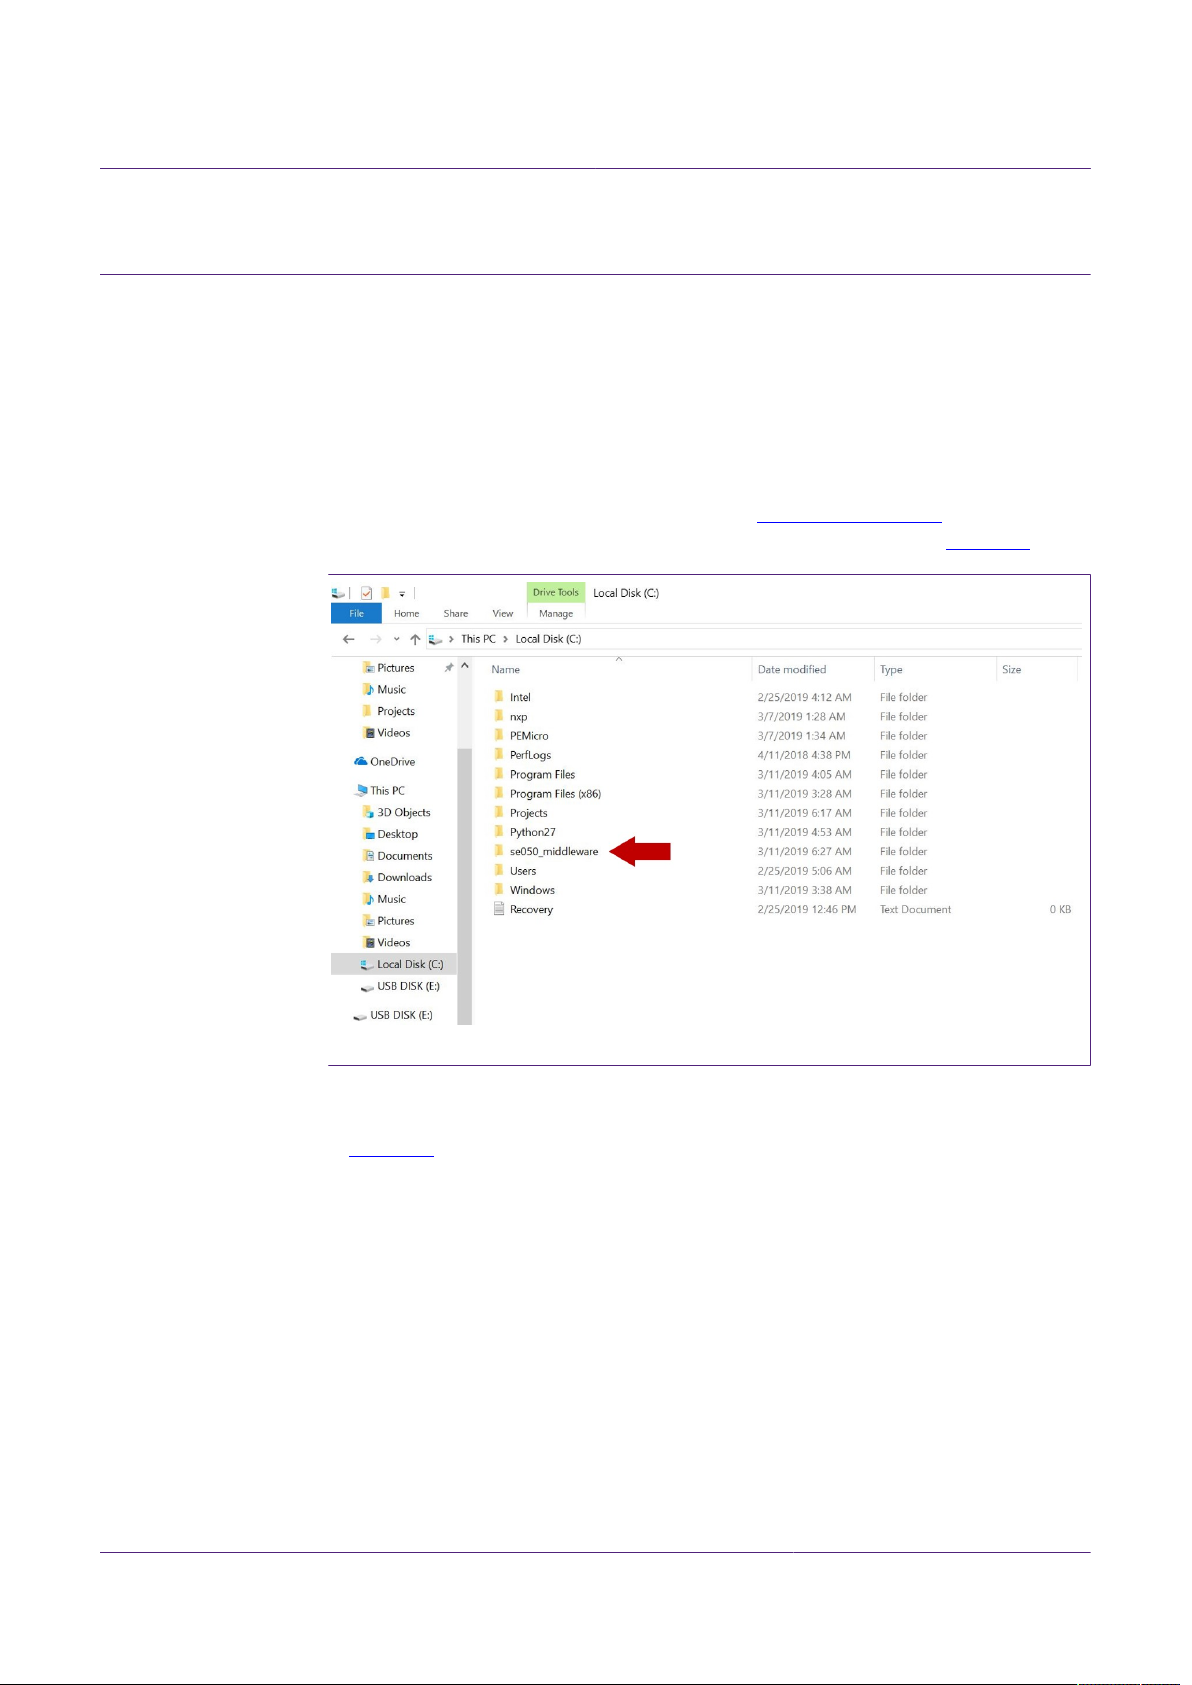
2. Create a folder called se050_middleware in C: directory as shown in Figure 40:
AN12398
Figure 40. Create se050_middleware folder
3. Create a folder calle simw-top inside the se050_middleware. Unzip SE050
middleware inside the simw-top folder. The unzipped package should look as shown
in Figure 41:
AN12398 All information provided in this document is subject to legal disclaimers. © NXP B.V. 2019. All rights reserved.
Application note Rev. 1.1 — 20 June 2019
534611 26 / 36
Page 27

NXP Semiconductors
AN12398
Quick start guide to SE050 Visual Studio projects
Figure 41. Unzip se050 middleware
Note: It is recommended to keep simw-top with the shortest path possible and
without spaces in it. This avoids some issues that could appear when building the
middleware if the path contains spaces.
4.2 Build SE050 Plug & Trust middleware project examples
The SE050 Plug & Trust middleware uses CMake for building the project examples into
your local machine. To build SE050 Plug & Trust middleware, open a Command Prompt
and use the following steps as shown in Figure 42:
1. Go to folder with the unzipped SE050 middleware:
(1) Send >> cd C:\se050_middleware\simw-top\scripts
2. Define the environment:
(2) Send >> env_setup.bat
3. Generate the SE050 Plug & Trust middleware project examples:
(3) Send >> create_cmake_projects.py
Note: This command may take a few seconds to complete.
AN12398 All information provided in this document is subject to legal disclaimers. © NXP B.V. 2019. All rights reserved.
Application note Rev. 1.1 — 20 June 2019
534611 27 / 36
Page 28

NXP Semiconductors
4. Your project directory should now contain two folders: an empty (1) simw-top folder
AN12398
Quick start guide to SE050 Visual Studio projects
Figure 42. Generate SE050 Plug & Trust middleware project examples
and a (2) simw-top_build folder as shown in Figure 43:
Figure 43. SE050 middleware project structure
5. Go to the C:\se050_middleware\simw-top_build directory with the Windows
File Explorer, if CMake runs successfully, the directory should look like Figure 44:
Figure 44. CMake native compilation - build directory
AN12398 All information provided in this document is subject to legal disclaimers. © NXP B.V. 2019. All rights reserved.
Application note Rev. 1.1 — 20 June 2019
534611 28 / 36
Page 29

NXP Semiconductors
4.3 Execute SE050 Visual Studio project examples
This section explains how to run the SE050 Plug & Trust middleware test example called
se05x_minimal. The se05x_minimal project outputs the memory left in SE050
security IC.
Note: The execution of the se05x_minimal project is shown as an example. The steps
detailed in this section can be replicated to run any other test example included as part of
the SE050 Plug & Trust middleware.
To execute the se05x_minimal test example, follow these steps:
1. Connect the FRDM-K64F board to your laptop as shown in Figure 45. Check that your
AN12398
Quick start guide to SE050 Visual Studio projects
Windows Device Manager recognizes FRDM-K64F board as shown in Figure 36.
Figure 45. Plug OpenSDA and USB FRDM-K64F ports.
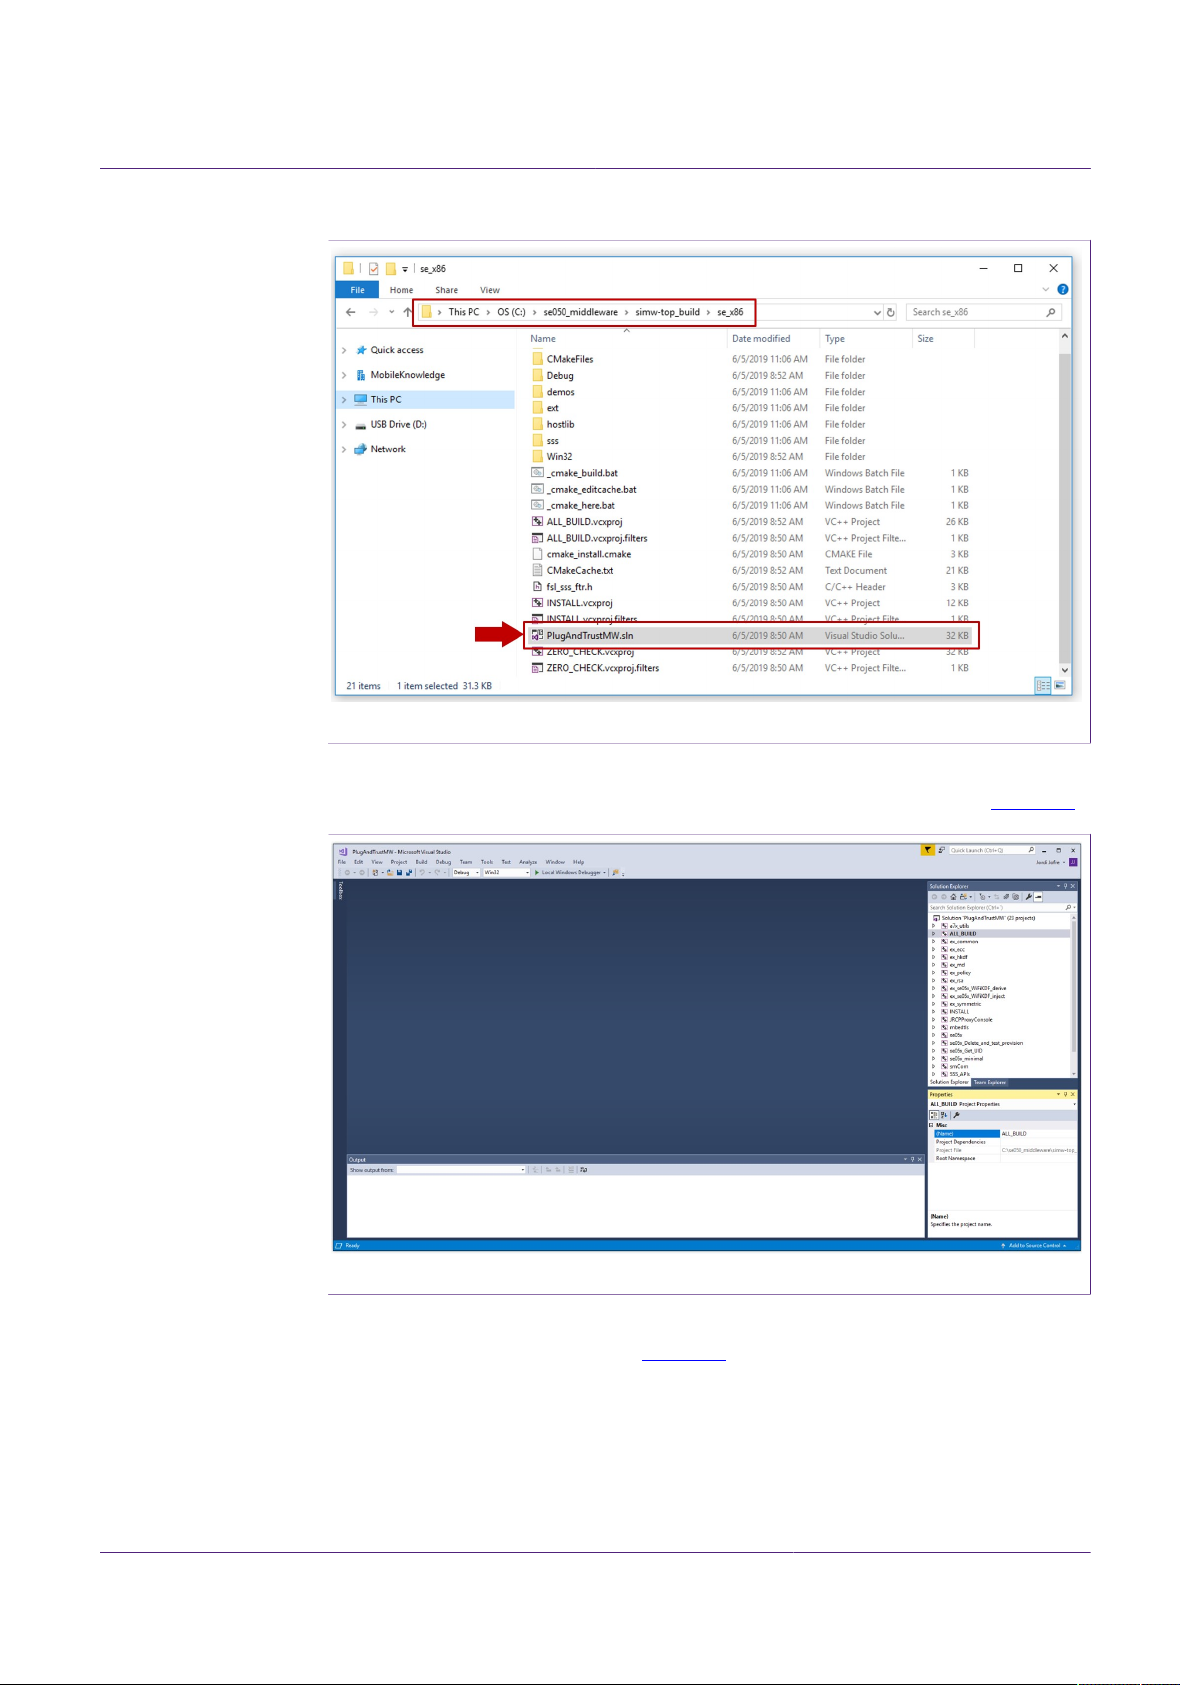
2. Go to the C:\se050_middleware\simw-top_build\se_x86 directory. Double
click the PlugAndTrustMW.sln Visual Studio project solution as shown in Figure 46:
AN12398 All information provided in this document is subject to legal disclaimers. © NXP B.V. 2019. All rights reserved.
Application note Rev. 1.1 — 20 June 2019
534611 29 / 36
Page 30
NXP Semiconductors
AN12398
Quick start guide to SE050 Visual Studio projects
Figure 46. Open PlugAndTrustMW.sln Visual Studio project solution
3. The Visual Studio Community 2017 IDE will open with the SE050 Plug & Trust
middleware project examples included in the workspace as can be seen in Figure 47:
Figure 47. PlugAndTrustMW.sln Visual Studio project workspace
4. Change the VCOM port number in the SE050 Plug & Trust middleware project. To do
so, follow the instructions shown in Figure 48:
a. Go to the ex_common project and open the ex_sss_ports.h file inside the
headers directory.
b. Change #define EX_SSS_BOOT_SSS_COMPORT_DEFAULT "\\\\.\\COMx"
with the port COM number your laptop assigned to your FRDM-K64F. In this setup,
the COM number is COM9.
AN12398 All information provided in this document is subject to legal disclaimers. © NXP B.V. 2019. All rights reserved.
Application note Rev. 1.1 — 20 June 2019
534611 30 / 36
Page 31

NXP Semiconductors
AN12398
Quick start guide to SE050 Visual Studio projects
Figure 48. Change VCOM port number in your solution
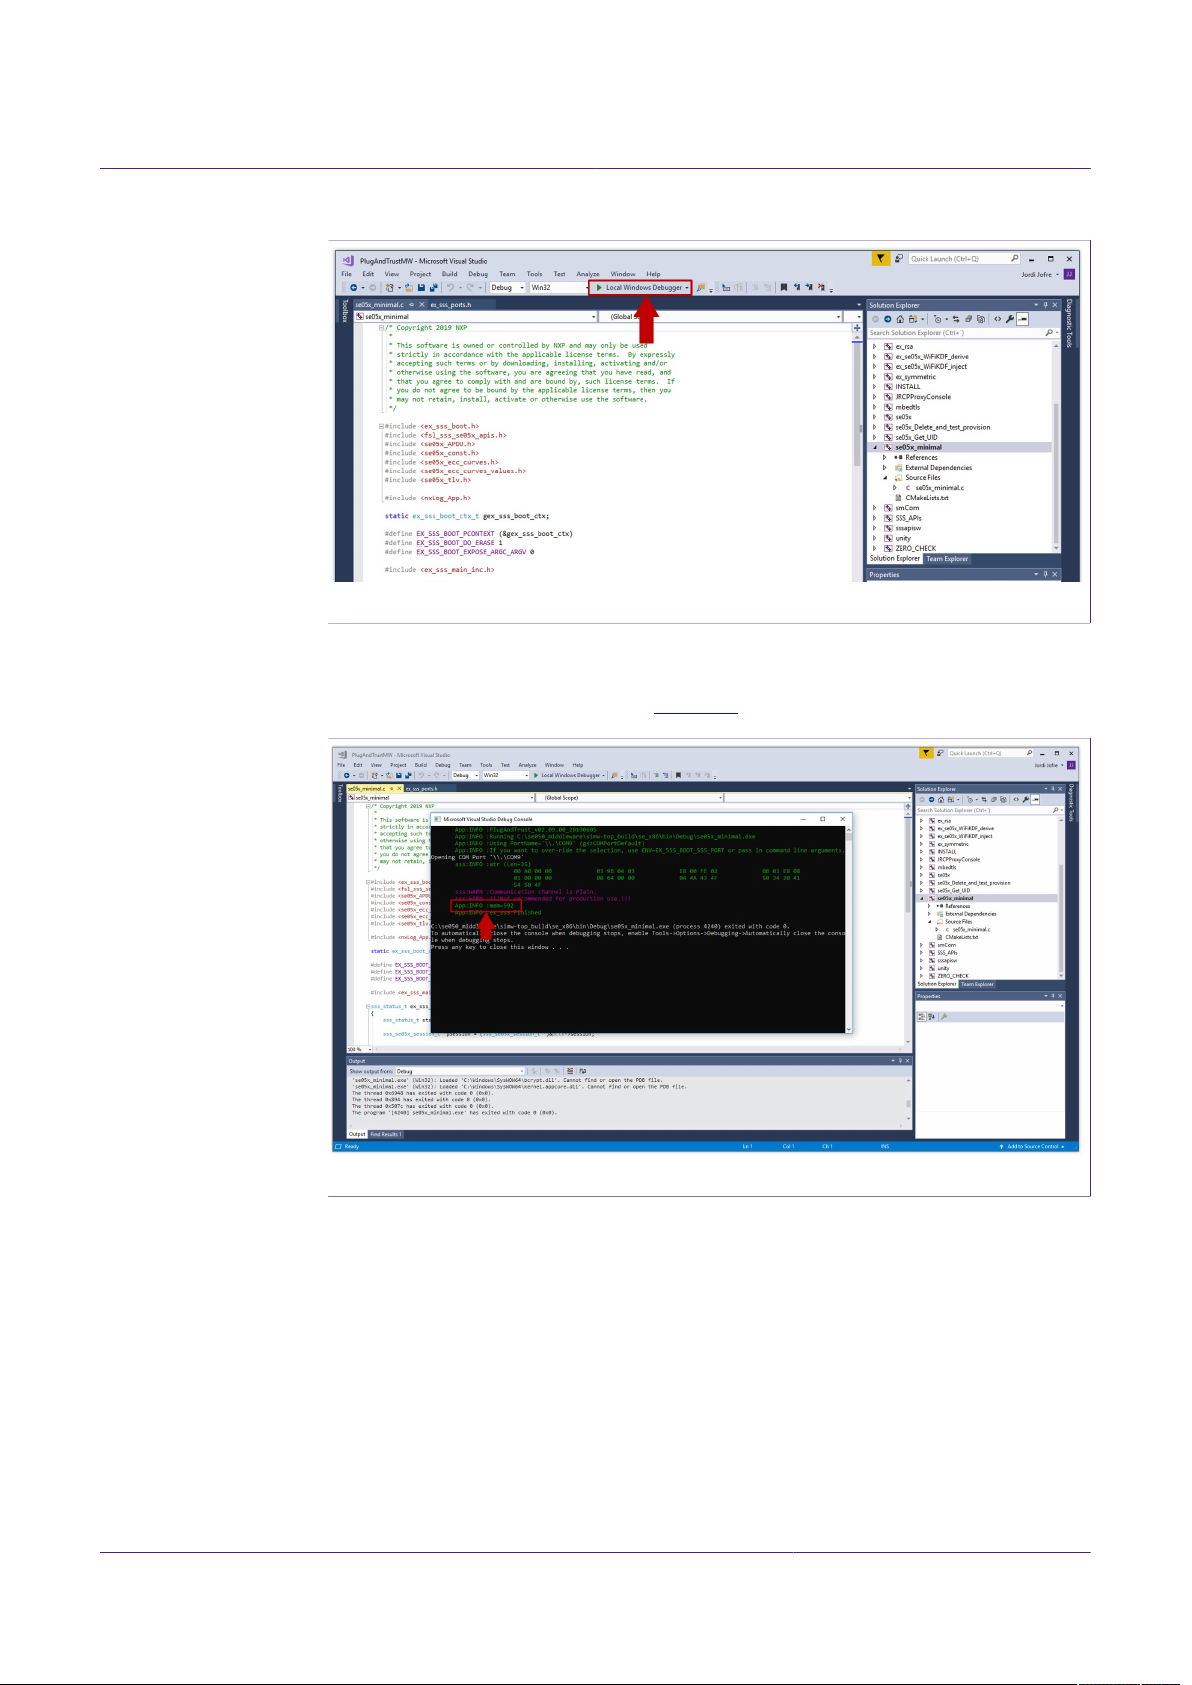
5. Select the se05x_minimal project from the Solution Explorer window located on the
right-hand side of the Visual Studio IDE. Do right-click on the project and click on Set
as StartUp project as shown in Figure 49:
Figure 49. Set se05x_minimal as StartUp project
6. Click on Local Windows Debugger button in the top menu to run se05x_minimal
project as shown in Figure 50. The project will be executed after the project building
process has finished.
AN12398 All information provided in this document is subject to legal disclaimers. © NXP B.V. 2019. All rights reserved.
Application note Rev. 1.1 — 20 June 2019
534611 31 / 36
Page 32
NXP Semiconductors
7. If the se05x_minimal project runs successfully, a Console window will be opened.
AN12398
Quick start guide to SE050 Visual Studio projects
Figure 50. Build and run se05x_minimal project
The logs in this Console window indicate the available memory in SE050 security IC
(in this case, 592) as can be seen in Figure 51:
Figure 51. Verify that se05x_minimal project is running
8. The same operation can be repeated with any of the other SE050 Plug & Trust
middleware test examples.
AN12398 All information provided in this document is subject to legal disclaimers. © NXP B.V. 2019. All rights reserved.
Application note Rev. 1.1 — 20 June 2019
534611 32 / 36
Page 33

NXP Semiconductors
5 Legal information
5.1 Definitions
Draft — The document is a draft version only. The content is still under
internal review and subject to formal approval, which may result in
modifications or additions. NXP Semiconductors does not give any
representations or warranties as to the accuracy or completeness of
information included herein and shall have no liability for the consequences
of use of such information.
5.2 Disclaimers
Limited warranty and liability — Information in this document is believed
to be accurate and reliable. However, NXP Semiconductors does not
give any representations or warranties, expressed or implied, as to the
accuracy or completeness of such information and shall have no liability
for the consequences of use of such information. NXP Semiconductors
takes no responsibility for the content in this document if provided by an
information source outside of NXP Semiconductors. In no event shall NXP
Semiconductors be liable for any indirect, incidental, punitive, special or
consequential damages (including - without limitation - lost profits, lost
savings, business interruption, costs related to the removal or replacement
of any products or rework charges) whether or not such damages are based
on tort (including negligence), warranty, breach of contract or any other
legal theory. Notwithstanding any damages that customer might incur for
any reason whatsoever, NXP Semiconductors’ aggregate and cumulative
liability towards customer for the products described herein shall be limited
in accordance with the Terms and conditions of commercial sale of NXP
Semiconductors.
Right to make changes — NXP Semiconductors reserves the right to
make changes to information published in this document, including without
limitation specifications and product descriptions, at any time and without
notice. This document supersedes and replaces all information supplied prior
to the publication hereof.
Suitability for use — NXP Semiconductors products are not designed,
authorized or warranted to be suitable for use in life support, life-critical or
safety-critical systems or equipment, nor in applications where failure or
malfunction of an NXP Semiconductors product can reasonably be expected
to result in personal injury, death or severe property or environmental
damage. NXP Semiconductors and its suppliers accept no liability for
inclusion and/or use of NXP Semiconductors products in such equipment or
applications and therefore such inclusion and/or use is at the customer’s own
risk.
Applications — Applications that are described herein for any of these
products are for illustrative purposes only. NXP Semiconductors makes
no representation or warranty that such applications will be suitable
for the specified use without further testing or modification. Customers
are responsible for the design and operation of their applications and
products using NXP Semiconductors products, and NXP Semiconductors
accepts no liability for any assistance with applications or customer product
design. It is customer’s sole responsibility to determine whether the NXP
Semiconductors product is suitable and fit for the customer’s applications
and products planned, as well as for the planned application and use of
AN12398
Quick start guide to SE050 Visual Studio projects
customer’s third party customer(s). Customers should provide appropriate
design and operating safeguards to minimize the risks associated with
their applications and products. NXP Semiconductors does not accept any
liability related to any default, damage, costs or problem which is based
on any weakness or default in the customer’s applications or products, or
the application or use by customer’s third party customer(s). Customer is
responsible for doing all necessary testing for the customer’s applications
and products using NXP Semiconductors products in order to avoid a
default of the applications and the products or of the application or use by
customer’s third party customer(s). NXP does not accept any liability in this
respect.
Export control — This document as well as the item(s) described herein
may be subject to export control regulations. Export might require a prior
authorization from competent authorities.
Evaluation products — This product is provided on an “as is” and “with all
faults” basis for evaluation purposes only. NXP Semiconductors, its affiliates
and their suppliers expressly disclaim all warranties, whether express,
implied or statutory, including but not limited to the implied warranties of
non-infringement, merchantability and fitness for a particular purpose. The
entire risk as to the quality, or arising out of the use or performance, of this
product remains with customer. In no event shall NXP Semiconductors, its
affiliates or their suppliers be liable to customer for any special, indirect,
consequential, punitive or incidental damages (including without limitation
damages for loss of business, business interruption, loss of use, loss of
data or information, and the like) arising out the use of or inability to use
the product, whether or not based on tort (including negligence), strict
liability, breach of contract, breach of warranty or any other theory, even if
advised of the possibility of such damages. Notwithstanding any damages
that customer might incur for any reason whatsoever (including without
limitation, all damages referenced above and all direct or general damages),
the entire liability of NXP Semiconductors, its affiliates and their suppliers
and customer’s exclusive remedy for all of the foregoing shall be limited to
actual damages incurred by customer based on reasonable reliance up to
the greater of the amount actually paid by customer for the product or five
dollars (US$5.00). The foregoing limitations, exclusions and disclaimers
shall apply to the maximum extent permitted by applicable law, even if any
remedy fails of its essential purpose.
Translations — A non-English (translated) version of a document is for
reference only. The English version shall prevail in case of any discrepancy
between the translated and English versions.
Security — While NXP Semiconductors has implemented advanced
security features, all products may be subject to unidentified vulnerabilities.
Customers are responsible for the design and operation of their applications
and products to reduce the effect of these vulnerabilities on customer’s
applications and products, and NXP Semiconductors accepts no liability for
any vulnerability that is discovered. Customers should implement appropriate
design and operating safeguards to minimize the risks associated with their
applications and products.
5.3 Trademarks
Notice: All referenced brands, product names, service names and
trademarks are the property of their respective owners.
AN12398 All information provided in this document is subject to legal disclaimers. © NXP B.V. 2019. All rights reserved.
Application note Rev. 1.1 — 20 June 2019
534611 33 / 36
Page 34

NXP Semiconductors
Quick start guide to SE050 Visual Studio projects
AN12398
Tables
Tab. 1. OM-SE050ARD development kit details ............3 Tab. 2. FRDM-K64F details ...........................................3
AN12398 All information provided in this document is subject to legal disclaimers. © NXP B.V. 2019. All rights reserved.
Application note Rev. 1.1 — 20 June 2019
534611 34 / 36
Page 35

NXP Semiconductors
Figures
AN12398
Quick start guide to SE050 Visual Studio projects
Fig. 1. Download Visual Studio IDE ............................. 4
Fig. 2. Visual Studio IDE installation wizard ................. 5
Fig. 3. Select desktop development with C++ .............. 5
Fig. 4. Install desktop development with C++ ...............6
Fig. 5. Visual Studio installation - reboot ......................6
Fig. 6. Download CMake ..............................................7
Fig. 7. Execute CMake installer ................................... 7
Fig. 8. Run the CMake installer ....................................8
Fig. 9. CMake installation wizard ................................. 8
Fig. 10. Add CMake path ............................................... 9
Fig. 11. Install CMake .................................................... 9
Fig. 12. Complete CMake installation ...........................10
Fig. 13. Download Python 2.7.15 32 bit version ...........10
Fig. 14. Install Python 2.7.15 32 bit for Windows (I) ..... 11
Fig. 15. Install Python 2.7.15 32 for Windows (II) ......... 11
Fig. 16. Open your environment variables menu ..........12
Fig. 17. Find PATH environment variable .................... 12
Fig. 18. Add Python to your PATH environment
variable (I) ....................................................... 13
Fig. 19. Add Python to your PATH environment
variable (II) ...................................................... 13
Fig. 20. Verify Python installation .................................14
Fig. 21. Select development board .............................. 15
Fig. 22. Select FRDM-K64F development board ..........16
Fig. 23. Download FRDM-K64F board SDK .................16
Fig. 24. Accept FRDM-K64F board SDK software
terms and conditions ....................................... 17
Fig. 25. Import FRDM-K64F board SDK into
MCUXpresso environment .............................. 17
Fig. 26. FRDM-K64F board SDK imported ...................18
Fig. 27. DAPLink firmware update - select board ......... 19
Fig. 28. DAPLink firmware update - select board ......... 19
Fig. 29. Enter bootloader mode ....................................20
Fig. 30. Enter bootloader mode ....................................20
Fig. 31. Enter bootloader mode ....................................21
Fig. 32. Unplug and plug OpenSDA port ......................21
Fig. 33. FRDM-K64F drive ........................................... 22
Fig. 34. VCOM binary folder ........................................ 22
Fig. 35. Drag and drop VCOM binary .......................... 23
Fig. 36. Check VCOM and serial ports ........................ 24
Fig. 37. Arduino connectors of OM-SE050ARD and
FRDM-K64F boards ........................................ 24
Fig. 38. OM-SE050ARD mounted in FRDM-K64F
board ............................................................... 25
Fig. 39. Jumper configuration for FRDM-K64F .............25
Fig. 40. Create se050_middleware folder .................... 26
Fig. 41. Unzip se050 middleware .................................27
Fig. 42. Generate SE050 Plug & Trust middleware
project examples ............................................. 28
Fig. 43. SE050 middleware project structure ............... 28
Fig. 44. CMake native compilation - build directory ...... 28
Fig. 45. Plug OpenSDA and USB FRDM-K64F ports. ...29
Fig. 46. Open PlugAndTrustMW.sln Visual Studio
project solution ................................................ 30
Fig. 47. PlugAndTrustMW.sln Visual Studio project
workspace ....................................................... 30
Fig. 48. Change VCOM port number in your solution ... 31
Fig. 49. Set se05x_minimal as StartUp project ............ 31
Fig. 50. Build and run se05x_minimal project .............. 32
Fig. 51. Verify that se05x_minimal project is running ....32
AN12398 All information provided in this document is subject to legal disclaimers. © NXP B.V. 2019. All rights reserved.
Application note Rev. 1.1 — 20 June 2019
534611 35 / 36
Page 36

NXP Semiconductors
Contents
1 Read this first ......................................................3
1.1 Required hardware ............................................ 3
1.2 Required software ............................................. 3
2 Prepare your laptop ............................................ 4
2.1 Install Visual Studio Community 2017 ............... 4
2.2 Install CMake .....................................................6
2.3 Install Python ................................................... 10
3 Prepare your host platform ..............................15
3.1 Prepare your FRDM-K64F board .....................15
3.1.1 Install FRDM-K64F SDK ..................................15
3.1.2 Update FRDM-K64F board with DAPLink
firmware ........................................................... 18
3.1.3 Flash FRDM-K64F with VCOM software ......... 21
3.1.3.1 Flash FRDM-K64F with VCOM software ......... 21
3.1.4 Hardware setup for FRDM-K64F ..................... 24
3.1.4.1 Mounting the boards ........................................ 24
3.1.4.2 Jumper configuration ....................................... 25
4 Run SE050 Plug & Trust middleware test
examples ............................................................ 26
4.1 Download SE050 Plug & Trust middleware ..... 26
4.2 Build SE050 Plug & Trust middleware project
examples ..........................................................27
4.3 Execute SE050 Visual Studio project
examples ..........................................................29
5 Legal information ..............................................33
AN12398
Quick start guide to SE050 Visual Studio projects
Please be aware that important notices concerning this document and the product(s)
described herein, have been included in section 'Legal information'.
© NXP B.V. 2019. All rights reserved.
For more information, please visit: http://www.nxp.com
For sales office addresses, please send an email to: salesaddresses@nxp.com
Date of release: 20 June 2019
Document identifier: AN12398
Document number: 534611
 Loading...