


The Intelligent Surveillance Solution
NVRmini 2
User Manual
Ver. 1.6.0.120920.00
Table of Contents
1. |
Installation ................................................................... |
8 |
|
1.1 |
Installation Process ..................................................... |
8 |
|
1.2 |
LED Status Definitions ............................................... |
16 |
|
2. |
Settings |
..................................................................... |
17 |
2.1 |
Camera Setup........................................................... |
17 |
|
|
2.1.1 Add Cameras by Camera Search........................ |
17 |
|
|
2.1.2 |
Add Cameras Manually ..................................... |
19 |
|
2.1.3 |
Modify Camera Information .............................. |
20 |
|
2.1.4 |
Modify Camera Parameters ............................... |
20 |
|
2.1.5 Set up Lens Settings ........................................ |
21 |
|
|
2.1.6 Set up 2nd Stream .......................................... |
22 |
|
|
2.1.7 |
View Camera Status ........................................ |
23 |
2.2 Recording & Event Setup............................................ |
24 |
||
|
2.2.1 |
Recording Mode Setup ..................................... |
24 |
|
2.2.2 Recording Schedule / Event Setup ..................... |
25 |
|
|
2.2.3 Camera Events and Responding Actions Setup .... |
29 |
|
|
2.2.4 I/O Box Input and Responding Action Setup........ |
31 |
|
|
2.2.5 System Events and Responding Actions Setup..... |
32 |
|
|
2.2.6 |
Push Notification ............................................. |
33 |
|
2.2.7 |
SMTP Server Setup .......................................... |
36 |
|
2.2.8 |
Add Event Contacts ......................................... |
37 |
2.3 RAID & File Settings .................................................. |
37 |
||
|
2.3.1 Create a RAID Volume ..................................... |
37 |
|
|
2.3.2 View RAID Volume Status ................................. |
39 |
|
|
2.3.3 View Disk Drive Information ............................. |
40 |
|
|
2.3.4 |
Modify RAID Volume ........................................ |
40 |
|
2.3.5 Delete a RAID Volume...................................... |
43 |
|
|
2.3.6 |
Format ........................................................... |
44 |
2.3.7Modify the “My Network Places” Protocol Settings 44
|
2.3.8 Modify the FTP Protocol Settings........................ |
45 |
|
2.4 |
Auto Backup ............................................................. |
46 |
|
|
2.4.1 Set up Backup Schedule ................................... |
46 |
|
|
2.4.2 Set up Backup Server ...................................... |
47 |
|
2.5 |
Network Setup .......................................................... |
48 |
|
|
2.5.1 |
View Network Status........................................ |
48 |
|
2.5.2 |
Network Settings............................................. |
48 |
|
2.5.3 |
Auto Port-Forwarding ....................................... |
50 |
|
|
1 |
|
|
2.5.4 |
Network Service Setup ..................................... |
51 |
|
2.5.5 |
CMS Service Setup .......................................... |
53 |
2.6 |
Management............................................................. |
53 |
|
|
2.6.1 View the List of Users ...................................... |
53 |
|
|
2.6.2 |
Create New Users ............................................ |
54 |
|
2.6.3 |
Modify User Information ................................... |
55 |
|
2.6.4 Change a User’s Password ................................ |
55 |
|
|
2.6.5 |
Delete Users ................................................... |
56 |
|
2.6.6 |
Online License Activation .................................. |
56 |
|
2.6.7 |
Offline License Activation.................................. |
57 |
|
2.6.8 View the Event Log .......................................... |
59 |
|
|
2.6.9 |
Save Unit Configuration.................................... |
60 |
|
2.6.10 |
Load Unit Configuration / Default Settings ....... |
61 |
2.7 |
System .................................................................... |
62 |
|
|
2.7.1 |
View System Information ................................. |
62 |
|
2.7.2 |
Smart Fan Control ........................................... |
63 |
|
2.7.3 |
Buzzer Configuration........................................ |
63 |
|
2.7.4 |
UPS Setup ...................................................... |
64 |
|
2.7.5 |
Upgrade the System ........................................ |
65 |
|
2.7.6 |
Upgrade Notification ........................................ |
65 |
|
2.7.7 System Date and Time Setup............................ |
66 |
|
|
2.7.8 |
Restart the Unit............................................... |
67 |
|
2.7.9 Shut down the Unit.......................................... |
68 |
|
3. |
POS........................................................................... |
|
70 |
3.1 |
Introduction ............................................................. |
70 |
|
|
3.1.1 |
System Introduction ........................................ |
70 |
|
3.1.2 Hardware Installation – SCB-C31A..................... |
71 |
|
|
3.1.3 Software Installation – SCB-C31A...................... |
72 |
|
|
3.1.4 Connection via TCP Client ................................. |
73 |
|
3.2 |
Software Setup ......................................................... |
74 |
|
|
3.2.1 |
Activate POS License........................................ |
74 |
|
3.2.2 |
NVR POS Setting ............................................. |
74 |
|
3.2.3 |
Insert POS Setting........................................... |
75 |
|
3.2.4 |
Delete POS Device........................................... |
77 |
|
3.2.5 |
Configure POS Setting...................................... |
77 |
3.3 |
Tag Filter.................................................................. |
77 |
|
|
3.3.1 Add New Tag Filter........................................... |
77 |
|
|
3.3.2 |
Edit Tag Filter.................................................. |
80 |
|
|
2 |
|
|
3.3.3 |
Delete Tag Filter .............................................. |
80 |
|
3.3.4 |
Import/Export Tag Filter ................................... |
81 |
3.4 |
POS Display Font....................................................... |
81 |
|
|
3.4.1 |
Live View........................................................ |
81 |
|
3.4.2 |
Remote Live Viewer ......................................... |
82 |
|
3.4.3 |
Playback......................................................... |
83 |
|
3.4.4 |
Playback System ............................................. |
84 |
3.5 |
POS Transaction Data Search ...................................... |
85 |
|
|
3.5.1 |
Search POS Transaction Data through Playback ... |
85 |
|
3.5.2 |
Search POS Transaction Data through Playback |
|
|
System |
86 |
|
3.6 |
Playback Video with POS Data .................................... |
86 |
|
|
3.6.1 |
Select Period by POS Search ............................. |
87 |
|
3.6.2 |
Select Period by Data & Time through Playback ... |
87 |
|
3.6.3 |
Select Period by Data & Time through Playback |
|
|
System |
87 |
|
3.7 |
Backup Video with POS Data....................................... |
88 |
|
|
3.7.1 |
Backup through Internet Explorer...................... |
88 |
|
3.7.2 |
Backup through Playback System ...................... |
89 |
|
3.7.3 |
Backup through Backup System ........................ |
89 |
4. |
I/O ............................................................................ |
|
90 |
4.1 |
Introduction ............................................................. |
90 |
|
|
4.1.1 |
System Introduction ........................................ |
90 |
|
4.1.2 |
HW Installation ............................................... |
90 |
|
4.1.3 |
Software Installation – SCB-C31........................ |
91 |
|
4.1.4 |
Software Installation – SCB-C24/26/28 .............. |
92 |
4.2 |
Software Setup ......................................................... |
94 |
|
|
4.2.1 |
Add I/O Box.................................................... |
94 |
|
4.2.2 |
Modify I/O Box Information .............................. |
95 |
|
4.2.3 |
I/O Pin Setting ................................................ |
95 |
4.3 |
Relative Configuration and Application ......................... |
96 |
|
|
4.3.1 |
Record on Input Trigger.................................... |
96 |
|
4.3.2 |
Input and Responding Actions ........................... |
96 |
|
4.3.3 |
I/O Control Panel in Live View ........................... |
96 |
5. |
Live view.................................................................... |
97 |
|
5.1 |
Internet Explorer....................................................... |
97 |
|
|
5.1.1 |
Live View Control Panel .................................... |
97 |
|
5.1.2 |
Live View Setting........................................... |
100 |
|
|
3 |
|
|
5.1.3 |
General Setting ............................................. |
100 |
|
5.1.4 |
Stream Profile Setting .................................... |
101 |
|
5.1.5 OSD (On-screen display) Setting ..................... |
102 |
|
|
5.1.6 |
Monitor Display Setting .................................. |
102 |
|
5.1.7 |
Notification ................................................... |
103 |
|
5.1.8 Set up Joystick Control................................... |
104 |
|
5.2 Remote Live Viewer Application................................. |
106 |
||
|
5.2.1 Remote Live Viewer Application Control Panel ... |
106 |
|
|
5.2.2 |
Unit Connection Setting.................................. |
109 |
|
5.2.3 |
General Setting ............................................. |
110 |
|
5.2.4 |
Camera Group Setting.................................... |
111 |
|
5.2.5 Delete/ Rename Camera Groups...................... |
112 |
|
|
5.2.6 |
Stream Profile Setting .................................... |
112 |
|
5.2.7 OSD (On-screen display) Setting ..................... |
113 |
|
|
5.2.8 |
Monitor Display Setting .................................. |
113 |
|
5.2.9 |
Notification ................................................... |
114 |
|
5.2.10 |
Set up Joystick Control ............................... |
115 |
|
5.2.11 |
Set up Remote Live Viewer.......................... |
116 |
6. |
E-Map ...................................................................... |
|
117 |
6.1 |
Internet Explorer..................................................... |
117 |
|
|
6.1.1 |
E-Map Control Panel ...................................... |
117 |
|
6.1.2 |
Add Map....................................................... |
118 |
|
6.1.3 |
Edit Map....................................................... |
119 |
|
6.1.4 |
Delete Map ................................................... |
119 |
|
6.1.5 |
Add/Rotate Device Indicator ........................... |
119 |
|
6.1.6 |
Delete Device Indicator .................................. |
119 |
|
6.1.7 |
Layout Adjustment ........................................ |
120 |
|
6.1.8 Relative Configuration and Application.............. |
120 |
|
6.2 Remote Live Viewer Application................................. |
121 |
||
|
6.2.1 |
E-Map Control Panel ...................................... |
121 |
7. |
Playback .................................................................. |
122 |
|
7.1 |
Internet Explorer..................................................... |
122 |
|
|
7.1.1 |
Playback Control Panel ................................... |
122 |
|
7.1.2 Search the Recorded Video ............................. |
124 |
|
|
7.1.3 Play the Recorded Video ................................. |
126 |
|
|
7.1.4 |
Intelligent Search .......................................... |
126 |
|
7.1.5 |
Recorded Video Enhancement ......................... |
127 |
|
7.1.6 |
Save a Video................................................. |
128 |
|
|
4 |
|
|
7.1.7 |
Save an Image.............................................. |
129 |
|
7.1.8 |
Print an Image .............................................. |
130 |
|
7.1.9 Backup the Recorded Video ............................ |
131 |
|
|
7.2 Remote Playback System Application ......................... |
133 |
|
|
7.2.1 Playback System Application Control Panel ....... |
133 |
|
|
7.2.2 Set up Unit Connections ................................. |
133 |
|
|
7.2.3 Search the Recorded Video ............................. |
134 |
|
|
7.2.4 Play the Recorded Video ................................. |
135 |
|
|
7.2.5 |
Intelligent Search .......................................... |
135 |
|
7.2.6 |
Recorded Video Enhancement ......................... |
136 |
|
7.2.7 |
Save a Video................................................. |
137 |
|
7.2.8 |
Save an Image.............................................. |
138 |
|
7.2.9 |
Print an Image .............................................. |
138 |
|
7.2.10 |
Backup the Recorded Video ......................... |
139 |
8. |
Backup and Delete Records ........................................ |
140 |
|
|
8.1 The Backup System Application................................. |
140 |
|
8.2Backup the Recorded Video through Windows Explorer 142
8.3 |
|
Backup the Recorded Video through FTP .................... |
143 |
|
8.4 |
|
Playback the Backup Records.................................... |
143 |
|
|
8.4.1 |
With Playback Application ............................... |
143 |
|
|
8.4.2 |
Without Playback Application .......................... |
143 |
|
8.5 |
|
Delete the Recorded Video ....................................... |
143 |
|
|
8.5.1 |
With Backup Application ................................. |
143 |
|
|
8.5.2 |
Without Backup Application ............................ |
146 |
|
9. |
Verification Tool......................................................... |
147 |
||
9.1 |
|
Execute Verification Tool........................................... |
147 |
|
9.2 |
|
Verify Image / Video................................................ |
148 |
|
10. |
External Storage ....................................................... |
149 |
||
10.1 |
Create a Volume on DAS ....................................... |
149 |
||
10.2 |
Create an External Storage ................................... |
149 |
||
11. |
Log out |
.................................................................... |
151 |
|
12. |
Remote ................................PC System Requirements |
152 |
||
13. |
Troubleshooting ........................................................ |
153 |
||
13.1 |
Replace ....................................a Failed Disk Drive |
153 |
||
13.2 |
Respond .........................to a Critical RAID Volume |
153 |
||
13.3 |
Respond ..........to a File System Error RAID Volume |
153 |
||
13.4 |
Restore ..........the Default Administrator’s Password |
153 |
||
13.5 |
Restore ............................All Default Configuration |
154 |
||
|
|
|
5 |
|
13.6 |
Install ActiveX ..................................................... |
154 |
13.7 Cannot Log in to the Unit with Internet Explorer ...... |
155 |
|
Appendix – RAID System....................................................... |
156 |
|
Introduction to RAID ....................................................... |
156 |
|
RAID 0 |
– Stripe .............................................................. |
156 |
RAID 1 |
– Mirror .............................................................. |
157 |
RAID 5 |
– Block Striping with Distributed Parity ................... |
158 |
RAID 10 – Mirror / Stripe ................................................. |
158 |
|
Choosing a RAID Level .................................................... |
159 |
|
Appendix – Camera Integration.............................................. |
161 |
|
Camera Support List ....................................................... |
161 |
|
6
GNU General Public License
This product includes copyrighted third-party software licensed under the terms of the GNU General Public License. Please see the GNU General Public License (GPL) for the exact terms and conditions of this license at www.gnu.org. The GPL source code incorporated into the product is available for free download at our web site http://www.nuuo.com/.
Subject to GPL, you may re-use, re-distribute and modify the GPL source code.
Note that with respect solely to the GPL Software, no warranty is provided. We do not offer direct support for the distribution.
7

1.Installation
1.1 Installation Process Step 1: Unpack the Unit
This package contains the following items:
The unit
Quick Start Guide
Screws for disk drives
Key
Power cord
Warranty card
19V DC power transformer
CD with Install Wizard, Backup, Live View, Playback, Verification Tool and Offline Tool application, user manual, and quick start guide
The electronic components within the unit can be damaged by Electrostatic Discharge (ESD). Please take precautions at all times when handling the unit or its sub-assemblies.
To configure the unit, you must install the software onto a desktop/ laptop running Windows XP-SP3 32bit, Windows 7 32/64bit.
2 bay unit front/rear view
LED |
|
|
Power Status |
|
Reset |
|
|
|
System Status |
HDD Tray |
|
|
|
|
USB Status |
|
USB Connection |
|
|
|
DISK 1 Status |
|
|
DISK 2 Status |
|
RJ45 Network |
|
|
|
Ethernet Activity |
|
Connection |
|
|
|
Lock |
Cooling Fan |
Power Connection |
|
|
8

4 bay unit front/rear view
LED
System Status ; eSATA Status
Ethernet 1 & 2 Activity
DISK 1 & 2 Status
DISK 3 & 4 Status
Reset
eSATA Conn. 1& 2
 USB Conn.
Power Status
|
RJ45 Network |
Lock |
Conn. 1 & 2 |
|
|
HDD Tray |
Cooling Fan Power Connection |
Step 2: Install Hard Drives
Refer to compatibility list and install HDDs. For optimal performance consideration, install disks with the same model and storage capacity. The available RAID level depends on the amount of disks installed.
1.Open the lid on the front of the unit enclosure.
2.Pull a HDD tray from the enclosure. See the front view figure.
3.Carefully lock the disks into the HDD tray with screws. 4 screws for each disk. Put the HDD tray back once you finished.
Step 3: Connect to the Network
1.Attach one end of the network cable to the RJ45 network connection. See the rear view figure.
2.Attach the other end of the network cable to your Ethernet hub or switch.
If there are multiple networks at your facility, note the network to which you connect the unit. You will need this information during the setup process. Please also enable the DHCP function within the network, as the unit will retrieve an IP address through DHCP by default.
Step 4: Connect the Power
1. Attach the power cord from the power source to the power adapter.
9
2.Connect the power adapter to the back of the unit enclosure. See the rear view figure.
3.On the front of the unit, press the power button. See the front view figure.
It takes about a minute for the unit to fully power up. Once it is powered up:
The System Status LED turns blue. See the front view figure.
The buzzer beeps one time.
Step 5: Install the Software
1.Insert the CD into your CDROM.
2.Double-click Setup.exe to begin installation.
3.Follow the instruction of Setup.exe, and click the Finish button to close the installer.
Step 6: Set up the Unit
The software Installation Wizard performs the setup procedures on the unit. After the procedure, you can begin using it.
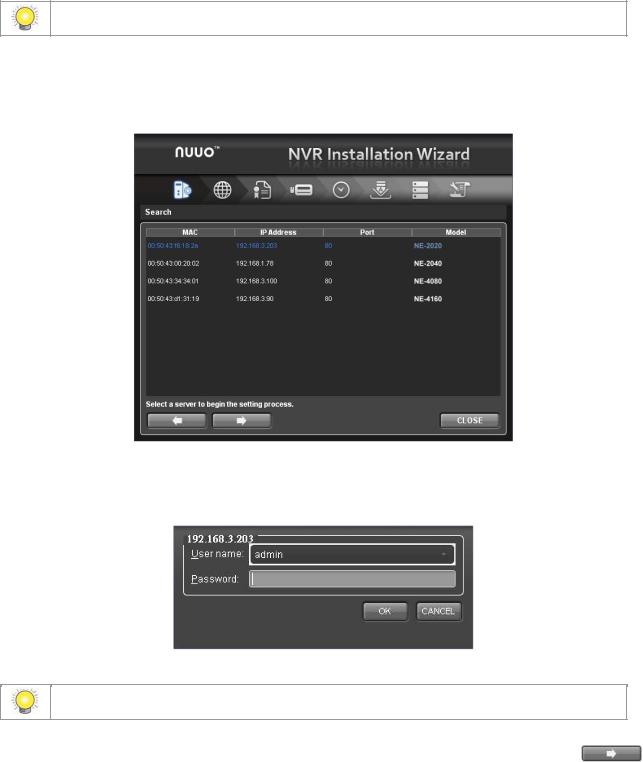
1.Go to Start > NUUO NVRmini 2 > NUUO Install Wizard.
2.This program will show the default language setting and initiation mode.
3.Choose your preferred language and initiation mode, and then click the  button.
Express Mode: you don’t need to set up the network settings, Date/Time
10
and RAID level.
Advanced Mode: configure all settings manually: network, license, camera, Date/Time, upgrade notification, and RAID level
“Add license” function is supported in v1.0.0.20 and later version.
4.The Installation Wizard program starts searching for all the units on the internet currently. Choose one of them, and then click the  button.
5. Type in the password, and then click the OK button.
The default Administrator password is “admin”.
6.Name this server and select the network type, and then click the button.
11
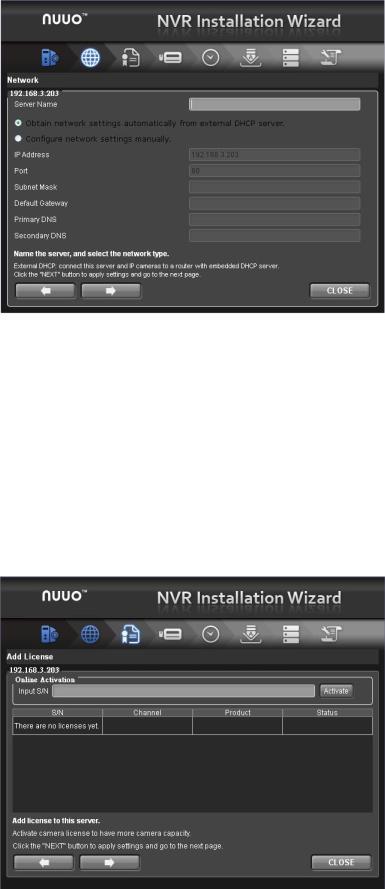
Obtain network settings automatically from external DHCP server: apply all settings which are automatically generated by the DHCP server, such as IP, subnet mask, gateway, and DNS.
Configure network settings manually: configure the preferred settings one by one.
7.Activate camera license to have more channel capacity, and click the  button.
8. Add cameras for this server. There are two ways of adding cameras,
12

selecting the searched cameras and manually configuring the cameras. Click the  button after completing camera list.
13

9.Set up the time zone, date, and time, and adjust daylight saving changes if needed. Once daylight saving function is enabled, the time change will activate automatically every year based on the recurrence you set. Click the  button.
10.Check “Enable Upgrade Notification” box if you want to receive notification when there is a newer FW version. Click the  button.
14

11.Follow the following instruction and select the RAID type you want to create. Click the  button.
For 2 bay unit, only RAID 0 and 1 are available.
12.Review your settings. If the settings are correct, click the Finish button to exit the settings procedure and activate the system.
15

Once the “FINISH” button is clicked, the unit will start working. In order to ensure the stability of the unit, never pull any disks out when the system is running.
1.2 LED Status Definitions
|
Function |
|
|
LED Status |
|
|
|
|
|
||
|
|
|
|
|
|
|
Power Status |
|
|
Power-on: blue |
|
|
|
|
|
Power-off: dark |
|
|
System Status |
|
|
Healthy: blue |
|
|
|
|
|
Reset admin password: blue with blinking |
|
|
|
|
|
Unhealthy or abnormal temperature status: orange |
|
|
|
|
|
Reset to default setting: orange with blinking |
|
|
|
|
|
Off: dark |
|
|
HDD Status |
|
|
Healthy: blue |
|
|
|
|
|
Failed: orange |
|
|
|
|
|
No disk: dark |
|
|
|
|
|
Rebuilding: orange with blinking |
|
|
|
|
|
Healthy: blue |
|
|
eSATA Status |
|
|
|
|
|
|
|
|
No disk: dark |
|
|
|
|
|
|
|
|
Ethernet Status |
|
|
Linking: blue |
|
|
|
|
|
Accessing: blue with blinking |
|
|
|
|
|
No linking: dark |
|
16

2.Settings
After setting up the unit, log in to the system by entering its IP address in the browser (Internet Explorer 8 and later). When connecting, choose your language, enter the username and password, and then begin using this system.
There are five main functions of this unit: settings, live view, playback, help, and logout. They will be shown on the top of the page. Current firmware version and free storage capacity are shown above the function list.
2.1Camera Setup
2.1.1Add Cameras by Camera Search
The function enables user to automatically search and add cameras in the same network. There are two search mechanisms, one is UPnP, another is camera search tool. Before searching UPnP cameras, make sure that the cameras possess UPnP function. Refer to camera support list.
1.Open Internet Explorer and log in to the unit.
2.Click IP Camera/ Camera Settings.
3.Click the Camera Search tab.
17

4. Click the Search button.
5.The system will list all the currently available cameras. The inserted cameras are shown in blue. Click the  icon to add a camera into your camera list.
6.After clicking the  icon, the camera setting page will pop up. Click the item to which you want to add a camera.
7.Insert the camera name, username, and password.
To have better compatibility between camera and system, please make sure the privilege of camera credential is admin-level.
8. Click the Add button to add it.
18

9.After clicking the Add button, the updated camera list will be displayed in the Camera Setting tab.
2.1.2 Add Cameras Manually
1.Open Internet Explorer and log in to the unit.
2.Click IP Camera / Camera Settings.
3.Click the Camera Settings tab, and the camera list will be displayed on the bottom of the page.
4.Click on the camera list for the channel you want to add and enter the camera’s information.
Camera name: The name of the camera.
Address: The IP address.
Port: The transmission port.
Administrator Name: Login username.
Password: Login password.
Video Channel: Select the number of analog cameras supported by one
video server or select the number of IP cameras possessing multiple
19
lens/channels.
Protocol: Data transmission protocol.
Vendor: Camera vendor name.
Model: Camera model name.
To have better compatibility between camera and system, please make sure the privilege of camera credential is admin-level.
5.Click the Save button.
Save: Save the information of this camera.
Reset: Return to the latest saved settings of the selected camera.
Clear: Set all the settings to default value.
Auto Detection: After inserting IP address, port, username, and password, click this button to automatically detect other camera information, including Channel, Protocol, Vendor, and Model.
2.1.3 Modify Camera Information
1.Open Internet Explorer and log in to the unit.
2.Click IP Camera / Camera Settings.
3.Click the Camera Settings tab.
4.Click the camera which you want to modify.
5.Modify the information of this camera.
6.Click the Save button.
7.Use the same method to replace a camera if needed.
2.1.4 Modify Camera Parameters
1.Open Internet Explorer and log in to the unit.
2.Click IP Camera / Camera Parameters.
3.Click the Camera Parameter tab.
4.Click the camera which you want to modify on the camera list.
5.Modify the information of this camera.
6.Click the Save button.
20

Camera Name: The name of the camera.
Video Format: Choose the type of format which this camera supports.
Frame rate: Select the frame rate of the camera.
Resolution: Select the resolution of the camera.
Quality: Select the image quality of the camera.
Audio: Check the Enable Audio option to view and enable audio recording.
2.1.5 Set up Lens Settings
1.Open Internet Explorer and log in to the unit.
2.Click IP Camera / Camera Parameters.
3.Click the Lens Settings tab.
4.Click the camera which you want to modify in the camera list.
5.Modify the information of this camera.
6.Click the Save button.
Camera Name: The name of the camera.
Lens Type: There are two types of lens currently, ImmerVision and
21

Vivotek (FE8171V). You are not allowed to select type so far, type depends on camera model.
Lens: Enable or disable lens function.
Camera Position: Select the position of the camera.
If users enable the lens while lens is not installed correctly or not even installed, a warning message will pop up as a notification if users are trying to operate lens on liveview page.
2.1.6 Set up 2nd Stream
Stream profile is designed for mobile client and lower fps live stream display. Without stream profile integration, users cannot watch live video on mobile client nor select lower fps stream on live view. Further, for performance consideration, we fix the resolution and frame rate for each brand/series. Refer to camera support list.
1.Open Internet Explorer and log in to the unit.
2.Click IP Camera / Camera Parameters.
3.Click the 2nd Stream Settings tab.
Stream Profile: The default status is Disable. If you want mobile client user to access to this camera, you can select Enable, and click Save button in the middle of the page.
Low Profile: The stream profile, under 300kbps, is designed for mobile client single-view.
Minimum Profile: The stream profile, under 100 kbps, is designed for
mobile client multi-view.
22

2.1.7 View Camera Status
1.Open Internet Explorer and log in to the unit.
2.Click IP Camera / Camera Status.
Connection Status: The status of the connection. Click the Connect or Disconnect button to change the connection status.
|
Status |
Icon |
|
|
|
Connection Status |
Connected |
|
|
|
|
|
|
|
Connection Status |
Disconnected |
|
|
|
|
|
|
|
|
|
|
Connection Status |
Connecting |
|
|
|
|
|
|
|
Connection Button |
Connected: Normal |
|
|
|
|
|
|
|
|
Connected: Over |
|
|
|
|
Connection Button |
Disconnected: Normal |
|
|
|
|
|
|
|
|
Disconnected: Over |
|
|
|
|
Rec. Status: The set recording schedule of this camera in this time.
|
|
Status |
Icon |
|
|
|
|
Recording Status |
|
No Recording |
|
|
|
|
|
|
|
|
|
|
23 |
|
|

Recording Status |
Always Recording – |
|
|
|
|
|
Recording |
|
|
|
|
Recording Status |
Always Recording – Stopped |
|
|
|
|
|
||
|
|
|
Recording Status |
Schedule Recording – |
|
|
|
|
|
Recording |
|
|
|
|
Recording Status |
Schedule Recording – |
|
|
|
|
|
Stopped |
|
|
|
|
Frame Rate: The frame rate of this camera.
Bit Rate: The transmission bit rate of this camera.
Estimated Remaining Recording Time: Estimated remaining recording time is dividing the current free capacity by dynamic total bit rate.
If your total bit rate becomes red, it means that the loading of the system is too heavy.
2.2Recording & Event Setup
2.2.1Recording Mode Setup
1.Open Internet Explorer and log in to the unit.
2.Click Recording & Event / Recording settings.
3.Click the Recording Mode tab.
4.If selecting Always Record, the chosen cameras will begin to record immediately.
No Recording: Turn off the recording.
Record by Schedule: Recording by schedule.
24
Always Record: Permanently turn on the chosen cameras.
Automatic Recycle: Check the Enable option to recycle disk space automatically when the disk space is full.
Keep Video: Set a period during which the recorded video clips will be kept intact. (max: 365)
The privilege of automatically recycle is higher than keep video if you select both.
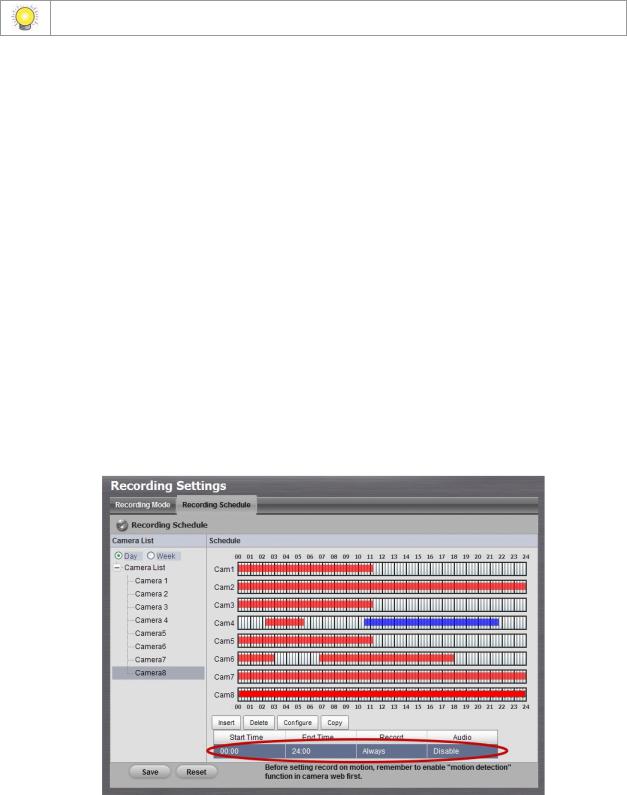
2.2.2 Recording Schedule / Event Setup
Instead of Always Record, you can begin the recording by setting the
Recording Schedule.
1.Open Internet Explorer and log in to the unit.
2.Click Recording & Event / Recording Settings.
3.Click the Recording Schedule tab.
4.Check the Day or Week mode.
Day: Schedule the recording to turn the recorder on and off at the same time every day according to your setting.
Week: Schedule the recording for each day of the week differently.
5.Click the schedule of the camera which needs to be modified.
6.Click the column at the bottom of the page.
25

Insert: Insert new schedules.
Delete: Delete the selected schedule.
Configure: Modify the schedule and recording mode settings.
Copy: Copy current Day Schedule to other channel(s); copy current Week Schedule to other day(s) of a week or to other channel(s).
7.The default setting of the camera’s recording schedule is from 00:00 to
24:00. If you want to modify the time slot, click the Configure button to modify the default settings first.
8. Choose the recording mode.
26

Always Record: Always record.
Record on Event: Record when events triggered. The event can be triggered by Motion or Digital input.
When setting the event Motion, please first ensure that the motion detection function of the camera has been enabled.
9.If you want to add another new schedule, click the Insert button to add a new one.
10. Click the Save button.
When changing the motion detection settings of a camera, make sure to disconnect
27

your unit and that camera first. Once you have finished, re-connecting them will update the settings in your unit.
When setting an event, Motion or Digital input can be triggered from other cameras. This means that if the system detects motion or digital input from other cameras or I/O Box, the camera will begin recording.
There is another way to set the schedule. If you want to change the recording time length, drag the end of the time bar from 24:00 back to the length you wish, and then drag the beginning of the time bar to the point at which you would like it to commence recording. (You may also click the Insert button to add new schedules.)
28

2.2.3 Camera Events and Responding Actions Setup
1.Open Internet Explorer and log in to the unit.
2.Click Recording & Event / Event & Action Management.
3.Choose the camera, and then select one of the events. The event list depends on camera its own ability.
Connect lost: When a connection between the camera and this unit is lost, the system will trigger an action.
Motion from Camera: When video motion is detected, the camera triggers an action.
Input: Any external input can trigger an action.
When setting the event Motion from Camera, make sure to set up the camera’s motion detection function first. Besides, event log will be recorded only if event is selected on this page.
4.Click the Configure button to enable the event and select the active period.
29
 Loading...