

Page 1

•
• CÂBLE D’ALIMENTATION
•
•
• CABLE DE ALIMENTACIÓN
PROFESSIONAL 19” MIXER
Quick Start Owner’s Manual
BOX CONTENTS
• MIXER
POWER CABLE
Manual de inicio rápido para el usuario
(ESPAÑOL)
CONTENIDOS DE LA CAJA
• MEZCLADOR
Schnellbedienungsanleitung (DEUTSCH)
SCHACHTELINHALT
• MISCHPULT
STROMKABEL
Manuel d’utilisation du propriétaire
Manuale rapido di utilizzazione
(FRANÇAIS)
CONTENU DE LA BOÎTE
• MIXER
(ITALIANO)
CONTENUTO DELLA CONFEZIONE
• MIXER
CAVO DI ALIMENTAZIONE
Page 2

TO MIC
TO PHONO 1TO PHONO 3
TO LINE
FROM
START
FADER
DUAL CD PLAYER
CD PLAYER CD PLAYER DJ MIC
CD PLAYER
TO LINE
TO LINETO LINE
TO LINE
TO LINE
TO PHONO 2
TO MIC
TO MIC
TO LINETO LINETO LINETO LINE
OR
TO AMP
TO AMP
FROM RECORD
VARI-CUT
LOPASS
RATE
FILTERED
RATE
AUTOCUT
LR
AUTOPAN
FLANGER
FILTERS
NORMAL
CD BURNER
or or
MP3 PLAYER
OUTPUT
REMOTE MIXER
TAPE DECK
DVD PLAYER
DVD PLAYER
DJ HEADPHONE
HOUSE AMP
BOOTH AMP
Page 3
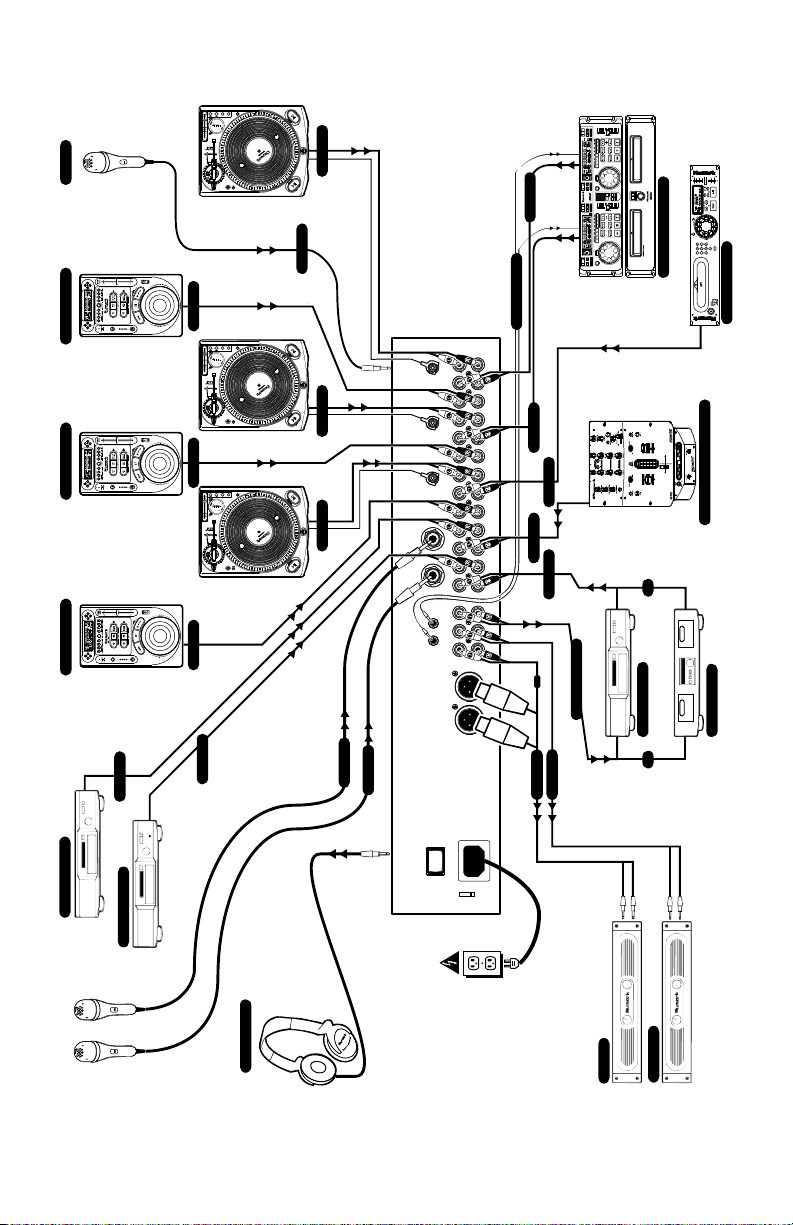
MIXER QUICK SETUP
1. Make sure all items listed on the
front of this guide are included
in the box.
2. READ SAFETY INSTRUCTION
BOOKLET BEFORE USING THE
PRODUCT.
3. Study this setup diagram.
4. Place mixer in an appropriate
position for operation.
5. Make sure all devices are turned
off and all faders and gain knobs
are set to “zero”
6. Connect all stereo input sources
as indicated in the diagram.
7. Connect the stereo outputs to
power amplifier(s), tape decks,
and/or other audio sources.
8. Plug all devices into AC power.
9. Switch everything on in the
following order.
• audio input sources (i.e.
turntables or CD players)
• mixer
• last, any amplifiers or
output devices
10. When turning off, always
reverse this operation by,
• turning off amplifiers
• mixer
• last, any input devices
11. Go to http://www.numark.com
for product registration.
More information about this
product may be found at
http://www.numark.com
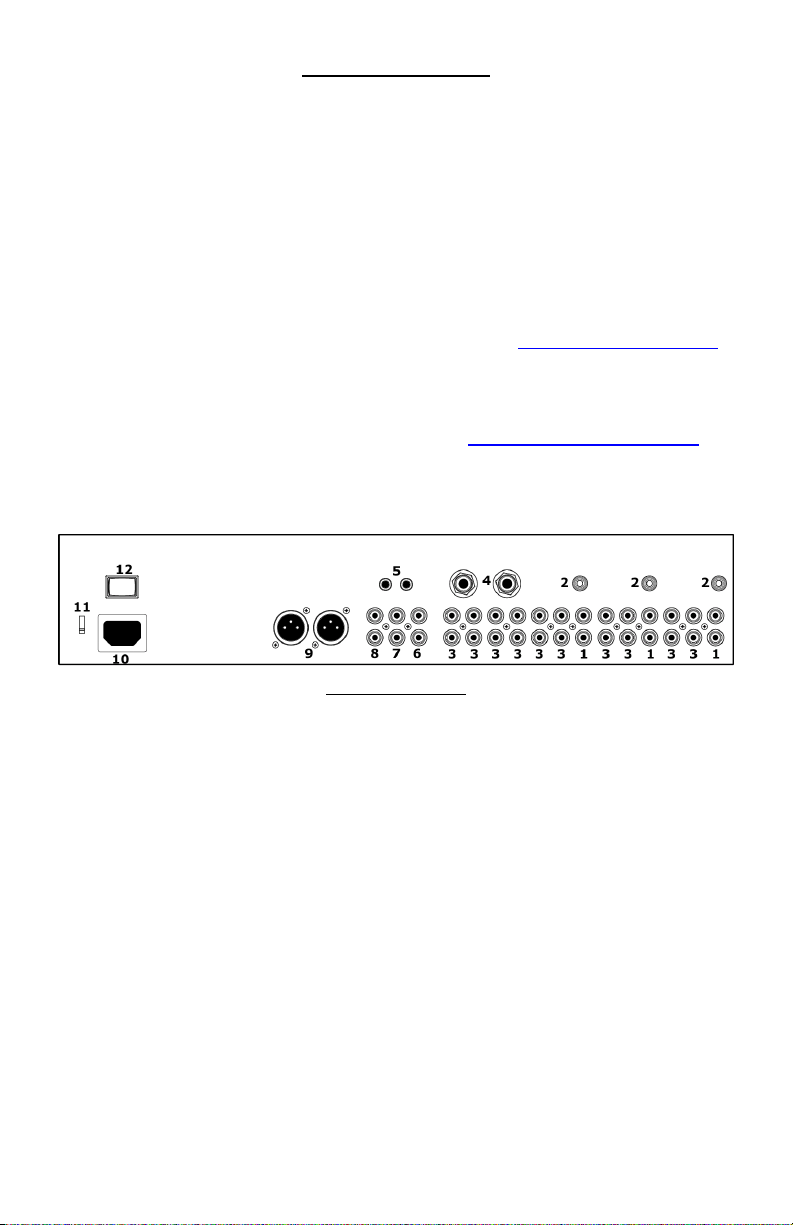
REAR CONNECTIONS
1. Phono Inputs: This input is used for connecting
your turntables through the sensitive RIAA phono
preamplifiers. Only turntables with phono level
output should be attached. Line level turntables
must be attached to the line inputs.
2. GND: This screw connector should be used to
secure any turntables or other devices connected
to the mixer that need to be grounded.
3. Line Inputs: CD players, Tape Decks, Samplers
or other line level input devices should be
connected to these inputs.
4. Microphone Input: Microphones with a ¼”
connector can be connected to these input
terminals.
5. Fader Start Connector: to attach your mixer to
a remote start equipped Numark CD player using
industry standard 1/8”(3.5mm) cables.
6. Record Output: This RCA output is for
connecting a recording device such as a tape
deck or CD recorder. The level of the record
output is based upon pre-master levels.
7. Zone Output (RCA): This output is for
connecting an external monitoring device such as
a PA system, powered monitors or a home
stereo. The level of the zone stereo output signal
is controlled by the zone fader.
8. Master Output (RCA): This output is for
connecting an external monitoring device such as
a PA system, powered monitors or a home
stereo. The level of the master stereo output
signal is controlled by the master fader.
9. Stereo Balanced Master Outputs (XLR): lowimpedance XLR type connectors controlled by the
Master fader.
10. AC In: This mixer is designed to work with the
power supply cord that comes with the unit.
While the power is switched off, plug the power
supply into the mixer first, then plug it into the
outlet.
11. Voltage Selector: Set this to the correct voltage
for your location standard.
12. Power Switch: Use this switch to turn on the
mixer after all input devices are already
connected to prevent damage to your equipment.
Turn the mixer on before you turn on amplifiers
and turn of amplifiers before you turn off the
mixer.
Page 4
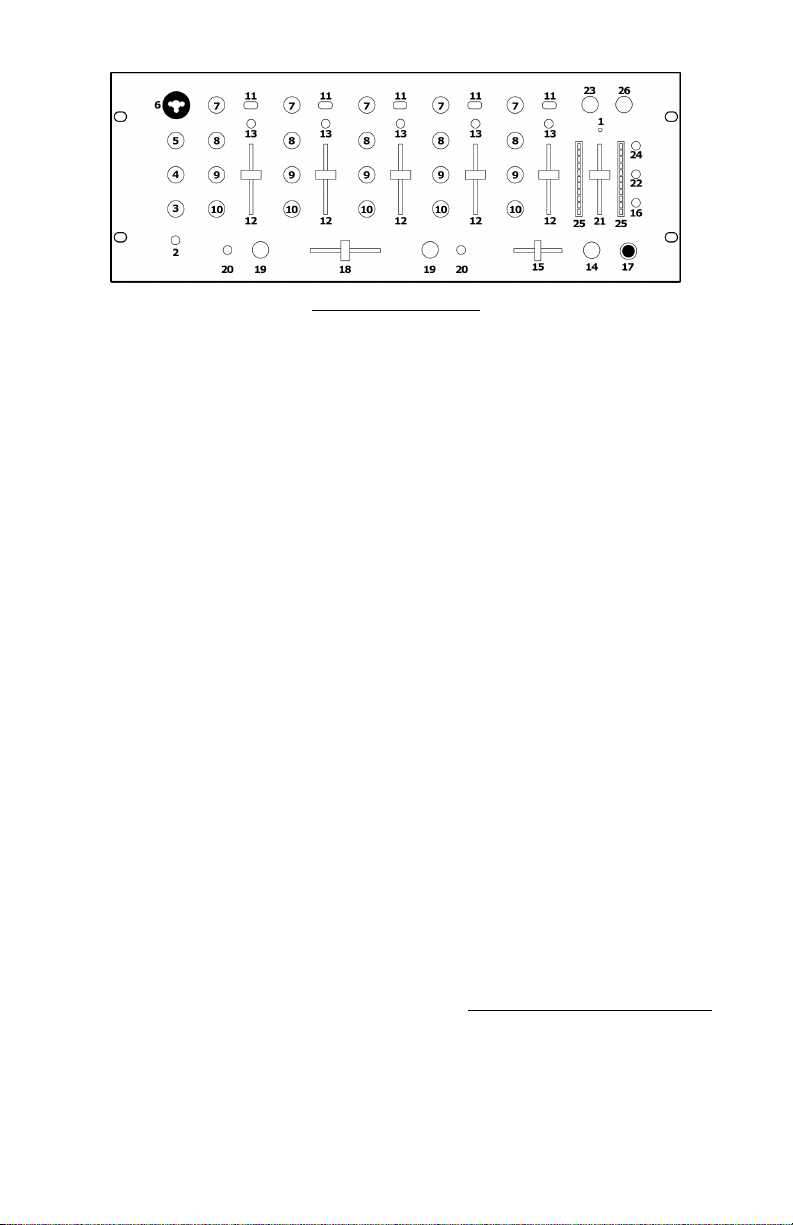
FRONT PANEL FEATURES
1. Power LED: Illuminates when the mixer is
on.
2. Mic ON/OFF: Toggles activation of the DJ
Mic.
3. Mic Gain: This knob adjusts the volume of
the microphone input.
4. Mic Bass: This knob adjusts the low-tone
of the microphone.
5. Mic Treble: This knob adjusts the hightone of the microphone.
6. XLR/¼” Combo Microphone Input
Jack: Connect your DJ mic at this location.
7. Channel Gain: This rotary control adjusts
the pre-fader input level.
8. Channel Treble: This rotary control
adjusts the high-tone level.
9. Channel Middle: This rotary control
adjusts the middle-tone level.
10. Channel Bass: This rotary control adjusts
the low-tone level.
11. Input Selector: This toggles select what
input source is routed to the channel from
the rear panel connected units.
12. Channel Fader: This slide fader is used to
adjust the level sent to program mix.
13. Cue Button: pressing this button sends
post gain, post EQ, and pre channel fader
level audio the PFL “Pre–fader level” section
of the headphone cue.
14. Headphone Volume: This rotary control
adjusts the volume level of the headphone
output.
15. Headphone Mix: Program level and PFL
(CUE) signal levels can be mixed by this
slider. When all the way left, audio heard
will be determined by Cue Button
selections. When all the way right final
only (PGM) program mix audio will be
heard.
16. Split/Blend Button: When in the down
position, headphone audio will be split so
mono PFL audio is in the left ear and mono
PGM audio is in the right ear. When the
button is up, stereo PFL and PGM audio will
be mixed (blended).
17. Headphone Jack: Your headphones can
be connected to this ¼” terminal. The
volume should always be set at its lowest
setting while connecting and disconnecting
headphones to prevent damage to
headphones and/or your hearing.
18. Replaceable Crossfader: This slide fader
blends audio between the channels
assigned to the left and right assign
switches.
Note: This fader is user replaceable if it
should ever wear out. Simply remove the
facepanel and then remove the screws
holding it in position. Replace the fader
with a quality authorized replacement from
your local Numark retailer.
19. Assign Knob: Rotary position determines
which input channel will be heard when the
crossfader is moved towards this knob.
Volume levels of channels not selected will
be determined only by the individual
channel sliders.
20. Fader Start: activates the crossfader to
send play and cue digital pulse commands
to your auto-start Numark CD player or
other popular brand. For fader start, attach
your mixer to a remote start CD player
using industry standard 1/8”(3.5mm)
cables. When you move the crossfader
toward the active channel, the attached CD
player will start. When it is moved away,
that side will cue (similar to pressing the
cue button) or stop depending upon brand
of CD player.
21. Master Slider: This control adjusts the
main output volume using the PROGRAM
audio as a source.
22. Stereo/Mono toggle: adjusts the Master
output for stereo or mono operation.
23. Panning: adjusts the balance of right to
left audio in all outputs (Master, Record,
Zone).
24. Meter Assign: determines whether PFL or
post master level audio is sent to the
stereo LED meter.
25. Stereo Level Indicator: quickly and
accurately tracks level of audio sent to it.
When using as a master output meter,
set the crossover, equalizer and power amp
inputs to avoid distortion at each step in
the audio chain. Proper attention to the
peak meter results in the punchiest
possible sound without audible distortion.
When used to adjust the PFL levels, PFL
cue signal is sent to the meter through the
cue assign buttons. Accurately match
channel levels with the Pre-fader gain and
EQ controls before mixing them together.
The idea is to properly match PFL inputs,
not the input with the stereo output meter!
26. Booth/Zone Fader: controls volume for a
remote zone or booth monitors using
PROGRAM audio as a source.
Note: This could also be used to supply line
level audio to a lighting controller or to
lights that are sound activated.
Page 5
HACIA PHONOHACIA PHONOHACIA PHONO
HACIA LINEA
REPRODUCTOR DE CD REPRODUCTOR DE CD REPRODUCTOR DE CD MICRO DE DJ
HACIA LINEA
HACIA LINEAHACIA LINEAHACIA LINEA
HACIA LINEA
HACIA MICRO
HACIA MICRO
HACIA MICRO
DESDE FADER START
HACIA LINEA HACIA LINEA
HACIA LINEA HACIA LINEA
O
A AMPERIOS
A AMPERIOS
DESDE LA GRABADORA
REPRODUCTOR DE CD DUAL
VARI-CUT
LOPASS
RATE
FILTERED
RATE
AUTOCUT
LR
AUTOPAN
FLANGER
FILTERS
NORMAL
GRABADORA DE CD
O O
REPRODUCTOR DE MP3
SEGUNDA SALIDA DEL MEZCLADOR
CINTA DE CASSETTE
REPRODUCTOR DE DVD
REPRODUCTOR DE DVD
AURICULARES DE DJ
AMP LOCAL
AMP DE CABINA
Page 6

MIXER QUICK SETUP (ESPAÑOL)
1. Asegúrese de que todos los
artículos incluidos al inicio de
este manual están incluidos en
la caja.
2. LEA LAS INSTRUCCIONES
DEL FOLLETO DE SEGURIDAD
ANTES DE UTILIZAR EL
PRODUCTO.
3. Estudie este diagrama de
instalación.
4. Coloque el mezclador en una
posición adecuada para su
funcionamiento.
5. Asegúrese de que todos los
dispositivos están apagados y de
que todos los faders y controles
de ganancia están en posición
“zero”.
6. Conecte todas las fuentes de
entrada al estéreo como se
indica en el diagrama.
7. Conecte las salidas del estéreo a
los amplificadores de
alimentación, unidades de cinta
magnética y/o otras fuentes de
audio.
8. Enchufe todos los dispositivos a
la toma de corriente alterna.
9. Prenda todo en el siguiente
orden:
• fuentes de entrada de audio
(por ej. giradiscos o
reproductores de CD)
• mezclador
• por último, cualquier
amplificador o dispositivo de
salida
10. Al apagar, realice siempre esta
operación al contrario,
• apague los amplificadores
• el mezclador
• por último, cualquier
dispositivo de entrada
11. Visite http://www.numark.com
para registrar el producto.
Para más información sobre este
producto
visítenos en
http://www.numark.com
CONEXIONES TRASERAS
1. Entradas de Phono: Esta entrada se usa para
conectar sus giradiscos utilizando los preamplificadores phono RIAA. Solo los giradiscos con
salida de nivel phono deben ser conectados. Los
giradiscos con nivel de línea deben ser conectados a
las entradas de línea.
2. GND: Este conector de tornillo debe ser usado para
sujetar cualquier giradiscos u otro dispositivo
conectado al mezclador que debe ser conectado a
tierra.
3. Entradas de línea: Los Reproductores de CD,
unidades de cinta magnética, samplers u otros
dispositivos de entrada de nivel de línea deben ser
conectados a estas entradas.
4. Entrada de micrófono: Los micrófonos con un
conector de ¼” pueden conectarse a estas
terminales de entrada.
5. Conector fader Start: Para conectar su mezclador
a un reproductor de CD Numark con start remoto
usando cables estándar de 1/8 (3.5mm).
6. Salida de grabación: Esta salida RCA es para
conectar un dispositivo de grabación como una
unidad de cinta magnética o grabador de CD. El
nivel de la salida de registro se basa en los niveles
de pre-master.
7. Salida de zona (RCA): Esta salida es para
conectar un dispositivo de monitorización como un
sistema de megafonía, monitores de potencia o un
estéreo. El nivel de la señal de salida de la zona de
estéreo está controlado por el zone fader.
8. Salida Master (RCA): Esta salida es para conectar
un dispositivo de monitorización externo como un
sistema de megafonía, monitores de potencia o un
estéreo. El nivel de la señal de salida de la zona de
estéreo está controlado por el master fader.
9. Salidas Master balanceadas de estéreo (XLR):
Conectores tipo XLR de baja impedancia controlados
por el Master fader.
10. AC In: Este mezclador está diseñado para trabajar
con el cable de suministro de alimentación que
acompaña a la unidad. Mientras esté apagada la
alimentación, enchufe el suministro de alimentación
al mezclador primero y luego enchúfelo a la toma de
corriente.
11. Selector de voltaje: Regule este selector al voltaje
correcto para su estándar de ubicación.
12. Interruptor de alimentación: Use este
conmutador para prender el mezclador después que
todos los dispositivos de entrada hayan sido
conectados para prevenir daño a su equipo. Prenda
el mezclador antes de prender los amplificadores y
apague los amplificadores antes de apagar el
mezclador.
Page 7

1. Power LED: Se ilumina cuando el mezclador está
prendido.
2. Mic ON/OFF: Produce la activación del micrófono
DJ.
3. Mic Gain (Ganancia de Micrófono): Este botón
ajusta el volumen de la entrada del micrófono.
4. Agudos de micro: Este botón ajusta el tono alto
del micrófono.
5. Graves de micro:Este botón ajusta el tono bajo del
micrófono.
6. Jack de entradas de Micrófono Combo XLR de
¼”: Conecte aquí su micrófono DJ.
7. Ganancia de canal: Este mando giratorio ajusta el
nivel de entrada del pre-fader.
8. Agudos de canal: Este mando giratorio ajusta el
nivel del tono alto.
9. Medio de canal: Este mando giratorio ajusta el
nivel del tono medio.
10. Graves de canal: Este mando giratorio ajusta el
nivel del tono bajo.
11. Selector de entrada: Selecciona la fuente de
entrada dirigida al canal.
12. Fader de canal: Este fader deslizante se usa para
ajustar el nivel enviado a la mezcla del programa.
13. Botón de Cue: Al presionar este botón envía post
ganancia, post EQ, y el audio de nivel fader del precanal, la sección de PFL (Nivel de Pre-Fader) de la
señal de los auriculares.
14. Volumen de los auriculares: Este mando giratorio
ajusta el nivel de volumen de la salida de los
auriculares.
15. Mezcla de los auriculares: Con este deslizador se
puede mezclar el nivel del programa y los niveles de
la señal del PFL (CUE). Cuando se gire totalmente
hacia la izquierda, se escuchará el audio
determinado por las selecciones del Botón de Cue.
Cuando se gire totalmente hacia la derecha, se
escuchará solamente la mezcla de audio final del
programa (PGM).
16. Botón de partida/mezclada: Cuando esté hacia
abajo, parta el audio de los auriculares para que el
audio PFL mono esté en el auricular izquierdo y el
audio PGM mono esté en el derecho. Cuando el
botón esté hacia arriba, el audio de estéreo PFL y
PGM serán mezclados.
17. Jack de auriculares: Puede conectar sus
auriculares a esta terminal de ¼”. El volumen debe
ser siempre ajustado en su posición más baja
cuando se conecten los auriculares para prevenir
que se dañen los auriculares y/o su oído.
18. Crossfader reemplazable: Este fader deslizante
mezcla el audio entre los canales asignados a los
conmutadores de la izquierda y de la derecha.
Nota: El usuario puede reemplazar este fader en
caso de que se desgaste. Simplemente retire el
panel frontal y luego retire los tornillos que lo
mantienen sujeto. Cambie el fader con un repuesto
de calidad autorizado en su vendedor de Numark
más cercano.
LAS CARACTERÍSTICAS DEL PANEL FRONTAL
19. Control de asignación: La posición giratoria
determina qué canal de entrada se podrá escuchar
cuando se mueva el crossfader hacia este botón.
Los niveles de volumen de los canales no
seleccionados se determinarán solamente por los
deslizadores de canal individuales.
20. Fader Start: Activa el crossfader para enviar
mandos de impulso digitales de play y cue a su
reproductor de CD Numark con auto-start u otra
marca popular. Para fader start, conecte su
mezclador a un reproductor de CD con start remoto
usando cables estándar de 1/8 (3.5mm). Cuando
deslice el crossfader hacia el canal activo, el
reproductor de CD conectado se prenderá. Cuando
lo deslice hacia el otro lado, ese lado señalizará
(semejante a presionar el botón cue) o parará
dependiendo de la marca de reproductor de CD.
21. Deslizador Master: Este control ajusta el volumen
de salida principal usando el audio PROGRAM de
fuente.
22. Conmutador Estéreo/Mono: Ajusta la salida
Master para la operación estéreo o mono.
23. Balance: Ajusta el balance derecho/izquierdo en
todas las salidas (Master, Grabar, Zona).
24. Asignación del medidor: Determina si el nivel de
audio PFL o post-master es enviado al medidor LED
de estéreo.
25. Indicador de nivel de estéreo: Sigue de forma
rápida y precisa el nivel de audio que se le envía. Al
usar un medidor de salida master, posicione las
entradas del crossover, ecualizador y potencia de
amperios para evitar la distorsión a cada paso en la
cadena de audio. La atención adecuada al medidor
de picos tiene como resultado el sonido más fuerte
posible sin distorsión audible. Cuando se usan
para ajustar los niveles de PFL, la señal PFL cue
se envía al medidor usando los botones de
asignación de cue. Empareje los niveles de los
canales con la ganancia del Pre-Fader y los
controles EQ antes de mezclarlos. ¡La idea es
emparejar las entradas PFL correctamente, no la
entrada con el medidor de salida de estéreo!
26. Fader de cabina/zona: Controla el volumen para
un seguimiento de zona remota o booth usando el
audio PROGRAMA de fuente.
Nota: Esto se puede utilizar también para
suministrar el nivel de línea de audio a un
controlador de iluminación o a las luces que se
activan con sonido
Page 8

ZU PHONOZU PHONOZU PHONO
ZU LINEAR
CD SPIELER CD SPIELER CD SPIELER DJ MIC
ZU LINEAR
ZU LINEARZU LINEARZU LINEAR
ZU LINEAR
ZUM MIC
ZUM MIC
ZUM MIC
VON FADER START
ZU LINEAR ZU LINEAR
ZU LINEAR ZU LINEAR
ODER
'ZUM VERSTÄRKER
'ZUM VERSTÄRKER
VON AUFNAHME
'DUALER CD SPIELER
VARI-CUT
LOPASS
RATE
FILTERED
RATE
AUTOCUT
LR
AUTOPAN
FLANGER
FILTERS
NORMAL
'CD BRENNER
ODER ODER
MP3 PLAYER
ZWEITER MISCHPULT AUSGANG
KASSETTENDECK
DVD SPIELER
DVD SPIELER
DJ KOPFHÖRER
HAUPTVERSTÄRKER
'BOOTH VERSTÄRKER
Page 9

MISCHPULT SCHNELLAUFBAU (DEUTSCH)
1. Versichern Sie sich, daß alle im
Anfang dieser Anleitung
aufgeführten Teile in der
Schachtel enthalten sind.
2. LESEN SIE DIE
SICHERHEITSBROSCHÜRE
BEVOR SIE DAS GERÄT
BENUTZEN.
3. Sehen Sie sich das
Aufbaudiagramm sorgfältig an.
4. Stellen Sie das Mischpult an eine
für den Betrieb geeignete Stelle.
5. Stellen Sie sicher, daß sämtliche
Vorrichtungen ausgeschaltet
sind und alle Fader und Regler
auf “Null” stehen.
6. Schließen Sie alle
Stereoeingabequellen wie im
Diagramm gezeigt an.
7. Schließen Sie die
Stereoausgänge an den (die)
Verstärker, Kassettendecks
und/oder andere Tonquellen an.
8. Schließen Sie alle Geräte an die
Stromquelle an.
9. Schalten Sie alles in der
folgenden Reihenfolge ein.
• Toneingabequellen (z.B.
Plattenspieler oder CDSpieler)
• Mischpult
• zuletzt, vorhandene
Verstärker oder
Ausgabegeräte
10. Beim Ausschalten drehen Sie die
Reihenfolge um, und schalten
Sie
• Verstärker
• Mischpult
• und zuletzt vorhandene
Eingabequellen aus
11. Um das Produkt zu registrieren,
besuchen Sie bitte
http://www.numark.com.
Mehr Informationen über dieses
Produkt können auf
http://www.numark.com
gefunden werden.
RÜCKWÄRTIGE ANSCHLÜSSE
1. Phono Anschlüsse: Dieser Anschluß ist zum
Anschließen Ihrer Plattenspieler durch die
empfindlichen RIAA Phono-Vorverstärker. Nur
Plattenspieler, welche über eine Phono-Ausgabe
verfügen, sollten angeschlossen werden. Lineare
Plattenspieler müssen an die linearen Anschlüsse
angeschlossen werden.
2. GND: Diese Schraubverbindung sollte zur Sicherheit
aller Plattenspieler oder anderer Geräte, welche
geerdet werden müssen und mit dem Mischpult
verbunden sind, verwendet werden.
3. Lineare Anschlüsse: CD-Spieler, Kassettendecks,
Sampler oder andere lineare Eingabegeräte sollten
an diese Anschlüsse angeschlossen werden.
4. Mikrofonanschluß: Mikrofone mit einem ¼”
Stecker können an diese Anschlüsse angeschlossen
werden.
5. Fader Start Anschluß: Zum Anschluß Ihres
Mischpults an einen mit Fernstart ausgerüsteten
Numark CD-Spieler mit herkömmlichen 3.5mmKabeln.
6. Aufnahmeausgabe: Diese RCA-Ausgabe dient
dazu, ein Aufnahmegerät wie z.B. ein Kassettendeck
oder einen CD-Recorder anzuschließen. Der
Ausgabepegel der Aufnahme basiert auf dem PreMaster-Pegel.
7. Zonenausgabe (RCA): Dieser Anschluß dient zum
Anschliessen eines externen Monitorgeräts wie z.B.
einer PA, eines aktiven Monitors oder einer
Heimstereoanlage. Der Stereo-Ausgabepegel des
Zonensignals wird über den Zonen-Fader
kontrolliert.
8. Master-Ausgabe (RCA): Dieser Anschluß dient
zum Anschliessen eines externen Monitorgeräts wie
z.B. einer PA, eines aktiven Monitors oder einer
Heimstereoanlage. Der Stereo-Ausgabepegel des
Master-Signals wird über den Master-Fader
kontrolliert.
9. Stereo-Balance Master Ausgabe (XLR):
Niedrigimpedanzanschlüsse vom Typ XLR, welche
über den Master-Fader gesteuert werden.
10. Wechselstrom Ein: Dieses Mischpult wurde zum
Betrieb mit dem beigelegten Stromkabel entworfen.
Während das Gerät abgeschaltet ist, stecken Sie das
Stromkabel zuerst in das Mischpult und dann in die
Steckdose.
11. Voltauswahl: Stellen Sie hier die für Ihren
Standort richtige Voltzahl ein.
12. Ein/Aus-Schalter: Benutzen Sie diesen Schalter
um das Mischpult, nachdem alle Eingabegeräte
angeschlossen sind, einzuschalten um Beschädigung
zu vermeiden. Schalten Sie das Mischpult ein, bevor
Sie die Verstärker einschalten und schalten Sie die
Verstärker aus, bevor Sie das Mischpult ausschalten.
Page 10

1. LED Stromanzeige: Leuchtet auf, wenn das
Mischpult eingeschaltet ist.
2. Mic EIN/AUS: Ein- und Ausblenden des DJMikrofons.
3. Mic Regler: Dieser Drehregler stellt die Lautstärke
der Mikrofoneingabe ein.
4. Mic Höhen: Dieser Drehregler stellt die hohen
Tonlagen des Mikrofons ein.
5. Mic Tiefen: Dieser Drehregler stellt die tiefen
Tonlagen Mikrofons ein.
6. XLR/¼” Combo-Mikrofoneingang: Schließen Sie
hier Ihr DJ-Mikrofon an.
7. Kanal Gain: Dieser Drehregler stellt den
Eingabepegel vor dem Fader ein.
8. Kanal Höhen: Dieser Drehregler stellt die hohen
Tonpegel ein.
9. Kanal Mitten: Dieser Drehregler stellt die mittleren
Tonpegel ein.
10. Kanal Bässe: Dieser Drehregler stellt die tiefen
Tonpegel ein.
11. Eingabe Auswahl: Hier kann gewählt werden, mit
welcher Eingabequelle der Kanal belegt wird.
12. Kanal Fader: Der Schiebe-Fader dient zur
Einstellung des Pegels welcher zur
Programmischung gesendet wird.
13. Cue-Taste: Durch Drücken dieser Taste werden
Nachverstärkung, Nach-Equaliser und Vor-Kanal
Tonpegel zur PFL “Pre–fader level”-Sektion der
Warteschleife des Kopfhörers gesendet.
14. Lautstärke Kopfhörer: Dieser Drehregler stellt die
Lautstärke der Kopfhörerausgabe ein.
15. Mischung Kopfhörer: Programmpegel und PFL
(Warteschleife) Signalpegel können mit diesem
Regler gemischt werden. Steht der Regler ganz
links, wird der durch die Cue-Tasten eingestellte Ton
gehört. Steht der Regler ganz rechts, wird nur der
endgültige (PGM) Programmischungston gehört.
16. Teilungs-/Mischungs-Schalter: In der Stellung
“unten” wird der Ton im Kopfhörer getrennt, so daß
Mono PFL-Ton auf dem linken Ohr und Mono PGMTon auf dem rechten Ohr gehört werden. In der
“oben” Stellung werden Stereo-PFL und PGM-Ton
gemischt (Überblenden).
17. Kopfhöreranschluß: Ihr Kopfhörer kann an diesen
Anschluß angeschlossen werden. Während des Einund Aussteckens des Kopfhörers sollte die
Lautstärke immer auf den niedrigsten Wert
eingestellt sein um eine Beschädigung des
Kopfhörers und/oder eine Beeinträchtigung Ihres
Hörvermögens zu vermeiden.
18. Austauschbarer Crossfader: Dieser Schieberegler
mischt den Ton zwischen den Kanälen welche durch
die linken und rechten Zuordnungsschaltern
zugeordnet sind.
Hinweis: Dieser Fader kann im Falle von Abnutzung
vom Bediener ausgewechselt werden. Entfernen Sie
einfach die Abdeckung und lösen Sie dann die
Schrauben welche den Fader befestigen. Ersetzen
Sie den Fader mit einem von Ihrem örtlichen
Numark-Händler anerkannten Ersatzteil.
BEDIENUNGSELEMENTE VORDERSEITE
19. Zuordnungsknopf: Die Stellung des Knopfes ist
maßgebend dafür, welcher Eingabekanal gehört wird
wenn der Crossfader in Richtung dieses Knopfes
geschoben wird. Lautstärken nicht gewählter
Kanäle können nur durch die einzelnen
Kanalschieberegler bestimmt werden.
20. Fader Start: Aktiviert den Crossfader, die Befehle
“Spielen” und “Warten” per Digitalimpuls zu Ihrem
Auto-Start Numark CD-Spieler oder andere
weitverbreitete Marken zu schicken. Um den Fader
die Startfunktion ausführen zu lassen, schließen Sie
Ihr Mischpult an einen hierfür ausgerüsteten CDSpieler mit herkömmlichen 3.5mm-Kabeln an. Wenn
Sie den Crossfader in Richtung des aktiven Kanals
schieben, startet der angeschlossene CD-Spieler.
Schieben Sie den Regler in die andere Richtung,
wird der Kanal auf “Warten” (ähnlich wie bei
Betätigung der Cue-Taste) gesetzt oder anhalten,
abhängig von der Marke des Gerätes.
21. Master-Schieberegler: Dieser Regler stellt das
Master-Ausgabevolumen, auf der Quelle PROGRAMM
Pegel basierend, ein.
22. Stereo/Mono Auswahl: stellt die Master-Ausgabe
auf Stereo- oder Mono-Betrieb ein.
23. Panning: Einstellung der Tonbalance zwischen
rechts/links auf allen Ausgabekanälen (Master,
Aufnahme, Zone).
24. Zuteilungsmesser: bestimmt ob PFL oder PostMaster-Tonpegel zur Stereo-LEDAussteuerungsanzeige gesendet wird.
25. Stereo-LED-Aussteuerungsanzeige: schnelle und
genaue Erfassung des gesendeten Tonpegels. Falls
dies zur Messung der Master-Ausgabe
verwendet wird, stellen Sie die Crossover-,
Equalizer- und Verstärker-Eingaben ein, um
Verzerrungen an jedem Punkt der Tonkette zu
vermeiden. Genaue Beobachtung der
Spitzenanzeigen bringt den bestmöglichen Sound
ohne Tonverzerrung. Falls es zur Einstellung der
PFL-Pegel verwendet wird, wird das PFLWartesignal über die Cue-Zuteilungstasten zur
Anzeige gesendet. Passen Sie die Kanalpegel vor
dem Mixen mit dem Vor-Fader Regler und den EQEinstellungen genauestens an. Idealerweise sollten
die PFL-Eingaben genau aneinander angepasst
werden, nicht die Eingabe mit der StereoAussteuerungsanzeige!
26. Areal/Zonen-Fader: bestimmt die Lautstärke für
eine weiter entfernte Zone oder Monitorareale wobei
das Programm-Audio als Quelle verwendet wird.
Hinweis: Dies kann auch dazu verwendet werden,
einen linearen Tonpegel einem Beleuchter oder
tongesteuerter Beleuchtung zur Verfügung zu
stellen.
Page 11

VERS PHONOVERS PHONOVERS PHONO
VERS LIGNE
LECTEUR CD LECTEUR CD LECTEUR CD MIC DJ
HACIA LINEA
VERS LIGNEVERS LIGNEVERS LIGNE
HACIA LINEA
VERS MIC
VERS MIC
VERS MIC
DÉPART DU FADER
VERS LIGNE VERS LIGNE
VERS LIGNE VERS LIGNE
OU
VERS AMPÈRES
DE L'ENREGISTREUR
VERS AMPÈRES
LECTEUR CD DOUBLE
VARI-CUT
LOPASS
RATE
FILTERED
RATE
AUTOCUT
LR
AUTOPAN
FLANGER
FILTERS
NORMAL
GRAVEUR DE CD
OU OU
LECTEUR MP3
SORTIE DEUXIÈME MIXER
CONSOLE D'ENREGISTREMENT
LECTEUR DVD
LECTEUR DVD
ÉCOUTEURS DJ
AMP LOCAUX
AMP CHAMBRE SOURDE
Page 12

MONTAGE RAPIDE DU MIXER (FRANÇAIS)
1. Vous assurer que tous les
articles énumérés au début de
ce guide sont inclus dans la
boîte.
2. LIRE LE LIVRET
D’INSTRUCTIONS DE
SÉCURITÉ AVANT
D’UTILISER LE PRODUIT.
3. Étudier le diagramme de
montage.
4. Placer le mixer dans un endroit
approprié pour l’utilisation.
5. Vous assurer que tous les
dispositifs sont éteints (OFF),
que tous les atténuateurs
(faders) et les boutons
d’acquisition sont mis à «zéro.»
6. Connecter toutes les entrées
(input) comme indiqué sur le
diagramme.
7. Connecter les sorties (ouput) de
la stéréo à l’amplificateur(s),
enregistreurs et/ou autres
sources audio.
8. Brancher (ON) tous les
dispositifs à l’alimentation AC.
9. Tout allumer dans l’ordre qui
suit:
• Sources d’entrée audio (ex.:
platine ou lecteurs CD)
• Mixer
• En dernier, tous les
amplificateurs ou dispositifs
de sortie
10. Pour éteindre, toujours inverser
l’opération:
• Éteindre (OFF) les
amplificateurs
• Mixer
• En dernier, tous les
dispositifs d’entrée (input)
11. Cliquez sur
http://www.numark.com pour
enregistrer le produit.
Vous trouverez plus
d’information sur ce produit
à http :www.numark.com
CONNEXIONS ARRIÈRES
1. Entrées Phono: Cette entrée sert à connecter vos
platines aux préamplificateurs sensibles RIAA du
phono. Seules des platines avec une sortie de niveau
phono devraient être reliées. Les platines à niveau de
ligne devraient être reliées à la ligne d’entrée.
2. GND: Ce connecteur à vis devrait être utilisé pour
assurer toutes les platines ou autres dispositifs
connectés au mixer qui ont besoin d’une mise à terre
(grounded).
3. Entrées de ligne (input): Lecteurs CD, console
d’enregistrement, échantillons ou autres dispositifs à
ligne d’entrée devraient être connectés à ces entrées.
4. Entrée de microphone( input): Les microphones
avec un connecteur de ¼” peuvent être connectés à
ces terminaux d’entrée.
5. Connecteur d’atténuateur (Fader): pour relier
votre mixer à une télécommande de lecteur de CD
Numark employant les câbles standards 1/8”(3,5
mm).
6. Sortie de l’enregistreur (output) : Cette sortie
(output) RCA sert à connecter un dispositif
d’enregistrement tel que console d’enregistrement ou
enregistreur de CD. Le niveau de la sortie
d’enregistrement est basé sur les niveaux maîtres
établis.
7. Sortie (output) de Zone (RCA): Cette sortie
(output) sert à connecter un dispositif de contrôle
externe tel qu’un système PA, une commande ou une
stéréo maison. Le niveau du signal de sortie (output)
de la zone stéréo est contrôlé par l’atténuateur de
zone.
8. Sortie (output) principale (RCA): Cette
sortie(output) sert à brancher (ON) un dispositif de
contrôle externe tel qu’un système PA, moniteurs
activés ou une stéréo maison. Le niveau du signal de
sortie (output) principal est contrôlé par l’atténuateur
(fader).
9. Sorties d’équilibrage maîtresse (master ouput)
de stéréo (XLR): Des connecteurs à faible
impédance de type XLR contrôlé par l’atténuateur
(fader) principal.
10. AC In: Ce mixer est conçu pour fonctionner avec
l’alimentation de puissance qui est fourni avec l’unité.
Lorsque le courant est coupé (OFF), brancher d’abord
(ON) l’alimentation dans le mixer, puis dans la prise
de courant .
11. Sélecteur de voltage: Régler sur le voltage selon les
normes de votre localisation.
12. Interrupteur de courant (switch): Utiliser cet
interrupteur pour allumer le mixer après que tous les
appareils sont déjà branchés (ON) pour éviter un
dommage à votre équipement. Allumer (ON) le mixer
avant d’allumer (ON) les amplificateurs et éteindre
(OFF) les amplificateurs avant d’éteindre (OFF) le
mixer.
Page 13

1. Témoin LED: S’illumine quand le mixer est allumé
(on)
2. Mic ON/OFF: Active le microphone.
3. Mic Gain: Ce bouton ajuste le volume d’entrée du
microphone.
4. Mic Aigu (treble): Ce bouton ajuste les aigus du
microphone.
5. Mic Basse (bass): Ce bouton ajuste la tonalité
basse du microphone.
6. Prise de sortie (output) combine microphone
XLR/¼” : Brancher votre micro de DJ à cet endroit.
7. Acquisition de canaux (CH) : Ce contrôle rotatif
ajuste le niveau de sortie du pré-atténuateur.
8. Voie aiguë (treble) : Ce contrôle rotatif ajuste le
niveau aigu du son.
9. Voie moyenne (middle): Ce contrôle rotatif ajuste
le niveau du son moyen.
10. Voie grave (bass): Ce contrôle rotatif ajuste le
niveau grave du son.
11. Sélecteurs d’entrée (input): Ceci sélectionne
quelle source d’entrée est acheminée vers le canal.
12. Voie de l’atténuateur (Fader): La coulisse
d’atténuateur sert à ajuster le niveau envoyé au
programme de mixage.
13. Bouton de circuit auxiliaire (Cue) : Ce bouton
envoie le gain, le EQ, le niveau acoustique du
niveau pre-fader affichés, le niveau pre-fader de la
section PFL au circuit auxiliaire des écouteurs.
14. Volume des écouteurs: Cette commande rotative
ajuste le niveau du volume des écouteurs.
15. Mixage des écouteurs: Le niveau du programme
et le circuit auxiliaire (CUE) peuvent être mixés avec
cette coulisse. Complètement à gauche, les
sélections déterminées par le circuit auxiliaire seront
entendues. Complètement à droite, seul le
programme de mixage audio (PGM) sera entendu.
16. Bouton répartiteur / mélangeur (mixer): En
position inférieure, l’acoustique des écouteurs sera
répartie pour que l’acoustique PFL mono soit dans
l’oreille gauche et l’acoustique PGM mono soit dans
l’oreille droite. Lorsque le bouton est levé, la stéréo
PFL et l’acoustique PGM seront mixées.
17. Prise des écouteurs: Vos écouteurs peuvent être
branchés à ce terminal ¼”. Le volume devrait
toujours être au plus faible niveau lors de la
connexion ou de la déconnexion des écouteurs pour
éviter des dommages aux écouteurs et/ou à votre
ouie.
18. Crossfader remplaçable : Ce fader navigateur
mélange l’audio lors de l’alternance entre les canaux
assignés à gauche et ceux assignés à droite.
Note: Cet atténuateur peut être remplacé par
l’utilisateur s’il se détériore. Simplement ôter le
panneau avant, retirer les vis qui le retiennent.
Remplacer l’atténuateur avec un atténuateur de
qualité approuvé par votre distributeur Numark.
CARACTÉRISTIQUES DU PANNEAU AVANT
19. Bouton d’assignation: La rotation détermine
l’entrée du canal qui sera entendu lorsque le
crossfader est amené vers ce bouton. Le volume
des voies sera déterminé par les coulisses
individuelles des voies.
20. Démarrage du fader (fader ON) : Active le
crossfader pour jouer et envoyer la pulsion digitale
qui commande le démarrage automatique du lecteur
CD Numark ou autre marque populaire. Pour
démarrer le fader, connecter votre mixer à une
commande de lecteur de CD au moyen de câbles
standard 1/8” (3,5mm). Lorsque vous avancez le
crossfader vers un canal actif, le lecteur de CD
connecté démarrera. Lorsque enlevé, ce côté se
connectera (comme lorsque vous appuyez sur le
bouton CUE) ou s’arrêtera dépendant de la marque
du lecteur de CD.
21. Coulisse maîtresse (master): Ce contrôle ajuste
la sortie (output) originale du volume déterminé par
le PROGRAMME acoustique.
22. Commande Stéréo/Mono : ajuste la sortie
maîtresse pour le fonctionnement de la stéréo ou du
mono.
23. Répartition: ajuste la balance droite/gauche de
toutes les sorties (Maître, enregistrement, zone).
24. Assignation du potentiomètre (fader):
détermine si le PFL ou le niveau audio post-maître
est envoyé au témoin LED du potentiomètre de la
stéréo.
25. Indicateurs de niveau Stéréo: Détecte
rapidement avec précision le niveau de l’acoustique
qui est envoyé. Lorsque utilisé comme
potentiomètre (fader) de sortie, positionner les
sorties transversales, égalisateur et les ampères du
courant pour éviter une distorsion à chaque étape
de la chaîne audio. Une attention particulière au
crête-mètre découle dans un son dynamique sans
de distorsion audible. Lorsque utilisé pour
ajuster les niveaux PFL, un signal de connexion
PFL est envoyé au potentiomètre par les boutons
correspondants. Assortir avec précision les niveaux
des fréquences avec le gain pre-fader et les
contrôles le EQ avant de les mixer ensemble.
L’idée consiste à bien assortir les entrées PFL, non
l’entrée avec le potentiomètre (fader) de sortie
stéréo!
26. Atténuateurs (faders) de chambre sourde
(mute) /Zone: contrôle le volume d’une zone
éloignée ou d’une chambre sourde utilisant un
PROGRAMME audio comme source.
Note: Ceci pourrait être utilisé comme liaison audio
par un contrôleur de l’éclairage ou à un éclairage
activé par le son.
Page 14

MICROFONO DEL DJ
A PHONOA PHONOA PHONO
LETTORE CD LETTORE CD LETTORE CD
A INGRESSI LINEA
A INGRESSI LINEAA INGRESSI LINEAA INGRESSI LINEA
A INGRESSI LINEA
A MIC
A MIC
A MIC
DALL'AVVIO DEL FADER
A INGRESSI LINEA A INGRESSI LINEA
A INGRESSI LINEA
A INGRESSI LINEA
A INGRESSI LINEA
O
DA REGISTRAZIONE
AD AMPLIFICATORE
AD AMPLIFICATORE
DOPPIO LETTORE CD
VARI-CUT
LOPASS
RATE
FILTERED
RATE
AUTOCUT
LR
AUTOPAN
FLANGER
FILTERS
NORMAL
MASTERIZZATORE
O O
LETTORE MP3
USCITA PER IL SECONDO MIXER
PIASTRA DI REGISTRAZIONE
LETTORE DVD
LETTORE DVD
CUFFIA DEL DJ
AMP FISSO
AMP DIFFUSORI
Page 15

MONTAGGIO RAPIDO DEL MIXER (ITALIANO)
1. Verificate che tutti gli elementi
elencati sul frontespizio di
questo manuale siano inclusi
nella confezione.
2. PRIMA DI UTILIZZARE IL
PRODOTTO LEGGETE IL
LIBRETTO DELLE
ISTRUZIONI DI SICUREZZA
3. Esaminate attentamente lo
schema di montaggio.
4. Posizionate il mixer in modo
adeguato all’operazione.
5. Assicuratevi che tutti i dispositivi
siano spenti e che tutti i fader e
le manopole di guadagno (gain)
siano impostate a “zero”
6. Collegate tutte le sorgenti di
ingresso stereo come indicato
nello schema.
7. Collegate le uscite stereo agli
amplificatori, piastre di
registrazione, e/o altre sorgenti
audio.
8. Collegate tutte le
apparecchiature alla corrente
c.a.
9. Accendete tutto nel seguente
ordine:
• Sorgenti di ingresso audio
(cioè le piastre o i lettori
CD)
• mixer
• per ultimi, gli amplificatori e
i dispositivi di uscita
10. Al momento dello spegnimento,
invertite l’operazione
• spegnendo gli amplificatori
• il mixer
• per ultimi, tutti i dispositivi
di ingresso
11. Andate sul sito
http://www.numark.com per la
registrazione del prodotto.
Potrete trovare ulteriori
informazioni relative a questo
prodotto sul sito
http://www.numark.com
CONNESSIONI POSTERIORI
1. Ingressi Phono: Questo ingresso viene utilizzato
per la connessione dei vostri piatti attraverso i
preamplificatori phono RIAA sensibili. Solo piatti con
uscite a livello phono dovrebbero essere collegati.
Piatti con uscite a livello di linea devono essere
collegati agli ingressi di linea.
2. GND: Questo connettore a vite dev’essere utilizzato
per assicurare piatti o altri dispositivi collegati al
mixer che richiedono una messa a terra.
3. Ingressi di Linea: A questi ingressi dovrebbero
essere connessi lettori CD, Piastre di Registrazione,
Campionatori o altri dispositivi di ingresso a livello di
linea.
4. Ingresso Microfono: A questi terminali di ingresso
possono essere connessi microfoni con connettori a
¼” .
5. Connettore di Avvio del Fader: per collegare il
vostro mixer a un lettore CD Numark dotato di avvio
remoto che utilizzi cavi standard a 1/8”(3.5mm).
6. Uscita Registrazione: Questa uscita RCA è
designata al collegamento di dispositivi di
registrazione quali una piastra di registrazione o un
registratore CD. Il livello di uscita del registratore è
basato sui livelli pre-master.
7. Uscita Zonale (RCA): Questa uscita è designata
alla connessione di un impianto di monitoraggio
esterno, quali un sistema di diffusione sonora,
diffusori o un impianto di home stereo. Il livello del
segnale stereo dell’uscita zonale è controllato dal
fader zonale.
8. Uscita Master (RCA): Questa uscita è designata
alla connessione di un impianto di monitoraggio
esterno, quali un sistema di diffusione sonora,
diffusori o un impianto di home stereo. Il livello del
segnale stereo di uscita master è controllata
dall’attenuatore (fader) del master.
9. Uscite Stereo Bilanciate del Master (XLR):
connettori a bassa impedenza di tipo XLR controllati
dal Cursore Master.
10. Collegamento CA: Questo mixer è progettato per
funzionare con il cavo di alimentazione che trovate
insieme all’unità. Ad alimentazione spenta, inserite
prima la spina dell’alimentazione nel mixer, quindi
inseritela nella presa di corrente.
11. Selettore di Voltaggio: Impostate il selettore al
voltaggio corretto per la vostra zona di residenza.
12. Interruttore dell’alimentazione: Utilizzate
questo interruttore per accendere il mixer solo dopo
che sono stati collegati tutti i dispositivi di ingresso
per prevenire danni al vostro equipaggiamento.
Accendete il mixer prima di accendere gli
amplificatori, e spegnete gli amplificatori prima di
spegnere il mixer.
Page 16

CONFIGURAZIONE PANNELLO ANTERIOR
1. LED di Alimentazione: Si illumina quando il mixer
è acceso.
2. Mic ON/OFF: Attiva/Disattiva il Microfono DJ.
3. Guadagno mic: Questa manopola regola il volume
di ingresso del microfono.
4. Mic Acuti (Treble): Questa manopola regola i toni
acuti del microfono.
5. Mic Bassi (Bass): Questa manopola regola i toni
bassi del microfono.
6. Gruppo Jack di Ingresso Microfonico in
formato XLR/¼”: In questa posizione va collegato
il vostro microfono DJ.
7. Guadagno d’Ingresso: Questa manopola regola il
livello di ingresso pre-fader.
8. Canale Acuti (Treble): Questa manopola regola il
livello dei toni acuti.
9. Canale Medi: Questa manopola regola il livello dei
toni medi.
10. Canale Bassi (Bass): Questa manopola regola il
livello dei bassi.
11. Selettore di Ingressi: Questo seleziona quale
sorgente in ingresso viene convogliata al canale.
12. Cursore (Fader) Canale: Questo fader scorrevole
è utilizzato per regolare il livello inviato al missaggio
del programma.
13. Tasto Cue: la pressione di questo tasto invia post
guadagno, post EQ e livelli audio da cursore precanale alla sezione PFL “Pre-Fader Level” del cueing
delle cuffie.
14. Volume Cuffie: Questo comando a rotella regola il
livello del volume dell’uscita delle cuffie.
15. Missaggio Cuffie: Il livello del programma e i livelli
dei segnali PFL (CUE) possono essere missati con
questo slider. Quando viene spostato tutto a
sinistra, si sentirà l’audio determinato dalle selezioni
del tasto Cue. Quando è tutto a destra si sentirà
solo il programma di missaggio audio finale (PGM).
16. Tasto Split/Mix: Quando è abbassato, l’audio delle
cuffie verrà splittato in modo tale che l’audio mono
PFL si troverà alla cuffia di sinistra, l’audio mono
PGM in quella di destra. Quando è alzato, l’audio
stereo PFL e PGM verrà missato. (miscelato)
17. Presa per cuffia: Le vostre cuffie si possono
connettere a questo terminale da ¼”. Il volume
dovrebbe sempre essere impostato al minimo
durante l’inserimento ed il disinserimento delle
cuffie, per prevenire danni alle cuffie stesse e/o al
vostro udito.
18. Crossfader Sostituibile: Questo fader a cursore
miscela l’audio tra i canali assegnati agli interruttori
di assegnazione di sinistra e di destra.
Attenzione: Il cursore è sostituibile dall’utente,
caso mai si dovesse usurare. Rimuovete
semplicemente il pannello frontale e le viti che lo
mantengono in posizione. Sostituite il cursore con
un ricambio autorizzato che troverete presso il
vostro rivenditore locale Numark.
19. Manopola di Assegnazione: Determina,
ruotandone la posizione, quale canale di ingresso
verrà ascoltato quando il crossfader viene spostato
verso questa manopola. I livelli di volume dei
canali non selezionati verrà determinato solo dai
singoli slider di canale.
20. Avvio del Fader: attiva il crossfader per inviare
segnali di comando impulsi digitali “play” e “cue” al
vostro lettore CD Numark o di altre marche
famose, all’avvio automatico. Per avviare il fader,
connettete il vostro mixer ad un lettore CD ad avvio
remoto che utilizzi cavi standard da 1/8”(3.5mm).
Quando muoverete il crossfader verso il canale
attivo, partirà il lettore CD ad esso collegato.
Quando viene allontanato, quel lato eseguirà un
cueing (simile alla pressione del tasto cue) o si
fermerà, a seconda della marca del lettore CD.
21. Cursore (Fader) Master: Questo comando regola
il volume di uscita principale usando come sorgente
il PROGRAMMA audio.
22. Commutatore Stereo/Mono: regola l’uscita
Master per lavorare in stereo o in mono.
23. Panning: regola i livelli in arrivo a tutte le uscite:
destra/sinistra (Master, Registrazione, Zonale).
24. Assegnazione Misuratore: stabilisce se inviare
livelli audio PFL o post-master al misuratore stereo a
LED.
25. Indicatore di Livello Stereo: traccia velocemente
ed accuratamente il livello di audio che gli viene
inviato. Quando viene utilizzato come
misuratore dell’uscita master, impostate gli
ingressi del crossover, dell’equalizzatore e
dell’amplificatore per evitare la distorsione ad ogni
livello della catena audio. Un’attenzione adeguata ai
livelli di picco risulterà nel suono più vigoroso
possibile senza distorsioni udibili. Quando viene
utilizzato per regolare i livelli PFL, il segnale di
cue PFL è inviato al misuratore attraverso i tasti di
assegnazione cue. Prima di missarli, accoppiate
accuratamente i livelli di canale con il guadagno prefader e i controlli EQ. L’idea è quella di abbinare
adeguatamente gli ingressi PFL, non gli ingressi con
il misuratore dell’uscita stereo!
26. Fader Diffusori/Zonale: controlla il volume di una
zona remota o di impianti di diffusione fissi
utilizzando come sorgente il PROGRAMMA audio.
ATTENZIONE: Questo potrebbe anche essere
utilizzato per fornire audio a livello di linea a un
combinatore dell’illuminazione o a luci ad attivazione
sonora.
 Loading...