

Page 1
Rev - 3.0
Page 2
Rev - 3.0
CONNECTING TO A COMPUTER
If wanting to use your ReMOTE SL to control software then the setup couldn’t be simpler. As the unit is MIDI
class compliant, no drivers are required so the only action to take is connection over USB. Using the supplied
USB cable, connect the ReMOTE SL to one of the computer’s USB ports. Power will be supplied over USB so
an external power supply (PSU) is not required. If in use, Sustain and/or Expression pedals can also be connected
to the rear panel inputs.
Now, the ReMOTE SL will appear as a MIDI device in the sequencer or music application in use and
effortless controlling can begin! PC users should note that the SL will appear as a MIDI device named
‘USB Audio Device’.
CONNECTING TO EXTERNAL HARDWARE
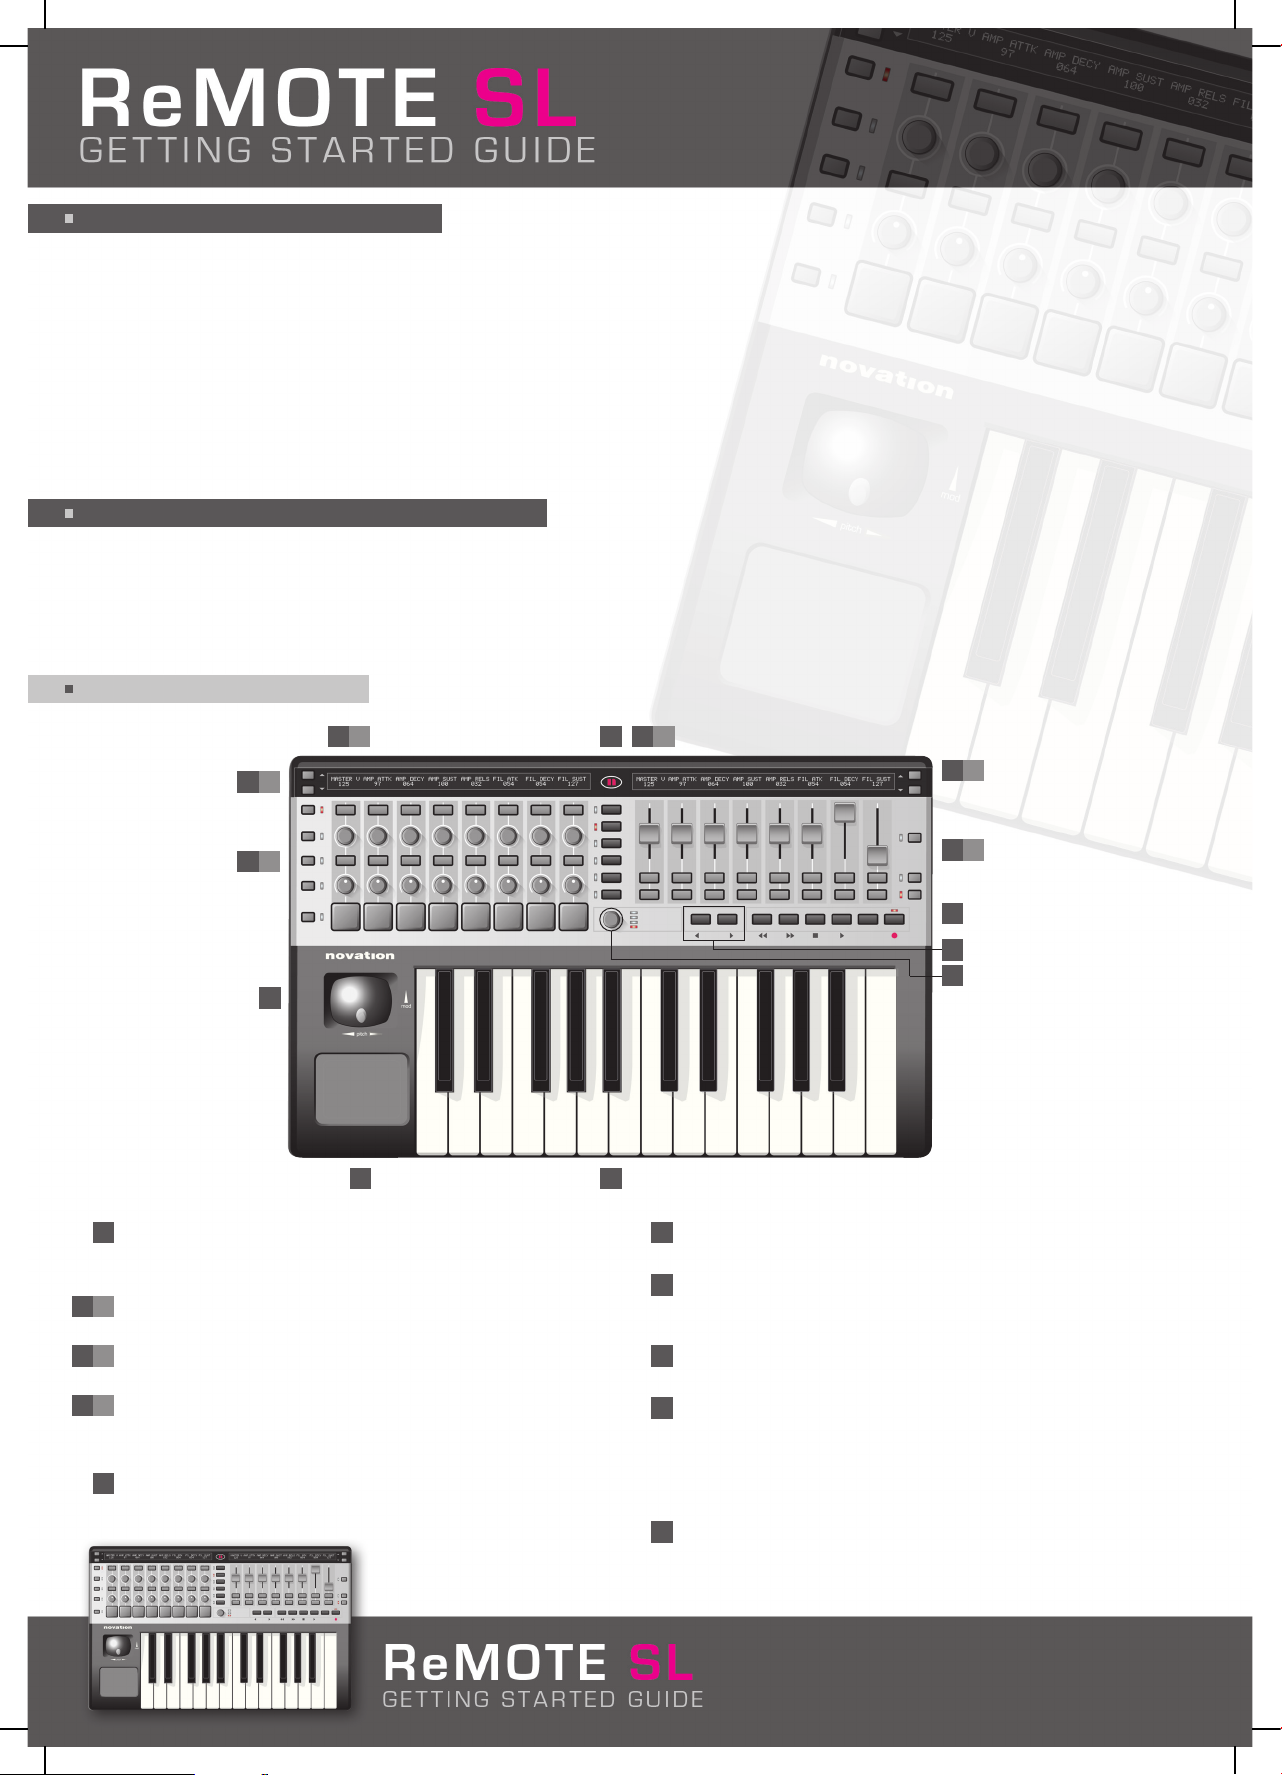
FRONT PANEL DIAGRAM
If wanting to control hardware MIDI devices (e.g. sound modules) with the ReMOTE SL then an external power
supply (Novation PSU-6, not supplied) will need connecting first or batteries will need inserting. To insert batteries,
turn the SL over, remove the battery cover and install 4 C-size batteries. Once done, the ReMOTE SL can be
connected using standard MIDI cables (not supplied) to and from the hardware device.
Mode/Action buttons – select the mode (PLAY, EDIT, TEMPLATE,
GLOBAL) or carry out an action (WRITE, TAP TEMPO)
LCD Screens – view control data and Menus
Scroll up/down buttons – move between Menu pages
Row select buttons – select row of controls to display on the
LCD screen above in PLAY mode
Transport controls – assignable MIDI buttons used for
Transport control in relevant Templates
Combined pitch bend/modulation joystick
Assignable X/Y Touchpad – can control up to 4 simultaneous
parameters (2 on each axis)
Keyboard
Data/Tempo encoder - press to select Template/Program/
Bank/Tempo change mode (depending on illuminated LED
alongside) in PLAY mode. Rotate to select Template/Program/
Bank/Tempo
Octave up/down buttons - transpose keyboard up and down
an octave
1
2
A/B
3
A/B
4
A/B
5
1
2 A 2 B
3 A
3 B
4 A
4 B
5
6
7
8
9
10
6
7
8
9
10
2
Page 3

Rev - 3.0
REAR PANEL DIAGRAM
USING THE SL
If you are not familiar with Novation controllers, the ReMOTE SL is a comprehensive hardware surface for easy
and rapid remote control of any sequencing software, plug-ins or external MIDI devices. There are 40 (36
programmable, 4 automap) onboard memory slots, all of which have been factory preset so that the ReMOTE SL
works with all popular software and hardware from the moment the unit is first powered up. This means that
some or all of the ReMOTE SL’s assignable controls (pots, encoders, buttons, trigger pads, joystick, Touchpad
and Transport controls) have been assigned the relevant MIDI data to act as a logical remote control for the
destination software or hardware. These saved MIDI settings are referred to as Templates. All Templates can be
edited on the unit itself or using the Template Editor (available for free from www.novationmusic.com), whilst brand
new Templates can also be created by the same means and saved in any of the 36 (Numbers 1-36) standard
Template memory slots.
If you are familiar with Novation controllers, the SL employs the same fundamental modes of operation, with
several obvious improvements. Two large LCD screens can display 16 assignable controls’ names and values
simultaneously, whilst also allowing multiple edit Menu pages to be simultaneously viewed and modified. Generally,
the left screen displays data and the right screen shows instructions. Modes are activated using the central
vertical column of buttons, with the data encoder at the bottom now only used for one of four functions in
PLAY mode and not as an option select for the edit menus (see PLAY mode section).
Another major development is the enhanced software interactivity, where in some applications (Cubase SX3 and
Reason 3, more to follow) automatic MIDI mapping means that simply pressing one button or clicking once with
the mouse is all that’s required to switch from controlling one plug-in or instrument to another. In other words,
the ‘automap’ Template does all the hard work for you so that no Templates need to be created or repeatedly
called up and all plug-in sections automatically and intelligently map to known areas of the SL control surface. (For
full details, consult the ReMOTE SL User Guide on the Resources CD or visit http://www.novationmusic.com.)
The Mode/Action buttons running down the centre of the SL call up the four modes (PLAY, Template Individual
EDIT, TEMPLATE Common edit and GLOBAL) and perform two actions (WRITE and TAP TEMPO). The currently
active mode is indicated by the LED alongside the buttons. The default setting is PLAY mode, which will be active
when the unit first powers up. If wanting to activate individual Template edit mode, press the EDIT button and so
on. The contrast of the LCD screens can be adjusted in GLOBAL mode (see GLOBAL mode section).
External power supply (PSU) input
Power select switch - selects between battery/
PSU, OFF and USB (from left to right)
USB port
Sustain pedal input
Expression pedal input
MIDI Out (Port 2)
MIDI Thru (Port 1)
MIDI Out (Port 1)
MIDI In (Port 1)
1
2
5
6
7
8
9
3
4
1 2 3 4 5 6 7 8 9
3
Page 4

Rev - 3.0
PLAY MODE
This is the main mode of operation, in which different Templates can be selected and the ReMOTE SL can be
used as a control surface for multiple plug-ins/instruments. The DATA/TEMPO encoder has four functions,
indicated by the four LEDs alongside. The default encoder function is Template select, so rotating the encoder
will scroll through the 40 onboard Templates, displaying the number on the left LCD and the name on the right.
Pressing the encoder will change its action to one of three other choices: MIDI BANK select (sending MIDI Bank
change messages; calling up Sound Banks on a software synth), MIDI PROGRAM select (sending MIDI Program
change messages; calling up sounds on a software synth) and MIDI TEMPO select (sending MIDI Tempo messages).
Use the ROW SELECT buttons to display names and values of a particular row of eight controls on the LCD
screens, and use the scroll up/down buttons to change to additional screens where more details about the
MIDI data assigned to each control is shown. Moving a control in a row that the values for which are not displayed
will make that row the currently selected one shown on the screen above.
AUTOMAP WITHIN PLAY MODE
Templates 37-40 on the ReMOTE SL are the Automap Templates. Once Automap has been setup for a particular
application (see section below), these Templates will automatically load when that application is booted up, and all
instruments and sections within the session will be sensed by the SL and mapped to it. If using Automap with
Reason 3 then simply mouse click on the MIDI In column of a particular section of the rack (within the sequencer
section in the Reason software) to make this section active on the SL. If using Automap with Cubase SX3 then
simply press the scroll up and down buttons on the top right of the SL to change between controlling different
VSTs. Press the row select buttons on the SL once to call up a particular row’s names and values on the screen
above. Pressing the row select buttons repeatedly will change the function of some rows as controls can have up
to 3 different MIDI values in Automap mode. Note that for the current version of Cubase, buttons on the SL
cannot be used in Automap mode, only pots, encoders, sliders and trigger pads.
The currently supported applications (Oct 2005) are Cubase SL3/SX3 (version 3.1.0.933 or later) and Reason 3
(version 3.0.4 or later). Check the website for updates as other popular platforms are expected to follow shortly.
SETTING UP AUTOMAP MODE
On the Resources CD, there is an Installer (ReMOTE SL Setup) which will set up Automapping for either or both of
the applications (Reason 3 and Cubase SL/SX 3). Double click the relevant version of the Installer (.exe file for PC
and .dmg file for Mac) then simply check or uncheck the boxes when the Automap setup window appears during
the install process.
The ReMOTE SL must be selected as the MIDI controller within the application in use. See sequencer documentation if
unsure of the MIDI setup process. Full details are available in the SL user guide on the Resources CD/Novation website.
EDIT MODE (TEMPLATE INDIVIDUAL EDIT)
This is the Template Individual Edit Mode, in which the nature of each assignable control (the data assigned to
it and the way it behaves when pressed/moved/rotated) in any of the 36 standard Templates (Numbers 1-36)
can be defined. Pressing the EDIT button when using a particular Template will move to the edit mode for that
Template so that it can be modified.
To call up a particular control for editing (slider, pot, trigger pad etc.), simply hold down the EDIT button and
move the control. Once activated, the Menu pages for that control will be displayed on the left LCD screen, with
instructions on the right screen. To edit the control options, simply use the controls directly below each option
on the screen; the buttons above and below the encoder increase and decrease the option respectively, whilst
the encoder and pot will scroll through options. (See diagram on next page.)
4
Page 5

Rev - 3.0
TEMPLATE MODE (TEMPLATE COMMON EDIT)
Pressing the TEMPLATE button activates the Template Common edit mode, in which the universal settings across
all controls within a Template can be modified. Press the scroll up/down buttons to move to additional pages and
modify settings using the same means listed above.
The SL has been expanded to allow for further User options with regards to override MIDI channel settings and
routing. There are now two (universal) options for each control (in addition to the full range of individual options):
COMMON and KEYBOARD. Any control now has the option of using the COMMON or KEYBOARD MIDI channel
and the COMMON or KEYBOARD routing setting. Within each factory Template, controls can be set to COMMON
or KEYBOARD, as well as assigned an individual MIDI channel or routing option, to allow for quick changes to
multiple controls simultaneously. The COMMON and KEYBOARD MIDI channel and routing can be set within the
pages in this (TEMPLATE) Mode. (See User Guide for full details.)
GLOBAL MODE (GLOBAL EDIT)
Pressing the GLOBAL button repeatedly alternates between two different sets of ‘Global’ edit Menu pages. The
first is the set of ‘General Parameters’ pages, where the main ReMOTE SL settings such as Memory protect, port
routing and display timeout can be defined. The second is the set of ‘Keyboard Zones’ pages, where the settings
of up to 4 keyboard zones can be defined. Press the scroll up/down buttons to move to additional pages and
modify settings using the same means listed above.
The facility to update the Operating System and receive/dump Templates is found within the ‘General parameters’
pages in GLOBAL Mode. Press the GLOBAL button followed by the scroll up button (repeatedly) to the left of the
left LCD screen to access.
To adjust the contrast of the screens, press the GLOBAL button once and then use the first or last encoder or
pot to set the left and right screen value, respectively, between 0 and 15. The GLOBAL memory protect must be
off to save this setting. Press the left scroll up button (next to the left screen) once, then use the first encoder/
pot/button to set memory protect to OFF. Once this is done, the WRITE button can be used to save GLOBAL settings.
BUTTONS
INCREASE X
LCD SCREEN
X
ENCODERS
BUTTONS
POTS
DECREASE X
CONTROLS THAT EFFECT X
INCREASE X/
DECREASE X
INCREASE X/
DECREASE X
Press the scroll up/down keys to the left of the screen to move to the additional edit page(s) for each control.
The DATA/TEMPO encoder is inactive in this mode.
5
Page 6

Rev - 3.0
WRITE BUTTON
The WRITE button is used to save the current Template or Global settings into the onboard memory. To save the
current Template (individual and common) settings, press the WRITE button in PLAY, EDIT or TEMPLATE mode
(but not GLOBAL mode), making sure that the Memory Protect is set to OFF in the Global settings. Then, to name
the Template and select its number, use the buttons directly below the relevant areas of the left hand screen to
move the cursor left and right as well as select the character type (upper case, lower case etc.), and the
buttons/pot/encoder below the name and number to scroll through characters and numbers. Once done, press
the WRITE button again to save the Template settings.
Pressing the WRITE button whilst in GLOBAL mode (with GLOBAL memory protect off) will save the currently
selected Global settings.
TAP TEMPO BUTTON
The Tap Tempo button provides another means of setting the Tempo of a track. Simply tap the button repeatedly
to send a MIDI Tempo message based on the timing of each tap.
OCTAVE UP/DOWN
Use the Octave up and down buttons to transpose the ReMOTE SL keyboard across the entire MIDI note range.
The content of this User Guide is correct as of 31/10/05. Novation products are subject to continual updates
in order to achieve maximum usability. As such, certain sections of this document may be incorrect at the time
of reading. Check www.novationmusic.com for updates.
6
 Loading...