

Page 1

Nocturn
Keyboard
USER GUIDE – FIRMWARE VERSION 1.0
FA336 - 02
1
Page 2

ContEntS
IntRoDUCtIon .................................................................................. 2
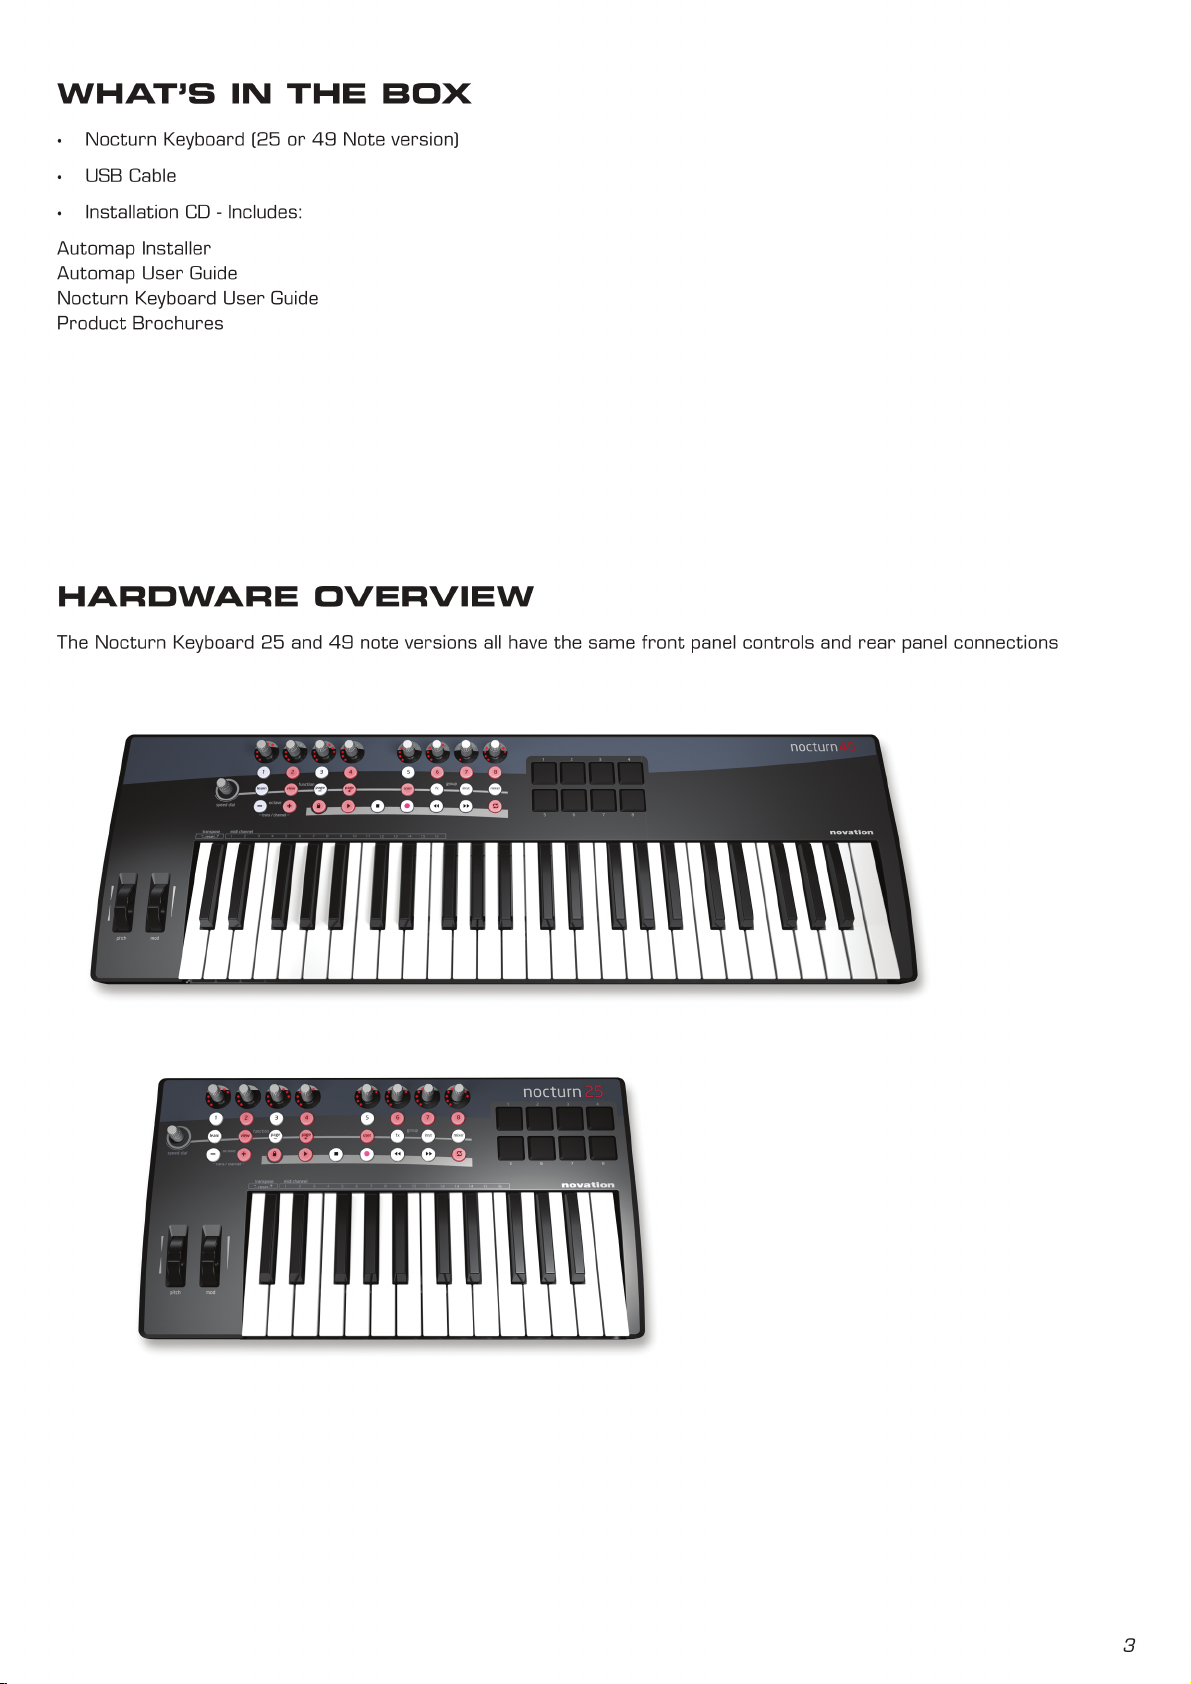
What’S In thE Box ........................................................................... 3
haRDWaRE oVERVIEW ....................................................................... 3
FRONT PANEL .................................................................................4
REAR PANEL ...................................................................................5
InS ta llatI on .................................................................................... 5
ConnECtIon to CompUtER .............................................................. 5
aUtomap oVERVIE W ......................................................................... 6
aUtomap hUD - hEaDS Up DISplay .................................................. 6
DEVICES ............................................................................................ 7
DRUM PAD SENSITIVITY ..................................................................7
VEGAS MODE ..................................................................................7
ContRol map VIEW .......................................................................... 8
ContRol map SEt tInGS ................................................................... 8
SpEED DIal ....................................................................................... 9
non-aUtom ap opERatIon ................................................................ 9
SpECIfICatIonS .............................................................................. 10
tRoUBlEShootInG ......................................................................... 10
IntRoDUCtIon
Welcome to the Nocturn Keyboard User Guide.
This guide will introduce you to the Nocturn Keyboard hardware and give you information on choosing how best to use the
keyboard for your software studio set-up.
There is a separate User Guide for the Automap Software which is included on installation CD or can be downloaded from
our website: www.novationmusic.com/support
Automap software is a new and exciting way to control your favourite music software applications. It operates the same
way for all Novation Automap hardware (Products) so if you are using the Nocturn Keyboard for Automap control of
software then you should only need to read the first few chapters of this guide to familiarise yourself with the hardware.
Detailed information on installing, setting up, and operating Automap software can be found in the Automap User Guide.
Instructions on setting up your DAW software for use with Automap is found in the Automap sof tware itself by clicking the
DAW set-up guide button for detailed instructions.
For additional information, up to date support articles and a form to contact our Technical Support Team please visit the
Novation Answerbase at: www.novationmusic.com/answerbase
2
Page 3
Page 4

4
fRont panEl
1) 8 touch sensitive endless rotary encoders with LED rings: These controls have no end points, so offer full 360˚
of movement. These controls offer speed dependent variable resolution, so moving the encoder slowly gives fi ner
resolution than moving the encoder quickly.
2) 8 buttons: All buttons are back-lit with LEDs.
3) Automap Buttons: These 8 buttons are used for Automap Software navigation and control.
4) Octave / Transpose / MIDI Channel buttons:
Press - or + to transpose the keyboard up or down by one octave. Press and release both but tons together to reset
the octave.
Press - AND + together and hold, then press the keys below transpose - and + to transpose the keyboard up and down
by one semitone. Press both keys together to reset the keyboard transpose.
Press - AND + together and hold, then press the keys below MIDI channel 1 - 16 to change the keyboard MIDI Channel.
5) Transport Lock button: Press to switch transport buttons from transport control to freely assignable buttons.
6) 6 Transport buttons
7) 8 velocity-sensitive drum trigger pads.
8) Pitch wheel
9) Modulation wheel
10) Speed Dial Knob: The Speed Dial function acts as a way of controlling the computers mouse using
the Nocturn Keyboard. When this button is pressed down it acts as a preset selector.
11) Keyboard: The Nocturn Keyboard range is available in 25 or 49 note keyboard versions.
5 6 7 8
fxuser inst mixer
1
2 3 4
learn view
page page
1
10
11
8
2
3
9
6
5
4
7
Page 5

5
REaR panEl
1) Power switch: Use to switch the Nocturn Keyboard on or off.
2) USB in socket: Use to connect the Nocturn Keyboard to your computer with the included USB cable.
3) Sustain pedal socket: Use to connect a sustain pedal. Any polarity pedal can be used.
4) Expression pedal Socket: Use to connect an expression pedal. Note that a 3 pin jack connector must be used.
InS ta llatI on
The Nocturn Keyboard should be installed onto your computer using the Automap software installer. This is found on the
installation CD or can be downloaded from www.novationmusic.com/support.
Full sof tware installation instructions can be found in the Automap Guide (also on the installer CD or available from the
above website address)
ConnECtIon to CompUtER
The Nocturn Keyboard is a class compliant device, meaning that it can be connected to a computer without the need to
install any driver software. However, as Automap software is an integral part of controlling software with the Nocturn
Keyboard, we recommend that the software is installed BEFORE connecting the keyboard to the computer.
To connect the Nocturn Keyboard to your computer, simply use the supplied USB cable to connect the USB port on the
back panel of the Keyboard to a USB port on your computer.
5 6 7 8
fxuser inst mixer
1
2 3 4
learn view
page page
1
2
3
4
USB
Page 6

aUtomap oVERVIE W
Nocturn
Keyboard
Port
MIDI/Instrument Trac
DAW Mixer
Plug-in
Automap Port
There is a dedicated Automap user guide which explains the setup and usage of Automap in detail. The following
information is intended to be a brief overview.
Automap software ‘sits’ between the Nocturn Keyboard and your DAW software. It allows direct control of AU, VST, RTAS
and TDM plug-in parameters, as well as a control of supported DAW mixers, and also MIDI CC control of software.
Data from the Nocturn Keyboard is sent to the computer via the USB cable in two separate ‘Ports’.
Keyboard Note data is sent directly from the Nocturn Keyboard to the input of a MIDI / software instrument channel via
the Nocturn Keyboard Port. This will appear in your DAW software with the name ‘Nocturn Keyboard’ (or similar depending
on the computer OS).
Control data is sent from the Nocturn Keyboard to the Automap Software via a hidden Automap Port. Automap Software
directly controls FX and Instrument plug-in parameters, DAW Mixer control and DAW Transport control. Data is sent back
from the Automap Server to the Nocturn Keyboard, updating the LED rings and button LEDs.
aUtomap hUD - hEaDS Up DISplay
When you open your DAW software, the Automap software will automatically open.You will be presented with the Automap
startup page:
All of the options presented here are covered in the Automap Guide, however there are settings specific to the Nocturn
keyboard in the Devices section.
6
Page 7

aUtomap hUD - DEVICES
Click on the Devices icon to access the Nocturn keyboard settings.
Once you have selected the Nocturn Keyboard device, you will see the above screen.
DRUm paD SEnSItIVIty SEttInGS
The Nocturn Keyboard will be pre-calibtrated, however you may wish to alter the responce of the drum pads.
Hit each of the drum pads in turn to calibrate the desired velocity response. You will see the hit velocity displayed each
time you hit a drum pad.
Hit a pad at full strength to check the current calibration. If the hit velocity value above the pad goes to 127 too easily,
decrease the sensitivity. This will reduce the sensitivity of the pad, meaning you need to hit it harder to reach maximum
velocity.
Hit a pad softly and view the hit velocity value. If the value does not update when you hit the pad then the threshold is
too high. Use the encoders to adjust the threshold values. Lowering the threshold will increase the sensitivity of the pad
meaning that it will respond to a softer hit.
Note that once you have pressed Save Setup to Device, you will not need to re-calibrate.
VEGaS moDE
Vegas Mode can be set to On or Off. Vegas mode turns on all the LEDs on the Nocturn keyboard in sequence after the unit
has been left idle for a period of time.
7
Page 8

aUtomap hUD - ContRol map VIEW
The layout of the Automap HUD (Heads-up-display) mirrors the layout of the Nocturn Keyboard hardware.
All displayed controls are available for use in the Automap Mapping.
The following controls can be switched in and out of Automap:
Transport controls - Hit the Transport Lock button on the Nocturn Keyboard Hardware to switch between transport
control and assignable controls in Automap.
Modulation Wheel
Sustain and Expression Pedals
Drum Pads
When unassigned to a parameter in Automap, these controls output fixed MIDI messages on the Nocturn Keyboard Port as used for Non-Automap mode. See page 9 for details.
aUtomap hUD - ContRol map SEt tInGS
Channel: Click to select the MIDI Channel that the Keyboard outputs data on.
Octave: Click to transpose the keyboard octave up or down
Transpose: Click to transpose the keyboard up or down by semitones.
Aftertouch: Click to set the Keyboard Aftertouch to on or off.
Curve: Click to select the velocity curve of the keyboard. The settings available are: Loud 1, 2, Medium 1, 2, Quiet 1, 2, and
fixed velocities of 8 to 127.
Note that all these settings are saved for each mapping. For example, two different mappings can have different MIDI
channel and velocity curve settings.
If any of the above settings are set to No Change then the settings from the previous mapping will be used (i.e. no change
to the settings).
If a mapping is not in instrument group the default will be ‘no change’ for all settings.
If a mapping is in the instrument group, the default will be - channel 1, octave 0, transpose 0, AT on, curve medium 2.
If the MIDI Channel, Octave, or Transpose settings are changed from the Nocturn Keyboard Hardware, then the settings
will update on the Automap HUD.
8
Page 9

SpEED DIal
MIDI/Instrument Trac
DAW Mixer
Plug-in
Nocturn
Keyboard
Port
The speed dial knob has 2 functions in Automap Mode.
Speed Dial mode: The speed dial can be used to control any on-screen parameter that can be altered using the mouse.
Simply move the mouse cursor over the parameter you want to change then rotate the knob to control it.
This process can be used for e.g. altering parameters on a sof t-synth, controlling mixer parameters in your sequencer,
selecting an option from a drop-down menu or resizing a window. The Automap Server software must be running for
this function to work.
Preset mode: Press and rotate the knob whilst held down to select different plug-in presets. Preset navigation will only
work where a plug-in uses the host preset navigation system, rather than it’s own built-in one.
non-aUtom ap opERatIon
The Nocturn Keyboard can be used without the Automap software running. In this case both the Keyboard Notes and
Controls are sent to the computer using Nocturn Keyboard Port. This will appear as ‘Nocturn Keyboard’ (or similar
depending on computer OS) in your DAW.
The controls output fixed MIDI message as follows:
Encoder 1 2 3 4 5 6 7 8
MIDI CC No 7 (Volume) 10 (Pan) 74 73 71 72 91 92
Button 1 2 3 4 5 6 7 8
MIDI CC No 51 52 53 54 55 56 57 58
Transport Button Play Stop Record RW FF Loop
(Transport Lock On)
MMC Commands
(Transport Lock Off)
MMC Play MMC Stop MMC Record MMC Rewind MMC Fast
CC 85
Forward
28 29 86 30 31 85
MIDI CC No
Drum Pads
Pad 1
Note 45 / F1
Tom 1
Pad 5
Note 36 / C1
Kick
Pad 2
Note 47 / G1
Tom 2
Pad 6
Note 38 / D1
Snare 1
Pad 3
Note 50 / A1
Tom 3
Pad 7
Note 40 / E1
Snare 2
Pad 4
Note 46 / A#1
Hi-Hat Open
Pad 8
Note 42 / F#1
Hi-Hat Closed
Sustain Pedal CC64 Speed Dial Speed Dial Knob as two functions:
Expression Pedal CC11 Rotate Bank Change
Push and Rotate Program Change
9
Page 10

SpECIfICatIonS
Keyboard
Keys: 25/49
Type: Velocity sensitive with aftertouch
Pitch and Mod Wheel Mechanism
Pitch wheel: Spring loaded, centre return front to back motion
Mod wheel: Free running, front to back motion
Interfacing
Data Ports: 1 x USB MIDI (Win XP/Mac OSX class-compliant)
Sustain Pedal: 1 x 1/4 Jack Input
Expression pedal: 1 x 1/4 Jack Input
Dimensions
Size (25): W=472mm, H=68mm, D=260mm
Size (49): W=798mm, H=68mm, D=260mm
Weight
(25): 2.50 kg
(49): 3.70 kg
tRoUBlEShootInG
There is no troubleshooting section in this guide. This is because up to date support articles and a form to contact our
Technical Support Team is available from the Novation Answerbase at: www.novationmusic.com/answerbase
10
 Loading...