

Page 1
1
Launchpad X User Guide
Page 2

2
Introduction
Hardware Overview
……………….……..…………….……………….…….………….………….3
Key Features……………………..………………….…………...3
In the Box…….…………………..………………….…………...4
Getting up and running……….…..……………..….………….4
Launchpad Intro……….……….…..……………..….………….6
Ableton Live…..……….……….…..……………..….………….7
Using with other software.…….…..……………..….………….7
…………………………………………………………………………8
Launchpad X Interface Overview
Session mode
…………….………………………..……………………………………….10
Ableton Live’s Session View…………………..….………….10
Mixer Mode……….……………..…………………………….12
Note mode
Custom modes
…………..….……………….…………………..………………….………….16
Chromatic mode…….….……..………..…………………….17
Scale mode……….….…..………..………………….……….17
Note Mode Settings…………………………………………..18
Overlap settings…...…………………..……….…….……….20
Drum mode……….……...………..………………….……….22
…………….…………………..………………….……………….……….23
Setting up Custom Modes……….……………….………….24
Lighting Pads………………………………………..…………25
Settings
………..……………….…………….….……….………………………...……….26
Default MIDI mappings
……….…………….….………………………………...……….34
Table of Contents
…..……….….……….…....…..………...……………11
Page 3

3
Introduction
Launchpad X is our essential grid controller Ableton Live. Launchpad X will
accelerate your music production and allow your live performances to become fast
and tactile experiences.
Launchpad X makes launching clips in Ableton Live easy by bringing your Session
View from the screen to your fingertips in full RGB colour. Take music making
further and build tracks with Launchpad X by using the powerful Note mode to lay
down expressive beats and melodies with the velocity and pressure sensitive pads.
This manual will help you to understand every feature of your new grid controller
and will teach you how to take your production and performance to the next level
with Launchpad X.
Launchpad X Key Features:
• An 8x8 grid of 64
Velocity and pressure sensitive
•
instruments
• Perform with Ableton Live by launching clips and scenes
Capture MIDI
•
• Plug and Play - USB bus-powered
• Powerful and versatile modes
• Ableton Live Mixer – control
• Direct access to performance controls with
Arm
buttons
• Powerful music production software included - Ableton Live 10 Lite, as
well as a range of high-quality instruments & effects
• Endless possibilities for controlling your software with
RGB LED
Record
and
backlit pads
pads for expressive performance of your
your playing in Ableton Live
: Session, Note and Four Custom Modes
Volume, Pan
Sends
and
Stop, Solo, Mute
per track
and
Custom Modes
Record
Page 4

4
In the box:
• Launchpad X
• USB-C to USB-A cable
Getting Up and Running
We’ve made getting up and running with Launchpad X as easy as possible, whether
you’re a brand new beatmaker or a seasoned producer. Our Easy Start Tool
provides a step-by-step guide on getting set up that is tailored to your needs,
whether you’ve never made music before or you just want to download your
included software as fast as possible.
To access the Easy Start Tool,
If you’re on a Mac:
1. On your Desktop find and open the folder “LAUNCHPAD X”.
2. Inside the folder, click the link: “Click Here to Get Started.html”
3. You’ll be taken to the Easy Start Tool where we’ll get you set up.
first plug in your Launchpad X
.
Alternatively, if you have Google Chrome open upon plugging in Launchpad X, a
pop-up will appear that will take you straight to the easy start tool.
Page 5

5
Double click the “Launchpad X” drive
Double click the “Click Here To Get Started” link
If you’re on Windows:
1. Press the Start button and type “This PC”, then press enter.
2. In This PC, find the drive: “Launchpad X”, and double click.
3. Inside the drive, click the link: “Click Here to Get Started.html”
4. You’ll be taken to the Easy Start Tool where we’ll get you set up.
Page 6
6
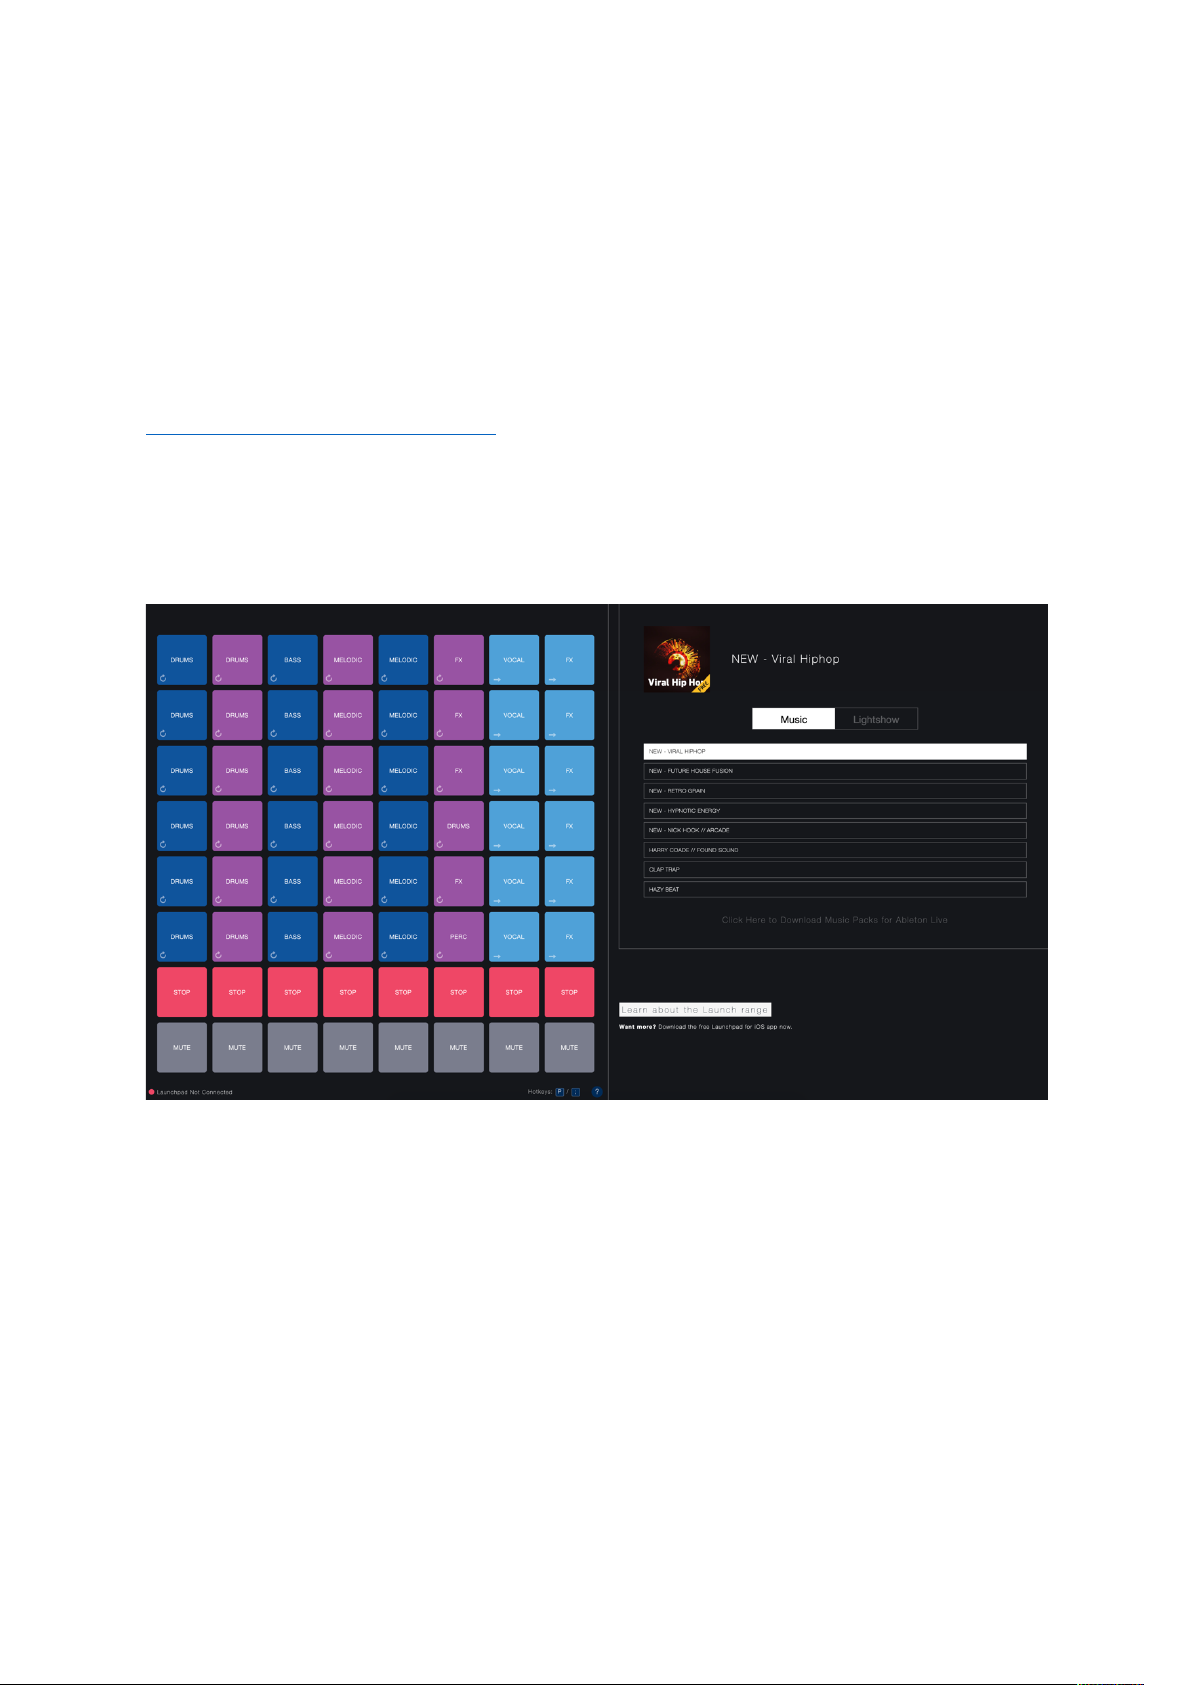
Launchpad Intro
If you’re new to Launchpads,
Launchpad Intro
is a great place to start. Choose from
a variety of curated packs from Ampify Music and start performing immediately.
Your Launchpad X will match the on-screen grid - press pads to launch loops and
one-shots to build up your track.
To get there, plug your Launchpad X into your computer and visit
https://intro.novationmusic.com/. Your Launchpad X will be automatically detected
and you’ll immediately be able to play beats using our curated packs.
Warning: To access Launchpad Intro, you must use a WebMIDI enabled browser.
We recommend Google Chrome or Opera.
Page 7

7
Ableton Live
Ableton Live
software for music creation. Ableton Live 10 Lite is provided with your Launchpad X,
which gives you all the tools you’ll need to get started with making your own music.
If you’ve never used Ableton Live before, we recommend visiting our Easy Start
Tool (see
and installing Ableton Live 10 Lite. You’ll also find videos covering the software’s
basic features so you can get started making music in Ableton Live with Launchpad
X.
With Ableton Live installed, get your Launchpad X up and running by plugging it
into your Mac or PC’s USB port. When you open Live your Launchpad X will be
automatically detected and it will enter Session Mode.
More resources on using Ableton Live’s many functions may be found on Ableton’s
site at: https://www.ableton.com/en/live/learn-live/.
You may register your Launchpad X and obtain your Ableton Live 10 Lite license at:
https://customer.novationmusic.com/register.
Using with other software
Launchpad X is made for Ableton Live, but it may also be used as a controller for
other software. If you’re using other music production software, visit
support.novationmusic.com for more information on how to set up your Launchpad
X.
Having trouble?
In case you’re having any trouble getting setup, don’t hesitate to contact our
support team! You can find more information and answers to FAQs in the Novation
Help Centre at support.novationmusic.com.
(often referred to only as Live) is a unique and powerful piece of
Getting Up and Running
). Here you’ll be guided through downloading
Page 8
8
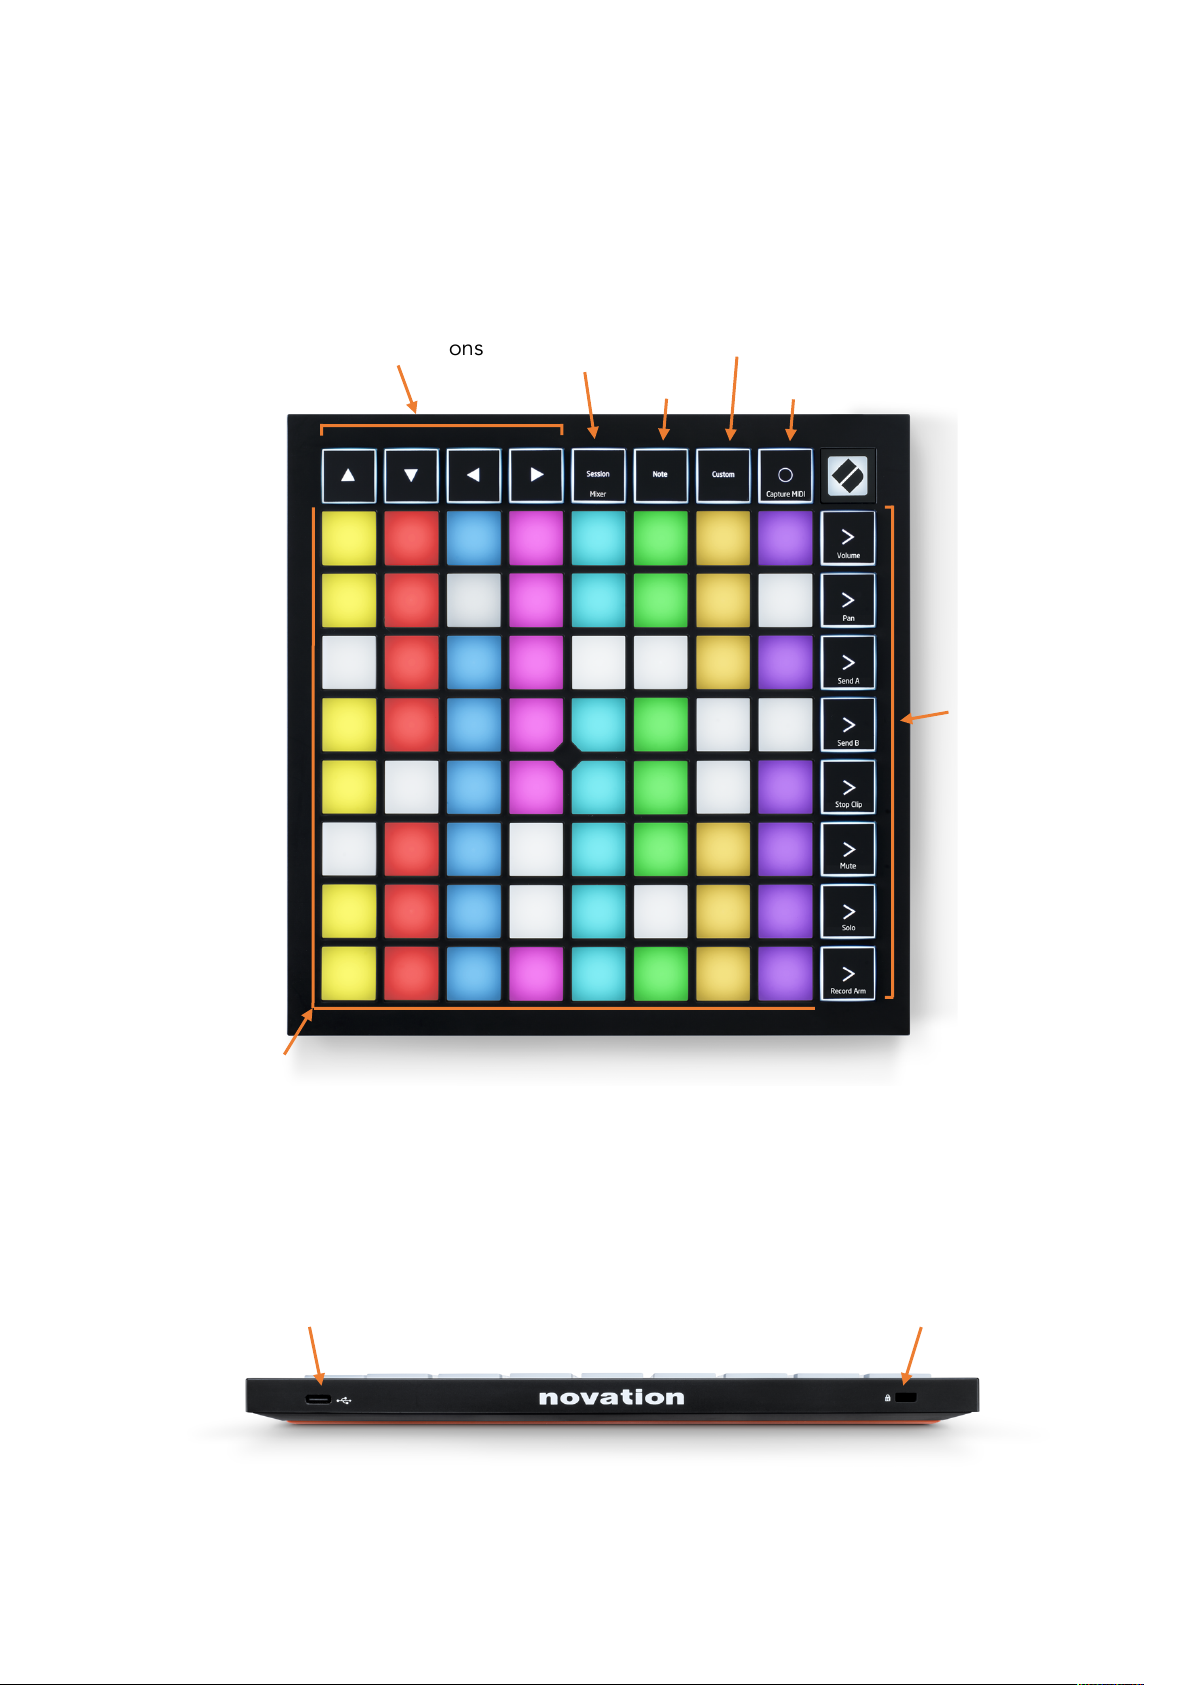
Navigational buttons
Session Mode
(+ Mixer Toggle)
Scene Launch &
Mixer Buttons
Note Mode
8x8 Pad Grid
Custom Mode
Record & Capture MIDI
USB-C Socket
Kensington MiniSaver™ Socket
Front panel
Hardware Overview
Back panel
Page 9
9
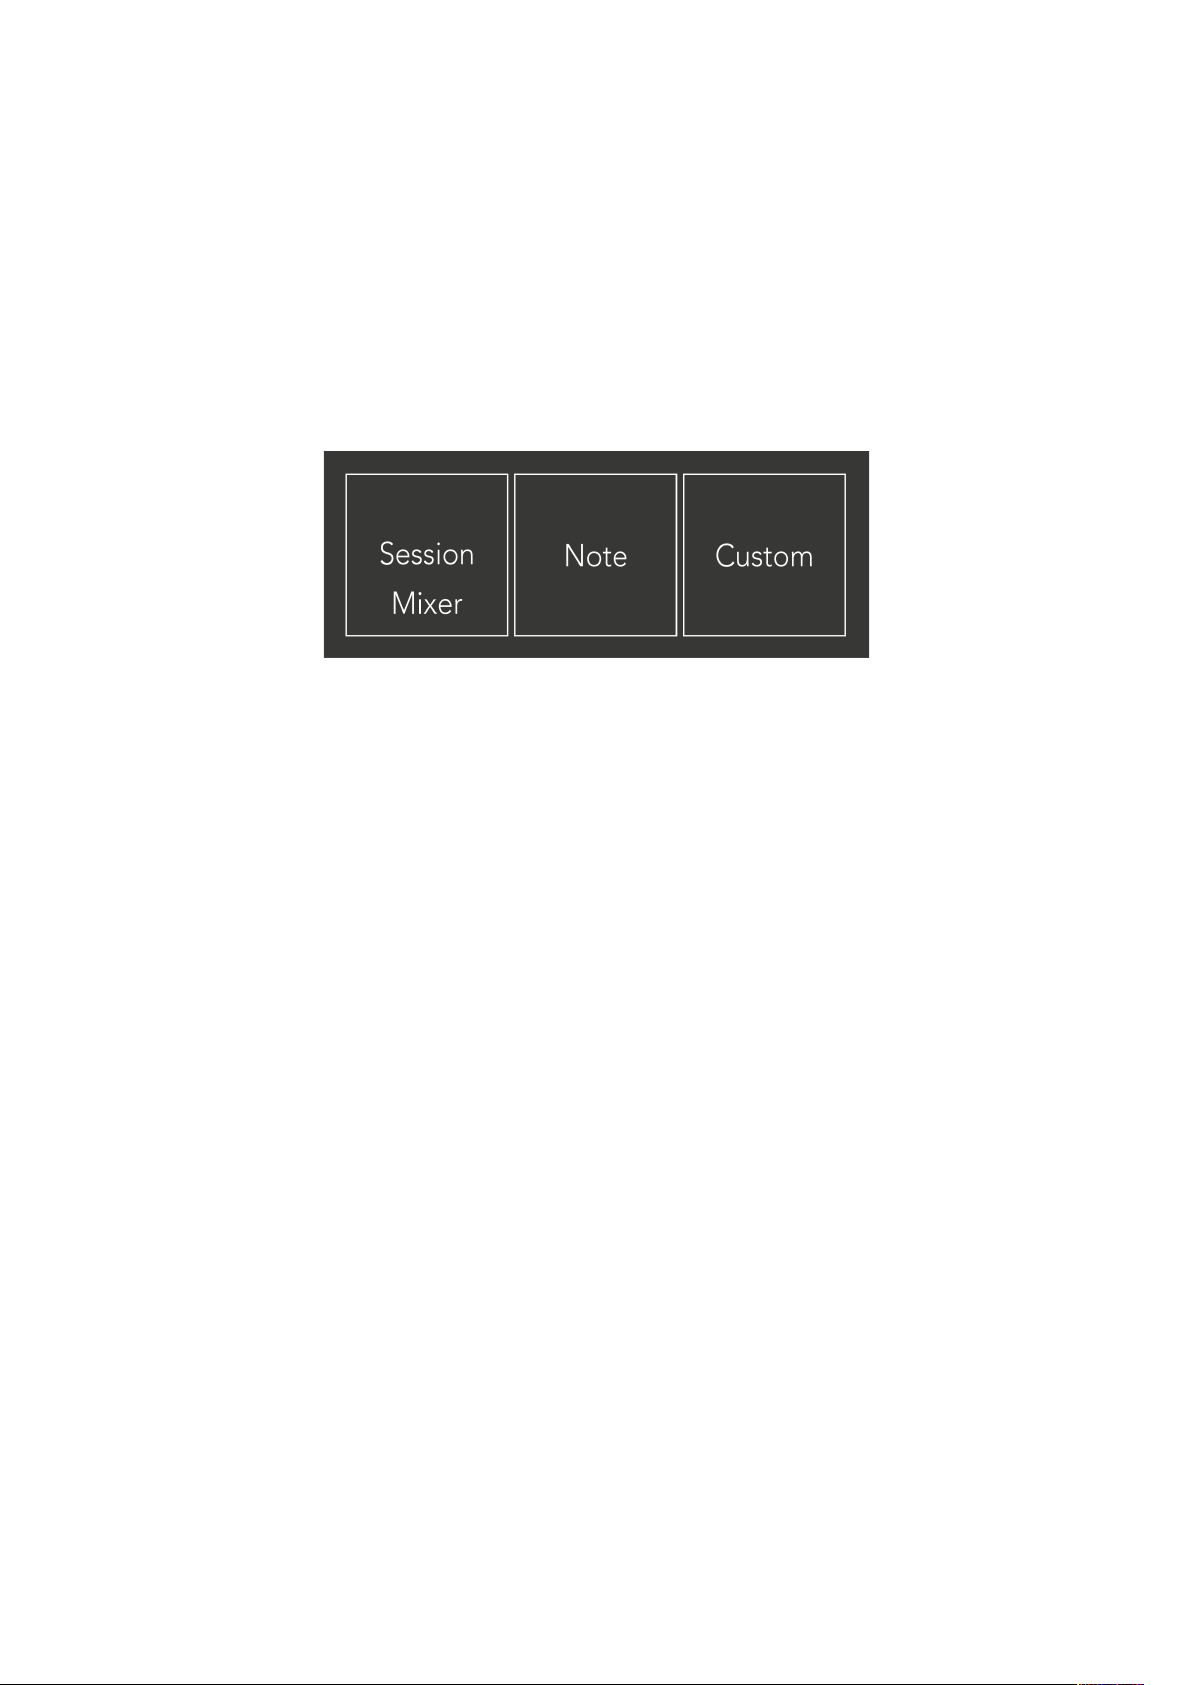
Launchpad X Interface
Modes are the core of the Launchpad X interface. They allow you to switch between
views, offering different functionality in each.
There are three different modes available –
Press a mode button (above) to enter the respective mode. The currently active
mode will be lit pale green. Currently available modes will be lit dim white.
When in Session Mode, press Session once again to toggle Mixer Mode. In Mixer
Mode the Scene Launch buttons will become Ableton Live mixer functions in line
with their sub text.
There are 4
enter Custom Mode 1 by default. Access each of these by pressing the top 4 Scene
Launch buttons after the Custom button is pressed. The Custom Mode lit in pale
green is selected, while available ones will be lit dim white. Using Novation
Components, you are able to edit these four modes and customise them to your
needs (see
Custom
Custom Modes
modes available. When the Custom button is pressed you will
).
Session, Note
and
Custom
.
Page 10
10
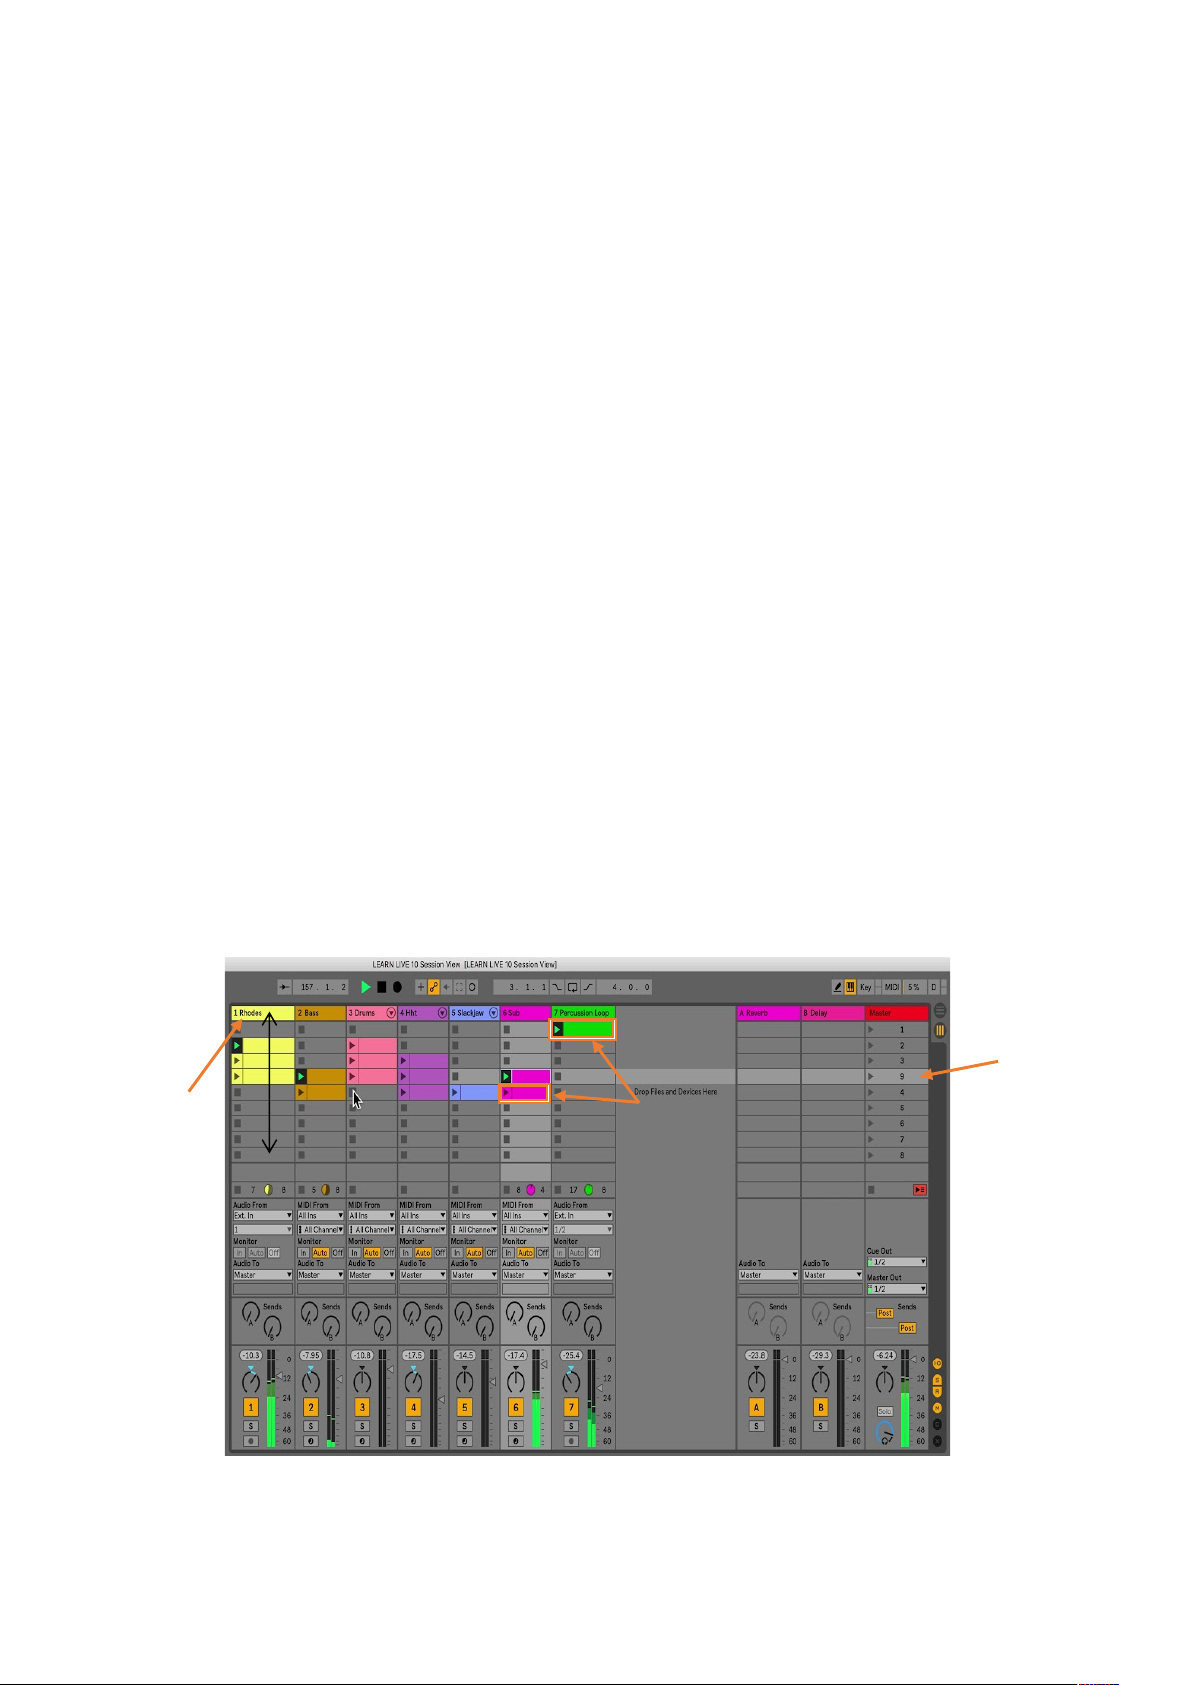
A row represents a
scene “9”.
The yellow column
titled “1 Rhodes”.
Clips
Ableton Live’s Session View
Session mode is designed to control
If you’ve never used Ableton Live before, we recommend visiting our Easy Start
Tool (see
Lite download code (if you choose to register your Launchpad X), alongside videos
covering installing, the software’s basic features, and how to get started making
music with your Launchpad X in Ableton Live.
Session View is a grid that consists of
Session mode provides an 8x8 view of your clips in Session view on Launchpad X.
Clips
Tracks
tracks will play back on the instrument that is assigned to that track.
Scenes
means that you can arrange clips into horizontal groups (across tracks) to form a
song structure, launching scene after scene to progress through a song.
shows a track,
Getting Up and Running
Session Mode
Ableton Live’s Session View
). Here you’ll find your included Ableton Live 10
clips, tracks
(columns) and
, seen below.
scenes
(rows).
are typically loops that contain MIDI notes or audio.
represent virtual instruments or audio tracks. MIDI clips placed on instrument
are rows of clips. Launching a scene will launch all clips in that row. This
scene, highlighted is
Page 11
11
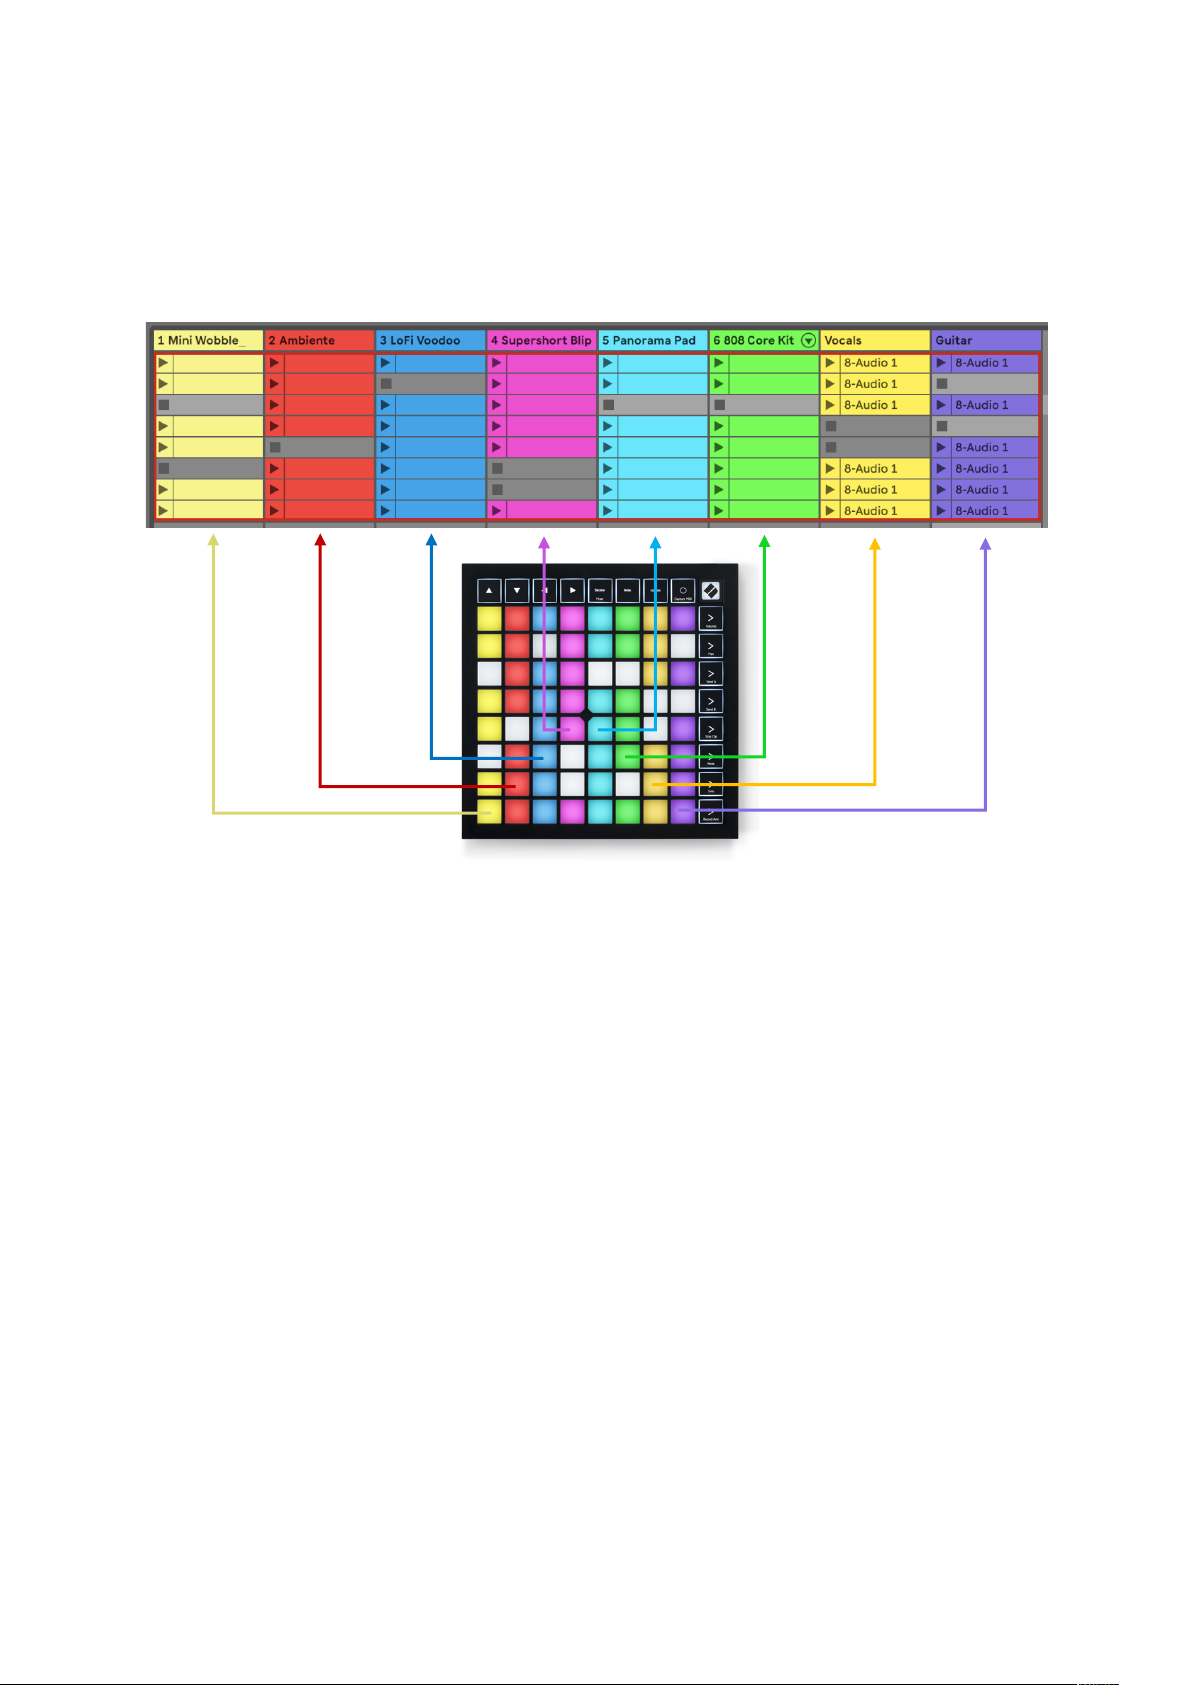
The ▲▼◄ ► buttons let you navigate session view. The red outline in the Session
View grid shows the area currently visible on Launchpad X.
Note: This outline may appear in any colour - this won’t affect its function.
• Press a pad to play the corresponding clip in Ableton. The colour will match
between the screen and pads.
• When a pad is pressed it will flash green, indicating that the clip is queued
and will soon begin to play. When a clip is playing, the pad will pulse green.
• Only one clip may play at a time per track. Pressing an empty clip will stop
the current one on that track.
• A horizontal line of clips is called a
>
(scene launch) buttons on the right-hand side of Launchpad X.
Scene
. Scenes can be triggered using the
When a track is record armed (see
Mixer Mode
), you may use the [O] button
(Session Record) to enable overdub recording of the currently playing clip.
Pressing and hold Capture MIDI to capture any recent playing and place it into a
MIDI track. If no clip was playing on the armed track, Ableton Live will place the
MIDI notes into a new clip. If a clip was playing, the MIDI notes will be overdubbed
onto that clip.
Page 12

12
Mixer Mode
Mixer Mode
parameters in
is a sub-mode of Session mode that allows you to control various track
Ableton Live 10
. Mixer Mode can be toggled on and off by pressing
the Session button when in Session Mode. When in Mixer Mode, Session will be lit
orange, as opposed to pale green when in Session Mode.
In Mixer mode, the Scene Launch buttons will become Mixer
Functions corresponding to the text on each button.
When a Mixer function is pressed, it will be lit brightly to indicate that
it is selected. Pressing the same Mixer function once more will
deselect it. Unselected mixer functions will be lit dim white.
Volume:
Control the volume levels of the tracks within the currently
selected 8x8 area in Session view. Volume faders are vertical.
Pan:
Control the stereo panning of the tracks within the currently
selected 8x8 area in Session view.
Pans will show horizontally
- the top
pan represents the leftmost track, and the bottom represents the
rightmost.
Send A:
selected 8x8 area in Session view to Send A. Send faders are vertical.
Send B:
selected 8x8 area in Session view to send B. Send faders are vertical.
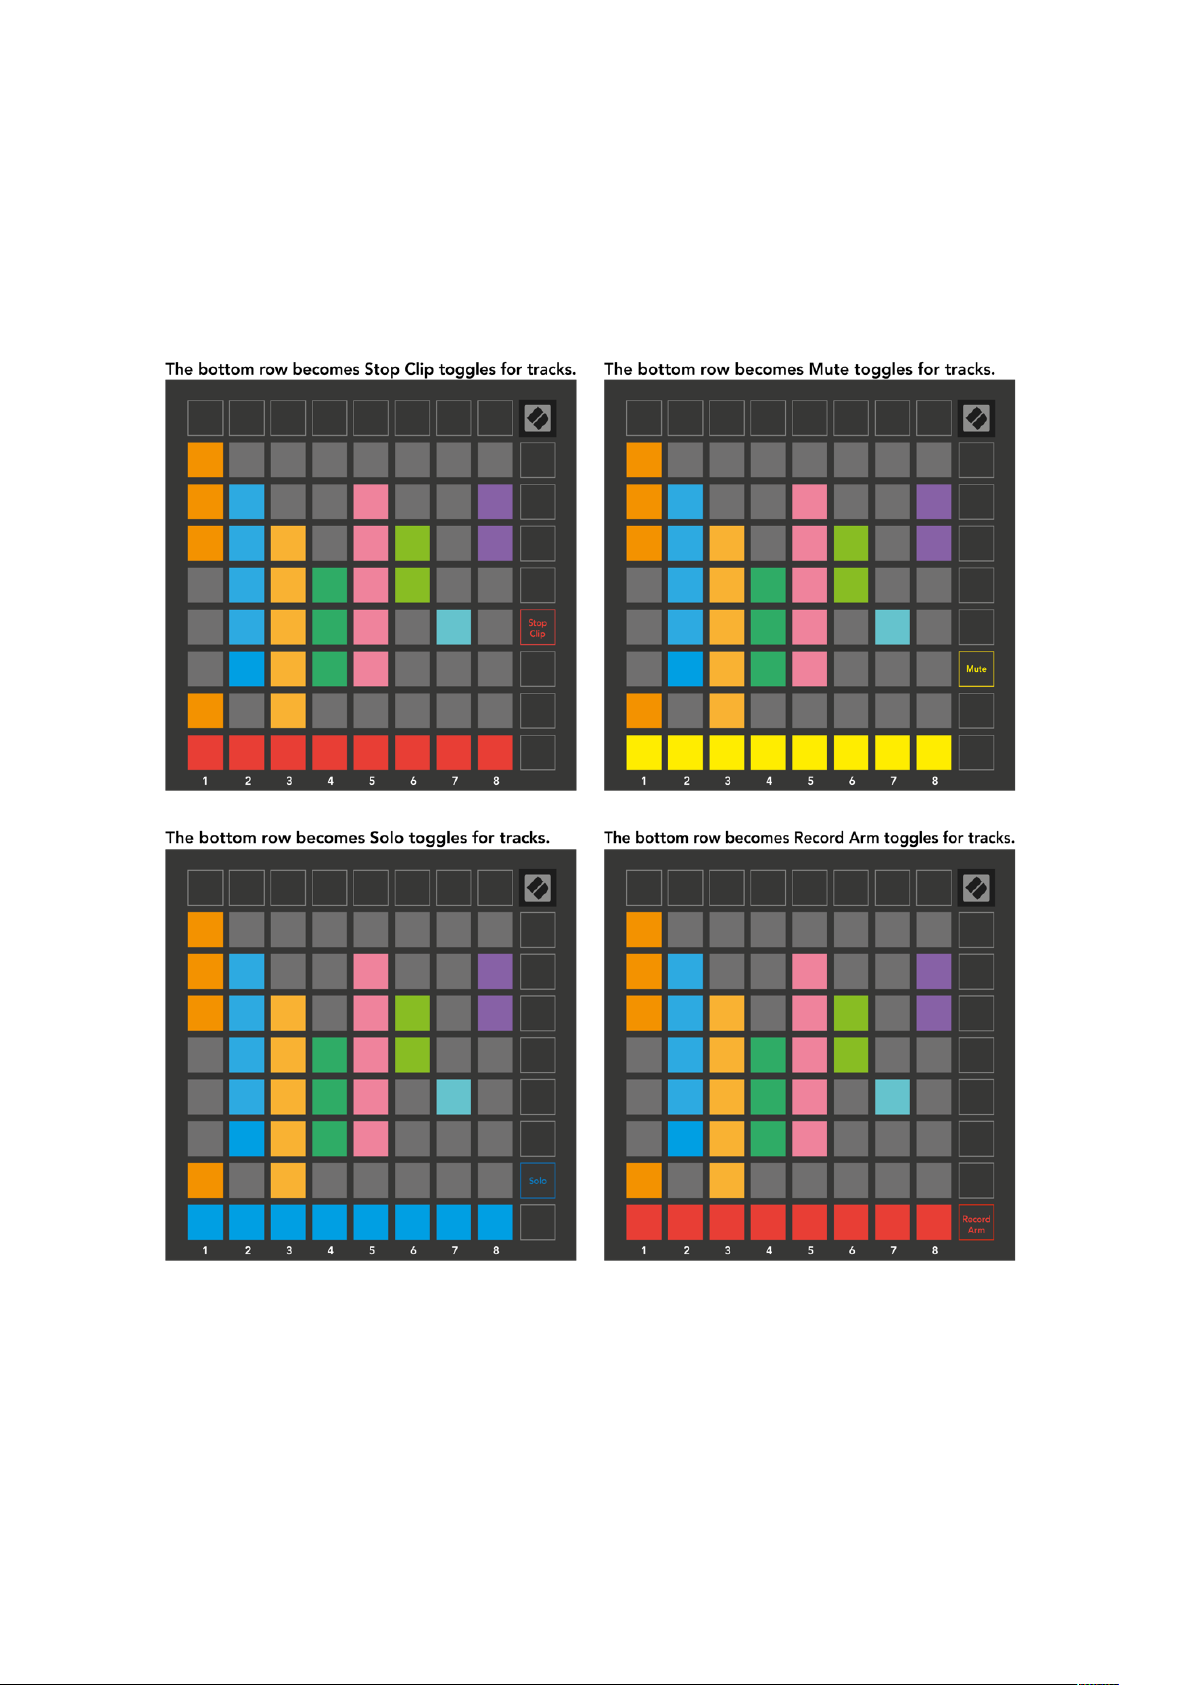
Stop Clip:
Control the send level of the tracks within the currently
Control the send level of the tracks within the currently
Overlay the bottom row of pads with Stop Clip triggers.
When pressed, the clip in the corresponding track will stop playing at
the end of the phrase.
Mute:
Overlay the bottom row of pads with Mute track toggles. When
pressed, the clip in the corresponding track will stop playing.
Page 13

13
Solo:
Overlay the bottom row of pads with Solo track toggles. When pressed, the
clip in the corresponding track will stop playing.
Record Arm:
Overlay the bottom row of pads with Record Arm track toggles. When
pressed, the clip in the corresponding track will stop playing.
Volume, Pan, Send A
and
Send B
are each sets of 8 faders. The faders are vertical
for Volume, Send A and Send B, whereas they are horizontal for Pan (see below).
Press a pad to move the fader position up and down (or left to right).
Faders
are velocity sensitive. Hitting a pad on a fader hard will cause the value to
move quickly, while pressing a pad softly will result in a more gradual change of the
value.
Faders also feature
microvalues
that may be accessed by tapping a single pad
multiple times – each press will output a slightly higher value. This allows for more
fine-tuned control with faders. There are four microvalues per pad. Once the
highest microvalue for a pad is reached, a further press to the same pad will return
to the lowest value for the pad. Fader microvalues are indicated by the brightness
of the highest value pad of a fader, with dim being the lowest microvalue, and full
brightness being the highest.
Page 14

14
The numbers in each fader above shows which track the fader is related to with
regards to Session View’s red outline. The left-most track becomes the top track for
pans.
Page 15
15
In Mixer mode, the bottom row of pads can provide immediate control for four
performance
track
controls:
(solo a specific track),
Mute
Stop
(stop clip from playing on a specific track),
(mute a specific track) or
Record Arm
Solo
(arm a specific
track for recording). These functions are overlaid onto the bottom row of pads when
their Mixer functions are pressed.
The pads for the currently Record Armed, Muted and Soloed tracks will be lit
brightly, while the others will be dimly lit.
When a track is record armed, all empty clips in a column will be dimly lit red. When
a clip is pressed it will flash red to show that it is queued to record (the record
button will also flash in unison). The pad will pulse red once recording begins, with
Page 16

16
Monitor is set to Auto.
Red arm button indicates
the record button lit bright red. If the record button is then pressed, the clip will
flash red to indicate that it will soon stop recording. If the track is un-armed during
recording, the clip will immediately stop recording.
Views within Session Mode and Mixer Mode allow for momentary switching.
For example, you may currently be viewing your track mutes, but want to quickly
visit your volume faders to turn a track up. Press and hold Volume, edit a volume
fader, and release Volume to return to Mute view.
Note that Faders will not continue to move when not currently viewed.
Note mode
Use Launchpad X’s Note Mode to play drums and melodic instruments expressively
with the velocity and pressure sensitive 8x8 grid.
The layout of Note mode is variable, with the option to have a chromatic, scale, or
drum layout. You are able to customise Launchpad X’s playing surface to suit you.
When in any layout, use ▲▼ to increase or decrease the octave, and use ◄ ► to
transpose the grid by a semitone up or down.
Note Mode will react dynamically to the currently armed instrument in Ableton Live.
When a track with a Drum Rack is armed in Live, Note Mode will automatically
switch to a Drum layout, and vice versa for any other instrument.
In Ableton Live, load an instrument into a MIDI track by selecting an instrument
from the browser and double clicking it (or alternatively drag it to a track). If you
cannot hear anything, ensure that the track is record armed and that monitoring is
set to auto.
that track is record armed.
Page 17

17
Chromatic Mode
Chromatic Mode is the default layout of Note mode. Press pads in the 8x8 grid to
trigger notes. While Chromatic Mode allows all notes to be played, a visual
indication for which notes are in scale is provided.
Blue pads represent notes in the currently selected scale (C Minor by default),
purple pads represent the root of the scale, and blank pads represent notes outside
of the scale.
The default chromatic layout seen here is similar to that of a guitar, with an octave
being two pads up and two pads across. This allows for guitar chord shapes to be
used. Additionally, the sixth column of pads will play the same notes as the first
column on the row above, further mimicking a guitar layout.
The layout of chromatic mode can be altered in Note Mode settings, accessed by
holding Note. See
Scale Mode
Note Mode Settings
for details.
In Scale Mode, Launchpad X will only display notes in the current scale. This allows
you to play freely without ever going out of key.
As with Chromatic Mode, Blue pads represent notes in the currently selected scale,
while purple pads represent the root of the scale. Here, blank pads show that no
Page 18

18
note exists at their location as pads are outside of playable range. This out of range
behaviour also applies to Chromatic Mode.
The layout of chromatic mode can be altered in Note Mode settings, accessed by
holding Note. See
Note Mode Settings
for details.
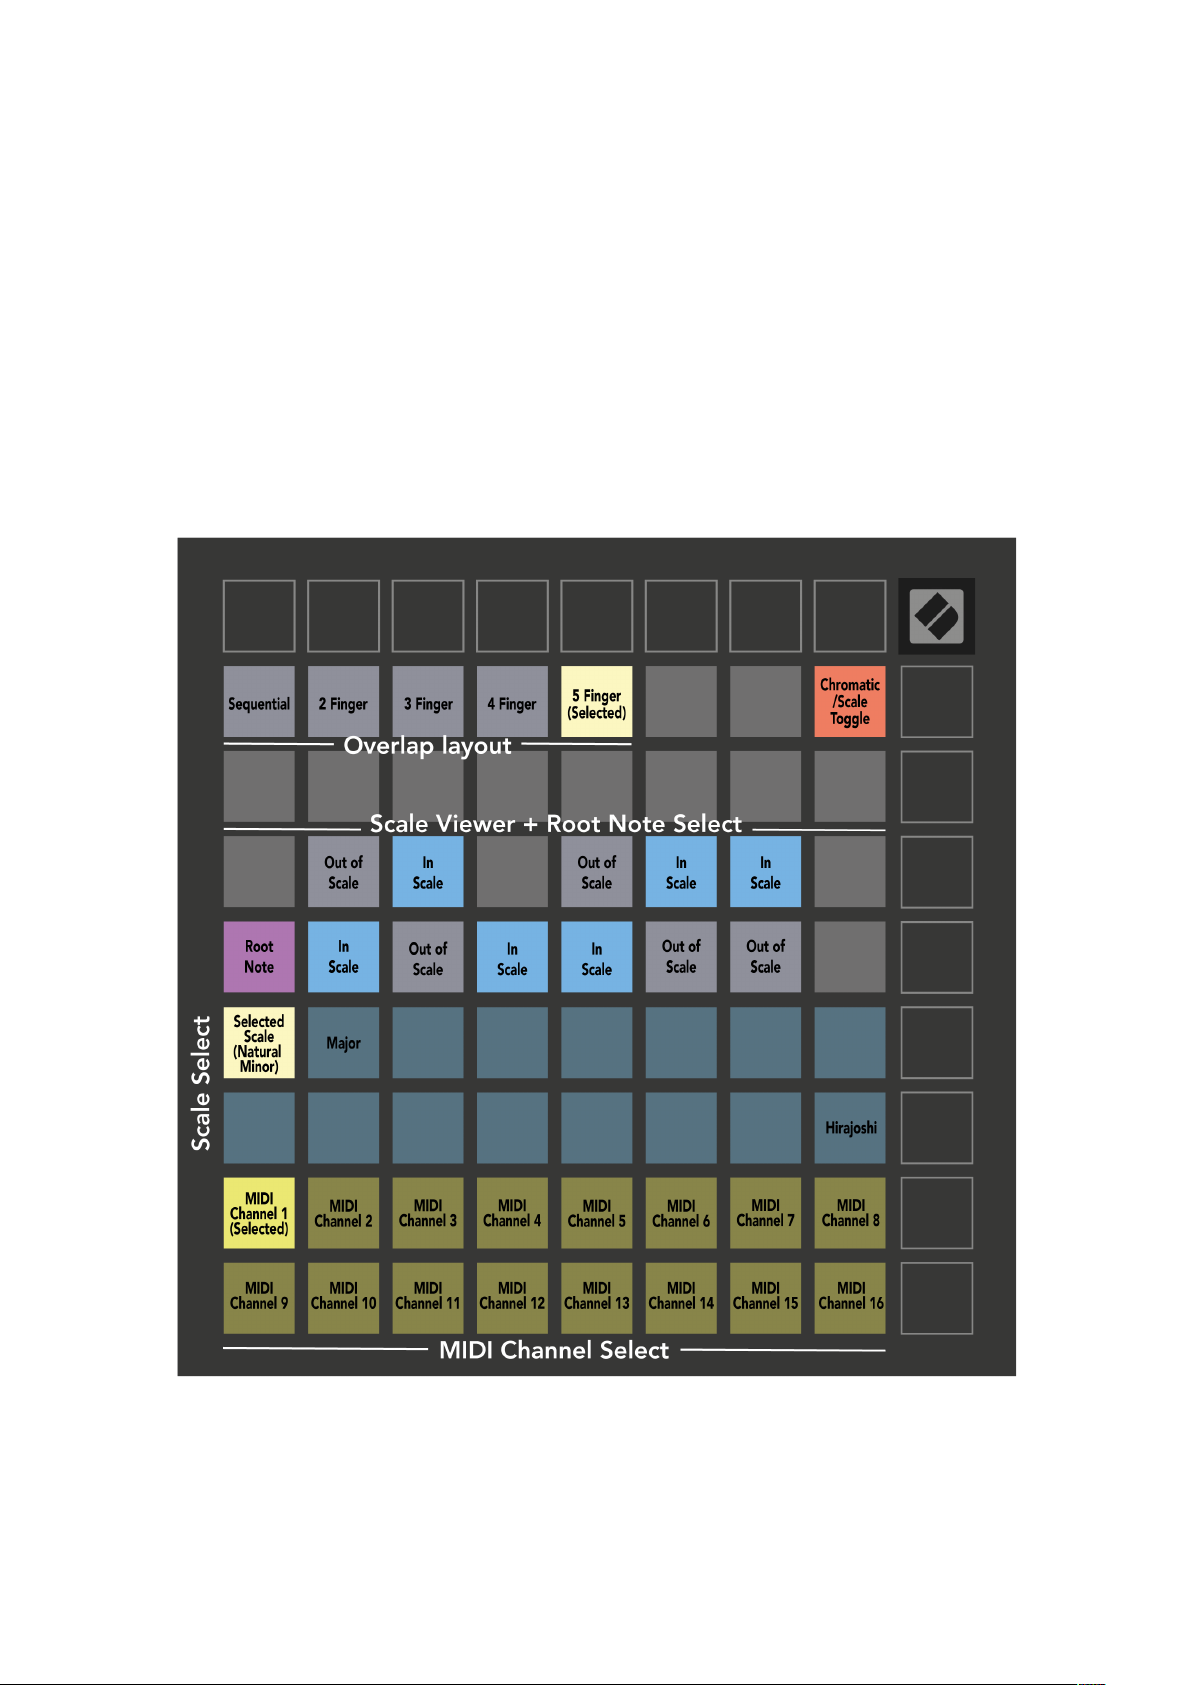
Note Mode Settings
Note Mode settings allow you to switch between Chromatic Mode and Scale Mode,
change the currently selected scale and root note, alter Note Mode’s layout with
overlap controls, and change Note Mode’s MIDI channel.
Enter Note Mode settings by pressing and holding
Note
. Note will pulse green
when in Note Mode settings.
Chromatic/Scale toggle
The
will switch between Chromatic Mode (lit dim red) and
Scale Mode (lit bright green) upon being pressed.
Overlap
allows you to alter the layout of both Chromatic Mode and Scale Mode.
See the following section for a detailed explanation.
The Scale Viewer
shows which notes are in the currently selected scale on a piano
layout keyboard. Blue pads show notes in the scale, the purple pad shows the root,
Page 19
19
and the dimly lit white pads show notes outside of the scale. Press a pad in the
Scale Viewer to change the root note of the scale.
Scale Select
lets you choose from 16 different scales. Press a pad to select a scale.
The selected scale will be lit bright white, while unselected scales will be lit dim
blue.
The MIDI channel
that Note Mode transmits on may be selected between 1 and 16.
This is useful when you want to send notes to a specific track when you have
multiple tracks record armed.
Page 20

20
Overlap
Overlap determines the relationship between notes on different rows. An overlap of
5 means that the leftmost pad on a row will play the same note as the sixth pad
across on the row below.
Each overlap level represents how many fingers are needed to play a scale. For
example, with a 4 Finger overlap you are able to play a scale going vertically up the
grid with only 4 fingers. This is great for playing with a single a hand.
Sequential overlap behaves differently from 2, 3, 4 and 5 Finger overlaps. In
Chromatic Mode, notes will be laid out linearly and are unique to each pad. In Scale
Mode, only octaves of the root will be overlapped. Sequential layout in Scale Mode
provides a great way to play scales over a range of octaves easily.
Page 21

21
Page 22

22
2
1
3
4
Drum Mode
Ableton Live Drum rack
If an
is loaded to the currently armed track, Note Mode will
represent the current state of the drum rack, showing which slots are currently filled.
In Ableton Live, load a drum kit into a MIDI track by selecting a Drum kit from the
browser and double clicking it (or alternatively drag it to a track). If you cannot hear
anything, ensure that the track is record armed and that monitoring is set to auto
Note Mode
(
).
The view is divided into four 4x4 areas, each of which represents the areas of the
Drum rack, shown below.
The visible area of the Drum rack may be scrolled through in sets of 16 slots using
the ▲▼ buttons, or in sets of 4 slots using the ◄ ► buttons. The bottom left 4x4
area will always correspond with the currently visible slots in the Ableton Drum rack.
If there is a sample loaded in the areas 2, 3 or 4 in the diagram above, it will be
visible as a brightly lit yellow pad, exactly as seen in area 1.
When a drum pad is pressed, the pad will turn blue to indicate that it is selected.
The sample present in this slot may then be edited from within the Ableton Drum
Rack.
Page 23

23
When any other instrument is on the currently armed track, the grid will revert to
Scale Mode or Chromatic Mode.
In Ableton Live, load an instrument into a MIDI track by selecting an instrument
from the browser and double clicking it (or alternatively drag it to a track). If you
cannot hear anything, ensure that the track is record armed and that monitoring is
set to auto.
Custom Modes
Custom Modes
surface.
Custom Modes can be created & edited using
hub for all Novation products. You may also back up any Custom Modes you create
here. We have several Custom Mode templates for you to download and explore on
Components.
To access Components, visit
WebMIDI enabled browser (we recommend Google Chrome or Opera).
Alternatively, download the
page on the Novation site.
Custom modes are fully compatible between Launchpad Mini [MK3] and Launchpad
X.
Default Custom Modes
Four custom modes are available by default on the device.
To access custom modes, press the Custom button. The top four Scene Launch
buttons will be lit and can be pressed to switch between Custom modes 1, 2, 3 and
4.
Custom 1
that this is a static layout – it is not representative of the current Ableton Drum rack
and will not respond to changing octave. This mode is useful for playing Drum
machines other than the Ableton Drum rack.
turn Launchpad X’s 8x8 grid into a deeply customisable control
Novation Components
https://components.novationmusic.com/
standalone version
is a Drum layout, similar to the Note mode drum layout. What differs is
of Components from your Account
– our online
using a
Page 24

24
Custom 2
is a chromatic layout that is representative of a traditional
piano/keyboard. As with all custom modes, this mode will not respond to changing
octave.
Custom 3
is a non-lit version of Custom 2. Sending MIDI notes to this layout will
light the pads according to the velocity of the incoming notes.
Custom 4
is a non-lit layout with different note values to Custom 3. The note values
match Programmer Mode, but for the 8x8 grid only.
Setting up a Custom Mode in Novation Components
Custom Modes are created and edited on Novation Components. When
Components is loaded on your computer, Launchpad X will connect automatically.
If the product name next to the home icon (in the top right-hand corner) is not
Launchpad X, press the home icon and select Launchpad X from the list of
products.
Page 25

25
Within a Custom Mode, each pad within the 8x8 grid may act as a
(control change)
, or a
Program Change
message.
Note
MIDI CC
, a
The pads may behave either as
toggles, triggers or momentary
switches.
Momentary behaviour will turn on a note when the pad is pressed and release the
note when un-pressed. Triggers will always send a specified CC value or program
change message.
Full rows and columns of pads may also act as
faders
. Faders can be assigned CC
values and may be unipolar or bipolar. Faders may be positioned horizontally or
vertically.
Pads within a Custom Mode may be assigned an “On” and “Off” colour for when
pads within the 8x8 grid are pressed/toggled. (e.g. when a note is being played or a
temporary CC change is toggled). There may only be one “On” colour per Custom
Mode, but each pad may have a unique “Off” colour.
Custom Modes may have any combination of notes, CCs, program changes and
faders – you can set up your own personalised control surface for your studio.
For more hands-on information on how to create your own Custom Modes, visit
components for an interactive tutorial – it’s easier than it may sound!
Lighting Pads (Advanced)
By default, Custom 3 & 4 have all pads unlit. MIDI Note messages sent to
Launchpad X will light pads according to note number and velocity. The note sent
will determine which pad lights up, and the note’s velocity will determine the
colour. This is useful for creating light displays using the 64 RGB pads.
Page 26

26
The RGB LEDs are capable of outputting 127 colours, the index of which can be
found in the Programmer’s Reference Guide.
Additionally, all pads and buttons can be lit in
For detailed information on lighting pads and using Launchpad X as a control
surface for software, see the Programmers Reference Guide which can be
downloaded at https://customer.novationmusic.com/support/downloads.
Ghost mode
un-light any function buttons around the edge of Launchpad X during use of a
custom mode. To enter Ghost mode, press Note and Custom in quick succession.
Following this action, only the 8x8 grid will be lit. To re-enable the button LEDs,
press any button outside the 8x8 grid.
is a special sub-mode of custom views. When triggered, this will
Programmer Mode
.
Settings
Launchpad X’s settings menu allows you to set your preferences across many of its
aspects. There are four pages available: LED, velocity, aftertouch, and fader.
To enter the settings menu, press and hold Session briefly. The top 4 rows will
display the characters LED, indicating the topic of the menu. Use the top four Scene
Launch buttons to access different pages.
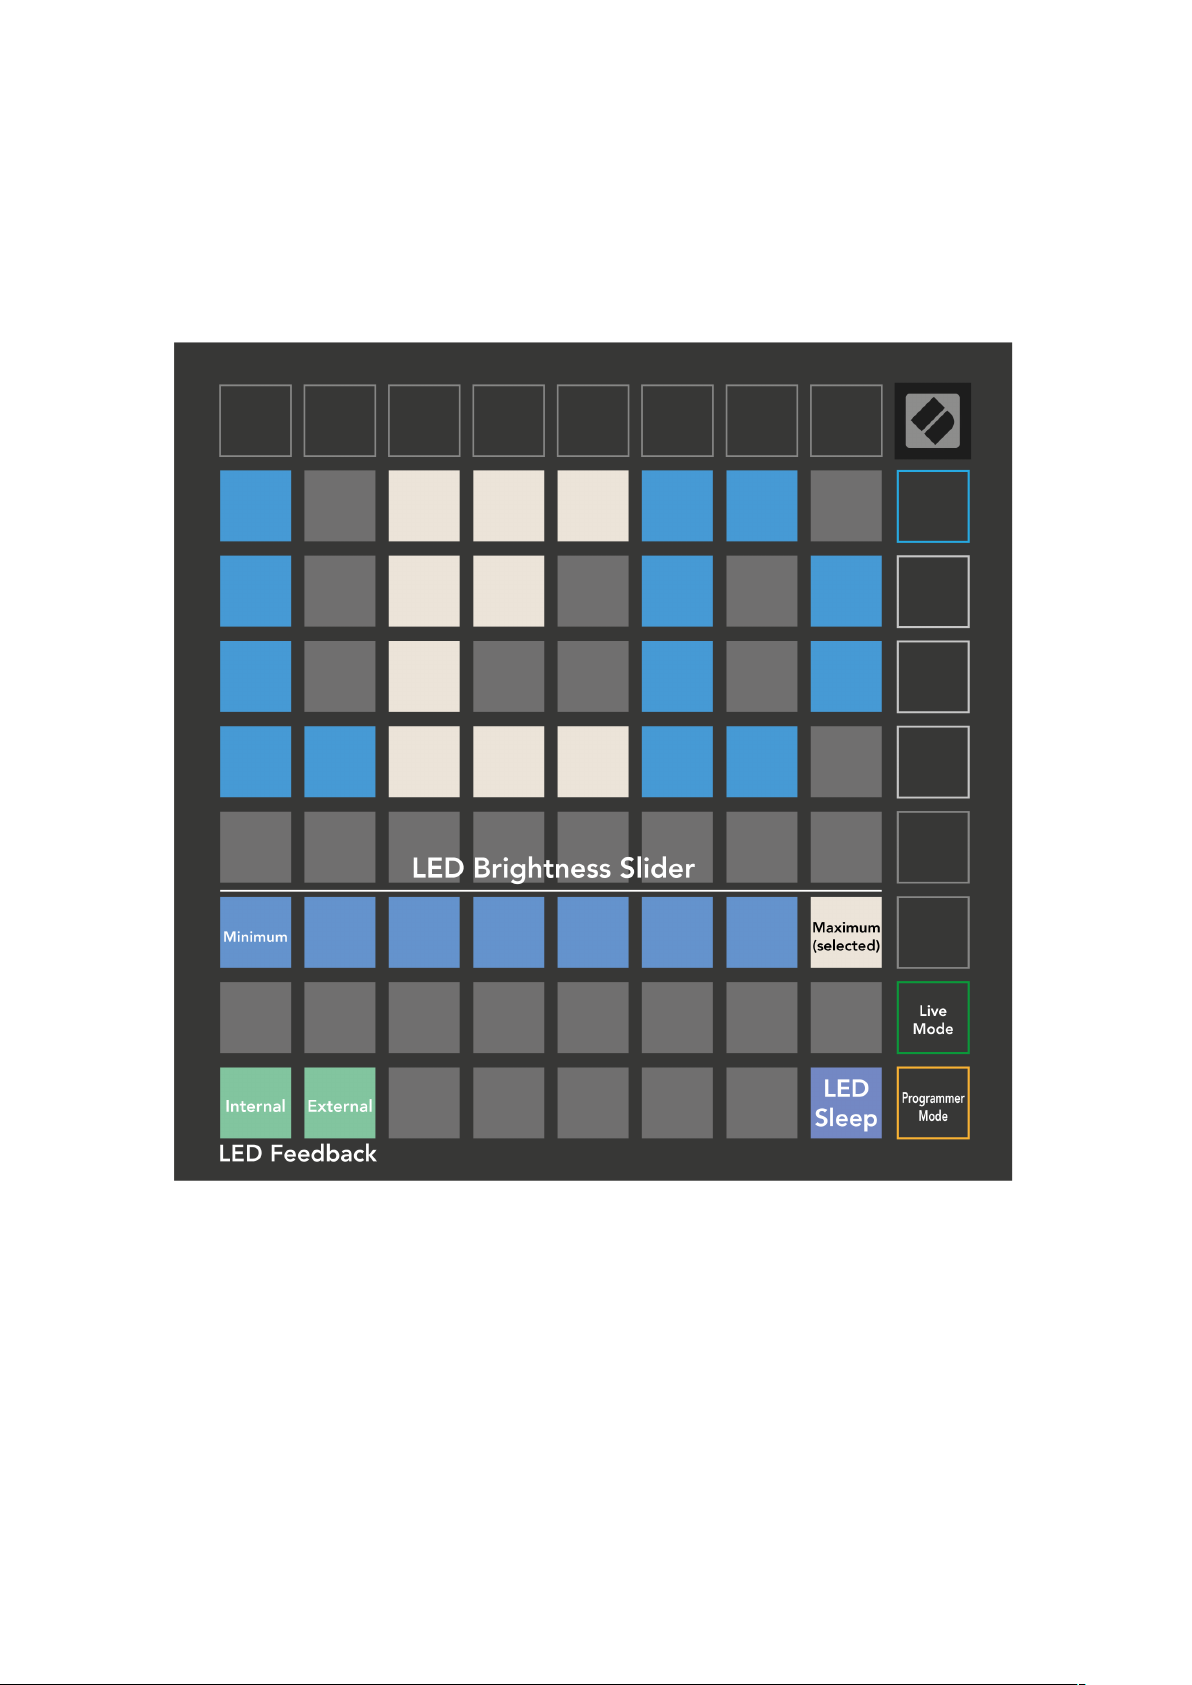
LED Settings
The first Scene Launch button accesses the LED settings for Launchpad X. Here you
can change LED brightness, LED feedback, and enter LED sleep.
LED brightness level slider
The
The brightly lit white pad indicates which level is currently selected.
LED feedback (internal)
pressed in Custom Modes. Bright green indicates that LED feedback (internal) is
enabled, whereas dim red indicates that it is disabled. The setting is enabled by
default.
toggles whether pads on the 8x8 grid light up when
has 8 levels, from minimum to maximum brightness.
Page 27
27
LED feedback (external)
toggles whether pads on the 8x8 grid light up when MIDI is
received externally in Custom Modes and Programmer Mode. Bright green
indicates that LED feedback (external) is enabled, whereas dim red indicates that it
is disabled. The setting is enabled by default.
LED sleep
may be pressed to turn off all LEDs on Launchpad X. Press any button or
pad to wake up the device. This is useful for when you are not using Launchpad X
but you do not want to unplug it.
Page 28
28
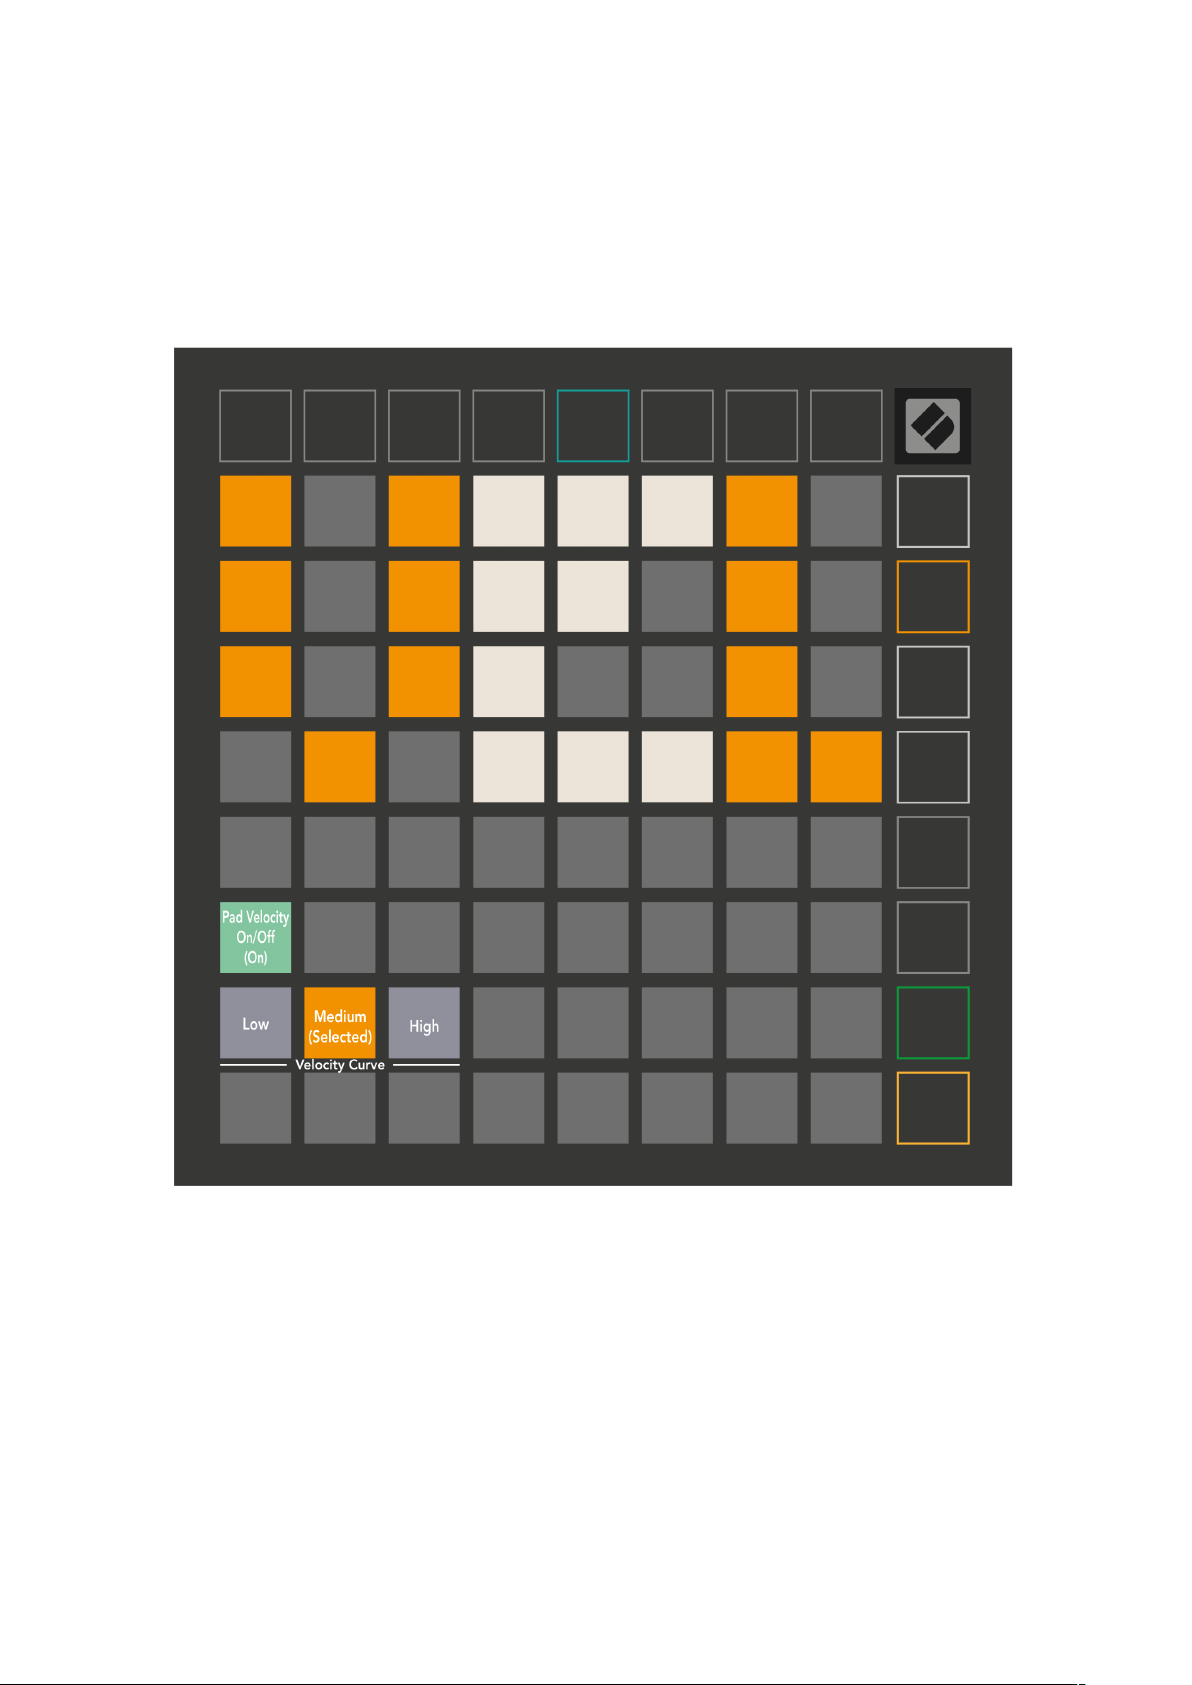
Velocity Settings
The second Scene Launch button accesses the velocity (VEL) settings for Launchpad
X. Here you can turn velocity sensitivity on or off, and choose between three
velocity curves.
Press the
Enable/Disable Velocity toggle
to enable or disable velocity globally on
Launchpad X. The pad will be lit bright green when velocity is enabled, and dim red
when disabled.
Three
Velocity Curves
may be selected between. Low requires higher force to
trigger high velocity values, and high requires lower force for high values. The
selected curve is lit bright orange, while the others are lit dim white.
Page 29
29
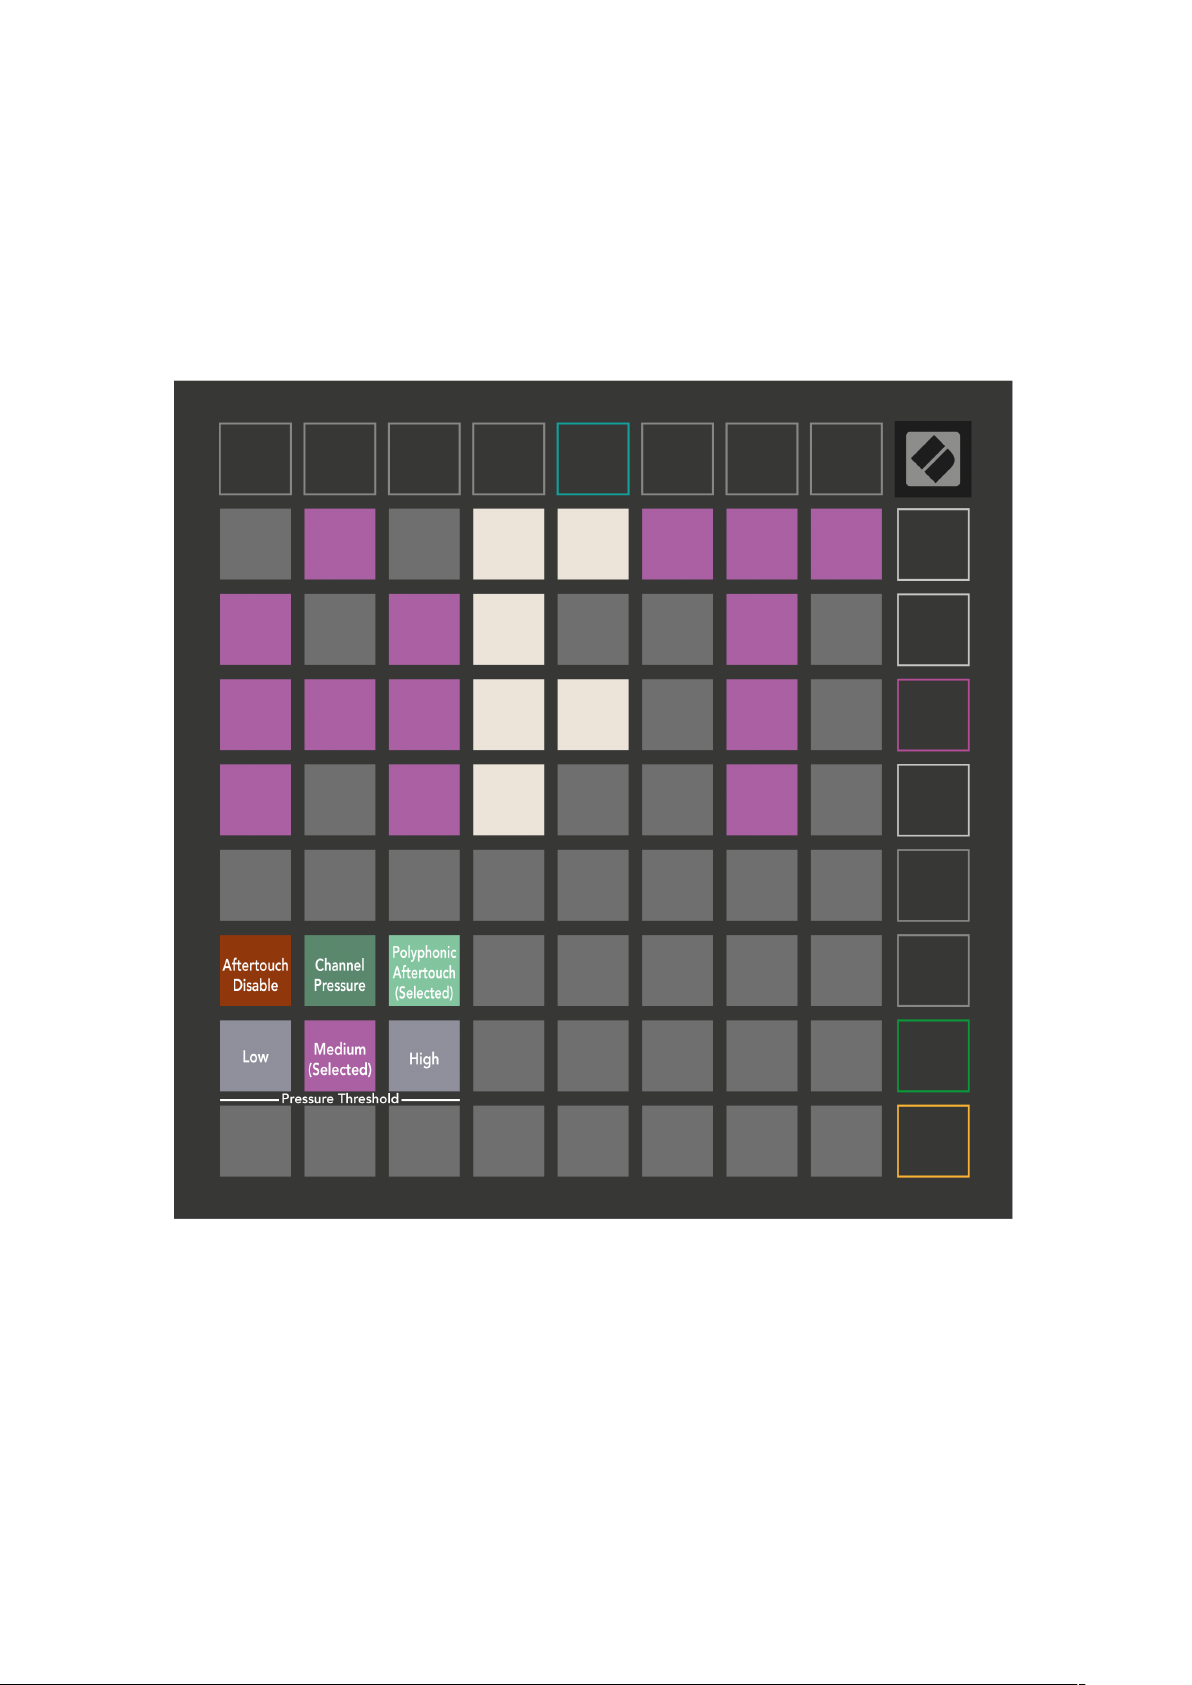
Aftertouch Settings
The third Scene Launch button accesses the aftertouch (AFT) settings for Launchpad
X. Here you can select between channel pressure, polyphonic aftertouch, or
disabling aftertouch, with a choice of three thresholds for triggering aftertouch.
Choose between
Aftertouch
. The selected mode will be brightly lit, the others dimly lit.
Aftertouch disabled, Channel Pressure, and Polyphonic
Three
Aftertouch Thresholds
may be selected between. Low requires a lower force
to engage aftertouch, and high requires greater force. The selected threshold is lit
bright purple, while the others are lit dim white.
Page 30
30
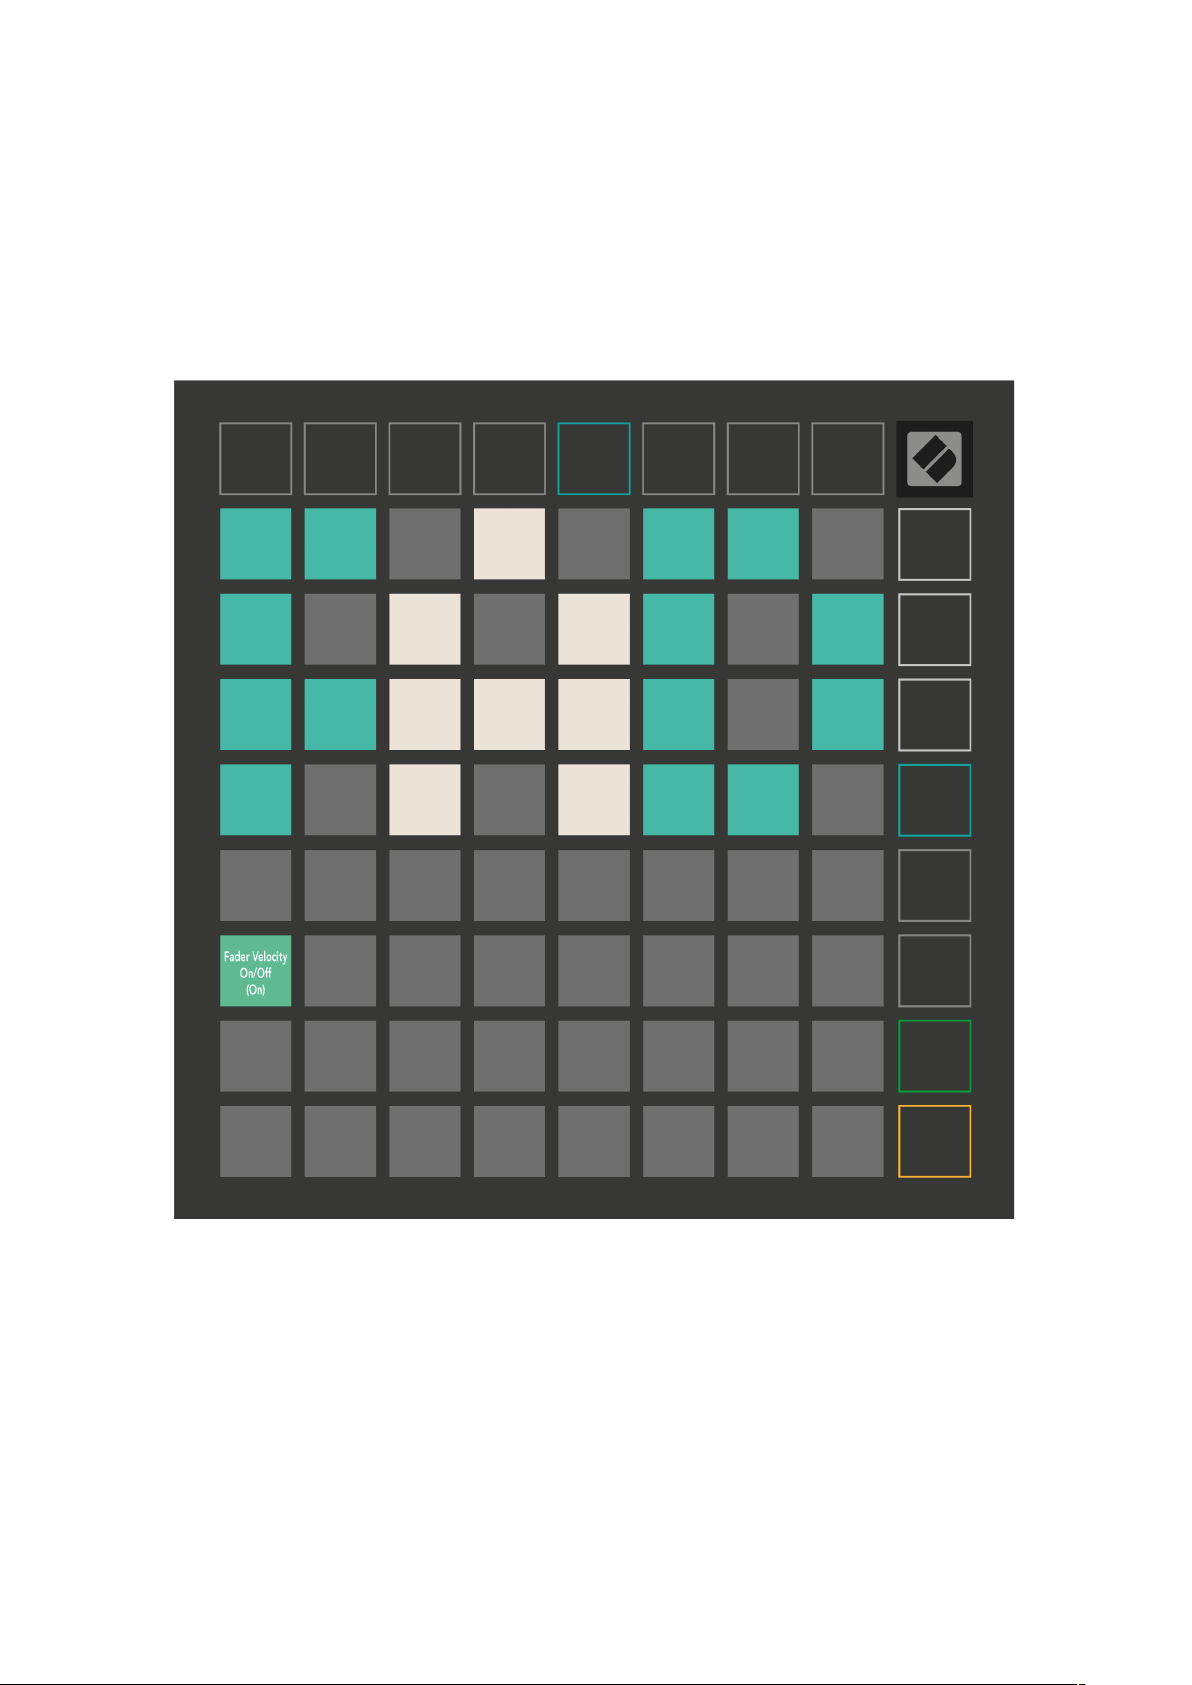
Fader Settings
The fourth Scene Launch button accesses the fader (FAD) settings for Launchpad X.
Here you may enable or disable velocity sensitivity for faders independently of
global velocity sensitivity.
Enable or Disable Velocity for Faders
by pressing the pad. The pad will be lit bright
green when fader velocity is enabled, and dim red when it is disabled.
Page 31
31
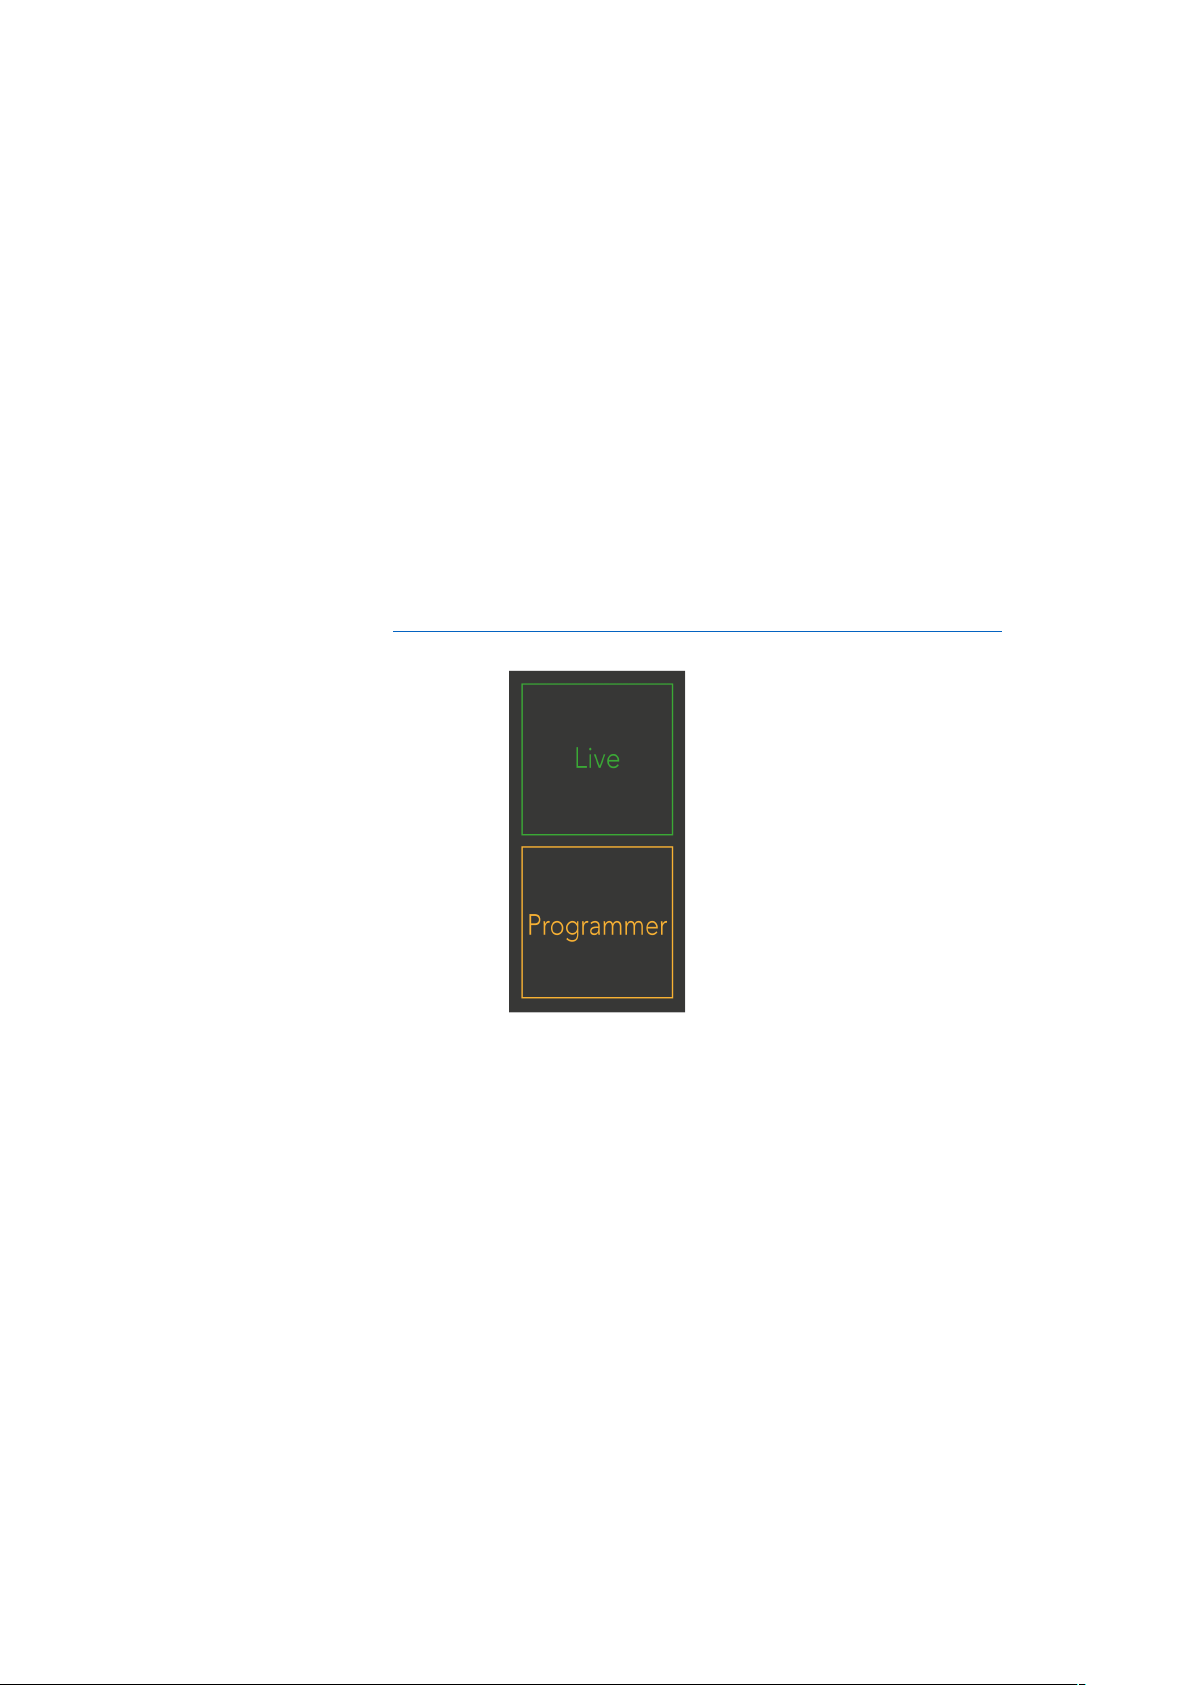
Live and Programmer Mode
Live Mode and Programmer Mode are the two states that Launchpad X can be used
in.
In Live mode, Launchpad X will function as normal & you may access Session Mode,
Note Mode and Custom Mode.
In Programmer mode Launchpad X loses access to Session Mode, Note Mode and
Custom Modes, and the entire surface (pads and buttons) becomes unlit. Each pad
and button will send out a specified MIDI message when pressed.
The pads and buttons may be lit up by sending their corresponding MIDI messages
to Launchpad X. For more information see the Programmer Reference Guide, which
can be downloaded at https://customer.novationmusic.com/support/downloads.
To switch between Live Mode and Programmer Mode, enter the settings menu by
pressing and holding Session briefly. Press the green Scene Launch button to enter
Live Mode, or the orange Scene Launch button to enter Programmer Mode.
Launchpad X will always power on into Live Mode.
Page 32

32
Bootloader Menu
Launchpad X’s bootloader menu allows you to change LED brightness, LED
feedback, mass storage device availability, and device ID.
To enter the bootloader menu, hold Capture MIDI when plugging in Launchpad X.
LED brightness level slider
The
has 8 levels, from minimum to maximum brightness.
The brightly lit white pad indicates which level is currently selected.
Bootloader Version
Application Version
will inform which version of the Bootloader is on Launchpad X.
will inform which version of the Application is on Launchpad X.
Page 33

33
Pressing the
Boot-up
button will start Launchpad X normally, exiting the bootloader
menu.
MSD Mode
toggles the mass storage device behaviour of Launchpad X on or off.
MSD Mode is enabled by default. This is why Launchpad X appears as a mass
storage device when plugged in to your computer. Inside the LAUNCHPAD X folder
is a link to our Easy Start Tool, which will help to get you set up with your
Launchpad X (see
Getting up and Running
). Once you’re set up with Launchpad X
you may no longer want it to appear as a mass storage device. Use this toggle to
disable the behaviour completely. When the pad is brightly lit MSD mode is
enabled, and it is dimly lit when disabled.
Device ID
allows you to use multiple Launchpad X units with Ableton Live at once.
When different ID is selected on each Launchpad X, they will each have their own
Session Ring (grid outline), and thus can navigate the Live session independently.
Page 34

34
Custom 1:
Default MIDI mappings
8x8 grid, Momentary Note On messages (note numbers below)
Custom 2:
8x8 grid, Momentary Note On messages (note numbers below)
Page 35

35
Custom 3:
8x8 grid, Momentary Note On messages (note numbers below)
Custom 4:
8x8 grid, Momentary Note On messages (note numbers below)
Page 36

36
Programmer Mode:
Includes buttons and pads (full 9x9 grid), logo LED may be
addressed, Momentary Note On messages (note numbers below)
For more detailed information regarding the MIDI implementation of Launchpad X,
please see the programmer’s reference guide at:
https://customer.novationmusic.com/support/downloads.
 Loading...